

Page 1

Professional 36” Range
RG3F, RG3G, RG3R & RG36
models
Professional 48” Range
RG4D, RG4F, RG4G, RG4R &
RG4T models
Professional 36” Rangetop
CG3F, CG3G, CG3R & CG36
models
Professional 48” Rangetop
CG4D,CG4F, CG4G, CG4R &
CG4T models
User guide
Page 2
1
Safety and warnings 2
Introduction 6
First use
Conditioning the oven and Seasoning the griddle 12
Oven use
Positioning the racks 13
Oven modes 16
Using your oven for baking and roasting 18
Using your oven for broiling 19
Oven cooking guidelines 20
Rangetop use
Using the rangetop burners 22
Guidelines for using the rangetop burners 23
Using the French Top 24
Using the grill 25
Using the griddle 26
Care and cleaning
Manual cleaning chart 27
Removing and replacing the oven door 33
Removing and replacing the side ladder rack system 35
Replacing the burner parts 36
Replacing the oven light bulb 37
Troubleshooting 39
Warranty and service 43
French warnings 46
Important!
SAVE THESE INSTRUCTIONS
The models shown in this user guide may not be available in all markets and are subject to change at any time. For
current details about model and specication availability in your country, please visit our website listed on the back cover
or contact your Caliber Appliances dealer.
Do not store or use gasoline or other ammable
vapors and liquids in the vicinity of this or any other
appliance. NEVER use this appliance as a space
heater to heat or warm the room. Doing so may
result in carbon monoxide poisoning and
overheating of the appliance.
WHAT TO DO IF YOU SMELL GAS
• Do not try to light any appliance.
• Do not touch any electrical switch.
• Do not use any phone in your building.
• Immediately call your gas supplier from a
neighbor’s phone. Follow the gas
supplier’s instructions.
• If you cannot reach your gas supplier, call
theredepartment.
Installation and service must be performed by a
qualied installer, service agency or the gas
supplier.
WARNING!
If the information in this manual is not followed
exactly,areorexplosionmayresultcausing
property damage, personal injury or death.
Contents
Page 3
2 3
IMPORTANT SAFETY INSTRUCTIONS
To reduce the risk of re, electrical shock, injury to persons, or damage when using the
appliance, follow the important safety instructions listed below:
Safety and warningsSafety and warnings
WARNING!
Electrical Shock Hazard
Before removing a faulty oven light bulb, make sure you turn the power to the range
off at the main fuse or circuit breaker panel. If you don’t know how to do this, contact an electrician. Do not remove the kickstrip grate. Due to access to live electrical
parts behind it, the kickstrip grate should only be removed by a qualied technician.
This appliance is equipped with a three-prong or four-prong grounding plug for your
protection against shock hazard and should be plugged directly into a properly
grounded power outlet. Do not under any circumstances cut or remove the grounding prong from this plug. Failure to follow this advice may result in death or electrical shock.
WARNING!
Tipping Hazard
A child or adult can tip this range and be killed. It must be secured by a properly
installed anti-tip bracket. See installation instructions for details.
Ensure the anti-tip device is re-engaged when the range is moved. Check
engagment following the steps above. Do not use the appliance until it has been
secured. Failure to do so can result in or death or serious burns to children or
adults.
WARNING!
Explosion Hazard
If you smell gas, do not use the appliance. Open a window or door to let the
gas escape, then follow the instructions on the inside front cover of this manual. Do
not use water on grease res. A violent steam explosion may result. Turn all burners off, then smother re or ame or use dry chemical or foam-type extinguisher.
Do not heat unopened food containters such as cans – Build-up of
pressure may cause container to burst and result in injury. Failure to follow this advice may result in injury or death.
WARNING!
Fire Hazard
Never use your appliance for warming or heating the room. Persons could be
injured or a re could start. Keep the area around the appliance free from combustible materials (e.g. wall coverings, curtains, drapes), gasoline and other ammable
vapors and liquids.
Do not let cooking grease or other ammable materials accumulate in, or, or near
the appliance. Do not hang any articles (e.g. dish towels) off the oven handle.
Some fabrics may ignite or melt from the heat. Never leave the rangetop burners
unattended when in use – Boilover causes smoking and greasy spillovers that may
ignite. Be sure all the controls are turned off and the appliance is cool before using
any type of aerosol cleaner on or around the appliance. Chemicals in such cleaners
could, in the presence of heat, ignite or cause metal parts to corrode.
Failure to follow this advice may result in death or serious injury.
WARNING!
Poisoning Hazard
Never cover any slots, holes or passages in the oven bottom or cover an entire
rack or the oven oor with materials such as aluminum foil. Doing so blocks airow
through the oven and may cause carbon monoxide poisoning. Aluminum foil linings
may also trap heat, causing a re hazard.
Clean the appliance with caution. If a wet sponge or cloth is used to wipe spills on
a hot cooking area, be careful to avoid steam burn. Some cleaners can produce
noxious fumes if applied to a hot surface. Follow the directions of the cleaner manufacturer. Never use this appliance as a space heater to heat or warm the room.
Doing so may result in carbon monoxide poisoning and overheating of the appliance. Failure to follow this advice may result in poisoning or death.
WARNING!
Hot Surface Hazard
Accessible parts may become hot during use. Do not touch burners, areas near
burners, the French Top, grill, griddle, grease drip-pans, heating elements or interior
surfaces of oven – These may be hot enough to cause burns even though they are
dark in color. During and after use, do not touch, or let clothing or other ammable
materials contact these parts and surfaces until they have had sufcient time to
cool. Other parts and surfaces of the appliance may become hot enough to cause
burns - among these areas are the grates, back trim and oven vents at the back of
the rangetop, front edge, surfaces adjacent to the rangetop, and the oven door.
Use only dry potholders – Moist or damp potholders on hot surfaces may result in
burns from steam. Do not let potholder touch hot heating elements. Do not use a
towel or other bulky cloth. Let hot grease cool before attempting to handle it. Ovens
with a CLEAN cycle: During self-cleaning, the oven reaches higher temperatures
than it does for cooking. Under such conditions, the surfaces may get hotter than
usual. Children should be kept away. Failure to follow this advice could result in
burns and scalds.
Page 4

4 5
Safety and warnings Safety and warnings
IMPORTANT SAFETY INSTRUCTIONS
• Safe food handling: leave food in the oven for as short a time as possible before and after cooking.
This is to avoid contamination by organisms which may cause food poisoning. Take particular care
during warmer weather.
• Clean only the parts listed in this manual.
• Do not use a steam cleaner to clean any part of the appliance.
• Do not obstruct the ow of combustion and ventilation air to the appliance.
• Before self-cleaning the oven – Remove oven shelves, side racks, broiler pan and all other cook-
ware/utensils, and wipe up large food spills or grease deposits.
• Before self-cleaning the oven –make sure you move any pet birds to another, closed and well ventilated room. Some pet birds are extremely sensitive to the fumes given off during a self-cleaning
cycle, and may die if left in the same room as the range during such a cycle.
• Do not use any cookware on the French Top, grill or griddle.
• Top cover (lid) must be removed when the griddle is in operation.
• When using the grill or griddle, make sure the grease drip-pan is in place – absence of this during
use may subject wiring or components underneath to damage.
• The oven(s), French Top, grill, and griddle of your rangetop cannot be used in the event of a power
failure. Do not attempt to operate these during power failure.
• Do not use aluminum foil to line any part of the oven or rangetop. This will cause heat to be trapped
underneath it. This trapped heat can upset the cooking performance and damage the nish of the
oven or rangetop parts.
• Do not place any dishes, trays, water or ice directly on the oven oor during cooking, as doing so will
irreversibly damage the porcelain enamel nish.
• For safety reasons, the rangetop burner ame size should be adjusted so it does not extend beyond
the edge of the cookware.
• Use cookware of the appropriate size and construction for the type of cooking. This appliance is
equipped with burners of different sizes. Cookware must be matched to the size of the burner.
• Select utensils with at bottoms large enough to cover the burner ames. The use of undersized
utensils will expose a portion of the burner ames to direct contact and may result in ignition of clothing. Proper relationships of utensil to burner will also improve efciency.
• Protective liners – Do not use aluminum foil to line grease drip-pans or oven bottoms.
• Glazed cooking utensils – only certain types of glass, glass/ceramic, ceramic, earthenware, or other
glazed utensils are suitable for rangetop service without breaking due to the sudden change in temperature.
• Utensil handles should be turned inward and not extend over adjacent rangetop burners – To reduce
the risk of burns, ignition of ammable materials, and spillage due to unintentional contact with the
utensil, the handle of a utensil should be positioned so that it is turned inward, and does not extend
over adjacent rangetop burners.
• The Governor of California is required to publish a list of substances known to the State of California
to cause cancer or reproductive harm and requires businesses to warn customers of potential exposures to such substances.
WARNING!: This product emits exhaust that contains chemicals known to the State of California to cause
cancer, birth defects, and other reproductive harm. To reduce the risk from such chemicals, make sure this
appliance is installed, operated, and maintained according to the manufacturer’s instructions.
IMPORTANT SAFETY INSTRUCTIONS
• Read all the instructions before using the appliance. Use the appliance only for its intended purpose as described in these instructions.
• Proper installation – Be sure your appliance is properly installed and grounded by a qualied technician. A risk of tip-over exists when the appliance is not installed in accordance with the installation
instructions.
• Do not operate the appliance if it is damaged or not working properly. If you received a damaged
product, contact your dealer or installer immediately.
• Be sure to have the installer show you where and how to turn off the power supply to the range (i.e.
location of the main fuse or circuit breaker panel) and where and how to turn off the gas supply to
the range in an emergency.
• Do not leave children alone – Children should not be left alone or unattended in the area where the
appliance is in use. They should never be allowed to play with the appliance or to sit or stand on
any part of the appliance.
• Caution – for safety reasons, do not store items of interest to children in cabinets above a range or
at the back of the range – children climbing on the range to reach items could be seriously injured.
• Wear proper apparel – Loose-tting or hanging garments should never be worn while using the
appliance.
• User servicing – Do not repair or replace any part of the appliance unless specically recommended in the manual. All other servicing should be referred to a qualied technician.
• Technicians must disconnect the appliance from the power supply before any servicing.
• Storage in or on appliance – Flammable materials should not be stored in an oven or near the
rangetop.
• Use care when opening the oven door – Let hot air or steam escape before removing or replacing
food.
• Keep oven vent ducts unobstructed.
• Keep rugs and mats well clear of the base of the range.
• Placement of oven shelves – Always position shelves in the desired location while the oven is cool
(before preheating). If a shelf must be removed while the oven is hot, do not let oven mitts or potholder contact the base of the oven or hot heating elements in the oven.
• Do not clean the oven gasket or use any oven-cleaning products on it. It is essential for a good
seal, which ensures that the oven operates efciently. Care should be taken not to rub, damage or
move it.
• Do not use oven cleaners, harsh/abrasive cleaning agents, waxes, or polishes in a self-cleaning
oven. No commercial oven cleaner, oven liner, or protective coating of any kind should be used in\
or around any part of a self-cleaning oven.
• Do not use harsh/abrasive cleaners, scourers or sharp metal scrapers to clean the oven door glass
since they scratch the surface, which may result in the glass shattering.
• Do not sit or stand on the oven door or place any heavy objects on it – doing so may result in personal injury.
• Be careful when reaching for items stored in cabinets above the appliance.
Page 5

6 7
Introduction Introduction
48”models
Professional 48” Range Models:
RG4D, RG4F, RG4G, RG4R & RG4T
Professional 48” Rangetop Models:
CG4D,CG4F, CG4G, CG4R & CG4T
36"models
Professional 36” Range Models:
RG3F, RG3G, RG3R & RG36
Professional 36” Rangetop Models:
CG3F, CG3G, CG3R & CG36
Page 6
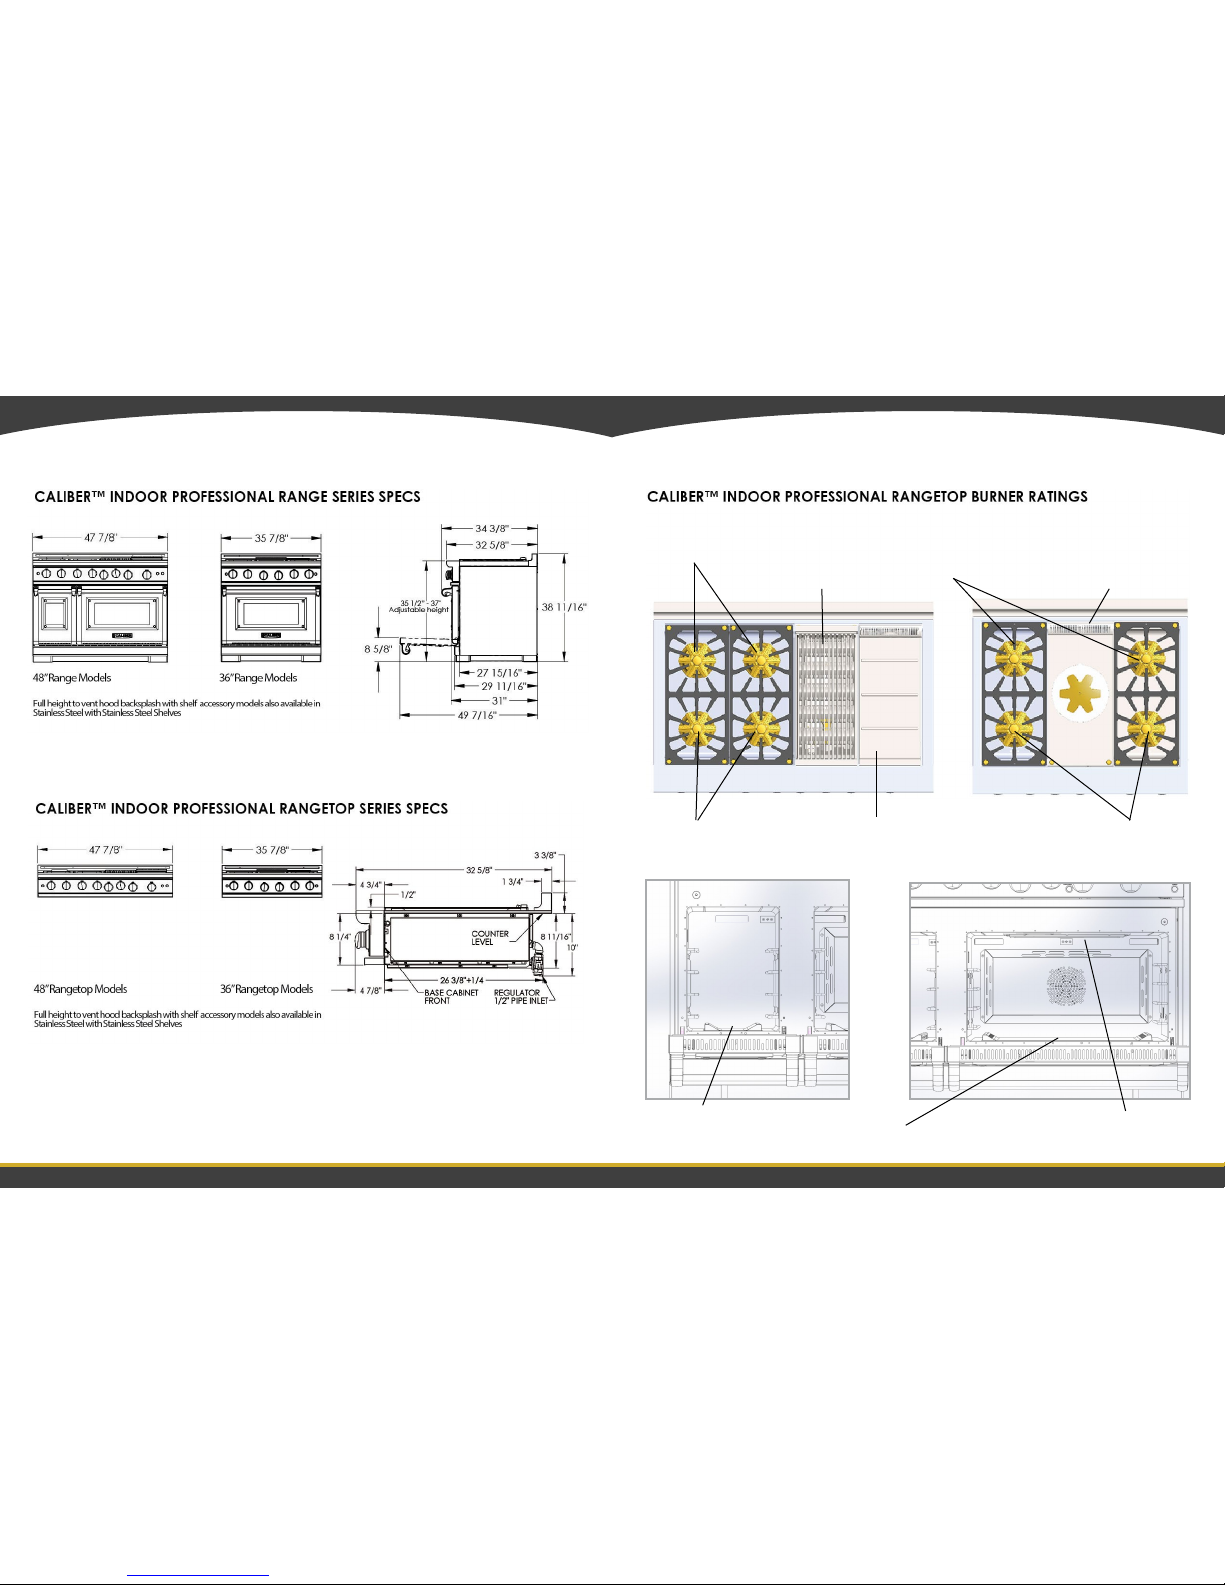
8 9
Introduction Introduction
Griddle
18,000 BTU burner
All Back Burners
15,000 BTU burner
All Front Burners
23,000 BTU burner
French Top
25,000 BTU burner
Grill
20,000 BTU burner
All Front Burners
23,000 BTU burner
All Back Burners
15,000 BTU burner
Broil Burner for Main Ovens Only
20,000 BTU burner
Bake Burner for Companion Ovens
Only 18,000 BTU burner
Bake/Convection for Main Ovens
Only 35,000 BTU burner
Page 7
10 11
Before you start
1. Make sure that the anti-tip bracket at the right rear of the range has been properly
installed.
2. Prior to installation of the range or rangetop please nd the model and serial numbers
on the label on the back of the unit (middle to bottom right-hand corner of the oven frame or
below backguard of the rangetop). See the drawing below for range label placement. Note
these numbers down for future reference in the space provided in section ‘Warranty and service’.
3. Read this guide, taking special note of the ‘Safety and warnings’ section.
4. Remove all the packaging from the oven(s) and rangetop. Recycle items that you can.
If any adhesive residue is left on surfaces, remove this using dish washing liquid on a soft
cloth. Do not use any harsh or abrasive cleaners.
5. Make sure you follow the instructions under ‘First use’ before using your range for
cooking.
Introduction
Important!
Do not block the vents of the oven, griddle and oven door with cookware, utensils or towels. During cleaning, take care not to let any liquids run down these
vents.
Introduction
Front Burner Knobs
Rear Burner Knobs
Companion Oven
Knob
Grill
Knob
Grill
Convection Fan
Button (Main Oven)
Main Oven
Knob
Griddle
Knob
Griddle
Integral Island Trim
Oven Light
Switch
(Both Ovens)
Panel Light
Switch
Panel
Lighting
Oven Lights
Companion
Oven Racks
Door Light
Switch Actuator
Door Light
Switch Actuator
Convection
Fan Intake
Main Oven Racks
Companion
Oven Door
Main Oven
Door
Model and Serial
Numbers Label
Page 8

12 13
Conditioning the oven
Conditioning will burn off any manufacturing residues and ensure that you get the best results right
from the start.
1 Insert all of the racks. See ‘Positioning the racks for instructions.
2 Turn on the ventilation hood above your range on high.
3 Heat the empty oven at 450 degrees F for:
30 minutes using BAKE
15 minutes using BROIL (Main oven only).
See sections ‘Using your oven for baking and roasting’ and ‘Using your oven for broiling’ for instructions. There will be a distinctive smell while you are conditioning the oven. This is normal. Make
sure the kitchen is well ventilated during the conditioning.
4 Once cooled, wipe the oven interior with a damp cloth and mild detergent, and dry thoroughly.
Seasoning the griddle
1 Clean the griddle thoroughly with hot, soapy water to remove any protective coating.
2 Rinse with a mixture of 1 cup water and ¼ cup white vinegar, then dry thoroughly.
3 Pour 1 tsp vegetable (but not corn) oil into the center of the griddle, then rub it over its entire
surface, using a soft, heavy cloth.
4 Turn the griddle knob counterclockwise to 350oF.
5 When the oil begins to smoke, turn the knob clockwise to OFF and allow the griddle to cool.
6 Repeat steps 3 to 5.
7 Wipe the entire surface of the griddle using a soft, heavy cloth.
8 Apply a very thin layer of vegetable (but not corn) oil.
9 Check the grease drip-pan and clean if necessary. Discard any liquid or soiling that may have
collected in the grease drip-pan during the conditioning.
The griddle is now ready to use.
For best results, re-season the griddle after long periods of non-use.
Note: the griddle will darken with use. This is normal.
First use Oven use
Positioning the racks
• Rack ladder positions are numbered from the bottom.
• Position the racks you will need before turning the oven on.
• For advice on which rack position to use, see sections ‘Oven modes’ and ‘Oven
cooking guidelines’.
• Two racks and four ladder positions are provided for each oven.
COMPANION OVEN
(48” models only)
MAIN OVEN
Companion oven racks pictured above
• These racks use slides with stops to keep
them from sliding out of the oven when
pulled out toward you.
• The slides prevent the racks from hitting
against the back of the oven.
Main oven shelves pictured above
• The wire racks and slides are built together as one unit.
• When positioned correctly, the slides will
prevent the wire racks from tilting when
pulled out toward you.
• Beware: these racks are heavy.
1
2
3
4
1
2
3
4
Slide
Slide
Companion
Oven Wire Rack
Main Oven
Wire Rack
Page 9
14 15
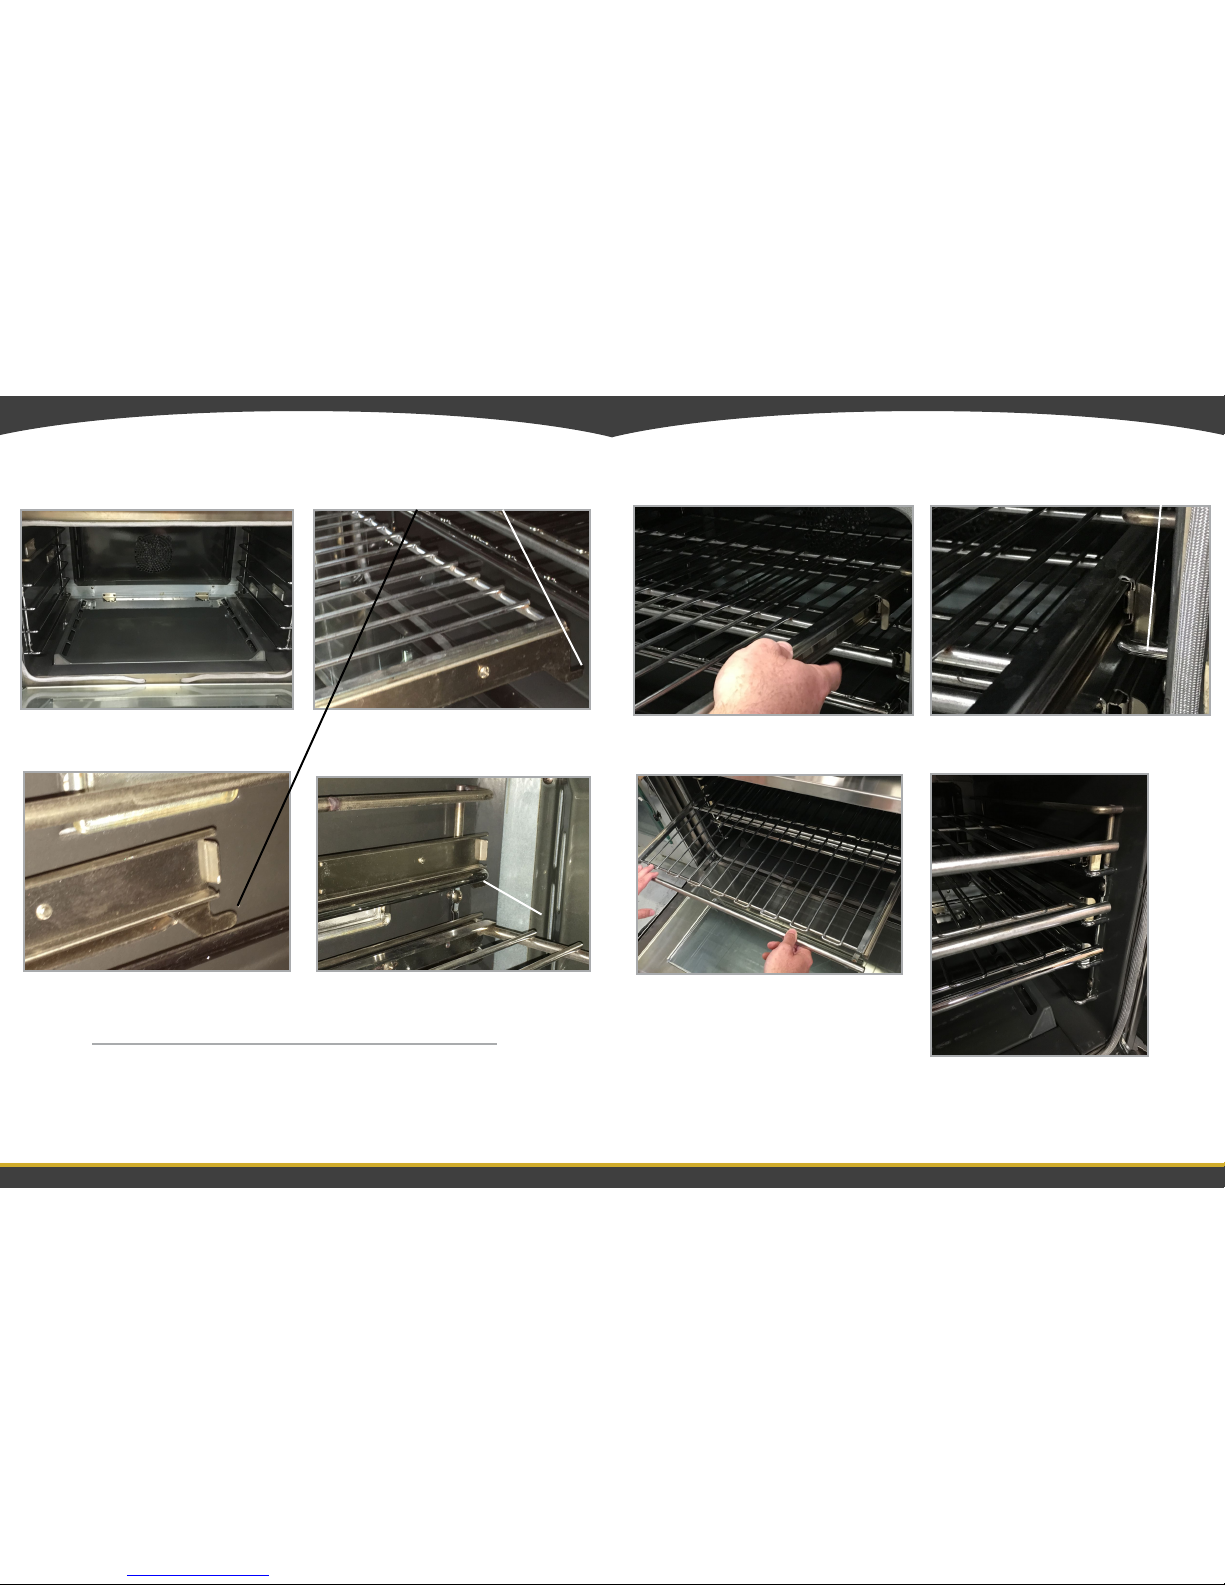
Oven use Oven use
To insert the racks - MAIN & COMPANION OVENS
Guard rail hook
4 Make sure the guard rail hook loops in at the
back, facing down to engage the ladder system
properly.
7 Once properly installed you will be able to
slide rack out, and the guard rail hook will
prevent the rack from coming out of the oven
completely for safety purposes.
To insert the racks - MAIN & COMPANION OVENS
5 Make sure slide rail system on middle of the rack
engages towards the front of the ladder system.
6 Close up image of the slide rail of rack correctly inserted into the front ladder systerm.
2 Make sure the guard rail hook loop on rack is
facing down before inserting it into the oven.
1 See 4 position ladder rack system within
each oven.
3 This is an image of the guard rail hook on
the left side view.
Guard
rail hook
correctly inserted
8 Push the shelf all the way into the oven by
sliding them on the rack rails until the front tab
on the rack sits behind the rack rail on both
sides.
To remove the shelves
1 Wait for the oven to cool down completely.
2 Hold the shelf rmly with both hands, making sure you grip the wire rack too to stop it
from sliding forward.
3 Pull the shelf forward about 3/4 of the way.
4 Lift the rear of the shelf slightly so that hooks clear the side rack wires, then remove.
Page 10

16 17
Oven use Oven use
Oven modes
Important!
In convection mode, a cooling fan may come on to prevent parts of the range from overheating; you will
hear the fan and feel warm air coming from the vents in the back trim.
*Note: BAKE can be used for proong dough.
ACTIVITY OVEN MODE DESCRIPTION
• BAKING
• ROASTING
• REHEATING
• DEFROSTING
BAKE This is a traditional mode for baking, roasting,
and reheating food, ideal for recipes developed
in older ovens. Great for your favourite roasts
and baked goods that have a pastry base and do
not require direct heat and browning on the top.
BAKE
CONVECTION
Similar to BAKE, but a convection fan in the back
of the oven helps distribute the heat more
evenly, resulting in quicker browning and shorter
cooking times. When converting recipes from
traditional to convection baking, reduce the stated
cooking time or temperature. For some recipes,
reducing both slightly may give the best results.
• BROILING BROIL Intense heat from the top browns or ‘nishes off’
your meals. Broiling also gives you a healthier
alternative to frying or searing meat. For broiling
that requires a quick burst of intense heat, use
this mode with the temperature set to BROIL
(= maximum intensity).
BROIL
CONVECTION
Intense heat from the top is distributed by the
convection fan, giving a nish similar to a
rotisserie: meat is crispy and evenly browned on
the outside, juicy and tender in the middle. Also
great for cooking vegetables and suitable for
foods that you would normally pan-fry or grill.
Important!
• Depending on your model, your oven may have only some or all of the oven modes below.
TYPICAL FOODS ARRANGEMENT DO I NEED TO PREHEAT THE OVEN?
• Pies
• Pizza
• Cakes
• Cookies
• Quiche
• Whole turkey
• If baking on
more than one shelf,
ensure items or pans are
staggered on shelves so
that one is never directly
above another.
• Center items in the
oven as much as possible
for best air circulation.
• For baking: preheat the oven
for about 15 minutes or less for your
desired temperature.
• For roasting and reheating,
you don’t need to preheat the oven.
• Bread
• Brownie
• Mufns
• Prime rib roast
• Pork roast
• Vegetables
• Lasagna
• Chicken breasts
• Fish
• Steak/Chops/Cutlets
• Bacon
• Hamburger patties
• Browning casseroles
• ‘Au gratin’ dishes
• Slices of toast
• Always broil with
the oven door closed.
• For best results,
place food on the broil/
roast pan and grid and
center it under the broiler.
• Use a higher shelf
position for items that
require quick broiling, and
lower ones that need more
time to cook through.
• The oven generally doesn’t
need preheating for broiling.
• However, for best results
when you want quick browning or
searing, we recommend you let the
broiler heat for about 5-8 minutes
before placing food in the oven.
• Vegetables
• Whole chicken
• Tenderloin of beef
Page 11

18 19
Oven use
1 Check that you have the shelf/shelves you
will need in place.
If not, see section ‘Positioning the racks’
for instructions.
Using your oven for baking and roasting
2 Turn the OVEN knob counterclosckwise to the desired
temperature. The indicator light on bezel of the knob
lights up when in use.
3 If CONVECTION is required push
“CONVECTION FAN” on.
4 When you have nished using the oven, turn the
Oven knob clockwise to OFF and push the “CONVECTION FAN” button off, if was in use.
The indicator light on bezel of the knob will no
longer light up in the OFF position.
Oven use
1 Check that you have the rack you will
need in place.
If not, see section ‘Positioning the racks’
for instructions.
2 Turn the OVEN knob counterclockwise almost
back to OFF to reach BROIL. You should feel a
detent when the BROIL position is reached. The
indicator light on bezel of the knob lights up when in
use.
For best results when you want quick browning or
searing, preheat the broiler for about 5-8 minutes
before placing food in the oven.
4 When you have nished using theoven, turn the
Oven knob clockwise to OFF.
The indicator light on bezel of the knob will no longer light up in the OFF position.
4 Never block the vents within the bottom of the
oven with foil or other items. This could start a re.
Using your oven for broiling
Off
Position
On Position of WARM
and BROIL position is
3/4 Counterclockwise
On/Off
Indicator Light
Off Position
Clockwise
Convection Fan
On/Off Switch
DO NOT Block the
Vents
BROIL
Position
WARM
WARM
250
Page 12

20 21
Oven useOven use
Oven cooking guidelines
Important!
• Use all the oven modes with the oven door closed.
• Never use aluminum foil to cover the oven shelves or to line the oor of the oven. The trapped heat
can irreversibly damage the enamel and may even cause re.
• Do not place water, ice, or any dish or tray directly on the oven oor, as this will irreversibly damage the
enamel.
• Do not cover the slotted grid of the broil/roast pan with aluminum foil. This will catch the grease and
could cause re.
• Do not use plastic wrap or wax paper in the oven.
• For food safety reasons, do not leave food in the oven for longer than two hours before and after cook-
ing or defrosting. This is to avoid contamination by organisms which may cause food poisoning. Take
particular care during warmer weather.
Baking
• Always position the oven shelf/shelves you will need before turning the oven on. For single shelf baking, the most frequently used shelf position is no. 2. See the ‘Baking charts’ for more suggestions on
shelf positions. Remove any unused shelves and baking utensils from the oven.
• Preheat the oven to the temperature stated in the recipe before most baking. Depending on the temperature and the size of the oven, preheating will take around 15-20 minutes.
• If you have a 48” range, the main oven is ideal for multi-shelf baking or baking larger quantites. For
smaller quantities baked on a single shelf, use the companion oven.
• Arrange pans and food items evenly on the shelves. Make sure pans do not touch each other or the
sides of the oven. When baking a single item, always center the item on the oven shelf. If baking on
multiple shelves, make sure you stagger items on the shelves so that one is never directly above another.
• To convert recipes from traditional baking (BAKE) to convection baking (BAKE CONVECTION), either
reduce the temperature stated in the recipe and leave the baking time unchanged, or reduce the baking time by several minutes and leave the temperature unchanged. For foods with a baking time of
over an hour, reducing both the temperature and time slightly may give the best results.
• Dark metal baking pans or those with a dull nish absorb heat faster than shiny pans, and are excellent
for pies and breads, or anything that needs browning or a crisper crust.
• A shiny nish may work best for foods that require lighter, delicate browning (e.g. cakes and cookies),
as it reects some heat and gives a less intense baking surface.
• Avoid opening the oven door frequently during baking. Do not open the oven door until at least ¾
through the suggested baking time.
Oven cooking guidelines
Roasting
• Use the broil/roast pan and slotted grid supplied with the range when roasting, elevating the meat on
a metal roasting rack. This allows hot air to circulate around the meat, giving a more even browning
and a result similar to a rotisserie.
• When roasting larger items like a whole turkey, use only the pan and grid for greater stability.
• Use a meat thermometer to accurately determine the doneness of meat.
Broiling
• Always broil with the oven door closed. If you open the oven door to check the food, have it open for
as short a time as possible. This is to prevent the control panel from overheating.
• The grid helps to reduce smoking and splatter by letting grease drip into the bottom of the pan, away
from intense heat. To prevent food sticking, spray the grid with a light coating of non-stick cooking
spray.
• Use a meat thermometer to accurately determine the doneness of meat.
• Choose a suitable shelf position. To ensure that meat is cooked through rather than just browned on
the outside, broil thick pieces of meat and poultry on shelf positions 2 or 3. Use shelf position 4 for
thinner items that need less cooking time like steaks, chops, or hamburger patties.
• When nishing off meals by browning the top under the broiler, use metal or glass-ceramic bakeware. Do not use heatproof glass or eartenware, as these cannot withstand the intense heat of the
broiler.
• Center the item in the oven, so that it is directly under the broiler.
Proongdough
• Heatproof glass bowls are best for proong, as you can gauge the increase in size without having to
open the oven or remove the cover.
• To lock in or increase moisture during proong, cover the bowl with a damp dish towel.
Defrosting
• To thaw uncooked frozen food, set the oven temperature to WARM. Once thawed, cook the food
immediately and do not refreeze.
• To prevent liquid from thawing food dripping on the oven oor, be sure any uncooked food is tightly
wrapped in foil and/or placed in a container.
For more oven cooking tips, visit our website, www.caliberappliances.com
Page 13

22 23
Rangetop use Rangetop use
1 Identify the knob of the burner you want to use.
Knobs are marked FRONT and REAR.
2 Push the knob in and turn it counterclockwise to
LO.
Make sure you stop at LO before turning the knob to
any ame setting.
The indicator light on bezel of the knob lights up
when in use.
You will start hearing a clicking sound. If there is no
clicking, turn the knob clockwise back to OFF and
see ‘Troubleshooting’ for advice.
3 When the burner has lit, turn the knob to any
setting between HI (high) and SIM
(simmer).
The clicking should stop as soon as the burner
has lit.
If the burner doesn’t light, and/or the clicking
doesn’t stop, or the ames are not blue and welldened, turn the knob clockwise back to OFF and
see ‘Troubleshooting’ for advice.
4 When you have nished cooking, turn the
knob clockwise back to OFF.
The indicator light on bezel of the knob will no longer
light up in the OFF position.
If you are using LP gas, there may be a slight ‘extinc-
tion pop’ or ash at the ame spreader a few seconds
after the burner has been turned off. This is normal for
LP gas.
Guidelines for using the rangetop burners
All burners have the same low turn-down setting (SIM) for gentle simmering. Use
the SIM setting for melting chocolate and butter, cooking rice and delicate sauces, simmering
soups and stews, and keeping cooked food hot.
For cooking that requires especially intense heat (e.g. searing meat, wok-cooking, stir-frying),
use the front burners, as these have a higher maximum output (23,000 BTU/hr for Natural gas). The
back burners output (15,000 BTU/hr for Natural gas).
Never leave the rangetop unattended when in use. Boilovers cause smoking and greasy spills
that may ignite.
Never allow ames to extend beyond cookware or curl up its sides. This could discolor and
damage the utensil and you may get burned touching a hot handle.
Keep handles out of the way. Turn handles so that they don’t extend over the edge of the range
or another burner that is on. Take care when deep-frying. Oil or fat can overheat very quickly, particularly on a high setting.
Make sure that all burner parts are properly in place. Incorrect or incomplete burner
assemblies may produce dangerous ames. See ‘Replacing the burner parts’ in ‘Care and cleaning’.
Keep the burners clean, especially after a spill or boilover, make sure you clean the affected
burners before using them again. Food residue may clog the ignitor and burner ports, stopping the burner from functioning correctly. See ‘Care and cleaning’ for instructions.
Check that the burner ames are regular. They should be blue with no yellow tipping, or uttering anywhere on the burner. If not, see ‘Troubleshooting’ for advice.
Using the rangetop burners
On/Off
Indicator Light
On Position
Counterclockwise
Off Position
Clockwise
Burner
Locating
Pin lines up
into this hole for
proper
placement
proper
placement
will give you a
ame like this
Page 14

24 25
Rangetop use
Using the grill
The grill is powered by a 20,000 BTU burner, and has a reversible grate. This allows you to change the
level of the food you are cooking to get a better sear and be closer or further away from the ame.
For foods that
should be closer to
the ame and on the
lower level grate for
a better sear, such
as:
Hamburger patties
Steak
Sausages
For foods that need
to be a greater dis-
tance from the ame
and on the higher
grate, such as:
Oily Fish
Vegetables
Chicken with skin
To use the grill
1 Check that the grill grate and the stainless steel radiant
tray are properly in place and you have the best side for
your food (rest of instructions below).
To use the grill (continued):
2 Turn the grill knob counterclockwise to the Lo (low) setting. The indicator light on bezel of the knob
lights up when in use. There may be a delay of up to a few seconds or so before the grill burner
lights. This is normal. If the grill does not light up in 5 seconds, turn to OFF, wait 1 minute, then turn
grill on again.
3 Allow the empty grill to preheat for about 10 minutes.
4 Adjust the heat anywhere between HI (high) and LO (low) during grilling.
5 When you have nished using the grill, turn the grill knob clockwise back to OFF.
6 Clean the grill grate immediately after use. See ‘Care and cleaning’ for instructions.
7 When the grill has cooled down, clean the grease drip-pan. See ‘Care and cleaning’ for instructions.
Flip Grate
over for
Higher
Level
Usage
Grate Low
Position
Level
Shown
Radiant
Tray
Crossame Pro
Burner
Rangetop use
Using the French Top
The French Top is powered by a very high 25,000 BTU burner, and therefore has certian removable
pieces for specic cooking uses. The hottest area on a French Top is on the center star. You can also
remove the center star and outer ring allowing a wok to sit right above the exposed ame for high
temperature cooking. As you move away from the center star the heat becomes less intense. The outer
ring area is great for simmering. French Top pieces are heavy, and directions below are for safe revoval.
The surface area away from the star in the front can also be used for simmering dleicate items or as a
warming area. Caution when using this cooking surface becuase of its high performance and use.
Removing the French Top pieces
1 Make sure French Top is cool before removal
gegins. Place French Top tool into center of star.
2 Once the star is tilted up, grasp it with your
other hand.
3 Gently remove the star when using French Top
used to quickly heat a smaller stock pot.
4 Grasp the outer ring with both hands to remove.
5 Gently remove the outer ring when using French
Top used to quickly heat a larger stock pot.
6 A wok an also be used on French Top to have
direct heat high temperature cooking.
Page 15

26 27
Rangetop use
Grill cooking guidelines
Important!
• Never leave the grill unattended during use. Grease drippings may cause short are-ups or even
• sustained aming. If left unattended, these may cause a re.
• Make sure you have your ventilation hood set on maximum during grilling.
• Clean the radiant tray after frequently using. Accumulated grease can be a re hazard.
• The longer you preheat the grill, the darker the grill marks will appear on food.
• Trim excess fat off meat to minimize are-ups.
• Generally, start out on a high setting to sear or brown meat, then lower the setting to make sure
that meat or poultry is cooked through.
• When turning meat over, use tongs or a spatula as these will not puncture the meat and allow the
juices to run out.
Using the griddle
The griddle is powered by an 18,000 BTU burner. The griddle will darken and ‘season’ with use, developing a natural non-stick coating. When it is properly seasoned, it can be used without any additional
oil.
1 Check that the grease drip-pan is properly in place.
Important!
Always keep the vents at the rear of the griddle frame clear of any object: airow to the vents
must not be blocked.
2 If you haven’t used the griddle for a long time, re-season it. See section ‘First use’ for instructions.
3 Turn the griddle knob counterclockwise to the desired temperature.
There may be a delay of a minute or so before the griddle comes on. This is normal. The indicator light
on bezel of the knob lights up when in use. See the ‘Griddle cooking chart’ below for suggestions.
4 After turning the griddle ON for about 15 minutes, it will be ready to use.
5 When you have nished using the griddle, turn its knob clockwise back to OFF.
6 Clean the griddle and grease drip-pan after every use. The griddle should be cleaned very
carefully while it is still hot. See ‘Care and cleaning’ for instructions.
Important!
Clean the grease drip-pan after every use. Accumulated grease can be a re hazard.
Griddle cooking chart
Food Temperature setting
Eggs 225-250º F
Bacon, ham, pork chops 300-325º F
Sausage, grilled cheese sandwiches 325-350º F
Pancakes, french toast 350-375º F
Hash brown potatoes 400-425º F
Care and cleaning
Manual cleaning chart
DOs DON’Ts
• Read these cleaning instructions and the
‘Safety and warnings’ section before you start
cleaning your range.
• Before cleaning or removing any part, make
sure that everything on the range has been turned
off.
• Unless suggested otherwise in the chart following, allow any part to cool to a safe temperature
before cleaning. If you do need to handle a warm
or hot part (e.g. French Top, grill or griddle), take
extreme care. Wear long protective mitts to avoid
burns from steam or hot surfaces.
• Try using any cleaner on a small area rst, to
ensure it doesn’t stain.
• See the pages following this chart for instructions on removing and replacing different parts of
the range for cleaning or maintenance.
• To help you identify any parts, see illustrations in section ‘Introduction’ and after this cleaning
chart.
• Ensure the anti-tip device is re-engaged if
you move the range for cleaning. Failure to do this
may result in the oven tipping, and adults and children may be killed.
• Do not use aerosol cleaners until the
range has completely cooled. The propel-
lant in these cleaners could catch re in the
presence of heat.
• Do not let soiling or grease accumulate anywhere in or on the range. This will
make future cleaning more difcult and may
present a re hazard.
• Do not use any abrasive or harsh
cleaners, cloths, scouring pads or steel
wool. These will scratch your range and
damage its appearance.
• Do not use a steam cleaner to clean
any part of the range.
• Do not perform any cleaning or main-
tenance on parts not specically named in
the chart below. If in doubt, contact Customer Care.
• Do not lift the black grill and griddle
frames off the rangetop.
What? How? Important!
Range exterior
Door frame
exterior,
Control panel,
Sump area
around rangetop
burners,
Grill and griddle
covers,
Back trim
1 Soften any stubborn stains
under a hot soapy cloth.
2 Clean with a solution of mild
detergent and hot water, then
wipe dry with a microber
cloth.
3 For extra shine, use a
suitable stainless steel
cleaner and polish, following
manufacturer’s instructions.
Always rub the stainless steel
in the direction of the polish
lines.
• Always read the label to make
sure your stainless steel cleaner
does not contain chlorine compounds as these are corrosive
and may damage the appearance
of your range.
• Do not use and take care not to
spill any stainless steel cleaner
on the knobs, oven handles, or
the kickstrip grate. These are not
stainless steel parts and their
surface may be damaged by
stainless steel cleaner.
• When cleaning the back trim and
the top of the oven door, be careful not to let any liquid run down
the vent holes.
Page 16

28 29
Care and cleaning
What? How? Important!
Range exterior
Control knobs,
Oven handles,
Kickstrip grate
1 Wipe with a damp cloth using a solution of mild
detergent and hot water.
2 Dry thoroughly with microber cloth.
If desired, the knobs can be removed for cleaning.
Before removing a knob, make sure that it is set to
OFF, then pull it straight towards you. Remove only
one knob at a time, and make sure that you ret it
on its shaft completely and correctly after cleaning.
Do not use stainless steel cleaner on these parts, as doing so
may damage their coating.
The knobs are not interchangeable: if you remove them for
cleaning, do so one at a time.
This is to ensure that you replace each knob exactly where
you removed it from.
Oven parts
Enamel
oven interior –
light soiling
1 Wipe with a damp cloth and a solution of hot
water and mild detergent.
2 Wipe dry with a soft cloth.
Note: the oven door may be removed to
make reaching into the oven easier.
To prevent soiling from becoming ‘baked on’ and stubborn, we
recommend removing any easyto-reach spills, food or greasy
stains from the enamel after
each use.
Enamel
oven interior –
stubborn,
‘baked-on’
soiling
1 Remove everything from the oven: shelves, side
racks, all utensils.
2 Cover the kick panelgrate and the oor in front
of the oven with several layers of newspaper. This
is to protect these surfaces from damage by oven
cleaner seeping out or accidentally dripping on
them.
3 Apply an ammonia-based cleaner or oven cleaner
following the cleaner manufacturer’s instructions.
4 After cleaning, replace the side racks and
shelves.
Oven cleaners are caustic and
may permanently stain or
damage some surfaces. When
using an oven cleaner in a
non-selfcleaning oven, take care
not to let it come in contact with
any surface other than the oven
interior. If it accidentally does,
remove immediately.
Side racks Pre-soak any stubborn, burnt-on soiling, then clean
with a solution of mild detergent and hot water and
wipe dry with a microber cloth. Alternatively, clean
these in the dishwasher.
Oven racks 1 To remove stubborn or ‘baked-on’ soiling, scrub
with a dampened, soap-lled, nonmetal, non-abrasive pad, then wipe dry.
2 Apply a chrome cleaner with a damp sponge or
cloth following manufacturer instructions.
3 Wipe and dry.
Do not wash the main oven
racks in the dishwasher, immerse them in soapy water, or
use oven cleaner on them. Doing
so will remove the lubricating
grease in the slides, stopping
them from running smoothly.
Care and cleaning
What? How? Important!
Oven
Broil/roast pan
and slotted grid
1 Pre-soak any stubborn soiling in a
solution of mild detergent and hot water.
2 Wash by hand or in a dishwasher.
Bake and
broil burners
(gas ovens)
Do not clean these parts. They self-clean during normal use.
Broil element
(electric ovens)
Oven door glass
(interior)
• Use a soft cloth and a mixture
of warm water and dishwashing
liquid to remove light soiling. For
stubborn stains, try using a ceramic rangetop cleaner or a mixture of
baking soda and warm water, then
wipe dry with a soft, lint-free cloth.
• Do not use excessive amounts of
cleaning solution as it may seep
under the glass causing moisture
or staining.
Do not use oven cleaners
or any other harsh/abrasive
cleaners, cloths, scouring
pads, steel wool or sharp
metal scrapers to clean
the oven door glass. These
scratch the glass, which in
turn could result in the glass
cracking and shattering.
Oven door glass
(exterior)
Clean using a soft cloth and a mixture of
warm water and dishwashing liquid or glass
cleaner.
Oven door
gasket
Avoid cleaning this part. If you need
to remove large food particles off it,
proceed as follows:
1 Dampen a sponge with clean hot
water.
2 Gently wipe off the soiling, but do
not rub.
3 Press a dry towel gently on the gasket to dry.
• Do not use any cleaning
agent on the gasket.
• The gasket is essential for
a good seal. Take care not
to rub, displace, or damage it.
Page 17

30 31
What? How? Important!
Rangetop parts
Burner caps and
base
1 Check that the burner is turned OFF
and allow it to cool.
2 Lift off the burner cap.
3 Wash it in hot soapy water, rinse,
and dry.
• Use a stiff nylon brush or
straight-ended paper clip to clear
the burner ports.
4 Replace the burner cap correctly.
See ‘Replacing the burner parts’.
• Before replacing the burner parts, check that they
are dry. Wet burner parts
may result in an irregular
ame.
• Before lighting a burner
you have reassembled,
check that all of its parts
are positioned correctly.
Incorrect assembly can
cause dangerous irregular
amesandignitionproblems.
Ignitors 1 Check that the burner is turned
OFF.
2 Clean the ignitor gently with a small
brush (e.g. old toothbrush) or cotton
swab that has been dipped into rubbing alcohol.
• The ignitors must be kept
clean and dry to work correctly. Dirty or wet ignitors could cause constant
clicking and sparking,
evenifaameispresent.
Burner grates 1 Wait until the grates have cooled
completely.
2 Carefully lift the grates off the
rangetop and place them on a protected surface.
3 To remove stubborn stains, soak the
grates in a mixture of clothes washing
detergent and water.
4 Wash in a mixture of hot water and
dishwashing liquid, then rinse and
allow to dry.
• The grates are also dishwasher
safe.
• Take care, the grates are
heavy.
• Make sure you place a
dishtowel or other soft
cover on the surface before putting a grate on it.
Care and cleaning
Care and cleaning
What? How? Important!
Rangetop parts
Grill grate 1 Check that the grill has been turned
off and the grate is still hot.
2 Put on barbecue mitts for protection
against steam and heat.
3 Scrub the grill with a brass bristle
barbecue brush dipped frequently into
a bowl of warm water. The softened
food particles will drop onto the radiant tray below the grate.
4 Once the grate has cooled completely, remove it and wash in the sink
with hot soapy water.
5 Dry with a soft cloth, then replace.
• The grill grate should be
cleaned immediately afte
use (while it is still hot), so
that food particles do not
become ‘baked-on’ and
hard to remove.
• The grill grate will change
color with use. This is
normal.
• To ensure that you replace
the grill grate correctly,
see illustrations in section
‘Using the grill’.
Radiant tray
(under grill
grate)
1 Wait until the grill has completely
cooled.
2 Lift off the grill grate.
3 Carefully lift out the radiant tray.
4 Shake it gently over a sheet of
newspaper or waste bin to empty it of
ash and food particles.
5 Replace the tray.
6 Replace the grate.
• Regular cleaning of the
grill radiant tray reduces grease build-up and
smoke production when in
use.
Radiant
Tray
Page 18

32 33
Care and cleaning
What? How? Important!
Rangetop parts
Griddle • To remove light soiling after each use:
1 While the griddle is still hot, use a wet cloth
and square-edged spatula to clean the griddle
of grease and food particles, while pushing the
cloth with the spatula.
2 Once the griddle has cooled to
lukewarm, rub the surface lightly with
vegetable oil, then wipe thoroughly
with a heavy, coarse cloth.
• To remove stubborn, ‘baked-on’ soiling:
1 Use a griddle stone following manufacturer’s
instructions, taking care to avoid the griddle’s
frame.
2 Wash with hot soapy water, rinse and dry.
3 Re-season the griddle following instructions in
section ‘First use’.
• Take extreme care while
cleaning a hot griddle:
wear barbecue mitts and
be careful of steam and
hot surfaces.
• Neveroodthehotgriddle
with cold water: this could
cause it to crack or warp.
• Do not lift the black griddle frame off the rangetop.
The griddle assembly
must not be removed.
• The griddle will develop
a non-stick coating and
will darken or discolor in
patches with use: this is
normal.
Grease drip-pan 1 Wait until the grease drip-pan has cooled to a
safe temperature to touch, then slide it slightly
towards you and lift out. Pull the drip pan handle
toward you until it stops. Remove the dtrip pan.
2 Discard grease, then clean the drip-pan with
hot water and dishwashing liquid. The grease
drip-pan is also dishwashersafe.
3 Rinse with clean water and allow to dry.
4 Replace the clean grease drip-pan.
• Do not use abrasive
cleaners or scouring pads
as they may damage the
nish.
Care and cleaning
Removing and replacing the oven door
Important!
• Do not lift the oven door by its handle. Doing so may damage the door.
• Make sure the oven and the door are cool before you begin to remove the door.
• Before removing the door, make sure there is a large, clear, protected surface in the kitchen
to rest the door on.
• Take care, the oven door is heavy!
To remove the oven door
1 Open the door fully. 2 Open the levers fully on both sides by rotat-
ing the levers towards you.
3 Holding the door rmly on both sides,
gently close it about halfway.
4 Disengage the hinges and remove the door.
Place on a protected surface.
Push Lever Down to
Open Lever
Page 19

34 35
Care and cleaning
To re-install the oven door
2 Insert the hinge tongues into the slots,
making sure that the bottom notches on both
sides drop into place as shown.
3 Open the door fully and fully close the
levers on the left and right hinges up.
4 Levers on the left and right hinges fully
closed upward, as shown, then close the
door.
Care and cleaning
Removing and replacing the side ladder rack system
To remove side racks
1 Remove any racks rst. See section
‘Positioning the racks for instructions.
2 Remove the 4 screws that attach the side ladder
rack system for the racks to side into the oven.
To replace side racks
1 Supporting the ladder system with your hand
from underneath position the side rack until one
hole is aligned.
2 Insert the screw, but don’t tighten. Align and
insert the remaining screws then tighten all.
Push Lever Up to
Close Lever
1 Hold the door rmly in an approximately
halfway open position.
Push Lever Up to
Close Lever
4 screws
Page 20

36 37
Care and cleaning
Replacing the burner parts
Important!
When replacing the burners, make sure that the locating pin on the bottom of the brass
port ring is properly aligned with the locating pin slot on the top of the burner base.
Incorrect alignment will produce a potentially dangerous ame and poor burner performance.
Care and cleaning
Replacing the oven light bulb
Important!
Use a 25 W G9 appliance light bulb for replacement. Do not use a standard light bulb in any
oven, the heat will break it.
1 Allow the oven (including the lamp cover and the bulb) to cool completely.
2 Remove any shelves that may get in the way.
3 Remove the door if the lamp will be hard to reach.
4 Turn the power supply to the range off at the main fuse or circuit breaker panel. If you don’t
know how to do this, contact an electrician.
Important!
Failure to disconnect the range from the power supply may result in death or electrical shock.
5 See diagram below for location of oven light bulbs.
6 follow step by step instructions on next page for replacing the oven light bulb.
Remove the lamp cover and turn it counterclockwise to unscrew.
6 Remove the faulty bulb and replace with a new 25 W G9 appliance light bulb.
7 Replace the lamp cover: turn it clockwise to tighten.
8 Turn the power supply to the range back on at the main fuse or circuit breaker panel.
Two oven light bulbs located on
the right and left side of the oven
Burner not properly
aligned (see gap)
Burner
Locating Pin
lines up into
this notch for
proper
placement
Burner properly
aligned (NO gap)
Burner
properly
placed under
the grate
Page 21

38 39
Care and cleaning
Replacing the oven light bulb
Note: before you start, disconnect power to unit before you start and you’ll need Phillips & at screwdriver.
1. Remove screw as
shown.
2. Pull out light carefully.
Do not damage wires.
3. Locate screw heads,
the screw closer to light
holds light bulb, screw
closer to wires connects
to wires.
4. Loosen screw close
to wires to remove light
assembly.
5. Picture of Light assembly removed.
6. Carefully install new
Light assembly
7. Assemble light on
oven opening taking care
of not damaging wires.
8. Place back screw as
it was before and you are
done.
Note: Turn the power supply to the range back on at the main fuse or circuit breaker panel and check for light to work.
Troubleshooting
If you can’t nd an answer to your problem in the chart below, or if the problem cannot be
xed, you will need technical help. Contact your Authorized Service Center or Customer Care.
Problem Possible Causes What to do
Oven
The oven doesn’t
work (no heating).
No power supply (oven light and
halos do not come on either).
Check that the circuit breaker
hasn’t tripped and there is no
power outage in your area. If
there is a power outage, you
cannot use the oven until power
has been restored.
No gas supply (gas ovens). The supply to the house may
not be working or there may be
an outage. Contact your local
gas supplier.
One of the oven
lights does not come
on, but the oven
works.
The light bulb is loose or burned out. See instructions for ‘Replacing
the oven light bulb’ in section
‘Care and cleaning’. Before replac-
ing the bulb, simply
ensure that it is secure in its
socket.
The light bulb has burned out. Replace the bulb. See
instructions for ‘Replacing the
oven light bulb’ in section ‘Care
and cleaning.’
There is a power
failure – can I still use
the oven?
Power outage in your home or
neighborhood.
The oven cannot be used until
power is restored.
Condensation around
oven (e.g. on control
panel or top of oven
door.)
Food has high moisture content or
local climate (temperature, humidity)
is contributing to condensation.
Condenstaion is normal. You
can wipe the drops off the
control panel. If there is
frequent or excessive
condensation, make sure that
cabinetry around the range is
moisture-proofed.
Steam coming from
oven vents at the
back of the range.
Moisture from food evaporating
during cooking.
This is normal, especially if you
are cooking large quantities
of food in the oven using the
CONVECTION fan.
The oven door won’t
open.
Obstacle is in the way Remove item preventing door from
opening freely.
Page 22

40 41
Troubleshooting Troubleshooting
Problem Possible Causes What to do
Oven
The oven door won’t
open.
Obstacle is in the way. Remove item preventing door from
opening freely.
The convection fan
does not come on
when the CONVECTION button is
pushed.
Oven door is open. Close the oven door.
Technical fault. Contact your Authorized Service
Center or Customer Care.
Uneven baking. Oven not properly preheated. Preheat oven for 10 minutes at 350
degrees F.
Unsuitable or incorrectly arranged
bake-ware.
See ‘Oven cooking guidelines’
for advice. Close door fully.
Rangetop Burners
None of the burners,
French Top, grill, or
griddle will
light.
No power supply. Check that there is no power
outage in your area and that
the power supply to the range
is switched on at the circuit
breaker panel.
No gas. Check that the gas supply to the
house is working. You should
hear the gas when you turn
a burner on. If you are using
bottled gas, check that it is not
empty or turned off.
Theburneramesare
uneven, very large,
yellow or yellowtipped or sooty.
Technical fault: the gas is the
wrong type or hasn’t been
adjusted properly.
Do not use your rangetop
burners. Contact your
Authorized Service Center or
Customer Care.
The ignitor keeps
clicking (continuous
spark) even when a
burner has lit.
Dirty or wet ignitor(s). Clean the ignitor(s). See ‘Care
and cleaning’ for instructions.
Problem Possible Causes What to do
Rangetop Burners
Some burners will
not light.
Flames do not burn
all around the burner
cap.
Burner parts or ignitors may be
wet, dirty, or misaligned.
Check that the burner parts
are clean, dry, and correctly
assembled. Check that the
ignitors are clean and dry.
See ‘Care and cleaning’ for
instructions.Check and clear the
burner ports.
There is no clicking
when I try to light a
burner.
The ignitor is dirty or there is a
power outage.
Clean the ignitor(s). See ‘Care
and cleaning’ for instructions.
Check power to the rangetop.
There is a power
failure – can I still use
the rangetop burners?
Power outage in your area. The rangetop burners can still be
used. To light them:
1 Holding a lighted match to
the burner port, push in on the control knob and turn counterclockwise
to LO.
2 When the ame is burning
all the way around the
burner, you may adjust the
heat.
Important!
Iftheameisblownoutduring
a power failure, turn the knob
immediately to OFF, as the
burner will not automatically
relight and gas may escape.
Theameshave
suddenly gone out.
A draft or a spill has extinguished
the ame.
No action required. The
burner will detect this and
automatically relight. However,
if there has been a large spill,
we recommend turning the
burners off and cleaning the
burners and sump area. See
‘Care and cleaning’ for
instrucions.
Page 23

42 43
Troubleshooting
Problem Possible Causes What to do
Rangetop Burners
There is a slight
‘extinction pop’ or
ashafterI’veturned
a rangetop burner off.
This is normal for LP gas and
requires no action.
French Top
For issues related to
burner use, heat or
amesSee"Rangetop Burners" troubleshooting section
since the French
Top is powered by a
burner.
See "Rangetop Burners" troubleshooting section.
French Top getting
extremely hot.
The French Top is powered by a
very high 25,000 BTU burner, and
therefore has certian removable
pieces for specic cooking uses.
Caution when using this cooking
surface becuase of its high performance and use.
1) Remove brass star and round
stainless steel star cut out off the
French Top when getting a large
stock pot to a quick boil.
2) Remove just the brass star off
the French Top when getting a
small stock pot to a quick boil.
3) Keep all pices on when in SIM
(simmer) mode. The surface area
away from the star in the front can
also be used for simmering dleicate
items or as a warming area.
Griddle
The surface is discolored in patches.
Oils cooked onto the surface due to
repeated use.
This is normal and doesn’t affect
cooking performance.
There is a power
failure – can I still use
the griddle?
Power outage in your home or
neighborhood.
The griddle cannot be used
until power is restored.
Troubleshooting
Problem Possible Causes What to do
Grill
Flare-ups during
grilling.
Fatty cuts of meat. Minor are-ups are normal. To
minimize them, trim excess fat
off meat before grilling.
Grill grate or radiant tray is not positioned correctly.
Turn the grill off, wait for
it to cool, then position grates and
radiant tray below correctly. See
‘Using the grill’ for instructions and
illustrations.
There is a power
failure – can I still use
the grill?
Power outage in your home or
neighborhood.
The grill can still be used. To light
them:
1 Holding a lighted match to
the Crossame burner, push
in on the control knob and
turn counterclockwise to
LO.
2 When the ame is burning
all the way around the
burner, you may adjust the
heat.
Important!
Iftheameisblownoutduring
a power failure, turn the knob
immediately to OFF, as the
burner will not automatically
relight and gas may escape.
Warranty and service
FULL NINETY (90) DAY COSMETIC WARRANTY: Caliber Professional Gas Ranges/Rangetops are warranted to be
free from cosmetic defects in materials or workmanship (such as scratches on stainless steel, paint/porcelain blemishes, etc.) for a period of ninety (90) days from the date of original retail purchase or closing date for new construction,
whichever period is longer. Any defects must be reported to the selling dealer within thirty (30) days from the date of
original retail purchase.Caliber uses the highest quality processes and materials commercially available to produce all
color nishes; however, slight color variation may be noticed because of the inherent differences in painted parts and
porcelain parts as well as differences in kitchen lighting, product locations, and other factors. Therefore, this warranty
does not apply to color variation attributable to such factors.
Page 24

44 45
Warranty and service
Before you call for service or assistance ...
Check the things you can do yourself. Refer to the installation instructions and your user guide and check
that: 1) your product is correctly installed and 2) you are familiar with its normal operation.
If after checking these points you still need assistance or parts, please refer to the Service &
Warranty booklet for warranty details and your nearest Authorized Service Center, Customer
Care, or contact us through our website www.caliberappliances.com.
Contact details
For replacement parts or if further help is needed concerning this appliance call:
714-848-1349 or contact us through our website, www.caliberappliances.com or write to:
Caliber Appliances, 17812 Metzler Lane, Huntington Beach, CA 92647 USA
Product details
Model No._____________________________Serial No.___________________________
Date of Purchase______________ Purchaser________________________________
Dealer_____________________ Address______________________________________
City, State Zip______________________________________ Country________________
Warranty and service
FULL NINETY (90) DAY WARRANTY IN “PROFESSIONAL TRADE” APPLICATIONS: This warranty applies to
installations where the use of the Product exceeds that of normal residential use but does not reasonably experience
the heavy use found in commercial cooking establishments (as determined by Caliber). Examples of this type of use
include Country Clubs, Community “common” areas, Bed & Breakfasts, Fire Stations, Private Clubs, Churches, Yachts,
etc., and other locations where the product is used extensively. Under this warranty, the product, its components and
accessories are warranted to be free from defective material or workmanship for a period of ninety (90) days from the
date of original retail purchase. Caliber will at its option repair or replace any defective part with the Owner paying for all
other costs including freight and labor.
THREE YEAR FULL WARRANTY: Caliber Professional Gas Ranges/Rangetops and all of their component parts,
except as detailed below are warranted to be free from defective materials or workmanship in normal residential use
for a period of three (3) years from the date of original retail purchase or closing date for new construction, whichever
period is longer. Caliber agrees to repair or replace, at its option, any part which fails or is found to be defective during
the warranty period.
FIVE YEAR LIMITED WARRANTY ON BURNERS: Any surface burner, griddle burner, grill burner, or oven burner
which fails due to defective materials or workmanship (excluding cosmetic failures) in normal household use during the
fourth through fth year from the date of original retail purchase will be repaired or replaced, free of charge for the part
itself, with the owner paying all other costs, including labor. This does not include ignition systems, lights, switches, etc.
TEN YEAR LIMITED WARRANTY ON PORCELAIN: Any porcelain oven part which corrodes through due to defective
materials or workmanship in normal household use during the fourth through the tenth year from the date of original retail purchase will be repaired or replaced, free of charge for the part itself, with the owner paying all other costs, including labor.
LIMITED LIFETIME WARRANTY: During the life of the product any stainless steel parts found to be defective in material or workmanship will be repaired or replaced, free of charge for the part itself, with the owner paying all other costs,
including labor. This warranty excludes surface corrosion or rust, scratches, grease build-up, discoloration, water or
atmospheric conditions, or cleaning practices which are part of normal residential use. Defective parts will be repaired
or replaced free of charge with the Owner paying all other costs including freight and labor.
TERMS AND CONDITIONS: This warranty extends to the original purchaser of the product and applies to products
purchased and located in the United States and Canada. The warranty coverage period commences from the original
date of purchase and proof of date of purchase is required. In order to activate the warranty coverage term you need
to return the “Warranty Card” supplied with each Product. This card (with the attached serial number label) must be
promptly returned to Caliber in order to ensure warranty coverage. The warranty applies to the original owner only and
may not be transferred; however, the warranty is still valid to the original Owner even if the product is relocated (excluding transit damage). Caliber will not sell, share or otherwise distribute information supplied on the warranty cards. Under
the terms of this warranty, service must be performed by a factory authorized Caliber service agent or representative.
Service will be provided during normal business hours, and labor performed at overtime or premium rates shall not be
covered by this warranty. Owner shall be responsible for proper installation, providing reasonable and necessary maintenance, providing proof of purchase upon request, and making the appliance reasonably accessible for service. The
return of the Owner Registration Card is not a condition of warranty coverage. You should, however, return the Owner
Registration Card so that Caliber can contact you should any question of safety arise which could affect you.
WHAT IS NOT COVERED BY THIS WARRANTY: This warranty shall not apply to damage resulting from shipping,
transit, mishandling during installation, abuse, failure to provide reasonable or necessary maintenance, accident, deliv-
ery, negligence, natural disaster, re or water damage, loss of electrical power to the product for any reason, alteration,
outdoor use, improper installation, improper operation, unauthorized adjustments or calibrations, dings, dents, scratch-
es, or damages related to the use of harsh cleaning chemicals and acids, or repair or service of the product by anyone
other than an authorized Caliber service agency or representative. This warranty excludes use of the product in any
outdoor or commercial location such as restaurants, food service or institutional locations (as determined by Caliber).
LIMITATION OF REMEDIES: LIMITATION OF REMEDIES AND DURATION OF IMPLIED WARRANTY OWNER’S
SOLE AND EXCLUSIVE REMEDY FOR A CLAIM OF ANY KIND WITH RESPECT TO THIS PRODUCT SHALL BE
THE REMEDIES SET FORTH ABOVE. CALIBER IS NOT RESPONSIBLE FOR CONSEQUENTIAL OR INCIDENTAL
DAMAGE, INCLUDING BUT NOT LIMITED TO FOOD OR MEDICINE LOSS, DUE TO PRODUCT FAILURE, WHETHER ARISING OUT OF BREACH OF WARRANTY, BREACH OF CONTRACT OR OTHERWISE. ANY IMPLIED WARRANTIES OF MERCHANTABILITY OR FITNESS FOR A PARTICULAR PURPOSE APPLICABLE TO THIS PRODUCT
ARE LIMITED IN DURATION TO THE PERIOD OF COVERAGE OF THE APPLICABLE EXPRESS WRITTEN LIMITED
WARRANTIES SET FORTH ABOVE. Some states do not allow limitations on how long an implied warranty lasts, so
the above limitation may not apply to you. Caliber shall not be liable for incidental, consequential, special or contingent
damages resulting from its breach of this written warranty or any implied warranty. Some States do not allow limitations
on how long an implied warranty lasts, or the exclusions of or limitations on consequential damages. This warranty
gives you specic rights and you may have other rights which vary from state to state. This warranty does not cover
travel costs to isolated geographic locations of two hours’ time both ways or locations only accessible by plane, train,
boat, ferry, etc.
WARRANTY SERVICE: Warranty service must be rst authorized by Caliber and then performed by an authorized
service representative during normal business hours. Any non-authorized service costs will not be covered by this warranty. To obtain warranty service, contact your authorized Caliber service agent, or Caliber Appliances, 17812 Metzler
Lane, Huntington beach, CA, 92647, (714)-848-1349 during normal PST business hours. Please be prepared to provide
the Purchaser’s name and address, Dealer name, model and serial number, date of original purchase or closing date
for a new construction along with an accurate description of the problem. The Owner is responsible for proper installation, cleaning, providing normal care and maintenance, providing proof of purchase and providing access to the appliance for any service calls.
IMPORTANT: Retain proof of original purchase to establish warranty period. Specications are subject to change with-
out notice.
Page 25

46 47
MISE EN GARDE!
Risque de surface brûlante
Les pièces accessibles peuvent devenir brûlantes pendant l’utilisation. Ne touchez pas
les brûleurs, les zones à proximité des brûleurs, la grille, la plaque de cuisson, les ramasse-gouttes, les éléments chauffants ou les surfaces intérieures du four — tous ces
éléments peuvent être sufsamment chauds pour causer des brûlures, même s’ils sont
de foncés. Pendant et après l’utilisation, ne laissez pas les vêtements ou autres matières
inammables entrer en contact avec les éléments de surface ou les zones à proximité, et ne les touchez pas avant qu’ils soient refroidis. Les autres pièces et surfaces de
l’appareil peuvent devenir assez chaudes pour causer des brûlures — parmi elles, on
retrouve les grilles, la garniture arrière et les évents de four à l’arrière de la table de
cuisson, le bord avant, les surfaces adjacentes à la table de cuisson, et la porte du four.
N’utilisez que des poignées sèches — des poignées mouillées ou humides sur des surfaces chaudes pourraient provoquer des brûlures de vapeur. Attention que les poignées
ne touchent pas les éléments chauffants brûlants. N’utilisez pas de serviette ou chiffon
encombrant. Laissez refroidir la graisse chaude avant de tenter de le manipuler. Les
fours dotés d’un cycle de nettoyage: durant l’auto-nettoyage, le four atteint des températures plus élevées que lorsqu’il est utilisé pour faire la cuisine. Dans de telles conditions,
les surfaces peuvent devenir encore plus chaudes que d’habitude. Gardez les enfants
à l’écart. Ne pas vous conformer à cette consigne pourrait provoquer des brûlures et
échaudages.
French warnings French warnings
Consignes de sécurité et mises en garde
CONSIGNES DE SÉCURITÉ IMPORTANTES
Pour réduire les risques d’incendie, de décharge électrique, de blessures corporelles ou de dommages lors de
l’utilisation de cet appareil, conformez-vous aux consignes de sécurité importantes énumérées ci-dessous:
MISE EN GARDE!
Risque de décharge électrique
Avant de retirer une ampoule de four défectueuse, prenez soin d’éteindre l’appareil
au niveau du fusible principal ou du disjoncteur. Si vous ne savez pas comment
faire, contactez un électricien. N’enlevez pas la grille de la plinthe de protection.
En raison de l’accès aux pièces électriques sous tension derrière elle, la grille de la
plinthe de protection ne doit être enlevée que par un technicien qualié. Cet appareil est équipé d’une mise à la terre trois broches ou quatre broches pour vous
protéger contre les risques de décharge et doit être branché directement dans une
prise de courant mise à la terre. En aucune circonstance ne devez-vous couper ou
enlever la broche de mise à la terre de cette che. Négliger de suivre cet avis pourrait provoquer une décharge électrique, voire la mort.
MISE EN GARDE!
Risque de basculement
Un enfant ou un adulte peut faire basculer cette cuisinière et être tué. Il doit être
xé par une bride antibasculement correctement installé. Voir les instructions d’installation pour plus de détails. S’assurer que le dispositif antibascule est réengagé
lorsque la plage est déplacée. Vérier les ançailles suivant les étapes décrites
ci-dessus. N’utilisez pas l’appareil jusqu’à ce qu’il a été obtenu. Ne pas le faire peut
entraîner la mort ou de graves brûlures pour les enfants ou les adultes.
MISE EN GARDE!
Risque d’incendie
N’utilisez jamais votre appareil pour chauffer une pièce. Quelqu’un pourrait être
blessé ou un incendie pourrait se déclarer. Gardez la zone autour de l’appareil libre
de toute matière combustible (par exemple revêtements muraux, rideaux, tentures),
essence et autres vapeurs et liquides inammables. Ne laissez pas la graisse de
cuisson ou d’autres matières inammables s’accumuler dans l’appareil ou dans
sa proximité. Ne suspendez jamais un quelconque article (par exemple, linges à
vaisselle) sur la poignée du four. Certains tissus peuvent s’enammer ou fondre à
la chaleur. Ne laissez jamais les brûleurs sans surveillance lorsqu’ils sont en ser-
vice - les débordements produisent de la fumée et des déversements de matières
grasses qui peuvent s’enammer. Assurez-vous que tous les contrôles sont hors
tension et que l’appareil est froid avant d’utiliser tout type de produit nettoyant en
aérosol sur ou autour de l’appareil. Les produits chimiques contenus dans les pro-
duits nettoyants pourraient, en présence de chaleur, s’enammer ou provoquer la
corrosion des parties métalliques. Négliger de suivre cet avis peut entraîner la mort
ou des blessures graves.
MISE EN GARDE!
Risque d’explosion
Si vous sentez une odeur de gaz, n’utilisez pas l’appareil. Ouvrez une fenêtre ou une
porte pour laisser échapper le gaz, puis suivez les instructions indiquées à la page avant
la ‘Table des matières’. N’utilisez pas d’eau sur les incendies de graisse. Une violente
explosion de vapeur pourrait en résulter. Éteignez tous les brûleurs, puis étouffez le
feu ou les ammes ou employez des produits chimiques secs ou un extincteur de type
à mousse. Ne faites pas chauffer des contenants à aliments non ouverts tels que des
boîtes de conserve — l’accumulation de pression pourrait faire exploser le contenant et
causer des blessures. Négliger de suivre cet avis pourrait entraîner des blessures ou la
mort.
MISE EN GARDE!
Risque d’empoisonnement
Ne recouvrez jamais les fentes, trous ou passages de la partie inférieure du four et ne
recouvrez jamais la grille en entier ou le plancher du four de matériau comme le papier
d’aluminium. Ce faisant, vous pourriez bloquer le débit d’air dans le four et provoquer un
empoisonnement au monoxyde de carbone. Une doublure en papier d’aluminium peut
aussi piéger la chaleur, provoquant ainsi un incendie. Nettoyez l’appareil avec précaution. Si vous utilisez une éponge ou un chiffon humide pour essuyer les renversements
sur une surface de cuisson chaude, faites preuve de vigilance pour éviter tout risque de
brûlure par la vapeur. Certains produits nettoyants peuvent produire des vapeurs nocives
lorsqu’ils sont appliqués sur une surface brûlante. Suivez les directives de nettoyage du
fabricant du produit. N’utilisez jamais cet appareil comme un appareil de chauffage pour
chauffer ou réchauffer la pièce. Cela pourrait provoquer une intoxication au monoxyde
de carbone et une surchauffe de l’appareil. Négliger de suivre cet avis peut entraîner une
intoxication ou la mort.
Page 26

48 49
French warnings
Consignes de sécurité et mises en garde
CONSIGNES DE SÉCURITÉ IMPORTANTES
• Lisez toutes les instructions avant d’utiliser l’appareil. Utilisez l’appareil uniquement pour l’usage auquel
il est conçu, tel que le décrivent ces instructions.
• Installation appropriée — veillez à ce que votre appareil soit correctement installé et mis à la terre par
un technicien qualié.
• Ne l’utilisez pas s’il est endommagé ou s’il ne fonctionne pas correctement. Si vous avez recevé un
produit endommagé, contactez votre revendeur ou votre installateur immédiatement.
• Assurez-vous que l’installateur vous démontre où et comment désactiver l’alimentation à la cuisinière
(c.-à-d. l’emplacement du fusible principal ou du disjoncteur) et où et comment désactiver l’approvision-
nement en gaz de la cuisinière en cas d’urgence.
• Ne laissez jamais les enfants sans surveillance — ne laissez pas les enfants seuls ou sans surveillance
à proximité de l’endroit où l’appareil est utilisé. Ils ne devraient jamais être autorisés à jouer avec l’ap-
pareil ou à s’asseoir dessus ou à se tenir sur une partie quelconque de l’appareil.
• Attention — pour des raisons de sécurité, ne rangez pas d’articles d’intérêt pour les enfants dans des
armoires au-dessus ou à l’arrière d’une cuisinière — les enfants qui grimperaient sur la cuisinière pour
atteindre de tels objets pourraient être gravement blessés.
• Portez des vêtements appropriés — ne portez pas de vêtements amples ou pendants lorsque vous
utilisez cet appareil.
• Entretien par l’utilisateur — ne réparez et ne remplacez aucune pièce de cet appareil, sauf si cela est
spéciquement recommandé dans le présent document. Tous les autres travaux doivent être conés à
un technicien qualié. Les techniciens doivent débrancher l’appareil de l’alimentation électrique avant
toute intervention.
• Rangement dans l’appareil et sur celui-ci — ne rangez aucune matière inammable dans un four ou à
proximité des éléments de surface.
• Soyez prudent lors de l’ouverture de la porte du four — laissez l’air chaud ou la vapeur s’échapper
avant d’en sortir ou d’y replacer des aliments.
• Veillez à ce que les conduits de ventilation ne soient jamais obstrués.
• Garder les paillassons et largement à l’écart de la base de la cuisinière.
• Mise en place des grilles du four — positionner toujours les grilles à l’endroit désiré pendant que le four
est froid (avant le préchauffage). Si une grille devait être retirée alors que le four est chaud, ne laissez
pas les poignées ou les mitaines de four entrer en contact avec la base du four chaud ou les éléments
de chauffage du four.
• Attention de ne pas nettoyer et de n’utiliser aucun produit de nettoyage sur le joint d’étanchéité du four.
Il est indispensable à une bonne étanchéité, ce qui garantit que le four fonctionne efcacement. Il ne
faut pas le frotter, l’endommager ou le déplacer.
• N’utilisez pas de nettoyants à four, de produits abrasifs ou durs, de cires ou de polis dans un four auto-nettoyant. Aucun nettoyant pour four commercial, doublure de four, ou revêtement de protection de
quelque nature que ce soit ne doit être utilisé dans ou autour de n’importe quelle partie d’un four autonettoyant.
• N’utilisez pas de savon ou de nettoyants abrasifs, tampons à récurer ou racloirs métalliques tranchants
pour nettoyer la vitre de la porte du four, car ces articles éraeraient la surface, ce qui pourrait faire
éclater la vitre.
• Ne vous assoyez pas et ne vous tenez jamais debout sur la porte du four et ne placez jamais un objet
lourd dessus — cela pourrait entraîner des blessures.
• Soyez prudent lorsque vous désirez atteindre des objets entreposés dans des armoires au-dessus de
l’appareil.
• Manipulation sécuritaire des aliments: ne laissez la nourriture dans le four que pendant une durée
aussi courte que possible avant et après la cuisson. Ainsi, vous éviterez la contamination par des organismes qui peuvent causer des intoxications alimentaires. Soyez particulièrement vigilant par temps
chaud.
• Ne nettoyez que les pièces répertoriées dans ce manuel.
• N’utilisez pas un nettoyeur à vapeur pour nettoyer une quelconque partie de l’appareil.
• N’obstruez pas le ux d’air de combustion et la ventilation de l’appareil.
• Avant l’auto-nettoyage du four — retirez les grilles du four, les grilles latérales, la lèchefrite et tous les
autres ustensiles de cuisine et essuyez tout important déversement d’aliment ou dépôts de graisse.
• Avant l’auto nettoyage du four - assurez-vous de déplacer vos oiseaux de compagnie dans une autre
pièce fermée et bien aérée. Certains oiseaux de compagnie sont extrêmement sensibles à la fumée
dégagée lors d’un cycle d’auto-nettoyage, et risquent de mourir s’ils restent dans la même pièce que
la cuisinière durant un tel cycle.
• N’utilisez pas d’ustensile de cuisson sur le gril ou la plaque de cuisson.
• Le couvercle supérieur doit être retiré lorsque le gril ou plaque de cuisson est en marche.
• Lorsque vous utilisez le gril ou plaque de cuisson, assurez-vous que le ramasse-gouttes est en place
— son absence durant l’utilisation pourrait endommager le câblage ou les composantes.
• Le(s) four(s), grilles et plaque de cuisson de votre cuisinière ne peuvent pas être utilisés en cas de
panne de courant. N’essayez pas de les faire fonctionner en cas de panne de courant.
• N’utilisez jamais de papier d’aluminium pour recouvrir une quelconque partie du four ou de la table de
cuisson. La chaleur risquerait d’y rester prise au piège. Cette chaleur emprisonnée pourrait affecter la
performance de cuisson et endommager la nition du four ou des parties de la table de cuisson.
• Ne placez pas de vaisselle, de plateaux, d’eau ou de glace directement sur le plancher du four pen-
dant la cuisson, car cela sera endommagerait de façon irréversible le ni en émail de porcelaine.
• Pour des raisons de sécurité, la taille de la amme du brûleur de cuisson doit être ajustée de sorte
qu’elle ne dépasse pas le bord de la casserole.
• Utilisez des casseroles de format et de fabrication appropriés au le type de cuisson. Cet appareil est
équipé de brûleurs de différentes tailles. Les casseroles doivent être adaptées à la taille du brûleur.
Choisissez des casseroles à fond plat, assez grandes pour couvrir les ammes du brûleur. L’utilisation
d’ustensiles de cuisson de trop petite taille expose une portion des ammes du brûleur à un contact direct, qui risque alors d’enammer vos vêtements. De plus, l’utilisation d’ustensiles adaptés à l’élément
chauffant améliore le rendement de l’appareil.
• Doublures de protection — n’utilisez pas d’aluminium pour doubler le fond d’un ramasse-gouttes ou du
four.
• Casseroles émaillées — seuls certains types de casseroles en verre, verre/céramique, terre cuite ou
autres matériaux émaillés peuvent être utilisés pour la cuisson sans risquer d’être endommagés par
les changements de température soudains.
• Tournez les poignées des ustensiles vers l’intérieur, en veillant à ce qu’elles ne soient pas placées
au-dessus des éléments de surface adjacents - Pour réduire les risques de brûleur d’inammation des
matériaux inammables et de déversement résultant d’un contact accidentel avec les ustensiles, tour-
nez leur poignée vers l’intérieur, en veillant à ce qu’elle ne soit pas placée au-dessus des éléments de
surface adjacents.
• Le gouverneur de la Californie est tenu de publier une liste de substances connues de l’État de Cali-
fornie comme pouvant causer le cancer ou des malformations congénitales et oblige les entreprises
à mettre en garde les clients potentiels de l’exposition à de telles substances. AVERTISSEMENT: Ce
produit émet des gaz d’échappement contenant des produits chimiques connus de l’état de Californie
comme pouvant causer le cancer, des malformations congénitales et d’autres dangers pour la reproduction. Pour réduire les risques que présentent ces produits chimiques, assurez-vous cet appareil est
installé, exploité et entretenu conformément aux instructions du fabricant.
French warnings
Page 27

17812 METZLER LANE | HUNTINGTON BEACH, CALIFORNIA 92647 | 714-848-1349
Copyright © Caliber Appliances 2018. All rights reserved.
The product specications in this booklet apply to the specic
products and models described at the date of issue. Under
our policy of continuous product improvement, these specications may change at any time. You should therefore check
with your Dealer to ensure this booklet correctly describes the
product currently available.
© CALIBER APPLIANCES 2018
P/N# 15390 FRENCH REV. 06-2018
CALIBERAPPLIANCES.COM
 Loading...