

LTR20091032, Rev. A
12/16/08

Delivery and Set-Up ....................1
Planning the Best Location for Your Spa Wrap ....1
Preparing a Good Foundation..................1
Spa Wrap Assembly.....................2
Tools and Materials ..........................2
Assembly ..................................2
Seam and Joint Finishing .....................5
Installing Your Spa Wrap Fireplace ........7
LP Gas Requirements ........................7
Natural Gas Requirements ....................8
What To Do If You Smell Gas ..................8
Testing for Leaks............................9
Lighting Your Gas Fireplace ...................9
To Turn Off the Appliance .....................9
Safety Information ........................ 10
Maintenance and Care..................12
Read This First!
Carefully read and follow all safety instructions.
When installing and assembling your spa wrap,
it is recommended that two or more people be
involved.
Do not use the unit during an electrical storm.
Do not attempt any repair without consulting the
manufacturer rst. Unauthorized repairs will void
the manufacturer’s warranty (within the rst 90
days).
Maintaining Your Fireplace.................. 12
Cleaning................................. 12
Replacement Parts ....................13
Warranty Information..................14
Copyright 2008-2009 LMS, Inc. All rights reserved. Duplication without
written consent is strictly prohibited.
Cal Spas™ and Cal Enclosures™ are registered trademarks.
Due to continuous improvement programs, all models, operation, and/or
specications are subject to change without prior notice.
LTR20091032, Rev. A
12/16/08
CONTACT INFORMATION
For customer service, please contact
your authorized dealer immediately. If
you need additional information and/
or assistance, please contact:
LMS Customer Service Department
1462 East Ninth Street
Pomona, CA 91766.
Toll Free: 1-800-CAL-SPAS
Fax: 1-909-629-3890

www. c a l s p as. c o m
Delivery and Set-Up
Planning the Best Location
1
Delivery and Set-up
Preparing a Good Foundation
for Your Spa Wrap
Most cities and counties require permits for exterior
construction and electrical circuits. In addition, some
communities have codes requiring residential barriers
such as fencing and/or self-closing gates on property
to prevent unsupervised access to the property by
children under the age of ve. Your dealer can provide
information on which permits may be required and
how to obtain them prior to the delivery of your
equipment.
The following are some of the things that you will
need to consider when determining the placement of
your new spa wrap.
Consider How You Will Use Your Spa
Wrap
How you intend to use your spa wrap will help you
determine where you should position it. For example,
will you use your spa wrap for recreational purposes?
If your spa wrap is mainly used for family functions, be
sure to leave plenty of room around it for activity.
Consider Your Privacy
In a cold weather climate, bare trees won’t provide
much privacy. Think of your spa wraps surroundings
during all seasons to determine your best privacy
options. Consider the view of your neighbors as well,
when you plan the location of your spa wrap.
Your spa wrap needs a solid and level foundation. The
area that it sits on must be able to support the weight
of the spa wrap and the occupants who use it. If the
foundation is inadequate, it may shift or settle after
the spa wrap is in place, causing stress that could
DAMAGE YOUR SPA WRAP.
Place the spa wrap on an elevated foundation
(preferably a 3” concrete slab). Be sure that the
concrete slab is at least 12” wider than the outside
dimension on the spa wrap.
If you are installing a spa on an elevated wood •
deck or other structure, we strongly recommend
that you consult a structural engineer or contractor
to ensure the structure will support the weight of
150 Lbs./ sq. ft.
It is strongly recommended that a qualied, •
licensed contractor prepare the foundation for
your spa.
Size Specications
Model Length Width Height
SW-100 129” 159” 96”
SW-200 133” 152” 60”
SW-300 122” 149” 70”
SW-400 122” 133” 60”
SW-500 146” 140” 83”
Provide A View With Your Spa Wrap
Think about the direction you will be facing when sitting
in your spa wrap. Do you have a special landscaped
area in your yard that you nd enjoyable? Perhaps
there is an area that catches a soothing breeze during
the day and lovely sunset in the evening. Consider
these things when you plan your location.
2009 Spa Wraps
LTR20091032, Rev. A
NOTE: For all spa wraps, regardless of model, it is
recommended that the foundation extend beyond
the dimension of the spa wrap. For example, if the
spa wrap you purchased is 12’x12’, you will want
your foundation to be 14’x14’. The reason for this is
because it will be easier to maintain the area around
the spa wrap (mowing the lawn, edging, etc.) without
damaging or scarring the spa wrap. Also, in doing this,
you will eliminate any potential problems, foundationwise, in the future.

www. c a l s p as. c o m
2
Spa Wrap Assembly
Spa Wrap Assembly
The following will tell you how to assemble your spa
wrap. If you have any questions, problems with material
and/or parts, please contact your local retailer.
NOTE: It is strongly advised that you have a licensed
professional install the foundation for your new spa
wrap. It is imperative that the foundation is level, as
any damage that occurs due to an uneven foundation
is not covered by the warranty.
If you are having a new spa delivered, we recommend
that you determine, prior to its delivery, where your spa
will be placed. For example: if you are going to center
your spa on the concrete slab, take measurements
that will enable you to determine where the edges of
the spa will be located. When done, mark the corner
locations. Upon delivery of your new Cal Spa, notify
the installation crew that you have determined where
you want the spa located.
After the spa has been installed and is operating, the
assembly of the your new spa wrap may begin.
Important: This spa wrap is a free-standing unit.
As with any structure, it is critical that all the main
support surface be level. If the main support surface
is not level, then the entire spa and spa wrap will be
misaligned.
Tools and Materials
Utility knife 25’ tape measure Cordless drill
100’ extension cord Electric drill Phillips-head drill tips
1/8” pilot hole drill bit 9/16” socket Slotted-head drill tips
Sandpaper (various grades) Redwood stain Wood putty
Gray wash stain Rags 1/2” ratchet and impact drill
1/2” carbide drill bit (masonry bit)
Assembly
After your Spa is professionally installed, clear the surrounding area for the installation of your spa wrap. If your
spa is already in place and not a new unit, make sure the area surrounding your spa is suitable for a spa wrap
install. The area (slab or deck area) should be level so the spa wrap ts correctly with the spa unit.
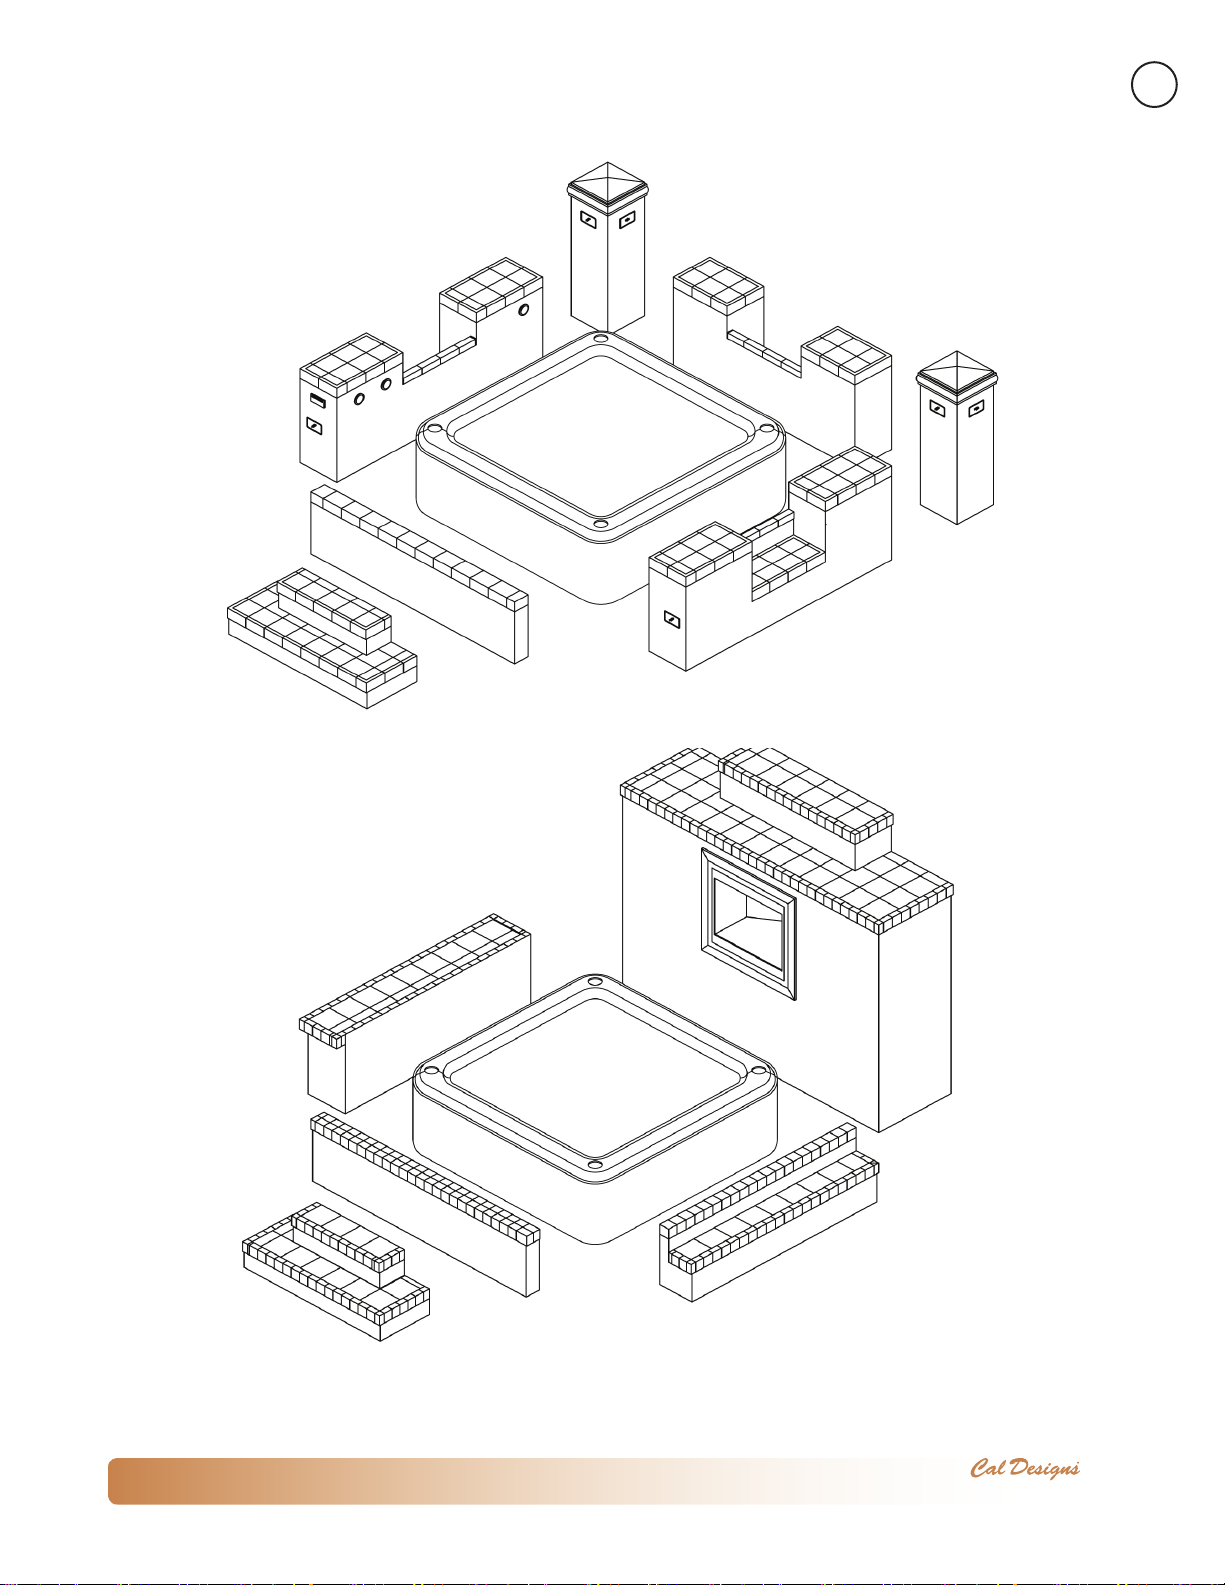
Carefully unpack the components and make sure your new spa wrap parts are arranged properly. Place each of
the four spa wrap sections around the spa as shown in the exploded views (see Figure 1).
Use Figure 2 for assembly of the SW-400, including electrical assembly.
If your unit has a re place, see the instructions in the chapter “Planning for and Using Your Spa Wrap Fireplace
(Model SW-100)”.
2009 Spa Wraps
LTR20091032, Rev. A
Spa Wrap Assembly
www. c a l s p as. c o m
3
Figure 1. Exploded view of SW-100 and SW-400
2009 Spa Wraps
LTR20091032, Rev. A

www. c a l s p as. c o m
4
Spa Wrap Assembly
Figure 2. SW-400 Assembly
2009 Spa Wraps
LTR20091032, Rev. A

www. c a l s p as. c o m
Seam and Joint Finishing
After you have unpacked all of the pieces and have put them in place around your spa, you may wish to apply
grout and stucco to the seams to give your spa wrap a more “nished” appearance.
Note: When access is needed inside your spa, the seams will need to be split. When work inside the spa is
nished, the seams will need to be renished, so plan accordingly.
Prepare and ll the gap or seam line with speed set.1.
Using your ngertips, push and atten out the speed set into the seam line.2.
5
Spa Wrap Assembly
NOTE: Allow the speed set to dry before proceeding with the next step.
Using a small brush or hopper gun, apply stucco to the seam line.3.
Mix grout with water in a container.4.
Fill the tile seam line with grout using a small spatula or your nger.5.
Clean the grout with a damp rag.6.
2009 Spa Wraps
LTR20091032, Rev. A

www. c a l s p as. c o m
6
Spa Wrap Assembly
Let the grout and stucco dry for at least three hours.7.
2009 Spa Wraps
LTR20091032, Rev. A

www. c a l s p as. c o m
Installing Your Spa Wrap Fireplace
Safe and satisfactory operation of your new replace spa wrap depends upon its proper installation. Installation,
adjustments and service must be performed by L.M.S. qualied installers and service technicians to ensure
proper operation and prevent accidents.
LP Gas Requirements
Check the rating plate to make sure the gas supply you are hooking up to is the gas type the replace is
manufactured for.
IMPORTANT WARNING: All Cal Flame s and replaces are manufactured with the highest regard to safety. For
this reason, Cal Flame s and replaces are either manufactured to operate on liquid propane (LP) or natural
gas (NG) and cannot be converted. To verify the replace’s operating fuel, remove the bottom drip pan and
check serial number label on the left. Either LP or NG will be marked on the operating tab, indicating the proper
operating fuel. Attempting to convert a Cal Flame replace from one fuel to another may result in serious injury
and void the warranty coverage.
If you do not have an updated ller valve on your existing propane tank, you will need to purchase one at your
local hardware store, as you will not be allowed to rell the tank at any lling station.
LP Gas Hook Up: An enclosure for an LP gas cylinder shall be vented by openings at the level of the cylinder
valve and at oor level. The effectiveness of the opening(s) for purposes of ventilation shall be determined with
the LP-gas supply cylinder in place. This shall be accomplished in one of the following manners:
7
Installing Your Spa Wrap Fireplace
One side of the enclosure shall be completely open.•
Enclosures that have four sides, complete with a top and bottom:•
At least two ventilation openings at cylinder valve level shall be provided in the sidewall, equally sized, •
spaced at 180˚ (3.14 rad), and unobstructed. Each opening shall have a total free area of not less than
” square inch per pound (7.1 cm≈/kg) of stored fuel capacity, and not less than a total free area of 10
square inches (64.5 cm≈).
Ventilation opening(s) shall be provided at oor level and shall have a total free area of not less than •
square inch per pound (7.1 cm≈/kg) of stored fuel capacity and not less than a total free area of 10
square inches (64.5cm≈). If ventilation openings at oor level are in a sidewall, there shall be at least
two openings. The bottom of the openings shall be at oor level and the upper edge no more than 5
inches (127 mm) above the oor. The openings shall be equally sized, spaced at 180˚ (3.14 rad) and
unobstructed.
Every opening shall have minimum dimensions so as to permit the entrance of a 1/8 inch (3.2 mm) •
diameter rod.
For plumbed-in LP installation, use a convertible regulator and set it for LP gas.
LP Gas Supply Pressure: Maximum line pressure for plumbed-in propane is 14” W.C (3.5 kPa). Minimum
line pressure for propane is 11” W.C.
LP Gas Pressure Regulator: The unit must be used with the gas pressure regulator. The regulator will control
and maintain a uniform gas pressure in the manifold. The burner orices have been sized for the gas pressure
delivered by the regulator.
LPG Cylinder Specication: Any LP gas supply cylinder used with this replace must be approximately 12
inches in diameter and 18 inches high. The maximum fuel capacity is 20 lbs. of propane, or 5 gallons. Full
cylinder weight should be approximately 38 lbs. (43.7 lbs. nominal water capacity.) Always use the cylinder dust
cap on the cylinder valve outlet during transport and when the cylinder is not connected to the replace.
Transporting the LP Gas Supply Cylinder: Only one cylinder should be transported at a time. Transport
cylinder in an upright and secure manner with control valve turned off and the dust cap in place.
2009 Spa Wraps
LTR20091032, Rev. A

www. c a l s p as. c o m
8
Natural Gas Requirements
Always check the rating plate to make sure the gas
supply you are hooking up to is the gas type the
replace is manufactured for.
IMPORTANT WARNING: All Cal Flame replaces are
manufactured with the highest regard to safety. For
this reason, Cal Flame s and replaces are either
manufactured to operate on liquid propane (LP) or
natural gas (NG) and cannot be converted. To verify
the operating fuel, remove the bottom drip pan and
check serial number label on the left. Either LP or NG
will be marked on the operating tab, indicating the
proper operating fuel.
Attempting to convert a Cal Flame replace from one
fuel to another may result in serious injury and void
the warranty coverage.
IMPORTANT: Never connect the replace to an
unregulated gas supply.
Installing Your Spa Wrap Fireplace
The installation of this appliance must conform with
local codes or, in the absence of local codes, to the
national fuel gas code, ANSI Z223.1a-1998. Installation
in Canada must be in accordance with the standard
CAN/CGA-B149.2, Propane Installation Code. Natural
gas connection must be performed by a licensed
contractor or local gas company representative.
Ensure that the service supplying the replace is tted
with a conveniently positioned shut off valve with easy
access.
Your Cal Flame replace for use with natural gas
comes equipped with its own regulator which MUST
NOT be removed. If this regulator needs to be
replaced, use only the type specied by Cal Flame for
this appliance.
Remove the rear panel to gain access to the •
regulator and gas connection point.
Connect a suitable ex connector to the •
regulator.
What To Do If You Smell Gas
Do not try to light the appliance.•
Do not touch any electric switch. Do not use any phone in the immediate area.•
Immediately call your gas supplier from a neighbor’s phone. Follow the gas •
supplier’s instructions.
If you cannot reach your gas supplier, call the re department.•
Use only your hand to turn the gas control knob. Never use tools. If the valve will •
not turn by hand, don’t try to repair it -- call a qualied service technician. Force
or attempted repair may result in a re or explosion.
2009 Spa Wraps
LTR20091032, Rev. A

www. c a l s p as. c o m
Testing for Leaks
9
Installing Your Spa Wrap Fireplace
Lighting Your Gas Fireplace
Perform a leak test at least once each year whether the
gas supply cylinder has been disconnected or not. In
addition, anytime the gas cylinder is connected to the
regulator or any part of the gas system is disconnected
or replaced, conduct a leak test.
As a safety precaution, remember to always leak test
your replace outdoors in a well-ventilated area. Never
smoke or permit sources of ignition in the area while
doing a leak test. Do not use a ame, such as a lighted
match to test for leaks. Use only a leak testing solution
as specied below.
Prepare a leak testing solution of sudsy water by 1.
mixing in a spray bottle half-liquid soap and half
water.
Check and make sure all the control knobs are in 2.
the OFF position.
Turn cylinder valve knob counter clockwise one 3.
turn to open.
Apply leak-testing solution by spraying on joints of 4.
the gas delivery system.
Blowing bubbles in the soap solution indicates 5.
that a leak is present.
Stop a leak by tightening the loose joint or by 6.
replacing the faulty part with a replacement part
recommended by the manufacturer. Do not attempt
to repair the cylinder valve if it should become
damaged. The cylinder must be replaced.
If you are unable to stop a leak, shut off the gas 7.
supply at the cylinder valve. Remove the cylinder
from the replace. Call an authorized gas appliance
service technician or LP gas dealer. Do not use the
appliance until the leak is corrected.
Push in and turn any control knob to release 8.
pressure in the hose and manifold.
Turn off the control knob.9.
Read the safety information above before attempting
to light your replace.
This appliance must be lit by hand. When lighting,
follow these instructions exactly. Before lighting, smell
around the appliance area for gas. Be sure to smell
next to the base of the appliance, because some gas
is heavier than air and will settle on the ground.
Locate the manual gas control valve, located on 1.
the outside of the , two inches from the base of
the . (Look for a bright red knob.)
Place a burning match on top of the burner in 2.
the middle where ports are present. DO NOT
HOLD THE MATCH IN YOUR HAND. For natural
gas appliances, turn on the ON/OFF valve slowly
at the appliance. For LP appliances, turn the valve
on the LP tank counterclockwise all the way and
then turn “ON” the ON/OFF valve slowly at the
appliance.
If the burner does not light before the match goes 3.
out, immediately turn the gas valve to “OFF”.
Wait at least ve minutes to clear out any gas. 4.
Then smell for gas, including the base of the
appliance. If you smell gas, STOP! Follow Safety
Information above. If you don’t smell gas, repeat
Step 2 above.
To Turn Off the Appliance
Turn the ON/OFF valve to the “OFF” position at 1.
the appliance for the natural gas appliance.
For an LP appliance, turn the ON/OFF valve to 2.
the “OFF” position at the appliance and then turn
the valve on the LP tank clockwise to the “OFF”
position.
Do not use this appliance if any part has been •
underwater. Immediately call a qualied service
technician to inspect the appliance, and to replace
any part which has been under water.
2009 Spa Wraps
LTR20091032, Rev. A

www. c a l s p as. c o m
10
Safety Information
Always keep the appliance area clear and free from
combustible materials, gasoline and any other
ammable vapors and liquids.
The log set is sold separately from the replace.
For installation and lighting instructions, refer to the
manufacturer’s owner’s manual.
DO NOT USE SOLID FUEL IN YOUR FIREPLACE!
Inspect the burner before each use of the appliance.
If there is any evidence that the burner is damaged,
it must replaced before operating. Upon completing
the gas line connection, a small amount of air will be
in the lines. When rst lighting the burner, it will take
a few minutes for the lines to purge themselves of
this air. Subsequent lighting of the appliance will not
require such purging.
CAUTION: Never allow the ON/OFF valve to remain in
Installing Your Spa Wrap Fireplace
the open position without placing a burning match on
top of the burner FIRST!
IF YOU DO NOT FOLLOW THESE INSTRUCTIONS
EXACTLY, A FIRE OR EXPLOSION MAY RESULT ,
CAUSING PROPERTY DAMAGE, PERSONAL INJURY
AND/OR LOSS OF LIFE.
General Safety Precautions
CAUTION: To prevent re and smoke damage,
remove all packaging material before operating your
replace.
Spiders and other insects can nest in the burners •
and block the gas and airow to the burner ports.
This creates a dangerous condition that can result
in a re from behind the valve panel. Inspect
and clean the burners periodically and follow
the guidelines in the maintenance section of this
manual.
In the event that a burner goes out and gas •
escapes, turn off the gas supply let it air-out. Do
not attempt to use the replace until the gas has
had time to dissipate.
Unless specically recommended in this manual, •
do not repair or replace any part of your replace.
Have a qualied technician perform all of the
service. Any repairs made by a non- L.M.S. approved
dealer technician will void your warranty.
Keep any electrical supply cord or power supply •
cord away from the heated areas of the replace.
Never use the replace in windy conditions. If •
located in a consistently windy area (oceanfront,
mountaintop, etc.) a windbreak will be required.
The area surrounding your new replace should •
be kept clean, and free from ammable liquids
and other combustible materials such as mops,
rags, brooms, as well as solvents, cleaning uids,
and gasoline.
Do not use the replace as a storage area for •
ammable or plastic items which may ignite. Do
not store any materials inside or near replace.
Do not store the liquid propane (LP) cylinder in
the vicinity of this or any other appliance when it
is not being used.
Never line replace with aluminum foil.•
When the unit is not in use, be sure to turn off the •
gas at the LP tank.
Never locate this appliance in an enclosed room, •
under a sealed overhead structure or any type,
or in an enclosed area such as a garage, shed, or
breezeway. Keep clear of trees and shrubs.
Do not place your replace under or near windows •
or vents that can be opened into your home.
Precautions Regarding Children
Never leave children unattended when the •
replace is being used.
Do not store items of interest to children around •
or below the replace.
Never allow children to sit or stand on any part of •
the replace.
Other Common Sense Precautions
Never leave the replace unattended while using •
high ame settings.
Never let clothing or other ammable materials •
come in contact with or close to any grate, rock
or re screen until it has cooled. Fabric may ignite
and result in personal injury.
When using the replace, do not touch the rock, •
re screen, or immediate surroundings, as these
areas become extremely hot and could cause
burns.
Proper apparel is a safety consideration. Never •
wear loose tting or hanging garments while using
your new replace.
2009 Spa Wraps
LTR20091032, Rev. A

www. c a l s p as. c o m
11
Do not heat any unopened glass or metal container •
of food on the replace. Pressure may build up and
cause the container to burst resulting in serious
harm or damage to the replace.
Do not use charcoal in this replace.•
Do not block the vents located near the base of •
your replace as gas may build up in case of leak
and cause serious damage.
Do not reach over your replace or any other •
surfaces when hot or in use.
Most cities and counties require permits for exterior
construction and electrical circuits. In addition, some
communities have codes requiring residential barriers
such as fencing and/or self-closing gates on property
to prevent unsupervised access to the property by
children under the age of 5. Your dealer can provide
information on which permits may be required and
how to obtain them prior to the delivery of your
equipment.
Installing Your Spa Wrap Fireplace
2009 Spa Wraps
LTR20091032, Rev. A

www. c a l s p as. c o m
12
Maintenance and Care
Maintenance and Care
Maintaining Your Fireplace
Inspect the appliance before initial use. Clean the
appliance at least annually and have it inspected by
a qualied eld service person.
Tampering with this appliance is DANGEROUS and
voids all warranties. Replace any faulty components
only with approved components.
For best operation, the burner ames should be
steady, not lifting or oating.
Periodically remove the logs and examine the
burner. If the burner is dirty, clean it with a soft wire
brush. Also examine the area around the burner air
shutter. Remove any dirt or debris in this area. This
will ensure long life and trouble-free operation.
Periodically check the hose connecting the LP gas
cylinder to ensure it is not damaged in any way.
Carbon (soot) may build up on the surfaces of the
logs with heavy use. This is more likely to occur
with LP gas. Clean soot off the surface of the logs
periodically to prevent excessive buildup.
Cleaning
Your spa wrap was designed with low cleaning and
maintenance in mind. We recommend that the spa
wrap be cleaned at least twice a month (or more, if
needed). When cleaning your spa wrap, do not use
cleaning solvents -- using a sponge and water will
be ne. For ground-in dirt and grime, refer to the
following section.
Maintaining your Spa and spa wrap is an easy task.
We recommend that every six months you inspect
your Spa unit. Take note of any deformities in the
material (i.e. cracking, peeling, dirt, grime, etc).
When cleaning your spa wrap, do not use cleaning
solvents – using a sponge and water will be ne.
2009 Spa Wraps
LTR20091032, Rev. A

www. c a l s p as. c o m
Replacement Parts
SW-100
Part # Description
SW04801641 BAR
SW04801642 BENCH
SW04801643 FRONT PANEL
SW04801644 STEP
SW04801645 FIREPLACE PANEL
WOOD127-CS BAR STOOL
SW-200
Part # Description
SW04801735 SIDE BAR
SW04801736 CORNER COLUMN
SW04801643 FRONT PANEL
SW04801644 STEP
OPTSW838 LED LIGHT OPTION
WOOD127-CS BAR STOOL
13
Maintenance and Care
SW-300
Part # Description
SW04801737 BAR
SW04801738 PRIVACY PANEL
SW04801643 FRONT PANEL
SW04801644 STEP
SW04801739 PRIVACY PANEL TIER
WOOD127-CS BAR STOOL
SW-400
Part # Description
SW04801740 BENCH PANEL
SW04801742 FRONT PANEL
SW04801644 STEP
SW04801736 CORNER COLUMN
OPTSW838 LED LIGHT OPTION
OPTSW853 SPLASH STEREO SYSTEM
WOOD127-CS BAR STOOL
2009 Spa Wraps
LTR20091032, Rev. A

Warranty Information
See your Cal Enclosures spa wrap dealer for a copy of the applicable warranty, details and any questions you may
have regarding the warranty coverage on your spa wrap.
Warranty Limitations
The Limited Warranty is void if the spa wrap has been subject to negligence, alteration, misuse, abuse, repairs
by non-LMS authorized representatives, acts of God and any other cases beyond the control of LMS Examples of
common acts invalidating this warranty include but are not limited to:
Use of the spa wrap in a non-residential application•
Scratches caused by normal use•
Damage caused by extreme weather conditions (heat, cold, etc.)•
Damage caused by dirt, sand, and/or water damage•
Damage caused by direct sunlight•
Damage caused as a result of failure to follow the assembly instructions as dened in this Owner’s Manual•
This Limited Warranty applies only to spa wraps normally used for personal, family, or household purposes.
This Limited Warranty is obsolete 90 days after the original purchase date.
Warranty
LMS warranties the spa wrap from defects in material and workmanship for a period of 90 days from the
original date of purchase.
DON’T FORGET TO REGISTER YOUR NEW PRODUCT AT WWW. CALSPAS.COM.
Customer Service
For customer service, contact the authorized selling dealer immediately. If you need additional information and
assistance, please contact the LMS Customer Relations Department at 1462 East Ninth Street, Pomona, CA 91766,
or call 909-623-8781.
Spa Wrap Model: ______________________________________________________________________
Spa Wrap Serial Number: _______________________________________________________________
Date Purchased: _______________________________________________________________________
Date Installed: ________________________________________________________________________
Cal Spa Dealer’s Phone Number: __________________________________________________________
Cal Spa Dealer’s Address: _______________________________________________________________
 Loading...