

Page 1

LTR50001036, Rev. D
1/1/16
Page 2

PRELIMINARY . . . . . . . . . . . . . . . . . . . . .i
Planning the Best Location . . . . . . . . . . 1
Preparing a Good Foundation . . . . . . . . 2
Electrical Requirements . . . . . . . . . . . . 3
Natural Gas Installation . . . . . . . . . . . . 4
Water and Drainage Installation . . . . . 5
Installation After Delivery . . . . . . . . . . 6
Cleaning and Maintenance . . . . . . . . . 12
Limited Warranty . . . . . . . . . . . . . . . . 22
Copyright 2016 LMS, Inc. All rights reserved.
Duplication without written consent is strictly
prohibited.
Cal Flame® is a registered trademark.
Due to continuous improvement programs, all
models, operation, and/or specications are
subject to change without prior notice.
LTR50001036, Rev. D
1/1/16
250-458
California Proposition 65 Warning: Chemicals known to the State
of California to cause cancer, birth
defects or other reproductive harm
are found in and/or created by the
combustion of natural gas, propane,
butane and other fuels. Always operate this unit as described in the
owner’s manual and in well ventilated areas.
Page 3

Planning the Best Location
Here are some of the things that you will need to consider when determining where to place your new barbecue island.
Safety First
Do not place your barbecue island near trees and shrubs.
Be certain that your installation will meet all city and local safety codes and
requirements.
Consider How You Will Use Your Barbecue Island
Your barbecue island is mainly used for family recreation. Be sure to leave
plenty of room around it for activity.
Ventilation and Access
If you place your barbecue island close to a wall or fence, make sure you
allow room for ventilation. Also, if you have storage areas in your barbecue
island, make sure they can be conveniently accessed.
Enclosures and Awnings
Your barbecue island is for outdoor use ONLY.
You can locate your barbecue island any place where there is adequate
ventilation. The size and conguration of your house and yard will determine
how you should locate your barbecue island, but as a general rule, do not
place it under or near windows that can be opened into your home.
1
Do not locate your barbecue island in an enclosed room such as a garage,
shed, or breezeway or under a sealed overhead structure.
You can place your barbecue island in your patio as long as there is
adequate ventilation and no re risk. We do not recommend placing your
barbecue island in any enclosed area, that is, any covered area that is
walled on two, three or four sides.
You can install an awning over your barbecue island, provided you make
sure it is high enough to prevent damage or re. Maintain sufcient distance
as to not overheat any overhead combustible material. We recommend
you check with local inspectors and your homeowner’s association.
Plan for Your Environment
If you live in a region where it snows in the winter or rains frequently,
place the barbecue island near a house entry. Consider adding a covered
walkway from your barbecue island to your house or patio.
Barbecue Islands
LTR50001036, Rev. D
www.calamebbq.com
Page 4

2
Preparing a Good Foundation
Your barbecue island needs a solid and level foundation. Damage
caused by inadequate or improper foundation support is not covered
by the warranty. It is the responsibility of the owner to provide a proper
foundation for the barbecue island.
If you do not already have a location for your barbecue island, we
recommend you have a concrete slab prepared to accommodate it.
There are several advantages of having a permanent slab, including
stability, levelness, and it eliminates sagging.
As you prepare your slab, this is the best time to run gas, electrical, and
water lines and locate stub-ups for your barbecue island to connect
to. The size and shape of the base of the barbecue island is called a
footprint.
Footprint drawings show the actual dimensions of the base and
suggested locations for your stub-ups. Footprint drawings for each
model can be found in in the Cal Flame Barbecue Island Pre-Delivery
Guide, available from your dealer, the Cal Flame web site, or through
Cal Flame customer service.
Although a permanent slab is recommended, you can place your
barbecue island on a prepared surface with bricks or pavers. We
do not recommend you place your barbecue island on gravel, sand,
timbers, dirt or grass because these surfaces have the potential to
become unstable or uneven. Your barbecue island should always be
on a stable, at, level surface.
You can put your barbecue island on a deck provided it is rated to
support the full weight of your barbecue island, grill, and all accessories.
We recommend you have a contractor or structural engineer examine
your deck to determine whether it can bear the load of your barbecue
island.
Your Cal Flame retailer can help you with your foundation and more.
Your retailer has a wealth of information and experience about how to
get the most out of your barbecue island and can provide you with a
full line of accessories that are designed to complement your barbecue
island and increase your enjoyment.
Barbecue Islands
www.calamebbq.com
LTR50001036, Rev. D
Page 5

Electrical Requirements
You do not need to hire a contractor to install your electrical service,
but you must ensure you have all required permits and the installation
complies with State and local code. We recommend you hire a certied
contractor if you do not wish to do the installation yourself.
If your dealer is not a certied contractor, you will need to hire a
contractor for installation of your electrical service.
When installed in the United States, the electrical wiring must meet the
requirements of National Electric Code, ANSI/NFPA 70-1999 and any
applicable state or local codes. The electrical circuit must be installed
by an electrical contractor and approved by a local building / electrical
inspector.
Supplying power to a barbecue island that is not in accordance with
these instructions will void both the independent testing agency listing
and the manufacturer’s warranty.
The power supplied to the barbecue island must be on a dedicated
circuit with no other appliances or lights sharing the power.
To determine the current, voltage, and wire size required for the island
conguration to be connected, refer to the following:
• Wire size is determined by length of run from breaker box to the
barbecue island and maximum current draw.
3
• We recommend copper wire with THHN insulation.
• All wiring must be copper to ensure adequate connections. Do not
use aluminum wire.
• When NEC requires the use of wires larger than #6 (10mm²), install a junction box near the barbecue island and use #6 (10mm²)
wire between the junction box and the barbecue island.
120 Volt Electrical Installation
For 120V grills, you need a dedicated 120V 20 amp grounded electrical
service.
There will be a 110V power outlet inside the barbecue island. Using
romax or similar grounded, shielded wire, connect the outlet to the
electrical service in the stub-up.
If the circuit breaker trips while the barbecue island is in use, reset it.
If it does not reset, contact a licensed electrician for service. DO NOT
USE THE BARBECUE ISLAND!
Barbecue Islands
LTR50001036, Rev. D
www.calamebbq.com
Page 6

4
Natural Gas Installation
You do not need to hire a contractor to install your natural gas service,
but you need to make sure you have all required permits and ensure
the installation complies with State and local code. We recommend
you hire a certied contractor if you do not wish to do the installation
yourself.
If your dealer is not a certied contractor, you will need to hire a
contractor for installation of your gas service.
The natural gas pipe from your house to the location of your barbecue
island needs to be ¾” and terminate with a shut-off valve with a
½” male tting. Check with a contractor or your local inspector for
requirements.
www.calamebbq.com
Barbecue Islands
LTR50001036, Rev. D
Page 7

Water and Drainage Installation
If you have a sink or ice maker installed, there are several ways you
can provide water and drainage to your barbecue island. A contractor
can help you decide on the best solution for your needs. You are
responsible for ensuring all plumbing and drainage complies with State
and local codes.
Water Sources
Garden hose -- This is by far the easiest way of getting water to your
barbecue island. You have two options:
• You can bring the hose through the front access door and attach it
underneath the sink when you need it, or
• You can bury the length of the hose and bring it up beneath the
barbecue island in the same manner as the gas and electrical stubups. Once you connect it to your sink, you won’t need to remove
it.
½” cold water pipe -- Plumb a single ½” cold water pipe from your
house plumbing to a stub-up beneath the sink.
Hot water plumbing -- You have many options for plumbing your sink for
hot water, including tapping from your house’s hot water tank, installing
a tankless point-of-use water heater, and installing a solar water heater.
Consider several factors to nd a solution that best addresses your
needs, including your water consumption, electrical power supply, and
drainage. A contractor can help you best with this.
5
Drainage
Five gallon bucket -- Place a ve gallon bucket beneath the sink drain.
This solution has the advantage of being inexpensive and the least
trouble to maintain for winterizing your barbecue island.
Drain to your garden -- if your yard is on a slope, you can take advantage
of this feature by draining sink water to a place in your garden where
you can re-use the water.
Gray water drain -- Installing a line to drain to your house’s gray water
drainage may incur some cost and labor, but it may be your best solution
if you plan to locate your barbecue island in its place permanently.
Barbecue Islands
LTR50001036, Rev. D
www.calamebbq.com
Page 8

6
Installation After Delivery
For more information on installing your grill and accessories, see the
grill owner’s manual.
Connection to Services
After your barbecue island is delivered, set in place, and the grill is
mounted, you will need to connect all of the services to your hardware.
If your dealer is not a certied contractor, you will need to hire a
contractor for this.
The natural gas line connects to the grill inside the island. As you are
facing the grill, the connection is located at the right rear side of the grill.
The stub-up will terminate with a valve and a ½” male tting. Connect
the exible tubing from the grill to the male tting.
Both the natural gas and the electrical service connect inside where
the grill outlet is located.
The voltage transformer can be mounted to any part of the frame where
it will not be in the way. Plug it into the 110V grounded outlet located
inside the barbecue island.
Side burners do not require a separate regulator. You can put in a tee
in the line after it comes out of the regulator. For detailed installation
instructions, see the grill and cart owner’s manual.
If you have a GPV3100, the sections will need to be connected before
you connect it to services. See the following instructions “Joining the
GPV3100 Sections”.
If you have a LBK870, see the following instructions “Arranging the
LBK870 Sections”.
LED Light Switch
The switch for the LED lights is located in a covered utility box on the
side of the barbecue island. Flip it up to turn all the lights on.
www.calamebbq.com
Barbecue Islands
LTR50001036, Rev. D
Page 9

Joining the GPV3100 Sections
This applies only to Grand Pavillion model GPV3100.
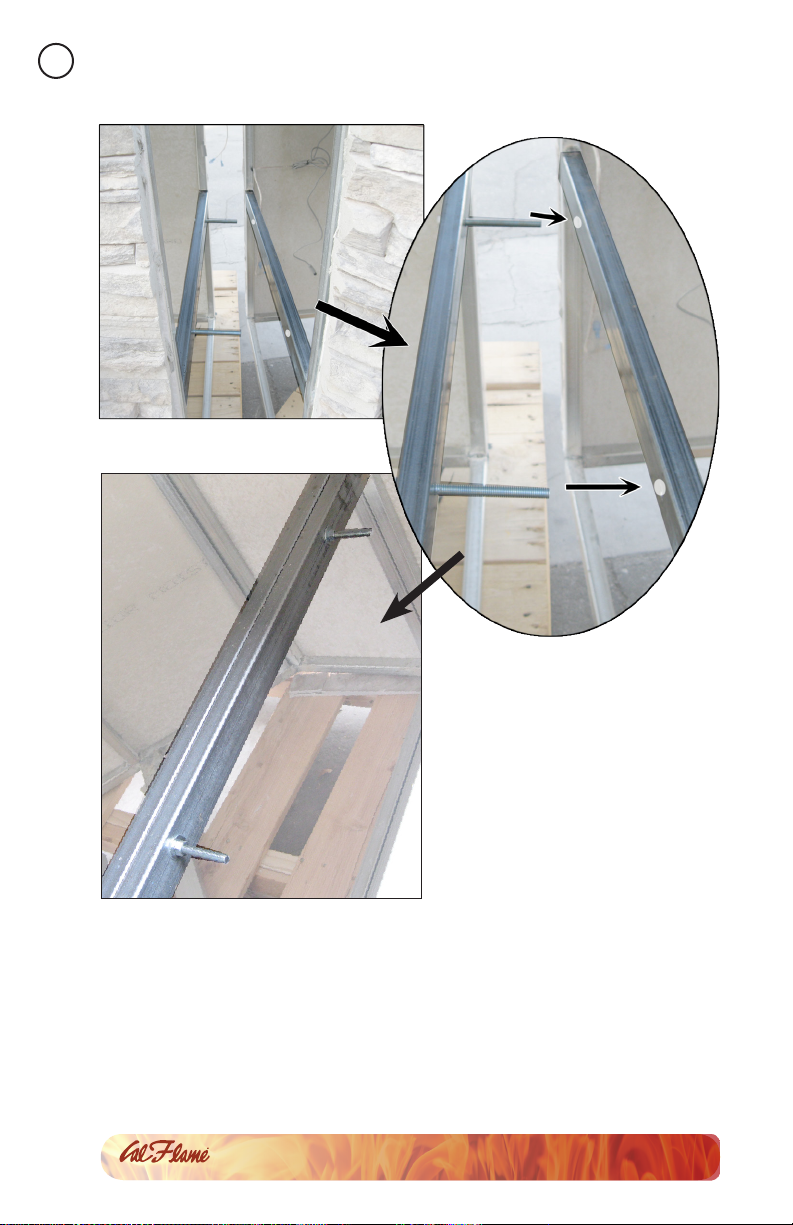
Model GPV3100 is built in three sections to make delivery easier. When
they arrive, they will need to be bolted together. Use four bolts with four
nuts and washers to connect each section.
Place the three sections together as shown in the gure below. You
may nd it easiest to set the center section in place and move the two
side sections against it.
See the gure on the next page for an illustration of how the sections
are bolted together.
7
Barbecue Islands
LTR50001036, Rev. D
www.calamebbq.com
Page 10
8
After the sections are joined, if your barbecue island has a stucco nish,
you may want to apply a small line of stucco to the seam.
When the sections are connected, continue to the section “Connecting
Wiring within the Island” before you connect to gas and electrical
services.
Barbecue Islands
www.calamebbq.com
LTR50001036, Rev. D
Page 11
Arranging the LBK870 Sections
This applies only to model LBK870.
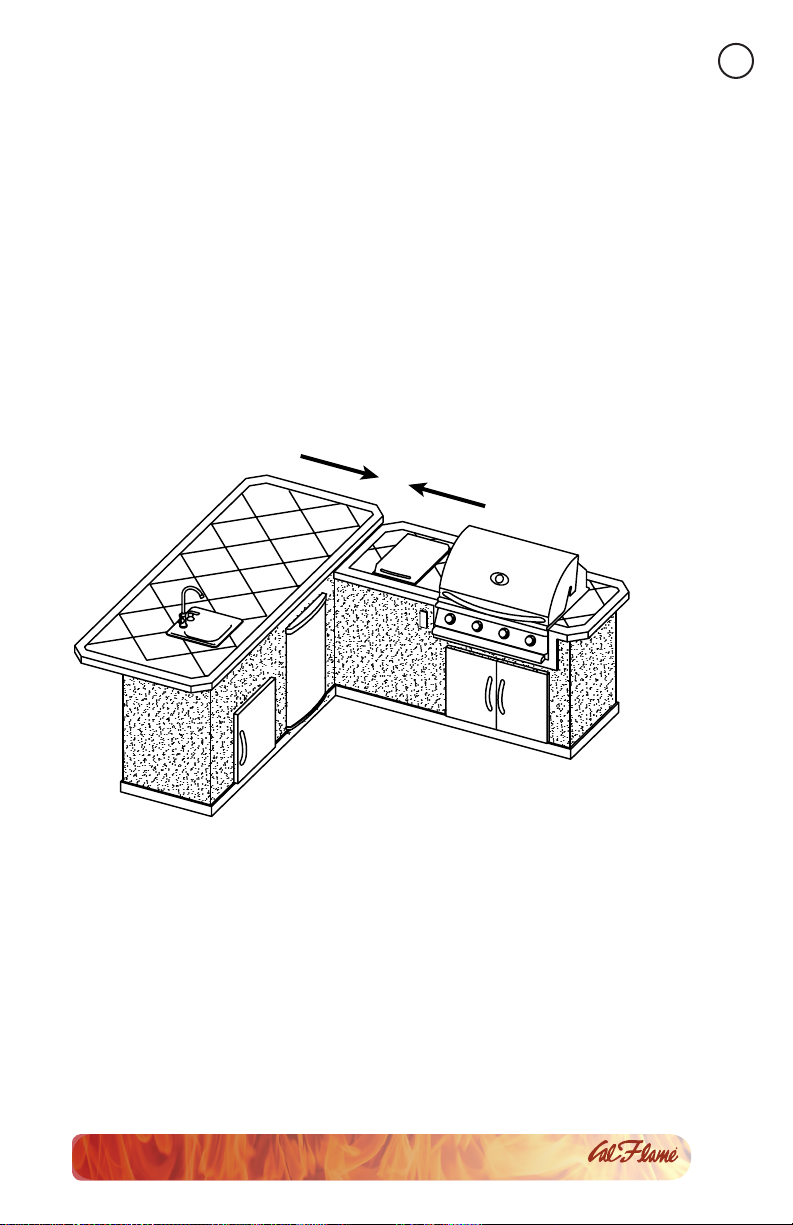
Model LBK870 is built in two sections to make delivery easier. When
they arrive, they will need to be placed together. They do not need to be
connected. Push the two sections together as close as they will go as
shown in the example below. If there is any wiring that goes between
the two sections, make sure the holes where the wires will be passed
through are aligned.
When the sections are in place, continue to the section “Connecting
Wiring within the Island” before you connect to gas and electrical
services.
9
Barbecue Islands
LTR50001036, Rev. D
www.calamebbq.com
Page 12
10
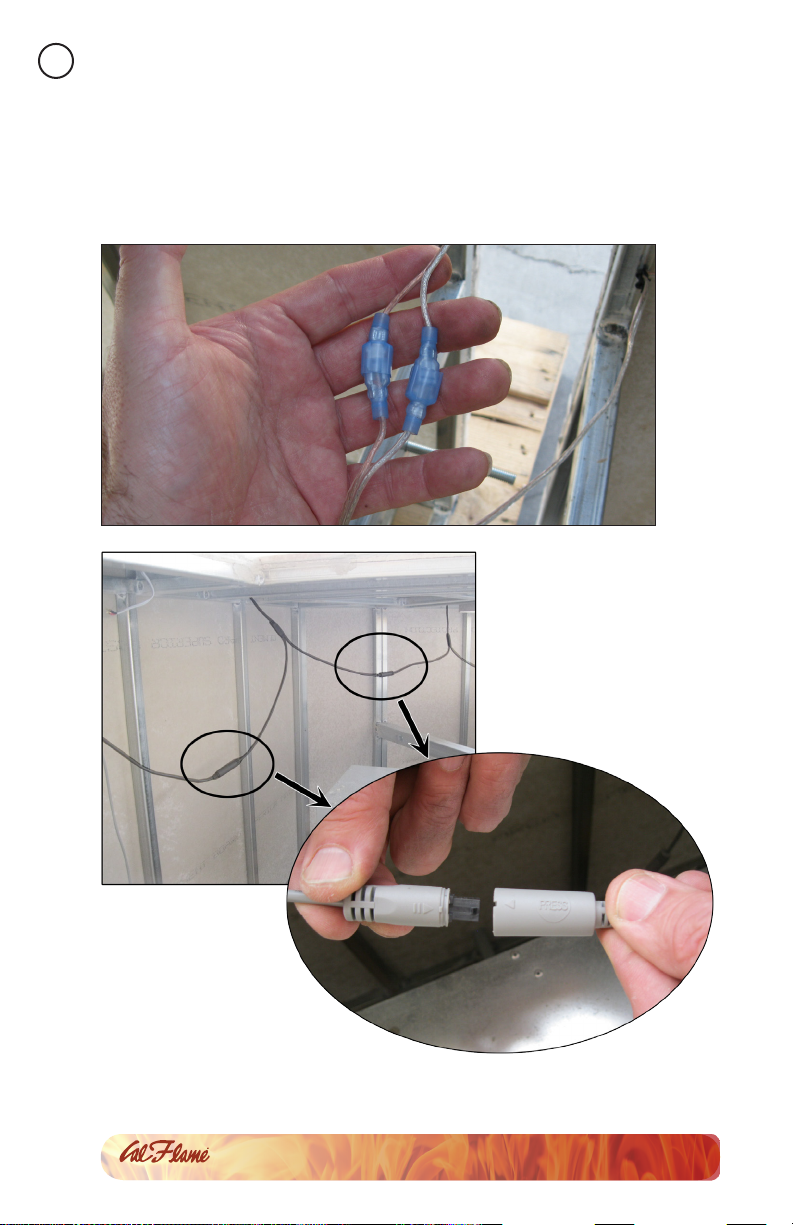
Connecting Wiring within the Island
If you have LED lights or a stereo installed, make sure all of the sections
are connected together. There are only a few connections and are
easily identiable.
www.calamebbq.com
Barbecue Islands
LTR50001036, Rev. D
Page 13
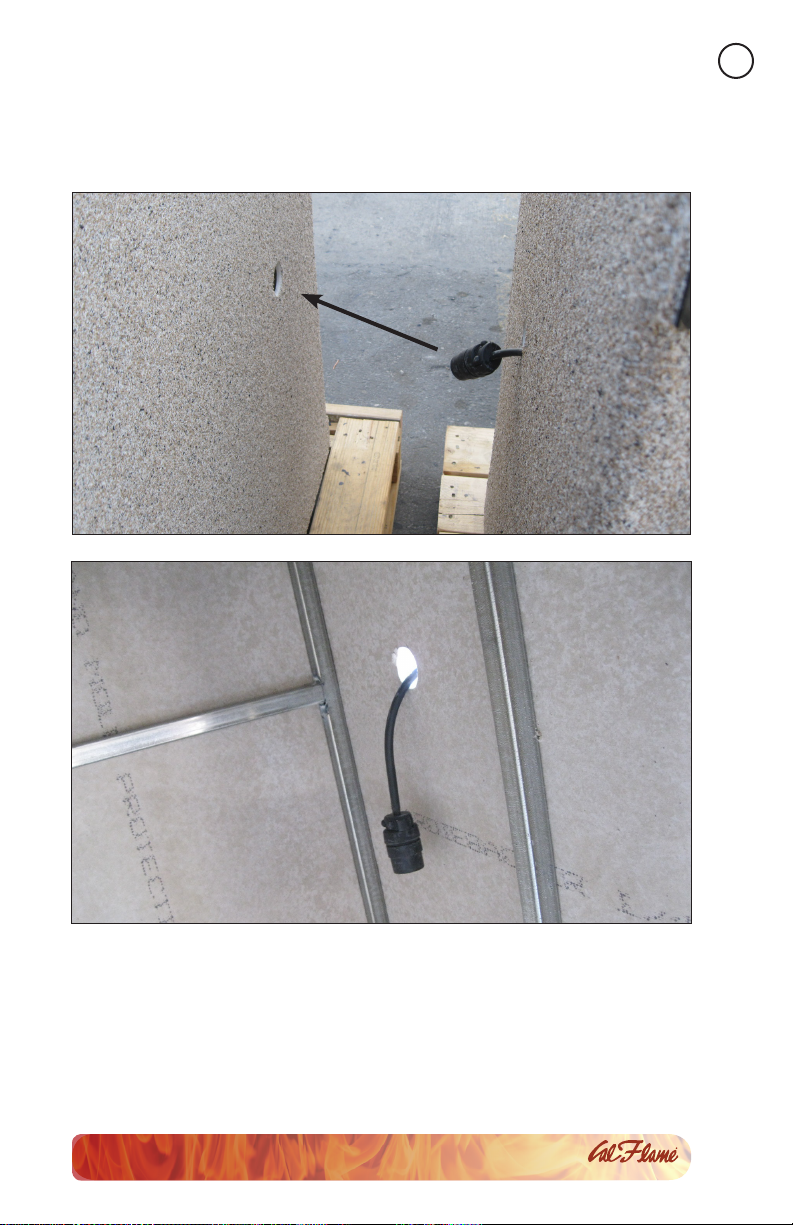
If your LBK870 island has a built-in electrical service, the two sections
have an extension cord that needs to be passed through a small
opening in the sides of the two sections as shown below.
11
Barbecue Islands
LTR50001036, Rev. D
www.calamebbq.com
Page 14

12
Cleaning and Maintenance
About Natural Stone
A natural characteristic of granite and marble is its inherent lack of
uniformity. Because it is a completely natural material, it can have a
great deal of variation in color, shade, nish, tint, hardness, strength,
and so on.
Any time you use natural stone, you can always expect differences
from one tile to the next. You will frequently see dry seams, pit or fos-
sils. These areas are often lled in at the factory. Over time through
normal use, the ll may work its way out.
Even though stone tile is a natural product, it nevertheless can be affected by extremes in weather. Both marble and granite are decorative
and durable, but they have different compositions and wear differently
in the elements.
We recommend barbecue island owners keep their island covered if
they are concerned about damage from constant exposure to weather.
This is particularly true in areas where there is snow, ice, or very hot
weather.
Stone is porous, especially marble, and often has natural ssures in the
surface. Constant exposure to extreme heat or cold can cause these
natural features to expand and eventually crack.
Although the stone has been properly nished and is suitable for use in
an outdoor environment, Cal Flame does not apply a weather sealant
to our countertops. We never wish to second-guess how our customers
want to use their barbecues or the locale they will use them in, so we
leave the choice of applying a weather sealant entirely up to owners.
We do not recommend any specic brand or manufacturer, although
there are literally hundreds of excellent products on the market customers may choose from.
In addition to maintaining the stone tile surfaces, barbecue island owners need to know that the grout between the tile, while it is durable,
can also be affected by both extremes in weather and by normal use.
Grout is much easier to repair than stone tile and gaps between the tile
can cause water to seep into the barbecue island and cause damage
to the interior.
In those instances where natural cracks occur, we recommend having
an experienced tile worker lling them with a material of a complementary color. After the ller sets and is sanded smooth, apply a weather
sealant to help prevent further cracking.
www.calamebbq.com
Barbecue Islands
LTR50001036, Rev. D
Page 15

Granite Top
Clean stone surfaces with a few drops of neutral cleaner, stone soap
(available from Monticello Granite) or a mild liquid dishwashing detergent and warm water. Use a clean rag for best results.
Too much cleaner or soap may leave a lm and cause streaks.
Do not use products that contain lemon, vinegar or other acids on the
granite the high acid content may etch the surface.
Rinse the surface thoroughly after washing with the soap solution and
dry with a soft cloth.
Change the rinse water frequently.
Do’s
• Dust surfaces frequently
• Clean surfaces with mild detergent or stone soap
• Thoroughly rinse and dry the surface after washing
• Blot up spills immediately
Don’ts
• Don’t use vinegar, lemon juice or other cleaners containing acids.
• Don’t use cleaners that contain acid such as bathroom cleaners,
grout cleaners or tub & tile cleaners.
• Don’t use abrasive cleaners such as dry cleansers or soft cleansers.
• Don’t mix bleach and ammonia; this combination creates a toxic
and lethal gas.
13
Scratches and Chips
Small scratches are visible because they are lighter in color than the
surrounding areas. Making them darker will hide them. On dark stones,
we have had success using permanent black magic markers. Do not
use them on lighter stones. Apply the marker to the scratch, let it dry,
and then rub it off the surrounding area.
Both marble and granite may chip when subjected to a sudden impact.
If you have a large chip, try to nd the loose pieces. They can often be
epoxied back into place. The chip can also be lled with colored epoxy
to match the surrounding stone. Repairing this kind of damage should
be left to other knowledgeable professionals.
Barbecue Islands
LTR50001036, Rev. D
www.calamebbq.com
Page 16

14
Tile
If spillage occurs, then clean up as soon as possible.
Care
• Protect against chipping by using a cutting board.
• Protect against scratches, especially on natural stone tiles.
• Avoid hard blows that can chip the tile.
• Standing water or other liquids can deteriorate tile and grout, and
should always be removed.
Cleaning
Wash with detergent solution, and rinse. To clean dingy grout, occasionally apply a solution of chlorine bleach and water to stand not
more than 5 minutes; rinse thoroughly and wipe dry. General-purpose
household cleaners may also be used if label says can be used on
ceramic tile; follow directions exactly. NEVER use scouring powders or
other abrasives as they will scratch the nish.
Stain Removal Guide
Stain Removal Agent
Grease and fats Soda and water or commercial spot lifter
Inks and colored dyes Household bleach
Blood Hydrogen Peroxide or household bleach
Coffee, tea, food, fruit,
lipstick, juices
Caution: Vinegar may damage some tile.
www.calamebbq.com
Neutral cleaner in hot water followed by hydrogen peroxide or household bleach
Barbecue Islands
LTR50001036, Rev. D
Page 17

DO’s and DON’Ts of Tile Care
• Do test scouring pads in a small area rst.
• Do use a silicone sealer on grout joints if continuous staining is a
problem.
• Do read and follow label directions for all cleaners.
• Do keep this information and refer to it when necessary.
• Do not combine ammonia and household bleaches.
• Do not use harsh cleaning agents (such as steel wool pads) which
can scratch or damage the surface of your tile.
• Do not place sharp object on tile surface.
• Never use wax to clean tile surface.
Care and Maintenance of Tile Grout
Grout may present a special cleaning problem because it is susceptible
to many staining agents.
Apply a silicone sealer to grout joints several times a year for maximum
protection.
15
In addition to keeping the grout clean, be sure to keep grout joints in
good repair. Scrape out loose, cracked or powdery joints and rell with
a good grout.
One common grouting trouble spot is the joint between the tub and
and the wall in your bathroom. As the house or tub settles, the grout
may crack and crumble. It’s relatively simple to remedy. Remove the
old grout with a sharp pointed tool, watching out that you don’t scratch
tile or tub. Then dry the joint thoroughly and ll with a exible tub or
wall caulking compound, such as silicone rubber caulking.
Barbecue Islands
LTR50001036, Rev. D
www.calamebbq.com
Page 18

16
Synthetic Panel
Do’s
• Do dust surfaces frequently.
• Do clean synthetic panels with water and mild detergent.
Don’ts
• Don’t use any cleaning chemical to clean or wash synthetic
panels.
• Don’t use vinegar, lemon juice or other cleaners containing acids.
• Don’t use cleaners that contain acid such as bathroom cleaners.
• Don’t mix bleach and ammonia; this combination creates a toxic
and lethal gas.
Stainless Steel
All exposed stainless steel surfaces require special attention if you want
to keep them looking clean and bright. Following these simple instruc-
tions will help avoid scratching or damaging the nish and keep your
stainless steel attractive.
Cleaning instructions for grill interiors, including racks and burners, are
described after this section.
Although stainless steel grills will discolor and accumulate grime with
regular use, they can keep their original shine with periodic cleaning.
We strongly recommend using a surface protectant to prevent smudging and surface rust from accumulating.
The easiest way to clean the grill is immediately after cooking is com-
pleted. Doing so will extend the life of your grill, prevent grease res,
and present a pleasant appearance while you grill.
To ensure safe and proper maintenance, we recommend you fol-
low these directions carefully.
Clean internal parts of the grill regularly as determined by the
amount of use and foods cooked. The entire grill should be cleaned
at least once a year.
In addition, keep the area around your grill clear and free from
combustible materials, gasoline, and other ammable vapors and
liquids. Do not obstruct the ow of combustion and ventilation air.
www.calamebbq.com
Barbecue Islands
LTR50001036, Rev. D
Page 19

Cleaning Products and Materials
Avoid using these common cleaning products and materials – they
will damage the surface of your stainless steel.
• CLR
• Lime-Away
• Oven cleaner
• Cleansers such as Ajax or Comet
• Ammonia
• Bleach
• Chlorine
• Steel wool pads
• Wire brushes
• Scrapers
• Pumice
We recommend these products for cleaning your stainless steel:
• Mild dish detergent such as Dawn
• Formula 409
• Fantastik
• Sheila Shine (exterior ONLY)
• WD-40 (exterior ONLY)
17
We have had best success with Sheila Shine, but WD-40 works very
well too. Sheila Shine is available in some hardware stores; WD-40
is widely available.
Some people have reported that using baking soda, lemon oil, olive
oil, vinegar, or club soda can be effective for cleaning light soil on all
stainless steel surfaces.
Do not use steel wool or wire brushes to scrub your grill. For light
soil, use a damp sponge or cloth. For heavier stains, use a ScotchBrite scrubber or similar product.
Barbecue Islands
LTR50001036, Rev. D
www.calamebbq.com
Page 20
18
1. Clean
Thoroughly clean stains, food, and grime using a sponge or damp
cloth with warm water and a mild dish soap. Use Fantastik or Formula 409 to remove heavier soil.
2. Rinse
Thoroughly rinse all surfaces and dry them completely with a clean
towel. Do not allow stainless steel to air dry.
3. Polish
We strongly recommend that you apply a surface protectant to all
exposed stainless steel surfaces.
Spray a small amount of WD-40 or Sheila Shine on a piece of paper
towel and rub with the grain over the surface of the appliance. Using
a clean terry cloth or paper towel, polish the appliance by rubbing
with the grain until excess liquid is removed and the surface shines. It
should not be oily to the touch, however some residue is acceptable.
Some people have reported that using lemon oil products such as Old
English furniture polish is effective for polishing stainless steel and protecting the surface.
Caution
Fire
Hazard
www.calamebbq.com
Do not use WD-40 or Sheila Shine near food or on food
preparation surfaces as it is a health hazard. This includes
the interior of the grill, grill racks, stainless steel sinks, the
inside of cabinets, warming drawers, and ovens.
NEVER spray WD-40 or Sheila Shine near an open ame!
These products are extremely ammable while in their
aerosol forms.
Barbecue Islands
LTR50001036, Rev. D
Page 21
Rust Removal
It is a common misconception that stainless steel does not rust. It does
not stain, corrode, or rust as easily as ordinary steel (it stains less),
but it is not stain-proof. If not properly protected and maintained, it
can corrode, pit, and discolor.
Because salt will accelerate rust and corrosion, grill or
barbecue island owners who live near the beach need
to be diligent in maintaining their stainless steel hard-
Important
Periodically clean exterior stainless steel surfaces with WD-40 or Sheila
Shine and wipe down with a dry cloth or paper towel until surface is
free of rust. If there is signicant rust or corrosion, use a Scotch-Brite
scrubber.
Both of these products will act as a surface protectant and help resist
smudges, stains, and rust.
ware. You need to clean and polish your stainless steel
frequently, apply a protectant, and ensure water does
not collect and puddle.
19
Although nitric acid (also called aqua fortis) can be effective for rust removal, it is a highly corrosive chemical.
Caution
Because of the potential for injury or damage to your
stainless steel, we do not recommend using nitric acid.
Barbecue Islands
LTR50001036, Rev. D
www.calamebbq.com
Page 22

20
Cleaning the Interior of Your Grill
1. Thoroughly clean stains, food, and grime using a sponge or damp
cloth with warm water and a mild dish soap. Use Fantastik or Formula 409 to remove heavier soil.
2. Thoroughly rinse all surfaces and dry them completely with a clean
towel. Do not allow water to accumulate and puddle on stainless
steel. Water from various sources such as garden hoses contains
iron which will give the appearance of rusting on stainless steel. If
allowed to stand for long periods of time on stainless steel, it will
cause pitting.
3. The racks, ame tamers, and avor bars can all be removed for
cleaning and are dishwasher safe.
Burners
Spiders and small insects occasionally inhabit or make nests in the
burner tubes, obstructing the gas ow. Sometimes this results in a
type of re in and around the gas tubes called “ashback”. To reduce
the risk of ashback, this procedure should be followed at least once
a month or when your grill has not been used for an extended period
of time.
IMPORTANT: Prior to starting this procedure, turn OFF all of the gas
control knobs, shut off the fuel supply, and disconnect the fuel line.
The burners can be removed by removing the keeper pins and lifting
them out. The keeper pins are located under the grill toward the back.
They are used to keep the burners in place during shipping and are not
necessary to operate your grill. Remove burners from the grill by care-
fully lifting each burner up and away from the gas valve orice.
Use a wire brush to clean the outer surface of each burner to remove
food residue and dirt. Clean any clogged ports with a stiff wire such as
an opened paper clip.
Inspect each burner for damage (cracks and holes). If any damage is
found, replace the burner and discontinue grill usage.
Upon reinstallation, inspect the gas valve orices for cleanliness and
condition and the location of the igniters. When you replace the burners, you do not need to replace the keeper pins.
Barbecue Islands
www.calamebbq.com
LTR50001036, Rev. D
Page 23

Cooking Grates
Use a solution equal parts detergent and hot water just as you would
for any cooking equipment. A stiff wire brush or steel wool may also be
helpful in removing grime and food deposits.
Do not use a wire brush or stainless steel on any other part
of your grill or any other stainless steel surface except the
Note
cooking grates or the griddle!
Drip Pan
The full width drip pan will collect grease from the main grill area.
The pan should be cleaned after every use to avoid the possibility of a
grease re. Be sure to allow the drip pan to cool prior to cleaning. You
may clean the drip pan with a solution of warm soapy water. Make sure
to rinse thoroughly to avoid staining.
Steam Cleaning Your Grill
Steam cleaning the interior of your grill is very effective and will not
void your warranty. Portable hand-held steam cleaners are inexpensive
and do not require chemicals. You can steam clean all parts of your Cal
Flame grill, including the burners. When you are nished, make sure
you wipe all surfaces down.
21
If you spray the burners, ignite them and let them burn for about 10
minutes to prevent any water from accumulating inside them.
Covering Your Grill
When not in use and after cooling, cover your grill with our canvas
cover. (See your local Cal Flame dealer for details.) The cover will help
protect your grill from detrimental effects of weather and environmental pollutants. Never put a cover on a hot grill. Allow the grill to cool
before covering.
Barbecue Islands
LTR50001036, Rev. D
www.calamebbq.com
Page 24

22
Limited Warranty
All Cal Flame barbecue islands are manufactured with the highest quality appliances and are warranted to be free from defects in material
and workmanship at time of delivery.
LMS warrants barbecue islands from deterioration, corrosion, and defects in material and workmanship for a period of one year from the
original date of delivery. Specically warranted are the structural frame,
reproof panels, the base, and electrical wiring and components, in-
cluding switches and outlets.
LMS warrants for a period of 90 days hardware and components, including, but not limited to: stainless steel doors, stainless steel drawers,
sinks, drop-in cocktail center, ice chest, blender station, food warmer,
drop-in bar center, cutting board and cutting board storage, griddle
and griddle storage, Deep Fryer Helper, paper towel storage, propane
tank drawer.
LMS warrants the decorative nishes to be free of defects at time of
delivery, including, but not limited to, stucco, grout, brick, rock, tile,
granite, and foot rest.
Extent of Warranty
This limited warranty is only valid on Cal Flame models delivered in the
United States or Canada and extends through the selling dealer to the
original purchaser at the original site of installation.
Manufacturer Warranty
The appliance warranty is extended through the manufacturer of the
product. These items include, but are not limited to, refrigerators, umbrellas, accessories, stereos, speakers, televisions, and DVD players.
Many of the items mentioned above are delivered with their own manufacturer’s warranty. For more information, see their warranties in the
owner’s information package that was delivered with your barbecue
island.
Warranty Performance
In the event of a malfunction or defect covered under the terms of
this warranty, contact either the selling dealer or a local contractor or
service technician. Depending on your needs, this may be a contractor
www.calamebbq.com
Barbecue Islands
LTR50001036, Rev. D
Page 25

qualied to repair stone and tile or a service agent licensed to repair
gas or electrical appliances.
In the event the consumer is unable to obtain satisfactory customer
service from the selling dealer or service agent, written notication
must be given to the LMS Customer Relations Department within 30
days of the reported failure.
There will be no charge for parts on a covered item. Cost of labor is the
responsibility of the owner. Shipping and handling charges will apply
to all warranted replacement parts. The service agent may assess a
reasonable travel or mileage charge per service call. If LMS determines
that repair of a covered item is not feasible, LMS reserves the right to
replace the defective merchandise with merchandise equal in value to
the original purchase price. Warranty repair and / or replacement are
the sole discretion of LMS and this warranty does not cover costs therein, including but not limited to: freight, removal, re-installation, etc.
This warrant is non-transferable and may not be extended beyond
the above mentioned time frames under any circumstances, by any of
LMS’s representatives.
Warranty Limitations
This warranty is void if the barbecue island has been subject to negligence, alteration, misuse, repairs, dings, dents, scratches, or incorrect
and / or prohibited applications, as specied in the owner’s manual.
Gas lines must be installed by a licensed plumber only or local gas
company agent. Incorrect electrical installation by unlicensed electricians, service by non-LMS authorized representatives, acts of God and
other cases beyond the control of LMS are not covered by this warranty. Please refer to the owner’s manual for examples of exclusions
and common acts invalidating this warranty. This limited warranty applies only to barbecue islands used for personal, family, and outdoor
household purposes. This warranty does not apply to labor charges on
barbecue islands, replacement parts and hardware. This limitation is
retroactive and applies to all barbecue islands manufactured from 2000
and hereafter.
23
Examples of common acts invalidating this warranty include but are
not limited to:
• Scratches caused by normal use.
• Damage caused by extreme weather conditions (hot, cold, etc.)
Barbecue Islands
LTR50001036, Rev. D
www.calamebbq.com
Page 26

24
• Damage caused by dirt, sand, and/or water damage.
• Damage caused by salty and humid conditions (especially in beach
or seaside communities)
• Damage caused by continued operation of the barbecue with either known or unknown problems.
• Damage caused by direct sunlight.
• Damage caused as a result of failure to follow the operating in-
structions as dened in this owner’s manual.
This limited warranty applies only to barbecues normally used for per-
sonal, family, or household purposes and specically excludes rental or
commercial applications.
Disclaimers
LMS shall not be liable for loss of use of the barbecue islands or other
incidental or consequential costs, expense or damages, which may include, but are not limited to, removal of permanent deck or other cus-
tom xtures or the necessity for crane removal. Any implied warranty
shall have duration equal of the applicable warranty stated above.
Natural stone: Rock, travertine, marble, granite, etc. may be character-
ized by dry seams, pits, chips, cracks, and fossils that are often lled
with grout during installation. These are normal imperfections and are
not considered defects.
Legal Remedies
This limited warranty gives you specic legal rights. You may have
other rights, which may vary from state to state.
Customer Service
For customer service, contact the authorized selling dealer immediately. If you need additional information or assistance, please contact
the LMS Customer Relations Department at 1462 E. Ninth St., Pomona
CA 91766 or call (800) 225-7727.
See your Cal Flame barbecue dealer for a copy of the applicable warranty, details and any questions you may have regarding the warranty
coverage on your barbecue.
Don’t forget to register your new product at www.calamebbq.com.
www.calamebbq.com
Barbecue Islands
LTR50001036, Rev. D
Page 27

25
Barbecue Islands
LTR50001036, Rev. D
www.calamebbq.com
Page 28

LMS Customer Service Department
1462 East Ninth Street
Pomona, CA 91766
Toll Free: 1-800-225-7727
Fax: 1-909-629-3890
www.calamebbq.com
LTR50001036, Rev. D
1/1/16
 Loading...