

Page 1

~
%
feet
=
metric
fractions
diagonals
inch
volume
C
ONSTRUCTION
4030 C
44060 C
44065 C
4075 C
ONSTRUCTION MASTER
ONSTRUCTION MASTER
M
ASTER
4060 C
ONSTRUCTION MASTER
ONSTRUCTION MASTER
ONSTRUCTION MASTER
®
USER’S
GUIDE
®
FOR MODELS:
®
P
®
P
®
P
RO
DT P
P
RO TRIG PLUS
P
®
P
RO
RO
LT
RO
DT
RINTER
III
RO
™
Page 2
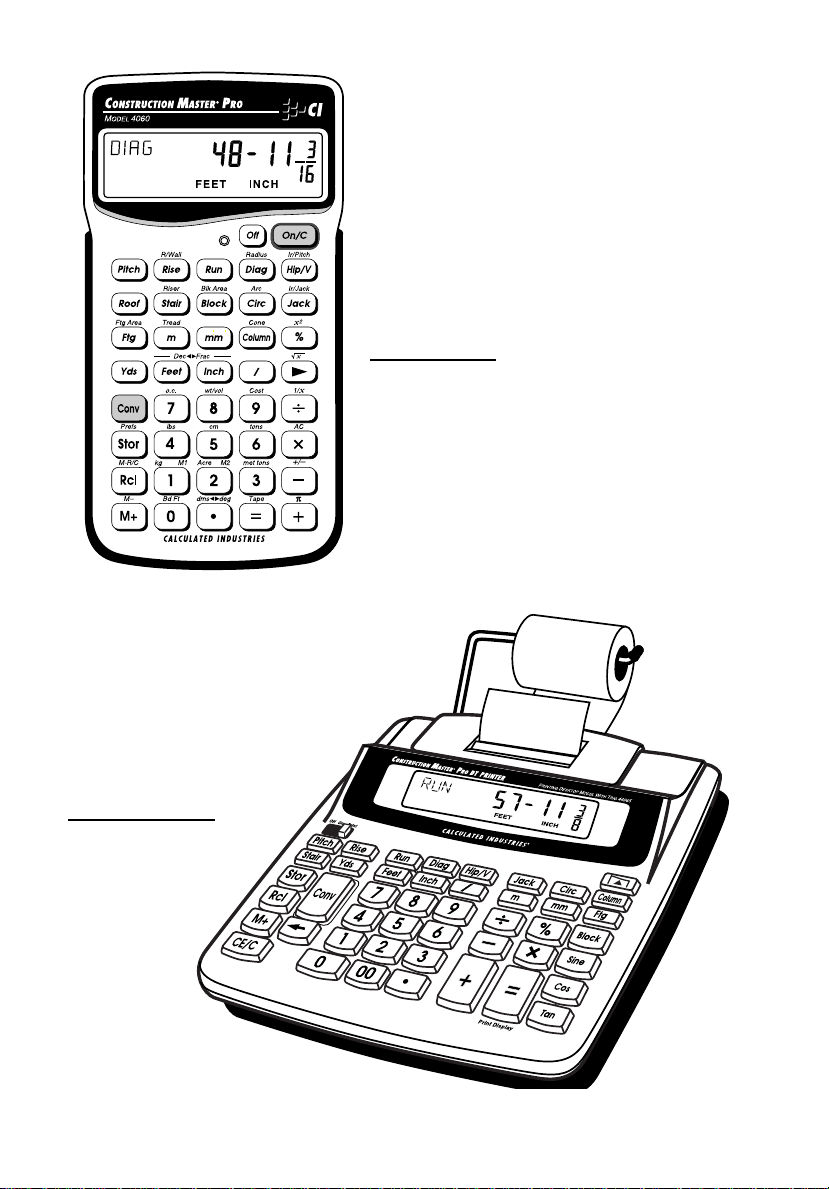
Construction Master Pro DT
Printer
(Desktop model)
Model 44065
Construction Master Pro
Model 4060
Page 3

CONSTRUCTION MASTER® PRO
USER’S GUIDE
This User’s Guide helps you solve common construction math and material estimation problems using the latest Construction Master® Pro
calculators—five of the most powerful feet-inch-fraction calculators to
date:
The Construction Master Pro Series —
1. LT (#4030)
2. Handheld (#4060)
3. Trig Plus III (#4075)
4. Desktop (#44060)
5. New! Desktop with Printer (#44065)*
*CI now offers a Printing Model—the Construction Master Pro DT
Printer! It has all the features of the Construction Master Pro Desktop,
plus a built-in printer (see Appendix C).
IMPORTANT: The Construction Master Pro calculators share many
keys and functions. However, some keys and functions differ. Please
refer to the grid on page 8 to see what features are applicable to your
model, so that you can follow the corresponding examples in this
User’s Guide. Note: the Desktop with Printer (#44065) operates almost
identically to the Desktop (#44060).
User's Guide — 1
Page 4

TABLE OF CONTENTS
CONSTRUCTION MASTER® PRO USER’S GUIDE......1
INTRODUCTION .....................................................................7
CONSTRUCTION MASTER® PRO — KEY/FUNCTION
COMPARISON.........................................................................8
KEY DEFINITIONS..................................................................9
Basic Operation Keys.................................................................. 9
Convert [Conv] Key —Unit Conversions and Second Functions.....10
Memory and Storage Functions................................................11
Recall [Rcl] Key......................................................................12
Dimensional Measurement Unit Keys...........................................13
Weight Keys..............................................................................14
Construction Project Keys ..........................................................15
Block/Brick Key......................................................................15
Circular Function Keys ............................................................16
Column/Cone Key ...................................................................17
Footing Key............................................................................17
Right Triangle/Roof Framing Keys .............................................18
Hip/Valley and Jack Rafter Keys............................................20
Rake Wall Function ..............................................................22
Roof Key ................................................................................23
Stair Key................................................................................24
Trigonometry Function Keys........................................................25
GETTING STARTED ............................................................27
ENTERING DIMENSIONS...................................................27
Entering Linear Dimensions ......................................................27
Entering Square/Cubic Dimensions...........................................27
CONVERSIONS (LINEAR, AREA, VOLUME).................29
Linear Conversions ..................................................................29
Converting Feet -Inch-Fractions to Decimal Feet .........................29
Converting Decimal Feet to Feet -Inch-Fractions .........................30
Converting Fractional Inches to Decimal Inches ..........................30
Converting Decimal Inches to Fractional Inches ..........................30
Square Conversions .................................................................31
2 — CONSTRUCTION MASTER PRO
Page 5

Cubic Conversions .................................................................. 31
PERFORMING BASIC MATH WITH DIMENSIONS......32
Adding Dimensions ................................................................. 32
Subtracting Dimensions ...........................................................32
Multiplying Dimensions ............................................................32
Dividing Dimensions ................................................................ 33
Percentage Calculations.......................................................... 33
MEMORY OPERATION........................................................34
PAPERLESS TAPE OPERATION.....................................36
EXAMPLES — USING THE CONSTRUCTION
MASTER PRO.......................................................................38
LINEAR MEASUREMENT EXAMPLES...........................39
Adding Linear Measurements ...................................................39
Cutting Boards ........................................................................39
Window Measurement............................................................. 40
Calculating the Center Point .....................................................40
AREA CALCULATIONS......................................................41
Square Area (x2)..................................................................... 41
Area of a Rectangular Room (LxW)...........................................41
VOLUME CALCULATIONS................................................42
Rectangular Containers (LxWxH).............................................. 42
Volume of a Cylinder............................................................... 43
Volume of a Cone ................................................................... 43
WEIGHT/VOLUME CONVERSIONS.................................44
Weight Convers ions ................................................................44
Weight per Volume/Volume Conversions................................... 45
BLOCKS/BRICKS................................................................46
Number of Blocks (not available on LT and Trig Plus III)............46
Number of “Face” Bricks (not available on LT and Trig Plus III)... 47
Number of “Paver” Bricks (not available on LT and Trig Plus III).. 47
BOARD FEET — LUMBER ESTIMATION.......................48
Total Board Feet — With Dollar Cost........................................ 48
User's Guide — 3
Page 6

CIRCLE CALCULATIONS ..................................................49
Circumference and Area of a Circle...........................................49
Circle Properties — Arc Length and Diameter Known..................49
Arched Windows.....................................................................51
Arc Length — Degree and Diameter Known ...............................52
Arc Length — Degree and Radius Known ..................................52
CONCRETE/PAVING...........................................................53
Volume of Concrete for a Driveway............................................53
Concrete Columns ...................................................................54
Complex Concrete Volume.......................................................56
Concrete Footings (not available on Trig Plus III).......................58
Multiple Concrete Footings (not available on Trig Plus III)...........58
Squaring Up a Foundation ........................................................59
FLOOR COVERING AREA CALCULATIONS.................60
Carpeting................................................................................60
GRADE/SLOPE.....................................................................61
Back-Fill on a Slope — Percent of Grade Known........................61
RIGHT TRIANGLE AND ROOF FRAMING EXAMPLES63
Roof Framing Definitions .............................................................63
Common Rafter Length ............................................................66
Common Rafter Length — Pitch Unknown .................................67
Angle and Diagonal (Hypotenuse).............................................67
Rise.......................................................................................68
Rise and Diagonal...................................................................68
Finding Sheathing Cut .............................................................69
Regular (45°) Hip/Valley and Jack Rafters (not available on LT)...70
Jack Rafters — Using Other Than 16 Inch On-Center Spacing (not
available on LT) ......................................................................72
Irregular (non-45°) Hip/Valley and Jack Rafters — Descending,
with On-Center Spacing Maintained (not available on LT) ..........73
Irregular (non-45°) Hip/Valley and Jack Rafters — Ascending, with
Jacks Mating at Hip/Valley (not available on LT).............75
Rake Wall – No Base..............................................................77
Rake Wall – With Base...........................................................79
ROOFING MATERIALS........................................................80
Roof Covering — Bundles of Roof Shingles (not available
on LT and Trig Plus III)............................................................80
4 — CONSTRUCTION MASTER PRO
Page 7

Roof Covering — Number of Shingles ....................................... 81
Area for Roofing Materials........................................................82
STAIR LAYOUT EXAMPLES..............................................83
Stair Layout Definitions ...............................................................83
Stairs — Given Floor-to-Floor Rise ...........................................85
Stairs — Given Rise and Run................................................... 86
Stair Risers Only — Custom Height.......................................... 87
Baluster Spacing .................................................................... 88
NUMBER OF STUDS...........................................................89
TRIGONOMETRY AND D:M:S EXAMPLES....................90
Practical Trigonometric Formulas ................................................ 90
Converting Degrees:Minutes:Seconds....................................... 91
Time Calculations Using D:M:S ................................................92
Percent Grade/Slope ...............................................................92
Converting Tangent/Pitch to Angle............................................ 93
Converting Roof Angle to Pitch .................................................93
Angle — Rise and Hypotenuse Known (Trig Plus III and Desktop
Only)...................................................................................... 94
APPENDIX A — DEFAULT SETTINGS ...........................95
Metric Mode........................................................................... 95
APPENDIX B — PREFERENCE SETTINGS..................96
How to Set Preferences........................................................... 99
LT (#4030) .........................................................................100
Handheld (#4060) and Desktop (#44060)..............................101
Trig Plus III (#4075) ............................................................103
APPENDIX C — USING THE DESKTOP PRINTING
MODEL (DT PRINTER: #44065)......................................105
Printer Keys............................................................................105
Connecting the AC Adapter.......................................................108
Using Battery Power ................................................................109
Replacing the Paper Roll ..........................................................110
Replacing the Ink Roller ............................................................112
Notes on Using the Printer ........................................................114
APPENDIX D — IMPORTANT NOTES FOR OWNERS
OF PREVIOUS CONSTRUCTION MASTERS®...........117
User's Guide — 5
Page 8

APPENDIX E — ACCURACY, AUTO SHUT- OFF,
BATTERIES, ERRORS..................................................... 119
Accuracy/Errors.................................................................... 119
Auto Shut -Off........................................................................120
Battery(ies)...........................................................................120
Replacing the Battery(ies)...................................................... 120
Battery Replacement Instructions ........................................... 120
Reset Key ............................................................................ 121
APPENDIX F — AREA/VOLUME FORMULAS............ 122
REPAIR AND RETURN.................................................... 124
WARRANTY........................................................................ 125
INDEX................................................................................... 128
6 — CONSTRUCTION MASTER PRO
Page 9

INTRODUCTION
The Construction Master Pro line includes the most advanced feetinch-fraction calculators designed specifically for building pro’s!
The Pro calculators handle practically any problem involving measurements and can be used to save time, prevent errors, and accurately
perform common building projects such as: estimating concrete vo lume, squaring up foundations, framing roofs, ordering lumber, building
stairs, walls, laying driveways, carpet or floor covering, figuring precise
angle calculations, or simply working in feet-inch-fractions or decimal
feet!
Your Calculator Helps You Solve:
• Dimensional Math Problems
• Conversions Between Feet -Inch-Fractions, Decimal Feet, Deci-
mal Inch and Yards
• English/Metric Conversions
• Problems Involving All Common Fractions – 1/2" to 1/64"!
• Area/Volume Calculations
• Board Feet/Lumber Calculations
• Circle Calculations
• Material Estimations and Costs
• Rake Walls
• Right Angle/Triangle Solutions
• Stair Layout (Risers/Treads)
• Weight/Volume Conversions
Selected Models Also Solve:
• Block/Brick, Concrete Footing, Column and Roof Bundle
Material Estimation
• Complete Rafter Solutions (Regular and Irregular Hip/Valley Rafters, Jack Rafters and Cut Angles)
• Trigonometry Calculations
User's Guide — 7
Page 10
CONSTRUCTION MASTER® PRO —
KEY/FUNCTION COMPARISON
The Construction Master Pro calculators vary slightly in keys and functions, sharing basic measurement unit, right triangle and stair keys.
Some models additionally compute advanced roof framing problems,
project material estimations, or advanced Trigonometry applications.
Note: The DT (Desktop) with Printer (#44065) operates almost identically to the DT (#44060).
AVAILABLE KEYS
OR FUNCTIONS
Works in All Fractions
(1/2"-1/64")
Dimensional Unit Keys
and Conversions (Feet,
Inches, Fractions,
Yards, Metric, Acres)
Weight Keys and
Conversions (lbs, kg,
tons, Metric tons)
Block/Brick
Board Feet
Circle
Column
$Cost
D:M:S
Footing
Pitch, Rise, Run, Diag.
Rake Wall
Roof Framing Keys
(Reg. and Irreg. Hip/
Valley, Jacks, Cuts)
Roof Area and Bundles
Stair
Trigonometric Keys
Preference Settings
LT
(#4030)
Hand-
held
(#4060)
DT
(#44060
)
Trig
Plus III
(#4075)
• • • •
• • • •
• • • •
• •
• • • •
• • • •
• • •
• • • •
• • • •
• • •
• • • •
• • • •
• • •
• •
• • • •
• •
• • • •
8 — CONSTRUCTION MASTER PRO
Page 11

KEY DEFINITIONS
BASIC OPERATION KEYS
[On/C] — On/Clear
Turns power on. Pressing once clears the display. Pressing twice
clears all temporary values.
[Off]
Turns all power off, clearing all non-permanent registers.
[+] [–] [x] [÷] [=]
Arithmetic operation keys.
[%]
Four-function percent key.
[0] – [9] and [ •• ]
Digits used for keying in numbers.
[00] (Desktop Only)
Enters “00” to save keystrok es (e.g., 1 [00] to enter 100).
[u] — Backspace Key
Used to delete entries one keystroke at a time (unlike the [On/C]
function, which deletes the entire entry).
User's Guide — 9
Page 12

Convert [Conv] Key—Unit Conversions and Second
Functions
The [Conv] key is to convert between measurement units or to
access second functions, listed below:
[Conv] — Convert
Used with the measurement keys to convert between units or with
other keys to access special functions.
[Conv] [ x ] — All Clear
Clears all values, including Memory. Resets all permanent settings
to defaults.
þþ Note: Use only when necessary, as it deletes all stored values.
[Conv] [%] — x2
Squares the value in the display. For example, to square the value
10, enter 10 then [Conv] [%].
[Conv] [uu ] — Square Root Function (√ )
Used to find the square root of a non-dimensional or area value (e.g.,
100 [Conv] [uu ] = 10).
[Conv] [ / ] — x10x
Allows entry of an exponent. For example, 8 [Conv] [/] 14 is 8 times
10 to the 14th power.
[Conv] [ ÷ ] — 1/x
Finds the reciprocal of a number (e.g., 8 [Conv] [÷] = 0.125).
[Conv] [ – ] — Change (+ / –) Sign
Toggles the sign of the displayed value to plus or minus.
[Conv] [ + ] — Pi (ππ)
Constant = 3.141593
[Conv] [ •• ] — Degrees: Minutes: Seconds
Converts between D:M:S and decimal degree formats.
10 — CONSTRUCTION MASTER PRO
Page 13

[Conv] [ 9 ] — Total Cost
Computes total material cost given a unit dimension and an entered
Per Unit Cost.
[Conv] [ Stor ] — Access Preference Settings
Used to access various customizable settings, such as dimensional
answer formats (see Preference Settings on page 96).
Memory and Storage Functions
Your calculator has two types of Memory:
1) basic memory or semi-permanent, cumulative [M+];
2) non-cumulative Storage Registers (M1) and (M2).
[M+] — Semi-Permanent Memory
Adds any displayed number, dimensioned or unitless, to the semipermanent, accumulating Memory. Values can be subtracted from
this Memory using [Conv] [M+]. [Rcl] [Rcl] will recall and clear the
Memory. [Conv] [Rcl] will clear the accumulating Memory without
disturbing the existing display.
[Stor] [1] — Storage Register (M1)
Stores the displayed value in non-cumulative, permanent Memory
(e.g., 10 [Stor] [1], [Rcl] [1] = 10). Good for storing a single value, for
future reference.
þþ Note: Non-cumulative means it only accepts one value (does not
add or subtract) and a second entered value will replace the first.
Permanent means the value is stored even after the calculator is
shut off. To delete a stored value, enter a new value or perform an All
Clear [Conv] [x].
[Stor] [2] — Storage Register (M2)
Same function as [Stor] [1]. See above.
User's Guide — 11
Page 14

Recall [Rcl] Key
The [Rcl] key is used to recall or review stored values (e.g., [Rcl]
[Pitch] to recall a previously entered pitch value). It is also used in re-
viewing stored settings, or in Paperless Tape and Memory operation
(see below).
[Rcl] [ = ] — Paperless Tape
Accesses the paperless tape mode (see “Paperless Tape,” page
36), which keeps track of your past 20 entries. Useful for chec king
strings of numbers.
[Rcl] [Rcl] — Clear M+
Displays and clears M+.
[Rcl] [M+] — Recall M+
Displays value stored in M+.
[Rcl] [1] —Recall M1
Recalls the stored value in M1.
[Rcl] [2] —Recall M2
Recalls the stored value in M2.
12 — CONSTRUCTION MASTER PRO
Page 15

DIMENSIONAL MEASUREMENT UNIT KEYS
The following keys are used for entering units of measure, with ease
and accuracy:
[Yds] — Yards
Enters or converts to yards.
[Feet]
Enters or converts to feet. Also used with the [Inch] and [/] keys for
entering feet -inch values (e.g., 6 [Feet] 9 [Inch] 1 [/] 2 ). Note: Repeated presses after [Conv] toggle between feet -inches and decimal
feet (e.g., 6 [Feet] 9 [Inch] 1 [/] 2 [Convert] [Feet] = 6.791667 feet;
press [Feet] again to return to feet -inch-fractions).
[Inch]
Enters or converts to inches. Also used with the [/] key for entering
fractional inch values (e.g., 9 [Inch] 1 [/] 2). Note: Repeated presses
after [Conv] toggle between fractional and decimal inches (e.g., 9
[Inch] 1 [/] 2 [Convert] [Inch] = 9.5 inch; press [Inch] again to return to inch-fractions).
[ / ] — Fraction Bar
Used to enter fractions. Fractions may be entered as proper (1/2,
1/8, 1/16) or improper (3/2, 9/8). If the denominator (bottom) is not
entered, the calculator's fractional resolution setting is automat ically
used (e.g., entering 15 [/] [=] or [+] will display 15/16, based on the
default fractional res olution setting of 16ths (default setting for Trig
Plus III is 64ths).
[m] — Meters
Enters or converts to meters.
[Conv] [5] — Centimeters
Enters or converts to centimeters.
[mm] — Millimeters
Enters or converts to millimeters.
User's Guide — 13
Page 16

[Conv] [ 2 ] — Acres
Enters or converts (a square value) to acres.
[Conv] [ 0 ] — Board Feet
Enters or converts cubic values to board feet. One board foot is equal
to 144 cubic inches.
WEIGHT KEYS
[Conv] [ 1 ] — Kilograms
Enters or converts (a weight or volume value) to kilograms. A dimensioned volume will convert using the stored weight per volume value.
[Conv] [ 3 ] — Metric Tons
Enters or converts (a weight or volume value) to Metric tons. A dimensioned volume will convert using the stored weight per volume
value.
[Conv] [ 4 ] — Pounds (lbs)
Enters or converts (a weight or volume value) to pounds. A dimensioned volume will convert using the stored weight per volume value.
[Conv] [ 6 ] — Tons
Enters or converts (a weight or volume value) to tons. A dimensioned
volume will convert using the stored weight per volume value.
[Conv] [ 8 ] — Store Weight per Volume
Stores a new weight per volume value as tons per cubic yard (default
= 1.5 tons per cubic yard), or other format, as listed below:
þþ Note: After entering a value and pressing [Conv] [8], continue press-
ing the [8] digit key until you’ve reached the desired weight per volume format. To recall your setting, press [Rcl] [8].
• Ton Per CU YD
• LB Per CU YD
• LB Per CU FEET
• Ton Per CU M
• kG Per CU M
14 — CONSTRUCTION MASTER PRO
Page 17

Construction Project Keys
The following Construction Project Keys help you instantly figure quantities and costs of materials, so you can build like a pro!
Block/Brick Key
The Block key helps you quickly estimate the quantity of blocks or
bricks required for building walls, walkways or other areas.
[Block] — Number of Blocks or Bricks
Calculates the total number of concrete blocks required to fill a given
area. Uses a standard block/mortar area of 128 square inches. This
key can also be used for calculating the number of “face” or “paver”
bricks by storing a brick size (see below).
[Stor] [Block] — Store Block or Brick Size
Used to store a size other than the default block size of 128 square
inches (e.g., 120 [Stor] [Block] stores a size of 120 square inches).
This value is permanently stored until you change it or perform an All
Clear. To recall the stored setting, press [Rcl] [Block].
þþ Note: For Brick Estimates—You may also enter a brick size using
[Stor] [Block]. For example, when building with standard “face”
bricks, enter a brick size of 21 square inches (21 [Stor] [Block]) or
store a “paver” brick size of 32 square inches (32 [Stor] [Block];
based on Modular U.S. brick size of 3-5/8 inches x 2-1/4 inches x
7-5/8 inches, including 3/8 inch mortar = 4 inches x 2-5/8 inches x 8
inches).
User's Guide — 15
Page 18

Circular Function Keys
The circle key helps you quickly solve circular area, volume or arc
problems.
[Circ] — Circle
Displays and calculates the following values, given an entered circle
diameter* or radius:
• diameter
• circle area
• circumference
*To enter a diameter (e.g., 10 feet), press 10 [Feet] [Circ].
[Conv] [Diag] — Radius
Enters or calculates the circle radius (e.g., 5 [Feet] [Conv] [Diag]).
[Conv] [Circ] — Arc Length or Degree of Arc
Enters or calculates arc length or degree of arc, and further solves for
additional circular values, listed below.
If a circle diameter and arc degree (or arc length) are entered, further
presses of [Circ] will display and calculate the following:
• arc length or degree of arc
• chord length
• segment rise
• pie slice area
• segment area (between the chord and the arc)
[Run] — Run (Chord Length)
Used with [Rise] or [Conv] [Diag] to find the chord length or the ra-
dius of a circular segment. If the segment rise and radius have been
entered, this key will display the chord length of the circular segment.
16 — CONSTRUCTION MASTER PRO
Page 19

[Rise] — Rise (Segment Rise)
Used with [Run] or [Conv] [Diag] to find the rise or the radius of a
circular segment. If the chord length and radius have been entered,
this key will display the segment rise of the circular segment.
Column/Cone Key
The Column and Cone functions help you quickly estimate volume and
surface area of columns or cones.
[Column]
Calculates the total volume and surface area of a column using the
values stored in [Circ] and [Rise].
[Conv] [Column] — Cone
Calculates the total volume and surface area of a cone using the va lues stored in [Circ] and [Rise].
Footing Key
The Footing key helps you quickly estimate the volume of concrete required for concrete footings.
[Ftg] — Footing
Calculates total quantity of concrete required based on a given wall
length and footing size. Size based on standard or default footing
size equal to 1.8 square feet or 259.2 square inches.
[Stor] [Ftg] — Store Footing Area
Used to store a value other than the default of 1.8 square foot
footing size (e.g., 128 [Stor] [Ftg] stores a footing size of 128
square inches). This value is permanently stored until you change it
or perform an All Clear. To recall the stored setting, press [Rcl]
[Ftg].
User's Guide — 17
Page 20
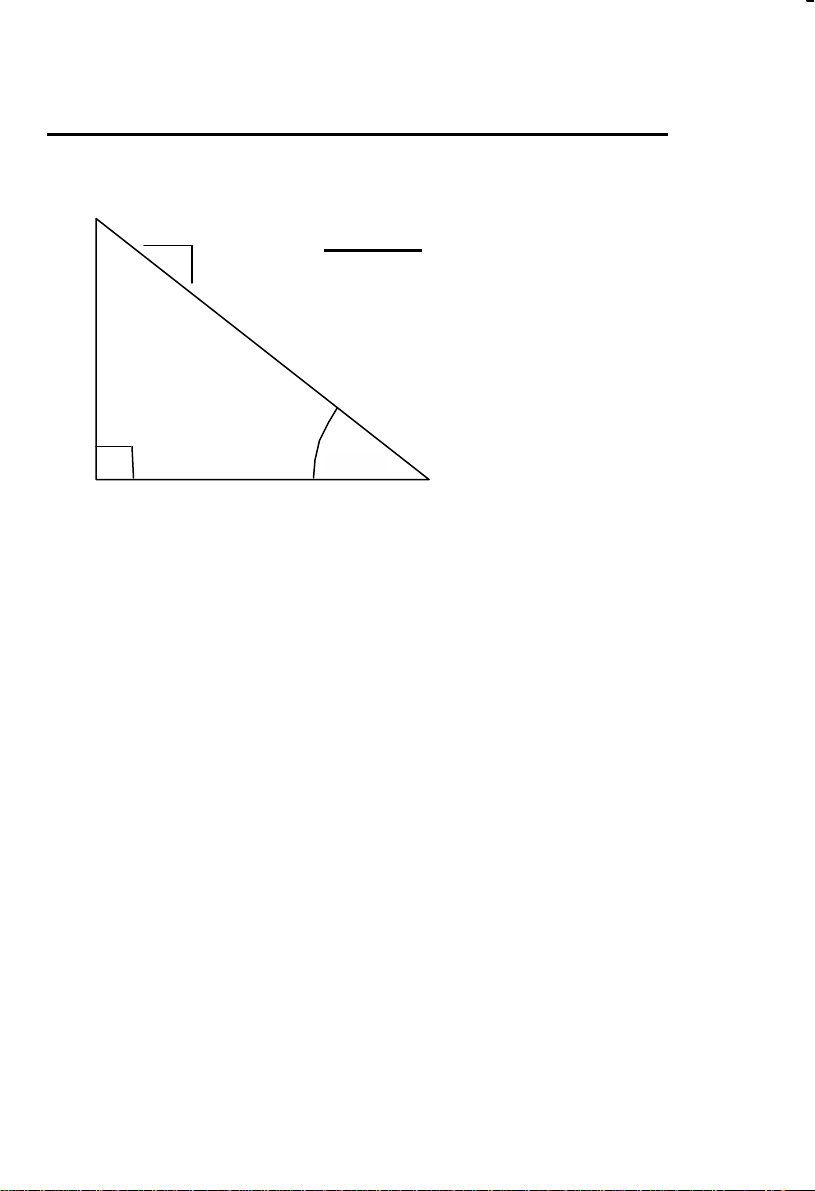
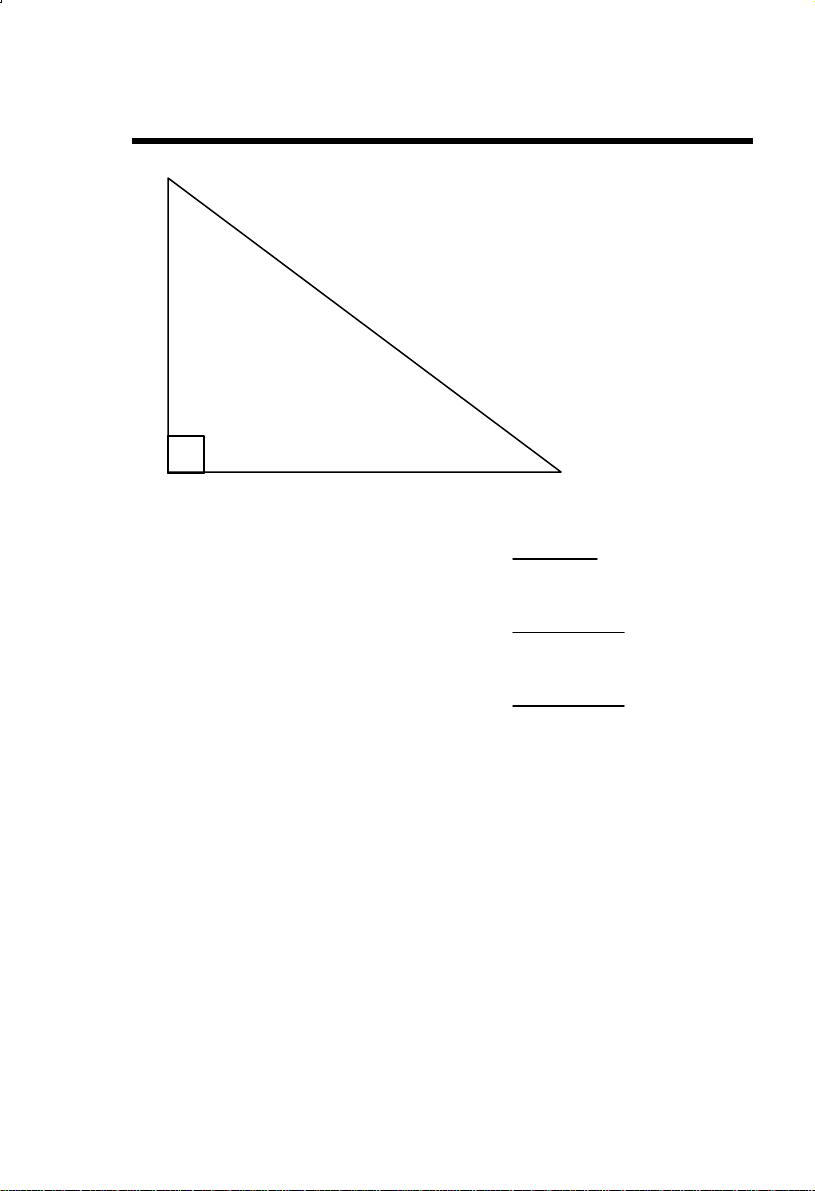
Right Triangle/Roof Framing Keys
Right Triangle:
Pitch =
Rise
Run
Using the Pythagorean theorem, the top row of keys on your Construction Master Pro provide instant solutions in dimensional format to right
triangle problems (particularly, roof framing).
The Construction Master Pro’s keys are labeled in easy to remember
roofing terms. The right triangle is calculated simply by entering two of
four variables: 1) Rise, 2) Run, 3) Diagonal or 4) Pitch.
[Pitch]
Enters or calculates the pitch (slope) of a roof (or right triangle).
Pitch is the amount of "rise" over 12 inches (or 1 meter) of "run."
Pitch may be entered as:
• a dimension: 9 [Inch] [Pitch]
• an angle: 30 [Pitch]
• a ratio: 0.75 [Conv] [Pitch]
• a percentage: 75 [%] [Pitch]
Unit Run
Diagonal
Pitch °°
Unit Rise
18 — CONSTRUCTION MASTER PRO
Page 21

þþ Note: An entered (vs. calculated) pitch is a permanent entry. This
means that it will remain stored even after you turn the calculator
off. To change the pitch, simply enter a new pitch value.
In contrast, a calculated pitch value is not permanently stored.
This means that the calculator will return to the pitch value you last
entered when you clear the calculator or press [On/C] twice.
[Rise]
Enters or calculates the rise or vertical leg (height) of a right triangle.
[Run]
Enters or calculates the run or horizontal leg (base) of a right
triangle.
[Diag] — Diagonal
Enters or calculates the diagonal leg (hypotenuse) of a right triangle.
Typical applications are “squaring up" slabs or finding Common rafter
lengths. Additional presses of the [Diag] key will also display Plumb
and Level cut angles in degrees.
þþ Note: The Common rafter calculation is the “point-to-point” length
and does not include the overhang or ridge adjustment.
User's Guide — 19
Page 22
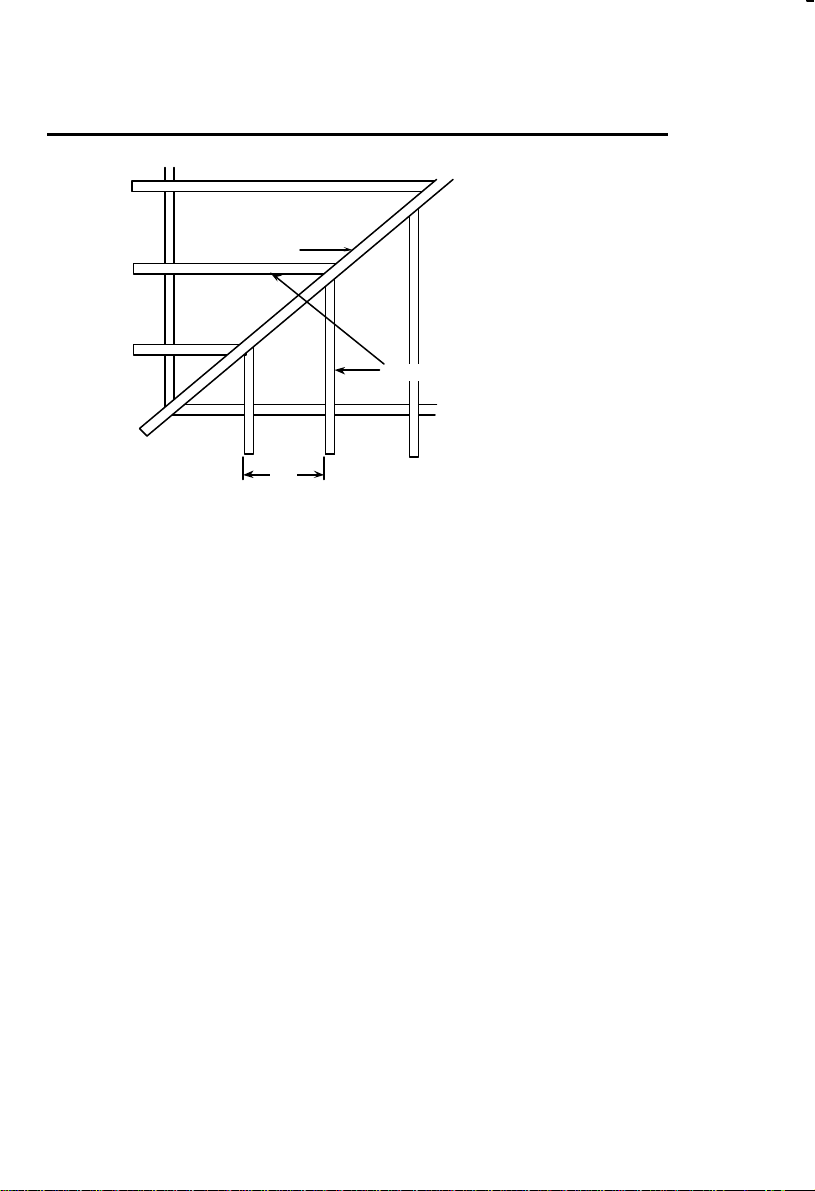
Hip/Valley and Jack Rafter Keys
Irregular
Side
[I/Jack]
Hip Rafter
Jack Rafters
Common
Side
[Jack]
16”
The Construction Master Pro uses the rise, run, diagonal, pitch and
o.c. spacing values to compute regular (45°) and irregular (non-45°)
Hip/Valley and Jack rafter lengths (excluding wood thickness, etc.).
When calculating regular and irregular Jack rafter lengths, you will see
the letters “JK” (Common pitch side) or “IJ” (irregular pitch side) and the
corresponding Jack number to the left of your calculator display. This
will help you keep track of the descending sizes and which side the
corresponding rafter is based on.
[Hip/V] — Hip/Valley Rafter
Finds the regular (45º) or irregular (non-45º) Hip/Valley rafter length.
• Regular Hip/Valley Length: After right triangle/rafter values
are entered or calculated (e.g., pitch, rise, run), pressing
[Hip/V] will calculate the length of the regular Hip/Valley
rafter.
• Irregular Hip/Valley Length: If an irregular pitch is entered via
[Conv] [Hip/V] (see next page), pressing [Hip/V] will calculate
the irregular Hip/Valley rafter length. (An irregular or “nonstandard” roof has two different pitches/slopes.)
20 — CONSTRUCTION MASTER PRO
Page 23

• Subsequent presses of the [Hip/V] key will also display Plumb,
Level, and Cheek cut angle values in degrees.
[Conv] [Hip/V] — Irregular Pitch
Enters the irregular or secondary pitch value used to calculate
lengths of the irregular Hip/Valley and Jack rafters.
You may enter the irregular pitch as:
• a dimension: 9 [Inch] [Conv] [Hip/V]
• an angle: 30 [Conv] [Hip/V]
• a percentage: 75 [%] [Conv] [Hip/V]
þþ Note: An entered irregular pitch can be recalled by pressing [Rcl]
[Conv] [Hip/V].
[Jack] — Jack Rafters
Finds the descending Jack rafter sizes for regular pitched roofs,
based on the stored on-center spacing and previously entered or calculated right triangle/rafter values (e.g., pitch, rise, run).
• The default on-center spacing is 16 inches. A new on-center
spacing may be entered and permanently stored by pressing
an inch value and [Stor] [7] (e.g., 12 [Inch] [Stor] [7]). The current on-center spacing value can be viewed by pressing [Rcl]
[7].
• Repeated presses of the [Jack] key will display all the rafter
sizes (on the regular pitch side) as well as display the Plumb,
Level, and Cheek cut angle values. Additional presses will display the rafter sizes on the irregular pitch side (if an irregular
pitch was entered; see above), or repeat the previously displayed values.
þþ Note: You may set your calculator to display the Jack rafter lengths
in either ascending or descending order (see Preference Settings on
page 96).
þþ Note: You may program your calculator to “mate up” the Jack rafters,
rather than using the entered or default on center for both sides (see
Preference Settings on page 96).
User's Guide — 21
Page 24

[Conv] [Jack] — Irregular Side Jacks
Operates same as [Jack], but displays the rafter values from the
irregular pitched side first.
Rake Wall Function
[Conv] [Rise] — Rake Wall
This function finds the stud sizes in a Rake Wall given computed or
entered values for pitch, rise and/or run. The various sizes will be
displayed via repeated presses of [Rise]. The sizes can be displayed
in either descending (from longest to shortest) or ascending (from
shortest to the longest) order, depending upon your preference setting (see Preference Settings on page 96). If a value is entered prior
to pressing [Conv] [Rise], this value will be taken as the Base size
and automatically added to the various rafter lengths.
[Stor] [7] — Store On-Center (o.c.) Spacing
Used to store a value other than the default of 16 inches on center
(e.g., 18 [Inch] [Stor] [7] stores an 18 inch on center) for Rake Wall
stud calculations. Press [Rcl] [7] to review the stored value.
22 — CONSTRUCTION MASTER PRO
Page 25

Roof Key
The Construction Master Pro's Roof function provides a quick computation of roof area, given a floor area and a roof pitch. In addition, this
function also converts the calculated Roof Area into a quantity of (331/3 square feet) bundles of shingles.
[Roof]
Converts an entered floor area into a roof area. A second press will
display the quantity of (33-1/3 square feet) bundles of shingles required to cover the computed roof area.
[Conv] [00] — Roof (Desktop Only)
Same as above. A second press of [00] will display the quantity of
(33-1/3 square feet) bundles of shingles required to cover the computed roof area.
User's Guide — 23
Page 26

Stair Key
The Construction Master Pro easily computes stair layout solutions.
Given values for rise and/or run, your calculator will compute riser,
tread, stringer and angle of incline values simply by pressing the
[Stair] key.
[Stair]
A multi-function key that uses a stored desired riser height, desired
tread width, and rise and run values to compute and display the following:
Press Result
1 Riser Size
2 Number of Risers
3 Riser Overage/Underage
4 Tread Width
5 Number of Treads
6 Tread Overage/Underage
7 Stringer Length
8 Angle of Incline
þþ Note: Default values are 7-1/2 inches for Desired Riser Height and
10 inches for Desired Tread Width.
þþ Note: It is not possible for the calculator to include the
nose/overhang measurement. Thus, you need to adjust for this
measurement per local codes.
[Stor] [Stair] — Store Desired Riser Height
Stores a value other than the default desired stair riser height of
7-1/2 inches (e.g., 8 [Inch] [Stor] [Stair] stores an 8-inch desired
stair riser height). To recall the stored setting, press [Rcl] [Stair].
[Stor] [m] — Store Desired Tread Width
Stores a value other than the default desired stair tread width of 10
inches (e.g., 12 [Inch] [Stor] [m] stores a 12-inch desired stair tread
width). This value is used when the run or the rise has not been en-
tered (used as the tread width when a run has not been entered and
with the run value to solve the stair parameters when a rise has not
been entered.) To recall the stored setting, press [Rcl] [m].
24 — CONSTRUCTION MASTER PRO
Page 27
TRIGONOMETRY FUNCTION KEYS
Hypotenuse
Opposite Side
Ø
Adjacent Side
Tangent Ø =
Sine Ø =
Cosine Ø =
The Desktop and Trig Plus III calculators have standard trigonometric
keys, in addition to Right Triangle/Rafter keys (e.g., Rise, Run, Diagonal), for advanced right triangle mathematics.
The sine, cosine and tangent of an angle are defined in relation to the
sides of a right triangle.
Using the [Conv] key with the trigonometric function gives you the
arcsine, arccosine and arctangent – all of which are used to find the
angle for the sine, cosine, or tangent value entered.
Opposite
Adjacent
Opposite
Hypotenuse
Adjacent
Hypotenuse
User's Guide — 25
Page 28

[Sine] — Sine Function
Computes the sine of a degree or undimensioned* value.
[Conv] [Sine] — Arcsine (sin-1)
Computes the angle for the entered or calculated sine value.
[Cos] — Cosine Function
Computes the cosine of a degree or undimensioned value.
[Conv] [Cos] — Arccosine (cos-1)
Computes the angle for the entered or calculated cosine value.
[Tan] — Tangent Function
Computes the tangent of a degree or undimensioned value.
[Conv] [Tan] — Arctangent (tan-1)
Computes the angle for the entered or calculated tangent value.
RR *Note: Cannot use on dimensioned values.
26 — CONSTRUCTION MASTER PRO
Page 29

GETTING STARTED
ENTERING DIMENSIONS
Entering Linear Dimensions
When entering feet -inch-fraction values, enter dimensions from largest
to smallest — e.g., feet before inches, inches before fractions. Enter
fractions by entering the numerator (top), pressing [ / ] (fraction bar key)
and then the denominator (bottom).
þþ Note: If a denominator is not entered, the fractional setting value
is used.
Examples:
Dimension Keystrokes
5 Yards 5 [Yds]
5 Feet 1-1/2 Inch 5 [Feet] 1 [Inch] 1 [ / ] 2
17.5 Meters 17.5 [m]
Entering Square/Cubic Dimensions
The Construction Master Pro lets you easily enter square and cubic
values. Simply press a dimensional unit key two times to label a number as a square value, or three times to label a cubic value. (Note: If
you pass the desired dimensional format, keep on pressing the dimensional unit key until the desired result is displayed.) Enter square and
cubic dimensions in the following order:
(1) Enter numerical value (e.g., 100).
(2) Press desired unit key (e.g., [Feet]) to label value as
“linear.”
(3) Second press of unit key (e.g., [Feet]) labels value as
“square.”
(4) Third press of unit key labels value as “cubic.”
þþ Note: Feet-Inch format cannot be used to enter square or
cubic values.
User's Guide — 27
Page 30

Examples of Square and Cubic Entry:
[Yds] [Yds] — Square Yards
(e.g., 5 [Yds] [Yds] will display 5. SQ YD).
[Yds] [Yds] [Yds] — Cubic Yards
(e.g., 5 [Yds] [Yds] [Yds] will display 5. CU YD).
[Feet] [Feet] — Square Feet
(e.g., 5 [Feet] [Feet] will display 5. SQ FEET).
[Feet] [Feet] [Feet] — Cubic Feet
(e.g., 5 [Feet] [Feet] [Feet] will display 5. CU FEET).
[Inch] [Inch] — Square Inches
(e.g., 5 [Inch] [Inch] will display 5. SQ INCH).
[Inch] [Inch] [Inch] — Cubic Inches
(e.g., 5 [Inch] [Inch] [Inch] will display 5. CU INCH).
[m] [m] — Square Meters
(e.g., 5 [m] [m] will display 5. SQ M).
[m] [m] [m] — Cubic Meters
(e.g., 5 [m] [m] [m] will display 5. CU M).
[mm] [mm] — Square Millimeters
(e.g., 5 [mm] [mm] will display 5. SQ MM).
[mm] [mm] [mm] — Cubic Millimeters
(e.g., 5 [mm] [mm] [mm] will display 5. CU MM).
[Conv] [5] [5] — Square Centimeters
(e.g., 5 [Conv] [5] [5] will display 5. SQ CM).
[Conv] [5] [5] [5] — Cubic Centimeters
(e.g., 5 [Conv] [5] [5] [5] will display 5. CU CM).
28 — CONSTRUCTION MASTER PRO
Page 31

CONVERSIONS (LINEAR, AREA, VOLUME)
Linear Conversions
Convert 14 feet to other dimensions:
Keystroke Display
[On/C] [On/C] 0.
14 [Feet] [Conv] [Yds] 4.666667 YD
[Feet] 14 FEET 0 INCH
[Inch] 168 INCH
[m] 4.267 M
[Conv] [5] (cm) 426.72 CM
[mm] 4267.2 MM
þþ Note: When performing multiple conversions, you only have to press
the [Conv] key once.
Converting Feet-Inch-Fractions to Decimal Feet
Convert 15 feet 9-1/2 inches to decimal feet. Then convert back to
feet-inch-fractions.
Keystroke Display
[On/C] [On/C] 0.
15 [Feet] 9 [Inch] 1 [/] 2 15 FEET 9-1/2 INCH
[Conv] [Feet] 15.79167 FEET
[Feet] 15 FEET 9-1/2 INCH
User's Guide — 29
Page 32

Converting Decimal Feet to Feet-Inch-Fractions
Convert 17.32 feet to feet-inch-fractions.
Keystroke Display
[On/C] [On/C] 0.
17.32 [Feet] 17.32 FEET
[Conv] [Feet] 17 FEET 3-13/16 INCH
Converting Fractional Inches to Decimal Inches
Convert 8-1/8 inches to decimal inches. Then convert to decimal feet.
Keystroke Display
[On/C] [On/C] 0.
8 [Inch] 1 [/] 8 8-1/8 INCH
[Conv] [Inch] 8.125 INCH
[Feet] 0.677083 FEET
Converting Decimal Inches to Fractional Inches
Convert 9.0625 inches to fractional inches. Then convert to decimal
feet.
Keystroke Display
[On/C] [On/C] 0.
9.0625 [Inch] 9.0625 INCH
[Conv] [Inch] 9-1/16 INCH
[Feet] [Feet] 0.755208 FEET
30 — CONSTRUCTION MASTER PRO
Page 33

Square Conversions
Convert 14 square feet to other square dimensions:
Keystroke Display
[On/C] [On/C] 0.
14 [Feet] [Feet] [Conv] [Inch] 2016. SQ INCH
[Yds] 1.555556 SQ YD
[m] 1.300643 SQ M
[Conv] [5] (cm) 13006.43 SQ CM
[mm] 1300643. SQ MM
Cubic Conversions
Convert 14 cubic feet to other cubic dimensions:
Keystroke Display
[On/C] [On/C] 0.
14 [Feet] [Feet] [Feet] [Conv] [Inch] 24192. CU INCH
[Yds] 0.518519 CU YD
[m] 0.396436 CU M
[Conv] [5] (cm) 396435.9 CU CM
[mm] 0.396436 CU M*
þþ *Note: The calculator's auto-range function displayed the answer in
meters because the answer in millimeters is out of the calculator's
normal 7-digit range. The Trig Plus III may show the result in mm using Exponential Notation format. If the Exponential Notation Preference is turned off, the calculator's auto-range function will display the
result in a larger unit of measure (if possible) instead of displaying
an error due to a display overflow (see Appendix E - Auto-Range).
User's Guide — 31
Page 34

PERFORMING BASIC MATH WITH
DIMENSIONS
Adding Dimensions
Keystroke Display
Add 11 inches to 2 feet 1 inch:
11 [Inch] [+] 2 [Feet] 1 [Inch] [=] 3 FEET 0 INCH
Add 5 feet 7-1/2 inches to 18 feet 8 inches:
5 [Feet] 7 [Inch] 1 [ / ] 2 [+] 18 [Feet] 8 [Inch] [=] 24 FEET
3-1/2 INCH
Subtracting Dimensions
Keystroke Display
Subtract 3 feet from 11 feet 7-1/2 inches:
11 [Feet] 7 [Inch] 1 [ / ] 2 [–] 3 [Feet] [=] 8 FEET 7-1/2 INCH
Subtract 32 inches from 81 inches:
81 [Inch] [–] 32 [Inch] [=] 49 INCH
Multiplying Dimensions
Keystroke Display
Multiply 5 feet 3 inches by 11 feet 6-1/2 inches:
5 [Feet] 3 [Inch] [x] 11 [Feet] 6 [Inch] 1[ / ] 2 [=] 60.59375 SQ FEET
Multiply 2 feet 7 inches by 10:
2 [Feet] 7 [Inch] [x] 10 [=] 25 FEET 10 INCH
32 — CONSTRUCTION MASTER PRO
Page 35

Dividing Dimensions
Keystroke Display
Divide 30 feet 4 inches by 7 inches:
30 [Feet] 4 [Inch] [÷] 7 [Inch] [=] 52.
Divide 20 feet 3 inches by 9:
20 [Feet] 3 [Inch] [÷] 9 [=] 2 FEET 3 INCH
Percentage Calculations
The percent [%] key is used to find a given percent of a number or to
perform add-on, discount or division percentage calculations. You may
also perform percentage calculations with dimensional units (feet, inc h,
etc.), in any format (linear, square or cubic).
Examples:
Keystroke Display
Find 18% of 500 feet:
500 [Feet] [x] 18 [%] 90 FEET 0 INCH
Add 10% to 137 square feet:
137 [Feet] [Feet] [+] 10 [%] 150.7 SQ FEET
Subtract 20% from 552 feet 6 inches:
552 [Feet] 6 [Inch] [–] 20 [%] 442 FEET 0 INCH
Divide 350 cubic yards by 80%:
350 [Yds] [Yds] [Yds] [÷] 80 [%] 437.5 CU YD
User's Guide — 33
Page 36

MEMORY OPERATION
Your calculator has two types of Memory operations:
1) a standard, cumulative, semi-permanent memory [M+]; and
2) two Storage Registers [M1] and [M2], used to permanently
store single, non-cumulative va lues.
Memory commands are listed below.
Function Keystrokes
M+:
Add value to M+ [M+]
Subtract value from M+ [Conv] [M+]
Clear M+ (displays and clears M+) [Rcl] [Rcl]
Clear M+ (clears M+ without displaying
contents of memory) [Conv] [Rcl]
Review stored value [Rcl] [M+]
M1/M2:
Store single value in M1 [Stor] [1]
Store single value in M2 [Stor] [2]
Clear register M1 [0] [Stor] [1]
Clear register M2 [0] [Stor] [2]
Review stored value in M1 [Rcl] [1]
Review stored value in M2 [Rcl] [2]
34 — CONSTRUCTION MASTER PRO
Page 37

i. Basic Cumulative Memory (M+)
Example:
Store 100 into M+, add 200, then subtract 50. Clear the Memory:
Keystroke Display
100 [M+] 100. M
200 [M+] 200.
50 [Conv] [M+] 50.
[Rcl] [Rcl] 250.
þþ Note: To Clear Memory (M+):
−− press [Rcl] [Rcl];
−− [Conv] [Rcl]; or
−− turn off the calculator.
ii. Permanent Storage Registers (M1 and M2)
Examples:
Store a rate of $175 into M1 and recall the value:
Keystroke Display
175 [Stor] [1] M-1 175.
[Off] [On/C] 0.
[Rcl] [1] M-1 175.
Store 1,575 square yards into M2 and recall the value:
Keystroke Display
1575 [Yds] [Yds] [Stor] [2] M-2 1575. SQ YD
[Off] [On/C] 0.
[Rcl] [2] M-2 1575. SQ YD
þþ Note: To Clear M1/M2: Values stored in M1/M2 will remain per-
manently stored, even after you turn the calculator off. You will
never need to clear the storage registers; simply enter a new
value. However, if you wish to clear M1/M2 to “zero”:
−− Enter [0] [Stor] [1] and [0] [Stor] [2] or
[Conv] [X] to clear the registers
M
M
User's Guide — 35
Page 38

PAPERLESS TAPE OPERATION
Note: Not available on DT (Desktop) Printer—Model #44065.
The Paperless Tape allows you to display and review the last twenty
entries of a regular math or basic dimensional math string calculation.
To access this mode after entering values, press [Rcl] [=]. Then, press
[+] or [–] to scroll forward or backward through the entries.
While in the Paperless Tape mode, the display will show the previously
entered or calculated value, along with the sequence number of entry
(e.g., 01, 02, 03, etc.) and the math operator (+, –, x, ÷, %) in the upper left corner of the display.
þþ Note: If [=] has been used in the middle of a string, SUB (for Subto-
tal) will display in the upper left. If [=] was the last operation performed, the display will show TTL (Total) as the last entry.
To exit this mode, press [=] to exit and maintain the last entry on the
display. When exiting, the last entry (or TTL) will be displayed, allowing
you to continue using the last tape value for another operation, if desired.
þþ Note: The Paperless Tape is cleared when:
−− [On/C] is pressed twice;
−− upon a new calculation (new equation string is started); or
−− when the calculator is shut off.
36 — CONSTRUCTION MASTER PRO
Page 39

Example:
Keystroke Display
1. Enter a string of numbers:
4 [Feet] [+] 4 FEET 0 INCH
5 [Feet] [+] 9 FEET 0 INCH
6 [Feet] [+] 15 FEET 0 INCH
7 [Feet] [=] 22 FEET 0 INCH
2. Access the tape function:
[Rcl] [=] TTL= 22 FEET 0 INCH
3. Scroll from first value to total:
[+] 01 4 FEET 0 INCH
[+] 02+ 5 FEET 0 INCH
[+] 03+ 6 FEET 0 INCH
[+] 04+ 7 FEET 0 INCH
[+] TTL = 22 FEET 0 INCH
4. Scroll last two values:
[–] 04+ 7 FEET 0 INCH
[–] 03+ 6 FEET 0 INCH
5. Exit tape function and continue:
[=] TTL= 22 FEET 0 INCH
[+] 22 FEET 0 INCH
2 [Feet] [=] 24 FEET 0 INCH
User's Guide — 37
Page 40

EXAMPLES — USING THE CONSTRUCTION
MASTER PRO
The Construction Master Pro calculators have keys and functions
labeled in common building terms. Just follow the examples and adapt
the keystrokes to your specific application.
Please note that the following examples may or may not apply to your
specific calculator model (refer to the Comparison Grid on page 8).
Also, if you are using the Trig Plus III, some of your answers in this
User’s Guide may differ slightly, as the calculator has a default fractional resolution of 1/64" (versus 1/16" in other models). A special keystroke, [Conv] [1], temporarily sets the fractional setting to sixteenths
in selected problems.
You may change your Trig Plus III’s fraction accuracy to sixteenths by
pressing [Conv] then [Stor] to access the fractional setting. Press [+]
until "1/16" shows in the display and press [On/C] to set and exit the
fractional setting mode.
38 — CONSTRUCTION MASTER PRO
Page 41

LINEAR MEASUREMENT EXAMPLES
Adding Linear Measurements
Find the total length of the following measurements: 5 feet 4-1/2
inches, 8 inches and 3.5 yards.
Keystroke Display
1. Add the measurements:
[On/C] [On/C] 0.
5 [Feet] 4 [Inch] 1 [/] 2 [+] 5 FEET 4-1/2 INCH
8 [Inch] [+] 6 FEET 0-1/2 INCH
3.5 [Yds] 3.5 YD
2. Find the total:
[=] 16 FEET 6-1/2 INCH
Cutting Boards
How many 2 foot 2 inch pieces can be cut from one 10-foot board?
Keystroke Display
Divide board length by smaller cuts:
[On/C] [On/C] 0.
10 [Feet] 10 FEET
[÷] 2 [Feet] 2 [Inch] [=] 4.615385
(or 4 whole pieces)
User's Guide — 39
Page 42

Window Measurement
What is the total width of three (3) window openings, if each measures
2 feet 5 inches in width?
Keystroke Display
1. Enter window width:
[On/C] [On/C] 0.
2 [Feet] 5 [Inch] 2 FEET 5 INCH
2. Find total width:
[x] 3 [=] 7 FEET 3 INCH
3. Convert to decimal feet:
[Feet] 7.25 FEET
Calculating the Center Point
You have a room that measures 13 feet 8 inches by 14 feet 10 inches.
Find the center point to install a ceiling fan.
Keystroke Display
1. Divide length in half, to figure first center point:
[On/C] [On/C] 0.
13 [Feet ] 8 [Inch] 13 FEET 8 INCH
[÷] 2 [=] 6 FEET 10 INCH
2. Divide width in half, to figure second center point:
14 [Feet] 10 [Inch] 14 FEET 10 INCH
[÷] 2 [=] 7 FEET 5 INCH
Therefore, you should install the fan at the intersection of 6 feet 10
inches length and 7 feet 5 inches width.
40 — CONSTRUCTION MASTER PRO
Page 43

AREA CALCULATIONS
Square Area (x2)
What is the area of a square room with sides measuring 7 feet 4
inches?
Keystroke Display
[On/C] [On/C] 0.
7 [Feet] 4 [Inch] [Conv] [%] (x2) 53.77778 SQ FEET
Area of a Rectangular Room (LxW)
What is the area of a room measuring 12 feet 6 inches by 15 feet 8
inches?
Keystroke Display
[On/C] [On/C] 0.
12 [Feet] 6 [Inch] 12 FEET 6 INCH
[x] 15 [Feet] 8 [Inch] [=] 195.8333 SQ FEET
User's Guide — 41
Page 44

VOLUME CALCULATIONS
Rectangular Containers (LxWxH)
What is the volume of a rectangular container that measures 3 feet by
1 foot 9-5/8 inches by 2 feet 4 inches?
Keystroke Display
1. Find volume in cubic feet:
[On/C] [On/C] 0.
3 [Feet] 3 FEET
[x] 1 [Feet] 9 [Inch] 5 [ / ] 8 1 FEET 9-5/8 INCH
[x] 2 [Feet] 4 [Inch] [=] 12.61458 CU FEET*
2. Convert to cubic yards:
[Conv] [Yds] 0.467207 CU YD
þþ *Note: If the “Volume Display Format” Preference Setting is set to
cubic yards or cubic meters, your result will display accordingly. (See
Preference Settings on page 96.)
42 — CONSTRUCTION MASTER PRO
Page 45

Volume of a Cylinder
Calculate the volume of a cylinder with a diameter of 2 feet 4 inches
and a height of 4 feet 6 inches:
h=4’ 6”
Keystroke Display
1. Find circle area:
[On/C] [On/C] 0.
2 [Feet] 4 [Inch] 2 FEET 4 INCH
[Circ] [Circ] AREA 4.276057 SQ FEET
2. Enter height and find volume:*
4 [Feet] 6 [Inch] [Rise] [Column] COL 19.24225 CU FEET
*Note: if using the LT, use the following keystrokes:
[x] 4 [Feet] 6 [Inch] [=] 19.24225 CU FEET
d=2’ 4”
Volume of a Cone
Calculate the volume of a cone with a diameter of 3 feet 6 inches and
a height of 5 feet:
Keystroke Display
1. Find circle area:
[On/C] [On/C] 0.
3 [Feet] 6 [Inch] 3 FEET 6 INCH
[Circ] [Circ] AREA 9.621128 SQ FEET
2. Enter height and find volume:*
5 [Feet] [Rise] [Conv] [Column] CONE 16.03521 CU FEET
*Note: if using the LT, use the following keystrokes:
[x] 5 [Feet] [÷] 3 [=] 16.03521 CU FEET
User's Guide — 43
Page 46

WEIGHT/VOLUME CONVERSIONS
Weight Conversions
Convert 2,500 pounds to kilograms, tons and metric tons:
Keystroke Display
1. Enter pounds:
[On/C] [On/C] 0.
2500 [Conv] [4] (lbs) 2500 LB
2. Convert to kilograms, tons and metric tons:
[Conv] [1] (kg) 1133.981 kG
[Conv] [6] (tons) 1.25 Ton
[Conv] [3] (met tons) 1.133981 MET Ton
44 — CONSTRUCTION MASTER PRO
Page 47

Weight per Volume/Volume Conversions
Convert 5 cubic yards of concrete to pounds, tons and kilograms, if
concrete weighs 1.5 tons per cubic yard.
Keystroke Display
1. Store weight per volume:
[On/C] [On/C] 0.
1.5 [Stor] [8]* (wt/vol) 1.5 Ton Per CU YD
2. Enter concrete volume:
5 [Yds] [Yds] [Yds] 5. CU YD
3. Convert to pounds, tons and kilograms:
[Conv] [4] (lbs) 15000. LB
[Conv] [6] (tons) 7.5 Ton
[Conv] [1] (kg) 6803.886 kG
*Keep pressing the [8] key until the desired format is displayed
(e.g., Ton Per CU YD, LB Per CU YD, LB Per CU FEET, Ton Per
CU M, or kG Per CU M).
User's Guide — 45
Page 48

BLOCKS/BRICKS
Number of Blocks (not available on LT and Trig
Plus III)
You are building an “L” shaped retaining wall out of standard 8-inch x
16-inch size blocks (note: default block size). One side of the retaining wall is 22 feet long, and the other side is 15 feet 8 inches long. The
wall is to be 4 feet high. How many blocks are required to build this
wall? Add a 5% waste allowance.
Keystroke Display
1. Find wall area:
[On/C] [On/C] 0.
[Rcl] [Block]* B_AR 128. SQ INCH
22 [Feet] [+] 15 [Feet] 8 [Inch] [x] 37 FEET 8 INCH
4 [Feet] [=] 150.6667 SQ FEET
2. Find the number of blocks and add 5% waste allowance:
[Conv] [Block] BLKS 169.5
[+] 5 [%] 177.975
*If [Rcl] [Block] does not result in 128 square inches, then enter
the following:
8 [Inch] [x] 16 [Inch] [=] 128. SQ INCH
[Stor] [Block] B_AR 128. SQ INCH
-OR-
128 [Stor] [Block] B_AR 128. SQ INCH
46 — CONSTRUCTION MASTER PRO
Page 49

Number of “Face” Bricks (not available on LT and Trig
Plus III)
How many “face” bricks (21 square inch size) will you need to purchase to fill a 40 foot by 8 foot wall, if you include a 3% waste allowance?
Keystroke Display
1. Enter brick size into Block Size key:
[On/C] [On/C] 0.
21 [Stor] [Block] B_AR 21. SQ INCH
2. Find area of wall:
40 [Feet] [x] 8 [Feet] [=] 320. SQ FEET
3. Find the number of bricks and add a 3% waste allowance:
[Conv] [Block] BLKS 2194.286 (Bricks)
[+] 3 [%] 2260.114
Number of “Paver” Bricks (not available on LT and
Trig Plus III)
How many “paver” bricks (32 square inch size) will you need to fill a 5foot by 15-foot walkway?
Keystroke Display
1. Enter brick size into Block Size key:
[On/C] [On/C] 0.
32 [Stor] [Block] B_AR 32. SQ INCH
2. Find area of walkway:
5 [Feet] [x] 15 [Feet] [=] 75. SQ FEET
3. Find the number of bricks:
[Conv] [Block] BLKS 337.5 (Bricks)
User's Guide — 47
Page 50

BOARD FEET — LUMBER ESTIMATION
The Construction Master Pro easily computes board feet for lumber estimation problems. Simply enter the board’s cubic dimensions and
press the [Conv] [0] keys to convert to board feet. Use the [Conv] [9],
or “Cost” function, to figure total lumber cost.
þþ Note: Unit cost is entered in the standard per thousand board foot
measure (Mbm) format.
Total Board Feet — With Dollar Cost
Find the total board feet for the following board sizes:
2 x 4 x 14
2 x 10 x 16
2 x 12 x 18
If the boards cost $250 per Mbm., what is the total cost?
Keystroke Display
1. Enter board sizes, convert to board feet and store in memory:
[On/C] [On/C] 0.
2 [x] 4 [x] 14 [Conv] [0] [M+] 9.333333 B FEETM
2 [x] 10 [x] 16 [Conv] [0] [M+] 26.66667 B FEETM
2 [x] 12 [x] 18 [Conv] [0] [M+] 36. B FEETM
2. Recall total board feet and compute total cost:
[Rcl] [Rcl] 72. B FEET
[x] 250 [Conv] [9] (Cost) $18.00
48 — CONSTRUCTION MASTER PRO
Page 51

CIRCLE CALCULATIONS
Circumference and Area of a Circle
Find the area and circumference of a circle with a diameter of 11
inches:
Keystroke Display
[On/C] [On/C] 0.
11 [Inch] [Circ] DIA 11 INCH
[Circ] AREA 95.03318 SQ INCH
[Circ] CIRC 34-9/16 INCH
Circle Properties — Arc Length and Diameter Known
Find the arc degree, chord length, rise, pie slice area and segment
area of a circle, given a 5-foot diameter and an arc length of 3 feet 3
inches:
a=3’ 3"
Keystroke Display
1. Enter circle diameter:
[On/C] [On/C] 0.
5 [Feet] [Circ] DIA 5 FEET 0 INCH
2. Enter arc length:
3 [Feet] 3 [Inch] [Conv] [Circ] ARC 3 FEET 3 INCH
d=5’
(Cont’d)
User's Guide — 49
Page 52

(Cont’d)
Keystroke Display
3. Find degree of arc:
[Circ] ARC 74.48°°
4. Find chord length:
[Circ] CORD 3 FEET 0-5/16 INCH
5. Find segment rise:
[Circ] RISE 0 FEET 6-1/8 INCH
6. Find pie slice area:
[Circ] PIE 4.0625 SQ FEET
7. Find segment area:
[Circ] SEG 1.051381 SQ FEET
þþ Note: Successive presses of [Circ] will toggle to the beginning.
50 — CONSTRUCTION MASTER PRO
Page 53

Arched Windows
Find the radius of an arched window with a chord length of 2 feet
7 inches and a rise of 10-1/2 inches. Then, find the arc angle, arc
length and segment area of the window.
Rise=10-1/2”
Run=2’7”
Keystroke Display
1. Enter chord length:
[On/C] [On/C] 0.
2 [Feet] 7 [Inch] [Run] RUN 2 FEET 7 INCH
2. Enter rise:
10 [Inch] 1 [/] 2 [Rise] RISE 10-1/2 INCH
3. Find radius:
[Conv] [Diag] RAD 16-11/16 INCH
4. Find arc angle:
[Conv] [Circ] ARC 136.46°
5. Find arc length:
[Circ] ARC 39-3/4 INCH
6. Find segment area:
[Circ] [Circ] [Circ] [Circ] SEG 235.7767 SQ INCH
User's Guide — 51
Page 54

Arc Length — Degree and Diameter Known
Find the arc length of an 85° portion of a circle with a 5-foot diameter:
Keystroke Display
[On/C] [On/C] 0.
5 [Feet] [Circ] DIA 5 FEET 0 INCH
85 [Conv] [Circ] ARC 85.00°°
[Circ] ARC 3 FEET 8-1/2 INCH
Arc Length — Degree and Radius Known
Find the arc length of a circle with a 24-inch radius and 77°° of arc
(77° of 360° circle):
Keystroke Display
[On/C] [On/C] 0.
24 [Inch] [Conv] [Diag] RAD 24 INCH
77 [Conv] [Circ] ARC 77.00°°
[Circ] ARC 32-1/4 INCH
52 — CONSTRUCTION MASTER PRO
Page 55

CONCRETE/PAVING
Volume of Concrete for a Driveway
Find the cubic yards of concrete required to pour a driveway with the
following dimensions: 36 feet 3 inches long by 11 feet 6 inches wide by
4 inches deep. If concrete costs $55 per cubic yard, what is the total
cost?
Keystroke Display
1. Multiply length by width:
[On/C] [On/C] 0.
36 [Feet] 3 [Inch] 36 FEET 3 INCH
[x] 11 [Feet] 6 [Inch] 11 FEET 6 INCH
2. Find area:
[=] 416.875 SQ FEET
3. Multiply by depth to find volume:
[x] 4 [Inch] [=] 5.146605 CU YD*
4. Multiply by per unit cost to find the total cost of concrete:
[x] 55 [Conv] [9] (Cost) $283.06
þþ *Note: This answer will automatically display in cubic yards due to
the multiplication of mixed units, unless the preference setting for
volume display has been changed from the default Standard Setting.
(See Preference Settings on page 96.)
User's Guide — 53
Page 56

Concrete Columns
Find the cubic yards of concrete required to pour five (5) columns, if
each has a diameter of 3 feet 4-1/2 inches and a height of 11 feet 6
inches. If the concrete weighs 1.75 tons per cubic yard, what is the total weight in tons? In pounds? In kilograms?
Keystroke Display
1. Find circle area:
[On/C] [On/C] 0.
3 [Feet] 4 [Inch] 1 [ / ] 2 3 FEET 4-1/2 INCH
[Circ] [Circ] AREA 8.946176 SQ FEET
2. Enter height, find total volume of concrete and add into Memory:
For the Handheld and Desktop:
11 [Feet] 6 [Inch] [Rise] RISE 11 FEET 6 INCH
[Column] COL 102.881 CU FEET
[Conv] [Yds] 3.810408 CU YD
[x] 5 [=] 19.05204 CU YD
[M+] 19.05204 CU YD
For the LT and Trig Plus III:
[x] 11 [Feet] 6 [Inch] 11 FEET 6 INCH
[=] 102.881 CU FEET
[Conv] [Yds] 3.810408 CU YD
[x] 5 [=] 19.05204 CU YD
[M+] 19.05204 CU YD
3. Enter weight in tons per cubic yards:
1.75 [Stor] [8] 1.75 Ton Per CU YDM
(Cont’d)
M
M
54 — CONSTRUCTION MASTER PRO
Page 57

(Cont’d)
4. Recall Memory and find weights:
[Rcl] [Rcl] 19.05204 CU YD
[Conv] [6] (tons) 33.34107 Ton
[Conv] [4] (lbs) 66682.14 LB
[Conv] [1] (kg) 30246.51 kG
11’ 6”
3’ 4-1/2”
User's Guide — 55
Page 58

ACB
Complex Concrete Volume
You’re going to pour an odd-shaped patio 4-1/2 inches deep with the
dimensions shown below. Calculate the total area (by dividing the drawing into three rectangles) and determine the total yards of concrete required. Then, find the total cost, if concrete costs $45 per cubic yard.
27’ 0”
17’ 6”
7’ 0”
9’ 0”
56 — CONSTRUCTION MASTER PRO
9’ 0”
9’ 0”
(Cont’d)
Page 59

(Cont’d)
Keystroke Display
1. Find area of Part A and store into Memory:
[On/C] [On/C] 0.
17 [Feet] 6 [Inch] [–] 17 FEET 6 INCH
7 [Feet] [=] 10 FEET 6 INCH
[x] 27 [Feet] [=] 283.5 SQ FEET
[M+] 283.5 SQ FEETM
2. Find area of Part B and store into Memory:
7 [Feet] 7 FEETM
[x] 9 [Feet] [=] 63. SQ FEETM
[M+] 63. SQ FEETM
3. Find area of Part C and store into Memory:
9 [Feet] 9 FEETM
[x] 9 [Feet] [=] 81. SQ FEETM
[M+] 81. SQ FEETM
4. Find total area and clear memory:
[Rcl] [Rcl] 427.5 SQ FEET
5. Find total cubic yards:
[x] 4 [Inch] 1 [ / ] 2 [=] 5.9375 CU YD
6. Find total cost:
[x] 45 [Conv] [9] (Cost) $267.19
User's Guide — 57
Page 60

Concrete Footings (not available on Trig Plus III)
Find the volume of concrete required for a (16 inch by 8 inch) footing
that measures 232 feet 6 inches in length.
Keystroke Display
1. Enter footing area:
[On/C] [On/C] 0.
16 [Inch] [x] 8 [Inch] [=] [Stor] [Ftg] F-AR 128. SQ INCH
2. Enter length to find volume:
232 [Feet] 6 [Inch] [Conv] [Ftg] FTG 7.654321 CU YD
Multiple Concrete Footings (not available on Trig
Plus III)
Find the total volume of concrete required to pour five (5) 24-inch by
12-inch footings, each 5 feet in length.
Keystroke Display
1. Enter footing area:
[On/C] [On/C] 0.
24 [Inch] [x] 12 [Inch] [=] [Stor] [Ftg] F-AR 288. SQ INCH
2. Enter length to find volume:
5 [Feet] [Conv] [Ftg] FTG 0.37037 CU YD
3. Multiply by 5 footings to find total concrete volume:
[x] 5 [=] 1.851852 CU YD
4. Clear and return stored footing size to default:
[Conv] [x] 0.
58 — CONSTRUCTION MASTER PRO
Page 61

Squaring Up a Foundation
A concrete foundation measures 45 feet 6 inches by 23 feet 8 inches.
Find the diagonal measurement (square up) to ensure the form is perfectly square.
23’8”
45’6”
Keystroke Display
1. Enter sides as rise/run:
[On/C] [On/C] 0.
23 [Feet] 8 [Inch] [Rise] RISE 23 FEET 8 INCH
45 [Feet] 6 [Inch] [Run] RUN 45 FEET 6 INCH
2. Find the square up (diagonal):
[Diag] DIAG 51 FEET 3-7/16 INCH
User's Guide — 59
Page 62

FLOOR COVERING AREA CALCULATIONS
Carpeting
You need to replace the carpet in two rooms, with dimensions as follows: (Room #1) 12 feet 4 inches x 10 feet; (Room #2) 14 feet 8
inches x 16 feet. Find the total square yards of carpet required.
Keystroke Display
1. Find area of Room #1 and add to memory:
[On/C] [On/C] 0.
12 [Feet] 4 [Inch] 12 FEET 4 INCH
[x] 10 [Feet] [=] [M+] 123.3333 SQ FEETM
2. Find area of Room #2 and add to memory:
14 [Feet] 8 [Inch] 14 FEET 8 INCHM
[x] 16 [Feet] [=] [M+] 234.6667 SQ FEETM
3. Find total square yards (while clearing memory):
[Rcl] [Rcl] [Conv] [Yds] 39.77778 SQ YD
60 — CONSTRUCTION MASTER PRO
Page 63

GRADE/SLOPE
Back-Fill on a Slope — Percent of Grade Known
You’ve built 55 linear feet of a 3 foot high retaining wall that is 3 feet
from the base of a 65% grade. You need to pour back-fill within 12
inches of the top of the wall (for a 2 foot depth). How many cubic yards
of fill should you have delivered?
Keystroke Display
1. Find volume for “A”:
[On/C] [On/C] 0.
55 [Feet] 55 FEET
[x] 3 [Feet] 3 FEET
[x] 2 [Feet] [=] [M+] 330. CU FEETM
2. Find run/diagonal of “B”:
65 [%] [Pitch] PTCH 0.65M
2 [Feet] [Rise] RISE 2 FEET 0 INCHM
[Run]* RUN 3 FEET 0-15/16 INCHM
[Diag]* DIAG 3 FEET 8-1/16 INCHM
*The Trig Plus III will have a higher fractional accuracy when displaying these values. If you desire to match the results as shown,
press [Conv] [1] to temporarily set fractional accuracy to one sixteenth, or use the Preference Setting to permanently set the calculator to one sixteenth.
(Cont’d)
User's Guide — 61
Page 64

(Cont’d)
Keystroke Display
3. Find volume of triangle “B”:
55 [Feet] 55 FEETM
[x] [Rcl] [Run] RUN 3 FEET 0-15/16 INCHM
[x] 2 [Feet] [=] 338.4615 CU FEETM
[÷] 2 [=] [M+] 169.2308 CU FEETM
4. Find total volume:
[Rcl] [Rcl] 499.2308 CU FEET
[Conv] [Yds] 18.49003 CU YD
62 — CONSTRUCTION MASTER PRO
Page 65

RIGHT TRIANGLE AND ROOF FRAMING
EXAMPLES
ROOF FRAMING DEFINITIONS
Rise: The vertical distance measured from the wall’s top plate to the
intersection of the pitch line and the center of the ridge.
Span: The horizontal distance or full width between the outside edges
of the wall’s top plates.
Run: The horizontal distance between the outside edge of the wall’s
top plate and the center of the ridge; in most cases this is equivalent to
half of the span.
Pitch: Pitch and slope are synonymous in modern trade language.
Pitch/slope of a roof is generally expressed in two types of measurement:
1) Ratio of rise to run — 7/12 or 7 inch
2) Angle of rafters, in degrees — 30.26°
Unit Rise: The number of inches of rise per foot (12 inches) of run.
Unit Run: This number is expressed as one foot (12 inches). In metric
mode, or when using metric dimensions, the unit run is one meter.
User's Guide — 63
Page 66

Plate: The top horizontal wall member that the ceiling joist and rafters
sit on and fasten to.
Ridge: The uppermost point of two roof planes.
Ridge Rafter: Also known as the “King rafter,” this rafter is the
uppermost rafter that all Hip, Valley, Valley Jack and Common rafters
are fastened to.
Rafters: Rafters are inclined roof support members. Rafters include the
following types:
• Common Rafter: The Common connects the plate to the ridge
and is perpendicular to the ridge.
• Hip Rafter: The Hip rafter extends from the corner of two wall
plates to the ridge or King rafter at angle other than 90°. The Hip
rafter is an external angle of two planes.
• Valley Rafter: The Valley rafter extends from the corner of two
wall plates to the ridge or King rafter at angle other than 90°. The
Valley rafter is an internal angle of two planes.
• Jack Rafters: Rafters that connect the Hip or Valley rafter to the
wall plate.
• Irregular Hip/Valley Jacks: Jack rafters found in dual pitch or
“irregular” roofs.
Regular Roof: A standard roof where the Hips and/or Valleys run at
45° and have the same pitch/slope on both sides of the Hip and/or Valley.
Irregular Roof: A non-standard roof where the Hips and/or Valleys bisect two different pitches/slopes, or have “skewed wings” or irregular
Jacks.
Rake Wall: A gable end wall that follows the pitch/slope of a roof.
64 — CONSTRUCTION MASTER PRO
Page 67

Cheek
Level Cut Angle Plumb Cut Angle
Irregular
[I/Jack]
Cut
Angle
Side
Hip Rafter
Common
Side
[Jack]
Jack Rafters
Plumb: Vertical Cut. The angle of cut from the edge of the board that
allows the rafter to mate on the vertical side of the ridge rafter.
Level: Horizontal Cut. The angle of cut from the edge of the board that
allows the rafter to seat flat on the wall plate.
Cheek: Side Cut(s). The angle to cut from the SIDE of the Jack rafter
to match up against the Hip or Valley rafter, usually made by tilting the
blade from 90°. Jack rafters typically have one Cheek cut. If there is
only one pitch (no irregular pitch), the angle will be 45°. If there are two
pitches, each side will have a different Cheek cut for the Jack rafter and
the angles will total 90°.
User's Guide — 65
Page 68

Common Rafter Length
If a roof has a 7/12 pitch and a span of 14 feet 4 inches, what is the
point-to-point length of the Common rafter (excluding the overhang or
ridge adjustment)? What are the Plumb and Level cuts?
7/12 Pitch
14’ 4”
Keystroke Display
1. Find diagonal or point-to-point length of the Common rafter:
[On/C] [On/C] 0.
7 [Inch] [Pitch] PTCH 7 INCH
14 [Feet] 4 [Inch] [÷] 2 [=] 7 FEET 2 INCH
[Run] RUN 7 FEET 2 INCH
[Diag] DIAG 8 FEET 3-9/16 INCH
2. Find Plumb and Level cuts:
[Diag] PLMB 30.26°
[Diag] LEVL 59.74°
66 — CONSTRUCTION MASTER PRO
Page 69

Common Rafter Length — Pitch Unknown
Find the Common rafter length for a roof with a rise of 6 feet 11-1/2
inches and a run of 14 feet 6 inches. Solve for the pitch in inches and
degrees.
Keystroke Display
Find diagonal and pitch:
[On/C] [On/C] 0.
[Conv] [1]* 0.
6 [Feet] 11 [Inch] 1 [ / ] 2 [Rise] RISE 6 FEET 11-1/2 INCH
14 [Feet] 6 [Inch] [Run] RUN 14 FEET 6 INCH
[Diag] DIAG 16 FEET 1 INCH
[Pitch] PTCH 25.64°
[Pitch] PTCH 5-3/4 INCH
*Optional keystroke, which temporarily sets the fractional accuracy
to one-sixteenth (over-riding the Trig Plus III's default 1/64 setting).
Angle and Diagonal (Hypotenuse)
Find the diagonal (hypotenuse) and degree of angle of a right triangle
that is 9 feet high and 12 feet long.
Keystroke Display
1. Enter rise and run:
[On/C] [On/C] 0.
9 [Feet] [Rise] RISE 9 FEET 0 INCH
12 [Feet] [Run] RUN 12 FEET 0 INCH
2. Solve for diagonal/hypotenuse and degree of angle:
[Diag] DIAG 15 FEET 0 INCH
[Pitch] PTCH 36.87°
[Pitch] PTCH 9 INCH
User's Guide — 67
Page 70

Rise
Find the rise given a 7/12 pitch and a run of 11 feet 6 inches.
Keystroke Display
[On/C] [On/C] 0.
7 [Inch] [Pitch] PTCH 7 INCH
11 [Feet] 6 [Inch] [Run] RUN 11 FEET 6 INCH
[Rise] RISE 6 FEET 8-1/2 INCH
Rise and Diagonal
Find the rise and diagonal of a right triangle given a 30° pitch and a run
of 20 feet 4 inches.
Keystroke Display
[On/C] [On/C] 0.
30 [Pitch] PTCH 30.00°
20 [Feet] 4 [Inch] [Run] RUN 20 FEET 4 INCH
[Rise] RISE 11 FEET 8-7/8 INCH
[Diag] DIAG 23 FEET 5-3/4 INCH
68 — CONSTRUCTION MASTER PRO
Page 71

Finding Sheathing Cut
You have framed an equal pitch roof and need to apply the roof sheathing. Find the distance from the corner of the sheathing so that you can
finish the run at the Hip rafter and cut the material. The pitch is 6
inches and you are using 4-foot by 8-foot plywood, with the
8-foot side along the plate.
Keystroke Display
1. Enter pitch:
[On/C] [On/C] 0.
6 [Inch] [Pitch] PTCH 6 INCH
2. Enter width of plywood:
4 [Feet] [Diag] DIAG 4 FEET 0 INCH
3. Find length of sheathing:
[Run] RUN 3 FEET 6-15/16 INCH
User's Guide — 69
Page 72

Regular (45°) Hip/Valley and Jack Rafters (not available on LT)
You’re working with a 7/12 pitch, and half your total span is 8 feet 5
inches:
(1) Find point-to-point length and cut angles for the Common rafter;
(2) Find the length and cut angles of the adjoining Hip (or Valley) and;
(3) Find the regular Jack rafter lengths and cut angles (Jack rafters at
16 inches on-center spacing).
Keystroke Display
1. Find Common rafter length and Plumb and Level cuts:
[On/C] [On/C] 0.
[Conv] [1] (Temporarily sets fractional setting to 1/16)* 0.
8 [Feet] 5 [Inch] [Run] RUN 8 FEET 5 INCH
7 [Inch] [Pitch] PTCH 7 INCH
[Diag] DIAG 9 FEET 8-15/16 INCH
[Diag] PLMB 30.26°
[Diag] LEVL 59.74°
2. Find Hip/Valley rafter length and cut angles:
[Hip/V] H/V 12 FEET 10-1/2 INCH
[Hip/V] PLMB 22.42°
[Hip/V] LEVL 67.58°
[Hip/V] CHK1 45.00°
þþ *Note: If using the Trig Plus III, you may obtain the same answers
(displayed in fractional accuracy of sixteenths versus sixty-fourths)
by pressing [Conv] [1] as indicated, or by changing the Preference
Setting by pressing [Conv] [Stor], then [+] until 1/16 is shown in the
display.
(Cont’d)
70 — CONSTRUCTION MASTER PRO
Page 73

(Cont’d)
Keystroke Display
3. Find Jack rafter lengths and cut angles:
[Jack] JKOC 16 INCH*
[Jack] JK1 8 FEET 2-3/8 INCH
[Jack] JK2 6 FEET 7-7/8 INCH
[Jack] JK3 5 FEET 1-3/8 INCH
[Jack] JK4 3 FEET 6-13/16 INCH
[Jack] JK5 2 FEET 0-5/16 INCH
[Jack] JK6 0 FEET 5-13/16 INCH
[Jack] JK7 0 FEET 0 INCH
[Jack] PLMB 30.26°°
[Jack] LEVL 59.74°°
[Jack] CHK1 45.00°°
þþ *Note: If display does not read JKOC 16 INCH (the default), then re-
set by pressing 16 [Inch] [Stor] [7].
User's Guide — 71
Page 74

Jack Rafters — Using Other Than 16 Inch On-Center
Spacing (not available on LT)
A roof has a 9/12 pitch and a run of 6 feet 9 inches. Find the Jack rafter lengths and cut angles at 18-inch (versus 16-inch) on-center
spacing.
Keystroke Display
1. Enter pitch, run and spacing:
[On/C] [On/C] 0.
9 [Inch] [Pitch] PTCH 9 INCH
6 [Feet] 9 [Inch] [Run] RUN 6 FEET 9 INCH
18 [Inch] [Stor] [7] OC 18 INCH
2. Find Jack rafter lengths and cut angles:
[Jack] JKOC 18 INCH
[Jack] JK1 6 FEET 6-3/4 INCH
[Jack] JK2 4 FEET 8-1/4 INCH
[Jack] JK3 2 FEET 9-3/4 INCH
[Jack] JK4 0 FEET 11-1/4 INCH
[Jack] JK5 0 FEET 0 INCH
[Jack] PLMB 36.87°°
[Jack] LEVL 53.13°°
[Jack] CHK1 45.00°°
72 — CONSTRUCTION MASTER PRO
Page 75

Irregular (non-45°) Hip/Valley and Jack Rafters —
Descending, with On-Center Spacing Maintained (not
available on LT)
You’re working with a 7/12 pitch and half your overall span is 4 feet.
The irregular pitch is 8/12, and 16 inch on-center spacing is maintained
on both sides. Complete the following steps:
(1) Find the length of the Common rafter;
(2) Reset calculator to 16 inch on-center spacing;
(3) Ent er the irregular pitch; find the length of the adjoining “irregular”
Hip (or Valley) and the cut angles;
(4) Find the Jack lengths on the “irregular” pitch side (16 inch on-
center spacing);
(5) Find the cut angles;
(6) Find the Jack lengths on the “regular” pitch side (16 inch on-
center spacing);
(7) Find the cut angles.
Keystroke Display
1. Find Common rafter length:
[On/C] [On/C] 0.
[Conv] [1] (Temporarily sets fractional rounding to 1/16) 0.
7 [Inch] [Pitch] PTCH 7 INCH
4 [Feet] [Run] RUN 4 FEET 0 INCH
[Diag] DIAG 4 FEET 7-9/16 INCH
2. Enter on-center spacing:
16 [Inch] [Stor] [7] OC 16 INCH
3. Find irregular Hip/Valley rafter length and cut angles:
8 [Inch] [Conv] [Hip/V] IPCH 8 INCH
[Hip/V] IH/V 5 FEET 9-11/16 INCH
[Hip/V] PLMB 23.70°°
[Hip/V] LEVL 66.30°°
[Hip/V] CHK1 41.19°°
[Hip/V] CHK2 48.81°°
(Cont’d)
User's Guide — 73
Page 76

(Cont’d)
Keystroke Display
4. Find irregular Jack lengths:
[Conv] [Jack] IJOC 16 INCH
[Jack]* IJ1 2 FEET 9-5/8 INCH
[Jack] IJ2 1 FEET 4-13/16 INCH
[Jack] IJ3 0 FEET 0 INCH
þþ *Note: It is not necessary to continue pressing [Conv] when display-
ing each Jack rafter size.
5. Find irregular Jack Plumb, Level and Cheek cut angles:
[Jack] PLMB 33.69°°
[Jack] LEVL 56.31°°
[Jack] CHK1 41.19°°
6. Find regular Jack lengths:
[Jack] JKOC 16 INCH
[Jack] JK1 2 FEET 10-3/8 INCH
[Jack] JK2 1 FEET 1-1/4 INCH
[Jack] JK3 0 FEET 0 INCH
7. Find regular Jack Plumb, Level and Cheek cut angles:
[Jack] PLMB 30.26°°
[Jack] LEVL 59.74°°
[Jack] CHK1 48.81°°
74 — CONSTRUCTION MASTER PRO
Page 77

Irregular (non-45°) Hip/Valley and Jack Rafters —
Ascending, with Jacks Mating at Hip/Valley (not
available on LT)
You’re working with a 7/12 pitch and half your overall span is 4 feet.
The irregular pitch is 8/12, and the Jacks need to mate at the Hip. The
maximum allowable on-center spacing is 16 inches. Find the Jack rafter sizes from smallest to largest (ascending order). Complete the following steps:
(1) Set Preference display to “JK ASCEND” (Jack sizes in ascending
order);
(2) Set Preference display to “IRJK JAC-JAC” (Jacks mate);
(3) Find the length of the Common rafter;
(4) Find the length of the adjoining “irregular” Hip (or Valley) and the
cut angles;
(5) Find the o.c., Jack lengths and cut angles on the “irregular”
pitched side;
(6) Find the o.c., Jack lengths and cut angles on the “regular” pitched
side.
þþ Note: After completing this example, you may need to reset the Pref-
erences back to “IRJK OC-OC” if you do not normally figure Jacks in
this manner. (See Preference Settings on page 96.)
Keystroke Display
1. Review Preferences until you find “Jack Descend”:
[On/C] [On/C] 0.
[Conv] [Stor] FRAC 0-1/16 INCH
(If not at 1/16, press [+] until 1/16 is displayed)
[Stor] AREA Std.
[Stor] VOL Std.
[Stor] RAKE dESCEnd
[Stor] JACK dESCEnd
Set Preference to “Ascend”:
[+] (plus sign) JACK ASCEnd
2. Set Preference to “Jacks Mate”:
[Stor] IRJK OC-OC
[+] (plus sign) IRJK JAC-JAC
(Cont’d)
User's Guide — 75
Page 78

(Cont’d)
Keystroke Display
3. Find Common rafter length:
7 [Inch] [Pitch] PTCH 7 INCH
4 [Feet] [Run] RUN 4 FEET 0 INCH
[Diag] DIAG 4 FEET 7-9/16 INCH
4. Enter irregular pitch and find irregular Hip/Valley rafter length and
cut angles:
8 [Inch] [Conv] [Hip/V] IPCH 8 INCH
[Hip/V] IH/V 5 FEET 9-11/16 INCH
[Hip/V] PLMB 23.70°°
[Hip/V] LEVL 66.30°°
[Hip/V] CHK1 41.19°°
[Hip/V] CHK2 48.81°°
5. Find the o.c., irregular Jack lengths and cut angles:
[Conv] [Jack] IJOC 16 INCH*
[Jack] IJ1 1 FEET 4-13/16 INCH
[Jack] IJ2 2 FEET 9-5/8 INCH
[Jack] IJ3 4 FEET 2-1/2 INCH
[Jack] PLMB 33.69°°
[Jack] LEVL 56.31°°
[Jack] CHK1 41.19°°
6. Find the o.c., regular Jack lengths and cut angles:
[Jack] JKOC 14 INCH*
[Jack] JK1 1 FEET 6-1/2 INCH
[Jack] JK2 3 FEET 1-1/16 INCH
[Jack] JK3 4 FEET 7-9/16 INCH
[Jack] PLMB 30.26°°
[Jack] LEVL 59.74°°
[Jack] CHK1 48.81°°
þþ *Note: The stored on-center spacing is used as the maximum allow-
able spacing. Therefore, it is assigned to the side with the largest entered pitch. In this example, the “irregular” side pitch is larger than
the “regular” side pitch; thus, the irregular side is calculated using the
maximum on-center value (16 inches). If the regular pitch side had
the larger pitch, it would require the larger (16 inches) on-center.
76 — CONSTRUCTION MASTER PRO
Page 79

Rake Wall – No Base
Find each stud size in a Rake Wall with a peak of 4 feet, and a length
of 8 feet. Use 16 inches as your spacing.
Rise=4’
Run=8’
þþ Note: The wall has no base.
Keystroke Display
1. Enter rise, run and o.c. spacing:
[On/C] [On/C] 0.
4 [Feet] [Rise] RISE 4 FEET 0 INCH
8 [Feet] [Run] RUN 8 FEET 0 INCH
[Rcl] [7]* OC 16 INCH
*If 16 is not displayed, enter 16 [Stor] [7].
(Cont’d)
User's Guide — 77
Page 80

(Cont’d)
Keystroke Display
2. Find stud lengths:
[Conv] [Rise] (R/Wall) OC 16 INCH
[Rise] RW 1 3 FEET 4 INCH
[Rise] RW 2 2 FEET 8 INCH
[Rise] RW 3 2 FEET 0 INCH
[Rise] RW 4 1 FEET 4 INCH
[Rise] RW 5 0 FEET 8 INCH
[Rise] BASE 0 FEET 0 INCH
3. Find Rake Wall angle of incline:
[Rise] RW 26.57°
þþ Note: By setting the Rake “Ascend” Preference (see Preference Set-
tings on page 96), you may view Rake Wall stud lengths from smallest to largest size.
78 — CONSTRUCTION MASTER PRO
Page 81

Run= 8’
Rake Wall – With Base
Find each stud size in a Rake Wall with a peak of 4 feet, a length of 8
feet, and a base of 5 feet. Use 16 inches as your on-center spacing.
Keystroke Display
1. Enter rise, run, and o.c. spacing:
[On/C] [On/C] 0.
4 [Feet] [Rise] RISE 4 FEET 0 INCH
8 [Feet] [Run] RUN 8 FEET 0 INCH
[Rcl] [7]* OC 16 INCH
*If 16 is not displayed, enter 16 [Stor] [7].
2. Enter base and find stud lengths and angle of incline:
5 [Feet] [Conv] [Rise] (R/Wall) OC 16 INCH
[Rise] RW 1 8 FEET 4 INCH
[Rise] RW 2 7 FEET 8 INCH
[Rise] RW 3 7 FEET 0 INCH
[Rise] RW 4 6 FEET 4 INCH
[Rise] RW 5 5 FEET 8 INCH
[Rise] BASE 5 FEET 0 INCH
[Rise] RW 26.57°
Rise
= 4’
Base
= 5’
User's Guide — 79
Page 82

ROOFING MATERIALS
Roof Covering — Bundles of Roof Shingles (not
available on LT and Trig Plus III)
How many bundles of roof shingles will you need for a 10-inch pitch
roof covering a floor area of 14 feet by 11 feet?
Keystroke Display
1. Enter pitch and floor area:
[On/C] [On/C] 0.
10 [Inch] [Pitch] PTCH 10 INCH
14 [Feet] [x] 11 [Feet] [=] 154. SQ FEET
2. Find roof area:
[Conv] [Roof] ROOF 200.4631 SQ FEET
3. Find number of bundles:
[Roof] BNDL 6.01
þþ Note: If using the Construction Master Desktop, enter square
footage then press [Conv] [00] then [00] for number of roof
bundles.
þþ Note: If entering a roof area instead of a floor area, be sure to
enter zero for pitch.
80 — CONSTRUCTION MASTER PRO
Page 83

Roof Covering — Number of Shingles
You’re going to use 12-inch wide by 36-inch long asphalt (strip) shingles with 5-inch weather exposure. How many shingles are required for
a roof measuring 1,745 square feet? Add a 10% waste allowance.
þþ Note: Shingle Exposure Area = exposure x length, plus Number
of Shingles = roof area ÷ shingle exposure area.
Keystroke Display
1. Find and save Shingle Exposure Area:
[On/C] [On/C] 0.
5 [Inch] [x] 36 [Inch] [=] 180. SQ INCH
[M+] 180. SQ INCHM
2. Find total Number of Shingles:
1745 [Feet] [Feet] 1745. SQ FEETM
[÷] [Rcl] [M+] [=] 1396. (shingles)M
3. Add 10% for waste:
[+] 10 [%] 1535.6 (1536 shingles)M
4. Clear memory and display:
[Rcl] [Rcl] [On/C] 0.
User's Guide — 81
Page 84

Area for Roofing Materials
Find the number of roofing rolls needed to cover a roof with a 5/12
pitch, an overall span of 27 feet and a length of 34 feet 6 inches. The
rolls measure 25 square feet each.
Keystroke Display
For the Handheld and Desktop:
1. Enter pitch and find area of roof:
[On/C] [On/C] 0.
5 [Inch] [Pitch] PTCH 5 INCH
27 [Feet] [x] 34 [Feet] 6 [Inch] [=] 931.5 SQ FEET
[Roof] (or [Conv] [00]) ROOF 1009.125 SQ FEET
2. Find number of rolls:
[÷] 25 [Feet] [Feet] [=] 40.365 (rolls)
For the LT and Trig Plus III:
1. Find Common rafter length:
[On/C] [On/C] 0.
5 [Inch] [Pitch] PTCH 5 INCH
27 [Feet] [÷] 2 [=] [Run] RUN 13 FEET 6 INCH
[Diag] DIAG 14 FEET 7-1/2 INCH
2. Find area of one side:
[x] 34 [Feet] 6 [Inch] [=] 504.5625 SQ FEET
3. Find area of both sides:
[x] 2 [=] 1009.125 SQ FEET
4. Find number of rolls:
[÷] 25 [Feet] [Feet] [=] 40.365 (rolls)
82 — CONSTRUCTION MASTER PRO
Page 85

STAIR LAYOUT EXAMPLES
STAIR LAYOUT DEFINITIONS
Rise: The “floor-to-floor” or “landing-to-landing” rise is the actual vertical
rise required for building a stairway after the finish flooring has been installed.
Run: The run of a stairway is the amount of horizontal space required.
The total run of a stairway is equal to the width of each tread multiplied
by the number of treads.
Desired Riser Height: The desired riser height is the amount of ve rtical rise you allow for each individual riser in the stairway. This is sometimes dictated by local code.
Actual Riser Height: The actual height of each riser is measured from
the top of one tread to the top of the next tread.
User's Guide — 83
Page 86

Number of Risers: The number of risers includes both the first and the
last riser of the stairway.
Riser Overage or Underage: The riser overage or underage is the difference between the “floor-to-floor” rise and the total height of all of the
risers. Many times the riser height does not divide evenly into the floorto-floor rise and a small fraction of an inch is left over. A positive remainder is an overage, while a negative remainder is an underage.
Tread Width: The width of each tread is measured from the front of
one riser to the front of the next riser. The width of each tread does
NOT include the nosing or overhang of the tread, when a nosing or
overhang is used. (The nosing or overhang of a tread is the rounded
front of the tread that projects beyond the face of the riser.)
Number of Treads: The number of treads is one less than the number
of risers.
Tread Overage or Underage: The tread overage or underage is the
difference between the run or horizontal space that a stairway must fit
into and the total width of the treads. Similar to the riser ove rage/underage, many times the total width of the treads does not divide
evenly into the run or horizontal space for the stairway and a small
fraction of an inch is left over. A positive remainder is an ove rage, a
negative remainder is an underage.
Stringers: Also called carriages, stair horses or stair jacks. Stringers
are the diagonal members that support the treads and risers.
Angle of Incline: The angle of incline of the stairway is determined by
the rise and run of each stair. The angle of incline should not be confused with the pitch of the stairway. The pitch of a stairway is the angle
based on the floor-to-floor rise and the horizontal run of the stairway.
The angle of incline is based on the “actual” riser height and the “actual” tread width of the stair.
84 — CONSTRUCTION MASTER PRO
Page 87

Stairs — Given Floor-to-Floor Rise
You’re building a stairway with a total rise of 9 feet 11 inches. Your desired riser height is 7-1/2 inches and desired tread width is 10 inches.
Find the riser height; number of risers; riser underage/overage; tread
width; number of treads; tread underage/overage; stringer length; and
angle of incline.
Keystroke Display
1. Enter known rise:
[On/C] [On/C] 0.
9 [Feet] 11 [Inch] [Rise] RISE 9 FEET 11 INCH
2. Recall stored desired stair riser height:
[Rcl] [Stair] R-HT 7-1/2 INCH
3. Recall stored desired stair tread width:
[Rcl] [m] T-WD 10 INCH
4. Find stair values:
[Stair] R-SZ 7-7/16 INCH
[Stair] RSRS 16.
[Stair] R+/– 0 INCH
[Stair] T-WD 10 INCH
[Stair] TRDS 15.
[Stair] T+/– 0 INCH
[Stair] STRG 15 FEET 6-15/16 INCH
[Stair] INC° 36.64°
User's Guide — 85
Page 88

Stairs — Given Rise and Run
You need to build a stairway with a floor-to-floor height of 10 feet 1
inch, a run of 15 feet 5 inches, and a nominal desired riser height of 71/2 inches (default). Find all stair values.
Keystroke Display
1. Enter rise and run:
[On/C] [On/C] 0.
10 [Feet] 1 [Inch] [Rise] RISE 10 FEET 1 INCH
15 [Feet] 5 [Inch] [Run] RUN 15 FEET 5 INCH
2. Recall stored 7-1/2 inches desired riser height:
[Rcl] [Stair] R-HT 7-1/2 INCH
3. Find stair values:
[Stair] R-SZ 7-9/16 INCH
[Stair] RSRS 16.
[Stair] R+/– 0 INCH
[Stair] T-WD 12-5/16 INCH
[Stair] TRDS 15.
[Stair] T+/– – 0-5/16 INCH
[Stair] STRG 18 FEET 0-3/4 INCH
[Stair] INC° 31.56°
86 — CONSTRUCTION MASTER PRO
Page 89

Stair Risers Only — Custom Height
You’re building an access stairway for a client who can’t handle conventional-height stairs. If the total rise is 3 feet 9 inches and your desired riser height is approximately 5-1/2 inches, find the actual riser
height, number of risers and underage or overage remaining.
Keystroke Display
1. Enter rise and riser height:
[On/C] [On/C] 0.
3 [Feet] 9 [Inch] [Rise] RISE 3 FEET 9 INCH
5 [Inch] 1[ / ] 2 [Stor] [Stair] R-HT 5-1/2 INCH
2. Find stair values:
[Stair] R-SZ 5-5/8 INCH
[Stair] RSRS 8.
[Stair] R+/– 0 INCH
3. Return riser height setting to default:
7 [Inch] 1[ / ] 2 [Stor] [Stair] R-HT 7-1/2 INCH
User's Guide — 87
Page 90

Baluster Spacing
You are going to install a handrail at the top of a balcony. Your total
span is 156 inches and you would like the space between the balusters to be about 4 inches. If each baluster is 1-1/2 inches wide, what
is the exact spacing between each baluster?
Keystroke Display
1. Estimate number of balusters in span.
[On/C] [On/C] 0.
156 [Inch] [÷] 156 INCH
5 [Inch] 1[/] 2 [=]* 28.36364 (28 balusters)
*desired spacing plus baluster width (4” plus 1-1/2”).
2. Find total space ‘occupied’ by the balusters by multiplying the
width of each baluster by the rounded number of balusters (found
above):
1 [Inch] 1 [/] 2 [x] 1-1/2 INCH
28 [=] 42 INCH
3. Find total space between all balusters:
156 [Inch] [-] 156 INCH
42 [Inch] [=] 114 INCH
4. Find actual baluster spacing by dividing total space between all
balusters by the number of spaces between the balusters (number of balusters plus one equals 29):
114 [Inch] [÷] 114 INCH
29 [=] 3-15/16 INCH
88 — CONSTRUCTION MASTER PRO
Page 91

NUMBER OF STUDS
Find the number of 16-inch on-center studs needed for a wall with a
length of 18 feet 7-1/2 inches.
Keystroke Display
1. Divide length by spacing:
[On/C][On/C] 0.
18 [Feet] 7 [Inch] 1 [ / ] 2 18 FEET 7-1/2 INCH
[÷] 16 [Inch] [=] 13.96875 (14 studs)
2. Add one for the end:
[+] 1 [=] 14.96875 (15 studs)
User's Guide — 89
Page 92

C = 5 ft
TRIGONOMETRY AND D:M:S EXAMPLES
PRACTICAL TRIGONOMETRIC FORMULAS
The drawing and formulas below illustrate practical trigonometric
applications:
a = 53.1301°
a
B = 4 ft
Given side A and angle a, find:
Side C A [÷] a [Cos] [=]
(i.e., 3 [Feet] [÷] 53.13 [Cos] [=])
Side B A [x] a [Tan] [=]
Angle b 90° [–] a [=]
Given side A and angle b, find:
Side B A [÷] b [Tan] [=]
Side C A [÷] b [Sine] [=]
Angle a 90° [–] b [=]
Given side B and angle a, find:
Side A B [÷] a [Tan] [=]
Side C B [÷] a [Sine] [=]
Given side C and angle a, find:
Side A C [x] a [Cos] [=]
Side B C [x] a [Sine] [=]
Given side A and side C, find:
Angle a A [÷] C [=] [Conv] [Cos]
Angle b A [÷] C [=] [Conv] [Sine]
90 — CONSTRUCTION MASTER PRO
b
b = 36.8699°
Page 93

Converting Degrees:Minutes:Seconds
Convert 23°42’39” to decimal degrees:
Keystroke Display
[On/C] [On/C] 0.
23 [ • ] 42 [ • ] 39 DMS 23.42.39°°
[Conv] [ • ] (d:m:s) DEG 23.71083°°
Convert 44.29° to degrees:minutes:seconds format:
Keystroke Display
[On/C] [On/C] 0.
44.29 [Conv] [ • ] (d:m:s) DMS 44.17.24°°
þþ Note: Improperly formatted entries will be redisplayed in the correct
convention after any operator key is pressed. For example, 30°89’
entered will be corrected and displayed at 31°29’ 0” or 31.48333°.
User's Guide — 91
Page 94

Time Calculations Using D:M:S
Add 7 hours 45 minutes 33 seconds to 11 hours 16 minutes 20 seconds:
Keystroke Display
[On/C] [On/C] 0.
7 [ • ] 45 [ • ] 33 DMS 7.45.33°°
[+] 11 [ • ] 16 [ • ] 20 [=] DMS 19.01.53°°
Percent Grade/Slope
You are grading a piece of property and the site plans call for an embankment with a grade “no steeper than 35%.” Your level shows the
slope at an 18°15’ angle. Will this pass?
Keystroke Display
Enter grade and convert to degrees:minutes:seconds:
Calculators with trigonometric functions:
[On/C] [On/C] 0.
35 [%] [Conv] [Tan] [Conv] [ • ]* DMS 19.17.24°°
þþ *Note: Your calculator may already show the answer in decimal
degrees prior to pressing [Conv]. Simply press [Conv] [ •• ] to
toggle between desired decimal degree or d:m:s formats.
Calculators without trigonometric functions:
[On/C] [On/C] 0.
35 [%] [Pitch] PTCH 0.35
[Pitch] PTCH 19.29°
[Conv] [ • ] DMS 19.17.24°°
Since your level reading of 18°15’ is less steep than 19°17’24”, the
slope will pass inspection.
92 — CONSTRUCTION MASTER PRO
Page 95

Converting Tangent/Pitch to Angle
Find the angle and corresponding tangent for a roof with an 8/12 pitch.
Keystroke Display
1. Enter pitch:
[On/C] [On/C] 0.
8 [Inch] [Pitch] PTCH 8 INCH
2. Convert pitch to degrees:
[Pitch] 33.69°
3. Find tangent:*
[Tan] 0.666667
*For LT, Handheld and Desktop: Press [Conv] [Pitch] to obtain
same result.
Converting Roof Angle to Pitch
Find the pitch of a roof with an angle of 30.25°.
Keystroke Display
1. Enter angle:*
[On/C] [On/C] 0.
30.25 [Tan] 0.583183
2. Convert to pitch:
[Conv] [Pitch] PTCH 0.583183
[Pitch] PTCH 7 INCH
*For a quicker solution for all Pro models: Press 30.25 [Pitch]
[Pitch] to obtain the answer.
User's Guide — 93
Page 96

Angle — Rise and Hypotenuse Known (Trig Plus III
and Desktop Only)
Find the angle that connects the rise and hypotenuse of a right triangle, if the rise is 6 feet and the hypotenuse is 10 feet in length.
Keystroke Display
1. Use trigonometric formula (divide rise(A) by hypotenuse(C)):
[On/C] [On/C] 0.
6 [Feet] [÷] 10 [Feet] [=] 0.6
2. Solve for degrees:minutes:seconds or angle:
[Conv] [Cos] DEG 53.1301°
[Conv] [ • ] DMS 53.07.48°
94 — CONSTRUCTION MASTER PRO
Page 97

APPENDIX A — DEFAULT SETTINGS
After a Full Reset/All Clear, your calculator will return to the following
settings:
Setting Imperial Metric
Area Display Standard n/a
Exponent Off Off
(On for Trig Plus III) (On for Trig Plus III)
Desired Riser Height 7-1/2 inch 185 mm
Desired Tread Width 10 inch 250 mm
Fractional Preference Standard Standard
Fractional Resolution 1/16 1/16
(1/64 for Trig Plus III) (1/64 for Trig Plus III)
Jack Rafters Descending Descending
On Center 16 Inch 600 mm
Meter Linear Display 0.000 0.000
Rake Wall Descending Descending
Reg./Irreg. Jack Spacing OC-OC OC-OC
Weight per Volume 1.5 Tons/Yd3 1775 kg/M3
Volume Display Standard n/a
Metric Mode
If you work in Metric vs. Imperial measurements, you can set your calculator to “Metric Mode,” where settings or answers are defaulted to
the above metric values. To set the calculator to Metric Mode, press
the digit [1] key while turning the calculator on. To return to Imperial Mode, repeat this procedure.
þþ Note: Removing the battery or a dead battery will cause the calcula-
tor to revert to the default of Imperial Mode.
User's Guide — 95
Page 98

APPENDIX B — PREFERENCE SETTINGS
The Construction Master Pro calculators have Preference Settings that
allow you to customize or set desired dimensional formats and calculations. The options vary per model.
þþ Note: * = Default Setting or the setting calculator defaults to upon
performing an All Clear [Conv] [x].
Preference Options
1) Fractional Resolution −− *1/16 (displays fractional values to the nearest 16th of
an inch)
−− 1/64 (*Default for Trig Plus III)
−− 1/32
−− 1/64
−− 1/2
−− 1/4
−− 1/8
2) Area Display Format
(n/a for Metric Mode)
−− *Standard (if units entered are the same—
e.g., feet x feet—the answer will remain in this format
(sq. ft), but if units entered are different —e.g., inches
x feet—area answer will be
di splayed in square feet)
−− Square Feet (area answers always displayed in sq.
ft, regardless of unit entry—e.g.,
inches x inches = sq. ft)
−− Square Yards (area answers always displayed in
sq. yards—e.g., feet x feet = sq. yds)
−− Square Meters (area answers always
displayed in sq. meters—e.g.,
feet x feet = sq. meters)
(Cont’d)
þþ Note: To check the current Fractional Resolution, press [Rcl] [/]. Ei-
ther “Std” (standard fractional resolution) or “Cnst” (constant) will be
displayed, along with the fractional resolution).
96 — CONSTRUCTION MASTER PRO
Page 99

(Cont’d)
Preference Options
3) Volume Display Format
(n/a for Metric Mode)
4) Rake Wall Descending or
Ascending
5) Jack Rafters Descending or
Ascending (n/a for LT model)
6) Jack Rafters O-C or Mate
(n/a for LT model)
7) Fraction Standard or Constant
−− *Standard (if units entered are the same—
e.g., ft x ft x ft—the answer will remain in this format
(cu. ft), but if units entered are different—e.g., feet x
feet x inches—vol. answer will always be displayed in
cubic yards)
−− Cubic Yards (vol. answers always displayed in cu.
yards, regardless of unit entry—e.g., feet x feet x feet
= cu. yds)
−− Cubic Feet (vol. answers always displayed in cu.
feet, regardless of unit entry—e.g., inches x inches x
inches = cu. ft)
−− Cubic Meters (vol. answers always displayed in cu.
meters, regardless of unit entry—e.g., feet x feet x
feet = cu. meters)
−− *Descending (Rake Wall studs are displayed from
largest to smallest size)
−− Ascending (Rake Wall studs are displayed from
smallest to largest size)
−− *Descending (Jack rafters are displayed from largest
to smallest size)
−− Ascending (Jack rafters are displayed from smallest
to largest size)
−− *OC-OC (on-center spacing maintained on both regular
and irregular sides)
−− JAC-JAC (regular/irregular Jack rafters “mate” at the
hip/valley, i.e., on-center spacing not maintained on both
sides)
−− *Standard (standard fractional resolution)
−− Constant (fractions are always based on user-set frac-
tional resolution; default 16ths)
(Cont’d)
User's Guide — 97
Page 100

(Cont’d)
Preference Options
8) Exponent Off or On
9) Meter Linear Display
−− *Off (Exponential Mode is Off; turns on Auto-ranging;
i.e., if display can’t show seven digits, will display in
next largest unit).
−− On (Exponential Mode is On - *Default for Trig Plus III)
−− *0.000 (linear meter answers always displayed to third
decimal place)
−− 0. (linear meter answers displayed to the maximum
number of decimal points, as entered—e.g., 1.234 M +
2.56 M=3.794 M)
98 — CONSTRUCTION MASTER PRO
 Loading...