

Page 1
,0(16,21
'
$67(5
0
/86
3
(Ve rsion 2.0)
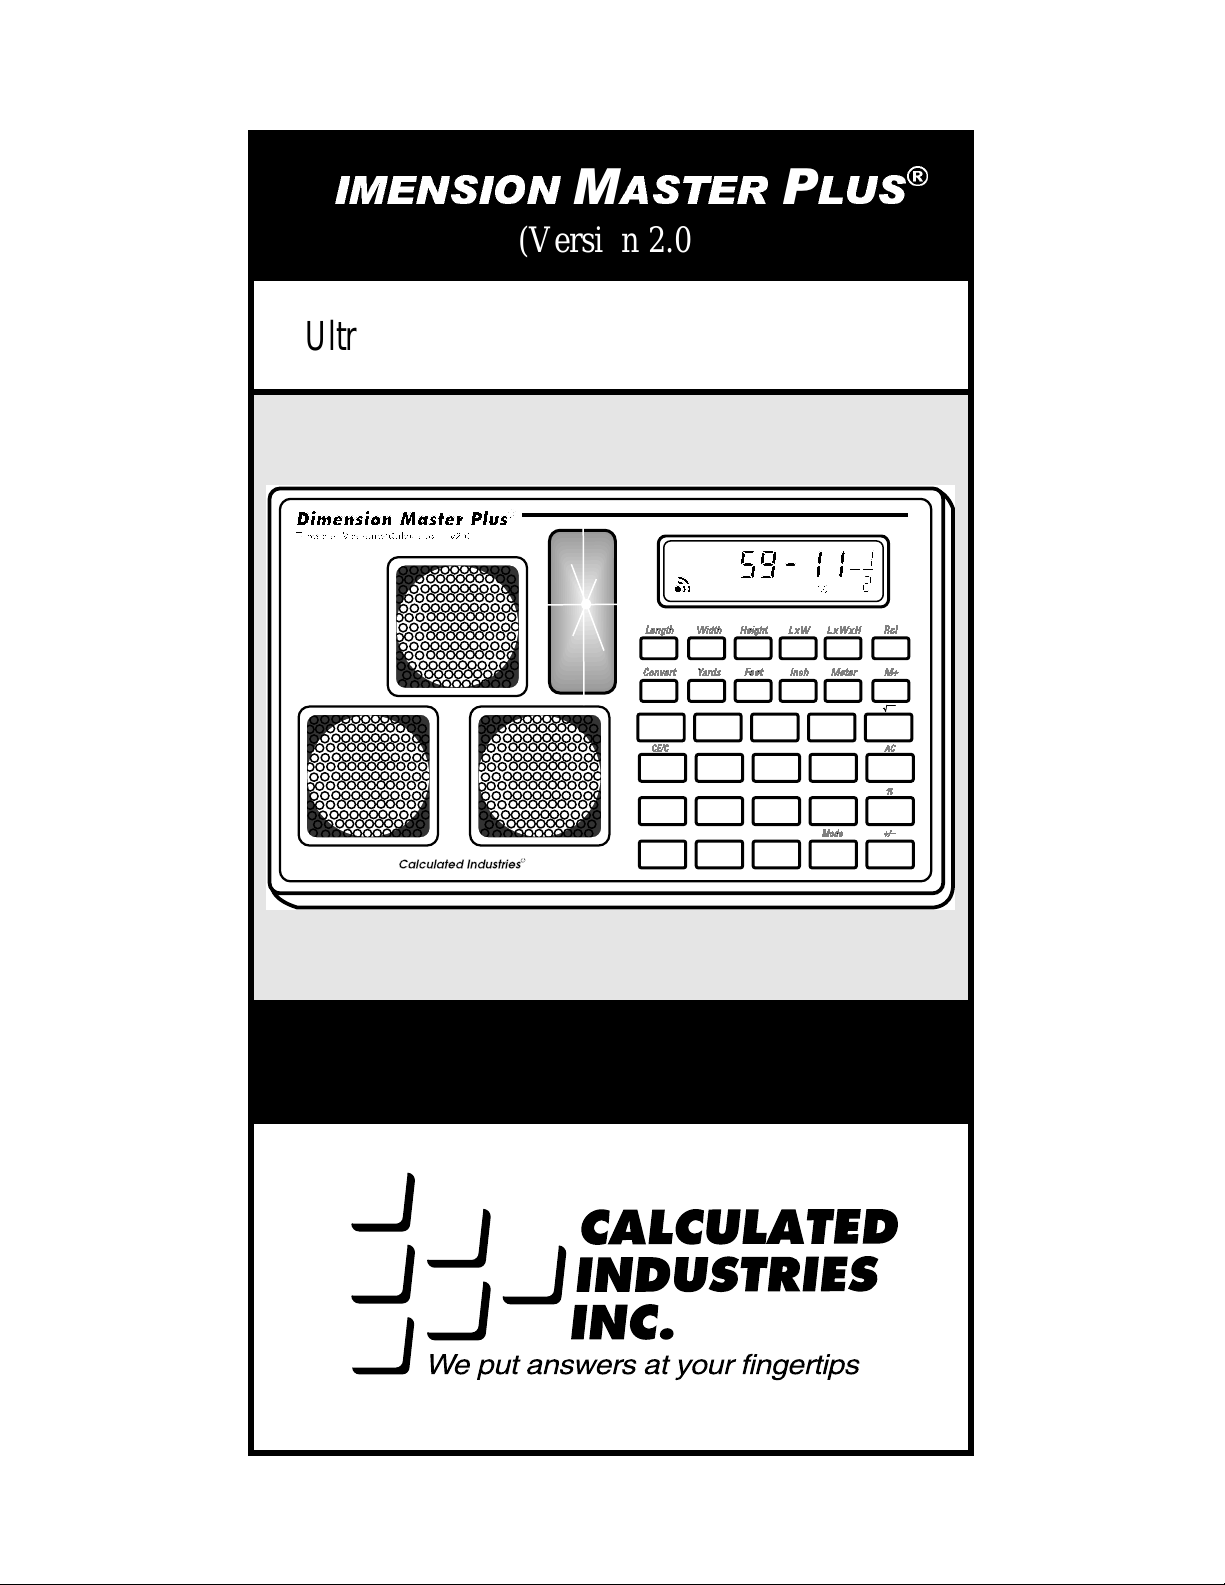
Ultrasonic Tapeless Measure & Calculator
7
8
Off
9
.
.
4
ON
Sq
/
5
1
2
.
0
8VHU·V*XLGH
x
6
+
3
=
–
Page 2
7DEOH RI &RQWHQWV
INTRODUCING THE DIMENSION MASTER PLUS...3
Background..........................................................4
Key Functions......................................................7
New and Improved Features..............................11
HOW TO USE THE DIMENSION MASTER PLUS.....16
Taking Accurate Measurem ents........................16
Taking a Linear Measurem ent...........................16
Taking an Area Measurement............................18
Volume Me asurements......................................18
Large Room Measurements...............................19
Entering Dimensioned Values...........................20
Spacing Calculation – Linear Division Us ing
the Manual Entry Method .................................21
Converting Feet-Inch- Fr actions to Decimal
Feet ....................................................................22
Square Conversions...........................................22
Area Calculation – Known Dimension.............22
Volume Calculation – Concrete ........................23
Memo ry Functions.............................................24
APPENDIX.................................................................25
Troubleshooting.................................................25
Environmental Conditions.................................26
GERMAN (DEUTCH) ADDENDUM............................28
WARRANTY...............................................................35
³'
,0(16,210$67(53/86
Page 3
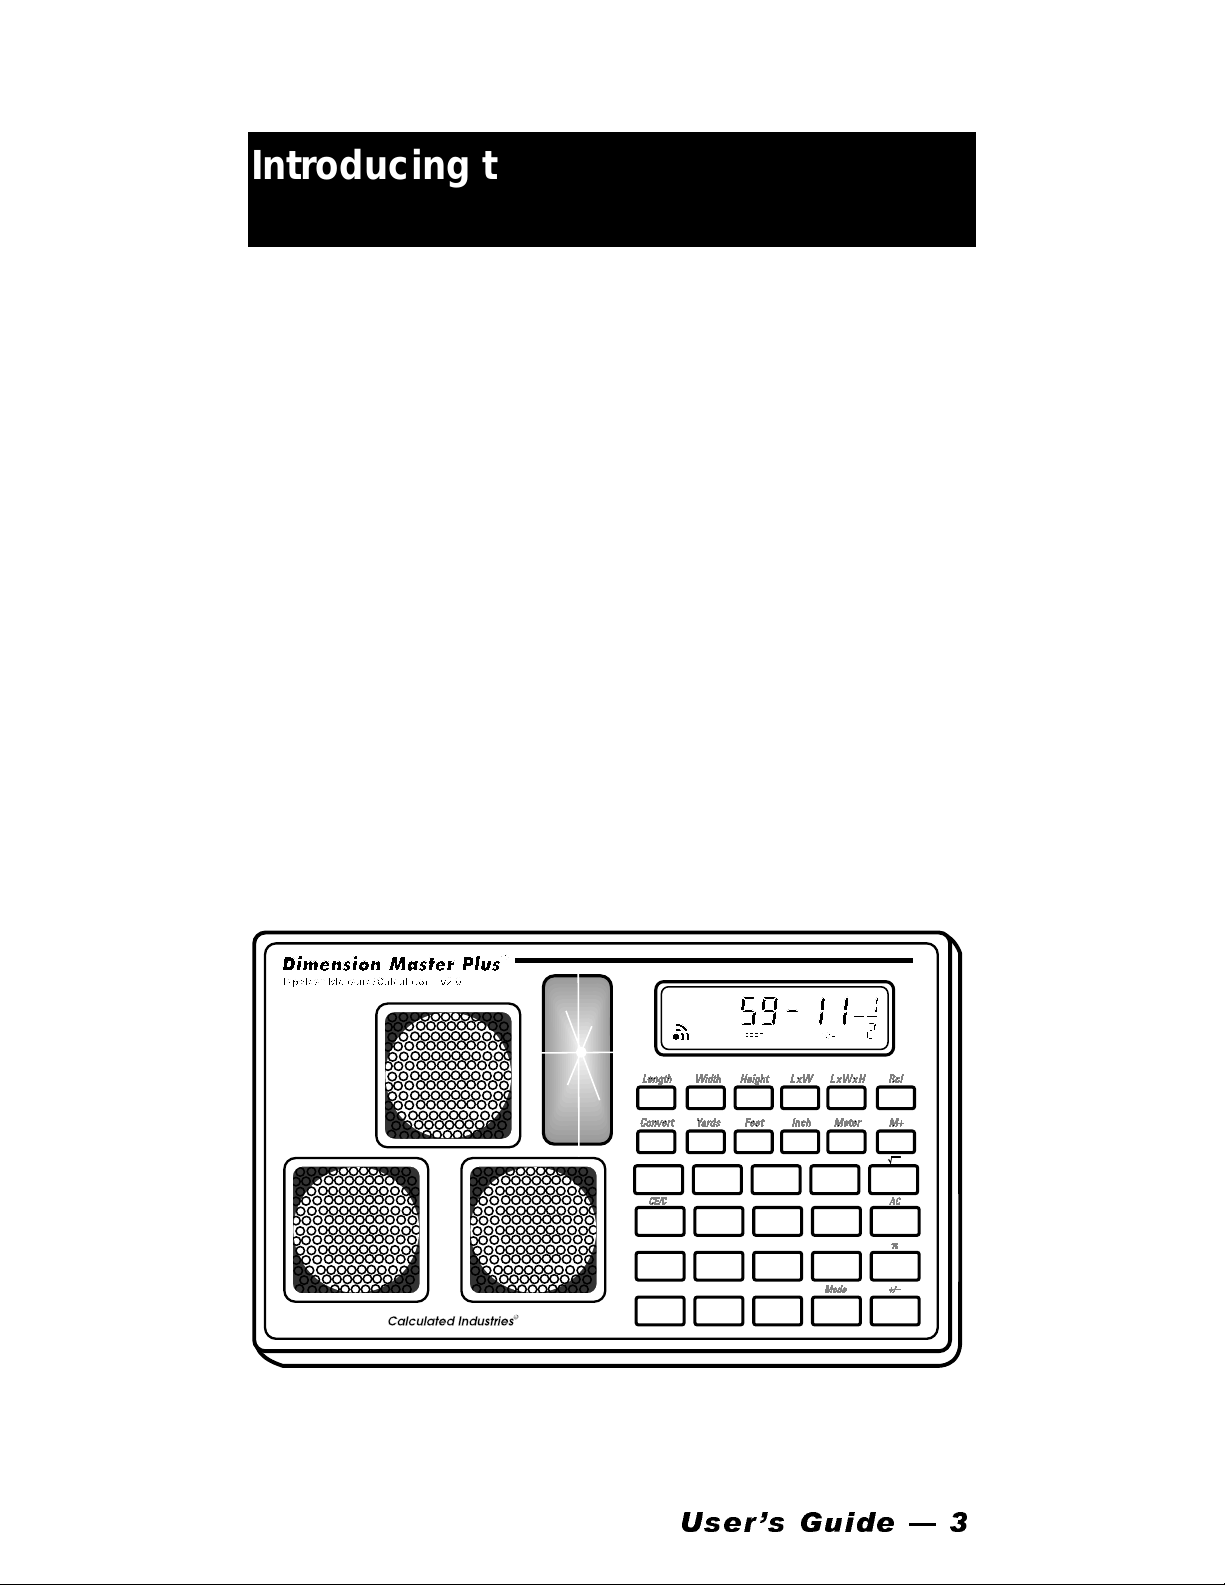
Introducing the
Dimension Master Plus
The Dimension Mas ter Plus (v2.0) is a high-tech
measuring tool that uses the late st in ultrasonic
technology. This tapeless measure and calculator
allows you to take quick and accurate measurements wi th the touch of a button. You can measur e
a single room in se conds or a whole building in
minutes. The Dimension Master Plus features in-
clude:
™
A special Aim Assist
•
ultrasonic beam alignme nt,
A built-in dimensional calculator that allows
•
pointer lamp simplifying
calculations and storage of measured values,
Easy dimensional conversions using the “Con-
•
vert” function key,
7
8
Off
ON
Sq
4
1
/
0
9
5
6
2
3
.
=
.
.
x
+
–
8VHU·V *XLGH ³
Page 4
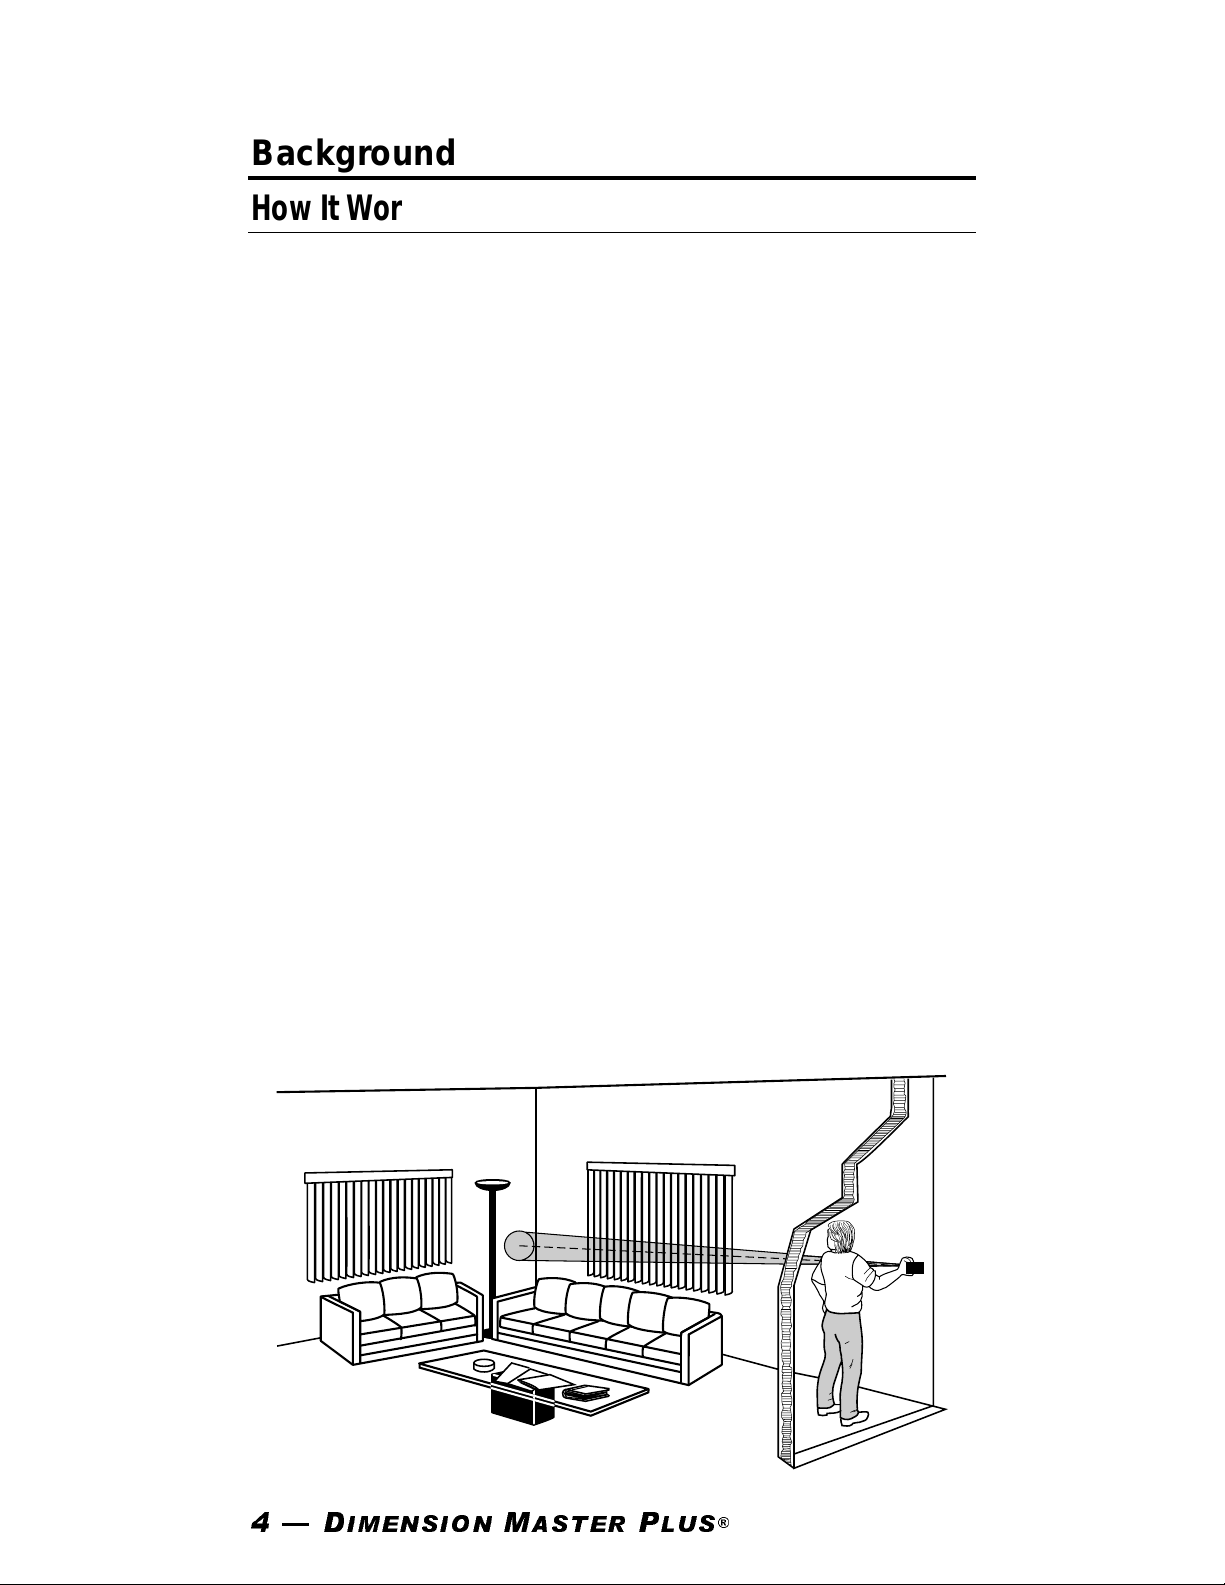
Background
How It Works
Using a patented TriSensor Technology™, the Dimension Master Pl us sends out a n inaudible, nar-
row ultrasonic beam of so und that bounces off the
“target” surface and returns to the unit as an echo.
The Dimension Mas ter Plus then determines how
long the echo took to return and calculates a linear
distance reading, while internally compensating for
variables such as temperature. Unlike other ultrasonic measuring devices, the beam stays extremely
narrow as it travels from the Dime nsion Maste r
Plus. This exceptionally narrow beam allows you
to measure through doorways, down corridor s and
in crowded rooms or offices for room-to-room
measurements.
To aid in accurate measuring, the Aim Assist
™
pointer lamp enables you to pinpoint the center of
the ultrasonic beam, thus avoiding interference
from obstacles or clutter in your path.
³'
,0(16,210$67(53/86
Page 5
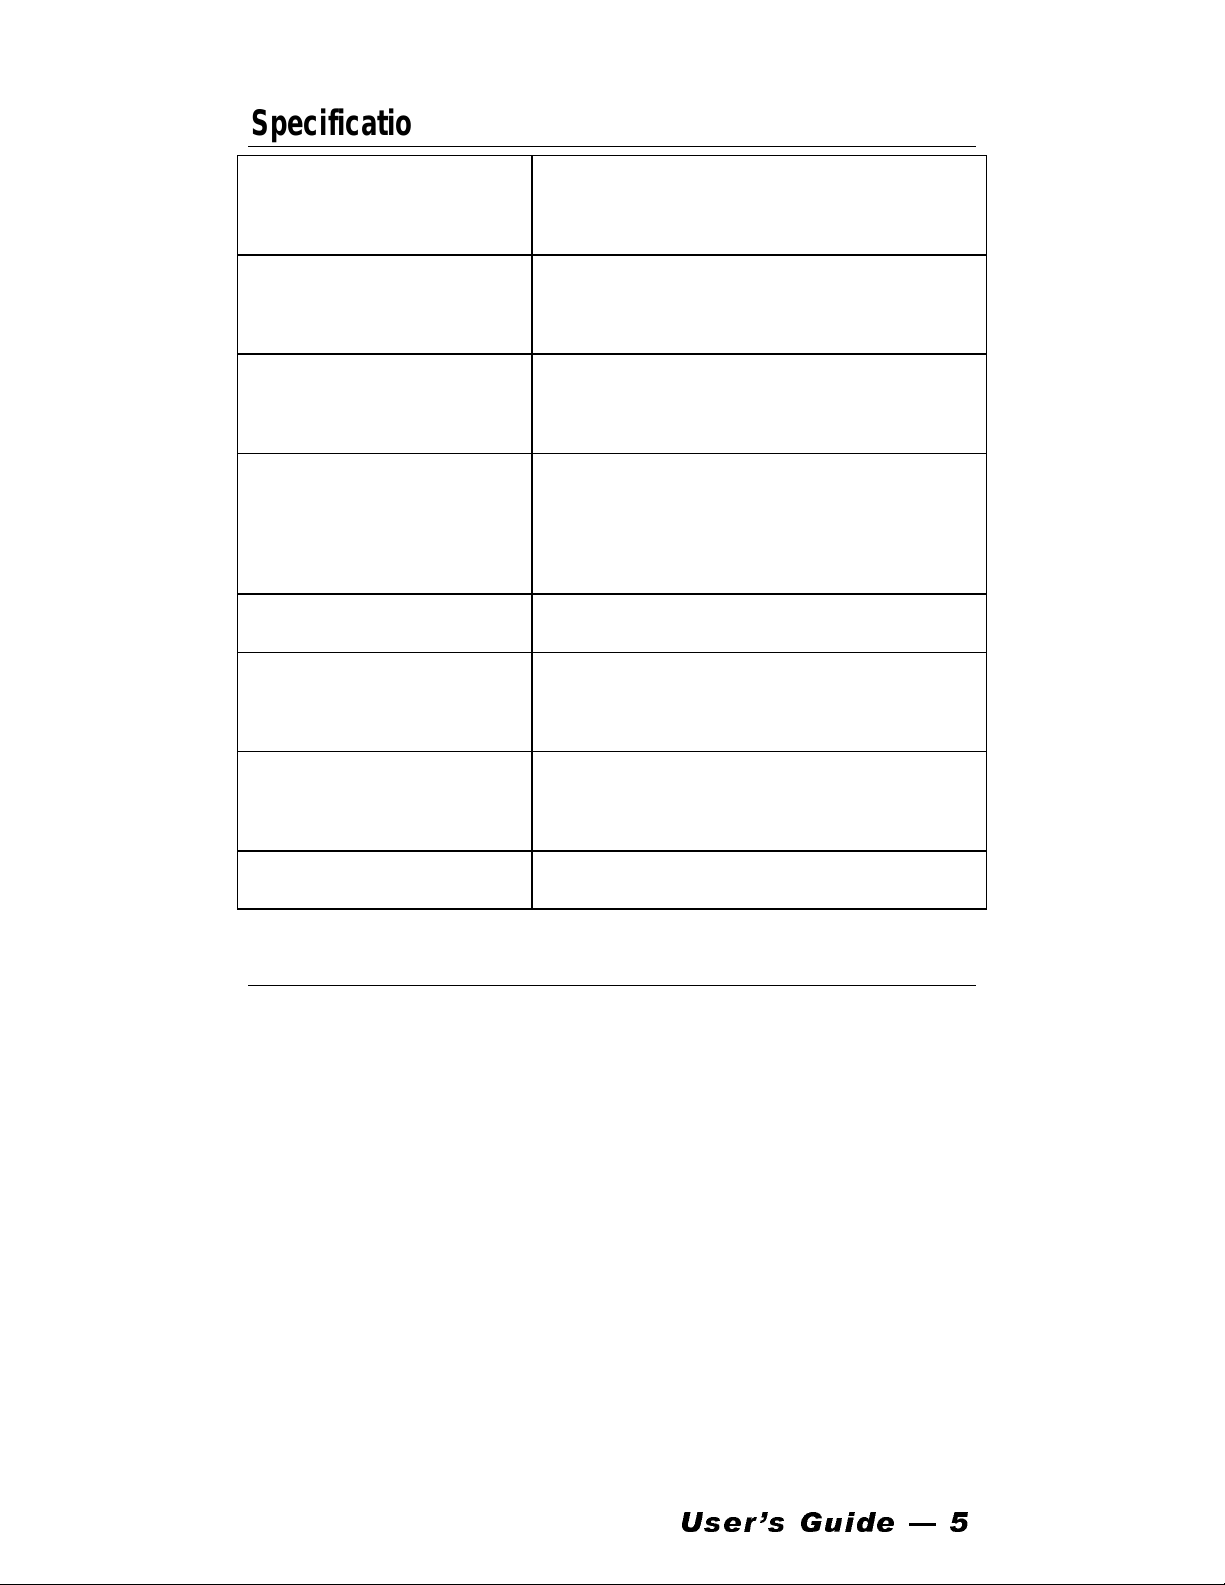
Specifications
Power Source
Range
Accuracy
Displayed
6 Volts - 4 AAA Alkal ine
(MN2400) 1.5 volt batteries
18 inches – 60 feet
(0.5m – 18m)
99.5% or better over entire
range
1/4 inch up to 10 feet; 1 inch
Measurement
Resolution
Beam Angle
Operating
Temperature
Size
bey ond 10 fe et (6mm up to
3m; 25mm beyond 3m)
2°
32°F – 100°F
(0°C – 38°C)
5.6 x 3.25 x 0.9 i nches
(143 x 84 x 23mm)
6 ounces (170 grams)
Weight
Battery Information
When you first receive your Dimension Master
Plus, you will need to remove the plastic tab sticking out of the battery compartment before you use
it. 4 AAA Alkaline batteries are used to po wer the
Dimension Master Plus. If a “lo batt” reading appears on the display, the batteries ne ed to be replaced by r emoving the door on the back of the
unit. The unit will continue to operate for approximately 2 hours after the low battery indication. For
®
best results, use DURACELL
AAA (MN2400)
batteries.
8VHU·V *XLGH ³
Page 6
Feet/Inch or Metric Switch
For your convenience, a switch on the left side of
the unit allows you to set the m easureme nt mode to
either the English/Im perial Feet-Inch (F/I) system
or to the Metric (Met) system.
Aim Assist™ Pointer Lamp
The Aim Assist™ pointer lamp is designed for
many years of servi ce under norma l ope ration.
Should the bulb burn out, please contact the manufacturer for replace ment details.
Display Accuracy
The Dimension Mas ter Plus has an eleven-digit
display. This is made up of seven dig its for the
normal display and four digits for the fractional
display. In a standard calculation, the calculation is
carried out to a 10-digit internal accuracy, and then
rounded to a 7-dig it standard display using a 5/4
rounding.
Automatic Shutoff
The Dimension Mas ter Plus is designed to shut it-
se lf off after approximately 7 minutes of non-use.
Any value shown on the display is cleared at this
point. All values stored in the memory re gisters remain unchange d.
None/Erro r M essages
If the Dimension Mas ter Plus is unable to measure
a distance, two beeps sound a nd either the word
³'
,0(16,210$67(53/86
Page 7

“none ” or “Error” is displayed, de pending on the
measurement situation. The unit will also display
“Error” if you make an incorrect entry, try to perform invalid dimensional calculations (i.e., adding
areas and volumes together) or the resulting answer
is beyond the range of the calculator. “Error” will
also appear if you enter a mathematical impossibility, such as division by zero.
There is no need to clear the “none” or “Error”
message. The next valid measurem ent or keystroke
automatically clears the display. The “none” or
“Error” message will not clear previously stored
values from memory.
Key Functions
[On]
On/Clear Entry Key — Turns power on. Pressed
once clears the last entry and display. Pressing
the me asure ment button will also turn the unit
on.
[Off]
Off Key — Turns all power off. Clears the display and all values stored in memory (M+).
[÷] [x] [+] [−] [=]
Math Operator Keys — Used for basic math
operations.
[0]-[9] & [•]
Digit Keys — Used for ke ying in numbers.
8VHU·V *XLGH ³
Page 8
[Sq]
Square Key — Used with a dimension key (feet,
inches, yards, meters) to label entry as an area or
“square” v alue (e.g., 10 Square Feet).
[ / ]
Fraction Bar Key — Used to separate the numerator and denominat or whe n entering fra ctions. [Rcl] [/] shows current fraction setting
(Default is 1/8”).
[Length]
Length Key — Labels, stores or recalls a dimensioned value or measurement as Length. Entering a non-dimensioned va lue can re sult in an error when computing Areas o r Widths.
[Width]
Width Key — Labels, stores or recalls a dime nsioned value or measurement as Width. Entering
a non-dimensioned v alue can result in an error
when computing Ar eas or Widths.
[Height]
Height Ke y — Labels, stores or recalls a dimensioned value or measurement as Height. Entering a non-dimensioned va lue can re sult in an error when computing Areas o r Widths.
[LxW]
Area Key — Calculates or recalls area based on
Length and Width. If one of these values is not
entered, “None” displays. Repeated presses toggle through the available units of measure.
³'
,0(16,210$67(53/86
Page 9

[LxWxH]
Volume Key — Calculates or recalls volume
based on Le ngth, Width and Height. I f one of
these values is not entered, “None” displays.
Repeated pre sse s toggl e through t he av ailable
units of measure.
[Yards]
Yards Key — Labels a value as Yards. [Conve rt] [Yards ] converts whole or decimal numbers of a different unit of measure to Yards.
[Feet]
Feet Key — Labels a value as Feet. [Convert]
[Feet] converts whole or deci mal numbers of a
different unit of m eas ure to Feet. Suc cessive
presses of [Feet] toggle between Feet-Inch and
Decimal Feet.
[Inch]
Inch Key — Labels a value as Inches. [Convert]
[Inch] conve rts whole o r decimal num bers of a
different unit of m eas ure to Inc hes. Succe ssive
presse s of [Inch] toggle be tween Decim al and
Fractional Inches.
[Meter]
Meter Key — Labels a value as Meters. [Convert] [Meter] converts whole or decimal numbers of a different unit of measure to Meters.
[Rcl]
Recall Key — Used with other keys to recall
and display stored values or settings.
8VHU·V *XLGH ³
Page 10

[Convert]
Conversion Key — Converts be tween units of
measure and accesse s secondary functions. Repea ted press es s croll through av ailable units of
measure:
Linear: Feet-Inch-Fract ion, Decimal Feet, I nch-
Fraction, Decimal Inch, Yards and M et ers
Square: Square Feet, Square Yards and Square
Meters
Cubic: Cubic Feet, Cubic Yards and Cubic Meters
Additional Functions Using [Convert]
[Convert
[÷]
] used with . . .
{Square Root}
Calculates the square root of
a displayed value.
[x]
{AC}
Clears and resets all registers to default
values.
}
[+]
[−]
[=]
{
π
Displays Pi (π = 3.141593).
{+/–}
{Mode}
Toggles displayed value’s sign (+/–).
Changes and displays Measuring
Beam Mode setting.
[•] {°F/°C} Displays the am bient temperature. If
³'
the unit is set to English/Imperial (F/I), the
temperature is displayed as °F. If the unit is
set to Metric (Met), the temperature is displayed as °C.
,0(16,210$67(53/86
Page 11

[5] Tags displayed dimension as a value to be ig-
nored when measuring in a cluttered room.
When activated, “Skip” will be lit in the display.
This mode will be cleared upon power down or
when the On button is pressed t wice.
[9] Used to test the LCD. Lights all display seg-
ments.
[M+]
Memory Key — Adds displayed value to the
cumulative memory.
New and Improved Features
The Dimension Mas ter Plus (v2. 0) give s you the
following new featur es:
Three ne w “M eas uring Beam Modes”
•
-
-
A new “Skip” mode which allows yo u to ignore
•
Sma rt Mode
Narrow Mode
Wide Mode
an object in your measuring path
A new, more powerful microprocessor.
•
Expanded fractional setting accuracy.
•
Expande d storage capa city.
•
Easier to read display.
•
8VHU·V *XLGH ³
Page 12

Measuring Beam Modes
One of the most important new features of the Dimension Master Pl us (v2.0) is the addition of three
different measuring bea m modes:
Normal Mode
is the default setting and can
be used for most m easuring situations.
Narrow Mode
is used for higher accuracy
within a confined space (narrow hallways, corridors, etc.) or when there is a need to eliminate interferenc e fr om surrounding objects (such as bo okshelves, lam ps, e tc.). Since this mo de is essentially
using a smaller beam area, this method requires
careful alignme nt of the measuring beam.
Wide Mode
is used when walls are not parallel to one another or the alignment of the measuring beam is difficult. If there are several or large
objects/obstructions in the measuring beam path,
you may have difficulty obtaining accurate measurements using Wide Mo de.
[Rcl] [=] displays the current Beam Mode se tting .
[Convert] [=] is used the change the setting. The
first press changes to the next Beam Mode setting
and shows it to the left of the LCD display. Repea ted pr ess es of the [=] key toggle throug h the
Beam Mode se tting s. Pre ss any ke y, other than [=],
to select a desired Beam Mode once that mode has
been displayed on the LCD display .
³'
,0(16,210$67(53/86
Page 13

Skip Measurement M ode
The “Skip Measurement” mode of the Dimension
Maser Plus allows you to take accurate measure-
ments in a cluttered room, without having to switch
measuring modes. When the Dimension Master
Plus takes a reading from an object in the way of
your target, you can set the unit to ignore this
measure ment in future readings by pressing [Convert] then [5]. This ignored value will remain in
memory until [On] is pressed twice, or the unit is
powe red down.
Greater Math Accuracy
Equipped with a new, more powerful Int egrated
Circuit Chip, the Dimensi on Master Pl us performs
math calculations faster and with more accuracy.
Greater Fractional Accuracy
With the addition of three new fraction denominator settings, greater fractional accuracy can be
achieved. Use the following me thods to display the
fraction denominator setting:
Method 1
Press [Rcl] [/] to display the current fraction denominator setting. Press [+] or [−] to scroll through
the settings (1/2”, 1/4”, 1/8”, 1/16”, 1/32”, 1/64”).
Once the desired setting is displayed, press any key,
other than [+] or [–], to “set” your setting sele ction.
8VHU·V *XLGH ³
Page 14

Method 2
Use the keystrokes below to select and “set” the desired fraction denominator setting:
KEYSTROKE SETTING KEYSTROKE SETTING
[Convert] [1] 1/16” [Convert] [2] 1/2”
[Convert] [3] 1/32” [Convert] [4] 1/4”
[Convert] [6] 1/64” [Convert] [8] 1/8”*
Note: 1/8” is the default setting. When a fraction
denominator setting other than the default setting of
1/8” is being used, a s tar (★) will appear on the
display when the unit is turned on.
Fractional F eet-Inch/Decimal Toggle
Now “Fractional Feet-Inch” values can be conve rted to “De cimal” values and back by press ing
[Convert] and repeatedly pres sing the [Feet] or
[Inch] key t o toggle between f ormats.
Greater Storage All ocation
With the addition of extra storage re gisters, you can
now store [Lengt h], [Width] and [He ight] measurements. Once stored, these values can be easily
recalled and used with other measurement s when
calculating area and volume.
³'
,0(16,210$67(53/86
Page 15

Expanded Use of [LxW] and [LxWxH] Keys
When area and volume are calculated, the results
are displayed in the last used unit of measure. Repea ted pr ess es of the [LxW] or [LxWxH] keys r ecalculate the results for each available unit of
measure.
Expanded Memory Functions
Your Di mension Master Plus includes the follow-
ing functions for greater flexibility during use:
Function Keystroke
Add displayed value to Mem ory
Display & clear value in Memory
Clear value in Memory,
not the value in display
Subtract displayed value from
value in Memory
[Convert] [−] [M+]
Replace value in Memory
with displayed value
[Convert] [Rcl] [M+]
[M+]
[Rcl] [Rcl]
[Convert] [Rcl]
8VHU·V *XLGH ³
Page 16

How to Use the
Dimension Master Plus
Taking Accur ate Measurements
Be sure to hold the Dimensi on Master Pl us still and
directly parallel to the target area while taking a
measurement. The Dimensi on Master Pl us may
give an inaccurate reading or a none/error message
if it is moved or held at an angle while you are attempting to take a measurement.
Make sure that you hold the Dimension Maste r
Plus in such a way that your fingers do not cover
the three Ultrasonic Sensors on the front of the unit
or the Thermistor (automatic temperature sensor)
located on the bottom left hand side of the unit. The
Dimension Master Plus must be able to accurately
se nse the ambient temperature of the surrounding
environment in order to work properly.
The Dimension Mas ter Plus works best when
aimed at smooth surfaces that easily reflect the ultrasonic measuring beam back to the unit. For example, when aiming the Dimensi on Master Plus at
a window covered by a curtain, open the curtain to
ensure an accurate measurement.
Taking a Linear Measurement
1.
Place the back of the Dimension Master Plus
on a flat surface parallel to the target area
(e.g., hold the back of the unit against the
wall across from the parallel wall you are
targeting).
³'
,0(16,210$67(53/86
Page 17

2.
Press the “
Measure
” button (the blue button
on top of the unit) down halfway to activate
™
the Aim Assist
Note:
The Aim Assist
pointer lamp.
™
pointer lamp’s beam
is visible for 35 to 40 f t. If you are measuring in a brightly lit area, the beam may not
be visible. Even so, t he narrow beam ensures an accurate measurement.
3.
4.
Press the “
Measure
” button down com-
pletely to take your measurement.
The word “
Run
” displays while the Dimen-
sion Master Plus is measuring. When the
distance has been calculated, a single beep
sounds and the measurement value appe ars
on the display.
Note:
If the Dimension Master Plus is unable to measure the distance, either the word
“none” or “Error” (depending on the
measurement situation) will appear on the
display. Two audible beeps will then sound
alerting you to a measurement problem.
8VHU·V *XLGH ³
Page 18

Taking an Ar ea Measurement
1.
2.
3.
4.
5.
Measure the length of the room as described
in steps 1-4 above.
When the measurement is displayed, press
[Length] to enter the value.
Measure the wi dth of the room.
When the measurement is displayed, press
[Width] to enter the value.
Press [LxW] to display the area calculation.
Note
: There is no need to clear the display
after each measurement. The Dimension
Master Plus automat ically clear s the display
with each new measurement.
Volume Measurements
To take a volume measurement, follow steps 1-4
shown for area measurement. Take a third measurement and press [Heig ht]. Press [LxWxH] to display the calculated volume. Your measurement is
now displayed in cubic dim ensi ons.
³'
,0(16,210$67(53/86
Page 19

Note:
Area and volume measur ements can
also be calculated by entering values manually into [Length], [Width] and [Height].
Large Room Measurements
If you want to measure a room beyond the 60-foot
range, take two linear measurem ents. Stand in the
center of the room and take one measurement in
one direction. Turn around and take a sec ond
measure ment in the opposite direction. Follow the
directions below to add both measurem ents to the
cumulative memory:
1.
Pick a point in the center of the room . In one
direction, take the first measurement towards the
wall. When the measurem ent is displayed, press
[M+].
2.
In the opposite direction, take the second
measure ment to the opposite wall. When the
measurement is displayed, press [M+].
3.
Press [Rcl] [M+] to display the cumulative
total that has been stored in Memory.
8VHU·V *XLGH ³
Page 20

Entering Dimensioned Values
DISPLAY
2
0 ½
2- 1
11
15
When entering dimensioned values, e nte r the largest dime nsion first; feet before inches, inches before
fractions. Enter fractions by first entering the numerator (value above the line ), the n press the [/]
key, then the denominator (value below the line).
Note:
The first valued dimension entered in a
problem determines the format of the result.
For example:
63 yards + 59 inches =
63 meters + 59 inches =
64.63889 yards
64.499 me ters
Dimension Examples
Enter the following dimensions (clear after e ach
entry):
DIMENSION KEYSTROKE
2 feet 2 [Feet]
FEET
½ inch 1 [/] 2
2 feet 1 inch 2 [Feet] 1 [I nch]
11 yards 11 [Yards]
15 meters 15 [Meter]
Note:
Yards and meters may only be entere d
as whole (5 yards) or de cimal (5.5 mete rs)
values, not in c ombination wit h feet-inchfractions (5 feet 10-7/16 inches).
³'
,0(16,210$67(53/86
INCH
FEET INCH
YDS
METERS
Page 21

Enter the following square dim ensions:
DISPLAY
2
120
32
647
DISPLAY
15.7
188.4
DIMENSION KEYSTROKE
2 square yards 2 [Sq] [Yards]
120 square feet 120 [Sq] [Feet ]
32 square meters 32 [Sq] [M et er]
647 square inches 647 [Sq] [Inch]
SQ YDS
SQ FEET
SQ METERS
SQ INCH
Spacing Calculation – Linear Division
Using the Manual Entry Method
An office wall that is 78 feet 6 inches in length
must be divided into 5 equal spaces. Find the leng th
of each section:
STEP
KEYSTROKE
Enter dimensi ons: 78 [Feet] 6 [I nch]
Divide by 5 [÷] 5 [=]
Convert to deci m al
[Convert] [Feet]
feet:
Convert to deci m al
[Inch]
inches:
78−6
15−8 3/8
FEET INCH
FEET INCH
FEET
INCH
8VHU·V *XLGH ³
Page 22

Converting Feet-Inch-
DISPLAY
1.166667
2.333333
4.708333
DISPLAY
144
20736
16
13.378
Fractions t o Decimal Feet
Convert the following feet-inch-f raction dimensions to decimal feet e quivalents :
STEP KEYSTROKE
Enter & conver t 1
foot 2 inches:
Enter & conver t 2
feet 4 inches:
Enter & conver t 4
feet 8-1/2 i nches:
1 [Feet] 2 [Inch]
[Convert] [Feet]
2 [Feet] 4 [Inch]
[Convert] [Feet]
4 [Feet] 8 [Inch] 1 [/]
2 [Convert] [Feet]
FEET
FEET
FEET
Square Conversions
Convert 144 s quare feet to all other squared dimensions:
STEP KEYSTROKE
Enter dimensi on 144 [Sq] [Feet ]
SQ FEET
[Convert] [Inch]
[Yards]
[Meter]
SQ INCH
SQ YDS
SQ METERS
Area Calculation – Known Dimension
Two walls need papering. The ceiling is 8 fe et high.
You must find the total length of the two walls for
the room’s total area and quantity of wallpaper. The
length of the first wall is 16 feet 2 inches. The
³'
,0(16,210$67(53/86
Page 23

length of the second wall is 12 feet. What is the to-
DISPLAY
16– 2
16– 2
12
12– 0
28– 2
225.3333
DISPLAY
36- 3
11- 6
138.9583
tal wall length and wall area?
STEP KEYSTROKE
Enter length of one
16 [Feet] 2 [Inch]
wall:
Enter into memory: [M+]
Enter 2nd wall’s
12 [Feet]
length:
Enter into memory: [M+]
Display total wall
[Rcl] [M+]
length:
Multiply by 8 feet for
[x] 8 [Feet] [=]
total area:
Volume Calculation – Concrete
M
M
M
M
FEET INCH
FEET INCH
FEET
FEET INCH
FEET INCH
SQ FEET
You are g oing to form and pour your own concrete
patio. The patio measurements are as follows: 36
feet 3 inches in length, 11 feet 6 inches in width, 4
inches thick. How many cubic yards of concrete are
needed to pour the patio?
STEP KEYSTROKE
Enter patio length 36 [Feet] 3 [I nch]
[Length]
Enter patio width 11 [Feet] 6 [I nch]
[Width]
Enter patio thickness 4 [Inch] [Height]
Solve for volume [LxWxH]
L
W
FEET INCH
FEET INCH
H 4 INCH
CU FEET
8VHU·V *XLGH ³
Page 24

Convert to cu. yar ds [Conver t ] [Yards]
5.146605
DISPLAY
0.
10- 5
5- 3
0 1/16
0.
CU YDS
Memory Functions
Use the [Convert] [−] [M+] keys to subtract from
the Memory:
STEP KEYSTROKE
Clear calculator: [On] [O n]
Enter values into
10 [Feet] 5 [Inch] [M+]
memory:
5 [Feet] 3 [Inch] [M+]
1 [/] 16 [M+]
Display memory
[Rcl] [M+]
total:
Subtract 10 f eet
from memory:
[10] [Feet] [Convert]
[−][M+]
Display results: [Rcl] [M+]
Clear calculator: [Convert] [ x ]
M
M
M
M
M
15
5
FEET INCH
INCH
INCH
−
8 1/16
FEET INCH
−10−
M
FEET INCH
−
FEET INCH
8 1/16
0
Note:
In addition to [Convert] [x], turning the unit
[Off] will also clear all values stored in Memory.
³'
,0(16,210$67(53/86
Page 25

Appendix
Troubleshooting
Symptom:
Solution
: Check display screen. If there is a “lo
Symptom
Solution
: Check to make sure the batte ries are
Symptom
Erratic operation
batt” display reading, the batteries
need to be replaced.
: No response when “On” key is
presse d. The display is blank.
installed correctly or replace the batteries.
: Unit operates, but measurements are
erratic.
Solutio n
: 1) Make sure the unit is parallel to the
surface that is being measured.
2) Check to see if there are objects obstructing the measuring beam.
Note: For technical probl ems not s hown above,
please contact Calculated Indust ries, Inc.
technical support at 702/885-4975.
8VHU·V *XLGH ³
Page 26

Environmental Conditions
Temperature
The Dimension Mast er Plus uses
—
automatic temperature compensation for ensuring
the consistency of measurements in the tempe rature
range o f 32ºF to 100ºF (0ºC t o 38ºC). The response
rate of this circuitry enables you to move between
warm and cold areas and measure with reasonable
accuracy. However, we recom mend that you do not
leave your Dimension Master Plus in very cold or
very hot conditions (e.g., sunlight in a car), as the
unit will then require more time to adjust to ambient temperature.
As long as the internal temperature is approximately equal to the ambient temperature, accuracy
is unaffected. It is best to wait a few moments for
the unit’s internal temperature to stabilize to the
ambient temperature. You may compensate for this
by adding 1% of the measured distance for each
10ºF (5.5ºC) that the internal temperature is below
the actual ambient tempe rature or subtracting 1% of
the measure d distance for each 10ºF (5.5ºC) that
the internal temperature is above the actual ambient
temperature.
³'
,0(16,210$67(53/86
Page 27

Humidity and Altitude
Humidity and altitude
—
can affect the maximum measurement distance and
beam angle of all ultrasonic distance-mea suring
tools. As the humidity increases or the altitude decreases, the maximum m easureme nt distance and
beam angle is reduced. As humidity dec reases or
the altitude increases, the m aximum range and
beam angle is incre ased.
Therefore on a day with a very low humidity you
are more likely to detect objects over a wider fie ld
of view and at a greater distance.
The Dimension Mas -
Outdoor Me asurem ents
—
ter Plus is primarily designed for indoor use. It may
also be us ed out doors , provided there is only li ght
wind. A strong wind will tend to affect the m aximum measurement range.
Moisture —
Your Dimension Master Plus is a
high precision measuring device that is open to the
atmosphere. For this reason, it should not be used
in conditions (i.e., rain, mist, etc.) where moisture
can get within the unit.
8VHU·V *XLGH ³
Page 28

German (Deutsch) Addendum
86$7= =80
=
,0(16,21
'
(187=(5+$1'%8&+
%
$67(5
0
Off
3
7
8
/86
9
.
.
ON
Sq
4
5
1
2
/
.
0
x
6
+
3
=
–
Neue, verbesserte DMP-Tastatur mit Display
Der neue und verbess erte Dimension Master Plus
von CII bi etet viele der beli ebtesten Funkti onen
unserer Bestseller-Produktreihe Construction
®
Master
. Vor der erstmaligen Anwendung des
Dimension Master Plus sollten Sie kurz die
folge nden Seite n durchlese n.
™
³'
,0(16,210$67(53/86
Page 29

Erhöhte Bruchgenauigkeit
Mit den zusät zlichen drei Brucheinstellunge n kann
eine höhe re Buchge nauig keit erzielt werden. Der
Nenner ka nn mit einer der folgenden Methoden
eingestellt werden:
1. Methode
Drücken Sie [Rcl] und [/], um die aktuelle
Brucheinstellung anzuzeigen. Dr ücken Sie [+] und
[–], um die verfügbar en Optionen anzuzeige n.
Wenn die gewünschte Einstellung angezeigt ist,
drücken Sie ei ne belie bige andere Taste, um dies e
zu wählen.
2. Methode
Drücken Sie die in der folgenden Tabelle gezeigten
Tastenko mbinationen, um den entsprechenden
Nenner e inzustellen:
Tastenkombination/
Einstellung
Tastenkombination/
Einstellung
[Convert] [1] 1/16 [Convert] [2] 1/2
[Convert] [3] 1/32 [Convert] [4] 1/4
[Convert] [6] 1/64 [Convert] [8] 1/8*
*Standardeinstellung
Umschalten zwi schen Bruch- u nd
Dezimalanzeige von Foot/Inch
Foot /Inch-Werte können jetzt l eicht auf
Dezimal w erte bzw. auf Bruchwe rte umgerechnet
werden. Mi t jedem Drücken der Taste [Feet] wird
zwischen beiden Formaten umgeschaltet.
8VHU·V *XLGH ³
Page 30

Zusätzliche Meßstrahloptionen
Der neue DMP bietet erweiterte Meßfähigkeiten
durch drei vers chiedene Meß(strahl)optione n.
Normaler Modus
ist die
Standardeinstellung und kann für die meisten
Meßarbei ten v erwendet werden.
Schmaler Modus
wird verwendet, wenn
eine hohe Genauigkeit erforderlich ist, oder
wenn Störungen durch periphere
Gege nstände eliminiert werden müssen.
Durch den schmaleren Meßstrahl w inkel muß
bei dieser Methode auf eine sorgfältige
lotge rechte Fluchtung ge achtet we rden, um
eine g enaue Ablesung zu ge währleisten.
Breiter Modus
wird verwendet, wenn
Wände nicht parallel zueinander verl aufen,
ode r wenn eine Fluchtung des Meßstrahls
schwierig ist. We nn sich mehr ere oder große
Gegenstände im Meßweg befinden, ka nn es
schwierig sein, eine genaue Ablesung zu
erzielen.
Diese Einstellungen werden durch Drücken der
Tasten [Convert] und [=] vorgenommen. Beim
ersten Tastendruck wird die aktuelle Einst ellung
angeze igt. Durch wiederholtes Drüc ken der Tas te
[=] werden die verfügbaren Optionen nacheinander
angezeig t. Um die angezeigte Option zu wählen,
drücken Sie ei ne be liebige andere Taste.
³ '
,0(16,210$67(53/86
Page 31

Höhere mathematische Genauigkeit
Der Dimensi on Master Plus (DMP) ist mit einem
neuen, leistungsstarken Chip ausgestattet, wodurch
Kalkulationen schneller und mit höherer
Genauigk eit durchgeführt werden.
Erweiterte Funktion der Tasten [Area] und [Volume]
Wenn Fl äche und Volum en be rechnet werden, wird
das Erge bnis in der zuletzt verwendeten Ma ßeinheit
ang eze igt . Bei jede m erneuten Drücke n der [Area]ode r [Volume]-Taste wird das Er gebnis in die
nächste v erfügbar e Maßeinheit umgerechnet.
Erweiterte Speich erfu nktionen
DMP bietet jetzt die folgenden Funkti onen, die zu
einer gesteigerten Flexibilität bei der Anwendung
beitragen.
Funktion Tastenkombination
Angezeigten Wert zum gespeicherten Wert addier en [M+]
Speicher anzeigen und l öschen [Rcl] [ R cl]
Speicher löschen; nicht die Anzeige [Convert] [Rcl]
Subtrahier t den angezeigten vom
gespeicherten Wert [Convert] [–] [M+]
Ersetzt den gespei cher t en mit
dem angezeigten Wert [Convert] [Rcl] [M+]
8VHU·V *XLGH ³
Page 32

Größere Spei cherkapazität
Es wurden extra Speicherregister hinzugefügt, in
denen Längen-, Breiten- und Höhenmessungen
gespe ichert wer den können. Die so gespeicherten
Werte können leicht abg erufen und für andere
Messungen, z.B. zur Berechnung von Fläche und
Volumen, verw endet werden.
Erweiterte Anzeig e
Das LCD-Display des DPM wurde erweitert, so
daß mehr Informationen angezeigt und die Za hlen
leichter abgelesen wer den können.
Tastaturfunktionen
[Length]
[Width]
[Height]
[LxW]
Legt de n Wert als Länge fest
Legt de n W ert als Breite fe st
Legt de n Wert als Höhe fest
Berechnet die Fläc he anhand der
eingegebenen Länge und Breite und zeigt das
Ergebnis an. Wurde einer dieser Werte nicht
eingegeben, erscheint "None". Durch
wiederholtes Drücken dieser Taste, wird
zwischen de n ver fügba ren Maßeinheiten
umge schaltet.
[LxWxH]
Berechnet das Volumen anhand der
einge ge bene n Länge, Breite und Höhe. W urde
einer dieser Werte nicht eingegeben, erscheint
"None" . Durch wieder holtes Drücken dieser
Taste, wird zwischen den verfügbaren
Maßeinheiten umgeschaltet.
³'
,0(16,210$67(53/86
Page 33

[Rcl]
Wird in Verbindung mit andere n
Tasten gedrückt, um gespeicherte Werte oder
Einstellungen anzuzeigen.
[Convert]
Rechnet zwische n den Maßeinheiten
um und bietet Zugr iff auf sekundäre Funktionen.
Durch wiederholtes Drücken werde n die
verfügbaren Maßeinheiten angezeigt:
Linear: Foot/Inch, Foot, Inch, Yard, Meter
Quadrat: Quadrat-Foot, Quadrat-Yard,
Quadratmeter
Kubik: Kubik-Foot, Kubik-Yard, Kubikm et er
[Yards]
[Feet]
Legt den Wert als Yard-Maß fest.
Legt den Wert als Foot-Maß fest.
Durch Drücke n von [Convert] und [Feet] werde n
ganze oder Dezimalwerte einer anderen
Maßeinhei t in Foot umgerechnet. Dient auch
zum Umsc halten zwischen Foot/Inch und
Dezimal-Foot.
[Inch]
Legt den Wert als Inch-Maß fest.
Durch Drücke n von [Convert] und [Inch]
werden ganze oder Dezimalwerte einer anderen
Maßeinhei t in Inch umgerechnet. Dient auch
zum Umschalten zwischen Dezimal- und
Bruchteilanzeige der Inch.
[÷] [x] [+] [–] [=] [.]
[Meter]
Legt den Wert als Meter-Maß fest.
Mathematische Operatoren
Durch Drücke n von [Convert] und [Me ter]
werden ganze oder Dezimalwerte in DezimalMeter umgerechnet.
8VHU·V *XLGH ³
Page 34

[M+]
Speichert den angezeigte n Wert.
[Sq]
Legt de n W ert als "Quadratwurzel"
fest.
[/]
Bruchstrich. Zum Trennen vo n Nenne r
und Zä hler. Durch Drücke n von [Rcl] und [/]
wird die aktuelle Brucheinstellung angezeigt.
Weitere Funktionen in Verbindung mit der Taste
[Convert]
[Convert]
[÷]
[x]
in Verbindung mit . . .
berechnet die Quadratwurzel.
löscht alle Werte bzw. setzt diese auf
die Standardeinstellung zurück.
[+]
zeigt den Pi an ( p = 3.141593).
[–]
schaltet das Vorsatzzeic hen (+/-) des
angezeig ten Wertes um.
[=]
[.]
zeigt die Meßstrahleinstellung an.
zeigt di e Te mperatur an. Wenn der
Rechner auf ∞F/1" eingestellt ist, wird die
Temperatur i n ∞F gem essen. Ist er auf
"Metrisch" eingestellt, werden ∞C angezeigt.
³'
,0(16,210$67(53/86
Page 35

Warranty
Warranty Repair Service – U. S.A.
Calculated Industries, Inc. (“CII”) warrants this
product ag ainst defects in ma terials and workmanship for a period of one (1) year from the date of
original consumer purchase in the U.S. If a defect
exists during the warranty period, CII, at its option,
will either repair (using new or rem a nufactured
parts) or replace (with a new or remanufa ctured
unit) the product at no charge.
THE WARRANTY WILL NOT APPLY TO THE
PRODUCT IF IT HAS BEEN DAMAGED BY MISUSE,
ALTERATION, ACCIDENT, IMPROPER HANDLING
OR OPERATION, OR IF UNAUTHORIZED REPAIRS
ARE ATTEMPTED OR MADE. SOME EXAMPLES OF
DAMAGES NOT COVER ED BY WARRANTY
INCLUDE, BUT ARE NOT LIMITED TO, BATTERY
LEAKAGE, BENDING, OR VISIBLE CRAC KING OF
THE LCD, WHICH ARE PRESUMED TO B E
DAMAGES RES ULTING FROM M ISUSE OR ABUSE.
To obtain warranty service in the U.S., ship the
product postage paid to the CII Authorized Service
Provider listed on the back page of the User’s
Guide. Please provide an explana tion of the service
requirement, your name, address, day phone number and dated proof of purchase (typically a sales
recei pt). If the product is over 90 days old, inc lude
payment of $6.95 for return shipping and handling
within the contiguous 48 states. Outside the contiguous 48 s tates, please call CII for return shipping
costs.
8VHU·V *XLGH ³
Page 36

A repaired or replacement product assume s the remaining warranty of the original product or 90
days, whichever is longer.
Non-Warranty Rep ai r Service – U.S.A.
Non-warranty repair co ver s service beyond the
warranty period or service reque sted due to damage
resulting from misuse or abuse. Contact the CII
Authorized Service Provider listed on the back
page of the User’s Guide to obtain current product
repair information and charges. Repairs are guaranteed f or 90 day s.
Repair Service – Ou tside the U.S.A.
Not all countries have CII Authorized Service Providers or the sam e warranty and service policies. To
obtain warranty or non-warranty repair service for
goods purchased outside the U.S., contact the
dealer through which you initially purchased the
product. If you c annot reas onably have the product
repaired in your area, you may contact CII to obtain
current product repair information and charges, including freight and dut ies.
Calculat ed Industries, Inc.
4840 Hytech Drive
Carson City, NV 89706 U.S.A
Tel: 775/885-4975 • Fax: 775/885-4949
htt p://www.calcu lated .com • techsupport@calculated.com
³'
,0(16,210$67(53/86
Page 37

Disclaimer
CII MAKES NO WARRANTY OR REPRESENTATION,
EITHER EXPRESS OR IMPLIED, WITH RESP ECT TO
THE PRODUCT’S QUALITY, PERFORM ANCE,
MERCHANTABILITY, OR FITNESS FOR A
PARTICULAR PURPOSE. AS A RESULT, THIS
PRODUCT, INCLUDING BUT NOT LIMITED TO,
KEYSTROKE PROCEDUR ES, MATHEMATICAL
ACCURACY AND PR EP ROGRAMMED MATERIAL, IS
SOLD “AS IS,” AND YOU THE PURCHASER ASSUME
THE ENTIRE RISK AS TO ITS QUALITY AND
PERFORMANCE.
IN NO EVENT WILL CII BE LIABLE FOR DIRECT,
INDIRECT, SPECIAL, INCIDENTAL, OR
CONSEQUENTIAL DAMAGES RESULTING FROM
ANY DEFECT IN THE PRODUCT OR ITS
DOCUMENTATION.
The warranty, disclaimer, and rem edies set fo rth
above are exclusive and replace all others, oral or
written, express or implied. No CII dealer, agent or
employee is authorized to make any modification,
extension or addition to this warranty.
Some states do not allow the exclusion or limitation
of implied warranties or liability for incidental or
consequential damages, so the above limitation or
exclusion may not apply to you. This warranty
gives you specific rights and you may also have
other rights which vary from state to state.
FCC Class B
This equipment has been certified to comply with
the limits for a Class B computing device, pursuant
to Subpart J of Part 15 of FCC rules.
8VHU·V *XLGH ³
Page 38

Looking for New Ideas
Calculated Industries, I nc. (CII), a leading ma nufacturer of special function calculators and digital
measuring instrume nts, is always looking for new
product ideas in these areas.
If you have one or if you have any suggestions for
improvements to this product or its User’s Guide,
please call or write our Product Development Department. Thank you.
Calculat ed Industries, Inc.
Attn: Product Development
4840 Hytech Drive
Carson City, NV 89706 U.S.A
Tel: 775/885-4975 • Fax: 775/885-4949
htt p://www.calcu lated .com • techsupport@calculated.com
³'
,0(16,210$67(53/86
Page 39

NOTE
8VHU·V *XLGH ³
Page 40

TriSensor Technology
and Aim Assist Pointer Lamp
are trademarks of C alculated Industr ies, Inc.
Dimension Master P lus
and Calculated Industries®
are registered trademarks of
Calculated Industries, Inc.
ALL RIGHTS RESERVED
Duracell i s a r egistered trademark of Duracell Inc.
U.S. Patent #4,953,141
Calculated Industries, Inc.
4840 Hytech Dri ve
Carson Cit y , NV 89706 U.S. A
Phone: 775/885-4975 • Fax: 775/885-4949
Web: http://www.calculated.com • E-Mail: info@calculated.com
Designed in the U .S. by Calcul ated Industries, Inc.
1998, Calculated Industries, Inc.
Manual 3302-MN-A
Printed in Taiwan, DMP-MAN v2.0
 Loading...