

Page 1

SONAR
User’s Guide
Page 2

Information in this document is subject to change without notice and does not represent a commitment on the part of Cakewalk, Inc. The software described in this document is furnished under a
license agreement or nondisclosure agreement. The software may be used or copied only in accordance of the terms of the agreement. It is against the law to copy this software on any medium
except as specifically allowed in the agreement. No part of this document may be reproduced or
transmitted in any form or by any means, electronic or mechanical, including photocopying and
recording, for any purpose without the express written permission of Cakewalk, Inc.
Copyright © 2009 Cakewalk, Inc. All rights reserved.
Program Copyright © 2009 Cakewalk, Inc. All rights reserved.
ACID is a trademark of Sony Creative Software, Inc.
Cakewalk is a registered trademark of Cakewalk, Inc. and the Cakewalk logo are trademarks of
Cakewalk, Inc. Other company and product names are trademarks of their respective owners.
Visit Cakewalk on the World Wide Web at www.cakewalk.com.
Page 3

Table of Contents
Preface . . . . . . . . . . . . . . . . . . . . . . . . . . . . . . . . . . . . . . . . . . . . . . . . . . . . . . . . . . . . . . . . . . . 9
About this manual . . . . . . . . . . . . . . . . . . . . . . . . . . . . . . . . . . . . . . . . . . . . . . . . . 9
Conventions used in this book . . . . . . . . . . . . . . . . . . . . . . . . . . . . . . . . . . . . . . 10
Introduction . . . . . . . . . . . . . . . . . . . . . . . . . . . . . . . . . . . . . . . . . . . . . . . . . . . . . . . . . . . . . . 11
About SONAR . . . . . . . . . . . . . . . . . . . . . . . . . . . . . . . . . . . . . . . . . . . . . . . . . . . 12
Publish . . . . . . . . . . . . . . . . . . . . . . . . . . . . . . . . . . . . . . . . . . . . . . . . . . . . . 12
Music Composition and Exploration . . . . . . . . . . . . . . . . . . . . . . . . . . . . . . . 12
Remixing. . . . . . . . . . . . . . . . . . . . . . . . . . . . . . . . . . . . . . . . . . . . . . . . . . . . 12
Game Sound Development . . . . . . . . . . . . . . . . . . . . . . . . . . . . . . . . . . . . . 12
Sound Production and Engineering . . . . . . . . . . . . . . . . . . . . . . . . . . . . . . . 13
Web Authoring . . . . . . . . . . . . . . . . . . . . . . . . . . . . . . . . . . . . . . . . . . . . . . . 13
Film and Video Scoring and Production . . . . . . . . . . . . . . . . . . . . . . . . . . . . 13
Publishing Music on the Internet . . . . . . . . . . . . . . . . . . . . . . . . . . . . . . . . . 13
Burning Audio CDs . . . . . . . . . . . . . . . . . . . . . . . . . . . . . . . . . . . . . . . . . . . . 13
Flexibility. . . . . . . . . . . . . . . . . . . . . . . . . . . . . . . . . . . . . . . . . . . . . . . . . . . . 14
Computers, Sound, and Music . . . . . . . . . . . . . . . . . . . . . . . . . . . . . . . . . . . . . . 14
MIDI . . . . . . . . . . . . . . . . . . . . . . . . . . . . . . . . . . . . . . . . . . . . . . . . . . . . . . . 14
Digital audio . . . . . . . . . . . . . . . . . . . . . . . . . . . . . . . . . . . . . . . . . . . . . . . . . 15
Setup. . . . . . . . . . . . . . . . . . . . . . . . . . . . . . . . . . . . . . . . . . . . . . . . . . . . . . . . . . 16
Audio connections . . . . . . . . . . . . . . . . . . . . . . . . . . . . . . . . . . . . . . . . . . . . 17
MIDI Connections . . . . . . . . . . . . . . . . . . . . . . . . . . . . . . . . . . . . . . . . . . . . . 19
Changing I/O devices . . . . . . . . . . . . . . . . . . . . . . . . . . . . . . . . . . . . . . . . . . 20
Starting SONAR . . . . . . . . . . . . . . . . . . . . . . . . . . . . . . . . . . . . . . . . . . . . . . . . . 23
SONAR basics . . . . . . . . . . . . . . . . . . . . . . . . . . . . . . . . . . . . . . . . . . . . . . . . . . 26
SONAR file types . . . . . . . . . . . . . . . . . . . . . . . . . . . . . . . . . . . . . . . . . . . . . 27
Opening a file . . . . . . . . . . . . . . . . . . . . . . . . . . . . . . . . . . . . . . . . . . . . . . . . 28
Views . . . . . . . . . . . . . . . . . . . . . . . . . . . . . . . . . . . . . . . . . . . . . . . . . . . . . . 28
Page 4

Working on a project . . . . . . . . . . . . . . . . . . . . . . . . . . . . . . . . . . . . . . . . . . .46
Windows taskbar indicators . . . . . . . . . . . . . . . . . . . . . . . . . . . . . . . . . . . . . . . . .46
Screen colors and wallpaper . . . . . . . . . . . . . . . . . . . . . . . . . . . . . . . . . . . . . . . .47
Color presets . . . . . . . . . . . . . . . . . . . . . . . . . . . . . . . . . . . . . . . . . . . . . . . . .48
Installing SONAR . . . . . . . . . . . . . . . . . . . . . . . . . . . . . . . . . . . . . . . . . . . . . . . . .51
Starting to use SONAR . . . . . . . . . . . . . . . . . . . . . . . . . . . . . . . . . . . . . . . . . . . .52
Tutorial 1 – Creating, playing, and saving projects. . . . . . . . . . . . . . . . . . . . . . . . . . . . . . 53
Creating a new project . . . . . . . . . . . . . . . . . . . . . . . . . . . . . . . . . . . . . . . . . . . . .54
Opening project files . . . . . . . . . . . . . . . . . . . . . . . . . . . . . . . . . . . . . . . . . . . . . .56
Playing project files . . . . . . . . . . . . . . . . . . . . . . . . . . . . . . . . . . . . . . . . . . . . . . .58
Configuring your sound device . . . . . . . . . . . . . . . . . . . . . . . . . . . . . . . . . . .58
Setting the tracks outputs . . . . . . . . . . . . . . . . . . . . . . . . . . . . . . . . . . . . . . .59
Playing the project . . . . . . . . . . . . . . . . . . . . . . . . . . . . . . . . . . . . . . . . . . . . .61
Looping project files . . . . . . . . . . . . . . . . . . . . . . . . . . . . . . . . . . . . . . . . . . . . . . .62
Saving project files. . . . . . . . . . . . . . . . . . . . . . . . . . . . . . . . . . . . . . . . . . . . . . . .63
Tutorial 2 – Using the Media Browser. . . . . . . . . . . . . . . . . . . . . . . . . . . . . . . . . . . . . . . . . 65
Finding and previewing audio loops. . . . . . . . . . . . . . . . . . . . . . . . . . . . . . . . . . .68
Previewing MIDI groove clips . . . . . . . . . . . . . . . . . . . . . . . . . . . . . . . . . . . .69
Adding loops to your project . . . . . . . . . . . . . . . . . . . . . . . . . . . . . . . . . . . . .70
Tutorial 3 – Recording vocals and musical instruments . . . . . . . . . . . . . . . . . . . . . . . . . 71
Troubleshooting. . . . . . . . . . . . . . . . . . . . . . . . . . . . . . . . . . . . . . . . . . . . . . .74
Tutorial 4 – Playing and recording software instruments. . . . . . . . . . . . . . . . . . . . . . . . . 77
Adding an instrument track to your project . . . . . . . . . . . . . . . . . . . . . . . . . .78
Recording MIDI . . . . . . . . . . . . . . . . . . . . . . . . . . . . . . . . . . . . . . . . . . . . . . .80
Manually entering MIDI notes . . . . . . . . . . . . . . . . . . . . . . . . . . . . . . . . . . . .80
Tutorial 5 – Working with music notation. . . . . . . . . . . . . . . . . . . . . . . . . . . . . . . . . . . . . . 85
Printing your notation. . . . . . . . . . . . . . . . . . . . . . . . . . . . . . . . . . . . . . . . . . .92
4
Page 5

Tutorial 6 – Editing your music . . . . . . . . . . . . . . . . . . . . . . . . . . . . . . . . . . . . . . . . . . . . . . 93
Selection. . . . . . . . . . . . . . . . . . . . . . . . . . . . . . . . . . . . . . . . . . . . . . . . . . . . 93
Moving clips . . . . . . . . . . . . . . . . . . . . . . . . . . . . . . . . . . . . . . . . . . . . . . . . . 95
Splitting Clips . . . . . . . . . . . . . . . . . . . . . . . . . . . . . . . . . . . . . . . . . . . . . . . . 95
Cropping Clips . . . . . . . . . . . . . . . . . . . . . . . . . . . . . . . . . . . . . . . . . . . . . . . 96
Undo and Redo . . . . . . . . . . . . . . . . . . . . . . . . . . . . . . . . . . . . . . . . . . . . . . 97
Tutorial 7 – Mixing and adding effects . . . . . . . . . . . . . . . . . . . . . . . . . . . . . . . . . . . . . . . . 99
Volume and pan . . . . . . . . . . . . . . . . . . . . . . . . . . . . . . . . . . . . . . . . . . . . . 100
Adding effects (FX) . . . . . . . . . . . . . . . . . . . . . . . . . . . . . . . . . . . . . . . . . . . 101
Using Automation . . . . . . . . . . . . . . . . . . . . . . . . . . . . . . . . . . . . . . . . . . . . 105
Tutorial 8 – Working with video . . . . . . . . . . . . . . . . . . . . . . . . . . . . . . . . . . . . . . . . . . . . . 107
Importing video . . . . . . . . . . . . . . . . . . . . . . . . . . . . . . . . . . . . . . . . . . . . . . . . . 107
What if I don’t see the Video Thumbnail pane or Video view? . . . . . . . . . . 110
Changing the video properties . . . . . . . . . . . . . . . . . . . . . . . . . . . . . . . . . . 110
Working with markers . . . . . . . . . . . . . . . . . . . . . . . . . . . . . . . . . . . . . . . . . . . . 112
Exporting your video . . . . . . . . . . . . . . . . . . . . . . . . . . . . . . . . . . . . . . . . . . . . . 114
Tutorial 9 – Exporting, CD burning and sharing. . . . . . . . . . . . . . . . . . . . . . . . . . . . . . . . 115
Burning an audio CD . . . . . . . . . . . . . . . . . . . . . . . . . . . . . . . . . . . . . . . . . 117
Cakewalk Publisher . . . . . . . . . . . . . . . . . . . . . . . . . . . . . . . . . . . . . . . . . . 119
New features in SONAR 8.5 . . . . . . . . . . . . . . . . . . . . . . . . . . . . . . . . . . . . . . . . . . . . . . . . 121
PX-64 Percussion Strip . . . . . . . . . . . . . . . . . . . . . . . . . . . . . . . . . . . . . . . . . . . 123
VX-64 Vocal Strip . . . . . . . . . . . . . . . . . . . . . . . . . . . . . . . . . . . . . . . . . . . . . . . 124
Session Drummer 3 . . . . . . . . . . . . . . . . . . . . . . . . . . . . . . . . . . . . . . . . . . . . . 125
Alias Factor . . . . . . . . . . . . . . . . . . . . . . . . . . . . . . . . . . . . . . . . . . . . . . . . . . . . 126
Classic Phaser . . . . . . . . . . . . . . . . . . . . . . . . . . . . . . . . . . . . . . . . . . . . . . . . . 126
HF Exciter . . . . . . . . . . . . . . . . . . . . . . . . . . . . . . . . . . . . . . . . . . . . . . . . . . . . . 127
Mod Filter . . . . . . . . . . . . . . . . . . . . . . . . . . . . . . . . . . . . . . . . . . . . . . . . . . . . . 127
Multivoice Chorus/Flanger . . . . . . . . . . . . . . . . . . . . . . . . . . . . . . . . . . . . . . . . 127
Para-Q. . . . . . . . . . . . . . . . . . . . . . . . . . . . . . . . . . . . . . . . . . . . . . . . . . . . . . . . 128
Stereo Compressor/Gate . . . . . . . . . . . . . . . . . . . . . . . . . . . . . . . . . . . . . . . . . 128
Stereo Delay . . . . . . . . . . . . . . . . . . . . . . . . . . . . . . . . . . . . . . . . . . . . . . . . . . . 129
Studioverb2 . . . . . . . . . . . . . . . . . . . . . . . . . . . . . . . . . . . . . . . . . . . . . . . . . . . . 129
5
Page 6

New Impulse Responses for Perfect Space . . . . . . . . . . . . . . . . . . . . . . . . . . .129
Step Sequencer 2.0 . . . . . . . . . . . . . . . . . . . . . . . . . . . . . . . . . . . . . . . . . . . . . .130
Integrated arpeggiator . . . . . . . . . . . . . . . . . . . . . . . . . . . . . . . . . . . . . . . . . . . .131
Support for more MIDI ports . . . . . . . . . . . . . . . . . . . . . . . . . . . . . . . . . . . . . . .131
Matrix view . . . . . . . . . . . . . . . . . . . . . . . . . . . . . . . . . . . . . . . . . . . . . . . . . . . . .132
REX file import . . . . . . . . . . . . . . . . . . . . . . . . . . . . . . . . . . . . . . . . . . . . . . . . . .133
Freeze and Archive buttons in Track view . . . . . . . . . . . . . . . . . . . . . . . . . . . . .133
New Freeze option. . . . . . . . . . . . . . . . . . . . . . . . . . . . . . . . . . . . . . . . . . . . . . .134
Solo track/bus from plug-in window . . . . . . . . . . . . . . . . . . . . . . . . . . . . . . . . . .134
Insert Send Assistant enhancements . . . . . . . . . . . . . . . . . . . . . . . . . . . . . . . .135
DC offset meter in Analyst . . . . . . . . . . . . . . . . . . . . . . . . . . . . . . . . . . . . . . . . .136
AudioSnap 2.0 . . . . . . . . . . . . . . . . . . . . . . . . . . . . . . . . . . . . . . . . . . . . . . . . . .137
TAB to transients . . . . . . . . . . . . . . . . . . . . . . . . . . . . . . . . . . . . . . . . . . . . . . . .138
Auto Scroll Lock in Clips pane . . . . . . . . . . . . . . . . . . . . . . . . . . . . . . . . . . . . . .138
Clips pane vertical grid lines . . . . . . . . . . . . . . . . . . . . . . . . . . . . . . . . . . . . . . .138
Draggable Now Time marker . . . . . . . . . . . . . . . . . . . . . . . . . . . . . . . . . . . . . . .138
Change I/O devices without restarting SONAR . . . . . . . . . . . . . . . . . . . . . . . . .139
VST plug-in compatibility options. . . . . . . . . . . . . . . . . . . . . . . . . . . . . . . . . . . .139
Media Browser enhancements . . . . . . . . . . . . . . . . . . . . . . . . . . . . . . . . . . . . .140
Troubleshooting . . . . . . . . . . . . . . . . . . . . . . . . . . . . . . . . . . . . . . . . . . . . . . . . . . . . . . . . . 141
Audio dropouts or crash when playing back large files at maximum latency. . .142
When I Play a File, I Don’t Hear Anything . . . . . . . . . . . . . . . . . . . . . . . . . . . . .143
I Can’t Record from My MIDI Instrument . . . . . . . . . . . . . . . . . . . . . . . . . . . . . .144
When I Play a File Containing Audio, the Audio Portion Doesn’t Play. . . . . . . .145
I Can’t Record Any Audio. . . . . . . . . . . . . . . . . . . . . . . . . . . . . . . . . . . . . . . . . .146
The Music Is Playing Back with the Wrong Instrument Sounds. . . . . . . . . . . . .146
My Keyboard Doubles Every Note I Play . . . . . . . . . . . . . . . . . . . . . . . . . . . . . .147
I Don’t See the Clips Pane in the Track View . . . . . . . . . . . . . . . . . . . . . . . . . .147
Why Can’t SONAR Find My Audio Files? . . . . . . . . . . . . . . . . . . . . . . . . . . . . .147
Why Do I Get Errors from the Wave Profiler? . . . . . . . . . . . . . . . . . . . . . . . . . .148
My Track or Bus Fader is Maximized, But There’s No Sound or Level . . . . . . .148
How Do I Use SONAR to Access All the Sounds on My MIDI Instrument? . . . .149
I Hear an Echo When I Record . . . . . . . . . . . . . . . . . . . . . . . . . . . . . . . . . . . . .149
Dropouts Happen in High Bit-depth or High Sample Rate Audio. . . . . . . . . . . .150
Patching an Effect into SONAR Causes a Dropout . . . . . . . . . . . . . . . . . . . . . .150
6
Page 7

I Can’t Open My Project . . . . . . . . . . . . . . . . . . . . . . . . . . . . . . . . . . . . . . . . . . 151
Audio Distorts at Greater than 16 Bits. . . . . . . . . . . . . . . . . . . . . . . . . . . . . . . . 151
No Sound from My Soft Synth. . . . . . . . . . . . . . . . . . . . . . . . . . . . . . . . . . . . . . 152
My Pro Audio 9 Files Sound Louder/Softer When I Open Them in SONAR. . . 153
SONAR Can’t Find the Wavetable Synth or MPU401. . . . . . . . . . . . . . . . . . . . 153
I Get an Error Message When I Change a Project to 24-bit Audio . . . . . . . . . . 153
Bouncing Tracks Takes a Long Time . . . . . . . . . . . . . . . . . . . . . . . . . . . . . . . . 154
The GUI is not Smooth During Playback . . . . . . . . . . . . . . . . . . . . . . . . . . . . . 154
Plug-in windows flicker or don't display properly. . . . . . . . . . . . . . . . . . . . . . . . 154
File Recovery mode . . . . . . . . . . . . . . . . . . . . . . . . . . . . . . . . . . . . . . . . . . . . . 156
Glossary . . . . . . . . . . . . . . . . . . . . . . . . . . . . . . . . . . . . . . . . . . . . . . . . . . . . . . . . . . . . . . . . 159
LICENSE AGREEMENT . . . . . . . . . . . . . . . . . . . . . . . . . . . . . . . . . . . . . . . . . . . . . . . . . . . . 177
7
Page 8

8
Page 9

Preface
SONAR User’s Guide is designed to help you learn and use SONAR. This book explains how
SONAR works and how to use it to create, edit, produce, and perform. The SONAR User’s Guide is
task-oriented, with lots of cross-references, so that you can find the information you need. The
User’s Guide book also includes a comprehensive index that you can use to find information on any
specific topic.
About this manual
This manual provides basic information about how to install and set up SONAR make initial settings
and system setup. It also provides tutorials to help you get started as well as a glossary of terms
used in this manual.
Using the online Help
SONAR also includes complete documentation in an HTML-based online Help system. SONAR’s
online Help provides detailed information about each feature in the program, including menu
commands, windows, dialogs, keyboard shortcuts and common procedures. You can get contextsensitive help at any time by pressing the F1 key.
Need more info?
In addition to the User’s Guide and the online Help, you can also find more help in the following
places:
• The ReadMe file contains information that was not available at the time of this printing. On
SONAR’s Help menu, click View README.RTF.
• Access videos on the SONAR Owner’s page at
http://www.cakewalk.com/Owners/SONAR85.
• Visit the peer-to-peer Cakewalk forums at http://forum.cakewalk.com/default.asp.
• Visit the SONAR Support page at
http://www.cakewalk.com/Support/SONAR/DEFAULT.ASP.
Page 10
Conventions used in this book
The following table describes the text conventions in this book:
Convention Meaning
Bold Text that appears in bold is a command in SONAR.
Right guillemet
(File > Open)
Monospace font A monospace font is used for file names, directory paths and code examples.
Plus sign (+) A plus sign (+) is used between the keys to be pressed in a key combination.
For example: Click OK.
A right guillemet is a menu item separator and represents a level in the menu hierarchy.
For example: File > Open means to click on the File menu and select the Open
command.
For example: Locate the project named
For example: CTRL+A means hold down the CTRL key and press the A key.
SONAR_AudioDemo1.cwp.
10
Conventions used in this book
Page 11

Introduction
SONAR is a professional tool for authoring sound and music on your personal computer. It’s
designed for musicians, composers, arrangers, audio and production engineers, multimedia and
game developers, and recording engineers. SONAR supports Wave, MP3, ACIDized waves, WMA,
AIFF and other popular formats, providing all the tools you need to do professional-quality work
rapidly and efficiently.
SONAR is more than an integrated MIDI and digital audio authoring software package—it’s an
expandable platform that can function as the central nervous system of your recording studio. With
drivers for common high-end audio hardware, full support for audio plug-ins, software synthesizers,
MFX MIDI plug-ins, and MIDI Machine Control (MMC) of external MIDI gear, SONAR can handle
your most demanding projects.
In This Chapter
About SONAR . . . . . . . . . . . . . . . . . . . . . . . . . . . . . . . . . . . . . . . . . . . . . . . . 12
Computers, Sound, and Music. . . . . . . . . . . . . . . . . . . . . . . . . . . . . . . . . . . . 14
Setup . . . . . . . . . . . . . . . . . . . . . . . . . . . . . . . . . . . . . . . . . . . . . . . . . . . . . . . 16
Starting SONAR. . . . . . . . . . . . . . . . . . . . . . . . . . . . . . . . . . . . . . . . . . . . . . . 23
SONAR basics . . . . . . . . . . . . . . . . . . . . . . . . . . . . . . . . . . . . . . . . . . . . . . . . 26
Windows taskbar indicators . . . . . . . . . . . . . . . . . . . . . . . . . . . . . . . . . . . . . . 46
Screen colors and wallpaper . . . . . . . . . . . . . . . . . . . . . . . . . . . . . . . . . . . . . 47
Installing SONAR . . . . . . . . . . . . . . . . . . . . . . . . . . . . . . . . . . . . . . . . . . . . . . 51
Page 12

About SONAR
SONAR lets you work with music on your own level. Here are some of the ways you can make music
with SONAR:
Publish
Publishing usually means printing your music; it’s one way to share your finished product with other
performers. After you’ve recorded and arranged a song in SONAR, you can produce printed lead
sheets and small scores with lyrics for sharing. You can also share the music files themselves.
SONAR will save your music in a format that you can put on a web site or email to other people.
SONAR is the flagship product of the Cakewalk line of integrated MIDI and digital audio sequencers
for the Windows platform. SONAR has a comprehensive feature set that makes it the single most
productive tool for sound and music authoring. Here are some of the ways you can use SONAR.
Music Composition and Exploration
SONAR is a powerful music-composition application, providing tools to record your own musical
performances; enhance or improve the quality of those performances; and edit, arrange, and
experiment with the music. With a few simple clicks of the mouse, you can arrange, orchestrate, and
audition your composition. Fully integrated sequencing allows you to combine the convenience and
flexibility of MIDI composition with the high-quality sound and subtlety of digital audio sound
recording and reproduction. Change the feel of a piece by locking it to a musical groove, or add
delicate delays, anticipations, or echoes that add richness to the music.
SONAR displays and lets you edit your music using standard musical notation and guitar tablature,
so you can adjust individual notes, add performance markings, and print individual parts or full
scores. You can graphically draw tempo and volume changes, or add lyrics to display on-screen or
to include with printed scores.
Remixing
SONAR’s Groove clips allow you to import, create, export and edit loops, making it possible to
quickly change tempos and keys for an entire project. The Media Browser view lets you preview
loops in the project’s tempo and key before dragging and dropping them onto a track.
Game Sound Development
There’s no better tool than SONAR for composing music for electronic games. Clip-based
sequencing lets you create and reuse musical themes freely, so you can associate musical sections
with game characters, locations, objects, and actions. Your creations can be saved and replayed
using the compact MIDI file format, which adapts its sound automatically to the target hardware for
the best possible sound reproduction.
12
About SONAR
Page 13

Sound Production and Engineering
If you want to produce music CDs or master tapes, SONAR has virtually everything you need from
recording to mixing and mastering. Multichannel recording lets you capture studio or live
performances track by track. Reconfigurable buses provide full control over your mix. Real-time
stereo effects like chorus, flange, reverb, and delay/echo can be applied as track inserts, in effects
loops, or to the master mix. SONAR supports 44.1 KHz sampling for CD-quality sound, 24-bit/96
kHz sound for DVD-quality sound, and lets you choose from lower or higher sample rates as well. All
audio effects are 32-bit floating point for faster processing and high-quality sound reproduction.
Many effects now support 64-bit processing for pristine quality.
Web Authoring
SONAR is the ideal tool for developing and producing music and sound for the World Wide Web,
because it lets you save your work in the formats that are most commonly used on web sites: MIDI,
MP3, and Windows Media Advanced Streaming Format. Any SONAR project—musical composition,
audio clip, commercial spot, jingle with voice-over—can be stored in a web-compatible format with a
few simple mouse clicks.
Film and Video Scoring and Production
SONAR has many of the tools you need to execute audio post-production projects quickly and
efficiently. SONAR provides chase lock sync to time code for frame-by-frame accuracy when
synchronizing audio or MIDI to film or video. Or, you can turn chase lock off to conserve CPU power.
SONAR provides high-quality time stretching and sample-accurate editing with zero-crossing
detection so you can make the fine adjustments you need very quickly and easily. In addition,
SONAR’s support for video files gives you convenient synchronized access to digitized video,
making film and video scoring easier than ever.
Publishing Music on the Internet
Cakewalk Publisher allows you to easily present and share your music online. With Cakewalk
Publisher, you can create a customized streaming music player with a playlist of your music, upload
it to your personal or band's website, and embed it in any other website. You can also update your
playlist with album art, links (URLs), and artist, track, & album information.
Burning Audio CDs
SONAR has integrated Audio CD burning, which allows you to write your audio tracks to an audio
CD that can be played in any standard CD player.
About SONAR
13
Page 14

Flexibility
SONAR works the way you want to work—you can customize screen layouts, toolbars, and audio
and MIDI system configurations to make your work more efficient. SONAR integrates with other
sound editing tools so you can access them in an instant without leaving SONAR. There are custom
software modules to support specialized audio devices from Roland and Yamaha. SONAR’s unique
StudioWare technology provides software interfaces for common studio hardware.
Computers, Sound, and Music
This section provides some background on the different ways that computers store and play sound
and music. Computers work with sound and music in two different forms: MIDI and digital audio.
MIDI
MIDI (short for Musical Instrument Digital Interface) is the way computers communicate with most
sound cards, keyboards, and other electronic instruments. MIDI refers to both the type of cables and
plugs used to connect the computers and instruments, and to the language those computers and
instruments use to talk to each other. The MIDI standard is accepted and used worldwide. Almost
any electronic instrument you buy today will have MIDI connectors and can be used with other MIDI
instruments and with your computer’s MIDI interface. To record MIDI in SONAR, you have to have a
MIDI cable connecting the MIDI OUT port on your MIDI instrument to a MIDI IN port on either your
sound card or your MIDI interface. You must also make sure that you have installed the software
MIDI driver that came with your sound card or MIDI interface.
The MIDI language conveys information and instructions, both from the computer to the instrument
and from the instrument to the computer. For example, if your computer wants your keyboard to play
a note, it sends a MIDI “Note On” message and tells the keyboard which note to play. When your
computer wants the keyboard to stop playing that note, it sends another message that stops the note
from playing.
The MIDI language has many other instructions, such as messages to change the sound that is
used to play the notes (the bank and patch), messages that enable working with the sustain pedal
and the pitch-bend wheel, and others. By sending the right messages at the right times, your
computer can control your electronic instrument and make it play music.
MIDI information can be sent on 16 different channels. You can set up your MIDI equipment to listen
for messages on all channels or on only a few.
MIDI files contain all the MIDI messages and timing information that are needed to play a song. MIDI
files can be read and played by many different programs, including SONAR, and can even be played
by programs on other types of computers. MIDI files have the extension .mid.
14
Computers, Sound, and Music
Page 15

There are several important advantages of the MIDI format:
• Large amounts of music can be stored in a very compact form
• Different parts of a piece can easily be assigned to any instrument you can imagine
• The music contains information on notes, tempos, and key signatures that makes it possible to
display and edit the piece using standard musical notation
The primary disadvantage of MIDI is that the quality of the sound a listener hears will vary depending
on the MIDI equipment the listener is using. For example, MIDI usually sounds much better on an
expensive synthesizer than it does on an inexpensive sound card.
Digital audio
Digital audio (frequently referred to here as just “audio”) is a simple way to record and play sounds of
any type. It works like a tape recorder—you record something, then later play it back. Digital audio
stores the sound as a long series of numbers. To record audio in SONAR, you have to have an audio
cable connecting the audio output of your electronic instrument to the audio input on your sound
card or audio hardware. If you’re recording vocals or an acoustic instrument, you need to connect a
microphone to the audio input on your sound card or audio hardware.
Sound Waves
Sound waves are vibrations in the air. Sound waves are generated by anything that vibrates; a
vibrating object causes the air next to it to vibrate, and the vibration is passed through the air in all
directions. When the vibrating air enters your ear, it makes your eardrum vibrate, and you hear a
sound. Likewise, if the vibrating air hits a microphone, it causes the microphone to vibrate and send
electrical signals to whatever it's connected to.
These vibrations are very fast. The slowest vibration frequency you can hear is about 20 vibrations
per second, and the fastest is around 16,000 to 20,000 vibrations per second.
Recording digital audio
To record digital audio, your computer monitors the electrical signal generated by a microphone, an
electric guitar, or another source. At equal intervals of time (for CD-quality sound, this means 44,100
times a second), the computer measures and saves the strength of the electrical signal from the
microphone, on a scale from 0 to 65,535.
That's it. Digital audio data is just a long series of numbers. The computer sends these numbers, in
the form of electrical signals, to a speaker. The speaker then vibrates and generates the same
sound that was recorded.
The primary advantage of digital audio is the quality of the sound. Unlike MIDI, a digital audio
recording is very rich, capturing all the nuances, overtones, and other characteristics of the sound
exactly as performed. The main drawback of digital audio is that it takes up a lot of disk space. To
record a 1-minute segment of stereo, CD-quality digital audio, you need about 10 megabytes of disk
space.
On the PC, digital audio is usually stored in Wave files (extension .wav). There are many programs
available that let you create, play, and edit these files. SONAR reads, writes, and lets you edit Wave
files.
Computers, Sound, and Music
15
Page 16
Setup
5-pin DIN
connector
A
B
You can install SONAR on any computer that runs Windows XP or x64 and has a sound card or
built-in sound module. If you want to hook up other devices, like a MIDI keyboard, an electric guitar,
or a microphone, you need the right cables, and you need to find the right connectors on your
computer.
Before you install SONAR, take a minute to register the software so we can let you know when
updates become available and provide you with technical support. To register anytime log onto
www.cakewalk.com/register, or call 888-CAKEWALK (U.S.) or +(617)-423-9004 (outside the U.S.)
between 9 AM and 8 PM Eastern Standard Time. If you live outside of North America, please visit
our distributor’s page at www.cakewalk.com/Dealers/International.asp to get the telephone number
of your local distributor. You’ll need to supply your serial number, your name, and a valid email
address.
To connect a MIDI keyboard to your computer, you need standard MIDI cables or a MIDI adapter
cable (joystick connector), such as the one available in Cakewalk’s PC Music Pack. One end of the
adapter cable should have two 5-pin DIN connectors that connect to your keyboard or other MIDI
device. At the other end, you need a 15-pin connector to connect to a sound card through its MIDI/
joystick port.
A. MIDI to 15 Pin Connector B. 15-pin connector (DB15)
If you have a dedicated MIDI interface, lots of electronic music gear, or work with many different
music software packages, see the online help topic “Hardware Setup.”
Before you attach or detach any cables from your computer, you should shut down your computer
and turn off the power to all your equipment. This greatly reduces the chance of electrical damage to
your equipment while plugging and unplugging cables.
16
Setup
Page 17

User accounts
Previous versions of SONAR required a user to have Windows Administrator status. This is no
longer the case. Any level of user can now install and run SONAR. Only one copy of SONAR per
machine is necessary for multiple users to run SONAR with each user’s personal settings.
When you first install SONAR, all application data files and .ini files are installed to the systemspecified “all users” application data folders:
Windows XP:
C:\Documents and Settings\All Users\Application Data\Cakewalk
Windows Vista:
C:\ProgramData\Cakewalk
When you launch SONAR for the first time, all content files (such as track templates and project
templates) will be copied from the global application data folder (All Users) to the user application
data folder (User Account), before the program launches.
If you install a SONAR patch on top of the original installation, any updated content files in the patch
will not overwrite existing content files in your personal user application data folder. However, you
can force SONAR to update the default content files in your personal user data folder.
Warning: The following action will overwrite any SONAR data files such as track templates
and project templates that you may have customized. A message box will prompt you if you wish
to continue or cancel. Only proceed if you are certain that you will not overwrite any important
customized files.
To force SONAR to update and overwrite any default content files, hold down the CTRL key while
starting SONAR.
Data in the Program Files folder will be common to all users.
Audio connections
There are several types of audio interfaces (soundcards). CardBus (PCI), USB/USB2 and FireWire
are the most common. Laptops can use an audio PCMCIA card. Many audio interfaces also have
MIDI inputs and some have built in MIDI synthesizers as well. This section covers the various audio
connection options.
Analog and digital Inputs
There are two basic types of audio inputs, analog and digital. Analog inputs allow you to connect a
guitar, mic or other instrument to your computer directly. The audio interface converts the analog
input to digital. Digital inputs allow other digital devices to connect directly to your computer.
Common digital inputs include external analog to digital converters, popular guitar processors like
the Line 6 POD, and other digital recording systems like the ADAT decks. Analog inputs are very
common, and are standard in virtually all consumer sound cards (the ones that come with your PC).
Digital inputs are becoming more popular and are very common on professional and mid-level,
“prosumer” interfaces. Analog inputs allow you to record a mono or stereo signal (assuming you
Setup
17
Page 18
have a stereo input) while digital inputs allow you to record 1 to 8 signals depending on the type of
digital connection.
The following table describes the various analog inputs and outputs.
Type of analog input/output Description
Balanced (XLR, phono or RCA) A mono input/output
Unbalanced (TRS) A stereo or mono input/output
Table 1.
The following table describes the various digital inputs and outputs.
Type of digital input/output Description
S/PDIF Sony/Philips Digital Interface capable of carrying a stereo signal, S/
PDIF is transmitted via RCA, Toslink or more rarely BNC jacks (singlepin cable-TV connections).
ADAT Lightpipe Up to 8 channels of simultaneous transfer. If you want to import your old
TDIF Tascam Digital Interface up to 8 channels of simultaneous transfer.
AES/EBU Often referred to as simply AES, this type of digital connection uses a
Table 2.
ADAT material without any signal degradation, this is the connection
you should use.
modified XLR cable to transfer a stereo signal.
Read your hardware documentation carefully to determine what kind of digital connections, if any,
you have on your audio interface.
To connect an electric guitar or keyboard to your computer
• If your sound card has a 1/8 inch input jack (built-in sound cards that come with your PC usually
do), plug your 1/4 inch mono guitar or audio cable into a 1/8 inch stereo adapter, and then plug
the 1/8 inch adapter into the microphone input or line input jack on your computer sound card. If
you are connecting a keyboard, the audio cable must go from the keyboard’s audio out or line out
jack to the sound card input jack. 1/8 inch stereo adapters are available at consumer electronic
supply stores.
Or
• If you use a professional or “prosumer” sound card, there is probably a 1/4 inch input jack on your
sound card or audio hardware interface that you can plug your guitar cable or audio cable into.
18
Setup
Page 19

To connect a microphone to your computer
• If your sound card has a 1/8 inch input jack (built-in sound cards that come with your PC usually
do), and your microphone cable has a 1/4 inch plug on the end, plug the mic cable into a 1/8 inch
stereo adapter, and then plug the 1/8 inch adapter into the microphone input jack on your
computer sound card. 1/8 inch stereo adapters are available at consumer electronic supply
stores.
• If you use a professional or “prosumer” sound card, there is probably a 1/4 inch input jack on your
sound card or audio hardware interface that you can plug your mic cable into.
• If your mic has a cable with an XLR plug on the end, and your sound card or audio hardware
interface has a 1/4 inch input jack, plug the mic cable into an XLR-to-quarter inch adapter, and
then plug your mic cable into your audio hardware. If your audio hardware has an XLR input, of
course it’s better to use that.
• You can also plug your mic into a mixer or pre-amp, and connect the mixer or pre-amp to an input
jack on your audio hardware. This is usually the best method.
That's it! Now that your instruments are all set to go, you can restart your computer and turn on your
keyboard, guitar, and microphone.
For a complete description of audio input options, see the online help topic “Hardware Setup.”
MIDI Connections
There are three types of MIDI cables in common use. Here’s how to connect each of the three types:
• USB cable. This is extremely common. Many electronic keyboards and stand-alone MIDI
interfaces use this type of connection. To use this type of connection, simply plug one end of the
USB cable into the USB jack on your MDI keyboard or stand-alone MIDI interface, and plug the
other end into your computer. If you are using a stand-alone USB MIDI interface, you then need to
connect standard MIDI cables between your MIDI keyboard and your stand-alone MIDI interface
(see the next procedure, below). If you haven’t already installed the software MIDI driver that
came with your keyboard or interface, make sure you do so.
• Standard MIDI cable. This is also very common. MIDI keyboards usually have jacks for these
cables even if they have a USB connection. You need two of these cables. To use this type of
cable, use one cable to connect the MIDI OUT jack on your MIDI instrument to the MIDI IN jack
on your stand-alone MIDI interface or sound card, and one to connect the MIDI IN jack on your
MIDI instrument to the MIDI OUT jack on your stand-alone MIDI interface or sound card. Many
stand-alone MIDI interfaces and audio interfaces use this type of connector.
Setup
19
Page 20
Figure 1. Standard MIDI cable—use this if your MIDI interface has standard 5-pin input and output ports
A
B
C
• Joystick connector. This is becoming less common. This is the type of connection seen on
older SoundBlaster type sound cards. To use this type of connection, find the end of one of the
MIDI cables that is labeled OUT. Plug this connector into the MIDI IN jack on your electronic
keyboard. The other 5-pin connector on the MIDI cable is labeled IN. Plug this connector into the
MIDI OUT jack on your electronic keyboard. Plug the 15-pin connector on the MIDI cable into the
MIDI/joystick port on your sound card. If you have a joystick, unplug it, plug in the MIDI cable, and
plug the joystick into the pass-through connector on the MIDI cable.
Figure 2. Joystick connector—use this if your MIDI interface is the joystick port on your sound card.
A. Insert this MIDI IN plug into the MIDI OUT port on your MIDI instrument B. Insert this MIIDI OUT plug into the
MIDI IN port on your MIDI instrument C. Insert this plug into the joystick port on your sound card
Changing I/O devices
You can add or remove USB/FireWire audio and MIDI devices while SONAR is running, and the
audio and MIDI engines will dynamically respond to any changes.
When a device is added or removed, SONAR prompts you to confirm or cancel the change. If you
click Yes , playback stops and the audio and MIDI engines reload.
Preserve selected audio devices on device changes
Enabled inputs and outputs are persisted per device and per driver mode. This prevents audio ports
from shifting around and causing unwanted devices to become selected as active audio inputs and
outputs. You can add a device back at any time and SONAR will remember the last set of enabled
inputs and outputs for that device.
You can freely add or remove devices without impacting the current working set of enabled devices.
Adding a device back will remember its last selected inputs and outputs. You can also switch driver
20
Setup
Page 21
modes and the existing enabled devices will be remembered for the next time when you switch back
to that mode.
Loading a project after changing audio devices
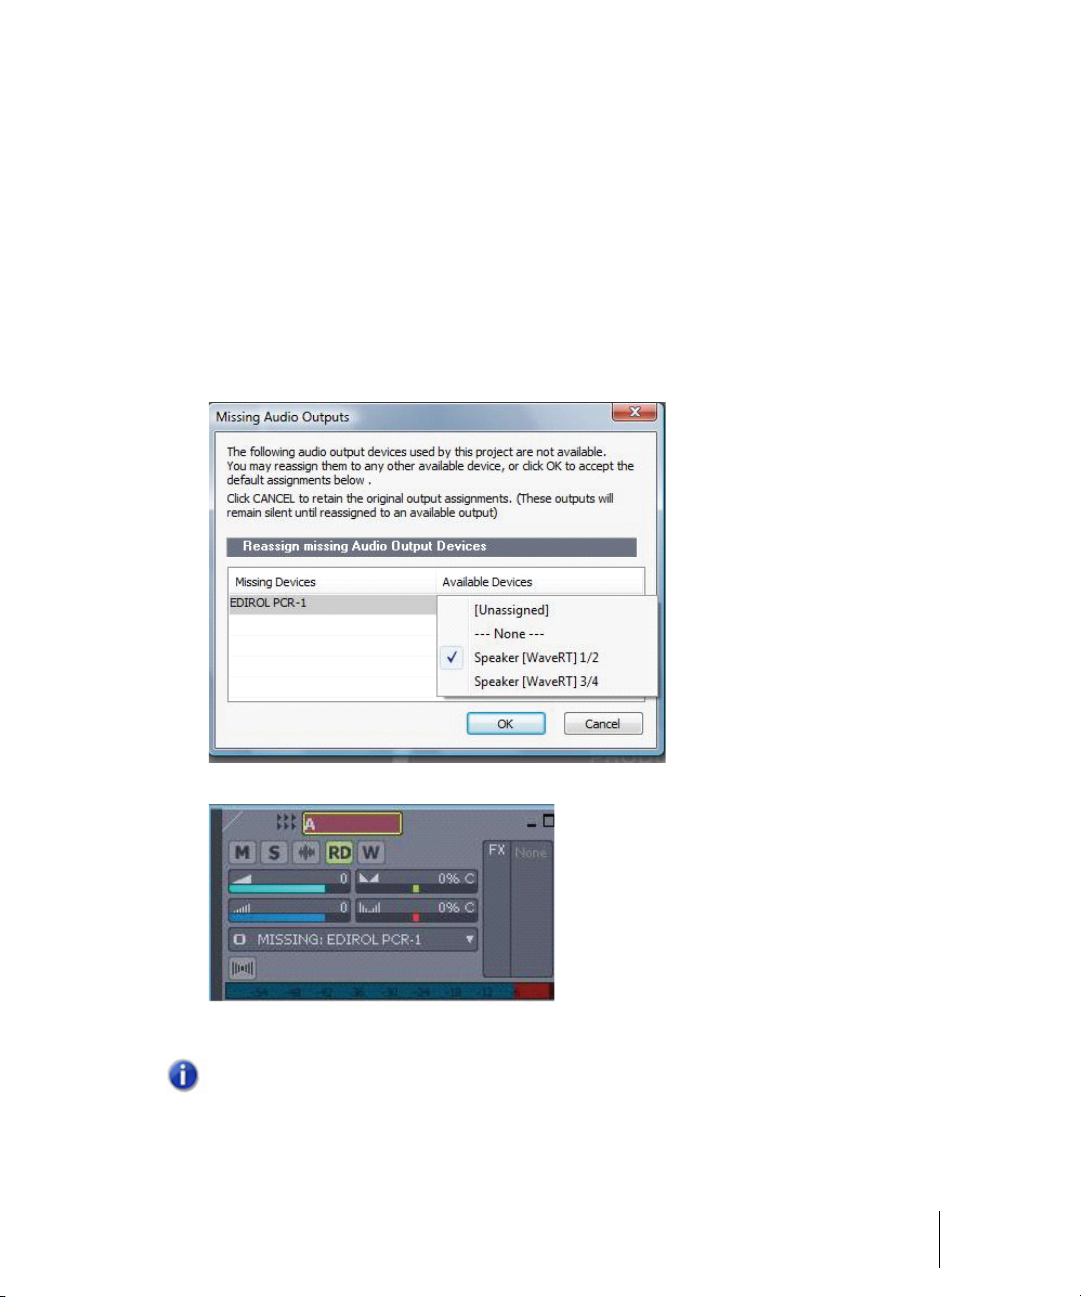
When loading a project after changing audio devices, SONAR will attempt to automatically remap
any missing device to an equivalent new device. If an equivalent match is not found, the Missing
Audio Outputs dialog appears, allowing you to manually reassign any unresolved output ports.
The Missing Audio Outputs dialog will suggest default assignments for any missing devices. You
can click OK to accept the assignments, or click Cancel to preserve the original missing device
assignments. You can also preserve the original missing device by selecting [Unassigned] from the
Available Devices list. If you choose not to reassign a missing device, the Output port selection in
SONAR will show the missing device name prefixed by MISSING.
Note: The Missing Audio Outputs dialog is not shown if there is only a single missing output
port and only one available output port. In this case, SONAR will automatically assign the
missing output port to the available output port.
Setup
21
Page 22

Remapping using friendly driver names
When Use friendly names to represent audio drivers is selected in Options > Audio > Drivers,
SONAR can intelligently remap devices across different hardware configurations or driver models by
using your assigned friendly driver names, even if the hardware names do not match.
This can be very useful if you switch driver modes and load projects you worked on earlier in another
driver mode, or if you collaborate with other people who have different hardware configurations. As
long as you set up friendly names that match, all outputs will be automatically remapped.
Note: Remapping with friendly names takes precedence over the actual hardware device
names.
Automatic MIDI port remapping for control surfaces
SONAR persists the names of MIDI ports that are assigned to control surfaces. This ensures that the
correct MIDI ports are assigned to control surfaces, even if you add or remove other MIDI devices.
22
Setup
Page 23
Starting SONAR
There are many different ways to start SONAR. Here are a few:
• Double-click the SONAR icon on your desktop.
• Click the Start button, and choose Programs > Cakewalk > SONAR 8.5 (Studio or Producer) >
SONAR 8.5 (Studio or Producer).
• Click the Start button, point to Documents, and choose a SONAR project from the menu.
• Double-click the SONAR program or any SONAR document from the Windows Explorer or the
Find menu.
When starting SONAR, you will see the Quick Start dialog box.
Figure 3. The Quick Start dialog
The Quick Start dialog box has several options:
Option How to use it
Open a Project Choose a project from the Open File dialog box to open it
Open a Recent Project Select a project from the list, and click this button to open it
Create a New Project Click here to create a new project.
Online Videos and more Click this link to view our tutorial videos online. An active Internet
connection is needed in order to access this content.
Getting Started Click here to view the Getting started topic in the Help file. This topic has
links to a glossary of terms, as well as some basic procedures.
Table 3.
Starting SONAR
23
Page 24
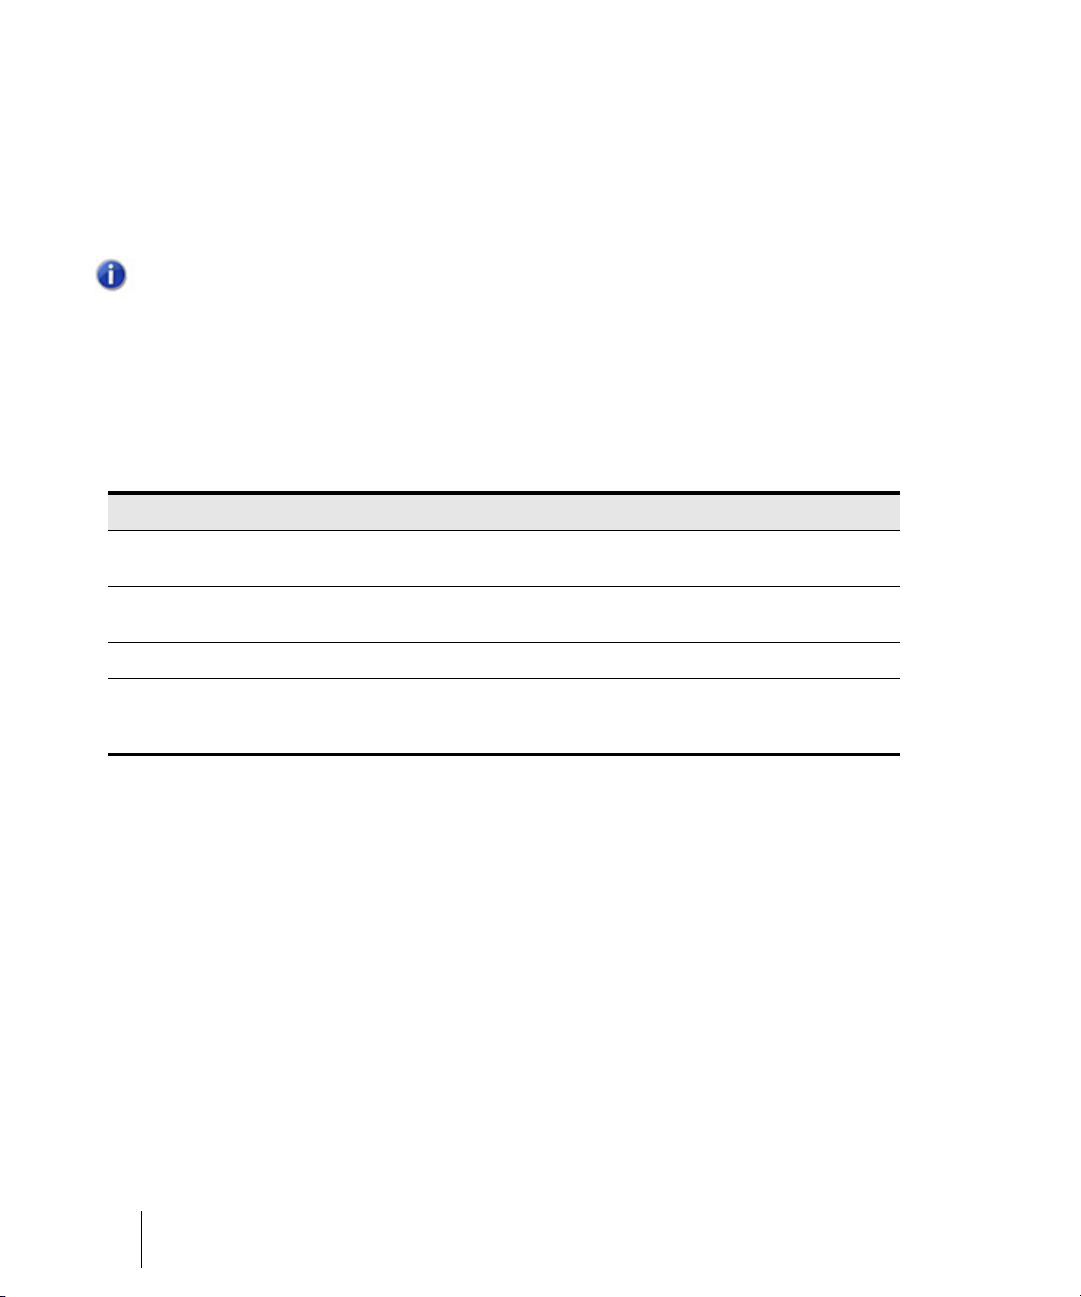
If you don’t want to see the Quick Start dialog box in the future, uncheck the box at the bottom of
the dialog box, and click Close. You can see the Quick Start dialog box later by choosing Help >
Quick Start.
RIFF/MID will not launch SONAR when double-clicked
Note: Double-clicking RIFF MIDI files and Standard MIDI files will fail to launch SONAR even
if these file types are associated with SONAR.
Migrating preferences
If you have a previous version of Cakewalk installed, SONAR will detect it and give you the option of
migrating certain preferences from a single earlier version.
When you choose to migrate preferences, SONAR migrates the following settings from an earlier
Cakewalk version:
Setting Description
Global Options Settings in the Global Options dialog. Open by selecting Options >
Key Bindings Your customized key bindings for controlling SONAR using your MIDI
Instrument Definitions Files used to control specific MIDI instruments.
Audio data directory (WaveData
folder) and Picture Cache directory
locations
Table 4.
Global.
keyboard or computer keyboard.
SONAR uses the Data directory and Picture Cache directories from the
previous Cakewalk version for storing project wave files and their
waveform image files.
Running Wave Profiler
The first time you start SONAR, it automatically runs the Wave Profiler utility. Wave Profiler
determines the proper MIDI and Audio timings for your sound card and writes them to a file that
SONAR refers to when using the card. Wave Profiler does not change the sound card’s DMA, IRQ,
or port address settings.
Wave Profiler detects the make and model of your sound card, which determine the card’s audio
characteristics. If Wave Profiler finds a card that has a WDM driver, it only profiles that card. If you
want to use more than one sound card at a time, and they don’t both have WDM drivers, you must
force the one with the WDM driver to use that driver as an older, MME driver. It is not necessary to
run the Wave Profiler for a sound card using an ASIO driver. For more information about Wave
Profiler, WDM, and MME, see the online help topic The Wave Profiler.
24
Starting SONAR
Page 25

When Wave Profiler determines the kind of card you have, always accept the default settings.
Note: You can run the Wave Profiler again at a later time (for example, if you install a new
sound card or driver) by choosing the Options > Audio General tab command and clicking
Wave Profiler.
Setting up the MIDI In and MIDI Out devices
When you start SONAR for the first time, it checks your computer to find all the MIDI input and
output devices you have installed (such as sound cards and MIDI interfaces). However, sometimes
you need to tell SONAR exactly which devices you want it to use. If you’re not getting sound from
your sound card or MIDI keyboard, or if you just want to change the MIDI outputs and devices that
you are using, follow the steps in this section.
Choose Options > MIDI Devices to open a dialog box in which you select the MIDI In and MIDI Out
devices that SONAR will use. Each item in the list is a MIDI Input or MIDI Output from drivers
installed using the Windows Control Panel.
1. Select Options > MIDI Devices. You will see the MIDI Devices dialog box, which lets you choose
instruments on MIDI inputs and outputs.
Figure 4. The MIDI Devices dialog
2. Look at the top window. Notice that it shows devices on MIDI Inputs; make sure that all devices in
this window are checked. If a device isn’t checked, click on it once to select it for MIDI Input.
3. Look at the window on the bottom. Notice that it shows devices on MIDI Outputs. SONAR
numbers its MIDI Outputs by the order of the devices in this window. The device on top is on
Output 1, the one below it is on Output 2, and so on.
Starting SONAR
25
Page 26
4. Check one device at a time in the Outputs window and click Move Selected Devices to Top to
change its order. Then check all the devices that appear in the window to select them for output.
Tip:
Be sure to enable (check) MIDI output devices in the
MIDI Devices
play songs in SONAR.
command). If you don’t do this, you won’t hear any of your MIDI instruments when you
MIDI Devices
dialog (use the
Options >
Using MIDI devices after making driver changes
If you later add or remove drivers using the Drivers icon of the Windows Control Panel, SONAR
reacts in the following way:
• If you remove a Control Panel driver, SONAR will not use the device it belongs to the next time
you run the program. Any other devices you had selected using the Options > MIDI Devices
command will remain selected.
• If you add a driver through the Control Panel, SONAR does not automatically use it. You must use
the Options > MIDI Devices command to enable the new driver in SONAR’s list.
Note: After you add or remove a driver with the Drivers icon in the Windows Control Panel,
you must restart Windows for the change to take effect.
Defining your MIDI instrument or sound card
Once you have selected your MIDI Input and Output devices, SONAR, by default, plays back MIDI
sequences using a General MIDI instrument definition. If you are using a synthesizer or sound card
that does not adhere to the General MIDI standard, you may want to define that instrument. See the
online help topic: Instrument Definitions for more information.
SONAR basics
SONAR’s menus and toolbars give you quick access to all the features of SONAR. Some menu
choices and tools display dialog boxes that let you choose among various options, or type in the
values you want. If you click in most views, in time rulers, or on certain other items with the right
mouse button, you see a pop-up menu that provides quick access to many common operations.
The project is the center of your work in SONAR. If you’re a musician, a project might contain a
song, a jingle, or a movement of a symphony. If you’re a post-production engineer, a project might
contain a 30-second radio commercial or a lengthy soundtrack for a film or videotape production. By
default, every project is stored in a file (known as a project file). The normal file extension for a
SONAR work file is .cwp.
SONAR organizes the sound and music in your project into tracks, clips, and events.
26
SONAR basics
Page 27
Tracks are used to store the sound or music made by each instrument or voice in a project. For
example, a song that is arranged for four instruments and one vocalist may have 5 tracks—one for
each instrument and one for the vocals. Each project can have an unlimited number of tracks. Some
of these tracks may be used in your finished project, while others can hold alternate takes, backup
tracks, and variations that you might want to keep for future use. Each track can be made up of one
or many clips.
Clips are the pieces of sound and music that make up your tracks. A clip might contain a horn solo,
a drum break, a bass or guitar riff, a voice-over, a sound effect like the hoot of an owl, or an entire
keyboard performance. A track can contain a single clip or dozens of different clips, and you can
easily move clips from one track to another.
Groove clips are audio clips which have tempo and pitch information embedded within them,
allowing them to follow changes to the project tempo or project pitch. You can click on either edge of
a Groove clip and drag out repetitions in the track.
Events are MIDI data (in MIDI tracks) or automation data.
SONAR file types
Projects in SONAR can be saved as a project file with the extension .cwp or as a Bundle file with the
extension .cwb.
For a complete description of the differences between project files and bundle files, see the online
help topic Project Files and Bundle Files.
Other types of files
SONAR lets you create and work with several other types of files, in addition to project (.cwp) and
bundle (.cwb) files that store your projects:
File type Description
MIDI files (extension .mid) Standard MIDI files.
Template files (extension .tpl) Templates for new files you create
StudioWare (extension .CakewalkStudioware) To control external MIDI devices from SONAR
OMF (extension .omf) Open Media Framework format files.
Table 5.
SONAR basics
27
Page 28

Opening a file
Use the following procedure to open a file.
To open a file in SONAR
1. If you haven't already done so, start SONAR.
2. Choose File > Open.
3. In the Open dialog box, navigate to the directory where the project you want to open is located
and select it.
4. Click the Open button.
5. If you are opening an OMF file, the Unpack OMF dialog appears. Set the initial tempo and specify
the directory where you want to save the file and its audio. For more information about opening
OMF files, see Unpack OMF dialog in the online help.
SONAR loads the project.
Views
SONAR displays your project in windows on the screen that are known as views. You can have
many views open at once, all showing the same project. When you edit a project in one view, the
other related views are updated automatically.
The Track View
Track view is the main window that you use to create, display, and work with a project. When you
open a project file, SONAR displays the Track view for the project. When you close the Track view
for a project, SONAR closes the file.
The Track view is divided into several sections: toolbars (at the top), the Navigator pane, the Video
Thumbnails pane, the Track pane, the Track/Bus Inspector, the Clips pane, and the Bus pane.
You can change the size of the panes by dragging the vertical or horizontal splitter bars that
separate them.
28
SONAR basics
Page 29
Figure 5. The Track view
AB
I
C
DE
F
G
H
A. The Track Pane B. The Clips Pane C. Clips D. Splitter bars E. Show/hide bus pane F. Track/Bus Inspector
G. Minimized tracks H. Expanded track I. The Video Thumbnails Pane
All of the current track’s controls, plus a few that are only available in the Console view, are
contained in the Track/Bus Inspector which is an expanded version of the current track’s controls
located on the far left side of the Track view. You can hide or show the Track/Bus Inspector by
pressing I on your keyboard (see “Track/Bus Inspector” on page 31, for more information).
The Tra ck pane lets you see and change the initial settings for each track. By default, the current
track is displayed in gold. To change the current track, move the highlight using the mouse or the
keyboard as follows:
What it does Key
Moves the highlight to the next or previous control. LEFT/RIGHT ARROW
Moves to the same control in the adjacent track, or the next track of the same type
if the control only applies to a specific track type (for example, the Patch control
only applies to MIDI tracks).
Displays the next page of tracks. PAGE DOWN
Displays the previous page of tracks. PAGE UP
Table 6.
UP/DOWN ARROW
29
SONAR basics
Page 30
What it does Key
Moves the focus to the first track. HOME
Moves the focus to the last track. END
Table 6.
The current track’s controls are contained in the Track/Bus Inspector.
The Clips pane shows the clips in your project on a horizontal timeline called the Time Ruler that
helps you visualize how your project is organized. Clips contain markings that indicate their
contents. The Clips pane lets you select, move, cut and copy clips from place to place to change the
arrangement of music and sound in your project.
The Bus pane shows the buses in the project, and also shows any editing views that are in tabbed
(docked) format. The Show/Hide Bus pane button allows you to show or hide the Bus pane at
the bottom of the Track view.
The Navigator pane displays a large part of your project so you can see an overview of your song.
The Navigator pane displays all of your project’s tracks.
The Track view makes it easy to select tracks, clips, and ranges of time in a project. These are the
most common selection methods:
To Do this
Select tracks Click on the track number, or drag over several track numbers
Select clips Click on the clip, or drag a rectangle around several clips
Select time ranges Drag in the Time Ruler, or click between two markers
Select partial clips Hold down the ALT key while dragging over a clip
Table 7.
As with most other Windows programs, you can also use the SHIFT-click and CTRL-click
combinations when selecting tracks and clips. Holding the SHIFT key while you click adds tracks or
clips to the current selection. Holding the CTRL key while you click lets you toggle the selection
status of tracks or clips.
30
SONAR basics
Page 31
Track/Bus Inspector
Track/Bus Inspector for an audio track Track/Bus Inspector for a MIDI track
Most controls can be
shown or hidden.
E
I
J
F
G
H
D
A
B
C
The Track/Bus Inspector makes it easy to adjust the current track’s (or bus’s) controls, because it’s a
greatly expanded version of the current track’s controls that is located on the left side of the Track
pane.
In addition to the controls that a track or bus displays in the Track view, the Track/Bus Inspector also
contains a built-in 4-band EQ. See the online help topic “Using the Per-track EQ” for more
information.
The following graphic shows most of the Track/Bus Inspector’s controls (there may not be room to
display all of a track’s controls on the Track/Bus Inspector, depending on the resolution of your
monitor):
Figure 6. The Track/Bus Inspector
A. Audio icon B. Output routing C. Track name D. Display menu E. Module menu F. MIDI icon G. Output
routing H. Track name I. Display menu J. Module menu
SONAR basics
31
Page 32

You can hide or show any of the Track/Bus Inspector’s controls, and use it to display the controls
from any track or bus. The following table shows you how.
To do this Do this
Hide or show the Track/Bus Inspector Press I on your keyboard.
Display a certain track’s or bus’s controls in the
Track/Bus Inspector
Hide or show any of the Track/Bus Inspector’s
controls
Reassign MIDI controller sliders in a MIDI Track’s
Fx bin
Display the parameters of a different automatable
effect
Assign a control to a group, arm it for automation,
take an automation snapshot, or set up remote
control
Bypass the FX bin Right-click the FX bin and choose Bypass Bin from the
Table 8.
Click the track or bus to make it current, or choose the track
or bus in the track/bus drop-down menu that’s at the bottom
of the Track/Bus Inspector.
Click the Display menu or Module menu, and choose
Options.
Note: you can not display a MIDI track’s Time + or Key +
controls in the Track/Bus Inspector.
Right-click the slider you want to reassign and choose
Reassign Control from the pop-up menu, choose the new
parameter, and click OK.
Click the name of the effect you want to select.
Right-click the control and choose options from the pop-up
menu.
pop-up menu.
The Console View
The Console view is where you can mix the sounds on all the different tracks to create the final mix
of your project. While the Track view provides most of the same controls, you may want to use the
more familiar interface of the Console view for mixing.
You use the Console view to adjust the levels of sound for the different tracks in your project, to
change the stereo panning, and to apply real-time effects to an individual track, combinations of
tracks, or the final mix.
The Console view contains several groups of controls. There is one module for each track in your
project, and one module for each bus. You can use bus sends to direct certain tracks to special
modules that are known as buses.
32
SONAR basics
Page 33

Figure 7. The Console view
ABC
D
E
F
G
H
A. Audio module B. MIDI module C. MIDI velocity D. Bus out E. Main out F. Show/hide strip controls buttons
G. Widen all strips H. Show/hide for tracks, buses, mains
As in the Track view, you can change track settings or record new music or sound in the Console
view. You may choose to use one view or the other, or the choice you make may depend on which
project you are working on.
Other views
SONAR has a number of other views you can use to display and work on your project. To display
these views, select one or more tracks, by CTRL-clicking their track numbers and:
• Click the icon for the view in the Views toolbar
Or
• Choose the view you want from the View menu
The Piano Roll view : shows the notes from a MIDI track or tracks as they would appear on a
player-piano roll. You can move the notes around, make them longer or shorter, and change their
pitches by just dragging them with the mouse. You can also use the Piano Roll view to display and
edit MIDI velocity, controllers, and other types of information. The Piano Roll view also contains the
Drum Editor, which allows you to “paint” drum patterns using the Pattern Brush tool and play
different drum modules from a single track.
33
SONAR basics
Page 34

Figure 8. The Piano Roll view
AB CDE FGH
I
J
The Staff view : displays the notes from one or more MIDI tracks using standard music notation,
similar to the way the notation would appear on a printed page. You can add, edit, or delete notes;
create percussion parts; add guitar chords and other notation markings; display guitar tablature;
display the Fretboard pane; and print whole scores or individual parts to share with other musicians.
Figure 9. The Staff view
A. Dynamics and markings B. Time and pitch locator C. Editing tools D. Zoom out E. Zoom in F. Snap to Grid
G. Show/hide track pane H. Fretboard display I. Track list pane J. Fretboard pane
34
SONAR basics
Page 35

The Loop Construction view : allows you to create and edit Groove clips (SONAR loops that
“know” the tempo and key in which they were recorded), and export these clips as ACIDized files.
Figure 10. The Loop Construction view
The Media Browser view : allows you to preview ACIDized files and other Wave files; and drag
and drop them into your project.
Figure 11. The Media Browser view
The Event List view : displays the events in a project individually, so that you can make changes
at a very detailed level.
Figure 12. The Event List view
SONAR has several other views that are used for very specific purposes:
SONAR basics
35
Page 36
View How you use it
Meter/Key
Big Time
Markers
Lyrics
Video
Synth Rack
Navigator
Surround Panner (Producer
version only)
Sysx
Tempo
Step Sequencer Lets you compose patterns by clicking cells in a grid to turn notes on or
Matrix
Table 9.
To change the meter (time signature) or key signature, or to insert changes
in the meter or key signature at specific times in a project.
To display the Now time in a large, resizable font that you can read more
easily.
To add, move, rename, or delete labels for parts of your project that make it
easier to move from one point to another.
To add and display lyrics for a track.
To display a loaded video file.
Manage your soft synths
Manage the Now Time in a project
Pan a surround track
To create, display, store, and edit System Exclusive MIDI messages used to
control instruments and other gear that are MIDI capable.
To view and edit the project's tempo changes.
off.For details, see the “Step Sequencer View” online Help topic
Lets you trigger multiple audio and MIDI patterns, either with a mouse or via
MIDI remote control. For details, see the “Matrix view” online Help topic.
36
SONAR basics
Page 37

Zoom controls
A
B
C
D
E
F
GH
Many of the views contain Zoom tools that let you change the horizontal and vertical scale of the
view.
Figure 13. Zoom controls
A. Zoom Clips pane out vertically B. Vertical Zoom fader for Clips pane C. Zoom Clips pane in vertically
D. Zoom Bus pane out vertically E. Vertical Zoom fader for Bus pane F. Zoom in horizontally G. Horizontal zoom
fader H. Zoom out horizontally
The Track view toolbar contains the Zoom tool:
The Zoom tools are used as described in the following table:
Too l How you use it
Zoom out (Clips pane or Bus pane)
Zoom in (Clips pane or Bus pane)
Zoom fader
Zoom tool
Table 10.
SONAR basics
Click to zoom out incrementally, or press SHIFT and click to zoom all
the way out
Click to zoom in incrementally, or press SHIFT and click to zoom all
the way in
Click and drag to zoom continuously
Click to arm, then click and drag in the view to select the zoom area.
Click the drop-down arrow to display a menu of zoom and view
options.
37
Page 38

You can also zoom with the keyboard:
AB C
D
Key What it does
CTRL+UP ARROW Zoom out vertically
CTRL+DOWN ARROW Zoom in vertically
CTRL+RIGHT ARROW Zoom in horizontally
CTRL+LEFT ARROW Zoom out horizontally
G Go to (center) the Now time, without zooming
Hold down Z Arm the Zoom tool
U Undo the current zoom
F Fit tracks to window
A Show all tracks
SHIFT+F Fit project to window
SHIFT+double-click a clip Maximize track height
Tab le 11 .
Docking views
You can dock any view other than the Console view in the lower-right corner of the Track view by
enabling a view’s Enable Tabbed option. You can have as many views open in tabbed format as
you want. You can toggle through the different views by clicking the tab of the view you want to see
(or use the CTRL+SHIFT+LEFT/RIGHT ARROW shortcut). You can also maximize the pane to do
detailed work in a view, or drag the splitter bar at the top of the view to enlarge the tabbed view area.
For step-by-step instructions, see the procedures below.
A. Maximize pane B. Scroll left or right to view tabs C. Active view D. Tabs
38
SONAR basics
Page 39

To do this Do this
Display a view in tabbed format Click the upper left corner of a view, and choose Enable Tabbed from
the pop-up menu
Disable tabbed format for a view Right-click the view’s tab, and choose Disable Tabbed from the pop-up
menu.
Enable or disable tabbed format for
all open views
Maximize a tabbed view
Restore tabbed view
Close a view that is in tabbed format Right-click the view’s tab, and choose Close from the pop-up menu
Table 12.
Use the View > Enable Tabbing for Open Views command.
Click the Maximize/Restore button that’s just to the left of the tabs.
Click the Restore button that’s in the lower left corner of the view
that you’re restoring.
Locking views
By default SONAR allows only one instance of each view, but you can lock the contents of most
views, preserving the current view by forcing a new instance of the view to appear if necessary.
Locking views is the only way you can have multiple instances of the same view open. Only the
Track and Console views cannot be locked.
To lock a view, just click the Lock button at the top right of the view. An unlocked view looks like
this , and a locked view looks like this . A view can be locked automatically by pressing the
CTRL key when opening the view.
Floating views
When a view is float enabled, you can move it outside of the confines of SONAR. This is particularly
useful if you take advantage of SONAR’s dual monitor support. Using dual monitor support, you can
keep the Track or Console view on one monitor and “float” other views to the other monitor by
dragging them to the second screen.
For more information, see the online help topic “Floating Views and Dual Monitor Support.”
X-Ray windows
The X-Ray Windows feature eliminates the need to constantly minimize, move, or close windows in
order to work in other windows. It works by decreasing the opacity of the current window enough so
that you can see and work with the window that’s behind the current window. You activate the
feature by pressing a keyboard shortcut (default shortcut is SHIFT+X) when the mouse cursor is
over a window you want to x-ray. You can choose to X-Ray whichever window is underneath the
mouse cursor, or automatically X-Ray all FX/synth property pages in one step (Note: the mouse
cursor does not need to be over any plug-in property pages).
SONAR basics
39
Page 40

The X-Ray Windows feature works on the following windows:
• AudioSnap palette
• Synth Rack
• Piano Roll view (when float-enabled)
• Snap To Grid dialog
• Plug-in effects and synths
• Controller/Surface plug-ins
To select key bindings for X-Ray windows
1. Use the Options > Key Bindings command to open the Key Bindings dialog.
2. If you want to use currently unassigned keys or key combinations, scroll through the options in the
Key window until the Global Key Assignment field that is just under the window reads
Unassigned. It’s a good idea to find two unassigned options that are next to each other or easy to
remember.
Note: For best results with X-Ray Windows, avoid using ALT key combinations.
3. Once you’ve decided on two keys or key combinations that you want to use, select Global
Bindings in the Bind Context field, and scroll to the bottom of the list of commands that are in the
window below that field.
4. In the Key window, highlight the key or key combination that you want to use for the X-Ray
command, then highlight X-Ray in the function column of the list of commands, then click the
Bind button to bind them together.
5. Now highlight the key or key combination that you want to use for the X-Ray All FX/Synths
command, then highlight X-Ray All FX/Synths in the function column of the list of commands,
then click the Bind button to bind them together.
6. Click OK to close the dialog.
To use X-Ray windows
1. Use the Options > Global command to open the Global Options dialog, and on the General
tab, make sure that the Enable X-Ray check box is enabled.
2. Make sure that the view windows you want to X-Ray are in the Floating-enabled state: to check
this, click the view or fx icon that’s in the upper left corner of a window, and select Enable
Floating from the drop-down menu. If Disable Floating is in the menu, then the Floating option
is already enabled.
40
Note: All FX/Synth/Control surface property pages are float-enabled by default.
SONAR basics
Page 41

3. To X-Ray or un-X-Ray a single window, move the mouse cursor over the window, and press the
keyboard shortcut (default is SHIFT+X) for the X-Ray command. The window does not need to
have focus (does not need to be the highlighted window).
4. To X-Ray or un-X-Ray all plug-in windows at once, press the key binding for the X-Ray All FX/
Synths command.
Note: If a window has focus, and the window’s Give All Keystrokes To Plug-in button is
enabled, X-Ray keyboard commands won’t work.
To Adjust X-Ray Windows Options
1. Use the Options > Global command to open the Global Options dialog.
2. On the General tab, you can adust these options:
• Enable X-Ray. Enable or disable this check box to turn the X-Ray Windows feature on or off.
• Opacity. Adjust this value by typing in a value, or by clicking and holding the + or - button to
adjust the final opacity percentage value that an X-Rayed window reaches.
• Fade Out Time. Adjust this value by typing in a value, or by clicking and holding the + or -
button to adjust the amount of time that an X-Rayed window takes to reach its final opacity
percentage value.
• Fade In Time. Adjust this value by clicking and holding the + or - button to adjust the amount
of time that an X-Rayed window takes to restore its original opacity.
3. Click OK to close the dialog and accept your changes.
To exclude a plug-in from X-Ray capablity
Some plug-ins (very few) use DirectDraw to create their windows. These windows appear jittery
when x-rayed.
To exclude a plug-in from X-Ray capablity, follow these steps:
1. Open the Cakewalk Plug-in Manager: use the Tools >Cakewalk Plug- in Manager command.
2. In the Plug-in Categories window, select the category that the plug-in you want to exclude is in.
3. In the Registered Plug-ins window, select the plug-in that you want to exclude.
4. If the plug-in is a DirectX effect or an MFX, write down (or select and copy) the CLSID value that’s
in the CLSID field at the bottom of the dialog.
5. If the plug-in is a VST or VSTi, write down the VST ID value that’s in the VST ID field at the bottom
of the dialog.
6. Close the Plug-in Manager dialog.
7. Open the Xrayexclude.ini file that’s in your SONAR program folder (use Notepad).
SONAR basics
41
Page 42

8. At the end of the file, find the [EffectProps View] section.
You will see entries such as the following:
; Waves SSL EQ Stereo
XRayExclude11=1397510483
XRayExclude12={E451379E-F7E1-4E82-98D9-BEB87AC45E90}
9. Exclude your plug-in by creating a blank line below the last entry in the [EffectProps View]
section, and then typing:
;[name of your plug-in, but withour brackets]
XRayExclude[type the next available number in XRayExclude list, but without brackets]=[VST ID
number, with no brackets, or CLSID number, with curly braces at start and finish]
For example, if the last entry in the [EffectProps View] section was:
; Waves SSL EQ Stereo
XRayExclude11=1397510483
XRayExclude12={E451379E-F7E1-4E82-98D9-BEB87AC45E90}
And you wanted to exclude the Cakewalk FxDelay from the X-Ray Windows feature, after
creating a blank line you would type:
; Cakewalk FxDelay
XRayExclude13={985DAF67-589F-4B8D-8BBC-D7AD651B9022}
If there was also a VST version of the Cakewalk FxDelay, you would add another line:
XRayExclude14=[some VST ID number, with no brackets]
10.Save and close the Xrayexclude.ini file, and restart SONAR to implement your changes.
Customizable menus
All main menus and context menus are customizable. You can fine-tune your workflow by hiding
menu items that are rarely used and reordering commands that you use frequently. You can even
design and save menu layouts specific to different tasks.
Caution: You can move commands completely out of their default menus. For example, you
can move commands out of the Edit menu into the Process menu. Keep in mind that this
manual describes commands by their original menu locations, so if you’re looking for help about
the Process > Nudge command, and you’ve moved the Nudge command to the Edit menu, the
documentation for this command will still refer to the command as Process > Nudge. You can
always load the default menu layout to restore the original command structure.
• To open the Menu Editor dialog, choose Options > Menu Editor.
• In the Menu Editor dialog, to choose a menu to edit, select one from the Menu drop-down list.
42
SONAR basics
Page 43

To do this Do this
Hide items in a menu Click a menu Item (CTRL-click to select multiple items) and press the Hide
button.
The hidden command(s) will only be visible in the submenu that is automatically
created at the bottom of the menu. You can display the submenu by clicking one
of the arrows at the bottom of the menu.
Show items in a menu Click a menu Item (CTRL-click to select multiple items) and press the Show
button.
The command(s) will reappear in its original location.
Reorder items in a menu Click and drag menu Items up or down to change their position in the menu
order.
Note: You can also click and drag Menu Items in and out of submenus.
Create a new submenu Right-click an item in the Menu Items list and select Create Submenu. That
Rename a menu item or
submenu
Create a new separator bar Right-click a menu item and select Insert Separator.
Remove a submenu or
separator bar
Save a new menu layout Enter a new name into the Menu Layout field and press the Save button.
Delete an existing menu
layout
Edit a menu layout Launch the Menu Editor and choose the menu layout you wish to edit from the
Load a different menu layout Launch the Menu Editor and choose a different Menu Layout from the drop-
Table 13.
item will now appear in its own new submenu.
Or
Select one or more items from the list and press the Create New button in the
Submenus section of the dialog.
Right-click a menu Item or submenu and select Rename, then enter a new
name.
Or
Select a menu Item and press F2, then enter a new name.
The separator bar will appear above the menu item you right-clicked.
Right-click the submenu or separator and select Remove Submenu or Remove
Separator.
Select the menu layout you wish to delete and press the Delete button
drop-down menu, then make your changes.
down menu, then close the dialog.
OR
Use the Options > Menu Layouts command, and select a layout from the
available options.
SONAR basics
43
Page 44

Note 1: Keep in mind that the factory default menu layout cannot be overwritten. If you want to
change this layout, save your changes under a new layout name.
Note 2: If you change your menu layout so much that you can’t find some commands, you can
always load the factory default menu layout.
Altering your menus may affect your menus’ hotkeys, which allow you to navigate through the
application’s menus without using a mouse. You can view the hotkeys in your menus by pressing
ALT and observing the underlined letters. Pressing the underlined letter on your keyboard will launch
that menu command. In order to ensure you have no duplicates hotkeys in your customized menu,
do the following.
1. Launch the Menu Editor and select the menu or submenu you wish to check for duplicate
hotkeys. Right-click the menu item and select Check Hotkeys. The Menu Editor will then report
back if duplicate hotkeys are found, or if a command has no hotkey at all.
Note: The Check Hotkeys command examines only commands on the menu that you right-
clicked, at the menu level that you right-clicked. It does not examine submenus of that menu.
2. If missing or duplicate hotkeys are found, right-click again and select Generate Hotkeys. New
non-duplicate hotkeys will be assigned for each item in that menu or submenu (but only on the
menu level where you right-clicked, not on any submenus of the menu or submenu that you rightclicked).
Note: Hotkeys are indicated within the Menu Editor by ampersands (“&”) in each menu item’s
name. The ampersand is placed directly before the letter that represents the menu item’s hotkey.
If you wish to assign hotkeys manually, you can do so by when you rename a hotkey by placing
the ampersand before your preferred hotkey letter for that command or submenu.
3. If necessary, re-save your layout to preserve these changes.
Customizable toolbars
You can customize each toolbar in SONAR. You can hide or reorder each component of a toolbar, or
add buttons to a toolbar from other toolbars. You can create up to three new toolbars from
components of other toolbars. You can also hide or show all toolbars with a single command, and
dock toolbars vertically if you want.
• To choose what toolbars you want to see, use the View >Toolbars command, and check the
toolbars that you want to see in the dialog box.
• To hide or show all toolbars, use the View > Show Toolbars command. This command is
available in the Key Bindings dialog (Options > Key Bindings command).
44
SONAR basics
Page 45

To customize a toolbar:
1. Right-click the toolbar that you want to customize, and choose Customize from the pop-up menu
to open the Customize Toolbar dialog.
2. In the Available Toolbar Buttons field, select a component that you want to see in the toolbar,
and click the Add button to move the component to the Current Toolbar Buttons field.
3. Repeat step 2 for any additional components you would like to display.
4. In the Current Toolbar Buttons field, select a component that you do not want to see in the
toolbar, and click the Remove button to move the component to the Available Toolbar Buttons
field.
5. Repeat step 4 for any additional components you would like to remove.
6. If you would like to move a toolbar component to a different location in the toolbar, select the
component in the Current Toolbar Buttons field, and click the Move Up button or the Move
Down button to change the button’s location in the toolbar.
7. Repeat step 7 for any additional components.
8. If you want to restore the toolbar to its default appearance, click the Reset button.
9. Click Close when you want to close the dialog.
To create a toolbar:
1. Use the View > Toolbars command, and check one of the User “n” options.
A toolbar appears, with a default set of controls.
2. Right-click the toolbar, and choose Customize from the pop-up menu to open the Customize
Toolbar dialog.
3. Customize the toolbar the in the same way as the previous procedure.
To rename a toolbar:
1. Right-click the toolbar, and choose Rename from the pop-up menu to open the Rename Toolbar
dialog
2. Fill in the New Name field, and click OK.
Now when you open the Toolba rs dialog, the name you chose is listed in the dialog.
To dock or undock a toolbar:
• To dock a toolbar horizontally, drag it to the top or bottom of the interface.
• To dock a toolbar vertically, drag it to the left or right side of the interface.
• To undock a toolbar, drag it to the part of the interface where you want it, or entirely away from the
interface.
Layouts
You may spend a lot of time making sure that all the views are laid out on the screen just the way
you want. When you save your work, you can save the screen layout along with it. You can also
save the layout by itself and then use the layout with other projects. For more information, see the
online help topic “Layouts.”
SONAR basics
45
Page 46

Working on a project
ECGHFD
BA
Much of your time in SONAR is spent recording and listening to your project as it develops. The
Transport toolbar, shown below, contains the most important tools and other pieces of information
you’ll need to record and play back your project.
Every project has a current time, known as the Now time. As you record or play back a project, the
Now time shows your current location in the project. When you create a project, the Now time is set
to the beginning of the project. The current Now time is saved with your project.
You control recording and playback using tools on the Large Transport toolbar (press F4 to show or
hide), which work a lot like the ones on your tape deck or CD player:
Figure 14. The Large Transport toolbar
A. Play B. Record C. Click to move ahead one measure D. Auto-punch toggle E. Drag Now Time to any
desired position F. Click to jump to the end G. Click to back up one measure H. Click to jump to the beginning
As you work with a project, you can use SONAR’s mute and solo features to choose which tracks
are played, or you can create loops to play a particular section over and over again. You can also
create markers, which are named time points you add to your project to make it easy to jump to a
particular location.
Windows taskbar indicators
When SONAR is running, you’ll normally see two indicators in your Windows taskbar, right next to
the clock.
The MIDI activity monitor contains two lights that indicate MIDI input and output. When you play
your MIDI keyboard, the first light flashes when each note is pressed, and it flashes again when
each note is released. When you play back a project that contains MIDI, the second indicator lights
up.
The volume control is used to control the playback and record volumes on your sound card.
Double-click on this indicator to open a dialog box that lets you control the levels for audio, MIDI, CD
playback, and record.
The volume control is available only if your sound card is using a native Windows driver. If your
sound card does not use a native Windows driver, no volume control will be displayed in the taskbar.
46
Windows taskbar indicators
Page 47

In this case, your sound card probably came with a separate program to control input and output
levels. See your sound card documentation for more information.
Screen colors and wallpaper
SONAR lets you customize the colors that are used for virtually all parts of the program using the
Options > Colors command. This command also lets you change the background bitmap that is
displayed in the SONAR window.
For any SONAR screen element, you can assign a color in two ways:
• Choose one of the colors that is part of your Windows color scheme.
• Assign a custom color.
To Assign Custom Colors
1. Choose Options > Colors to display the Configure Colors dialog box.
2. Choose the screen element whose color you want to change from the Screen Element list.
3. Assign a color to the screen element in one of two ways:
• To use a color from the Windows color scheme, choose one of the options in the Follow
System Color list
• To use a custom color, check Use Specific Color, click the Choose Color button, and select
the color you want
4. To save these changes from session to session, check the Save Changes for Next Session box.
5. Click OK when you are done.
SONAR uses the colors you have chosen.
To restore the default colors
1. Choose Options > Colors to display the Configure Colors dialog box.
2. In the Screen Elements window, select the elements that you want to restore; you can CTRL-
click or SHIFT-click to select multiple elements.
3. Click the Defaults button.
4. Click OK.
SONAR uses the default colors for all selected screen elements.
Screen colors and wallpaper
47
Page 48

To change the wallpaper
1. Choose Options > Colors to display the Configure Colors dialog box.
2. Choose the desired wallpaper according to the table:
To do this Do this
Use the default wallpaper Check Default in the Wallpaper list
Not use any wallpaper Check None in the Wallpaper list
Use a custom bitmap Check Custom, choose a bitmap, and click Open
Table 14.
3. Click OK when you are done.
Color presets
Once you create a color arrangement that you like, you can save it as a preset, and then load it
whenever you want to use that arrangement. You can also load any of the many factory presets,
some of which duplicate the colors of earlier versions of SONAR. You can also import and export
color arrangements in the form of .clr files so that SONAR users can share color layouts. And you
can back up or export all of your presets with a single command, and import a group of presets that
you or another SONAR user created.
Note: Both single color presets, and collections of presets use the file extension .clr, so when
you export either the current color arrangement, or all of your presets at once, give the exported
file a name that clearly labels it as either a single preset, or as a collection of presets.
48
Screen colors and wallpaper
Page 49

Figure 15. The Configure Colors dialog
A
B
A. Presets menu B. Import and Export buttons
To load a color preset
1. Open the Configure Colors dialog by using the Options > Colors command.
2. Click the drop-down arrow on the Presets menu to display the list of presets, then click the name
of the preset you want to load.
To save a color preset
1. Open the Configure Colors dialog by using the Options > Colors command.
2. Adjust the color settings you want to save.
3. Type a name for your preset in the Presets menu.
4. Click the floppy disk icon that’s next to the Presets menu to save your preset.
49
Screen colors and wallpaper
Page 50

To export the current color arrangement
1. Open the Configure Colors dialog by using the Options > Colors command.
2. Arrange or load the color arrangement you want to export.
3. Click the Export Colors button in the Configure Colors dialog.
The Export Color Set dialog appears.
4. Navigate to the folder where you want to store your new color set file.
5. Type a name for your color set file in the File Name field.
6. Make sure that the Export Current Color Set check box is enabled.
7. Click the Save button.
To import one or more color presets
1. Open the Configure Colors dialog by using the Options > Colors command.
2. Click the Import Colors button in the Configure Colors dialog.
The Import Color Set dialog appears.
3. Navigate to the folder where the color set file you want to import is. Both single presets and
groups of presets are stored in color set files, which use the .clr file extension.
4. Click the file that you want to import.
5. Click the Open button.
6. If your Preset menu in SONAR already contains a preset that is included in the preset collection
file you are importing, SONAR asks you if you want to overwrite the file. This happens for each file
that has the same name as a preset in the preset collection you are importing. Click Yes or No for
each file in question, or Yes All or No All to either overwrite or protect all of your current preset
files.
To export all your color presets
1. Open the Configure Colors dialog by using the Options > Colors command.
2. Click the Export Colors button in the Configure Colors dialog.
The Export Color Set dialog appears.
3. Navigate to the folder where you want to store your the exported file. This file will contain all or
your color presets.
4. Type a name for your file in the File Name field. Use a file name that you will recognize as a
collection of presets, rather than as a single color arrangement.
5. Make sure that the Export Color Presets check box is enabled.
6. Click the Save button.
Note: A file of color presets can be large, and might take a minute or so to export.
50
Screen colors and wallpaper
Page 51

Installing SONAR
SONAR is easy to install. All you need to do is choose the folder where the program and sample
project files should be stored. Before you start, make sure you have your serial number handy. Your
serial number is located on the back of your DVD case.
Note: If you choose to not install the Sample files, you will not have the necessary content to
use the tutorials in Chapter 2.
To install SONAR
1. Start your computer.
2. Close any open programs you have running.
3. Place the SONAR installation disc in your disc drive.
If you have autorun enabled, the SONAR AutoRun menu opens automatically, showing you a
dialog box with several buttons. If autorun is not enabled, you can open the SONAR AutoRun
menu by selecting Start > Run and entering d:\AutoRun.exe (where d:\ is your disc drive).
4. Click the Install SONAR button.
Note: If you exit Setup without completing the installation, choose Start > Run, type
D:\AutoRun.exe (where D:\ is your DVD drive), and click OK. This will reopen the AutoRun
window, and you can click Install to start installation again.
5. Follow the installation instructions on the screen.
You can also install SONAR by choosing Start > Run and running the application named
from the DVD.
SETUP.EXE
Uninstalling SONAR
When you installed SONAR, the setup program placed an Uninstall icon in the Start menu. To
uninstall SONAR, click the Start button and choose Programs > Cakewalk > SONAR 8.5 (Studio or
Producer) > Uninstall SONAR 8.5 (Studio or Producer).
Installing SONAR
51
Page 52

Starting to use SONAR
This chapter has provided you with an overview of SONAR and basic information on how to install
the software and configure your system.
The following tutorials will give you some hands-on practice in playing, recording, and mixing your
projects. If you have not already done so, you may want to refer to “SONAR basics” on page 26 to
get the most out of these tutorials.
Note: If, during installation, you chose in the Select Components dialog not to install the
Tutorials folder (part of the Sample files), you will not have access to the sample tutorial files
needed to follow the tutorials in this chapter. If you didn’t install these files, insert your product
disc and copy the files to your hard drive.
Tutorial 1 – Creating, playing, and saving projects . . . . . . . . . . . . . . . . . . . . . 53
Tutorial 2 – Using the Media Browser . . . . . . . . . . . . . . . . . . . . . . . . . . . . . . . 65
Tutorial 3 – Recording vocals and musical instruments. . . . . . . . . . . . . . . . . . 71
Tutorial 4 – Playing and recording software instruments. . . . . . . . . . . . . . . . . 77
Tutorial 5 – Working with music notation . . . . . . . . . . . . . . . . . . . . . . . . . . . . . 85
Tutorial 6 – Editing your music. . . . . . . . . . . . . . . . . . . . . . . . . . . . . . . . . . . . . 93
Tutorial 7 – Mixing and adding effects. . . . . . . . . . . . . . . . . . . . . . . . . . . . . . . 99
Tutorial 8 – Working with video . . . . . . . . . . . . . . . . . . . . . . . . . . . . . . . . . . . 107
Tutorial 9 – Exporting, CD burning and sharing. . . . . . . . . . . . . . . . . . . . . . . 115
52
Starting to use SONAR
Page 53

Tutorial 1 – Creating, playing, and saving
projects
Understanding and managing project files is central to your work flow in SONAR. In this tutorial, we are
going to cover the basics of getting started with project files and some of the operations that can be
performed with them. Whenever you write or record music in SONAR, you are writing it to be saved into
a project. A project can contain a variety of elements, including:
• Audio tracks
• MIDI tracks
• Instrument tracks
• DirectX and VST audio effects
• Project settings such as Tempo, Key and Meter changes
•Lyrics
Page 54

Creating a new project
There are several ways to get started with a project in SONAR. When SONAR is opened, you will be
greeted with the Quick Start dialog. Let’s take a look at the options available in this dialog.
Open a Project. Opens a standard File Open dialog, which lets you select the project that you
want to open.
Open a Recent Project. The drop-down list shows the most recent projects that have been
opened in SONAR. Select the desired project from the list and click the button to the left of the list to
open the project.
Create a New Project. Click this button to open the New Project File dialog, which lets you create
a new project based on any available template.
Online Videos and more. Click this link to view our tutorial videos online. An active Internet
connection is needed in order to access this content.
Getting Started. Click this button to open the SONAR online Help.
Show this at Startup. Clear this check box if you don’t want the Quick Start dialog to launch the
next time you start SONAR.
Close. Use this button to close the Quick Start dialog.
For this tutorial, we want to create a new project.
• Click the Create a New Project button .
Tip:You can also perform this same operation by clicking
the top of SONAR’s screen.
54
Creating a new project
File > New
from the main menu across
Page 55

The New Project File dialog appears. Whenever you create a new project, you will be presented
with this dialog.
Let’s explore some of the things you can do in this window.
Name. Type the name of your project in the Name box. For this exercise, let’s name your project
Tutorial 1.
Location. Use the Location box to specify where the project should be saved. Click to
browse to a specific location. For this tutorial, use the default, as shown in the preceding figure.
Audio Path. Use the Audio Path box to specify where to save audio recordings for your project.
Click to browse to a specific location.
Store Project Audio in its own Folder. Select this check box if you want to store the project’s
audio files in a separate folder. It is recommended that you select this option.
Templa te. This list shows all available pre-made templates that are included with SONAR. This list
will also include any custom templates that you create. Your Te mplat e list may vary from the
preceding figure. For this tutorial, select the template named Normal.
OK. Click OK to create a new project based on the specified settings.
Cancel. Click Cancel to close the New Project File dialog.
Help. Click Help to open the online Help topic for the New Project File dialog.
Click OK now to move forward with this tutorial.
Congratulations, you have just created a new project in SONAR!
Creating a new project
55
Page 56

Opening project files
Next we are going to talk about opening existing project files. There are two ways this can be done in
SONAR:
• Click the Open a Project button in the Quick Start dialog that is first presented when SONAR
starts.
•Select File > Open from the menu bar across the top of SONAR’s screen.
Let’s go ahead and try one of the above methods. Either of them will bring you to the Open dialog as
shown in the following figure. The Open dialog functions like any other file browsing dialog in
Microsoft Windows.
• The vertical navigation buttons let you jump to popular locations on your computer’s hard disk.
• The browsing pane lists all the project files and folders that are available in the selected folder.
•The Go to Folder dropdown list allows you to quickly move to commonly used folders for
project files in SONAR. Typically, you can get to your projects by selecting Project Files.
• For more detailed information about all of the options and functions in this dialog, click Help.
For this tutorial we want to open one of the sample project files that are included with SONAR. To do
so, select Template Files in the Go to Folder list. This option appears when clicking on the little
arrow to the right of the dropdown list.
56
Opening project files
Page 57

This will refresh the browsing pane to display all the files and folders in the Template Files directory.
Double-click on the Tutori al s folder to open it and then Locate the project named
SONAR_AudioDemo1.cwp.
You can load project files into SONAR in one of two ways:
• Select a file by clicking on it so that it is selected, then click Open.
• Double-click the file from the browsing pane.
Let’s now use one of these methods to open the project file SONAR_AudioDemo1.cwp. When the
project opens, the File Information window appears. This window can be used for storing notes,
comments, credits and other helpful information about a project. For now, close File Information
window by clicking the Close button in the upper right corner of the window.
Opening project files
57
Page 58

Playing project files
For this next section we are going to configure the project named SONAR_AudioDemo1.cwp for
playback in SONAR. If you have not opened the project yet using the steps from the previous
section Opening project files, do so before continuing.
Configuring your sound device
Before we can get any sound, we need to ensure that SONAR is communicating with your
computer’s sound card or audio interface. To do so, click on the Options menu across the top of
SONAR’s screen and choose Audio. For this tutorial, there are two pages of this window we are
concerned with. The first is the Drivers tab shown in the following image. To get to this page, click
the Drivers tab. Before you can hear any sound play in SONAR, you have to ensure that the
devices you want to use are selected. An Edirol audio interface is used in the following example, so
all the Input Drivers and Output Drivers check boxes for the Edirol device are selected. Your
device list will most likely be different from the following image.
After you have selected the desired Input and Output devices that you plan to use with SONAR, click
the General tab. In the Playback Timing Master list, select the audio output device that you want
SONAR to treat as the default or main output device. This should be the output on your sound card
that has either speakers or headphones connected to it. In the Record Timing Master list, select
the input on your sound card that you plan to plug devices into, such as a microphone, keyboard or
other instrument.
58
Playing project files
Page 59

If you are having trouble with any of the steps in the last section thus far, we have created a helpful
set-up guide on our web site that provides step-by-step instructions for configuring your audio
hardware. You can find it here: www.cakewalk.com/Support/hardwaresetup.
Setting the tracks outputs
The next important step is telling SONAR which output on your sound device you would like audio
tracks to play on. In some cases, it is desirable to have tracks playing different outputs (such as if
you are using external hardware processing for effects). In this scenario, you’ll want to set all of the
audio tracks to the same output.
Let’s start with the Bass track. Locate the track named Upright Bass in the project. Let’s take a
closer look at a few of the track’s controls. If the track controls are not all visible, you may need to
expand the track to see them all.
To expand a track to make all of its controls visible
1. Point the cursor to the bottom edge of the track.
2. Click and drag down to reveal all track controls.
Tip:
If you find the number of track controls overwhelming, you can show/hide specific types of track
controls by using the tabs located at the bottom of the Track view.
Control Description
This is the Mute button. It is used to silence a track during playback. Any tracks that are
muted will not be heard.
This is the Solo button. It is used to silence every track except the one that is soloed. This
can be handy for isolating a particular performance or recording for monitoring or mixing
purposes. SONAR allows you to solo multiple tracks simultaneously.
Playing project files
59
Page 60

Control Description
This is the Arm or Record Enable button, which must be enabled on any track that you want
to record onto. For more details, see Tutorial 3 – Recording vocals and musical instruments.
This is the Input Echo or Input Monitor button. When clicked, this enables the track’s input
to be heard directly through its output. For more details, see Tutorial 3 – Recording vocals
and musical instruments.
This is the Write Automation button. When enabled, changes to adjustable track
parameters during playback are recorded. For more details, see Tutorial 7 – Mixing and
adding effects.
This is the Freeze button. It is used to temporarily convert a synth or instrument track into an
audio track to conserve CPU power.
Locate the dropdown list for Output and click the small arrow to show all available outputs. Select
the output that your speakers or headphones are connected to. If you can’t find the Output
dropdown list, make sure you have expanded the track fully by dragging it down.
Note: Your options will be different from the preceding image. Select the output that
corresponds to your sound card or audio device.
Next, you will want to repeat the above process for all of the tracks in your project.
Tip:
If you need to change multiple outputs simultaneously, you can also do it by clicking
Select > All
and then
Tracks > Property > Outputs.
This will bring up a dialog that will allow you
to change the Audio and MIDI outputs of all selected tracks.
60
Playing project files
Edit >
Page 61
Playing the project
Now that all of the track’s outputs are set to the appropriate device, the next step is to play the
project to make sure it can be heard and sounds right.
Locate the Transport tool bar at the top of SONAR’s screen. If you can’t find this toolbar, press F4 to
show the Large Transport toolbar.
The transport contains many useful functions related to projects in SONAR. For now, simply click the
Play button to hear the project.
Experiment with the Mute and Solo buttons on each track. If you solo multiple tracks you will
hear all of the soloed tracks. If you mute any tracks, they will not be heard.
Tip:
You can also use your keyboard’s SPACEBAR key to start and stop playback in SONAR.
Once you are done listening, click the Stop button .
Playing project files
61
Page 62

Looping project files
SONAR features a really handy tool that allows you to repeat specified sections of a project file. You
may want to do this for many reasons, such as to rehearse a part or phase or to listen closely to a
specific section. Perhaps you might set up a loop just because it’s your favorite part of the song and
you want to hear it over and over again. For all of the above, you will need to loop a section of the
song.
You may have noticed this demo file is an example of swing or jazz music. Let’s pretend for a second
that you are the guitar player and you wanted to practice your solo section right before the Violin
soloist begins. This requires you do two things:
1. Create a looped section of the Bass and Rhythm Guitar for you to practice with.
2. Mute the existing Solo Guitar track.
To enable looping in SONAR is easy. Simply click the Loop button in the Loop/Auto Shuttle
toolbar. You can also find this button in the Large Transport toolbar by pressing F4. When enabled,
the Loop button is lit .
Take note of the measure numbers displayed in the preceding image. The first number (2:01:000)
indicates the start of the loop region and second number (38:01:000) indicates the end of the loop
region.
When looping is enabled, the time ruler across the top of SONAR's track view displays yellow flag
markers that indicate where the loop region starts and ends. If you want to change the loop region,
you can drag the loop markers to a new location. Drag the loop start marker to measure 25 and the
loop end marker to measure 37. This will create a 12 bar loop.
Finally, mute both the Solo Guitar and Violin tracks and click Play to audition the loop region.
You will now hear only the Upright Bass and Rhythm Guitar tracks so that you, the guitarist in our
scenario, can practice your solo section.
62
Looping project files
Page 63

Saving project files
SONAR offers you many options for saving your work. To investigate these options, click on the File
menu and choose Save As. This opens the Save As dialog. Before doing anything in this window,
the first thing you should do is select Project Files in the Go to Folder list. Even if it already says
Project Files, click it anyway.
You will notice this window looks very familiar to the Open dialog we looked at earlier in this tutorial.
The Save As dialog navigates files much in the same way as Windows does. If you would like to
read the finer points and in-depth information about using this window, click the Help button
. For this exercise, we are going to look at the different types of project files you can
save with SONAR.
Saving project files
63
Page 64

Take a look at the dropdown list labeled Save as type. Click the Save as type arrow to see a list of
supported file formats. Let’s look at these different files formats now:
• Normal. This is the first option listed and the most common format used for saving project files.
Choosing this will create a Cakewalk Project file with the .cwp file extension. It is important to
remember that Cakewalk Project files do not actually store any audio data, but rather reference
audio files from where they are saved on your computer’s hard drive.
• Template. Template files are used as a starting point for new projects. Templates can store layout
information about your project, such as how many audio and MIDI tracks there are and which
Output ports they are assigned to. Detailed information about using templates can be found in
SONAR’s help topic Tem pl at es
• Cakewalk Bundle. This format is typically only used when transferring projects to other people or
other computers. Cakewalk Bundle files use the .cwb file extension and are similar to Cakewalk
Project files. The main difference is that Cakewalk Bundle files actually contain all of a project’s
audio data. Cakewalk Bundle files are much larger in size than regular Cakewalk Project files
because they contain all of the audio data for a project, so try to avoid using this format unless
you need to move a project between computers. When opening a Cakewalk Bundle file, SONAR
will “unpack” the embedded audio data and save it to a new audio folder on your computer.
• MIDI. This option lets you save a standard MIDI file of your project. MIDI files do not contain any
embedded audio or references to external audio files, so any audio data in a project will be
discarded when you save a MIDI file. MIDI files can be either Format 0 or Format 1. Format 0
combines all the MIDI events into a single track. This is compatible with many older sequencers
and keyboards. MIDI Format 1 files can store up to 7256 tracks and are a better choice if you plan
on using your MIDI file with another computer-based sequencing application. Although not as
common, SONAR also allows you to save in the RIFF MIDI format. Unless you are positive that
the playback system requires a RIFF MIDI file, you will want to use the MIDI format.
In most cases, the best choice for saving your files is Normal. To save this project, do the following:
1. In the Go to Folder list, select Project Files. Even if Project Files is already selected, select it
again for good practice.
2. In the Save as type list, select Normal.
3. Type a name in the File Name box.
4. Click Save to save the project.
This completes the tutorial.
64
Saving project files
Page 65

Tutorial 2 – Using the Media Browser
New to SONAR is the enhanced Media Browser view; designed to improve workflow and make
working with audio loops and MIDI groove clips simple. When you open a project in SONAR, the
Media Browser will open underneath the track view. It is outlined in the image below.
To show or hide the Media Browser, click the the Media Browser View button located to the left
of the Transport controls in the top of SONAR’s screen, or press ALT+1.
Now that we know how to show and hide the Media Browser view, let’s take a closer look at some of
its features, starting with the toolbar that spans across the top of the Media Browser view. Locate the
section on your computer screen that looks like the following image.
Page 66

First, let’s review the controls on the left side of the toolbar.
Control Description
This is the Move up button. It is used to open the folder one level above the active folder.
The Refresh button is used to refresh the active folder. This is helpful if you move new
loops into the folder and want SONAR to be able use/see them.
This is the Windows Explorer button. Click to open Windows Explorer at the same
directory being viewed in the Media Browser view.
Stop is used to stop play back of the selected loop.
Play is used to listen to the currently selected loop.
When enabled, the Auto Preview button automatically previews loops and files when you
click on them in the Media Browser view.
Clicking the Views button allows you to choose how files are displayed in the list view. For
more details on this check out the online help topic “The Media Browser View”
The Content Location drop down box shown below allows you to quickly jump to popular locations
on your hard drive.
The Audio Preview Bus drop down box shown below allows you to select the output device used to
listen to loops and files from the Media Browser view.
66
Page 67

The next three controls are used for software synths.
Control Description
The Insert Soft Synth button allows you to add an instrument track to your project so you can
preview MIDI groove clips directly from the Media Browser.
This is the Delete Soft Synth button, which is used to remove the selected synth from the
Preview Synth list from your project.
Click the Properties button to open up the property page for the selected synth.
Table 15.
Below the toolbar, the Media Browser is split into two or three panes. From left to right they are the
Preview Synth list, the Folders pane and the Explorer pane.
Note: The folders list can be hidden using the Views button.
67
Page 68

Finding and previewing audio loops
Now that we have a general idea of how the Media Browser is laid out, let’s find some of the content
that is included with SONAR and give it a listen.
1. Make sure the Media Browser view is open and visible. If it is not, click the Media Browser view
button or press ALT+1.
2. Click on the Views button and make sure that the option for Folders is selected and that the
bullet point is set to Details.
3. In the Folders list, locate the My Documents directory. Click the little triangle to the left of my
documents to expose all of the folders inside of it.
4. Using the same process, navigate to the following directory:
My Documents\Cakewalk\SONAR\Sample Content\PowerFX\DowntempoDub\.You can
open folders by double-clicking on them.
Tip:You can quickly jump to the
Content Location
the
Your folders list should look something like the image below.
Notice that when you click on the Funky folder all of the contents of that folder are displayed in
the Explorer pane to the right.
5. Click on the file named DrumLoop1.wav.
drop-down list.
Sample Content
folder by selecting
Sample Content
from
68
Finding and previewing audio loops
Page 69

6. Click the Play button in the Media Browser toolbar.
The selected file is previewed.
If you don’t hear anything, revisit the settings of your Audio Preview Bus, as discussed above, and
ensure that it is set to the audio device that your headphones or speakers are connected to.
If you need to preview a lot of loops quickly, enable the Auto-Preview function . When enabled,
an audio loop will start playing as soon as you select it.
Previewing MIDI groove clips
In addition to audio loops, the Media Browser view also allows you to preview MIDI groove clips.
Let’s try this now with one of the clips included with SONAR. Unlike audio loops, MIDI groove clips
require a soft synth or instrument track to play through.
1. Click the Insert Soft Synth button , point to Soft Synths and select Cakewalk TTS-1.
The Insert Soft Synth Options dialog appears.
2. Clear all of the check boxes except for Single Track Instrument, Recall Assignable Controls,
and Ask This Every Time.
3. Click OK.
Cakewalk TTS-1 is added to your project.
Now that we have a synth in our project that we can preview MIDI groove clips with, let’s find some
and give them a listen.
1. Using the same process we did to find audio loops, use the Folders and Explorer panes to
browse to My Documents\Cakewalk\SONAR\Sample Content\Smart Loops.
2. Locate the MIDI groove clip named Bangin 10.mid.
Before we can preview a MIDI groove clip, we need to tell SONAR what instrument or synth we
would like to preview it with.
3. In the Preview Synth pane, select Cakewalk TTS-1 1.
Finding and previewing audio loops
69
Page 70

4. Now that SONAR knows what synth to play MIDI groove clips through, select the groove clip
named Bangin 10.mid just as you did with the audio loop previously.
5. Click the Play button in the Media Browser toolbar.
Just like with audio loops, you can set MIDI groove clips to auto-preview by clicking the Auto-
Preview button.
In addition to using soft synths to preview MIDI groove clips, soft synths also have many other useful
and powerful features. For more details and instructions on using them, see “Tutorial 4 – Playing and
recording software instruments” on page 77.
Adding loops to your project
Once you have found an audio loop or MIDI groove clip that you would like to use in your project, the
next important step is to add it to your project. Adding loops is easy with SONAR’s intuitive drag and
drop interface.
To add a loop to your project, do the following:
1. Locate the loop you would like to use in the Browser pane of the Media Browser view.
2. Drag the loop to a track. If you are selecting an audio loop, you must drag it to an audio track. If
you would like to use a MIDI groove clip, be sure you drag it to a MIDI track.
You should also notice that, as you drag the file, your mouse pointer changes to an arrow with a
plus sign .
3. When you drag a loop or groove clip into a project, it will only show one repetition. You can extend
how long a loop is by pointing the mouse pointer to the clip’s right edge, then drag the clip edge to
the desired duration. When you point the mouse pointer to the right clip edge, a blue vertical line
appears and the mouse pointer looks like this .
This completes the tutorial. You should now be able to drag loops into your projects and loop them.
70
Finding and previewing audio loops
Page 71

Tutorial 3 – Recording vocals and
musical instruments
One of the most important aspects of creating music in SONAR is digital audio recording. This is the
process of taking the sound from a microphone or an instrument and recording it to an audio track.
Once this step is completed you can edit and mix the song to prepare it to share with the world.
This tutorial will walk you through the steps involved and provide you with some insight on how to get
the best possible audio recordings.
Adding an audio track
In Tutorial 1, you learned about opening project templates. Let's open a blank project for this tutorial:
1. On the File menu, click New.
2. Select the Blank (no tracks or buses) template and click OK.
A new blank project is created.
With the blank project open, you can insert new tracks as you need them. For the task of
recording digital audio you'll need a new audio track. Follow these steps to insert one:
1. Do one of the following:
• Click Insert and then click Audio Track.
• Right-click on the Tracks pane and select Insert Audio Track on the pop-up menu.
A new audio track is added to your project.
2. In the new audio track, expand the track to expose all of its controls (for details, see “To expand a
track to make all of its controls visible” on page 59).
The track's controls are exposed.
3. Click the Input drop-down menu to select the track’s input.
The available inputs for the track are displayed.
Page 72

4. Select the physical jack that you're instrument is plugged in to. If you know, for instance, that your
Input may be too low
Input is too loud
guitar is plugged into input 1, click the Input control and select the first option. Some audio
interfaces refer to their stereo inputs as pairs, like 1/2, 3/4 or 5/6. Most often left channels are
represented by odd numbers and right channels are represented by even numbers.
Note: Most microphones and guitars are mono, so you'll want to select either the left or right
channel accordingly.
5. Click the Output drop-down menu to select the track’s output.
The available outputs for the track are displayed.
6. Select the output port that you want the audio track to play through during playback. This is how
you ultimately route the audio to your speakers. You will usually choose 1 and 2, because these
are most commonly the outputs that speakers or audio monitors are connected to.
7. Click the track's Record Enable button .
Note: SONAR only allows recording to tracks that have been record enabled. This is
necessary since SONAR allows for multi-track recording. This tells SONAR what track you want
your new material recorded to. Otherwise, every track would be recorded to during every take.
8. Click the Input Echo button if you want to hear the input during recording. Many sound cards
and audio interfaces have an option to do this automatically on the hardware level. If you can
already hear the input signal, simply move on to the next section.
Getting ready to record
At this point, we need to check the input levels to make sure they are sufficient and not distorting.
Perform as you would if you were recording and watch the meter on the track respond to the sounds
you produce.
If the meter never even comes close to the maximum, increase the input level. If the meter even
occasionally reaches the maximum, decrease the input level.
Input levels are usually adjusted via a knob next to the input jack on the sound card, but features like
this may vary slightly between devices. So, if you have never recorded an instrument or microphone
with your sound card, you may want to read about doing so in the device's manual.
Figure 16. The record meter shows the input level
72
Page 73

Recording your performance
Now that everything is set up, let's record something!
1. On the Options menu, select Project and then click the Metronome tab.
2. Set the metronome for a 2 measure count-in.
• Click Use Audio Metronome, select the Recording check box and set Record Count-in to 2
Measures. For details about each metronome option, click Help.
3. Make sure the track has been record enabled by clicking the track’s Record Enable button. The
Record Enable button on the track should be lit in red like this: . Again, if you don't arm a
track, SONAR will not know where to put the audio and the transport Record button will be
disabled .
4. On the Transport, click Record, or press R on your computer keyboard.
5. You'll hear two measures counted in by the metronome and then recording will begin. Start
performing at the beginning of the third count.
6. When you finish recording, click the Stop button or press the SPACEBAR.
A new audio clip appears.
Press Play to play back the project. If you would like to redo the take, go to Edit > Undo to undo the
previous recording, then repeat steps 3, 4 and 5 above until you get a perfect take.
Now that your first track has been recorded, you can “over-dub” another part. To do so, disable
recording on track 1 and repeat the steps in this tutorial. After repeating the steps, you will have
recorded to track 2. Both recorded tracks will play during playback. Each will also have its own
exclusive volume and pan control, FX chain and can be muted or soloed. You'll learn more about this
in future tutorials.
73
Page 74

Troubleshooting
If you weren't able to record successfully by following this tutorial, please check the following:
I only get one side of my guitar/microphone recorded
You may be recording a mono signal through a stereo input. Guitars and microphones produce
mono signals. Right-click the track and select Track Properties from the popup menu. This opens
the Track Properties dialog, where you can specify the desired input port. Select the appropriate
side of your stereo pair, either left or right as opposed to stereo.
Also make sure you don't have a mono adapter going into the Line-in and that you have the Left side
of your sound card (mono) chosen for input in SONAR.
Previously recorded tracks are mixed into my new recordings
This can happen when your soundcard is set to record everything that comes out of your computer
speakers.
1. Click on the Windows Start button and go to All Programs > Accessories > Entertainment >
Volume Control.
The Volume Control window appears.
2. On the Options menu, click Properties.
The Properties dialog appears.
3. In the Adjust Volume For section, click Recording.
4. Click OK to close the Properties dialog.
The Record Mixer appears.
5. Make sure What You Hear or Stereo Mix (exact name various depending on the sound card
manufacturer) is not selected. If this option is enabled, click the Select check box below the
desired input (normally Line In or Mic).
This problem can also occur when you are using an analog mixer in your setup. Carefully follow all
of your signal paths to ensure that your sound cards audio output is not being looped back into itself.
You should also consider the possibility of your microphone picking up the signal from your speakers
or headphones.
Only a flat line/silence is recorded
In Windows XP, click the Start button and go to Programs > Accessories > Entertainment >
Vol ume Contr ol to open the Windows Mixer.
The Windows Mixer controls the volume levels of your sound card inputs and can also mute any
input or output device.
74
Page 75

The Windows Mixer looks like this:
When you open the Windows Mixer it may be labeled Play Control or Recording Control. We want
to see the recording controls.
To view the recording controls in Windows XP:
1. On the Options menu, click Properties.
The Properties dialog appears.
2. In the Adjust Volume For section, click Recording.
3. In the Show the Following Volume Controls section, click Line-in and Microphone.
4. Click OK to close the Properties dialog.
The recording controls appear in the Windows Mixer.
5. Click the Select check box under the input you wish to use (normally Line In or Mic).
To view the recording controls in Windows Vista:
1. Go to the Windows Start Menu and type the word SOUND in the Start Search box.
2. The search results appear.
3. Click Sound to open the Windows Sound Control Panel.
4. Click the Recording tab.
All available input devices are listed along with a meter for each device.
5. Play your instrument or speak into the microphone.
Meter activity is visible on one of the input devices.
6. Right-click the input device that has meter activity and select Set As Default from the popup
menu.
75
Page 76

76
Page 77

Tutorial 4 – Playing and recording
software instruments
Software instruments, which are also referred to as soft synths, are a major part of computer music.
Our goal in this tutorial is to add a software instrument to a project. We'll explore a few different ways
they can be used with SONAR and look at some options to really make the most of them.
Note: Feel free to skip to the next section if you want to start using synths right away.
A brief history
For our purposes, a synth has two basic functions:
• Receive a digital message
• Make a sound based on the information contained in that message
In the early 1980's, all of the major manufacturers of keyboards and drum machines got together to
decide on a way for their products to work well with each other. Since they all operated under some
version of the two functions listed above, it was a simple goal.
They needed to standardize what messages were used to represent particular expressions. For
example: if it was a drum machine, everyone would need to use the C note for the bass drum, the D
note for the snare drum and so on. That way, messages sent from one drum machine can be fed to
another made by a different company. It will play the same beat, but using the drum sounds from the
different module.
The standard they established is known as MIDI (usually pronounced [mid-ee]). As soon as
computers entered the scene, it was clear that there could (and should) be a way to connect a synth
and send MIDI messages to it from a software sequencer. That's how Cakewalk was born. Our first
application was a DOS program that would allow a user to edit the MIDI data in detail, and play it out
to a connected synth. You could also record the events from a performance into the computer.
Things have evolved a lot since then. As computers have grown more powerful, the capabilities of
Cakewalk software have expanded. Computers are now so fast that software companies are able to
make synths and drum machines that are completely software-based. They are essentially the guts
of a keyboard in a computer program.
Page 78

Adding an instrument track to your project
Adding instrument tracks to your project is easy and something you’ll find yourself doing often, so
let’s explore some of the basics. For this exercise, we'll start with a blank project:
1. On the File menu, click New.
2. Select the Blank (no tracks or buses) template and click OK.
A new project opens.
3. Click Insert >Soft-Synths.
A menu lists all available software synths that are installed on your computer.
4. Click DropZone.
The Insert Soft Synth Options dialog appears.
5. Select the following options:
• Simple Instrument Track
• Synth Property Page
• Recall Assignable Controls
• Ask This Every Time
A new track is inserted in your project. This track is a combination of the two types of tracks you
have learned about in the previous tutorials. It holds MIDI data and accepts a MIDI input, but it
outputs the sound of the synth, like an audio track would. The DropZone window may also open.
If not, you can open it manually by double-clicking on the track icon.
78
Note: You can always launch a given software instrument's window by double-clicking its track
icon.
Page 79

Let's take a quick look at DropZone.
One of the first things you'll typically need to do is choose a sound. In DropZone and most other
Cakewalk synths, a sound preset is referred to as a program.
1. In DropZone's Program window, click Empty Program.
The Program Browser appears.
Note: It may take a minute the first time the Program Browser opens. This is because
DropZone is building a list of all available sounds. Once the list has been built, the Program
Browser will open faster the next time.
2. Select a program by double-clicking its name. For this tutorial we'll use Acid Quinda from the
Basses section.
DropZone loads the program and displays the program name.
3. Click the keyboard image to hear what the program sounds like.
Note: Each soft synth uses a different method of choosing and auditioning sounds. This is
often outlined in the synth's documentation. You can press the F1 key to open the online help
for a synth.
Now that we have inserted an instrument and selected one of its sounds we can make use of these
sounds in our project. This is where you can get creative. You have the option of recording a
performance that you play on a MIDI keyboard (also referred to as a controller) or manually entering
notes and events to play out to the software synth. We'll explore each method in the following
sections.
79
Page 80

Recording MIDI
First, we'll try recording. This only works if you have a MIDI controller. If you do not have a MIDI
controller, skip ahead to the next section of this tutorial.
For recording, you don't need the DropZone window open. You can close an instrument by clicking
in the upper right corner. This doesn't cause the synth to stop functioning—it will continue to work
in the background.
Note: If you need to see the DropZone window again, just double-click the track icon.
In the Track view, we can assign the input port. If you only have one MIDI keyboard this should be
set up already. Try playing some notes to see if it works. If not, go to Options > MIDI Devices and
make sure your keyboard is enabled in the Input Port list.
The next step is arming the track for recording. Click the track's Record Enable button . This
enables recording on the track.
Now, click the Record button in the Transport toolbar. The Now Time cursor starts to roll. Play
some notes and click the Stop button when you're done.
You have just recorded your first MIDI performance through a software instrument. Press the Play
button to hear it play back.
Manually entering MIDI notes
Using this method, you can manually draw notes on a grid called the Piano Roll View (often referred
to as the PRV). This is the preferred method if you're not much of a keyboard player or don't have
access to a MIDI controller. It allows you to edit every detail of a performance.
To get to the PRV, you first need to select the track you would like to see in it. Simply click the track
icon once so that it changes color. Next, go to Views > Piano Roll to open the PRV.
80
Page 81

The ruler at the top of this view represents musical measures and beats. The keyboard image on the
left represents what notes are being played.
Click on the Draw tool . You can also enable this tool by pressing the D key on your computer
keyboard. The Draw tool allows you to click on the grid to create a note.
To create a note, click on the grid at measure 1.
If you click on various sections of a note, the Draw tool performs a different function:
• Left edge. Adjusts the start time.
• Right edge. Adjusts the end time or the duration.
• Top. Adjusts the velocity of the note, which indicates how hard the note is played.
• Bottom. Allows you to move the note to another location on the PRV grid.
Try to create a melody using this technique. You might find that you can only create 16th notes or
longer. If you want 32nd notes or triplets, click the Snap To Grid options button .
This will open the Snap To Grid dialog box where you can set the resolution to 32nd notes.
81
Page 82

Click OK. You can now draw notes at shorter distances from each other.
What if I already have a project that contains MIDI tracks?
If you already have a MIDI track that you would like to play through a software instrument, the steps
are a bit different.
Let's start by opening a sample project.
1. On the File menu, click Open.
2. Naviagate to My Documents/Cakewalk/SONAR/Sample Content/Tutorials.
3. Click on the file named Latin.cwp and click OK.
If you press Play, you are not likely to hear anything. That's because this project does not contain a
software synth for the MIDI tracks to play through. Since there are 11 tracks in this project, it would
be best to use one synth track and route them all to the same instrument. Some instruments, such
as the Cakewalk TTS-1 can output more than one type of sound. These instruments are known as
multi-timbral synths. They know what notes are played through each sound based on the MIDI
channel they are sent over. If you examine the Track Properties dialog of each track in this project,
you'll notice that each one is set to its own channel. No two tracks share the same channel.
Let's insert the Cakewalk TTS-1:
1. Go to Insert > Soft Synths > Cakewalk TTS-1.
The Insert Synth Options dialog appears.
2. In the Create These Tracks area, click First Synth Audio Output.
82
Page 83

3. In the Open These Windows area, click Synth Property Page.
Note: If you would like a detailed explanation of each option, click Help.
4. Click OK.
A new synth track is inserted in your project.
On some computers, the tracks may play back through the TTS-1 at this point. However, on
computers that have hardware MIDI outputs available, you may need to specify the TTS-1 as each
track's output. Here's a fast way to do that:
1. Hold down the CTRL key and click each track to select them.
The tracks are highlighted to indicate they are selected.
2. Go to Tracks > Property > Output.
The Track Outputs dialog appears.
3. In the MIDI Outputs list, select Cakewalk TTS-1.
Press Play to play back the project. If you'd like to add your own track to play through the TTS-1, you
can click on the New Track button again. This time select MIDI Track. On your new MIDI track, set
the output to TTS-1. Remember, it needs to be on its own discreet MIDI channel. In this project, MIDI
channels 1-11 are already used, so let's assign this track to channel 12. You can also select the
sound via the track's Patch control. Then use one of the methods described above to create MIDI
data. You can also add MIDI data to your new track from the Media Browser. See Tutorial 2 for
details about the Media Browser. Another option is using the Staff view as an alternative to the Piano
Roll view. That will be covered in the next tutorial: Tutorial 5 - Working with music notation.
83
Page 84

84
Page 85

Tutorial 5 – Working with music notation
A great way to compose in SONAR is by using the Staff view. The Staff pane displays MIDI note
events as musical notation. For some musicians, this may be the most familiar and comfortable view
in which to work. The Staff pane provides many features that make it easy for you to compose, edit,
and print music. You can add notes to your composition with simple point-and-click techniques.
This tutorial will introduce you to the tools and features that SONAR provides for working with
notation.
Let’s start by opening the Staff view in a new project:
1. On the File menu, click New.
The New Project File dialog appears.
2. Select the Normal template, specify a project name and save location, then click OK.
SONAR loads the new project, which contains two audio tracks and two MIDI tracks.
3. Click on track 3 labeled “MIDI 1”.
4. On the Views menu, click Staff.
The Staff view opens.
Page 86

Next we need to configure the Staff View tools for the purpose of this tutorial:
1. Change the Display Resolution to the smallest note value.
2. Disable Fill Durations and Trim Durations .
3. Select the Draw tool .
For this tutorial we will also change the time signature to ¾, the key to G and the staff layout to
display a treble and bass clef.
1. On the Insert menu, click Meter/Key Change.
The Meter/Key Signature dialog appears.
2. Change Beats per Measure to 3 and Key Signature to 1 Sharp (G), then click OK to close the
Meter/Key Signature dialog.
3. In the Staff view, click the Layout button .
The Staff View Layout dialog appears.
86
Page 87

4. In the Clef list, select Treble/Bass, then click OK to close the Staff View Layout dialog.
The Staff View now looks like this:
Now that you know how to set up the Staff View, it's time to play! You can either record a MIDI track
in this project or manually add notes. The rest of this tutorial will provide you with a basic overview of
the notation tools. For more in depth information about all the features and functionality of the Staff
View, including using the Fretboard and the Lyrics View, check out the online help in SONAR.
Selecting the note value
Simply select any of the note value buttons found in the center of the Staff view. You can also create
a dotted note or triplet by clicking the appropriate buttons found just to the right.
Adding a note
To add a note:
1. Click the Draw tool .
2. Click at the point where you want to add a note.
A note event is inserted.
87
Page 88

Selecting notes
To select notes:
1. Click the Select tool .
2. Do one of the following:
• To select a single note, click the note head.
• To select multiple adjacent notes, click outside the first note you want to select and drag the
mouse to draw a rectangle around the desired notes.
• To select discontiguous notes, hold down the CTRL key and click the desired notes.
Moving Notes (Change timing or pitch)
To move notes:
1. Click the Select tool .
2. Select the note or notes that you want to move.
3. Click on any selected note and drag the mouse left or right to change timing or up and down to
change pitch.
Copying notes
To copy notes:
1. Press and hold the CTRL key down while you click the desired note(s).
2. While still holding the CTRL key and the left mouse button, drag the note(s) to the desired
location, then release the mouse button.
The note(s) is copied.
Changing the duration of a note
You can change the duration of a note while using either the Draw tool or the Select tool .
1. Right click the note head to open the Note Properties dialog.
2. In the Duration field, enter in the number of ticks you want for the note, then click OK to close the
Note Properties dialog.
88
Page 89

The following table shows the relationship between note durations and ticks (with the default
timebase of 960 ticks per quarter note).
Note Duration in ticks
Whole 4:000
Half 2:000
Quarter 1:000
Eighth 480
Sixteenth 240
Thirty-second 120
Deleting a note
Select the Erase tool and click the note you want to delete.
89
Page 90

Adding lyrics
To add a lyric event below a note:
1. Click the Draw tool .
2. Enable the Lyric button .
3. Position the pointer just below the note and click.
A box appears where lyrics can be typed.
4. Press the space bar to quickly jump to the next note.
Adding chord symbols
To add a chord symbol above a note:
1. Click the Draw tool .
2. Enable the Chord button .
3. Position the pointer above the note you want to add the chord to and click.
A chord symbol is added above the note.
4. To change the chord properties or show a guitar chord grid, right-click the chord name.
The Chord Properties dialog appears.
90
Page 91

Adding expressions
1. Click the Draw tool .
2. Enable the Expression button .
3. Position the pointer just below a note and click.
A box appears where expressions can be entered.
Adding a crescendo or decrescendo/diminuendo
1. Click the Draw tool .
2. Enable the Hairpin button .
3. Position the pointer just below a note and click.
A hairpin event (crescendo or decrescendo) is inserted.
4. To change the hairpin type and duration, right-click the hairpin event.
The Hairpin Properties dialog appears.
Note: Hairpin events are ornamental only and do not affect playback.
91
Page 92

Adding pedal marks (sustain)
1. Click the Draw tool .
2. Enablen the Pedal button .
3. Position the pointer below the staff and click.
Pedal down and Pedal up marks are inserted.
4. Click and drag to move the marks to a new time if needed.
Printing your notation
Once you are finished entering and editing notes you can print out the score or individual parts.
1. Select the MIDI track or tracks you want to print the notation for.
2. On the Views menu, click Staff.
The Staff view opens.
3. On the File menu, click Print Preview.
The Print Preview window opens, allowing you to see how the printed score will look.
4. To change the rastral size of the score, click Configure.
The Staff View Print Configure dialog appears. For more information about the different rastral
sizes, see the “Printing” topic in the SONAR SONAR online help.
5. To print the score, click Print.
92
Tip:
To change the title, composer and copyright information, select
window.
File > Info
to open the File Info
Page 93

Tutorial 6 – Editing your music
While working on your music, you are likely to find that editing is a major part of the song creation
process. Before people started making music on computers, all of the editing was done by cutting
tape with a razor blade and piecing it together. You can imagine how difficult it could become. In
SONAR, you can actually select a part of your music with the mouse and delete/copy/paste/move it
all very easily. This Tutorial will introduce SONAR's tools for making some common edits and offer a
few tips to make it faster and more fun.
Selection
One of the most important things to understand in order to edit your music successfully is selection.
Once you become familiar with selecting, the rest is easy. You typically need to have the appropriate
parts selected in order to make edits on them.
There are two aspects of selection:
• Time Range
• Tracks
Let's say you'd like to delete the second measure of a certain track. The time range specifies that the
edit will need to occur between measures 2 and 3. The track selection specifies what track's clips will
be deleted, while leaving its surrounding tracks unchanged.
Let's explore some different ways to do this in a sample project. All of the tools described are
available in the Track View toolbar, which is located directly above the tracks in the Track View. For
a complete description of all of the tools in the Track view toolbar, see “Track View Toolbar” on page
1444.
Note: If you would like to try both of the following methods, select Edit > Undo after
completeting the first method. Doing so will revert the project to its previous state.
Page 94

Method 1:
1. Select the track that you want to delete measure two from.
Tip:
Click in the Tracks pane on the left, not the Clips pane on the right.
2. Drag in the time ruler from measure 2 through measure 3.
The selected time range is highlighted.
3. Press DELETE or select Edit > Delete.
Measure two is deleted from the selected track.
Method 2:
1. Select the Free Edit tool .
2. Click in the center of the clip and drag to select the section you want to delete.
The selected section is highlighted.
3. Press DELETE or select Edit > Delete.
You might have noticed that you're only able to select full measures. What if you need to edit a
smaller amount of time? You'll need to turn off Snap To Grid. To do so, click the Snap to Grid
button .
With this button disabled, you will be able to make finer selections. You can also choose different
Snap To Grid options. Press SHIFT+N to open the Snap To Grid window and try different options.
For information about each option, click Help.
94
Page 95

Moving clips
From time to time, you may need to move clips around. If you understand selection, you're half way
there already.
1. Select the section you want to move.
2. With the Free Edit tool, click the top or bottom of the selection and drag the clip to the desired
location.
The Drag and Drop Options dialog appears, which lets you specify what to do with any existing
data in the target location. You can either replace the existing data or blend the old and new data.
Splitting Clips
In some cases, you might want to split a clip. As described later in this tutorial, it can be beneficial to
have clip borders at different points on a track. You can split a clip with the Split tool .
To split a clip, do one of the following:
• To split a clip in two, click the desired position on the clip.
• To split a clip at two separate points, click the first split position and drag to the second split
position.
Note: The Split tool obeys the Snap to Grid settings. If a split does not occur exactly where
you click, disable Snap to Grid and try again.
Tip:
You can also use the Free Edit tool to click the desired position on the clip, then press the S
key to split.
95
Page 96

Cropping Clips
You can crop a clip by using a gesture called slip editing. Slip editing lets you “roll out” the beginning
or the end of a clip to different places without changing the position of the music. Imagine that the
clips are “windows” that allow you to see and hear pieces of audio or MIDI. You can change the size
of that window so that less of the data is visible. If it's not visible, it won't be heard during playback.
The data still exists, so you can enlarge the “window” by slip editing the clip. The visible data will
then be audible.
Click the Select tool to enable slip editing.
Now, if you point to the left or right clip edge, the cursor changes and you can drag the clip edge to a
new location.
Fading Clips
You can also fade individual clips by using the Select tool. Drag the upper left corner of a clip to
create a fade-in. Drag the upper right corner of a clip to create a fade-out.
To change the fade characteristics, right-click an existing fade and select the desired fade type from
the popup menu.
96
Page 97

Undo and Redo
While editing a project, you might make mistakes or experiment with an idea that doesn't produce
the desired results. SONAR has unlimited Undo for such occasions. You can undo one step at a time
by selecting Edit > Undo or by pressing CTRL+Z. You can also look at your edit history and select a
time to go back to. To do so, go to Edit > History, choose the edit you'd like to return to and click
OK.
Note: When you close a project, the undo history is erased.
If you change your mind and want to revert to the previous undo state, select Edit > Redo or press
CTRL+SHIFT+Z.
This tutorial has shown you how to use different tools to shape your recordings into well-organized
and great sounding projects. The next step is mixing, which is covered in “Tutorial 7 – Mixing and
adding effects” on page 99.
97
Page 98

98
Page 99

Tutorial 7 – Mixing and adding effects
Mixing is an important part of recording that can really help the music you create in SONAR sound
its best. Mixing involves placing different instruments and sounds in layers of the frequency
spectrum, adjusting levels so that tracks blend nicely, spreading them across the stereo field and
adding effects where appropriate.
There are many important decisions to make when mixing; things that are sometimes not considered
while writing a song. The choices you make can have a major effect on how pleasurable the listening
experience is for your audience.
In this tutorial, we'll discuss some general guidelines. But, it's important to remember that there are
no rules. This is another artistic stage of song creation.
We'll start by opening the MixingTutorial project:
1. Go to File > Open and select the file named MixingTutorial.cwp.
Note: Tutorial files are located in the My Documents/Cakewalk/SONAR/Sample
Content/Tutorials folder. You can jump to this folder by selecting Template Files from the
Go to folder drop-down list in the Open dialog.
2. Go to File > Save As and save it under a new name. This way, you can save your work without
overwriting the original, in case you'd like to start over.
In the same folder is a file named MixingTutorial-Complete.cwp, which is a copy of the same
project, but after the tutorial has been completed. You can use this project as a reference to which
you can compare settings and levels.
Page 100

Volume and pan
Adjusting volume and pan is always a good place to start when mixing. One of the biggest benefits
of SONAR's Console view is that you can easily see the volume and pan controls for many tracks
simultaneously, in addition to large meters. Some people also enjoy working in the Console view
because it doesn't offer a graphical representation of what the music “looks like”. Since the final
outcome will be an audio file, the listener will not be distracted by the visual cues that are shown in
the project's Track view. You may find that you are better able to focus on the actual sound when not
seeing the clips.
To open the Console view
•Do one of the following:
• Click the Console view button in the Views toolbar.
• Click Views > Console.
• Press ALT+3.
Here, we'll be shaping the song's foundation. If you listen to the project as it is, you'll probably notice
that it sounds pretty “muddy” and bland. This usually happens because all of the instruments are
fighting each other for space in the frequency spectrum and stereo field. They're all trying to be
heard at the same level in the same location.
Normally, when recording a track, it is common to try to get a relatively loud signal. This is done to
achieve the best signal-to-noise ratio and knowing that you will eventually adjust levels during the
mixing stage.
Some people like to begin this process by turning down every track and then gradually turning up
one track at a time, starting with the rhythm section. Begin by increasing the volume of the bass
drum to the desired level. Continue with the snare, the rest of the drums and finally the bass guitar-moving on in order of importance. If there is a lead vocal in the song, that would come last, so that it
sits on top of the instrumental foundation you've established.
Other people approach mixing the opposite way, turning things down a bit one at a time. If one
method doesn't seem more appealing than the other, try both to see which one is more comfortable
for you.
100
Important: Pay close attention to the main meter while mixing. You never want the main
meter to reach the very top, which will result in undesirable audible noise. This is called clipping.
Note: You can find the Mains meters on the far right side in the Console view. If you don’t see
the Mains meters it, click the Mains button .
 Loading...