

Page 1

©
™
Cakewalk SONAR
Reference Guide
Page 2

Information in this document is subject to change without notice and does not represent a commit
ment on the part of Cakewalk, Inc. The software described in this document is furnished under a
license agreement or nondisclosure agreement. The software may be used or copied only in accor
dance of the terms of the agreement. It is against the law to copy this software on any medium
except as specifically allowed in the agreement. No part of this document may be reproduced or
transmitted in any form or by any means, electronic or mechanical, including photocopying and
recording, for any purpose without the express written permission of Cakewalk, Inc.
Copyright © 2008 Cakewalk, Inc. All rights reserved.
Program Copyright © 2008 Cakewalk, Inc. All rights reserved.
ACID is a trademark of Madison Media Software, Inc.
Cakewalk is a registered trademark of Cakewalk, Inc. SONAR and the Cakewalk logo are trade
marks of Cakewalk, Inc. Other company and product names are trademarks of their respective own
ers.
Visit Cakew alk on the World Wide Web at ww w.cakewalk. com.
Page 3

Table of Contents
Preface . . . . . . . . . . . . . . . . . . . . . . . . . . . . . . . . . . . . . . . . . . . . . . . . . . . . . . . . . . 27
Registering SONAR Today . . . . . . . . . . . . . . . . . . . . . . . . . . . . . . . . . . .27
Conventions Used in this Book . . . . . . . . . . . . . . . . . . . . . . . . . . . . . . . .28
Getting Help . . . . . . . . . . . . . . . . . . . . . . . . . . . . . . . . . . . . . . . . . . . . . .28
1 Introduction . . . . . . . . . . . . . . . . . . . . . . . . . . . . . . . . . . . . . . . . . . . . . . . . . . 29
About SONAR . . . . . . . . . . . . . . . . . . . . . . . . . . . . . . . . . . . . . . . . . . . . .30
Music Composition and Exploration . . . . . . . . . . . . . . . . . . . . . . . . .30
Remixing. . . . . . . . . . . . . . . . . . . . . . . . . . . . . . . . . . . . . . . . . . . . . .30
Game Sound Development . . . . . . . . . . . . . . . . . . . . . . . . . . . . . . .30
Sound Production and Engineering . . . . . . . . . . . . . . . . . . . . . . . . .31
Web Authoring . . . . . . . . . . . . . . . . . . . . . . . . . . . . . . . . . . . . . . . . .31
Film and Video Scoring and Production . . . . . . . . . . . . . . . . . . . . . .31
Publishing Music on the Internet . . . . . . . . . . . . . . . . . . . . . . . . . . .31
Burning Audio CDs. . . . . . . . . . . . . . . . . . . . . . . . . . . . . . . . . . . . . .32
Flexibility. . . . . . . . . . . . . . . . . . . . . . . . . . . . . . . . . . . . . . . . . . . . . .32
Page 4

Computers, Sound, and Music. . . . . . . . . . . . . . . . . . . . . . . . . . . . . . . . 32
MIDI . . . . . . . . . . . . . . . . . . . . . . . . . . . . . . . . . . . . . . . . . . . . . . . . . 32
Digital Audio . . . . . . . . . . . . . . . . . . . . . . . . . . . . . . . . . . . . . . . . . . 33
Setup . . . . . . . . . . . . . . . . . . . . . . . . . . . . . . . . . . . . . . . . . . . . . . . . . . . 34
Audio Connections . . . . . . . . . . . . . . . . . . . . . . . . . . . . . . . . . . . . . 36
MIDI Connections . . . . . . . . . . . . . . . . . . . . . . . . . . . . . . . . . . . . . . 38
Starting SONAR. . . . . . . . . . . . . . . . . . . . . . . . . . . . . . . . . . . . . . . . . . . 40
SONAR Basics. . . . . . . . . . . . . . . . . . . . . . . . . . . . . . . . . . . . . . . . . . . . 44
SONAR File Types . . . . . . . . . . . . . . . . . . . . . . . . . . . . . . . . . . . . . 45
Opening a File . . . . . . . . . . . . . . . . . . . . . . . . . . . . . . . . . . . . . . . . . 46
Views. . . . . . . . . . . . . . . . . . . . . . . . . . . . . . . . . . . . . . . . . . . . . . . . 46
Working on a Project . . . . . . . . . . . . . . . . . . . . . . . . . . . . . . . . . . . . 67
Windows Taskbar Indicators . . . . . . . . . . . . . . . . . . . . . . . . . . . . . . . . . 68
Screen Colors and Wallpaper . . . . . . . . . . . . . . . . . . . . . . . . . . . . . . . . 68
Color Presets. . . . . . . . . . . . . . . . . . . . . . . . . . . . . . . . . . . . . . . . . . 70
Starting to Use SONAR . . . . . . . . . . . . . . . . . . . . . . . . . . . . . . . . . . . . . 73
Installing SONAR . . . . . . . . . . . . . . . . . . . . . . . . . . . . . . . . . . . . . . . . . . 73
2 Controlling Playback. . . . . . . . . . . . . . . . . . . . . . . . . . . . . . . . . . . . . . . . . . . . 75
The Now Time and How to Use It . . . . . . . . . . . . . . . . . . . . . . . . . . . . . 76
The Now Time Marker. . . . . . . . . . . . . . . . . . . . . . . . . . . . . . . . . . . 78
The Track View Now Time Display . . . . . . . . . . . . . . . . . . . . . . . . . 79
Displaying the Now Time in Large Print . . . . . . . . . . . . . . . . . . . . . 80
Other Ways to Set the Now Time . . . . . . . . . . . . . . . . . . . . . . . . . . 81
The Time Ruler . . . . . . . . . . . . . . . . . . . . . . . . . . . . . . . . . . . . . . . . 82
Controlling Playback . . . . . . . . . . . . . . . . . . . . . . . . . . . . . . . . . . . . . . . 84
Handling Stuck Notes . . . . . . . . . . . . . . . . . . . . . . . . . . . . . . . . . . . 85
Looping . . . . . . . . . . . . . . . . . . . . . . . . . . . . . . . . . . . . . . . . . . . . . . 86
Using the Large Transport. . . . . . . . . . . . . . . . . . . . . . . . . . . . . . . . 88
Track-by-Track Playback . . . . . . . . . . . . . . . . . . . . . . . . . . . . . . . . . . . . 91
The Playback State Toolbar . . . . . . . . . . . . . . . . . . . . . . . . . . . . . . 93
Silencing Tracks . . . . . . . . . . . . . . . . . . . . . . . . . . . . . . . . . . . . . . . 93
Soloing Tracks. . . . . . . . . . . . . . . . . . . . . . . . . . . . . . . . . . . . . . . . . 94
Inverting the Phase of a Track. . . . . . . . . . . . . . . . . . . . . . . . . . . . . 95
Changing Tracks’ Mono/Stereo Status . . . . . . . . . . . . . . . . . . . . . . 95
Changing Track Settings . . . . . . . . . . . . . . . . . . . . . . . . . . . . . . . . . . . . 96
Setting Up Output Devices . . . . . . . . . . . . . . . . . . . . . . . . . . . . . . 108
Assigning Tracks to Outputs . . . . . . . . . . . . . . . . . . . . . . . . . . . . . 110
Choosing the Instrument Sound (Bank and Patch) . . . . . . . . . . . 111
Adding Effects . . . . . . . . . . . . . . . . . . . . . . . . . . . . . . . . . . . . . . . . 113
4 Table of Contents
Page 5

Adjusting Volume and Pan . . . . . . . . . . . . . . . . . . . . . . . . . . . . . . .113
Configurable Panning Laws . . . . . . . . . . . . . . . . . . . . . . . . . . . . . .114
Adjusting Volume Trim . . . . . . . . . . . . . . . . . . . . . . . . . . . . . . . . . .115
Assigning a MIDI Channel (Chn) . . . . . . . . . . . . . . . . . . . . . . . . . .115
Adjusting the Key/Transposing a Track (Key+) . . . . . . . . . . . . . . .116
Adjusting the Note Velocity (Vel+) . . . . . . . . . . . . . . . . . . . . . . . . .117
Adjusting the Time Alignment of a MIDI Track (Time+) . . . . . . . . .118
Other MIDI Playback Settings . . . . . . . . . . . . . . . . . . . . . . . . . . . .119
Controlling Live MIDI Playback—MIDI Echo. . . . . . . . . . . . . . . . . . . . .119
Local Control. . . . . . . . . . . . . . . . . . . . . . . . . . . . . . . . . . . . . . . . . . . . .123
Playing Files in Batch Mode . . . . . . . . . . . . . . . . . . . . . . . . . . . . . . . . .124
The Play List View . . . . . . . . . . . . . . . . . . . . . . . . . . . . . . . . . . . . .124
Video Playback, Import, and Export . . . . . . . . . . . . . . . . . . . . . . . . . . .126
Inserting and Playing Back Videos . . . . . . . . . . . . . . . . . . . . . . . . .127
Exporting Video . . . . . . . . . . . . . . . . . . . . . . . . . . . . . . . . . . . . . . .130
Optimizing Video Performance. . . . . . . . . . . . . . . . . . . . . . . . . . . .131
Using the Video Thumbnails Pane . . . . . . . . . . . . . . . . . . . . . . . . .132
Video Playback on a FireWire DV Device . . . . . . . . . . . . . . . . . . .135
Exporting a Project to a FireWire DV Device . . . . . . . . . . . . . . . . .136
Synchronizing External Video Playback to Audio. . . . . . . . . . . . . .137
Locating Missing Audio . . . . . . . . . . . . . . . . . . . . . . . . . . . . . . . . . . . . .138
The Find Missing Audio File Dialog . . . . . . . . . . . . . . . . . . . . . . . .138
Restoring Missing Audio Files . . . . . . . . . . . . . . . . . . . . . . . . . . . .138
Managing Shared and External Files . . . . . . . . . . . . . . . . . . . . . . .139
3 Tutorials . . . . . . . . . . . . . . . . . . . . . . . . . . . . . . . . . . . . . . . . . . . . . . . . . . . . 141
Tutorial 1—The Basics . . . . . . . . . . . . . . . . . . . . . . . . . . . . . . . . . . . . .142
Opening a Project File . . . . . . . . . . . . . . . . . . . . . . . . . . . . . . . . . .142
Preparing for Playback . . . . . . . . . . . . . . . . . . . . . . . . . . . . . . . . . .143
Playing the Project . . . . . . . . . . . . . . . . . . . . . . . . . . . . . . . . . . . . .146
Restarting the Project Automatically. . . . . . . . . . . . . . . . . . . . . . . .150
Changing the Tempo . . . . . . . . . . . . . . . . . . . . . . . . . . . . . . . . . . .152
Muting and Soloing Tracks. . . . . . . . . . . . . . . . . . . . . . . . . . . . . . .154
Changing a Track's Instrument. . . . . . . . . . . . . . . . . . . . . . . . . . . .156
Playing Music on a Keyboard . . . . . . . . . . . . . . . . . . . . . . . . . . . . .157
Tutorial 2—Recording MIDI. . . . . . . . . . . . . . . . . . . . . . . . . . . . . . . . . .159
Creating a New Project. . . . . . . . . . . . . . . . . . . . . . . . . . . . . . . . . .159
Recording a MIDI Track . . . . . . . . . . . . . . . . . . . . . . . . . . . . . . . . .159
Saving Your Work. . . . . . . . . . . . . . . . . . . . . . . . . . . . . . . . . . . . . .164
Loop Recording . . . . . . . . . . . . . . . . . . . . . . . . . . . . . . . . . . . . . . .164
Punch-In Recording . . . . . . . . . . . . . . . . . . . . . . . . . . . . . . . . . . . .167
5Table of Contents
Page 6

Tutorial 3—Recording Digital Audio. . . . . . . . . . . . . . . . . . . . . . . . . . . 168
Setting the Sampling Rate. . . . . . . . . . . . . . . . . . . . . . . . . . . . . . . 169
Setting the Audio Driver Bit Depth and Recording Bit Depth. . . . . 169
Open a New Project . . . . . . . . . . . . . . . . . . . . . . . . . . . . . . . . . . . 170
Setting Up an Audio Track. . . . . . . . . . . . . . . . . . . . . . . . . . . . . . . 170
Checking the Input Levels . . . . . . . . . . . . . . . . . . . . . . . . . . . . . . . 171
Recording Digital Audio. . . . . . . . . . . . . . . . . . . . . . . . . . . . . . . . . 172
Listening to the Recording. . . . . . . . . . . . . . . . . . . . . . . . . . . . . . . 172
Recording Another Take . . . . . . . . . . . . . . . . . . . . . . . . . . . . . . . . 173
Input Monitoring. . . . . . . . . . . . . . . . . . . . . . . . . . . . . . . . . . . . . . . 173
Loop and Punch-In Recording . . . . . . . . . . . . . . . . . . . . . . . . . . . . 174
Recording Multiple Channels. . . . . . . . . . . . . . . . . . . . . . . . . . . . . 174
Tutorial 4—Editing MIDI. . . . . . . . . . . . . . . . . . . . . . . . . . . . . . . . . . . . 174
Transposing. . . . . . . . . . . . . . . . . . . . . . . . . . . . . . . . . . . . . . . . . . 175
Copying Clips with Drag and Drop . . . . . . . . . . . . . . . . . . . . . . . . 176
Editing Notes in the Piano Roll View . . . . . . . . . . . . . . . . . . . . . . . 177
Slip-editing. . . . . . . . . . . . . . . . . . . . . . . . . . . . . . . . . . . . . . . . . . . 179
Drawing MIDI Envelopes . . . . . . . . . . . . . . . . . . . . . . . . . . . . . . . . 180
Converting MIDI to Audio . . . . . . . . . . . . . . . . . . . . . . . . . . . . . . . 181
Tutorial 5—Editing Audio . . . . . . . . . . . . . . . . . . . . . . . . . . . . . . . . . . . 183
Opening the Project. . . . . . . . . . . . . . . . . . . . . . . . . . . . . . . . . . . . 183
Importing a Wave File . . . . . . . . . . . . . . . . . . . . . . . . . . . . . . . . . . 183
Moving and Looping the Clips . . . . . . . . . . . . . . . . . . . . . . . . . . . . 184
Slip-editing a Clip. . . . . . . . . . . . . . . . . . . . . . . . . . . . . . . . . . . . . . 185
Automatic Crossfades . . . . . . . . . . . . . . . . . . . . . . . . . . . . . . . . . . 186
Bouncing Tracks . . . . . . . . . . . . . . . . . . . . . . . . . . . . . . . . . . . . . . 186
Tutorial 6—Using Groove Clips . . . . . . . . . . . . . . . . . . . . . . . . . . . . . . 187
Adding Groove Clips to a Project . . . . . . . . . . . . . . . . . . . . . . . . . 188
Looping Groove Clips . . . . . . . . . . . . . . . . . . . . . . . . . . . . . . . . . . 190
Changing the Pitch of Groove Clips . . . . . . . . . . . . . . . . . . . . . . . 192
Changing the Tempo of Your Project . . . . . . . . . . . . . . . . . . . . . . 193
Creating Your Own Groove Clips . . . . . . . . . . . . . . . . . . . . . . . . . 194
Tutorial 7—Mixing . . . . . . . . . . . . . . . . . . . . . . . . . . . . . . . . . . . . . . . . 198
Adding Real-time Audio Effects. . . . . . . . . . . . . . . . . . . . . . . . . . . 198
Automating an Individual Effect’s Settings . . . . . . . . . . . . . . . . . . 199
Grouping Controls . . . . . . . . . . . . . . . . . . . . . . . . . . . . . . . . . . . . . 200
Automating Your Mix . . . . . . . . . . . . . . . . . . . . . . . . . . . . . . . . . . . 201
Exporting an MP3 File . . . . . . . . . . . . . . . . . . . . . . . . . . . . . . . . . . 202
Tutorial 8—Using Soft Synths . . . . . . . . . . . . . . . . . . . . . . . . . . . . . . . 204
Inserting Cakewalk TTS-1 into a Project . . . . . . . . . . . . . . . . . . . . 204
Playing MIDI Tracks through a Soft Synth. . . . . . . . . . . . . . . . . . . 205
Converting Your Soft Synth Tracks to Audio. . . . . . . . . . . . . . . . . 206
6 Table of Contents
Page 7

Tutorial 9—Drum Maps. . . . . . . . . . . . . . . . . . . . . . . . . . . . . . . . . . . . .208
Create a New Project . . . . . . . . . . . . . . . . . . . . . . . . . . . . . . . . . . .208
Creating a Drum Map . . . . . . . . . . . . . . . . . . . . . . . . . . . . . . . . . . .208
Create a Drum Track . . . . . . . . . . . . . . . . . . . . . . . . . . . . . . . . . . .209
Map Drum Notes to Different Outputs . . . . . . . . . . . . . . . . . . . . . .210
4 Recording . . . . . . . . . . . . . . . . . . . . . . . . . . . . . . . . . . . . . . . . . . . . . . . . . . . 213
Creating a New Project . . . . . . . . . . . . . . . . . . . . . . . . . . . . . . . . . . . . .214
Using Per-Project Audio Folders . . . . . . . . . . . . . . . . . . . . . . . . . .214
Creating a New Project File . . . . . . . . . . . . . . . . . . . . . . . . . . . . . .214
Setting the Meter and Key Signatures . . . . . . . . . . . . . . . . . . . . . .216
Setting the Metronome and Tempo Settings . . . . . . . . . . . . . . . . .217
Setting the Audio Sampling Rate and Bit Depth. . . . . . . . . . . . . . .220
Setting the MIDI Timing Resolution . . . . . . . . . . . . . . . . . . . . . . . .221
Preparing to Record . . . . . . . . . . . . . . . . . . . . . . . . . . . . . . . . . . . . . . .221
Recording Modes . . . . . . . . . . . . . . . . . . . . . . . . . . . . . . . . . . . . . .222
Choosing an Input . . . . . . . . . . . . . . . . . . . . . . . . . . . . . . . . . . . . .223
Arming Tracks for Recording . . . . . . . . . . . . . . . . . . . . . . . . . . . . .226
Auto Arming . . . . . . . . . . . . . . . . . . . . . . . . . . . . . . . . . . . . . . . . . .227
Recording Music from a MIDI Instrument . . . . . . . . . . . . . . . . . . . . . . .227
Input Quantizing . . . . . . . . . . . . . . . . . . . . . . . . . . . . . . . . . . . . . . . . . .228
Recording Audio . . . . . . . . . . . . . . . . . . . . . . . . . . . . . . . . . . . . . . . . . .230
Tuning an Instrument . . . . . . . . . . . . . . . . . . . . . . . . . . . . . . . . . . .232
Confidence Recording and Waveform Preview . . . . . . . . . . . . . . . . . .234
Input Monitoring . . . . . . . . . . . . . . . . . . . . . . . . . . . . . . . . . . . . . . . . . .235
The Audio Engine Button . . . . . . . . . . . . . . . . . . . . . . . . . . . . . . . . . . .239
Loop Recording. . . . . . . . . . . . . . . . . . . . . . . . . . . . . . . . . . . . . . . . . . .240
Punch Recording. . . . . . . . . . . . . . . . . . . . . . . . . . . . . . . . . . . . . . . . . .242
Step Recording . . . . . . . . . . . . . . . . . . . . . . . . . . . . . . . . . . . . . . . . . . .245
Step Record Keyboard Shortcuts . . . . . . . . . . . . . . . . . . . . . . . . . .252
Step Pattern Recording . . . . . . . . . . . . . . . . . . . . . . . . . . . . . . . . .253
Recording Specific Ports and Channels . . . . . . . . . . . . . . . . . . . . . . . .254
Input Filtering . . . . . . . . . . . . . . . . . . . . . . . . . . . . . . . . . . . . . . . . .256
Importing Music and Sound . . . . . . . . . . . . . . . . . . . . . . . . . . . . . . . . .257
Importing Audio Files . . . . . . . . . . . . . . . . . . . . . . . . . . . . . . . . . . .257
Importing Audio CD Tracks . . . . . . . . . . . . . . . . . . . . . . . . . . . . . .259
Importing Material from Another SONAR Project. . . . . . . . . . . . . .260
Importing OMF Projects . . . . . . . . . . . . . . . . . . . . . . . . . . . . . . . . .261
Importing MIDI Files . . . . . . . . . . . . . . . . . . . . . . . . . . . . . . . . . . . .263
Saving Your Work . . . . . . . . . . . . . . . . . . . . . . . . . . . . . . . . . . . . . . . . .264
7Table of Contents
Page 8

Using File Versioning. . . . . . . . . . . . . . . . . . . . . . . . . . . . . . . . . . . 265
Labeling Your Projects . . . . . . . . . . . . . . . . . . . . . . . . . . . . . . . . . 266
File Statistics . . . . . . . . . . . . . . . . . . . . . . . . . . . . . . . . . . . . . . . . . 268
5 Arranging. . . . . . . . . . . . . . . . . . . . . . . . . . . . . . . . . . . . . . . . . . . . . . . . . . . . 269
Arranging Tracks . . . . . . . . . . . . . . . . . . . . . . . . . . . . . . . . . . . . . . . . . 270
Changing the Order of Tracks . . . . . . . . . . . . . . . . . . . . . . . . . . . . 271
Inserting Tracks. . . . . . . . . . . . . . . . . . . . . . . . . . . . . . . . . . . . . . . 274
Configuring the Display of Tracks in the Track View . . . . . . . . . . . 275
Copying Tracks . . . . . . . . . . . . . . . . . . . . . . . . . . . . . . . . . . . . . . . 277
Erasing Tracks. . . . . . . . . . . . . . . . . . . . . . . . . . . . . . . . . . . . . . . . 278
Track Templates . . . . . . . . . . . . . . . . . . . . . . . . . . . . . . . . . . . . . . 278
Track Icons . . . . . . . . . . . . . . . . . . . . . . . . . . . . . . . . . . . . . . . . . . 280
Configuring Track View Controls. . . . . . . . . . . . . . . . . . . . . . . . . . 282
Arranging Clips . . . . . . . . . . . . . . . . . . . . . . . . . . . . . . . . . . . . . . . . . . 284
Displaying Clips. . . . . . . . . . . . . . . . . . . . . . . . . . . . . . . . . . . . . . . 284
Using the Navigator View . . . . . . . . . . . . . . . . . . . . . . . . . . . . . . . 289
Opening Views by Double-clicking Clips . . . . . . . . . . . . . . . . . . . . 290
Selecting Clips. . . . . . . . . . . . . . . . . . . . . . . . . . . . . . . . . . . . . . . . 290
Moving and Copying Clips. . . . . . . . . . . . . . . . . . . . . . . . . . . . . . . 291
Locking Clips . . . . . . . . . . . . . . . . . . . . . . . . . . . . . . . . . . . . . . . . . 296
Nudge . . . . . . . . . . . . . . . . . . . . . . . . . . . . . . . . . . . . . . . . . . . . . . . . . 298
Nudge Settings . . . . . . . . . . . . . . . . . . . . . . . . . . . . . . . . . . . . . . . 298
Working with Partial Clips . . . . . . . . . . . . . . . . . . . . . . . . . . . . . . . . . . 300
Markers and the snap grid . . . . . . . . . . . . . . . . . . . . . . . . . . . . . . . . . . 302
Showing Gridlines . . . . . . . . . . . . . . . . . . . . . . . . . . . . . . . . . . . . . 302
Defining and Using the Snap Grid. . . . . . . . . . . . . . . . . . . . . . . . . 302
Snap Offsets . . . . . . . . . . . . . . . . . . . . . . . . . . . . . . . . . . . . . . . . . 305
Creating and Using Markers . . . . . . . . . . . . . . . . . . . . . . . . . . . . . 305
Working with Linked Clips . . . . . . . . . . . . . . . . . . . . . . . . . . . . . . . . . . 310
Splitting and Combining Clips . . . . . . . . . . . . . . . . . . . . . . . . . . . . . . . 312
Take Management and Comping Takes . . . . . . . . . . . . . . . . . . . . . . . 314
Clip Muting and Isolating (Clip Soloing) . . . . . . . . . . . . . . . . . . . . . . . . 318
Clip Muting with the Default Style . . . . . . . . . . . . . . . . . . . . . . . . . 318
Clip Muting with the Alternate Style . . . . . . . . . . . . . . . . . . . . . . . . 320
Audition (Selection Playback) . . . . . . . . . . . . . . . . . . . . . . . . . . . . 321
Isolating (Clip Soloing). . . . . . . . . . . . . . . . . . . . . . . . . . . . . . . . . . 321
Track Folders . . . . . . . . . . . . . . . . . . . . . . . . . . . . . . . . . . . . . . . . . . . . 322
Adding Effects in the Track View . . . . . . . . . . . . . . . . . . . . . . . . . . . . . 326
Changing Tempos . . . . . . . . . . . . . . . . . . . . . . . . . . . . . . . . . . . . . . . . 327
8 Table of Contents
Page 9

Using the Tempo Toolbar . . . . . . . . . . . . . . . . . . . . . . . . . . . . . . . .328
Using the Tempo Commands. . . . . . . . . . . . . . . . . . . . . . . . . . . . .329
Using the Tempo View . . . . . . . . . . . . . . . . . . . . . . . . . . . . . . . . . .332
Undo, Redo, and the Undo History . . . . . . . . . . . . . . . . . . . . . . . . . . . .336
Slip-editing (Non-destructive Editing) . . . . . . . . . . . . . . . . . . . . . . . . . .338
Using Slip-editing . . . . . . . . . . . . . . . . . . . . . . . . . . . . . . . . . . . . . .338
Slip-editing Multiple Clips . . . . . . . . . . . . . . . . . . . . . . . . . . . . . . . .341
Fades and Crossfades . . . . . . . . . . . . . . . . . . . . . . . . . . . . . . . . . . . . .341
Using Fades and Crossfades in Real Time . . . . . . . . . . . . . . . . . .341
6 AudioSnap . . . . . . . . . . . . . . . . . . . . . . . . . . . . . . . . . . . . . . . . . . . . . . . . . . 347
What is it Exactly?. . . . . . . . . . . . . . . . . . . . . . . . . . . . . . . . . . . . . . . . .347
How Does it Work? . . . . . . . . . . . . . . . . . . . . . . . . . . . . . . . . . . . . . . . .348
Why Would I Use It? . . . . . . . . . . . . . . . . . . . . . . . . . . . . . . . . . . . . . . .349
Aligning Measure Lines and Tempo . . . . . . . . . . . . . . . . . . . . . . . . . . .349
Extract Timing Tutorial . . . . . . . . . . . . . . . . . . . . . . . . . . . . . . . . . .355
Fixing Timing Errors . . . . . . . . . . . . . . . . . . . . . . . . . . . . . . . . . . . . . . .358
Synchronizing Clips . . . . . . . . . . . . . . . . . . . . . . . . . . . . . . . . . . . .365
Doubling Sounds. . . . . . . . . . . . . . . . . . . . . . . . . . . . . . . . . . . . . . . . . .370
Changing a Project’s Tempo. . . . . . . . . . . . . . . . . . . . . . . . . . . . . . . . .372
Snapping Edits to Audio Beats . . . . . . . . . . . . . . . . . . . . . . . . . . . . . . .373
Splitting Beats into Clips . . . . . . . . . . . . . . . . . . . . . . . . . . . . . . . . . . . .376
Fixing Multiple Tracks While Maintaining Phase Relationships . . . . . .380
Algorithms and Rendering. . . . . . . . . . . . . . . . . . . . . . . . . . . . . . . . . . .386
Enabling AudioSnap . . . . . . . . . . . . . . . . . . . . . . . . . . . . . . . . . . . . . . .388
The AudioSnap Palette . . . . . . . . . . . . . . . . . . . . . . . . . . . . . . . . . . . . .390
Transient Markers . . . . . . . . . . . . . . . . . . . . . . . . . . . . . . . . . . . . . . . . .393
Displaying Markers. . . . . . . . . . . . . . . . . . . . . . . . . . . . . . . . . . . . .393
Disabling and Enabling Markers . . . . . . . . . . . . . . . . . . . . . . . . . . .394
Marker Appearance . . . . . . . . . . . . . . . . . . . . . . . . . . . . . . . . . . . .395
Editing Markers. . . . . . . . . . . . . . . . . . . . . . . . . . . . . . . . . . . . . . . .396
The Pool . . . . . . . . . . . . . . . . . . . . . . . . . . . . . . . . . . . . . . . . . . . . . . . .399
Keyboard Shortcuts. . . . . . . . . . . . . . . . . . . . . . . . . . . . . . . . . . . . . . . .401
Groove Quantize and Quantize to Pool . . . . . . . . . . . . . . . . . . . . . . . .402
Copying Audio Rhythms as MIDI . . . . . . . . . . . . . . . . . . . . . . . . . . . . .404
Adding Automation . . . . . . . . . . . . . . . . . . . . . . . . . . . . . . . . . . . . . . . .404
The Set Measure/Beat At Now Command . . . . . . . . . . . . . . . . . . . . . .405
9Table of Contents
Page 10

7 Using Loops. . . . . . . . . . . . . . . . . . . . . . . . . . . . . . . . . . . . . . . . . . . . . . . . . . 411
The Loop Construction View . . . . . . . . . . . . . . . . . . . . . . . . . . . . . . . . 412
Loop Construction Controls . . . . . . . . . . . . . . . . . . . . . . . . . . . . . . 412
The Loop Explorer View. . . . . . . . . . . . . . . . . . . . . . . . . . . . . . . . . . . . 417
Folders Pane . . . . . . . . . . . . . . . . . . . . . . . . . . . . . . . . . . . . . . . . . 418
Contents List Pane . . . . . . . . . . . . . . . . . . . . . . . . . . . . . . . . . . . . 418
Working with Loops . . . . . . . . . . . . . . . . . . . . . . . . . . . . . . . . . . . . . . . 419
Working with Groove Clips. . . . . . . . . . . . . . . . . . . . . . . . . . . . . . . . . . 420
How Groove Clips Work in SONAR. . . . . . . . . . . . . . . . . . . . . . . . 420
Using Groove Clips . . . . . . . . . . . . . . . . . . . . . . . . . . . . . . . . . . . . 421
Creating and Editing Groove Clips . . . . . . . . . . . . . . . . . . . . . . . . 422
Editing Slices. . . . . . . . . . . . . . . . . . . . . . . . . . . . . . . . . . . . . . . . . 426
Saving Groove Clips as Wave Files/ACIDized Wave Files . . . . . . 427
Using Pitch Markers in the Track View . . . . . . . . . . . . . . . . . . . . . 428
MIDI Groove Clips . . . . . . . . . . . . . . . . . . . . . . . . . . . . . . . . . . . . . . . . 429
Exporting, and Importing MIDI Groove Clips . . . . . . . . . . . . . . . . . 431
Importing Project5 Patterns . . . . . . . . . . . . . . . . . . . . . . . . . . . . . . . . . 433
8 Editing MIDI Events and Controllers . . . . . . . . . . . . . . . . . . . . . . . . . . . . . . 435
Event Inspector Toolbar. . . . . . . . . . . . . . . . . . . . . . . . . . . . . . . . . . . . 436
The Piano Roll View. . . . . . . . . . . . . . . . . . . . . . . . . . . . . . . . . . . . . . . 437
Note Map Pane . . . . . . . . . . . . . . . . . . . . . . . . . . . . . . . . . . . . . . . 438
Drum Grid Pane. . . . . . . . . . . . . . . . . . . . . . . . . . . . . . . . . . . . . . . 438
Notes Pane . . . . . . . . . . . . . . . . . . . . . . . . . . . . . . . . . . . . . . . . . . 439
Controller Pane . . . . . . . . . . . . . . . . . . . . . . . . . . . . . . . . . . . . . . . 439
Track List Pane . . . . . . . . . . . . . . . . . . . . . . . . . . . . . . . . . . . . . . . 439
Opening the View . . . . . . . . . . . . . . . . . . . . . . . . . . . . . . . . . . . . . 439
Working with Multiple Tracks in the Piano Roll View. . . . . . . . . . . 440
Note Names. . . . . . . . . . . . . . . . . . . . . . . . . . . . . . . . . . . . . . . . . . 442
Displaying Notes and Controllers (Piano Roll View Only) . . . . . . . . . . 443
Adding and Editing Notes in the Piano Roll . . . . . . . . . . . . . . . . . . . . . 444
Selecting Notes . . . . . . . . . . . . . . . . . . . . . . . . . . . . . . . . . . . . . . . 444
Editing Notes with the Draw Tool and the Select Tool . . . . . . . . . 446
Adding and Editing Controllers in the Piano Roll . . . . . . . . . . . . . . . . . 453
Adding Controllers. . . . . . . . . . . . . . . . . . . . . . . . . . . . . . . . . . . . . 454
Selecting Controllers . . . . . . . . . . . . . . . . . . . . . . . . . . . . . . . . . . . 456
Editing Controllers . . . . . . . . . . . . . . . . . . . . . . . . . . . . . . . . . . . . . 456
The Inline Piano Roll View . . . . . . . . . . . . . . . . . . . . . . . . . . . . . . . . . . 458
Displaying the Inline Piano Roll View . . . . . . . . . . . . . . . . . . . . . . 459
The MIDI Scale . . . . . . . . . . . . . . . . . . . . . . . . . . . . . . . . . . . . . . . 460
10 Table of Contents
Page 11

Displaying Notes and Controllers in the Inline Piano Roll View . . .462
Selecting and Editing Events . . . . . . . . . . . . . . . . . . . . . . . . . . . . . . . .463
Copying and Pasting MIDI Data . . . . . . . . . . . . . . . . . . . . . . . . . . .463
Transposing . . . . . . . . . . . . . . . . . . . . . . . . . . . . . . . . . . . . . . . . . .464
Inserting Time or Measures into a Project . . . . . . . . . . . . . . . . . . .466
Stretching and Shrinking Events . . . . . . . . . . . . . . . . . . . . . . . . . .469
Reversing Notes in a Clip . . . . . . . . . . . . . . . . . . . . . . . . . . . . . . . .472
Adding Crescendos and Decrescendos . . . . . . . . . . . . . . . . . . . . .473
Changing the Timing of a Recording. . . . . . . . . . . . . . . . . . . . . . . . . . .474
Quantizing . . . . . . . . . . . . . . . . . . . . . . . . . . . . . . . . . . . . . . . . . . .474
Fit Improvisation . . . . . . . . . . . . . . . . . . . . . . . . . . . . . . . . . . . . . . .485
Snap to Scale . . . . . . . . . . . . . . . . . . . . . . . . . . . . . . . . . . . . . . . . . . . .486
Searching for Events. . . . . . . . . . . . . . . . . . . . . . . . . . . . . . . . . . . . . . .491
Event Filters . . . . . . . . . . . . . . . . . . . . . . . . . . . . . . . . . . . . . . . . . .492
Controllers, RPNs, NRPNs, and
Automation Data . . . . . . . . . . . . . . . . . . . . . . . . . . . . . . . . . . . . . . . . . .497
The Event List View . . . . . . . . . . . . . . . . . . . . . . . . . . . . . . . . . . . . . . .500
Event List Buttons and Overview . . . . . . . . . . . . . . . . . . . . . . . . . .502
Selecting Events in the Event List View . . . . . . . . . . . . . . . . . . . . .505
Event List Display Filter . . . . . . . . . . . . . . . . . . . . . . . . . . . . . . . . .505
Editing Events and Event Parameters . . . . . . . . . . . . . . . . . . . . . .506
Additional Event Information. . . . . . . . . . . . . . . . . . . . . . . . . . . . . .508
MIDI Effects (MIDI Plug-ins) . . . . . . . . . . . . . . . . . . . . . . . . . . . . . . . . .510
MIDI Effects Presets. . . . . . . . . . . . . . . . . . . . . . . . . . . . . . . . . . . .510
Quantizing . . . . . . . . . . . . . . . . . . . . . . . . . . . . . . . . . . . . . . . . . . .511
Adding Echo/Delay. . . . . . . . . . . . . . . . . . . . . . . . . . . . . . . . . . . . .512
Filtering Events. . . . . . . . . . . . . . . . . . . . . . . . . . . . . . . . . . . . . . . .513
Adding Arpeggio . . . . . . . . . . . . . . . . . . . . . . . . . . . . . . . . . . . . . . .514
Analyzing Chords . . . . . . . . . . . . . . . . . . . . . . . . . . . . . . . . . . . . . .515
Changing Velocities with the Velocity Effect. . . . . . . . . . . . . . . . . .517
Transposing MIDI Notes with the Transpose MIDI Effect. . . . . . . .518
9 Drum Maps and the Drum Grid Pane . . . . . . . . . . . . . . . . . . . . . . . . . . . . . 521
The Basics . . . . . . . . . . . . . . . . . . . . . . . . . . . . . . . . . . . . . . . . . . . . . .522
Creating and Editing a Drum Map. . . . . . . . . . . . . . . . . . . . . . . . . . . . .522
The Drum Map Manager . . . . . . . . . . . . . . . . . . . . . . . . . . . . . . . .522
Working in the Drum Map Manager . . . . . . . . . . . . . . . . . . . . . . . .524
The Map Properties Dialog. . . . . . . . . . . . . . . . . . . . . . . . . . . . . . .525
Saving a Drum Map . . . . . . . . . . . . . . . . . . . . . . . . . . . . . . . . . . . .525
Using Drum Maps . . . . . . . . . . . . . . . . . . . . . . . . . . . . . . . . . . . . . . . . .526
11Table of Contents
Page 12

Assigning a MIDI Track to a Drum Map. . . . . . . . . . . . . . . . . . . . . 526
Opening a Drum Map . . . . . . . . . . . . . . . . . . . . . . . . . . . . . . . . . . 526
Displaying Tracks in the Drum Grid Pane . . . . . . . . . . . . . . . . . . . 526
Velocity Tails . . . . . . . . . . . . . . . . . . . . . . . . . . . . . . . . . . . . . . . . . 527
Editing Note Velocities. . . . . . . . . . . . . . . . . . . . . . . . . . . . . . . . . . 527
Previewing a Mapped Sound. . . . . . . . . . . . . . . . . . . . . . . . . . . . . 528
The Note Map Pane. . . . . . . . . . . . . . . . . . . . . . . . . . . . . . . . . . . . . . . 529
Changing Mapped-note Settings . . . . . . . . . . . . . . . . . . . . . . . . . . 529
The Drum Grid Pane . . . . . . . . . . . . . . . . . . . . . . . . . . . . . . . . . . . . . . 531
Grid Lines . . . . . . . . . . . . . . . . . . . . . . . . . . . . . . . . . . . . . . . . . . . 531
The Pattern Brush Tool . . . . . . . . . . . . . . . . . . . . . . . . . . . . . . . . . . . . 532
How the Pattern Brush Tool Works . . . . . . . . . . . . . . . . . . . . . . . . 532
Creating Custom Patterns . . . . . . . . . . . . . . . . . . . . . . . . . . . . . . . 534
10 Editing Audio. . . . . . . . . . . . . . . . . . . . . . . . . . . . . . . . . . . . . . . . . . . . . . . . . 537
Digital Audio Fundamentals . . . . . . . . . . . . . . . . . . . . . . . . . . . . . . . . . 538
Basic Acoustics . . . . . . . . . . . . . . . . . . . . . . . . . . . . . . . . . . . . . . . 538
Example—A Guitar String . . . . . . . . . . . . . . . . . . . . . . . . . . . . . . . 538
Waveforms . . . . . . . . . . . . . . . . . . . . . . . . . . . . . . . . . . . . . . . . . . 540
Recording a Sound . . . . . . . . . . . . . . . . . . . . . . . . . . . . . . . . . . . . 542
The Decibel Scale . . . . . . . . . . . . . . . . . . . . . . . . . . . . . . . . . . . . . 543
Audio Clips . . . . . . . . . . . . . . . . . . . . . . . . . . . . . . . . . . . . . . . . . . 544
Managing Audio Data . . . . . . . . . . . . . . . . . . . . . . . . . . . . . . . . . . 545
Basic Audio Editing . . . . . . . . . . . . . . . . . . . . . . . . . . . . . . . . . . . . . . . 545
Editing Clip Properties . . . . . . . . . . . . . . . . . . . . . . . . . . . . . . . . . . 546
Moving, Copying, Pasting and Deleting Audio Clips . . . . . . . . . . . 547
Audio Scaling. . . . . . . . . . . . . . . . . . . . . . . . . . . . . . . . . . . . . . . . . 548
Splitting Audio Clips. . . . . . . . . . . . . . . . . . . . . . . . . . . . . . . . . . . . 552
Bouncing to Clips. . . . . . . . . . . . . . . . . . . . . . . . . . . . . . . . . . . . . . 553
Scrubbing . . . . . . . . . . . . . . . . . . . . . . . . . . . . . . . . . . . . . . . . . . . 554
Basic Audio Processing . . . . . . . . . . . . . . . . . . . . . . . . . . . . . . . . . . . . 555
Using the Normalize and Gain Commands . . . . . . . . . . . . . . . . . . 556
Reversing Audio Data . . . . . . . . . . . . . . . . . . . . . . . . . . . . . . . . . . 558
Advanced Audio Processing . . . . . . . . . . . . . . . . . . . . . . . . . . . . . . . . 558
Removing Silence . . . . . . . . . . . . . . . . . . . . . . . . . . . . . . . . . . . . . 558
Removing DC Offset . . . . . . . . . . . . . . . . . . . . . . . . . . . . . . . . . . . 560
Applying Fades and Crossfades Offline . . . . . . . . . . . . . . . . . . . . 562
Audio Effects (Audio Plug-ins) . . . . . . . . . . . . . . . . . . . . . . . . . . . . . . . 564
Applying Audio Effects. . . . . . . . . . . . . . . . . . . . . . . . . . . . . . . . . . 565
Directly Applying Audio Effects . . . . . . . . . . . . . . . . . . . . . . . . . . . 565
12 Table of Contents
Page 13

11 Software Synthesizers. . . . . . . . . . . . . . . . . . . . . . . . . . . . . . . . . . . . . . . . . 567
Synth Rack View. . . . . . . . . . . . . . . . . . . . . . . . . . . . . . . . . . . . . . . . . .568
Synth Tracks. . . . . . . . . . . . . . . . . . . . . . . . . . . . . . . . . . . . . . . . . . . . .569
Inserting Soft Synths. . . . . . . . . . . . . . . . . . . . . . . . . . . . . . . . . . . . . . .569
Opening a Soft Synth’s Property Page . . . . . . . . . . . . . . . . . . . . . . . . .573
Synth Rack Icons . . . . . . . . . . . . . . . . . . . . . . . . . . . . . . . . . . . . . . . . .573
Playing a Soft Synth . . . . . . . . . . . . . . . . . . . . . . . . . . . . . . . . . . . . . . .574
Muting and Soloing Soft Synth Tracks . . . . . . . . . . . . . . . . . . . . . . . . .577
Multi-port Soft Synths . . . . . . . . . . . . . . . . . . . . . . . . . . . . . . . . . . . . . .577
Converting Your Soft Synth Tracks to Audio. . . . . . . . . . . . . . . . . . . . .578
Using the Assignable Controls Feature. . . . . . . . . . . . . . . . . . . . . . . . .579
Automating Controls from the Synth Rack . . . . . . . . . . . . . . . . . . . . . .580
Displaying Synth Rack Automation . . . . . . . . . . . . . . . . . . . . . . . .581
Remote Control of the Synth Rack . . . . . . . . . . . . . . . . . . . . . . . . .581
Drawing Soft Synth Automation in the Clips Pane . . . . . . . . . . . . .581
Soft Synth MIDI Output Support . . . . . . . . . . . . . . . . . . . . . . . . . . . . . .582
Recording a Soft Synth’s MIDI Output . . . . . . . . . . . . . . . . . . . . . .582
ReWire . . . . . . . . . . . . . . . . . . . . . . . . . . . . . . . . . . . . . . . . . . . . . . . . .583
ReWire Instruments . . . . . . . . . . . . . . . . . . . . . . . . . . . . . . . . . . . .583
Inserting a ReWire Instrument . . . . . . . . . . . . . . . . . . . . . . . . . . . .585
Routing MIDI Data to ReWire Instruments . . . . . . . . . . . . . . . . . . .587
Mixing Down ReWire Instruments . . . . . . . . . . . . . . . . . . . . . . . . .587
Automating ReWire Instruments. . . . . . . . . . . . . . . . . . . . . . . . . . .587
ReWire Troubleshooting Guide . . . . . . . . . . . . . . . . . . . . . . . . . . .588
Stand-alone Synths . . . . . . . . . . . . . . . . . . . . . . . . . . . . . . . . . . . . . . . .589
Playing a Stand-alone Synth . . . . . . . . . . . . . . . . . . . . . . . . . . . . .589
Recording a Stand-alone Synth . . . . . . . . . . . . . . . . . . . . . . . . . . .590
12 Mixing . . . . . . . . . . . . . . . . . . . . . . . . . . . . . . . . . . . . . . . . . . . . . . . . . . . . . . 593
Preparing to Mix . . . . . . . . . . . . . . . . . . . . . . . . . . . . . . . . . . . . . . . . . .594
Configuring the Console and Track Views . . . . . . . . . . . . . . . . . . .597
Mixing MIDI . . . . . . . . . . . . . . . . . . . . . . . . . . . . . . . . . . . . . . . . . . . . . .600
Mixing a MIDI Track . . . . . . . . . . . . . . . . . . . . . . . . . . . . . . . . . . . .600
Converting MIDI to Audio . . . . . . . . . . . . . . . . . . . . . . . . . . . . . . . .601
Signal Flow . . . . . . . . . . . . . . . . . . . . . . . . . . . . . . . . . . . . . . . . . . . . . .603
Sidechaining Signal Flow . . . . . . . . . . . . . . . . . . . . . . . . . . . . . . . .605
Routing and Mixing Digital Audio . . . . . . . . . . . . . . . . . . . . . . . . . .606
Stereo Buses . . . . . . . . . . . . . . . . . . . . . . . . . . . . . . . . . . . . . . . . .607
Surround Buses (Producer Edition Only) . . . . . . . . . . . . . . . . . . . .608
13Table of Contents
Page 14

Main Outs . . . . . . . . . . . . . . . . . . . . . . . . . . . . . . . . . . . . . . . . . . . 610
Metering. . . . . . . . . . . . . . . . . . . . . . . . . . . . . . . . . . . . . . . . . . . . . . . . 610
What the Meters Measure. . . . . . . . . . . . . . . . . . . . . . . . . . . . . . . 611
Hiding and Showing Meters. . . . . . . . . . . . . . . . . . . . . . . . . . . . . . 611
Changing the Meters’ Display . . . . . . . . . . . . . . . . . . . . . . . . . . . . 612
Segmented and Non-segmented Meters. . . . . . . . . . . . . . . . . . . . 614
Changing the Meters’ Performance. . . . . . . . . . . . . . . . . . . . . . . . 615
Peak Markers . . . . . . . . . . . . . . . . . . . . . . . . . . . . . . . . . . . . . . . . 616
Waveform Preview for Buses and Synth Tracks . . . . . . . . . . . . . . . . . 617
Freeze Tracks and Synths . . . . . . . . . . . . . . . . . . . . . . . . . . . . . . . . . . 619
Using Real-Time Effects . . . . . . . . . . . . . . . . . . . . . . . . . . . . . . . . . . . 622
Effects Parameters . . . . . . . . . . . . . . . . . . . . . . . . . . . . . . . . . . . . 623
How to Use Real-Time Effects . . . . . . . . . . . . . . . . . . . . . . . . . . . 624
Presets and Property Pages . . . . . . . . . . . . . . . . . . . . . . . . . . . . . 627
Effects on Clips . . . . . . . . . . . . . . . . . . . . . . . . . . . . . . . . . . . . . . . 629
Organizing Plug-ins . . . . . . . . . . . . . . . . . . . . . . . . . . . . . . . . . . . . . . . 631
VST Configuration . . . . . . . . . . . . . . . . . . . . . . . . . . . . . . . . . . . . . . . . 632
V-Vocal Clips . . . . . . . . . . . . . . . . . . . . . . . . . . . . . . . . . . . . . . . . . . . . 634
Using V-Vocal . . . . . . . . . . . . . . . . . . . . . . . . . . . . . . . . . . . . . . . . . . . 636
Playing Back V-Vocal Clips . . . . . . . . . . . . . . . . . . . . . . . . . . . . . . 638
Pitch Editing. . . . . . . . . . . . . . . . . . . . . . . . . . . . . . . . . . . . . . . . . . 639
Editing Time. . . . . . . . . . . . . . . . . . . . . . . . . . . . . . . . . . . . . . . . . . 643
Editing Formants . . . . . . . . . . . . . . . . . . . . . . . . . . . . . . . . . . . . . . 644
Editing Dynamics. . . . . . . . . . . . . . . . . . . . . . . . . . . . . . . . . . . . . . 645
Context Menu . . . . . . . . . . . . . . . . . . . . . . . . . . . . . . . . . . . . . . . . 645
Keyboard Shortcuts . . . . . . . . . . . . . . . . . . . . . . . . . . . . . . . . . . . . 646
Using the Per-track EQ . . . . . . . . . . . . . . . . . . . . . . . . . . . . . . . . . . . . 648
Applying Audio Effects. . . . . . . . . . . . . . . . . . . . . . . . . . . . . . . . . . . . . 651
Applying MIDI Effects. . . . . . . . . . . . . . . . . . . . . . . . . . . . . . . . . . . . . . 652
Using Control Groups . . . . . . . . . . . . . . . . . . . . . . . . . . . . . . . . . . . . . 652
Quick Groups. . . . . . . . . . . . . . . . . . . . . . . . . . . . . . . . . . . . . . . . . 656
Using Remote Control . . . . . . . . . . . . . . . . . . . . . . . . . . . . . . . . . . . . . 658
Using the Learn Option . . . . . . . . . . . . . . . . . . . . . . . . . . . . . . . . . 660
Bouncing Tracks . . . . . . . . . . . . . . . . . . . . . . . . . . . . . . . . . . . . . . . . . 661
Preparing to Create an Audio CD . . . . . . . . . . . . . . . . . . . . . . . . . 664
Preparing Audio for Distribution. . . . . . . . . . . . . . . . . . . . . . . . . . . . . . 665
Exporting OMF Files . . . . . . . . . . . . . . . . . . . . . . . . . . . . . . . . . . . 672
Dithering . . . . . . . . . . . . . . . . . . . . . . . . . . . . . . . . . . . . . . . . . . . . 673
14 Table of Contents
Page 15

13 Surround Mixing. . . . . . . . . . . . . . . . . . . . . . . . . . . . . . . . . . . . . . . . . . . . . . 675
Surround Basics . . . . . . . . . . . . . . . . . . . . . . . . . . . . . . . . . . . . . . . . . .676
Configuring SONAR for Surround Mixing . . . . . . . . . . . . . . . . . . . . . . .676
Using Surround Format Templates . . . . . . . . . . . . . . . . . . . . . . . .676
Choosing a Surround Format . . . . . . . . . . . . . . . . . . . . . . . . . . . . .679
Surround Buses . . . . . . . . . . . . . . . . . . . . . . . . . . . . . . . . . . . . . . .681
Routing in Surround . . . . . . . . . . . . . . . . . . . . . . . . . . . . . . . . . . . .681
Downmixing . . . . . . . . . . . . . . . . . . . . . . . . . . . . . . . . . . . . . . . . . .682
Panning in Surround . . . . . . . . . . . . . . . . . . . . . . . . . . . . . . . . . . . . . . .684
Controlling Surround Panning . . . . . . . . . . . . . . . . . . . . . . . . . . . .686
Automating Surround Panning . . . . . . . . . . . . . . . . . . . . . . . . . . . .691
Joystick Support . . . . . . . . . . . . . . . . . . . . . . . . . . . . . . . . . . . . . . . . . .691
Surround Metering . . . . . . . . . . . . . . . . . . . . . . . . . . . . . . . . . . . . . . . .692
Bass Management . . . . . . . . . . . . . . . . . . . . . . . . . . . . . . . . . . . . . . . .693
Surround Effects . . . . . . . . . . . . . . . . . . . . . . . . . . . . . . . . . . . . . . . . . .694
The SurroundBridge . . . . . . . . . . . . . . . . . . . . . . . . . . . . . . . . . . . .694
Effect Property Pages. . . . . . . . . . . . . . . . . . . . . . . . . . . . . . . . . . .694
Effect Presets . . . . . . . . . . . . . . . . . . . . . . . . . . . . . . . . . . . . . . . . .695
How to Patch and Configure Surround Effects. . . . . . . . . . . . . . . .695
Importing Surround Mixes . . . . . . . . . . . . . . . . . . . . . . . . . . . . . . . . . . .697
Exporting Surround Mixes. . . . . . . . . . . . . . . . . . . . . . . . . . . . . . . . . . .698
14 Automation . . . . . . . . . . . . . . . . . . . . . . . . . . . . . . . . . . . . . . . . . . . . . . . . . . 701
Quick Automation Guide . . . . . . . . . . . . . . . . . . . . . . . . . . . . . . . . . . . .702
The Automation Toolbar . . . . . . . . . . . . . . . . . . . . . . . . . . . . . . . . . . . .703
Automation Methods . . . . . . . . . . . . . . . . . . . . . . . . . . . . . . . . . . . . . . .703
Automation Read and Automation Write Buttons . . . . . . . . . . . . . .704
Recording Individual Fader or Knob Movements . . . . . . . . . . . . . .705
Creating and Editing Audio Envelopes . . . . . . . . . . . . . . . . . . . . . .706
Creating and Editing MIDI Envelopes. . . . . . . . . . . . . . . . . . . . . . .708
Dotted Lines . . . . . . . . . . . . . . . . . . . . . . . . . . . . . . . . . . . . . . . . . .711
Using the Envelope Draw Tool . . . . . . . . . . . . . . . . . . . . . . . . . . . .711
Drawing Envelopes on Clips. . . . . . . . . . . . . . . . . . . . . . . . . . . . . .713
Showing or Hiding Envelopes. . . . . . . . . . . . . . . . . . . . . . . . . . . . .714
Deleting Envelopes. . . . . . . . . . . . . . . . . . . . . . . . . . . . . . . . . . . . .714
Copying and Pasting Envelopes. . . . . . . . . . . . . . . . . . . . . . . . . . .715
Resetting Envelopes and Nodes to Current or Neutral Values . . .716
Envelope Mode and Offset Mode . . . . . . . . . . . . . . . . . . . . . . . . . .716
Converting MIDI Envelopes to Shapes. . . . . . . . . . . . . . . . . . . . . .719
Snapshots. . . . . . . . . . . . . . . . . . . . . . . . . . . . . . . . . . . . . . . . . . . .720
15Table of Contents
Page 16

Adding Nodes at a Selection . . . . . . . . . . . . . . . . . . . . . . . . . . . . . 721
Automating Effects. . . . . . . . . . . . . . . . . . . . . . . . . . . . . . . . . . . . . . . . 722
Automating Individual Effects Parameters. . . . . . . . . . . . . . . . . . . 722
Recording Automation Data from an External Controller . . . . . . . 723
Reassigning Envelopes . . . . . . . . . . . . . . . . . . . . . . . . . . . . . . . . . . . . 724
The Envelope Editing and Node Editing Menus . . . . . . . . . . . . . . . . . 724
Automated Muting . . . . . . . . . . . . . . . . . . . . . . . . . . . . . . . . . . . . . 726
15 Layouts, Templates and Key Bindings . . . . . . . . . . . . . . . . . . . . . . . . . . . . 729
Layouts . . . . . . . . . . . . . . . . . . . . . . . . . . . . . . . . . . . . . . . . . . . . . . . . 730
Floating Views and Dual Monitor Support . . . . . . . . . . . . . . . . . . . 733
Templates . . . . . . . . . . . . . . . . . . . . . . . . . . . . . . . . . . . . . . . . . . . . . . 734
Template Example: Three MIDI Instruments. . . . . . . . . . . . . . . . . 735
Key Bindings . . . . . . . . . . . . . . . . . . . . . . . . . . . . . . . . . . . . . . . . . . . . 736
Importing Key Bindings . . . . . . . . . . . . . . . . . . . . . . . . . . . . . . . . . 739
Exporting Key Bindings . . . . . . . . . . . . . . . . . . . . . . . . . . . . . . . . . 740
16 Notation and Lyrics. . . . . . . . . . . . . . . . . . . . . . . . . . . . . . . . . . . . . . . . . . . . 741
The Staff View . . . . . . . . . . . . . . . . . . . . . . . . . . . . . . . . . . . . . . . . . . . 742
Opening the Staff View . . . . . . . . . . . . . . . . . . . . . . . . . . . . . . . . . 743
Staff Pane Layout . . . . . . . . . . . . . . . . . . . . . . . . . . . . . . . . . . . . . 744
The Staff Pane Right-Click Menu . . . . . . . . . . . . . . . . . . . . . . . . . 744
The Fretboard . . . . . . . . . . . . . . . . . . . . . . . . . . . . . . . . . . . . . . . . 746
Fretboard Popup Menu . . . . . . . . . . . . . . . . . . . . . . . . . . . . . . . . . 747
Basic Musical Editing . . . . . . . . . . . . . . . . . . . . . . . . . . . . . . . . . . . . . . 748
Inserting Notes on the Staff. . . . . . . . . . . . . . . . . . . . . . . . . . . . . . 748
Inserting Notes with the Fretboard . . . . . . . . . . . . . . . . . . . . . . . . 750
Selecting Notes . . . . . . . . . . . . . . . . . . . . . . . . . . . . . . . . . . . . . . . 750
Moving, Copying, and Deleting Notes on the Staff . . . . . . . . . . . . 751
Moving Notes from within the Fretboard . . . . . . . . . . . . . . . . . . . . 752
Auditioning. . . . . . . . . . . . . . . . . . . . . . . . . . . . . . . . . . . . . . . . . . . 753
Changing Note Properties . . . . . . . . . . . . . . . . . . . . . . . . . . . . . . . 753
Deglitch Dialog . . . . . . . . . . . . . . . . . . . . . . . . . . . . . . . . . . . . . . . 754
Working with Triplets . . . . . . . . . . . . . . . . . . . . . . . . . . . . . . . . . . . 755
Beaming of Rests . . . . . . . . . . . . . . . . . . . . . . . . . . . . . . . . . . . . . 756
Changing the Way Notes Are Displayed . . . . . . . . . . . . . . . . . . . . 756
Using Enharmonic Spellings . . . . . . . . . . . . . . . . . . . . . . . . . . . . . 758
MIDI Channels and the Fretboard . . . . . . . . . . . . . . . . . . . . . . . . . 760
Chords and Marks . . . . . . . . . . . . . . . . . . . . . . . . . . . . . . . . . . . . . . . . 761
Adding Chord Symbols . . . . . . . . . . . . . . . . . . . . . . . . . . . . . . . . . 761
16 Table of Contents
Page 17

Adding Expression Marks. . . . . . . . . . . . . . . . . . . . . . . . . . . . . . . .765
Adding Hairpin Symbols . . . . . . . . . . . . . . . . . . . . . . . . . . . . . . . . .767
Adding Pedal Marks . . . . . . . . . . . . . . . . . . . . . . . . . . . . . . . . . . . .768
Tablature. . . . . . . . . . . . . . . . . . . . . . . . . . . . . . . . . . . . . . . . . . . . . . . .769
Tablature Settings . . . . . . . . . . . . . . . . . . . . . . . . . . . . . . . . . . . . .769
Changing Fretboard Texture and Orientation . . . . . . . . . . . . . . . . .771
Quick TAB . . . . . . . . . . . . . . . . . . . . . . . . . . . . . . . . . . . . . . . . . . .771
Regenerate TAB . . . . . . . . . . . . . . . . . . . . . . . . . . . . . . . . . . . . . . .772
Entering Notes from the TAB Staff . . . . . . . . . . . . . . . . . . . . . . . . .773
Single Note Editing from the TAB Staff . . . . . . . . . . . . . . . . . . . . .773
Editing Chords or Groups of Notes from the TAB Staff . . . . . . . . .774
Editing Notes and Chords from the Fretboard . . . . . . . . . . . . . . . .774
Working with Percussion. . . . . . . . . . . . . . . . . . . . . . . . . . . . . . . . . . . .776
Setting Up a Percussion Track . . . . . . . . . . . . . . . . . . . . . . . . . . . .776
Setting Up a Percussion Staff or Line. . . . . . . . . . . . . . . . . . . . . . .777
Ghost Strokes. . . . . . . . . . . . . . . . . . . . . . . . . . . . . . . . . . . . . . . . .779
Printing . . . . . . . . . . . . . . . . . . . . . . . . . . . . . . . . . . . . . . . . . . . . . . . . .780
The Meter/Key View . . . . . . . . . . . . . . . . . . . . . . . . . . . . . . . . . . . . . . .781
What Is Meter? . . . . . . . . . . . . . . . . . . . . . . . . . . . . . . . . . . . . . . . .781
What Is Key? . . . . . . . . . . . . . . . . . . . . . . . . . . . . . . . . . . . . . . . . .782
Opening the Meter/Key View . . . . . . . . . . . . . . . . . . . . . . . . . . . . .783
Adding and Editing Meter/Key Changes. . . . . . . . . . . . . . . . . . . . .784
Music Notation for Non-concert-key
Instruments. . . . . . . . . . . . . . . . . . . . . . . . . . . . . . . . . . . . . . . . . . .785
Working with Lyrics. . . . . . . . . . . . . . . . . . . . . . . . . . . . . . . . . . . . . . . .786
Adding and Editing Lyrics in the Staff View . . . . . . . . . . . . . . . . . .787
Opening the Lyrics View. . . . . . . . . . . . . . . . . . . . . . . . . . . . . . . . .788
Adding and Editing Lyrics in the Lyrics View . . . . . . . . . . . . . . . . .789
17 Instrument Definitions. . . . . . . . . . . . . . . . . . . . . . . . . . . . . . . . . . . . . . . . . 791
Assigning Instruments. . . . . . . . . . . . . . . . . . . . . . . . . . . . . . . . . . . . . .792
Importing Instrument Definitions . . . . . . . . . . . . . . . . . . . . . . . . . . . . . .794
Creating Instrument Definitions. . . . . . . . . . . . . . . . . . . . . . . . . . . . . . .795
Creating and Editing Patch Name and Other Lists. . . . . . . . . . . . .799
Copying Name Lists . . . . . . . . . . . . . . . . . . . . . . . . . . . . . . . . . . . .800
Assigning the Bank Select Method. . . . . . . . . . . . . . . . . . . . . . . . .800
Assigning Patch Names . . . . . . . . . . . . . . . . . . . . . . . . . . . . . . . . .802
Assigning Note Names . . . . . . . . . . . . . . . . . . . . . . . . . . . . . . . . . .803
Assigning Controller, RPN, and NRPN Names . . . . . . . . . . . . . . .806
Instrument Definition Tutorial . . . . . . . . . . . . . . . . . . . . . . . . . . . . . . . .807
Why Use Instrument Definitions? . . . . . . . . . . . . . . . . . . . . . . . . . .807
17Table of Contents
Page 18

What Can They Do and Not Do?. . . . . . . . . . . . . . . . . . . . . . . . . . 808
Where Do Instrument Definitions Come From? . . . . . . . . . . . . . . . 808
Start of Tutorial . . . . . . . . . . . . . . . . . . . . . . . . . . . . . . . . . . . . . . . 808
18 System Exclusive Data . . . . . . . . . . . . . . . . . . . . . . . . . . . . . . . . . . . . . . . . . 813
What Is System Exclusive? . . . . . . . . . . . . . . . . . . . . . . . . . . . . . . . . . 814
Sysx Events. . . . . . . . . . . . . . . . . . . . . . . . . . . . . . . . . . . . . . . . . . 814
Using the System Exclusive View . . . . . . . . . . . . . . . . . . . . . . . . . . . . 814
Sending Sysx Banks at Startup . . . . . . . . . . . . . . . . . . . . . . . . . . . . . . 815
Importing, Creating, and Dumping Sysx Banks . . . . . . . . . . . . . . . . . . 816
More about Dump Request Macros. . . . . . . . . . . . . . . . . . . . . . . . 818
Editing Sysx Banks . . . . . . . . . . . . . . . . . . . . . . . . . . . . . . . . . . . . . . . 819
Sysx View Buttons . . . . . . . . . . . . . . . . . . . . . . . . . . . . . . . . . . . . . . . . 820
Send . . . . . . . . . . . . . . . . . . . . . . . . . . . . . . . . . . . . . . . . . . . . . . . 820
Send All . . . . . . . . . . . . . . . . . . . . . . . . . . . . . . . . . . . . . . . . . . . . 820
Receive . . . . . . . . . . . . . . . . . . . . . . . . . . . . . . . . . . . . . . . . . . . . . 820
Clear Bank . . . . . . . . . . . . . . . . . . . . . . . . . . . . . . . . . . . . . . . . . . 820
Name . . . . . . . . . . . . . . . . . . . . . . . . . . . . . . . . . . . . . . . . . . . . . . 820
Auto . . . . . . . . . . . . . . . . . . . . . . . . . . . . . . . . . . . . . . . . . . . . . . . 820
Output . . . . . . . . . . . . . . . . . . . . . . . . . . . . . . . . . . . . . . . . . . . . . . 821
Edit Bytes . . . . . . . . . . . . . . . . . . . . . . . . . . . . . . . . . . . . . . . . . . . 821
Load Bank and Save Bank . . . . . . . . . . . . . . . . . . . . . . . . . . . . . 821
Transmitting Banks During Playback . . . . . . . . . . . . . . . . . . . . . . . . . . 822
Real-time Recording of System Exclusive Messages . . . . . . . . . . . . . 823
Sysx Echo . . . . . . . . . . . . . . . . . . . . . . . . . . . . . . . . . . . . . . . . . . . . . . 823
Sysx .
INI File Settings. . . . . . . . . . . . . . . . . . . . . . . . . . . . . . . . . . . . . . 824
Troubleshooting . . . . . . . . . . . . . . . . . . . . . . . . . . . . . . . . . . . . . . . . . . 825
19 Synchronizing Your Gear. . . . . . . . . . . . . . . . . . . . . . . . . . . . . . . . . . . . . . . 827
Synchronization Overview . . . . . . . . . . . . . . . . . . . . . . . . . . . . . . . . . . 828
Choosing Clock Sources: SONAR as Master . . . . . . . . . . . . . . . . . . . 829
MIDI Synchronization. . . . . . . . . . . . . . . . . . . . . . . . . . . . . . . . . . . . . . 831
SONAR as the Slave. . . . . . . . . . . . . . . . . . . . . . . . . . . . . . . . . . . 832
SONAR as the Master. . . . . . . . . . . . . . . . . . . . . . . . . . . . . . . . . . 833
Using MIDI Sync with Drum Machines . . . . . . . . . . . . . . . . . . . . . 834
Troubleshooting MIDI Sync . . . . . . . . . . . . . . . . . . . . . . . . . . . . . . 835
SMPTE/MIDI Time Code Synchronization . . . . . . . . . . . . . . . . . . . . . . 835
Playing Digital Audio under SMPTE/MTC Sync . . . . . . . . . . . . . . 840
SMPTE/MTC Sync and Full Chase Lock. . . . . . . . . . . . . . . . . . . . 841
18 Table of Contents
Page 19

Troubleshooting SMPTE/MTC Sync. . . . . . . . . . . . . . . . . . . . . . . .842
MIDI Machine Control (MMC) . . . . . . . . . . . . . . . . . . . . . . . . . . . . . . . .843
20 Audio File Management. . . . . . . . . . . . . . . . . . . . . . . . . . . . . . . . . . . . . . . . 845
The Project Files Dialog . . . . . . . . . . . . . . . . . . . . . . . . . . . . . . . . . . . .846
Project Files and Bundle Files. . . . . . . . . . . . . . . . . . . . . . . . . . . . . . . .847
Audio Folders . . . . . . . . . . . . . . . . . . . . . . . . . . . . . . . . . . . . . . . . . . . .849
Global Audio Folders . . . . . . . . . . . . . . . . . . . . . . . . . . . . . . . . . . .849
Per-project Audio Folders. . . . . . . . . . . . . . . . . . . . . . . . . . . . . . . .850
Imported Audio Files. . . . . . . . . . . . . . . . . . . . . . . . . . . . . . . . . . . .852
Backing Up Projects with Digital Audio . . . . . . . . . . . . . . . . . . . . . . . . .853
Deleting Unused Audio Files. . . . . . . . . . . . . . . . . . . . . . . . . . . . . . . . .855
21 Improving Audio Performance . . . . . . . . . . . . . . . . . . . . . . . . . . . . . . . . . . 857
System Configuration . . . . . . . . . . . . . . . . . . . . . . . . . . . . . . . . . . . . . .858
The Wave Profiler. . . . . . . . . . . . . . . . . . . . . . . . . . . . . . . . . . . . . .858
Enabling and Disabling Audio Devices . . . . . . . . . . . . . . . . . . . . . .859
Sampling Rates . . . . . . . . . . . . . . . . . . . . . . . . . . . . . . . . . . . . . . .860
Bit Depths, and Float Resolution . . . . . . . . . . . . . . . . . . . . . . . . . .861
Bit Depths for Playback . . . . . . . . . . . . . . . . . . . . . . . . . . . . . . . . .862
Bit Depths for Recording . . . . . . . . . . . . . . . . . . . . . . . . . . . . . . . .863
Bit Depths for Importing Audio . . . . . . . . . . . . . . . . . . . . . . . . . . . .864
Bit Depths for Exporting Audio . . . . . . . . . . . . . . . . . . . . . . . . . . . .864
Bit Depths for Rendering Audio . . . . . . . . . . . . . . . . . . . . . . . . . . .865
Preparing Higher-quality Audio for CD Burning . . . . . . . . . . . . . . .865
SONAR Project File Compatibility Notes . . . . . . . . . . . . . . . . . . . .866
Improving Performance with Digital Audio . . . . . . . . . . . . . . . . . . . . . .867
Getting the Most Out of Your PC . . . . . . . . . . . . . . . . . . . . . . . . . .867
Mixing Latency . . . . . . . . . . . . . . . . . . . . . . . . . . . . . . . . . . . . . . . .870
ASIO Drivers. . . . . . . . . . . . . . . . . . . . . . . . . . . . . . . . . . . . . . . . . .871
Queue Buffers . . . . . . . . . . . . . . . . . . . . . . . . . . . . . . . . . . . . . . . .871
Status Bar/CPU Meter/Disk Meter . . . . . . . . . . . . . . . . . . . . . . . . .872
24-bit Tips . . . . . . . . . . . . . . . . . . . . . . . . . . . . . . . . . . . . . . . . . . .873
Dropouts and Other Audio Problems . . . . . . . . . . . . . . . . . . . . . . .875
Optimized Picture Cache Redrawing . . . . . . . . . . . . . . . . . . . . . . .885
22 External Devices. . . . . . . . . . . . . . . . . . . . . . . . . . . . . . . . . . . . . . . . . . . . . . 887
Edirol PCR Controllers . . . . . . . . . . . . . . . . . . . . . . . . . . . . . . . . . . . . .888
Connecting and Disconnecting . . . . . . . . . . . . . . . . . . . . . . . . . . . . . . .890
ACT MIDI Controller Plug-in . . . . . . . . . . . . . . . . . . . . . . . . . . . . . . . . .892
19Table of Contents
Page 20

Using the ACT MIDI Controller Property Page . . . . . . . . . . . . . . . 893
Presets . . . . . . . . . . . . . . . . . . . . . . . . . . . . . . . . . . . . . . . . . . . . . 894
Assigning Controls on Your Controller/Surface to Cells in the
ACT MIDI Property Page . . . . . . . . . . . . . . . . . . . . . . . . . . . . . . . 894
Cakewalk Generic Surface Plug-in . . . . . . . . . . . . . . . . . . . . . . . . . . . 895
Loading Presets. . . . . . . . . . . . . . . . . . . . . . . . . . . . . . . . . . . . . . . 895
Assigning Faders and Knobs to Control SONAR Parameters . . . 896
Controlling Different Tracks or Groups of Tracks . . . . . . . . . . . . . 900
The Cakewalk Generic Surface Property Page. . . . . . . . . . . . . . . 901
The WAI Display . . . . . . . . . . . . . . . . . . . . . . . . . . . . . . . . . . . . . . . . . 907
ACT . . . . . . . . . . . . . . . . . . . . . . . . . . . . . . . . . . . . . . . . . . . . . . . . . . . 909
OPT Panels . . . . . . . . . . . . . . . . . . . . . . . . . . . . . . . . . . . . . . . . . . . . . 911
Working with StudioWare. . . . . . . . . . . . . . . . . . . . . . . . . . . . . . . . . . . 912
StudioWare Panels . . . . . . . . . . . . . . . . . . . . . . . . . . . . . . . . . . . . 912
Using Panels . . . . . . . . . . . . . . . . . . . . . . . . . . . . . . . . . . . . . . . . . 914
Grouping Controls . . . . . . . . . . . . . . . . . . . . . . . . . . . . . . . . . . . . . 916
Recording Control Movements . . . . . . . . . . . . . . . . . . . . . . . . . . . 919
Control Settings. . . . . . . . . . . . . . . . . . . . . . . . . . . . . . . . . . . . . . . 922
StudioWare Panel Drawing Speed . . . . . . . . . . . . . . . . . . . . . . . . 923
23 Troubleshooting . . . . . . . . . . . . . . . . . . . . . . . . . . . . . . . . . . . . . . . . . . . . . . 925
Audio dropouts or crash when playing back large files at
maximum latency . . . . . . . . . . . . . . . . . . . . . . . . . . . . . . . . . . . . . . . . 926
When I Play a File, I Don’t Hear Anything . . . . . . . . . . . . . . . . . . . . . . 926
I Can’t Record from My MIDI Instrument . . . . . . . . . . . . . . . . . . . . . . . 928
When I Play a File Containing Audio, the Audio Portion Doesn’t Play. 929
I Can’t Record Any Audio . . . . . . . . . . . . . . . . . . . . . . . . . . . . . . . . . . . 930
The Music Is Playing Back with the Wrong Instrument Sounds. . . . . . 931
My Keyboard Doubles Every Note I Play. . . . . . . . . . . . . . . . . . . . . . . 931
I Don’t See the Clips Pane in the Track View . . . . . . . . . . . . . . . . . . . 932
Why Can’t SONAR Find My Audio Files? . . . . . . . . . . . . . . . . . . . . . . 932
Why Do I Get Errors from the Wave Profiler? . . . . . . . . . . . . . . . . . . . 932
My Track or Bus Fader is Maximized, But There’s No
Sound or Level . . . . . . . . . . . . . . . . . . . . . . . . . . . . . . . . . . . . . . . . . . 933
How Do I Use SONAR to Access All the Sounds on My
MIDI Instrument? . . . . . . . . . . . . . . . . . . . . . . . . . . . . . . . . . . . . . . . . 933
I Hear an Echo When I Record . . . . . . . . . . . . . . . . . . . . . . . . . . . . . . 934
Dropouts Happen in High Bit-depth or High Sample Rate Audio. . . . . 935
Patching an Effect into SONAR Causes a Dropout . . . . . . . . . . . . . . . 935
20 Table of Contents
Page 21

I Can’t Open My Project . . . . . . . . . . . . . . . . . . . . . . . . . . . . . . . . . . . .936
Audio Distorts at Greater than 16 Bits. . . . . . . . . . . . . . . . . . . . . . . . . .936
No Sound from My Soft Synth. . . . . . . . . . . . . . . . . . . . . . . . . . . . . . . .936
My Pro Audio 9 Files Sound Louder/Softer When I Open Them
in SONAR. . . . . . . . . . . . . . . . . . . . . . . . . . . . . . . . . . . . . . . . . . . . . . .937
SONAR Can’t Find the Wavetable Synth or MPU401. . . . . . . . . . . . . .938
I Get an Error Message When I Change a Project to 24-bit Audio . . . .938
Bouncing Tracks Takes a Long Time . . . . . . . . . . . . . . . . . . . . . . . . . .939
The GUI is not Smooth During Playback . . . . . . . . . . . . . . . . . . . . . . .939
24 Hardware Setup . . . . . . . . . . . . . . . . . . . . . . . . . . . . . . . . . . . . . . . . . . . . . . 941
Connect Your MIDI Equipment . . . . . . . . . . . . . . . . . . . . . . . . . . . . . . .941
Set Up to Record Digital Audio . . . . . . . . . . . . . . . . . . . . . . . . . . . . . . .944
25 View Reference. . . . . . . . . . . . . . . . . . . . . . . . . . . . . . . . . . . . . . . . . . . . . . . 949
Track View . . . . . . . . . . . . . . . . . . . . . . . . . . . . . . . . . . . . . . . . . . . . . .949
SONAR Empty View . . . . . . . . . . . . . . . . . . . . . . . . . . . . . . . . . . . . . . .958
Piano Roll View . . . . . . . . . . . . . . . . . . . . . . . . . . . . . . . . . . . . . . . . . . .958
Piano Roll View Toolbar . . . . . . . . . . . . . . . . . . . . . . . . . . . . . . . . .959
Note Map Pane. . . . . . . . . . . . . . . . . . . . . . . . . . . . . . . . . . . . . . . .961
Drum Grid Pane . . . . . . . . . . . . . . . . . . . . . . . . . . . . . . . . . . . . . . .962
Notes Pane. . . . . . . . . . . . . . . . . . . . . . . . . . . . . . . . . . . . . . . . . . .962
Controller pane . . . . . . . . . . . . . . . . . . . . . . . . . . . . . . . . . . . . . . . .962
Track List pane . . . . . . . . . . . . . . . . . . . . . . . . . . . . . . . . . . . . . . . .962
Step Sequencer View . . . . . . . . . . . . . . . . . . . . . . . . . . . . . . . . . . . . . .962
Step Sequencer Interface. . . . . . . . . . . . . . . . . . . . . . . . . . . . . . . .963
Event List View . . . . . . . . . . . . . . . . . . . . . . . . . . . . . . . . . . . . . . . . . . .969
Staff View . . . . . . . . . . . . . . . . . . . . . . . . . . . . . . . . . . . . . . . . . . . . . . .970
The Staff View Toolbar . . . . . . . . . . . . . . . . . . . . . . . . . . . . . . . . . .971
Synth Rack View. . . . . . . . . . . . . . . . . . . . . . . . . . . . . . . . . . . . . . . . . .974
Lyrics view. . . . . . . . . . . . . . . . . . . . . . . . . . . . . . . . . . . . . . . . . . . . . . .976
Console View . . . . . . . . . . . . . . . . . . . . . . . . . . . . . . . . . . . . . . . . . . . .976
Video View . . . . . . . . . . . . . . . . . . . . . . . . . . . . . . . . . . . . . . . . . . . . . .981
Tempo View . . . . . . . . . . . . . . . . . . . . . . . . . . . . . . . . . . . . . . . . . . . . .982
Meter/Key View. . . . . . . . . . . . . . . . . . . . . . . . . . . . . . . . . . . . . . . . . . .984
Markers View . . . . . . . . . . . . . . . . . . . . . . . . . . . . . . . . . . . . . . . . . . . .984
SYSX View . . . . . . . . . . . . . . . . . . . . . . . . . . . . . . . . . . . . . . . . . . . . . .985
Loop Construction view. . . . . . . . . . . . . . . . . . . . . . . . . . . . . . . . . . . . .985
21Table of Contents
Page 22

Loop Explorer View . . . . . . . . . . . . . . . . . . . . . . . . . . . . . . . . . . . . . . . 990
Tree View Pane. . . . . . . . . . . . . . . . . . . . . . . . . . . . . . . . . . . . . . . 991
Contents List Pane . . . . . . . . . . . . . . . . . . . . . . . . . . . . . . . . . . . . 991
Navigator View. . . . . . . . . . . . . . . . . . . . . . . . . . . . . . . . . . . . . . . . . . . 991
Play List View. . . . . . . . . . . . . . . . . . . . . . . . . . . . . . . . . . . . . . . . . . . . 992
Surround Panner . . . . . . . . . . . . . . . . . . . . . . . . . . . . . . . . . . . . . . . . . 993
26 New features in SONAR 8. . . . . . . . . . . . . . . . . . . . . . . . . . . . . . . . . . . . . . . 995
TS-64 Transient Shaper plug-in . . . . . . . . . . . . . . . . . . . . . . . . . . . . . . 999
TL-64 Tube Leveler plug-in . . . . . . . . . . . . . . . . . . . . . . . . . . . . . . . . 1000
Beatscape . . . . . . . . . . . . . . . . . . . . . . . . . . . . . . . . . . . . . . . . . . . . . 1001
Dimension Pro . . . . . . . . . . . . . . . . . . . . . . . . . . . . . . . . . . . . . . . . . . 1002
Channel Tools plug-in . . . . . . . . . . . . . . . . . . . . . . . . . . . . . . . . . . . . 1003
Native Instruments Guitar Rig 3 LE . . . . . . . . . . . . . . . . . . . . . . . . . . 1004
TruePianos Amber Module VSTi plug-in . . . . . . . . . . . . . . . . . . . . . . 1004
Digital Sound Factory Volume 2 Classic Keys for Dimension Pro . . . 1005
Hollywood Edge FX for Dimension Pro . . . . . . . . . . . . . . . . . . . . . . . 1005
Dimension Pro expansion packs . . . . . . . . . . . . . . . . . . . . . . . . . . . . 1006
Assign tracks to mono hardware outputs. . . . . . . . . . . . . . . . . . . . . . 1007
Enhanced CPU performance . . . . . . . . . . . . . . . . . . . . . . . . . . . . . . . 1008
Audio driver changes without restart . . . . . . . . . . . . . . . . . . . . . . . . . 1008
Minimize driver state changes . . . . . . . . . . . . . . . . . . . . . . . . . . . . . . 1009
Vista audio enhancements. . . . . . . . . . . . . . . . . . . . . . . . . . . . . . . . . 1010
WASAPI support . . . . . . . . . . . . . . . . . . . . . . . . . . . . . . . . . . . . . 1010
MMCSS task profile support . . . . . . . . . . . . . . . . . . . . . . . . . . . . 1011
WaveRT updates. . . . . . . . . . . . . . . . . . . . . . . . . . . . . . . . . . . . . 1012
Instrument track . . . . . . . . . . . . . . . . . . . . . . . . . . . . . . . . . . . . . . . . . 1013
Loop Explorer enhancements . . . . . . . . . . . . . . . . . . . . . . . . . . . . . . 1017
Auditioning audio files . . . . . . . . . . . . . . . . . . . . . . . . . . . . . . . . . 1019
Auditioning MIDI files. . . . . . . . . . . . . . . . . . . . . . . . . . . . . . . . . . 1020
Arm tracks during playback/recording . . . . . . . . . . . . . . . . . . . . . . . . 1022
Insert Send Assistant . . . . . . . . . . . . . . . . . . . . . . . . . . . . . . . . . . . . . 1022
Exclusive Solo mode . . . . . . . . . . . . . . . . . . . . . . . . . . . . . . . . . . . . . 1027
Solo Override . . . . . . . . . . . . . . . . . . . . . . . . . . . . . . . . . . . . . . . . . . . 1028
Live input bounce . . . . . . . . . . . . . . . . . . . . . . . . . . . . . . . . . . . . . . . . 1028
Clip selection groups . . . . . . . . . . . . . . . . . . . . . . . . . . . . . . . . . . . . . 1029
Editing clips in a group . . . . . . . . . . . . . . . . . . . . . . . . . . . . . . . . 1032
Enhanced editing with keyboard . . . . . . . . . . . . . . . . . . . . . . . . . . . . 1034
22 Table of Contents
Page 23

Navigating with a keyboard . . . . . . . . . . . . . . . . . . . . . . . . . . . . .1036
Selecting with a keyboard. . . . . . . . . . . . . . . . . . . . . . . . . . . . . . .1038
Editing with a keyboard . . . . . . . . . . . . . . . . . . . . . . . . . . . . . . . .1040
Aim Assist line. . . . . . . . . . . . . . . . . . . . . . . . . . . . . . . . . . . . . . . . . . .1042
Free Edit Tool . . . . . . . . . . . . . . . . . . . . . . . . . . . . . . . . . . . . . . . . . . .1043
Quick Group enhancement . . . . . . . . . . . . . . . . . . . . . . . . . . . . . . . . .1044
Edit tools enhancements. . . . . . . . . . . . . . . . . . . . . . . . . . . . . . . . . . .1044
Transport enhancements . . . . . . . . . . . . . . . . . . . . . . . . . . . . . . . . . .1044
Pause button . . . . . . . . . . . . . . . . . . . . . . . . . . . . . . . . . . . . . . . .1044
True Rewind and Fast Forward buttons . . . . . . . . . . . . . . . . . . . .1045
Audition button . . . . . . . . . . . . . . . . . . . . . . . . . . . . . . . . . . . . . . .1045
Control surface enhancements . . . . . . . . . . . . . . . . . . . . . . . . . . . . . .1046
Synchronizing channel strips between SONAR and
control surfaces . . . . . . . . . . . . . . . . . . . . . . . . . . . . . . . . . . . . . .1046
Control surfaces keep MIDI port assignments . . . . . . . . . . . . . . .1047
Display logical VST parameter values . . . . . . . . . . . . . . . . . . . . .1047
MIDI out port assignments are retained when adding/removing
MIDI devices . . . . . . . . . . . . . . . . . . . . . . . . . . . . . . . . . . . . . . . . . . .1047
Audio Option configuration settings . . . . . . . . . . . . . . . . . . . . . . . . . .1049
Limit number of plug-in sidechain inputs. . . . . . . . . . . . . . . . . . . . . . .1050
Select all AudioSnap/SlipStretched clips . . . . . . . . . . . . . . . . . . . . . .1051
SurCode Dolby Surround encoders . . . . . . . . . . . . . . . . . . . . . . . . . .1051
QuickTime 7 import/export . . . . . . . . . . . . . . . . . . . . . . . . . . . . . . . . .1051
Updated ACT mappings and presets . . . . . . . . . . . . . . . . . . . . . . . . .1051
Step Sequencer . . . . . . . . . . . . . . . . . . . . . . . . . . . . . . . . . . . . . . . . .1052
Step Sequencer Interface. . . . . . . . . . . . . . . . . . . . . . . . . . . . . . .1052
Flexible Piano Roll Tools. . . . . . . . . . . . . . . . . . . . . . . . . . . . . . . . . . .1072
The PRV Tool Configuration Dialog . . . . . . . . . . . . . . . . . . . . . . .1072
Default PRV Tool Assignments . . . . . . . . . . . . . . . . . . . . . . . . . .1080
Piano Roll View Enhancements . . . . . . . . . . . . . . . . . . . . . . . . . . . . .1083
Multiple Automation Controller Lanes. . . . . . . . . . . . . . . . . . . . . .1083
Piano Roll Microscope Mode . . . . . . . . . . . . . . . . . . . . . . . . . . . .1087
Note Event Colors Based on Velocity. . . . . . . . . . . . . . . . . . . . . .1091
Hiding Events in Muted Clips . . . . . . . . . . . . . . . . . . . . . . . . . . . .1091
Adjust Velocity without Changing the Display Type . . . . . . . . . . .1092
Select Controllers within Note Duration . . . . . . . . . . . . . . . . . . . .1093
Show Velocity on Selected Notes (Optional) . . . . . . . . . . . . . . . .1094
Selection Sensitive Velocity Drawing . . . . . . . . . . . . . . . . . . . . . .1095
Note/Controller Painting (freehand) . . . . . . . . . . . . . . . . . . . . . . .1096
Note/Controller Painting (linear) . . . . . . . . . . . . . . . . . . . . . . . . . .1096
23Table of Contents
Page 24

Controller/Velocity Painting (freehand) . . . . . . . . . . . . . . . . . . . . 1096
Controller/Velocity Painting (linear) . . . . . . . . . . . . . . . . . . . . . . . 1097
Note Split. . . . . . . . . . . . . . . . . . . . . . . . . . . . . . . . . . . . . . . . . . . 1097
Note Glue . . . . . . . . . . . . . . . . . . . . . . . . . . . . . . . . . . . . . . . . . . 1098
Drag-Quantize . . . . . . . . . . . . . . . . . . . . . . . . . . . . . . . . . . . . . . . 1098
MIDI Event Mute . . . . . . . . . . . . . . . . . . . . . . . . . . . . . . . . . . . . . 1100
New Erase Tool Behavior . . . . . . . . . . . . . . . . . . . . . . . . . . . . . . 1101
Note Hit Testing Improvements . . . . . . . . . . . . . . . . . . . . . . . . . . 1101
Velocity Audition Options. . . . . . . . . . . . . . . . . . . . . . . . . . . . . . . 1102
V-Vocal Pitch-to-MIDI . . . . . . . . . . . . . . . . . . . . . . . . . . . . . . . . . . . . 1103
MIDI Activity Indicators . . . . . . . . . . . . . . . . . . . . . . . . . . . . . . . . . . . 1104
Dimension LE Synth with Garritan Pocket Orchestra . . . . . . . . . . . . 1104
Rapture LE Synth. . . . . . . . . . . . . . . . . . . . . . . . . . . . . . . . . . . . . . . . 1105
DropZone Synth. . . . . . . . . . . . . . . . . . . . . . . . . . . . . . . . . . . . . . . . . 1106
Z3TA+ Synth . . . . . . . . . . . . . . . . . . . . . . . . . . . . . . . . . . . . . . . . . . . 1106
Rename Synths in the Synth Rack View . . . . . . . . . . . . . . . . . . . . . . 1107
Delete Synth Safeguards . . . . . . . . . . . . . . . . . . . . . . . . . . . . . . . . . . 1107
Reload Instrument Definitions . . . . . . . . . . . . . . . . . . . . . . . . . . . . . . 1107
Sidechaining . . . . . . . . . . . . . . . . . . . . . . . . . . . . . . . . . . . . . . . . . . . 1108
Sidechainable Sonitus Plug-ins . . . . . . . . . . . . . . . . . . . . . . . . . . . . . 1109
Sidechainable Vintage Channel VC-64 Plug-in . . . . . . . . . . . . . . . . . 1110
Audio I/O Assignment . . . . . . . . . . . . . . . . . . . . . . . . . . . . . . . . . . . . 1111
LP-64 EQ Plug-in . . . . . . . . . . . . . . . . . . . . . . . . . . . . . . . . . . . . . . . . 1114
LP-64 Multiband Compressor Plug-in . . . . . . . . . . . . . . . . . . . . . . . . 1114
External Insert Plug-in . . . . . . . . . . . . . . . . . . . . . . . . . . . . . . . . . . . . 1115
Copying EQ Settings . . . . . . . . . . . . . . . . . . . . . . . . . . . . . . . . . . . . . 1119
Dim Solo Mode . . . . . . . . . . . . . . . . . . . . . . . . . . . . . . . . . . . . . . . . . 1120
Allow Playback with No Data . . . . . . . . . . . . . . . . . . . . . . . . . . . . . . . 1122
Reduce GUI Updates to Improve Playback Performance . . . . . . . . . 1122
Auto Fade when Starting/Stopping Playback. . . . . . . . . . . . . . . . . . . 1123
Real-time Bounce . . . . . . . . . . . . . . . . . . . . . . . . . . . . . . . . . . . . . . . 1124
Modification to Track Export . . . . . . . . . . . . . . . . . . . . . . . . . . . . . . . 1126
64-bit timeline. . . . . . . . . . . . . . . . . . . . . . . . . . . . . . . . . . . . . . . . . . . 1127
Sony Wave-64 Support . . . . . . . . . . . . . . . . . . . . . . . . . . . . . . . . . . . 1128
New Audio File Formats. . . . . . . . . . . . . . . . . . . . . . . . . . . . . . . . . . . 1130
New Import Formats . . . . . . . . . . . . . . . . . . . . . . . . . . . . . . . . . . 1130
New Export Formats . . . . . . . . . . . . . . . . . . . . . . . . . . . . . . . . . . 1131
Encoding Options . . . . . . . . . . . . . . . . . . . . . . . . . . . . . . . . . . . . 1132
24 Table of Contents
Page 25

Preview Bus . . . . . . . . . . . . . . . . . . . . . . . . . . . . . . . . . . . . . . . . . . . .1135
Integrated Audio CD Ripping . . . . . . . . . . . . . . . . . . . . . . . . . . . . . . .1136
Cakewalk Publisher. . . . . . . . . . . . . . . . . . . . . . . . . . . . . . . . . . . . . . .1136
Burning Audio CDs . . . . . . . . . . . . . . . . . . . . . . . . . . . . . . . . . . . . . . .1137
Revert Clip(s) to Original Time Stamp . . . . . . . . . . . . . . . . . . . . . . . .1138
Import Audio / MIDI Files from Clips Pane . . . . . . . . . . . . . . . . . . . . .1139
Enable Input Monitoring when Arming Tracks . . . . . . . . . . . . . . . . . .1139
Euphonix EuCon Control Surface Support . . . . . . . . . . . . . . . . . . . . .1140
Patch Browser Keyboard Shortcut . . . . . . . . . . . . . . . . . . . . . . . . . . .1140
File Recovery Mode . . . . . . . . . . . . . . . . . . . . . . . . . . . . . . . . . . . . . .1141
User Account Control (UAC) Update . . . . . . . . . . . . . . . . . . . . . . . . .1143
Status Bar Indicators. . . . . . . . . . . . . . . . . . . . . . . . . . . . . . . . . . . . . .1144
Index . . . . . . . . . . . . . . . . . . . . . . . . . . . . . . . . . . . . . . . . . . . . . . . . . . . . . . . . . . 1145
LICENSE AGREEMENT . . . . . . . . . . . . . . . . . . . . . . . . . . . . . . . . . . . . . . . . . . .1179
25Table of Contents
Page 26

26 Table of Contents
Page 27

Preface
The SONAR Reference Guide is designed to help you learn and use SONAR. This Guide explains
how SONAR works and how to use it to create, edit, produce, and perform. The SONAR Reference
Guide is both task-oriented, and reference-oriented, providing information for basic procedures, and
descriptions of the various parts of the interface. The Reference Guide also includes a
comprehensive index that you can use to find information on any specific topic.
Registering SONAR Today
New Cakewalk products will require product registration. When you register your product, you
provide some information including your name and email address, as well as the serial number for
your product.
Product registration can be done quickly on the internet or by phone.
To register anytime log onto http://www.cakewalk.com/register, or call 888-CAKEWALK (U.S.) or
+1 (617)-423-9004 (outside the U.S.) between 9 AM and 8 PM Eastern Standard Time. If you live
outside of North America, please visit our distributor’s page at www.cakewalk.com/Dealers/
International.asp to get the telephone number of your local distributor.
You’ll need to supply your serial number, your name, and a valid email address. In return for this
information, we’ll email you a registration code that will allow you to keep using the software forever.
We recommend you write this registration code on the serial number sticker for safekeeping.
Page 28
Conventions Used in this Book
The following table describes the text conventions in this book:
Convention... Meaning...
Bold Italics Text that appears in bold italics is a command in
SONAR.
hyphen (File-Open) A hyphen represents a level in the menu hierarchy. For
example, File-Open means to click on the File menu
and select the Open command.
SMALL CAPS Small caps are used for file extensions (.MID) and file
names (
AUD.INI).
Getting Help
In addition to this Reference Guide, SONAR includes online help that can provide you with quick
reference information whenever you need it. Simply press F1 or click the Help button in any dialog box to
find the information you need. If you are new to recording and editing music on your PC, see the online
help topic “Beginner’s Guide to Cakewalk Software” for an introduction.
If you need more information than you can find in the SONAR Reference Guide or the online help, here
are two great places to look:
• Check the Support page of our Web site (www.cakewalk.com) for updated technical
information and answers to frequently asked questions.
• Post messages to the SONAR user community using one of the Cakewalk forums. For
more information about the newsgroups, visit www.cakewalk.com.
You can also get technical support directly from Cakewalk. In order to obtain technical support, you must
register your product. You can obtain technical support for this product in the following ways:
• Visit http://www.cakewalk.com/Support/SONAR/SR7.asp.
• Call Cakewalk Technical Support at +1 (617) 423-9021 on weekdays, 10:00 AM to 6:00
PM, Eastern time. Be sure to have your serial number ready when you call.
Technical support hours, policies, and procedures are subject to change at any time. Check our Web site
for the latest support information.
28 Preface
Conventions Used in this Book
Page 29

Introduction
SONAR is a professional tool for authoring sound and music on your personal computer.
It’s designed for musicians, composers, arrangers, audio and production engineers,
multimedia and game developers, and recording engineers. SONAR supports Wave,
MP3, ACIDized waves, WMA, AIFF and other popular formats, providing all the tools you
need to do professional-quality work rapidly and efficiently.
SONAR is more than an integrated MIDI and digital audio authoring software package—
it’s an expandable platform that can function as the central nervous system of your
recording studio. With drivers for common high-end audio hardware, full support for audio
plug-ins, software synthesizers, MFX MIDI plug-ins, and MIDI Machine Control (MMC) of
external MIDI gear, SONAR can handle your most demanding projects.
In This Chapter
About SONAR . . . . . . . . . . . . . . . . . . . . . . . . . . . . . . . . . . . . . . . . . . . . . . . . . . . 30
Computers, Sound, and Music. . . . . . . . . . . . . . . . . . . . . . . . . . . . . . . . . . . . . . . 32
Setup . . . . . . . . . . . . . . . . . . . . . . . . . . . . . . . . . . . . . . . . . . . . . . . . . . . . . . . . . . 34
Starting SONAR. . . . . . . . . . . . . . . . . . . . . . . . . . . . . . . . . . . . . . . . . . . . . . . . . . 40
SONAR Basics. . . . . . . . . . . . . . . . . . . . . . . . . . . . . . . . . . . . . . . . . . . . . . . . . . . 44
Windows Taskbar Indicators . . . . . . . . . . . . . . . . . . . . . . . . . . . . . . . . . . . . . . . . 68
Screen Colors and Wallpaper . . . . . . . . . . . . . . . . . . . . . . . . . . . . . . . . . . . . . . . 68
Installing SONAR. . . . . . . . . . . . . . . . . . . . . . . . . . . . . . . . . . . . . . . . . . . . . . . . . 73
Page 30

About SONAR
SONAR is the flagship product of the Cakewalk line of integrated MIDI and
digital audio sequencers for the Windows platform. SONAR has a
comprehensive feature set that makes it the single most productive tool for
sound and music authoring. Here are some of the ways you can use
SONAR.
Music Composition and Exploration
SONAR is a powerful music-composition application, providing tools to
record your own musical performances; enhance or improve the quality of
those performances; and edit, arrange, and experiment with the music.
With a few simple clicks of the mouse, you can arrange, orchestrate, and
audition your composition. Fully integrated sequencing allows you to
combine the convenience and flexibility of MIDI composition with the highquality sound and subtlety of digital audio sound recording and
reproduction. Change the feel of a piece by locking it to a musical groove,
or add delicate delays, anticipations, or echoes that add richness to the
music.
SONAR displays and lets you edit your music using standard musical
notation and guitar tablature, so you can adjust individual notes, add
performance markings, and print individual parts or full scores. You can
graphically draw tempo and volume changes, or add lyrics to display onscreen or to include with printed scores.
Remixing
SONAR’s Groove clips allow you to import, create, export and edit loops,
making it possible to quickly change tempos and keys for an entire project.
The Loop Explorer view lets you preview loops in the project’s tempo and
key before dragging and dropping them onto a track.
Game Sound Development
There’s no better tool than SONAR for composing music for electronic
games. Clip-based sequencing lets you create and reuse musical themes
freely, so you can associate musical sections with game characters,
locations, objects, and actions. Your creations can be saved and replayed
using the compact MIDI file format, which adapts its sound automatically to
the target hardware for the best possible sound reproduction.
30 Introduction
About SONAR
Page 31

Sound Production and Engineering
If you want to produce music CDs or master tapes, SONAR has virtually
everything you need from recording to mixing and mastering. Multichannel
recording lets you capture studio or live performances track by track.
Reconfigurable buses provide full control over your mix. Real-time stereo
effects like chorus, flange, reverb, and delay/echo can be applied as track
inserts, in effects loops, or to the master mix. SONAR supports 44.1 KHz
sampling for CD-quality sound, 24-bit/96 kHz sound for DVD-quality sound,
and lets you choose from lower or higher sample rates as well. All audio
effects are 32-bit floating point for faster processing and high-quality sound
reproduction. Many effects now support 64-bit processing for pristine
quality.
Web Authoring
SONAR is the ideal tool for developing and producing music and sound for
the World Wide Web, because it lets you save your work in the formats that
are most commonly used on web sites: MIDI, MP3, and Windows Media
Advanced Streaming Format. Any SONAR project—musical composition,
audio clip, commercial spot, jingle with voice-over—can be stored in a webcompatible format with a few simple mouse clicks.
Film and Video Scoring and Production
SONAR has many of the tools you need to execute audio post-production
projects quickly and efficiently. SONAR provides chase lock sync to time
code for frame-by-frame accuracy when synchronizing audio or MIDI to film
or video. Or, you can turn chase lock off to conserve CPU power. SONAR
provides high-quality time stretching and sample-accurate editing with zerocrossing detection so you can make the fine adjustments you need very
quickly and easily. In addition, SONAR’s support for video files gives you
convenient synchronized access to digitized video, making film and video
scoring easier than ever.
Publishing Music on the Internet
Cakewalk Publisher allows you to easily present and share your music
online. With Cakewalk Publisher, you can create a customized streaming
music player with a playlist of your music, upload it to your personal or
band's website, and embed it in any other website. You can also update
your playlist with album art, links (URLs), and artist, track, & album
information.
Introduction
About SONAR
31
Page 32

Burning Audio CDs
SONAR has integrated Audio CD burning, which allows you to write your
audio tracks to an audio CD that can be played in any standard CD player.
Flexibility
SONAR works the way you want to work—you can customize screen
layouts, toolbars, and audio and MIDI system configurations to make your
work more efficient. SONAR integrates with other sound editing tools so
you can access them in an instant without leaving SONAR. There are
custom software modules to support specialized audio devices from Roland
and Yamaha. SONAR’s unique StudioWare technology provides software
interfaces for common studio hardware.
Computers, Sound, and Music
This section provides some background on the different ways that
computers store and play sound and music. Computers work with sound
and music in two different forms: MIDI and digital audio.
MIDI
MIDI (short for Musical Instrument Digital Interface) is the way computers
communicate with most sound cards, keyboards, and other electronic
instruments. MIDI refers to both the type of cables and plugs used to
connect the computers and instruments, and to the language those
computers and instruments use to talk to each other. The MIDI standard is
accepted and used worldwide. Almost any electronic instrument you buy
today will have MIDI connectors and can be used with other MIDI
instruments and with your computer’s MIDI interface. To record MIDI in
SONAR, you have to have a MIDI cable connecting the MIDI OUT port on
your MIDI instrument to a MIDI IN port on either your sound card or your
MIDI interface. You must also make sure that you have installed the
software MIDI driver that came with your sound card or MIDI interface.
The MIDI language conveys information and instructions, both from the
computer to the instrument and from the instrument to the computer. For
example, if your computer wants your keyboard to play a note, it sends a
MIDI “Note On” message and tells the keyboard which note to play. When
your computer wants the keyboard to stop playing that note, it sends
another message that stops the note from playing.
The MIDI language has many other instructions, such as messages to
change the sound that is used to play the notes (the bank and patch),
32 Introduction
Computers, Sound, and Music
Page 33

messages that enable working with the sustain pedal and the pitch-bend
wheel, and others. By sending the right messages at the right times, your
computer can control your electronic instrument and make it play music.
MIDI information can be sent on 16 different channels. You can set up your
MIDI equipment to listen for messages on all channels or on only a few.
MIDI files contain all the MIDI messages and timing information that are
needed to play a song. MIDI files can be read and played by many different
programs, including SONAR, and can even be played by programs on other
types of computers. MIDI files have the extension .
There are several important advantages of the MIDI format:
• Large amounts of music can be stored in a very compact form
• Different parts of a piece can easily be assigned to any instrument you
can imagine
• The music contains information on notes, tempos, and key signatures
that makes it possible to display and edit the piece using standard
musical notation
The primary disadvantage of MIDI is that the quality of the sound a listener
hears will vary depending on the MIDI equipment the listener is using. For
example, MIDI usually sounds much better on an expensive synthesizer
than it does on an inexpensive sound card.
MID.
Digital Audio
Digital audio (frequently referred to here as just “audio”) is a simple way to
record and play sounds of any type. It works like a tape recorder—you
record something, then later play it back. Digital audio stores the sound as a
long series of numbers. To record audio in SONAR, you have to have an
audio cable connecting the audio output of your electronic instrument to the
audio input on your sound card or audio hardware. If you’re recording
vocals or an acoustic instrument, you need to connect a microphone to the
audio input on your sound card or audio hardware.
Sound Waves
Sound waves are vibrations in the air. Sound waves are generated by
anything that vibrates; a vibrating object causes the air next to it to vibrate,
and the vibration is passed through the air in all directions. When the
vibrating air enters your ear, it makes your eardrum vibrate, and you hear a
sound. Likewise, if the vibrating air hits a microphone, it causes the
microphone to vibrate and send electrical signals to whatever it's connected
to.
Introduction
Computers, Sound, and Music
33
Page 34

These vibrations are very fast. The slowest vibration frequency you can
hear is about 20 vibrations per second, and the fastest is around 16,000 to
20,000 vibrations per second.
Recording Digital Audio
To record digital audio, your computer monitors the electrical signal
generated by a microphone, an electric guitar, or another source. At equal
intervals of time (for CD-quality sound, this means 44,100 times a second),
the computer measures and saves the strength of the electrical signal from
the microphone, on a scale from 0 to 65,535.
That's it. Digital audio data is just a long series of numbers. The computer
sends these numbers, in the form of electrical signals, to a speaker. The
speaker then vibrates and generates the same sound that was recorded.
The primary advantage of digital audio is the quality of the sound. Unlike
MIDI, a digital audio recording is very rich, capturing all the nuances,
overtones, and other characteristics of the sound exactly as performed. The
main drawback of digital audio is that it takes up a lot of disk space. To
record a 1-minute segment of stereo, CD-quality digital audio, you need
about 10 megabytes of disk space.
On the PC, digital audio is usually stored in Wave files (extension .wav).
There are many programs available that let you create, play, and edit these
files. SONAR reads, writes, and lets you edit Wave files.
Setup
You can install SONAR on any computer that runs Windows XP or x64 and
has a sound card or built-in sound module. If you want to hook up other
devices, like a MIDI keyboard, an electric guitar, or a microphone, you need
the right cables, and you need to find the right connectors on your
computer.
Before you install SONAR, take a minute to register the software so we can
let you know when updates become available and provide you with
technical support. To register anytime log onto http://www.cakewalk.com/
register, or call 888-CAKEWALK (U.S.) or +(617)-423-9004 (outside the
U.S.) between 9 AM and 8 PM Eastern Standard Time. If you live outside of
North America, please visit our distributor’s page at www.cakewalk.com/
Dealers/International.asp to get the telephone number of your local
distributor. You’ll need to supply your serial number, your name, and a valid
email address.
34 Introduction
Setup
Page 35

To connect a MIDI keyboard to your computer, you need standard MIDI
cables or a MIDI adapter cable (joystick connector), such as the one
available in Cakewalk’s PC Music Pack. One end of the adapter cable
should have two 5-pin DIN connectors that connect to your keyboard or
other MIDI device. At the other end, you need a 15-pin connector to connect
to a sound card through its MIDI/joystick port.
If you have a dedicated MIDI interface, lots of electronic music gear, or work
with many different music software packages, see see the online help topic
“Hardware Setup.”
Before you attach or detach any cables from your computer, you should
shut down your computer and turn off the power to all your equipment. This
greatly reduces the chance of electrical damage to your equipment while
plugging and unplugging cables.
User Accounts
Previous versions of SONAR required a user to have Windows
Administrator status. This is no longer the case. Any level of user can now
install and run SONAR. Only one copy of SONAR per machine is necessary
for multiple users to run SONAR with each user’s personal settings.
There is now also a new folder structure for personal settings (presets, .ini
files, etc.). Each user account gets its own Application Data folder (this
folder is called App Data in Vista). The first time SONAR is launched under
a new user account, a new application data folder is created for that
account, and all the data in the C:\Documents and Settings\All
Users\Application Data\Cakewalk folder is copied to the new user account’s
application data folder—C:\Documents and Settings\<user
name>\Application Data\Cakewalk. For Vista users the folders are
C:\Progarm Data\Cakewalk and C:\Users\<user
name>\AppData\Roaming\Cakewalk.
Data in the Program FIles folder will be common to all users.
Introduction
Setup
35
Page 36

Audio Connections
There are several types of audio interfaces (soundcards). CardBus (PCI),
USB/USB2 and FireWire are the most common. Laptops can use an audio
PCMCIA card. Many audio interfaces also have MIDI inputs and some have
built in MIDI synthesizers as well. This section covers the various audio
connection options.
Analog and Digital Inputs
There are two basic types of audio inputs, analog and digital. Analog inputs
allow you to connect a guitar, mic or other instrument to your computer
directly. The audio interface converts the analog input to digital. Digital
inputs allow other digital devices to connect directly to your computer.
Common digital inputs include external analog to digital converters, popular
guitar processors like the Line 6 POD, and other digital recording systems
like the ADAT decks. Analog inputs are very common, and are standard in
virtually all consumer sound cards (the ones that come with your PC).
Digital inputs are becoming more popular and are very common on
professional and mid-level, “prosumer” interfaces. Analog inputs allow you
to record a mono or stereo signal (assuming you have a stereo input) while
digital inputs allow you to record 1 to 8 signals depending on the type of
digital connection.
The following table describes the various analog inputs and outputs:
Type of analog input/output... Description…
Balanced (XLR, phono or RCA) a mono input/output
Unbalanced (TRS) a stereo or mono input/output
The following table describes the various digital inputs and outputs:
36 Introduction
Setup
Page 37

Type of digital input/
Description…
output...
S/PDIF Sony/Philips Digital Interface—capable of
carrying a stereo signal, S/PDIF is transmitted
via RCA, Toslink or more rarely BNC jacks
(single-pin cable-TV connections)
ADAT Lightpipe Up to 8 channels of simultaneous transfer. If
you want to import your old ADAT material
without any signal degradation, this is the
connection you should use.
TDIF Tascam Digital Interface—up to 8 channels of
simultaneous transfer.
AES/EBU Often referred to as simply AES, this type of
digital connection uses a modified XLR cable
to transfer a stereo signal.
Read your hardware documentation carefully to determine what kind of
digital connections, if any, you have on your audio interface.
To Connect an Electric Guitar or Keyboard to Your
Computer
• If your sound card has a 1/8 inch input jack (built-in sound cards that
come with your PC usually do), plug your 1/4” mono guitar or audio
cable into a 1/8” stereo adapter, and then plug the 1/8” adapter into the
microphone input or line input jack on your computer sound card. If you
are connecting a keyboard, the audio cable must go from the
keyboard’s audio out or line out jack to the sound card input jack. 1/8”
stereo adapters are available at consumer electronic supply stores.
Or
• If you use a professional or “prosumer” sound card, there is probably a
1/4 inch input jack on your sound card or audio hardware interface that
you can plug your guitar cable or audio cable into.
Introduction
Setup
37
Page 38

To Connect a Microphone to Your Computer
• If your sound card has a 1/8 inch input jack (built-in sound cards that
come with your PC usually do), and your microphone cable has a 1/4”
plug on the end, plug the mic cable into a 1/8” stereo adapter, and then
plug the 1/8” adapter into the microphone input jack on your computer
sound card. 1/8” stereo adapters are available at consumer electronic
supply stores.
• If you use a professional or “prosumer” sound card, there is probably a
1/4 inch input jack on your sound card or audio hardware interface that
you can plug your mic cable into.
• If your mic has a cable with an XLR plug on the end, and your sound
card or audio hardware interface has a 1/4 inch input jack, plug the mic
cable into an XLR-to-quarter inch adapter, and then plug your mic cable
into your audio hardware. If your audio hardware has an XLR input, of
course it’s better to use that.
• You can also plug your mic into a mixer or pre-amp, and connect the
mixer or pre-amp to an input jack on your audio hardware. This is
usually the best method.
That's it! Now that your instruments are all set to go, you can restart your
computer and turn on your keyboard, guitar, and microphone.
For a complete description of audio input options, see the online help topic
“Hardware Setup.”
MIDI Connections
There are three types of MIDI cables in common use. Here’s how to
connect each of the three types:
• USB cable—this is extremely common. Many electronic keyboards and
stand-alone MIDI interfaces use this type of connection. To use this
type of connection, simply plug one end of the USB cable into the USB
jack on your MDI keyboard or stand-alone MIDI interface, and plug the
other end into your computer. If you are using a stand-alone USB MIDI
interface, you then need to connect standard MIDI cables between your
MIDI keyboard and your stand-alone MIDI interface (see the next
procedure, below). If you haven’t already installed the software MIDI
driver that came with your keyboard or interface, make sure you do so.
• Standard MIDI cable—this is also very common. MIDI keyboards
usually have jacks for these cables even if they have a USB
connection. You need two of these cables. To use this type of cable,
use one cable to connect the MIDI OUT jack on your MIDI instrument to
38 Introduction
Setup
Page 39
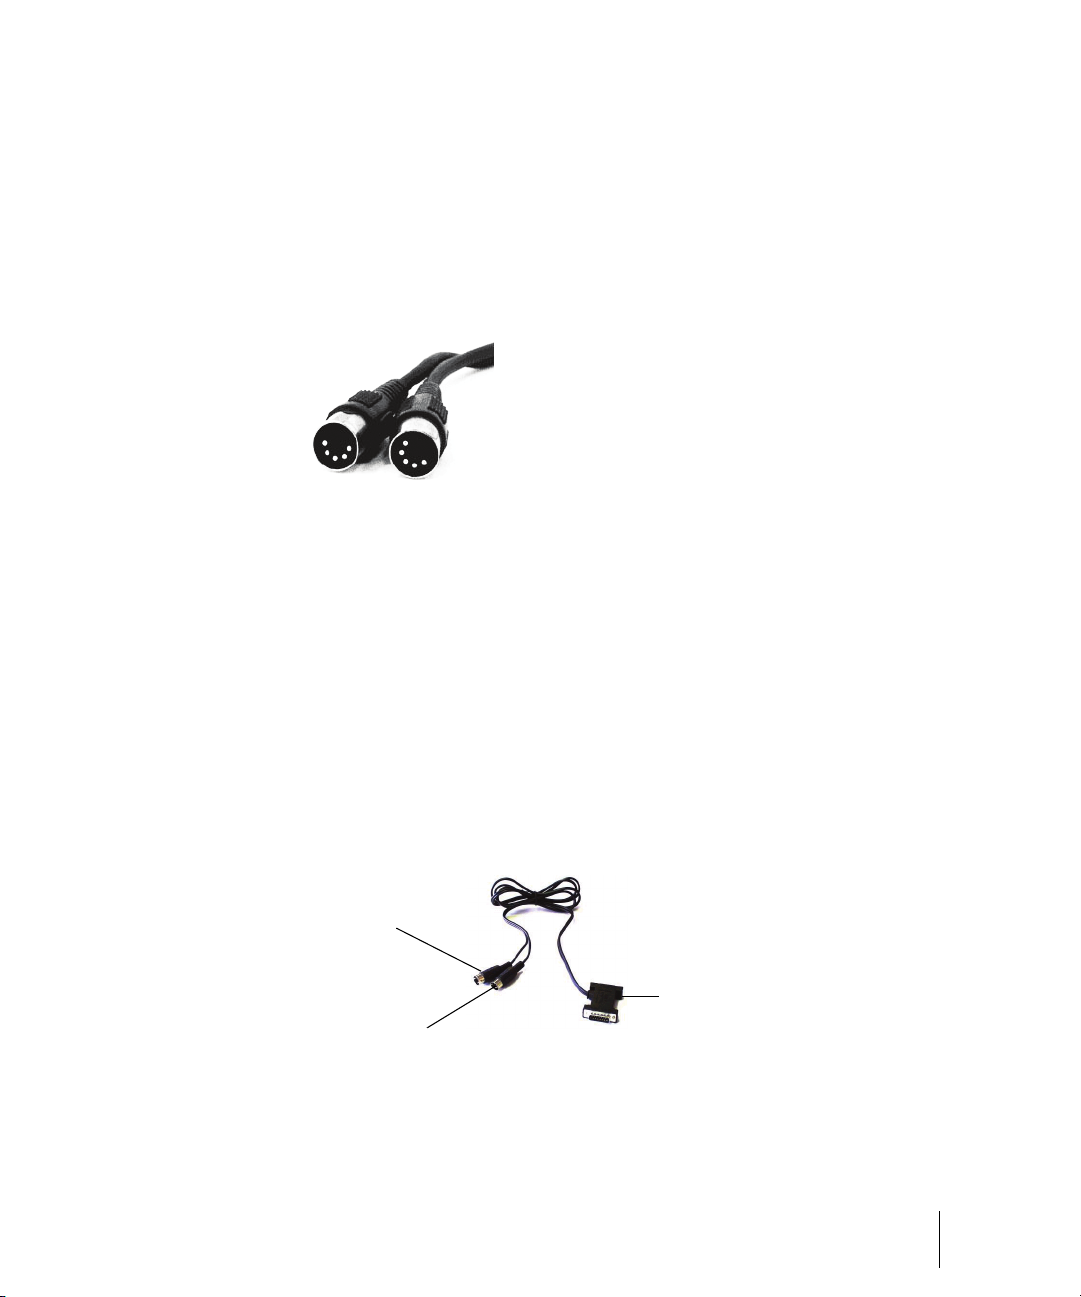
the MIDI IN jack on your stand-alone MIDI interface or sound card, and
Standard MIDI cable—use this if your MIDI interface has standard 5-pin input and output
ports
Joystick connector—use this if your MIDI interface is the joystick port on your sound card.
A
B
C
one to connect the MIDI IN jack on your MIDI instrument to the MIDI
OUT jack on your stand-alone MIDI interface or sound card. Many
stand-alone MIDI interfaces and audio interfaces use this type of
connector.
• Joystick connector—this is becoming less common. This is the type of
connection seen on older SoundBlaster type sound cards. To use this
type of connection, find the end of one of the MIDI cables that is labeled
OUT. Plug this connector into the MIDI IN jack on your electronic
keyboard. The other 5-pin connector on the MIDI cable is labeled IN.
Plug this connector into the MIDI OUT jack on your electronic keyboard.
Plug the 15-pin connector on the MIDI cable into the MIDI/joystick port
on your sound card. If you have a joystick, unplug it, plug in the MIDI
cable, and plug the joystick into the pass-through connector on the MIDI
cable.
A. Insert this MIIDI IN plug into the MIDI OUT port on your MIDI instrument B. Insert
this MIIDI OUT plug into the MIDI IN port on your MIDI instrument C. Insert this plug
into the joystick port on your sound card
Introduction
Setup
39
Page 40

Starting SONAR
There are many different ways to start SONAR. Here are a few:
• Double-click the SONAR icon on your desktop.
• Click the Start button, and choose Programs-Cakewalk-SONAR 8
(Studio Edition or Producer Edition)-SONAR 8 (Studio Edition or
Producer Edition).
• Click the Start button, point to Documents, and choose a SONAR
project from the menu.
• Double-click the SONAR program or any SONAR document from the
Windows Explorer or the Find menu.
When starting SONAR, you will see the Quick Start dialog box.
The Quick Start dialog box has several options:
Option... How to use it…
Open a Project Choose a project from the Open File dialog
Open a Recent Project Select a project from the list, and click this
40 Introduction
Starting SONAR
box to open it
button to open it
Page 41

Option... How to use it…
Create a New Project Click here to create a new project.
Getting Started Click here to view the Getting Started topic in
the help file. This topic has links to a glossary
of terms, as well as some basic procedures.
If you don’t want to see the Quick Start dialog box in the future, uncheck the
box at the bottom of the dialog box, and click Close. You can see the Quick
Start dialog box later by choosing Help-Quick Start.
Migrating Preferences
If you have a previous version of Cakewalk installed, SONAR will detect it
and give you the option of migrating certain preferences from a single
earlier version.
When you choose to migrate preferences, SONAR migrates the following
settings from an earlier Cakewalk version:
Setting... Description…
Global Options Settings in the Global Options dialog. Open by
selecting Options-Global.
Key Bindings Your customized key bindings for controlling
SONAR using your MIDI keyboard or computer
keyboard.
Instrument Definitions Files used to control specific MIDI instruments.
Audio data directory (WaveData
folder) and Picture Cache
directory locations
SONAR uses the Data directory and Picture
Cache directories from the previous Cakewalk
version for storing project wave files and their
waveform image files.
Introduction
Starting SONAR
41
Page 42

Running Wave Profiler
The first time you start SONAR, it automatically runs the Wave Profiler
utility. Wave Profiler determines the proper MIDI and Audio timings for your
sound card and writes them to a file that SONAR refers to when using the
card. Wave Profiler does not change the sound card’s DMA, IRQ, or port
address settings.
Wave Profiler detects the make and model of your sound card, which
determine the card’s audio characteristics. If Wave Profiler finds a card that
has a WDM driver, it only profiles that card. If you want to use more than
one sound card at a time, and they don’t both have WDM drivers, you must
force the one with the WDM driver to use that driver as an older, MME
driver. It is not necessary to run the Wave Profiler for a sound card using an
ASIO driver. For more information about Wave Profiler, WDM, and MME,
see the online help topic The Wave Profiler. When Wave Profiler
determines the kind of card you have, always accept the default settings.
Note: You can run the Wave Profiler again at a later time (for example, if
you install a new sound card or driver) by choosing the Options-Audio
General tab command and clicking Wave Profiler.
Setting Up the MIDI In and MIDI Out Devices
When you start SONAR for the first time, it checks your computer to find all
the MIDI input and output devices you have installed (such as sound cards
and MIDI interfaces). However, sometimes you need to tell SONAR exactly
which devices you want it to use. If you’re not getting sound from your
sound card or MIDI keyboard, or if you just want to change the MIDI outputs
and devices that you are using, follow the steps in this section.
Choose Options-MIDI Devices to open a dialog box in which you select
the MIDI In and MIDI Out devices that SONAR will use. Each item in the list
is a MIDI Input or MIDI Output from drivers installed using the Windows
Control Panel.
42 Introduction
Starting SONAR
Page 43
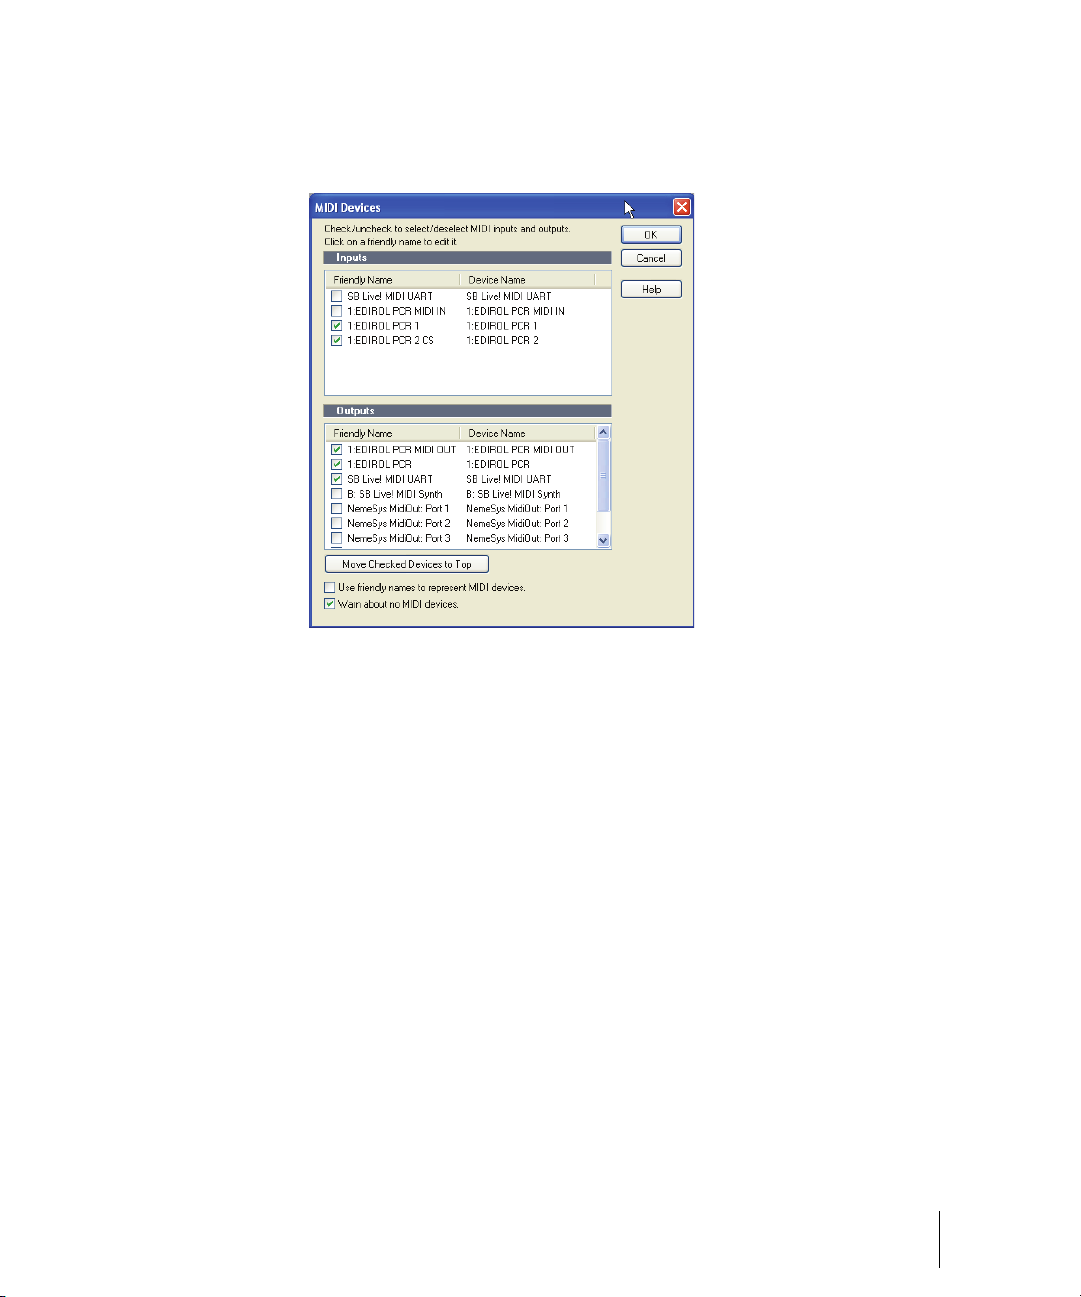
1. Select Options-MIDI Devices. You will see the MIDI Devices dialog
box, which lets you choose instruments on MIDI inputs and outputs.
2. Look at the top window. Notice that it shows devices on MIDI Inputs;
make sure that all devices in this window are checked. If a device isn’t
checked, click on it once to select it for MIDI Input.
3. Look at the window on the bottom. Notice that it shows devices on MIDI
Outputs. SONAR numbers its MIDI Outputs by the order of the devices
in this window. The device on top is on Output 1, the one below it is on
Output 2, and so on.
4. Check one device at a time in the Outputs window and click Move
Selected Devices to Top to change its order. Then check all the devices
that appear in the window to select them for output.
Tip: Be sure to enable (check) MIDI output devices in the MIDI Devices
dialog (use the Options-MIDI Devices command). If you don’t do this, you
won’t hear any of your MIDI instruments when you play songs in SONAR.
Introduction
Starting SONAR
43
Page 44

Using MIDI Devices After Making Driver Changes
If you later add or remove drivers using the Drivers icon of the Windows
Control Panel, SONAR reacts in the following way:
• If you remove a Control Panel driver, SONAR will not use the device it
belongs to the next time you run the program. Any other devices you
had selected using the Options-MIDI Devices command will remain
selected.
• If you add a driver through the Control Panel, SONAR does not
automatically use it. You must use the Options-MIDI Devices
command to enable the new driver in SONAR’s list.
Note: After you add or remove a driver with the Drivers icon in the Windows
Control Panel, you must restart Windows for the change to take effect.
Defining Your MIDI Instrument or Sound Card
Once you have selected your MIDI Input and Output devices, SONAR, by
default, plays back MIDI sequences using a General MIDI instrument
definition. If you are using a synthesizer or sound card that does not adhere
to the General MIDI standard, you may want to define that instrument. See
the online help topic: Instrument Definitions for more information.
SONAR Basics
SONAR’s menus and toolbars give you quick access to all the features of
SONAR. Some menu choices and tools display dialog boxes that let you
choose among various options, or type in the values you want. If you click
in most views, in time rulers, or on certain other items with the right mouse
button, you see a popup menu that provides quick access to many common
operations.
The project is the center of your work in SONAR. If you’re a musician, a
project might contain a song, a jingle, or a movement of a symphony. If
you’re a post-production engineer, a project might contain a 30-second
radio commercial or a lengthy soundtrack for a film or videotape production.
By default, every project is stored in a file (known as a project file). The
normal file extension for a SONAR work file is .
SONAR organizes the sound and music in your project into tracks, clips,
and events.
Tracks are used to store the sound or music made by each instrument or
voice in a project. For example, a song that is arranged for four instruments
and one vocalist may have 5 tracks—one for each instrument and one for
the vocals. Each project can have an unlimited number of tracks. Some of
44 Introduction
SONAR Basics
CWP.
Page 45

these tracks may be used in your finished project, while others can hold
alternate takes, backup tracks, and variations that you might want to keep
for future use. Each track can be made up of one or many clips.
Clips are the pieces of sound and music that make up your tracks. A clip
might contain a horn solo, a drum break, a bass or guitar riff, a voice-over, a
sound effect like the hoot of an owl, or an entire keyboard performance. A
track can contain a single clip or dozens of different clips, and you can
easily move clips from one track to another.
Groove clips are audio clips which have tempo and pitch information
embedded within them, allowing them to follow changes to the project
tempo or project pitch. You can click on either edge of a Groove clip and
drag out repetitions in the track.
Events are MIDI data (in MIDI tracks) or automation data.
SONAR File Types
Projects in SONAR can be saved as a project file with the extension .CWP or
as a Bundle file with the extension .
For a complete description of the differences between project files and
bundle files, see the online help topic Project Files and Bundle Files.
Other Types of Files
SONAR lets you create and work with several other types of files, in
addition to project (.
CWP) and bundle (.CWB) files that store your projects:
CWB.
File type… Description…
MIDI files (extension .MID) Standard MIDI files.
Template files (extension .
StudioWare (extension
AKEWALKSTUDIOWARE)
.C
OMF (extension .
OMF) Open Media Framework format files.
TPL) Templates for new files you create
To control external MIDI devices from
SONAR
Introduction
SONAR Basics
45
Page 46

Opening a File
Use the following procedure to open a file.
To Open a File in SONAR
1. If you haven't already done so, start SONAR.
2. Choose File-Open.
3. In the Open dialog box, navigate to the directory where the project you
want to open is located and select it.
4. Click the Open button.
5. If you are opening an OMF file, the Unpack OMF dialog appears. Set
the initial tempo and specify the directory where you want to save the
file and its audio. For more information about opening OMF files, see
Unpack OMF dialog in the online help.
SONAR loads the project.
Views
SONAR displays your project in windows on the screen that are known as
views. You can have many views open at once, all showing the same
project. When you edit a project in one view, the other related views are
updated automatically.
The Track View
The Track view is the main window that you use to create, display, and
work with a project. When you open a project file, SONAR displays the
Track view for the project. When you close the Track view for a project,
SONAR closes the file.
The Track view is divided into several sections: toolbars (at the top), the
Navigator pane, the Video Thumbnails pane, the Track pane, the Track/
Bus Inspector, the Clips pane, and the Bus pane. You can change the
size of the panes by dragging the vertical or horizontal splitter bars that
separate them.
46 Introduction
SONAR Basics
Page 47
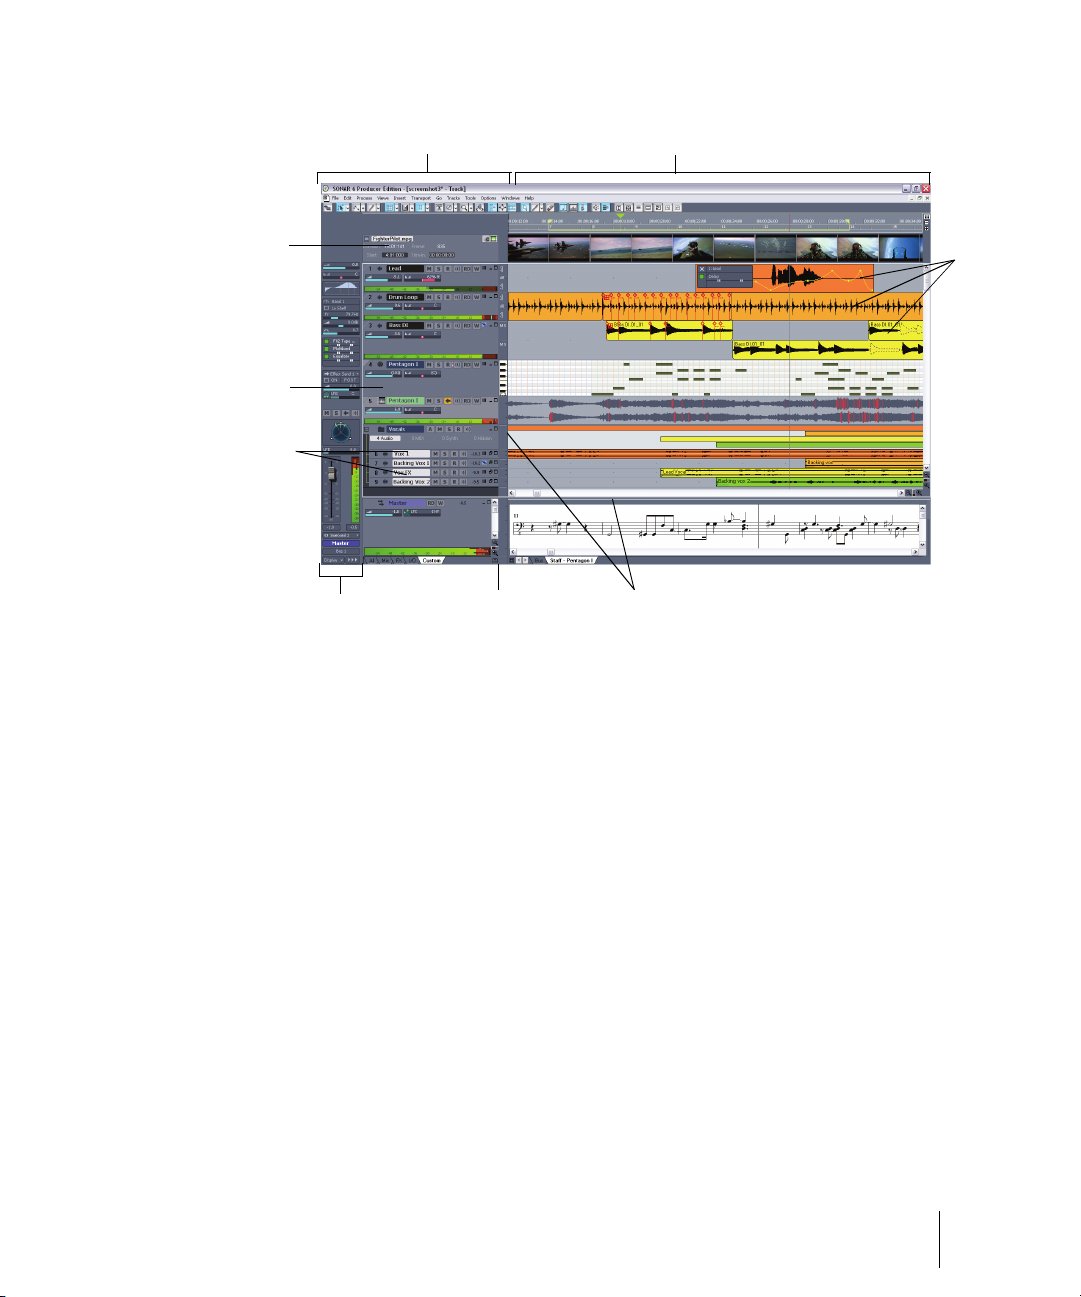
A. The Track Pane B. The Clips Pane C. Clips D. Splitter bars E. Show/hide bus
AB
I
C
DE
F
G
H
pane F. Track/Bus Inspector G. Minimized tracks H. Expanded track I. The Video
Thumbnails Pane
All of the current track’s controls, plus a few that are only available in the
Console view, are contained in the Track/Bus Inspector which is an
expanded version of the current track’s controls located on the far left side
of the Track view. You can hide or show the Track/Bus Inspector by
pressing i on your keyboard (see “Track/Bus Inspector” on page 49, for
more information).
By default, the current track is displayed in gold. To change the current
track, move the highlight using the mouse or the keyboard as follows:
The Track pane lets you see and change the initial settings for each track.
Introduction
47
SONAR Basics
Page 48

Key… What it does…
Left/Right Arrow Moves the highlight to the next or previous
control.
Up/Down Arrow Moves to the same control in the adjacent
track, or the next track of the same type if the
control only applies to a specific track type (for
example, the Patch control only applies to
MIDI tracks).
Page Down Displays the next page of tracks.
Page Up Displays the previous page of tracks.
Home Moves the focus to the first track.
End Moves the focus to the last track.
The current track’s controls are contained in the Track/Bus Inspector.
The Clips pane shows the clips in your project on a horizontal timeline
called the Time Ruler that helps you visualize how your project is
organized. Clips contain markings that indicate their contents. The Clips
pane lets you select, move, cut and copy clips from place to place to
change the arrangement of music and sound in your project.
The Bus pane shows the buses in the project, and also shows any editing
views that are in tabbed (docked) format. The Show/Hide Bus pane button
allows you to show or hide the Bus pane at the bottom of the Track view.
The Navigator pane displays a large part of your project so you can see an
overview of your song. The Navigator pane displays all of your project’s
tracks.
The Track view makes it easy to select tracks, clips, and ranges of time in a
project. These are the most common selection methods:
48 Introduction
SONAR Basics
Page 49

To… Do this…
Select tracks Click on the track number, or drag over several
track numbers
Select clips Click on the clip, or drag a rectangle around
several clips
Select time ranges Drag in the Time Ruler, or click between two
markers
Select partial clips Hold down the Alt key while dragging over a
clip
As with most other Windows programs, you can also use the Shift-click and
Ctrl-click combinations when selecting tracks and clips. Holding the Shift
key while you click adds tracks or clips to the current selection. Holding the
Ctrl key while you click lets you toggle the selection status of tracks or clips.
Track/Bus Inspector
The Track/Bus Inspector makes it easy to adjust the current track’s (or
bus’s) controls, because it’s a greatly expanded version of the current
track’s controls that is located on the left side of the Track pane.
In addition to the controls that a track or bus displays in the Track view, the
Track/Bus Inspector also contains a built-in 4-band EQ. See the online help
topic “Using the Per-track EQ” for more information.
The following graphic shows most of the Track/Bus Inspector’s controls
(there may not be room to display all of a track’s controls on the Track/Bus
Inspector, depending on the resolution of your monitor):
Introduction
SONAR Basics
49
Page 50

Track/Bus Inspector for an Audio Track Track/Bus Inspector for a MIDI Track
Most controls
can be shown
or hidden.
E
I
J
F
G
H
D
A
B
C
A. Audio icon B. Output routing C. Track n a me D. Display menu E. Module menu
F. MIDI icon G. Output routing H. Track na m e I. Display menu J. Module menu
You can hide or show any of the Track/Bus Inspector’s controls, and use it
to display the controls from any track or bus. The following table shows you
how:
50 Introduction
SONAR Basics
Page 51

To do this… Do this…
Hide or show the Track/Bus
Inspector
Display a certain track’s or bus’s
controls in the Track/Bus Inspector
Hide or show any of the Track/Bus
Inspector’s controls
Reassign MIDI controller sliders in a
MIDI Track’s Fx bin
Display the parameters of a different
automatable effect
Assign a control to a group, arm it for
automation, take an automation
snapshot, or set up remote control
Bypass the FX bin Right-click the FX bin and choose Bypass
Press i on your keyboard.
Click the track or bus to make it current, or
choose the track or bus in the track/bus
dropdown menu that’s at the bottom of the
Track/Bus Inspector.
Click the Display menu or Module menu,
and choose options.
Note: you can not display a MIDI track’s
Time + or Key + controls in the Track/Bus
Inspector.
Right-click the slider you want to reassign
and choose Reassign Control from the
popup menu, choose the new parameter,
and click OK.
Click the name of the effect you want to
select.
Right-click the control and choose options
from the popup menu.
Bin from the popup menu.
The Console View
The Console view is where you can mix the sounds on all the different
tracks to create the final mix of your project. While the Track view provides
most of the same controls, you may want to use the more familiar interface
of the Console view for mixing.
You use the Console view to adjust the levels of sound for the different
tracks in your project, to change the stereo panning, and to apply real-time
effects to an individual track, combinations of tracks, or the final mix.
The Console view contains several groups of controls. There is one module
for each track in your project, and one module for each bus. You can use
bus sends to direct certain tracks to special modules that are known as
buses.
Introduction
SONAR Basics
51
Page 52

A. Audio module B. MIDI module C. MIDI velocity D. Bus out E. Main out F. Show/
ABC
DE
F
G
H
hide strip controls buttons G. Widen all strips H. Show/hide for tracks, buses, mains
As in the Track view, you can change track settings or record new music or
sound in the Console view. You may choose to use one view or the other, or
the choice you make may depend on which project you are working on.
Other Views
SONAR has a number of other views you can use to display and work on
your project. To display these views, select one or more tracks, by Ctrlclicking their track numbers and:
• Click the icon for the view in the Views toolbar
Or
• Choose the view you want from the View menu
The Piano Roll view : shows the notes from a MIDI track or tracks as
they would appear on a player-piano roll. You can move the notes around,
make them longer or shorter, and change their pitches by just dragging
them with the mouse. You can also use the Piano Roll view to display and
edit MIDI velocity, controllers, and other types of information. The Piano
Roll view also contains the Drum Editor, which allows you to “paint” drum
52 Introduction
SONAR Basics
Page 53

patterns using the Pattern Brush tool and play different drum modules from
a single track.
The Staff view : displays the notes from one or more MIDI tracks using
standard music notation, similar to the way the notation would appear on a
printed page. You can add, edit, or delete notes; create percussion parts;
add guitar chords and other notation markings; display guitar tablature;
display the Fretboard pane; and print whole scores or individual parts to
share with other musicians.
Introduction
SONAR Basics
53
Page 54

A. Dynamics and markings B. Time and pitch locator C. Editing tools D. Zoom out
AB CDE FGH
I
J
E. Zoom in F. Snap to Grid G. Show/hide track pane H. Fretboard display I. Trac k list
pane J. Fretboard pane
The Loop Construction view : allows you to create and edit Groove
clips (SONAR loops that “know” the tempo and key in which they were
recorded), and export these clips as ACIDized files.
54 Introduction
SONAR Basics
Page 55

The Loop Explorer view : allows you to preview ACIDized files and
other Wave files; and drag and drop them into your project.
The Event List view : displays the events in a project individually, so
that you can make changes at a very detailed level.
SONAR has several other views that are used for very specific purposes:
View… How you use it…
Meter/Key To change the meter (time signature) or key
signature, or to insert changes in the meter or
key signature at specific times in a project.
Big Time To display the Now time in a large, resizable
font that you can read more easily.
Markers To add, move, rename, or delete labels for
parts of your project that make it easier to
move from one point to another.
Lyrics To add and display lyrics for a track.
Introduction
SONAR Basics
55
Page 56

View… How you use it…
A
B
C
D
E
F
GH
Video To display a loaded video file.
Synth Rack Manage your soft synths
Navigator Manage the Now Time in a project
Surround Panner (Producer
version only)
Sysx To create, display, store, and edit System
Tempo To view and edit the project's tempo changes.
Pan a surround track
Exclusive MIDI messages used to control
instruments and other gear that are MIDI
capable.
Zoom Controls
Many of the views contain Zoom tools that let you change the horizontal
and vertical scale of the view:
A. Zoom Clips pane out vertically B. Vertical Zoom fader for Clips pane C. Zoom
Clips pane in vertically D. Zoom Bus pane out vertically E. Vertical Zoom fader for
Bus pane F. Zoom in horizontally G. Horizontal zoom fader H. Zoom out horizontally
The Track view toolbar contains the Zoom tool:
The zoom tools are used as described in the following table:
56 Introduction
SONAR Basics
Page 57
Tool… How you use it…
Zoom out (Clips pane or Bus
pane)
Zoom in (Clips pane or Bus pane) Click to zoom in incrementally, or press Shift
Zoom fader Click and drag to zoom continuously
Zoom tool Click to arm, then click and drag in the view to
Click to zoom out incrementally, or press Shift
and click to zoom all the way out
and click to zoom all the way in
select the zoom area. Click the dropdown
arrow to display a menu of zoom and view
options.
You can also zoom with the keyboard:
Key… What it does…
Ctrl+up arrow Zoom out vertically
Ctrl+down arrow Zoom in vertically
Ctrl+right arrow Zoom in horizontally
Ctrl+left arrow Zoom out horizontally
G Go to (center) the Now time, without zooming
Hold down Z Arm the Zoom tool
U Undo the current zoom
F Fit tracks to window
A Show all tracks
Shift+F Fit project to window
Shift+Double Click a clip Maximize track height
Introduction
SONAR Basics
57
Page 58
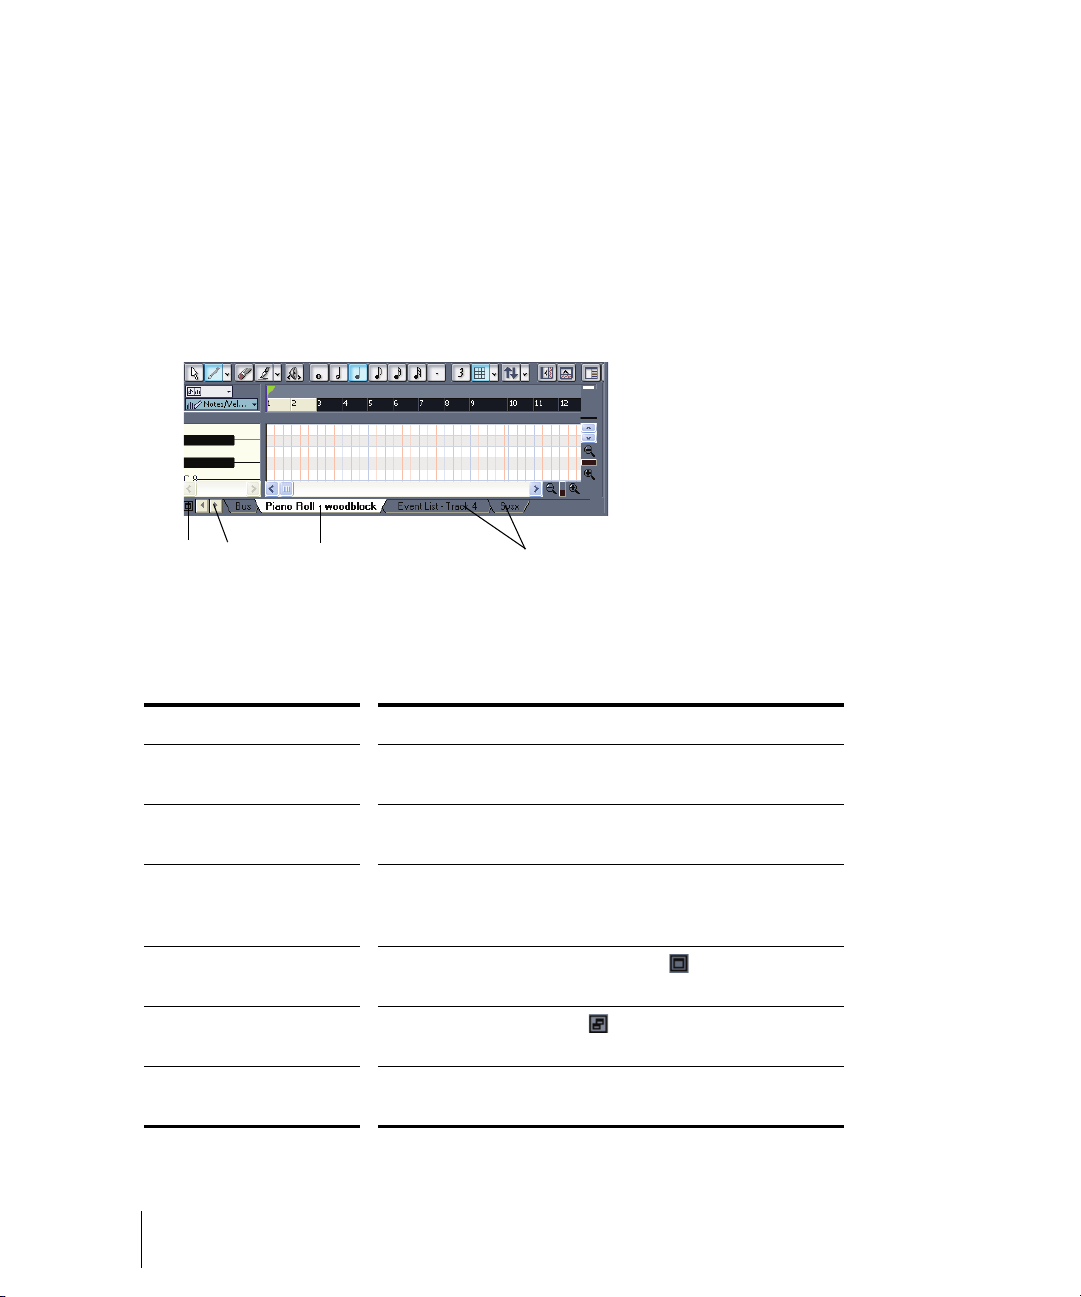
Docking Views
AB C
D
You can dock any view other than the Console view in the lower-right
corner of the Track view by enabling a view’s Enable Tabbed option. You
can have as many views open in tabbed format as you want. You can
toggle through the different views by clicking the tab of the view you want to
see (or use the Ctrl+Shift+Left/Right Arrow shortcut). You can also
maximize the pane to do detailed work in a view, or drag the splitter bar at
the top of the view to enlarge the tabbed view area. For step-by-step
instructions, see the procedures below.
A. Maximize pane B. Scroll left or right to view tabs C. Active view D. Tabs
To do t his … Do this…
Display a view in tabbed
format
Disable tabbed format
for a view
Enable or disable
tabbed format for all
open views
Maximize a tabbed view Click the Maximize/Restore button that’s just to the
Restore tabbed view Click the Restore button that’s in the lower left
Close a View that is in
Tabbed Format
58 Introduction
SONAR Basics
Click the upper left corner of a view, and choose Enable
Tabbed from the popup menu
Right-click the view’s tab, and choose Disable Tabbed
from the popup menu.
Use the View-Enable Tabbing for Open Views
command.
left of the tabs.
corner of the view that you’re restoring.
Right-click the view’s tab, and choose Close from the
popup menu
Page 59

Locking Views
By default SONAR allows only one instance of each view, but you can lock
the contents of most views, preserving the current view by forcing a new
instance of the view to appear if necessary. Locking views is the only way
you can have multiple instances of the same view open. Only the Track and
Console views cannot be locked.
To lock a view, just click the lock button at the top right of the view. An
unlocked view looks like this , and a locked view looks like this . A view
can be locked automatically by pressing the Ctrl key when opening the
view.
Floating Views
When a view is float enabled, you can move it outside of the confines of
SONAR. This is particularly useful if you take advantage of SONAR’s dual
monitor support. Using dual monitor support, you can keep the Track or
Console view on one monitor and “float” other views to the other monitor by
dragging them to the second screen.
For more information, see the online help topic “Floating Views and Dual
Monitor Support.”
X-Ray Windows
The X-Ray Windows feature eliminates the need to constantly minimize,
move, or close windows in order to work in other windows. It works by
decreasing the opacity of the current window enough so that you can see
and work with the window that’s behind the current window. You activate the
feature by pressing a keyboard shortcut (default shortcut is Shift+X) when
the mouse cursor is over a window you want to x-ray. You can choose to XRay whichever window is underneath the mouse cursor, or automatically XRay all FX/synth property pages in one step (note: the mouse cursor does
not need to be over any plug-in property pages).
The X-Ray Windows feature works on the following windows:
• AudioSnap palette
•Synth Rack
• Piano Roll view (when float-enabled)
• Snap To Grid dialog
• Plug-in effects and synths
• Controller/Surface plug-ins
To Select Key Bindings for X-Ray Windows
Introduction
SONAR Basics
59
Page 60

1. Use the Options-Key Bindings command to open the Key Bindings
dialog.
2. If you want to use currently unassigned keys or key combinations,
scroll through the options in the Key window until the Global Key
Assignment field that is just under the window reads Unassigned. It’s a
good idea to find two unassigned options that are next to each other or
easy to remember.
Note: for best results with X-Ray Windows, avoid using Alt key
combinations.
3. Once you’ve decided on two keys or key combinations that you want to
use, select Global Bindings in the Bind Context field, and scroll to the
bottom of the list of commands that are in the window below that field.
4. In the Key window, highlight the key or key combination that you want
to use for the X-Ray command, then highlight X-Ray in the function
column of the list of commands, then click the Bind button to bind them
together.
5. Now highlight the key or key combination that you want to use for the XRay All FX/Synths command, then Highlight X-Ray All FX/Synths in
the function column of the list of commands, then click the Bind button
to bind them together.
6. Click OK to close the dialog.
To Use X-Ray Windows
1. Use the Options-Global command to open the Global Options dialog,
and on the General tab, make sure that the Enable X-Ray checkbox is
enabled.
2. Make sure that the view windows you want to X-Ray are in the Floatingenabled state: to check this, click the view or fx icon that’s in the upper
left corner of a window, and select Enable Floating from the dropdown
menu. If Disable Floating is in the menu, then the Floating option is
already enabled.
Note: all FX/Synth/Control surface property pages are float-enabled by
default.
60 Introduction
SONAR Basics
Page 61

3. To X-Ray or un-X-Ray a single window, move the mouse cursor over
the window, and press the keyboard shortcut (default is Shift+X) for the
X-Ray command. The window does not need to have focus (does not
need to be the highlighted window).
4. To X-Ray or un-X-Ray all plug-in windows at once, press the key
binding for the X-Ray All FX/Synths command.
Note: if a window has focus, and the window’s Give All Keystrokes To Plugin button is enabled, X-Ray keyboard commands won’t work.
To Adjust X-Ray Windows Options
1. Use the Options-Global command to open the Global Options dialog.
2. On the General tab, you can adust these options:
• Enable X-Ray—enable or disable this checkbox to turn the X-Ray
Windows feature on or off.
• Opacity—adjust this value by typing in a value, or by clicking and
holding the + or - button to adjust the final opacity percentage value
that an X-Rayed window reaches.
• Fade Out Time—adjust this value by typing in a value, or by clicking
and holding the + or - button to adjust the amount of time that an XRayed window takes to reach its final opacity percentage value.
• Fade In Time—adjust this value by clicking and holding the + or -
button to adjust the amount of time that an X-Rayed window takes
to restore its original opacity.
3. Click OK to close the dialog and accept your changes.
To Exclude a Plug-in from X-Ray Capablity
Some plug-ins (very few) use DirectDraw to create their windows. These
windows appear jittery when X-Rayed.
To exclude a plug-in from X-Ray Capablity, follow these steps:
1. Open the Cakewalk Plug-in Manager: use the Tools-Cakewalk Plug-in
Manager command.
2. In the Plug-in Categories window, select the category that the plug-in
you want to exclude is in.
3. In the Registered Plug-ins window, select the plug-in that you want to
exclude.
Introduction
SONAR Basics
61
Page 62

4. If the plug-in is a DirectX effect or an MFX, write down (or select and
copy) the CLSID value that’s in the CLSID field at the bottom of the
dialog.
5. If the plug-in is a VST or VSTi, write down the VST ID value that’s in the
VST ID field at the bottom of the dialog.
6. Close the Plug-in Manager dialog.
7. Open the
XRAYEXCLUDE.INI file that’s in your SONAR program folder
(use Notepad).
8. At the end of the file, find the [EffectProps View] section.
You will see entries such as the following:
; Waves SSL EQ Stereo
XRayExclude11=1397510483
XRayExclude12={E451379E-F7E1-4E82-98D9-BEB87AC45E90}
9. Exclude your plug-in by creating a blank line below the last entry in the
[EffectProps View] section, and then typing:
;[name of your plug-in, but withour brackets]
XRayExclude[type the next available number in XRayExclude list, but
without brackets]=[VST ID number, with no brackets, or CLSID number,
with curly braces at start and finish]
For example, if the last entry in the [EffectProps View] section was:
; Waves SSL EQ Stereo
XRayExclude11=1397510483
XRayExclude12={E451379E-F7E1-4E82-98D9-BEB87AC45E90}
And you wanted to exclude the Cakewalk FxDelay from the X-Ray
Windows feature, after creating a blank line you would type:
; Cakewalk FxDelay
XRayExclude13={985DAF67-589F-4B8D-8BBC-D7AD651B9022}
If there was also a VST version of the Cakewalk FxDelay, you would
add another line:
XRayExclude14=[some VST ID number, with no brackets]
10. Save and close the
implement your changes.
62 Introduction
SONAR Basics
XRAYEXCLUDE.INI file, and restart SONAR to
Page 63

Customizable Menus
All main menus and context menus are customizable. You can fine-tune
your workflow by hiding menu items that are rarely used and reordering
commands that you use frequently. You can even design and save menu
layouts specific to different tasks.
Caution: you can move commands completely out of their default menus.
For example, you can move commands out of the Edit menu into the
Process menu. Keep in mind that this manual describes commands by their
original menu locations, so if you’re looking for help about the Process-
Nudge command, and you’ve moved the Nudge command to the Edit
menu, the documentation for this command will still refer to the command
as Process-Nudge. You can always load the default menu layout to restore
the original command structure.
• To open the Menu Editor dialog, choose Options-Menu Editor.
• In the Menu Editor dialog, to choose a menu to edit, select one from the
Menu dropdown list.
To do this… Do this…
Hide items in a menu Click a Menu Item (Ctrl-click to select multiple items)
and press the Hide button.
The hidden command(s) will only be visible in the
submenu that is automatically created at the bottom of
the menu. You can display the submenu by clicking one
of the arrows at the bottom of the menu.
Show items in a menu Click a Menu Item (Ctrl-click to select multiple items)
and press the Show button.
The command(s) will reappear in its original location.
Reorder items in a
menu
Click and drag Menu Items up or down to change their
position in the menu order.
Note that you can click and drag Menu Items in and out
of submenus as well.
Introduction
SONAR Basics
63
Page 64

To do t his … Do this…
Create a new submenu Right-click an item in the Menu Items list and select
Create Submenu. That item will now appear in its own
new submenu.
Or
Select one or more items from the list and press the
Create New button in the Submenus section of the
dialog.
Rename a Menu Item or
submenu
Create a new separator
bar
Remove a submenu or
separator bar
Save a new menu
layout
Delete an existing menu
layout
Edit a menu layout Launch the Menu Editor and choose the menu layout
Load a different menu
layout
Right-click a Menu Item or submenu and select
Rename, then enter a new name.
Or
Select a Menu Item and press F2, then enter a new
name.
Right-click a Menu Item and select Insert Separator.
The separator bar will appear above the Menu Item you
right-clicked.
Right-click the submenu or separator and select
Remove Submenu or Remove Separator.
Enter a new name into the Menu Layout field and press
the Save button.
Select the menu layout you wish to delete and press the
Delete button
you wish to edit from the dropdown menu, then make
your changes.
Launch the Menu Editor and choose a different Menu
Layout from the dropdown menu, then close the dialog.
OR
Use the Options-Menu Layouts command, and select
a layout from the available options.
Note 1: Keep in mind that the factory default menu layout cannot be
overwritten. If you want to change this layout, save your changes under a
new layout name.
Note 2: If you change your menu layout so much that you can’t find some
commands, you can always load the factory default menu layout.
64 Introduction
SONAR Basics
Page 65

Altering your menus may affect your menus’ hotkeys, which allow you to
navigate through the application’s menus without using a mouse. You can
view the hotkeys in your menus by pressing Alt and observing the
underlined letters. Pressing the underlined letter on your keyboard will
launch that menu command. In order to ensure you have no duplicates
hotkeys in your customized menu, do the following.
1. Launch the Menu Editor and select the menu or submenu you wish to
check for duplicate hotkeys. Right-click the Menu Item and select
Check Hotkeys. The Menu Editor will then report back if duplicate
hotkeys are found, or if a command has no hotkey at all.
Note: the Check Hotkeys command examines only commands on the
menu that you right-clicked, at the menu level that you right-clicked. It
does not examine submenus of that menu.
2. If missing or duplicate hotkeys are found, right-click again and select
Generate Hotkeys. New non-duplicate hotkeys will be assigned for
each item in that menu or submenu (but only on the menu level where
you right-clicked, not on any submenus of the menu or submenu that
you right-clicked).
Note: Hotkeys are indicated within the Menu Editor by ampersands
(“&”) in each menu item’s name. The ampersand is placed directly
before the letter that represents the menu item’s hotkey. If you wish to
assign hotkeys manually, you can do so by when you rename a hotkey
by placing the ampersand before your preferred hotkey letter for that
command or submenu.
3. If necessary, re-save your layout to preserve these changes.
Customizable Toolbars
You can customize each toolbar in SONAR. You can hide or reorder each
component of a toolbar, or add buttons to a toolbar from other toolbars. You
can create up to three new toolbars from components of other toolbars. You
can also hide or show all toolbars with a single command, and dock
toolbars vertically if you want.
• To choose what toolbars you want to see, use the View-Toolbars
command, and check the toolbars that you want to see in the dialog
box.
• To hide or show all toolbars, use the View-Show Toolbars command.
This command is available in the Key Bindings dialog (Options-Key
Bindings command).
To customize a toolbar:
Introduction
SONAR Basics
65
Page 66

1. Right-click the toolbar that you want to customize, and choose
Customize from the popup menu to open the Customize Toolbar
dialog.
2. In the Available Toolbar Buttons field, select a component that you want
to see in the toolbar, and click the Add button to move the component to
the Current Toolbar Buttons field.
3. Repeat step 2 for any additional components you would like to display.
4. In the Current Toolbar Buttons field, select a component that you do not
want to see in the toolbar, and click the Remove button to move the
component to the Available Toolbar Buttons field.
5. Repeat step 4 for any additional components you would like to remove.
6. If you would like to move a toolbar component to a different location in
the toolbar, select the component in the Current Toolbar Buttons field,
and click the Move Up button or the Move Down button to change the
button’s location in the toolbar.
7. Repeat step 7 for any additional components.
8. If you want to restore the toolbar to its default appearance, click the
Reset button.
9. Click Close when you want to close the dialog.
To create a toolbar:
1. Use the View-Toolbars command, and check one of the User “n”
options.
A toolbar appears, with a default set of controls.
2. Right-click the toolbar, and choose Customize from the popup menu to
open the Customize Toolbar dialog.
3. Customize the toolbar the in the same way as the previous procedure.
To rename a toolbar:
1. Right-click the toolbar, and choose Rename from the popup menu to
open the Rename Toolbar dialog
2. Fill in the New Name field, and click OK.
Now when you open the Toolbars dialog, the name you chose is listed in
the dialog.
To dock or undock a toolbar:
66 Introduction
SONAR Basics
Page 67

• To dock a toolbar horizontally, drag it to the top or bottom of the
ECGHFD
BA
interface.
• To dock a toolbar vertically, drag it to the left or right side of the
interface.
• To undock a toolbar, drag it to the part of the interface where you want
it, or entirely away from the interface.
Layouts
You may spend a lot of time making sure that all the views are laid out on
the screen just the way you want. When you save your work, you can save
the screen layout along with it. You can also save the layout by itself and
then use the layout with other projects. For more information, see the online
help topic “Layouts.”
Working on a Project
Much of your time in SONAR is spent recording and listening to your project
as it develops. The Transport toolbar, shown below, contains the most
important tools and other pieces of information you’ll need to record and
play back your project.
Every project has a current time, known as the Now time. As you record or
play back a project, the Now time shows your current location in the project.
When you create a project, the Now time is set to the beginning of the
project. The current Now time is saved with your project.
You control recording and playback using tools on the Large Transport
toolbar (press F4 to show or hide), which work a lot like the ones on your
tape deck or CD player:
A. Play B. Record C. Click to move ahead one measure D. Auto-punch toggle
E. Drag Now Time to any desired position F. Click to jump to the end G. Click to back
up one measure H. Click to jump to the beginning
Introduction
SONAR Basics
67
Page 68

As you work with a project, you can use SONAR’s mute and solo features
to choose which tracks are played, or you can create loops to play a
particular section over and over again. You can also create markers, which
are named time points you add to your project to make it easy to jump to a
particular location.
Windows Taskbar Indicators
When SONAR is running, you’ll normally see two indicators in your
Windows Taskbar, right next to the clock.
The MIDI activity monitor contains two lights that indicate MIDI input and
output. When you play your MIDI keyboard, the first light flashes when each
note is pressed, and it flashes again when each note is released. When you
play back a project that contains MIDI, the second indicator lights up.
The volume control is used to control the playback and record volumes
on your sound card. Double-click on this indicator to open a dialog box that
lets you control the levels for audio, MIDI, CD playback, and record.
The volume control is available only if your sound card is using a native
Windows driver. If your sound card does not use a native Windows driver,
no volume control will be displayed in the taskbar. In this case, your sound
card probably came with a separate program to control input and output
levels. See your sound card documentation for more information.
Screen Colors and Wallpaper
SONAR lets you customize the colors that are used for virtually all parts of
the program using the Options-Colors command. This command also lets
you change the background bitmap that is displayed in the SONAR window.
For any SONAR screen element, you can assign a color in two ways:
• Choose one of the colors that is part of your Windows color scheme.
• Assign a custom color.
68 Introduction
Windows Taskbar Indicators
Page 69

To Assign Custom Colors
1. Choose Options-Colors to display the Configure Colors dialog box.
2. Choose the screen element whose color you want to change from the
Screen Element list.
3. Assign a color to the screen element in one of two ways:
• To use a color from the Windows color scheme, choose one of the
options in the Follow System Color list
• To use a custom color, check Use Specific Color, click the Choose
Color button, and select the color you want
4. To save these changes from session to session, check the Save
Changes for Next Session box.
5. Click OK when you are done.
SONAR uses the colors you have chosen.
To Restore the Default Colors
1. Choose Options-Colors to display the Configure Colors dialog box.
2. In the Screen Elements window, select the elements that you want to
restore; you can Ctrl-click or Shift-click to select multiple elements.
3. Click the Defaults button.
4. Click OK.
SONAR uses the default colors for all selected screen elements.
To Change the Wallpaper
1. Choose Options-Colors to display the Configure Colors dialog box.
2. Choose the desired wallpaper according to the table:
To do this… Do this…
Use the default wallpaper Check Default in the Wallpaper list
Not use any wallpaper Check None in the Wallpaper list
Use a custom bitmap Check Custom, choose a bitmap, and click Open
3. Click OK when you are done.
Introduction
Screen Colors and Wallpaper
69
Page 70

Presets menu
Import and Export
buttons
Configure Colors dialog
Color Presets
Once you create a color arrangement that you like, you can save it as a
preset, and then load it whenever you want to use that arrangement. You
can also load any of the many factory presets, some of which duplicate the
colors of earlier versions of SONAR. You can also import and export color
arrangements in the form of .
layouts. And you can back up or export all of your presets with a single
command, and import a group of presets that you or another SONAR user
created.
Note: both single color presets, and collections of presets use the file
extension .
CLR, so when you export either the current color arrangement, or
all of your presets at once, give the exported file a name that clearly labels it
as either a single preset, or as a collection of presets.
CLR files so that SONAR users can share color
70 Introduction
Screen Colors and Wallpaper
Page 71

To Load a Color Preset
1. Open the Configure Colors dialog by using the Options-Colors
command.
2. Click the dropdown arrow on the Presets menu to display the list of
presets, then click the name of the preset you want to load.
To Save a Color Preset
1. Open the Configure Colors dialog by using the Options-Colors
command.
2. Adjust the color settings you want to save.
3. Type a name for your preset in the Presets menu.
4. Click the floppy disk icon that’s next to the Presets menu to save
your preset.
To Export the Current Color Arrangement
1. Open the Configure Colors dialog by using the Options-Colors
command.
2. Arrange or load the color arrangement you want to export.
3. Click the Export Colors button in the Configure Colors
dialog.
The Export Color Set dialog appears.
4. Navigate to the folder where you want to store your new color set file.
5. Type a name for your color set file in the File Name field.
6. Make sure that the Export Current Color Set checkbox is enabled.
7. Click the Save button.
To Import One or More Color Presets
1. Open the Configure Colors dialog by using the Options-Colors
command.
2. Click the Import Colors button in the Configure Colors
dialog.
The Import Color Set dialog appears.
3. Navigate to the folder where the color set file you want to import is. Both
single presets and groups of presets are stored in color set files, which
use the .
CLR file extension.
Introduction
Screen Colors and Wallpaper
71
Page 72

4. Click the file that you want to import.
5. Click the Open button.
6. If your preset menu in SONAR already contains a preset that is
included in the preset collection file you are importing, SONAR asks
you if you want to overwrite the file. This happens for each file that has
the same name as a preset in the preset collection you are importing.
Click Yes or No for each file in question, or Yes All or No All to either
overwrite or protect all of your current preset files.
To Export All Your Color Presets
1. Open the Configure Colors dialog by using the Options-Colors
command.
2. Click the Export Colors button in the Configure Colors
dialog.
The Export Color Set dialog appears.
3. Navigate to the folder where you want to store your the exported file.
This file will contain all or your color presets.
4. Type a name for your file in the File Name field. Use a file name that
you will recognize as a collection of presets, rather than as a single
color arrangement.
5. Make sure that the Export Color Presets checkbox is enabled.
6. Click the Save button.
Note: a file of color presets can be large, and might take a minute or so to
export.
72 Introduction
Screen Colors and Wallpaper
Page 73

Starting to Use SONAR
This chapter has provided you with an overview of SONAR and basic
information on how to install the software and configure your system. To get
started with SONAR, try the Tutorials in Chapter 2.
Installing SONAR
SONAR is easy to install. All you need to do is choose the folder where the
program and sample project files should be stored.Before you start, make
sure you have your serial number handy. Your serial number is located on
the back of your DVD case.
Installation note: If you choose to not install the Sample files, you will not
have the necessary content to use the tutorials in Chapter 2.
To Install SONAR
1. Start your computer.
2. Close any open programs you have running.
3. Place the SONAR installation disc in your disc drive.
If you have autorun enabled, the SONAR AutoRun menu opens
automatically, showing you a dialog box with several buttons. If autorun
is not enabled, you can open the SONAR AutoRun menu by selecting
Start-Run and entering d:\AutoRun.exe (where d:\ is your disc drive).
4. Click the Install SONAR button.
Note: If you exit Setup without completing the installation, choose StartRun, type D:\AutoRun.exe (where D:\ is your DVD drive), and click OK. This
will reopen the AutoRun window, and you can click Install to start installation
again.
5. Follow the installation instructions on the screen.
You can also install SONAR by choosing Start-Run and running the
application named
SETUP.EXE from the DVD.
Uninstalling SONAR
When you installed SONAR, the setup program placed an Uninstall icon in
the Start menu. To uninstall SONAR, click the Start button and choose
Programs-Cakewalk-SONAR 8 (Studio Edition or Producer Edition)-
Uninstall SONAR 8..
Introduction
Starting to Use SONAR
73
Page 74

74 Introduction
Installing SONAR
Page 75
Controlling Playback
When you play your SONAR project, you have full control over the tempo or speed of
playback, which tracks are played, which sound cards or other devices are used to
produce the sound, and what the tracks sound like. You can access most of the playback
functions from the Large Transport toolbar.
SONAR’s multi-MIDI enhancements give you the ability to play multiple synths or tracks
from a single keyboard or controller, or let multiple performers play the same or different
tracks. You have total control over MIDI echo (MIDI echo refers to where MIDI input
signals are sent once SONAR receives them).
Note: SONAR has a button called the Audio Engine button in the Transport toolbar
which you click to stop any feedback you may experience if there is a loop somewhere in
your mixer setup. Whenever you play a project, SONAR automatically enables the audio
engine, which you can tell by watching the Status bar—whenever the audio engine is
running, the Audio Running indicator in the Status bar lights up.
In This Chapter
The Now Time and How to Use It . . . . . . . . . . . . . . . . . . . . . . . . . . . . . . . . . . . . 76
Controlling Playback . . . . . . . . . . . . . . . . . . . . . . . . . . . . . . . . . . . . . . . . . . . . . . 84
Track-by-Track Playback . . . . . . . . . . . . . . . . . . . . . . . . . . . . . . . . . . . . . . . . . . . 91
Changing Track Settings . . . . . . . . . . . . . . . . . . . . . . . . . . . . . . . . . . . . . . . . . . . 96
Controlling Live MIDI Playback—MIDI Echo . . . . . . . . . . . . . . . . . . . . . . . . . . . 119
Local Control . . . . . . . . . . . . . . . . . . . . . . . . . . . . . . . . . . . . . . . . . . . . . . . . . . . 123
Video Playback, Import, and Export. . . . . . . . . . . . . . . . . . . . . . . . . . . . . . . . . . 126
Locating Missing Audio . . . . . . . . . . . . . . . . . . . . . . . . . . . . . . . . . . . . . . . . . . . 138
Page 76

The Now Time and How to Use It
BAC
Every project has a current time, known as the Now time, which keeps
track of where you are in a project. The Now time appears as a vertical line
in the Track view and is displayed in both the Large Transport toolbar and
the Position toolbar, in two formats.
The measure, beat, and tick number (MBT) identifies the Now time in
musical time units. Ticks are subdivisions of quarter notes and indicate the
timebase of the project. For more information about the timebase, see
“Setting the MIDI Timing Resolution” on page 221. The other time format is
the SMPTE format, expressed in hours, minutes, seconds, and frames.
A. The current measure, beat, and tick B. The current time in hours, minutes,
seconds, and frames C. Meter Key Signature display
Here are some examples of times expressed in measure, beat, and tick
(MBT) format:
Time... What it means...
1:01:000 First beat of the first measure
9:04:000 Fourth beat of the ninth measure
4:02:060 The 60
76 Controlling Playback
The Now Time and How to Use It
measure
th
tick of the second beat of the fourth
Page 77
The hours-minutes-seconds-frames format is commonly referred to as the
SMPTE time. SMPTE is the acronym for the Society of Motion Picture and
Television Engineers. In this format, time is measured in hours, minutes,
seconds, and frames. It’s not necessary for a project to begin at time zero in
this format—any time can be used to represent the start of a project. If you
are synchronizing SONAR with an external device whose start time is not 0,
you must offset SONAR to match the external device’s start time. For more
information, see Chapter , Synchronizing Your Gear.
Here are some examples of times expressed in this format (assuming that
zero is the start time):
Time... What it means...
00:00:00:00 The beginning of the project
00:05:10:00 Five minutes and ten seconds from the
beginning of the project
01:30:00:00 One hour and thirty minutes into the project
00:00:00:05 Five frames into the project
SONAR provides many ways to set the Now time. Here are just a few:
To Change the Now Time
• Click the desired time on the Time Ruler in the Track view, Piano Roll
view, or Staff view
• In the Navigator pane, click anywhere in the view while holding down
the Ctrl key to change the Now Time to that location
• Click on the Now time in the Large Transport toolbar, enter the desired
time, and press Enter
• Choose Go-Time or press F5, enter the desired time, and click OK
• Click on an event in the Event List view
You can also set the Now time by right-clicking in the Clips pane if you
enable the Right Click Sets Now option in the Track View Properties dialog.
Right-click a an empty area of the Clips pane, and select View Options
from the menu that appears to open the Clip View Properties dialog.
Controlling Playback
The Now Time and How to Use It
77
Page 78
When entering a time in MBT format, the beat and tick values are optional.
You can use a colon, space, decimal point, or vertical bar to separate the
parts of the Now time:
You enter… The Now time is set to…
22:01:000
4 2 0 4:02:000
99:01:000
5|1:30 5:01:030
When entering a time in SMPTE format, you can enter a single number
(hour), two numbers (hour and minutes), three numbers (hour, minutes,
and seconds), or all four numbers.
If you click in the Time Ruler while the snap grid is enabled, the Now time
will be snapped to the nearest point in the grid. By setting the grid size to a
whole note or quarter note, you can easily set the Now time to a measure or
beat boundary.
You can also use the buttons and the scroll bar in either the Transport
toolbar or Large Transport toolbar (shown below) to adjust the time.
When playback or recording is stopped, the Now Time either remains at the
point where the project stopped or snaps back to the Now Time Marker.
This behavior is controlled in the General tab of the Global Options dialog.
The Now Time Marker
In the Track view, the Now time appears as a black vertical line. When you
set the Now time in the Track view a green triangle called the Now time
marker appears in the Time Ruler. This marker represents the point at
which the Now time will snap back to after you stop playback or recording.
You can change the Now time marker behavior so that the marker moves to
the current Now time when playback or recording is stopped (use the
Options-Global command; on the General tab uncheck On Stop, Rewind
to Now Marker).
78 Controlling Playback
The Now Time and How to Use It
Page 79
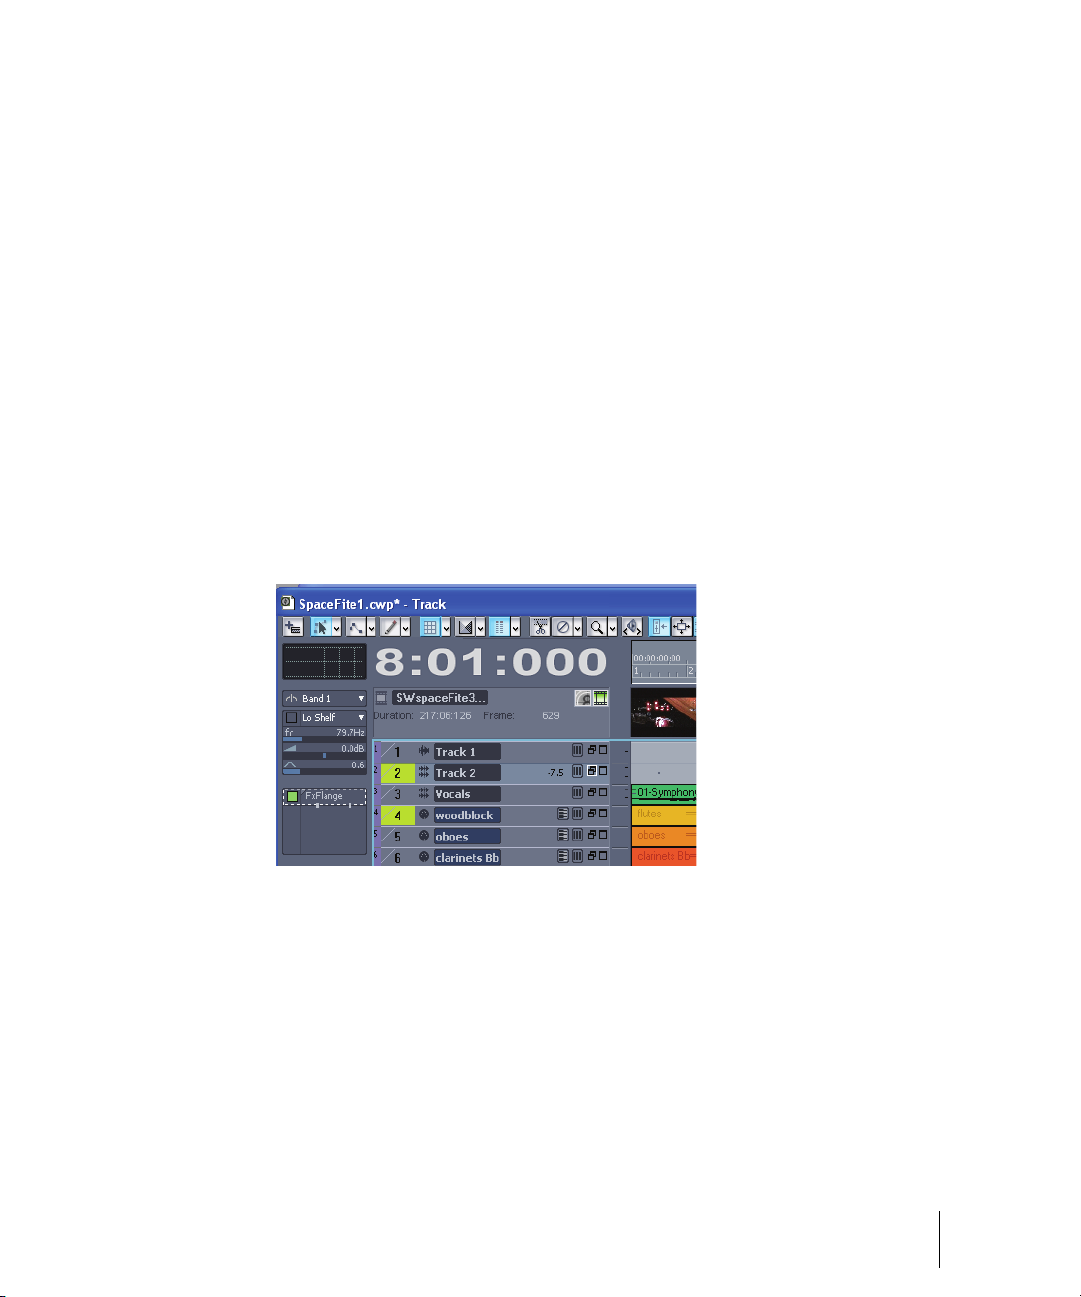
To Change the Now Time Marker Behavior
1. Select Options-Global from the SONAR menu.
The Global Options dialog appears.
2. Click the General tab.
3. Uncheck the On Stop, Rewind to Now Marker option to have the Now
time marker move to follow the current Now time when you stop
playback.
Or
Check the On Stop, Rewind to Now Marker option to have the Now time
snap back to the Now time marker when you stop playback.
4. Click OK.
The Track View Now Time Display
The Track view displays the Now Time above the track strips in a large and
configurable format.
Click the display to display the following time formats:
• M:B:T (Measure:Beat:Tick—example: 8:01:000)
• SMPTE (Hours:Minutes:Seconds:Frames—example: 00:00:21:00)
• Frames (example—629), only available if project contains video
• Milliseconds (Hours:Minutes:Seconds:Milliseconds—example:
00:00:21:000)
• Samples (example: 926100)
Controlling Playback
The Now Time and How to Use It
79
Page 80

You can also right-click the display, and choose time formats from the
popup menu.
The popup menu also lets you choose the following display options:
•To hide the time display, choose None.
•To show the time display, right-click the empty area and choose one of
the available time formats from the popup menu.
• To choose font, size,color, or resizing options, choose Font... from the
popup menu to open the Font dialog. Enabling the Automatically
Resize to Window option causes the display to automatically shrink
the display to fit the available space.
• To choose alignment options, choose Align-Left, Align-Center, or
Align-Left from the popup menu.
You can also configure the color from the Configure Colors dialog
(Options-Colors; "Track View Header Time Display"). The color is saved
with color presets.
The time display settings are global and persist between sessions.
Displaying the Now Time in Large Print
SONAR can display the Now time in large print so that it’s easier to see
when you are far from your monitor (for example, when you’re at your
keyboard or another instrument) or when several people need to read the
Now time from a distance. Here’s how:
To Display the Big Time View
1. Choose Views-Big Time to display the Big Time view.
2. Change the settings according to the table:
80 Controlling Playback
The Now Time and How to Use It
Page 81

To do this… Do this…
Switch time format Click on the view to toggle between MBT and
SMPTE time
Change font or color Right-click on the view, choose the font and color
you want, and click OK
Change the size of the view Drag any corner of the view to change its size
Note that SONAR ignores font styles and effects such as strikeout and
underline.
Other Ways to Set the Now Time
There are a variety of commands and keyboard shortcuts you can use to
set the Now time:
Command... Shortcut... What it does...
Go-Time F5 Lets you enter the Now time in the Position
toolbar or in a dialog box
Go-From F7 Sets the Now time to the From time (the start
time of the current time selection)
Go-Thru F8 Sets the Now time to the Thru time (the end
time of the current time selection)
Go-Beginning Ctrl+Home Sets the Now time to the beginning of the
project
Go-End Ctrl+End Sets the Now time to the end of the project
Go-Previous
Measure
Go-Next Measure Ctrl+PgDn Sets the Now time to the start of the next
Ctrl+PgUp Sets the Now time to the start of the current
measure if the Now time is not on a barline,
or to the start of the previous measure if the
Now time is on a barline.
measure
Controlling Playback
The Now Time and How to Use It
81
Page 82

If your project has markers, you can use the Marker toolbar to set the Now
time:
To do this… Do this…
Skip to the next marker Click on the Markers toolbar (or press
Ctrl+Shift+PgDn).
Skip to the previous marker Click on the Markers toolbar (or press
Ctrl+Shift+PgUp).
Jump to any marker Click on the Markers toolbar to open the
Markers view. Click on the marker you want to
jump to in the Markers view.
For more information about markers, see “Creating and Using Markers” on
page 305.
The Time Ruler
The Time ruler appears in the Track view, Tempo view, Staff view and Piano
Roll view. It has several functions, including:
• Making a time selection—the Time Ruler follows the Snap to Grid
settings, if enabled.
• Changing the Now time
• Adding loop, punch, and pitch markers—you can right-click in the Time
Ruler to add markers.
In the Track view, the Time Ruler has the following time display options or
formats:
• Measures, Beats and Ticks (M:B:T)
• Hours, Minutes, Seconds and Frames (H:M:S:F—also called SMPTE)
• Samples
• Milliseconds
82 Controlling Playback
The Now Time and How to Use It
Page 83

A. M:B:T B. H:M:S:F C. Samples D. Milleseconds E. Add Musical Snap to transient
B
A
C
D
E
F
snap pool (see AudioSnap) F. Minus and Plus buttons
The M:B:T setting follows your settings in the Meter/Key view. If you project
is set to 4/4 time, you have four beats in the Time Ruler for each measure. If
your project is set to 6/8 time, you have six beats in the Time Ruler for each
measure.
If there is only one format displayed in the Time Ruler, you can switch the
format by right-clicking in the Time Ruler and selecting the format you
prefer.
To Switch the Time Ruler Format to M:B:T
1. Right-click in the Track view Time Ruler.
2. In the menu that appears, select Time Ruler Format-M:B:T.
To Switch the Time Ruler Format to H:M:S:F (SMPTE)
1. Right-click in the Track view Time Ruler.
2. In the menu that appears, select Time Ruler Format-H:M:S:F.
To Switch the Time Ruler Format to Samples
1. Right-click in the Track view Time Ruler.
2. In the menu that appears, select Time Ruler Format-Samples.
To Switch the Time Ruler Format to Milliseconds
1. Right-click in the Track view Time Ruler.
2. In the menu that appears, select Time Ruler Format-Milliseconds.
Additionally, you can add or remove Time Ruler formats using the plus/
minus buttons located just outside the right edge of the Time Ruler.
Note: If only one Time Ruler format is being used, only the plus button is
displayed.
Controlling Playback
The Now Time and How to Use It
83
Page 84

To Add or Remove Time Ruler Formats Using the Plus/
Minus Buttons
• Click the Plus button and select a Time Ruler format you would like to
add from the popup menu.
• Click the Minus button and select from the popup menu to remove an
active Time Ruler format.
• Right-click in the Time Ruler and move the cursor to Time Ruler Format
in the popup menu. A list of all Time Ruler formats appears. Active
formats are checked, inactive formats are unchecked.
• Click a checked format to move it down one row.
• Click an unchecked format to replace the topmost displayed format.
Controlling Playback
To control playback, you have your choice of tools, menu commands, and
shortcut keys for most common operations.
When you start playback, the Now time updates continuously to show the
current time. When you stop playback, the Now time rewinds to the Now
Time Marker. When you start playback again, it continues from the same
point.
If the Now time is advancing but you don’t hear any sound, see
Troubleshooting. If you are using MIDI sync or syncing to MIDI time code,
SONAR waits to receive external timing data before it begins playing. If the
various views are not updating during playback, make sure the Scroll Lock
key on your computer keyboard is not enabled. For more information, see
Chapter , Synchronizing Your Gear.
Note: If your Windows setup uses any system sounds that are associated
with any typical activity, such as minimizing a window, etc., you should
disable these sounds. They can sound extremely loud through your
monitors, and also interrupt playback and recording, if you open any dialog
boxes or do anything that has a system sound attached to it while a project
plays. The quickest way to disable all system sounds is to open the Control
Panel (Start-Settings-Control Panel), double-click the Sounds icon to
open the Sounds Properties dialog box, and in the Schemes field select No
Sounds. Click Apply, and then click OK.
84 Controlling Playback
Controlling Playback
Page 85

To Start and Stop Playback
To do this… Do this…
Start playback Press the Spacebar, click , or choose
Transport-Play, or double-click in the Time Ruler
Stop playback Press the Spacebar, click , or choose
Transport-Stop
Rewind to the start of the
project
Skip to the end of the
project
Click , press the w key, or choose Transport-
Rewind
Click
Note:The default behavior for the Now time when you click the Stop button
is for it to return to the Now time marker where playback began. If you want
the Now time to remain where it is when you stop playback, you can use the
keyboard shortcut Ctrl+Spacebar. If you want to change the default
behavior, select Options-Global and click the General tab. In the General
tab, uncheck the On Stop, Rewind to Now Marker option.
Handling Stuck Notes
Under MIDI, the events that turn notes on are separate from the events that
stop notes from playing. Normally, when you stop playback, SONAR
attempts to turn off all notes that are still playing. Depending on how your
equipment is configured, it’s possible for notes to get stuck in the “on”
position. The Transport-Reset command is used to stop all notes from
playing. The Transport-Reset command also stops feedback from input
monitoring.
Note: You can control the MIDI messages that are sent by the Transport-
Reset command by changing the Panic Strength variable in the
cakewalk.ini file.
To Clear Stuck Notes
• Choose Transport-Reset, or click on the Large Transport toolbar.
Controlling Playback
Controlling Playback
85
Page 86

Looping
B
A
C
D
E
BA
Sometimes you want to listen to one portion of a project over and over,
either so you can play along and rehearse or because you want to edit that
section of the project while it is playing and hear the results as you make
changes. SONAR has a playback looping feature that makes this simple.
Looping is defined in the Loop/Auto Shuttle toolbar, as shown here:
A. Click to turn looping on or off B. Click to copy the selection (From and Thru)
times C. Click to open the Loop/Auto Shuttle dialog box D. Loop End time E. Loop
Start time
To set up a loop, you do three things:
• Set the start time of the loop
• Set the end time of the loop
• Enable looping
From then on, SONAR will automatically jump back to the start of the loop
when it reaches the end.
When looping is enabled, the loop times are indicated by special markers in
the Time Ruler.
A. Loop From B. Loop Thru
To Move a Loop in the Time Ruler
1. Click the yellow bar that connects the two loop markers
The cursor becomes a horizontal double-headed arrow.
2. Drag the loop to the desired location in the Time Ruler.
86 Controlling Playback
Controlling Playback
Page 87

The Loop/Auto Shuttle dialog box, which appears when you use the
Transport-Loop and Auto Shuttle command or click the Loop and Auto
Shuttle button in the Loop toolbar, contains two additional settings that
affect the details of how looping operates:
Option... How it works...
Stop at the end time Playback does not proceed beyond the end of
the loop
Loop continuously When playback reaches the end of the loop
and rewinds to the start, playback continues
automatically (this option is on by default)
With the default option settings, SONAR will play the loop over and over
again, continuously.
If you start playback before the loop start time, SONAR will play until the
loop end time is reached, then jump back to the loop start time.
Note: If you stop playback while looping is enabled, the Now time jumps to
the Now time marker. If you disable the On Stop Rewind to Now Marker
option in the General tab of the Global Options dialog, the Now time stays
wherever you stopped playback.
The Rewind command operates slightly differently when looping is in effect.
The first time you rewind, the Now time is set to the start of the loop. If the
Now time is already at the start of the loop, Rewind takes you to the
beginning of the project. From then on, Rewind switches back and forth
between the loop start time and the start of measure 1.
To Set Up a Playback Loop
1. Set the loop start and end times in one of the following ways:
• Drag the mouse between two points in the Time Ruler of the Track
view, Staff, or Piano Roll view to select a range of times, then click
in the Loop/Auto Shuttle toolbar to copy the selection time to the
loop time.
• Click between two markers in the Track, Staff, or Piano Roll view to
select a range of times, then click in the Loop/Auto Shuttle
toolbar to copy the selection time to the loop time.
Controlling Playback
Controlling Playback
87
Page 88

• Type the loop start and end times directly into the toolbar.
BACDEF
G
H
I
J
K
L
• Select a range of times, then right-click in the Time Ruler and
choose Set Loop Points (this method makes the second option
unnecessary).
Looping is automatically turned on when you use the Set Loop to Selection
command.
To Change the Loop Settings
1. Click , or choose Transport-Loop and Auto Shuttle to display the
Loop/Auto Shuttle dialog box.
2. Check the options you want to use.
3. Click OK.
To Cancel a Playback Loop
• Click on the toolbar to disable looping.
Using the Large Transport
The Large Transport consists of six sections, each of which can be shown
or hidden according to the needs of your project. Right click anywhere in
the Large Transport, and deselect any section from the popup menu that
you wish to hide. The six sections are Markers, Record, Transport, Loop,
Tempo and System.
A. Markers section B. Punch In/Out section C. Transport section D. Loop section
E. Tempo section F. System section G. Click to move ahead one measure H. Auto-
punch toggle I. Drag Now Time to any desired position J. Click to jump to the end
K. Click to back up one measure L. Click to jump to the beginning
88 Controlling Playback
Controlling Playback
Page 89

The Large Transport toolbar differs from the Transport toolbar in that it
B
A
C
D
E
displays a Markers section (numeric keypad), the Now time (which you can
set by entering numbers into the display fields in either MBT or SMPTE
time), a CPU and Disk Cache Performance meter, and the Time/Key
Signature display. The Time/Key Signature display shows the current meter,
key signature, and tempo. You can edit the meter and key signature by
clicking the display to open the Time/Key Signature dialog box. You can
display the Large Transport toolbar by selecting the Views-Toolbars
command to open the Toolbars dialog box, and checking Transport (Large).
You can also display and hide the Large Transport toolbar by pressing F4.
Using the Markers Section
You can store up to 12 markers in the Markers section, making it easy to
navigate through your project. Assign markers to milestones in your project
using the Insert-Marker
in the desired location for your marker. When your cursor hovers over a
button in the Markers section, the name you assigned to the marker is
displayed as a tooltip.
command or by pressing F11 when the now time is
A. Marker buttons B. Record options C. Set punch in time D. Set punch out time
E. Set punch points to selection
To Use the Punch In/Out Section
1. Click the Record Options button .
The Record Options dialog box appears.
2. Select between Blending existing data with new data, or Overwriting
existing data with new data.
3. Select between storing looped takes in a single track or storing looped
takes in individual tracks.
For more information see “Loop Recording” on page 240. You can also set
Auto-punch from the Record Options dialog.
Controlling Playback
Controlling Playback
89
Page 90
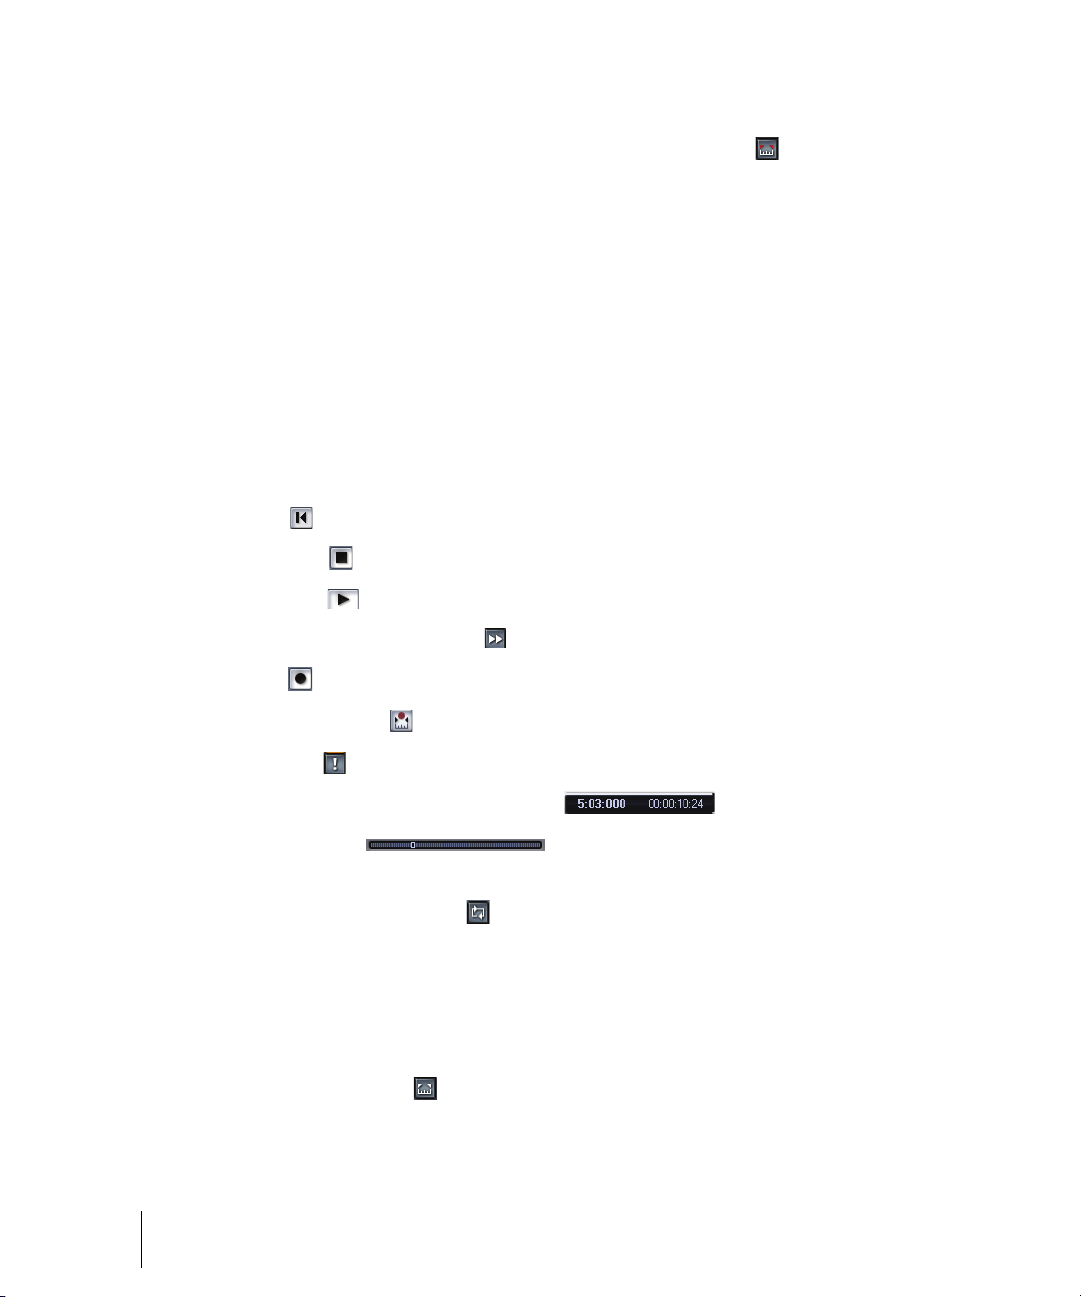
To Use Auto-punch in the Punch In/Out Section
1. Activate Auto-punch by clicking the Set punch points button .
2. Click the Punch In M:B:T meter and enter the Punch In time using the
spinners or keying in the desired M:B:T.
3. Click the Punch Out M:B:T meter and enter the Punch Out time using
the spinners or keying in the desired M:B:T.
4. Set the Now Time far enough ahead of the Punch In point for you to be
ready for it.
5. Click the Record button on the Large Transport or press R on your
keyboard.
SONAR plays the project, and begins recording on the selected track at the
Punch In time you entered, then stops recording at the Punch Out time.
Buttons in the Transport Section
•Rewind
• Stop project
• Play project
• Fast-forward to end of project
• Record .
• Toggle Auto-punch
• Reset MIDI
• Now Time measured inM:B:T, H:M:S:F
• Now Time slider
To Use the Loop Section
1. Clip the Loop On/Off button .
2. Set the Loop Start time in the M:B:T meter either manually or by using
the spinner. Set the Loop End time in the M:B:T meter either manually
or by using the spinner.
You can also set a loop from the Large Transport toolbar by highlighting a
section of your project in the Time Ruler and then clicking the Set Loop
Points to Selection button .
90 Controlling Playback
Controlling Playback
Page 91

Reading the Key Signature, Time Signature, Tempo and
A
B
C
D
E
F
G
System Display
The Large Transport displays a variety of information about the project you
are working on, including tempo, key, meter, metronome settings, and CPU
and disk cache performance.
.
A. Tem po B. CPU performance meter C. Disk cache performance meter D. Time
signature E. Key signature F. Metronome on/off during record G. Metronome on/
off during playback
Track-by-Track Playback
SONAR lets you play back any combination of tracks at one time by
changing each track’s status. You can control the status of each track with
the individual controls that are on every track, or with the global controls on
the Playback State toolbar or the Status bar that’s at the bottom of the
SONAR window. For more information about the Status bar, see “Status
Bar/CPU Meter/Disk Meter” on page 872. For more information about the
Playback State toolbar, see “The Playback State Toolbar” on page 93.
There are several different status settings for each track:
Status... What it means...
Normal The track plays unless one or more of your
other tracks is soloed.
Muted The track is not played, but you can turn it on
while playback is in progress.
Controlling Playback
Track-by-Track Playback
91
Page 92

Status... What it means...
Archived The track is not played, and you must stop
playback to re-enable it. Archived tracks do not
tax your CPU during playback so they can be
used to store alternate takes.
Soloed Only those tracks that are designated as solo
tracks are played; all others are muted.
Armed The track is armed for recording.
Mono/Stereo The track plays back in either mono or stereo,
depending on what the individual track setting
is, and whether the Play in Mono button in the
Playback State toolbar is depressed.
Phase normal or inverted If a track was accidentally recorded out of
phase with another track, the Phase button lets
you reverse the phase of a track.
While playback is in progress, you can mute and unmute tracks in any
combination, which means you can hear only the tracks that you want. You
can change the status of a track in the Track view, the Console view, the
Track menu, or the Playback State toolbar.
If a track is both muted and soloed, it does not play. Mute has precedence.
The track status is saved with the SONAR project file. If you save a SONAR
project as a Standard MIDI File, however, all tracks are saved without mute,
solo, or archive indicators.
92 Controlling Playback
Track-by-Track Playback
Page 93
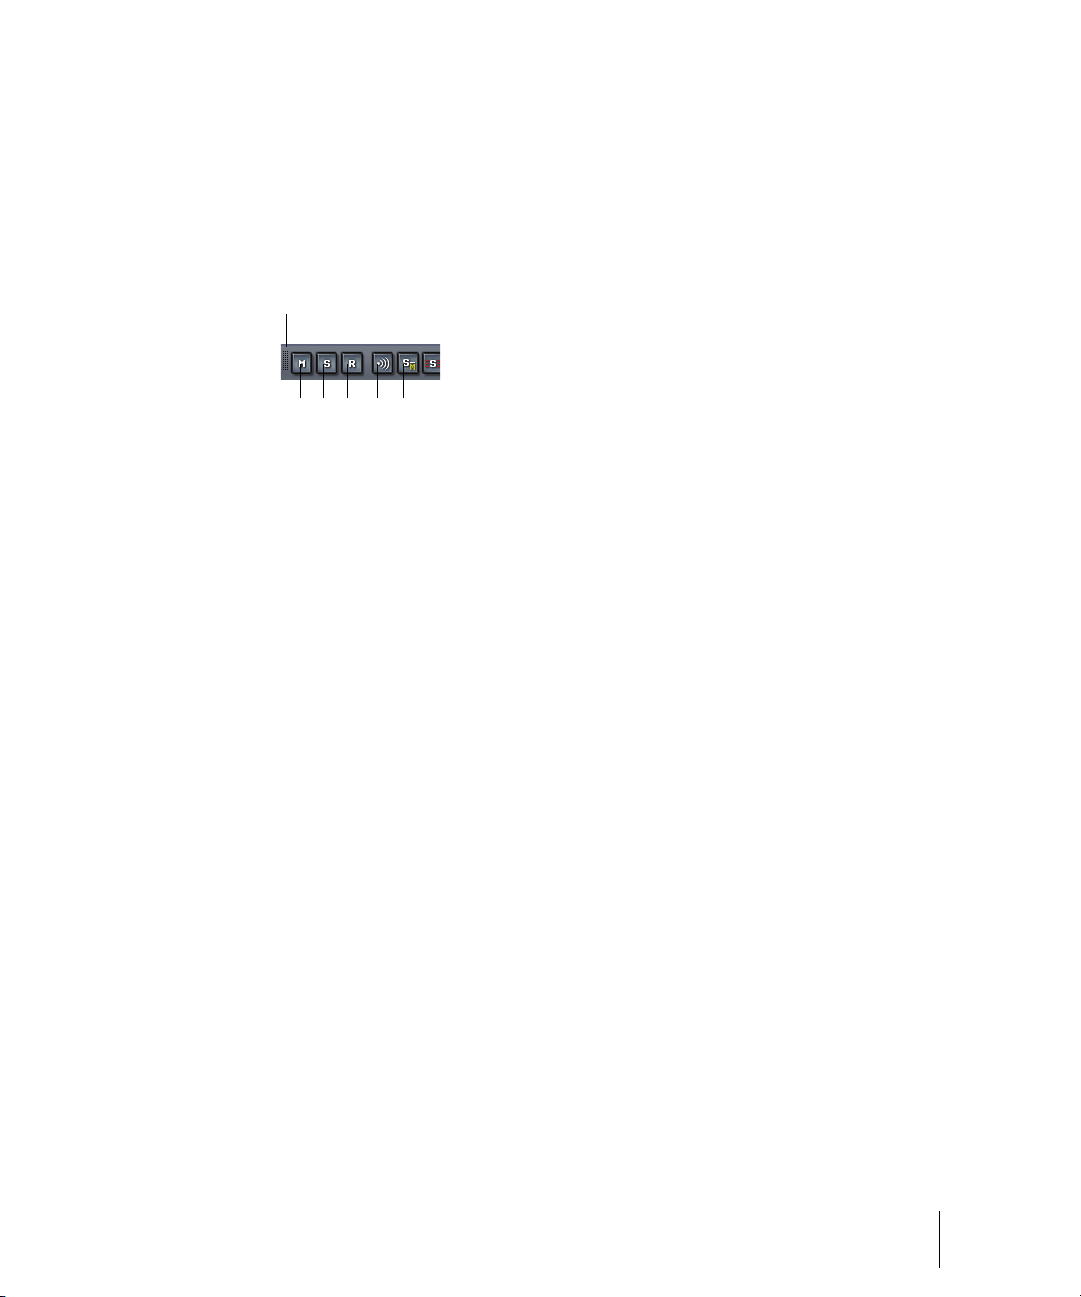
The Playback State Toolbar
A
B
C D E F
To display the Playback State toolbar, use the Views-Toolbars command to
open the Toolbars dialog box, and make sure Playback State is checked.
The Playback State toolbar is a global control that allows you to mute or
unmute, solo or unsolo, arm or disarm, and toggle the input echo status of
all tracks.
A. Drag to reposition B. Mute C. Solo D. Arm E. Input echo or MIDI echo
F. Solo Dim
Silencing Tracks
When a track is muted, SONAR processes the track while playback is in
progress so that you can unmute the track without stopping playback. If you
have lots of muted tracks, this can place a heavy load on your computer.
Archived tracks, on the other hand, don’t place any load on your computer.
Therefore, if there are tracks you want to keep but don’t need to play, you
should archive them instead. Archived tracks are indicated by the letter A in
the Mute button that is displayed in the Track and Console views.
When you mute or unmute a track while playback is in progress, there may
be a slight delay before you hear the effect of the change. This is to be
expected and does not indicate a hardware or software problem.
To Mute or Unmute Individual Tracks
• To mute or unmute a track, click its M button in the Track or Console
view.
• To mute or unmute several tracks at once, select the tracks and choose
Tracks-Mute, or select the tracks, right-click, and choose Mute from
the popup menu.
To Unmute All Tracks
• Click the M button in the Playback State toolbar or the Mute label in the
Status bar.
Controlling Playback
Track-by-Track Playback
93
Page 94

To Mute All Tracks
• If no tracks are currently muted, click the M button in the Playback State
toolbar.
Or
• Select all tracks, and then use the Tracks-Mute command.
To Archive or Unarchive Tracks
1. Select one or more tracks in the Track view.
2. Choose Tracks-Archive, or right-click and choose Archive from the
menu to toggle the archive status of the selected tracks.
Soloing Tracks
Sometimes you want to hear a single track, or a few tracks at once, without
having to mute all the other tracks. You can do this by soloing the tracks
you want to hear.
As soon as any track is marked as a solo track, SONAR ignores all mute
settings (unless a soloed track is also muted—mute takes precedence over
solo) and plays only the track or tracks that are set to solo. Any number of
tracks at one time can be marked as solo. All these tracks will play together.
As soon as the solo status of the final solo track is turned off, SONAR once
again plays back tracks based on their mute settings.
To Solo or Unsolo Individual Tracks
• To solo or unsolo a track, click the Solo button in the Track or Console
view
• To solo or unsolo several tracks at once, select the tracks and choose
Tracks-Solo, or right-click, and choose Solo from the popup menu.
To Unsolo All Tracks
• Click the S button in the Playback State toolbar or the Solo label in the
Status bar.
To Solo All Tracks
• If no tracks are currently soloed, click the S button in the Playback State
toolbar.
Or
• Select all tracks, and then use the Tracks-Solo command.
94 Controlling Playback
Track-by-Track Playback
Page 95

Inverting the Phase of a Track
A waveform’s exact opposite is called an inversion. It is a shift of 180
degrees. A waveform and its inversion cancel each other out completely, so
it is usually not desirable to have two track recordings of the same source if
one is phase inverted. It can lead to reduced volume, lowered or distorted
response in certain frequencies, or even silence in the case of two tracks
which are exactly identical (i.e. cloned tracks).
Occasionally, for example when recording a source using two microphones,
one of the microphones may be recording an inversion of the other, the
resulting tracks may, to some degree, be cancelling each other out. SONAR
allows you to invert the phase of a track to match another.
To Invert the Phase of a Track
1. Open the Track view or Console view.
2. In the track you want to invert the phase, click the phase inversion
button .
Changing Tracks’ Mono/Stereo Status
SONAR has a mono/stereo button in each track module in the Track and
Console views. The buttons in the track modules force each track to play in
either stereo or mono, but preserve the tracks’ pan positions in the stereo
mix.
The Mono/Stereo button in each track forces the track’s audio signal to
enter any patched plug-ins as either mono or stereo, whether or not the
tracks are mono or stereo. This allows you to use either mono effects on a
stereo track or stereo effects on a mono track.
Note: You may lose important stereo data by using mono effects with stereo
tracks because your stereo tracks are summed to mono in order to pass
through the effect. If you never want your stereo data to be summed to
mono, select stereo.
To Use a Track’s Stereo/Mono Button
1. Display the Track view or Console view.
2. In the track you want to force to either mono or stereo for processing
effects, click the Stereo/Mono button to the desired position:
• Speaker icon pointing left—This choice means that you manually
selected mono for this track.
• Speaker icon pointing left and right (as pictured above)—This
choice means that you manually selected stereo for this track.
Controlling Playback
Track-by-Track Playback
95
Page 96

Changing Track Settings
An audio track
Each track in a project contains MIDI or audio information and has a variety
of settings (also called parameters) that determine how the track sounds.
By changing these parameters, you can change the sound of your project.
For audio tracks, you control parameters such as volume, stereo panning,
and the output device that is used to produce the sound. For MIDI tracks,
you control many additional parameters, including the type of instrument
sound that is used to play the notes stored in the track. Both kinds of tracks
contain an Automation Read button and an Automation Write button, which
enable or disable automation playback and recording, respectively.
Note 1: You can control all sliders and knobs in the Console and Track
Views by clicking a control, then hover over it with the mouse and
manipulate the mouse wheel. If you move the mouse cursor away from the
slider or knob while using the mouse wheel, you will lose control of the
slider or knob you are adjusting
Note 2:You can hide, reorder, and visually group the controls in tracks and
buses. You can also control how the display tabs at the bottom of the Track
pane function. See “Configuring Track View Controls” on page 282 for more
information.
Audio Track Parameters
The following pictures illustrate the parameters that audio tracks have. The
pictures are of an audio track that is located in the Track view, however
most of these parameters can also be adjusted in the Console view:
96 Controlling Playback
Changing Track Settings
Page 97

Audio track header controls
C
D
E
A
B
F
G
H
Audio track interior controls
CD
AB
E
F
G
H
I
J
K
L
M
A. Strip selector B. Header icon C. Track name D. Show layers button E. Maximize
track F. Minimize track G. Peak value H. Track number
A.
Input echo B. Volume slider C. Send pan D. Send level E. Mono/stereo switch
F. Phase button G. Send enable H. Send destination I. Input trim J. Output
K. Automation Read and Write buttons L. Input M. Pan slider
Controlling Playback
Changing Track Settings
97
Page 98

A. Currently patched effect B. FX interleave indicator C. Track scale D. FX bin
Audio track FX bin, meter, and track scale
C
D
A
B
Here is a summary table of the different audio track parameters and how
they are used.
Parameter... What it means...
Strip selector Click this to add a track to a Quick Group, which means that
certain controls in tracks that are in the Quick Group are
grouped.
Number A sequential track number used for reference
Name A name that you assign the track for easy reference. Note that
if you do not assign a name to a track, the default name is
the track number. This track number will change if you
change the order of your tracks.
Mute When enabled, mutes the track
Solo When enabled, solos the track
Arm When enabled, arms the track for audio recording.
Input Echo Turns input monitoring on or off.
Automation Read and
Write buttons
Peak value Displays the Peak value, which is the amplitude of the latest
98 Controlling Playback
Changing Track Settings
Enable/disable automation playback and recording,
respectively
audio peak in the track.
Page 99

Parameter... What it means...
Show Layers button Hides or shows track layers.
Minimize/restore track
button
Maximize/restore track
button
Vol (volume) The current volume level for the track, ranging from -INF
Pan The stereo distribution of the output, ranging from 100% left
Trim (volume trim) Volume Trim is a pre-fader control which allows the fine tuning
Collapses track to minimum possible height, or restores it to
the size it was before it was minimized.
Expands track to maximum possible height, or restores it to
the size it was before it was maximized.
(silent) to +6 dB (maximum volume).
(hard left) to 100% right (hard right); a value of “C” indicates
sound that is centered left-to-right. On stereo tracks, pan acts
as balance.
of a single track’s volume.
For example, let’s say you have four tracks, three tracks have
their volume fader set to 0 dB while the fourth track’s fader is
set to +10 dB. You want to group the faders and do a slow
fade out, but the slightly higher level of the fourth track causes
its volume to be higher in relation to the other tracks towards
the end of the fade out. To balance the fader levels, reduce the
fader level for the fourth track to 0 dB and raise the Volume
Trim value for that track to +10 dB. The resulting volume levels
for the project are the same, but now you can group the faders
and perform a fade out with no track standing out
disproportionately at the end of the fade out.
Input The input source for the track, used in recording
Output The output bus through which the track is played
Send Enable Activates a send module, which sends a copy of the track
signal to a bus.
Send Level Controls volume of audio data sent by this send module.
Send Pan Adjusts the send pan setting.
Send Pre/Post switch Pre (pre-fader) means that the Send signal goes to the bus
prior to the track’s volume fader; post means the Send signal
goes to the bus after the volume fader.
Controlling Playback
Changing Track Settings
99
Page 100

Parameter... What it means...
A MIDI track
C
A
B
E
D
Send destination Displays name of bus that the Send is sending data to.
Mono/Stereo A switch that determines whether a track’s signal enters an
effect or chain of effects as mono or stereo, regardless of the
nature of the track.
Phase In/Out A switch that inverts the phase of the track.
Effects bin The patch point for a track’s plug-ins or soft synths.
Meters The recording and playback levels are displayed in the
Playback and Record meters.
MIDI Track Parameters
The following pictures illustrate MIDI track parameters:
A. Output menu B. Channel menu C. Bank menu D. Patch menu E. Dropdown
arrow to display menu
100 Controlling Playback
Changing Track Settings
 Loading...