

Page 1

©
™
Cakewalk SONAR
User’s Guide
Page 2

Page 3

Information in this document is subject to change without notice and does not represent a commitment on the part of Twelve Tone Systems, Inc. The software described in
this document is furnished under a license agreement or nondisclosure agreement.
The software may be used or copied only in accordance of the terms of the agreement.
It is against the law to copy this software on any medium except as specifically allowed
in the agreement. No part of this document may be reproduced or transmitted in any
form or by any means, electronic or mechanical, including photocopying and recording,
for any purpose without the express written permission of Twelve Tone Systems, Inc.
Copyright © 2005 Twelve Tone Systems, Inc. All rights reserved.
Program Copyright © 2005 Twelve Tone Systems, Inc. All rights reserved.
ACID is a trademark of Sonic Foundry, Inc.
Cakewalk is a registered trademark of Twelve Tone Systems, Inc. SONAR and the
Cakewalk logo are trademarks of Twelve Tone Systems, Inc. Other company and product names are trademarks of their respective owners.
Visit Cakewalk on the World Wide Web at www.cakewalk.com.
Page 4

Page 5

Table of Contents
Preface . . . . . . . . . . . . . . . . . . . . . . . . . . . . . . . . . . . . . . . . . . . . . . . . . . . . . . . . . . . . xxiii
About This Book . . . . . . . . . . . . . . . . . . . . . . . . . . . . . . . . . . . . . . . . . . . xxiii
Registering SONAR Today . . . . . . . . . . . . . . . . . . . . . . . . . . . . . . . . . . .xxiii
Conventions Used in this Book . . . . . . . . . . . . . . . . . . . . . . . . . . . . . . . xxiv
Getting Help . . . . . . . . . . . . . . . . . . . . . . . . . . . . . . . . . . . . . . . . . . . . . .xxiv
1 Introduction . . . . . . . . . . . . . . . . . . . . . . . . . . . . . . . . . . . . . . . . . . . . . . . . . . . . . . 25
About SONAR . . . . . . . . . . . . . . . . . . . . . . . . . . . . . . . . . . . . . . . . . . . . . . 26
Music Composition and Exploration . . . . . . . . . . . . . . . . . . . . . . . . . 26
Remixing . . . . . . . . . . . . . . . . . . . . . . . . . . . . . . . . . . . . . . . . . . . . . . . 26
Game Sound Development . . . . . . . . . . . . . . . . . . . . . . . . . . . . . . . . . 26
Sound Production and Engineering . . . . . . . . . . . . . . . . . . . . . . . . . . 26
Web Authoring . . . . . . . . . . . . . . . . . . . . . . . . . . . . . . . . . . . . . . . . . . 26
Film and Video Scoring and Production . . . . . . . . . . . . . . . . . . . . . . 26
Flexibility . . . . . . . . . . . . . . . . . . . . . . . . . . . . . . . . . . . . . . . . . . . . . . 27
Computers, Sound, and Music . . . . . . . . . . . . . . . . . . . . . . . . . . . . . . . . . 27
MIDI . . . . . . . . . . . . . . . . . . . . . . . . . . . . . . . . . . . . . . . . . . . . . . . . . . 27
Digital Audio . . . . . . . . . . . . . . . . . . . . . . . . . . . . . . . . . . . . . . . . . . . . 28
Installing SONAR . . . . . . . . . . . . . . . . . . . . . . . . . . . . . . . . . . . . . . . . . . . 28
Setup . . . . . . . . . . . . . . . . . . . . . . . . . . . . . . . . . . . . . . . . . . . . . . . . . . . . . 29
Audio Connections . . . . . . . . . . . . . . . . . . . . . . . . . . . . . . . . . . . . . . . 30
MIDI Connections . . . . . . . . . . . . . . . . . . . . . . . . . . . . . . . . . . . . . . . . 31
Starting SONAR . . . . . . . . . . . . . . . . . . . . . . . . . . . . . . . . . . . . . . . . . . . . 31
SONAR Basics . . . . . . . . . . . . . . . . . . . . . . . . . . . . . . . . . . . . . . . . . . . . . . 35
SONAR File Types . . . . . . . . . . . . . . . . . . . . . . . . . . . . . . . . . . . . . . . 35
Opening a File . . . . . . . . . . . . . . . . . . . . . . . . . . . . . . . . . . . . . . . . . . . 36
Views . . . . . . . . . . . . . . . . . . . . . . . . . . . . . . . . . . . . . . . . . . . . . . . . . . 36
Working on a Project . . . . . . . . . . . . . . . . . . . . . . . . . . . . . . . . . . . . . . 47
Windows Taskbar Indicators . . . . . . . . . . . . . . . . . . . . . . . . . . . . . . . . . . 48
Screen Colors and Wallpaper . . . . . . . . . . . . . . . . . . . . . . . . . . . . . . . . . . 48
Page 6

Starting to Use SONAR . . . . . . . . . . . . . . . . . . . . . . . . . . . . . . . . . . . . . . . 49
2 Tutorials . . . . . . . . . . . . . . . . . . . . . . . . . . . . . . . . . . . . . . . . . . . . . . . . . . . . . . . . . 51
Tutorial 1—The Basics . . . . . . . . . . . . . . . . . . . . . . . . . . . . . . . . . . . . . . . . 52
Opening a Project File . . . . . . . . . . . . . . . . . . . . . . . . . . . . . . . . . . . . . 52
Preparing for Playback . . . . . . . . . . . . . . . . . . . . . . . . . . . . . . . . . . . .52
Playing the Project . . . . . . . . . . . . . . . . . . . . . . . . . . . . . . . . . . . . . . . . 56
Restarting the Project Automatically . . . . . . . . . . . . . . . . . . . . . . . . .58
Changing the Tempo . . . . . . . . . . . . . . . . . . . . . . . . . . . . . . . . . . . . . . 60
Muting and Soloing Tracks . . . . . . . . . . . . . . . . . . . . . . . . . . . . . . . . . 61
Changing a Track's Instrument . . . . . . . . . . . . . . . . . . . . . . . . . . . . . 62
Playing Music on a Keyboard . . . . . . . . . . . . . . . . . . . . . . . . . . . . . . .63
Tutorial 2—Recording MIDI . . . . . . . . . . . . . . . . . . . . . . . . . . . . . . . . . . .64
Creating a New Project . . . . . . . . . . . . . . . . . . . . . . . . . . . . . . . . . . . . 64
Recording a MIDI Track . . . . . . . . . . . . . . . . . . . . . . . . . . . . . . . . . . . 65
Saving Your Work . . . . . . . . . . . . . . . . . . . . . . . . . . . . . . . . . . . . . . . .67
Loop Recording . . . . . . . . . . . . . . . . . . . . . . . . . . . . . . . . . . . . . . . . . . . 68
Punch-In Recording . . . . . . . . . . . . . . . . . . . . . . . . . . . . . . . . . . . . . . . 69
Tutorial 3—Recording Digital Audio . . . . . . . . . . . . . . . . . . . . . . . . . . . . . 71
Setting the Sampling Rate . . . . . . . . . . . . . . . . . . . . . . . . . . . . . . . . . 71
Setting the Audio Driver Bit Depth and Recording Bit Depth . . . . . 71
Open a New Project . . . . . . . . . . . . . . . . . . . . . . . . . . . . . . . . . . . . . . .72
Setting Up an Audio Track . . . . . . . . . . . . . . . . . . . . . . . . . . . . . . . . . 72
Checking the Input Levels . . . . . . . . . . . . . . . . . . . . . . . . . . . . . . . . . .72
Recording Digital Audio . . . . . . . . . . . . . . . . . . . . . . . . . . . . . . . . . . . .73
Listening to the Recording . . . . . . . . . . . . . . . . . . . . . . . . . . . . . . . . . 73
Recording Another Take . . . . . . . . . . . . . . . . . . . . . . . . . . . . . . . . . . . 74
Input Monitoring . . . . . . . . . . . . . . . . . . . . . . . . . . . . . . . . . . . . . . . . . 74
Loop and Punch-In Recording . . . . . . . . . . . . . . . . . . . . . . . . . . . . . . . 74
Recording Multiple Channels . . . . . . . . . . . . . . . . . . . . . . . . . . . . . . . 74
Tutorial 4—Editing MIDI . . . . . . . . . . . . . . . . . . . . . . . . . . . . . . . . . . . . . 75
Transposing . . . . . . . . . . . . . . . . . . . . . . . . . . . . . . . . . . . . . . . . . . . . .75
Copying Clips with Drag and Drop . . . . . . . . . . . . . . . . . . . . . . . . . . .75
Editing Notes in the Piano Roll View . . . . . . . . . . . . . . . . . . . . . . . . .76
Slip Editing . . . . . . . . . . . . . . . . . . . . . . . . . . . . . . . . . . . . . . . . . . . . . .78
Drawing MIDI Envelopes . . . . . . . . . . . . . . . . . . . . . . . . . . . . . . . . . . 79
Converting MIDI to Audio . . . . . . . . . . . . . . . . . . . . . . . . . . . . . . . . . . 80
Tutorial 5—Editing Audio . . . . . . . . . . . . . . . . . . . . . . . . . . . . . . . . . . . . .81
Opening the Project . . . . . . . . . . . . . . . . . . . . . . . . . . . . . . . . . . . . . . . 81
Importing a Wave File . . . . . . . . . . . . . . . . . . . . . . . . . . . . . . . . . . . . .81
Moving and Looping the Clips . . . . . . . . . . . . . . . . . . . . . . . . . . . . . . .82
Slip Editing a Clip . . . . . . . . . . . . . . . . . . . . . . . . . . . . . . . . . . . . . . . . 82
Automatic Crossfades . . . . . . . . . . . . . . . . . . . . . . . . . . . . . . . . . . . . .83
Bouncing Tracks . . . . . . . . . . . . . . . . . . . . . . . . . . . . . . . . . . . . . . . . . .83
vi
Page 7

Tutorial 6—Using Groove Clips . . . . . . . . . . . . . . . . . . . . . . . . . . . . . . . . 84
Adding Groove Clips to a Project . . . . . . . . . . . . . . . . . . . . . . . . . . . . 85
Looping Groove Clips . . . . . . . . . . . . . . . . . . . . . . . . . . . . . . . . . . . . . 86
Changing the Pitch of Groove Clips . . . . . . . . . . . . . . . . . . . . . . . . . . 88
Changing the Tempo of Your Project . . . . . . . . . . . . . . . . . . . . . . . . . 89
Creating Your Own Groove Clips . . . . . . . . . . . . . . . . . . . . . . . . . . . . 89
Tutorial 7—Mixing . . . . . . . . . . . . . . . . . . . . . . . . . . . . . . . . . . . . . . . . . . 92
Adding Real-time Audio Effects . . . . . . . . . . . . . . . . . . . . . . . . . . . . . 92
Automating an Individual Effect’s Settings . . . . . . . . . . . . . . . . . . . 93
Grouping Controls . . . . . . . . . . . . . . . . . . . . . . . . . . . . . . . . . . . . . . . . 94
Automating Your Mix . . . . . . . . . . . . . . . . . . . . . . . . . . . . . . . . . . . . . 94
Exporting an MP3 File . . . . . . . . . . . . . . . . . . . . . . . . . . . . . . . . . . . . 95
Tutorial 8—Using Soft Synths . . . . . . . . . . . . . . . . . . . . . . . . . . . . . . . . . 96
Inserting Cakewalk TTS-1 into a Project . . . . . . . . . . . . . . . . . . . . . 96
Playing MIDI Tracks through a Soft Synth . . . . . . . . . . . . . . . . . . . 97
Converting Your Soft Synth Tracks to Audio . . . . . . . . . . . . . . . . . . 97
Tutorial 9—Drum Maps . . . . . . . . . . . . . . . . . . . . . . . . . . . . . . . . . . . . . . 99
Create a New Project . . . . . . . . . . . . . . . . . . . . . . . . . . . . . . . . . . . . . 99
Creating a Drum Map . . . . . . . . . . . . . . . . . . . . . . . . . . . . . . . . . . . . . 99
Create a Drum Track . . . . . . . . . . . . . . . . . . . . . . . . . . . . . . . . . . . . . 99
Map Drum Notes to Different Outputs . . . . . . . . . . . . . . . . . . . . . . 100
3 Controlling Playback . . . . . . . . . . . . . . . . . . . . . . . . . . . . . . . . . . . . . . . . . . . . . . 103
The Now Time and How to Use It . . . . . . . . . . . . . . . . . . . . . . . . . . . . . 104
The Now Time Marker . . . . . . . . . . . . . . . . . . . . . . . . . . . . . . . . . . . 106
Displaying the Now Time in Large Print . . . . . . . . . . . . . . . . . . . . 107
Other Ways to Set the Now Time . . . . . . . . . . . . . . . . . . . . . . . . . . . 107
The Time Ruler . . . . . . . . . . . . . . . . . . . . . . . . . . . . . . . . . . . . . . . . . 108
Controlling Playback . . . . . . . . . . . . . . . . . . . . . . . . . . . . . . . . . . . . . . . . 109
Handling Stuck Notes . . . . . . . . . . . . . . . . . . . . . . . . . . . . . . . . . . . . 110
Looping . . . . . . . . . . . . . . . . . . . . . . . . . . . . . . . . . . . . . . . . . . . . . . . 110
Track-by-Track Playback . . . . . . . . . . . . . . . . . . . . . . . . . . . . . . . . . . . . 112
The Playback State Toolbar . . . . . . . . . . . . . . . . . . . . . . . . . . . . . . . 113
Silencing Tracks . . . . . . . . . . . . . . . . . . . . . . . . . . . . . . . . . . . . . . . . 113
Soloing Tracks . . . . . . . . . . . . . . . . . . . . . . . . . . . . . . . . . . . . . . . . . . 114
Inverting the Phase of a Track . . . . . . . . . . . . . . . . . . . . . . . . . . . . . 114
Changing Tracks’ Mono/Stereo Status . . . . . . . . . . . . . . . . . . . . . . 114
Changing Track Settings . . . . . . . . . . . . . . . . . . . . . . . . . . . . . . . . . . . . 115
Setting Up Output Devices . . . . . . . . . . . . . . . . . . . . . . . . . . . . . . . . 123
Assigning Tracks to Outputs . . . . . . . . . . . . . . . . . . . . . . . . . . . . . . 125
Choosing the Instrument Sound (Bank and Patch) . . . . . . . . . . . . 125
Adding Effects . . . . . . . . . . . . . . . . . . . . . . . . . . . . . . . . . . . . . . . . . . 127
Adjusting Volume and Pan . . . . . . . . . . . . . . . . . . . . . . . . . . . . . . . . 127
vii
Page 8

Configurable Panning Laws . . . . . . . . . . . . . . . . . . . . . . . . . . . . . . . 128
Adjusting Volume Trim . . . . . . . . . . . . . . . . . . . . . . . . . . . . . . . . . . . 128
Assigning a MIDI Channel (Chn) . . . . . . . . . . . . . . . . . . . . . . . . . . . 128
Adjusting the Key/Transposing a Track (Key+) . . . . . . . . . . . . . . . . 129
Adjusting the Note Velocity (Vel+) . . . . . . . . . . . . . . . . . . . . . . . . . .129
Adjusting the Time Alignment of a MIDI Track (Time+) . . . . . . . . 130
Other MIDI Playback Settings . . . . . . . . . . . . . . . . . . . . . . . . . . . . . 130
Controlling Live MIDI Playback—MIDI Echo . . . . . . . . . . . . . . . . . . . .131
Local Control . . . . . . . . . . . . . . . . . . . . . . . . . . . . . . . . . . . . . . . . . . . . . . . 133
Playing Files in Batch Mode . . . . . . . . . . . . . . . . . . . . . . . . . . . . . . . . . .133
The Play List View . . . . . . . . . . . . . . . . . . . . . . . . . . . . . . . . . . . . . . . 134
Video Playback, Import, and Export . . . . . . . . . . . . . . . . . . . . . . . . . . . . 135
Inserting and Playing Back Videos . . . . . . . . . . . . . . . . . . . . . . . . . . 136
Exporting Video . . . . . . . . . . . . . . . . . . . . . . . . . . . . . . . . . . . . . . . . .138
Optimizing Video Performance . . . . . . . . . . . . . . . . . . . . . . . . . . . . .139
Using the Video Thumbnails Pane . . . . . . . . . . . . . . . . . . . . . . . . . . 139
Video Playback on a FireWire DV Device . . . . . . . . . . . . . . . . . . . . .141
Exporting a Project to a FireWire DV Device . . . . . . . . . . . . . . . . . .142
Synchronizing External Video Playback to Audio . . . . . . . . . . . . . . 143
Locating Missing Audio . . . . . . . . . . . . . . . . . . . . . . . . . . . . . . . . . . . . . . 143
The Find Missing Audio File Dialog . . . . . . . . . . . . . . . . . . . . . . . . . 143
Restoring Missing Audio Files . . . . . . . . . . . . . . . . . . . . . . . . . . . . . 144
Managing Shared and External Files . . . . . . . . . . . . . . . . . . . . . . . . 144
viii
4 Recording . . . . . . . . . . . . . . . . . . . . . . . . . . . . . . . . . . . . . . . . . . . . . . . . . . . . . . . 145
Creating a New Project . . . . . . . . . . . . . . . . . . . . . . . . . . . . . . . . . . . . . . 146
Using Per-Project Audio Folders . . . . . . . . . . . . . . . . . . . . . . . . . . . . 146
Creating a New Project File . . . . . . . . . . . . . . . . . . . . . . . . . . . . . . . 146
Setting the Meter and Key Signatures . . . . . . . . . . . . . . . . . . . . . . . 147
Setting the Metronome and Tempo Settings . . . . . . . . . . . . . . . . . . 148
Setting the Audio Sampling Rate and Bit Depth . . . . . . . . . . . . . . . 150
Setting the MIDI Timing Resolution . . . . . . . . . . . . . . . . . . . . . . . . 152
Preparing to Record . . . . . . . . . . . . . . . . . . . . . . . . . . . . . . . . . . . . . . . . . 152
Recording Modes . . . . . . . . . . . . . . . . . . . . . . . . . . . . . . . . . . . . . . . .153
Choosing an Input . . . . . . . . . . . . . . . . . . . . . . . . . . . . . . . . . . . . . . . 153
Arming Tracks for Recording . . . . . . . . . . . . . . . . . . . . . . . . . . . . . .155
Auto Arming . . . . . . . . . . . . . . . . . . . . . . . . . . . . . . . . . . . . . . . . . . . .156
Recording Music from a MIDI Instrument . . . . . . . . . . . . . . . . . . . . . .156
Recording Audio . . . . . . . . . . . . . . . . . . . . . . . . . . . . . . . . . . . . . . . . . . . .156
Tuning an Instrument . . . . . . . . . . . . . . . . . . . . . . . . . . . . . . . . . . . .158
Confidence Recording and Waveform Preview . . . . . . . . . . . . . . . . . . . .159
Input Monitoring . . . . . . . . . . . . . . . . . . . . . . . . . . . . . . . . . . . . . . . . . . .159
Page 9

The Audio Engine Button . . . . . . . . . . . . . . . . . . . . . . . . . . . . . . . . . . . . 162
Loop Recording . . . . . . . . . . . . . . . . . . . . . . . . . . . . . . . . . . . . . . . . . . . . 163
Punch Recording . . . . . . . . . . . . . . . . . . . . . . . . . . . . . . . . . . . . . . . . . . . 164
Step Recording . . . . . . . . . . . . . . . . . . . . . . . . . . . . . . . . . . . . . . . . . . . . . 166
Step Record Keyboard Shortcuts . . . . . . . . . . . . . . . . . . . . . . . . . . . 171
Step Pattern Recording . . . . . . . . . . . . . . . . . . . . . . . . . . . . . . . . . . . 172
Recording Specific Ports and Channels . . . . . . . . . . . . . . . . . . . . . . . . . 173
Input Filtering . . . . . . . . . . . . . . . . . . . . . . . . . . . . . . . . . . . . . . . . . . 174
Importing Music and Sound . . . . . . . . . . . . . . . . . . . . . . . . . . . . . . . . . . 175
Importing Audio Files . . . . . . . . . . . . . . . . . . . . . . . . . . . . . . . . . . . . 175
Importing Material from Another SONAR Project . . . . . . . . . . . . . 176
Importing OMF Projects . . . . . . . . . . . . . . . . . . . . . . . . . . . . . . . . . . 176
Importing MIDI Files . . . . . . . . . . . . . . . . . . . . . . . . . . . . . . . . . . . . 178
Saving Your Work . . . . . . . . . . . . . . . . . . . . . . . . . . . . . . . . . . . . . . . . . . 178
Labeling Your Projects . . . . . . . . . . . . . . . . . . . . . . . . . . . . . . . . . . . 180
File Statistics . . . . . . . . . . . . . . . . . . . . . . . . . . . . . . . . . . . . . . . . . . 181
5 Arranging . . . . . . . . . . . . . . . . . . . . . . . . . . . . . . . . . . . . . . . . . . . . . . . . . . . . . . . 183
Arranging Tracks . . . . . . . . . . . . . . . . . . . . . . . . . . . . . . . . . . . . . . . . . . 184
Changing the Order of Tracks . . . . . . . . . . . . . . . . . . . . . . . . . . . . . 184
Inserting Tracks . . . . . . . . . . . . . . . . . . . . . . . . . . . . . . . . . . . . . . . . 186
Configuring the Display of Tracks in the Track View . . . . . . . . . . 187
Copying Tracks . . . . . . . . . . . . . . . . . . . . . . . . . . . . . . . . . . . . . . . . . 188
Erasing Tracks . . . . . . . . . . . . . . . . . . . . . . . . . . . . . . . . . . . . . . . . . 188
Track Templates . . . . . . . . . . . . . . . . . . . . . . . . . . . . . . . . . . . . . . . . 189
Track Icons . . . . . . . . . . . . . . . . . . . . . . . . . . . . . . . . . . . . . . . . . . . . 190
Arranging Clips . . . . . . . . . . . . . . . . . . . . . . . . . . . . . . . . . . . . . . . . . . . . 191
Displaying Clips . . . . . . . . . . . . . . . . . . . . . . . . . . . . . . . . . . . . . . . . 191
Using the Navigator View . . . . . . . . . . . . . . . . . . . . . . . . . . . . . . . . 194
Double-clicking Clips . . . . . . . . . . . . . . . . . . . . . . . . . . . . . . . . . . . . 194
Selecting Clips . . . . . . . . . . . . . . . . . . . . . . . . . . . . . . . . . . . . . . . . . . 194
Moving and Copying Clips . . . . . . . . . . . . . . . . . . . . . . . . . . . . . . . . 195
Nudge . . . . . . . . . . . . . . . . . . . . . . . . . . . . . . . . . . . . . . . . . . . . . . . . . . . . 198
Nudge Settings . . . . . . . . . . . . . . . . . . . . . . . . . . . . . . . . . . . . . . . . . 199
Working with Partial Clips . . . . . . . . . . . . . . . . . . . . . . . . . . . . . . . . . . . 200
Markers and the Snap Grid . . . . . . . . . . . . . . . . . . . . . . . . . . . . . . . . . . 201
Showing Gridlines . . . . . . . . . . . . . . . . . . . . . . . . . . . . . . . . . . . . . . . 201
Defining and Using the Snap Grid . . . . . . . . . . . . . . . . . . . . . . . . . . 201
Snap Offsets . . . . . . . . . . . . . . . . . . . . . . . . . . . . . . . . . . . . . . . . . . . 203
Creating and Using Markers . . . . . . . . . . . . . . . . . . . . . . . . . . . . . . 203
Working with Linked Clips . . . . . . . . . . . . . . . . . . . . . . . . . . . . . . . . . . . 206
Splitting and Combining Clips . . . . . . . . . . . . . . . . . . . . . . . . . . . . . . . . 208
ix
Page 10

Take Management and Comping Takes . . . . . . . . . . . . . . . . . . . . . . . . .210
Clip Muting and Isolating (Clip Soloing) . . . . . . . . . . . . . . . . . . . . . . . . 212
Clip Muting with the Default Style . . . . . . . . . . . . . . . . . . . . . . . . . 213
Clip Muting with the Alternate Style . . . . . . . . . . . . . . . . . . . . . . . .214
Audition (Selection Playback) . . . . . . . . . . . . . . . . . . . . . . . . . . . . . . 215
Isolating (Clip Soloing) . . . . . . . . . . . . . . . . . . . . . . . . . . . . . . . . . . . 215
Track Folders . . . . . . . . . . . . . . . . . . . . . . . . . . . . . . . . . . . . . . . . . . . . . .216
Adding Effects in the Track View . . . . . . . . . . . . . . . . . . . . . . . . . . . . . . 218
Changing Tempos . . . . . . . . . . . . . . . . . . . . . . . . . . . . . . . . . . . . . . . . . . .218
Using the Tempo Toolbar . . . . . . . . . . . . . . . . . . . . . . . . . . . . . . . . . 219
Using the Tempo Commands . . . . . . . . . . . . . . . . . . . . . . . . . . . . . . 220
Using the Tempo View . . . . . . . . . . . . . . . . . . . . . . . . . . . . . . . . . . . . 222
Undo, Redo, and the Undo History . . . . . . . . . . . . . . . . . . . . . . . . . . . . . 225
6 Using Loops . . . . . . . . . . . . . . . . . . . . . . . . . . . . . . . . . . . . . . . . . . . . . . . . . . . . . 227
The Loop Construction View . . . . . . . . . . . . . . . . . . . . . . . . . . . . . . . . . . 228
Loop Construction Controls . . . . . . . . . . . . . . . . . . . . . . . . . . . . . . . . 228
The Loop Explorer View . . . . . . . . . . . . . . . . . . . . . . . . . . . . . . . . . . . . . . 231
Folders Pane . . . . . . . . . . . . . . . . . . . . . . . . . . . . . . . . . . . . . . . . . . . . 232
Contents List Pane . . . . . . . . . . . . . . . . . . . . . . . . . . . . . . . . . . . . . . .232
Working with Loops . . . . . . . . . . . . . . . . . . . . . . . . . . . . . . . . . . . . . . . . .233
Working with Groove Clips . . . . . . . . . . . . . . . . . . . . . . . . . . . . . . . . . . .234
How Groove Clips Work in SONAR . . . . . . . . . . . . . . . . . . . . . . . . . 234
Using Groove Clips . . . . . . . . . . . . . . . . . . . . . . . . . . . . . . . . . . . . . . 235
Creating and Editing Groove Clips . . . . . . . . . . . . . . . . . . . . . . . . . . 235
Editing Slices . . . . . . . . . . . . . . . . . . . . . . . . . . . . . . . . . . . . . . . . . . .237
Saving Groove Clips as Wave Files/ACIDized Wave Files . . . . . . .238
Using Pitch Markers in the Track View . . . . . . . . . . . . . . . . . . . . . . 238
MIDI Groove Clips . . . . . . . . . . . . . . . . . . . . . . . . . . . . . . . . . . . . . . . . . . 239
Exporting, and Importing MIDI Groove Clips . . . . . . . . . . . . . . . . . 241
Importing Project5 Patterns . . . . . . . . . . . . . . . . . . . . . . . . . . . . . . . . . . 242
7 Editing MIDI Events and Controllers . . . . . . . . . . . . . . . . . . . . . . . . . . . . . . . . . 243
Event Inspector Toolbar . . . . . . . . . . . . . . . . . . . . . . . . . . . . . . . . . . . . . . 244
The Piano Roll View . . . . . . . . . . . . . . . . . . . . . . . . . . . . . . . . . . . . . . . . . 244
Note Map Pane . . . . . . . . . . . . . . . . . . . . . . . . . . . . . . . . . . . . . . . . . . 245
Drum Grid Pane . . . . . . . . . . . . . . . . . . . . . . . . . . . . . . . . . . . . . . . . . 245
Notes Pane . . . . . . . . . . . . . . . . . . . . . . . . . . . . . . . . . . . . . . . . . . . . .245
Controller Pane . . . . . . . . . . . . . . . . . . . . . . . . . . . . . . . . . . . . . . . . .246
Track List Pane . . . . . . . . . . . . . . . . . . . . . . . . . . . . . . . . . . . . . . . . . 246
Opening the View . . . . . . . . . . . . . . . . . . . . . . . . . . . . . . . . . . . . . . . . 246
Working with Multiple Tracks in the Piano Roll View . . . . . . . . . . 246
x
Page 11

Note Names . . . . . . . . . . . . . . . . . . . . . . . . . . . . . . . . . . . . . . . . . . . . 248
Displaying Notes and Controllers (Piano Roll View Only) . . . . . . . . . . 248
Adding and Editing Notes in the Piano Roll View . . . . . . . . . . . . . . . . . 249
Selecting Notes . . . . . . . . . . . . . . . . . . . . . . . . . . . . . . . . . . . . . . . . . 249
Editing Notes with the Draw Tool and the Select Tool . . . . . . . . . . 250
Adding and Editing Controllers in the Piano Roll View . . . . . . . . . . . . 254
Adding Controllers . . . . . . . . . . . . . . . . . . . . . . . . . . . . . . . . . . . . . . 254
Selecting Controllers . . . . . . . . . . . . . . . . . . . . . . . . . . . . . . . . . . . . . 255
Editing Controllers . . . . . . . . . . . . . . . . . . . . . . . . . . . . . . . . . . . . . . 256
The Inline Piano Roll View . . . . . . . . . . . . . . . . . . . . . . . . . . . . . . . . . . . 257
Displaying the Inline Piano Roll View . . . . . . . . . . . . . . . . . . . . . . . 258
The MIDI Scale . . . . . . . . . . . . . . . . . . . . . . . . . . . . . . . . . . . . . . . . . 258
Displaying Notes and Controllers in the Inline Piano Roll View . . 260
Selecting and Editing Events . . . . . . . . . . . . . . . . . . . . . . . . . . . . . . . . . 261
Copying and Pasting MIDI Data . . . . . . . . . . . . . . . . . . . . . . . . . . . 261
Transposing . . . . . . . . . . . . . . . . . . . . . . . . . . . . . . . . . . . . . . . . . . . . 261
Shifting Events in Time . . . . . . . . . . . . . . . . . . . . . . . . . . . . . . . . . . 263
Inserting Time or Measures into a Project . . . . . . . . . . . . . . . . . . . 263
Stretching and Shrinking Events . . . . . . . . . . . . . . . . . . . . . . . . . . 265
Reversing Notes in a Clip . . . . . . . . . . . . . . . . . . . . . . . . . . . . . . . . . 267
Adding Crescendos and Decrescendos . . . . . . . . . . . . . . . . . . . . . . . 267
Slip Editing MIDI (Non-destructive Editing) . . . . . . . . . . . . . . . . . . . . 268
Slip Editing Modes . . . . . . . . . . . . . . . . . . . . . . . . . . . . . . . . . . . . . . 268
Using Slip Editing for MIDI Clips . . . . . . . . . . . . . . . . . . . . . . . . . . 268
Slip-editing Multiple MIDI Clips . . . . . . . . . . . . . . . . . . . . . . . . . . . 270
Changing the Timing of a Recording . . . . . . . . . . . . . . . . . . . . . . . . . . . 270
Quantizing . . . . . . . . . . . . . . . . . . . . . . . . . . . . . . . . . . . . . . . . . . . . . 270
Fit Improvisation . . . . . . . . . . . . . . . . . . . . . . . . . . . . . . . . . . . . . . . 278
Snap to Scale . . . . . . . . . . . . . . . . . . . . . . . . . . . . . . . . . . . . . . . . . . . . . . 279
Searching for Events . . . . . . . . . . . . . . . . . . . . . . . . . . . . . . . . . . . . . . . . 282
Event Filters . . . . . . . . . . . . . . . . . . . . . . . . . . . . . . . . . . . . . . . . . . . 283
Controllers, RPNs, NRPNs, and
Automation Data . . . . . . . . . . . . . . . . . . . . . . . . . . . . . . . . . . . . . . . . . . . 287
The Event List View . . . . . . . . . . . . . . . . . . . . . . . . . . . . . . . . . . . . . . . . 289
Event List Buttons and Overview . . . . . . . . . . . . . . . . . . . . . . . . . . 290
Selecting Events in the Event List View . . . . . . . . . . . . . . . . . . . . . 292
Event List Display Filter . . . . . . . . . . . . . . . . . . . . . . . . . . . . . . . . . 292
Editing Events and Event Parameters . . . . . . . . . . . . . . . . . . . . . . 292
Additional Event Information . . . . . . . . . . . . . . . . . . . . . . . . . . . . . 294
MIDI Effects (MIDI Plug-ins) . . . . . . . . . . . . . . . . . . . . . . . . . . . . . . . . . 295
MIDI Effects Presets . . . . . . . . . . . . . . . . . . . . . . . . . . . . . . . . . . . . . 295
Quantizing . . . . . . . . . . . . . . . . . . . . . . . . . . . . . . . . . . . . . . . . . . . . . 296
Adding Echo/Delay . . . . . . . . . . . . . . . . . . . . . . . . . . . . . . . . . . . . . . 296
xi
Page 12

Filtering Events . . . . . . . . . . . . . . . . . . . . . . . . . . . . . . . . . . . . . . . . . 297
Adding Arpeggio . . . . . . . . . . . . . . . . . . . . . . . . . . . . . . . . . . . . . . . . . 298
Analyzing Chords . . . . . . . . . . . . . . . . . . . . . . . . . . . . . . . . . . . . . . . . 299
Changing Velocities with the Velocity Effect . . . . . . . . . . . . . . . . . . 299
Transposing MIDI Notes with the Transpose MIDI Effect . . . . . . .300
8 Drum Maps and the Drum Grid Pane . . . . . . . . . . . . . . . . . . . . . . . . . . . . . . . . . 303
The Basics . . . . . . . . . . . . . . . . . . . . . . . . . . . . . . . . . . . . . . . . . . . . . . . . . 304
Creating and Editing a Drum Map . . . . . . . . . . . . . . . . . . . . . . . . . . . . . 304
The Drum Map Manager . . . . . . . . . . . . . . . . . . . . . . . . . . . . . . . . . . 304
Working in the Drum Map Manager . . . . . . . . . . . . . . . . . . . . . . . . 306
The Map Properties Dialog . . . . . . . . . . . . . . . . . . . . . . . . . . . . . . . . 307
Saving a Drum Map . . . . . . . . . . . . . . . . . . . . . . . . . . . . . . . . . . . . . .307
Using Drum Maps . . . . . . . . . . . . . . . . . . . . . . . . . . . . . . . . . . . . . . . . . . 308
Assigning a MIDI Track to a Drum Map . . . . . . . . . . . . . . . . . . . . . 308
Opening a Drum Map . . . . . . . . . . . . . . . . . . . . . . . . . . . . . . . . . . . .308
Displaying Tracks in the Drum Grid Pane . . . . . . . . . . . . . . . . . . . . 308
Velocity Tails . . . . . . . . . . . . . . . . . . . . . . . . . . . . . . . . . . . . . . . . . . . 309
Editing Note Velocities . . . . . . . . . . . . . . . . . . . . . . . . . . . . . . . . . . . 309
Previewing a Mapped Sound . . . . . . . . . . . . . . . . . . . . . . . . . . . . . . . 310
The Note Map Pane . . . . . . . . . . . . . . . . . . . . . . . . . . . . . . . . . . . . . . . . .310
Changing Mapped-note Settings . . . . . . . . . . . . . . . . . . . . . . . . . . . . 310
The Drum Grid Pane . . . . . . . . . . . . . . . . . . . . . . . . . . . . . . . . . . . . . . . .311
Grid Lines . . . . . . . . . . . . . . . . . . . . . . . . . . . . . . . . . . . . . . . . . . . . . . 311
The Pattern Brush Tool . . . . . . . . . . . . . . . . . . . . . . . . . . . . . . . . . . . . . .312
How the Pattern Brush Tool Works . . . . . . . . . . . . . . . . . . . . . . . . . 312
Creating Custom Patterns . . . . . . . . . . . . . . . . . . . . . . . . . . . . . . . . .313
xii
9 Editing Audio . . . . . . . . . . . . . . . . . . . . . . . . . . . . . . . . . . . . . . . . . . . . . . . . . . . . 315
Digital Audio Fundamentals . . . . . . . . . . . . . . . . . . . . . . . . . . . . . . . . . .316
Basic Acoustics . . . . . . . . . . . . . . . . . . . . . . . . . . . . . . . . . . . . . . . . . .316
Example—A Guitar String . . . . . . . . . . . . . . . . . . . . . . . . . . . . . . . . 316
Waveforms . . . . . . . . . . . . . . . . . . . . . . . . . . . . . . . . . . . . . . . . . . . . .318
Recording a Sound . . . . . . . . . . . . . . . . . . . . . . . . . . . . . . . . . . . . . . . 320
The Decibel Scale . . . . . . . . . . . . . . . . . . . . . . . . . . . . . . . . . . . . . . . .321
Audio Clips . . . . . . . . . . . . . . . . . . . . . . . . . . . . . . . . . . . . . . . . . . . . . 321
Managing Audio Data . . . . . . . . . . . . . . . . . . . . . . . . . . . . . . . . . . . . 322
Basic Audio Editing . . . . . . . . . . . . . . . . . . . . . . . . . . . . . . . . . . . . . . . . . 322
Editing Clip Properties . . . . . . . . . . . . . . . . . . . . . . . . . . . . . . . . . . . 323
Moving, Copying, Pasting and Deleting Audio Clips . . . . . . . . . . . . 323
Audio Scaling . . . . . . . . . . . . . . . . . . . . . . . . . . . . . . . . . . . . . . . . . . .324
Splitting Audio Clips . . . . . . . . . . . . . . . . . . . . . . . . . . . . . . . . . . . . .326
Bouncing to Clips . . . . . . . . . . . . . . . . . . . . . . . . . . . . . . . . . . . . . . . .327
Page 13

Scrubbing . . . . . . . . . . . . . . . . . . . . . . . . . . . . . . . . . . . . . . . . . . . . . . 328
Basic Audio Processing . . . . . . . . . . . . . . . . . . . . . . . . . . . . . . . . . . . . . . 328
Using the Normalize and Gain Commands . . . . . . . . . . . . . . . . . . . 329
Reversing Audio Data . . . . . . . . . . . . . . . . . . . . . . . . . . . . . . . . . . . . 330
Advanced Audio Processing . . . . . . . . . . . . . . . . . . . . . . . . . . . . . . . . . . 330
Removing Silence . . . . . . . . . . . . . . . . . . . . . . . . . . . . . . . . . . . . . . . 330
Extracting Timing . . . . . . . . . . . . . . . . . . . . . . . . . . . . . . . . . . . . . . . 332
Removing DC Offset . . . . . . . . . . . . . . . . . . . . . . . . . . . . . . . . . . . . . 334
Slip-editing Audio (Non-destructive Editing) . . . . . . . . . . . . . . . . . . . . 335
Slip-editing Modes . . . . . . . . . . . . . . . . . . . . . . . . . . . . . . . . . . . . . . 335
Using Slip-editing . . . . . . . . . . . . . . . . . . . . . . . . . . . . . . . . . . . . . . . 335
Slip-editing Multiple Audio Clips . . . . . . . . . . . . . . . . . . . . . . . . . . 338
Fades and Crossfades . . . . . . . . . . . . . . . . . . . . . . . . . . . . . . . . . . . . . . . 338
Using Fades and Crossfades in Real Time . . . . . . . . . . . . . . . . . . . 338
Applying Fades and Crossfades Offline . . . . . . . . . . . . . . . . . . . . . . 343
Audio Effects (Audio Plug-ins) . . . . . . . . . . . . . . . . . . . . . . . . . . . . . . . . 345
Applying Audio Effects . . . . . . . . . . . . . . . . . . . . . . . . . . . . . . . . . . . 345
Directly Applying Audio Effects . . . . . . . . . . . . . . . . . . . . . . . . . . . . 346
Shifting Pitch . . . . . . . . . . . . . . . . . . . . . . . . . . . . . . . . . . . . . . . . . . 346
Stretching Time and Pitch . . . . . . . . . . . . . . . . . . . . . . . . . . . . . . . . 347
10 Working with Software Synthesizers . . . . . . . . . . . . . . . . . . . . . . . . . . . . . . . . . 349
Synth Rack View . . . . . . . . . . . . . . . . . . . . . . . . . . . . . . . . . . . . . . . . . . . 350
Synth Tracks . . . . . . . . . . . . . . . . . . . . . . . . . . . . . . . . . . . . . . . . . . . . . . 350
Inserting Soft Synths . . . . . . . . . . . . . . . . . . . . . . . . . . . . . . . . . . . . . . . 350
Multi-port Soft Synths . . . . . . . . . . . . . . . . . . . . . . . . . . . . . . . . . . . 351
Inserting a Soft Synth . . . . . . . . . . . . . . . . . . . . . . . . . . . . . . . . . . . . 351
Opening a Soft Synth’s Property Page . . . . . . . . . . . . . . . . . . . . . . . 353
Playing a Soft Synth . . . . . . . . . . . . . . . . . . . . . . . . . . . . . . . . . . . . . 353
Muting and Soloing Soft Synth Tracks . . . . . . . . . . . . . . . . . . . . . . 355
Converting Your Soft Synth Tracks to Audio . . . . . . . . . . . . . . . . . 355
Automating a Soft Synth’s Controls . . . . . . . . . . . . . . . . . . . . . . . . 356
ReWire Instruments . . . . . . . . . . . . . . . . . . . . . . . . . . . . . . . . . . . . . . . . 357
Inserting a ReWire Instrument . . . . . . . . . . . . . . . . . . . . . . . . . . . . 358
Mixing Down ReWire Instruments . . . . . . . . . . . . . . . . . . . . . . . . . 360
Automating ReWire Instruments . . . . . . . . . . . . . . . . . . . . . . . . . . . 360
ReWire Troubleshooting Guide . . . . . . . . . . . . . . . . . . . . . . . . . . . . 360
Stand-alone Synths . . . . . . . . . . . . . . . . . . . . . . . . . . . . . . . . . . . . . . . . . 360
Playing a Stand-alone Synth . . . . . . . . . . . . . . . . . . . . . . . . . . . . . . 360
Recording a Stand-alone Synth . . . . . . . . . . . . . . . . . . . . . . . . . . . . 361
11 Mixing and Effects Patching . . . . . . . . . . . . . . . . . . . . . . . . . . . . . . . . . . . . . . . .363
xiii
Page 14

Preparing to Mix . . . . . . . . . . . . . . . . . . . . . . . . . . . . . . . . . . . . . . . . . . . . 364
Configuring the Console and Track Views . . . . . . . . . . . . . . . . . . . . 368
Mixing MIDI . . . . . . . . . . . . . . . . . . . . . . . . . . . . . . . . . . . . . . . . . . . . . . . 371
Mixing a MIDI Track . . . . . . . . . . . . . . . . . . . . . . . . . . . . . . . . . . . . .371
Converting MIDI to Audio . . . . . . . . . . . . . . . . . . . . . . . . . . . . . . . . . 372
Signal Flow . . . . . . . . . . . . . . . . . . . . . . . . . . . . . . . . . . . . . . . . . . . . . . . . 373
Routing and Mixing Digital Audio . . . . . . . . . . . . . . . . . . . . . . . . . . 374
Stereo Buses . . . . . . . . . . . . . . . . . . . . . . . . . . . . . . . . . . . . . . . . . . . . 376
Surround Buses (Producer Edition Only) . . . . . . . . . . . . . . . . . . . . . 377
Main Outs . . . . . . . . . . . . . . . . . . . . . . . . . . . . . . . . . . . . . . . . . . . . . . 378
Metering . . . . . . . . . . . . . . . . . . . . . . . . . . . . . . . . . . . . . . . . . . . . . . . . . . 378
What the Meters Measure . . . . . . . . . . . . . . . . . . . . . . . . . . . . . . . . . 378
Hiding and Showing Meters . . . . . . . . . . . . . . . . . . . . . . . . . . . . . . . 379
Changing the Meters’ Display . . . . . . . . . . . . . . . . . . . . . . . . . . . . . . 380
Segmented and Non-segmented Meters . . . . . . . . . . . . . . . . . . . . . .381
Changing the Meters’ Performance . . . . . . . . . . . . . . . . . . . . . . . . . 382
Peak Markers . . . . . . . . . . . . . . . . . . . . . . . . . . . . . . . . . . . . . . . . . . .382
Waveform Preview for Buses and Synth Tracks . . . . . . . . . . . . . . . . . . 383
Freeze Tracks and Synths . . . . . . . . . . . . . . . . . . . . . . . . . . . . . . . . . . . . 384
Using Real-Time Effects . . . . . . . . . . . . . . . . . . . . . . . . . . . . . . . . . . . . . .386
Effects Parameters . . . . . . . . . . . . . . . . . . . . . . . . . . . . . . . . . . . . . . . 387
How to Use Real-Time Effects . . . . . . . . . . . . . . . . . . . . . . . . . . . . . . 387
Presets . . . . . . . . . . . . . . . . . . . . . . . . . . . . . . . . . . . . . . . . . . . . . . . . 389
Effects on Clips . . . . . . . . . . . . . . . . . . . . . . . . . . . . . . . . . . . . . . . . . .390
V-Vocal Clips . . . . . . . . . . . . . . . . . . . . . . . . . . . . . . . . . . . . . . . . . . . . . . . 391
Using V-Vocal . . . . . . . . . . . . . . . . . . . . . . . . . . . . . . . . . . . . . . . . . . . . . . 392
Playing Back V-Vocal Clips . . . . . . . . . . . . . . . . . . . . . . . . . . . . . . . . 393
Pitch Editing . . . . . . . . . . . . . . . . . . . . . . . . . . . . . . . . . . . . . . . . . . . 394
Editing Time . . . . . . . . . . . . . . . . . . . . . . . . . . . . . . . . . . . . . . . . . . . . 397
Editing Formants . . . . . . . . . . . . . . . . . . . . . . . . . . . . . . . . . . . . . . . . 397
Editing Dynamics . . . . . . . . . . . . . . . . . . . . . . . . . . . . . . . . . . . . . . . .398
Context Menu . . . . . . . . . . . . . . . . . . . . . . . . . . . . . . . . . . . . . . . . . . . 398
Keyboard Shortcuts . . . . . . . . . . . . . . . . . . . . . . . . . . . . . . . . . . . . . .399
Using the Per-track EQ (Producer Edition Only) . . . . . . . . . . . . . . . . . . 401
Applying Audio Effects . . . . . . . . . . . . . . . . . . . . . . . . . . . . . . . . . . . . . . . 402
Applying MIDI Effects . . . . . . . . . . . . . . . . . . . . . . . . . . . . . . . . . . . . . . . 403
The VST Configuration Wizard . . . . . . . . . . . . . . . . . . . . . . . . . . . . . . . .403
Using Control Groups . . . . . . . . . . . . . . . . . . . . . . . . . . . . . . . . . . . . . . . .404
Quick Groups . . . . . . . . . . . . . . . . . . . . . . . . . . . . . . . . . . . . . . . . . . . 408
Using Remote Control . . . . . . . . . . . . . . . . . . . . . . . . . . . . . . . . . . . . . . .410
Using the Learn Option . . . . . . . . . . . . . . . . . . . . . . . . . . . . . . . . . . . 411
Bouncing Tracks . . . . . . . . . . . . . . . . . . . . . . . . . . . . . . . . . . . . . . . . . . . . 411
xiv
Page 15

Preparing to Create an Audio CD . . . . . . . . . . . . . . . . . . . . . . . . . . 413
Preparing Audio for Distribution . . . . . . . . . . . . . . . . . . . . . . . . . . . . . . 413
Exporting OMF Files . . . . . . . . . . . . . . . . . . . . . . . . . . . . . . . . . . . . 418
Dithering . . . . . . . . . . . . . . . . . . . . . . . . . . . . . . . . . . . . . . . . . . . . . . 419
12 Surround Mixing . . . . . . . . . . . . . . . . . . . . . . . . . . . . . . . . . . . . . . . . . . . . . . . . . . 421
Surround Basics . . . . . . . . . . . . . . . . . . . . . . . . . . . . . . . . . . . . . . . . . . . 422
Configuring SONAR for Surround Mixing . . . . . . . . . . . . . . . . . . . . . . . 422
Using Surround Format Templates . . . . . . . . . . . . . . . . . . . . . . . . . 422
Choosing a Surround Format . . . . . . . . . . . . . . . . . . . . . . . . . . . . . . 424
Surround Buses . . . . . . . . . . . . . . . . . . . . . . . . . . . . . . . . . . . . . . . . . 425
Routing in Surround . . . . . . . . . . . . . . . . . . . . . . . . . . . . . . . . . . . . . 426
Downmixing . . . . . . . . . . . . . . . . . . . . . . . . . . . . . . . . . . . . . . . . . . . 426
Panning in Surround . . . . . . . . . . . . . . . . . . . . . . . . . . . . . . . . . . . . . . . . 428
Controlling Surround Panning . . . . . . . . . . . . . . . . . . . . . . . . . . . . . 429
Automating Surround Panning . . . . . . . . . . . . . . . . . . . . . . . . . . . . 432
Joystick Support . . . . . . . . . . . . . . . . . . . . . . . . . . . . . . . . . . . . . . . . . . . 432
Surround Metering . . . . . . . . . . . . . . . . . . . . . . . . . . . . . . . . . . . . . . . . . 434
Bass Management . . . . . . . . . . . . . . . . . . . . . . . . . . . . . . . . . . . . . . . . . . 434
Surround Effects . . . . . . . . . . . . . . . . . . . . . . . . . . . . . . . . . . . . . . . . . . . 435
The SurroundBridge . . . . . . . . . . . . . . . . . . . . . . . . . . . . . . . . . . . . . 435
Effect Property Pages . . . . . . . . . . . . . . . . . . . . . . . . . . . . . . . . . . . . 435
Effect Presets . . . . . . . . . . . . . . . . . . . . . . . . . . . . . . . . . . . . . . . . . . 435
How to Patch and Configure Surround Effects . . . . . . . . . . . . . . . . 435
Importing Surround Mixes . . . . . . . . . . . . . . . . . . . . . . . . . . . . . . . . . . . 437
Exporting Surround Mixes . . . . . . . . . . . . . . . . . . . . . . . . . . . . . . . . . . . 438
13 Automation . . . . . . . . . . . . . . . . . . . . . . . . . . . . . . . . . . . . . . . . . . . . . . . . . . . . . .439
Quick Automation Guide . . . . . . . . . . . . . . . . . . . . . . . . . . . . . . . . . . . . 440
The Automation Toolbar . . . . . . . . . . . . . . . . . . . . . . . . . . . . . . . . . . . . 441
Automation Methods . . . . . . . . . . . . . . . . . . . . . . . . . . . . . . . . . . . . . . . . 441
Recording Individual Fader or Knob Movements . . . . . . . . . . . . . . 441
Creating and Editing Audio Envelopes . . . . . . . . . . . . . . . . . . . . . . 442
Creating and Editing MIDI Envelopes . . . . . . . . . . . . . . . . . . . . . . 444
Dotted Lines . . . . . . . . . . . . . . . . . . . . . . . . . . . . . . . . . . . . . . . . . . . 445
Using the Envelope Draw Tool . . . . . . . . . . . . . . . . . . . . . . . . . . . . . 446
Drawing Envelopes on Clips . . . . . . . . . . . . . . . . . . . . . . . . . . . . . . . 447
Showing or Hiding Envelopes . . . . . . . . . . . . . . . . . . . . . . . . . . . . . 447
Deleting Envelopes . . . . . . . . . . . . . . . . . . . . . . . . . . . . . . . . . . . . . . 448
Copying and Pasting Envelopes . . . . . . . . . . . . . . . . . . . . . . . . . . . . 448
Resetting Envelopes and Nodes to Current or Neutral Values . . . 449
Envelope Mode and Offset Mode . . . . . . . . . . . . . . . . . . . . . . . . . . . 449
xv
Page 16

Converting MIDI Envelopes to Shapes . . . . . . . . . . . . . . . . . . . . . . . 451
Snapshots . . . . . . . . . . . . . . . . . . . . . . . . . . . . . . . . . . . . . . . . . . . . . . 451
Adding Nodes at a Selection . . . . . . . . . . . . . . . . . . . . . . . . . . . . . . . 452
Automating Effects . . . . . . . . . . . . . . . . . . . . . . . . . . . . . . . . . . . . . . . . . . 452
Automating Individual Effects Parameters . . . . . . . . . . . . . . . . . . . 452
Recording Groups of Faders and/or Knobs . . . . . . . . . . . . . . . . . . . .453
Recording Automation Data from an External Controller . . . . . . . 454
Reassigning Envelopes . . . . . . . . . . . . . . . . . . . . . . . . . . . . . . . . . . . . . . . 454
The Envelope Editing and Node Editing Menus . . . . . . . . . . . . . . . . . .455
Automated Muting . . . . . . . . . . . . . . . . . . . . . . . . . . . . . . . . . . . . . . . 456
14 Layouts, Templates
and Key Bindings . . . . . . . . . . . . . . . . . . . . . . . . . . . . . . . . . . . . . . . . . . . . . . . . . . . . 457
Layouts . . . . . . . . . . . . . . . . . . . . . . . . . . . . . . . . . . . . . . . . . . . . . . . . . . . 458
Floating Views and Dual Monitor Support . . . . . . . . . . . . . . . . . . . . 460
Templates . . . . . . . . . . . . . . . . . . . . . . . . . . . . . . . . . . . . . . . . . . . . . . . . . 461
Template Example: Three MIDI Instruments . . . . . . . . . . . . . . . . . 462
Key Bindings . . . . . . . . . . . . . . . . . . . . . . . . . . . . . . . . . . . . . . . . . . . . . . . 463
Importing Key Bindings . . . . . . . . . . . . . . . . . . . . . . . . . . . . . . . . . . 465
Exporting Key Bindings . . . . . . . . . . . . . . . . . . . . . . . . . . . . . . . . . . . 465
15 Working with Notation and Lyrics . . . . . . . . . . . . . . . . . . . . . . . . . . . . . . . . . . . 467
The Staff View . . . . . . . . . . . . . . . . . . . . . . . . . . . . . . . . . . . . . . . . . . . . . 468
Opening the Staff View . . . . . . . . . . . . . . . . . . . . . . . . . . . . . . . . . . . 469
Staff Pane Layout . . . . . . . . . . . . . . . . . . . . . . . . . . . . . . . . . . . . . . . 469
The Staff Pane Right-Click Menu . . . . . . . . . . . . . . . . . . . . . . . . . . .469
The Fretboard . . . . . . . . . . . . . . . . . . . . . . . . . . . . . . . . . . . . . . . . . . .471
Fretboard Popup Menu . . . . . . . . . . . . . . . . . . . . . . . . . . . . . . . . . . . 471
Basic Musical Editing . . . . . . . . . . . . . . . . . . . . . . . . . . . . . . . . . . . . . . . .472
Inserting Notes on the Staff . . . . . . . . . . . . . . . . . . . . . . . . . . . . . . . 472
Inserting Notes with the Fretboard . . . . . . . . . . . . . . . . . . . . . . . . .473
Selecting Notes . . . . . . . . . . . . . . . . . . . . . . . . . . . . . . . . . . . . . . . . . . 473
Moving, Copying, and Deleting Notes on the Staff . . . . . . . . . . . . .474
Moving Notes from within the Fretboard . . . . . . . . . . . . . . . . . . . . . 475
Auditioning . . . . . . . . . . . . . . . . . . . . . . . . . . . . . . . . . . . . . . . . . . . . . 475
Changing Note Properties . . . . . . . . . . . . . . . . . . . . . . . . . . . . . . . . .476
Deglitch Dialog . . . . . . . . . . . . . . . . . . . . . . . . . . . . . . . . . . . . . . . . . . 477
Working with Triplets . . . . . . . . . . . . . . . . . . . . . . . . . . . . . . . . . . . .477
Beaming of Rests . . . . . . . . . . . . . . . . . . . . . . . . . . . . . . . . . . . . . . . .478
Changing the Way Notes Are Displayed . . . . . . . . . . . . . . . . . . . . . 478
Using Enharmonic Spellings . . . . . . . . . . . . . . . . . . . . . . . . . . . . . . . 479
MIDI Channels and the Fretboard . . . . . . . . . . . . . . . . . . . . . . . . . . 481
xvi
Page 17

Chords and Marks . . . . . . . . . . . . . . . . . . . . . . . . . . . . . . . . . . . . . . . . . . 482
Adding Chord Symbols . . . . . . . . . . . . . . . . . . . . . . . . . . . . . . . . . . . 482
Adding Expression Marks . . . . . . . . . . . . . . . . . . . . . . . . . . . . . . . . 485
Adding Hairpin Symbols . . . . . . . . . . . . . . . . . . . . . . . . . . . . . . . . . . 486
Adding Pedal Marks . . . . . . . . . . . . . . . . . . . . . . . . . . . . . . . . . . . . . 486
Tablature . . . . . . . . . . . . . . . . . . . . . . . . . . . . . . . . . . . . . . . . . . . . . . . . . 488
Tablature Settings . . . . . . . . . . . . . . . . . . . . . . . . . . . . . . . . . . . . . . 488
Changing Fretboard Texture and Orientation . . . . . . . . . . . . . . . . 489
Quick TAB . . . . . . . . . . . . . . . . . . . . . . . . . . . . . . . . . . . . . . . . . . . . . 489
Regenerate TAB . . . . . . . . . . . . . . . . . . . . . . . . . . . . . . . . . . . . . . . . 489
Entering Notes from the TAB Staff . . . . . . . . . . . . . . . . . . . . . . . . . 490
Single Note Editing from the TAB Staff . . . . . . . . . . . . . . . . . . . . . 490
Editing Chords or Groups of Notes from the TAB Staff . . . . . . . . . 491
Editing Notes and Chords from the Fretboard . . . . . . . . . . . . . . . . 491
Working with Percussion . . . . . . . . . . . . . . . . . . . . . . . . . . . . . . . . . . . . 492
Setting Up a Percussion Track . . . . . . . . . . . . . . . . . . . . . . . . . . . . . 492
Setting Up a Percussion Staff or Line . . . . . . . . . . . . . . . . . . . . . . . 493
Ghost Strokes . . . . . . . . . . . . . . . . . . . . . . . . . . . . . . . . . . . . . . . . . . 494
Printing . . . . . . . . . . . . . . . . . . . . . . . . . . . . . . . . . . . . . . . . . . . . . . . . . . 494
The Meter/Key View . . . . . . . . . . . . . . . . . . . . . . . . . . . . . . . . . . . . . . . . 495
What Is Meter? . . . . . . . . . . . . . . . . . . . . . . . . . . . . . . . . . . . . . . . . . 495
What Is Key? . . . . . . . . . . . . . . . . . . . . . . . . . . . . . . . . . . . . . . . . . . . 495
Opening the Meter/Key View . . . . . . . . . . . . . . . . . . . . . . . . . . . . . . 496
Adding and Editing Meter/Key Changes . . . . . . . . . . . . . . . . . . . . . 496
Music Notation for Non-concert-key
Instruments . . . . . . . . . . . . . . . . . . . . . . . . . . . . . . . . . . . . . . . . . . . . 498
Working with Lyrics . . . . . . . . . . . . . . . . . . . . . . . . . . . . . . . . . . . . . . . . 498
Adding and Editing Lyrics in the Staff View . . . . . . . . . . . . . . . . . 499
Opening the Lyrics View . . . . . . . . . . . . . . . . . . . . . . . . . . . . . . . . . 500
Adding and Editing Lyrics in the Lyrics View . . . . . . . . . . . . . . . . 500
16 Using Instrument Definitions . . . . . . . . . . . . . . . . . . . . . . . . . . . . . . . . . . . . . . . 503
Assigning Instruments . . . . . . . . . . . . . . . . . . . . . . . . . . . . . . . . . . . . . . 504
Importing Instrument Definitions . . . . . . . . . . . . . . . . . . . . . . . . . . . . . 505
Creating Instrument Definitions . . . . . . . . . . . . . . . . . . . . . . . . . . . . . . 506
Creating and Editing Patch Name and Other Lists . . . . . . . . . . . . 508
Copying Name Lists . . . . . . . . . . . . . . . . . . . . . . . . . . . . . . . . . . . . . 509
Assigning the Bank Select Method . . . . . . . . . . . . . . . . . . . . . . . . . 509
Assigning Patch Names . . . . . . . . . . . . . . . . . . . . . . . . . . . . . . . . . . 510
Assigning Note Names . . . . . . . . . . . . . . . . . . . . . . . . . . . . . . . . . . . 511
Assigning Controller, RPN, and NRPN Names . . . . . . . . . . . . . . . 512
Instrument Definition Tutorial . . . . . . . . . . . . . . . . . . . . . . . . . . . . . . . . 513
Why Use Instrument Definitions? . . . . . . . . . . . . . . . . . . . . . . . . . . 513
xvii
Page 18

What Can They Do and Not Do? . . . . . . . . . . . . . . . . . . . . . . . . . . . .513
Where Do Instrument Definitions Come From? . . . . . . . . . . . . . . . . 513
Start of Tutorial . . . . . . . . . . . . . . . . . . . . . . . . . . . . . . . . . . . . . . . . . 514
17 Using System Exclusive Data . . . . . . . . . . . . . . . . . . . . . . . . . . . . . . . . . . . . . . 517
What Is System Exclusive? . . . . . . . . . . . . . . . . . . . . . . . . . . . . . . . . . . . 518
Sysx Events . . . . . . . . . . . . . . . . . . . . . . . . . . . . . . . . . . . . . . . . . . . . 518
Using the System Exclusive View . . . . . . . . . . . . . . . . . . . . . . . . . . . . . . 518
Sending Sysx Banks at Startup . . . . . . . . . . . . . . . . . . . . . . . . . . . . . . . . 518
Importing, Creating, and Dumping Sysx Banks . . . . . . . . . . . . . . . . . . 519
More about Dump Request Macros . . . . . . . . . . . . . . . . . . . . . . . . . . 521
Editing Sysx Banks . . . . . . . . . . . . . . . . . . . . . . . . . . . . . . . . . . . . . . . . . 521
Sysx View Buttons 5 . . . . . . . . . . . . . . . . . . . . . . . . . . . . . . . . . . . . . . . . . . 22
Send . . . . . . . . . . . . . . . . . . . . . . . . . . . . . . . . . . . . . . . . . . . . . . . . . 522
Send All . . . . . . . . . . . . . . . . . . . . . . . . . . . . . . . . . . . . . . . . . . . . . . .522
Receive . . . . . . . . . . . . . . . . . . . . . . . . . . . . . . . . . . . . . . . . . . . . . . . .522
Clear Bank . . . . . . . . . . . . . . . . . . . . . . . . . . . . . . . . . . . . . . . . . . . . .522
Name . . . . . . . . . . . . . . . . . . . . . . . . . . . . . . . . . . . . . . . . . . . . . . . . . 522
Auto . . . . . . . . . . . . . . . . . . . . . . . . . . . . . . . . . . . . . . . . . . . . . . . . . . 522
Output . . . . . . . . . . . . . . . . . . . . . . . . . . . . . . . . . . . . . . . . . . . . . . . .522
Edit Bytes . . . . . . . . . . . . . . . . . . . . . . . . . . . . . . . . . . . . . . . . . . . . .522
Load Bank and Save Bank . . . . . . . . . . . . . . . . . . . . . . . . . . . . . . . 523
Transmitting Banks During Playback . . . . . . . . . . . . . . . . . . . . . . . . . . 523
Real-time Recording of System Exclusive Messages . . . . . . . . . . . . . . . 524
Sysx Echo . . . . . . . . . . . . . . . . . . . . . . . . . . . . . . . . . . . . . . . . . . . . . . . . . 524
Sysx .
INI File Settings . . . . . . . . . . . . . . . . . . . . . . . . . . . . . . . . . . . . . . . 524
Troubleshooting . . . . . . . . . . . . . . . . . . . . . . . . . . . . . . . . . . . . . . . . . . . . 525
xviii
18 Synchronizing Your Gear . . . . . . . . . . . . . . . . . . . . . . . . . . . . . . . . . . . . . . . . . . 527
Synchronization Overview . . . . . . . . . . . . . . . . . . . . . . . . . . . . . . . . . . . .528
Choosing Clock Sources When SONAR is the Master . . . . . . . . . . . . . .529
MIDI Synchronization . . . . . . . . . . . . . . . . . . . . . . . . . . . . . . . . . . . . . . . 529
SONAR as the Slave . . . . . . . . . . . . . . . . . . . . . . . . . . . . . . . . . . . . . 530
SONAR as the Master . . . . . . . . . . . . . . . . . . . . . . . . . . . . . . . . . . . .531
Using MIDI Sync with Drum Machines . . . . . . . . . . . . . . . . . . . . . . 532
Troubleshooting MIDI Sync . . . . . . . . . . . . . . . . . . . . . . . . . . . . . . . 532
SMPTE/MIDI Time Code Synchronization . . . . . . . . . . . . . . . . . . . . . . . 532
Playing Digital Audio under SMPTE/MTC Sync . . . . . . . . . . . . . . . 535
SMPTE/MTC Sync and Full Chase Lock . . . . . . . . . . . . . . . . . . . . . 536
Troubleshooting SMPTE/MTC Sync . . . . . . . . . . . . . . . . . . . . . . . . .536
MIDI Machine Control (MMC) . . . . . . . . . . . . . . . . . . . . . . . . . . . . . . . . 537
Page 19

19 Audio File Management . . . . . . . . . . . . . . . . . . . . . . . . . . . . . . . . . . . . . . . . . . . . 539
The Project Files Dialog . . . . . . . . . . . . . . . . . . . . . . . . . . . . . . . . . . . . . 540
Project Files and Bundle Files . . . . . . . . . . . . . . . . . . . . . . . . . . . . . . . . 541
Audio Folders . . . . . . . . . . . . . . . . . . . . . . . . . . . . . . . . . . . . . . . . . . . . . . 542
Global Audio Folders . . . . . . . . . . . . . . . . . . . . . . . . . . . . . . . . . . . . 542
Per-project Audio Folders . . . . . . . . . . . . . . . . . . . . . . . . . . . . . . . . . 542
Imported Audio Files . . . . . . . . . . . . . . . . . . . . . . . . . . . . . . . . . . . . 544
Backing Up Projects with Digital Audio . . . . . . . . . . . . . . . . . . . . . . . . 544
Deleting Unused Audio Files . . . . . . . . . . . . . . . . . . . . . . . . . . . . . . . . . 546
20 Improving Audio Performance . . . . . . . . . . . . . . . . . . . . . . . . . . . . . . . . . . . . . . 547
System Configuration . . . . . . . . . . . . . . . . . . . . . . . . . . . . . . . . . . . . . . . 548
The Wave Profiler . . . . . . . . . . . . . . . . . . . . . . . . . . . . . . . . . . . . . . . 548
Enabling and Disabling Audio Devices . . . . . . . . . . . . . . . . . . . . . . 548
Sampling Rates . . . . . . . . . . . . . . . . . . . . . . . . . . . . . . . . . . . . . . . . . 549
Bit Depths, and Float Resolution . . . . . . . . . . . . . . . . . . . . . . . . . . . 550
Bit Depths for Playback . . . . . . . . . . . . . . . . . . . . . . . . . . . . . . . . . . 550
Bit Depths for Recording . . . . . . . . . . . . . . . . . . . . . . . . . . . . . . . . . 551
Bit Depths for Importing Audio . . . . . . . . . . . . . . . . . . . . . . . . . . . . 551
Bit Depths for Exporting Audio . . . . . . . . . . . . . . . . . . . . . . . . . . . . 551
Bit Depths for Rendering Audio . . . . . . . . . . . . . . . . . . . . . . . . . . . . 552
Preparing Higher-quality Audio for CD Burning . . . . . . . . . . . . . . 552
Improving Performance with Digital Audio . . . . . . . . . . . . . . . . . . . . . . 553
Getting the Most Out of Your PC . . . . . . . . . . . . . . . . . . . . . . . . . . . 553
Mixing Latency . . . . . . . . . . . . . . . . . . . . . . . . . . . . . . . . . . . . . . . . . 555
ASIO Drivers . . . . . . . . . . . . . . . . . . . . . . . . . . . . . . . . . . . . . . . . . . . 555
Queue Buffers . . . . . . . . . . . . . . . . . . . . . . . . . . . . . . . . . . . . . . . . . . 555
Status Bar/CPU Meter/Disk Meter . . . . . . . . . . . . . . . . . . . . . . . . . 555
21 Appendix A:
Troubleshooting . . . . . . . . . . . . . . . . . . . . . . . . . . . . . . . . . . . . . . . . . . . . . . . . . . . . . .557
When I Play a File, I Don’t Hear Anything . . . . . . . . . . . . . . . . . . . . . . 557
I Can’t Record from My MIDI Instrument . . . . . . . . . . . . . . . . . . . . . . . 559
When I Play a File Containing Audio, the Audio Portion Doesn’t Play 560
I Can’t Record Any Audio . . . . . . . . . . . . . . . . . . . . . . . . . . . . . . . . . . . . 560
My Track or Bus Fader is Maximized, But There’s No Sound or Level 561
The Music Is Playing Back with the Wrong Instrument Sounds . . . . . 561
How Do I Use SONAR to Access All the Sounds on My MIDI Instrument? 562
My Keyboard Doubles Every Note I Play . . . . . . . . . . . . . . . . . . . . . . . . 562
I Don’t See the Clips Pane in the Track View . . . . . . . . . . . . . . . . . . . . 562
xix
Page 20

Why Can’t SONAR Find My Audio Files? . . . . . . . . . . . . . . . . . . . . . . . . 563
I Get an a Error Message When I Change a Project to 24-bit Audio . . . 563
Bouncing Tracks Takes a Long Time . . . . . . . . . . . . . . . . . . . . . . . . . . . 563
Why Do I Get Errors from the Wave Profiler? . . . . . . . . . . . . . . . . . . . . 564
I Hear an Echo When I Record . . . . . . . . . . . . . . . . . . . . . . . . . . . . . . . .564
Audio Distorts at Greater than 16 Bits . . . . . . . . . . . . . . . . . . . . . . . . . . 564
No Sound from My Soft Synth . . . . . . . . . . . . . . . . . . . . . . . . . . . . . . . . .565
My Pro Audio 9 Files Sound Louder/Softer When I Open Them in SONAR
565
I Can’t Open My Project . . . . . . . . . . . . . . . . . . . . . . . . . . . . . . . . . . . . . . 566
SONAR Can’t Find the Wavetable Synth or MPU401 . . . . . . . . . . . . . .566
22 Appendix B: Hardware Setup . . . . . . . . . . . . . . . . . . . . . . . . . . . . . . . . . . . . . . . 567
Connect Your MIDI Equipment . . . . . . . . . . . . . . . . . . . . . . . . . . . . . . . . 567
Set Up to Record Digital Audio . . . . . . . . . . . . . . . . . . . . . . . . . . . . . . . . 570
23 Appendix C: New Features in SONAR 5 . . . . . . . . . . . . . . . . . . . . . . . . . . . . . . 575
V-Vocal . . . . . . . . . . . . . . . . . . . . . . . . . . . . . . . . . . . . . . . . . . . . . . . . . . . 575
Integrated VST Support . . . . . . . . . . . . . . . . . . . . . . . . . . . . . . . . . . . . . . 575
Inline Piano Roll View . . . . . . . . . . . . . . . . . . . . . . . . . . . . . . . . . . . . . . . 575
Streamlined Piano Roll View . . . . . . . . . . . . . . . . . . . . . . . . . . . . . . . . . .575
Improved MIDI Step Recording . . . . . . . . . . . . . . . . . . . . . . . . . . . . . . . . 576
64-bit Audio Engine . . . . . . . . . . . . . . . . . . . . . . . . . . . . . . . . . . . . . . . . . 576
Video Output to FireWire Devices . . . . . . . . . . . . . . . . . . . . . . . . . . . . . . 576
Grouping Enhancements . . . . . . . . . . . . . . . . . . . . . . . . . . . . . . . . . . . . .576
Per/Clip Effects Bins . . . . . . . . . . . . . . . . . . . . . . . . . . . . . . . . . . . . . . . . 576
Float File Support and Multiple Bit Depths . . . . . . . . . . . . . . . . . . . . . .577
Track Layer Enhancements . . . . . . . . . . . . . . . . . . . . . . . . . . . . . . . . . . . 577
Waveform Preview for Buses and Synth Tracks . . . . . . . . . . . . . . . . . . 577
Peak Markers . . . . . . . . . . . . . . . . . . . . . . . . . . . . . . . . . . . . . . . . . . . . . . 577
Audio Scaling in Buses . . . . . . . . . . . . . . . . . . . . . . . . . . . . . . . . . . . . . . . 577
Cloning Multiple Tracks . . . . . . . . . . . . . . . . . . . . . . . . . . . . . . . . . . . . .577
Fade Options . . . . . . . . . . . . . . . . . . . . . . . . . . . . . . . . . . . . . . . . . . . . . . . 577
OMF Enhancements . . . . . . . . . . . . . . . . . . . . . . . . . . . . . . . . . . . . . . . . .577
Lock Track Height . . . . . . . . . . . . . . . . . . . . . . . . . . . . . . . . . . . . . . . . . .578
Insert Multiple Tracks . . . . . . . . . . . . . . . . . . . . . . . . . . . . . . . . . . . . . . . 578
Automation Enhancements . . . . . . . . . . . . . . . . . . . . . . . . . . . . . . . . . . . 578
Snap to Scale . . . . . . . . . . . . . . . . . . . . . . . . . . . . . . . . . . . . . . . . . . . . . . . 578
Remove DC Offset . . . . . . . . . . . . . . . . . . . . . . . . . . . . . . . . . . . . . . . . . . .578
xx
Page 21

New Normalize and Gain Commands . . . . . . . . . . . . . . . . . . . . . . . . . . 578
MIDI Scale/Zoom Control . . . . . . . . . . . . . . . . . . . . . . . . . . . . . . . . . . . . 578
Audio Meter Enhancements . . . . . . . . . . . . . . . . . . . . . . . . . . . . . . . . . . 579
Enhanced Preset Management . . . . . . . . . . . . . . . . . . . . . . . . . . . . . . . . 579
Interleave Indicator in FX Bins . . . . . . . . . . . . . . . . . . . . . . . . . . . . . . . 579
Track Templates . . . . . . . . . . . . . . . . . . . . . . . . . . . . . . . . . . . . . . . . . . . 579
Track Icons . . . . . . . . . . . . . . . . . . . . . . . . . . . . . . . . . . . . . . . . . . . . . . . . 579
Tabbed Views . . . . . . . . . . . . . . . . . . . . . . . . . . . . . . . . . . . . . . . . . . . . . . 579
Add Nodes at Selection Command . . . . . . . . . . . . . . . . . . . . . . . . . . . . . 579
Round Envelope Nodes . . . . . . . . . . . . . . . . . . . . . . . . . . . . . . . . . . . . . . 579
24 Index . . . . . . . . . . . . . . . . . . . . . . . . . . . . . . . . . . . . . . . . . . . . . . . . . . . . . . . . . . . 581
xxi
Page 22

xxii
Page 23

Preface
The SONAR User’s Guide is designed to help you learn and use SONAR. This Guide explains
how SONAR works and how to use it to create, edit, produce, and perform. The SONAR
User’s Guid
information you need. The User’s Guide also includes a comprehensive index that you can
use to find information on any specific topic.
e is task-oriented, with lots of cross-references, so that you can find the
About This Book
The SONAR User’s Guide is organized as follows:
Chapter 1, Introduction, provides an overview of SONAR, installation instructions and basic
equipment setup options.
Chapter 2, Getting Started, contains tutorials that cover many of the features of SONAR.
The remaining chapters cover all the basic and advanced skills you need to use SONAR to
play, record, edit, arrange, and mix your projects.
The appendices contain additional information you can use for troubleshooting, setting up
SONAR for use with audio hardware, and SONAR’s new features.
Registering SONAR Today
New Cakewalk products will require product registration. When you register your product,
you provide some information including your name and email address, as well as the serial
number for your product.
Product registration can be done quickly on the internet or by phone.
To register anytime log onto http://www.cakewalk.com/register, or call 888-CAKEWALK
(U.S.) or +(617)-423-9004 (outside the U.S.) between 9 AM and 8 PM Eastern Standard Time.
If you live outside of North America, please visit our distributor’s page at
www.cakewalk.com/Dealers/International.asp to get the telephone number of your local
distributor.
You’ll need to supply your serial number, your name, and a valid email address. In return for
this information, we’ll email you a registration code that will allow you to keep using the
software forever. We recommend you write this registration code on the serial number sticker
for safekeeping.
English
Page 24
Conventions Used in this Book
The following table describes the text conventions in this book:
Convention... Meaning...
Bold Italics Text that appears in bold italics is a command in SONAR.
hyphen (File-Open) A hyphen represents a level in the menu hierarchy. For example, File-
SMALL CAPS Small caps are used for file extensions (.MID) and file names (AUD.INI).
Open means to click on the File menu and select the Open command.
Getting Help
In addition to this User’s Guide, SONAR includes online help that can provide you with quick
reference information whenever you need it. Simply press F1 or click the Help button in any
dialog box to find the information you need. If you are new to recording and editing music on
your PC, see the online help topic “Beginner’s Guide to Cakewalk Software” for an
introduction.
If you need more information than you can find in the User’s Guide or the online help, here
are two great places to look:
• Check the Support page of our Web site (www.cakewalk.com) for updated technical
information and answers to frequently asked questions.
• Post messages to the SONAR user community using one of the Cakewalk forums. For
more information about the newsgroups, visit www.cakewalk.com.
You can also get technical support directly from Cakewalk. In order to obtain technical
support, you must register your product. You can obtain technical support for this product in
the following ways:
• Visit http://www.cakewalk.com/Support/SONAR/SR5.asp.
• Call Cakewalk Technical Support at +1 (617) 423-9021 on weekdays, 10:00 AM to 6:00
PM, Eastern time. Be sure to have your serial number ready when you call.
Technical support hours, policies, and procedures are subject to change at any time. Check
our Web site for the latest support information.
xxiv
Page 25

1
Introduction
SONAR is a professional tool for authoring sound and music on your personal computer. It’s
designed for musicians, composers, arrangers, audio and production engineers, multimedia
and game developers, and recording engineers. SONAR supports Wave, MP3, ACIDized
waves, WMA, AIFF and other popular formats, providing all the tools you need to do
professional-quality work rapidly and efficiently.
SONAR is more than an integrated MIDI and digital audio authoring software package—it’s
an expandable platform that can function as the central nervous system of your recording
studio. With drivers for common high-end audio hardware, full support for audio plug-ins,
software synthesizers, MFX MIDI plug-ins, and MIDI Machine Control (MMC) of external
MIDI gear, SONAR can handle your most demanding projects.
In This Chapter
About SONAR . . . . . . . . . . . . . . . . . . . . . . . . . . . . . . . . . . . . . . . . . . . . . . . . . . . . . . . . . . 26
Computers, Sound, and Music. . . . . . . . . . . . . . . . . . . . . . . . . . . . . . . . . . . . . . . . . . . . . . 27
Installing SONAR . . . . . . . . . . . . . . . . . . . . . . . . . . . . . . . . . . . . . . . . . . . . . . . . . . . . . . . . 28
Setup . . . . . . . . . . . . . . . . . . . . . . . . . . . . . . . . . . . . . . . . . . . . . . . . . . . . . . . . . . . . . . . . . 29
Starting SONAR. . . . . . . . . . . . . . . . . . . . . . . . . . . . . . . . . . . . . . . . . . . . . . . . . . . . . . . . . 31
SONAR Basics. . . . . . . . . . . . . . . . . . . . . . . . . . . . . . . . . . . . . . . . . . . . . . . . . . . . . . . . . . 35
Windows Taskbar Indicators . . . . . . . . . . . . . . . . . . . . . . . . . . . . . . . . . . . . . . . . . . . . . . . 48
Screen Colors and Wallpaper . . . . . . . . . . . . . . . . . . . . . . . . . . . . . . . . . . . . . . . . . . . . . . 48
Starting to Use SONAR . . . . . . . . . . . . . . . . . . . . . . . . . . . . . . . . . . . . . . . . . . . . . . . . . . . 49
English
Page 26

:
About SONAR
SONAR is the flagship product of the Cakewalk line of integrated MIDI and digital audio sequencers for
the Windows platform. SONAR has a comprehensive feature set that makes it the single most
productive tool for sound and music authoring. Here are some of the ways you can use SONAR.
Music Composition and Exploration
SONAR is a powerful music-composition application, providing tools to record your own musical
performances; enhance or improve the quality of those performances; and edit, arrange, and experiment
with the music. With a few simple clicks of the mouse, you can arrange, orchestrate, and audition your
composition. Fully integrated sequencing allows you to combine the convenience and flexibility of MIDI
composition with the high-quality sound and subtlety of digital audio sound recording and
reproduction. Change the feel of a piece by locking it to a musical groove, or add delicate delays,
anticipations, or echoes that add richness to the music.
SONAR displays and lets you edit your music using standard musical notation and guitar tablature, so
you can adjust individual notes, add performance markings, and print individual parts or full scores.
You can graphically draw tempo and volume changes, or add lyrics to display on-screen or to include
with printed scores.
Remixing
SONAR’s Groove clips allow you to import, create, export and edit loops, making it possible to quickly
change tempos and keys for an entire project. The Loop Explorer view lets you preview loops in the
project’s tempo and key before dragging and dropping them onto a track.
Game Sound Development
There’s no better tool than SONAR for composing music for electronic games. Clip-based sequencing
lets you create and reuse musical themes freely, so you can associate musical sections with game
characters, locations, objects, and actions. Your creations can be saved and replayed using the compact
MIDI file format, which adapts its sound automatically to the target hardware for the best possible
sound reproduction.
Sound Production and Engineering
If you want to produce music CDs or master tapes, SONAR has virtually everything you need from
recording to mixing and mastering. Multichannel recording lets you capture studio or live performances
track by track. Reconfigurable buses provide full control over your mix. Real-time stereo effects like
chorus, flange, reverb, and delay/echo can be applied as track inserts, in effects loops, or to the master
mix. SONAR supports 44.1 KHz sampling for CD-quality sound, 24-bit/96 kHz sound for DVD-quality
sound, and lets you choose from lower or higher sample rates as well. All audio effects are 32-bit
floating point for faster processing and high-quality sound reproduction. Many effects now support 64bit processing for pristine quality.
Web Authoring
SONAR is the ideal tool for developing and producing music and sound for the World Wide Web, because
it lets you save your work in the formats that are most commonly used on web sites: MIDI, MP3, and
Windows Media Advanced Streaming Format. Any SONAR project—musical composition, audio clip,
commercial spot, jingle with voice-over—can be stored in a web-compatible format with a few simple
mouse clicks.
Film and Video Scoring and Production
SONAR has many of the tools you need to execute audio post-production projects quickly and
efficiently. SONAR provides chase lock sync to time code for frame-by-frame accuracy when
26
Page 27

synchronizing audio or MIDI to film or video. Or, you can turn chase lock off to conserve CPU power.
SONAR provides high-quality time stretching and sample-accurate editing with zero-crossing
detection so you can make the fine adjustments you need in record time. In addition, SONAR’s support
for video files gives you convenient synchronized access to digitized video, making film and video
scoring easier than ever.
Flexibility
SONAR works the way you want to work—you can customize screen layouts, toolbars, and audio and
MIDI system configurations to make your work more efficient. SONAR integrates with other sound
editing tools so you can access them in an instant without leaving SONAR.
Computers, Sound, and Music
This section provides some background on the different ways that computers store and play sound and
music. Computers work with sound and music in two different forms: MIDI and digital audio.
MIDI
MIDI (short for Musical Instrument Digital Interface) is the way computers communicate with most
sound cards, keyboards, and other electronic instruments. MIDI refers to both the type of cables and
plugs used to connect the computers and instruments, and to the language those computers and
instruments use to talk to each other. The MIDI standard is accepted and used worldwide. Almost any
electronic instrument you buy today will have MIDI connectors and can be used with other MIDI
instruments and with your computer’s MIDI interface.
The MIDI language conveys information and instructions, both from the computer to the instrument
and from the instrument to the computer. For example, if your computer wants your keyboard to play a
note, it sends a MIDI “Note On” message and tells the keyboard which note to play. When your
computer wants the keyboard to stop playing that note, it sends another message that stops the note
from playing.
The MIDI language has many other instructions, such as messages to change the sound that is used to
play the notes (the bank and patch), messages used to work the sustain pedal and the pitch-bend wheel,
and others. By sending the right messages at the right times, your computer can control your electronic
instrument and make it play music.
MIDI information can be sent on 16 different channels. You can set up your MIDI equipment to listen
for messages on all channels or on only a few.
MIDI files contain all the MIDI messages and timing information that are needed to play a song. MIDI
files can be read and played by many different programs, including SONAR, and can even be played by
programs on other types of computers. MIDI files have the extension .
There are several important advantages of the MIDI format:
• Large amounts of music can be stored in a very compact form
• Different parts of a piece can easily be assigned to any instrument you can imagine
• The music contains information on notes, tempos, and key signatures that makes it possible to
display and edit the piece using standard musical notation
The primary disadvantage of MIDI is that the quality of the music a listener hears will vary depending
on the MIDI equipment the listener is using. For example, MIDI usually sounds much better on an
expensive synthesizer than it does on an inexpensive sound card.
MID.
English
27
Page 28

:
Digital Audio
Digital audio is a simple way to record and play sounds of any type. It works like a tape recorder—you
record something, then later play it back. Digital audio stores the sound as a long series of numbers.
Sound Waves
Sound waves are vibrations in the air. Sound waves are generated by anything that vibrates; a
vibrating object causes the air next to it to vibrate, and the vibration is passed through the air in all
directions. When the vibrating air enters your ear, it makes your eardrum vibrate, and you hear a
sound. Likewise, if the vibrating air hits a microphone, it causes the microphone to vibrate and send
electrical signals to whatever it's connected to.
These vibrations are very fast. The slowest vibration frequency you can hear is about 20 vibrations per
second, and the fastest is around 16,000 to 20,000 vibrations per second.
Recording Digital Audio
To record digital audio, your computer monitors the electrical signal generated by a microphone, an
electric guitar, or another source. At equal intervals of time (for CD-quality sound, this means 44,100
times a second), the computer measures and saves the strength of the electrical signal from the
microphone, on a scale from 0 to 65,535.
That's it. Digital audio data is just a long series of numbers. The computer sends these numbers, in the
form of electrical signals, to a speaker. The speaker then vibrates and generates the same sound that
was recorded.
The primary advantage of digital audio is the quality of the sound. Unlike MIDI, a digital audio
recording is very rich, capturing all the nuances, overtones, and other characteristics of the sound
exactly as performed. The main drawback of digital audio is that it takes up a lot of disk space. To
record a 1-minute segment of stereo, CD-quality digital audio, you need about 10 megabytes of disk
space.
On the PC, digital audio is usually stored in Wave files (extension .wav). There are many programs
available that let you create, play, and edit these files. SONAR reads, writes, and lets you edit Wave
files.
Installing SONAR
SONAR is easy to install. All you need to do is choose the folder where the program and sample project
files should be stored.Before you start, make sure you have your serial number handy. Your serial
number is located on the back of your CD case.
Installation note: If you choose to not install the Sample files, you will not have the necessary content
to use the tutorials in Chapter 2.
28
Page 29

To Install SONAR
1. Start your computer.
2. Close any open programs you have running.
3. Place the SONAR CD-ROM in your CD-ROM drive.
If you have autorun enabled, the SONAR AutoRun menu opens automatically, showing you a
dialog box with several buttons. If autorun is not enabled, you can open the SONAR AutoRun
menu by selecting Start-Run and entering d:\AutoRun.exe (where d:\ is your CD-ROM drive).
4. Click the Install SONAR button.
Note:
If you exit Setup without completing the installation, choose Start-Run, type
D:\AutoRun.exe (where D:\ is your CD-ROM drive), and click OK. This will
reopen the AutoRun window, and you can click Install SONAR to start
installation again.
5. Follow the installation instructions on the screen.
You can also install SONAR by choosing Start-Run and running the application named
from the CD.
SETUP.EXE
Uninstalling SONAR
When you installed SONAR, the setup program placed an Uninstall icon in the Start menu. To
uninstall SONAR, click the Start button and choose Programs-Cakewalk-SONAR 5 (Studio Edition
or Producer Edition)-Uninstall SONAR 5.
Setup
You can install SONAR on any computer that runs Windows XP or x64 and has a sound card or built-in
sound module. If you want to hook up other devices, like a MIDI keyboard, an electric guitar, or a
microphone, you need the right cables, and you need to find the right connectors on your computer.
Before you install SONAR, take a minute to register the software so we can let you know when updates
become available and provide you with technical support. To register anytime log onto http://
www.cakewalk.com/register, or call 888-CAKEWALK (U.S.) or +(617)-423-9004 (outside the U.S.)
between 9 AM and 8 PM Eastern Standard Time. If you live outside of North America, please visit our
distributor’s page at www.cakewalk.com/Dealers/International.asp to get the telephone number of your
local distributor. You’ll need to supply your serial number, your name, and a valid email address.
To connect a MIDI keyboard to your computer, you need standard MIDI cables or a MIDI adapter cable,
such as the one available in Cakewalk’s PC Music Pack. One end of the adapter cable should have two 5-
pin DIN connectors that connect to your keyboard or other MIDI device. At the other end, you need a
15-pin connector to connect to a sound card through its MIDI/joystick port.
If you have a dedicated MIDI interface, lots of electronic music gear, or work with many different music
software packages,see
Before you attach or detach any cables from your computer, you should shut down your computer and
turn off the power to all your equipment. This greatly reduces the chance of electrical damage to your
equipment while plugging and unplugging cables.
English
29
Page 30
:
Audio Connections
There are several types of audio interfaces (soundcards). CardBus (PCI), USB/USB2 and FireWire are
the most common. Laptops can use an audio PCMCIA card. Many audio interfaces also have MIDI
inputs and some have built in MIDI synthesizers as well. This section covers the various audio
connection options.
Analog and Digital Inputs
There are two basic types of audio inputs, analog and digital. Analog inputs allow you to connect a
guitar, mic or other instrument to your computer directly. The audio interface converts the analog input
to digital. Digital inputs allow other digital devices to connect directly to your computer. Common
digital inputs include external analog to digital converters, popular guitar processors like the Line6
Pod, and other digital recording systems like the ADAT decks. Analog inputs are very common, and are
standard in virtually all consumer sound cards (the ones that come with your PC). Digital inputs are
becoming more popular and are very common on professional and mid-level, “prosumer” interfaces.
Analog inputs allow you to record a mono or stereo signal (assuming you have a stereo input) while
digital inputs allow you to record 1 to 8 signals depending on the type of digital connection.
The following table describes the various analog inputs and outputs:
Type of Analog Input/Output… Description...
Balanced (XLR, phono or RCA) a mono input/output
Unbalanced (TRS) a stereo or mono input/output
The following table describes the various digital inputs and outputs:
Type of Digital Input/Output… Description...
S/PDIF Sony/Philips Digital Interface—capable of carrying a stereo signal, S/
ADAT Lightpipe Up to 8 channels of simultaneous transfer. If you want to import your
TDIF Tascam Digital Interface—up to 8 channels of simultaneous transfer.
AES/EBU Often referred to as simply AES, this type of digital connection uses a
Read your hardware documentation carefully to determine what kind of digital connections, if any, you
have on your audio interface.
To Connect an Electric Guitar to Your Computer
• If your sound card has a 1/8 inch input jack, plug your 1/4” mono guitar cable into a 1/8” stereo
adapter, and then plug the 1/8” adapter into the microphone input or line input jack on your
computer sound card.
• If you use a professional or “pro-sumer” sound card, there is probably a 1/4 inch input jack on your
PDIF is transmitted via RCA, Toslink or more rarely BNC jacks (singlepin cable-TV connections)
old ADAT material without any signal degradation, this is the
connection you should use.
modified XLR cable to transfer a stereo signal.
30
Page 31

sound card or audio hardware interface that you can plug your guitar cable into.
To Connect a Microphone to Your Computer
• If your sound card has a 1/8 inch input jack, and your microphone cable has a 1/4” plug on the end,
plug the mic cable into a 1/8” stereo adapter, and then plug the 1/8” adapter into the microphone
input jack on your computer sound card.
• If you use a professional or “pro-sumer” sound card, there is probably a 1/4 inch input jack on your
sound card or audio hardware interface that you can plug your mic cable into.
• If your mic has a cable with an XLR plug on the end, and your sound card or audio hardware
interface has a 1/4 inch input jack, plug the mic cable into an XLR-to-quarter inch adapter, and
then plug your mic cable into your audio hardware. If your audio hardware has an XLR input, of
course it’s better to use that.
• You can also plug your mic into a mixer or pre-amp, and connect the mixer or pre-amp to an input
jack on your audio hardware. This is usually the best method.
That's it! Now that your instruments are all set to go, you can restart your computer and turn on your
keyboard, guitar, and microphone.
For a complete description of audio input options, see the online help topic Hardware Setup.
MIDI Connections
Use the following procedure to connect a MIDI instrument to your computer.
To Connect a MIDI Keyboard to Your Computer
1. One of the 5-pin connectors on the MIDI cable is labeled Out. Plug this connector into the MIDI In
jack on your electronic keyboard.
2. The other 5-pin connector on the MIDI cable is labeled In. Plug this connector into the MIDI Out
jack on your electronic keyboard.
3. If you are using a MIDI adaptor cable, plug the 15-pin connector on the MIDI cable into the MIDI/
joystick port on your sound card. If you have a joystick, unplug it, plug in the MIDI cable, and plug
the joystick into the pass-through connector on the MIDI cable.
Or
If you are using standard MIDI cables, plug the cable connected to the MIDI Out on your MIDI
instrument into the MIDI In of your sound card or MIDI interface. Plug the cable connected to the
MIDI In on your MIDI instrument into the MIDI Out of your sound card or MIDI interface.
English
Starting SONAR
There are many different ways to start SONAR. Here are a few:
• Double-click the SONAR icon on your desktop.
• Click the Start button, and choose Programs-Cakewalk-SONAR 5 (Studio Edition or
Producer Edition)-SONAR 5 (Studio Edition or Producer Edition).
• Click the Start button, point to Documents, and choose a SONAR project from the menu.
• Double-click the SONAR program or any SONAR document from the Windows Explorer or the
Find menu.
When you start SONAR, you see the Quick Start dialog box.
31
Page 32

:
The Quick Start dialog box has several options:
Option… How to use it…
Open a Project Choose a project from the Open File dialog box to
Open a Recent Project Select a project from the list, and click this button
Create a New Project Click here to create a new project.
Getting Started Click here to view the Getting Started topic in the
If you don’t want to see the Quick Start dialog box in the future, uncheck the box at the bottom of the
dialog box, and click Close. You can see the Quick Start dialog box later by choosing Help-Quick Start.
Migrating Preferences
If you have a previous version of Cakewalk installed, SONAR will detect it and give you the option of
migrating certain preferences from a single earlier version.
When you choose to migrate preferences, SONAR migrates the following settings from an earlier
Cakewalk version:
Setting… Description...
Global Options Settings in the Global Options dialog. Open by
Key Bindings Your customized key bindings for controlling
open it
to open it
help file. This topic has links to a glossary of
terms, as well as some basic procedures.
selecting Options-Global.
SONAR using your MIDI keyboard or computer
keyboard.
32
Instrument Definitions Files used to control specific MIDI instruments.
Page 33

Setting… Description...
Audio data directory (WaveData folder) and
Picture Cache directory locations
SONAR uses the Data directory and Picture
Cache directories from the previous Cakewalk
version for storing project wave files and their
waveform image files.
Running Wave Profiler
The first time you start SONAR, it automatically runs the Wave Profiler utility. Wave Profiler
determines the proper MIDI and Audio timings for your sound card and writes them to a file that
SONAR refers to when using the card. Wave Profiler does not change the sound card’s DMA, IRQ, or
port address settings.
Wave Profiler detects the make and model of your sound card, which determine the card’s audio
characteristics. If Wave Profiler finds a card that has a WDM driver, it only profiles that card. If you
want to use more than one sound card at a time, and they don’t both have WDM drivers, you must force
the one with the WDM driver to use that driver as an older, MME driver. It is not necessary to run the
Wave Profiler for a sound card using an ASIO driver. For more information about Wave Profiler, WDM,
and MME, see the online help topic “The Wave Profiler.” When Wave Profiler determines the kind of
card you have, always accept the default settings.
Note:
You can run the Wave Profiler again at a later time (for example, if you install
a new sound card or driver) by choosing the Options-Audio General tab
command and clicking Wave Profiler.
English
Setting Up the MIDI In and MIDI Out Devices
When you start SONAR for the first time, it checks your computer to find all the MIDI input and output
devices you have installed (such as sound cards and MIDI interfaces). However, sometimes you need to
tell SONAR exactly which devices you want it to use. If you’re not getting sound from your sound card
or MIDI keyboard, or if you just want to change the MIDI outputs and devices that you are using, follow
the steps in this section.
Choose Options-MIDI Devices to open a dialog box in which you select the MIDI In and MIDI Out
devices that SONAR will use. Each item in the list is a MIDI Input or MIDI Output from drivers
installed using the Windows Control Panel.
33
Page 34
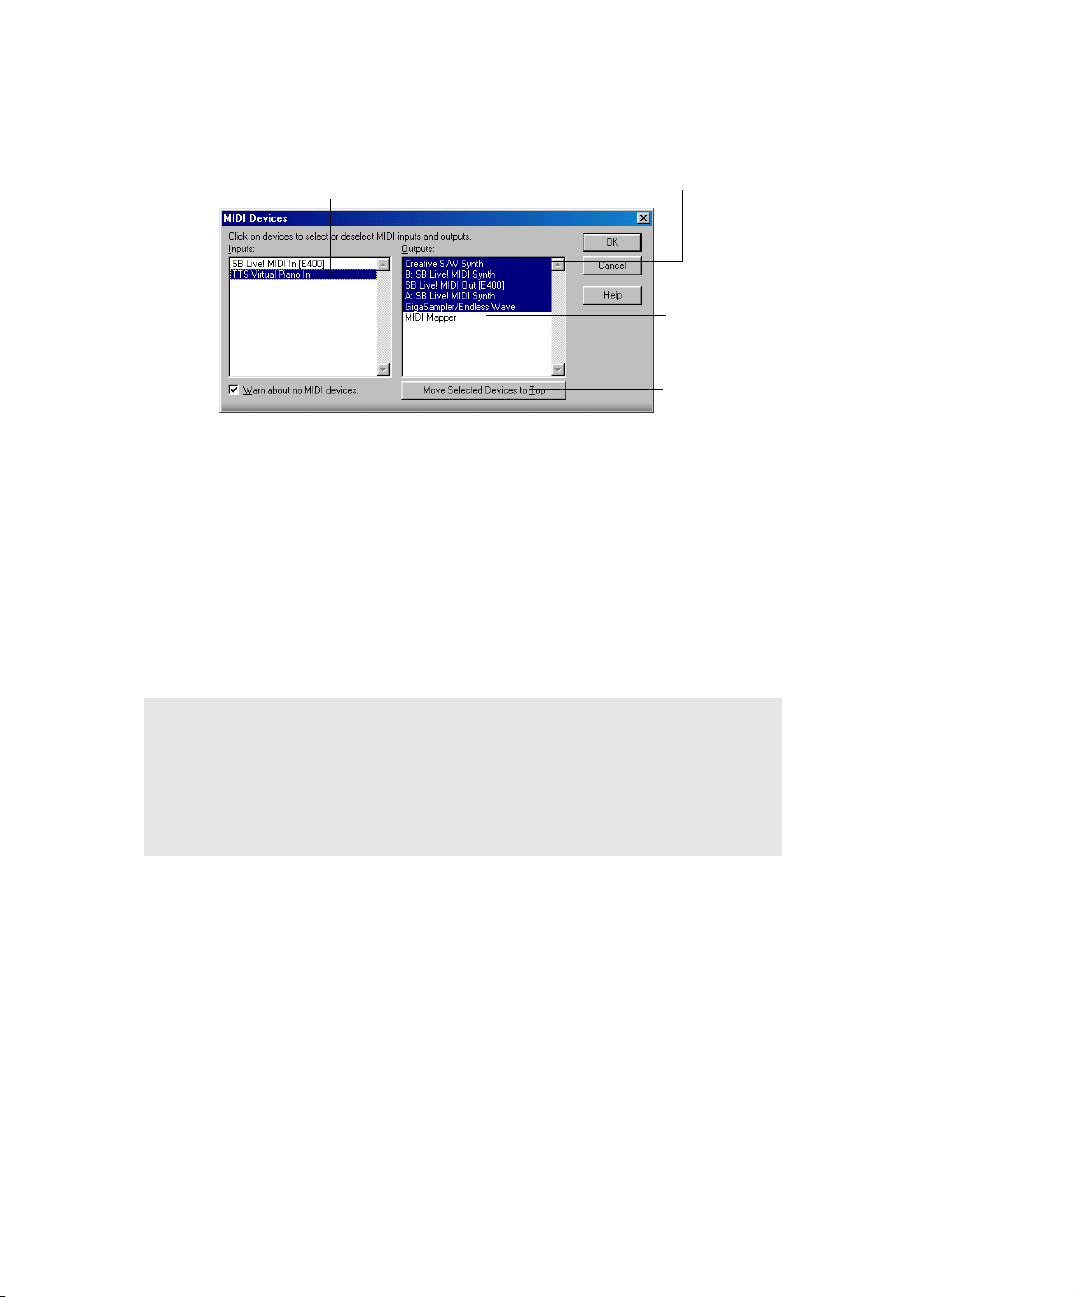
:
1. Select Options-MIDI Devices. You will see the MIDI Devices dialog box, which lets you choose
instruments on MIDI inputs and outputs.
Device selected for MIDI input
2. Look at the left window. Notice that it shows devices on MIDI Inputs; make sure that all devices in
this window are highlighted. If a device isn’t highlighted, click on it once to select it for MIDI
Input.
3. Look at the window on the right. Notice that it shows devices on MIDI Outputs. SONAR numbers
its MIDI Outputs by the order of the devices in this window. The device on top is on Output 1, the
one below it is on Output 2, and so on.
4. Highlight one device at a time in the Outputs window and click Move Selected Devices to Top to
change its order. Then highlight all the devices that appear in the window to select them for
output.
Tip!
Be sure to enable (highlight) MIDI output devices in the MIDI Devices dialog
(use the Options-MIDI Devices command). If you don’t do this, you won’t
hear any of your MIDI instruments when you play songs in SONAR.
Devices selected for MIDI output
Device not
selected for MIDI
output
Click here to
change order of
MIDI devices
34
Using MIDI Devices After Making Driver Changes
If you later add or remove drivers using the Drivers icon of the Windows Control Panel, SONAR reacts
in the following way:
• If you remove a Control Panel driver, SONAR will not use the device it belongs to the next time you
run the program. Any other devices you had selected using the Options-MIDI Devices command
will remain selected.
• If you add a driver through the Control Panel, SONAR does not automatically use it. You must use
Page 35

the Options-MIDI Devices command to enable the new driver in SONAR’s list.
Note:
After you add or remove a driver with the Drivers icon in the Windows
Control Panel, you must restart Windows for the change to take effect.
Defining Your MIDI Instrument or Sound Card
Once you have selected your MIDI Input and Output devices, SONAR, by default, plays back MIDI
sequences using a General MIDI instrument definition. If you are using a synthesizer or sound card
that does not adhere to the General MIDI standard, you may want to define that instrument.
SONAR Basics
SONAR’s menus and toolbars give you quick access to all the features of SONAR. Some menu choices
and tools display dialog boxes that let you choose among various options, or type in the values you
want. If you click in most views, in time rulers, or on certain other items with the right mouse button,
you see a popup menu that provides quick access to many common operations.
The project is the center of your work in SONAR. If you’re a musician, a project might contain a song,
a jingle, or a movement of a symphony. If you’re a post-production engineer, a project might contain a
30-second radio commercial or a lengthy soundtrack for a film or videotape production. By default,
every project is stored in a file (known as a project file). The normal file extension for a SONAR work
file is .
CWP.
SONAR organizes the sound and music in your project into tracks, clips, and events.
Tracks are used to store the sound or music made by each instrument or voice in a project. For
example, a song that is arranged for four instruments and one vocalist may have 5 tracks—one for each
instrument and one for the vocals. Each project can have an unlimited number of tracks. Some of these
tracks may be used in your finished project, while others can hold alternate takes, backup tracks, and
variations that you might want to keep for future use. Each track can be made up of one or many clips.
Clips are the pieces of sound and music that make up your tracks. A clip might contain a horn solo, a
drum break, a bass or guitar riff, a voice-over, a sound effect like the hoot of an owl, or an entire
keyboard performance. A track can contain a single clip or dozens of different clips, and you can easily
move clips from one track to another.
Groove clips are audio clips which have tempo and pitch information embedded within them, allowing
them to follow changes to the project tempo or project pitch. You can click on either edge of a Groove clip
and drag out repetitions in the track.
Events are MIDI data (in MIDI tracks) or automation data.
English
SONAR File Types
Projects in SONAR can be saved as a project file with the extension .CWP or as a Bundle file with the
extension .
For a complete description of the differences between project files and bundle files, see the online help
topic Project Files and Bundle Files.
CWB.
35
Page 36

:
Other Types of Files
SONAR lets you create and work with several other types of files, in addition to project (.CWP) and
bundle (.
File type… Description…
MIDI files (extension .MID) Standard MIDI files.
CWB) files that store your projects:
Template files (extension .
StudioWare (extension
AKEWALKSTUDIOWARE)
.C
OMF (extension .
TPL) Templates for new files you create
To control external MIDI devices from SONAR
OMF) Open Media Framework format files.
Opening a File
Use the following procedure to open a file.
To Open a File in SONAR
1. If you haven't already done so, start SONAR.
2. Choose File-Open.
3. In the Open dialog box, navigate to the directory where the project you want to open is located and
select it.
4. Click the Open button.
5. If you are opening an OMF file, the Unpack OMF dialog appears. Set the initial tempo and specify
the directory where you want to save the file and its audio. For more information about opening
OMF files, see Unpack OMF dialog in the online help.
SONAR loads the project.
Views
SONAR displays your project in windows on the screen that are known as views. You can have many
views open at once, all showing the same project. When you edit a project in one view, the other related
views are updated automatically.
The Track View
The Track view is the main window that you use to create, display, and work with a project. When you
open a project file, SONAR displays the Track view for the project. When you close the Track view for a
project, SONAR closes the file.
The Track view is divided into several sections: toolbars (at the top), the Navigator pane, the Video
Thumbnails pane (Producer Edition only), the Track pane, the Track/Bus Inspector, the Clips
36
Page 37

pane, and the Bus pane. You can change the size of the panes by dragging the vertical or horizontal
splitter bars that separate them.
Expanded
track
Minimized
tracks
Track icon
Track/Bus Inspector
The Track pane
Show/Hide Bus pane
The Clips pane
Splitter bars
Clips
The Bus pane
All of the current track’s controls, plus a few that are only available in the Console view, are contained
in the Track/Bus Inspector which is an expanded version of the current track’s controls located on the
far left side of the Track view. You can hide or show the Track/Bus Inspector by pressing i on your
keyboard (see “Track/Bus Inspector” on page 38, for more information).
The Track pane lets you see and change the initial settings for each track. By default, the current track
is displayed in gold. To change the current track, move the highlight using the mouse or the keyboard as
follows:
English
Key… What it does…
Left/Right Arrow Moves the highlight to the next or previous
Up/Down Arrow Moves to the same control in the adjacent track,
Page Down Displays the next page of tracks.
Page Up Displays the previous page of tracks.
Home Moves the focus to the first track.
End Moves the focus to the last track.
control.
or the next track of the same type if the control
only applies to a specific track type (for example,
the Patch control only applies to MIDI tracks).
37
Page 38

:
The current track’s controls are contained in the Track/Bus Inspector.
The Clips pane shows the clips in your project on a horizontal timeline called the Time Ruler that helps
you visualize how your project is organized. Clips contain markings that indicate their contents. The
Clips pane lets you select, move, cut and copy clips from place to place to change the arrangement of
music and sound in your project.
The Bus pane shows the buses in the project, and also shows any editing views that are in tabbed
(docked) format. The Show/Hide Bus pane button allows you to show or hide the Bus pane at the
bottom of the Track view.
The Navigator pane displays a large part of your project so you can see an overview of your song. The
Navigator pane displays all of your project’s tracks.
The Track view makes it easy to select tracks, clips, and ranges of time in a project. These are the most
common selection methods:
To… Do th is …
Select tracks Click on the track number, or drag over several
Select clips Click on the clip, or drag a rectangle around
Select time ranges Drag in the Time Ruler, or click between two
Select partial clips Hold down the Alt key while dragging over a clip
As with most other Windows programs, you can also use the Shift-click and Ctrl-click combinations
when selecting tracks and clips. Holding the Shift key while you click adds tracks or clips to the current
selection. Holding the Ctrl key while you click lets you toggle the selection status of tracks or clips.
Track/Bus Inspector
The Track/Bus Inspector makes it easy to adjust the current track’s (or bus’s) controls, because it’s a
greatly expanded version of the current track’s controls that is located on the left side of the Track pane.
You can hide or show any one or all of the controls in the Track/Bus Inspector by clicking the four
buttons at the bottom of the Track/Bus Inspector.
The following graphic shows most of the Track/Bus Inspector’s controls (there may not be room to
display all of a track’s controls on the Track/Bus Inspector, depending on the resolution of your
monitor):
track numbers
several clips
markers
38
Page 39

Track/Bus Inspector for an Audio Track
Input menu
Trim
Phase, Mono,
Input Echo
Mute, Solo, Arm
Pan
Volu me fad er
Volume meter
Icon
Output menu
Track/Bus Inspector for a MIDI Track
Fx bin: large view
with assignable
sliders
Send controls: MIDI ch.,
Bank, Patch
Input Echo
Mute, Solo, Arm
Pan
Volume fader
Icon
Output menu
Choose track or
bus menu
English
Click to select the Track/Bus
Inspector controls you want to
display
39
Page 40

:
You can hide or show any of the Track/Bus Inspector’s controls, and use it to display the controls from
any track or bus. The following table shows you how:
To do this… Do this…
Hide or show the Track/Bus Inspector Press i on your keyboard.
Display a certain track’s or bus’s controls in the
Track/Bus Inspector
Hide or show any of the Track/Bus Inspector’s
controls
Click the track or bus to make it current, or choose the
track or bus in the track/bus dropdown menu that’s at the
bottom of the Track/Bus Inspector.
Click any of the four buttons at the bottom of the Track
Inspector (these are 3-position buttons, except for the
Volume button):
• Send button —when yellow, displays
send controls for audio tracks and busses;
and channel, bank, and patch controls for
MIDI tracks. When blue, shows as many
sends as possible. When grey, hides the
send controls.
• Volume button —hides or shows the
volume fader in MIDI tracks, audio tracks,
and busses.
• EQ button —in audio tracks and busses
shows the built-in EQ controls. When yellow,
shows band 1; when blue, shows all 4
bands. In MIDI tracks it has no function.
• FX button —when yellow, shows the FX
bin in audio tracks and busses. When blue,
also shows the first 4 parameters of the
selected effect (if it’s an automatable effect).
In MIDI tracks, shows the FX bin when
yellow. When blue, shows sliders for 4
assignable MIDI continuous controllers.
Note: you can not display a MIDI track’s Time + or Key +
controls in the Track/Bus Inspector.
40
Reassign MIDI controller sliders in a MIDI
Track’s Fx bin
Display the parameters of a different
automatable effect
Assign a control to a group, arm it for
automation, take an automation snapshot, or
set up remote control
Narrow the Track Inspector Right-click a blank area and choose Narrow Strip from
Bypass the FX bin Right-click the FX bin and choose Bypass Bin from the
Right-click the slider you want to reassign and choose
Reassign Control from the popup menu, choose the
new parameter, and click OK.
Click the name of the effect you want to select.
Right-click the control and choose options from the
popup menu.
the popup menu.
popup menu.
Page 41

The Console View
The Console view is where you can mix the sounds on all the different tracks to create the final mix of
your project. While the Track view provides most of the same controls, you may want to use the more
familiar interface of the Console view for mixing.
You use the Console view to adjust the levels of sound for the different tracks in your project, to change
the stereo panning, and to apply real-time effects to an individual track, combinations of tracks, or the
final mix.
The Console view contains several groups of controls. There is one module for each track in your project,
and one module for each bus. You can use bus sends to direct certain tracks to special modules that are
known as buses.
Bus Send Enable
Stereo/Mono button
Pan control
Volume fader
for each track
Show/Hide
controls buttons
Icon
Audio module
MIDI module
Mute, Solo, and Track Arming buttons
Bus Main Out
English
As in the Track view, you can change track settings or record new music or sound in the Console view.
You may choose to use one view or the other, or the choice you make may depend on which project you
are working on.
41
Page 42

:
Other Views
SONAR has a number of other views you can use to display and work on your project. To display these
views, select one or more tracks, by Ctrl-clicking their track numbers and:
• Click the icon for the view in the Views toolbar
Or
• Choose the view you want from the View menu
The Piano Roll view : shows the notes from a MIDI track or tracks as they would appear on a
player-piano roll. You can move the notes around, make them longer or shorter, and change their
pitches by just dragging them with the mouse. You can also use the Piano Roll view to display and edit
MIDI velocity, controllers, and other types of information. The Piano Roll view also contains the Drum
Editor, which allows you to “paint” drum patterns using the Pattern Brush tool and play different drum
modules from a single track.
The Console View
42
Page 43

The Staff view : displays the notes from one or more MIDI tracks using standard music notation,
similar to the way the notation would appear on a printed page. You can add, edit, or delete notes;
create percussion parts; add guitar chords and other notation markings; display guitar tablature;
display the Fretboard pane; and print whole scores or individual parts to share with other musicians.
The Loop Construction view : allows you to create and edit Groove clips (SONAR loops that
“know” the tempo and key in which they were recorded), and export these clips as ACIDized files.
English
43
Page 44

:
The Loop Explorer view : allows you to preview ACIDized files and other Wave files; and drag and
drop them into your project.
The Event List view : displays the events in a project individually, so that you can make changes at
a very detailed level.
44
SONAR has several other views that are used for very specific purposes:
View… How you use it…
Meter/Key To change the meter (time signature) or key
Big Time To display the Now time in a large, resizable font
Markers To add, move, rename, or delete labels for parts of
Lyrics To add and display lyrics for a track.
Video To display a loaded video file.
Sysx To create, display, store, and edit System
signature, or to insert changes in the meter or key
signature at specific times in a project.
that you can read more easily.
your project that make it easier to move from one
point to another.
Exclusive MIDI messages used to control
instruments and other gear that are MIDI capable.
Page 45

Tempo To view and edit the project's tempo changes.
Zoom Controls
Many of the views contain Zoom tools that let you change the horizontal and vertical scale of the view:
Zoom Clips pane out vertically
Vertical Zoom fader for Clips pane
Zoom Clips pane in vertically
Zoom Bus pane out vertically
Vertical Zoom fader for Bus pane
Zoom in horizontally
Zoom out horizontally
Horizontal zoom fader
The Track view toolbar contains the Zoom tool:
The zoom tools are used as described in the following table:
Tool… How you use it…
Zoom out (Clips pane or Bus pane) Click to zoom out incrementally, or press Shift and
Zoom in (Clips pane or Bus pane) Click to zoom in incrementally, or press Shift and
Zoom fader Click and drag to zoom continuously
Zoom tool Click to arm, then click and drag in the view to
click to zoom all the way out
click to zoom all the way in
select the zoom area. Click the dropdown arrow to
display a menu of zoom and view options.
You can also zoom with the keyboard:
Key… What it does…
English
Ctrl+up arrow Zoom out vertically
Ctrl+down arrow Zoom in vertically
Ctrl+right arrow Zoom in horizontally
Ctrl+left arrow Zoom out horizontally
G Go to (center) the Now time, without zooming
45
Page 46

:
Hold down Z Arm the Zoom tool
U Undo the current zoom
F Fit tracks to window
A Show all tracks
Shift+F Fit project to window
Shift+Double Click a clip Maximize track height
Docking Views
You can dock any view other than the Console view in the lower-right corner of the Track view by
enabling a view’s Enable Tabbed option. You can have as many views open in tabbed format as you
want. You can toggle through the different views by clicking the tab of the view you want to see (or use
the Ctrl+Shift+Left/Right Arrow shortcut). You can also maximize the pane to do detailed work in a
view, or drag the splitter bar at the top of the view to enlarge the tabbed view area. For step-by-step
instructions, see the procedures below.
46
Scroll left or right to
view tabs
Maximize pane
To do thi s… Do this…
Display a view in tabbed
format
Disable tabbed format for a
view
Enable or disable tabbed
format for all open views
Maximize a tabbed view Click the Maximize/Restore button that’s just
Restore tabbed view Click the Restore button that’s in the lower
Close a View that is in Tabbed
Format
Active view
Tabs
Click the upper left corner of a view, and choose
Enable Tabbed from the popup menu
Right-click the view’s tab, and choose Disable
Tabb ed from the popup menu.
Use the View-Enable Tabbing for Open Views
command.
to the left of the tabs.
left corner of the view that you’re restoring.
Right-click the view’s tab, and choose Close
from the popup menu
Page 47

Locking Views
By default SONAR allows only one instance of each view, but you can lock the contents of most views,
preserving the current view by forcing a new instance of the view to appear if necessary. Locking views
is the only way you can have multiple instances of the same view open. Only the Track and Console
views cannot be locked.
To lock a view, just click the lock button at the top right of the view. An unlocked view looks like this ,
and a locked view looks like this . A view can be locked automatically by pressing the Ctrl key when
opening the view.
Floating Views
When a view is float enabled, you can move it outside of the confines of SONAR. This is particularly
useful if you take advantage of SONAR’s dual monitor support. Using dual monitor support, you can
keep the Track or Console view on one monitor and “float” other views to the other monitor by dragging
them to the second screen.
For more information, see the online help topic “Floating Views and Dual Monitor Support.”
Layouts
You may spend a lot of time making sure that all the views are laid out on the screen just the way you
want. When you save your work, you can save the screen layout along with it. You can also save the
layout by itself and then use the layout with other projects. For more information, see the online help
topic “Layouts.”
Working on a Project
Much of your time in SONAR is spent recording and listening to your project as it develops. The
Transport toolbar, shown below, contains the most important tools and other pieces of information you’ll
need to record and play back your project.
Every project has a current time, known as the Now time. As you record or play back a project, the
Now time shows your current location in the project. When you create a project, the Now time is set to
the beginning of the project. The current Now time is saved with your project.
You control recording and playback using tools on the Transport toolbar, which work a lot like the ones
on your tape deck or CD player:
English
Go to End
Stop
Go to Beginning
As you work with a project, you can use SONAR’s mute and solo features to choose which tracks are
played, or you can create loops to play a particular section over and over again. You can also create
markers, which are named time points you add to your project to make it easy to jump to a particular
location.
Play
Record automation
Record
Reset
47
Page 48

:
Windows Taskbar Indicators
When SONAR is running, you’ll normally see two indicators in your Windows Taskbar, right next to the
clock.
The MIDI activity monitor contains two lights that indicate MIDI input and output. When you play
your MIDI keyboard, the first light flashes when each note is pressed, and it flashes again when each
note is released. When you play back a project that contains MIDI, the second indicator lights up.
The volume control is used to control the playback and record volumes on your sound card. Doubleclick on this indicator to open a dialog box that lets you control the levels for audio, MIDI, CD playback,
and record.
The volume control is available only if your sound card is using a native Windows driver. If your sound
card does not use a native Windows driver, no volume control will be displayed in the taskbar. In this
case, your sound card probably came with a separate program to control input and output levels. See
your sound card documentation for more information.
Screen Colors and Wallpaper
SONAR lets you customize the colors that are used for virtually all parts of the program using the
Options-Colors command. This command also lets you change the background bitmap that is
displayed in the SONAR window.
For any SONAR screen element, you can assign a color in two ways:
• Choose one of the colors that is part of your Windows color scheme.
• Assign a custom color.
To Assign Custom Colors
1. Choose Options-Colors to display the Colors dialog box.
2. Choose the screen element whose color you want to change from the Screen Element list.
3. Assign a color to the screen element in one of two ways:
• To use a color from the Windows color scheme, choose one of the options in the Follow System
Color list
• To use a custom color, check Use Specific Color, click the Choose Color button, and select the
color you want
4. To save these changes from session to session, check the Save Changes for Next Session box.
5. Click OK when you are done.
SONAR uses the colors you have chosen.
To Restore the Default Colors
1. Choose Options-Colors to display the Colors dialog box.
2. Click the Defaults button.
3. Click OK.
SONAR uses the default colors for all screen elements.
To Change the Wallpaper
1. Choose Options-Colors to display the Colors dialog box.
48
Page 49

2. Choose the desired wallpaper according to the table:
To do thi s… Do this…
Use the default wallpaper Check Default in the Wallpaper list
Not use any wallpaper Check None in the Wallpaper list
Use a custom bitmap Check Custom, choose a bitmap, and click Open
3. Click OK when you are done.
Starting to Use SONAR
This chapter has provided you with an overview of SONAR and basic information on how to install the
software and configure your system. To get started with SONAR, try the Tutorials in Chapter 2.
English
49
Page 50

:
50
Page 51

2
Tutorials
Now that you’ve learned some of the basics, it’s time to put that knowledge to work. These
tutorials will give you some hands-on practice in playing, recording, and mixing your
projects.
Note:
If, during installation, you chose in the Select Components dialog not to install
the Tutorials folder (part of the Sample files), you will not have access to the
sample tutorial files needed to follow the tutorials in this chapter. If you didn’t
install these files, insert your product CD and copy the files to your hard drive.
English
In This Chapter
Tutorial 1—The Basics. . . . . . . . . . . . . . . . . . . . . . . . . . . . . . . . . . . . . . . . . . . . . . . . . . . . 52
Tutorial 2—Recording MIDI . . . . . . . . . . . . . . . . . . . . . . . . . . . . . . . . . . . . . . . . . . . . . . . . 64
Tutorial 3—Recording Digital Audio. . . . . . . . . . . . . . . . . . . . . . . . . . . . . . . . . . . . . . . . . . 71
Tutorial 4—Editing MIDI. . . . . . . . . . . . . . . . . . . . . . . . . . . . . . . . . . . . . . . . . . . . . . . . . . . 75
Tutorial 5—Editing Audio . . . . . . . . . . . . . . . . . . . . . . . . . . . . . . . . . . . . . . . . . . . . . . . . . . 81
Tutorial 6—Using Groove Clips . . . . . . . . . . . . . . . . . . . . . . . . . . . . . . . . . . . . . . . . . . . . . 84
Tutorial 7—Mixing . . . . . . . . . . . . . . . . . . . . . . . . . . . . . . . . . . . . . . . . . . . . . . . . . . . . . . . 92
Tutorial 8—Using Soft Synths . . . . . . . . . . . . . . . . . . . . . . . . . . . . . . . . . . . . . . . . . . . . . . 96
Tutorial 9—Drum Maps . . . . . . . . . . . . . . . . . . . . . . . . . . . . . . . . . . . . . . . . . . . . . . . . . . . 99
Page 52

:
Tutorial 1—The Basics
The first tutorial teaches you the basics of SONAR. You'll learn how to:
• Open and play a project file
• Make the project repeat automatically
• Use markers
• Speed or slow the tempo
• Mute a track and play a track solo
• Change a track's instrument
• Play a track on a MIDI instrument
If you have not already done so, please read Chapter 1, Introduction, for basic background information
about projects, tracks, clips, the Track view, and the Console view.
Opening a Project File
As you learned in Chapter 1, SONAR stores MIDI and digital audio data in project files. The first
thing you need to do is load a project file.
To Open a Project File
1. If you haven't already done so, start SONAR.
2. Choose File-Open.
3. In the Open dialog box, navigate to the directory in which you installed SONAR, double-click the
Tutorial folder to open it and select the file
4. Click the Open button.
SONAR loads the project and opens the Track view. Feel free to move and resize the Track view to
better fit your screen.
TUTORIAL1.CWP.
52
Preparing for Playback
Before you can play a project, you must choose the outputs for both MIDI sounds and audio sounds. By
choosing the outputs, you are telling SONAR from which outputs you want to hear the sounds.
You may have a soundcard with a built-in synthesizer, or a MIDI keyboard that produces sounds. We
will discuss using these with a project later on in the tutorial. First we will explore using a software
synthesizer to hear a project’s MIDI tracks. A software synthesizer is a software program that produces
various sounds through your audio interface when the soft synth program receives MIDI data from a
MIDI controller or sequencer program. When you insert a software synth, you need to assign the output
of the MIDI track to that software synth.
The software synthesizer itself must be routed to one of your audio outputs in order for you to hear it.
Your project might also contain audio data, perhaps vocals, that you have recorded. To hear the audio
data playing back, you need to choose an output for the audio track that contains the audio data. The
output you choose for both the software synthesizer and the audio data will be the one on your sound
card that you have connected to an amplifier and speakers, or to headphones.
Let’s insert a software synthesizer, Cakewalk TTS-1, to the tutorial project file.
To Insert Cakewalk TTS-1 into a Project
1. Use the Insert-Soft Synths command and click Cakewalk TTS-1 on the popup menu.
The Insert Soft Synth Options dialog appears.
Page 53

2. In the Create These Tracks fields, deselect MIDI Source, because we want to patch the pre-existing
MIDI tracks into Cakewalk TTS-1.
3. Verify that the First Synth Audio Output option is checked. We’ll need this track to route
Cakewalk TTS-1 to our chosen audio output. The new synth track will have Cakewalk TTS-1
already patched as an audio input.
4. In the Open These Windows fields, select only the Synth Property Page. This option opens
Cakewalk TTS-1’s property page (interface).
5. Click OK.
SONAR opens the TTS-1 interface, and inserts a synth track that has the Cakewalk TTS-1’s output 1 as
an input. Feel free to look over the Cakewalk TTS-1’s interface, but we will not be making any
adjustments here in this tutorial. Close the TTS-1 property page (interface) by clicking X in the upperright corner of the window.
Now that you have a software synthesizer available for use, you can continue preparing the project for
playback. We now need to direct our MIDI tracks to the Cakewalk TTS-1.
To Choose MIDI Outputs for Your Project’s Tracks
1. In the Track view, click the dropdown arrow in the Output dropdown menu in a MIDI track to
display the track’s Output menu. MIDI tracks display a MIDI icon just to the right of the track
number:
MIDI icon
You may need to enlarge the track to show the Output control: In Track 1, click the Restore Strip
Size button to expand the track. Also, you may have to click the All tab control that’s at the bottom
of the Track pane to display all the controls in the track.
Output menu
Restore Stip Size button
Dropdown arrow to
display menu
English
53
Page 54

:
All tab control—click this to display all the track controls. Click the other tabs
to display smaller groups of controls.
After you click the dropdown arrow in a track’s Output menu, a dropdown menu appears,
containing a list of enabled MIDI outputs.
2. Select the output you want to use for that track—select “Cakewalk TTS-1 1 Output 1.”
3. For all the other MIDI tracks, you’ll also want to choose the “Cakewalk TTS-1 1 Output 1” option:
press the down arrow on your computer keyboard to move the “focus rectangle” to the Output field
for the next track, press Enter to display the track’s Output menu, and choose the Cakwalk TTS-1
again.
4. Repeat step 3 for each track.
Each MIDI track is now routed to the Cakewalk TTS-1. Next we need to enable the audio output we’ll
use to hear the sounds the software synthesizer produces.
To Enable Audio Outputs
1. Select Options-Audio from the menu.
The Audio Options dialog box appears.
2. Click the Drivers tab in the Audio Options dialog box.
3. In the Output Drivers field, select the drivers you want enabled. All enabled drivers appear
highlighted. Be sure to enable the driver of the audio device connected to your speakers or
headphones.
4. Click OK.
Your desired audio output will now be available for selection in your synth track’s Output menu.
To Choose an Audio Output for your Synth Track
1. In the Track view, click the Output dropdown arrow in the Cakewalk TTS-1 synth track. Synth
tracks are distinguished by the synth icon to the right of the track number.
54
Output dropdown arrow
2. From the Output dropdown menu, select the audio output that is connected to your speakers or
headphones.
Page 55

Note: TUTORIAL1.CWP does not contain audio data or audio tracks, but if you need to choose an audio
output for an audio track, each audio track also has an Output menu. Audio tracks display an audio
icon just to the right of the track number:
Audio icon
Audio output menu in an
audio track
This tutorial has so far focused on using a software synthesizer as a sound source for your MIDI tracks.
If you have built-in synthesizer on your soundcard, or a MIDI keyboard that produces sounds (that
you’ve connected to your computer through a MIDI interface of some kind), you might want to use these
devices instead. The following optional procedure describes how to configure your project to use these
MIDI outputs.. If you’re happy using Cakewalk TTS-1, feel free to skip ahead to the next section.
To Use Other Sound Sources for MIDI Tracks
1. Select Options-MIDI Devices from the menu to open the MIDI Devices dialog box.
2. In the MIDI Devices dialog in the Outputs field, arrange the outputs by doing the following:
To do this… Do this…
English
Enable or disable a device Click on it—an enabled device appears highlighted; a disabled
Move a device to the top of the
list
3. Click OK.
Note: If you have a large number of MIDI outputs enabled, you may occasionally get MIDI
transmission errors or an out-of-memory message. You can try either deselecting some outputs, or
lowering the number of Sysx buffers by using the Options-Global command to open the Global
Options dialog box: on the MIDI tab, lower the value in the Number of Buffers field to 16.
4. Return to the Track view and reassign the Output menu setting on any MIDI tracks you wish to
hear through something other than Cakewalk TTS-1.
• If using a soundcard synthesizer, you need to select the name of that synthesizer (for example,
SB Live! Synth A for the synthesizer in a SoundBlaster Live sound card) in the Output menu.
• If you’ve connected a keyboard or MIDI sound module to a MIDI interface, you need to select
the name of the MIDI interface, and set the correct output MIDI channel in the same track
(the MIDI channel that your keyboard is set to receive on).
device does not appear highlighted.
Highlight it, temporarily deselect all other highlighted devices,
and click the Move Selected Devices to Top button.
55
Page 56

:
MIDI Channel menu for
track 1
Let's play the project!
Dropdown arrow to
display menu
Playing the Project
Buttons in the Large Transport toolbar, shown in the following picture, can control most of SONAR’s
basic playback functions.
If you don’t see the Large Transport toolbar, then choose View-Toolbars and check Transport
(Large).
Run/Stop Audio Engine
Record Automation
Auto-punch
Meter/Key
Reset
Play
Go to End
Record
Rewind
Stop
To Start Playback
• To play the project, click the Play button , or press the Spacebar.
Do you hear music? If you don't hear anything, see the online help topic called Troubleshooting for some
troubleshooting tips.
The Now Time
The Now time is the current time in the project—the time where playback is occurring, or where
playback will start up again if playback is stopped. The Now time is indicated in the Clips pane by a
vertical black line, which moves as your project plays to indicate what part of your project is playing.
When playback is stopped, at the top of the black line you will see a green triangle. This triangle, known
as the Now time marker, represents the point at which the Now time will snap back to after you stop
playback or recording (you can change this behavior in the Global Options dialog—select Options-
Global, click the General tab in the Global Options dialog, and uncheck the On Stop, Rewind to Now
Marker option).
56
Page 57

Now time marker
Now time
The Now time is also shown in the Transport toolbar, both in MBT (measure/beat/tick) format and in
time code format (hour/minute/second/frame). During playback, the Now time increases in accordance
with the progress of the project.
You can set the Now time of the project by clicking in the Time Ruler in the Clips pane, or (when
playback is stopped) by dragging the Now time slider in the Large Transport toolbar.
While you are playing the project, you may want to keep an eye on the Now time. The Big Time view
displays the Now time in a large font so you can more easily see it from a distance. To open this view,
choose View-Big Time. You can change the time format displayed in the Big Time window by clicking
on it. You can change its font by right-clicking on it.
To Restart the Project
When SONAR gets to the end of the project, it stops. By default SONAR will rewind to the Now Time
marker after you stop playback or recording. To play the project again, do the following:
1. If the Now time marker is at a measure other than the first, click the Rewind button , or press
w to go back to the first measure.
2. Click the Play button, or press the Spacebar.
To Pause Playback
• To temporarily pause playback, hit Ctrl-Spacebar. By default, hitting just the Spacebar or Stop
or Play will rewind the project to the Now time marker rather than pausing at the current
Now time. However, you can change the Now time marker behavior so that the marker moves to
the current Now time when playback or recording is stopped (use the Options-Global command;
on the General tab uncheck On Stop, Rewind to Now Marker).
Certain SONAR functions can only be used when the project is paused. If a function or command does
not seem to work, try pausing the project
For more information on the Now time and Now Time marker, see the online help topic “The Now Time
and How to Use It”.
Starting from a Marker
Markers make it easier to find certain points within the project. You may want to set markers at the
beginning of each section of your project or at times with which some event must be synchronized. The
English
57
Page 58

:
Markers toolbar lets you move the Now time to a marker, add a new marker at the Now time, and edit
the marker list. If you don’t see the Markers toolbar, then choose View-Toolbars and check Markers.
Open Markers view
Markers list
The current project contains several markers. Let’s try starting playback from the marker labeled C:
1. If the project is playing, pause playback by clicking the Stop button .
2. In the Current Marker dropdown menu in the Markers toolbar (the larger dropdown menu, on the
left), select the marker labeled C. The Now time moves to the start of measure 17.
3. Click the Play button .
You can jump to the next or previous marker by pressing Ctrl+Shift+ Page Down or Ctrl+Shift+Page
Up.
For more information on markers, see the online help topic “Creating and Using Markers.”
Previous
marker
Next
marker
Insert
marker
Default Groove clip pitch
Restarting the Project Automatically
Wouldn’t it be easier to practice your solo if you didn't have to restart the project each time it ended?
Rather than manually rewinding and restarting the project, you can make SONAR automatically jump
back to the beginning and keep playing.
Looping Over the Entire Project
To control looping, use the tools in the Loop/Auto Shuttle toolbar. If you don’t see this toolbar, choose
View-Toolbars and check Loop.
Loop properties
Loop On/Off
Loop start time
Loop end time
Set loop to selection time
58
Page 59

To loop over the entire project, do the following:
1. In the Loop toolbar, click the Loop Start time. The time display changes to an edit box with spin
controls.
2. To loop over the entire project, the loop must start at 1:01:000. If the Loop Start time is not already
set to 1:01:000, use the keyboard or spin controls to enter this value. To set it to 1:01:000, click the
Loop Start time, enter 1 and press Enter.
3. In the Loop toolbar, click the Loop End time.
4. Press F5 to open the Markers dialog box.
5. Select the marker named <End> and click OK. The Loop End time is set to the end of the project.
6. Click the Loop On/Off button to enable looping.
7. Click Play.
When looping is enabled, the Time Ruler displays special flag markers that indicate the loop start and
end times. You can drag these markers to change the loop start and end times.
Loop Start
To turn looping off, click the Loop button again.
Loop End
Looping Over a Section of the Project
Maybe you would like to practice one section of the project over and over. Or, maybe you'd like one
section played repeatedly so you can practice an extended solo. In either case, you need to set the start
and end times of the loop section. Let's have SONAR loop over the section between markers C and D:
1. In the Loop toolbar, click on the Loop Start time.
2. Press F5 to open the Markers dialog box.
3. In the Markers dialog box, select marker C and click OK. The loop start time is set to the marker
time.
4. In the Loop toolbar, click on the Loop End time.
5. Press F5 to open the Markers dialog box.
English
6. In the Markers dialog box, select marker D and click OK.
7. Click the Loop On/Off button to enable looping.
59
Page 60
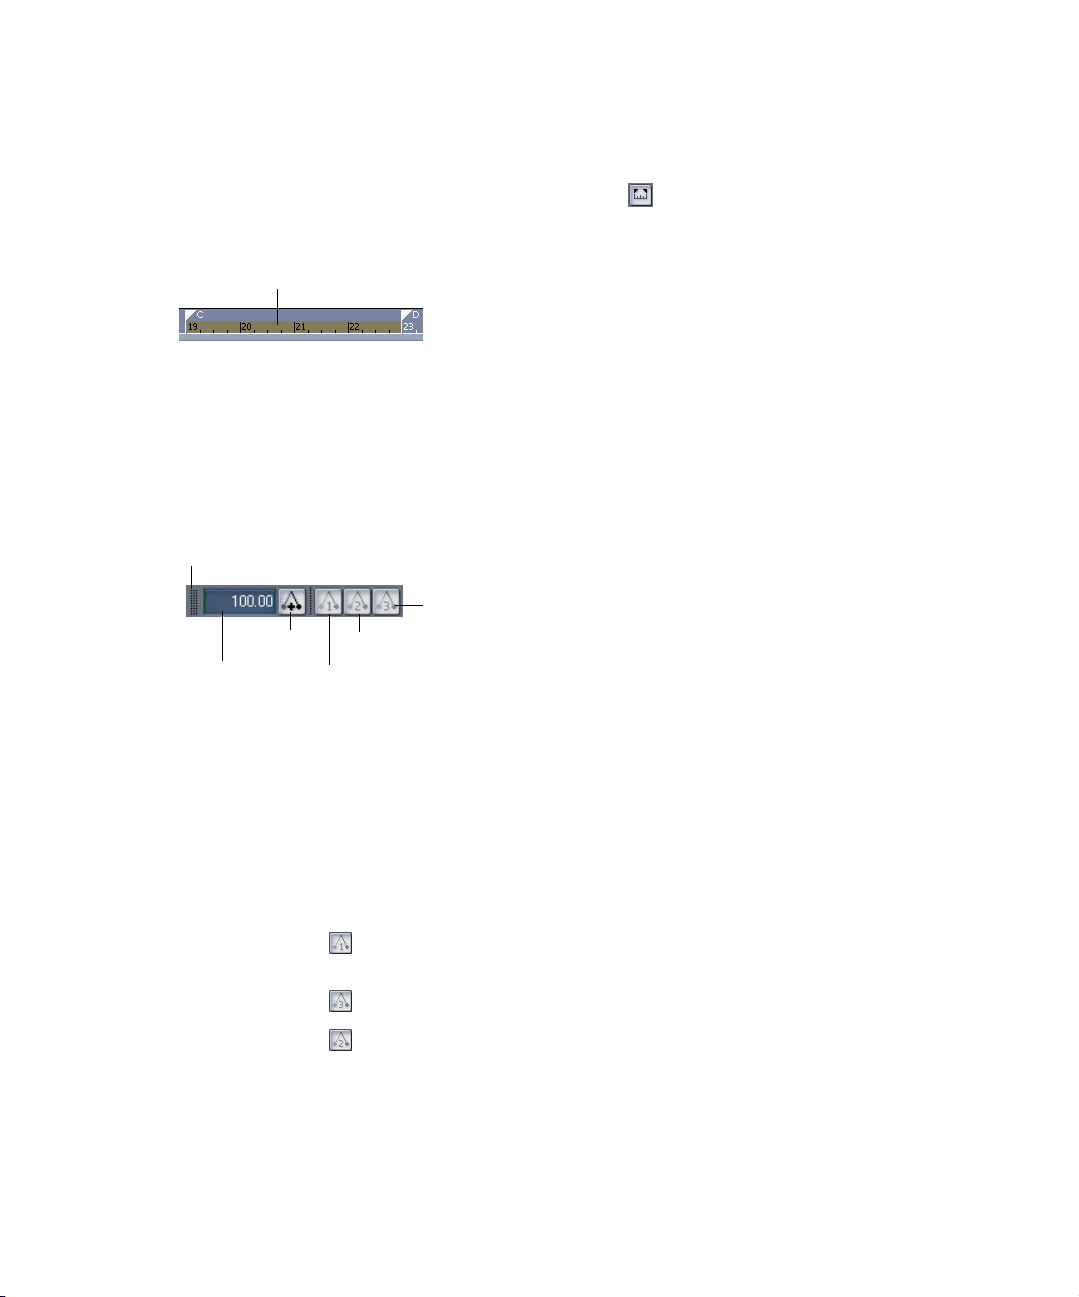
:
8. Click Rewind. The project rewinds to the Loop Start time.
9. Click Play.
A quicker way of selecting the loop times in the preceding example would be to simply click in the area
between the markers at the top of the Clips pane, then click to copy the selection start and end
times to the Loop/Auto Shuttle toolbar.
Click here to select the portion of the project between markers C and D
Changing the Tempo
If the project is having trouble keeping up with you (or if you're having trouble keeping up with the
project!), you can easily speed up or slow down the project since it contains only MIDI data. There are
two ways to do this: you can change the tempo, or you can change the tempo ratio, which determines the
tempo by multiplying it by a user-defined amount. The controls for either method are found on the
Tempo toolbar. If you don’t see this toolbar, choose View-Toolbars and check Tempo.
Drag here to move toolbar to new location
Tempo ratio 3
Insert tempo
Tem p o
Setting the Tempo
Let’s pick up the pace a little. Do the following:
1. With the project playing, click on the tempo value in the Tempo toolbar. The tempo will be
highlighted and spin controls will appear.
2. Use the spin controls to increase the tempo to 100 beats per minute.
3. Press Enter. The project will play a little faster.
Changing the Tempo with the Tempo Ratio Buttons
By default, the Tempo Ratio buttons let you play the project at half or double tempo. Try this:
1. Click Button 1 . The project slows to half its normal tempo. Note that the displayed project
tempo has not changed.
2. Click Button 3 . The project speeds to twice its normal tempo.
3. Click Button 2 . The project returns to its normal tempo.
Note: The Tempo Ratio buttons do not function in projects containing audio clips. Also, the clock source
setting on the Clock tab of the Project Options dialog (Options-Project command) must be set to
Internal.
Tempo ra tio 2
Tempo ratio 1
60
Page 61

Setting the Tempo Ratios
Tempo ratios can be changed by Shift-clicking on them in the Tempo toolbar and entering a new number
in the dialog box. By default, tempo ratios are set to 0.50, 1.00, and 2.00, respectively.
Advanced Tempo Control
This project is a special case in that it has only one tempo for the entire project. If you need to vary the
project’s tempo, SONAR lets you insert tempo changes. Tempo changes can be inserted individually so
that different sections can be played at different tempos, or they can be inserted graphically in the
Tempo view. For more information, see the online help topic 'Changing Tempos.”
Tempo ratios affect the entire project, even if there are tempo changes. SONAR always multiplies the
current tempo in the project by the tempo ratio to determine the playback tempo.
Muting and Soloing Tracks
Muting a track causes it not to sound when you play your project. Soloing a track mutes all the tracks
except the ones that are soloed.
You can change a track’s mute or solo status while your project is playing.
Muting a Track
Frequently you will want to temporarily turn off one or more instruments in your ensemble. SONAR
makes it easy to mute the parts you don’t want to hear.
For example, suppose that you are practicing the piano part for this project and want to hear only the
other instruments. Let’s mute the piano part. With the project playing, do the following:
1. In the Track pane, click the Mute button in the Piano track (track 1). The button turns yellow,
and the piano part drops out of the project.
2. To turn the piano back on, click the Mute button again.
Note that the yellow MUTE indicator lights up in the Status bar whenever a track is muted (the Status
bar is located at the bottom of the SONAR window). This can be very helpful if there are muted tracks
that aren’t visible.
Let's try using a different method to mute two tracks simultaneously:
1. In the Track pane, click the track number (the left-most column) of the Piano track. The track is
selected.
2. While pressing Ctrl, click the track number in the Sax track. The Piano and Sax tracks are
selected.
3. Choose Track-Mute. Both tracks are muted.
You can also mute or unmute tracks by using the popup menu:
1. In the Track pane, click the track number of the Piano track.
2. While pressing Ctrl, click the track number of the Sax track. The piano and sax tracks are selected.
3. Right-click on either track to bring up the popup menu.
4. Choose Mute (which should have a check mark beside it).
SONAR unmutes the tracks. You can also unmute all tracks by clicking the Mute indicator on the
Status bar.
English
61
Page 62

:
Playing a Track Solo
If you want to hear one track by itself, you could mute all other tracks. But there’s a quicker way to do
it—the Solo button. For example, to play the drum part by itself, do the following:
1. Click the Solo button in the Drum track (track 5). Voila, a percussion solo!
2. To let the other instruments back into the project, click the Drum track's Solo button again.
Solo is not exclusive—you can let as many instruments as you like into the solo. Notice that the green
SOLO indicator lights up in the Status bar (located at the bottom of the screen) whenever a track is
soloed.
Let’s use a different method to solo all three percussion tracks:
1. In the Track pane, click the track number in the Drums track. The track becomes selected.
2. While pressing Shift, click the track numbers in the Shaker and Triangle tracks. All three
percussion tracks become selected.
3. Choose Track-Solo.
When you want to let the entire ensemble back into the project, click the Solo indicator on the Status
bar to unsolo all the tracks, or select all soloed tracks and choose Track-Solo. As a third option, rightclick, bring up the popup menu, and turn off the solo from there.
Note that Mute takes priority over Solo. If both buttons are enabled in a track, the track does not play.
Mute and Solo in the Console View
The Console view contains Mute and Solo buttons identical to those in the Track view. The two sets of
buttons are synchronized. To see this, do the following:
1. In the Console view, mute the Bass, Sax, and Drums tracks.
2. Solo the Piano track.
3. In the Track view, check that the first track is soloed and that tracks 2, 3, and 5 are muted. Click
the enabled Solo and Mute buttons to return the tracks to normal.
62
Changing a Track's Instrument
If the sound card synthesizer or software synthesizer you are using is like most, it is capable of
producing at least 128 different instrument sounds, plus several dozen percussion sounds. Now you'll
find out how to get some of those other instruments into the act. Let’s try changing the instrument
playing the piano line.
Changing the Patch in the Track View
With the project playing, do the following:
1. Solo the Piano track so you can hear the piano part more clearly. To do this, click the Solo button
in the Piano track (track 1).
2. Loop the project, or a part of the project and click Play.
3. In the Piano track in the Track pane, find the Patch control (it’s the field just after the Bank
control). Click the down arrow that is at the end of the patch name (the patch name should be
something like Acoustic Grand Piano).
4. To change the patch, select a new patch from the menu that appears. SONAR closes the menu and
immediately starts playing the piano part with that new instrument.
5. Have fun trying all the different patches!
6. Click the Solo button in track 1 again to unsolo the Piano track.
Page 63

You can change the patch at other times in the project besides the beginning by using the Insert-Bank/
Patch Change command:
1. Stop playback.
2. Select the track in which you want to insert a patch change by clicking on its track number.
3. Move the Now time to the place where you want to insert the patch change.
4. Use the Insert-Bank/Patch Change command.
The Bank/Patch Change dialog box appears.
5. Choose a patch from the Patch field and click OK.
SONAR inserts the patch change that you selected at the Now time.
6. Move the Now time to a place before the patch change and play the project so that the Now time
moves through the place where you put the patch change. You may want to solo the track to hear it
clearly.
7. Listen to the sound change when the Now time reaches the patch change.
You may want to experiment with changing all the instruments used by the project. One thing you
should know: Changing the instrument on a percussion track (such as the Drum, Shaker, and Triangle
tracks in this project) may have no effect. Percussion instruments are played on MIDI channel 10,
which in General MIDI is dedicated to percussion. The note determines the instrument, and the patch
is irrelevant.
Changing the Patch in the Track/Bus Inspector
You can also change a track’s patch in the Track/Bus Inspector, which is a vertically expanded version of
the current track’s controls at the far left side of the Track view. The current track is the one with the
gold title bar. Whichever track’s controls that you click becomes the current track. For example, to
change the Piano track’s patch, click the Patch button in the Piano track’s Track/Bus Inspector and
choose a new patch from the menu. The Patch button is just below the Bank button. You can hide or
show the Track/Bus Inspector by pressing i on your computer keyboard.
English
Playing Music on a Keyboard
If you've connected a MIDI keyboard (or another instrument) to your external MIDI interface or the
MIDI interface of your sound card, you can play one or more parts of the project on the keyboard instead
of the sound card’s internal synthesizer. For instructions on connecting a keyboard to your computer, see
“To Connect a MIDI Keyboard to Your Computer” on page 31. For this section, we assume that you want
to connect the keyboard to the MIDI In and MIDI Out of your sound card.
Checking Your MIDI Device Settings
First, let’s make sure that SONAR is set up to send MIDI output to your keyboard.
1. Choose Options-MIDI Devices to open the MIDI Devices dialog box.
2. In the Outputs field, two devices should be selected. The first should be your sound card
synthesizer device; the second should be the MIDI output your MIDI device is connected to (it
should say something like “SB Live MIDI Out”). The uppermost selected device will correspond to
63
Page 64

:
Output 1, the second device to Output 2, and so on. For help with these settings, see the online help
topic “Setting Up Output Devices.”
3. Click OK.
Routing MIDI Data to the Keyboard
Let’s play back the Piano track through your MIDI keyboard. First, turn your keyboard on and make
sure it is set up to receive MIDI input on channel one. Then, do the following:
1. In the Track view, in the Piano track (track 1), click the Output field to open the menu of outputs.
2. Select the output that your keyboard is attached to.
3. Click the Play button or press the Spacebar to play your project.
SONAR plays the piano part through your keyboard.
Or, if you prefer, the procedure is similar in the Console view:
1. In the Console view (to display, use the View-Console command), click the Output button in the
Piano module to open the menu of outputs. The Output button is just below the volume fader.
2. Select the output that your keyboard is attached to.
3. Play your project.
Tutorial 2—Recording MIDI
This tutorial teaches you how to record MIDI data with SONAR. You’ll learn how to:
• Set up the metronome
• Record MIDI tracks
• Use loop recording
• Use punch recording
Creating a New Project
If you haven’t already done so, the first thing you need to do is create a project file:
1. Start SONAR.
2. Choose File-New.
3. In the New Project File dialog box, enter Tutorial2 in the Name field.
64
Page 65

4. Select the MIDI tracks template from the template list.
5. Click OK.
SONAR opens a new project named Tutorial2, containing only MIDI tracks.
Recording a MIDI Track
Let’s record a new MIDI track in the project.
Setting Up the Metronome
Musicians often use a metronome to keep track of the beat. SONAR’s metronome is more versatile than
most real metronomes. You can configure it to sound on playback or recording; it can count off any
number of lead-in measures or beats; and it can use audio clips or MIDI notes to produce sounds. It also
quickly and accurately follows any tempo changes that happen in the project.
You can set up the metronome with the Metronome toolbar. If you don’t see the Metronome toolbar,
choose View-Toolbars and select Metronome.
Accent first beat Use Audio Metronome
Metronome settings
Measures
Count-in
Let’s set up the metronome to play audio for two count-in measures when recording. Here's what to do:
1. In the Metronome toolbar, click in the Count-in box.
2. Use the + or - buttons to set the count-in value to 2.
3. Click the Count-in Measures option to select it.
4. Deselect the Metronome During Record option .
5. Select the Use Audio Metronome option .
By disabling the Metronome During Record option, you cause the metronome to turn off after the countin measures. If you would prefer to hear the metronome during the entire project while recording,
enable this option instead.
In this example, the metronome counts in for recording, not for playback.
Beats
Metronome during
record
Metronome during playback
Use MIDI metronome
Setting MIDI Inputs
Let's make sure that SONAR is set up to receive MIDI data from your instrument.
1. Choose Options-MIDI Devices to open the MIDI Devices dialog box.
English
65
Page 66

:
2. In the Inputs column, select your sound card's MIDI In device or the MIDI In for your external
MIDI interface. For help with these settings, seethe online help topic “Setting Up the MIDI In and
MIDI Out Devices.”
3. Click OK.
Setting Up Playback
During recording, SONAR will play the rest of a project as usual. Depending on what instrumental part
of the project you are going to record, you may want to mute one or more tracks, or solo certain tracks.
For example, if you are going to record a new piano part, you might want to mute the old piano part so
that you're not competing with it while recording (you can also record over the old piano part—arm the
piano track and make sure Overwrite is the selected mode in the Record Options dialog box, which you
open with the Transport-Record Options command). To mute any track, click the track's Mute button
.
Since this is a new project, there is no need to mute or solo any track.
You can also set other playback options, such as the tempo ratio, to make your recording session easier.
Recording MIDI
Now you'll record a track in the project. Do the following:
1. Make sure your instrument is turned on and set up to transmit MIDI data.
2. If you don’t have an unused MIDI track in the project, create a new MIDI track by right-clicking in
the Track pane and selecting Insert MIDI Track from the menu that appears.
66
3. In a MIDI track, click the Arm button (arming a track automatically sets the Input field to
MIDI Omni, meaning that this track will record incoming MIDI data from any channel).
4. On the Transport toolbar, click Record , or press r.
The metronome counts off two measures, then SONAR starts recording.
5. Play your MIDI instrument.
6. When you finish recording, click the Stop button , or press the Spacebar.
If you've played any notes, a new clip appears in the Clips pane in the track you recorded on. If no new
clip appears, see “I Can’t Record from My MIDI Instrument” in the Troubleshooting section of the
online help for some troubleshooting hints.
Listening to the Recording
Let’s play back your performance on your sound card. For an added dimension, we’ll open a few other
views in the process. Do the following:
Page 67

1. Display the controls of the track you recorded by clicking its Restore Strip Size button , or by
dragging the Vertical Zoom control that’s located at the lower right corner of the Clips pane. You
may need to click the All tab at the bottom of the Track pane to display all the controls.
2. Click the Output dropdown arrow to display the menu of available outputs.
3. Select your sound card’s MIDI synthesizer (if you don’t see the outputs you expect to see, use the
Options-MIDI Devices command and enable the correct outputs—see “Preparing for Playback”
on page 52).
4. In the Ch field, click the dropdown arrow to select a MIDI channel, and select an unused channel.
5. In the Patch field, select any patch.
6. Choose View -Piano Roll to open the Piano Roll view.
7. Choose View -Staff to open the Staff view.
8. Choose View -Event List to open the Event List view.
9. Choose Window-Tile in Rows to tile the views.
10. To return to the start of the project, click the Rewind button, or press w.
11. Click Play or press the Spacebar.
It’s almost as easy to listen to your performance on your MIDI instrument. For instructions on how to
play a track on a MIDI keyboard, refer to Tutorial 1.
The Piano Roll, Staff, and Event List views all show the same basic information—the notes that you
recorded. The Piano Roll view displays the track as a player-piano roll. The Staff view shows notes in
traditional music notation. The Event List view lists all MIDI events for the track. When you need to
edit a track, you can work in any of these views. On different occasions you may have reason to use
different views. More information about the Piano Roll, Staff, and Event List views can be found in later
chapters of this manual or in the online help.
When you're ready to continue, close the Piano Roll, Staff, and Event List views.
Recording Another Take
Maybe your first attempt at recording resulted in a perfect performance, but maybe not. If you'd like to
remove your first take and try again, do the following:
1. Choose Edit-Undo Recording or press Ctrl+Z to undo your recording.
English
2. Click Rewind , or press w. The track is still armed for recording, so you don't need to re-arm it.
3. Click Record , or press r.
4. When you finish recording, click the Stop button in the Transport toolbar or press the Spacebar.
Alternatively, you could record your next attempt on a new track. That way you can keep all the takes
and select the best one later (or combine the best parts of each!). If you record on a new track, be sure to
arm the new track for recording and to disarm the previous track. See “Loop Recording” on page 68 for
a convenient way to record multiple takes.
Saving Your Work
When you have something you’d like to keep, you can save the project by doing the following:
1. Choose File-Save As.
2. In the File Name box, type a new file name, such as my project.
67
Page 68

:
3. Click OK.
SONAR saves the project under the new name. From now on, you can click the Save button to save
this project.
Loop Recording
If you'd like to record several takes successively, you can set up SONAR to loop over the entire project,
or just some section of it. SONAR will record a new take during each loop, storing that take in a new
clip. You can set SONAR to place each clip in a new track or to pile all clips in one track.
Let's try recording a few takes of the first four measures of a project, placing each take in a new track.
Setting Up Looping
First, let's set up SONAR to loop over the first four measures:
1. Click the down arrow in the Snap to Grid combo button to open the Snap to Grid dialog box. If
the Snap to Grid button is not visible in the Track view toolbar, use your mouse to drag the vertical
splitter between the Track pane and the Clips pane to the right.
2. In the Snap to Grid dialog box, click the Musical Time button and select Measure from the list of
durations. In the Mode field, select Move To, and click OK to close the dialog box.
Now you can only select exact one-measure blocks of time in the Time Ruler, which is located at the
top of the Clips pane.
3. In the Time Ruler, drag through the first four measures to select them.
4. In the Loop/Auto Shuttle toolbar, click the Set Loop to Selection button to set the Loop Start
and Loop End times.
Clicking enables looping automatically.
Setting Up the Tracks
Now let's set up the first of the tracks where the takes will be stored:
68
1. Arm a MIDI track by making sure its Arm button is red.
2. Click the track’s Output field to set its output to your sound card's MIDI synthesizer.
3. Use the track’s Ch field to set its Channel to an unused channel.
4. Use the track’s Patch field to select any patch.
As usual, you could set the tracks to play back on your MIDI keyboard instead by specifying the
appropriate output and channel.
Page 69

Loop Recording
Finally, let's record our takes:
1. Choose Transport-Record Options to display the Record Options dialog box.
2. Choose the Store Takes in Separate Tracks option to store each new take in a separate track. Each
time a new take starts, the settings from the first track will be copied to the new track.
3. Click OK.
4. Click Rewind .
5. Click Record .
SONAR loops over the designated section and records your takes to successive tracks. If you want
to erase the most recent take during loop recording, choose Transport-Reject Loop Take.
6. To stop recording, click Stop , or press the Spacebar.
Now you can listen to each take individually by muting the other ones.
Alternatively, you could set your loop recording options to Store Takes in a Single Track and display
them all within one track. After you finish recording several takes, press the Track Layers button
on the track strip. The track will then expand to show all clips on separate layers that can be muted and
soloed indivdiually.
For more information on Track Layers, see the online help topic “ Take Management and Comping
Takes.”
English
Punch-In Recording
Imagine that one of your takes was close to ideal, except for one or two notes in one measure. Rather
than recording another full take, you'd prefer to keep the take but replace that measure.
Punch-in recording lets you replace a section of a track. The way it works is this: first, you set the start
and end times of the punch to the section you want to replace, and turn on punch recording. Then, you
arm the track and start recording. You can play along with the original take to get the rhythm and
feeling. However, nothing will be recorded until the Now time reaches the punch start time. During the
punch, the material already in the track will be replaced with what you record. When the punch ends,
the project will continue to play, but recording will stop.
69
Page 70

:
Let's try it. Suppose you want to replace several measures in the recording you made earlier in this
tutorial.
1. Display the Record toolbar by choosing View-Toolbars-Record.
Auto-punch on/off
Punch In
Time
2. In the Record toolbar, click the Punch In Time.
3. Type the number of the measure at which you want to begin punch recording and press Enter.
4. Click the Punch Out Time.
5. Type the number of the measure at which you want to end punch recording and press Enter.
6. Click the Auto-Punch On/Off button to enable punch recording.
7. Select Overwrite from the Record Mode dropdown menu.
8. Arm the track in which you want to punch record.
9. If looping is still on, click the Loop button to turn it off.
10. Click Rewind .
11. Click Record .
Play along until you are past the punch end time, then click Stop . Replay your take to hear the
difference. If it's still not right, try again!
An alternative method is to select measures by dragging in the Time Ruler. Then right-click the Time
Ruler and choose Set Punch Points. This automatically enables punch recording.
You can combine loop recording with punch recording; see the online help topic “Punch Recording” for
details.
When Auto Punch is enabled, the Time Ruler displays special markers that indicate the punch in and
punch out times. You can drag these markers to change the punch in and punch out times.
Punch Out
Time
Record mode
Click here to set punch
times to the selection start
and end times
Step record
Click to open the Record
Options dialog box
70
Punch OutPunch In
Page 71

Tutorial 3—Recording Digital Audio
To record digital audio, you need some sort of device hooked up to your sound card's line or mic input—
an electric guitar, a preamp, or a mixer, for example. If nothing else, try playing or singing into a
microphone!
If you have never connected an instrument to your sound card, see “To Connect an Electric Guitar to
Your Computer” on page 30.
This tutorial covers these procedures:
• Setting the sampling rate
• Setting the audio driver bit depth and recording bit depth
• Opening a new project
• Setting up an audio track
• Checking the input levels
• Recording digital audio
• Listening to the recording
• Recording another take
• Input monitoring
• Loop and punch-in recording
• Recording multiple channels
Setting the Sampling Rate
Each SONAR project has a parameter that specifies the sampling resolution for all digital audio data in
the project. You should set this rate before recording any digital audio.
To set the sampling rate:
1. Choose Options-Audio to open the Audio Options dialog box.
2. Click the General tab.
3. Under Default Settings for New Projects, select a Sampling Rate. For CD-quality sound, use 44100
Hz.
4. Click OK.
Lower sampling rates will save disk space but will result in lower-quality audio. Before embarking on
any major project, consider what media your project will eventually be stored on, and what sampling
rate is best for that media.
English
Setting the Audio Driver Bit Depth and Recording Bit Depth
The drivers for most sound cards use anywhere from 16 to 24 bits to play back recorded data. CD’s use
16 bits. You can possibly get better sound quality by recording at a higher bit depth and converting to 16
bits when it’s time to master your project, but keep in mind that 24 bit audio takes 50% more memory
than 16 bit audio, possibly straining your computer’s storage capability and speed of operation. Your
sound card’s documentation could have some advice on choosing an audio driver bit depth.
You can record audio data at 16 bits or 24 bits. It usually makes sense to record and play back at the
same bit depth.
To set the audio driver bit depth:
71
Page 72

:
1. Use the Options-Audio command to open the Audio Options dialog box.
2. On the General tab, find the Audio Driver Bit Depth field and select one of the options.
3. Click OK.
For more information about audio driver bit depth, see the online help topic “Bit Depths for Playback.”
To set the record bit depth:
1. Use the Options-Global command to open the Global Options dialog box.
2. On the Audio Data tab, find the Record Bit Depth field and select one of the options.
3. Click OK.
Open a New Project
Let’s open a new project for this tutorial.
1. Select File-New from the menu.
2. In the New Project File dialog box, enter Tutorial3 in the Name field.
3. Select the Normal template from the template list and click OK.
Note: In the New Project File dialog you can also confirm where your project and project audio will be
stored when you save a new project. Do so by adjusting the paths in the Location and Audio Path fields.
For the purpose of these tutorials, however, the default locations should be acceptable.
Setting Up an Audio Track
Let’s set up a track for digital audio:
1. Insert a new track by doing the following: in the Track pane, right-click below the last track, or
wherever you want to insert a track, and choose Insert Audio Track from the popup menu.
SONAR inserts a new audio track.
2. In the track’s Output field, click the dropdown arrow and select an audio output from the menu.
3. In the track’s Input field, choose an audio input. Usually you select the left channel of one of your
sound card’s inputs to record a mono track, or the stereo input to record a stereo track.
The Normal template has several audio tracks in it already, which you could use to record with. You
don’t have to insert a new audio track to record with if your project already has one or more empty
audio tracks.
72
Checking the Input Levels
Before trying to record, you need to check and adjust the audio input levels. If your audio input is too
low, it will be lost in the background noise. If it is too high, it will overload the input channel and be
distorted/clipped. Before you check input levels, make sure that the Record Meters are set to be
displayed in the Track view. Click the right arrow next to the Show/Hide Meters button and in the
menu that appears, select the Record Meters command if it is not already checked.
You may need to drag the splitter bar that separates the Track pane from the Clips pane to the right to
see all the buttons in the Track view toolbar.
Note: SONAR has a button called the Audio Engine button in the Transport toolbar, which you
click to stop any feedback you may experience if there is a loop somewhere in your mixer setup.
Whenever you play a project, SONAR automatically enables the audio engine, which you can tell by
watching the Status bar—whenever the audio engine is running, the Audio Running indicator in the
Status bar lights up. The Status bar is located at the bottom of the SONAR window.
Page 73

To check the audio input levels:
1. Click the Arm button in your new audio track. The track’s meter becomes a record meter.
2. Perform as you would during recording. Watch the meter respond to the sounds you produce. If the
meter does not respond, you may need to raise the volume of your plugged-in instrument. Also,
make sure that the Audio Engine button in the Transport toolbar is depressed.
If you still don't see any movement of the audio meters, you may have an audio input problem.
3. If the meter never comes even close to the maximum, increase the input level by using the
Windows mixer or your sound card’s software mixer (or if you are recording your instrument
through an amplifier or mic preamp, turn up the amp or preamp).
4. If the meters even occasionally reach the maximum, decrease the input level.
The idea is to try to get the input level to rise as high as possible, but without ever reaching the
maximum. That way, you get the strongest possible signal without distortion.
SONAR’s meters are extremely adjustable for the kind and range of data they display. For more
information, see the online help topic “Metering.”
Recording Digital Audio
It's time to record!
1. If you haven’t already set up the metronome, follow the directions in “Setting Up the Metronome”
on page 65 to set the metronome for a two-measure count-in.
2. The track is already armed for recording.
3. In the Transport toolbar, click Record , or press r on your computer keyboard.
You’ll hear two measures counted in by the metronome, then playback and recording begin.
4. Go ahead and perform!
English
5. When you finish recording, click the Stop button , or press the Spacebar.
A new clip appears in the Clips pane. Also, right-click in the Clips pane and choose View-Options to
open the Track View Options dialog box—make sure Display Clip Names and Display Clip Contents are
checked.
Listening to the Recording
Let's play back your performance. Do the following:
1. In the track’s Output field, click the dropdown arrow to display the menu of available outputs, and
select a pair of your sound card’s stereo outputs (if your sound card only has two outputs, just
select the name of your sound card).
2. To return to the start of the project, click the Rewind button.
3. Disarm your audio track by clicking its Arm button again—this changes the track’s meter to a
playback meter. The track is disarmed when its Arm button is not red.
4. Click Play .
5. Watch the track’s meter. If the level is not what you want, record your track again.
73
Page 74

:
Recording Another Take
If you'd like to delete your performance and try again, do the following:
1. Choose Edit-Undo Recording to undo your recording, or press Ctrl+Z (Undo).
2. If necessary, click Rewind or press w.
3. Make sure the track is still armed for recording.
4. Click Record .
5. When you finish recording, click the Stop button , or press the Spacebar.
Alternatively, you could record your next attempt on a new track, or in the same track. If you enable a
track’s Track Layers button , you can display alternate takes in different “lanes” in a single track.
To avoid erasing each take, enable Sound on Sound (Blend) mode in the Record Options dialog
(Transport-Record Options command), and make sure that Create New Layers On Overlap is
enabled in the same dialog.
Input Monitoring
SONAR has a feature called input monitoring, which allows you to hear any instrument that is
plugged into your sound card whether you are currently recording the instrument or not. You can hear
your instrument, including any plug-in effects, whenever input monitoring is enabled and the Audio
Engine button in the Transport toolbar is depressed. You can enable or disable input monitoring on
an individual track by clicking the track’s Input Echo button , and you can enable or disable input
monitoring on all tracks at once by clicking the Input Echo button that’s on the Playback State toolbar
(to display, use the View-Toolbars-Playback State command).
Caution: If you have any kind of a loop in your mixer setup that causes the output of your sound card
to be fed back into the input, you can get feedback. Input monitoring can make it very intense because
both the direct signal and the processed signal are coming out of your sound card. Turn your speakers
off whenever you enable input monitoring, and then try turning them up very gradually to try it out. If
you hear feedback, click the Audio Engine button in the Transport toolbar to turn input
monitoring off.
For more information on Input Monitoring, see the online help topic “Input Monitoring.”
74
Loop and Punch-In Recording
Loop and Punch-in work the same for digital audio recording as they did for MIDI recording. For more
information, see the online help topics “Loop Recording” or “Punch Recording.”
Recording Multiple Channels
If you can gather the entire band around your computer, and if you have the proper equipment, you can
record a full multiple-instrument performance all at once. If you have several MIDI instruments, you
can route their input into your sound card through a MIDI merger—data that arrives on different MIDI
channels can be routed to different tracks. Likewise, a typical sound card can record audio on both right
and left channels—each can be recorded on a different track by choosing the right channel as an input
for one track, and the left channel as an input for another. Multiple sound cards and multi-I/O sound
cards can expand the number of possible inputs. For more information, see the online help topic
“System Configuration.”
That completes the audio recording tutorial. Now you’ve learned the basics of playing and recording
material for your projects. In the following tutorials you'll learn about basic editing techniques for both
MIDI and audio.
Page 75

Tutorial 4—Editing MIDI
SONAR has too many powerful MIDI features to look at in one tutorial, so let’s look at some of the most
basic features and also cover some exciting new ones, such as slip editing and MIDI envelopes.
In this tutorial, start by opening the file
installed. We will be doing the following tasks:
• Transposing
• Copying Clips with Drag and Drop
• Editing Notes in the Piano Roll View
• Slip Editing
• Drawing MIDI Envelopes
• Converting MIDI to Audio
Transposing
Here are two ways to transpose MIDI data in SONAR:
• You can apply the Transpose command to selected data (see the procedure below).
• You can use the Key+ control for a specific track—the Key+ control is located with the other track
parameter controls in the Track pane. This method causes a track to play higher or lower by the
number of half steps you enter in the Key+ control. This is a non-destructive form of editing that
leaves the pitch of the original data unchanged, but adds an “offset” when the track plays back.
To Transpose our Tutorial File
1. Select all the notes in the bass track by clicking the bass track’s track number. The track number
should appear highlighted when it is selected.
2. Select all the notes in the organ track by Ctrl-clicking (holding down the Ctrl key while you click)
the organ track’s track number. Ctrl-clicking allows you to make multiple selections.
3. Use the Process-Transpose command to open the Transpose dialog box.
4. Enter -2 (negative 2) in the Amount field and click OK.
5. Ctrl-click both track numbers again to deselect them.
SONAR transposes the selected data down a whole step (2 half steps). Choose MIDI outputs for your
tracks and play the project. You can undo the transposition by pressing Ctrl+Z, and redo the
transposition by pressing Ctrl+Shift+Z.
TUTORIAL4.CWP in the Tutorial folder where SONAR is
English
Copying Clips with Drag and Drop
The first clip in the bass track is two measures long; we can easily drag-copy it to make it eight
measures long. When we drag-copy some of the clips, we can make them into linked clips. When you
edit a linked clip, SONAR performs the exact same edits on all other clips that the clip is linked to.
To Copy Clips Using Drag and Drop
1. In the Track view toolbar, click the Snap to Grid button’s down arrow to open the Snap to Grid
dialog box.
2. Make sure that the Musical Time radio button is selected, and in the list to the right of it, select
Measure.
3. In the Mode field, select Move By and click OK. Now we can only move clips in the Clips pane by
distances of an exact measure or measures.
75
Page 76

:
4. While holding down the Ctrl key, drag the first clip in the bass track to the right and release the
mouse when the start of the clip is at measure three. The Drag and Drop Options dialog box
appears. Click OK—SONAR places a copy of the clip in measures three through four. Ctrl-dragging
a clip copies and moves it, while dragging without holding down any extra keys moves a clip
without making a copy of it.
5. Now let’s make a linked clip copy of the new clip in measure three: Ctrl-drag the clip from measure
three to measure five. When the Drag and Drop Options dialog box appears, click the Copy Entire
Clips as Linked Clips checkbox and click OK. SONAR places a linked clip copy into measures five
and six. The two linked clips have dotted outlines to show they are linked.
6. Make another linked copy of one of the linked clips and place it in measures seven and eight.
Because this copy overlaps the clip that’s in measure 9, make sure that the Blend Old and New
option is checked in the Drag and Drop dialog box. Because none of the notes in the two clips
overlap, blending the two clips does not change any of their data.
Now you have linked clip copies in measures three through eight: when you edit any of these three clips,
SONAR performs the exact same edits on the other two.
Editing Notes in the Piano Roll View
SONAR’s Piano Roll view gives you complete control of individual note properties. Let’s edit a couple of
notes.
To Edit Notes in the Piano Roll View
1. Open the Piano Roll view of the first bass clip by double-clicking the clip. In the Piano Roll view,
you may have to use the Up Arrow and Down Arrow keys on your computer keyboard to display the
note data (the Right and Left Arrow keys scroll the display in the horizontal direction).
2. Drag the Piano Roll’s Horizontal Zoom control in the lower right corner of the Notes pane to make
the note data large enough for easy editing (see following picture).
76
3. In the Piano Roll toolbar, right-click the Snap to Grid button to open the Snap to Grid dialog
box (Snap to Grid settings in each view are independent of each other).
4. Make sure the Musical Time radio button is selected, and in the window to the right of it, select
Eighth.
5. In the Mode field, make sure that the Move By radio button is selected and click OK. Now we can
only move data in the Piano Roll view by exact distances of one or more eighth notes.
6. In the Piano Roll toolbar, click the Draw tool to activate it.
Page 77

7. Find the note that starts at the beginning of measure three and move the cursor over the
beginning of the note so that the cursor becomes a cross. Drag the beginning of the note to the left
by a half beat, and release the mouse.
Beat 1 of Measure 3
Drag Horizontal Zoom controlDrag note from here
SONAR moves the note to the left by a half beat and lengthens the note by a half beat, and also
performs the same edits on the identical notes that are at the beginnings of the other two linked
clips.
8. Close the Piano Roll view when you finish editing.
If you want to unlink clips when you’re through editing them, select the clips you want to unlink (in
the Track view), right-click one of them, and choose Unlink from the Clips pane popup menu. Select
Independent, Not Linked At All in the Unlink Clips dialog box and click OK.
English
77
Page 78

:
When you move the Draw tool over a note, it changes into one of 3 different editing tools, depending on
what part of the note you move it over:
• If you move the Draw tool over the beginning or end of a note, the Draw tool changes into a cross.
When you drag one end of a note with the cross icon, the other end of the note stays put, thereby
changing the duration of the note as you move the opposite end.
• If you move the Draw tool just inside the beginning of a note, the Draw tool changes into a
horizontal, double-ended arrow. When you drag the beginning of a note with this icon, the other
end of the note moves with the beginning of the note, thereby keeping the duration of the note
constant.
• If you move the Draw tool over the middle of a note, the Draw tool changes into a vertical, doubleended arrow. Use this tool to drag the note up or down in pitch.
Slip Editing
Now let’s take advantage of one of the most convenient features of SONAR: slip editing. Slip editing lets
you drag the beginning or ending borders of a clip to hide the notes or other MIDI data that are in the
area that you drag through (slip editing also works on audio clips). SONAR does not delete these notes
or data, but does not play them either. As soon as you drag the clip borders to display the data again,
SONAR plays them again. Slip editing is a very fast and convenient way to try out different sounds
without destroying any data. You can also leave the clip borders unchanged and only drag the data
that’s within the clip, which is called scroll-trimming. Scroll-trimming changes the rhythmic placement
of data without changing the clip’s borders.
To Slip Edit TUTORIAL4.CWP
1. Drag the horizontal zoom controls in the Clips pane so that a space of about 2 measures fills up the
Clips pane.
2. Click the down arrow in the Snap to Grid combo button to open the Snap to Grid dialog box, change
the Musical Time resolution to Eighth, make sure Move By is selected in the Mode field, and click
OK. Now we can only drag the borders of clips by units of eighth notes.
3. In the organ track in the Clips pane, move the cursor over the right end of the first clip until the
cursor changes to a square. Drag the right border to the left until the MIDI data at the end of the
clip is hidden.
78
Now you can’t hear those notes.
Hide this region
Like this
Page 79

4. Drag the end of the second clip to the left until just the “tail” or glissando of the data is hidden.
5. In the third clip, hold down both the Alt and Shift keys and drag only the data inside the clip to the
You can experiment as much as you want with slip editing, all without destroying any data! For more
information about Slip Editing, see the online help topic “Slip-editing Audio (Non-destructive Editing).”
Hide this region
left by about one eighth note.
Like this
Drawing MIDI Envelopes
MIDI envelopes are lines and curves you can draw on MIDI data in the Clips pane. Each envelope
produces continuous control over one of the following track parameters: volume, pan, chorus, reverb,
automated mute, or a MIDI controller. You can show or hide any envelope you create, but the envelope
still functions when it is hidden. For our tutorial, let’s create a MIDI volume envelope.
To Draw and Edit a MIDI Volume Envelope
1. In the Clips pane in the organ track, right-click and choose Envelopes-Create Track EnvelopeVolume (default Ch. 1) from the Clips pane popup menu.
SONAR creates a blue line through the organ track, with a small round dot (a node) at the
beginning of the line. The line shows the initial volume of the track, if it has an initial volume.
Otherwise, it shows a default value.
2. Scroll the Now Time to the next marker by pressing Ctrl+Shift+Page Down; the marker is called
Verse, and is located just before measure nine. Drag the Horizontal zoom control so that the beat
markers are visible in the Time Ruler.
3. At the fourth beat of measure eight, add a node to the envelope by moving the cursor over it until a
double-ended, vertical arrow appears under it, right-clicking to open the Envelope Editing menu,
and choosing Add Node from the menu. A shortcut to add a node is to double-click the line.
4. At the start of measure nine, add another node.
5. Move the cursor over the newest node until a cross appears under it, and drag the node downwards
until it’s just below the MIDI data that’s at the start of the clip.
English
Drag second node to here
6. At the fourth beat of measure twelve, add another node and drag it up to the top of the track. Now
you have a gradual volume increase in the organ track for almost four measures.
7. At the start of measure thirteen, add another node and drag it downward just below the MIDI data
at the start of the measure.
79
Page 80

:
8. Right-click the line that’s between the last two nodes, and choose Slow Curve from the Envelope
Editing menu. SONAR changes the line to a curve. Now the drop in volume is a little more gradual.
Now you have some interesting dynamics in your track. You can add a lot more to your envelope, and
add more envelopes if you wish. You can also copy and paste envelopes. For more information, see the
online help topic “Automation Methods.”
Converting MIDI to Audio
When you finally get your MIDI project into the shape you want, you can convert the MIDI tracks to
audio for export as Wave, MP3, or other file formats. If you are using external MIDI modules, just
record the outputs of your modules into your sound card. If you are using soft synths, use the File-
Export-Audio command, or the Edit-Bounce to Track(s) command. If you are using the built-in
synthesizer in your sound card to produce MIDI sounds, you can use your sound card’s “What You Hear”
or wave capture function to convert the MIDI tracks, if your sound card can function this way. See the
following procedure:
To Convert MIDI to Audio
1. Pick a destination audio track (or create a new one) and set the Input field to Stereo (name of
your sound card).
Note: If you have more than one sound card installed, select the one that has the built-in synth
that your MIDI tracks use.
2. Arm the destination track. Make sure its Input Echo button is off, so you won’t hear an echo when
you’re recording.
3. Mute or archive any tracks that you don’t want to record to the destination track.
4. If SONAR’s metronome is set to use any software synth to produce a click, disable the metronome
during recording option in the Project Options dialog box. To do this, select Options-Project to
open the Project Options dialog box, select the Metronome tab and uncheck Recording in the
General section. Alternatively, you could set the metronome to use the audio metronome and not
use a MIDI note.
5. Open your sound card's mixer device. This is normally done by double-clicking the speaker icon on
your Windows taskbar, or by choosing Start-Programs-Accessories-Entertainment-Volume
Control-Options-Properties.
Note: Some sound cards have their own proprietary mixer. If yours has one, please use it instead.
6. If you’re using the Windows mixer, use its Options-Properties command to open the Properties
dialog box, click Recording (in the Adjust Volume For field), and make sure all boxes in the Show
the Following Volume Controls field are checked.
7. Click OK, and locate the slider marked MIDI, Synth, Mixed Input, or What You Hear. Check the
Select box at the bottom, then close the window.
8. In SONAR, rewind to the beginning of your project, click the Record button, and click the Stop
button when you’re done recording.
SONAR records all the MIDI tracks that are assigned to your sound card synth as a stereo audio track.
After you finish recording, mute the MIDI tracks that you just recorded so you don’t hear them and the
new audio track at the same time.
80
Page 81

Tutorial 5—Editing Audio
In this tutorial we will be editing a bundle file with drums, bass, guitar and organ. We will add some
additional percussion, and edit some of the existing tracks. This tutorial covers the following:
• Importing wave files
• Dragging and looping clips
• Slip editing
• Using automatic crossfades
• Bouncing tracks
Opening the Project
1. In SONAR select File-Open from the menu.
2. In the Open dialog, select T
3. The Unpack Bundle dialog now appears. This dialog lets you specify where the project and project
audio will be stored if you Save the file. For the purpose of this tutorial, the defaults should be
acceptable: click OK.
The audio data is loaded into SONAR and T
Importing a Wave File
Now that you have the file open, click the Play button to hear the project. The project contains drums,
bass, and two guitar tracks. Let’s import an organ track:
To Import a Wave File
1. Click the down arrow in the Snap to Grid combo button located in the Track view toolbar.
The Snap to Grid dialog appears.
2. In the Snap to Grid dialog, click the Musical Time radio button, select Measure from the list of
durations and click OK.
3. Make sure the Snap to Grid button is depressed (on).
4. In the Track pane, right-click below the bottom track and select Insert Audio Track from the
menu that appears.
5. Click the track number of the new track to select it.
6. We want to insert the new part at measure 18, so click in the Time Ruler at measure 18. The Time
Ruler is at the top of the Clips pane above the drum track.
7. Select File-Import-Audio from the File menu.
The Open dialog appears.
UTORIAL5.CWB and click OK.
UTORIAL5.CWB opens.
English
81
Page 82

:
8. Open the Tutorials folder located in the directory where SONAR is installed.
9. Select
10. Double-click the track name, and type in a new name: “Organ,” and press Enter.
11. Move the Now time to the beginning, insert another audio track, import the file
12. Insert another audio track, import the file
Moving and Looping the Clips
When you drag and drop clips in the Clips pane, the Snap to Grid setting determines the resolution to
which the clips “snap to.” If your Snap to Grid setting is Measures and you drop a clip between two
measures, the clip appears aligned to the closest measure.
We have just dropped two percussion clips into our project, and we could have dropped them where we
wanted, but then we wouldn’t get a lesson on how to move clips in SONAR.
Let’s move both clips to the 18th measure of the project.
1. Click and drag the maracas clip to measure 18 (the Snap Grid is still set to Measure).
2. The Drag and Drop Options dialog appears. The Drag and Drop Options dialog box has options for
3. Now move the congas clip to the 18th measure by using the same method.
Now let’s loop the two percussion clips to make copies of them by using their Groove clip characteristics:
ORGAN.WAV and click Open.
A new clip appears in the selected track at the specified Now Time—measure 18.
MARACAS.WAV, and
name the track.
After you import
ones. That means it’s a Groove clip, and contains tempo and pitch information. We’ll learn more
about Groove clips in the next tutorial.
track.
how the clip you are dragging affects existing clips. Since the clip we are dragging is not being
moved onto an existing clip, we can just accept the default setting. Click OK to accept the default
settings.
The clip now appears at the 18th measure.
MARACAS.WAV, notice that the clip has beveled or rounded corners instead of sharp
CONGAS.WAV (which is also a Groove clip) and name the
82
1. Move the cursor over the end of the maracas clip until the cursor looks like this .
2. When the cursor changes, click the end of the clip and drag it to the right until you have created
repetitions of the clip through the end of measure 28.
3. Copy the congas clip the same way until it reaches the end of measure 28.
Slip Editing a Clip
Solo the two guitar tracks and listen to the project. We are going to combine these two tracks and create
an automatic crossfade between them. Before we do, we have to hide the beginning of the second guitar
part so it doesn’t affect the crossfade. We’ll do this using slip editing.
1. Click the Snap to Grid button to turn off Snap to Grid. The Snap to Grid settings control slip
editing as well as drag and drop.
2. Move the cursor over the beginning of the second guitar clip.
Page 83

3. When the cursor turns into a rectangle, click and drag the beginning of the clip until you have
reached the beginning of the waveform.
Drag to here
The beginning of the clip is now hidden. The data is not lost, as you will see if you drag the
beginning to where it was originally. slip edited data is still in the project, but it is not seen or
heard.
Automatic Crossfades
Let’s combine these two tracks and create a crossfade.
1. Enable automatic crossfades by clicking (depressing) the
Enable/Disable Automatic Crossfades combo button located next to the Snap to Grid button
on the Track view toolbar.
2. Click the down arrow on the Enable/Disable Automatic Crossfades combo button, select Default
Crossfade Curves and select a crossfade curve.
3. Make sure no clips are currently selected by clicking in the Clips pane outside of any clips.
4. Hold down the Shift key and drag the second guitar clip on top of the first guitar track and drop it
there; make sure that Blend Old and New is selected in the Drag and Drop dialog box before you
click OK. Shift-dragging ensures that a clip can only move vertically and not horizontally, so you
don’t need to enable the Snap to Grid button to keep the same exact rhythmic placement of a
dragged clip.
The two clips appear on the same track with a crossfade marker on the overlapping data. The first
guitar track fades out as the second guitar fades in. For more information about crossfades, see the
online help topic “Using Fades and Crossfades in Real Time.”
English
Bouncing Tracks
When you finish editing a certain number of audio tracks, you can conserve memory and simplify your
mix by bouncing (combining) some tracks down to one or two tracks. You can choose to include any
effects and automation in the new track that are on the tracks that you want to combine, greatly
reducing the load on your CPU.
Let’s bounce, or combine our two percussion tracks together:
1. Make sure no time range is selected by clicking in the Clips pane outside of any clips.
2. Select the tracks that you want to combine: in this case, Maracas and Congas. To select multiple
tracks, hold down the Ctrl key while you click each track’s track number. You can also solo tracks
instead of selecting them.
3. Click the Snap to Grid button to turn it on (the Snap to Grid setting is still set to Measure).
4. In the Time Ruler, select measures 18 through 28.
5. Use the Edit-Bounce to Track(s) command to open the Bounce to Track(s) dialog box.
6. In the Destination field, choose <8> New Track.
83
Page 84

:
7. In the Source Category field, choose Entire Mix.
8. In the Channel Format field, since our two original percussion tracks are in stereo, choose Stereo.
This way we preserve their stereo quality.
9. In the Source Bus(es) field, make sure the name of the sound card that the relevant tracks use to
play back on is highlighted.
10. In the Mix Enables field, make sure everything is checked. By checking the Track Mute/Solo
option, you make sure that SONAR only mixes down the unmuted tracks. If any tracks are soloed,
this option causes SONAR to mix down only the soloed tracks.
11. Click OK.
SONAR creates a new, stereo track that combines both percussion tracks. Now you can archive the old
percussion tracks so that they don’t consume memory. Do this by right-clicking each track number and
choosing Archive from the popup menu.
Tutorial 6—Using Groove Clips
Groove clips are audio clips that “know” their tempo and root note pitch. SONAR uses this information
to stretch the clips to match changes in tempo and to transpose the root note pitch to match the project’s
pitch and pitch changes. SONAR also has MIDI Groove clips that work much the same as audio Groove
clips.
You can create repetitions, or loops of Groove clips simply by dragging their ends in the Track view,
creating as many repetitions as you want.
You can change the pitch of your Groove clips by inserting pitch markers in the Time Ruler. The default
project pitch for Groove clips in a new project is C. The root note of your Groove clips is transposed to
the default for any part of the Groove clips that come before the first pitch marker, or if you do not have
pitch markers in your project. You can change the default pitch of the current project in the Markers
toolbar.
You can create and edit Groove clips in the Loop Construction view.
This tutorial covers the following:
• Adding Groove clips to a project
• Looping Groove clips
• Changing the pitch of Groove clips
• Making Groove clips follow the project tempo
84
Page 85

Adding Groove Clips to a Project
There are two ways to add a Groove clip to your project. Let’s use both.
To Import a Groove Clip
1. Select File-New to create a new project.
2. In the New Project File dialog box, enter Tutorial6 in the Name field.
3. Select the Normal template from the template list and click OK.
4. Set the default pitch to E by clicking the dropdown arrow in the Markers toolbar and choosing E (if
you don’t see the Markers toolbar, use the View-Toolb ars command and check Markers).
Click here
5. Click the Rewind button in the Transport toolbar to move the Now Time to the beginning of the
project.
6. Select track 1 by clicking its track number.
7. Select File-Import-Audio from the menu.
The Open dialog appears.
8. Navigate to the Tutorial folder in the directory where you installed SONAR.
9. Select 100
The clip appears on the track at the beginning of your project—the clip’s corners are beveled instead of
sharp, indicating that it is a Groove clip.
Before we import another loop, let’s give this track a name. In the track titlebar, double-click on the
track name and enter the name Sound Effect and press Enter.
Let’s add some more Groove clips:
To Drag and Drop a Groove Clip into a Project
1. Click the down arrow in the Snap to Grid combo button located in the Track view toolbar.
The Snap to Grid dialog appears.
2. In the Snap to Grid dialog, on the Clips tab, select the Musical Time radio button and the duration
Measure.
3. In the mode section, select the Move To radio button.
4. Click OK to close the Snap to Grid dialog.
5. Make sure Snap to Grid is on. When Snap to Grid is on, the button appears blue.
FX.WAV and click Open.
English
6. Open the Loop Explorer view by clicking the Loop Explorer icon in the Views toolbar .
85
Page 86

:
7. Navigate to the Tutorial folder in the directory where you installed SONAR.
8. Select 100
Repeat step 8 by dragging 100
at measure 1, and close the Loop Explorer view. SONAR automatically creates any necessary audio
tracks when you import audio data.
You now have a four track project. If you haven’t done so yet, click the play button to take a listen to
your project before we begin to arrange the clips.
Your project should look something like this:
ONETWO.WAV and drag it into the Clips pane below the Sound Effect track at measure 3.
BEAT2.WAV below Track 2 at measure 7 and 100ORGAN.WAV below Track 3
86
Looping Groove Clips
Here’s where Groove clips get real fun. You need only drag the beginning or end of a Groove clip to
create repetitions or loops.
First, though, lets copy the Groove clip in Track 2.
To Copy a Groove Clip
1. Press the Ctrl key and click and drag the clip until the beginning is at measure 8 and release.
The Drag and Drop Options dialog appears.
2. Make sure the Copy Entire Clips as Linked Clips option is not checked and click OK.
A copy of the Groove clip now appears on the same track at measure 8.
To Loop a Groove Clip
1. Move the cursor over the end of the first Groove clip in Track 2 until the cursor looks like this .
2. When the cursor changes, click the end of the clip and drag it to the right until you have created
one repetition of the clip (through the end of measure 6).
You can also create a partial loop of a Groove clip if the Snap to Grid setting is set to less than one
measure. You can create a partial loop as small as the Snap to Grid setting allows. For example, if your
Snap to Grid setting is set to quarter notes, you can create partial repetitions as small as a quarter of a
measure.
Now lets edit the clip we copied on Track 2.
Page 87

To Crop a Groove Clip
1. Click the dropdown arrow on the Snap to Grid button to open its dialog box, set the Musical Time
duration to Quarter, and click OK to close the dialog box.
2. Move your cursor over the beginning of the second clip in Track 2 until it looks like this .
3. “Crop” the beginning of the clip one and a quarter measure (you may want to expand the Clips
pane a little by dragging the Horizontal Zoom slider that’s in the lower right corner).
Like this:
4. Crop the end of the clip by one quarter measure.
Like this:
English
87
Page 88

:
5. Click on the clip and drag it one measure to the left.
Like this:
The Drag and Drop Options dialog appears.
6. In the Drag and Drop Options dialog, click Blend Old and New and click OK.
You have added Groove clips and edited them. Your project should look like this:
88
Let’s take a listen to what we have. Click the Play button in the Transport toolbar.
Changing the Pitch of Groove Clips
Now that you have heard what your project sounds like, let’s change some pitch settings.
To Set a Groove Clip to Not Follow the Project Pitch
1. Double-click on the Groove clip in Track 4.
The Loop Construction view appears.
2. Deselect the Follow Project Pitch button .
3. Close the Loop Construction view and listen to your project again.
It sounds different because the Groove clip on Track 4 is no longer following the default project
pitch of E, instead it follows its own root note of C.
Next, let’s add some pitch markers.
To Add Pitch Markers
1. Click the Solo button in Track 4 to solo the track.
Page 89

2. Right-click in the Time Ruler at the beginning of measure 1 and select Insert Marker from the
menu.
The Marker dialog appears.
3. In the Groove Clip Pitch dropdown, select C and click OK.
4. Create another pitch marker at the beginning of measure 2, this time selecting F from the Groove
Clip Pitch Change dropdown.
5. Double-click on the clip in track 4 to open the Loop Construction view.
6. In the Loop Construction view, click the Follow Project Pitch button to enable it.
Listen to the project. Because the default pitch of the project is now C at measure 1, the clip in
track 4 sounds at its original pitch, because its original root note is C. When the Now time reaches
measure 2, the project pitch changes to F, which forces the clip to transpose all of its data up a
perfect 4th, from a root note of C to a root note of F.
Now let’s change the tempo of the project.
Changing the Tempo of Your Project
Groove clips follow the project’s tempo, so we can change the tempo, either for the entire project or just
one part, and still have all our clips playing in time with each other.
To Change the Project Tempo
1. Select Insert-Tempo Change from the menu.
2. In the Tempo field, enter 110 and click OK.
The project’s tempo is now 110.
Play your project. Do you hear the difference? Try other tempos.
Now that we have created a project that uses existing Groove clips, let’s take the next step and learn
how to create our own Groove clips.
English
Creating Your Own Groove Clips
Any audio clip (of a reasonable size) can be a Groove clip.
We are going to take a clip, slip edit it so that it contains just the parts we want, and open it in the Loop
Construction view to add tempo and pitch information to it.
To Create a Groove Clip (example 1)
In this example we will import a short clip of a bass guitar, slip edit it and convert it to a Groove clip.
1. Select File-New to create a new project.
2. In the New Project File dialog box, enter Tutorial6B in the Name field.
3. Select the Normal template from the template list and click OK.
4. Right-click the Snap to Grid button to open its dialog box, set the Musical Time duration to
Measure, and click OK to close the dialog box.
5. Click in the Views toolbar to open the Loop Explorer view.
6. In the Explorer view, navigate to the Tutorials folder in the directory where you installed SONAR.
7. Drag and drop the
8. Double-click the clip.
BASS.WAV file into the new project at measure 1.
89
Page 90

:
The Loop Construction view appears. You see that there is silence at both the beginning and end of
the clip. We are going to slip edit the clip so that the clip begins with the attack of the first note and
ends as the last note tails off.
9. Move you cursor to the beginning of the clip.
10. When the cursor changes to look like this , drag the beginning of the clip until you reach the
edge of the first rise in the waveform and release the mouse.
11. Slip edit the end of the clip until you reach the end of the last note’s decay. You may need to scroll
the scrollbar at the bottom of the Loop Construction view a little to the right to see the end of the
loop.
Note: You can not slip edit a clip that has its Groove clip characteristics enabled. You can turn a
clip’s Groove clip characteristics on or off either in the Loop Construction view, or in the Clips pane.
In the Clips pane, right-click the clip and choose Groove-Clip Looping from the popup menu.
Your clip should look something like this:
90
12. Click the Enable Looping button on the Loop Construction view toolbar to enable the clip’s
Groove clip characteristics.
SONAR automatically slices the clip and assigns in a number of beats. Notice that SONAR has
sliced this clip at eighth note intervals. This is a clip with a waveform that does not have dramatic
transients (sharp rises in volume). For clips like this, markers at beat intervals work best.
The clip is now a Groove clip, and it looks like this:
Page 91

The bass track is now a Groove clip, so you can move it where you want and create repetitions by
dragging it out.
Let’s create another Groove clip.
To Create a Groove Clip (example 2)
For this example we are going to use a clip that does not need to be slip edited.
1. In the Explorer view, navigate to the Tutorials folder in the directory where you installed SONAR.
2. Drag and drop the
3. Double-click the clip.
4. Click the Enable Looping button .
SONAR automatically slices the clip and assigns in a number of beats. Notice that SONAR has
sliced this clip at eighth notes and at the beginning of some transients. This has dramatic
transients. For clips like this, transient markers work best.
The clip is now a Groove clip, and it looks like the following picture. You can click the zoom buttons
in the lower right corner to get a better view.
DRUMS.WAV file into the new project below your bass track at measure 1.
English
The markers in the Loop Construction view are used to tell SONAR where to preserve timing. The idea
is to preserve the clip while being able to change the tempo. When a clip has a lot of transients, as this
one does, it is a good idea to make sure that the slicing markers fall at the beginning of the transients,
thus preserving their timing. This clip has several markers which can be fine tuned to give better
results. Let’s move some markers to better preserve the timing of this clip.
To Fine Tune the Slicing Markers in a Groove Clip
1. Identify the markers which are close to the beginning of a transient.
An example of transients that should be moved:
Slicing marker
Slicing marker which
should be moved
Transients
91
Page 92

:
2. Click the Select tool .
3. Click and drag the slicing markers that need to be fine tuned so that they are at the very beginning
of the transient.
Like this:
Slicing markers which
have been edited. Edited
slicing markers appear in
blue.
Slicing markers now appear right next
to the beginning of the transients
Use the two projects you have created to experiment with Groove clips further. Try new loops, change
tempos, add pitch markers, record clips and use them to create your own loops. For more information
about Groove clips, see the online help topic “Using Loops.”
Tutorial 7—Mixing
SONAR has an almost unlimited number of tools to help you mix down. You can automate almost any
knob, fader, or button by using any of several methods. You can even automate the internal settings of
some effects—not just the bus controls, but the controls of some individual effects. When your project
sounds the way you want, you can save it and export it in Wave, MP3, or Windows Media Advanced
Streaming format.
Let’s do some more work on
• Adding real-time audio effects
• Automating an individual effect’s settings
• Grouping controls
• Automating your mix
• Exporting an MP3 file
Adding Real-time Audio Effects
Let's add some flanging to the first guitar track in TUTORIAL5.CWB:
1. Add the flange effect to a guitar track by right-clicking its FX field, and choosing Audio Effects-
Cakewalk-FxFlange from the popup menu.
The effect’s dialog box appears.
2. Choose a preset flange setting from the Presets field.
92
TUTORIAL5.CWB, and explore the following tasks:
Page 93

3. Play the project to hear what it sounds like. You can continue to adjust the effect while the project
plays; there is a slight delay before your adjustments are audible.
Close the dialog box. You can add effects to buses with the same method (right-click the FX field in a
bus, and choose an effect from the popup menu).
You can delete an effect from an FX field by right-clicking the effect’s name and choosing Delete from
the popup menu. Instead of moving the controls manually, let’s automate them by drawing an envelope
in the Clips pane.
Automating an Individual Effect’s Settings
Let’s draw an envelope to automate one of the flanger’s controls:
1. In the Clips pane, right-click in the first guitar track (the track you added the FxFlange effect to)
and choose Envelopes-Create Track Envelope-FxFlange 1 from the popup menu.
The FxFlange1 dialog box appears.
2. Let’s create only one envelope, even though we could create many: in the Envelope Exists field,
check the Voice 1 Feedback option to create an envelope that controls the level of feedback on voice
1 of the FxFlange effect.
3. Click OK (you could choose a color for the envelope before you click OK by clicking the Choose
Color button).
A solid line with 2 nodes (round dots) appears on top of the guitar clip, one node at the beginning
and one at the end of the last clip in the project. The dotted line after the project ends means there
is no automation data in that area of a track—only nodes and solid lines represent actual values.
4. Let’s add a node at measure 17 of the guitar track: move the cursor over the line at measure 17
until a vertical, double-ended arrow appears under it, and right-click the line.
The Envelope Editing menu appears.
5. Choose Add Node from the menu.
A new node appears on the envelope at measure 17.
6. Move the cursor over the node until a cross appears under it, and drag the node up to the top of the
track. Now you have a gradual increase in the level of Voice 1 Feedback. Notice that the line
between the two nodes is solid, indicating that there is automation data everywhere between the
two nodes.
7. Change the straight line between the two nodes, which is called a Linear shape, into a Slow
Curve shape, by moving the cursor over the straight line until the vertical, double-ended arrow
appears, then right-clicking the line and choosing Slow Curve from the Envelope Editing menu.
English
Node
Now you have a gradual, but not linear increase in the Voice 1 Feedback level of your flange effect. You
can drag linear and curve shapes vertically, but not horizontally. To change their horizontal positions,
drag the node at either end of a shape. You can drag a node in any direction.
Slow curve
Node
93
Page 94

:
Grouping Controls
To assist in manipulating the controls, you can tie faders to one another. For example, if you want to
increase the volume level on several tracks at the same time, you can assign them to a group. Then,
when you move one volume fader, you move them all. You can even have the controls move in opposite
directions. For example, you can fade one track in and another out.
To group faders:
1. In the Track view (you can use the Console view if you want), right-click the volume fader for track
2 (bass).
2. In the popup menu, choose Group and select A from the dropdown list. This assigns the fader to
group A. A red marker appears next to the volume fader, indicating that it belongs to group A,
whose color is red.You could also create your own customized group name and color by choosing
New.
3. Repeat steps 1 and 2 for tracks 3 and 4.
Now you’ve grouped the volume faders of three tracks. When you move one fader, all of the others follow.
If you want to move a single fader independently of the others, hold the Ctrl key while moving the fader.
To ungroup a fader, right-click it and choose Remove From Group from the popup menu.
Automating Your Mix
You can record the fader movements of the mix, which is called automating them. To do so:
1. Rewind to the beginning of the project.
2. Move the faders, pans, and any other controls to the initial settings you desire. You should set up a
good balance between the tracks.
3. Arm the volume fader for track 4 by right-clicking it and choosing Arm for Automation from the
popup menu. A highlighted rectangle appears around the armed fader.
4. Display the Automation toolbar by using the View-Toolbars-Automation command.
94
5. Make sure that the Enable Automation Playback button in the Automation toolbar is in the
depressed position and lit blue.
6. To start recording the automation, click the Record Automation button in the Transport
toolbar, and move the armed fader as needed so that the balance between the guitar and other
instruments is optimized throughout the project. You can see a preview of your automation is
drawn as you record.
7. Stop recording by clicking the Stop button or by pressing the Spacebar.
You’ve now automated the volume fader of track 4 of your project—SONAR draws a graph (an envelope)
of the automation in the Clips pane of track 4. You can hide or show envelopes by using the dropdown
arrow located on the side of the Envelope tool button in the Track view toolbar, or by using the
Clips pane popup menu, or the Envelope Editing menu. Now let’s listen to the project again and watch
the fader move automatically:
1. Rewind to the beginning.
2. Press the Spacebar to start playing the project.
You’ll see the fader move just the way it moved when you recorded its movements. You can compare this
mix to a mix with no automation by clicking the Enable Automation Playback button and playing
your project again. Clicking the Enable Automation Playback button toggles the automation off and on.
Page 95

When you’re done tweaking the mix, to make sure you don’t accidentally erase any automation data,
you can disarm any armed controls by clicking the Disarm All Automation Controls button in the
Automation toolbar, or the red AUTO indicator that’s in the Status bar.
Exporting an MP3 File
When your project finally sounds the way you want, you can export it in any or all of several file
formats, including:
• Wave (CD format)
•MP3
• Windows Media Advanced Streaming Format
When you export a file from SONAR, you can choose to include any or all of the effects, automation, and
mute and solo settings that your project contains.
Let’s export our project as an MP3:
1. Make sure all the tracks you want to export are unmuted and unarchived. If you only want to
export one or two tracks, it’s easier to solo these tracks instead of muting all the others.
2. Make a time selection, if necessary. If any tracks use real-time effects such as reverb or delay,
select your whole project plus an extra measure or two at the end so you won’t cut off the reverb
“tail.”
3. Choose File-Export-Audio to display the Export Audio dialog box.
4. Select a destination folder using the Look In field.
5. Enter a file name.
6. Choose MP3 from the Files of type dropdown list.
7. In the Format field, select one of the following options:
• Export to Stereo File(s)—All exported tracks are mixed down to a single stereo file.
• Export to Separate Left and Right Files—All exported tracks are mixed down to two mono
files, left and right.
• Export to Mono File(s)—All exported tracks are mixed down to a single mono file.
8. In the Bit Depth field, select the bit depth that you want your exported file to use. For MP3s use
16.
9. In the Source Bus(es) field, select a sound card or sound cards from the list. If you select more than
one, you can select the Each Source to Separate Submix checkbox to create separate files for each
device selected in the Source Bus(es) field.
10. If the Outputs of the tracks you are combining are the same (if they have the same thing listed in
their Output fields—they should in this tutorial example), you can ignore this step. Otherwise, in
the Separation field, choose from these options:
• Each Bus to Separate Submix—if the tracks you are combining use different buses in their
Output fields, choose this option if you want to create separate files for each different output
that the tracks use.
• Each Main Out to Separate Submix—if the Outputs of the tracks you are combining go to
different Main Outs, choose this option to create separate files for each different Main Out
that the tracks use.
English
95
Page 96

:
• All Main Outs to Single Mix—if the Outputs of the tracks you are combining go to different
Main Outs, choose this option to create a single new file that combines the output data from
all the Main Outs.
11. In the Mix Enables field, select the effects you want to include in your new file—usually, you select
all the listed options.
Note: Selecting the Track Mute/Solo option causes muted tracks to be left out of the exported mix,
and soloed tracks to be the only tracks exported.
12. Click Export.
The Cakewalk MP3 Export Options (Trial Version) dialog box appears.
13. Choose the options you want for your new MP3 file—for help choosing options click the Help
button in the dialog box.
14. When you finish choosing options, click the OK button.
SONAR compresses and mixes your project to a file with the extension .
you chose in the Look In field of the Export Audio dialog box.
Tutorial 8—Using Soft Synths
A software synthesizer is a software program that produces various sounds through your audio
interface when the soft synth program receives MIDI data from a MIDI controller or sequencer
program. SONAR supports all major varieties of software synthesizers, including DXi, ReWire, and VST
Instruments (you can use VST instruments by running SONAR’s included VST Configuration Wizard to
configure the VST instruments). SONAR has a Synth Rack view to make inserting a soft synth a onestep process.
Cakewalk TTS-1 is a great example of a soft synth, so let’s use it for our tutorial. Because this soft synth
supports the mult-output format, it has multiple outputs (4), and you can record the movement of some
of its controls as automation. You probably installed Cakewalk TTS-1 when you installed SONAR. To
make sure, open a project that has at least one audio track, right-click the FX field of an audio track to
open the plug-in popup menu, and look under Soft Synths. You should see Cakewalk TTS-1 listed. If
you don’t, insert your SONAR CD into your CD drive, install the software synthesizers including
Cakewalk TTS-1 to your hard drive, and restart SONAR.
This tutorial covers the following:
• Inserting Cakewalk TTS-1 into a project
• Playing MIDI tracks through a soft synth
• Converting soft synth tracks to audio
MP3 that is located in the folder
96
Inserting Cakewalk TTS-1 into a Project
Inserting a soft synth into a project means that the name of the soft synth appears in the dropdown
menus of MIDI track Output fields and audio track Input fields.
To Insert Cakewalk TTS-1 into a Project
1. Open a MIDI project—for this tutorial use TUTORIAL8.CWP.
2. Use the Insert-Soft Synths command and click Cakewalk TTS-1 on the popup menu.
The Insert Soft Synth Options dialog appears.
3. In the Create These Tracks fields, deselect MIDI Source, because we want to patch some preexisting tracks into Cakewalk TTS-1.
Page 97

4. Select All Synth Audio Outputs because we’re going to use a different synth track for each of
Cakewalk TTS-1’s 4 outputs. The new synth tracks have Cakewalk TTS-1 already patched to them
as audio inputs.
5. In the Open These Windows fields, select both Synth Property Page and Synth Rack view. These
two options open Cakewalk TTS-1’s property page (interface), and the Synth Rack view,
respectively.
6. Click OK.
SONAR inserts 4 synth tracks that each have one of Cakewalk TTS-1’s outputs as an input (notice that
these tracks have the soft synth label next to their track numbers), opens the Synth Rack view with
Cakewalk TTS-1 displayed in the first row, and opens Cakewalk TTS-1’s property page.
Notice that the Output field of the MIDI track is labeled Cakewalk TTS-1 1. The “1” means that this is
the first instance of Cakewalk TTS-1 that you have inserted into this project. If you use the Insert-Soft
Synths command to insert another instance or copy of Cakewalk TTS-1 into this project, its label will
be Cakewalk TTS-1 2, and it will function as a totally separate synth. MIDI data in tracks that use
Cakewalk TTS-1 1 as an output will have no effect on MIDI tracks that have Cakewalk TTS-1 2 as an
output.
Playing MIDI Tracks through a Soft Synth
Now that you have verified that Cakewalk TTS-1 is installed, let’s try some of its sounds on some prerecorded MIDI data.
To Play MIDI Tracks through Cakewalk TTS-1
1. Drag the Cakewalk TTS-1 property page out of the way for now, and in the first MIDI track (Guitar
1), click the dropdown arrow in the track’s Output field, and choose Cakewalk TTS-1 as an output.
Notice that when you choose Cakewalk TTS-1 as a track’s output, the patch for that track’s MIDI
channel in Cakewalk TTS-1 interface changes to the same one that the track displays.
2. Set the Output fields in all the other MIDI tracks to Cakewalk TTS-1. Note: When the cursor is in
the Output field of one track, pressing the Up or Down arrow key moves the cursor to the same
field in the next track.
3. Let’s insert a patch change in track 1: click the track number of the Guitar 1 track to select it, and
move the Now time to the Verse 1 marker by clicking the Next Marker button once (the Next
Marker button is in the Markers toolbar; if you don’t see it, use the View-Toolbars command and
check Markers).
4. Use the Insert-Patch/Bank Change command to open the Bank/Patch Change dialog box.
5. In the Bank field, select 15488-Preset Normal 0, and in the Patch field, select Overdrive Gt, and
click OK.
Now you’ve routed your MIDI tracks through Cakewalk TTS-1, and inserted a patch change. Rewind
the project and play it to hear the project through Cakewalk TTS-1.
English
Converting Your Soft Synth Tracks to Audio
Once your project sounds the way you want it, it’s extremely easy to convert your soft synth MIDI tracks
to either new audio tracks, or Wave, MP3, or other exportable files.
To Convert Your Soft Synth Tracks to New Audio Tracks
1. Mute all tracks that you don’t want to convert; make sure you don’t mute the synth track(s) that
the soft synth is patched into, or the MIDI track(s) that you are using as a source.
97
Page 98

:
2. Let’s set our MIDI tracks to use different outputs on the TTS-1: in the TTS-1 interface, click the
System button to open the System Settings panel, and click the Option button in System Settings
to open the Options dialog.
3. On the Output Assign tab look in the Tone Name column, and click one of the four Output buttons
next to each name in the Tone Name column. This assigns your individual MIDI instruments to
different audio outputs from the TTS-1. Click the Close button.
4. Use the Edit-Bounce to Track(s) command.
The Bounce to Track(s) dialog box appears.
5. In the Source Category field, choose Tracks.
6. In the Channel Format field, choose mono if you want mono tracks, and stereo if you want stereo
tracks.
7. In the Source/Buses field, make sure all 4 outputs are selected. This will create a separate audio
track for each selected output. If you wanted to combine your MIDI tracks into just one audio
tracks, send all the MIDI tracks through just one output (Step 3), and select only that output in the
Source/Buses field.
8. In the Mix Enables field, make sure all choices are selected.
9. Click OK.
SONAR creates new audio tracks from the outputs you selected. When you’re through converting, don’t
forget to mute your MIDI tracks so you won’t hear them and the new audio track(s) at the same time.
To Export Your Soft Synth Tracks as Wave, MP3, or Other Type Files
1. Mute all tracks that you don’t want to export; make sure you don’t mute the synth track(s) that the
soft synth is patched into, or the MIDI track(s) that you are using as a source.
2. Use the File-Export-Audio command.
The Export Audio dialog box appears.
3. In the Look in field, choose the location where you want the exported file to be.
4. Type a file name in the File name field.
5. In the Files of Type field, choose the kind or file you want to create.
6. In the So urce Category field, choose Tracks if you want to create sepa rate files for each MIDI track,
or choose Entire Mix if you want to create one file.
7. Choose a channel format, sample rate, and bit depth that are appropriate for the new file(s) you
are creating. Don’t choose Split Mono in the Channel Format field if you want to export a single
file.
8. In the Source/Buses field, select all outputs if you chose Tracks in Step 6, or accept the default if
you chose Entire Mix.
9. In the Mix Enables field, make sure all choices are selected.
10. Click OK.
SONAR creates a new audio file or files of the type you specified. Find the file(s) in the folder you
specified, and double-click each file to listen to it.
98
Page 99

Tutorial 9—Drum Maps
In SONAR drum maps allow you to assign a single MIDI track to multiple outputs. MIDI drum tracks
appear in the Piano Roll view’s Drum Grid pane. In the Note Map pane you can map pitches to notes in
any number of software or hardware outputs.
In this tutorial we are going to create a drum map, create a MIDI drum track using the Pattern Brush,
and use the drum map to map drum notes to several different outputs.
Create a New Project
First, we need to create a new project.
1. Select File-New from the menu.
2. In the New Project File dialog box, enter Tutorial9 in the Name field.
3. Select the Normal template from the template list and click OK..
Creating a Drum Map
Drum maps allow you to map note pitches from the same track to different output devices, either
hardware or software.
Note: Before you begin, make sure you have some MIDI devices selected. To check, select Options-
MIDI Devices.
To Create a New Drum Map
1. In a MIDI track, click the Output dropdown menu and choose Drum Map Manager from the
menu that appears.
The Drum Map Manager dialog appears.
2. Click the Create New Drum Map button .
A new drum map appears in the Drum Maps Used in Current Project field.
3. Click the Presets dropdown arrow and select GM Drums (Complete Kit).
4. In the Out Port column, click one of the down arrows, hold down the Ctrl and Shift keys, and click
the name of the port or instrument that you want to hear drums on.
All the Out Port entries change to the port or instrument you selected. Later, we’ll start sending
individual notes to different outputs.
5. In the Chn column, make sure all entries are set to 10, or whatever MIDI channel your drum
sounds are on.
6. Close the Drum Map Manager.
English
Create a Drum Track
You can use any blank MIDI track for your drums. If you don’t have a MIDI track, create using the
Insert-MIDI Track command.
To Assign a MIDI Track to a Drum Map
1. Display the Track view if it is minimized.
2. In the track you want to assign to a drum map, click the Output dropdown and select DM1GM
Drums (Complete Kit) from the options in the menu that appears.
To Create a Drum Track Using the Pattern Brush
1. Select the track you have assigned to a drum map and select View-Piano Roll.
99
Page 100

:
The blank drum track appears in the Drum Grid pane of the Piano Roll view.
2. In the Piano Roll view, click on the down arrow to the right of the Pattern Brush tool and
select Kick+Snare Patterns (R-T)-Stacy 7.
3. Click the down arrow again and select Use Pattern Polyphony. This option tells SONAR to use
the original pitch values when “painting” notes in the Drum Grid pane.
4. Click on the Pattern Brush to select it.
5. Starting at the beginning of your track, click and drag the Pattern Brush tool for a few measures in
the Drum Grid pane.
A series of notes, at different pitch values appears in the Drum Grid pane. If you don’t see any
notes, scroll down in the Drum Grid to see the notes.
6. Click the Pattern Brush down arrow again and select Cymbal Patterns (C-F)-Fill 4.
7. Repeat step 5.
8. Listen to your drum track. Make a mental note of the drum sounds your hear, because they are
about to change.
Now it is time to mix things up a bit. Lets send some of your drum sounds to a different output.
Map Drum Notes to Different Outputs
First, we need to create an output to use, so let’s open Cakewalk TTS-1 and use that soft synth for this
part of the tutorial.
To Open Cakewalk TTS-1
1. Select View-Synth Rack from the menu.
100
2. Click the Insert Synth button in the Synth Rack toolbar and select Soft Synths-Cakewalk
TTS-1 from the menu that appears.
The Insert Soft Synth Options dialog appears.
3. Make sure that the MIDI Source option in the Create These Tracks section is unchecked.
4. In the Create These Tracks section, check the First Synth Audio Output option. This option creates
a single synth output track.
5. In the Open These Windows section, check the Synth Property Page option. This option opens
Cakewalk TTS-1 when we close the Insert Soft Synth Options dialog.
6. Click OK.
7. An synth output track for the Cakewalk TTS-1 appears in the Track view and the Cakewalk TTS-1
appears. If you don’t see the track, scroll down in the Track pane to find it.
Now, we can map notes to different outputs.
To Map a Note to a New Output
1. Select your drum track and open the Piano Roll view by selecting View-Piano Roll from the
menu.
2. Right-click in the Note Map pane (the list of drum names on the far left of the Piano Roll view) and
select Drum Map Manager from the right-click menu.
The Drum Map Manager appears.
3. In the Drum Map Manager, change the Out Port for the In Note 46 (Bb3) to Cakewalk TTS-1.
 Loading...