

Page 1

™
SONAR
User’s Guide
Recording System
Page 2

Information in this document is subject to change without notice and does not represent a
commitment on the part of Twelve Tone Systems, Inc. The software described in this document is
furnished under a license agreement or nondisclosure agreement. The software may be used or
copied only in accordance of the terms of the agreement. It is against the law to copy this software
on any medium except as specifically allowed in the agreement. No part of this document may be
reproduced or transmitted in any form or by any means, electronic or mechanical, including
photocopying and recording, for any purpose without the express written permission of Twelve
Tone Systems, Inc.
Copyright © 2007–2008 Twelve Tone Systems, Inc. and Roland Corporation. All rights reserved.
Cakewalk is a registered trademark of Twelve Tone Systems, Inc. SONAR and the Cakewalk logo
are trademarks of Twelve Tone Systems, Inc. Other company and product names are trademarks of
their respective owners.
Visit Cakew alk on the World Wide Web at www.cakewal k.com.
Page 3

Table of Contents
SONAR™ REAC Recording System . . . . . . . . . . . . . . . . . . . . . . . . . . . . . . . . . . . . . . . . . . . 5
Equipment Provided . . . . . . . . . . . . . . . . . . . . . . . . . . . . . . . . . . . . . . . . . . . . . . . 5
Hardware and Software Requirements. . . . . . . . . . . . . . . . . . . . . . . . . . . . . . . . . 5
Digital Snake System Requirements . . . . . . . . . . . . . . . . . . . . . . . . . . . . . . . 5
Computer Requirements . . . . . . . . . . . . . . . . . . . . . . . . . . . . . . . . . . . . . . . . 5
Audio Interface . . . . . . . . . . . . . . . . . . . . . . . . . . . . . . . . . . . . . . . . . . . . . . . . 6
Software . . . . . . . . . . . . . . . . . . . . . . . . . . . . . . . . . . . . . . . . . . . . . . . . . . . . . 6
Digital Audio Clock Synchronization. . . . . . . . . . . . . . . . . . . . . . . . . . . . . . . . 6
Hardware Setup . . . . . . . . . . . . . . . . . . . . . . . . . . . . . . . . . . . . . . . . . . . . . . . . . . 6
Software Installation . . . . . . . . . . . . . . . . . . . . . . . . . . . . . . . . . . . . . . . . . . . . . . . 8
PC Setup . . . . . . . . . . . . . . . . . . . . . . . . . . . . . . . . . . . . . . . . . . . . . . . . . . . . . . 13
Configure Windows XP SP2. . . . . . . . . . . . . . . . . . . . . . . . . . . . . . . . . . . . . 14
Configure Windows VISTA . . . . . . . . . . . . . . . . . . . . . . . . . . . . . . . . . . . . . . 17
SPS/FA-66 Setup. . . . . . . . . . . . . . . . . . . . . . . . . . . . . . . . . . . . . . . . . . . . . 20
SONAR 7 Producer Setup . . . . . . . . . . . . . . . . . . . . . . . . . . . . . . . . . . . . . . 20
About the REAC Control Panel . . . . . . . . . . . . . . . . . . . . . . . . . . . . . . . . . . 22
Notes on Word Clock, Synchronization and Latency . . . . . . . . . . . . . . . . . . 24
Known Issues . . . . . . . . . . . . . . . . . . . . . . . . . . . . . . . . . . . . . . . . . . . . . . . . . . . 25
Troubleshooting . . . . . . . . . . . . . . . . . . . . . . . . . . . . . . . . . . . . . . . . . . . . . . . . . 26
English English English English
Index. . . . . . . . . . . . . . . . . . . . . . . . . . . . . . . . . . . . . . . . . . . . . . . . . . . . . . . . . . . . . . . . . . . . 29
LICENSE AGREEMENT. . . . . . . . . . . . . . . . . . . . . . . . . . . . . . . . . . . . . . . . . . . . . . . . . . . . . 33
Table of Contents
•
3
•
•
•
•
•
Page 4

•
SONAR REAC Recording System User’s Guide
4
•
•
•
•
•
Page 5

SONAR™ Recording System
à S-4000S with SO-AES4 (AES/EBU Option
Equipment Provided
Software
• Cakewalk SONAR 7 Producer Edition
• SONAR REAC Driver for Windows
• Cakewalk SPS-66/Edirol FA-66 Driver
Hardware
Card) at FOH position for audio outputs to a
console
à S-4000-SP REAC Gigabit Ethernet Splitter
Note: All above systems can be used without
the M-400 mixer.
English English English English
• Cakewalk SPS-66 or Edirol FA-66 FireWire
Audio Interface
Hardware and Software
Requirements
Digital Snake System
Requirements
This recording system can be used with the
following RSS Digital Snake Systems:
• RSS V-Mixing System
à (2) S-1608 at stage position
à M-400 at FOH position
• RSS S-1608 System
à S-1608 at stage position
à S-0816 at FOH position for audio outputs to
console
à S-4000-SP REAC Gigabit Ethernet Splitter
• RSS S-4000 System
à S-4000S at stage position
Computer Requirements
This system is currently designed to work on PC
computers only, but can also be run on Mac OS X
using Boot Camp.
• Intel Core 2 Duo 2GHz or higher
•RAM
à 3 GB for 40 channel recording
à 2 GB for 24 channel recording
à 1.5 GB for 8 channel recording
• Audio Recording Hard Drive
à RAID 0 with (2) SATA Drives for 8 to 40
channels
à Internal SATA or eSATA for 8 to 24 channels
à USB 2.0 for 8 channels only
• Gigabit Ethernet Port
• Windows Vista (32 bit) or Windows XP SP2 (32
bit)
à 64 bit systems are not officially supported
• DVD-ROM Drive for software installation
• RSS-4000-SP Gigabit Ethernet Switch
(depending on system)
Equipment Provided
•
5
•
•
•
•
•
Page 6
• CAT5e Gigabit Ethernet Cables
S-1608 16-ch Snake (slave) S-1608 16-ch Snake (slave)
REAC A REAC B
REAC Split
PC with SONAR 7
FireWire
Digital Audio Clock
SPS/FA-66
M-400 Digital Mixer (master)
Monitoring
à Do not use CAT6 cables
à If possible, only use the supplied CAT5e
from Roland
There are a number of other variables that may
affect performance; including differences in
hardware design, system configuration and overall
combination of software applications that are
installed.
Audio Interface
The following audio interfaces have been approved
for monitoring by Roland and Cakewalk:
• Cakewalk SPS-66
• EDIROL FA-66
Software
• Cakewalk SONAR 7 Producer or later
• SONAR REAC driver for Windows
• Cakewalk SPS-66/EDIROL FA-66 driver
For additional information and operating
instructions, please refer to the manuals for the
above applications.
Digital Audio Clock
Synchronization
In order to monitor the recording through the SPS/
FA-66 without noise or monitoring glitches, the SPS/
FA-66 must be synchronized to the Digital Snake
System, by connecting the digital output of the
snake to the optical input of the SPS/FA-66. Please
refer to the diagrams in the Hardware Setup section
for more information.
Hardware Setup
The following diagrams are common configurations
for the Digital Snake System with a PC. Please refer
to the diagram that best reflects your system.
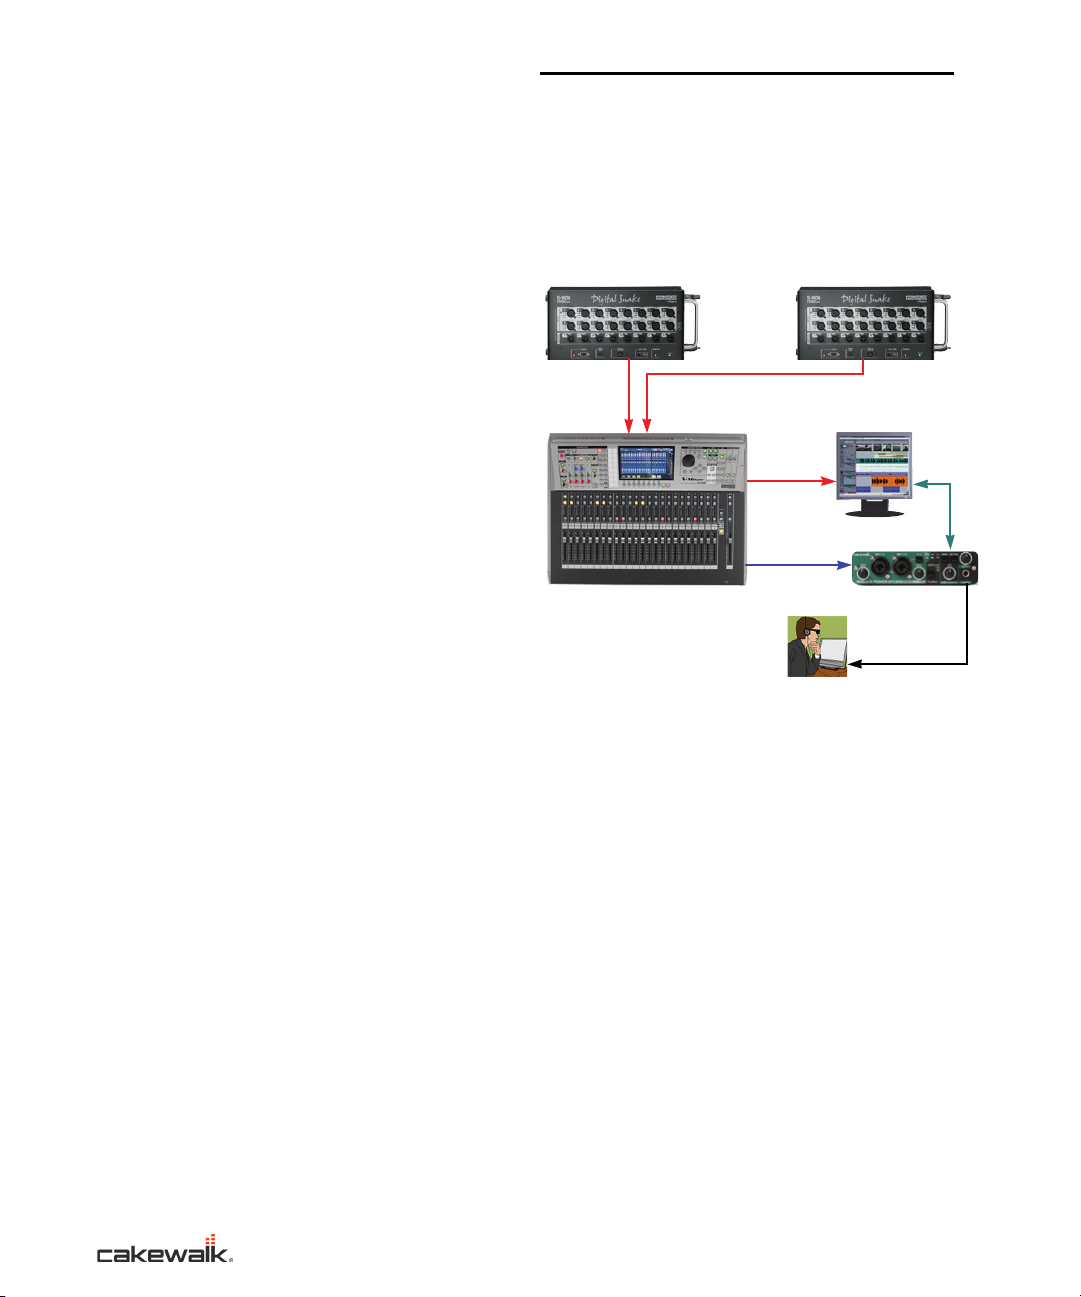
Figure 1. V-Mixing System Diagram
The preceding V-Mixing system consists of two
S-1608(s) (16 inputs x 2 and 8 outputs x 2) and an
M-400.
The two S-1608(s) must be configured as the
SLAVE using the REAC MODE switches and the
M-400 must be configured as the FOH (MASTER)
using the REAC Config option on the M-400.
Please refer to the M-400 manual for more details.
The SPS/FA-66 is used for monitoring during
recording.
•
SONAR REAC Recording System User’s Guide
6
•
•
•
•
•
Page 7
The sample rate of SPS/FA-66 must be set to the
S-1608 (master)
PC with SONAR 7
S-4000SP
Digital Audio Clock
S-0816 (slave)
SPS/FA-66
FireWire
same sample rate as the M-400. You can check the
sample rate of the M-400 by following these steps:
1. Push the SYSTEM button.
2. On screen, look for INTERNAL SAMPLING
FREQ that will tell you the sample rate of the M-
400.
Figure 2. S-1608 System Diagram
Note: The SONAR REAC Driver Control
Panel also displays the current REAC sample
rate when connected.
Digital Audio Clock Synchronization is necessary to
avoid monitoring problems, such as noises and
gaps. To synchronize the SPS/FA-66 with the Digital
Snake System, simply connect an optical cable from
the digital output of the M-400 to the digital input of
the SPS/FA-66 and press the DIGITAL IN SYNC
button on the SPS/FA-66.
The SONAR REAC driver can receive up to 40
channels of audio data from the REAC split port on
the M-400. The following table shows the input
channel numbers of the SONAR REAC driver and
the corresponding audio sources.
SONAR REAC Driver
Input channel No.
1BUS 1
2 BUS 2
... ...
8 BUS 8
9 1ch (REAC A)
10 2ch (REAC A)
... ...
24 16ch (REAC A)
25 1ch (REAC B)
26 2ch (REAC B)
... ...
40 16ch (REAC B)
Table 1. Input channel numbers of the SONAR REAC
driver and audio sources
Audio Source
English English English English
The preceding S-1608 system consists of an S-1608
(16 inputs and 8 outputs) and an S-0816 (8 inputs
and 16 outputs). To record 16 inputs from the
S-1608 and 8 inputs from the S-0816 into SONAR,
configure the S-1608 as the MASTER using the
REAC MODE switch, and configure the S-0816 as
the SLAVE.
The SPS/FA-66 is used for monitoring during
recording.
Digital Audio Clock Synchronization is necessary to
avoid monitoring problems, such as noises and
gaps. To synchronize the SPS/FA-66 with the Digital
Snake System, simply connect an optical cable from
the digital output of the Digital Snake to the digital
input of the SPS/FA-66.
Hardware Setup
•
7
•
•
•
•
•
Page 8
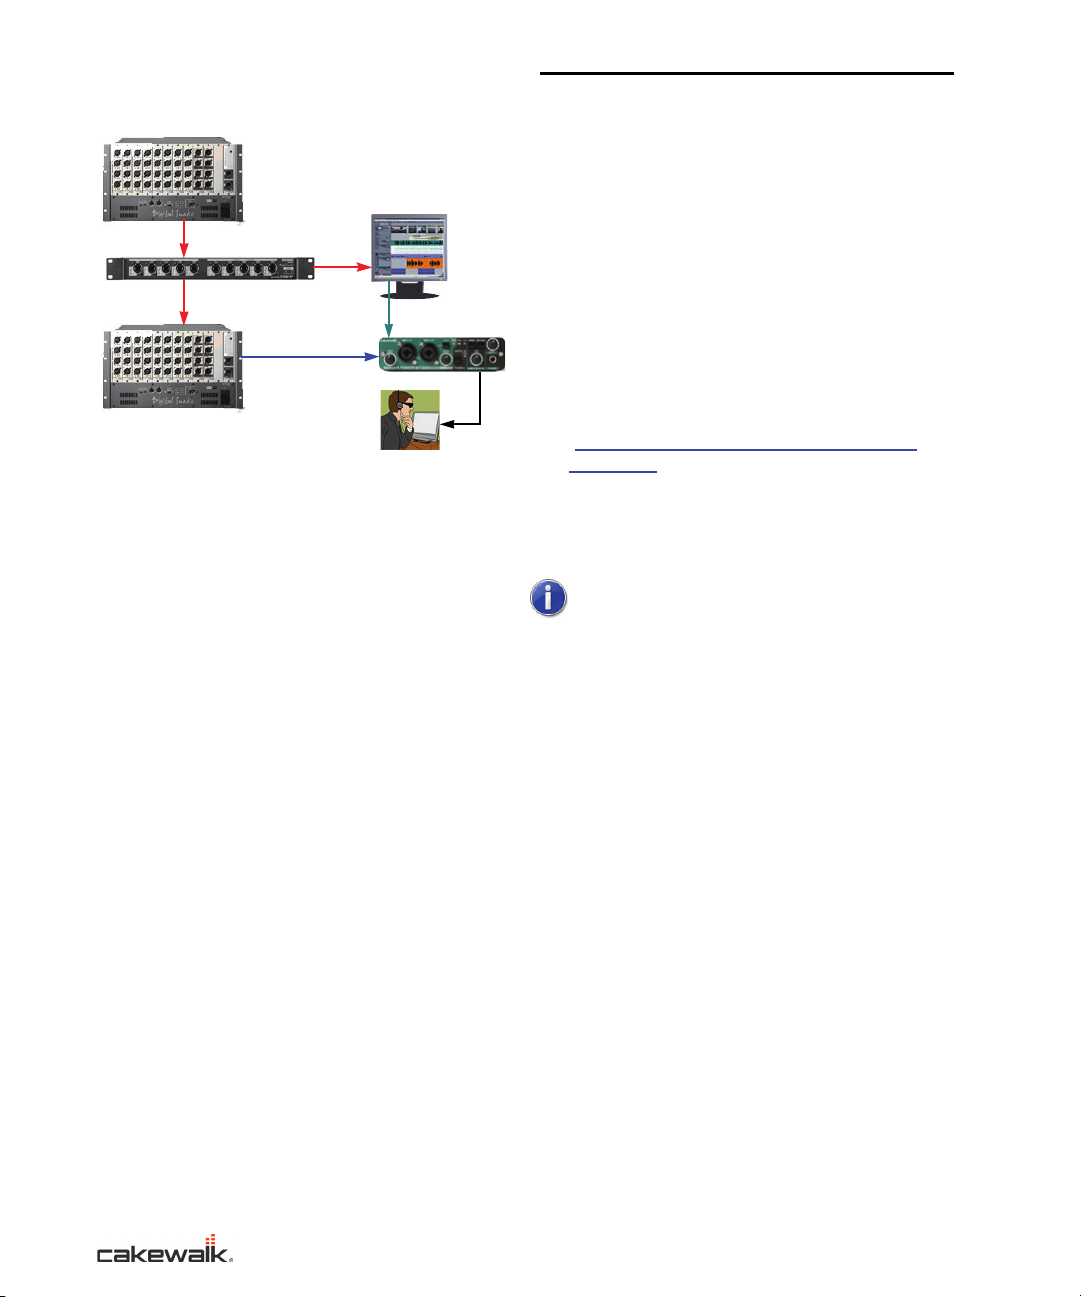
Figure 3. S-4000 System Diagram
S-4000S-3208 (master)
PC with SONAR 7
S-4000SP
Digital Audio Clock
SPS/FA-66
FireWire
S-4000S-0832 (slave)
The preceding S-4000 system consists of an
S-4000S-3208 (32 inputs and 8 outputs) and an
S-4000S-0832 (8 inputs and 32 outputs with an
SO-AES4 module (4 channel AES/EBU Output
Module). The SO-AES4 module is an optional card
that can be purchased from your local dealer.
To record 32 inputs from the S-4000S-3208 into
SONAR, configure the S-4000S-3208 as the
MASTER and the S-4000S-0832 as the SLAVE
using the REAC MODE switches.
The SPS/FA-66 is used for monitoring during
recording.
Digital Audio Clock Synchronization is necessary to
avoid monitoring problems, such as noises and
gaps. The connection occurs between the REAC
hardware (AES/EBU or Wordclock) and the SPS/
FA-66 (Optical Toslink). The following methods have
been approved for use with this system;
• AES/EBU-to-optical converter or other digital
format converter
• AES/EBU to S/PDIF Transformer to optical
converter
• BNC Word clock to RCA type S/PDIF Cable (for
S-4000S configurations only)
Software Installation
Install SONAR 7 Producer Edition
Please refer to the installation guide for SONAR 7.
1. Insert the SONAR 7 Producer DVD into the PC’s
DVD-ROM drive.
2. Launch the installer and follow the on-screen
instructions.
3. After you have completed the installation, start
SONAR and follow the on-screen instructions to
register the software.
4. Be sure to download any updates for SONAR.
You can find updates in the SUPPORT section
(http://www.cakewalk.com/Support/SONAR/
default.asp) of the Cakewalk web site. You must
be registered to get updates.
5. Exit SONAR
Note: The SONAR REAC Driver does not
officially support 64 bit Operating Systems at
this time.
Install SONAR REAC Driver
1. Insert the REAC/SPS-66 CD-ROM into the PC’s
DVD-ROM drive
2. Double click the REACDriverSetup file located
in the REAC Driver folder.
3. When the SONAR REAC Driver Setup Wizard
appears, follow the on-screen instructions to
begin installation.
4. When installation completes, restart the
computer.
Install SPS/FA-66 Driver
To install the Windows XP SPS/FA-66 driver, see
“Install Windows XP SPS/FA-66 Driver” on page 9.
To install the Windows Vista SPS/FA-66 driver, see
“Install Windows Vista SPS/FA-66 Driver” on page
11.
•
SONAR REAC Recording System User’s Guide
8
•
•
•
•
•
Page 9

WARNING: Do not connect the SPS/FA-66 to
C:\Program Files\Cakewalk\SPS-66
Welcome to CAKEWALK SPS-66 Driver Setup program
This program will install CAKEWALK SPS-66 Driver in the Destination
Folder shown below on your computer.
CAKEWALK SPS-66 Driver Settings
1. Connect the SPS-66 to this co mputer and turn it
on.
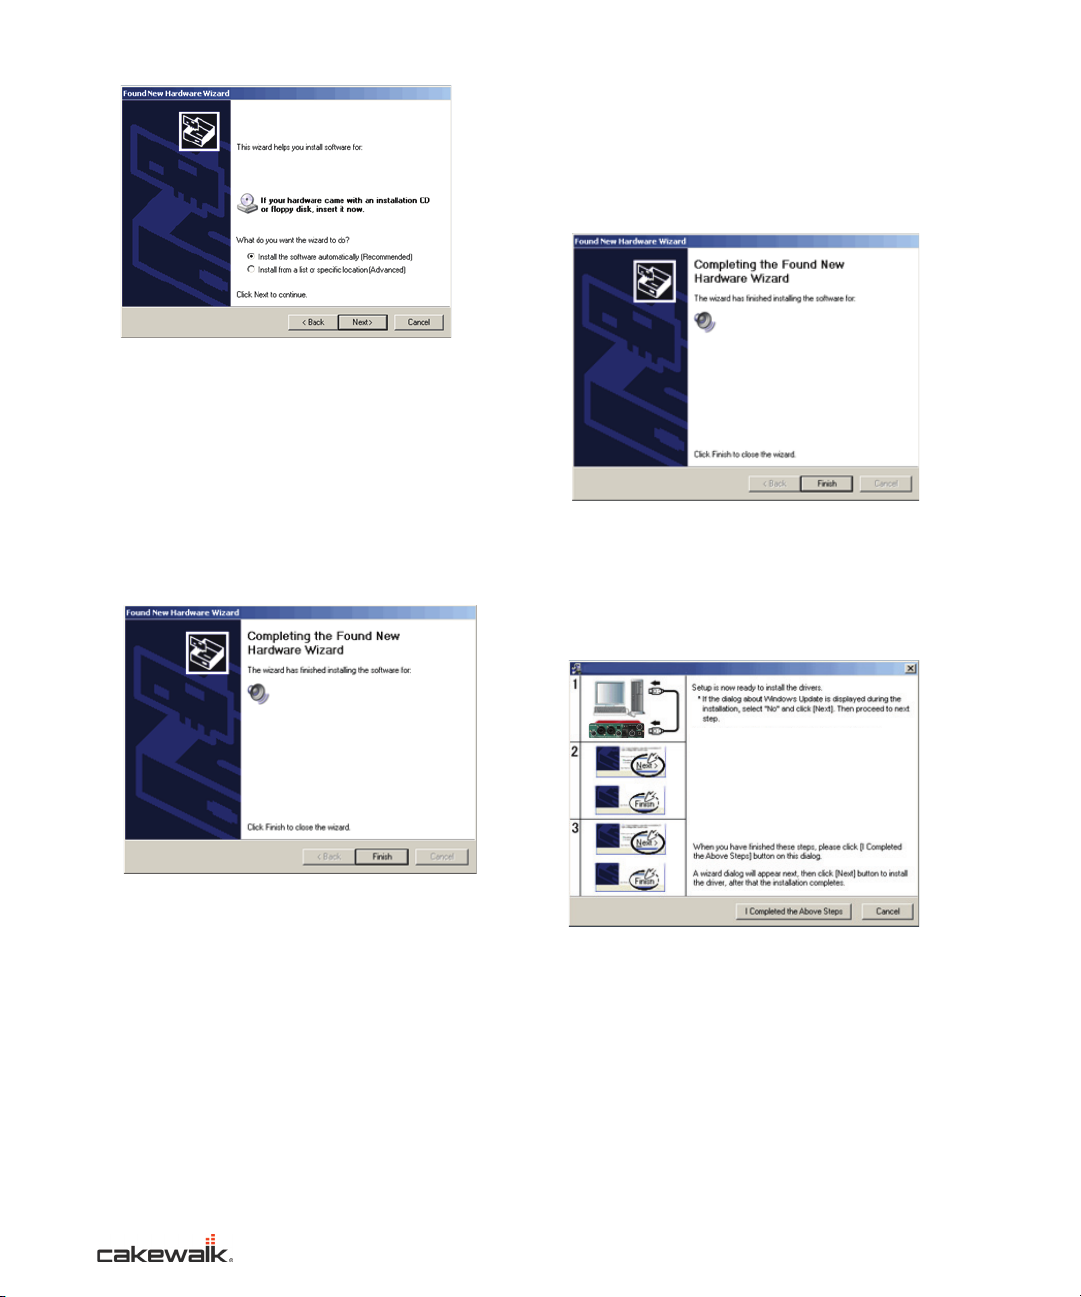
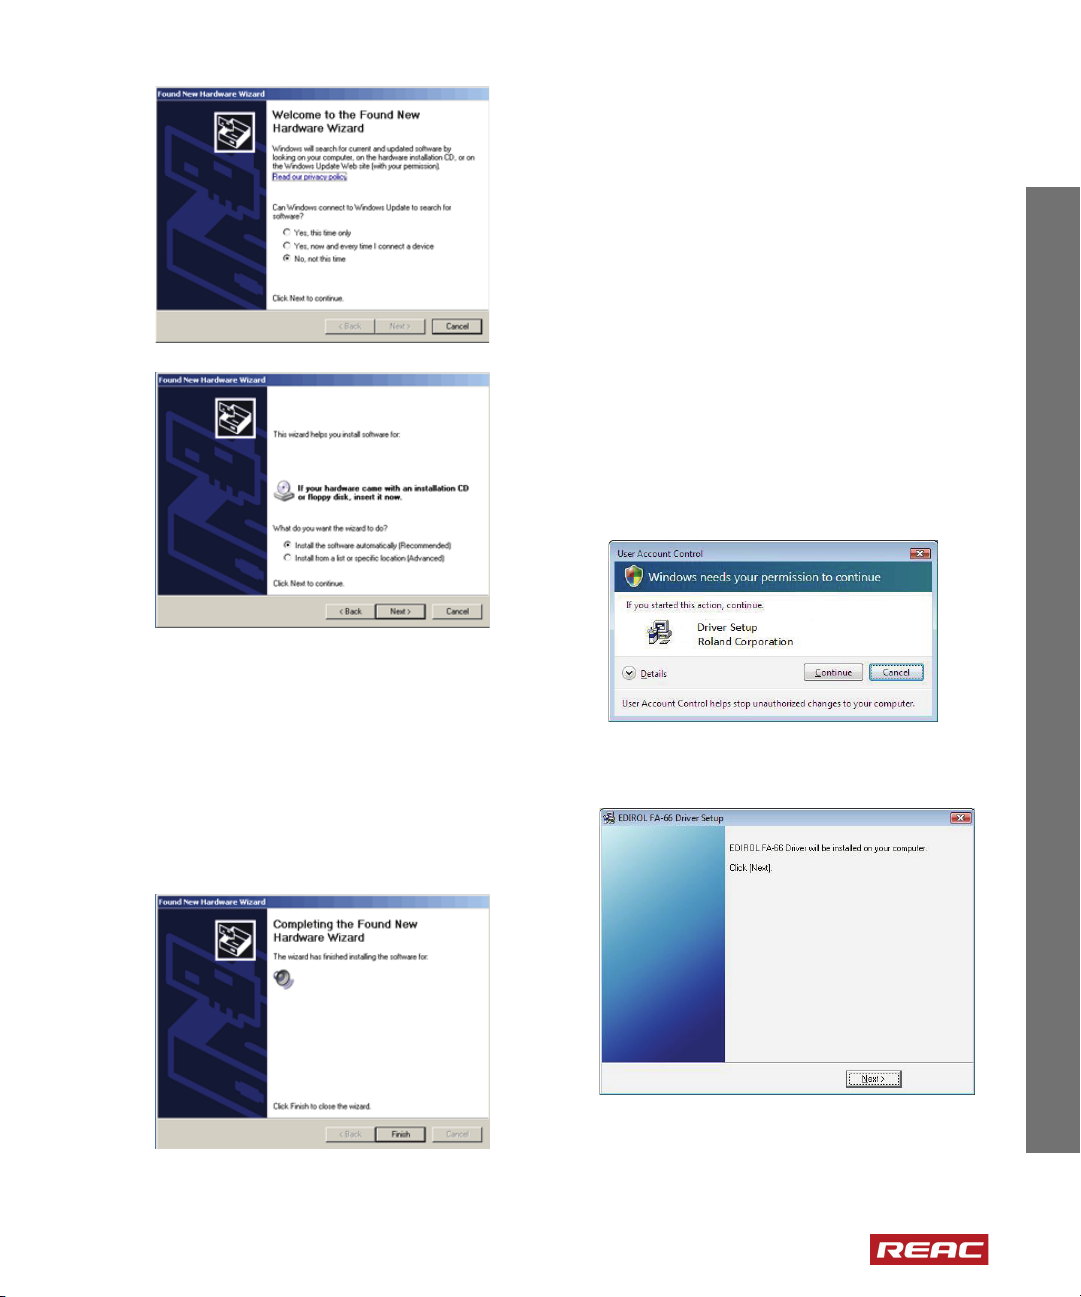
2. When “Welcome to the Found New Hardware
Wizard” app ears, click the [Next] button to
install the driver.
When “Completing the Found New Hardware
Wiza rd” is disp layed . clic k the [ Finis h] but ton.
3. When “Welcome to the Found New Hardware
Wizard” appears again, click the [Next] button
to install the driver. When “Completing the
Found New Hardware
Wizard” is displayed, click the [Finish] button.
CAKEWALK SPS-66 Driver Se ttings
the computer until indicated in the directions
below.
Install Windows XP SPS/FA-66 Driver
1. Make sure you’re logged into Windows as an
Administrator, and that Driver Signing Options
in the Windows Control Panel is set to Warn,
and place the installation CD into your computer.
After the CD is in the drive, use the Install/
Uninstall Components option within the
AutoRun on the CD to choose to install the SPS/
FA-66 driver. The SPS/FA-66 driver installation
program is in the Hardware/<Cakewalk SPS-
66 or Edirol FA-66>/Driver/XP_EN
folder, and is called setup.exe.
2. After hardware driver installation begins, the
SPS/FA-66 Driver Setup dialog appears. Click
Install.
English English English English
à Make sure sample rate switch on the rear of
the unit is set to 44.1.
à Use a FireWire (IEEE 1394) cable to connect
the SPS/FA-66 to your computer.
à With the power switch turned off, connect the
AC adapter to the SPS/FA-66.
à Plug the AC adapter’s power cord into an AC
outlet.
4. Turn on the power switch of the SPS/FA-66. The
Found New Hardware Wizard message
appears near the taskbar. Please wait.
5. The Welcome to the Found New Hardware
Wizard screen appears.
If a dialog says The software you are installing
has not passed Windows Logo testing, click
Continue Anyway.
3. The Setup Is Now Ready to Install the Drivers
screen appears.
Software Installation
•
9
•
•
•
•
•
Page 10
If Windows asks you to search for software, click
Cakewalk SPS-66 Sub 1
Cakewalk SPS-66 Sub 1
Cakewalk SPS-66
1. Connect the SPS-66 to this computer and turn it
on.
2. When “Welcome to the Found New Hardware
Wizard” appears, click the [Next] button to
install the driver.
Wh en “Completing the Found New Hardware
Wizard” is displayed. click the [Finish] button.
3. When “Welcome to the Found New Hardware
Wizard” appears again, click the [Next] button
to install the driver. When “Completing the
Found New Hardware
Wizard” is displayed, click the [Finish] button.
CAKEWAL K SPS-66 Driver Se ttings
No, not this time. Make sure that the next
dialog box indicates SPS/FA-66 Sub 1, choose
Install the software automatically
(Recommended) and click Next. The dialog
displays Please wait while the wizard installs the
software.
6. When the Please wait screen finishes, the
Completing the Found New Hardware Wizard
screen appears. Click Finish.
(Recommended) and click Next. The dialog
displays Please wait while the wizard installs the
software.
8. When the Please wait screen finishes, the
Completing the Found New Hardware Wizard
screen appears. Click Finish.
The Found New Hardware message appears
near the taskbar.
9. In the SPS/FA-66 Driver Setup dialog box that
is already displayed, click I Completed the
Above Steps.
Once again, the Found New Hardware message
appears near the taskbar.
7. The same dialog boxes as in step 6 appear now,
with the exception that instead of Sub 1, the
Found New Hardware Wizard dialog is labeled
Sub 2. The Welcome to the Found New
Hardware Wizard screen appears.
If Windows asks you to search for software, click
No, not this time. Make sure that the next
dialog box indicates SPS/FA-66 Sub 2, choose
Install the software automatically
•
SONAR REAC Recording System User’s Guide
10
•
•
•
•
•
The Found New Hardware message appears
near the taskbar.
10. The same dialog boxes as in step 6 appear now,
with the exception that instead of Sub 1, the
Found New Hardware Wizard dialog is labeled
SPS/FA-66. The Welcome to the Found New
Hardware Wizard screen appears.
Page 11
If Windows asks you to search for software, click
Cakewalk SP S-66
Cakewalk SPS -66
No, not this time. Make sure that the box
indicates SPS/FA-66, choose Install the
software automatically (Recommended) and
click Next. If a dialog says The software you
are installing has not passed Windows Logo
testing, click Continue Anyway.
11. When the Please wait screen finishes, the
Completing the Found New Hardware Wizard
screen appears.
Click Finish. Once again, the Found New
Hardware message appears near the taskbar.
This completes driver installation. If Windows asks if
you want to restart your computer, click Yes.
Install Windows Vista SPS/FA-66
Driver
1. Place the installation CD into your computer.
After the CD is in the drive, use the Install/
Uninstall Components option within the
AutoRun on the CD to choose to install the SPS/
FA-66 driver. The SPS/FA-66 driver installation
program is in the Vista Hardware/
<Cakewalk SPS-66 or Edirol FA-66>/
Driver folder and is called setup.exe.
2. When the hardware driver installation begins, a
User Account dialog will appear. Click
Continue to begin the Vista SPS/FA-66 driver
installation.
3. Click Next in the SPS/FA-66 Driver Setup
dialog.
English English English English
Software Installation
•
11
•
•
•
•
•
Page 12

4. Click Next to begin the SPS/FA-66 driver
installation.
5. In the first Windows Security dialog, click
Install.
6. When the second Windows Security dialog
appears, click Install.
• Make sure that the
SAMPLE RATE switch on the
rear of the unit is set to the same sample rate as
your REAC system.
Note to European users:All SPS/FA-66
hardware units have English text.
• Connect a 6pin FireWire cable from the SPS/
FA-66 to a FireWire port on your computer. (This
port is bus-powered and does not require an
external power source)
• Switch the
POWER SWITCH from Off to Bus.
Note: If you are using the 4 pin (mini
connector) to 6 pin FireWire cable, you will
need to use the supplied AC adapter to power
your SPS/FA-66.
Applying power will cause the “Connecting to the
SPS/FA-66” message to display.
7. Connect the SPS/FA-66 to your computer. See
note below for power options for the SPS/FA-66.
•
SONAR REAC Recording System User’s Guide
12
•
•
•
•
•
Page 13

8. Click Finish to complete the driver installation.
Windows may prompt you to restart your computer.
If it does, click Yes .
You may now begin to use your SPS/FA-66!
PC Setup
The two Windows operating systems that have been
approved are:
• Windows XP SP2 (32 Bit)
• Windows Vista (32 Bit)
English English English English
Note: The SONAR REAC Driver does not
officially support 64 bit Operating Systems at
this time.
Please select your system and follow the
instructions to optimize your PC for this recording
system. You will only need to make these changes
once.
Important: Before configuring the computer,
please make sure that you have completed the
following steps:
• Make sure you have connected the Digital
Audio Clock from the Digital Snake to the
audio interface.
• Make sure you have already installed the
following software and drivers:
à SONAR 7 Producer
à The SONAR REAC Driver
à The SPS/FA-66 Driver
• Make sure you have installed the latest
chipset driver and graphics driver for your
computer.
• You may want to disable automatic updates
for certain applications that may inhibit
performance. These typically include Adobe
applications, QuickTime, firewall and antivirus software.
PC Setup
•
13
•
•
•
•
•
Page 14

Configure Windows XP SP2
PC Performance Setting
1. On the Windows Desktop, right click My
Computer
2. Choose Properties from the pop-up menu
The System Properties dialog appears.
3. Click the Advanced tab.
4. In the Performance area, click Settings.
The Performance Options dialog appears.
7. Click OK to apply the setting.
8. Click OK to close the System Properties dialog.
Power Management Setting
1. Right-click the Desktop and choose Properties
from the pop-up menu.
The Display Properties dialog appears.
2. Click the Screen Saver tab.
3. In the Screen Saver box, select (None).
5. Click the Advanced tab.
6.
a) In the Processor Scheduling area, click
Background services.
b) In the Processor Scheduling area, click
Programs.
•
SONAR REAC Recording System User’s Guide
14
•
•
•
•
•
4. In the Monitor power area, click Power.
Page 15

The Power Options Properties dialog appears.
5. Click the Power Schemes tab.
6. In the Power Schemes box, select Always On.
7. In the Settings for Always On power scheme
area, set all options to Never.
8. Click OK to close the Power Options
Properties dialog.
9. Click OK to close the Display Properties dialog.
The Network Connections dialog appears.
3. Click the Network Connections icon.
4. If there is more than one connection, disable all
of the connections except one Local Area
Connection which is used to connect to the
Digital Snake system.
How to disable the connections
1. Right-click the connection icon that you want to
disable.
2. Click Disable on the pop-up menu.
English English English English
Network Setting
First, disable the following devices/ports using the
BIOS setup or detach the devices from the PC:
• 2nd Ethernet(LAN) port
• Wireless LAN device
• Modem device
Please refer to your computer’s documentation for
information about disabling devices/ports.
Note: The Ethernet (LAN) port should be
used exclusively for REAC recording. This port
should not be used for any another
applications, such as Web, email and so on. If
any data packets are transferred via Ethernet,
the glitch noise or pop noise will be occur in the
Digital Snake system recording.
1. Open the Windows Control Panel.
2. Double-click Network and Internet
Connections.
3. Right-click the enabled Local Area Connection
icon and choose Properties from the pop-up
menu.
The Local Area Connection Properties dialog
appears.
4. Click the General tab and clear all check boxes
except Internet Protocol (TCP/IP).
For example, clear:
à Client for Microsoft Networks
à File and Printer Sharing for Microsoft
Networks
à QoS Packet Scheduler
PC Setup
•
15
•
•
•
•
•
Page 16

5. Double-click Internet Protocol (TCP/IP).
The Internet Protocol (TCP/IP) Properties
dialog appears.
6. Click Use the following IP address and
configure as follows:
8. Click OK to close the Local Area Connection
Properties dialog.
Security Center Setting
1. Open the Windows Control Panel.
2. Double-click Security Center.
The Windows Security Center window
appears.
3. In the Manage security settings for area, click
Automatic Updates.
The Automatic Updates dialog appears.
4. Click Turn off Automatic Updates.
5. Click OK to close the Automatic Updates
dialog.
6. Click OK to close the Windows Security
Center window.
Note: In order to receive software updates,
you must revert the Security Center settings. If
Windows Update is enabled during the
recording process, the recording may gap.
Note: The specific address has no meaning; it
just serves to prevent DHCP service.
7. Click OK to close the Internet Protocol (TCP/
IP) Properties dialog.
•
SONAR REAC Recording System User’s Guide
16
•
•
•
•
•
Page 17

Configure Windows VISTA
PC Performance Setting
1. Open the Windows Control Panel.
2. Double-click System and Maintenance and
then click the System icon.
3. Click Advanced system settings located in the
left side of the Window.
If the User Account Control dialog appears,
click Continue.
4. Click the Advanced tab.
5. In the Performance area, click Settings.
6. Click the Advanced tab.
7. In the Adjust for best performance of item
area, click Background services.
8. Click OK to apply the setting.
9. Click OK to close the System Properties dialog.
Power Management Setting
1. Right-click the Desktop and click Personalize
on the pop-up menu.
2. Click the Screen Saver icon.
3. In the Screen saver box, select (None).
English English English English
6. Under High performance, click Change plan
settings.
7. In the Turn off the display and Put the
computer to sleep boxes, select Never.
4. Click Change power settings.
The Power Options window appears.
5. In the Preferred plans area, click High
performance.
8. Click Save changes.
9. Click Change advanced power settings.
The Power Options dialog appears.
PC Setup
•
17
•
•
•
•
•
Page 18

10. Click the plus (+) icon to the left of Hard Disk to
see more options.
11. Click the plus (+) icon to the left of Turn off hard
disk after to see more options.
12. In the Settings (Minutes) box, select Never.
13. Click OK to close the Power Options dialog.
14. Click Save Changes and close the window.
15. Click OK to close the Screen Saver Settings
dialog.
1. Open the Windows Control Panel.
2. Under Network and Internet,click View
network status and tasks.
3. Click Manage network connections in the left
side of the window.
4. If there is more than one connection, disable all
of connections except one Local Area
Connection, which is used to connect to the
Digital Snake System.
How to disable the connections
1. Right-click the connection icon that you want to
disable.
2. Choose Disable on the pop-up menu.
Network Setting
First, disable the following devices/ports using the
BIOS setup or detach the devices from the PC:
• 2nd Ethernet(LAN) port (* The Cakewalk
recording needs only one port)
• Wireless LAN device
• Modem device
Please refer to your computer’s documentation for
information about disabling devices/ports.
Note: The Ethernet (LAN) port should be
used exclusively for REAC recording. This port
should not be used for any another
applications, such as Web, email and so on. If
any data packets are transferred via Ethernet,
the glitch noise or pop noise will be occur in the
Digital Snake system recording.
•
SONAR REAC Recording System User’s Guide
18
•
•
•
•
•
3. Right-click the Local Area Connection icon and
click Properties on the pop-up menu.
If the User Account Control dialog appears,
click Continue.
4. Clear all check boxes except Twelve Tone
Systems Driver.
Page 19

5. Click OK to close the Local Area Connections
Properies dialog.
Security Setting
Windows Update Setting
1. Open the Windows Control Panel.
2. Under Security, click Check this computer's
security status.
3. Click Windows Update in the left side of the
window.
4. Click Change settings in the left side of the
window.
5. Choose Never check for updates and then
click OK.
If the User Account Control dialog appears,
click Continue.
Windows Defender Setting
1. Click Windows Defender located on the left
side of the Windows Security Center window.
2. Click the Tools icon at the top of the Windows
Defender window.
English English English English
3. Under Settings, click Options.
4. Under Automatic scanning, clear the
Automatically scan my computer check box.
5. Click Save to close the window.
Note: In order to receive software updates,
you must revert the Windows Defender
settings. If Windows Update is enabled during
the recording process, the recording may be
interrupted.
Sidebar Setting
1. Open the Windows Control Panel.
2. Click Appearance and Personalization.
3. Click Windows Sidebar Properties.
4. Clear the Start Sidebar when Windows starts
check box.
5. Click OK to close the Windows Sidebar
Properties dialog.
6. Restart Windows.
PC Setup
•
19
•
•
•
•
•
Page 20

Problem Reports and Solutions
Setting
1. Open the Windows Control Panel.
2. Click System and Maintenance.'
3. Click Problem Reports and Solutions.
4. Click Change settings located in the left side of
the displayed window.
5. Click Advanced settings.
6. Under For my programs, problem reporting
is, click OFF.
7. After Allow all users and programs, problem
reporting is set to, click Change Settings.
8. Select Off and click OK.
9. Choose Off in the displayed window and click
OK.
10. In the User Account Control dialog, click
Continue.
11. Click OK to close the window.
12. Click OK again and then click Close to close the
window.
SPS/FA-66 Setup
1. Push the DIGITAL IN button on the front panel of
your SPS/FA-66.
2. Set the Sample Rate switch to the same rate as
the Digital Snake.
3. Connect the AC adapter to the SPS/FA-66.
4. Connect the SPS/FA-66 to the PC using a
FireWire cable.
5. Open the Windows Control Panel.
6. Click the following items depending on your
operating system.
Windows Vista: Additional Options
Windows XP: Other Control Panel Options
7. Click the Cakewalk SPS-66/EDIROL FA-66
icon.
The Driver Setting dialog appears.
8. Move the Buffer Size slider to the Max position.
9. In the ASIO box, select Larger.
10. Click OK to close the Driver Settings dialog.
The driver displays a dialog asking that the SPS/
FA-66 be turned off and back on before the
changes will take effect.
11. Turn the SPS/FA-66 off and back on again.
SONAR 7 Producer Setup
1. Launch SONAR
2. If the Wave Profiler dialog is displayed, click
No.
3. If the Audio Driver Error dialog is displayed,
click Disable.
4. If the Tip of the Day dialog is displayed, click
Close.
5. If the No MIDI Outputs Selected dialog is
displayed, select the Don't show this again
check box and click Continue With No MIDI
Output.
6. If the No MIDI Inputs Selected dialog is
displayed, select the Don't show this again
check box and click Continue With No MIDI
Input.
7. If a message box about MIDI controllers and
control surfaces is displayed, click No.
•
SONAR REAC Recording System User’s Guide
20
•
•
•
•
•
Page 21

8. Close the Quick Start dialog box.
Audio Settings
1. On the Options menu, click Audio to open the
Audio Options dialog.
2. Click the Advanced tab.
3. In the Driver Mode box, select ASIO.
4. Click OK.
5. Close and restart SONAR.
6. On the Options menu, click Audio to open the
Audio Options dialog.
7. Click the Drivers tab.
8. Clear all the Input/Output Drivers check boxes.
9. Select all the REAC driver check boxes.
10. Click OK to close the Audio Options dialog.
11. Close and restart SONAR.
12. Confirm the following settings:
a) On the Options menu, click Audio to open the
Audio Options dialog.
b) Click the General tab
c) Click ASIO Panel to open the SONAR REAC
Driver control panel.
d) Under Sync Mode, click Locked.
This is the preferred Sync Mode. For
information about other available Sync Modes
please see “About the REAC Control Panel”
on page 22.
e) In the Playback/Monitor Device box, select
SPS/FA-66.
f) In the Record buffer box, select 11520.
g) In the REAC Inputs box, select the number of
ports that you want to record.
English English English English
h) Click OK to close the SONAR REAC Driver
control panel.
i) In the Audio Options dialog, click the
Advanced tab.
j) In the Playback I/O Buffer Size box, type 512.
k) In the Record I/O Buffer Size box, type 512.
l) Clear the Use Multiprocessing Engine check
box.
m)If SONAR is running in Windows Vista, clear
the Use MMCSS check box.
Note: Make sure that the Enable Read
Caching and the Enable Write Caching check
boxes are cleared.
n) Click OK to close the Audio Options dialog.
o) On the Option menu, click Global to open the
Global Options dialog.
p) Click the Audio Data tab.
q) In the Record Bit Depth box, select 24.
13. In the Per-Project Audio section, click Use PerProject Audio Folders.
14. Click OK to close the Global Options dialog.
PC Setup
•
21
•
•
•
•
•
Page 22

Note: The Audio Path must be set to a folder
which is located on the audio recording drive.
6. Click OK.
A new project is created.
About the REAC Control Panel
The following section describes the controls in the
SONAR REAC Driver Panel.
Preferred Sync Setting
Locked
Create a New Project
Note: 8, 16 and 40 channel REAC recording
templates are included with SONAR.
1. On the File menu, click New to open the New
Project File dialog
2. In the Templ ate list, select the REAC template.
3. Click Store Project Audio in its own Folder.
4. In the Name box, type the project name.
5. In the Location box and Audio Path box,
specify the hard drive that you use for audio
recording.
This option is selected by default. When this mode
is selected, REAC is the clock master for both
SONAR and the SPS/FA-66. Use this option when
there is a physical clock connection between the
SPS/FA-66 and the AES/EBU or Word Clock output
on the REAC hardware system. When Locked is
selected, the Freewheel Options button is
unavailable. This is the most desired sync mode
setting for this recording system.
Alternate Sync Settings
There may be situations where it is not possible to
have a dedicated clock connection between the
REAC hardware and the SPS/FA-66 monitoring
device. The following are alternative clock settings
in the SONAR REAC Driver Control Panel.
Please be advised that any of the settings below will
either increase latency or create gaps, pops, clicks
or other noise during audio playback.
Freewheel (Re-sync)
When this mode is selected, REAC is the clock
master for SONAR only. Use this option only if it is
not possible to have a physical clock connection
between the SPS/FA-66 and the AES/EBU or Word
Clock output on the REAC hardware system. Using
this option runs the risk of audio dropouts when
monitoring. Selecting this option enables the
Freewheel Options button.
Freewheel Options:
•
SONAR REAC Recording System User’s Guide
22
•
•
•
•
•
Page 23

• Fixed—This option is selected by default when
in Freewheel (Re-sync) mode. Selecting Fixed
means the latency between an audio event
(either live monitoring or playback) remains
constant despite the Output Buffers setting.
However, selecting this option may increase the
risk of monitoring and playback gapping. The
Fixed option increases the buffer size and
provides better playback.
• Based on Buffers—This setting compensates
for clocks that are faster and/or have higher jitter
than the REAC clock by increasing the Record
Buffer. While the audio playback may be more
consistent, the latency will increase.
Playback Only
When this mode is selected, the SPS/FA-66
becomes the clock master for SONAR. This option
allows for the best playback performance without a
physical clock connection between the SPS/FA-66
and the REAC hardware. Selecting this option
disables the Freewheel Options button.
gapping, but may increase latency based on the
Fixed or Based on Buffers settings.
Other Panel Settings and Controls
REAC Status
On indicates that the SONAR workstation is
connected to the RSS/REAC system and is
receiving data. Off may indicate a connection and/or
communication problem between the REAC
hardware and SONAR. For example, the Ethernet
cable may not be connected to the PC, or a part of
the REAC system may have lost power. This control
works in real-time and will update its state if a
connection change is detected from the Digital
Snake, even while the dialog is open.
REAC Inputs
By default, this control will be set to the highest
number of inputs currently configured on your REAC
hardware. You can choose to set this value lower
than the actual number of physical inputs, which will
simply expose a shorter list of inputs to SONAR.
Sample Rate
Indicates the REAC sample rate. If the REAC signal
is not detected, this field will display the last sample
rate detected by the system.
Note: SONAR and the SPS/FA-66 must be
set to the same sample rate as your Digital
Snake and/or V-Mixer.
English English English English
Record Only
When this mode is selected, the SPS/FA-66 is not
available for monitoring. This option is primarily
used for recording only without a physical clock
connection between the SPS/FA-66 and the REAC
hardware. When Record Only mode is enabled, the
Freewheel Options button is unavailable.
Output Buffers
Indicates the number of output buffers being used
by the SONAR REAC driver itself when in
Freewheel mode. Decreasing the value will increase
the frequency of gaps in monitoring or playback.
Increasing the value will decrease the frequency of
Record Buffer Setting
This setting is used to maximize performance of the
system when recording high track counts over long
(two or more hours) periods of time. The default
setting is 11520. The Record Buffer setting can be
decreased in order to ensure lower latency, however
gaps and noise during recording may occur.
Playback / Monitor Device
This control panel allows you to configure the SPS/
FA-66 monitoring device. This is the only device
currently supported for monitoring when using this
recording system. Only devices that are supported
will be displayed in the drop-down menu.
PC Setup
•
23
•
•
•
•
•
Page 24

Panel
This button is used to open the ASIO panel of the
SPS/FA-66 monitoring device.
About
This button opens the About dialog, which contains
version and copyright information.
Notes on Word Clock,
Synchronization and Latency
What Is Word Clock?
Word clock is a signal used to synchronize digital
audio devices, such as digital mixers, digital audio
converters and digital audio workstations. Word
clock is used to maintain a constant and accurate
timing reference to avoid data errors. Word clock is
essential to avoid frequency drift between the
internal clocks of each device in the digital audio
signal path. For the purposes of this setup, word
clock sync can be derived from the Optical S/PDIF
connection.
Why Is Syncronization Important?
For example:
REAC Input Latency = 11520(default setting)
/ 96000 kHz = 120 ms (0.12 sec)
REAC Output Monitor Latency = 3 buffers *
120 ms = 360 ms (0.36 sec)
Latency is managed by changing the buffer size.
Depending on your workflow and needs, you can
generally refer to the following guidelines when
dealing with latency and playback/recording
performance:
Larger buffer size - Higher latency, decreases
processing load, best for high track counts and long
recordings (two hours or more)
Smaller buffer size - Lower latency, increases
processing load, best for lower track counts and
shorter recordings
If word clock is not distributed properly, a number of
audible problems can occur including a collapse of
the stereo image and loss of detail in high and low
frequencies. Whenever possible, you should have a
dedicated word clock connection between all digital
audio components. The device which maintains the
word clock on a network is the master clock.
What Is Latency?
Latency is the delay caused by the time it takes a
computer to process data. All computer based
recording systems have some measurable (but not
necessarily audible) latency.
For this recording system, latency is determined by
the following formula:
REAC Input Latency = Record Buffer size /
SampleRate
REAC Output Monitor Latency = REAC driver
pre-roll * REAC Input Latency
•
SONAR REAC Recording System User’s Guide
24
•
•
•
•
•
Page 25

Caution: Before you begin:
Known Issues
• Ensure that all audio recording hard drives
have been de-fragmented prior to recording.
• Ensure that there is enough unused hard
drive space to record your project.
• Keep the computer in a cool, dry and safe
location, preferably away from speakers and
other high RF audio equipment.
• Use an Uninterruptible Power Supply (UPS)
for the computer and any other critical
components.
• Disconnect the Ethernet cable from the PC
when you start/restart/shutdown. You may
also choose to disconnect the Ethernet
cable between the PC and Digital Snake
and/or V-Mixer as well to avoid unintentional
loud noises when reconnecting.
• Before turning on power for the Digital
Snake System, switch off the DIGITAL IN
button of the SPS/FA-66. After turning on
the system, switch on the DIGITAL IN
button.
• During the set-up process, your Network
Settings and Security Settings were
disabled in order to provide a stable
recording environment. In order to obtain
driver updates you will need to manually
change the settings back to allow the PC to
connect to the Internet.
Important: The sample rate automatically
defaults to 96khz any time the Digital Snakes
are restarted.
The following are known issues in the SONAR
REAC Driver that may be addressed in the future.
Using large Output Buffer Values in
Freewheel (Re-sync) mode
With an Output Buffers setting of 16 or higher
selected, there may be a large offset between the
SONAR Now Time and when the audio is actually
heard. One consequence of this offset is that the
Now Time will reach and pass the start of an audio
clip long before the audio can be heard. Another
consequence is that when the end of the longest clip
in a project is reached by the Now Time, playback
will stop even though the audio has not finished
playing to the end. The workaround is to change the
Timing Offset (msec) option in the Advanced tab
in SONAR's Audio Options dialog. Configure the
Timing Offset (msec) value based on the following
formula:
-1 * ((Output Buffers /2) - 2) * reported
ASIO latency in ms
For example, if Output Buffers is set for 256 (the
maximum, which should result in at least an hour of
gap-less audio depending on the audio hardware
being used) the calculation would be
-1 * ((256 /2) - 2) * 24ms
or
-126*24 = -3024
Setting Timing Offset (msec) to -3024 will result in
audio that is in sync with what you hear.
English English English English
Known Issues
•
25
•
•
•
•
•
Page 26

Troubleshooting
REAC Status Indicator is Red (Off)
If the REAC status indicator in the REAC Panel is
Red (Off), recheck all Ethernet and power
connections to the PC and Digital Snake system.
SPS/FA-66 is Not Listed
If an audio device does not appear in the REAC
Panel Output Monitor ASIO Device list, ensure that
the SPS/FA-66 is connected, powered on and is set
to the correct sample rate. If the sample rate on the
SPS/FA-66 needs to be changed, follow the steps
below:
1. Close SONAR
2. Turn the SPS/FA-66 off. You do not need to
disconnect it from the PC.
3. Change the sample rate on the SPS/FA-66.
4. Turn the SPS/FA-66 on.
5. Start SO NAR
6. Open a project
You do not need to restart your computer in order for
this change to take effect.
REAC Inputs Are Not Listed/REAC
Panel Does Not Open
If you have created a new project in SONAR and do
not see any REAC inputs available and/or the REAC
Panel will not open, it is possible that there was a
change in your hardware set-up since it was last
used. Follow the steps below to reset the monitoring
device back to the SPS/FA-66.
1. On the Options menu, click Audio to open the
Audio Options dialog.
2. Click the Advanced tab.
3. In the Driver Mode box, select ASIO.
4. Click OK.
5. Close and restart SONAR.
6. On the Options menu, click Audio to open the
Audio Options dialog.
7. Click the Drivers tab.
8. Clear all of the Input/Output Drivers check
boxes.
9. Select all of the REAC drivers check boxes.
10. Click OK.
11. Close and restart SONAR.
Note: Only the SPS/FA-66 is approved for use
with this system.
SONAR Audio Engine Drops Out While
Recording
Some users may have Audio Engine dropouts when
attempting to record large numbers of 96kHz/24-bit
audio tracks, especially when using REAC and the
RSS S-4000. Here are some tips to optimize
SONAR for this configuration.
Recording large projects consisting of multiple
tracks at high sampling and bit rates can cause CPU
or Disk strain on some PCs. If you experience Audio
Engine dropouts (SONAR audio engine and the
Now Time stops) while the transport is rolling or if
you see high amounts or spikes in Disk or CPU
utilization when recording projects, implementing
one or more of the following tips may help reduce or
eliminate Audio Engine dropouts.
• Make sure SONAR’s Enable Write Caching
option disabled. To change the setting, go to
Options¾ Audio, click the Advance tab and
make sure the Enable Write Caching check
box is cleared.
• If the status bar and toolbars are not needed,
you can disable them. To disable the status bar,
go to Options¾Global Options, click the
General tab and clear the Show Status Bar
check box. To show/hide toolbars, go to
Views ¾Show Toolbars. The savings of doing
this is small, but could help CPU usage in some
circumstances.
• Set SONAR’s Playback I/O Buffer Size (KB)
and Record I/O Buffer Size (KB) settings to
1024. To change the setting, go to Options¾
Audio, click the Advance tab and type 1024 in
the Playback I/O Buffer Size (KB) and Record
•
SONAR REAC Recording System User’s Guide
26
•
•
•
•
•
Page 27

I/O Buffer Size (KB) boxes.
Note: Some systems may not see an
improvement with a value of 1024, so leaving it
at the default of 512 or trying some other value
may be more helpful.
•In aud.ini, you can set
RecordPreAllocSeconds=<number of
seconds>.
This will pre-allocate the wave files to the desired
length prior to recording. Specify the number of
seconds that you expect to record. This reduces
disk thrashing and possible audio engine dropouts.
•In aud.ini you can set
ComputePicturesWhilePlaying=0. This
helps more if CPU usage is impacting the Audio
Engine.
For information about editing aud.ini, see the
SONAR online help.
Clicks and Pops Occur During
Recording
If the recorded audio contains pop or clicks,
increase the Record Buffer size in the REAC
Control Panel dialog and try recording again.
English English English English
Troubleshooting
•
27
•
•
•
•
•
Page 28

•
SONAR REAC Recording System User’s Guide
28
•
•
•
•
•
Page 29

Index
English English English English
A
Alternate sync settings 22
Audio Interface
6
C
Cakewalk SPS-66 6
Cakewalk SPS-66/EDIROL FA-66 driver
Computer requirements
Configure
SONAR
Windows VISTA
Windows XP SP2
Create a project
20
22
5
17
14
D
Digital Audio Clock Synchronization 6
DIGITAL IN SYNC
Dropouts
26
see also Troubleshooting
7
E
EDIROL FA-66 6
Equipment provided
hardware
software
5
5
5
F
FA-66 6
20
setup
6
Freewheel (Re-sync)
Based on Buffers
23
Fixed
22
23
H
Hardware
requirements
6
setup
5
I
Input channel numbers 7
23
Inputs
Installation
Roland REAC driver
software
SONAR
SPS/FA-66 driver
8
8
Windows Vista
Windows XP
8
11
9
K
Known issues 25
see also Troubleshooting
L
Latency 24
22
Locked
M
Monitor device 23
8
Index
•
29
•
•
•
•
•
Page 30

P
PC Setup 13
Playback / monitor device
Project
create new
22
23
R
REAC
about dialog
control panel
inputs
panel
status
REAC Control Panel
Output Buffers
Preferred Sync Setting
Record Buffer setting
Requirements
computer
digital snake system
hardware
software
Roland REAC driver
RSS Digital Snake Systems
S-1608 System
S-4000 System
V-Mixing System
24
22
23
24
23
23
22
23
5
5
5
5
6
5
5
5
SONAR
audio settings
8
install
20
setup
SPS-66
Status
Sync settings
see also Sync settings
Synchronization
SYSTEM
6
20
setup
23
alternate
Freewheel (Re-sync)
locked
Output Buffers
Playback Only
Record Only
21
22
22
22
23
23
23
24
7
T
Troubleshooting
clicks and pops during recording
dropouts
REAC inputs not listed
5
REAC panel does not open
red status indicator
SPS/FA-66 not listed
see also Known Issues
26
26
26
26
27
26
S
S-1608 System 5
S-4000 System
Sample rate
Setup
hardware
13
PC
SONAR
audio settings
SPS/FA-66
Software Installation
Software requirements
•
SONAR REAC Recording System User’s Guide
30
•
•
•
•
•
5
7, 23
6
20
21
20
8
5
V
V-Mixing System 5
W
Windows VISTA
configure
disable connections
network setting
PC performance setting
PC power management setting
problem reports and solutions setting
security setting
17
18
18
17
19
17
20
Page 31

sidebar setting 19
Windows Defender setting
Windows Update setting
Windows XP
disable connections
network setting
PC performance setting
power management setting
Security Center setting
Word clock
15
24
15
14
16
19
19
14
English English English English
Index
•
31
•
•
•
•
•
Page 32

•
SONAR REAC Recording System User’s Guide
32
•
•
•
•
•
Page 33

TWELVE TONE SYSTEMS, INC.
d/b/a CAKEWALK
LICENSE AGREEMENT
YOU SHOULD CAREFULLY READ ALL OF THE FOLLOWING TERMS AND CONDITIONS BEFORE USING
THIS PRODUCT. INSTALLING AND USING THE PRODUCT INDICATES YOUR ACCEPTANCE OF THESE
TERMS AND CONDITIONS. IF YOU DO NOT AGREE WITH THEM, YOU SHOULD PROMPTLY RETURN THE
PRODUCT UNUSED AND YOUR MONEY WILL BE REFUNDED.
1. GRANT OF LICENSE. In consideration of payment of the license fee, Twelve Tone Systems, Inc., d/b/a Cakewalk
("Cakewalk" or the "Licensor") grants to you, the Licensee, a nonexclusive license to have one person use the
enclosed Cakewalk software product (the "Product") on one personal computer at a time. If you want to use the Product on more than one personal computer at a time, or if you want to network the Product, you must obtain separate
licenses from Cakewalk by calling (617)423-9004. This license does not grant you any right to any enhancement or
update to the Product. Enhancements and updates, if available, may be obtained by you at Cakewalk's then current
standard pricing, terms and conditions.
2. OWNERSHIP OF THE PRODUCT. Portions of the Product incorporate certain material proprietary to third parties. Cakewalk and licensors of Cakewalk own and will retain all title, copyright, trademark and other proprietary
rights in and to the Product. This License is NOT a sale of the Product or any copy of it. You, the Licensee, obtain
only such rights as are provided in this Agreement. You understand and agree as follows:
2.1. You may NOT make any copies of all or any part of the Product except for archival copies of the computer software components of the Product as permitted by law,
2.2. You may NOT reverse compile, reverse assemble, reverse engine er, modify, incorporate in whole or in part in any
other product or create d erivative works based on all or any part of the Product.
2.3. You may NOT remove any copyright, trademark, proprietary rights, disclaimer or warning notice included on or
embedded in any part of the Product.
2.4. You may NOT transfer the Product. If transferred, in whole or in part, t he original and subsequent owners forfeit all rights to use the software.
2.5 You may not use the documentation for any purpose othe r than to support your use of the SOFTWARE PRODUCT.
2.6 You may not perform engineering analyses of the SOFTWARE PRODUCT, including performance analyses, or
benchmark analyses, without the written permission of Cakewalk.
3. INSTRUMENT CONTENT
3.1 The audio samples, recorded sounds, programs, MIDI patterns used by any instrument (“instrument content”)
included with the Product remain the property of Licensor and are licensed, not sold, to you for use on your computer.
3.2 The Licensee may modify the instrument content. LICENSEE MAY USE THE INSTRUMENT CONTENT FOR
COMMERCIAL PURPOSES WITHIN MUSICAL COMPOSITIONS.
3.3. This license expressly forbids resale, re licensing or other distribution of the instrument content, either as they
exist on these discs, or any modification thereof. You cannot sell, loan, rent, lease, assign or transfer all or any of the
enclosed sounds to another use r, or for use in any competitive product.
4. DEMO or THIRD PARTY DEMO CONTENT RESTRICTIONS. Unless specified elsewhere in your product package, the following restrictions apply to all digitally recorded sounds, MIDI or Cakewalk-format song files or rhythm
patterns, and printed or digit ally reproduced sheet music contained in the product package (the "demo content"): Al l
demo content is protected by copyright and owned by Cakewalk or other parties that have licensed these works to
Cakewalk. Any duplication, adaptation, or arrangement of the demo content without written consent of the owner is
an infringement of U.S. or foreign copyright law and subject to the penalties and liabilities provided therein. You
may not synchronize the demo content with any videotape or film, or print the demo content in the form of standard
music notation, without the express written permission of the copyright owner. The demo content may not be used
for broadcast or transmission of any kind. You may not resell or redistribute the demo content "as is" (i. e., stand
alone) in any way, including for use in sampling or sample playback units, or in any sound library product, o r in any
radio or television broadcast, soundtrack, film or other commercial product in any media, whether the works remain
in their original form or are reformatted, mixed, filtered, re-synthesized or otherwise edited.
5. LICENSEE'S RESPONSIBILITIES FOR SELECTION AND USE OF THE PRODUCT. Cakewalk hopes the Product will be useful to your business or personal endeavors. HOWEVER, CAKEWALK DOES NOT WARRANT THE
OPERATION OF THE PRODUCT OR THE ACCURACY OR COMPLETENESS OF ANY INFORMATION CONTAINED IN THE PRODUCT. You, and not Cakewalk, are responsible for all uses of the Product.
6. WARRANTY.
6.1. Limited Warranty. Subject to the other provisions in Articles 4 and 5 of this Agreement, Cakewalk warrants to
you, the original licensee, that the media on which the Product is recorded will be free of defects in material and
Page 34

workmanship under normal use for a period of thirty (30) days from purchase, and that the Product will
perform substantially in accordance with the user guide for a period of thirty (30) days from purchase.
Cakewalk's sole responsibility under this warranty will be, at its option, (1) to use reasonable efforts to
correct any defects that are reported to it within the foregoing warranty period or (2) to refund the full
purchase price. Cakewalk does not warrant that the Product will be error free, nor that all program
errors will be corrected. In addition, Cakewalk makes no warranties if the failure of the Product results
from accident, abuse or misapplication. Outside the United States, these remedies are not available
without proof of purchase from an authorized international source. All requests for warranty assistance
shall be directed t o Cakewalk at the following address:
Cakewalk, 268 Summer Street, Boston, MA 02210 U.S.A. 617/423-9004
6.2. Limitations on Warranties. THE EXPRESS WARRANTY SET FORTH IN THIS ARTICLE 4 IS
THE ONLY WARRANTY GIVEN BY CAKEWALK WITH RESPECT TO THE ENTIRE PRODUCT;
CAKEWALK MAKES NO OTHER WARRANTIES, EXPRESS, IMPLIED OR ARISING BY CUSTOM
OR TRADE USAGE, AND SPECIFICALLY DISCLAIMS THE IMPLIED WARRANTIES OF NONINFRINGEMENT, MERCHANTABILITY OR FITNESS FOR ANY PARTICULAR PURPOSE. CAKEWALK SHALL NOT BE HELD RESPONSIBLE FOR THE PERFORMANCE OF THE PRODUCT NOR
FOR ANY LIABILITY TO ANY OTHER PARTY ARISING OUT OF USE OF THE PRODUCT.
SOME STATES DO NOT ALLOW LIMITATIONS ON HOW LONG AN IMPLIED WARRANTY LASTS,
SO THE ABOVE LIMITATION MAY NOT APPLY TO YOU. THIS WARRANTY GIVES YOU SPECIFIC
LEGAL RIGHTS, AND YOU MAY ALSO HAVE OTHER RIGHTS WHICH VARY FROM STATE TO
STATE.
7. LIMITATIONS ON REMEDIES. Cakewalk's liability in contract, tort or otherwise arising in connection with the Product shall not exceed the purchase price of the Product. IN NO EVENT SHALL CAKEWALK BE LIABLE FOR SPECIAL, INCIDENTAL, TORT OR CONSEQUENTIAL DAMAGES
(INCLUD ING ANY DAMAGES RESULTING FROM LOSS OF USE, LOSS OF DATA, LOSS OF PROFITS OR LOSS OF BUSINESS) ARISING OUT OF OR IN CONNECTION WITH THE PERFORMANCE
OF THE PRODUCT, EVEN IF CAKEWALK HAS BEEN ADVISED OF THE POSSIBILITY OF SUCH
DAMAGES.
SOME STATES DO NOT ALLOW THE EXCLUSION OR LIMITATION OF INCIDENTAL OR CONSEQUENTIAL DAMAGES SO THE ABOVE EXCLUSION OR LIMITATION MAY NOT APPLY TO YOU.
8. U.S. GOVERNMENT RESTRICTED RIGHTS. If you are a government agency, you acknowledge that
the Product was developed at private expense and that the computer software component is provided to
you subject to RESTRICTED RIGHTS. The rights of the government regarding its use, duplication,
reproduction or disclosure by the Government is subject to the restrictions set forth in subparagraph
(c)(1)(ii) of the rights in Technical Data and Computer Software clause at DFARS 252.227-7013, and
(c)(1) and (2) of the Commercial Computer Software -- Restricted Rights clause at FAR 52.227-19. Contractor is Twelve Tone Systems, Inc., d/b/a Cakewalk.
9. TERMINATION. This License Agreement will terminate immediately if you breach any of its terms.
Upon termination, you will be required promptly to return to Cakewalk or to destroy all copies of the
Product covered by this License Agreement.
10. MISCELLANEOUS.
10.1. Governing Law. The terms of this License shall be construed in accordance with the substantive
laws of the United States and/ or Commonwealth of Massachusetts, U.S. A.
10.2. No Waiver. The failure of either party to enforce any rights granted hereunder or to take any
action against the other party in the event of any breach hereunder shall not be deemed a waiver by
that party as to subsequent enforcement of rights or subsequent actions in the event of future breaches.
10.3. Litigation Expenses. If any action is brought by either party to this Agreement against the other
party regarding the subject matter hereof, the prevailing party shall be entitled to recover, in addition to
any other relief granted, reasonable attorneys' fees and litigation expenses.
10.4. Unenforceable Terms. Should any term of this License Agreement be declared void or unenforceable by any court of competent jurisdiction, such declaration shall have no effect on the remaining terms
hereof.
YOU ACKNOWLEDGE THAT YOU HAVE READ THIS LICENSE AGREEMENT, UNDERSTAND IT
AND AGREE TO BE BOUND BY ITS TERMS AND CONDITIONS. YOU FURTHER AGREE THAT IT
IS THE COMPLETE AND EXCLUSIVE STATEMENT OF THE LICENSE AGREEMENT BETWEEN
YOU AND CAKEWALK WHICH SUPERSEDES ANY PROPOSALS, OR PRIOR AGREEMENT, ORAL
OR WRITTEN, AND ANY OTHER COMMUNICATIONS BETWEEN YOU AND CAKEWALK RELATING TO THE SUBJECT MATTER OF THIS LICENSE AGREEMENT.
 Loading...