

Page 1

Project5 Version 2
Online Help
Page 2

Information in th is documen t is subjec t to chan ge without notice a nd does not represent a commi tment on t he part of Twelve Tone
Systems, Inc. The software describe d in this docume nt is furn ished u nder a license agre ement or nondi sclosur e agre ement . The software may be used or co pied only in accordan ce of the terms of the agre ement. It is against the law to copy this software on any
medium except as specifically allowed in the agreement. No part of this document may be reproduced or transmitted in any form or
by any means, electro nic o r mecha nica l, inc luding p hotoc opy ing a nd rec ordin g, for any p urpo se w ithou t the e xpress w ritte n perm ission of Twelve Tone Systems, Inc.
Copyright © 2005 Twelve Tone Systems, Inc. All rights reserved.
Program Copyright © 2005 Twelve Tone Systems, Inc. All rights reserved.
ACID is a trademark of Sonic Foundry, Inc.
Cakewalk is a registe red trademark of Twelve Tone Systems, Inc. Project5 and the Ca kewalk logo a re trademarks of Twelve Tone
Systems, Inc. Other company and product names are trad em a r ks of th ei r respective owners.
Visit Cakewalk on the World Wide Web at www.cakewalk.com.
Page 3

Table of Contents
1 Basics . . . . . . . . . . . . . . . . . . . . . . . . . . . . . . . . . . . 1
Anatomy of Project5 . . . . . . . . . . . . . . . . . . . . . . . . . . .3
Main Control View. . . . . . . . . . . . . . . . . . . . . . . . .3
Track View . . . . . . . . . . . . . . . . . . . . . . . . . . . . . .5
Track Pane . . . . . . . . . . . . . . . . . . . . . . . . . . . . . .6
Track Pane Context Menu . . . . . . . . . . . . . . . . . .9
Arrange Pane . . . . . . . . . . . . . . . . . . . . . . . . . . .11
Groove Matrix . . . . . . . . . . . . . . . . . . . . . . . . . . .13
Bus Pane. . . . . . . . . . . . . . . . . . . . . . . . . . . . . . .13
The Device Browser . . . . . . . . . . . . . . . . . . . . . .15
Track Inspector. . . . . . . . . . . . . . . . . . . . . . . . . .15
The Bus Inspector. . . . . . . . . . . . . . . . . . . . . . . .17
The Editor . . . . . . . . . . . . . . . . . . . . . . . . . . . . . .18
Arpeggiator . . . . . . . . . . . . . . . . . . . . . . . . . . . . .23
Loops/Ptns (Patterns) Tab . . . . . . . . . . . . . . . . .25
Basic Operations. . . . . . . . . . . . . . . . . . . . . . . . . . . . .26
Selecting MIDI and Audio Drivers . . . . . . . . . . . .27
Opening a Project . . . . . . . . . . . . . . . . . . . . . . . .28
Playing a Project. . . . . . . . . . . . . . . . . . . . . . . . .28
The Now Time. . . . . . . . . . . . . . . . . . . . . . . . . . .29
Inserting New Audio or Instrument Track s . . . . .30
Loading and Saving Device Chains . . . . . . . . . .30
Loading Patterns. . . . . . . . . . . . . . . . . . . . . . . . .31
Muting, Soloing, and Arming Tracks . . . . . . . . . .32
Looping a Project . . . . . . . . . . . . . . . . . . . . . . . .32
Changing the Tempo. . . . . . . . . . . . . . . . . . . . . .33
Changing the Time Signature . . . . . . . . . . . . . . .33
Using the Metronome . . . . . . . . . . . . . . . . . . . . .34
Saving a Proje ct. . . . . . . . . . . . . . . . . . . . . . . . . 34
Exporting Wave and MP3 Files . . . . . . . . . . . . . 35
2 Tutorials. . . . . . . . . . . . . . . . . . . . . . . . . . . . . . . . . .51
Playing a Proj e c t . . . . . . . . . . . . . . . . . . . . . . . . . . . . 52
Looping a Project. . . . . . . . . . . . . . . . . . . . . . . . . . . . 52
Choosing MIDI Patterns. . . . . . . . . . . . . . . . . . . . . . . 53
Copying MIDI Patterns. . . . . . . . . . . . . . . . . . . . . . . . 54
Using Audio Loops . . . . . . . . . . . . . . . . . . . . . . . . . . . 54
Adding Instruments a nd Tr a cks. . . . . . . . . . . . . . . . . 55
Using Effects . . . . . . . . . . . . . . . . . . . . . . . . . . . . . . . 56
Using Aux Bus e s . . . . . . . . . . . . . . . . . . . . . . . . . . . . 56
Arpeggiator . . . . . . . . . . . . . . . . . . . . . . . . . . . . . . . . 57
Remote Con trol . . . . . . . . . . . . . . . . . . . . . . . . . . . . . 59
Using Devic e C h a i n s . . . . . . . . . . . . . . . . . . . . . . . . . 60
Recording Audio . . . . . . . . . . . . . . . . . . . . . . . . . . . . 61
Automation. . . . . . . . . . . . . . . . . . . . . . . . . . . . . . . . . 62
Setting Up a Velocity Drum Track . . . . . . . . . . . . . . . 63
Using Grooves. . . . . . . . . . . . . . . . . . . . . . . . . . . . . . 65
Exporting Patterns . . . . . . . . . . . . . . . . . . . . . . . . . . . 66
Exporting Wave and MP3 Files . . . . . . . . . . . . . . . . . 67
ReWiring to S O N A R . . . . . . . . . . . . . . . . . . . . . . . . . 68
3 New Features. . . . . . . . . . . . . . . . . . . . . . . . . . . . . .69
User Interf a ce . . . . . . . . . . . . . . . . . . . . . . . . . . . . . . 70
Main Control View . . . . . . . . . . . . . . . . . . . . . . . 71
Page 4

Track Controls. . . . . . . . . . . . . . . . . . . . . . . . . . .71
Bus Pane and Tempo Track . . . . . . . . . . . . . . . .72
Track Inspector. . . . . . . . . . . . . . . . . . . . . . . . . .72
The Bus Inspector. . . . . . . . . . . . . . . . . . . . . . . .75
Device Browser. . . . . . . . . . . . . . . . . . . . . . . . . .75
Arpeggiator . . . . . . . . . . . . . . . . . . . . . . . . . . . . .75
Loops/Ptns (Patterns) Tab . . . . . . . . . . . . . . . . .78
The Editor . . . . . . . . . . . . . . . . . . . . . . . . . . . . . .79
Automation Editing in th e Tra ck View . . . . . . . . . . . . .85
Automation Selection . . . . . . . . . . . . . . . . . . . . . . . . .85
Editing Enhancements . . . . . . . . . . . . . . . . . . . . . . . .85
Transposing Tracks. . . . . . . . . . . . . . . . . . . . . . .85
Merging Patterns (Clips). . . . . . . . . . . . . . . . . . .85
Splitting Patterns. . . . . . . . . . . . . . . . . . . . . . . . .86
Shift-dragging Patterns . . . . . . . . . . . . . . . . . . . .86
Ctrl-Alt-dragging Patterns . . . . . . . . . . . . . . . . . .86
Shifting Even t s i n Ti m e . . . . . . . . . . . . . . . . . . . .86
Scaling Velocity. . . . . . . . . . . . . . . . . . . . . . . . . .87
Unlinking Patterns. . . . . . . . . . . . . . . . . . . . . . . .87
Groove Quantizing . . . . . . . . . . . . . . . . . . . . . . .87
Show Waveform or MIDI Notes on Patterns. . . .88
Tap Tempo . . . . . . . . . . . . . . . . . . . . . . . . . . . . . . . . .88
Using the Groove Matrix . . . . . . . . . . . . . . . . . . . . . . .88
Groove Playback. . . . . . . . . . . . . . . . . . . . . . . . .89
Cell Playback . . . . . . . . . . . . . . . . . . . . . . . . . . .91
Editing Grooves. . . . . . . . . . . . . . . . . . . . . . . . . .92
Recording Grooves . . . . . . . . . . . . . . . . . . . . . . .93
Track Layers. . . . . . . . . . . . . . . . . . . . . . . . . . . . . . . .94
ReWire Hosting. . . . . . . . . . . . . . . . . . . . . . . . . . . . . .94
New Audio Features . . . . . . . . . . . . . . . . . . . . . . . . . .94
Audio Types . . . . . . . . . . . . . . . . . . . . . . . . . . . .94
Audio Folders . . . . . . . . . . . . . . . . . . . . . . . . . . .95
Loading Audio Patterns. . . . . . . . . . . . . . . . . . . . . . . .95
Recording Audio . . . . . . . . . . . . . . . . . . . . . . . . . . . . .96
Choosing a Sound Card Input. . . . . . . . . . . . . . .96
Input Monitoring . . . . . . . . . . . . . . . . . . . . . . . . .96
Starting to Record. . . . . . . . . . . . . . . . . . . . . . . .96
Working Wit h Gr oove Clips . . . . . . . . . . . . . . . . . . . . .97
Groove Clip Editor Pane Controls . . . . . . . . . . . 98
Freeze . . . . . . . . . . . . . . . . . . . . . . . . . . . . . . . . . . . . 99
4 Device Chains, Instruments, and Effec ts. . . . . .101
Inserting Tracks, Instruments, and Device Chains . 102
Multiple Outputs. . . . . . . . . . . . . . . . . . . . . . . . 104
Loading, Editing, and Saving Device Chains. . . . . . 105
Loading Device Chains . . . . . . . . . . . . . . . . . . 105
Changing Instruments and Effects. . . . . . . . . . 106
Controlling Device Chain Parameters . . . . . . . 107
Saving Device Chains . . . . . . . . . . . . . . . . . . . 109
Automating Device Chain Controls . . . . . . . . . 109
Using Aux Bus e s . . . . . . . . . . . . . . . . . . . . . . . . . . . 109
Layering Instruments for Real-time Playback . . . . . 110
Using the Arpeggiator . . . . . . . . . . . . . . . . . . . . . . . 112
Playing Through the Arpeggiator. . . . . . . . . . . 112
Adjusting the Arpeggiator’s Settings . . . . . . . . 113
Using VST instruments and Effects . . . . . . . . . . . . . 114
5 Patterns: Loading, Arranging, and Editing. . . . .117
Loading Patterns . . . . . . . . . . . . . . . . . . . . . . . . . . . 118
Loading and Deleting Patterns in the Loops/Patterns
Tab. . . . . . . . . . . . . . . . . . . . . . . . . . . . . . . . . . 119
Previewing Patterns in the Loops/Patterns tab 120
Arranging Patterns. . . . . . . . . . . . . . . . . . . . . . . . . . 120
Slip-editing and Slip-copying (Rolling-out) Patterns
121
Drag-copying Patterns with the Ctrl Key . . . . . 122
Copying and Pasting Patterns with Edit Menu
Commands . . . . . . . . . . . . . . . . . . . . . . . . . . . 123
Moving, Selecting, and Deleting Patterns . . . . 123
Transposing Multiple Patterns. . . . . . . . . . . . . 124
Editing Pa tt e r n s . . . . . . . . . . . . . . . . . . . . . . . . . . . . 124
Displaying Patterns in the Editor . . . . . . . . . . . 125
Zooming and Scrolling in the Editor. . . . . . . . . 126
Pattern Appearance. . . . . . . . . . . . . . . . . . . . . 126
Naming Patterns and Saving Patterns. . . . . . . 127
Assigning a MIDI Channel to a Pattern . . . . . . 127
Setting the Transposition Level of a Pattern . . 128
iv
Page 5

Using the Snap to Grid Button in the Editor . . .129
Selecting and Deselecting Notes and Data in the
Editor. . . . . . . . . . . . . . . . . . . . . . . . . . . . . . . . .130
Changing the Length of Patterns . . . . . . . . . . .131
Editing Not e s in a P a t te r n . . . . . . . . . . . . . . . .132
Groove Quantizing . . . . . . . . . . . . . . . . . . . . . . 136
Shifting Even t s i n Ti m e . . . . . . . . . . . . . . . . . . .137
Merging Patterns (Clips). . . . . . . . . . . . . . . . . .138
Splitting Patterns. . . . . . . . . . . . . . . . . . . . . . . .138
Splitting MIDI Patterns in the Editor . . . . . . . . .138
Setting Swing . . . . . . . . . . . . . . . . . . . . . . . . . .139
Undoing Edits, and Undo History . . . . . . . . . . . . . . .139
6 Creating MIDI Patterns . . . . . . . . . . . . . . . . . . . . 141
Importing Patterns. . . . . . . . . . . . . . . . . . . . . . . . . . .142
Creating P a tt e r n s in Step Mode . . . . . . . . . . . . . . . .14 3
Using Flam . . . . . . . . . . . . . . . . . . . . . . . . . . . .144
Using Gate . . . . . . . . . . . . . . . . . . . . . . . . . . . .145
Using Legato. . . . . . . . . . . . . . . . . . . . . . . . . . .145
Changing the Default Pattern Length and Step Count
145
The Time Rul e r in St e p M od e . . . . . . . . . . . . . .146
Drawing No te s In Free Mode . . . . . . . . . . . . . . . . . .1 4 6
Drawing Notes. . . . . . . . . . . . . . . . . . . . . . . . . .146
Recording a MIDI Pattern in the Editor. . . . . . . . . . .147
Recording a MIDI Pattern in a Track. . . . . . . . . . . . .147
Step Recording. . . . . . . . . . . . . . . . . . . . . . . . . . . . .148
7 Automation . . . . . . . . . . . . . . . . . . . . . . . . . . . . . 151
Quick Overview. . . . . . . . . . . . . . . . . . . . . . . . . . . . .152
Automating Track Controls . . . . . . . . . . . . . . . . . . . . 153
Automating Instrument and Effect Parameters . . . . .155
Automating Aux and Master Buses. . . . . . . . . . . . . .158
Automation Selection . . . . . . . . . . . . . . . . . . . . . . . .159
Reassigning Automation. . . . . . . . . . . . . . . . . . . . . .159
Editing Velocity, Pitch Wheel, and MIDI Controllers .160
Automating Arpeggiator Parameters. . . . . . . . . . . . .161
8 Remote Control. . . . . . . . . . . . . . . . . . . . . . . . . . .163
Using Remote Control . . . . . . . . . . . . . . . . . . . . . . . 165
The MIDI Remote Control Dialog. . . . . . . . . . . 166
9 ReWire and MIDI Sync . . . . . . . . . . . . . . . . . . . . .167
ReWire. . . . . . . . . . . . . . . . . . . . . . . . . . . . . . . . . . . 168
MIDI Synchro n i zation. . . . . . . . . . . . . . . . . . . . . . . . 169
10 Guide to
Instruments and Effects . . . . . . . . . . . . . . . . . . . . . . . .171
What Instrument Should I Use?. . . . . . . . . . . . 172
What Effects Should I Use?. . . . . . . . . . . . . . . 173
DS864 Samp l e r . . . . . . . . . . . . . . . . . . . . . . . . . . . . 175
Using DS864 . . . . . . . . . . . . . . . . . . . . . . . . . . 176
DS864 Program Controls. . . . . . . . . . . . . . . . . 176
DS864 Performance Controls . . . . . . . . . . . . . 177
Master Controls . . . . . . . . . . . . . . . . . . . . . . . . 177
Envelope s . . . . . . . . . . . . . . . . . . . . . . . . . . . . 179
LFOs . . . . . . . . . . . . . . . . . . . . . . . . . . . . . . . . 181
Key Map Controls . . . . . . . . . . . . . . . . . . . . . . 182
DS864 Reference . . . . . . . . . . . . . . . . . . . . . . 184
nPULSE Modular Drum Synth. . . . . . . . . . . . . . . . . 189
Feature Summary . . . . . . . . . . . . . . . . . . . . . . 190
Using nPULSE. . . . . . . . . . . . . . . . . . . . . . . . . 190
Master cont r o l s . . . . . . . . . . . . . . . . . . . . . . . . 19 0
Common con trols. . . . . . . . . . . . . . . . . . . . . . . 191
PSYN II Virtual Analog Synth e sizer. . . . . . . . . . . . . 193
Using PSYN II . . . . . . . . . . . . . . . . . . . . . . . . . 1 9 3
PSYN II Graphical User Interface . . . . . . . . . . 194
PSYN II Architecture . . . . . . . . . . . . . . . . . . . . 196
Filters. . . . . . . . . . . . . . . . . . . . . . . . . . . . . . . . 198
Envelope Generators (EGs). . . . . . . . . . . . . . . 200
Low Frequency Oscillators (LFOs) . . . . . . . . . 202
Effects Secti o n . . . . . . . . . . . . . . . . . . . . . . . . . 204
Master . . . . . . . . . . . . . . . . . . . . . . . . . . . . . . . 205
Performance Controls . . . . . . . . . . . . . . . . . . . 206
FM and Ring Modulation . . . . . . . . . . . . . . . . . 207
Filters. . . . . . . . . . . . . . . . . . . . . . . . . . . . . . . . 208
v
Page 6

VELOCITY Dr u m Sampler . . . . . . . . . . . . . . . . . . . .209
Master Controls. . . . . . . . . . . . . . . . . . . . . . . . .210
Pads . . . . . . . . . . . . . . . . . . . . . . . . . . . . . . . . .210
Pad Inspector . . . . . . . . . . . . . . . . . . . . . . . . . .211
Dimension Sampling Synthesizer . . . . . . . . . . . . . . .213
The Structure . . . . . . . . . . . . . . . . . . . . . . . . . .213
The Interface. . . . . . . . . . . . . . . . . . . . . . . . . . .213
The Interfa ce C o n trols. . . . . . . . . . . . . . . . . . . .2 1 4
Up/Down Se l e c tors . . . . . . . . . . . . . . . . . . . . . .215
Text Selectors. . . . . . . . . . . . . . . . . . . . . . . . . .215
The Sound Elements. . . . . . . . . . . . . . . . . . . . .216
The Mixer . . . . . . . . . . . . . . . . . . . . . . . . . . . . .231
The Global Effects. . . . . . . . . . . . . . . . . . . . . . .232
The Piano Body/Damper simulator . . . . . . . . . .234
Program and Element File Handling . . . . . . . . .234
Program, Element, Multisample and Sample folder
and files organization . . . . . . . . . . . . . . . . . . . . 235
Parameter Ranges . . . . . . . . . . . . . . . . . . . . . .236
MIDI Matrix So u rces . . . . . . . . . . . . . . . . . . . . .2 4 1
MIDI Matrix Destinatio n s . . . . . . . . . . . . . . . . . .241
Dimension R e s ources Usag e . . . . . . . . . . . . . .244
Cyclone DXi . . . . . . . . . . . . . . . . . . . . . . . . . . . . . . .246
Cyclone DXi Toolbar. . . . . . . . . . . . . . . . . . . . . 247
Pad Groups. . . . . . . . . . . . . . . . . . . . . . . . . . . .247
Pad Inspector . . . . . . . . . . . . . . . . . . . . . . . . . .248
Loop Bin . . . . . . . . . . . . . . . . . . . . . . . . . . . . . .250
Loop View and Key Map View . . . . . . . . . . . . .250
Pad Editor. . . . . . . . . . . . . . . . . . . . . . . . . . . . .252
Slice Inspector. . . . . . . . . . . . . . . . . . . . . . . . . .252
Using Cyclone DXi . . . . . . . . . . . . . . . . . . . . . .252
Roland GrooveSynth. . . . . . . . . . . . . . . . . . . . . . . . .253
The Edit View . . . . . . . . . . . . . . . . . . . . . . . . . .253
Using The Rh ythm Edit Vie w . . . . . . . . . . . . . .255
Controlling the Roland GrooveSynth from a MIDI
Controller. . . . . . . . . . . . . . . . . . . . . . . . . . . . . .256
Parameter Control Via MID I . . . . . . . . . . . . . . .256
Troubleshooting . . . . . . . . . . . . . . . . . . . . . . . .256
Controlling Individual Pads—Volume, Pan, Mute,
Solo, Sync, Looping, and Content. . . . . . . . . . .259
Loop Editing. . . . . . . . . . . . . . . . . . . . . . . . . . . 259
Keyboard Shortcuts in Cyclone DXi. . . . . . . . . 260
Undo and Redo . . . . . . . . . . . . . . . . . . . . . . . . 261
Cyclone Tu to rial. . . . . . . . . . . . . . . . . . . . . . . . 261
A Few Basics . . . . . . . . . . . . . . . . . . . . . . . . . . 261
Hit Replacement—Map Your Favorite Samples to Any
Groove. . . . . . . . . . . . . . . . . . . . . . . . . . . . . . . 262
Apply Effects to Slices within the Loop . . . . . . 262
Mix It Up: Creating Loop Variations. . . . . . . . . 263
Chorus/Flanger . . . . . . . . . . . . . . . . . . . . . . . . . . . . 265
Classic Phaser. . . . . . . . . . . . . . . . . . . . . . . . . . . . . 267
Compressor/Gate. . . . . . . . . . . . . . . . . . . . . . . . . . . 270
Tempo Delay . . . . . . . . . . . . . . . . . . . . . . . . . . . . . . 272
HF Exciter . . . . . . . . . . . . . . . . . . . . . . . . . . . . . . . . 274
Modfilter. . . . . . . . . . . . . . . . . . . . . . . . . . . . . . . . . . 275
Para-Q . . . . . . . . . . . . . . . . . . . . . . . . . . . . . . . . . . . 276
Studioverb2 . . . . . . . . . . . . . . . . . . . . . . . . . . . . . . . 277
Spectral Transformer. . . . . . . . . . . . . . . . . . . . . . . . 278
Alias Factor . . . . . . . . . . . . . . . . . . . . . . . . . . . . . . . 279
How Alias Factor Works. . . . . . . . . . . . . . . . . . 279
Using Alias Factor . . . . . . . . . . . . . . . . . . . . . . 279
Alias Factor Controls . . . . . . . . . . . . . . . . . . . . 279
Project5 Arpeggiator . . . . . . . . . . . . . . . . . . . . . . . . 281
Playing Through the Arpeggiator. . . . . . . . . . . 281
Adjusting the Arpeggiator’s Settings . . . . . . . . 281
11 Spectral Transformer . . . . . . . . . . . . . . . . . . . . . .283
Getting Sta rted . . . . . . . . . . . . . . . . . . . . . . . . . 284
Effects . . . . . . . . . . . . . . . . . . . . . . . . . . . . . . . 290
Musical Aspects of Working with Sound . . . . . 314
Spectral Transformer: A Friendly Guide to Technical
Terms. . . . . . . . . . . . . . . . . . . . . . . . . . . . . . . . 319
12 Connecting a MIDI Keyboard. . . . . . . . . . . . . . . .331
If Your Keyboard Has a Built-in USB MIDI Interface
332
If You Have a Stand-alone USB MIDI Interface 332
If Your Sound Card Contains a MIDI Interface 333
vi
Page 7

13 Troubleshooting . . . . . . . . . . . . . . . . . . . . . . . . . 335
There’s No Audio . . . . . . . . . . . . . . . . . . . . . . .336
No Sound When I Play My Keyboard . . . . . . . .336
It Takes a Long Time to Hear my Keyboard When I
Play it . . . . . . . . . . . . . . . . . . . . . . . . . . . . . . . .337
CPU is at 100% and I Get Distortion. . . . . . . . .337
When I Preview a Pattern, the First Note Doesn’t
Sound . . . . . . . . . . . . . . . . . . . . . . . . . . . . . . . .337
ReWire Client Interface Does Not Open . . . . . .337
14 Menus. . . . . . . . . . . . . . . . . . . . . . . . . . . . . . . . . . 339
File-New-Project . . . . . . . . . . . . . . . . . . . . . . . . . . . .340
File-New-Project From Template File . . . . . . . . . . . .340
File-Open . . . . . . . . . . . . . . . . . . . . . . . . . . . . . . . . .340
File-Save. . . . . . . . . . . . . . . . . . . . . . . . . . . . . . . . . .340
File-Save As . . . . . . . . . . . . . . . . . . . . . . . . . . . . . . .340
File-Save As Template . . . . . . . . . . . . . . . . . . . . . . .340
File-Info. . . . . . . . . . . . . . . . . . . . . . . . . . . . . . . . . . .340
File-Import. . . . . . . . . . . . . . . . . . . . . . . . . . . . . . . . . 340
File-Export. . . . . . . . . . . . . . . . . . . . . . . . . . . . . . . . .340
File-Recent File. . . . . . . . . . . . . . . . . . . . . . . . . . . . .340
File-Exit. . . . . . . . . . . . . . . . . . . . . . . . . . . . . . . . . . .340
Edit-Undo . . . . . . . . . . . . . . . . . . . . . . . . . . . . . . . . .340
Edit-Redo . . . . . . . . . . . . . . . . . . . . . . . . . . . . . . . . .341
Edit-Undo History . . . . . . . . . . . . . . . . . . . . . . . . . . .341
Edit-Cut . . . . . . . . . . . . . . . . . . . . . . . . . . . . . . . . . . .341
Edit-Copy . . . . . . . . . . . . . . . . . . . . . . . . . . . . . . . . .341
Edit-Paste . . . . . . . . . . . . . . . . . . . . . . . . . . . . . . . . .341
Edit-Delete . . . . . . . . . . . . . . . . . . . . . . . . . . . . . . . .341
Edit-Combin e Se l e cted Clips . . . . . . . . . . . . . . . . . .341
Edit-Split Selected Clips . . . . . . . . . . . . . . . . . . . . . .341
Edit-Unlink Selected Clips. . . . . . . . . . . . . . . . . . . . .341
Edit-Groove Clip Looping . . . . . . . . . . . . . . . . . . . . .341
Edit-Split Until Marker . . . . . . . . . . . . . . . . . . . . . . . . 341
Edit-Split From Marker . . . . . . . . . . . . . . . . . . . . . . .342
Edit-Insert Audio Track . . . . . . . . . . . . . . . . . . . . . . .342
Edit-Delete Track . . . . . . . . . . . . . . . . . . . . . . . . . . .342
Edit-Freeze/Unfreez e Track. . . . . . . . . . . . . . . . . . . 342
Edit-Clone Instrument Track . . . . . . . . . . . . . . . . . . 342
Edit-Insert Time Signature . . . . . . . . . . . . . . . . . . . . 342
Edit-Change Time Signature . . . . . . . . . . . . . . . . . . 342
Edit-Delete Time Signature . . . . . . . . . . . . . . . . . . . 342
Edit-Select All. . . . . . . . . . . . . . . . . . . . . . . . . . . . . . 342
Process-Quantize . . . . . . . . . . . . . . . . . . . . . . . . . . 342
Process-Groove Quantize . . . . . . . . . . . . . . . . . . . . 342
Process-Transpose . . . . . . . . . . . . . . . . . . . . . . . . . 343
Process-Slide. . . . . . . . . . . . . . . . . . . . . . . . . . . . . . 343
Process-Length . . . . . . . . . . . . . . . . . . . . . . . . . . . . 343
Process-Scale Velocity . . . . . . . . . . . . . . . . . . . . . . 343
Process-R e trograde. . . . . . . . . . . . . . . . . . . . . . . . . 343
View-Show/Hide Track Ins p e ct o r. . . . . . . . . . . . . . . 343
View-Show/Hide Groove Matr ix. . . . . . . . . . . . . . . . 343
View-Show Ed i to r. . . . . . . . . . . . . . . . . . . . . . . . . . . 343
View-Show Loops and Patterns. . . . . . . . . . . . . . . . 343
View-Maximize/Restore Track View . . . . . . . . . . . . 344
View-Show/Hide Track Automation . . . . . . . . . . . . . 344
View-Show/Hide Bus Pane . . . . . . . . . . . . . . . . . . . 344
Transport-Stop. . . . . . . . . . . . . . . . . . . . . . . . . . . . . 344
Transport-Play . . . . . . . . . . . . . . . . . . . . . . . . . . . . . 344
Transport-Record. . . . . . . . . . . . . . . . . . . . . . . . . . . 344
Transport -R e w ind . . . . . . . . . . . . . . . . . . . . . . . . . . 344
Transport-Jog Bac kward . . . . . . . . . . . . . . . . . . . . . 344
Transport-Jog Forward . . . . . . . . . . . . . . . . . . . . . . 344
Transport-Loop ON/OFF . . . . . . . . . . . . . . . . . . . . . 344
Transport-Patte rn Preview. . . . . . . . . . . . . . . . . . . . 344
Transport-Metr o nome ON/ OFF . . . . . . . . . . . . . . . . 344
Transport-Count ON/OFF . . . . . . . . . . . . . . . . . . . . 345
Options-M I D I D e v i c e s . . . . . . . . . . . . . . . . . . . . . . . 345
Options-Audio . . . . . . . . . . . . . . . . . . . . . . . . . . . . . 345
Options-Send MIDI Sync . . . . . . . . . . . . . . . . . . . . . 345
Options-MIDI Remote Control . . . . . . . . . . . . . . . . . 345
Options-Metronome . . . . . . . . . . . . . . . . . . . . . . . . . 345
Options-Freeze Tail Duration. . . . . . . . . . . . . . . . . . 345
vii
Page 8

Options-Default Step Size for Step Sequencer-Measure
345
Options-Default Step Size for Step Sequencer-Half Note
345
Options-Default Step Size for Step Sequencer-Quarter
Note. . . . . . . . . . . . . . . . . . . . . . . . . . . . . . . . . . . . . .345
Options-Default Step Size for Step Sequencer-Eighth Note
345
Options-Default Step Size for Step Sequencer-Sixteenth
Note. . . . . . . . . . . . . . . . . . . . . . . . . . . . . . . . . . . . . .346
Options-Default Step Size for Step Sequencer-Thirty
Second Note . . . . . . . . . . . . . . . . . . . . . . . . . . . . . . .346
Options-Default Step Size for Step Sequencer-Sixty Fourth
Note. . . . . . . . . . . . . . . . . . . . . . . . . . . . . . . . . . . . . .346
Options-Default Step Size for Step Sequencer-One Twenty
Eighth Note . . . . . . . . . . . . . . . . . . . . . . . . . . . . . . . .346
Options-Default Step Size for Step Sequencer-Follow Snap
Grid . . . . . . . . . . . . . . . . . . . . . . . . . . . . . . . . . . . . . .346
Options-Default Step Count for Step Sequencer-Eight
Steps. . . . . . . . . . . . . . . . . . . . . . . . . . . . . . . . . . . . .346
Options-Default Step Count for Step Sequencer-Sixteen
Steps. . . . . . . . . . . . . . . . . . . . . . . . . . . . . . . . . . . . .346
Options-Default Step Count for Step Sequencer-Thirty Two
Steps. . . . . . . . . . . . . . . . . . . . . . . . . . . . . . . . . . . . .346
Options-Default Step Count for Step Sequencer-Sixty Four
Steps. . . . . . . . . . . . . . . . . . . . . . . . . . . . . . . . . . . . .346
Options-Open Last Pr o j e ct At Startup. . . . . . . . . . . .346
Options-S croll With No w Ti me . . . . . . . . . . . . . . . . .347
Options-Left Click Sets Now Time . . . . . . . . . . . . . .347
Options-Right Click Sets Now Time . . . . . . . . . . . . .347
Options-Show Transport At Left (For Multiple Monitors).
347
Help-Help Contents. . . . . . . . . . . . . . . . . . . . . . . . . .347
Help-Proje ct5 Owner’ s Pa g e. . . . . . . . . . . . . . . . . . .347
Help-Keyboard Shortcuts . . . . . . . . . . . . . . . . . . . . .347
Help-Project5.com. . . . . . . . . . . . . . . . . . . . . . . . . . .351
Help-View R E ADME.rtf . . . . . . . . . . . . . . . . . . . . . . .351
Help-Order Project5 Online . . . . . . . . . . . . . . . . . . . 351
Help-Abo ut Pr o j e ct5. . . . . . . . . . . . . . . . . . . . . . . . . 351
15 Dialogs. . . . . . . . . . . . . . . . . . . . . . . . . . . . . . . . . .353
Audio Optio ns d i a l o g . . . . . . . . . . . . . . . . . . . . . . . . 354
Create Shortcut dialog. . . . . . . . . . . . . . . . . . . . . . . 355
Export dialog . . . . . . . . . . . . . . . . . . . . . . . . . . . . . . 356
Freeze Tail Duration dialog . . . . . . . . . . . . . . . . . . . 357
Groove Quantize dialog. . . . . . . . . . . . . . . . . . . . . . 357
ID3 Tag dialog . . . . . . . . . . . . . . . . . . . . . . . . . . . . . 358
Import dialog . . . . . . . . . . . . . . . . . . . . . . . . . . . . . . 358
Insert Time Signature and Change Time Signature dialog
358
Length dialog . . . . . . . . . . . . . . . . . . . . . . . . . . . . . . 359
Metronome Properties dialog. . . . . . . . . . . . . . . . . . 359
MIDI Devic e s d ia l o g . . . . . . . . . . . . . . . . . . . . . . . . 360
MIDI Remote Control dialog. . . . . . . . . . . . . . . . . . . 361
MP3 Encoder Activation dialog . . . . . . . . . . . . . . . . 361
No MIDI Inputs Selected dialog . . . . . . . . . . . . . . . . 361
Open dialog . . . . . . . . . . . . . . . . . . . . . . . . . . . . . . . 362
Open Pattern dialog. . . . . . . . . . . . . . . . . . . . . . . . . 362
Open Preset dialog . . . . . . . . . . . . . . . . . . . . . . . . . 362
Quantize dialog . . . . . . . . . . . . . . . . . . . . . . . . . . . . 362
Save As dialog. . . . . . . . . . . . . . . . . . . . . . . . . . . . . 363
Save Device Chain dialog . . . . . . . . . . . . . . . . . . . . 363
Save Preset dia l o g. . . . . . . . . . . . . . . . . . . . . . . . . . 36 3
Scale Velocity dialog . . . . . . . . . . . . . . . . . . . . . . . . 364
Slide dialog . . . . . . . . . . . . . . . . . . . . . . . . . . . . . . . 364
Song Information dialog. . . . . . . . . . . . . . . . . . . . . . 365
Transpos e dia l o g . . . . . . . . . . . . . . . . . . . . . . . . . . . 365
Undo History dialog . . . . . . . . . . . . . . . . . . . . . . . . . 365
16 Glossary. . . . . . . . . . . . . . . . . . . . . . . . . . . . . . . . .367
17 Index. . . . . . . . . . . . . . . . . . . . . . . . . . . . . . . . . . . .371
18 LICENSE AGREEMENT . . . . . . . . . . . . . . . . . . . .381
viii
Page 9

Basics
Page 10

Project5 is intended for the creation of pattern-based electronic music using DirectX and VST instruments, Groove
clips (ACIDized wave files), standard audio files (wave),
and effects. You can play through Project5 using a MIDI
controller, or create patterns to play through instruments
and effects.
New features include a streamlined user interface, ReWire
hosting, a powerful new arpeggiator, numerous editing
enhancements, a separate bus pane and tempo track, tap
tempo, audio recording, audio playback from disk (no size
limit on clips), input monitoring, freezing tracks, real-time
Groove triggering, track lanes for layered patterns, Groove
clip (ACIDized clip) editing and export, the new PSYN II
instrument, and the multi-mode sampling synth (Dimension). Project5 now creates a separate folder for each
project’s audio data, which is located inside the folder that
the project is located in, and is called “[project name]
Audio.”
Project5's advanced MIDI input filtering system lets you
layer and control multiple instruments, or even play along
with other musicians at the same time. Because of this
MIDI flexibility , you can think of Project5 as a "super-instrument" with multiple layers and sounds, or as an instrument
hub where numerous musicians can play together through
various MIDI devices.
See:
Tutorials
Anatomy of Project5
Basic Operations
Looping a Project
Changing the Tempo
Changing the Time Signature
Uninstalling Project5
When you installed Project5, the setup program placed an
Uninstall icon in the Start menu. T o uninst all Project5, click
the Start button and choose Programs-Cakewalk-
Project5 Version 2-Uninstall Project5 Version 2. You
can also uninstall Project5 from the Windows Control panel
as follows:
To Uninstall Project5 Using the Control Panel
1. Click the Start button, and choose Settings/Control
Panel.
2. Double-click on the Add/Remove Programs icon.
3. Choose Project5, then click Add/Remove.
Click Yes to confirm that you want to uninstall Project5.
2
Page 11
Anatomy of Project5
Arpeggiator
This section covers the Project5 user interface.
Main Control view
(left side)
Track/Bus Inspector
See:
Main Control View
Track View
Track Inspector
Arrange Pane
Groove Matrix
Bus Pane
The Editor
Loops/Ptns (Patterns) Tab
The Device Browser
Track pane
Bus pane
Groove Matrix
Arrange pane
Editor
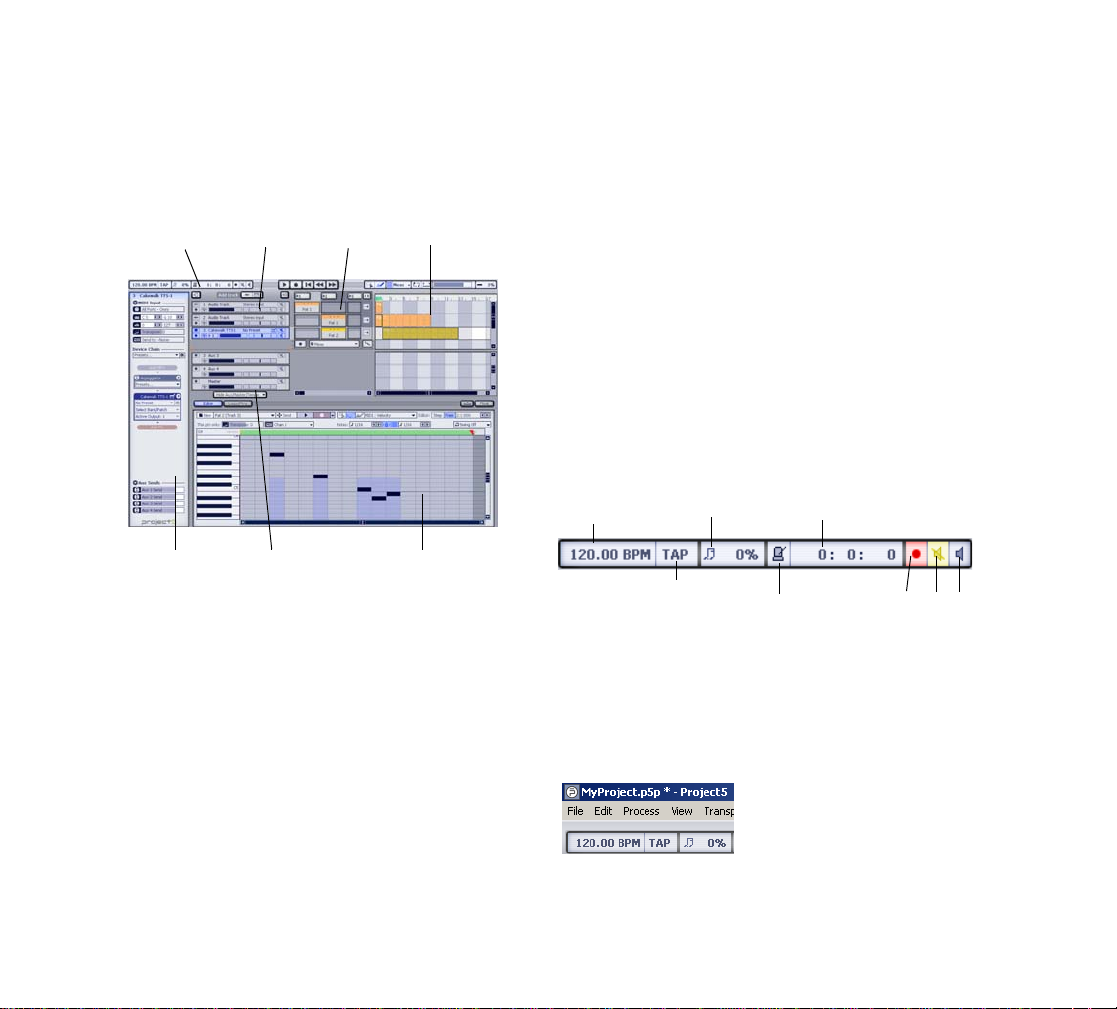
Main Control View
The Main Control view has controls for starting and stopping; tempo; metronome; project name; swing; global
mute, solo, and arm; selection; automation; Snap to Grid;
looping; master volume; and CPU usage.
The Main Control view is split into three groups of controls.
Here’s a description of each group of controls:
Main Control View—Left Side
Here’s a picture of the Main Control view controls that are
grouped on the left side:
Main Control view (left side)
Tempo field-double-click to
set
Tap Tempo control--click
at the speed you want to
set the tempo to.
Song Title—This is the name of the current project as it
was last saved. If you have made any edits since you last
saved the file, an asterisk appears at the end of the song
title.
Swing
strength
Now Time display (in M:B:T
format--right-click to use
H:M:S format)
Metronome on/off
Master arm, mute, solo
3
Page 12
Tempo (BPM) Control—The Tempo control displays the
current tempo, which is displayed in the BPM (Beats Per
Minute) field. Tempo automation can be edited in the Editor.
To set the tempo, double-click the BPM field and either
type a number, or click the Up/Down arrows to set the
tempo. You can also click and drag up/down over the
arrows for faster response. See Changing the Tempo for
more information.
Tap Tempo Button—You can set the tempo in Project5 by
clicking the T ap button that’ s in the Main Control view . Just
click the button at the playback speed that you want your
project to use. You can also click the Tap button by
Remote Control--right-click the Tap button and choose
MIDI Remote Control from the context menu, and assign a
MIDI note or controller to the Tap button.
Swing Strength —The swing strength field sets the
amount of swing applied to a selected pattern in the Editor
when the swing note-size menu in the Editor is displaying
a note size. The amount of swing ranges from 0 to 100%.
See Setting Swing for more information.
Metronome On/Off—The Metronome On/off button turns
a click sound on or off, so you can hear the tempo while
you’re recording. To set the count-in and other metronome
options, use the Options-Metronome command.
Now Time Display—The Now Time display shows the
current Now Time as a numerical value. You can choose to
display the Now Time in either measures, beats, and ticks
(M:B:T) or in SMPTE. To change the display, right-click the
display and choose the option on the popup menu.
Master Arm Button—This button lights up whenever any
track or bus is armed. You can disarm all tracks and buses
by clicking the button.
Master Mute Button—This button lights up whenever any
track or bus is muted. You can unmute all tracks and buses
by clicking the button.
Master Solo Button—This button lights up whenever any
track is soloed. You can unsolo all tracks by clicking the
button.
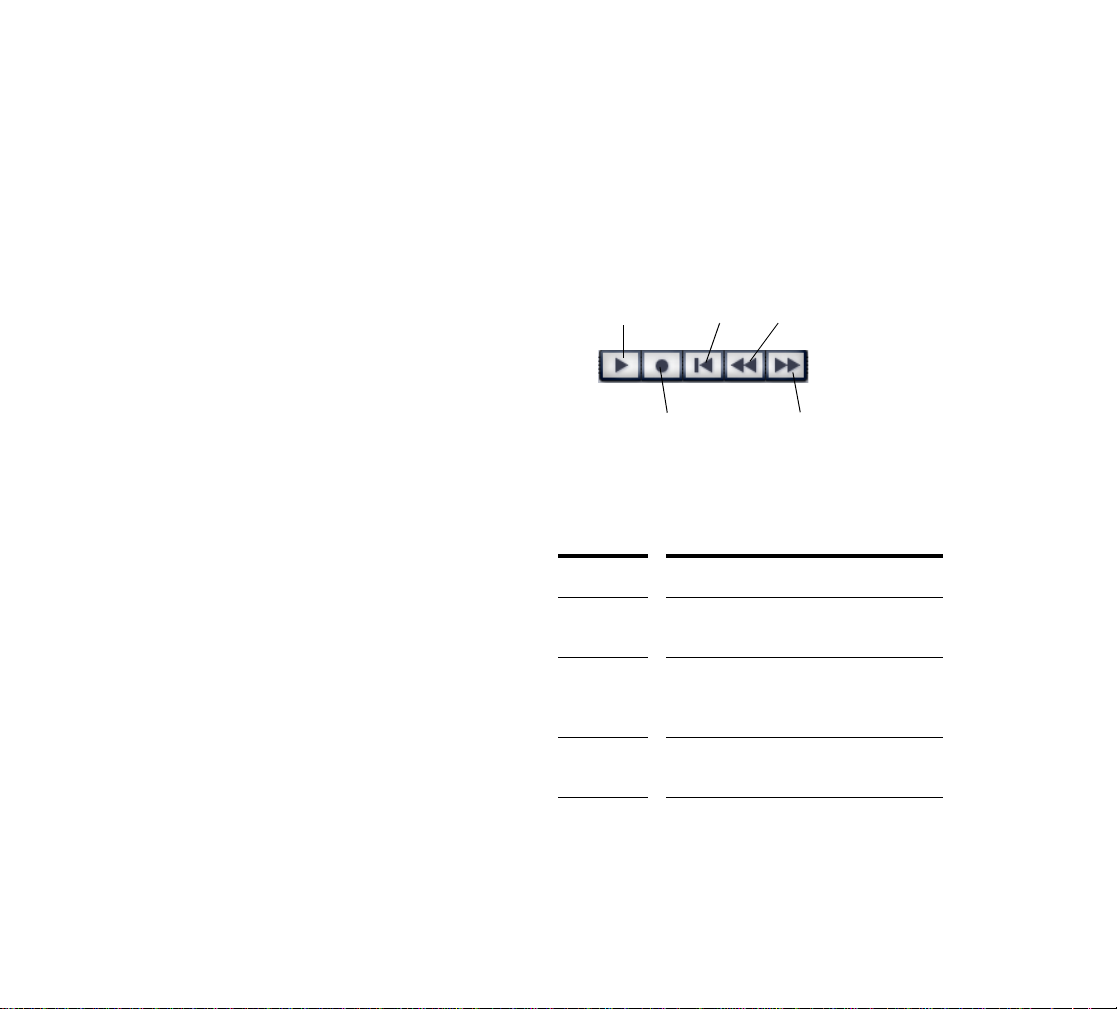
Transport Controls
The Transport contains the Play, Record, Rewind, Jog
Backward, and Jog Forward buttons.
Main Control view (transport section)
Play
Record
The following table gives a brief description of each of the
Transport buttons:
Button Description
Play The Play button begins playback at the
Record The Record button begins recording
Rewind The Rewind button moves the Now
Jog
Backward
current Now Time.
MIDI data to all armed tracks at the
current Now Time.
Time to the beginning of your project.
The Jog Backward button nudges the
Now Time backward by the current
Snap Grid resolution.
Jog backward by Snap to Grid value
Rewind
Jog forward by Snap to Grid
value
4
Page 13

Jog
Forward
The Jog Forward button nudges the
Now Time forward by the current Snap
Grid resolution.
Main Control View—Right Side
Here’s a picture of the Main Control view controls that are
grouped on the right side:
Main Control view (right side)
Select tool
Selection Tool—Use this tool to select data in t he Arrange
pane.
Automation T ool —Use this tool to draw automation in the
Arrange pane.
Snap to Grid On/Off Button—Click this button to turn on
or turn off the Snap to Grid in Project5. The resolution of
the Snap to Grid button is determined by the setting in the
dropdown menu to the right of the Snap to Grid button.
Snap to Grid Resolution Menu—Set the resolution of the
Snap to Grid in Project5.
Loop On/Off Button—Project5 allows you to loop over a
section. Enabling the Loop On/Off button displays two
markers in the Time Ruler of the Arrange pane that show
what time range your project is repeating.
Snap on/off Snap menu
Automation tool
Loop on/off
Main output volume slider and meter
Set loop to selection
CPU meter
Set Loop to Selection Button—Clicking this button creates markers at the beginning and end of the selection. A
selection can be either a pattern or several patterns.
Master Volume Slider and Meter—Drag this slider to control the main output volume. This slider is a duplicate of the
one on the Master track in the Bus pane. The meter to the
right of the slider displays the master volume level. If the
meter is displaying the red clipping indicator, turn down
your loudest track, and click the meter to reset the meter.
CPU Meter—The CPU meter displays the current CPU
usage on a percent scale.
The Overload indicator lets you know if you have
exceeded your computer’s CPU. Clicking the number field
in the CPU meter resets the audio and MIDI engines of
Project5. You can try this if you have any stuck notes or
sudden audio problems.
Show/hide Track Inspector Button —Click this button to show or hide the Track Inspector.
Add Track Buttons —Clicking the left
button adds a new audio track below the last track in the
Track pane. Clicking the right button opens the Device
Browser, which lets you add a new instrument track or
device track just above whatever track is highlighted.
Show/hide Groove Matr ix Button —Click this button
to show or hide the Groove Matrix.
Track View
The Track view lets you insert instruments, control track
and bus parameters, arrange patterns, and create and edit
automation for tracks and buses. The Track view provides
an overview of your project, and contains the Track pane,
the Bus pane, the Groove Matrix, and the Arrange pane.
The Track view also contains the Show Aux/Master/T empo
button, which hides or shows the Bus pane and Tempo
Track when you click it.
5
Page 14
See:
Track Pane
Track Pane Context Menu
Arrange Pane
Groove Matrix
Bus Pane
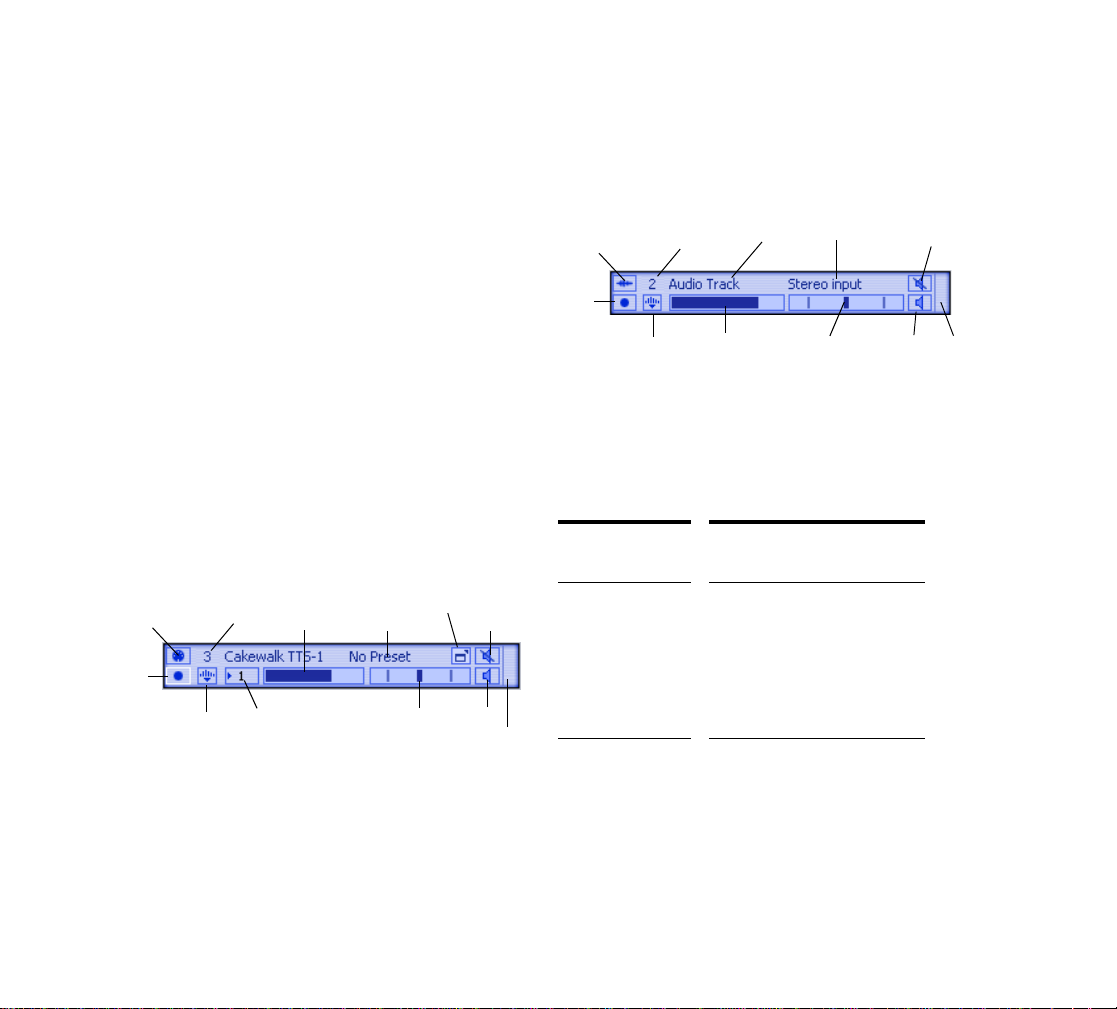
Audio Track Controls
Input monitor on/off
Track number
Trac k n am e
Input menu
Mute
Track Pane
The Track pane is where you control individual track
parameters such as volume, pan, mute, arm, solo, input
monitoring, audio inputs, and MIDI routing. You can also
create track lanes in the Track pane, so that you can drag
overlapping patterns into their own lanes.
Note: double-clicking a track’s volume, pan, or width control sets the control to its default value.
Here’s a picture of the controls in the Track pane:
MIDI Track Controls
MIDI Routing Override
Arm
Expand track for
automation editing
Track number
Vol um e
slider
Output menu for multi-output
instruments. Drag up or down
to change outputs. Disabled
output numbers are grey.
Double-click an output
number to enable the output.
Presets menu
a
P
l
s
t
o
Show
Instrument
property page
d
h
t
i
n
/
W
l
r
t
C
r
d
e
:
i
s
t
W
a
d
j
u
Mute
Solo
r
d
a
g
-
Meter
d
h
t
i
Arm
Expand tr ack for
automation editing
The following two tables describe the parameters in both
audio and MIDI tracks in the Track pane:
Audio Track
Vol ume
slider
Description…
Pan/Width
slider--Ctrl-drag
to adjust Width
Solo
Meter
Parameter…
Input monitor
button
If you’re recording audio,
you can enable this button to
hear the instrument or voice
that you’re recording
together with any plug-in
effects that are on the armed
track.
6
Page 15

Track number This number represents the
order the track appears in
the Track pane. If you drag
an individual track strip to
another location, the name
of the strip that you drag
stays the same but its
number changes.
Track name A name for the track that you
can edit. Double-click the
name to enable editing, and
press Enter to save your
name change.
Input menu Click this menu to set the
audio input to Stereo, Left,
Right, or None. Choose
None if you want to record
automation on the track
without recording audio data.
Volume slider Use this slider to adjust the
track’s volume as it goes to
the Master bus. The
minimum volume for a track
is -INF (no volume) and the
maximum volume is 6 dB.
Pan slider Use this slider to change the
stereo balance for the track.
This value ranges from
100% Left to 100% R.
Center is represented by C,
which is the default value.
Width slider Ctrl-drag the Pan slider to
adjust Width. Width is the
perceived distance between
the left and right stereo
channels. Width ranges from
0 to 120 degrees. 0 degree
is effectively mono while 120
degrees is extreme left/right
separation.
Mute button Click this button to silence a
Solo button Click this button to play only
Volume meter Displays the track’s volume
Arm button Click to arm the track for
Show/HIde
Automation
button
MIDI Track
track.
this track and any others that
are soloed.
level.
recording.
Click this button to expand
the track so that there is
space below the track in the
Arrange pane to view and
edit track automation.
Description…
Parameter…
7
Page 16

MIDI Routing
Override button
Track number This number represents the
MIDI indicator
light
Track name A name for the track that you
Clicking this button to the on
position forces all live MIDI
input through this track only.
You can enable the button on
multiple tracks by holding the
Ctrl key down while you click
each button.
order the track appears in the
Track pane. If you drag an
individual track strip to another
location, the name of the strip
that you drag stays the same
but its number changes.
Behind the track number is an
indicator light that lights up
when the track receives MIDI
data from either live input or
from a pattern in the track.
can edit. Double-click the name
to enable editing, and press
Enter to save your name
change.
Preset menu If you want to save or load
some particular parameter
settings of the track’s
instrument, you can use the
Preset menu. An instrument
preset does not save effects,
effect parame te r s, or remote
control assignments, so if you
want to save these along with
your instrument’s settings,
save a device chain instead of
a preset. See Loading and
Saving Device Chains for more
information.
Show Instrument
Property Page
button
Arm button Click to arm the track for
Click this button to display the
property page of the instrument
that is patched into this track.
You can also open the property
page from the Presets menu,
the Track pane context menu
(right-click to open this menu),
or by double-clicking the track
number.
recording.
Show/HIde
Automation
button
Click this button to expand the
track so that there is space
below the track in the Arrange
pane to view and edit track
automation.
8
Page 17

Output menu When you load a multi-output
instrument into a track, the
track displays the Output
menu. This menu shows you
which output the track controls
apply to. You can display
controls for a different output
by dragging up or down on the
menu. To enable an output,
double-click its number in the
menu so that the number is not
grey.
Volume slider Use this slider to adjust the
channel’s volume as it goes to
the Master bus. The minimum
volume for a track is -INF (no
volume) and the maximum
volume is 6 dB.
Solo button Click this button to play only
this track and any others that
are soloed.
Volume meter Displays the track’s volume
level.
See:
Track Pane Context Menu
Arrange Pane
Bus Pane
Track Pane Context Menu
Right-clicking on a track name or number opens the Track
pane context menu. The following table describes each of
the commands:
Pan slider Use this slider to change the
stereo balance for the track.
This value ranges from 100%
Left to 100% R. Center is
represented by C, which is the
default value.
Width slider Sets the perceived distance
between the left and right
stereo channels. Width ranges
from 0 to 120 degrees. 0
degree is effectively mono
while 120 degrees is extreme
left/right separation.
Mute button Click this button to silence a
track.
Command… Description…
Show Instrument
(MIDI tracks only)
Insert Instrument This command opens a
Displays the property
page of the instrument
that is patched into this
track.
menu where you can
select from a list of the
instruments installed on
your machine. Selecting
an instrument inserts a
new instrument/track
combination.
9
Page 18

Replace
Instrument
Clone Instrument Creates a copy of the
Create Layer This option creates an
No Ports (MIDI
tracks only)
Select from a menu of
instruments with which
you can replace the
instrument that you rightclicked.
track that you rightclicked.
auxiliary track below the
track you right-clicked.
You can drag any
overlapping patterns into
the auxiliary track so that
the patterns are easy to
see and edit. The auxiliary
track uses the same
instrument, volume slider,
and pan/width slider as
the original track, but has
its own mute, solo, arm,
and show/hide automation
buttons. Auxiliary MIDI
tracks have their own
MIDI Routing Override
button.
This option prevents the
instrument from
responding to input from
your MIDI controller.
All Ports (MIDI
tracks only)
Port “n” (name of
port) (MIDI tracks
only)
Audio Input
(audio tracks only)
Phase Invert
(audio tracks only)
This option causes the
instrument to respond to a
specific MIDI channel that
comes in through any
MIDI port (interface). If
you choose Omni, the
instrument responds to
any MIDI input on any
MIDI port.
This option causes the
instrument to respond to a
specific MIDI channel that
comes in on a specific
MIDI port. If you choose
Omni, the instrument
responds to any MIDI
input on the specified
MIDI port.
This option lets you
choose an audio input for
the track. If there are no
options in the menu, you
need to use the Options-
Audio command and
choose an Input Channel.
This command inverts the
track’s phase. Try this
command if you think a
track may be experiencing
phase cancellation with
another track.
10
Page 19
Freeze Track This option mixes your
track and all of its plug-in
effects down to an audio
pattern, and then disables
the instrument and/or
effects that are patched
into this track. This greatly
reduces the load on your
CPU, especially if you’re
freezing a MIDI track.
Bypass For MIDI tracks: Click this
option to open a menu of
bypassed outputs.
Checkmarks in the menu
show which outputs are
disabled. Click an output
number to enable or
disable the associated
output.
For audio tracks: enabling
the bypass option in this
menu mutes the audio
track, and removes the
audio track and any plugins from the audio stream,
reducing the resources
that your computer needs
to play your project.
Delete Deletes the track that you
right-clicked.
See:
Arrange Pane
Bus Pane
Arrange Pane
The Arrange pane displays your project’s sound patterns
on a timeline. Each instrument track or audio track has a
corresponding row in the Arrange pane which displays that
track’s sound patterns.
Here’s a picture of the Arrange pane:
Snap to Grid button
Tim e Rul er
Save as Device
Chain
This command opens the
Save Device Chain
dialog, which allows you
to save the instrument
that you right-clicked
along with its settings and
effects.
Now Time cursor
The Arrange pane has the following components:
• Time Ruler—The Time Ruler is located at the top of
Patte rn
11
Page 20

the Arrange pane. The Time Ruler displays your
project’s timeline in measures, beats and ticks
(M:B:T). The Time Ruler conforms to the current time
signature, so a song in 3/4 time would have just three
beats per measure. The time your project is at on the
Time Ruler is called the Now Time. For more
information about the Now Time, see The Now Time.
For information about setting or changing the time
signature, see Changing the Time Signature.
• Patterns—Below the Time Ruler, and taking up most
of the Arrange pane is the area where each track’s
MIDI or audio patterns are represented by rectangles.
You can click and drag out repetitions of these
patterns in addition to moving, cutting and pasting
them to other parts of a track or to a different track.
• Z oom ing and scrolling controls—You can drag the
scroll bars that are at the bottom and right borders of
the Arrange pane to scroll horizontally or vertically,
respectively. If you drag the center of the horizontal
scroll bar up or down, you can zoom horizontally.
Dragging the center of the vertical scroll bar to the left
or right zooms vertically. Enabling the Scroll Lock key
on your computer keyboard causes the Arrange pane
to scroll along with the Now Time cursor.
• Arrange pane context me nu —Right-clicking over a
pattern in the Arrange pane opens the Arrange pane
context menu which has the following commands:
Command… Description…
In Use This command displays a popup
menu of the patterns that are
already in the Arrange pane.
Select a pattern to add it to the
Arrange pane at the spot where
you right-clicked.
Not in Use This command displays a popup
Groove-Clip
Looping
Cut Only available when right-clicking
Copy Only available when right-clicking
menu of the patterns that have
been used in your project, but are
not currently being used. Select a
pattern to add it to the Arrange
pane at the spot where you rightclicked.
If you right-click an audio pattern,
this command changes the
pattern to a Groove clip
(ACIDized wave file). Repeat the
command to turn the pattern back
into a standard wave file.
over a channel. This command
removes the channel and its data.
The channel and its data remain
on the clipboard.
over a channel. This command
places a copy of the channel and
its data on the clipboard.
DISK This command displays a popup
menu of your Project5 patterns
that are on your hard disk. Select
a pattern to add it to the Arrange
pane at the spot where you rightclicked.
12
Paste This command pastes cut or
copied data at the point of
insertion. If you access this
command by right-clicking over a
channel, the paste appears above
that channel.
Page 21
Delete Only available when right-clicking
over a channel. This command
removes the channel and its data
without storing it on the clipboard.
Merge Selected
Patterns
Split Selected
Patterns
Unlink Selected
Patterns
Combines selected patterns on
the same track into one pattern.
Splits selected patterns at the
Now Time.
Makes selected duplicate
patterns into independent
patterns.
The Global Track Override button determines allows you to
mute the output of all patterns in the Arrange pane, or
mute all patterns in the Groove Matrix, or let all patterns
sound. The individual Track Override buttons allow you to
mute an individual track’s patterns in the Groove Matrix,
and/or the Arrange pane.
For more information about the Groove Matrix, see Using
the Groove Matrix.
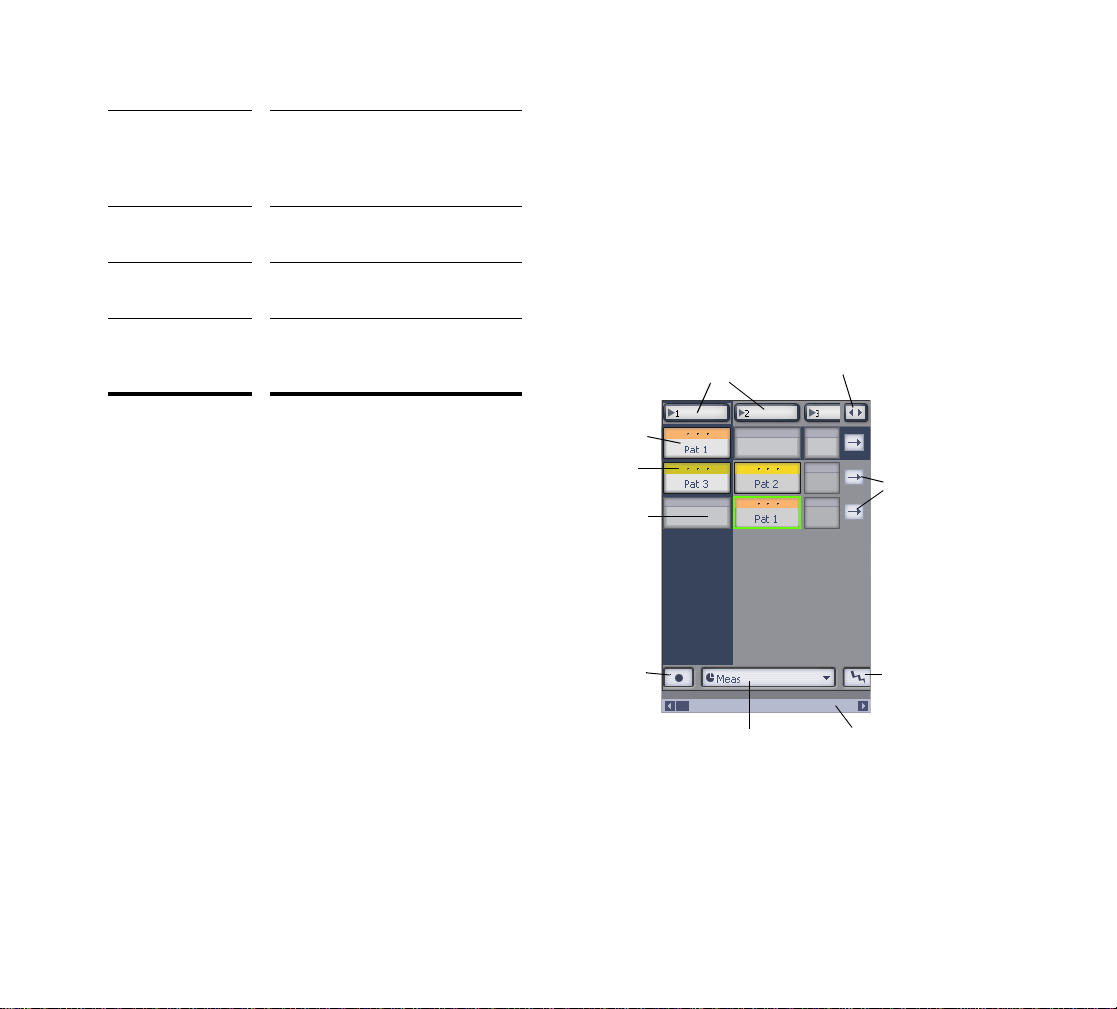
Groove Matrix
Groove headers
Global Track Override
button
See:
Bus Pane
Groove Matrix
A groove in Project5 is a collection of one or more patterns
stacked vertically in the Groove Matrix, one pattern per
track. Each groove lasts as long as the longest pattern in
that particular groove. The shorter patterns in a groove
repeat until the longest pattern in that groove finishes (by
default, but you can change this). Each column in the
Groove Matrix is made up of cells, which are just pattern
holders, one per track. You can drag one pattern into each
cell, or leave the cell empty.
The Trigger Snapper menu sets the time lag between
when you trigger a groove or cell, and when it starts playing.
By default, you can play one groove at a time, starting
each groove by clicking its header, or by triggering the
groove with remote control.
You can record your grooves in the Arrange pane.
Cell with pattern
Cell header
Empty cell
Arm Groove
Matrix for
recording
Trigger Snapper menu
Individual
Track Override
buttons
Reset playback
state and
selection of all
cells
Groove Matrix
scrollbar
Bus Pane
The Bus pane is located below the Track pane, and contains strips of controls for the master output (main output),
the aux buses, and the tempo track. You can hide or show
13
Page 22
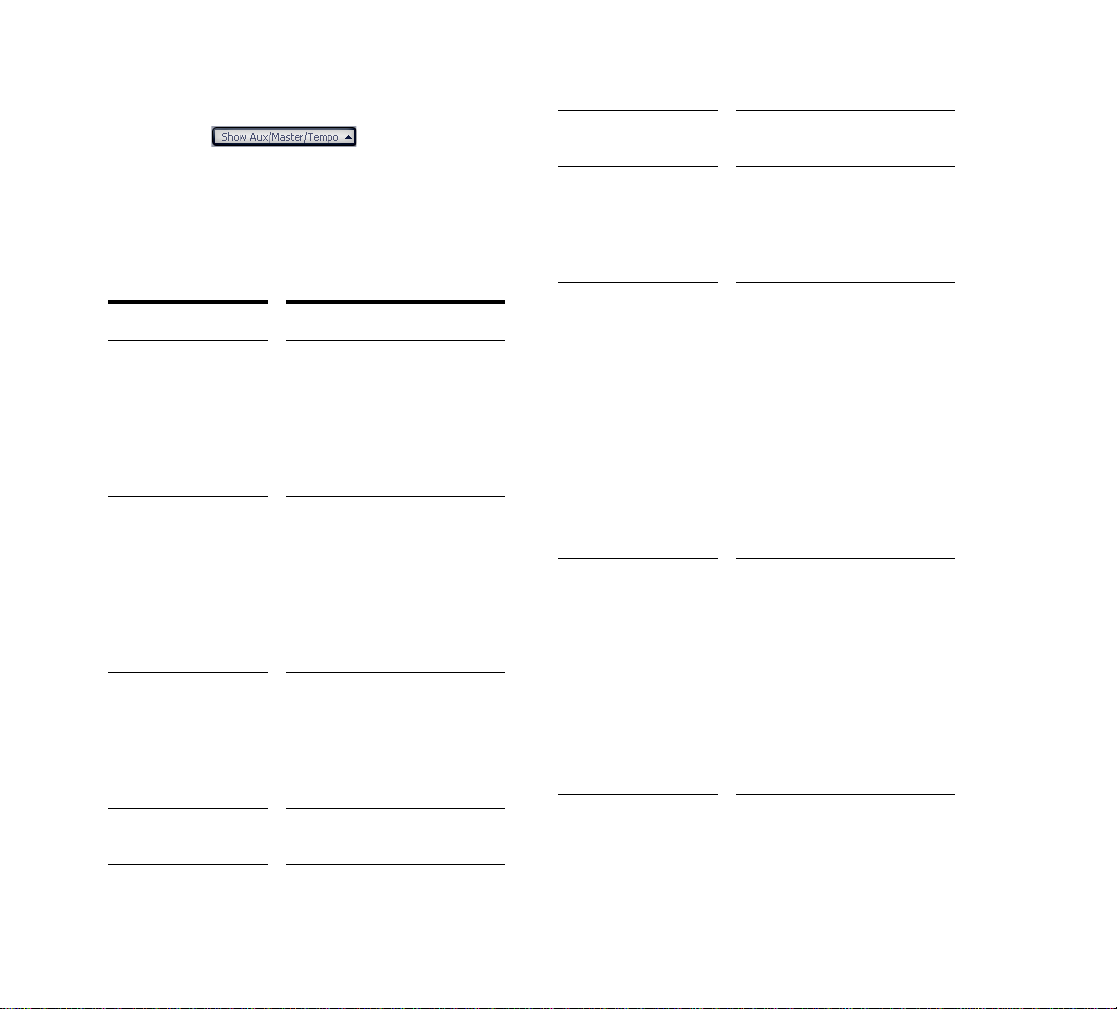
the Bus pane by clicking the Show/Hide Aux/Master/
Tempo button that’s at the bottom of
the Bus pane. The Bus pane, and the part of the Arrange
pane that the Bus pane uses, are separated from the Track
pane and the upper part of the Arrange pane by a splitter
bar. You can drag the splitter bar to resize the Track pane
and the Bus pane. Each control strip in the Bus pane contains the following controls:
Volume meter Displays the bus’s volume
level.
Volume slider Drag this slider to adjust the
bus volume. The minimum
volume for a bus is -INF (no
volume) and the maximum
volume is 6 dB.
Parameter… Description…
Arm button Click this button to arm a bus
strip for automation
recording. After you start
recording, you can move any
of the bus strip’s controls,
and record the movements
as automation.
Strip number This number represents the
order the bus appears in the
Bus pane. If you drag an
individual track strip to
another location, the name of
the strip that you drag stays
the same but its number
changes.
Bus name A name for the bus that you
can edit. Double-click the
name to enable editing
(except for the Master bus),
and press Enter to save your
name change.
Mute button Click this button to silence a
bus.
Balance/Width slider
(balance)
Balance/Width slider
(width)
Drag this slider to change the
stereo balance for the bus.
This value ranges from 100%
Left to 100% R. Center is
represented by C, which is
the default value. You can
restore most Project5
controls to their default
values by double-clicking
them. This slider also
controls Width, when you
hold the Ctrl key down while
you drag.
Ctrl-drag (hold the Ctrl key
down while you drag) the
Balance slider to control
Width. Width is the perceived
distance between the left and
right stereo channels. Width
ranges from 0 to 180
degrees. 0 degree is
effectively mono while 180
degrees is extreme left/right
separation.
14
Page 23
Tempo track You can draw tempo
changes in this track with the
Automation tool that’s in the
Main Control view. The slider
on the Tempo Track controls
what range of tempo is
displayed in the Arrange
pane. When the slider is all
the way to the left, the
Arrange pane can display
tempos ranging from 0 to 200
bpm. When the slider is all
the way to the right, the
Arrange pane can display
tempos ranging from 0 to
1000 bpm.
See:
The Editor
Arpeggiator
The Device Browser
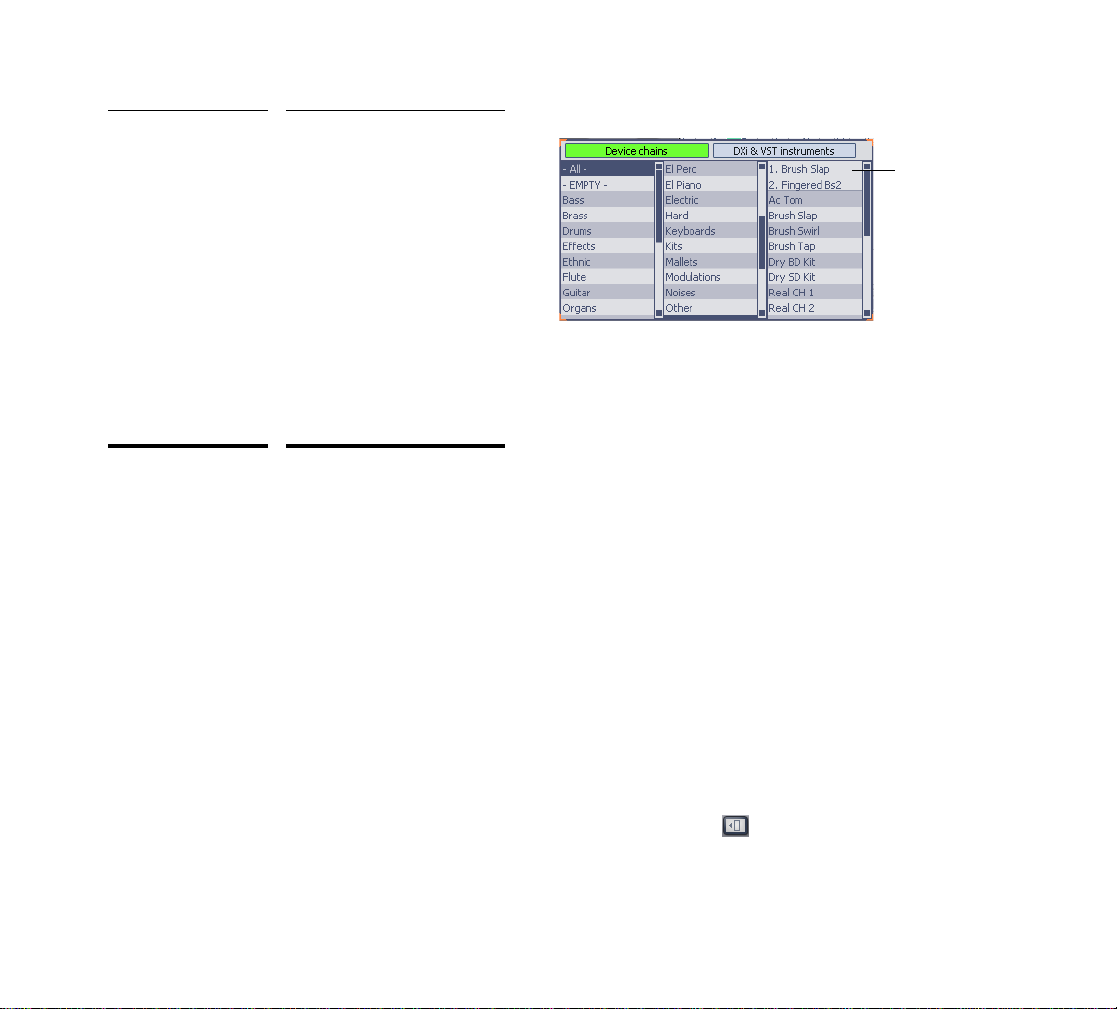
Formerly known as the Patch Browser, the Device Browser
displays device chains that are saved on your hard drive.
Instead of loading an instrument and some effects, you
can load everything at once by loading a device chain (formerly known as a patch). A device chain is made up of an
instrument, any effects that were loaded with the instrument when the device chain was saved, the parameters for
the instrument and effects, and remote control settings for
the instrument and effects. The Device Browser appears
when you click the right button in the Add Track section
that’s just above Track 1 in the Track pane.
Here’s a picture of the Device Browser:
Most Recently
Used list
The Device Browser has the following components:
• The Device Chains button—displays the device
chains that are on your hard drive. Clicking the name
of a device chain loads it into the currently-selected
track.
• The DXi and VSTi Instruments button—displays the
DXi, VSTi, and ReWire instruments and applications
that are on your hard drive. Clicking the name of an
instrument or ReWire application loads it into the
currently-selected track.
• Most Recently Used list—at the top of the right
column is a numbered list of your most recently used
instruments or device chains.
See:
Track Inspector
Track Inspector
The Track Inspector replaces the old SYN.OPS view. The
Track Inspector displays the track information of the track
that is currently selected in the Track view. You can show
or hide the Track Inspector by clicking the Show/Hide
Track Inspector button that’s just left of the Add Track
buttons in the Main Control view.
15
Page 24
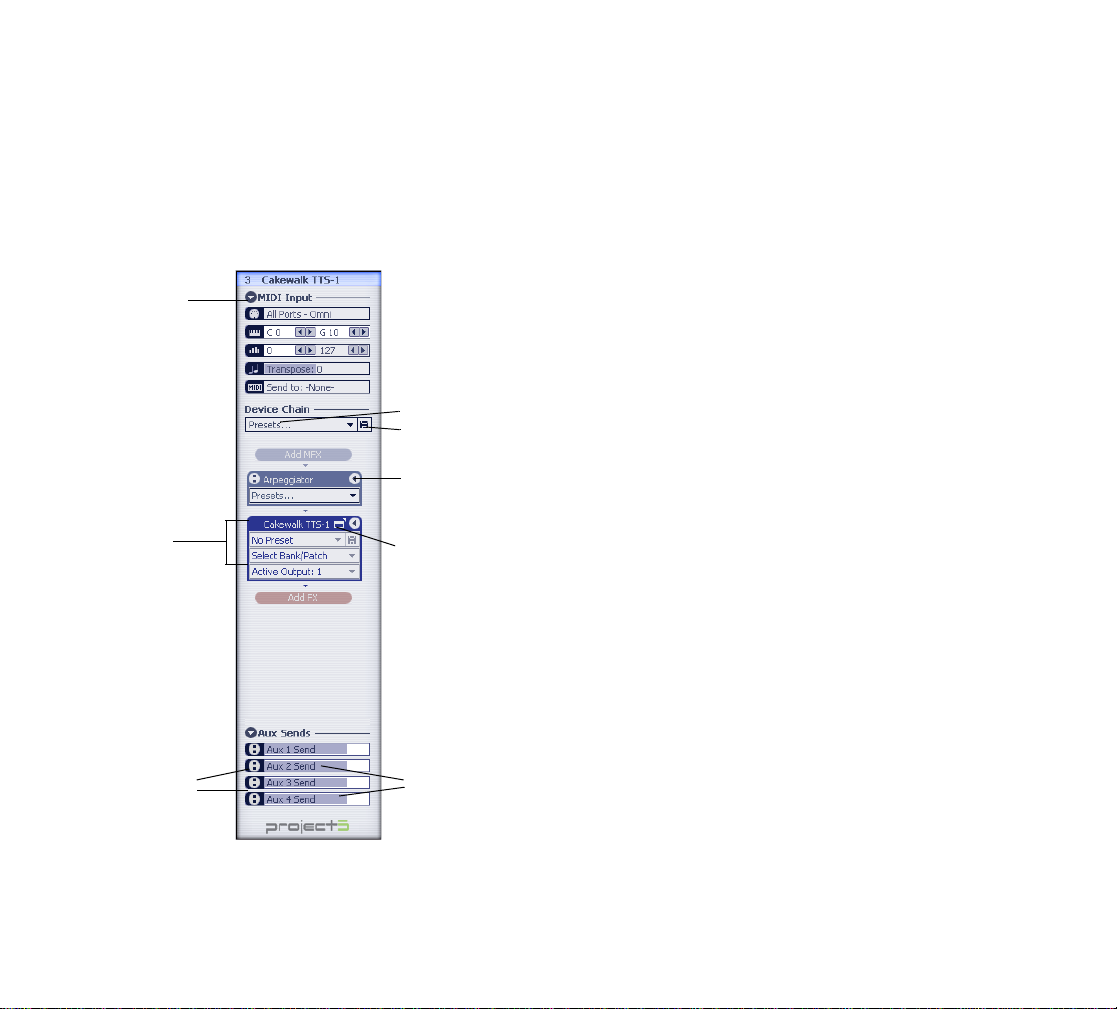
Track Inspector
Show/HIde MIDI
Input section
Instrument
controls
Aux send enable
buttons
Device Browser and
Save Device button
Show/Hide Settings
button
Display instrument
property page
Aux send level
controls—drag to
set
The Track Inspector is divided into three sections:
MIDI Input Section
The Input section of the Track Inspector contains:
• The track name (at the very top of the Track
Inspector)
• MIDI input port and channel—this menu filters out any
live MIDI input that’s not on the listed port and/or
channel.
• Key range filter—excludes any live MIDI input that’s
not in the selected range of notes that is bounded by
the low note and high note that you select in these
two fields.
• Velocity range filter—excludes any live MIDI input
that’s not in the selected velocity range that is
bounded by the lower velocity and higher velocity that
you select in these two fields.
• Input transposition field—transposes live input and
patterns up or down by the positive or negative
number of half-steps you enter in this field.
• Send to MIDI channel menu—sets the MIDI channel
for patterns in this track, and for incoming notes and
data when you’re playing live. This menu overrides
the MIDI channel menu that’s in the Editor , unless this
menu is set to None.
Note: If you create multiple lanes in a track, each lane has
its own instance of the T rack Inspector with it s own Send to
MIDI channel menu. Just highlight each lane in succession
to see each lane's Track Inspector. If a lane's Send to MIDI
Channel menu is set to None, then each pattern in that
lane will play back on the MIDI channel that the pattern
contains. Otherwise, patterns play back on the MIDI channel that's listed in that track's Send to MIDI Channel menu
in the Track Inspector.
16
Page 25

Device Chain Section
The Device Chain section of the Track Inspector contains
the device chain, which displays the instrument and effects
that a track uses in the order of their signal flow . To hide or
show the parameter controls on the instrument or
effects, click the Show/HIde Settings button that’s on the
right end of the titlebar of each instrument or effect.
The Device Chain section has modules that contain the following devices:
• Device Chain menu—use this menu to open the
Device Browser, which allows you to choose a device
chain for the current track. A device chain is made up
of an instrument, effects, parameter settings for the
instrument and effects, and remote control
assignments for the parameters. Once you’ve created
or edited a device chain, you can click the disk icon to
save the device chain for use in other projects.
• Add MFX (Add MIDI effects)—MIDI effects come first
in the device chain’s signal flow. When you click the
Add MFX button to add a MIDI effect, a popup menu
of MIDI effects appears, from which you can select
one to insert. You can use as many as your
computer’s processing power can handle. You can
change the order of effects by dragging one from a
lower position to a higher one
• Arpeggiator—each track gets its own instance of
Project5’s powerful new arpeggiator. See Arpeggiator
for more information.
• Instr ument module (or Add Instrument button if no
instrument is loaded)—the instrument comes next in
the device chain. If no instrument is loaded in this
track, you can click the Add Instrument button to open
a list of instruments and ReWire applications. Click
the name of a device on the list to load it. After an
instrument is loaded, you can open the interface of an
instrument or ReWire application by double-clicking
the name of the instrument or effect in the device
chain, or by clicking the Show Property Page button
that’s just to the right of each instrument or ReWire
name in the device chain. The Bank/Patch menu lets
you load factory-supplied sounds for the displayed
instrument.
• Add FX (Add Audio effects)—audio effects come last
in the device chain’s signal flow. When you click the
Add FX button to add an audio effect, a popup menu
of audio effects appears, from which you can select
one to insert. You can use as many as your
computer’s processing power can handle. You can
change the order of effects by dragging one from a
lower position to a higher one. After an effect is
loaded, you can open the interface of the effect by
double-clicking the name of the effect in the device
chain, or by clicking the Show Property Page button
that’s just to the right of each effect name in the
device chain.
Note: the device chain supports mouse wheel scrolling.
Aux Sends Section
The Aux Sends section of the Track Inspector contains:
• Aux send enable and aux send level controls for the
selected track
See:
The Bus Inspector
The Bus Inspector
When you click an aux or master strip in the Bus pane, the
Track Inspector becomes the Bus Inspector. The Bus
Inspector only has one control:
Add FX (Add Audio Effects)
• Effects are displayed according to signal flow, with
the earliest effect in the bus’s chain displayed at the
top. The Add FX button enables you to insert multiple
effects into the bus. To hide or show the controls of
17
Page 26
the effects, click the Show Settings button, which is
at the right end of the titlebar of each effect.
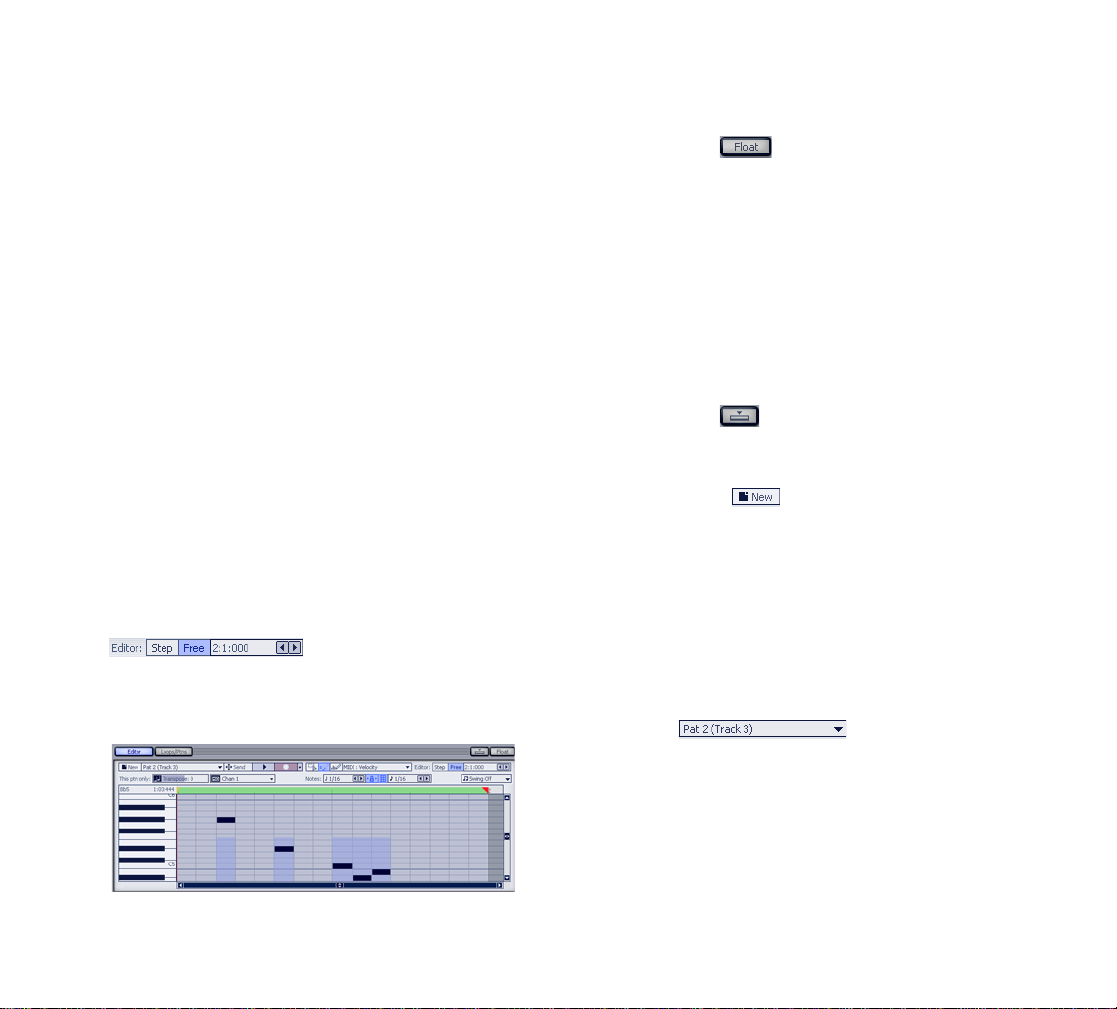
The Editor
The Editor is where you create new MIDI patterns (you can
also create MIDI patterns by recording in the Track view),
edit patterns (including pattern automation), and save patterns to your patterns folders. You can also edit Groove
clips in the editor.
The Editor has three modes:
• Step mode—this mode models a hardware step
sequencer, allowing you to create and edit MIDI
patterns on a grid. In Step mode, you can draw notes
(always of a fixed length) with the mouse and also do
Step Recording, but not real-time recording
• Free mode—in this mode, the Editor displays a
traditional piano-roll style editing surface, which
allows any note length. In Free mode, you can draw
notes with the mouse, and also do both Step
Recording and real-time recording.
• Groove clip mode—when you double-click a Groove
clip (ACIDized clip) in the Arrange pane, the Editor
becomes a Groove clip editor.
Click the Step or Free fields in the Editor menu
to change the Editor to Step
mode, or back to Free mode.
Here’s a picture of the Editor:
The Editor has the following controls:
Float/Dock Button
To Float or Dock the Editor:
• Click the Float/Dock button that’s in the upper right
corner.
Or
• Double-click the left border
To Resize the Editor:
• Drag any border or corner.
Note: when the Editor is docked, dragging its upper border
changes the size of the Arrange pane.
Show/Hide Button
Click this button to show or hide the Editor and the Loops/
Ptns tab.
New Pattern Button
Clicking this button creates a new empty pattern, and automatically loads the pattern into the Arrange pane at the
Now time on the selected track. The new pattern is one
measure long by default, but you can change this by using
the Options-Default Step Size for Step Sequencer command, together with the Options-Default Step Count for
Step Sequencer command. For example, if you chose a
default step size of 16th notes, and a default step count of
32 steps, that would create a pattern of two measures in 4/
4 time.
Pattern Menu
The Pattern menu, located the in upper left corner of the
Editor, displays the name of the current pattern. You can
rename the pattern by double-clicking the pattern name.
Clicking the dropdown button in the Pattern menu displays
these options:
• Open Pattern—opens the Open Pattern dialog to the
default directory for patterns. Navigate to the directory
18
Page 27
you want and select a file to open in the Editor.
• Save Pattern—opens the Export Pattern dialog,
enabling you to name and save the pattern to the
folder where you store patterns.
• Duplicate Pattern—copies the current pattern under
a new name, so that any editing you do to the new
copy doesn’t affect the original.
• Automatically send new patterns to track view—if
this option is enabled, every time you click the New
Pattern button, Project5 automatically places the new
pattern on the highlighted track at the Now Time.
• In Use—opens a menu of patterns that are currently
in use in the current project.
• Not In Use—opens a menu of patterns that have
been used in the current project, but were deleted
from the Arrange pane.
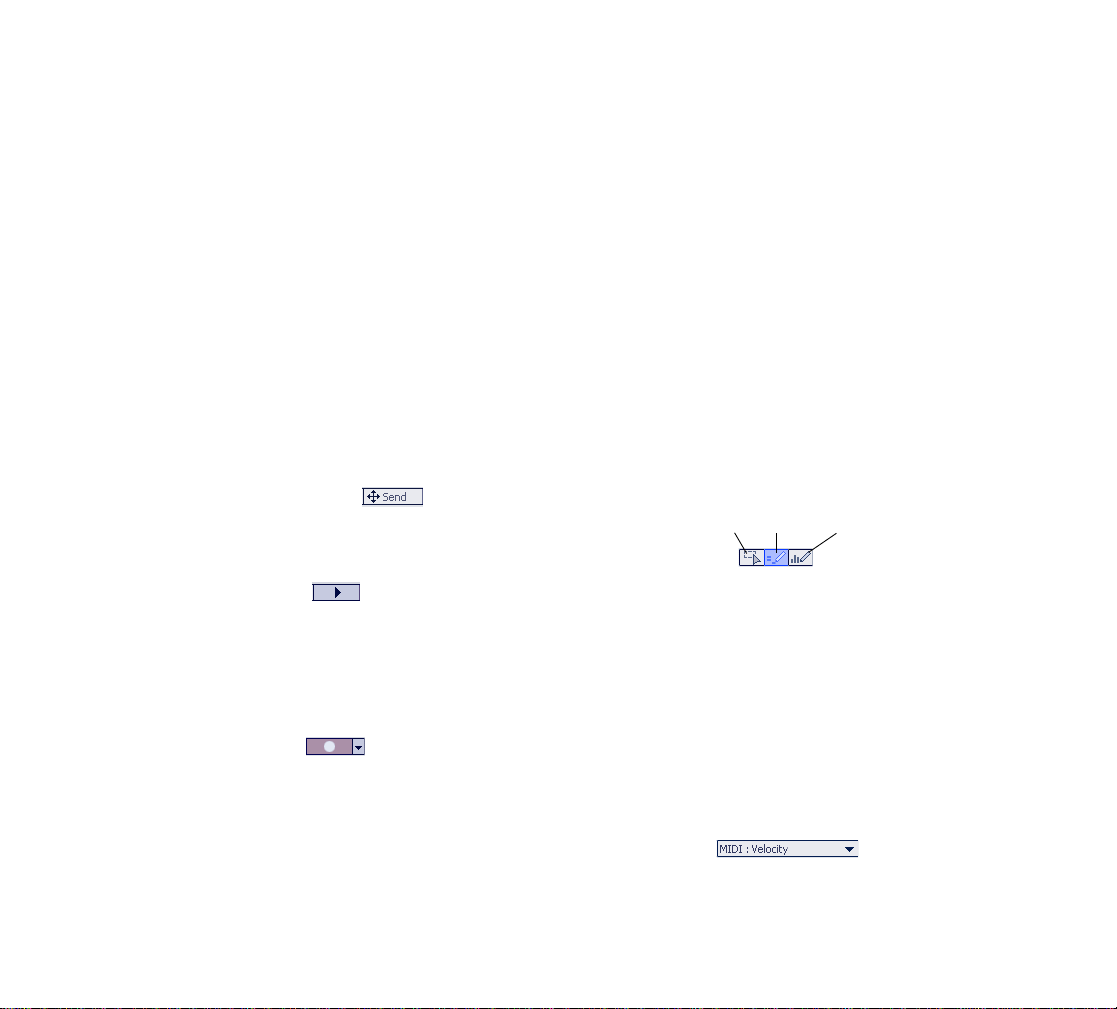
Send Pattern to Track Button
Click this button to place the pattern that’s currently displayed in the Editor on the highlighted track at the Now
Time.
Pattern Preview Button
Click this button to play the pattern that’s currently displayed in the Editor. The pattern plays back through whatever instrument is currently selected in the Track view. You
can set the time where playback begins in the Editor by
double-clicking in the Editor’s Time Ruler , which moves the
Edit Marker to the location you double-clicked.
Record Pattern Button
Click this button to record a new pattern by either live or
step recording in the Editor.
Click the dropdown arrow on the Record Pattern button to
choose recording options. Choose any or all of these three
options:
• Constant Velocity—when this option is checked,
recorded notes are not affected by velocity changes
from the MIDI controller. Note velocities are all set to
100.
• Overwrite—when this option is checked, current note
data is overwritten by new note data.
• Step Record—when this option is checked, the
recording mode is set to Step Recording. Step
Recording means that instead of recording notes that
you play at the time the notes were played, Project5
records notes of exactly the same length, one after
another, each time you play your MIDI controller, no
matter how much time has passed since the last note
was entered. The note lengths are determined by the
Notes menu setting.
Tools
The Editor has three tools to help you create and edit patterns.
Select tool Note tool
• The Select tool is an all-purpose tool for selecting
data, however you can use the Note tool when you
just need to select an individual object without
dragging it. Pressing T on your keyboard toggles
which tool is active (including the Select tool).
•Use the Note tool to draw notes in a pattern. The note
length menu determines the length of the notes you
draw.
• Use the Automation tool to draw automation in a
pattern. Select an automation parameter to draw or
edit in the automation edit menu in the Editor.
Automation tool
Automation Menu
The automation menu is just to the right of the Auto tool
(Automation tool). Clicking the dropdown arrow on the
19
Page 28
automation edit menu displays a menu of automation editing options:
• Output s—choosing this option displays a menu of
parameters that are specific to a particular output of
the currently-selected track. If the instrument in the
selected track has multiple outputs, the menu will
show parameters for each output.
• MIDI—choosing this option displays a menu of
standard MIDI continuous controllers that affect all
the outputs on the selected track.
• DXi—choosing this option displays a menu of
parameters that are specific to the instrument that is
loaded into the selected track.
• Ef fects—choosing this option displays a menu of
parameters that are specific to the selected effect on
the selected track.
• Arpeggiator—choosing this option displays a menu of
parameters that control the Arpeggiator on the current
track.
For more information, see Automation.
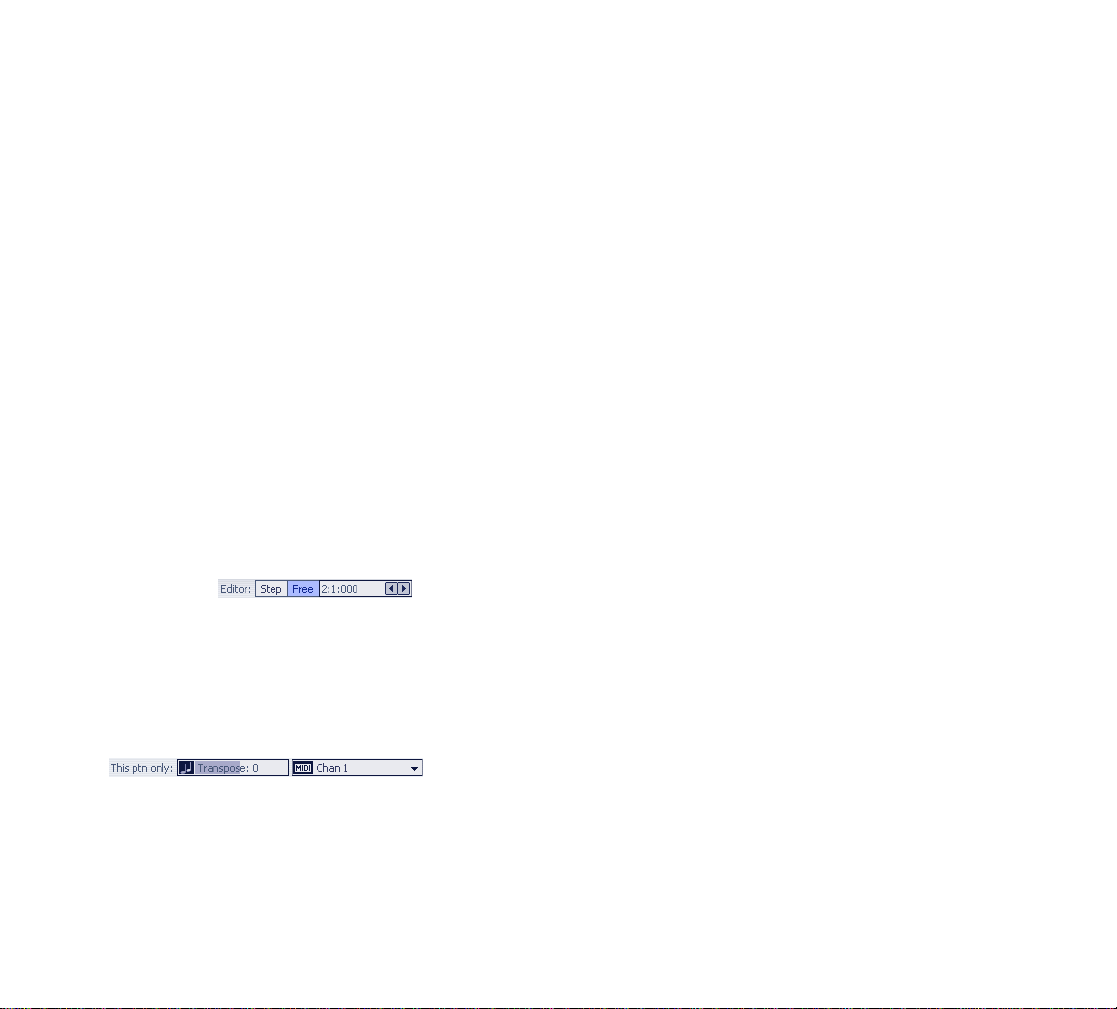
Editor Menu
Click the Step or Free fields in the menu to change the Editor to Step mode, or back to Free mode. Also, you can click
the left or right arrows in the menu to set the length of the
current pattern. See Creating Patterns in Step Mode and
Drawing Notes In Free Mode for more information.
This Ptn Only Menus
By default, all copies of a pattern in the Arrange pane are
identical except for their MIDI channel and transposition.
The Transpose and MIDI Ch menus allow you to change
the transposition and MIDI channel of a particular instance
of a pattern. Double-click the instance of the pattern where
it appears in the Arrange pane to display the instance for
editing.
• Transpose menu—this menu lets you transpose just
the current instance of a pattern (the pattern in the
Arrange pane that has the black border). The field
lists the number of half-steps up (+) or down (-) that
the current instance of the pattern is being
transposed.
If you use copies of this pattern in other parts, the
Transpose menu is independent for each copy.
Select a pitch offset for the current instance of the
pattern. The range is from -127 to +127 for a MIDI
pattern or -24 to +24 for a Groove clip. You can
double-click the value, type a number, and press
Enter if you don’t want to click the up and down
arrows. The transposition value is displayed in
parenthesis next to the pattern name
• MIDI Ch menu—this menu allows you to choose
which MIDI channel that the displayed pattern plays
back through, and also sets the channel that the
Editor’s keyboard display uses when you click the
keys. Choosing different MIDI channels for a pattern
allows you to access different sounds on different
channels of a multi-timbral instrument.
Note: the Track Inspector has a menu for each track
or track layer called the Send to MIDI Channel menu.
This menu overrides the MIDI channel that you
assign to a pattern in the Editor, forcing all patterns on
a track or track layer to play on the MIDI channel
that’s listed in the Send to MIDI Channel menu. To
disable the Send to MIDI Channel menu, set the
menu to None.
20
Page 29
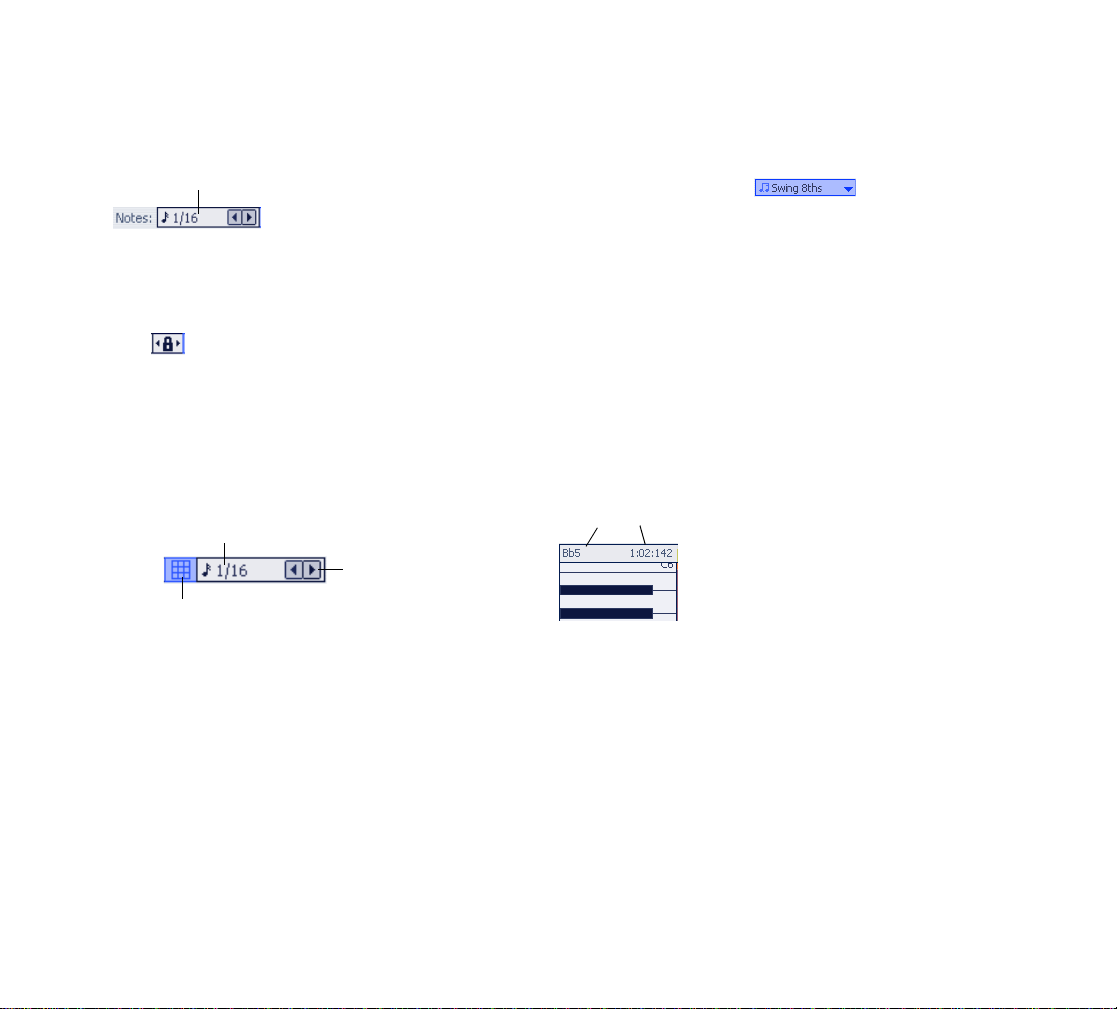
Notes Menu
Click to select a note length
Controls the length of the current step-recorded note, or of
notes that you draw with the Notes tool. You can select a
new length at any time
Link
The Link button forces the Snap to Grid button resolution
and the Notes menu value to be the same. For example, if
you change the Notes menu setting then click the Link button, the Snap to Grid resolution will follow the Not e Length
setting.
Snap to Grid
When the Snap to Grid button is disabled, or when you are
overriding it, data moves by ticks. Project5 divides each
beat into 960 ticks.
Swing Note-size Menu
When the swing note-size menu has a note size displayed,
patterns of consecutive 8th notes, 16th notes, or 32nd
notes play back with a swing feel, instead of a straight feel.
Y ou control the strength of the swing effect for each project
by dragging the Swing Strength control that’s in the Main
Control view.
Keyboard Display
The keyboard display, which is on the left side of the Editor. lights up to show what pitches you’re playing on a MIDI
keyboard. It also gives you a visual reference for pitches
while you’re drawing notes with the Note tool.
Cursor Display
Snap resolution
Page through
resolution options
Turn Snap to Grid button on/off
In Free mode, the Snap to Grid setting sets the precision at
which notes can be entered and edited, and also sets the
time interval that the Now Time moves when you doubleclick in the Editor’s Time Ruler. The Snap to Grid control is
not visible in Step mode, because the Snap to Grid is
always on in that mode, and is set to whatever duration the
Notes menu is set to. A snap resolution of 1/2 means that
entered notes and notes you drag and drop in the Editor
“snap” to the nearest 1/2 note boundary. The snap resolution in the Editor ranges from measures to 1/128th notes.
The default is 1/16th. You can override the snap resolution
setting by holding the Shift key while dragging notes.
Readout area
At the very top of the Keyboard Display is the Cursor Display, which shows a readout of the vertical and horizontal
coordinates of whatever tool you’re using in the Note pane,
both while the tool is moving and while it’s not.
21
Page 30
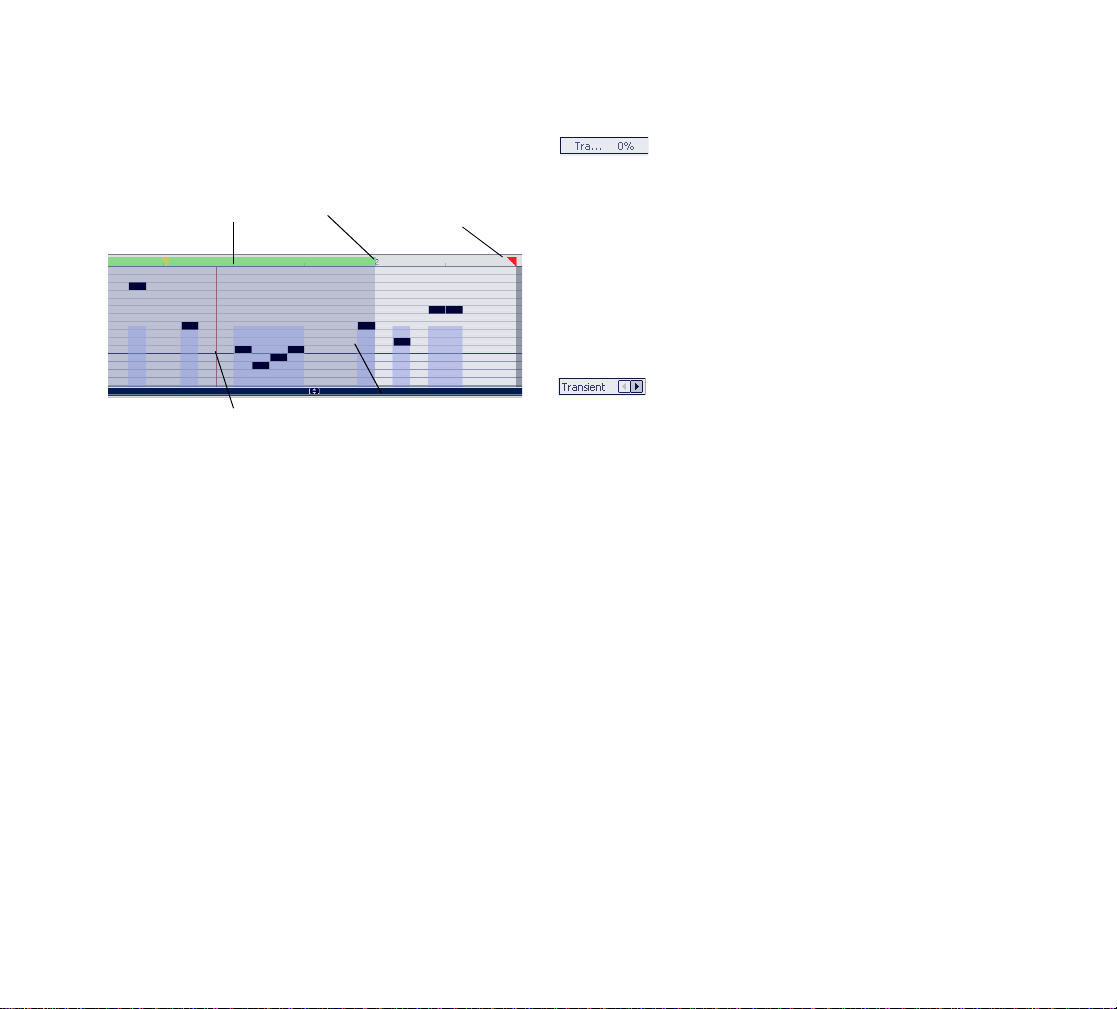
Time Ruler
Tim e Rul er
Measure number
End marker—drag
to set pattern
length
Trans “n” % (in Groove Clip Mode Only)
When you double-click a Groove clip in the Arrange pane,
the Editor changes to Groove clip mode, displaying the
Groove clip with a series of transient markers. The Trans
Detect control senses transients in your audio pattern and
assigns a marker at the beginning and end of each transient that it finds. As the you increase the sensitivity (by
using larger numbers) smaller transients are detected and
the number of markers increases.
Slice Division Menu (in Groove Clip Mode Only)
Now Time cursor
The Time Ruler in Free mode shows measure numbers
and beat boundaries. The Now Time cursor (vertical black
line) moves through the Note pane during playback to
show you where the Now Time currently is in your pattern.
In Step mode, the Time Ruler has no measure numbers.
See The Time Ruler in Step Mode for more information.
Note pane
Note Pane
This is the pane where you display and edit patterns.
Zooming and Scrolling
You can zoom and scroll in all modes of the Editor (see
Zooming and Scrolling in the Editor).
The Now Time
The Editor has its own Now Time, which is independent of
the Now Time in the Arrange pane. The Editor’s Now Time
marks the point in a pattern at which playback is taking
place, or where playback is currently stopped. The vertical
cursor in the Editor is a graphical display of the Editor’s
Now Time position. You can set the Now T ime in the Editor
by double-clicking in the Editor’s Time Ruler.
22
The Slices Division menu sets the resolution for the creation of markers, or the “slicing” of the looped clip. This
menu uses transients or note lengths, so the settings are:
• Transient Only
• Whole 1/1
• Half 1/2
• Quarter 1/4
• Eighth 1/8
• Sixteenth 1/16
• Thirty-second 1/32
The automatic markers appear at the note resolutions
according to the slider setting. At the eighth note setting,
there are eight markers per measure.
This control works well for slicing audio that has more subtle changes in volume with few dramatic transients.
The markers in a Groove clip preserve the timing of the
audio at that moment. Too few or too many markers can
cause unwanted “artifacts” when a Groove clip is
stretched.
Page 31

Restore Markers (in Groove Clip Mode Only)
The Restore Markers tool restores all automatically generated markers to the original position and enables all those
that were disabled. Manually created markers remain as
is.
Beats in Clip (in Groove Clip Mode Only)
The number of beats in the clip.
Transient Markers (in Groove Clip Mode Only)
Markers
Project5 uses the transient markers in a clip to stretch or
shrink the clip to synchronize to different tempos. Transient
markers mark the loudest and most characteristic-sounding parts of the clip, so Project5 tries to leave these parts of
the clip alone as much as possible when adjusting tempo.
If you want to move markers, you can drag them to new
positions, with or without the Snap to Grid button enabled.
You can add new markers by double-clicking in the Time
Ruler.
See Editing Patterns for more information.
Arpeggiator
P5’s arpeggiator lets you play intricate patterns of notes
that would otherwise be extremely difficult or impossible to
play manually and at speeds and octave ranges that exist
beyond the physical limitations of the player or keyboard
range.
Arpeggiated events are new events that are based on
notes that you play on your controller keyboard. The new
events are rhythmically and harmonically specified by the
arpeggiator’s preset, allowing you to “play” an endless
variety sophisticated musical passages with simple key
pressing.
In addition to note events, the arpeggiator can send
parameter automation such as pan, volume, and even
effects automation for the current track.
Each P5 track owns an arpeggiator, visually located in the
Track Inspector. Running multiple arpeggiators across
tracks can help realize exciting melodic and rhythmic textures.
The arpeggiator can be played in real-time so that it is reliable for live performance.
Here’s a picture of the Arpeggiator:
Enable/Disable
button
Rate menu
Shapes menu
Show/Hide
Controls
button
23
Page 32

Controls
The following table describes the controls in the Arpeggiator:
Control… Description…
Enable/
Disable
Preset
Control
Rate Adjusts the relative speed of the arp
Enables/disables the arpeggiator on a
given track. This control can be
assigned to MIDI RC and modified in
real-time during project playback.
You can create and edit arpeggiator
presets; all user parameters are stored
in the preset.
• Arpeggiator settings are included
in track patches.
• Arpeggiator presets can be saved
to a file and exchanged with other
users.
• Arpeggiator files are stored in a
shared directory
sequence by changing all the note
durations by a factor of the current
tempo. This control can be assigned to
MIDI RC and modified in real-time
during project playback.
Octave
Range
Latch Latch keeps the arpeggio playing after
Swing Swing is either on or off, as it is with the
Velocity An offset control that adds whatever
Sets the number of octaves through
which the arpeggio will play. A value of 1
means that a held chord will only
arpeggiate the notes that are being held
within the octave from which the notes
are being transmitted. A value of 2
means a held chord will arpeggiate for
two octaves. The held chord always
represents the bass octave, meaning
that the other octaves sound in a higher
register.
If you specify a range higher than the
standard MIDI specifications, the
Arpeggiator will repeat the pattern in the
highest available octave as necessary.
This control can be assigned to MIDI RC
and modified in real-time during project
playback.
you let go of the keys.
Control: Button; this control can be
assigned to MIDI RC and modified in
real-time during project playback.
Editor’s Step mode.
velocity value you select to the
velocities of the notes in the pattern.
24
Gate Controls whether the notes in the
pattern are held to their full value, or are
held for shorter or longer durations.
Pitch Offset A transposition control in half-steps, up
or down a maximum of 2 octaves.
Page 33

Flam
Amount
Hold Chord
Mix
Ch MIDI input and output menu—the
If a pattern contains flams, this menu
controls how big a difference there is
between the attack time of the flam and
the note it is attached to.
When 0, simultaneously held notes
arpeggiate as single notes. At 50%,
simultaneously held notes are heard as
a chord in addition to the usual
arpeggiated notes, both at equal levels.
At 100%, only the held chord is audible.
Control: Knob (0 – 100%); this control
can be assigned to MIDI RC and
modified in real-time during project
playback.
Arpeggiator only affects input data that’s
on the MIDI channels listed on this
menu, and then the Arpeggiator sends
the arpeggiated data out on this channel
also. These functions are independent
of the Track Inspector’s Send to MIDI
Channel menu.
Shapes Choosing a shape which specifies the
direction in which currently held notes
are to be sequenced.
The Shape selectors behave as a
button radio group, and include the
following:
•Forward
• Reverse
• Forward Circle
• Reverse Circle
• Forward Circle Inclusive
• Reverse Circle Inclusive
• Inward
•Outward
• Inward Circle
• Outward Cir c le
• As Played
• Random
• None ( = implicit rhythm mode)
For a tutorial, see Arpeggiator.
Loops/Ptns (Pa t t erns) T ab
Replacing the old Patterns Bin is the Loops/Patterns tab.
The Loops/Patterns tab allows you to navigate your computer to show patterns, preview them, and drag them into
the Arrange pane.
The Loops/Patterns tab has three modes:
• Explorer mode—this mode displays your patterns
and audio loops in Windows Explorer style. Click the
Explore button to enter Explorer mode. The Explorer
25
Page 34

mode also displays:
• Browse mode—this mode displays your patterns
and audio loops in several columns, divided by type.
Click the Browse button to enter Browse mode.
• In Project mode—this mode displays the In Use
folder, which shows all the patterns that are currently
being used in the Arrange pane, and the N ot In Use
folder, which stores patterns that you have viewed in
the Editor or have deleted from the Arrange pane, but
are not currently being used in the Arrange pane.
The Loops/Patterns tab also has the following components:
• Create Shortcut button—the Loops/Ptns tab can
remember where you browse. Click a folder to make
it the current folder, and then click the Create
Shortcut button to bookmark the folder.
• Stop Preview button—Stops the playback of a file
being previewed.
• Minimize button—click this button to hide the Loops/
Patterns tab and the Editor at the bottom of the
Project5 user interface.
• Float/Dock button—you can float or dock the Loops/
Patterns tab along with the Editor.
• Delete Button—the Delete button deletes the
currently selected pattern from the Not In Use or In
Use folders.
• Delete Not In Use Patterns Button—the Delete Not In
Use Patterns button clears the Not In Use folder
of all unused patterns.
Loops/Patterns tab
Preview button
Float/Dock button
Basic Operations
This section covers the most basic tasks in Project5.
See:
Selecting MIDI and Audio Drivers
Opening a Project
Playing a Project
The Now Time
Inserting New Audio or Instrument Tracks
Loading and Saving Device Chains
Loading Patterns
26
Page 35

Muting, Soloing, and Arming Tracks
Looping a Project
Changing the Tempo
Changing the Time Signature
Using the Metronome
Saving a Project
Exporting Wave and MP3 Files
Selecting MIDI and Audio Drivers
When you installed Project5, Project5 asked you to choose
the MIDI driver that you want to use to send MIDI data to
Project5. A MIDI driver is a small software program that
manages the flow of MIDI data between your MIDI interface and your computer. If you have more than one MIDI
interface connected to your computer, you need to make
sure that the drivers that are enabled (chosen) in Project5
are the ones you’re using for your MIDI keyboards and any
other MIDI devices you want to use in Project5. If you only
have one MIDI input port and therefore only one MIDI input
driver, you would obviously enable that driver. Still, it’s
good to know how to enable different MIDI drivers, especially if you’re adding or changing MIDI interfaces, sound
cards, or related hardware.
Similarly, if you have more than one audio driver on your
computer, you need to make sure that the one that manages the sound card that you use for playback is the one
that is enabled in Project5. Otherwise, you won’t hear anything when you play your projects.
To Select MIDI Drivers
1. Use the Options-MIDI Devices command to open
the MIDI Devices dialog.
2. In the Available MIDI Input Devices list, highlight the
driver(s) for the MIDI interface(s) that you have
connected to your MIDI keyboards or other
controllers, and click the Right Arrow button to move
it/them to the Active MIDI Input Ports list.
3. Click OK.
You can use multiple MIDI input ports (interfaces) with
Project5.
To Change the Order of MIDI Devices
Y ou may want to change the order of your MIDI devices as
they appear in Project5’s port menus.
1. Select a device in the Active MIDI Input Ports dialog.
2. Click the Up arrow to move it up or the Down arrow to
move it down.
To Select Audio Drivers, Sample Rate, and
Latency
1. Use the Options-Audio command to open the Audio
Options dialog.
2. In the Device menu, select the sound card you want
to use for recording and playback.
3. In the Select Input Channel menu, select the input
channel you want to use for recording.
4. In the Select Output Channel menu, select the output
channel you use for playback. This channel on your
sound card should be one that is connected to your
amplifier and speakers, so you can hear the sounds
Project5 produces.
5. In the Playback Bit Depth fields, Project5 enables the
16 bit option by default (this is standard, CD-quality
audio). If you want to use 24-bit playback, choose 24.
If you choose 24, you may need to change the Justify
field. Consult your sound card’s documentation for
the proper setting, or just turn down your speakers
and try the three options.
Note: the justification setting is not something the
user can have a preference for, since it basically
27
Page 36

means "how the sound card likes its audio formatted."
Each sound card can only understand one of those
justification settings. Unfortunately there is no easy
way for Project5 to know the format the sound card
wishes to receive. This is why it is up to the user to try
the various options (of course with volume levels set
low for safety) and stick with the one that works. It is
strongly suggested that the user keep the setting
where the correct playback can be heard.
6. In the Mixing Latency section, drag the Buffer Size
slider down to 20 mS, or even less if you’re confident
your system can handle it. At settings higher than 20
mS, the response time between when you play your
keyboard and when you hear the sound from Project5
starts to get too big. If you get distortion from your
sound card at 20 mS, you may need to download a
new audio driver from your sound card vendor.
Note 1: WDM and ASIO drivers provide the lowest
latency in Project5.
Note 2: Actual system latency may not be the latency
reported by the slider, and in the case of DSound
drivers, this latency is typically about 30 ms higher
unless the sound card supports hardware mixing. For
more information consult your sound card's
documentation.
7. In the Default Settings for New Projects fields,
Project5 enables the 44,100 Hz sample rate and 16bit audio file bit depth options by default (this is
standard, CD-quality audio). If you want to use other
settings for your particular sound card, choose them
now. If you’re going to be creating and playing back
24-bit files, choose the 24-bit option.
Note: as soon as you import audio (non-ACIDized
audio), or record audio into your project, the sample
rate and audio file bit depth of your project are fixed at
the settings displayed in the Default Settings for New
Projects fields. As soon as this happens, the project
settings are displayed in the Current Project Settings
field. You can still change the settings in the Default
Settings for New Projects fields, but the changes only
apply to future projects.
8. Click OK.
Note: if you need to create a CD from your project, you
can use 24-bit format while you create your project, and
choose to export your project in 16-bit format when you
export your finished project.
Now that your MIDI and audio drivers are enabled, see:
Opening a Project.
Opening a Project
Use the File-Open command to open projects. Project5
comes with sample projects that demonstrate important
features.
After you open a project, you can press the Spacebar to
start and stop playback. See the following topic for more
playback information.
Note: by default, when you launch Project5, the last
project you worked on opens. You can change this so that
Project5 opens an empty project instead, by unchecking
the Options-O pen Last Proje c t A t Sta r tup option that’s
in the Options menu.
See:
Playing a Project
Playing a Project
Y ou can use any of Project5’ s demo projects to get f amiliar
with the Transport controls.
By default, when you play a project, the Arrange pane
does not scroll along with the Now Time cursor. You can
change this by enabling the Scroll Lock key on your computer keyboard. Enabling the Scroll Lock key automatically
enables the Options-Scroll with Now Time option, and
28
Page 37

vice versa, so that your Scroll Lock key and the OptionsScroll with Now Time command are always synchro-
nized.
To Play a Project
• Click the Play button in the Main Control view
(or press the Spacebar).
Note: If you experience stutters or glitches during playback, chances are the Buffer Size slider in the Audio
Options dialog’s Mixing Latency section is set too low for
your CPU or sound card to handle. To correct this, select
Options-Audio and increase the buffer size setting by
several milliseconds (ms) and try playing your project.
Repeat if necessary.
To Rewind a Project
Main Control view, and choosing the option from the popup
menu.
Tim e Rule r
Arrange pane
Now Time cursor
• Click the Rewind button in the Main Control
view (or press w on your keyboard).
Note: if you want the Arrange pane to scroll to the beginning along with the Now Time cursor, make sure the Scroll
Lock key on your computer keyboard is enabled.
To Stop Playback
• Click the Stop button in the Main Control view
(or press the Spacebar).
See:
The Now Time
The Now Time
The Now Time in Project5 marks the point at which playback is taking place, or will begin when playback is started.
The Now Time is indicated by a vertical line in the Arrange
pane, and by the display in Project5’s Main Control view.
You can change the display of the Now Time from the
Measures/Beats/Ticks format to Hours/Minutes/Seconds
or vice versa by right-clicking the Now Time display in the
The Editor has its own Now Time that is independent of the
project’s Now Time. The Editor’s Now Time is the time
where any pattern in the Editor starts to play back when
you click the Editor’s Preview Pattern button.
To Change the Now Time in a Project
• During playback or when playback is stopped, click
(left-click) in the Time Ruler at the place where you
want the Now Time to be.
• When playback is stopped, you can optionally leftclick or right-click in the Time Ruler or in the Arrange
pane at the place where you want the Now Time to
be. The Options-Left Click Sets Now Time and
Options-Right Click Sets Now Time menu
commands allow you to enable either or both of these
two options.
The Snap to Grid setting determines the precision of the
placement of the Now Time when you click. You can also
change the Now Time using the Transport controls in the
Main Control view.
29
Page 38
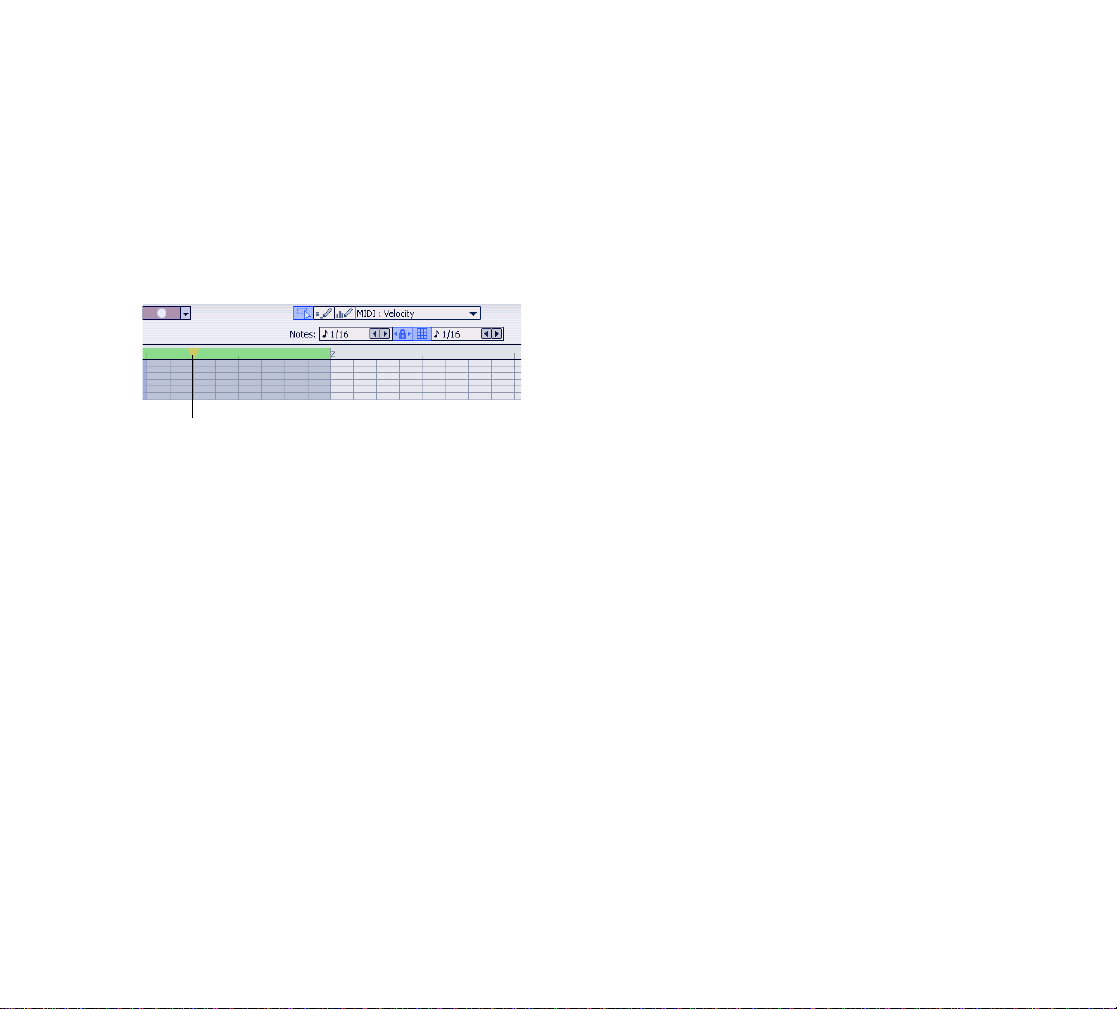
To Change the Now Time in the Editor
• Double-click in the Editor’s Time Ruler where you
want the Editor’s Now Time to be.
Or
• Drag the Edit Marker in the Editor to where you want
the Editor’s Now Time to be.
Edit marker
Now that you can navigate in Project5, see:
Inserting New Audio or Instrument Tracks.
Inserting New Audio or Instrument
Tracks
There are two types of tracks in Project5: instrument tracks
and audio tracks. Each instrument track is associated with
a single instrument. MIDI patterns play back through
instrument tracks, and audio patterns plays back through
audio tracks.
To Insert an Instrument Track
1. In the Main Control view, click the right button in the
Add track section.
The Device Browser appears.
2. At the top of the browser, click either the Device
Chains button if you want to load an instrument and
effects, or click the DXi and VST Instruments button if
you want to add only an instrument.
3. Choose an instrument or device chain from the menu,
or from the Most Recently Used numbered list that
appears in the upper right corner of the Device
Browser after you’ve inserted at least one instrument.
Project5 inserts the instrument or device chain that you
chose into the new track.
Another way to insert an instrument is to right-click in the
Track pane, select Insert Instrument from the popup
menu, or select Insert from Device Chain if you want to
add an instrument and related effects.
To Insert an Audio Track
• In the Main Control view, click the left button in the
Add track section.
Or
• Right-cli ck in an empty area of the Track pane, select
Insert Audio Track from the popup menu.
Project5 adds an audio track at the bottom of the Track
pane.
See:
Loading and Saving Device Chains
Loading and Saving Device Chains
A device chain consists of an instrument (software synthesizer), any audio and MIDI effects inserted in the instrument’s signal chain, the parameter settings of the
instrument and effects, and any remote control assignments you make to the instrument or effects. After you create or edit a device chain, you can save a device chain file
to disk for use in other projects.
You can open the Device Browser from either the Add
track section of the Main Control view, or from the Track
Inspector. If you open the Device Browser from the Track
Inspector, clicking the name of a device chain in the
Device Browser loads that device chain into the currently-
30
Page 39

selected track. If you open the Device Browser from the
Add track section, clicking the name of a device chain in
the Device Browser loads that device chain into a new
track.
T o Load a Device Ch ain from the Track Inspector
1. Select the track whose instrument or device chain
you want to replace.
2. In the Track Inspector, click the dropdown arrow in
the Device Chain section to open the Device Browser.
3. In the Device Browser, choose the instrument or
device chain that you want to load.
Project5 loads the selected instrument or device chain into
the selected track.
To add, replace, or delete instruments and effects, or
change their parameters, see Changing Instruments and
Effects, and Controlling Device Chain Parameters.
Project5 loads the selected device chain into the current
track.
If you make any changes to the device chain, and think
you might want to use the same device chain in another
project, use the following procedure to save the device
chain.
To Save a Device Chain
1. In the Track Inspector, in the Device Chain menu,
click the Save Device Chain button to open the
Save Device Chain dialog (jump to step 2, below).
Or
1. In the Track pane, right-click the track that contains
the device chain you want to save, and choose Save
as Device Chain from the popup menu.
2. Navigate to the folder where you want to store the
device chain, type a name for the device chain, and
click Save.
Project5 saves the current instrument and its settings,
together with the current effects and their settings.
The instrument, effect and Remote Control settings for the
track are saved in the device chain file.
See:
Loading Patterns
Loading Patterns
To load a pattern, find the name of the pattern in the Loop s/
Patterns tab, and drag the pattern to the time and location
you want in the Arrange pane. The Loops/Patterns tab displays both MIDI and audio patterns.
The Loops/Patterns tab has three modes:
• Explorer mode—this mode displays your patterns
and audio loops in Windows Explorer style. Click the
Explore button to enter Explorer mode. The Explorer
mode also displays:
• Brow s e mode—this mode displays your patterns
and audio loops in several columns, divided by type.
Click the Browse button to enter Browse mode.
• In Project mode—this mode displays the In Use
folder, which shows all the patterns that are currently
being used in the Arrange pane, and the Not In Use
folder, which stores patterns that you have viewed in
the Editor or have deleted from the Arrange pane, but
are not currently being used in the Arrange pane.
You can preview patterns by clicking the preview button
that’s on the left side of each pattern name.
You can also load a pattern by displaying it in the Editor
(use the Open Pattern command in the Editor’s pattern
menu, which is just right of the New Pattern button). By
default, the Editor loads any new pattern you create into
the highlighted track at the Now Time. Y ou can change this
behavior by unchecking the Automatic ally Send New
Patterns to Track View option that’ s in the Editor’s pattern
31
Page 40

menu. If you uncheck this option, you can send patterns to
the Arrange pane from the Editor by clicking the Send button that’s just right of the pattern menu. You can also drag
the Send button to the location where you want the pattern
to go.
See:
Muting, Soloing, and Arming Tracks
Main Control view (left side) master mute, solo, and arm buttons
Master arm, mute, solo
Muting, Soloing, and Arming Tracks
Each of Project5’s tracks has a mute button, solo button,
and an arm button.
Project5 also has master mute, solo, and arm buttons that
will unmute, unsolo, or disarm all tracks simultaneously.
Whenever any tracks are muted, the master mute button
lights up; whenever any tracks are soloed, the master solo
button lights up; and whenever any tracks are armed, the
master arm button lights up. Note that clicking the master
buttons will only turn single-track buttons off, not on.
Single track mute, solo, and arm
buttons
Mute
Mute
Arm
Solo
To Mute or Unmute a Track
• Click the track’s mute button.
To Solo or Unsolo a Track
• Click the track’s solo button.
To Arm or Disarm a Track
• Click the track’s arm button.
To Unmute, Unsolo, or Disarm all Tracks
• Click the master mute, solo, or arm buttons,
respectively.
See:
Looping a Project
Looping a Project
Y ou can use the Looping controls in the Project5 toolbar to
loop all or part of a project.
To Loop a Project
1. In the Project5 toolbar, click the Loop On/Off button.
2. In the Time Ruler , drag the beginning and ending loop
markers to the loop boundaries that you want. The
Snap to Grid setting determines what beat
boundaries are available: for example, if the Snap to
Grid is set to Measure, you can’t drop the loop
markers between measure boundaries.
3. Click the Play button to loop your project.
32
Page 41

Y ou can also set loop boundaries by selecting one or more
patterns in the Arrange pane, and then clicking the Set
Loop to Selection button.
Note: if you record audio while looping (loop recording),
when you stop recording, Project5 puts each loop take on
an extra track lane. See Recording Audio for information
about audio recording.
See:
Changing the Tempo
Changing the Tempo
Project5 has controls for changing the tempo of the whole
project, or for changing the tempo at any point in the
project. The Tempo control, located in the main toolbar,
changes the tempo of the whole project. If you want to add
tempo changes, or vary the tempo during the project, use
the Tempo Track in the Bus pane.
To Change the Tempo Using the Tempo Control
• In the Main Control view, click the Tempo control and
drag up to increase the tempo, or down to decrease
the tempo.
Or
• If you want to change the tempo more precisely,
double-click the Tempo control, type a new number
(you can use up to two decimal places, or none at all),
and press Enter.
To Dr aw Tempo Changes in the Tempo Track
1. In the Main Control view, click the Automation tool
.
The Track and Bus panes expand to allow automation
editing.
2. Display the Bus pane (click the Show Aux/Master/
Tem po button), and if necessary, drag the vertical
scroll bar that’s on the right edge of the Bus pane
down to display the Tempo track.
3. Set the Snap to Grid menu to a value that will allow
you to draw tempo changes at the intervals you want,
or turn off the Snap to Grid button.
4. In the Bus pane in the Tempo Track, use the
Automation tool to draw a tempo graph. The slider on
the Tempo Track controls what range of tempo is
displayed in the Arrange pane. When the slider is all
the way to the left, the Arrange pane can display
tempos ranging from 8 to 200 bpm. When the slider is
all the way to the right, the Arrange pane can display
tempos ranging from 8 to 1000 bpm.
Slider controls display
resolution
Draw tempo graph here
Tip: to draw straight lines in the Tempo Track, hold down
the Shift key while you drag the Automation tool.
See:
Changing the Time Signature
Changing the Time Signature
By default a new project in Project5 is in 4/4 time. Maybe
that’s all you’ll ever use, but Project5 lets you change the
time signature for your project. You can change the time
33
Page 42

signature for the whole project or make a change at any
point in your project.
To Change the Time Signature for the Whole
Project
1. Select Edit-Change Time Si gnature from the
Project5 menu.
Or
Right-click in the Time Ruler in the Arrange pane and
select Change Time Signature.
The Change Time Signature dialog appears.
2. In the Change Time Signature dialog, set the number
of beats you want per measure and the note value of
each beat.
3. Click OK.
To Change the Time Signature at a Specific
Measure
1. Select Edit-Insert Time Signature fro the Project5
menu.
Or
Right-click in the Time Ruler in the Arrange pane and
select Insert Time Signature to open the Insert Time
Signature dialog.
2. In the At Measure field, choose the measure where
you want to insert the new time signature.
3. In the Beats per Measure and Beat Value fields, set
the number of beats you want per measure and the
note value of each beat, respectively.
4. Click OK.
See:
Using the Metronome
Using the Metronome
The metronome allows you to hear the tempo during
recording and/or playback.
To Use the Metronome
1. In the Project5 Main Control view, click the
Metronome on/off button to turn on the
metronome.
2. If you want the metronome to count in before
recording begins, use the Transport-Count-in On/
Off command. When the command is enabled, a
checkmark appears next to the command.
3. To set the number of beats in the count-in, use the
Options-Metronome command to open the
Metronome Properties dialog, and choose the
number of count-in beats in the Count in # of Beats
field. You can also adjust the metronome sound in
this dialog. Click the Help button in the dialog to get
an explanation of all the options.
4. Click OK to close the Metronome Properties dialog.
See:
Saving a Project
Saving a Project
Project5 projects are saved with the extension .P5P.
To Save a Project
1. Select File-Save As from the Project5 menu.
The Save As dialog appears.
2. Navigate to the folder where you want to save your
project.
3. Enter a name for your project.
4. Click the Save button.
34
Page 43

For projects that contain recorded audio, Project5 creates
a separate folder for each project’s audio data, which is
located inside the folder that the project is located in, and
is called “[project name] Audio.” If you want to create a
backup copy of your project, make sure to copy both the
project file (extension .
P5P), and the project’s audio folder.
Exporting Wave and MP3 Files
You can export all or part of a project as a wave or MP3
file, to burn to CD, send over the Internet, or import back
into one of Projct5’s samplers.
Note: You must activate your MP3 encoder before it will
become available as a Project5 export option. Information
on how to activate Project5's MP3 encoder is located on
the Project5 Owner's Page on the Cakewalk web site. In
Project5's Help menu, select the Owner's Page option to
visit the site (Help-Project5 Owner's Page).
To Export Your Finished Project
1. Make sure your levels are set, effects are inserted the
way you want, and no tracks that you want in the mix
are muted. If you only want a few tracks to go in the
mix, you can solo those tracks.
2. Use the File-Export command to open the Export
Audio dialog.
3. In the Save In field, navigate to the folder where you
want your exported project file to be.
4. In the File Name field, type the name of the file.
5. In the Save as Type field, choose Wave files or MP3
files.
6. If you chose Wave files, choose a Bits per Sample
value (CD quality is 16 bits).
7. Choose a Sample Rate (if you chose Wave files, CD
quality is 44,100 Hz).
8. If you want to leave room in the file for the sound of
any effects that may still be sounding when the
project stops playing, choose a value in the Effects
Tails field of up to 99 seconds (usually a couple of
seconds is enough—play the end of your project and
listen for when all the sound stops after the last note).
9. If you have a looped region in your project, and you
only want that section in your exported file, enable the
Export Looped Region Only checkbox. If you’re not
exporting an MP3 file, skip to step 15.
10. If you chose MP3 files, drag the Quality/Speed slider
to strike a balance between sound quality and
bandwidth—higher quality increases file size and
download times.
11. If you chose MP3 files, choose a Bit Rate—128 is a
good-quality MP3 bit rate, 320 approaches CD
quality , 80 creates fast downloads, etc.
12. If you chose MP3 files, choose a Stereo Mode from
these options:
• Mono—this option creates a standard
mono file for minimum bandwidth.
• Stereo— this option creates a standard
stereo file.
• Joint S t ereo—not a full stereo file, but most
files will sound just as good, and at smaller
bandwidth. If stereo separation is important
for this particular file, choose Stereo or Mid/
Side instead.
• Mid/Side Stereo—preserves most of the
stereo effect of a file but at lower
bandwidth. Not too useful at bit rates above
128 kbs.
13. Enable High Pass/Low Pass Filters—these filters
decrease your file size by eliminating frequencies that
people don’t usually hear anyway.
35
Page 44

14. ID3 Tag—clicking this button opens the ID3 Tag
dialog, where you can enter identifying information
that is stored in your MP3 file and can be read by
most MP3 players and similar hardware.
15. Click the Save button to finish exporting your file.
36
Page 45

Tutorials
Page 46

This series of tutorials gives you a quick hands-on demonstration of Project5’s major features. For a more detailed
introduction, please see the Basics section of the online
help. You can open the online help from the Help menu or
by pressing F1 on your computer keyboard. Use the Contents tab, the Index tab, or the Search tab to find the information you need. Many help topics are context-sensitive,
meaning that if you press F1 while a particular dialog,
menu, or part of the interface has the focus (meaning it
was the last thing you clicked, or held the mouse over), an
appropriate help topic appears.
See Playing a Project to proceed.
Notice that while the file is playing, the Now Time cursor
moves to the right, to show at what time in the project playback is taking place. Y ou can easily move the Now T ime by
clicking in the Time Ruler or by pressing the Ctrl+Page Up
and Ctrl+Page Down keys on your keyboard. The Time
Ruler displays the number of each measure in your
project. When you click in the Time Ruler, the precision of
the distance that the Now Time moves when you click is
controlled by the Snap menu.
Snap to Grid on/off
Snap to Grid menu
Playing a Project
We’ll be looking at File1.p5p during the first part of our
tutorial, so if this file isn’t open already, use the File-Open
command to open it. It’s located in the Project5 Version 2/
Tutorials folder (Program Files/Cakewalk/Project5 Version
2/Tutorials).
Once the file is open, press the Spacebar to start play-
back. Pressing the Spacebar also stops playback. Y ou can
rewind the file by pressing W on your keyboard, or by clicking the Rewind button in the Transport.
Play
Record
If you don’t hear anything when you play the file, make
sure your speakers or headphones are turned up, and if
you’re still not hearing anything, see the online help topic
There’s No Audio in the Troubleshooting section.
Jog backward by Snap to Grid value
Rewind
Jog forward by Snap to Grid
value
52
Tim e Ru ler
Now Time cursor
Next, see Looping a Project.
Looping a Project
If you want to repeat a section of the project over and over
(called looping), there are a couple of ways to accomplish
this:
• Click the Loop On/Off button to turn it on, and then
drag the loop markers to the end and the beginning of
the section you want to loop over.
Or
• Click a pattern that’s in the Arrange pane to select it,
and then click the Set Loop to Selection button.
Page 47

Let’s loop over measures 1 to 3 so we can try out some
patterns. First, let’s zoom in far enough so you can see the
measure numbers in the Time Ruler easily: find the Horizontal Zoom control that’s at the bottom of the Arrange
pane, and drag it upward to zoom in.
Tim e Rul er
Horizontal Zoom control and
scrollbar
Rewind (press W on your keyboard), click the Loop On/Off
button so that it’s lit up, and then drag the second loop
marker in the Time Ruler to measure 3.
Loop on/off
Loop start marker
Loop end marker
Arrange pane
Vertical Zoom control and
scrollbar
Set Loop to
Selection button
Choosing MIDI Patterns
Now that our project file is set up to loop over measures 1
to 3, let’s try out some new MIDI patterns.
1. Start playing the project, and then click the “2nd Bass
(Dim)” track (track 4) to make sure it’s the active
track.
2. To preview som e bass patterns through that track,
let’s display the Loops/Patterns tab in Browse mode:
click the Loops/Ptns tab, then click its Browse button.
This displays your pattern folders in columns.
3. Click Bass in the first column. Try clicking on different
genres in the middle column, and then start
previewing the patterns that appear in the right-most
column by clicking each pattern's Preview button (see
graphic).
4. Find the pattern named Bass Ostinato 1.
Notice that the patterns preview through the current track
and in sync with the project while the project is playing
back.
If you cannot find ““Bass Ostinato 1” in the pattern browser,
click on the button labeled “In Project” (top left of the view),
then click on the “Not in use” folder.
Once you find a pattern you like, simply drag it to the place
in the track where you want it. For this tutorial, drag the
Bass Ostinato 1 pattern to the beginning of track 4 and
release the mouse.
Next, see Choosing MIDI Patterns.
53
Page 48

2. Move the cursor over the end of the MIDI pattern that
you dragged to Track 4 so that the cursor turns into
the slip-edit tool: .
3. Drag the end of the pattern to the beginning of
measure 37 and release the mouse. Project5 “rolls
out” enough copies of the pattern to fill the space.
Next, see Using Audio Loops.
Drag the Bass Ostinato 1 pattern to here
The value in the Snap to Grid menu determines whether a
dragged pattern lines up with a measure boundary, beat
boundary, or no boundary at all. For example, if you want a
dragged pattern to line up with a measure boundary, set
the Snap menu to Measure. If you want the pattern to line
up with a beat boundary, set the Snap to Grid menu to
Quarter Note. If you don’t want the dragged pattern to line
up with a precise boundary, click the Snap to Grid button to
turn it off (grey).
Snap to Grid button
Next, see Copying MIDI Patterns.
Snap to Grid menu
Copying MIDI P atterns
Let’s copy our MIDI pattern so that it fills up measures 1 to
37:
1. Make sure that the Snap menu is set to Measure.
Using Audio Loops
Project5 can play both ACIDized audio loops, and nonACIDized loops. ACIDized loops play back at your
project’s tempo.
Let’s preview some audio loops:
With the project playing, start previewing audio loops:
In the first column of the Loops/Patterns tab, click Audio
Loops, then click Funky in the next column, and then start
previewing the patterns in the Funky folder by clicking
each pattern’s Preview button (see graphic). Since these
loops are ACIDized, the patterns preview in sync with the
project while the project is playing back.
Preview buttons
54
Page 49

Once you find a pattern you want to use, simply drag it to
an audio track where you want to place the pattern, or drag
the pattern to an empty space below the last track strip.
Dragging a pattern to an empty space below the last track
strip will create a new audio track for you.
Next, see Adding Instruments and Tracks.
Adding Instruments and Tracks
Clicking the Add New Instrument Track button in the Add
Track section allows you to add an instrument and track
above the current (highlighted) track.
Let's add a track below the last track instead:
Right-click the empty space below the last track, and
choose Insert Instrument-PSYN II from the popup menu.
You may have to drag the scrollbar that’s on the right side
of the Arrange pane downward to expose the empty area
of the Track pane:
Show Property Page button that's at the right end of the
instrument's name in the Track Inspector.
Show/Hide Settings button
Show Property Page button
Tim e Rul er
Empty area of Track pane
Project5 adds an instrument and track below the last track.
The Track Inspector (see next graphic) displays some con-
trols for the instrument in the currently-highlighted track .
You can see all of the instrument's controls by clicking the
Horizontal scrollbar
Arrange pane
Vertical scrollbar
If you change a parameter, and decide you want to undo
the change, you can press Ctrl+Z to undo. You can press
Ctrl+Z as many times as you want to undo edits in the
reverse order that you made them (the last edit you made
is the first one that you undo, etc.). When you save your
project, any changes you make to instrument or effects
parameters are saved with the project. If you want to use a
particular group of instrument and effects settings that
you've come up with in other projects, you can save these
as a device chain. A device chain is made up of an instrument, any effects patched into that instrument's track, the
55
Page 50

parameter settings for the instrument and effects, and any
remote control assignments you've made to the instrument
or effects.
When you've created some settings you might want to use
in other projects, you can save them by selecting the Save
As Device Chain command on the track strip’s right-click
popup menu.
Next, see Using Effects.
Using Effects
Project5 supports DX effects, and can use VST effects
after you register them with the included VST adapter
(Start-Programs-Cakewalk-Cakewalk VST Adapter 4-
Cakewalk VST Adapter 4 command).
Let’s add an effect to our PSYN II track:
1. Click the PSYN II track to highlight it.
2. In the Track Inspector, just above the Aux Sends
section, click the Add FX button to display the popup
menu of available effects.
3. For this tutorial, choose Project5-Mod filter.
Project5 adds the Modfilter effect just below PSYN II
in the Track Inspector.
4. Find the Show Property Page button on the Modfilter
titlebar, and click the button to open the Modfilter
property page.
5. Choose a preset from the Presets window, or
configure the Modfilter parameters yourself. If you
press F1, a help file appears which explains the
controls in the Modfilter.
6. Close the Modfilter property page.
You can add more effects by clicking the Add FX button
again. The order of effects in the Track Inspector illustrates
the signal flow, starting at the top. You can reorder the
effects by dragging the name of an effect from a higher
location to a lower one. You can replace or delete an effect
by right-clicking the effect and choosing options from the
popup menu.
Next, see Using Aux Buses.
Using Aux Buses
If you have two or more tracks that can use the same effect
with the same parameter settings, you can save a lot of
CPU power by adding the effect to an aux bus and sending
the two (or more) tracks through the aux bus.
56
Show Property Page button
Page 51

Aux 1 track
controls
section, click the Aux 1 enable button that’s just left of
the Aux 1 volume slider to send the track signal
through Aux 1.
Aux 1 Enable/
Disable
3. Drag the Aux 1 volume slider to adjust the level.
You can send the track through more Aux buses by clicking Aux enable buttons, and adjusting the corresponding
Aux volume sliders.
Next, see Arpeggiator.
Aux 1 volume
slider
Show/Hide Aux/Master Tempo
button
Note: Individual effects on tracks (inserts) are pre-fader.
Aux send controls are post-fader.
Let’s add an effect to an Aux bus:
1. In the Track view, click the Show Aux/Master/Te mpo
button to display the Bus pane.
2. Click the Aux 1 track controls to highlight Aux 1.
3. In the Track Inspector (it’s actually a Bus Inspector at
this moment), click the Add FX button to add an
effect.
4. Adjust the effect, and repeat steps 3 and 4 if you want
to add more effects to this Aux bus.
Now let’s send a track’s signal through Aux 1:
1. In the Track view, click the Hide Aux/Master/Tempo
button to hide the Bus pane.
2. Click an instrument track’s controls to highlight the
track, and in the Track Inspector, in the Aux Sends
Arpeggiator
Let's try out Project5's powerful new arpeggiator. One
arpeggiator device appears on every instrument track,
located in the Track Inspector just above the instrument’s
controls. In this project, the arpeggiator is being triggered
by MIDI notes in a pattern. Let’s check it out:
1. Click on track 6, “Live Arp Lead (Dim)”. You’ll notice
the arpeggiator is enabled in the track inspector.
Unbroken vertical line
indicates a device is enabled
2. In the Arrange pane, drag the horizontal scrollbar to
display measure 33, and double-click the track 6
pattern named Arp Chords. Double-clicking the
pattern displays the pattern in the Editor. Notice that
the pattern consists of several held notes.
57
Page 52

Arp 6 pattern displayed
in the Editor
Measure 33 Double-click the Arp
Chords pattern
Several held notes
Scrollbar
Notice that patterns may contain arpeggiator automation.
In this case the pattern contains Gate automation, which
controls how short or long arpeggiated notes are played.
As the pattern plays through, the individual note lengths
become longer toward the end, creating an interesting
musical effect. You can see the Gate automation by opening the Editor’s automation menu and selecting Arpeggiator-In Use- Ga te.
The arpeggiator is also a useful device for live performance because it affects MIDI input. Let’s experiment with
live input by doing the following:
1. On track 6, click the MIDI Routing Override button to
make sure we receive MIDI input on this track only.
Trac k 6 MI DI
Routing
Override button
3. Click the Preview Pattern button in the Editor to hear
how the pattern sounds through the arpeggiator.
4. Press the Spacebar to stop previewing the pattern.
Preview Pattern button
Automation menu
Graph of
Gate
automation
58
2. In the Track Inspector (make sure Track 6 in the
Track pane is highlighted in blue so that the correct
track is dis p la yed in the Track In sp ector), cli c k th e
Latch button in the arpeggiator module; this causes
notes that you play on the MIDI controller to hold.
Latch button
3. Hold down two or more notes on your MIDI controller
then release the keys. A series of arpeggiated events
Page 53

should be playing now, without any further input from
you.
4. Now try listening to a few different “shapes” by
selecting various presets from the bottom-most menu
in the arpeggiator (you can ignore “Rhythms” for the
moment).
Show/Hide Settings button
Shapes menu
5. Hold down a different set of notes on your MIDI
controller; the new notes replace those that were
previously latched.
6. When you are done, click the Latch button again to
disable it.
You can manipulate arpeggiator output in other ways by
adjusting various parameters on the arpeggiator device.
However, the most significant capability of the arpeggiator
is its ability to apply algorithmic variations on your input as
well as MIDI-based patterns, which you can load via the
arpeggiator’s top-most Presets control. Let’s try it now:
1. Click on the arpeggiator’s Presets control and select
Load Preset.
2. Navigate to Rhythms, and select any pattern.
3. Hold down a note on your MIDI controller.
Notice that a rhythmic pattern plays through the instrument. The pattern’s first note begins on whichever key is
currently being held. Also note that the preset’s shape is
set to Rhythms Only. This means that the MIDI data wil l be
played exactly as it appears in the file.
Next, see Remote Control.
Remote Control
You can control many of Project5’s features and functions
from your MIDI controller. If you need help connecting a
MIDI controller to Project5, please see the online help topic
Connecting a MIDI Keyboard.
You can control the parameters of many instruments and
effects with remote control, as well as many of Project5’s
buttons and sliders, creating almost limitless ways to continuously change the mix and content of your project’s
sounds as your project plays.
First let’s assign a PSYN II parameter to the first control
field in the Track Inspector:
1. Click a PSYN II track to highlight the track.
2. In the Track Inspector, right-click on the first control
field to display a menu of parameters that you can
control by dragging in this field.
59
Page 54
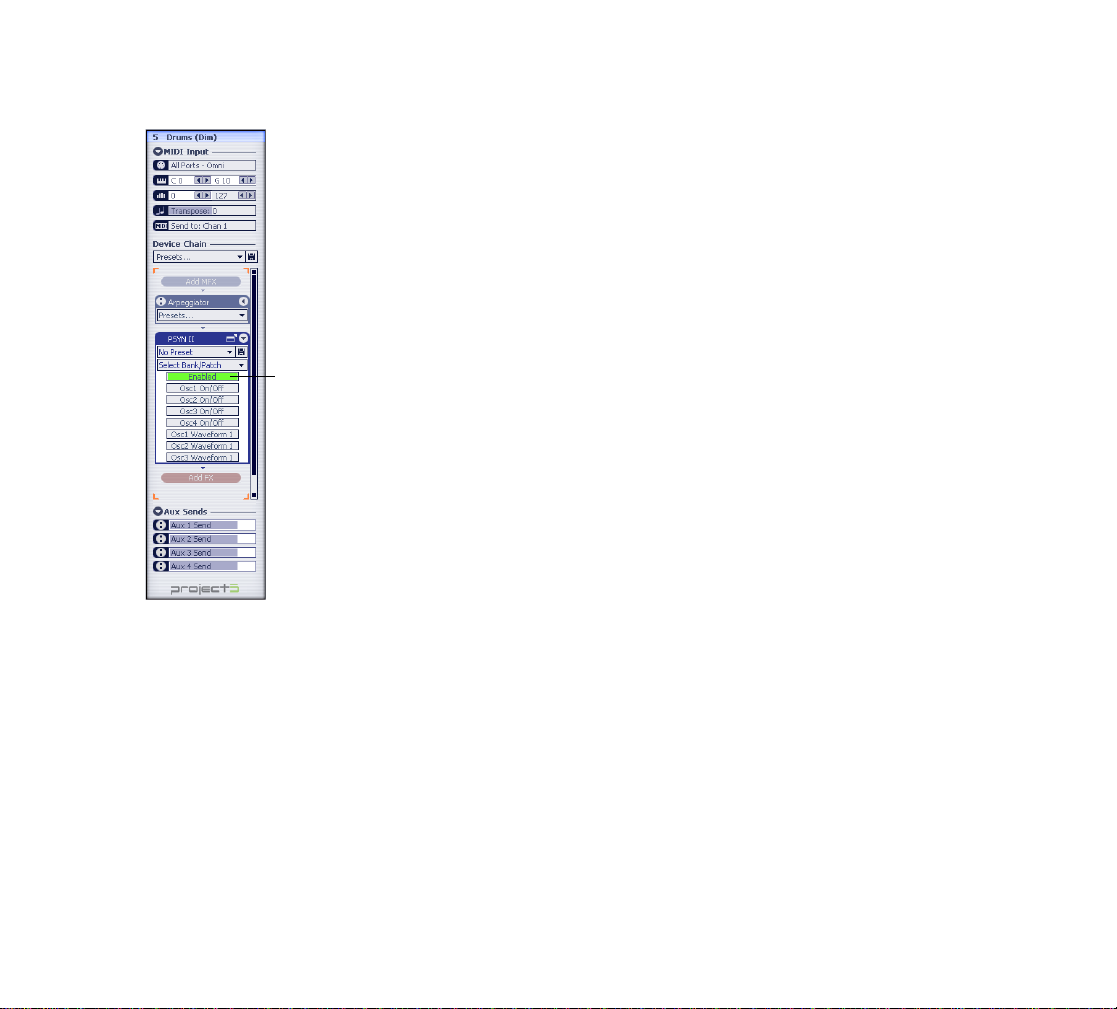
Right-click here
the PSYN II property page should move as you drag
the control field back and forth.
Now let’s assign a knob or slider on your MIDI controller to
control the first field in the Track Inspector:
1. Right-click the first control field in the Track Inspector
and choose MIDI Remote Control from the popup
menu.
The MIDI Remote Control dialog appears.
2. In the Mapped Parameters list, make sure that PSYN
II Filter I Cutoff is highlighted, then click the Learn
button that’s at the bottom of the dialog.
3. Move the knob or slider on your MIDI keyboard that
you want to use to control the filter cutoff.
4. Click Stop Learning, and then click OK.
Now move the knob or slider on your MIDI keyboard that
you had Project5 “learn,” and watch the Cutoff knob in the
PSYN II property page move.
Next, see Using Device Chains.
Using Device Chains
3. From the popup menu, choose Osc2 Sublevel-Filter
1 Keyb-Filter 1 Cutoff.
Project5 assigns the filter 1 cutoff parameter to the
first control field, and lists the assigned parameter in
the Assigned section of the popup menu.
4. Open the PSYN II property page (click the Show
Property Page button that’s at the right end of the
PSYN II titlebar in the Track Inspector), drag the
property page so that it doesn’t block the Track
Inspector, and then drag the first control field in the
Track Inspector (the control field should be labeled
Filter 1 Cutoff). The Cutoff knob in the FLT section of
60
In Project5 the term “device chain” refers to an instrument,
any effects inserted into the instrument’s track, the parameter settings of the instrument and effects, and any remote
control assignments you’ve made to the instrument and/or
effects.
As noted earlier, when you save your project, any changes
you make to instrument or effects parameters are saved
with the project. If you want to use these changes in other
projects, you can save these as a device chain by rightclicking a track’s controls in the Track pane and choosing
Save as Device from the popup menu. Device chains that
you save in Project5’s Device Chains folder (Program
Files/Cakewalk/Project5 Version 2/Device Chains) show
Page 55
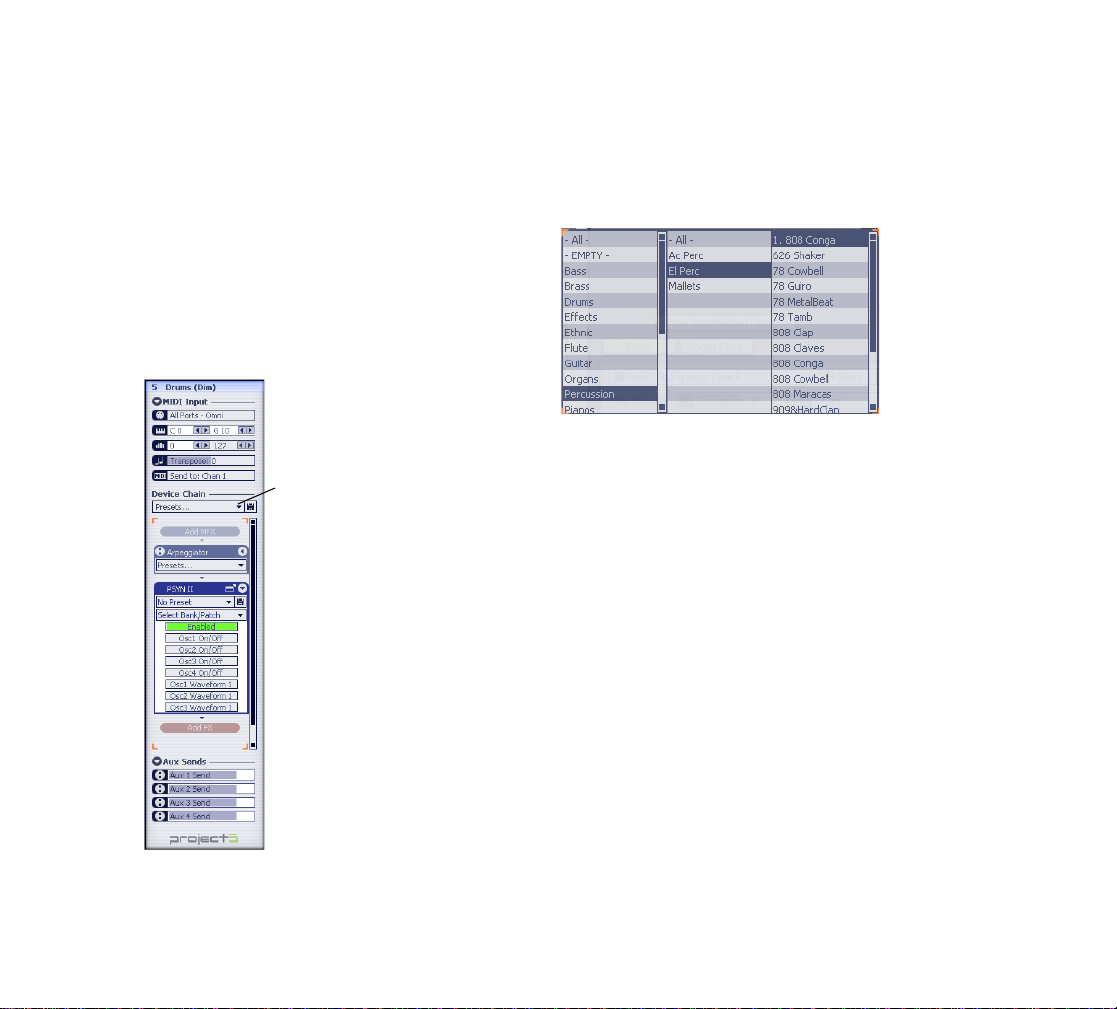
up in the Device Browser so you can load them at any
time.
Let’s load a device chain from the Device Browser into
Track 1 1:
1. Click anywhere in Track 11’s controls in the Track
pane to make it the current track.
The Track Inspector displays Track 11’s device chain
and aux send controls.
2. Open the Device Browser by clicking the Choose
Device button that’s in the Track Inspector.
Choose Device button
3. In the Device Browser, for this tutorial, click
Percussion in the first column, then click El Perc in
the second column, then click 808 Conga in the third
column.
Project5 loads the 808 Conga device chain. Notice in the
Track Inspector that the instrument in this device chain is
the P5antom. If you pick a different percussion device
chain, that device chain might use a different instrument.
Play the 808 Conga device chain from your MIDI keyboard
if you have one connected. Y ou may need t o click the MIDI
Routing Override button on Track 11 to hear only Track 11.
You can also click the Loops/Ptns tab, click Drums in column 1, click one of the drum styles in column 2, and then
preview some drum patterns in column 3 by clicking their
Preview buttons, which are on the left end of each name in
column 3.
Next, see Recording Audio.
Recording Audio
1. Open the Audio Options dialog by using the OptionsAudio command.
2. In the Select Input Channel field, choose the audio
input you want to record into. Click OK.
61
Page 56

3. Plug your instrument or microphone into the audio
input you selected (or plug your pre-amp or mixer into
that input, if your instrument or mic is connected to a
pre-amp or mixer).
4. Add an audio track by right-clicking the empty space
below Track 1 1, and selecting Insert Audio Track from
the popup menu.
5. In the audio track, click the Arm button so that it’s
enabled (red), and also click the track’s Input Monitor
button so that it’s enabled (blue).
Properties dialog to choose a Count-in duration in the
Count-in # of Beats field.
9. After you close the Metronome dialog, click the
Record button to start recording, and play your
instrument.
Record
Input Monitor button
Arm button
Meter
6. Play your instrument and observe the meter in the
armed track. Use your sound card’s software mixer
(or hardware controls, if it has them) to adjust the
input volume so that the meter almost peaks when
you play the loudest volume that you plan to record.
7. If you want to hear the Metronome while you’re
recording, click the Metronome button in the Main
Control view to enable it (it turns blue when enabled).
Metronome on/off
8. If you want the metronome to do a count-in before
you start recording, make sure that the Transport-
Count-in On/Off command has a checkmark next to
it in the Transport menu. Use the Options-
Metronome command to open the Metronome
10. Press the Spacebar to stop recording.
Project5 displays your recorded data in the audio track.
Rewind and play back what you recorded. You can press
Ctrl+Z to erase what you recorded if you’re not satisfied.
Next, see Automation.
Automation
Automation means to record the movement of a fader,
knob, or other “control” so that the next time you play your
project, that control moves automatically. You can use
Remote Control to move the control while you’re recording.
You can also draw and edit automation with the Automation tool in either the Arrange pane or the Editor. You can
put automation into patterns and reuse the patterns in any
place in your project where you want an automation command to go.
Project5 allows you to automate track controls, pattern
parameters, aux buses, the main bus, effects parameters,
and instrument parameters. When you export your finished
project, Project5 uses all your automation data to create
your final mix.
Let’s add some volume automation to Track 1 of our tutorial file:
62
Page 57

1. Arm Track 1.
S
2. Move the Now Time to where you want to start
recording. Let’s record at the beginning: press W on
your keyboard to rewind.
3. Drag the volume slider in Track 1 all the way to the
left, so that we can create a fade-in.
Automation tool
Volume slider
nap to Grid button
Show or hide Automation
button
4. Click the Record button in the Main Control view to
start recording.
5. While you’re recording, drag the volume slider in
Track 1 to the right until the tooltip says 0.7 dB.
6. Stop recording (press the Spacebar).
Rewind, and play back Track 1: watch the volume slider
move the way that you moved it while you were recording.
Click the Show/Hide Automation button in Track 1 to show
the automation you just recorded. You can edit the automation with the Automation tool. T urn the Snap butto n off
in the Main Control view so you can draw smoother
curves. To display different kinds of automation in a particular track, click the dropdown arrow in the track’s Automation menu, and choose the kind of automation you want to
draw or edit.
Automation menu in Track 1 Graph of volume automation in
track 1
You may need to drag the vertical zoom control to display
the automation data at a convenient size.
Vertical zoom control—
drag sideways to zoom
Horizontal zoom control—drag
vertically to zoom
Next, see Setting Up a Velocity Drum Track.
Setting Up a Velocity Drum
Track
There are numerous ways to set up drum tracks in
Project5 using the various instruments and drum patterns.
Let’s take a look at the V elocity drum sampler . The V elocity
drum sampler is a multi-output sampler that lets you drag
63
Page 58
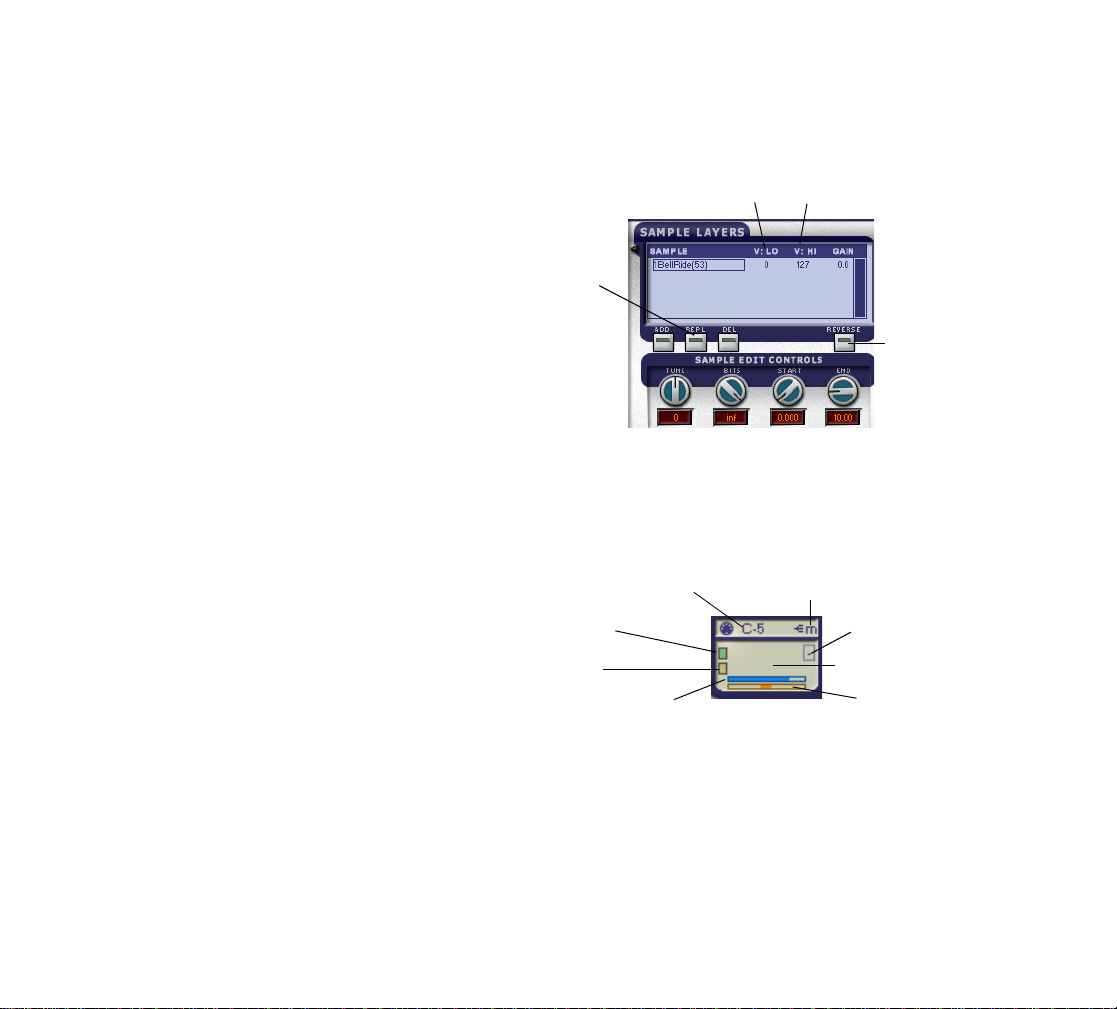
in new sound files, edit and mix them, and build a drum set
from scratch, or by editing one of the included drum sets.
Let’s load a factory-supplied drum set, and then edit it:
1. Insert the Velocity instrument into a track, and open
its property page.
2. Let’s load the AfroCuban 1 set: in the Bank section of
the Velocity property page, click the Load button, and
in the VELOCITY Banks folder, select
A
FROCUBAN1.P5D. Click the Open button to load the
set.
Let’s preview a pattern through this set:
• In the Loops/Patterns tab, click the Drums column,
then the All column, and find ChiHse2_drm. Click its
preview button to hear the pattern played through
Velocity.
Notice that each pad in Velocity lights up when the pad is
played. Go ahead and click the other pads to hear the
samples that are assigned to them. You can trigger each
pad with the MIDI note that’s listed at the top of each pad.
You can change each pad’s assigned note by dragging up
or down on the note name.
Let’s replace the sample that’s assigned to pad 14
(CNGAOS01):
1. Click pad 14 to select it.
2. In the Sample Layers section of the property page,
click the REPL button to open the Select A Sound File
dialog.
3. In the Jungle folder , select B
Open to load it.
While pad 14 is selected, you can use any of the sample
editing controls to edit the sample (reverse, tune, bits,
loop, amp eg, pitch eg, filter). You can also drag samples
to pads from the Windows Explorer, and set what velocity
range each sample responds to by dragging the V:LO and
ELLRIDE53.WAV, and click
V:HI numbers that appear on the Sample Layers screen
when each sample is selected.
V: Lo V: Hi
Replace
sample
Reverse
sample
Each pad also has controls for mute, solo, volume, pad,
output, and choke group. Choke group means that any pad
in the group that is currently sounding will stop playing
when any other member of the group is played. This feature is used primarily for hi-hat samples.
Output menuMIDI trigger note
Solo
Mute
Level
Let’s send pad 9 (FNKBL224 sample) to output 2 and add
an effect to it:
1. In pad 9, find the Output menu control in the upper
right corner of the pad, and drag it up so that it is set
to 2.
Choke group
Sample name
Pan
64
Page 59
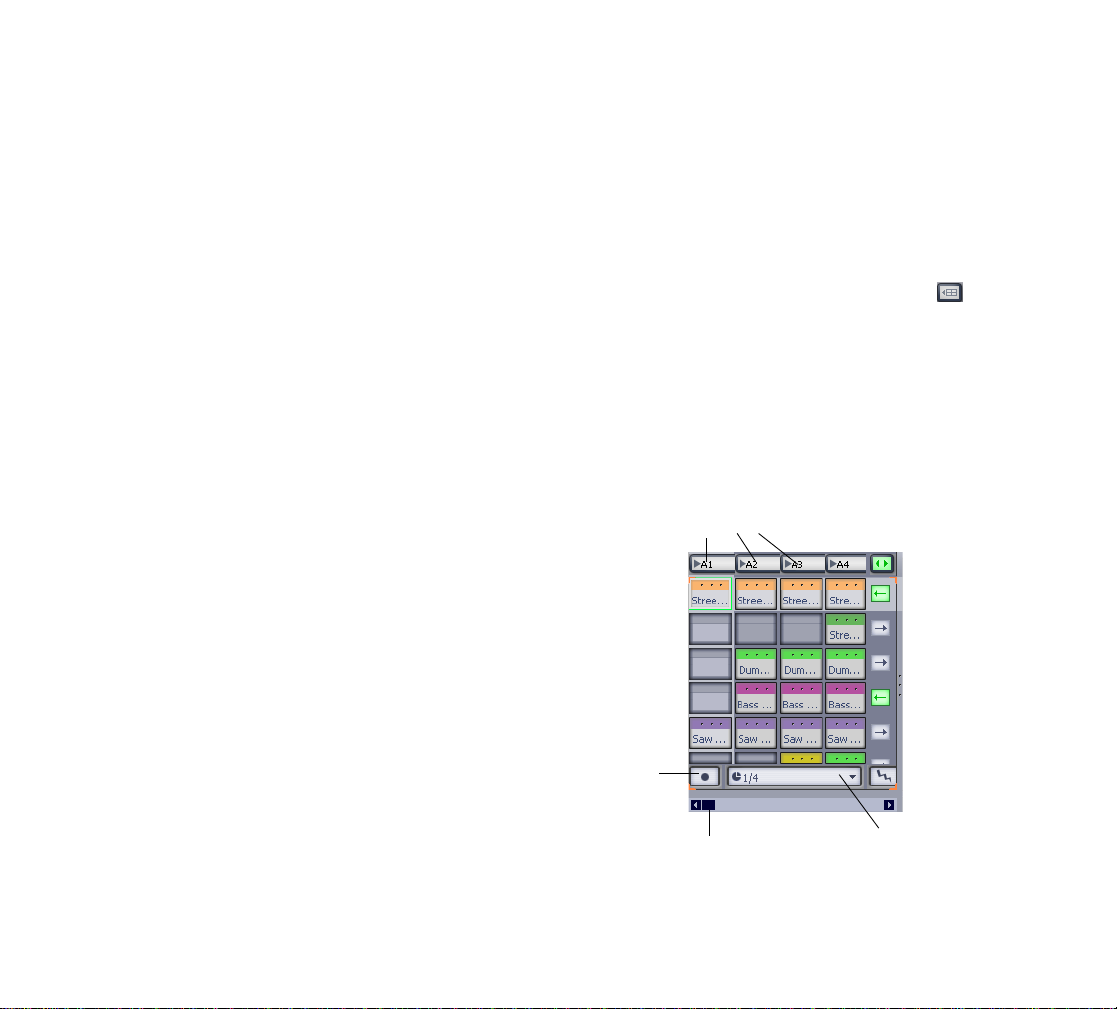
2. In the Track Inspector Output menu, click BypassEnable All Outputs., then in the same menu, choose
Active Output-Out 2.
3. Click the Add FX button, and select Project5-Tempo
Delay.
4. In the Tempo Delay property page, try the default
setting. For this tutorial, make sure the Tempo Sync
field is set to 1/2 D.
If you like this particular drum set, you can click the Save
button in the Velocity interface (it’s in the Bank section),
and save the new set under a new name.
You can save your instrument and effect settings as a
device chain, by right-clicking the Velocity track and choosing Save As Device Chain from the popup menu.
Next, see Using Grooves.
Using Grooves
A groove in Project5 is a collection of one or more patterns
stacked vertically in the Groove Matrix, one pattern per
track. You can play grooves in any order you want, repeating any groove as many times as you want. Each groove
lasts as long as the longest pattern in that particular
groove. The shorter patterns in a groove repeat until the
longest pattern in that groove finishes (by default, but you
can change this). Each column in the Groove Matrix is
made up of cells, which are just pattern holders, one per
track. Y ou can drag one pattern into each cell, or leave the
cell empty.
By default, you can play one groove at a time, starting
each groove by clicking the groove’s header, or by triggering the groove with a MIDI note or remote control.
You can record grooves into the Arrange pane, triggering
each groove when you want it to start. Our tutorial file was
actually built from grooves, which you can examine in the
Groove Matrix.
Let’s rebuild part of our tutorial file:
1. Save a new copy of the tutorial file under the name of
FileGroove.p5p: use the File-Save As command to
do this.
2. In FileGroove.p5p, display the Groove Matrix by
clicking the Show Or Hide Groove Matrix button .
3. For this tutorial , l e t’s remove the patterns fr o m the
Arrange pane: click one of the patterns to select it,
then use the Edit-Select All command to select all
the patterns, then press the Delete key.
4. The Trigger Snapper menu sets the time lag between
when you trigger a groove, and when the groove
starts playing, Let’s click the menu and set it to
Change on Measure.
Groove headers
Arm Groove
Matrix button
Groove Matrix scrollbar
5. Click the header on groove A1 to hear it play.
Trigger Snapper menu
65
Page 60

6. Press the Spacebar to stop playback.
7. Let’s rebuild some of our tutorial file: click the Arm
Groove Matrix button to enable it.
8. Start recording by clicking the header on groove A1.
Project5 starts playing groove A1, and starts
recording.
9. Just before you want groove A2 to start playing, click
the header on groove A2. When the Now Time
reaches the next measure boundary (remember, the
Trigger Snapper menu is set to change on Measure),
groove A2 starts playing/recording, and groove A1
stops.
10. Click other groove headers when you want them to
start playing. You can trigger multiple grooves by
holding down the Ctrl key while you click.
11. When you’re finished recording, press the Spacebar
to stop. Rewind, and listen to what you recorded. You
can press Ctrl+Z to erase the recording.
Notice that when you play groove A2, groove A1 stops
playing.
Instead of playing the grooves by clicking the groove headers, we can trigger the groove headers with remote control:
1. Right-click the groove header of groove A1, and
choose MIDI Remote Control from the popup menu.
2. In the MIDI Remote Control dialog, click the Learn
button, play a note on your MIDI keyboard (if it’s
connected to your computer), and then click Stop
Learning. Click OK.
3. Repeat steps 1 and 2 with the groove header of
groove A2, but use a different MIDI note as a trigger.
Now you can start groove A1 by playing a MIDI note, and
you can switch to groove A2 by playing a different MIDI
note (recorded MIDI notes will not trigger a groove). You
can set the lag time between when you trigger a groove,
and when it starts playing by choosing options in the Trigger Snapper menu in the Groove Matrix. Notice that when
you trigger a groove, but it hasn’t started playing yet, it
blinks. A groove that is playing appears green.
You can record the output of the Groove Matrix as audio
and/or MIDI data (audio patterns record as audio, MIDI
patterns record as MIDI), with or without any patterns that
are in the Arrange pane.
See Recording Grooves for more information.
Next, see Exporting Patterns.
Exporting Patterns
You can use MIDI patterns from Project5 in other Cakewalk programs, such as SONAR and Kinetic.
To export a pattern, simply save it in one of Project5’s Patterns folders, or any place you want to save it (display the
pattern in the Editor, and use the Save Pattern As command from the Pattern menu dropdown). If the pattern has
already been saved (if it came with Project5, or you created it), you don’t have to save it again. Then import it into
another Cakewalk program, such as SONAR, by using the
File-Import-MIDI command, and choosing P5 Pattern in
the Files of Type field.
66
Page 61

Click to open pattern menu
Next, see Exporting Wave and MP3 Files.
Exporting Wave and MP3 Files
You can export all or part of a project as a wave or MP3
file, to burn to CD, send over the Internet, or import back
into one of Project5’s samplers.
Note: You must activate your MP3 encoder before it will
become available as a Project5 export option. Information
on how to activate Project5's MP3 encoder is located on
the Project5 Owner's Page on the Cakewalk web site. In
Project5's Help menu, select the Owner's Page option to
visit the site (Help-Project5 Owner's Page).
To Export Your Finished Project
1. Make sure your levels are set, effects are patched the
way you want, and no tracks that you want in the mix
are muted. If you only want a few tracks to go in the
mix, you can solo those tracks.
2. Use the File-Export command to open the Export
Audio dialog.
3. In the Save In field, navigate to the folder where you
want your exported project file to be.
4. In the File Name field, type the name of the file.
5. In the Save as Type field, choose Wave files or MP3
files.
6. If you chose Wave files, choose a Bits per Sample
value (CD quality is 16 bits).
7. Choose a Sample Rate (if you chose Wave files, CD
quality is 44,100 Hz).
8. If you want to leave room in the file for the sound of
any effects that may still be sounding when the
project stops playing, choose a value in the Effects
Tails field of up to 99 seconds (usually a couple of
seconds is enough—play the end of your project and
listen for when all the sound stops after the last note).
9. If you have a looped region in your project, and you
only want that section in your exported file, enable the
Export Looped Regions Only checkbox.
10. If you chose MP3 files, drag the Quality/Speed slider
to strike a balance between sound quality and
bandwidth—higher quality increases file size and
download times.
11. If you chose MP3 files, choose a Bit Rate—128 is a
good-quality MP3 bit rate, 320 approaches CD
quality , 80 creates fast downloads, etc.
12. If you chose MP3 files, choose a Stereo Mode from
these options:
• Mono—this option creates a standard
mono file for minimum bandwidth.
• Stereo— this option creates a standard
stereo file.
• Joint S t ereo—not a full stereo file, but most
files will sound just as good, and at smaller
bandwidth. If stereo separation is important
for this particular file, choose Stereo or Mid/
Side instead.
67
Page 62

• Mid/Side Stereo—preserves most of the
stereo effect of a file but at lower
bandwidth. Not too useful at bit rates above
128 kbs.
13. Enable High Pass/Low Pass Filters—these filters
decrease your file size by eliminating frequencies that
people don’t usually hear anyway.
14. ID3 Tag—clicking this button opens the ID3 Tag
dialog, where you can enter identifying information
that is stored in your MP3 file and can be read by
most MP3 players and similar hardware.
15. Click the Save button to finish exporting your file.
Project5 exports your project.
Next, see ReWiring to SONAR.
ReWiring to SONAR
ReWire is a software format that allows two audio applications to synchronize their transports and share audio data.
Project5 can function as either a ReWire client or host, and
works with any application that supports ReWire.
Let’s try running Project5 as a client of SONAR, which has
been a ReWire host since version 2:
1. Always open your ReWire host first, so launch
SONAR.
2. In SONAR, use the Insert-ReWire Devices
command to display a menu of installed ReWire
devices.
3. Choose Project5 Version 2 from the menu.
The Insert DXi Synth Options dialog appears.
4. For this tutorial, in the Create These Tracks section,
choose First Synth Output ( Audio) , and in the Open
These Windows section, choose Synth Property
Page. Click OK.
SONAR creates an audio track called Project5 Version 2
Main L/Main R, and opens the Project5 interface.
Now you have an audio track in SONAR that uses
Project5’s Master track as its input. You can now monitor
and /or record Project5’s main output on a stereo track in
SONAR. The transports of both applications are now synchronized—running the transport in either application does
the identical operation in the other application, except for
recording, which is independent. SONAR controls the
tempo, ignoring any tempo data in Project5. Sound card
latency is determined by SONAR.
Y ou can make any of Project5’s buses and tracks available
as audio inputs to SONAR. In Project5’s Audio Options
dialog (Options-Audio command), you can choose what
buses and tracks to expose as ReWire outputs from
Project5. Just remember though, that creating these outputs uses a lot of memory, so only create the number that
you know you will use. These buses and tracks show up as
audio inputs in SONAR, and are numbered starting with
the Master track, then the aux buses, then the instrument
and/or audio tracks in the order that they appear in
Project5's Track view. If you want to automatically create
audio tracks for all these inputs in SONAR, check the All
Synth Outputs option in SONAR’s Insert DXi Synth
Options dialog when you insert Project5.
68
Page 63

New Features
Page 64

New features include a streamlined user interface, ReWire
hosting, a powerful new arpeggiator, numerous editing
enhancements, a separate bus pane and tempo track, tap
tempo, audio recording, audio playback from disk (no size
limit on clips), input monitoring, freezing tracks, real-time
Groove triggering, track lanes for layered patterns, Groove
clip (ACIDized clip) editing and export, the new PSYN II
instrument, and the multi-mode sampling synth (Dimension).
The Pattern Bin has been replaced by the Loops/Patterns
tab, which can be undocked and resized along with the
Editor.
The new Groove Matrix provides a place to arrange
groups of patterns into grooves, and then trigger each
group for live playback and/or recording. You can hide or
show the Groove Matrix by clicking the Groove Matrix button that is just to the right of the Add Track buttons.
User Interface
Project5’s user interface has been rearranged for quicker
workflow. Some components have new names. The
Tracker is now called the Arrange pane. The controls for
the master bus, the aux buses, and the new Tempo Track
are now in the new Bus pane instead of in the Main Control view. The Bus pane is just below the Track pane in the
Track view (the Track view includes the Track pane, the
Bus pane, the Arrange pane, and the Groove Matrix). You
can show or hide the Bus pane by clicking the Show/Hide
Aux/Master/T empo button. The Tempo Track provides a
dedicated place to edit tempo changes, replacing the
tempo editing mode that was in P-SEQ.
The old SYN.OPS view is now the Track Inspector , whi ch
is located to the left of the Track view. You can hide or
show the Track inspector by clicking the Show/Hide Track
Inspector button that’s just left of the Add Track buttons. The Track Inspector becomes the Bus Inspector
when you click a bus in the Bus pane.
The old P-SEQ view is now called the Editor, and is
located along the bottom of the Project5 interface. You can
dock, float, and resize the Editor, or float it and drag it to
another monitor if you want. A horizontal splitter bar
between the Editor and the Track view provides control
over the vertical size ratio.
Main Control view
(left side)
Track/Bus Inspector
See:
Main Control View
Track pane
Bus pane
Groove Matrix
Arrange pane
Editor
70
Page 65

Main Control View
The Main Control view stretches across the top of the
interface, and has a new look:
Main Control view (left side)
Main Control view (right side)
Select tool
Snap on/off Snap menu
Main output volume slider and meter
Tempo field-double-click to
set
Tap Tempo control--click
at the speed you want to
set the tempo to.
Swing
amount
Main Control view (transport section)
Play
Rewind
Record
Now Time display (in M:B:T
format--right-click to use
H:M:S format)
Metronome on/off
Jog backward by Snap to Grid value
Jog forward by Snap to Grid
value
Master arm, mute, solo
Automation tool
See:
Track Controls
Loop on/off
Set loop to selection
Track Contro ls
The track controls have been updated:
MIDI Track Controls
Presets menu
and Show
Property Page
MIDI Routing Override
Arm
Expand track for
automation editing
Track number
Vol um e
slider
CPU meter
Mute
Solo
t
h
W
i
/
d
P
a
n
g
r
-
d
l
a
r
:
C
t
r
d
e
l
i
s
u
d
s
j
t
o
t
a
Meter
h
W
i
d
t
71
Page 66

Audio Track Controls
Bus pane and Tempo Track
Input monitor on/off
Arm
Expand tr ack for
automation editing
See:
Bus Pane and Tempo Track
Track number
Vol ume
slider
Trac k n am e
Input menu
Pan/Width
slider--Ctrl-drag
to adjust Width
Solo
Mute
Meter
Bus Pane and Tempo Track
The Master bus and the Aux buses have new controls, and
the new Tempo Track allows you to draw tempo changes
with the Automation tool.
Bus name--
Arm for
automation
recording
Expand track
for
automation
editing
Expand track for tempo editing
See:
Changing the Tempo
Track Inspector
double-click to
edit
Vol um e
slider
Tempo zoom--drag right to display higher
tempo values in Arrange pane (up to 1000
bpm).
Balance/Width slider-
-Ctrl-drag to adjust
Width
Mute
Track Inspector
The Track Inspector replaces the old SYN.OPS view. The
Track Inspector displays the track information of the track
that is currently selected in the Track view. You can show
or hide the Track Inspector by clicking the Show/Hide
72
Page 67

Track Inspector button that’s just left of the Add Track
buttons in the Main Control view.
Track Inspecto r
Show/HIde MIDI
Input section
Device Browser and
Save Device button
Show/Hide Settings
button
Instrument
controls
Aux send enable
buttons
Display instrument
property page
Multiple Output
menu
Aux send level
controls—drag to
set
73
Page 68

The Track Inspector is divided into three sections:
MIDI Input Section
The Input section of the Track Inspector contains:
• The track name (at the very top of the Track
Inspector)
• MIDI input port and channel—this menu filters out any
live MIDI input that’s not on the listed port and/or
channel.
• Key range filter—excludes any live MIDI input that’s
not in the selected range of notes that is bounded by
the low note and high note that you select in these
two fields.
• Velocity range filter—excludes any live MIDI input
that’s not in the selected velocity range that is
bounded by the lower velocity and higher velocity that
you select in these two fields.
• Input transposition field—transposes live input and
patterns up or down by the positive or negative
number of half-steps you enter in this field.
• Send to MIDI channel menu—sets the MIDI channel
for patterns in this track, and for incoming notes and
data when you’re playing live. This menu overrides
the MIDI channel menu that’s in the Editor , unless this
menu is set to None.
Note: If you create multiple lanes in a track, each lane has
its own instance of the T rack Inspector with its own Send t o
MIDI channel menu. Just highlight each lane in succession
to see each lane's Track Inspector. If a lane's Send to MIDI
Channel menu is set to None, then each pattern in that
lane will play back on the MIDI channel that the pattern
contains. Otherwise, patterns play back on the MIDI channel that's listed in that track's Send to MIDI Channel menu
in the Track Inspector.
Device Chain Section
The Device Chain section of the Track Inspector contains
the device chain, which displays the instrument and effects
that a track uses in the order of their signal flow . To hide or
show the parameter controls on the instrument or
effects, click the Show/HIde Settings button that’s on the
right end of the titlebar of each instrument or effect.
The Device Chain section has modules that contain the following devices:
• Device Chain menu—use this menu to open the
Device Browser, which allows you to choose a device
chain for the current track. A device chain is made up
of an instrument, effects, parameter settings for the
instrument and effects, and remote control
assignments for the parameters. Once you’ve created
or edited a device chain, you can click the disk icon to
save the device chain for use in other projects.
• Add MFX (Add MIDI effects)—MIDI effects come first
in the device chain’s signal flow. When you click the
Add MFX button to add a MIDI effect, a popup menu
of MIDI effects appears, from which you can select
one to insert. You can use as many as your
computer’s processing power can handle. You can
change the order of effects by dragging one from a
lower position to a higher one
• Arpeggiator—each track gets its own instance of
Project5’s powerful new arpeggiator. See Arpeggiator
for more information.
• Instr ument module (or Add Instrument button if no
instrument is loaded)—the instrument comes next in
the device chain. If no instrument is loaded in this
track, you can click the Add Instrument button to open
a list of instruments and ReWire applications. Click
the name of a device on the list to load it. After an
instrument is loaded, you can open the interface of an
instrument or ReWire application by double-clicking
the name of the instrument or effect in the device
74
Page 69

chain, or by clicking the Show Property Page button
that’s just to the right of each instrument or ReWire
name in the device chain.
• Add FX (Add Audio effects)—audio effects come last
in the device chain’s signal flow. When you click the
Add FX button to add an audio effect, a popup menu
of audio effects appears, from which you can select
one to insert. You can use as many as your
computer’s processing power can handle. You can
change the order of effects by dragging one from a
lower position to a higher one. After an effect is
loaded, you can open the interface of the effect by
double-clicking the name of the effect in the device
chain, or by clicking the Show Property Page button
that’s just to the right of each effect name in the
device chain.
Note: the device chain supports mouse wheel scrolling.
Aux Sends Section
The Aux Sends section of the Track Inspector contains:
• Aux send enable and aux send level controls for the
selected track
See:
The Bus Inspector
The Bus Inspector
When you click an aux or master strip in the Bus pane, the
Track Inspector becomes the Bus Inspector. The Bus
Inspector has two sections:
Device Chain
• Name of the selected bus (at very top of Bus
Inspector)
• Add FX (Add Audio Effects)—The Devices section
shows the effects that are currently inserted into the
bus. Effects are displayed according to signal flow,
with the earliest effect in the bus’s chain displayed at
the top. The Devices section also contains the Add
FX button, which enables you to insert more effects
into the bus. T o hide or show the controls of the
effects, click the Show Settings button, which is at
the right end of the titlebar of each effect.
See:
Device Browser
Device Browser
Project5 patches are now called device chains. A device
chain is made up of an instrument, effects, parameter settings for the instrument and effects, and remote control
assignments for the parameters. The Device Browser (see
graphic below) appears when you open the device chain
menu that’s in the Device Chain section of the Track
Inspector, or when you click the Add Instrument Track button in the Track view . Use the Device Browser to load, edit,
and save patches. You can change or delete the instrument and effect(s) in a device chain if you want.
See:
Arpeggiator
Arpeggiator
P5’s arpeggiator lets you play intricate patterns of notes
that would otherwise be extremely difficult or impossible to
75
Page 70

play manually and at speeds and octave ranges that exist
beyond the physical limitations of the player or keyboard
range.
Arpeggiated events are new events that are based on
notes that you play on your controller keyboard. The new
events are rhythmically and harmonically specified by the
arpeggiator’s preset, allowing you to “play” an endless
variety sophisticated of musical passages with simple key
pressing.
In addition to note events, the arpeggiator can send
parameter automation such as pan, volume, and even
effects automa ti o n fo r th e current tra c k.
Each P5 track owns an arpeggiator, visually located in the
Track Inspector. Running multiple arpeggiators across
tracks can help realize exciting melodic and rhythmic textures.
The arpeggiator can be played in real time so that it is reliable for live performance.
Enable/Disable
button
Show/Hide
Controls
button
Controls
The following table describes the controls in the Arpeggiator:
Control… Description…
Enable/
Disable
Preset
Control
Rate Adjusts the relative speed of the arp
Enables/disables the arpeggiator on a
given track. This control can be
assigned to MIDI RC and modified in
real-time during project playback.
You can create and edit arpeggiator
presets; all user parameters are stored
in the preset.
• Arpeggiator settings are included
in track patches.
• Arpeggiator presets can be saved
to a file and exchanged with other
users.
• Arpeggiator files are stored in a
shared directory
sequence by changing all the note
durations by a factor of the current
tempo. This control can be assigned to
MIDI RC and modified in real-time
during project playback.
76
Page 71

Octave
Range
Latch Latch keeps the arpeggio playing after
Swing Swing is either on or off, as it is with the
Sets the number of octaves through
which the arpeggio will play. A value of 1
means that a held chord will only
arpeggiate the notes that are being held
within the octave from which the notes
are being transmitted. A value of 2
means a held chord will arpeggiate for
two octaves. The held chord always
represents the bass octave, meaning
that the other octaves sound in a higher
register.
If you specify a range higher than the
standard MIDI specifications, the
Arpeggiator will repeat the pattern in the
highest available octave as necessary.
This control can be assigned to MIDI RC
and modified in real-time during project
playback.
you let go of the keys.
Control: Button; this control can be
assigned to MIDI RC and modified in
real-time during project playback.
Editor’s Step mode.
Flam
Amount
Hold Chord
Mix
Ch MIDI input and output menu—the
If a pattern contains flams, this menu
controls how big a difference there is
between the attack time of the flam and
the note it is attached to.
When 0, simultaneously held notes
arpeggiate as single notes. At 50%,
simultaneously held notes are heard as
a chord in addition to the usual
arpeggiated notes, both at equal levels.
At 100%, only the held chord is audible.
Control: Knob (0 – 100%); this control
can be assigned to MIDI RC and
modified in real-time during project
playback.
Arpeggiator only affects input data that’s
on the MIDI channels listed on this
menu, and then the Arpeggiator sends
the arpeggiated data out on this channel
also. These functions are independent
of the Track Inspector’s Send to MIDI
Channel menu.
Velocity An offset control that adds whatever
velocity value you select to the
velocities of the notes in the pattern.
Gate Controls whether the notes in the
pattern are held to their full value, or are
held for shorter or longer durations.
Pitch Offset A transposition control in half-steps, up
or down a maximum of 2 octaves.
77
Page 72

Shape Choosing a shape which specifies the
direction in which currently held notes
are to be sequenced.
The Shape selectors behave as a
button radio group, and include the
following:
•Rhythm
•Forward
• Reverse
• Forward Circle 1
• Reverse Circle 1
• Forward Circle 2
• Reverse Circle 2
• Inward
•Outward
• Inward Circle
• Outward Circle
• As Played
• As Played Circle
• Random
• None ( = implicit rhythm mode)
For a tutorial, see Arpeggiator.
Next, see:
Loops/Ptns (Patterns) Tab
Loops/Ptns (Patterns) Tab
Replacing the old Patterns Bin is the Loops/Patterns tab.
The Loops/Patterns tab is located in the same space as
the Editor, just click the “tab” that’s labeled Loops/Ptns to
display it. The Loops/Patterns tab allows you to navigate
your computer to show patterns, preview them, and insert
them into your project.
The Loops/Patterns tab has three modes:
• Explorer mode—this mode displays your patterns
and audio loops in Windows Explorer style. Click the
Explore button to enter Explorer mode.
• Brow s e mode—this mode displays your patterns
and audio loops in several columns, divided by type.
Click the Browse button to enter Browse mode.
• In Project mode—this mode displays the In Use
folder, which shows all the patterns that are currently
being used in the Arrange pane, and the Not In Use
folder, which stores patterns that you have viewed in
the Editor or have deleted from the Arrange pane, but
are not currently being used in the Arrange pane.
The Loops/Patterns tab also has the following components:
• Create Shortcut button—the Loops/Ptns tab can
remember where you browse. Click a folder to make
it the current folder, and then click the Create
Shortcut button to bookmark the folder.
• Stop Preview button—Stops the playback of a file
being previewed.
• Float/Dock button—you can float or dock the Loops/
Patterns tab along with the Editor.
• Delete button—the Delete button deletes the
currently selected pattern from the Not In Use or In
Use folders.
• Delet e Not In Use Patterns butt on—the Delete Not In
Use Patterns button clears the Not In Use folder
of all unused patterns.
78
Page 73

Loops/Patterns tab
Preview button
Float/Dock button
• Free mode—in this mode, the Editor displays a
traditional piano-roll style editing surface, which
allows any note length. In Free mode, you can draw
notes with the mouse, and also do both Step
Recording and real-time recording.
• Groove clip mode—when you double-click a Groove
clip (ACIDized clip) in the Arrange pane, the Editor
becomes a Groove clip editor.
Click the Step or Free fields in the Editor menu
to change the Editor to Step
mode, or back to Free mode.
Here’s a picture of the Editor:
Next, see:
The Editor
The Editor
The Editor is where you create new MIDI patterns (you can
also create MIDI patterns by recording in the Track view),
edit patterns (including pattern automation), and save patterns to your patterns folders. You can also edit Groove
clips in the editor.
The Editor has three modes:
• Step mode—this mode models a hardware step
sequencer, allowing you to create and edit MIDI
patterns on a grid. In Step mode, you can draw notes
(always of a fixed length) with the mouse and also do
Step Recording, but not real-time recording
The Editor has the following controls:
Float/Dock Button
To Float or Dock the Editor:
• Click the Float/Dock button that’s in the upper right
corner.
Or
• Double-click the left border
To Resi ze the Ed itor:
• Drag any border or corner.
Note: when the Editor is docked, dragging its upper border
changes the size of the Arrange pane.
79
Page 74

Show/Hide Button
Click this button to show or hide the Editor and the Loops/
Ptns tab.
New Pattern Button
Clicking this button creates a new empty pattern, and automatically loads the pattern into the Arrange pane at the
Now time on the selected track. The new pattern is one
measure long by default, but you can change this by using
the Options-Default Step Size for Step Sequencer command, together with the Options-Default Step Count for
Step Sequencer command. For example, if you chose a
default step size of 16th notes, and a default step count of
32 steps, that would create a pattern of two measures in 4/
4 time.
Pattern Menu
The pattern menu, located the in upper left corner of the
Editor, displays the name of the current pattern. You can
rename the pattern by double-clicking the pattern name.
Clicking the dropdown button in the pattern menu displays
these options:
• Open Pattern—opens the Open Pattern dialog to the
default directory for patterns. Navigate to the directory
you want and select a file to open in the Editor.
• Save Pattern As—opens the Export Pattern dialog,
enabling you to name and save the pattern to the
folder where you store patterns.
• Duplicate Pattern—copies the current pattern under
a new name, so that any editing you do to the new
copy doesn’t affect the original.
• Automatically send new patterns to track view—if
this option is enabled, every time you click the New
Pattern button, Project5 automatically places the new
pattern on the highlighted track at the Now Time.
• In Use—opens a menu of patterns that are currently
in use in the current project.
• Not In Use—opens a menu of patterns that have
been used in the current project, but were deleted
from the Arrange pane.
Send Pattern to Track Button
Click this button to place the pattern that’s currently displayed in the Editor on the highlighted track at the Now
Time.
You can also drag this button to the track and time where
you want your pattern to go.
Pattern Preview Button
Click this button to play the pattern that’s currently displayed in the Editor. The pattern plays back through whatever instrument is currently selected in the Track view. You
can set the time where playback begins in the Editor by
double-clicking in the Editor’s Time Ruler, which moves the
Edit Marker to the location you double-clicked.
Record Pattern Button
Click this button to record a new pattern by either live or
step recording in the Editor.
Click the dropdown arrow on the Record Pattern button to
choose recording options. Choose any or all of these three
options:
• Constant Velocity—when this option is checked,
recorded notes are not affected by velocity changes
from the MIDI controller. Note velocities are all set to
100.
• Overwrite—when this option is checked, current note
data is overwritten by new note data.
• Step Record—when this option is checked, the
recording mode is set to Step Recording. Step
Recording means that instead of recording notes that
you play at the time the notes were played, Project5
records notes of exactly the same length, one after
another, each time you play your MIDI controller, no
matter how much time has passed since the last note
80
Page 75
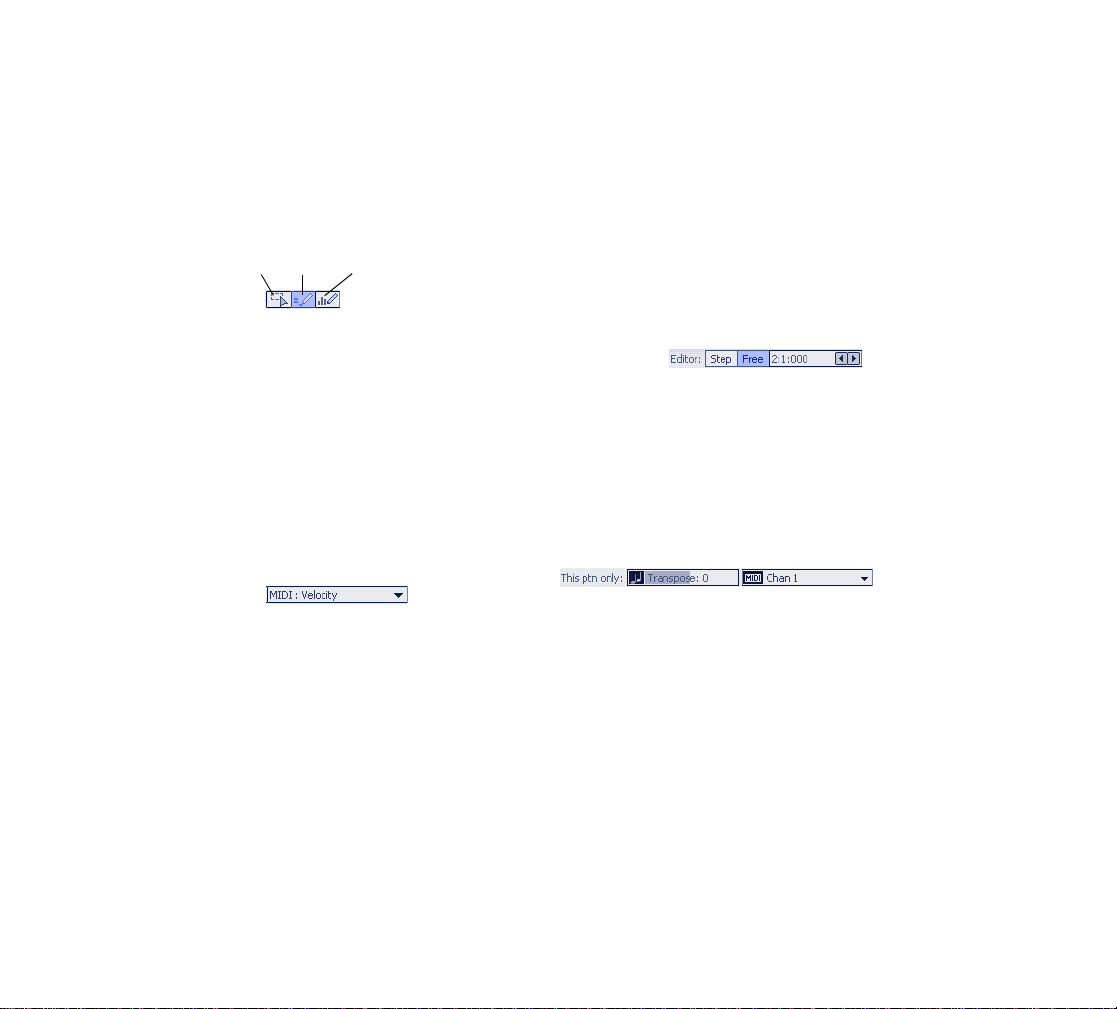
was entered. The note lengths are determined by the
Notes menu setting.
Tools
The Editor has three tools to help you create and edit patterns.
Select tool Note tool
•The Select tool is an all-purpose tool for selecting
data, however you can use the Note tool when you
just need to select an individual object without
dragging it. Pressing T on your keyboard toggles
which tool is active (including the Select tool).
• Use the Note t ool to draw notes in a p attern. The note
length menu determines the length of the notes you
draw.
• Use the Automation tool to draw automation in a
pattern. Select an automation parameter to draw or
edit in the automation edit menu in the Editor.
Automation tool
Automation Menu
The automation menu is just to the right of the Auto tool
(Automation tool). Clicking the dropdown arrow on the
automation edit menu displays a menu of automation editing options:
• Output s—choosing this option displays a menu of
parameters that are specific to a particular output of
the currently-selected track. If the instrument in the
selected track has multiple outputs, the menu will
show parameters for each output.
• MIDI—choosing this option displays a menu of
standard MIDI continuous controllers that affect all
the outputs on the selected track.
• DXi—choosing this option displays a menu of
parameters that are specific to the instrument that is
loaded into the selected track.
• Ef fects—choosing this option displays a menu of
parameters that are specific to the selected effect on
the selected track.
• Arpeggiator—choosing this option displays a menu of
parameters that control the Arpeggiator on the current
track.
For more information, see the online help topic Automation.
Editor Menu
Click the Step or Free fields in the menu to change the Editor to Step mode, or back to Free mode. Also, you can click
the left or right arrows in the menu to set the length of the
current pattern, or double-click the length field and type a
length value. See the online help topics Creating Patterns
in Step Mode and Drawing Notes In Free Mode for more
information.
This Ptn Only Menus
By default, all copies of a pattern in the Arrange pane are
identical except for their MIDI channel and transposition.
The Transpose and MIDI Ch menus allow you to change
the transposition and MIDI channel of a particular instance
of a pattern. Double-click the instance of the pattern where
it appears in the Arrange pane to display the instance for
editing.
• Trans pose menu— th is menu lets you transpose just
the current instance of a pattern (the pattern in the
Arrange pane that has the black border). The field
lists the number of half-steps up (+) or down (-) that
the current instance of the pattern is being
transposed.
81
Page 76

If you use copies of this pattern in other parts, the
Transpose menu is independent for each copy.
Select a pitch offset for the current instance of the
pattern. The range is from -127 to +127 for a MIDI
pattern or -24 to +24 for a Groove clip. You can
double-click the value, type a number, and press
Enter if you don’t want to click the up and down
arrows. The transposition value is displayed in
parenthesis next to the pattern name
• MIDI Ch menu—this menu allows you to choose
which MIDI channel that the displayed pattern plays
back through, and also sets the channel that the
Editor’s keyboard display uses when you click the
keys. Choosing different MIDI channels for a pattern
allows you to access different sounds on different
channels of a multi-timbral instrument.
Note: the Track Inspector has a menu for each track
or track layer called the Send to MIDI Channel menu.
This menu overrides the MIDI channel that you
assign to a pattern in the Editor, forcing all patterns on
a track or track layer to play on the MIDI channel
that’s listed in the Send to MIDI Channel menu. To
disable the Send to MIDI Channel menu, set the
menu to None.
Notes Menu
Click to select a note length
The Notes menu controls the length of the current steprecorded note, or of notes that you draw with the Notes
tool. You can select a new length at any time
Link
Link the Snap resolution setting to the Notes menu setting
The Link button forces the Snap to Grid button resolution
and the Notes menu value to be the same. For example, if
you change the Notes menu setting then click the Link button, the Snap to Grid resolution will follow the Note Length
setting.
Snap to Grid
Snap resolution
Turn Snap to Grid button on/off
In Free mode, the Snap to Grid setting sets the precision at
which notes can be entered and edited, and also sets the
time interval that the Now Time moves when you doubleclick in the Editor’s Time Ruler. The Snap to Grid control is
not visible in Step mode, because the Snap to Grid is
always on in that mode, and is set to whatever duration the
Notes menu is set to. A snap resolution of 1/2 means that
entered notes and notes you drag and drop in the Editor
“snap” to the nearest 1/2 note boundary. The snap resolution in the Editor ranges from measures to 1/128th notes.
The default is 1/16th. You can override the snap resolution
setting by holding the Shift key while dragging notes.
When the Snap to Grid button is disabled, or when you are
overriding it, data moves by ticks. Project5 divides each
beat into 960 ticks.
82
Page 77

Swing Control
When the Swing Control is on, patterns of consecutive 8th
notes, 16th notes, or 32nd notes play back with a swing
feel, instead of a straight feel. You control the strength of
the swing effect for each project by dragging the Swing
control that’s in the Main Control view.
Keyboard Display
The keyboard display, which is on the left side of the Editor, lights up to show what pitches you’re playing on a MIDI
keyboard. It also gives you a visual reference for pitches
while you’re drawing notes with the Note tool.
Cursor Display
Time Ruler
Tim e Rul er
Measure number
End marker—drag
to set pattern
length
Readout area
At the very top of the Keyboard Display is the Cursor Display, which shows a readout of the vertical and horizontal
coordinates of whatever tool you’re using in the Note pane,
both while the tool is moving and while it’s not.
Now Time cursor
The Time Ruler in Free mode shows measure numbers
and beat boundaries. The Now Time cursor (vertical white
line) moves through the Note pane during playback to
show you where the Now Time currently is in your pattern.
In Step mode, the Time Ruler has no measure numbers.
See the online help topic The Time Ruler in Step Mode for
more information.
Note pane
Note Pane
This is the pane where you display and edit patterns.
Zooming and Scrolling
Y ou can zoom and scroll in all modes of the Editor (see the
online help topic Zooming and Scrolling in the Editor).
The Now Time
The Editor has its own Now Time, which is independent of
the Now Time in the Arrange pane. The Editor’s Now Time
marks the point in a pattern at which playback is taking
place, or where playback is currently stopped. The vertical
cursor in the Editor is a graphical display of the Editor’s
83
Page 78
Now Time position. You can set the Now Time in the Editor
by double-clicking in the Editor’s Time Ruler.
Trans “n” % (in Groove Clip Mode Only)
When you double-click a Groove clip in the Arrange pane,
the Editor changes to Groove clip mode, displaying the
Groove clip with a series of transient markers. The Trans
Detect control senses transients in your audio pattern and
assigns a marker at the beginning and end of each transient that it finds. As the you increase the sensitivity (by
using larger numbers) smaller transients are detected and
the number of markers increases.
Slice Division Menu (in Groove Clip Mode Only)
The Slices Division menu sets the resolution for the creation of markers, or the “slicing” of the looped clip. This
menu uses transients or note lengths, so the settings are:
• Trans ient Only
• Whole
•Half
• Quarter
• Eighth
• Sixteenth
• Thirty-second
The automatic markers appear at the note resolutions
according to the slider setting. At the eighth note setting,
there are eight markers per measure.
This control works well for slicing audio that has more subtle changes in volume with few dramatic transients.
The markers in a Groove clip preserve the timing of the
audio at that moment. Too few or too many markers can
cause unwanted “artifacts” when a Groove clip is
stretched.
Restore Markers (in Groove Clip Mode Only)
The Restore Markers tool restores all automatically generated markers to the original position and enables all those
that were disabled. Manually created markers remain as
is.
Beats in Clip (in Groove Clip Mode Only)
The number of beats in the clip.
Transient Markers (in Groove Clip Mode Only)
Markers
Project5 uses the transient markers in a clip to stretch or
shrink the clip to synchronize to different tempos. Transient
markers mark the loudest and most characteristic-sounding parts of the clip, so Project5 tries to leave these parts of
the clip alone as much as possible when adjusting tempo.
If you want to move markers, you can drag them to new
positions, with or without the Snap to Grid button enabled.
You can add new markers by double-clicking in the Time
Ruler.
Next, see:
Automation Editing in the Track View
84
Page 79

Automation Editin g in the
Track View
When you click the Automation tool in the Main Control
view, the tracks automatically expand vertically to provide
a space to edit track automation. Each track also has a
Show/Hide Automation button for more control.
For more information, see:
Automation
Next, see:
Automation Selection
Automation Select io n
Y ou can now use the Select tool to select automation in the
Arrange pane. After you select it, you can press the Delete
key to delete it, cut or copy it with Ctrl+X or Ctrl+C commands, paste it at the Now Time in the current track with
the Ctrl+V command, or move it by the Snap to Grid value
by pressing the left or right arrow keys. Pressing the up or
down arrow moves the selected automation to adjacent
tracks.
Next, see:
Editing Enhancements
• Ctrl-Alt-dragging patterns
• Sliding patterns or notes
• Scaling velocity
• Unlinking p atterns
• Groove quantizing
See:
Transposing Tracks
Merging Patterns (Clips)
Splitting Patterns
Shift-dragging Patterns
Ctrl-Alt-dragging Patterns
Shifting Events in Time
Scaling Velocity
Unlinking Patterns
Groove Quantizing
Transposing Tracks
Unlike the old SYN.OPS transpose menu, the Transpose
menu in the Track Inspector affects both live input and patterns. You can transpose whole tracks at a time in this
menu by entering the number of half-steps (positive or
negative) by which you want to transpose your track.
Editing Enhancements
Project5 continues to add editing enhancements, including:
• Transposing tracks
• Merging patterns
• Splitting patterns
• Shift-dragging patterns
Merging Patterns (Clips)
Y ou can now merge selected audio or MIDI patterns on the
same track.
Note: track automation, and slip-edited (cropped) data are
not included in the merge.
85
Page 80

To Merge Patterns
1. If you don’t want empty space in the newly formed
pattern, move the patterns you want to merge so that
their borders line up back to front.
2. Select the patterns (Ctrl-click each one). Selected
patterns appear darker than unselected patterns.
3. Right-click one of the selected patterns and choose
Combine Selected Clips from the popup menu.
Note: the terms “patterns” and “clips” are used
interchangeably in Project5.
Project5 creates a new pattern out of the selected patterns.
Splitting Patterns
You can now split audio or MIDI patterns in the Arrange
pane. Splitting a pattern creates two slip-edited sections of
the same pattern. Both patterns contain the same data and
are still the same pattern, but only the data that appears on
the pattern sounds.
Note: the terms “patterns” and “clips” are used interchangeably in Project5.
To Split Patterns
1. Move the Now Time to the place where you want to
split the patterns.
2. If you want to split multiple patterns on multiple
tracks, move any patterns you want to split so that the
Now Time cursor lies across the places where you
want to split the patterns.
3. Select the patterns you want to split.
4. Right-click a selected pattern and choose Split
Selected Clips from the popup menu.
Shift-dragging Patterns
When you drag patterns from one track to another, holding
the Shift key while you drag keeps the patterns at their
original time location.
Ctrl-Alt-dragging Patterns
Ctrl-Alt-dragging patterns creates independent copies of
the dragged patterns in both the Arrange pane and the
Groove Matrix, instead of creating new instances of the
same patterns.
Shifting Events in Time
The Process-Slide command opens the Slide dialog box,
which allows you to move selected MIDI notes or automation (not track automation) forward or backward in time.
Note1: the Process-Slide command moves selected MIDI
data, but does not move the pattern that the data occupies.
After you slide your MIDI data, you may need to lengthen
the boundaries of the pattern that the data is in to see and
hear the data.
Note 2: this command is intended for MIDI pattern data
only. However, some Groove clips created in earlier versions of Project5 may contain MIDI data that will respond
to this command.
To Shift Events in Time
1. Select the notes or patterns you want to shift.
2. Choose Process-Slide to display the Slide dialog
box.
3. Enter the number of measures, ticks, seconds, or
frames to slide. Enter a negative number to shift
material earlier. Note that you cannot slide any event
earlier than 1:01:000. For example, if the current
selection starts at 2:01:000, you cannot slide events
earlier by more than one measure.
4. Click OK when you are done.
86
Page 81

Project5 shifts the selected events.
Scaling Velocity
This feature creates a smooth velocity transition from the
beginning of a selection to the end.
Note: this command is intended for MIDI pattern data only .
However, some Groove clips created in earlier versions of
Project5 may contain MIDI data that will respond to this
command.
To Scale Velocity
1. Make sure the patterns in the Arrange pane, or the
notes in the Editor are selected.
2. Use the Process-Scale Velocity command.
The Scale Velocity dialog opens.
3. Fill in beginning and ending values for the selected
notes or patterns. If you decide to use percentages
instead of actual values, click the Percentages
checkbox first.
4. Click OK.
Project5 scales the velocity values of the selected patterns
or notes. If you selected multiple patterns, the beginning of
a pattern gets the beginning velocity value that you chose,
and the end of the pattern gets the ending value.
Unlinking Patterns
You can now unlink instances of a pattern, making independent copies.
Note: the terms “patterns” and “clips” are used interchangeably in Project5.
To Unlink Patterns
1. Select the copies of a pattern that you want to unlink.
2. Use the Edit-Unlink Selected Clips command.
Project5 unlinks the selected patterns, and edits their
names.
Groove Quantizing
Groove quantizing changes the timing of selected notes to
resemble the timing of another group of selected notes,
which is referred to as a groove.
Note: commands from Project5’s Process menu are
intended for MIDI pattern data only. However, some
Groove clips created in earlier versions of Project5 may
contain MIDI data that will respond to these commands.
To Use the Groove Quantize Command
1. Select the pattern or group of notes you want to
quantize.
2. Choose Process-Groove Quantize to display the
Groove Quantize dialog box.
3. Choose a groove file from the Groove File field.
4. Choose a groove pattern from the Groove Pattern
field.
87
Page 82

5. Use the following fields to configure your pattern:
Setting… What to do…
Resolution Choose a note size or enter the
Window
Sensitivity
If Outside
Window
Only Note
Events
Strength Use the sliders or enter values for
6. Click OK when you are done.
Project5 quantizes the selected data. You can use Undo to
restore the material to its original state.
number of clock ticks
Enter the window sensitivity value
(percentage)
Choose what should happen to
events outside the window
Check to prevent MIDI controller,
aftertouch, and xRPN data from
being adjusted
Note strength, Duration strength,
and Velocity strength
Show Waveform or MIDI Notes on
Patterns
Project5 now displays MIDI patterns and audio patterns
with distinctive markings:
• MIDI patt erns show MIDI notes
Tap Tempo
You can set the tempo in Project5 by clicking the T ap button that’s in the Main Control view. Jus t click the button at
the playback speed that you want your project to use. You
can also click the Tap button by Remote Control--right-click
the Tap button and choose MIDI Remote Control from the
context menu, and assign a MIDI note or controller to the
Tap button.
Click here
Using the Groove Matrix
A groove in Project5 is a collection of one or more patterns
stacked vertically in the Groove Matrix, one pattern per
track. Each groove lasts as long as the longest pattern in
that particular groove. The shorter patterns in a groove
repeat until the longest pattern in that groove finishes (by
default, but you can change this). Each column in the
Groove Matrix is made up of cells, which are just pattern
holders, one per track. You can drag one pattern into each
cell, or leave the cell empty.
By default, you can play one groove at a time, starting
each groove by clicking its header, or by triggering the
groove with remote control.
You can record your grooves in the Arrange pane.
• Audio patterns show audio waveforms
88
Page 83

Groove Matrix
Cell with pattern
Cell header
Empty cell
Arm Groove
Matrix for
recording
Groove headers
Trigger Snapper menu
Global Track Override
button
Groove Matrix
scrollbar
Individual
Track Override
buttons
Reset playback
state and
selection of all
cells
• Drag a pattern to a different cell, or a group of
selected patterns to different cells.
To Select Patterns in Cells
• Select a pattern by clicking its cell header, or select
multiple patterns by Ctrl-clicking their cell headers
Patterns display a green outline when they are selected.
To Deselect a Pattern in a Cell
• Ctrl-click the cell header.
To Deselect All Patterns in Cells
• Click inside of an empty cell, or click the Reset Cells
button
To Scroll the Groove Matrix
• Drag the horizontal scrollbar that’s at the bottom of
the Groove Matrix.
For more informaiton, see:
Groove Playback
Cell Playback
Editing Grooves
Recording Grooves
To Show or Hide the Groove Matrix
• Cli ck the Show/Hide Groove Matrix button .
To Add a Pattern to a Cell
• Drag a pattern from the Loops/Patterns tab or from
the Arrange pane to the desired cell.
To Remove Patterns from Cells
• Select a cell by clicking its header , or select multiple
cells by Ctrl-clicking their headers; then press the
Delete key to remove the patterns from the selected
cells.
Or
Groove Playback
By default, grooves repeat themselves until another
groove starts to play (you can change the default behavior). Grooves also play back simultaneously with patterns
in the Arrange pane, unless you enable the global Track
Override button (each track also has its own Track Override button). If you enable the global Track Override button, only the Groove Matrix sounds if there are patterns in
the Arrange pane that would sound at the same time.
Besides playing grooves, you can audition individual or
multiple cells. You can trigger grooves and cells from a
MIDI controller if you want.
89
Page 84

To Play a Groove
• Click the groove header.
All the patterns in the groove start playing, and all the cells
in the groove turn green to show that they are selected for
playback. Each cell that’s playing back displays a progress
bar to show what part of the cell’s pattern is playing at any
given time.
To Set the Time Lag Before a Groove or Cell
Starts Playing
• In the Trigger Snapper menu (it’s at the bottom of the
Groove Matrix, just right of the Arm button), choose
one of the available options.
Now, when you trigger (play) a groove or cell, playback
starts after the amount of time you chose in the Trigger
Snapper menu.
To Play Multiple Grooves Simultaneously
• Ctrl-cli ck the groove header on each groove you want
to play.
To Pause or Resume Playback of all Currentlyplaying Grooves and Cells
• Press the Spacebar.
Starting or stopping playback with the Spacebar maintains
the playback selection of all currently-playing grooves and
cells.
To Stop Playing a Groove
• Click the groove header.
Clicking a groove header stops the groove from playing
back, and removes the groove from playback selection.
To Trigger a Groove or Cell with Remote Control
1. If you want to trigger a groove, right-click the groove
header and select MIDI Remote Control to open the
MIDI Remote Control dialog.
2. If you want to trigger a cell, right-click the cell header
and select MIDI Remote Control to open the MIDI
Remote Control dialog.
3. Click the Learn button, and then move the MIDI key
or control you want to use to trigger the groove or cell.
4. Click the Stop Learning button, and click OK to close
the dialog.
Now when you press the MIDI key or control you selected,
the groove or cell starts to play.
T o Retrigge r Grooves from the Beginning
• Right -cli ck an empty place in the Groove Matrix and
choose Trigger = Play/Retrigger from the popup
menu.
By default, retriggering a groove stops playback of the
groove. However, if you choose the above option, when
you retrigger a groove, the groove will start playing from
the beginning of the groove, after the amount of time listed
in the Trigger Snapper menu.
If you’re playing multiple grooves, retriggering a groove
stops other grooves from playing back. if you want other
groove to keep playing, retrigger grooves by Ctrl-clicking
instead of just clicking.
To Mute or Unmute the Arrange Pane or Groove
Matrix
• If you want groove patterns on a certain track to
override the Arrange pane (mute the Arrange pane
while that tracks’s groove patterns play), click that
track’s Track Override button so that the button arrow
points at the Groove Matrix.
• If you want patterns on a certain track in the Arrange
pane to override the same track in the Groove Matrix,
click that track’s Track Override button so that the
button arrow points at the Arrange pane.
• If you want a certain track’s patterns in both the
90
Page 85

Arrange pane and the Groove Matrix to sound, Altclick that track’s Track Override button so that the
button arrow points both directions.
• I f you want all patterns in the Groove Matrix to
override the Arrange pane when any Groove Matrix
patterns play, click the Groove Matrix’s Global Track
Override button so that the arrow points at the Groove
Matrix.
• I f you want all patterns in the Arrange pane to
override the Groove Matrix, click the Groove Matrix’s
Global Track Override button so that the arrow points
at the Arrange pane.
• If you want both the Arrange pane and the Groove
Matrix to sound, Alt-click the Groove Matrix’s Global
Track Override button so that the arrow points in both
directions.
See Cell Playback.
Cell Playback
You can play individual or multiple cells whether grooves
are playing or not.
To Set the Time Lag Before a Groove or Cell
Starts Playing
• I n the Trigger Snapper menu, choose one of the
available options.
When you trigger (play) a groove or cell, playback starts
after the amount of time that’s selected in the Trigger
Snapper menu.
To Play One or More Cells
• Click each cell in the lower part of the cell where the
pattern name is. You can only play one cell per track
at the same time unless you Ctrl-click (see next
procedure).
While a cell plays, the cell turns green to show that the cell
is selected for playback, and the cell displays a progress
bar that shows what part of the cell is playing at any given
time.
To Play Multiple Cells on the Same Track
• Ctrl-click each cell in the lower part of the cell where
the pattern name is.
To Play a Cell in Sync with the Song
1. Right-click the cell header and choose Play In Time
With Song from the popup menu.
Project5 displays the clock icon on the cell.
2. Play the cell.
Using this option starts the cell playing after the Trigger
Snapper interval passes, and in sync with the Now Time in
your project. It’s as if the cell’s pattern was repeated
throughout the song and you unmuted the pattern at a certain point.
To Pause or Resume Playback of all Currentlyplaying Grooves and Cells
• Press the Spacebar.
Starting or stopping playback with the Spacebar maintains
the playback selection of all currently-playing grooves and
cells.
To Stop Playing One or More Cells
• Click each cell in the lower part of the cell where the
pattern name is.
Stopping playback with this method stops the cell from
playing back, and removes the cell from playback selection.
To Trigger a Groove or Cell with Remote Control
1. If you want to trigger a groove, right-click the groove
header and choose MIDI Remote Control from the
popup menu to open the MIDI Remote Control dialog.
2. If you want to trigger a cell, right-click the cell header
to open the MIDI Remote Control dialog.
91
Page 86

3. In the MIDI Remote Control dialog, click the Learn
button, and then move the MIDI key or control you
want to use to trigger the groove or cell.
4. Click the Stop Learning button, and click OK to close
the dialog.
Now when you press the MIDI key or control you selected,
the Groove or cell starts to play.
To Cause a Cell to Play Just Once Without
Repeating
• Right-click the cell and choose One-shot from the
popup menu.
Project5 displays the One-shot icon on the cell that you
right-clicked.
To Retrigger Cells from the Beginning
• Right -click an empty place in the Groove Matrix and
choose Trigger = Play/Retrigger from the popup
menu.
By default, retriggering a cell stops playback of the cell.
However, if you choose the above option, when you retrigger a cell, the cell will start playing from the beginning of
the cell, after the amount of time listed in the Trigger Snapper menu.
Note 1: the cell’s Play In Time With Song option over-
rides the retriggering option.
Note 2: if you’re playing more than one cell on a track,
retriggering a cell stops other cells on the same track from
playing back.
To Remove All Cells from Playback Selection
• Click the Reset All Cells button.
See Editing Grooves.
Editing Grooves
You can drag patterns from the Loops/Patterns tab or the
Arrange pane to cells, you can also drag patterns from one
cell to another, and use standard cut/copy/paste commands.
To Rename a Groove
• Right -cli ck a groove header, choose Rename
Groove from the popup menu, and press Enter.
To Change the Width of Cells
• Right -cli ck an empty cell, and select Cells Width[small, normal, or large] from the popup menu.
Project5 changes the width of all the cells.
To Remove All Patterns from a Groove
• Right-click the groove header, and select Clear
Groove from the popup menu.
To Remove a Groove
• Right-click the groove header, and select Remove
Groove from the popup menu.
Project5 removes the groove, and moves any grooves that
are to the right of the groove to the left.
To Insert a Groove
• Right-click a groove header, and select Insert
Groove from the popup menu.
Project5 inserts an empty groove to the left of the groove
you right-clicked.
To Select Cells
• Select a cell by clicking the cell header, or select
multiple cells by Ctrl-clicking their cell headers.
Cells display a green outline when they are selected. You
can also drag around a group of cells that you want to
select.
92
Page 87

To Play Only Selected Cells
• Shift-click the lower part of one of the selected cells
where the pattern name is.
To Remove Specific Patterns from Cells
• Select a pattern by clicking its header, or select
multiple patterns by Ctrl-clicking their headers; then
press the Delete key.
Or
• Drag a pattern to a different cell, or a group of
selected patterns to different cells.
To De-select a Pattern in a Cell
• Ctrl-click the cell header.
To De-select All Patterns in Cells
• Click inside of an empty cell.
Or
• Click the Reset All Cells button .
To Copy or Cut Patterns from Cells
• Select the patterns you want to copy or cut, and use
the Ctrl+C or Ctrl+X command, respectively.
Or
• Copy and paste a pattern or a group of selected
patterns to a new cell or cells by Ctrl-dragging the
pattern(s).
Tip: If you Alt-Ctrl-drag, you create independent copies of
the dragged patterns.
To Paste Patterns into Cells
1. Click inside of an empty cell.
2. Use the Ctrl+V command.
Project5 pastes the cell data from the clipboard into the
Groove Matrix, starting at the cell you clicked, and maintaining the same pattern of filled cells that you copied.
To Reorder Grooves
• Drag the groove header to move the groove to a new
place in line.
See Recording Grooves.
Recording Grooves
You can record the output of the Groove Matrix on the
same tracks that each filled cell in the Groove Matrix uses.
If there are already patterns in the tracks you’re recording
to, the pre-existing patterns are not overwritten.
Audio patterns in the Groove Matrix record as audio patterns in the Arrange pane, and MIDI patterns record as
MIDI patterns.
To Record Grooves
1. Set the triggering time lag in the Trigger Snapper.
2. If you want some or all tracks in the Groove Matrix to
override the Arrange pane, click the appropriate
Override buttons in the Groove Matrix.
3. Click the Groove Matrix’s Arm button to enable it.
4. Move the Now Time to where you want to start
recording.
5. Click a groove header to start playback.
Project5 starts recording.
6. Trigger other grooves and/or cells when you want
them to start playing.
7. Click the Stop button or press the S pacebar when you
want to stop recording.
Project5 records the output of each cell into the same track
the cell occupies. To erase your recording, press Ctrl+Z.
93
Page 88

Track Layers
ReWire Hosting
The new track layer feature lets you drag overlapping patterns into separate lanes in a track so you can easily see
and edit the patterns. Lanes look like new tracks, and have
a track number that increases by 0.1 every time you create
a new lane. Each new lane that you add to a track is controlled by the same volume and pan controls as the original
track, but each lane has its own mute, solo, and arm controls. Y ou can display and edit different automation parameters in separate lanes, but the parameters apply to all the
lanes (it’s still only one track). On MIDI tracks, you can use
different MFX (MIDI effects), and a different program/channel combination on each lane.
Note 1: an original track and all of its track lanes use the
same output on a multi-output instrument.
Note 2: you can only patch Project5’s Arpeggiator into an
original track, but the Arpeggiator affects all lanes of the
track.
To Add Lanes to a Track
1. Right-click the track name, and choose Create Layer
from the popup menu.
Project5 creates a new track lane.
2. Drag overlapping patterns to the new lane. If you
have more than two layers of patterns, repeat step 1
to create extra lanes, and drag the remaining
overlapping patterns to the new lane.
You can rename any of the new lanes if you want. To add
more lanes, right-click any of the lanes and choose Create
Layer from the popup menu.
To Remove a Lane from a Track
Right-click the lane, and choose Delete from the popup
menu.
Project5 can now function as either a ReWire host or client.
For more information, see the ReWire topic in the online
help.
New Audio Features
New audio features include audio recording, audio playback from disk (no size limit on clips), input monitoring,
freezing tracks, Groove clip (ACIDized clip) editing and
export, and per-project audio folders to store each project’s
recorded audio. Project5 Version 2 lets you record and
play back audio in several forms. You can use Groove clips
which follow your project’s tempo, or standard audio wave
files which are streamed off your hard disk.
Let’s look at the different types of audio files and where
they are stored.
See:
Audio Types
Audio Types
There are two types of audio files which you can use in
Project5: wave files and Groove clips (ACIDized wave
files). Wave files are standard Windows audio files while
Groove clips are special files that “know” their pitch and
tempo and can adjust to your project accordingly. Groove
clips are stored in RAM. Wave files are streamed off your
hard disk.
See:
Loading Audio Patterns
Recording Audio
Audio Folders
94
Page 89

Audio Fold ers
Each project has its own audio folder . When you save your
project, it creates a folder with your project’s name in the
same directory as the project. The audio folder is the same
as the project name plus the word Audio at the end. For
example, a project called My Project would create an audio
folder called My Project Audio. When you back up or move
a project, make sure you include the project’s audio folder.
See:
Loading Audio Patterns
Recording Audio
Loading Audio Patterns
Use the following procedure to load an audio pattern into
Project5.
To Load a Groove Clip or Wave File
1. Use the Loops/Patterns tab to navigate to the folder
where your audio clips (patterns) are stored.
2. If you want, click the Play button that’s on the left side
of the audio clip name to preview the clip.
3. Drag the clip from the Loops/Patterns tab into the
Arrange pane at the place and time where you want
the clip to be.
To Import a Groove Clip or Wave File
1. Select the track that you want to load the clip into.
2. Move the Now Time to the place where you want to
load the clip.
3. Use the File-Import command to open the Import
dialog, and navigate to the folder where the desired
audio pattern is stored.
4. Select the pattern. If the pattern is not ACIDized and
you want it to be, click the Convert Audio to Groove
Clip option in the dialog.
5. Click OK.
Project5 imports the clip to the time and track you chose,
and displays the clip in the Editor.
95
Page 90

See:
Recording Audio
Audio Folders
Recording Audio
In addition to importing audio clips and Groove clips, you
can record your own audio tracks in Project5.
See:
Choosing a Sound Card Input
Choosing a Sound Card Input
You need to choose a sound card input for recording.
To Choose a Sound Card Input
1. Open the Audio Options dialog by using the OptionsAudio command.
2. In the Select Input Channel field, choose the sound
card input you want to record into. Click OK.
To Connect an Instrument
Plug your instrument or microphone into the audio input
you selected (or plug your pre-amp or mixer into that input,
if your instrument or mic is connected to a pre-amp or
mixer).
See:
Input Monitoring
Input Monitoring
Input monitoring lets you hear any effects you have associated with the track. It also lets you see an output meter for
the track.
To Check Levels
1. In an audio track, click the Arm button so that it’s
enabled (red), and also click the track’s Input Monitor
button so that it’s enabled.
2. Play your instrument and observe the meter in the
armed track. Use your sound card’s software mixer
(or hardware controls, if it has them) to adjust the
input volume so that the meter almost peaks when
you play the loudest volume that you plan to record.
See:
Starting to Record
Starting to Record
Once you have set up your track and inputs for recording,
you are ready go.
To Record Audio
1. Select the track and the Now Time where you want
the recording to appear in the Track pane.
2. If you want to hear the Metronome while you’re
recording, click the Metronome button in the Main
Control view to enable it (it turns blue when enabled).
3. If you want to hear a count-in before you record, use
the Tr ansport-Cou nt-in On/Of f command. When the
command is enabled, a checkmark appears next to
the command.
4. To set the number of beats in the count-in, use the
Options-Metronome command to open the
Metronome Properties dialog, choose a count-in
duration in the Count in # of Beats field, and click OK.
5. Select an audio input from these options in the track
strip’s input menu: Stereo, Left, Right, or None. Select
None if you want to record automation on the track
without recording audio data at the same time.
96
Page 91

6. Click the Record button to start recording, and
play your instrument.
If audio data is successfully being recorded, Project5
displays a red bar graph in the area of the track
where audio data is being recorded. Recording
automation data only does not generate the bar
graph.
7. Press the Spacebar to stop recording.
Project5 displays your recorded data in the audio track.
Rewind and play back what you recorded. You can press
Ctrl+Z to erase what you recorded if you’re not satisfied.
When you save your project, Project5 stores the record ed
audio in the project’s own audio folder, which is called
“(name of project) Audio,” and is located in the same folder
that the project file is stored in. When you back up your
project on another disk, make sure that you copy both the
project file and its associated audio folder.
Note: if you want to record automation on the track without
recording audio data at the same time, select None in the
track’s audio input menu.
Working With Groove Clips
In Project5, you can import two kinds of audio files: Groove
clips (ACIDized clips), and Wave files. Groove clips
change their tempo to the project tempo when you import
them; Wave files do not. You can transpose Groove clips in
the Editor pane (see second procedure, following).
Audio files play back on audio tracks. If you create an
audio track and select it, importing an audio file brings the
imported file to the selected audio track. If you haven’t created any audio tracks, Project5 will automatically create
one the first time you drag an audio file from the Loops/
Patterns tab into the project. You can copy and move audio
files, and edit pattern length and some kinds of automation
in the Editor pane. You can drag audio patterns directly
from the Loops/Patterns tab to the Arrange pane, and also
preview one or more at the same time (see Loading Patterns).
To Insert an Audio Track
• Right -cli ck an empty area of the Track pane, and
choose Insert-Audio Track from the popup menu.
The audio track appears in the Track pane.
To Transpose a Groove Clip
1. In the Arrange pane, double-click the Groove clip to
both display it in the Editor and make it the active
instance of this pattern. The pattern has a black
outline in the Arrange pane when the pattern is the
active instance.
2. In the Editor pane’s Transpose menu, use the up and
down arrows to choose the number of half-steps to
transpose the Groove clip by.
This transposes just this one instance of the Groove clip.
All copies of an audio pattern are identical except for their
Transpose value. Now, wherever this one instance of the
Groove clip appears in the Arrange pane, it will display a
plus or minus number on it to show its Transpose level.
Y ou can also just select a p attern in the Arrange pane, and
press the + or - keys on your keyboard’s Num Pad to transpose the pattern.
To Make an Audio Clip a Groove Clip
1. Right-click on the clip in the Arrange pane.
2. Select Groove-clip Looping from the menu that
appears.
When you display a Groove clip in the Editor, the name of
the Groove clip reads “(Grooved)” when the clip’s looping
feature is turned on.
97
Page 92

To Export a Groove Clip (ACIDized Wave File)
1. Double-click the clip in the Arrange pane to open the
clip in the Editor.
2. In the pattern menu, click the dropdown arrow and
select Export Loop to WAV File from the menu that
appears (this option is greyed-out if the clip is not a
Groove clip).
3. In the Save Pattern dialog, type a name for the
Groove clip, choose a folder to store it in, and click
Save to close the dialog.
Project5 exports your file as an ACID-compatible wave file.
To Set the Number of Beats in a Groove Clip
Find the pattern length menu that’s in the top right corner
of the Editor, and click the left arrow to reduce the number
of beats or the right arrow to increase the number of beats.
To Send a Groove Clip to the Arrange Pane
1. Select the Track in which you want the clip to appear.
2. Select the time at which you want the clip to appear in
the Track pane.
3. Click the Send button .
Instead of selecting a track and time location, you can just
drag the Send button to the place where you want the pattern to be.
See also:
Groove Clip Editor Pane Controls
Patterns: Loading, Arranging, and Editing
Groove Clip Editor P ane Controls
The following is a list of Groove clip controls in the Editor
pane, followed by a description:
Send
Creates an instance of the current Groove clip in the Track
pane. The clip appears at the Now time on the selected
track.
Preview Loops
Plays the current loop repeatedly. Use the Stop Preview
control to stop playback.
Stop Preview
Stops loop preview playback.
Record
Begins recording. What you record is determined by the
setting in the dropdown menu to the right.
Select
Use the Select tool to move markers in the Markers bar.
Draw Automation
Use to draw automation data in a Groove clip.
Automation Parameters
Select the automation you want to draw in your Groove
clip.
Clip Duration
Adjust the length of the clip. This is an alternative to dragging the clip end marker.
Trans Detec t (%)
The Trans Detect control senses transients in your audio
clip and assigns a marker at the beginning and end of each
one it finds. As the you increase the sensitivity (by using
larger numbers) smaller transients are detected and the
number of markers increases.
98
Page 93

Slice Division Menu
The Slice Division menu sets the resolution for the creation
of markers, or the “slicing” of the looped clip. This menu
uses note lengths, so the settings are:
• Whole notes
• Half notes
• Quarter notes
• Eighth notes
• Sixteenth notes
• Thirty-second notes
The automatic markers appear at the note resolutions
according to the slider setting. At the eighth note setting,
there are eight markers per measure.
This control works well for slicing audio that has more subtle changes in volume with few dramatic transients.
The markers in a loop clip preserve the timing of the audio
at that moment. Too few or too many markers can cause
unwanted “artifacts” when a loop clip is stretched.
Restore Markers
The Restore Markers tool restores all automatically generated markers to the original position and enables all those
that were disabled. Manually created markers remain as
is.
Beats in Clip
The number of beats in the clip.
Snap to Grid
Snap resolution
Page through
resolution options
Turn Snap to Grid button on/off
The Snap to Grid button turns the Snap to Grid on or off.
The Snap Resolution control sets the Snap to Grid resolution.
Clip Transpose
Raise or lower the pitch of the clip by half-steps.
Freeze
The Freeze Track command preserves all of the instrument and effect settings for the track by rendering the
track, essentially mixing the track down temporarily into an
audio pattern, and disabling the track’s instrument and
effects. This has several benefits. Frozen tracks use much
less of your CPU, giving you the potential to add more
instruments and effects to your project. The patterns in a
frozen track can’t be edited, eliminating the possibility of
accidentally altering them.
The following track parameters can be edited in a frozen
track:
•Volume
•Pan
• Aux Send
• Phase Invert
• Output
When you freeze a track, any effects that the track uses
frequently need some extra time at the end of the track to
finish. You can set the amount of extra time that Project5
adds to a frozen track by using the Options-Freeze Tail
99
Page 94

Duration command, and entering the amount of extra time
you want.
To Freeze a Track
1. Right-click on the track (directly on to of the track
name or above the volume or pan controls).
2. From the menu that appears, select Freeze Track.
The track is mixed down, and appears greyed-out.
Note: if you freeze a ReWire track, Project5 only mixes
down audio on the part(s) of the track where there are patterns.
To Unfreeze a Track
1. Right-click on the track (directly on to of the track
name or above the volume or pan controls).
2. From the menu that appears, select Unfreeze Track.
100
Page 95

De vice Chains, Instruments, and
Effects
Page 96

Project5 refers to software synthesizers as instruments.
Instead of loading an instrument and then adding an effect
to the instrument, in Project5 you can load a device chain
instead (formerly known as a Project5 patch). A device
chain is made up of an instrument, any effects that were
loaded with the instrument when the device chain was
saved, the parameter settings of the instrument and
effects, and remote control settings for the instrument and
effects. When you change anything about a device chain,
you can save your changes to that device chain so that
you can use the same device chain in other projects. If you
save a project without saving any device chains, the
changes you make to device chains in that project are only
available in that project.
With Project5 you can play and layer as many instruments
as your computer can handle. You can play them all at the
same time, using different effects on each one if you like,
trigger each one independently with recorded MIDI data,
split your keyboards by range and velocity, and transpose
MIDI data from either live playback or from patterns.
Project5 uses instruments that conform to the DXi plug-in
standard, but includes a special adapter that allows you to
use VST instruments and plug-in effects also.
In Project5, each instrument gets its own track, with controls for volume, pan, width, mute, solo, arm, and output
(for multi-output instruments). You can choose what MIDI
channel and port an instrument responds to, opening up
the possibility of using several controllers on different MIDI
interfaces at the same time. You can add extra lanes to a
track, and use different MIDI channels on each lane to trigger different sounds on multi-timbral instruments for live
keyboard playback and/or patterns in the Arrange pane.
Only your computer’s processing power limits the number
of instruments you can use.
The Device Browser appears when you click the Add New
Instrument Track button that’s in the Add Track section of
the Main Control view. Use the Device Browser to load
either a device chain or an instrument into a new track.
You can change or delete the instrument and effect(s) in a
device chain if you want.
See:
Inserting Tracks, Instruments, and Device Chains
Loading, Editing, and Saving Device Chains
Layering Instruments for Real-time Playback
Using VST instruments and Effects
Using the Arpeggiator
Inserting Tracks, Instruments,
and Device Chains
There are two types of tracks in Project5: instrument tracks
and audio tracks. Each instrument gets its own track: one
instrument = one track; one track = one instrument.
MIDI patterns play back through instrument tracks, and
audio data plays back through audio tracks.
T o Inser t an Instrum ent or Device Ch ain and a
New Track
1. In the Main Control view, click the right button in the
Add track section:
Click here
The Device Browser appears.
2. At the top of the browser, click either the Device
Chains button if you want to load an instrument and
effects, or click the DXi and VST Instruments button if
you want to add only an instrument.
3. Choose an instrument or device chain from the menu,
or from the Most Recently Used list that appears in
the upper right corner of the Device Browser (a
numbered list appears if you’ve inserted at least one
instrument into this project).
102
Page 97

Project5 inserts the instrument or device chain that you
chose into the new track.
Play your MIDI controller and listen to the instrument.
Notice that the volume meter on the instrument’s track
lights up when you play the instrument. You can adjust the
instrument’s track controls to change volume, pan, etc.
Another way to insert an instrument is to right-click in the
Track pane, select Insert Instrument-(name of instru-
ment) from the popup menu, or select Insert InstrumentInsert from Device Chain-(name of device chain) if you
want to add an instrument and related effects.
To Insert an Audio Track
• In the Main Control view, click the left button in the
Add track section:
Or
• Right-cli ck in an empty area of the Track pane, select
Insert Audio Track from the popup menu.
Project5 adds an audio track below the last track.
See also:
Multiple Outputs
Click here
To Clone an Instrument Track
• Right-click the controls of the instrument track you
want to clone, and choose Clone Instrument from
the popup menu.
Or
• Click the controls of the instrument track you want to
clone, and use the Edit-Clone Instrument
command.
Note: cloning an instrument and track does not clone the
patterns that the track contains.
To Transpose an Instrument and Track
• In the Track Inspector, drag the the Transpose menu
to the left or right by the number of half-steps (positive
or negative) by which you want to transpose your
track.
To Replace an Instrument in an Existing Track
• Right-click the controls of an existing track, and
choose Replace Instrument-[name of the
instrument you want].
To Replace a Device Chain in an Existing Track
• Right-click the controls of an existing track, and
choose Replace Instrument and then Replace from
Device Chain on the popup menu, and select the
name of the device chain you want to insert.
To Rename a Track
• Double-click the name of the track, type a new name,
and press Enter.
To Delete a Track
• Right-click the track’s name or number, and choose
Delete from the popup menu.
To Unmute, Unsolo, or Disarm All Instruments
• In the Main Control view, click the master mute
button, the master solo button, or the master arm
button so that the appropriate button is not lit.
Main Control view (left side) master arm, mute, and solo buttons
Master arm, mute, solo
The master mute button lights up whenever any instrument’s mute button is lit. The master solo button lights up
whenever any instrument’s solo button is lit, and the master arm button lights up whenever any instrument’s arm
103
Page 98

button is lit. Turning any of these master buttons off turns
off all buttons of the same kind that are on individual instrument tracks.
To Change the Order of Tracks
• Drag the track name of t he track you want t o move to
the location where you want it.
Multiple Outputs
If the instrument you inserted has multiple outputs (Cakewalk TTS-1 is a multi-output instrument), Project5 shows
what output the track controls apply to in the output menu
that’s located just left of the volume slider in each track,
and in the Track Inspector just below the Bank/Patch
menu. Each track has as many sets of track controls as its
instrument has outputs. For multi-output instruments, use
each instrument’s property page to route specific sounds
or MIDI channels through specific outputs. You can use
separate effects on each output. Remember though, that
effects use a lot of your computer’s processing power. If
two or more outputs can use the same effect, consider
inserting the effect into an aux bus, and sending each output’s signal through that bus.
Show Instrument button
Output menu or Track 3
Note: to use extra outputs on an instrument, you must
enable each extra output. Only the first output is enabled
by default to conserve memory.
To Enable All Extra Outputs for an Instrument
• Right-click the track name in the Track pane, and
under Bypass, select Enable All Outputs (the
checkmarks show what outputs are NOT enabled).
To Enable Individual Outputs for an Instrument
• In the output menu of an instrument track, drag the
displayed number up or down to display the desired
output number. When the desired number appears,
double-click the number so that it is not grey.
Or
• Right-click the track name in the Track pane, and
under Bypass, select the output you want to enable
(the checkmarks show what outputs are NOT
enabled).
Or
• Click the Track Inspec tor’s output menu, and under
Bypass, select the output you want to enable (the
checkmarks show what outputs are NOT enabled).
To Display the Track Controls for a Specific
Output
• In the output menu of an instrument track, drag the
displayed number up or down to display the desired
output number.
Or
• Right-click the track name in the Track pane, and
under Active Output, select the output whose
controls you want to display (the checkmark shows
what output is displayed).
To Send Specific MIDI Channels or Sounds
Through Specific Output s
1. Open an instrument’s property page by clicking its
Show Instrument button that’s just left of the track’s
mute button.
2. Use the instrument’s property page to route specific
MIDI channels to specific outputs. Each property
page is unique to the instrument. You may have to
read the instrument’s documentation to find the
controls for this function.
104
Page 99

See:
Loading, Editing, and Saving Device Chains
Loading, Editing, and Saving
Device Chains
A device chain is made up of an instrument, any MIDI and
audio effects that were loaded with the instrument when
the device chain was saved, the parameter settings for the
instrument and effects, and any remote control settings for
the instrument and effects. Use the Device Browser to load
device chains. The Device Browser appears when you
click the Add Instrument Track button in the Add Track section, or when you click the device chain menu in the Track
Inspector.
You can change device chains rapidly while playback continues. This lets you quickly try out sounds for a particular
pattern.
Device chain menu in the Track
Inspector
See:
Loading Device Chains
Loading Device Chains
The Device Browser lets you see your stored device
chains, and load them into new or pre-existing tracks. You
can open the Device Browser from either the Add track
section of the Main Control view, or from the Track Inspector. If you open the Device Browser from the Track Inspector, clicking the name of a device chain in the Device
Browser loads that device chain into the currently-selected
track. If you open the Device Browser from the Add track
section, clicking the name of a device chain in the Device
Browser loads that device chain into a new track.
105
Page 100

Device Browser
Most Recently
Used list
Note: if you’ve been editing a device chain and you then
load another device chain without saving the device chain
you were working with, you can get back to the previous
device chain by using the Edit-Undo command (or press-
ing Ctrl+Z). You can use this command repeatedly (press
Ctrl+Z multiple times) to go back to any edit you’ve done
since you opened Project5, up to the default limit of 64
edits.
T o Load a Device Ch ain into a Pre-existing Trac k
1. Select the track whose instrument or device chain
you want to replace.
2. In the Track Inspector, click the dropdown arrow in
the device chain menu to open the Device Browser.
Device chain menu in the Track
Inspector
3. In the Device Browser, choose the instrument or
device chain that you want to load.
Project5 loads the selected instrument or device chain into
the selected track.
To Insert a Device Chain and a New Track
1. In the Main Control view, click the right button in the
Add track section:
Click here
The Device Browser appears.
2. At the top of the browser, click either the Device
Chains button if you want to load an instrument and
effects, or click the DXi and VST Instruments button if
you want to add only an instrument.
3. Choose an instrument or device chain from the menu,
or from the Most Recently Used list that appears in
the upper right corner of the Device Browser.
Project5 inserts the instrument or device chain that you
chose into the new track.
To add, replace, or delete instruments and effects, or
change their parameters, see Changing Instruments and
Effects, and Controlling Device Chain Parameters.
Changing Instruments and Effects
In the Track Inspector, the effect modules and instrument
module appear in vertical order illustrating the signal flow:
MIDI effects are first in the chain and appear at the top of
the Track Inspector. Next comes the instrument, and then
come the audio effects. You can change the order of the
MIDI and audio effects in their respective areas. The
instrument module stays between the MIDI effects and the
audio effects.
Use the following procedures to add and delete instruments and effects, and change their order.
106
 Loading...