

Page 1

©
Cakewalk Professional
User’s Guide
Page 2

Information in this document is subject to change without notice and does not represent a commitment on the part of Twelve Tone Systems, Inc. The software described
in this document is furnished under a license agreement or nondisclosure agreement. The software may be used or copied only in accordance of the terms of the
agreement. It is against the law to copy this software on any medium except as specifically allowed in the agreement. No part of this document may be reproduced or
transmitted in any form or by any means, electronic or mechanical, including photocopying and recording, for any purpose without the express written permission of
Twelve Tone Systems, Inc.
Copyright © 1998 Twelve Tone Systems, Inc. All rights reserved.
Program Copyright © 1998 Twelve Tone Systems, Inc. All rights reserved.
Cakewalk is a registered trademark of Twelve Tone Systems, Inc. Cakewalk Pro
Audio, Cakewalk Professional, Cakewalk Home Studio, Cakewalk Guitar Studio,
Cakewalk Audio FX, Cakewalk Metro, Virtual Jukebox, Virtual Piano, CFX, StudioWare, and the Cakewalk logo are trademarks of Twelve Tone Systems, Inc. Other
company and product names are trademarks of their respective owners.
Page 3
Table of Contents
Preface . . . . . . . . . . . . . . . . . . . . . . . . . . . . . . . . . . . . . . . . . xv
About This Book . . . . . . . . . . . . . . . . . . . . . . . . . . . . . . . . . . . . . . . . xv
Registering Professionalª . . . . . . . . . . . . . . . . . . . . . . . . . . . . . . . .xvi
Getting Help . . . . . . . . . . . . . . . . . . . . . . . . . . . . . . . . . . . . . . . . . . .xvi
1 Introduction . . . . . . . . . . . . . . . . . . . . . . . . . . . . . . . . . . .18
Make a Performance Sound Great . . . . . . . . . . . . . . . . . . . . . . . . . . 18
Improvise . . . . . . . . . . . . . . . . . . . . . . . . . . . . . . . . . . . . . . . . . . . 18
Edit and Arrange . . . . . . . . . . . . . . . . . . . . . . . . . . . . . . . . . . . . 18
Orchestrate . . . . . . . . . . . . . . . . . . . . . . . . . . . . . . . . . . . . . . . . . 19
Work Efficiently . . . . . . . . . . . . . . . . . . . . . . . . . . . . . . . . . . . . . 19
Share Your Music . . . . . . . . . . . . . . . . . . . . . . . . . . . . . . . . . . . . 19
Record Demo Tapes or CD Masters . . . . . . . . . . . . . . . . . . . . . . 19
Coordinate with Other Media and Hardware . . . . . . . . . . . . . . 19
Produce Printed Scores and MIDI Files . . . . . . . . . . . . . . . . . . 19
Professionalª Basics . . . . . . . . . . . . . . . . . . . . . . . . . . . . . . . . . . . . 20
Views . . . . . . . . . . . . . . . . . . . . . . . . . . . . . . . . . . . . . . . . . . . . . . 20
Working on a Project . . . . . . . . . . . . . . . . . . . . . . . . . . . . . . . . . . 28
Other Types of Files . . . . . . . . . . . . . . . . . . . . . . . . . . . . . . . . . . 29
Computers, Sound, and Music . . . . . . . . . . . . . . . . . . . . . . . . . . . . . 29
MIDI . . . . . . . . . . . . . . . . . . . . . . . . . . . . . . . . . . . . . . . . . . . . . . . 29
Digital Audio . . . . . . . . . . . . . . . . . . . . . . . . . . . . . . . . . . . . . . . . 30
Installing Professionalª . . . . . . . . . . . . . . . . . . . . . . . . . . . . . . . . . . 31
Table of Contents
Page 4

Starting Professionalª . . . . . . . . . . . . . . . . . . . . . . . . . . . . . . . . . . . 34
Learning to Use Professionalª . . . . . . . . . . . . . . . . . . . . . . . . . . . . 35
2 Getting Started . . . . . . . . . . . . . . . . . . . . . . . . . . . . . . . 37
Tutorial 1ÑPlaying a Song . . . . . . . . . . . . . . . . . . . . . . . . . . . . . . . . 38
Rehearsal Time . . . . . . . . . . . . . . . . . . . . . . . . . . . . . . . . . . . . . . 38
Opening a Project File . . . . . . . . . . . . . . . . . . . . . . . . . . . . . . . . . 38
Playing the Song . . . . . . . . . . . . . . . . . . . . . . . . . . . . . . . . . . . . . 39
Restarting the Song Automatically . . . . . . . . . . . . . . . . . . . . . . 41
Changing the Tempo . . . . . . . . . . . . . . . . . . . . . . . . . . . . . . . . . 43
Muting and Soloing Tracks . . . . . . . . . . . . . . . . . . . . . . . . . . . . . 45
Changing a Track's Instrument . . . . . . . . . . . . . . . . . . . . . . . . . 47
Playing Music on a Keyboard . . . . . . . . . . . . . . . . . . . . . . . . . . . 48
Transposing . . . . . . . . . . . . . . . . . . . . . . . . . . . . . . . . . . . . . . . . . 50
Tutorial 2ÑRecording MIDI and Digital Audio . . . . . . . . . . . . . . . . 53
Rehearsal Time, Part 2 . . . . . . . . . . . . . . . . . . . . . . . . . . . . . . . . 53
Opening the Project File . . . . . . . . . . . . . . . . . . . . . . . . . . . . . . . 53
Recording MIDI . . . . . . . . . . . . . . . . . . . . . . . . . . . . . . . . . . . . . . 54
Loop Recording . . . . . . . . . . . . . . . . . . . . . . . . . . . . . . . . . . . . . . 58
Punch-In Recording . . . . . . . . . . . . . . . . . . . . . . . . . . . . . . . . . . . 60
Recording Digital Audio . . . . . . . . . . . . . . . . . . . . . . . . . . . . . . . 61
Recording Multiple Channels . . . . . . . . . . . . . . . . . . . . . . . . . . . 64
Tutorial 3ÑAudio Editing and Mixing . . . . . . . . . . . . . . . . . . . . . . . 64
Audio Engineering . . . . . . . . . . . . . . . . . . . . . . . . . . . . . . . . . . . . 65
Opening the Project File . . . . . . . . . . . . . . . . . . . . . . . . . . . . . . . 65
The Plan . . . . . . . . . . . . . . . . . . . . . . . . . . . . . . . . . . . . . . . . . . . . 65
Stretching the Music . . . . . . . . . . . . . . . . . . . . . . . . . . . . . . . . . . 67
Adding the Announcer . . . . . . . . . . . . . . . . . . . . . . . . . . . . . . . . 68
Trimming the Announcer . . . . . . . . . . . . . . . . . . . . . . . . . . . . . . 69
Editing the Announcer . . . . . . . . . . . . . . . . . . . . . . . . . . . . . . . . 72
Making It Fit . . . . . . . . . . . . . . . . . . . . . . . . . . . . . . . . . . . . . . . . 73
Mixing the Radio Spot . . . . . . . . . . . . . . . . . . . . . . . . . . . . . . . . . 74
Automating Your Mix . . . . . . . . . . . . . . . . . . . . . . . . . . . . . . . . . 76
Saving the Project . . . . . . . . . . . . . . . . . . . . . . . . . . . . . . . . . . . . 77
3 Controlling Playback . . . . . . . . . . . . . . . . . . . . . . . . . . 79
The ÒNow TimeÓ and How to Use It . . . . . . . . . . . . . . . . . . . . . . . . . 80
Displaying the Now Time in Large Print . . . . . . . . . . . . . . . . . . 82
Other Ways to Set the Now Time . . . . . . . . . . . . . . . . . . . . . . . . 83
Controlling Playback . . . . . . . . . . . . . . . . . . . . . . . . . . . . . . . . . . . . . 84
Handling Stuck Notes . . . . . . . . . . . . . . . . . . . . . . . . . . . . . . . . . 85
Loops . . . . . . . . . . . . . . . . . . . . . . . . . . . . . . . . . . . . . . . . . . . . . . 85
Track-by-Track Playback . . . . . . . . . . . . . . . . . . . . . . . . . . . . . . . . . 88
iv
Page 5

Silencing Tracks . . . . . . . . . . . . . . . . . . . . . . . . . . . . . . . . . . . . . 89
Soloing Tracks . . . . . . . . . . . . . . . . . . . . . . . . . . . . . . . . . . . . . . . 90
Changing Track Settings . . . . . . . . . . . . . . . . . . . . . . . . . . . . . . . . . 91
Setting Up Output Devices . . . . . . . . . . . . . . . . . . . . . . . . . . . . . 95
Assigning Tracks to Ports . . . . . . . . . . . . . . . . . . . . . . . . . . . . . . 97
Choosing the Instrument Sound (Bank and Patch) . . . . . . . . . 98
Adjusting Volume and Pan . . . . . . . . . . . . . . . . . . . . . . . . . . . . 101
Assigning a MIDI Channel (Chn) . . . . . . . . . . . . . . . . . . . . . . 102
Adjusting the Key/Transposing a Track (Key+) . . . . . . . . . . . 103
Adjusting the Note Velocity (Vel+) . . . . . . . . . . . . . . . . . . . . . 104
Adjusting the Time Alignment of a Track (Time+) . . . . . . . . . 105
Other MIDI Playback Settings . . . . . . . . . . . . . . . . . . . . . . . . . 106
Video Playback . . . . . . . . . . . . . . . . . . . . . . . . . . . . . . . . . . . . . . . . 107
4 Recording a Performance . . . . . . . . . . . . . . . . . . . . . 111
Creating a New Project . . . . . . . . . . . . . . . . . . . . . . . . . . . . . . . . . . 112
Creating a New Project File . . . . . . . . . . . . . . . . . . . . . . . . . . . 112
Setting the Time and Key Signatures . . . . . . . . . . . . . . . . . . . 113
Setting the Metronome and Tempo Settings . . . . . . . . . . . . . . 114
Setting the Audio Sampling Rate . . . . . . . . . . . . . . . . . . . . . . . 117
Setting the MIDI Timing Resolution . . . . . . . . . . . . . . . . . . . . 118
Preparing to Record . . . . . . . . . . . . . . . . . . . . . . . . . . . . . . . . . . . . . 119
Recording Modes . . . . . . . . . . . . . . . . . . . . . . . . . . . . . . . . . . . . 120
Choosing a Source . . . . . . . . . . . . . . . . . . . . . . . . . . . . . . . . . . . 120
Arming Tracks for Recording . . . . . . . . . . . . . . . . . . . . . . . . . . 122
Auto Arming . . . . . . . . . . . . . . . . . . . . . . . . . . . . . . . . . . . . . . . 123
Recording Music from a MIDI Instrument . . . . . . . . . . . . . . . . . . 123
Virtual Piano . . . . . . . . . . . . . . . . . . . . . . . . . . . . . . . . . . . . . . . 124
Recording Audio . . . . . . . . . . . . . . . . . . . . . . . . . . . . . . . . . . . . . . . . 125
Loop Recording . . . . . . . . . . . . . . . . . . . . . . . . . . . . . . . . . . . . . . . . 128
Punch Recording . . . . . . . . . . . . . . . . . . . . . . . . . . . . . . . . . . . . . . . 130
Step Recording . . . . . . . . . . . . . . . . . . . . . . . . . . . . . . . . . . . . . . . . . 132
Step Pattern Recording . . . . . . . . . . . . . . . . . . . . . . . . . . . . . . . 135
Recording Channel by Channel . . . . . . . . . . . . . . . . . . . . . . . . 136
Importing Music and Sound . . . . . . . . . . . . . . . . . . . . . . . . . . . . . . 138
Importing Wave (.wav) Files . . . . . . . . . . . . . . . . . . . . . . . . . . 138
Importing Material from Another Cakewalk Project . . . . . . . 139
Importing MIDI Files . . . . . . . . . . . . . . . . . . . . . . . . . . . . . . . . 140
Saving Your Work . . . . . . . . . . . . . . . . . . . . . . . . . . . . . . . . . . . . . . 140
Labeling Your Projects . . . . . . . . . . . . . . . . . . . . . . . . . . . . . . . 142
File Statistics . . . . . . . . . . . . . . . . . . . . . . . . . . . . . . . . . . . . . . 144
MIDI Input and Echo Controls . . . . . . . . . . . . . . . . . . . . . . . . . . . . 144
Table of Contents
v
Page 6

Input Filtering . . . . . . . . . . . . . . . . . . . . . . . . . . . . . . . . . . . . . . 144
MIDI Echo . . . . . . . . . . . . . . . . . . . . . . . . . . . . . . . . . . . . . . . . . 145
Local Control . . . . . . . . . . . . . . . . . . . . . . . . . . . . . . . . . . . . . . . 146
5 Arranging Tracks and Clips . . . . . . . . . . . . . . . . . . . 149
Arranging Tracks . . . . . . . . . . . . . . . . . . . . . . . . . . . . . . . . . . . . . . . 150
Changing the Order of Tracks . . . . . . . . . . . . . . . . . . . . . . . . . 151
Copying Tracks . . . . . . . . . . . . . . . . . . . . . . . . . . . . . . . . . . . . . 152
Erasing Tracks . . . . . . . . . . . . . . . . . . . . . . . . . . . . . . . . . . . . . 153
Arranging Clips . . . . . . . . . . . . . . . . . . . . . . . . . . . . . . . . . . . . . . . . 153
Displaying Clips . . . . . . . . . . . . . . . . . . . . . . . . . . . . . . . . . . . . 154
Selecting Clips . . . . . . . . . . . . . . . . . . . . . . . . . . . . . . . . . . . . . . 156
Moving and Copying Clips . . . . . . . . . . . . . . . . . . . . . . . . . . . . 156
Working with Partial Clips . . . . . . . . . . . . . . . . . . . . . . . . . . . . . . . 160
Markers and the Snap Grid . . . . . . . . . . . . . . . . . . . . . . . . . . . . . . 162
Showing Gridlines . . . . . . . . . . . . . . . . . . . . . . . . . . . . . . . . . . . 163
Defining and Using the Snap Grid . . . . . . . . . . . . . . . . . . . . . . 163
Creating and Using Markers . . . . . . . . . . . . . . . . . . . . . . . . . . 165
Working with Linked Clips . . . . . . . . . . . . . . . . . . . . . . . . . . . . . . . 169
Splitting and Combining Clips . . . . . . . . . . . . . . . . . . . . . . . . . . . . 172
Changing Tempos . . . . . . . . . . . . . . . . . . . . . . . . . . . . . . . . . . . . . . 174
Using the Tempo Toolbar . . . . . . . . . . . . . . . . . . . . . . . . . . . . . 175
Using the Tempo Commands . . . . . . . . . . . . . . . . . . . . . . . . . . 176
Using the Tempo View . . . . . . . . . . . . . . . . . . . . . . . . . . . . . . . 179
6 Editing Events and Controllers . . . . . . . . . . . . . . . . . 183
The Piano Roll View . . . . . . . . . . . . . . . . . . . . . . . . . . . . . . . . . . . . 184
Opening the View . . . . . . . . . . . . . . . . . . . . . . . . . . . . . . . . . . . 184
Selecting and Editing Notes . . . . . . . . . . . . . . . . . . . . . . . . . . . 185
Percussion, Drum Notes, and Note Names . . . . . . . . . . . . . . . 189
Controllers Pane . . . . . . . . . . . . . . . . . . . . . . . . . . . . . . . . . . . . 190
Selecting and Editing Events . . . . . . . . . . . . . . . . . . . . . . . . . . . . . 190
Transposing . . . . . . . . . . . . . . . . . . . . . . . . . . . . . . . . . . . . . . . . 190
Shifting Events in Time . . . . . . . . . . . . . . . . . . . . . . . . . . . . . . 191
Inserting Measures into a Project . . . . . . . . . . . . . . . . . . . . . . 192
Stretching and Shrinking Events . . . . . . . . . . . . . . . . . . . . . . . 194
Reversing Notes in a Clip . . . . . . . . . . . . . . . . . . . . . . . . . . . . . 196
Adding Crescendos and Decrescendos . . . . . . . . . . . . . . . . . . . 197
Changing the Timing of a Recording . . . . . . . . . . . . . . . . . . . . . . . 197
Quantizing . . . . . . . . . . . . . . . . . . . . . . . . . . . . . . . . . . . . . . . . . 198
Fit Improvisation . . . . . . . . . . . . . . . . . . . . . . . . . . . . . . . . . . . . 208
Searching for Events . . . . . . . . . . . . . . . . . . . . . . . . . . . . . . . . . . . . 209
vi
Page 7

Event Filters . . . . . . . . . . . . . . . . . . . . . . . . . . . . . . . . . . . . . . . 210
Controllers, RPNs, NRPNs, and Automation Data . . . . . . . . . . . 216
Using the Controllers Pane . . . . . . . . . . . . . . . . . . . . . . . . . . . 218
The Event List View . . . . . . . . . . . . . . . . . . . . . . . . . . . . . . . . . . . . 224
Event List Overview . . . . . . . . . . . . . . . . . . . . . . . . . . . . . . . . . 225
Event List Display Filter . . . . . . . . . . . . . . . . . . . . . . . . . . . . . 227
Editing Events and Event Parameters . . . . . . . . . . . . . . . . . . 227
Additional Event Information . . . . . . . . . . . . . . . . . . . . . . . . . 229
MIDI Effects . . . . . . . . . . . . . . . . . . . . . . . . . . . . . . . . . . . . . . . . . . 230
Presets . . . . . . . . . . . . . . . . . . . . . . . . . . . . . . . . . . . . . . . . . . . . 231
Quantizing . . . . . . . . . . . . . . . . . . . . . . . . . . . . . . . . . . . . . . . . . 232
Adding Echo/Delay . . . . . . . . . . . . . . . . . . . . . . . . . . . . . . . . . . 233
Filtering Events . . . . . . . . . . . . . . . . . . . . . . . . . . . . . . . . . . . . 234
Adding Arpeggio . . . . . . . . . . . . . . . . . . . . . . . . . . . . . . . . . . . . 234
Analyzing Chords . . . . . . . . . . . . . . . . . . . . . . . . . . . . . . . . . . . 236
Changing Velocities . . . . . . . . . . . . . . . . . . . . . . . . . . . . . . . . . 236
7 Editing Audio . . . . . . . . . . . . . . . . . . . . . . . . . . . . . . . . 239
Digital Audio Fundamentals . . . . . . . . . . . . . . . . . . . . . . . . . . . . . 240
Basic Acoustics . . . . . . . . . . . . . . . . . . . . . . . . . . . . . . . . . . . . . 240
ExampleÑA Guitar String . . . . . . . . . . . . . . . . . . . . . . . . . . . . 240
Waveforms . . . . . . . . . . . . . . . . . . . . . . . . . . . . . . . . . . . . . . . . . 242
Recording a Sound . . . . . . . . . . . . . . . . . . . . . . . . . . . . . . . . . . 244
The Decibel Scale . . . . . . . . . . . . . . . . . . . . . . . . . . . . . . . . . . . 245
Audio Events . . . . . . . . . . . . . . . . . . . . . . . . . . . . . . . . . . . . . . . 246
Managing Audio Data . . . . . . . . . . . . . . . . . . . . . . . . . . . . . . . . 247
The Audio View . . . . . . . . . . . . . . . . . . . . . . . . . . . . . . . . . . . . . . . . 248
Basic Audio Editing . . . . . . . . . . . . . . . . . . . . . . . . . . . . . . . . . . . . . 249
Editing Event Properties . . . . . . . . . . . . . . . . . . . . . . . . . . . . . 250
Setting Volume and Pan Envelopes . . . . . . . . . . . . . . . . . . . . . 252
Moving, Copying, and Deleting Audio Events . . . . . . . . . . . . . 254
Splitting Audio Events . . . . . . . . . . . . . . . . . . . . . . . . . . . . . . . 254
Combining Audio Events . . . . . . . . . . . . . . . . . . . . . . . . . . . . . 255
Applying Fades with the Draw Tool . . . . . . . . . . . . . . . . . . . . 256
Scrubbing . . . . . . . . . . . . . . . . . . . . . . . . . . . . . . . . . . . . . . . . . . 258
Basic Audio Processing . . . . . . . . . . . . . . . . . . . . . . . . . . . . . . . . . . 259
Increasing or Decreasing Volume . . . . . . . . . . . . . . . . . . . . . . 260
Reversing Audio Data . . . . . . . . . . . . . . . . . . . . . . . . . . . . . . . . 262
Equalizing Audio Data . . . . . . . . . . . . . . . . . . . . . . . . . . . . . . . 262
Advanced Audio Processing . . . . . . . . . . . . . . . . . . . . . . . . . . . . . . 263
Parametric Equalization . . . . . . . . . . . . . . . . . . . . . . . . . . . . . . 263
Fades and Crossfades . . . . . . . . . . . . . . . . . . . . . . . . . . . . . . . . 265
Audio Effects . . . . . . . . . . . . . . . . . . . . . . . . . . . . . . . . . . . . . . . . . . 267
Table of Contents
vii
Page 8

Mixing Audio Effects . . . . . . . . . . . . . . . . . . . . . . . . . . . . . . . . . 268
Adding Parametric Equalization . . . . . . . . . . . . . . . . . . . . . . . 269
Adding Chorus . . . . . . . . . . . . . . . . . . . . . . . . . . . . . . . . . . . . . . 270
Applying Delay and Echo . . . . . . . . . . . . . . . . . . . . . . . . . . . . . 272
Adding Flanging . . . . . . . . . . . . . . . . . . . . . . . . . . . . . . . . . . . . 272
Applying Reverb . . . . . . . . . . . . . . . . . . . . . . . . . . . . . . . . . . . . 273
Shifting Pitch . . . . . . . . . . . . . . . . . . . . . . . . . . . . . . . . . . . . . . 274
8 Working with Notation and Lyrics . . . . . . . . . . . . . 277
The Staff View . . . . . . . . . . . . . . . . . . . . . . . . . . . . . . . . . . . . . . . . . 278
Opening the Staff View . . . . . . . . . . . . . . . . . . . . . . . . . . . . . . . 278
Staff View Layout . . . . . . . . . . . . . . . . . . . . . . . . . . . . . . . . . . . 279
Basic Musical Editing . . . . . . . . . . . . . . . . . . . . . . . . . . . . . . . . . . . 280
Inserting Notes . . . . . . . . . . . . . . . . . . . . . . . . . . . . . . . . . . . . . 280
Selecting Notes . . . . . . . . . . . . . . . . . . . . . . . . . . . . . . . . . . . . . 281
Moving, Copying, and Deleting Notes . . . . . . . . . . . . . . . . . . . 282
Changing Note Properties . . . . . . . . . . . . . . . . . . . . . . . . . . . . 283
Working with Triplets . . . . . . . . . . . . . . . . . . . . . . . . . . . . . . . . 284
Beaming of Rests . . . . . . . . . . . . . . . . . . . . . . . . . . . . . . . . . . . . 285
Changing the Way Notes Are Displayed . . . . . . . . . . . . . . . . . 285
Using Enharmonic Spellings . . . . . . . . . . . . . . . . . . . . . . . . . . 287
MIDI Channels and Voices . . . . . . . . . . . . . . . . . . . . . . . . . . . . 289
Chords and Marks . . . . . . . . . . . . . . . . . . . . . . . . . . . . . . . . . . . . . . 289
Adding Chord Symbols . . . . . . . . . . . . . . . . . . . . . . . . . . . . . . . 290
Adding Expression Marks . . . . . . . . . . . . . . . . . . . . . . . . . . . . . 293
Adding Hairpin Symbols . . . . . . . . . . . . . . . . . . . . . . . . . . . . . . 295
Adding Pedal Marks . . . . . . . . . . . . . . . . . . . . . . . . . . . . . . . . . 296
Working with Percussion . . . . . . . . . . . . . . . . . . . . . . . . . . . . . . . . 298
Setting Up a Percussion Track . . . . . . . . . . . . . . . . . . . . . . . . . 298
Setting Up a Percussion Staff or Line . . . . . . . . . . . . . . . . . . . 299
Ghost Strokes . . . . . . . . . . . . . . . . . . . . . . . . . . . . . . . . . . . . . . 301
Printing . . . . . . . . . . . . . . . . . . . . . . . . . . . . . . . . . . . . . . . . . . . . . . 302
The Meter/Key View . . . . . . . . . . . . . . . . . . . . . . . . . . . . . . . . . . . . 303
What Is Meter? . . . . . . . . . . . . . . . . . . . . . . . . . . . . . . . . . . . . . 303
What Is Key? . . . . . . . . . . . . . . . . . . . . . . . . . . . . . . . . . . . . . . . 304
Opening the Meter/Key View . . . . . . . . . . . . . . . . . . . . . . . . . . 304
Adding and Editing Meter/Key Changes . . . . . . . . . . . . . . . . . 305
Working with Lyrics . . . . . . . . . . . . . . . . . . . . . . . . . . . . . . . . . . . . 307
Adding and Editing Lyrics in the Staff View . . . . . . . . . . . . . . 307
Opening the Lyrics View . . . . . . . . . . . . . . . . . . . . . . . . . . . . . . 309
Adding and Editing Lyrics in the Lyrics View . . . . . . . . . . . . 309
viii
9 Mixing and Effects Patching . . . . . . . . . . . . . . . . . . 311
Page 9

The Console View . . . . . . . . . . . . . . . . . . . . . . . . . . . . . . . . . . . . . . 312
Configuring the Console . . . . . . . . . . . . . . . . . . . . . . . . . . . . . . 314
Mixing MIDI . . . . . . . . . . . . . . . . . . . . . . . . . . . . . . . . . . . . . . . . . . 319
Routing and Mixing Digital Audio . . . . . . . . . . . . . . . . . . . . . . . . . 321
Audio Track Modules . . . . . . . . . . . . . . . . . . . . . . . . . . . . . . . . 324
Aux Buses . . . . . . . . . . . . . . . . . . . . . . . . . . . . . . . . . . . . . . . . . 324
Audio Main Output Modules . . . . . . . . . . . . . . . . . . . . . . . . . . 325
Using Real-Time Effects . . . . . . . . . . . . . . . . . . . . . . . . . . . . . . . . . 326
Using Control Groups . . . . . . . . . . . . . . . . . . . . . . . . . . . . . . . . . . . 329
Using Remote Control . . . . . . . . . . . . . . . . . . . . . . . . . . . . . . . . . . . 333
Recording Automation Data . . . . . . . . . . . . . . . . . . . . . . . . . . . . . . 335
Mixing Down and Distributing Audio . . . . . . . . . . . . . . . . . . . . . . 338
Preparing Audio for Distribution . . . . . . . . . . . . . . . . . . . . . . . . . . 339
10 Using Instrument Definitions . . . . . . . . . . . . . . . . . . 343
Assigning Instruments . . . . . . . . . . . . . . . . . . . . . . . . . . . . . . . . . . 344
Importing Instrument Definitions . . . . . . . . . . . . . . . . . . . . . . . . . 346
Creating Instrument Definitions . . . . . . . . . . . . . . . . . . . . . . . . . . 347
Creating Lists . . . . . . . . . . . . . . . . . . . . . . . . . . . . . . . . . . . . . . 350
Copying Name Lists . . . . . . . . . . . . . . . . . . . . . . . . . . . . . . . . . 351
Assigning the Bank Select Method . . . . . . . . . . . . . . . . . . . . . 351
Assigning Patch Names . . . . . . . . . . . . . . . . . . . . . . . . . . . . . . 352
Assigning Note Names . . . . . . . . . . . . . . . . . . . . . . . . . . . . . . . 354
Assigning Controller, RPN, and NRPN Names . . . . . . . . . . . 355
11 Working with StudioWare . . . . . . . . . . . . . . . . . . . . . 357
StudioWare Panels . . . . . . . . . . . . . . . . . . . . . . . . . . . . . . . . . . . . . 358
Using Panels . . . . . . . . . . . . . . . . . . . . . . . . . . . . . . . . . . . . . . . . . . 359
Grouping Controls . . . . . . . . . . . . . . . . . . . . . . . . . . . . . . . . . . . 362
Recording Control Movements . . . . . . . . . . . . . . . . . . . . . . . . . 364
Control Settings . . . . . . . . . . . . . . . . . . . . . . . . . . . . . . . . . . . . 368
StudioWare Panel Drawing Speed . . . . . . . . . . . . . . . . . . . . . . 368
12 Using Layouts and Templates . . . . . . . . . . . . . . . . . . 371
Layouts . . . . . . . . . . . . . . . . . . . . . . . . . . . . . . . . . . . . . . . . . . . . . . . 372
Templates . . . . . . . . . . . . . . . . . . . . . . . . . . . . . . . . . . . . . . . . . . . . . 375
Template Example: Three MIDI Instruments . . . . . . . . . . . . 376
Table of Contents
13 Improving Audio Performance . . . . . . . . . . . . . . . . . 379
Audio System Configuration . . . . . . . . . . . . . . . . . . . . . . . . . . . . . . 379
ix
Page 10

The Wave Profiler . . . . . . . . . . . . . . . . . . . . . . . . . . . . . . . . . . . 379
Configuring Your Audio Hardware . . . . . . . . . . . . . . . . . . . . . 381
Digital Audio Data Management . . . . . . . . . . . . . . . . . . . . . . . . . . 383
Changing the Wavedata Folder . . . . . . . . . . . . . . . . . . . . . . . . 385
Deleting Unused Audio Files . . . . . . . . . . . . . . . . . . . . . . . . . . 386
Compacting Audio Files . . . . . . . . . . . . . . . . . . . . . . . . . . . . . . 387
Backing Up Projects with Digital Audio . . . . . . . . . . . . . . . . . 387
Take Vault and Audio Data Handling . . . . . . . . . . . . . . . . . . 388
Imported Audio Files . . . . . . . . . . . . . . . . . . . . . . . . . . . . . . . . . 389
Improving Performance with Digital Audio . . . . . . . . . . . . . . . . . . 389
14 Using System Exclusive Data . . . . . . . . . . . . . . . . . . 393
What Is System Exclusive? . . . . . . . . . . . . . . . . . . . . . . . . . . . . . . . 394
Sysx Events . . . . . . . . . . . . . . . . . . . . . . . . . . . . . . . . . . . . . . . . 394
Using the System Exclusive View . . . . . . . . . . . . . . . . . . . . . . . . . 395
Send . . . . . . . . . . . . . . . . . . . . . . . . . . . . . . . . . . . . . . . . . . . . . . 395
Send All . . . . . . . . . . . . . . . . . . . . . . . . . . . . . . . . . . . . . . . . . . . 395
Receive . . . . . . . . . . . . . . . . . . . . . . . . . . . . . . . . . . . . . . . . . . . . 395
More about Dump Request Macros . . . . . . . . . . . . . . . . . . . . . 398
Name . . . . . . . . . . . . . . . . . . . . . . . . . . . . . . . . . . . . . . . . . . . . . 398
Auto . . . . . . . . . . . . . . . . . . . . . . . . . . . . . . . . . . . . . . . . . . . . . . 398
Port . . . . . . . . . . . . . . . . . . . . . . . . . . . . . . . . . . . . . . . . . . . . . . . 398
Edit Bytes . . . . . . . . . . . . . . . . . . . . . . . . . . . . . . . . . . . . . . . . . 398
Delete . . . . . . . . . . . . . . . . . . . . . . . . . . . . . . . . . . . . . . . . . . . . . 399
Load Bank and Save Bank . . . . . . . . . . . . . . . . . . . . . . . . . . . . 399
Transmitting Banks during Playback . . . . . . . . . . . . . . . . . . . . . . 399
Real-time Recording of System Exclusive . . . . . . . . . . . . . . . . . . . 400
Sysx Echo . . . . . . . . . . . . . . . . . . . . . . . . . . . . . . . . . . . . . . . . . . . . . 400
Saving MIDI Files Containing Sysx Banks . . . . . . . . . . . . . . . . . . 401
Sysx . ini File Settings . . . . . . . . . . . . . . . . . . . . . . . . . . . . . . . . . . . 401
Troubleshooting . . . . . . . . . . . . . . . . . . . . . . . . . . . . . . . . . . . . . . . . 402
15 Synchronizing Your Gear . . . . . . . . . . . . . . . . . . . . . 405
Synchronization Overview . . . . . . . . . . . . . . . . . . . . . . . . . . . . . . . 405
Clock Sources with No External Devices . . . . . . . . . . . . . . . . . . . . 407
MIDI Synchronization . . . . . . . . . . . . . . . . . . . . . . . . . . . . . . . . . . . 408
Professionalª as the Slave . . . . . . . . . . . . . . . . . . . . . . . . . . . . 409
Professionalª as the Master . . . . . . . . . . . . . . . . . . . . . . . . . . 410
Using MIDI Sync with Drum Machines . . . . . . . . . . . . . . . . . . 411
Troubleshooting MIDI Sync . . . . . . . . . . . . . . . . . . . . . . . . . . . 412
SMPTE/MIDI Time Code Synchronization . . . . . . . . . . . . . . . . . . 412
x
Page 11

Playing Digital Audio under SMPTE/MTC Sync . . . . . . . . . . 414
SMPTE/MTC Sync and Full Chase Lock . . . . . . . . . . . . . . . . . 415
Troubleshooting SMPTE/MTC Sync . . . . . . . . . . . . . . . . . . . . 416
MIDI Machine Control . . . . . . . . . . . . . . . . . . . . . . . . . . . . . . . . . . 417
16 Programming with Cal . . . . . . . . . . . . . . . . . . . . . . . . 419
Creating and Running CAL Programs . . . . . . . . . . . . . . . . . . . . . . 420
Sample CAL Files . . . . . . . . . . . . . . . . . . . . . . . . . . . . . . . . . . . . . . 421
SPLIT NOTE TO TRACKS.CAL . . . . . . . . . . . . . . . . . . . . . . . 421
SPLIT CHANNEL TO TRACKS.CAL . . . . . . . . . . . . . . . . . . . 422
RANDOM TIME.CAL . . . . . . . . . . . . . . . . . . . . . . . . . . . . . . . . 422
THIN CONTROLLER DATA.CAL . . . . . . . . . . . . . . . . . . . . . . 422
THIN CHANNEL AFTERTOUCH.CAL . . . . . . . . . . . . . . . . . 422
THIN PITCH WHEEL.CAL . . . . . . . . . . . . . . . . . . . . . . . . . . . 423
MAJOR CHORD.CAL, MINOR CHORD.CAL . . . . . . . . . . . . 423
Writing CAL Programs . . . . . . . . . . . . . . . . . . . . . . . . . . . . . . . . . . 423
Recording CAL Programs . . . . . . . . . . . . . . . . . . . . . . . . . . . . . . . . 424
Table of Contents
Appendix A: Troubleshooting . . . . . . . . . . . . . . . . . . . . . 427
When I Play a File, I DonÕt Hear Anything . . . . . . . . . . . . . . . 427
I CanÕt Record from My MIDI Instrument . . . . . . . . . . . . . . . 428
When I Play a File Containing Audio, the Audio
Portion DoesnÕt Play . . . . . . . . . . . . . . . . . . . . . . . . . . . . . . . . . 429
I CanÕt Record Any Audio . . . . . . . . . . . . . . . . . . . . . . . . . . . . . 430
The Music Is Playing Back with the Wrong
Instrument Sounds . . . . . . . . . . . . . . . . . . . . . . . . . . . . . . . . . . 430
How Do I Use Professionalª to Access All the Sounds
on My MIDI Instrument? . . . . . . . . . . . . . . . . . . . . . . . . . . . . 431
My Keyboard Doubles Every Note I Play . . . . . . . . . . . . . . . . 431
I DonÕt See the Clips Pane in the Track View . . . . . . . . . . . . . 432
Why CanÕt Professionalª Find My Audio Files? . . . . . . . . . . 432
Why Do I Get Errors from the Wave Profiler? . . . . . . . . . . . . 433
Appendix B: Tips & Tricks . . . . . . . . . . . . . . . . . . . . . . . . 435
Video Support . . . . . . . . . . . . . . . . . . . . . . . . . . . . . . . . . . . . . . . . . 436
Double-Clicking Clips . . . . . . . . . . . . . . . . . . . . . . . . . . . . . . . . . . . 436
Playing Files in Batch Mode . . . . . . . . . . . . . . . . . . . . . . . . . . . . . . 436
The Play List View . . . . . . . . . . . . . . . . . . . . . . . . . . . . . . . . . . 437
Virtual Jukebox . . . . . . . . . . . . . . . . . . . . . . . . . . . . . . . . . . . . . 438
Key Bindings . . . . . . . . . . . . . . . . . . . . . . . . . . . . . . . . . . . . . . . . . . 442
Windows Taskbar Indicators . . . . . . . . . . . . . . . . . . . . . . . . . . . . . 445
xi
Page 12

Undo, Redo, and the Undo History . . . . . . . . . . . . . . . . . . . . . . . . . 446
Screen Colors and Wallpaper . . . . . . . . . . . . . . . . . . . . . . . . . . . . . 447
Music Notation for Nonconcert Key
Instruments . . . . . . . . . . . . . . . . . . . . . . . . . . . . . . . . . . . . . . . . . . . 450
Appendix C: Advanced Setup . . . . . . . . . . . . . . . . . . . . 451
Step 1. Install Windows 95 or NT . . . . . . . . . . . . . . . . . . . . . . 451
Step 2. Install Cakewalk Professionalª . . . . . . . . . . . . . . . . . 452
Step 3. Read the README File . . . . . . . . . . . . . . . . . . . . . . . . 453
Step 4. Install a MIDI Driver . . . . . . . . . . . . . . . . . . . . . . . . . . 454
Step 5. Connect Your MIDI Equipment . . . . . . . . . . . . . . . . . . 457
Step 6. Configure Your Audio Hardware . . . . . . . . . . . . . . . . . 460
Step 7. Set Up to Record Digital Audio . . . . . . . . . . . . . . . . . . 461
Step 8. Start Cakewalk . . . . . . . . . . . . . . . . . . . . . . . . . . . . . . . 464
Appendix D: MIDI Files . . . . . . . . . . . . . . . . . . . . . . . . . 469
Timebases . . . . . . . . . . . . . . . . . . . . . . . . . . . . . . . . . . . . . . . . . 470
Supported MIDI File Meta-Events . . . . . . . . . . . . . . . . . . . . . . 470
Features Not Supported by MIDI Files . . . . . . . . . . . . . . . . . . 470
Other MIDI File Handling Notes . . . . . . . . . . . . . . . . . . . . . . . 471
Special Handling of GM, GS, and XG MIDI Files . . . . . . . . . . 471
If You Have Problems Playing MIDI Files . . . . . . . . . . . . . . . 472
If You Plan to Publish Your Songs . . . . . . . . . . . . . . . . . . . . . . 472
Appendix E: Initialization Files . . . . . . . . . . . . . . . . . . . 475
Initialization Files . . . . . . . . . . . . . . . . . . . . . . . . . . . . . . . . . . . . . . 475
Initialization File Format . . . . . . . . . . . . . . . . . . . . . . . . . . . . . . . . 476
CAKEWALK.INI . . . . . . . . . . . . . . . . . . . . . . . . . . . . . . . . . . . . 476
TTSSEQ.INI . . . . . . . . . . . . . . . . . . . . . . . . . . . . . . . . . . . . . . . 478
Variables in the [Options] Section . . . . . . . . . . . . . . . . . . . . . . . . . 478
Variables in the [MIDI Input Devices]
Section . . . . . . . . . . . . . . . . . . . . . . . . . . . . . . . . . . . . . . . . . . . . . . . 480
Variables in the [MIDI Output Devices] Section . . . . . . . . . . . . . . 481
AUD.INI . . . . . . . . . . . . . . . . . . . . . . . . . . . . . . . . . . . . . . . . . . . 481
Variables in the [Aud] Section . . . . . . . . . . . . . . . . . . . . . . . . . . . . 481
Appendix F: Presets . . . . . . . . . . . . . . . . . . . . . . . . . . . . . 483
FX Stereo Reverb and CFX Reverb . . . . . . . . . . . . . . . . . . . . . 484
FX Stereo Chorus and CFX Chorus . . . . . . . . . . . . . . . . . . . . 485
FX Stereo Flanger and CFX Flanger . . . . . . . . . . . . . . . . . . . 485
FX Stereo Delay . . . . . . . . . . . . . . . . . . . . . . . . . . . . . . . . . . . . 486
xii
Page 13

CFX Delay/Echo . . . . . . . . . . . . . . . . . . . . . . . . . . . . . . . . . . . . 486
FX Pitch Shifter . . . . . . . . . . . . . . . . . . . . . . . . . . . . . . . . . . . . 486
FX Stereo Parametric EQ . . . . . . . . . . . . . . . . . . . . . . . . . . . . 488
CFX 2-Band EQ . . . . . . . . . . . . . . . . . . . . . . . . . . . . . . . . . . . . 488
Appendix G: Summary of New Features . . . . . . . . . . . . 489
MIDI Effects . . . . . . . . . . . . . . . . . . . . . . . . . . . . . . . . . . . . . . . 489
Improved Audio Streaming . . . . . . . . . . . . . . . . . . . . . . . . . . . 489
Pan and Volume Envelopes for Audio Events . . . . . . . . . . . . . 489
Adjustable Audition Duration . . . . . . . . . . . . . . . . . . . . . . . . . 490
Audio View Display Units . . . . . . . . . . . . . . . . . . . . . . . . . . . . 490
Video support . . . . . . . . . . . . . . . . . . . . . . . . . . . . . . . . . . . . . . 490
Zoom Enhancements . . . . . . . . . . . . . . . . . . . . . . . . . . . . . . . . . 490
Event List Display Filter . . . . . . . . . . . . . . . . . . . . . . . . . . . . . 490
Metronome Enhancements . . . . . . . . . . . . . . . . . . . . . . . . . . . . 490
Record Drop-down List in Record Toolbar . . . . . . . . . . . . . . . . 490
Tempo List in Tempo View . . . . . . . . . . . . . . . . . . . . . . . . . . . . 491
Patch Browser . . . . . . . . . . . . . . . . . . . . . . . . . . . . . . . . . . . . . . 491
Show/Hide Gradient Background . . . . . . . . . . . . . . . . . . . . . . 491
Mixdown Audio Command Moved to Tools Menu . . . . . . . . . . 491
New Pop-up Menus . . . . . . . . . . . . . . . . . . . . . . . . . . . . . . . . . . 491
Snap To or Move By Snap Resolution . . . . . . . . . . . . . . . . . . . 491
New Buttons in Markers and Meter/Key Views . . . . . . . . . . . 491
Loop and Punch Markers . . . . . . . . . . . . . . . . . . . . . . . . . . . . . 491
Go to Folder in File Open Dialog Box . . . . . . . . . . . . . . . . . . . 492
Double-Clicking on Clips . . . . . . . . . . . . . . . . . . . . . . . . . . . . . 492
Console View Enhancements . . . . . . . . . . . . . . . . . . . . . . . . . . 492
MIDI System Exclusive Echo . . . . . . . . . . . . . . . . . . . . . . . . . . 493
Table of Contents
Index. . . . . . . . . . . . . . . . . . . . . . . . . . . . . . . . . . . . . . . . . . . 494
xiii
Page 14

xiv
Page 15
Preface
The Cakewalk Professionalª UserÕs Guide is designed to help you learn
and use Cakewalk Professionalª Version 8. In everyday language, this
Guide explains how Professionalª works and how to use it to create,
edit, produce, and perform. WeÕve made this
and task-oriented, with lots of cross-references so that you can Þnd the
information you need. The
index that you can use to Þnd information on any speciÞc topic.
UserÕs Guide also includes a comprehensive
UserÕs Guide easy to read
About This Book
The UserÕs Guide is organized as follows:
Chapter 1, Introduction , provides an overview of Professionalª and
instructions for installing the software and setting up your equipment.
Chapter 2,
give you some practical experience with Professionalª and some
exposure to many of its capabilities.
Chapters 3 through 9 cover all the basic skills you need to use
Professionalª to play, record, edit, arrange, and mix your projects. By
the time you complete these chapters, youÕll know all about the different
ways you can work with your projects, and youÕll know about most of the
tools you need to create music and sound using your computer.
Chapters 10 through 15 cover the advanced features of Professionalª.
By the time you complete these chapters, youÕll know how to customize
Professionalª both to make the best use of all the MIDI and audio
equipment you have in your studio and to be more efÞcient and
productive in your work.
The appendices contain additional information you can use for
troubleshooting, advanced installation and setup, use of MIDI Þles, and
some tips and tricks for using Professionalª. If youÕve used earlier
Getting Started , is a set of three hands-on tutorials that will
Preface
Page 16

versions of Professionalª, be sure to turn to Appendix G to see a
summary of the new features in Professionalª Version 8.
Registering Professional™
Please be sure to complete and return the registration card in your
product package or to register your product on our World Wide Web site
(www.cakewalk.com). If you do not register, we cannot provide you with
technical support.
Getting Help
In addition to this UserÕs Guide , Professionalª includes on-line help
that can provide you with quick reference information whenever you
need it. Simply press F1 or click the Help button in any dialog box to Þnd
the information you need.
If you need more information than you can Þnd in the
the on-line help, here are two great places to look:
¥ Check the Support page of our World Wide Web site
(www.cakewalk.com) for updated technical information and answers
to frequently asked questions
¥ Post messages to the Professionalª user community using one of
the Cakewalk newsgroups. For more information about the
newsgroups, visit www.cakewalk.com.
You can also get technical support directly from Cakewalk. In order to
obtain technical support, you must submit the product registration card
that is included with your Cakewalk product, or register your product on
our World Wide Web site. You can obtain technical support for this
product in the following ways:
¥ E-mail your questions to support@cakewalk.com. Be sure to include
your serial number in your e-mail.
¥ Call Cakewalk Technical Support at (617) 441-7891 on weekdays,
10:00AM to 6:00PM, Eastern time. Be sure to have your serial
number ready when you call.
Technical support hours, policies, and procedures are subject to change
at any time. Check our web site for the latest support information.
UserÕs Guide or
xvi
Page 17

Introduction
1
1
Cakewalk Professionalª harnesses the power of your computer so you
can produce great music fast. It has tools to make you productive and
efÞcient so you can make the most of your creative ideas. YouÕll use
Professionalª as your musical scratchpad from the start of a musical
project right through to a polished Þnal result.
With Professionalª, you can work in any musical style. You can produce
demo tapes, music for multimedia and games, sound effects and music
for the computer or the World Wide Web, printed lead sheets and scores,
or accompaniment tracks for performing and improvising. Your music
can combine MIDI music with digital audio recordings of acoustic
instruments and vocals. Professionalª is ßexible Ñ whatever your
musical goals, Professionalª can take you there..
In This Chapter
Professional™ Basics . . . . . . . . . . . . . . . . . . . . . . . . . . . . . . . . . . . . . . . 20
Computers, Sound, and Music . . . . . . . . . . . . . . . . . . . . . . . . . . . . . . . 29
Installing Professional™. . . . . . . . . . . . . . . . . . . . . . . . . . . . . . . . . . . . . 31
Starting Professional™. . . . . . . . . . . . . . . . . . . . . . . . . . . . . . . . . . . . . . 34
Learning to Use Professional™ . . . . . . . . . . . . . . . . . . . . . . . . . . . . . . . 35
Introduction
Page 18

It doesnÕt matter whether you have a small home studio or a high-
powered, fully equipped professional recording studio. Professionalª
helps you make the most of the equipment you have. It acts like the
mixer, tape deck, and effects rack in a traditional recording studio. You
record tracks and adjust their levels. Your sound sources can be
synthesized sounds, or sounds you record yourself. Special control panels
let you control the other equipment in your studio. Any gear that accepts
MIDI commands can interface with Cakewalk, allowing you to
incorporate their settings into a mix.
Make a Performance Sound Great
With Professionalª, you can record a performance on a track and add it
to a musical composition. Once youÕve got the sounds into your computer,
you can apply advanced editing tools to turn it into the perfect recording.
You can process your recordings with EQ and sophisticated effects like
reverb and delay. You can apply fadeouts and cross-fades and you can
adjust volume to correct recordings that are too soft. You can Þx a
performerÕs mistakes by adjusting the pitch or change the musical
concept by adjusting the duration of a recording.
Professionalª provides plenty of visual and audio feedback so you can
work fast and accurately. You can see the audio waveforms and watch
audio meters. You can listen to single or multiple tracks in tiny segments
so that you can Þnd and Þx glitches and edit out unwanted sections.
Professionalª P
polishing your musical ideas without getting in your way.
ROFESSIONAL
provides the tools for capturing and
Improvise
Record your ideas a track at a time, building a composition even if you
donÕt have an ensemble to jam with. Professionalª can be your musical
sketchpad, holding onto ideas that you can edit later. You can record
MIDI tracks using your keyboard or any other MIDI controller, or you
can set up your microphone and record audio tracks.
Edit and Arrange
Apply ProfessionalÕsª editing tools to Þne-tune a performance. Fix
rhythmic problems or give a track a new rhythmic feel. Select and
rearrange phrases -- apply loops, adjust the timing between tracks by
dragging, double or repeat a phrase by cutting and pasting. Select and
edit the music note by note and event by event, or apply powerful editing
procedures to change any parameter of selected events.
1-18
Page 19

Orchestrate
You have access to the full palette of sounds on your MIDI synthesizer.
You can add patch changes and double notes and phrases on other tracks
until the music sounds right. You can identify sounds by name instead of
remembering sounds by number.
Work Efficiently
Professionalª has many views so you can see the music at any level of
detail. You can see MIDI tracks and audio tracks side by side so you can
align and edit them. You can work on individual notes or on phrases and
tracks. You can apply Þlters to the musical data, letting you work on one
type of information at a time. You can label musical phrases and insert
markers, making editing and arranging easy.
Share Your Music
YouÕll want to share your music with other people, whether theyÕre your
clients, your band members, or other composers. Your results can be
recordings, computer Þles, or printed scores.
Record Demo Tapes or CD Masters
When the music sounds just the way you want it, you can hook up your
cassette or DAT recorder to get a recording that you can share with your
band or send to the CD mastering house. Or, if your studio doesnÕt have a
high-end synthesizer with great sounds, you can take your
Professionalª Þles into a bigger studio with more gear. If they have a
PC running Cakewalk, you can make your master recordings there with
great-sounding MIDI synthesizers.
Coordinate with Other Media and Hardware
Cakewalk synchronizes to other recorders with most popular SMPTE
and MIDI time code formats. If you work on multimedia projects, you
can use Professionalª as the master controller. Commands you insert in
a track can trigger other multimedia applications such as animation and
video.
Produce Printed Scores and MIDI Files
You can produce printed lead sheets and small scores with lyrics, or
share the projects in digital form. Cakewalk will save your music in
audio or MIDI formats that you can put on a web site or share with
others.
Introduction
1-19
Page 20

Professional™ Basics
Professionalª looks and acts like many other Microsoft Windows
programs. The
features of Professionalª. Some menu choices and tools display
boxes
that let you choose among various options or type in the values
you want. If you click in most views, in time rulers, or on certain other
items with the right mouse button, you see a pop-up menu that provides
quick access to many common operations.
The
project is the center of your work in Professionalª. If youÕre a
musician, a project might contain a song, a jingle, or a movement of a
symphony. If youÕre a post-production engineer, a project might contain a
30-second radio commercial or a lengthy soundtrack for a Þlm or
videotape production. By default, every project is stored in a Þle (known
as a
work Þle ). The normal Þle extension for aProfessionalª work Þle is
.
wrk .
menus and toolbars give you quick access to all the
dialog
Professionalª organizes the sound and music in your project into tracks,
clips, and events.
Tracks are used to store the sound or music made by each instrument
or voice in a project. For example, a song that is arranged for four
instruments and one vocalist would normally have 5 tracksÑone for
each instrument and one for the vocals. Each project can have up to 256
tracks. Some of these tracks may be used in your Þnished project, while
others can hold alternate takes, backup tracks, and variations that you
might want to keep for future use.
Clips are the pieces of sound and music that make up your project. A
clip might contain a horn solo, a drum break, a bass or guitar riff, a
voice-over, a sound effect like the hoot of an owl, or an entire keyboard
performance. A track can contain a single clip or dozens of different clips,
and you can easily move clips from one track to another.
Events are the individual bits of sound and music that make up a clip. A
note played on a piano or bass is an event, as is the pressing of a sustain
pedal on a keyboard or the turn of a pitch wheel. Each continuous piece
of digital audio in your project is an event.
Views
Professionalª displays your project in windows on the screen that are
known as
same project. When you edit a project in one view, the others are updated
automatically.
views . You can have many views open at once, all showing the
1-20
Page 21
The Track View
The Track view is the main window that you use to create, display, and
work with a project. When you open a project Þle, Professionalª
displays the Track view for the project. When you close the Track view
for a project, Professionalª closes the Þle.The Track view is divided into
two sections: the
size of the two panes by dragging the vertical splitter bar that separates
the two panes.
Each row is a track
Track pane and the Clips pane . You can change the
The Clips paneThe Track pane
The Track pane lets you see and change the initial settings for each
track. One trackÑthe current trackÑis always displayed in color or
marked by a rectangle around one cell. To change the current track,
move the highlight using the mouse or the keyboard as follows:
Key… What it does…
Arrow Moves one cell in any direction
Page Down Displays the next page of tracks
Page Up Displays the previous page of tracks
Home Moves the highlight to the first track in
the project
Introduction
1-21
Page 22
End Moves the highlight to the last track in
the project
The Clips pane shows the clips in your project on a timeline that helps
you visualize how your project is organized. Clips contain markings that
indicate their contents. The Clips pane lets you select, move, and copy
clips from place to place to change the arrangement of music and sound
in your project.
The Track view makes it easy to select tracks, clips, and ranges of time
in a project. These are the most common selection methods:
To… Do this…
Select tracks Click on the track number, or drag over
several track numbers
Select clips Click on the clip, or drag a rectangle
around several clips
Select time ranges Drag in the time ruler, or click between
two markers
As with most other Windows programs, you can also use the Shift-click
and Ctrl-click combinations when selecting tracks and clips. Holding the
Shift key while you click adds tracks or clips to the current selection.
Holding the Ctrl key while you click lets you toggle the selection status
of tracks or clips.
1-22
The Console View
The Console view is the place where you mix the sounds on all the
different tracks to create the Þnal version of your project. You use the
Console view to adjust the levels of sound for the different tracks in your
project, to change the stereo panning, and to apply real-time effects to an
individual track, combinations of tracks, or the Þnal mix.
The mixing console contains several groups of controls. There is one
module for each track in your project, and one module for each output
Page 23

device. You can use auxiliary sends (or aux sends) to direct certain
tracks to special modules that are known as submixes.
Audio module
MIDI module
Patch point for
real-time effects
Aux Sends knobs
and on/off buttons
Mute, Solo, and
Track Arming
buttons
Pan and volume
fader for each
track
As in the Track view, you can change track settings or record new music
or sound in the Console view. You may choose to use one view or the
other, or the choice you make may depend on which project you are
working on.
Other Views
Professionalª has a number of other views you can use to display and
work on your project. To display these views, select one or more tracks
and:
Track settings
Master volume
faders
Introduction
¥ Click the icon for the view
¥ Choose the view you want from the View menu
¥ Right-click on a selected track and choose the view you want from
the menu
1-23
Page 24
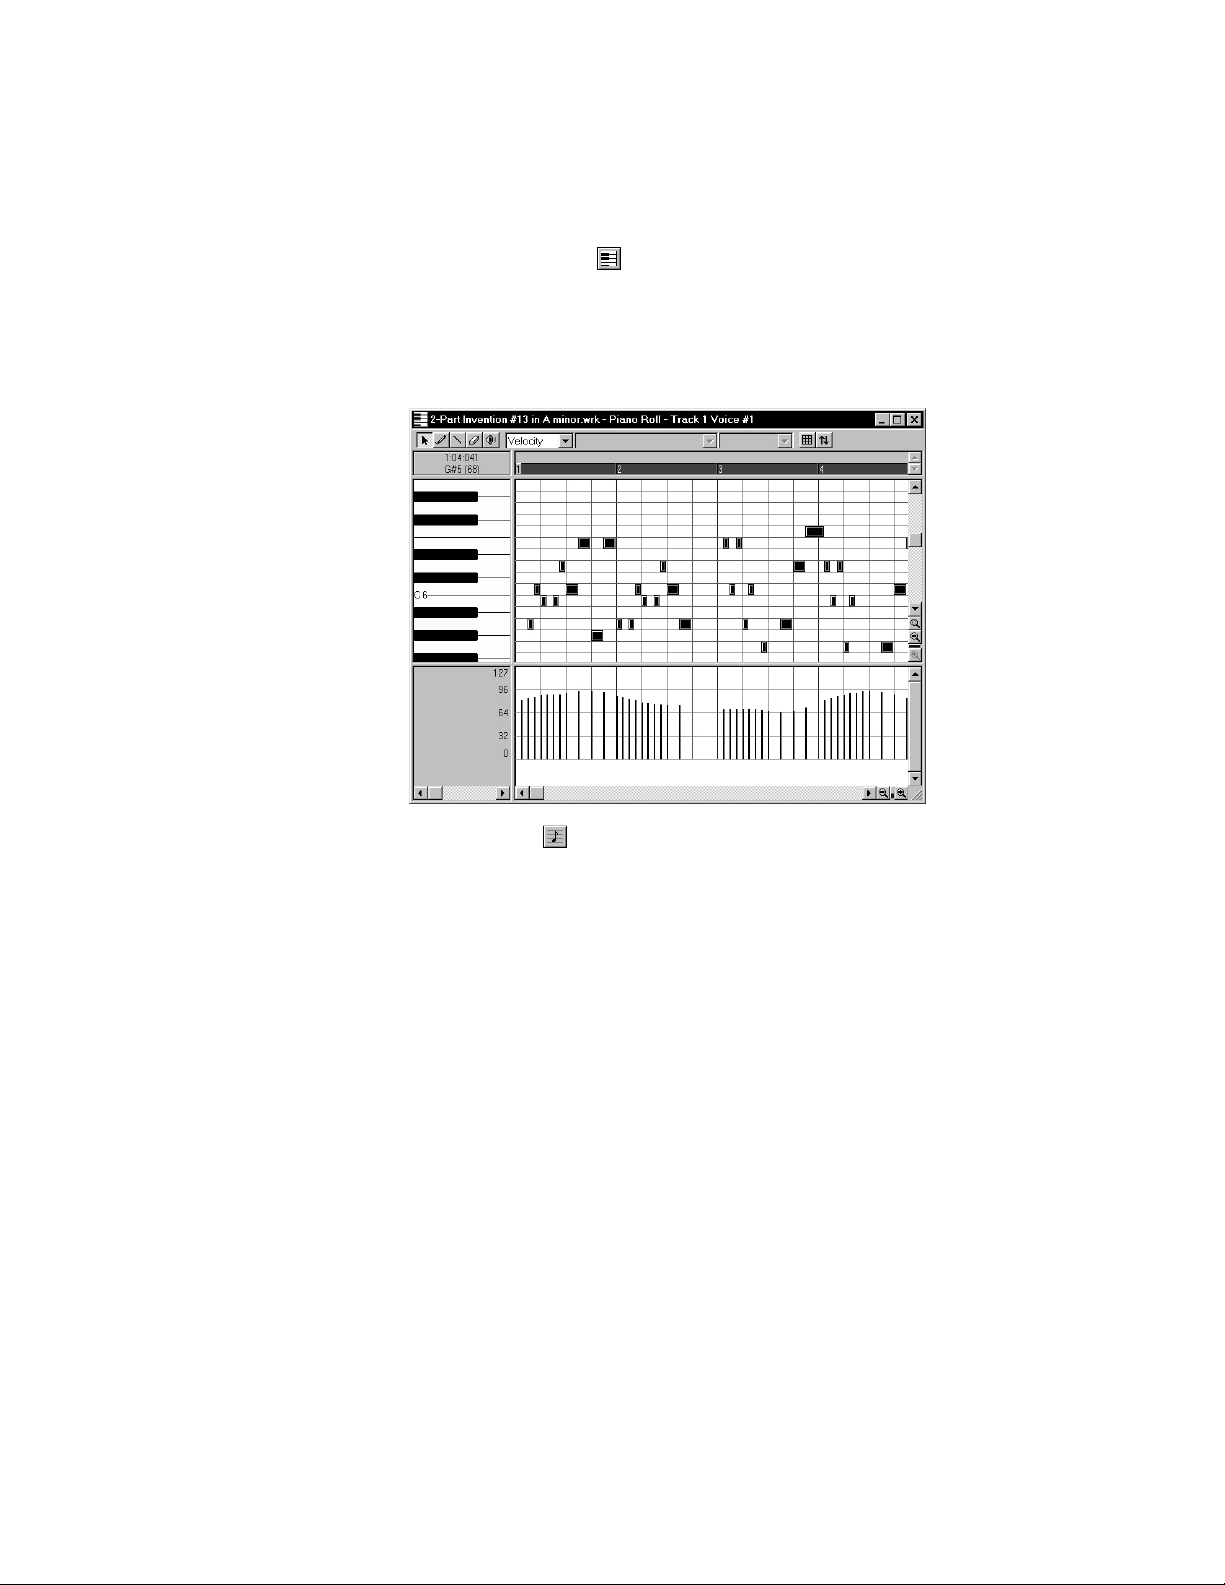
The Piano Roll view shows the notes from a single track as they
would appear on a player-piano roll. You can move the notes around,
make them longer or shorter, and change their pitches by just dragging
them with the mouse. You can also use the Piano Roll view to display
and edit MIDI velocity, controllers, and other types of information.
1-24
The Staff view displays the notes from one or more tracks using
standard music notation, similar to the way the notation would appear
on a printed page. You can add, edit, or delete notes; create percussion
Page 25
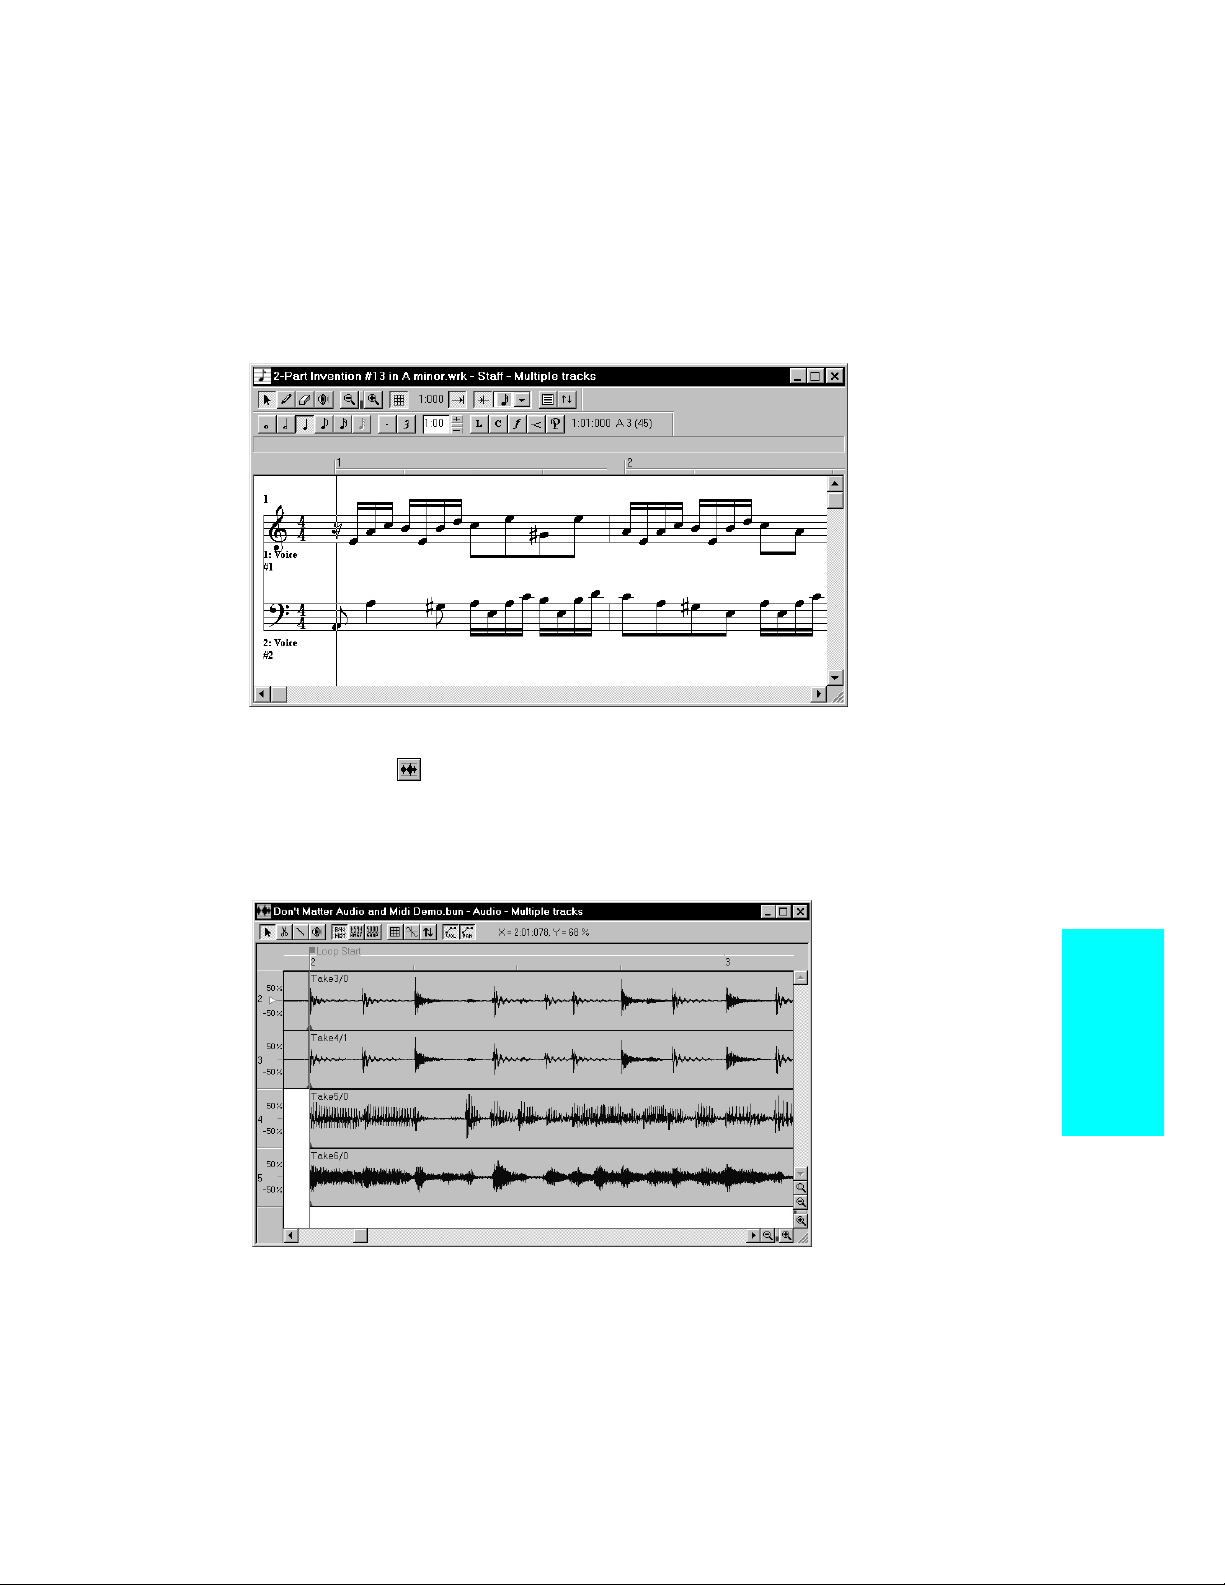
parts; add guitar chords and other notation markings; and print whole
scores or individual parts to share with other musicians.
The Audio view displays the sound waves that make up one or more
audio tracks of your project and provides tools to edit, arrange, and
apply effects to audio events.
1-25
Introduction
Page 26
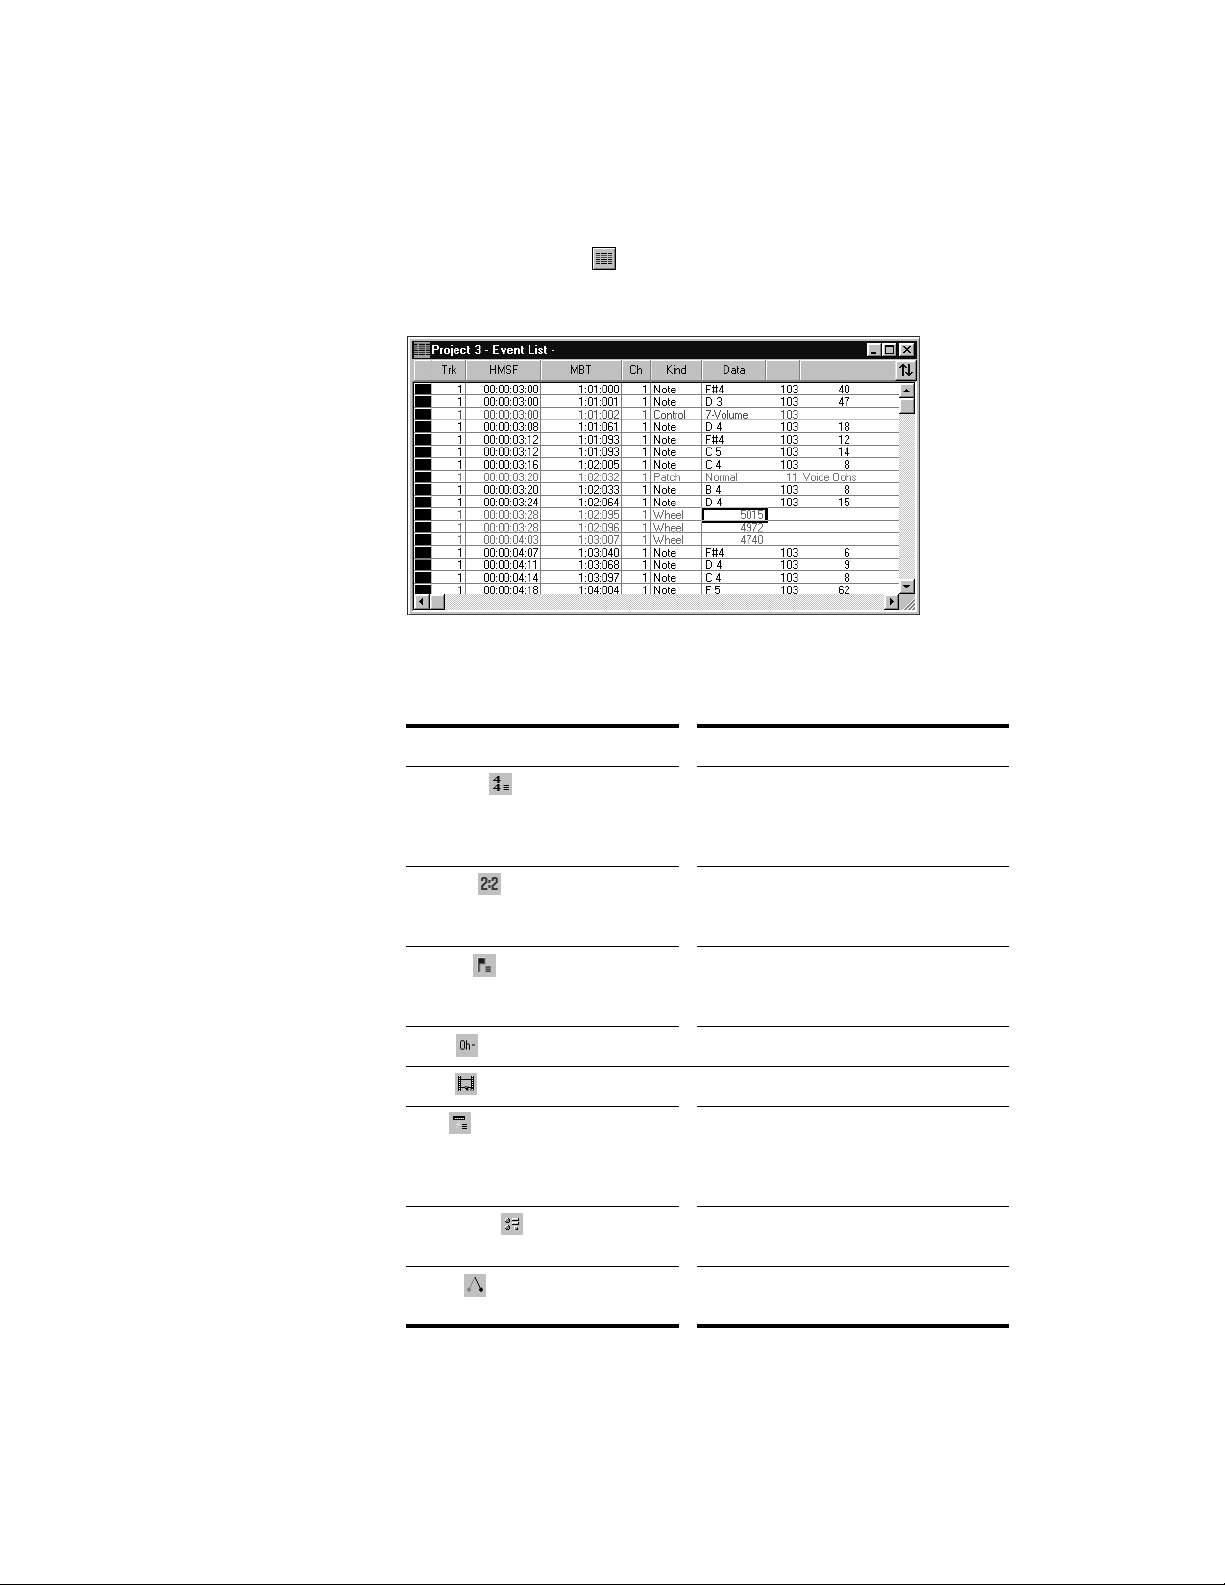
The Event List view displays the events in a project individually, so
that you can make changes at a very detailed level.
Professionalª has several other views that are used for very speciÞc
purposes:
View… How you use it…
Meter/Key To change the meter (time signature) or
key signature or to insert changes in the
meter or key signature at specific times
in a project
1-26
Big Time To display the Now time in a large,
resizable font that you can read more
easily
Markers To add, move, rename, or delete labels
for parts of your song that make it easier
to move from one point to another
Lyrics To add and display lyrics for a track
Video To display a loaded video file
Sysx To create, display, store, and edit
System Exclusive MIDI messages used
to control instruments and other gear
that are MIDI capable
StudioWare To use custom software interfaces to
control your MIDI gear
Tempo To view and edit the project's tempo
changes
Page 27
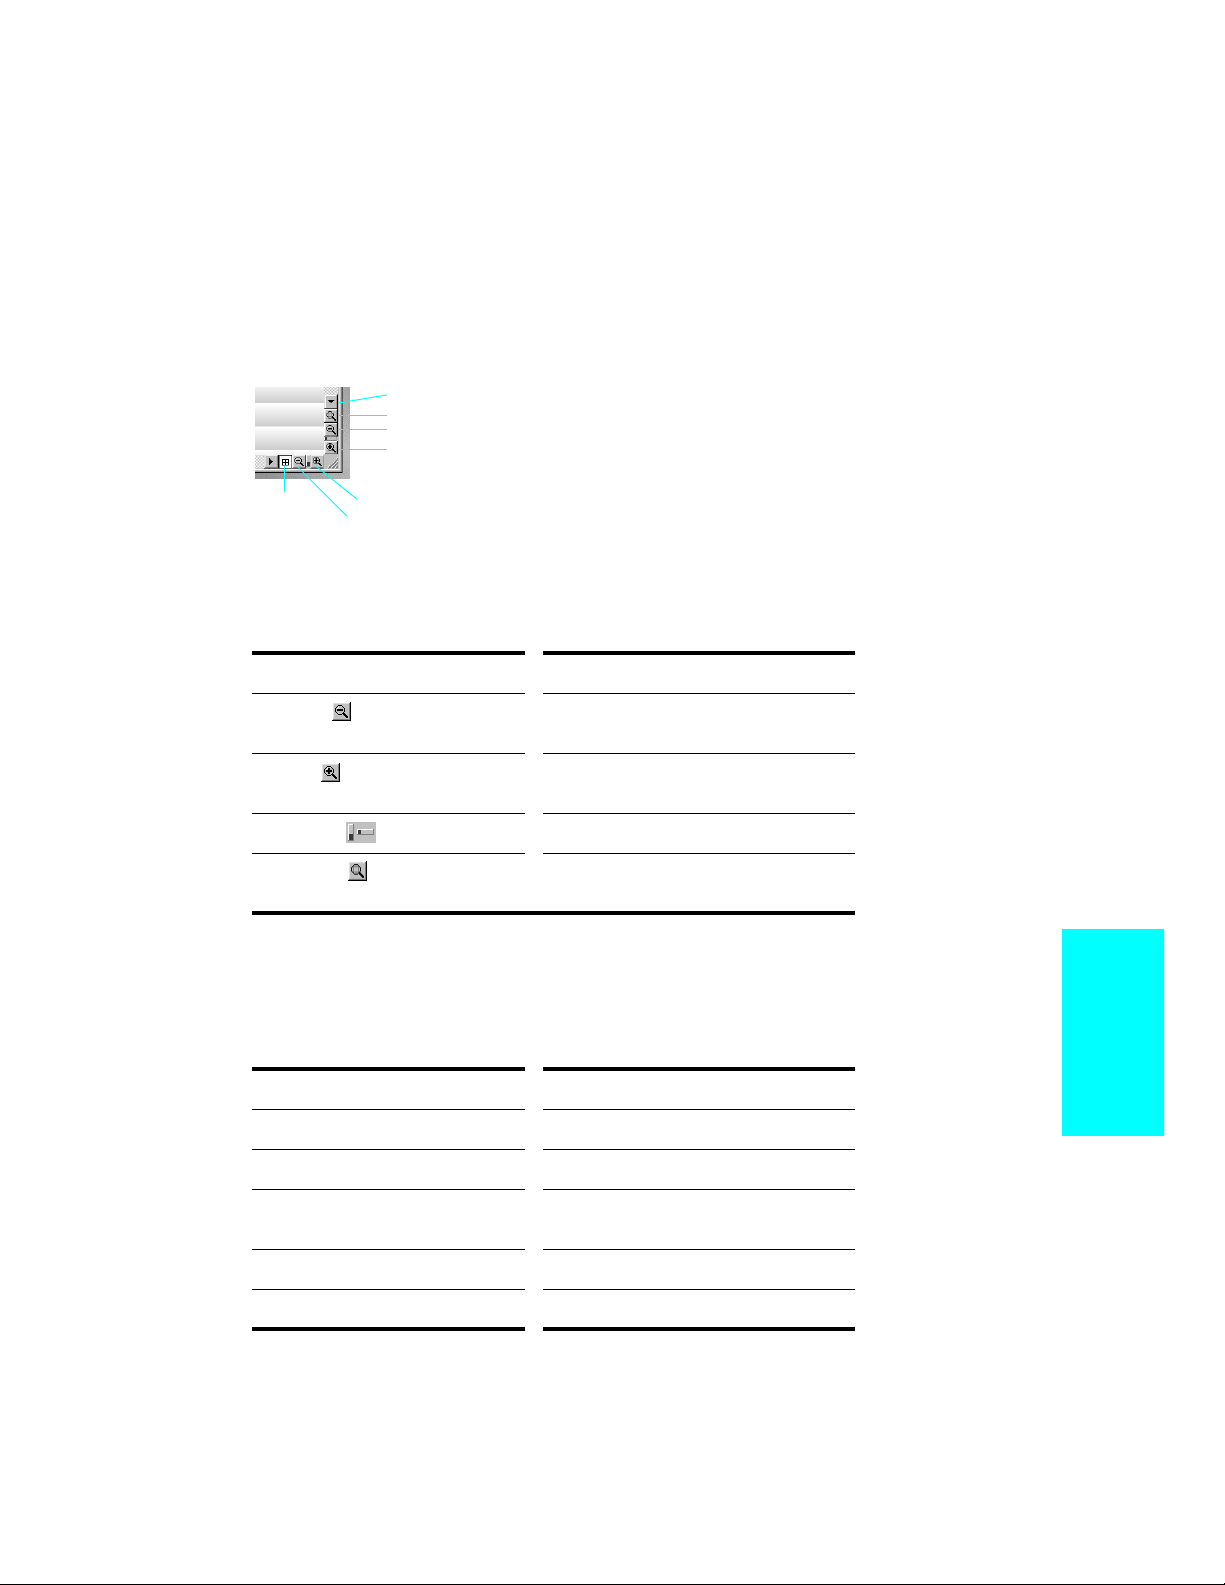
Zoom Controls
Many of the views contain Zoom tools that let you change the horizontal
and vertical scale of the view:
Lasso zoom
Vertical zoom fader
Zoom out vertically
Zoom in vertically
Horizontal
zoom fader
Zoom in horizontally
Zoom out horizontally
The zoom tools are used as described in the following table:
Tool… How you use it…
Zoom out Click to zoom out incrementally, or press
Shift and click to zoom all the way out
Zoom in Click to zoom in incrementally, or press
Shift and click to zoom all the way in
Zoom fader Click and drag to zoom continuously
Lasso zoom Click to arm, then click and drag in the
view to select the zoom area
Lasso zoom is automatically disarmed after use. Double-click the lasso
zoom button to make the selection stick.
You can also zoom with the keyboard:
Key… What it does…
I Zoom in vertically and horizontally
O Zoom out vertically and horizontally
G Go to (center) the Now time, without
zooming
Z Arm lasso zoom
U Undo the current zoom
Introduction
1-27
Page 28
Layouts
You may spend a lot of time making sure that all the views are laid out
on the screen just the way you want. When you save your work, you can
save the screen layout along with it. You can also save the layout by
itself and then use the layout with other projects.
Working on a Project
Much of your time in Professionalª is spent recording and listening to
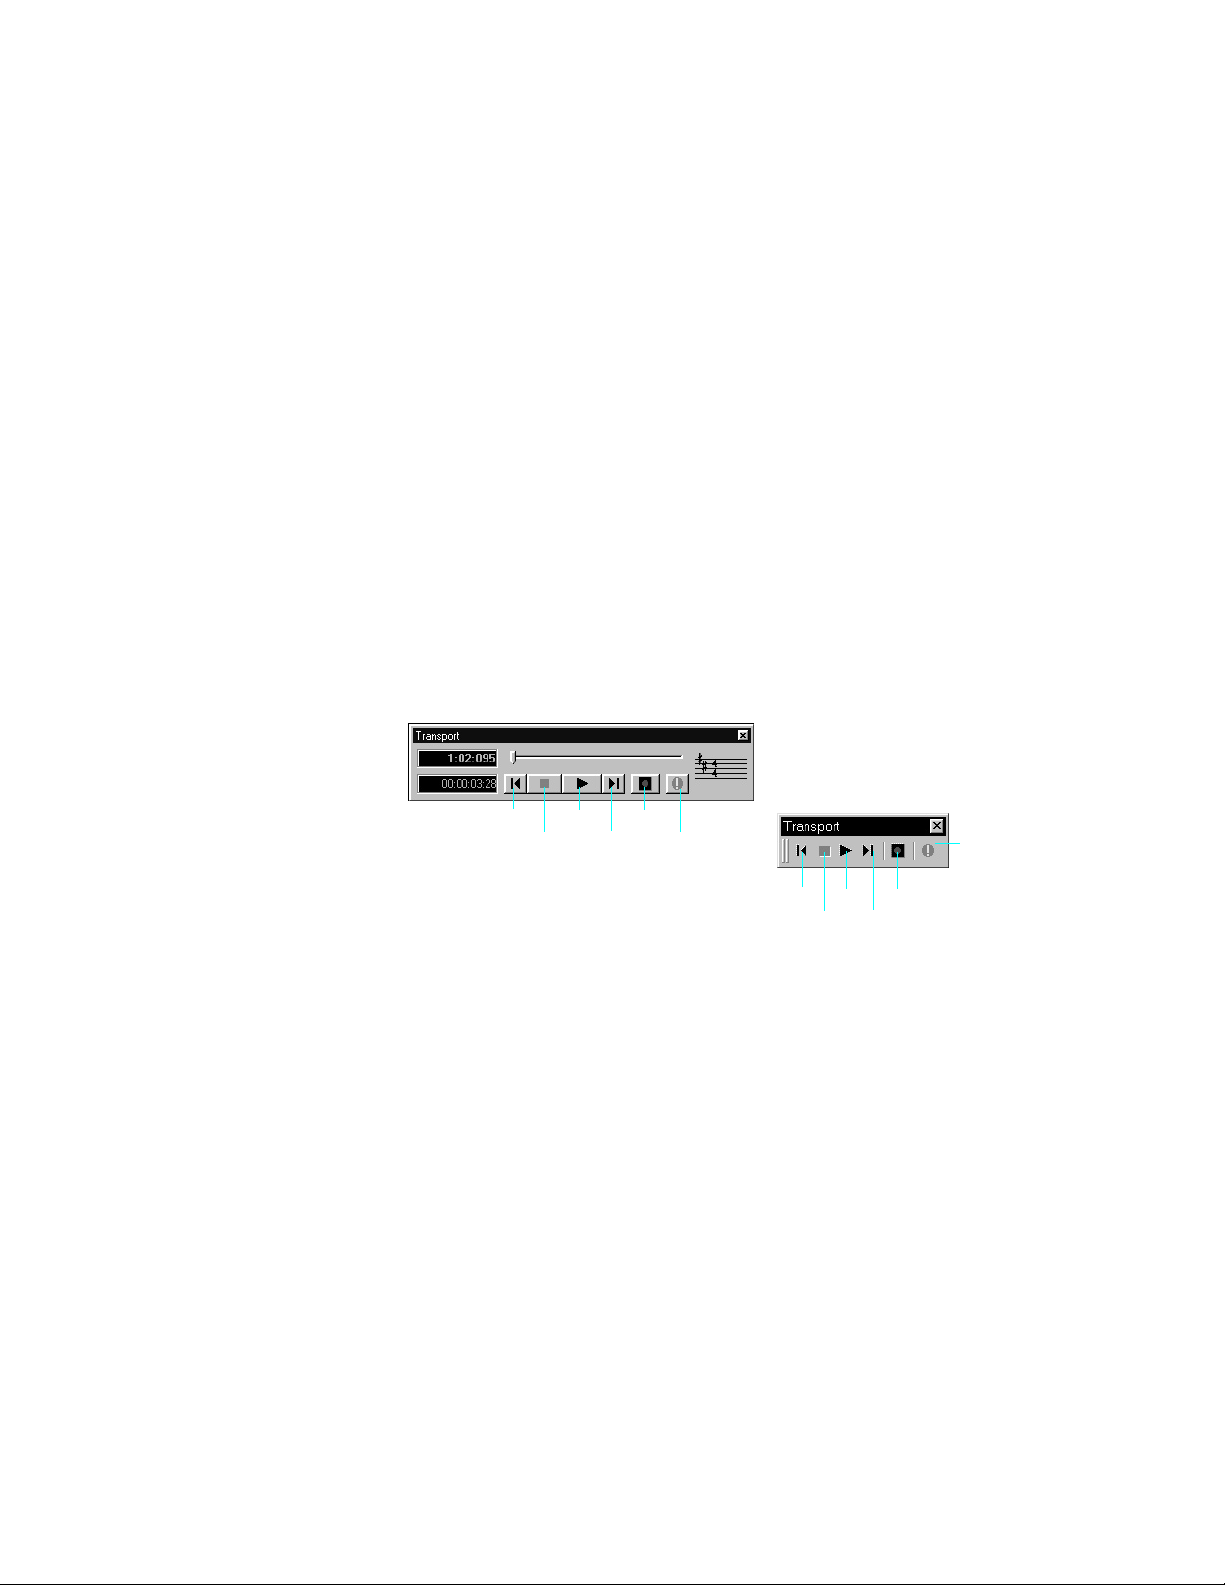
your project or song as it develops. The Transport toolbar, shown below,
contains the most important tools and other pieces of information youÕll
need to record and play back your project.
Every project has a current time, known as the Now time. As you record
or play back a project, the Now time shows your current location in the
project. When you open or create a project, the Now time is set to the
beginning of the project.
You control recording and playback using tools on the Transport toolbar,
which work a lot like the ones on your tape deck or CD player:
Play RecordGo to Beginning
Go to EndStop
Reset
Reset
1-28
Play RecordGo to Beginning
Go to EndStop
As you work with a project, you can use ProfessionalªÕs mute and solo
features to choose which tracks are played, or you can create loops to
play a particular section over and over again. You can also create
markers, which are named time points you add to your project to make
it easy to jump to a particular location.
Page 29
Other Types of Files
Professionalª lets you create and work with several other types of Þles,
in addition to the work Þles that store your songs and other projects:
File type… Purpose…
Playlist To play a series of Professional™
projects and standard MIDI files, one
after another
CAL To write, edit, and run CAL programs
that extend the capabilities of
Professional™
StudioWare To control external MIDI devices from
Professional™ Professional™
Computers, Sound, and Music
This section provides some background on the different ways that
computers store and play sound and music. Computers work with sound
and music in two different forms: MIDI and digital audio.
MIDI
MIDI (short for Musical Instrument Digital Interface) is the way
computers communicate with most sound cards, keyboards, and other
electronic instruments. MIDI refers to both the type of cables and plugs
used to connect the computers and instruments, and to the language
those computers and instruments use to talk to each other. The MIDI
standard is accepted and used worldwide. Almost any electronic
instrument you buy today will have MIDI connectors and can be used
with other MIDI instruments and with your computerÕs MIDI interface.
The MIDI language conveys information and instructions, both from the
computer to the instrument and from the instrument to the computer.
For example, if your computer wants your keyboard to play a note, it
sends a MIDI ÒNote OnÓ message and tells the keyboard which note to
play. When your computer wants the keyboard to stop playing that note,
it sends another message that stops the note from playing.
The MIDI language has many other instructions, such as messages to
change the sound that is used to play the notes (the bank and patch),
messages used to work the sustain pedal and the pitch-bend wheel, and
others. By sending the right messages at the right times, your computer
can control your electronic instrument and make it play music.
Introduction
1-29
Page 30

MIDI information can be sent on 16 different channels. You can set up
your MIDI equipment to listen for messages on all channels or on only a
few.
MIDI Þles contain all the MIDI messages and timing information that
are needed to play a song. MIDI Þles can be read and played by many
different programs, including Cakewalk, and can even be played by
programs on other types of computers. MIDI Þles have the extension
.
MID.
There are several important advantages of the MIDI format:
¥ Large amounts of music can be stored in a very compact form
¥ Different parts of a piece can easily be assigned to any instrument
you can imagine
¥ The music contains information on notes, tempos, and key
signatures that makes it possible to display and edit the piece using
standard musical notation
The primary disadvantage of MIDI is that the quality of the music a
listener hears will vary depending on the MIDI equipment the listener is
using. For example, MIDI usually sounds much better on an expensive
synthesizer than it does on an inexpensive sound card.
Digital Audio
Digital audio is a simple way to record and play sounds of any type. It
works like a tape recorderÑyou record something, then later play it
back. Digital audio stores the sound as a long series of numbers.
1-30
Sound Waves
Sound waves are vibrations in the air. Sound waves are generated by
anything that vibrates; a vibrating object causes the air next to it to
vibrate, and the vibration is passed through the air in all directions.
When the vibrating air enters your ear, it makes your eardrum vibrate,
and you hear a sound. Likewise, if the vibrating air hits a microphone, it
causes the microphone to vibrate and send electrical signals to whatever
it's connected to.
These vibrations are very fast. The slowest vibration frequency you can
hear is about 20 vibrations per second, and the fastest is around 16,000
to 20,000 vibrations per second.
Recording Digital Audio
To record digital audio, your computer monitors the electrical signal
generated by a microphone, an electric guitar, or another source. At
equal intervals of time (for CD-quality sound, this means 44,100 times a
Page 31

second), the computer measures and saves the strength of the electrical
signal from the microphone, on a scale from 0 to 65,535.
That's it. The digital audio data is just a long series of numbers. Later,
the computer can send these numbers, in the form of electrical signals,
to a speaker. The speaker then vibrates and generates the same sound
that was recorded.
The primary advantage of digital audio is the quality of the sound.
Unlike MIDI, a digital audio recording is very rich, capturing all the
nuances, overtones, and other characteristics of the sound exactly as
performed. The main drawback of digital audio is that it takes up a lot of
disk space. If you record a 1-minute segment of stereo, CD-quality digital
audio, you need about 10 megabytes of disk space to store the resulting
Þle.
On the PC, digital audio is usually stored in wave Þles, with the
extension .
play, and edit these Þles. Professionalª reads, writes, and lets you edit
wave Þles.
More information about digital audio can be found in Chapter 7, Editing
Audio.
WAV. There are many programs available that let you create,
Installing Professional™
You can install Professionalª on any computer that runs Windows and
has a sound card or built-in sound module. If you want to hook up other
devices, like a MIDI keyboard, an electric guitar, or a microphone, you
need the right cables, and you need to Þnd the right connectors on your
computer.
Before you install ProfessionalªProfessionalª, take a minute to
register the software so we can let you know when updates become
available and provide you with technical support. To register your copy
of Professionalª, Þll in the registration card in your product package
and mail or FAX it back to us. Or, register at our web site:
www.cakewalk.com.
To connect a MIDI keyboard to your computer, you need to have a MIDI
adapter cable. One end of the cable should have two 5-pin DIN
connectors that connect to your keyboard. At the other end, you need a
Introduction
1-31
Page 32

15-pin connector to connect to a sound card through its MIDI/joystick
port.
MIDI to 15 Pin Connector
5-pin DIN
connector
15-pin
connector
(DB15)
If you have a dedicated MIDI interface, lots of electronic music gear, or
work with many different music software packages, you should read
Appendix C: Advanced Setup.
Before you attach or detach any cables from your computer, you should
shut down your computer and turn off the power to all your equipment.
This greatly reduces the chance of electrical damage to your equipment
while plugging and unplugging cables.
To Connect a MIDI Keyboard to Your Computer…
1. One of the 5-pin connectors on the MIDI cable is labeled Out.
Plug this connector into the MIDI In jack on your electronic
keyboard.
2. The other 5-pin connector on the MIDI cable is labeled In. Plug
this connector into the MIDI Out jack on your electronic
keyboard.
3. Plug the 15-pin connector on the MIDI cable into the MIDI/
joystick port on your sound card. (If you have a joystick, unplug
it, plug in the MIDI cable, and plug the joystick into the passthrough connector on the MIDI cable.)
1-32
To Connect an Electric Guitar to Your Computer…
1. Plug your 1/4” mono guitar cable into a 1/8” stereo adapter.
Page 33

2. Plug the 1/8” jack into the microphone input or line input jack on
your computer sound card.
To Connect a Microphone to Your Computer…
1. If your microphone does not have a 1/8” mono or stereo plug,
plug the microphone into a 1/8” adapter.
2. Plug the 1/8” jack into the microphone input jack on your
computer sound card.
That's it! Now that your instruments are all set to go, you can restart
your computer and turn on your keyboard, guitar, and microphone.
To Install Professional™…
Professionalª is easy to install. All you need to do is choose the folder
where the program and sample project Þles should be stored. Before you
start, make sure you have your serial number and CD-KEY handy. Your
serial number is located on your registration card. Your CD-KEY is
located on the back of your CD case.
1. Start Windows.
2. Place the Cakewalk Professional™ CD in your CD-ROM drive.
The Cakewalk Professional™ CD Autorun screen displays
automatically.
3. Click the Install Professional™ button to start Cakewalk Setup.
4. Follow the installation instructions displayed on the screen.
The setup program walks you through the installation process,
making suggestions as you go. The setup program also adds a
Cakewalk folder and program icon to your desktop.
You can also install Professional™ by choosing Start-Run and
running the application named
SETUP.EXE from the CD.
To Uninstall Professional™…
When you installed Professionalª, the setup program placed an
Uninstall icon in the Cakewalk folder. To uninstall Professionalª,
Introduction
1-33
Page 34

simply click on this icon. You can also uninstall Professionalª from the
Windows Control Panel as follows:
1. Click the Start button, and choose Control Panel.
2. Double-click on the Add/Remove Programs icon.
3. Choose Professional™, then click Add/Remove.
4. Click Yes to confirm that you want to uninstall Professional™.
Starting Professional™
There are many different ways to start Professionalª. Here are a few:
¥ Click on the Professionalª icon on your desktop.
¥ Click on the Start button, and choose Cakewalk-Cakewalk
Professionalª from the Programs menu.
¥ Right-click on the desktop, and choose New-Cakewalk Song. When
the song icon appears, type a name for the song. Then double-click
the icon to start Professionalª.
¥ Click the Start button, point to Documents, and choose a
Professionalª project from the menu.
1-34
¥ Double-click the Professionalª program or any
Professionalªdocument from the Windows Explorer or the Find
menu.
Page 35

When you start Professionalª, you see the Quick Start dialog box:
The Quick Start dialog box has several options:
Option… How to use it…
Open a Project Choose a project from the Open File
dialog box to open it
Open a Recent Project Select a project from the list, and click
this button to open it
Create a New Project Choose a template for the new project in
the New dialog box, and click OK to
create the project
Find Out More about Cakewalk Click here to visit Cakewalk on the World
Wide Web
If you donÕt want to see the Quick Start dialog box in the future, uncheck
the box at the bottom of the dialog box, and click Close. You can see the
Quick Start dialog box later by choosing Help-Quick Start.
Learning to Use Professional™
This chapter has provided you with an overview of Professionalª and
basic information on how to install the software and conÞgure your
system. To get started with Professionalª, you can do two things:
¥ Try the tutorials that appear in Chapter 2.
¥ Watch the TECHniques tutorials to see some of ProfessionalªÕs
Introduction
1-35
Page 36

1-36
Page 37

Getting Started
2
2
Now that youÕve learned some of the basics, itÕs time to put that
knowledge to work. The three tutorials in this chapter will give you some
hands-on practice in playing, recording, and mixing your projects. If you
want to learn more about any topic, youÕll Þnd references to the
appropriate part of the UserÕs Guide.
In This Chapter
Tutorial 1—Playing a Song. . . . . . . . . . . . . . . . . . . . . . . . . . . . . . . . . . . 38
Tutorial 2—Recording MIDI and Digital Audio . . . . . . . . . . . . . . . . . . . 53
Tutorial 3—Audio Editing and Mixing . . . . . . . . . . . . . . . . . . . . . . . . . . 64
Getting Started
Page 38

Tutorial 1—Playing a Song
The Þrst tutorial teaches you the basics of playing MIDI with
Professionalª. You'll learn how to:
¥ Open and play a project Þle
¥ Make the song repeat automatically
¥ Use markers
¥ Speed or slow the tempo
¥ Mute a track and play a track solo
¥ Change a track's instrument
¥ Play a track on a MIDI keyboard
¥ Transpose the song
If you have not already done so, please read Chapter 1, Introduction, for
basic background information about projects, tracks, clips, the Track
view, and the Console view.
Rehearsal Time
YouÕre a member of a garage band preparing to make a demo tape. The
band practices three nights a week, but youÕd like a little extra time to
work on a solo in one of your songs. Fortunately, one of your fellow
performers is also a Professionalª owner and has created a project Þle
containing a portion of the song. So, on your off nights, rather than
practice your solo all by yourself, you can load the song into
Professionalª and play with the other instruments.
2-38
So, itÕs rehearsal time. LetÕs go!
Opening a Project File
As you learned in Chapter 1, Professionalª stores MIDI and digital
audio data in project Þles. The Þrst thing you need to do is load the
project Þle containing your band's song.
1. If you haven't already done so, start Professional™.
2. Choose
3. In the Open dialog box, select the file
Open button.
File-Open
.
tutorial1.wrk
. Click the
Page 39

Professional™ loads the project and opens the Track and Console
views. Feel free to move and resize these views to better fit your
screen; we'll be doing a little work in each of these views later in the
tutorial. Right now, though, let's play the song!
Playing the Song
Buttons in the Large Transport toolbar, shown in the following picture,
can control most of ProfessionalªÕs basic playback functions. If you donÕt
see the Large Transport toolbar, then choose View-Toolbars and check
Transport (Large).
Now time (MBT)
Now time (SMPTE)
Now time slider
Rewind
Stop
Play
Record
Go to End
Meter/Key
Reset
Starting Playback
1. To play the song, click the Play button , or press the space
bar.
Do you hear music? Go ahead, get out your instrument and jam
along! If you don't hear anything, see
for some troubleshooting tips.
Appendix A: Troubleshooting
Restarting the Song
When Professional™ gets to the end of the song, it stops. To play the
song again, do the following:
1. Click the Rewind button , or press W to go back to the first
measure.
2. Click the Play button, or press the space bar.
Getting Started
2-39
Page 40

Pausing Playback
1. To temporarily pause playback, click the Play button or the
Stop button , or press the space bar. Click the Play button
again to resume playback.
Certain Professional™ functions can only be used when the song is
paused. If a function or command does not seem to work, try pausing
the song.
The Now Time
The Now time is the current time in the song. In the Clips pane of the
Track view, the Now time is indicated by a vertical line. The Now time is
also shown in the Transport toolbar, both in MBT (measure/beat/tick)
format and in time code format (hour/minute/second/frame). During
playback, the Now time increases in accordance with the progress of the
song.
You can set the Now time of the song by clicking in the ruler in the Clips
pane or (when playback is paused) by dragging the Now slider in the
Transport toolbar.
While you are playing with the song, you may want to keep an eye on the
Now time. The Big Time view displays the Now time in a large font so
you can more easily see it from a distance. To open this view, choose
View-Big Time. You can change the time format displayed in the Big
Time window by clicking on it. You can change its font by right-clicking
on it.
2-40
Starting from a Marker
Markers make it easier to Þnd certain points within the song. You may
want to set markers at the beginning of each section of your song or at
times with which some event must be synchronized. The Markers
toolbar lets you move the Now time to a marker, add a new marker at
Page 41

the Now time, and edit the marker list. If you donÕt see the Marker
toolbar, then choose View-Toolbars and check Markers.
View markers
Marker list Previous
marker
The current song contains several markers. LetÕs try starting playback
from the marker labeled C:
1. If the song is playing, pause playback by clicking the Stop button
.
2. In the drop-down list in the Markers toolbox, select the marker
labeled C. The Now time moves to the start of measure 17.
3. Click the Play button .
For more information about markers, see ÒCreating and Using MarkersÓ
on page 5-165.
Insert marker
Next marker
Restarting the Song Automatically
WouldnÕt it be easier to practice your solo if you didn't have to rewind
and restart the song each time it ended? Rather than manually
rewinding and restarting the song, you can make Professionalª
automatically jump back to the beginning and keep playing.
Looping Over the Entire Song
To control looping, use the tools in the Loop/Auto Shuttle toolbar. If you
donÕt see this toolbar, choose View-Toolbars and check Loop.
Loop properties
Loop On/Off
From time
Thru time
Copy selection time
Getting Started
2-41
Page 42

To loop over the entire song, do the following:
1. Click the Loop From time. The time display changes to an edit
box with spin controls.
2. To loop over the entire song, the loop must start at 1:01:000. If
the Loop From time is not already set to 1:01:000, use the
keyboard or spin controls to enter this value.
3. Click the Loop Thru time.
4. Press F5 to open the Markers dialog box.
5. Select the marker named <End> and click OK. The Loop Thru
time is set to the end of the song.
6. Click the Loop button to enable looping.
7. Click Play.
When looping is enabled, the time ruler displays special ßag markers
that indicate the loop start and end times. You can drag these markers to
change the loop start and end times.
Loop From Loop Thru
2-42
To turn looping off, click the Loop button again.
Looping Over a Section of the Song
Maybe you would like to practice one section of the song over and over.
Or, maybe you'd like one section played repeatedly so you can practice an
extended solo. In either case, you need to set the start and end times of
the loop section. Let's have Professionalª loop over the section between
markers C and D:
1. Click on the Loop From time.
2. Press F5 to open the Markers dialog box.
3. In the Markers dialog box, select marker C and click OK. The loop
start time is set to the marker time.
4. Click on the Loop Thru time.
Page 43

5. Press F5.
6. In the Markers dialog box, select marker D and click OK.
7. Click the Loop button to enable looping.
8. Click Rewind. The song rewinds to the Loop From time.
9. Click Play.
A quicker way of selecting the loop times in the preceding example
would be to simply click in the area between the markers at the top of
the Clips pane, then click to copy the selection start and end times
to the Loop/Auto Shuttle toolbar.
Click here to select the portion of the song
between markers C and D
Changing the Tempo
If the song is having trouble keeping up with you (or if you're having
trouble keeping up with the song!), you can easily speed up or slow down
the song. There are two ways to do this: you can change the tempo, or
you can change the tempo ratio, which determines the tempo by
multiplying it by a user-deÞned amount. The controls for either method
Getting Started
2-43
Page 44

are found on the Tempo toolbar. If you donÕt see this toolbar, choose
View-Toolbars and check Tempo.
Tempo ratio 3
Insert
tempo
Tempo
Tempo ratio 2
Tempo ratio 1
Setting the Tempo
LetÕs pick up the pace a little. Do the following:
1. With the song playing, click on the tempo. The tempo will be
highlighted and spin controls will appear.
2. Use the spin controls to increase the tempo to 100 beats per
minute.
3. Press Enter. The song will play a little faster.
Changing the Tempo with the Tempo Ratio Buttons
By default, the Tempo Ratio buttons let you play the song at half or
double tempo. Try this:
1. Click the first button . The song slows to half its normal
tempo. Note that the actual song tempo (100.00) has not
changed.
2. Click the third button . The song speeds to twice its normal
tempo.
2-44
3. Click the middle button . The song returns to its normal
tempo.
Setting the Tempo Ratios
Tempo ratios can be changed by Shift-clicking on them and entering a
new number in the dialog box. By default, tempo ratios are set to 0.50,
1.00, and 2.00, respectively.
Advanced Tempo Control
This song is a special case in that it has only one tempo for the entire
song. If you need to vary the songÕs tempo, Professionalª lets you insert
tempo changes. Tempo changes can be inserted individually so that
Page 45

different sections can be played at different tempos, or they can be
inserted graphically in the Tempo view. For more information, see
ÒChanging TemposÓ on page 5-174.
Tempo ratios affect the entire song, even if there are tempo changes.
Professionalª always multiplies the current tempo in the song by the
tempo ratio to determine the playback tempo.
Muting and Soloing Tracks
Muting a Track
Frequently you will want to temporarily turn off one or more
instruments in your ensemble. Professionalª makes it easy to mute the
parts you donÕt want to hear.
For example, suppose that you are practicing the piano part for this song
and want to hear only the other instruments. LetÕs mute the piano part.
With the song playing, do the following:
1. In the Track pane, click on the Mute button in the Piano track
(track 1). The button turns yellow, and the piano part drops out
of the song.
2. To turn the piano back on, click the Mute button again.
Note that the yellow MUTE indicator lights up in the status bar
whenever a track is muted. This can be very helpful if there are muted
tracks that arenÕt visible.
Let's try using a different method to mute two tracks simultaneously:
1. In the Track pane, click the track number (the leftmost column) of
the Piano track. The track is selected.
2. While pressing Ctrl, click the track number in the Sax track. The
Piano and Sax tracks are selected.
3. Choose
You can also mute or unmute tracks by using the pop-up menu:
1. In the Track pane, click the track number of the Piano track.
2. While pressing Ctrl, click the track number of the Sax track. The
piano and sax are selected.
Track-Mute
. Both tracks are muted.
Getting Started
2-45
Page 46

3. Right-click on either track to bring up the pop-up menu.
4. Choose
tracks are unmuted.
Mute
(which should have a check mark beside it). The
Playing a Track Solo
If you want to hear one track by itself, you could mute all other tracks.
But thereÕs a quicker way to do itÑthe Solo button. For example, to play
the drum part by itself, do the following:
1. Click the Solo button in the Drum track (track 5). Voila, a
percussion solo!
2. To let the other instruments back into the song, click the Drum
track's Solo button again.
Solo is not exclusiveÑyou can let as many instruments as you like into
the solo. Note that the green SOLO indicator lights up in the status bar
whenever a track is soloed.
LetÕs use a different method to solo all three percussion tracks:
1. In the Track pane, click the track number in the Drums track. The
track is selected.
2. While pressing Shift, click the track numbers in the Shaker and
Triangle tracks. All three percussion tracks are selected.
2-46
3. Choose
When you want to let the entire ensemble back into the song, click all
the selected (green) Solo buttons again to turn them off, or select all
soloed tracks and choose Track-Solo. As a third option, right-click,
bring up the pop-up menu, and turn off the solo from there.
Note that Solo takes priority over Mute. If both buttons are selected in a
track, the track will be played.
Track-Solo
.
Mute and Solo in the Console View
The Console view contains Mute and Solo buttons identical to those in
the Track view. The two sets of buttons are synchronized. To see this, do
the following:
1. In the Console view, mute the Bass, Sax, and Drums tracks.
Page 47

2. Solo the Piano track.
3. In the Track view, check that the first track is soloed and that
tracks 2, 3, and 5 are muted. Click the selected Solo and Mute
buttons to return the tracks to normal.
Changing a Track's Instrument
If your sound card is like most, its internal synthesizer is capable of
producing at least 128 different instrument sounds, plus several dozen
percussion sounds. Now you'll Þnd out how to get some of those other
instruments into the act. LetÕs try changing the instrument playing the
piano line.
Changing the Patch in the Track View
With the song playing, do the following:
1. Solo the Piano track so you can hear the piano part more clearly.
To do this, click on the Solo button in the Piano track (track 1).
2. Right-click on any column in the Piano track to open the pop-up
menu.
3. Choose
4. Find the Patch setting. This setting indicates which patch, or
instrument, is used by this track. Right now, the Piano track uses
the patch called Acoustic Grand Piano.
5. To change the patch, select a new patch from the drop-down list.
Professional™ immediately starts playing the piano part with
that new instrument.
Track Properties
to open the Track Properties dialog box.
Getting Started
2-47
Page 48

6. Have fun trying all the different patches!
7. Click OK to keep the patch you have selected currently, or click
Cancel to go back to the original patch.
8. Click the Solo button in track 1 again to unsolo the Piano track.
You can also change the patch by clicking in the Patch Þeld and using
the + and Ð keys to increment through the different patches. To do so:
1. Solo the Piano track by clicking on the Solo button in track 1.
2. Click in the Patch field in the Piano track, moving the highlight to
that field.
3. Press the + or – key on the numeric keypad.
4. Click the Solo button in track 1 again to unsolo the Piano track.
You may want to experiment with changing all the instruments used by
the song. One thing you should know: Changing the instrument on a
percussion track (such as the Drum, Shaker, and Triangle tracks in this
song) may have no effect. Percussion instruments are played on MIDI
channel 10, which in General MIDI is dedicated to percussion. The note
determines the instrument, and the patch is irrelevant.
2-48
Changing the Patch in the Console View
ItÕs easier to change a trackÕs patch in the Console view. For example, to
change the Piano trackÕs patch, click the Patch button in the Piano
module and choose a new patch from the menu.
Playing Music on a Keyboard
If you've connected a MIDI keyboard (or another instrument) to your
external MIDI interface or the MIDI interface of your sound card, you
can play one or more parts of the song on the keyboard instead of the
sound cardÕs internal synthesizer. For instructions on connecting a
keyboard to your computer, see ÒTo Connect a MIDI Keyboard to Your
ComputerÉÓ on page 1-32. For this tutorial, we assume that you want to
connect the keyboard to the MIDI in and out of your sound card.
Checking Your MIDI Device Settings
First, letÕs make sure that Professionalª is set up to send MIDI output
to your keyboard.
1. Choose
Tools-MIDI Devices
to open the MIDI Ports dialog box.
Page 49

2. In the Output Ports column, two devices should be selected. The
first should be your sound card synthesizer device; the second
should be your MIDI out device. The uppermost selected device
will correspond to Port 1, the second device to Port 2, and so on.
For help with these settings, see “Setting Up Output Devices” on
page 3-95.
3. Click OK.
Routing MIDI Data to the Keyboard
LetÕs play the Piano track on the MIDI keyboard. First, turn your
keyboard on and make sure it is set up to receive MIDI input on channel
1. Then, do the following:
1. In the Track view, right-click on any column in the Piano track
(track 1) to open the pop-up menu.
2. Choose
3. For Port, select your MIDI out device.
4. Click OK.
Or, if you prefer, the procedure is a little easier in the Console view:
1. In the Console view, click the Port button in the Piano module.
2. Choose your MIDI out device from the menu.
If you donÕt hear anything on your keyboard, see Appendix A:
Troubleshooting for some hints on troubleshooting.
Track Properties
to open the Track Properties dialog box.
Getting Started
2-49
Page 50

Transposing
Sometimes itÕs useful to transpose, that is, to move the pitch of the song
upward or downward. You may want to bring the song into someoneÕs
vocal range, make the song easier to play along with on your instrument,
or simply make an aesthetic adjustment.
LetÕs raise the pitch of the song by a Þfth. With the song playing, do the
following:
1. In the Track pane, drag over the track numbers for tracks 1
through 4 to select them.
2. Choose
3. In the Transpose dialog box, enter 7 in the Amount box. You can
type the number or use the spin controls.
4. Click OK.
Professional™ raises all the notes in the selected tracks by seven halfsteps (for example, C is raised to G, D is raised to A, and so on). The
Transpose dialog box also has an option for transposing by diatonic
steps; see “Transposing” on page 6-190 for more information.
To undo your transposition, choose
If you want to transpose to a lower key, do the same thing, except
enter a negative number in the Transpose dialog’s Amount box. For
example, to lower the pitch of the song by a fifth, enter -7.
Note that you do not have to transpose entire tracks at one time;
when you learn more about selecting smaller sections of music, you
will be able to transpose individual clips, or parts of clips.
Edit-Transpose
.
Edit-Undo
, or press Ctrl-Z.
2-50
Transposing Percussion
You may be wondering why we did not transpose the percussion tracks.
As mentioned earlier, in General MIDI each note in the percussion
channel is mapped to a particular percussion instrument: a snare, a kick
drum, a cymbal, a triangle, and so on. Transposing the percussion tracks
will not change the pitch of each note but rather will change the
instrument used to play each note! This is not usually the desired effect,
Page 51

so in general you would not use the Transpose command on percussion
tracks.
On the other hand, when a track contains events for only one percussion
instrument (that is, all the notes are the same pitch), you can change the
instrument by transposing the track. For example:
1. With the song playing, solo the Triangle track (track 7).
2. To hear the triangle more clearly, click in the Triangle track's Vel+
column and enter 127. This increases the velocities of the
triangle notes, which increases their notes’ volume.
3. Press Enter.
4. Select the Triangle track by clicking on its track number.
5. Choose
6. In the Amount box, enter -25.
7. Click OK.
The triangle sound is replaced with the sound of a cow bell.
To undo your transposition, choose
Edit-Transpose
to open the Transpose dialog box.
Edit-Undo
, or press Ctrl-Z.
Transposing with Key+
Another way to transpose a track is to use the Key+ column in the Track
view. For example, letÕs raise the Sax track by an octave:
1. Click in the Sax track’s Key+ column.
2. Enter 12. This raises all notes in the track by 12 half-steps, or an
octave.
3. Press Enter.
Transposing with the Transpose MIDI Effect
One Þnal way to transpose a track is to use the Transpose MIDI plug-in
effect. ProfessionalªÕs MIDI and audio effects let you modify notes and
sounds on the ßy, as they are played, without making permanent
changes to your music and sound data. (They can also be used to perform
destructive, or permanent, editing.)
2-51
Getting Started
Page 52

For example, letÕs raise the Bass track by an octave too. In the Console
view, do the following:
1. Right-click in the Bass track effects patch point (the empty box
below the track name) and choose
The Transpose effect is added to the track.
2. Double-click the Transpose effect to open the Transpose dialog
box.
3. In the Offset box, type 12. You can also use the pop-up slider
below the box to set the offset value.
Transpose
from the menu.
2-52
If the song is playing, youÕll immediately hear the change. You can use
this technique to adjust your effects in real time.
To delete the Transpose effect, click on it and press Delete.
That completes the Þrst tutorial. In the next tutorial, youÕll learn to
record MIDI and digital audio tracks into Professionalª.
Page 53

Tutorial 2—Recording MIDI and
Digital Audio
This tutorial teaches you how to record with Professionalª. YouÕll learn
how to:
¥ Set up the metronome
¥ Record MIDI tracks
¥ Use loop recording
¥ Use punch recording
¥ Record digital audio tracks
Rehearsal Time, Part 2
In Tutorial 1, you used Professionalª to help you rehearse a solo in one
of your bandÕs songs. Professionalª played the backup parts of the song
while you played your solo. Now that youÕve had some time to practice,
youÕd like to record your solo with Professionalª so you can play it and
hear how you sound.
Professionalª lets you record two different types of data: MIDI and
digital audio. If you have a MIDI instrument connected to the MIDI In
port of your sound card or an external MIDI interface, youÕll probably
want to record your performance as MIDI. Otherwise, youÕll need to hook
your instrument, preamp, effects rack, mixer, or microphone to the
appropriate audio input of your sound card and record your performance
as digital audio. For information on how to connect your instrument to
the computer, see ÒInstalling ProfessionalªÓ on page 1-31.
Opening the Project File
If you havenÕt already done so, the Þrst thing you need to do is load the
project Þle containing your bandÕs song.
1. Start Professional™.
2. Choose
3. In the Open dialog box, select the file
4. Click the Open button.
Professional™ loads the project and opens the Track and Console
views.
File-Open
.
tutorial1.wrk
.
Getting Started
2-53
Page 54

Recording MIDI
LetÕs record a new MIDI track in the song. If you have no MIDI device to
connect to your computer, you can use CakewalkÕs Virtual Piano
(included with Professionalª) as a MIDI source. For more information
about this tool, see ÒVirtual PianoÓ on page 4-124.
Setting Up the Metronome
Musicians often use a metronome to keep track of the beat.
ProfessionalªÕs metronome is more versatile than most real
metronomes. You can conÞgure to sound on playback or recording; it can
count off any number of lead-in measures or beats; it can use the PC
speaker or a MIDI note; and it can accent the Þrst beat of each measure.
It also quickly and accurately follows any tempo changes that happen in
the song.
You can set up the metronome with the Metronome toolbar. If you donÕt
see the Metronome toolbar, choose View-Toolbars and select
Metronome.
Accent first beat Use PC speaker
Metronome settings
2-54
Measures
Count-in
Beats
Metronome
during record
Metronome
during playback
Use MIDI note
LetÕs set up the metronome to play two count-in measures on the PC
speaker when recording. Here's what to do:
1. In the Metronome toolbar, click in the Count-in box.
2. Use the spin control to set the count-in value to 2.
3. Select the Count-in Measures option .
4. Deselect the Metronome During Record option .
5. Select the Use PC Speaker option .
6. Deselect the Use MIDI Metronome option .
Page 55

By disabling the Metronome During Record option, you cause the
metronome to turn off after the count-in measures. If you would
prefer to hear the metronome during the entire song while recording,
enable this option instead.
The metronome counts in for recording, not for playback.
Checking Your MIDI Device Settings
Let's make sure that Professionalª is set up to receive MIDI data from
your instrument.
1. Choose
2. In the Input Ports column, select your sound card's MIDI In
device or the MIDI In for your external MIDI interface. (If you will
be using the Virtual Piano, select the Virtual Piano device as
well.) For help with these settings, see “Setting Up the MIDI In
and MIDI Out Devices” on page C-465.
3. Click OK.
Tools-MIDI Devices
to open the MIDI Ports dialog box.
Setting Up Playback
During recording, Professionalª will play the rest of the song as usual.
Depending on what instrumental part of the song you are going to
record, you may want to mute one or more tracks, or solo certain tracks.
For example, if you are going to record a new piano part, you might want
to mute track 1 so that you're not competing with the old piano part
while recording. To mute any track, click the track's Mute button .
You can also set other playback options, such as the Tempo ratio, to
make your recording session easier.
Getting Started
2-55
Page 56

Recording MIDI
Now you'll record a new track in the song. Do the following:
1. Make sure your instrument is turned on and set up to transmit
MIDI data.
2. Double-click the Name column in track 8 and type a name for
your new track.
3. Make sure the Source column in track 8 is MIDI Omni. If it isn’t,
double-click the Source column and set the Source in the Track
Properties dialog box to MIDI Omni.
4. In track 8, click the Arm button .
5. On the Transport toolbar, click Record , or press R.
You'll hear two measures counted in by the metronome, then
playback and recording will begin. Go ahead and start playing!
When you finish recording, click the Stop button , or press the
space bar. If you've played any notes, a new clip will appear in the
Clips pane in track 8. If no new clip appears, see “I Can’t Record from
My MIDI Instrument” on page A-428 for some troubleshooting hints.
Listening to the Recording
LetÕs play back your performance on your sound card. For an added
dimension, weÕll open a few other views in the process. Do the following:
2-56
1. Double-click in the Source, Port, Channel, or Patch column in
track 8 to open the Track Properties dialog box.
2. For Port, select your sound card’s MIDI synthesizer.
3. For Channel, select an unused channel, such as 7.
4. For Patch, select any instrument.
5. Click OK.
6. Choose
7. Choose
8. Choose
9. Choose
10. To return to the start of the song, click the Rewind button .
View-Piano Roll
View-Staff
View-Event List
to open the Piano Roll view.
to open the Staff view.
to open the Event List view.
Window-Tile in Rows
to tile the views.
Page 57

11. Click Play .
ItÕs almost as easy to listen to your performance on your MIDI
instrument. For instructions on how to play a track on a MIDI keyboard,
refer to tutorial 1.
The Piano Roll, Staff, and Event List views all show the same basic
informationÑthe notes in track 8. The Piano Roll view displays the track
as a player-piano roll. The Staff view shows notes in traditional music
notation. The Event List view lists all MIDI events for the track. When
you need to edit a track, you can work in any of these views. On different
occasions you may have reason to use different views. More information
about the Piano Roll, Staff, and Event List views can be found in later
chapters of the UserÕs Guide.
When you're ready to continue, close the Piano Roll, Staff, and Event
List views.
Recording Another Take
Maybe your Þrst attempt at recording resulted in a perfect performance,
but maybe not. If you'd like to remove your Þrst take and try again, do
the following:
1. Choose
recording.
2. Click Rewind , or press W. The track is still armed for
recording, so you don't need to re-arm it.
3. Click Record , or press R.
Alternatively, you could record your next attempt on a new track. That
way you can keep all the takes and select the best one later (or combine
the best parts of each!). If you record on a new track, be sure to arm the
new track for recording and to disarm the previous track.
Edit-Undo Recording
or press Ctrl-Z to undo your
Fine Tuning
After you've recorded a MIDI track, you can use Professionalª to make
automatic adjustments to the timing of notes. For example, the
Quantize command rounds off the start times and durations of notes to
evenly spaced note boundaries (quarter notes, eighth notes, sixteenth
notes, and so on). Quantize lets you select full or partial rounding, and
it even lets you distort the timing into a ÒswingÓ beat. For more
information on Quantize and other related commands, see ÒChanging
the Timing of a RecordingÓ on page 6-197.
Getting Started
2-57
Page 58

Saving Your Work
When you have something youÕd like to keep, you can save the project by
doing the following:
1. Choose
2. In the File Name box, type a new file name, such as
3. Click OK.
The project is saved under the new name. From now on, you can click
the Save button to save your work.
File-Save As
.
my project
.
Loop Recording
If you'd like to record several takes successively, you can set up
Professionalª to loop over the entire song, or just some section of it.
Professionalª will record a new take during each loop, storing that take
in a new clip. You can set Professionalª to place each clip in a new track
or to pile all clips in one track.
Let's try recording a few takes of the section between markers A and B,
placing each take in a new track.
Setting Up Looping
First, let's set up Professionalª to loop over the section between
markers A and B:
1. In the Clips pane, click in the ruler between markers A and B.
This selects the range of time from marker A to marker B.
2-58
2. In the Loop/Auto Shuttle toolbar, click to set the Loop From
and Loop Thru times.
When you click , looping is turned on automatically.
Setting Up the Tracks
Now let's set up the Þrst of the tracks where the takes will be stored:
1. In track 9 (or the first available empty track), double-click the
Name column and name the track.
2. Click the Arm button.
Page 59

3. Double-click in the Source, Port, Channel, or Patch column to
open the Track Properties dialog box.
4. Set the Source to MIDI Omni.
5. Set the Port to your sound card's MIDI synthesizer.
6. Set the Channel to an unused channel or to the channel you
used for your earlier take(s).
7. For Patch, select any patch.
8. Click OK.
As usual, you could set the tracks to play back on your MIDI
instrument instead by specifying the appropriate port and channel.
Loop Recording
Finally, let's record our takes:
1. Choose
dialog box.
2. Choose the Store Takes in Separate Tracks option to store each
new take in a separate track. Each time a new take starts, the
settings from the first track will be copied to the new track.
3. Click OK.
4. Click Rewind .
5. Click Record .
Realtime-Record Options
to display the Record Options
2-59
Getting Started
Page 60

Professional™ loops over the designated section and records your
takes to successive tracks. If you want to erase the most recent take
during loop recording, choose
Ctrl-space bar.
To stop recording, click Stop , or press the space bar.
Realtime-Reject Loop Take
, or press
Punch-In Recording
Imagine that one of your takes was close to ideal, except for one or two
notes in one measure. Rather than recording another full take, you'd
prefer to keep the take but replace that measure.
Punch-in recording lets you replace a section of a track. The way it works
is this: First, you set the start and end times of the punch to the section
you want to replace and turn on punch recording. Then, you arm the
track and start recording. You can play along with the original take to
get the rhythm and feeling. However, nothing will be recorded until the
punch start time. During the punch, the material already in the track
will be replaced with what you record. When the punch ends, the song
will continue to play, but recording will stop.
Let's try it. Suppose you want to replace measures 5 and 6 in the take in
track 8.
1. In the Record toolbar, click on the Punch In Time.
2-60
2. Type 5 and press Enter.
3. Click on the Punch Out Time.
4. Type 7 and press Enter.
5. Select Auto Punch from the Record Mode drop-down list.
6. Arm track 8 and disarm any other tracks that are armed.
7. If you like, you can mute the tracks containing your other takes,
or even solo track 8.
8. If looping is still on, click the Loop button to turn it off.
9. Click Rewind .
10. Click Record .
Page 61

Play along until you are past the punch end time, then click Stop .
Replay your take to hear the difference. If it's still not right, try again!
An alternative method is to select measures 5 and 7 by dragging in
the time ruler. Then right-click the time ruler and choose
Points
.
You can combine loop recording with punch recording; see “Punch
Recording” on page 4-130 for details.
When Auto Punch is enabled, the time ruler displays special markers
that indicate the punch in and punch out times. You can drag these
markers to change the punch in and punch out times.
Punch In Punch Out
Set Punch
Recording Digital Audio
If your instrument is not MIDI-compatible, you must record your solo as
digital audio data. To record digital audio, you need some sort of device
hooked up to your sound card's line or mic inputÑan electric guitar, a
preamp, a mixer, and so on. If nothing else, try playing or singing into a
microphone!
Setting the Sampling Rate
Each Professionalª project has a parameter that speciÞes the sampling
resolution for all digital audio data in the project. You should set this
rate before recording any digital audio.
1. Choose
2. Click the General tab.
3. Select a Default Sampling Rate. For CD-quality sound, use 44100
Hz.
4. Click OK.
Lower sampling rates will save disk space but will result in lowerquality audio. Before embarking on any major project, try sampling at
different rates to determine which one best suits your needs.
Tools-Audio Options
.
Getting Started
2-61
Page 62

Setting Up an Audio Track
LetÕs set up a track for digital audio.
1. In the Track pane, in the first available empty track, double-click
the Name column and enter a name for your new track.
2. Double-click in the Source column and set the Source in the
Track Properties dialog box to your sound card’s audio input.
Checking the Input Levels
Before trying to record, you need to check and adjust the audio input
levels. If your audio input is too low, it will be lost in the background
noise. If it is too high, it will overload the input channel and be distorted/
clipped.
Here's how to check the audio input levels:
1. Open the Console view and click the Arm button in your new
audio track. An audio meter will appear next to the track's
volume fader.
2. Perform as you would during recording. Watch the meters
respond to the sounds you produce.
3. If the meters never come even close to the maximum, increase
the input level using the Windows 95 mixer or your sound card’s
software mixer.
2-62
4. If the meters even occasionally reach the maximum, decrease
the input level using the Windows 95 mixer or your sound card’s
software mixer.
The idea is to try to get the input level to rise as high as possible, but
without ever reaching the maximum. That way, you get the strongest
possible signal without distortion.
If you don't see any movement of the audio meters, you may have an
audio input problem. Refer to “I Can’t Record Any Audio” on page A430 for troubleshooting hints.
Page 63

Recording Digital Audio
It's time to record!
1. If you haven’t already set up the metronome, follow the
directions in the “Setting Up the Metronome” section earlier in
this tutorial to set the metronome for a two-measure count-in.
2. Mute any tracks you don't want to hear while recording, or solo
the tracks you do want to hear.
3. The track is already armed for recording.
4. In the Transport toolbar, click Record .
You’ll hear two measures counted in by the metronome, then
playback and recording will begin. Go ahead and perform!
When you finish recording, click the Stop button , or press the
space bar. A new clip will appear in the Clips pane. If no new clip
appears, see “I Can’t Record Any Audio” on page A-430 for some
troubleshooting hints.
Listening to the Recording
Let's play back your performance. Do the following:
1. Double-click in the Source, Port, Channel, or Patch column in the
new track to open the Track Properties dialog box.
2. For Port, select your sound card's audio output device.
3. Click OK.
4. To return to the start of the song, click the Rewind button .
5. Click Play .
Recording Another Take
If you'd like to delete your performance and try again, do the following:
1. Choose
Ctrl-Z (Undo).
2. Click Rewind .
3. The track is still armed for recording, so you don't need to rearm it.
Edit-Undo Recording
to undo your recording, or press
Getting Started
2-63
Page 64

4. Click Record .
Alternatively, you could record your next attempt on a new track.
Loop and Punch-In Recording
Loop and Punch-in work the same for digital audio recording as they did
for MIDI recording. For more information, refer to the relevant sections
preceding, or to ÒLoop RecordingÓ on page 4-128 or ÒPunch RecordingÓ on
page 4-130.
Recording Multiple Channels
If you can gather the entire band around your computer, and if you have
the proper equipment, you can record a full performance all at once. If
you have several MIDI instruments, you can route their input into your
sound card through a MIDI merger; data that arrives on different MIDI
channels can be routed to different tracks. Likewise, a typical sound card
can record audio on both right and left channels; each can be recorded on
a different track. Multiple sound cards can expand the number of
possible inputs. For more information, see ÒConÞguring Your Audio
HardwareÓ on page 13-421.
That completes the second tutorial. Now youÕve learned the basics of
playing and recording material for your projects. In the next tutorial
you'll learn about basic audio editing techniques, audio effects, and
mixing with the Console view.
2-64
Tutorial 3—Audio Editing and Mixing
The third tutorial teaches you how to edit digital audio and apply audio
effects. You'll learn how to:
¥ Stretch or compress music to Þt a certain period of time
¥ Edit and rearrange audio data
¥ Apply effects to audio data
¥ Apply real-time effects in the Console view
¥ Control the mix during playback
¥ Save a project as a Professionalª Bundle Þle
¥ Export a project as a RealMedia Þle
Page 65

Audio Engineering
YouÕre an audio engineer. One of your clients has an idea for a 20-second
radio spot and has sent you a script and a project containing some raw
material from which to start. Your task is to Þnish the radio spot.
Opening the Project File
First, letÕs load and play the project Þle from your client. Do the
following:
1. Start Professional™.
2. Choose
3. In the Open dialog box, select the file
4. Click the Open button.
5. Click Play .
The project contains several tracks. Tracks 1 through 6 are MIDI tracks
that have an edited version of ÒBoston Rain,Ó which weÕll use as
background music for the radio spot.
File-Open
.
radiospot.bun
.
The Plan
LetÕs talk about what you need to do to transform this into a 20-second
radio spot.
Music
Your client likes the edited version of ÒBoston RainÓ as background
music, but it is too long for the 20-second spot. There are two choices:
You could fade the volume as you approach the 20-second mark, or you
could speed the music to stretch it. In this tutorial, we'll use the second
option.
Script
Your client has supplied the following script:
Music... Announcer...
Getting Started
2-65
Page 66

Edited “Boston Rain” From Cakewalk, makers of the world’s
number-one-selling music and sound
software, comes Professional™ Version
8— the most powerful release yet for
Windows 95 and NT.
(Pause)
With Professional™, you can produce
complete music and audio projects in one
integrated system.
(Pause)
Professional™ is available at finer music
and computer stores worldwide or by
calling 1-888-CAKEWALK.
2-66
Page 67

Stretching the Music
First, letÕs speed the music to Þt within 20 seconds.
There are two ways the music can be made to Þt: by increasing the
tempo or by keeping the tempo and changing the note start times and
durations. It is usually advantageous when compressing or stretching
music to change the tempo rather than the notes, because this will keep
the relationship of notes to measures intact and let you edit the music
more easily later. In the present case we'll change the tempo
Do the following:
1. In the Track view, select the area between the markers labeled
Start and End.
2. Select all the MIDI tracks (1 through 6), by dragging over the
track numbers.
3. Choose
4. For New Thru, enter 00:00:20:00. If this field is displayed as
Measures:Beats:Ticks, click the Format button.
5. For Modify by Changing, select Tempo Map.
6. Click OK.
Play the project again and note the difference. You'll see that the
tempo in the Tempo toolbar has changed from the original 90.00
beats per minute to 95.97. You could have entered this number
directly, bypassing the Fit to Time dialog box, but you probably would
have had to experiment with different numbers until the MIDI tracks
ended up at just the right length. Fit to Time calculated the correct
tempo value for you.
Edit-Fit to Time
to open the Fit to Time dialog box.
2-67
Getting Started
Page 68

Saving Your Work
Because we are going to do some serious editing later in the tutorial, you
may want to save your work as you go along:
1. Choose
2. In the File Name box, type an unused file name, such as My
RadioSpot.
3. For Save as Type, select Normal.
4. Click OK.
The project is saved under the new name. From now on, you can click
the Save button to save your work.
File-Save As
.
Adding the Announcer
Your next task is to record the announcer track. The procedure is similar
to the one we used in the last tutorial, but you don't need to set the
sampling rate (because it is already set) and you don't need to turn on
the metronome (the music will give you timing cues for the beginning
and ending of the spot).
To record the announcer track, you'll need a microphone. For help with
connecting a microphone to your computer, see ÒTo Connect a
Microphone to Your ComputerÉÓ on page 1-33.
Setting Up the Announcer Track
LetÕs create a new track for the announcer.
2-68
1. In the Track view, select track 1 by clicking the track number.
2. Right-click the track number and choose
pop-up menu to insert a new track.
3. Double-click the Name column and type Announcer for the
name of the new track.
4. Double-click in the Source column to open the Track Properties
dialog box.
5. Set the Source to your sound card's audio input.
6. For Port, select your sound card's audio output.
7. Click OK.
Insert Track
from the
Page 69

Checking the Input Levels
Before trying to record, you need to check and adjust the audio input
levels. If your audio input is too low, it will be lost in the background
noise. If it is too high, it will overload the input channel and be distorted/
clipped. You can do this by using the Console view, as we did in the
previous tutorial. Please refer to that section if you need to know how to
do this.
Recording
Let's record the announcer track.
1. Make sure that the Announcer track is armed for recording.
2. In the Transport toolbar, click Rewind , then click Record .
3. Read the script, with feeling.
When you finish recording, click the Stop button , or press the
space bar. A new clip will appear in track 1 in the Clips pane.
Play back what you’ve recorded and see how it sounds! If you don’t
like the results, choose
again. It’s okay if the announcer’s voice over doesn’t fit exactly…
because we will be editing it to make it shorter soon.
When you have a recording you like, remember to disarm track 1 and
save your work.
Edit-Undo Recording
(or press Ctrl-Z) and try
Trimming the Announcer
Our next task is to edit the announcer segment to make it Þt within the
20 seconds. There are two parts to this. First, we'll trim the beginning of
the audio and move the entire voice-over so that it starts at the
beginning. Then, we'll remove the pauses or breaths and slide the
segments around in time until they Þt.
Opening the Audio View
We'll perform our editing work in the Audio view. To set up the Audio
view, do the following:
1. Solo the Announcer track, so you don’t hear the music while you
edit.
2. Select the Announcer track by clicking on the track number
(track 1).
Getting Started
2-69
Page 70

3. Choose
track 1 is displayed.
4. If selected, deselect the snap grid .
5. Select the Snap to Zero Crossing option . With this option,
any selections we make will snap to the nearest zero crossing in
the audio waveform. This prevents unwanted pops and clicks
resulting from any edits.
6. Click the H:M:S:F button to display the ruler in SMPTE time.
7. Use the horizontal and vertical zoom buttons as necessary to
zoom out and in on the waveform.
View-Audio
to open the Audio view. The audio data in
2-70
Trimming the Beginning of the Announcer
Now weÕll see how to trim the beginning of the announcerÕs read. This
will eliminate any unwanted silence at the beginning. Do the following:
1. In the Audio view, select the Scrub tool .
2. Use the horizontal zoom buttons until you can see enough of the
audio event to identify the three separate sections.
3. Click on the event to hear the audio near the beginning of the
voice-over. Let go when you have reached the point directly
before the first word.
4. Right-click on the event and choose
5. Click OK in the dialog box that appears.
The event has now been split into two events, each of which has the
same name. The first portion, which should only be silence, is
currently selected.
Split
from the pop-up menu.
Page 71

1. Right-click on the first portion of the audio event (the one that is
only silence) and choose
2. In the dialog box that appears, make sure that only Events in
Tracks is selected. This means that other items, such as tempo
changes and markers, will not be deleted.
3. Click OK.
The silence that existed before the announcer is now gone, and now we
can move the remaining piece of voice-over so that it begins right at the
start of the spot.
1. Select the Selection tool and then click on the announcer’s
audio event.
2. While holding down the mouse button, drag the event so that it
starts closer to the beginning of the music. Let go of the mouse
button.
3. In the dialog box that opens, choose the Replace Old with New
option and click OK.
4. Rewind to the beginning of the project and hit play. Listen to
where the voice-over begins. If you need to move it earlier,
follow steps 1 through 3 again.
Delete
from the pop-up menu.
Renaming Audio Events
Now that weÕve got the announcer starting in the right place, letÕs
rename that audio event:
1. Right-click on the announcer audio event.
2. Choose
Event Properties
from the pop-up menu.
Getting Started
2-71
Page 72

3. In the Name field, enter the name Edited V/O.
4. Click OK.
Now our audio event bears the name Edited V/O, which is more
descriptive. Next, we will remove the pauses between sections of the
script. You may want to save your work before continuing.
Editing the Announcer
Now that the announcerÕs read begins at the correct time, we will
remove any pauses or breaths. This will allow us to Þt the entire read
into the allotted time. To do so, we will split the audio and delete the
silence in the same way that we trimmed the preceding event.
2-72
1. In the Audio view, choose the Scrub tool .
2. Find the beginning of the silence.
3. Right-click and choose
4. Click OK in the dialog box.
5. Find the end of the silence.
6. Right-click and choose
7. Click OK in the dialog box.
8. Right-click on the newly defined event, which is comprised
entirely of silence.
9. Choose
Events in tracks is selected.
10. Click OK.
Delete
from the pop-up menu and make sure that only
Split
Split
.
.
Page 73

11. Repeat this procedure so that all silence has been deleted.
The silence has been deleted, so now we should move the audio that
followed it.
1. Click on the middle section of voice-over and drag it earlier in
the track so that a more natural pause exists between the two
sections.
2. Release the mouse button.
3. In the dialog box that appears, choose Blend Old with New or
Replace Old with New, then click OK.
4. Listen to the read. If the pause seems natural, do the same to the
last section. If not, try moving the middle section until the pause
is correct.
Combining Audio Events
After you have moved the audio around and Þnished tightening pauses,
you may want to have a single, continuous audio event instead of three
separate ones. To do this:
1. Select all the events by holding Shift while clicking on each.
2. Right-click on any of the events and select
pop-up menu. The events will combine into a single audio event.
If you overlapped any of the events when you moved them, you will
be presented with a dialog box asking how to treat the overlapping
parts. For more on this, see “Moving and Copying Clips” on page 5-
156.
Combine
from the
Making It Fit
Now that weÕve edited the announcer clip, letÕs see if it Þts in our allotted
time. Unsolo the announcer track and press Play. Does it Þt? If so, move
to the next section. If not, youÕll have to use the Fit to Time edit on the
audio. To do so:
1. From the Track view, select the announcer clip by clicking on it.
2. Choose
Edit-Fit to Time
.
Getting Started
2-73
Page 74

3. In the dialog box that appears, set the New Thru time to
00:00:20:00 and make sure that the box next to Stretch Audio is
checked.
4. Click OK. Professional™ processes the audio so that it runs
faster while keeping the same pitch (also known as time
compression).
5. Click Play and listen to the spot. The announcer should now fit in
the 20 seconds of the music.
If the announcer’s clip still doesn’t fit, you could remove the middle
section, but that’s cheating.
You should save your file again now.
Mixing the Radio Spot
Now letÕs go to the Console view and Þnish the project. WeÕll apply realtime audio effects to the announcer track, then automate the faders in
real time.
Preparing the Console
Before starting, let's make sure that the Console view is set up correctly.
2-74
1. If the Console view is not open, choose
2. Click the Module Manager button to open the Module
Manager dialog box.
3. Make sure all options are selected and click OK.
View-Console
.
Page 75

Applying Real-Time Audio Effects
It's quite simple to apply real-time effects to a track. Let's add a small
amount of equalization to the announcer track.
1. In the announcer track’s effects patch point, right-click and
choose
2. Double-click the effect to display the settings.
3. Choose Unplugged from the preset list.
Play the project to hear what it sounds like. You can continue to adjust
the effect while the project plays; there is a slight delay before your
adjustments are audible.
At this point, we are nearly Þnished; all that's left is to balance the mix.
Cakewalk-FX
Reverb. The effect is added to the track.
Real-Time Mixing Control
The Console view is a live mixer. During playback, you can control the
main volume and the volume and panning of each track. You can mute
and solo tracks. You can turn routing to aux buses on and off and change
the send levels. And, on MIDI tracks, you can control the Chorus and
Reverb and change patches Òon the ßy.Ó Try it now! To learn more about
how to use the controls in the Console view, see Chapter 9, Mixing and
Effects Patching.
Getting Started
2-75
Page 76

Grouping Controls
To assist in manipulating the controls, you can tie faders to one another.
For example, if you want to increase the volume level on three tracks,
you can assign them to a group. Then, when you move one volume fader,
you move them all. You can even have the controls move in opposite
directions For example, you can fade one track in and another out.
To group faders:
1. Right-click on the fader for track 2 (Piano).
2. In the pop-up menu, choose
down list. This assigns the fader to group A.
3. Repeat this for all the MIDI tracks.
Now you’ve grouped all the MIDI track faders. When you move one
fader, all of the others follow. If you want to move a single fader
independently of the others, hold the Ctrl key while moving the fader.
For more on creating and using control groups, see “Using Control
Groups” on page 9-329.
Group
and select A from the drop-
Automating Your Mix
Finally, you can record the movements and settings of the mix or
automate them. To do so:
1. Rewind to the beginning of the project.
2. Move the faders, pans, and any other controls to the initial
settings you desire. You should set up a good balance between
voice and music.
3. Enable automation recording by clicking on the Record
Automation button .
4. Begin playback, and move the faders as needed so that the
balance between voice-over and music is maintained
throughout the spot. If you want, adjust the pan controls, too.
2-76
Near the end of the spot, you may want to fade the music out. To do this:
1. Grab any of the faders for the MIDI tracks and pull it down.
Because the faders are grouped, all will lower.
Page 77

YouÕve now automated your radio spot. Now letÕs listen to it again and
watch the faders move automatically:
1. Rewind to the beginning.
2. To make sure the faders always show their current value, select
the Update option .
3. Press Play.
You’ll see the faders move just the way they moved when you
recorded their movements. When you’re done tweaking the mix,
disable the Record Automation button.
For more information about automation and the Console view, see
“Recording Automation Data” on page 9-335.
Saving the Project
If youÕve been good, you've been saving your work all along. So far,
though, youÕve been saving the project as a normal Professionalª
project Þle (with the extension .wrk). The normal Professionalª Þle
contains all the projectÕs musical data, as well as screen layout and other
project information. However, this Þle does not contain the projectÕs
digital audio data, which is managed automatically by Professionalª
and stored in a different location. By managing the digital audio data,
Professionalª is able to store the data more efÞciently and save disk
space. If you work with large samples, this can be quite signiÞcant.
If you would like to send your Professionalª project to other people,
though, you need to create a Þle containing all the projectÕs data,
including the digital audio data. Here are two ways to do it.
Saving the Project as a Bundle File
A Bundle Þle (with the extension .bun) is similar to a normal project Þle,
but it also contains the project's digital audio data. Bundle Þles must be
opened and played with Professionalª. To save the project as a Bundle
Þle, do the following:
1. Choose
2. Choose Cakewalk Bundle from the Save as Type list.
3. Enter a file name in the File Name box.
4. Click Save.
File-Save As
.
Saving the Project as a RealMedia Metafile
Getting Started
2-77
Page 78

2-78
Page 79

Controlling Playback
3
3
Controlling playback is simple with Professionalª. When you play your
song, you have full control over the tempo or speed of playback, which
tracks are played, which sound cards or other devices are used to
produce the sound, and what the tracks sound like.
Playback
In This Chapter
The “Now Time” and How to Use It . . . . . . . . . . . . . . . . . . . . . . . . . . . 80
Controlling Playback . . . . . . . . . . . . . . . . . . . . . . . . . . . . . . . . . . . . . . . . 84
Track-by-Track Playback . . . . . . . . . . . . . . . . . . . . . . . . . . . . . . . . . . . . . 88
Changing Track Settings. . . . . . . . . . . . . . . . . . . . . . . . . . . . . . . . . . . . . 91
Video Playback . . . . . . . . . . . . . . . . . . . . . . . . . . . . . . . . . . . . . . . . . . . 107
Page 80

The current time
in hours, minutes,
seconds, and
frames
The “Now Time” and How to Use It
Every project has a current time, known as the Now time, which keeps
track of where you are in a project. The Now time is displayed in both
the large Transport toolbar and the Position toolbar, in two formats:
The current measure, beat,
and tick
The measure, beat, and tick number (MBT) identiÞes the Now time in
musical time units. Ticks are subdivisions of quarter notes and indicate
the timebase of the song. For more information about the timebase, see
ÒSetting the MIDI Timing ResolutionÓ on page 4-118.
Here are some examples of times expressed in measure, beat, and tick
(MBT) format:
Time... What it means...
3-80
1:01:000 First beat of the first measure
9:04:000 Fourth beat of the ninth measure
4:02:060 The 60th tick of the second beat of the
fourth measure
The second time format is commonly referred to as the SMPTE time.
SMPTE is the acronym for the Society of Motion Picture and Television
Engineers. In this format, time is measured in hours, minutes, seconds,
and frames. ItÕs not necessary for a project to begin at time zero in this
formatÑany arbitrary time can be used to represent the start of a
project. For more information, Chapter 15, Synchronizing Your Gear.
Page 81

Here are some examples of times expressed in this format (assuming
that zero is the start time):
Time... What it means...
00:00:00:00 The beginning of the project
00:05:10:00 Five minutes and ten seconds from the
beginning of the project
01:30:00:00 One hour and thirty minutes into the
project
00:00:00:05 Five frames into the project
Professionalª provides many ways to set the Now time. Here are just a
few:
To Change the Now Time…
• Click the desired time on the time ruler in the Track, Piano Roll,
Staff, or Audio view
• Click on the Now time in the large Transport toolbar, enter the
desired time, and press Enter
Playback
• Choose
Go-Time
or press F5, enter the desired time, and click
OK
• Click on an event in the Event List view
When entering a time in MBT format, the beat and tick values are
optional. You can use a colon, space, or vertical bar to separate the parts
of the Now time:
You enter… The Now time is set to…
2 2:00:000
2|1 2:01:000
4 2 0 4:02:000
9:1 9:01:000
5|1:30 5:01:030
3-81
Page 82

When entering a time in SMPTE format, you can enter a single number
(hour), two numbers (hour and minutes), three numbers (hour, minutes,
and seconds), or all four numbers.
If you click in the time ruler while the snap grid is enabled, the Now
time will be snapped to the nearest point in the grid. By setting the grid
size to a whole note or quarter note, you can easily set the Now time to a
measure or beat boundary.
You can also use the buttons and the scroll bar in the Transport toolbar
to adjust the time, as shown here:
Click to back up
one measure
Click to jump to
Click to jump to
the beginning
the beginning
Drag to any
desired position
Click to jump
to the end
Click to move ahead
one measure
Displaying the Now Time in Large Print
Professionalª can display the Now time in large print so that itÕs easier
to see when you are far from your monitor (for example, when youÕre at
your keyboard or another MIDI instrument) or when several people need
to read the Now time from a distance. HereÕs how:
To Display the Big Time View…
1. Choose
View-Big Time
to display the Big Time view.
3-82
Page 83

2. Change the settings according to the table:
To do this… Do this…
Switch time format Click on the view to toggle between
MBT and SMPTE time
Change font or color Right-click on the view, choose the
font and color you want, and click OK
Change the size of the view Drag any corner of the view to
change its size
Note that Professionalª ignores font styles and effects such as strikeout
and underline.
Other Ways to Set the Now Time
There are a variety of commands and keyboard shortcuts you can use to
set the Now time:
Command... Shortcut... What it does...
Playback
Go-Time
Go-From
Go-Thru
Go-Beginning
Go-End
Go-Previous Measure
Go-Next Measure
F5 Lets you enter the Now time in
the toolbar or in a dialog box
F7 Sets the Now time to the From
time (the start time of the current
selection)
F8 Sets the Now time to the Thru
time (the end time of the current
selection)
Ctrl-Home Sets the Now time to the
beginning of the project
Ctrl-End Sets the Now time to the end of
the project
Ctrl-PgUp Sets the Now time to the start of
the previous measure
Ctrl-PgDn Sets the Now time to the start of
the next measure
3-83
Page 84

If your project has markers, you can use the Marker toolbar to set the
Now time:
To do this… Do this…
Skip to the next marker Click on the Marker toolbar (or press
Ctrl-Shift-PgDn)
Skip to the previous marker Click on the Marker toolbar (or press
Ctrl-Shift-PgUp)
Jump to any marker Choose the marker name from the list in
the Marker toolbar, or press F5 when
typing a Now time in the Transport
toolbar
For more information about markers, see ÒCreating and Using MarkersÓ
on page 5-165.
Controlling Playback
Controlling playback is very simple, and you have your choice of tools,
menu commands, and shortcut keys for most common operations.
3-84
When you start playback, the Now time updates continuously to show
the current time. When you stop playback, the Now time stops at the
time you stopped. When you start playback again, it continues from the
same point.
If the Now time is advancing but you donÕt hear any sound, see Appendix
A: Troubleshooting. If you are using MIDI sync or MIDI time code sync,
Professionalªwaits to receive external timing data before it begins
playing. For more information, see Chapter 15, Synchronizing Your
Gear.
To Start and Stop Playback…
To do this… Do this…
Start playback Press the spacebar, click , or
choose
Realtime-Play
Stop playback Press the spacebar, click , or
choose
Realtime-Stop
Page 85

Rewind to the start of the
project
Skip to the end of the project Click
Click , press the W key, or choose
Realtime-Rewind
Handling Stuck Notes
Under MIDI, the events that turn notes on are separate from the events
that stop notes from playing. Normally, when you stop playback,
Professionalª attempts to turn off all notes that are still playing.
Depending on how your equipment is conÞgured, itÕs possible for notes to
get stuck in the ÒonÓ position. The Realtime-Reset command is used to
stop all notes from playing.
Note:
You can control the MIDI messages that are sent by the RealtimeReset command. See Appendix E: Initialization Files for more
information.
To Clear Stuck Notes…
Playback
1. Choose
Realtime-Reset
, or click on the toolbar.
Loops
Sometimes you want to listen to one portion of a project over and over,
either so you can play along and rehearse or because you want to edit
that section of the project while it is playing and hear the results as you
make changes. Professionalª has a playback loop feature that makes
this simple.
3-85
Page 86

Loops are deÞned in the Loop/Auto Shuttle toolbar, as shown here:
Click to copy the
selection (From
and Thru) times
Click to turn looping on or off
Loop Thru
time
Loop From
time
Click to open the
Loop/Auto Shuttle
dialog box
To set up a loop, you do three things:
¥ Set the start time of the loop
¥ Set the end time of the loop
¥ Enable looping
ThatÕs all there is to it. From then on, Professionalª will automatically
jump back to the start of the loop when it reaches the end.
When looping is enabled, the loop times are indicated by special markers
in the time ruler.
3-86
Loop From Loop Thru
The Loop/Auto Shuttle dialog box contains three additional settings that
affect the details of how looping operates:
Option... How it works...
Rewind to start time on stop Whenever you stop playback for any
reason, Professional™ rewinds
immediately to the start of the loop (this
option is off by default)
Stop at the end time Playback does not proceed beyond the
end of the loop
Loop continuously When playback reaches the end of the
loop and rewinds to the start, playback
continues automatically (this option is on
by default)
Page 87

With the default option settings, Professionalª will play the loop over
and over again, continuously. You can stop and resume playback at any
point during the loop.
If you start playback before the loop start time, Professionalª will play
until the loop end time is reached, then jump back to the loop start time.
If you start playback after the loop end time, the loop is ignored.
The Rewind command operates slightly differently when looping is in
effect. The Þrst time you rewind, the Now time is set to the start of the
loop. If the Now time is already at the start of the loop, Rewind takes you
to the beginning of the project. From then on, Rewind switches back and
forth between the loop start time and the start of measure 1.
To Set Up a Playback Loop…
1. Set the loop start and end times in one of the following ways:
• Drag the mouse between two points in the time ruler of the
Track, Piano Roll, Staff, or Audio view to select a range of
times, then click in the Loop/Auto Shuttle toolbar to copy
the selection time to the loop time
• Click between two markers in the Track, Piano Roll, Staff, or
Audio view to select a range of times, then click in the
Loop/Auto Shuttle toolbar to copy the selection time to the
loop time
Playback
• Type the loop start and end times directly into the toolbar
• Select a range of times, then right-click in the time ruler and
choose
unnecessary)
2. Click to turn looping on.
Set Loop Points
(this method makes step 2
To Change the Loop Settings…
1. Click , or choose
the Loop/Auto Shuttle dialog box.
2. Check the options you want to use.
3. Click OK.
Realtime-Loop and Auto Shuttle
To Cancel a Playback Loop…
1. Click on the toolbar to disable looping.
to display
3-87
Page 88

Track-by-Track Playback
Professionalª lets you play back any combination of tracks at one time
by changing each trackÕs status. There are four different status settings
for each track:
Status... What it means...
Normal The track is played as usual
Mute The track is not played, but you can turn
it on while playback is in progress
Archive The track is not played, and you must
stop playback to re-enable it
Solo Only those tracks that are designated as
solo tracks are played; all others are
muted
While playback is in progress, you can mute and unmute tracks in any
combination, which means you can hear only the tracks that you want.
You can change the status of a track in the Track view or in the Console
view or by using commands on the Track menu.
3-88
Page 89

The status of each track is shown in the Track and Console views:
Archived track
Normal
track
Muted
track
Solo
track
Normal
track
Muted
track
Playback
Solo trackArchived track
The track status is saved with the Professionalª project Þle. If you save
a Professionalª project as a standard MIDI Þle, however, all tracks are
saved without mute, solo, or archive indicators.
Silencing Tracks
When a track is muted, Professionalª processes the track while
playback is in progress so that you can unmute the track without
stopping playback. If you have lots of muted tracks, this can place a
3-89
Page 90

heavy load on your computer. Archived tracks, on the other hand, donÕt
place any load on your computer. Therefore, if there are tracks you want
to keep but donÕt need to play, you should archive them instead. Archived
tracks are indicated by the letter A in the Mute button that is displayed
in the Track and Console views.
When you mute or unmute a track while playback is in progress, there
may be a slight delay before you hear the effect of the change. This is to
be expected and does not indicate a hardware or software problem.
To Mute or Unmute Tracks…
• To mute or unmute a track, click the Mute button in the Track or
Console view
• To mute or unmute several tracks at once, select the tracks and
choose
Mute
Track-Mute
, or select the tracks, right-click, and choose
To Archive or Unarchive Tracks…
1. Select one or more tracks in the Track view.
2. Choose
menu to toggle the archive status of the selected tracks.
Track-Archive
, or right-click and choose
Archive
from the
Soloing Tracks
Sometimes you want to hear a single track, or a few tracks at once,
without having to mute all the other tracks. You can do this by soloing
the tracks you want to hear.
As soon as any track is marked as a solo track, Professionalª ignores all
mute settings and plays only the track or tracks that are set to solo. Any
number of tracks at one time can be marked as solo. All these tracks will
play together. As soon as the solo status of the Þnal solo track is turned
off, Professionalª once again plays back tracks based on their mute
settings.
To Solo or Unsolo Tracks…
• To solo or unsolo a track, click the Solo button in the Track or
Console view
3-90
Page 91

• To solo or unsolo several tracks at once, select the tracks and
choose
Track-Solo
, or select the tracks, right-click, and choose
Solo
Changing Track Settings
Each track in a project contains MIDI or audio information and has a
variety of settings that determine how the track sounds. By changing
these settings, you can change the sound of your project. For audio
tracks, you control the volume, the stereo panning, and the output device
that is used to produce the sound. For MIDI tracks, you control many
additional settings, including the type of instrument sound that is used
to play the notes stored in the track.
Here is a summary table of the different track parameters and how they
are used. For more information on any setting, see the indicated page of
the UserÕs Guide. The following parameters apply to all types of tracks:
Setting... What it means... See page...
Number A sequential track number,
ranging from 1 to 256, used only
for reference
Name A name that you assign the track
for easy reference
Source The input source for the track,
used in recording
Port The output device through which
the track is played; also indicates
whether the track contains MIDI
or audio data
5-151
4-120
3-97
Playback
Volume The starting volume level for the
track, ranging from 0 (silent) to
127 (maximum volume)
Pan The stereo distribution of the
output, ranging from 0 (hard left)
to 127 (hard right); a value of 64
indicates sound that is centered
left-to-right
3-101
3-101
3-91
Page 92

Vel+ The change in velocity (volume)
that will be applied to notes in
this track on playback; ranges
from –127 to +127
3-104
The following parameters apply only to MIDI tracks:
Setting... What it means... See page...
Normal
track
Muted
track
Channel The MIDI channel through which the notes
will be played
Bank The set of patch names available for the
track
Patch The instrument sound that will be used for
playback
Key+ The number of steps by which the notes in
the track are transposed on playback (e.g.,
12 to transpose up one octave)
Size The total number of MIDI events stored in
the track
Time+ An offset applied to the start time of the
events in the track
3-102
3-98
3-98
3-103
3-105
Track settings are shown in the Track paneÑthe left half of the Track
view. HereÕs what the Track pane looks like:
3-92
Archived
track
Solo track
Page 93

You can rearrange and resize the columns of the Track pane as shown in
the following:
To do this... Do this...
Change the size of the Track pane Drag to the left or right the divider that
separates the Track and Clips panes
Resize a column Move the mouse to the top of the
column, and drag the column divider to
the right or left
Move a column Click on the column name, and drag it to
the left or right
Changing Values in the Track Pane
You can change the values in the Track pane in a number of ways:
¥ Move the highlight to the cell you want to change (using the mouse
or the arrow keys), and type the new value
¥ Double-click on the cell, then type the new value
You can also change numeric values as shown in the following:
To do this... Do this...
Change the value by 1 Press the - or + key on your numeric
keypad, or click on the spinner control
Change the value by 10 (for Key+,
by 12)
Enter a new value Type the new value using the keyboard,
Press the [or] key, or right-click on the
spinner control
and press Enter
Playback
You can use the mouse to change values in the Track pane. Click and
hold the mouse button on the value you want to change, then move the
mouse forward or backward until you reach the value you want. For
numeric Þelds, you can press and hold both mouse buttons to change the
value by increments of 10.
3-93
Page 94

There are a few special shortcuts for setting certain parameters:
Parameter… Shortcut…
Source Hold the Shift key, and click in the cell to
cycle through the available audio
sources
Key+ Right-click, and press the [and] keys to
change the value by 12 (a full octave)
instead of 10
You can also edit Track properties in the Track Properties dialog box. To
open this dialog box:
¥ Move the highlight to the trackÕs Source, Port, Chn, Bank, or Patch
column, then press Enter
¥ Double-click in the trackÕs Source, Port, Chn, Bank, or Patch column
¥ Right click on any column in the track and choose Track Properties
3-94
You can change the value of a track parameter for several tracks at once
using commands on the Track-Property menu. For example, to assign a
group of tracks to the same output port, select the tracks you want to
assign, then choose Track-Property-Port. These menu commands can
also be used to change the settings for individual tracks.
All track parameters are saved with a Professionalª project. However, if
you export a project to a standard MIDI Þle, several of the parameters
Page 95

(Key+, Vel+, Time+, and Chn) are applied to the MIDI data as the Þle is
being exported. Other parameters, including Source, Port, Mute, Solo,
and Archive, are lost when you export the project to a MIDI Þle. For
more information, see Appendix D: MIDI Files.
The following sections contain more information about many of the
parameters in the Track view. For more information on the track source
and the track Arming button, see ÒPreparing to RecordÓ on page 4-119.
Setting Up Output Devices
The port setting for a track determines which piece of hardware will be
used to produce the sound stored in your project. In a very simple
equipment setup, you might have only a computer equipped with a basic
sound card. In this case, you want to play all MIDI and audio output
through the sound card on your computer.
If your equipment setup also includes a MIDI keyboard attached to the
MIDI port on your sound card, you can choose to route MIDI data
directly to the sound card or through the sound card MIDI port to the
keyboard. If you choose the former, the music will play from your
computer speakers. If you choose the latter, the sound will play from the
speaker attached to your keyboard. You can even choose to send some
MIDI information to each of these devices so that they both play at once.
You can purchase MIDI interfaces that plug into your parallel or serial
port to add MIDI ports to your computer. For more information on
complex system conÞgurations, see Appendix C: Advanced Setup.
Playback
If your computer has several MIDI ports, choose the ones you want to
use and put them in a particular order using the Tools-MIDI Devices
command. From then on, MIDI Port 1 refers to the Þrst selected MIDI
output, MIDI Port 2 to the second selected MIDI output, and so on. The
port number is based solely on the order in which the selected ports
appear in the MIDI Devices dialog box. As a result, the port numbers
3-95
Page 96

used in Professionalª may not match the port numbers that appear on
your external multiport MIDI device.
These devices
are not
selected
MIDI Port 1
When Professionalª is installed, a single MIDI output device is
selectedÑthe best available MIDI synthesizer that Professionalª can
locate. This is usually an internal synthesizer on your computerÕs sound
card. You may have other devices that sound better, so experiment by
selecting different devices in the MIDI Devices dialog box.
Your computer is usually equipped with at least one audio deviceÑyour
computer sound card. Your setup may have several different audio
output devices, or you may have a multichannel sound card that
presents itself to your computer as though it were several different
devices, one for each stereo pair. In Professional, you choose one audio
device for all your audio output.
MIDI Port 2
3-96
To Choose MIDI Devices…
1. Choose
2. Click on any MIDI device in the Output Ports list.
3. Click Move to Top to move the selected devices to the top of the
list.
4. When all devices are selected in the order you want, click OK.
The first selected MIDI output device will be assigned to Port 1, the
second to Port 2, and so on.
Tools-MIDI Devices
to display the MIDI Ports dialog box.
Page 97

Assigning Tracks to Ports
You assign each track to a MIDI or an audio port using the Port column
in the Track view. From then on, material on that track will be sent to
the appropriate output device. In the preceding example, you could send
tracks 1 through 8 to the MIDI synthesizer on your computer sound
card, tracks 9 through 12 to your MIDI keyboard, and tracks 13 through
16 to your audio device.
Playback
Note:
If you rearrange your MIDI output devices after making port
assignments, you may Þnd MIDI information being sent to different
instruments than you expect. Also, Professionalª allows you to
deÞne instruments that are associated with certain output ports and
channels. If you use this feature, the name of the port will change to
reßect the instrument you have chosen. For more information about
instrument deÞnitions, see Chapter 10, Using Instrument DeÞnitions.
3-97
Page 98

To Assign a Track to a Port…
1. Move the highlight to the Port column of the track you want to
assign.
2. Press the + or – key until the port you want is displayed.
You can also change the port value in a variety of other ways, as
described on page 3-93. To change the port setting for more than one
track at a time, select the tracks you want to change and choose
Track-Property-Port
.
Choosing the Instrument Sound (Bank and
Patch)
Electronic keyboards and synthesizers often contain hundreds or
thousands of different sounds. Each sound is known as a patch. The
name comes from the early days of synthesizers, for which you
physically rewired (using patch cords) the oscillators and modulators to
produce different sounds. Patches are normally organized into groups of
128, called banks. Most instruments have between 1 and 8 banks, but
MIDI supports up to 16,384 banks of 128 patches each (thatÕs over 2
million patches).
The bank and patch settings in the Track view control the initial bank
and patch of a track during playback. Every time Professionalª starts
playback at the beginning of a song, the bank and patch settings for the
track are set to these initial values.
3-98
Many instruments have descriptive names for their banks and patches.
Professionalª stores these names in an instrument deÞnition. For more
information about instrument deÞnitions, see Chapter 10, Using
Instrument DeÞnitions. If you are using an instrument that supports
Page 99

general MIDI, your patch list will contain the 128 sounds that are
deÞned by the general MIDI speciÞcation.
Note to Experts:
Different MIDI instruments use different types of commands to
change banks. Cakewalk supports four common methods for changing
banks. For information about the bank selection method you should
use with your MIDI gear, see the UserÕs Guide for your MIDI
equipment.
Note that a single MIDI channel can only play one patch at a time on
each instrument assigned to that channel. Therefore, if two or more
MIDI tracks are set to the same port and channel but have different
bank and patch settings, the patch of the highest-numbered track will be
used for all the tracks.
In some projects you want the sound played by a track to change while
playback is in progress. You can accomplish this using the Insert-Bank/
Patch Change command. When you start playback in the middle of a
song, Professionalª searches back through the track to Þnd the correct
patch to use Ð either the initial bank and patch or the most recent bank/
patch change. Note that the Track view only shows the initial bank and
patch, even while a different bank and patch are being played back. The
only way to see and edit a bank/patch change is in the Event List view.
For more information, see ÒThe Event List ViewÓ on page 6-224.
Playback
When a track contains audio, Professionalª interprets the patch as an
indicator of the type of audio information contained in the track, such as
vocals, drums, or woodwinds. When you do certain types of audio editing,
Professionalª uses this information to try to preserve the quality of the
audio.
To Assign an Initial Bank and Patch to a Track…
1. Double-click on the Source, Port, Channel, Bank, or Patch
column on the track you want to change.
2. In the Track Properties dialog box, choose the desired bank and
patch from the drop-down lists.
3. To search for a patch containing specific text, click the Patch
Browser button to the right of the drop-down lists.
4. Click OK.
3-99
Page 100

Another Way to Assign a Patch to a Track…
1. Move the highlight to the Patch column of the track you want to
assign.
2. Press the + or – key until the patch you want is displayed.
You can also change the patch and bank values in a variety of other
ways, as described on page 3-93. To change the bank and patch
settings for more than one track at a time, select the tracks you want
to change and choose
Track-Property-Bank
or
Track-Property-Patch
.
To Insert a Bank/Patch Change…
1. Move the highlight to the track whose bank and patch you want
to change.
2. Set the Now time to the time at which you want the change to
occur.
3. Choose
Change dialog box.
4. Choose a bank and patch from the lists.
5. Click OK.
Professional™ inserts a change in bank and patch. When you play
back the song, the initial bank and patch shown in the Track view will
be used to the point at which the bank/patch change takes place. You
can remove a bank/patch change in the Event List view.
Insert-Bank/Patch Change
to display the Bank/Patch
3-100
 Loading...