

Page 1

Dimension Quick Start Guide
In This Chapter
Loading Programs . . . . . . . . . . . . . . . . . . . . . . . . . . . . . . . 2
Loading Elements. . . . . . . . . . . . . . . . . . . . . . . . . . . . . . . . 2
Combining Elements. . . . . . . . . . . . . . . . . . . . . . . . . . . . . . 5
Copying, Unloading, Resetting, and Chaining Elements . . 5
Using Dimension as a Multi-timbral Instrument . . . . . . . . . 6
Saving Programs and Elements . . . . . . . . . . . . . . . . . . . . . 6
Using the LoFi Module . . . . . . . . . . . . . . . . . . . . . . . . . . . . 7
Using the Filter . . . . . . . . . . . . . . . . . . . . . . . . . . . . . . . . . . 7
Using the Drive Module . . . . . . . . . . . . . . . . . . . . . . . . . . . 8
Using the EQ’s . . . . . . . . . . . . . . . . . . . . . . . . . . . . . . . . . . 8
Using the Delay Module . . . . . . . . . . . . . . . . . . . . . . . . . . . 8
Using the Modulators Module. . . . . . . . . . . . . . . . . . . . . . . 9
Mixing . . . . . . . . . . . . . . . . . . . . . . . . . . . . . . . . . . . . . . . . 11
Vector Mixing . . . . . . . . . . . . . . . . . . . . . . . . . . . . . . . . . . 13
Groove Programs . . . . . . . . . . . . . . . . . . . . . . . . . . . . . . . 13
MIDI Matrix . . . . . . . . . . . . . . . . . . . . . . . . . . . . . . . . . . . . 13
Sinc Interpolation . . . . . . . . . . . . . . . . . . . . . . . . . . . . . . . 14
Page 2

Dimension is a sampling synthesizer that contains over
1000 programs, and includes extensive manipulation and
mutilation tools for combining and editing the sounds.
Here are some procedures to get started.
Loading Programs
A Dimension program is made of up to four Elements.
Each Element contains a wave player/synth engine, and a
chain of effects, filters, envelope generators, and LFO’s.
You can turn each Element off or on in the Mix section at
the bottom of Dimension’s interface. You can also set each
Element to respond to a different MIDI channel, if you want
to use Dimension as a four-part multi-timbral synth.
Note: many programs use the Mod Wheel to change the
sound of the program while the program is playing back. If
the program name contains “mw,” try applying the Mod
Wheel during playback.
To Load a Program
1. Click the program window:
Click here
The Program Browser appears.
2. Navigate to the folder where the desired program is
located, and double-click the name of the program.
Close the Program Browser after you double-click the
program.
Dimension loads the program you double-clicked, and displays the program name in the program window.
You can also load a program by clicking the Program/Element Handling button and choosing Load Program
from the popup menu.
When you load a program, you load up to four elements at
a time, along with all the associated effects, filters, etc. You
can load a single element at a time if you want, in case
you’re using Dimension multi-timbrally, or if you want to
combine some elements to create a new program.
Loading Elements
Loading a single element loads the samples and effects
that a single element contains. This procedure does not
clear the samples or effects from the other three elements.
If you want to do that, initialize the program first by clicking
the Program/Element Handling button and choosing
Initialize Program from the popup menu.
To Load an Element
1. Click the Program/Element Handling button and
choose Load Element from the popup menu:
The Load Element dialog appears.
2. Navigate to the folder where the desired element is
located, click the name of the element, and click the
Open button.
Dimension loads the element you clicked, and displays the
name of the multisample in the multisample window.
2
Page 3

Name of
multisample
Multisample window
Element selector buttons
When you load an element, you load all of the element’s
associated effects, filters, etc. You can load only multisamples if you want, in case you’re creating a new program,
and want to configure all the effects yourself.
Loading Samples
Y ou can load single samples (wave files), or multisamples,
which already contain key mapping and velocity switching
assignments. Loading a sample or multisample does not
clear the effects that may be patched into Dimension at the
time of loading. If you want to clear all effects first, initialize
the program by clicking the Program/Element Handling
button and choosing Initialize Program from the
popup menu.
To Load a Multisample
1. Click the multisample window.
The Load Multisample dialog appears.
2. Navigate to the folder where the desired multisample
is located, click the name of the multisample, and
click the Open button.
Dimension loads the multisample and displays the name in
the multisample window.
A multisample consists of a group of samples, their key
mapping, and velocity switching. If you want to change key
mapping and/or velocity switching, you can edit each multisample’s SFZ file, which is found in the multisample folder
along with the multisamples. An SFZ editor (not included)
is a valuable tool for this type of editing.
To Load a Single Sample
1. Click the multisample window to open the Load
Multisample dialog, and navigate to the folder where
the desired sample (wave file) is located.
Note: Dimension streams samples from RAM, so
only samples under a minute in length are suitable for
loading, depending on the amount of RAM in your
computer.
2. Click the name of the sample, and click the Open
button.
Or
3
Page 4

• Drag a wave file from the Windows Explorer to the
multisample window.
Editing Sam pl e Playback Parameters
If you want to change how a sample responds to MIDI
input, you can edit the fields in the multisample window. To
edit number fields, drag the number in the field up or down.
To reset the field to its default value, double-click it. To edit
an On/Off field, click the field.
A multisample consists of a group of samples, their key
mapping, and velocity switching. If you want to change key
mapping and/or velocity switching for multisamples, you
can edit each multisample’s SFZ file, which is found in the
multisample folder along with the multisamples. An SFZ
editor is a valuable tool for this type of editing, but you can
use Notepad.
The following table describes how to use the fields in the
multisample window. The Lo/Hi Key fields and Lo/Hi Vel
fields are useful for working with single samples, but to
control the key mapping and velocity range of each sample
in a multisample, you need to edit the SFZ file for the multisample.
To Do This... Do This...
Change the range
of notes that
trigger the
sample(s)
Change the
velocity range
that triggers the
sample(s).
Set the Lo/Hi Key fields.
Set the Lo/Hi Vel fields.
Change the pitch
bend range.
Change whether
the program
responds to MIDI
Sustain data (cc #
64), or MIDI Soft
pedal (cc # 66).
Transpose the
input from your
keyboard.
Tune the
sample(s) up or
down.
Change the
amount that each
sample is
transposed when
the trigger note is
raised by a halfstep. The default
is 100 cents, or
one half-step.
Transpose the
sample(s).
Set the
polyphony.
Set the Bend Dn (down) and Bend
Up fields to the desired number of
half-steps.
Set the Sus t/ S o st fields to On or
Off.
Set the Transpose field to the
desired number of half-steps.
Set the Tune field to the number of
cents, positive or negative, by
which you want to adjust the
sample(s).
Set the KeyTrack field to the
number of cents, positive or
negative, by which you want to
transpose each sample when the
trigger note is raised by a halfstep.
Set the Shift value in half-steps,
positive or negative.
Set the Polyphony field to a value
between 0 and 8191, inclusive.
4
Page 5

See what sample
layer is currently
playing.
View the value in the Layer field
during playback.
After you edit a program, you can save your changes by
clicking the Program/Element Handling button and
choosing either Save Program or Save Program As from
the popup menu.
Combining Elements
If you want to combine different elements into a new program, you basically load up to four elements and then save
a new program. This is valuable if you want to play different instruments at the same time: for example, you could
double strings and piano, or guitar and violin.
Here’s the procedure:
To Combine Elements into a New Program
1. Initialize the program to clear all sounds and effects:
click the Program/Element Handling button and
choose Initialize Program from the popup menu
(click Yes to the All Current Settings Will Be
Discharged prompt).
2. Click the E1 button to display the controls for Element
1.
3. Load an element into Element 1: click the Program/
Element Handling button , choose Load Element
from the popup menu, navigate to the desired
element, select it and click the Open button.
4. Adjust any effects, filters, etc. for Element 1, and
make sure Element 1’s On button is enabled in the
Mix section:
5. Repeat steps 2-4 for any additional Elements you
want to combine for this program (for Element 2, click
button E2 to display the controls for Element 2, load
an Element into Element 2, adjust effects for Element
2, and make sure Element 2’s On button is enabled;
for Element 3, click button E3, etc.).
6. When you’ve loaded and configured up to four
Elements, mix the pan, volume, and global effects for
the Elements by using the knobs in the Mix section.
You can display the controls for the global effects by
clicking the FX button. If you want a hard limiter
applied to this program, enable the Limiter On button.
7. When the program sounds the way you want it, save
the program by clicking the Program/Element
Handling button and choosing Save Program
As from the popup menu.
Copying, Unloa ding, Resetting,
and Chaining Elements
If you right-click an Element button (E1 through E4), a
popup menu appears, which contains the following commands:
• Unload Multisample—removes the multisample from
the multisample window without removing parameter
settings.
• Reset Element—removes the multisample from the
multisample window and removes all parameter
settings.
5
Page 6

• Copy Element—places all information from current
Element, including multisample assignments and all
parameter settings, on the clipboard.
• Paste Element—pastes copied Element data from the
clipboard to the current Element: to paste, right-click
the Element button of the Element that you want to
paste to, and select Paste Element from the popup
menu.
• Chain to Next Element—this command patches the
output of one Element into the EQ and delay chain of
the next Element. You can chain the first three
Elements into the last Element if you want. This
allows you to turn off the EQ and delay on the
previous Element to conserve CPU, or use the EQ’s
and delay processors in all the chained Elements.
When an Element is chained, the Element’s FX1 and
FX2 knobs are disabled. Also, if an Element is
chained to an Element that contains no multisample,
the first Element won’t sound. You can load the
ELEMENT CHAIN.SFZ multisample into the second
Element as a workaround, if you don’t want to load an
actual multisample. This multisample is found in the
98- Special folder in the Multisamples folder.
Using Dimension as a Multitimbral Instrument
Each of the four Elements can function as a separate
instrument, if you want to use a single instance of Dimension as a four-part multi-timbral instrument.
To Use Dimension as a Multi-timbral Instrument
1. Load the program that you want to use as a multitimbral program.
2. Click the Options button . The Options dialog
appears.
3. Check the Set Program As Multi-timbral option, and
click OK.
4. Save the program, if you want to change it to a multitimbral program.
When a program is in Multi-timbral mode, the four Elements respond to MIDI channels 1-4, respectively.
Saving Programs and Elements
Once you’ve configured a Program or an Element the way
you want it, you can save it to your Programs or Elements
folders.
To Save a Program
1. When the program sounds the way you want it, click
the Program/Element Handling button and
choose Save Program or Save Program As from
the popup menu.
2. If you chose Save Program, Dimension saves the
program under its current name in its current folder.
3. If you chose Save Program As, the Save Program
dialog appears: navigate to the folder where you want
to save the program, type a name for the program,
and click the Save button.
To Save an Element
1. When the element sounds the way you want it, click
the Program/Element Handling button and
choose Save Element As from the popup menu. This
opens the Save Element dialog.
2. Navigate to the folder where you want to save the
element, type a name for the element, and click the
Save button.
6
Page 7

To Save the Default Program
1. Load the program that you want Dimension to use
when you haven’t chosen a program.
2. Click the Program/Element Handling button and
choose Save Default Program from the popup
menu.
3. Click Yes when Dimension asks you if this is what
you want to do.
Dimension saves the current program as the default program.
Using the LoFi Module
Dimension’s LoFi module contains a bit reduction effect
and a decimation effect that you can apply to the current
Element.
The bit reduction effect emulates the sound of older, low
bit-resolution samplers. The decimation effect continuously
adjusts the sample rate.
To Use Bit Reduction
1. Enable the On button that’s above the Bit Red knob.
2. Adjust the Bit Red knob between 0 and 100% to
achieve the desired sound.
To Use Decimation
1. Enable the On button that’s above the Decim knob.
2. Adjust the Decim knob between 0 and 100% to
achieve the desired sound.
Using the Filter
Dimension’s Filter creates a wide selection of filter types,
which you choose from the dropdown menu:
Choose filter types here
The dropdown menu has the following choices:
• Low Pass (LP), one pole (1P), two pole, four pole, or
six pole—this is a standard low-pass filter with
choices for 6 dB filtering (1P), 12 dB (2P), 24 dB (4P),
and 36 dB (6P). Use the Cutoff knob to select the
cutoff frequency for the low-pass filter. Resonance is
available for all choices except 1P; use the Reso
knob to adjust resonance.
Note: resonance can dramatically increase loudness
as the cutoff frequency is reduced. Keep the Limiter in
the Mix section turned on when you edit programs
that use resonance.
• High Pass (HP), one pole (1P), two pole, four pole, or
six pole—this is a standard high-pass filter with
choices for 6 dB filtering (1P), 12 dB (2P), 24 dB (4P),
and 36 dB (6P). Use the Cutoff knob to select the
cutoff frequency for the high-pass filter. Resonance is
available for all choices except 1P; use the Reso
knob to adjust resonance.
• Band Reject (BR), one pole (1P), or two pole (2P)—
this filter rejects the band of frequencies whose
center frequency you choose with the Cutoff knob.
The volume reduction of the selected band is 6dB
(1P), or 12 dB (2P).
• All Pass (AP), one pole (1P)—this very subtle effect
7
Page 8
introduces sub-sample delay times, which are useful
when phase aligning samples between different
elements.
• PK (2P)—peak filtering reinforces the cutoff
frequency by 6 dB, and the surrounding frequencies
with a slope of 12 dB per octave. The width of the
peak is adjusted with the Reso knob.
• Comb filter—this choice creates several frequency
notches, which color the sound in a particular way.
• Pink—a multiple knee filter composed of multiple low
pass, one-pole filters. When applied to sampled
material, the effect is a slight darkening of tone,
without changing the sound character.
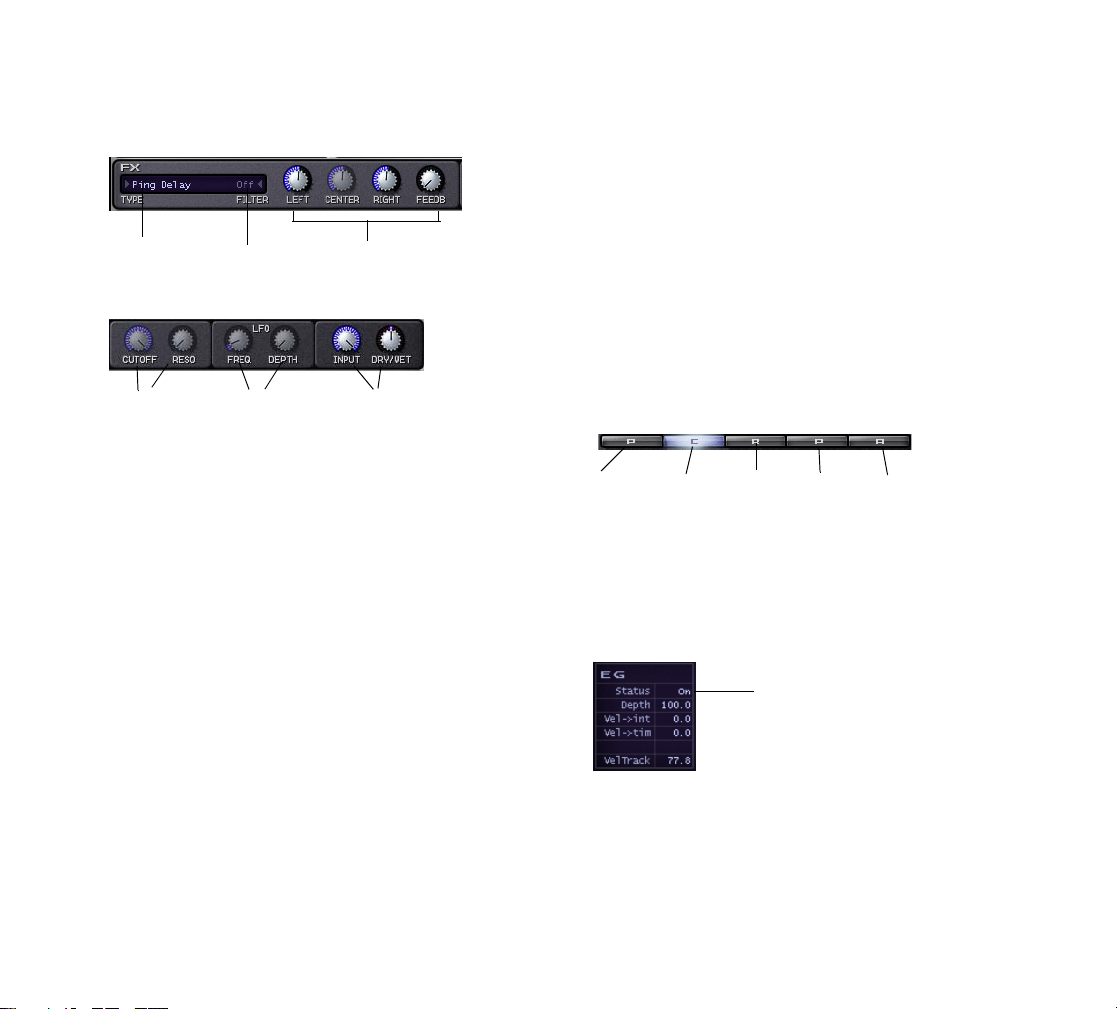
Using the Drive Module
Dimension’s Drive module adds various overdrive effects,
which you choose from the dropdown menu:
Choose overdrive types here
Try the various choices in the dropdown menu, and use
the Shape knob to color each one. The Tone knob is
intended to soften the resulting overdriven tone.
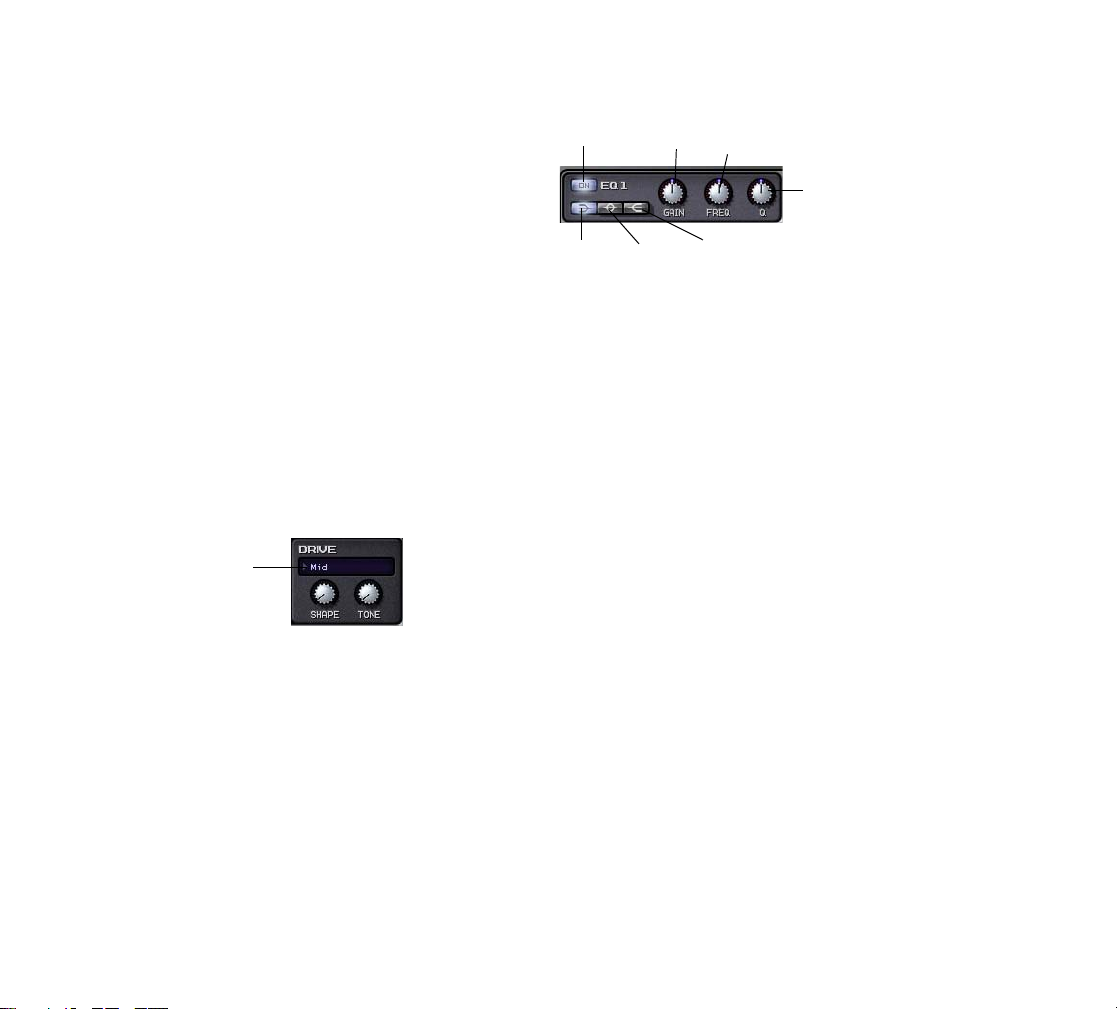
Using the EQ’s
EQ On button
Lo shelf
• On button—enable this button to use the EQ.
• Low shelf button—when this button is enabled, the
EQ modifies all frequencies below the Freq knob
value.
• Band pass button—when this button is enabled, the
EQ modifies all frequencies surrounding the Freq
knob value.
• High shelf button—when this button is enabled, the
EQ modifies all frequencies above the Freq knob
value.
• Gain knob—turn this knob to the left to cut the
selected frequencies by up to 24 dB, or to the right to
boost by up to 24 dB.
• Freq knob—turn this knob to select a frequency
between 8 and 22350 Hz.
• Q (Quality) knob—turn this knob to the left to narrow
the range of affected frequencies, or to the right to
widen the range.
Band pass
Gain
Frequency
Q
High shelf
Dimension’s three EQ modules give you tremendous control over the sound of each Element.
Each EQ has the following controls:
8
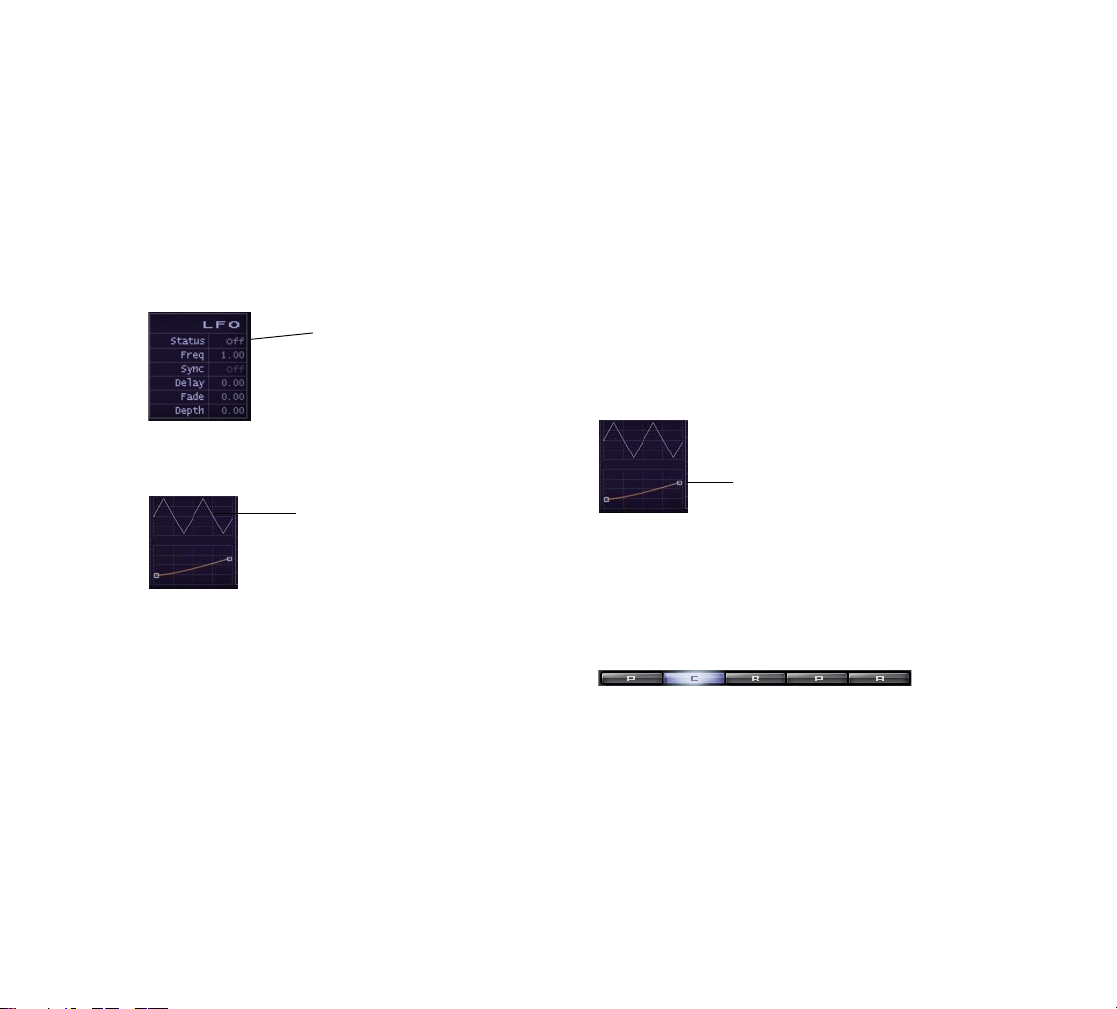
Using the Delay Module
Dimension’s Delay module offers many delay types in the
Type menu, and has a built-in filter that you can select
options for in the Filter menu.
Page 9
The Delay module has the following controls:
Delay menu
Filter parameters
• Delay menu—choose the desired type of delay effect.
• Filter menu—choose the type of filter. Choices are
Low Pass (LP), Band Pass (BP), High Pass (HP),
Band Reject (BR), All Pass (AP), Peak (PK), Comb
filter, and Pink. Strength choices are 6 dB(1P) up to
36 dB (6P).
• Delay parameters—Left delay: choose a tempo ratio.
Center delay: choose a tempo ratio (knob is greyedout if the delay type doesn’t use a center delay). Right
delay: choose a tempo ratio. Feedback: choose from
0 to 100%.
• Filter parameters—choose a cutoff frequency and
resonance level. A knob is greyed-out if the chosen
filter doesn’t support the parameter that the knob
controls.
• LFO parameters—if a chosen delay type uses an
LFO, set the frequency and depth with these two
knobs. Knobs are greyed-out if the relevant
parameter is not used.
• Mix parameters—use these knobs to control the
Filter menu
LFO parameters
Delay parameters
Mix parameters
delay input level and dry/wet mix.
Using the Modula tors Module
The Modulators module allows you to generate envelopes
to control an Element’s pitch, cutoff, resonance, pan, and
amplitude.
Here are some procedures for generating envelopes:
To Display an Envelope
• To display the envelope for pitch, cutoff, resonance,
pan, or amplitude, respectively, click the Pitch button,
Cutoff button, Resonance button, Pan button, or
Amplitude button, respectively.
Pitch Cutoff Resonance
Pan
To Turn On an Envelope Generator
1. Display the desired envelope.
2. Click the EG Status field so that it’s on.
Click here
To Edit EG Depth and Velocity Response
• To edit EG Depth, drag the Depth field up or down.
• To edit velocity intensity, drag the Vel->int value up or
down. This controls the intensity in which the Note-on
Amplitude
9
Page 10
velocity affects the modulation depth.
• To edit how velocity affects EG times, as a multiplier
of the time, drag the Vel->tim value up or down.
• To edit how velocity affects the current envelope’s
value, drag the Vel Track field up or down.
To Control an Envelope’s LFO
• Click the LFO Status field to turn the LFO on or off.
LFO Status field
• Click the current waveform to select a waveform.
LFO waveform
• Drag the LFO Freq field to control LFO frequency.
• Click the LFO Sync field to select tempo sync options.
For example, if Sync is set to 1, the LFO will generate
one cycle in each beat.
• Drag the LFO Delay field to select LFO Delay options
in seconds. This is the time from Note-On message to
LFO startup.
• Drag the LFO Fade field to select LFO Fade options
in seconds. This is the time it takes the LFO to reach
maximum modulation level.
• Drag the LFO Depth field to select LFO Depth
options.
To Control Keytracking
• Drag the nodes or curve of the Keytrack envelope
where it appears under the LFO waveform. You can
drag the line segment into a curve, or reset the line
segment by double-clicking it.
Keytracking maps the range of your MIDI controller to
changes in the current envelope. For example, if you display the Cutoff envelope, and drag the Keytrack envelope
into an upward slope, playing higher notes on your controller will raise the cutoff frequency. On the Amplitude envelope, you can actually use the Keytrack envelope as a
global gain—drag both nodes of the Keytrack envelope up
or down to control global output volume.
Keytrack envelope
To Copy/Paste a Modulator Value
1. To copy a whole Modulator, just one envelope, an
LFO, or a Keytrack setup, right-click an envelope
button and choose Copy-(name of component you
want to copy) from the popup menu.
Right-click one of the five envelope buttons
2. To paste what you just copied, right-click the
envelope button where you want to paste the copied
data, and choose Paste-(name of component you
want to paste) from the popup menu.
You can paste between instances of Dimension.
10
Page 11
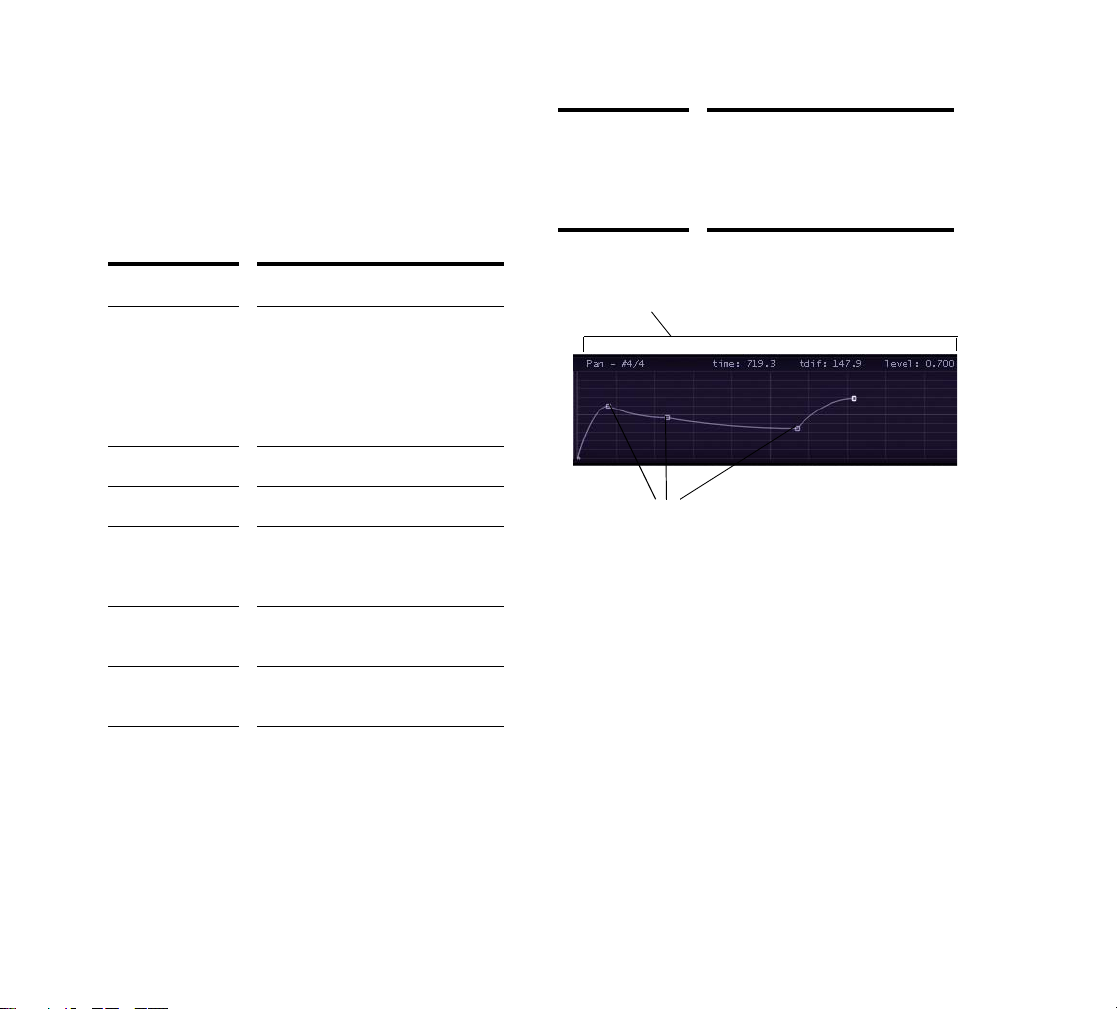
To Graph or Edit an Envelope
1. Click an envelope button to display the desired
envelope, and make sure the EG Status field is On.
2. Add and edit nodes according to the following table:
Display the
values of a node.
Hold the mouse over the node.
The node values appear at the top
of the graph, including node
number, time, distance from
previous node, and level.
To Do This... Do This...
Add a node to the
envelope.
Remove a node. Right-click the node.
Move a node. Drag the node.
Move a node
without moving
other nodes.
Edit a line
segment.
Reset a line
segment.
Remove all
nodes.
Right-click the envelope. If the
envelope does not have any line
segments and nodes yet, rightclick the graph where you would
like to insert a line segment and a
node.
Ctrl-drag the node.
Drag the line segment.
Double-click the segment.
Press r.
Node values
Nodes
Mixing
At the bottom of Dimension’s interface is the Mix section,
where you mix together the output of the four Elements.
The Mix section contains controls for each Element, an FX
section to control the two global effects, and a hard Limiter ,
which can only be turned on or off.
Here is a list of procedures for using the Mix section:
To Turn an Element’s Output On or Off
• Click the Element’s On button so that it is lit up
(enabled) or grey (off).
11
Page 12

Turn Element 1 on or
off
To Control an Element’s Pan or Volume
• Drag the Element’s Pan or Vol knobs, respectively.
To Send an Element’s Output to the Global
Effects
• Drag the Element’s FX1 knob to the right to send the
Element’s output to the Modulation FX processor.
• Drag the Element’s FX2 knob to the right to send the
Element’s output to the Reverb processor.
To Choose Global Effects
1. Display the global effects by clicking the FX button in
the Mix section.
4. Choose a Reverb effect by clicking the arrow in the
Reverb window and then choosing an effect from the
dropdown menu.
Parameter knobs
5. Adjust the Reverb effect by using the parameter
knobs.
To Use the Limiter
• Turn the Limiter button off or on. This is a hard limiter,
which is not adjustable.
Click to choose an effect
2. Choose a Modulation effect by clicking the arrow in
the Modulation FX window and then choosing an
effect from the dropdown menu.
3. Adjust the effect with the parameter knobs.
Parameter knobs
12
Page 13

Vector Mixing
Groove P rograms
The Vector Mixer is an extra gain stage located after the
Mix section in the signal chain. The Vector Mixer allows
you to dynamically mix the output of the four Elements on
a graph. You can balance the output of the four Elements
by dragging the cross hair through the four quadrants of
the graph, or by using a joystick.
The Desaccel field allows you to slow down the response
of the cross hair—higher values cause a slower response.
Open the Vector Mixer by clicking the Show/Hide Vector
Mixer button .
Element 3 quadrant
Cross hair
Element 1 quadrant
Element 4 quadrant
Element 2 quadrant
Some Dimension programs contain MIDI patterns that trigger audio patterns in the program. You can drag the MIDI
patterns into Project5’s Arrange pane, and open them in
the Editor if you want to change the cycle of sample triggering in the pattern.
To Drag a MIDI Pattern from Dimension
1. Open a program from the Musical Grooves folder.
2. Drag from within Dimension’s interface (for example,
where the interface says Dimension) to your
Dimension track in Project5.
3. Double-click the pattern in the Arrange pane to view it
in the Editor.
4. Rearrange the notes in the pattern, if you want to
trigger the program samples in a different order or
rhythm.
MIDI Matrix
Dimension’s MIDI Matrix works like Project5’s remote control feature: use can use a MIDI message to control a
Dimension parameter.
To Assign a MIDI Message to a Dimension
Parameter
1. Display the MIDI Matrix by clicking the Show/Hide
MIDI Matrix button .
2. In the Source column, click the arrow at the left side
of the column to open the MIDI Source menu.
3. Pick a MIDI message that you want to use to control a
Dimension parameter.
13
Page 14

4. In the Destination column, click the arrow at the left
side of the column to open the Destination menu (a
list of Dimension parameters).
5. Click the Dimension parameter that you want to
control with the MIDI message you chose in the left
column.
6. In the Depth column, drag up or down to enter a
number that controls how strongly and in which
direction the parameter responds to changes in the
source (negative numbers produce an inverse
relationship).
7. In the Smooth column, drag upward to produce a
number that smooths out the response of the
Destination to the Source
Sinc Interpolation
When you freeze or play back a Dimension track, you have
the option to use a higher-quality algorithm called sinc
interpolation. This can increase the time it takes to freeze
tracks, and use a little more of your computer’s resources
when you play back audio. If you’re using distortion, you
don’t need this algorithm.
To Use Sinc Interpolation
1. Open the Options dialog by clicking the Options
button .
2. Check the Use Sinc Interpolation When Freezing/
rendering checkbox.
14
 Loading...