

Page 1
C USTOMER C ONVENIENCE/PERSONALIZATION GUIDE
Page 2
SRX
TABLE OF CONTENTS
DRIVER INFORMATION
Instrument Panel . . . . . . . . . . . .1
Instrument Panel Cluster . . . . . . .2
Driver Information Center . . . . . .3
SEATS, LIGHTS & WIPERS
Manual Seat Adjustments . . . . . .5
Power Seat Adjustments . . . . . .5
Power Lumbar . . . . . . . . . . . . . .6
Heated Front Seats . . . . . . . . . . .6
Second-Row Seat . . . . . . . . . . .6
Third-Row Access . . . . . . . . . . . .6
Power Third-Row Seat . . . . . . . .7
Child Restraints (LATCH) . . . . . .7
Memory Seat and Mirrors . . . . . .8
Instrument Panel and
Courtesy Lights . . . . . . . . . . . . .8
Rear Washer/Wiper . . . . . . . . . . .8
ENTERTAINMENT SYSTEMS
Standard Audio System . . . . . . .9
Bose®Audio System . . . . . . . . . .9
Navigation System . . . . . . . . . . .9
Rear Seat Entertainment (RSE) . .11
CONVENIENCE FEATURES
OnStar®. . . . . . . . . . . . . . . . . . .12
XM Satellite Radio . . . . . . . . . .12
Universal Home Remote . . . . .12
Ultrasonic Rear Parking Assist
(URPA) . . . . . . . . . . . . . . . . . . .13
UltraView/UltraView Plus
Sunroof . . . . . . . . . . . . . . . . . .13
Power Adjustable Pedals . . . . .13
Cruise Control . . . . . . . . . . . . . .14
Dual Climate Control . . . . . . . .14
Rear Air Conditioning . . . . . . . .14
POWERTRAIN & CHASSIS
Engine Fuel . . . . . . . . . . . . . . . .15
Transmission . . . . . . . . . . . . . . .15
Traction & Stability . . . . . . . . . .15
OWNER PRIVILEGES™
Roadside Service . . . . . . . . . . .16
Customer Assistance . . . . . . . .16
Cadillac Online . . . . . . . . . . . . .16
Page 3
Driver Information
1
11
2 3
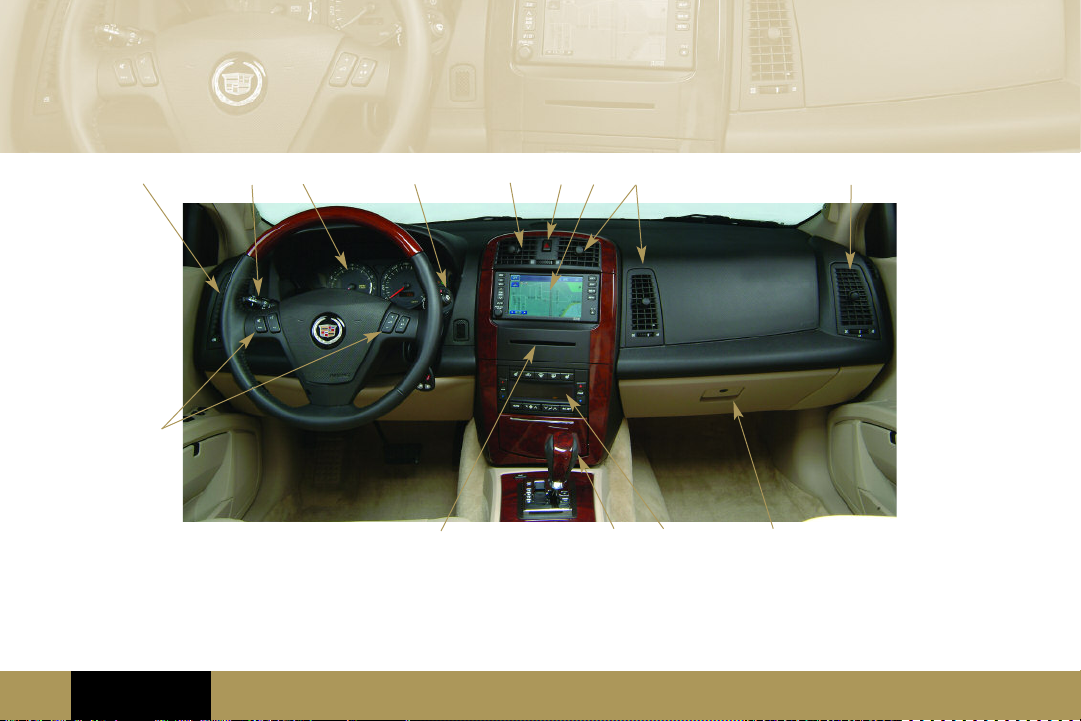
INSTRUMENT PANEL
1. Air Outlets
2. Turn Signal/Multifunction Lever
3. Instrument Panel Cluster
4. Windshield Wiper Lever
Refer to your Owner Manual for more information.
Driver
Information
Seats, Lights
& Wipers
4 5 6
10
1
1 1
9
5. Hazard Warning Flasher Button
6. Audio System/
Navigation System (if equipped)
7. Glove Box
8. Dual Climate Control
Entertainment
Systems
Convenience
Features
8
7
9.
Automatic Transmission Shift
Lever
10. CD Player
11. Steering Wheel Controls
1
Powertrain
& Chassis
Owner
Privileges™
Page 4
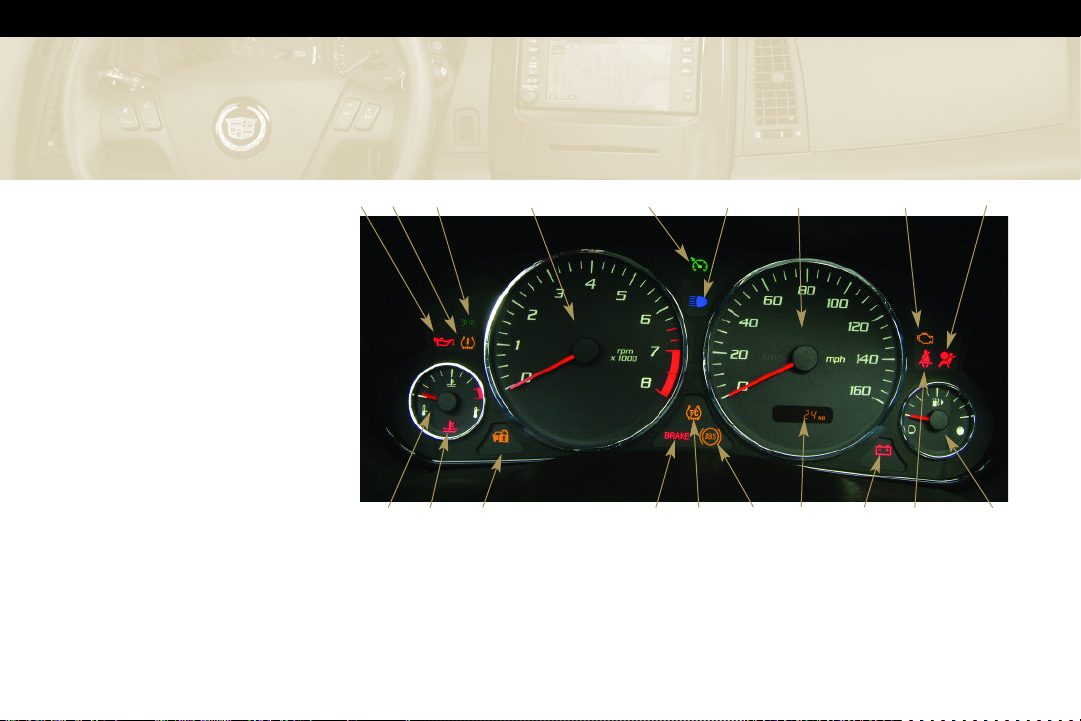
INSTRUMENT PANEL CLUSTER
1. Oil Pressure Light
2. Tire Pressure Light
3. Fog Lamp Light
4. Tachometer
5. Cruise Control Light
6. High Beam On Light
7. Speedometer
8. Malfunction Indicator Lamp
(Check Engine Light)
9. Air Bag Readiness Light
10. Fuel Gauge
11. Safety Belt Reminder Light
12. Charging System Light
13. Odometer/Driver Shift Control
(DSC) Display
14. Antilock Brake System (ABS)
Warning Light
15. Traction Control System (TCS)
Warning Light
16. Brake System Warning Light
17. Security Light
18. Engine Coolant Temperature
Warning Light
19. Engine Coolant Temperature
Gauge
SRX
12
8
11
9
10
3
2
1
19
18
Note: Some of the gauges and indicators may differ from the illustration presented. The
instrument panel cluster is designed to let you know about many important aspects of your
vehicle’s operation.
It is important for you to read your Owner Manual and become familiar with the information
that is being relayed to you by the lights, gauges and indicators, particularly the message center,
as well as what action can be taken to ensure your safety and to prevent damage.
4
17
5
16
6
15
14
7
13
Page 5

DRIVER INFORMATION CENTER (DIC)
The DIC displays vehicle system
status, warning messages,
personalization features and the
clock.
All information will appear on the
audio display or, if the vehicle is
equipped with the optional
navigation system, it will appear on
the navigation display.
The following procedures are
provided only to acquaint you with
the DIC. It is strongly recommended
that you review your Owner Manual
to become familiar with the various
messages and how to access and/or
reset them.
Vehicle System Status
The vehicle system menu provides
the following information:
• OUTSIDE TEMPERATURE
• TRIP ODOMETER A
• TRIP ODOMETER B
• FUEL RANGE
• AVERAGE FUEL ECONOMY
• INSTANTANEOUS FUEL ECONOMY
• FUEL USED
• AVERAGE VEHICLE SPEED
• TIMER
• BATTERY VOLTAGE
• TIRE PRESSURES (Requires optional
Tire Pressure Monitor)
• ENGINE OIL LIFE
• TRANSMISSION FLUID LIFE
You can view the above information
at any time, but only one item at a
time. Refer to your Owner Manual for
detailed descriptions of the menu
items and how to reset them.
Display Status without Navigation
To display the vehicle system status
menu in vehicles without navigation,
the vehicle must be in RUN.
Use the following controls to access
the vehicle system status menu:
1. Push the arrows on the
INFO
button located to the lower right
of the audio display to scroll
through the
vehicle system
information.
2. Press the CLR
button to clear
and/or reset DIC
items to zero.
Refer to your
Owner Manual
for detailed
description.
Refer to your Owner Manual for more information.
Driver
Information
Seats, Lights
& Wipers
Entertainment
Systems
Convenience
Features
❏ Reviewed with Customer (Please Check Box)
Powertrain
& Chassis
Owner
Privileges™
3
Page 6
SRX
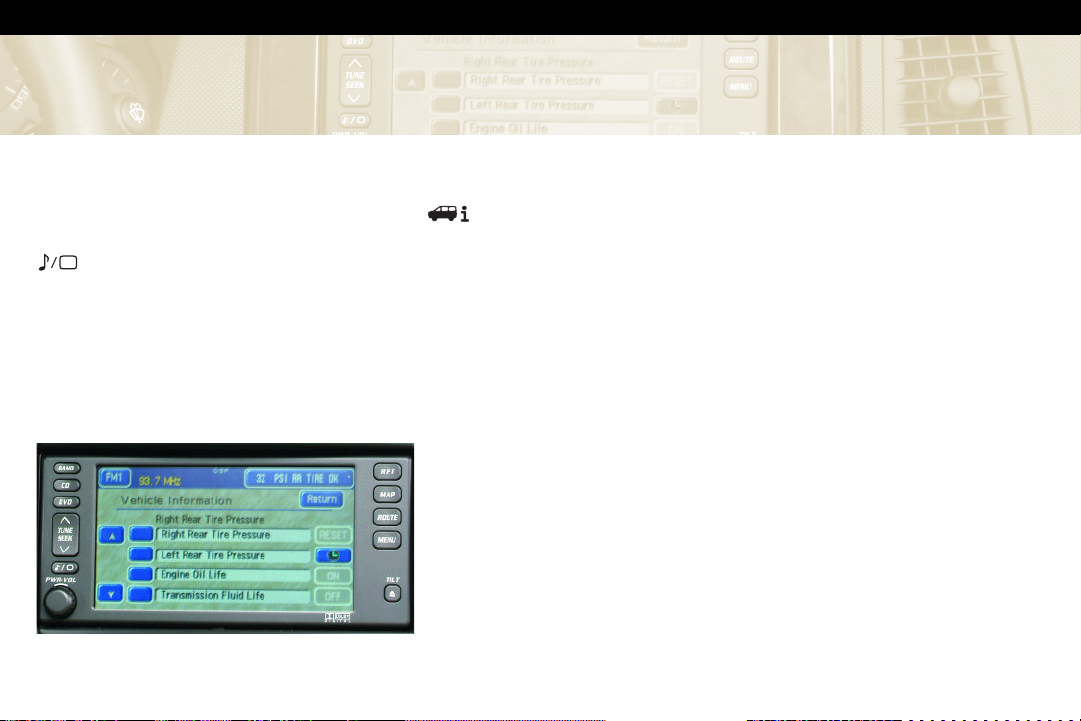
Display Status with Navigation
(if equipped)
To display the vehicle system status
menu in vehicles with navigation, the
vehicle must be keyed On. Push the
hard key to display the main
system menu.
1. The vehicle system status
information is displayed on the
upper-right corner of the display.
Touch this soft button to cycle
through the vehicle system status
menu.
2. To view the complete vehicle
system status menu, touch and hold
this rectangular soft button or touch
the soft button on the lower
part of the display.
3. Cycle through the menu items with
4. The
Warning Messages
Messages will appear on the audio or
navigation/audio display if there is a
problem sensed in one of your vehicle’s
the
pushed to reset.
soft buttons.
RESET soft button can be
systems. You must acknowledge
a message to clear it from the
screen for further use.
For vehicles without navigation,
press the
the audio display to clear a
message.
To clear a message in vehicles
with navigation, press the OK
soft button.
CLR button next to
Note: Removing the message does not
remove the sensed problem or
condition. Refer to your Owner Manual
for a list of messages and
accompanying icons, a description of
the condition and the recommended
action. Be sure to regard seriously any
message that appears and take the
appropriate action.
Check Warning Lights with OnStar
(if equipped)
If your vehicle is equipped with OnStar
and your Malfunction Indicator Lamp
(Check Engine Light) illuminates, or any
other warning message appears, you
can press the blue OnStar button and
speak to an OnStar Advisor. In many
vehicles, OnStar Advisors can access
certain diagnostic information and tell
you how serious the condition is and
what you should do about it.
Page 7

Personalization
Your vehicle is equipped with
personalization capability that allows
you to program certain features to a
preferred setting for up to two
drivers. To personalize programmable
features, please refer to the
Personalization Instructional CD and
booklet or the Owner Manual
provided with your vehicle.
Setting the Time
If your vehicle is not equipped with
the Navigation System:
1. Press the TUNE/SEL knob to enter
the main menu.
2. Turn the TUNE/SEL knob until “SET
CLOCK” is displayed.
3. Press the TUNE/SEL knob to select
SET CLOCK.
4. Turn the TUNE/SEL knob to adjust
the time.
5. Press the TUNE/SEL knob to
update the time. “VEHICLE TIME
UPDATED” will be displayed.
If your vehicle is equipped with
navigation, refer to the Entertainment
and Navigation Supplement.
Seats, Lights & Wipers
MANUAL SEAT ADJUSTMENTS
(passenger side only)
Use the bar at the front of the seat to
adjust seat position. Use the lever at
the side of the seat to recline the
seat or return it to upright.
POWER SEAT ADJUSTMENTS
If your vehicle has this feature, the
power seat controls are located on
the outboard sides of the front seats.
1. The front or rear part of the lever
will raise or lower the front or
rear of the seat cushion.
Move the entire lever up or
down to raise or lower the entire
seat.
Slide the entire lever forward or
rearward to move the seat in that
direction.
2. Move the vertical lever rearward
to recline, and forward to return,
the seatback.
1
2
Refer to your Owner Manual for more information.
Driver
Information
Seats, Lights
& Wipers
Entertainment
Systems
Convenience
Features
❏ Reviewed with Customer (Please Check Box)
Powertrain
& Chassis
Owner
Privileges™
5
Page 8

SRX
POWER LUMBAR (if equipped)
If your vehicle has this feature, a
two-way switch is located beneath
the power seat switch controls. Hold
the control forward or rearward to
increase or decrease support.
HEATED FRONT SEATS (if equipped)
The buttons to heat the driver and
front passenger seats are located on
the Climate Control panel. The
ignition must be on to heat the seats
and the heated
seats must be
turned on again
(if desired) after
the vehicle has
been turned off.
1. Press the button twice for the seat
you wish to heat to set the
heat to LO (approximately normal
body temperature).
2. Press the button once to set the
heat at HI (slightly higher than
LO setting).
3. Press the button a third time
to turn the heat OFF.
The selected setting will appear on
the display panel.
SECOND-ROW SEAT
Adjusting the Seat
An adjustment lever to move the
seat forward or rearward is located
under each side of the 60/40 seat.
After adjustment, move the seat back
and forth to make sure it locks into
place.
THIRD-ROW ACCESS
The right side of the second-row
60/40 seat has an easy entry feature
to make it easier to get into and out
of the third-row seat, if equipped.
To operate the easy entry seat:
• Pull the release lever located on
the top of the seat upward.
• Tilt the seatback forward by
pulling the top of the seat
forward.
• Pull upward on the release lever
located on the back of the seat
and rock forward until it stops.
Page 9

POWER THIRD-ROW SEAT
(if equipped)
If your vehicle has a third-row seat,
it includes a power-folding feature
to provide additional cargo space.
Before the seat can be folded, the
headrests must be removed and
stored.
Removing Headrests
1. Press the button on top of the
seatback below the headrest and
pull up on the headrest.
2. Open the storage compartment
cover behind the seat and insert
the headrest posts through the
slats in the carpet.
3. Position and snap the headrests in
the storage tray provided.
The seatback will not fold all the way
down if the headrests are not
removed.
Folding/Unfolding Seat
Before folding or unfolding the thirdrow seat,
all
of the following
conditions must be met:
• The vehicle must be in Park and
not have a low battery.
Refer to your Owner Manual for more information.
Driver
Information
Seats, Lights
& Wipers
• The liftgate or right-side rear
door must be open.
• The carpet seatback panel must be
folded and attached to itself.
• The ignition must be in ON or
ACCESSORY. If not, pressing the
unlock button on the key fob or
door
three
times will enable
power folding or unfolding for two
minutes.
Two buttons are located on the rightside panel behind the third-row seat.
One folds and raises the seat and the
other changes the seatback angle.
The other button
for folding the seat
is located on the
right-side trim
panel behind the
second-row seat.
Entertainment
Systems
Convenience
Features
Press and hold either folding button
to fold or unfold the seat.
After the seat is folded, the panel on
the back of the seat must be flipped
forward to create a flat floor space.
Before returning the seat to its
upright position, the panel must be
returned to its folded position.
CHILD RESTRAINTS (LATCH)
Your vehicle is equipped with LATCH
anchors, and may have top tethers
for use with a LATCH compatible
child restraint. If your child restraint
is not compatible with the LATCH
system, you may still use it by
installing the child restraint with the
seat belt system.
Choose a child restraint that is
appropriate for the child’s age and
size (weight and height).
See Section 1 of your Owner Manual.
❏ Reviewed with Customer (Please Check Box)
Powertrain
& Chassis
Owner
Privileges™
7
Page 10

SRX
MEMORY SEAT AND MIRRORS
(if equipped)
The buttons to set the seat and mirror
memory are located on the driver’s
armrest. To set the memory, first adjust
the driver’s seat, including the seatback
recliner, both outside mirrors, the
throttle and brake pedals, audio settings
and HVAC settings.
1. Press and hold button 1 until two
beeps are heard to confirm memory
setting.
2. Repeat the procedure using button 2
to store memory for a second driver.
Setting Exit Position
1. Press button 1 or the unlock symbol
on the keyless entry fob with number
1 on the back. Adjust the driver’s
seat to the desired exit position.
2. Press and hold the exit button,
located above buttons 1 and 2 on the
driver door armrest, until two beeps
are heard to confirm exit memory
setting. Repeat the procedure for a
second driver using button 2 and the
key fob with 2 on the back.
To recall stored exit positions, press and
release the exit button. A beep will
sound and the seat will move to the
memory exit position for the identified
driver. If no exit position is stored, the
seat will move all the way back.
Note: The vehicle must be in Park to
recall the exit position.
For further programming instructions for
seat and mirror memory, refer to your
Owner Manual or Personalization
Instructional CD and Booklet.
INSTRUMENT PANEL AND COURTESY
LIGHTS
Slide the lever in the overhead console
forward to brighten the panel lights and
past the resistance point to turn the
courtesy lights on. Slide the lever in the
opposite direction to turn off the
courtesy lights or dim the panel lights.
REAR WASHER/WIPER
The rear washer/wiper
control is located in the
overhead console. Press
the center of the switch to
wash the rear window.
Press the forward part of
the switch for delayed
wipes. Press the rear part
of the switch for steady wipes.
Page 11

Entertainment Systems
Your SRX is equipped with one of the
following audio systems.
STANDARD AUDIO SYSTEM: AM/FM
radio with Radio Data System (RDS),
a single-disc CD player or optional
six-disc CD changer, and seven
speakers (shown below).
BOSE®AUDIO SYSTEM: Bose
AM/FM stereo radio with RDS &
Digital Signal Processing (DSP), eight
speakers and integral six-disc CD
changer.
NAVIGATION SYSTEM: Bose premium
eight-speaker audio system and
integrated DVD navigation system with
movie-playing capability when vehicle
is in Park.
Refer to your Owner Manual for more information.
Driver
Information
®
Seats, Lights
& Wipers
Note: The following procedures
apply only to audio systems without
the navigation system. If your SRX is
equipped with the navigation
system, a supplemental manual is
provided and must be referenced for
audio system operating procedures.
Radio Controls
PWR:
Press this button to turn the
system on and off.
VOL: Rotate this knob to adjust the
volume.
BAND: Press this button to select
FM1, FM2, AM or XM1 or XM2
(if equipped).
SOURCE: Press this button to select
the radio or compact disc.
SEEK
: Press this button’s up or
down arrow to seek the next or
previous station.
SCAN
: Press this button’s up
arrow to scan to the next station.
The radio will play a station for five
seconds and then go to the next
receivable station. Press the button
again to stop scanning. To scan your
Entertainment
Systems
Convenience
Features
preset stations, press and hold this
button for more than two seconds
until you hear a beep. Press the
button again to stop scanning.
Setting Preset Stations
Your audio system includes six
numbered preset buttons (F1 through
F6) that allow you to return to your
favorite stations. To set a frequency
to a preset button:
1. Turn the radio on.
2. Press BAND to select FM1, FM2,
AM or XM1 or XM2 (if equipped).
Six stations can be preset for each
band.
3. Tune in the desired station.
4. Press and hold one of the
numbered buttons until you hear a
beep. The preset number will
appear on the display.
5. Repeat the steps for each
pushbutton.
❏ Reviewed with Customer (Please Check Box)
Powertrain
& Chassis
Owner
Privileges™
9
Page 12

SRX
Single-Disc CD Player Controls
To play a CD, insert the disc, label
up, partway into the CD slot. The
player will pull it in. Use the
following controls to operate the
player.
down arrow to seek the next or
previous track on the CD.
to each track for 10 seconds. Press
the button again to stop scanning
tracks.
button to stop a CD when it is
playing or to eject a CD that is
currently playing.
Six-Disc CD Changer Controls
(without Navigation System)
Loading One Disc:
With the ignition on or off, do the
following:
SEEK
: Press this button’s up or
SCAN
: Press this button to listen
EJECT: Press and release this
• Press and release the LOAD
button. “Please Wait” will appear
on the display.
• Load the disc when the display
reads “INSERT.” Insert a disc
partway into the slot, label side up.
The player will pull the disc in.
Loading Multiple Discs:
With the ignition on or off, do the
following:
• Press and hold the LOAD button
for two seconds. A beep will be
heard and “Please Wait” will
appear on the display.
• When the display reads “INSERT,”
load a disc partway into the slot,
label side up. The player will
pull it in.
If the radio is on, the last disc loaded
will begin to play automatically. Use
the SEEK, SCAN and EJECT buttons as
described previously to operate the
player.
Note: CDs with any labels may jam in
the CD player. Label a CD using a
permanent marker. If more than one
CD is inserted into the slot at one
time, or if scratched or damaged CDs
are played, the CD player could be
damaged. When using the CD player,
use only CDs in good condition
without added labels; load one CD at
a time; and keep the CD player and
the loading slot free of foreign
materials, liquids and debris.
Digital Signal Processing
(DSP) (if equipped with Bose
Audio System)
The Digital Signal Processing (DSP)
system provides a choice of five
different listening experiences:
• DSP Normal: This setting provides
the best overall audio performance
for all passengers.
®
Page 13

• Talk: This setting should be used
when listening to non-musical
entertainment, such as news, talk
shows, and sports broadcasts. This
setting helps make spoken words
sound clearer.
• Spacious: This setting makes the
listening space seem larger.
• Rear Seat: This setting adjusts the
audio to give the rear seat
passenger(s) the best possible
sound qualities.
• Driver Seat: This setting adjusts the
audio to give the driver the best
possible sound qualities.
To select a DSP setting, perform the
following:
1. Press the
TUNE/SEL knob to enter
the main menu.
2. Turn the
TUNE/SEL knob until one
of the five settings appears on the
display.
3. Press the
TUNE/SEL knob to select
a DSP setting.
4. Press
CLR to exit the display.
REAR SEAT ENTERTAINMENT (RSE)
The available RSE system (for rear
seat passengers only) includes a DVD
player, video display screen, two sets
of wireless headphones and a remote
control. DVD power may be turned
on using the remote control or by
controls on the unit itself with the
ignition in the ON, ACC, or Retained
Accessory Power position.
The audio portion of a DVD program
can be played through the wireless
headphones or the vehicle radio
speakers. Use the SOURCE button on
the RSE to select HEADSETS or
SPEAKERS for the RSE audio. A
movie in the navigation DVD player
may also be viewed on the RSE. Use
the SOURCE button to select FRONT.
See Section 3 of your Owner Manual
for full RSE operating instructions.
Parental Control: Press this button
while a DVD or CD is playing to
freeze the video and mute the audio.
Press the button again to restore
normal operation.
RSE Lock: Press this button to
prevent rear passengers from
operating the front seat audio
controls, such as Source and Volume.
RSE On: Press this button to give
rear passengers control of all audio
operations of the radio (BAND, CDX,
DVD, etc.) as well as the volume for
all vehicle speakers.
RSE Off: Press this button to turn
off the Rear Seat Entertainment
system. When this button is pressed,
rear seat passengers can only eject
the disc from the Rear Seat
Entertainment device.
Refer to your Owner Manual for more information.
Driver
Information
Seats, Lights
& Wipers
Entertainment
Systems
Convenience
Features
❏ Reviewed with Customer (Please Check Box)
Powertrain
& Chassis
Owner
Privileges™
11
Page 14

SRX
Convenience Features
®
ONSTAR
The OnStar system provides invehicle safety, security and phone
services, available 24 hours a day,
7 days a week. These services are
easily accessed through the three
OnStar buttons in your vehicle. For
more information about OnStar
features, refer to the OnStar Owner’s
Manual and Audio CD, located in
your glove box.
XM SATELLITE RADIO
Two subscription service bands are
available: XM1 and XM2. To access
them on equipped radios, press the
BAND button until “XM1” or “XM2”
appears on the display. An extra-cost
subscription to XM Satellite Radio
service brings you the quality of
digital audio and text reception from
coast to coast.
Available only in the 48 contiguous
states and Canada (if available), XM
offers more than 120 channels of
music, news, sports, talk and
children’s programming. For more
information, contact XM on the
Internet at www.XMradio.com or call
1-800-852-XMXM (9696).
UNIVERSAL HOME REMOTE
This programmable remote can store
three frequencies for items such as a
garage door opener, entry door lock
or security system. With the ignition
OFF, program the remote as follows:
• Press and hold down the two
outer buttons on the unit until
the indicator light flashes (about
20 seconds — do not hold for
more than 30 seconds).
• Hold the end of your hand-held
transmitter up to three inches
from the remote and press its
button and the remote button you
wish to program.
• Release both buttons when the
indicator light flashes rapidly.
• Press and release the remote
button again. If the indicator light
stays lit constantly, programming
is complete.
• Continue programming
additional devices using the
remote, but do not press the two
outside buttons on the remote
again.
See Section 2 of your Owner Manual
for complete Universal Home Remote
operating instructions.
Page 15

ULTRASONIC REAR PARKING
ASSIST (URPA)
This feature helps you determine
how close an object is to your rear
bumper. URPA operates only at
speeds less than 3 mph (5 km/h) and
detects objects at distances between
5 ft. (1.5 m) and 1 ft. (.03 m). Both a
variable audible chime and a visual
display located above the rear
window convey distance to an
object.
ULTRAVIEW/ULTRAVIEW PLUS
SUNROOF
On vehicles equipped with UltraView
or UltraView Plus sunroofs, the
switches are located in the overhead
console and operate as follows:
UltraView
1. This switch
1
operates the
front sunroof.
Press the rear
of the switch
to the first
detent to
open partially
and press to the second detent for
express open. The express feature
opens to a comfort stop. Press
again to express-open all the way.
Press the front of the switch to the
first detent to partially close, and
press to the second detent to
express-close.
2. This switch operates the front
sunshade. Press the rear of the
switch to the first detent to open
partially and to the second detent
for express-open. Press the front of
the switch to the first detent to
partially close, and to the second
detent to express-close.
UltraView Plus (if equipped)
There is a third switch located below
button 2. This switch operates the
rear sunshade. Press the rear of the
switch to open; press the front of the
switch to close.
2
POWER ADJUSTABLE PEDALS
If your vehicle is equipped with this
feature, you can change the position
of the throttle and brake pedals. The
switch is
located on the
side of the
steering
column. Push
the switch
rearward to
move the
pedals closer
to you or
forward to
move the
pedals away from you.
Refer to your Owner Manual for more information.
Driver
Information
Seats, Lights
& Wipers
Entertainment
Systems
Convenience
Features
❏ Reviewed with Customer (Please Check Box)
Powertrain
& Chassis
Owner
Privileges™
13
Page 16

SRX
CRUISE
CONTROL
Use the Cruise
Control for
steady driving
on relatively
straight,
uncrowded
roads. The controls are located on
the end of the multifunction lever.
The symbols function as follows:
(Off): This position turns the
system off.
l (On): This position turns the system
on.
+ (Resume/Accelerate): Push the
lever to this position to resume a
previously set speed or to accelerate
when Cruise Control is already
active.
– (Set/Decrease): Pressing this
button sets the speed or decreases
vehicle speed when cruise is already
active.
DUAL CLIMATE CONTROL
Your vehicle’s Dual Climate Control
system allows the driver and front
passenger to set his/her own
temperatures. Key operating features
include:
AUTO: Press this button to
automatically control the inside
temperature, the air delivery mode
and the fan speed.
(Mode): Press this button to
control the system manually. To clear
fog from your windshield, press this
button until the Floor/Defog icon
( ) appears on the display. The
Floor/Defog mode directs air
between the windshield, floor outlets
and side windows. Press AUTO again
to return to automatic operation.
PWR: Press this button on either side
of the control panel to turn the driver
or passenger climate control system
on. Press the up or down arrow to
increase or decrease the temperature
for that system.
See your Owner Manual for complete
operating instructions.
REAR AIR CONDITIONING
If equipped, your Rear Air
Conditioning system provides air
conditioning to the second- and
third-row occupants. The system
includes four air outlets: two over the
outboard second-row seats and two
more near the cargo area or thirdrow seat (if equipped). The system
can be controlled from the front
overhead console or it can be placed
in the AUX mode to allow rear
passengers to control the system
from the second-row overhead
console.
Page 17

Powertrain & Chassis
ENGINE FUEL
For normal driving, use regular
unleaded fuel rated at 87 octane or
higher. If the octane rating is less
than 87, you may experience engine
knock when driving. For optimum
acceleration and performance, use
premium unleaded fuel with an
octane rating of 91 or higher.
TRANSMISSION
Automatic Overdrive
Automatic Overdrive is best used for
normal driving. For further
information regarding gear selection
for various driving conditions, refer
to your Owner Manual.
Refer to your Owner Manual for more information.
Driver
Information
Seats, Lights
& Wipers
Driver Shift Control (DSC)/
Sport Mode
When Driver Shift Control (DSC) is
activated, your SRX transmission will
allow you to change gears similar to
a manual transmission for more
control. It will also provide fir mer
shifting and increased performance.
1. Slide the shift lever over from
AUTOMATIC OVERDRIVE (
D) to
the right DSC area. The Sport
Mode light ( ) in the instrument
panel will illuminate.
2. Push the shift lever forward to
upshift or rearward to downshift.
The intended gear number will
appear in place of the odometer
display.
TRACTION & STABILITY
Traction Control System
The Traction Control System comes
on automatically every time you start
your vehicle. When one or more of
the drive wheels begin to spin from
traction loss, the system will apply
braking to the spinning wheel(s) and
Entertainment
Systems
Convenience
Features
may reduce engine
power until traction
is regained.
If your vehicle
becomes stuck, and
rocking the vehicle is required, the
system should be turned off.
• Press the button located near the
shift lever to turn the system off or
back on.
StabiliTrak®– Stability Control
System
StabiliTrak is an advanced computercontrolled system that assists with
directional control of the vehicle
during sudden maneuvers or low
traction situations. It is normal to
hear the system working, and the
system will automatically disengage
Cruise Control when activated.
❏ Reviewed with Customer (Please Check Box)
Powertrain
& Chassis
Owner
Privileges™
15
Page 18

Owner Privileges
To make your ownership experience
as satisfying and rewarding as
possible, we are proud to provide
you with Cadillac’s exceptional
Owner Privileges, designed to
accommodate you anytime and
anywhere.
ROADSIDE SERVICE
1-800-882-1112
Roadside Service provides every
Cadillac owner with the advantage of
contacting a Cadillac advisor and,
when appropriate, a Cadillac-trained
dealer technician who can provide
on-site services:
• Towing Service
• Battery Jump-Starting
• Lockout Assistance
• Fuel Delivery
• Flat Tire Assistance
Roadside Assistance and OnStar
(if equipped)
If your vehicle is OnStar-equipped,
press the blue OnStar button and the
vehicle will send your current GPS
location to an OnStar Advisor who
will speak to you, assess your
condition, contact Roadside
Assistance and relay your exact
TM
location so you will get the help you
need.
Trip Interruption: If your trip is
interrupted due to a component
failure covered under warranty,
incidental expenses may be
reimbursed, including hotel, meals
and rental car.
Courtesy Transportation may also
be provided for warranted repairs,
including shuttle service for sameday repairs and loaner transportation
for overnight repair.
Roadside Service is also available to
Cadillac customers beyond the
warranty period for a charge.
CUSTOMER ASSISTANCE
1-800-458-8006
In Canada, call 1-888-446-2000
Should you need to ask a question,
make a comment, or request
additional information, the Cadillac
Customer Assistance Center is staffed
around the clock with professionals
to serve you.
When you call Cadillac Roadside
Service or Customer Assistance,
when possible, please provide the
phone advisor with:
• Your telephone number
• Your location
• Your Cadillac’s location
• A description of the problem
• Vehicle Identification Number
• Year and model of your Cadillac
• Delivery date
• Current mileage
CADILLAC ONLINE
For more information about your
Cadillac, including access to the
Cadillac owner Center at My GMLink,
visit www.cadillac.com.
Certain restrictions, precautions and
safety procedures apply to your
vehicle. Please read your Owner
Manual for complete instructions. All
information contained herein is based
on information available at the time
of printing and is subject to change
without notice.
SRX is a registered trademark of
Cadillac Motor Car Division and
General Motors Corporation.
Copyright 2005 by Cadillac Motor
Car Division. All rights reserved.
Page 19

Refer to your Owner Manual for more information.
Driver
Information
Seats, Lights
& Wipers
Entertainment
Systems
06SRXGTK A
Convenience
Features
❏ Reviewed with Customer (Please Check Box)
Powertrain
& Chassis
Owner
Privileges™
Page 20

 Loading...