

Page 1

cadillac :: Cadillac DeVille V8-4.6L VIN Y (1998)
Page 2

> Relays and Modules > Relays and Modules - Accessories and Optional Equipment > Accessory Delay Module > Accessory Delay Relay > Component Information > Locations
Accessory Delay Relay: Locations
Passenger Compartment, Behind Lower Left Front Trim
On the left front of the passenger compartment, taped in the body harness
Page 3

Page 4

> Relays and Modules > Relays and Modules - Accessories and Optional Equipment > Antenna Relay > Component Information > Locations
Antenna Relay: Locations
Rear Compartment, In The Right Side
In the right side of the rear compartment, on the power antenna assembly
Page 5

Page 6

> Relays and Modules > Relays and Modules - Accessories and Optional Equipment > Antenna Relay > Component Information > Locations > Page 11
Power Antenna Relay C1
Page 7

Page 8

> Relays and Modules > Relays and Modules - Accessories and Optional Equipment > Antitheft Relay > Component Information > Locations
LH Side Of The Engine Compartment
Page 9

Page 10

> Relays and Modules > Relays and Modules - Accessories and Optional Equipment > Antitheft Relay > Component Information > Locations > Page 15
Antitheft Relay: Service and Repair
REMOVAL PROCEDURE
1. Remove the cover (1) from the engine compartment relay center.2. Disconnect the electrical connector.3. Remove the starter enable relay (2).
INSTALLATION PROCEDURE
1. Install the starter enable relay (2).2. Connect the electrical connector.3. Install the cover (1) to the engine compartment relay center.
Page 11

Page 12
> Relays and Modules > Relays and Modules - Accessories and Optional Equipment > Audio Control Relay > Component Information > Locations
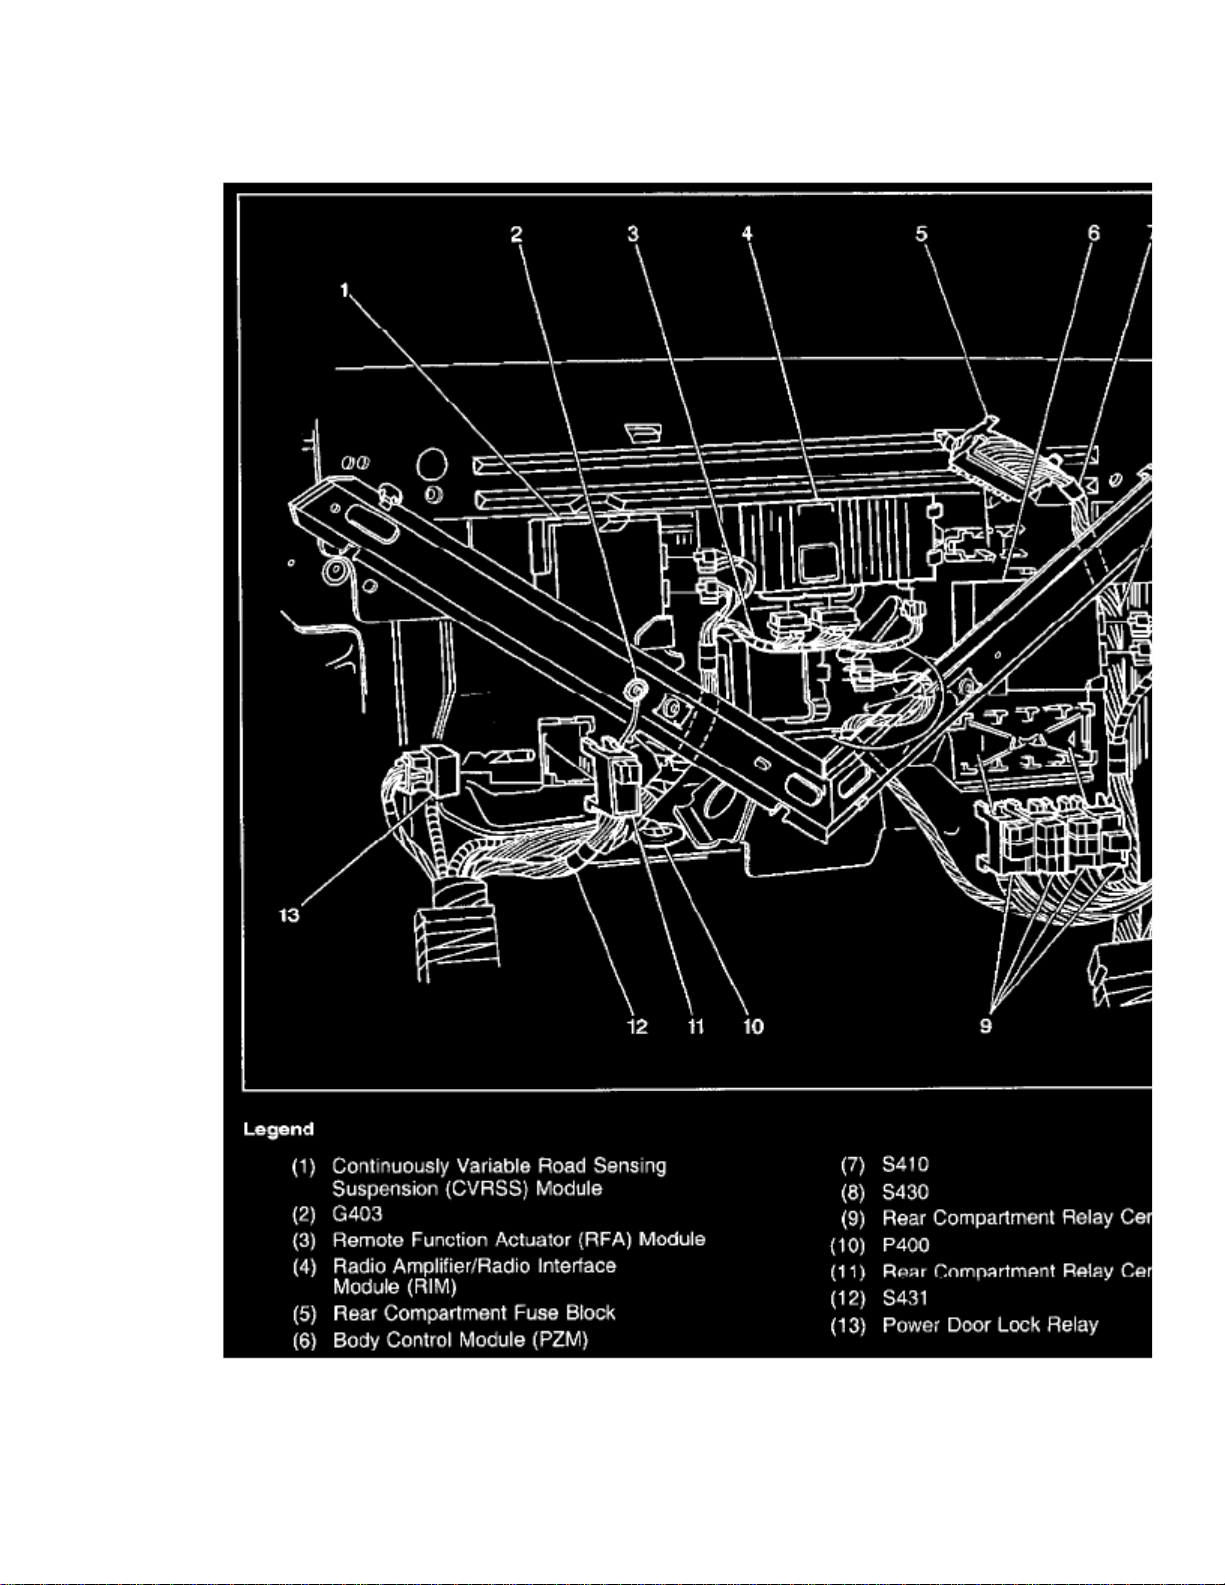
Audio Control Relay: Locations
Passenger Compartment, Behind The Rear Seat
The LH & RH Bose(R) Relays are located in the Rear Compartment Relay Center 1.
Page 13

Page 14
> Relays and Modules > Relays and Modules - Accessories and Optional Equipment > Emergency Contact Module > Component Information > Technical Service Bulletins > Recalls: > Campaign - Deactivation Of Analog
OnStar(R) > Campaign - Deactivation Of Analog OnStar(R)
Emergency Contact Module: RecallsCampaign - Deactivation Of Analog OnStar(R)
# 08089C: Special Coverage Adjustment - Analog OnStar Deactivation(Nov 18, 2008)
Subject:08089C -- SPECIAL COVERAGE ADJUSTMENT - ANALOG ONSTAR(R) DEACTIVATION
Page 15

> Relays and Modules > Relays and Modules - Accessories and Optional Equipment > Emergency Contact Module > Component Information > Technical Service Bulletins >
Recalls: > Campaign - Deactivation Of Analog OnStar(R) > Campaign - Deactivation Of Analog OnStar(R) > Page 25
DeVille V8-4.6L VIN Y (1998)
Page 16

Models
The service procedure in this bulletin has been revised. Step 11 in the procedure for the 2004-2005 Saab 9-3 (9440) Convertible has been revised.Discard all copies of bulletin 08089B, issued September 2008.
Condition
In November 2002, the U.S. Federal Commissions (FCC) ruled that wireless carriers would no longer be required to support the analog wireless networkbeginning in 2008. As a result, On Star(R) is unable to continue analog service.
Page 17

> Relays and Modules > Relays and Modules - Accessories and Optional Equipment > Emergency Contact Module > Component Information > Technical Service Bulletins >
Recalls: > Campaign - Deactivation Of Analog OnStar(R) > Campaign - Deactivation Of Analog OnStar(R) > Page 26
DeVille V8-4.6L VIN Y (1998)
OnStar(R) has deactivated most of the systems operating in the analog mode; however, there are some vehicles that OnStar(R) could not deactivate.Although the analog OnStar(R) hardware in these vehicles can no longer communicate with OnStar(R), the hardware in the vehicle is still active. If theOnStar(R) emergency button is pressed, or in the case of an airbag deployment, or near deployment, the customer may hear a recording that OnStar(R) isbeing contacted. However, since analog service is no longer available, the call will not connect to OnStar(R). To end the call, the customer must pressthe white phone or white dot button. If the call is not ended, the system will continue to try to connect to OnStar(R) until the vehicle battery is drained.
Special Policy Adjustment
At the customer's request, dealers/retailers are to deactivate the OnStar(R) system. The service will be made at no charge to the customer.
This special coverage covers the condition described above until December 31, 2008 for all non-Saab vehicles; April 30, 2009 for all Saab vehicles.
Vehicles Involved
Page 18

Page 19

> Relays and Modules > Relays and Modules - Accessories and Optional Equipment > Emergency Contact Module > Component Information > Technical Service Bulletins >
Recalls: > Campaign - Deactivation Of Analog OnStar(R) > Campaign - Deactivation Of Analog OnStar(R) > Page 27
DeVille V8-4.6L VIN Y (1998)
Page 20

Page 21

> Relays and Modules > Relays and Modules - Accessories and Optional Equipment > Emergency Contact Module > Component Information > Technical Service Bulletins >
Recalls: > Campaign - Deactivation Of Analog OnStar(R) > Campaign - Deactivation Of Analog OnStar(R) > Page 28
DeVille V8-4.6L VIN Y (1998)
Page 22

Page 23

> Relays and Modules > Relays and Modules - Accessories and Optional Equipment > Emergency Contact Module > Component Information > Technical Service Bulletins >
Recalls: > Campaign - Deactivation Of Analog OnStar(R) > Campaign - Deactivation Of Analog OnStar(R) > Page 29
DeVille V8-4.6L VIN Y (1998)
Page 24

Page 25

> Relays and Modules > Relays and Modules - Accessories and Optional Equipment > Emergency Contact Module > Component Information > Technical Service Bulletins >
Recalls: > Campaign - Deactivation Of Analog OnStar(R) > Campaign - Deactivation Of Analog OnStar(R) > Page 30
DeVille V8-4.6L VIN Y (1998)
Page 26

Page 27

> Relays and Modules > Relays and Modules - Accessories and Optional Equipment > Emergency Contact Module > Component Information > Technical Service Bulletins >
Recalls: > Campaign - Deactivation Of Analog OnStar(R) > Campaign - Deactivation Of Analog OnStar(R) > Page 31
DeVille V8-4.6L VIN Y (1998)
Page 28

Page 29

> Relays and Modules > Relays and Modules - Accessories and Optional Equipment > Emergency Contact Module > Component Information > Technical Service Bulletins >
Recalls: > Campaign - Deactivation Of Analog OnStar(R) > Campaign - Deactivation Of Analog OnStar(R) > Page 32
DeVille V8-4.6L VIN Y (1998)
Page 30

Page 31

> Relays and Modules > Relays and Modules - Accessories and Optional Equipment > Emergency Contact Module > Component Information > Technical Service Bulletins >
Recalls: > Campaign - Deactivation Of Analog OnStar(R) > Campaign - Deactivation Of Analog OnStar(R) > Page 33
DeVille V8-4.6L VIN Y (1998)
Page 32

Page 33

> Relays and Modules > Relays and Modules - Accessories and Optional Equipment > Emergency Contact Module > Component Information > Technical Service Bulletins >
Recalls: > Campaign - Deactivation Of Analog OnStar(R) > Campaign - Deactivation Of Analog OnStar(R) > Page 34
DeVille V8-4.6L VIN Y (1998)
Page 34

Page 35

> Relays and Modules > Relays and Modules - Accessories and Optional Equipment > Emergency Contact Module > Component Information > Technical Service Bulletins >
Recalls: > Campaign - Deactivation Of Analog OnStar(R) > Campaign - Deactivation Of Analog OnStar(R) > Page 35
DeVille V8-4.6L VIN Y (1998)
Page 36

Involved are certain vehicles within the VIN breakpoints shown above.
PARTS INFORMATION -- Saab US Only
Customer Notification
Page 37

> Relays and Modules > Relays and Modules - Accessories and Optional Equipment > Emergency Contact Module > Component Information > Technical Service Bulletins >
Recalls: > Campaign - Deactivation Of Analog OnStar(R) > Campaign - Deactivation Of Analog OnStar(R) > Page 36
DeVille V8-4.6L VIN Y (1998)
General Motors will notify customers of this special coverage on their vehicles (see copy of typical customer letter shown in this bulletin - actualdivisional letter may vary slightly).
Page 38

Page 39

> Relays and Modules > Relays and Modules - Accessories and Optional Equipment > Emergency Contact Module > Component Information > Technical Service Bulletins >
Recalls: > Campaign - Deactivation Of Analog OnStar(R) > Campaign - Deactivation Of Analog OnStar(R) > Page 37
DeVille V8-4.6L VIN Y (1998)
Page 40

Page 41

> Relays and Modules > Relays and Modules - Accessories and Optional Equipment > Emergency Contact Module > Component Information > Technical Service Bulletins >
Recalls: > Campaign - Deactivation Of Analog OnStar(R) > Campaign - Deactivation Of Analog OnStar(R) > Page 38
DeVille V8-4.6L VIN Y (1998)
Page 42

Claim Information - GM, Saturn Canada and Saab Canada Only
Claim Information - Saturn US Only
Customer Reimbursement Claims - Special Attention Required
Customer reimbursement claims must have entered into the "technician comments" field the CSO # (if repair was completed at a Saturn Retail Facility)date, mileage, customer name, and any deductibles and taxes paid by the customer.
Claim Information - Saab US Only
Page 43

> Relays and Modules > Relays and Modules - Accessories and Optional Equipment > Emergency Contact Module > Component Information > Technical Service Bulletins >
Recalls: > Campaign - Deactivation Of Analog OnStar(R) > Campaign - Deactivation Of Analog OnStar(R) > Page 39
DeVille V8-4.6L VIN Y (1998)
Page 44

1. To receive credit, submit a claim with the information above.
Disclaimer
Page 45

Page 46

> Relays and Modules > Relays and Modules - Accessories and Optional Equipment > Emergency Contact Module > Component Information > Technical Service Bulletins > Recalls: > Campaign - Deactivation Of Analog
OnStar(R) > Service Procedure > 2001 and Older Model Year Vehicles (Except Saab Vehicles)
Emergency Contact Module: Recalls2001 and Older Model Year Vehicles (Except Saab Vehicles)
2001 and Older Model Year Vehicles (Except Saab Vehicles)
Important:
2001 and older model year vehicles require the removal of the battery power from the OnStar(R) vehicle interface unit (VIU) to eliminate thepossibility of an inadvertent OnStar(R) or emergency/airbag call.
1. Locate and gain access to the OnStar VIU. Refer to OnStar Vehicle Interface Unit Replacement in SI.
Important:
Complete removal of the VIU is usually not required. Perform only the steps required to gain access to the C2 32-way blue connector.Residing in the C2 connector are the battery positive (+) circuits. Removal of the C2 connector will deactivate the unit and eliminate thepossibility of an inadvertent OnStar(R) or emergency/airbag call.
2.
Disconnect the C2 32-way blue connector from the VIU and tape the connector to a secure location. Refer to Cellular Communications ConnectorEnd Views and related schematics in SI, if required.
Important:
DO NOT perform the OnStar(R) reconfiguration and/or programming procedure.
3.
Secure the VIU in its original brackets and/or mounting locations and reinstall the VIU and interior components that were removed to gain accessto the VIU. Refer to OnStar Vehicle Interface Unit Replacement in SI.
Page 47

Page 48

> Relays and Modules > Relays and Modules - Accessories and Optional Equipment > Emergency Contact Module > Component Information > Technical Service Bulletins > Recalls: > Campaign - Deactivation Of Analog
OnStar(R) > Service Procedure > 2001 and Older Model Year Vehicles (Except Saab Vehicles) > Page 42
Emergency Contact Module: Recalls2002 Through 2006 Model Year Vehicles (Except Saab Vehicles)
2002 through 2006 Model Year Vehicles (Except Saab Vehicles)
Important:
The Tech 2 diagnostic tool must be updated with version 28.002 or later in order to successfully perform the VCIM setup procedure anddisable the analog system.
1. Connect the Tech 2 to the data link connector (DLC), which is located under the instrument panel of the vehicle.
2. Turn the Tech 2 ON by pressing the power button.
Important:
Tech 2 screen navigation to get to the setup procedure depends on the year and make of the vehicle. The actual name of the setup procedure(Setup New OnStar or VCIM Setup) depends on model year and vehicle make as well. Example Tech 2 navigation to the setup procedure Tech2 screen is provided below.
^ Diagnostics >> (2) 2002 >> Passenger Car >> Body >> C >> OnStar >> Special Functions >> Setup New OnStar >>
^
Diagnostics >> (5) 2005 >> Passenger Car >> (4) Buick >> C >> Body >> Vehicle Comm. Interface Module >> Module Setup >> VCIMSetup >>
3. Setup VCIM using the Tech 2. Follow on-screen instructions when you have reached the setup Tech 2 screen.
Page 49

Page 50

> Relays and Modules > Relays and Modules - Accessories and Optional Equipment > Emergency Contact Module > Component Information > Technical Service Bulletins > Recalls: > Campaign - Deactivation Of Analog
OnStar(R) > Service Procedure > 2001 and Older Model Year Vehicles (Except Saab Vehicles) > Page 43
Emergency Contact Module: Recalls2000-2002 Saab 9-3 (9400) 4D/5D; 2000-2003 Saab 9-3 (9400) CV
2000-2002 Saab 9-3 (9400) 4D/5D; 2000-2003 Saab 9-3 (9400) CV
1. Remove the ground cable from the battery's negative terminal.
2. Apply the handbrake brake.
3. Detach the floor console.
4. Remove the switch and the floor console:
3.1. Twist loose the immobilizer unit (A), bayonet fitting. Unplug the unit's connector.
3.2.
Remove the ignition switch cover (B) by first undoing the rear edge of the cover and then unhooking the front edge. Unplug the ignitionswitch lighting connector.
3.3. Undo the floor console's retaining bolts (C).
3.4. Take out the rear ashtray/cover (D).
3.5. Remove the screw (E) for the rear cover.
3.6. Remove the floor console's retaining nuts (E).
3.7. Detach the floor console (G) by pulling it straight back and lifting it slightly.
3.8. If required, detach the switch for the rear seat heater and unplug the connector.
4. Remove the switch and the floor console:
Page 51

> Relays and Modules > Relays and Modules - Accessories and Optional Equipment > Emergency Contact Module > Component Information > Technical Service Bulletins >
Recalls: > Campaign - Deactivation Of Analog OnStar(R) > Service Procedure > 2001 and Older Model Year Vehicles (Except Saab Vehicles) > Page 44
DeVille V8-4.6L VIN Y (1998)
Page 52

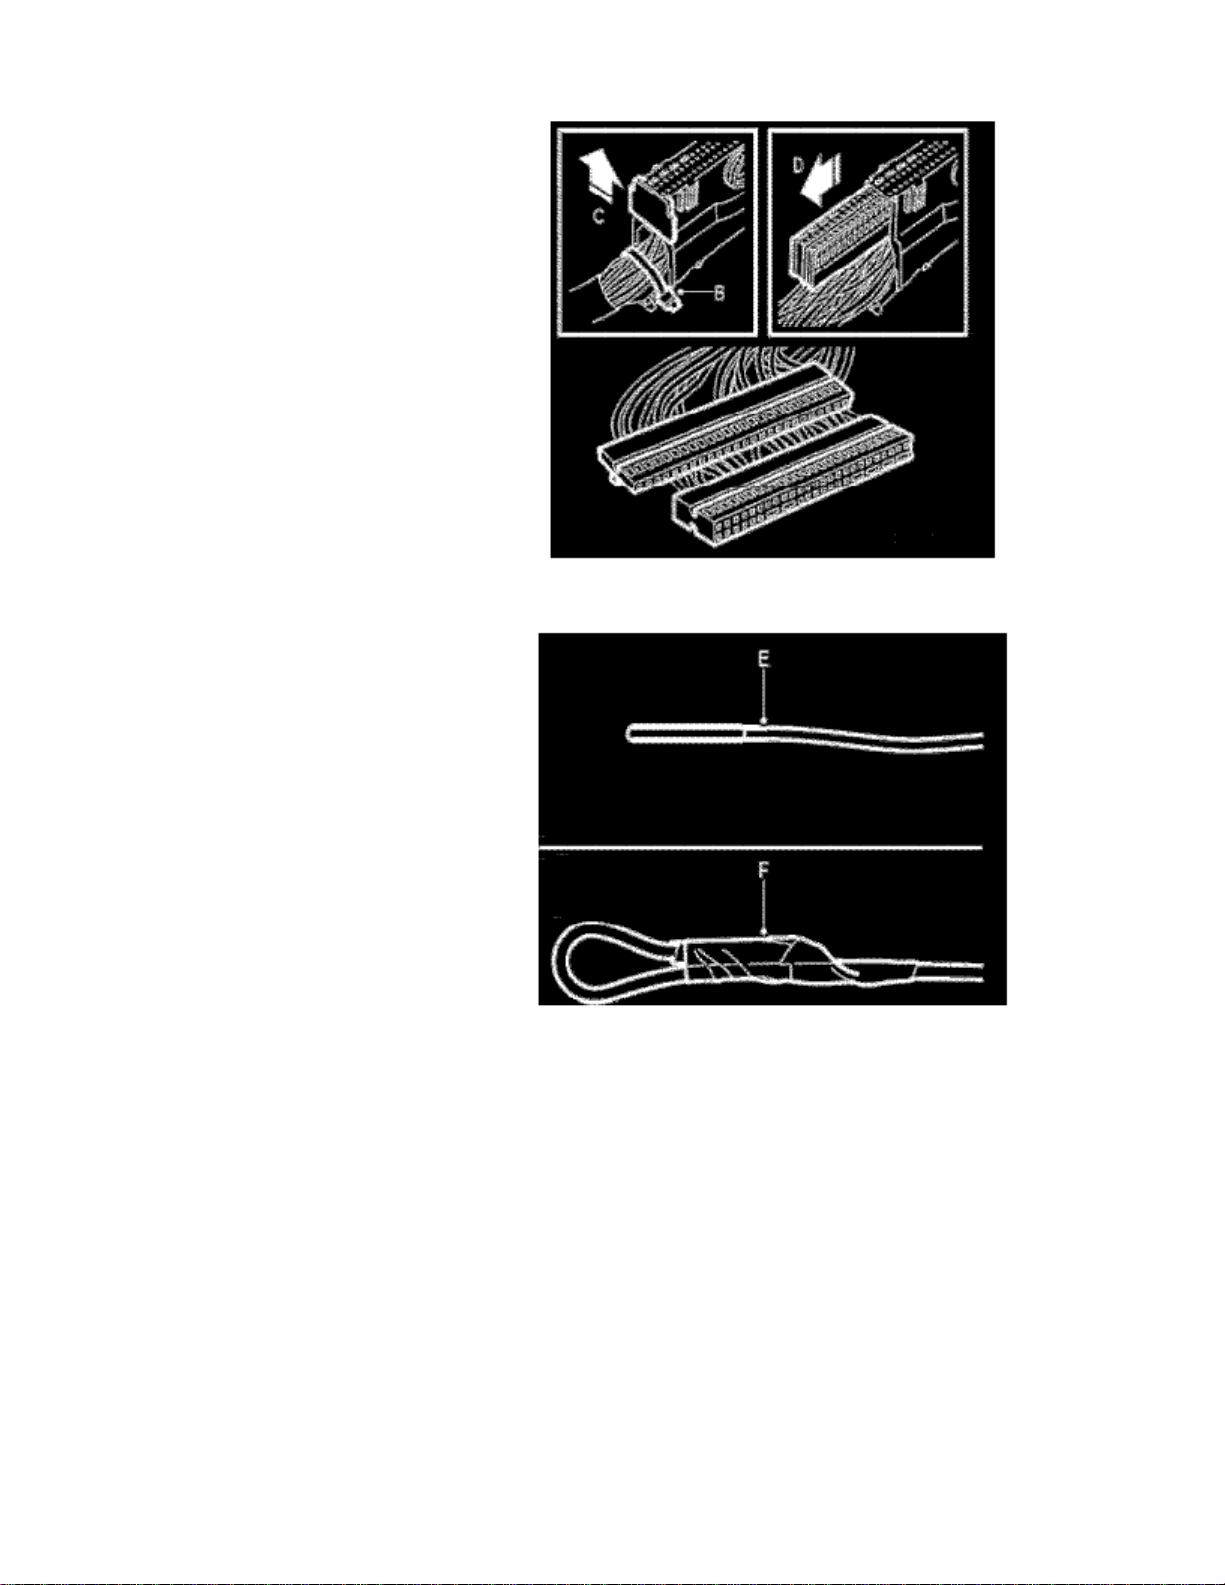
4.1. Detach the window lift module (A) by loosening it in the front edge (snap fastener). Unplug the window lift module's connector.
4.2. Detach the switch for the roof lighting (B) and unplug its connector. Lift away the floor console.
5. Pry out the signal line from the SRS control module to the OnStar(R) control module and secure it:
5.1. Unplug the SRS control module's connector (A).
Page 53

> Relays and Modules > Relays and Modules - Accessories and Optional Equipment > Emergency Contact Module > Component Information > Technical Service Bulletins >
Recalls: > Campaign - Deactivation Of Analog OnStar(R) > Service Procedure > 2001 and Older Model Year Vehicles (Except Saab Vehicles) > Page 45
DeVille V8-4.6L VIN Y (1998)
5.2 Cut off the cable tie (B), detach the connector's rear end face (C) and pull out the connecting rail (D).
Page 54

5.3. Remove pin 39, cut off the cable terminal and insulate the end with tape (E). Fold back the cable and secure it with tape (F).
5.4. Fit the connecting rail and end face.
5.5. Plug in the connector (A) and secure the cables with cable ties (B).
6. Install the floor console over the handbrake. Do not press the console down into place, but instead allow it to fit loosely.
7. Install the switch:
7.1. Install the switch for the roof lighting (B) and plug in its connector.
7.2.
Guide the connectors for the window lift module and rear seat heater, if equipped, through the hole for each respective unit. Plug in thewindow lift module's connector and install the module (A).
7.3. If equipped, connect the rear seat heater's connector and install the switch.
8. Install the floor console:
Page 55

> Relays and Modules > Relays and Modules - Accessories and Optional Equipment > Emergency Contact Module > Component Information > Technical Service Bulletins >
Recalls: > Campaign - Deactivation Of Analog OnStar(R) > Service Procedure > 2001 and Older Model Year Vehicles (Except Saab Vehicles) > Page 46
DeVille V8-4.6L VIN Y (1998)
Page 56
8.1. Install the floor console's retaining bolts (C) and retaining nuts (F).
8.2. Align the rear cover; make sure that the air duct connects firmly to the air nozzle. Screw in the cover (E).
8.3. Install the ashtray/cover (D).
8.4. Install the ignition switch cover (B).
8.5. Plug in the immobilizer unit (A) connector. Install the unit, bayonet fitting.
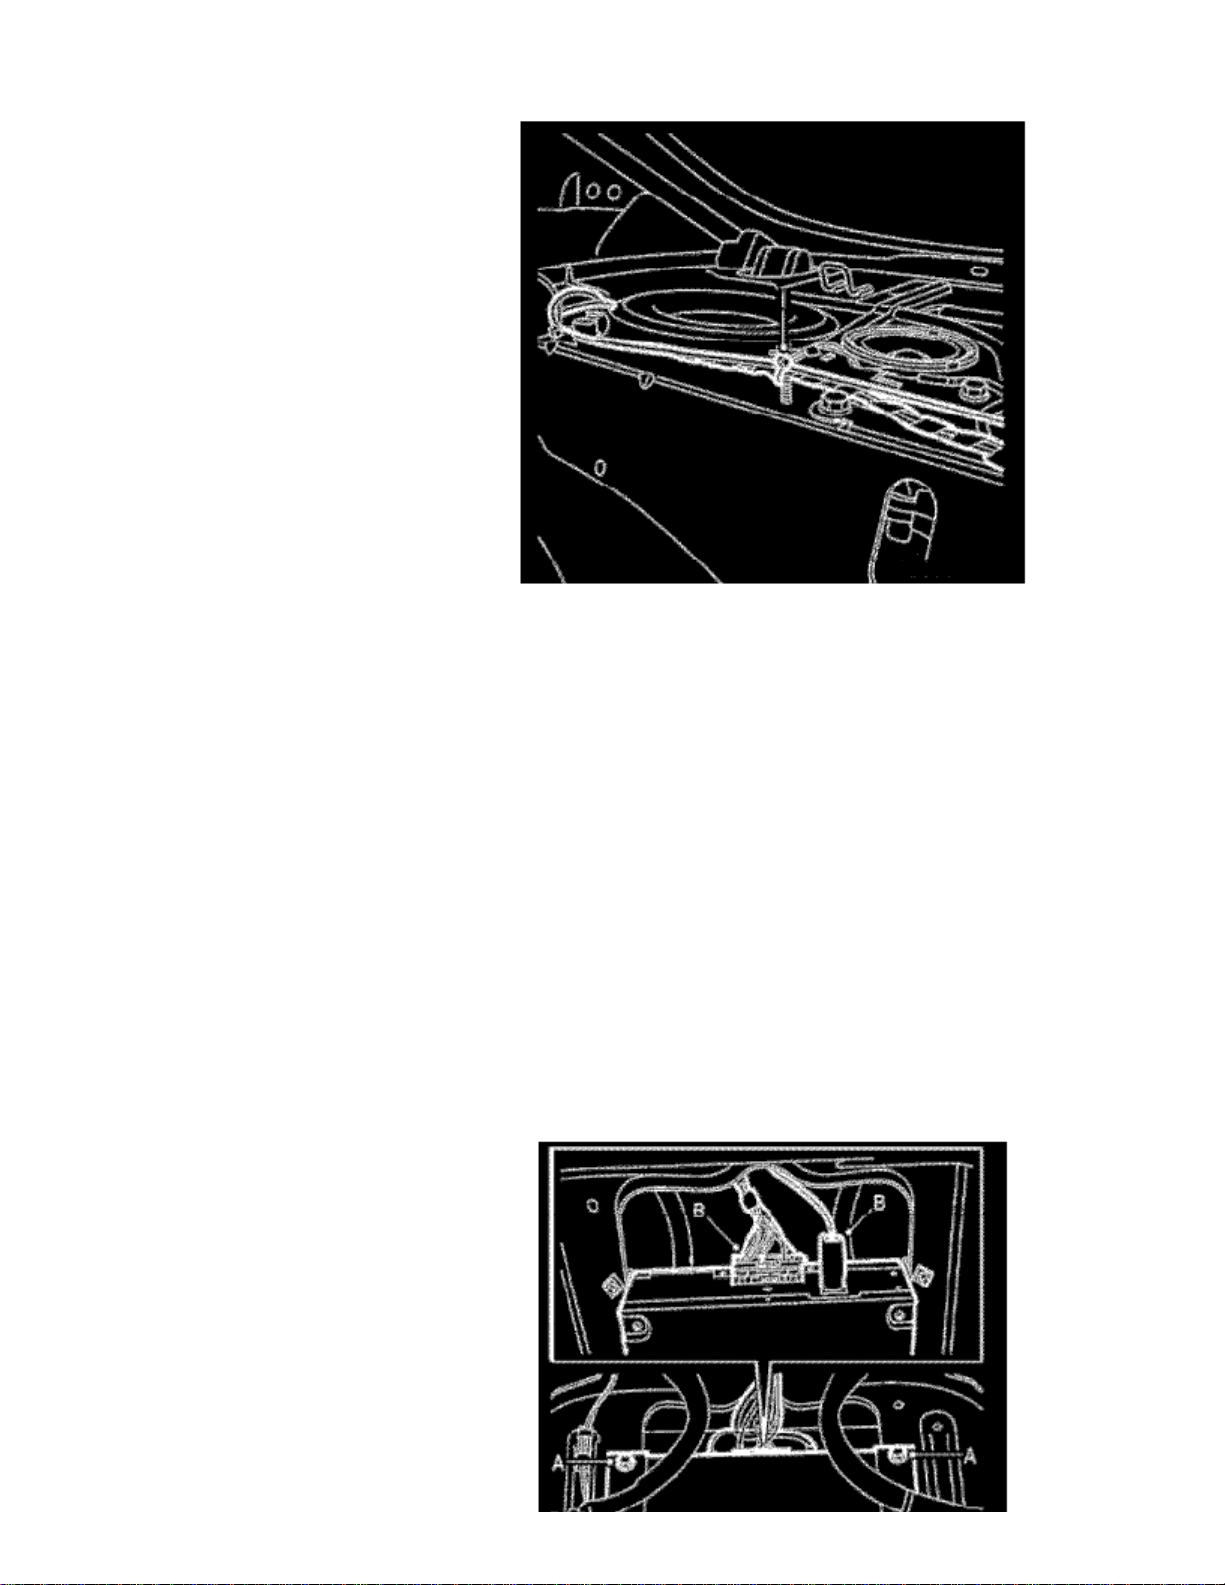
9. Remove the OnStar(R) control modules and secure the wiring:
9.1. Remove the right-hand rear luggage compartment trim in accordance with WIS - 8.
Body - Interior equipment - Adjustment/Replacement.
9.2. Unplug the connectors (A) from the OnStar(R) control modules.
Page 57

> Relays and Modules > Relays and Modules - Accessories and Optional Equipment > Emergency Contact Module > Component Information > Technical Service Bulletins >
Recalls: > Campaign - Deactivation Of Analog OnStar(R) > Service Procedure > 2001 and Older Model Year Vehicles (Except Saab Vehicles) > Page 47
DeVille V8-4.6L VIN Y (1998)
9.3. Remove the console (B) together with the OnStar(R) control modules.
Page 58
Important:
Secure the wiring harness so that there is no risk of chafing and rattling.
9.4. Fold back the wiring harness and tape over the connectors (C). Fold back the wiring harness once more and secure with cable ties (D).
9.5. Install the right-hand rear luggage compartment in accordance with WIS - 8. Body - Interior equipment - Adjustment/Replacement.
10. Install the ground cable to the battery's negative terminal.
11. Clear the diagnostic trouble codes.
12. Set the date and time, see WIS - 3. Electrical system - Information display (SID_ - Technical description.
Page 59

Page 60

> Relays and Modules > Relays and Modules - Accessories and Optional Equipment > Emergency Contact Module > Component Information > Technical Service Bulletins > Recalls: > Campaign - Deactivation Of Analog
OnStar(R) > Service Procedure > 2001 and Older Model Year Vehicles (Except Saab Vehicles) > Page 48
Emergency Contact Module: Recalls2003-2005 Saab 9-3 (9400) 4D/5D; 2004-2005 Saab 9-3 (9400) CV
2003-2005 Saab 9-3 (9440) 4D/5D; 2004-2005 Saab 9-3 (9440) CV
Notice:
Handle the fiber optic cables with care or the signal may be distorted.
^ It is very important that the two leads in the connector are not confused with one another.
^ Do not splice the cables.
^ Do not bend the cable in a radius smaller than 25 mm (1 in).
^ Do not expose the cable to temperatures exceeding 185F (85C).
^ Keep the cable ends free from dirt and grime.
^
Do not expose the cable to impact as this may cause the transparent plastic to whiten, thereby reducing the intensity of the light and causingpossible communication interruptions.
^ The cable should not lie against any sharp edges as this may cause increased signal attenuation.
1.
Remove the ECU CU with a Tech 2(R) according to the following: Fault diagnosis - Select model year - Select Saab 9-3 Sport (9440) - All -Add/Remove - Control Module - CU/PU - Remove.
2. Remove the ground cable from the battery's negative terminal.
3. Remove the floor console in accordance with WIS - 8. Body - Interior equipment - Adjustment/Replacement.
4. Pry out the signal line from the SRS control module to the OnStar(R) control module and secure it:
4.1. Unplug the SRS control module's connector (A).
Page 61

> Relays and Modules > Relays and Modules - Accessories and Optional Equipment > Emergency Contact Module > Component Information > Technical Service Bulletins >
Recalls: > Campaign - Deactivation Of Analog OnStar(R) > Service Procedure > 2001 and Older Model Year Vehicles (Except Saab Vehicles) > Page 49
DeVille V8-4.6L VIN Y (1998)
Page 62
4.2. Cut off the cable tie (B), detach the connector's rear end face (C), and pull out the connecting rail (D).
4.3. Extract pin 15, cut off the cable terminal and insulate the end with tape (E). Fold back the cable and secure it with tape (F).
4.4. Fit the connecting rail and end face.
4.5. Plug in the connector (A) and secure the cables with cable ties (B).
5. Remove the parcel shelf trim in accordance with WIS - 8. Body - Interior equipment - Adjustment/Replacement.
6. M03: Replace the optic cable on the right-hand side
Important:
Secure the wiring harness so that there is no risk of chafing or rattling.
6.1. Remove the passenger seat in accordance with WIS 8. Body - Seats - Adjustment/Replacement.
6.2. Remove the right-hand B-pillar trim in accordance with WIS - 8. Body - Interior equipment - Adjustment/Replacement.
Page 63

> Relays and Modules > Relays and Modules - Accessories and Optional Equipment > Emergency Contact Module > Component Information > Technical Service Bulletins >
Recalls: > Campaign - Deactivation Of Analog OnStar(R) > Service Procedure > 2001 and Older Model Year Vehicles (Except Saab Vehicles) > Page 50
DeVille V8-4.6L VIN Y (1998)
6.3. Remove the right-hand C pillar trim in accordance with WIS - 8. Body - Interior equipment - Adjustment/Replacement.
6.4. Fold the rear seat backrest forward.
6.5. Remove the right-hand side bolster in accordance with WIS - 8. Body - Seats - Adjustment/Replacement.
6.6. Remove the A-pillar's lower side piece.
6.7. Open the cover on the right-hand wiring harness channels.
Page 64

6.8. Loosen the locking strip (A) on the 2-pin connector (H2-11) for the optic cable, located by the right-hand A-pillar.
6.9. Loosen the catch (B) and remove the optic cable that runs backward in the car.
6.10. Dismantle the end cap from the new optic cable (12 783 577) and connect it to the connector H2-11. Push in the optic cable and make sure
the catch (B) locks and refit the locking strip (A).
6.11. Secure the connector and the old optic cable using the cable tie for the existing wiring harness (C).
Page 65

> Relays and Modules > Relays and Modules - Accessories and Optional Equipment > Emergency Contact Module > Component Information > Technical Service Bulletins >
Recalls: > Campaign - Deactivation Of Analog OnStar(R) > Service Procedure > 2001 and Older Model Year Vehicles (Except Saab Vehicles) > Page 51
DeVille V8-4.6L VIN Y (1998)
Important:
Page 66

The optic cable must not be bent with a radius less than 25 mm (1 in).
6.12. Place the optic cable in the wiring harness channels on the right-hand side. Thread through the existing cable ties (C) if possible, otherwise,
secure with a cable tie to the existing one. Close the cover on the channels. Ensure the catches lock.
6.13. Secure the optic cable along the right-hand rear wheel housing, next to the ordinary wiring harness securing points and by the SRS unit (D).
6.14. Thread the optic cable up next to the safety belt by the old optic cable and place on the parcel shelf.
6.15. Unplug the connectors (E) from the OnStar(R) control modules.
6.16. Remove the console (F) together with the OnStar(R) control modules.
Important:
The optic cable must not be bent with a radius less than 25 mm (1 in).
Page 67

> Relays and Modules > Relays and Modules - Accessories and Optional Equipment > Emergency Contact Module > Component Information > Technical Service Bulletins >
Recalls: > Campaign - Deactivation Of Analog OnStar(R) > Service Procedure > 2001 and Older Model Year Vehicles (Except Saab Vehicles) > Page 52
DeVille V8-4.6L VIN Y (1998)
6.17. Fold back the wiring harness and tape over the connectors (G). Fold back the wiring harness once more and secure with cable ties (H).
Page 68
6.18. Secure the new optic cable on the parcel shelf along the existing wiring harness by the ordinary securing points and by the speaker (I).
6.19. Thread the optic cable down next to the old cable from the parcel shelf to the left-hand wheel housing, next to REC. The cable is secured in
the existing clips.
6.20. Fit the right-hand C-pillar trim in accordance with WIS - 8. Body - Interior equipment - Adjustment/Replacement.
6.21. Fit the parcel shelf trim in accordance with WIS - 8. Body - Interior equipment - Adjustment/Replacement.
6.22. Fit the passenger seat in accordance with WIS - 8. Body - Seats - Adjustment/Replacement.
6.23. Fit the right-hand side bolster in accordance with WIS - 8. Body - Seats - Adjustment/Replacement.
6.24. Fold up the rear seat backrest.
6.25. Fit the right-hand B-pillar trim in accordance with WIS - 8. Body - Interior equipment - Adjustment/Replacement.
6.26. Fit the A-pillar's lower side piece.
7. M04-05, 4D: Removing the OnStar control modules and securing the wiring:
Page 69

> Relays and Modules > Relays and Modules - Accessories and Optional Equipment > Emergency Contact Module > Component Information > Technical Service Bulletins >
Recalls: > Campaign - Deactivation Of Analog OnStar(R) > Service Procedure > 2001 and Older Model Year Vehicles (Except Saab Vehicles) > Page 53
DeVille V8-4.6L VIN Y (1998)
7.1. Remove the console (A) together with the OnStar(R) control modules.
7.2. Remove the connectors (B).
Page 70
Important:
The optic cable must not be bent with a radius less than 25 mm (1 in).
Important:
Secure the wiring harness so that there is no risk of chafing and rattling.
7.3. Fold back the wiring harness and tape over the connectors (C). Fold back the wiring harness once more and secure with cable ties (D).
7.4. Fit the parcel shelf trim in accordance with WIS - 8. Body - Interior equipment - Adjustment/Replacement.
8. CV: Removing the OnStar(R) control modules and securing the wiring: Adjustment/Replacement.
8.1. Open the luggage compartment floor.
8.2. Remove the console (A) together with the OnStar(R) control modules.
Page 71

> Relays and Modules > Relays and Modules - Accessories and Optional Equipment > Emergency Contact Module > Component Information > Technical Service Bulletins >
Recalls: > Campaign - Deactivation Of Analog OnStar(R) > Service Procedure > 2001 and Older Model Year Vehicles (Except Saab Vehicles) > Page 54
DeVille V8-4.6L VIN Y (1998)
Page 72

8.3. Remove the connectors (B).
Important:
The optic cable must not be bent with a radius less than 25 mm (1 in).
Important:
Secure the wiring harness so that there is no risk of chafing and rattling.
8.4. Fold back the wiring harness and tape over the connectors (C). Fold back the wiring harness once more and secure with cable ties (D).
8.5. Close the luggage compartment floor.
9. Fold down the left-hand rear side hatch in the luggage compartment.
10. M03: Replace the optic cable on the left-hand rear side:
Page 73

> Relays and Modules > Relays and Modules - Accessories and Optional Equipment > Emergency Contact Module > Component Information > Technical Service Bulletins >
Recalls: > Campaign - Deactivation Of Analog OnStar(R) > Service Procedure > 2001 and Older Model Year Vehicles (Except Saab Vehicles) > Page 55
DeVille V8-4.6L VIN Y (1998)
Page 74

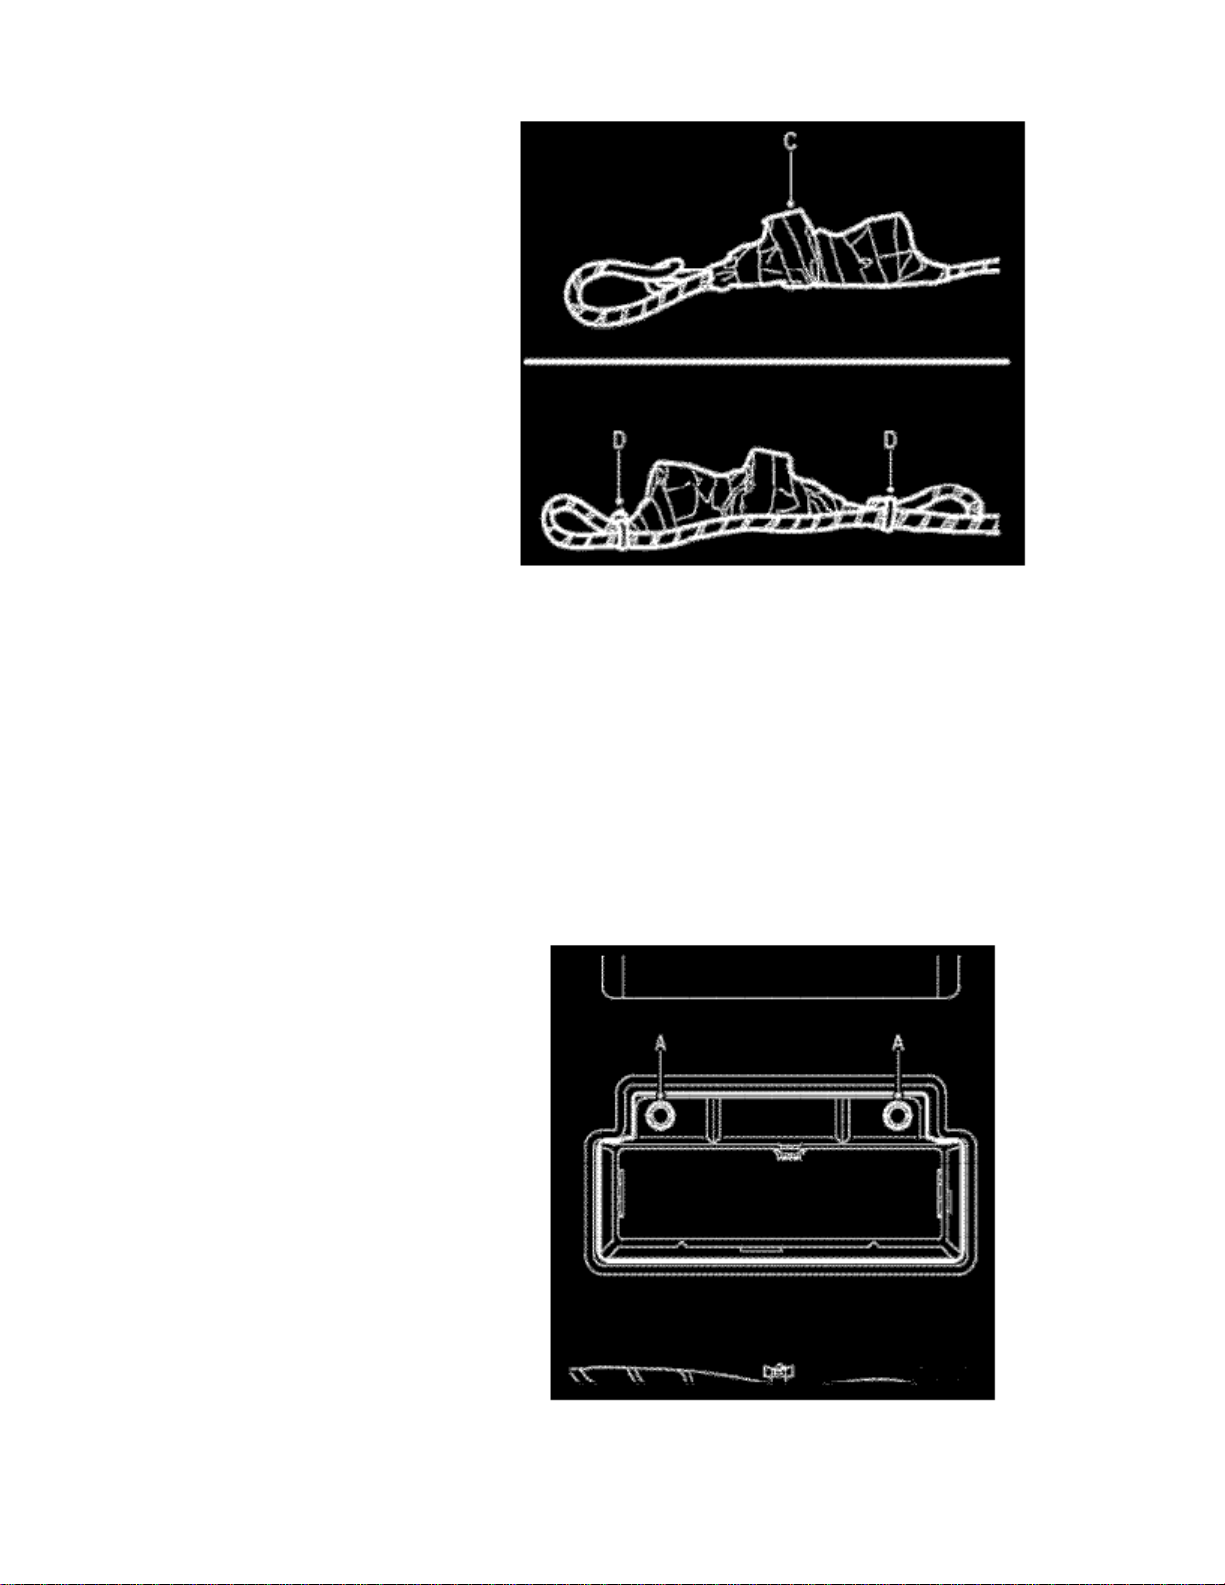
10.1. Place the optic cable so that it is positioned behind the terminal housing on top of REC (A).
10.2. Remove the locking strip (B) on the 2-pin connector (H2-9) for the optic cable.
10.3. Open the terminal housing (C) with a screwdriver. Remove the secondary catch (D) on the connector and disconnect the optic cable coming
from the OnStar(R) control modules.
Page 75

> Relays and Modules > Relays and Modules - Accessories and Optional Equipment > Emergency Contact Module > Component Information > Technical Service Bulletins >
Recalls: > Campaign - Deactivation Of Analog OnStar(R) > Service Procedure > 2001 and Older Model Year Vehicles (Except Saab Vehicles) > Page 56
DeVille V8-4.6L VIN Y (1998)
10.4. Remove the end cap from the new optic cable, connect to the connector and refit the secondary catch (D). Fit the terminal housing (C) to the
connector and refit the locking strip (B).
Page 76

10.5. Secure the old optic cable together with the new one (E).
Important:
The optic cable must not be bent with a radius less than 25 mm (1 in).
Important:
Secure the wiring harness so that there is no risk of chafing and rattling.
11.
CV: Remove the rear seat in accordance with WIS - 8. Body - Interior equipment - Adjustment/Replacement. The O-bus connector H2-9 is locatedbehind the left speaker.
12. M04-05: Disconnect the optic cables on the OnStar(R) control modules and join the cables:
12.1. Cut off the cable tie holding the connector (H2-9) against REC.
Page 77

> Relays and Modules > Relays and Modules - Accessories and Optional Equipment > Emergency Contact Module > Component Information > Technical Service Bulletins >
Recalls: > Campaign - Deactivation Of Analog OnStar(R) > Service Procedure > 2001 and Older Model Year Vehicles (Except Saab Vehicles) > Page 57
DeVille V8-4.6L VIN Y (1998)
12.2. Cars with brackets for e.g. an amplifier: Remove the pin strap (A) from the bracket and remove the tape (B) holding the optic cables.
Page 78

12.3. Remove the locking strip (C) on the 2-pin connector (H2-9). Open the terminal housing with a screwdriver. Remove the secondary catch (E)
on the connector and remove the optic cables coming from the OnStar(R) control modules.
12.4. Loosen one of the optic cables remaining in H2-9 (F), connect it to the connector and fit the secondary catch (E). Connect the connector so
that the optic cables are opposite each other (G). Connect the terminal housing (D) and refit the locking strip (C).
Page 79

> Relays and Modules > Relays and Modules - Accessories and Optional Equipment > Emergency Contact Module > Component Information > Technical Service Bulletins >
Recalls: > Campaign - Deactivation Of Analog OnStar(R) > Service Procedure > 2001 and Older Model Year Vehicles (Except Saab Vehicles) > Page 58
DeVille V8-4.6L VIN Y (1998)
Important:
The optic cable must not be bent with a radius less than 25 mm (1 in).
Page 80

12.5. Cars with brackets for e.g. an amplifier: Fit the cable tie (11 900 515) to the wiring harness approx. 100 mm (4 in) from H2-9, fit the cable
tie (H) to the bracket. Gather the optic cable in a gentle loop (I) and then place the loop behind the bracket.
Important:
The optic cable must not be bent with a radius less than 25 mm (1 in).
12.6. Cars without brackets for e.g. an amplifier: Gather the optic cable in a gentle loop (J) and secure with cable tie.
13. CV: Fit the left-hand, rear side hatch trim in accordance with WIS - 8. Body - Interior equipment - Adjustment/Replacement.
14. Fit the ground cable to the battery's negative terminal.
15. Carry out procedures after disconnecting the battery, see WIS - 3. Electrical System - Charging system - Adjustment/Replacement.
Important:
Follow Tech 2(R) on-screen instructions.
16. Add ECU ICM, choose without OnStar(R). See WIS-General-Tech 2(R) - Description and Operation - Add/Remove.
Page 81

Page 82
> Relays and Modules > Relays and Modules - Accessories and Optional Equipment > Emergency Contact Module > Component Information > Technical Service Bulletins > Recalls: > Campaign - Deactivation Of Analog
OnStar(R) > Service Procedure > 2001 and Older Model Year Vehicles (Except Saab Vehicles) > Page 59
Emergency Contact Module: Recalls2000-2004 Saab 9-5
2000-2004 Saab 9-5
1. Remove the ground cable from the battery's negative cable.
2. Remove the center console, see WIS - Body - Interior.
3. Loosen the gear shift housing (A).
AUT: Disconnect the 6-pin connector (B) to improve access to the gear shift housing screws.
4. Disconnect the signal cable from the SRS control module to the OnStar(R) control module and secure the cable.
4.1. Disconnect the connector (A) from the SRS control module and cut the cable tie (B).
Page 83

> Relays and Modules > Relays and Modules - Accessories and Optional Equipment > Emergency Contact Module > Component Information > Technical Service Bulletins >
Recalls: > Campaign - Deactivation Of Analog OnStar(R) > Service Procedure > 2001 and Older Model Year Vehicles (Except Saab Vehicles) > Page 60
DeVille V8-4.6L VIN Y (1998)
Page 84

4.2. Release the back end of the connector (C) and remove from the contact rail (D).
4.3. M00-01: Disconnect pin 39, cut off the cable terminal and insulate the end using tape (E). Fold back the cable and secure using tape (F).
4.4. M02-04: Disconnect pin 58, cut off the cable terminal and insulate the end using tape (E). Fold back the cable and secure using tape (F).
4.5. Assemble the contact rail and end.
4.6. Connect connector (A) and secure the cable using a cable tie (B).
Page 85

> Relays and Modules > Relays and Modules - Accessories and Optional Equipment > Emergency Contact Module > Component Information > Technical Service Bulletins >
Recalls: > Campaign - Deactivation Of Analog OnStar(R) > Service Procedure > 2001 and Older Model Year Vehicles (Except Saab Vehicles) > Page 61
DeVille V8-4.6L VIN Y (1998)
5. Assemble the gear shift housing (A).
AUT: Connect connector (B).
6. Assemble the center console, see WIS - Body - Interior.
Page 86

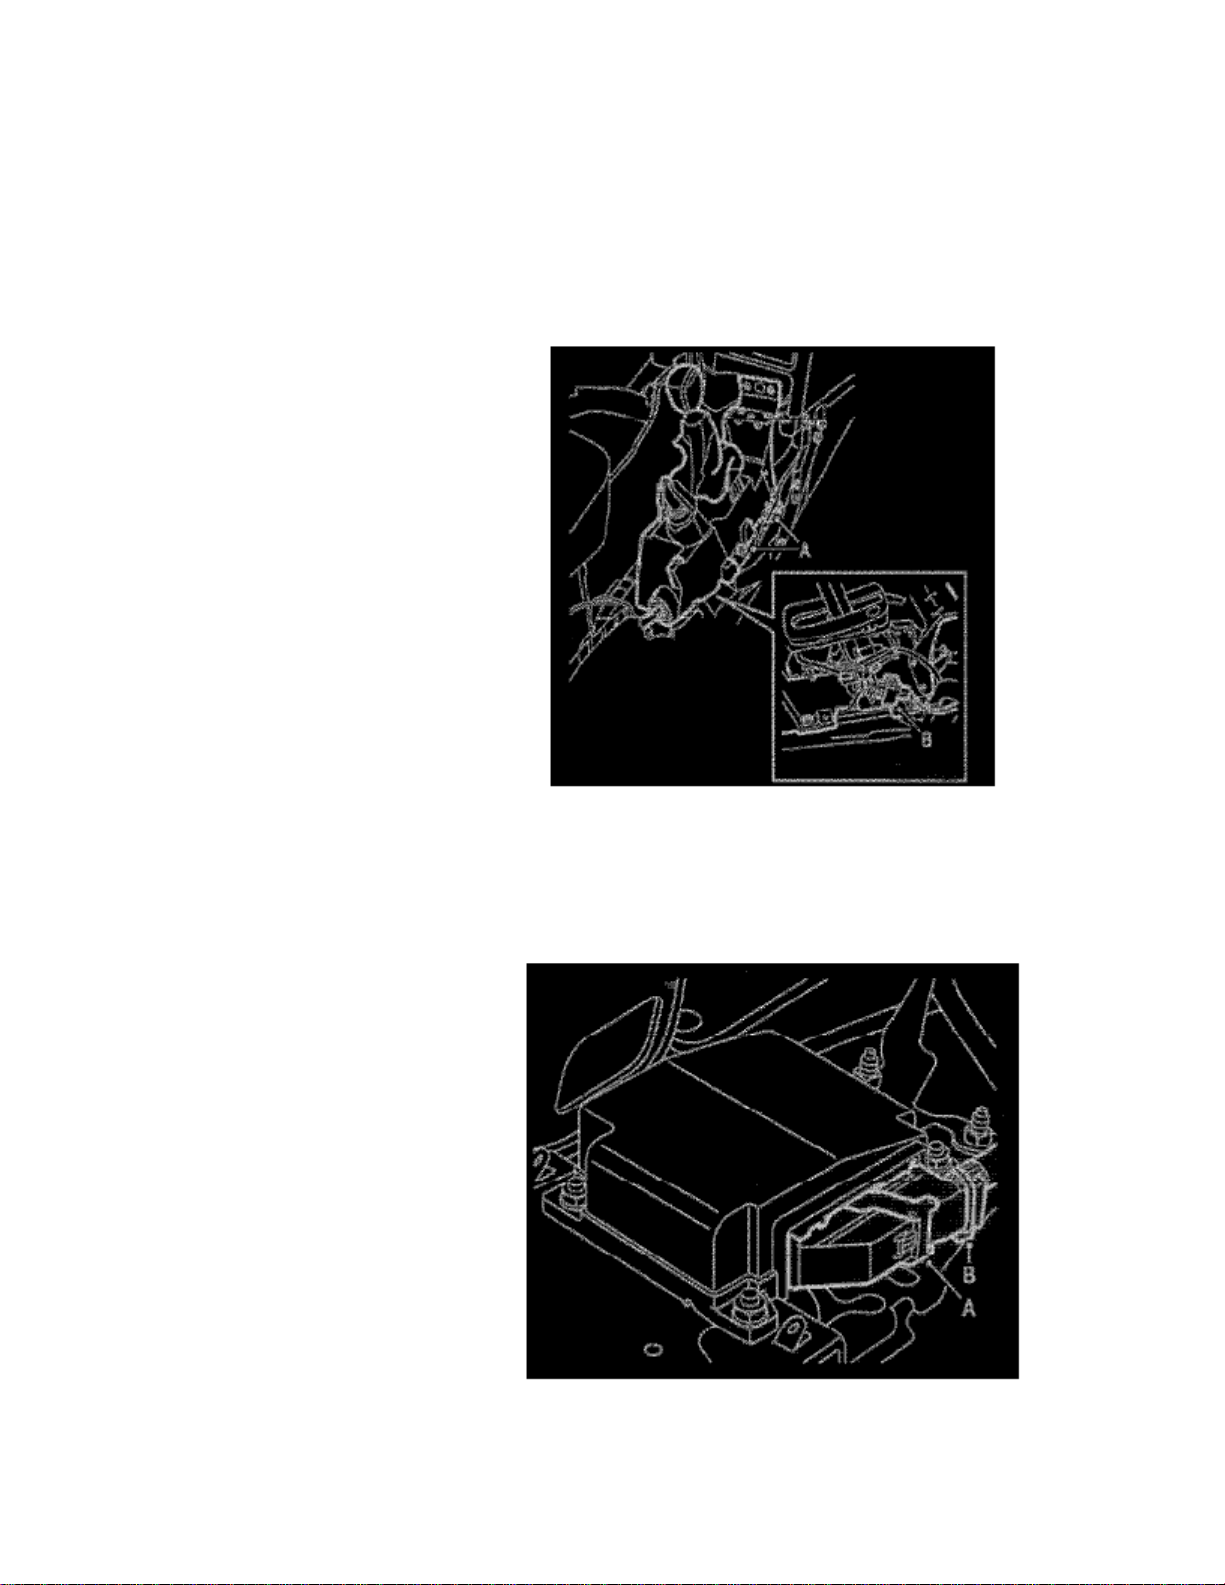
7. Remove the OnStar(R) control module and secure the cable harness:
7.1. 5D: Remove the right-hand cover from the luggage compartment floor.
7.2. Remove the console (A).
7.3. Disconnect the connector (B) from the OnStar(R) control module.
Page 87

> Relays and Modules > Relays and Modules - Accessories and Optional Equipment > Emergency Contact Module > Component Information > Technical Service Bulletins >
Recalls: > Campaign - Deactivation Of Analog OnStar(R) > Service Procedure > 2001 and Older Model Year Vehicles (Except Saab Vehicles) > Page 62
DeVille V8-4.6L VIN Y (1998)
Important:
Secure the cable harness to prevent the risk of scraping and rattling.
7.4. Fold back the cable harness and tape down the connector (C). Fold back the cable harness again and secure with cable ties (D).
Page 88

7.5. 5D: Assemble the right-hand cover for the luggage compartment floor.
8. Fit the ground cable on the battery's negative cable.
9. Erase the diagnostic trouble codes.
10. Set the date and time, see WIS - 3. Electrical system - Information display (SID) - Technical description.
Page 89

Page 90

> Relays and Modules > Relays and Modules - Accessories and Optional Equipment > Emergency Contact Module > Component Information > Technical Service Bulletins > Recalls: > Campaign - Deactivation Of Analog
OnStar(R) > Service Procedure > Page 63
Emergency Contact Module: RecallsOwner Letter
Page 91

Page 92

> Relays and Modules > Relays and Modules - Accessories and Optional Equipment > Emergency Contact Module > Component Information > Technical Service Bulletins > Recalls: > 08089C > Nov > 08 > Campaign -
Deactivation Of Analog OnStar(R) > Campaign - Deactivation Of Analog OnStar(R)
Emergency Contact Module: RecallsCampaign - Deactivation Of Analog OnStar(R)
# 08089C: Special Coverage Adjustment - Analog OnStar Deactivation(Nov 18, 2008)
Subject:08089C -- SPECIAL COVERAGE ADJUSTMENT - ANALOG ONSTAR(R) DEACTIVATION
Page 93

> Relays and Modules > Relays and Modules - Accessories and Optional Equipment > Emergency Contact Module > Component Information > Technical Service Bulletins >
Recalls: > 08089C > Nov > 08 > Campaign - Deactivation Of Analog OnStar(R) > Campaign - Deactivation Of Analog OnStar(R) > Page 69
DeVille V8-4.6L VIN Y (1998)
Page 94

Models
The service procedure in this bulletin has been revised. Step 11 in the procedure for the 2004-2005 Saab 9-3 (9440) Convertible has been revised.Discard all copies of bulletin 08089B, issued September 2008.
Condition
In November 2002, the U.S. Federal Commissions (FCC) ruled that wireless carriers would no longer be required to support the analog wireless networkbeginning in 2008. As a result, On Star(R) is unable to continue analog service.
Page 95

> Relays and Modules > Relays and Modules - Accessories and Optional Equipment > Emergency Contact Module > Component Information > Technical Service Bulletins >
Recalls: > 08089C > Nov > 08 > Campaign - Deactivation Of Analog OnStar(R) > Campaign - Deactivation Of Analog OnStar(R) > Page 70
DeVille V8-4.6L VIN Y (1998)
OnStar(R) has deactivated most of the systems operating in the analog mode; however, there are some vehicles that OnStar(R) could not deactivate.Although the analog OnStar(R) hardware in these vehicles can no longer communicate with OnStar(R), the hardware in the vehicle is still active. If theOnStar(R) emergency button is pressed, or in the case of an airbag deployment, or near deployment, the customer may hear a recording that OnStar(R) isbeing contacted. However, since analog service is no longer available, the call will not connect to OnStar(R). To end the call, the customer must pressthe white phone or white dot button. If the call is not ended, the system will continue to try to connect to OnStar(R) until the vehicle battery is drained.
Special Policy Adjustment
At the customer's request, dealers/retailers are to deactivate the OnStar(R) system. The service will be made at no charge to the customer.
This special coverage covers the condition described above until December 31, 2008 for all non-Saab vehicles; April 30, 2009 for all Saab vehicles.
Vehicles Involved
Page 96
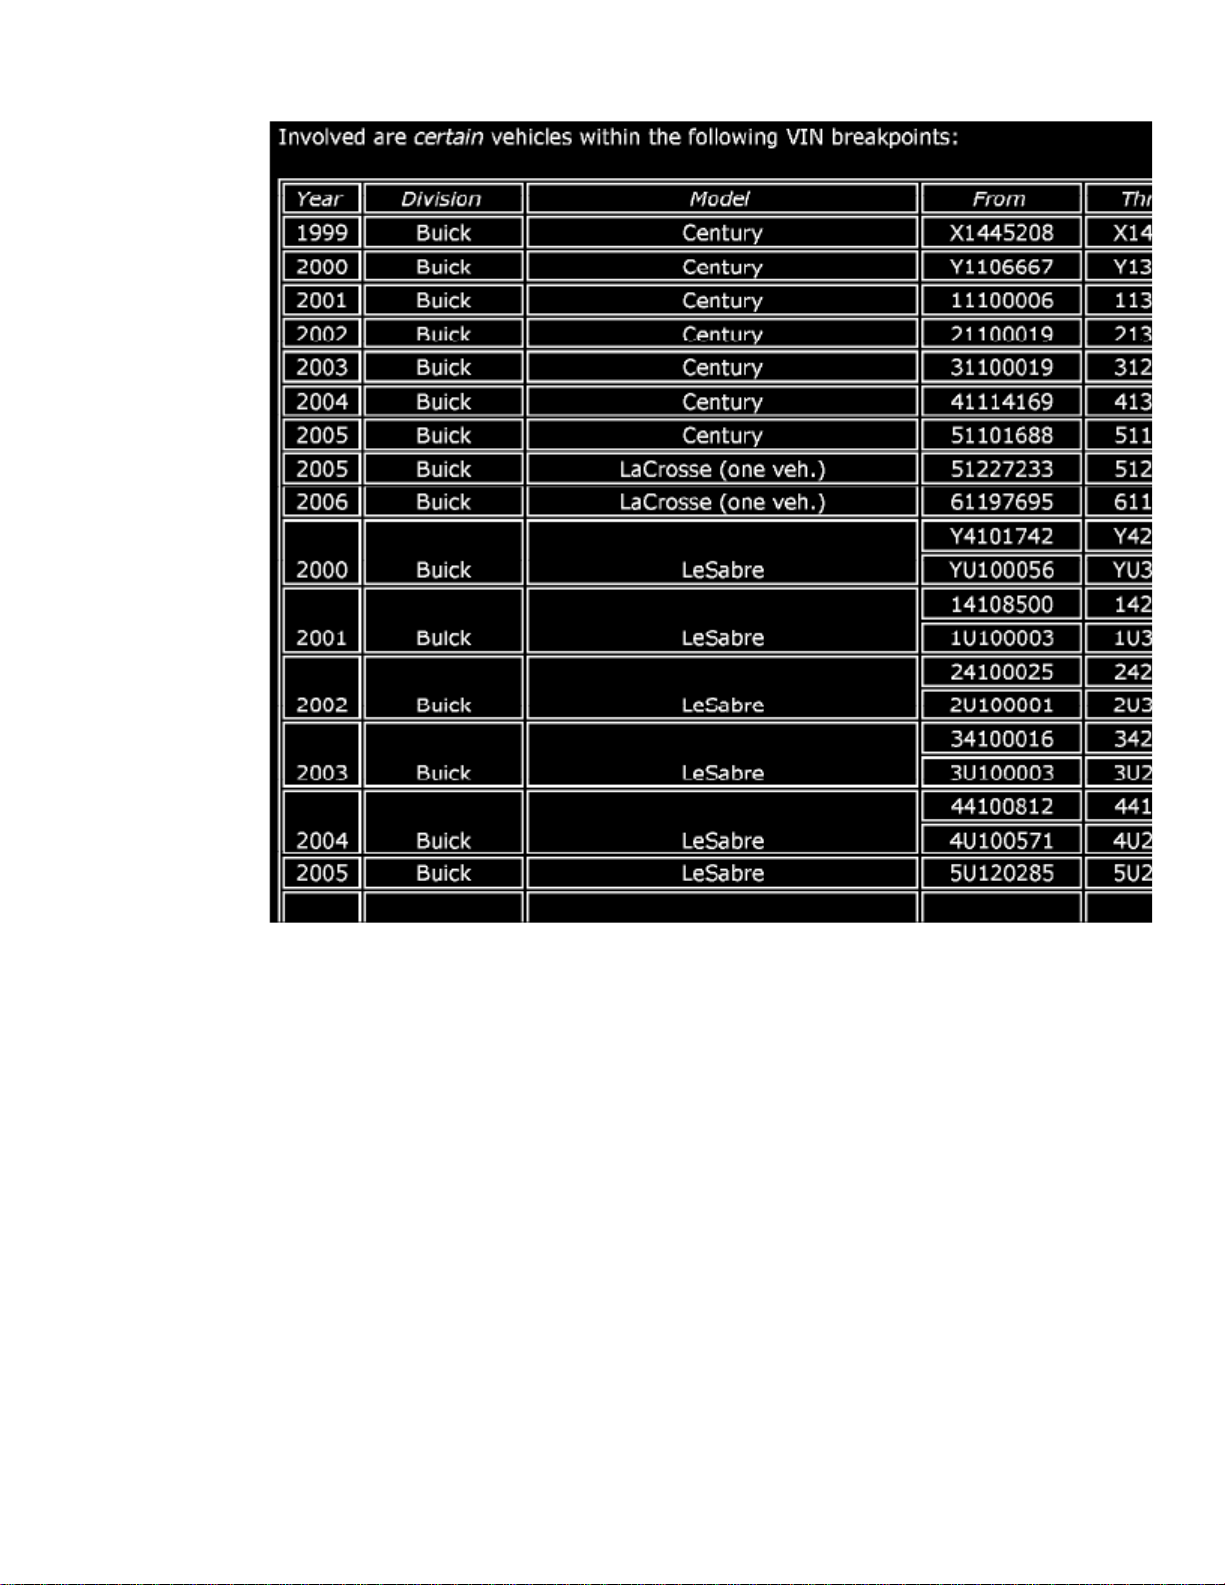
Page 97

> Relays and Modules > Relays and Modules - Accessories and Optional Equipment > Emergency Contact Module > Component Information > Technical Service Bulletins >
Recalls: > 08089C > Nov > 08 > Campaign - Deactivation Of Analog OnStar(R) > Campaign - Deactivation Of Analog OnStar(R) > Page 71
DeVille V8-4.6L VIN Y (1998)
Page 98

Page 99

> Relays and Modules > Relays and Modules - Accessories and Optional Equipment > Emergency Contact Module > Component Information > Technical Service Bulletins >
Recalls: > 08089C > Nov > 08 > Campaign - Deactivation Of Analog OnStar(R) > Campaign - Deactivation Of Analog OnStar(R) > Page 72
DeVille V8-4.6L VIN Y (1998)
Page 100

 Loading...