

Page 1

SSIM-H2-02
Fast Ethernet - Translational Switch
SmartStack Interface Module
Installation
and
User Guide
Page 2

Notice
Cabletron Systems reserves the right to make changes in specifications and other
information contained in this document without prior notice. The reader should in all
cases consult Cabletron Systems to determine whether an y s uch chan ges have been made.
The hardware, firmware, or software described in this manual is subject to change
without notice.
IN NO EVENT SHALL CABLETRON SYSTEMS BE LIABLE FOR ANY
INCIDENTAL, INDIRECT, SPECIAL, OR CONSEQUENTIAL DAMAGES
WHATSOEVER (INCLUDING BUT NOT LIMITED TO LOST PROFITS) ARISING
OUT OF OR RELATED TO THIS MANUAL OR THE INFORMATION CONTAINED
IN IT, EVEN IF CABLETRON SYSTEMS HAS BEEN ADVISED OF, KNOWN, OR
SHOULD HAVE KNOWN, THE POSSIBILITY OF SUCH DAMAGES.
© October 1999 by:
Cabletron Systems, Inc.
35 Industrial Way
Rochester, NH 03867
i
All Rights Reserved.
Order Number: 9032962-01
(OC-7063 v. 1.1, 710001816)
SmartStack
CompuServe
i960 microprocessor
Ethernet
Notice
is a trademark of Cabletron Systems, Inc.
is a registered trademark of CompuServe, Inc.
is a registered trademark of Intel Corp.
is a trademark of Xerox Corporation.
Page 3

ii
FCC Notice
This device complies with Part 15 of the FCC rules. Operation is subject to the following
two conditions: (1) this device may not cause harmful interference, and (2) this device
must accept any interference received, including interference that may cause undesired
operation.
NOTE:
digital device, pursuant to Part 15 of the FCC rules. These limits are designed to provide
reasonable protection against harmful interference when the equipment is operated in a
commercial environment. This equipment uses, generates, and can radiate radio
frequency energy and if not installed in accordance with the operator’s manual, may
cause harmful interference to radio communications. Operation of this equipment in a
residential area is likely to cause interference in which case the user will be required to
correct the interference at his own expense.
WARNING:
approved by the party responsible for compliance could void the user’s authority to
operate the equipment.
This equipment has been tested and found to comply with the limits for a Class A
Changes or modifications made to this device which are not expressly
VCCI Notice
This is a Class A product based on the standard of the Voluntary Control Council for
Interference by Information Technology Equipment (VCCI). If this equipment is used in
a domestic enviro nment, radio disturbance may arise. When such troub le occurs, the user
may be required to take corrective actions.
Industry Canada Notice
This digital apparatus does not exceed the Class A limits for radio noise emissions from
digital apparatus set out in the Radio Interference Regulations of the Canadian
Department of Communications.
Le présent appareil numérique n'émet pas de bruits radioélectriques dépassant les limites
applicables aux appareils numériques de la class A prescrites dans le Règlement sur le
brouillage radioélectrique édicté par le ministère des Communications du Canada.
Notice
Page 4

Declaration of Conformity
Addendum
iii
Application of Council Directive(s):
Manufacturer’s Name:
Manufacturer’s Address:
European Representative Nam e:
European Representative Address:
Conformance to Directive(s)/Product Standards:
Equipment Type/Environment:
We the undersigned, hereby declare, under our sole responsibility, that the equipment
packaged with this notice conforms to the above directives.
Manufacturer Legal Representati v e in Europe
89/336/EEC
73/23/EEC
Cabletron Systems, Inc.
35 Industrial Way
PO Box 5005
Rochester, NH 03867
Mr. J. Solari
Cabletron Systems Limited
Nexus House,
Newbury Business Park
London Road, Newbury
Berkshire RG13 2PZ, England
EC Directive 89/336/EEC
EC Directive 73/23/EEC
EN 55022
EN 50082-1
EN 60950
Networking Equipment, for use
in a Commercial or Light
Industrial Environment.
Mr . Ronald Fotino
Full Name Full Name
Principal Compliance Engineer
Title Title
Rochester, NH, USA
Location Location
Notice
Mr. J. Solari
Managing Director - E.M.E.A.
Newbury , Berk shire, England
Page 5

iv
NoticevSSIM-H2-02 Fast Ethernet - Translational Switch SmartStack Interface Module Installation and User Guide
Page 6

Table of Contents
1. Introduction 1
MIB Support . . . . . . . . . . . . . . . . . . . . . . . . . . . . 4
2. Installation 5
Package Contents . . . . . . . . . . . . . . . . . . . . . . . . . 5
Installation Procedure . . . . . . . . . . . . . . . . . . . . . . . 6
Physical Installation . . . . . . . . . . . . . . . . . . . . . . . . 7
Software Installation . . . . . . . . . . . . . . . . . . . . . . . . 8
TFTP Download . . . . . . . . . . . . . . . . . . . . . . . . 8
Serial Download . . . . . . . . . . . . . . . . . . . . . . . . 9
Cabling . . . . . . . . . . . . . . . . . . . . . . . . . . . . . . 10
LEDs . . . . . . . . . . . . . . . . . . . . . . . . . . . . . . . 10
Power-On Self Test . . . . . . . . . . . . . . . . . . . . . . . 11
Configuration . . . . . . . . . . . . . . . . . . . . . . . . . . . 12
Default Configuration. . . . . . . . . . . . . . . . . . . . . 12
3. Configuration 13
Introduction. . . . . . . . . . . . . . . . . . . . . . . . . . . . 14
Ports, Port Groups and VLANs. . . . . . . . . . . . . . . . 14
TS Virtual Ports and VLAN Tagging . . . . . . . . . . . . . 15
Virtual Port Restriction . . . . . . . . . . . . . . . . . . . . 15
Ring Number Restriction . . . . . . . . . . . . . . . . . . . 15
Bridging Modes. . . . . . . . . . . . . . . . . . . . . . . . . . 16
Source Routed Switching (SRS) Operation Mode . . . . . . 16
Source Routed Transparent Bridging (SRT) Mode. . . . . . 16
Source Routed Bridging (SRB) Mode . . . . . . . . . . . . 17
Redundant Connections to Fast Ethernet Network . . . . . . . 19
Network Scenarios . . . . . . . . . . . . . . . . . . . . . . 19
Spanning Tree Configuration. . . . . . . . . . . . . . . . . 21
Technical Background . . . . . . . . . . . . . . . . . . . . 24
General Guidelines . . . . . . . . . . . . . . . . . . . . . . . . 26
Navigating Within the Menus. . . . . . . . . . . . . . . . . 27
Configuration Overview . . . . . . . . . . . . . . . . . . . . . 27
VLAN Configuration . . . . . . . . . . . . . . . . . . . . . . . 28
BRF Configuration . . . . . . . . . . . . . . . . . . . . . . 28
Local VLAN Port Configuration. . . . . . . . . . . . . . . . 28
Port Configuration - TS Ports. . . . . . . . . . . . . . . . . . . 28
Virtual Port Configuration. . . . . . . . . . . . . . . . . . . 29
Page 7

vi
Frame Conversion Configuration . . . . . . . . . . . . . . . . . 32
TCP/IP Conversion Status. . . . . . . . . . . . . . . . . . . 32
TCP/IP Conversion Parameters Change . . . . . . . . . . . 32
Novell Conversion Status . . . . . . . . . . . . . . . . . . . 34
Novell Conversion Parameters Change . . . . . . . . . . . . 34
NetBios Conversion Status . . . . . . . . . . . . . . . . . . 36
NetBios Conversion Parameters Change . . . . . . . . . . . 36
SNA Conversion Status . . . . . . . . . . . . . . . . . . . . 38
SNA Conversion Parameters Change. . . . . . . . . . . . . 38
Other Frames w/SNAP Conversion Status . . . . . . . . . . 40
Other Frames w/SNAP Conversion Parameters Change . . . 40
Other Frames w/o SNAP Conversion Status . . . . . . . . . 42
Other Frames w/o SNAP Conversion Parameters Change . . 42
Dual Home FEP Addresses Configuration . . . . . . . . . . 43
4. Statistics 45
Statistics Menu. . . . . . . . . . . . . . . . . . . . . . . . . . . 46
Port Status. . . . . . . . . . . . . . . . . . . . . . . . . . . 47
Port Statistics . . . . . . . . . . . . . . . . . . . . . . . . . 48
General Statistics . . . . . . . . . . . . . . . . . . . . . . . 48
Discarded Frames . . . . . . . . . . . . . . . . . . . . . . . 49
802.3 Statistics . . . . . . . . . . . . . . . . . . . . . . . . 51
Traffic Counters . . . . . . . . . . . . . . . . . . . . . . . . 51
Error Counters . . . . . . . . . . . . . . . . . . . . . . . . . 51
Virtual Port Statistics. . . . . . . . . . . . . . . . . . . . . . 53
Discarded Frames Statistics. . . . . . . . . . . . . . . . . . 53
5. Getting in Touch with Technical Support 57
Appendix A. Abbreviations 59
SSIM-H2-02 Fast Ethernet - Translational Switch SmartStack Interface Module Installation and User Guide
Page 8

List of Figures
Figure 1. SSIM-H2-02 Switch SmartStack Interface Module . . . . . 1
Figure 2. Removing the Expansion Slot Cover . . . . . . . . . . . . 7
Figure 3. Installing the SSIM-H2-02 . . . . . . . . . . . . . . . . . . 8
Figure 4. Ethernet CRF in SRT Bridging Mode . . . . . . . . . . . . 16
Figure 5. Ethernet CRF in SRB Bridging Mode . . . . . . . . . . . . 17
Figure 6. Frame Duplication . . . . . . . . . . . . . . . . . . . . . . 18
Figure 7. Frame Looping . . . . . . . . . . . . . . . . . . . . . . . . 19
Figure 8. Broken Ethernet Cloud . . . . . . . . . . . . . . . . . . . 20
Figure 9. Redundant Connections to Fast Ethernet Network . . . . . 21
Figure 10. Load Sharing in Redundant Connections to Fast Ethernet
Network . . . . . . . . . . . . . . . . . . . . . . . . . . . 22
Figure 11. STP Cost Modification . . . . . . . . . . . . . . . . . . . 24
Figure 12. Main Switch Menu . . . . . . . . . . . . . . . . . . . . . 26
vii
SSIM-H2-02 Fast Ethernet - Translational Switch SmartStack Interface Module Installation and User Guide
Page 9

viii
List of Tables
Table 1. Features and Benefits . . . . . . . . . . . . . . . . . . . . 2
Table 2. LEDs at the Left on the Front Panel . . . . . . . . . . . . . 10
Table 3. LEDs at the Right of Every Port . . . . . . . . . . . . . . . 10
Table 4. Translational Switch Physical Port Status . . . . . . . . . . 29
Table 5. Translational Switch Virtual Port Status . . . . . . . . . . . 30
Table 6. Translational Switch Configured and Actual Frame SIze . . .30
Table 7. IP: Token Ring Format . . . . . . . . . . . . . . . . . . . . 32
Table 8. IP: Ethernet Format . . . . . . . . . . . . . . . . . . . . . . 33
Table 9. IP: Source Routing . . . . . . . . . . . . . . . . . . . . . . 33
Table 10. IP: Explorer Frames Type . . . . . . . . . . . . . . . . . . 34
Table 11. IP: Explorer Frames Type . . . . . . . . . . . . . . . . . . 34
Table 12. NOVELL: Token Ring Format . . . . . . . . . . . . . . . .35
Table 13. NOVELL: Ethernet Format . . . . . . . . . . . . . . . . . 35
Table 14. NOVELL: Source Routing . . . . . . . . . . . . . . . . . . 36
Table 15. Novell: Explorer Frames Type . . . . . . . . . . . . . . . .36
Table 16. NetBios: Token Ring Format . . . . . . . . . . . . . . . . 37
Table 17. NetBios: Ethernet Format . . . . . . . . . . . . . . . . . . 37
Table 18. NetBios: Source Routing . . . . . . . . . . . . . . . . . .37
Table 19. NetBios: Explorer Frames Type . . . . . . . . . . . . . . . 38
Table 20. SNA: Token Ring Format . . . . . . . . . . . . . . . . . . 38
Table 21. SNA: Ethernet Format . . . . . . . . . . . . . . . . . . . . 39
Table 22. SNA: Source Routing . . . . . . . . . . . . . . . . . . . . 39
Table 23. SNA: Explorer Frames Type . . . . . . . . . . . . . . . . 40
Table 24. Other Frames w/SNAP: Token Ring Format . . . . . . . .40
Table 25. Other Frames w/SNAP: Ethernet Format . . . . . . . . . . 41
Table 26. Other Frames w/SNAP: Source Routing . . . . . . . . . .41
Table 27. Other Frames w/SNAP: Explorer Frames Type . . . . . . . 41
Table 28. Other Frames w/o SNAP: Token Ring Format . . . . . . . 42
Table 29. Other Frames w/o SNAP: Ethernet Format . . . . . . . . . 42
Table 30. Other Frames w/o SNAP: Source Routing . . . . . . . . . 43
Table 31. Other Frames w/o SNAP: Explorer Frames Type . . . . . . 43
SSIM-H2-02 Fast Ethernet - Translational Switch SmartStack Interface Module Installation and User Guide
Page 10
1. Introduction
The Cabletron Systems SmartStack SSIM-H2-02 2-port Translational Switch
SSIM (Sm artStack SS IM-H2-02) provides co nnectivit y to 10/100 Mbps Fast
Ethernet for the SmartStack STS 16-20RM Token Ring Switch. Des i gned for hi gh
performance and low latency, the SmartStack SSIM-H2-02 seamlessly integrates
legacy Token Ring networks and Fast Ethernet backbones.
1
➽
References to SmartStack STS16-20RM are also applicable to SmartStack
Note:
STS16-20FRM.
The module mounts in one of the two front panel expansion module slots on the
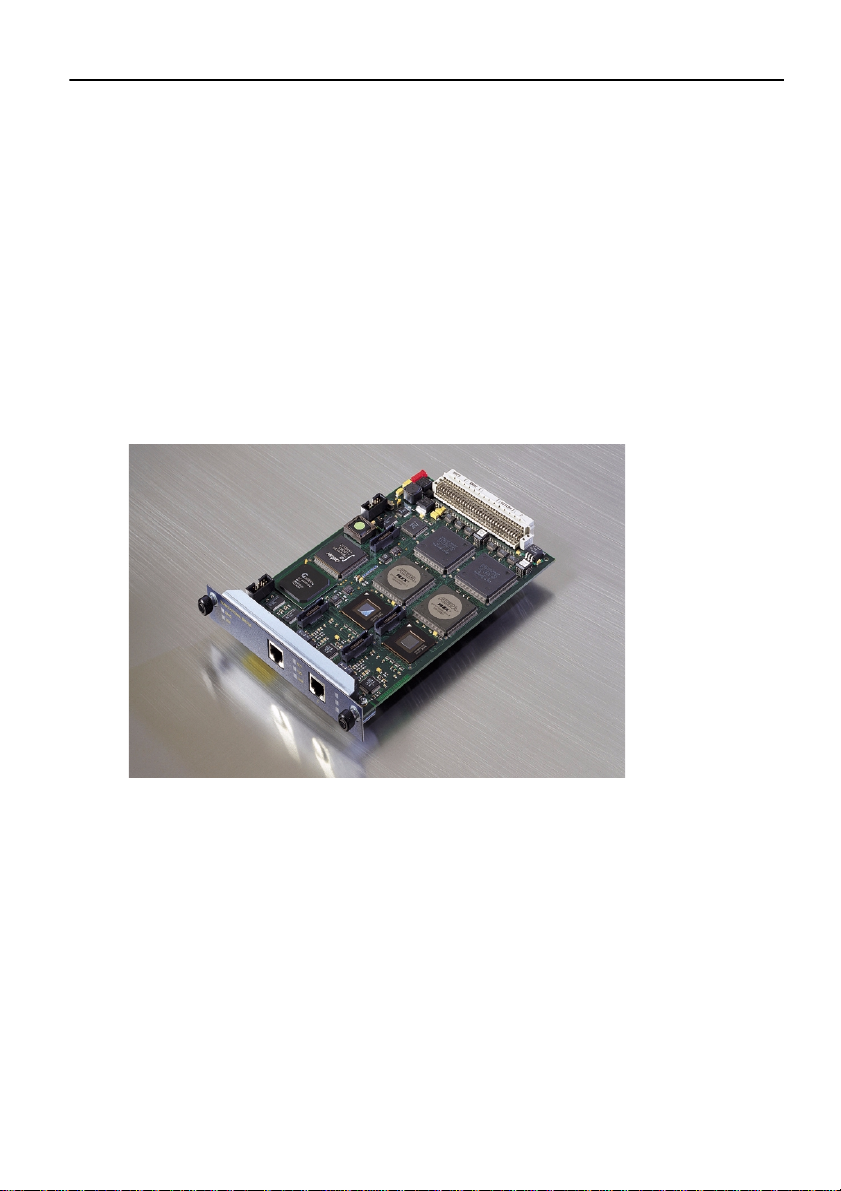
SmartStack STS16-20RM switch.
Figure 1. SSIM-H2-02 Switch SmartStack Interface Module
The SSIM-H2-02 conforms to the IEEE standard 802.3U for 100 Mbps Fast
Ethernet 100BASE-TX.
A Translational Switch (TS) port can connect to a standard Fast Ethernet adapter or
it can act as a trunk port and carry traffic from all of the 63 VLANs it is possible to
configure in the switch. This is achieved using standard IEEE 802.1Q VLAN frame
tagging. For each VLAN, a virtual port is created which behaves much like an
ordinary Ethernet port.
The module supports all of the switching modes implemented in the switch. Eight
LEDs on the front panel indicate the overall operational state of the module and the
two ports. Configuration and detailed status information is available from the
switch console or from the graphical management application.
SSIM-H2-02 Fast Ethernet - Translational Switch SmartStack Interface Module Installation and User Guide Introduction
Page 11

2
The module supports translati onal switc hing for all ke y netw ork protocols (such as
IP, IPX, SNA, NetBios) and generic conversion:
Feature Description
SRT and SRB Support for SRT and SRB bridging.
IEEE 802.1Q This standard frame-tagging protocol is used
to carry frames that belong to different
VLANs over the same physical Fast Ethernet
link.
Benefit: Enables VLAN trunking with other
standards based equipment.
IEEE 802.1D IEEE 802.1D Spanning Tree on the Ethernet
side with a m anual configurat i on option.
IP multicasts address
translation
IP multicasts translated to a single functional
address on the Token-Ring side, and IP
multicasts on the Token-Ring side translated to
multiple MAC addresses on the Ethernet side.
IP fragmentation IP fragmentation makes it possible to easily
connect IP networks between Token-Ring and
Ethernet networks.
NetBios addresses
translation
Translation of NetBios functio nal address from
the Token-Ring side to a specific Ethernet
group address, and frames with an additional
functional addresses from Token-Ring side are
not forwarded on the Ethernet side.
Source-Routing Source-Routing is suppor ted .
Benefit: Provides optimal Token-Ring
connectivity and ensures smooth integration
into existing Source-Routing based networks.
For each supported protocol, frames can be
sent as transparent or source-routed traffic.
Table 1. Features and Benefits
SSIM-H2-02 Fast Ethernet - Translational Switch SmartStack Interface Module Installation and User Guide Introduction
Page 12

Feature Description
SNMP SNMP is supported via the h ost processor (the
processor on the SmartStack STS16-20RM).
This makes it possible to configure the device
in a standards-based way and as an integrated
part of the LAN switch.
3
Can serve multiple
switches in one stack
The SmartStack SSIM-H2-02 can serve as
uplink for multiple LAN switches
interconnected by a stacker. This reduces the
cost of connecting a number of LAN switches
to an Fast Ethernet backbone.
Dual home FEP A To ken- Ring netw ork u sing SRB can support
duplicate MAC addresses. This capability has
been exploited by SNA gateways, which can
provide a redundant host connection: two
gateways have the same MAC address but are
on different rings and due to the sou rce routing
discovery process the SNA sessions are
randomly distributed between the two
gateways. Sessions are established between
configured MAC addresses.
Protocol filters The SmartStack SSIM-H2-02 offers the same
protocol filters as the SmartStack STS1620RM. This makes for consistent protocol
filtering and thereby reduces the risk of
network congestion and security breaches.
Broadcast Suppression On output, the Translational Switch SSIM
must keep the rate of broadcast frames sent to
Ethernet within the limit set by the Maximum
Broadcast Frame Count per Second
configuration parameter. Broadcasts include:
- ARE, STE source routed frames
- unknown destination frames
- frames with the MAC header broadcast bit set
Table 1. Features and Benefits
SSIM-H2-02 Fast Ethernet - Translational Switch SmartStack Interface Module Installation and User Guide Introduction
Page 13

4
MIB Support
RFC 1213: MIB II
•
RFC 1493: Bridge MIB
•
RFC 1525: SR Bridge MIB
•
RFC 1573: Evaluation of Interfaces Group of MIB II
•
RFC 1650: Dot3 MIB
•
RFC 1757: RMON MIB
•
STS16 MIB
•
FEUplink MIB
•
SSIM-H2-02 Fast Ethernet - Translational Switch SmartStack Interface Module Installation and User Guide Introduction
Page 14

2. Installation
This chapter describes how to install, connect, and start using the SSIM-H2-02. The
following main topics are covered:
Package Contents
•
Installation Procedure
•
Hardware Installation
•
Software Installation
•
Cabling
•
LEDs
•
Power-On Self Test
•
Configuration
•
Package Con te nts
Your SSIM-H2-02 package contains the following items:
One SmartStack SSIM-H2-02 2-Port Translational Switch SSIM (UTP).
•
5
One CD-ROM containing the Token Ring switch software and the Switch
•
Manager for Windows and HP Open View for Windows, as well as user
documentation in pdf format.
One
•
SSIM-H2-02 Fast Ethernet - Translational Switch SmartStack Interface Module Installation and User Guide Installation
SSIM-H2-02 Switch SmartStack Interface Module Installation and User
(this guide).
Guide
Page 15

6
Installation Procedure
The SSIM-H2-02 is packaged with the software for both the module itself and the
SmartStack STS16-20RM Token Ring Switch. The switch is also supplied with
both software images. To ensure compatibility between the module and the switch,
the latest of the two software revisions should be installed .
The switch and SSIM-H2-02 software is also available via Cabletron Systems's
online services, including the Cabletron Systems Web site.
Install the module as follows:
1. Install the software in the switch. See the switch manual for instructions on
downloading the software.
2. Optionally, clear the NVRAM in the base switch. This will erase all
configuration in the switch.
3. Reset the switch to activate the new software.
4. If the NVRAM was cleared in step 2, re-establish the switch configuration.
Verify that the switch is operating correctly.
5. Turn off the switch.
➽
Warning:
SSIM-H2-02 (version 3.10 or later) before physically inserting the module.
Otherwise, the switch will not recognize it and will cease functioning.
6. Physically install the module in one of the two expansion slots. See the
7. Turn on the switch.
8. Download the software for the module. See the “Software Installation” on
9. If you plan to use the graphical SmartStack Manager application, install it no w
10.If necessary , co nf igure the modu le. For details, see chapter 3, “Configuration”.
SSIM-H2-02 Fast Ethernet - Translational Switch SmartStack Interface Module Installation and User Guide Installation
Be sure to install a version of the base switch software that supports the
“Hardware Installation” on page7 for detailed instructions.
page 8 for detailed instructions.
on your PC.
Page 16

Hardwar e In stallation
7
➽
Warning
expansion modules while the power to the switch is on, damage may occur to the
switch and to the module.
➽
Warning:
SSIM-H2-02 (version 3.10 or later) before physically inserting the module.
Otherwise, the switch will not recognize it and this may in some cases corrupt the
configuration.
Use the following steps to install the module in a SmartStack STS16-20RM Token
Ring Switch:
1. Power of f the b ase switch b y unplugg ing the po wer cord from the po wer ou tlet.
2. Select an empty ex pansion m odule sl ot in whi ch to in stall t he module. You can
3. Remove the cover from the expansion slot on the front of the switch by
: Expansion modules are not hot-swappable. If you install or remove
Be sure to install a version of the base switch software that supports the
If the switch uses the optional SmartStack STS-PSU Redundant Power Unit,
unplug the connector from the base switch as well.
install the module in either or both of the slots.
loosening the two retaining thumb scre ws (see Figure 2). K eep the pl ate for use
in the cases when the expansion module is removed.
Figure 2. Removing the Expansion Slot Cover
SSIM-H2-02 Fast Ethernet - Translational Switch SmartStack Interface Module Installation and User Guide Installation
Page 17

8
4. Carefully insert the module into the rails on each side of the expansion slot,
sliding it back until the connector on the module is seated into the connector at
the back of the slot. See Figure 3. When the module is fully seated, the module
faceplate will be flush with the front of the base switch.
Figure 3. Installing the SSIM-H2-02
5. Secure the module with the two attached thumb screws.
6. Re-apply power to the switch.
Software Installation
Before you can use your SSIM-H2-02, you have to install the module software
image. The software image can be downloaded to the module via TFTP or via a
serial line. Search the disks supplied with the module for a file named FEyyzz.BIN.
The letters yyzz in the file name represent the version number of the software. For
example, FE0310.BIN is version 3.10 of the software image.
TFTP Download
1. Copy the software image to a suitable directory on the TFTP server.
2. Set-up VLAN IP configuration on the VLAN which will be used to download.
3. From the main menu in the console, select
4. Select
5. Set the IP address of the TFTP server. Also, set the do wnload VLAN (the BRF
6. Select
7. Select
8. Select
SSIM-H2-02 Fast Ethernet - Translational Switch SmartStack Interface Module Installation and User Guide Installation
TFTP Download→→→→Upload
which will be used to perform the download).
TS Firmware Download
TS Firmware Download Filename
software image to download.
Execute TS Image Network Download
.
.
Download→→→→Upload
and type the file name of the
to start the download.
.
Page 18

The console will display the download activity while the software is transferred
over the network by counting received blocks. When the software has been
transferred, you will see the following messages:
Network download complete. N ow transferring to TS
Module(s), please wait...
Download of TS firmware comp lete - TS module(s) b eing
reinitialized...
9
➽
Warning:
displayed.
The software image is then programmed into the FLASH memory on the module.
The software image remains in memory until it is replaced. When the software
installation is complete, the module is started for normal operation, and the
following message is displayed:
➽
Note:
downloaded, but to activate the module’s software you must restart the switch.
If you use Telnet as a manager console, download activity will not be
Press <RETURN> to continue...
Remember that new module software is active immediately after it is
Serial Download
1. From the main menu, select
2. Select
3. Select
4. Using your terminal software, transfer the software image to the SSIM-H2-02
The software image is then programmed into the FLASH memory of the module,
and will remain there until it is replaced. When the software installation is
complete, the module is started for normal operation and the following message is
displayed:
Serial Link Download
TS Firmware Download
with the X-Modem protocol. Th e transfer may t ake se v eral minutes, d epending
on your terminal emulator baud.
Download→→→→Upload
.
.
.
Press <RETURN> to continue...
SSIM-H2-02 Fast Ethernet - Translational Switch SmartStack Interface Module Installation and User Guide Installation
Page 19

10
Cabling
The module uses standard or crossed-over UTP-5 copper cables. The maximum
cable length is 100 m (328 feet).
1. Insert the modular RJ-45 jack from either end of a standard or crossed-over
UTP-5 cable into one of the connectors on the SSIM-H2-02 front panel.
2. Connect the other end of the cable to:
— another TS port (using the crossed-over UTP-5 cable)
— 100/10 MB Ethernet adapter (using the crossed-over UTP-5 cable)
— 100/10 MB Ethernet switch or hub port (using the standard UTP-5 cable)
LEDs
There are eight LEDs on the front panel of the SSIM-H2-02. During normal
operation, the two LEDs on the left side of the front panel indicate the module
status:
LED Position State Meaning
DIAG (green) Top
ERR (yellow) Bottom
Table 2. LEDs at the Left on the Front Panel
The three LEDs on the right of every port indicate the port status:
LED Position State Meaning
ACTIVITY
(green)
Table 3. LEDs at the Right of Every Port
SSIM-H2-02 Fast Ethernet - Translational Switch SmartStack Interface Module Installation and User Guide Installation
Top
On
Off
On
Off
Flashing
Off
Diagnostics are in process.
No diagnostics are in process.
A module failure has occurred.
The module is working
correctly.
The port is receiving or
transmitting frames.
Currently no traffic on the port.
Page 20

11
100 (green) Middle
LINK (green) Bottom
Table 3. LEDs at the Right of Every Port
On
Off
On
Off
The port is in 100 Mbps mode.
The port is in 10 Mbps mode.
The port is active.
The port is disabled or not
inserted.
Power-On Self Test
When you start the switch, it will run a power-on self-test to ensure that all the
devices are working correctly. During this test, the switch will detect and start any
module found in an expansion slot.
The module will then perform an internal power-on self test. During the entire test,
the DIAG and ERR LEDs will be lit while the other LEDs may turn on and off.
The test lasts a few minutes. If no problems are found, the DIAG and ERR LEDs
turn off and the module enters its normal operational state. If a problem is found,
the DIAG LED will turn off and the ERR LED will remain on. Messages in the
message log or on the console will indicate what the problem is.
➽
Switch Console message:
Note:
Press RETURN key to activate console...
means that the console is available, but it takes more time to activate the module.
You can check if they are up in the
SSIM-H2-02 Fast Ethernet - Translational Switch SmartStack Interface Module Installation and User Guide Installation
Configuration→→→→Module Information
menu.
Page 21

12
Configuration
The SSIM-H2-02 can be configured in two ways:
From the switch console, directly with a VT100 terminal emulator on the RS-
•
232 port or via Telnet.
By a SNMP based graphical management application.
•
Console configuration i s described in chapte r 3, “Configuration”. The management
application is described in the online help.
All configuration parameters are stored by the switch and not in the module. This
means that the modules can be exchanged without recon figu ring the s witch. Note,
however, that the module software image is stored on the SSIM-H2-02 itself and
will follow the module when it is moved to another switch.
Default Configuration
When a SSIM-H2-02 is inserted into an expansion slot for the first time, the switch
will generate a default configuration:
Both TS ports are enabled.
•
Both TS ports have a single virtual port in the default CRF.
•
This configuration is suitable for connecting both TS adapters and other TS ports
to the default CRF. If more advanced configurations are required, refer to
chapter 3, “Configuration” for details.
❏
SSIM-H2-02 Fast Ethernet - Translational Switch SmartStack Interface Module Installation and User Guide Installation
Page 22

3. Configuration
This chapter explains how to view and edit the configuration of the SSIM-H2-02
using a VT100 terminal emulator attached directly to the SmartStack STS16-20RM
Token Ring switch. The SSIM-H2-02 configuration can also be modified from a
remote VT100 console via a Telnet session. (The manual supplied with the
SmartStack STS16-20RM Token Ri ng Switch describes h ow to conn ect a network
management console).
This chapter is divided into the following sections:
Introduction
•
Bridging Modes
•
Redundant Connections to Fast Ethernet Network
•
General Guidelines
•
Configuration O v erview
•
VLAN Configuration
•
Port Configuration - TS Ports
•
Frame Conversion Configuration
•
13
For more information on configuration, see the
20FRM Token Ring Switch Installation and User Guide
SSIM-H2-02 Fast Ethernet - Translational Switch SmartStack Interface Module Installation and User Guide Configuration
SmartStack STS16-20RM/ ST S1 6-
.
Page 23

14
Introduction
Each SSIM-H2-02 has two 100 Mbps Fast Ethernet ports. In the console
configuration, port numbers are used to refer to ports, with ordinary Token Ring
ports numbered 1 to 20. If a module is inserted into the left expansion slot, the TS
ports are numbered 21 and 2 2. If a mo dule is inserted into t he right expans ion sl ot,
the TS ports are numbered 25 and 26. The number of modules in a stack is limited
only by the number of available slots in the stack.
The TS ports are configured much like ordinary Token Ring ports, and generally
appear in all tables where ordinary Token Ring ports appear.
Ports, Port Groups and VLANs
This section briefly describes the VLAN concept and switching modes of the
SmartStack STS16-20RM Switch. For more detailed information about these
subjects, see the
Installation and User Guide.
The switch supports up to 63 VLANs. A VLAN forms a single bridged domain and
the visibility of MAC addresses, bridge and ring numbers as well as the scope of
broadcast frames are limited to the VLAN in which they originate. Frames must be
routed to move between VLANs.
SmartStack STS16-20RM/STS16-20FRM Token Ring Switch
A VLAN consists of a number of port groups called CRFs (Concentrator Relay
Functions). A CRF is conceptually equal to a ring. If a VLAN contains two or mo re
CRFs they are conceptually connected by a multiport bridge called a BRF (Bridge
Relay Function).
The BRF performs either source-ro ute b ridgin g ( SRB) or source-route transparent
switching (SRT) between CRFs depending on the CRF configuration. CRFs
configured for SRT switching form an S RT domain in which source-ro uted frames
are source routed and non-source-routed frames are transparently switched.
Each ordinary Token Ring port is assigned to a specific CRF, which also
determines to which VLAN it belongs.
In the default configuration, all ordinary Token Ring ports are assigned to the
trcrf- default CRF, which belongs to the trbrf-default BRF. The only limitations to
this are that the names cannot be changed, the parent BRF of the default CRF
cannot be changed and other CRFs cannot be assigned to the trbrf-default BRF.
SSIM-H2-02 Fast Ethernet - Translational Switch SmartStack Interface Module Installation and User Guide Configuration
Page 24

15
TS Virtual Ports and VLAN Tagging
Unlike ordinary Token Ring ports, Tr anslational Switch ( TS) ports can f unction as
trunk ports, which means they can car ry traffic belon ging to all of the 63 VLANs it
is possible to configure in the switch over the same physical cable connection.
Frames from different VLANs are distinguished by means of standard IEEE
802.1Q frame tags. A frame tag consists of a 2-byte Ethernet Frame Type of value
0x8100 (as described by standard P802.3ac) followed by a 2-byte Tag Control
Information (TCI) field. It is insert ed into the Ethernet frame after the frame header
before transmission on the TS, and subs equently recognized and removed when the
frame is received.
To identify the VLAN to which the frame belon gs, the TCI field makes use of a 12bit VLAN identifier that uniquely identifies the BRF. It also contains a 3 bit priority
field (described in “FC Modification” on page 31).
Each TS port can be assigned to several CRFs, but there can be only one TS port
per BRF/VLAN. A virtual port is created for each CRF to which the TS port is
assigned. All virtual ports but one must be tagged (that is a single virtual port can
be left untagged).
Note that a TS port with a single untagged virtual port is functionally equivalent to
an ordinary Token Ring port. This is also the default configuration, with the virtual
port in trcrf-default.
Virtual Port Restriction
A TS port can have only one virtual port in each VLAN. Otherwise it would n ot be
possible to distinguish frames from two virtual ports in the same VLAN, since they
would have the same VLAN identifier.
Ring Number Restriction
All CRFs in which a TS port has virtual ports must have the same ring number. The
ring number is a per-port parameter and not a per-virtual-port parameter. If this
were not the case, the meani ng of th e R IF w ould be ambiguous and would de pen d
on the VLAN to which the frame was sent. It would thus be incomprehensible to
equipment that does not interpret VLAN tags.
SSIM-H2-02 Fast Ethernet - Translational Switch SmartStack Interface Module Installation and User Guide Configuration
Page 25

16
Bridging Modes
Source Routed Switching (SRS) Operation Mode
SRS is the default mode of operation. This mode is also restored after NVRAM
reset of the SmartStack STS16-20RM switch. In this mode, all ports of the switch
are in the same CRF (including SmartStack SSIM-H2-02 switch ports). Frames are
switched between ports bas ed only on MAC addres ses. In this mode , by default the
spanning tree algorithm is disabled. If more than one translational link is used to
connect to the Ethernet cloud, IEEE spanning tree on the CRF should be enabled.
Source Routed Transparent Bridging (SRT) Mode
➽
SRT is the suggested mode of operation.
Note:
If multiple CRFs are used on a switch, all translational links to the same Ethernet
cloud should be grouped into one CRF. If spanning tree is to be used, enable STP
on the CRF and BRF. The CRF’s STP should be set to IEEE; the BRFs’ STP should
be set to Based on Bridging mode or IEEE. (For more information, see the
SmartStack STS16-20RM/ STS16-20FRM Token Ring Swi tch Install ation and User
Guide.)
Note that this translational CRF is used only on the Token Ring side and is used
toroute source-routed Token Ring frames toward the Ethernet cloud.
Figure 4. Ethernet CRF in SRT Bridging Mode
SSIM-H2-02 Fast Ethernet - Translational Switch SmartStack Interface Module Installation and User Guide Configuration
Page 26

Source Routed Bridging (SRB) Mode
17
➽
SRT is the suggested mode of operation.
Note:
If multiple CRFs are used on a switch, all translational links to the same Ethernet
cloud should be grouped into o ne CRF. If a CRF i s created in S RB Bridg ing mode
and spanning tree is to be used, IEEE STP must be manually conf igured on the BRF
and CRF.
Note that this translational CRF is used only on the Token Ring side and is used to
route source-routed Token Ring frames toward the Ethernet cloud.
Figure 5. Ethernet CRF in SRB Bridging Mode
➽
SSIM-H2-02 Fast Ethernet - Translational Switch SmartStack Interface Module Installation and User Guide Configuration
In this mode IEEE STP works on all SRT and SRB CRFs. For more
Note:
information, see the
Installation and User Guide.
SmartStack STS16-20RM/STS16-20FRM Token Ring Switch
Page 27

18
Redundant Connections to Fast Ethernet Network
A connection to the Ethernet cloud can be made using several translational links
from multiple switches. Translational links connected from one switch to the same
Ethernet cloud should be grouped into one common CRF with an assigned LAN
segment number. From each switch, one CRF can be connected to the same
Ethernet cloud.
Redundant connections between source routed and tran sparent networks may cause
ARE frame duplication and infinite ARE frame loops as a result of discarding
source routing information dur ing translation from Token Ring to Ethernet format.
There are, however, solutions to both problems:
Infinite frame loops a re eliminated b y using a common LAN s eg ment numb er
•
for the entire Ethernet cloud or by proper spanning tree configuration. The
recommended CRF number is 4095.
Frame duplication is eliminated by a proper STP configuration allowing only
•
one link between the Token Ring cloud and the Ethernet to be forwarding.
Network Scenarios
Preventing Frame Duplication
The ARE duplication problem can occur only in a configuration with redundant
translational links in different switches (see Figure 6).
It is assumed that the network consi sts of a physically connected Et hernet cloud and
a physically connected Token Ring cloud. The two clouds are then con nected by a
number of links that implement translational bridging.
Figure 6. Frame Duplication
SSIM-H2-02 Fast Ethernet - Translational Switch SmartStack Interface Module Installation and User Guide Configuration
Page 28

19
In a pure Token Ring network, an All Routes Explorer (ARE) frame generated from
Station A traverses all rings only one time based on a Routing Information Field
(RIF) expanded by each source-routed bridge. In this example, both translational
links are in the forwarding state. An ARE frame originating in Ring1 may go
through the Ethernet cloud and come back to Ring 2. B ecause the RIF is los t when
passing through the Ethernet cloud, LAN segment 1 is no longer included in the
new RIF and the frame will be forwarded by Bridge1 from Ring2 back to Ring1.
This results in frame duplication – after visiting Ring1 again, the frame will be
discarded by the switch connected to Ring1.
This issue can be resolved by making sure that only one translational link can be in
the forwarding state.
Preventing Frame Looping
The network presented in Figure 6 was free of the ARE looping issue because the
entire the Ethernet cloud had the same LAN Segment number – each switch had the
same number for its Ethernet ports.
In Figure 7, the switches have different LAN segment numbers for Ethernet ports
(3 and 4). In this configuration, an infinite loop is created in addition to the frame
duplication issue.
Station A sends an ARE frame to Ring1, for example IP ARP with destination
MAC being Broadcast. This frame is co nverted to a transparen t broadcast and sent
on Ethernet link 1. The frame is then received by the switch on link 2 and sent as
an ARE frame to Ring 2 – note that the RIF d oes not contain LAN Segment 4 . The
ARE frame is then forwarded by Bridge 1 and switch link 1 back to the Ethernet,
and so on.
Figure 7. Frame Looping
SSIM-H2-02 Fast Ethernet - Translational Switch SmartStack Interface Module Installation and User Guide Configuration
Page 29

20
This loop can be resolved by making sure that only one translational lin k is in the
forwarding state or by using the same LAN segment number for all translational
links.
Using two different LAN segment numbers has some interesting advantages. If the
Ethernet cloud becomes phys ically separated into two par ts (see bel ow), both par ts
can still communicate via the Token Ring cloud. If the Ethernet cloud is not split
and the root of the spanning tree is on the Token Ring side, there m ight be a loss of
connectivity between Ethernet stations depending on the CRF numbers configur ed.
To avoid such hazardous situations, follow the recommendations for the s panning
tree parameter (described below).
Figure 8. Broken Ethernet Cloud
Spanning Tree Configuration
Running the IEEE Spanning Tree Protocol (STP) will create a single spann ing tree
covering the entire network. D epending on the top ology and configured path costs,
there will be one or more forwarding links between the two clouds.
If there are multiple translational links in multiple switches, the path costs on these
links should be selected so that only one forwards. This will prevent ARE
duplication and the looping problem.
Normally this can be achieved by assigning very large path costs on both sides of
the translational links so that at most one can be forwarding. The SmartStack
SSIM-H2-02 provides support for STP cost manipulation which does not require
cost configuration on both sides of the link.
SSIM-H2-02 Fast Ethernet - Translational Switch SmartStack Interface Module Installation and User Guide Configuration
Page 30

21
For each CRF of translational links connected to the same Ethernet cloud, a
connection attribute can be assigned:
— Primary connection – for a main connection to the Ethernet cloud (default
value for each CRF). This connection is always forwarding if active.
— Secondary 1 – for a backup connection to the Ethernet cloud. This
connection is always blocking if the Primary is active.
— Secondary 2 – for a second backup connection to the Ethernet cloud. This
connection is always blocking if the Primary or the Secondary 1 are active.
Each CRF of translational links connected to the same Ethernet cloud must have a
different connection attribute set.
Figure 9. Redundant Connections to Fast Ethernet Network
The described spanning tree configuration results in exactly one forwarding link
between Ethernet and Token Ring clouds, additional links becoming stand-by. To
migrate from Token Ring to Ethernet you should, over time, physically split the
Token Ring cloud into disjoint networks to increase bandwidth between Token
Ring and Ethernet.
SSIM-H2-02 Fast Ethernet - Translational Switch SmartStack Interface Module Installation and User Guide Configuration
Page 31

22
Figure 10 illustrates a network with two physically disjoint Ethernet clouds. Each
SmartStack STS16-20RM switch in the config uration has one primary conn ection
to one of the two Ethernet clouds and one secondary connection to the other cloud.
This way redundancy for both Ethern et clouds i s prov id ed, whil e at the s ame t ime
the traffic load between the Token Ring and Ethernet clouds is split between the
two switches.
Figure 10. Load Sharing in Redundant Connections to Fast Ethernet
Network
➽
SSIM-H2-02 Fast Ethernet - Translational Switch SmartStack Interface Module Installation and User Guide Configuration
The CRF connection attribute can be set from the console.
Note:
Page 32

23
Technical Background
For each CRF with a translational link, spanning tree should be enabled. For SRT
CRF, the default STP algorithm is IEEE 802.1D. Only this spanning tree algorithm
can be used for translational links.
A translational link has its own LAN segment number and recognizes source
routing. However, the translational link is an element of a transparent network and
frames are passed through only in the forwarding state. This restriction applies to
all frames, including ARE and specifically-routed frames.
Only one link of a CRF at a time may become forwarding. To achieve this, the
spanning tree costs of the internal BRF-to-CRF link will be mo dified according to
the CRF connection attribute. The BRF-to-CRF link is a virtual internal link and
exists only for spanning tree purposes. The spanning tree cost of each primary
connection remains unmodified.
Note that in the Secondary 1 and Secondary 2 connections, different values are
added to the cost of the internal BRF-to-CRF link to ensure that, when the Primary
fails, the Secondary 1 will become forwarding the Secondary 2.
Cost modification of BRF-to-CR F link:
For the Secondary 1 connection, the cost of the internal BRF-to-CRF link is
•
increased by 20,000.
For the Secondary 2 connection, the cost of the internal BRF-to-CRF link is
•
increased by 40,000.
In Figure 11, the SmartStack TR Switch 2 and Ethernet switch 2 know that the root
path cost seen from the secondary link is 20,000 higher than the root path cost of
the primary link seen by the TR.
With TR switch 1 and Ethernet switch 1. The secondary link will be blocked on the
internal CRF-to-BRF link.
To configure spanning-tree costs for a backup connection to Ethernet manually, set
each connection attribute to Primary and then change spanning-tree costs on each
side of the backup link.
SSIM-H2-02 Fast Ethernet - Translational Switch SmartStack Interface Module Installation and User Guide Configuration
Page 33

24
Figure 11. STP Cost Modification
In Figure 11, TR Switch 2 and Ethernet Switch 2 know that the cost of the
Secondary link is 20,000 high er than the cost of the p rimary link seen by TR Switch
1 and Ethernet Switch 1. This means that the secon dary link will be block ed on one
of its ends.
To manually configure spanning-tree cos ts for a backup connection to the Ethernet,
set each connection attribute to Primary and then change the spanning-tree costs
must be changed on each side of the backup link.
SSIM-H2-02 Fast Ethernet - Translational Switch SmartStack Interface Module Installation and User Guide Configuration
Page 34

General Guidelines
This section describes guidelines for work within the console menu s.
25
To select a menu item, use the arrow keys to highlight it, then press
•
If you need to specify additional information for any item (for example,
•
selecting
you want to exit the prompt without changing the value, press
In most cases, new values are saved when you select
•
Item
•
•
•
•
•
•
•
•
More
screen.
Selecting
If the screen is a one-screen display, selecting
Item
Port
20RM.
Item
Index
To return to the main menu from any screen within the menus, press
Note that any changes made to the screen are not saved. To return to the
greeting screen, press
To refresh the console panel at any time, press
To clear all queued messages, press
message log.
If you are administering switches in a stack, many of the conso le screens will
prompt for a box number. To continue, enter the number of the box you want
to administer. The box that you are connected to is highlighted.
or No or supplying a value), a prompt appears on the screen. If
Yes
ESC
Return
means there is more information than what is displayed on that
and pressing
More
refers to the number of a specific port on a SmartStack STS16-
refers to the numerical order of a list.
CTRL-B
displays the next screen of information.
ENTER
will update the screen.
More
from any screen.
CTRL-L
CTRL-D
. The messages will still be in the
.
.
ENTER
.
CTRL-P
.
.
The console automatically returns to the greeting screen after a default time of
•
five minutes of inactivity. The time can be changed at the
Configuration
Configuration
For protection against inadvertent or unauthorized access to the configuration
•
screens, you can establish a password to be entered at the greeting screen. If no
password is configured, just press
SSIM-H2-02 Fast Ethernet - Translational Switch SmartStack Interface Module Installation and User Guide Configuration
screen. The
menu that is accessed from the main menu.
Console Configuration
and the main menu is presented.
ENTER
Console
screen opens from the
Page 35

26
Navigating Within the Menus
Use the arrow keys (cursor keys) to highlight a selection. If the selection is a menu,
pressing the
command, such as
A heading with an ellipsis (three dots) after it means that when that heading is
selected, a submenu or screen is displayed.
Unless specified differently, all the screens or menus are accessed in the same way.
See the example in Figure 12:
key displays a new screen of information; if the selection is a
ENTER
, pressing the
Reset
key initiates that function.
ENTER
Figure 12. Main Switch Menu
SSIM-H2-02 Fast Ethernet - Translational Switch SmartStack Interface Module Installation and User Guide Configuration
Page 36

Configuration Overview
Execute the following general steps to configure a SSIM-H2-02:
Determine which VLANs the TS ports should connect.
•
Determine which VLAN, if any, should be untagged.
•
Configure the TS VLAN ID for all the BRFs that should be tagged.
•
Make sure that each TS VLAN ID matches that of the TS equipment at the
•
other end.
Assign CRFs to the TS port, thereby creating one virtual port in each VLAN.
•
Optional: create new CRFs to make sure that the CRFs do not hav e conflicting
ring numbers, as discussed in the “Ring Number Restriction” on page 15.
Configure the virtual ports, in particular the tagging mode. The relevant
•
configuration menus are described in detail in the following sections.
Configure the translational bridging parameters for each Virtual Port.
•
Assign CRFs to the TS port, thereby creating one virtual port in each VLAN.
•
You may want to create new CRFs to ensure that the CRFs do not have
conflicting ring numbers (see “Ring Number Restriction” on page 15).
Remember that each CRF ring number must b e set man ually if automatic ring
number learning is impossible.
27
SSIM-H2-02 Fast Ethernet - Translational Switch SmartStack Interface Module Installation and User Guide Configuration
Page 37

28
VLAN Configuration
For general information about the configuration of VLANs, refer to the
STS16-20RM/STS16-20 FRM Token Ring Swit ch Installation a nd User Guide
issues relating to the configuration of TS ports are described here.
BRF Configuration
Additional parameter 802.1Q VLAN ID has been added to the BRF configuration:
The 802.1Q VLAN ID is the value that is inserted in the IEEE 802.1 Q frame tag s.
It is entered as a decimal value between 1 and 4094.
The 802.1Q VLAN ID should not be confused with the existing VLAN ID, which
is a number chosen by the user and used by the Token Ring switch to index CR Fs
and BRFs. By default, the 802.1Q VLAN ID is set to the same value as the VLAN
ID.
Local VLAN Port Configuration
The TS ports will appear as trunk ports in the
This means that more than one CRF can be assigned to the TS p orts. Note, however,
the virtua l port restric tion described on page 15.
Local VLAN Port Configuration
SmartStack
. Only
.
Port Configuration - TS Ports
To configure a TS port on the SSIM-H2-02, select
Configuration
Enabled
Sets the administrative state of the port, possible values are
port is disabled, the LINK LED is off.
Default:
SSIM-H2-02 Fast Ethernet - Translational Switch SmartStack Interface Module Installation and User Guide Configuration
menu and enter the port number of the TS port (21, 22, 25 or 26).
Yes
Port Configuration
and No. When the
Yes
from the
Page 38

Status
Display only. Shows the current status of the port.
Value Meaning
29
Down
Going Up
The port is d own.
The port is enabled a protocol connection is being auto-
negotiated.
Up
Table 4. Translational Switch Physical Port Status
The port is u p .
Address Demand Aging Level
Sets the threshold on the number of entries in the address table on which entries are
aged faster. Possible values are 50, 60, 70,
Default:
90 percent
and 90 percent and
80,
Disabled
.
Trace Mask
Sets a bit mask for which messages are logged in the message log. Used mainly by
Cabletron Systems support for debugging purposes.
Virtual Port Configuration
To configure a virtual port on a TS por t, select
Port Conf iguration
menu of the TS port. If the TS po rt has mo re t han on e virt ual
Virtual Port Configuration
port, a list of the co rres pon di ng CR F s appear s f rom which the virtual port mu st be
selected. The following menu options are available:
on the
Enabled
Sets the administrative state of the virtual port to
Default:
SSIM-H2-02 Fast Ethernet - Translational Switch SmartStack Interface Module Installation and User Guide Configuration
Yes
Yes
or
No.
Page 39

30
Status
Display only. Shows the current status of t he virtual port.
Value Meaning
Admin down
Waiting for port up
The port or virtual port is disable d.
The virtual port is waiting for the port to
come up.
Up
The virtual port is up but not
forwarding.
Forwarding
Temporary down
The virtual port is up and forwarding.
The virtual port is currently down,
because the port is temporarily down.
Table 5. Translational Switch Virtual Port Status
MTU
You can use only one value as MTU.
MTU configured Actual TS frame size LF bits
1500
Table 6. Translational Switch Configured and Actual Frame SIze
Default:
1500
1558 001
Max Broadcast Rate (frames/sec)
Sets the maximum broadcast frame rate; possible values are 0 to
or
Disabled
. If enabled, this will limit the amount of broadcast frames being
5000
frames/sec
forwarded from the TS side of the virtual port to the switch.
Default:
SSIM-H2-02 Fast Ethernet - Translational Switch SmartStack Interface Module Installation and User Guide Configuration
Disabled
Page 40

31
VLAN Tagging Mode
Sets the VLAN tagging mode of the virtual port; possible values are
Untagged
. As explained previously, only one virtual port on each TS port can be
Tagged
and
untagged. All other virtual po rts must be tagged and the 802. 1Q VLAN ID must be
the same in both ends.
Because VLAN tagging mode imposes a small overhead, the VLAN that is
expected to have the largest amount of traffic should be untagged.
Default:
Untagged
for the first virtual port and
Tagged
for the subsequent ports.
FC Modification
Enabled FC modification preserves frame priority during translation between
Ethernet and Token Ring (both directions). Possible values are
Disabled
. As discussed earlier, a VLAN frame tag also contains a 3-bit priority
Enabled
and
field. If FC modification is enabled, the Token Ring frame priority in the FC byte
is set to the frame tag priority. If FC modification is disabled, the FC priority is set
to 0, and the frame tag priority is discarded.
When the SSIM-H2-02 inserts a frame tag in a frame, and FC modification is
enabled, the SmartStack SSIM-H2-02 module uses the FC priority from the Token
Ring frame. Otherwise the frame tag priority is set to 0 and the FC priority is
discarded.
Default:
Disabled
Address Aging Time
Sets the aging time for addresses and RIFs learned on an TS port. Possible value
are 1 to
minutes or 0 to disable aging. When there has been no activity on an
9999
address it is deleted from the address table.
For an address using the RIF entry, when no frames with the RIF have been
received for the specified period of time, the RIF and address entry is deleted. Only
for address entries known from the ho st is the status o f the address changed to
unknow
n.
RIF
Default: 5 minutes
RIF Not Learn Interval
Sets the learning blocked interval for RIF entries. Possible values are 0 to
900
seconds. A new RIF cannot be learned unless a specified period of time has passed
since the activity on current RIF entry was seen.
Default:
SSIM-H2-02 Fast Ethernet - Translational Switch SmartStack Interface Module Installation and User Guide Configuration
20
seconds
Page 41

32
Explorer RIF Aging Time
On output, the Translational Switch UEM quickly deletes addresses known only
from forwarded explorer frames. The session starts with an explorer frame
followed by a specifically routed frame. The explorer frame’s RIF aging time
makes it possible to limit the number of known addres s and RIF entries to
established sessions. Possible values are 0 to
is removed after this time if a specifically routed frame does not follow the
explorer.
seconds. A RIF with an address
900
Default:
10
seconds
Frame Conversion Configuration
To configure frame conversion on a TS port, select
Configuration
The following menu options are listed:
— IP Conversion Status
— IP conversion parameters change
IP Conver sion Status
Display only. Shows the current status of the IP Conversion.
Possible values are
IP Conversion Parameters Change
To change IP conversion parameters select
the
Frame Conversion Configuration
IP Frames Conversion
Sets the state of the IP frames Conversion. Possible values are
Disabled
Default:
on the
Virtual Port Configuration
Enabled
. If the state is set to
Enabled
and
Disabled
Disabled IP,
.
IP conversion parameters
menu of the TS port.
the traffic will be dropped.
Frame Conversion
menu of the TS port.
Enabled
change on
and
IP: Token Ring Format
Sets the format of IP frames on Token Ring.
Format Meaning
802.5 SNAP
Table 7. IP: Token Ring Format
SSIM-H2-02 Fast Ethernet - Translational Switch SmartStack Interface Module Installation and User Guide Configuration
Frame in the IEEE 802.5 format with SNAP
Page 42

IP: Ethernet Format
Sets the format of IP frames on Ethernet.
Format Meaning
33
802.3 SNAP
Ethernet II
Table 8. IP: Ethernet Format
Default:
Ethernet II
Frame in the IEEE 802.3 format with SNAP
Frame in Ethernet II format
Source Routing
Enables or disables Source Routing in IP frames transmitted to Token Ring.
Value Meaning
SR
Source Routing information will be added to frames
converted from Ethernet to Token Ring format.
noSR
Frame will be transmitted to T oken Ring as a transparent
frame.
Table 9. IP: Source Routing
Default:
SR
SSIM-H2-02 Fast Ethernet - Translational Switch SmartStack Interface Module Installation and User Guide Configuration
Page 43

34
Explorer Frames Type
Sets the type of explorer that should be used for
ARP/RARP
traffic. From the set
of IP protocols explorer frame type can be chosen only for ARP/RARP frames.
Other IP pr otocols can generate onl y STE explorer.
Value Meaning
ARE
STE
Table 10. IP: Explorer Frames Type
The All Routes Explorer should be used.
Spanning Tree Explorer should be used.
Value Meaning
ARE
STE
Table 11. IP: Explorer Frames Type
Default:
STE
Use All Routes Explorer.
Use Spanning Tree Explorer.
(change to ARE for typical Token Ring behavior for ARP frames)
Enable IP Fragmentation
Enables or disables fragmentation of IP frames received from Token Ring and
transmitted to Ethernet. The possible values are
Default:
Enabled
Enabled
and
Disabled
.
TR MAC Address for IP Multicasts
Allows entering the IP multicast address. The address is entered in the MAC
address format.
Default:
C00000:040000
Novell Conversion Status
Display only. Shows the current status of the Novell Conversion.
Possible values are
SSIM-H2-02 Fast Ethernet - Translational Switch SmartStack Interface Module Installation and User Guide Configuration
Enabled
and
Disabled
.
Page 44

Novell Conversion Parameters Change
To change Novell conversion parameters select
parameters
change on the
Frame Conv e r sion Config u r at i on
port.
NOVELL Frames Conversion
Determines how Novell frames are converted. Possible values are
Disabled
. If the state is set to
Disabled
Novell traffic will be dropped.
NOVELL conversion
menu of the TS
Enabled
35
and
Default:
Enabled
NOVELL: Token Ring Format
Sets the fo rmat of Novel l frames on Token Ring.
Format Meaning Novell Naming Conventions
802.5 SNAP
Frame in the IEEE 802.5
Token Ring SNAP
format with SNAP
802.5
Frame in the IEEE 802.5
Token Ring
format without SNAP
Table 12. NOVELL: Token Ring Format
Default:
802.5
NOVELL: Ethernet Format
Sets the format of Novell frames on Ethernet.
Format Meaning
802.3
Frame in the IEEE 802.2
Novell Naming
Conventions
802.2
format.
Novell 802.3
Frame in the IEEE 802.3
Normal 802.3
format.
802.3 SNAP
Frame in the IEEE 802.3
Ethernet SNAP
format with SNAP.
Ethernet II
Table 13. NOVELL: Ethernet Format
Default:
SSIM-H2-02 Fast Ethernet - Translational Switch SmartStack Interface Module Installation and User Guide Configuration
802.3
Frame in Ethernet II format. Ethernet II
Page 45

36
Source Routing
Enables or disables Source Routing in Novell frames transmitted to Token Ring.
Value Meaning
SR
Source Routi ng information will be added to frames
converted from Ethernet to Token Ring format .
noSR
Frame will be transmitted to Token Ring as a transparent
frame.
Table 14. NOVELL: Source Routing
Default:
noSR
Explorer Frames Type
Sets the type of explorer for IPX traffic.
Value Meaning
ARE
STE
Table 15. Novell: Explorer Frames Type
Default:
STE
Use All Routes Explorer.
Use Spanning Tree Explorer.
IPX Address Translation
Enables and disables reversing MAC address bits in Novell frames.
Possible values are
do not bit reverse
and
bit reversed
.
Default:
do not bit reverse
NetBios Conversion Status
Display only. Shows the current status of the NetBios Conversion.
Possible values are
Enabled
and
Disabled
.
NetBios Conversion Parameters Change
To change NetBios conversion parameters select
change
on the
Frame Conversion Configuration
NetBios Frames Conversion
Determines how NetBios frames are converted. Possible values are
SSIM-H2-02 Fast Ethernet - Translational Switch SmartStack Interface Module Installation and User Guide Configuration
NetBios conversion parameters
menu of the TS port.
Enabled
and
Page 46

37
Disabled
Default:
. If the state is set to
Enabled
Disabled
, NetBios traffic will be dropped.
NetBios: Token Ring Format
Sets the format of NetBios frames on Token Ring.
Format Meaning
802.5 Frame in the IEEE 802.5 format.
Table 16. NetBios: Token Ring Format
NetBios: Ethernet Format
Sets the format of NetBios frames on Ethernet.
Format Meaning
802.3
Ethernet II
Table 17. NetBios: Ethernet Format
Default:
802.3
Frame in the IEEE 802.3 format.
Frame in Ethernet II format.
Source Routing
Enables or disables Source Routing in NetBios frames transmitted to Token Ring.
Value Meaning
SR
Source Routing information will be added to frames
converted from Ethernet to Token Ring format.
noSR
Frame will be transmitted to To ken Ring as a transparent
frame.
Table 18. NetBios: Source Routing
Default:
SSIM-H2-02 Fast Ethernet - Translational Switch SmartStack Interface Module Installation and User Guide Configuration
SR
Page 47

38
Explorer Frames Type
Sets the type of explorer that should be used for NetBios traffic.
Value Meaning
ARE
STE
Table 19. Net Bios: Explorer Frames Type
Default:
STE
Use All Routes Explorer.
Use Spanning Tree Explorer.
TR Functional Address
The TR Functional Address is entered in the MAC address format.
Default:
C00000:000080
Ethernet Group Address
The Ethernet Group Address is entered in the MAC address format.
Default:
030000:000001
SNA Conversion Status
Display only. Shows the current status of the SNA Conversion.
Possible values:
Enabled
and
Disabled
.
SNA Conversion Parameters Change
To change SNA conversion parameters select
change
on the
Frame Conversion Configuration
SNA conversion parameters
menu of the TS port.
SNA Frames Conversion
Sets the state of the SNA Frames Conversion. Possible values are
Disabled
Default:
. If the state is set to
Enabled
Disabled
, SNA traffic will be dropped.
Enabled
and
SNA: Token Ring Format
Sets the format of SNA frames on Token Ring.
Format Meaning
802.5
Table 20. SNA: Token Ring Format
SSIM-H2-02 Fast Ethernet - Translational Switch SmartStack Interface Module Installation and User Guide Configuration
Frame in the IEEE 802.5 format.
Page 48

SNA: Ethernet Format
Sets the format of SNA frames on Ethernet.
Format Meaning
39
802.3
Ethernet II
Table 21. SNA: Ethernet Format
Default:
802.3
Frame in the IEEE 802.3 format.
Frame in Ethernet II format.
Source Routing
Enables or disables Source Routing in SNA frames transmitted to Token Ring.
Value Meaning
SR
Source Routing information will be added to frames
converted from Ethernet to Token Ring format.
noSR
Frame will be transmitted to T oken Ring as a transparent
frame.
Table 22. SNA: Source Routing
Default:
SR
SSIM-H2-02 Fast Ethernet - Translational Switch SmartStack Interface Module Installation and User Guide Configuration
Page 49

40
Explorer Frames Type
Sets the type of explorer that should be used for SNA traffic.
Value Meaning
ARE
STE
Table 23. SNA: Explorer Frames Type
Default:
ARE
Use All Routes Explorer.
Use Spanning Tree Explorer.
Other Frames w/SNAP Conversion Status
Display only. Shows the current status of the Other Frames With SNAP
Conversion. Possible values are
Enabled
and
Disabled
.
Other Frames w/SNAP Conversion Parameters Change
To change Other Frames w/SNAP conversion parameters select
SNAP conversion parameters change
on the
Frame Conversion Configuration
menu of the TS port.
Other Frames w/SNAP Frames Conversion
Sets the state of the Other Frames w/SNAP Frames Conversion. Possible v alues are
Enabled
and
Disabled
. If the state is set to
Disabled
, Other Frames w/SNAP traffic
will be dropped.
Default:
Enabled
Other Frames w/SNAP: Token Ring Format
Sets the format of Other Frames w/SNAP frames on Token Ring.
Other Frames w/
Format Meaning
802.5 SNAP
Table 24. Other Frames w/SNAP: Token Ring Format
SSIM-H2-02 Fast Ethernet - Translational Switch SmartStack Interface Module Installation and User Guide Configuration
Frame in the IEEE 802.5 format with SNAP
Page 50

Other Frames w/SNAP: Ethernet Format
Sets the format of Other Frames w/SNAP frames on Ethernet.
Formats available:
Format Meaning
41
802.3 SNAP
Ethernet II
Table 25. Other Frames w/SNAP: Ethernet Format
Default:
Ethernet II
Frame in the IEEE 802.3 format with SNAP
Frame in Ethernet II format
Source Routing
Enables or disables Source Routing in Other Frames w/SNAP frames transmitted
to Token Ring.
Value Meaning
SR
Source Routing information will be added to frames
converted from Ethernet to Token Ring format.
noSR
Frame will be transmitted to Token Ring as a
transparent frame.
Table 26. Other Frames w/SNAP: Source Routing
Default:
SR
Explorer Frames Type
Sets the type of explorer that should be used for Other Frames w/SNAP traffic.
Value Meaning
ARE
STE
Table 27. Other Frames w/SNAP: Explorer Frames Type
Default:
ARE
Use All Routes Explorer.
Use Spanning Tree Explorer.
Other Frames w/o SNAP Conversion Status
Display only. Shows the current status of the Other Frames Without SNAP
SSIM-H2-02 Fast Ethernet - Translational Switch SmartStack Interface Module Installation and User Guide Configuration
Page 51

42
Conversion. Possible values are
Enabled
and
Disabled
.
Other Frames w/o SNAP Conversion Parameters Change
To change Other Frames w/o SNAP conversion parameters select
w/o SNAP conversion parameters change
Configuration
menu of the TS port. The following menu options are listed:
on the
Frame Conversion
Other Frames w/o SNAP Frames Conversion
Sets the state of the Other Frames w/o SNAP frames Conversion. Possible values
are
Enabled
and
Disabled
. If the state is set to
Disabled
, Other Frames w/o SNAP
traffic will be dropped.
Default:
Enabled
Other Frames w/o SNAP: Token Ring Format
Sets the format of Other Frames w/o SNAP frames on Token Ring.
Format Meaning
802.5 Frame in the IEEE 802.5 format.
Table 28. Other Frames w/o SNAP: Token Ring Format
Other Frames w/o SNAP: Ethernet Format
Sets the format of Other Frames w/o SNAP frames on Ethernet.
Other Frames
Format Meaning
802.3 Frame in the IEEE 802.3 format.
Table 29. Other Frames w/o SNAP: Ethernet Format
SSIM-H2-02 Fast Ethernet - Translational Switch SmartStack Interface Module Installation and User Guide Configuration
Page 52

43
Source Routing
Enables or disables Source Routing in Other Frames w/o SNAP frames transmitted
to Token Ring.
Value Meaning
SR
noSR
Table 30. Other Frames w/o SNAP: Source Routing
Default:
Explorer Frames Type
Sets the type of explorer that should be used for Other Frames w/o SNAP traffic.
Default:
SR
Value Meaning
ARE
STE
Table 31. Other Frames w/o SNAP: Explorer Frames Type
STE
Source Routing information will be added to frames
converted from Ethernet to Token Ring format.
Frame will be transmitted to T oken R ing as a transparent
frame.
Use All Routes Explorer.
Use Spanning Tree Explorer.
Dual Home FEP Addresses Configuration
To configure Dual Home FEP Addresses on a TS port, select
Addresses Configuration
port. For each Virtual Port (on each TS port), 10 addresses can be configured as
Dual Home FEP addresses. A constant li st of 10 MAC addresses nu mbered 1-10 is
shown when this menu is opened. Addresses which consist entirely of zer os
represent empty entries.
on the
Virtual Port Configuration
Dual Home FEP
menu of the TS
To add or change an address, highlight the address, press
enter the new MAC address or simply press
address (empty entry).
once more to enter a NULL
ENTER
, and then either
ENTER
❏
SSIM-H2-02 Fast Ethernet - Translational Switch SmartStack Interface Module Installation and User Guide Configuration
Page 53

44
SSIM-H2-02 Fast Ethernet - Translational Switch SmartStack Interface Module Installation and User Guide Configuration
Page 54

4. Statistics
A wide range of statistics is available for the SmartStack Token-Ring Switch. The
following topics are discussed in this chapter:
Port Status
•
Port Statistics
•
General Statistics
•
Discarded Frames
•
802.3 Statistics
•
Traffic Coun ters
•
Error Counters
•
Virtual Port Statistics
•
Discarded Frames Statistics
•
45
SSIM-H2-02 Fast Ethernet - Translational Switch SmartStack Interface Module Installation and User Guide Statistics
Page 55

46
Statistics Menu
When
Statistics
— Switch Statistics
— Power Supply Information
— Port Status
— Port St atistics
— A ddress Tables
— Current Spanning Tree Information
— VLAN Statistics
— Diagnostic Test Results
— Message Log Information
— Display Summary
is selected from the main menu, the following options are listed:
The menu items in the
SmartStack Token Ring Swi tches. For general infor mation about these menu i tems,
refer to that guide.
However, some of the menu items contain additional information that is specific for
the SSIM-H2-02:
Port Status
•
Port Statistics
•
Address Tables
•
Message Log In f o rmation
•
Statistics
- The module virtual ports are included in the port overview.
- contains additional counters for TS ports.
- also contains addresses learned from TS ports.
menu are all described in the guide for the
- also contains messages generated by the module.
SSIM-H2-02 Fast Ethernet - Translational Switch SmartStack Interface Module Installation and User Guide Statistics
Page 56

Port Status
Besides the ordinary Token-Ring ports, the table contains an entry for each TS
virtual port, along with its current status.
47
When
Port Status
is selected on the
Statistics
menu, the following items are
displayed:
Port
The TS port for which the virtual port is defined. Possible values are: 21, 22,
25
,
and 26.
TrCRF
The name of the CRF in which the virtual port is defined.
TrBRF
The name of the BRF in which the virtual port is defined.
Enabled/Ins
For ordinary Token Ring port s, this is the enabled and i nserted status. This does not
apply to virtual ports on a TS port. Instead, the current state of the virtual port is
displayed. For details, refer to the description of virtual port configuration.
Spd
The connect speed in Mbps , which is di splayed as 10 or 100 for TS modul e virt ual
ports. Note that 100 Mbps full-dup lex is the total bandwidth av ailable on a TS port
and is shared by all the virtual ports on that port. The actual bandwidth on a
particular virtual port depends on the amount of traffic on other virtual ports.
Oper Mode
The operation mode is for TS virtual ports may be displaye d as HDX (Half DupleX)
or FDX (Full DupleX).
Fwd Mode
The forwarding mode is always displayed as Store-Fwd, since the SSIM-H2-02
always operates in the store-and-forward switching mode.
SSIM-H2-02 Fast Ethernet - Translational Switch SmartStack Interface Module Installation and User Guide Statistics
Page 57

48
Port Statistics
When
Port Statistics
following options are listed:
— General Statistics
— 802.3 Statistics
— Virtual Port Statistics
The available information is discussed in the following sections.
is selected and the port number of a TS port is entered, the
General Statistics
When
General Statistics
number of frames and bytes received, forwarded and transmitted on the TS port.
These numbers include traffic for all virtual ports. The screen is automatically
updated every five seconds.
Frame and Byte Counters
The following frame and byte counters are defined:
Received
Frames received from TS, but not necessarily forwarded.
is selected on the
Port Statistics
, the screen shows the
Forwarded
Frames received from TS and forwarded to other ports in the switch.
Transmitted
Frames transmitted to TS.
Frames
The number of frames received, forwarded or transmitted. The number is
subdivided into the NSR, SRF, STE and AR E frames, as expl ained on page 49. For
received frames it is also subdivided into unicast, broadcast and multicast frames,
explained on page 49.
Bytes
The total number of bytes in fr ames. The b yte count includ es all by tes from AC up
to and including the FCS field. Note that the forwarded byte count can be lower
than the received byte count even though all frames are forwarded. Th is is because
the VLAN frame tag is removed before a frame is forwarded.
NSR Frames
Number of Non-Source Routed frames.
SSIM-H2-02 Fast Ethernet - Translational Switch SmartStack Interface Module Installation and User Guide Statistics
Page 58

SRF Frames
Number of Specifically Routed Frames.
STE Frames
Number of Spanning Tree Explorers.
ARE Frames
Number of All-Routes Explorers.
Unicast Frames
Number of frames with a unicast MAC address as destination.
Broadcast Frames
Number of frames with a Token-Ring broadcast address as destination.
Multicast Frames
Number of frames with a Token-Ring functional or group address as destination.
Reset
When you choose
, the counters for frames, bytes and discarded frames are
Reset
reset. The time since last reset is shown on the screen.
49
Discarded Frames
When
Discarded Frames
shows the number of frames discarded on the TS port in both inbound (from TS)
and outbound (to TS) directions. The discard reasons are described below.
Discarded Inbound Frames
The following discard reasons are defined for inbound frames:
Invalid VLAN
A frame was received on an unknown VLAN. This is either a VLAN tagged frame
containing an unknown VLAN ID, or an untag ged frame when no untagged virtual
ports are defined. Make sure that the 802.1Q VLAN ID and virtual port tagging
mode is set to the same value on both sides of the connection.
Table Invalid VLAN Tag CFI
A VLAN tagged frame with an invalid Canonical Format Indicator (CFI) was
received. The CFI is a bit in the Tag Control Information field o f a VLAN tag. This
bit indicates the bit order of any MAC addresses in the information field. It is 0 for
Ethernet format and 1 for Token-Ring format. It should always be 1 in received
frames.
SSIM-H2-02 Fast Ethernet - Translational Switch SmartStack Interface Module Installation and User Guide Statistics
is chosen on the general statistics display, the screen
Page 59

50
Table Filtered by Address Filter
The frame by discarded because of a MAC address filter.
Table Filtered by DSAP Filter
The frame by discarded because of a protocol (DSAP or protocol type) filter.
Locally Filtered
The frame is destined to the local (connect to the Ethernet segment) station.
Table Blocked Virtual Port
The frame is discarded because the virtual port is currently not in f orwarding state.
Unrecognized SNA
Number of unrecognized SNA frames.
Discarded Outbound Frames
The following discard reasons are defined for outbound frames:
Table Invalid Frame Header Tag
A frame could not be transmitted because it has an invalid internal frame header tag
(note that this internal frame header tag is not the same thing as the VLAN tag).
Table Blocked Virtual Port
The frame is not transmitted because the virtual port is curren tly not in forwar ding
state.
Table Filtered by DSAP Filter
The frame is not transmitted because of a protocol (DSAP or protocol type) filter.
Table Frame Too Large
The frame is larger than the maximum frame size, which has been configured for
the virtual port. Refer to the “Virtual Port Configuration” on page 29.
Broadcast Overflow
Number of broadcast frames dropped because the ring number was exceeded.
Learning Fails
(TS ports only.) Incremented if address learning from r eceived Token Ring fr ames
fails. Possible reasons:
Translational Switch received frame with damaged RIF
•
(wrong length, bad ring).
SSIM-H2-02 Fast Ethernet - Translational Switch SmartStack Interface Module Installation and User Guide Statistics
Page 60

51
Translational Switch received frame with RIF but, for this protocol, the noSR
•
flag is used during conversions. If you have the default configuration this can
happen for IPX frames (clear and set flag useSR for Novell conversion
parameters to see if this is the reason).
For the CRF in which the Translational Switch port exists, the ring number is
•
set to Auto but it is impossible to learn the proper ring number.
802.3 Statistics
From a port popup menu select
dialog box. The dialog box displays IEEE 802.3 traffic and error counters for the
selected port. All counters are retrieved from a physical layer of the uplink and
automatically updated every 5 seconds.
TS Port Statistics | 802.3 Statistics
to access this
Tr affic Counters
Bytes Received
Number of bytes received on this port.
Bytes Transmitted
Number of bytes transmitted by this port.
Frames Received
Number of frames received on this port.
Frames T ransmitted
Number of frames transmitted by this port.
Multicast Bytes Received
Number of bytes in multicast frames received on this port.
Multicast Frames Received
Number of multicast frames received on this port without errors.
Frames Transmitted, Deferred
Number of frames transmitted by this port but initially deferred. (The 21143 FE
transceiver had to defer while ready to transmit a frame because the carrier was
asserted).
SSIM-H2-02 Fast Ethernet - Translational Switch SmartStack Interface Module Installation and User Guide Statistics
Page 61

52
Error Counters
Single Collisions
Number of frames transmitted by this port after single collision.
Multiple Collisio ns
Number of frames transmitted by this port after multiple collision.
Excessive Collisions
Number of frames dropped because of excessive collisions.
Carrier Check Failures
Number of frames dropped because of late collision and loss of carrier.
Short Circuits
Number of frames dropped because of short circuits.
Open Circuits
Number of frames dropped because of open circuits.
Remote Failures
Number of frames dropped because of remote failures.
CRC Errors
Number of frames received on this port with CRC error.
Framing Errors
Number of frames dropped because of framing error.
Frames Too Long
Number of received frames longer than the maximum length receivable.
Data Overrun
Number of frames dropped because of data overrun.
System Buffers Unavailable
Number of frames dropped because of lack of system received buffers.
User Buffers Unavailable
Number of tries of buffer allocation.
Frames Congested
Number of frames congested, due to a lack of space in Tx queue.
SSIM-H2-02 Fast Ethernet - Translational Switch SmartStack Interface Module Installation and User Guide Statistics
Page 62

53
Virtual Port Statistics
When
Virtual Port Statistics
port, counters for the virtual port are displayed. If more than one virtual port is
defined for the TS port, the requested virtual port must first be selected from a list
of CRFs.
The following items are displayed:
Virtual Port State
This is the current state of the virtual port. Refer to the “Virtual Port Configuration”
on page 33 for details.
Frames Forwarded
The number of frames received and forwarded on this virtual port.
Frames T ransmitted
The number of frame transmitted on this virtual port.
Frames Received
The number of frames received but not necessarily forwarded on this virtual port.
Reset
The time since these counters were last restarted. Select
on this screen.
is selected from the
Port Statistics
to reset the counters
Reset
menu for a TS
Discarded Frames Statistics
When
Disc Frames (in)
Statistics
option was chosen (in or
Inbound (No Translation)
TCP/IP
Number of frames dropped because TCP/IP translation is disabled or inbound
frames are received from Ethernet in a format different than that specified in the TS
configuration dialog.
IPX
Number of frames dropped because IPX translation is disabled or inbound frames
are received from Ethernet in a format different than that specified in the TS
configuration dialog.
SSIM-H2-02 Fast Ethernet - Translational Switch SmartStack Interface Module Installation and User Guide Statistics
menu, counters of discarded frames are di s played . Depend in g on which
or
Disc Frames (out)
), inbound or outbound statistics are displayed.
out
is selected from the
Virtual Port
Page 63

54
NetBios
Number of frames dropped because NetBios translation is disabled or inbound
frames are received from Ethernet in a format different than that specified in the TS
configuration dialog.
SNA
Number of frames dropped because SNA translation is disabl ed or inbound fr ames
are received from Ethernet in a format different than that specified in the TS
configuration dialog.
Other w/SNAP
Number of frames dropped because this translation is disabled or inbound frames
are received from Ethernet in a format different than that specified in the TS
configuration dialog.
Other w/o SNAP
Number of frames dropped because this translation is disabled.
Inbound Translation errors
TCP/IP
Number of frames dropped because of TCP/IP translation errors.
IPX
Number of frames dropped because of IPX translation errors.
NetBios
Number of frames dropped because of NetBios translation errors.
SNA
Number of frames dropped because of SNA translation errors.
Other w/SNAP
Number of frames dropped because of translation errors for other frames with
SNAP.
Other w/o SNAP
Number of frames dropped because of translation errors for other frames without
SNAP.
SSIM-H2-02 Fast Ethernet - Translational Switch SmartStack Interface Module Installation and User Guide Statistics
Page 64

55
Outbound (No Translation)
TCP/IP
Number of frames dropped because TCP/IP translation is disabled.
IPX
Number of frames dropped because IPX translation is dis abled or outbound frames
received from Token Ring in format different than specified in TS configuration
dialog.
NetBios
Number of frames dropped because NetBios translation is disabled.
SNA
Number of frames dropped because SNA translation is disabled.
Other w/SNAP
Number of frames dropped because translation is disabled for other frames with
SNAP.
Other w/o SNAP
Number of frames dropped because trans lation is disabled for other frames without
SNAP.
Outbound Translation Errors
TCP/IP
Number of frames dropped because of TCP/IP translation errors.
IPX
Number of frames dropped because of IPX translation errors.
NetBios
Number of frames dropped because of NetBios translation errors.
SNA
Number of frames dropped because of SNA translation errors.
Other w/SNAP
Number of frames dropped because of translation errors for other frames with
SNAP.
SSIM-H2-02 Fast Ethernet - Translational Switch SmartStack Interface Module Installation and User Guide Statistics
Page 65

56
Generic w/o SNAP
Number of frames dropped because of translation erro rs for generic frames without
SNAP.
Fragmentation Error
(TCP/IP only.) Number of frames dropped because IP fragmentation finished with
an error or an IP frame was received with the Don't Fragment bit set.
❏
SSIM-H2-02 Fast Ethernet - Translational Switch SmartStack Interface Module Installation and User Guide Statistics
Page 66

5. Getting in Touch with Technical Support
For additional support related to this device or document, contact Cabletron
Systems using one of the following methods:
World Wide Web http://www.cabletron.com/
Phone (603) 332-9400
Internet mail support@cabletron.com
FTP ftp://ftp.cabletron.com/
Login
Password
To send comments or suggestions concerning this document, contact the
Cabletron Systems Technical Writing Department via the following
email address:
Make sure to include the document Part Number in the email message.
Before calling Cabletron Systems, have the following information ready:
Your Cabletron Systems service contract number
•
TechWriting@cabletron.com
anonymous
your email address
57
A description of the failure
•
A description of any action(s) already taken to resolve the problem (e.g.,
•
changing mode switches, rebooting the unit, etc.)
The serial and revisi on numbers of all in v olv ed Cabletron Systems products in
•
the network
A description of your network environment (layout, cable type, etc.)
•
Network load and frame size at the time of trouble (if known)
•
The device history (i.e., hav e you returned the de vice bef ore, is this a recurring
•
problem, etc.)
Any previous Return Material Authorization (RMA) numbers
•
SSIM-H2-02 Fast Ethernet - Translational Switch SmartStack Interface Module Installation and User GuideGetting in Touch with Technical Support
Page 67

58
SSIM-H2-02 Fast Ethernet - Translational Switch SmartStack Interface Module Installation and User GuideGetting in Touch with Technical Support
Page 68

Appendix A. Abbreviations
59
AC
ARE
ATM
BRF
CFI
CRC
CRF
DA
DSAP
DTR
ECO
FC
FCS
FDX
HDX
HSTR
IP
Access Control
All-Routes Explorer
Asynchronous Transfer Mode
Bridge Relay Function
Canonical Format Indicator
Cyclic Redundancy Check
Concentrator Relay Function
Destination Address
Destination SAP
Dedicated Token-Ring
Engineering Check Order
Frame Control
Frame Check Sequence
Full Duplex
Half Duplex
High-Speed Token-Ring
Internet Protocol
LAN
LED
LLC
MAC
Mbps
MMF
MTU
NSR
NVRAM
RAM
SSIM-H2-02 Fast Ethernet - Translational Switch SmartStack Interface Module Installation and User Guide Abbreviations
Local Area Network
Light Emitting Diode
Logical Link Control
Media Access Control
MegaBit Per Second
Multi Mode Fiber
Maximum Transmission Unit
Non-Source Routed
Non-Volatile RAM
Random Access Memory
Page 69

60
RIF
RX
SA
SAP
SNA
SNAP
SNMP
SR
SRB
SRF
SRS
SRT
SSAP
SSIM
STE
TS
TCI
Route Information Field
Receive Data
Source Address
Service Access Point
Systems Network Architecture
Sub-Network Access Protocol
Simple Network Management Protocol
Source Routing
Source Route Bridging
Specifically Routed Frame
Source Route Switching
Source Route Transparent
Source SAP
SmartStack Interface Module
Spanning Tree Explorer
Translational Switch
Tag Control Information
TFTP
TR
TX
TXI
UTP
VLAN
Trivial File Transfer Protocol
Token-Ring
Transmit Data
Transmit Immediate
Unshielded Twisted Pair
Virtual LAN
❏
SSIM-H2-02 Fast Ethernet - Translational Switch SmartStack Interface Module Installation and User Guide Abbreviations
Page 70

Index
index-1
A
abbreviations 59
B
Bridging Modes 16
Source Routed Bridging (SRB ) 17
Source Routed Switching (SRC) 16
Source Routed Transparent Bridging (SRT) 16
C
cabling 10
configuration 12
default 12
console configuration 13
configuration overv ie w 27
general gu id elines 25
introduction 14
navigating within the menus 26
ports, port groups and VLA N s 14
ring number restriction 15
TS virtual ports and VLAN tagging 15
virtual port restriction 15
CrossFire 8660 module
configuration 27
connection 1
installati o n 7
software installation 8
I
Installation
software 8
installation
physical 7
procedure 6
introduction 1
L
LEDs 10
N
network scenarios
frame duplication 18
frame looping 19
P
package conten ts 5
port configuration - TS ports 28
power-on self test 11
R
redundant connectio ns to Fa st Ethe rne t network 18
redundant connectio ns to fa st e the rnet network
technical background 23
F
frame conversion configuration 32
dual home FEP addresses configuration 43
NetBios conversion parameters change 36
NetBios conversion status 36
Novell conversion parameters change 35
Novell Conversion Status 34
other frames w/o SNAP conversion parameters
change 42
other frames w/o SNAP conversion status 41
other frames w/SNAP conversion parameters
change 40
other frames w/SNAP conversion status 40
SNA conversion parameters change 38
SNA conversion status 38
TCP/IP conversion parameters change 32
TCP/IP conversion status 32
frame duplication 18
frame looping 19
Index SSIM-H2-02 Fast Ethernet - Translational Switch SmartStack Interface Module Installation and User Guide
S
service 57
software installation 8
software download 9
TFTP download 8
Source Routed Switching (SRS) 16
Source Routed Transparent Bridging (SRB) 17
Source Routed Transparent Bridging (SRT) 16
Spanning Tree configura tion 20
statisti cs 45
discarded frames 53
general statistics 48
menus 46
port statistics 48
port status 47
virtual port statistics 53
Page 71

index-2
V
VLAN configuration 28
BRF configuration 28
local VLAN port configuration 28
SSIM-H2-02 Fast Ethernet - Translational Switch SmartStack Interface Module Installation and User Guide Index
Page 72

*710001816*
 Loading...