


SmartSwitch Series
6E122, 6E123, 6E128, 6E129,
6E132, 6E133, 6E138, 6E139,
6H122, 6H123, 6H128, 6H129,
6H133, and 6M146
Local Management Supplement
9033026-01


Only qualified personnel should perform installation
procedures.
NOTICE
Cabletron Systems reserves the right to make changes in specifications and other information
contained in this document without prior notice. The reader should in all cases consult Cabletron
Systems to determine whether any such changes have been made.
The hardware, firmware, or software described in this manual is subject to change without notice.
IN NO EVENT SHALL CABLETRON SYSTEMS BE LIABLE FOR ANY INCIDENTAL,
INDIRECT, SPECIAL, OR CONSEQUENTIAL DAMAGES WHATSOEVER (INCLUDING BUT
NOT LIMITED TO LOST PROFITS) ARISING OUT OF OR RELATED TO THIS MANUAL OR
THE INFORMATION CONTAINED IN IT, EVEN IF CABLETRON SYSTEMS HAS BEEN
ADVISED OF, KNOWN, OR SHOULD HAVE KNOWN, THE POSSIBILITY OF SUCH
DAMAGES.
Cabletron Systems, Inc.
35 Industrial Way
Rochester, NH 03867
1999 by Cabletron Systems, Inc.
All Rights Reserved
Printed in the United States of America
Order Number: 9033026-01 August 1999
Cabletron Systems, SPECTRUM
trademark of Cabletron Systems, Inc.
All other product names mentioned in this manual may be trademarks or registered trademarks of
their respective companies.
, and
LANVIEW
are registered trademarks and
SmartSwitch
is a
Local Management Supplement i

Notice
FCC NOTICE
This device complies with Part 15 of the FCC rules. Operation is subject to the following two
conditions: (1) this device may not cause harmful interference, and (2) this device must accept any
interference received, including interference that may cause undesired operation.
NOTE:
device, pursuant to Part 15 of the FCC rules. These limits are designed to provide reasonable
protection against harmful interference when the equipment is operated in a commercial environment.
This equipment uses, generates, and can radiate radio frequency energy and if not installed in
accordance with the operator’s manual, may cause harmful interference to radio communications.
Operation of this equipment in a residential area is likely to cause interference in which case the user
will be required to correct the interference at his own expense.
WARNING:
party responsible for compliance could void the user’s authority to operate the equipment.
This equipment has been tested and found to comply with the limits for a Class A digital
Changes or modifications made to this device which are not expressly approv ed by the
INDUSTRY CANADA NOTICE
This digital apparatus does not exceed the Class A limits for radio noise emissions from digital
apparatus set out in the Radio Interference Regulations of the Canadian Department of
Communications.
Le présent appareil numérique n’émet pas de bruits radioélectriques dépassant les limites applicables
aux appareils numériques de la class A prescrites dans le Règlement sur le brouillage radioélectrique
édicté par le ministère des Communications du Canada.
VCCI NOTICE
This is a Class A product based on the standard of the Voluntary Control Council for Interference by
Information Technology Equipment (VCCI). If this equipment is used in a domestic environment,
radio disturbance may arise. When such trouble occurs, the user may be required to take corrective
actions.
ii Local Management Supplement

Notice
CABLETRON SYSTEMS, INC.
PROGRAM LICENSE AGREEMENT
IMPORTANT: THIS LICENSE APPLIES FOR USE OF PR ODUCT IN THE FOLLOWING
GEOGRAPHICAL REGIONS:
CANADA
MEXICO
CENTRAL AMERICA
SOUTH AMERICA
BEFORE OPENING OR UTILIZING THE ENCLOSED PRODUCT,
CAREFULLY READ THIS LICENSE AGREEMENT.
This document is an agreement (“Agreement”) between You, the end user, and Cabletron
Systems, Inc. (“Cabletron”) that sets forth your rights and obligations with respect to the Cabletron
software program (“Program”) in the package. The Program may be contained in firmware, chips or
other media. UTILIZING THE ENCLOSED PRODUCT, YOU ARE AGREEING TO BECOME
BOUND BY THE TERMS OF THIS AGREEMENT, WHICH INCLUDES THE LICENSE AND
THE LIMITATION OF WARRANTY AND DISCLAIMER OF LIABILITY. IF YOU DO NOT
AGREE TO THE TERMS OF THIS AGREEMENT , RETURN THE UNOPENED PRODUCT TO
CABLETRON OR YOUR DEALER, IF ANY, WITHIN TEN (10) DAYS FOLLOWING THE DATE
OF RECEIPT FOR A FULL REFUND.
IF YOU HAVE ANY QUESTIONS ABOUT THIS AGREEMENT, CONTACT CABLETRON
SYSTEMS +1-603-332-9400. Attn: Legal Department.
1. LICENSE.
package subject to the terms and conditions of this License Agreement.
You may not copy, reproduce or transmit any part of the Program except as permitted by the
Copyright Act of the United States or as authorized in writing by Cabletron.
2. OTHER RESTRICTIONS.
Program.
3. APPLICABLE LAW.
laws and in the state and federal courts of New Hampshire. You accept the personal jurisdiction and
venue of the New Hampshire courts.
4. EXPORT REQUIREMENTS.
regulation by agencies of the U.S. Government, including the U.S. Department of Commerce, which
prohibit export or diversion of certain technical products to certain countries, unless a license to export
the product is obtained from the U.S. Government or an exception from obtaining such license may be
relied upon by the exporting party.
If the Program is exported from the United States pursuant to the License Exception CIV under
the U.S. Export Administration Regulations, You agree that You are a civil end user of the Program
and agree that You will use the Program for civil end uses only and not for military purposes.
You have the right to use only the one (1) copy of the Program provided in this
You may not reverse engineer, decompile, or disassemble the
This License Agreement shall be interpreted and governed under the
You understand that Cabletron and its Affiliates are subject to
Local Management Supplement iii

Notice
If the Program is exported from the United States pursuant to the License Exception TSR under
the U.S. Export Administration Regulations, in addition to the restriction on transfer set forth in
Sections 1 or 2 of this Agreement, You agree not to (i) reexport or release the Program, the source
code for the Program or technology to a national of a country in Country Groups D:1 or E:2 (Albania,
Armenia, Azerbaijan, Belarus, Bulgaria, Cambodia, Cuba, Estonia, Georgia, Iraq, Kazakhstan,
Kyrgyzstan, Laos, Latvia, Libya, Lithuania, Moldova, North Korea, the People’s Republic of China,
Romania, Russia, Rwanda, Tajikistan, Turkmenistan, Ukraine, Uzbekistan, Vietnam, or such other
countries as may be designated by the United States Government), (ii) export to Country Groups D:1
or E:2 (as defined herein) the direct product of the Program or the technology, if such foreign
produced direct product is subject to national security controls as identified on the U.S. Commerce
Control List, or (iii) if the direct product of the technology is a complete plant o r any major
component of a plant, export to Country Groups D:1 or E:2 the direct product of the plant or a major
component thereof, if such foreign produced direct product is subject to national security controls as
identified on the U.S. Commerce Control List or is subject to State Department controls under the
U.S. Munitions List.
5. UNITED STATES GOVERNMENT RESTRICTED RIGHTS.
was developed solely at private expense; (ii) contains “restricted computer software” submitted with
restricted rights in accordance with section 52.227-19 (a) through (d) of the Commercial Computer
Software-Restricted Rights Clause and its successors, and (iii) in all respects is proprietary data
belonging to Cabletron and/or its suppliers. For Department of Defense units, the Product is considered
commercial computer software in accordance with DFARS section 227.7202-3 and its successors, and
use, duplication, or disclosure by the Government is subject to restrictions set forth herein.
6. EXCLUSION OF WARRANTY.
writing, Cabletron makes no warranty, expressed or implied, concerning the Program (including its
documentation and media).
CABLETRON DISCLAIMS ALL WARRANTIES, OTHER THAN THOSE SUPPLIED TO
YOU BY CABLETRON IN WRITING, EITHER EXPRESS OR IMPLIED, INCLUDING BUT
NOT LIMITED TO IMPLIED WARRANTIES OF MERCHANTABILITY AND FITNESS FOR A
PARTICULAR PURPOSE, WITH RESPECT TO THE PROGRAM, THE ACCOMPANYING
WRITTEN MATERIALS, AND ANY A CCOMPANYING HARDWARE.
7. NO LIABILITY FOR CONSEQUENTIAL DAMAGES.
CABLETRON OR ITS SUPPLIERS BE LIABLE FOR ANY DAMAGES WHATSOEVER
(INCLUDING, WITHOUT LIMITATION, DAMAGES FOR LOSS OF BUSINESS, PROFITS,
BUSINESS INTERRUPTION, LOSS OF BUSINESS INFORMATION, SPECIAL, INCIDENTAL,
CONSEQUENTIAL, OR RELIANCE DAMAGES, OR OTHER LOSS) ARISING OUT OF THE
USE OR INABILITY TO USE THIS CABLETRON PRODUCT, EVEN IF CABLETRON HAS
BEEN ADVISED OF THE POSSIBILITY OF SUCH DAMAGES. BECAUSE SOME STATES DO
NOT ALLOW THE EXCLUSION OR LIMITATION OF LIABILITY FOR CONSEQUENTIAL OR
INCIDENTAL DAMAGES, OR IN THE DURATION OR LIMITATION OF IMPLIED
WARRANTIES IN SOME INSTANCES, THE ABOVE LIMITATION AND EXCLUSIONS MAY
NOT APPLY TO YOU.
Except as may be specifically provided by Cabletron in
IN NO EVENT SHALL
The enclosed Product (i)
iv Local Management Supplement

Notice
CABLETRON SYSTEMS SALES AND SERVICE, INC.
PROGRAM LICENSE AGREEMENT
IMPORTANT: THIS LICENSE APPLIES FOR USE OF PRODUCT IN THE UNITED
STATES OF AMERICA AND BY UNITED STATES OF AMERICA
GOVERNMENT END USERS.
BEFORE OPENING OR UTILIZING THE ENCLOSED PRODUCT,
CAREFULLY READ THIS LICENSE AGREEMENT.
This document is an agreement (“Agreement”) between You, the end user, and Cabletron Systems
Sales and Service, Inc. (“Cabletron”) that sets forth your rights and obligations with respect to the
Cabletron software program (“Program”) in the package. The Program may be contained in firmware,
chips or other media. UTILIZING THE ENCLOSED PRODUCT, YOU ARE AGREEING TO
BECOME BOUND BY THE TERMS OF THIS AGREEMENT, WHICH INCLUDES THE
LICENSE AND THE LIMITATION OF WARRANTY AND DISCLAIMER OF LIABILITY. IF
YOU DO NOT AGREE TO THE TERMS OF THIS A GREEMENT, RETURN THE UNOPENED
PRODUCT TO CABLETRON OR YOUR DEALER, IF ANY, WITHIN TEN (10) DAYS
FOLLOWING THE DATE OF RECEIPT FOR A FULL REFUND.
IF YOU HAVE ANY QUESTIONS ABOUT THIS AGREEMENT, CONTACT CABLETRON
SYSTEMS +1-603-332-9400. Attn: Legal Department.
1. LICENSE.
package subject to the terms and conditions of this License Agreement.
You may not copy, reproduce or transmit any part of the Program except as permitted by the
Copyright Act of the United States or as authorized in writing by Cabletron.
2. OTHER RESTRICTIONS.
Program.
3. APPLICABLE LAW.
laws and in the state and federal courts of New Hampshire. You accept the personal jurisdiction and
venue of the New Hampshire courts.
4. EXPORT REQUIREMENTS.
regulation by agencies of the U.S. Government, including the U.S. Department of Commerce, which
prohibit export or diversion of certain technical products to certain countries, unless a license to export
the product is obtained from the U.S. Government or an exception from obtaining such license may be
relied upon by the exporting party.
If the Program is exported from the United States pursuant to the License Exception CIV under
the U.S. Export Administration Regulations, You agree that You are a civil end user of the Program
and agree that You will use the Program for civil end uses only and not for military purposes.
You have the right to use only the one (1) copy of the Program provided in this
You may not reverse engineer, decompile, or disassemble the
This License Agreement shall be interpreted and governed under the
You understand that Cabletron and its Affiliates are subject to
Local Management Supplement v

Notice
If the Program is exported from the United States pursuant to the License Exception TSR under
the U.S. Export Administration Regulations, in addition to the restriction on transfer set forth in
Sections 1 or 2 of this Agreement, You agree not to (i) reexport or release the Program, the source
code for the Program or technology to a national of a country in Country Groups D:1 or E:2 (Albania,
Armenia, Azerbaijan, Belarus, Bulgaria, Cambodia, Cuba, Estonia, Georgia, Iraq, Kazakhstan,
Kyrgyzstan, Laos, Latvia, Libya, Lithuania, Moldova, North Korea, the People’s Republic of China,
Romania, Russia, Rwanda, Tajikistan, Turkmenistan, Ukraine, Uzbekistan, Vietnam, or such other
countries as may be designated by the United States Government), (ii) export to Country Groups D:1
or E:2 (as defined herein) the direct product of the Program or the technology, if such foreign
produced direct product is subject to national security controls as identified on the U.S. Commerce
Control List, or (iii) if the direct product of the technology is a complete plant o r any major
component of a plant, export to Country Groups D:1 or E:2 the direct product of the plant or a major
component thereof, if such foreign produced direct product is subject to national security controls as
identified on the U.S. Commerce Control List or is subject to State Department controls under the
U.S. Munitions List.
5. UNITED STATES GOVERNMENT RESTRICTED RIGHTS.
was developed solely at private expense; (ii) contains “restricted computer software” submitted with
restricted rights in accordance with section 52.227-19 (a) through (d) of the Commercial Computer
Software-Restricted Rights Clause and its successors, and (iii) in all respects is proprietary data
belonging to Cabletron and/or its suppliers. For Department of Defense units, the Product is considered
commercial computer software in accordance with DFARS section 227.7202-3 and its successors, and
use, duplication, or disclosure by the Government is subject to restrictions set forth herein.
6. EXCLUSION OF WARRANTY.
writing, Cabletron makes no warranty, expressed or implied, concerning the Program (including its
documentation and media).
CABLETRON DISCLAIMS ALL WARRANTIES, OTHER THAN THOSE SUPPLIED TO
YOU BY CABLETRON IN WRITING, EITHER EXPRESS OR IMPLIED, INCLUDING BUT
NOT LIMITED TO IMPLIED WARRANTIES OF MERCHANTABILITY AND FITNESS FOR A
PARTICULAR PURPOSE, WITH RESPECT TO THE PROGRAM, THE ACCOMPANYING
WRITTEN MATERIALS, AND ANY A CCOMPANYING HARDWARE.
7. NO LIABILITY FOR CONSEQUENTIAL DAMAGES.
CABLETRON OR ITS SUPPLIERS BE LIABLE FOR ANY DAMAGES WHATSOEVER
(INCLUDING, WITHOUT LIMITATION, DAMAGES FOR LOSS OF BUSINESS, PROFITS,
BUSINESS INTERRUPTION, LOSS OF BUSINESS INFORMATION, SPECIAL, INCIDENTAL,
CONSEQUENTIAL, OR RELIANCE DAMAGES, OR OTHER LOSS) ARISING OUT OF THE
USE OR INABILITY TO USE THIS CABLETRON PRODUCT, EVEN IF CABLETRON HAS
BEEN ADVISED OF THE POSSIBILITY OF SUCH DAMAGES. BECAUSE SOME STATES DO
NOT ALLOW THE EXCLUSION OR LIMITATION OF LIABILITY FOR CONSEQUENTIAL OR
INCIDENTAL DAMAGES, OR IN THE DURATION OR LIMITATION OF IMPLIED
WARRANTIES IN SOME INSTANCES, THE ABOVE LIMITATION AND EXCLUSIONS MAY
NOT APPLY TO YOU.
Except as may be specifically provided by Cabletron in
IN NO EVENT SHALL
The enclosed Product (i)
vi Local Management Supplement

Notice
CABLETRON SYSTEMS LIMITED
PROGRAM LICENSE AGREEMENT
IMPORTANT: THIS LICENSE APPLIES FOR THE USE OF THE PRODUCT IN THE
FOLLOWING GEOGRAPHICAL REGIONS:
EUROPE
MIDDLE EAST
AFRICA
ASIA
AUSTRALIA
PACIFIC RIM
BEFORE OPENING OR UTILIZING THE ENCLOSED PRODUCT,
CAREFULLY READ THIS LICENSE AGREEMENT.
This document is an agreement (“Agreement”) between You, the end user, and Cabletron
Systems Limited (“Cabletron”) that sets forth your rights and obligations with respect to the
Cabletron software program (“Program”) in the package. The Program may be contained in firmware,
chips or other media. UTILIZING THE ENCLOSED PRODUCT, YOU ARE AGREEING TO
BECOME BOUND BY THE TERMS OF THIS AGREEMENT, WHICH INCLUDES THE
LICENSE AND THE LIMITATION OF WARRANTY AND DISCLAIMER OF LIABILITY. IF
YOU DO NOT AGREE TO THE TERMS OF THIS A GREEMENT, RETURN THE UNOPENED
PRODUCT TO CABLETRON OR YOUR DEALER, IF ANY, WITHIN TEN (10) DAYS
FOLLOWING THE DATE OF RECEIPT FOR A FULL REFUND.
IF YOU HAVE ANY QUESTIONS ABOUT THIS AGREEMENT, CONTACT CABLETRON
SYSTEMS +1-603-332-9400. Attn: Legal Department.
1. LICENSE.
package subject to the terms and conditions of this License Agreement.
You may not copy, reproduce or transmit any part of the Program except as permitted by the
Copyright Act of the United States or as authorized in writing by Cabletron.
2. OTHER RESTRICTIONS.
Program.
3. APPLICABLE LAW.
law. The English courts shall have exclusive jurisdiction in the event of any disputes.
4. EXPORT REQUIREMENTS.
regulation by agencies of the U.S. Government, including the U.S. Department of Commerce, which
prohibit export or diversion of certain technical products to certain countries, unless a license to export
the product is obtained from the U.S. Government or an exception from obtaining such license may be
relied upon by the exporting party.
If the Program is exported from the United States pursuant to the License Exception CIV under
the U.S. Export Administration Regulations, You agree that You are a civil end user of the Program
and agree that You will use the Program for civil end uses only and not for military purposes.
You have the right to use only the one (1) copy of the Program provided in this
You may not reverse engineer, decompile, or disassemble the
This License Agreement shall be governed in accordance with English
You understand that Cabletron and its Affiliates are subject to
Local Management Supplement vii

Notice
If the Program is exported from the United States pursuant to the License Exception TSR under
the U.S. Export Administration Regulations, in addition to the restriction on transfer set forth in
Sections 1 or 2 of this Agreement, You agree not to (i) reexport or release the Program, the source
code for the Program or technology to a national of a country in Country Groups D:1 or E:2 (Albania,
Armenia, Azerbaijan, Belarus, Bulgaria, Cambodia, Cuba, Estonia, Georgia, Iraq, Kazakhstan,
Kyrgyzstan, Laos, Latvia, Libya, Lithuania, Moldova, North Korea, the People’s Republic of China,
Romania, Russia, Rwanda, Tajikistan, Turkmenistan, Ukraine, Uzbekistan, Vietnam, or such other
countries as may be designated by the United States Government), (ii) export to Country Groups D:1
or E:2 (as defined herein) the direct product of the Program or the technology, if such foreign
produced direct product is subject to national security controls as identified on the U.S. Commerce
Control List, or (iii) if the direct product of the technology is a complete plant o r any major
component of a plant, export to Country Groups D:1 or E:2 the direct product of the plant or a major
component thereof, if such foreign produced direct product is subject to national security controls as
identified on the U.S. Commerce Control List or is subject to State Department controls under the
U.S. Munitions List.
5. UNITED STATES GOVERNMENT RESTRICTED RIGHTS.
was developed solely at private expense; (ii) contains “restricted computer software” submitted with
restricted rights in accordance with section 52.227-19 (a) through (d) of the Commercial Computer
Software-Restricted Rights Clause and its successors, and (iii) in all respects is proprietary data
belonging to Cabletron and/or its suppliers. For Department of Defense units, the Product is considered
commercial computer software in accordance with DFARS section 227.7202-3 and its successors, and
use, duplication, or disclosure by the Government is subject to restrictions set forth herein.
6. EXCLUSION OF WARRANTY.
writing, Cabletron makes no warranty, expressed or implied, concerning the Program (including its
documentation and media).
CABLETRON DISCLAIMS ALL WARRANTIES, OTHER THAN THOSE SUPPLIED TO
YOU BY CABLETRON IN WRITING, EITHER EXPRESS OR IMPLIED, INCLUDING BUT
NOT LIMITED TO IMPLIED WARRANTIES OF MERCHANTABILITY AND FITNESS FOR A
PARTICULAR PURPOSE, WITH RESPECT TO THE PROGRAM, THE ACCOMPANYING
WRITTEN MATERIALS, AND ANY A CCOMPANYING HARDWARE.
7.
NO LIABILITY FOR CONSEQUENTIAL DAMAGES. IN NO EVENT SHALL
CABLETRON OR ITS SUPPLIERS BE LIABLE FOR ANY DAMAGES WHATSOEVER
(INCLUDING, WITHOUT LIMITATION, DAMAGES FOR LOSS OF BUSINESS, PROFITS,
BUSINESS INTERRUPTION, LOSS OF BUSINESS INFORMATION, SPECIAL, INCIDENTAL,
CONSEQUENTIAL, OR RELIANCE DAMAGES, OR OTHER LOSS) ARISING OUT OF THE
USE OR INABILITY TO USE THIS CABLETRON PRODUCT, EVEN IF CABLETRON HAS
BEEN ADVISED OF THE POSSIBILITY OF SUCH DAMAGES. BECAUSE SOME STATES DO
NOT ALLOW THE EXCLUSION OR LIMITATION OF LIABILITY FOR CONSEQUENTIAL OR
INCIDENTAL DAMAGES, OR IN THE DURATION OR LIMITATION OF IMPLIED
WARRANTIES IN SOME INSTANCES, THE ABOVE LIMITATION AND EXCLUSIONS MAY
NOT APPLY TO YOU.
Except as may be specifically provided by Cabletron in
The enclosed Product (i)
viii Local Management Supplement

Notice
SAFETY INFORMATION
CLASS 1 LASER TRANSCEIVERS
THE FE-100F3 FAST ETHERNET INTERFACE MODULE, FPIM-05 AND
FPIM-07 FDDI PORT INTERFACE MODULES, AND APIM-29 ATM
PORT INTERFACE MODULE USE CLASS 1 LASER TRANSCEIVERS.
READ THE FOLLOWING SAFETY INFORMATION BEFORE
INSTALLING OR OPERATING THESE MODULES.
The Class 1 laser transceivers use an optical feedback loop to maintain Class 1 operation limits. This
control loop eliminates the need for maintenance checks or adjustments. The output is factory set, and
does not allow any user adjustment. Class 1 Laser transceivers comply with the following safety
standards:
• 21 CFR 1040.10 and 1040.11 U.S. Department of Health and Human Services (FDA).
• IEC Publication 825 (International Electrotechnical Commission).
• CENELEC EN 60825 (European Committee for Electrotechnical Standardization).
When operating within their performance limitations, laser transceiver output meets the Class 1
accessible emission limit of all three standards. Class 1 levels of laser radiation are not considered
hazardous.
SAFETY INFORMATION
CLASS 1 LASER TRANSCEIVERS
LASER RADIATION AND CONNECTORS
When the connector is in place, all laser radiation remains within the fiber. The maximum amount of
radiant power exiting the fiber (under normal conditions) is -12.6 dBm or 55 x 10-6 watts.
Removing the optical connector from the transceiver allows laser radiation to emit directly from the
optical port. The maximum radiance from the optical port (under worst case conditions) is
0.8 W cm-2 or 8 x 10³ W m2 sr-1.
Do not use optical instruments to view the laser output. The use of optical instruments to view
laser output increases eye hazard. When viewing the output optical port, power must be
removed from the network adapter.
Local Management Supplement ix

Notice
DECLARATION OF CONFORMITY
Application of Council Directive(s):
Manufacturer’s Name:
Manufacturer’ s Address:
European Representative Name:
European Representative Address:
Conformance to Directive(s)/Product Standards:
Equipment Type/Environment:
89/336/EEC
73/23/EEC
Cabletron Systems, Inc.
35 Industrial Way
PO Box 5005
Rochester, NH 03867
Mr. J. Solari
Cabletron Systems Limited
Nexus House, Newbury Business Park
London Road, Newbury
Berkshire RG14 2PZ, England
EC Directive 89/336/EEC
EC Directive 73/23/EEC
EN 55022
EN 50082-1
EN 60950
Networking Equipment, for use in a
Commercial or Light
Environment.
Industrial
We the undersigned, hereby declare, under our sole responsibility, that the equipment packaged
with this notice conforms to the above directives.
Manufacturer Legal Representative in Europe
Mr. Ronald Fotino Mr. J. Solari
___________________________________ ___________________________________
Full Name Full Name
Compliance Engineering Manager Managing Director - E.M.E.A.
___________________________________ ___________________________________
Title Title
Rochester, NH, USA Newbury, Berkshire, England
___________________________________ ___________________________________
Location Location
x Local Management Supplement

CONTENTS
Figures ....................................................................................................xv
Tables.....................................................................................................xvi
CHAPTER 1 CHANGES TO LOCAL MANAGEMENT SCREENS
1.1 Introduction..................................................................................1-1
1.2 Accessing Local Management.....................................................1-2
1.2.1 Navigating Local Management Screens.........................1-2
1.2.2 Screen Format................................................................1-5
1.3 Chassis Menu Screen (Chassis).................................................1-6
1.4 Port Redirect/Redirect Configuration Menu Screen (Chassis)....1-7
1.5 Port Redirect Configuration Screen (Chassis).............................1-9
1.5.1 Changing Source and Destination Ports....................... 1-12
1.6 VLAN Redirect Configuration Screen (Chassis)........................1-14
1.6.1 Changing Source VLAN and Destination Ports ............ 1-17
1.7 Module Configuration Menu Screen.......................................... 1-18
1.8 System Resources Information Screen..................................... 1-20
1.8.1 Resetting the Reset Peak Switch Utilization.................1-22
1.9 Flash Download Configuration Screen...................................... 1-22
1.9.1 Image File Download Using TFTP................................1-24
1.9.2 Image File Download Using Runtime ........................... 1-25
1.9.3 Image File Download Using BootP...............................1-26
1.10 Port Configuration Menu Screen...............................................1-27
1.11 Ethernet Full Duplex Configuration Screen...............................1-29
1.11.1 Setting the Operational Mode.......................................1-31
1.12 High Speed Interface Configuration Menu Screen.................... 1-32
1.13 High Speed Interface Configuration Screen.............................. 1-33
1.13.1 Configuring an FE-100FX or FE-100F3........................1-36
1.13.2 Setting the FE-100FX or FE-100F3
Operational Mode .........................................................1-36
1.13.3 Configuring an FE-100TX.............................................1-37
1.13.4 Setting the FE-100TX Operational Mode...................... 1-37
1.13.5 Setting the FE-100TX Advertised Ability....................... 1-37
1.14 Port Redirect Configuration/Redirect
Configuration Menu Screen.......................................................1-38
1.15 Port Redirect Configuration Screen...........................................1-39
1.15.1 Changing Source and Destination Ports....................... 1-41
1.16 VLAN Redirect Configuration Screen........................................ 1-43
1.16.1 Changing Source VLAN and Destination Ports ............ 1-46
Local Management Supplement xi

Contents
1.17 Broadcast Suppression Configuration Screen...........................1-47
1.17.1 Setting the Threshold....................................................1-48
1.17.2 Resetting the Reset Peak..............................................1-49
1.18 Repeater Configuration Menu Screen .......................................1-49
1.19 802.1 Configuration Menu Screen.............................................1-49
1.20 Switch Configuration Screen......................................................1-52
1.20.1 Setting the STA.............................................................1-54
1.20.2 Setting the Age Time Field............................................1-54
1.20.3 Setting (Enabling or Disabling) the Port Status.............1-55
1.21 Summary of VLAN Local Management......................................1-55
1.22 802.1Q VLAN Configuration Menu Screen................................1-56
1.23 IGMP/VLAN Configuration Screen.............................................1-57
1.23.1 Configuring VLANs for IGMP ........................................1-60
1.24 802.1p Priority Configuration/
Priority/Multicast Configuration Menu Screen............................1-61
1.25 Port Priority Configuration Screen .............................................1-63
1.25.1 Setting Switch Port Priority Port-by-Port .......................1-64
1.25.2 Setting Switch Port Priority on All Ports ........................1-64
1.26 Advanced Port Priority Configuration Screen ............................1-65
1.26.1 Setting the TX Mapping Queues...................................1-68
1.26.2 Setting the TX Regeneration Priorities..........................1-68
1.26.3 Setting the Default Priority of a Port..............................1-69
1.27 Network Tools............................................................................1-70
1.27.1 Built-in Command..........................................................1-71
CHAPTER 2 LM SECURITY SCREENS FOR
6E123-50 AND 6E133-49
2.1 Repeater Configuration Menu Screen .........................................2-1
2.2 Repeater Level Security Configuration ........................................2-2
2.2.1 Setting the Repeater Level Security................................2-4
2.3 Port Level Security Configuration Screen....................................2-5
2.3.1 Setting the Port Level Security........................................2-7
xii Local Management Supplement

Contents
CHAPTER 3 LM SECURITY SCREENS FOR
6H123-50 AND 6H133-37
3.1 Repeater Configuration Menu Screen......................................... 3-1
3.2 Repeater Port Configuration Screen ...........................................3-2
3.2.1 Setting the Port Operating Mode ....................................3-5
3.2.2 Enabling /Disabling Ports................................................ 3-6
3.2.3 Setting All Ports ..............................................................3-6
3.3 Module Level Security Configuration...........................................3-7
3.3.1 Setting the Module Level Security ..................................3-9
3.4 Port Level Security Configuration Screen..................................3-10
3.4.1 Setting the Port Level Security ..................................... 3-13
CHAPTER 4 GENERIC ATTRIBUTE REGISTRATION PROTOCOL
(GARP)
4.1 GARP Switch Operation.............................................................. 4-1
4.1.1 GARP VLAN Registration Protocol.................................4-1
4.2 GARP Multicast Registration Protocol.........................................4-3
4.3 GARP Operation Status Screen.................................................. 4-4
4.3.1 Setting a Port to Operate in GMRP or GVRP.................4-6
4.3.2 Setting All Ports on the Switch........................................ 4-6
4.4 GMRP Configuration Screen....................................................... 4-7
4.4.1 Setting a Mode, Port-by-Port ..........................................4-8
4.4.2 Setting a Mode for All Ports............................................4-9
APPENDIX A ABOUT IGMP
A.1 IGMP Overview ...........................................................................A-1
A.2 Supported Features and Functions.............................................A-1
A.3 Detecting Multicast Routers.........................................................A-2
INDEX
Local Management Supplement xiii


FIGURES
Figure Page
1-1 802.1D Switching Mode, LM Screen Hierarchy........................1-3
1-2 802.1Q Switching Mode, LM Screen Hierarchy .......................1-4
1-3 Example of a Local Management Screen ................................1-5
1-4 Chassis Menu Screen (Chassis)..............................................1-6
1-5 Redirect Configuration Menu Screen (Chassis).......................1-8
1-6 Port Redirect Configuration Screen (Chassis) .......................1-10
1-7 VLAN Redirect Configuration Screen (Chassis).....................1-15
1-8 Module Configuration Menu Screen.......................................1-19
1-9 System Resources Information Screen..................................1-21
1-10 Flash Download Screen.........................................................1-23
1-11 Port Configuration Menu Screen............................................1-27
1-12 Ethernet Full Duplex Configuration Screen............................1-29
1-13 High Speed Interface Configuration Menu Screen.................1-32
1-14 High Speed Interface Configuration Screen...........................1-34
1-15 Redirect Configuration Menu Screen.....................................1-38
1-16 Port Redirect Configuration Screen........................................1-40
1-17 VLAN Redirect Configuration Screen.....................................1-44
1-18 Broadcast Suppression Configuration Screen .......................1-47
1-19 802.1 Configuration Menu Screen..........................................1-50
1-20 Switch Configuration Screen..................................................1-52
1-21 802.1Q VLAN Configuration Menu Screen ............................1-56
1-22 IGMP/VLAN Configuration Screen.........................................1-58
1-23 Priority/Multicast Configuration Menu Screen........................1-62
1-24 Port Priority Configuration Screen..........................................1-63
1-25 Advanced Port Priority Configuration Screen.........................1-66
1-26 Network Tools Help Screen....................................................1-70
2-1 Repeater Configuration Menu Screen......................................2-1
2-2 Repeater Level Security Configuration Screen........................2-3
2-3 Port Level Security Configuration Screen ................................2-5
3-1 Repeater Configuration Menu Screen......................................3-1
3-2 Repeater Port Configuration Screen........................................3-3
3-3 Module Level Security Configuration Screen...........................3-7
3-4 Port Level Security Configuration Screen ..............................3-10
4-1 Example of VLAN Propagation via GVRP................................4-2
4-2 GARP Operation Status Screen...............................................4-4
4-3 GMRP Configuration Screen....................................................4-7
Local Management Supplement xv

TABLES
Table Page
1-1 User’s Guides Affected.............................................................1-1
1-2 TX Queue Mapping Default Values........................................1-66
1-3 TX Priority Regeneration Default Values................................1-67
2-1 ENET/Repeater Port Relationship............................................2-6
3-1 CONN/Repeater Port Relationship...........................................3-3
3-2 CONN/Network Organization....................................................3-4
3-3 CONN/Repeater Port Relationship...........................................3-8
3-4 CONN/Repeater Port Relationship.........................................3-11
3-5 CONN/Network Organization..................................................3-11
xvi Local Management Supplement

CHAPTER 1
CHANGES TO LOCAL MANAGEMENT SCREENS
This chapter introduces the scope of this document, new hierarchy, and
documents the changes affecting the screens at the chassis level and
module level for the new firmware revisions 4.08.xx and 4.09.xx. Also
covered is the new Network Tools command.
1.1 INTRODUCTION
This supplement applies to the SmartSwitch modules with firmware
revision 4.08.xx and 4.09.xx, and documents the changes and additions to
the SmartSwitch user’s guides listed in Table 1-1.
Table 1-1 User’s Guides Affected
Title Part Number
6E122-26/6E132-25/6E123-26/6E133-25 User’s Guide 9032076-05
6E123-50/6E133-49 User’s Guide 9032269-04
6E128-26/6E138-25/6E129-26/6E139-25 User’s Guide 9032311-03
6H122-08 User’s Guide 9032159-02
6H122-16 User’s Guide 9032361-03
6H123-50/6H133-37 User’s Guide 9032276-04
6H128-08/6H129-08 User’s Guide 9032364-02
6M146-04 User’s Guide 9032362-02
This document applies to several SmartSwitch models. Unless
NOTE
otherwise noted, the term SmartSwitch or module is used in
the following text instead of a particular model number.
Local Management Supplement 1-1

Chapter 1:
Changes to Local Management Screens
1.2 ACCESSING LOCAL MANAGEMENT
Access to Local Management (LM) is controlled through the Password
screen.
1.2.1 Navigating Local Management Screens
The Local Management application consists of a series of menu screens.
Navigate through Local Management by selecting items from the menu
screens.
The SmartSwitch supports three modes of switch operation. The
switching modes are as follows:
•
802.1D Switching (traditional switching)
•
802.1Q Switching (802.1Q VLANs)
•
SecureFast VLAN (Cabletron Systems SecureFast switching). A
separate image is required for this operation.
Refer to the Release Notes shipped with the product to verify
NOTE
which screens are supported in each of the available s witching
modes.
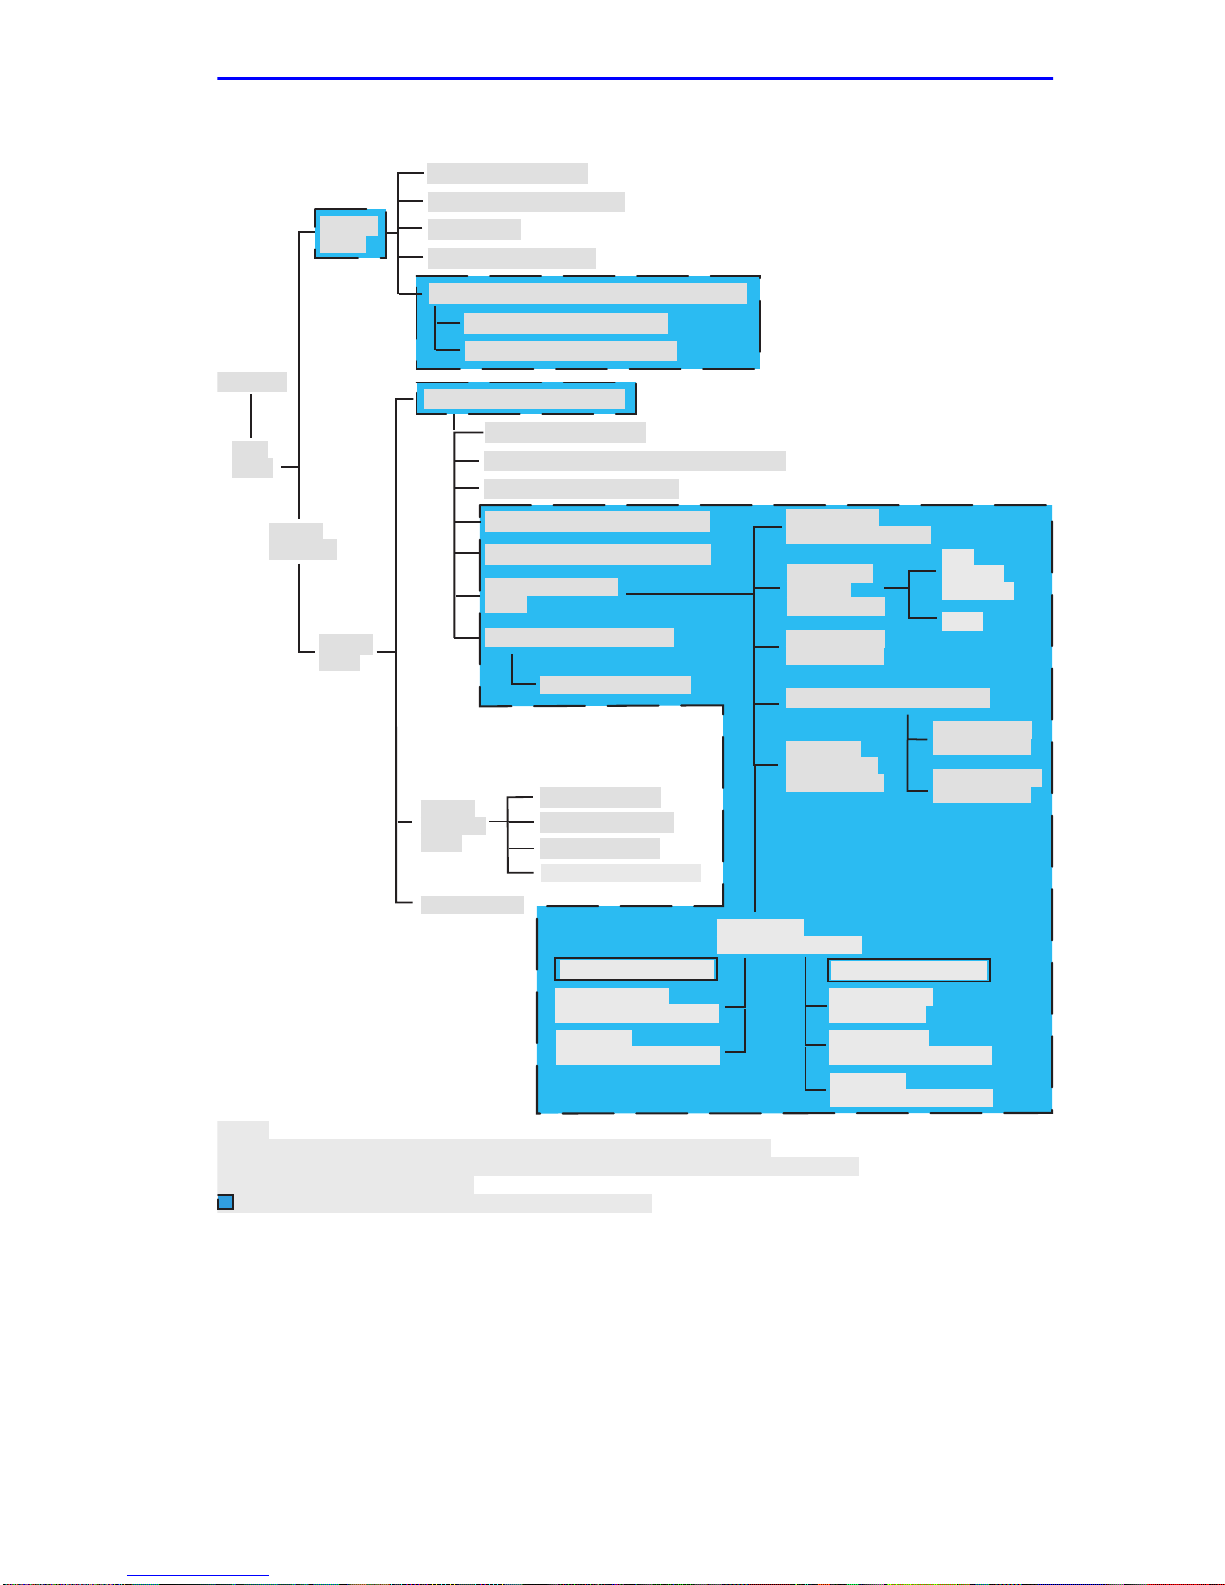
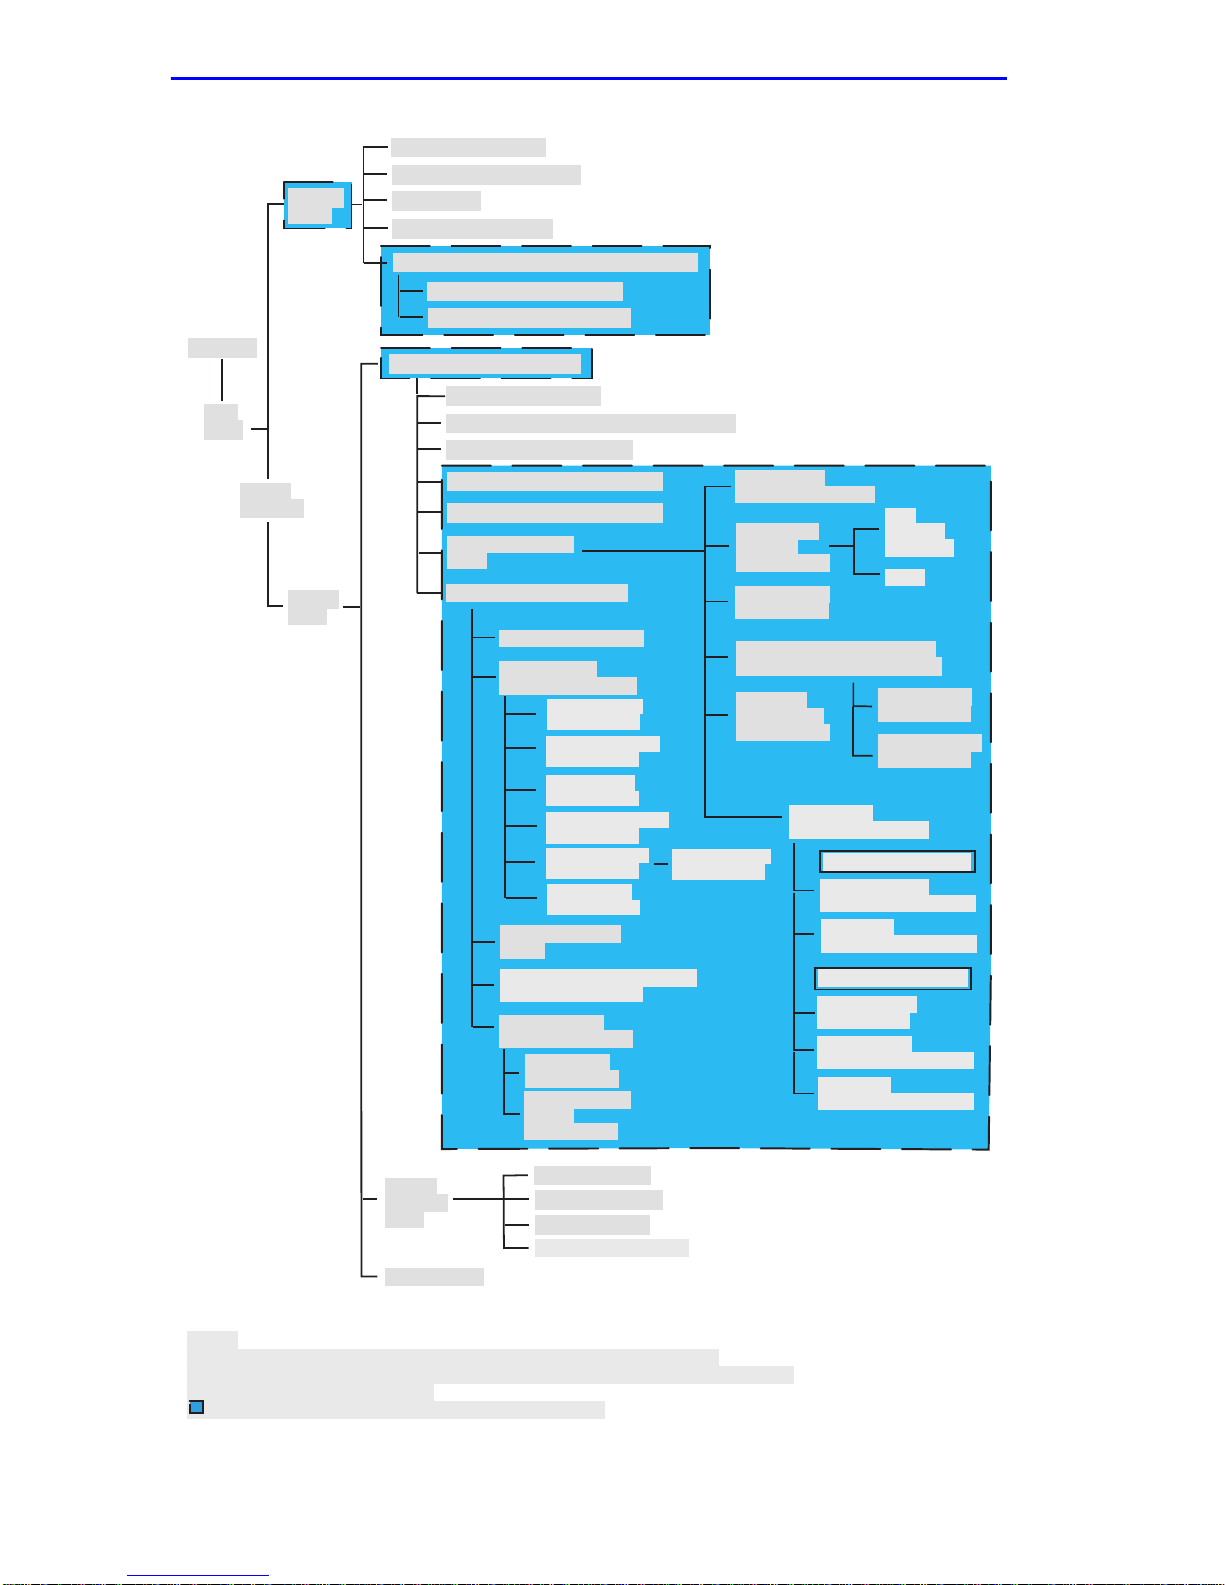
Depending on the Operational Mode set for the module, the hierarchy of
the Local Management screens differs as shown in Figure 1-1 and
Figure 1-2. Refer to the appropriate figure that relates to the Operational
Mode set for the module to see the applicable Local Management screen
hierarchy.
The areas that changed in the hierarchy are highlighted as
NOTE
shown in Figure 1-1 and Figure 1-2. The screens involved are
covered in this document. These screens may have been
added, changed, or have changed location in the
hierarchy.
1-2 Local Management Supplement
Accessing Local Management
\
Chassis Configuration
SNMP Community Names
Chassis
Menu
assword
Main
Menu
Module
Selection
Module
Menu
Notes:
Refer to the
SmartTrunk User's Guide
* This screen is only available on repeater devices (6E123-50, 6E133-49,
6H123-50, and 6H133-37).
Indicates the part of the hierarchy that changed.
SNMP Traps
Chassis Environmental
Port Redirect/Redirect Configuration Menu
Port Redirect Configuration
VLAN Redirect Configuration
Module Configuration Menu
General Configuration
SNMP Community Names Configuration
SNMP Traps Configuration
System Resources Information
Flash Download Configuration
Port Configuration
Menu
802.1 Configuration Menu
Switch Configuration
Module
Statistics
Menu
Network Tools
Switch Statistics
Interface Statistics
RMON Statistics
** Repeater Statistics
6E123-50/6E133-49 only
Repeater Level
Security Configuration
Port Level
Security Configuration
for the screen hierarchy.
Ethernet Full
Duplex Configuration
High Speed
Interface
Configuration
* SmartTrunk
Configuration
Port Redirect Configuration
Broadcast
Suppression
Configuration
** Repeater
Configuration Menu
6H123-50/6H133-37 only
Repeater Port
Configuration
Module Level
Security Configuration
Port Level
Security Configuration
Fast
Ethernet
Interfaces
HSIM
Port Redirect
Configuration
VLAN Redirect
Configuration
30262_82
Figure 1-1 802.1D Switching Mode, LM Screen Hierarchy
Local Management Supplement 1-3
Chapter 1:
Chassis
Menu
Password
Main
Menu
Module
Selection
Module
Menu
Changes to Local Management Screens
Chassis Configuration
SNMP Community Names
SNMP Traps
Chassis Environmental
Port Redirect/Redirect Configuration Menu
Port Redirect Configuration
VLAN Redirect Configuration
Module Configuration Menu
General Configuration
SNMP Community Names Configuration
SNMP Traps Configuration
System Resources Information
Flash Download Configuration
Port Configuration
Menu
802.1 Configuration Menu
Switch Configuration
802.1Q VLAN
Configuration Menu
Module/VLAN
Configuration
Port Assignment
Configuration
Port Filtering
Configuration
VLAN Forwarding
Configuration
Protocol VLAN
Configuration
IGMP/VLAN
Configuration
GARP Operation
Status
GMRP Group Registrations/
GMRP Confguration
802.1p Priority
ConfigurationMenu
Port Priority
Configuration
Advanced Port
Priority
Configuration
Protocol Ports
Configuration
Ethernet Full
Duplex Configuration
High Speed
Interface
Configuration
* SmartTrunk
Configuration
Port Redirect Configuration/
Redirect Configuration Menu
Broadcast
Suppression
Configuration
Fast
Ethernet
Interfaces
HSIM
Port Redirect
Configuration
VLAN Redirect
Configuration
** Repeater
Configuration Menu
6E123-50/6E133-49 only
Repeater Level
Security Configuration
Port Level
Security Configuration
6H123-50/6H133-37 only
Repeater Port
Configuration
Module Level
Security Configuration
Port Level
Security Configuration
Module
Statistics
Menu
Network Tools
Notes:
* Refer to the
SmartTrunk User's Guide
** This screen is only available on repeater devices (6E123-50, 6E133-49,
6H123-50, and 6H133-37).
Indicates the part of the hierarchy that changed.
Figure 1-2 802.1Q Switching Mode, LM Screen Hierarchy
1-4 Local Management Supplement
Switch Statistics
Interface Statistics
RMON Statistics
** Repeater Statistics
for the screen hierarchy.
30261_82
Accessing Local Management
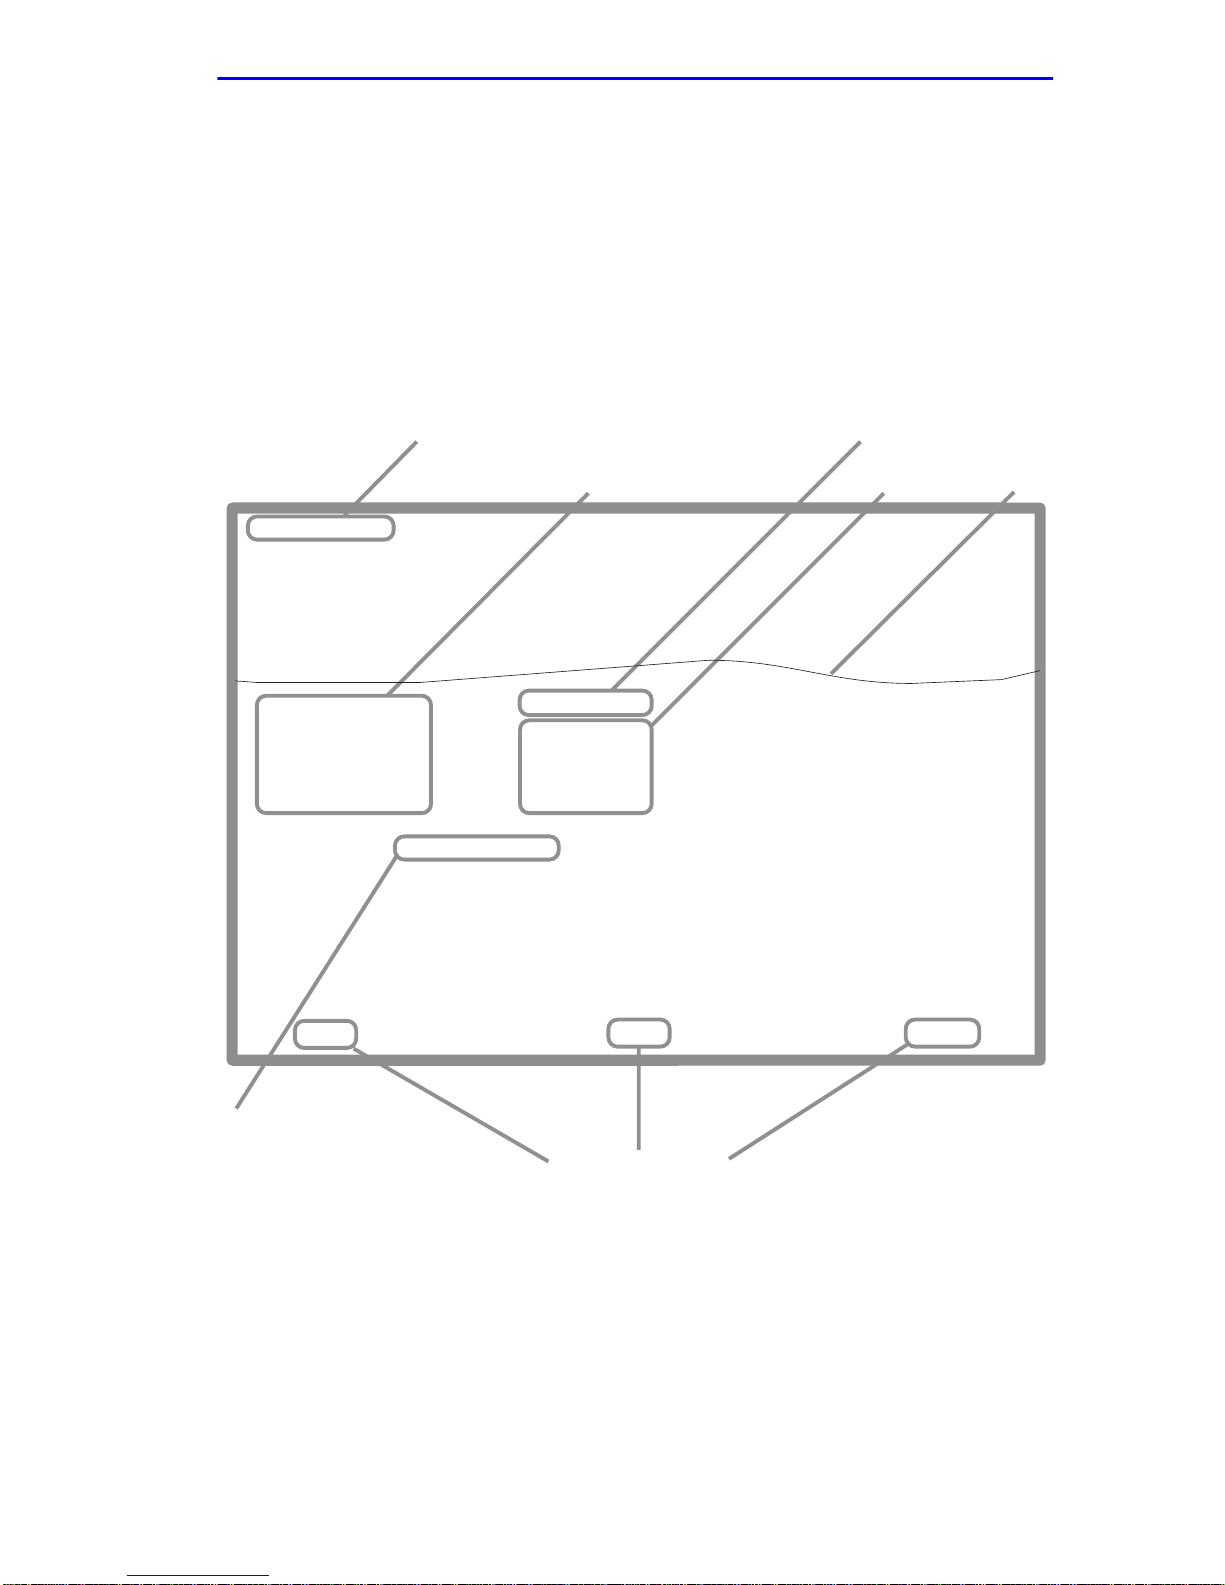
1.2.2 Screen Format
Since the top part of the screen contains the same type of information (the
name of the screen, the SmartSwitch model number, the firmware
revision, and the BOOT PROM revision), it is not shown in the following
descriptions of each screen. Only the fields in the lower portion of the
screens are shown. The name of the screen is in the figure title for each
screen. Figure 1-3 shows an example of the fields in a screen.
Event Message Field
Event Message Line
Device Type: 6xxxx-xx
MAC Address:
IP Address:
Subnet Mask:
Default Gateway:
TFTP Gateway IP Addr:
Operational Mode: [802.1Q SWITCHING]
Clear NVRAM [NO]
IP Fragmentation [ENABLED]
Display Fields
6xxxx-xx LOCAL MANAGEMENT
General Configuration
00-00-ID-00-00-00
0.0.0.0
255.255.0.0
NONE DEFINED
0.0.0.0
Display Field
Input Fields
Firmware Revision: XX.XX.XX
BOOTPROM Revision: XX.XX.XX
Device Date:
Device Time:
Screen Refresh Time:
Screen Lockout Time:
Device Uptime XX D XX H XX M
10/11/1999
14:23:00
30 sec.
15 min.
See
Note
Selection Field
Note:
This shows the location of the cutaway that is used in most of the screen graphics in this
document. The top portion of the screen is cut away to eliminate repeating the same
information in each graphic.The screen title is contained in the figure title for each screen.
Figure 1-3 Example of a Local Management Screen
Local Management Supplement 1-5
EXIT
Command Fields
RETURNSAVE
3026_14

Chapter 1:
Changes to Local Management Screens
1.3 CHASSIS MENU SCREEN (CHASSIS)
Section 1.3 through Section 1.6 provide information about the
NOTE
The Chassis Menu screen, Figure 1-4, provides access to Local
Management screens that allow you to configure and monitor operating
parameters, modify SNMP community names, set SNMP traps, monitor
the 6C105 environmental status, and to perform port redirect functions.
To access the Chassis Menu screen from the Main Menu screen, use the
arrow ke ys to highlight the
Chassis Menu screen displays.
chassis level screens and followed by the information
concerning the module level screens.
CHASSIS
menu item and press ENTER. The
CHASSIS CONFIGURATION
SNMP COMMUNITY NAMES
SNMP TRAPS
CHASSIS ENVIRONMENTAL
PORT REDIRECT
RETURN
3026_99
Figure 1-4 Chassis Menu Screen (Chassis)
The following briefly explains each screen accessible from the Chassis
Menu screen.
CHASSIS CONFIGURATION
Used to configure operating parameters for the 6C105 chassis. For details,
refer to your SmartSwitch user’s guide.
1-6 Local Management Supplement

Port Redirect/Redirect Configuration Menu Screen (Chassis)
SNMP COMMUNITY NAMES
Used to enter new, change, or review the community names used as
access passwords for module management operation. Access is limited
based on the password level of the user. For details, refer to your
SmartSwitch user’s guide.
SNMP TRAPS
Provides display and configuration access to the table of IP addresses
used for trap destinations and associated community names. For details,
refer to your SmartSwitch user’s guide.
CHASSIS ENVIRONMENTAL
Provides access to the chassis power supply status, power supply
redundancy status, and chassis fan tray status. For details, refer to your
SmartSwitch user’s guide.
PORT REDIRECT
Provides access to the Redirect Configuration Menu, which provides
access to the Port Redirect Configuration and VLAN Configuration
screens. For details, refer to Section 1.4.
1.4 PORT REDIRECT/REDIRECT CONFIGURATION
MENU SCREEN (CHASSIS)
The Redirect Configuration Menu screen displays only when
NOTE
The Redirect Configuration Menu screen (Figure 1-5) for the chassis
provides access to the Port Redirect Configuration and VLAN Redirect
Configuration screens. An y combination, up to 128, of port and/or VLAN
redirect instances can be configured per installed module, giving a
maximum of 640 instances for a chassis with 5 modules. Up to 24
instances per module can be configured as remote instances to other
modules in the chassis.
the operational mode of one or more of the modules in the
chassis are set to 802.1Q switching. If no modules in the
chassis are set to 802.1Q switching, the Redirect Configuration
Menu screen will display directly when the Port Redirect field is
selected, and the VLAN Redirect Configuration screen will not
be accessible.
Local Management Supplement 1-7

Chapter 1:
Changes to Local Management Screens
T o access the Redirect Configuration Menu screen from the Chassis Menu
screen, use the arrow keys to highlight the
PORT REDIRECT
menu
item and press ENTER. The Redirect Configuration Menu screen
displays.
PORT REDIRECT CONFIGURATION
VLAN REDIRECT CONFIGURATION
EXIT
Figure 1-5 Redirect Configuration Menu Screen (Chassis)
RETURN
3026_94
The following defines each selectable item of the Redirect Configuration
Menu screen:
PORT REDIRECT CONFIGURATION
Used to redirect traffic from a source switch port to a destination switch
port. The source and destination ports can be on different modules in the
chassis. For details, refer to Section 1.5.
VLAN REDIRECT CONFIGURATION
Used to configure the module to direct traffic from a VLAN to a particular
switch port across modules in the chassis. For details, refer to Section 1.6.
1-8 Local Management Supplement

Port Redirect Configuration Screen (Chassis)
1.5 PORT REDIRECT CONFIGURATION SCREEN
(CHASSIS)
The Port Redirect Configuration screen, Figure 1-6, enables the user to
select a source module and port as well as a destination module and port
and add a new Port Redirect or delete an existing one. Source and
destination ports can only be used in one redirect instance, and only
installed and capable modules and ports will appear in the selectable
fields. If a port is currently being redirected, it does not appear in the
source or destination selectable fields. Frames received on the source port
can be redirected in a particular frame format, and any frames with errors
can be either dropped or forwarded to the destination port. For example,
port 1 can be set as the source port with port 2 as the destination port.
Frames from port 1 are then automatically redirected to port 2 according
to a particular frame format, and frames with errors can be either
forwarded or dropped according to the screen settings.
The port redirect function is extremely useful for troubleshooting
purposes, as it allows traf fic to be sent to a particular port where, with the
use of an analyzer or RMON probe, all current traffic from the source port
can be examined.
Although all traffic from the source port (including, if desired,
NOTE
errored frames) is sent to the destination port, normal s witching
is still performed for all frames on the source port.
To access the Port Redirect Configuration screen from the Port Redirect
screen, use the arrow keys to highlight the PORT REDIRECT
CONFIGURATION menu item and press ENTER.
Local Management Supplement 1-9

Chapter 1: Changes to Local Management Screens
Source
----------------------
Module Port
1 1
1 2
1 3
1 4
1 5
1 6
1 7
1 8
Src Port [ 2 ]
Src Module [ 1 ]
SAVE
Destination
------------------------ --------------------
Module Port
2 1
2 2
2 3
2 4
2 5
2 6
2 7
2 8
Frame Format [UNTAGGED]Dest Port [ 16 ]
Dest Module [ 2 ]
PREVIOUS NEXT
Remap Errors [OFF]
FrameFormat
NORMAL
TAGGED
UNTAGGED
NORMAL
NORMAL
NORMAL
NORMAL
NORMAL
Remap Errors
--------------------
ON
ON
ON
ON
ON
ON
ON
ON
EXIT
Status [DELETE]
RETURN
RETURN
3026_26
Figure 1-6 Port Redirect Configuration Screen (Chassis)
The following definitions briefly explain each field of the Port Redirect
Configuration screen:
Source Module (Read-Only)
Shows which modules are currently set as source modules.
Source Port (Read-only)
Shows which ports are currently set as source ports.
Destination Module (Read-Only)
Shows which modules are currently set as destination modules.
Destination Port (Read-only)
Shows which ports are currently set as destination ports. Only one
destination port may be assigned to a source port.
1-10 Local Management Supplement

Port Redirect Configuration Screen (Chassis)
Frame Format (Read-Only)
Displays the current frame format setting: NORMAL, TAGGED or
UNTAGGED. The default is NORMAL.
• NORMAL – Frames are redirected in the format that they were
received or transmitted on the source port.
• TAGGED – Frames are transmitted on the destination port with a
VLAN tag inserted according to the frame classification.
• UNT A GGED – Frames are transmitted on the destination port without
a VLAN tag regardless of the format of the received frame.
Remap Errors (Read-Only)
Displays whether the corresponding source ports are configured ON to
send errored frames to the destination ports, or OFF to drop all errored
frames and only forward traffic without errored frames to the destination
ports. All redirected error frames display in the way the y were recei v ed or
transmitted on the source port, regardless of the frame format setting.
Refer to Section 1.15.1 for directions on how to change the
NOTE
Src Port [n] (Selectable)
settings for the following fields.
Used to select the port [n] that is to be changed to a source port. If a port
is currently being redirected, it will not display as a selectable port.
Src Module [n] (Selectable)
Used to select the module [n] that is to be changed to a source module.
Dest Port [n] (Selectable)
Used to select the port [n] that is to be changed to a destination port. If a
port is currently being redirected, it will not display as a selectable port.
Dest Module [n] (Selectable)
Used to select the module [n] that is to be changed to a destination
module.
Local Management Supplement 1-11

Chapter 1: Changes to Local Management Screens
Frame Format (Selectable)
Used to select the frame format for the transmission of redirected frames
on the destination port. NORMAL, TAGGED, or UNTAGGED may be
selected. Refer to the previously described read-only Frame Format field
for details about each format. The default setting is NORMAL.
Remap Errors (Toggle)
Used to set each source port to either ON, to send errored frames to its
destination port, or OFF to drop errored frames, and send only valid
traffic to its destination port. The default setting is OFF.
Status (Toggle)
Used to add or delete source and destination ports selected in the Source
Port [n] and Destination Port [n] fields.
1.5.1 Changing Source and Destination Ports
To add or delete source port and destination port entries and set the Frame
Format and Redirect Errors functions, proceed as follows:
1. Use the arrow keys to highlight the Src Port field near the bottom of
the screen.
2. Press the SPACE bar or BACKSPACE one or more times to increment
or decrement the port number displayed in the brackets [n] until the
appropriate port number displays.
3. Use the arrow keys to highlight the Src Module field near the bottom
of the screen.
4. Use the SPACE bar or BACKSPACE to step to the appropriate
module number for the source module.
5. Use the arrow keys to highlight the Dest Port field near the bottom of
the screen.
6. Press the SPACE bar or BACKSPACE one or more times to increment
or decrement the port number displayed in the brackets [n] until the
appropriate port number displays.
7. Use the arrow keys to highlight the Dest Module field near the bottom
of the screen.
8. Use the SPACE bar or BACKSPACE to step to the appropriate
module number for the destination module.
1-12 Local Management Supplement

Port Redirect Configuration Screen (Chassis)
9. Use the arrow keys to highlight the Frame Format field near the
bottom of the screen.
10. Use the SPACE bar or BACKSPACE to step to the appropriate frame
format setting (NORMAL, TAGGED, or UNTAGGED) for the
selected Destination Port.
11. Use the arrow keys to highlight the Remap Errors field near the
bottom of the screen.
12. Use the SPACE bar to select either the ON or OFF option and press
ENTER. ON forces the source port to forward errored frames to the
destination port(s). OFF forces the errored frames to be dropped
before forwarding traffic.
13. Use the arrow keys to highlight the Status field.
14. Use the SPACE bar to select either the ADD or DEL option. Press
ENTER. This adds or deletes the selections for the Source Port,
Destination Port, Frame Format, and Redirect Errors made in steps 1
through 12 and also updates the screen.
If more than one port is being redirected, repeat steps 1
NOTE
through 14 for each additional setting. Then go to step 15 to
save all the new settings at once.
If an entry is to be changed, delete the entry, save the screen,
then recreate the entry with its new settings.
Any combination of port redirect instances (configured on the
Port Redirect Configuration screen) and/or VLAN redirect
instances (configured on the VLAN Redirect Configuration
screen) can be configured, up to 128 instances total per
module. A maximum of 640 instances can be configured on a
fully loaded (5 module) chassis. Up to 24 instances can be
configured as remote instances to other modules in the
chassis. Remote instances are instances that are mapped from
one module to another within the same chassis.
15. Use the arrow keys to highlight SAVE at the bottom of the screen.
Press ENTER. The message “SAVED OK” displays. This saves the
new settings and updates the Source Port and Module, and the
Destination Port and Module read-only fields.
Local Management Supplement 1-13

Chapter 1: Changes to Local Management Screens
1.6 VLAN REDIRECT CONFIGURATION SCREEN
(CHASSIS)
The VLAN Redirect Configuration screen, Figure 1-6, enables the user to
select a source module and VLAN ID and a destination module and port
as well as add a new VLAN Redirect or delete an existing one. For
example, VLAN ID 1 can be set as the source VLAN ID with port 2 as the
destination port. Traffic from VLAN 1 is then automatically redirected to
port 2 according to the Frame Format setting for that source VLAN. The
Frame Format setting determines the format in which the frames receiv ed
belonging to the source VLAN are redirected to the destination port. The
frames can be forwarded in the frame format as received, tagged, or
untagged.
The VLAN redirect function is very useful for troubleshooting purposes,
as it allows traffic associated with a particular VLAN to be sent to a
particular port where, with the use of an analyzer or RMON probe, all
current traffic from the source VLAN can be examined.
Although traffic associated with a particular VLAN is sent to the
NOTE
destination port, normal switching is still performed for all
frames on the source port.
The Redirect Errors function is not supported on this screen.
To access the VLAN Redirect Configuration screen from the Port
Redirect screen, use the arrow keys to highlight the VLAN REDIRECT
CONFIGURATION menu item and press ENTER. The VLAN Redirect
Configuration screen displays.
1-14 Local Management Supplement

VLAN Redirect Configuration Screen (Chassis)
EXIT
Remap Errors
--------------------
––
––
––
––
––
––
––
––
Status [ADD]
RETURN
RETURN
3026_105
Source
----------------------
Module VLAN ID
1 1
1 2
1 3
1 4
1 5
1 6
1 7
1 8
Src VLAN ID [ 2 ]
Src Module [ 1 ]
SAVE
Destination
------------------------
Module Port
2 1
2 2
2 3
2 4
2 5
2 6
2 7
2 8
Frame Format [UNTAGGED]Dest Port [ 2 ]
Dest Module [ 1 ]
PREVIOUS NEXT
Redirect Errors UNSUPPORTED
Frame Format
--------------------
RECEIVED
TAGGED
UNTAGGED
RECEIVED
RECEIVED
RECEIVED
RECEIVED
RECEIVED
Figure 1-7 VLAN Redirect Configuration Screen (Chassis)
The following definitions briefly explain each field of the VLAN Redirect
Configuration screen:
Source Module (Read-Only)
Shows which modules are currently set as source modules.
Source VLAN ID (Read-Only)
Shows the VLAN ID of the VLANs that are currently set as source
VLANs.
Destination Module (Read-Only)
Shows which modules are currently set as destination modules.
Destination Port (Read-Only)
Shows which ports are currently set as destination ports. Multiple
VLAN IDs may be assigned to a destination port.
Local Management Supplement 1-15

Chapter 1: Changes to Local Management Screens
Frame Format (Read-Only)
Displays the current frame format setting: RECEIVED, TAGGED or
UNTAGGED. The default is RECEIVED.
• RECEIVED – Frames are redirected in the format in which they were
received by the module.
• TAGGED – Frames are transmitted on the destination port with a
VLAN tag inserted according to the frame classification.
• UNT A GGED – Frames are transmitted on the destination port without
a VLAN tag regardless of the format of the received frame.
Refer Section 1.6.1 to change the settings on the following
NOTE
fields.
Remap Errors
Unsupported (only valid frames can be classified into a VLAN).
Src VLAN ID [n] (Modifiable)
Used to enter the VLAN ID of the VLAN that is to be changed to a source
VLAN. If a VLAN is currently being redirected, it will not display as a
selectable VLAN.
Src Module [n] (Selectable)
Used to select the module [n] that is to be changed to a source module.
Dest Port [n] (Selectable)
Used to select the port [n] that is to be changed to a destination port. If a
port is currently being redirected, it will not display as a selectable port.
Dest Module [n] (Selectable)
Used to select the module [n] that is to be changed to a destination
module.
Frame Format (Selectable)
Used to select the frame format for the transmission of redirected frames
on the destination port. RECEIVED, TAGGED, or UNTAGGED may be
selected. Refer to the previously described read-only Frame Format field
for details about each format. The default setting is RECEIVED.
1-16 Local Management Supplement

VLAN Redirect Configuration Screen (Chassis)
Redirect Errors
Unsupported.
Status (Toggle)
Used to add or delete source and destination ports selected in the
Src VLAN ID [n] and Dest Port [n] fields.
1.6.1 Changing Source VLAN and Destination Ports
To add or delete source VLAN and destination port entries and set the
Frame Format and Redirect Errors functions, proceed as follows:
1. Use the arrow keys to highlight the Src VLAN ID field near the
bottom of the screen.
2. Type in the VLAN ID number of the source VLAN to be configured.
3. Use the arrow keys to highlight the Src Module field near the bottom
of the screen.
4. Use the SPACE bar or BACKSPACE to step to the appropriate
module number for the source module.
5. Use the arrow keys to highlight the Dest Port field near the bottom of
the screen.
6. Press the SPACE bar or BACKSPACE one or more times to increment
or decrement the port number displayed in the brackets [n] until the
appropriate port number displays.
7. Use the arrow keys to highlight the Dest Module field near the bottom
of the screen.
8. Use the SPACE bar or BACKSPACE to step to the appropriate
module number for the destination module.
9. Use the arrow keys to highlight the Frame Format field near the
bottom of the screen.
10. Use the SPACE bar or BACKSPACE to step to the desired frame
format setting (RECEIVED, TAGGED, or UNTAGGED) for the
selected Destination Port.
11. Use the arrow keys to highlight the Status field.
Local Management Supplement 1-17

Chapter 1: Changes to Local Management Screens
12. Use the SPACE bar to select either the ADD or DEL option. Press
ENTER. This adds or deletes the selections for the Source VLAN,
Destination Port, and Frame Format made in steps 1 through 10 and
also updates the screen.
If more than 1 port is being redirected, repeat steps 1
TIP
through 12 for each additional setting. Then go to step 13 to
save all the new settings at once.
If an entry is to be changed, delete the entry, save the screen,
then recreate the entry with its new settings.
Any combination, up to 128, of port redirect instances
(configured on the Port Redirect Configuration screen) and/or
VLAN redirect instances (configured on the VLAN Redirect
Configuration screen) can be configured.
13. Use the arrow keys to highlight SAVE at the bottom of the screen.
Press ENTER. The message “SAVED OK” displays. This saves the
new settings and updates the Source VLAN and Destination Port
read-only fields.
1.7 MODULE CONFIGURATION MENU SCREEN
The Module Configuration Menu screen, Figure 1-8, provides access to
Local Management screens that allow you to configure and monitor
operating parameters, modify SNMP community names, set SNMP traps,
configure switch parameters and configure ports.
The path to the Module Configuration screen is
MAIN MENU/MODULES/SELECT SLOT #/MODULE MENU.
To access the Module Configuration Menu screen from the Module Menu
screen, use the arrow keys to highlight the MODULE
CONFIGURATION menu item and press ENTER. The Module
Configuration Menu screen displays.
1-18 Local Management Supplement

Module Configuration Menu Screen
GENERAL CONFIGURATION
SNMP COMMUNITY NAMES CONFIGURATION
SNMP TRAPS CONFIGURATION
SYSTEM RESOURCES INFORMATION
FLASH DOWNLOAD CONFIGURATION
PORT CONFIGURATION MENU
802.1 CONFIGURATION MENU
EXIT
Figure 1-8 Module Configuration Menu Screen
RETURN
19602_66
The following briefly explains each screen accessible from the Module
Configuration Menu screen:
GENERAL CONFIGURATION
Used to monitor and configure SmartSwitch operating parameters. For
details, refer to your SmartSwitch user’s guide.
SNMP COMMUNITY NAMES CONFIGURATION
Allows the user to enter new, change, or review the community names
used as access passwords for module management operation. Access is
limited based on the password level of the user. For details, refer to your
SmartSwitch user’s guide.
SNMP TRAPS CONFIGURA TION
Provides display and configuration access to the table of IP addresses
used for trap destinations and associated community names. For details,
refer to your SmartSwitch user’s guide.
SYSTEM RESOURCES INFORMATION
Displays the CPU type used in the module and its operating speed;
displays the size of each memory system used (FLASH memory, DRAM
and NVRAM) in the module and the unused portion of each memory; and
displays the current CPU (switch) utilization and the peak switch
utilization. For details, refer to Section 1.8.
Local Management Supplement 1-19

Chapter 1: Changes to Local Management Screens
FLASH DOWNLOAD CONFIGURATION
Used to force the SmartSwitch to download a ne w image file from a TFTP
server to its FLASH memory. For details, refer to Section 1.9.
PORT CONFIGURATION MENU
Used to select the screens for configuring the SmartSwitch ports. For
details, refer to Section 1.10.
802.1 CONFIGURATION MENU
Displays only if the SmartSwitch has been configured to operate as an
IEEE 802.1Q switch. When selected, the 802.1 Configuration Menu
screen provides access to the Switch Configuration, 802.1Q VLAN
Configuration Menu, GARP Operating Status, GARP Group Registration,
and 802.1p Priority Configuration Menu screens. For details, refer to
Section 1.19.
1.8 SYSTEM RESOURCES INFORMATION SCREEN
The System Resources Information screen, Figure 1-9, provides
information concerning the processor used in the SmartSwitch and the
amount of FLASH memory, DRAM, and NVRAM that is installed and
how much of that memory is av ailable. This screen is also used to monitor
the current switch utilization and the peak switch utilization.
To access the System Resources Information screen from the Module
Configuration Menu screen, use the arrow ke ys to highlight the SYSTEM
RESOURCES INFORMATION menu item and press ENTER. The
System Resources Information screen displays.
1-20 Local Management Supplement

System Resources Information Screen
CPU Type: i960 HX 66 Mhz
Flash Memory Installed: 4 MB
DRAM Installed: 20 MB
NVRAM Installed: 128 KB
Current Switch Utilization: 66%
Peak Switch Utilization: 75%
Reset Peak Switch Utilization: [NO]
SAVE
Available: XXXXX Bytes
Available: XXXXX Bytes
Available: XXXXX Bytes
EXIT
RETURN
RETURN
Figure 1-9 System Resources Information Screen
The following briefly defines each field of the System Resources
Information screen.
CPU Type (Read-Only)
Indicates the microprocessor used in the SmartSwitch.
3026-23
Flash Memory Installed (Read-Only)
Indicates the amount of FLASH memory installed in the SmartSwitch and
how much is currently available.
DRAM Installed (Read-Only)
Indicates the amount of DRAM installed in the SmartSwitch and how
much of it is currently available.
NVRAM Installed (Read-Only)
Indicates the amount of NVRAM installed in the SmartSwitch and how
much of it is currently available.
Current Switch Utilization (Read-Only)
Shows the percentage of the module switching capacity currently being
used.
Peak Switch Utilization (Read-Only)
Shows the peak percentage of module switching capacity used since the
last reset.
Local Management Supplement 1-21

Chapter 1: Changes to Local Management Screens
Reset Peak Switch Utilization (Toggle)
Used to reset the Peak Switch Utilization field. The switch may be set to
either YES or NO as described in Section 1.8.1. YES resets the Peak
Switch Utilization field to the current system utilization.
1.8.1 Resetting the Reset Peak Switch Utilization
To set the Reset Peak Switch Utilization field to YES or NO, proceed as
follows:
1. Use the arrow keys to highlight the Reset Peak Switch Utilization
field.
2. Press the SPACE bar to select YES or NO.
3. Use the arrow keys to highlight the SAVE command at the bottom of
the screen.
4. Press ENTER. The message “SAVED OK” displays and the Reset
Peak Utilization counter resets to zero.
1.9 FLASH DOWNLOAD CONFIGURATION SCREEN
The Flash Download Configuration screen, sho wn in Figure 1-10, enables
the user to download a new image file from a TFTP server to Flash
memory.
The user may also force a download by changing the position
NOTE
Before downloading a new image to the module, load the image onto the
network TFTP server .
NOTE
of dipswitch 6 located inside the module. Refer to your
SmartSwitch user’s guide for details.
For information on how to set up a workstation as a TFTP
server, refer to the specific workstation documentation.
To access the Flash Download Configuration screen from the Module
Configuration screen, use the arrow keys to highlight the FLASH
DOWNLOAD CONFIGURATION menu item and press ENTER. The
Flash Download screen displays.
1-22 Local Management Supplement

Flash Download Configuration Screen
9
NOTE
Download Method:
Reboot After Download:
TFTP Gateway IP Addr:
Last Image Server IP:
Last Image File Name:
Download Server IP:
Download File Name:
EXECUTE
RUNTIME
[YES]
nnn.nnn.nnn.nnn
nnn.nnn.nnn.nnn
/tftpboot/xxxxx.fls
nnn.nnn.nnn.nnn
/tftpboot/xxxxx.fls
EXIT
RETURN
Figure 1-10 Flash Download Screen
Download Server IP and Download File Name display only
when TFTP or RUNTIME are selected in Download Method.
2971-4
The following briefly defines each field of the Flash Download screen:
Download Method (Selectable)
This field steps between TFTP, RUNTIME and BOOTP. If set for
BOOTP, the module sends out a BootP request to determine the IP
address of the TFTP server and the filename of the image to be
downloaded. If set for TFTP or RUNTIME, the module attempts a TFTP
download based on the IP address and filename entered in the fields at the
bottom of the Flash Download screen.
Section 1.9.1 describes how to download using TFTP. Section 1.9.2
describes how to download using RUNTIME. Section 1.9.3 describes
how to download using BootP.
Local Management Supplement 1-23

Chapter 1: Changes to Local Management Screens
Reboot After Download (Modifiable when user chooses RUNTIME)
This field notifies the user that the SmartSwitch will reboot after the
download is complete. If a RUNTIME Download is performed this field
toggles between YES and NO. If YES is selected, the module reboots
after the download is completed. If NO is selected the module will
continue using the existing firmware image. The module stores the new
firmware image in FLASH memory. When the module or 6C105 chassis
is reset, the module will boot from FLASH memory using the new image.
TFTP Gateway IP Addr (Selectable)
This field shows the IP address of the TFTP gateway server defined in the
General Configuration screen.
Last Image Server IP (Read-only)
This field shows the IP address of the server used for the pre vious FLASH
Download.
Last Image File Name (Read-only)
This field shows the complete path and file name of the last image
downloaded to FLASH.
If TFTP or RUNTIME is selected as the download method
NOTE
Download Server IP (Selectable)
(Figure 1-10), the following two additional fields display.
The IP address of the TFTP server to be used for the FLASH do wnload is
entered in this field.
Download File Name (Selectable)
The complete TFTP server path and file name of the ne w image is entered
in this field.
1.9.1 Image File Download Using TFTP
Set the module to download to FLASH using TFTP as follows:
1. Use the arrow keys to highlight the Download Method field.
2. Use the SPACE bar to select TFTP.
1-24 Local Management Supplement

Flash Download Configuration Screen
3. Use the arrow keys to highlight the TFTP Gateway IP Addr field.
4. Set the IP address of the TFTP gateway server (this defaults to the
same IP address as that set in the TFTP Gateway IP Addr field on the
General Configuration screen).
5. Use the arrow keys to highlight the Download Server IP field.
6. Enter the IP address of the TFTP server using the DDN format.
For example: nnn.nnn.nnn.nnn
7. Use the arrow keys to highlight the Download File Name field.
8. Enter the complete path and file name of the image stored on the
download server.
For example: /tftpboot/6H123.hex
9. Use the arrow keys to highlight EXECUTE at the bottom of the screen
and press ENTER. The message “TFTP DOWNLOAD. WILL
COMMIT TO FLASH. REBOOT IN PROGRESS...” displays in the
event message line at the top of the screen and the new image is
downloaded into FLASH memory.
1.9.2 Image File Download Using Runtime
Set the module to download to FLASH using RUNTIME as follows:
1. Use the arrow keys to highlight the Download Method field.
2. Use the SPACE bar to step to RUNTIME.
3. Use the arrow keys to highlight the Reboot After Download field.
4. Use the SPACE bar to select either YES or NO. Select YES if you
want the module to reboot after the download is complete. Select NO
if you want the module to store the new image in FLASH memory
until the module is manually reset.
5. Use the arrow keys to highlight the TFTP Gateway IP Addr field.
6. Set the IP address of the TFTP gateway server (this defaults to the
same IP address as that set in the TFTP Gateway IP Addr field on the
General Configuration screen).
7. Use the arrow keys to highlight the Download Server IP field.
Local Management Supplement 1-25

Chapter 1: Changes to Local Management Screens
8. Enter the IP address of the TFTP server using the DDN format.
For example: nnn.nnn.nnn.nnn
9. Use the arrow keys to highlight the Download File Name field.
10. Enter the complete path and file name of the image stored on the
download server.
For example: /tftpboot/6H123.fls
11. Use the arrow keys to highlight EXECUTE at the bottom of the screen
and press ENTER. The message “RUNTIME DOWNLOAD. WILL
COMMIT TO FLASH.” displays in the event message line at the top
of the screen and the new image is downloaded into FLASH memory.
1.9.3 Image File Download Using BootP
Set the module to download to FLASH using BootP as follows:
1. Use the arrow keys to highlight the Download Method field.
2. Use the SPACE bar to select BOOTP.
3. Use the arrow keys to highlight the TFTP Gateway IP Addr field.
4. Set the IP address of the TFTP gateway server (this defaults to the
same IP address set in the TFTP Gateway IP Addr field in the General
Configuration screen).
5. Use the arrow keys to highlight EXECUTE at the bottom of the screen
and press ENTER. The message “BOOTP DOWNLOAD. WILL
COMMIT TO FLASH. REBOOT IN PROGRESS...” displays in the
event message line at the top of the screen and the new image is
downloaded into FLASH memory.
1-26 Local Management Supplement

Port Configuration Menu Screen
1.10 PORT CONFIGURATION MENU SCREEN
The Port Configuration Menu screen, Figure 1-11, is used to select
screens to perform port configuration tasks on the SmartSwitch.
The Repeater Configuration Menu screen and its subordinate
NOTE
To access the Port Configuration Menu screen from the Module
Configuration Menu screen, use the arrow keys to highlight the PORT
CONFIGURATION MENU item and press ENTER. The Port
Configuration Menu screen displays.
screens apply only to the repeater devices 6E123-50,
6E133-49, 6H123-50, and 6H133-37.
ETHERNET FULL DUPLEX CONFIGURATION
HIGH SPEED INTERFACE CONFIGURATION
SMARTTRUNK CONFIGURATION
PORT REDIRECT CONFIGURATION
BROADCAST SUPPRESSION CONFIGURATION
REPEATER CONFIGURATION MENU
EXIT
Figure 1-11 Port Configuration Menu Screen
The following briefly defines each selectable item of the Port
Configuration Menu screen:
RETURN
27622_20
ETHERNET FULL DUPLEX CONFIGURATION
The Ethernet Full Duplex Configuration screen allows each 10 Mbps port
to be set for either Standard Ethernet or Full Duplex operation. The screen
also indicates whether or not each port is linked to another 10BASE-T
module and if that port is enabled. For details, refer to Section 1.11.
Local Management Supplement 1-27

Chapter 1: Changes to Local Management Screens
HIGH SPEED INTERFACE CONFIGURATION
The High Speed Interface Configuration screen selection does
NOTE
not display unless an optional interface module is installed.
The High Speed Interface Configuration screen provides access to the
Fast Ethernet Interfaces screen and the HSIM screen. For details, refer to
Section 1.12.
SMARTTRUNK CONFIGURATION
Used to logically group interfaces together to create a greater bandwidth
uplink. Refer to the Cabletron Systems SmartTrunk User’s Guide for
information about how to access and use the SmartTrunk screens.
PORT REDIRECT CONFIGURATION
Used to access the Redirect Configuration Menu screen, which provides
access to the Port Redirect Configuration and VLAN Redirect
Configuration screens. For details, refer to Section 1.14.
BROADCAST SUPPRESSION CONFIGURATION
Used to set a desired limit of received broadcast frames that are forw arded
out other interfaces. For details, refer to Section 1.17.
REPEATER CONFIGURATION MENU
Used to access the Repeater Level Security Configuration and Port Level
Security Configuration screens for the 6E123-50 and 6E133-49, or to
access the Repeater Port Configuration, Module Level Security
Configuration, and Port Level Security Configuration for the 6H123-50
and 6H133-49.
This menu item applies only to the 6E123-50, 6E133-49, 6H123-50, and
6H133-37 repeater devices. For details, refer to Chapter 2 for the
6E123-50 and 6E133-49, and Chapter 3 for the 6H123-50 and 6H133-37.
1-28 Local Management Supplement

Ethernet Full Duplex Configuration Screen
1.11 ETHERNET FULL DUPLEX CONFIGURATION
SCREEN
The Ethernet Full Duplex Configuration screen, Figure 1-12, allows the
user to set the front panel ports, individually or all at once, to either
Standard Ethernet or Full Duplex operation, and monitor each port to see
whether or not it is enabled and linked to another Ethernet module. Refer
to Section 1.13 to set the Operation Mode.
To access the Ethernet Full Duplex Configuration screen from the Port
Configuration Menu screen, use the arrow keys to highlight the
ETHERNET FULL DUPLEX CONFIGURATION menu item and
press ENTER. The Ethernet Full Duplex Configuration screen displays.
SAVE
PORT #
1
2
3
4
5
6
7
8
9
10
11
12
OPERATION MODE
[STANDARD ENET]
[STANDARD ENET]
[STANDARD ENET]
[STANDARD ENET]
[STANDARD ENET]
[STANDARD ENET]
[STANDARD ENET]
[STANDARD ENET]
[STANDARD ENET]
[STANDARD ENET]
[STANDARD ENET]
[STANDARD ENET]
SET ALL PORTS: FULL
LINK STATUS
Link
Link
Link
No Link
Link
Link
Link
Link
Link
Link
Link
Link
EXIT
PORT STATUS
ENABLED
ENABLED
ENABLED
ENABLED
ENABLED
ENABLED
ENABLED
ENABLED
ENABLED
ENABLED
ENABLED
ENABLED
[13-24]
RETURN
RETURN
19601-21
Figure 1-12 Ethernet Full Duplex Configuration Screen
This section explains each field of the Ethernet Full Duplex Configuration
screen.
PORT # (Read-only)
Identifies the number of the port.
Local Management Supplement 1-29

Chapter 1: Changes to Local Management Screens
OPERATION MODE (Toggle)
Allows the user to set the specified port to transmit and receive data
separately (Standard) or simultaneously (Full Duplex). Set this field to
one of the following values:
• STANDARD ENET – The port is running in half duplex (default) and
either transmits data or receives data, b ut not both at the same time. To
set Ethernet ports for Standard operation, refer to Section 1.11.1.
• FULL DUPLEX – Depending on the SmartSwitch, the port transmits
and receives data simultaneously at 10 or 100 Mbps, thus enabling the
port to effecti v ely switch at 20 or 200 Mbps. To set Ethernet ports for
Full Duplex operation, refer to Section 1.11.1.
LINK STATUS (Read-only)
Indicates whether there is a physical connection from this port to another
Ethernet module. One of the following values displays:
• Link – A link signal is present; there is a valid physical connection
from this port to another module.
• No Link – No link signal is present; there is no valid physical
connection from this port to another module.
PORT STATUS (Read-only)
Indicates whether the port was turned on or off administratively (by the
user). One of the following values is displayed:
• ENABLED – The port is turned on administratively.
• DISABLED – The port is turned off administratively.
Enabling or disabling ports from the Switch Configuration
NOTE
SET ALL PORTS (Toggle)
screen is described in Section 1.20.3.
All front panel ports can be set at once to either STANDARD or FULL
DUPLEX from this field. To set ports, refer to Section 1.11.1.
1-30 Local Management Supplement

Ethernet Full Duplex Configuration Screen
[1-12], [13-24], [25-36], or [37-48] (Navigation Key)
When the Full Duplex Configuration screen displays, the current
operation mode and status information are displayed for the first 12 ports.
This field allows the user to step to another screen for the same type of
information for ports 13 through 24, 25 through 36, and 37 through 48, if
available. The number of ports a v ailable is dependent on the SmartSwitch
model. To navigate to the next screen, highlight the
[xx-xx] field and press
ENTER. The user can change the Operation Mode fields while in any of
the selected screens.
1.11.1 Setting the Operational Mode
The Operational Mode may be set to Standard Ethernet or Full Duplex
either one port at a time or all at once. The following steps describe
setting the port Operational Mode for individual ports followed by steps
to set the Operational Mode for all ports.
To set the Operational Mode for individual ports, proceed as follows:
1. Use the arrow keys to highlight the Operation Mode field adjacent to
the number of the port(s) that you plan to change.
The Operation Mode for the first 12 ports can be changed on
NOTE
the first screen. To display the Operation Mode for additional
groups of twelve ports (13 – 24, 25 – 36, and 37 – 48), use the
arrow keys to highlight the Ports [xx-xx] field and press
ENTER.
2. Press the SPACE bar until the appropriate mode, FULL DUPLEX or
STANDARD ENET displays in the field.
3. Use the arrow keys to highlight the SAVE command on the bottom
line of the screen.
4. Press ENTER. The message “SAVED OK” displays.
To set the Operation Mode for all ports, proceed as follows:
1. Use the arrow keys to highlight the SET ALL PORTS field.
2. Press the SPACE bar until you see FULL or STANDARD.
Local Management Supplement 1-31

Chapter 1: Changes to Local Management Screens
3. Use the arrow keys to highlight the SAVE command on the bottom
line of the screen.
4. Press ENTER. The message “SAVED OK” displays.
1.12 HIGH SPEED INTERFACE CONFIGURATION MEN U
SCREEN
This High Speed Interface Configuration Menu screen does not
NOTE
The High Speed Interface Configuration Menu screen, Figure 1-13,
applies to the Fast Ethernet Interface Modules and the High Speed
Interface Module.
display unless an optional interface module is installed: one or
two F ast Ethernet Interface Modules, or a High Speed Interf ace
Module (HSIM), depending on what the host SmartSwitch
supports.
To access the High Speed Interface Configuration Menu screen from the
Port Configuration Menu screen, use the arrow keys to highlight the
HIGH SPEED INTERFACE CONFIGURATION menu item and
press ENTER. The High Speed Interface Configuration Menu screen,
Figure 1-13, displays.
FAST ETHERNET INTERFACES
HSIM
SAVE
Figure 1-13 High Speed Interface Configuration Menu Screen
1-32 Local Management Supplement
EXIT
RETURN
19601-53

High Speed Interface Configuration Screen
The following briefly explains each screen accessible from the High
Speed Interface Configuration Menu screen.
FAST ETHERNET INTERFACES
Displays the types of fast Ethernet interfaces installed in the module, their
current operating mode, and indicates if the ports are linked. This screen
also allows the user to enable or disable Auto-Negotiation and set the
Advertised Ability. For details, refer to Section 1.13.
HSIM
Displays the types of interfaces installed in the High Speed Interface
Module (HSIM) slot. The HSIM screens are depicted in their respective
user’s guides.
1.13 HIGH SPEED INTERFACE CONFIGURATION
SCREEN
The High Speed Interface Configuration screen, Figure 1-14,
NOTE
The High Speed Interface Configuration screen displays the types of
installed Fast Ethernet Interface Modules, their current operating mode,
and indicates if the ports are linked. This screen also allows the user to
enable or disable Auto-Negotiation and set the Advertised Ability.
To access the High Speed Interface Configuration screen from the High
Speed Interface Configuration Menu screen, use the arrow keys to
highlight the FAST ETHERNET INTERFACES menu item and press
ENTER. The High Speed Interface Configuration screen displays.
applies only to installed optional Fast Ethernet Interface
Modules. This screen supports the FE-100TX, FE-100FX,
FE-100F3, and FE-100LH Fast Ethernet Interf ace Modules that
operate at 100 Mbps.
Local Management Supplement 1-33

Chapter 1: Changes to Local Management Screens
Port Type
Link Status
Current Oper. Mode
Desired Oper. Mode
Advertised Ability
Port 25
FE-100TX
Link
100Base-TXFD
[Auto-Negotiation]
[100Base-TXFD] [Disabled]
EXIT
Port 26
Unknown
N/A
[N/A]
[N/A]
[N/A]
RETURNSAVE
19601-24
Figure 1-14 High Speed Interface Configuration Screen
The following briefly explains each field of the High Speed Interface
Configuration screen.
Port Type (Read-only)
Displays the type of interface (FE-100FX, FE-100TX, FE-100F3,
FE-100LH, or Unknown) installed. Figure 1-14 shows that there is an
FE-100TX interface installed in one optional port slot and no interface
indicated by Unknown in another optional port slot. This example does
not apply to all modules because the number of ports vary, depending on
the SmartSwitch model.
Link Status (Read-only)
Indicates whether or not there is a physical connection from this port to
another 10BASE-T or 100BASE-TX/FX module. One of the following
values displays:
• Link – There is a link signal present and a valid physical connection
to another module.
• No Link – There is no link signal present and no valid physical
connection to another module.
1-34 Local Management Supplement

High Speed Interface Configuration Screen
Current Oper. Mode (Read-only)
This field displays the current operating mode of interfaces installed in
the optional port slot(s). Depending on whether a 100BASE-FX, or
100BASE-TX is installed, this field displays the following:
• With a 100BASE-FX interface: 100Base-FX, 100Base-FXFD (full
duplex), or N/A when port is empty.
• With a 100BASE-TX interface: Unknown, 10Base-T, 10Base-TFD
(full duplex), 100Base-TX, 100Base-TXFD (full duplex) or N/A when
port is empty.
Desired Oper. Mode (Selectable)
This field allows the user to select the desired operational mode for an
interface in one of the optional port slots. The field toggles between
100BASE-FX and 100BASE-FXFD (full duplex) when an FE-100FX or
FE-100F3 is installed. Section 1.13.1 describes how to configure a port
with an FE-100FX or FE-100F3.
In normal operation, the port with an FE-100TX installed
NOTE
automatically establishes a link with the module at the other
end of the segment without requiring user setup. However,
Local Management provides the user with the option of
manually configuring that port.
If an FE-100TX is installed, the field steps to Auto-Negotiation,
10Base-T, 10Base-TFD (full duplex), 100Base-TX, and 100Base-TXFD
(full duplex). In normal operation, the port with an FE-100TX installed is
capable of auto-negotiating the operational mode and no further user
setup is required. Section 1.13.3 describes how to manually configure an
FE-100TX.
In Auto-Negotiation, the FE-100TX negotiates to the highest common
denominator of the two interfaces. The order of priority of negotiation is
100BASE-TXFD, 100BASE-TX, 10BASE-TFD, and 10BASE-T.
Local Management Supplement 1-35

Chapter 1: Changes to Local Management Screens
Advertised Ability (Selectable)
During auto-negotiation, the FE-100TX “tells” the module at the other
end of the segment about its capabilities. The capabilities of a port with an
FE-100TX installed are 10Base-T, 10Base-TFD (full duplex mode),
100Base-TX and 100Base-TXFD (full duplex mode). In normal
operation, with all capabilities enabled, the FE-100TX “advertises” that it
has the ability to operate in any mode. The Network Manager (or user)
may choose to set up the port so that only a portion of the available
capabilities are advertised and the others are disabled. For example, only
100Base-TX and 100Base-TXFD might be enabled so that only devices
that operate at 100 Mbps can communicate with that port. Section 1.13.5
describes how to enable or disable advertised modes.
1.13.1 Configuring an FE-100FX or FE-100F3
When an FE-100FX or FE-100F3 is installed, it must be manually set to
operate in the same technology as the device at the other end of the
connected segment. Section 1.13.2 provides instructions for manually
configuring the port with an FE-100FX or FE-100F3 interface.
1.13.2 Setting the FE-100FX or FE-100F3
Operational Mode
Use this field to set the active technology. This field toggles between
100Base-FX and 100Base-FXFD (full duplex). To set the active
technology through Local Management, proceed as follows:
1. Use the arrow keys to highlight the Desired Operational Mode field.
2. Use the SPACE bar to select 100Base-FX or 100Base-FXFD (full
duplex).
3. Press ENTER. The port now operates in the chosen mode.
4. Use the arrow keys to highlight the SAVE command. Press ENTER.
The message “SAVED OK” displays and Local Management saves
the changes to memory.
1-36 Local Management Supplement

High Speed Interface Configuration Screen
1.13.3 Configuring an FE-100TX
In normal operation, an FE-100TX interface automatically establishes a
link with the device at the other end of the segment and no user setup is
required. Section 1.13.4 and Section 1.13.5 provide instructions for
manually configuring the port with an FE-100TX installed.
1.13.4 Setting the FE-100TX Operational Mode
Use this field to set the active technology. This field steps between
Auto-Negotiation, 10Base-T, 10Base-TFD (full duplex), 100Base-TX,
and 100Base-TXFD (full duplex). If Auto-Negotiation is selected, the
FE-100TX automatically sets the active technology.
To manually set the active technology through Local Management,
proceed as follows:
1. Use the arrow keys to highlight the Desired Oper. Mode field.
2. Use the SPACE bar to select the desired mode. Press ENTER. If any
mode other than Auto-Negotiation is selected, the port only operates
in the chosen mode and Auto-Negotiation is disabled.
3. Use the arrow keys to highlight the SAVE command. Press ENTER.
The message “SAVED OK” displays and Local Management saves
the changes to memory. The selected mode is displayed in both the
Desired Operational Mode field and the Current Operational Mode
field.
1.13.5 Setting the FE-100TX Advertised Ability
In normal operation, an FE-100TX auto-negotiates to the highest speed
possible. Under some circumstances, the Network Administrator may
want the port to advertise only some of the available modes and not
advertise in other modes. This field steps to 10Base-T, 10Base-TFD (full
duplex), 100Base-TX, and 100Base-TXFD (full duplex). To set the
advertised ability, proceed as follows:
1. Use the arrow keys to highlight the Desired Oper. Mode field.
2. Use the SPACE bar to select the desired mode.
3. Use the LEFT-ARROW key to move back to the Advertised Ability
selection and use the SPACE bar to select the next mode to enable or
disable.
Local Management Supplement 1-37

Chapter 1: Changes to Local Management Screens
4. Use the RIGHT-ARROW key to move across to the
Enabled/Disabled field to the right of the selection.
5. Use the SPACE bar to select Enabled or Disabled. Press ENTER.
Continue this process until you have completed enabling or disabling
the advertised modes.
6. Use the arrow keys to highlight the SAVE command. Press ENTER.
The message “SAVED OK” displays and Local Management saves
the changes to memory.
1.14 PORT REDIRECT CONFIGURATION/REDIRECT
CONFIGURATION MENU SCREEN
The Redirect Configuration Menu screen (Figure 1-15) provides access to
the Port Redirect Configuration and VLAN Redirect Configuration
screens. Any combination, up to 128, of port and/or VLAN redirect
instances can be configured.
To access the Redirect Configuration Menu screen from the Port
Configuration Menu screen, use the arrow keys to highlight the PORT
REDIRECT CONFIGURATION menu item and press ENTER. The
Redirect Configuration Menu screen displays.
PORT REDIRECT CONFIGURATION
VLAN REDIRECT CONFIGURATION
EXIT
RETURN
Figure 1-15 Redirect Configuration Menu Screen
1-38 Local Management Supplement
2971_94

Port Redirect Configuration Screen
The following defines each selectable item of the Redirect Configuration
Menu screen:
PORT REDIRECT CONFIGURATION
The Port Redirect Configuration screen is used to redirect traffic from a
source switch port to a destination switch port. For details, refer to
Section 1.15.
VLAN REDIRECT CONFIGURATION
The VLAN Redirect Configuration screen is used to configure the module
to direct traffic from a VLAN to a particular switch port. For details, refer
to Section 1.16.
1.15 PORT REDIRECT CONFIGURATION SCREEN
The Port Redirect Configuration screen, Figure 1-16, enables the user to
redirect frames from one source port to one destination port on the
module. Frames received on the source port can be redirected and
transmitted in the frame format in which they are received (normal), or
they can be redirected with a VLAN Tag (TAGGED) or without a VLAN
Tag (UNTAGGED). Also, any errored frames received can be either
dropped or forwarded to the destination port. For example, port 1 can be
set as the source port with port 2 as the destination port. Frames from port
1 are then automatically redirected to port 2 according to the configured
frame format, and frames with errors can be either forwarded or dropped
according to the screen settings.
If an optional ATM interface is installed, up to 128 ports may be
NOTE
set to redirect frames. This includes ATM Port Virtual Channels
(PVCs).
The port redirect function is very useful for troubleshooting purposes, as
it allows traffic to be sent to a particular port where, with the use of an
analyzer or RMON probe, all current traffic from the source port can be
examined.
Although all traffic from the source port (including, if desired,
NOTE
Local Management Supplement 1-39
errored frames) is sent to the destination port, normal s witching
is still performed for all frames on the source port.

Chapter 1: Changes to Local Management Screens
To access the Port Redirect Configuration screen from the Redirect
Configuration Menu screen (shown in Figure 1-15), use the arro w k e ys to
highlight the PORT REDIRECT CONFIGURATION menu item and
press ENTER. The Port Redirect Configuration screen displays.
Source Port
-------------------- ---------------------- -------------------- 1
3
6
--
--
--
--
--
Source Port [1]
Destination Port [1]
SAVE
Destination Port
2
4
9
--
--
--
--
--
Frame Format [UNTAGGED]
Redirect Errors [OFF]
PREVIOUS
Frame Format
---------------------
NORMAL
TAGGED
UNTAGGED
--
--
--
--
--
NEXT
Redirect Errors
ON
ON
OFF
--
--
--
--
--
Status [ADD]
RETURN
EXIT
RETURN
2971-22
Figure 1-16 Port Redirect Configuration Screen
The following definitions briefly explain each field of the Port Redirect
Configuration screen:
Source Port (Read-Only)
Shows which ports are currently set as source ports.
Destination Port (Read-Only)
Shows which ports are currently set as destination ports.
Only one destination port may be assigned to a source port.
NOTE
Frame Format (Read-Only)
Displays the current frame format setting: NORMAL, TAGGED or
UNTAGGED The default is NORMAL.
• NORMAL – Frames are redirected in the format that they were
received or transmitted on the source port.
1-40 Local Management Supplement

Port Redirect Configuration Screen
• TAGGED – Frames are transmitted on the destination port with a
VLAN tag inserted according to the frame classification.
• UNT A GGED – Frames are transmitted on the destination port without
a VLAN tag regardless of the format of the received frame.
Redirect Errors (Read-Only)
Displays whether the corresponding source ports are configured ON to
send errored frames to the destination ports, or OFF to drop all errored
frames and only forward valid frames to the destination ports. All
redirected error frames display in the way they were received or
transmitted on the source port, regardless of the frame format setting.
Source Port [n] (Selectable)
Used to select the port [n] that is to be changed to a source port. If a port
is currently being redirected, it will not display as a selectable port. For
details, refer to Section 1.15.1.
Destination Port [n] (Selectable)
Used to select the port [n] that is to be changed to a destination port. If a
port is currently being redirected, it will not display as a selectable port.
For details, refer to Section 1.15.1.
Frame Format (Selectable)
Used to select the frame format for the transmission of redirected frames
on the destination port. NORMAL, TAGGED, or UNTAGGED may be
selected. Refer to the previously described read-only Frame Format field
for details about each format. The default setting is NORMAL.
Redirect Errors (Toggle)
Used to set each source port to either ON, to send errored frames to its
destination port, or OFF to drop errored frames, and send only valid
traffic to its destination port. The default setting is OFF.
Status (Toggle)
Used to add or delete source and destination ports selected in the Source
Port [n] and Destination Port [n] fields.
1.15.1 Changing Source and Destination Ports
To add or delete source port and destination port entries and set the Frame
Format and Redirect Errors functions, proceed as follows:
1. Use the arrow keys to highlight the Source Port field near the bottom
of the screen.
Local Management Supplement 1-41

Chapter 1: Changes to Local Management Screens
2. Press the SPACE bar or BACKSPACE one or more times to increment
or decrement the port number displayed in the brackets [n] until the
appropriate port number displays.
3. Use the arrow keys to highlight the Destination Port field near the
bottom of the screen.
4. Use the SPACE bar or BACKSPACE to step to the appropriate port
number for the destination port.
5. Use the arrow keys to highlight the Frame Format field near the
bottom of the screen.
6. Use the SPACE bar or BACKSPACE to step to the appropriate frame
format setting (NORMAL, TAGGED, or UNTAGGED) for the
selected Destination Port.
7. Use the arrow keys to highlight the Redirect Errors field near the
bottom of the screen.
8. Use the SPACE bar to select either the ON or OFF option and press
ENTER. ON forces the source port to forward errored frames to the
destination port(s). OFF forces the errored frames to be dropped
before forwarding traffic.
9. Use the arrow keys to highlight the Status field.
10. Use the SPACE bar to select either the ADD or DEL (delete) option.
Press ENTER. This adds or deletes the selections for the Source Port,
Destination Port, Frame Format, and Redirect Errors made in steps 1
through 8 and also updates the screen.
A destination port can only be assigned to one source port.
NOTE
1-42 Local Management Supplement

VLAN Redirect Configuration Screen
If more than one port is being redirected, repeat steps 1
TIP
through 10 for each additional setting. Then go to step 11 to
save all the new settings at once.
If an entry is to be changed, delete the entry, save the screen,
then recreate the entry with its new settings.
Any combination, up to 128, of port redirect instances
(configured on the Port Redirect Configuration screen) and/or
VLAN redirect instances (configured on the VLAN Redirect
Configuration screen) can be configured.
11. Use the arrow keys to highlight SAVE at the bottom of the screen.
Press ENTER. The message “SAVED OK” displays. This saves the
new settings and updates the Source Port and Destination Port
read-only fields.
1.16 VLAN REDIRECT CONFIGURATION SCREEN
The VLAN Redirect Configuration screen, Figure 1-17, enables the user
to select a source VLAN ID and a destination port on the module. For
example, VLAN ID 1 can be set as the source VLAN with port 2 as the
destination port. Traffic from VLAN 1 is then automatically redirected to
port 2 according to the Frame Format setting for that source VLAN. The
Frame Format setting determines the format in which the frames receiv ed
belonging to the source VLAN are redirected to the destination port. The
frames can be forwarded in the frame format as received, tagged, or
untagged.
The VLAN redirect function is very useful for troubleshooting purposes,
as it allows traffic associated with a particular VLAN to be sent to a
particular port where, with the use of an analyzer or RMON probe, all
current traffic from the source VLAN can be examined.
Although traffic associated with a particular VLAN is sent to the
NOTE
destination port, normal switching is still performed for all
frames on the source port.
The Redirect Errors function is not supported on this screen.
Local Management Supplement 1-43

Chapter 1: Changes to Local Management Screens
To access the VLAN Redirect Configuration screen from the Redirect
Configuration Menu screen (shown in Figure 1-15), use the arro w k e ys to
highlight the VLAN REDIRECT CONFIGURATION menu item and
press ENTER. The VLAN Redirect Configuration screen displays.
Source VLAN
-------------------- 1
3
6
--
--
--
--
--
Source VLAN [1]
Destination Port [1]
SAVE
Destination Port
---------------------- -------------------- 2
4
9
--
--
--
--
--
Frame Format [UNTAGGED]
Redirect Errors Unsupported
PREVIOUS
Frame Format
--------------------
RECEIVED
TAGGED
UNTAGGED
--
--
--
--
--
NEXT
Redirect Errors
UNSUPPORTED
UNSUPPORTED
UNSUPPORTED
--
--
--
--
--
Status [ADD]
RETURN
EXIT
RETURN
2971-95
Figure 1-17 VLAN Redirect Configuration Screen
The following definitions briefly explain each field of the VLAN Redirect
Configuration screen:
Source VLAN (Read-Only)
Shows the VLAN ID of the VLANs that are currently set as source
VLANs.
Destination Port (Read-Only)
Shows which ports are currently set as destination ports.
Multiple VLANs may be assigned to a destination port.
NOTE
1-44 Local Management Supplement

VLAN Redirect Configuration Screen
Frame Format (Read-Only)
Displays the current frame format setting: RECEIVED, TAGGED or
UNTAGGED. The default is RECEIVED.
• RECEIVED – Frames are redirected in the format that they were
received by the module.
• TAGGED – Frames are transmitted on the destination port with a
VLAN tag inserted according to the frame classification of the
receiving port.
• UNT A GGED – Frames are transmitted on the destination port without
a VLAN tag regardless of the format of the received frame.
Redirect Errors
Unsupported.
Source VLAN [n] (Modifiable)
Used to enter the VLAN ID of the VLAN that is to be changed to a source
VLAN. If a VLAN is currently being redirected, it will not display as a
selectable VLAN. For details, refer to Section 1.15.1.
Destination Port [n] (Selectable)
Used to select the port number that is to be changed to a destination port.
If a port is currently being redirected, it will not display as a selectable
port. For details, refer to Section 1.15.1.
Frame Format (Selectable)
Used to select the frame format for the transmission of redirected frames
on the destination port. RECEIVED, TAGGED, or UNTAGGED may be
selected. Refer to the previously described read-only Frame Format field
for details about each format. The default setting is RECEIVED.
Redirect Errors
Unsupported.
Status (Toggle)
Used to add or delete source and destination ports selected in the Source
VLAN [n] and Destination Port [n] fields.
Local Management Supplement 1-45

Chapter 1: Changes to Local Management Screens
1.16.1 Changing Source VLAN and Destination Ports
To add or delete source VLAN and destination port entries and set the
Frame Format, proceed as follows:
1. Use the arrow keys to highlight the Source VLAN field near the
bottom of the screen.
2. Type in the VLAN ID number of the source VLAN to be configured.
3. Use the arrow keys to highlight the Destination Port field near the
bottom of the screen.
4. Use the SPACE bar or BACKSPACE to step to the appropriate port
number for the destination port.
5. Use the arrow keys to highlight the Frame Format field near the
bottom of the screen.
6. Use the SPACE bar or BACKSPACE to step to the appropriate frame
format setting (RECEIVED, TAGGED, or UNTAGGED) for the
selected Destination Port.
7. Use the arrow keys to highlight the Status field.
8. Use the SPACE bar to select either the ADD or DEL (delete) option.
Press ENTER. This adds or deletes the selections for the Source
VLAN, Destination Port, and Frame Format made in steps 1
through 6 and also updates the screen.
Multiple VLANs may be assigned to a destination port.
NOTE
The Redirect Errors function is not supported on this screen.
If more than one VLAN is being redirected, repeat steps 1
TIP
through 8 for each additional setting. Then go to step 9 to save
all the new settings at once.
If an entry is to be changed, delete the entry, save the screen,
then recreate the entry with its new settings.
Any combination, up to 128, of port redirect instances
(configured on the Port Redirect Configuration screen) and/or
VLAN redirect instances (configured on the VLAN Redirect
Configuration screen) can be configured.
1-46 Local Management Supplement

Broadcast Suppression Configuration Screen
9. Use the arrow keys to highlight SAVE at the bottom of the screen.
Press ENTER. The message “SAVED OK” displays. This saves the
new settings and updates the Source Port and Destination Port
read-only fields.
1.17 BROADCAST SUPPRESSION CONFIGURATION
SCREEN
The Broadcast Suppression Configuration screen, Figure 1-18, enables
the user to set a desired limit of receive broadcast frames that are switched
out to the other ports.
Broadcast frames received above the threshold setting are
NOTE
dropped.
To access the Broadcast Suppression Configuration screen from the Port
Configuration Menu screen, use the arrow keys to highlight the
BROADCAST SUPPRESSION CONFIGURATION menu item and
press ENTER. The Broadcast Suppression Configuration screen displays.
PORT #
1
2
3
4
5
6
7
8
9
10
11
12
SAVE
Total RX
12345678910
12345678910
12345678910
12345678910
12345678910
12345678910
12345678910
12345678910
12345678910
12345678910
12345678910
12345678910
Peak Rate
150000
150000
150000
150000
150000
150000
150000
150000
150000
150000
150000
150000
Time Since Peak
999:23:59
999:23:59
999:23:59
999:23:59
999:23:59
999:23:59
999:23:59
999:23:59
999:23:59
999:23:59
999:23:59
999:23:59
Threshold
150000
150000
150000
150000
150000
150000
150000
150000
150000
150000
150000
150000
EXIT[13-24]
Reset Peak
[NO]
[NO]
[NO]
[NO]
[NO]
[NO]
[NO]
[NO]
[NO]
[NO]
[NO]
[NO]
RETURN
RETURN
Figure 1-18 Broadcast Suppression Configuration Screen
Local Management Supplement 1-47
2762_56

Chapter 1: Changes to Local Management Screens
The following explains each field of the Broadcast Suppression screen:
PORT # (Read-Only)
Identifies the number of the port.
Total RX (Read-Only)
Displays the total number of broadcast frames received.
Peak Rate (Read-Only)
Displays the highest number of broadcast frames received in a one-second
interval.
Time Since Peak (Read-Only)
Displays the time since peak rate was achieved.
Threshold (Modifiable)
Used to set the desired limit of receive broadcast frames that will be
forwarded per port per second. For details on how to set the threshold,
refer to Section 1.17.1.
Reset Peak (Toggle)
Used to reset the Peak Rate. Resetting the Peak Rate also resets the Time
Since Peak field. The Reset Peak field toggles between YES and NO. For
details, refer to Section 1.17.2.
1.17.1 Setting the Threshold
To set the Threshold, proceed as follows:
1. Use the arrow keys to highlight the Threshold field for the selected
port.
To access the next highest or lowest group of ports, use the
NOTE
2. Type in the numbers for the desired limit. Only enter values in
increments of ten (for example: 10, 20, 30, etc.).
arrow keys to highlight the port range [xx-xx], and press the
ENTER key.
3. Use the arrow keys to highlight the SAVE command at the bottom of
the screen.
4. Press ENTER. The message “SAVED OK” displays.
1-48 Local Management Supplement

Repeater Configuration Menu Screen
1.17.2 Resetting the Reset Peak
To reset the peak level of the broadcast traffic, proceed as follows:
1. Use the arrow keys to highlight the Reset Peak field for the selected
port.
2. Press the SPACE bar to select YES or NO.
3. Use the arrow keys to highlight the SAVE command at the bottom of
the screen.
4. Press ENTER. The message “SAVED OK” displays and the Time
Since Peak field is also reset.
1.18 REPEATER CONFIGURATION MENU SCREEN
Chapter 2 provides information that is specific to the 6E123-50 and
6E133-49 modules on the Repeater Configuration Menu screen and
security.
Chapter 3 provides information that is specific to the 6H123-50 and
6H133-37 modules on the Repeater Configuration Menu screen for
configuration and security.
1.19 802.1 CONFIGURATION MENU SCREEN
The 802.1 Configuration Menu screen, Figure 1-19, provides access to the
Switch Configuration, 802.1Q VLAN Configuration Menu, GARP
Operation Status, GMRP Group Registrations, and 802.1p Priority
Configuration Menu screens.
To access the 802.1 Configuration Menu screen from the Module
Configuration Menu screen, use the arrow keys to highlight the 802.1
CONFIGURATION MENU item and press ENTER. The 802.1
Configuration Menu screen displays.
When the SmartSwitch is operating in the 802.1D switching
NOTE
mode, SWITCH CONFIGURATION is the only menu item that
displays.
Local Management Supplement 1-49

Chapter 1: Changes to Local Management Screens
SWITCH CONFIGURATION
802.1Q VLAN CONFIGURATION MENU
GARP OPERATION STATUS
GMRP GROUP REGISTRATIONS
802.1p PRIORITY CONFIGURATION MENU
EXIT
Figure 1-19 802.1 Configuration Menu Screen
RETURN
2971_89
The following briefly describes each screen that is accessible from the
802.1 Configuration Menu screen.
SWITCH CONFIGURATION
Provides the basic setup options for customizing the operation of a switch
device in the network. For details, refer to Section 1.20.
802.1Q VLAN CONFIGURATION MENU
Displays only if the SmartSwitch has been configured to operate as an
IEEE 802.1Q switch. When selected, this menu item opens the 802.1Q
VLAN Configuration Menu screen.
The IGMP/VLAN Configuration screen has been added to the 802.1Q
VLAN Configuration Menu screen. The revised menu screen is shown in
this supplement along with a description of how to use the IGMP/VLAN
Configuration screen. Refer to Section 1.23 for details.
For details about the other VLAN Local Management screens and how to
use them to configure VLANs in the SmartSwitch, refer to the Cabletron
Systems 802.1Q VLAN User’s Guide.
1-50 Local Management Supplement

802.1 Configuration Menu Screen
GARP OPERATION STATUS
Used to enable/disable GVRP and GMRP on the switch and set each port
to operate as a GVRP- or GMRP-aware port so it can send/recei ve frames
from other GVRP- or GMRP-aware devices. GVRP and GMRP enables
the switch to dynamically create VLANs and Multicast Registration
across a switched network. For more information about GVRP and
GMRP, refer to Section 4.1.
For details about the GARP Operation Status screen, refer to Section 4.3.
GMRP GROUP REGISTRATIONS
Used to select individual ports or all of the ports and apply one of four
modes of operation according to, or regardless of, multicast address
registration. For more information about GVRP and GMRP, refer to
Section 4.1.
For details about the GMRP Group Registrations/GMRP Configuration
screen, refer to Section 4.4.
802.1p PRIORITY CONFIGURATION MENU
Used to select the Priority/Multicast Configuration Menu screen, which in
turn enables the selection of the Port Priority Configuration and Advanced
Port Priority Configuration screens. For details, refer to Section 1.24.
Local Management Supplement 1-51

Chapter 1: Changes to Local Management Screens
1.20 SWITCH CONFIGURATION SCREEN
The Switch Configuration screen, Figure 1-20, provides the basic setup
options to make a switch operational in your network.
To access the Switch Configuration screen from the 802.1 Configuration
Menu screen, use the arrow keys to highlight the SWITCH
CONFIGURATION menu item and press ENTER.
Switch Address: 00-00-1D-00-00-00
Number of Ports: 27
Port #
1
2
3
4
5
6
7
8
MAC Address
00-00-1D-00-00-00
00-00-1D-00-00-01
00-00-1D-00-00-02
00-00-1D-00-00-03
00-00-1D-00-00-04
00-00-1D-00-00-05
00-00-1D-00-00-06
00-00-1D-00-00-07
EXIT
[9-16]
Type of STA: [DEC]
Age Time (sec): 300
State
learning
listening
standby
learning
listening
standby
listening
listening
Status
[ENABLED]
[DISABLED]
[ENABLED]
[DISABLED]
[ENABLED]
[DISABLED]
[ENABLED]
[DISABLED]
RETURNSAVE
19601-18
Figure 1-20 Switch Configuration Screen
The following describes each field of the Switch Configuration screen:
Switch Address (Read-Only)
Displays the MAC address of the switch.
Number of Ports (Read-Only)
Displays the total number of switched ports on the SmartSwitch.
Type of STA (Toggle)
Allows the user to set the method that switches use to decide which
switch is the controlling (Root) switch when two or more switches exist in
parallel (Spanning T ree Algorithm). Valid entries include IEEE, DEC, and
None. To set the STA, refer to Section 1.20.1.
1-52 Local Management Supplement

Switch Configuration Screen
Age Time (Modifiable)
Allows the user to set the amount of time (in seconds) that the
SmartSwitch keeps an address in its switch table before discarding it. An
address is automatically discarded when a valid frame is not received
from that address within the time specified in the Age Time field. To
change the Age Time field from the default value of 300 seconds, refer to
Section 1.20.2.
Port # (Read-Only)
Lists each switched port on the module. If the number of ports is greater
than eight, then the additional ports are listed on subsequent screens.
MAC Address (Read-Only)
Displays the base hardware address assigned to each listed port.
State (Read-Only)
Disabled: Management disabled this interface. No traffic is received or
forwarded while the interface is disabled.
• Listening – The switch is not adding information to the Transparent
Database. The switch is monitoring BPDU traffic while preparing to
move from the learning to the forwarding state.
• Learning – The switch is learning the addresses on this interface. The
switch enters the learning state when the Transparent Database is
created (during start-up or after being deleted), or when the Spanning
Tree Algorithm detects a network topology change.
• Forwarding – The switch is operating and this interf ace is forw arding
traffic.
• Standby – This interface will not forward an y traffic through the switch
because a loop condition has been detected by the STA.
Status (Toggle)
Allows the user to disable or enable a port by setting the status of the
listed interface to either ENABLED or DISABLED. To set the port status,
refer to Section 1.20.3.
Local Management Supplement 1-53

Chapter 1: Changes to Local Management Screens
[1-8], [9-16], [17-24], [25-32], [33-40], or [41-48] (Navigation Key)
When the Switch Configuration screen displays, the current screen
settings are displayed for the first 8 ports. This field is used to step to
another screen for the same type of information for ports 9 through 16, 17
through 24, 25 through 32, 33 through 40, and 41 through 48, if available.
The number of ports available is dependent on the SmartSwitch model. To
navigate to the next screen, highlight the
[xx-xx] field and press ENTER.
The user can change the field settings while in any of the selected screens.
1.20.1 Setting the STA
The Spanning Tree Algorithm (STA) setting allows the user to set the
method that the switches use to decide which is the controller (Root)
switch when two or more switches are in parallel. The a vailable selections
are IEEE, DEC, and NONE.
To set the STA, proceed as follows:
1. Use the arrow keys to highlight the Type of STA field.
2. Use the SPACE bar to step to the appropriate setting (IEEE, DEC, or
NONE).
3. Use the arrow keys to highlight the SAVE command at the bottom of
the screen.
4. Press ENTER. The message “SAVED OK” displays.
1.20.2 Setting the Age Time Field
To set the Age Time, proceed as follows:
1. Use the arrow keys to highlight the Age Time field.
2. Type in the desired Age Time in increments of 10. The available Age
Time range is 10 to 1,000,000 seconds with the default value being
300 seconds.
3. Use the arrow keys to highlight the SAVE command at the bottom of
the screen.
4. Press ENTER. The message “SAVED OK” displays.
1-54 Local Management Supplement

Summary of VLAN Local Management
1.20.3 Setting (Enabling or Disabling) the Port Status
To set the status of an interface (port), proceed as follows:
1. Use the arrow keys to highlight the Status field of the port.
2. Use the SPACE bar to toggle to either ENABLED or DISABLED.
3. Use the arrow keys to highlight the SAVE command at the bottom of
the screen.
4. Press ENTER. The message “SAVED OK” displays.
1.21 SUMMARY OF VLAN LOCAL MANAGEMENT
The VLAN configuration process is an extension of normal Local
Management operations. A series of Local Management screens provides
access to the functions and commands necessary to add, change, or delete
VLANs and to assign ports to those VLANs. The IGMP/VLAN
Configuration screen has been added to the SmartSwitch to enable the
operation of IGMP on selected VLANs.
A switch supporting 802.1Q VLANs provides the VLAN Configuration
screens as a standard part of its Local Management hierarchy when the
switch is configured to operate in 802.1Q Mode. The hierarchy of the
Local Management screens pertaining to 802.1Q VLAN configuration is
shown back in Figure 1-2. For information concerning the other VLAN
screens, refer to the Cabletron Systems 802.1Q VLAN User’s Guide.
Local Management Supplement 1-55

Chapter 1: Changes to Local Management Screens
1.22 802.1Q VLAN CONFIGURATION MENU SCREEN
The 802.1Q VLAN Configuration Menu screen, Figure 1-21, provides
access to the new IGMP/VLAN Configuration screen.
NOTE
Refer to the Cabletron Systems
information on the 802.1Q VLAN Configuration menu screen
802.1Q VLAN User’s Guide
for
other than the new IGMP/VLAN CONFIGURATION menu item.
To access the 802.1Q VLAN Configuration Menu screen from the 802.1
Configuration Menu screen, use the arrow keys to highlight the 802.1Q
VLAN CONFIGURATION MENU item and press ENTER. The
802.1Q VLAN Configuration Menu screen displays.
The 802.1Q VLAN Configuration Menu screen is not available
NOTE
when the module is set to SecureFast mode.
Your SmartSwitch user’s guide provides instructions for setting
the operational mode.
MODULE/VLAN CONFIGURATION
PORT ASSIGNMENT CONFIGURATION
PORT FILTERING CONFIGURATION
VLAN FORWARDING CONFIGURATION
PROTOCOL VLAN CONFIGURATION
IGMP/VLAN CONFIGURATION
EXIT RETURN
Figure 1-21 802.1Q VLAN Configuration Menu Screen
3026_103
1-56 Local Management Supplement

IGMP/VLAN Configuration Screen
The 802.1Q VLAN Configuration Menu screen displays 6 menu items,
including the following new menu item:
IGMP/VLAN CONFIGURATION
Used to enable or disable IGMP (Internet Group Management Protocol)
on selected VLANs. For details, refer to Section 1.23.
1.23 IGMP/VLAN CONFIGURATION SCREEN
The IGMP/VLAN Configuration screen, Figure 1-22, allows the user to
enable or disable IGMP (Internet Group Management Protocol,
RFC 2236) on selected VLANs.
IGMP provides a solution for handling multicast streams in layer 2
switching devices. IGMP is for hosts on multi-access networks to inform
locally attached switches of their Multicast group membership
information. This is performed by hosts multicasting IGMP Host
Membership Reports. Multicast switches listen for these messages and
then pass them to routers. This allows distribution trees to be formed to
deliver multicast datagrams.
Information from the IGMP packets is used to send the multicast stream
only to the end stations that request it. IGMP is enabled or disabled by
VLAN, not port-by-port.
Certain versions of firmware will not allow the switch to be a
NOTE
querier. Please check your release notes for further
information. Refer to RFC 2236, Section 8, for more
information on IGMP, and also Appendix A.
The following multicast routing protocols are transparently supported and
are used only to detect the location of routers (see the Release Notes for
any changes or additions to this list):
• DVMRP (Distance Vector Multicast Routing Protocol, RFC 1075)
• PIM (Protocol Independent Multicast) version 1 and 2
• CBT (Core Based Trees)
• MOSPF (Multicast OSPF, RFC 1583)
Local Management Supplement 1-57

Chapter 1: Changes to Local Management Screens
T o access the IGMP/VLAN Configuration screen from the 802.1Q VLAN
Configuration Menu, use the arrow keys to highlight the IGMP/VLAN
CONFIGURATION menu item and press ENTER. The IGMP/VLAN
Configuration screen, Figure 1-22, displays.
Configuration Statistics
------------------- ----------- IGMP Version: [ 2 ] Querier Address: 0.0.0.0
Query Interval: 120 Querier Uptime: 0 D 0 H 0 M
Query Response Time: 10 Querier Expire Time: 24500 S
Interface Robustness: 2
Last Member Query Interval: 10
VLAN ID: [ 1]
IGMP State: [ DISABLED ]
Default for new VLANS: [ DISABLED ]
SAVE EXIT RETURN
3026_201
Figure 1-22 IGMP/VLAN Configuration Screen
The following briefly explains each IGMP/VLAN Configuration screen
field:
IGMP Ver sion (T oggle)
Displays the current configured IGMP version running on the VLAN
selected in the VLAN ID field. The default is version 2. The IGMP
Version field can be toggled to configure the switch in either version 1 or
2 to match the router configuration. For IGMP to function correctly, all
switches on a LAN must be configured to run the same version of IGMP.
Query Interval (Modifiable)
If the switch is the querier, the value in the Query Interval field indicates
how often IGMP Host-Query frames are transmitted on the VLAN
selected in the VLAN ID field. This value is also used in calculations for
other timers. The default value is 125 seconds. The range of possible
entries is 1 to 300 seconds. An entry outside of the range will cause the
error message “PERMISSIBLE RANGE: 1...300” to display in the Event
Message field.
1-58 Local Management Supplement

IGMP/VLAN Configuration Screen
Query Response Time (Modifiable)
The maximum query response time advertised in IGMPv2 general queries
on this VLAN. This v alue is also used in calculations for other timers. The
default value is 10 seconds. The range of possible entries is 1 to 300
seconds. The value entered in this field cannot be bigger than the Query
Interval.
Interface Robustness (Modifiable)
Allows tuning for the expected frame loss on a subnet. If a subnet is
expected to be high loss, the Robustness Variable may be increased.
IGMP is robust to (Robustness Variable-1) packet losses. This value is
also used in calculations for other timers. The default value is 2.
If the Interface Robustness is adjusted higher than the default
TIP
value, depending on the network, this may be an indication of
problems with the network that need to be resolved.
Last Member Query Interval (Modifiable)
Displays the Max Response Time inserted into Group-Specific Queries
sent in response to Leave Group messages, and is also the amount of time
between Group-Specific Query messages. This value may be tuned to
modify the leave latency of the network. A reduced value results in
reduced time to detect the loss of the last member of a group. The interval
is in tenths of seconds. This value is not used if the switch is not the
querier.
Querier Address (Read-Only)
Displays the address of the IGMP Querier on the IP subnet to which this
VLAN is attached.
Querier Uptime (Read-Only)
Displays the number of seconds that the current IGMP Querier has been
operational since the last change in Queriers.
Querier Expire Time (Read-Only)
The number of seconds remaining before the Other Querier Present T imer
expires. If the local system (current device displayed) is the querier, the
value of this object is zero.
Local Management Supplement 1-59

Chapter 1: Changes to Local Management Screens
VLAN ID (Selectable)
Displays the Identifying number for the VLANs available to be modified.
The information in the Configuration and Statistics fields applies only to
this VLAN ID number. The SPACE bar is used to toggle through all
available VLAN IDs.
IGMP State (Selectable)
Displays the current state of the VLAN indicated in the VLAN ID field,
which can be modified. Use the SPACE bar to toggle through the choices:
ENABLED, DISABLED, ENABLE ALL, DISABLE ALL. The
commands ENABLED and DISABLED will act only on the ID of the
VLAN that is in the VLAN ID field. The commands ENABLE ALL and
DISABLE ALL act on all VLANs available to the module.
Default for new VLANS (Toggle)
New VLANs can be set up by default to be either ENABLED or
DISABLED, by choosing the number of a specific VLAN.
1.23.1 Configuring VLANs for IGMP
To set up IGMP protocol for VLANs, proceed as follows:
1. Use the arrow keys to highlight the VLAN ID field, and use the
SPACE bar to toggle through the VLAN choices to find the specific
VLAN to be configured.
2. Use the arrow keys to highlight the IGMP State field.
3. Use the SPACE bar to select ENABLED, DISABLED,
ENABLE ALL or DISABLE ALL. If a specific VLAN was chosen
in Step 1, ENABLED and DISABLED are used to enable or disable
the VLAN chosen. ENABLE ALL and DISABLE ALL are used to
enable or disable all available VLANs at one time.
4. Use the arrow keys to highlight the Default for new VLANS field.
5. Use the SPACE bar to toggle the setting to either ENABLED or
DISABLED to set the default for new VLANs.
6. Use the arrow keys to highlight the IGMP Version field. Then use the
Space Bar to select the proper IGMP version for the VLAN shown in
the VLAN ID field.
1-60 Local Management Supplement

802.1p Priority Configuration/ Priority/Multicast Configuration Menu
When configuring IGMP, it is advisable to follow the IGMP
TIP
configuration rules in RFC 2236 concerning switches and
routers.
7. Use the arrow keys to highlight the remaining fields: Query Interval,
Query Response Time, Interface Robustness, and Last Member
Query Interval. Enter the desired numbers in each field.
8. Use the arrow keys to highlight the SAVE command and press the
ENTER key to save the information in all the fields that were changed.
The event message line will indicate “SAVED OK” and the screen can
now be exited. To set up a VLAN, see Section 1.6.
1.24 802.1p PRIORITY CONFIGURATION/
PRIORITY/MULTICAST CONFIGURATION MENU
SCREEN
The Priority/Multicast Configuration Menu screen, Figure 1-23, provides
access to the Port Priority Configuration, and Advanced Port Priority
Configuration screens. These screens are used for the following:
• Setting the default priority of frames received without a priority
setting.
• Mapping the frame priorities to transmit queues for each front panel
port. The number of ports is dependent on the SmartSwitch model.
The 802.1p Priority Configuration Menu item cannot be
NOTE
To access the Priority/Multicast Configuration Menu screen from the
802.1 Configuration Menu screen, use the arrow keys to highlight the
802.1p PRIORITY CONFIGURATION MENU item and press
ENTER. The Priority/Multicast Configuration Menu screen displays.
selected from the Port Priority Configuration screen when the
operational mode of the module is set to 802.1D SWITCHING.
Local Management Supplement 1-61

Chapter 1: Changes to Local Management Screens
PORT PRIORITY CONFIGURATION
ADVANCED PORT PRIORITY CONFIGURATION
EXIT
Figure 1-23 Priority/Multicast Configuration Menu Screen
RETURN
27623_86
The Priority/Multicast Configuration Menu screen displays the following
menu items:
PORT PRIORITY CONFIGURATION
Used to set the port default transmit priority (0 through 7) of each port for
frames that are received without priority information in their tag header.
For details, refer to Section 1.25.
ADVANCED PORT PRIORITY CONFIGURATION
Used to map priorities to transmit queues for each port. This screen is also
used to change priority on a port by port basis and to reprioritize frames
received in one priority so they can be transmitted at a different priority.
For details, refer to Section 1.26.
1-62 Local Management Supplement

Port Priority Configuration Screen
1.25 PORT PRIORITY CONFIGURATION SCREEN
The Port Priority Configuration screen, Figure 1-24, is used to set a
priority (0 through 7) on a port. A frame received without priority
information in its tag header is assigned a priority according to the
priority setting on the port. For example, if the priority of a port is set to 5,
all frames received through that port without priority indicated in their tag
header are classified as a priority 5.
A frame with priority information in its tag header will be placed in the
priority queue according to the priority indicated in its tag header.
The Port Priority Configuration screen does not display when
NOTE
the operational mode of the module is set to 802.1D
SWITCHING.
To access the Port Priority Configuration screen from the 802.1p Priority
Configuration screen, use the arrow keys to highlight the PORT
PRIORITY CONFIGURATION menu item and press ENTER. The
Port Priority Configuration screen displays.
Port #
1
2
3
4
5
6
7
8
9
10
11
12
SAVE EXIT
Priority
[0]
[2]
[2]
[3]
[3]
[4]
[4]
[0]
[5]
[6]
[6]
[7]
Set All Switch Port's Priority [3]
PREVIOUS NEXT
Port #
13
14
14
16
17
18
19
20
21
22
23
24
Priority
[4]
[4]
[4]
[4]
[4]
[6]
[6]
[6]
[1]
[1]
[1]
[1]
RETURN
Figure 1-24 Port Priority Configuration Screen
Local Management Supplement 1-63
2762-87

Chapter 1: Changes to Local Management Screens
The following describes each field of the Port Priority Configuration
screen:
Port # (Read-Only)
Lists each switched port on the module.
Priority (Selectable)
Used to select the transmit priority of the frames received without the
priority indicated in their tag header. A priority of 0 through 7 (with 0
being the lowest priority and 7 the highest) can be selected for each port.
All ports are set to the default value of “0” when the module is initialized.
To set the transmit priority for each port, refer to Section 1.25.1.
Set All Switch Port’s Priority (Selectable)
Used to set all ports to one default transmit priority. A value of 0 through
7 (with 0 being the lowest priority and 7 the highest) can be selected that
will apply to all ports. To set the default transmit priority for all ports,
refer to Section 1.25.2.
1.25.1 Setting Switch Port Priority Port-by-Port
To set the default port priority on a particular port, proceed as follows:
1. Use the arrow keys to highlight the Priority field for the particular
port.
2. Press the SPACE bar to step to the appropriate value: 0 through 7.
3. Use the arrow keys to highlight the SAVE command at the bottom of
the screen.
4. Press ENTER. The message “SAVED OK” displays and the setting is
saved.
1.25.2 Setting Switch Port Priority on All Ports
To set the port priority on all ports, proceed as follows:
1. Use the arrow keys to highlight the Set All Switch Port’s Priority
field.
2. Press the SPACE bar to select a priority from 0 through 7 (0 is the
lowest priority).
1-64 Local Management Supplement

Advanced Port Priority Configuration Screen
3. Use the arrow keys to highlight the SAVE command at the bottom of
the screen.
4. Press ENTER. The message “SAVED OK” displays and the setting is
saved.
1.26 ADVANCED PORT PRIORITY CONFIGURATION
SCREEN
The Advanced Port Priority Configuration screen, Figure 1-25, is used to
set the Priority/Queue Mapping and Priority Regeneration for a particular
port and also can be used to change the default port priority.
Priority/Queue Mapping is used to set the transmit (TX) queue (0 or 1,
with 0 being the lowest level TX queue) for each frame priority.
For example, if the TX queue is set to 1 for those frames with a priority 1,
then those frames would be transmitted before any frames with a priority
that has the TX queue set to 0.
Priority Regeneration is used to classify different types of traffic by
reprioritizing received frames to a different transmit priority. For
example, the frames associated with a particular type of traffic that ha v e a
received (RX) transmit priority, or a port default priority, of 3 could be
changed to have a transmit priority of 5.
The Advanced Port Priority Configuration screen does not
NOTE
display when the operational mode of the module is set to
802.1D SWITCHING.
To access the Advanced Port Priority Configuration screen from the
802.1p Priority Configuration screen, use the arrow keys to highlight the
ADVANCED PORT PRIORITY CONFIGURATION menu item and
press ENTER. The Advanced Port Priority Configuration screen displays.
Local Management Supplement 1-65

Chapter 1: Changes to Local Management Screens
Priority/Queue Mapping
-------------------------------
Priority
0
1
2
3
4
5
6
7
SAVE PREVIOUS EXITNEXT
TX Queue
[0]
[0]
[0]
[0]
[1]
[1]
[1]
[1]
Default Priority [7]
Priority Regeneration
----------------------------
RX Priority
0
1
2
3
4
5
6
7
Port #: xxx
TX Priority
[0]
[1]
[2]
[3]
[4]
[5]
[6]
[7]
RETURN
Figure 1-25 Advanced Port Priority Configuration Screen
The following describes each field of the Advanced Port Priority
Configuration screen:
3026_88
Priority (Read-Only)
Lists the eight priorities, 0 through 7.
TX Queue (Toggle)
Enables the frames with a certain priority to be mapped to transmit
according to one of two TX queues (0 or 1) with 0 being the lowest
transmit level. Refer to Table 1-2 for the TX Queue default values
according to frame priority.
Table 1-2 TX Queue Mapping Default Values
Priority 0 1 2 3 4 5 6 7
TX Queue
00001111
To set the TX Mapping Queues, refer to Section 1.26.1.
RX Priority (Read-Only)
Lists the eight priorities, 0 through 7.
1-66 Local Management Supplement

Advanced Port Priority Configuration Screen
TX Priority (Selectable)
Enables the frames with a certain RX priority to be changed to transmit
according to a different TX priority (0 through 7).
The following describes ho w frames of learned traffic is handled. When a
frame is received, it is checked to see if it has a priority. If it does, it is
forwarded to the appropriate output port. If it does not, the frame is
assigned the default RX priority and then forwarded to the appropriate
output port. At the output port, the RX priority of the frame is checked
against the TX Regeneration table and may be transmitted at a different
TX priority according to the table. For example, a frame with an RX
priority of 3 could be regenerated with a TX priority of 5. The new value
would also be inserted in the VLAN tag if the frame is tagged as
outbound.
The regenerated priority is used to determine the correct queue as defined
in the Priority/Queue Mapping. The default values for the TX Priority
settings are listed in Table 1-3 according to RX priority.
Table 1-3 TX Priority Regeneration Default Values
RX Priority 0 1 2 3 4 5 6 7
TX Priority
01234567
To set the TX Regeneration Priorities, refer to Section 1.26.2.
Default Priority (Selectable)
Used to set the default port priority (0 through 7) of the port selected in
the Port command. To set the default port priority, refer to Section 1.26.3.
Port # (Modifiable)
Used to enter the number of the port to be configured. Using an arrow ke y
or pressing ENTER after entering a port number, causes the screen to
refresh and show the current settings for that port.
Local Management Supplement 1-67

Chapter 1: Changes to Local Management Screens
1.26.1 Setting the TX Mapping Queues
To set the TX queue for frames with a particular priority, proceed as
follows:
1. Use the arrow keys to highlight the Port # field.
2. Type in the number of the port to which the TX queue setting will be
applied.
3. Use the arrow keys to highlight the Default Priority field. The screen
refreshes and displays the current settings of the port in the Port #
field.
4. Use the arrow keys to highlight the TX Queue field for the particular
frame priority.
5. Press the SPACE bar to step to the appropriate value, 0 or 1. The 0
selection is the lowest level TX queue.
6. If more than one TX queue is to be changed, repeat steps 4 and 5 until
all the appropriate TX queue settings are changed.
7. Use the arrow keys to highlight the SAVE command at the bottom of
the screen.
8. Press ENTER. The message “SAVED OK” displays and the setting is
saved.
1.26.2 Setting the TX Regeneration Priorities
To set the TX priority for frames with a particular RX priority, proceed as
follows:
1. Use the arrow keys to highlight the Port # field.
2. Type in the number of the port to which the TX priority setting will be
applied.
3. Use the arrow keys to highlight the Default Priority field at the
bottom of the screen. The screen refreshes and displays the current
settings of the port in the Port # field.
4. Use the arrow keys to highlight the TX Priority field for the particular
RX frame priority.
1-68 Local Management Supplement

Advanced Port Priority Configuration Screen
5. Press the SPACE bar to step to the appropriate value, 0 through 7. The
0 selection is the lowest level TX priority value.
6. If more than one TX priority is to be changed, repeat steps 4 and 5 until
all the appropriate TX priority settings are changed.
7. Use the arrow keys to highlight the SAVE command at the bottom of
the screen.
8. Press ENTER. The message “SAVED OK” displays and the setting is
saved.
1.26.3 Setting the Default Priority of a Port
To set the default port priority, proceed as follows:
1. Use the arrow keys to highlight the Port # field.
2. Type in the number of the port having the default priority changed.
3. Use the arrow keys to highlight the Default Priority field at the
bottom of the screen. The screen refreshes and displays the current
settings of the port in the Port # field.
4. Press the SPACE bar to step to the appropriate value, 0 through 7. The
0 selection is the lowest level priority.
5. Use the arrow keys to highlight the SAVE command at the bottom of
the screen.
6. Press ENTER. The message “SAVED OK” displays and the setting is
saved. This new setting will be reflected in the Port Priority
Configuration screen the next time it is displayed.
Local Management Supplement 1-69

Chapter 1: Changes to Local Management Screens
1.27 NETW ORK TOOLS
This section introduces the “cdp” command, which is a new addition to
the built-in commands listed in the SmartSwitch User’s Guide.
The Network Tools function resides on the platform firmware and allows
the user to access and manage network devices. Figure 1-26 shows the
updated Network Tools Help screen.
To access the Network Tools screen, access Local Management, then use
the arrow keys to highlight the NETWORK TOOLS menu item in the
Module Menu screen and press ENTER. The Network Tools screen
displays.
Type help at the prompt to list all the commands that are
TIP
available for the device in the current operational mode. A
command used incorrectly (wrong syntax) will prompt a display
of the correct usage. Use lower case characters when entering
commands in Network Tools.
Welcome to Network Tools
-> help
Commands Available to the User:
Built in Commands:
arp
netstat
show traceroute
soft_reset
atm_stp_state
SPECIAL:
done, quit, or exit - Exit from the Network Tools.
For help with a specific command, type 'help <command>'.
->
bridge
ping
telnet
cdp
defroute
reset
link_trap
stpStandby
Figure 1-26 Network Tools Help Screen
090829
1-70 Local Management Supplement

Network T ools
The Network Tools functions are performed using a series of commands.
Entering commands in Network Tools involves typing the command to be
executed at the Network Tools prompt, adding any desired or required
extensions, and pressing ENTER. For detailed information, see the
applicable Local Management User’s Guide.
1.27.1 Built-in Command
The built-in command listed in this section activ ates a ne w function on the
managed module being accessed through Network Tools.
cdp:
Syntax: cdp [enable/disable/status]
Description: Allows management of Cabletron Discovery Protocol
(CDP) on this module. This protocol is used by a network
device to discov er other neighboring network devices and
establish the topology of the network fabric. This protocol
can also be used by a network device to propagate specific
information to neighboring network devices. The user
may enable, disable, or see the current status of CDP.
Options: Not Applicable
Example:
-> cdp status
CDP is Enabled
-> cdp disable
-> cdp status
CDP is Disabled
-> cdp enable
-> cdp status
CDP is Enabled
cdp
Local Management Supplement 1-71


CHAPTER 2
LM SECURITY SCREENS FOR
6E123-50 AND 6E133-49
The information in this chapter replaces Local Management (LM)
information in previous manuals that is specific to the 6E123-50 and
6E133-49 modules on the Repeater Configuration Menu screen and the
Repeater Port Configuration screen.
2.1 REPEATER CONFIGURATION MENU SCREEN
The Repeater Configuration Menu screen, Figure 2-1, is used to access
the Repeater Level Security Configuration, or Port Level Security
Configuration screen.
To access the Repeater Configuration Menu screen from the Port
Configuration Menu screen, select the REPEATER
CONFIGURATION MENU item and press ENTER. The Repeater
Configuration Menu screen displays.
REPEATER LEVEL SECURITY CONFIGURATION
PORT LEVEL SECURITY CONFIGURATION
RETURNEXIT
27462_104e
Figure 2-1 Repeater Configuration Menu Screen
Local Management Supplement 2-1

Chapter 2: LM Security Screens for 6E123-50 and 6E133-49
The following introduces each screen that is accessible from the Repeater
Configuration Menu.
REPEATER LEVEL SECURITY CONFIGURATION
Used to set the security state for all ports on one connector
simultaneously. The ports can be set to receive all frames (NonSecure
state), lock on the source address of the next frame received
(LockOnNext) or lock on a specific address (LockedOnAddr). For details,
refer to Section 2.2.
PORT LEVEL SECURITY CONFIGURATION
Used to set the security for each individual port of a connector. For
details, refer to Section 2.3.
2.2 REPEATER LEVEL SECURITY CONFIGURATION
The Repeater Level Security Configuration screen, Figure 2-2, is used to
set the security state for all ports on a connector . A connector can be set to
receive all frames (NonSecure state), lock on the source address of the
next frame received (LockOnNext), or lock on a specific address
(LockedOnAddr). When either of the last two options are set, the switch
can be set to receive or not receive frames and to send or not send traps
when an intruder is detected.
T o access the Repeater Le vel Security Configuration screen, use the arro w
keys to highlight the REPEATER LEVEL SECURITY
CONFIGURATION menu item on the Repeater Configuration Menu
screen and press ENTER. The Repeater Level Security Configuration
screen displays.
2-2 Local Management Supplement

Repeater Level Security Configuration
Interface Security State Action On Intruder
1 [NonSecure]
2 [LockedOnAddr] [DisablePort] [SendTrap]
3 [LockOnNext] [DisablePort] [SendTrap]
4 [NonSecure]
SAVE EXIT RETURN
Figure 2-2 Repeater Level Security Configuration Screen
27463_112e
The following section defines the fields on the Repeater Level Security
Configuration screen.
Interface (Read-Only)
Displays the number of the available interface connectors.
Security State (Selectable)
Used to set all ports on an interface connector to the same security state.
PortMismatch displays for an interface connector when all the ports on
the interface connector are not set to the same state. The selectable states
are as follows:
• NonSecure – Allows the ports on the connector to receive all frames.
The source address of received frames is not e xamined and the frames
are processed in a non-secure state.
• LockedOnAddr – The Security State of all ports on the specified
interface connector are set to LockedOnAddr. This setting is for
convenience, so that all ports on an interface connector can be set to
LockedOnAddr at one time. Until the address is set at the port level,
the port will assume “00-00-00-00-00-00” as the locked on address for
a default. The port will lock do wn on the address once it is configured
in the Port Level Security Configuration screen.
Local Management Supplement 2-3

Chapter 2: LM Security Screens for 6E123-50 and 6E133-49
• LockOnNext – The next frame received by each port on the interface
connector is examined to learn its source address. After the source
address of a frame is learned on a port, it is now locked on that address
and only those frames received with that same source address are
allowed on that port. All frames received that do not have that same
source address will cause the device to ex ecute the actions selected in
the Action On Intruder field.
Action On Intruder (Toggle)
Used to select the actions taken for the selected security state. There are
two fields to select the actions. Both toggle to activate or deactivate the
action.
• DisablePort/NoDisable – DisablePort causes the switch to turn off the
port that had a security violation. With NoDisable set, the port is not
turned off.
• SendTrap/NoT rap – SendTrap causes the switch to send an SNMP trap
when a port detects a security violation. With NoTrap set, no SNMP
trap is sent.
2.2.1 Setting the Repeater Level Security
To set the security on all repeater ports of a connector at one time,
proceed as follows:
1. Use the arrow keys to highlight the Security State field for the
interface connector.
2. Use the SPACE bar to step to the appropriate security level
(NonSecure, LockedOnAddr, or LockOnNext).
3. If the security level chosen causes the DisablePort and SendTrap
fields to display under Action On Intruder, use the arrow keys to
highlight the DisablePort field. If the security level chosen does not
cause the fields to display under Action On Intruder, proceed to step 7.
4. To change the DisablePort setting to NoDisable, press the SPACE
bar to toggle the setting.
5. Use the arrow keys to highlight the SendTrap field.
6. To change the SendTrap setting to NoTrap, press the SPACE bar to
toggle the setting.
2-4 Local Management Supplement

Port Level Security Configuration Screen
7. To change the security on more than one connector, repeat step 1
through step 6 for each connector. Then proceed to step 8 to save all
settings at once.
8. Use the arrow keys to highlight the SAVE command.
9. Press ENTER. The message “SAVED OK” displays and all ports of
the connector are set to the selected operating mode.
If LockedOnAddr is chosen as the Security State, the individual
NOTE
port must be configured in the Port Level Security
Configuration screen. Refer to Section 2.3.
2.3 PORT LEVEL SECURITY CONFIGURATION
SCREEN
The Port Level Security Configuration screen, Figure 2-3, functions
similarly to the Repeater Level Security Configuration screen, e xcept that
it is used to set the security of each port of an interface connector.
To access the Port Level Security Configuration screen, use the arrow
keys to highlight the PORT LEVEL SECURITY CONFIGURATION
menu item on the Repeater Configuration Menu screen and press ENTER.
The Port Level Security Configuration screen displays.
Port Security State Action On Intruder Address
1 [LockedOnAddr]
2 [NonSecure] [00-00-00-00-00-00]
3 [LockedOnAddr] [DisablePort] [SendTrap] [xx-xx-xx-xx-xx-xx]
4 [LockOnNext] [NoDisable] [SendTrap]
5 [LockOnNext] [DisablePort] [NoTrap]
6 [NonSecure] [00-00-00-00-00-00]
7 [NonSecure] [00-00-00-00-00-00]
8 [LockOnNext] [NoDisable] [SendTrap]
9 [LockOnNext] [DisablePort] [NoTrap]
10 [LockedOnAddr] [DisablePort] [SendTrap] [xx-xx-xx-xx-xx-xx]
11 [NonSecure] [00-00-00-00-00-00]
12 [LockedOnAddr] [DisablePort] [SendTrap] [12-34-1d-56-78-90]
[DisablePort] [SendTrap] [xx-xx-xx-xx-xx-xx]
SAVE INTERFACE #: [1] EXIT RETURN
Figure 2-3 Port Level Security Configuration Screen
Local Management Supplement 2-5
27462_113e

Chapter 2: LM Security Screens for 6E123-50 and 6E133-49
The following section defines the fields on the Port Level Security
Configuration screen.
Port (Read-only)
Lists the repeater port on the ENET interface connector (ENET 1
through 4) selected in the INTERFACE # field. Refer to Table 2-1 for the
ENET/repeater port relationship on the device.
Table 2-1 ENET/Repeater Port Relationship
ENET 1 = Repeater ports 1 – 12 ENET 3 = Repeater ports 25 – 36
ENET 2 = Repeater ports 13 – 24 ENET 4 = Repeater ports 37 – 48
Security State (Selectable)
Used to select the security state for each port on the connector for frames
received. The states are as follows:
• NonSecure – Allows the ports on the connector to receive all frames.
The source address of received frames is not e xamined and the frames
are processed in a non secure state. The last source address detected is
displayed in the address column. This provides a quick and easy way
to see what address belongs to what port.
• LockOnNext – The next frame received by each port is examined to
learn its source address. After the source address of a frame is learned
on a port, it is now locked on that address and only those frames
received with that same source address are allowed on that port. All
frames received that do not have that same source address will cause
the device to execute the actions selected in the Action On Intruder
field.
• LockedOnAddr – The port locks do wn on the address that is currently
configured in the Port Level Security Configuration screen (if one is
entered) or on the source address of the currently received frame. If an
address is not configured or received, the device assumes the default
address of “00-00-00-00-00-00” as the locked on address as indicated
by the address fields in Figure 2-3. When a port is locked on an address
and a frame received violates the set security, the actions selected in
the Action On Intruder field are executed.
2-6 Local Management Supplement

Port Level Security Configuration Screen
Action On Intruder (Toggle)
Used to select the actions taken for the selected security state. There are
two fields to select the actions. Both toggle to activate or deactivate the
action.
• DisablePort/NoDisable – DisablePort causes the switch to turn off the
port that had a security violation. With NoDisable set, the port is not
turned off.
• SendTrap/NoT rap – SendTrap causes the switch to send an SNMP trap
when a port detects a security violation. With NoTrap set, no SNMP
trap is sent.
Address (Modifiable)
Used to enter the source MAC address for the LockedOnAddr security
state setting. Once a secure address is defined on a port, only those frames
received with that same source address are allo wed on that port. An y other
frame detected with a different address is considered as an intruder,
causing the actions selected in the Action On Intruder field to be executed.
When the security state setting is NonSecure, the field displays the source
address of the last frame.
INTERFACE # (Selectable)
Used to select the front panel interface connector (ENET 1 to ENET 4) to
which the port security settings will be applied.
2.3.1 Setting the Port Level Security
To set the security for each repeater port on a connector, proceed as
follows:
1. Use the arrow keys to highlight the INTERFACE # field.
2. Use the SPACE bar to step to the appropriate interface connector
number (ENET 1 to ENET 4).
3. Press ENTER to display the ports on the chosen interface connector.
4. Use the arrow keys to highlight the Security State field for the
interface connector.
5. Use the SPACE bar to step to the appropriate security level
(NonSecure, LockOnNext, or LockedOnAddr).
Local Management Supplement 2-7

Chapter 2: LM Security Screens for 6E123-50 and 6E133-49
6. If the security level chosen causes the DisablePort and SendTrap
fields to display under Action On Intruder, use the arrow keys to
highlight the DisablePort field. If the security level chosen does not
cause the fields to display under Action On Intruder, proceed to
step 12.
7. To change the DisablePort setting to NoDisable, press the SPACE
bar to toggle the setting.
8. Use the arrow keys to highlight the SendTrap field.
9. To change the setting to NoTrap, press the SPACE bar to toggle the
setting.
10. If the security state selected is LockedOnAddr, use the arrow keys to
highlight the Address field for the port. Otherwise go to step 12.
11. Enter the MAC address, using the numerical keys. It is not necessary
to separate the numbers with dashes when entering the address.
12. To change the security on more than one port, repeat step 4 through
step 11 for each port. Then proceed to step 13 to save all settings at
once.
13. Use the arrow keys to highlight the SAVE command.
14. Press ENTER. The message “SAVED OK” displays and all ports of
the connector are set to the selected operating mode.
15. To change the security on a different interface connector, repeat step 1
through step 14 as needed.
2-8 Local Management Supplement

CHAPTER 3
LM SECURITY SCREENS FOR
6H123-50 AND 6H133-37
The information in this chapter replaces Local Management (LM)
information in previous manuals that is specific to the 6H123-50 and
6H133-37 modules on the Repeater Configuration Menu and Repeater
Port Configuration screens.
3.1 REPEATER CONFIGURATION MENU SCREEN
The Repeater Configuration Menu screen, Figure 3-1, is used to access
the Repeater Port Configuration, Module Level Security Configuration,
and Port Level Security Configuration screen. To access the Repeater
Configuration Menu screen from the Port Configuration Menu screen,
select the REPEATER CONFIGURATION MENU item and press
ENTER. The Repeater Configuration Menu screen displays.
REPEATER PORT CONFIGURATION
MODULE LEVEL SECURITY CONFIGURATION
PORT LEVEL SECURITY CONFIGURATION
Figure 3-1 Repeater Configuration Menu Screen
RETURNEXIT
2745_104h
Local Management Supplement 3-1

Chapter 3: LM Security Screens for 6H123-50 and 6H133-37
The following introduces each screen that is accessible from the Repeater
Configuration Menu.
REPEATER PORT CONFIGURATION
Used to monitor the link status and current operating mode of each port
on the 10-Mbps or 100-Mbps network of a front panel connector , and also
to turn each port on or off. For details, refer to Section 3.2.
MODULE LEVEL SECURITY CONFIGURATION
Used to set the security state for all ports on one connector
simultaneously. All ports on a connector can be set to receive all frames
(NonSecure state), lock on the source address of the next frame received
(LockOnNext), or lock on a specific address (LockedOnAddr). For
details, refer to Section 3.3.
PORT LEVEL SECURITY CONFIGURATION
Used to set security for each port of a connector. For details, refer to
Section 3.4.
3.2 REPEATER PORT CONFIGURATION SCREEN
The Repeater Port Configuration screen, Figure 3-2, is used to monitor
the link status and current operating mode of each repeater port on a
10-Mbps or 100-Mbps network of a front panel connector. The screen is
also used to change the operating mode, and turn each repeater port on
(enable) or off (disable).
To access the Repeater Port Configuration screen, use the arrow keys to
highlight the REPEATER PORT CONFIGURATION menu item from
the Repeater Configuration Menu screen and press ENTER. The Repeater
Port Configuration screen displays.
3-2 Local Management Supplement
 Loading...