

Cabela's Gold Owner's Manual

METAL DETECTOR
OWNER’S MANUAL
If you do not have
prior experience with a
metal detector, we
strongly recommend that you:
1) Adjust the Sensitivity to a low setting
in the event of false signals. Always begin
use at a reduced sensitivity level; increase to
full sensitivity after you have become familiar
with the detector.
2) Do not use indoors. This detector is for outdoor use
only. Many household appliances emit electromagnetic energy,
which can interfere with the detector. If conducting an indoor
demonstration, turn the sensitivity down and keep the search coil
away from appliances such as computers, televisions and
microwave ovens. If your detector beeps erratically, turn off
appliances and lights.
Also keep the search coil away from objects containing metal, such
as floors and walls.
3) Use a 9-volt ALKALINE battery only.
Do not use Heavy Duty Batteries.

2
TABLE OF CONTENTS
Terminology . . . . . . . . . . . . . . . . . . . . . . . . . . . . . . . . . . . . . .3
Assembly
. . . . . . . . . . . . . . . . . . . . . . . . . . . . . . . . . . . . . . .4-5
Batteries
. . . . . . . . . . . . . . . . . . . . . . . . . . . . . . . . . . . . . . . . .6
Quick-Start Demo
. . . . . . . . . . . . . . . . . . . . . . . . . . . . . . . . . .8
Basic Of Metal Detecting . . . . . . . . . . . . . . . . . . . . . . . . . . .8-9
Ground Minerals . . . . . . . . . . . . . . . . . . . . . . . . . . . . . . .8
Trash . . . . . . . . . . . . . . . . . . . . . . . . . . . . . . . . . . . . . . . .8
Identifying Buried Objects . . . . . . . . . . . . . . . . . . . . . . .8
Size and Depth of Buried Objects . . . . . . . . . . . . . . . . . .9
EMI . . . . . . . . . . . . . . . . . . . . . . . . . . . . . . . . . . . . . . . . .9
How To Work The Controls
. . . . . . . . . . . . . . . . . . . . . . . . . .10
MENU Selections
Disc Level . . . . . . . . . . . . . . . . . . . . . . . . . . . . . . . . . . .11
Notch . . . . . . . . . . . . . . . . . . . . . . . . . . . . . . . . . . . . . .11
Sensitivity . . . . . . . . . . . . . . . . . . . . . . . . . . . . . . . . . . .12
Volume . . . . . . . . . . . . . . . . . . . . . . . . . . . . . . . . . . . . .12
Target Identification
. . . . . . . . . . . . . . . . . . . . . . . . . . . . . . .13
Depth And Target Display
. . . . . . . . . . . . . . . . . . . . . . . . . . .14
In The Field Techniques
. . . . . . . . . . . . . . . . . . . . . . . . . .15-17
Headphones
. . . . . . . . . . . . . . . . . . . . . . . . . . . . . . . . . . . . .18
Trouble Shooting
. . . . . . . . . . . . . . . . . . . . . . . . . . . . . . . . . .19
Code of Ethics
. . . . . . . . . . . . . . . . . . . . . . . . . . . . .Back Cover
Warranty
. . . . . . . . . . . . . . . . . . . . . . . . . . . . . . . . .Back Cover
SYMPTOM CAUSE SOLUTION
Detector chatters • Using detector • Use detector
or beeps erratically indoors outdoors only
Constant low tone •
or
constant repeating
tones
LCD does not lock • Multiple targets •
on to one target ID present at different angles
or detector emits • Highly oxidized • Only dig up
multiple tones target repeatable signals
No power, no • Dead battery • Replace battery
sounds
TROUBLE SHOOTING

TERMINOLOGYHEADPHONE JACK
The following terms are used throughout the manual, and are standard
terminology among detectorists.
ELIMINATION
Reference to a metal being "eliminated" means that the detector will
not emit a tone, nor light up an indicator, when a specified object
passes through the coil’s detection field.
DISCRIMINATION
When the detector emits different tones for different types of metals,
and when the detector "eliminates" certain metals, we refer to this
as the detector "discriminating" among different types of metals.
Discrimination is an important feature of professional metal
detectors. Discrimination allows the user to ignore trash and
otherwise undesirable objects.
RELIC
A relic is an object of interest by reason of its age or its association
with the past. Many relics are made of iron, but can also be made
of bronze or precious metals.
IRON
Iron is a common, low-grade metal that is an undesirable target in
certain metal detecting applications. Examples of undesirable iron
objects are old cans, pipes, bolts, and nails.
Sometimes, the desired target is made of iron. Property markers,
for instance, contain iron. Valuable relics can also be composed of
iron; cannon balls, old armaments, and parts of old structures and
vehicles can also be composed of iron.
FERROUS
Metals which are made of, or contain, iron.
PINPOINTING
Pinpointing is the process of finding the exact location of a buried
object. Long-buried metals can appear exactly like the surrounding
soil, and can therefore be very hard to isolate from the soil.
PULL-TABS
Discarded pull-tabs from beverage containers are the most bothersome
trash items for treasure hunters. They come in many different shapes
and sizes. Pull-tabs can be eliminated from detection, but some other
valuable objects can have a magnetic signature similar to pull-tabs, and
will also be eliminated when discriminating out pull-tabs.
GROUND BALANCE
Ground Balancing is the ability of the detector to ignore, or "see
through," the earth’s naturally occurring minerals, and only sound
a tone when a metal object is detected. This Detector incorporates
proprietary circuitry to eliminate false signals from severe ground
conditions
3
4
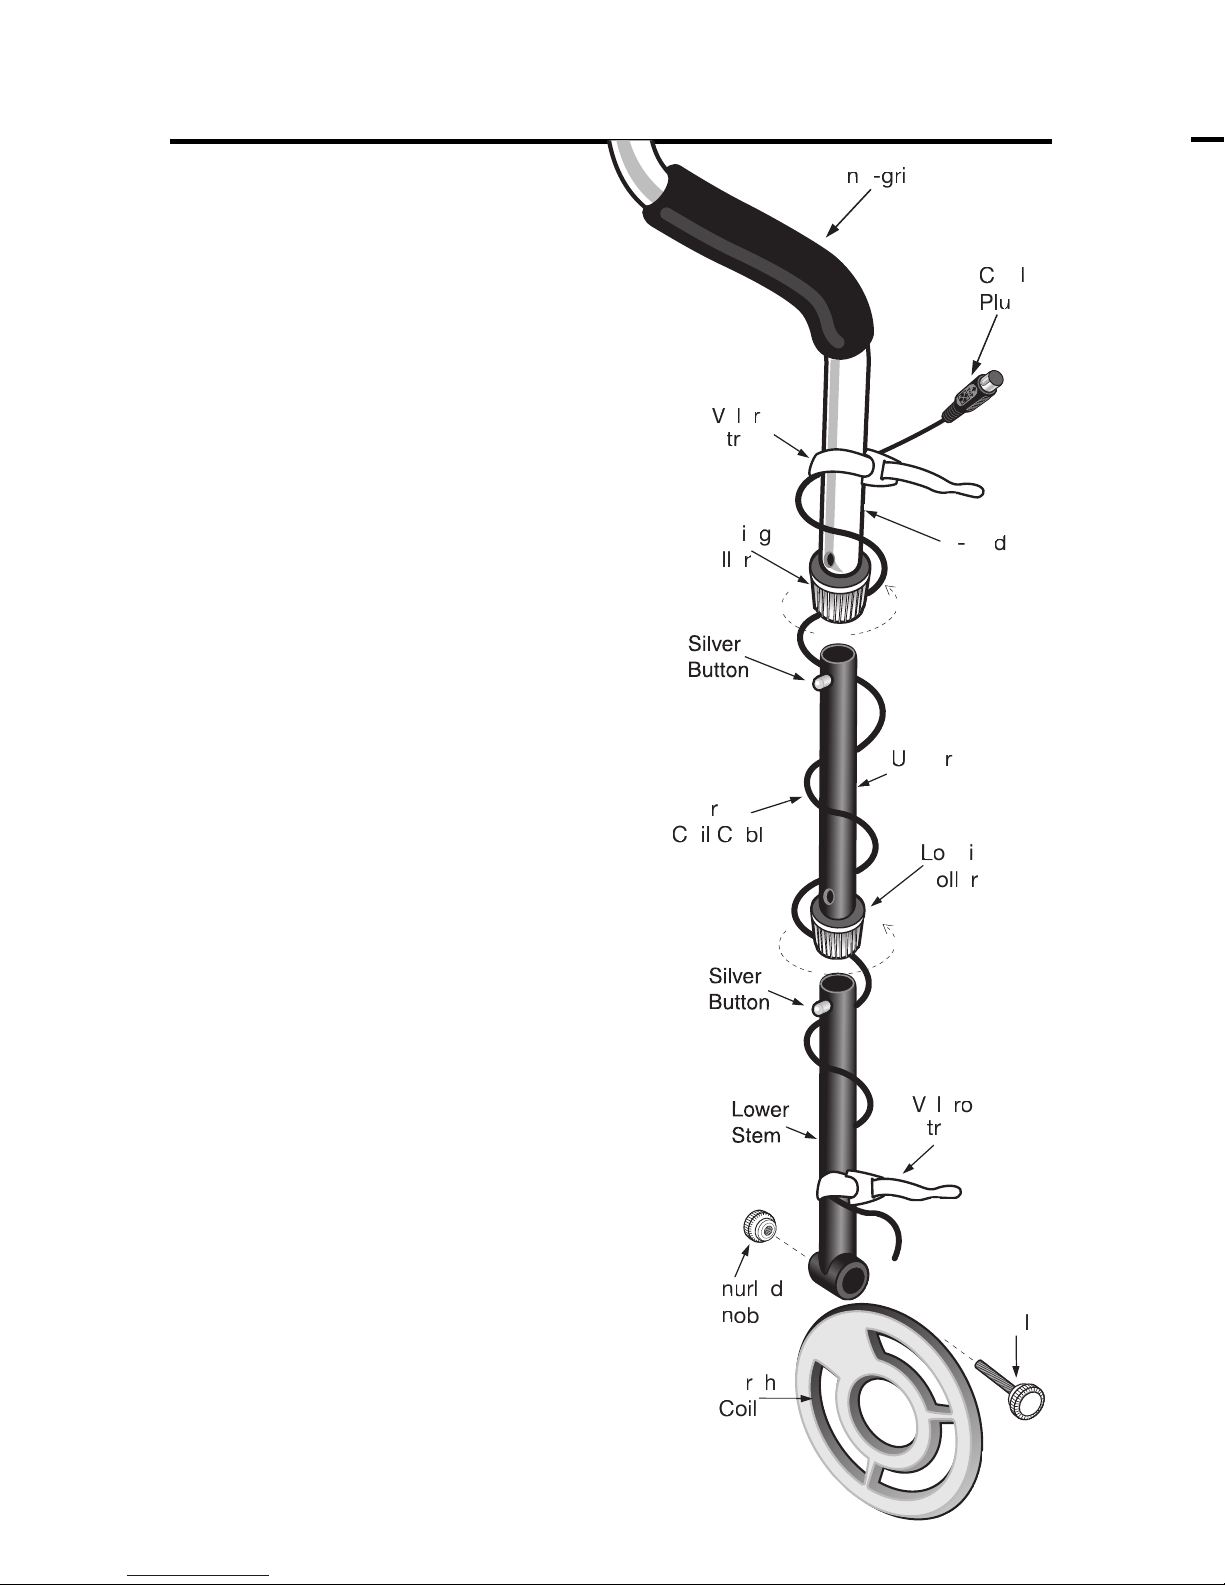
ASSEMBLY
Assembly is easy and
requires no tools.
●
1 Loosen both Locking Collars by
rotating 100% counterclockwise.
●
2 Insert the Upper Stem into the S-Rod and click
Silver Button into hole.
●
3 Position the Lower Stem with the
Silver Button toward the back. Using
the Bolt and Knurled Knob, attach the
Search Coil to the Lower Stem.
●
4 Press the button on the upper end of
the Lower Stem and slide the Lower
Stem in to the Upper Stem.
Adjust the stem to a length that
lets you maintain a comfortable
upright posture, with your arm relaxed
at your side, and the search coil
parallel to the ground in front of
you.
●
5 Wind the cable securely
around the stems.
●
6 Insert the plug into the matching
connector on the back of the detector
body. Be sure that the key-way and
pins line up correctly.
●
7 Tighten both Locking Collars.
●
8 Secure the cable with the 2 velcro straps
provided, one on the Lower Stem close to
the coil, one on the Upper Stem, close to
the housing.
Caution: Do not force the plug in. Excess
force will cause damage. To
disconnect the cable, pull on the
plug.
Do not pull on the cable.
Loc
kin
g
Col
lar
S-R
od
Vel
cro
Str
ap
Vel
cro
Str
ap
Knurled
Kno
b
Bolt
Ser
ch
Coi
l
Hand-grip
Sea
rch
Coil Cable
Cable
Plug
Loc
kin
g
Col
lar
Upp
er
Stem
angles, you may have
encountered multiple objects.
If you are new to the hobby,
you may want to dig all targets
at first. With practice in the
field, you will learn to better
discern the nature of buried
objects by the nature of the
detector’s response.
You may encounter some false
signals as you proceed. False
signals occur when the detector
beeps, but no metal target is
present. False signals can be
induced by electromagnetic
interference, oxidation, or
highly mineralized ground
soils. If the detector beeps
once, but does not repeat the
signal with several additional
sweeps over the same spot,
there is probably no target
present.
When searching very trashy
ground, it is best to scan small
areas with slow, short sweeps.
IN THE FIELD TECHNIQUES
5
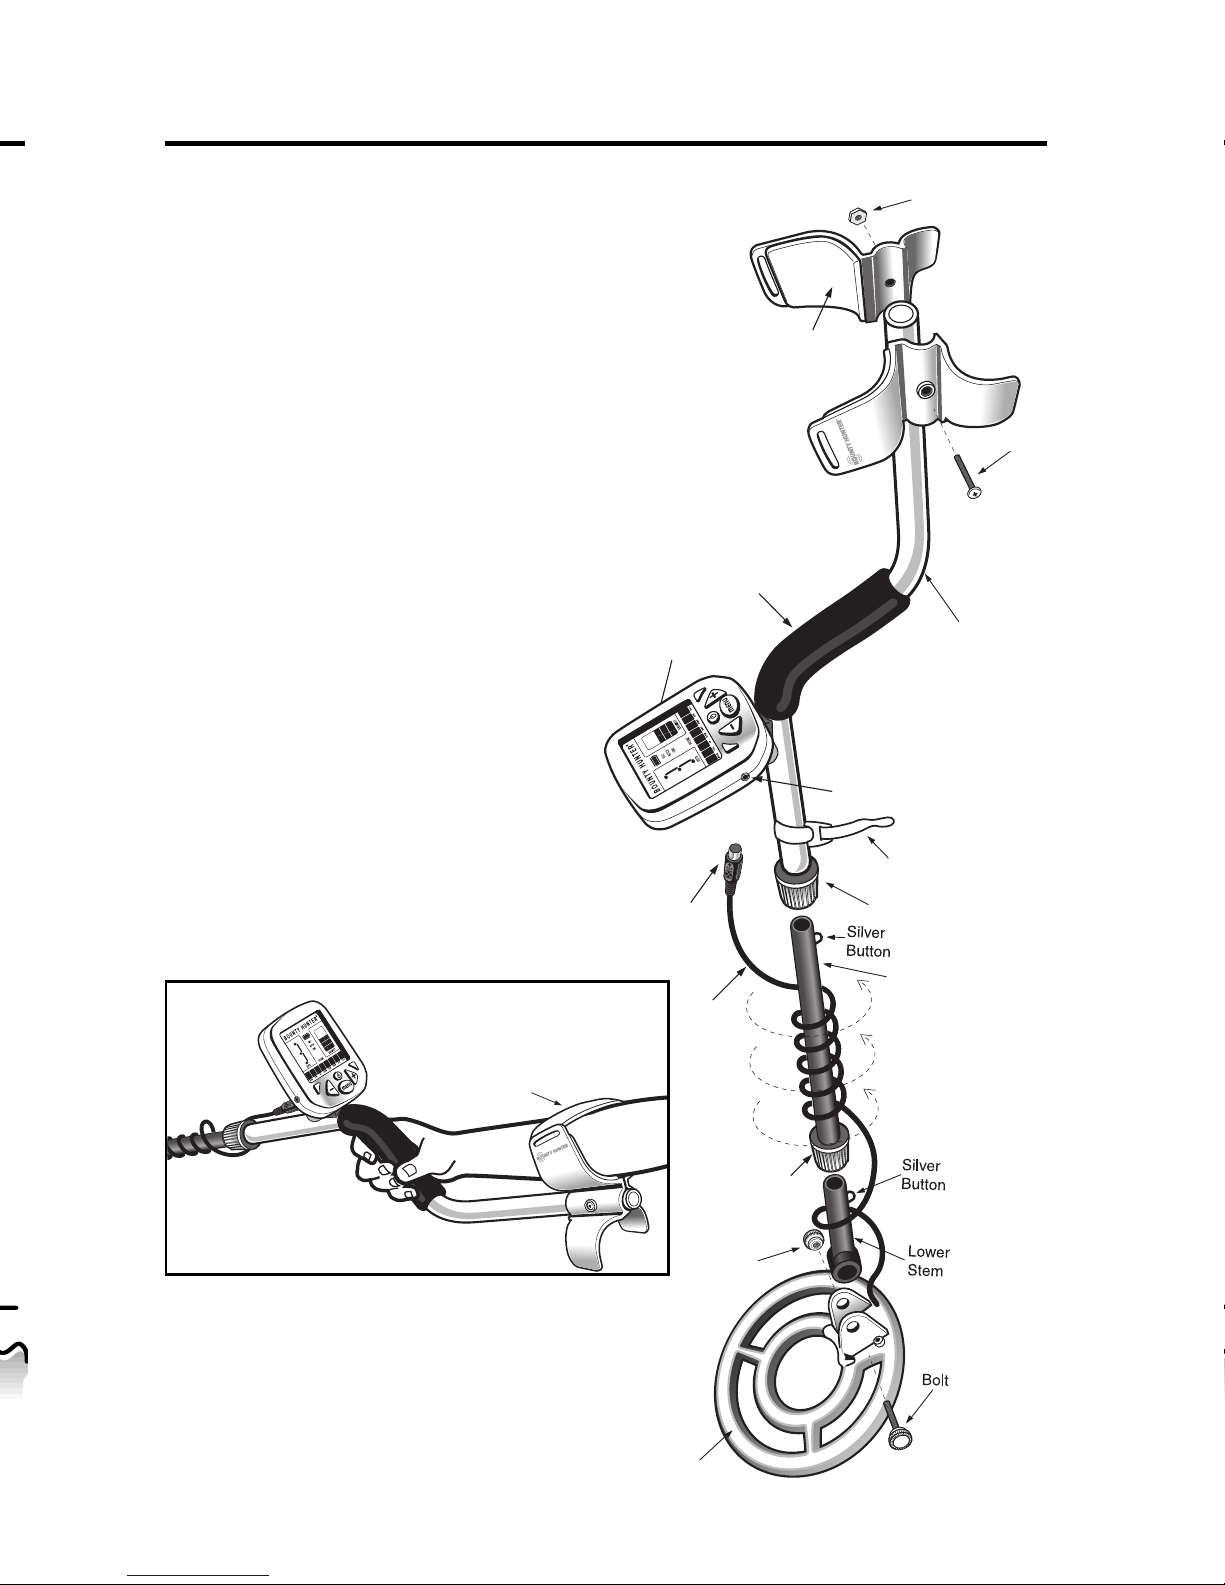
ASSEMBLY
Adjusting the Arm Rest
The arm rest may be moved
forward or backwards by
removing the single screw and
nut, and then repositioning the
2-piece arm rest. Users with
shorter arms may find the arm
rest more comfortable in the
forward position. In order to
move the arm rest backwards,
the plastic plug must be
removed from the aluminum
tube.
Arm Rest Strap (not included)
Some users prefer to use a strap
when swinging the detector
vigorously, in order to hold the
detector secure against the arm.
The strap may be purchased as
an optional accessory.
The detector can also be used
without the strap with no
compromise to detector balance
and stability under most
conditions.
Battery
Com
par
tme
nt
(back side)
Sea
rch
Coil
Knurled
Knob
Hand
-grip
Nut
Scre
w
Head
phone Jack
Search
Coil
Cable
Cable
Plug
S-Rod
armrest
Velcro
Strap
Lockin
g
Collar
Lock
in
g
Col
lar
Upp
er
Stem
Optional Arm Strap

6
The detector requires a single 9-volt ALKALINE battery (battery not included).
Do not use ordinary zinc carbon batteries.
Rechargeable batteries can also be used.
If you wish to use rechargeable batteries, we recommend using a
Nickel Metal Hydride rechargeable battery.
The battery compartment is located on the back side of the housing.
Slide the battery door to the side and remove it to expose the battery
compartment.
BATTERY LIFE
Expect 20 to 25 hours of life from a 9-volt alkaline battery.
Rechargeable batteries provide about 8 hours of usage per charge.
SPEAKER VOLUME AND BATTERY CHARGE
You may notice the speaker volume drop while one battery segment is
illuminated.
With one segment flashing, low speaker volume will be very apparent.
BATTERY INDICATOR
The 3-segment battery indicator has 4 stages of indication.
These indications are accurate for a 9-volt alkaline battery.
Segments Illuminated Battery Voltage
3 -segments more than 8.3 volts
2 -segments more than 7.0 volts
1 -segment more than 6.2 volts
1 -segment flashing less than 6.2 volts
After the battery indicator begins flashing, expect the detector to shut off
within 10 minutes.
A rechargeable battery will usually illuminate all segments throughout
most of its useful charge. But as soon as it drains to the 2-segment level,
it will then discharge very rapidly.
BATTERIES IN THE FIELD TECHNIQUES
When pinpointing a target, try drawing an “X”,
as illustrated, over where the tone is induced.
PINPOINTING
Accurate pinpointing takes practice
and is best accomplished by
“X-ing” the target area.
1. Once a buried target is indicated
by a good tone response,
continue sweeping the coil over
the target in a narrowing
side-to-side pattern.
2. Take visual note of the place on
the ground where the “beep”
sounds.
3. Stop the coil directly over this
spot on the ground.
4. Now move the coil straight
forward and straight back
towards you a couple of times.
5. Again make visual note of the
spot on the ground at which
the “beep” sounds.
6. If needed, “X” the target at
different angles to “zero in” on
the exact spot on the ground at
which the “beep” sounds.
 Loading...