

Page 1

USER GUIDE
WIRELESS USB TO VGA WITH INTEGRATED AUDIO KIT
Model: 81667
1
Page 2

TABLE OF CONTENTS
Introduction.................................................................................................................................................2
Features......................................................................................................................................................3
System Requirements.................................................................................................................................4
Package Contents.......................................................................................................................................5
Device Overview
Wireless USB Host Adapter................................................................................................................6
Wireless VGA with Integrated Audio Adapter.....................................................................................7
Software/Device Installation........................................................................................................................8
Using the Wireless USB to VGA with Integrated Audio Kit.......................................................................14
Frequently Asked Questions.....................................................................................................................24
Video Playback Tips..................................................................................................................................28
Technical Specifications............................................................................................................................29
C2G Warranty............................................................................................................................31
FCC...........................................................................................................................................................32
Important Safety Information.....................................................................................................................33
Appendix
Association with other devices.........................................................................................................34
Cable Association Procedure...........................................................................................................35
PIN Association Procedure..............................................................................................................37
PIN Change Procedure....................................................................................................................39
1
Page 3

INTRODUCTION
Thank you for purchasing the TruLink™ Wireless USB to VGA with Integrated Audio Kit. The TruLink
USB to VGA with Integrated Audio Kit includes everything you need to wirelessly stream video and audio
from your computer to a remote monitor, projector, or television. Utilising Ultra-Wide Band technology,
the USB to VGA with Integrated Audio Kit enables in-room wireless connectivity at distances up to 10
metres between the computer and the display equipment. This highly secure wireless connection is ideal
for classroom or conference room presentations or to display content from your laptop to your home
entertainment system. We recommend that you read this manual thoroughly and retain for future
reference.
2
Page 4

FEATURES
Video and audio support in a single device adapter, delivered wirelessly from a computer to an external
display Supports high resolution UXGA/WSXGA video and 3.5mm stereo audio
Works in both extended desktop and dual monitor screen modes
Supports native mode for playback of high resolution video
Up to six computers can share one wireless display and speaker set*
One computer can broadcast over six audio/video displays**
Video streaming is supported up to 720p (720p only available at resolution 1280x720 or lower)
In-room wireless connectivity up to 10 metres
Ultra-Wide Band operates in the frequency of 3.1GHz to 4.8GHz (WiMedia™ Band Group 1&3)
Certified Wireless™ USB 1.0 compliant
WiMedia 1.0 MAC & 1.1 PHY compliant
*Requires the purchase of additional USB Host Adapters for the additional computers
** Requires the purchase of additional VGA with Integrated Audio Device adapters for additional displays
3
Page 5

SYSTEM REQUIREMENTS
Microsoft® Windows® XP 32-bit with Service Pack 3 or higher; Microsoft® Vista® 32-bit/64-bit; or
Windows 7 32-bit/64-bit
Minimum Requirements (Office, Productivity, and Web applications)
Windows XP- Processor: 1.66GHz Atom or Celeron
Ram: 512MB
Windows Vista/
Windows 7- Overall WEI Score: 3.0 or better
Processor: 1.4GHz Core2Duo or better
Memory: 1GB
Video Card: Any GPU
Recommended Requirements (Full-Screen Video Playback)
Windows XP- Processor: 1.8GHz Core2Duo or better
RAM: 1GB
Windows Vista/
Windows 7- Overall WEI Score: 4.5 or better
Processor: 2.4GHz Core2Duo or better
Memory: 2GB
Video Card: Intel GMA X4500, ATI Radeon HD3 series, NVidia GeForce 9 series or
better
You must also have administrative privileges on your PC to install the software package
4
Page 6

PACKAGE CONTENTS
Wireless USB Host Adapter for your computer
Wireless VGA With Integrated Audio Adapter for your display
Two Dipole-Antennas
.9m USB A Male/Mini B Male Cable
.3m VGA Male/Male Cable
.9m 3.5mm Male /Male Cable
.9m 3.5mm Male to 2 RCA Male Cable
5V/2.5A Power Adapter
USB Extender with Cradle
Mounting Bracket
Two Self-Tapping Screws
Quick Start Guide
Driver CD
User Manual
5
Page 7
1
2
DEVICE OVERVIEW
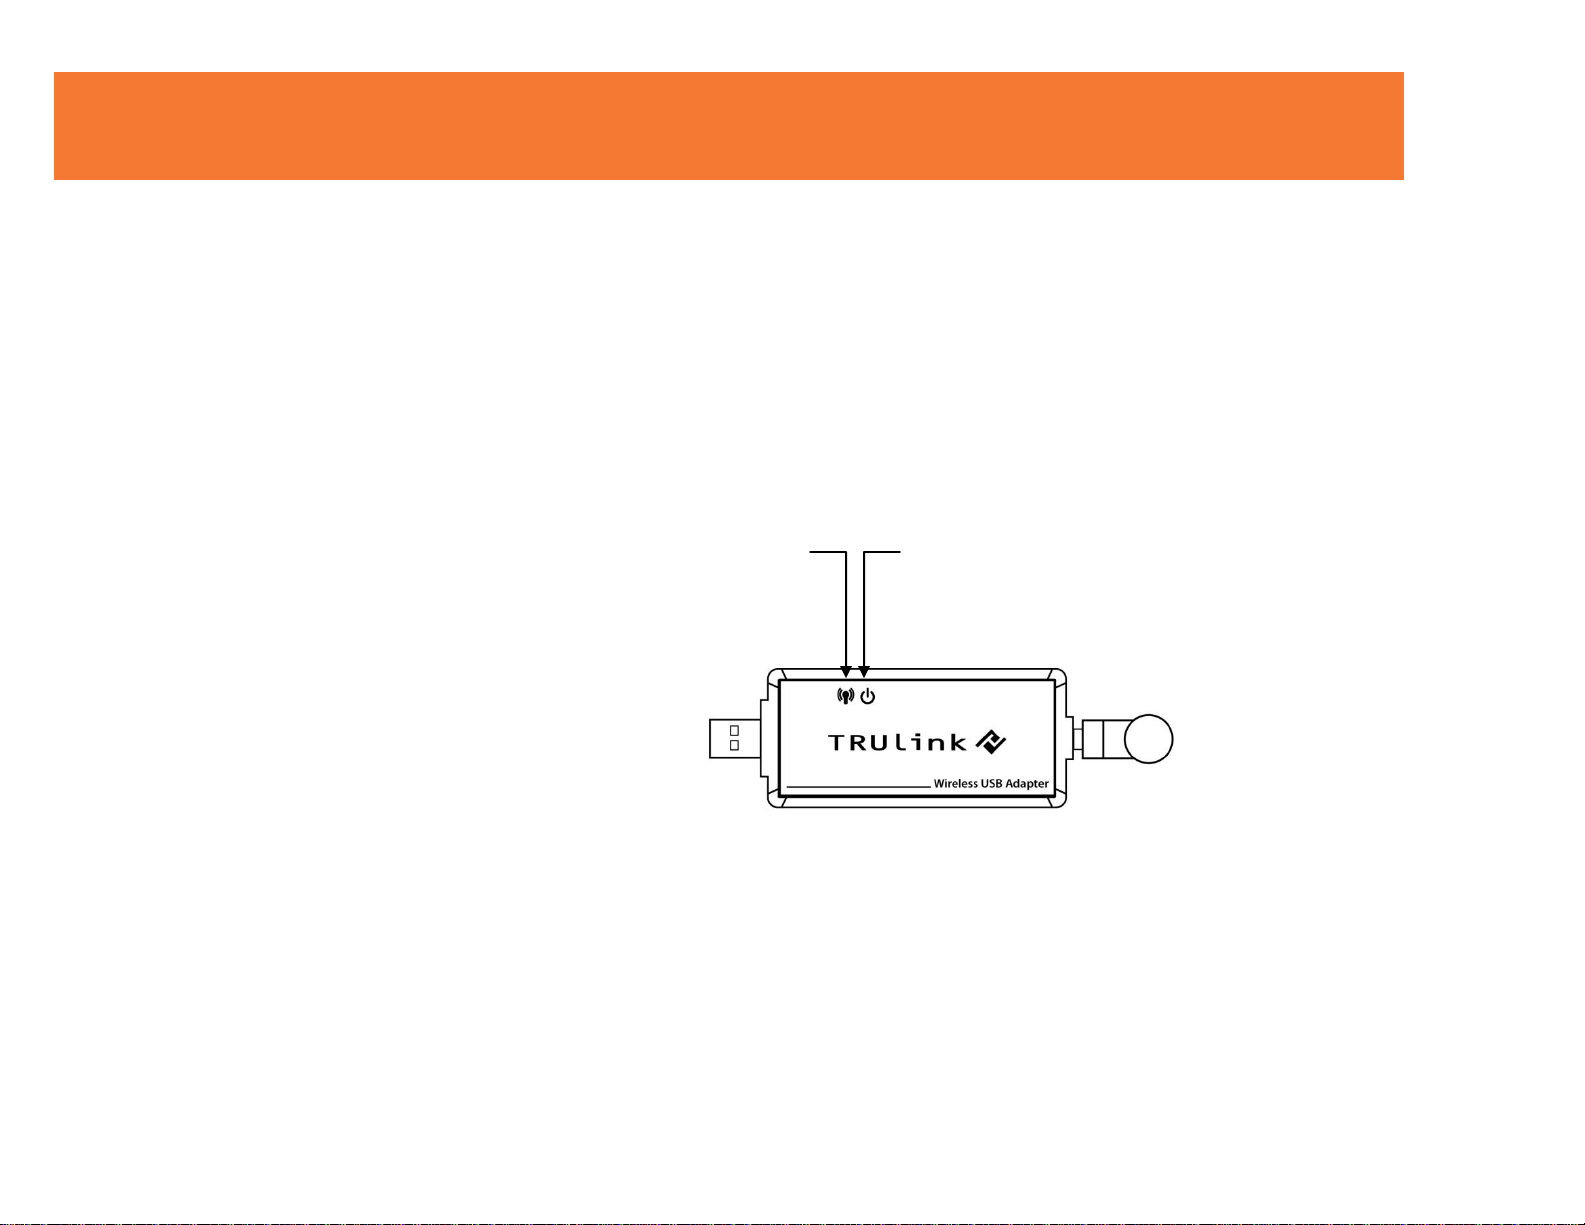
WIRELESS USB HOST ADAPTER
1. Link: Data Connection Indicator
LED is solid when transfer device is connected
LED blinks when data is being transferred
2. PWR: Power
LED is solid when powered by the PC
6
Page 8
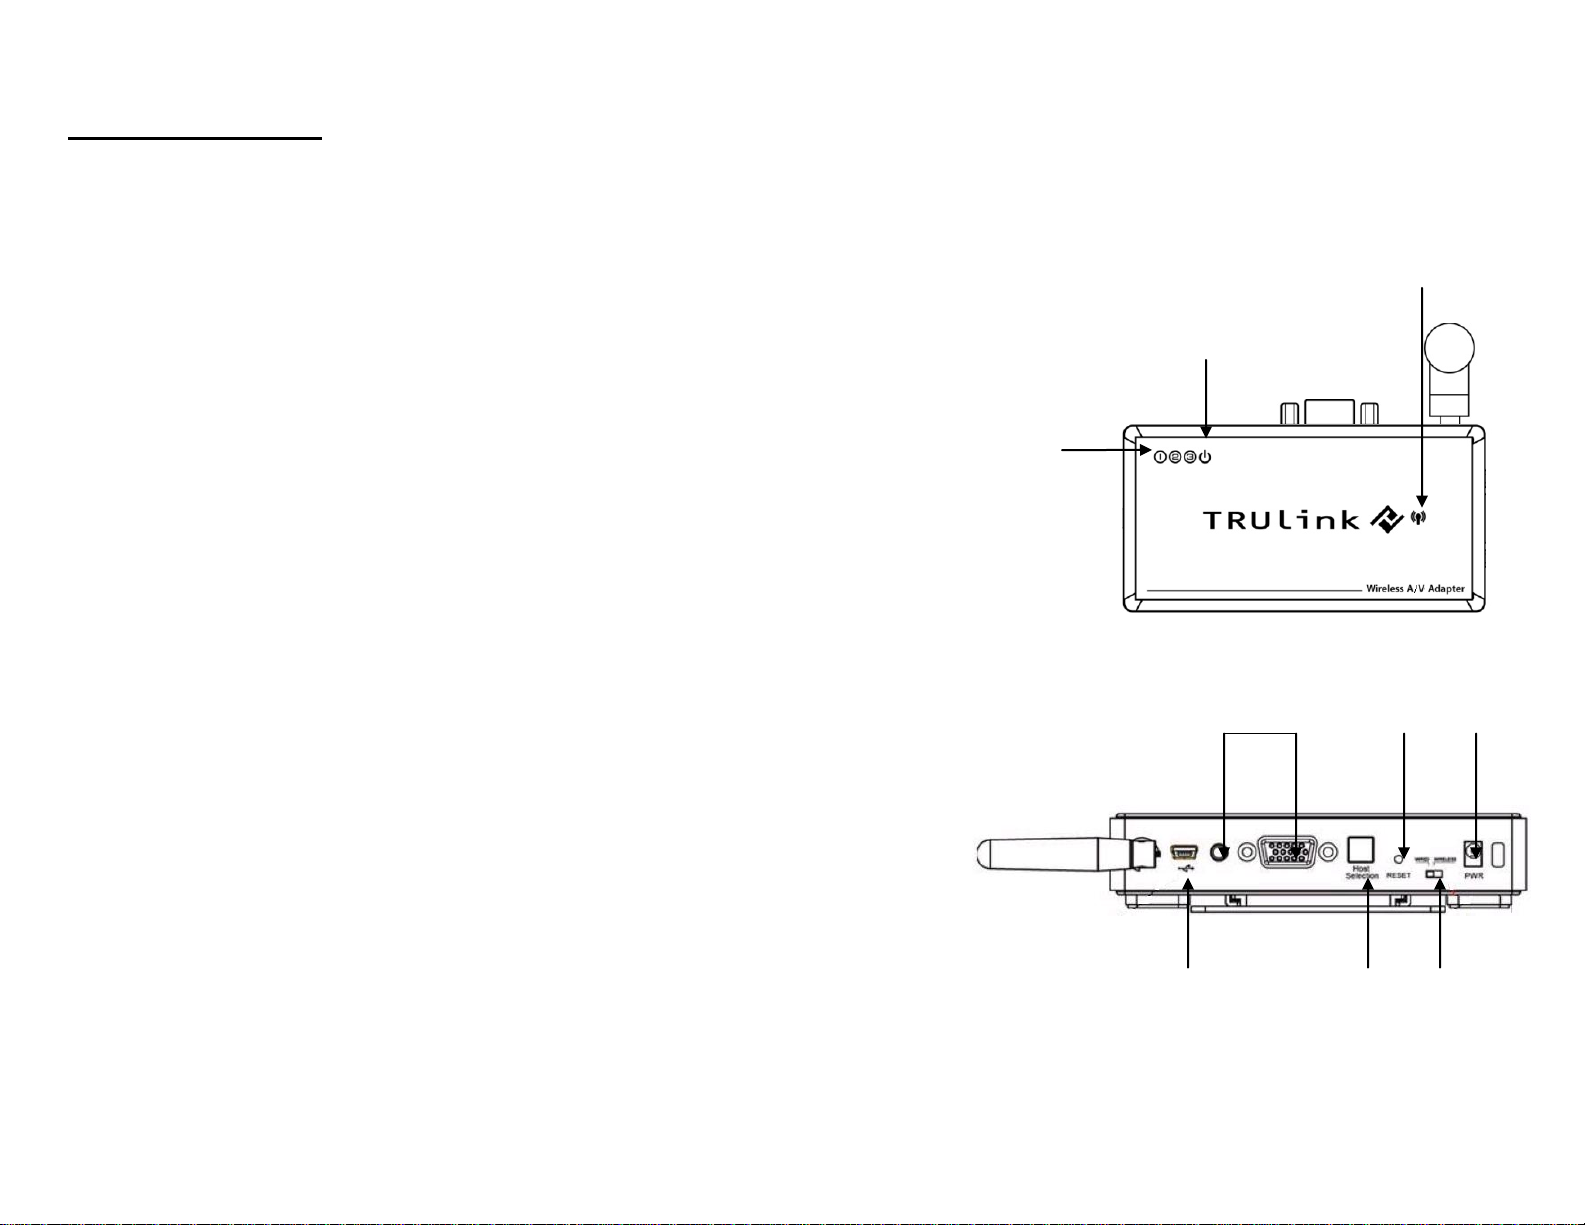
1. VGA: VGA Activity Indicator
LED is solid when display cable is connected.
LED is blinking when data is being transferred.
2. PWR: Power Indicator
LED is solid when power is applied.
3. 1-2-3: Status Indicator
Illuminated number/s indicates the wireless USB Host
Adapter that is currently synced with the Wireless VGA with
Integrated Audio Adapter.
4. PWR plug
Power adapter input
5. Wireless/Wired switch
Choose from wired or wireless mode by moving the switch.
6. Reset
Association history can be erased by pressing and holding
this button for 10 seconds.
7. Host Selection:
This button is used to select a different Wireless USB Host
Adapter
8. VGA/Audio Outputs
HD15 and 3.5mm output connections for connecting to your
video and audio source
9. USB input
In Wireless mode, this connector is used for cable
association.
In Wired mode, this connector is used for wired operation of
the Wireless VGA with Integrated Audio Adapter
3
4 5 6 7 8
9
WIRELESS VGA WITH INTEGRATED AUDIO ADAPTER
DEVICE OVERVIEW
1
2
7
Page 9

SOFTWARE/DEVICE INSTALLATION
IMPORTANT NOTE:
If installing on Windows XP, Service Pack 3 (SP3) is required. Verify that this has been
installed before installing the Wireless USB to VGA with Integrated Audio Kit software.
Before installing the software, make sure that the Wireless USB Host Adapter and
Wireless VGA with Integrated Audio Adapter are not connected to the computer. Also
make sure that the Wireless VGA with Integrated Audio Adapter is not powered.
STEP 1-INSTALLING THE SOFTWARE
Insert the CD provided and the software will run automatically. Please follow the instructions on the
InstallShield Wizard to proceed through the software installation.
8
Page 10
SOFTWARE/DEVICE INSTALLATION
STEP 2A – DEVICE INSTALLATION FOR THE WIRELESS VGA WITH INTEGRATED AUDIO ADAPTER
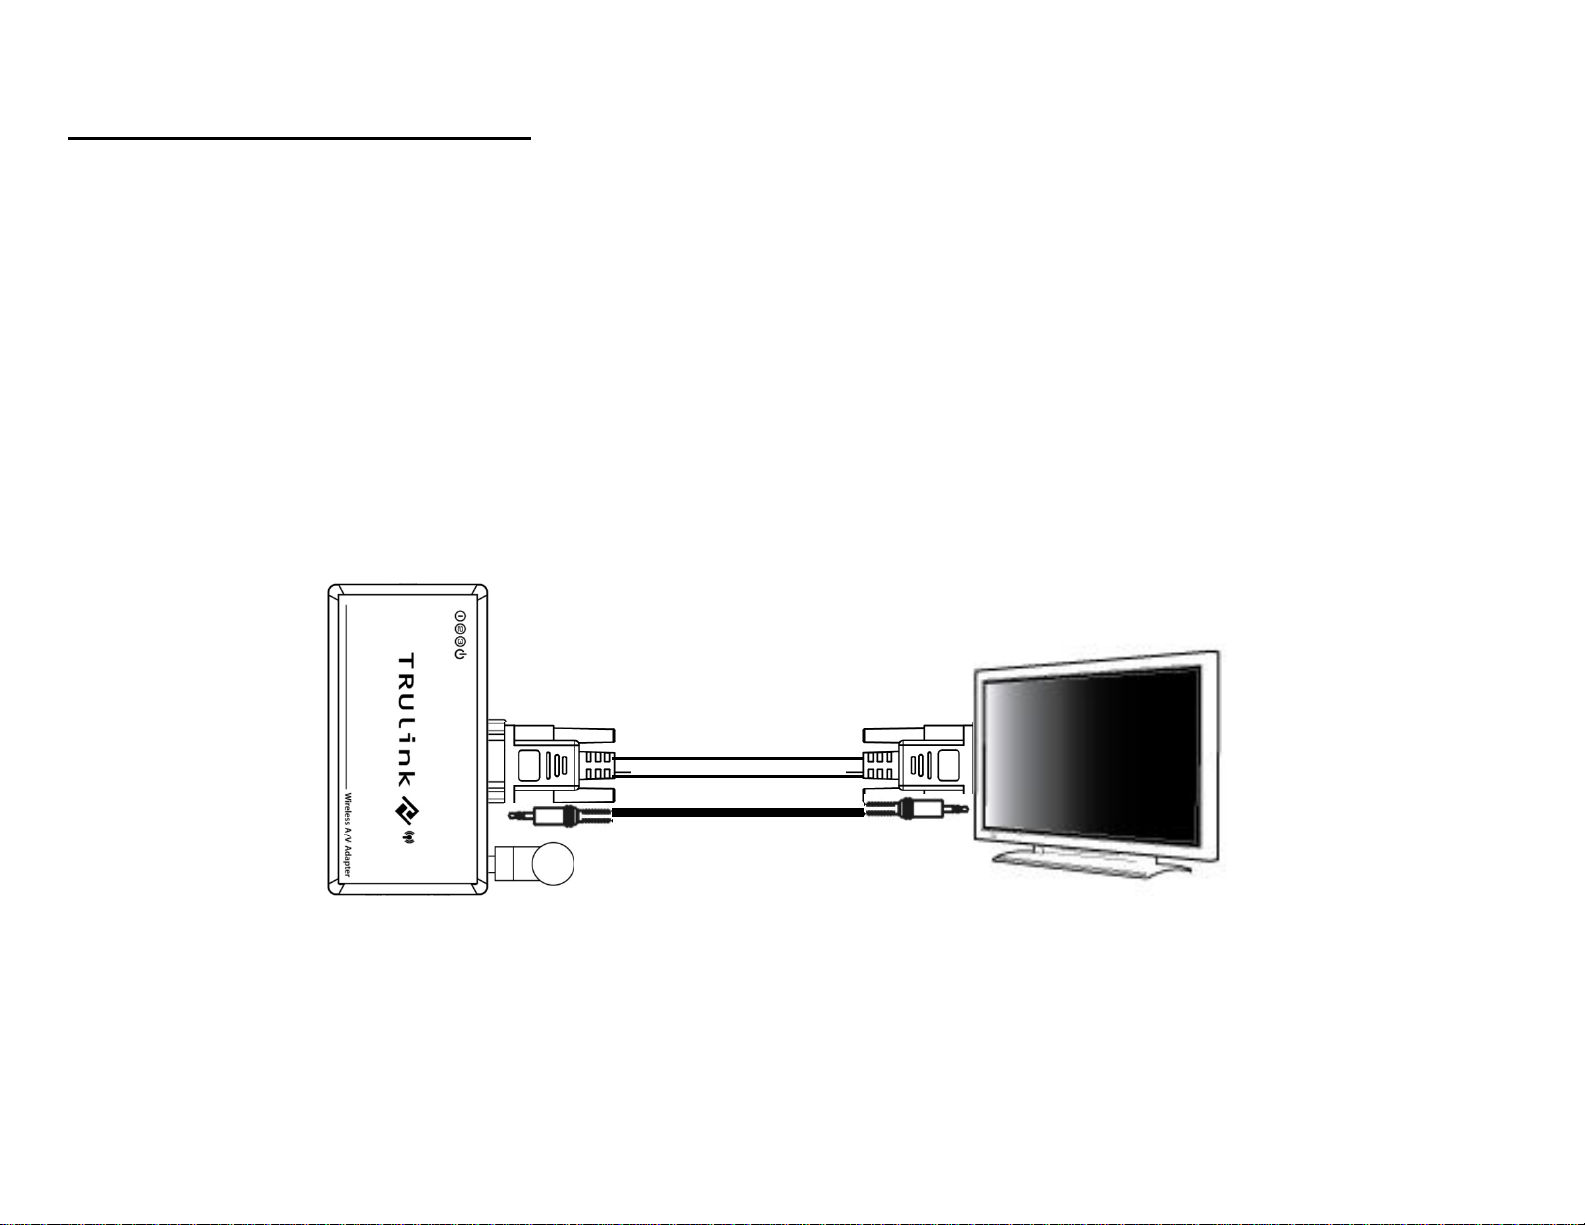
1. Connect one of the dipole antennas to the Wireless VGA with Integrated Audio Adapter.
2. Power on your display device (i.e. monitor, projector, television).
3. Using a VGA male to male cable, connect the Wireless VGA with Integrated Audio Adapter to your
display device.
4. With a 3.5mm cable or 3.5mm to L/R audio cable, connect the Wireless VGA with Integrated Audio
Adapter to your display device, audio device (A/V receiver) or PC speakers (equipped with a 3.5mm
cable attached).
5. Plug in the power adapter to the Wireless USB to VGA with Integrated Audio Kit.
9
Page 11
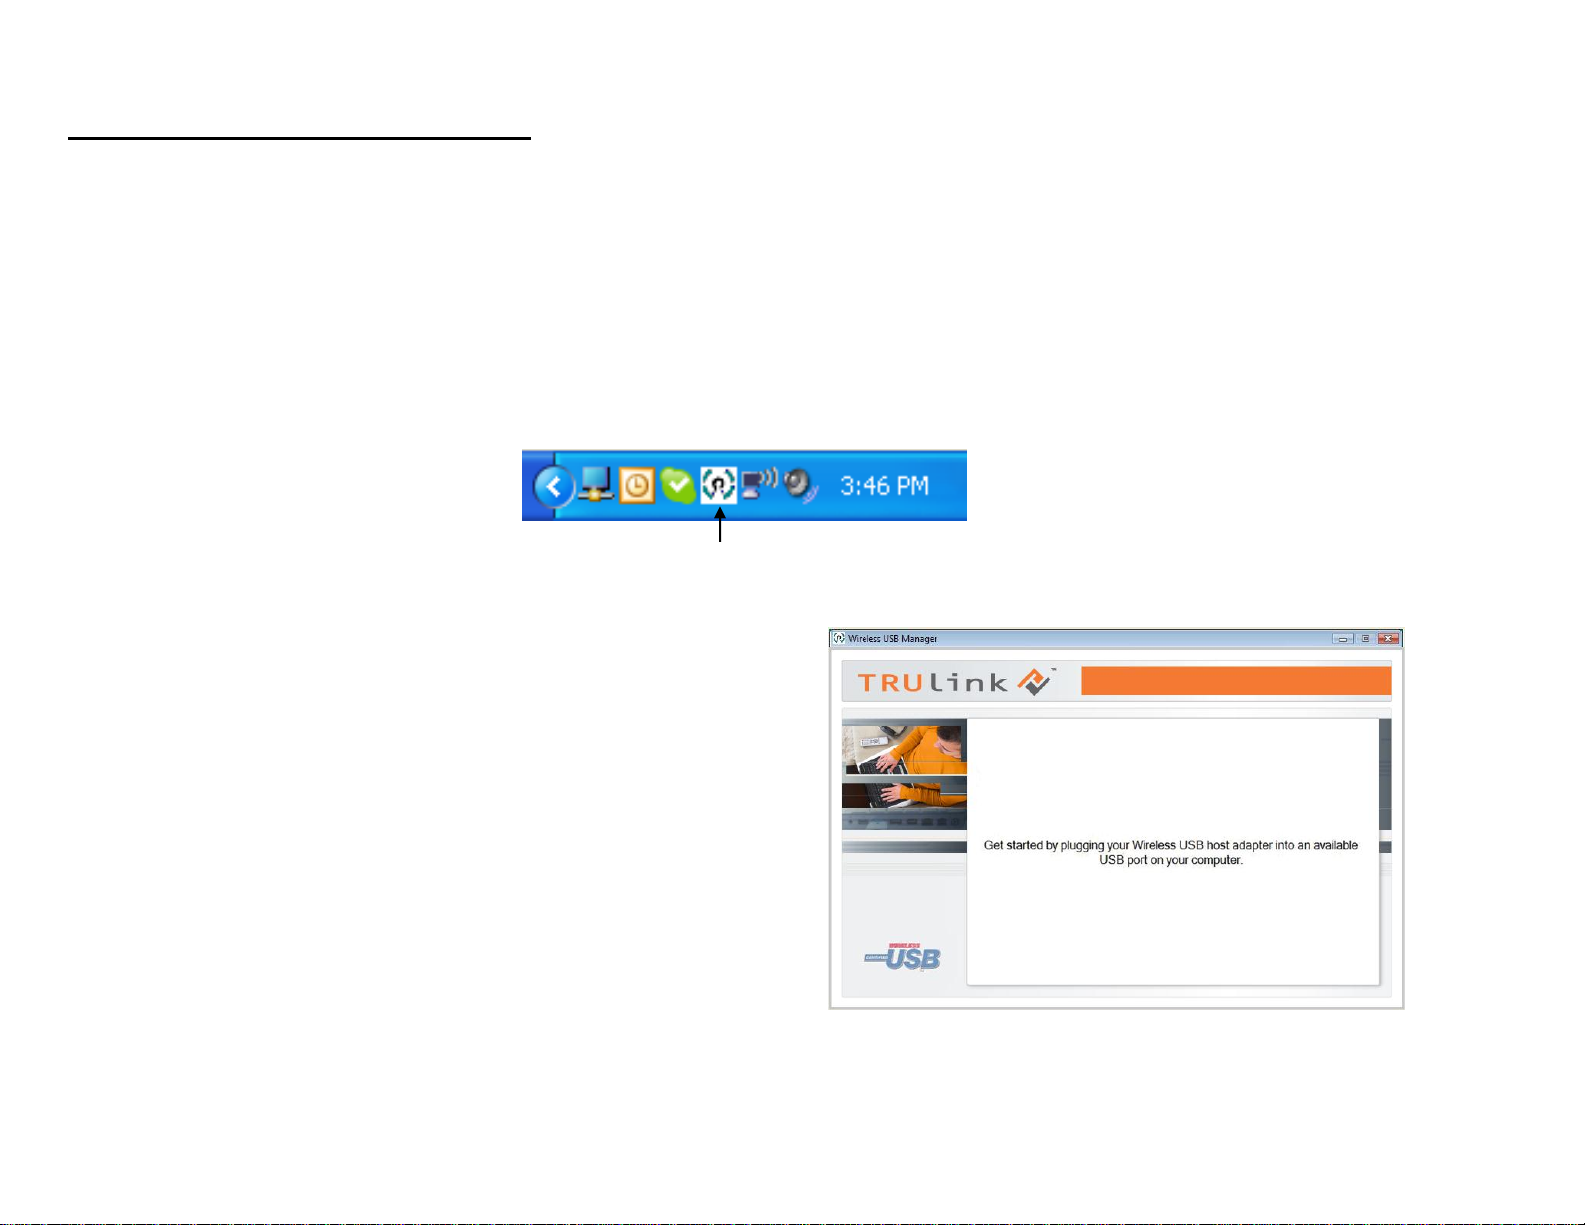
Figure: Wireless USB Manager
SOFTWARE/DEVICE INSTALLATION
Figure: Wireless USB Manager Welcome
Screen
STEP 3 -DRIVER INSTALLATION FOR THE WIRELESS USB HOST ADAPTER
Your Wireless USB to VGA with Integrated Audio Kit has been pre-associated for you, meaning the
Wireless USB Host Adapter will automatically recognise the Wireless VGA with Integrated Audio Adapter
upon being powered and its successful driver installation. After the software installation you should see
the Wireless USB Manager icon in your Windows icon tray. Double-click on this icon to open the
manager utility.
The Wireless USB Manager will open and instruct you on
what to do next (Figure: Wireless USB Manager Welcome
Screen).
1. Screw on one of the supplied dipole antennas to the
Wireless USB Host Adapter and connect the Wireless
USB Host Adapter to an available USB port on your
computer. You also have the option to connect the
Wireless USB Host Adapter to the USB Cradle provided
in the package if you need to make the adapter more
mobile.
10
Page 12
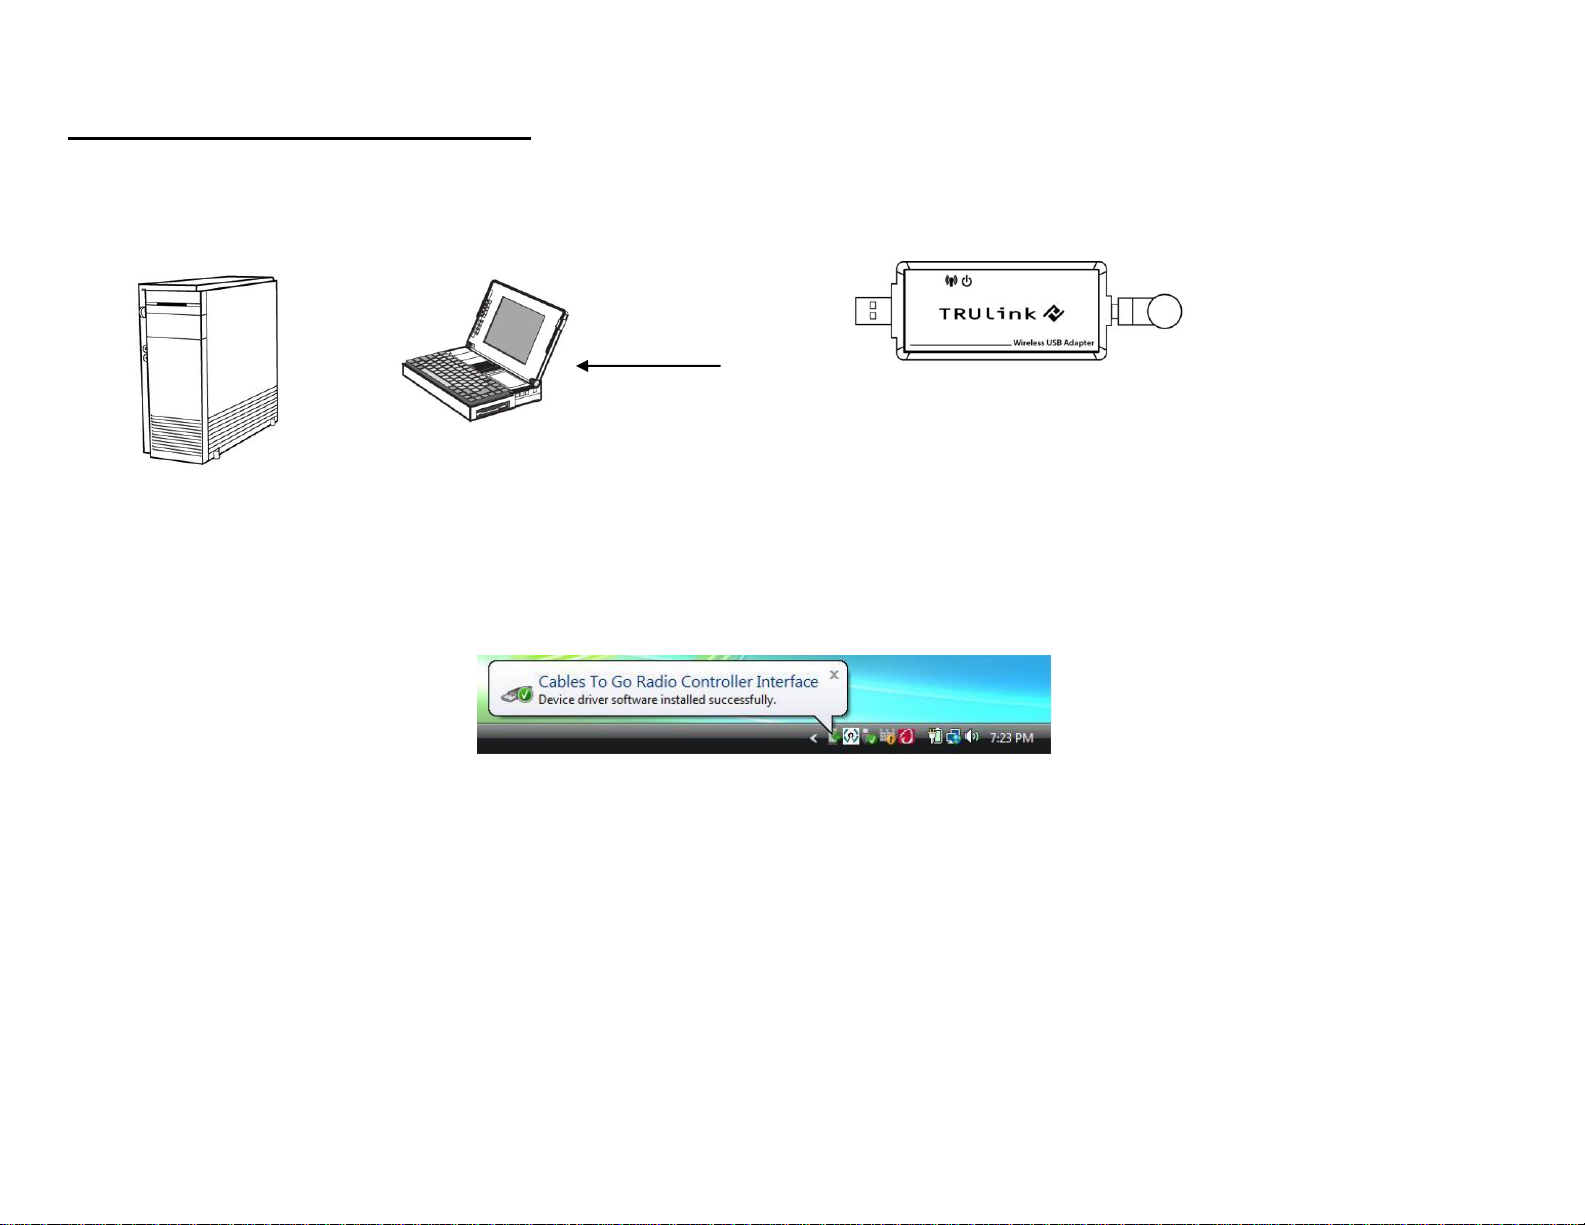
SOFTWARE/DEVICE INSTALLATION
Figure: Successful Install Message
After you connect the Wireless USB Host Adapter to your computer, Windows will automatically install it
and you should get a successful install message in your icon tray such as this figure shows.
11
Page 13
SOFTWARE/DEVICE INSTALLATION
Figure: DisplayLink Manager
Figure: Wireless VGA with Integrated
Audio Adapter Connected
The Wireless USB Host Adapter will search for the Wireless VGA with Integrated Audio Adapter. When
association is confirmed between the devices, the Activity Indicators will light up on both units. The
DisplayLink Manager utility (Figure: DisplayLink Manager) will activate and install an icon in the Windows
icon tray. The TruLink Wireless USB to VGA with Integrated Audio Kit is now fully functional and you are
ready to use it.
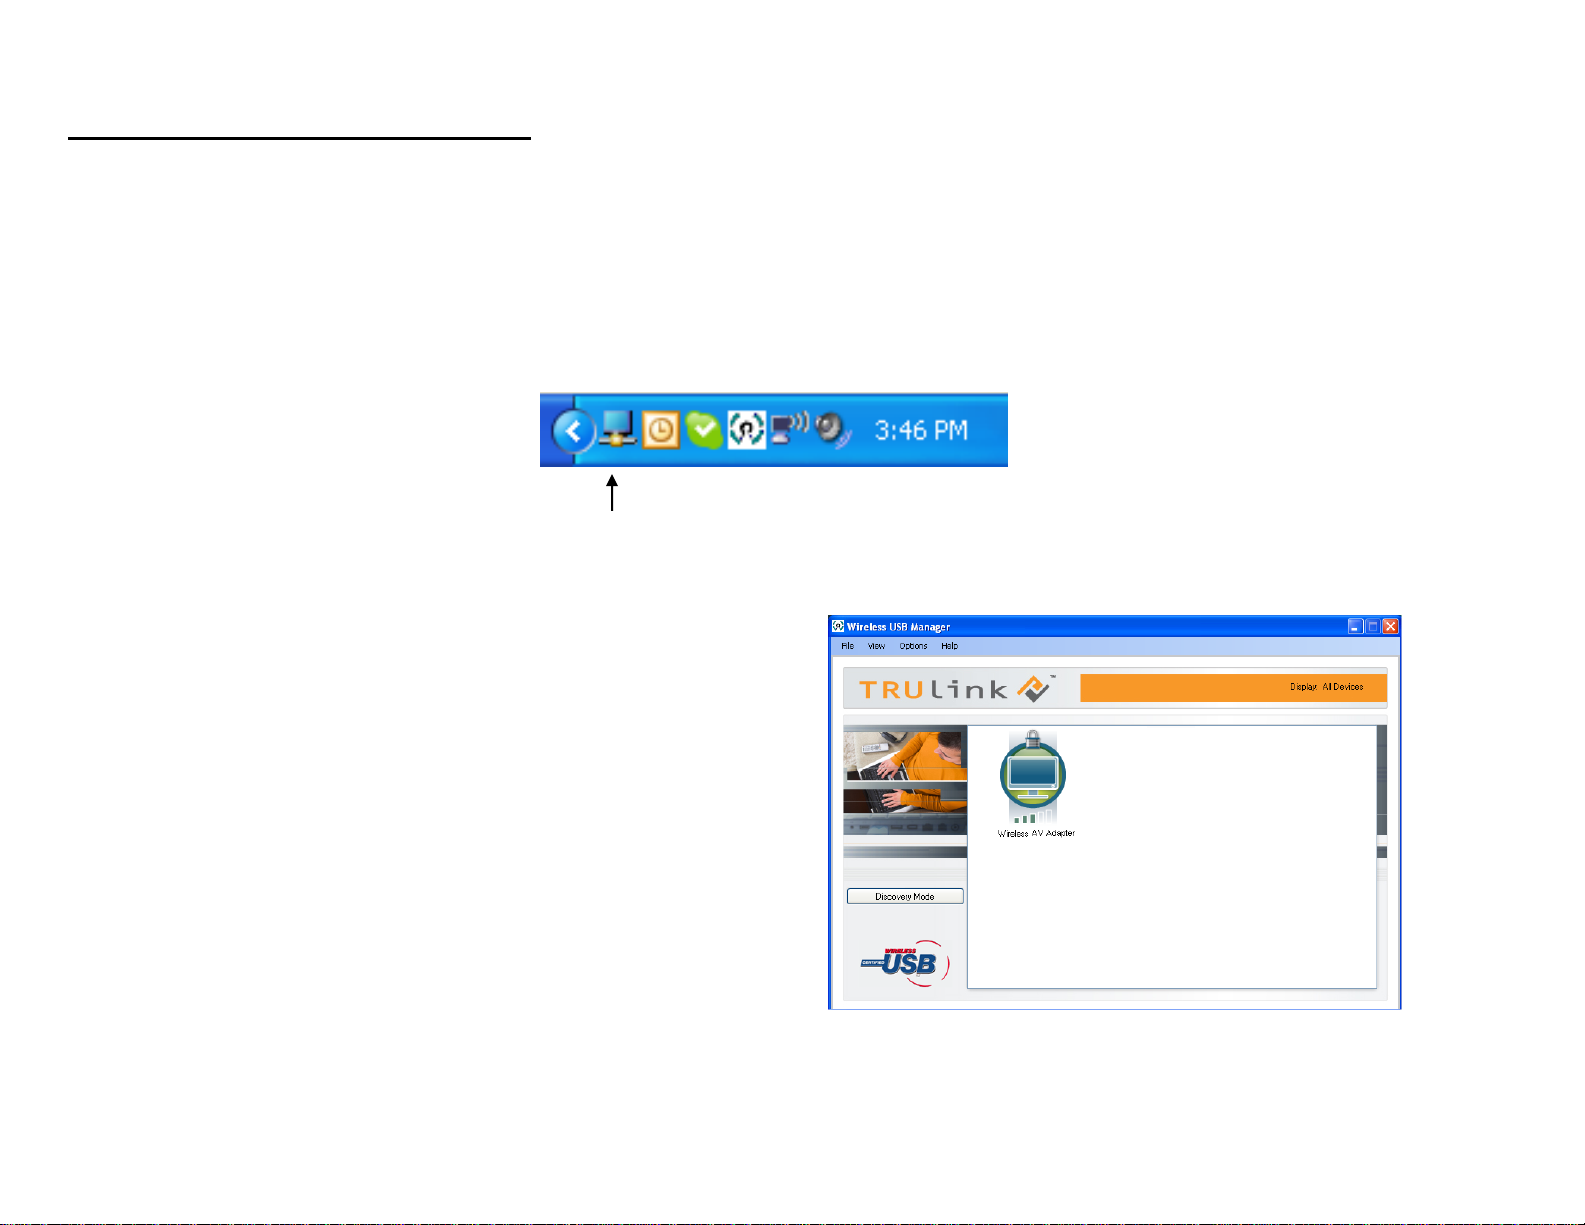
VERIFY CONNECTION
In the Wireless USB Manager, you should see the
wireless device icon represented (Figure: Wireless VGA
with Integrated Audio Adapter Connected), which
verifies an active connection status.
12
Page 14

SOFTWARE/DEVICE INSTALLATION
Note: The default setting extends your desktop to the right so you should see the desktop background on
the wireless display device, but you will not see any icons initially. You may continue to use it in this
setting called, “Extended” mode, allowing you to open applications and documents on the wireless display
device to increase your viewing area or this may be switched to “Mirror” mode to clone your main display
image. Settings are discussed further in the next section.
13
Page 15

USING THE WIRELESS USB TO VGA WITH INTEGRATED AUDIO KIT
Figure: DisplayLink Manager
WIRELESS VGA DISPLAY SETTINGS
The TruLink Wireless USB to VGA with Integrated Audio Kit hosts a number of various settings so that
you may configure your image to the way you need it.
After you have installed the Wireless USB to VGA with Integrated Audio Kit, an icon representing a
monitor will appear in your Windows icon tray. This is the DisplayLink Manager. From this utility, you can
adjust your image settings. To open the manager, right click on the icon in the Windows tray (Figure:
DisplayLink Manager). A menu (Figure: Display Settings Menu) will appear and you will have the
ability to change parameters such as resolution, colour quality, mirror mode or extension mode and more.
Note: When your Wireless VGA with Integrated Audio Adapter is not in use, the DisplayLink Manager icon
will not be visible in your icon tray.
14
Page 16

MENU DESCRIPTIONS
USING THE WIRELESS USB TO VGA WITH INTEGRATED AUDIO KIT
Screen Resolution
This allows adjustment for your video’s display capable screen resolutions. Please note that if all the
options appear from the range of 800x600~1920x1080, your monitor will most likely only accept what its
maximum capability is. You may want to refer to your specification section of your display device user
guide to see the optimal resolution. If you are using a notebook, Screen Resolution will only be available
in Extended mode, as in Mirror mode your additional display will mimic the settings of your main notebook
monitor and cannot be adjusted to a different resolution.
Colour Quality
In this setting you can adjust the colour bits between Medium (16-bit) and High (32-bit).
Screen Rotation
This setting allows you to leave the display screen in Normal viewing mode, Rotated Left, Rotated
Right, or Upside-Down viewing.
Extend To
If you are using Extended mode you can utilise this option to extend the display to the Right, Left, Above,
or Below depending on where your monitor is positioned.
Extend
In this mode you can “extend” your desktop space to an additional monitor so you can have more view of
different applications.
Mirror
In this mode you can duplicate your main monitor onto an additional monitor.
15
Page 17

USING THE WIRELESS USB TO VGA WITH INTEGRATED AUDIO KIT
Advanced...
This will allow you to go into the Display Properties settings and make adjustments to your display
settings.
16
Page 18

USING THE WIRELESS USB TO VGA WITH INTEGRATED AUDIO KIT
AUDIO SETTINGS
Upon connecting the Wireless VGA with Integrated Audio Adapter, your audio output from your PC will be
defaulted through it at 50% listening level.
By right-clicking on the audio icon in the systems icon tray, you can go to Adjust Audio Properties to
make any audio adjustments as you would with any audio projection device.
That will open up the Sounds and Audio Devices Properties screen and here you can make any
adjustments. The name given to the audio output through the Wireless VGA with Integrated Audio
Adapter is USB Multimedia Audio Device.
17
Page 19

Light
Light
Light
User 1
On
Off
Off
User 2
Off
On
Off
User 3
Off
Off
On
User 4
On
On
Off
User 5
Off
On
On
User 6
On
Off
On
USING THE WIRELESS USB TO VGA WITH INTEGRATED AUDIO KIT
WIRELESS USB HOST ADAPTER SELECTION
The “HOST” button on the Wireless USB to VGA with Integrated Audio Kit is used to switch between
Wireless USB Host Adapters. By pressing this button, the Wireless USB to VGA with Integrated Audio Kit
will look for the next associated Wireless USB Host Adapter in its list and connect to it. The 1-2-3 lights
indicate which host is connected and will move position based on which host is currently associated. The
LED scheme is as follows:
18
Page 20

USING THE WIRELESS USB TO VGA WITH INTEGRATED AUDIO KIT
Wireless USB to VGA with Integrated Audio Adapter Reset
To erase all Wireless USB Host Adapters associated to your Wireless USB to VGA with Integrated Audio
Adapter, hold down the “RESET” button for 10 seconds. This will cause the Wireless USB to VGA with
Integrated Audio Adapter to erase all Wireless USB Host Adapters that have been associated from its list.
A Wireless USB Host Adapter will then have to be re-associated with the Wireless USB to VGA with
Integrated Audio Adapter using one of the association processes (cable or pin association) in order to
connect to it again.
19
Page 21
USING THE WIRELESS USB TO VGA WITH INTEGRATED AUDIO KIT
Figure: Wireless USB Manager Icon
Figure: Wireless VGA with Integrated Audio
Adapter Not Connected
WIRELESS USB MANAGER
The Wireless USB Manager is simple and easy to use interface to manage your Wireless USB devices
and control your Wireless USB Host Adapter settings. The Wireless USB Manager can be accessed via
Wireless USB Manager Icon in the Windows tray (Figure: Wireless USB Manager Icon).
To launch the Wireless USB Manager, double click on the
Wireless USB Manager icon. In the main pane, you can
find an icon representing your Wireless USB Device
Adapter. If your Wireless USB Device Adapter is not
connected, the icon will be grey (Figure: Wireless VGA
with Integrated Audio Adapter Not Connected). If your
Wireless USB Host Adapter is connected and ready to
work, the icon will change colour and show signal
strength (Figure: Wireless VGA with integrated Audio
Adapter Connected-next page).
20
Page 22
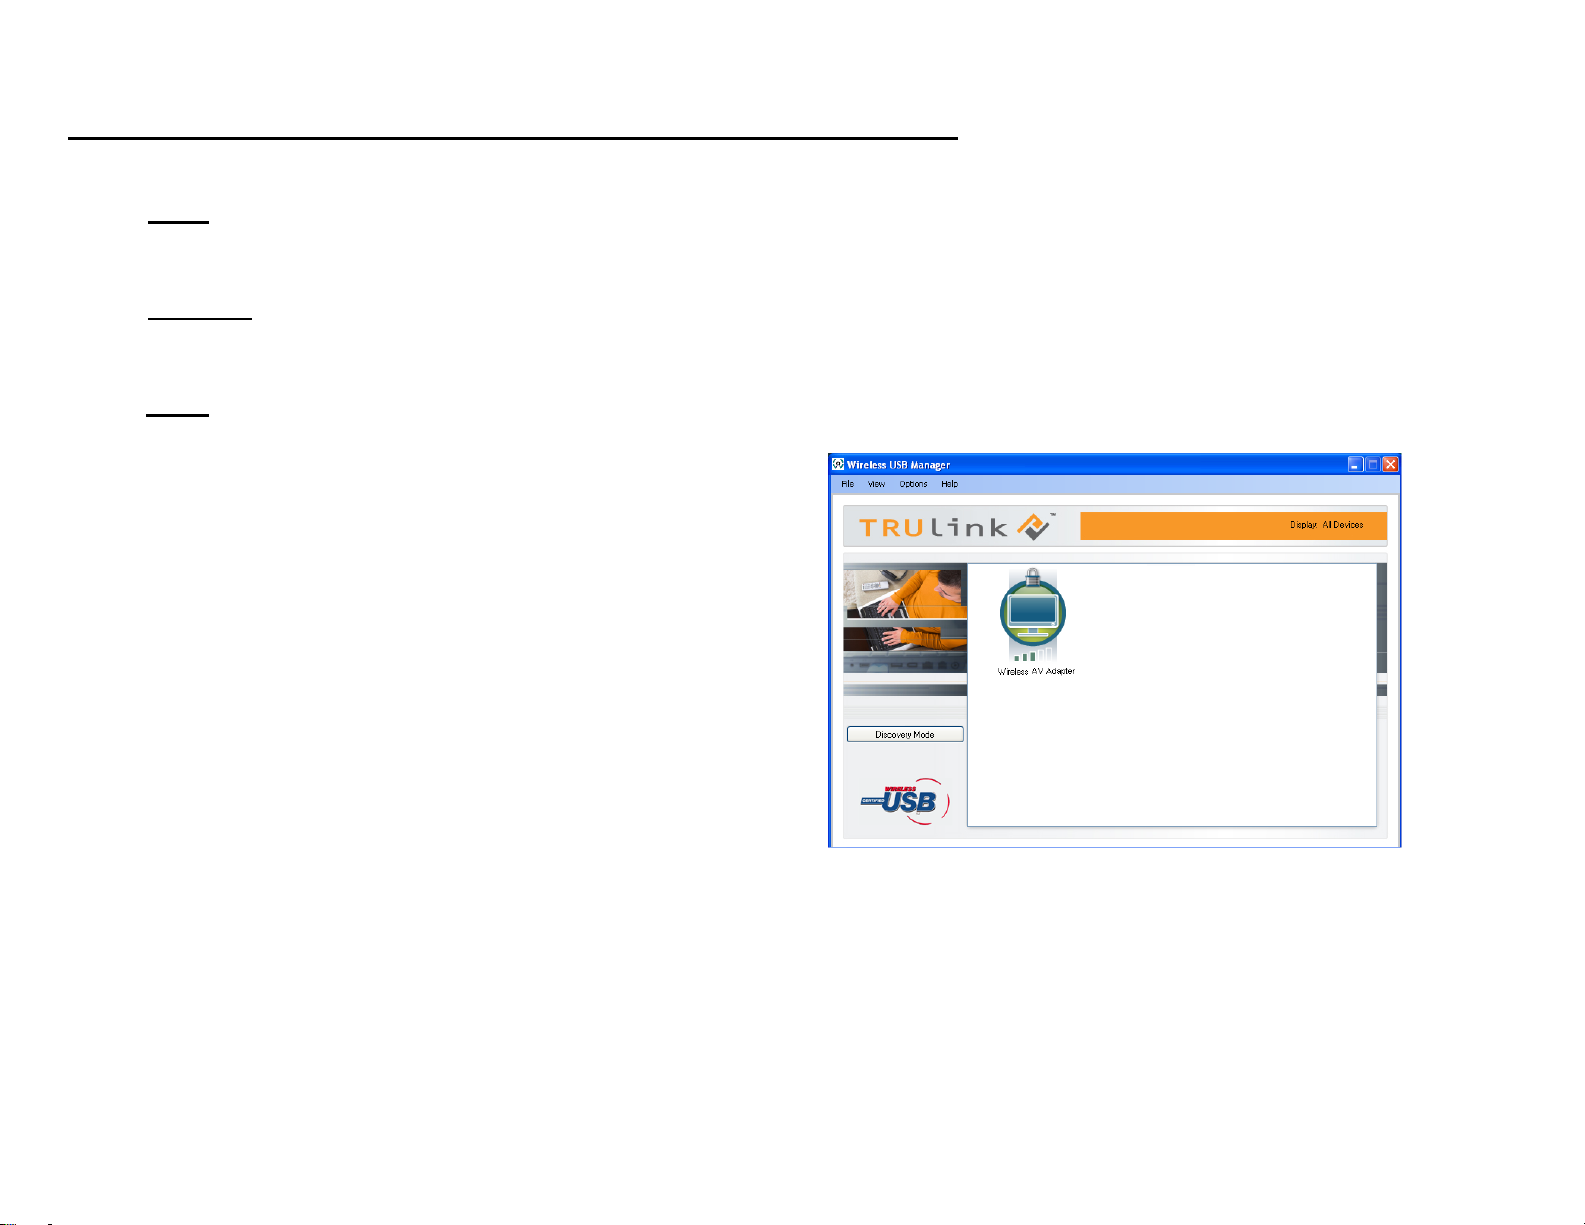
The VIEW menu will give the option of what type of devices you wish to display (All Devices, Connected
USING THE WIRELESS USB TO VGA WITH INTEGRATED AUDIO KIT
Figure: Wireless VGA with Integrated Audio
Adapter Connected
Devices and Not Connected Devices).
The OPTIONS menu will give the option to launch Host Settings window and turn the Wireless USB Host
Adapter radio on or off.
The HELP menu offers quick help on how to connect devices to your Wireless USB Host Adapter.
21
Page 23

Figure: Host Settings - General
To manage the Wireless USB Host Adapter settings, either select “Host Settings” in the “Option” menu of
USING THE WIRELESS USB TO VGA WITH INTEGRATED AUDIO KIT
the Wireless USB Manager application or right click on the Wireless USB Manager icon in the Windows
tray.
GENERAL TAB (Figure: Host Settings – General)
1. Enable this Wireless USB radio: turn on or off the Wireless
USB radio.
2. Host name: Change the name of your Wireless USB Host
Adapter.
3. Cable association connection rules*: Always, Never or Ask
me each time. By default Wireless USB will ask you each
time you cable associate.
*Note that the cable association function is NOT needed to
run your kit. This function will be used if you purchase
additional Wireless USB devices.
22
Page 24
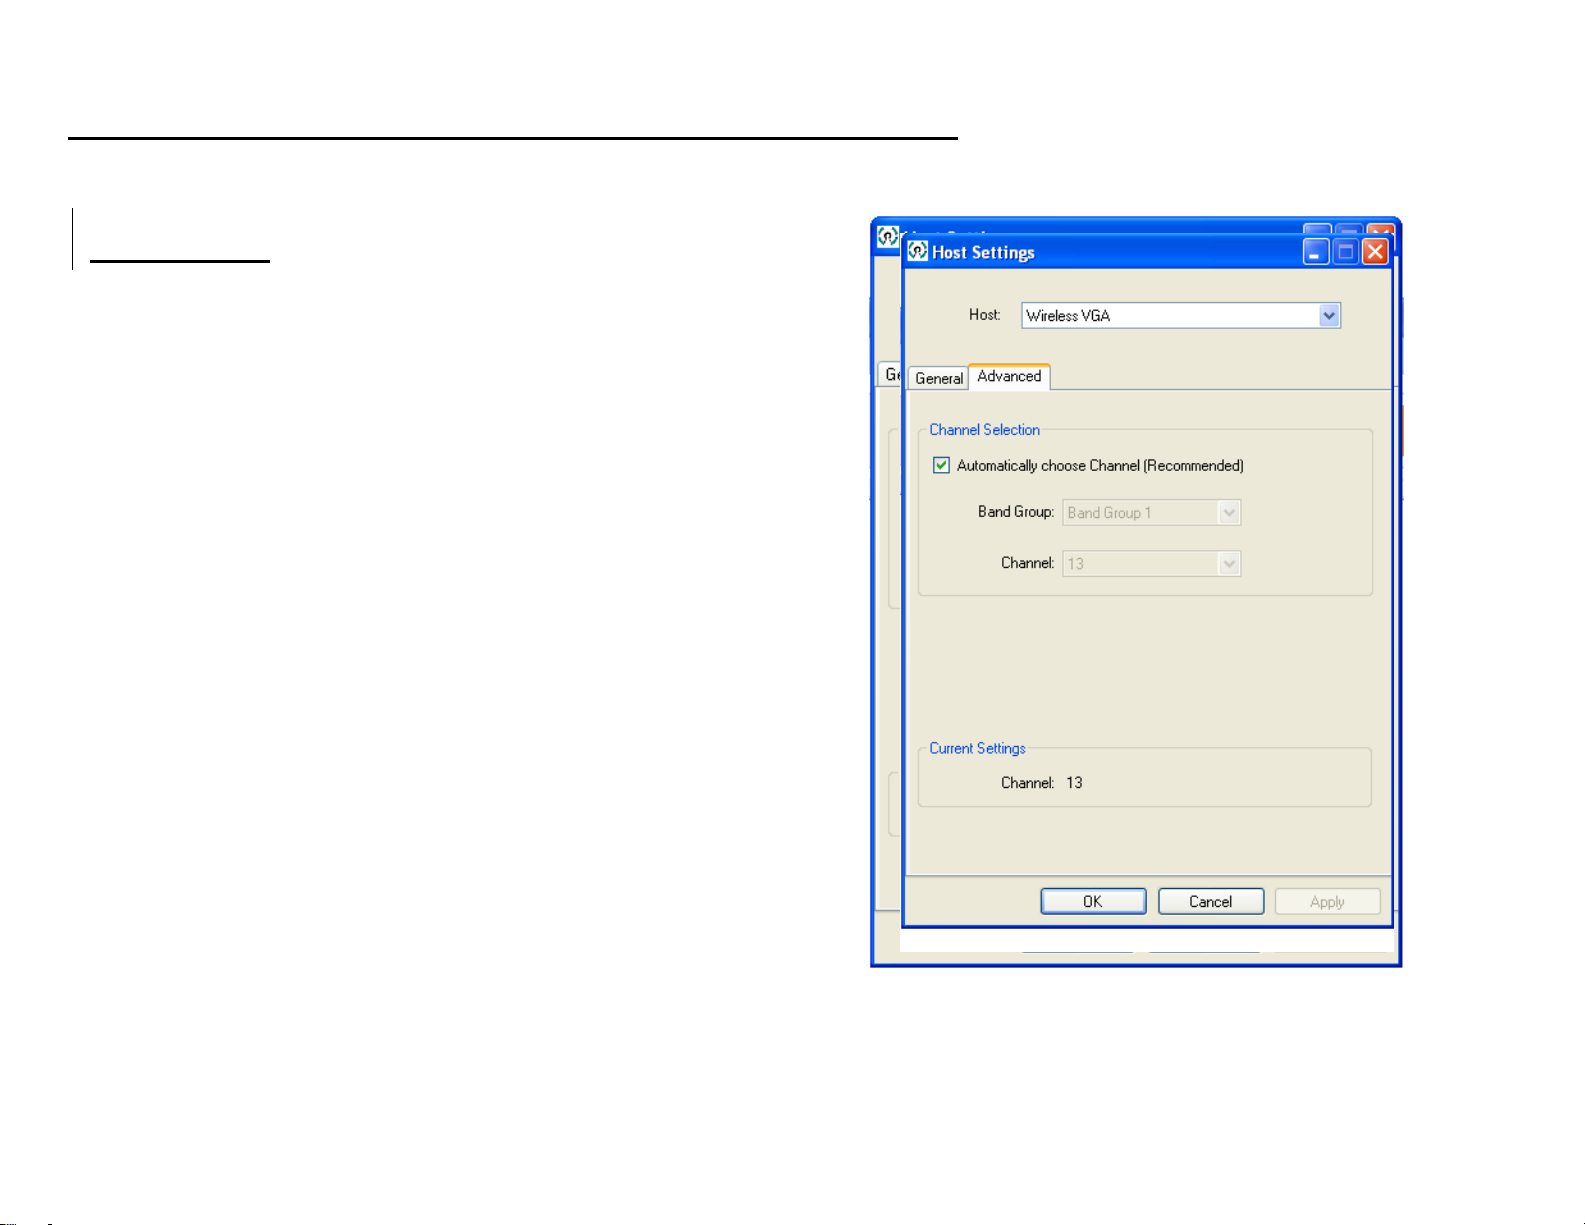
Figure: Host Settings - Advanced
USING THE WIRELESS USB TO VGA WITH INTEGRATED AUDIO KIT
ADVANCED TAB (Figure: Host Settings – Advanced)
1. Channel selection: this function allows you to set manually
a radio channel for the wireless communication
(combination of Band Group and Channel). For optimal
performance, the automatic setting is recommended.
23
Page 25

FREQUENTLY ASKED QUESTIONS
1. Why can’t I install .NET?
You may have an older version of .NET, preventing the newer one from being installed. Using
Add/Remove Programs or Programs and Features on the Control Panel, uninstall any version of
Microsoft .NET Framework™ older than version 3.0. Then install Microsoft .NET Framework™ from
the Wireless USB to VGA with Integrated Audio Kit installer.
2. My Wireless USB Host Adapter is plugged into my computer and my Wireless USB to VGA
with Integrated Audio Adapter is powered but I do not see anything on my display. What’s
wrong?
Check the Wireless USB Manager to see if there is an icon for your Wireless USB to VGA with
Integrated Audio Adapter. If there is no icon, try unplugging and then plugging in your Wireless USB
Host Adapter to reload the Wireless USB to VGA with Integrated Audio Adapter.
If you see an icon that is gray in the Wireless USB Manager, try resetting the Wireless USB to VGA
with Integrated Audio Adapter by unplugging its power and plugging it back in. You should see the
icon in the Wireless USB Manager appear in colour when it is connected.
If both Activity Indicators are lit on the Host Adapter and VGA with Audio Adapter, check your icon
tray and make sure that the DisplayLink Manager is there. If you do not see the DisplayLink Manager
icon, the DisplayLink software is not active. You will need to reboot your computer, and when it
restarts the software will finish its installation.
24
Page 26

Still not connected?
FREQUENTLY ASKED QUESTIONS
Try adjusting the resolution from the DisplayLink Manager. Some displays such as television type
displays can be recognised as a default monitor and therefore your PC may set it as a default
1280x1024 which can be too high for the monitor. If your monitor is not capable of displaying that
resolution, you will need to lower the setting.
3. I don’t see all the resolutions available through the DisplayLink Manager. Why is this?
Note all displays have the same capabilities. Computer monitors will typically have the capability for
the PC to recognise its capable resolutions. HDTVs may not have this capability built in through its
PC input, so if you are connecting to this type of display, only some of the resolutions may appear in
the resolution drop down selection in the DisplayLink Manager.
4. Why is my video choppy?
If you are experiencing choppy video, try changing the channel (please refer to your Wireless USB
Host Adapter settings for this) or move in your computer closer to the display. Also, make sure your
PC meets the recommended requirements for the type of video application you are using.
Video playback at full screen is only recommended at resolutions 1280x720 or less. To avoid choppy
video, scale the resolution back to 1280x720 or lower. This can be done through the DisplayLink
Manager.
25
Page 27

FREQUENTLY ASKED QUESTIONS
5. I see a blue screen or my desktop background on my display connected with the Wireless
USB to VGA with Integrated Audio Kit, but no icons. Is something wrong with my unit?
No, your unit is working properly. The default setting of this device will extend your desktop on the
additional display. With this function, you can grab icons or open applications on that display to make
your overall viewing space larger. The setting can be changed to Mirror mode, and with this, you can
duplicate the image from your main display or laptop screen to the additional display.
6. I am having issues transmitting video during DVD playback when using Windows Media
Player. Is my unit not working properly? If it is, can this be fixed?
Your unit is working properly. Although Windows Media Player works, it does not react well for all
scenarios. Windows Media Player will only work on the display connected with the Wireless USB to
VGA with Integrated Audio Kit, when you make this your primary display. To make it your primary
display, you should go to the “Settings” tab in your Windows Display Properties and click the
DisplayLink Device monitor, and check “Use this device as the primary monitor”. Then go to your
primary monitor and if “Extend my Windows desktop on the monitor” is checked, uncheck this option.
Your image should now transmit to the display connected with the Wireless USB to VGA with
Integrated Audio Kit.
Please note, this setup will not allow use of the original display. We recommend using a DVD based
playback software if possible (i.e. PowerDVD, WinDVD) as these players have less playback issues
and your wireless display does not have to be primary.
26
Page 28

FREQUENTLY ASKED QUESTIONS
7. I am trying to play back a DVD on my extended display, but I am getting no picture.
Playback of protected content is not supported by this product, which means some DVD players and
all Blu-ray players will not display video when connected through your display.
8. My Wireless USB Host Adapter is plugged into my computer but I do not hear anything out of
my speakers when connected through the Wireless VGA with Integrated Audio Adapter.
What’s wrong?
Check the Wireless USB Manager to see if there is an icon for your Wireless VGA with Integrated
Audio Device Adapter. If there is no icon, try unplugging and then plugging in your Wireless USB
Host Adapter to reload the Wireless VGA with Integrated Audio Adapter.
If you see an icon that is grey in the Wireless USB Manager, try resetting the Wireless VGA with
Integrated Audio Adapter by unplugging its power and plugging it back in. You should see the icon in
the Wireless USB Manager appear in colour when it is connected.
Still not connected?
If you are using an audio source such as an A/V receiver, make sure the receiver is on the right input
channel or attempt troubleshooting with your audio output device equipment.
27
Page 29

VIDEO PLAYBACK TIPS
1. We only recommend playing back video in “Extend” mode.
2. Don’t switch between “Mirror” and “Extended” modes while video is being played on the wireless
display. Doing this can confuse the video player which may cause it to stop its playback. We
recommend stopping playback, and then switching viewing modes if needed. Then you can restart
your playback.
3. Avoid dragging video while playing from one display to another. The video may stop playback if this
is done. To void this potential issue, open your media player on the wireless display, close the media
player, and then re-open it. When you re-open it, the media player should open on the wireless
display. From here, you can start playback of your video.
4. Avoid changing the resolution of the wireless display while a video is being played back, as this can
cause the image to move to another screen if one is connected.
5. If you experience issues with QuickTime movie trailers, the solution is to disable DirectX in the
QuickTime options menu. This can be found in the “Advanced” tab in the QuickTime player plug in
settings.
6. If you are using a notebook, the power plan settings should be set to “High Performance” mode or
similar depending on what operating system you are using, to ensure that you will have all the
necessary CPU resources available.
Please visit our website for these and other tips and frequently asked questions.
www.c2g.com
28
Page 30

TECHNICAL SPECIFICATIONS
Systems Information
Operating System
Support: Microsoft XP 32-bit; Microsoft Vista 32-bit/64-bit; Microsoft Windows7
Operating Range: Up to 10 metres
PHY Data Rate: 53.3Mbps, 80Mbps, 106.6Mbps, 160Mbps,200Mbps, 320Mbps, 400Mbps, 480Mbps
PHY Compliance: WiMedia 1.0 MAC & 1.1 PHY compliant & support for 1.2 PHY
Frequency: 3.1GHz to 4.8GHz (WiMedia Band Group 1); 6.336~7.920 GHz (WiMedia Band Group 3)
RF Modulation Type: QPSK/DCM
Number of Channels: 7 Channels (3 FFI + 4 TFI)
USB Specification: Certified Wireless USB 1.0
Security: AES 128-bit
Antenna Type: Omni-directional; SMA + I-PEX Dipole Antenna 81XXAA15.G05 (Type-A)
Wireless USB to VGA with Integrated Audio Adapter Specs
Chipset: RTU 7105 Module; DisplayLink DL-165G-video
Interface: USB 2.0 mini-B female for wired association method; HD15 female video output; 3.5mm Stereo output
Video Resolution: 800x600 ~ 1920x1080
Video Streaming: Up to 720p (720p only available at resolution 1280x720 or lower)
Screen Mode: Extended and Mirror mode
Colour Depth: 32-bit True Colour
Audio Output: 2 CH DAC output
Audio Sample Rate: 8KHz, 16KHz, 44.1KHz to 48KHz with 16-bit resolution
Association Mode: Pre-Association, Cable Association and PIN Association;
Stores up to 16 associated hosts
Native Mode: For playback of high resolution video
Reset Switch: Used for erasing association history by pressing and holding the button for 10 seconds
Environmental Specs
Work Environment: Operation Temperature: 10~40 degrees (Celsius)
Storage Temperature: -10~60 degrees (Celsius)
Power Information
Power Consumption: 3.3W
Max Output Power: -41.3 dBm/MHz
Power Adapter: 5V, 2.5A; 100-240VAC 50-60Hz 0.5A
29
Page 31

TECHNICAL SPECIFICATIONS
Wireless USB Host Adapter Specs
Chipset: RTU 7012; RTU 7300
Interface: USB 2.0 type A
Antenna: Omni-directional; SMA + I-PEX Dipole Antenna 81XXAA15.G05 (Type-A)
Power Mode: Bus-powered
Environmental Specs
Work Environment: Operation Temperature: 10~40 degrees (Celsius)
Storage Temperature: -10~60 degrees (Celsius)
Power Information
Operating Power: 203 mA
Suspend Mode
Power: 170mA
Certification: CE/FCC/WUSB-IF
30
Page 32

C2G™ WARRANTY STATEMENT
Headquarters Location:
Road 30 Hortonwood Industrial Estate
Telford, Shropshire TF17AB
0800.328.2916
www.c2g.com
At C2G, we want you to be totally confident in your purchase. That is why we offer a one year warranty
on this device. If you experience problems due to workmanship or material defect for the duration of this
warranty, we will repair or replace this device. To request a Return Merchandise Authorisation (RMA)
number, contact customer service at 0800 328 2916 or www.c2g.com.
31
Page 33

FCC
This equipment has been tested and found to comply with the limits for a Class B digital device, pursuant to Part 15 of the
FCC Rules. These limits are designed to provide reasonable protection against harmful interference in a residential
installation. This equipment generates, uses and can radiate radio frequency energy and, if not installed and used in
accordance with the instructions, may cause harmful interference to radio communications. However, there is no guarantee
that interference will not occur in a particular installation. If this equipment does cause harmful interference to radio or
television reception, which can be determined by turning the equipment off and on, the user is encouraged to try to correct
the interference by one of the following measures:
● Reorient or relocate the receiving antenna.
● Increase the separation between the equipment and receiver.
● Connect the equipment into an outlet on a circuit different from that to which the receiver is connected.
● Consult the dealer or an experienced radio/TV technician for help.
FCC Caution: Any changes or modifications not expressly approved by the party responsible for compliance could void the
user’s authority to operate this equipment.
This device complies with Part 15 of the FCC Rules. Operation is subject to the following two conditions: (1) This device
may not cause harmful interference, and (2) this device must accept any interference received, including interference that
may cause undesired operation.
This device and its antenna(s) must not be co-located or operation in conjunction with any other antenna or transmitter.
A UWB device operating under the provisions of this section shall transmit only when it is sending information to an
associated receiver. The UWB intentional radiator shall cease transmission within 10 seconds unless it receives an
acknowledgement from the associated receiver that its transmission is being received. An acknowledgement of reception
must continue to be received by the UWB intentional radiator at least every 10 seconds or the UWB device must cease
transmitting.
32
Page 34

IMPORTANT SAFETY INFORMATION
! Do not plug the unit in any outlet that does not have enough current to allow the device to function. Refer to the
specifications in this manual for power level of the unit.
! Liquid:
If this unit or its corresponding power adapter has had liquid spilled on or in it, do not attempt to use the unit.
Do not attempt to use this product in an outdoor environment as elements such as rain, snow, hail, etc. can damage the
product.
! In case of a storm, it is recommended that you unplug this device from the outlet.
! Avoid placing this product next to objects that produce heat such as portable heaters, space heaters, or heating ducts.
! THERE ARE NO USER SERVICEABLE PARTS
Do not attempt to open this product and expose the internal circuitry. If you feel that the product is defective, unplug the
unit and refer to the warranty information section of this manual.
©2009 C2G. Microsoft, Windows and Vista are either registered trademarks or trademarks of Microsoft Corporation in the
United States and/or other countries. This product is not endorsed or manufactured by Microsoft Corporation.
WiMedia is a registered trademark of the WiMedia Alliance. This product is not manufactured by WiMedia Alliance.
33
Page 35

APPENDIX
ASSOCIATION WITH OTHER DEVICES
ASSOCIATION CONCEPT
In order to establish a secure wireless connection, both your Wireless USB Host Adapter and the Wireless
VGA with Audio Adapters must exchange information about each other. This is done via cable or PIN
association.
ASSOCIATION PROCESS
If you purchase additional Certified Wireless USB host adapters, such as the TruLink Wireless USB Host
Adapter, you will need to associate them with your Wireless VGA and Audio Device Adapter. Refer to
your Wireless USB device documentation for more information on its settings for association or try
contacting the product’s manufacturer for assistance if needed.
34
Page 36

Figure: Cable Association
CABLE ASSOCIATION PROCEDURE
APPENDIX
Cable association steps. Examples/Figures shown are used with the association of the TruLink Wireless
USB to VGA with Integrated Audio Kit.
1. Make sure that the Wireless USB host adapter utility is running. Check your Windows tray for the
Wireless USB Manager icon (Figure: Wireless USB Manager).
2. Make sure the WIRELESS/WIRED switch is in the WIRELESS position on the Wireless USB to VGA
with Integrated Audio Adapter.
3. Plug in the power adapter for your TruLink Wireless USB to VGA with Integrated Audio Adapter.
4. Connect the USB cable between an available USB port on your computer and your Wireless USB to
VGA with Integrated Audio Adapter.
5. Complete cable association by pressing the “Accept Association” button when prompted (Figure:
Cable Association).
6. Remove the USB cable from your Wireless VGA with Integrated Audio Adapter and computer.
35
Page 37

Figure: TruLink Wireless VGA with Integrated Audio
Adapter Connected
Associated Certified Wireless USB Devices will appear as icons in the Wireless USB Manager. When the
APPENDIX
Certified Wireless USB devices are connected, the icon will appear in colour (Figure: TruLink Wireless
VGA with Integrated Audio Adapter Connected).
Note: You may rename or delete the Wireless USB Device by right-clicking the device icon in the
Wireless USB Manager and select “rename”. You can also delete a wireless device adapter association
by selecting “delete”.
36
Page 38

Figure: Discovery Mode Screen
PIN ASSOCIATION PROCEDURE
APPENDIX
PIN association steps: Examples/Figures shown are used with the association of the TruLink Wireless
USB to VGA with Integrated Audio Kit.
1. Make sure your Wireless USB to VGA with
Integrated Audio Adapter is powered on and your
Wireless USB Host Adapter is connected to your
computer. Click the “Discovery Mode” button
(Figure: Discovery Mode Screen).
37
Page 39

Figure: Discovery Mode in Process
APPENDIX
2. The Wireless USB Host Adapter will search for the
Wireless USB to VGA with Integrated Audio Adapter
within its range. Note that this operation can take up to
20 seconds (Figure: Discovery Mode in Process).
3. Once the Wireless USB Host Adapter and the Wireless USB to VGA with Integrated Audio Adapter
have exchanged security information, a dialog box will appear and you can enter the PIN of your
Wireless Device Adapter.
38
Page 40

APPENDIX
4. Enter the PIN of the Wireless USB to VGA with Integrated Audio Adapter (4-digit PIN) and click
“Accept Association”. The Wireless USB to VGA with Integrated Audio Kit and Wireless USB Host
Adapter are now associated and ready for operation.
PIN CHANGE PROCEDURE
The default PIN setting for the Wireless VGA and Audio Device Adapter is “1234”. This section gives you
the instructions to change the PIN to another 4-Digit value.
IMPORTANT: The application used to change the PIN is not supported in Vista 64bit.
1. Make sure your Wireless USB Host Adapter and the Wireless VGA with Integrated Audio Adapter is
not connected to your computer.
2. Open/Launch the application “Pin Update” (C:\Program Files\Wireless USBManager\Utility\PINUpdate).
The utility will begin search for the Wireless USB with Integrated Audio Adapter.
39
Page 41

APPENDIX
3. Make sure the WIRELESS/WIRED switch on your Wireless USB to VGA with Integrated Audio Adapter
is in the WIRELESS position and the power cable is plugged in your Wireless USB to VGA with
Integrated Audio Kit. Connect the USB cable between your Wireless USB to VGA with Integrated
Audio Adapter and any available USB port on your computer while the Searching for Device box is
visible.
40
Page 42

APPENDIX
4. Click Install this driver software anyway.
5. To change pin, click “Change PIN”
6. Enter a 4-Digit PIN (0-9) and click OK.
7. If your PIN is valid, a window displaying your new PIN will appear. Press OK. Your PIN has been
successfully changed. IMPORTANT: please exit the Trulink PIN Utility application (Exit button as
shown on figure in step 5) before unplugging your Wireless USB to VGA with Integrated Audio Adapter
from your PC.
41
Page 43

42
Page 44

For more information on this product or to check for updated drivers,
manuals or frequently asked questions, please visit our website.
www.c2g.com
VER R1.04.04.12
43
Page 45

BENUTZERHANDBUCH
WIRELESS USB ZU VGA MIT INTEGRIERTEM AUDIO-KIT
Modell: 81667
44
Page 46

INHALTSVERZEICHNIS
Einführung...................................................................................................................................................2
Merkmale....................................................................................................................................................3
Systemanforderungen.................................................................................................................................4
Packungsinhalt............................................................................................................................................5
Geräteübersicht
Wireless USB-Hostadapter..................................................................................................................6
Wireless VGA-Adapter mit integriertem Audio.....................................................................................7
Software-/Geräteinstallation........................................................................................................................8
Verwendung des Wireless USB zu VGA mit integriertem Audio-Kit.........................................................14
Häufig gestellte Fragen.....................................................................................................................24
Tipps zur Videowiedergabe.......................................................................................................................28
Technische Daten.............................................................................................................................29
C2G-Garantie.............................................................................................................................31
FCC...........................................................................................................................................................32
Wichtige Sicherheitshinweise....................................................................................................................33
Anhang
Zuordnung zu anderen Geräten......................................................................................................34
Kabelzuordnung...............................................................................................................................35
PIN-Zuordnung................................................................................................................................37
PIN-Änderung..................................................................................................................................39
1
Page 47

EINFÜHRUNG
Vielen Dank, dass Sie das TruLink™ Wireless USB zu VGA mit integriertem Audio-Kit gekauft haben. Das
TruLink USB zu VGA mit integriertem Audio-Kit enthält alles, was Sie brauchen, um Bild und Ton drahtlos
von Ihrem Computer zu einem entfernten Monitor, Projektor oder Fernsehgerät zu streamen. Mithilfe der
Ultra-Breitband-Technologie ermöglicht das USB zu VGA mit integriertem Audio-Kit drahtlose
Konnektivität in einem Raum bei einem Abstand von bis zu 10 Metern zwischen dem Computer und dem
Anzeigegerät. Die äußerst sichere drahtlose Verbindung ist ideal für Präsentationen in Schulungs- oder
Konferenzräumen oder die Anzeige von Inhalten von Ihrem Laptop auf Ihrem Heimunterhaltungssystem.
Bitte lesen Sie dieses Handbuch sorgfältig durch und bewahren Sie es zum zukünftigen
Nachschlagen auf.
2
Page 48

MERKMALE
Bild- und Tonunterstützung in einem einzigen Geräteadapter, drahtlos von einem Computer zu einem
externen Anzeigegerät. Unterstützt UXGA/WSXGA-Bilder mit hoher Auflösung und 3,5-mm-Stereoton
Funktioniert sowohl mit erweitertem Desktop- als auch mit Dual-Monitor-Bildschirmmodus
Unterstützt nativen Modus für die Wiedergabe hochauflösender Bilder
Bis zu sechs Computer können ein drahtloses Anzeigegerät- und Lautsprecher-Set gemeinsam
nutzen*
Übertragung von einem Computer zu bis zu sechs Ton-/Bildanzeigegeräten**
Video-Streaming wird bis zu 720p unterstützt (720p ist nur bei einer Auflösung von 1280 x 720 oder
geringer verfügbar)
Drahtlose Konnektität in einem Raum bei einem Abstand von bis zu 10 Metern
Ultra-Breitband arbeitet mit einer Frequenz von 3,1 GHz bis 4,8 GHz (WiMedia™-Bandgruppe 1 und 3)
Certified Wireless™ USB 1.0-kompatibel
WiMedia 1.0 MAC & 1.1 PHY-kompatibel
* Erfordert den Kauf zusätzlicher USB-Hostadapter für die zusätzlichen Computer.
** Erfordert den Kauf zusätzlicher VGA-Adapter mit integriertem Audio für zusätzliche Anzeigegeräte.
3
Page 49

SYSTEMANFORDERUNGEN
Microsoft® Windows® XP 32-bit mit Service Pack 3 oder höher, Microsoft® Vista® 32-bit/64-bit oder
Windows 7 32-bit/64-bit
Mindestanforderungen (Office-, Produktivitäts- und Internetanwendungen)
Windows XP- Prozessor: 1,66 GHz Atom oder Celeron
Arbeitsspeicher: 512 MB
Windows Vista/
Windows 7- WEI-Bewertung insgesamt: 3,0 oder besser
Prozessor: 1,4 GHz Core2Duo oder besser
Speicherplatz: 1 GB
Grafikkarte: Jede GPU
Empfohlene Anforderungen (Vollbild-Videowiedergabe)
Windows XP- Prozessor: 1,8 GHz Core2Duo oder besser
Arbeitsspeicher: 1 GB
Windows Vista/
Windows 7- WEI-Bewertung insgesamt: 4,5 oder besser
Prozessor: 2,4 GHz Core2Duo oder besser
Speicherplatz: 2 GB
Grafikkarte: Intel GMA X4500, ATI Radeon HD3-Serie, NVidia GeForce 9-Serie oder
besser
Sie müssen außerdem Administratorrechte auf Ihrem PC haben, um das Softwarepaket installieren
zu können.
4
Page 50

PACKUNGSINHALT
Wireless USB-Hostadapter für Ihren Computer
Wireless VGA-Adapter mit integriertem Audio für Ihr Anzeigegerät
Zwei Dipolantennen
0,9 m USB A/Mini B-Kabel
0,3 m VGA-Kabel
0,9 m 3,5-mm-Klinkenkabel
0,9 m 3,5 mm-Klinken- an 2 RCA-Kabel
5 V/2,5 A Netzadapter
USB-Extender mit Cradle
Montagehalterung
Zwei Schneidschrauben
Kurzanleitung
Treiber-CD
Benutzerhandbuch
5
Page 51

1
2
GERÄTEÜBERSICHT
WIRELESS USB-HOSTADAPTER
3. Link: Datenverbindungsanzeige
LED leuchtet, wenn das Übertragungsgerät verbunden ist.
LED blinkt, wenn Daten übertragen werden.
4. PWR: Netz
LED leuchtet, wenn das Gerät vom PC mit Strom versorgt wird.
6
Page 52

10. VGA: VGA-Aktivitätsanzeige
LED leuchtet, wenn das Anzeigekabel angeschlossen ist.
LED blinkt, wenn Daten übertragen werden.
11. PWR: Netzanzeige
LED leuchtet, wenn das Gerät mit Strom versorgt wird.
12. 1-2-3: Statusanzeige
Beleuchtete Zahlen geben den Wireless USB-Hostadapter an, der
zurzeit mit dem Wireless VGA-Adapter mit integriertem Audio
synchronisiert wird.
13. PWR-Stecker
Netzadaptereingang
14. Wireless/Wired-Schalter
Wählen Sie den drahtlosen oder drahtgebundenen Modus mithilfe
des Schalters.
15. Reset (Zurücksetzen)
Der Zuordnungsverlauf kann durch 10 Sekunden langes
Gedrückthalten dieser Taste gelöscht werden.
16. Host Selection (Hostauswahl):
Diese Taste wird verwendet, um einen anderen Wireless USB-
Hostadapter auszuwählen.
17. VGA-/Audio-Ausgänge
HD15- und 3,5-mm-Ausgangsanschlüsse für das Anschließen der
Bild- und Tonquelle.
18. USB-Eingang
Im drahtlosen Modus wird dieser Anschluss für die
Kabelzuordnung verwendet.
Im drahtgebundenen Modus wird dieser Anschluss für den
drahtgebundenen Betrieb des Wireless VGA-Adapters mit
integriertem Audio verwendet.
3
4 5 6 7 8
9
WIRELESS VGA-ADAPTER MIT INTEGRIERTEM AUDIO
GERÄTEÜBERSICHT
1
2
7
Page 53

SOFTWARE-/GERÄTEINSTALLATION
WICHTIGER HINWEIS:
Bei Installation auf Windows XP ist Service Pack 3 (SP3) erforderlich. Vergewissern Sie
sich, dass es installiert ist, bevor Sie die Software für das Wireless USB zu VGA mit
integriertem Audio-Kit installieren.
Vergewissern Sie sich vor der Installation der Software, dass der Wireless USB-
Hostadapter und der Wireless VGA-Adapter mit integriertem Audio nicht an den Computer
angeschlossen sind. Vergewissern Sie sich außerdem, dass der Wireless VGA-Adapter
mit integriertem Audio nicht eingeschaltet ist.
SCHRITT 1 - INSTALLIEREN DER SOFTWARE
Legen Sie die mitgelieferte CD ein. Die Software wird automatisch ausgeführt. Bitte befolgen Sie während
der Softwareinstallation die Anweisungen des InstallShield-Assistenten.
8
Page 54

SOFTWARE-/GERÄTEINSTALLATION
SCHRITT 2A - GERÄTEINSTALLATION FÜR DEN WIRELESS VGA-ADAPTER MIT INTEGRIERTEM AUDIO
1. Schließen Sie eine der Dipolantennen an den Wireless VGA-Adapter mit integriertem Audio an.
2. Schalten Sie Ihr Anzeigegerät ein (d.h. Monitor, Projektor, Fernsehgerät).
3. Schließen Sie den Wireless VGA-Adapter mit integriertem Audio mithilfe eines VGA-Kabels an Ihr
Anzeigegerät an.
4. Schließen Sie den Wireless VGA-Adapter mit integriertem Audio mit einem 3,5-mm-Kabel oder einem
3,5-mm auf L/R-Audiokabel an Ihr Anzeigegerät, Audiogerät (A/V-Receiver) oder die PC-Lautsprecher
(mit einem 3,5-mm-Kabel) an.
5. Schließen Sie den Netzadapter an das Wireless USB zu VGA mit integriertem Audio-Kit an.
9
Page 55

Abbildung: Wireless USB Manager
SOFTWARE-/GERÄTEINSTALLATION
Abbildung: Wireless USB Manager-
Begrüßungsbildschirm
SCHRITT 3 - TREIBERINSTALLATION FÜR DEN WIRELESS USB-HOSTADAPTER
Das Wireless USB zu VGA mit integriertem Audio-Kit wurde für Sie bereits zugeordnet, das heißt, der
Wireless USB-Hostadapter erkennt nach dem Einschalten und erfolgreicher Treiberinstallation den
Wireless VGA-Adapter mit integriertem Audio automatisch. Nach der Softwareinstallation sollte das
Wireless USB Manager-Symbol in der Windows-Symbolleiste angezeigt werden. Doppelklicken Sie auf
dieses Symbol, um das Manager-Dienstprogramm zu öffnen.
Der Wireless USB Manager wird geöffnet und sagt
Ihnen, was als nächstes zu tun ist (Abbildung: Wireless
USB Manager-Begrüßungsbildschirm).
1. Schrauben Sie eine der mitgelieferten Dipolantennen
an den Wireless USB-Hostadapter und schließen Sie
den Wireless USB-Hostadapter an einen freien USBAnschluss an Ihrem Computer an. Sie haben auch die
Möglichkeit, den Wireless USB-Hostadapter an das
mitgelieferte USB-Cradle anzuschließen, wenn der
Adapter mobiler sein soll.
10
Page 56

SOFTWARE-/GERÄTEINSTALLATION
Abbildung: Meldung über die
Nachdem Sie den Wireless USB-Hostadapter an Ihren Computer angeschlossen haben, wird er von
Windows automatisch installiert und es sollte eine Meldung über die erfolgreiche Installation in der
Symbolleiste angezeigt werden (siehe Abbildung).
11
Page 57

SOFTWARE-/GERÄTEINSTALLATION
Abbildung: DisplayLink Manager
Abbildung: Wireless VGA-Adapter mit
integriertem Audio verbunden
Der Wireless USB-Hostadapter sucht nach dem Wireless VGA-Adapter mit integriertem Audio. Wenn die
Zuordnung zu den Geräten bestätigt ist, leuchten die Aktivitätsanzeigen an beiden Geräten auf. Das
DisplayLink Manager-Dienstprogramm (Abbildung: DisplayLink Manager) wird aktiviert und installiert ein
Symbol in der Windows-Symbolleiste. Das TruLink Wireless USB zu VGA mit integriertem Audio-Kit ist
jetzt voll funktionsfähig und einsatzbereit.
VERBINDUNG ÜBERPRÜFEN
Im Wireless USB Manager sollte das Symbol für das
drahtlose Gerät angezeigt werden (Abbildung:
Wireless VGA-Adapter mit integriertem Audio
verbunden). Dies bestätigt den aktiven
Verbindungsstatus.
12
Page 58

SOFTWARE-/GERÄTEINSTALLATION
Hinweis: Die Standardeinstellung erweitert Ihren Desktop nach rechts, so dass Sie auf dem drahtlosen
Anzeigegerät den Desktop-Hintergrund, jedoch anfangs noch keine Symbole sehen. Sie können diese
Einstellung namens „Erweiterter“ Modus weiter verwenden, so dass Sie Anwendungen und Dokumente
auf dem drahtlosen Anzeigegerät öffnen können, um Ihren Anzeigebereich zu vergrößern, oder Sie
können in den „Spiegel“-Modus umschalten, um das Bild Ihres Hauptanzeigegeräts zu klonen. Die
Einstellungen werden im nächsten Abschnitt beschrieben.
13
Page 59

VERWENDUNG DES WIRELESS USB ZU VGA MIT INTEGRIERTEM AUDIO-KIT
Abbildung: DisplayLink Manager
WIRELESS VGA-ANZEIGEEINSTELLUNGEN
Das TruLink Wireless USB zu VGA mit integriertem Audio-Kit enthält eine Reihe von Einstellungen, mit
denen Sie das Bild nach Bedarf konfigurieren können.
Nachdem Sie das Wireless USB zu VGA mit integriertem Audio-Kit installiert haben, wird ein MonitorSymbol in der Windows-Symbolleiste angezeigt. Dies ist der DisplayLink Manager. In diesem
Dienstprogramm können Sie die Bildeinstellungen anpassen. Um den Manager zu öffnen, klicken Sie mit
der rechten Maustaste auf das Symbol in der Windows-Symbolleiste (Abbildung: DisplayLink
Manager). Ein Menü (Abbildung: Menü „Anzeigeeinstellungen“) wird angezeigt und Sie haben die
Möglichkeit, Parameter wie Auflösung, Farbqualität, Spiegelmodus oder Erweiterungsmodus und mehr zu
ändern.
Hinweis: Wenn der Wireless VGA-Adapter mit integriertem Audio nicht verwendet wird, wird das
DisplayLink Manager-Symbol nicht in der Symbolleiste angezeigt.
14
Page 60

MENÜBESCHREIBUNGEN
VERWENDUNG DES WIRELESS USB ZU VGA MIT INTEGRIERTEM AUDIO-KIT
Bildschirmauflösung
Damit können Sie die Bildschirmauflösungen für Ihr Video anpassen. Bitte beachten Sie, dass, wenn alle
Optionen im Bereich von 800 x 600 ~ 1920 x 1080 angezeigt werden, nur die maximalen Werte Ihres
Monitor akzeptiert werden. Die optimale Auflösung finden bei den technischen Daten im
Benutzerhandbuch des Anzeigegeräts. Wenn Sie ein Notebook verwenden, ist die Bildschirmauflösung
nur im erweiterten Modus verfügbar, da im Spiegelmodus das zusätzliche Anzeigegerät die Einstellungen
Ihres Notebook-Hauptmonitors übernimmt und nicht auf eine andere Auflösung eingestellt werden kann.
Farbqualität
In dieser Einstellung können Sie die Farbwerte zwischen Mittel (16-bit) und Hoch (32-bit) einstellen.
Bildschirmdrehung
Mit dieser Einstellung können Sie den Bildschirm des Anzeigegeräts auf die Anzeigemodi Normal, Nach
links gedreht, Nach rechts gedreht oder Umgekehrt einstellen.
Erweitern nach
Wenn Sie den erweiterten Modus verwenden, können Sie mit dieser Option die Anzeige je nach
Monitorposition nach Rechts, Links, Oben oder Unten erweitern.
Erweitern
In diesem Modus können Sie den Desktop-Platz auf einen zusätzlichen Monitor „erweitern“, um
verschiedene Anwendungen anzeigen zu können.
Spiegel
In diesem Modus können Sie Ihren Hauptmonitor auf einem zusätzlichen Monitor duplizieren.
15
Page 61

VERWENDUNG DES WIRELESS USB ZU VGA MIT INTEGRIERTEM AUDIO-KIT
Erweitert ...
Damit können Sie zu den Einstellungen der „Anzeigeeigenschaften“ gehen und Änderungen an den
Anzeigeeinstellungen vornehmen.
16
Page 62

VERWENDUNG DES WIRELESS USB ZU VGA MIT INTEGRIERTEM AUDIO-KIT
AUDIOEINSTELLUNGEN
Nach Anschließen des Wireless VGA-Adapters mit integriertem Audio ist die PC-Audioausgabe
standardmäßig auf eine Lautstärke von 50% eingestellt.
Wenn Sie mit der rechten Maustaste auf das Audiosymbol in der Symbolleiste klicken, können Sie zu
Audioeigenschaften einstellen gehen, um Audioeinstellungen wie bei jedem anderen
Audioprojektionsgerät vorzunehmen.
Der Bildschirm Eigenschaften von Sounds und Audiogeräte wird geöffnet und Sie können dort
Einstellungen vornehmen. Der Name, den der Wireless VGA-Adapter mit integriertem Audio dem
Audioausgang gibt, lautet USB Multimedia Audio Device.
17
Page 63

Lampenanzeige:
Lampenanzeige:
Lampenanzeige:
Benutzer 1
Ein
Aus
Aus
Benutzer 2
Aus
Ein
Aus
Benutzer 3
Aus
Aus
Ein
Benutzer 4
Ein
Ein
Aus
Benutzer 5
Aus
Ein
Ein
Benutzer 6
Ein
Aus
Ein
VERWENDUNG DES WIRELESS USB ZU VGA MIT INTEGRIERTEM AUDIO-KIT
AUSWAHL DES WIRELESS USB-HOSTADAPTERS
Die Taste „HOST“ am Wireless USB zu VGA mit integriertem Audio-Kit wird zum Umschalten zwischen
Wireless USB-Hostadaptern verwendet. Wenn Sie diese Taste drücken, sucht das Wireless USB zu VGA
mit integriertem Audio-Kit nach dem nächsten zugeordneten Wireless USB-Hostadapter in seiner Liste
und verbindet sich mit ihm. Die Lämpchen 1-2-3 geben an, welcher Host verbunden ist. Ihre Position
ändert sich je nachdem, welcher Host zurzeit zugeordnet ist. Das LED-Schema ist wie folgt:
18
Page 64

VERWENDUNG DES WIRELESS USB ZU VGA MIT INTEGRIERTEM AUDIO-KIT
Zurücksetzen des Wireless USB zu VGA-Adapters mit integriertem Audio
Um alle dem Wireless USB zu VGA-Adapter mit integriertem Audio zugeordneten Wireless USB-
Hostadapter zu löschen, halten Sie die Taste „RESET“ 10 Sekunden lang gedrückt. Der Wireless USB zu
VGA-Adapter mit integriertem Audio löscht dann alle zugeordneten Wireless USB-Hostadapter aus seiner
Liste. Dem Wireless USB zu VGA-Adapter mit integriertem Audio muss dann wieder ein Wireless USBHostadapter mithilfe eines der Zuordnungsprozesse (Kabel- oder PIN-Zuordnung) zugeordnet werden,
um erneut eine Verbindung aufzubauen.
19
Page 65

VERWENDUNG DES WIRELESS USB ZU VGA MIT INTEGRIERTEM AUDIO-KIT
Abbildung: Wireless USB Manager-Symbol
Abbildung: Wireless VGA-Adapter mit
integriertem Audio nicht verbunden
WIRELESS USB MANAGER
Der Wireless USB Manager ist eine einfache und benutzerfreundliche Oberfläche für die Verwaltung Ihrer
Wireless USB-Geräte und die Kontrolle der Wireless USB-Hostadapter-Einstellungen. Der Wireless USB
Manager kann über das Wireless USB Manager-Symbol in der Windows-Symbolleiste aufgerufen werden
(Abbildung: Wireless USB Manager-Symbol).
Um den Wireless USB Manager zu starten,
doppelklicken Sie auf das Wireless USB ManagerSymbol. Im Hauptbereich finden Sie ein Symbol, das
Ihren Wireless USB-Geräteadapter darstellt. Wenn der
Wireless USB-Geräteadapter nicht angeschlossen ist,
ist das Symbol abgegraut (Abbildung: Wireless VGAAdapter mit integriertem Audio nicht verbunden). Wenn
der Wireless USB-Hostadapter angeschlossen und
einsatzbereit ist, ändert das Symbol die Farbe und zeigt
die Signalstärke an (Abbildung. Wireless VGA-Adapter
mit integriertem Audio verbunden - nächste Seite).
20
Page 66

Im Menü ANSICHT haben Sie die Möglichkeit, anzuzeigen, welche Art von Gerät Sie anzeigen möchten
VERWENDUNG DES WIRELESS USB ZU VGA MIT INTEGRIERTEM AUDIO-KIT
Abbildung: Wireless VGA-Adapter mit
integriertem Audio verbunden
(Alle Geräte, Verbundene Geräte und Nicht verbundene Geräte).
Im Menü OPTIONEN haben Sie die Möglichkeit, das Fenster „Hosteinstellungen“ zu öffnen und den
Funkbetrieb des Wireless USB-Hostadapters ein- oder auszuschalten.
Das Menü HILFE bietet schnelle Hilfe zum Verbinden von Geräten mit dem Wireless USB-Hostadapter.
21
Page 67

Abbildung: Hosteinstellungen – Allgemein
Um die Einstellungen des Wireless USB-Hostadapters zu verwalten, wählen Sie entweder
VERWENDUNG DES WIRELESS USB ZU VGA MIT INTEGRIERTEM AUDIO-KIT
„Hosteinstellungen“ im Menü „Option“ des Wireless USB Manager oder Sie klicken mit der rechten
Maustaste auf das Wireless USB Manager-Symbol in der Windows-Symbolleiste.
REGISTERKARTE „ALLGEMEIN“ (Abbildung: Hosteinstellungen –
Allgemein)
5. Enable this Wireless USB radio (Diesen Wireless USBFunkbetrieb aktivieren): Schalten Sie den Wireless USBFunkbetrieb ein oder aus.
6. Hostname: Ändern Sie den Namen des Wireless USBHostadapters.
7. Kabelzuordnungsregeln*: Immer, Nie oder Jedes Mal
fragen Standardmäßig fragt Sie Wireless USB jedes Mal,
wenn Sie ein Kabel zuordnen.
* Beachten Sie, dass die Kabelzuordnungsfunktion für die
Verwendung des Kit NICHT erforderlich ist. Diese Funktion
wird verwendet, wenn Sie zusätzliche Wireless USB-Geräte
kaufen.
22
Page 68

Abbildung: Hosteinstellungen – Erweitert
VERWENDUNG DES WIRELESS USB ZU VGA MIT INTEGRIERTEM AUDIO-KIT
REGISTERKARTE „ERWEITERT“ (Abbildung: Hosteinstellungen – Erweitert)
2. Channel Selection (Kanalauswahl): Mit dieser Funktion
können Sie manuell einen Funkkanal für die drahtlose
Kommunikation einstellen (Kombination aus Bandgruppe
und Kanal). Für optimale Leistung wird die automatische
Einstellung empfohlen.
23
Page 69

HÄUFIG GESTELLTE FRAGEN
9. Warum kann ich .NET nicht installieren?
Sie haben möglicherweise eine ältere Version von .NET, die verhindert, dass eine neuere installiert
wird. Deinstallieren Sie mithilfe von „Programme ändern oder entfernen“ oder „Programme und
Funktionen“ in der Systemsteuerung alle Versionen von Microsoft .NET Framework™, die älter als
Version 3.0 sind. Installieren Sie dann Microsoft .NET Framework™ mit dem Installationsprogramm
für das Wireless USB zu VGA mit integriertem Audio-Kit.
10. Mein Wireless USB-Hostadapter ist an meinen Computer angeschlossen und mein Wireless
USB zu VGA-Adapter mit integriertem Audio ist eingeschaltet, es wird aber nichts auf meinem
Anzeigegerät angezeigt. Was stimmt nicht?
Sehen Sie im Wireless USB Manager nach, ob es ein Symbol für den Wireless USB zu VGA-Adapter
mit integriertem Audio gibt. Wenn es kein Symbol gibt, versuchen Sie, den Wireless USBHostadapter zu trennen und wieder anzuschließen, um den Wireless USB zu VGA-Adapter mit
integriertem Audio erneut zu laden.
Wenn im Wireless USB Manager ein abgegrautes Symbol angezeigt wird, versuchen Sie, den
Wireless USB zu VGA-Adapter mit integriertem Audio zurückzusetzen, indem Sie den Stecker ziehen
und wieder anschließen. Das Symbol sollte nach dem Anschließen im Wireless USB Manager wieder
in Farbe angezeigt werden.
Wenn beide Aktivitätsanzeigen am Hostadapter und VGA-Adapter mit integriertem Audio leuchten,
sehen Sie in der Symbolleiste nach, ob der DisplayLink Manager dort angezeigt wird. Wenn das
DisplayLink Manager-Symbol nicht angezeigt wird, ist die DisplayLink-Software nicht aktiv. Sie
müssen den Computer neu starten, damit die Software die Installation fertigstellen kann.
24
Page 70

Immer noch keine Verbindung?
HÄUFIG GESTELLTE FRAGEN
Versuchen Sie, die Einstellung im DisplayLink Manager anzupassen. Einige Anzeigegeräte, zum
Beispiel Fernsehgeräte, können als Standardmonitor erkannt werden. Ihr PC stellt diese dann
standardmäßig auf 1280 x 1024 ein, was für den Monitor zu hoch sein kann. Wenn der Monitor diese
Auflösung nicht anzeigen kann, müssen Sie die Einstellung verringern.
11. Im DisplayLink Manager werden nicht alle verfügbaren Auflösungen angezeigt. Woran liegt
das?
Nicht alle Anzeigegeräte haben dieselben Fähigkeiten. PCs erkennen normalerweise die möglichen
Auflösungen von Computermonitoren. Bei HDTVs ist dies u.U. nicht möglich. Wenn Sie ein solches
Anzeigegerät anschließen, werden nur einige der Auflösungen im Dropdown-Feld in DisplayLink
Manager angezeigt.
12. Warum ist mein Bild ungleichmäßig?
Wenn das Bild ungleichmäßig ist, versuchen Sie, den Kanal zu wechseln (bitte sehen Sie dazu in den
Einstellungen des Wireless USB-Hostadapters nach) oder stellen Sie den Computer näher zum
Anzeigegerät. Vergewissern Sie sich außerdem, dass der PC die empfohlenen Anforderungen für die
Art der Videoanwendung erfüllt, die Sie verwenden.
Videowiedergabe mit Vollbild wird nur bei einer Auflösung von 1280 x 720 oder geringer empfohlen.
Um ein unregelmäßiges Bild zu vermeiden, skalieren Sie die Auflösung auf 1280 x 720 oder geringer.
Dies können Sie über den DisplayLink Manager ausführen.
25
Page 71

HÄUFIG GESTELLTE FRAGEN
13. Ich sehe einen blauen Bildschirm oder meinen Desktop-Hintergrund auf dem Anzeigegerät,
das mit dem Wireless USB zu VGA mit integriertem Audio-Kit verbunden ist, aber keine
Symbole. Stimmt etwas mit meinem Gerät nicht?
Nein, Ihr Gerät arbeitet normal. Die Standardeinstellung dieses Geräts erweitert Ihren Desktop auf
das zusätzliche Anzeigegerät. Mit dieser Funktion können Sie Symbole greifen oder Anwendungen
auf diesem Anzeigegerät öffnen, um den gesamten Anzeigeplatz zu vergrößern. Die Einstellung kann
zum Spiegelmodus geändert werden. Damit können Sie das Bild von Ihrem Hauptanzeigegerät oder
Laptop-Bildschirm auf das zusätzliche Anzeigegerät duplizieren.
14. Ich habe Probleme beim Übertragen des Bilds während der DVD-Wiedergabe, wenn ich
Windows Media Player verwende. Funktioniert mein Gerät nicht richtig? Falls ja, kann dies
behoben werden?
Ihr Gerät arbeitet normal. Windows Media Player funktioniert zwar, reagiert aber nicht in allen Fällen
richtig. Windows Media Player funktioniert nur auf dem mit dem Wireless USB zu VGA mit
integriertem Audio-Kit verbundenen Anzeigegerät, wenn Sie dies zu Ihrem primären Anzeigegerät
machen. Um es zu Ihrem primären Anzeigegerät zu machen, gehen Sie zur Registerkarte
„Einstellungen“ in Ihren Windows-Anzeigeeigenschaften und klicken Sie auf den DisplayLink-
Gerätemonitor und markieren „Dieses Gerät als primären Monitor verwenden“. Gehen Sie dann zu
Ihrem primären Monitor, und wenn „Meinen Windows-Desktop auf den Monitor erweitern“ markiert ist,
entfernen Sie die Markierung. Ihr Bild sollte jetzt zum Anzeigegerät übertragen werden, das mit dem
Wireless USB zu VGA mit integriertem Audio-Kit verbunden ist.
Bitte beachten Sie, dass bei diesem Setup die Verwendung des ursprünglichen Anzeigegeräts nicht
möglich ist. Wir empfehlen, wenn möglich, die Verwendung einer DVD-basierten Wiedergabesoftware
(z.B. PowerDVD, WinDVD), da diese Player weniger Wiedergabeprobleme haben und Ihr drahtloses
Anzeigegerät nicht das primäre sein muss.
26
Page 72

HÄUFIG GESTELLTE FRAGEN
15. Ich versuche, eine DVD auf meinem erweiterten Anzeigegerät wiederzugeben, es wird aber
kein Bild angezeigt.
Die Wiedergabe geschützter Inhalte wird von diesem Produkt nicht unterstützt. Das bedeutet, dass
einige DVD-Player und alle Blu-ray-Player kein Bild anzeigen, wenn Sie über das Anzeigegerät
verbunden sind.
16. Der Wireless USB-Hostadapter ist an meinen Computer angeschlossen, aber ich höre nichts
aus meinen Lautsprechern, wenn sie über den Wireless VGA-Adapter mit integriertem Audio
angeschlossen sind. Was stimmt nicht?
Sehen Sie im Wireless USB Manager nach, ob es ein Symbol für den Wireless VGA-Adapter mit
integriertem Audio gibt. Wenn es kein Symbol gibt, versuchen Sie, den Wireless USB-Hostadapter zu
trennen und wieder anzuschließen, um den Wireless VGA-Adapter mit integriertem Audio erneut zu
laden.
Wenn im Wireless USB Manager ein abgegrautes Symbol angezeigt wird, versuchen Sie, den
Wireless VGA-Adapter mit integriertem Audio zurückzusetzen, indem Sie den Stecker ziehen und
wieder anschließen. Das Symbol sollte nach dem Anschließen im Wireless USB Manager wieder in
Farbe angezeigt werden.
Immer noch keine Verbindung?
Wenn Sie eine Audioquelle, zum Beispiel einen A/V-Receiver verwenden, vergewissern Sie sich,
dass der Receiver am richtigen Eingabekanal angeschlossen ist, oder versuchen Sie die
Fehlerbehebung mit Ihrem Audioausgabegerät.
27
Page 73

TIPPS FÜR DIE VIDEOWIEDERGABE
7. Sie sollten Videos nur im „Erweiterten“ Modus wiedergeben.
8. Schalten Sie nicht zwischen dem „Spiegel“- und „Erweiterten“ Modus um, während ein Video auf dem
drahtlosen Anzeigegerät abgespielt wird. Dies kann den Video-Player verwirren und dazu führen,
dass er die Wiedergabe stoppt. Sie sollten die Wiedergabe stoppen und dann den Anzeigemodus
umschalten, falls nötig. Sie können dann die Wiedergabe erneut starten.
9. Vermeiden Sie es, das Video während der Wiedergabe von einem Anzeigegerät zu einem anderen
zu ziehen. Es kann sein, dass in diesem Fall die Video-Wiedergabe gestoppt wird. Um dieses
Problem zu vermeiden, öffnen Sie Ihren Media-Player auf dem drahtlosen Anzeigegerät, schließen
Sie den Media-Player und öffnen Sie ihn erneut. Wenn Sie ihn erneut öffnen, sollte er auf dem
drahtlosen Anzeigegerät geöffnet werden. Sie können dann die Wiedergabe des Videos von dort aus
starten.
10. Vermeiden Sie es, die Auflösung des drahtlosen Anzeigegeräts zu ändern, während ein Video
abgespielt wird, da dies dazu führen kann, dass das Bild zu einem anderen eventuell
angeschlossenen Bildschirm verschoben wird.
11. Wenn Sie Probleme mit QuickTime-Filmtrailern haben, deaktivieren Sie DirectX im QuickTime-Menü
„Optionen“. Sie finden es in der Registerkarte „Erweitert“ in den Plugin-Einstellungen des QuickTimePlayers.
12. Wenn Sie ein Notebook verwenden, sollten die Energieeinstellungen auf „Hohe Leistung“ oder einen
ähnlichen Modus eingestellt sein, je nachdem welches Betriebssystem Sie verwenden, um
sicherzustellen, dass Ihnen alle erforderliche CPU-Ressourcen zur Verfügung stehen.
Auf unserer Website finden Sie diese und andere Tipps sowie häufig gestellte Fragen. www.c2g.com
28
Page 74

TECHNISCHE DATEN
Systeminformationen
Betriebssystem
Unterstützung: Microsoft XP 32-bit, Microsoft Vista 32-bit/64-bit, Microsoft Windows 7
Betriebsbereich: Bis zu 10 Meter
PHY-Datenrate: 53,3 Mbps, 80 Mbps, 106,6 Mbps, 160 Mbps, 200 Mbps, 320 Mbps, 400 Mbps, 480 Mbps
PHY-Kompatibilität: WiMedia 1.0 MAC & 1.1 PHY-kompatibel und Unterstützung für 1.2 PHY
Frequenz: 3,1 GHz bis 4,8 GHz (WiMedia-Bandgruppe 1); 6,336 ~ 7,920 GHz (WiMedia-Bandgruppe 3)
HF-Modulationstyp: QPSK/DCM
Anzahl der Kanäle: 7 Kanäle (3 FFI + 4 TFI)
USB-Spezifikation: Certified Wireless USB 1.0
Sicherheit: AES 128-bit
Antennentyp: Ungerichtet, SMA + I-PEX Dipolantenne 81XXAA15.G05 (Typ-A)
Technische Daten des Wireless USB zu VGA-Adapters mit integriertem Audio
Chipsatz: RTU 7105 Modul, DisplayLink DL-165G-Video
Schnittstelle: USB 2.0 Mini-B für drahtgebundene Zuordnungsmethode, HD15-Videoausgang, 3,5-mm-Stereoausgang
Videoauflösung: 800 x 600 ~ 1920 x 1080
Video-Streaming: Bis zu 720p (720p nur bei einer Auflösung von 1280 x 720 oder geringer verfügbar)
Bildschirmmodus: Erweiterter und Spiegelmodus
Farbtiefe: 32-bit True Colour
Audioausgang: 2 CH DAC-Ausgang
Audioabtastfrequenz: 8 kHz, 16 kHz, 44,1 kHz bis 48 kHz mit 16-bit Auflösung
Zuordnungsmodus: Voreingestellte Zuordnung, Kabelzuordnung und PIN-Zuordnung;
Speichert bis zu 16 zugeordnete Hosts
Nativer Modus: Für die Wiedergabe hochauflösender Bilder
Reset-Schalter: Wird für das Löschen des Zuordnungsverlaufs durch 10 Sekunden langes Gedrückthalten der Taste verwendet.
Umgebungsdaten
Betriebsumgebung: Betriebstemperatur: 10 ~ 40 Grad Celsius
Lagertemperatur: -10 ~ 60 Grad Celsius
Stromdaten
Stromverbrauch: 3,3 W
Max. Ausgangsleistung: -41,3 dBm/MHz
Netzadapter: 5 V, 2,5 A, 100 - 240 V 50 - 60 Hz 0,5 A
29
Page 75

TECHNISCHE DATEN
Daten des Wireless USB-Hostadapters
Chipsatz: RTU 7012; RTU 7300
Schnittstelle: USB 2.0 Typ A
Antenne: Ungerichtet, SMA + I-PEX Dipolantenne 81XXAA15.G05 (Typ-A)
Strommodus: Stromversorgung über den USB-Anschluss
Umgebungsdaten
Betriebsumgebung: Betriebstemperatur: 10 ~ 40 Grad Celsius
Lagertemperatur: -10 ~ 60 Grad Celsius
Stromdaten
Betriebsleistung: 203 mA
Ruhemodus
Leistung: 170 mA
Zertifizierung: CE/FCC/WUSB-IF
30
Page 76

C2G™-GARANTIEERKLÄRUNG
Hauptsitz in Großbritannien:
Road 30 Hortonwood Industrial Estate
Telford, Shropshire TF17AB
0800.328.2916
www.c2g.com
Wir bei C2G möchten, dass Sie mit Ihrem Kauf vollständig zufrieden sind. Deshalb bieten wir eine
einjährige Garantie auf dieses Gerät. Wenn während dieser Garantie Probleme aufgrund eines
Fertigungs- oder Materialsfehlers auftreten, reparieren oder ersetzen wir dieses Gerät. Wenden Sie sich
zum Anfordern einer Return Merchandise Authorisation (RMA)-Nummer an unseren Kundenservice
unter 0800 328 2916 oder www.c2g.com.
31
Page 77

FCC
Dieses Gerät wurde getestet und entspricht den Bestimmungen für ein digitales Gerät der Klasse B gemäß Teil 15 der
FCC-Bestimmungen. Diese Grenzwerte bieten angemessenen Schutz vor schädlichen Störungen beim Betrieb des Geräts
in Wohngebieten. Dieses Gerät erzeugt und verwendet Hochfrequenzenergie und strahlt sie ab. Wenn es nicht gemäß der
Anleitung installiert wird, kann es schädliche Funkstörungen verursachen. Es wird jedoch keinerlei Garantie dafür
übernommen, dass bei einer bestimmten Installation keine Störungen auftreten. Sollte dieses Gerät den Radio- und
Fernsehempfang stören, was sich durch Ein- und Ausschalten des Geräts nachprüfen lässt, müssen Sie die Störungen
durch eine oder mehrere der folgenden Maßnahmen beheben:
● die Empfangsantenne verlegen oder anders ausrichten
● den Abstand zwischen dem Gerät und dem Empfänger vergrößern
● das Gerät an eine Steckdose eines Schaltkreises anschließen, der nicht mit dem Empfangsgerät verbunden ist
● einen Händler oder erfahrenen Rundfunk-/Fernsehtechniker zu Rate ziehen
Vorsicht: Bei Änderungen oder Umbauten, die nicht ausdrücklich von der für die Konformität verantwortlichen Partei
genehmigt wurden, verliert der Benutzer die Berechtigung zum Betrieb des Geräts.
Dieses Gerät entspricht den Anforderungen von Teil 15 der FCC-Bestimmungen. Für den Betrieb gelten die folgenden zwei
Bedingungen: (1) dieses Gerät darf keine schädlichen Störungen verursachen; (2) dieses Gerät muss jede empfangene
Störung akzeptieren, auch solche Störungen, die unerwünschte Funktionen verursachen können.
Dieses Gerät und seine Antenne(n) dürfen nicht bei einer anderen Antenne bzw. einem anderen Sender aufgestellt oder in
Verbindung damit betrieben werden.
Ein Ultrabreitbandgerät darf gemäß diesen Bestimmungen nur während der Übertragung an den entsprechenden
Empfänger Signale senden. Die Übertragung wird nach 10 Sekunden abgebrochen, wenn vom Empfänger innerhalb dieser
Zeit keine Empfangsbestätigung eingeht. Die Empfangsbestätigung muss vom Sender weiterhin mindestens alle
10 Sekunden empfangen werden; anderenfalls wird die Übertragung abgebrochen.
Kennzeichnung – CE 0700
32
Page 78

WICHTIGE SICHERHEITSHINWEISE
! Schließen Sie das Gerät nicht an eine Steckdose an, die nicht genug Strom für das Gerät liefert. Die entsprechenden
Daten für das Gerät finden Sie in diesem Handbuch.
! Flüssigkeit:
Wenn auf dieses Gerät oder den dazugehörigen Netzadapter Flüssigkeiten geschüttet wurden, darf es/er nicht
verwendet werden.
Verwenden Sie dieses Produkt nicht im Freien, da Regen, Schnee, Hagel usw. das Produkt beschädigen können.
! Ziehen Sie bei einem Gewitter den Netzstecker des Geräts.
! Stellen Sie dieses Produkt nicht in der Nähe von Gegenständen auf, die Hitze erzeugen, zum Beispiel tragbare
Heizgeräte, Heizöfen oder Heizungsleitungen.
! ES BEFINDEN SICH KEINE VOM BENUTZER REPARIERBAREN TEILE IM GERÄT.
Versuchen Sie nicht, das Produkt zu öffnen und den internen Schaltkreis freizulegen. Wenn das Produkt defekt ist,
ziehen Sie den Netzstecker und sehen Sie im Abschnitt mit den Garantieinformationen in diesem Handbuch nach.
©2009 C2G. Microsoft, Windows und Vista sind eingetragene Marken oder Marken der Microsoft Corporation in den
Vereinigten Staaten und/oder anderen Ländern. Dieses Produkt wird nicht von der Microsoft Corporation unterstützt oder
gefertigt.
WiMedia ist eine eingetragene Marke der WiMedia Alliance. Dieses Produkt wird nicht von der WiMedia Alliance gefertigt.
33
Page 79

ANHANG
ZUORDNUNG ZU ANDEREN GERÄTEN
ZUORDNUNGSKONZEPT
Um eine sichere Drahtlosverbindung aufzubauen, müssen sowohl Ihr Wireless USB-Hostadapter als auch
der Wireless VGA-Adapter mit Audio Informationen miteinander austauschen. Dazu ist eine Kabel- oder
PIN-Zuordnung erforderlich.
ZUORDNUNGSVORGANG
Wenn Sie zusätzliche Certified Wireless USB-Hostadapter kaufen, zum Beispiel den TruLink Wireless
USB-Hostadapter, müssen Sie sie dem Wireless VGA- und Audiogeräte-Adapter zuordnen. In der
Dokumentation des Wireless USB-Geräts finden Sie weitere Informationen zu den Einstellungen für die
Zuordnung oder wenden Sie sich an den Hersteller des Produkts, wenn Sie Hilfe benötigen.
34
Page 80

Abbildung: Kabelzuordnung
KABELZUORDNUNGSVERFAHREN
ANHANG
Kabelzuordnungsschritte. Die abgebildeten Beispiele/Abbildungen beziehen sich auf die Zuordnung des
TruLink Wireless USB zu VGA mit integriertem Audio-Kit.
1. Vergewissern Sie sich, dass das Wireless USB-Hostadapter-Dienstprogramm läuft. Suchen Sie das
Wireless USB Manager-Symbol in der Windows-Symbolleiste (Abbildung: Wireless USB Manager).
2. Vergewissern Sie sich, dass der Schalter WIRELESS/WIRED am Wireless USB zu VGA-Adapter mit
integriertem Audio sich in der Position WIRELESS befindet.
3. Schließen Sie den Netzadapter des TruLink Wireless USB zu VGA-Adapters mit integriertem Audio an.
4. Schließen Sie das USB-Kabel an einen freien USB-Anschluss am Computer und am Wireless USB zu
VGA-Adapter mit integriertem Audio an.
5. Schließen Sie die Kabelzuordnung ab, indem Sie die Schaltfläche „Zuordnung akzeptieren“ drücken,
wenn Sie aufgefordert werden (Abbildung: Kabelzuordnung).
6. Entfernen Sie das USB-Kabel von Ihrem Wireless VGA-Adapter mit integriertem Audio und Computer.
35
Page 81

Abbildung: TruLink Wireless VGA-Adapter mit
integriertem Audio verbunden
Zugeordnete Certified Wireless USB-Geräte werden als Symbole im Wireless USB Manager angezeigt.
ANHANG
Wenn zertifizierte Wireless USB-Geräte verbunden sind, wird das Symbol in Farbe angezeigt (Abbildung:
TruLink Wireless VGA-Adapter mit integriertem Audio verbunden).
Hinweis: Sie können das Wireless USB-Geräte umbenennen oder löschen, indem Sie mit der rechten
Maustaste auf das Gerätesymbol im Wireless USB Manager klicken und „Umbenennen“ auswählen. Sie
können die Adapterzuordnung für ein drahtloses Gerät durch Auswählen von „Löschen“ löschen.
36
Page 82

Abbildung: Erkennungsmodus-Bildschirm
PIN-ZUORDNUNGSVERFAHREN
ANHANG
PIN-Zuordnungsschritte. Die abgebildeten Beispiele/Abbildungen beziehen sich auf die Zuordnung des
TruLink Wireless USB zu VGA mit integriertem Audio-Kit.
1. Vergewissern Sie sich, dass der Wireless USB zu
VGA-Adapter mit integriertem Audio eingeschaltet
und der Wireless USB-Hostadapter mit dem
Computer verbunden ist. Klicken Sie auf die
Schaltfläche „Erkennungsmodus“ (Abbildung:
Erkennungsmodus-Bildschirm).
37
Page 83

Abbildung: Erkennungsmodus wird durchgeführt
ANHANG
2. Der Wireless USB-Hostadapter sucht nach dem
Wireless USB zu VGA-Adapter mit integriertem Audio
innerhalb seines Bereichs. Beachten Sie, dass dieser
Vorgang bis zu 20 Sekunden dauern kann
(Abbildung: Erkennungsmodus wird durchgeführt).
3. Sobald der Wireless USB-Hostadapter und der Wireless USB zu VGA-Adapter mit integriertem Audio
Sicherheitsinformationen ausgetauscht haben, wird ein Dialogfeld angezeigt und Sie können die PIN
des Adapters für das drahtlose Gerät eingeben.
38
Page 84

ANHANG
8. Geben Sie die PIN des Wireless USB zu VGA-Adapters mit integriertem Audio ein (4-stellige PIN) und
klicken Sie auf „Zuordnung akzeptieren“. Das Wireless USB zu VGA mit integriertem Audio-Kit und
der Wireless USB-Hostadapter sind nun zugeordnet und betriebsbereit.
PIN-ÄNDERUNG
Die voreingestellte PIN-Einstellung für den Wireless VGA- und Audiogeräte-Adapter lautet „1234“. In
diesem Abschnitt finden Sie eine Anleitung, wie Sie die PIN zu einem anderen 4-stelligen Wert ändern.
WICHTIG: Die Anwendung, die zum Ändern der PIN verwendet wird, wird unter Vista 64-bit nicht
unterstützt.
2. Vergewissern Sie sich, dass der Wireless USB-Hostadapter und der Wireless VGA-Adapter mit
integriertem Audio nicht mit dem Computer verbunden sind.
2. Öffnen/starten Sie die Anwendung „PIN Update“ (C:\Programme\Wireless
USBManager\Utility\PINUpdate). Das Dienstprogramm beginnt mit der Suche nach dem Wireless
USB-Adapter mit integriertem Audio.
39
Page 85

ANHANG
3. Vergewissern Sie sich, dass der Schalter WIRELESS/WIRED am Wireless USB zu VGA-Adapter mit
integriertem Audio sich in der Position WIRELESS befindet und das Netzkabel an das Wireless USB
zu VGA mit integriertem Audio-Kit angeschlossen ist. Schließen Sie das USB-Kabel an den Wireless
USB zu VGA-Adapter mit integriertem Audio und einen freien USB-Anschluss am Computer an,
während das Feld Nach Gerät wird gesucht angezeigt wird.
40
Page 86

ANHANG
4. Klicken Sie auf „Diese Treibersoftware trotzdem installieren“.
5. Um die PIN zu ändern, klicken Sie auf „PIN ändern“.
6. Geben Sie eine 4-stellige PIN (0 - 9) ein und klicken Sie auf „OK“.
7. Wenn Ihre PIN gültig ist, wird ein Fenster mit der neuen PIN angezeigt. Drücken Sie „OK“. Ihre PIN
wurde erfolgreich geändert. WICHTIG: Bitte beenden Sie das Trulink PIN-Dienstprogramm
(Schaltfläche „Beenden“ wie in der Abbildung bei Schritt 5 dargestellt), bevor Sie Ihren Wireless USB
zu VGA-Adapter mit integriertem Audio vom PC trennen.
41
Page 87

42 43
Page 88

Weitere Informationen über dieses Produkt und aktualisierte Treiber,
Handbücher und häufig gestellte Fragen finden Sie auf unserer Website.
www.c2g.com
VER R1.04.04.12
Page 89

GUIDE D’UTILISATION
KIT SANS FIL USB VERS VGA AVEC AUDIO INTEGRE
Modèle : 81667
44
Page 90

TABLE DES MATIERES
Introduction.................................................................................................................................................2
Caractéristiques..........................................................................................................................................3
Configuration du système...........................................................................................................................4
Contenu du pack.........................................................................................................................................5
Présentation de l'appareil
Adaptateur hôte USB sans fil .............................................................................................................6
Adaptateur VGA sans fil avec audio intégré.......................................................................................7
Installation du logiciel/de l'appareil..............................................................................................................8
Se servir du kit sans fil USB vers VGA avec audio intégré......................................................................14
Questions souvent posées........................................................................................................................24
Conseils de lecture vidéo..........................................................................................................................28
Spécifications techniques..........................................................................................................................29
Garantie C2G ............................................................................................................................31
FCC...........................................................................................................................................................32
Informations importantes de sécurité........................................................................................................33
Annexe
Association avec d'autres appareils.................................................................................................34
Procédure d'association des câbles.................................................................................................35
Procédure d'association du code PIN...............................................................................................37
Procédure de changement du code PIN...........................................................................................39
1
Page 91

INTRODUCTION
Merci pour votre achat du kit sans fil USB vers VGA avec audio intégré TruLink™. Le kit USB vers VGA
avec audio intégré TruLink™comprend tout ce dont vous avez besoin pour diffuser sans fil vos contenus
vidéo et audio, à partir de votre ordinateur vers un écran, projecteur ou une télévision à distance. En
utilisant la technologie ultralarge bande, le kit USB vers VGA avec audio intégré permet la connectivité
sans fil dans une pièce pour des distances entre l'ordinateur et l'équipement d'affichage pouvant aller
jusqu'à 10 mètres. Cette connexion sans fil très sécurisée est idéale pour les présentations en salle de
classe ou en salle de conférence ou encore pour afficher du contenu provenant de votre ordinateur
portable sur votre système de divertissement maison. Nous vous recommandons de lire en entier ce
manuel et de le conserver pour future référence.
2
Page 92

FONCTIONS
Support vidéo et audio en un seul adaptateur d'appareil, connectant sans fil un ordinateur à un écran
externe, prenant en charge une haute résolution vidéo UXGA/WSXGA et jack audio stéréo 3,5 mm.
Fonctionne à la fois en mode bureau étendu et double écran.
Prend en charge le format natif en lecture de vidéo haute résolution
Jusqu'à six ordinateurs peuvent partager un écran sans fil et un ensemble de haut-parleurs.*
Un ordinateur peut diffuser plus de six affichages audio/vidéo**
Diffusion vidéo prise en charge jusqu'à 720p (720p disponible uniquement à une résolution de
1280x720 ou inférieure)
Connectivité à l'intérieur d'une pièce, sans fil jusqu'à 10 mètres
L'ultralarge bande opère à la fréquence de 3,1GHz à 4,8GHz (Groupe de bande WiMedia™ 1&3)
Conformité USB 1.0 Wireless™ certifiée
Conformité WiMedia 1.0 MAC & 1.1 PHY
*Demande l'achat d'adaptateurs hôtes USB supplémentaires pour les ordinateurs supplémentaires.
**Demande l'achat d'adaptateurs d'appareil audio VGA intégrés supplémentaires pour les écrans
supplémentaires.
3
Page 93

CONFIGURATION DU SYSTEME
Microsoft® Windows® XP 32 bits avec Service Pack 3 ou supérieur ; Microsoft® Vista® 32 bits /64 bits
; ou Windows 7 32 bits /64 bits
Configuration minimale (applications Bureau, Productivité, et Web)
Windows XP- Processeur : 1,66 GHz Atom ou Celeron
Ram : 512 Mo
Windows Vista/
Windows 7- Score global WEI : 3.0 ou supérieur
Processeur : 1,4 GHz Core2Duo ou supérieur
Mémoire : 1 Go
Carte vidéo : tout processeur graphique
Configuration recommandée (lecture vidéo plein écran)
Windows XP- Processeur : 1,8 GHz Core2Duo ou supérieur
RAM : 1Go
Windows Vista/
Windows 7- Score global WEI : 4,5 ou supérieur
Processeur : 2,4 GHz Core2Duo ou supérieur
Mémoire : 2 Go
Carte vidéo : Intel GMA X4500, série ATI Radeon HD3, série NVidia GeForce 9 ou
supérieur
Vous devez aussi disposer des privilèges administratifs de votre ordinateur pour installer le pack
logiciel.
4
Page 94

CONTENU DU PACK
Adaptateur hôte USB sans fil pour votre ordinateur
Adaptateur VGA sans fil avec audio intégré pour votre écran
Deux antennes dipôles
Câble A mâle/mini B mâle 0,9 m USB
Câble mâle/mâle 0,3 m VGA
Câble 3,5 mm mâle/mâle 0,9 m
Câble 3,5 mm mâle à 2 RCA mâle 0,9 m
Adaptateur d'alimentation 5V, 2,5A
Câble d'extension USB avec berceau
Support de fixation
Deux vis autotaraudeuses
Guide de démarrage rapide
CD du pilote
Manuel de l'utilisateur
5
Page 95

1
2
PRESENTATION DE L'APPAREIL
ADAPTATEUR HOTE USB SANS FIL
5. Lien : Indicateur de connexion des données
Le LED est continu quand le dispositif de transfert est connecté
Le LED clignote lorsque les données sont transférées
6. PWR : Alimentation
Le LED est continu quand il est alimenté par le PC
6
Page 96

19. VGA : Indicateur d'activité du VGA
Le LED est continu quand le câble de l'écran est connecté.
Le LED clignote lorsque les données sont en cours de
transfert.
20. PWR : Voyant d'alimentation
Le LED est continu lorsqu'il est sous tension.
21. 1-2-3: Indicateur d'état
Le(s) numéro(s) illuminé(s) indique(nt) l'adaptateur hôte
USB sans fil qui est en cours de synchronisation avec
l'adaptateur VGA sans fil avec audio intégré.
22. Fiche d'alimentation
Entrée de l'adaptateur d'alimentation
23. Commutateur sans fil/filaire
Sélectionnez le mode 'sans fil' ou 'filaire' en déplaçant le
commutateur.
24. Réinitialisation
L'historique d'association peut être effacé en appuyant le
bouton tout en le maintenant pendant 10 secondes.
25. Sélection de l'hôte :
Ce bouton sert à sélectionner un adaptateur hôte USB sans
fil différent
26. Sorties VGA/audio
Connexions de sortie HD15 et 3,5 mm pour la connexion à
votre source vidéo et audio
27. Entrée USB
En mode sans fil, ce connecteur sert à l'association des
câbles.
En mode filaire, ce connecteur sert à l'opération filaire de
l'adaptateur VGA sans fil avec audio intégré.
3
4 5 6 7 8
9
ADAPTATEUR VGA SANS FIL AVEC AUDIO INTEGRE
1
2
PRESENTATION DE L'APPAREIL
7
Page 97

INSTALLATION DU LOGICIEL/DE L'APPAREIL
REMARQUE IMPORTANTE :
Pour une installation sur Windows XP, le Service Pack 3 (SP3) est requis. Vérifiez qu'il a
été installé avant d'installer le logiciel du kit sans fil USB vers VGA avec audio intégré.
Avant d'installer le logiciel, assurez-vous que l'adaptateur hôte USB sans fil et l'adaptateur
VGA sans fil avec audio intégré ne sont pas connectés à l'ordinateur. Assurez-vous
également que l'adaptateur VGA sans fil avec audio intégré ne se trouve pas sous tension.
ÉTAPE 1 : INSTALLATION DU LOGICIEL
Insérez le CD fourni pour mettre en route l'exécution du logiciel. Veuillez suivre les instructions de
l'assistant InstallShield afin de procéder aux diverses étapes de l'installation du logiciel.
8
Page 98

INSTALLATION DU LOGICIEL/DE L'APPAREIL
ÉTAPE 2A : INSTALLATION DE L'APPAREIL POUR L'ADAPTATEUR VGA SANS FIL AVEC AUDIO INTEGRE
1. Connectez l'une des antennes dipôles à l'adaptateur VGA sans fil avec audio intégré.
2. Allumez votre appareil d'affichage (c.-à-d. moniteur, projecteur, télévision).
3. À l'aide d'un câble VGA mâle à mâle, connectez l'adaptateur VGA sans fil avec audio intégré à votre
appareil d'affichage.
4. Grâce à un câble de 3,5 mm ou à un câble audio L/R de 3,5 mm, connectez l'adaptateur VGA sans fil
avec audio intégré à votre appareil d'affichage, votre appareil audio (récepteur A/V) ou vos hautparleurs PC (équipés d'un câble de 3,5 mm, joint).
5. Branchez l'adaptateur d'alimentation au kit sans fil USB vers VGA avec audio intégré.
9
Page 99

Figure : Gestionnaire USB sans fil
INSTALLATION DU LOGICIEL/DE L'APPAREIL
Figure : Écran d'accueil du Gestionnaire
USB sans fil
ÉTAPE 3 : INSTALLATION DU PILOTE POUR L'ADAPTATEUR HOTE USB SANS FIL
Votre kit sans fil USB vers VGA avec audio intégré a été préassocié pour vous, ce qui veut dire que
l'adaptateur hôte USB sans fil reconnaîtra automatiquement l'adaptateur VGA sans fil avec audio intégré
quand il sera mis sous tension et que son pilote aura été installé de manière satisfaisante. Après
l'installation du logiciel, vous devriez voir l'icône Gestionnaire USB sans fil dans la barre d'état Windows.
Double-cliquez sur cette icône afin d'ouvrir l'utilitaire du gestionnaire.
Le gestionnaire USB sans fil s'ouvrira et vous instruira
de la marche à suivre (Figure : Écran d'accueil du
Gestionnaire USB sans fil).
1. Vissez l'une des antennes dipôles fournies à
l'adaptateur hôte USB sans fil et connectez l'adaptateur
hôte USB sans fil à un port USB disponible de votre
ordinateur. Vous pouvez aussi connecter l'adaptateur
hôte USB sans fil au berceau USB fourni dans le pack si
vous avez besoin de rendre l'adaptateur plus mobile.
10
Page 100

INSTALLATION DU LOGICIEL/DE L'APPAREIL
Figure : Message d'installation réussie
Après avoir connecté l'adaptateur hôte USB sans fil à votre ordinateur, Windows l'installera
automatiquement et vous devriez recevoir un message d'installation réussie dans votre barre d'état telle
que celui indiqué par l'illustration ci-dessous.
11
 Loading...