

Page 1
Page 2
Chapter
VGA resolution up to 1600 x 1200 in 16.7 million
image into IV and HDTV (High Definition TV) with finest quality, which is the most effective way of turning
your PC into a wide screen
9
-
level Adaptive Flicker Control, Video Quality Enhancement, Liner Zoom-n-Pan, and Remote Control to
provide crisper video image and user
I.
Product Introduction
ct
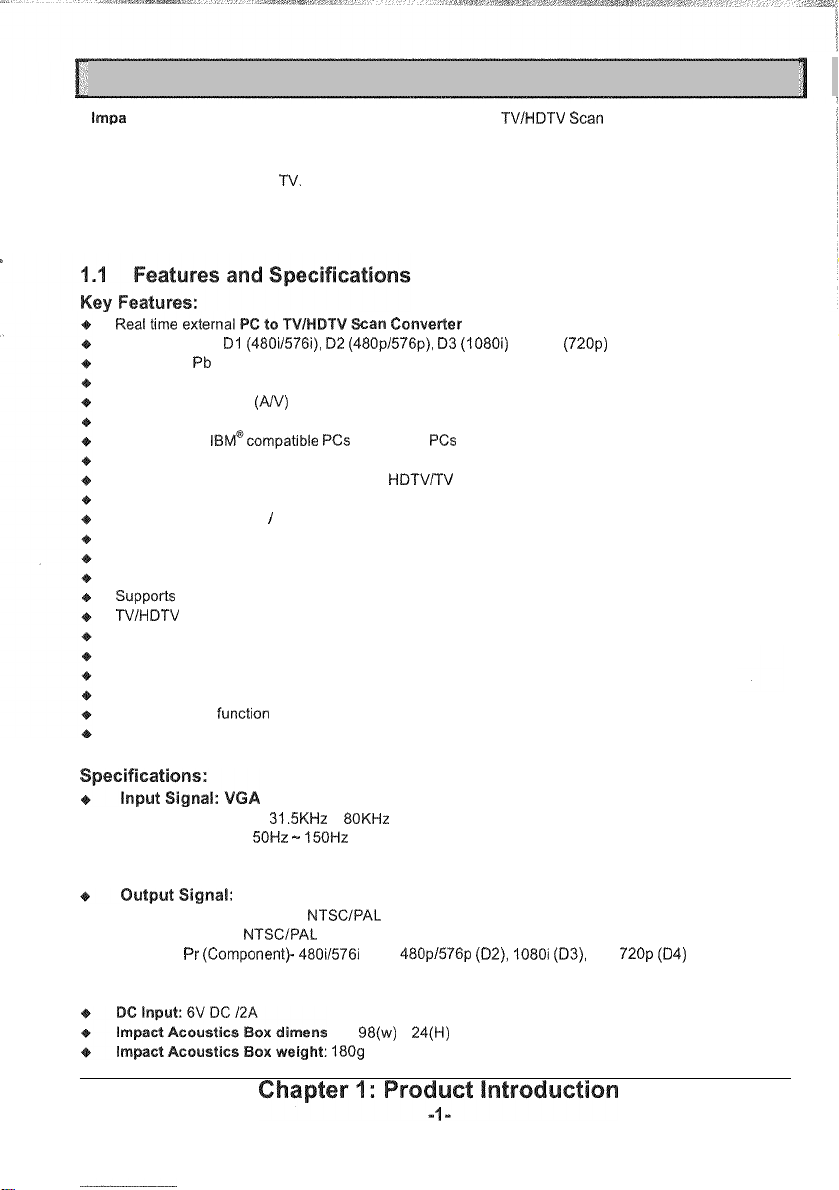
Acoustics is your best choice for professional PC to TVIHDTV Scan Converter. It accepts input
-
color depth. lrnpact Acoustics converts the computer
Impact Acoustics offers powerful features such as, 64 Position Marks,
-
friendly environments.
Supports HDTV Dl (480i1576i), D2 (480p/576p), 03 (1080i) and D4 (720p) video resolution
Supports
Switches video to NISC and PAL TV
Supports Composite
Accepts VGA resolution from 640x480 up to 1600x1200 in 16.7 million
Supports with
Plug
Simultaneous display on PC monitor and
Full functions Infrared Remote Control
Full screen Underscan
9
Video Quality Enhancement
Supports
Horizontal and Vertical frequency detection to adjust picture position
Linear Zoom and Pan function
Save settings during power
64 Position Marks to save after Zooming and Panning
Screen Freeze
1:1 Analog to Digital sarnple rate
Y
-
Video out
-n-
play (No! software required)
-
Qverscan
-
off
-
-
-
level Adaptive Flicker Control adjustment
"
Power Down Pass-Through" function when system is off (Between VGA and monitor)
Horizontal Frequency:
Vertical Frequency: 50Hz
Vertical lines: 1200 lines
(1)
Composite Video (AV)
(2)
S-VHS Video
(3) Y Pb Pr (Component)- 480il576i (Dl), 480pl576p (D2), '1080i (D3), and 720p (84)
(4) Computer Monitor
-
color depth
ion:
x
Page 3

Check your Impact Acoustics pack;
I.
Scan Converter box
for the following items
Remote Control (with battery)
. Power Adapter
VGA Cable
i
. Compos~te Vldeo
TV, HDTV, or Projector
Business and education presentation
Demonstration tape production
Educational aid-tools
Home entertainment
(AN)
Cable
signal generator
Pb
Pr
(Component) V~deo
User's Manual
.
Cable
Page 4
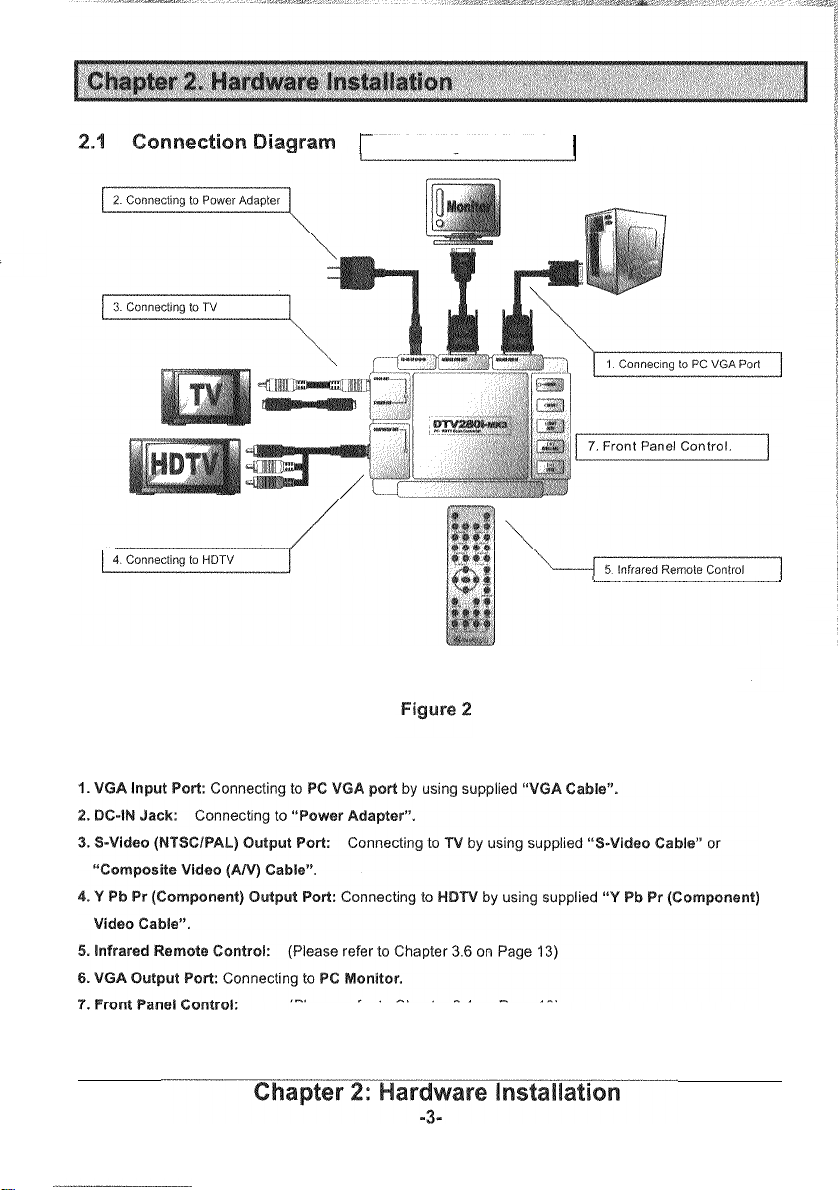
6.
Connecting to PC Monitor.
(Please
refer
to
Chapter
3.4
on
Page
10)
Page 5
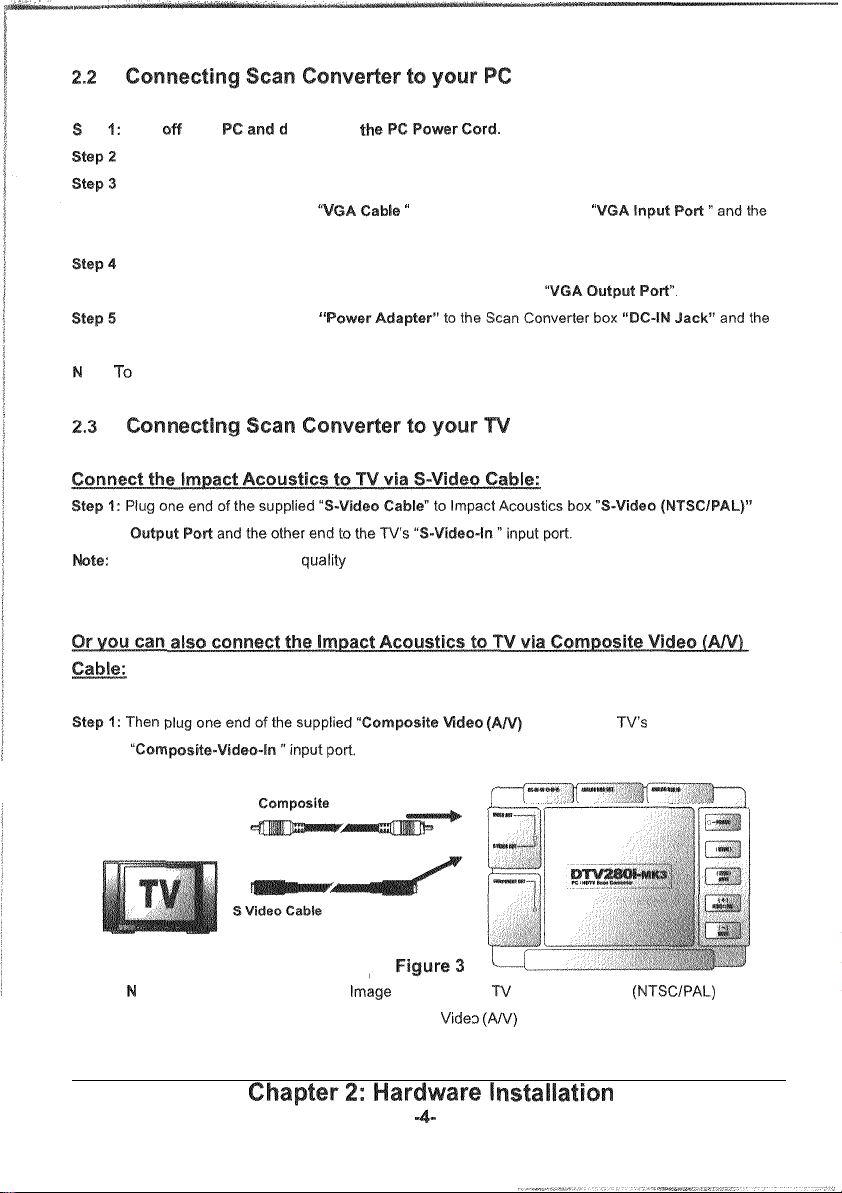
(Please refer to Figure 2 on page
tep
Turn
:
Disconnect the Monitor Cable from your computer VGA port.
:
Connect the Scan Converter to PC VGA port:
Plug one end of the supplied
other end to the PC's VGA port.
:
Connect the Scan Converter to PC Monitor:
Plug one end of PC's Monitor Cable to the Scan Converter box
:
Connect one end of supplied
ate:
S-Video provides a higher qualit), video than Composite Video and should be used if your TV has a
S
-
Video Input.
your isconnect
other end to an electrical outlet
avoid
damaging your Scan Converter,
to the Scan Converter box
use
only
the
supplied Power
(Please refer to Figure 3 as below)
Adapter.
3)
(AN)
ote:
The converted Computer Image will transfer
"
by using the S-Video Cable or Composite Vide1
Port
Gable
Cable" lo the TV's
to
through "S-Video (NTSCIPAL) Output
Page 6
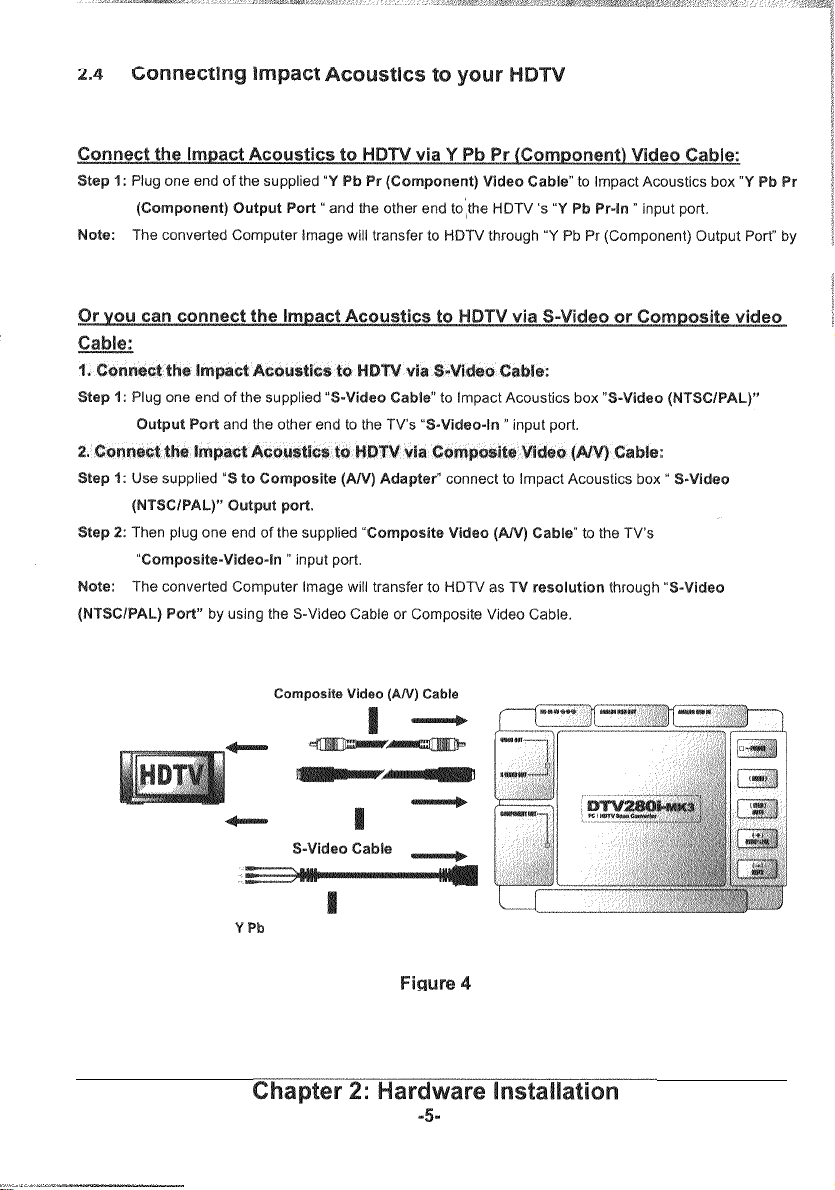
using
below)
the
Y
Pb Pr (Component) Video Cable,
(Please refer to Figure 4 as
Pr
(Component) Video Cable
Page 7

Make sure your lmpact Acoustics is secured and correct install with your PC. (Please refer to the
Hardware lnstallation "'Connecting Impact Acoustics to your PC" in Chapter
Make sure your lmpact Acoustics is secured and correct install with your TV. (Please refer
"
Hardware Installation
Turn on your PC, and check with VGA resolution. Impact Acoustics can convert the VGA resolution from
640x480 up to 1600x1200.
which is depending on different VGA resolution. Please refer to "Supported VGA Modes" in Appendix on
page 15.
Press
Power button on the lmpact Acoustics box, the LED light will be on when the Power Adapter is
plugged in.
Turn on your TV, and select the external input source (for example: Video 1,
have connected the lmpact Acoustics.
If your TV-screen image cannot display properly (no display, or appears black and white with
unstable signal), please press the
(Please refer to your TV document to check with your TV system).
Make sure your lmpact Acoustics is secured and correct install with your PC. (Please refer to the
Hardware
Make sure your Impact Acoustics is secured and correct install
Hardware
Turn an your PC, and check with VGA resolution. lmpact Acoustics can convert the VGA resolution From
640x480 up to
which is depending on different VGA resolution. Please refer to "Supported VGA Modes" in Appendix on
page 15.
plugged in.
Turn on your HDTV, and
connected the lmpact Acoustics.
Connecting lmpact Acoustics to your TV" in Chapter
It accepts the VGA refresh rate (vertical frequency) from
tton
on the Impact Acoustics box to switch the Computer Image into NTSC or
button again to match your TV system as NTSC or PAL
"
Cannecting lmpact Acoustics to your PC" in Chapter
"
Connecting lmpact Acoustics to your HDTV" in Chapter 2.4 on page 5)
accepts the VGA refresh rate (vertical frequency) from 60Hz tol50Wz,
button on the Impact AcauStics box, the LED light will be an when the Power Adapter is
2.2
an page 4)
2.3
on page 4)
2.2
on page 4)
Page 8

7.
If
you also connect the Impact Acoustics lo HDTV via S-Video or Composite Video Cable, press
button will switch Computer Image into HDTV as TV resolution.
If your TV-screen image cannot display properly (no display, or appears black and white with
ole:
button again to match your TV system as NTSC or PAL
(Please refer to your
FIT
The default setting is
mode, Impact Acoustics converts the corriputer image to a television irnage by using
horizontallvertical scaling and frame rate converting. The computer image will convert to television and
display as the
When
mode is active, Impact Acoustics takes
computer image, which can convert the cornputer image to a television image without
scaling. You will get the
computer image on television at high fidelity with less distortion. (Please refer the
example as below)
ode to get
a
TSC)
Page 9

Impact Acoustics provides Video Quality Enhancement function to erase Horizontal Video jitter, which can
Step
Simply press the
on your TV!HDTV.
on your
I
button on the Remote Control to adjust the best Colnputer Image
nd refers to how much light is emitted from the display.
I
button an the Remote Control to adjust the Brightness level
Adjust the contrast setting
:
Simply press the
Step
your
Adjust the Sharpness level will sharpen or soften the video edges, such as the edge or text letter will become
crisper and blur.
Step
:
Simply press the
lmage on your
Convert the De-interlace VGA signal to the Interlace TV signal will cause the flicker in image. If user wants
to work on a spreadsheet while watching a movie in a window, both the text
more flicker filtering and the movie requiring less flicker filtering can look their best. As text and graphic
require different levels of Flicker reduction for optimal effect, Impact Acoustics
will provide with more satisfactory results across various application.
Step
1:
Simply press the
the highlights and shadows in TVIWDTV video.
+
I
-
button on the Remote Control to adjust the best Computer
-
intensive application requiring
9
level Adaptive Flicker Control
Page 10

You can move the Computer linage on your TVIHDTV, and adjust both the screen width and height.
emote Control to move the Computer lmage an TVIHDTV
screen vertically.
emote Control to move the Computer lmage on TVIHDTV
screen horizontally.
the screen.
+
Step
Impact Acoustics provide 64 level zooming function, just press
button on your Remote
Control to zoom out Computer lmage on TVIHDTV.
Remote Control to zoom in Computer lmage on TVIHDTV.
button on Remote Control to move zoomed image position.
n on Rernote Control will bring
position.
utton on Remote Control will freeze the image on the television; you can make
t your audience watching it.
-
utton second time to un
Freeze the image.
ming size and panning position as one
on Remote Control
Mar
this function.
ave the Zooming size and Panning position and memarized as one Position Mark, you can create 64
Position Marks from
Go back to previous Position Mark.
:
Press the button and hold for three seconds to clear all Position Marks.
W
r Image on NIHDTV, some of the image sent lo a TV can extend past the visible
area of the T'V screen. You can toggle between Overscan and Underscan setting to get the suitable image
size on TV.
utton on your Remote Control to enable the Qverscan
utton again on your Remote Control
Computer lmage will be completely display on TVIHDTV.
Page 11

Front Panel Control has four buttons; which can provide the two different operation modes,
When you power on Impact Acoustics, or turn off the OSD Menu, you will stay in
the Front Panel Control Buttons will be defined as:
Press this button to open the OSD Menu (entry the OSD Menu Mode)
Press this button to display
toggle between
available while you conne~t to
ote:
Press this button to display Computer lmage on your MDTV screen, press it again
to toggle between
to
video resolution on HDTV system.
The indicator LED will turn on as
"
Regular Operation Mode",
The indicator
LED
will turn
Page 12

button on Impact Acoustics
When you entry the OSD Menu Mode, the Front Panel
Press this button to exit the OSD Menu.
he setting option on
Press this button to decrease value on OSD Menu setting option
Press this button to increase value on
button on Impact Acoustics Front Panel to entry the OSD (On Screen Display) Menu
Mode.
2.
You will see the OSD Main Menu on thvmiddle of your TVII-IDTV screen. (Please refer to the Figure
button to select the setting option on OSD Menu, the selected item will be high light as
green bar.
on
button to close the OSD Menu.
can
also
operate
the
Page 13

Erase Mor~zontal Video jitter, enhance the v~deo quality on WHDTV
Increase or decrease the br~ghlness level on TVIHDTV
Adjust the Sharpness level will sharpen or soften the video edges
:
(9-level Adaptwe Flicker Control adjustment)
Text and
Adaptive
Move the Computer
Move the Computer lmaye on TVIWDTV screen vert~cally
ut of the Computer lmage on TVlHDTV screen
Menu
9
level
Page 14

Impact Acoust~cs oRers full funct~on Remote Control to let you operate
Scan Converter as easy and
4:
Please remove the tab from battery compartment at the back of
the Remote Control
2:
The Infrared Sensor
box
:
Switch the Impact Acoustics onloff.
Zoom in and out of the Computer Image on TVlMDTV screen.
located at the front panel of the Impact. Acoust~cs
Adjust the Sharpness level on TVlHDTV image.
Adjust the Brightness level on TVIHDTV image.
on
:
Press this button to freeze the image on the TVIHDTV.
his button to convert the Computer Image lo NTSC
The home setting will bring your image back to the normal position.
Save the Zooming sire and Panning position, and memorized as one Position Mark.
Jump to
:
Go back to previous Position Mark.
:
Press this button and hold for three seconds to clear all Position Mark.
Position Mark.
TV
system.
Page 15

Appendix
Page 16

This
table
supported
display
mode to
convert
signal
into
and
screen
Page 17

ion
There is no display on my TVIHDTV screen
Check all the Cable ends are positioned correctly when connecting.
Make sure lmpact Acoustics is secured and correct install with your TV or
HDTV. (Please refer to the
page 4 and page
Check with your TVIHDTV setting, select the external input source (for
example: Video
lmpact Acoustics.
If you are using the laptop computer, please
switched to External VGA display mode (Please refer to your laptop's
manual).
If you connect Impact Acoustics to TV, you have to press the
5)
If you connect Impact Acoustics to HDTV, you have to press the
"
NO VGA SIGNAL" error message
Check the connection between lmpact Acoustics and PC VGA port.
is secured and correct connect with your
to the Hardware Installation in Chapter
Make sure your PC is turn on and display properly on PC monitor.
If
you are using the laptop computer, please make sure its has been
switched to External VGA display mode (Please refer
manual).
1.
Press the Power Button on lmpact Acoustics box or Remote Control. The
LED
will light up on the front of the panel.
2.
Please make sure the Power Adapter is securely connected into an
-
electrical outlet and connected to the lmpact Acoustics DC
3. To avoid damaging your
Adapter.
4.
Check the power source using another electrical device to make sure the
power source is supplying sufficient voltage,
IN Jack.
Page 18

blurry and fuzzy, which won't look exactly the same as the original image
displayed on VGA monitor.
Blurry fonts on television are really a limitation of the TV set and the analog
video signal.
2.
3.
4.
Picture appears black and white on
Impact Acoustics Scan Converter offer both NTSC and PAL Video output
system in the same unit. Depending on where you plan on using your scan
converter, you can
specification
(Please consult your television documentation to determine
Remote Contr
There are many things
has an S-Video Input, please use S-Video connection instead of
Composite video.
Please adjust your VGA display Modes as 640~480(60Hz),
or
your
Please adjust CONTRAST, SHARPNESS, QIJAI-ITY, and FLICKER
Control setting on lmpact Acoustics.
Increase the sire of the fonts being displayed on you PC. The small text
PC
sizes
can adjust VGA setting by using large fonts. (Please consult your VGA
card documentation for more detail information)
can appear blurred or unclear on a TV. You
)
button on lmpact Acoust~cs box or
2.
If your VGA resolution or refresh rate (vertical frequency) is too high,
please change your setting and selecting the properly VGA Modes.
 Loading...