

Page 1

Multi-Function Converter w/CATV Tuner & PIP
Model: 40972
Operation Manual
Page 2
Operational Manual
Multi-Function Converter w/CATV Tuner & PIP
Converts a CRT or LCD computer monitor to a television set
Model: 40972
Thank you for purchasing the Multi-Function Converter w/CATV Tuner & PIP. We hope that you
will be pleased with the functionality and capabilities that this converter offers. We recommend
that you read this manual thoroughly and retain for future reference.
Function:
The imaging method of a CRT or LCD monitor is quite different from a television set. CRTs and
LCDs utilize non-interlace scanning to form an image on the screen while the TV uses interlaced
scanning. It becomes apparent that an LCD or CRT monitor is better for long time viewing and
the CRT or LCD has higher resolution than a TV. Traditional television sets have limited
resolution (Horizontal Lines) and CRT or LCDs generally have more than two to three times the
resolution. The Multi-Function Converter turns your CRT or LCD into a second TV with higher
picture quality and stability for DVD, VCR, Video Games and television viewing.
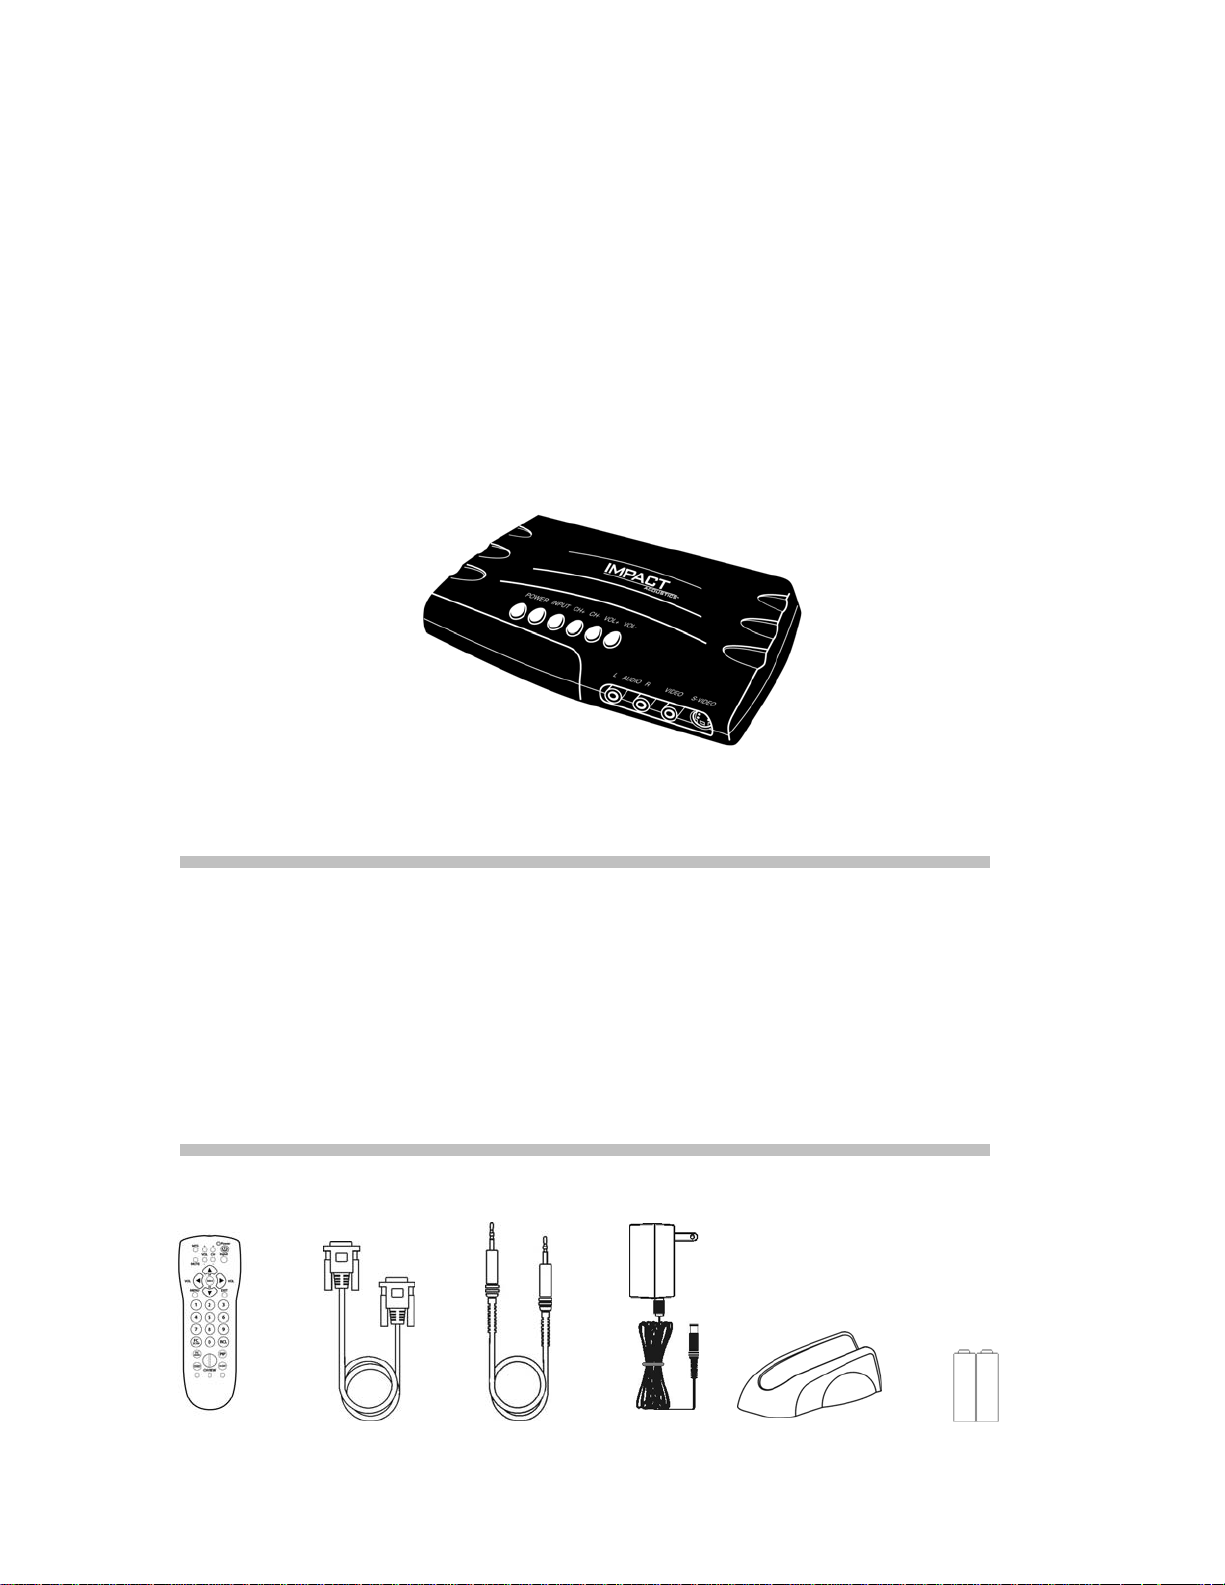
Package Contents
Before connecting your devices, please make sure that the package contents include the
following accessories:
Remote Control
VGA Cable
3.5mm
Audio Cable
AC/DC
Adapter
Base AAA Batteries
ii
Page 3

Table of Contents
Functions ………………………………………………………………………….ii
Package Contents………………………………………………………………...ii
Features……………………………………………………………………………1
Connecting the Converter…….…………………………………………………..1
Operating the Multi-Function Converter…………………………………………4
Troubleshooting…………………………………………………………………..10
Specifications……………………………………………………………………..10
Replaceable Parts………………………………………………………………...10
Warranty/Important Safety Information…………………………………………11
iii
Page 4
Features:
CH Select
V
• Plug ‘n’ Play: No software required
• Full Channel Selection for CATV up to channel 125
• 4 output resolutions, 1024X768, 800X600, 640X480, 852X480 (Mac)
• Stylish Design, can place upright (stand included) or horizontal
• Full-function remote control
• Front panel AV and S-Vide o inputs; Rear panel VGA in/ out and 3.5mm audio in/ out
• Adjustable TV function: brightness, hue, color, etc.
• Auto-Scan channel programming
• MTS Stereo for a true theater like experience
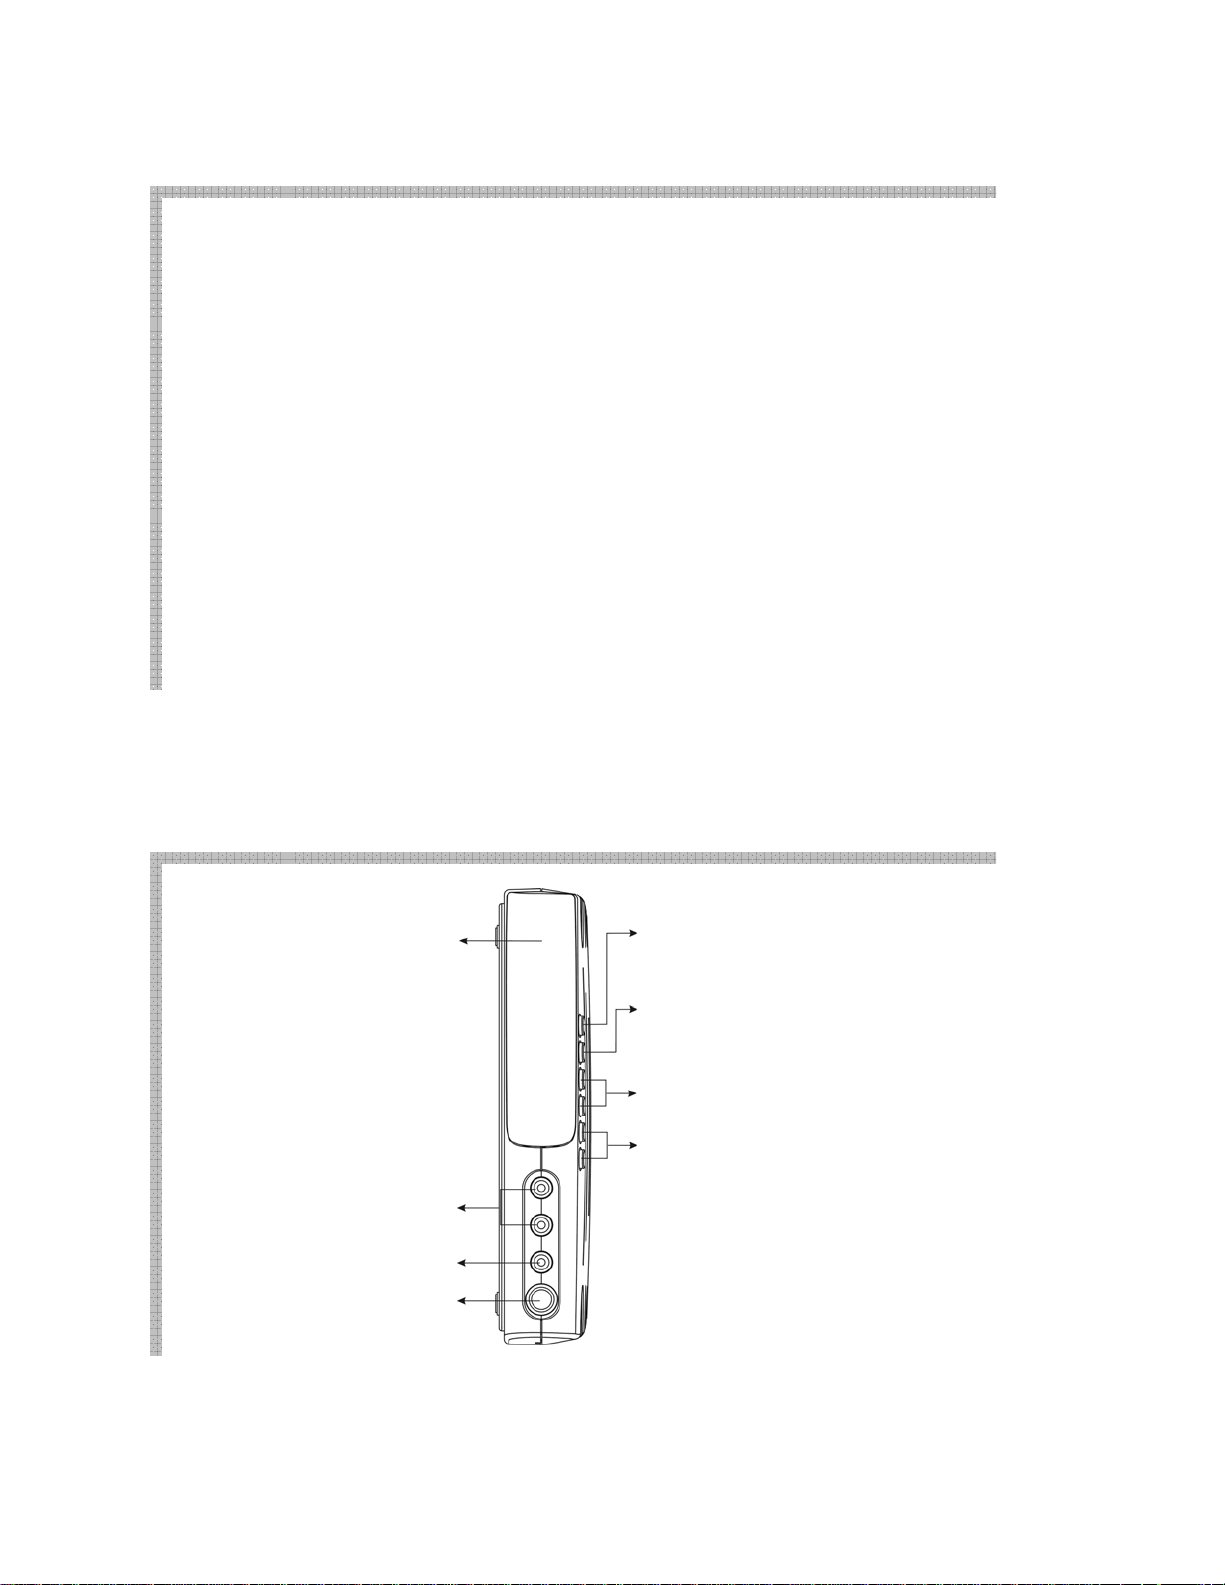
Connecting the Converter:
Front Panel
IR Receiver: Receives IR
signals from the remote
control
Audio Input
Video Input
S-Video Input
POWER
Switches the unit to by-pass
when in the OFF state
INPUT
Input selection, this is repeated
TVÆ CVBS Æ S-Video Æ PC
CH+: Channel up
CH-: Channel Down
olume Level
VOL+: Volume up
VOL-: Volume Down
1
Page 5
V
V
ge,
V
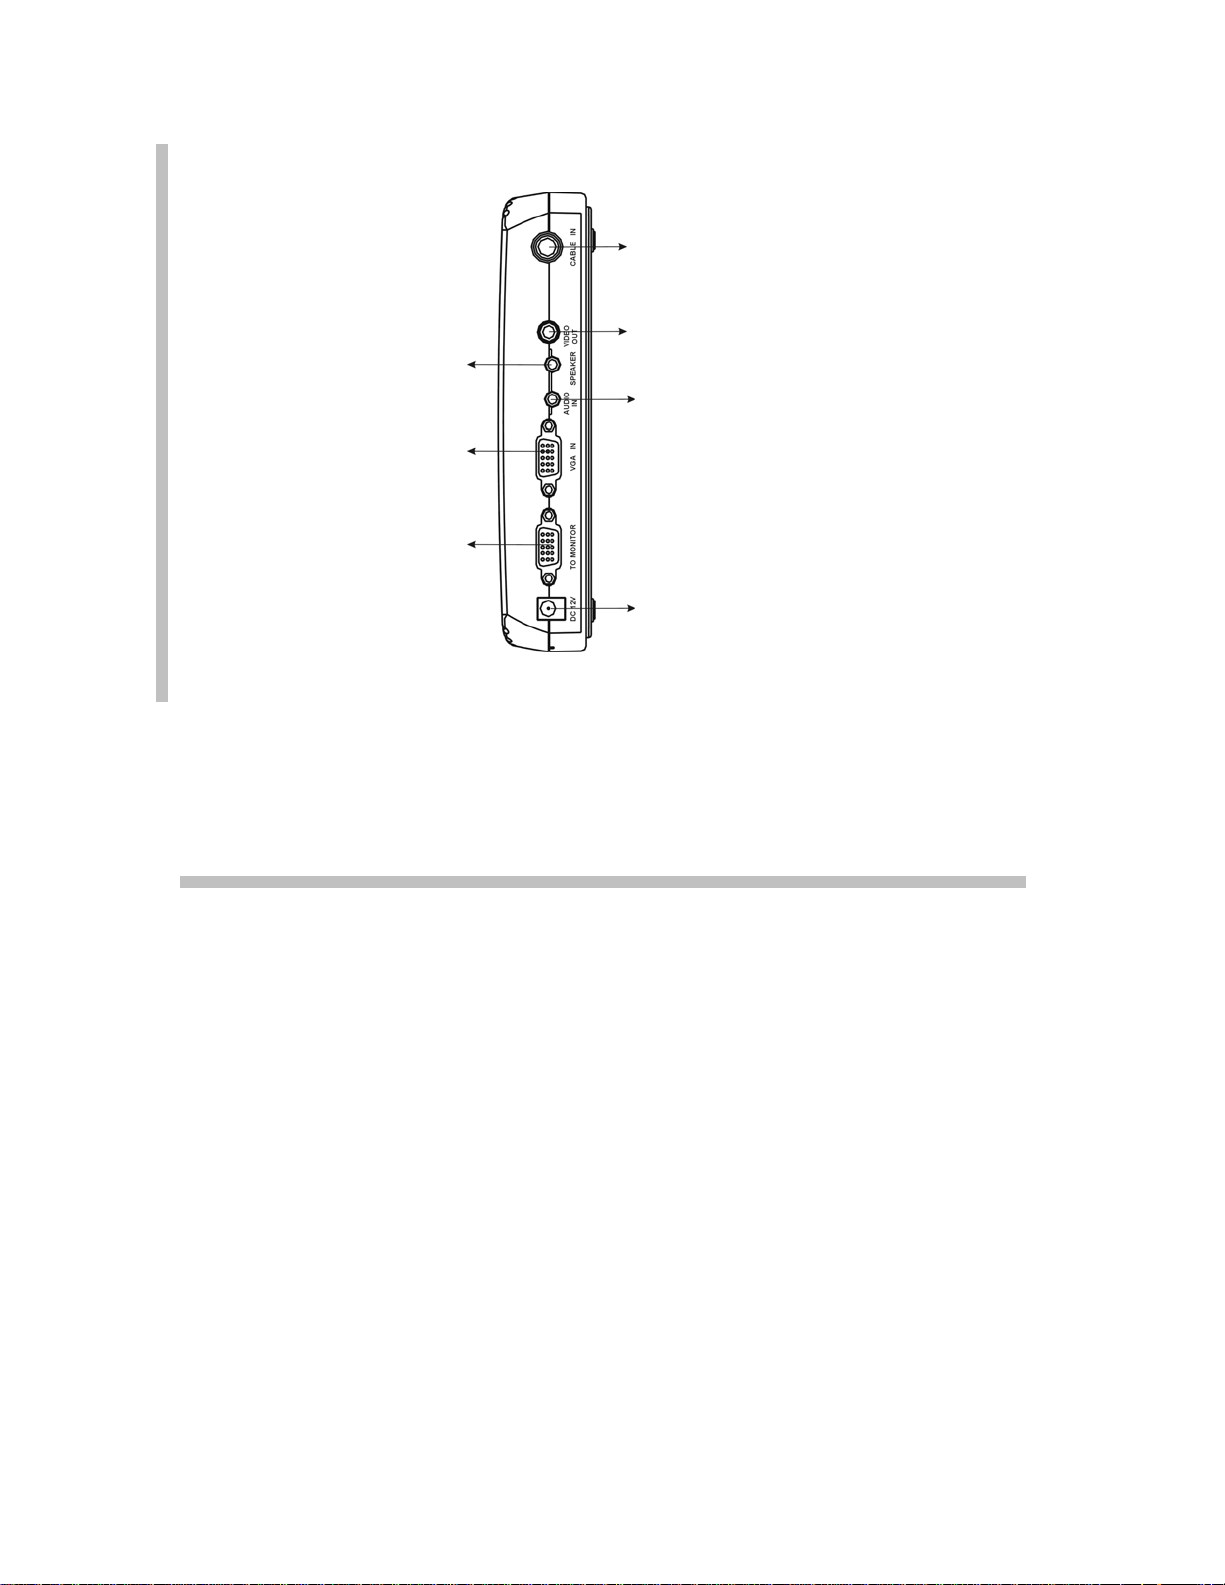
Rear Panel
SPEAKER CONNECTION
3.5mm Stereo connection for
speakers or amplifier
GA IN
HD-15 VGA Female
connector for connection to
CRT or LCD
TO MONITOR
HD-15 VGA Female
connector for connection to
VGA Output Port of VGA
Card of PC
CABLE IN
F (or IEC) connector for CATV
signal input
ideo Output Only
operates in TV mode
AUDIO IN
3.5mm Stereo connection from a
PC sound card
DC 12
Power input connection for the
supplied AC/DC Adapter
Note: using different rated
power supply may cause
dama
serious injury or fire.
To connect to a PC:
1. Place your Multi-Function Video Converter near the monitor.
2. Connect the CATV cable to the “CABLE IN” jack on the back panel.
3. Connect the monitor’s VGA cable to the “TO MONITOR” jack on the back panel. Tighten the
screws as a loose connection will cause picture distortion.
4. Connect your multimedia (computer) speaker (please note the connector should be
3.5mm male stereo type) to “SPEAKER” on the back panel.
5. Connect the supplied 3.5mm audio cable to the speaker output of your PC sound card and
the opposite end to the “AUDIO IN” on the back panel.
6. Connect the supplied AC/DC adapter to “DC 12V” on the back panel and then plug into a
standard 110~120Volt receptacle. NOTE: Using a differently rated adapter may result in
damage to the unit, risk of electrical shock and possible fire.
7. Turn on your monitor and then push the “POWER” button on the Multi-Function Converter.
You should have a TV image on your LCD or CRT screen. Turn off the Multi-Function
converter and your computer should be displayed.
2
Page 6

To connect a source device –
If your video source has a composite video output, follow these steps:
1. Connect the 3-RCA patch cable to the output of your; game, DVD, VCR, etc. (pay special
attention to color coding; YELLOW for video, WHITE for left audio and RED for right audio).
2. Connect the other end of RCA patch cable to the “Video/Audio Input” on the front panel of
Multi-Function Converter (paying attention to color coding).
If your video source has a S-Video output, follow these steps:
1. Connect the S-Video and 2-RCA patch cable to the output of your; game, DVD, VCR, etc.
(pay special attention to connector orientation and color coding; WHITE for left audio and
RED for right audio).
2. Connect the S-Video patch cable to the S-Video input and the 2-RCA patch cable to the
“AUDIO” on the Multi-Function Converter (pay special attention to connector orientation and
color code).
3
Page 7

Operating the Multi-Function Converter
V
p
r
Remote control functions
OL+/-: Volume Control
CH+/-: Channel u
MTS (NTSC)
Second Audio
Program Select
MUTE:
Mute key for audio
muting
CH+/-: channel
up/down (only valid in
TV/CATV mode)
Select: selection key
(should work with
“MENU” key)
MENU: Setting of TV
function
FC SCAN: Scan
function of TV/CATV
Channel (only valid in
TV/CATV mode)
FC MEMO: selection
of the Output
Resolution
OSD: OSD Display
/down
Powe
: TV/PC mode
selection
INPUT: Source
selection between
different sources
Volume Control:
Volume Control for
TV, Video, S-Video
EXIT: exit key (for
use with the “Menu”
key)
Numeric Key: 0~9
RCL: Last Channel
Recall (only valid in
TV/CATV mode)
PIP: PIP Function
Key
Sleep: Timer for
sleep
9 Channel Preview
4
Page 8

Operating the Multi-Function Converter con’t
(1) MTS
When you are watching a CATV Program, use this button to select the audio output mode.
(Please note: not all the CATV Programs are broadcast in MTS STEREO)
(2) Power
When the power is switched “ON”, the Multi-Function Converter operates in CATV mode.
When the power is switched “OFF” the Multi-Function Converter will pass through PC
video. Please note that if your PC is off, when you press this button to PC mode, there will
be no video on your screen.
(3) MUTE
To MUTE the audio, press this button. To resume audio, press this button or “VOLUME
UP” Please Note: this function only works in “CATV Mode”.
(4) Input Source Selection
There are four possible sources for the Multi-Function Converter. You can press this
button to select between Composite Video Base-Band Signal (CVBS), S-Video, CATV and
PC. The selection mode is repeated.
Press
“MTS”
Press “Power”
Press
“Mute”
CATVÆ CVBS (A/V) Æ S-Video Æ PC
Press
“Input”
Press
“Input”
Press
“MTS”
Press
“Input”
5
Page 9

(5) Channel +/-
Press + for channel
up or - for channel down.
Please note these keys only
operate in CATV MODE
(6) Navigate/Select
These keys navigate the “MENU”
to make adjustments.
(7) VOL +/-
Adjusts the listening level
of the audio you hear.
+ for volume up,
- for volume down.
Please note these keys only
operate in CATV MODE
(8) MENU
Adjustment of the Multi-Function Converter,
there are 6 selections available,
1. Input:
There are 4 selections available, use the navigation keys to choose what you like. Press the ”Select” key to
finish the operation.
MENU
1.Input 1.TV
2.Picture 2.CVBS
3.TV Function Choose Input then press 3.S-Video
4.Resolution Select, 4 items show up 4.PC
5.OSD Function
6.Language
7. Reset
2. Picture: Setting the Picture Parameters
There are 5 adjustments available within this function. Navigate over the intended adjustment and press
“SELECT”. Use the left and right arrows to make the adjustment.
Brightness is for adjusting the brightness on your screen.
Contrast is for adjusting the contrast of the Picture.
Color is for adjusting the color of picture.
Hue is for adjusting the saturation of Color.
Sharpness is for adjusting the sharpness of Picture.
MENU
1. Input 1.Brightness
2.Picture 2.Contrast
3.TV Function Choose Picture then press 3.Color
4.Resolution “Select” , 5 items show up 4.Hue
5.OSD Function 5.Sharpaness
6.Language
7. Reset
Press
MENU
1.Input
2.Picture
3.TV Function
4.Resolution
5.OSD Function
6.Language
7. Reset
6
Page 10

3. TV Function
There are 6 adjustments available within this function. To make an adjustment, highlight the item you want to
adjust, press the “Select” key on the remote and make the adjustment. Å key to adjust lower, Æ to adjust
higher.
MENU
1. Input 1.TV system
2.Picture 2.Channel Edit
3.TV Function Choose TV Function then press 3.Fine Tune
4.Resolution “Select”, 4 items show up 4.MTS
5.OSD Function 5.Full Scan
6.Language
7. Reset
4. Resolution
There are 6 adjustments available within this function. To make an adjustment, highlight the item you want to
adjust, press the “Select” key on the remote and make the adjustment. Å Key to adjust lower, Æ to adjust
higher.
1. Input
2.Picture 2. 800X600 60Hz
3.TV Function Choose Resolution then press 3. 852X480 60Hz
4.Resolution “Select” , 8 items show up 4.1024X768 60Hz
5.OSD Function 5. 640 X480 75Hz
6.Language
7. Reset
8. 1024X768 75Hz
5. OSD Function
There are 2 adjustments available within this function. To make an adjustment, highlight the item you want to
adjust, press the “Select” key on the remote and make the adjustment. Å key to adjust lower, Æ to adjust
higher.
OSD Position: Select “OSD Position” and press ↓↑ÆÅ to adjust the image position.
OSD Color: Choose the color of OSD Message
TV System Æ “CATV”
Channel EditÆ “Add”, “Erase” 2 selections
Fine Tune: Fine tuning the TV frequency,
MTSÆ MONO, STEREO, SAP
Full Scan: Scan the available television channels
Channel Scan: Scan television Channels with internal freq uency map
6.Channel Scan
640X480 60Hz, 800X600 60Hz, 852X480 60Hz, 1024 X768 60Hz,
640X480 75Hz, 800X600 75Hz, 852X480 75Hz, 1024 X768 75Hz
MENU
1. 640 X480 60Hz
6. 800X600 75Hz
7. 852X480 75Hz
7
Page 11

MENU
1. Input 1.OSD Position
2.Picture 2. OSD Color
3.TV Choose OSD then
4.Resolution “Select”, 2 items show
5.OSD
6.Language
7. Reset
6. Language:
There are 2 adjustments available within this function. To make an adjustment, highlight the item you want to
adjust, press the “Select” key on the remote and make the adjustment. Å key to adjust lower, Æ to adjust
higher.
1. English 2.Chinese
7. Reset
Select this function to bring the Multifunction Video Converter to original factory settings.
(9) EXIT
In “MENU” functions, press this key to return to Main MENU or exit set up.
(10) Numeric Key
You can directly select the channel you want to watch. Please note these keys are only active in TV Mode.
(11) SCAN
When you set up Multifunction Video Converter for the first time, it is recommended to press this key to search for
television channels available in your area and store them into memory. There are 3 selections available:
1. Full Scan,
2. Channel Scan
3. Exit.
Full Scan: scans the available channels by frequency (recommended).
Channel Scan: scans the available channels according to the internal pre-set channel map.
Please Note: this key is valid in TV Mode only.
(12) RCL
Press to return to the previous channel. Please Note: this key is valid only in TV Mode only.
(13) FC MEMO
There are 8 resolution selections available, and this function is cyclic. 640X480 60Hz, 800X600 60Hz, 852X480
60Hz, 1024 X768 60Hz, 640X480 75Hz, 800X600 75Hz, 852X480 75Hz, 1024 X768 75Hz
(14) OSD Function
Press this key to review the input source and/or channel selected, press again to remove the display from view.
8
Page 12

(15) 9 Channels Preview
Please note: This function is only valid in TV mode only
You can preview up to 9 channels. To select a channel from the preview, press numeric key 1-9 or press a
numeric key twice to cancel.
TV mode Press this key 9 Channel Preview
to view the channel
shown in 9 channels
press a numeric key (0-9)
(16) Sleep
Press the SLEEP key to active the sleep timer. This will turn the unit off after the pre-set time.
1. 5 min
2. 10 min
3. 15 min
4. 30 min
5. 60 min
6. 90 min
7. OFF
(17) PIP Function
There are 4 PIP modes; 1/4, 1/9, 1/16 and off, the selection mode is cyclic. Use the navigation keys (arrow keys) to
position the PIP display on the screen. When you activate the PIP display, the last source selected will be displayed.
9
Page 13

Troubleshooting:
Problem Solution
No picture
No sound
No response while using the
remote control
1. Compare all connections to the appropriate
illustrations to verify correct connectivity.
2. Make sure the power adapter is connected to the
electrical supply and the converter.
3. Make sure that the selected mode is the same as the
input signal, and then perform Auto Scan.
1. Compare all connections to the appropriate illustrations
to verify correct connectivity.
1. Make sure that you are pointing to the IR sensor
window within 20ft. and within +/- 15 degrees of the
unit.
2. Check batteries and replace with new ones if
necessary.
Specifications:
CATV/TV Input 75 Ohm “F” type female connector
Video Input Composite Video, S-Video
Composite Video 75Ohm, 1V p-p via RCA type connector
S-Video 75Ohm, 1V p-p via 4-Pin mini-DIN
Audio Input (Signal Source) Stereo Audio via 2 RCA type connectors
Audio Input (PC) Stereo Audio via 3.5mm stereo connector
VGA In HD-15 Female
Power-AC/DC adaptor 12 V DC 500mA (UL, CE)
VGA Output HD-15 Female
Video Output (only Valid on TV Mode) 75Ohm, 1V p-p via RCA type connector
Audio Output Stereo Audio via 3.5mm stereo connector
FCC 15.225
Regulatory specification:
Complies with requirements of:
FCC Part 15-Class B
ICES-003
CE
Replaceable Parts
In the event of a lost or
98023- Remote control
damage part, the following
replaceable accessories are
available. Please call
877-AV-EXPERT for order
information.
Part Number: 98000- AC/DC adapter
10
Page 14

Impact Acoustics™ One Year Warranty
At Impact Acoustics, we want you to be totally confident in your purchase. That is why we offer a
one year warranty on this device. If you experience problems due to workmanship or material
defect for the duration of this warranty, we will repair or replace this device. To request a Return
Merchandise Authorization (RMA) number, contact customer service at 877-AV-EXPERT or
www.impactacoustics.com.
Important Safety Information
! Do not plug the unit in any outlet that does not have enough current to allow the switch to
function. Refer to the specifications in this manual for power level of the unit.
!
Liquid:
If this unit or its corresponding power adapter has had liquid spilled on or in it, do not attempt to
use the unit.
Do not attempt to use this product in an outdoor environment as elements such as rain, snow,
hail, etc. can damage the product.
!
In case of a storm, it is recommended that you unplug this device from the outlet.
!
Avoid placing this product next to objects that produce heat such as portable heaters, space
heaters, or heating ducts.
! THERE ARE NO USER SERVICEABLE PARTS
Do not attempt to open this product and expose the internal circuitry. If you feel that the
product is defective, unplug the unit and refer to the warranty information section of this
manual.
11
 Loading...