


535

::
435
Operator’s Manual
::
485
::
535
89002109 12/2007

Foreword
To the Owner
This manual contains information concerning the operation, adjustment, and maintenance of Buhler Versatile 4WD tractors. You
have purchased a dependable machine. With only proper care and operation can you expect to receive the performance and long
service built into this tractor.
HAVE ALL OPERATORS READ THIS MANUAL CAREFULLY AND KEEP IT AVAILABLE FOR READY REFERENCE.
The tractor was designed to pull agricultural equipment in agricultural applications at field speeds of 7.2 KPH (4.5 MPH) or greater.
Proper ballasting to provide equal traction to front and rear axles under moderate to heavy load will improve tractor performance
and life. Your Buhler Versatile dealer will instruct you in the general operation of your tractor. Your dealer’s staff of factory–trained
service technicians will be glad to answer any questions that may arise regarding the operation of your tractor.
For engine maintenance not covered in this manual, follow the instructions provided in the Cummins Engine Operator’s manual.
Before putting the tractor in service, become familiar with the procedures outlined in both manuals.
At this time biodiesel blends up to B5 are the only blends approved for use in all Cummins engines for both On highway and
Off highway markets. B5 which is a blend of 5 percent pure biodiesel (B100) and 95 percent standard petroleum diesel has
demonstrated to have no impact on engine performance, durablilty or maintenance. The industry standard known as ASTM D6751
defines the specification for B100. However, this standard currently lacks a specification for stability. Without a specification for
stability, the quality of the fuel blends higher than B5 could degrade to a point which could damaging to engines. Cummins is
supporting industry efforts to add a stability spec to the current ASTM standard, and continues to evaluate the impact of these
blends on the durability of engines. Until this spec is developed and tested, other blends of biodiesel will be unsuitable for use in
Cummins On highway and Off highway engines.
The warranty coverage that is extended to your Buhler Versatile 4WD tractor is explained in the Warranty and Limitation of Liability
Agreement form. Your dealer will provide you with a copy of the warranty and retain a copy which you have signed. After you read
the warranty, ask your dealer to explain any points that you may not understand.
Do not modify, alter, or permit anyone else to modify or alter this tractor or any of its components, or any tractor function, without
first consulting an authorized Buhler Versatile dealer. If you have any questions regarding tractor modifications, contact Buhler
Versatile Inc., 1260 Clarence Ave, Winnipeg MB, R3C 4E8.
Your safety, and the safety of those around you depends upon the care and good judgement you use while operating this equipment.
Read the safety precautions carefully.
For a complete list of the delivery service checks performed by your dealer, refer to the Delivery Report in this manual. The first
copy is your record of the service performed and the second copy, which is to be removed from the manual, is your dealer’s record.
MAKE SURE THAT BOTH COPIES ARE SIGNED BY YOURSELF AND YOUR DEALER.
After you have operated the tractor for 50 hours, have your dealer perform the factory recommended first 50–hour service. Return
this manual with your tractor to the dealer so the “First 50–Hour Service” checklist can be filled out. You will be responsible for the
cost of lubricants, fluids, filters and other items replaced as part of normal maintenance. Prior to taking the tractor to your selling
dealer for service, it is recommended that you contact them to determine any other charges for which you may be responsible.
All data given in this book is subject to production model variations. Dimensions and weights are approximations only, and the
illustrations do not necessarily show tractors in standard condition. For exact information about any particular tractor, please
consult your Buhler Versatile dealer.
CAUTION: THIS SYMBOL IS USED THROUGHOUT THIS BOOK WHENEVER PERSONAL SAFETY IS INVOLVED. TAKE TIME TO
READ AND FOLLOW THE INSTRUCTIONS.
CAUTION: PICTURES IN THIS MANUAL MAY SHOW PROTECTIVE SHIELDING OPEN OR REMOVED TO BETTER ILLUSTRATE
A PARTICULAR FEATURE OR ADJUSTMENT.
BE CERTAIN, HOWEVER, TO CLOSE OR REPLACE ALL SHIELDING BEFORE OPERATING THE MACHINE.
Improvements
Buhler Versatile Inc. is continually striving to improve its products. We reserve the right to make improvements or changes when
it becomes practical and possible to do so, without incurring any obligation to make changes or additions to the equipment sold
previously.
435/485/535

1-2
435/485/535

1-3
Operator’s Manual - Contents
Section 1 - Safety Information . . . . . . . . . . . . . . . . . . . . . . . . . . . . . . . . . . . . . . . . . . . . . .1-5
Section 2 - General Information . . . . . . . . . . . . . . . . . . . . . . . . . . . . . . . . . . . . . . . . . . . . .2-1
Section 3 - Operation . . . . . . . . . . . . . . . . . . . . . . . . . . . . . . . . . . . . . . . . . . . . . . . . . . . .3-1
Section 4 - Lubrication and Maintenance . . . . . . . . . . . . . . . . . . . . . . . . . . . . . . . . . . . . . .4-1
Section 5 - Troubleshooting . . . . . . . . . . . . . . . . . . . . . . . . . . . . . . . . . . . . . . . . . . . . . . . .5-1
Section 6 - Specifications . . . . . . . . . . . . . . . . . . . . . . . . . . . . . . . . . . . . . . . . . . . . . . . . .6-1
Index . . . . . . . . . . . . . . . . . . . . . . . . . . . . . . . . . . . . . . . . . . . . . . . . . . . . . . . . . . . . . . .6-23
Delivery Report . . . . . . . . . . . . . . . . . . . . . . . . . . . . . . . . . . . . . . . . . . . . . . . . . . . . . . . .6-27
435/485/535

1-4
435/485/535

1-5
Section 1 - Safety
Contents
Section 1 Contents - Safety Information
Introduction to the Manual . . . . . . . . . . . . . . . . . . . . . . . . . . . . . . . . . . . . . . . . . . . . . . . .1-6
Tractor Statement of Use . . . . . . . . . . . . . . . . . . . . . . . . . . . . . . . . . . . . . . . . . . . . . . . . .1-6
Precautionary Statements . . . . . . . . . . . . . . . . . . . . . . . . . . . . . . . . . . . . . . . . . . . . . . . . .1-7
Personal Safety . . . . . . . . . . . . . . . . . . . . . . . . . . . . . . . . . . . . . . . . . . . . . . . . . . .1-7
Machine Safety . . . . . . . . . . . . . . . . . . . . . . . . . . . . . . . . . . . . . . . . . . . . . . . . . . .1-7
The Tractor . . . . . . . . . . . . . . . . . . . . . . . . . . . . . . . . . . . . . . . . . . . . . . . . . . . . . .1-8
Driving the Tractor . . . . . . . . . . . . . . . . . . . . . . . . . . . . . . . . . . . . . . . . . . . . . . . . .1-8
Operating the Tractor . . . . . . . . . . . . . . . . . . . . . . . . . . . . . . . . . . . . . . . . . . . . . . .1-9
Operating the PTO . . . . . . . . . . . . . . . . . . . . . . . . . . . . . . . . . . . . . . . . . . . . . . . .1-10
Servicing the Tractor . . . . . . . . . . . . . . . . . . . . . . . . . . . . . . . . . . . . . . . . . . . . . . .1-11
Diesel Fuel . . . . . . . . . . . . . . . . . . . . . . . . . . . . . . . . . . . . . . . . . . . . . . . . . . . . .1-12
Safety Cab . . . . . . . . . . . . . . . . . . . . . . . . . . . . . . . . . . . . . . . . . . . . . . . . . . . . . .1-12
Safety Labels . . . . . . . . . . . . . . . . . . . . . . . . . . . . . . . . . . . . . . . . . . . . . . . . . . . .1-13
Additional Safety Items . . . . . . . . . . . . . . . . . . . . . . . . . . . . . . . . . . . . . . . . . . . . . . . . . .1-16
Articulation Lock . . . . . . . . . . . . . . . . . . . . . . . . . . . . . . . . . . . . . . . . . . . . . . . . .1-16
Emergency Exit . . . . . . . . . . . . . . . . . . . . . . . . . . . . . . . . . . . . . . . . . . . . . . . . . .1-16
Safety Cab . . . . . . . . . . . . . . . . . . . . . . . . . . . . . . . . . . . . . . . . . . . . . . . . . . . . . . . . . . .1-17
ROPS Maintenance and Inspection . . . . . . . . . . . . . . . . . . . . . . . . . . . . . . . . . . . .1-17
Damage to the Cab/ROPS . . . . . . . . . . . . . . . . . . . . . . . . . . . . . . . . . . . . . . . . . . .1-17
435/485/535
1-6
F1-1
Foreword
Introduction to this manual
This manual has been prepared to assist you in the
correct procedure for breaking in, driving, operating,
and maintaining your tractor.
The manual is divided into 6 sections with contents
page at the beginning of each section itemizes the
section in detail. A detailed index is also provided at
the back of this manual.
The sections are:
Section 1 - Safety Information
Section 2 - General Information
Section 3 - Operation
Section 4 - Lubrication and maintenance
Section 5 - Troubleshooting Charts
1
Section 6 - Specifications
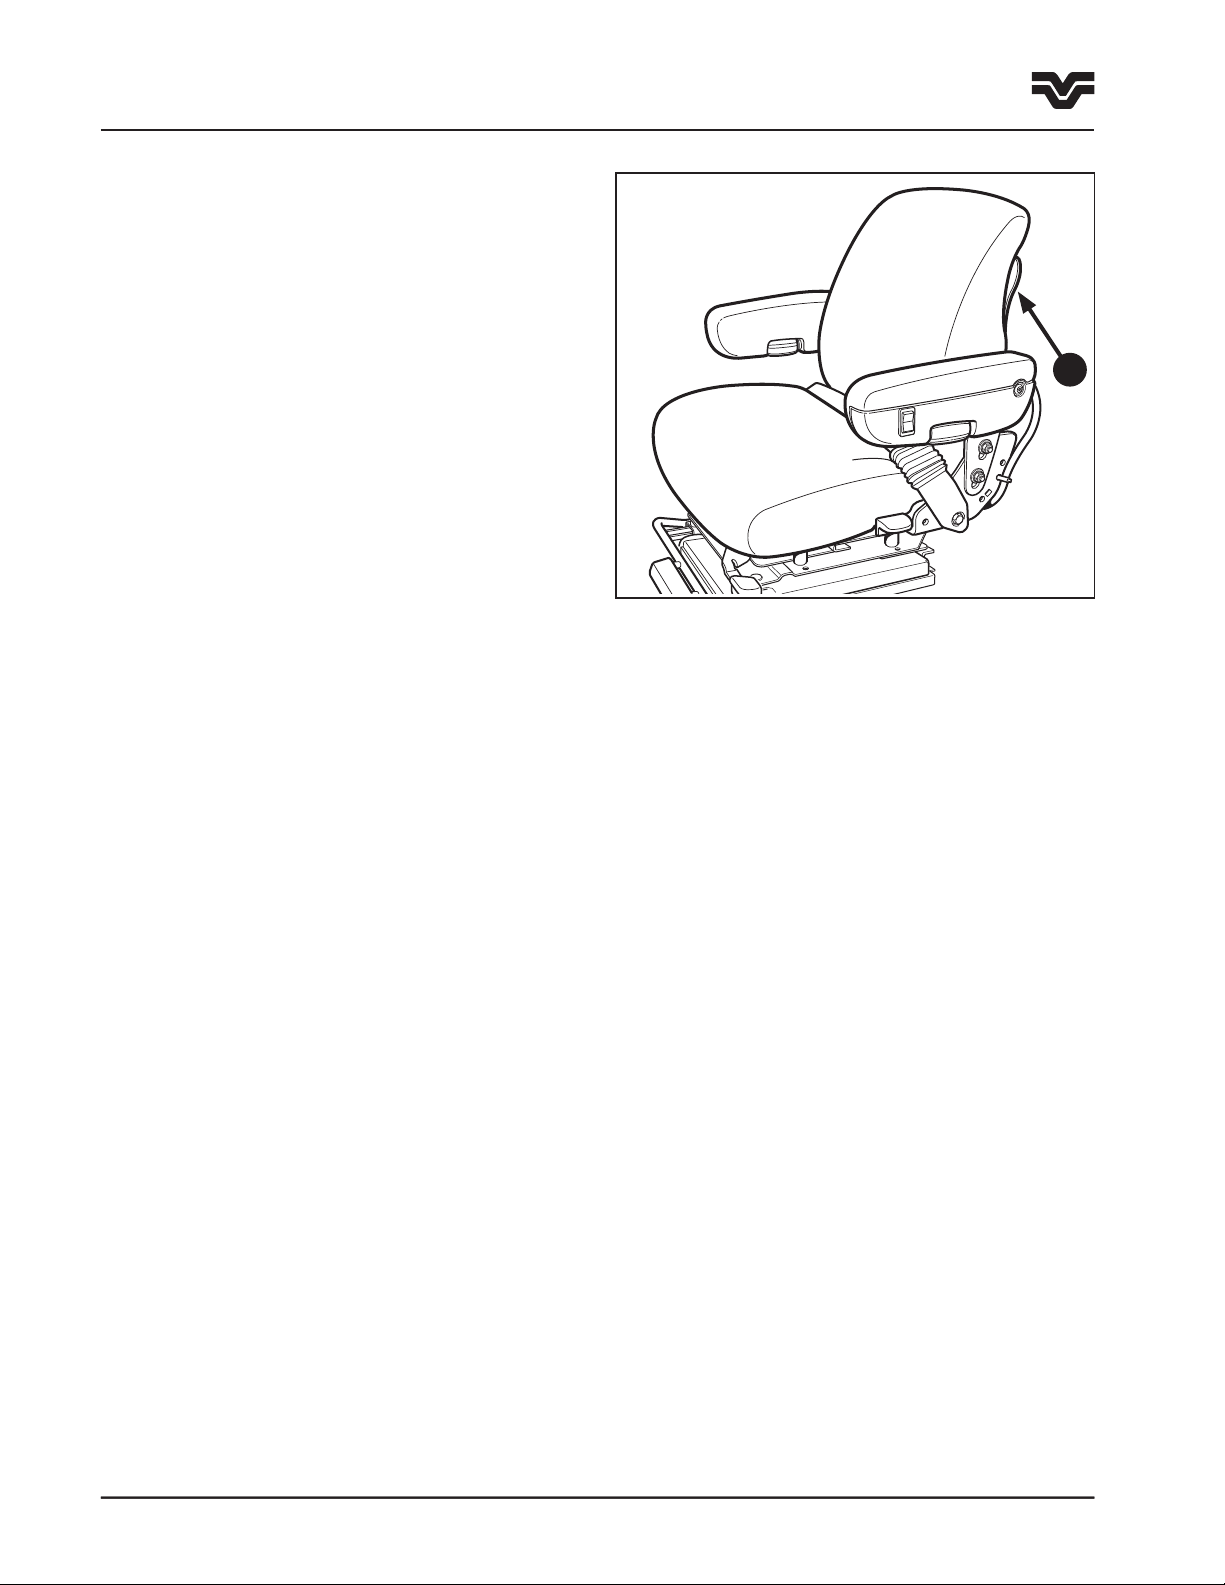
Read this manual carefully and keep it along with other
tractor information in the storage pocket attached to
the rear of the seat (1) for future reference. If at any
time you require advice concerning your tractor, do not
hesitate to contact your authorized Buhler Versatile
dealer. He has factory trained personnel, genuine
replacement parts, and the necessary equipment for
your service requirements.
Your tractor has been designed and built to give
maximum performance, economy and ease of operation
under a wide variety of operating conditions. Prior to
delivery, the tractor was carefully inspected, both at
the factory and by your dealer, to ensure that it reaches
you in optimum condition. To maintain this condition
and ensure trouble–free operation, it is important that
the routine services, as specified in this manual, are
carried out at the recommended intervals.
All data given in this book is subject to production
variations. Dimensions and weights are approximate
only, and the illustrations do not necessarily show
tractors in standard condition. For exact information
about any particular tractor, please consult your
authorized dealer.
Tractor Statement of Use
Buhler Versatile has designed the 435, 485 and 535
4WD articulated tractors to be used in customary
agricultural applications. Using the tractor in an
industrial only application (ie. road building) will not
be covered by warranty.
The machine is constructed to use specific tire
combinations along with additional ballast to properly
distribute weight and power for the operation of
agricultural equipment.
To obtain maximum performance and durability, the
tractor must be operated and maintained in a manner
as described in this manual. Failure to follow the
information contained in this manual may lead to
premature deterioration or personal injury.
You have made a substantial investment in this
agricultural tractor and it demands proper operation
and maintenance.
PLEASE FOLLOW YOUR OPERATOR’S MANUAL.
The company policy is one of continuous improvement,
and the right to change prices, specifications or
equipment at any time without notice is reserved.
Section 1 of this manual lists the precautions to be
observed to ensure your safety and the safety of others.
Read the safety precautions carefully and follow the
advice offered BEFORE operating the tractor.
435/485/535

1-7
Section 1 - Safety
Precautionary Statements
Precautionary Statements
Personal Safety
Throughout this manual and on machine decals, you will find precautionary statements (“CAUTION”, “WARNING”,
and “DANGER”) followed by specific instructions. These precautions are intended for the personal safety of you
and those working with you. Please take the time to read them.
CAUTION: THE WORD “CAUTION” IS USED WHERE A SAFE BEHAVIORAL PRACTICE ACCORDING TO
OPERATING AND MAINTENANCE INSTRUCTIONS AND COMMON SAFETY PRACTICES WILL PROTECT THE
OPERATOR AND OTHERS FROM ACCIDENT INVOLVEMENT.
WARNING: THE WORD “WARNING” DENOTES A POTENTIAL OR HIDDEN HAZARD WHICH HAS A POTENTIAL
FOR SERIOUS INJURY. IT IS USED TO WARN OPERATORS AND OTHERS TO EXERCISE EVERY APPROPRIATE
MEANS TO AVOID A SURPRISE INVOLVEMENT WITH MACHINERY.
DANGER: THE WORD “DANGER” DENOTES A FORBIDDEN PRACTICE IN CONNECTION WITH A SERIOUS
HAZARD.
FAILURE TO FOLLOW THE “CAUTION”, “WARNING”, AND “DANGER” INSTRUCTIONS MAY RESULT IN
SERIOUS BODILY INJURY OR DEATH.
Machine Safety
Additional precautionary statements (“ATTENTION” and “IMPORTANT”) are followed by specific instructions.
These statements are intended for machine safety.
ATTENTION: The word “ATTENTION” is used to warn the operator of potential machine damage if a certain
procedure is not followed.
IMPORTANT: The word “IMPORTANT” is used to inform the reader of something he needs to know to prevent
minor machine damage if a certain procedure is not followed.
435/485/535

1-8
Section 1 - Safety
Precautionary Statements
Safety
Precautionary Statements
National Safety Council statistics indicate many people die or suffer serious injury each year as a result of farm
accidents.
Don’t become a statistic or victim.
Carefully review the procedures given in this manual with all operators ANNUALLY. It is important that all
operators be familiar with, AND FOLLOW, safety precautions.
Operating instructions must be given to everyone using the tractor before operation and at least once yearly
thereafter in compliance with OSHA Regulation 1928.57 (United States).
A careful operator is the best operator. Most accidents can be avoided by observing certain precautions. To help
prevent accidents, read and take the following precautions before operating the tractor. Equipment should be
operated only by those who are responsible and instructed to do so.
The Tractor
1. Read the Operator’s Manual carefully before
using the tractor. Lack of operating knowledge
can lead to accidents.
2. Only allow properly trained and qualified persons
to operate the tractor.
3. Do not permit anyone but the operator to ride on
the tractor, especially children. The instructional
seat (optional) is used for instructing or service
diagnosing only.
4. Keep safety decals free of dirt or grime.
Replace safety decals if missing, illegible or
damaged.
5. Do not modify, alter, or permit anyone else to
modify or alter the tractor or any of its components
or any tractor function without first consulting an
authorized Buhler Versatile dealer.
6. Install all shields before starting or operating the
tractor.
7. Always use the steps and handrails
when entering and exiting the tractor. Never
jump from the tractor. There is a danger of
catching clothing on protruding parts.
Driving the Tractor
1. Always sit in the driver’s seat while starting or
driving the tractor.
2. When driving on public roads always use hazard
lights (and extremity lights where applicable).
Have consideration for other road users by pulling
to the side of the road so that any following traffic
may pass.
3. Dim the tractor lights when meeting a vehicle at
night. Make sure the lights are adjusted to prevent
blinding the driver of an oncoming vehicle.
4. Reduce engine speed before turning or applying
the brakes.
5. Any towed vehicle whose total weight exceeds that
of the towing tractor must be equipped with
brakes for safe operation.
6. Never apply the differential lock when turning.
When engaged, the differential lock will increase
the effort required to turn the tractor and increase
the turning radius.
7. Always check overhead clearance, especially
when transporting the tractor. Watch where you
are going, especially at row ends, on roads, and
around trees and low overhanging obstacles.
435/485/535
8. To avoid overturns, drive the tractor with care and
at speeds compatible with safety, especially when
operating over rough ground, when crossing
ditches or slopes and when turning corners.

1-9
Section 1 - Safety
Precautionary Statements
9. Use extreme caution when operating on steep
slopes.
10. Keep the tractor in the same gear when going
down hill as would be used when going uphill.
Do not coast or freewheel down hills.
11. When descending steep grades, select a sufficiently
low gear to maintain control with minimum
braking.
12. Drive the tractor slowly on hillsides and curves to
eliminate the danger of tipping. Avoid slopes
which are too steep for safe operation. Avoid sharp
uphill turns.
13. When driving out of a ditch, gully or up a steep
hillside, engage the clutch slowly. Avoid sharp
uphill turns.
14. Use caution when driving near the edge of a ditch
or gully. It may cave in, causing the tractor to roll
over.
15. Use extreme caution when operating the tractor
on single wheels. The danger of tipping increases.
Do not travel at high speeds.
16. Before transporting the tractor and implement
on public roadways, check with authorities for
local regulations.
Operating the Tractor
1. Apply the parking brake, place the PTO control
in the “OFF” position, the lift control in the down
position, the remote control valve levers in the
neutral position and the transmission lever in
neutral before starting the tractor.
2. Do not start the engine or operate controls
while standing beside the tractor. Always sit in
the tractor seat when starting the engine or
operating the controls.
3. Do not bypass the transmission neutral start
circuit. Consult your authorized dealer if your
neutral start controls malfunction.
4. Use jumper cables only in the recommended
manner. Improper use can result in a tractor
runaway.
5. Avoid accidental contact with the gear shift
lever while the engine is running. Unexpected
tractor movement can result from such contact.
6. Do not get off the tractor while it is in motion.
7. Shut off the engine and PTO and apply the parking
brake before getting off the tractor.
8. Do not park the tractor on a steep incline.
17. Use the wide transport marker lights to clearly
indicate the full width of the tractor with those
tire options.
18. Ensure towed implements are equipped with slow–
moving vehicle (SMV) signs when traveling on
public roads.
19. Install additional lights on implement rear to
safeguard against rear–end collisions. Daybreak
and dusk are particularly dangerous. Buhler
Versatile tractors have seven–pin trailer connectors
to facilitate installation of extra lighting.
20. Be aware of the transport width of towed
implements. Install additional lights to the sides
of wide implements to alert passing traffic. Keep
clear of the approaching lane.
21. Use hazard warning flashers as required by law
when transporting or driving the tractor on public
roads. Use extremity lighting kit when required or
deemed necessary.
22. Use extreme caution when pulling heavy loads
at road speeds. Avoid hard application of the
tractor brakes at high speed.
9. Do not operate the tractor engine in an enclosed
building without adequate ventilation. Exhaust
fumes can cause death.
10. The cab air filter is designed to remove dust from
the air but will not exclude chemical vapor. Follow
the chemical manufacturer’s directions regarding
protection from dangerous chemicals.
11. Always wear a protective mask when working with
toxic spray chemicals. Follow the directions on
the chemical container.
12. If the power steering or engine ceases to operate,
stop the tractor immediately as the tractor will be
more difficult to control.
13. WARNING: RELIEVE PRESSURE BEFORE
STOPPING THE ENGINE TO CONNECT OR
DISCONNECT HYDRAULIC, STEERING, WATER,
OR FUEL LINES.
435/485/535

1-10
Section 1 - Safety
Precautionary Statements
14. Pull only from the drawbar. Use only a drawbar
pin that locks in place. Pulling from the tractor
rear axle or any point above the axle may cause
the tractor to overturn.
15. Be sure hydraulic couplers are properly mounted
and will disconnect safely in case of accidental
detachment of the implement.
16. Do not leave equipment in the raised position
when the vehicle is stopped or unattended.
17. Ensure any attached equipment or accessories
are approved for use and are correctly
installed. Maintained in accordance with the
instructions issued by the equipment or accessory
manufacturer.
18. Remember that your tractor, if abused or
incorrectly used, can be dangerous and become a
hazard both to the operator and to bystanders.
Do not overload or operate with attached equipment
which is unsafe, not designed for the particular task,
or is poorly maintained.
19. The cab is designed to meet and exceed
the applicable noise level standards (86dBA).
However, noise (sound pressure level)
in the workplace can exceed this level
when the cab window is open. Therefore, it
is recommended that the operators wear suitable
ear protectors when operating in high noise level
conditions.
20. Always keep sleeves, jackets or other clothing
relatively tight and belted. Loose clothing may
catch in moving parts and result in personal injury
or death.
21. Use steps and hand holds when mounting and
dismounting the tractor or for servicing
components too high to reach from the ground.
22. Lock the seat in position and buckle your safety
belt before operating the tractor.
23. Do not operate the tractor when you are tired,
sick, or impaired in any way.
24. Never operate the tractor in confined areas, or
when visibility next to the tractor is reduced. Injury
to bystanders or damage to the tractor or
equipment may result.
25. When hitching drawn equipment to the drawbar,
only allow an assistant between the tractor and
implement if the tractor is off, in neutral and the
brakes are engaged.
26. Do not leave implements with the hydraulic
cylinders fully extended or retracted where the
heat from the sun can cause the hydraulic fluid
to expand. Hydraulic pressure can rupture the
hoses, releasing high pressure oil causing personal
injury.
27. Be careful when turning with an implement. Lift
it from the ground if possible during turns. Side
thrust caused by the implement could damage
the tire and implement.
28. Use transport locks, lower the implement to the
ground and securely block the frame before
servicing the implement. Relieve pressure from
the hydraulic system and shut off the tractor.
Operating the PTO
1. When operating PTO–driven equipment, shut off
the engine and wait until the PTO stops before
getting off the tractor and disconnecting the
equipment.
2. Do not wear loose clothing when operating the
power take–off or when near rotating equipment.
3. When operating stationary PTO–driven equipment,
ensure that the park brake is set and the gearshift
lever is in neutral, block the rear wheels front and
rear and engage the articulation lock. Do not leave
the tractor unattended. If you must leave the
tractor for any reason, stop the engine and remove
the key.
4. To avoid injury, do not clean, adjust, unclog or
service PTO driven equipment when the tractor
engine is running.
5. Make sure all PTO shields are in position at all
times.
7. Take special care in hook–up of implements to
the PTO.
435/485/535

Servicing the Tractor
1-11
Section 1 - Safety
Precautionary Statements
Most accidents can be avoided by observing certain
precautions. To help prevent accidents, read and
take the following precautions before servicing the
tractor.
1. The cooling system operates under pressure which
is controlled by the radiator cap. It is dangerous
to remove the cap while the system is hot. Always
turn the cap slowly to the first stop and allow the
pressure to escape before removing the cap
entirely. Wear gloves when removing the cap.
2. Do not smoke while refueling the tractor. Keep
any type of open flame away.
3. Keep the tractor and equipment, particularly
brakes and steering, maintained in a reliable
and satisfactory condition to ensure your safety
and comply with legal requirements.
4. To prevent fire or explosion, keep open flames
away from the battery or cold– weather starting aids.
To prevent sparks which could cause explosion,
use jumper cables according to instructions.
5. Do not attempt to service the air conditioning
system. It is possible to suffer severe frost bite or
injury from escaping refrigerant. Special
equipment and instruments are required to
service the air conditioning system which uses
R134A refrigerant. See your authorized Buhler
Versatile dealer for service.
6. Stop the engine before performing any service on
the tractor.
7. Escaping diesel/hydraulic fluid under pressure
can penetrate the skin causing serious injury.
• DO NOT use your hand to check for leaks.
Use a piece of cardboard or paper to search
for leaks.
• Stop the engine and relieve pressure before
connecting or disconnecting lines.
• Tighten all connections before starting the
engine or pressurizing lines.
• If fluid is injected into the skin, obtain medical
attention immediately or gangrene may
result.
8. Do not modify, alter or permit anyone else to
modify or alter the tractor or any of its components
or any tractor function without first consulting an
authorized Buhler Versatile dealer.
9. Unqualified persons should not remove or attempt
to adjust a pump, injector, nozzle or any other
part of the fuel injection system. Failure to follow
these instructions can result in serious injury.
10. Continuous long–term contact with used engine
oil may cause skin cancer. Avoid prolonged
contact with used engine oil. Wash skin promptly
with soap and water.
11. Tractor wheels are very heavy. Handle with care
and ensure, when stored, they cannot fall and
cause injury.
12. Dispose of all drained fluids and removed filters
properly. Follow local laws governing disposal of
used engine oil.
13. Never oil, grease or adjust the tractor while it is
running. Do not leave the engine running while
the tractor or drawn equipment is being adjusted,
repaired or cleaned.
14. Be sure all connections are tight and lines and
hoses are undamaged. Before disconnecting
hydraulic lines, relieve all pressure. Do not overfill
the hydraulic tank.
15. Do not smoke and avoid open flames when
servicing batteries.
16. Starting fluid is highly flammable. Do not use
near fire, sparks, or open flames.
17. Remove mud, crop residue, chains and tools from
steps and operator’s platform. They may interfere
with pedal operation or entry/exit from the
tractor.
18. Never operate the tractor with a damaged tire.
The tire may explode.
19. Tighten all connections before starting the engine
or pressurizing lines.
435/485/535

1-12
Section 1 - Safety
Precautionary Statements
Diesel Fuel
1. Under no circumstances should gasoline, alcohol
or blended fuels be added to diesel fuel. These
combinations can create an increased fire or
explosive hazard. In a closed container, such as a
fuel tank, these blends are more explosive than
pure gasoline. Do not use these blends.
2. Do not smoke while refueling the tractor or when
standing near fuel. Keep any type of open flame
away.
3. Never remove the fuel cap or refuel with the
engine running. Allow the tractor to cool off before
fueling.
4. Use the proper fuel transfer hose and nozzle. Make
sure the nozzle and hose are grounded to dissipate
static electric charges.
5. When refueling, make sure the nozzle is in
contact with the filler neck of the tractor fuel tank
before fuel starts to flow and during the entire
time fuel is flowing.
6. Maintain control of the fuel filler pipe nozzle when
filling the tank.
7. Do not fill the fuel tank to capacity. Allow room for
expansion.
8. Wipe up spilled fuel immediately.
9. Always tighten the fuel tank cap securely.
Safety Cab
Your tractor is equipped with a safety cab which must
be maintained in a serviceable condition. Be careful
when driving through doorways or working in confined
spaces with low headroom.
1. Do not modify, drill, weld, or alter the safety cab
in any way. Doing so could render you liable to
legal prosecution in some countries.
2. Never attempt to straighten or weld any part of the
main frame or retaining brackets which have
suffered damage. By doing so you may weaken
the structure and endanger your safety. Replace
all damaged parts.
3. Never attach chains or ropes to the cab or main
frame for pulling purposes.
4. Never take unnecessary risks even though your
safety cab affords you the maximum protection
possible.
5. Do not carry harmful chemicals in the cab.
Chemicals may rupture the container, and the
fumes may poison the operator.
6. The tractor cab is not designed to provide a
“sprayer safe” environment for the operator. When
applying chemicals from a spray unit, do not rely
on the cab filter elements to provide protection to
the operator from the airborne chemicals.
10. If the original fuel tank cap is lost, replace it with
a genuine replacement cap. A non–approved cap
may not be safe.
11. Keep equipment clean and properly maintained.
12. Do not drive equipment near open fires.
13. Never use fuel for cleaning purposes.
14. Arrange fuel purchases so that summer grade
fuels are not held over and used in the winter.
15. Ground fuel storage tanks to prevent static
buildup.
435/485/535
F1-2
1-13
Section 1 - Safety
Safety Labels
Safety Labels
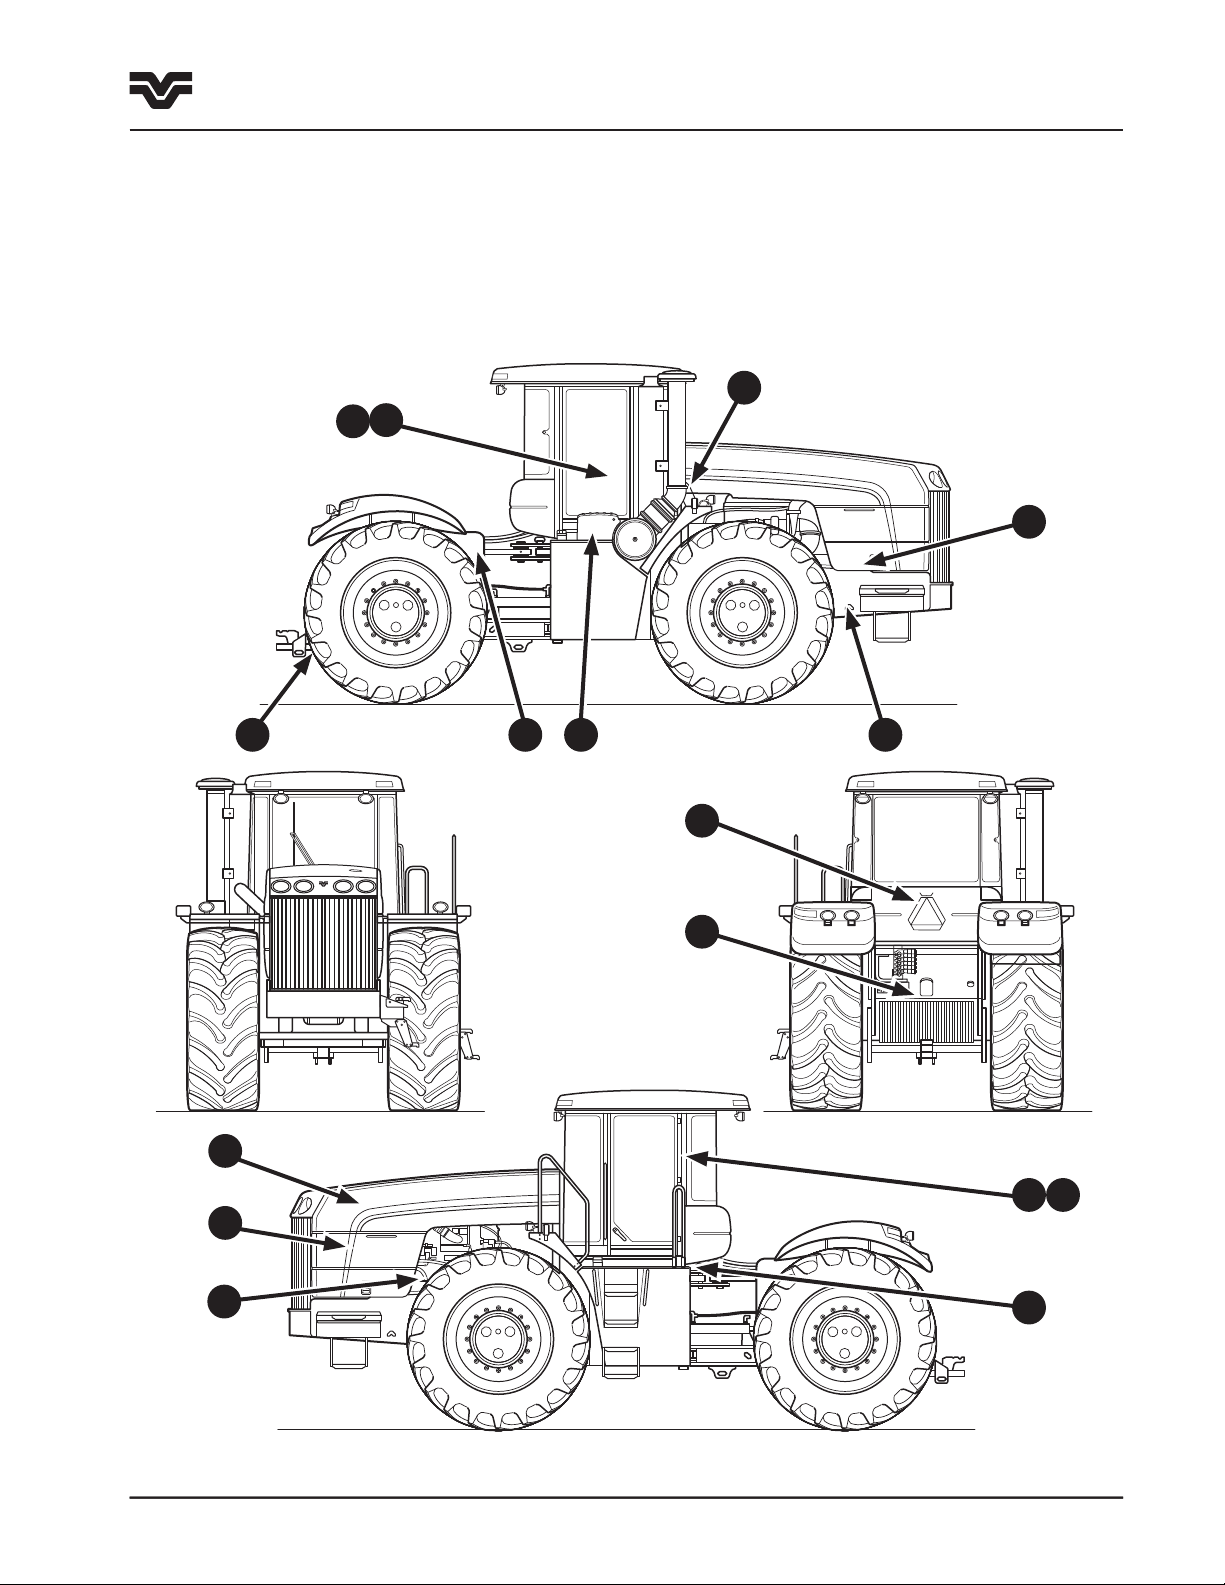
The following warning signs are installed on the tractor in the areas indicated. They are intended for your safety
and for those working with you. Please become familiarized with the content and location of these warning
signs.
Make sure all warning signs are legible. Clean or replace where necessary. Replacements warning signs can be
obtained from your Buhler Versatile dealer.
6
15
4
11
10
12
7
3
9
8
3
2
5
13 14
1
435/485/535

CAUTION
ATTACH IMPLEMENTS PROPERLY
Attaching clevis
type tongues
Attaching clevis
type tongues
Pull only from drawbar or three
point hitch.
Use a safety chain when towing
implement.
•
•
•
•
86000550-C
WARNING
AVOID POSSIBLE
INJURY OR DEATH
Do not start engine by shorting
across starter terminals. Engine can
start and machine can move when
starting safety switch is by-passed.
Start engine only from operator’s
seat with transmission in neutral and
the parking brake applied
86000552-C
WARNING
CONTENTS UNDER PRESSURE
Accumulator charged to 69 bar (1000 psi).
Pump service brakes at least ten times
with engine off to release pressure before
loosening any fittings connected to the
accumulator.
86034047
WARNING
ENGAGE PARK BRAKE
BEFORE EXITING
TRACTOR
86034142
CAUTION
DO NOT CONNECT JUMPER CABLE TO NEGATIVE POST OF DISCHARGE BATTERY
BATTERY BOOST INSTRUCTIONS
86000551-D
•
Apply parkbr ake, set transmis sion in neutral a nd turn all elec trical connection s off
•
Connect one end of jumper cab le to positive te rminal of boosti ng battery and ot her
end to posit ive terminal of d ischarged battery
•
Connect one end of negative c able to negative post of battery and other end to
tractor fram e at least 300 mm (12") from dis charged battery
•
DO NOT LEAN OVER BATTERIES WHILE MAKING CONNECTIONS
•
DO ENSURE POSITIVE AND NEGATIVE CLAMOS ARE NOT IN CONTACT
•
DO ENSURE VEHICLES ARE NOT IN CONTACT
•
86001239
ROLL OVER PROTECTIVE STRUCTURE
FOR TRACTORS: 435/485/535
MEETS OSHA REGULATION
PROTECTIVE STRUCTURE
PART NO: 86031286
CERTIFIED TO CSA STANDARD
86033283
F1-3A
1-14
Section 1 - Safety
Safety Labels
1. ROPS Certificate - Located left underside of cab.
2. Slow-Moving Vehicle - Located on rear of cab.
5. Implement Attaching - Located above the drawbar
at the rear of the tractor.
6. Accumulator Pressure - Located on the fender
support above the multifunction valve.
3. Tie down brackets
- Located on frames.
4. Park Brake - Located
inside cab on right hand window
8. Battery Boosting - Located on the underside of
the battery cover.
435/485/535
7. Jump starting - Located on the left
side frame next to the starter.
CAUTION
PRESSURIZED SYSTEM
Remove cap slowly
86000548-C
CAUTION
HOT EXHAUST SYSTEM COMPONENTS
86000549-C
WARNING
ARTICULATING JOINT
STAY CLEAR OF THIS AREA WHEN ENGINE IS RUNNING
TO PREVENT PERSONAL INJURY
Engage articulation lock before lifting tractor, transporting tractor on another vehicle,
performing maintenance in articulation area or operating stationary PTO equipment.
86000554-C
Shut off engine before servicing articulation area.
Disengage lock before driving the tractor,
•
•
•
CAUTION
This roll over protective structure meets
OSHA and other safety standards when
installed in accordance with approved
factory mounting instructions
The protection afforded may be impaired if it
has been subjected to alteration, structural
damage, or involved in an overturn accident.
In these cases the entire structure must be
replaced.
BE SURE OPERATION AND SAFETY
INSTRUCTIONS ARE GIVEN TO
ANYONE USING THIS TRACTOR AT
THE TIME OF INITIAL ASSIGNMENT
AND ANNUALLY THEREAFTER.
BEFORE STARTING:
WHEN OPERATING:
BEFORE DISMOUNTING, SERVICING,
CLEANING OR ADJUSTING TRACTOR
OR IMPLEMENT:
FAILURE TO FOLLOW ALL OF THE
ABOVE INSTRUCTIONS COULD LEAD
TO SERIOUS INJURY.
Read the operator’s manual provided.
Know all the operating and safety
instructions in the operator’s manual
and on the machine.
86000553-D
•
Securely fasten your seatbelt.
•
Be sure all shields are in place.
•
Hitch only to drawbar or three point
hitch lift points.
•
No riders should be permitted in the
cab or on the tractor.
•
Make sure everyone is clear of the
machinery.
•
Do not allow children to operate the
tractor.
•
Avoid operating tractor near holes,
ditches or steep slopes.
•
Bring tractor to a complete stop. Lower
implement, shift transmission to neutral,
set park brake.
•
Stop engine and wait for all moving parts
to come to a complete halt. Remove key
if leaving tractor.
•
Avoid jerky starts or stops.
•
Use flashers and extremity lights
when required.
•
Reduce speed when turning, crossing
slopes and on rough, slick, or muddy
surfaces.
•
Be sure the transmission is in neutral,
PTO is disengaged and implement
hydraulic levers are in neutral.
•
86033512
CAUTION
This instructional seat
has been provided only
for training operators
or diagnosing machine
problems.
Keep all other riders off
the tractor and equipment.
Always wear your seat belt.
WARNING
Ke ep ha nds a nd
cl oth in g a wa y f ro m
ro tat in g f an an d bel ts .
Fa ilu re to c omp ly co ul d
re sul t in de ath
or se ri ous i nju ry.
86501511-E
F1-3B
IMPORTANT
CLUTCH PEDAL MUST BE
DEPRESSED & TRANSMISSION
MUST BE IN NEUTRAL TO
START TRACTOR
86034143
1-15
Section 1 - Safety
Safety Labels
9. Pivoting Frames - Located on the right and left
sides.
1
0. Radiator Cap Pressure - Located on the left side
of the hood at the access hole for the radiator cap.
11. Hot Exhaust - Located on the right side frame
under engine hood.
12. Engine Cooling Fan - Located on both sides of
radiator under the engine side shields
14. ROPS Caution - Located inside cab on left hand
door post.
13. Instructional Seat - Located inside cab on left
hand door post.
15. Clutch Pedal operation - Located inside cab on
right hand window
435/485/535
F1-6
F1-4
F1-5
1-16
Section 1 - Safety
Additional Safety Items
Additional Safety Items
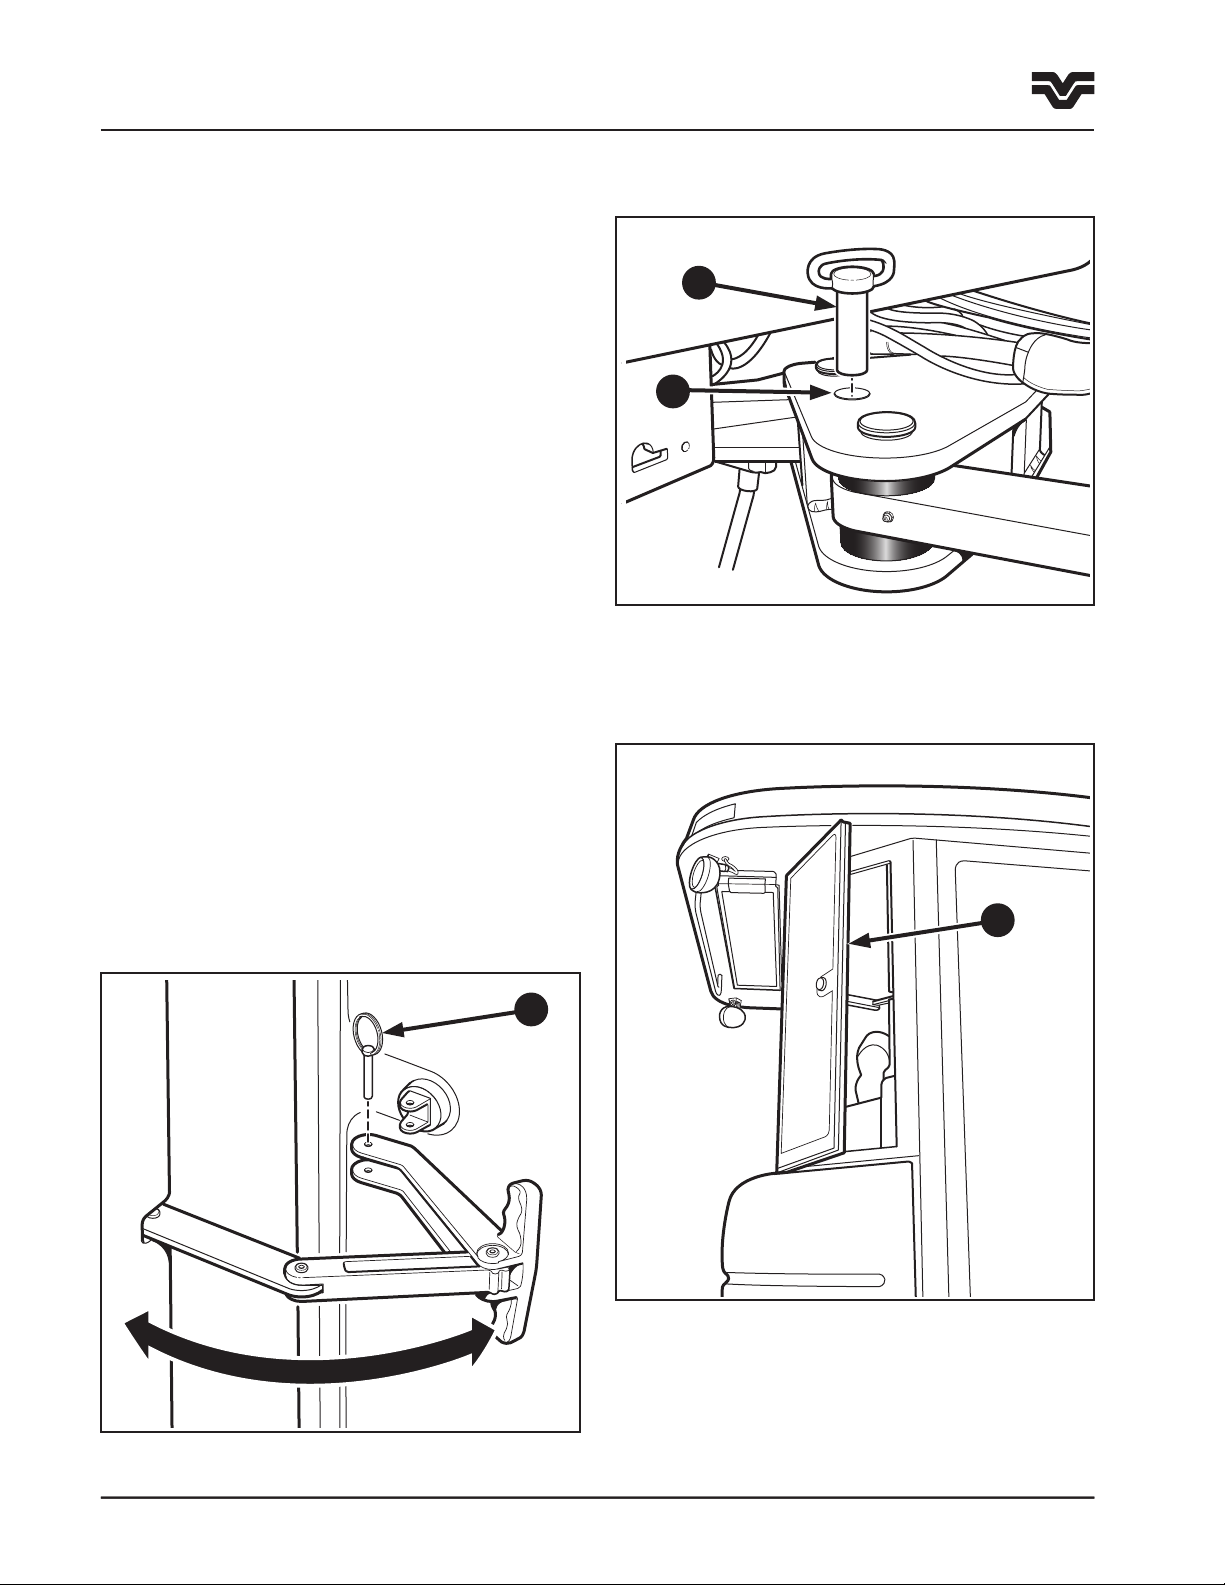
Articulation Locks
1. Use the articulation lock during stationary
applications, servicing, jacking or overhaul
operations. Do not use when the tractor is
operating.
1
2. Before engaging the lock, drive the tractor to a
level surface, put the steering straight, engage the
park brake, put the gearshift in neutral and stop
the engine.
3. Remove the pin (1) from the storage position
located on the right of the swing frame and insert
the pin through the hole on the left of swing
frame (2).
NOTE: It may be necessary to start the engine and
articulate the frame slightly to enable the
articulation pin to seat properly through the swing
frame and front frame.
Emergency Exit
1. The cab has an emergency exit located in the right
rear of the cab (3). To operate, pull out the
pin (4) attaching the lever to the glass window.
This will allow the window to open beyond
the latch. If greater access is required, the
silicone hinge/seal can be cut to remove the
window completely.
2
3
435/485/535
4

1-17
Section 1 - Safety
Safety Cab
Safety Cab
A safety cab incorporates a Roll Over Protective
Structure (ROPS). Safety belts are standard fitted
equipment for the tractor at the time of factory
assembly. The safety belt, when used by the operator,
maximizes the protection offered by the ROPS.
WARNING: ALWAYS USE YOU SAFETY BELT WITH
THE CAB/ROPS TO PREVENT BEING THROWN
FROM THE TRACTOR IN THE EVENT OF ROLLOVER.
SAFETY BELTS SAVE LIVES WHEN THEY ARE
USED.
Information regarding the safety cab/ROPS and safety
belt are available from your authorized Buhler Versatile
dealer.
ROPS Maintenance and Inspection
After the first 50 hours of operation and every 1500 of
operation (or yearly, whichever comes first):
Damage to the Cab/ROPS
If the tractor has rolled over or the cab has been
damaged (such as striking an overhead object during
transport), it must be replaced to provide the original
protection.
IMPORTANT: Do not try to weld or straighten the
cab/ROPS.
After an accident, check for damage to the cab/ROPS,
operator’s seat, safety belt and safety belt mountings.
Replace all damaged parts before operating the
tractor.
WARNING: NEVER ATTACH, CHAINS, ROPES
OR CABLES TO THE CAB/ROPS FOR PULLING
PURPOSES. ALWAYS PULL FROM THE TRACTOR
DRAWBAR. BE CAREFUL WHEN DRIVING THROUGH
DOOR OPENINGS OR UNDER LOW OVERHEAD
OBJECTS. MAKE SURE THERE IS SUFFICIENT
OVERHEAD CLEARANCE FOR THE CAB/ROPS.
1. Check the torque of the cab/ROPS mounting bolts,
as detailed in the lubrication and maintenance
section of this manual.
2. Check the operators seat mounting bolts and safety
belt mounting bolts. Tighten the seat mounting
bolts to 40 N
damaged parts.
·m (30 ft-lbs.). Replace any worn or
WARNING: IF THE CAB/ROPS IS REMOVED OR
REPLACED, MAKE CERTAIN THAT THE PROPER
HARDWARE IS USED AND THE RECOMMENDED
TORQUE VALUES ARE APPLIED TO THE ATTACHING
BOLTS. SEE YOUR AUTHORIZED BUHLER
VERSATILE DEALER.
435/485/535

1-18
435/485/535

2-1
Section 2 - General Information
Contents
Section 2 Contents - General Information
Tractor Orientation . . . . . . . . . . . . . . . . . . . . . . . . . . . . . . . . . . . . . . . . . . . . . . . . . . . . . .2-2
Overall Description . . . . . . . . . . . . . . . . . . . . . . . . . . . . . . . . . . . . . . . . . . . . . . . . .2-2
Tractor Terminology. . . . . . . . . . . . . . . . . . . . . . . . . . . . . . . . . . . . . . . . . . . . . . . . .2-2
Tractor Identification Data . . . . . . . . . . . . . . . . . . . . . . . . . . . . . . . . . . . . . . . . . . . . . . . . .2-3
Vehicle Identification Plate . . . . . . . . . . . . . . . . . . . . . . . . . . . . . . . . . . . . . . . . . . .2-3
Tractor Identification . . . . . . . . . . . . . . . . . . . . . . . . . . . . . . . . . . . . . . . . . . . . . . . .2-3
Engine Identification . . . . . . . . . . . . . . . . . . . . . . . . . . . . . . . . . . . . . . . . . . . . . . .2-4
Transmission Identification . . . . . . . . . . . . . . . . . . . . . . . . . . . . . . . . . . . . . . . . . . .2-4
Front & Rear Axle Identification . . . . . . . . . . . . . . . . . . . . . . . . . . . . . . . . . . . . . . . .2-5
Protective Shielding . . . . . . . . . . . . . . . . . . . . . . . . . . . . . . . . . . . . . . . . . . . . . . . . . . . . .2-6
Engine Side Covers . . . . . . . . . . . . . . . . . . . . . . . . . . . . . . . . . . . . . . . . . . . . . . . . .2-6
Starter Solenoid Shield . . . . . . . . . . . . . . . . . . . . . . . . . . . . . . . . . . . . . . . . . . . . . .2-6
Battery Cover . . . . . . . . . . . . . . . . . . . . . . . . . . . . . . . . . . . . . . . . . . . . . . . . . . . . .2-6
Break-In period . . . . . . . . . . . . . . . . . . . . . . . . . . . . . . . . . . . . . . . . . . . . . . . . . . . . . . . .2-7
Towing the Tractor . . . . . . . . . . . . . . . . . . . . . . . . . . . . . . . . . . . . . . . . . . . . . . . . . . . . . .2-8
Transporting the Tractor . . . . . . . . . . . . . . . . . . . . . . . . . . . . . . . . . . . . . . . . . . . . . . . . . .2-9
435/485/535

2-2
F2-3
F2-2
F2-4
F2-1
Section 2 - General Information
Tractor Orientation
Tractor Orientation
Overall Description
The Models 435, 485 and 535 tractors are
classified as 4–wheel drive articulating vehicles.
The tractors consist of front and rear frame assemblies
which steer by pivoting at the center articulation
joint.
The front frame, (1) incorporates the engine, fuel
tanks, transmission, front drive axle, and cab. The rear
frame, (2) incorporates the rear drive axle and supports
any implements that are operated by the tractor. This
type of design allows for greater flexibility of weight
distribution, depending upon operating conditions and
type of implement. The operator can ballast the tractor
to best suit the needs of the particular operation.
The construction of the tractor is a modular-type
construction. This means that the major components
are individual units which are supported within
the front and rear frames. This makes for easier
serviceability and longer life due to reduced structural
stress on components.
Tractor Terminology
This manual uses the following terms to describe
tractor function and directional relationships:
Front (1) - The engine end of the tractor. This direction
will also be referred to as the “Forward Direction
of Travel”.
Right (2) - The console side of the cab.
Rear (3) - The drawbar end of the tractor, which is
used for pulling implements.
Left (4) - The doorway side of the cab.
1
2
1
2 3
4
Articulation - The ability to steer by pivoting
between front and rear frame sections.
435/485/535
Oscillation - The ability of a vehicle to twist,
allowing travel over uneven terrain.

F2-7
F2-6
Tractor Identification Data
MODEL
TRANSMISSION
HYDRAULIC PUMP
FWD-FACTOR
BUHLER VERSATILE INC.
TRACTOR NUMBER
ENGINE
FRONT AXLE
UNIT
REAR AXLE
HYDRAULIC LIFT
SPECIAL ORDER
F2-5
The tractor and its major components are identified
using serial numbers and/or manufacturing codes.
These codes are recorded on the Vehicle Identification
Plate, (ID plate).
NOTE: Tractor identification data must be supplied
to the dealer when requesting parts or service.
Identification data is needed to aid in identifying the
tractor if it is ever stolen.
Please record the following identification data in the
sample ID plate, right.
The following information provides the locations of the
identification data.
2-3
Section 2 - General Information
Tractor Identification Data
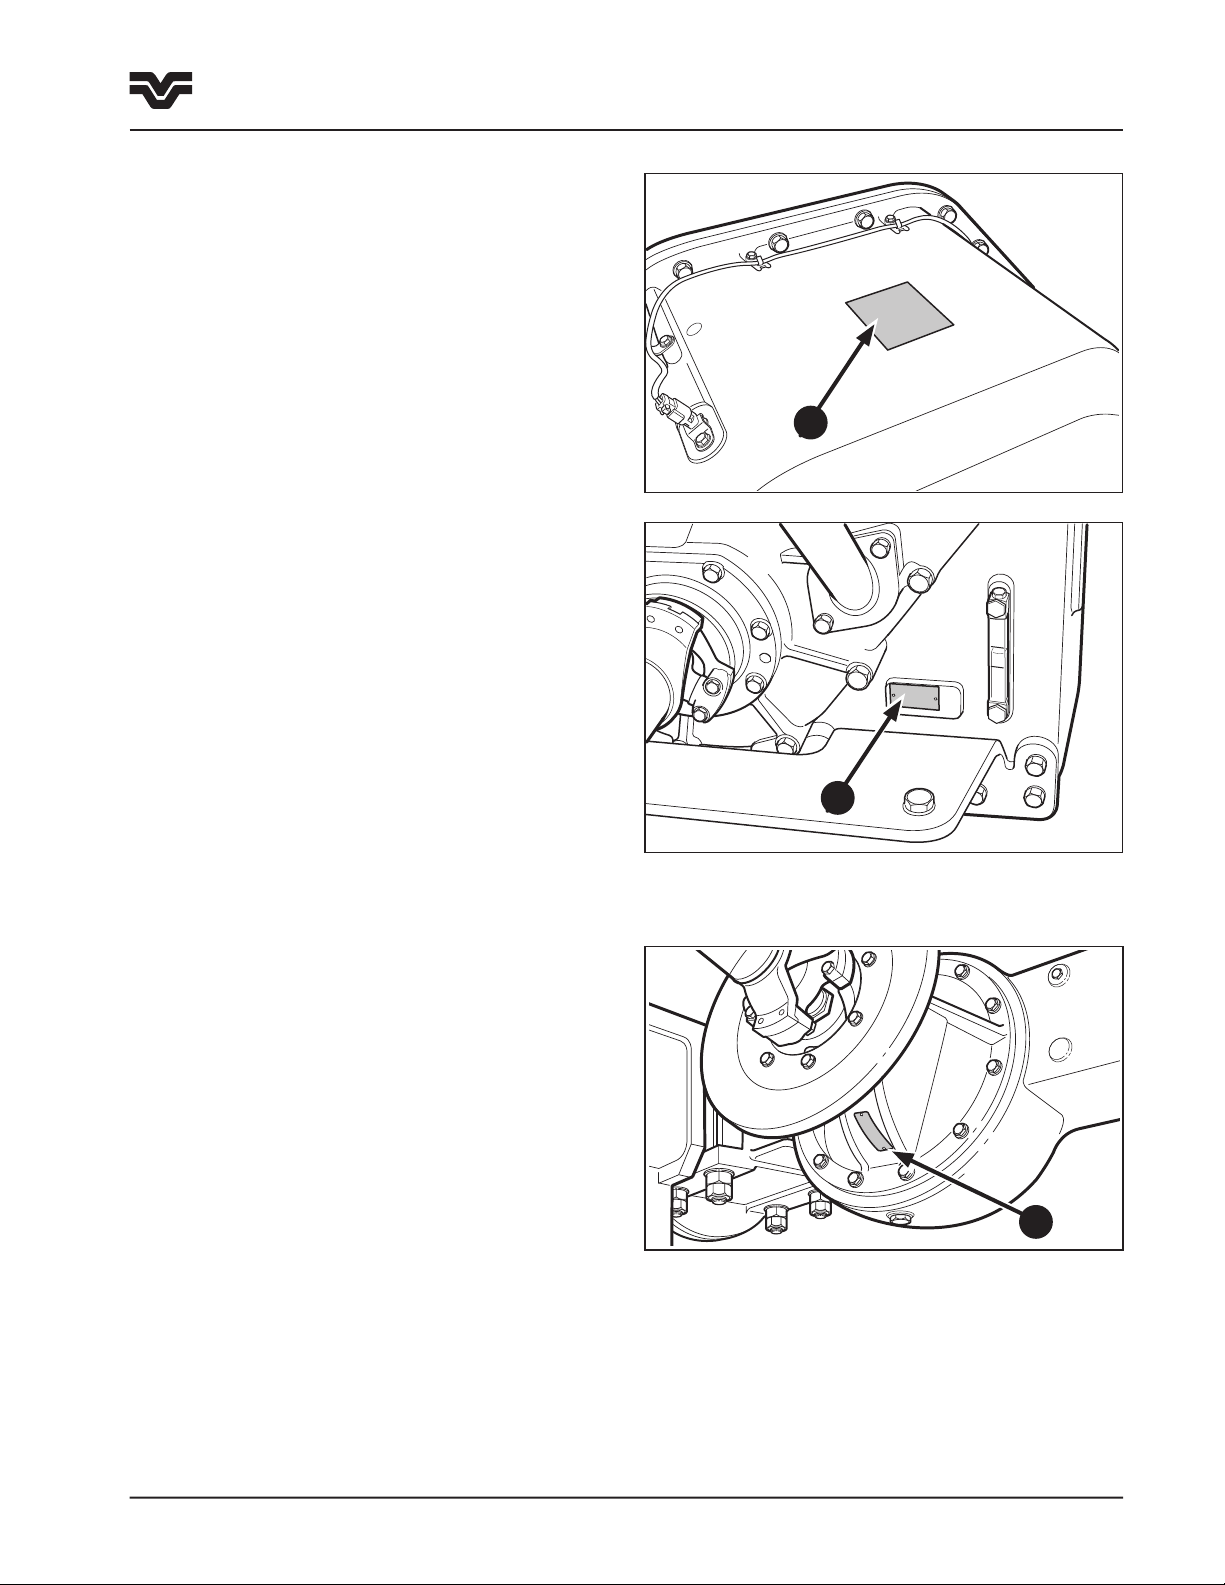
Vehicle Identification Plate
The Vehicle Identification Plate (1) is located on the
left rear underside corner of the cab.
The ROPS identification plate (2) is located adjacent
to it.
Tractor Identification
The tractor serial number (3) is stamped on the front
frame.
This serial number stamp is used in the event that the
Tractor Identification Plate is removed or mutilated.
1
2
3
435/485/535

2-4
F2-9S
F2-8
F2-9P
Section 2 - General Information
Tractor Identification Data
Engine Identification
The Cummins engine used in your Buhler Versatile
4WD tractor is serviced solely by the Cummins
Engine Company through its authorized dealers and
distributors. Many Buhler Versatile dealers are
authorized Cummins dealers. If your dealer is
not, he will arrange for the engine service on
your tractor to be carried out by an authorized
Cummins engine dealer or distributor.
For service, warranty, and parts information, contact
your Buhler Versatile dealer.
For the 435, 485 and 535 tractor (Cummins QSX15
engine), the Engine Identification Plate (1) is located
on the front left side of the engine block below the
valve cover.
Transmission Identification
Synchromesh Transmission (12 x 4 Synchronized)
The serial number plate is on the right rear of
the transmission case (2). This is a 6-digit alpha
numeric number.
1
1407 Twindisc Powershift Transmission
The serial number plate is located on the left rear of
the transmission case (3).
435/485/535
2
3
F2-10
CAT TA22 Powershift Transmission
F2-9C2
F2-9C1
There are two serial number plates, located on the top
of the transmission case (1) and on the bottom rear
right below the transmission oil level sight glass (2).
2-5
Section 2 - General Information
Tractor Identification Data
1
Front & Rear Axle Identification
On the underside (or topside) of the input shaft is
the Differential Identification Plate (3) containing
differential model information.
NOTE: Make a copy of the information recorded in the
preceding paragraphs and keep in a safe location in
the event your operator’s manual is lost or destroyed.
2
3
435/485/535
2-6
F2-13
F2-12
F2-11
Section 2 - General Information
Protective Shielding
Protective Shielding
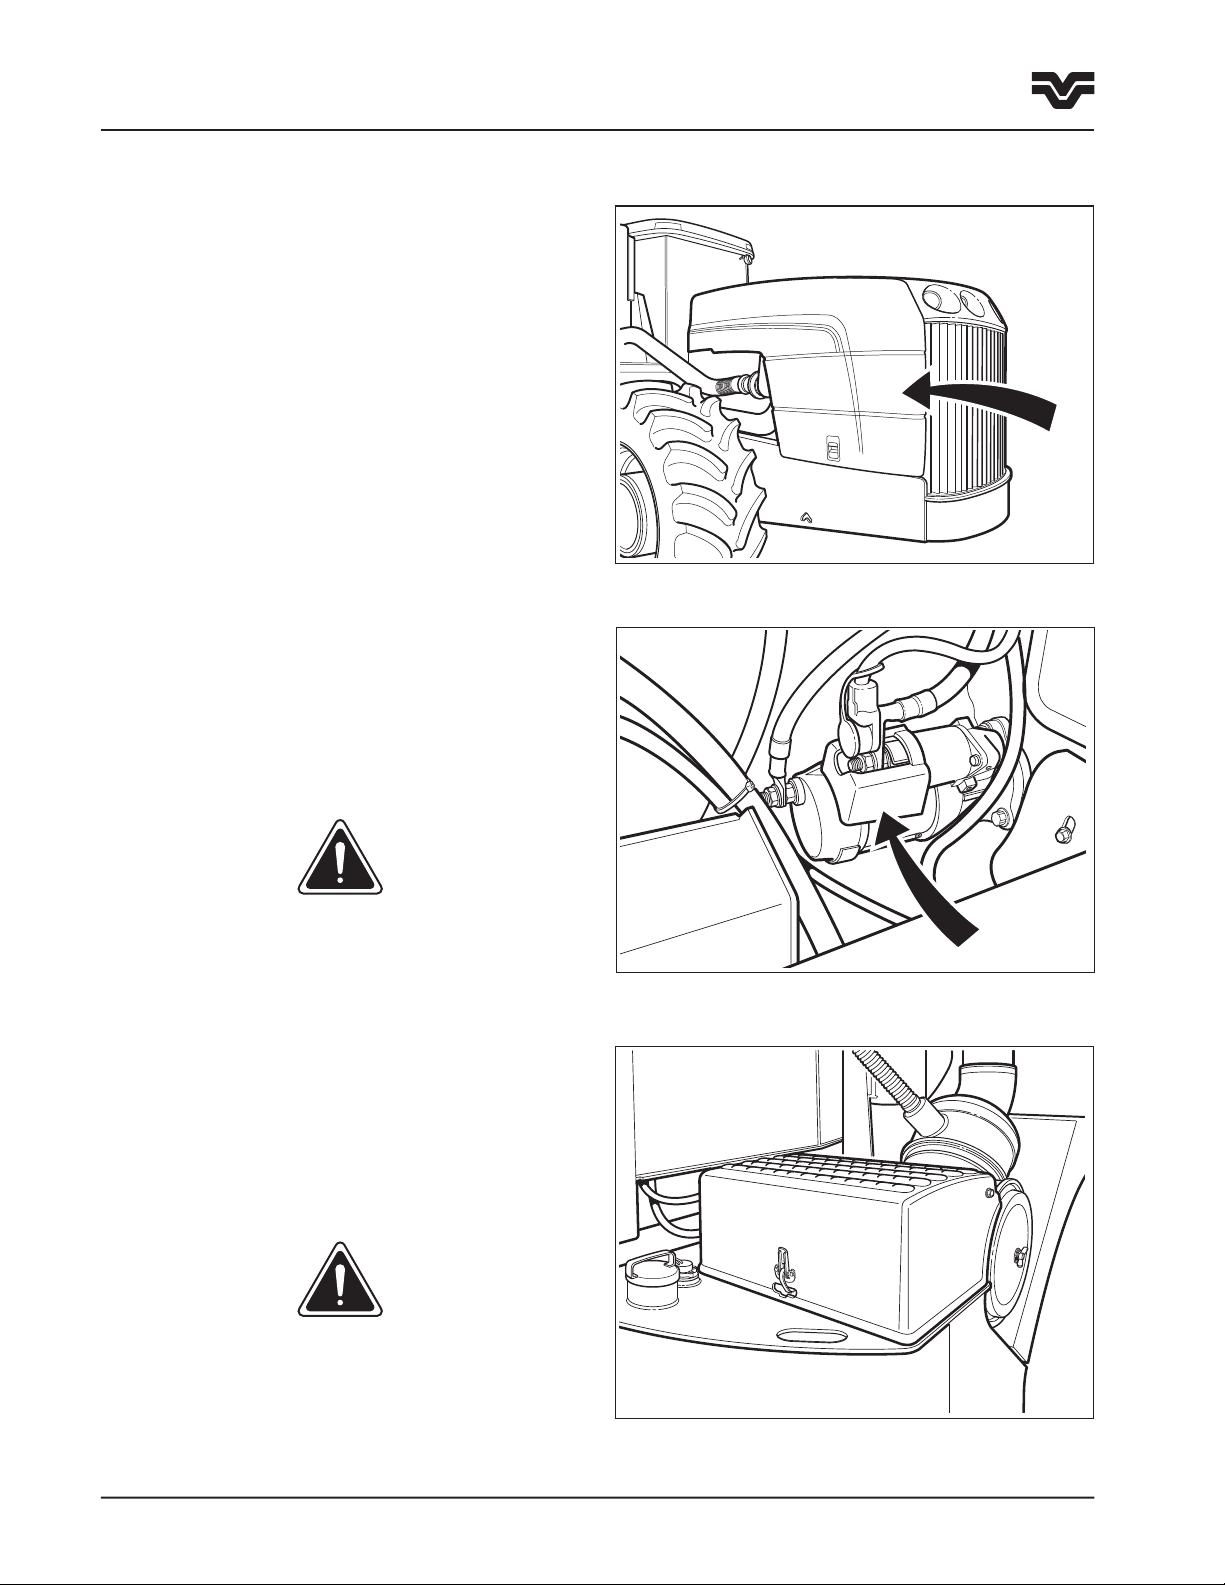
Engine Side Covers
The side covers protect the operator from hot and/or
moving parts. Do not operate the tractor unless the
engine side covers are in place and latched.
Starter Solenoid Shield
The shield covers the starter solenoid electrical
connections to prevent accidental contact. The
shield must be installed whenever the batteries are
connected to the electrical system. Always disconnect
battery before removing the shield.
DANGER: NEVER ATTEMPT TO START THE TRACTOR
BY BYPASSING THE WIRES TO THE STARTER
MOTOR.
Battery Cover
The battery cover protects the batteries from damage
and the electrical connections from accidental contact.
The battery cover must always be in place and latched
during operation.
WARNING: INSTALL ALL PROTECTIVE SHIELDS
BEFORE STARTING OR OPERATING THE TRACTOR.
435/485/535

Break-in Periods
2-7
Section 2 - General Information
Break-In Period
The first 50 hours of operation are the most critical for
insuring long and dependable tractor life. Please carry
out the following procedures:
1. Review the tractor Pre-delivery Checklist contained
in the assembly manual with your dealer. Be sure
all applicable items on the sheet have been
checked.
2. Check all fluid levels and be sure all systems are
filled with the correct fluids for your operating
conditions.
3. Check the engine, transmission, and hydraulic oil
levels hourly during the first 10 hours of
operation.
4. Inspect the tractor for leaks hourly during the first
10 hours of operation.
5. Torque the wheel bolts to 715 N
after the first hour of operation and after every three
hour of operation for the first day. Re-tighten to the
specified torque daily until wheel hardware
maintains the specified torque.
6. Operate the engine at 3/4 load as much as possible
during the first 50 hours (3/4 load is approximately
one gear lower than would be normally used to pull
a matched load).
·m (525 ft-lbs)
Engine Break-in
The Cummins engine used in Buhler Versatile 4WD
tractors has been run on a dynamometer before
installation but not enough to be considered broken
in.
1. Do not operate the engine at more than 3/4 load
for the first 24 hours of operation. Full load should
only be held for short intervals during the next 24
hours of operation.
2. Check the oil level every 8 to 10 hours for the first
100 hours of operation.
3. Follow the recommendations outlined in the
Cummins manual supplied with your tractor.
7. Do not operate the engine at idle speed or maximum
horsepower for more than 5 minutes at a time for
the first 50 hours.
8. Check the frame pivot pin, drag link and steering
cylinder cap screw torques after the first 10 hours
of operation. Torque the frame pivot pin to 1365
N
·m (1000 ft-lbs) and the remaining pins to 175
N
·m (130 ft-lbs).
9. Have your dealer complete the “First 50-Hour
Service” checklist at the end of this manual.
435/485/535

2-8
Section 2 - General Information
Towing the Tractor
Towing The Tractor
IMPORTANT: The tractor should only be towed a short
distance such as out of a building. Do not tow down
roadways or as a method of transport. Haul the tractor
on a trailer.
If towing the tractor is necessary, use a strong chain
or cable of sufficient strength to tow the vehicle.
Consult your Buhler Versatile Dealer. Tow the tractor
BACKWARD from the drawbar or FORWARD from both
of the front tie-down slots. Use the tie-down slots in
the front and rear frames to attach the chains to the
tractor.
WARNING: WHEN THE TRACTOR IS TOWED AND
THE ENGINE IS NOT RUNNING THERE WILL BE NO
BRAKES AVAILABLE ON THE TRACTOR RESULTING
IN A POSSIBLE COLLISION. ALWAYS USE A SOLID
TOWING BAR BETWEEN THE TRACTOR AND THE
TOWING VEHICLE. THE TOWING VEHICLE MUST
BE OF ADEQUATE SIZE TO STOP THE TOWED
TRACTOR.
IMPORTANT: Do not tow the tractor by hooking to the
engine cross brace.
1. Engage the parking brake, then shift transmission
in neutral. Attach the chain to the tractor.
2. If possible start the engine and let the engine run
so that full use can be made of the power steering
and brakes. If the engine cannot be run engage
the articulation lock. (see page 1-12)
IMPORTANT: If the engine is not operational, and
the transmission internal components are rotated by
the axle drive shafts for a long period of time,
possible transmission damage due to lack of
lubrication may result.
IMPORTANT: When the engine is running, the
clutch, transmission input shaft, and transmission
output shafts will also be driven. Be sure that
these components are functional prior to starting
the engine.
3. Release the parking brake and tow the tractor.
CAUTION: DO NOT TOW THE TRACTOR FASTER
THAN 8 KPH (5 MPH). ENGAGE THE ARTICULATION
LOCK WHEN IT IS NOT POSSIBLE TO STEER THE
TRACTOR (WITH THE ENGINE RUNNING).
WARNING: ONLY USE CABLES OF SUFFICIENT
STRENGTH TO TOW THE TRACTOR. IF A CABLE
BREAKS OR SLIPS, IT MAY WHIP WITH SUFFICIENT
FORCE TO CAUSE SERIOUS INJURY. WHEN USING
A CHAIN, ATTACH WITH THE HOOK OPEN SIDE
FACING UP; IF IT SLIPS, IT WILL DROP DOWN
INSTEAD OF FLYING UPWARD CAUSING SERIOUS
INJURY.
435/485/535
F2-14
F1-6
Transporting the Tractor
2-9
Section 2 - General Information
Transporting
1. Haul the tractor with all four wheels on to a flatbed
trailer.
2. Remove the outer duals or triples during
transporting unless special permits allow for over width hauling. Consult local authorities for
information on over-width hauling.
3. Make an accurate measurement of the highest point
on the tractor when it is loaded on the transporter.
Consult local authorities regarding over-height
hauling based on the measurements taken.
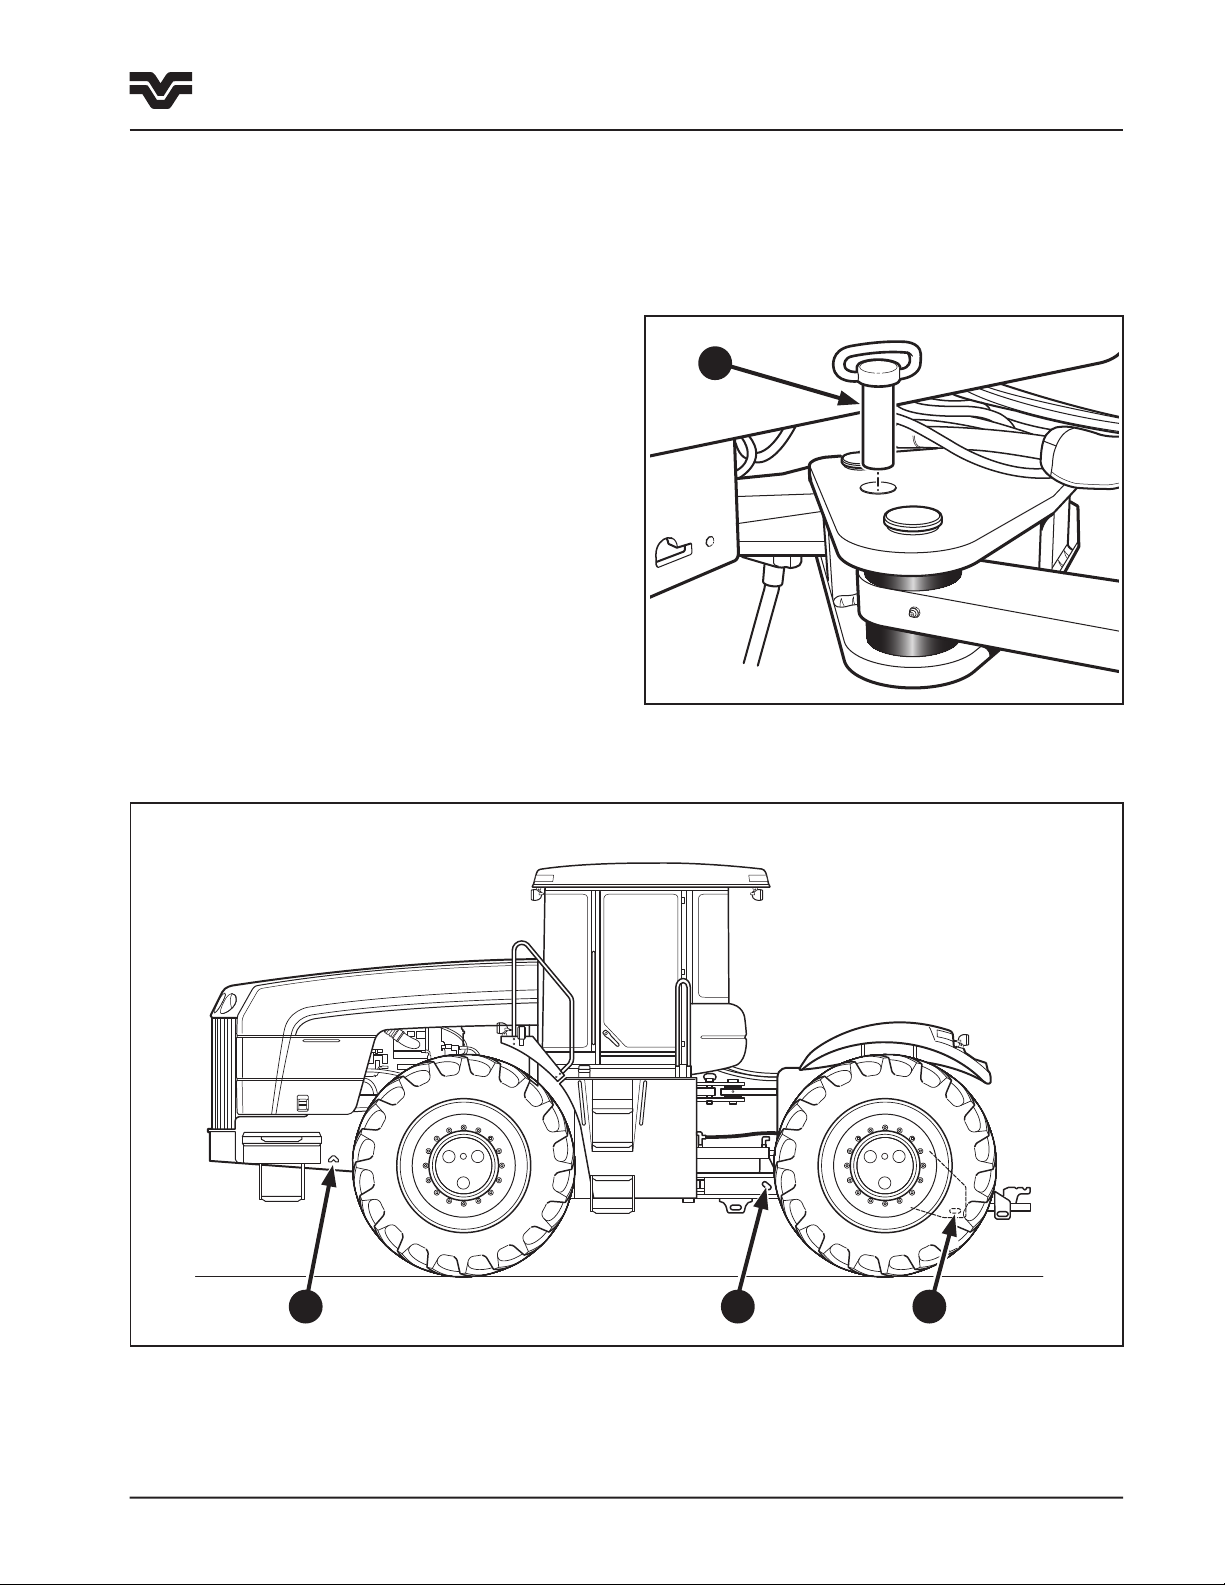
4. Tie-down brackets are located in the following
positions.
Cutout slots (1) are located on either side of the front
frame to allow a chain hook to be used to hold down
the front end of the tractor.
Tie-down brackets are located on either side of the rear
frame, in the articulation area (2) and on the drawbar
cage (3). Use a chain of adequate size, routed through
the brackets to hold down the tractor.
6. Always fully engage the park brake and install
the articulation lock pin (4) when transporting the
vehicle.
4
1
2 3
435/485/535

2-10
435/485/535

Section 3 Contents - Operation
3-1
Section 3 - Operation
Contents
Introduction . . . . . . . . . . . . . . . . . . . . . . . . . 3-2
Pre-operation Checks . . . . . . . . . . . . . . . . . . 3-2
Precautionary Statements . . . . . . . . . . . . . . . 3-2
Welding & Battery Charging . . . . . . . . . . . . . . 3-3
The Cab . . . . . . . . . . . . . . . . . . . . . . . . . . . . 3-4
Entering the Cab . . . . . . . . . . . . . . . . . .
Cab Features . . . . . . . . . . . . . . . . . . . . .
Emergency Exit / Rear Window . . . . . . . .
Operator’s Seat . . . . . . . . . . . . . . . . . . . . . . . 3-6
Seat Belt . . . . . . . . . . . . . . . . . . . . . . . .
Standard Seat . . . . . . . . . . . . . . . . . . . .
Deluxe Seat . . . . . . . . . . . . . . . . . . . . . .
Instructional Seat . . . . . . . . . . . . . . . . 3-11
Controls & Instruments Overview . . . . . . . . . 3-12
Forward Operator Controls . . . . . . . . . . 3-12
Overhead Controls . . . . . . . . . . . . . . . . 3-13
Right Side Console Controls . . . . . . . . . 3-14
Steering Wheel and Column Adjustments . . . 3-16
Park Brake . . . . . . . . . . . . . . . . . . . . . . . . . 3-16
Foot Brake & Decelerator Pedal . . . . . . . . . . 3-17
Forward Operator Control Console . . . . . . . . 3-18
Overhead Control Details . . . . . . . . . . . . . . . 3-20
Climate Control & Air Conditioning . . . . . . . . 3-21
Electronic Instrument Cluster . . . . . . . . . . . 3-25
Indicator, Warning Lamps & Alarm . . . .
EIC Tractor Performance Monitor . . . . . .
Fault Codes . . . . . . . . . . . . . . . . . . . . .
EIC Calibration . . . . . . . . . . . . . . . . . . 3-41
Right Side Console Controls . . . . . . . . . . . . 3-46
Synchromesh Transmission . . . . . . . . . .
Powershift Transmission . . . . . . . . . . . .
Hand Throttle . . . . . . . . . . . . . . . . . . .
Cruise Control . . . . . . . . . . . . . . . . . . .
Autoshift (CAT TA22 Transmission) . . . .
Differential Lock . . . . . . . . . . . . . . . . .
Remote Hydraulic Controls - Manual . . . . . . 3-47
Remote Hydraulic Controls -
Electro-Hydraulic . . . . . . . . . . . . . . . . . . . . 3-49
Tractor Start-up and Engine Operation . . . . . 3-50
Cold Weather Starting. . . . . . . . . . . . . . 3-51
Tractor Boosting . . . . . . . . . . . . . . . . . .
3-4
3-4
3-5
3-6
3-7
3-9
3-27
3-36
3-40
3-46
3-46
3-46
3-47
3-47
3-47
3-53
Tractor Operation . . . . . . . . . . . . . . . . . . . . 3-54
Hand Throttle Operation . . . . . . . . . . . .
Decelerator Pedal . . . . . . . . . . . . . . . . .
Cruise Control Operation . . . . . . . . . . . .
Stopping the Tractor . . . . . . . . . . . . . . .
Transmission Operation . . . . . . . . . . . . . . . . 3-57
Synchromesh Transmission Operation . .
1407 Powershift Transmission Operation
CAT TA22 Powershift Transmission Operation
Drawbar Operation . . . . . . . . . . . . . . . . . . . 3-67
External Lighting . . . . . . . . . . . . . . . . . . . . 3-70
Hydraulic System Overview . . . . . . . . . . . . . 3-72
Hydraulic Schematic Diagram . . . . . . . .
Remote Control Valve Operation - Manual . . . 3-74
Lockout Levers . . . . . . . . . . . . . . . . . .
Hydraulic Flow Controls . . . . . . . . . . . .
Hydraulic Quick Couplers . . . . . . . . . . .
Operating Continuous Flow Hydraulic
Equipment . . . . . . . . . . . . . . . . . . . . . 3-80
Hydraulic Motor Applications . . . . . . . . 3-81
Remote Control Valve Operation Electro-Hydraulic . . . . . . . . . . . . . . . . . . . 3-82
Electro-Hydraulic Control Pods . . . . . . .
Engagement Switch . . . . . . . . . . . . . . .
Manual Operation . . . . . . . . . . . . . . . .
Programmable Operation . . . . . . . . . . .
Flow Control Adjustment . . . . . . . . . . .
Hydraulic Quick Couplers . . . . . . . . . . .
Connecting Single-Acting Cylinders . . . .
Connecting Double-Acting Cylinders . . .
Operating Continuous Flow Hydraulic
Equipment . . . . . . . . . . . . . . . . . . . . . 3-89
Hydraulic Motor Application . . . . . . . . .
Bleeding Remote Cylinders . . . . . . . . . .
Wheels, Tires & Articulation Blocks . . . . . . . 3-91
Wheel Installation-Single . . . . . . . . . . . 3-91
Wheel Installation-Dual . . . . . . . . . . . .
Wheel Installation-Triple . . . . . . . . . . . .
Tire Selection . . . . . . . . . . . . . . . . . . .
Articulation Blocks . . . . . . . . . . . . . . . .
Ballasting . . . . . . . . . . . . . . . . . . . . . . . . . 3-98
Ballasting Weights . . . . . . . . . . . . . . . . . . 3-102
3-54
3-54
3-54
3-56
3-57
3-59
3-61
3-73
3-75
3-77
3-78
3-83
3-84
3-85
3-85
3-87
3-88
3-89
3-89
3-90
3-90
3-92
3-93
3-95
3-96
435/485/535
 Loading...