

Page 1
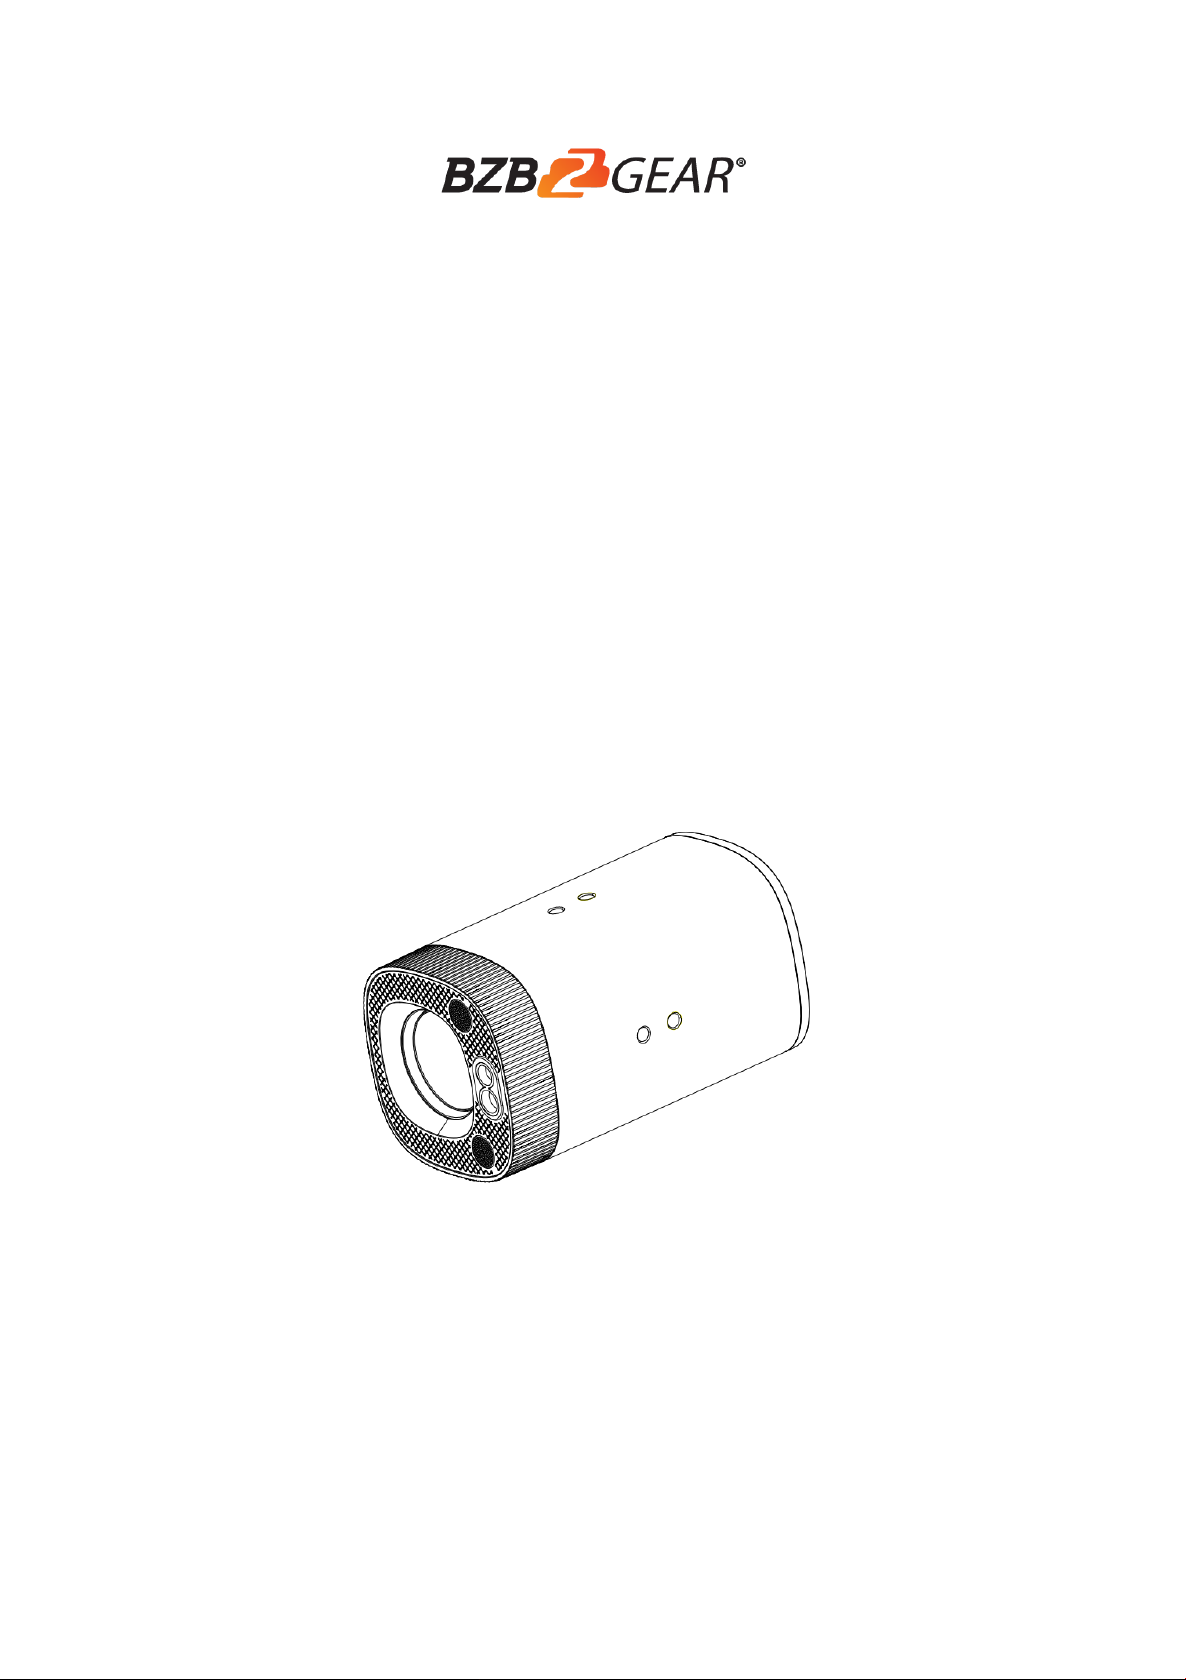
BG-PACKSHOT-C10X
HD LIVE CAMERA
User Manual
Page 2
1
Attention
This manual introduces functions, installation and operation for this live camera. Please read this manual
carefully before installation and use.
1. Caution
1.1 Avoid damage to product caused by heavy pressure, strong vibration or immersion during transportation,
storage and installation.
1.2 Housing of this product is made of organic materials. Do not expose it to any liquid, gas or solids which may
corrode the shell.
1.3 Do not expose the product to rain or moisture.
1.4 To prevent the risk of electric shock, do not open the case. Installation and maintenance should only be carried
out by qualified technicians.
1.5 Do not use the product beyond the specified temperature, humidity or power supply specifications.
1.6 Wipe it with a soft, dry cloth when cleaning the camera lens. Wipe it gently with a mild detergent if needed. Do
not use strong or corrosive detergents to avoid scratching the lens and affecting the image;
1.7 This product contains no parts which can be maintained by users themselves. Any damage caused by
dismantling the product by user without permission is not covered by warranty.
2. Electrical Safety
Installation and use of this product must strictly comply with local electrical safety standards.
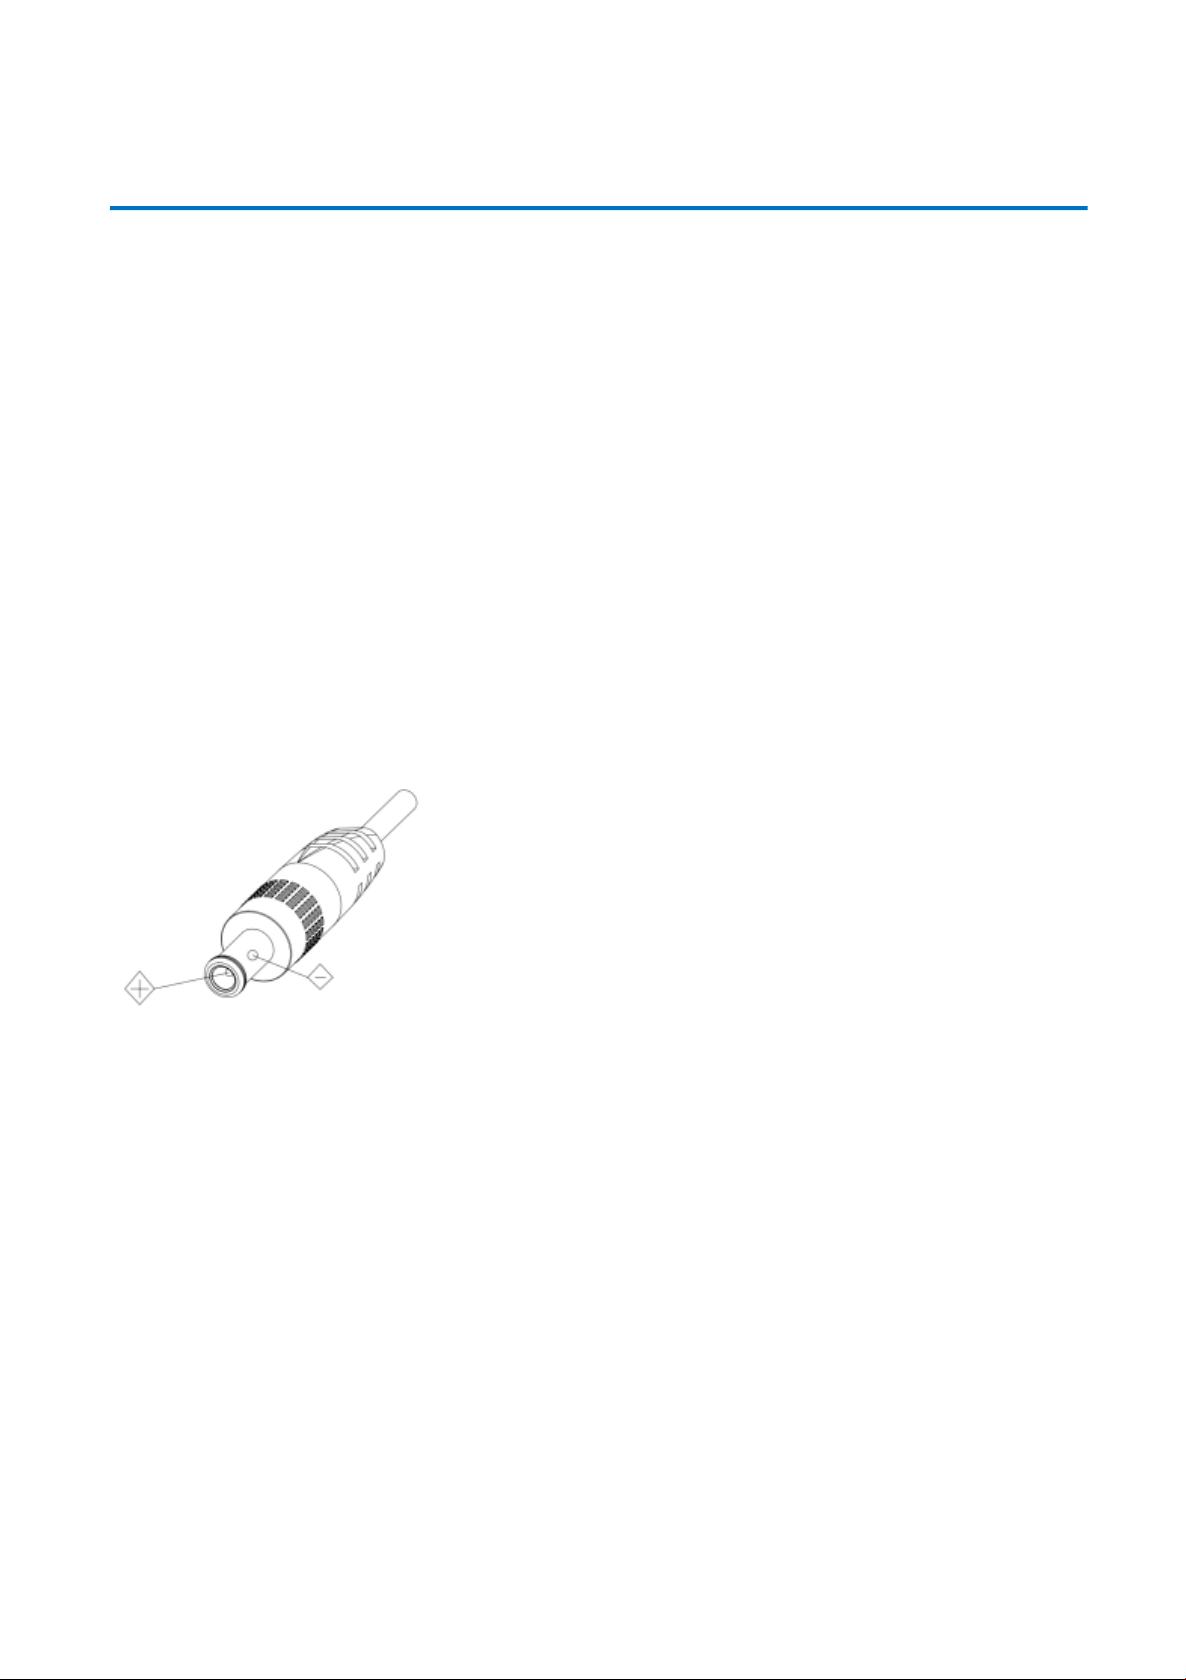
The power supply of the product is ±12V, the max electrical current is 2A.
3. Install
3.1 Do not rotate the camera head violently, otherwise it may cause mechanical failure.
3.2 This product should be placed on a stable desktop or other horizontal surface. Do not install the product
obliquely, otherwise it may display inclined image.
3.3 Ensure there are no obstacles within rotation range of the holder.
3.4 Do not power on before completely installation.
4. Magnetic Interference
Electromagnetic fields at specific frequencies may affect the video image. This product is Class A. It may cause
radio interference in household application. Appropriate measure is required.
Page 3

2
Content
1. CAMERA INSTALLATION ............................................................................................................................. 3
1.1 CAMERA INTERFACES................................................................................................................................... 3
1.2 POWER-ON INITIAL CONFIGURATION ............................................................................................................ 3
1.3 VIDEO OUTPUT ............................................................................................................................................ 3
2. PRODUCT OVERVIEW................................................................ ............................................................... 4
2.1 PRODUCT INTRODUCTION ............................................................................................................................ 4
2.1.1 Dimension ............................................................................................................................................ 4
2.1.2 Accessories ........................................................................................................................................... 4
2.2 MAIN FEATURES .......................................................................................................................................... 4
TECHNICAL PARAMETERS .................................................................................................................................. 5
2.3 INTERFACES AND CONNECTION .................................................................................................................... 6
3. APPLICATION INSTRUCTION ...................................................................................................................... 7
3.1 REMOTE CONTROL....................................................................................................................................... 7
3.1.1 MATCH CODE FOR WIRELESS REMOTE CONTROL ...................................................................................... 7
3.1.2 Keys Introduction for IR Remote Control ............................................................................................. 7
3.2 MENU INTRODUCTION ................................................................................................................................. 9
3.2.1 Main Menu ........................................................................................................................................... 9
4. MAINTENANCE AND TROUBLESHOOTING ............................................................................................ 15
4.1 CAMERA MAINTENANCE ............................................................................................................................ 15
4.2 TROUBLESHOOTING ................................................................................................................................... 15
5. WARRANTY.................................................................................................................................................. 16
6. MISSION STATEMENT ................................................................................................................................ 16
Page 4
3
1. Camera Installation
1.1 Camera Interfaces
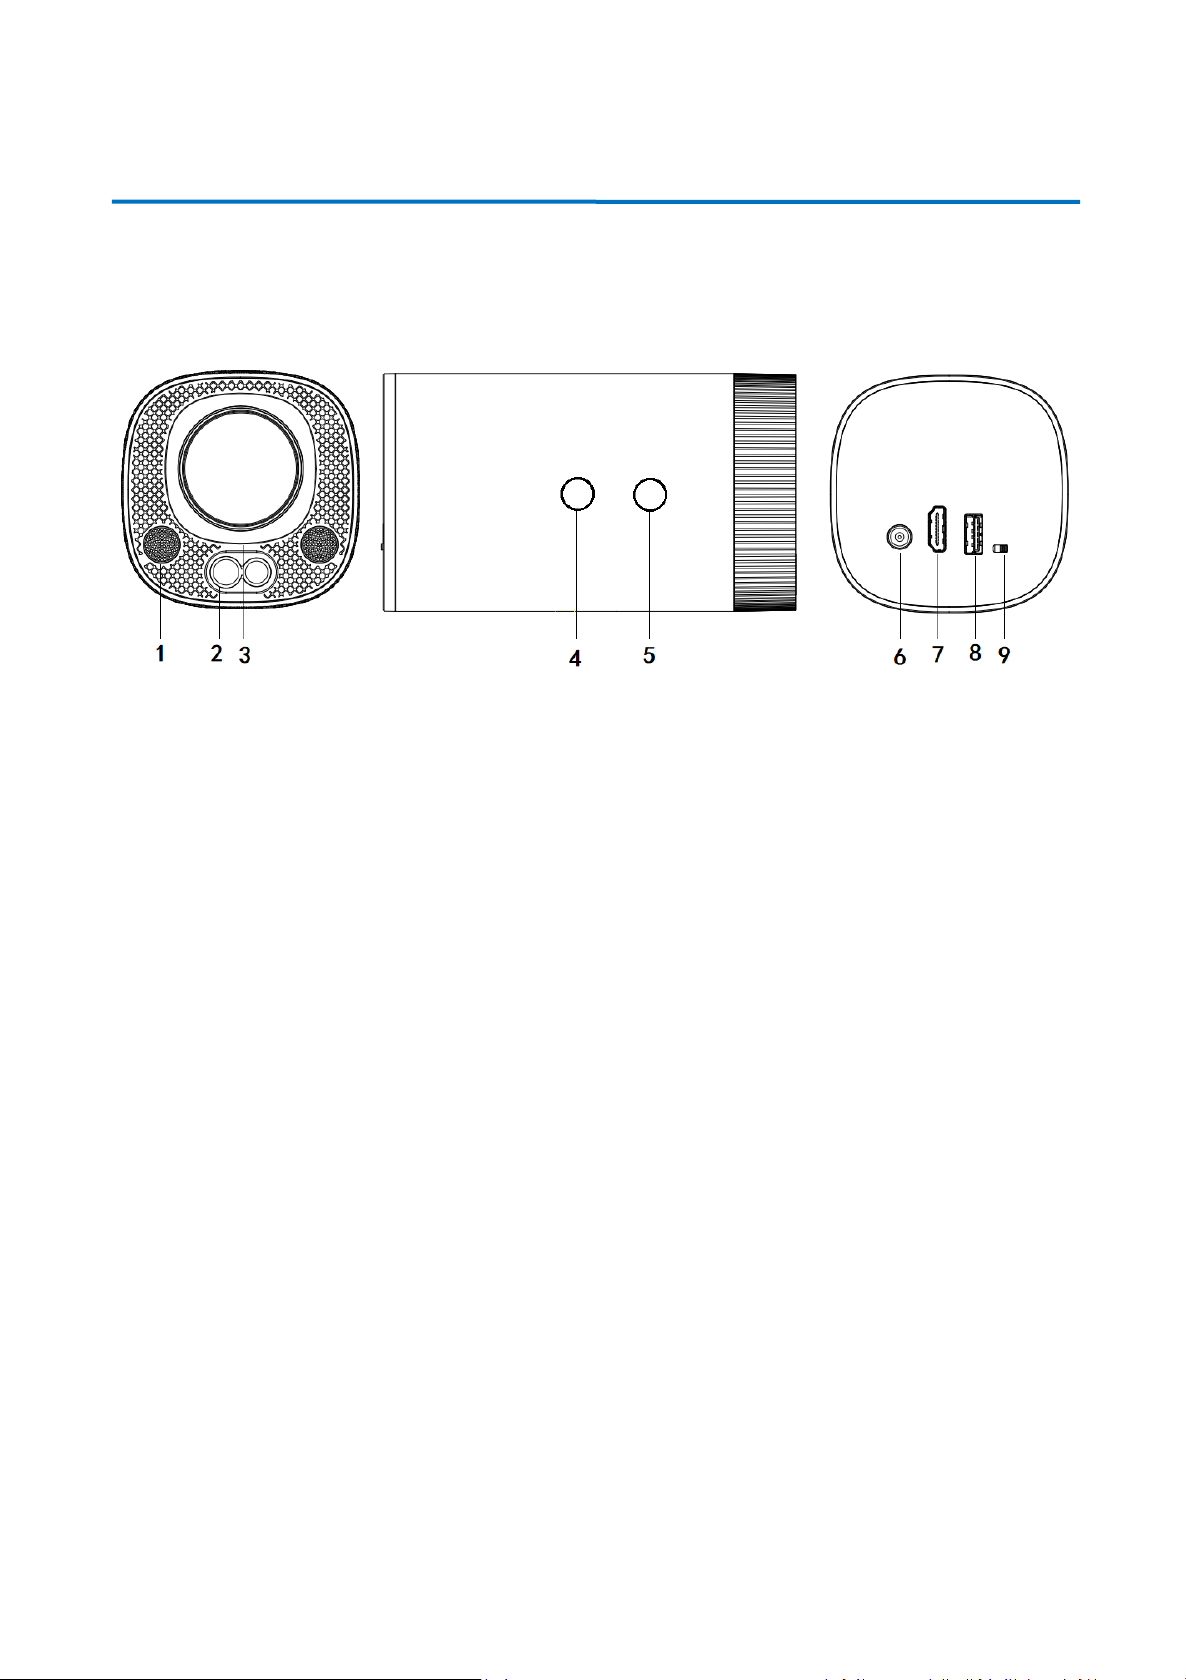
1.1 Product Interfaces
1. Built in pick-up
4. Screw Hole for Tripod
7. HDMI Interface
2. Focusing aid
5. Tripod Screw Hole
8. USB 3.0 Interface
3. Lens
6. Power Switch
9. Image Orientation Switch
1.2 Power-on Initial Configuration
1) Power-on: Connect DC12V power supply adapter with power supply socket
2) Initial Configuration: The movement first shrinks and then stretches after power on, finally returns to the front,
and the camera is normally identified on the computer, indicating that the self-checking is completed.
1.3 Video Output
1) HDMI Video Output
a. HDMI video cable connection: as shown in Figure1.1 label 7
b. Connect the camera and the monitor via HDMI video cable, and the video output is available after the
camera self-test.
2) USB3.0 Video Output
a. USB 3.0 video cable connection: as shown in Figure1.1 label 8
b. Connect the camera and the computer via USB3.0 video cable, open the video software and select the
image device to output the video.
Page 5
4
2. Product Overview
2.1 Product Introduction
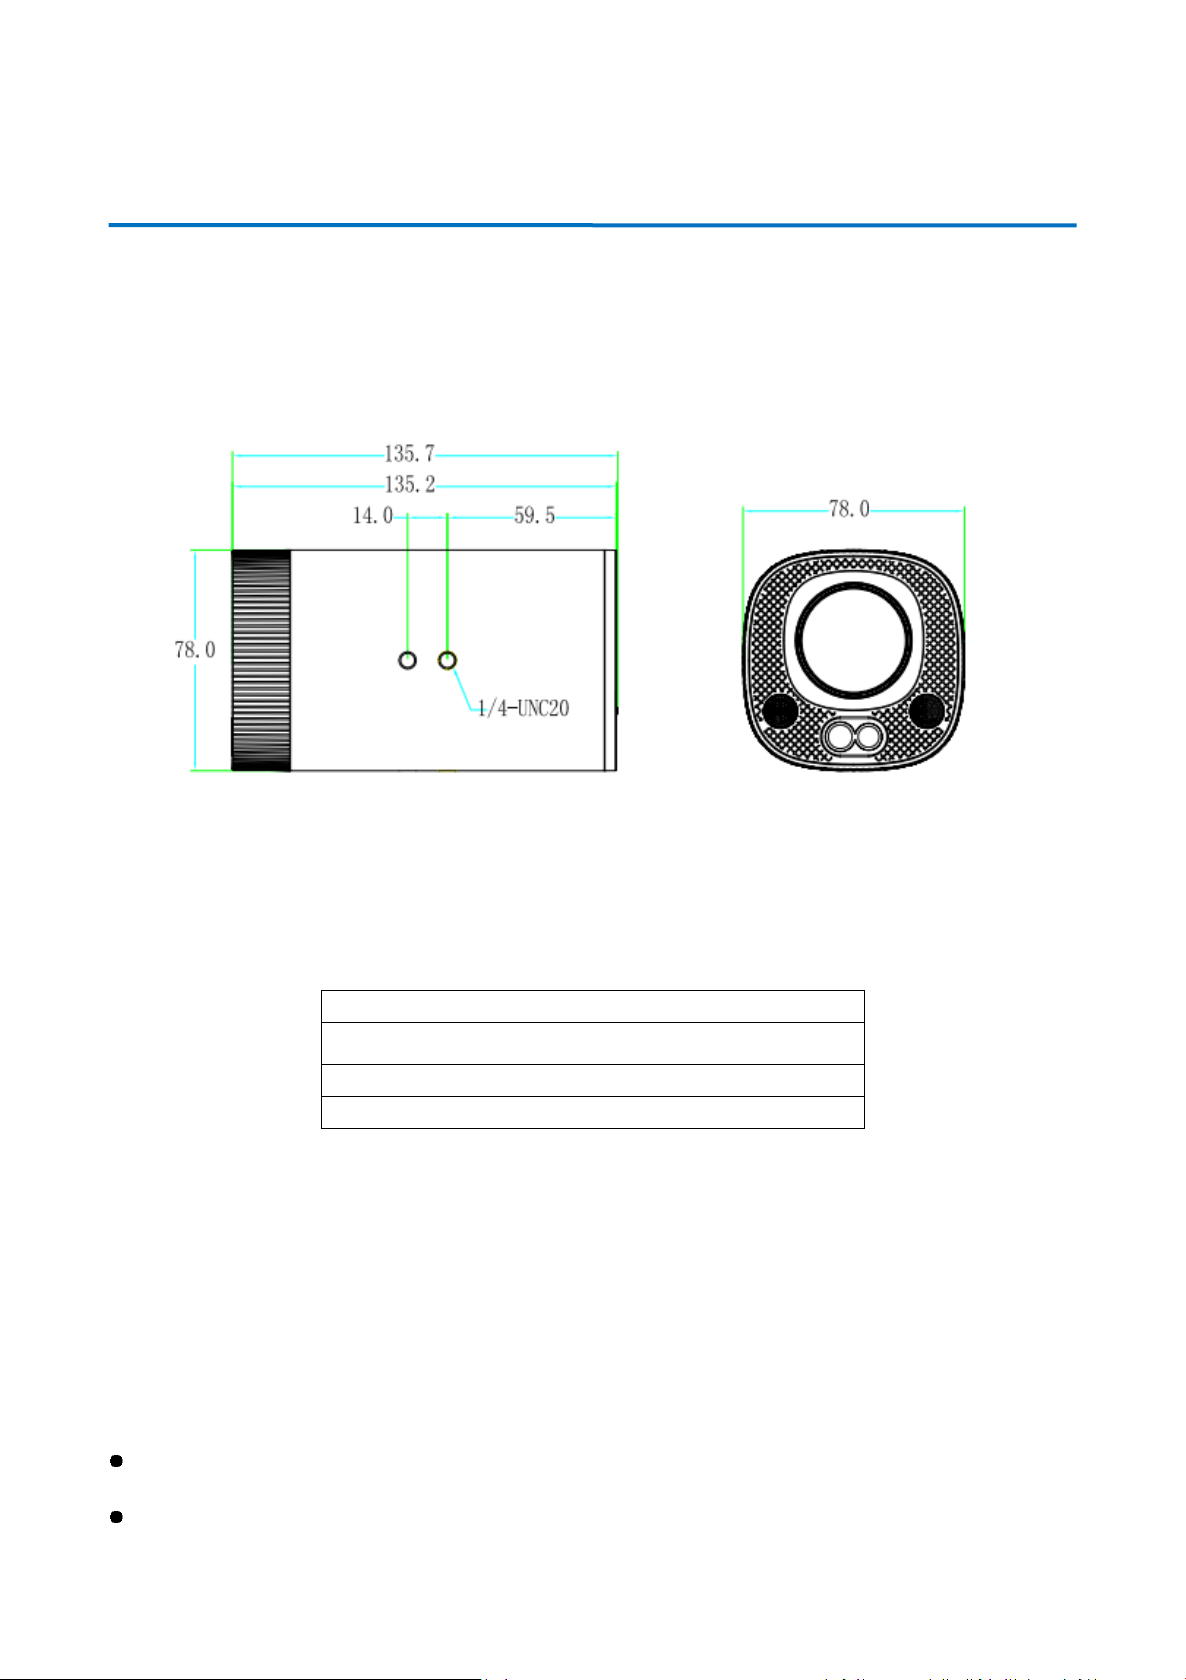
2.1.1 Dimensions
Figure 2.1 Product Dimension
2.1.2 Accessories
Please check below standard accessories when unpacking the box.
2.2 Main Features
This product is a new HD camera for the live broadcasting industry. It features a unique image orientation switch,
allowing the user to switch from landscape format to portrait format optimized for mobile devices. Equipped with
advanced ISP processing algorithms it offers vivid and high resolution video with a strong sense of depth and
fantastic color rendition. The camera is stable and reliable, and easy to operate and maintain. It is suitable for
various live scene applications.
Full HD Resolution: 1/2.8 inch high quality CMOS sensor. Resolution is up to 1920x1080 with frame rate
up to 30fps.
Optical Zoom Lens: 10X optical zoom lens and 68.8° wide angle lens.
Standard Accessories
Wireless Remote Control
USB3.0 Cable
User Manual
Page 6
5
Multiple Video Interfaces: HDMI, USB3.0; Simultaneously output audio and video signal
Leading Auto Focus Technology: Fast, accurate and stable auto focusing technology.
Horizontal and Vertical Screen: Allows the user to switch formats from landscape to portrait to optimize for
mobile devices.
Professional Image Style: Supports beauty and jewelry style mode to tailor image to makeup and fashion
applications.
Built-in microphone: Dual microphone array with a 6 meter omnidirectional pickup pattern (optimal pickup
distance is 3 meters), the noise suppression algorithm enhances voice capture.
Multiple Audio/Video Compression Standards: Support YUY2/NV12/MJPG/H.264/H.265 video
compression format.
Low Noise and High SNR: Super high SNR image is achieved with low noise CMOS. Advanced 2D/3D
noise reduction technology further reduces the noise while ensuring high image clarity.
Easy to use: No need to download drivers, USB output is plug and play with a convenient user experience.
Technical Parameters
Camera Parameter
Sensor
1/2.8inch sensor
Effective Pixels
2 megapixel, 16:9
Video Format
HDMI video format
1080I@60fps, 1080I@50fps, 1080P@30fps, 1080P@25fps, 720P@60fps,
720P@50fps
USB3.0 interface video format
Horizontal screen: 1920×1080@30fps, 1280×720@30fps,
1024×576@30fps, 960×540@30fps, 800×448@30fps, 640×360@30fps,
640×480@30fps, 320×176P30fps
Vertical screen: 1080×1920@30fps, 720×1280@30fps, 576×1024@30fps,
540×960@30fps, 448×800@30fps, 480×720@30fps, 480×640@30fps
View Angle
8.8°~ 68°
Focus Length
f=4.34mm~41.66mm
AV
F1.85 ~ F2.63
Optical Zoom
10X
Minimum
Illumination
0.1Lux(F1.8, AGC ON)
DNR
2D﹠3D DNR
Super Auto noise
reduction
On/Off
White Balance
Auto / Manual/ One Push
/3000K/3500K/4000K/4500K/5000K/5500K/6000K/6500K/7000K
Focus
Auto/Manual/One Push Focus
Exposure
Auto/Manual
BLC
On/Off
SNR
>50dB
Vertical Screen
Switch
On/Off
Focus Assist
On/Off
Minimum Object
Distance
10cm(W)~100cm(N)
Page 7
6
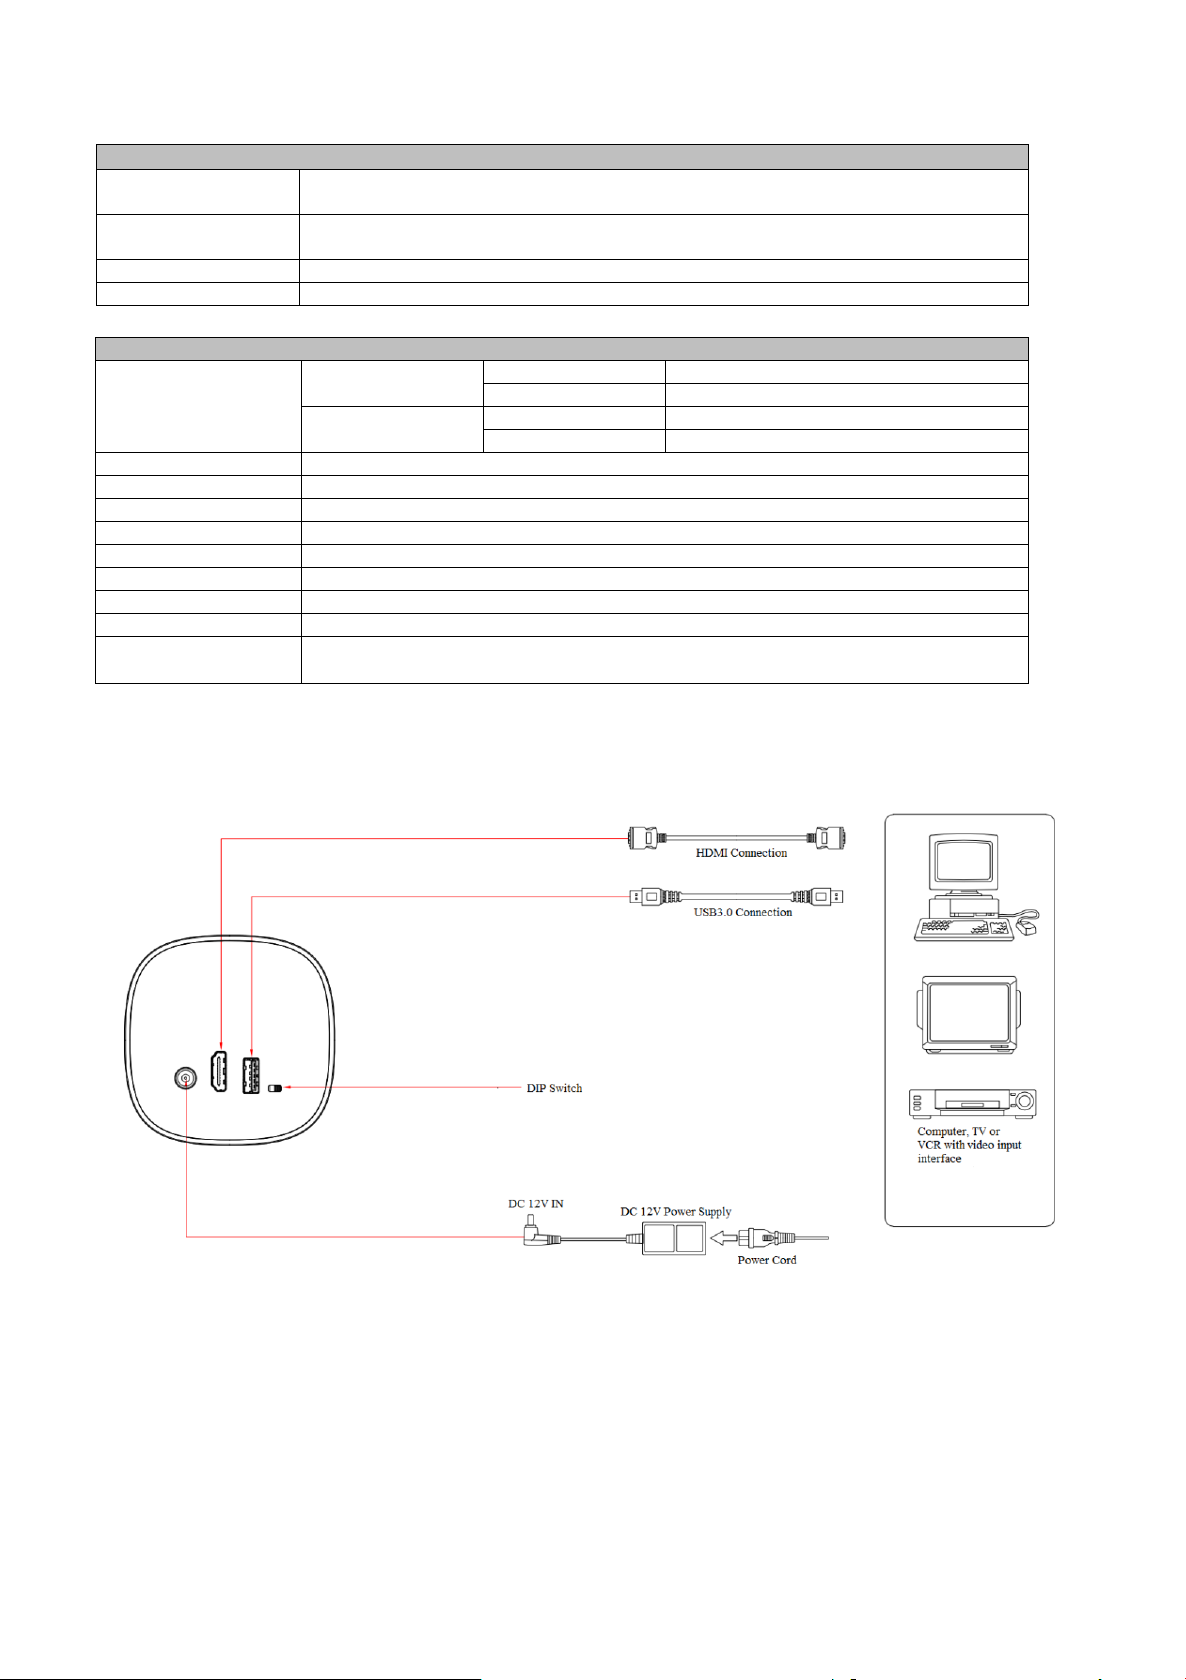
Input/Output Interface
Video Output
USB Interface: Support audio signal output
HDMI Interface: Support audio and video output
Video Compression
Format
YUV, NV12, MJPG, H.264
Audio Input
Built-in 2 MIC pickups
Control Interface
USB Interface
Other Parameter
Input Voltage/Current
Voltage
Power Adapter
12
USB
5V
Current
Power Adapter
0.425
USB
1A(Max.)
Power Consumption
5W(Max.)
Stored Temperature
-10℃~+60℃
Stored Humidity
20%~90%
Working Temperature
-10℃~+50℃
Working Humidity
20%~80%
Dimension(W*H*D)
78mm×137.5mm×78mm
Weight
0.6KG
Application
Indoor
Accessories
Power Supply, Wireless Remote Control, USB3.0 Cable, User Manual
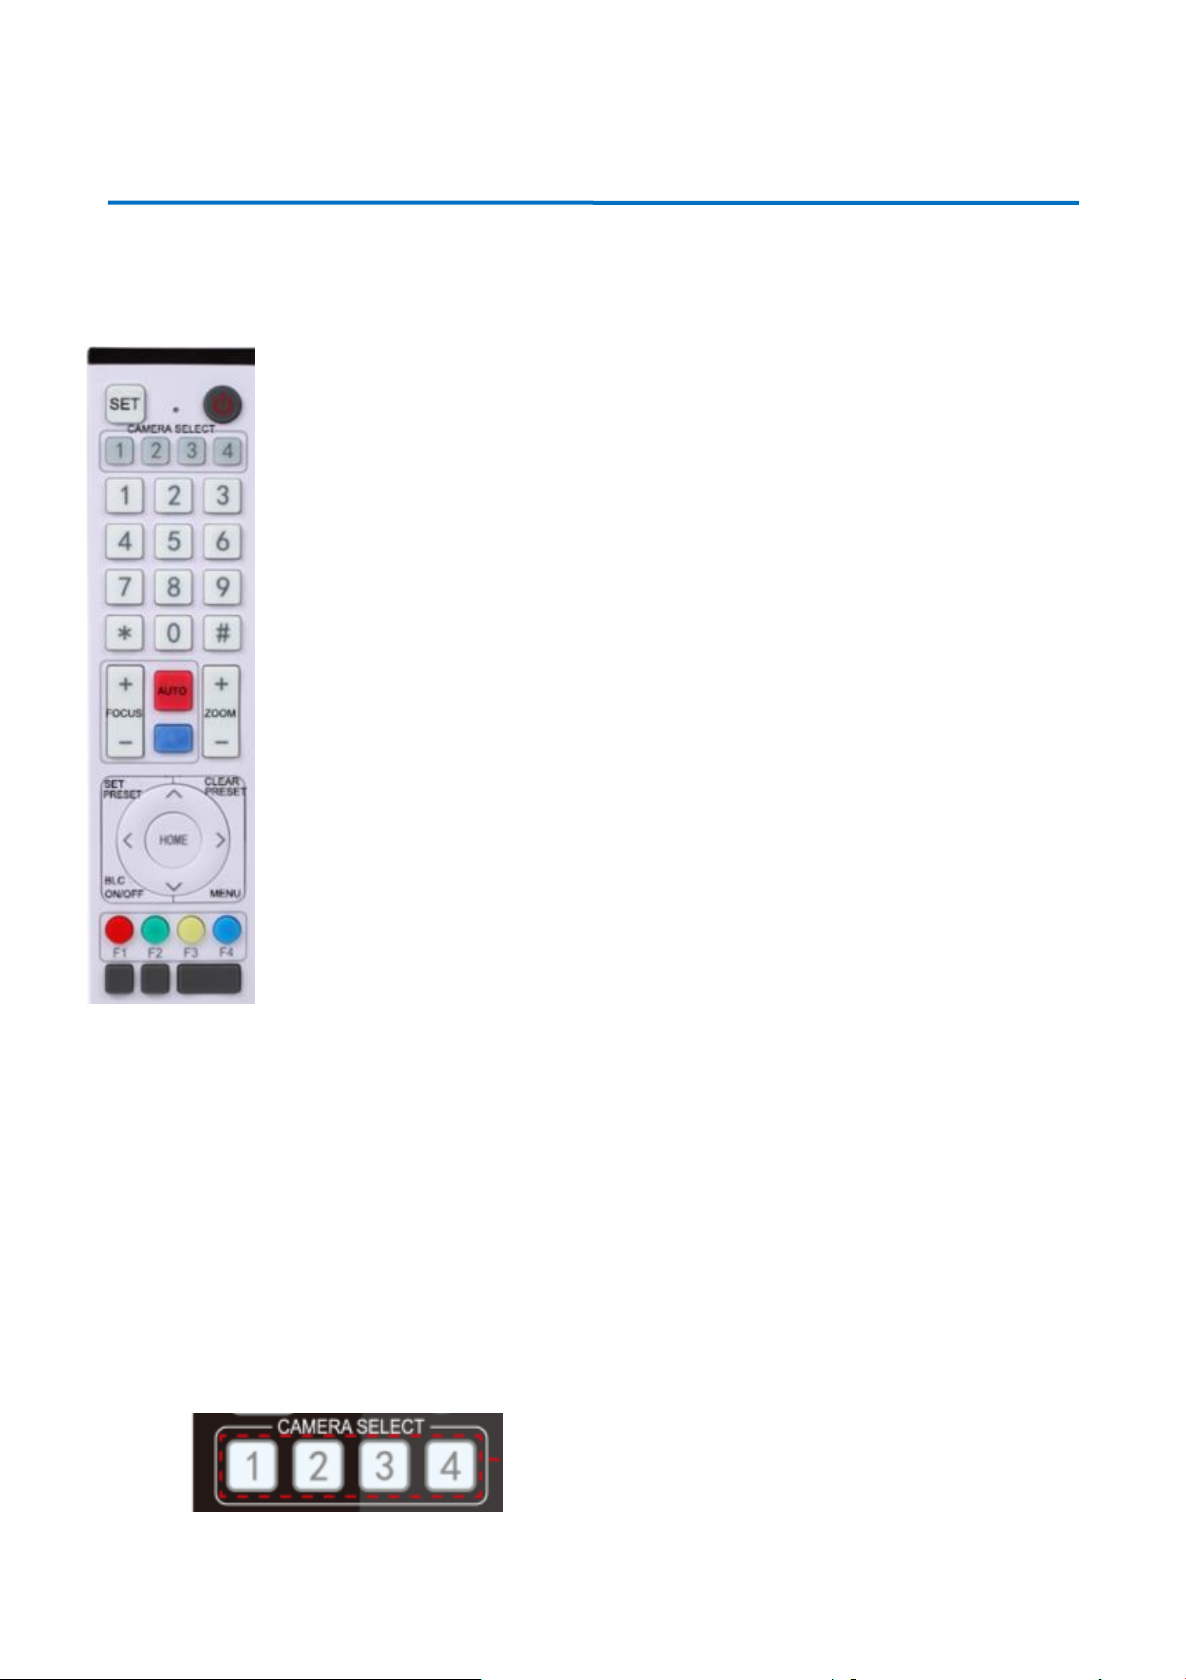
2.3 Interfaces and Connection
Figure 2.3 Wiring Diagram
Page 8
7
3. Application Instruction
3.1 Remote Control
3.1.1 Match Code for Wireless Remote Control
One to One Code Matching:
Press the "set" and "*" keys combined for 5 seconds, LED indicator starts flashing. Camera
receive the signal and power on, LED indicator will go off if code matching successfully. The
camera can be controlled by this wireless remote control only after one to one code pairing.
Otherwise please clear the code matching of this remote control, or use other remote control to
pair with the camera again.
If one to one code matching failed, the red LED light flashes for 20 seconds and then goes off,
camera will stop code match and turn on sleep mode; Press any key to wake up the camera and
re-match code.
Note: After code matching successfully, please select the camera address to control it.
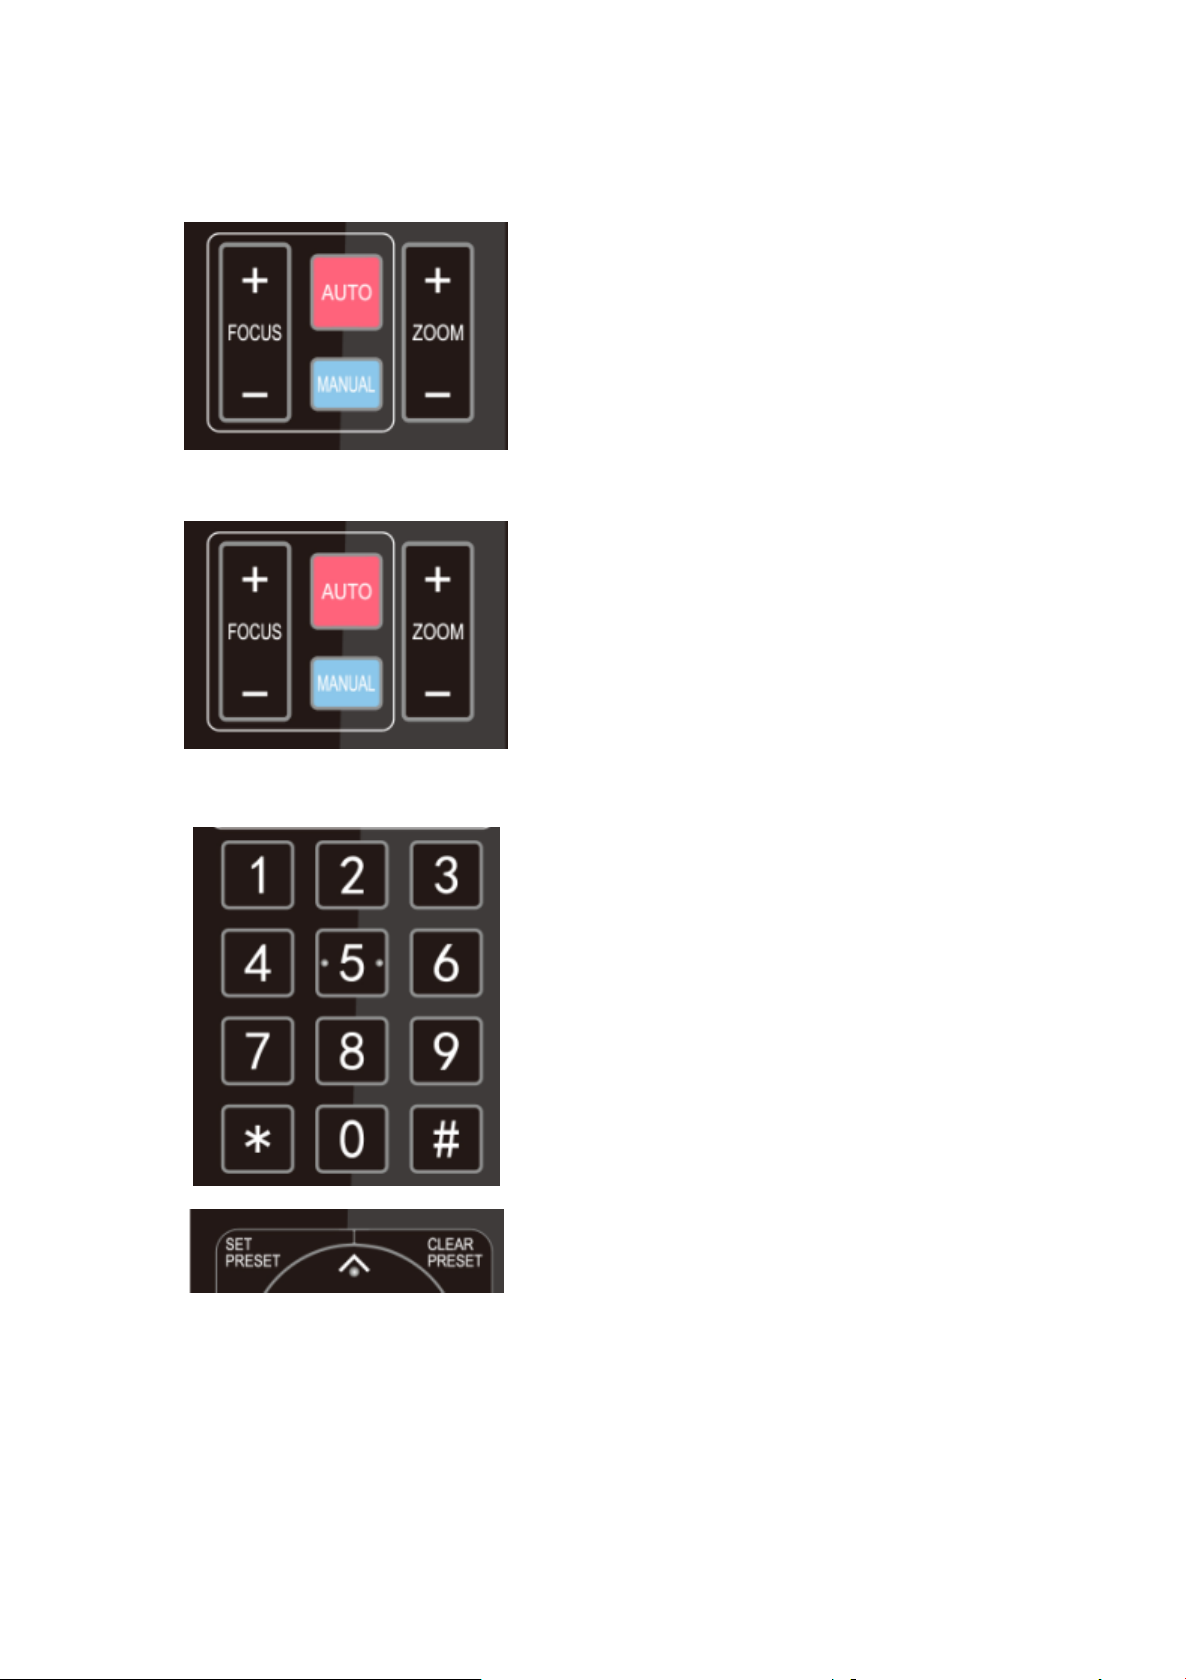
3.1.2 Keys Introduction for IR Remote Control
1. Standby Key
The camera enters standby mode if long press 3s on standby key;
Long press 3s again on the standby key, the camera will self-check again and return to HOME position (If preset 0
position is set, the camera will return to preset 0 position).
2. Camera Selection
Select the camera address to control.
Page 9
8
3. Focus Control
Auto: auto focus mode
Manual: manual focus mode
Focus + (near):Press【FOCUS +】 key (Valid only in
manual focus mode)
Focus - (far): Press【FOCUS -】 key (Valid only in
manual focus mode)
Press and hold the keys, the action of focus will keep
continue and stop as soon as the key is released.
4. Zoom Control
ZOOM +: press【ZOOM +】key to zoom in
ZOOM - : press 【ZOOM -】key to zoom out
Press and hold the keys, the action of focus will keep
continue and stop as soon as the key is released.
5. Set and Clear Presets
Set Preset: press 【SET PRESET】 button, and then
press the number key 0-9 to set preset positions.
Note: 10 presets via remote control.
Call Preset: Press a number key 0-9 directly to call a
preset position.
Clear Preset: press 【CLEAR PRESET】 button, and
then press the number key 0-9 to clear preset positions.
Note : press the【#】 key three times continually to
clear all presets.
Page 10
9
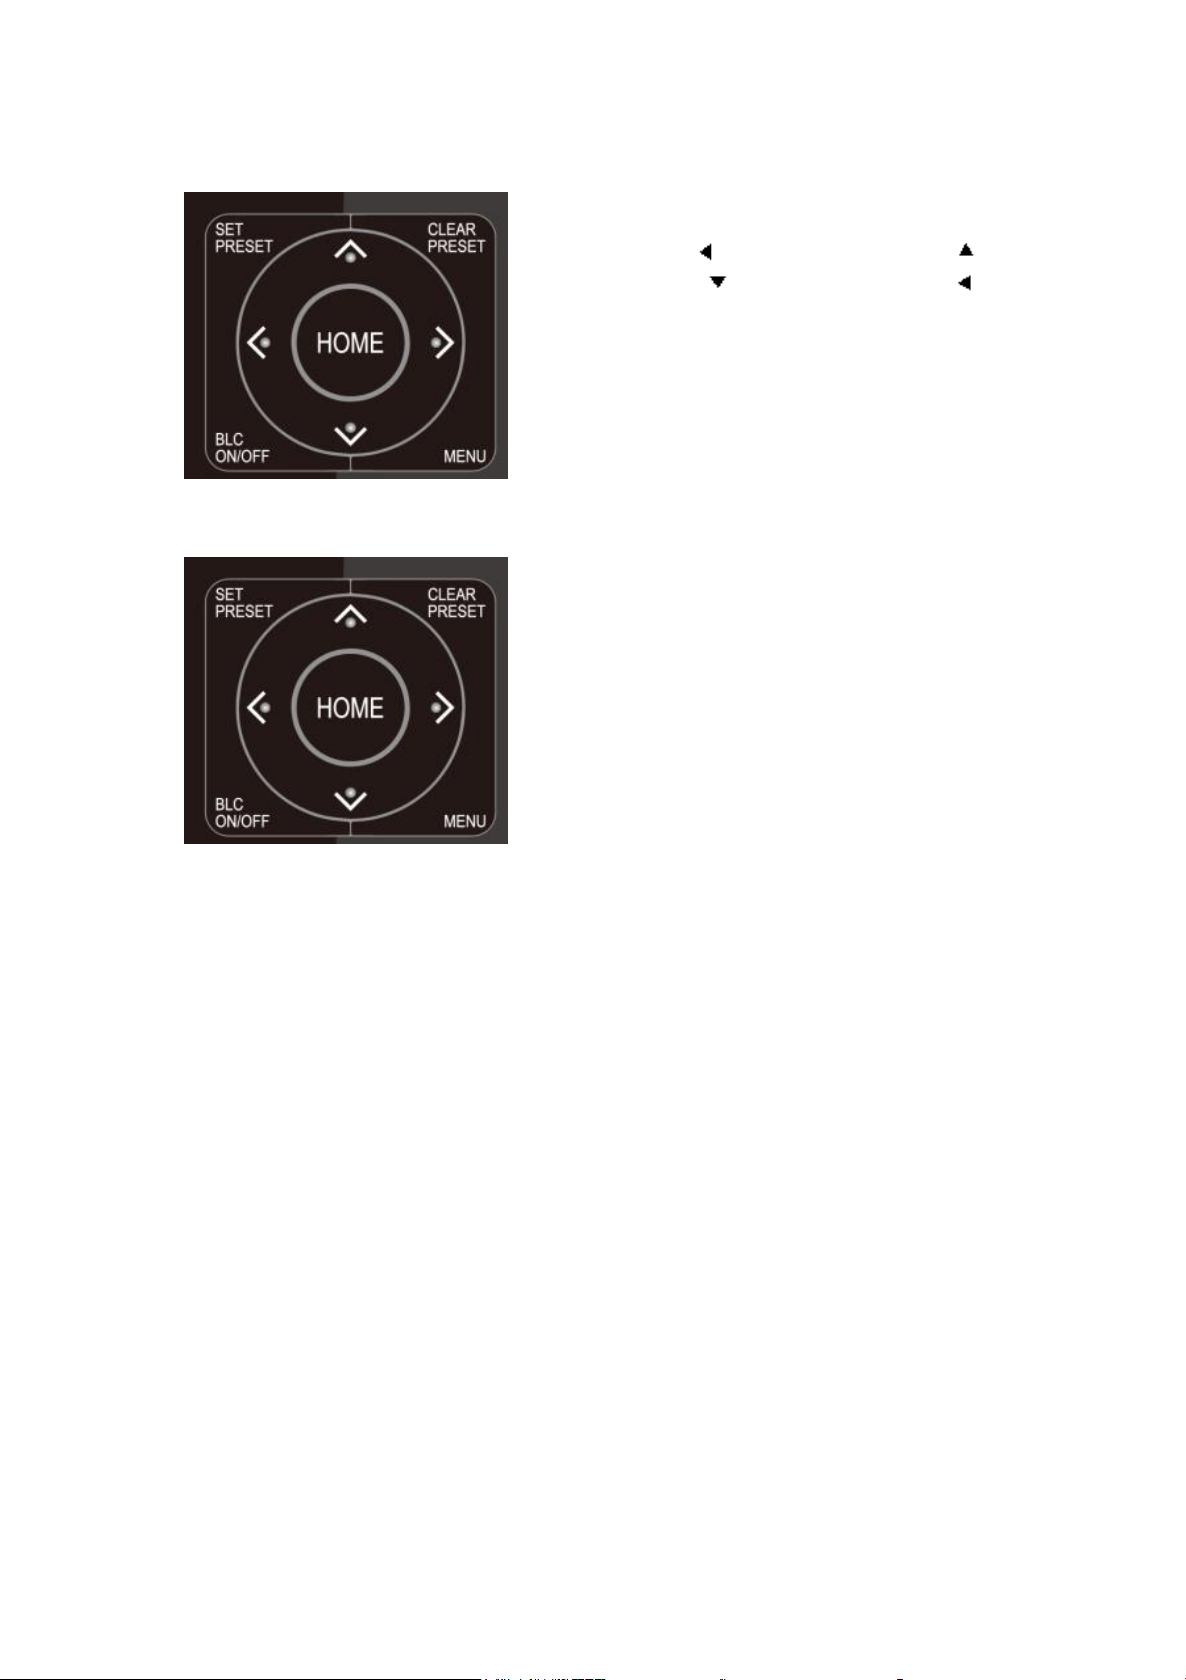
6. Direction Control
Up: press Down: press
Left: press Right: press
Back to middle position: press“【HOME】”
Press and hold the up/down/left/right key, the pan/tilt
movements will keep running, from slow to fast, until it
runs to the endpoint; stop as soon as the key is released.
7. Menu Setting
【MENU】: Open / close the OSD menu
【HOME】: Camera lens back to the middle position;
Confirm button; Enter next menu
【↑】【↓】:Choose item
【←】【→】:Modify values
【BLC ON/OFF】:Turn on or off the back light
compensation
3.2 Menu Introduction
3.2.1 Main Menu
In normal working mode, press 【MENU】 key to display the menu, using scroll arrow to point at or highlight the
selected items.
Page 11

10
1) Language: Move the pointer to (Language) in the main menu, and press the [←→] key to modify language.
2) Image Style: Move the pointer to (Image Style) in the main menu, and press the [←→] key to modify the style
default / Beauty / Jewelry
3) Anchor: Move the pointer to (Anchor) in the main menu, and press the [←→] key to modify the 1-4 host
numbers; Image parameters can be modified manually under different host numbers, and can be saved after power
failure.
4) Exposure Setting
Move the pointer to the (EXPOSURE) in the Main Menu, click the【HOME】key and enter into the (Exposure sub
menu) as shown below,
MENU
=================
Language English
Image Style Default
Anchor 1
(Color)
(Image)
(Focus)
(Noise Reduction)
(Focus)
(Video Format)
(Version)
(Restore Default)
[↑↓]Select [← →]Change Value
[Menu]Back[Home]OK
Page 12

11
Mode: Auto, Manual, Shutter priority and Brightness priority.
EV: On/Off (only available in auto mode)
Compensation Level: -7~7 (only available in auto mode when EV is ON)
BLC: ON/OFF for options (only available in auto mode)
Dynamic Range: 1~8, close
Anti-Flicker: OFF/50Hz/60Hz for options (only available in Auto/Iris priority/Brightness priority modes)
Gain limit: 0~15(only available in Auto/ Iris priority /Brightness priority mode)
WDR: Off, 1~8
ShutterPriority:1/25,1/30,1/50,1/60,1/90,1/100,1/120,1/180,1/250,1/350,1/500,1/1000,1/2000,1/3000,1/4000,1/
6000, 1/10000 (only available in Manual and Shutter priority mode)
Brightness: 0~23 (only available in Brightness priority mode)
5) Color
Move the pointer to the (COLOR) in the Main Menu, click the【HOME】and enter the (COLOR sub menu) as
follow,
WB Mode: Auto, Manual, One Push, Specified color temperature
COLOR
================
WB Mode Auto
RG Tuning 0
BG Tuning 0
Saturation 100%
Hue 7
AWB Sensitivity High
[↑↓]Select [← →]Change Value
[Menu]Back[Home]OK
EXPOSURE
===============
Mode Auto
EV OFF
BLC OFF
Flicker 50Hz
G.Limit 3
DRC 2
[↑↓]Select [← →]Change Value
[Menu]Back[Home]OK
Page 13

12
Saturation: 60%,70%,80%,90%,100%,110%,120%,130%,140%,150%,160%,170%,180%,190%,200%
Red fine-tuning: -10~10 (only available in automatic mode)
Blue fine-tunable: -10~10 (only available in automatic mode)
RED GAIN: 0~255(only available in Manual mode)
BLUE GAIN: 0~255(only available in Manual mode)
AWB Sensitivity: high/middle/low
Chroma: 0~14
6) Image
Move the pointer to the (IMAGE) in the Menu, click the【HOME】and enter into the (IMAGE sub menu) as follow,
Brightness: 0~14
Contrast: 0~14
Sharpness: 0~15
Flip-H: On/Off
Flip-V: On/Off
B&W Mode: color, black/white
Gamma: Default/0.45/0.50/0.55/0.63
DCI: Dynamic Contrast: Off/1~8
Minimum Illumination: On/Off
7) Noise Reduction
Move the pointer to the (NOISE REDUCTION) in the Menu, click the【HOME】and enter the (NOISE
REDUCTION) as follow,
IMAGE
================
Brightness 7
Contrast 7
Sharpness 4
Flip-H OFF
Flip-V OFF
B&W-Mode Color
Gamma Default
DCI Close
Low-Light Mode Close
[↑↓]Select [← →]Change Value
[Menu]Back[Home]OK
Page 14

13
2D Noise Reduction: Auto, close, 1~7
3D Noise Reduction: Close, 1~8
Dynamic Hot Pixel: Close, 1~5
8) Focus
Move the pointer to the (FOCUS) in the Menu, click the【HOME】and enter the (FOCUS) as follow,
Focus Mode: Auto/manual
Focus Assist: On/Off
AF-Zone: Up/middle/down
AF-Sensitivity: High/middle/low
9) Video Format
Move the pointer to the (Video Format) in the Menu, click the【HOME】and enter the (Video Format) as follow,
FOCUS
=================
Focus Mode Auto
Focus Auxiliary ON
AF-Zone Center
AF-Sensitivity Low
[↑↓]Select [← →]Change Value
[Menu]Back[Home]OK
NOISE REDUCTION
=================
NR-2D 2
NR-3D 5
Dynamic Hot Pixel OFF
[↑↓]Select [← →]Change Value
[Menu]Back[Home]OK
Page 15
14
10) Version
Move the pointer to the (VERSION) in the Main Menu, click the【HOME】and enter the (VERSION) as follow,
11) Restore Default
Move the pointer to the (RESTORE DEFAULT) in the Main Menu, click the【HOME】and enter the (RESTORE
DEFAULT) as follow,
Restore default: YES/NO.
Restore factory default only restores the image parameters under the current host number (Color style and video
format cannot be restored to factory default)
RESTORE DEFAULT
=================
Restore Default? NO
[↑↓]Select [← →]Change Value
[Menu]Back[Home]OK
VERSION
=================
Cam Version 1.0.0 2019-12-18
AFocus Version 1.0.0 2018-11-20
[Menu]Back
VIDEO FORMAT
================
1080I60
1080I50
1080P30
1080P25
720P60
720P50
[↑↓]Select
[Menu]Back[Home]OK
Page 16

15
4. Maintenance and Troubleshooting
4.1 Camera Maintenance
1) Please power off the camera and disconnect the power adapter and socket, if it’s not used for an extended period
of time.
2) Use soft cloth or tissue to clean the camera cover.
3) Wipe with a soft dry cloth when cleaning the camera lens. Wipe it gently with a mild detergent if needed. Do
not use strong or corrosive detergents to avoid scratching the lens and affecting the video quality.
4.2 Troubleshooting
1)No video output
a. Check whether the device is connected to the USB cable and whether the power indicator is on
b. Check whether the device is in standby state, long press the power button for 3s to see whether it can be turned
on
c. Restart the computer
d. Check the video output cable
e. Check whether the device is recognized, unplug the device and reconnect when it is displayed in the device
manager
2)Remote control not working
a. Re-code the wireless remote control to the camera
b. Remote control address is set to 1 (if the machine is set back to the factory defaults, remote control addresses
need to be back to 1 too)
c. Check whether the battery is installed on the remote controller or low
d, Check the camera working mode is the normal operating mode
Page 17

16
5. Warranty
BZBGEAR wants to assure you peace of mind. All BZBGEAR cameras and camera-related products include our
Stress-Free Three-Year Warranty.
For complete warranty information, please visit BZBGEAR.com/warranty.
For questions, please call 1.888.499.9906 or email [email protected].
6. Mission Statement
BZBGEAR manifests from the competitive nature of the audiovisual industry to innovate while keeping the
customer in mind. AV solutions can cost a pretty penny, and new technology only adds to it. We believe everyone
deserves to see, hear, and feel the advancements made in today’s AV world without having to break the bank.
BZBGEAR is the solution for small to medium-sized applications requiring the latest professional products in AV.
We live in a DIY era where resources are abundant on the internet. With that in mind, our team offers system
design consultation and expert tech support seven days a week for the products in our BZBGEAR catalog. You’ll
notice comparably lower prices with BZBGEAR solutions, but the quality of the products is on par with the top
brands in the industry. The unparalleled support from our team is our way of showing we care for every one of our
customers. Whether you’re an integrator, home theater enthusiast, or a do-it-yourselfer, BZBGEAR offers the
solutions to allow you to focus on your project and not your budget.
All the contents in this manual and its copyright are owned by BZBGEAR. No one is allowed to imitate, copy, or
translate this manual without BZBGEAR’s permission. This manual contains no guarantee, standpoint expression
or other implies in any form. Product specification and information in this manual is for reference only and subject
to change without notice.
All rights reserved. No reproducing is allowed without acknowledgement.
 Loading...