

Page 1
BG-EPTZ-AF
AI 4K UHD Video Conference Camera
User Manual
Page 2

Content
ATTENTION .............................................................................................................................. 1
1. FAST INSTALLATION ...................................................................................................... 2
1.1 CAMERA INTERFACE ........................................................................................................................ 2
1.2 CAMERA OPERATION ....................................................................................................................... 2
2. PRODUCT OVERVIEW .................................................................................................... 3
2.1 PRODUCT INTRODUCTION ................................................................................................................ 3
2.1.1 Dimensions ........................................................................................................................... 3
2.1.2 Accessories ........................................................................................................................... 3
2.2 MAIN FEATURES .............................................................................................................................. 3
2.3 TECHNICAL SPECIFICATIONS ....................................................................................................... 4
2.4 INTERFACE INSTRUCTION................................................................................................................. 5
2.4.1 External Interface ................................................................................................................. 5
3. APPLICATION INSTRUCTION ........................................................................................... 6
3.1 REMOTE CONTROLLER .................................................................................................................... 6
3.1.1 Keys Instruction .................................................................................................................... 6
3.1.2 Applications ........................................................................................................................... 7
3.2 MENU SETTING ........................................................................................................................... 9
3.2.1 Main Menu ............................................................................................................................ 9
4.MAINTENANCE AND TROUBLESHOOTING ................................................................. 14
4.1 MAINTENANCE .............................................................................................................................. 14
4.2 TROUBLESHOOTING ....................................................................................................................... 14
5. WARRANTY........................................................................................................................ 15
6. MISSION STATEMENT ...................................................................................................... 15
7. COPYRIGHT STATEMENT ............................................................................................... 15
Page 3

1
Attention
This manual introduces functions, installation and operations for the
camera in details. Please read this manual thoroughly before installation
and use.
1. How to Use
To prevent damage to this product or any product connected to it, this product should only be
used within the specified range.
1). Do not expose the product to rain or moisture.
2). To prevent the risk of electric shock, do not open the case. Installation and maintenance
should only be carried out by qualified technicians.
3). Do not use the product beyond the specified temperature, humidity or power supply
specifications.
4). Wipe it with a soft, dry cloth when cleaning the camera lens. Wipe it gently with a mild
detergent if needed. Do not use strong or corrosive detergents to avoid scratching the lens and
affecting the image;
2. Electrical Safety
Installation and use of this product must strictly comply with local electrical safety standards.
3. Handle with Care
Avoid damage to product caused by heavy pressure, strong vibration or immersion during
transportation, storage and installation.
4. Install with Caution
1). Do not rotate the camera head violently, otherwise it may cause mechanical failure;
2). This product should be placed on a stable desktop or other horizontal surface. Do not install
the product on a non-level surface, otherwise it may display a slanted image.
3). If the camera is installed on TV or computer, the base can be fixed by four double-sided
adhesive trays.
4). The housing of this product is made of organic materials. Do not expose it to any liquid, gas
or solids which may corrode the shell.
5). Ensure there are no obstacles within rotation range of the holder.
6). Do not power on before completely installation.
5. Do not Disassemble the Product Without Permission
This product contains no parts which can be maintained by users themselves. Any damage
caused by dismantling the product by user without permission is not covered by warranty.
6. Magnetic Interference
Electromagnetic fields at specific frequencies may affect the image. This product is Class A. It
may cause radio interference in household applications.
Page 4
2
1. Fast Installation
1.1 Camera Interface
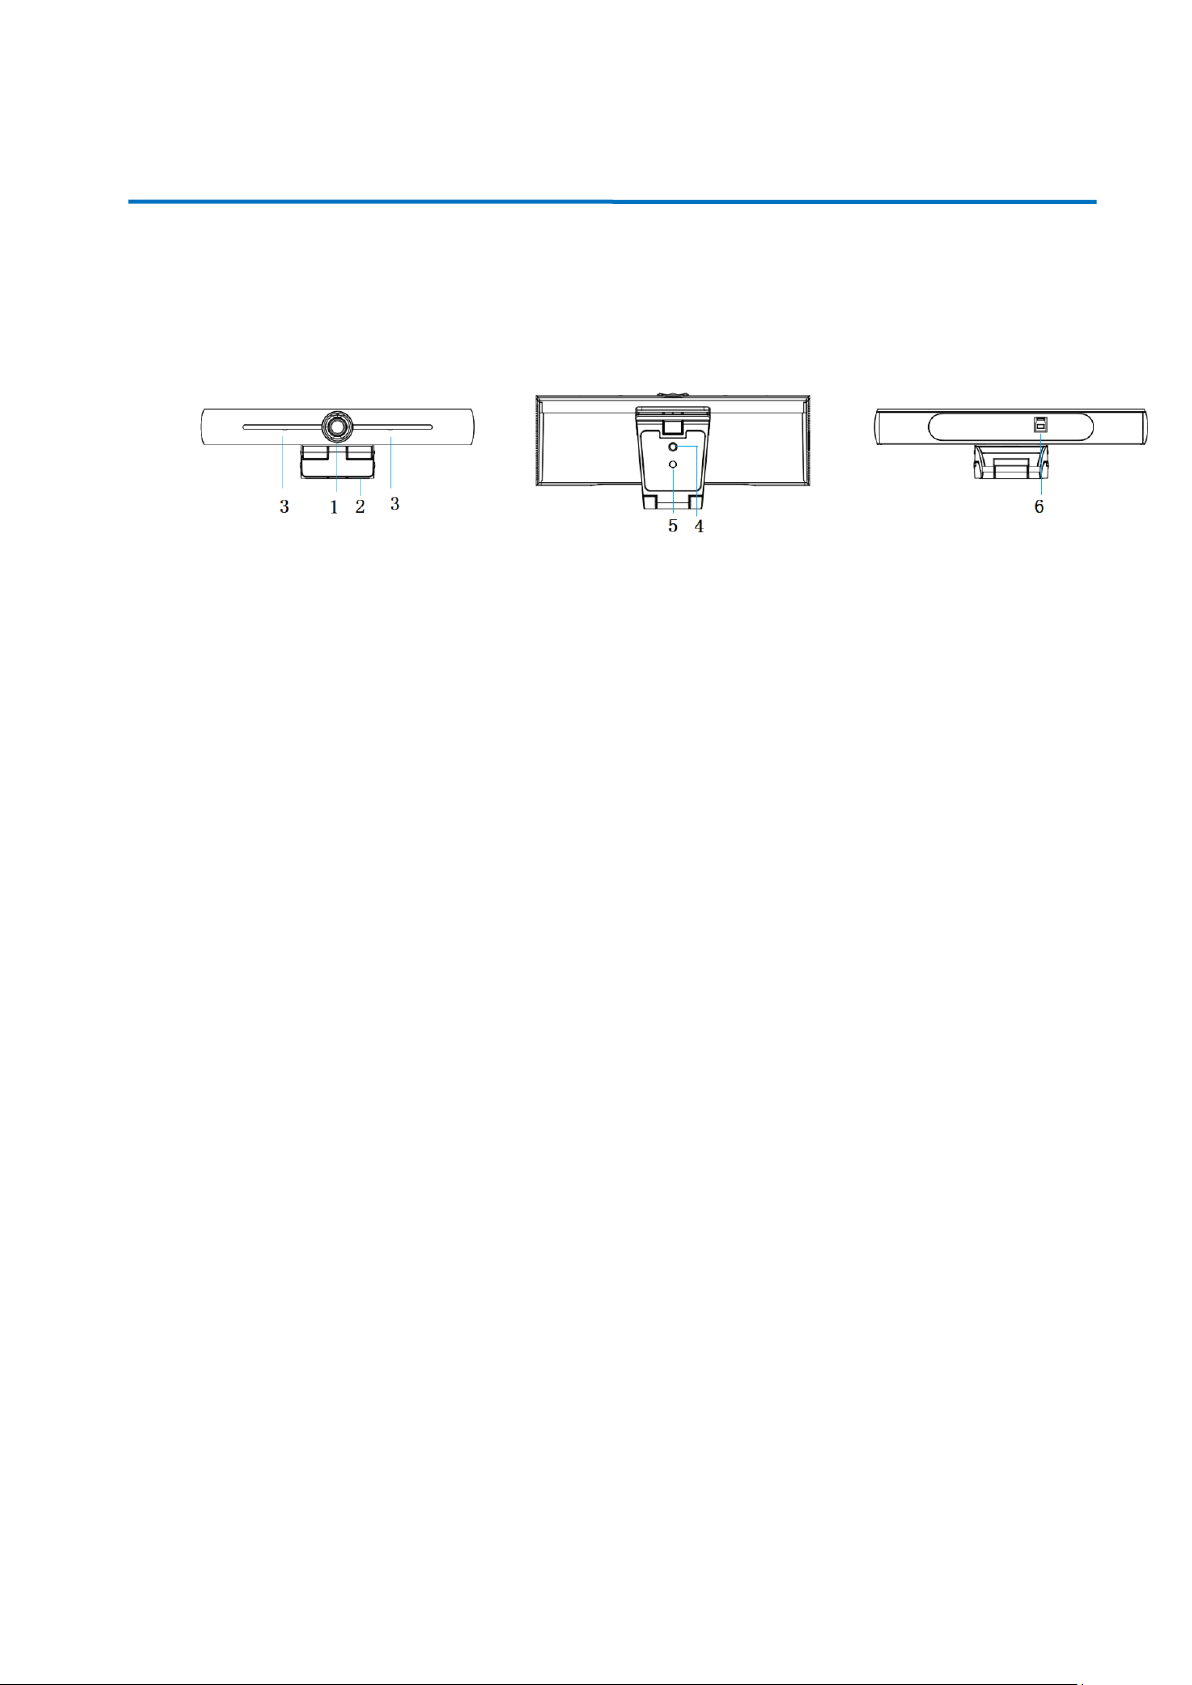
Figure 1.1 camera interface
1. camera lens
3. built-in MIC
5. positioning hole
2. bracket
4. tripod fixing hole
6. USB 3.0 output interface
1.2 Camera Operation
1) Product Installation: Camera can be installed on an LCD screen, the top of a computer, or
placed directly on a desk or tripod.
2) Connect camera via USB cable to computer, video conference terminal or other USB input
device, log in to the video conference software and select a video device to activate image
output.
Page 5
3
2. Product Overview
2.1 Product Introduction
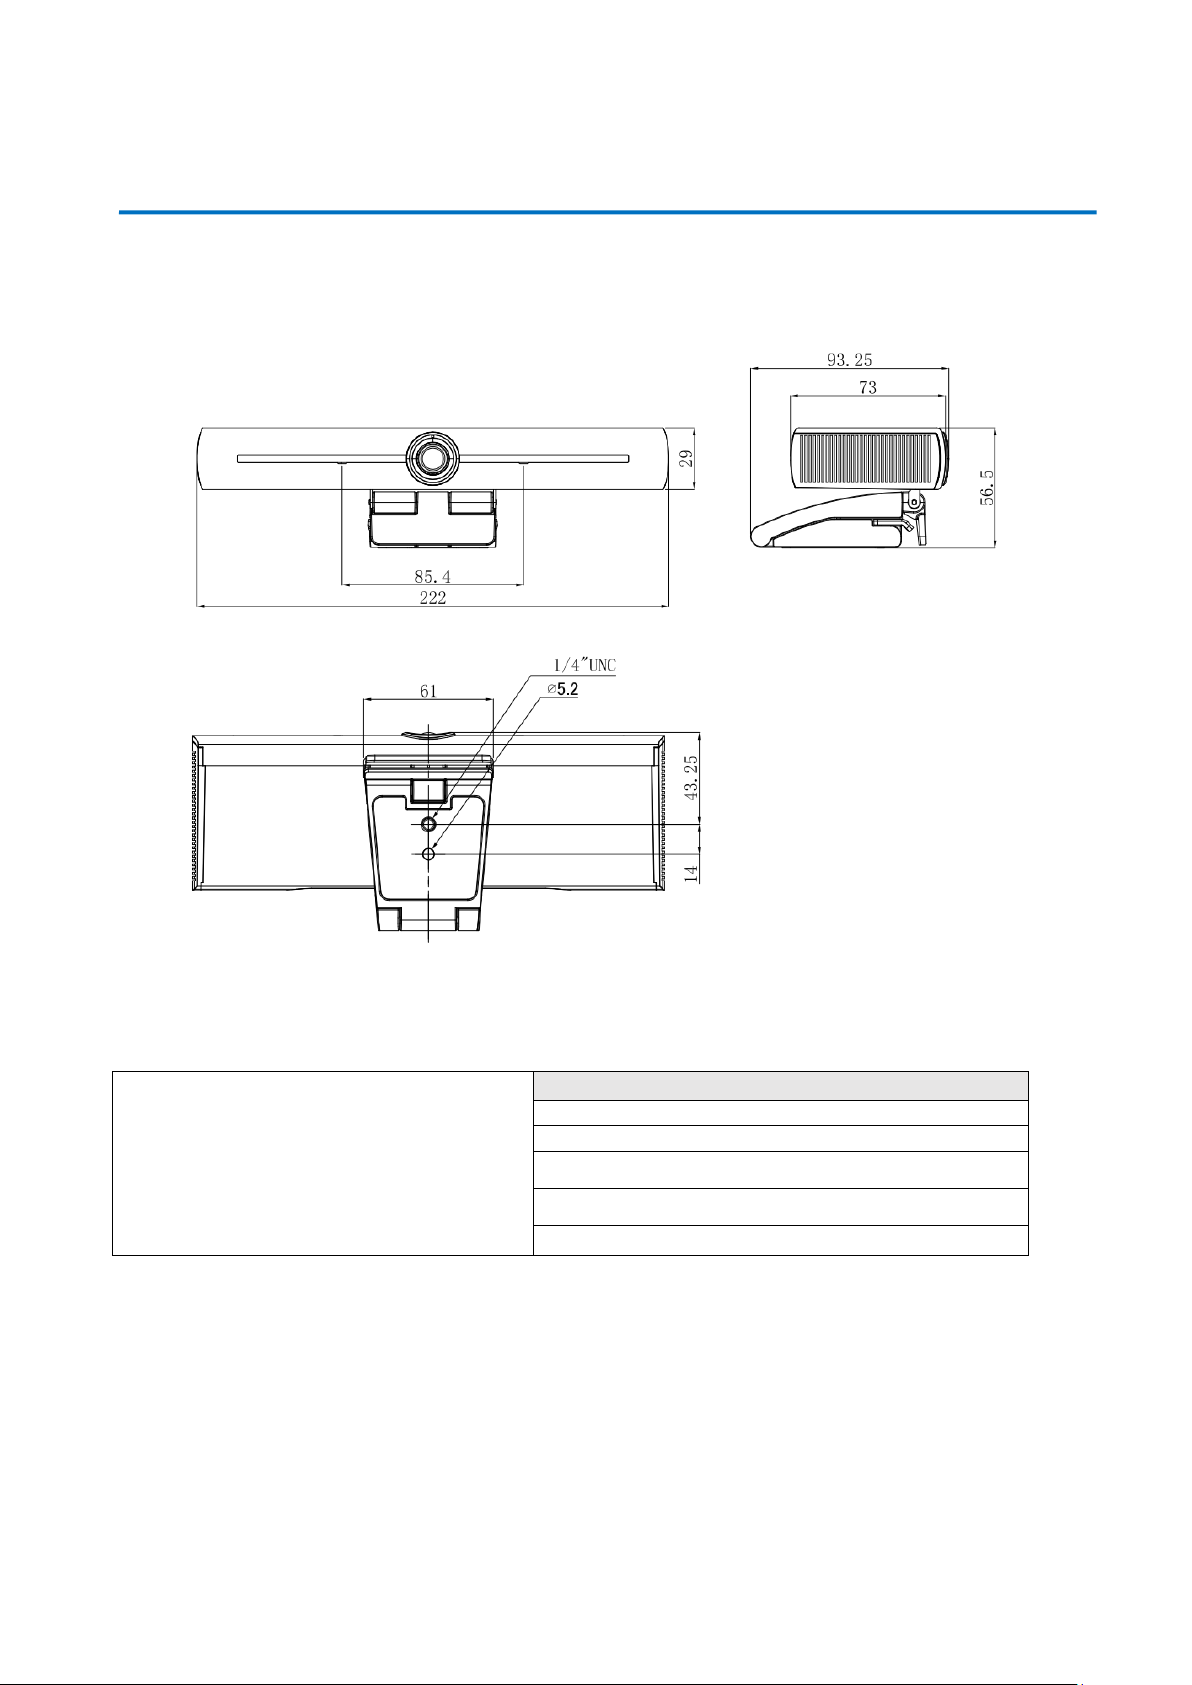
2.1.1 Dimensions
Figure 2.2 Camera Dimensions
2.1.2 Accessories
2.2 Main Features
The BG-EPTZ-AF is a new 4K UHD ePTZ video conference camera. It is built with AI functions,
which can automatically frame all people in the meeting and place them in the middle of the
scene. It also utilizes advanced ISP processing algorithms that provide vivid images with even
brightness, strong color layering, high resolution, and fantastic color rendition. Easy and
convenient to install and maintain, stable and reliable.
BG-EPTZ-AF
Accessories
Wireless remote controller
USB3.0 cable
Warranty card
Cushion
Packing List
Page 6
4
4K UHD: It employs 1/2.5-inch, 8 million pixels high quality CMOS sensor; supports 4K
UHD; provides 4K@ 30fps MJPG video resolution at most; and provides clear UHD video
and vivid expressions and movements. At the same time, it is compatible with 1080p and
720p resolution.
EPTZ: EPTZ and 4X digital Zoom
Built-in pickup: Includes 2 built-in pickups, all-round pickup. Antique noise suppression
algorithm ensures your voice be perfect. The effective pickup distance is up to 5 meters.
Dual stream output: The USB3.0 port support main stream and sub-stream output at the
same time.
Auto framing: With excellent facial detection algorithm, automatically adjust the zoom
according to the number of people in the meeting. It can frame all the meeting people and
make them shown in the middle of the scene.
Wide view angle without distortion: 120° super wide view angle lens
Low Noise and High SNR: Low Noise CMOS effectively ensures high SNR of video.
Image is still clear even under low light condition.
Multiple Installations: Standard equipped with mold clamp. Easy to install on any
devices, such as LCD screen, PC, table and tripod.
Easy to Use: No need to download driver; USB Plug and play.
Wide Applications: Personal video conferencing, enterprise video conferencing, unified
collaboration and etc.
2.3 Technical Specifications
Model Number
BG-EPTZ-AF
Camera Parameter
Image Sensor
1/2.5-inch 4K CMOS Sensor
Effective Pixels
8.28MP 16:9
Video output port
1* USB3.0, Type B, support audio output over USB3.0
Audio input
2 built-in MIC pickups
Video Format
Main stream: 3840×2160@30fps; 1920×1080P@30fps/25fps;
1280×720P@30fps/25fps, etc.
Sub-stream:1280×720P@30fps/25fps; 640×480P@30fps/25fps;
320×172P@30fps/25fps, etc.
View Angle
126°(D)/120°(H)/85°(V)
Lens
f=2.72mm
Aperture
F2.5
Digital zoom
4X
Min Illumination
0.1Lux (F1.8, AGC ON)
DNR
2D & 3D DNR
Ultra-low
illumination
On/off
White Balance
Auto / Manual/ One Push/ 3000K/ 3500K/ 4000K/ 4500K/ 5000K/ 5500K/ 6000K/
6500K/ 7000K
Focus
Auto / Manual
Exposure
Auto / Manual
Auto framing
On/off/sensitivity
Backlight
compensation
On/off
Dual stream
On/off
SNR
≥50dB
USB Feature
Page 7
5
Operation Systems
Windows 7(1080p at the most), Windows 8.1, Windows 10 ; macOS™ 10.10 or
higher, Linux (Require to support UVC.)
Video Compression
format
YUY2, MJPG, H.264, H.265
Audio over USB3.0
Support
USB communication
protocol
UVC, UAC
PTZ control
Support EPTZ
Hardware
requirement
2.4 GHz Intel@ Core 2 Duo processor or higher,2GB RAM or more,USB 2.0
/USB3.0 port ( USB 3.0 is needed for 4K)
Other Parameters
Input Voltage
5V
Input Current
1A(Max.)
Power consumption
5W(Max.)
Store Temperature
-10℃~+60℃
Store Humidity
20%~90%
Working
Temperature
-10℃~+50℃
Working Humidity
20%~80%
Dimension(W*H*D)
222mm×93.25mm×56.5mm
Weight
Around 0.53kg
Application
Indoor
Accessory
User Manual; Warranty card, remote controller, USB3.0 cable
2.4 Interface Instruction
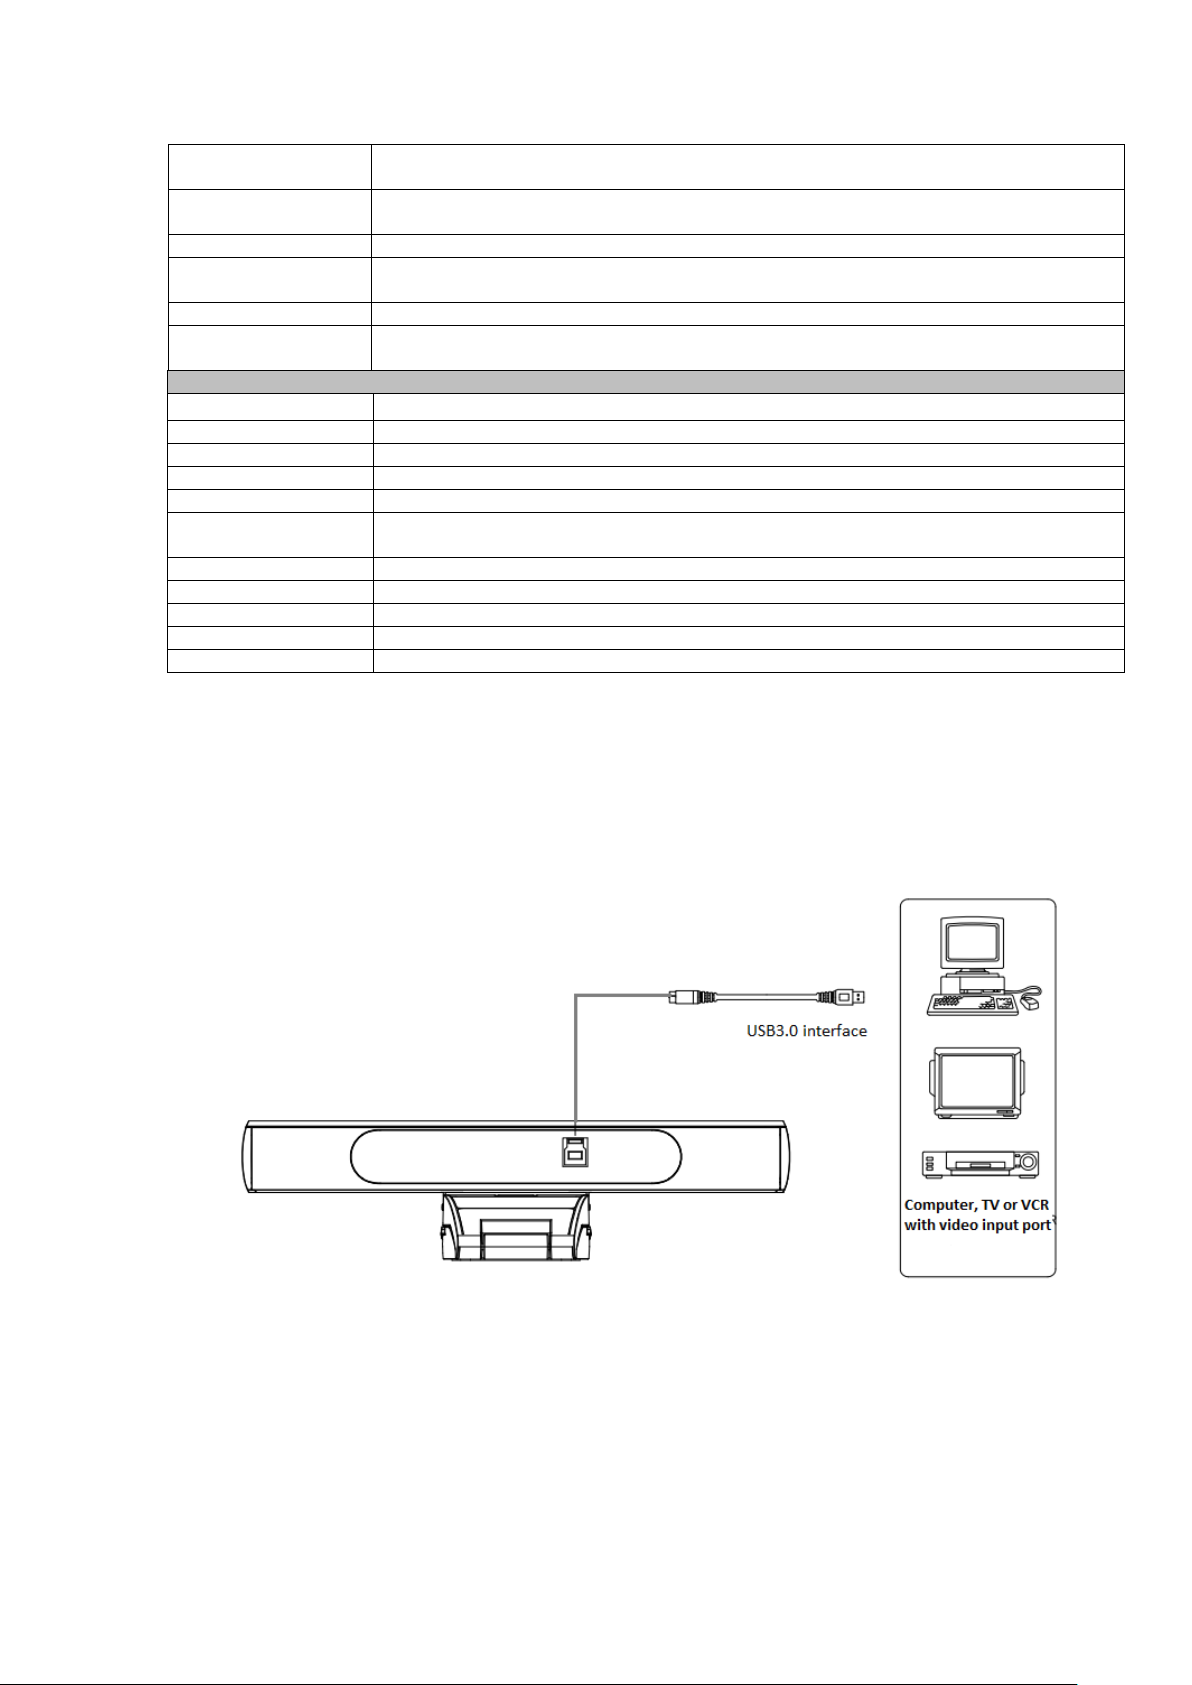
2.4.1 External Interface
The interface illustration is as Figure 2.4 below:
Figure.2.4 Interface Diagram
Page 8
6
3. Application Instruction
3.1 Remote Controller
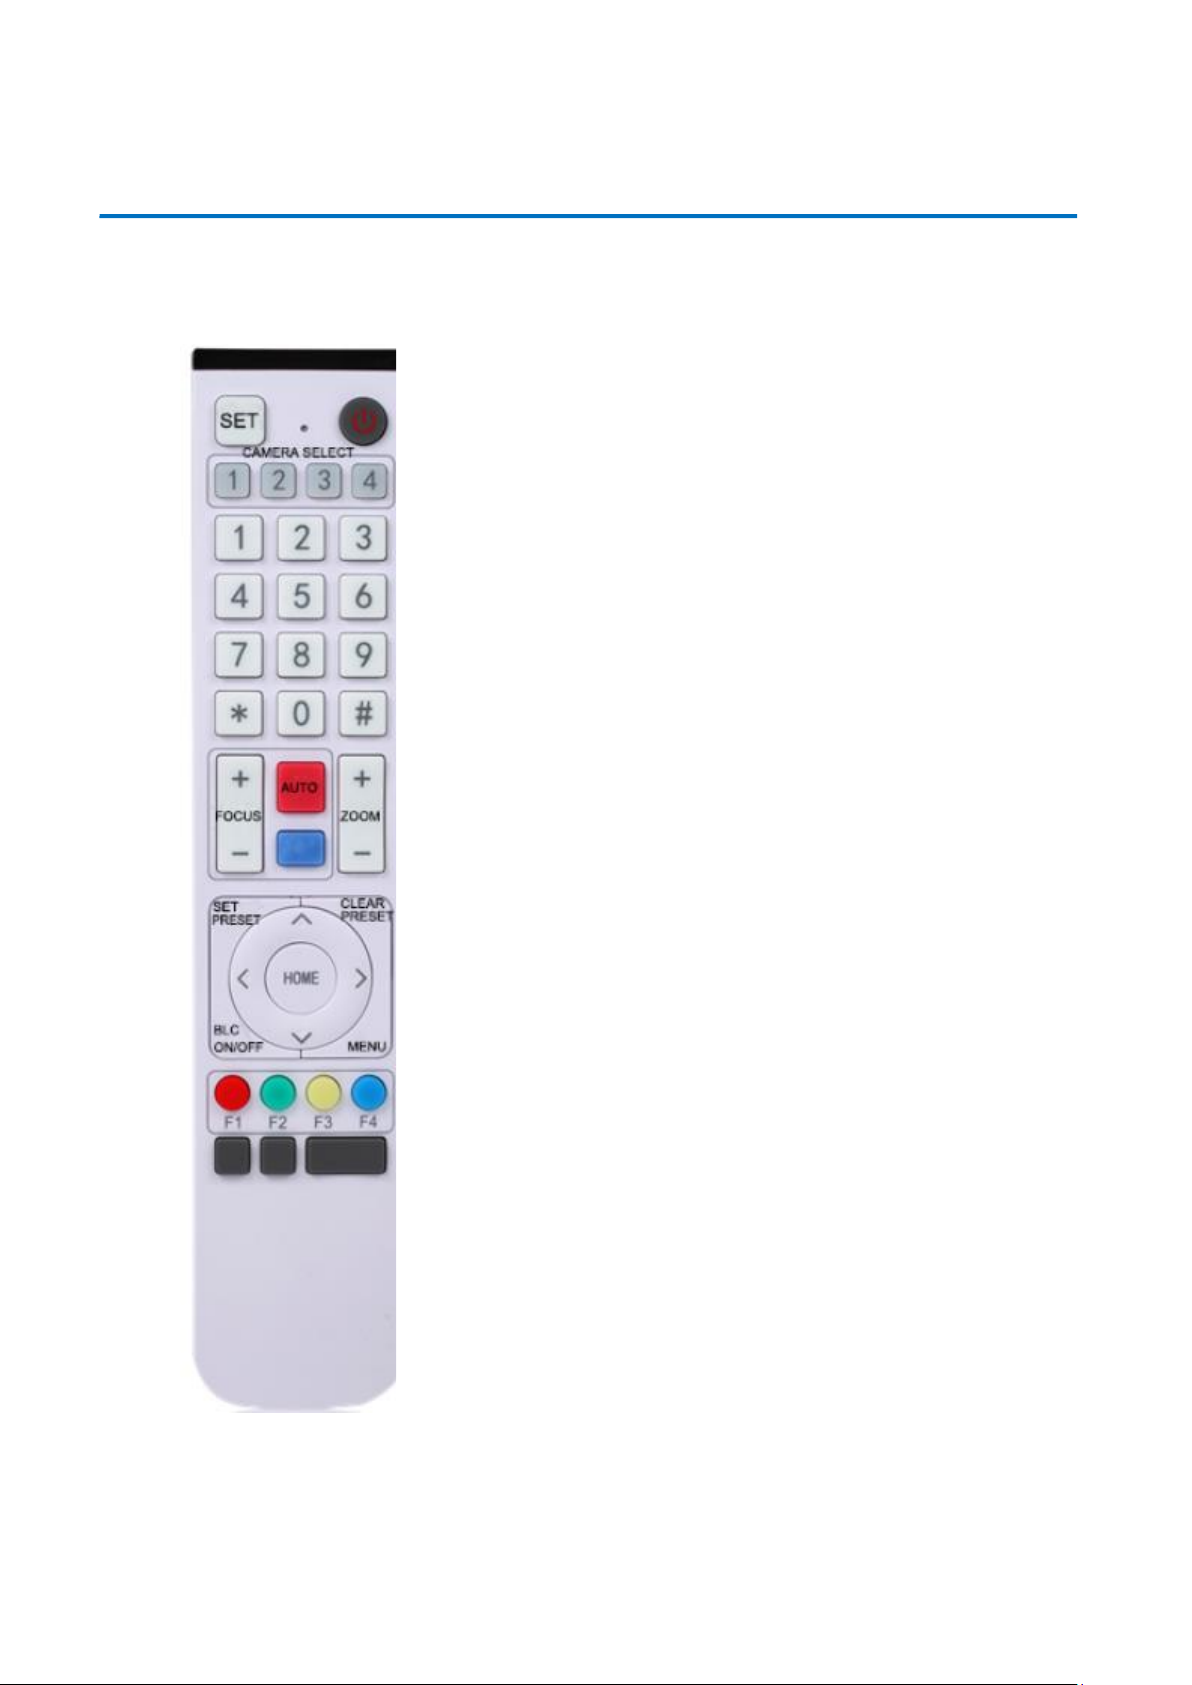
3.1.1 Keys Instruction
1. Standby Key(not supported currently)
After 3s long press, the camera will be in standby mode. Long press 3s again, the
camera will self-test again and back to HOME position. Note: If preset 0 is set, there
is no operation within 12s, camera head will automatically point to the specified
preset 0 position.
2. Camera Address Selection
Select the camera address
3. Number Key
Set or call 0-9 presets
4. *, # Key
Key combination use
Long Press 5s “SET” + “*” at the same time, the WR controller is light on, releases
hands. Power on the camera again, it will successfully pair with WR controller.
Long Press 5s “SET” + “*” at the same time, the WR controller is light on, releases
hands. Power on the camera again, it will cancel to paired with WR controller.
5. Focus Control Key
This camera does not support manual focus control.
6. Zoom Control Key
Manual zoom only functions when auto-framing feature is disabled.
7. Set or Clear Preset key:
Set Preset: Set preset key + 0-9 number key
Clear Preset key: Clear preset key + 0-9 number key
8. Electronic Pan/Tilt Control Key
Press Key : Up
Press Key : Down
Press Key : Left
Press Key: Right
“HOME” Key: Return to the middle position or enter into the sub-menu
9. BLC Control Key
Back Light ON / OFF: Turn on or off the back light
Page 9

7
10. Menu Setting
Open or close the OSD menu
Enter / exit the OSD menu or return to the previous menu
11. Address Setting
【*】+【#】+【F1】:Camera Address No.1
【*】+【#】+【F2】:Camera Address No. 2
【*】+【#】+【F3】:Camera Address No. 3
【*】+【#】+【F4】:Camera Address No. 4
12. Key Combination Functions
1) 【#】+【#】+【#】:Clear all presets
2) 【*】+【#】+【6】:Restore factory defaults
3) 【*】+【#】+【9】:Flip switch
4) 【*】+【#】+【4】:Menu set to English
5) 【*】+【#】+【3】:Menu set to Chinese
6) 【*】+【#】+【0-9】: Switch video format
7) 【*】+【#】+Manual: Restore the default user name,
password, and IP address
3.1.2 Applications
Power on the camera, press the “ SET ” and “ * ” keys together for 5 seconds, the indicator
light will be on. Then release the button and power on the camera again when the light is
flashing. The pairing process will be complete when the indicator light stops flashing. Then
users can control the pan/tilt/zoom, set and call preset positions via the wireless remote
controller.
Key Instruction:
1. In this manual, “press the key” means a click rather than a long-press, and a special note
will be given if a long-press for more than one second is required.
2. When a key-combination is required, do it in sequence. For example,“ 【*】+【#】+
【F1】”means press“【*】”first and then press“【#】” and last press“【F1】”.
1) Camera Selection
Select the camera address to control.
Page 10
8
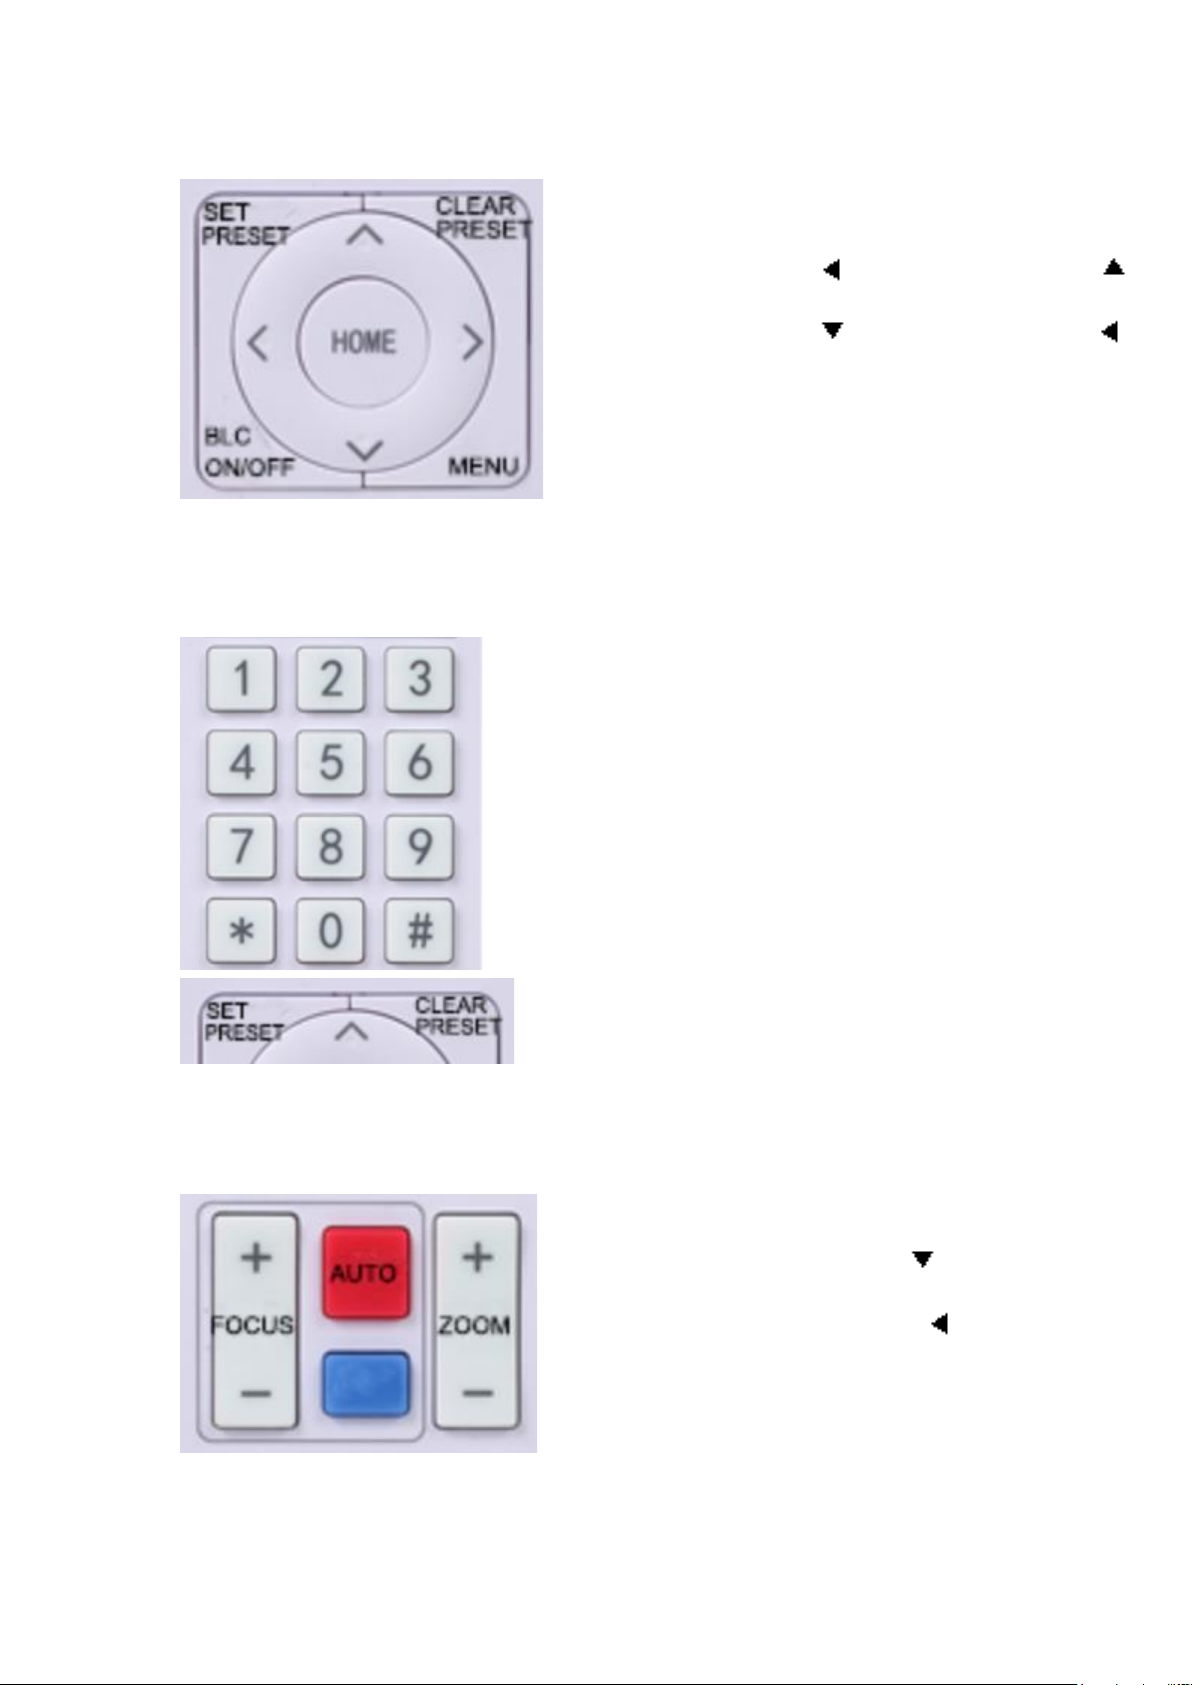
2) Pan/Tilt Control
Up: press Down: press
Left: press Right: press
Back to middle position: press“【HOME】”
Press and hold the up/down/left/right key, the pan/tilt
will keep running, from slow to fast, until it runs to the
endpoint; the pan/tilt running stops as soon as the key
is released.
3) Presets
1. Preset setting: to set a preset position, the users
should press the “【SET PRESET】” key first and then
press the number key 0-9 to set a relative preset,
Note: 10 preset positions in total are available by
remote controller.
2. Preset calling: Press a number key 0-9 directly to
call a relative preset.
Note: Nothing will happen if a relative preset position
is not set.
3. Preset clearing: to clear a preset position, the user
can press the “【CLEAR PRESET】” key first and then
press the number key 0-9 to clear the relative preset;
Note : press the“【#】” key three times continually
to clear all the presets.
4) Zoom Control
ZOOM IN: press “ZOOM “ key
ZOOM OUT: press “ZOOM ” key
NOTE: Manual zoom control only functions when
auto-framing feature is disabled!
Page 11
9
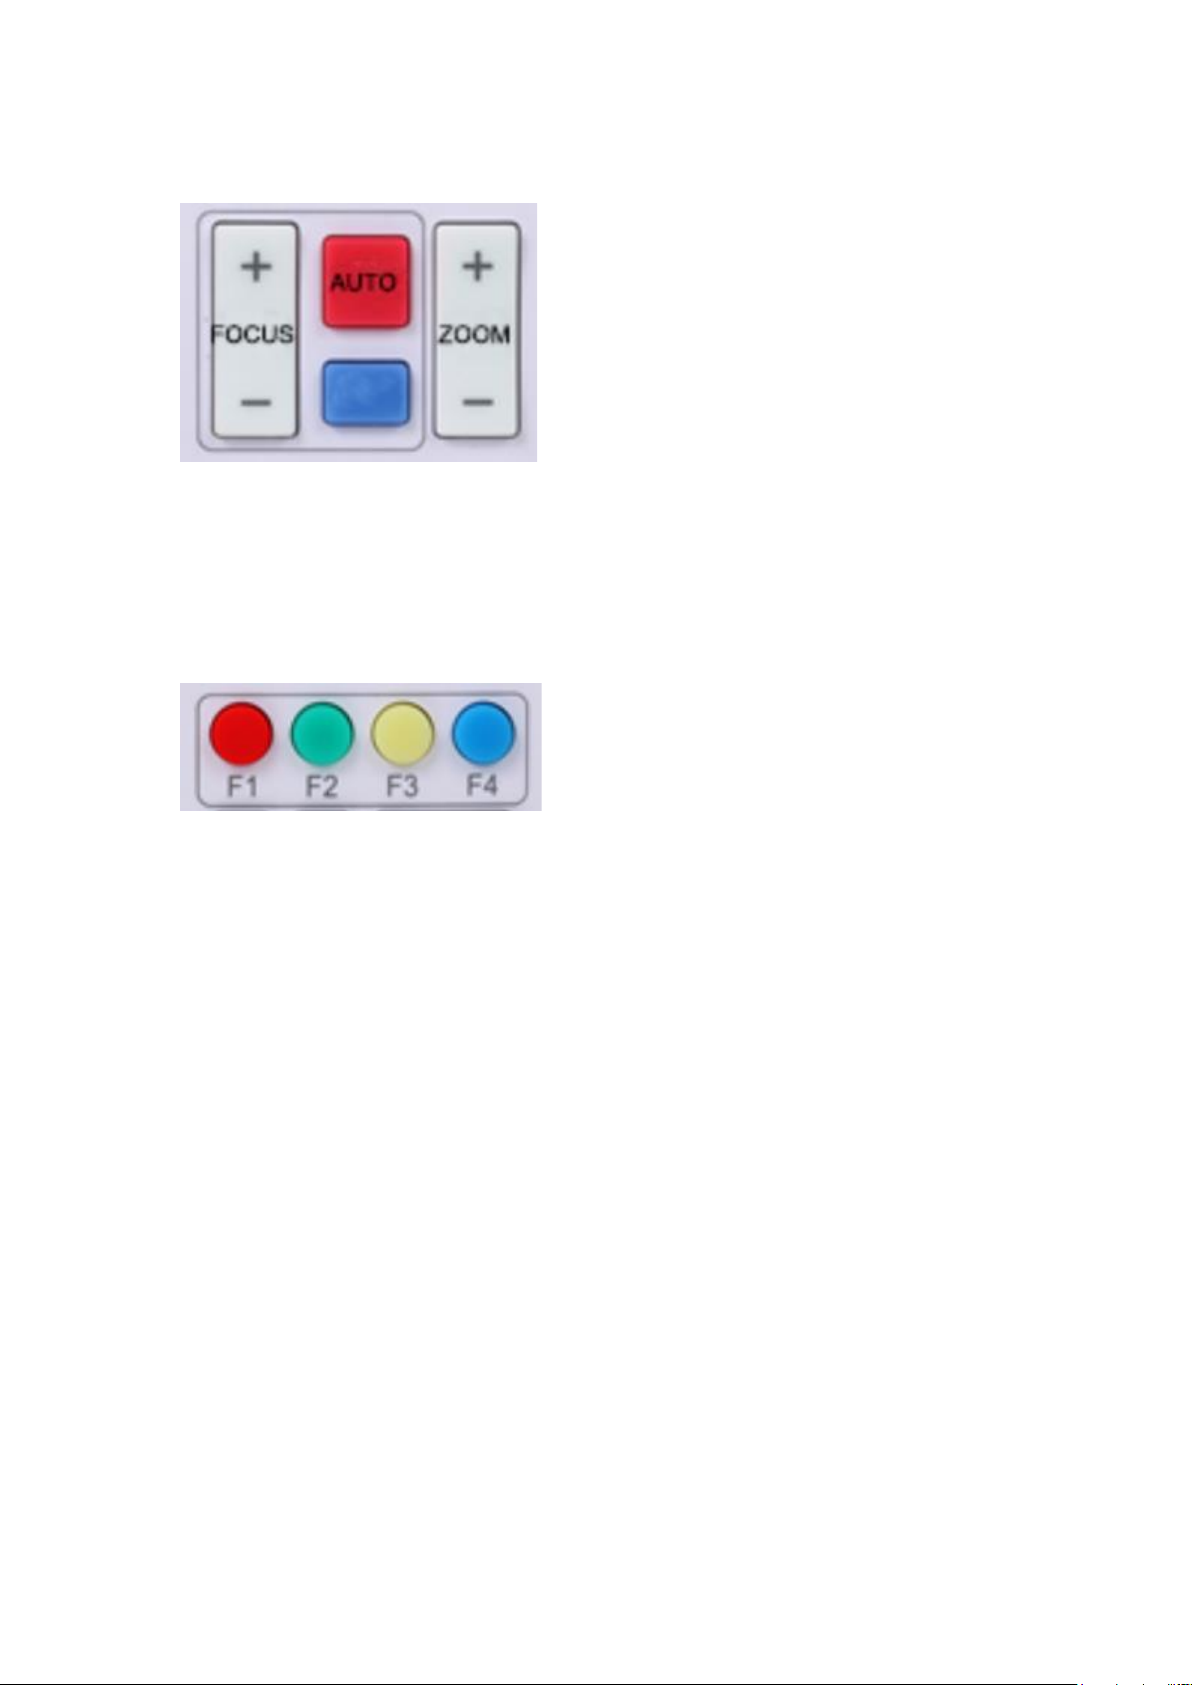
5) Focus Control
Focus (near):Press “【focus+】” key (Valid only in
manual focus mode)
Focus (far): Press “【focus-】”key (Valid only in manual
focus mode)
Auto Focus: yes
Manual Focus: yes
Press and hold the key, the focus adjustment will
continue until the key is released.
6) Address Setting
【*】+【#】+【F1】:Camera Address No.1
【*】+【#】+【F2】:Camera Address No. 2
【*】+【#】+【F3】:Camera Address No. 3
【*】+【#】+【F4】:Camera Address No. 4
3.2 MENU SETTING
3.2.1 Main Menu
When using MJPG/ H.264 / H.265 compression , press 【MENU】key to display the menu,
using scroll arrow to point at or highlight the selected items.
Page 12

10
1. Language Setting:press 【← →】key to select Language
2. Set up Setting: press 【Home】key to as below:
Image Style: Default/Conference/Clear/Bright/Soft Options
Dual: open/close
Auto Zoom: open/close, sensitivity 0-7
3. Exposure Setting
Move the pointer to EXPOSURE in the Main Menu, click the【 HOME】and enter the
(EXPOSURE SET) as follows:
Setup
=================
Image Style Default
Dual Close
(Auto Framing)
[↑↓]Select [← →]Change Value
MENU
=================
Language English
(Set up)
(Exposure)
(Color)
(Image)
(Focus)
(Noise Reduction)
(Version)
(Restore Default)
[↑↓]Select [← →]Change Value
Page 13

11
Mode : Auto, Manual, Shutter priority, Iris priority and Brightness priority.
EV : On/Off (only available in auto mode)
Compensation Level: -7~7 (only available in auto mode when EV is ON)
BLC: ON/OFF for options (only available in auto mode) Dynamic range: adjustable items:
1 ~ 8, close
Anti-Flicker: OFF/50Hz/60Hz for options (only available in Auto/Iris priority/Brightness
priority modes)
Gain Limit: 0~15 (only available in Auto/ Iris priority /Brightness priority mode)
WDR: Off,1~8
Shutter Priority:
1/25,1/30,1/50,1/60,1/90,1/100,1/120,1/180,1/250,1/350,1/500,1/1000,1/2000,1/3000,1/4000,
1/6000, 1/10000 (only available in Manual and Shutter priority mode)
Brightness: 0~23 (only available in Brightness priority mode)
4. Color Setting
Move the pointer to COLOR in the Main Menu, click the【HOME】and enter the (COLOR SET)
as follows:
WB Mode: Auto, Manual, One Push, 3000K, 3500K, 4000K, 4500K, 5000K, 5500K, 6000K,
COLOR
================
WB Mode Auto
RG Tuning 0
BG Tuning 0
Saturation 100%
Hue 7
AWB Sensitivity High
[↑↓]Select [← →]Change Value
EXPOSURE
===============
Mode Auto
EV OFF
BLC OFF
Flicker 50Hz
G.Limit 3
DRC 2
[↑↓]Select [← →]Change Value
Page 14

12
6500K, 7000K
RG Tuning: -10~10 (only available in Manual mode)
BG Tuning: -10~10 (only available in Manual mode)
Red Gain: 0~255 (only available in Manual mode)
Blue Gain: 0~255 (only available in Manual mode)
Saturation: 60%, 70%, 80%, 90%, 100%, 110%, 120%,130%, 140%,150%, 160%, 170%,
180%, 190%, 200%
Hue: 0~14
AWB Sensitivity: high/middle/low (only available in Manual mode)
5. Image Setting
Move the pointer to IMAGE in the Menu, click the【HOME】and enter the (IMAGE) as follows,
Brightness: 0~14
Contrast: 0~14
Sharpness: 0~15
Flip-H: On/Off
Flip-V: On/Off
B&W Mode: color, black/white
Gamma: default, 0.45, 0.50, 0.55, 0.63
DCI: Dynamic Contrast: Off,1~8
6. Focus Setting
This camera supports auto focus only; there is no manual adjustment possible.
7. Noise Reduction Setting
Move the pointer to NOISE REDUCTION in the Menu, click the【HOME】and enter the (NOISE
REDUCTION) as follows,
IMAGE
================
Brightness 7
Contrast 7
Sharpness 4
Flip-H OFF
Flip-V OFF
B&W-Mode Color
Gamma Default
DCI Close
Low-Light Mode Close
[↑↓]Select [← →]Change Value
Page 15

13
2D Noise Reduction: Auto, close, 1~7
3D Noise Reduction: Close, 1~8
Dynamic Hot Pixel: Close, 1~5
8. Version
Move the pointer to VERSION
9. Restore Default
Move the pointer to RESTORE DEFAULT in the Main Menu, click 【HOME】and enter
RESTORE DEFAULT as below:
Restore default: Yes/No for options. (the video format and color style won’t be restored)
Note: If the address of former remoter is not 1 but another one from 2,3,4, the
corresponding camera address will restore to 1 when all parameters or system
parameters are restored. User should change the remoter address to be 1 (press No.1
according to the camera so to get normal operation)
RESTORE DEFAULT
=================
Restore Default? NO
[↑↓]Select [← →]Change Value
VERSION
=================
Cam Version 1.0.2 2019-11-28
Focus Version 1.0.6 2018-8-21
[↑↓]Select [← →]Change Value
NOISE REDUCTION
=================
NR-2D 2
NR-3D 5
Dynamic Hot Pixel OFF
[↑↓]Select [← →]Change Value
Page 16

14
4.Maintenance and Troubleshooting
4.1 Maintenance
1) Please disconnect the camera if it is not used for a long time.
2) Use soft cloth or tissue to clean the camera cover.
3) Wipe it with a soft, dry cloth when cleaning the camera lens. Wipe it gently with a mild
detergent if needed. Do not use strong or corrosive detergents to avoid scratching the lens and
affecting the image;
4.2 Troubleshooting
1) No video output
a. Check whether USB cable is securely connected and power indicator light is ON.
b. Verify camera completes self-check after reboot.
c. Restart PC
d. Check whether the camera is recognized by computer.
2) Intermittent Image
a. Check the USB cable and connection.
3) Image dithering while zooming in or out
a. Verify the camera is securely mounted
b. Check for any devices near the camera that may transmit vibration
4) Remote control does not work
a. Repeat pairing of the camera and the wireless remote control.
b. Set the camera address to 1 (address reverts to 1 after restoring factory defaults)
c. Check batteries
d. Verify camera is in normal operating mode (see Table 2.2 and Table 2.3)
e. Exit the menu, the menu only displays under MJPG/H.264/H.265 compression format.
Page 17

15
5. Warranty
BZBGEAR wants to assure you peace of mind. All BZBGEAR cameras and camera-related
products include our Stress-Free Three-Year Warranty.
For complete warranty information, please visit BZBGEAR.com/warranty.
For questions, please call 1.888.499.9906 or email [email protected].
6. Mission Statement
BZBGEAR manifests from the competitive nature of the audiovisual industry to innovate while
keeping the customer in mind. AV solutions can cost a pretty penny, and new technology only
adds to it. We believe everyone deserves to see, hear, and feel the advancements made in
today’s AV world without having to break the bank. BZBGEAR is the solution for small to
medium-sized applications requiring the latest professional products in AV.
We live in a DIY era where resources are abundant on the internet. With that in mind, our team
offers system design consultation and expert tech support seven days a week for the products
in our BZBGEAR catalog. You’ll notice comparably lower prices with BZBGEAR solutions, but
the quality of the products is on par with the top brands in the industry. The unparalleled
support from our team is our way of showing we care for every one of our customers. Whether
you’re an integrator, home theater enthusiast, or a do-it-yourselfer, BZBGEAR offers the
solutions to allow you to focus on your project and not your budget.
7. Copyright Statement
All the contents in this manual and its copyright are owned by the company. No one is allowed
to imitate, copy, or translate this manual without the company’s permission. This manual
contains no guarantee, standpoint expression or other implies in any form. Product
specification and information in this manual is for reference only and subject to change without
notice.
All rights reserved. No reproduction is allowed without acknowledgement.
 Loading...