

Page 1
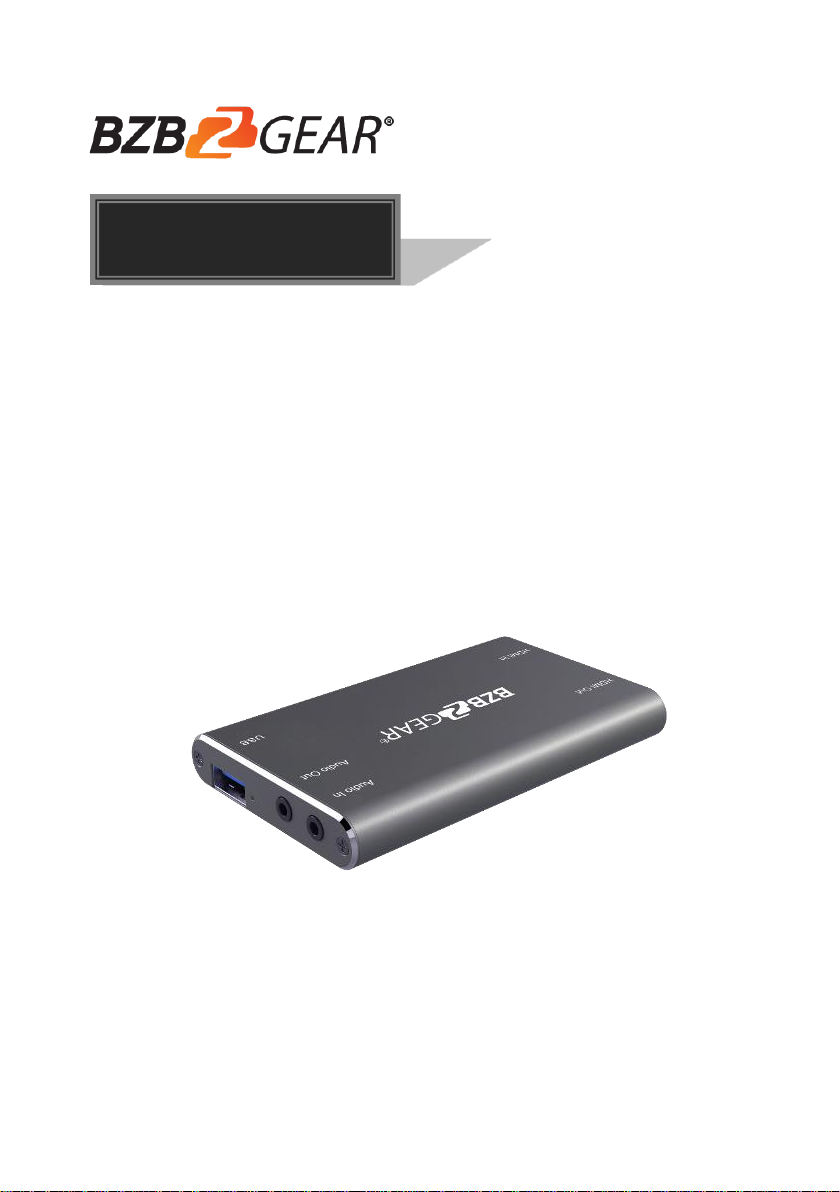
BG-CAP-HA
HDMI to USB Video Capture Device
All Rights Reserved
User Manual
Page 2
1
Introduction
The BG-CAP-HA is a HDMI to USB video capture device. The product is designed to
capture video and audio signal from the HDMI source. The content captured can be
saved to the PC/Laptop through a USB cable.
Features
Capture video and audio from HDMI sources.
HDMI video resolution is up to 4K@60Hz 4:4:4, HDR10
Supports HDMI loop output for display device connection.
Capture resolutions up to 1080p at 60 frames per second through USB port.
Compatible with multiple third-party applications, such as OBS/ VLC/PotPlayer/
YouTube on Windows, QuickTime on Mac OS X.
Supports embedding audio (audio input) and de-embedding audio (audio output).
Powered from USB port, no external power supply required.
Package List
Please make sure all the items listed below are in the package. If anything is missing or
damaged, please contact your distributor for a replacement.
1x BG-CAP-HA
1x USB Cable
1x User Manual
Panel Description
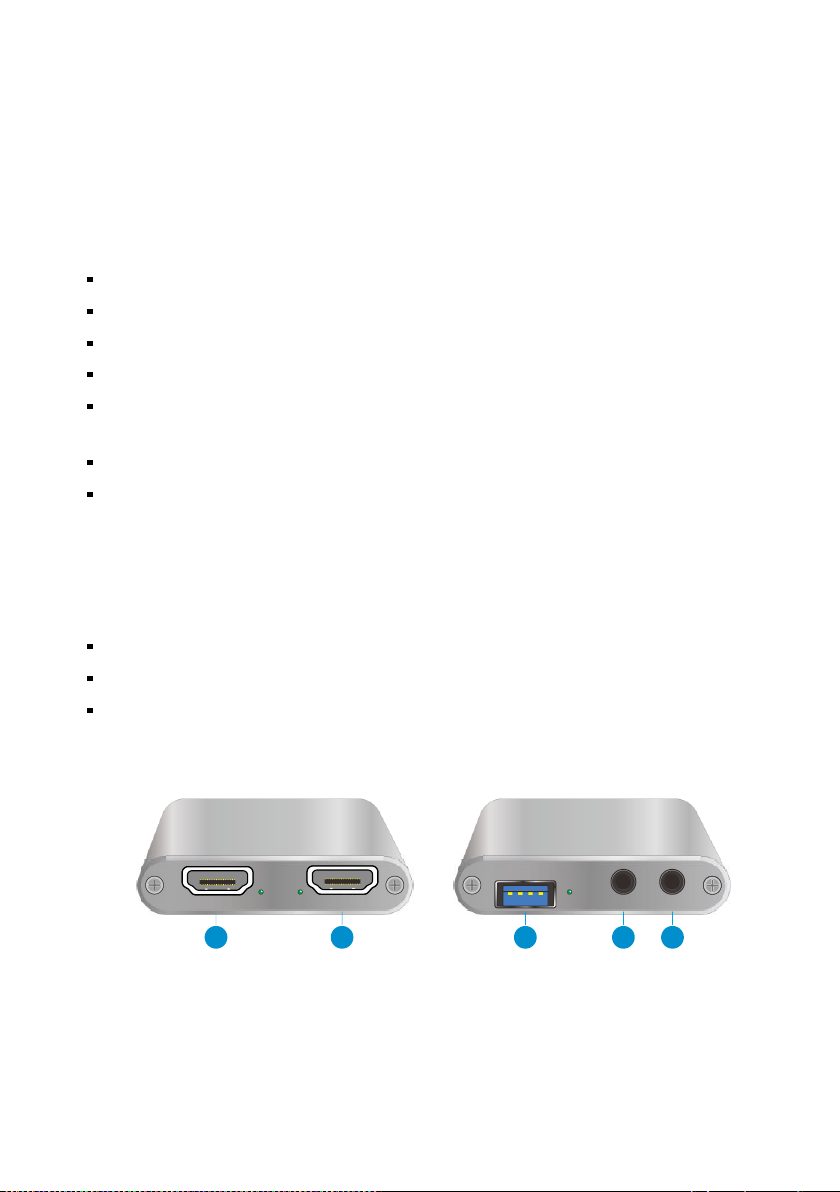
1. HDMI In: Connects to HDMI source device.
2. HDMI Out: HDMI loop output for HDMI display device connection.
3. USB: Connects to laptop, PC or other recording device.
4. Audio Out: Connects to headphone for audio de-embedding.
5. Audio In: Connects to microphone for audio mixing.
1
2
3
4
5
Page 3
2
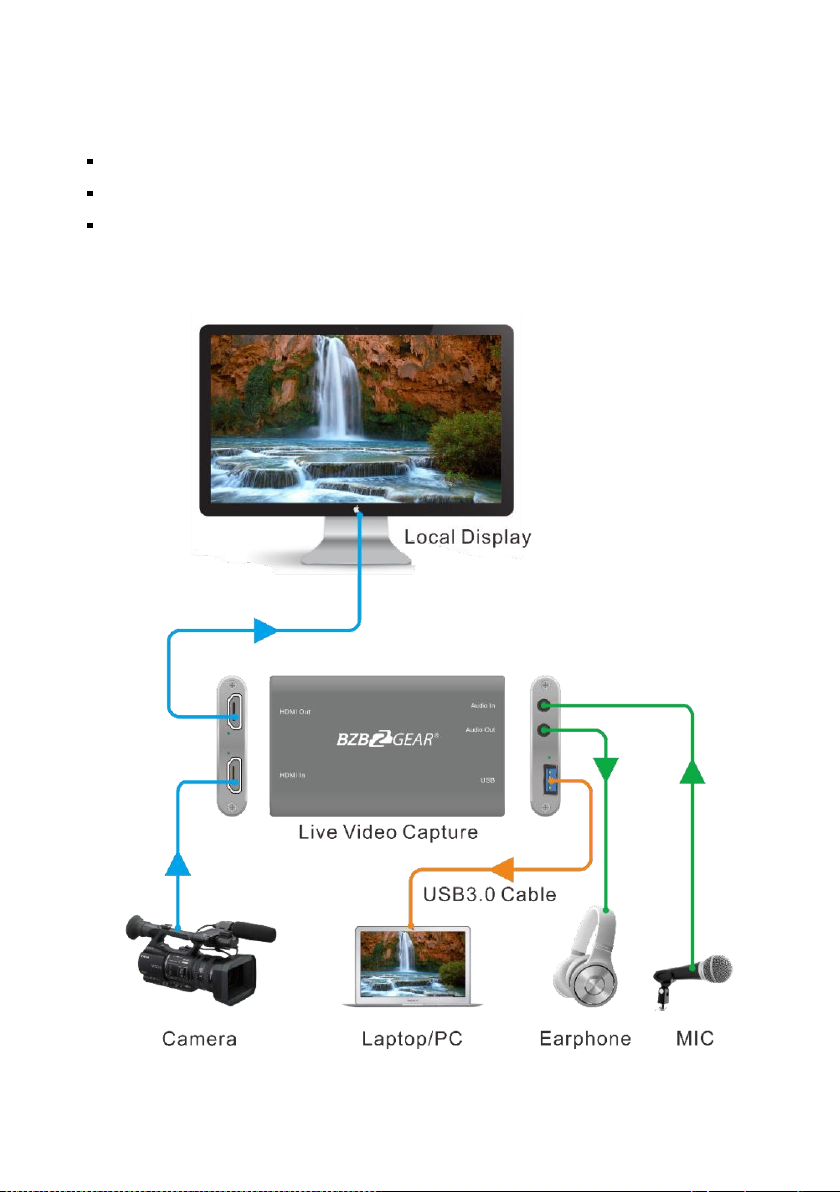
System Connection
System Requirement
The recording device with available type-A USB port.
Microsoft Windows, Mac OS X or Linux.
HDMI audio/video source with HDMI Cable (Camera, Xbox, PS4, DVD…etc.).
System Diagram
Page 4
3
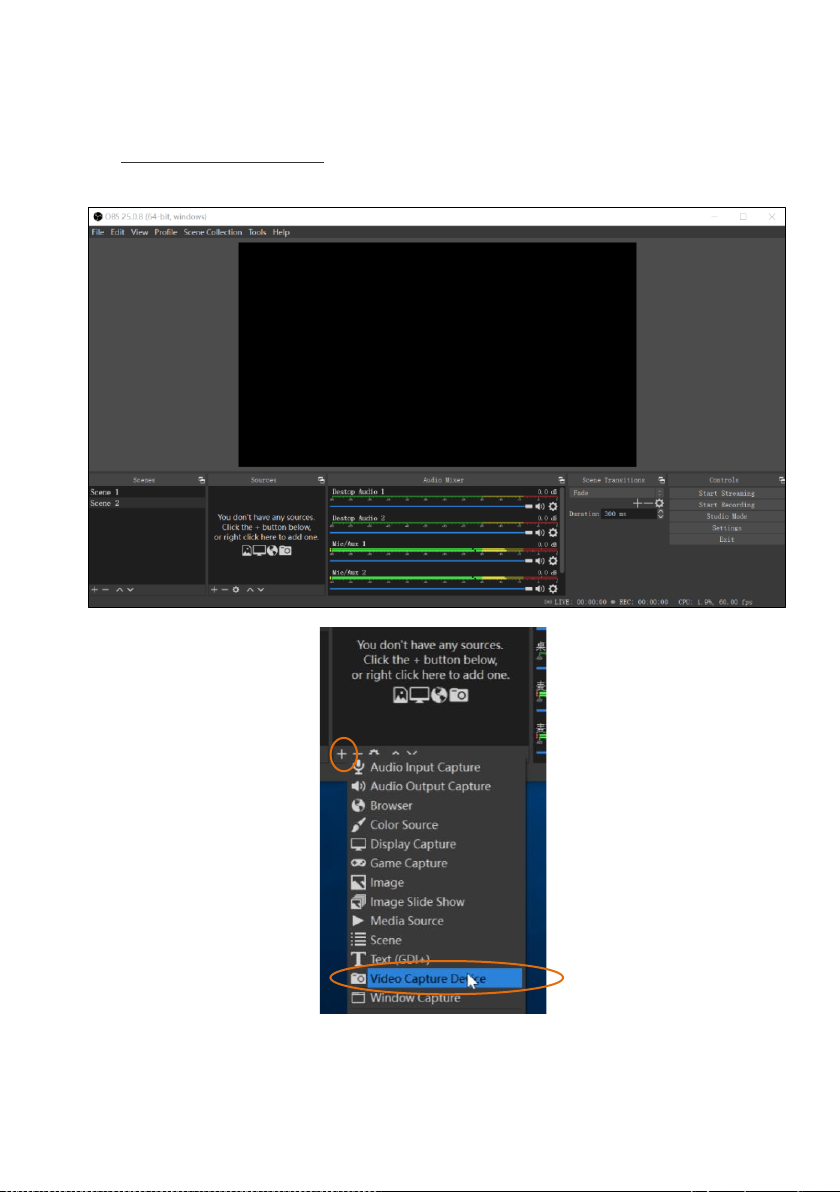
Recording for Windows using OBS
Note: The OBS Player is the first recommended software used for video capturing. Please
visit https://obsproject.com/ to download the player for Windows, Mac OS X or Linux.
1. Click the “+” icon at “Sources” zone, and then click “Video Capture Device”.
Page 5
4
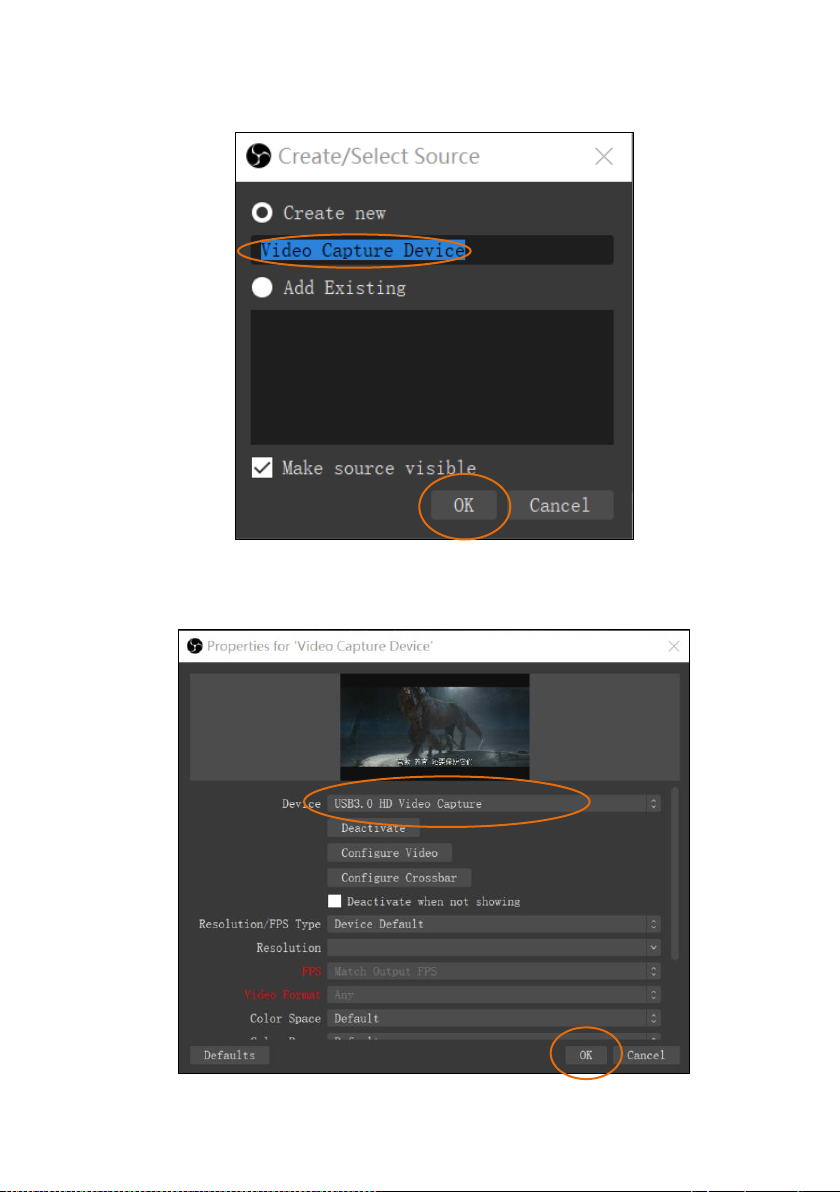
2. Type the new device name, and then click “OK” to create new source.
3. Select the video capture device and configure the video parameters, and then click
“OK”.
Page 6
5
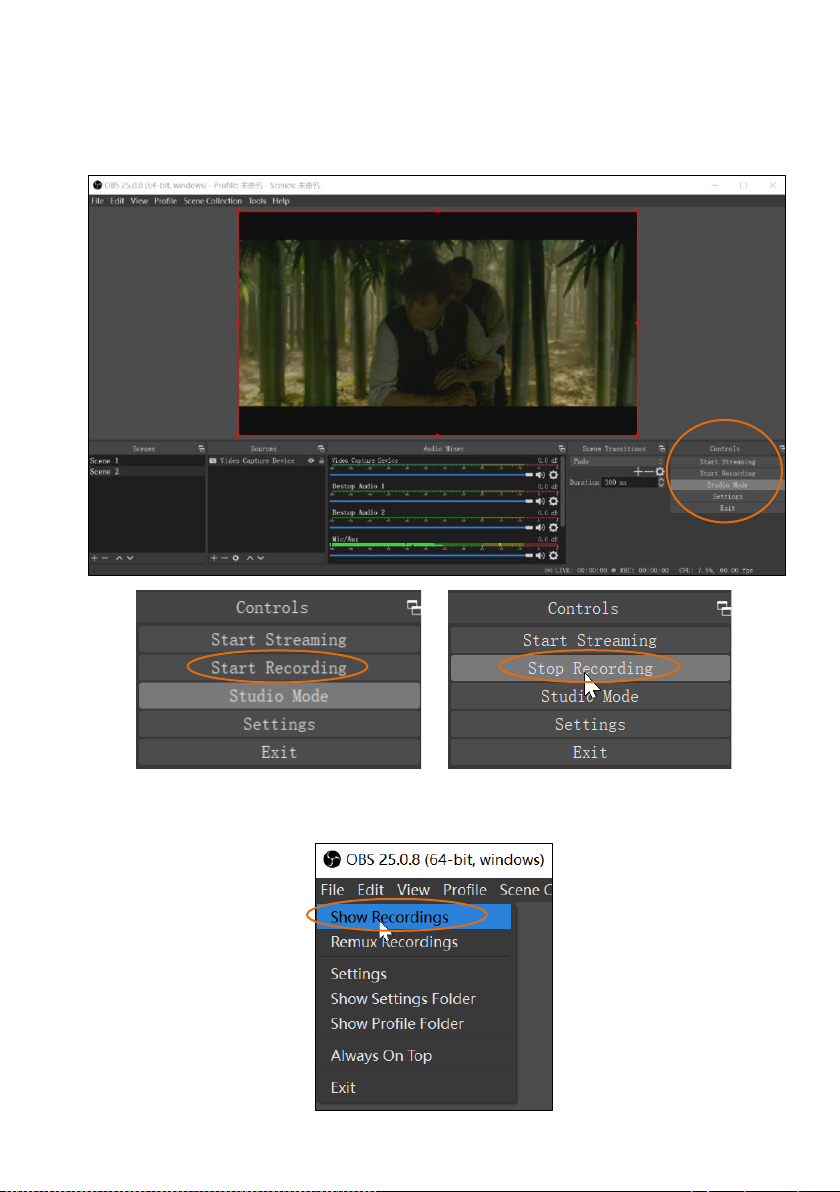
4. Click “Start Recording” at “Controls” zone, and the video and audio recording will
start.
5. To stop recording, simply click the “Stop Recording”.
6. Select “File”, and then click “Show Recordings” at the top down menu. The saved
recording video file can be found.
Page 7
6
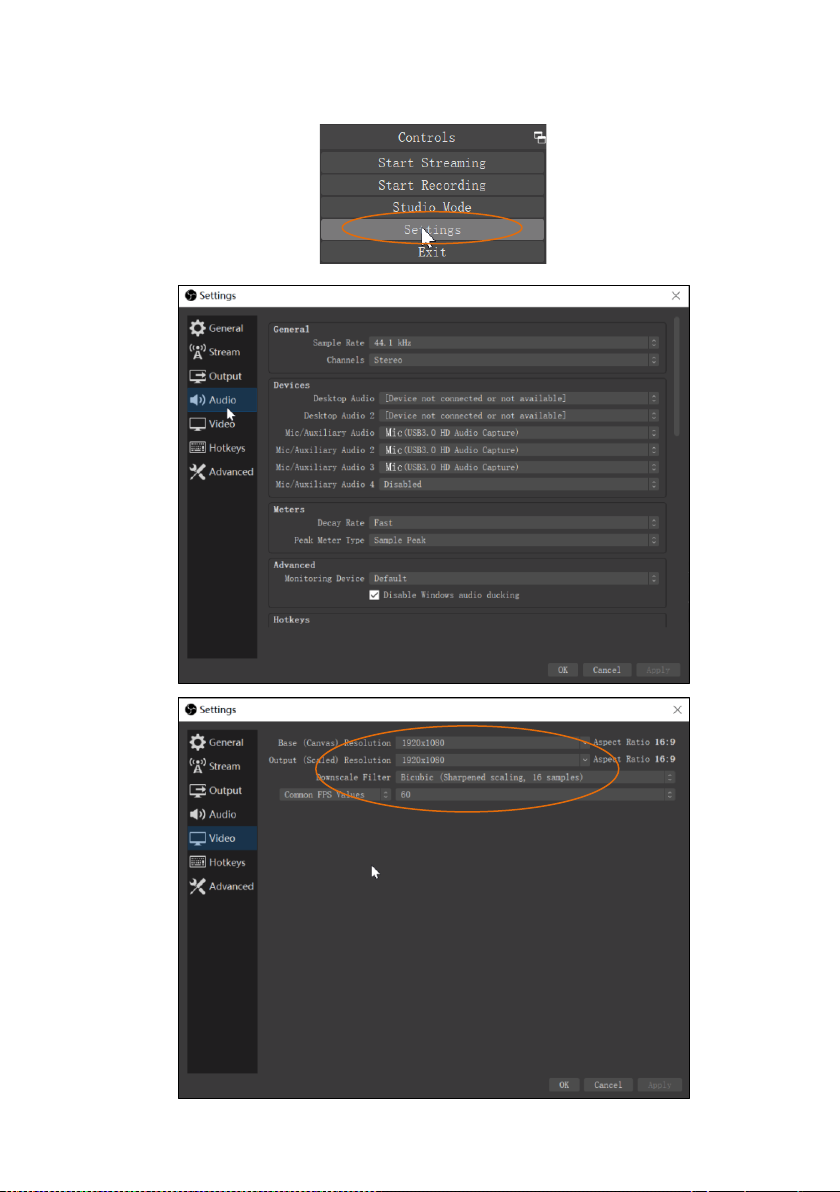
7. To configure audio and video parameters, click “Settings” at “Controls” zone.
Page 8
7
Recording for Mac using QuickTime
The QuickTime Player is the software that comes with Mac PC, it can also be used for
video recording.
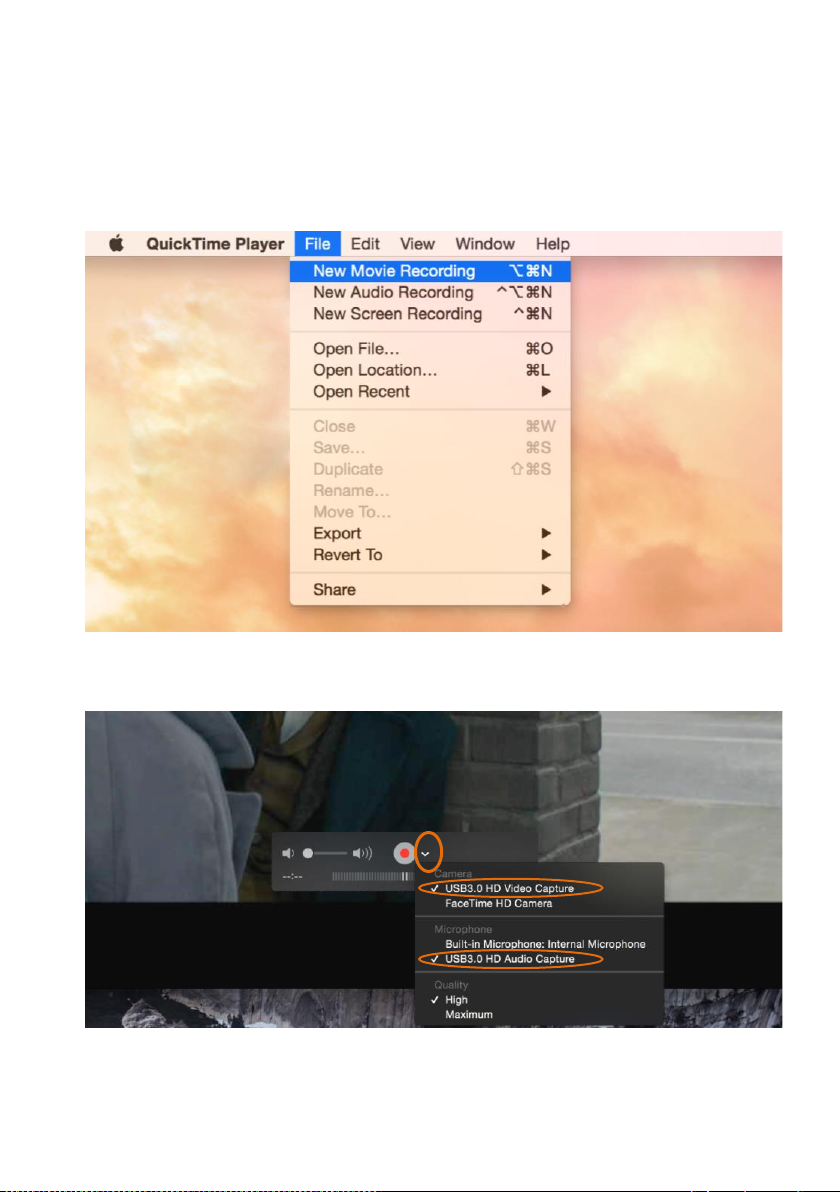
1. Launch QuickTime Player, click “File” at the top menu and select “New Movie
Recording”.
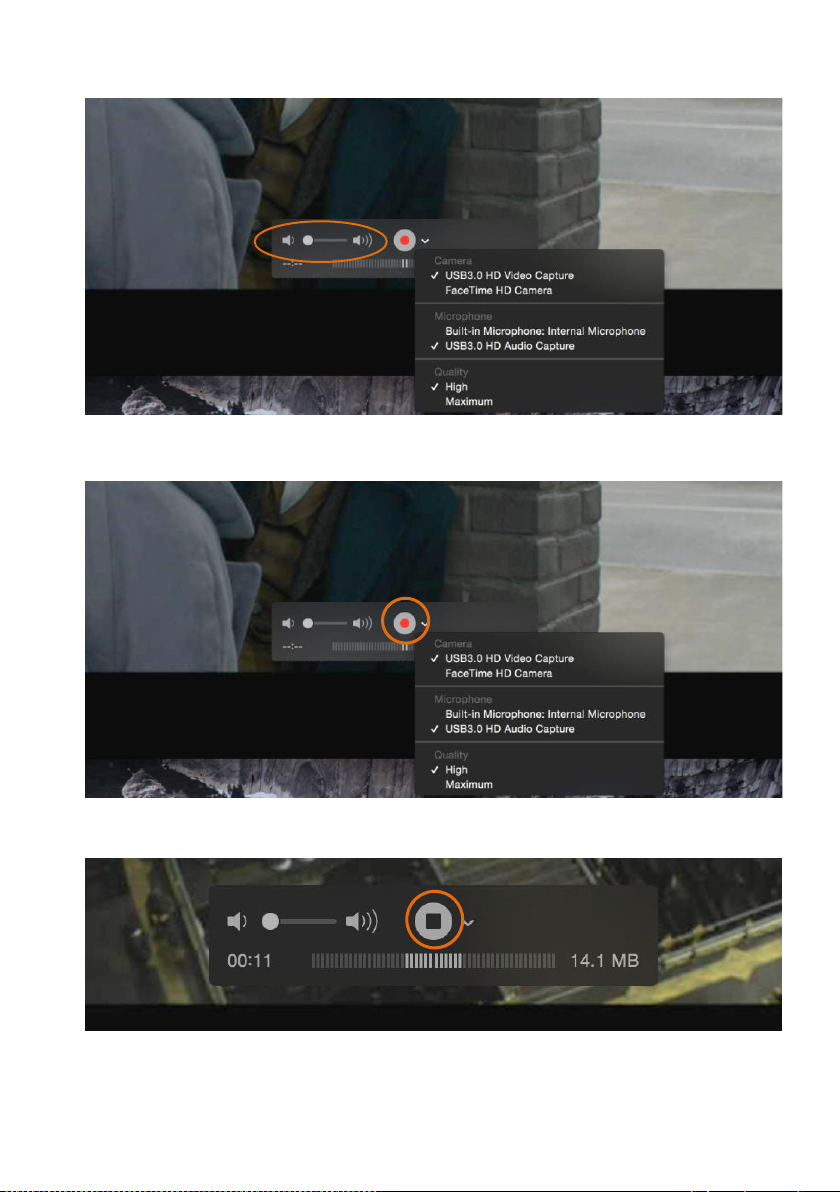
2. The recording control panel will appear on the screen, first click the “∨” symbol for
the drop down menu.
3. Select “USB3.0 HD Video Capture” under “Camera”, and select “USB3.0 HD Audio
Capture” under “Microphone”. Then adjust to desired volume for the speaker.
Page 9
8
4. Click the “Record” button to start recording.
5. To stop recording, simply click the square “Stop” button.
Page 10
9
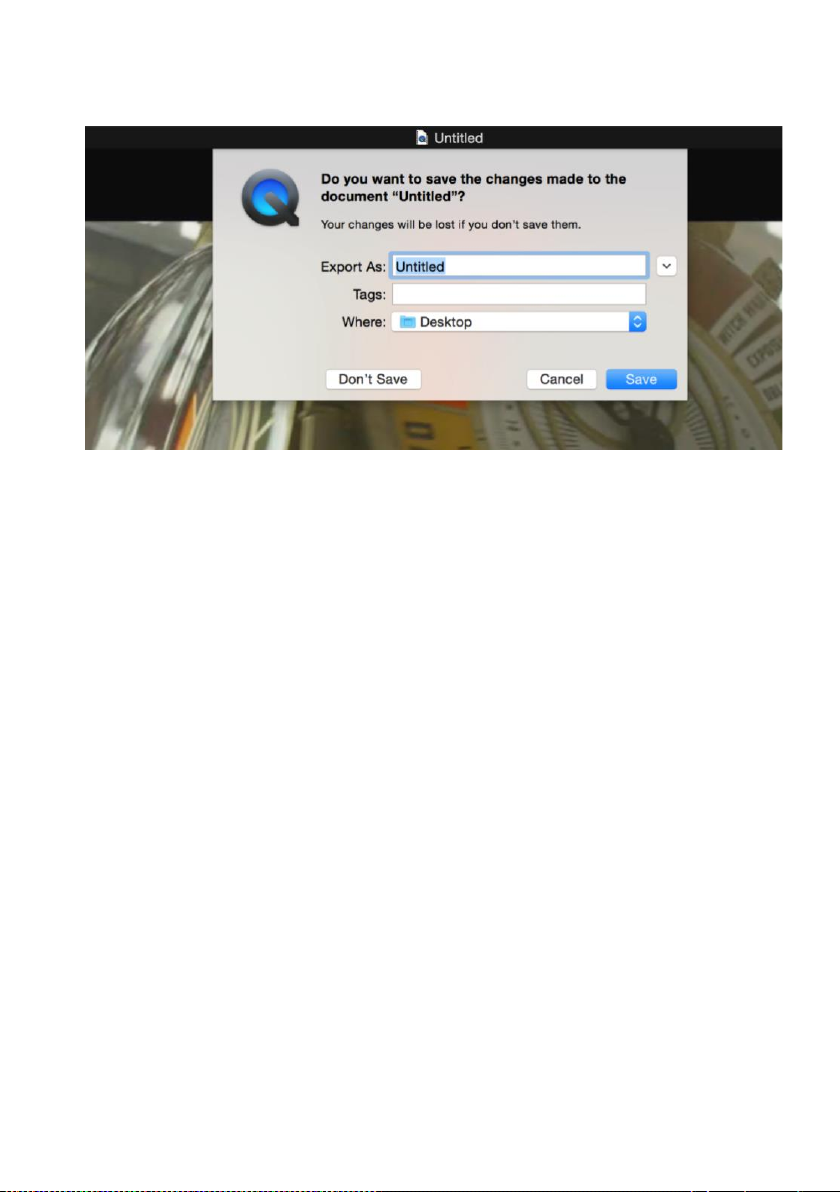
6. Enter the recording file name and select where to save the file.
Page 11
10
Recording for Windows using VLC
VLC Media Player Initial Setting
The VLC Media Player also can be used for video capturing. Please visit
www.videolan.org/vlc/ to download VLC Media Player for Windows, Mac OS X or Linux.
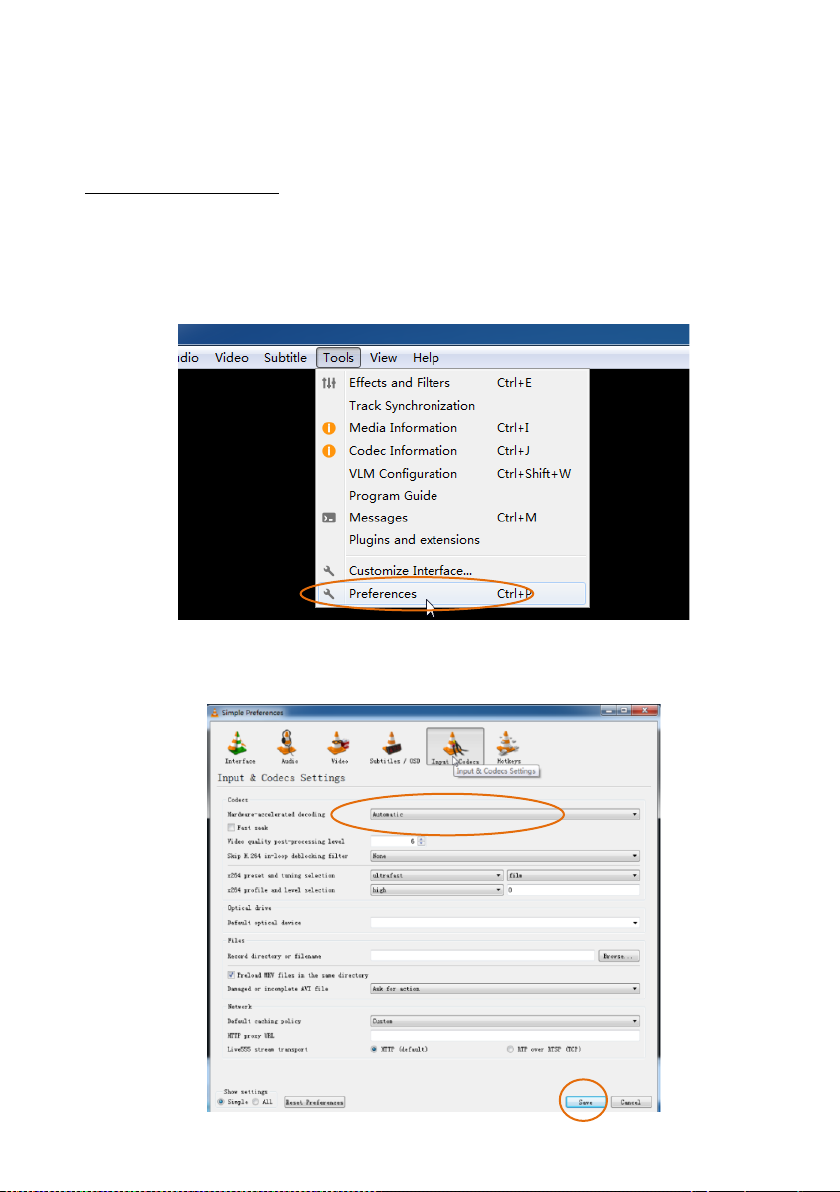
For initial use, the hardware accelerated decoding must be set at “Automatic” to ensure
the best performance. Please following the instructions below to set the hardware
accelerated decoding.
1. Select “Tools”, and then click on “Preferences” at the drop down menu.
2. Click “Input/Codes”, and the select “Automatic” for Hardware-accelerated decoding,
and then “Save” to finish the initial VLC setting.
Page 12
11
VLC Media Player Direct Show
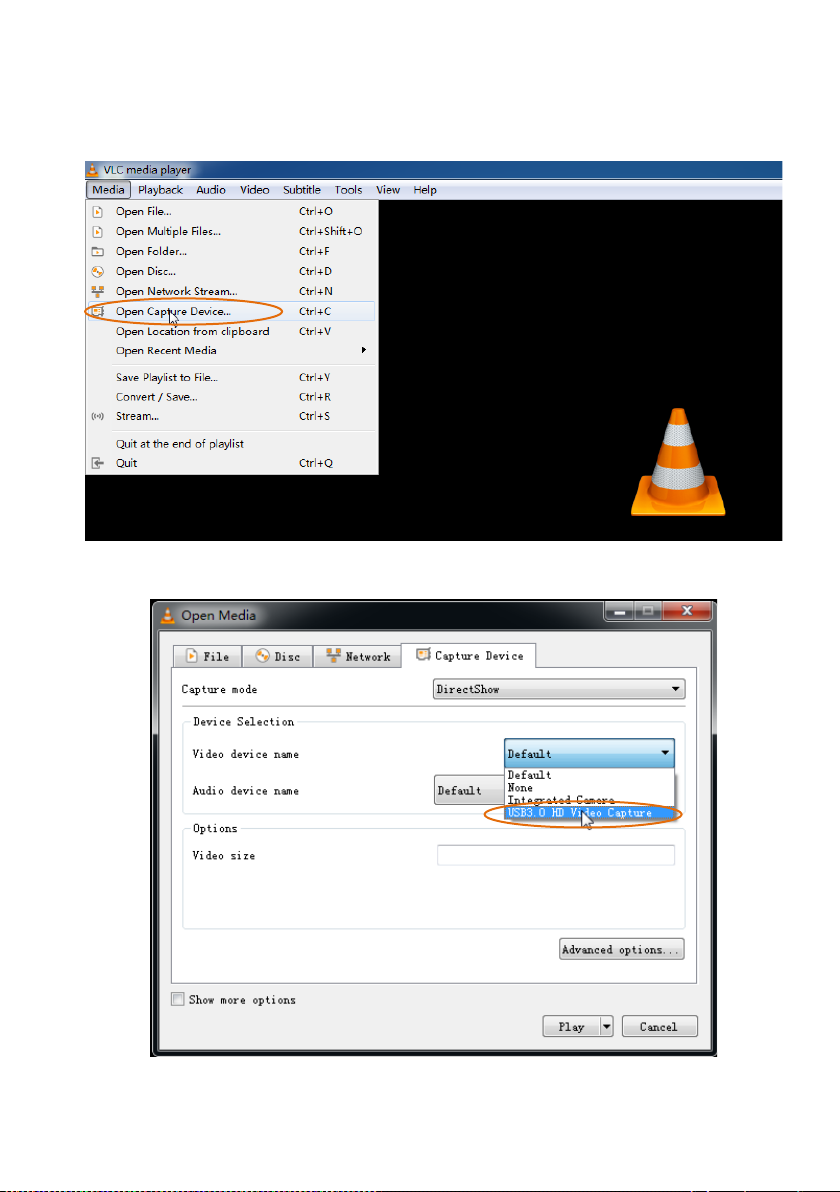
1. Select “Media”, and then select “Open Capture Device” at the drop down menu.
2. For video device name, select “USB3.0 HD Video Capture”.
Page 13
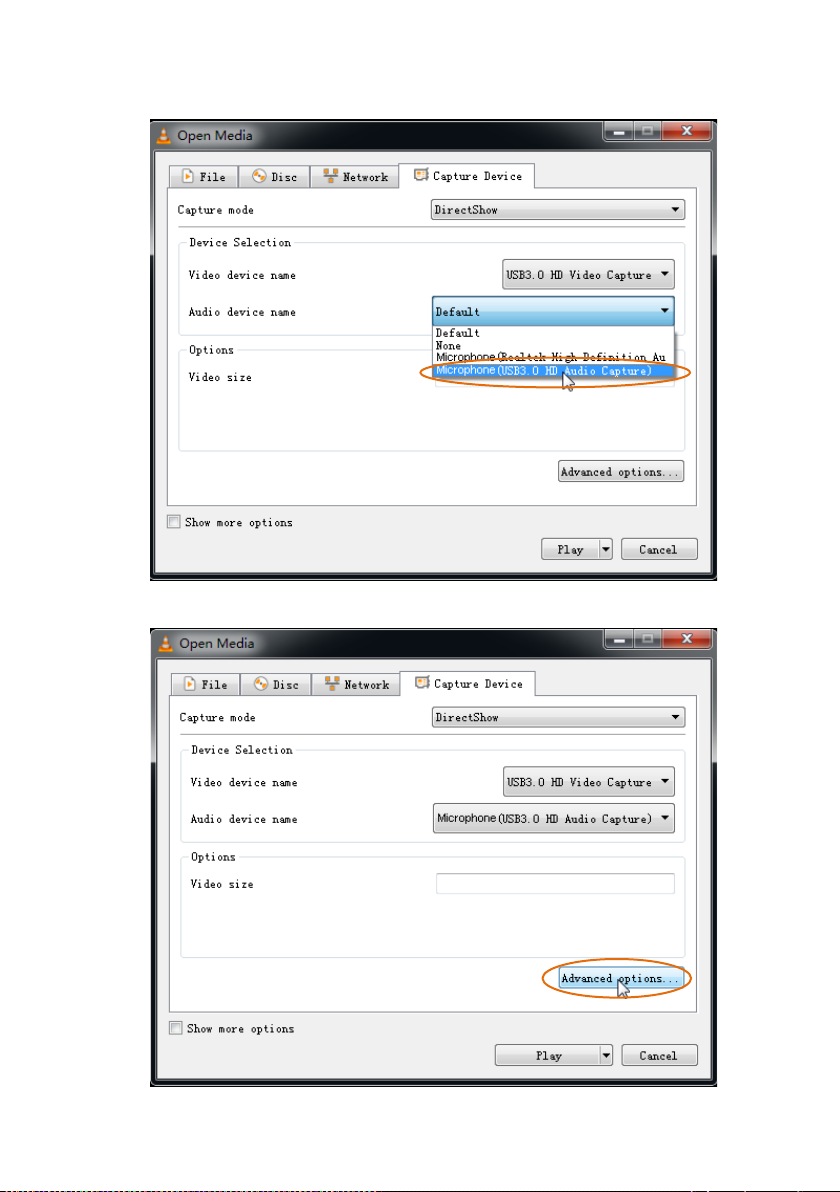
12
3. For audio device name, select “Microphone (USB3.0 HD Audio Capture)”.
4. To set up the correct aspect ratio, click “Advanced options”.
Page 14
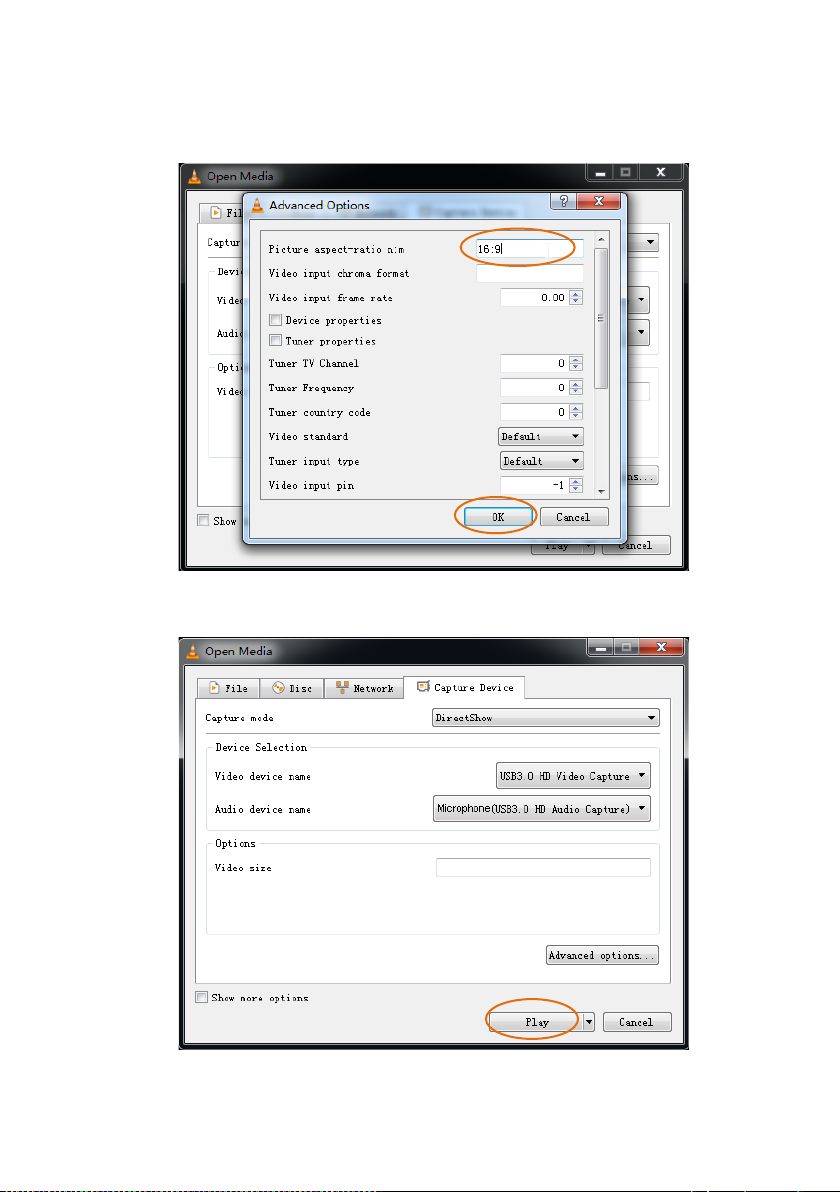
13
5. Enter the aspect ratio for the video source (e.g. 16:9).
6. Click “OK” to exit the “Advanced options” menu.
7. Click “Play”, the source screen will show in approximately several seconds.
Page 15
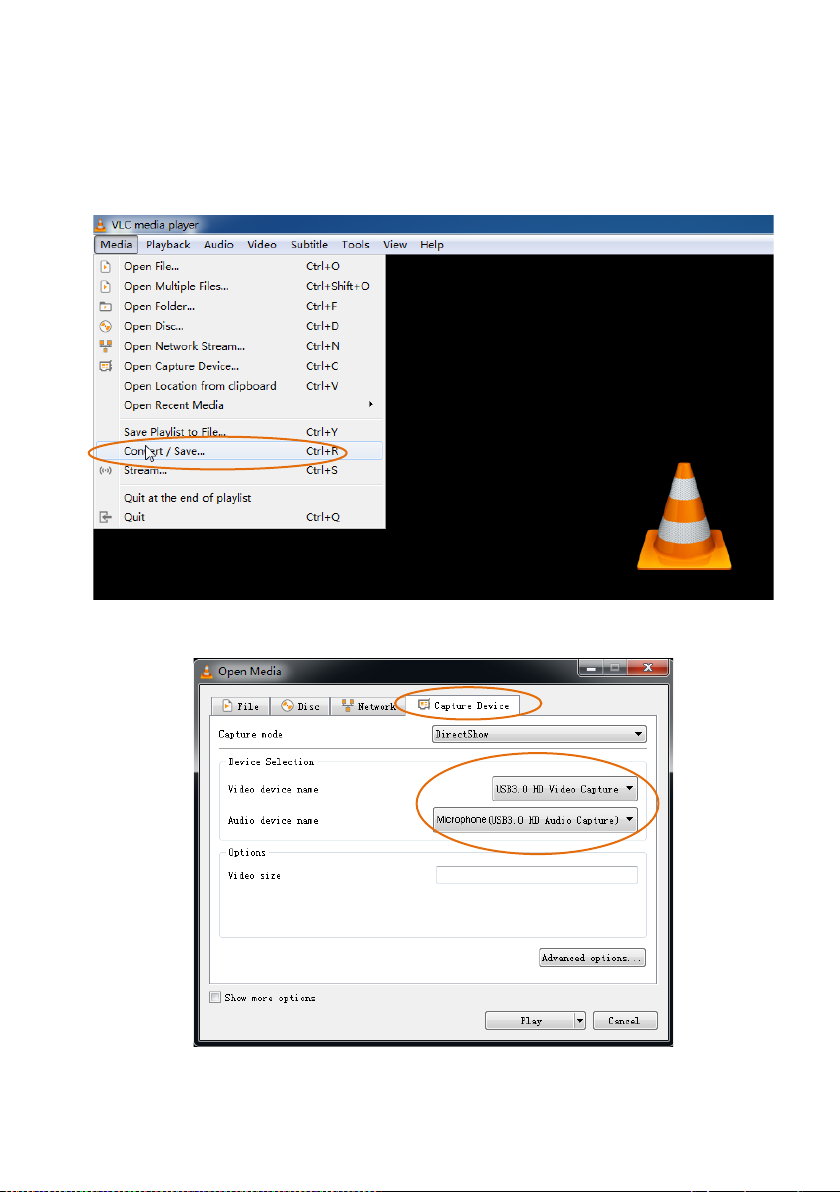
14
VLC Media Player Recording
Note: We recommend using the “Convert/Save” method to record the video from the
device for best performance.
1. Select “Media”, and then select “Convert / Save” at the dropdown menu.
2. Click “Capture Device” tab on the top right side.
3. Video device name should be “USB3.0 HD Video Capture” and audio device name
should be “Microphone (USB3.0 HD Audio Capture)”.
Page 16
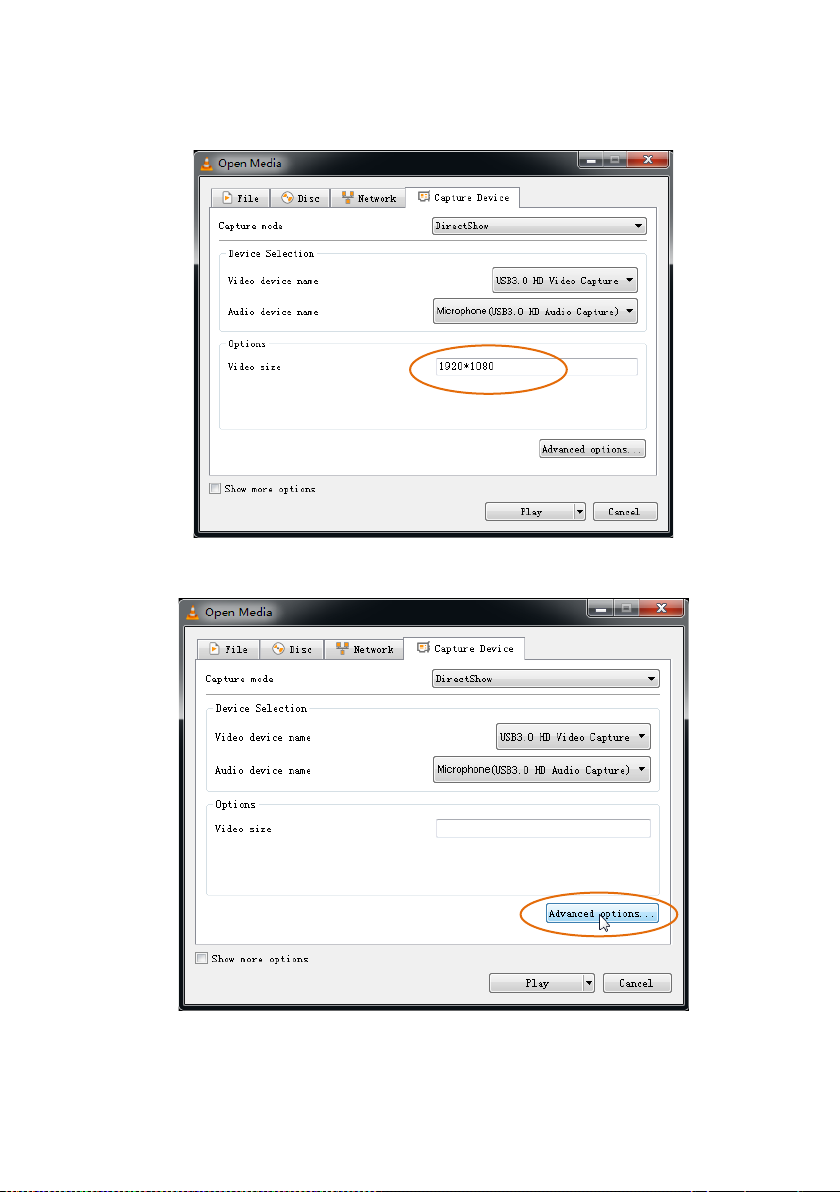
15
4. To set the video resolution, type the resolution (e.g. 1920*1080) at “Video size”
textbox.
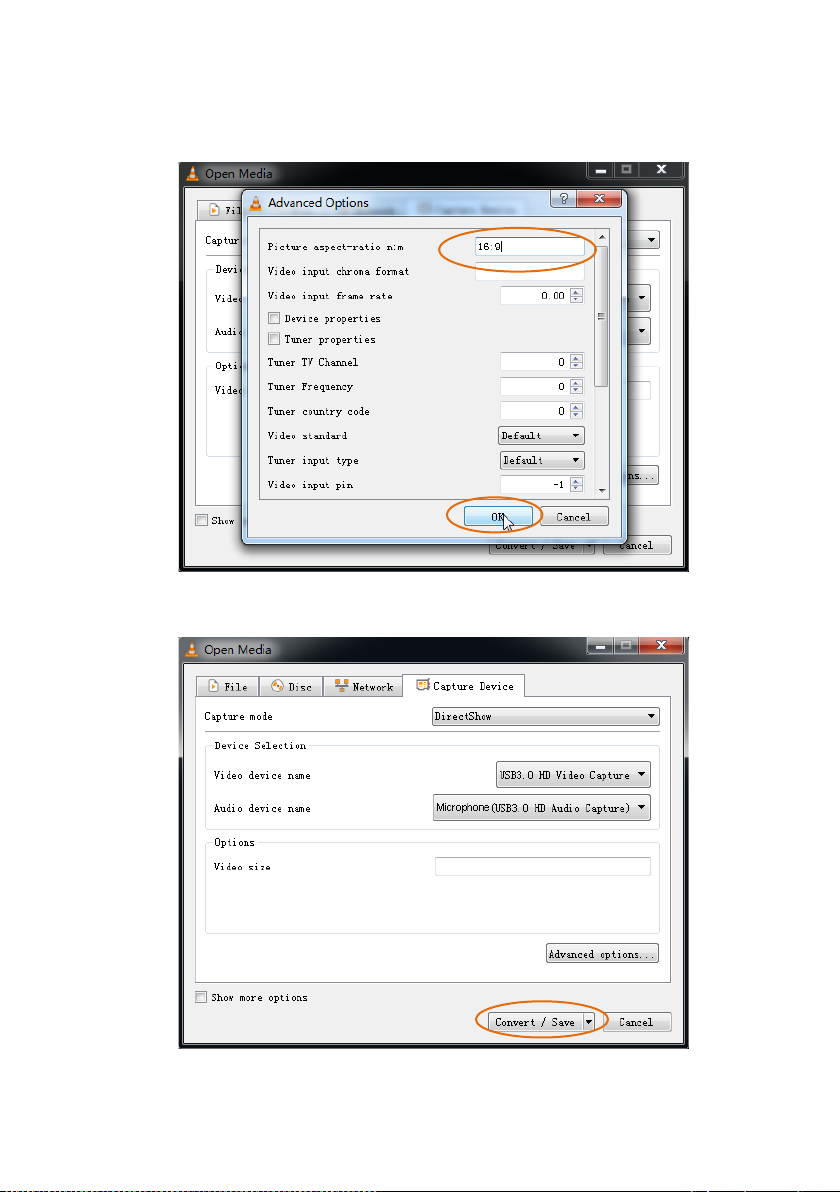
5. To set the aspect ratio, click “Advanced options”.
Page 17
16
6. Enter the aspect ratio for the video source (e.g. 16:9).
7. Click “OK” to exit the “Advanced options” menu.
8. Click “Convert / Save”.
Page 18
17
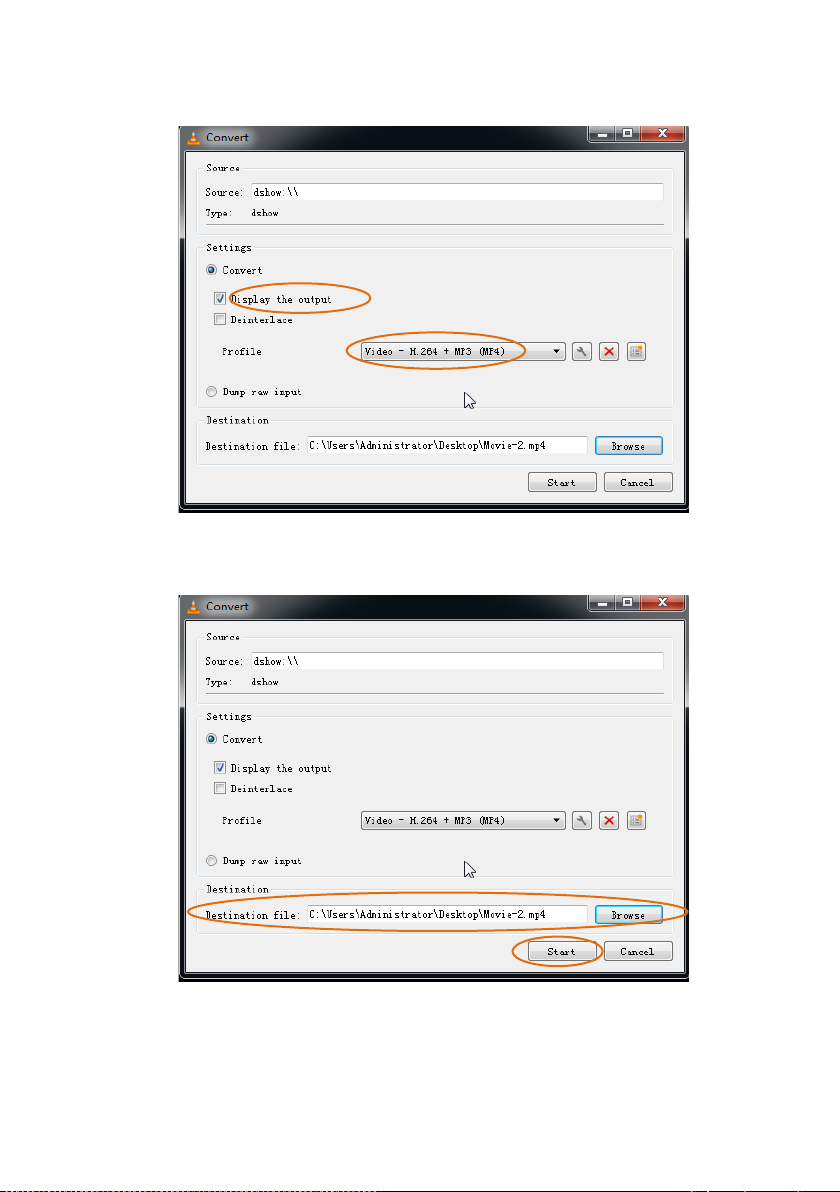
9. Select “Display the output” check-box, and set the video format.
10. Then click “Browse” to choose where to save the destination file and enter the file
name.
11. Click “Start”, and the video and audio recording will start in approximately several
seconds.
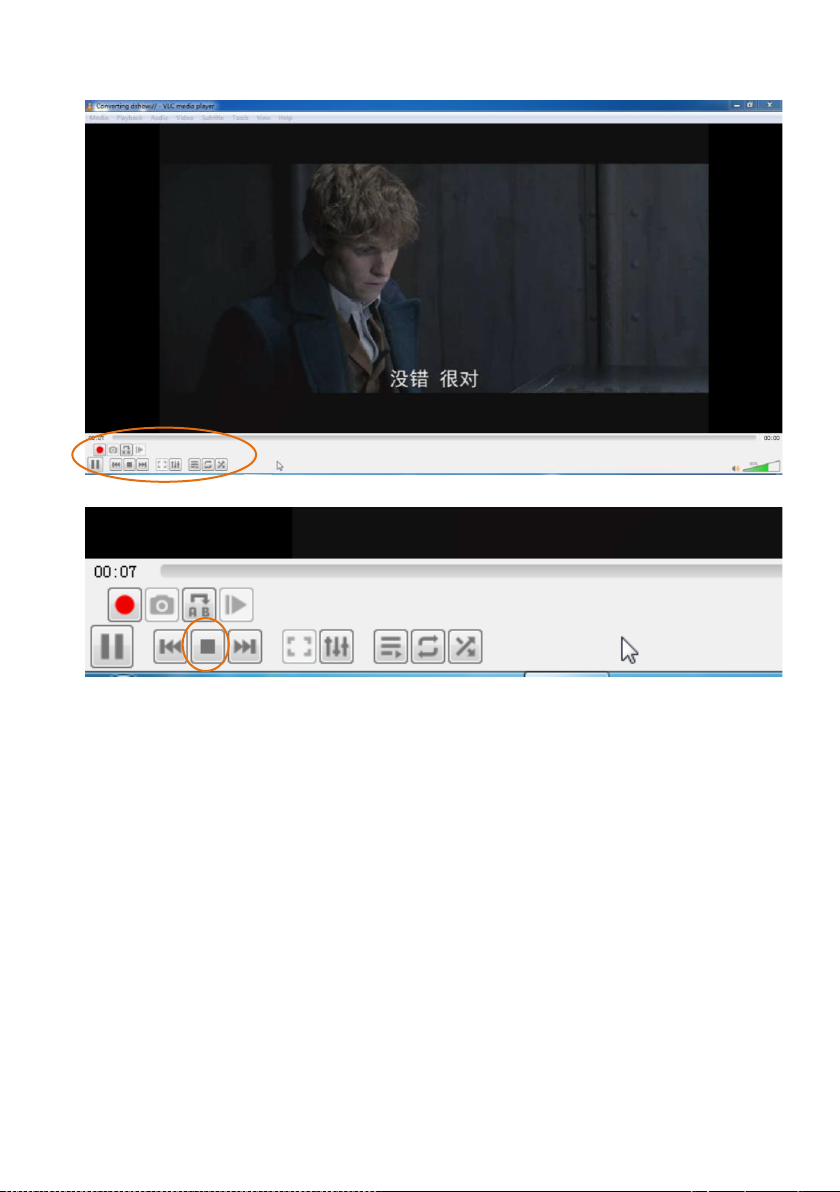
12. To stop recording, simply click the square “Stop” button at the bottom control panel.
Page 19
18
Page 20

19
Specification
Model
BG-CAP-HA
Description
HDMI to USB Video Capture Device
Input
(1) HDMI In, (1) Audio In
Input Connector
(1) Type-A HDMI, (1) 3.5mm jack
Output
(1) HDMI Out, (1) USB, (1) Audio Out
Output Connector
(1) Type-A HDMI, (1) Type-A USB, (1) 3.5mm jack
HDMI Standard
2.0
HDMI Input Resolution
Up to 4K@60Hz 4:4:4, HDR10
HDMI Output Resolution
Up to 4K@60Hz 4:4:4, HDR10
USB Output Color Space
YUV2, RGB
HDMI Audio Format
LPCM 7.1 audio, Dolby Atmos®, Dolby® TrueHD,
Dolby Digital® Plus, DTS:X™, and DTS-HD® Master
Audio™ pass-through.
Microphone Audio
Format
PCM 2.0
Headphone Audio
Format
PCM 2.0
OS Support
Windows, Mac OS X, Linux.
Compatible Media Player
OBS, PotPlayer, VLC and so on.
Video Capture Format
HDMI Source
Captured Video by USB
4K@60Hz 4:4:4
1080p@60Hz/720p
1080p@60Hz 4:4:4
1080p@60Hz/720p
720p
720p
480
480
576
576
General
Operation Temperature
-5 to +55℃ (+23° to +131°F)
Storage Temperature
-25 to +70℃ (-13° to +158°F)
Relative Humidity
10% to 90%, Non-condensing
Dimension (W*H*D)
102mm x 13mm x 61mm
Net Weight
75g
Page 21

20
Warranty
BZBGEAR wants to assure you peace of mind. We're so confident in the quality of our
products that along with the manufacturer's one-year limited warranty, we are offering
free second-year warranty coverage upon registration*!
Taking advantage of this program is simple, just follow the steps below:
1. Register your product within 90 days of purchase by visiting BZBGEAR.com/warranty.
2. Complete the registration form. Provide all necessary proof of purchase details,
including serial number and a copy of your sales receipt.
For questions, please call 1.888.499.9906 or email [email protected].
For complete warranty information, please visit BZBGEAR.com/warranty or scan the QR
code below.
*Terms and conditions apply. Registration is required.
Page 22

21
Mission Statement
BZBGEAR manifests from the competitive nature of the audiovisual industry to innovate
while keeping the customer in mind. AV solutions can cost a pretty penny, and new
technology only adds to it. We believe everyone deserves to see, hear, and feel the
advancements made in today’s AV world without having to break the bank. BZBGEAR is
the solution for small to medium-sized applications requiring the latest professional
products in AV.
We live in a DIY era where resources are abundant on the internet. With that in mind,
our team offers system design consultation and expert tech support seven days a week
for the products in our BZBGEAR catalog. You’ll notice comparably lower prices with
BZBGEAR solutions, but the quality of the products is on par with the top brands in the
industry. The unparalleled support from our team is our way of showing we care for
every one of our customers. Whether you’re an integrator, home theater enthusiast, or
a do-it-yourselfer, BZBGEAR offers the solutions to allow you to focus on your project
and not your budget.
 Loading...