

AS1
Owner’s Manual
and Warranty
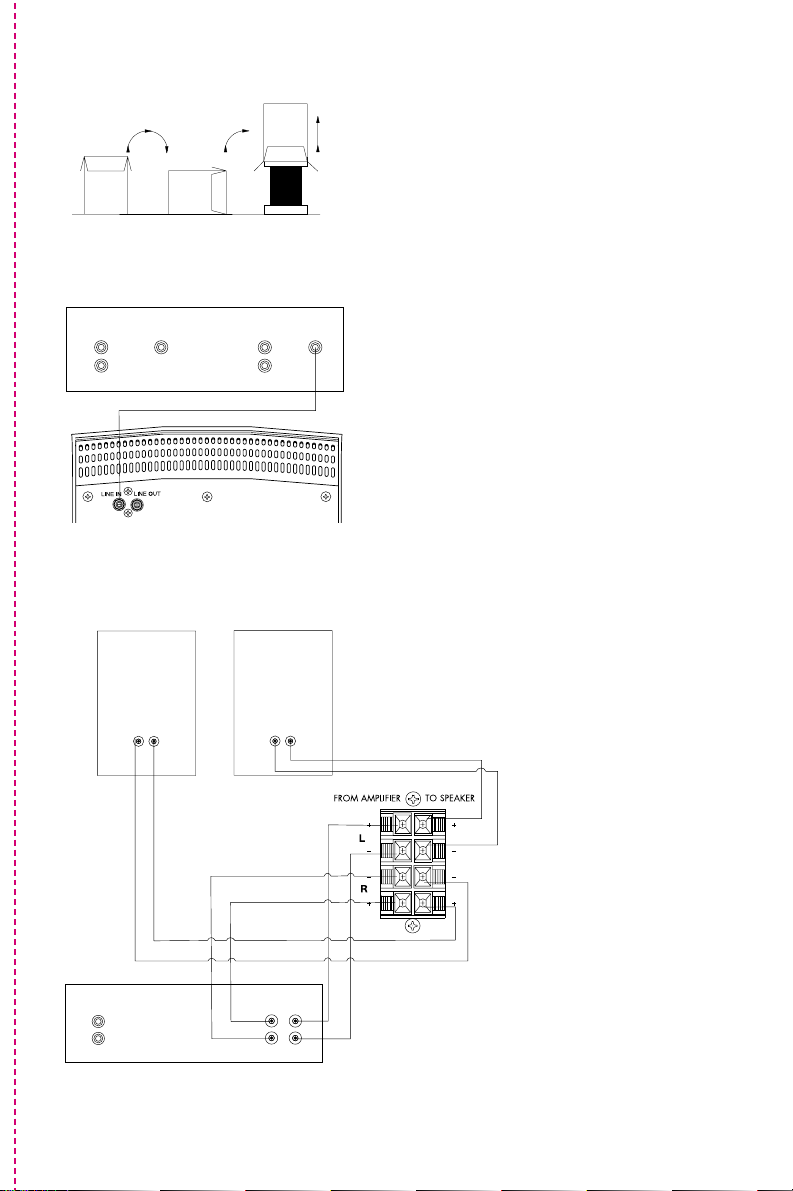
Figure 1
Figure 2
Figure 3
SUBWOOFER
SURROUND
CENTRE
L
R
FRONT
L
R
Decoder
RIGHT
LEFT
++
-
-
L
R
LINE IN
L
R
SPEAKERS OUT
+
-
Power Amplifier

Contents
English
Limited Warranty...........1
Owner’s Manual............1
Français
Garantie limitée.............3
Manuel d’utilisation .......4
Deutsch
Beschränkte Garantie ...5
Bedienungsanleitung.....5
Español
Garantía limitada...........7
Manual de
instrucciones ................7
Português
Garantia limitada...........9
Manual do utilizador .....9
Italiano
Garanzia limitata .........10
Manuale di istruzioni ...11
Nederlands
Beperkte garantie .......12
Handleiding ................12
Dansk
Begrænset garanti ......14
Brugervejledning.........14
Ελληνικά
Περιορισµένη
εγγύηση....................15
Οδηγίες Χρήσεως ....16
Русский
Ограниченная
гарантия....................17
Руководство по
эксплуатации............18
Norsk
Tidsbegrenset
garanti........................19
Bruksanvisning ...........20
Svenska
Begränsad garanti ......20
Bruksanvisning ...........20
Suomi
Takuuehdot.................21
Omistajan kasikirja ......21
.......................21
.....................21
.......................22
....................22
English
Limited Warranty
Dear customer,
Welcome to B&W.
This product has been designed and
manufactured to the highest quality
standards. However, if something does go
wrong with this product, B&W
Loudspeakers and its national distributors
warrant free of charge labour (exclusion
may apply) and replacement parts in any
country served by an official B&W
distributor.
This limited warranty is valid for a period of
five years from the date of purchase or two
years for electronics including amplified
loudspeakers.
Terms and Conditions
1 The warranty is limited to the repair of
the equipment. Neither transportation,
nor any other costs, nor any risk for
removal, transportation and installation
of products is covered by this warranty.
2 This warranty is only valid for the
original owner. It is not transferable.
3 This warranty will not be applicable in
cases other than defects in materials
and/or workmanship at the time of
purchase and will not be applicable:
a. for damages caused by incorrect
installation, connection or packing,
b. for damages caused by any use other
than correct use described in the user
manual, negligence, modifications, or
use of parts that are not made or
authorised by B&W,
c. for damages caused by faulty or
unsuitable ancillary equipment,
d. for damages caused by accidents,
lightning, water, fire heat, war, public
disturbances or any other cause
beyond the reasonable control of B&W
and its appointed distributors,
e. for products whose serial number has
been altered, deleted, removed or
made illegible,
f. if repairs or modifications have been
executed by an unauthorised person.
4 This guarantee complements any
national/regional law obligations of
dealers or national distributors and
does not affect your statutory rights as
a customer.
How to claim repairs under
warranty
Should service be required, please follow
the following procedure:
1 If the equipment is being used in the
country of purchase, you should
contact the B&W authorised dealer
from whom the equipment was
purchased.
2 If the equipment is being used outside
the country of purchase, you should
contact B&W national distributor in the
country of residence who will advise
where the equipment can be serviced.
You can call B&W in the UK or visit our
web site to get the contact details of
your local distributor.
To validate your warranty, you will need to
produce this warranty booklet completed
and stamped by your dealer on the date of
purchase. Alternatively, you will need the
original sales invoice or other proof of
ownership and date of purchase.
Owner’s manual
Important Safety
Instructions
Caution:
To reduce the risk of electric shock, do not
remove the back panel. No userserviceable parts inside. Refer servicing to
qualified personnel.
Explanation of Graphical
Symbols:
The lightning flash within an
equilateral triangle is intended
to alert you to the presence of
uninsulated “dangerous
voltage” within the product’s enclosure that
may be of sufficient magnitude to constitute
an electric shock to persons.
The exclamation point within
an equilateral triangle is
intended to alert you to the
presence of important
operating and maintenance (servicing)
instructions in the literature accompanying
the appliance.
1 Read Instructions – All the safety and
operating instructions should be read
before the appliance is operated.
2 Retain Instructions – The safety and
operating instructions should be
retained for future reference.
3 Heed Warnings – All warnings on the
appliance and in the operating
instructions should be adhered to.
4 Follow Instructions – All operating and
use instructions should be followed.
5 Cleaning – Unplug the product from
the wall outlet before cleaning. Refer to
the cleaning instructions in the section
of the manual titled “Aftercare”.
6 Attachments – Do not use attachments
not recommended by the product
manufacturer, as they may cause
hazards.
7 Water and Moisture – Do not use this
product near water – for example, near
a bathtub, washbowl, kitchen sink,
laundry tub, in a wet basement, or
near a swimming pool and the like.
8 Accessories – Do not place this
product on an unstable cart, stand,
tripod, bracket or table. The product
may fall, causing serious injury to a
child or adult, and serious damage to
the product. Use only with a cart,
stand, tripod, bracket or table
recommended by the manufacturer or
sold with the product. Any mounting of
the product should follow the
manufacturerís instructions and should
use a mounting accessory
recommended by the manufacturer.
9 A product and cart combination should
be moved with care. Quick stops,
excessive force and uneven surfaces
may cause the product and cart
combination to overturn.
10 Ventilation – Openings in the rear
control panel are provided for
ventilation and to ensure reliable
operation of the product and to
prevent it from overheating, and these
openings must not be blocked or
covered. The panel itself forms part of
the cooling mechanism and must not
be obscured by placing the product on
a bed, sofa, rug, or other similar
surface. The product should not be
placed in a built-in installation, such as
a rack, bookcase or cabinet unless
proper ventilation is provided or the
manufacturer’s instructions have been
adhered to.
11 Power Sources – This product should
be operated only from the type of
power source indicated on the marking
label situated on the rear panel above
the power input socket. If you are not
sure of the type of power supply to
your home, consult your product
dealer or local power company.
12 Grounding or Polarisation – The
appliance is not required to be
grounded. Versions of the product
marked for use with 120V power
supplies are equipped with a power
cord fitted with a polarised alternating
line plug (a plug having one blade
wider than the other). This plug will fit
onto the power outlet only one way.
This is a safety feature. If you are
unable to insert the plug fully into the
outlet, try reversing the plug. If the plug
should still fail to fit, contact your
electrician to replace your obsolete
outlet. Do not defeat the safety
purpose of the polarised plug. When
using an extension power-supply cord
or a power-supply cord other than that
supplied with the appliance, it should
be fitted with the appropriate mouldedon plugs and carry safety approval
appropriate to the country of use.
13 Power Cord Protection – Power-supply
cords should be routed so that they
are not likely to be walked on or
pinched by items placed on or against
them, paying particular attention to
cords at plugs, convenience
receptacles and the point where they
exit from the appliance.
1
CAUTION
RISK OF ELECTRIC SHOCK
DO NOT OPEN

14 Overloading – Do not overload wall
outlets, extension cords or integral
convenience receptacles, as this can
result in a risk of fire or electric shock.
15 Non-use Periods – The power cord of
the appliance should be unplugged
from the outlet when left unused for a
long period of time.
16 Object and Liquid Entry – Never push
objects of any kind into this product
through openings, as they may touch
dangerous voltage points or short out
parts that could result in a fire or
electric shock. Never spill liquid of any
kind on the product.
17 Servicing – Do not attempt to service
this product yourself, as opening or
removing covers may expose you to
dangerous voltage or other hazards.
Refer all servicing to qualified service
personnel.
18 Damage Requiring Service – Unplug
this product from the wall outlet and
refer servicing to qualified personnel
under the following conditions:
a When the power-supply cord or
plug has been damaged.
b If liquid has been spilled or objects
have fallen into the appliance.
c If the product has been exposed to
rain or water.
d If the product does not operate
normally by following the operating
instructions. Adjust only those
controls that are covered by the
operating instructions, as an
improper adjustment of other
controls may result in damage and
will often require extensive work by
a qualified technician to restore the
product to its normal operation.
e If the product has been dropped, or
damaged in any way.
f When the product exhibits a distinct
change in performance – this
indicates a need for service.
19 Replacement Parts – When
replacement parts are required, be
sure the service technician has used
replacement parts specified by the
manufacturer or have the same
characteristics as the original part.
Unauthorised substitutions may result
in fire, electric shock or other hazards.
20 Safety Check – Upon completion of
any service or repairs to this product,
ask the service technician to perform
safety checks to determine that the
product is in proper operating
condition.
21 Wall or Ceiling Mounting – The product
should be mounted to a wall or ceiling
only as recommended by the
manufacturer.
22 Heat – The product should be situated
away from heat sources such as
radiators, heat registers, stoves, or
other products (including amplifiers)
that produce heat.
WARNINGS:
CAUTION: 120V versions of the product are
supplied with a power cord equipped with
a polarised plug. To prevent electric shock,
match wide blade of plug to wide slot, fully
insert.
Ensure the plug is fully inserted into the wall
outlet or extension cord receptacle to
prevent blade or pin exposure.
To prevent fire or shock hazard, do not
expose this equipment to rain or moisture.
Observe all warnings on the equipment
itself.
To avoid electrical shock, do not open the
enclosure or remove the amplifier from the
rear panel. There are no user serviceable
parts inside. Refer all service questions to
an authorised B&W dealer.
Ensure that the voltage indicated on the
amplifier panel matches that of the power
supply.
The mains fuse holder is located on the
back panel of the amplifier module.
Replacement fuse must be of the same
type and rating as supplied and marked on
the product.
The product does not require earthing
(grounding).
Ensure the product is adequately ventilated.
Do not prevent air from circulating round
the rear amplifier panel. Do not obscure or
block the openings in the panel. Do not use
the product in a rack, bookcase, cabinet or
cupboard unless the volume behind the
product is adequately ventilated to the
room space.
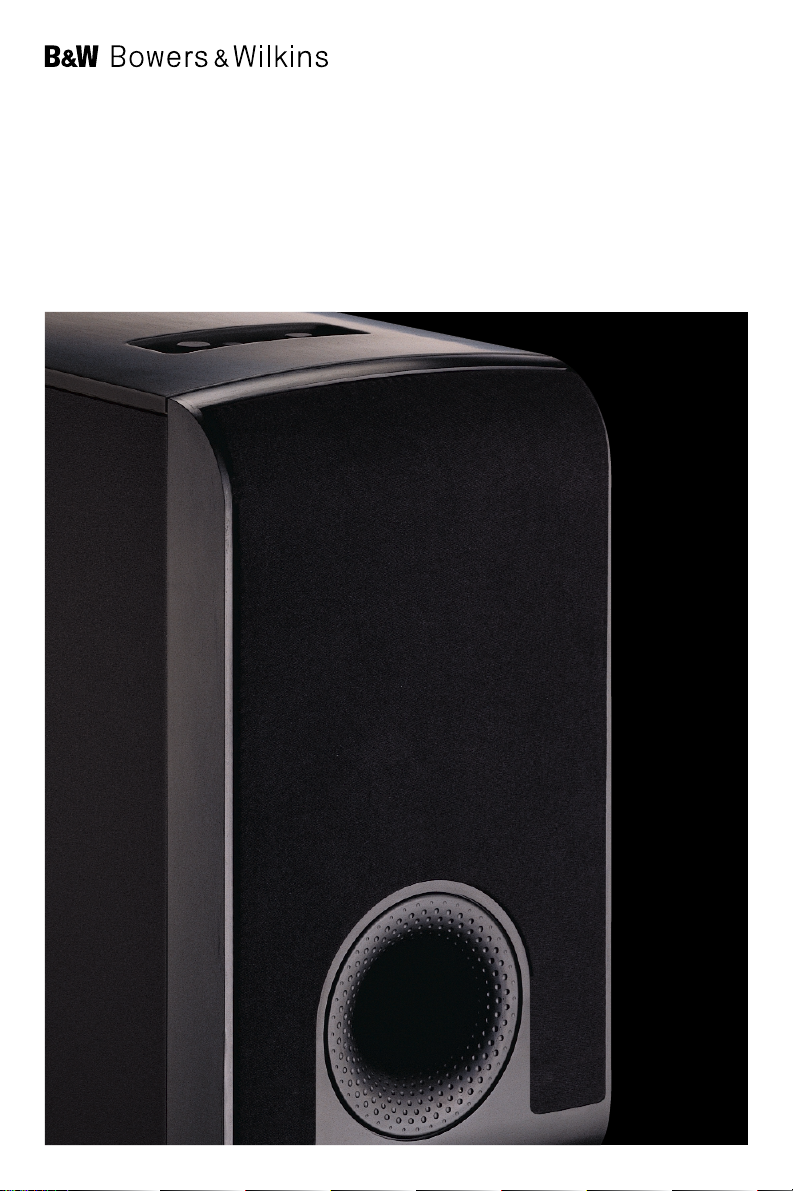
Introduction
Thank you for purchasing the Bowers and
Wilkins AS™1 Active Subwoofer.
Since its foundation in 1966, the continuing
philosophy of B&W has been the quest for
perfect sound reproduction. Inspired by the
company’s founder, the late John Bowers,
this quest has entailed not only high
investment in audio technology and
innovation but also an abiding appreciation
of music and the demands of film sound to
ensure that the technology is put to
maximum effect.
The AS™1 has been designed for Home
Theatre installations and to augment the
bass performance of full-range speakers in
2-channel audio use. Adding the subwoofer
to your system not only extends the bass
to lower frequencies, it improves the
midrange clarity by reducing the lowfrequency demands on your existing
speakers.
Please read through this manual fully before
using the subwoofer. All sound installations
require some planning and experimentation
if you are to get the best out of the
products used and this manual will guide
you in this process.
As the subwoofer is connected to the
electricity power supply, it is important that
you familiarise yourself with the safety
instructions and heed all warnings.
Keep this manual in a safe place for future
reference.
B&W loudspeakers are distributed to over
60 countries worldwide and we maintain an
international network of carefully chosen
and dedicated distributors. If you have a
problem, which your dealer cannot resolve,
our distributors will be more than willing to
assist you.
Unpacking (figure 1)
The easiest way to unpack the subwoofer
and avoid damage is as follows:
• Open the carton flaps right back and
invert the carton and contents.
• Lift the carton away from the product.
We recommend that you retain the
packaging for future use.
Positioning the subwoofer
Because the subwoofer produces only lowfrequency sounds, positioning is less critical
in some respects compared to full-range
speakers. Directional information is much
less precise and you have more choice
where to place the speakers to good effect.
This said, best results are obtained if the
subwoofer is placed between the satellite
speakers or in the vicinity of one of them. If
you use two subwoofers, it is best to put
one near each satellite speaker.
Placing the subwoofer behind the listeners,
even in surround sound installations,
generally gives inferior imaging, but may be
an acceptable compromise if domestic
considerations dictate.
If the subwoofer is to be used in a confined
space (eg in custom furniture), the space
must be ventilated to allow sufficient air to
circulate and cool the unit. Ask your dealer
for advice.
Electrical connections
Disconnect all sound system equipment
from the power supply until the signal
connections have been made and checked.
This avoids the risk of damage whilst
connections are made or broken.
The subwoofer will input and output linelevel signals via the RCA Phono sockets
located on the back panel.
The function of the subwoofer is to receive
signals from the amplifier and then feed full
range signal to the satellite speakers. The
single RCA Phono input allows you to feed
low bass to the subwoofer drive unit if
required.
Use the following table to select the correct
wiring method for your installation:
Home theatre (figure 2)
Connect the dedicated RCA Phono socket
on the home theatre processor to the RCA
Phono input of the subwoofer.
2

Using Speaker Level Connections
(figure 3)
Stereo
Connect the speaker level outputs of the
amplifier to the subwoofer speaker level
inputs, taking care to connect positive to
positive and negative to negative. Connect
the satellite speakers to the relevant
channel output to the speaker terminals on
the subwoofer.
With this method of connection the
subwoofer drive unit is still powered by the
subwoofer internal amplifier.
Home theatre
Connect the speaker level front left and
front right outputs from the home theatre
processor to the inputs on the subwoofer.
Connect the satellite speakers to the
relevant channel output to speaker
terminals on the subwoofer.
Double-check the connections
ENSURE THAT THE VOLTAGE INDICATED
ON THE AMPLIFIER PANEL MATCHES
THAT OF THE POWER SUPPLY.
Before auditioning the sound quality of your
new installation and fine-tuning it, doublecheck the connections. All too often, users
complain that they cannot get a decent
sound however they set the controls, only
to discover something has been wrongly
connected. Make sure that:
• The phasing is correct – there should be
no positive to negative connections to
the satellite speakers. If something is out
of phase you may get a fuzzy sound with
an imprecise and floating image, a lack of
bass or a combination of the two.
• There are no left to right mix-ups – this
can result, for example, in the orchestra
being the wrong way round or, more
disastrously, sounds on your Home
Theatre going in the opposite direction to
the action on the screen.
Switching on and off
We recommend that you switch the
subwoofer on after any amplifier or home
theatre processor the subwoofer. Similarly,
when switching off, switch the subwoofer
off first.
On:
With the switch in this position, the
amplifier remains permanently on, and the
light glows green.
Off:
When the subwoofer is not being used you
may choose to leave the sub off. In this
state no lights will appear on the
subwoofer.
Adjusting the Sound
Slight adjustments to the system can
enhance your sound enjoyment.
Set the volume level to the half way
position. Set the mode according to the
programme source as follows. DVD, LD,
Video cassette or other video source: set to
MOVIE.
CD, MD, Cassette tapes or other audio
source: set to MUSIC.
Rotate the Level control to adjust the
volume. Set the volume level to best suit
your preference according to the
programme source.
Aftercare
The cabinet of the subwoofer may be
cleaned by dusting with a dry cloth. If you
wish to use an aerosol cleaning spray, do
not spray directly on the cabinet; spray
onto the cloth.
Do not use the subwoofer as a table. When
in use, objects left on top of the subwoofer
are liable to rattle. In particular, avoid the
risk of liquids being spilled (eg from drinks
or vases of flowers).
If the system is taken out of use for a long
period, disconnect the subwoofer from the
power supply.
Français
Garantie limitée
Cher Client,
Bienvenue à B&W.
Ce produit a été conçu et fabriqué en vertu
des normes de qualité les plus rigoureuses.
Toutefois, en cas de problème, B&W
Loudspeakers et ses distributeurs
nationaux garantissent une main d’œuvre
(exclusions possibles) et des pièces de
rechange gratuites dans tout pays desservi
par un distributeur agréé de B&W.
Cette garantie limitée est valide pour une
période de cinq ans à compter de la date
d’achat ou une période de deux ans pour
les composants électroniques, y compris
les haut-parleurs amplifiés.
Conditions
1 La garantie est limitée à la réparation
de l’équipement. Les frais de transport
ou autres, les risques associés à
l’enlèvement, au transport et à
l’installation des produits ne sont pas
couverts par cette garantie.
2 La garantie est exclusivement réservée
au propriétaire d’origine et ne peut pas
être transférée.
3 Cette garantie ne s’applique qu’aux
produits faisant l’objet de vices de
matériaux et/ou de construction au
moment de l’achat et ne sera pas
applicable dans les cas suivants :
a. détériorations entraînées par une
installation, connexion ou un emballage
incorrect,
b. détériorations entraînées par un usage
autre que l’usage correct décrit dans le
manuel de l’utilisateur, la négligence,
des modifications ou l’usage de pièces
qui ne sont pas fabriquées ou agréées
par B&W,
c. détériorations entraînées par un
équipement auxiliaire défectueux ou
qui ne convient pas,
d. détériorations résultant de : accidents,
foudre, eau, chaleur, guerre, troubles
de l’ordre public ou autre cause ne
relevant pas du contrôle raisonnable de
B&W ou de ses distributeurs agréés,
e. les produits dont le numéro de série a
été modifié, effacé, éliminé ou rendu
illisible,
f. les produits qui ont été réparés ou
modifiés par une personne non
autorisée.
4 Cette garantie vient en complément à
toute obligation juridique nationale /
régionale des revendeurs ou
distributeurs nationaux et n’affecte pas
vos droits statutaires en tant que
client.
Comment faire une réclamation
en vertu de la garantie
Veuillez respecter la procédure ci-dessous,
si vous souhaitez faire une réclamation
sous garantie :
3

1 Si l’équipement est utilisé dans le pays
d’achat, veuillez contacter le
distributeur agréé de B&W qui a vendu
l’équipement.
2 Si l’équipement est utilisé dans un
pays autre que le pays d’achat, veuillez
contacter le distributeur national B&W
du pays de résidence, qui vous
indiquera où vous pouvez faire réparer
l’équipement. Vous pouvez appeler
B&W au Royaume-Uni ou consulter
notre site Web pour obtenir les
coordonnées de votre distributeur
local.
Afin de valider votre garantie, vous devrez
présenter ce livret de garantie qui aura été
rempli et tamponné par votre revendeur le
jour de l’achat. En l’absence de ce livret,
vous devrez présenter l’original de la
facture commerciale ou une autre preuve
d’achat et de la date d’achat.
Manuel d’utilisation
PRECAUTIONS :
ATTENTION ! Les versions 120 volts de ce
produit sont livrées avec des cordons
d’alimentation polarisés. Afin d’éviter tout
risque de choc électrique, introduisez le
contact le plus large dans la borne
correspondante de la prise réceptrice et
poussez bien à fond.
Vérifiez que les contacts sont bien
enfoncés dans la prise murale ou dans la
rallonge électrique et qu’aucun d’entre eux
n’est apparent.
Afin d’éviter tout risque d’incendie ou
d’électrocution, n’exposez jamais l’appareil
à la pluie ou même simplement à
l’humidité.
Observez tout signe anormal provenant de
l’appareil.
N’ouvrez jamais l’enceinte et ne sortez pas
son amplificateur. Il n’existe aucun réglage
interne destiné à l’utilisateur. En cas de
problème, n’intervenez pas vous-même,
contactez en premier lieu un revendeur
agréé par B&W.
Assurez-vous que la tension indiquée sur le
boîtier correspond à la tension de votre
réseau électrique.
Le fusible d’alimentation se trouve sur le
panneau de l’amplificateur. Si vous devez le
remplacer, employez un modèle dont les
caractéristiques sont absolument
identiques au modèle d’origine et aux
spécifications indiquées sur le produit.
Cet appareil ne doit pas être raccordé à la
terre.
Vérifiez que l’enceinte est convenablement
ventilée. Veillez à ne pas empêcher la libre
circulation de l’air autour d’elle. Ne
l’encastrez pas dans un meuble, un rack,
une étagère ou une niche si le volume
disponible à l’arrière ne peut être rafraîchi
par l’air ambiant.
Introduction
Nous vous remercions d’avoir choisi
l’enceinte Bowers & Wilkins AS™1.
Depuis la création de la marque en 1966, le
fondement de notre philosophie a toujours
été la quête de la perfection absolue.
Inspirée par le fondateur de l’entreprise, le
regretté John Bowers, cette aventure
extraordinaire n’a pas seulement entraîné
des investissements considérables
consacrés à la recherche et à l’innovation,
elle s’est appuyée sur une connaissance
très approfondie de la musique
et, maintenant, sur une prise en compte de
la spécificité du son au cinéma. Ces
connaissances nous permettent de nous
assurer que la technologie sera toujours
utilisée dans le sens du meilleur résultat et
non à la technique pour la technique.
Conçu pour les installations de « home
cinéma », l’AS™1 n’en demeure pas moins
un moyen très efficace de renforcement
des basses, dans le cadre d’une installation
stéréophonique traditionnelle. Un tel
subgrave ne se contente pas d’étendre la
réponse au très basses fréquences, il
permet d’améliorer la qualité de
reproduction du médium, les enceintes
principales étant moins sollicitées.
Veuillez lire attentivement ce guide avant
d’utiliser l’AS™1. Toute installation sonore
requiert un minimum d’attention et
d’expérimentations avant de donner le
meilleur d’elle-même. Cette notice vous
aidera à y parvenir.
Avant de brancher votre subgrave sur le
réseau électrique, il est important que vous
vous familiarisiez avec les consignes de
sécurité.
Rangez ce guide de façon à le retrouver
facilement en cas de consultation future.
La distribution de Bowers & Wilkins est
assurée dans le monde par un réseau de
distributeurs sélectionnés dans plus de
60 pays. Quelque soit le problème que
vous pourriez rencontrer, qu’un revendeur
ne saurait pas résoudre, n’hésitez pas à
contacter votre agent national afin qu’il
puisse vous aider.
Déballage (figure 1)
Pour déballer aisément votre subgrave, en
évitant les chocs malencontreux, veuillez
procéder de la manière suivante :
• Ouvrez les rabats du carton au maximum
puis retournez le colis.
• Soulevez le carton, l’appareil sort de
l’emballage.
Nous vous conseillons de conserver cet
emballage et ses accessoires pour toute
utilisation future.
Positionnement
Parce qu’une enceinte de subgrave ne
diffuse que les très basses fréquences,
difficiles à localiser dans l’espace, son
positionnement est moins critique que celui
des enceintes principales. Vous disposez
de possibilités plus larges pour trouver
l’emplacement convenable. En principe,
c’est en plaçant son subgrave exactement
entre les enceintes principales ou à
proximité de l’une d’entre elles que l’on
obtient les meilleurs résultats. Lorsque vous
utilisez deux subgraves, le mieux est de les
placer juste à côté de chaque enceinte.
Placer le subgrave derrière l’auditeur
procure une image généralement moins
précise. Il s’agit, cependant, d’un
compromis acceptable en cas de
contrainte domestique.
Si le subgrave est utilisé dans un endroit
confiné (dans un meuble, par exemple),
pensez à ventiler cet espace pur assurer le
refroidissement de l’électronique intégrée.
Questionnez votre revendeur à ce sujet.
Raccordement électrique
Débranchez les appareils du réseau
électrique tant que les différentes liaisons
n’auront pas été établies entre eux et
dûment contrôlées. Cette précaution vous
prémunira des risques de destructions ou
de dommages.
L’AS™1 peut recevoir et distribuer le signal
sonore au niveau ligne via les connecteurs
au standard RCA situés sur le panneau
arrière.
La fonction d’un subgrave est de recevoir
le signal large bande provenant de
l’amplificateur et de le redistribuer vers les
satellites. Les prises RCA permettent de
recevoir l’extrême-grave provenant d’une
sortie « subwoofer » et de le rediriger, si
nécessaire, vers un second subgrave.
Reportez-vous aux instructions suivantes
pour déterminer la méthode de
raccordement la mieux adaptée à votre
installation.
Home Cinéma (figure 2 )
Raccordez la sortie « subwoofer » de votre
processeur à l’entrée RCA du subgrave.
Utilisation des bornes de type
haut-parleur
(3 figure)
Stéréophonie
Reliez les sorties haut-parleurs de
l’amplificateurs aux bornes à baïonnettes
du subgrave en prenant soin de raccorder
les bornes positives ensemble et les bornes
négatives ensemble. Branchez les satellites
sur les bornes à baïonnettes
correspondantes du subgrave.
Avec ce mode de raccordement, le hautparleur du subgrave est amplifié par son
amplificateur interne.
Home cinéma
Raccordez les bornes du processeur,
destinées aux enceintes avant gauche et
droite, aux entrées du subgrave.
Connectez, ensuite, les satellites sur les
bornes pour haut-parleurs correspondantes
du subgrave.
Double contrôle
ASSUREZ-VOUS QUE LA TENSION
INDIQUEE SUR LE PANNEAU DU MODULE
D’AMPLIFICATION CORRESPOND A
CELLE DE VOTRE RESEAU ELECTRIQUE !
Avant de profiter de la qualité sonore de
votre toute nouvelle installation optimisée,
procédez à un double contrôle des
connexions. Trop souvent, ce sont de
mauvais raccordements qui sont la cause
4

de la plupart des dysfonctionnements
entraînant une mauvaise qualité du son.
Assurez-vous que :
• Il n’y a pas de problèmes de phase,
qu’aucune borne positive n’est raccordée
à une borne négative entre le subgrave et
les satellites. Lorsqu’une installation est
en opposition de phase, le son est
brouillé, l’image sonore est floue et
imprécise, les basses manquent.
• Qu’il n’y a pas d’inversion entre les
canaux pouvant être la cause d’une
modification de la place des musiciens
dans l’orchestre ou plus catastrophique
encore, en « home cinéma » lorsque le
son se déplace dans le sens opposé de
l’action vue à l’écran.
Allumage et extinction
Nous vous recommandons d’allumer le
subgrave après tous les autres appareils de
l’installation. A l’inverse, éteignez-le en
premier.
Allumage (on) :
Lorsque le commutateur est dans cette
position, l’amplificateur interne est en
fonction permanente et le témoin lumineux
s’éclaire en vert.
Extinction (off) :
Quand vous n’utilisez pas le subgrave,
vous devez l’éteindre. Dans cette position
du commutateur, aucun témoin lumineux
n’est éclairé.
Régler le son
Le réglage précis de votre système peut
améliorer votre plaisir d’écoute.
Réglez le contrôle de volume à mi course.
Réglez le mode en fonction du programme
que vous écoutez en suivant les conseils
qui suivent. Pour les DVD, LD, cassettes
vidéo ou autres sources vidéo, choisissez la
position « MOVIE ».
Pour les CD, MD, cassettes audio ou
autres sources audio, choisissez la position
« MUSIC ».
Tournez le volume pour ajuster le niveau
sonore jusqu’à l’obtention du meilleur
résultat en fonction du type de programme
que vous écoutez.
Entretien
L’ébénisterie de l’enceinte se nettoie avec
un chiffon sec. Si vous souhaitez utiliser un
produit aérosol, ne vaporisez jamais
directement sur le subgrave mais sur le
chiffon.
N’employez pas le subgrave comme table.
En cours de fonctionnement, les objets
posés dessus peuvent se mettre à vibrer.
Ne posez pas de verre ou de vase pour
éviter que du liquide se renverse.
Si vous n’utilisez pas le subgrave pendant
une assez longue période, pensez à le
déconnecter du réseau électrique.
Deutsch
Beschränkte
Garantie
Sehr geehrter Kunde
Wir danken Ihnen für den Kauf eines
Produktes der Marke B&W.
Dieses Produkt wurde nach höchsten
Qualitätsstandards entwickelt und
hergestellt. Sollte dieses Produkt jedoch
wider Erwarten einen Mangel aufweisen,
werden B&W Loudspeakers und seine
nationalen Vertriebsgesellschaften das
fehlerhafte Produkt ohne Berechnung der
Arbeits- und Materialkosten (abgesehen
von einigen Ausnahmen) in jedem Land, in
dem eine offizielle B&WVertriebsgesellschaft vertreten ist,
reparieren.
Diese beschränkte Garantie gilt für einen
Zeitraum von fünf Jahren ab Kaufdatum
bzw. für zwei Jahre auf elektronische
Bauteile einschliesslich aktive Lautsprecher.
Bedingungen
1 Die Garantie beschränkt sich auf die
Reparatur des Gerätes. Weder
Transportkosten, noch jegliche andere
Kosten, noch Speditions-, Transportund Montagerisiken der Produkte
werden von dieser Garantie gedeckt.
2 Die Garantie gilt nur für den
Originalbesitzer. Sie ist nicht
übertragbar.
3 Diese Garantie bezieht sich nur auf
Mängel, die auf Material- und/oder
Herstellungsfehler zum Zeitpunkt des
Kaufes zurückzuführen sind und deckt
keinen der folgenden Punkte:
a. Schäden durch unsachgemäße
Montage, einen unsachgemäßen
Anschluß oder die Verpackung,
b. Schäden durch unsachgemäßen
Gebrauch des Gerätes für einen
anderen als den vorgesehenen Zweck,
der in der Bedienungsanleitung
beschrieben ist, Nichtbeachtung der
Bedienungsanleitung, Veränderungen
oder Anpassungen, oder die
Verwendung von Teilen, die nicht von
B&W hergestellt oder zugelassen sind,
c. Schäden durch defekte oder
ungeeignete Zusatzgeräte,
d. Schäden durch Unfälle, Blitzschlag,
Wasser, Feuer, Hitze, Krieg, Unruhen
oder andere nicht in der Macht von
B&W und seinen
Vertriebsgesellschaften liegende
Ursachen,
e. Produkte, bei denen die Seriennummer
geändert, gelöscht, entfernt oder
unleserlich gemacht wurde,
f. wenn Reparaturen oder Veränderungen
von einer nicht dazu berechtigten
Person ausgeführt worden sind.
4 Diese Garantie schränkt weder die
gesetzlichen Rechte des Verbrauchers
nach dem jeweils geltenden nationalen
Recht noch die Rechte des
Verbrauchers gegenüber dem Händler
oder den nationalen
Vertriebsgesellschaften ein.
Inanspruchnahme von
Garantieleistungen
Sollte Ihr B&W-Produkt innerhalb des
Garantiezeitraumes einen Mangel
aufweisen, gehen Sie bitte wie folgt vor:
1 Wenn das Gerät in dem Land benutzt
wird, in dem es gekauft wurde,
wenden Sie sich bitte an den offiziellen
B&W-Händler, bei dem das Gerät
gekauft worden ist.
2 Wenn das Gerät in einem anderen
Land benutzt wird als in dem, in dem
es gekauft wurde, wenden Sie sich
bitte an die nationale B&WVertriebsgesellschaft in dem Land, in
dem Sie leben. Dort wird man Ihnen
mitteilen, wo Ihr Gerät repariert werden
kann. Die Adresse Ihrer nationalen
Vertriebsgesellschaft erfahren Sie von
B&W in Großbritannien oder über
unsere Homepage im Internet.
Garantieleistungen werden nur erbracht,
wenn dieses Garantieheft (vollständig
ausgefüllt und mit dem Händlerstempel und
dem Kaufdatum versehen) vorgelegt wird.
Ist das nicht möglich, ist als Kaufbeleg die
Originalrechnung oder ein anderer
Kaufbeleg vorzulegen, aus dem auch das
Kaufdatum ersichtlich wird.
Bedienungsanleitung
WARNHINWEISE:
VORSICHT: Um die Gefahr eines Brandes
oder eines elektrischen Schlages
auszuschließen, darf das Gerät weder
Nässe noch Feuchtigkeit ausgesetzt
werden.
Beachten Sie alle Warnhinweise auf dem
Gerät.
Um einem elektrischen Schlag
vorzubeugen, sollten Sie niemals das
Gehäuse öffnen oder den Verstärker an der
Rückseite ausbauen. Im Innern befinden
sich keine vom Bediener zu wartenden
Teile. Der Service ist ausschließlich von
einem autorisierten B&W-Fachhändler
durchzuführen.
Stellen Sie sicher, daß die auf dem
Verstärker angegebene Spannung der
Netzspannung entspricht. Sollte dies nicht
der Fall sein, wenden Sie sich an Ihren
autorisierten B&W-Fachhändler.
Der Sicherungshalter befindet sich an der
Rückseite des Verstärkermoduls. Beim
Austausch von Sicherungen dürfen nur
solche desselben Typs mit denselben
Nenndaten verwendet werden.
Das Gerät ist schutzisoliert und muß daher
nicht geerdet werden.
Bitte stellen Sie sicher, daß um das Gerät
genügend Freiraum ist, um eine
ausreichende Luftzirkulation zu
gewährleisten. Stellen Sie das Gerät weder
auf ein Bett, Sofa, Teppich oder ähnliche
Oberflächen, um die Ventilationsöffnungen
5

nicht zu verdecken. Das Gerät sollte nur
dann in einem Regal oder Schrank
untergebracht werden, wenn eine
ausreichende Luftzirkulation gewährleistet
ist.
Einleitung
Vielen Dank, daß Sie sich für den aktiven
Subwoofer AS™1 von Bowers und Wilkins
entschieden haben.
Seit der Gründung 1966 war B&Ws
oberstes Anliegen die perfekte
Klangwiedergabe. Inspiriert durch den
Firmengründer John Bowers wird diesem
Streben nicht nur durch hohe Investitionen
in die Audio-Technologie und stetige
Innovationen Rechnung getragen, sondern
auch durch die Liebe zur Musik, um
sicherzustellen, daß die Technologie auch in
neuen Anwendungsbereichen wie HiFiCinema optimal eingesetzt wird.
Der AS™1 ist für HiFi-CinemaAnwendungen und 2-Kanal-AudioAnwendungen entwickelt worden. In
2-Kanal-Audio-Anwendungen besteht seine
Aufgabe darin, die Möglichkeiten von „Full
Range“-Lautsprechern, d.h. Lautsprechern,
die das komplette Klangspektrum
abdecken, im Tieftonbereich zu optimieren.
Die Verwendung dieses Subwoofers
ermöglicht nicht nur die Wiedergabe von
tieferen Frequenzen, sondern verbessert
durch Entlastung der anderen Lautsprecher
im Tieftonbereich auch die Transparenz im
Mitteltonbereich.
Bitte lesen Sie sich diese
Bedienungsanleitung vor Inbetriebnahme
des Subwoofers aufmerksam durch. Das
Aufstellen von Beschallungsanlagen
verlangt einige Planung
und Experimentierfreudigkeit, wenn Sie das
bestmögliche Ergebnis erzielen möchten.
Diese Bedienungsanleitung wird Ihnen
dabei helfen.
Bevor Sie den Subwoofer an das Netz
anschließen, sollten Sie sich mit den
Sicherheitshinweisen vertraut machen.
Beachten Sie alle Warnhinweise.
Bewahren Sie diese Bedienungsanleitung
sorgfältig auf.
B&W liefert in über 60 Länder und verfügt
weltweit über ein Netz erfahrener
Distributoren, die Ihnen zusammen mit den
autorisierten B&W-Fachhändlern
weiterhelfen, um Ihnen den Musikgenuß zu
Hause zu ermöglichen.
Auspacken (Abbildung 1)
Gehen Sie beim Auspacken des
Subwoofers folgendermaßen vor:
• Klappen Sie die Kartonlaschen nach
hinten und drehen Sie Karton samt Inhalt
um.
• Ziehen Sie den Karton vom Inhalt ab.
Wir empfehlen, die Verpackung für einen
eventuellen späteren Transport
aufzubewahren.
Positionieren des Subwoofers
Da der Subwoofer ausschließlich Bässe
produziert, ist seine Positionierung in
gewisser Hinsicht nicht so schwierig wie die
von „Full-Range“-Lautsprechern. Die
gerichtete Information ist weit weniger
genau, so daß Sie von verschiedenen
Positionen aus ein gutes Ergebnis erzielen
können. Die besten Resultate erhalten Sie
jedoch, wenn der Subwoofer zwischen die
Satellitenlautsprecher oder in die Nähe
eines Satellitenlautsprechers gestellt wird.
Bei Verwendung von zwei Subwoofern
sollte jeweils einer neben einem
Satellitenlautsprecher stehen.
Eine Plazierung des Subwoofers hinter den
Zuhörern führt im allgemeinen zu einer
Verschlechterung des Klangbildes. Dies gilt
auch für Surroundanwendungen. Jedoch
kann hierin ein akzeptabler Kompromiß
bestehen, falls die örtlichen Gegebenheiten
es nicht anders zulassen.
Elektrische Anschlüsse
Die zum System gehörenden Geräte sollten
zunächst untereinander verbunden werden
(achten Sie dabei auf die korrekte Polarität
der Anschlüsse!), bevor die Anlage ans
Stromnetz angeschlossen wird. Dadurch
können Beschädigungen vermieden werden.
Der Subwoofer empfängt und sendet
Hochpegelsignale über die Cinch-Buchsen
an der Geräterückseite.
Die Funktion des Subwoofers besteht darin,
die Signale vom Verstärker zu empfangen
und die Full-Range-Signale anschließend zu
den Satellitenlautsprechern zu leiten. Der
Cinch-Eingang ermöglicht gegebenenfalls
die Übertragung der Tiefbaßinformationen
zum Subwoofer-Chassis.
Die folgenden Hinweise helfen Ihnen beim
korrekten Anschluß Ihrer Anlage:
HiFi-Cinema (Abbildung 2)
Verbinden Sie die Cinch-Buchse an Ihrem
HiFi-Cinema-Prozessor mit dem CinchEingang am Subwoofer.
Speaker LevelAnschlußmöglichkeiten
(Abbildung 3)
Stereo
Verbinden Sie die Speaker Level-Ausgänge
am Verstärker mit den entsprechenden
Eingängen (FROM AMPLIFIER) am
Subwoofer. Achten Sie dabei auf die
korrekte Polarität. Schließen Sie die
Satellitenlautsprecher an die
entsprechenden Ausgangsklemmen
(TO SPEAKER) am Subwoofer an.
Bei dieser Verbindungsart wird der
Subwoofer von seinem eingebauten
Verstärker angetrieben.
HiFi-Cinema
Verbinden Sie die Speaker Level-Ausgänge
Front links und rechts des HiFi-CinemaProzessors mit den Eingängen am
Subwoofer. Schließen Sie die
Satellitenlautsprecher an die
entsprechenden Ausgangsklemmen
(TO SPEAKER) am Subwoofer an.
Prüfen der Anschlüsse
VERGEWISSERN SIE SICH, DASS DIE AUF
DEM VERSTÄRKER ANGEGEBENE
SPANNUNG DER NETZSPANNUNG
ENTSPRICHT.
Bevor Sie mit der Klangoptimierung Ihres
neuen Systems beginnen und die
Komponenten aufeinander abstimmen,
sollten Sie noch einmal die Anschlüsse
prüfen. Ist der Klang des Systems nicht
optimal, obwohl die Bedienelemente des
Gerätes richtig eingestellt wurden, so kann
dies darauf zurückzuführen sein, daß ein
Gerät einfach nicht korrekt angeschlossen
wurde. Stellen Sie daher sicher, daß:
• Die Polarität korrekt ist. Verbinden Sie
niemals die positiven Anschlüsse mit den
negativen Anschlüssen an den
Satellitenlautsprechern und umgekehrt.
Dies führt zu einer Verschlechterung des
Klangbildes, zu einem schwachen Baß
oder zu einer Kombination aus beiden.
• Die Signale aus dem rechten und linken
Kanal nicht vermischt werden – das kann
z.B. dazu führen, daß die Musik eines
Orchesters genau seitenverkehrt
wahrgenommen wird oder, was noch
schlimmer ist, daß der Ton aus Ihrer HiFiCinema-Anlage nicht zur Handlung auf
dem Bildschirm paßt.
Ein- und Abschalten
Wir empfehlen, den Subwoofer erst nach
dem Verstärker oder dem HiFi-CinemaProzessor einzuschalten. Entsprechend
schalten Sie erst den Subwoofer und
anschließend die anderen Geräte aus.
On (Ein):
Befindet sich der Schalter in dieser
Position, bleibt der Verstärker
eingeschaltet, das Licht leuchtet grün.
Off (Aus):
Wird der Subwoofer nicht genutzt, so
sollten Sie diese Einstellung wählen. Am
Subwoofer leuchtet kein Licht.
Einstellen des Klanges
Geringfügige Veränderungen in der
Systemeinstellung können den Klang
verbessern.
Setzen Sie den LEVEL-Regler in die mittlere
Position. Stellen Sie den Modus je nach
Programmquelle wie folgt ein: DVD, LD,
Videocassette oder sonstige Videoquelle:
Einstellung MOVIE.
CD, MD, Cassette oder sonstige
Audioquelle: Einstellung MUSIC.
Drehen Sie am LEVEL-Regler, um die
Lautstärke so einzustellen, daß sie am
besten mit der Programmquelle harmoniert.
Pflege
Die Gehäuseoberfläche des Subwoofers
muß in der Regel nur mit einem trockenen
Tuch abgestaubt werden. Bei Verwendung
eines Aerosol-Reinigers sprühen Sie diesen
auf ein Tuch, niemals direkt auf das
Gehäuse.
Benutzen Sie den Subwoofer nicht als
Ablagefläche. Auf der Oberfläche
abgestellte Gegenstände können wackeln
und so die Klangqualität beeinträchtigen.
Besonders Flüssigkeiten (z.B. Getränke
oder Blumenvasen mit Wasser) sollten
niemals auf den Subwoofer gestellt werden.
Wird Ihr System für längere Zeit nicht in
Betrieb genommen, ziehen Sie den
Netzstecker aus der Steckdose.
6

Español
Garantía limitada
Estimado cliente:
Bienvenido a B&W.
Este producto ha sido diseñado y fabricado
de acuerdo con las más altas normas de
calidad. Sin embargo, si se hallara algún
desperfecto, B&W Loudspeakers y sus
distribuidores nacionales garantizan, sin
coste alguno para usted, la mano de obra
(es posible que haya excepciones) y la
reposición de piezas en cualquier país
donde se cuente con un distribuidor B&W
autorizado.
Esta garantía limitada es válida por un
período de cinco años desde la fecha de
compra y dos años para las partes
electrónicas, incluyendo altavoces
amplificados.
Términos y condiciones
1 Esta garantía está limitada a la
reparación del equipo. La garantía no
cubre ni el transporte, ni otros costes,
ni ningún riesgo por traslado,
transporte e instalación de los
productos.
2 La garantía será aplicable
exclusivamente para el propietario
original. No es transferible.
3 Esta garantía tendrá aplicabilidad
solamente si se trata de casos de
materiales defectuosos y/o de
fabricación existentes en el momento
de la compra, y no tendrá aplicabilidad
en los siguientes casos:
a. daños causados por instalación,
conexión o embalaje inapropiados,
b. daños causados por uso inapropiado
que no se corresponda con el uso
correcto tal como se describe en el
manual del usuario, negligencia,
modificaciones o la utilización de
piezas no originales de fábrica o no
autorizadas por B&W,
c. daños causados por equipos auxiliares
defectuosos o inapropiados,
d. daños causados por accidentes,
relámpagos, agua, incendios, calor,
guerra, disturbios sociales u otra causa
ajena al control razonable de B&W y
de sus distribuidores autorizados,
e. productos cuyo número de serie haya
sido modificado, borrado, quitado o
convertido en ilegible,
f. si una persona no autorizada ha
efectuado alguna reparación o
modificación en el producto.
4 Esta garantía complementa cualquier
obligación legal a nivel
nacional/regional de concesionarios o
distribuidores nacionales y, como
cliente, no afecta a sus derechos
estatutarios.
Cómo solicitar reparaciones bajo
garantía
En caso de ser necesaria alguna revisión,
siga el siguiente procedimiento:
1 Si está usando el equipo en el país en
el que fue adquirido, debería contactar
con el concesionario autorizado de
B&W en donde lo adquirió.
2 Si el equipo está siendo utilizado fuera
del país en el que fue adquirido,
debería contactar con el distribuidor
nacional de B&W correspondiente al
país donde reside, que le asesorará
sobre el lugar al que enviarlo para que
pueda ser revisado. Para obtener
información sobre cómo contactar con
su distribuidor local, puede llamar a
B&W en el Reino Unido o visitar
nuestro sitio web.
Para convalidar su garantía, debe mostrar
este folleto de garantía debidamente
rellenado y con la fecha de compra
estampada por su concesionario. De lo
contrario, tendrá que mostrar la factura de
venta original u otro comprobante que
demuestre su propiedad y la autenticidad
de su fecha de compra.
Manual de
instrucciones
ADVERTENCIA:
PRECAUCIÓN: Las versiones del aparato
diseñadas para funcionar a 120 V son
suministradas de serie con un enchufe
polarizado. Para prevenir cualquier
descarga eléctrica, haga coincidir cada
clavija del enchufe con su correspondiente
toma y a continuación insértela por
completo en la misma.
Asegúrese de que cada clavija del enchufe
esté firme y completamente insertada en la
toma de corriente de la pared o de un
cable de extensión a fin de que ninguno de
sus terminales quede a la vista.
Para evitar cualquier peligro de incendio o
electrocución, no exponga este aparato a
la lluvia o la humedad.
Observe todas las precauciones posibles
durante la manipulación del aparato.
Para evitar el riesgo de sufrir una descarga
eléctrica, no abra el recinto ni extraiga el
amplificador situado en su panel posterior.
No hay partes manipulables por el usuario
en el interior del aparato. Para cualquier
pregunta relacionada con el tema, consulte
con un distribuidor autorizado de
productos B&W.
Asegúrese de que la tensión eléctrica
indicada en el panel del amplificador
coincida con la de su red eléctrica local. En
caso contrario, contacte con un detallista
autorizado de B&W. No intente alterar por
su cuenta el ajuste del selector de tensión.
El compartimento portafusibles principal
está ubicado en el panel posterior del
módulo amplificador. El fusible de repuesto
debería ser del mismo tipo y valor que el
suministrado de serie.
Este aparato no debería ser conectado a
tierra.
Asegúrese de que el aparato esté
adecuadamente ventilado. Procure no
impedir la circulación de aire alrededor del
panel posterior del amplificador. No
bloquee ni obstruya las aberturas del panel.
No instale el aparato en un rack, estante,
mueble o armario a menos que el volumen
que haya detrás del aparato esté
adecuadamente ventilado.
Introducción
Gracias por haber adquirido el Subwoofer
Activo Bowers and Wilkins AS™1.
Desde su fundación en 1966, la filosofía de
Bowers and Wilkins no ha sido otra que la
búsqueda de la perfecta reproducción del
sonido. Inspirada por el fundador de la
compañía, el desaparecido John Bowers,
esta búsqueda ha supuesto no sólo la
realización de grandes inversiones en
innovación y tecnología aplicadas al campo
del audio sino también una muy precisa
apreciación de la música y de las
exigencias de la reproducción de bandas
sonoras de películas con el fin de asegurar
que dicha tecnología es aprovechada al
máximo de sus posibilidades.
El AS™1 ha sido diseñado para ser
utilizado en instalaciones de Cine en Casa
y para incrementar la respuesta en graves
de cajas acústicas de gama completa ("full
range") en aplicaciones de audio
estereofónico de dos canales. La adición
del subwoofer a su equipo no sólo extiende
la respuesta en graves del mismo sino que
mejora la claridad de la zona media,
reduciendo las demandas de energía para
cubrir la restitución de las octavas inferiores
por parte de las cajas acústicas que usted
posea.
Le rogamos que lea cuidadosamente el
presente manual antes de utilizar el
subwoofer. Todas las instalaciones de
sonido requieren cierta planificación y
experimentación durante su puesta a
punto. Si usted está interesado en explotar
al máximo las posibilidades de los
componentes de su equipo, este manual le
servirá de guía en el proceso.
Puesto que el subwoofer es conectado
directamente a la red eléctrica, es
importante que usted se familiarice con las
instrucciones de seguridad y tenga en
cuenta todas las advertencias que figuran
al principio del presente manual.
Guarde este manual en un lugar seguro
para el caso de que necesite utilizarlo en el
futuro.
Las cajas acústicas Bowers and Wilkins
son distribuidas en más de 60 países de
todo el mundo, motivo por el que
mantenemos una red internacional
constituida por distribuidores altamente
cualificados que han sido cuidadosamente
seleccionados. En caso de que tenga algún
problema que su detallista no pueda
resolver, nuestros distribuidores estarán
encantados de poder ayudarle.
7

Desembalaje (figura 1)
La manera más fácil de desembalar el
subwoofer y a la vez de evitar que pueda
sufrir daños es la siguiente:
• Abra las aletas del embalaje y sitúelas
hacia atrás, procediendo posteriormente
a colocar en posición invertida la caja y
su contenido.
• Levante la caja de modo que el
subwoofer quede depositado en el suelo.
Le recomendamos que guarde el embalaje
para un posible uso futuro del mismo.
Colocación del subwoofer
Puesto que el subwoofer produce
únicamente sonidos de baja frecuencia, en
muchos aspectos su posición resulta
menos crítica que la de las cajas acústicas
convencionales. La información direccional
es mucho menos precisa y por tanto usted
dispone de muchas más alternativas a la
hora de colocar las cajas acústicas y
conseguir un buen efecto. Dicho esto, los
mejores resultados se obtienen si el
subwoofer es colocado entre las cajas
acústicas satélites o en las cercanías de
una de ellas. Si usted utiliza dos
subwoofers, es mejor situar uno cerca de
cada satélite.
La colocación del subwoofer detrás de los
oyentes, incluso en instalaciones de sonido
envolvente, suele proporcionar una imagen
sonora de inferior calidad aunque puede
constituir un compromiso aceptable en
caso de que lo dicten las consideraciones
domésticas.
Si el subwoofer va a ser utilizado en un
espacio limitado (como por ejemplo un
mueble hecho a medida), dicho espacio
debe estar suficientemente ventilado para
permitir la perfecta refrigeración del
amplificador incluido en aquél. Consulte
con su detallista en caso de que precise de
algún consejo al respecto.
Conexiones eléctricas
Desconecte todos los componentes de su
equipo de sonido de la red eléctrica hasta
que hayan sido efectuadas y comprobadas
todas las conexiones de señal. De este
modo evitará el riesgo de que se
produzcan daños en caso de que se
realicen conexiones erróneas.
La función del subwoofer consiste en
recibir señales del amplificador y a
continuación enviar una señal de gama
completa a las cajas acústicas satélites. En
caso de que sea necesario, la entrada RCA
disponible le permite enviar una señal de
extremo grave al subwoofer.
El subwoofer admitirá la entrada y la salida
tanto de señales de nivel de línea como de
alto nivel a través, respectivamente, de los
terminales RCA y los de 4 mm para la
conexión de cajas acústicas ubicados en
su panel posterior.
Utilice la siguiente tabla para seleccionar el
modo de conexión más adecuado para su
instalación:
Cine en Casa (figura 2)
Conecte la toma RCA correspondiente al
canal de subgraves del
procesador/amplificador de sonido
envolvente a la entrada RCA del subwoofer.
Uso de Conexiones de Alto Nivel
(figura 3)
Estéreo
Conecte las salidas de conexión a cajas
acústicas del amplificador a las entradas de
alto nivel del subwoofer procurando
respetar las polaridades correctas (positivo
a positivo y negativo a negativo).
Con este método de conexión, el altavoz
del subwoofer sigue estando alimentado
por el amplificador interno de este último.
Cine en Casa
Conecte las salidas de nivel alto izquierda y
derecha del amplificador/receptor de A/V
a las entradas del subwoofer. Conecte las
cajas acústicas satélites a los terminales de
salida pertinentes del subwoofer.
Compruebe las conexiones
ASEGÚRESE DE QUE LA TENSIÓN DE
ALIMENTACIÓN INDICADA EN EL PANEL
DEL AMPLIFICADOR COINCIDA CON LA
DE SU RED ELÉCTRICA LOCAL.
Antes de proceder a la evaluación de la
calidad sonora de su nueva instalación y al
ajuste fino de la misma, compruebe las
conexiones realizadas. Muy a menudo, los
usuarios se quejan de que no pueden
obtener un sonido decente a pesar de
manejar adecuadamente los controles
aunque sólo para descubrir que algo había
sido conectado de forma errónea.
Asegúrese de que:
• La puesta en fase es correcta, lo que
significa que no debería haber
conexiones de positivo a negativo (o
viceversa) en las cajas acústicas
satélites. Si algo está fuera de fase, es
posible que se obtenga un sonido difuso
con una imagen sonora flotante e
imprecisa, una falta patente de graves o
una combinación de ambas cosas.
• No hay cruces entre canales, hecho que
podría derivar en, por ejemplo, que una
orquesta estuviese situada en la posición
incorrecta o, peor aún, los sonidos de su
sistema de Cine en Casa fueran en
dirección opuesta a la de la acción que
transcurre en la pantalla.
Puesta en marcha y desconexión
Le recomendamos que ponga en marcha el
subwoofer después de cualquier
amplificador o procesador de sonido
envolvente conectado al mismo. Del mismo
modo, en el momento del apagado del
sistema desactive el subwoofer en primer
lugar.
Puesta en marcha (“On”):
Con el conmutador en esta posición, el
amplificador permanece siempre activado y
el indicador luminoso se pone de color
verde.
Desconexión (“Off”):
Cuando el subwoofer no esté siendo
utilizado, usted puede optar por apagarlo,
en cuyo caso no se activará ningún
indicador luminoso.
Ajuste del sonido
La realización de pequeños ajustes en el
sistema puede mejorar sustancialmente la
calidad sonora.
Sitúe el nivel de volumen a la mitad. Ajuste
el modo en función de la fuente utilizada.
DVD, LD, videocasete u otra fuente de
vídeo: sitúe el ajuste en MOVIE.
CD, MD, casetes u otra fuente de audio:
sitúe el ajuste en MUSIC.
Gire el control de nivel para ajustar el
volumen. Ajuste el nivel de volumen a la
posición que se mejor se adapte a sus
preferencias teniendo en cuanta la fuente
utilizada.
Cuidado y mantenimiento
El recinto del subwoofer debe limpiarse con
ayuda de una gamuza seca. Si desea
utilizar un limpiador de tipo aerosol, no
pulverice nunca directamente hacia el
recinto de la caja sino hacia la gamuza.
No utilice el subwoofer como mesa ya que
cuando el mismo esté funcionando los
objetos situados en su parte superior
pueden moverse y caer. En particular, evite
los riesgos asociados al vertido de líquidos
(procedentes de bebidas o floreros).
Si el sistema no va a ser utilizado durante
un largo período de tiempo, desconecte el
subwoofer de la red eléctrica.
8

Português
Garantia limitada
Estimado Cliente,
Bem-vindo à B&W.
Este produto foi concebido e fabricado de
acordo com os mais elevados padrões de
qualidade. No entanto, se houver qualquer
problema com este produto, os Altifalantes
B&W e os seus distribuidores nacionais
garantem serviço de mão-de-obra
(podendo-se aplicar exclusões) e de
substituição de peças gratuitos em
qualquer país servido por um distribuidor
oficial de B&W.
Esta garantia limitada é válida por um
período de cinco anos a partir da data de
compra ou dois anos pela parte electrónica
incluindo altifalantes amplificados.
Termos e condições
1 Esta garantia limita-se à reparação do
equipamento. Nem transporte, nem
quaisquer outros custos, nem qualquer
risco de remoção, transporte e
instalação de produtos estão cobertos
por esta garantia.
2 A garantia só é válida para o
proprietário original. Não é transferível.
3 Esta garantia não será aplicável nos
casos em que os defeitos não sejam
atribuíveis a materiais e/ou mão-deobra na altura da compra e não será
aplicável a:
a. danos causados pela instalação,
ligação ou embalamento incorrectos,
b. danos causados por qualquer
utilização que não seja a correcta
conforme descrita no manual do
utilizador, negligência, modificações ou
utilização de peças que não sejam
fabricadas ou autorizadas pela B&W,
c. danos causados por equipamento
auxiliar inadequado ou defeituoso,
d. danos causados por acidentes,
relâmpagos, água, incêndio, calor,
guerra, distúrbios públicos ou qualquer
outra causa para além do controlo
razoável da B&W e dos seus
distribuidores nomeados,
e. produtos cujo número de série tenha
sido alterado, apagado, removido ou
que tenha sido tornado ilegível,
f. reparações ou modificações que
tenham sido efectuadas por pessoa
não autorizada.
4 Esta garantia complementa quaisquer
obrigações legais nacionais e regionais
de revendedores ou distribuidores
nacionais e não afecta os seus direitos
estatuários como cliente.
Como reivindicar reparações sob
garantia
Caso seja necessário assistência técnica,
queira seguir o procedimento seguinte:
1 Se o equipamento está a ser utilizado
no país de compra, deverá contactar o
distribuidor autorizado da B&W de
onde o equipamento foi comprado.
2 Se o equipamento está a ser utilizado
fora do país de compra, deverá
contactar o distribuidor nacional da
B&W do país de residência que o
aconselhará onde o equipamento pode
ser reparado. Pode telefonar para a
B&W no RU ou visitar a nossa web site
para obter os pormenores de contacto
do seu distribuidor local.
Para validar a sua garantia, precisará de
produzir este livrete de garantia preenchido
e carimbado pelo seu distribuidor na data
da compra. Em alternativa, precisará da
factura original de venda ou outra prova de
propriedade e data de compra.
Manual do utilizador
AVISOS:
Para evitar o risco de choque eléctrico, não
exponha este equipamento à chuva ou
humidade.
Respeite todos os avisos presentes no
próprio equipamento.
Para evitar choques eléctricos, não abra a
tampa nem retire o painel posterior.
Não existem partes substituíveis pelo
utilizador no interior, devendo todas as
questões relativas a assistência ser
apresentadas a um revendedor autorizado
Bowers & Wilkins.
Assegure-se que a tensão de alimentação
especificada para o amplificador é igual à
da sua instalação.
O fusível de alimentação está colocado no
interior do módulo de amplificação, em
caso de defeito, o substituto deve ser do
mesmo tipo e calibre do inicialmente
fornecido.
Este equipamento não necessita de ligação
à terra.
Assegure-se que o produto é
adequadamente ventilado. Não obstrua a
circulação de ar à volta do painel traseiro
do amplificador. Não bloqueie as aberturas
do painel. Não use este produto num
móvel ou armário a menos que o volume
atrás dele seja ventilado para o espaço da
sala.
Introdução
Obrigado pela sua preferência na compra
do Subwoofer Activo da Bowers & Wilkins
AS™1.
Desde a sua fundação em 1966, que a
filosofia de base da Bowers & Wilkins tem
sido a procura da reprodução sonora
perfeita. Inspirados pelo fundador da
companhia, o já falecido John Bowers, esta
busca significou não só um elevado
investimento em tecnologia e inovação de
audio mas também uma permanente
avaliação em termos musicais para
assegurar que a tecnologia é aproveitada
ao máximo.
O AS™1 foi desenhado para instalações de
Cinema em Casa e para aumentar a
performance de graves das colunas "full
range" usadas em 2 canais audio.
Adicionando o subwoofer ao seu sistema
não só estende o grave a frequências mais
baixas, como melhora a clareza dos
médios reduzindo a exigência de graves
nas suas colunas.
Por favor, leia a totalidade deste manual
antes de utilizar o subwoofer. Todas as
instalações sonoras necessitam de algum
planeamento e ensaio quando se pretende
obter o melhor desempenho dos
equipamentos utilizados. Este manual
poderá guiá-lo através deste processo.
Uma vez que o subwoofer é ligado à rede
de alimentação, será da maior importância
que se familiarize com as instruções de
segurança e siga todos os avisos.
Mantenha este manual em lugar seguro
para futuras consultas.
Os equipamentos Bowers & Wilkins
Loudspeakers são distribuídos em mais de
60 países de todo o mundo e mantemos
uma rede internacional de dedicados
distribuidores cuidadosamente escolhidos.
Se deparar com qualquer problema que o
seu revendedor não esteja em condições
de resolver, os nossos distribuidores estão
à sua disposição.
Desembalagem (figura 1)
A forma mais fácil para desembalar o
subwoofer é a seguinte:
• Abra completamente as tampas e
coloque a caixa em posição invertida.
• Levante a caixa deixando o equipamento
no chão.
Recomendamos que guarde a embalagem
para futura utilização.
Posicionando o subwoofer
Uma vez que o subwoofer reproduz apenas
sons de frequência muito baixa, a
colocação da unidade é menos exigente,
em certos aspectos, do que a das colunas
convencionais. A informação mais
direccional é muito menos precisa existindo
uma maior gama de escolha na colocação
do equipamento para obter um bom efeito.
Dito isto, os melhores resultados são
obtidos quando o subwoofer é colocado
entre as colunas ou próximo de uma delas.
Se utilizar dois subwoofers, o melhor será
colocar um junto de cada uma das colunas
frontais.
A colocação do subwoofer atrás do
ouvinte, mesmo em sistemas de som
envolvente, oferece geralmente uma
imagem sonora de menor qualidade; mas
pode constituir um compromisso aceitável
em casos de incompatibilidade com a
decoração doméstica.
Se pretender utilizar o subwoofer num
espaço exíguo, como é o caso de
mobiliário feito por medida, assegure-se
que existe suficiente ventilação para o
amplificador integrado no equipamento. Se
não estiver certo se o espaço para
ventilação é adequado, consulte o seu
revendedor.
9

Ligações eléctricas
Desligue todos os equipamentos do
sistema de som da respectiva alimentação
até efectuar e verificar todas as ligações.
Isto assegura que não há risco de provocar
avarias quando se ligam e desligam os
cabos.
A função do subwoofer é receber sinais do
amplificador e fornecer sinal full range às
colunas satélite. A entrada RCA única
permite-lhe fornecer frequências muito
baixas ao altifalante do subwoofer quando
necessário.
A função do subwoofer é receber sinais do
amplificador e, onde necessário para 2
canais audio, dividir o sinal em frequências
baixas e frequências altas e enviar as
mesmas para as colunas satélite. As
entradas dos canais esquerdo e direito
podem ser combinadas num envio único
mono de graves para a unidade do
subwoofer se necessário.
Utilize a tabela seguinte para escolher a
forma de ligação correcta do seu sistema.
Cinema em Casa (figura 2)
Ligue a ficha dedicada RCA do
processador AV à entrada RCA do
subwoofer.
Usando ligações de linha para as
colunas
(figura 3)
Estéreo
Ligue as saídas de colunas do amplificador
às entradas de colunas do subwoofer, não
esquecendo de ligar positivo com positivo
e negativo com negativo. Ligue as colunas
satélite aos terminais de coluna
correspondentes no subwoofer.
Com este método de ligação o altifalante
do subwoofer continua a ser alimentado
pelo amplificador interno do subwoofer.
Cinema em Casa
Ligue as saídas de linha das colunas
frontais esquerda e direita do processador
AV às entradas no subwoofer. Ligue as
colunas satélite aos terminais de coluna
correspondentes no subwoofer.
Confirme as ligações
ASSEGURE-SE QUE A TENSÃO INDICADA
NO PAINEL DO AMPLIFICADOR ESTÁ DE
ACORDO COM A SUA TENSÃO DE
ALIMENTAÇÃO.
Antes de apreciar a qualidade de som da
sua nova instalação e de efectuar o
respectivo ajuste fino, volte a verificar as
ligações. Os utilizadores queixam-se muitas
vezes de não conseguir obter um som de
qualidade decente quando ajustam os
controlos, e a causa está normalmente em
ligações erradas. Assegure-se que:
• A fase está correcta – não pode haver
nenhuma ligação positivo para negativo
para as colunas satélite. Se alguma coisa
está fora de fase pode obter um som
estranho com uma imagem imprecisa e
flutuante, uma falta de graves ou uma
combinação de ambas.
• Não devem existir trocas do canal
esquerdo com o direito – isso pode
resultar, por exemplo, numa disposição
incorrecta da orquestra ou, pior ainda, o
som do seu sistema de audio doméstico
é proveniente do lado oposto à acção
que decorre no ecran.
Ligando e desligando
Nós sugerimos que apenas ligue o
subwoofer depois de qualquer amplificador
ou processador AV. Na operação oposta,
ao desligar, desligue o subwoofer primeiro.
Ligado:
Com o interruptor nesta posição, o
amplificador permanece ligado, e a luz está
verde.
Desligado:
Quando o subwoofer não está a ser usado
poderá optar por deixá-lo desligado. Neste
estado não aparecerão quaisquer luzes no
subwoofer.
Ajustando o som
Pequenos ajustes no seu sistema podem
melhorar e aumentar o seu prazer de
audição.
Posicione o volume a meio do seu curso
total. Defina o modo de acordo com o tipo
de fonte conforme explicado a seguir. DVD,
LD, Vídeogravador ou outra fonte de vídeo:
defina como MOVIE.
CD, MD Cassetes ou outra fonte audio:
defina como MUSIC.
Rode o controle de nível para ajustar o
volume. Defina o nível de volume que
melhor sirva as suas preferências de
acordo com a fonte utilizada.
Cuidados de manutenção
A caixa do subwoofer pode ser limpa com
um pano do pó seco. Se desejar usar um
spray de limpeza aerosol, não pulverize
directamente na caixa; pulverize no pano.
Não utilize o subwoofer como mesa. Os
objectos colocados sobre ele chocalham e
deterioram a qualidade de som. Os líquidos
são particularmente perigosos (por
exemplo bebidas ou vasos de flores).
Se o seu sistema não for utilizado por um
longo período de tempo, desligue o
subwoofer da alimentação.
Italiano
Garanzia limitata
Egregio cliente
Un benvenuto da parte della B&W.
Questo prodotto è stato progettato e
fabbricato secondo i più alti standard
qualitativi. Tuttavia, nell’improbabile caso di
un guasto o malfunzionamento, B&W
Loudspeakers e i suoi distributori nazionali
garantiscono parti sostitutive e mano
d’opera gratuite (alcune eccezioni sono
possibili) nei paesi in cui è presente un
distributore ufficiale B&W.
Questa garanzia limitata è valida per un
periodo di cinque anni dalla data di
acquisto o di due anni per i componenti
elettronici, altoparlanti inclusi.
Termini e condizioni
1 La garanzia è limitata alla sola
riparazione delle apparecchiature. La
garanzia non copre i costi di trasporto
o nessun altro tipo di costo, né i rischi
derivanti dalla rimozione, il trasporto e
l’installazione dei prodotti.
2 La garanzia è valida solo per
l’acquirente originario e non è
trasferibile.
3 Questa garanzia è applicabile solo in
caso di materiali e/o fabbricazione
difettosi al momento dell’acquisto e
non è applicabile nei seguenti casi:
a. danni causati da installazione,
connessione o imballaggio incorretti,
b. danni causati da un uso inadeguato del
prodotto, diverso dall’uso specificato
nel manuale dell’utente, negligenza,
modifiche o impiego di componenti
non fabbricati o autorizzati da B&W,
c. danni causati da apparecchiature
ausiliarie difettose o inadatte,
d. danni causati da incidenti, fulmini,
acqua, fiamme, calore, guerra,
disordini pubblici o altra causa al di
fuori del ragionevole controllo di B&W e
i suoi ufficiali distributori,
e. quando il numero di serie del prodotto
è stato alterato, cancellato, rimosso o
reso illeggibile,
f. se riparazioni o modifiche sono state
effettuate da persone non autorizzate.
4 Questa garanzia completa le
obbligazioni di legge regionali e
nazionali dei rivenditori o distributori
nazionali e non incide sui diritti del
consumatore stabiliti per legge.
Riparazioni sotto garanzia
Se sono necessarie delle riparazioni,
seguire le procedure delineate qui di
seguito:
1 Se le apparecchiature sono utilizzate
nel paese in cui sono state acquistate,
contattare il rivenditore autorizzato
B&W da cui sono state acquistate.
2 Se le apparecchiature non sono
utilizzate nel paese in cui sono state
acquistate, contattare il distributore
10

nazionale B&W nel paese di residenza,
che sarà jn grado di fornire i dettagli
della ditta incaricata delle riparazioni.
Contattare B&W nel Regno Unito o
visitare il sito web per i dettagli dei vari
distributori di zona.
Per convalidare la garanzia, bisognerà
esibire questo opuscolo, compilato e
timbrato dal rivenditore il giorno
dell’acquisto. In alternativa, si potrà esibire
lo scontrino d’acquisto originale o altro tipo
di prova d’acquisto con data d’acquisto.
Manuale di istruzioni
AVVERTENZE:
ATTENZIONE: Versioni del prodotto a 120 V
vengono fornite con un cordone di
alimentazione provvisto di spina polarizzata.
Per evitare una scarica elettrica alloggiate la
lamella piatta della spina nella fessura piatta
ed inseritela completamente.
Assicuratevi che la spina sia
completamente inserita nella presa a parete
o nell’alloggiamento per il cordone di
alimentazione per evitare l’esposizione della
lamella o del polo.
Per evitare incendi o folgorazioni non
esporre l’apparecchiatura a pioggia o
umidità.
Rispettare tutte le avvertenze sulle
apparecchiature stesse.
Per evitare scosse non aprire il cabinet né
rimuovere l’amplificatore dal pannello
posteriore. Non contiene parti che l’utente
possa utilizzare. Per qualsiasi domanda
rivolgersi al rivenditore autorizzato B&W.
Controllare che il voltaggio dell’amplificatore
sia quello della rete.
L’alloggiamento del fusibile si trova sul
pannello posteriore del modulo
dell’amplificatore. Sostituite il fusibile della
rete solo con lo stesso tipo e la stessa
potenza come indicato sull’etichetta di
voltaggio.
Questa apparecchiatura non richiede la
messa a terra.
Assicuratevi che il prodotto sia ventilato
adeguatamente. Fate in modo che l’aria
circoli dietro al pannello posteriore
dell’amplificatore. Non oscurate o bloccate
le aperture del pannello. Non utilizzate il
prodotto in uno scaffale, in una libreria, in
un cabinet o in una credenza a meno che il
volume dietro al prodotto sia
adeguatamente ventilato per lo spazio della
stanza.
Introduzione
Grazie per avere acquistato il Subwoofer
attivo AS™1 Bowers & Wilkins.
Fin dalla sua fondazione nel 1966, la
costante filosofia di B&W è stata quella di
ricercare una perfetta riproduzione del
suono. Questa ricerca, ispirata dal
fondatore della società, John Bowers, ha
comportato non solo un elevato
investimento in tecnologia audio ed
innovazioni, ma ha anche significato una
costante rivalutazione della musica e della
qualità sonora nei film per garantire il
massimo rendimento della tecnologia
stessa.
L’AS™1 è stato progettato per istallazioni
home theatre e per aumentare la risposta
alle basse frequenze dei diffusori ‘full range’
nell’uso audio a 2 canali. L’aggiunta del
subwoofer al vostro sistema non solo
estende le basse frequenze a ottave
inferiori, ma migliora la purezza della
gamma media riducendo le richieste di
basse frequenze ai vostri attuali diffusori.
Vi preghiamo di leggere attentamente
questo manuale prima di usare il
subwoofer. Tutte le istallazioni sonore
richiedono alcune prove al fine di utilizzare
in maniera ottimale i prodotti
e questo manuale vi guiderà in questo
procedimento.
Appena collegato il subwoofer alla rete di
alimentazione è importante conoscere le
istruzioni di sicurezza e seguire le
avvertenze.
Conservate questo manuale in un posto
sicuro per successive consultazioni.
I diffusori B&W sono distribuiti in più di
60 paesi in tutto il mondo con una rete
internazionale di distributori esclusivi
accuratamente selezionati. Se avete un
problema che il vostro rivenditore non può
risolvere, i nostri distributori saranno lieti di
assistervi.
Sballaggio (figura 1)
Il modo migliore per togliere dall’imballo il
Subwoofer evitando di causare danni è il
seguente:
• Aprite totalmente i lembi della scatola e
capovolgete il cartone e il suo contenuto.
• Sollevate il cartone togliendolo dal
prodotto.
Vi raccomandiamo di conservare l’imballo
per un successivo utilizzo.
Posizionamento del subwoofer
Poiché il subwoofer riproduce solo note
molto basse, il posizionamento è in qualche
modo meno impegnativo di quello dei
diffusori a gamma estesa. La direzionalità
dell’informazione musicale è molto meno
precisa e voi avete maggiore scelta sul
posizionamento dei diffusori per ottenere il
miglior effetto. Detto questo, i risultati
migliori si ottengono se il subwoofer viene
collocato fra i diffusori satellite o in
prossimità di uno di essi. Se utilizzate due
subwoofer è meglio collocarne uno vicino
ad ogni diffusore satellite.
Collocando il subwoofer dietro agli
ascoltatori, anche in istallazioni con suono
surround, generalmente crea un immagine
inferiore, tuttavia può risultare un
compromesso accettabile nel caso fosse
dettato da considerazioni domestiche.
Se il subwoofer deve essere utilizzato in
uno spazio angusto (per esempio in un
mobile apposito), lo spazio deve essere
ventilato per consentire una sufficiente
circolazione d’aria per raffreddare l’unità.
Chiedete consiglio al vostro rivenditore.
Collegamenti elettrici
Scollegate tutto l’impianto audio dalla rete
di alimentazione fino a che i collegamenti di
segnale sono stati effettuati e controllati.
Ciò evita il rischio di danni mentre i
collegamenti vengono effettuati o che
questi possano essere interrotti.
Il subwoofer può ricevere ed inviare sia
segnali di livello linea attraverso le prese
RCA Phono collocate sul pannello
posteriore.
La funzione del subwoofer è quella di
ricevere segnali dalla catena di
amplificazione ed inviarli ai diffusori satellite
inalterati. L’ingresso RCA Phono ti permette
di avere un unico segnale a bassissime
frequenze all’unità subwoofer.
Utilizzate la seguente tavola per scegliere il
corretto metodo di cablaggio per la vostra
installazione:
Home Theater (figura 2)
Collegate l’uscita dedicata RCA Phono del
vostro processore home teathre all’ingresso
Phono del subwoofer.
Collegamento ad alto livello
(figura 3)
Stereo
Collegate le uscite degli altoparlanti del
vostro amplificatore agli ingressi del
subwoofer, facendo attenzione alla polarità.
Collegate i satelliti ai terminali di uscita dei
canali destro e sinistro del suwoofer.
Con questo metodo di collegamento l’unità
del subwoofer è sempre pilotata
dall’amplificatore interno dello stesso.
Home Theater
Collegate le uscite sinistra e destra frontali
del processore home theatre agli ingressi
del subwoofer. Collegate i satelliti ai
terminali di uscita dei canali destro e
sinistro del subwoofer.
Controllo accurato dei
collegamenti
ASSICURATEVI CHE IL VOLTAGGIO
INDICATO SUL PANNELLO
DELL’AMPLIFICATORE SIA UGUALE A
QUELLO DELLA RETE DI ALIMENTAZIONE.
Prima di ascoltare la qualità sonora della
vostra nuova istallazione e di metterla a
punto controllate accuratamente i
collegamenti. Troppo spesso gli utenti si
lamentano di non riuscire ad ottenere un
suono decente nonostante regolino i
controlli per poi scoprire che qualche
collegamento è stato effettuato male.
Assicuratevi che:
• La fase sia corretta – non ci dovrebbero
essere collegamenti da positivo a
negativo verso i diffusori satellite. Se
qualcosa è fuori fase potete notare un
suono confuso con un’immagine
imprecisa e fluttuante, una mancanza di
basse frequenze o una combinazione
delle due.
• Il canale destro e quello sinistro non
siano invertiti – questo può produrre
come risultato, per esempio, che
l’orchestra si trovi nella posizione
opposta o, ancor peggio, che i suoni nel
vostro sistema home theater vadano
11

nella direzione opposta all’ azione sullo
schermo.
Accensione e spegnimento
Vi raccomandiamo di accendere il
subwoofer per ultimo, dopo aver acceso
l’amplificatore o il processore home theatre.
Allo stesso modo quando lo spegnete,
spegnete il subwoofer per primo.
On:
Con l’interruttore in questa posizione,
l’amplificatore resta costantemente acceso
e la spia è verde.
Off:
Quando il subwoofer non è in funzione non
sarà accesa nessuna spia.
Aggiustamento del suono
Alcune regolazioni del sistema possono
migliorare notevolmente l’ascolto.
Posizionate la manopola del volume a metà
potenza. Posizionate il selettore del modo
di ascolto come segue. Per la riproduzione
di DVD, LD, Video Cassette o altre sorgenti
video: selezionate MOVIE.
Per la riproduzione di CD, MD, Cassette o
altre sorgenti audio: selezionate MUSIC.
Agite sul Level control per modificare il
volume. Regolate il volume al livello che più
vi aggrada per l’ascolto della sorgente
selezionata.
Cura del subwoofer
Il cabinet del subwoofer può essere pulito
spolverandolo con un panno asciutto. Se
preferite utilizzare un prodotto spray per la
pulizia, non spruzzatelo direttamente sul
cabinet, spruzzatelo sul panno.
Non utilizzate il subwoofer come un tavolo.
Quando è in funzione gli oggetti lasciati sul
piano superiore tendono a vibrare. In
particolare, evitate il rischio che liquidi
vengano versati (ad esempio bevande o
vasi di fiori).
Se il sistema non viene usato per parecchio
tempo, scollegate il subwoofer dalla
alimentazione.
Nederlands
Beperkte garantie
Beste klant,
Welkom bij B&W.
Dit product is volgens de hoogste
kwaliteitsnormen ontworpen en
vervaardigd. Als er echter iets defect raakt
aan dit product, geeft B&W Luidsprekers
en zijn nationale distributeurs u gratis
arbeidsuren (er kunnen zich uitzonderingen
voordoen) en vervangende onderdelen in
elk land waar een officiële B&W distributeur
gevestigd is.
De beperkte garantie is geldig voor een
periode van vijf jaar vanaf de
aankoopdatum of twee jaar voor
elektronica, waaronder versterkte
luidsprekers.
Voorwaarden
1 De garantie is beperkt tot de reparatie
van de apparatuur. Transport- of
andere kosten, noch eventueel risico
voor het verwijderen, vervoeren en
installeren van producten vallen onder
deze garantie.
2 De garantie is alleen geldig voor de
eerste eigenaar. Hij is niet
overdraagbaar.
3 Deze garantie is niet van toepassing in
andere gevallen dan defecten van
materialen en/of vakmanschap ten tijde
van aankoop en deze is niet van
toepassing:
a. voor schade die veroorzaakt is door
onjuiste installatie, aansluiting of
verpakking,
b. voor schade die veroorzaakt is door
een ander gebruik dan het juiste
gebruik zoals beschreven in de
gebruikershandleiding, nalatigheid,
aanpassingen, of gebruik van
onderdelen die niet door B&W
goedgekeurd of gemaakt zijn,
c. voor schade die veroorzaakt is door
defect of ongeschikte aanvullende
apparatuur,
d. voor schade die veroorzaakt is door
ongelukken, bliksem, water, brand,
hitte, oorlog, openbare verstoringen of
een andere oorzaak buiten de redelijke
controle van B&W en zijn aangestelde
distributeurs,
e. voor producten waarvan het
serienummer gewijzigd, verwijderd,
gewist of onleesbaar gemaakt is,
f. als reparaties of wijzigingen uitgevoerd
zijn door een onbevoegd persoon.
4 Deze garantie vult eventuele nationale /
regionale wettelijke verplichtingen voor
dealers of nationale distributeurs aan
en heeft geen invloed op uw statutaire
rechten als consument.
Het claimen van reparaties onder
de garantie
Mocht er onderhoud benodigd zijn, volgt u
dan de volgende procedure:
1 Als de apparatuur gebruikt wordt in het
land van aankoop, dan moet u contact
opnemen met de erkende B&W dealer
waar u de apparatuur gekocht heeft.
2 Als de apparatuur in een ander land
dan het land van aankoop wordt
gebruikt, moet u contact opnemen met
de nationale distributeur van B&W in
het land waar u verblijft. Deze kan u
vertellen waar u de apparatuur kunt
laten onderhouden. U kunt B&W in
Groot-Brittannië bellen of onze website
bezoeken voor de adresgegevens van
uw plaatselijke distributeur.
Om uw garantie geldig te maken, moet u
deze ingevulde garantiefolder die op de
aankoopdatum door uw dealer
afgestempeld is, kunnen tonen. De tweede
mogelijkheid is het originele aankoopbewijs
of ander bewijs van eigendom en
aankoopdatum tonen.
Handleiding
WAARSCHUWINGEN:
VOORZICHTIG: Steek de stekker altijd
volledig in het stopcontact of de
contrastekker.
Zorg dat er van de pennen geen metaal
zichtbaar is.
Om brand en schokken te voorkomen u dit
apparaat niet blootstellen aan regen of
vocht.
Volg de waarschuwingen die op het
apparaat staan nauwgezet op.
Voorkom elektrische schokken en open
daarom de behuizing niet en verwijder ook
de versterker niet uit het achterpaneel.
Onderdelen kunnen niet door de gebruiker
worden gerepareerd. Reparatie en
onderhoud uitsluitend laten verrichten door
een gekwalificeerde B&W-dealer.
Overtuig u ervan of de netspanning van het
apparaat overeenkomt met die ter plaatse.
De netzekering bevindt zich op het
versterkerpaneel op de achterzijde. Vervang
de zekering uitsluitend door één van
hetzelfde type en waarde als is
meegeleverd en aangegeven op de
achterzijde.
Het apparaat behoeft geen aarding (dubbel
geïsoleerd).
Zorg voor voldoende ventilatie en
controleer of de luchtstroom langs de
versterker niet geblokkeerd is en houd de
openingen in het paneel vrij. Gebruik dit
product niet in een rek, boekenkast,
wandmeubel of andere kast, tenzij er
voldoende ventilatieruimte aan de
achterzijde is.
Inleiding
Dank u voor de aanschaf van deze
Bowers & Wilkins AS™1 Actieve
Subwoofer!
Vanaf het allereerste begin in 1966 heeft
B&W altijd gezocht naar de “perfecte
geluidsweergave”. Deze zoektocht heeft
niet alleen geleid tot grote investeringen in
12

audiotechnologie en –ontwikkeling; maar
geïnspireerd door de inmiddels overleden
oprichter John Bowers ook in een
voortdurende muzikale betrokkenheid:
alleen op die manier namelijk kan alle
technologie optimaal wordt gebruikt.
De AS™1 is speciaal ontworpen voor
Home Cinema systemen en ook om het
laag van stereosystemen extra te
versterken. De subwoofer doet echter veel
meer dan de laagweergave van uw
audiosysteem uitbreiden. Doordat namelijk
de gewone luidsprekers in het laag nu veel
minder belast worden, verbetert ook de
weergave van het erg belangrijke
middengebied.
Wij raden u aan voor in gebruik name deze
handleiding in zijn geheel aandachtig door
te lezen. Hoe goed de luidspreker op zich
ook is, elke luidspreker is afhankelijk van de
ruimte waarin hij staat. De tijd die u daarom
spendeert aan een zo goed mogelijke
opstelling zal uiteindelijk resulteren in vele
uren luisterplezier.
Daar de actieve luidspreker direct is
verbonden met het lichtnet is het zeer
belangrijk de veiligheidsinstructies en
waarschuwingen goed te lezen en
nauwgezet op te volgen.
Bewaar deze handleiding op een veilige
plaats als referentie voor later.
Bowers &Wilkins luidsprekers worden
verkocht in meer dan 60 landen over de
hele wereld. B&W heeft een internationaal
netwerk van zorgvuldig geselecteerde
importeurs die u optimale service zullen
geven. Heeft u problemen heeft die uw
leverancier niet kan oplossen, neem dan
contact op met de importeur.
Uitpakken (afbeelding 1)
Dit is de eenvoudigste manier om de
luidsprekers uit te pakken:
• Vouw eerst de flappen geheel naar buiten
en keer dan de doos met inhoud om.
• Trek vervolgens de doos voorzichtig
omhoog.
We adviseren u om het
verpakkingsmateriaal te bewaren voor
eventueel toekomstig gebruik.
Opstellen van de subwoofer
De subwoofer produceert uitsluitend zeer
lage frequenties, daarom is de opstelling
minder belangrijk dan bij gewone
luidsprekers. De richtingsinformatie in het
laag is tamelijk vaag, zodat u meer vrijheid
heeft in het opstellen van de subwoofer.
Voor optimale resultaten adviseren we u de
AS™1 tussen de linker en rechter front
luidsprekers op te stellen, of in de nabijheid
van één van de twee. Gebruikt u twee
AS™1’s, plaats beide dan zo dicht mogelijk
bij een front luidspreker.
Een subwoofer achter de luisteraars geeft
zelfs in surround systemen meestal een
slecht geluidsbeeld. Het kan echter een
noodzakelijk compromis zijn, afhankelijk van
de inrichting van het interieur.
Wilt u de AS™1 in een kleine ruimte
inbouwen, zoals bijvoorbeeld in speciale
meubels, zorg dan vooral voor voldoende
ventilatie en koeling van de ingebouwde
eindversterker. Twijfelt u over de ventilatie,
vraag dan advies aan uw leverancier.
Aansluiten
Overtuig u er eerst van alle apparaten van
het systeem niet meer met het lichtnet zijn
verbonden. Hierdoor bent u er zeker van
dat er tijdens het losnemen en vastzetten
van kabels geen enkele schade kan
ontstaan.
De subwoofer heeft op de achterzijde cinch
lijn in- en uitgangen.
De subwoofer ontvangt de signalen van de
versterker en geeft een breedband signaal
door aan de satellietluidsprekers. De enkele
cinch ingang biedt de mogelijkheid het laag
aan een subwoofer door te geven.
Onderstaand overzicht geeft de juiste
aansluitmethode voor uw installatie aan:
Home Theater (afbeelding 2)
Verbind de speciale cinch uitgang op de
home theater processor met de cinch
ingang van de subwoofer.
Luidsprekerniveau aansluitingen
(afbeelding 3)
Stereo
Verbind de luidsprekeruitgangen van de
versterker met de luidsprekerniveau
ingangen van de subwoofer en houd
terdege rekening met de plus en min
aansluitingen (fase). Sluit de satelliet
luidsprekers aan op de relevante
luidsprekeruitgangen op de subwoofer.
Met deze manier van aansluiten wordt de
subwoofer nog steeds uitgestuurd door de
ingebouwde versterker van de subwoofer.
Home Theater
Verbind de linker en rechter
luidsprekeruitgangen van de home theater
processor met de ingangen van de
subwoofer. Sluit de satelliet luidsprekers
aan op de relevante luidsprekeruitgangen
op de subwoofer.
Controleer alle aansluitingen
nogmaals
CONTROLEER OF DE NETSPANNINGS –
ZOALS AANGEGEVEN OP HET
VERSTERKERPANEEL – OVEREENKOMT
MET DIE TER PLAATSE!
Voordat het systeem wordt ingeschakeld en
afgeregeld, nogmaals alle aansluitingen
controleren. Het gebeurt maar al te vaak
dat er bij het installeren iets verkeerd is
aangesloten. Controleer:
• De polariteit: verbind de plus van de
satelliet met de plus op de subwoofer en
de min met de min. Foutieve
aansluitinggeeft een "vage" weergave
met een onduidelijke positionering en/of
te weinig laag!
• Of de linker en rechter kanalen in het
gehele systeem op dezelfde manier zijn
aangesloten. In een goed Home Cinema
systeem beweegt het geluidsbeeld in
dezelfde richting als het beeld. Zo niet,
dan is er iets verkeerd aangesloten.
In- en uitschakelen
We raden aan de AS1 in te schakelen
nadat de versterker en/of processor is
ingeschakeld. Het omgekeerde geldt bij
uitschakelen: eerste de subwoofer
uitschakelen.
On (aan):
In deze positie is de versterker altijd actief
en licht de indicatie groen op.
Off (uit):
Wanneer de subwoofer niet wordt gebruikt
kan de subwoofer worden uitgeschakeld.
Geen enkele indicatie licht op.
Klankinstelling
Kleine correcties van het systeem kunnen
de klank aanzienlijk verbeteren.
Zet het volume ongeveer op de helft. Kies
de functie overeenkomstig de
programmabron: DVD, LD, videocassette of
een andere videobron en kies MOVIE.
Voor CD, MD, cassette of een andere
audiobron kiest u MUSIC.
Corrigeer zonodig het volume naar een
niveau dat u het prettigst vindt.
Onderhoud
Reinig de subwoofer gewoon met een
zachte droge doek. Bij gebruik van een
reinigingsmiddel uit een spuitbus nooit
direct op de kast spuiten, maar op een
doek.
Gebruik de subwoofer niet als tafeltje, daar
deze voorwerpen gemakkelijk gaan
rammelen. Zorg er vooral voor dat er geen
vloeistof in de subwoofer kan vallen – zet er
dus geen koffie, thee of bloemenvazen op!
Wanneer het systeem voor langere tijd niet
gebruikt zal worden is het verstandig de
stekker uit het stopcontact te nemen.
13

Dansk
Begrænset garanti
Kære kunde
Velkommen til B&W.
Dette produkt er designet og fremstillet
efter de højeste kvalitetsstandarder. Hvis
der imidlertid skulle være noget galt med
dette produkt garanterer B&W
Loudspeakers og dets nationale
distributører vederlagsfri arbejdskraft (der
kan forekomme indskrænkninger) og
reservedele i alle lande, der har en officiel
B&W-distributør.
Denne begrænsede garanti gælder i en
periode på fem år fra købsdatoen eller to år
for elektronik inkl. forstærkerhøjtalere.
Vilkår og betingelser
1 Garantien er begrænset til reparation af
anlægget. Hverken transport, andre
omkostninger eller evt. risiko forbundet
med flytning, transportering og
installation af produktet er omfattet af
nærværende garanti.
2 Garantien gælder kun for den originale
ejer. Garantien kan ikke overdrages.
3 Garantien finder kun anvendelse ved
materiale- og/eller fabrikationsfejl, der
var til stede på købstidspunktet, og
den dækker ikke:
a. skader forårsaget af forkert installering,
tilslutning eller indpakning,
b. skader forårsaget af anden brug end
den i brugermanualens anførte og
korrekte brug, forsømmelighed,
modifikationer eller brug af reservedele,
der ikke er fremstillet eller godkendt af
B&W,
c. skader forårsaget af defekt eller uegnet
tilbehør,
d. skader forårsaget af hændelige uheld,
lyn, vand, ild, varme, krig, offentlige
uroligheder eller andre årsager, der
ligger udenfor B&W og dets udpegede
distributørers rimelige kontrol,
e. for produkter hvis serienummer er
ændret, udvisket, fjernet eller gjort
ulæseligt,
f. hvis der er udført reparationer eller
modifikationer af en ikke godkendt
person.
4 Nærværende garanti er et supplement
til alle nationale/regionale lovkrav til
forhandlere eller nationale distributører
og griber ikke ind i Deres lovfæstede
rettigheder.
Således fremsætter De
reparationskrav i henhold til
garantien
Hvis det skulle blive nødvendigt med
servicering, bedes De følge efterfølgende
procedure:
1 Hvis anlægget bruges i det land, hvori
det var købt, skal De kontakte den af
B&W godkendte forhandler, fra hvem
De købte anlægget.
2 Hvis anlægget bruges udenfor det
land, hvori det var købt, skal De
kontakte den nationale B&W-distributør
i bopælslandet, som vil advisere Dem
om, hvor anlægget kan blive serviceret.
De kan ringe til B&W i UK eller besøge
vores website for at indhente
oplysninger om, hvem der er Deres
lokale distributør.
For at validere Deres garanti, skal De
forevise dette af Deres forhandler på
købstidspunktet udfyldte og stemplede
garantihæfte. Eller som et alternativ skal De
komme med den originale faktura eller
andet bevis på ejerforhold samt købsdato.
Brugervejledning
ADVARSEL:
BEMÆRK: produktet er i 120V versionen
forsynet med fasevendt-netstik. For at
undgå elektrisk stød, skal netstikket sættes
helt ind i stikkontakten.
For at forhindre brand eller evt. elektrisk
kortslutning bør udstyret ikke udsættes for
regn eller høj fugtighed.
Bemærk hvis udstyret selv giver
advarselssignal.
For at undgå elektrisk stød bør du ikke
åbne kassen eller fjerne forstærkerdelen fra
bagsiden. Der forefindes ingen muligheder
for justering inde i subwooferen. Henret
venligst alle spørgsmål vedrørende teknisk
service eller reparation til HiFi-Klubben.
Hvis du anvender forlængerledning eller
lignende, bør det sikres at stikkene er helt
sammenkoblede.
Vær opmærksom på at spændingstallet på
forstærkerpanelet er det samme som på
strømforsyningen, hvis ikke kontakt da HiFiKlubben. Prøv ikke på at indstille
spændingsvælgeren.
Sikringsholderen befinder sig på bagsiden
af forstærkermodulet. Hvis sikringen
udskiftes skal den være af samme type og
have samme værdi.
Subwooferen skal ikke forbindes til jord.
Sørg for at produktet har god ventilation.
Forhindre ikke luft i at kunne cirkulere
omkring forstærkerdelen og dennes
køleribbe. Placer ikke produktet i et lukket
rack eller lignende, medmindre der er god
ventilation ved produktets bagside.
Introduktion
Tillykke med din nye højttaler, og tak for at
du valgte Bowers and Wilkins AS™1 aktiv
subwoofer.
Siden vores grundlæggelse i 1966, har
filosofien bag Bowers and Wilkins været
klar – Vi ønsker at opnå den perfekte
lydgengivelse. Inspireret af firmaets
grundlægger, den afdøde John Bowers, har
denne filosofi ikke kun medført store
investeringer og nyskabelser indenfor
lydteknik, men også en blivende kærlighed
og forståelse for musik, samt krav der
sikrer at teknologien er på sit højeste når
det drejer sig om filmlyd.
AS™1 er designet til brug i
hjemmebiografer og til at forøge basydelsen
i stereohøjttalere ved almindelig 2-kanals
stereo. Ved at tilføje denne subwoofer til dit
system, opnår du ikke blot en betydelig
dybere basgengivelse, men forbedre
samtidig mellemtonen, da kravet til
stereohøjttalerne om at gengive
lavfrekvente signaler mindskes.
Læs venligst denne manual før du anvender
subwooferen. Alle HiFi opsætninger kræver
planlægning og eksperimentering, hvis du
vil have det fulde udbytte af dit produkt, og
denne manual vil hjælpe dig i denne
proces.
Da subwooferen indeholder elektronik og
derfor er tilsluttet spænding, er det
vigtigt, at du er bekendt med
sikkerhedsinstruktionen og følger denne.
Opbevar denne manual et sikkert sted i
tilfælde af at du skulle få brug for den
senere.
Bowers and Wilkins højttalere bliver solgt i
mere end 60 lande verden over og vi
opretholder et internationalt netværk af nøje
udvalgte og dedikerede forhandlere. Hvis
du mod forventning har et problem med dit
Bowers and Wilkins produkt kontakt da din
nærmeste forhandler.
Udpakning (figur 1)
Udpakning af subwooferen gøres lettest på
følgende måde:
• Buk papflapperne tilbage og vend kassen
med indhold på hovedet.
• Løft kassen op og væk fra produktet.
Vi anbefaler at du beholder kassen for
fremtidig brug.
Anbringelse af subwooferen
I og med at subwooferen kun gengiver
lavfrekvent lyd, vil den ofte være lettere at
placere end en traditionel højttaler. Delen af
retningsbestemte signaler er mindre, hvilket
giver dig større mulighed for at placere
subwooferen på et ønsket sted og stadig
opnå et godt resultat. Når dette er sagt,
skal det dog tilføjes, at det bedste resultat
opnås når subwooferen placeres imellem
de mindre højttalere eller i nærheden af en
af disse. Hvis du anvender to subwoofere
opnås det bedste resultat ved at anbringe
én subwoofer nær hver højttaler.
Placering af subwooferen bag lytteren, selv
i et surround sound system, giver generelt
et dårligere perspektiv, men er ofte et
acceptabelt kompromis hvis ikke andet er
muligt.
Hvis subwooferen anbringes i et lukket
møbel, skal der stadig være ventilation,
som tillader at luften stadig kan cirkulere og
afkøle subwooferen. Hvis du er i tvivl så
spørg din forhandler.
Elektrisk tilslutning
Frakobl alt HiFi-udstyr fra 220V nettet og
tilslut herefter subwooferen. Dette sikrer
mod evt. skader på udstyret som måtte
forekomme under tilslutningen.
Subwooferens funktion er at modtage
signaler fra forstærkeren og videre sende et
fuldt frekvens signal til satellitterne. RCA
14

phono input stikket giver mulighed for at
forsyne basenheden med lav-frekvent signal
hvis det ønskes.
Subwooferen kan modtage og afgive
liniesignal via RCA phono bøsningerne på
bagsiden.
Brug nedenstående gennemgang til at
vælge den rette forbindelsesmetode:
Hjemmebiograf (figure 2)
Tilslut den korrekte RCA phono udgang på
surround processoren til RCA phono
indgangen på subwooferen.
Tilslutning via højttalerkabler
(figur 3)
Stereo
Forbind højttalerkablerne fra forstærkerens
udgange til subwooferens indgange. Vær
opmærksom på at forbinde positiv (rød) til
positiv og negativ (sort) til negativ. Forbind
satellitterne til de relevante udgange på
subwooferen.
Ved denne tilslutning bliver basenheden
stadig styret af subwooferens indbyggede
forstærker.
Hjemmebiograf
Forbind højttalerkablerne fra surround
processorens udgange til subwooferens
indgange. Vær opmærksom på at forbinde
positiv (rød) til positiv og negativ (sort) til
negativ. Forbind satellitterne til de relevante
udgange på subwooferen.
Tjek alle forbindelser en ekstra
gang
VÆR SIKKER PÅ AT NETSPÆNDINGEN
ANGIVET PÅ FORSTÆRKEREN SVARER
TIL LYSNETTETS NETSPÆNDING.
Før du begynder at lytte til lydkvaliteten i dit
nye system og finindstille det, bør alle
forbindelser tjekkes en ekstra gang. Alt for
ofte sker det, at brugere beklager sig over,
at de ikke kan opnå en tilfredsstillende lyd –
ligegyldigt hvordan de indstiller knapperne,
hvorefter de opdager, at et eller andet er
blevet forkert forbundet. Sikre dig:
• At systemet spiller i fase – ingen positiv til
negativ forbindelse til satellit højttalerne
må forekomme. Hvis systemet spiller i
modfase, vil gengivelsen opleves sløret
med et svingende og upræcist
perspektiv, en ringe bas eller en
kombination af begge dele.
• At der ikke er byttet om på højre og
venstre signal – det kan fx resulterer i, at
et orkester står modsat af virkeligheden,
eller endnu værre, at lyde i din
hjemmebiograf bevæger sig modsat af
handlingen på tv-skærmen.
Tænd og sluk
Vi anbefaler at subwooferen tændes efter
forstærker eller surround processor som
den er tilkoblet. Ligeledes skal den slukkes
før forstærker eller surround processor når
disse skal afbrydes.
On:
Med knappen i denne position, vil
forstærkeren være fuld aktiv hele tiden og
lampen lyse grønt.
Off:
Når subwooferen ikke benyttes kan du
vælge at lade den være i off position. I
denne position vil lampen være slukket.
Justering af lyden
Små justeringer på systemet kan forbedre
lydoplevelsen.
Indstil volume knappen på halv styrke.
Indstil MODE funktionen alt efter hvad der
lyttes til. DVD, LD, video eller anden
billedkilde: vælg MOVIE.
CD, MD, bånd eller anden lydkilde: vælg
AUDIO.
Drej på volume knappen for at justere
lydniveauet. Indstil niveauet så det bedst
passer til dit ønske, alt efter hvilken lydkilde
der lyttes til.
Vedligeholdelse
Kabinettet kan renses ved af støve af med
en tør klud. Hvis det ønskes kan man bruge
en spray-rens, men spray da på kluden i
stedet for kabinettet.
Brug ikke subwooferen som bord. Ting, der
står på subwooferen vil rasle under
subwoofer-drift. Pas især på ikke at spilde
væsker på subwooferen.
Hvis du ikke skal bruge subwooferen i en
længere periode, er det en god idé at hive
stikket ud at stikkontakten.
Ελληνικά
Περιορισµένη
εγγύηση
Αξιτιµε Πελάτη
Καλωσορίσατε στην B&W.
Το παρν προϊν έχει σχεδιαστεί και
κατασκευαστεί σύµφωνα µε τισ
υψηλτερεσ προδιαγραφέσ ποιτητασ.
Πάντωσ, εάν κάποιο πρβληµα ντωσ
παρατηρηθεί µε το προϊν αυτ, η B&W
Loudspeakers και οι εθνικοί τησ
αντιπρσωποι, εγγυώνται τι θα
παρέχουν χωρίσ χρέωση εργασία
(µπορεί να ισχύσουν περιορισµοί) και
εξαρτήµατα σε κάθε χώρα που
υπάρχει εξουσιοδοτηµένοσ
αντιπρσωποσ τησ B&W.
Η περιορισµένη αυτή εγγύηση ισχύει
για µια περίοδο πέντε ετών απ την
ηµεροµηνία αγοράσ ή δύο ετών για
ηλεκτρονικά, συµπεριλαµβανοµένων
και ενισχυµένων µεγαφώνων.
ροι και προϋποθέσεισ
1 Η εγγύηση καλύπτει µνο την
επισκευή του εξοπλισµού. Η
εγγύηση δεν καλύπτει τα έξοδα
µεταφοράσ, ή οποιαδήποτε άλλα
έξοδα, ούτε άλλουσ κινδύνουσ για
τη µετακίνηση, µεταφορά και
εγκατάσταση των προϊντων.
2 Η εγγύηση ισχύει µνο για τον
αρχικ αγοραστή. ∆εν
µεταβιβάζεται.
3 Η εγγύηση δεν θα ισχύει σε
περιπτώσεισ που δεν σχετίζονται
µε αστοχία υλικών και/ή εργασία
συναρµολγησησ κατά τον χρνο
αγοράσ και δεν θα ισχύει:
α. για ζηµιέσ που προκλήθηκαν απ
λανθασµένη εγκατάσταση,
σύνδεση ή συσκευασία,
β. για ζηµιέσ που προκλήθηκαν απ
οποιαδήποτε άλλη απ τη σωστή
χρήση πωσ περιγράφεται στο
εγχειρίδιο χρήστη, απ αµέλεια,
απ µετατροπέσ ή απ χρήση
εξαρτηµάτων που δεν
κατασκευάζονται ούτε έχουν
εγκριθεί απ την B&W,
γ. για ζηµιέσ που προκλήθηκαν απ
ελαττωµατικ ή ακατάλληλο
βοηθητικ εξοπλισµ,
δ. για ζηµιέσ που προκλήθηκαν απ
ατυχήµατα, αστραπέσ, νερ, φωτιά,
θερµτητα, πλεµο, λαϊκέσ
εξεγέρσεισ ή οποιαδήποτε άλλη
αιτία υπεράνω του εύλογου
ελέγχου τησ B&W και των
εξουσιοδοτηµένων αντιπροσώπων
τησ,
ε. για προϊντα των οποίων ο αριθµσ
σειράσ έχει µεταβληθεί, διαγραφεί,
αφαιρεθεί ή έχει καταστεί
δυσανάγνωστοσ,
στ.
εάν έχουν γίνει επισκευέσ ή
µετατροπέσ απ κάποιο µηεξουσιοδοτηµένο άτοµο.
15

4 Η εγγύηση αυτή συµπληρώνει
οποιοδήποτε εθνικ / περιφερειακ
νµιµο δικαίωµα αντιπροσώπων ή
εθνικών διανοµέων και δεν
επηρεάζει τα νµιµα δικαιώµατά
σασ ωσ καταναλωτού.
Πωσ µπορείτε να ζητήσετε
επισκευέσ υπ την παρούσα
εγγύηση
Εάν ο εξοπλισµσ χρειαστεί επισκευή,
παρακαλώ ακολουθείστε την ακλουθη
διαδικασία:
1 Εάν ο εξοπλισµσ χρησιµοποιείται
στη χώρα που αγοράστηκε,
επικοινωνήστε µε τον
εξουσιοδοτηµένο αντιπρσωπο τησ
B&W απ που αγοράσατε τον
εξοπλισµ.
2 Εάν ο εξοπλισµσ χρησιµοποιείται
εκτσ απ τη χώρα αγοράσ, θα
πρέπει να επικοινωνήσετε µε τον
εξουσιοδοτηµένο αντιπρσωπο τησ
B&W στη χώρα που κατοικείτε πού
θα σασ συµβουλέψει πού µπορείτε
να επισκευάσετε τον εξοπλισµ.
Μπορείτε να καλέσετε την B&W
στην Βρετανία ή να επισκεφθείτε
τη σελίδα µασ στο Ιντερνετ για να
βρείτε πληροφορίεσ ωσ προσ την
διεύθυνση του τοπικού σασ
αντιπροσώπου.
Για να ισχύσει η εγγύηση αυτή, θα
πρέπει να έχετε µαζί σασ το παρν
εγχειρίδιο εγγύησησ συµπληρωµένο
και σφραγισµένο απ τον αντιπρσωπ
σασ την ηµέρα τησ αγοράσ.
Εναλλακτικά, θα χρειαστείτε να δείξετε
την πρωττυπη απδειξη ή τιµολγιο ή
άλλη απδειξη ιδιοκτησίασ και
ηµεροµηνίασ αγοράσ.
Οδηγίεσ Χρήσεωσ
Ο∆ΗΓΙΕΣ ΑΣΦΑΛΕΙΑΣ:
ΠΡΟΣΟΧΗ: Το καλώδιο ρεύµατοσ των
µοντέλων που λειτουργούν µε τάση
ρεύµατοσ 120 V έχει φισ µε γείωση. Για
να αποφύγετε τον κίνδυνο
ηλεκτροπληξίασ, τοποθετήστε καλά
τον πλατύ ακροδέκτη του φισ στην
πλατειά υποδοχή τησ πρίζασ (σηµ. τα
µοντέλα που είναι κατασκευασµένα για
την ελληνική αγορά λειτουργούν µε
τάση 220 V και έχουν το απλ διπολικ
φισ).
ταν θα βάζετε το φισ στην πρίζα,
φροντίστε να εισχωρήσει πλήρωσ και
να µην εξέχουν οι ακροδέκτεσ.
Για να αποφύγετε το ενδεχµενο
φωτιάσ ή ηλεκτροπληξίασ, µην
εκθέτετε τη συσκευή σε βροχή ή
υγρασία.
∆ιαβάστε και τηρήστε λεσ τισ οδηγίεσ
ασφαλείασ που αναγράφονται επάνω
στη συσκευή.
Για να αποφύγετε τον κίνδυνο
ηλεκτροπληξίασ, µην ανοίξετε το
κάλυµµα τησ συσκευήσ και µην
αφαιρέσετε τον ενισχυτή απ την πίσω
πλευρά. ∆εν υπάρχουν στο εσωτερικ
µέρη που µπορούν να επισκευαστούν
απ το χρήστη. Για οποιαδήποτε
απορία σασ σχετικά µε τη χρήση τησ
συσκευήσ ή για ενδεχµενη επισκευή,
απευθυνθείτε στην αντιπροσωπεία τησ
B&W.
Βεβαιωθείτε τι η τάση λειτουργίασ
τησ συσκευήσ που αναφέρεται στην
πίσω πλευρά τησ, είναι ίδια µε αυτή
τησ πρίζασ στην οποία θα τη
συνδέσετε.
Η υποδοχή τησ ασφάλειασ βρίσκεται
στην πίσω πλευρά του ενισχυτή. Αν
χρειαστεί να αλλάξετε την ασφάλεια,
χρησιµοποιήστε µία ίδιου τύπου και
χαρακτηριστικών.
Η συσκευή αυτή δεν χρειάζεται
γείωση.
Φροντίστε η συσκευή να αερίζεται
επαρκώσ και να µην εµποδίζεται η
κυκλοφορία του αέρα, κυρίωσ στην
πίσω πλευρά τησ που υπάρχει ο
ενισχυτήσ. Μην καλύψετε τα ανοίγµατα
εξαερισµού τησ πίσω πλευράσ. Μην
τοποθετείτε τη συσκευή σε βάσεισ
(racks), κλειστά έπιπλα ή ράφια, παρά
µνο αν υπάρχει αρκετσ χώροσ ώστε
να γίνεται καλή κυκλοφορία του αέρα.
Εισαγωγή
Σασ ευχαριστούµε που αγοράσατε το
ενεργ subwoofer AS™1 τησ Bowers
and Wilkins.
Aπ την ίδρυση τησ το 1966, η
φιλοσοφία τησ B&W δεν έπαψε ποτέ να
είναι η αναζήτηση τησ αναπαραγωγήσ
του τέλειου ήχου. Εµπνευσµένη απ
τον ιδρυτή τησ John Bowers, η
αναζήτηση αυτή δεν οδήγησε µνο σε
µεγάλεσ επενδύσεισ και καινοτοµίεσ
στο χώρο τησ τεχνολογίασ
αναπαραγωγήσ του ήχου αλλά και στο
σεβασµ προσ την ίδια τη µουσική και
στισ απαιτήσεισ του ήχου των ταινιών,
γεγονσ που εξασφαλίζει τι η χρήση
τησ τεχνολογίασ θα δώσει το καλύτερο
δυνατ αποτέλεσµα.
Το AS™1 έχει σχεδιαστεί για
συστήµατα οικιακού κινηµατογράφου
αλλά και για να ενισχύσει την απδοση
των µπάσων σε απλά στερεοφωνικά
συγκροτήµατα που χρησιµοποιούν
ηχεία πλήρουσ εύρουσ συχνοτήτων.
Προσθέτοντασ ένα subwoofer στο
σύστηµά σασ, δεν αυξάνετε µνο τη
δυναττητά του να αναπαράγει τα
µπάσα, αλλά βελτιώνετε και τη
διαύγεια των µεσαίων συχνοτήτων,
αποδεσµεύοντασ τα ηχεία σασ απ την
απαίτηση να αποδώσουν τισ πολύ
χαµηλέσ συχντητεσ.
Παρακαλούµε, πριν εγκαταστήσετε και
θέσετε σε λειτουργία το subwoofer,
διαβάστε προσεκτικά τισ οδηγίεσ
χρήσησ. λεσ οι ηχητικέσ
εγκαταστάσεισ απαιτούν κάποιο
σχεδιασµ και κάποιεσ δοκιµέσ
προκειµένου να έχετε την καλύτερη
δυνατή απδοση απ το σύστηµά σασ.
Το φυλλάδιο αυτ θα σασ χρησιµεύσει
ωσ οδηγσ στη διαδικασία αυτή.
Το AS™1 συνδέεται µε το ρεύµα,
γεγονσ που σηµαίνει τι στο
εσωτερικ του υπάρχει υψηλή τάση.
Για το λγο αυτ θα πρέπει να
προσέξετε λεσ τισ οδηγίεσ που
αφορούν την ασφάλειά σασ και να
λάβετε τισ σχετικέσ προφυλάξεισ.
Κρατήστε το φυλλάδιο µε τησ οδηγίεσ
για ενδεχµενη µελλοντική χρήση.
Η B&W διαθέτει τα προϊντα τησ σε
περισστερεσ απ 60 χώρεσ σε λο τον
κσµο, µέσω ενσ δικτύου επισήµων
αντιπροσώπων οι οποίοι είναι σε θέση
να σασ βοηθήσουν να λύσετε λα τα
προβλήµατα που ενδεχοµένωσ θα
συναντήσετε.
Αποσυσκευασία (εικνα 1)
Ο πιο εύκολοσ τρποσ να
αποσυσκευάσετε το ηχείο
αποφεύγοντασ οποιαδήποτε ζηµιά είναι
ο εξήσ:
• Ανοίξτε τελείωσ τα επάνω φύλλα του
κιβωτίου και γυρίστε το κιβώτιο
ανάποδα.
• Σηκώστε το και αφαιρέστε το,
αφήνοντασ το περιεχµενο κάτω.
Καλ είναι να κρατήσετε τη
συσκευασία για πιθανή µελλοντική
χρήση.
Τοποθέτηση
Για το λγο τι το subwoofer
αναπαράγει µνο χαµηλέσ συχντητεσ
(µπάσα), το σηµείο που θα τοποθετηθεί
δεν έχει τσο µεγάλη σηµασία, σο για
τα κανονικά ηχεία. Η κατεύθυνση προσ
την οποία θα πρέπει να είναι
στραµµένο δεν είναι τσο
συγκεκριµένη, και οι επιλογέσ που
έχετε είναι πολύ περισστερεσ. Γενικά
πάντωσ, το καλύτερο ηχητικ
αποτέλεσµα επιτυγχάνεται
τοποθετώντασ το subwoofer µεταξύ
των ηχείων-δορυφρων ή κοντά σε ένα
απ αυτά. Εάν χρησιµοποιείτε δύο
subwoofers, το καλύτερο είναι να
τοποθετήσετε απ ένα κοντά σε κάθε
δορυφρο.
Η τοποθέτηση του subwoofer πίσω απ
τουσ ακροατέσ δίνει γενικά κατώτερη
ηχητική εικνα – ακµη και σε
συστήµατα surround. Πάντωσ, εάν η
διάταξη του χώρου επιβάλλει κάτι
τέτοιο, η θέση αυτή είναι αποδεκτή.
Εάν τοποθετήσετε το subwoofer σε
κάποιο κλειστ χώρο (π.χ. σε κάποιο
ράφι ή ειδικ έπιπλο), θα πρέπει να
φροντίσετε ώστε ο χώροσ αυτσ να
επιτρέπει την επαρκή κυκλοφορία του
αέρα για να ψύχεται το ηχείο.
Συµβουλευτείτε σχετικά την
αντιπροσωπεία τησ B&W ή το
κατάστηµα απ που αγοράσατε το
ηχείο.
Συνδέσεισ
Για να αποκλείσετε το ενδεχµενο να
προκληθεί ζηµιά, βγάλτε λεσ τισ
συσκευέσ του συστήµατοσ απ την
πρίζα σο θα κάνετε τισ συνδέσεισ.
Το subwoofer οδηγεί λα τα σήµατα
εισδου και εξδου επιπέδου line µέσω
των υποδοχών RCA που υπάρχουν στη
πίσω πλευρά του.
16

Ο ρλοσ του subwoofer είναι να
δέχεται το σήµα απ τον ενισχυτή και
στη συνέχεια να στέλνει πλήρεσ εύροσ
συχνοτήτων στα ηχεία-δορυφρουσ.
Χρησιµοποιώντασ τη µονή είσοδο RCA
µπορείτε αν χρειάζεται να στείλετε τισ
πολύ χαµηλέσ συχντητεσ στο
subwoofer.
Χρησιµοποιήστε τον παρακάτω πίνακα
για να επιλέξετε το σωστ τρπο
σύνδεσησ για το σύστηµά σασ:
Οικιακσ Κινηµατογράφοσ (εικνα 2)
Συνδέστε την ειδική έξοδο RCA του
επεξεργαστή surround στην αντίστοιχη
είσοδο RCA του subwoofer.
Συνδέσεισ επιπέδου ηχείων
(speaker level)
(εικνα 3)
Στερεοφωνικ σύστηµα
Συνδέστε τισ εξδουσ επιπέδου ηχείων
του ενισχυτή στισ αντίστοιχεσ
εισδουσ του subwoofer, προσέχοντασ
ώστε να τηρήσετε την σωστή
πολικτητα (+, –). Συνδέστε τα ηχείαδορυφρουσ στουσ ακροδέκτεσ
εξδου του subwoofer.
Με αυτν τον τρπο σύνδεσησ, το
subwoofer ενισχύεται απ το
εσωτερικ του ενισχυτή και χι απ
τον ενισχυτή του συστήµατοσ.
Σύστηµα οικιακού κινηµατογράφου
Συνδέστε τουσ ακροδέκτεσ εξδου του
επεξεργαστή για τα δύο εµπρσθια
ηχεία, στισ αντίστοιχεσ εισδουσ
ηχείων του subwoofer. Συνδέστε τα
ηχεία-δορυφρουσ στουσ ακροδέκτεσ
εξδου του subwoofer.
Έλεγχοσ των συνδέσεων
ΒΕΒΑΙΩΘΕΙΤΕ ΟΤΙ Η ΤΑΣΗ ΠΟΥ
ΑΝΑΓΡΑΦΕΤΑΙ ΕΠΑΝΩ ΣΤΟΝ ΕΝΙΣΧΥΤΗ
ΕΙΝΑΙ Ι∆ΙΑ ΜΕ ΑΥΤΗ ΤΗΣ ΠΡΙΖΑΣ ΣΤΗΝ
ΟΠΟΙΑ ΘΑ ΤΟΝ ΣΥΝ∆ΕΣΕΤΕ.
Πριν ακούσετε την ηχητική απδοση
του συστήµατσ σασ και πριν κάνετε
τισ τελικέσ ρυθµίσεισ, ελέγξτε πάλι τισ
συνδέσεισ. Συµβαίνει πολύ συχνά, να
εκφράζονται παράπονα απ τουσ
χρήστεσ τι δεν µπορούν να επιτύχουν
καλ ήχο σο και αν προσπαθήσουν,
για να αποδειχτεί τελικά τι είχαν
κάνει κάποιο λάθοσ στισ συνδέσεισ.
Έτσι, θα πρέπει να βεβαιωθείτε:
• Η φάση είναι σωστή – δεν θα πρέπει
να έχουν συνδεθεί αντίστροφα οι
πλοι στα ηχεία-δορυφρουσ (π.χ. ο
θετικσ στον αρνητικ πλο). Αν κάτι
είναι εκτσ φάσησ µπορεί ο ήχοσ να
είναι παραµορφωµένοσ και η ηχητική
εικνα ανακριβήσ και ασταθήσ ή να
είναι περιορισµένεσ οι χαµηλέσ
συχντητεσ (µπάσα) ή και τα δύο.
• τι έχετε συνδέσει σωστά τα
κανάλια (το δεξί (Right – R) στο δεξί
και το αριστερ (Left – L) στο
αριστερ). Τέτοιου είδουσ λάθοσ
σύνδεση µπορεί να έχει σαν
αποτέλεσµα, τα ργανα τησ
ορχήστρασ να ακούγονται σαν ήταν
τοποθετηµένα ανάποδα ή – ακµη
χειρτερα – ο ήχοσ σε ένα σύστηµα
οικιακού κινηµατογράφου να έρχεται
αντίθετα απ τη δράση στην οθνη.
Ενεργοποίηση και
απενεργοποίηση του ηχείου
Καλ είναι, το subwoofer να τίθεται σε
λειτουργία µετά απ τον ενισχυτή (ή
τον επεξεργαστή surround) και
αντίστοιχα να απενεργοποιείται πρώτο.
Ενεργοποίηση (“On”)
Βάζοντασ το διακπτη στη θέση “ON”,
ο ενισχυτήσ τίθεται σε λειτουργία (η
φωτεινή ένδειξη ανάβει σε πράσινο
χρώµα).
Απενεργοποίηση (“Off”)
ταν δεν χρησιµοποιείτε το subwoofer,
µπορείτε να το θέσετε εκτσ
λειτουργίασ (η φωτεινή ένδειξη θα
σβήσει).
Ρύθµιση του ήχου
Με κάποιεσ µικρέσ ρυθµίσεισ µπορείτε
να βελτιώσετε αισθητά τον ήχο του
συστήµατσ σασ.
Βάλτε το ρυθµιστικ τησ έντασησ στη
µεσαία θέση. Ρυθµίστε την κατάσταση
λειτουργίασ (“Mode”) ανάλογα µε το
µέσο αναπαραγωγήσ που
χρησιµοποιείτε:
Για πηγέσ αναπαραγωγήσ εικνασ [DVD,
LD (laser disc), βιντεοκασέτεσ κ.λπ.]
βάλτε το ρυθµιστικ στη θέση MOVIE.
Για πηγέσ ήχου [CD, MD (mini disc),
κασέτεσ ήχου κ.λπ.] βάλτε το
ρυθµιστικ στη θέση MUSIC.
Χρησιµοποιώντασ το ρυθµιστικ Level,
ρυθµίστε την ένταση στο επίπεδο που
θέλετε.
Φροντίδα του ηχείου
Μπορείτε να καθαρίσετε την καµπίνα
του subwoofer χρησιµοποιώντασ ένα
στεγν κοµµάτι ύφασµα. Εάν θέλετε να
χρησιµοποιήσετε κάποιο καθαριστικ
σε µορφή σπρέι, µην ψεκάσετε κατ’
ευθείαν στην καµπίνα αλλά στο
ύφασµα.
Μην τοποθετείτε αντικείµενα επάνω
στο ηχείο. ταν το subwoofer
λειτουργεί δηµιουργούνται κραδασµοί
και µπορεί τα αντικείµενα να πέσουν
και να προξενήσουν ζηµιά. Αποφύγετε
κυρίωσ το ενδεχµενο να χυθεί κάποιο
υγρ επάνω στο ηχείο (π.χ. κάποιο
ποτ ή το νερ απ κάποιο βάζο).
Αν δεν πρκειται να χρησιµοποιήσετε
το σύστηµα για µεγάλο χρονικ
διάστηµα, βγάλτε το subwoofer απ
την πρίζα.
Русский
Ограниченная
гарантия
Уважаемый покупатель!
Добро пожаловать в компанию B&W!
Данное изделие было разработано и
произведено в соответствии с
высочайшими стандартами качества.
Однако, при возникновении какой-либо
неисправности, компания B&W
Loudspeakers и её национальные
дистрибьютеры гарантируют
бесплатную починку (существуют
некоторые исключения) и замену
частей в любой стране, обслуживаемой
официальным дистрибьютером
компании B&W.
Данная ограниченная гарантия
действительна на период 5 (пять) лет
со дня приобретения изделия или же
2 (два) года для электронного
оборудования, включая акустические
колонки с усилителем.
Условия гарантии
1 Данная гарантия ограничивается
починкой оборудования. Затраты по
перевозке и любые другие затраты,
а также риск при отключении,
перевозке и инсталлировании
изделий не покрываются данной
гарантией.
2 Действие данной гарантии
распространается только на
первоначального владельца и не
может быть переданной другому
лицу.
3 Данная гарантия распространяется
только на те неисправности,
которые вызваны дефектными
материалами и/или дефектами при
производстве на момент
приобретения и не
распространяется:
а. на повреждения, вызванные
неправильной инсталляцией,
подсоединением или упаковкой,
б. на повреждения, вызванные
использованием, не
соответствующим описанному в
руководстве по применению, а
также неправильным обращением,
модифицированием или
использованием запасных частей,
не произведённых или не
одобренных компанией B&W,
в. на повреждения, вызванные
неиспавным или неподходящим
вспомогательным оборудованием,
г. на повреждения, вызванные
несчастными случаями, молнией,
водой, огнём, теплом, войной,
публичными беспорядками или же
любыми другими факторами, не
подпадающими под контроль
компании B&W и её официальных
дистрибьютеров,
17

д. на изделия, чей серийный номер
был изменён, уничтожен или
сделан неузнаваемым,
е. в случае, если починка или
модификации оборудования
производились лицом, не
уполномоченным компанией B&W.
4 Данная гарантия является
дополнением к национальным/
региональным законодательствам,
которым подчиняются дилеры или
национальные дистрибьютеры, то
есть при возникновении
противоречий, национальные/
региональные законодательства
имеют приоритетную силу. Данная
гарантия не нарушает Ваших прав
потребителя.
Как требовать гарантийную
починку
При необходимости получения
гарантийного обслуживания, выполните
следующие шаги:
1 Если оборудование используется в
стране приобретения, Вам
необходимо связаться с
уполномоченным дилером
компании B&W, где было
приобретено оборудование.
2 Если оборудование используется за
пределами страны приобретения,
Вам необходимо связаться с
национальным дистрибьютером
компании B&W в данной стране,
который предоставит Вам совет об
обслуживании оборудования. Вы
можете позвонить в компанию B&W
в Великобритании или же посетить
наш вебсайт для того, чтобы узнать
контактный адрес Вашего местного
дистрибьютера.
Для получения гарантийного
обслуживания, Вам необходимо
предоставить данный буклет,
заполненный Вашим дилером и с
поставленной им печатью в день
приобретения оборудования; или же
чек продажи или другое
доказательство владения
оборудованием и даты приобретения.
Руководство по
эксплуатации
ПРЕДУПРЕЖДЕНИЯ:
ВНИМАНИЕ: Убедитесь в том, что
вилка полностью вставлена в стенную
розетку или в розетку удлинителя, для
предотвращения поражения
электрическим током.
Во избежание пожара или удара током
не допускайте проникновения влаги
внутрь аппарата.
Придерживайтесь всех инструкций по
безопасности, помещённых на самом
аппарате.
Во избежание электрошока, не
открывайте корпус аппарата и не
вынимайте усилитель.
Внутри нет никаких элементов,
которые могут обслуживаться
пользователем. По всем вопросам,
связанным с обслуживанием аппарата,
обращайтесь к уполномоченному
дилеру компании B&W.
Убедитесь, что параметры сетевого
напряжения соответствуют указанным
на панели усилителя.
Сетевой предохранитель расположен
на задней панели блока усилителя. Для
замены следует брать предохранитель
того же типа и номинала.
Данный аппарат не требует
заземления.
Убедитесь в том, что аппарат
правильно вентилируется. Не
создавайте препятствий
проникновению воздуха к задней
панели усилителя. Не загораживайте и
не блокируйте отверстия на панели. Не
размещайте аппарат на полке, в
книжном шкафу или серванте, если
пространство позади аппарата
недостаточно хорошо вентилируется.
Введение
Большое спасибо за приобретение
Активного Сабвуфера AS™1
производства компании Bowers &
Wilkins.
Со времени основания в 1966 году,
компания Bowers & Wilkins всегда
ставила своей целью безупречное
воспроизведение звука.
Воодушевляемая в этом стремлении
своим основателем, ныне покойным
Джоном Бауэрсом, компания
вкладывала большие средства не
только в разработку новейших аудио
технологий, но и в постоянное изучение
особенностей современной музыки и
кино, чтобы использовать эти
технологии максимально эффективно.
Сабвуфер AS™1 был разработан для
использования в качестве
акустической системы домашнего
кинотеатра, а также для того, чтобы
повысить уровень баса в
двухканальной полнодиапазонной
аудиосистеме. Добавка сабвуфера к
Вашей аудиосистеме не только
позволяет расширить басовый
диапазон до наиболее низких частот,
но и сделать чище звучание среднего
диапазона, снижая низкочастотную
нагрузку на Ваши колонки.
Пожалуйста, внимательно прочитайте
данное руководство перед
использованием сабвуфера. Настройка
любой аудиосистемы требует
планирования и эксперимента для
достижения её наиболее эффективной
работы, и данное руководство поможет
Вам достичь наилучшего результата.
До подключения сабвуфера к
электросети необходимо ознакомиться
со всеми инструкциями по
безопасности и прочитать все
предупреждения.
Поместите это руководство в надёжное
место для будущих справок.
Акустические системы компании B&W
поставляются в более чем 60 стран
по всему миру, и наша компания
поддерживает международную сеть
тщательно отобранных и
высококвалифицированных
дистрибьюторов. Если у Вас возникнет
проблема, с которой не может
справиться дилер, наши
дистрибьюторы с удовольствием
придут Вам на помощь.
Распаковка (рис.1)
Ниже описан простейший способ
распаковки сабвуфера без
повреждений:
• Отогните верхние клапаны коробки и
переверните её вверх дном.
• Снимите коробку с аппарата.
Мы рекомендуем сохранить упаковку
для использования в будущем.
Размещение сабвуфера
Из-за того, что сабвуфер издает только
низкочастотные звуки, его размещение
не так критично, как размещение
полнодиапазонных колонок.
Определение источника звука гораздо
менее точно, и у Вас есть возможность
широкого выбора при размещении
сабвуфера для достижения наилучшего
эффекта. Однако, лучшие результаты
достигаются, если сабвуфер размещён
между колонками-сателлитами или
вблизи одной из них. При
использовании двух сабвуферов лучше
всего поместить каждый из них рядом
со своей колонкой.
Размещение сабвуфера позади
слушателей даже в системах
окружающего звука обычно ухудшает
формирование звукового образа,
однако может быть приемлемо, если
условия комнаты не допускают других
вариантов.
Если сабвуфер необходимо разместить
в замкнутом пространстве (например,в
построенной на заказ мебели), то это
пространство должно быть хорошо
вентилируемо для охлаждения
аппарата. Посоветуйтесь об этом со
своим дилером.
Электрические соединения
Во избежание повреждений
отсоедините питание всего аудио
оборудования на время осуществления
и проверки подсоединений.
Сабвуфер вводит и выводит сигналы
линейного уровня через разъёмы типа
RCA Phono, расположенные на его
задней панели.
Сабвуфер должен принимать сигнал от
усилителя и посылать
полнодиапазонный сигнал далее на
сателлиты. Непарный RCA вход
позволяет при необходимости подать
уже отфильтрованный НЧ сигнал на
усилитель сабвуфера.
18

Выбор метода подключения сабвуфера
зависит от стоящей перед ним задачи.
Руководствуйтесь следующими
принципами:
Домашний Кинотеатр (рис.2)
Подсоедините специализированный
RCA выход процессора домашнего
театра для сабвуфера к RCA входу
сабвуфера.
Подача сигнала высокого
уровня
(рис.3)
Стерео
Подсоедините мощные выходы
усилителя ко входам сабвуфера
высокого уровня, соблюдая
необходимую полярность
(положительный к положительному,
отрицательный к отрицательному).
Подсоедините cателлитные колонки к
соответствующим выходам сабвуфера
для колонок.
При этом способе соединения выход
сабвуфера продолжает питаться
от встроенного усилителя.
Домашний театр
Подсоедините мощные выходы левого и
правого фронтальных каналов A/V
усилителя/ресивера ко входам
сабвуфера высокого уровня.
Подсоедините cателлитные колонки к
соответствующим выходам сабвуфера
для колонок.
Проверка правильности
подключений
УБЕДИТЕСЬ В ТОМ, ЧТО
НАПРЯЖЕНИЕ, ПОКАЗАННОЕ НА
ПАНЕЛИ УСИЛИТЕЛЯ, СОВПАДАЕТ С
НАПРЯЖЕНИЕМ ЭЛЕКТРОСЕТИ.
Перед проверкой качества звучания
новой аудиосистемы и её точной
настройкой, дважды проверьте
правильность всех соединений.
Пользователи часто жалуются, что не
могут добиться хорошего звучания
системы вне зависимости от её
регулировки. Это, как правило,
вызвано неправильным подключением.
Убедитесь в том, что:
• Правильно выбрана фаза положительные клеммы не должны
быть подключены к отрицательным
клеммам колонок. Неправильный
выбор фазы приводит к размытости
звука с неустойчивым звуковым
образом или к нехватке басов, или к
тому и к другому вместе.
• Правый и левый каналы не
перепутаны. Это может привести к
тому, что, скажем, звучание
инструментов в оркестре покажется
зеркально отражённым или же, что
ещё более неприятно, звуки не будут
совпадать с происходящим на экране
телевизора.
Включение и выключение
питания
Мы рекомендуем включать сабвуфер
после питающего его усилителя или A/V
процессора, а выключать его, наоборот,
первым.
On:
При переключателе в этом положении,
усилитель постоянно остаётся
включённым и световой индикатор
светится зелёным цветом.
Off:
Когда сабвуфер не используется, Вы
можете его выключить. В этом
состоянии индикатор погашен.
Регулировка звука
Можно произвести небольшую
подстройку для достижения более
приятного звучания.
Установите регулятор громкости в
среднее положение. Установите режим
в соответствии с источником звука
следующим образом: Для DVD, LD,
видеокассет или других
видеоисточников - режим MOVIE.
Для CD, MD, аудиокассет или других
аудиоисточников – режим MUSIC.
Затем установите желаемую громкость
с помощью регулятора громкости.
Уход за сабвуфером
Удалять пыль с корпуса сабвуфера
можно сухой тканью. При пользовании
аэрозольными чистящими средствами
распыляйте их не прямо на корпус, а на
ткань.
Не используйте сабвуфер в качестве
столика. При включении сабвуфера
предметы, лежащие на нём, будут
дребезжать. В особенности избегайте
ставить на сабвуфер вазы с цветами,
стаканы с напитками и т.п., так как
пролитая жидкость может вызвать
повреждения аппарата.
Если система долго не используется,
сабвуфер необходимо отключить от
электросети.
Norsk
Tidsbegrenset
garanti
Kjære kunde, velkommen til B&W
Dette produktet er designet og produsert
under strenge kvalitetskrav. Skulle det
likevel oppstå feil på det, tilbyr B&W
Loudspeakers og våre internasjonale
distributører garanti som dekker
arbeidskostnader (unntak kan forekomme)
og byttedeler ved reparasjon i alle land
representert av en offisiell B&W distributør.
Denne tidsbegrensede garantien gjelder i
en periode på fem år fra kjøpedato. For
elektronikk og høyttalere med innebygget
forsterker er denne garantien på to år.
Betingelser og vilkår
1 Garantien er begrenset til reparasjon av
produktet. Hverken transport eller
andre kostnader i anledning reparasjon
vil bli dekket av garantien.
2 Garantien gjelder kun for produktets
kjøper, og kan ikke overføres til andre.
3 Garantien gjelder kun for feil som er
tilstede på produktet når det kjøpes,
og dekker ikke følgende:
a. skade som har oppstått ved
installasjon, tilkobling og utpakking,
b. skader som skyldes feilbruk,
uaktsomhet, modifikasjon av produktet
eller bruk av deler som ikke er godkjent
av B&W,
c. skader som skyldes bruk sammen med
andre produkter som ikke passer,
d. skader som skyldes ulykker, lyn, vann,
brann, offentlige uroligheter eller andre
forhold som er utenfor B&Ws kontroll,
e. på produkter hvor serienummer er blitt
forandret, slettet, fjernet eller blitt gjort
uleselig,
f. skader som skyldes service utført av
personer som ikke er godkjent av
B&W.
4 Denne garantien komplimenterer alle
forhandlere og distributørers
forpliktelser ved regionale/nasjonale
lover, og påvirker ikke dine lovbestemte
rettigheter som forbruker.
Hvordan kreve garantireparasjon
Hvis service skulle være nødvendig,
vennligst følge denne prosedyren:
1 Hvis produktet brukes i samme land
som det er kjøpt, kontakt forhandleren
hvor produktet er kjøpt.
2 Hvis produktet brukes i et annet land
enn det er kjøpt, kontakt den nasjonale
B&W forhandler i landet du bor i. Her
vil du få råd om hvor produktet ditt kan
repareres. Du kan ta kontakt med B&W
i England eller besøke vår hjemmeside
for kontaktinformasjon om din lokale
distributør.
19

For å bekrefte din garantirett, må denne
garantifolderen fremvises utfylt og med
gyldig stempel fra forhandleren du kjøpte
produktet. Garantien vil også gjelde ved
fremvisning av original salgsfaktura eller
annet bevis på eierskap og kjøpedato.
Bruksanvisning
ADVARSEL:
ADVARSEL: 120V versjonen av dette
produktet blir levert med egen kabel med
polarisert støpsel. For å unngå elektrisk
sjokk, bruk den store pluggen på støpselet
i kontaktens store hull.
Sørg for at støpselet er festet skikkelig i
kontakten eller skjøteledningen slik at
pluggene ikke er synlige.
Må ikke brukes i kontakter som blottlegger
nettstikkets metalldeler.
Pass på at den oppgitte nettspenningen på
baksiden av apparatet korresponderer med
den lokale nettspenning.
Hovedsikrings-holderen er på bakplaten av
forsterkeren. Ny sikring må være av samme
type og størrelse som den originale.
Dette apparatet trenger ikke å jordes.
Dette apparatet må kun brukes med
kjølefinnene vertikalt for å sikre tilstrekkelig
kjøling.
Denne subwooferen er så tung at den kun
bør flyttes eller bæres av minst to personer.
Sørg for at produktet får tilstrekkelig kjøling
og at luft får sirkulere fritt rundt
forsterkerpanelet på baksiden. Ikke dekk til
åpningene i panelet. Ikke plasser produktet
i rack, bokhyller, kabinetter eller skap hvis
ikke plassen bak produktet er godt
ventilert.
Apparatet må løftes – ikke skyves – da
føttene på apparatet kan løsne fra
kabinettet og forårsake skade.
Vær forsiktig så du ikke setter apparatet på
dine egne bein.
Svenska
Begränsad garanti
Välkommen till B&W!
Denna produkt har tillverkats enligt högsta
kvalitetsstandard. Om något mot förmodan
skulle gå sönder garanterar B&W och dess
återförsäljare att utan kostnad (vissa
undantag finns) reparera och byta ut
reservdelar i alla länder som har en officiell
B&W-distributör.
Denna begränsade garanti gäller i fem år
från inköpsdatum, och i två år för
elektronikprodukter, inklusive högtalare med
inbyggda förstärkare.
Villkor
1 Garantin gäller endast reparation. Varken
transport- eller installationskostnader
eller andra kostnader täcks av garantin.
2 Garantin gäller endast ursprungliga
köparen och överförs inte om
produkten säljs i andra hand.
3 Garantin täcker inga andra skador än
reparation av felaktiga material eller
komponenter eller felaktigt arbete utfört
före inköpstillfället. Garantin täcker
således inte:
a. skador som uppstått vid felaktig
installation eller uppackning,
b. skador som uppstått vid annat bruk än
det som uttryckligen beskrivs i
instruktionsboken, till exempel
försumlighet, modifiering eller
användande av delar som inte
tillverkats eller godkänts av B&W,
c. skador som uppstått på grund av
kringutrustning,
d. skador som uppstått på grund av
blixtnedslag, eldsvåda, översvämning,
krig, upplopp eller andra händelser
som rimligtvis inte kan kontrolleras av
B&W och dess distributörer,
e. produkter som saknar eller har
ändrade serienummer,
f. produkter som reparerats eller
modifierats av icke-godkänd person.
4 Denna garanti är ett komplement till
nationella lagar och bestämmelser och
påverkar inte kundens lagliga
rättigheter och skyldigheter.
Så använder du garantin
Gör så här om du behöver använda dig av
garantin:
1 Om produkten används i inköpslandet
kontaktar du den auktoriserade B&Whandlare som du köpte produkten av.
2 Om produkten används i ett annat land
kontaktar du den nationella
distributören som kan ge dig
instruktioner om var du kan få
produkten reparerad. Om du vill ha
information om vem distributören är
kan du ringa till B&W i Storbritannien
eller besöka vår hemsida.
För att garantin skall gälla behöver du visa
upp detta häfte, ifyllt och stämplat av din
handlare vid köptillfället. Faktura eller annat
ägarbevis med information om
inköpstillfället kan också behövas.
Bruksanvisning
VARNINGAR:
VARNING: 120V versionen av denna
produkt har en polariserad kontakt. Var
noggrann att sätta in kontakten på ett
riktigt sätt för att undvika elektrisk stöt.
Se till att kontakten är helt intryckt i
strömuttaget för att undvika kontakt med
strömförande delar.
För att undvika eldsvåda och elektriska
stötar, får högtalaren inte utsättas för regn
eller fukt.
Lägg märke till all varningstext på
högtalaren. Avlägsna ej högtalarhöljet eller
demontera förstärkardelen från högtalarens
baksida då detta kan medföra elektriska
stötar. Högtalaren innehåller inga delar som
kan repareras av lekman. All service skall
utföras på av B&W auktoriserad verkstad.
Undvik elektriska stötar genom att alltid
tillse att stickkontakten sitter korrekt i
vägguttaget eller förlängningssladden.
Kontrollera att högtalarens märkspänning
överensstämmer med spänningen i
vägguttaget.
Huvudsäkringen är placerad i
förstärkardelen. Ersättning får endast ske
med samma typ och värde som originalet
och bytas på auktoriserad B&W verkstad.
Högtalaren behöver ej anslutas till jordat
vägguttag.
Se till att förstärkardelen får ordentlig
luftväxling genom att ej täppa till
ventilationshålen. Kylflänsarna måste
orienteras stående (vertikalt).
Se till att produkten har bra ventilation, den
bakre förstärkarpanelen måste ha möjlighet
till fri luftcirkulation. Placera ej produkten i
ett skåp eller annat utrymme som inte har
en öppen baksida med god ventilation till
övriga rummet.
Högtalaren är tung och skrymmande och
bör därför hanteras av minst två personer.
Baxa inte högtalaren på sina spikes efter
som de koniska fötterna då kan lossna från
högtalaren och orsaka skada på
underlaget.
Se till att du inte får fötterna i kläm under
högtalarens spikes. Spik i foten kan vara
allvarligt!
20

Suomi
Takuuehdot
Tervetuloa B&W:n pariin.
Tämä tuote on valmistettu noudattaen
korkealuokkaisia laatustandardeja, jos
kuitenkin jotain vikaa ilmenee B&W:n
tehdas ja virallinen jälleenmyyjä ovat
valmiita huoltamaan tuotteen.
Takuu on voimassa 5 vuotta ostopäivästä
lähtien. Kaiuttimien vahvistimien
elektroniikalla on kahden vuoden takuu.
Takuuehdot
1 Takuu kattaa tuotteen korjauksen.
Takuu ei vastaa kuljetuksista tai muista
kuluista, eikä kuljetuksesta johtuvista
vaurioista.
2 Takuu on voimassa ainoastaan
tuotteen alkuperäisellä ensiostajalla.
3 Takuu vastaa viallisista materiaaleista ja
työstä takuuajan puitteissa, mutta ei
vastaa:
a. Jos tuote on huolimattomasti pakattu
tai väärin kytketty.
b. Takuu ei vastaa jos tuotteen ohjeita ei
ole noudatettu, tuotetta on muuteltu,
huolimattomasti käytetty tai
tuotteeseen on asennettu muita kuin
B&W:n valmistamia osia.
c. Takuu ei vastaa jos on käytetty
virheellisiä, sopimattomia osia.
d. Takuu ei kata onnettomuuksista,
salamista, vesivahingoista, tulipaloista,
sodista, säistä tai muista ulkoisista
seikoista johtuneista vaurioista, mihin
B&W tai tuotteen jälleenmyyjä ei pysty
vaikuttamaan.
d. Takuu ei vastaa tuotteesta, jos
sarjanumeroa on muuteltu tai poistettu.
f. Takuu ei vastaa jos huoltoa on
suorittanut joku muu kuin virallisen
jälleenmyyjän huolto.
4. Tämä takuu täydentää kansallisia/
alueellisia jälleenmyyjän
lainvelvollisuuksia eikä vaikuta sinun
perusoikeuksiisi asiakkaana.
Kuinka toimia jos tuote tarvitsee
takuuhuoltoa
Jos tuotteesi tarvitsee takuuhuoltoa toimi
seuraavasti:
1 Jos laite on käytössä maassa josta
tuote on ostettu, ota yhteyttä B&W:n
viralliseen jälleenmyyjään, liikkeeseen
mistä olet laitteen ostanut.
2 Jos laite on käytössä muualla kuin
maassa mistä tuote on ostettu, ota
yhteyttä B&W:n paikalliseen viralliseen
jälleenmyyjään, josta saat neuvoa
missä saat laitteesi huollettua. Voit
myös soittaa B&W:lle Englantiin tai
käydä tutustumassa B&W:n
internetsivuilla saadaksesi selville
olinpaikkasi virallisen jälleenmyyjän.
Saadaksesi takuuhuoltoa tulee sinun täyttää
tämä takuukirja ja saada jälleenmyyjältäsi
ostopäivästä leima. Vaihtoehtoisesti
tarvitset jälleenmyyjältä saamasi
alkuperäisen ostotodistuksen tai kuitin,
mistä ilmenee ostopäivä.
Omistajan kasikirja
VAROITUKSIA:
VAROITUS: 120V:n versiot tuotteesta on
varustettu virtakaapelilla, jossa on
polarisoitu pistoke. Välttääksesi sähköiskua,
sovita pistokkeen leveä pää leveään
reikään.
Varmista, että pistoke on työnnetty pohjaan
pistorasiassa tai haaroitusrasiassa.
Välttääksesi tulipaloa tai sähköiskua, älä
altista tätä tuotetta sateelle tai kosteudelle.
Huomioi kaikki itse tuotteessa olevat
varoitukset.
Välttääksesi sähköiskua, älä avaa tuotetta
tai poista vahvistinta takapaneelista. Sisällä
ei ole mitään osia, joita käyttäjä voisi itse
vaihtaa. Ota kaikissa huoltoasioissa yhteyttä
valtuutettuun B&W-jälleenmyyjään.
Varmista, että vahvistimen paneelissa
ilmoitettu jännite on sama kuin verkosta
tuleva.
Pääsulakepesä sijaitsee vahvistimen
takapaneelissa. Korvaavan sulakkeen täytyy
olla samaa tyyppiä ja arvoiltaan sama, mitä
tuotteeseen on merkitty.
Tuote ei vaadi maadoitusta.
Varmista, että tuote saa asianmukaisen
tuuletuksen. Älä estä ilmankiertoa
vahvistinpaneelin takana. Älä peitä tai sulje
paneelissa olevia aukkoja. Älä käytä
tuotetta laitetelineessä, kirjahyllyssä,
kaapistossa tahi muussa hyllykössä, jossa
tuotteen taakse ei jää riittävästi tilaa.
Varmista, ettei maton alla kulje kaapeleita
sellaisessa kohtaa, että tuotteen alustapiikit
voisivat vahingoittaa niitä.
Älä keinuta tuotetta piikkien varassa, sillä
tämä voi johtaa niiden irtoamiseen kotelosta
ja aiheuttaa vaurioita.
Ole varovainen, ettet vahingoita itseäsi
siirrellessäsi tuotetta alustapiikkien ollessa
asennettuna.
21222324252627


AS1
Description
Drive unit
System frequency range
System frequency response
Amplifier
Dimensions
Internal Volume
Net Weight
Active vented-box system
1x ø165mm (6.5in) cone bass
-6dB 27Hz-100Hz Music/Movie mode
±3dB 34Hz to 75Hz on reference axis Movie mode
±3dB 31Hz to 75Hz on reference axis Music mode
Power output 85W continuous
Input impedance 100kΩ
Signal/Noise 94dB
Functions Input level control
Music/Movies switch
Inputs Line In (RCA/Phono)
Speaker level In (Spring Clips)
Outputs Line Out (RCA/Phono)
Speaker Level Out (Spring Clips unfiltered)
Height: 378mm (14.9in)
Width: 215mm (8.5in)
Depth: 385mm (15.2in)
16.5 litres (5.5 cu ft)
11kg (24.2 lb)
 Loading...