

Page 1

Manual
683 S2
684 S2
Page 2

Welcome and thank you for choosing Bowers & Wilkins.
Our founder, John Bowers, believed that imaginative design,
innovative engineering and advanced technology were keys that
could unlock the enjoyment of audio in the home. His belief is one
that we continue to share and inspires every product we design.
This is a high performance product that rewards thoughtful
installation, so we suggest that you take some time to read this
manual before you begin. Continue on page 4
Bienvenue et merci d’avoir choisi Bowers & Wilkins. Notre
fondateur, John Bowers, était persuadé qu’une conception
imaginative, des innovations en terme d’ingénierie et des
technologies parmi les plus avancées, étaient les clés ouvrant les
portes du plaisir de l’écoute à domicile. Ce qu’il croyait fait partie
de ce que nous continuons encore à partager et se retrouve dans
tous les produits que nous concevons aujourd’hui.
Vous disposez d’un produit dont les hautes performances
méritent une installation soignée, par conséquent nous vous
suggérons de consacrer un peu de temps à lire ce manuel avant
de commencer à l’utiliser. Rendez vous à la page 10
Willkommen bei Bowers & Wilkins. Der Firmengründer John
Bowers war der Meinung, dass ein wunderschönes Design,
eine innovative Konstruktion und ausgeklügelte Technologien
die Schlüssel zu Audio-Entertainment der Extraklasse in Ihrem
Zuhause sind. Wir teilen seine Meinung und jedes von uns
entwickelte Produkt basiert darauf.
Dies ist ein erstklassiges Produkt, dessen Installation und
Setup gut durchdacht werden müssen. Wir empfehlen daher, sich
ein wenig Zeit zu nehmen und diese Bedienungsanleitung vor der
Installation zu lesen. Fortsetzung auf Seite 16
Benvenuti e grazie per aver scelto un prodotto Bowers
& Wilkins. Il nostro fondatore, John Bowers, era convinto che
design attraente, capacità d’innovare e tecnologie all’avanguardia
fossero fattori vincenti per la riproduzione audio domestica.
Le sue idee sono ancor oggi condivise da noi tutti e fonte
d’ispirazione per ogni nuovo prodotto che realizziamo.
Questo modello è un diffusore di alte prestazioni che merita di
essere installato in maniera scrupolosa. Vi suggeriamo pertanto di
leggere attentamente questo manuale prima di iniziare. Continua
a pagina 28
Bienvenido y gracias por elegir Bowers & Wilkins.
John Bowers, nuestro fundador, estaba rmemente convencido
de que el diseño imaginativo, la ingeniería innovadora y la
tecnología avanzada eran las claves a la hora de llevar el disfrute
del sonido a la intimidad del hogar. Una creencia que seguimos
compartiendo y que inspira todos y cada uno de los productos
que diseñamos.
Si se instala adecuadamente, tanto la 683 S2 como la 684 S2
es un producto que ofrece unas prestaciones muy elevadas,
por lo que le sugerimos que antes de ponerse manos a la obra
dedique un poco de su tiempo a leer este manual. Continúa en
la página 22
Welkom en dank voor de aanschaf van een product van
Bowers & Wilkins. Onze oprichter John Bowers geloofde
in vindingrijke ontwerpen: innovatieve en vooruitstrevende
technologie vormen de kern waarmee plezier met muziek thuis
kan worden gerealiseerd. Deze visie is nog altijd ons uitgangspunt
en vormt de inspiratie voor elk product dat we ontwikkelen.
Dit is een hoogwaardig product dat een zorgvuldige installatie
verdient, daarom raden we u aan de tijd te nemen deze handleiding
te lezen voordat u begint. Lees verder op pagina 34
Page 3
Добро пожаловать и благодарим вас за приобретение
акустики компании Bowers & Wilkins. Наш основатель, Джон
Бауэрс, верил в то, что творческий подход в проектировании,
новаторская конструкция и передовые технологии смогут
открыть людям путь к подлинному звучанию в доме. Мы
продолжаем разделять его веру, и она вдохновляет нас при
проектировании всех новых продуктов.
Эти акустические системы способны на высококачественное
воспроизведение звука, поэтому они заслуживают вдумчивого
подхода к установке, и мы советуем вам уделить некоторое
время на изучение этой инструкции, прежде чем приступить к
прослушиванию. Продолжение на стр. 40
欢迎并感谢您选择Bowers & Wilkins。我们公司的创办人John
Bowers先生相信具有想象力的设计、创新的工程学设计和先进
的技术是开启家庭音响娱乐大门的重要元素。我们依然坚持着他
的信念,并赋予我们所有产品设计灵感。
这是一款高性能产品,在妥当安装后您将获得极佳的音效,
因此我们建议您在开始安装前花一些时间仔细阅读本手册。第46
页继续
Bowers & Wilkins製品をお買い上げいただき、ありがとうご
ざいます。Bowers & Wilkinsの創業者であるJohn Bowersは、
創意に富んだデザインと革新的な工業技術、そして先進技術が、
家庭でもオーディオを充分に楽しむ鍵であると信じていました。現
在でも彼の信念はBowers & Wilkinsで共有されており、この信
念はBowers & Wilkinsが設計するすべての製品に命を吹き込ん
でいます。
お買い上げいただいたスピーカーは、念入りな設置を行う価値
のある、非常に高性能な製品です。ご使用になる前に、このマニュア
ルをお読みください。52ページに続く
www.bowers-wilkins.com
Page 4
ENGLISH
1. Unpacking
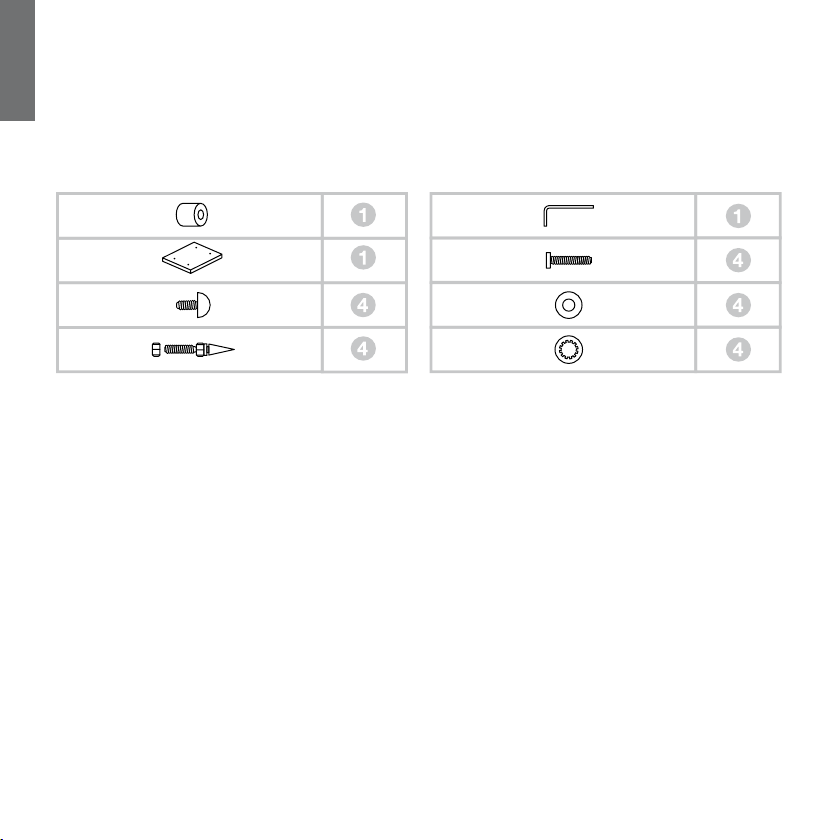
Carton Contents
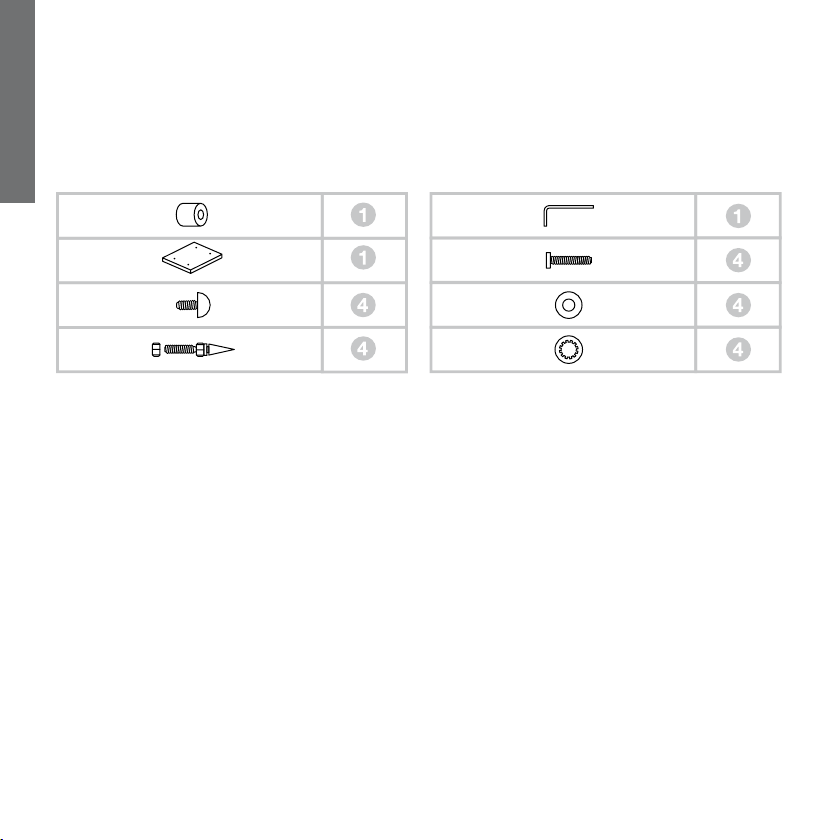
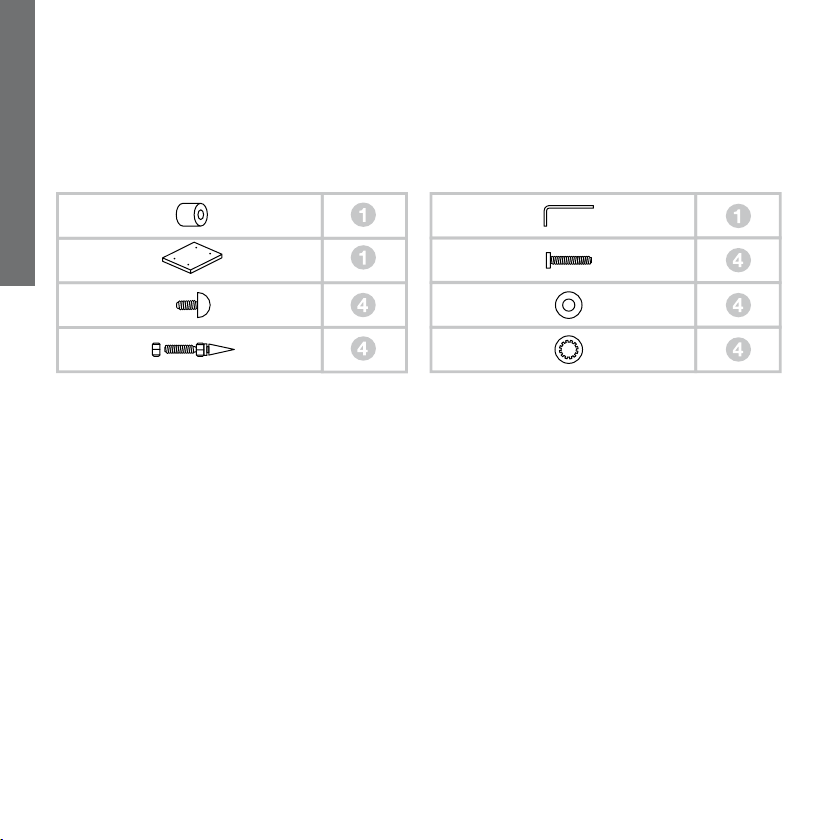
Check in the carton for:
1 Two-part foam plug
1 Plinth
1 Accessory pack containing
4 M4 spike feet
4 Rubber feet
4 Lock nuts (10mm across ats)
1 Accessory pack containing
1 Allen key
4 M6 x 35mm screws
4 Plain washers
4 Shakeproof washers
4
Environmental Information
This product complies with international directives, including but
not limited to:
i. the Restriction of Hazardous Substances (RoHS) in
electrical and electronic equipment,
II. the Registration, Evaluation, Authorisation and restriction of
CHemicals (REACH)
iii. the disposal of Waste Electrical and Electronic Equipment
(WEEE).
Consult your local waste disposal authority for guidance on how
properly to recycle or dispose of this product.
Page 5
2. Positioning
ENGLISH
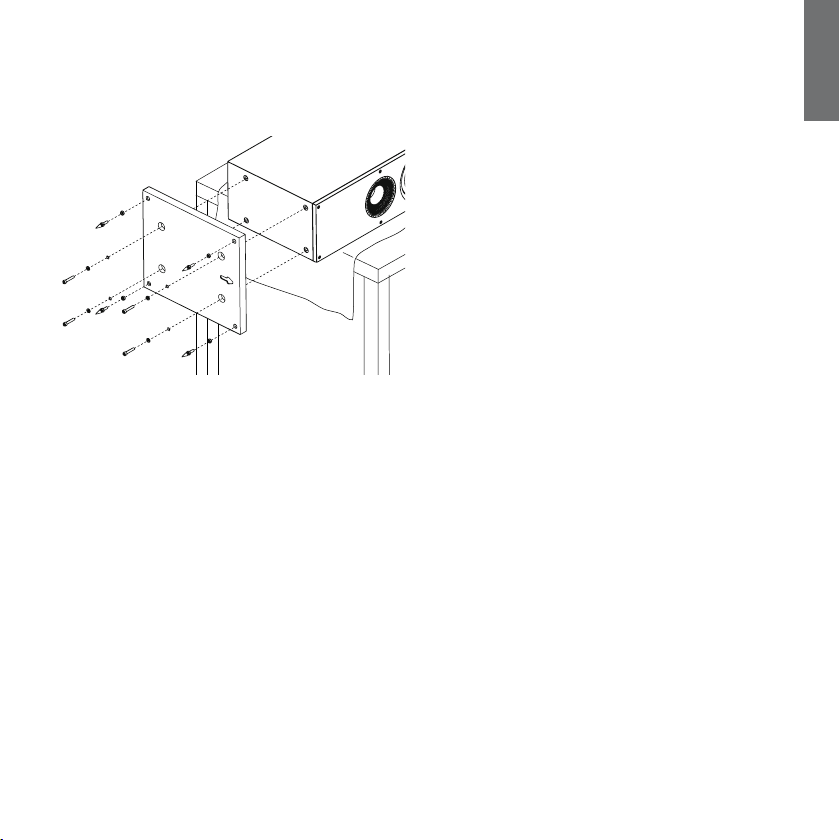
Speaker Installation
The speakers are intended to be oor mounted only. It is
important to ensure that the speakers stand rmly on the oor
using the spike feet supplied whenever possible. In addition, t
the plinth for proper stability.
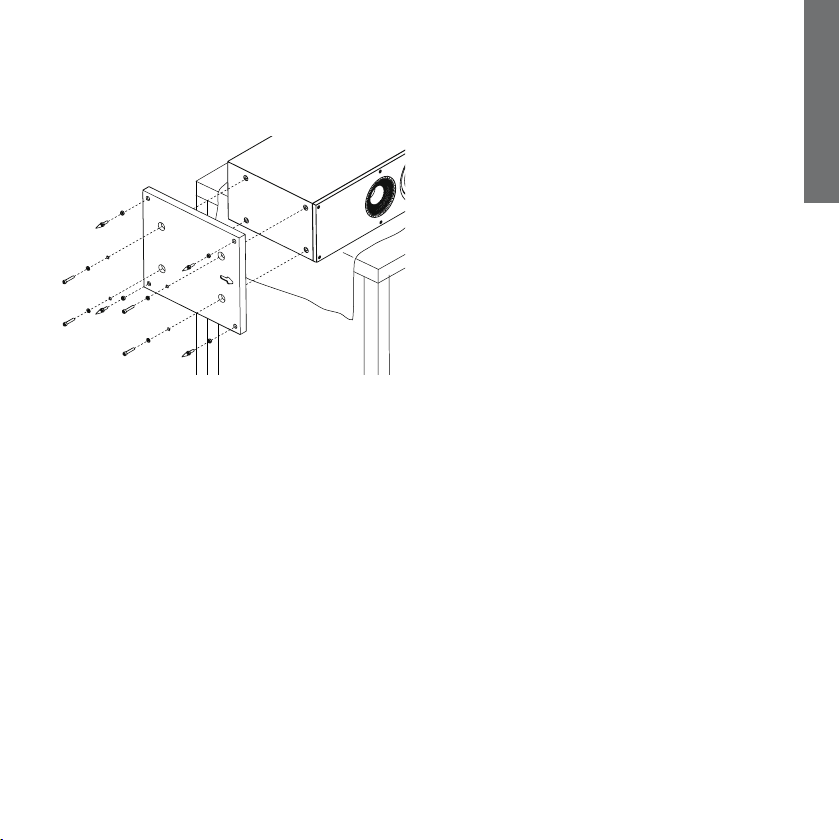
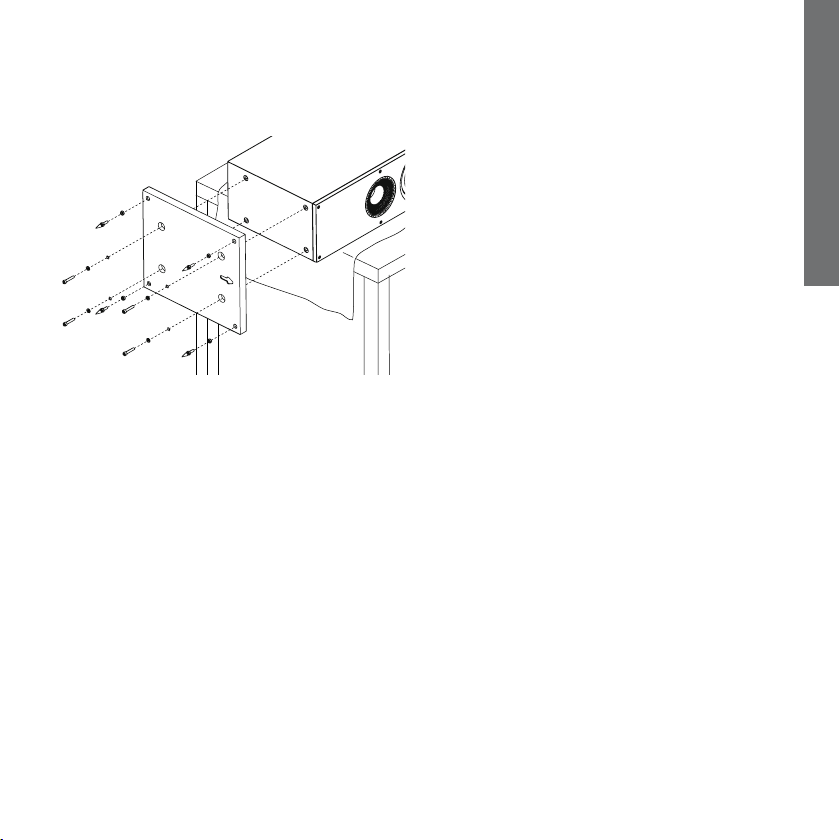
You may attach the plinth during the unpacking process, following
the diagrams on the top ap of the carton. Alternatively, you may
attach it after the product has been fully unpacked, by covering
a suitable support such as a table with a cloth and laying the
speaker on its side with the base of the cabinet overhanging the
support. Align the plinth with its attachment holes in the underside
of the cabinet, ensuring that the arrow on the underside of the
plinth points forwards. Secure the plinth using the screws and
washers supplied. Fit the shakeproof washers between the plain
washers and the screw heads. Tighten the screws using the Allen
key supplied.
The spike feet are designed to pierce carpet and rest on the oor
surface. Initially, screw the lock nuts onto the spikes enough to
leave the nuts oating just above the carpet when the spikes
are resting on the oor beneath. Screw the spikes fully into the
threaded inserts in the plinth. If the cabinet rocks when placed
on the oor, unscrew the two spikes that do not touch the oor
until the cabinet rests rmly without rocking. Finally, lock the nuts
against the cabinet. It may be more convenient to t and adjust
the spike feet after speaker positioning has been optimised.
If there is no carpet and you wish to avoid scratching the oor
surface, use either a protective metal disc (a coin perhaps)
between the spike and the oor, or use the supplied rubber feet.
Fit the rubber feet and level the cabinet in the same manner as
with the spike feet.
5
Page 6
ENGLISH
5.1 Channels 6.1 Channels 7.1 Channels
Stereo
0.5m
110° - 130°
~40°
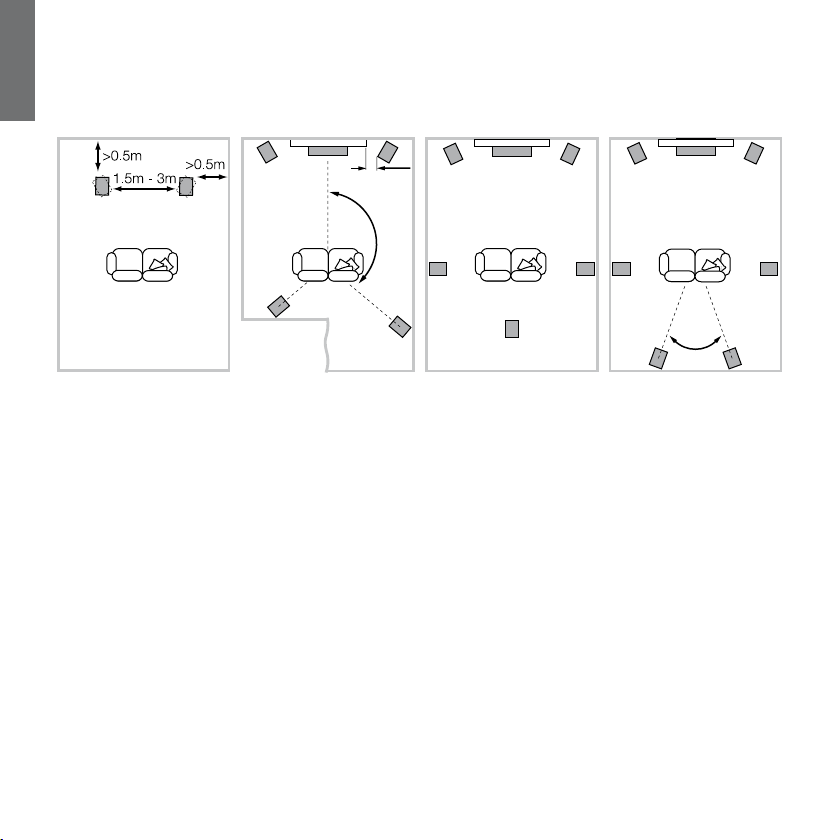
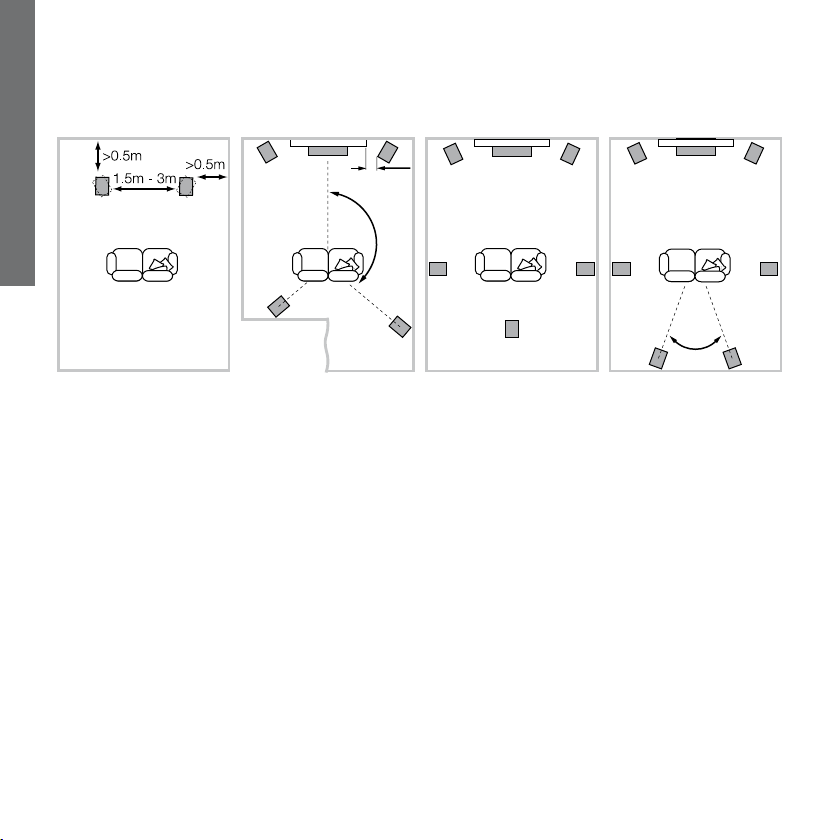
Speaker Positioning
Adjustment of speaker position following initial installation
will probably further improve the sound quality and is usually
worthwhile.
In either stereo or home theatre installations, try to ensure that the
immediate surroundings of each speaker are similar in acoustic
character. For example, if one speaker is adjacent to bare walls
while the other is adjacent to soft furnishings and curtains, both
the overall sound quality and the stereo image are likely to be
compromised.
Conventional Stereo Systems
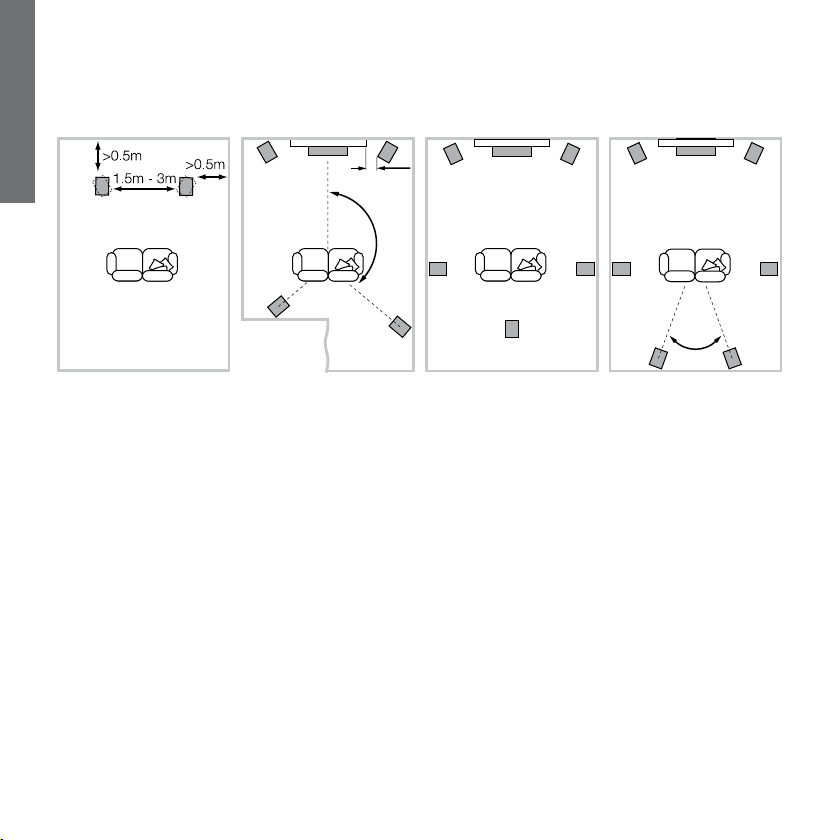
To begin with, the speakers should be positioned between 1.5m
and 3m apart at two corners of an equilateral triangle completed
by the listening area at the third corner. The speakers should be
approximately 0.5m away from the back wall, and at least 0.5m
away from any side walls (above).
6
Home Theatre Systems
If the speakers are to be used for the front channels in a home
theatre system, they should be placed closer together than for
2-channel audio, because the surround channels tend to widen
the image. Positioning the speakers within approximately 0.5m
of the sides of the screen will also help keep the sound image
in scale with the visual image. As with conventional stereo
positioning, the speakers should ideally be at least 0.5m away
from any side walls. If the speakers are preferred placed against
the back wall and this location results in over emphasised bass,
see the Fine Tuning section of this manual for information on
using the foam plugs.
Stray Magnetic Fields
The speaker drive units create stray magnetic elds that extend
beyond the boundaries of the cabinet. We recommend you keep
magnetically sensitive articles (CRT television and computer
screens, computer discs, audio and video tapes, swipe cards and
the like) at least 0.5m from the speaker. LCD, OLED and plasma
screens are not affected by magnetic elds.
Page 7
3. Connections
ENGLISH
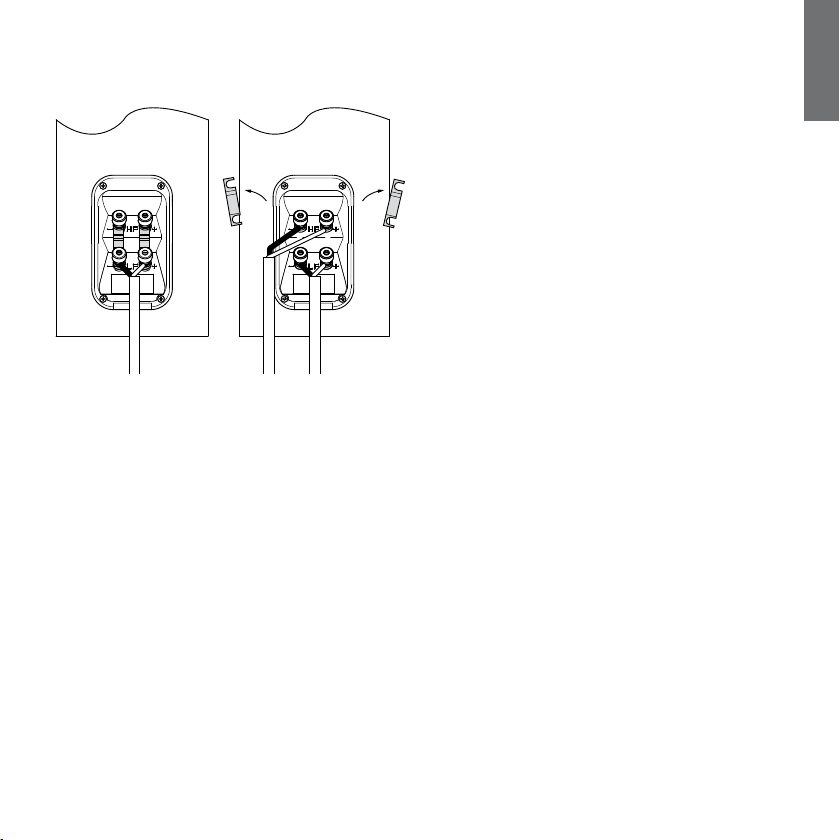
All connections should be made with the audio equipment
switched off.
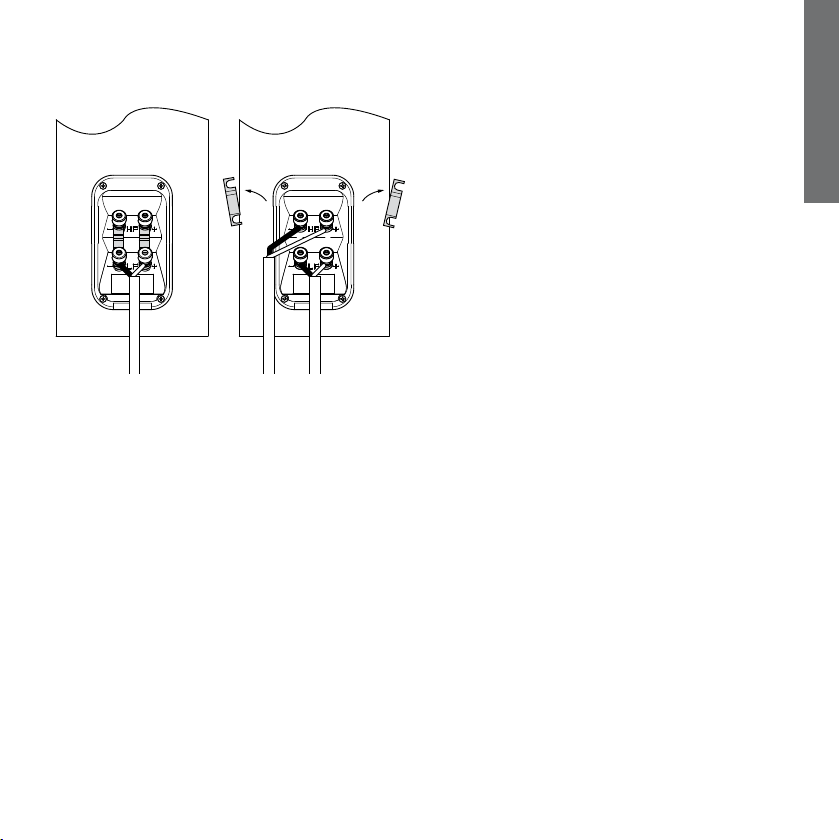
There are 2 linked pairs of terminals on the back of the
speaker. For conventional connection (above left), the
terminal links should remain in place (as delivered) and
just one pair of terminals connected to the amplier. For
bi-wire connection (above right), the terminal links should
be removed and each pair of terminals connected to the
amplier independently. Bi-wiring can improve the resolution
of low-level detail.
Ensure that the positive terminals on the speaker (marked
+ and coloured red) are connected to the positive output
terminal on the amplier and the negative terminals on the
speaker (marked – and coloured black) are connected to the
negative output terminal on the amplier. Incorrect connection
can result in poor imaging and loss of bass.
Ask your dealer for advice when selecting speaker cable.
Keep its total impedance below the maximum recommended
in the speaker specication and use a low inductance cable
to avoid attenuation of high frequencies.
7
Page 8
ENGLISH
4. Fine Tuning
Before ne tuning, make sure that all the connections in the
installation are correct and secure.
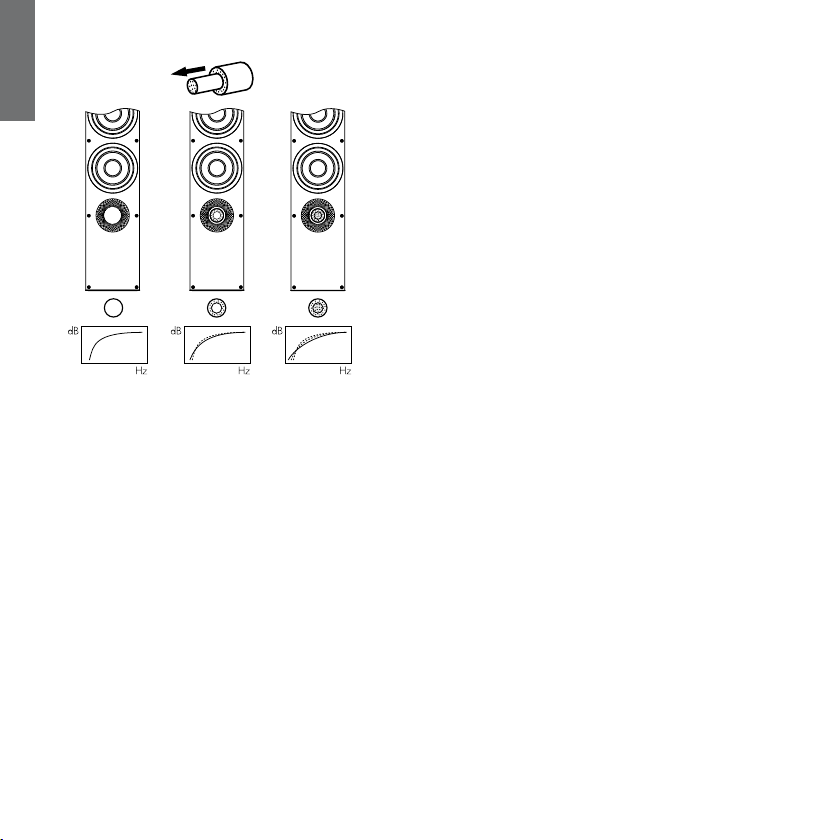
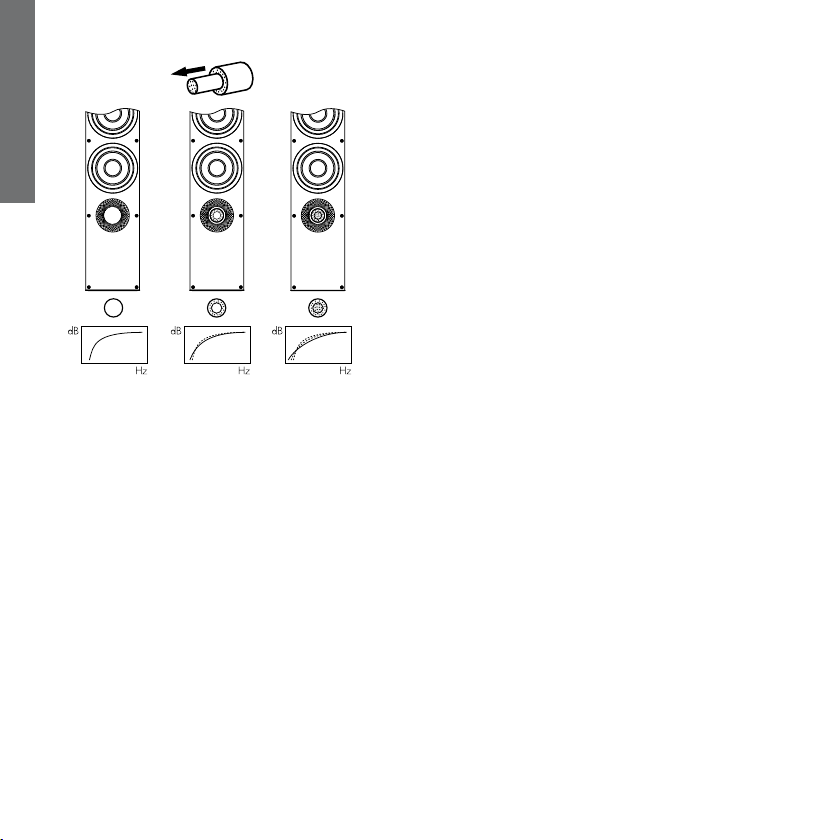
Moving the speakers further from the walls will generally
reduce the volume of bass. Space behind the speakers will
also help to create an aural impression of depth. Conversely,
moving the speakers closer to the walls will increase the
volume of bass. If you want to reduce the volume of bass
without moving the speakers further from the wall, t the
foam plugs or, for less severe bass reduction, the foam rings
in the port tubes (above).
If the bass seems uneven with frequency this will most
probably be due to resonance modes in the listening room.
Even small changes in the position of the speakers or the
listening position can have a profound effect on how these
resonances affect the sound. Try moving the listening position
or locating the speakers along a different wall. The presence
and position of large pieces of furniture can also inuence
resonance modes.
8
If the central image lacks focus, try moving the speakers
closer together or angling them inward so that they point at a
location just in front of the listening position.
If the sound is too bright, increasing the amount of soft
furnishing in the room (heavier curtains for example) may help
balance the sound. Conversely, reducing the amount of soft
furnishing may help brighten a dull sound.
Ensure that the speaker stands rmly on the oor. Use carpet
piercing spikes if appropriate and adjust them to take up any
unevenness.
Page 9

5. Running In 6. Aftercare
ENGLISH
The performance of the speaker will change subtly during the
initial listening period. If the speaker has been stored in a cold
environment, the damping compounds and suspension materials
of the drive units will take some time to recover their correct
mechanical properties. The drive unit suspensions will also loosen
up during the rst hours of use. The time taken for the speaker to
achieve its intended performance will vary depending on previous
storage conditions and how it is used. As a guide, allow up to
a week for the temperature effects to stabilise and 15 hours of
average use for the mechanical parts to attain their intended
design characteristics.
However, longer run-in periods (as long as a month) have
been reported and there is evidence to suggest that this has
little to do with the speaker changing and more to do with the
listener getting used to the new sound. This is especially so with
highly revealing speakers such as these, where there may be a
signicant increase in the amount of detail compared with what
the listener has previously been used to; the sound may at rst
appear too “up front” and perhaps a little hard. After an extended
period of time, the sound will seem to mellow, but without losing
clarity and detail.
The cabinet surfaces will usually only require dusting. If you wish
to use an aerosol or other cleaner, apply the cleaner onto the
cloth, not directly onto the product and test a small area rst,
as some cleaning products may damage some of the surfaces.
Avoid products that are abrasive, or contain acid, alkali or
antibacterial agents. Marks on the paint surface may be removed
with a dilute perfume-free soap solution. Remove any remaining
streak marks by spraying with a proprietary glass cleaner and
lightly wiping dry with a microbre cloth. Do not use cleaning
agents on the drive units and avoid touching them as damage
may result.
9
Page 10
1. Déballage
FRANÇAIS
Vérication du contenu de l’emballage
Vériez que le carton contienne bien :
1 tampon en mousse en deux parties
1 support de sol
1 carton d’accessoires contenant :
4 pieds-pointes M6
4 pieds en caoutchouc
4 écrous de blocage (10 mm)
1 carton d’accessoires contenant :
1 clé Allen
4 vis M6 x 35 mm
4 rondelles pleines
4 rondelles autobloquantes
10
Information sur l’environnement
Ce produit est conforme avec les directives internationales, y
compris mais sans se limiter à:
i. la limitation des substances dangereuses (RoHS) dans les
équipements électriques et électroniques,
ii. l’enregistrement, l’évaluation, l’autorisation et la restriction
des substances chimiques (REACH)
iii l’élimination des déchets électriques et électroniques
(WEEE).
Consultez votre organisme local d’élimination des déchets pour
des conseils sur la façon appropriée de recycler ou de jeter ce
produit.
Page 11
2. Positionnement
FRANÇAIS
Installation des enceintes
Les enceintes sont uniquement prévues pour être directement
posées au sol. Il est important de s’assurer qu’elles sont
parfaitement équilibrées sur le sol, en utilisant les pointes de
découplage fournies partout où cela est possible. De plus, xez le
support de sol (socle) pour une meilleure stabilité.
Vous pouvez xer le socle pendant la phase de déballage,
en suivant les indications situées sur la partie supérieure du
carton. Sinon, vous pouvez xer le socle une fois l’enceinte
complètement déballée en prenant soin d’intercaler un tissu épais
sur un support adéquat, comme par exemple une table. Couchez
l’enceinte sur le coté en faisant légèrement déborder la base de
l’enceinte de la table pour xer le socle. Alignez le socle avec
ses trous de xation présents à la base du coffret de l’enceinte,
en vous assurant que la èche gravée sur le support pointe bien
vers l’avant de l’enceinte. Fixez le socle en utilisant les rondelles
et les vis fournies. Placez les rondelles autobloquantes entre les
rondelles pleines et les vis. Serrez soigneusement chaque vis
avec la clé Allen fournie.
Les pieds-pointes fournis sont conçus pour transpercer la
moquette et prendre directement contact sur le sol en dur.
Avant de les mettre en place, vissez les écrous en les laissant
libres, de telle manière qu’ils afeurent la moquette une fois
les pointes correctement mises en contact avec le sol en dur.
Vissez complètement les pointes dans les inserts letés du
support de sol. Si l’enceinte n’est pas totalement stable sur le
sol, dévissez une ou plusieurs pointes jusqu’à ce que l’enceinte
soit parfaitement équilibrée sur le sol. Une fois cela assuré,
vissez complètement chaque écrou de blocage vers la base
de l’enceinte. Il est conseillé de garantir l’équilibrage parfait de
chaque enceinte seulement après avoir précisément déterminé sa
position dans la pièce d’écoute.
11
Page 12
FRANÇAIS
5.1 Channels 6.1 Channels 7.1 Channels
Stereo
0.5m
110° - 130°
~40°
Choix de la position
Le réglage de la position des enceintes au moment de leur
installation est susceptible d’améliorer grandement les résultats
sonores, et constitue donc une première étape essentielle.
Qu’il s’agisse d’une installation stéréophonique ou multicanal
Home Cinema, faites en sorte que l’environnement acoustique
de chaque enceinte soit le plus identique possible, dans son
caractère sonore. Par exemple, si une des enceintes est placée
près d’un mur lisse et nu, tandis que l’autre se trouve proche
d’épais tissus et tapis, la qualité et l’équilibre stéréophonique
naux risquent fort d’être compromis.
Systèmes stéréophoniques conventionnels
Comme base de départ, placer les deux enceintes éloignées
entre 1,5 et 3 mètres l’une de l’autre, formant ainsi les deux
angles d’un triangle équilatéral dont le troisième angle sera la
position d’écoute privilégiée. Les enceintes seront également
éloignées d’environ 50 centimètres du mur arrière et des murs
latéraux (ci-dessus).
12
Systèmes Home Cinema
Si les enceintes sont utilisées en tant qu’enceintes frontales d’un
système Home Cinema, elles doivent être plus rapprochées
l’une de l’autre que dans le cas d’une installation stéréophonique
traditionnelle, car les enceintes Surround arrière ont tendance
à agrandir l’image sonore générale. Positionnez les deux
enceintes à environ 0,50 mètre de chaque côté de l’écran, an
de conserver une image sonore en rapport avec l’image vidéo. Si
les enceintes doivent être plaquées contre le mur arrière pour des
raisons pratiques, il peut en résulter une augmentation articielle
du niveau de grave : voir le paragraphe Réglage n plus loin dans
ce manuel, pour une utilisation optimale des tampons de mousse
fournis.
Champs magnétiques
Les haut-parleurs à l’intérieur de l’enceinte génèrent des champs
magnétiques qui peuvent s’étendre au-delà du coffret de
l’enceinte. Nous vous recommandons donc de tenir éloignés d’au
moins 50centimètres des enceintes les appareils sensibles à ces
champs magnétiques (télévisions et moniteurs informatiques à
tube cathodique CRT, cassettes et bandes magnétiques audio
et vidéo, cartes magnétiques, etc.). Les écrans LCD, OLED et
plasma ne sont pas affectés pas les champs magnétiques.
Page 13
3. Connexions
FRANÇAIS
Tous les branchements doivent être effectués les appareils étant
tous éteints.
Il y a deux paires de prises réunies entre elles à l’arrière de
chaque enceinte. Pour les branchements classiques (ci-dessus
à gauche), les connexions reliant les prises (comme installé à la
livraison) doivent impérativement rester en place, une seule paire
de prises étant alors reliée à l’amplicateur. En cas de bi-câblage
(ci-dessus à droite), les liens seront retirés, et chaque paire de
prises sera alors reliée à l’amplicateur de manière indépendante.
Ce principe de bi-câblage permet d’améliorer la résolution et la
qualité des plus ns détails.
Branchez la prise « positif » de l’enceinte (prise de couleur rouge,
avec le repère « + ») sur la prise de sortie enceinte « positif » de
l’amplicateur, et branchez la prise « négatif » (prise de couleur
noire, avec le repère « – ») sur la prise « négatif » de l’amplicateur.
Le non-respect de cette polarité plus/moins entraîne une image
stéréophonique dégradée et une perte dans le grave.
Demandez conseil à votre revendeur pour le choix du câble
utilisé. L’impédance totale de charge ne doit jamais être inférieure
au minimum recommandé dans les spécications, et le câble doit
présenter une faible inductance, an d’éviter toute atténuation
des fréquences aiguës.
13
Page 14
4. Ajustements
FRANÇAIS
Avant de procéder à ces réglages, vériez que tous les
branchements sont correctement effectués, dans toute
l’installation, et fermement sécurisés.
Décaler les enceintes par rapport aux murs de la pièce a
généralement pour effet de réduire le niveau général du
grave. Un espace sufsant derrière les enceintes acoustiques
permet également d’améliorer la sensation de profondeur de
la reproduction sonore. Inversement, un rapprochement des
enceintes par rapport aux cloisons de la pièce entraîne une
augmentation du niveau du grave. Pour réduire le niveau de grave
sans modier la position des enceintes, utilisez les tampons de
mousse fournis dans les évents de décompression, ou, si le
niveau de grave à corriger reste limité, utilisez uniquement les
anneaux de mousse à la place des tampons, comme illustré
ci-dessus.
Si vous désirez réduire sensiblement le niveau de grave sans
pour autant modier la position des enceintes par rapport
aux murs, placez un des tampons de mousse dans l’évent
de décompression. Pour accéder à ces évents, retirez la grille
frontale des enceintes en la tirant doucement vers l’avant.
14
Si le niveau de grave vous paraît tout de même encore trop
important, cela est généralement dû à des modes de résonances
parasites dans la pièce d’écoute. Une modication, même légère,
de la position des enceintes dans la pièce peut alors avoir pour
effet des améliorations très sensibles. Essayez de placer les
enceintes le long d’un autre mur de la pièce. Le déplacement
des meubles les plus encombrants peut également sensiblement
modier les résultats sonores.
Si la focalisation centrale de l’image sonore est mauvaise,
essayez de rapprocher les deux enceintes acoustiques, et/ou
de modier leur angle (plus fermé) par rapport à la zone centrale
d’écoute privilégiée.
Si le son paraît trop brillant, ajoutez des meubles ou éléments
amortissants dans la pièce (par exemple, des tapis plus
nombreux ou épais). Inversement, réduisez l’inuence de tels
éléments si le son semble trop sourd ou éteint.
Assurez-vous que les enceintes sont fermement posées
sur le sol. Utilisez les pointes pour transpercer la moquette
si nécessaire, et réglez-les parfaitement pour compenser
parfaitement toute inégalité du sol.
Page 15

5. Rodage 6. Entretien
FRANÇAIS
Les performances d’une enceinte acoustique se modient
subtilement pendant une période de rodage initiale. Si l’enceinte
a été stockée dans un environnement de faible température, ses
composants amortissants et les suspensions des haut-parleurs
vont demander un peu de temps avant de retrouver leurs qualités
mécaniques optimales. De plus, ces suspensions vont également
se « libérer » pendant les premières heures d’utilisation. Ce temps
de rodage est variable, suivant la température de stockage et la
manière dont vous utilisez les enceintes. En moyenne, comptez
un week-end pour que les effets de la température se stabilisent,
et une quinzaine d’heures d’utilisation normale pour que tous les
composants mécaniques atteignent le fonctionnement parfait
correspondant à leur conception mécanique.
Cependant, des périodes plus longues (jusqu’à un mois) ont
été relevées, mais il semble que cela soit dû un peu à cause du
rodage des enceintes, et beaucoup parce que l’auditeur doit
se familiariser avec le nouveau son ! C’est particulièrement le
cas ici, avec des enceintes extrêmement dénies, capables de
reproduire un niveau de détail exceptionnellement élevé, plus que
ce à quoi s’attendait l’auditeur ; simplement, au début, ce son
peut sembler un tout petit peu « projeté » en avant et brillant. À la
n de la période de rodage, le son semblera plus neutre, sans ne
rien perdre pour autant de ses qualités en terme de transparence
et de sens du détail.
La surface du coffret ne nécessitera dans la plupart des cas
qu’un simple dépoussiérage. Si vous souhaitez utiliser un
produit en aérosol, ou tout autre produit nettoyant, vaporisez le
produit sur le tissu et pas directement sur la surface du coffret,
et faites d’abord un test sur une petite surface car certains
produits peuvent s’avérer néfastes. Éviter les produits abrasifs,
ou ceux qui contiennent de l’acide, de l’ammoniaque ou des
agents antibactériens. Les traces sur les surfaces peintes
peuvent être ôtées avec de l’eau et du savon dilué sans parfum.
Enlever les éventuelles marques résistantes en pulvérisant un
produit de nettoyage industriel pour vitres, que vous essuierez
complètement à l’aide d’un chiffon sec en microbres. Ne pas
employer de produits nettoyants sur les haut-parleurs et évitez
dans tous les cas d’y toucher pour ne pas les endommager.
15
Page 16
1. Auspacken
DEUTSCH
Kartoninhalt
Im Versandkarton liegen:
1 zweiteiliger Schaumstoffeinsatz
1 Sockel
1 Zubehörpaket mit:
4 M4-Spikes
4 Gummifüßen
4 Sicherungsmuttern (Schlüsselweite 10 mm)
1 Zubehörpaket mit:
1 Innensechskantschlüssel
4 Schrauben M6 x 35 mm
4 Unterlegscheiben
4 rüttelfesten Unterlegscheiben
16
Umweltinformation
Dieses Produkt entspricht internationalen Richtlinien. Dazu
gehören unter anderem:
i. die Beschränkung der Verwendung bestimmter gefährlicher
Stoffe in Elektro- und Elektronikgeräten (Restriction of
Hazardous Substances (kurz RoHS genannt))
ii. die Registrierung, Bewertung, Zulassung und
Beschränkung chemischer Stoffe (REACH)
iii. die Entsorgung von Elektro- und Elektronik-Altgeräten
(Waste Electrical and Electronic Equipment (WEEE)).
Wenden Sie sich an Ihre örtliche Entsorgungsstelle, wenn Sie
Fragen zum ordnungsgemäßen Recyceln bzw. Entsorgen dieses
Produktes haben.
Page 17
2. Aufstellen und Positionieren
DEUTSCH
Aufstellen der Lautsprecher
Die Lautsprecher sind als Standversion konzipiert. Es ist wichtig,
dass sie fest auf dem Boden stehen. Ver wenden Sie daher, wann
immer möglich, die beiliegen den Spikes. Befestigen Sie zusätzlich
den Sockel, um eine optimale Stabilität zu gewährleisten.
Sie können den Sockel während des Auspackens anbringen
(siehe Abbildungen auf der oberen Verschlussklappe des
Kartons). Alternativ können Sie dies auch nach dem Auspacken
machen. Suchen Sie sich dazu eine geeignete Auageäche
wie beispielsweise einen Tisch und decken Sie diese mit einem
Tuch ab. Legen Sie den Lautsprecher auf die Seite, so dass die
Unterseite des Lautsprechergehäuses vorne an der Auageäche
vorsteht. Richten Sie den Sockel den Befestigungslöchern an
der Gehäuseunter seite ent spre chend aus. Stellen Sie dabei
sicher, dass der Pfeil an der Sockelunterseite nach vorne zeigt.
Befestigen Sie den Sockel mit den beiliegenden Schrauben und
Unterlegscheiben. Setzen Sie die rüttelfesten Unterleg scheiben
zwischen die Unterleg scheiben und die Schraubenköpfe. Ziehen
Sie die Schrauben mit dem beiliegenden Innensechskantschlüssel
fest.
Die Spikes sind so ausgelegt, dass sie durch einen Teppich
hindurchgehen und auf der Bodenoberäche auiegen. Drehen
Sie zunächst die Sicherungsmuttern so auf die Spikes, dass
sie sich über dem Teppich benden, wenn die Spikes auf dem
Boden darunter auiegen. Drehen Sie die Spikes vollständig in die
Gewindebohrungen des Sockels. Sollte das Gehäuse wackeln,
wenn es auf den Boden gestellt wird, so lösen Sie die beiden
nicht auiegenden Spikes, bis der Lautsprecher fest auf dem
Boden steht. Ziehen Sie nun die Sicherungsmuttern gegen das
Gehäuse fest. Es ist sinnvoll, die Spikes erst dann anzubringen
und einzustellen, wenn Sie die optimale Position für den
Lautsprecher gefunden haben.
Liegt kein Teppich und möchten Sie ein Zerkratzen der
Bodenoberäche vermeiden, legen Sie entweder jeweils eine
Schutzscheibe (vielleicht eine Münze) unter die Spikes oder
verwenden die beiliegenden Gummifüße.
17
Page 18
DEUTSCH
5.1 Channels 6.1 Channels 7.1 Channels
Stereo
0.5m
110° - 130°
~40°
Positionieren der Lautsprecher
Die Position der Lautsprecher nach der Installation weiter zu
optimieren, kann zu einer Verbesserung der Klangqualität führen
und ist daher sinnvoll.
Versuchen Sie sowohl bei Stereo- als auch bei Heim kinoinstallationen sicherzustellen, dass sich die direkte akustische
Umgebung aller Lautsprecher ähnelt. Bendet sich beispielsweise
ein Lautsprecher in der Nähe einer kahlen Wand, während der
andere von weichen Einrichtungsgegenständen und Vorhängen
umgeben ist, so leiden darunter die Klang qualität und das StereoKlangbild.
Herkömmliche Stereosysteme
Zunächst sind die Lautsprecher in einem Abstand von 1,5 bis
3 m in zwei Ecken eines gleichseitigen Drei ecks zu platzieren,
das an der dritten Ecke durch den Hörbe reich vervollständigt
wird. Der Abstand zur Rück wand und zu den Seitenwänden
sollte mindestens 0,5 m betragen (siehe oben).
18
Heimkinosysteme
Werden die Lautsprecher für die Frontkanäle eines
Heimkinosystems genutzt, so sollten sie näher zusammengestellt
werden als bei 2-Kanal-Audio systemen, da die Surroundkanäle
zu einer Erwei te rung des Klangbildes führen. Eine Positionierung
der Lautsprecher innerhalb von ungefähr 0,5 m zu den Seiten
des Bildschirms ist darüber hinaus sehr hilf reich, um das
Klangbild optimal an das visuelle Bild anzupassen. Wie bei
der Positionierung in konven tionellen Stereosystemen sollten
die Lautsprecher einen Ab stand von ungefähr 0,5 m von der
Rückwand haben und einen Mindestabstand von 0,5 m zu den
Seiten wänden. Sollen die Lautsprecher an die Rück wand gestellt
werden und führt dies zu einem zu starken Bass, so erhalten Sie
unter „Feinabstimmung” in dieser Bedienungsanleitung Hinweise
zur Nutzung der Schaumstoffeinsätze.
Magnetische Streufelder
Die Lautsprecherchassis erzeugen ein magnetisches
Streufeld, das über die Gehäusegrenzen hinaus reicht. Daher
empfehlen wir, einen Mindestabstand von 0,5 m zwischen
magnetisch empndlichen Artikeln (CRT-Fernsehgeräten,
Computerbildschirmen, Discs, Audio- und Videobändern,
Scheckkarten usw.) und Lautspre cher zu bewahren. LCD-,
OLED- und Plasma-Bild schirme werden von magnetischen
Streufeldern nicht beeinusst.
Page 19

3. Anschließen der Lautsprecher
DEUTSCH
Schalten Sie alle Geräte vor dem Anschließen ab.
An der Lautsprecherrückseite sind jeweils zwei Anschlussklemmen über Brücken miteinander verbunden. Im
konventionellen Betrieb (siehe oben links) bleiben die Brücken
(wie bei der Lieferung) in ihrer Position und nur ein Anschlussklemmenpaar wird an den Verstärker ange schlossen.
Sollen die Lautsprecher im Bi-Wiring-Verfahren betrieben werden
(siehe oben rechts), sind zunächst die Brücken zu entfernen.
Hierbei werden alle vier Anschlussklemmen mit dem Verstärker
verbunden. Bi-Wiring kann die Detailtreue im Tieftonbereich
ver bessern.
Stellen Sie sicher, dass positive (rote und mit + gekennzeichnete)
Anschlussklemmen am Lautsprecher mit dem positiven
Ausgang am Verstärker und nega tive (schwarze und mit –
gekennzeichnete) Anschluss klemmen mit dem negativen
Ausgang am Verstärker verbunden werden. Ein nicht korrektes
Anschließen der Kabel kann zu einer Verschlechterung des Klangbildes und zu Bassverlusten führen.
Lassen Sie sich bei der Auswahl der Lautsprecherka bel von Ihrem
autorisierten Fachhändler beraten. Die Gesamtimpedanz sollte
unterhalb der in den Techni schen Daten angegebenen maximalen
Kabelimpedanz liegen. Insbesondere sollte das zum Hochtöner
füh rende Kabel eine geringe Induktivität besitzen, da sehr hohe
Töne sonst gedämpft werden.
19
Page 20

4. Feinabstimmung
DEUTSCH
Vergewissern Sie sich vor der Feinabstimmung Ihres Systems
noch einmal, dass alle Verbindungen richtig hergestellt wurden
und alle Kabel ordnungsgemäß angeschlossen sind.
Ein größerer Abstand zwischen Lautsprechern und Wänden führt
zu einer Reduzierung des Bassniveaus. Der Raum hinter den
Lautsprechern schafft auch einen Eindruck der Tiefe. Umgekehrt
wird das Bassniveau erhöht, wenn die Lautsprecher näher an
die Wände gestellt werden. Möchten Sie das Bassniveau reduzieren, ohne den Abstand zwischen Lautsprechern und Wand zu
vergrößern, setzen Sie die Schaumstoff einsätze oder – wenn Sie
eine geringere Reduzierung des Bassniveaus wünschen – nur die
Schaumstoff ringe in die Bassreexöffnungen ein (siehe oben).
Steht das Bassniveau nicht im Einklang mit der Frequenz, so ist
dies auf starke Resonanzen im Raum zurückzuführen. Selbst
kleinste Änderungen bei der Lautsprecherpositionierung bzw.
in der Hörposition können eine erhebliche Wirkung auf die
wahrgenom mene Klangqualität haben. So ändert sich die Klangqualität beispielsweise, wenn Sie die Hörposition verändern oder
die Lautsprecher an eine andere Wand gestellt werden. Auch das
Vorhandensein großer Möbelstücke und deren Position können
erhebliche Auswirkungen haben.
20
Ist das Klangbild in der Mitte schlecht, stellen Sie die
Lautsprecher näher zusammen oder so auf, dass sie in Richtung
Hörbereich zeigen.
Ist der Klang zu schrill, hilft die Verwendung weicher
Einrichtungsgegenstände (wie z. B. schwerer Vor hänge).
Umgekehrt sollte man bei dumpfem, leblosem Klang die
Verwendung solcher Einrichtungsgegenstände auf ein Minimum
reduzieren.
Stellen Sie sicher, dass der Lautsprecher fest auf dem Boden
steht. Liegt Teppich(boden), verwenden Sie die beiliegenden
Spikes und passen diese so an, dass alle Unebenheiten des
Bodens ausgeglichen werden.
Page 21

5. Einlaufphase 6. Pege
DEUTSCH
In der Einlaufphase gibt es feine Unterschiede in der
Wiedergabequalität des Lautsprechers. Wurde er in einer
kühlen Umgebung gelagert, so wird es einige Zeit dauern, bis
die Dämpfungskomponenten und die für die Aufhängung der
Chassis eingesetzten Werk stoffe ihre optimalen mechanischen
Eigenschaften besitzen. Die Aufhängung der Chassis wird
mit den ersten Betriebsstunden beweglicher. Die Zeit, die der
Lautsprecher benötigt, um seine maximale Leistungs fähigkeit
zu entwickeln, schwankt abhängig von den vorherigen Lagerund Einsatzbedingungen. Grund sätz lich kann man sagen,
dass es eine Woche dauert, bis sich die Lautsprecher nach
Temperatureinwir kungen stabilisiert haben. 15 Betriebsstunden
sind erforderlich, bis die mechanischen Teile ihre Funktion, wie bei
der Konstruktion festgelegt, erfüllen können.
Jedoch ist uns schon von längeren Einlaufphasen (bis zu einem
Monat) berichtet worden. Man kann aber davon ausgehen, dass
dieser Eindruck eher mit dem Hörer zu tun hat, der aufgrund
der hochwertigen Klangqualität dieser Lautsprecher jetzt Details
wahr nimmt, die vorher nicht zu hören waren. Der Klang mag ihm
zunächst vielleicht etwas hart erscheinen. Aber nach geraumer
Zeit wird er weicher, ohne dabei an Detailtreue zu verlieren.
Die Gehäuseoberäche muss in der Regel nur abgestaubt
werden. Bei Verwendung eines Aerosol- oder sonstigen Reinigers
sprühen Sie diesen auf ein Tuch, niemals direkt auf das Gehäuse.
Testen Sie zuerst an einer kleinen, unauffälligen Stelle, da einige
Reinigungsprodukte manche Oberächen beschädigen können.
Verwenden Sie keine scharfen oder säure- bzw. alkalihaltigen
oder antibakteriellen Produkte. Flecken auf der Lackoberäche
können mit einer verdünnten, parfümfreien Seifenlösung
beseitigt werden. Verwenden Sie zum Entfernen von Streifen
einen handelsüblichen Glasreiniger und wischen Sie die Fläche
vorsichtig mit einem Mikrofasertuch trocken. Verwenden Sie
für die Chassis keine Reinigungsmittel. Vermeiden Sie es, die
Lautsprecherchassis zu berühren, da dies zu Beschädigungen
führen kann.
21
Page 22

ESPAÑOL
1. Desembalaje
La Caja del Embalaje Contiene
Verique que en el embalaje guren los siguientes
elementos:
1 tapón de espuma de dos partes
1 base (plinto)
1 paquete de accesorios que contiene:
4 puntas metálicas de desacoplo M6
4 pies de goma
4 tuercas de jación (con arandelas planas de 10 mm)
1 paquete de accesorios que contiene:
1 llave Allen
4 tornillos M6 de 35 mm
4 arandelas planas
4 arandelas antisacudidas
22
Información Relativa a la Protección del Medio Ambiente
Este producto satisface varias directivas internacionales
relacionadas con la protección del medio ambiente. Entre ellas se
incluyen –aunque no son las únicas- las siguientes:
i. la de Restricción del Uso de Sustancias Peligrosas (RHoS) en
equipos eléctricos y electrónicos.
ii. la de Registro, Evaluación, Autorización y Restricción del Uso
de Componentes Químicos (REACH).
iii. la de Eliminación de Residuos Procedentes de Componentes
Eléctricos y Electrónicos (WEEE).
Contacte con sus autoridades locales en materia de gestión de
residuos para que le orienten sobre cómo desechar este producto
adecuadamente.
Page 23

2. Ubicación
ESPAÑOL
Instalación de las Cajas Acústicas
Estas cajas acústicas han sido pensadas para ser instaladas
única y exclusivamente sobre el suelo. Por lo tanto, es importante
asegurar que descansen rmemente sobre el suelo de la sala en la
que vayan a ser instaladas utilizando –siempre que ello sea posible–
las puntas de desacoplo suministradas de serie. Asimismo, coloque
la base (plinto) de tal modo que la estabilidad del conjunto sea
máxima.
Si lo desea, puede colocar la base (plinto) durante el proceso de
desembalaje siguiendo los dibujos que guran en la aleta superior
de la caja de cartón. De modo alternativo, puede colocarla una
vez que el producto haya sido completamente desembalado
recubriendo previamente una supercie adecuada, como por
ejemplo una mesa, con una gamuza, una sábana o una toalla, con
la caja acústica descansando sobre uno de sus paneles laterales
de tal modo que la parte inferior de la misma sobresalga de la
mesa para facilitar la operación de montaje. Alinee el plinto con
los pertinentes oricios de jación asegurándose de que la echa
que gura en su parte inferior apunte hacia fuera. Asegure el plinto
con ayuda de los tornillos y las arandelas suministrados de serie.
Coloque las arandelas antivibración entre las arandelas planas y las
tuercas de jación. Fije los tornillos con la llave Allen suministrada
de serie.
Las puntas de desacoplo están diseñadas para que perforen la
alfombra y descansen sobre la supercie del suelo. Inicialmente,
coloque las tuercas de jación en las puntas dejando que las
primeras “oten” ligeramente por encima de la alfombra cuando
las segundas descansen sobre el suelo. A continuación, je por
completo las puntas en los oricios dispuestos para ello en el plinto
(base). Si el recinto se mueve cuando esté en su posición denitiva,
aoje las dos puntas que no toquen el suelo hasta que aquél
descanse rmemente sin moverse. Finalmente, je sólidamente
las tuercas contra el recinto. Es posible que resulte más cómodo
colocar y ajustar las puntas una vez optimizada la posición de la
caja acústica.
En caso de que no haya ninguna alfombra y usted desee impedir
que se raye la supercie del suelo, utilice o bien un disco protector
metálico (una moneda también podría servir) entre la punta y el
suelo o bien los tacos de goma suministrados por el fabricante.
Coloque los tacos de goma y nivele el recinto del mismo modo que
con las puntas de desacoplo.
23
Page 24

ESPAÑOL
5.1 Channels 6.1 Channels 7.1 Channels
Stereo
0.5m
110° - 130°
~40°
Colocación de las Cajas Acústicas
Es muy probable que el ajuste de la posición de la caja acústica
una vez llevada a cabo la instalación inicial de la misma mejore la
calidad sonora, por lo que resulta completamente recomendable.
Tanto en instalaciones estereofónicas como de Cine en Casa,
intente asegurarse de que las zonas que rodean inmediatamente a
cada caja acústica sean similares desde el punto de vista acústico.
Por ejemplo, si una caja acústica está junto a una pared desnuda
mientras que la otra está cerca de mobiliario y cortinas blandos,
es más que probable que tanto la calidad sonora global como la
imagen estereofónica queden seriamente comprometidas.
Sistemas Estereofónicos Convencionales
Para empezar, las cajas acústicas deberían colocarse, separadas
entre sí de 1’5 a 3 metros, en los dos vértices de un triángulo
equilátero cuyo tercer vértice esté situado en el punto de escucha.
Las cajas deberían separarse aproximadamente 0’5 metros de la
pared posterior y al menos 0’5 metros de cualquier pared lateral
(ver dibujo superior).
24
Sistemas de Cine en Casa
Si las cajas acústicas van a ser utilizadas para los canales
frontales (principales) de un sistema de Cine en Casa, deberían
estar más cerca entre sí que en un equipo de audio de 2 canales
porque los canales de sonido envolvente tienden a ensanchar
la imagen sonora. La colocación de las cajas acústicas a unos
0’5 metros de distancia de cada lado de la pantalla de visualización
también ayudará a que la imagen del sonido envolvente esté
proporcionada con respecto a la imagen visual. Al igual que sucede
con el posicionado en sistemas estereofónicos convencionales,
idealmente las cajas acústicas deberían estar separadas unos
0’5 metros de la pared posterior y al menos 0’5 metros de cualquier
pared lateral. Si se preere colocar las cajas acústicas contra la
pared posterior y esta ubicación provoca un realce excesivo de los
graves, diríjase a la sección “Ajuste Fino” del presente manual para
obtener información sobre cómo utilizar los tapones de espuma.
Campos Magnéticos Parásitos
Los altavoces de las cajas acústicas crean campos magnéticos
parásitos que se extienden más allá de las fronteras físicas
del recinto. Es por ello que le recomendamos que aleje todos
aquellos objetos magnéticamente sensibles (pantallas de televisor
y ordenador basadas en tubos de rayos catódicos, discos de
ordenador, cintas de audio y vídeo, tarjetas con banda magnética
y cosas por el estilo) al menos 0’5 metros de la caja acústica.
Las pantallas de plasma, LCD y OLED no son afectadas por los
campos magnéticos.
Page 25

3. Conexiones
ESPAÑOL
Todas las conexiones deberían realizarse con el equipo
desconectado.
En la parte posterior de la caja acústica hay dos pares de
terminales de conexión unidos entre sí con sendos puentes. Para
realizar una conexión convencional (dibujo superior izquierdo),
dichos puentes deberían permanecer en su lugar (situación original,
es decir de fábrica) y por tanto solamente deberían conectarse un
par de terminales al amplicador. Para la conexión en bicableado
(dibujo superior derecho), los puentes deberían retirarse para poder
conectar por separado cada par de terminales al amplicador. El
bicableado puede mejorar la resolución de los detalles de baja
frecuencia.
Asegúrese de que los terminales positivos de la caja acústica
(marcados como + y de color rojo) son conectados al terminal de
salida positivo del amplicador y que los terminales negativos de la
caja acústica (marcados como – y de color negro) son conectados
al terminal de salida negativo del amplicador. Una conexión
incorrecta podría tener como resultado una imagen sonora pobre y
una pérdida de graves.
Consulte a su distribuidor para que le aconseje a la hora de elegir
el cable de conexión. Mantenga siempre la impedancia total por
debajo del máximo recomendado en las características técnicas y
utilice un cable de baja inductancia para evitar que se produzcan
atenuaciones en las frecuencias más altas.
25
Page 26

ESPAÑOL
4. Ajuste Fino
Antes de proceder al ajuste no, verique cuidadosamente que
todas las conexiones de la instalación sean correctas y seguras.
Cada vez que aumente la separación entre las cajas acústicas
y las paredes laterales y posterior de la sala se reducirá el nivel
general de graves. El espacio situado detrás de las cajas también
contribuye a crear una sensación aural de profundidad. Por el
contrario, si acerca las cajas acústicas a las paredes el nivel de
graves aumentará. Si desea reducir el nivel de graves sin separar
más las cajas acústicas de la pared, coloque los tapones de
espuma en los puertos bass-reex. Si desea que la reducción de
graves sea menos severa, coloque los anillos de espuma en los
puertos bass-reex (dibujo superior).
Si la respuesta en graves se desestabiliza a menudo, lo más
probable es que se deba a la excitación de modos de resonancia
en la sala de escucha. Incluso pequeños cambios en la posición
de las cajas acústicas o los oyentes pueden tener un profundo
efecto en la manera en que dichas resonancias afectan al sonido.
Intente colocar las cajas acústicas a lo largo de una pared diferente.
El cambio de posición de muebles y objetos de gran tamaño
presentes en la sala también puede modicar el sonido.
26
Si la imagen central carece de focalización, intente acercar las cajas
acústicas entre sí o inclínelas de manera que apunten hacia los
oyentes o estén encaradas hacia ellos.
Si el sonido es demasiado brillante (léase chillón), el aumento de la
cantidad de materiales blandos (generalmente fonoabsorbentes)
presentes en la sala (utilice, por ejemplo, cortinas más pesadas)
puede ayudar a equilibrarlo. Por el contrario, si se reduce la
presencia de los citados materiales se conseguirá incrementar el
nivel de brillo de un sonido apagado y carente de vida.
Asegúrese de que los pies de las cajas acústicas descansen
perfectamente sobre el suelo. En caso de que sea necesario,
utilice puntas metálicas de desacoplo y ajústelas para compensar
cualquier desequilibrio.
Page 27

5. Período de Rodaje 6. Cuidado y Mantenimiento
ESPAÑOL
Las prestaciones de la caja cambiarán de manera sutil durante
el período de escucha inicial. Si la caja ha estado almacenada
en un ambiente frío, tanto los materiales absorbentes y de
amortiguamiento acústico como los que forman parte de los
sistemas de suspensión de los diferentes altavoces tardarán cierto
tiempo en recuperar sus propiedades mecánicas correctas. Las
suspensiones de los altavoces también se relajarán durante las
primeras horas de uso. El tiempo que la caja acústica necesite
para alcanzar las prestaciones para las que fue diseñada variará en
función de las condiciones de almacenamiento previas de la misma
y de cómo se utilice. A modo de guía, deje transcurrir una semana
para la estabilización térmica de la caja y unas 15 horas de uso en
condiciones normales para que las partes mecánicas de la misma
alcancen las características de funcionamiento para las que fueron
diseñadas.
No obstante, hay constancia de períodos de rodaje más largos
(del orden de un mes) y las evidencias sucientes para sugerir que
ello tiene poco que ver con cambios en la caja acústica y bastante
con la adaptación del usuario al nuevo sonido proporcionado
por la misma. Esto resulta bastante cierto en cajas acústicas
con un elevado poder resolutivo, como por ejemplo las CM8 o
las CM9, hasta el punto de que puede producirse un aumento
signicativo del nivel de detalle en comparación con el que estaba
acostumbrado a percibir el usuario; en un primer momento, el
sonido puede aparecer excesivamente “adelantado” y quizá un
poco duro. Después de un largo período de tiempo, el sonido
parecerá más suave aunque sin perder claridad ni detalle.
Por regla general, la supercie del recinto sólo requiere que se
le quite el polvo. Si desea utilizar un limpiador de tipo aerosol
o de otra clase, aplíquelo sobre la gamuza limpiadora, nunca
directamente sobre el recinto, y realice antes una prueba con una
supercie pequeña puesto que determinados productos de limpieza
pueden dañar algunas de las supercies. Evite utilizar productos
abrasivos o que contengan ácido, álcalis o agentes antibacterianos.
Las marcas en la supercie pintada pueden eliminarse con una
solución diluida de jabón neutro. Limpie cualquier pequeña
ralladura o marca veteada rociándola con un aerosol limpiacristales
especíco para ello y secando suavemente con una gamuza de
microbras. No utilice productos de limpieza en los altavoces y evite
tocar estos últimos ya que podría dañarlos.
27
Page 28

1. Rimozione dall’imballo
ITALIANO
Contenuto della confezione
Controllare che nella scatola siano presenti:
1 Inserto in spugna composto da due elementi
1 Base
1 Set di accessori contenente:
4 Piedini a punta con letto M4
4 Piedini in gomma
4 Dadi (richiedono una chiave da 10 mm)
1 Set di accessori contenente:
1 Chiave a brugola
4 Viti M6 x 35 mm
4 Rondelle piane
4 Rondelle dentellate antisvitamento
Informazioni per l’ambiente
Questo prodotto è realizzato in conformità (e non limitatamente)
alle seguenti normative internazionali:
I. la limitazione delle sostanze pericolose (RoHS) negli
apparecchi elettrici ed elettronici,
II. la registrazione, valutazione, autorizzazione e restrizione
delle sostanze chimiche (REACH),
III lo smaltimento delle apparecchiature elettriche ed
elettroniche (WEEE).
Fare riferimento alle indicazioni dell’autorità del vostro Paese per il
corretto riciclo o smaltimento del prodotto.
28
Page 29

2. Posizionamento dei diffusori
Installazione
Questi diffusori sono stati progettati per il solo utilizzo a
pavimento. Montare preferibilmente i piedini a punta in dotazione,
assicurandosi che essi poggino uniformemente senza far oscillare
il mobile. Installando la base fornita, inoltre, si garantisce maggior
stabilità.
È possibile montare la base sul diffusore direttamente nell’imballo,
seguendo le illustrazioni riportate sul cartone. In alternativa
stendere un panno su una supercie adatta, ad esempio un
tavolo, e quindi adagiare il diffusore su un lato con il fondo oltre il
bordo. Allineare la base ai fori per le viti sul fondo, assicurandosi
che la freccia sul lato inferiore della base sia rivolta verso il frontale
del diffusore. Fissare la base tramite le quattro viti M6 x 35 mm
in dotazione inlando sotto la testa di ciascuna vite una rondella
dentellata e quindi una rondella piana. Serrare le viti tramite la
chiave a brugola fornita.
I piedini a punta sono progettati appositamente per penetrare
attraverso un eventuale tappeto in modo da poggiare
direttamente sul pavimento sottostante. Come prima cosa
montare i dadi di bloccaggio sui piedini in modo che rimangano
al di sopra del tappeto quando le punte toccano il pavimento.
Avvitare completamente i piedini negli inserti lettati della base.
Se il diffusore non è perfettamente stabile, svitare i due piedini
che non toccano il pavimento no a stabilizzarlo su tutte e quattro
le punte. Da ultimo serrare i dadi contro la base del mobile. Si
consiglia di regolare l’altezza dei piedini e stringere i dadi dopo
avere trovato la collocazione ottimale del diffusore.
Se nel locale non sono presenti tappeti e si desidera evitare graf
al pavimento, è possibile mettere un dischetto metallico protettivo
(ad esempio una piccola moneta) sotto ciascuna punta, oppure
montare i piedini in gomma in dotazione. Installare i piedini in
gomma e livellare il diffusore seguendo la stessa procedura
indicata per quelli a punta.
ITALIANO
29
Page 30

5.1 Channels 6.1 Channels 7.1 Channels
110° - 130°
Stereo
ITALIANO
Posizionamento
Dopo una prima installazione iniziale, è consigliabile effettuare
una regolazione ne della posizione dei diffusori che, con ogni
probabilità, apporterà ulteriori miglioramenti alla qualità del suono.
Sia in impianti stereo che home theatre, cercare di assicurarsi che
l’ambiente nelle immediate vicinanze di ciascun diffusore presenti
caratteristiche acustiche il più possibile uguali. Ad esempio, se
un diffusore si trova in prossimità di una parete spoglia mentre
l’altro si trova vicino ad una tenda, un mobile o un divano, tanto
la qualità sonora nel suo insieme, quanto l’immagine stereofonica
rischiano di venir compromesse.
Sistemi stereo convenzionali
Inizialmente i diffusori dovrebbero venir collocati ad una distanza
tra loro compresa tra 1,5 e 3 m ed agli angoli di un triangolo
equilatero il cui vertice inferiore è rappresentato dal punto
d’ascolto. I diffusori dovrebbero inoltre trovarsi a circa 0,5 m da
ciascuna delle pareti circostanti (vedi gura in alto).
0.5m
Sistemi Home Theatre
Se i diffusori vengono utilizzati come canali frontali in un sistema
home theatre, essi dovrebbero essere posizionati più vicini tra
loro rispetto ad un sistema stereo, in quanto i canali surround
tendono ad allargare l’immagine sonora. Una collocazione a
circa 0,5 m dai bordi dello schermo video aiuta a mantenere
l’immagine sonora in scala con le proporzioni di quanto osservato
visivamente. Come negli impianti stereo, anche in questo caso
i diffusori dovrebbero trovarsi idealmente ad almeno 0,5 m sia
dalla parte di fondo, sia da quella laterale. Qualora si preferisse
mantenere i diffusori a ridosso della parete di fondo ed in tale
posizione la gamma bassa risultasse eccessivamente enfatizzata,
si veda la sezione Regolazione ne più avanti dove viene descritto
l’impiego degli inserti in spugna.
Campi magnetici dispersi
Gli altoparlanti dei diffusori creano dei campi magnetici che
estendono la loro azione oltre i conni sici dei mobili. Si consiglia
pertanto di mantenere ad almeno 0,5 m di distanza ogni oggetto
sensibile ai campi magnetici (televisori a tubo catodico, nastri
audio e video, carte di credito e simili). Schermi al plasma, LCD o
OLED, al contrario, non risentono dei campi magnetici.
~40°
30
Page 31

3. Collegamenti
Tutti i collegamenti devono essere effettuati con i componenti
dell’impianto spenti.
Sul retro di ciascun diffusore vi sono due coppie di morsetti
collegate tra loro tramite ponticelli metallici. Per connessioni
tramite un unico cavo, lasciare i ponticelli in posizione (vedi gura
in alto a sinistra) e collegare solo una coppia di morsetti alle uscite
dell’amplicatore. Per collegamenti in bi-wiring tramite due cavi
(vedi gura in alto a destra), è necessario rimuovere i ponticelli
e collegare ciascuna coppia di morsetti indipendentemente
all’amplicatore con uno dei due cavi. Con questo tipo di
connessione viene di solito migliorata l’immagine e la risoluzione
dei dettagli.
Assicurarsi che i terminali positivi del diffusore (indicati con +
e di colore rosso) siano collegati al terminale di uscita positivo
dell’amplicatore, ed i terminali negativi (indicati con – e di
colore nero) a quello negativo. Un collegamento errato non crea
danni, ma darà origine ad una scadente immagine sonora e ad
un’insufciente gamma bassa.
Chiedere consiglio al vostro rivenditore sulla scelta dei cavi per i
diffusori. Accertatevi che la loro impedenza totale sia inferiore a
quella massima raccomandata nelle caratteristiche dei diffusori ed
utilizzare cavi a bassa induttanza per evitare l’attenuazione delle
frequenze più alte.
ITALIANO
31
Page 32

4. Regolazione ne
ITALIANO
Prima procedere con la regolazione ne, assicuratevi che tutti i
collegamenti dell’impianto siano corretti e stabili.
Allontanando i diffusori dalle pareti generalmente si riduce il
livello dei bassi. Un maggior spazio dietro ad essi incrementa
poi la sensazione di profondità della scena acustica. Al contrario
avvicinando i diffusori alle pareti la gamma bassa viene rinforzata.
Se si desidera ridurre i bassi senza allontanare ulteriormente i
diffusori dalle pareti, inserire nei condotti d’accordo sul retro gli
inserti in spugna completi o, per un effetto meno marcato, i soli
anelli esterni (vedi gura in alto).
Se il basso appare irregolare, ciò è generalmente dovuto
all’eccitazione dei modi di risonanza dell’ambiente. Anche piccoli
cambiamenti nella posizione dei diffusori o del punto d’ascolto
possono avere grande inuenza su come queste risonanze
alterano il suono. Provare ad esempio a cambiare posizione
d’ascolto collocando i diffusori a ridosso di una parete diversa.
Anche la presenza e la posizione di grandi mobili può inuire
signicativamente sui modi di risonanza del locale.
Se l’immagine sonora non risulta correttamente focalizzata al
centro, provare a posizionare i diffusori più vicini tra loro oppure
ad angolare il loro frontale in modo che puntino verso una zona
leggermente più avanti rispetto alla posizione d’ascolto.
Se il suono fosse troppo aspro, un aumento della quantità di
tessuti nel locale (ad esempio utilizzando tendaggi più pesanti)
può essere d’aiuto per compensare lo squilibrio. Al contrario,
riducendoli, si può contribuire a ravvivare un suono altrimenti
spento ed opaco.
Assicurarsi che i diffusori siano perfettamente stabili sul
pavimento. Utilizzare quando possibile i piedini a punta, ad
esempio in presenza di tappeti, regolandoli per compensare
eventuali irregolarità del pavimento.
32
Page 33

5. Rodaggio 6. Manutenzione
Le prestazioni dei diffusori possono variare leggermente durante il
periodo iniziale di ascolto. Se sono stati conservati in un ambiente
freddo, i materiali smorzanti e le sospensioni degli altoparlanti
necessiteranno di un certo intervallo di tempo per recuperare
le loro proprietà meccaniche. Anche le sospensioni esterne
tenderanno ad allentarsi durante le prime ore di utilizzo. Il tempo
necessario al diffusore per arrivare alle prestazioni ottimali varia
in base alle condizioni del precedente immagazzinaggio e da
come viene utilizzato. Indicativamente può trascorrere no ad
una settimana perché gli effetti della temperatura si stabilizzino e
15 ore di utilizzo medio afnché le parti meccaniche raggiungano
le caratteristiche ottimali denite in fase di progetto.
Talvolta è stata segnalata la necessità di periodi di rodaggio più
lunghi (anche no ad un mese), ma questo ha probabilmente
poco a che fare con presunti cambiamenti nei diffusori e molto più
con il grado di assuefazione dell’ascoltatore alle nuove sonorità.
Ciò è particolarmente vero con diffusori di così elevata qualità
ed estremamente precisi come questi, tramite i quali è plausibile
si ottenga un considerevole incremento dei dettagli riprodotti
rispetto a quanto l’ascoltatore non fosse in precedenza abituato.
Il suono inizialmente può risultare un po’ troppo “brillante” e
perno “duro”. Dopo un prolungato periodo di tempo però
tenderà ad apparire indubbiamente più caldo e pastoso, ma
senza perdere in chiarezza e dettaglio.
I mobili dei diffusori normalmente necessitano solo di essere
spolverati. Se si desidera utilizzare un prodotto spray per la loro
pulizia, applicarlo sul panno, non direttamente sul mobile. Si
consiglia altresì di provarlo prima su una piccola area non in vista,
dal momento che alcuni detergenti troppo aggressivi potrebbero
danneggiare la nitura. Non impiegare prodotti abrasivi o
contenenti acidi, alcali o agenti anti-batterici. Eventuali macchie
sulle superci verniciate possono essere eliminate con una
soluzione diluita a base di sapone priva di profumazione. Togliere
ogni altro segno utilizzando un prodotto per vetri ed asciugando
delicatamente con un panno in microbra. Non utilizzare alcun
detergente sugli altoparlanti ed evitare anche di toccarli per non
danneggiarli.
ITALIANO
33
Page 34

1. Uitpakken
Inhoud van de verpakking
Controleer of het volgende aanwezig is:
NEDERLANDS
1 Tweedelige schuim dop
1 Plint
1 Doos met de volgende inhoud:
4 M6 spikes
4 rubber voetjes
4 contramoeren (10 mm buitenmaat)
1 Doos met de volgende inhoud:
1 inbussleuteltje
4 M6 x 35 mm schroeven
4 vlakke revetten
4 trillingsvrije revetten
34
Informatie over het Milieu
Dit product voldoet aan de internationale richtlijnen waaronder,
maar daartoe niet beperkt:
i. de Restriction of Hazardeous Substances (RoHS) voor
elektrische en elektronische apparatuur;
ii. de Registration, Evaluation, Authorisation and restriction of
CHemicals (REACH);
iii. de afvoer van Waste Electrical and Electronic Equipment
(WEEE).
Raadpleeg de plaatselijke milieudienst voor informatie over het
verantwoord afvoeren van overtollige of afgedankte apparatuur.
Page 35

2. Opstelling
Luidspreker Installeren
Deze luidsprekers zijn uitsluitend bedoeld voor opstelling op
de vloer. Het is belangrijk dat de luidsprekers stevig op de
vloer staan, indien maar enigszins mogelijk op de bijgevoegde
spikes. Bovendien dient bij de hogere CM9 de plint te worden
gemonteerd voor een stabiele opstelling.
Tijdens het uitpakken kan het voetstuk worden bevestigd. Volg
hiervoor de afbeeldingen op de bovenap van de doos. U kunt
het voetstuk ook bevestigen als het product volledig uitgepakt
is. Bedek daarvoor een geschikt steunoppervlak, bijvoorbeeld
een tafel, met een doek en leg de luidspreker op zijn kant met de
onderkant van de behuizing over de rand van het steunoppervlak.
Breng de plint in lijn met de bevestigingsgaten in de onderzijde en
let erop dat de pijl in de onderzijde van de plint naar voren wijst.
Schroef de plint vast met de bijgeleverde schroeven en revetten.
Leg de borgring tussen de revet en de kop van de schroef. Draai
de schroeven vast met de bijgevoegde inbussleutel.
Spikes zijn bedoeld om door het karpet heen te prikken, zodat
de luidspreker op de vloer eronder staat. Schroef in eerste aanleg
de contramoeren zover op de spikes dat de moeren vrij blijven
van het karpet terwijl de spikes op de onderliggende vloer staan.
Schroef de spikes helemaal in de openingen met schroefdraad
van de plint. Wanneer de luidspreker niet stabiel staat en
wiebelt, schroef van de beide spikes die de vloer niet raken wat
verder naar buiten tot de kast niet meer wiebelt. Tot slot draait
u de contramoeren vast tegen de kast. Het is verstandig de
spikes vast te zetten nadat de optimale luidsprekeropstelling is
gevonden.
Bij andere vloeren dan tapijt kunt u krassen op de vloer
voorkomen door ter bescherming een metalen schijf – een
muntstuk bijvoorbeeld – tussen de spikes en de vloer te
gebruiken; ook kunt u de rubber voetjes gebruiken. Breng de
rubber voetjes op dezelfde wijze aan als de spikes en stel ze op
dezelfde manier af.
NEDERLANDS
35
Page 36

5.1 Channels 6.1 Channels 7.1 Channels
110° - 130°
Stereo
0.5m
~40°
Luidsprekeropstelling
Experimenteren met de luidsprekeropstelling nadat deze is
geïnstalleerd zal vaak de geluidskwaliteit verder verbeteren en is
NEDERLANDS
daarom bijna altijd de moeite waard.
Zowel bij stereo- als bij home theater systemen is het verstandig
te streven naar een identieke directe akoestische omgeving voor
alle luidsprekers. Wanneer bijvoorbeeld één luidspreker dichtbij
een kale wand is geplaatst en de andere in de nabijheid van
zachte meubilering of gordijnen, dan zullen zowel de algehele
geluidskwaliteit als het stereobeeld daar onder lijden.
Conventionele Stereosystemen
Als uitgangspunt worden de luidsprekers 1,5 tot 3meter uit elkaar
geplaatst, zodanig dat zij zich beide even ver van het luistergebied
bevinden. Het verdient de voorkeur een luidspreker ca. 0,5 m van
de achterwand en minimaal 0,5 m van de zijwanden te plaatsen
(zie afbeelding hierboven).
36
Home Theater Systemen
Wanneer de luidsprekers worden gebruikt voor de front kanalen
in een home theater systeem, dienen ze iets dichter bij elkaar te
staan dan bij tweekanalen stereo omdat de surround kanalen het
klankbeeld verbreden. Opstelling van de luidsprekers op 0,5 m
ter weerszijden van het beeldscherm houdt het klankbeeld in de
juiste verhouding met de grootte van het beeldscherm. Net als
bij conventionele stereo-opstelling dienen de luidsprekers liefst
ca. 0,5 m van de achterwand te blijven en eveneens 0,5 m van
de zijwanden. Wanneer de luidsprekers tegen de achterwand
worden geplaatst worden de bassen extra benadrukt. Kan het
niet anders, kijk dan onder ‘Fijnafstemming’ in deze handleiding
voor nadere informatie over het gebruik van de schuim doppen.
Magnetisch Strooiveld
De luidsprekereenheden veroorzaken een magnetisch strooiveld
dat ook buiten de kast merkbaar is. Wij raden u aan magnetisch
gevoelige zaken (beeldbuizen, computerdiscs, audio- en
videobanden, creditcards, enz.) minimaal op een afstand van
0,5 m van de luidspreker te houden. LCD- en plasmaschermen
zijn niet gevoelig voor het magnetisch veld. LCD, OLED en
plasma beeldschermen hebben geen last van magnetische
velden.
Page 37

3. Verbindingen
Voordat u apparatuur aansluit of iets aan de verbindingen
verandert, altijd eerst alle apparatuur uitschakelen.
Op de achterzijde van de luidspreker bevinden zich twee stel
doorverbonden aansluitingen. Voor conventionele aansluiting (zie
afbeelding hierboven links) blijven de doorverbindingen op hun
plaats (als bij aevering) en wordt slechts één paar aansluitingen
met de versterker verbonden. Voor bi-wire aansluiting (zie
afbeelding hierboven rechts) dienen de doorverbindingen
te worden verwijderd en wordt elk paar afzonderlijk met de
versterker verbonden. Bi-wiring kan de resolutie van zachte
details verbeteren.
Zorg ervoor dat de positieve aansluitingen van de luidspreker
(rood gekleurd en van een + voorzien) met de positieve
uitgang van de versterker worden verbonden en de negatieve
aansluitingen van de luidspreker (zwart gekleurd en van
een – voorzien) met de negatieve uitgang van de versterker
worden verbonden. Foutieve aansluiting geeft een minder goed
ruimtebeeld en verlies aan bas.
Vraag uw leverancier advies over de keuze van de
luidsprekerkabel. Houd de totale weerstand beneden het
maximum dat in de specicaties is aangegeven en gebruik een
kabel met een lage inductie om verzwakking van hoge frequenties
te voorkomen.
NEDERLANDS
37
Page 38

4. Fijnafstemming
Controleer voordat u aan het jnafstemmen begint, of alle
verbindingen correct en stevig zijn geïnstalleerd.
NEDERLANDS
Door de luidsprekers verder van de wand te plaatsen zal in het
algemeen het laag afnemen. De ruimte achter de luidsprekers
verhoogt ook de ruimtelijke indruk op het gehoor. Omgekeerd,
door de luidsprekers dichter bij de wand op te stellen, neemt
het laag juist toe. Wanneer u het laag wilt reduceren zonder
de luidsprekers verder van de wand te plaatsen, drukt u de
schuimrubber doppen in de poorten als aangegeven in afbeelding
hierboven.
Wanneer het laag niet op alle frequenties evenwichtig is, ligt
dat meestal aan resonanties ergens in de luisterruimte. Zelfs
kleine wijzigingen in de luidsprekeropstelling of de luisterpositie
kunnen een behoorlijke invloed hebben op het effect van deze
resonanties op de klank. Probeer de luisterpositie te wijzigen en
de luidsprekers bijvoorbeeld voor een andere wand te zetten. Ook
de aanwezigheid en positie van grote meubels hebben invloed op
deze resonanties.
38
Wanneer het centrale geluidsbeeld vaag is, probeer dan de
luidsprekers dichter bij elkaar te zetten en ze te richten op een
punt juist vóór de luisterpositie.
Is het geluid te helder, dan kan het aanbrengen van zachtere
stoffering in de kamer (zwaardere gordijnen bijvoorbeeld) een
betere balans bewerkstelligen. Omgekeerd kan het reduceren van
zachte stoffering een donkere klank helderder maken.
Controleer of de luidsprekerstands recht en stevig op de vloer
staan. Gebruik zonodig tapijtspikes en corrigeer eventuele
ongelijkheid.
Page 39

5. Inspelen 6. Onderhoud
De eigenschappen van de luidspreker zullen gedurende de
eerste luisterperiode op subtiele wijze iets veranderen. Wanneer
de luidspreker in een koude omgeving opgeslagen is geweest,
zijn de dempende materialen en de ophanging wat stug en het
duurt enige tijd voordat zij de juiste mechanische eigenschappen
terug hebben. Ook zal de ophanging in de eerste uren van het
gebruik nog wat soepeler worden. De tijd die de luidspreker nodig
heeft om de beoogde eigenschappen te bereiken, wordt bepaald
door de wijze waarop hij voorheen is opgeslagen en de manier
waarop hij wordt gebruikt. Houd als richtlijn een week aan om
een stabiele temperatuur te bereiken en ca. 15 uur gebruik om
de mechanische onderdelen de beoogde eigenschappen te laten
verkrijgen.
Maar ook langere inspeeltijden zijn gerapporteerd (tot een maand)
en er zijn ook aanwijzingen dat dit minder te maken heeft met
veranderingen van eigenschappen van de luidspreker als met
de gewenning van de luisteraar aan de nieuwe klank. Dat geldt
vooral voor luidsprekers als deze, die in hoge mate laten horen
wat de werkelijke inhoud van de opname is en daarmee een
grotere detaillering in vergelijking tot wat de luisteraar voorheen
was gewend. Aanvankelijk kan het geluid wat direct en zelfs
enigszins hard lijken. Na enige tijd lijkt het geluid zachter te
worden, maar zonder aan tekening en detaillering te verliezen.
De kast hoeft over het algemeen alleen maar te worden
afgestoft. Wilt u een spuitbus of een ander reinigingsmiddel
gebruiken, breng dat dan aan op een doek en niet rechtstreeks
op de kast; probeer het ook eerst op een niet zichtbare plaats
omdat sommige producten het oppervlak aantasten. Vermijd
vooral schurende producten en producten met vergif, alkali of
insecticiden. Afdrukken op de lak kunnen worden verwijderd
met een oplossing met een parfumvrije zachte zeep. Verwijder
eventueel achtergebleven strepen met een glasreiniger en
veeg het droog met een microber doekje. Gebruik nooit
reinigingsmiddelen op de luidsprekereenheden en raak ze niet
aan om beschadiging te voorkomen.
NEDERLANDS
39
Page 40

1. Распаковка
Содержание упаковки
Проверьте комплектацию:
1 составная поролоновая заглушка
1 плита основания
1 дополнительная упаковка, содержащая:
4 опоры – шипа с резьбой М4
4 резиновых опоры
4 контргайки (плоские 10 мм)
1 дополнительная упаковка, содержащая:
1 шестигранный ключ
РУССКИЙ
4 болта M6 x 35мм
4 плоских шайбы
4 упорных шайбы
40
Информация по защите окружающей среды
Этот продукт полностью соответствует международным
директивам, включая, но не ограничиваясь:
i. По ограничениям использования опасных материалов
(Restriction of Hazardous Substances – RoHS) в
электрическом и электронном оборудовании,
ii. По регистрации, оценке, авторизации и ограничению
использования химических веществ – Registration,
Evaluation, Authorisation and restriction of CHemicals
(REACH)
iii. По утилизации отходов – Waste Electrical and
Electronic Equipment – (WEEE).
Проконсультируйтесь с вашей местной организацией,
которая занимается утилизацией отходов, по вопросам
правильной сдачи вашего оборудования в утиль.
Page 41

2. Размещение
Установка колонок
Колонки предназначены только для напольной установки.
Важно всюду, где это возможно, обеспечить их прочное
положение на полу с помощью шипов, входящих в
комплект. Кроме того, установите АС на прилагаемую
плиту для лучшей устойчивости.
Вы можете прикрепить опорную плиту в ходе распаковки,
следуя указаниям рисунка на верхней плоскости
картонной коробки. Кроме того, вы можете прикрепить
ее после того, как колонка будет полностью распакована,
покрыв подходящую подставку типа стола тканью и
положив на него колонку боком, причем так чтобы ее
основание свешивалось с этого стола. Совместите
плиту с отверстиями для ее крепления в нижней части
корпуса, так чтобы стрелка на нижней поверхности плиты
указывала вперед. Прикрепите прочно плиту с помощью
прилагаемых в комплекте болтов и шайб. Наденьте
упорные шайбы между плоскими шайбами и головками
болтов. Затяните болты с помощью шестигранного ключа.
Шипы рассчитаны на то, чтобы проткнуть ковер и
опираться на поверхность пола. Сначала наверните
контргайки на шипы так, чтобы остался небольшой зазор
над ковром при шипах, прочно стоящих на полу. Затем
заверните шипы до упора в отверстия с резьбой в опорной
плите. Если корпус шатается, отверните назад шипы,
которые не касаются пола, чтобы он прочно встал на все
опоры.
Наконец, затяните контргайки в сторону корпуса или
плиты. Более удобно отрегулировать высоту шипов после
того, как вы выберете оптимальное место для колонок.
Если у вас нет ковра, и вы хотите избежать царапин
на полу, используйте защитные металлические диски
(например, монеты), вставляемые между шипами и полом,
или же установите резиновые ножки из комплекта.
Привинтите резиновые опоры и выровняйте корпус точно
так же, как и в случае с шипами.
РУССКИЙ
41
Page 42

5.1 Channels 6.1 Channels 7.1 Channels
110° - 130°
Stereo
0.5m
~40°
Выбор места для колонок
После начальной установки следует попробовать более
точно выбрать место для АС, т.к. это может дополнительно
улучшить качество звучания.
В системах домашнего театра или стерео системах
старайтесь сделать так, чтобы ближнее окружение каждой
из колонок было похожим по акустическим свойствам.
Например, если одна АС примыкает к голым стенам,
а другая – к мягкой мебели и шторам, то это может
отрицательно повлиять на звучание.
РУССКИЙ
Обычные стерео системы
Для начала расположите АС на расстоянии от 1,5 до 3 м
друг от друга в двух углах равностороннего треугольника,
третий угол которого – это центр зоны прослушивания.
Колонки должны быть на расстоянии по крайней мере
0,5 м от задней и боковых стен (см. рис. выше).
42
Системы Домашнего Театра
Если АС используются как фронтальные каналы в
домашнем театре, они должны стоять ближе друг к
другу, чем в 2-канальном варианте, т.к. тыловые каналы
расширяют образ. Размещение АС на расстоянии
приблизительно по 0.5 м от сторон экрана также помогает
согласовать масштаб звукового и зрительного образа.
Как и в случае обычного стерео, АС должны в идеале
располагаться на расстоянии не менее 0.5 м от задней и
боковых стен. Если колонки предпочтительно установить
вплотную к задней стене, и это приводит к излишнему
подчеркиванию басов, смотрите раздел “Тонкая
настройка” в этой инструкции, где даются советы по
использованию поролоновых заглушек.
Рассеянное магнитной поле
Динамики колонок создают магнитное поле,
выходящее за их пределы. Мы рекомендуем держать
магниточувствительные предметы (кинескопные CRTтелевизоры, дисплеи, дискеты, магнитные аудио и
видеокассеты, карточки и т.п.) на расстоянии минимум
0.5 м от колонок. LCD, OLED и плазменные панели не
подвержены действию магнитных полей.
Page 43

3. Подсоединения
Все подключения делаются только при выключенном
оборудовании.
На задней стороне АС находятся две связанных пары
клемм. При обычном подсоединении перемычка (см. рис.
слева выше) между ними должна оставаться на месте (как
при поставке) и только одна пара клемм подключается к
усилителю. Для соединения би-ваерингом перемычку (см.
рис. справа выше) нужно удалить и каждую пару клемм
подключать к усилителю отдельно. Такое подсоединение
позволяет улучшить разрешение деталей низкого уровня.
Подсоедините плюсовой разъем колонки (со знаком + и
окрашенный в красный) к плюсовому выходу усилителя,
а минусовой (со знаком – и окрашенный в черный) – к
минусовому на усилителе. Неверное подключение
приведет к искажению звукового образа и утере басов.
Попросите вашего дилера порекомендовать кабель.
Старайтесь, чтобы его импеданс был ниже максимально
допустимого в спецификации, а индуктивность тоже была
низкой, чтобы не ослабить высокие частоты.
РУССКИЙ
43
Page 44

4. Тонкая
настройка
Перед окончательной точной настройкой убедитесь, что
все подключено правильно и надежно.
Отодвигая колонки от стен, вы, как правило,
уменьшаете уровень басов. Достаточное расстояние
позади колонок позволяет также создать ощущение
глубины. Соответственно, придвинув колонки к стенам,
вы увеличите долю басов. Если вы хотите снизить
уровень басов, не отодвигая колонки от стен, вставьте
поролоновую заглушку в порт фазоинвертора, или же –
для не такого резкого снижения – поролоновое кольцо (см.
РУССКИЙ
рис. выше).
Неравномерное распределение басов обычно вызывается
стоячими волнами в комнате, и поэтому имеет смысл
поэкспериментировать с расстановкой обоих колонок и
выбором места слушателя. Попытайтесь расположить
колонки вдоль другой стены. На звучание может повлиять
даже перемещение крупной мебели.
44
Если звуковой образ в центре слабоват, попробуйте
пододвинуть колонки ближе друг к другу или же направить
в точку перед слушателями.
Если звук слишком резкий, добавьте мягкой мебели
в комнате (например, повесьте тяжелые шторы), или
наоборот – уберите их, если звук глухой и безжизненный.
Убедитесь, что колонки прочно стоят на полу. Используйте,
если это возможно, шипы, протыкающие ковер, и
отрегулируйте их высоту, чтобы скомпенсировать все
неровности.
Page 45

5. Прогрев и приработка 6. Уход
Звучание АС слегка меняется в течение начального
периода прослушивания. Если колонка хранилась в
холодном помещении, то для демпфирующих материалов
и подвеса динамиков потребуется некоторое время на
восстановление механических свойств. Подвес диффузора
также слегка снижает свою жесткость в течение первых
часов работы. Время, которое потребуется АС для полного
выхода на расчетные характеристики зависит от условия
хранения и интенсивности использования. Как правило,
потребуется неделя на устранения температурных
эффектов и около 15 часов на достижение механическими
частями желаемых характеристик.
К нам иногда поступают отзывы, что необходим более
длительный период приработки (например, месяц),
однако это, как правило, не имеет отношения к
изменениям в свойствах АС, а скорее всего связано с
привыканием слушателя к новому для него звучанию.
Это прежде всего относится к колонкам с высокой
разрешающей способностью, где слушателю может
открыться значительно большее количество деталей,
чем то, к которому он ранее привык; звучание поначалу
может показаться чересчур «выпяченным» и немного
трудным для восприятия. Однако после более или менее
продолжительного времени вам покажется, что звук стал
мягче и приятнее, но без какой-нибудь утери ясности и
детальности.
Обычно корпуса колонок не требуют ничего, кроме
протирки от пыли. Если же вы захотите использовать
аэрозоль или другое средство для чистки, то распыляйте
аэрозоль на протирочную ткань, а не на корпус, и
сначала проверьте его действие на небольшом участке,
т.к. некоторые чистящие вещества могут повредить
поверхность. Избегайте применения жидкостей с
абразивными частицами, содержащих кислоту или щелочь,
а также антибактериальные вещества. Отпечатки на
окрашенной поверхности можно удалить слабым мыльным
раствором, не содержащим душистых веществ. Любые
оставшиеся полосы или разводы удалите, распыляя
подходящую жидкость для очистки стекол и осторожно
вытирая ее микрофибровой салфеткой. Не используйте
чистящие жидкости для динамиков и избегайте касания
диффузоров, т.к. это может привести к их повреждению.
РУССКИЙ
45
Page 46

1. 开箱
包装箱内的物品
检查纸箱内的下列物品:
1 个泡棉塞(两部分)
1 个底座
1 个附件包,包括:
4 个M4钉脚
4 个橡胶脚垫
4 个防松螺母(对边为10毫米)
1 个附件包,包括:
1 个艾伦内六角扳钳
4 个M6 35毫米螺钉
4 个平垫圈
4 个防振垫圈
简体中文
46
环保信息
本产品符合国际指令,包括但不限于:
i. 有关电机和电子设备的危害物质禁用指令 (RoHS)
ii. 化学品注册、评估、许可和限制 (REACH)
iii. 废电机电子设备指令处理规定 (WEEE)
请咨询阁下当地的废弃物处理局,了解有关如何正确回收或处理
本产品的指导。
Page 47

2. 摆放位置
扬声器的安装
此扬声器的安装为座地式。尽可能使用附带的钉脚把它固定在地
板上。此外,为了更稳固,请安装底座。
可于拆箱的过程时安装底座,请遵循纸箱顶部纸瓣上的图表。或
可于产品完全拆箱后才安装底座,把扬声器摆放在铺上布块的适
当支撑上(如桌子),扬声器的侧面躺卧在支撑上,而底部悬垂。
固定底座于箱体底部的连接孔,确保底座底部的箭头指示向前。
使用附带的螺钉及垫圈来稳固地座。安装防振垫圈于平垫圈与螺
钉头之间。使用附带的艾伦内六角扳钳把螺钉拧紧。
钉脚须穿过地毯,竖立在地板表面。首先把螺母旋扭到钉脚上,
直到当钉脚安放在地面时,螺母刚好浮在地毯表面。然后将钉
脚全部拧入底座的螺纹圈中。如果箱体在地板上摇晃,松开未
接触到地板的钉脚,直到箱体稳当放置,不再摇晃。最后把螺
母向箱体方向锁紧。先选择好扬声器的定位才安置及调整钉脚
会较为便利。
如果没有地毯,而希望避免刮花地板表面,可在钉脚和地板之
间用上保护性的金属盘(比如说硬币),或是使用附带的橡胶脚
垫。安装橡胶脚垫及平衡箱体的方法如安装钉脚一样。
简体中文
47
Page 48

5.1 Channels 6.1 Channels 7.1 Channels
110° - 130°
Stereo
0.5m
~40°
扬声器的定位
初始安装后的扬声器的摆位将进一步提高声音的质量,因此值
得这样做。
无论是在立体声还是家庭影院的安装中,要设法确保每个紧贴扬
声器周围的物件在声音特色上类似。例如,如果一个扬声器的周
围是无遮蔽的墙,而另一个扬声器的周围是软性陈设品或窗帘,
则整个声音质量和立体结像则可能受到影响。
传统立体声系统
首先,扬声器应该定位在一个等边三角形的两个角的1.5至3米之
间,而等边三角形的第三角应该在视听区。扬声器应该离后墙约
0.5米,而离任何一侧墙至少约0.5米(见上图)。
简体中文
48
家庭影院系统
如果扬声器被用于家庭影院中的前声道,他们应该放置在较双声
道相互更近的位置,因为环绕声道趋向于将结像加宽。将扬声器
放置在离屏幕约0.5 米之内也有助于使声音结像与视觉影像成比
例。犹如传统的立体声定位一样,扬声器应该处于离任何一侧墙
至少0.5 米的理想位置。如欲把扬声器靠着后墙放置,而此定位
可导致低音过强,请参照本手册微调部份中使用泡棉塞的资料。
杂散磁场
扬声器的驱动系统可产生延伸到音箱周边以外地方的杂散磁场。
我们建议你将对磁场过敏的物体(如传统的显像管电视机和电脑
屏幕、电脑磁盘、录音及录像带、信用卡等)放置离它至少0.5
米的地方。LCD, OLED及等离子电视不会受这种磁场所影响。
Page 49

3. 连接
所有的连接应当在设备关闭时进行。
扬声器的背部有两套连着的端子。在传统的连接中(见左上图),
接线柱连接应该处于原来的位置(如交付时那样),让一对端子
与放大器相连。在双线连接中(见右上图),接线柱连接应该除
去,且每对端子须与放大器独立相连接。双线能够提高低频率细
节的分辨率。
确保扬声器上的正极端(标有+ 和红色)与放大器的正极输出端
相连接,而扬声器上的负极端(标有- 和黑色)与放大器的负极
输出端相连接。不正确的连接会导致结像效果差和低音失真。
在选择扬声器接线时可向你的零售商咨询。其总阻抗应该低于扬
声器规格中的最大值,并使用低电感接线以避免高频的衰减。
简体中文
49
Page 50

4. 微调
在微调前,确保安装中的所有连接正确且安全。
一般来说,把扬声器移离墙壁可降低低音。扬声器后的空
间会帮助创造出一种听觉上的深度感。相反,把扬声器移
近墙壁则可增加低音。如果你希望减少低音而不把扬声器移离墙
壁,可使用泡棉塞或泡棉环,来达到减低强烈的低音
(见上图)。
如果低音的频率不均衡,这很可能是因为试听室里的谐振模式引
起的。即使扬声器或试听的位置很小的改变都可以使谐振对声音
的效果产生很深的影响。设法移动试听的位置或者将扬声器放在
不同的墙旁边。大件家具的存在及其位置也会影响谐振模式。
简体中文
50
假如中心图像缺少焦点,可试着将扬声器彼此离得更近或者使其
向内成一个角度,这样它们就可以正对着试听的位置。
如果音质太过明快,则在房间内增加软性的陈设品(如较重的窗
帘)可以帮助平衡音质。相反,在房间内减少软性的陈设品可以
使迟缓的音质变得明快。
确保扬声器的架子垂直并稳固于地面。适当地使用能够穿过地毯
的脚钉并调整使其平衡。
Page 51

5. 煲机 6. 保养
在初始试听阶段,扬声器的性能会发生细微变化。如果扬声器被
安装在较冷的房间内,驱动装置的阻尼复合组件和悬挂材料会需
要一些时间来恢复其正确的机械性能。驱动装置的悬挂部分也会
在最初使用的几小时内松动。使扬声器达到理想性能状态的时间
将因以前的储存条件和使用方法而有所变化。作为使用指引,可
以用一周时间来稳定温度的影响,或者用平均使用15 小时的时
间来使机械部分达到理想的设计性能。
不过,也出现过更长时间的设备调试期(如一个月)。但证据显
示这与扬声器的改变没多大关系,而与试听者适应新的声音关系
更大。这在扬声器的声音细节与试听者以前所习惯的相比较有很
大程度增加时,尤其如此。声音在开始时也许太过“直接”,或
者有点猛烈。经过一段时间以后,声音将会变得柔美,但并不失
去清晰度和细节。
箱体表面通常仅需要除尘。如果想要使用喷雾剂或其它清洁剂,
请将清洁剂使用在布块上,不要直接喷到产品上,并先在一小块
面积上试用,因为有些清洁产品可能会损坏表面。请勿使用具有
磨蚀性,包含酸、碱或抗菌剂的产品。漆面上的污点可使用稀释
的无香味皂液清除。余下的斑纹可喷上专用玻璃清洁剂,然后使
用微细纤维布轻擦拭干。请勿对驱动单元使用清洁剂。请避免触
摸驱动单元,因为可能导致损坏。
简体中文
51
Page 52

1. 開梱
梱包内容
梱包箱の中には以下のものが同梱されています。ご確認ください。
分離型フォームプラグ
(フォームプラグ/フォームリング) 1個
台座 1個
アクセサリーパック1袋
中身
M4スパイク 4本
ゴム足 4個
ロックナット(10mm平面幅)4個
アクセサリーパック 1袋
中身
六角レンチ 1個
M6 x 35mmネジ 4個
平ワッシャー 4個
菊座ワッシャー 4個
日本語
52
環境関連情報
本製品は以下を含む国際指令に準拠しています。
i. 電子・電気機器における特定有害物質の使用制限(RoHS)
II. 化学物質の登録、評価、認可および制限(REACH)
iii. 廃電気電子機器指令(WEEE)
本製品の適切なリサイクルまたは処分方法の指針については現地
の廃棄物処理当局に問い合わせてください。
Page 53

2. 設置場所
スピーカーの設置
本スピーカーはフロアに設置されることを前提に設計されています。
可能な限り付属のスパイクを使用してフロアにしっかりと立たせる
事が重要です。加えて、背の高いCM10は適切な安全性を持たせる
ために台座を使用します。
開梱するときに、カートンの上蓋の図に従って台座を取り付けること
ができます。或いは、テーブルのような適切なサポートに布をかけ、
底部が突き出すようその上にスピーカーを横向きに寝かせることで、
完全に開梱した後に台座を取り付けることもできます。取り扱い中に
キャビネットやドライブユニットを破損しないように細心の注意を払
いながら作業を行ってください。台座の下側にある矢印が確実に前
側を指すように台座とキャビネットの下側の取り付け穴を合わせて
ください。そして付属のねじとワッシャーを使用し、台座を固定させ
ます。その際にねじの頭部分とワッシャーの間に菊座ワッシャーをは
さみます。付属の六角レンチを使用して、ねじを締めこみます。
スパイクは、床の上に敷かれているカーペットを貫いて、床の上に設
置するように設計されています。まず、フロアにスパイクが置かれた
時に、カーペットの上に十分ナットが浮かんだような状態になるよ
うに、スパイクのロックナットを廻しながら調整します。スパイクをね
じ込み式のインサートに目一杯ねじ込んでください。もしキャビネッ
トを、床面に置いたとき安定せずに揺れるようでしたら、揺れが止ま
り、キャビネットがしっかりと固定されるようになるまで、床に設置し
ていない2本のスパイクを緩めて下さい。最後に、キャビネットに対
してナットを固定してください。スピーカーの設置位置を最適に調整
した後にスパイクを調整した方が良いでしょう。
スピーカーを設置する場所にカーペットが全くなく、床の表面を傷
つけたくない場合は、スパイクと床の間の保護的な金属ディスク(
コイン等)を使用するか、または付属のゴム足を使用してください。
スパイクと同じ方法でゴム足の高さを調整しキャビネットを設置し
て下さい。
日本語
53
Page 54

5.1 Channels 6.1 Channels 7.1 Channels
110° - 130°
Stereo
0.5m
~40°
スピーカー設置位置
スピーカーを設置した後の設置位置の微調整は、サウンドクォリ
ティを更に向上させます。通常それは実施するだけの価値のある
ものです。
ステレオ又はホームシアターのどちらの場合でも、スピーカーの設
置はそれぞれのスピーカーの設置環境が、音響的特性において同じ
になるように行ってください。例えば片方のスピーカーが露出した壁
のすぐ近くに設置され、もう一方のスピーカーが軟らかい家具やカ
ーテンの近くに設置されたとします。この場合は、総合的なサウンド
クォリティとステレオイメージの両面で妥協した形になります。
従来のステレオシステム
始めに、左右のスピーカーを1.5mから3m離して設置し、次に左右
のスピーカーがリスニングポジションを頂点とした2等辺三角形の
位置になるように設置します。スピーカーは後ろの壁からは約0.5
m、横の壁からは0.5m以上離して設置してください (上図)。
日本語
54
ホームシアターシステム
ホームシアターシステムのフロントチャンネルにこのスピーカーを使
用する場合、サラウンドチャンネルが広がりのあるサウンドイメージ
を作る傾向にあるので、2チャンネルオーディオ(ステレオシステム)
セッティングより左右のスピーカーが近くになるように設置してくだ
さい。また映像のイメージとサウンドイメージのスケールが一致する
ように、フロントスピーカーはスクリーンの横から約0.5m以内に設
置するようにしてください。ステレオセッティングと同様に、スピーカ
ーはあらゆる壁から約0.5m以上離して設置することが理想的です。
スピーカーを壁のすぐ前に設置する場合、壁からの影響で低音が強
調されてしまう時は、本取扱説明書のファインチューニングの項目
に書かれているフォームプラグの使用方法を参考にして下さい。
漏洩磁界
スピーカーのドライブユニットは、キャビネットを越えて磁界を発生
させます。磁力に反応しやすい物品(ブラウン管テレビやコンピュー
ターのモニター、フロッピー・ディスク、オーディオ/ビデオ・テープ、
キャッシュ・カード類など)はスピーカーから少なくとも0.5メートル
は遠ざけておいてください。液晶テレビや有機ELディスプレーやプラ
ズマテレビは漏洩磁界に影響されません。
Page 55

3. 接続
全ての接続は、必ず機器のスイッチを全てオフにしてから行ってく
ださい。
スピーカーの後部にショートバーで繋がっている2組の端子があり
ます。一般的な接続方法ではショートバーをスピーカー端子に付け
たまま、どちらか1組のスピーカー端子にスピーカーケーブルを接続
し、そのケーブルをアンプに接続します(左上図)。バイワイヤ接続で
は、まずショートバーを外します。次に2組それぞれのスピーカー端
子に、独立したスピーカーケーブルを接続し( 右上図)、そのケーブル
をアンプのスピーカー端子に接続します。バイワイヤリングは詳細な
低レベルの解像度を向上させます。
スピーカーのプラス端子(“+”のマークがあり、端子の色は赤)をア
ンプのプラス出力端子に、スピーカーのマイナス端子(“-”のマーク
があり、端子の色は黒)をアンプのマイナス出力端子を確実に接続し
ます。間違った接続を行った場合、サウンドイメージが広がらないと
か、低音が出ないといった現象が起きます。
スピーカーケーブルをお選びになる際はディーラーまたは各国の代
理店へご相談ください。目安としては、トータルインピーダンスがスペ
ックの最大推奨値より低くなるようにして下さい。また、超高域の減
衰を避ける為にローインダクダンスのケーブルを使用して下さい。
日本語
55
Page 56

4. 微調整
ファインチューニングの前に、もう一度全ての設置と接続が正しく
且つ安全に行われているか確認して下さい。
一般的に壁からスピーカーを遠ざけると低音域の量が少なくなりま
す。スピーカーの後ろにスペースをつくることによって、音場の奥行
き感を得ることができます。逆に言えばスピーカーを壁に近づけるこ
とによって低音域のボリュームを増やすことができます。壁からの距
離を変えずにスピーカーに低音域のふくらみを低減させたい場合に
は、スピーカーのバスレフポートにフォームプラグ挿入してみてくだ
さい。また少し低音域を減少させたい場合はフォームリングをバス
レフポートに挿入して下さい。フォームプラグ、又はフォームリングの
使用方法は上図を参照してください。
もし低域が周波数的にフラットではないと思われたら、それはリスニ
ングルームの共振モードのために発生している可能性があります。
スピーカーの位置又はリスニングポジション等の小さな変更で、こ
れらの共振の影響が改善される場合もあります。リスニングポジシ
ョンを移動するか、または異なった壁に沿ってスピーカーの設置位
置を変更してみてください。大きな家具の位置や配置の共振モード
に影響します。
日本語
56
センターイメージのフォーカスがあいまいな場合は、左右のスピー
カーの間隔をもっと狭めるか、スピーカーの設置角度をリスニング
ポジションの前に合わせ、もっと内側に向けると改善される場合が
あります。
再生した音が高音域に偏っていると感じられた時は、部屋に音を吸
収するような柔らかい家具等を増やしてみてください。(例えば重た
いカーテンを使用する等)おそらくサウンドバランスを整える助けと
なります。また逆に、再生した音がこもった感じになった場合は、そ
れらの家具を減らしてみてください。
スピーカーがしっとりと床の上に立っていることを確認して下さい。
カーペットなどで床が不安定ならば鋭いスパイクを使用します、そし
て、スピーカーが直立するようにスパイクの長さを調整してください。
Page 57

5. ならし運転 6. お手入れ
スピーカーの性能は、御使用になるにつれて微妙に変化します。スピ
ーカーが冷たい環境に保管されていた場合、ドライブユニットのダン
ピング材とサスペンションが本来の機械的特性を取り戻すまで、し
ばらく時間が掛かります。ドライブユニットのサスペンションは音量
やソースにもよりますが、鳴らし始めてから1時間くらいで徐々にほ
ぐれてきます。スピーカーが意図された性能を取り戻すまでにかか
る時間は、開梱までの保管条件や、どの様に使用されるかによって
異なります。目安としては、温度による影響を安定させる為、ご使用
される状況で1週間、また意図されたデザイン特性に達するために、
平均15時間スピーカーを鳴らすことを見込んでください。
慣らし期間(少なくとも1ヶ月程度)は長いほど良いといわれていま
すが、これはスピーカーの音が変化することよりも聴き手が新しい
音に慣れてくることの方が大きいという証言もあります。特に、使用
開始直後には、音が前に出過ぎる等の違和感を感じたり、音が硬く
聞こえたりしますが、音の詳細(ディティール)などが今まで耳になれ
ていたスピーカーよりも顕著になった為であり、慣らし期間がより必
要となります。長期の慣らし期間の後のサウンドは明確さと詳細さ
を失うことなく滑らかになることでしょう。
キャビネットの表面は、普段はほこりを払うだけで十分です。エアゾ
ル剤その他の洗浄剤をお使いになりたい場合、洗浄剤によっては表
面を傷めることもありますので、本体に直接お使いになるのではな
く、布に取って小さな部分でお試しになってからお使いください。研
磨剤、または酸、アルカリ、殺菌剤が含まれている製品はお使いにな
らないでください。塗装面の汚れは、薄めた無香料セッケン溶液で落
ちる場合があります。それでも落ちない汚れは、専用のガラスクリー
ナーをスプレーし、マイクロファイバーの布で軽く拭き取ってくださ
い。破損の原因となる可能性がありますので、ドライブユニットに洗
浄剤を使ったり触ったりしないでください。
日本語
57
Page 58

EU DECLARATION OF CONFORMITY
We,
B&W Group Ltd.
whose registered office is situated at
Dale Road, Worthing, West Sussex, BN11 2BH, United Kingdom
declare under our sole responsibility that the products:
683 S2 and 684 S2
comply with the EU Electro-Magnetic Compatibility (EMC) Directive 89/336/EEC,
in pursuance of which the following standards have been applied:
EN 61000-6-1 : 2007
EN 61000-6-3 : 2007
EN 55020 : 2007
EN 55013 : 2001
and comply with the EU General Product Safety 2001/95/EC, in pursuance of which the following
standard has been applied:
EN 60065 : 2011
This declaration attests that the manufacturing process quality control and product documentation
accord with the need to assure continued compliance.
The attention of the user is drawn to any special measures regarding the use of this equipment that
may be detailed in the owner’s manual.
Signed:
G Edwards
Executive Vice President, Operations
B&W Group Ltd.
Page 59

II13749 Issue 2
B&W Group Ltd
Dale Road
Worthing West Sussex
BN11 2BH England
T +44 (0) 1903 221 800
F +44 (0) 1903 221 801
info@bwgroup.com
www.bowers-wilkins.com
B&W Group (UK Sales)
T +44 (0) 1903 221 500
E uksales@bwgroup.com
B&W Group North America
T +1 978 664 2870
E marketing@bwgroupusa.com
B&W Group Asia Ltd
T +852 3 472 9300
E info@bwgroup.hk
Copyright © B&W Group Ltd. E&OE
Printed in China
 Loading...