

Page 1

BK760 / BK76IB Inkjet
Part No. 9102423 User’s Guide V1.2
Page 2

BK760 / BK76IB Inkjet User’s Guide
Published by:
Buskro Ltd.
1738 Orangebrook Court, Unit #1
Pickering, ON, L1W 3G8
Canada
Tel.: (905) 839-6018
Fax: (905) 839-6023
All Rights Reserved. No part of this book may be used or reproduced in any form or by
any means, electronic or mechanical, or stored in a database or retrieval system,
without prior written permission of Buskro Ltd. except in case of brief quotations
embodied in critical articles or reviews. Making copies of any part of this book for any
purpose other than your own personal use is a violation of copyright laws.
Copyright © 2003, Buskro Ltd.
First Edition, 2003
Printed in Canada
This manual is sold as is, without warranty of any kind, either express or implied,
respecting the contents of this manual, including but not limited to implied warranties for
the manual’s quality, performance, merchantability, or fitness for any particular purpose.
Neither Buskro Ltd. nor its dealers or distributors shall be liable to the purchaser nor any
other person or entity with respect to any liability, loss, or damage caused or alleged to
be caused directly or indirectly by this manual.
Manual History
Version Date Description ECO No.
1.0 14-Sep-03 Manual Released. N/A
1.1 20-Feb-04 Updated Appendices 557
Buskro Ltd. BK760 / BK76IB Inkjet
Page 3

BK760 / BK76IB Inkjet
Table Of
Contents
1.0 General Information.............................................................................1-0
1.1 Description ............................................................................................................ 1-1
1.2 Features................................................................................................................. 1-2
1.2.1 Vacuum Table Belts......................................................................................... 1-2
1.2.2 Controller......................................................................................................... 1-2
1.2.3 Complete Instrument Panel.............................................................................. 1-2
1.2.4 BK1600 Series Conveyor Compatibility......................................................... 1-2
1.2.5 Tabber and Inkjet Compatibility...................................................................... 1-2
1.2.6 Auxiliary Feeder Compatibility....................................................................... 1-3
1.2.7 Print Quality Considerations............................................................................ 1-3
1.2.8 Software Considerations (Compose Si or IQ) ................................................. 1-3
1.3 Specifications......................................................................................................... 1-5
1.4 System Drawings................................................................................................... 1-6
2.0 Operator Instructions...........................................................................2-0
2.1 The Base Control Board....................................................................................... 2-1
2.2 Instrument Panel (Main Control)....................................................................... 2-2
2.2.1 Rocker Switches .............................................................................................. 2-3
2.2.2 Pushbuttons...................................................................................................... 2-3
2.2.3 Run/Jog Selector Knob.................................................................................... 2-3
2.2.4 Control Dials.................................................................................................... 2-3
2.3 Interconnecting Units (Systems) ......................................................................... 2-4
2.4 Material Side Guide Adjustments....................................................................... 2-5
2.5 Maintenance Schedule.......................................................................................... 2-5
Appendix A – Assembly Drawings
Appendix B – Electrical Drawings
Buskro Ltd. BK760 / BK76IB Inkjet
Page 4

General Information
1.0 General Information
Chapter 1
Buskro Ltd. BK760 / BK76IB Inkjet
Page 5

Chapter 1 General Information Page 1-1
1.1 Description
The Buskro BK760 / BK76IB series inkjet is an affordable inline transport base that does not
compromise flexibility or reliability. In the case of the BK760, an integrated computer with
Compose software is included with the base to provide full printing potential. In the case of
the BK76IB, it is designed purely as a transport base. However, it is also designed to be
modular to allow it to be integrated with a BK700 Portable Controller. By doing this, the
BK76IB becomes the BK776 which has the full range of Buskro print technologies available.
In addition, both the BK760 and BK76IB are available in both left to right (Right) and right
to left (Left) transport configurations.
Designed with modularity in mind, the BK760 / BK76IB is capable of integrating with a
number of other Buskro products. This includes feeders, extension tables, conveyors, other
inline bases, and tabber/labelers. This provides a great deal of flexibility.
From an electrical standpoint, the BK760 / BK76IB is designed to support both 115 and 230
VAC input voltages at 50 or 60 Hz without the need of a transformer. This is to provide
greater flexibility to the customer. However, the BK760 / BK76IB is shipped to support 230
VAC by default. In cases where only 115 VAC is available, the unit can be switched but
must be done by a qualified technician.
Buskro Ltd. BK760 / BK76IB Inkjet
Page 6

Chapter 1 General Information Page 1-2
1.2 Features
1.2.1 Vacuum Table Belts
The table belts, which transport the product past the inkjet imaging region, are equipped with
vacuum to provide positive adhesion to the base. This helps ensure accurate placement of
the image on the product.
1.2.2 Controller
The BK76IB is completely modular and was designed to accommodate the BK700 portable
controller. Alternatively, the BK760 can be purchased which includes a built-in controller
capable of supporting up to four inches of Apollo print.
1.2.3 Complete Instrument Panel
All necessary controls required to operate the unit are easily accessible to the operator on a
central instrument panel. The control panel comes complete with rocker switches, large
pushbuttons, and variable speed potentiometers for machine/conveyor speed regulation.
1.2.4 BK1600 Series Conveyor Compatibility
The BK760 / BK76IB is fully compatible with any BK1600 series conveyor from a 6-foot
model through to an 18-foot model. It is electrically integrated through a 7-pin circular
connector and can be controlled from the base.
1.2.5 Tabber and Inkjet Compatibility
The BK760 / BK76IB is compatible with all Buskro Tabbers and transport bases. It is
electrically integrated through the upstream and downstream connections in order to directly
start or stop the entire system.
Buskro Ltd. BK760 / BK76IB Inkjet
Page 7

Chapter 1 General Information Page 1-3
1.2.6 Auxiliary Feeder Compatibility
In the case where a BK720 friction feeder is used, an optional table (BK723) can be attached
to the base. This feeder is electrically integrated through a 14-pin auxiliary feeder connector
in order to directly start and stop the feeder from the base. In addition, a rocker switch (Feed
Enable) on the instrument panel can be used to enable or disable the feeder in order to run
the base without the feeder. In order to connect a shuttle feeder such as the BK425, the
upstream connector on the base is used to integrate the start and stop functions.
1.2.7 Print Quality Considerations
In order to optimize print quality, the BK760 / BK76IB has a textured tabletop to minimize
static buildup, a helical coupling encoder connection, vacuum-assisted transport belts, and a
sturdy cabinet design.
1.2.8 Software Considerations (Compose Si or IQ)
The BK760 is available in two main software configurations. Depending on which software
is used, different features are available to the customer. In general, Compose Si is the basic
model while Compose IQ offers full feature functionality. The main feature differences can
be seen in
Table 1-1.
Buskro Ltd. BK760 / BK76IB Inkjet
Page 8

Chapter 1 General Information Page 1-4
Table 1-1: Feature Comparison (Compose IQ and SI)
No. Feature description Si IQ
1 Job Handling
1.1 Multiple List Types: text, MS Access, Dbase, Foxpro, Excel
1.2 Multiple Code Pages; Foreign character sets
1.3 Multiple Copy Printing
1.4 Job Preparation and Recall
2 Setup
2.1 Stacker/Diverter Control
2.2 Printhead Supported: Apollo, Atlas, Atlas UVC, Elite
2.3 Printhead Micro-Alignment
2.4 Master/Slave Communication
2.5 Product Tracking; up to 8 zones
2.6 (Optional) OCR for camera/database lookup applications
2.7 (Optional) Selective for control of feeder and other devices
2.8 Print Verification
2.9 English only Language Interface
2.10 English, French, Spanish, German, Japanese, Korean, Chinese (simplified,
traditional), Thai Language Interface
2.11 Password Protection
3 Operator Display
3.1 Record Navigation Tools
3.2 Record Search, Re-printing, and Cueing
3.3 Record Status Color Coding
3.4 Single Record Display - Static
3.5 Multiple Record Display – Real-time refresh
3.6 Operator View: Multiple record or product tracking
4 Layout
4.1 Text: Fixed and Variable up to 99 components @ 255 characters/field
4.2 128 frames per printhead
4.3 Graphics: Fixed and Variable, Bitmap
4.4 Barcode; Linear: Code 128, Codabar, EAN, UPC, 2 of 5, 3 of 9
4.5 Barcode, postal: Postnet, Planet ALL
4.6 Barcode, 2D: Datamatrix ECC200, PDF417, QR
4.7 Alignment Tools : 0, 90, 180, 270 orientation
4.8 Text Manipulation Tools: typeface, alignment, True Type
4.9 Serial Numbering
4.10 Time and Date Stamping
5 Reports (Crystal)
5.1 Production: Job, Machine
5.2 Audit: completed, not completed, duplicate, lost/wasted records
6 Diagnostics
6.1 Printhead test label and test firing
6.2 Input Sensors and Output Device testing
6.3 Encoder Scope
6.4 Printhead Parameter Viewing
7 General
7.1 Windows-based, XP compatible (Compose V6.0)
7.2 Multiple Print Resolutions: 110, 150, 220, 330, 440, 660
7.3 Core Charge Rebate applicable
√ √
√ √
√ √
√ √
√ √
√ √
√
√ √
√ √
√ √
√ √
√
√ √
√ √
√ √
√ √
√ √
√ √
√ √
√ √
√ √
√ √
√ √
√ √
√ √
√ √
√
√
√
√
√
√
√
√
√
√
√
√
√
Buskro Ltd. BK760 / BK76IB Inkjet
Page 9

Chapter 1 General Information Page 1-5
1.3 Specifications
1.3.1 Product handling
1.3.2 Physical
1.3.3 Production rate
1.3.4 Electrical requirements
Minimum
Maximum
Thickness
Weight (crated) 450 lbs 204 kg
Belt Speed 0 to 600 ft/min 0 to 3.05 m/s
Cycle Speed 0 to 30,000 pph
Conveyor Speed 0 to 26.0” in/s 0 to 0.7 m/s
Line Voltage/Current
Power 0.920 kVA
Base Motor 1/4 hp, 90 VDC at 2.4A
Transport Blower 1/3 hp, 230 VAC at 2A
3.0” x 5.0” 76 mm x 127 mm
16.0” x 17.0” 406 mm x 432mm
Single Sheet to 1 1/8” Up to 28 mm
120V, 60Hz, 7.5A, ± 10% Volts
230V, 50/60Hz, 4A, ± 10% Volts
1.3.5. Operator controls
Conveyor Interface 1/8 hp, 90 VDC at 1.3A
Circuit-Breaker Switch Main
Machine
Pushbuttons/Rocker
Switches
Potentiometers Production, Conveyor, Stack
42 CFM, 39” H
DC Controller
Start, Stop, Run/Jog, Feeder,
Controller
O Max Pressure
2
Buskro Ltd. BK760 / BK76IB Inkjet
Page 10

Chapter 1 General Information Page 1-6
1.4 System Drawings
Figure 1-1: BK760 System Overview (BK760R Shown)
JB5
System
14
3
8
13
JB3
11
10
12
2
1
6
JB8
5
ON BK76IB
ONLY
4
Controller I/O
JB4
15
JB1
GND
16
Buskro Ltd. BK760 / BK76IB Inkjet
Page 11

Chapter 1 General Information Page 1-7
Table 1-2: BK760 Features and Interface Specifications (BK760R Shown)
Item Description Reference
1 Cover, Front Panel Assembly
2 Keyboard with Built-in Trackball (BK760 Only)
3 Computer Monitor (BK760 Only)
4 Computer Controller (BK760 Only)
5 Computer Power Push Button (BK760 Only)
6 HP and Controller Main Power Switch (BK760 Only)
7 Photo Sensor Receptacle (3-pin female)
8 Cycle Sensor Receptacle (3-pin female)
9 Jam Sensor Receptacle (3-pin female)
10 Stack Speed Pot
11 CD-ROM Drive
12 Floppy Drive, 3 ½”
13 Serial ports (optional)
14 System speed control (optional)
15 HP power supply (BK760 Only)
16 Controller I/O Connection (BK76IB Only)
JB3 Auxiliary Feeder Connector (17-14 CPC Female)
JB4 Downstream Connector (22-57 CPC Female)
JB5 Conveyor Connector (23-7 CPC female)
JB8 Upstream Connector (23-37 CPC female)
JB1 Receptacle, Male, 250VAC, 16A, IEC
Note: JB3, JB4, JB5, and JB8 are on opposite ends of the base in the left systems
(BK76IBL and BK760L).
Buskro Ltd. BK760 / BK76IB Inkjet
Page 12

Chapter 1 General Information Page 1-8
Figure 1-2: BK760 Overall Dimensions
REAR
O.L.
LEFT
FRONT
X1
O.H.
RIGHT
Z1
Z2
O.W.
Y1
B.C.
Table 1-3: BK760 Overall Dimensions
Symbol Description Dimensions
O.W. Overall Width 32.27” 820 mm
O.L. Overall Length 50.12” 1273 mm
O.H. Overall Height 64.91” to 66.13” 1649 mm to 1680 mm
B.C. Minimum Base Clearance 2.20” 56 mm
X1 Leveling Foot Length 40.88” 1038 mm
Y1 Tabletop Height 32.78” to 34” 833 to 864 mm
Z1 Leveling Foot Width 24.00” 610 mm
Z2 Base Width 28.00” 711 mm
Buskro Ltd. BK760 / BK76IB Inkjet
Page 13

Operator Instructions
2.0 Operator Instructions
Chapter 2
Buskro Ltd. BK760 / BK76IB Inkjet
Page 14

Chapter 5 Operator Instructions Page 2-1
2.1 The Base Control Board
The Base Interface Board (BCB) contains the central control circuitry for the BK760 and
BK76IB. In addition, the BCB interfaces with the computer and also handles communication
with upstream and downstream equipment. The BCB is located inside the enclosure at the
rear of the base (rear panel).
Access to the BCB should only be required if the system configuration is changed. This
includes the use of conveyors, upstream and downstream systems, jam sensors, computers,
and feeder enable/disable switches. In order to properly configure the BCB, the DIP switch
settings must be set. The BCB can be seen in Figure 2-1 with a description of the proper DIP
switch settings.
Figure 2-1: Base Control Board - 9102380 (BCB)
Switch
1
2
3 Downstream Connection OFF = Downstream Connected, ON = No Downstream
4
5
6
J3
SPEED CONTROL CONV STOP
J6
GND
+12V
D31
J7
J10
SENSOR
INPUTS
Description
Conveyor Connection OFF = Conveyor Connected, ON = No Conveyor
Upstream Connection OFF = Upstream Connected, ON = No Upstream
Jam Connection OFF = Jam Switch Connected, ON = No Jam Switch
Computer Connection OFF = Computer Connected, ON = No Computer
Run Enable/Disable OFF = Enable Feed Enable, ON = No Feed Enable
J1 J2
START STOP
D3 D4
A
STOP
INPUT
D34
1A
12V OK
START
INPUT
D33
D2
Setting
UPSTREAM CONNECTIONSDOWNSTREAM CONNECTIONS
RUN
CONTROLLER CONNECTIONS
J9
ON
1234
O
F
F
ROCKER DOWN
56
NOTE:
SET FEED ENABLE OFF (SWITCH 6) WHEN A FEED ENABLE
SWITCH IS AVAILABLE (I.E. BK760).
OFF
DETAIL A
SCALE 3:1
RELAY CONTROL FEEDER
FRONT
PANEL
J4
J5
J8
Buskro Ltd. BK760 / BK76IB Inkjet
Page 15

Chapter 5 Operator Instructions Page 2-2
The BCB is also equipped with six LEDs. This can be used for troubleshooting the system.
The description of each LED can be seen in Table 2-1.
Table 2-1: Base Control Board LED Descriptions
LED Color Description
D2 Yellow Indicates a start pulse is being sent to an upstream and downstream unit. Normally
OFF. ON only during pulse duration (when an upstream, downstream, or the base
Start is pressed).
D3 Green Indicates a stop pulse is being sent to an upstream and downstream unit. Normally
ON. OFF only during pulse duration (when an upstream, downstream, or the base
Stop is pressed).
D4 Green Indicates the base is running. ON if the base is running, OFF if the base has
stopped.
D31 Green +12 VDC is being supplied to the board. Will not indicate a blown fuse. Normally
ON.
D33 Yellow Indicates a start input is received. Normally OFF. ON as long as a start input is
received.
D34 Red Indicates a stop input. This signal will override any start signals. The base will not
run as long as this light is ON and it will not send any start signals to upstream or
downstream units. This LED is normally OFF.
2.2 Instrument Panel (Main Control)
The main controls for the base are found on the instrument panel located at the front of the
machine (Figure 2-2).
Figure 2-2: Base Instrument Panel
Optional Speed
Control Board Control
Auxiliary Feeder
Rocker Switch
Start Pushbutton
Jog/Run Selector
Feed Enable
START
JogSystem
Run
PRODUCTION CONTROL
STOP
Base
Conveyor
POWER
Power Rocker Switch
Conveyor Speed Dial
Production Speed Dial
Stop Pushbutton
BUSKRO
Buskro Ltd. BK760 / BK76IB Inkjet
Page 16

Chapter 5 Operator Instructions Page 2-3
2.2.1 Rocker Switches
There are two main rocker switches on the front panel. The POWER switch turns on and off
the main power to the base including the vacuum blower. The Feed Enable switch is used to
enable and disable the functionality of an auxiliary feeder. When enabled, the feeder will
start and stop with the base. When disabled, the feeder will remain off while the base
transport is on. In addition, when the Feed Enable is off, the base will not start any
upstream units.
2.2.2 Pushbuttons
There are two main pushbuttons on the front panel. The START button starts the base as
well as any interconnected units (i.e. feeders, bases, and conveyors) while the STOP button
stops the system.
2.2.3 Run/Jog Selector Knob
The Run/Jog selector is a knob that permits a choice between continuous and intermittent
machine operation. When the Run mode has been selected and the Start button is pressed,
the machine will operate continuously. In the Jog mode, the machine will cycle only as long
as the Start button remains pressed.
2.2.4 Control Dials
The two main production control dials on the instrument panel are the Base and Conveyor
dials. They control the speed of the transport base and the optional conveyor respectively.
In general, a clockwise rotation of the dial will increase the speed while a counter-clockwise
rotation will decrease the speed.
Buskro Ltd. BK760 / BK76IB Inkjet
Page 17

Chapter 5 Operator Instructions Page 2-4
2.3 Interconnecting Units (Systems)
The BK760 / BK76IB was designed to be modular. As a result, it is possible to interconnect
it with other Buskro products such as feeders, transport bases, controllers, extension tables,
and conveyors.
With the exception of friction feeders, controllers, and conveyors, most Buskro units are
interconnected through the use of a Universal Interconnect Cable (9102083A). In general,
this cable is connected to the downstream connector of one unit and the upstream connector
of another unit. By definition, upstream units are machines that are physically ahead of the
unit in question in terms of product flow. Downstream units are machines that are physically
after the unit (i.e. the product travels on the upstream unit, then the unit in question, then the
downstream unit). In the case of the BK760 / BK76IB, it is equipped with both an upstream
and downstream connector. As a result, it is considered an inline unit (it can be placed either
upstream or downstream of another unit or both).
In order to interconnect the BK760 / BK76IB to friction feeders, controllers, or conveyors,
separate connectors are provided. This includes a 14-Pin auxiliary feeder connector, a 26Pin I/O Controller ribbon cable connector (For BK76IB only), and a 7-Pin Conveyor
connection. Reference
Note: In order to interconnect other units, the DIP switch settings on the Base Control
Board may need to be changed. Reference Section 2.1 for more details.
Figure 1-1 for the locations of the interconnection connectors.
Buskro Ltd. BK760 / BK76IB Inkjet
Page 18

Chapter 5 Operator Instructions Page 2-5
2.4 Material Side Guide Adjustments
In units equipped with material side guides (9102181A), the incoming product can be
correctly aligned before being presented underneath the printheads. This is useful if the
product is fed into the transport base in a skewed manner.
Note: When adjusting the material side guides, the guides should not squeeze the
product (otherwise it will retard the products motion and result in incorrect print
positioning). Instead, the guides should be approximately 1/16” from the edge of
the product on both sides.
2.5 Maintenance Schedule
The maintenance schedule table presented below applies to equipment which is operated
daily on an 8-hour basis. If the equipment is used more frequently, the maintenance schedule
must be adjusted accordingly.
Table 2-2: Maintenance Schedule Table
Period Maintenance Function
Daily
Monthly
Semi-Annually
Note: The availability of a small air compressor is recommended. Compressed air is
useful in removing debris and is indispensable in cleaning out the vacuum
systems.
Wipe table surface clean of paper dust and other accumulated debris.
Remove the front door and clean any debris which may have fallen into the
machine.
Wipe away any ink which may have settled on the tabletops, belts, and rollers.
Clean vacuum lines and fittings with compressed air.
Examine all mechanical drive components for wear. Replace if necessary.
Examine the table belts and feed rollers for wear. Replace if necessary.
Buskro Ltd. BK760 / BK76IB Inkjet
Page 19

Assembly Drawings
A.0 Assembly Drawings
Appendix A
List of Tables
Table A-1: System, BK760, Left, Test (BKT760L)...................................................... A-1
Table A-2: System, BK760, Right, Test (BKT760R).................................................... A-3
Table A-3: Base, BKT76IB, Left, Test (BKT76IBL).................................................... A-5
Table A-4: Base, BKT76IB, Right, Test (BKT76IBR)................................................. A-6
Table A-5: Table, Friction Feeder Assembly – Optional (BK723)............................... A-7
Table A-6: Datapath Card Assembly (9100194A)........................................................ A-8
Table A-7: Fan Assembly, 12VDC (9100343A)........................................................... A-9
Table A-8: Blower Assembly (9100829A).................................................................. A-10
Table A-9: Panels Assembly, BK76IB, Left (9102065LA) ........................................ A-11
Table A-10: Panels Assembly, BK76IB, Right (9102065RA).................................... A-13
Table A-11: Panels Assembly, BK760, Left (9102066LA) ........................................ A-15
Table A-12: Panels Assembly, BK760, Right (9102066RA)...................................... A-17
Table A-13: Tabletop Assembly, BK760, Left (9102067LA)..................................... A-19
Table A-14: Tabletop Assembly, Right, BK760 (9102067RA).................................. A-20
Table A-15: Frame, Tabletop Assembly, BK760 (9102081A) ................................... A-21
Table A-16: Bracket, Encoder Assembly (9102171A)................................................ A-22
Table A-17: Motor Assembly, Left, BK760 (9102174LA)......................................... A-23
Table A-18: Motor Assembly, Right, BK760 (9102174RA) ...................................... A-24
Table A-19: Terminal Block Assembly, TB-1, BK760 (9102178A).......................... A-25
Table A-20: Infeed Mounting Rail Assembly – Optional (9102181A)....................... A-26
Table A-21: Monitor Mounting Tray Assembly (9102183A)..................................... A-27
Table A-22: Cover, Front Panel Assembly (9102185A)............................................. A-28
Table A-23: Terminal Block Assembly, TB-2, BK760 (9102200A).......................... A-29
Table A-24: Cover, Rear Panel Assembly (9102201A).............................................. A-31
Table A-25: Outfeed Roller Assembly (9102296A).................................................... A-32
Table A-26: Roller Assembly, Belt Tensioner (9102300A)........................................ A-33
Table A-27: Leveling Leg Assembly (9102320A)...................................................... A-34
Table A-28: Cover, Controller I/O (9102645A).......................................................... A-35
Table A-29: Base Cabinet Assembly, BK760 (9102684A)......................................... A-36
Table A-30: Base Assembly w/Controller, BK760 (9102685A)................................. A-38
Table A-31: Tabletop, Middle Plate Assembly (9102689A)....................................... A-40
Table A-32: Computer Chassis Assembly, Celeron P4 (9102776A) .......................... A-41
Table A-33: Power Supply Assembly, HP (9103361A).............................................. A-42
Buskro Ltd. BK760 / BK76IB Inkjet
Page 20

Appendix A Assembly Drawings
List of Figures
Figure A-1: System, BK760, Left, Test (BKT760L)..................................................... A-2
Figure A-2: System, BK760, Right, Test (BKT760R) .................................................. A-4
Figure A-3: Base, BK76IB Left, Test (BKT76IBL)...................................................... A-5
Figure A-4: Base, BK76IB Right, Test (BKT76IBR) ................................................... A-6
Figure A-5: Table, Friction Feeder Assembly – Optional (BK723).............................. A-7
Figure A-6: Datapath Card Assembly (9100194A)....................................................... A-8
Figure A-7: Fan Assembly, 12VDC (9100343A).......................................................... A-9
Figure A-8: Blower Assembly (9100829A)................................................................. A-10
Figure A-9: Panels Assembly, BK76IB, Left (9102065LA)....................................... A-12
Figure A-10: Panels Assembly, BK76IB, Right (9102065RA)................................... A-14
Figure A-11: Panels Assembly, BK760, Left (9102066LA)....................................... A-16
Figure A-12: Panels Assembly, BK760, Right (9102066RA)..................................... A-18
Figure A-13: Tabletop Assembly, BK760, Left (9102067LA) ................................... A-19
Figure A-14: Tabletop Assembly, Right, BK760 (9102067RA)................................. A-20
Figure A-15: Frame, Tabletop Assembly, BK760 (9102081A) .................................. A-21
Figure A-16: Bracket, Encoder Assembly (9102171A) .............................................. A-22
Figure A-17: Motor Assembly, Left, BK760 (9102174LA)........................................ A-23
Figure A-18: Motor Assembly, Right, BK760 (9102174RA)..................................... A-24
Figure A-19: Terminal Block Assembly, TB-1, BK760 (9102178A)......................... A-25
Figure A-20: Infeed Mounting Rail Assembly – Optional (9102181A)...................... A-26
Figure A-21: Monitor Mounting Tray Assembly (9102183A).................................... A-27
Figure A-22: Cover, Front Panel Assembly (9102185A)............................................ A-28
Figure A-23: Terminal Block Assembly, TB-2, BK760 (9102200A)......................... A-30
Figure A-24: Cover, Rear Panel Assembly (9102201A)............................................. A-31
Figure A-25: Outfeed Roller Assembly (9102296A) .................................................. A-32
Figure A-26: Roller Assembly, Belt Tensioner (9102300A)....................................... A-33
Figure A-27: Leveling Leg Assembly (9102320A)..................................................... A-34
Figure A-28: Cover, Controller I/O (9102645A)......................................................... A-35
Figure A-29: Base Cabinet Assembly, BK760 (9102684A)........................................ A-37
Figure A-30: Base Assembly w/Controller, BK760 (9102685A) ............................... A-39
Figure A-31: Tabletop, Middle Plate Assembly (9102689A) ..................................... A-40
Figure A-32: Computer Chassis Assembly, Celeron P4 (9102776A)......................... A-41
Figure A-33: Power Supply Assembly, HP (9103361A)............................................. A-42
Buskro Ltd. BK760 / BK76IB Inkjet
Page 21

Appendix A Assembly Drawings
Balloon Annotation and Parts Listing
Item Number
5
8
Quantity
Item Part Number Quantity Description Reference
1
2
The following is a description of how to interpret the information in this section:
Item:
This column indicates the item number used for each unique part in an assembly drawing.
It is matched with the top number in the balloon pointing at the associated part.
Part Number:
This column represents the Buskro part number.
Quantity:
This represents the total number of a given part in an assembly. It is matched with the
bottom number in the balloon pointing at the associated part.
Description:
This column contains a brief description of the part.
Reference:
This column indicates the page location for sub-assemblies.
Buskro Ltd. BK760 / BK76IB Inkjet
Page 22

Appendix A Assembly Drawings Page A-1
Table A-1: System, BK760, Left, Test (BKT760L)
Item Part Number Quantity Description Reference
1 403510 6 Screw, BHCS, 8-32 UNC x 1/4"
2 404510 20 Screw, BHCS, 10-32 UNF x ¼"
3 405510 8 Screw, BHCS, 1/4-20 UNC x 1/4"
4 405520 4 Screw, BHCS, 1/4-20 UNC x 3/8
5 405560 8 Screw, BHCS, 1/4-20 UNC x 7/8"
6 439010 8 Lockwasher, 1/4" I.D.
7 440010 8 Washer, 1/4" ID
8 446000 2 Slide Latch - A3
9 717530 2 Door Catch
10 9100361 2 T-Nut, 1/4-20 Triple
11 9100749 2 Rubber Washer, 3/8" ID x 1" x 1/8"
12 9101644 2 Sponge Rubber,1/4 x 3/8 (1" Long)
13 9101723 2 Gray T-Slot Cover 15 Series (20" Long)
14 9102066LA 1 Panels Assembly, BK760, Left Page A-15
15 9102075 1 Door, Cabinet Front
16 9102076 2 Door, Cabinet Back
17 9102172 2 Cover, Roller, BK760
18 9102177 2 Bushing, Snap-In
19 9102296A 1 Outfeed Roller Assembly Page A-32
20 9102348 4 Endcap, 10 Series, 3" X 1"
21 9102351 1 Cover, Computer Chassis
22 9102420 1 Cover, Pulley
23 9102469 2 Cover, Monitor Mount Rail
24 9102726 1 Grommet, Rubber, 2" O.D
Buskro Ltd. BK760 / BK76IB Inkjet
Page 23

Appendix A Assembly Drawings Page A-2
Figure A-1: System, BK760, Left, Test (BKT760L)
2
20
17
2
19
1
2
20
16
2
18
2
4
4
22
1
10
2
7
8
6
8
5
8
1
6
1
6
3
8
20
4
USE ENCODER (BK-ENC-STAN)
23
2
13
2
21
1
2
20
WITH BRACKET (9102171A)
FROM ACCESSORY KIT
24
15
1
8
2
11
2
1
16
2
14
1
2
20
18
2
Buskro Ltd. BK760 / BK76IB Inkjet
9
2
12
2
Page 24

Appendix A Assembly Drawings Page A-3
Table A-2: System, BK760, Right, Test (BKT760R)
Item Part Number Quantity Description Reference
1 403510 6 Screw, BHCS, 8-32 UNC x 1/4"
2 404510 20 Screw, BHCS, 10-32 UNF x 1/4"
3 405510 8 Screw, BHCS, 1/4-20 UNC x 1/4"
4 405520 4 Screw, BHCS, 1/4-20 UNC x 3/8
5 405560 8 Screw, BHCS, 1/4-20 UNC x 7/8"
6 439010 8 Lockwasher, 1/4" I.D.
7 440010 8 Washer, 1/4" ID
8 446000 2 Slide Latch - A3
9 717530 2 Door Catch
10 9100361 2 T-Nut, 1/4-20 Triple
11 9100749 2 Rubber Washer, 3/8" ID x 1" x 1/8"
12 9101644 2 Sponge Rubber,1/4 x 3/8 (1" LG.)
13 9101723 2 Gray T-Slot Cover 15 Series (20" Long)
14 9102066RA 1 Panels Assembly, BK760, Right Page A-17
15 9102075 1 Door, Cabinet Front
16 9102076 2 Door, Cabinet Back
17 9102172 2 Cover, Roller, BK760
18 9102177 2 Bushing, Snap-In
19 9102296A 1 Outfeed Roller Assembly Page A-32
20 9102348 4 Endcap, 10 Series, 3" X 1"
21 9102351 1 Cover, Computer Chassis
22 9102420 1 Cover, Pulley
23 9102469 2 Cover, Monitor Mount Rail
24 9102726 1 Grommet, Rubber, 2" O.D
Buskro Ltd. BK760 / BK76IB Inkjet
Page 25

Appendix A Assembly Drawings Page A-4
Figure A-2: System, BK760, Right, Test (BKT760R)
2
20
16
2
2
20
17
2
3
8
20
4
15
1
24
1
18
2
5
8
6
7
8
23
2
13
2
8
10
2
4
4
19
1
1
6
1
6
21
1
22
1
8
2
2
20
11
2
USE ENCODER (BK-ENC-STAN)
WITH BRACKET (9102171A)
FROM ACCESSORY KIT
Buskro Ltd. BK760 / BK76IB Inkjet
14
1
9
2
12
2
Page 26

Appendix A Assembly Drawings Page A-5
Table A-3: Base, BKT76IB, Left, Test (BKT76IBL)
Item Part Number Quantity Description Reference
1 404510 16 Screw, BHCS, 10-32 UNF x 1/4"
2 405510 8 Screw, BHCS, 1/4-20 UNC x 1/4"
3 405520 4 Screw, BHCS, 1/4-20 UNC x 3/8
4 446000 4 Slide Latch - A3
5 717530 4 Door Catch
6 9100361 2 T-Nut, 1/4-20 Triple
7 9100749 4 Rubber Washer, 3/8" ID x 1" x 1/8"
8 9101644 4 Sponge Rubber, 1/4 x 3/8 (1" Long)
9 9102065LA 1 Panels Assembly, BK76IB, Left Page A-11
10 9102075 2 Door, Cabinet Front
11 9102172 2 Cover, Roller, BK760
12 9102296A 1 Outfeed Roller Assembly Page A-32
13 9102348 4 Endcap, 10 Series, 3" x 1"
14 9102420 1 Cover, Pulley
Figure A-3:
1
16
11
2
4
4
Base, BK76IB Left, Test (BKT76IBL)
14
6
2
12
1
2
8
13
4
10
2
7
4
1
3
4
8
4
5
4
1
16
Buskro Ltd. BK760 / BK76IB Inkjet
Page 27

Appendix A Assembly Drawings Page A-6
Table A-4: Base, BKT76IB, Right, Test (BKT76IBR)
Item Part Number Quantity Description Reference
1 404510 16 Screw, BHCS, 10-32 UNF x 1/4"
2 405510 8 Screw, BHCS, 1/4-20 UNC X 1/4"
3 405520 4 Screw, BHCS, 1/4-20 UNC X 3/8
4 446000 4 Slide Latch - A3
5 717530 4 Door Catch
6 9100361 2 T-Nut, 1/4-20 Triple
7 9100749 4 Rubber Washer, 3/8" ID x 1" x 1/8"
8 9101644 4 Sponge Rubber,1/4 x 3/8
9 9102065RA 1 Panels Assembly, BK76IB, Right Page A-13
10 9102075 2 Door, Cabinet Front
11 9102172 2 Cover, Roller, BK760
12 9102296A 1 Outfeed Roller Assembly Page A-32
13 9102348 4 Endcap, 10 Series, 3" X 1"
14 9102420 1 Cover, Pulley
Figure A-4:
4
4
Base, BK76IB Right, Test (BKT76IBR)
1
16
11
2
2
8
13
4
10
2
8
4
5
4
1
16
6
2
12
1
14
1
3
4
9
1
7
4
Buskro Ltd. BK760 / BK76IB Inkjet
Page 28

Appendix A Assembly Drawings Page A-7
Table A-5: Table, Friction Feeder Assembly – Optional (BK723)
Item Part Number Quantity Description Reference
1 405520 6 Screw, BHCS, ¼-20 UNC x 3/8”
2 416185 2 Shoulder Bolt, 3/8” x 2” (5/16-18 UNC)
3 420015 2 Nut, 5/16-18 UNC
4 439015 2 Lockwasher, 5/16 I.D.
5 440015 2 Washer, 5/16” I.D.
6 9102192 1 Support Leg, Feeder Table
7 9102195A 1 Table, Friction Feeder
8 9102198 1 Support Joint, Feeder Table
9 9102199 2 Endcap, 1-3/4”, 10-14 Gauge Tube
10 9102344 4 T-Nut, ¼-20 UNC, Single
Figure A-5: Table, Friction Feeder Assembly – Optional (BK723)
4
2
3
7
1
2
5
2
1
6
2
2
9
2
6
1
9
2
1
6
2
2
10
4
3
4
2
5
2
2
8
1
Buskro Ltd. BK760 / BK76IB Inkjet
Page 29

Appendix A Assembly Drawings Page A-8
Table A-6: Datapath Card Assembly (9100194A)
Item Part Number Quantity Description Reference
1 401310 4 Screw, PHMS, 4-40 UNC x 1/4"
2 403510 1 Screw, BHCS, 8-32 UNC X 1/4"
3 420004 4 Nut, 4-40 UNC
4 440530 1 Washer, #6 Nylon
5 615322 8 Female Screwlock, 4-40 UNC
6 9100194 1 Data Path Card S/N
7 9100232A 1 Card Mounting Panel Assembly
8 9100335 1 Secondary Card Support Bracket
Figure A-6: Datapath Card Assembly (9100194A)
2
1
5
8
8
7
1
1
3
4
7
1
4
1
1
6
1
4
Buskro Ltd. BK760 / BK76IB Inkjet
Page 30

Appendix A Assembly Drawings Page A-9
Table A-7: Fan Assembly, 12VDC (9100343A)
Item Part Number Quantity Description Reference
1 614008 2 Contact, Male, 24-18 AWG, Mate-n-lok
2 614009 1 Connector, 4-Pin, Male, Mate-n-lok
3 9100343 1 Fan, 12 VDC
Figure A-7: Fan Assembly, 12VDC (9100343A)
Pin 1 = Black
Pin 2 = Red
3
1
2
1
1
2
Buskro Ltd. BK760 / BK76IB Inkjet
Page 31

Appendix A Assembly Drawings Page A-10
Table A-8: Blower Assembly (9100829A)
Item Part Number Quantity Description Reference
1 407670 4 Screw, HHMS, 3/8-16 UNC x 1”
2 439020 4 Lockwasher, 3/8” I.D.
3 440020 4 Washer, 3/8” I.D.
4 606034 65” Cable, #16-3 SJOW-A
5 609101 2 Marette, Orange, 14-22
6 609111 1 Ring Tongue Terminal
7 615131 1 Box Connector, 3/8”, Cable
8 802111 1 Hose Barb, 1” X 1”, Plastic
9 9100749 4 Rubber Washer, 3/8” X 1” X 1/8”
10 9100829 1 Regenerative Blower, 42 CFM
Figure A-8:
Blower Assembly (9100829A)
Buskro Ltd. BK760 / BK76IB Inkjet
Page 32

Appendix A Assembly Drawings Page A-11
Table A-9: Panels Assembly, BK76IB, Left (9102065LA)
Item Part Number Quantity Description Reference
1 402310 16 Screw, PHMS, 6-32 UNC x 1/4"
2 404282 6 Screw, SHCS, 10-32 UNF x 1 3/4"
3 404510 13 Screw, BHCS, 10-32 UNF x 1/4"
4 405560 12 Screw, BHCS, 1/4-20 UNC x 7/8"
5 420008 6 Nut, 10-32 UNF
6 439009 17 Lockwasher, No. 10
7 439010 12 Lockwasher, 1/4" I.D.
8 440008 17 Washer, #10 ID
9 440010 12 Washer, 1/4" ID
10 9101305 1 Hole Plug, 1/2" dia.
11 9101478 1 Hole Plug, Dome, 1.25"
12 9101479 1 Hole Plug, Dome, 1.75"
13 9102067LA 1 Tabletop Assembly, Left Page A-19
14 9102185A 1 Cover, Front Panel Assembly Page A-28
15 9102201A 1 Rear Panel Cover Assembly Page A-31
16 9102211 1 Cover, Front Panel Cutout
17 9102602 1 Plug, Rocker Switch Cutout, LTIG Series
18 9102645A 1 Cover, Controller I/O Page A-35
19 9102684A 1 Base Assembly Page A-36
20 9102727A 1 Cable, Upstream Remote, Left
21 9102728A 1 Cable, Conveyor Extension, Left
22 9102729A 1 Cable, Downstream Remote, Left
23 9102730A 1 Cable, Feeder Receptacle, Left
Buskro Ltd. BK760 / BK76IB Inkjet
Page 33

Appendix A Assembly Drawings Page A-12
Figure A-9: Panels Assembly, BK76IB, Left (9102065LA)
2
6
6
17
13
1
8
17
22
1
9
12
3
13
3
4
12
7
12
8
17
6
17
2
6
6
17
8
17
13
17
1
10
1
1
16
4
12
9
12
7
12
4
12
6
17
2
6
3
13
3
13
6
17
8
17
8
17
6
17
5
6
16
1
8
17
9
12
7
12
4
12
2
6
7
12
1
16
21
1
9
12
4
12
2
6
11
1
9
12
19
1
9
12
7
8
17
6
17
4
12
12
12
1
7
12
8
23
1
17
18
1
8
17
6
2
6
6
17
1
16
1
16
20
1
9
12
17
5
6
4
12
7
12
15
1
14
1
Buskro Ltd. BK760 / BK76IB Inkjet
Page 34

Appendix A Assembly Drawings Page A-13
Table A-10: Panels Assembly, BK76IB, Right (9102065RA)
Item Part Number Quantity Description Reference
1 402310 16 Screw, PHMS, 6-32 UNC x 1/4"
2 404282 6 Screw, SHCS, 10-32 UNF x 1 3/4"
3 404510 13 Screw, BHCS, 10-32 UNF x 1/4"
4 405560 12 Screw, BHCS, 1/4-20 UNC x 7/8"
5 420008 6 Nut, 10-32 UNF
6 439009 17 Lockwasher, No. 10
7 439010 12 Lockwasher, 1/4" I.D.
8 440008 17 Washer, #10 ID
9 440010 12 Washer, 1/4" ID
10 9101305 1 Hole Plug, ½" dia.
11 9101478 1 Hole Plug, Dome, 1.25"
12 9101479 1 Hole Plug, Dome, 1.75"
13 9102067RA 1 Tabletop Assembly, Right Page A-20
14 9102185A 1 Cover, Front Panel Assembly Page A-28
15 9102201A 1 Rear Panel Cover Assembly Page A-31
16 9102211 1 Cover, Front Panel Cutout
17 9102417A 1 Cable, Upstream Remote (BK760)
18 9102418A 1 Cable, Conveyor Extension, Right
19 9102419A 1 Cable, Downstream Remote, Right
20 9102421A 1 Cable, Feeder Receptacle, Right
21 9102602 1 Plug, Rocker Switch Cutout, LTIG Series
22 9102645A 1 Cover, Controller I/O Page A-35
23 9102684A 1 Base Assembly Page A-36
Buskro Ltd. BK760 / BK76IB Inkjet
Page 35

Appendix A Assembly Drawings Page A-14
Figure A-10: Panels Assembly, BK76IB, Right (9102065RA)
2
6
6
17
8
17
9
12
7
12
4
12
6
17
2
6
3
13
3
13
6
17
8
17
8
17
6
17
5
6
16
1
8
17
9
12
7
12
4
12
2
6
7
12
4
12
13
1
9
12
2
6
3
13
3
4
12
7
12
9
12
1
16
17
1
8
17
6
17
2
6
6
17
8
17
22
1
13
21
1
10
1
15
1
1
16
20
1
7
12
1
23
1
9
12
7
8
17
6
17
4
12
12
9
12
18
1
12
11
1
1
16
4
12
2
6
6
17
8
17
1
16
19
1
4
12
7
12
9
12
8
17
6
17
5
6
14
1
Buskro Ltd. BK760 / BK76IB Inkjet
Page 36

Appendix A Assembly Drawings Page A-15
Table A-11: Panels Assembly, BK760, Left (9102066LA)
Item Part Number Quantity Description Reference
1 402310 16 Screw, PHMS, 6-32 UNC x 1/4"
2 404282 6 Screw, SHCS, 10-32 UNF x 1 3/4"
3 404510 13 Screw, BHCS, 10-32 UNF x 1/4"
4 405270 4 Screw, SHCS, 1/4-20 UNC x 1"
5 405285 2 Screw, SHCS, 1/4-20 UNC x 2"
6 405560 12 Screw, BHCS, 1/4-20 UNC x 7/8"
7 406250 2 Screw, SHCS, 5/16-18 UNC x 3/4"
8 439009 11 Lockwasher, No. 10
9 439010 12 Lockwasher, 1/4" I.D.
10 440008 11 Washer, #10 ID
11 440010 12 Washer, 1/4" ID
12 606039 2 Cable, #14-2, Shielded, BK/RD (18" Long)
13 609110 4 Connector, Push-on, Blue
14 9100199A 1 Cable, Momentary Switch
15 9101478 1 Hole Plug, Dome, 1.25"
16 9101479 1 Hole Plug, Dome, 1.75"
17 9102067LA 1 Tabletop Assembly, Left Page A-19
18 9102183A 1 Monitor Mounting Tray Assembly Page A-27
19 9102185A 1 Cover, Front Panel Assembly Page A-28
20 9102201A 1 Rear Panel Cover Assembly Page A-31
21 9102288 1 Keyboard with Built-in Trackball
22 9102412 1 Bracket, Monitor Mount Support
23 9102601 1 Switch, Rocker, 250VAC/10A, DPST, LTIGK51
24 9102685A 1 Base Assembly w/Controller, BK760 Page A-38
25 9102727A 1 Cable, Upstream Remote, Left
26 9102728A 1 Cable, Conveyor Extension, Left
27 9102729A 1 Cable, Downstream Remote, Left
28 9102730A 1 Cable, Feeder Receptacle, Left
Buskro Ltd. BK760 / BK76IB Inkjet
Page 37

Appendix A Assembly Drawings Page A-16
Figure A-11: Panels Assembly, BK760, Left (9102066LA)
21
1
18
1
23
1
5
2
6
8
11
10
11
17
1
12
6
12
3
13
3
13
19
1
11
12
9
10
11
8
11
2
6
12
6
12
8
11
10
11
22
1
1
16
11
12
9
2
6
9
12
6
12
2
11
12
7
2
4
4
26
1
11
12
2
6
9
12
27
1
6
12
11
10
11
15
1
16
1
10
11
8
11
6
12
2
6
8
24
1
16
1
11
12
9
12
3
13
8
11
10
11
9
12
11
12
1
16
13
4
3
13
12
2
14
1
6
12
2
6
8
11
10
11
25
1
28
1
1
16
6
12
11
12
20
1
9
12
Buskro Ltd. BK760 / BK76IB Inkjet
Page 38

Appendix A Assembly Drawings Page A-17
Table A-12: Panels Assembly, BK760, Right (9102066RA)
Item Part Number Quantity Description Reference
1 402310 16 Screw, PHMS, 6-32 UNC x 1/4"
2 404282 6 Screw, SHCS, 10-32 UNF x 1 3/4"
3 404510 13 Screw, BHCS, 10-32 UNF x 1/4"
4 405270 4 Screw, SHCS, 1/4-20 UNC x 1"
5 405285 2 Screw, SHCS, 1/4-20 UNC x 2"
6 405560 12 Screw, BHCS, 1/4-20 UNC x 7/8"
7 406250 2 Screw, SHCS, 5/16-18 UNC x 3/4"
8 439009 11 Lockwasher, No. 10
9 439010 12 Lockwasher, 1/4" I.D.
10 440008 11 Washer, #10 ID
11 440010 12 Washer, 1/4" ID
12 606039 2 Cable, #14-2, Shielded, BK/RD (18" Long)
13 609110 4 Connector, Push-on, Blue
14 9100199A 1 Cable, Momentary Switch
15 9101478 1 Hole Plug, Dome, 1.25"
16 9101479 1 Hole Plug, Dome, 1.75"
17 9102067RA 1 Tabletop Assembly, Right Page A-20
18 9102183A 1 Monitor Mounting Tray Assembly Page A-27
19 9102185A 1 Cover, Front Panel Assembly Page A-28
20 9102201A 1 Rear Panel Cover Assembly Page A-31
21 9102288 1 Keyboard with Built-in Trackball
22 9102412 1 Bracket, Monitor Mount Support
23 9102417A 1 Cable, Upstream Remote (BK760)
24 9102418A 1 Cable, Conveyor Extension, Right
25 9102419A 1 Cable, Downstream Remote, Right
26 9102421A 1 Cable, Feeder Receptacle, Right
27 9102601 1 Switch, Rocker, 250VAC/10A, DPST, LTIGK51
28 9102685A 1 Base Assembly w/Controller, BK760 Page A-38
Buskro Ltd. BK760 / BK76IB Inkjet
Page 39

Appendix A Assembly Drawings Page A-18
Figure A-12: Panels Assembly, BK760, Right (9102066RA)
21
1
18
1
5
2
6
8
11
10
11
17
1
11
12
9
12
6
12
2
6
3
13
3
13
19
1
8
11
10
11
10
11
8
11
6
12
22
1
26
1
11
12
9
12
2
6
9
12
6
12
2
6
12
9
12
11
7
2
4
4
1
16
16
1
11
12
2
6
12
1
16
23
1
8
11
10
11
10
11
27
1
13
4
2
6
8
11
28
1
11
12
9
12
6
12
3
13
3
8
11
10
11
11
12
15
1
24
1
1
16
13
12
2
14
1
6
12
9
12
2
6
8
11
10
11
1
25
1
16
6
12
11
12
20
1
9
12
Buskro Ltd. BK760 / BK76IB Inkjet
Page 40

Appendix A Assembly Drawings Page A-19
Table A-13: Tabletop Assembly, BK760, Left (9102067LA)
Item Part Number Quantity Description Reference
1 116309 1 Pulley, 18LB075 x 3/4" w/o Shoulder
2 404510SS 4 Screw, BHCS, 10-32 UNF x 1/4" SS
3 405550 12 Screw, BHCS, 1/4-20 UNC x 3/4"
4 405850 2 Screw, SHSS, 1/4-20 UNC x 3/4"
5 416170 8 Shoulder Bolt, 3/8" x 1" (5/16-18)
6 436300 1 Spring Pin, 3/16" Dia. X 1 3/4" Long
7 440006 8 Washer, #8, 1/2" O.D. x 0.05" Thick
8 500055 2 Bearing, UBR-204-12S, 3/4" ID
9 9100361 4 T-Nut, 1/4-20 Triple
10 9101031A 1 Inline Roller
11 9102067 2 Tabletop, Side, BK760
12 9102071 2 Mount Block, Drive Roller
13 9102081A 1 Frame, Tabletop Assembly Page A-21
14 9102167 8 Bushing, Belt Guide
15 9102169 1 Shaft, 0.75" OD x 22.38" Lg.
16 9102174LA 1 Motor Assembly, Left, BK760 Page A-23
17 9102300A 1 Roller Assembly, Belt Tensioner Page A-33
18 9102667A 1 Belt Set, Transport, BK760
19 9102689A 1 Tabletop, Middle Plate Assembly Page A-40
20 9102773 8 Screw, Thumb, 8-32 UNC x 3/8" LG
Figure A-13: Tabletop Assembly, BK760, Left (9102067LA)
2
19
2
4
7
8
17
1
13
1
1
20
8
5
8
16
1
4
11
2
14
8
3
12
2
4
7
8
18
1
10
1
1
1
6
1
8
2
9
4
3
12
12
2
8
2
15
1
4
2
Buskro Ltd. BK760 / BK76IB Inkjet
Page 41

Appendix A Assembly Drawings Page A-20
Table A-14: Tabletop Assembly, Right, BK760 (9102067RA)
Item Part Number Quantity Description Reference
1 116309 1 Pulley, 18LB075 x 3/4" w/o Shoulder
2 404510SS 4 Screw, BHCS, 10-32 UNF x 1/4" SS
3 405550 12 Screw, BHCS, 1/4-20 UNC x 3/4"
4 405850 2 Screw, SHSS, 1/4-20 UNC x 3/4"
5 416170 8 Shoulder Bolt, 3/8" x 1" (5/16-18)
6 436300 1 Spring Pin, 3/16" Dia. x 1 3/4" Long
7 440006 8 Washer, #8, 1/2" O.D. x 0.05" Thick
8 500055 2 Bearing, UBR-204-12S, 3/4" ID
9 9100361 4 T-Nut, 1/4-20 Triple
10 9101031A 1 Inline Roller
11 9102067 2 Tabletop, Side, BK760
12 9102071 2 Mount Block, Drive Roller
13 9102081A 1 Frame, Tabletop Assembly Page A-21
14 9102167 8 Bushing, Belt Guide
15 9102169 1 Shaft, 0.75" OD x 22.38" Lg.
16 9102174RA 1 Motor Assembly, Right, BK760 Page A-24
17 9102300A 1 Roller Assembly, Belt Tensioner Page A-33
18 9102667A 1 Belt Set, Transport, BK760
19 9102689A 1 Tabletop, Middle Plate Assembly Page A-40
20 9102773 8 Screw, Thumb, 8-32 UNC x 3/8" LG
Figure A-14: Tabletop Assembly, Right, BK760 (9102067RA)
2
19
2
4
7
8
17
1
13
1
16
1
1
20
8
5
8
14
8
4
11
2
3
12
2
4
7
8
18
1
10
1
15
1
8
2
3
12
1
1
6
1
4
2
9
4
12
2
8
2
Buskro Ltd. BK760 / BK76IB Inkjet
Page 42

Appendix A Assembly Drawings Page A-21
Table A-15: Frame, Tabletop Assembly, BK760 (9102081A)
Item Part Number Quantity Description Reference
1 405520 16 Screw, BHCS, 1/4-20 UNC x 3/8"
2 405540 8 Screw, BHCS, 1/4-20 UNC x 5/8"
3 405550 16 Screw, BHCS, 1/4-20 UNC x 3/4"
4 436315 4 Pin, Dowel, 1/4" OD x 1-1/2" Lg.
5 9101126 4 T-Nut, 1/4-20 UNC, Double
6 9102081 2 Frame, Side, 1 x 3 x 50" Extrusion
7 9102082 2 Frame, Cross Member, 0.5 x 2.25 x 20"
8 9102301 4 Bracket, L-Shape, 1-7/8 x 2 x2"
Figure A-15: Frame, Tabletop Assembly, BK760 (9102081A)
6
2
4
4
1
3
5
4
16
16
8
4
6
2
4
4
7
2
2
8
Buskro Ltd. BK760 / BK76IB Inkjet
Page 43
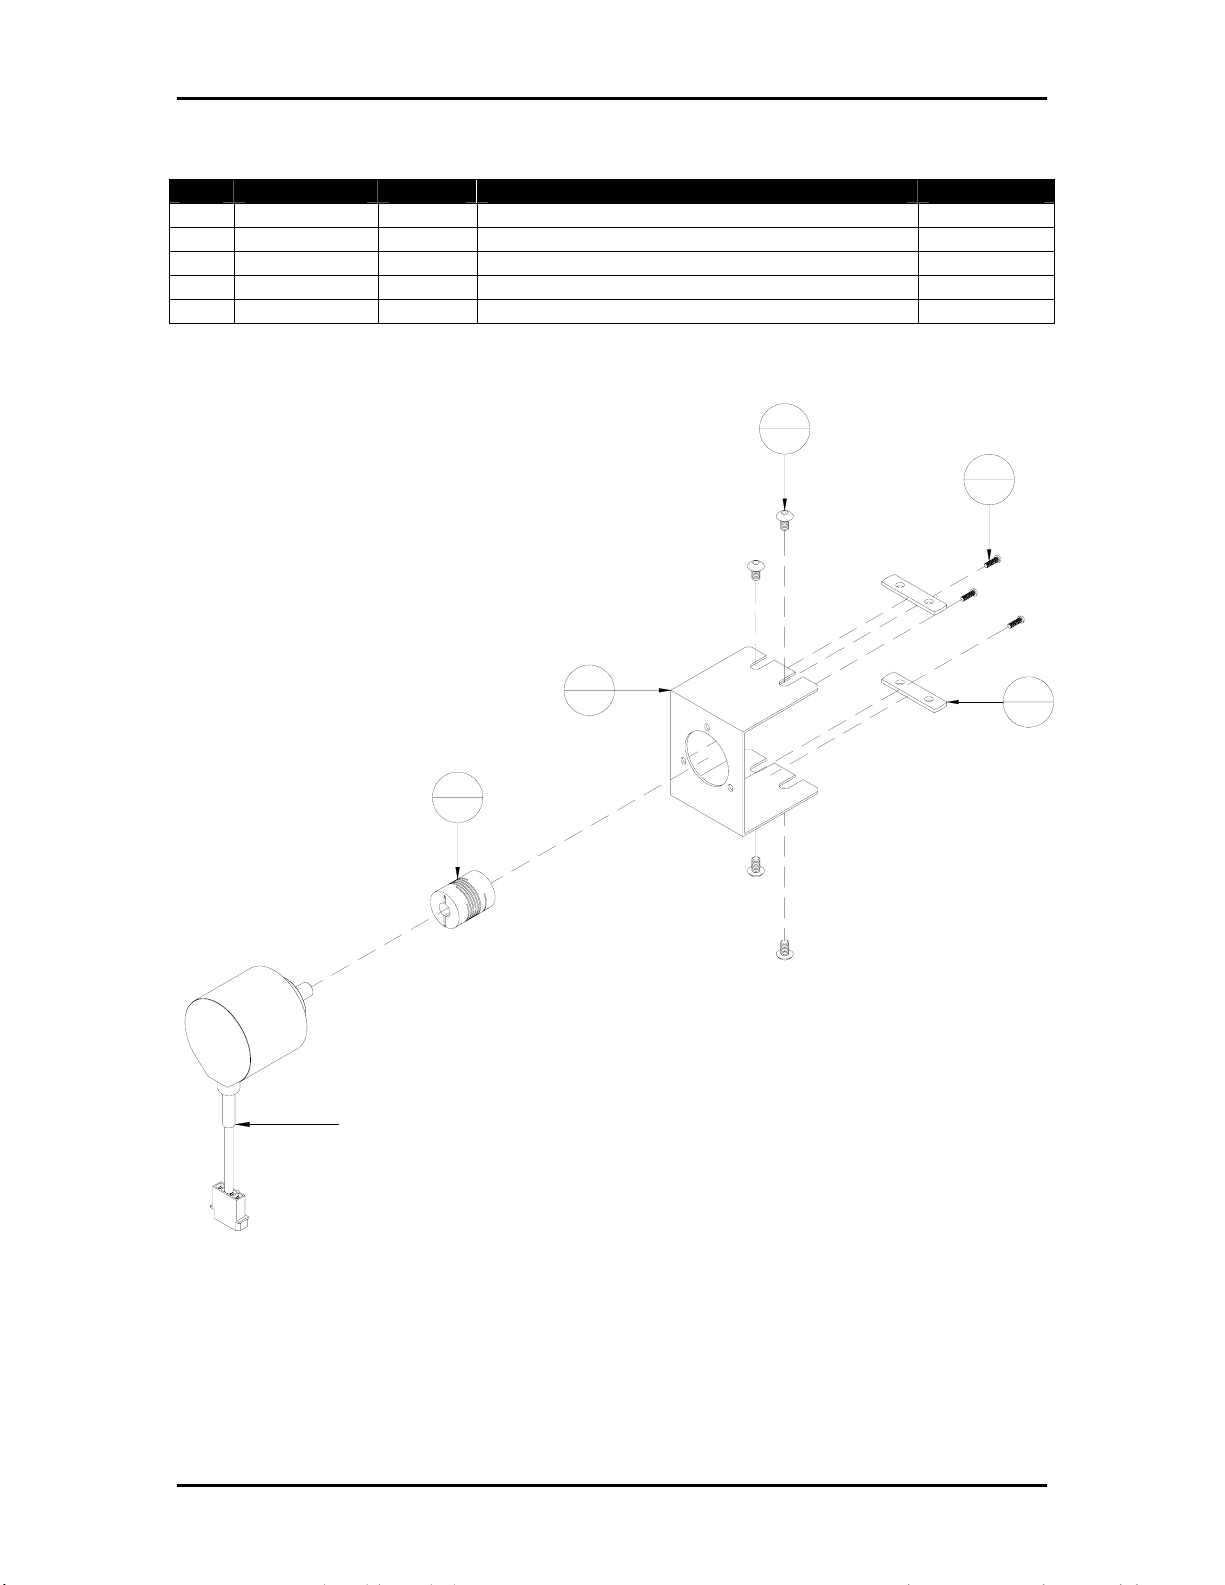
Appendix A Assembly Drawings Page A-22
Table A-16: Bracket, Encoder Assembly (9102171A)
Item Part Number Quantity Description Reference
1 405520 4 Screw, BHCS, 1/4-20 UNC x 3/8"
2 413510 3 Screw, BHCS, M3 x 10
3 9101126 2 T-Nut, 1/4-20 UNC, Double
4 9102171 1 Bracket, Encoder Mount
5 9102353 1 Helical Coupling, 3/8, ½ ID, 1 OD
Figure A-16:
Bracket, Encoder Assembly (9102171A)
4
1
5
1
1
4
2
3
3
2
ENCODER NOT INCLUDED WITH KIT
Buskro Ltd. BK760 / BK76IB Inkjet
Page 44

Appendix A Assembly Drawings Page A-23
Table A-17: Motor Assembly, Left, BK760 (9102174LA)
Item Part Number Quantity Description Reference
1 116301 1 Pulley, 18LB075 x 3/4"
2 120326 1 Belt, Timing, 240L075
3 405560 4 Screw, BHCS, 1/4-20 UNC x 7/8"
4 428288 4 Screw, SHCS, 1/4-28 UNF x 2 3/4"
5 439010 4 Lockwasher, 1/4" I.D.
6 440010 4 Washer, 1/4" ID
7 609001 1 Shrink Wrap, 1/4" I.D., 1" Long
8 9100361 2 T-Nut, 1/4-20 Triple
9 9100715 1 Plug, Mate'N'Lock, 3-pin
10 9100738 3 Socket, Contact brass, Pre-Tin
11 9102073 1 Mount Block, Drive Motor
12 9102168 4 Spacer, Drive Motor Mount
13 9102174 1 Motor, DC, 1/4 HP, 500 RPM
14 9102748A 1 Cable, Motor Extension
Figure A-17: Motor Assembly, Left, BK760 (9102174LA)
13
1
3
4
5
4
6
4
CUT CABLE TO 6" IN LENGTH
8
2
4
4
11
1
12
4
Colour
Blue
Brown
Green/Yellow
12
VIEW A
2
1
3
9100716 Pin
1
2
3
1
1
Function
A+
A-/F-
Ground
7
1
10
3
9
1
VIEW A
14
1
Buskro Ltd. BK760 / BK76IB Inkjet
Page 45
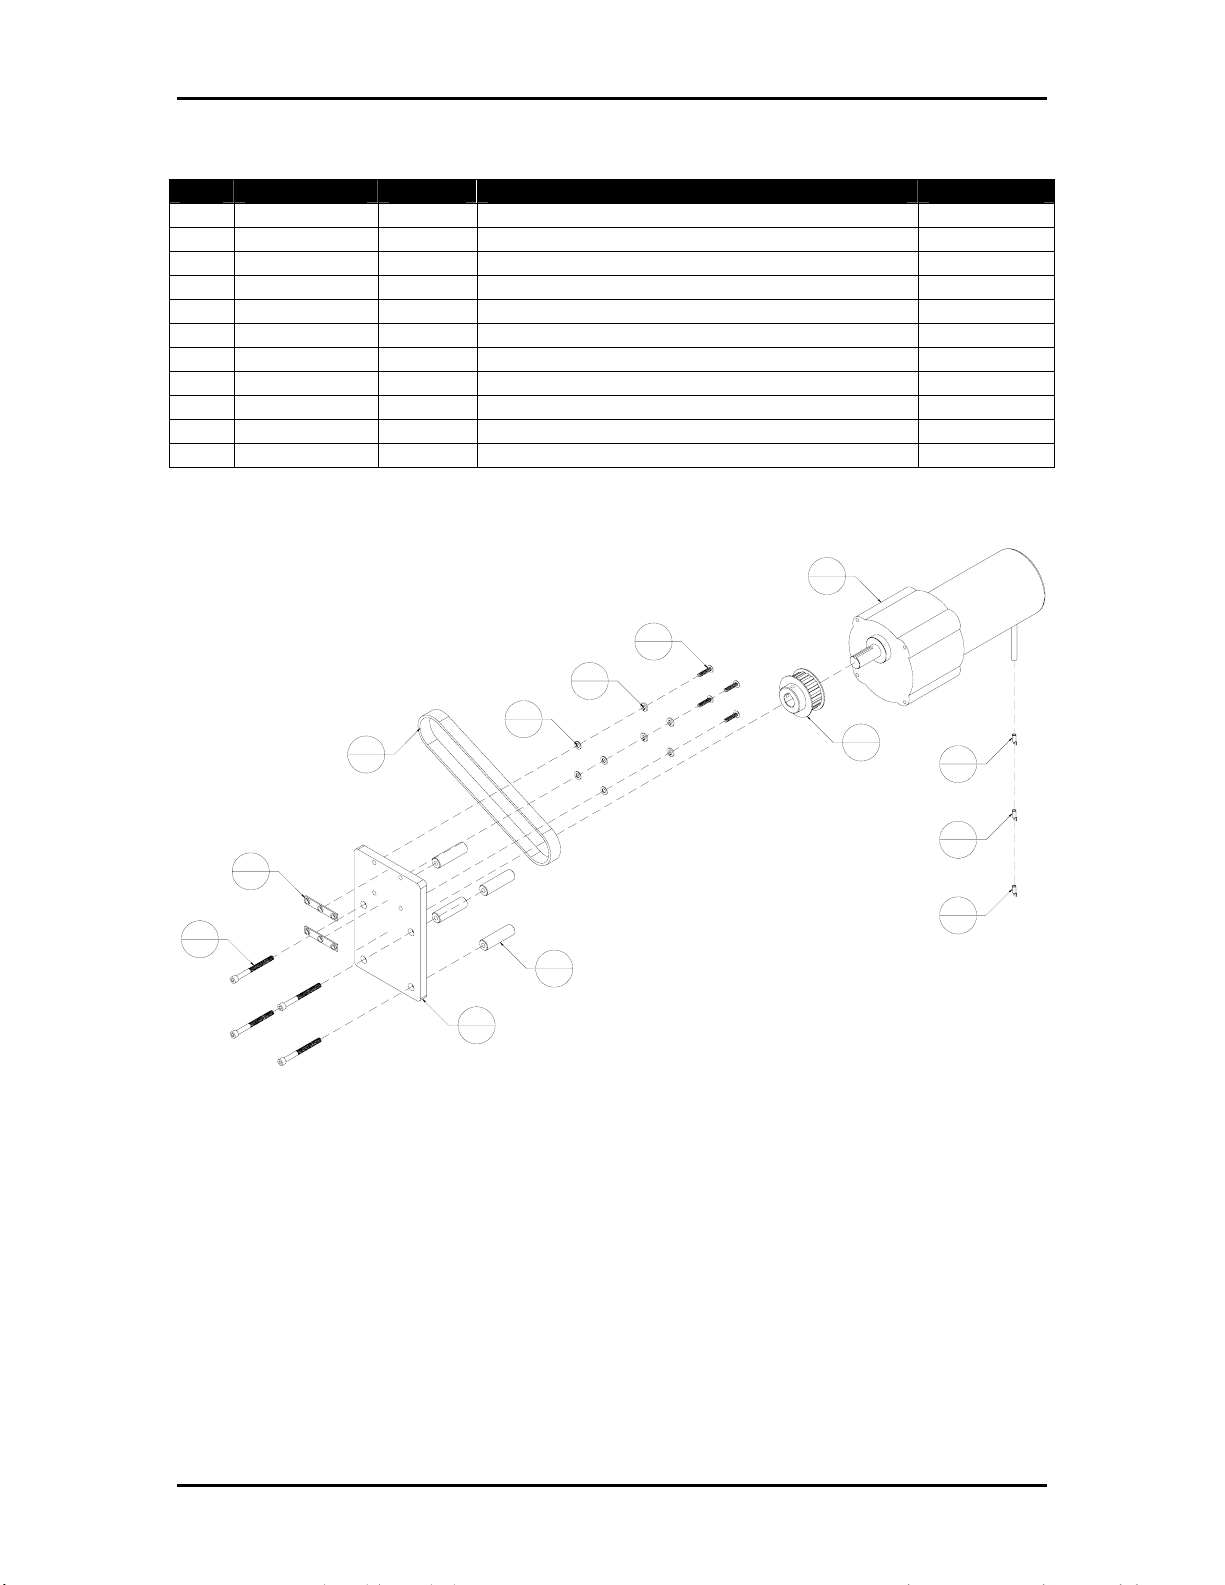
Appendix A Assembly Drawings Page A-24
Table A-18: Motor Assembly, Right, BK760 (9102174RA)
Item Part Number Quantity Description Reference
1 116301 1 Pulley, 18LB075 x 3/4"
2 120326 1 Belt, Timing, 240L075
3 405560 4 Screw, BHCS, 1/4-20 UNC x 7/8"
4 428288 4 Screw, SHCS, 1/4-28 UNF x 2 3/4"
5 439010 4 Lockwasher, 1/4" I.D.
6 440010 4 Washer, 1/4" ID
7 609107 3 Terminal, Fork, 22-16 AWG, #4, Red
8 9100361 2 T-Nut, 1/4-20 Triple
9 9102073 1 Mount Block, Drive Motor
10 9102168 4 Spacer, Drive Motor Mount
11 9102174 1 Motor, DC, 1/4 HP, 500 RPM
Figure A-18: Motor Assembly, Right, BK760 (9102174RA)
11
1
3
4
5
4
6
4
2
1
1
1
7
3
7
3
8
2
7
4
4
10
4
9
1
3
Buskro Ltd. BK760 / BK76IB Inkjet
Page 46

Appendix A Assembly Drawings Page A-25
Table A-19: Terminal Block Assembly, TB-1, BK760 (9102178A)
Item Part Number Quantity Description Reference
1 606030 58” Cable, #18-3 - Unshielded
2 606360 10” Wire, #10, Green/Yellow Hookup
3 609115 1 Terminal, Ring, 1/4", 10-12 AWG, Non-Insulate
4 615003 6 Terminal Block, M10/10, Grey, 10mm 7.5 A
5 615006 2 Jumper Bar, BJM10
6 615012 3 End Section, FEM6, Grey, 2.5mm
7 615016 1 End Stop, BAM, 9.1mm
8 615018 2 Ground Block, M10/10.P, Green & Yellow
9 615021 5.5” T-Rail, DIN
10 615037 1 Marker Card, 1, Vertical
11 615038 1 Marker Card, 2, Vertical
12 615039 2 Marker Card, 3, Vertical
13 615041 2 Marker Card, 4, Vertical
Figure A-19: Terminal Block Assembly, TB-1, BK760 (9102178A)
2
1
PLACE MARKER CARDS AS SHOWN
2
33
4
1
4
4
6
4
6
4
6
4
6
7
1
9
1
12
6
3
2
6
3
13
2
5
2
4
6
4
6
6
3
3
1
8
2
11
1
10
1
5
2
1
1
Buskro Ltd. BK760 / BK76IB Inkjet
Page 47

Appendix A Assembly Drawings Page A-26
Table A-20: Infeed Mounting Rail Assembly – Optional (9102181A)
Item Part Number Quantity Description Reference
1 212300 1 Left Material Guide
2 212301 1 Right Material Guide
3 402575 2 Screw, BHCS, 6-32 UNC x 1 ¼”
4 404020 4 Screw, FHCS, 10-32 UNF x 3/8”
5 405530 1 Screw, BHCS, ¼-20 UNC x ½”
6 405550 4 Screw, BHCS, ¼-20 UNC x ¾”
7 9100440 2 Brake Kit, 10 Series
8 9102170 1 Bracket, Jam Switch Mount
9 9102180 2 Knob, Thumb, 6-32 UNC, 11/32 OD
10 9102181 1 Mounting Rail, Infeed Guides
11 9102296 2 Mounting Block, Outfeed Shaft
12 9102344 5 T-Nut, ¼-20 UNC, Single
13 9102597 2 Bracket, Side Guide
14 9102600 2 Knob, Thumb, Knurled, ¼-20 UNC
15 9102678A 1 Cable, Jam Switch, N.C., N.O.
Figure A-20: Infeed Mounting Rail Assembly – Optional (9102181A)
6
4
11
10
1
12
5
9
2
8
1
7
2
13
3
2
15
1
2
2
13
2
5
1
4
4
2
14
2
1
14
2
1
1
Buskro Ltd. BK760 / BK76IB Inkjet
Page 48

Appendix A Assembly Drawings Page A-27
Table A-21: Monitor Mounting Tray Assembly (9102183A)
Item Part Number Quantity Description Reference
1 404520 8 Screw, BHCS, 10-32 UNF x 3/8"
2 406220 2 Screw, SHCS, 5/16-18 UNC x 3/8"
3 9102183 1 Monitor Mounting Tray
4 9102184 1 Keyboard Mounting Tray
5 9102232 2 Frame, Monitor Mount Leg
6 9102280 1 Support, Monitor Tray Mount
Figure A-21: Monitor Mounting Tray Assembly (9102183A)
1
8
2
2
3
1
6
1
1
8
4
1
1
8
5
2
Buskro Ltd. BK760 / BK76IB Inkjet
Page 49

Appendix A Assembly Drawings Page A-28
Table A-22: Cover, Front Panel Assembly (9102185A)
Item Part Number Quantity Description Reference
1 420008 1 Nut, 10-32 UNF
2 439008 1 Lockwasher, #10, External Tooth
3 603120 1 Switch, Green Push Button
4 603121 1 Switch, Red Mushroom Push Button
5 603122 1 Switch, 2 Position Rotary Knob
6 603125 3 Switch, Locking Collar
7 603126 1 Block, N.O. Contact, Green
8 603127 2 Block, N.C. Contact, Red
9 606038 3 Wire, #22, White (7" Long)
10 606039 2 Cable, #14-2, Shielded, BK/RD (20" Long)
11 609110 4 Connector, Push-on, Blue
12 609114 1 Terminal, Ring, #10, 12-10 AWG, Non-Insulate
13 609530 2 Connector, Push On, Red
14 613002 2 Knob, 36mm, Skirted
15 9101305 1 Hole Plug, 1/2" dia.
16 9102185 1 Cover, Front Panel, BK760
17 9102205 1 Circuit Breaker Switch, 15 A, 2 Pole
18 9102246 17” Wire, Green/Yellow Stripe, #18 Gauge
19 9102422 1 Switch, Rocker, 125VAC/4A, 250VAC/2A
20 9102651A 1 Cable, Front Panel Controls
21 9102673A 1 Cable, Conveyor Pot
22 9102674A 1 Cable, Base Pot
Figure A-22: Cover, Front Panel Assembly (9102185A)
19
1
15
1
16
1
13
2
3
1
5
1
14
4
2
1
22
1
6
3
7
1
8
2
9
3
20
1
8
2
9
3
9
3
17
1
11
4
10
2
12
1
2
1
21
1
1
1
18
1
Buskro Ltd. BK760 / BK76IB Inkjet
Page 50

Appendix A Assembly Drawings Page A-29
Table A-23: Terminal Block Assembly, TB-2, BK760 (9102200A)
Item Part Number Quantity Description Reference
1 606020 21” Wire, #18, Black, Hookup
2 606020 8” Wire, #18, Black, Hookup
3 606020 17” Wire, #18, Black, Hookup
4 606020 2 x 2” Wire, #18, Black, Hookup
5 606029 24” Wire, #18, White, Hookup
6 606029 8” Wire, #18, White, Hookup
7 606029 17” Wire, #18, White, Hookup
8 606029 12” Wire, #18, White, Hookup
9 606030 25” Cable, #18-3 - Unshielded
10 609107 8 Terminal, Fork, 22-16 AWG, #4, Red
11 610102 2 Relay, 12 VDC
12 615000 3 Terminal Block, M4/6.N, Blue, 6mm
13 615003 6 Terminal Block, M10/10, Grey, 10mm 7.5 A
14 615004 2 Relay Base
15 615006 2 Jumper Bar, BJM10
16 615012 3 End Section, FEM6, Grey, 2.5mm
17 615016 1 End Stop, BAM, 9.1mm
18 615018 1 Ground Block, M10/10.P, Green & Yellow
19 615021 9” T-Rail, DIN
20 615023 2 End Section, FEM13U
21 615024 2 Fuse Holder, MU10/13.SF.1, 10mm 16 A 60
22 615031 2 Marker Card, L1, Vertical
23 615032 2 Marker Card, L2, Vertical
24 615037 1 Marker Card, 1, Vertical
25 615038 1 Marker Card, 2, Vertical
26 646001 1 Fuse, 5A, 5 x 20 mm
27 646002 1 Fuse, 10A, 5 x 20 mm
28 9102650A 1 Cable, Relay Power
Buskro Ltd. BK760 / BK76IB Inkjet
Page 51

Appendix A Assembly Drawings Page A-30
Figure A-23: Terminal Block Assembly, TB-2, BK760 (9102200A)
1
18
6
13
6
13
3
16
1
25
6
13
6
13
6
13
6
13
3
12
3
12
3
12
2
14
2
21
1
2
2
20
2
21
4
2
1
26
16
2
11
1
1
22
2
15
3
2
15
3
16
2
8
10
1
24
8
10
2
23
1
7
1
8
8
10
2
20
1
3
2
14
1
27
1
17
1
19
2
1
9
11
1
6
8
1
5
8
10
10
8
10
1
28
4
2
2
1L2
L2L1L1
Place marker cards as shown
Buskro Ltd. BK760 / BK76IB Inkjet
Page 52

Appendix A Assembly Drawings Page A-31
Table A-24: Cover, Rear Panel Assembly (9102201A)
Item Part Number Quantity Description Reference
1 401310 10 Screw, PHMS, 4-40 UNC x 1/4"
2 420008 1 Nut, 10-32 UNF
3 439008 1 Lockwasher, #10, External Tooth
4 606360 10” Wire, #10, Green/Yellow Hookup
5 606601A 1 Cable, Shaft Encoder Extension
6 609114 1 Terminal, Ring, #10, 12-10 AWG, Non-Insulate
7 9100465 1 Connector, Female, 12-Pin, BLA12
8 9102201 1 Cover, Rear Panel, BK760
9 9102433A 3 Cable, Photocue Receptacle Assembly
10 9102590 1 Cover, 25 Pin Receptacle Cutout
Figure A-24: Cover, Rear Panel Assembly (9102201A)
9100465 Pin 9102433A CYCLE
1
2
3
4
5
6
7
8
9
10
11
12
9102433A JAM
-
-
-
-
-
-
-
-
-
-
White
Red
-
-
-
-
-
-
-
Red
White
Black
-
-
9102433A PHOTO
-
-
-
-
Red
White
Black
-
-
-
-
-
606601A
White
Green
Black
-
-
-
-
-
-
-
-
9102640A CYCLE
+12VRed
Enc+
Enc-
Gnd
+12V
Photo1
Gnd
+12V
Cycle
Gnd
Jam I/P
Gnd
1
10
9
3
5
1
12
7
1
10
1
1
1
10
8
1
6
1
3
1
4
1
2
1
Buskro Ltd. BK760 / BK76IB Inkjet
Page 53

Appendix A Assembly Drawings Page A-32
Table A-25: Outfeed Roller Assembly (9102296A)
Item Part Number Quantity Description Reference
1 100314 1 Outfeed Roller Shaft
2 106182 2 Pressure Roller
3 203302 2 Outfeed Roller Arm
4 405250 2 Screw, SHCS, 1/4-20 UNC x 3/4"
5 405550 4 Screw, BHCS, 1/4-20 UNC x 3/4"
6 416170 2 Shoulder Bolt, 3/8" x 1" (5/16-18)
7 500020 4 Bearing, R6, 3/8 ID
8 505384 2 Flange Bushing, 3/8 ID x ½ OD x ½ LG
9 9102296 2 Mounting Block, Outfeed Shaft
10 9102344 4 T-Nut, 1/4-20 UNC, Single
Figure A-25: Outfeed Roller Assembly (9102296A)
5
8
2
1
1
4
9
2
3
2
2
2
4
2
5
4
7
4
3
10
4
2
6
2
2
2
10
4
Buskro Ltd. BK760 / BK76IB Inkjet
Page 54

Appendix A Assembly Drawings Page A-33
Table A-26: Roller Assembly, Belt Tensioner (9102300A)
Item Part Number Quantity Description Reference
1 405550 8 Screw, BHCS, 1/4-20 UNC x 3/4"
2 405885 2 Screw, SHSS, 1/4-20 UNC x 2"
3 500055 2 Bearing, UBR-204-12S, 3/4" ID
4 9100361 4 T-Nut, 1/4-20 Triple
5 9102175 1 Shaft, 0.75" OD x 17.94" Lg.
6 9102300 2 Mounting Block, Belt Tensioner
7 9102357A 1 Roller, 2.84" OD x 13.75", Bearing Mounted
Figure A-26: Roller Assembly, Belt Tensioner (9102300A)
3
2
7
1
2
2
5
1
1
8
4
4
6
2
3
2
Buskro Ltd. BK760 / BK76IB Inkjet
Page 55

Appendix A Assembly Drawings Page A-34
Table A-27: Leveling Leg Assembly (9102320A)
Item Part Number Quantity Description Reference
1 9102318 1 Rod, 3/4-10 UNC x 6", Leveling Leg
2 9102319 1 Base Foot, 60mm, Fixed
Figure A-27: Leveling Leg Assembly (9102320A)
INCLUDED WITH LEG
1
1
2
1
Buskro Ltd. BK760 / BK76IB Inkjet
Page 56

Appendix A Assembly Drawings Page A-35
Table A-28: Cover, Controller I/O (9102645A)
Item Part Number Quantity Description Reference
1 615322 2 Female Screwlock, 4-40 UNC
2 9102645 1 Cover, Computer Leg Mount Cutout
3 9102733A 1 Cable, Controller I/O Receptacle, 18"
Figure A-28: Cover, Controller I/O (9102645A)
1
2
2
1
3
1
Buskro Ltd. BK760 / BK76IB Inkjet
Page 57

Appendix A Assembly Drawings Page A-36
Table A-29: Base Cabinet Assembly, BK760 (9102684A)
Item Part Number Quantity Description Reference
1 343016 4 Jam Nut, 3/4-10 UNC
2 401310 6 Screw, PHMS, 4-40 UNC x 1/4"
3 404510 12 Screw, BHCS, 10-32 UNF x 1/4"
4 420010 18 Nut, 1/4-20 UNC
5 439007 1 Lockwasher, 1/4", External Tooth
6 439010 16 Lockwasher, 1/4" I.D.
7 440010 16 Washer, 1/4" ID
8 600005 2 DC Controller, 90 VDC
9 615026 4 Flexible Grommet Edging (8.3" Long)
10 640301 2 Diode, 1N4004
11 640302 2 Metal Oxide Varistor, 250 VAC
12 803530 4 Swivel Caster, 4"
13 9100829A 1 Blower Assembly, 40 CFM Page A-10
14 9102064A 1 Cabinet, BK760
15 9102068 16 Bolt, Carriage, 1/4-20 UNC, 3/4" LG.
16 9102177 2 Bushing, Snap-In
17 9102178A 1 Terminal Block Assembly, TB-1, BK760 Page A-25
18 9102200A 1 Terminal Block Assembly, TB-2, BK760 Page A-29
19 9102320A 4 Leveling Leg Assembly Page A-34
20 9102358A 1 Cable, IEC Receptacle
21 9102360 1 Lock, IEC Connector Plug
22 9102363 2 Bushing, Snap-In, 1-5/16" I.D.
23 9102380 1 Board, Base Control
24 9102417 1 Power Supply, Switching, 12VDC/1.7A
25 9102422A 1 Cable, Output, 12VDC Power Supply
26 9102565A 1 Cable, Input, 12VDC Power Supply
27 9102672A 1 Cable, Stack Pot
Buskro Ltd. BK760 / BK76IB Inkjet
Page 58

Appendix A Assembly Drawings Page A-37
Figure A-29: Base Cabinet Assembly, BK760 (9102684A)
13
1
9
22
2
24
1
2
6
25
1
18
1
3
12
16
2
26
1
3
12
11
2
4
10
2
A
3
12
4X, DETAIL A
SCALE 3:1
8
2
23
1
3
12
14
1
15
16
1
4
19
4
6
16
4
18
17
1
5
1
22
2
16
2
27
1
12
4
7
16
4
18
4
18
2
6
21
1
20
1
Buskro Ltd. BK760 / BK76IB Inkjet
Page 59

Appendix A Assembly Drawings Page A-38
Table A-30: Base Assembly w/Controller, BK760 (9102685A)
Item Part Number Quantity Description Reference
1 401350 4 Screw, PHMS, 4-40 UNC x 3/4"
2 403510 2 Screw, BHCS, 8-32 UNC x 1/4"
3 404510 10 Screw, BHCS, 10-32 UNF x 1/4"
4 406250 2 Screw, SHCS, 5/16-18 UNC x 3/4"
5 413506 4 Screw, BHCS, M3 x 6
6 439015 2 Lockwasher, 5/16 I.D.
7 606322 1 Cable, Cordset, 10A/125VAC, 90”, IEC
8 606361A 1 Cable, Floppy Drive Ribbon
9 609300 2 Ribbon Cable Tie Mount
10 614009A 1 Cable, Floppy Drive Power
11 614306A 1 Cable, CDROM Ribbon
12 614601A 1 Cable, Jet Drive I/O
13 615026 7” Flexible Grommet Edging
14 803600 1 Floppy Drive, 3 1/2, Black
15 803601 1 CD-ROM Drive, Black
16 9100004 1 Floppy Cable Assembly
17 9100194A 1 Data Path Card Assembly Page A-8
18 9100343A 1 Fan Assembly (12 VDC) Page A-9
19 9101655 1 Filter, 12 VDC Fan
20 9102070 1 Computer Chassis Support Stand
21 9102080 1 Bracket, CD-ROM Mount
22 9102684A 1 Base Cabinet Assembly, BK760 Page A-36
23 9102697 1 Mounting Bar, Ribbon Cables
24 9102711 8 Screw, PHMS, 6-32 UNC x 3/8"
25 9102776A 1 Computer Chassis Assembly, Celeron P4 Page A-41
26 9103361A 1 Power Supply Assembly, HP Page A-42
Buskro Ltd. BK760 / BK76IB Inkjet
Page 60

Appendix A Assembly Drawings Page A-39
Figure A-30: Base Assembly w/Controller, BK760 (9102685A)
SET COMPUTER POWER
SUPPLY TO 230 VAC
23
1
25
1
9
2
24
8
24
5
4
10
1
3
10
8
21
1
13
1
24
8
4
2
6
2
20
1
7
1
26
1
17
1
3
10
2
2
12
1
1
3
10
19
1
4
18
1
16
1
11
1
15
1
8
1
14
1
3
10
Buskro Ltd. BK760 / BK76IB Inkjet
22
1
Page 61

Appendix A Assembly Drawings Page A-40
Table A-31: Tabletop, Middle Plate Assembly (9102689A)
Item Part Number Quantity Description Reference
1 402310 2 Screw, PHMS, 6-32 UNC x ¼"
2 403510 2 Screw, BHCS, 8-32 UNC x ¼"
3 404510 12 Screw, BHCS, 10-32 UNF x ¼"
4 405040 4 Screw, FHCS, ¼-20 UNC x 5/8”
5 444004 2 Clamp, Hose, Gear Type, 9/16 x 1 ¼”
6 802601 40” Tubing, Vacuum, Grey PVC
7 9101414 1 Vacuum Hose Flanged Fitting
8 9102689 1 Tabletop, Middle Plate, BK760
9 9102690 4 Grommet, Rubber, 11/16 O.D.
10 9102693 1 Plate, Finger Guard
11 9102694 4 Shaft, Tabletop Mount
12 9102746 1 Vacuum Tray
Figure A-31: Tabletop, Middle Plate Assembly (9102689A)
10
1
1
2
4
4
11
4
9
12
1
2
2
7
6
5
2
NOTE:
USE SILICON TO SEAL THE GAP ON BOTH ENDS OF THE VACUUM TRAY.
IF ASSEMBLY IS USED ON A LEFT SYSTEM, THE FINGER GUARD (9102693) MUST BE
ASSEMBLED ON THE OPPOSITE END OF THE TABLETOP.
1
1
4
11
4
9
4
8
1
3
12
Buskro Ltd. BK760 / BK76IB Inkjet
Page 62

Appendix A Assembly Drawings Page A-41
Table A-32: Computer Chassis Assembly, Celeron P4 (9102776A)
Item Part Number Quantity Description Reference
1 402310 11 Screw, PHMS, 6-32 UNC x 1/4"
2 402320 4 Screw, PHMS, 6-32 UNC x 3/8"
3 404310 6 Screw, PHMS, 10-32 UNF x 1/4"
4 420008 8 Nut, 10-32 UNF
5 426301 4 Hard Drive Rubber Mount
6 439006 4 Lockwasher, No.6
7 439009 8 Lockwasher, No. 10
8 440005 4 Washer, #6 ID
9 440008 8 Washer, #10 ID
10 600333 1 Hard Drive, IDE
11 713314 1 Hard Drive Mount
12 713318 1 Computer Power Supply Bracket
13 806600 1 Software, Windows (Not Shown)
14 9100236 1 Controller Chassis
15 9100239 1 Hard Drive Mount Bracket
16 9101863 1 Power Supply, 12V, ATX
17 9101864 1 Card, Video, AGP
18 9101932 1 Memory, 256 MB DDR
19 9101971 1 Software, Compose (Not Shown)
20 9102308 1 Motherboard, P4B533, Socket 478 S/N
21 9102776 1 CPU, Celeron P4, Socket 478
Figure A-32: Computer Chassis Assembly, Celeron P4 (9102776A)
2
4
6
4
8
4
5
4
15
3
6
7
8
4
8
16
1
3
6
11
12
1
1
9
8
1
11
1
10
1
4
8
7
8
9
8
1
11
1
11
17
1
18
1
21
1
20
1
1
11
14
1
Buskro Ltd. BK760 / BK76IB Inkjet
Page 63

Appendix A Assembly Drawings Page A-42
Table A-33: Power Supply Assembly, HP (9103361A)
Item Part Number Quantity Description Reference
1 401010 8 Screw, FHCS, 4-40 UNC x ¼”
2 402310 4 Screw, PHMS, 6-32 UNC x ¼”
3 9101931 2 Rivet, Plastic
4 9102362 4 Hex Spacer, 6-32 UNC x ¾”
5 9102418 1 Power Supply, Switching, 5.1VDC, 8A
6 9102419 1 Power Supply, Switching, 28V/1.8A
7 9102907 1 Board, HP Power Supply
8 9103361 1 Chassis, HP Power Supply
Figure A-33: Power Supply Assembly, HP (9103361A)
8
1
7
1
3
2
5
2
4
4
6
1
4
1
1
8
Buskro Ltd. BK760 / BK76IB Inkjet
Page 64

Electrical Drawings
B.0 Electrical Drawings
Appendix B
List of Figures
Figure B-1: Unit, BK760, Electrical Schematic (BK760AE).........................................B-1
Figure B-2: Unit, BK760, Wiring Diagram – Page 1/5 (BK760AC).............................B-2
Figure B-3: Unit, BK760, Wiring Diagram – Page 2/5 (BK760AC).............................B-3
Figure B-4: Unit, BK760, Wiring Diagram – Page 3/5 (BK760AC).............................B-4
Figure B-5: Unit, BK760, Wiring Diagram – Page 4/5 (BK760AC).............................B-5
Figure B-6: Unit, BK760, Wiring Diagram – Page 5/5 (BK760AC).............................B-6
Buskro Ltd. BK760 / BK76IB Inkjet
Page 65

Appendix B Electrical Drawings Page B-1
Figure B-1: Unit, BK760, Electrical Schematic (BK760AE)
Front Panel Controls
JB8 - Upstream Connector (37 pins)
J6 - 7 (Remote Stop from upstream equipment)
J6 - 8 (Remote Stop from upstream equipment)
J6 - 9 (Remote Start from upstream equipment)
J6 - 10 (Remote Start from upstream equipment)
J6 - 11 (Remote Stop to upstream equipment)
J6 - 12 (Remote Stop to upstream equipment)
J6 - 14 (Remote Start to upstream equipment)
J6 - 15 (Remote Start to upstream equipment)
J6 - 19 (Base+ signal to upstream equipment)
J6 - 20 (Base- signal to upstream equipment)
J6 - 34 (Master+ signal to upstream equipment)
J6 - 35 (Master- signal to upstream equipment)
J6 - 36 (To an upstream friction feeder)
J6 - 37 (To an upstream friction feeder)
JB3 - Feeder Connector (14 pins)
Jx - 8 (To an upstream friction feeder)
Jx - 9 (To an upstream friction feeder)
JB4 - Downstream Connector (57 pins)
J7 - 7 (Remote Stop to downstream equipment)
J7 - 8 (Remote Stop to downstream equipment)
J7 - 9 (Remote Start to downstream equipment)
J7 - 10 (Remote Start to downstream equipment)
J7 - 11 (Remote Stop from downstream equipment)
J7 - 12 (Remote Stop from downstream equipment)
J7 - 13 (Remote Start from downstream equipment)
J7 - 14 (Remote Start from downstream equipment)
J7 - 19 (Follow+ signal from downstream equipment)
J7 - 20 (Follow- signal from downstream equipment)
J7 - 29 (Switched +12 VDC for Heater Table Control)
J7 - 30 (Ground for Heater Table Control)
J7 - 34 (Master+ signal from downstream equipment)
J7 - 35 (Master- signal from downstream equipment)
J3 - 1 (to Conveyor Motor)
J3 - 2 (to Conveyor Motor)
J3 - 3 (Ground)
J3 - 4 (Jumpered to Pin 6 in Conveyor)
J3 - 5 (not connected)
J3 - 6 (Stop from Conveyor)
J3 - 7 (Stop from Conveyor)
JB1
(On Rear Panel)
1
11
Control
Power
Switch
21
2
(On Front Panel)
1
1
100 - 230 VAC
(see Notes)
2
GND
Notes:
11
Base
Power
Switch
21
2
1. Power Supplies:
+5 VDC is used for the HP Printheads
+12 VDC is used for all relays, the encoder
and the photoeye.
+ 28 VDC is used for the HP Printheads
2. 115 VAC/230VAC Operation:
The machine is normally shipped for
200 - 230 VAC operation. To reconfigure
The machine for 100 - 115 VAC
operation, the blower pump motor must
be rewired as indicated on the blower.
In addition, the computer power supply
must be switched to the proper setting
for the slide switch on the side of the
power supply.
No other changes are required.
3. BK760 and BK76IB Differences:
The BK760 is shown here. The BK76IB
is identical except it does not include the
computer or the +5 and +28 VDC power
supplies.
Front
Front
Panel
Panel
Start
HP Printhead
Power
Connector(s)
3
12
22
12
22
L1
Machine
Motor
L1
F1
3A
L1
F2
2A
3
3
M
1N
blk
wh
M
Blower
Pump
Contactor
(On Front Panel)
4004
3
(+Arm)4(-Arm)
5
Main
6
K1-1
(Hi)
3
Production
Pot
7
(W)
8
(Lo)
Controller
Dart
Speed
1
(L1)
2
(L2)
(On Front Panel)
4
Contactor
Main
Stack Relay
(On Bracket*)
Stack PotMain Pot
6
K1-2
(Hi)
7
(W)
8
(Lo)
(+Arm)
(-Arm)
Dart
Speed
Controller
3
4
1
(L1)
2
(L2)
4004
1N
6
2
K2-2
6
4
+28 V
+5 V
0 V
+5 V
+5 VDC
0 V
+28 V
+28 VDC
4
4
0 V
+12 V
+12 VDC
0 V
Control
Computer
Computer
Monitor
8
Contactor
Main
K1
7
8
Stack
Relay
K2
7
+12 V
Encoder
Connector
Photoeye
Connector
J6 - Connection to
Power Supply
3
2
0 V
1
J9 - Connection to
Control Computer
4
J5 - Connection to Power Relays
3
2
1
+12 V
Enc +
Enc Gnd
+12 V
Photo 1
Gnd
Stop
Switch
Switch
123 4
J8 - Connection to Front Panel Controls
Control
9102380A
J10 - Connection to peripheral sensors
12
34567
Run/Jog
Selector
R
J
Base
Board
8 9 10 11 12
Feeder
Disable
Switch
E
D
5
Gnd
Jam I/P
Gnd
Cycle
+12 V
J2 - Connection to Upstream Equipment
Feeder
Friction
J4 - Run
Enable to
J1 - Connection to Downstream Equipment
Speed Control Board
J3 - Connection to optional
J7
from
Conveyor
J7 - Stop I/P
Jam Switch
Connector
Cycle
Connector
1
2
3
4
5
6
7
8
9
10
11
12
13
14
J4
1
2
1
2
3
4
5
6
7
8
9
10
11
12
13
14
J3
1
Follow+ to Speed Control Board
2
Follow- to Speed Control Board
3
Master+ to Speed Control Board
4
Master- to Speed Control Board
5
Encoder+ to Speed Control Board
6
Encoder- to Speed Control Board
7
Photo1 to Speed Control Board
8
Ground
1
2
JB5 - Connection to BK16XX Conveyor
Conveyor Speed
Transport Speed
L2
L2
L2
Buskro Ltd. BK760 / BK76IB Inkjet
Page 66

Appendix B Electrical Drawings Page B-2
Figure B-2: Unit, BK760, Wiring Diagram – Page 1/5 (BK760AC)
SEE PAGE 3
SEE PAGE 3
Note: Cut pin 1 and 4
from power supply
CABLE #1, 9102422A
SEE PAGE 3
BK
RD
2
3
12VDC SWITCHING
POWER SUPPLY
BK
1
9102417
Note: Cut pin 2 and 3
from power supply
CABLE #3, 606030
SEE PAGE 3
WH
4
CABLE#4, 9102650A
CABLE #2, 9102565A
Terminal Block Assembly, TB-2, BK760, 9102200A
RD
K
B
GN
WH
8
7
56
K1
F1
3A
3
4
2
1
WH
BK
F2
2A
BK
WH
8
7
56
K2
3
4
2
1
RD
BK
BK
BK
BK
WH
L1
L2
L1
L2
BK
RD
WH
BK
WH, 18AWG
WH
RD
G
21
RD
DART CONTROLLER. 600005
(MOTOR SPEED)
640302
640301
L
A/F+A
+FNLOW
HI
DART CONTROLER, 600005
(CONVEYOR SPEED)
640302
640301
+AL
A/F
BK
WH
BK
+FNLOW
RD
HI
WH
RD
BK
CABLE #5A, 9102418A
FOR RIGHT MACHINE
SEE PAGE 4
CABLE #32A, 9102728A
FOR LEFT MACHINE
CABLE #6, 606030
CABLE#9, 9102673A
CABLE#8, 606039
CABLE#7, 606039
GN/YE, 10AWG
STOP
RD
WH
GN
RD
BK
1
RD
BK
CABLE#4, 606039
BK
WH
RD
BK
RD
2
WH
CABLE#10, 9102674A
BASE
CONVEYOR
POWER
CABLE#7, 9102651A
FEEDER ENABLE
BN
WH
START
BK
3
4
WH
JOG/RUN
WH
FRONT PANEL ASSEMBLY, 9102185A
This drawing shows the base to be wired to 200-230V were ” L1” and “L2” are used. For 100-115V machines the marker cards should show “L” and “N”.
Buskro Ltd. BK760 / BK76IB Inkjet
Page 67

Appendix B Electrical Drawings Page B-3
Figure B-3: Unit, BK760, Wiring Diagram – Page 2/5 (BK760AC)
Note: Cable #12, #15 and assembly 9102174LA shown
are for left machine wiring
Terminal Block Assembly, TB-2, BK760, 9102200A
8
7
56
K1
3
4
2
1
CABLE#14, 606034
F1 F2
3A
2A
8
7
56
K2
3
4
2
1
BK
MOTOR ASSEMBLY, LEFT
9102174LA
CABLE#15, 9102748A
CABLE#14, 606034
RD
DART CONTROLLER., 600005
N
L
BN
WH
BK
(MOTOR SPEED)
+F
A/F+A
BU
LO
WHI
WH
BK
L1
L1
L2
WH
RD
GN
G
21
L2
GN/YE
DART CONTROLLER, 600005
(CONVEYOR SPEED)
+ALA/F
MOTOR ASSEMBLY, RIGHT
+FNLOWHI
9102174RA
CABLE#12, 9102748A
BN
BU
GN
3
3
RD
1
1
WH
BK
CABLE#13, 9102672A
STACK POT
BLOWER ASSEMBLY, 9100829A
This drawing shows the base to be wired to 200-230V were ” L1” and “L2” are used. For 100-115V machines the marker cards should show “L” and “N”.
Buskro Ltd. BK760 / BK76IB Inkjet
RD
BK
WH
Page 68

Appendix B Electrical Drawings Page B-4
Figure B-4: Unit, BK760, Wiring Diagram – Page 3/5 (BK760AC)
CABLE#18, 9102358A
CABLE#16, 606039
CHASSIS GROUND STUD
NOTE: CABLE#19 IS CUT BEFORE
WIRING TO TERMINAL BLOCK
GN
CABLE #3, 606030
RD
9102178A
TB-1
GN / YE, 606360
CABLE#19, 606322 -
Not used on BK76IB
GN
POWER SUPPLY ASSEMBLY, HP,
9103361A - Not used on BK76IB
SEE PAGE 1
BK
BU
BN
BK
RD
33
BK
WH
4
RD
4
BK
1
2
WH
RD
G
G
SEE PAGE 1
CABLE #1, 9102422A
CABLE #4, 9102650A
WH
GN
BOARD, BASE CONTROL ASSEMBLY
J6- POWER
1
RD
BK
J10-SENSOR INPUTS
RD
RD
BK
GN
WH
9102380A
1
BK
RD
WH
BKWHBK
WH
RD
J5-RELAY
BK
1
BN
GN
RD
WH
CONTROLS
BK
J8-FRONT PANEL
CABLE #7, 9102651A
1
SEE PAGE 1
SEE PAGE 1
HP POWER SUPPLY BOARD
CABLE#17, 606039
GN / YE, 606360
GN
BK
13
LN
GND
5VDC SWITCHING
POWER SUPPLY
9102418
WH
GN
BK
WH
13
LN
GND
28VDC SWITCHING
POWER SUPPLY
9102419
NOTE: ALL WIRES SHOWN
TERMINATE ON HP POWER
SUPPLY BOARD
CABLE#21, 606601A
ENCODER ASSEMBLY,
9100188A
Not part of BK76IB
WH
BK
RD
GN
1234
WH
/BN
RD
WHBK
NOTE: CUT PIN 3 & 4
AS SHOWN
RD
BK
NOT USED ON BK76IB
ONLY ON BK760
RD
BK
61
BK
POWER SUPPLY WIRING
RD
61
61
43
RD
BK
NOTE: CUT PIN 1 & 6
AS SHOWN
CABLE#22, 9102433A
123
CABLE#23, 9102433A
123
CABLE#24, 9102433A
123
PHOTO CYCLE JAM
Buskro Ltd. BK760 / BK76IB Inkjet
Page 69

Appendix B Electrical Drawings Page B-5
Figure B-5: Unit, BK760, Wiring Diagram – Page 4/5 (BK760AC)
UPSTREAM AND DOWNSTREAM WIRING FOR RIGHT MACHINE
CABLE#26, 9102419A
JB4
JB5
CABLE#5A, 9102418A
SEE PAGE 1
JB1
4
433
1
2
G
G
CABLE#5C, 9102418A
TB-1, 9102178A
UPSTREAM AND DOWNSTREAM WIRING FOR LEFT MACHINE
CABLE#27, 9102417A
JB3
GN/BK
GN/WH
RD/BK
RD/WH
WH/BK
RD/BK
GN/BK
GN/WH
RD/WH
WH/BK
BK/WH
OG/BK
BU/BK
CABLE#5B, 9102418A
J1- DOWNSTREAM
BOARD, BASE CONTROL ASSEMBLY
J7- CONVEYOR
BK RD
1
CABLE#29, 9102730A
WH
GN
RD
OG
BU
BK
1
9102380A
BK/WH
OG/BK
BU/BK
J2- UPSTREAM
WH
GN
RD
OG
BU
BK
1
WH
BK
1
J4-FEEDER
CABLE#28, 9102421A
JB8
JB3
JB8
JB1
TB-1, 9102178A
2
211
X
Y
G
G
TB-1
9102178A
CABLE#30, 9102727A
GN/WH
RD/WH
BK
1
RD
CABLE#32C, 9102728A
CABLE#31, 9102729A
GN/WH
GN/BK
BK/WH
RD/WH
OG/BK
RD/BK
GN/BK
BK/WH
WH/BK
OG/BK
BU/BK
J1- DOWNSTREAM
BOARD, BASE CONTROL ASSEMBLY
CABLE#32B, 9102728A
WH
RD
GN
OG
BU
BK
1
9102380A
BU/BK
J2- UPSTREAM
RD/BK
WH/BK
WH
GN
RD
OG
BU
BK
1
WH
BK
1
J4-FEEDER
JB4
JB5
CABLE#32A, 9102728A
SEE PAGE 1
Buskro Ltd. BK760 / BK76IB Inkjet
Page 70

Appendix B Electrical Drawings Page B-6
Figure B-6: Unit, BK760, Wiring Diagram – Page 5/5 (BK760AC)
TB-1
9102178A
KEYBOARD, 9102288
BK
WH
GN
BK
33
WH
4
4
1
2
GN
G
CABLE #33
CABLE #34
Monitor
BOARD, BASE CONTROL ASSEMBLY
9102380A
CABLE #35
FLOPPY DRIVE, 3 1/2"
BLACK, 803600
CABLE #38, 606361A
CABLE #36, 614601A
TO 12VDC ON
9102196A
TO FDC
CONTROLLER
ON COMPUTER
SECONDARY
IDE ON
COMPUTER
TO
CABLE #40, 614009A
CABLE #39, 614306A
CD-ROM DRIVE, BLACK,
803601
CABLE #37, 9100004
CABLE #41, 9100199A
REAR COVER, 9102201A
Buskro Ltd. BK760 / BK76IB Inkjet
Note: Set Switch on Power Supply to
230 VAC
CHASSIS ASSEMBLY, P4
9102196A
 Loading...