

Page 1

PrintForm
User’s Guide
Version 7.80c Revision 1
September 2007
Page 2

Contact information Contact us on the Web at http://www.firstlogic.com/customer
If you find any problem with this documentation, please report it to Business Objects
in writing at
Copyright Copyright © 2006 Business Objects. All rights reserved.
Patents Business Objects owns the following U.S. patents, which may cover products that are
documentation@businessobjects.com
.
offered and sold by Business Objects: 5,555,403, 6,247,008 B1, 6,578,027 B2,
6,490,593 and 6,289,352.
Trademarks Business Objects, the Business Objects logo, Crystal Reports, and Crystal Enterprise
are trademarks or registered trademarks of Business Objects SA or its affiliated
companies in the United States and other countries. All other names mentioned herein
may be trademarks of their respective owners.
Third-party contributors Business Objects products in this release may contain redistributions of software
licensed from third-party contributors. Some of these individual components may
also be available under alternative licenses. A partial listing of third-party
contributors that have requested or permitted acknowledgments, as well as required
notices, can be found at: http://www.businessobjects.com/thirdparty
2
PrintForm User’s Guide
Page 3

Preface
About this guide In this guide, we explain what PrintForm can do and how you can apply it in
common situations. We point out the features and options you need, and a some
of the operational “how to” details. Think of this manual as a source for
understanding the concepts behind PrintForm. For specific instructions on how to
set up all PrintForm options and features, please rely on the online help.
Installation To install PrintForm, please follow the instructions in your System
Administrator’s Guide.
Related guides and resources
Along with this manual, Business Objects provides a wealth of documentation to
help you learn and master our products.
When you use PrintForm, you will tap into the power of two other advanced
mail-preparation applications from Business Objects: ACE (for Address
Correction and Encoding) and Presort (for mail sorting and preparation).
These are both full-featured programs with an enormous array of options
available to you. When you set up your PrintForm job, you may need to set
options in both ACE and Presort, depending on your goals. So, along with
your Printform documentation, we have included documentation for ACE
and Presort as well.
When you have learned what you need from this guide, turn to the online
help. There you will find all of the operational “how to” information that you
need to run PrintForm.
3
Page 4

Conventions This document follows these conventions:
Convention Description
Bold We use bold type for file names, paths, emphasis, and text that you
should type exactly as shown. For example, “Type
Italics We use italics for emphasis and text for which you should substitute
your own data or values. For example, “Type a name for your job,
and the
.job
extension (
jobname
Menu commands We indicate commands that you choose from menus in the following
format: Menu Name > Command Name. For example, “Choose File
> New.”
We use this symbol to alert you to important information and potential problems.
We use this symbol to point out special cases that you should know
about.
.job
).”
cd\dirs
.”
4
PrintForm User’s Guide
Page 5

Contents
Chapter 1:
Welcome to PrintForm ................................................................................. 9
Introduction to PrintForm...............................................................................10
Systems supported by PrintForm ...................................................................11
Files needed by PrintForm .............................................................................12
Input and output file formats..........................................................................14
Steps in a PrintForm job.................................................................................16
Chapter 2:
PrintForm features...................................................................................... 17
Features in every PrintForm job.....................................................................18
Defining groups..............................................................................................19
Cleaning addresses .........................................................................................20
Presorting .......................................................................................................22
Sorting statements ..........................................................................................23
Controlling printing........................................................................................24
Generating reports..........................................................................................25
Controlling print order ...................................................................................26
Advanced features ..........................................................................................27
Combining statements....................................................................................28
Duplex printing ..............................................................................................29
Selective inserting ..........................................................................................30
Chapter 3:
PCC: The Printer Carriage Control file ................................................... 31
Getting started: The PrintForm window.........................................................32
Sample jobs ....................................................................................................33
Execute after each task...................................................................................34
Select the input file.........................................................................................35
Choosing a PCC file.......................................................................................36
ASCII chart for selecting PCC files ...............................................................38
EBCDIC chart for selecting PCC files...........................................................39
PCC file setup.................................................................................................40
Chapter 4:
The statement file ........................................................................................ 45
Building the statement file .............................................................................46
PrintForm fields in the STM file....................................................................47
Mark statement fields .....................................................................................49
How to mark statement fields.........................................................................50
Marking a unique field ...................................................................................52
Marking a user field .......................................................................................53
Marking a search field....................................................................................54
Marking a customer ID field ..........................................................................56
Adding new fields to the statement file..........................................................57
Marking the output address block ..................................................................58
Contents
5
Page 6

Chapter 5:
Assigning and presorting addresses .......................................................... 61
Why assign and standardize addresses?......................................................... 62
Before you work with ACE or Presort Views ............................................... 63
Required in ACE and Presort: Post back to the input file ............................. 64
Strategies for using ACE and Presort Views................................................. 65
How to connect to ACE Views......................................................................67
ACE output files ............................................................................................ 69
ACE Reports .................................................................................................. 70
What is presorting and why do it? .................................................................71
Before you presort: Defining the piece description....................................... 72
How to connect to Presort Views ..................................................................73
Presort output files......................................................................................... 75
Group statement file....................................................................................... 76
Presort reports ................................................................................................ 79
Chapter 6:
Defining groups ........................................................................................... 81
Introduction to groups.................................................................................... 82
Examples of groups .......................................................................................83
Setting criteria with filters ............................................................................. 84
Sorting statements in a group......................................................................... 85
Nonpresorted and unqualified statements...................................................... 87
General group ................................................................................................ 88
How to set up a group....................................................................................89
The Filter Builder...........................................................................................90
Group order counts ........................................................................................ 91
Group example: Confidential statements.......................................................92
Group example: Undeliverable addresses......................................................94
Group example: Large statements ................................................................. 95
Group example: Internal mailing................................................................... 96
Group example: Unqualified pieces ..............................................................97
General group example.................................................................................. 98
Subgroup count reporting .............................................................................. 99
Chapter 7:
Combine Statements, Duplexing, and Fly Sheets................................... 101
Combining statements.................................................................................. 102
How to combine statements......................................................................... 104
Duplexing.....................................................................................................106
How to duplex only......................................................................................107
How to both combine and duplex................................................................108
Embedded instructions for Xerox printers................................................... 109
Fly sheets ..................................................................................................... 112
Chapter 8:
Getting ready to print............................................................................... 113
PrintForm output files.................................................................................. 114
Defining your own header and trailer pages................................................ 116
Printing to a printer device........................................................................... 118
Address block layout ...................................................................................119
Printing Postnet barcodes............................................................................. 121
Printing an endorsement line ....................................................................... 123
6
PrintForm User’s Guide
Page 7

Output merge and translation .......................................................................124
Statement printing order: N-up ....................................................................125
Statement printing order: Reverse................................................................126
Container labels............................................................................................127
How to create container labels .....................................................................128
Print container labels with Label Studio ......................................................130
How to reprint statements ............................................................................132
Banner pages ................................................................................................133
Chapter 9:
Adding inserter marks.............................................................................. 135
Introduction to inserter marks ......................................................................136
What do inserter marks look like?................................................................137
Inserter mark styles ......................................................................................138
Where do I set up inserter marks in PrintForm? ..........................................139
Inserter mark placement...............................................................................141
Inserter mark functions.................................................................................142
Marks that improve security.........................................................................144
Marks that help in the mailroom ..................................................................147
Selective inserting ........................................................................................148
How reverse and duplex printing affect marks ............................................150
Chapter 10:
Reports ....................................................................................................... 151
PrintForm reports .........................................................................................152
ACE and Presort reports...............................................................................153
Setting up reports .........................................................................................154
How to set up the report format ...................................................................155
Job Summary report .....................................................................................156
Group report .................................................................................................157
Piece Description report ...............................................................................158
File Detail report ..........................................................................................159
Inserter report ...............................................................................................160
Statement Combining report ........................................................................161
Appendix A:
Picopy utility ...............................................................................................163
Picopy: Convert print-image files to ASCII text..........................................164
Appendix B:
Post-processing ...........................................................................................167
Enabling post-processing .............................................................................168
Selecting files for post-processing ...............................................................169
Setting up post-processing options...............................................................170
Post-processing your PrintForm file ............................................................171
Post-processing and other aspects of PrintForm ..........................................172
Glossary.......................................................................................................173
Index ............................................................................................................177
Contents
7
Page 8

8
PrintForm User’s Guide
Page 9

Chapter 1:
Welcome to PrintForm
This chapter introduces you to PrintForm and its many meatures, as well as,
information on supported systems and required files.
9
Page 10

Introduction to PrintForm
What is PrintForm? PrintForm is a powerful program that forms a link between accounting or
database systems that generate statements and the printers that print them.
PrintForm processes the addresses from your statements and prepares them for
mailing before the forms are printed.
In most cases, PrintForm is used to process statements such as invoices. You’ll
supply the statements to PrintForm in the form of a print-image file. PrintForm
extracts address data and other information from each form. Then ACE uses that
data to:
assign postal codes (ZIP, ZIP+4, delivery point, and carrier route) and LOT
(line-of-travel) numbers to speed delivery and achieve U.S. Postal Service
(USPS) automation discounts
PrintForm takes over and can:
combine statements destined to the same customer
group statements according to criteria set by you
Next, it’s Presort’s turn to:
presort mail for automation discounts, while ensuring full compliance with
USPS regulations
calculate postage and produce detailed mailing reports
Then PrintForm can:
merge the sorted and standardized addresses back into statements
duplex statements, if you choose
apply intelligent-inserter marks, if you choose
write out a new file in one of several available formats
The statements are then ready to be printed in presort sequence, if you want, fully
prepared for inserting and finishing.
Who uses PrintForm? PrintForm is used by companies that mail large volumes of business documents
(for example, invoices, account statements, and form letters). Companies such as
hospitals, utilities, financial institutions, and mailing service bureaus are among
the companies that process millions of mail pieces each year with PrintForm.
10
PrintForm User’s Guide
Page 11

Systems supported by PrintForm
Print-image file generating systems
PrintForm supports print-image files created on the following types of computer
systems:
systems generating ANSI print files (EBCDIC data with ANSI carriage
control)
systems generating ASCII print files or fixed-length ASCII records
IBM 3090 and IBM ES/9000 systems generating IBM POWER/VS, IBM
POWER/VSE, and IBM POWER/VSEII print files
Burroughs B2500, B2700, B3500, B3700, and B4700 systems generating
Medium Burroughs print files
Burroughs B6700 and Unisys A-Series computers generating Large
Burroughs tape format
other common system print files
Printers PrintForm can interpret and produce Printer Carriage Control (PCC) codes used
by the following printer manufacturers:
Bull
Data General
Delphax
Digital Equipment (DEC)
Eastman Kodak
Genicom
Hewlett-Packard
IBM
Océ (Siemens)
Xerox
PrintForm also supports most PC-level printers for printing reports and container
labels.
Intelligent inserters PrintForm is compatible with any intelligent inserting equipment that can read
one of the eight different inserter marks that PrintForm can generate (see Chapter
9), including inserters manufactured by these and many others:
Bell & Howell
Pitney Bowes
Böwe
Memory requirements For details on the amount of disk space and memory that PrintForm requires, see
the System Administrator's Guide.
Systems supported by PrintForm
11
Page 12

Files needed by PrintForm
To perform its many tasks, PrintForm needs several files, one supplied by you
and the rest supplied by Business Objects, but chosen by you, or generated during
PrintForm setup:
print-image file (.dat)
printer carriage control file (.pcc)
printer driver file (.pfp)
PrintForm job file (.pf)
map file (.map)
inserter file (.ins)
design file (.dft or .dfs)
Important! Before selecting any file supplied by Business Objects, be sure to
!
rename it before using it in PrintForm. Make a copy and give it a new file
name. When we ship software updates, we always ship new copies of these
files. If you don’t change the file name, your customized file will be
overwritten the next time you install PrintForm.
Print-image file It’s up to you to supply PrintForm with a print-image file that contains the data
for your statement-printing job. This is the file that is generated by your
accounting or database program, and that contains the address data that PrintForm
needs to do its work.
A print-image file contains not only the text for your statements, but also may
contain printer-control commands that are embedded in the file. These commands
instruct your printer to perform such tasks as changing a font or moving to
another area of the form before printing more text.
PrintForm accepts one print-image file per job. If you have multiple print-image
files, you must process them separately or concatenate them into one file before
processing with PrintForm. These files should be of the same format. You must
delete file header information in all but the first file.
For a listing of the types of print-image files that PrintForm accepts, see “Input
and output file formats” on page 14.
12
PrintForm User’s Guide
Page 13

Printer Carriage Control file
The Printer Carriage Control (PCC) file is supplied by Business Objects. There
are several PCC files from which to choose and you must tell PrintForm which
one to use when it processes your print-image file. Your choice depends on the
format of the print-image file.
The PCC file contains information that tells PrintForm what carriage control
information it can expect to find embedded in your print-image file, as well as
information about the host system on which the print-image file was created.
When you create your output files, PrintForm will again ask you to choose a
PCC; this time, the PCC should reflect which format PrintForm should use when
generating the output file. That format, and therefore the output PCC, can be the
same or different from the one you used on input.
For example, if my input file format is ANSI, I would select the ansi.pcc file on
input. If I want my output file also to be formatted in ANSI, I would again choose
ansi.pcc on output.
Printer driver file To produce Postnet barcodes, the software also relies on a printer driver file
(.pfp). The .pfp files contain options that control printer initialization and font
switching. Business Objects supplies several printer driver files from which to
choose. For details on Postnet printing, please refer to Chapter 8.
PrintForm job file All of the settings that you make in the PrintForm windows are stored in the
PrintForm job file. You can use a job file again and again, if needed; for example,
if you process the same mailing in the same way every month.
Map file The map file stores field size and position information for PrintForm’s extraction
process.
Inserter file Business Objects supplies you with an inserter file for each of the different types
of inserter marks that PrintForm supports. You’ll need to choose the inserter file
that corresponds to the type of inserter marks you plan to print. We’ll show you
how in Chapter 9.
Design file With your PrintForm software, you’ll receive a number of pre-set label Design
Files to help you print container labels. Those files give PrintForm information
such as printer type and paper dimensions. In Chapter 8, we’ll help you choose
the right Design File for your printer and paper stock.
Files needed by PrintForm
13
Page 14
Input and output file formats
PrintForm accepts your print-image file in any of the following formats:
ANSI
ASCII PCC
ASCII Top
ASCII Bottom
ASCII Fixed
Large Burroughs
Medium Burroughs
Power VSE
RMS Var
RMS VFC
slight variations on the formats listed above
PrintForm takes your print-image file, regardless of format, and translates it into a
format that is unique to PrintForm. We call this the internal format. PrintForm’s
internal format is variable-length ASCII. Processing your records is easier for
PrintForm if the data is in this format; PrintForm does the translating
automatically.
After all processing is complete, PrintForm translates your data back into the
original format or into one of the formats of your choice from the list shown
above.
Picopy: Translating AS/400 & System 36
EBCDIC: If your print-image file uses EBCDIC characters, note the
!
following. When you set up your PCC file to help PrintForm translate your
print-image file, you must enter the decimal equivalent of the EBCDIC
character whenever you are asked to enter font and color characters,
movement values and DJDEs.
However, when you set up your PrintForm job and you select the fonts for
such features as inserter marks, endorsements, and Postnet barcodes, you
must define the fonts using ASCII characters. PrintForm will translate those
ASCII characters to EBCDIC on output as necessary.
If your print-image file is in either of the formats listed below, you can use a
PrintForm utility called Picopy (print-image copy) to translate your file into
ASCII before processing with PrintForm.
AS/400 Print Control
IBM System 36
See complete instructions for using the Picopy utility in Appendix A of this
manual.
14
PrintForm User’s Guide
Page 15

Extraction After PrintForm translates your print-image file into the internal format, it
extracts information from each record and builds a database called the statement
file (STM). Each record in the STM file represents a statement from the printimage file. This is the file that PrintForm uses to process your data.
PrintForm gives you control over which fields to include in the STM file. See
Chapter 4 for more details.
Input and output file formats
15
Page 16

Steps in a PrintForm job
A typical PrintForm job will involve each of the steps shown below. Your jobs
may vary, depending on the features you choose to use.
Step PrintForm Program
1
2
3
4
5
6
7
8
Job control
image file.
Define statement fields
processing. PrintForm stores this data in a file called a Statement file (STM).
Input Processing
the PCC file, PrintForm determines what format you’ve used to structure the data. PrintForm
translates the data from that format into PrintForm’s own internal format to help simplify processing.
Mark statement fields
record.
Address assignment.
Views, can assign the correct ZIP Code, ZIP+4 Code, delivery-point barcode (DPBC), line-oftravel (LOT) code and order, and carrier route number (CART). ACE also generates USPS and
mail-management reports.
Combine statements.
same customer for placement into the same envelope.
Piece description.
mail-piece weights. Any selective inserts are also assigned to the appropriate statements during
this step.
Grouping and sortation.
Business Objects’ presorting software, Presort Views, sorts addresses according to USPS mail
class. Then it adds other postal information, such as a P
ments. Presort also generates USPS and mail-management reports.
. First, choose which general process you want PrintForm to perform on your print-
. Define fields that will be needed for PrintForm, ACE, Presort, and label
. Tell PrintForm where to find your print-image file. Through information in
. Show PrintForm where to find the input address data in each input
To each address, Business Objects’ address-assignment software, ACE
If you want, PrintForm will combine statements that are destined to the
Using measurements and weights supplied by you, PrintForm calculates
Each address is assigned to a group according to your instructions.
OSTNET
barcode and optional endorse-
PrintForm
PrintForm
PrintForm
PrintForm
ACE
PrintForm
PrintForm
PrintForm
/Presort
9
10
11
12
16
Container labels.
sack tags for printing.
Output merge.
addresses back into the proper forms and outputs them in sorted sequence. This step also includes
duplexing pages, and adding printer instructions and inserter marks.
Address layout.
block.
Create reports.
PrintForm User’s Guide
From the container label file generated by Presort, PrintForm prepares tray or
Define the output files and assign groups to them. PrintForm merges the
Determine the content and position of the address fields in the output address
PrintForm generates reports for mail management. PrintForm
Label Studio
PrintForm
PrintForm
Page 17

Chapter 2:
PrintForm features
This chapter describes PrintForm features in general terms, offering an overview
of the kinds of tasks you can accomplish with PrintForm.
17
Page 18

Features in every PrintForm job
In every PrintForm job, there is a set of features that you will likely use regardless
of the type of job. Those features are listed below. The only step that is required
involves defining groups—a task that you must perform in every job. The rest are
optional, but applicable to almost any job.
define groups—required
assign postal codes and clean addresses
presort to gain USPS discounts for postal automation
sort nonpresorted statements
control printing
generate reports
control print order
See a brief discussion of each of these features on the following pages and more
detailed information later in this manual.
18
PrintForm User’s Guide
Page 19

Defining groups
In most jobs, you will want to presort statements to prepare them for mailing. But
we know that every job is different and some are not as simple as presorting every
statement in the job together.
That’s why PrintForm lets you control which statements are processed together
and which method is used to sort them. It does that by letting you define groups of
statements in a single job. You determine the criteria that a statement must meet
to be placed into a group and you determine how, or even if, the statements are
sorted within a group.
Here are some examples of reasons why you might form groups:
You want to divide your job and presort certain statements together. For
example, if you do not own intelligent inserting equipment, you might want
to presort one-page statements, then two-page statements, and so on.
You want to presort some statements one way and other statements another
(letters and flats, for example).
You have some statements that you do not want to presort at all (confidential
or undeliverable statements, for example).
Two steps Grouping statements is a two-step process. First, you decide how to group
statements—by department, by ZIP, by account balance, or whatever field you
choose. Then you choose how to sort the statements within each group⎯by
Presort, by field, or no sorting at all.
You can create up to 50 different groups, although most jobs require much fewer.
For more information on defining groups, see Chapter 6.
Defining groups
19
Page 20

Cleaning addresses
Business Objects’ address-assignment software is called ACE, an abbreviation
for Address Correction and Encoding. If you purchase ACE, you can access the
full-featured ACE software directly from your PrintForm software.
You can access ACE Views directly through windows in the PrintForm program.
ACE will offer you many options for cleaning and coding your address data.
So, in the midst of processing your file with PrintForm, you can hand off the
STM file to ACE Views to take advantage of the full power of that cleaning and
coding software. Afterward, ACE will hand the STM file back to PrintForm with
a complete, corrected, and standardized version of that address data. And at the
same time, ACE can give you codes for postal automation and other purposes.
Below we describe just a few of the functions offered by ACE. For complete
information on ACE and instructions on how to use it, please refer to the ACE
User’s Guide.
Address correction and data hygiene
Postal automation codes
For each address in your print-image file, ACE can perform many functions.
First, ACE verifies that each city, state, and ZIP Code agree with one another. If
an address contains only a city and state, ACE usually can add the ZIP. If you
have only the ZIP, ACE usually can add the city and state. ACE can standardize
the address line, too. For example, it can correct a misspelled street name, fill in
missing information, and strip out unnecessary punctuation marks.
ACE can convert your address data to UPPER CASE or Mixed Case. If your
address list contains any undeliverable addresses (vacant lots, condemned
buildings, and so on), ACE will identify these for you. And ACE can assign its
own diagnostic codes to help you find out why certain addresses were not
assigned or how they had to be corrected.
You can use ACE to assign these postal codes:
ZIP, ZIP+4, delivery point barcode (DPBC), and check-digit for Postnet
barcoding.
Carrier-route number (CART) for carrier-route presorting.
Line-of-travel (LOT) codes for Standard Mail (A), Enhanced Carrier Route
Subclass.
20
PrintForm User’s Guide
Page 21

Directories ACE assigns postal codes using directories based on data from the USPS. The
directories contain address range, street, city, state, ZIP Code, ZIP+4, LOT, and
CART numbers for firms and residential addresses throughout the nation.
To keep your mailing lists current and to ensure compliance with USPS
regulations, Business Objects publishes monthly and bimonthly updates of these
directories on a variety of media, including tapes and compact discs
(CD-ROM). For details, please refer to the System Administrator’s Guide.
Cleaning addresses
21
Page 22

Presorting
Presorting is the task of sorting mail and preparing it in containers so that it can
be transported through the postal system. It’s called “pre-”sorting because you
sort the mail before you submit it to the USPS instead of paying them to sort it.
To sort your addresses, PrintForm can turn to Business Objects’ Presort program.
If you’ve purchased Presort, you’ll access it directly through the PrintForm
screens. Think of Presort as a system that turns your print-image address data into
prepared mailings with container labels, reports, and USPS forms.
So, while processing your file with PrintForm, you can hand off the STM file to
Presort Views to take advantage of the full power of that presorting software.
Based on information about your mailing that you provide—piece and container
dimensions, for example—Presort figures out how many pieces will fit into each
package and container. When this is done, Presort can:
calculate postage
generate a container label file
generate reports for your management and clients
generate USPS forms, including all documentation required for mailing
acceptance; this includes mailing statements, postage listings, and so on
When Presort is done with all of these tasks, it hands the STM file back to
PrintForm for further processing.
USPS compliance Presort implements many USPS rules automatically. And when it’s not fully
automatic, Presort still helps you comply with USPS rules by guiding you
through the choices you need to make.
Because Presort processes according to USPS regulations, your mailing is
eligible for all available postage discounts. Whenever rates or regulations change,
Business Objects updates the Presort program to keep you current. With Presort,
mail is always compatible with USPS automation regulations so that it can be
processed quickly and delivered promptly. See the Presort User’s Guide for more
details on presorting and mail regulations.
USPS rules are published in the Domestic Mail Manual (DMM), Postal Bulletin,
and other USPS publications. If you want to become an expert presort mailer,
you’ll find subscriptions to those publications worthwhile.
22
PrintForm User’s Guide
Page 23

Sorting statements
Even if you choose to presort statements, there may be some statements that you
will want to keep out of the mailstream. You can set up separate groups for these
statements and filter them from the presorted statements.
Within these groups, you also can sort statements to best suit your needs, based
on your choice of criteria. Not only can you sort on PrintForm fields, such as a
ZIP Code, city, and state, you can define your own fields for sorting as well, such
as account number or account balance.
You can sort on any portion of a field or an entire field. You can also sort more
than once on different portions of the same field. For example, in an account
number where the first three digits indicate the type of account, you can sort on
the account type first, then sort by the entire account number.
PrintForm lets you choose up to 20 sort keys for sorting statements.
For more information on sorting statements, see Chapter 6.
Sorting statements
23
Page 24

Controlling printing
For greater control over your printer functions, PrintForm lets you add special
printer instructions to specific impressions in each statement.
For example, suppose you’re printing a multiple-page simplex letter (print on one
side of each sheet) in which the first page should be printed on letterhead. You
might instruct your printer to pull letterhead from bin #1 to print the first
impression, and to pull plain bond paper from printer bin #2 for the remaining
pages in the letter.
Or suppose you’re using PrintForm’s duplex feature to print bank statements.
On the back of the first sheet, you want to print a reconciliation form. You could
use printer instructions to signal your printer to print a form on the back of the
first page in each statement (from a printer-resident form file).
For more information on printer instructions, see the Chapter 8.
24
PrintForm User’s Guide
Page 25

Generating reports
PrintForm, ACE, and Presort each produce a variety of reports to help you
manage your statement processing and to submit your mailing to the USPS.
We’ve listed all of the reports that are available from each program below. For
descriptions and examples of the PrintForm reports, see Chapter 10. For
information on the ACE and Presort reports, see the respective user guides.
PrintForm reports Job Summary (.psm)
Group Report (.pgp)
Piece Description Report (.pds)
File Detail Report (.pfd)
Inserter Report (.pin)
Statement Combining Report (.pcm)
ACE reports Reports that show address assignment results are generated directly by the ACE
program. You may choose from any of the many reports available through ACE,
including:
Address Accuracy Statement (.aas)
CASS Report (.353)
Error Report (.err)
Executive Summary (.aex)
Job Summary (.ajs)
NDI Report (.ndi)
Standardization Report (.std)
Geocensus (.geo)
Mover ID (.mia)
Presort reports Reports that show mail-sorting results are generated directly by the Presort
program. You may choose from any of the many reports available through
Presort, including:
Job Summary (.pjs)
Mail Sort Listing (.msl)
Manifest Listing (.man)
Pallet Mixed-Zone Listing (.mzl)
Postage Statements for all mail classes (3600, 3541, 3602, 3605, and 3608)
(.360/.354/.362/.365/.368)
Processing Center Listing (pcl)
PVDS Consolidated Postage Statement Register (.pvd)
Qualification Report (.pqr)
Register of Mailings for Centralized Postage Payment (.cpp)
Summary Listing (.sum)
ZIP Code Listing (.zcl)
Generating reports
25
Page 26

Controlling print order
Because methods of printing, cutting, stacking, and feeding sheets to folders and
inserters vary from vendor to vendor, PrintForm provides two valuable features to
help you control statement printing order.
With PrintForm, you can:
N-up Reorder statements if you print more than one page on a sheet, then
Reverse Reverse the output so that statements are printed last page first and
For more information on print order, see Chapter 8.
cut and stack. The n-up feature enables you to print statements side
by side—for example, two-up or three-up.
first page last. The Reverse feature changes the output order of pages
within statements. This feature is useful to customers who own
certain types of inserters.
26
PrintForm User’s Guide
Page 27

Advanced features
In addition to the features that you’ll probably use in every PrintForm job, there
are advanced features for those sophisticated printing and inserting equipment.
PrintForm’s advanced features include:
statement combining
duplex printing
selective inserting
Each of these features is introduced on the following pages and described in
detail later in this manual.
Advanced features
27
Page 28

Combining statements
PrintForm’s statement-combining feature lets you consolidate multiple
statements that are destined to the same customer.
For example, a company might generate a separate invoice for each transaction
with a customer, but they want to save envelope and postage costs by mailing the
invoices in one envelope.
Or a customer might have several different accounts with the same company; for
example, a customer has several investment accounts with the same investment
broker. The brokerage firm can consolidate the account statements and mail them
in one envelope.
Statement combining presents a more polished image to the customer. You’ll
reduce paper, envelope, and postage costs and save your customers the confusion
of receiving multiple mail pieces.
PrintForm’s ability to reorder the processes allows you to perform address
correction after combining statements. If you choose to perform processing in
this order, you need to set up an input filter in ACE. Here is an example of a
filter you can use to produce accurate counts on you ACE reports:
db.combflag = "Y"
Combine and duplex Since the whole idea behind combining statements is to save money, you
probably will want to also duplex the job to save paper (see the next page for
more information on duplexing).
For details on combining statements and duplexing, see Chapter 7.
28
PrintForm User’s Guide
Page 29

Duplex printing
To help you save paper and postage, you can set up your job to print on both sides
of a sheet of paper; this is called duplexing.
PrintForm ensures efficient, accurate duplexing of your statements and lets you
choose from two modes, depending on your document-processing requirements.
Standard mode In the standard mode, PrintForm duplexes statements from sheet to sheet, front to
back, regardless of the number of pages in the input file. To ensure that PrintForm
does not print data from two different statements on one sheet, it can insert a
blank impression where needed so that all statements are output with an even
number of impressions. You wouldn't want to print page 5 from one customer’s
statement and page 1 from another customer’s statement on the same sheet of
paper.
Reconciliation mode Reconciliation mode is handy for banks, investment firms, and other financial
institutions that send monthly account statements to their customers. These firms
often provide a reconciliation form on the back of the first page of each
statement⎯a form to help you balance your account. These forms are often preprinted and you wouldn’t want PrintForm to print account information there.
In reconciliation mode, PrintForm duplexes all sheets, but leaves a blank
impression on the back of the first sheet for your reconciliation form. If you
don’t have preprinted forms, you can print a reconciliation form at the same time
that you print your statements, using printer instructions to signal your printer to
generate the form from a printer-resident form file.
Combining and duplexing
While duplexing is an excellent way to cut paper costs, you’ll find even further
reductions on paper usage when you duplex statements and then use PrintForm’s
statement-combining feature to combine multiple statements that are destined for
the same person.
For more information on duplexing, see Chapter 7.
Duplex printing
29
Page 30

Selective inserting
To help you totally automate your laser-printed mailings, PrintForm supports
selective inserting for up to 12 inserts. You can choose several styles of inserter
marks to place on individual pages. The mark signals your inserter equipment,
conveying which inserts belong with each statement.
In PrintForm, you’ll use a database-type filter expression to define the criteria for
placing each insert into an envelope.
For custom needs, you can use PrintForm to instruct your intelligent inserter to
insert different types of materials, depending on the attributes of the statement.
For example, you could instruct your equipment to insert one brochure for
statements in a certain ZIP Code, a different brochure for past-due accounts, and
still another for those with account balances over an amount you specify.
PrintForm is compatible with many different intelligent inserting machines and
can generate eight different styles of inserter marks. In addition, PrintForm lets
you place inserter marks at various locations on the document to meet the exact
requirements of your particular inserter.
For more information on selective inserting, see Chapter 9.
30
PrintForm User’s Guide
Page 31

Chapter 3:
PCC: The Printer Carriage Control file
The Printer Carriage Control (PCC) file is critical to the successful processing of
your print-image file. It contains information that tells PrintForm what carriage
control information is embedded in the print-image file.
Business Objects supplies several PCC files from which to choose. This chapter
provides details on choosing and customizing the PCC file.
31
Page 32

Getting started: The PrintForm window
PrintForm’s main window is the PrintForm window. It is the first window that
you’ll see whenever you start the program.
All buttons are grey, initially
All of the buttons on this screen will be de-activated (that is, they will be greyed
out and you will be unable to use them) when you first open PrintForm. That’s
because PrintForm is waiting for you to load an existing job or create a new one.
32
PrintForm User’s Guide
Page 33

Sample jobs
PrintForm comes equipped with several sample jobs that you can use to:
practice setting up and running PrintForm.
use as the basis for your own job⎯a starting point, if you will.
We strongly urge you to rename the sample file before using it as the basis for
!
your job. Make a copy and give it a new file name. When we ship software
updates, we always ship new copies of the sample jobs. If you don’t change
the file name, your customized file will be overwritten the next time you
install PrintForm.
All sample PrintForm jobs are set up with a default set of fields needed for
posting through ACE and Presort.
If you want to do this kind of PrintForm processing…
Add inserter marks and form groups.
Complete all PrintForm processes except
Choose this .pf file as a starting
point:
sample1.pf
sample2.pf
statement combining, and perform address
assignment using the
Complete all PrintForm processes, including
sample2.ace
file.
sample3.pf
statement combining; also perform address
assignment using the
presort using the
sample3.ace
sample3.pst
file and
file, and print
container labels.
Create a new job If you want to build a PrintForm job from scratch (this will require more work),
create a new job without using a sample job as a starting point. To do this, choose
File > New.
Sample jobs
33
Page 34

Execute after each task
Notice that many of the tasks in the PrintForm window are accompanied by their
own Execute button. As you set up your job (defining groups, setting up reports,
and so on), you must check your work after each task by signaling PrintForm to
execute that task. And you must execute tasks in the descending order shown in
the PrintForm window. If PrintForm cannot execute that task because of the way
that you set up the job, it will issue warning messages. In this way, you can ensure
that the way you set up the job is correct and that the job will run.
When you finish setting up the PrintForm job, and you click the Process button,
PrintForm returns to the beginning of the job and processes the job in its entirety.
But executing each process one at a time as you set up your job could be timeconsuming, particularly if your print-image file is very large. So PrintForm gives
you the option of using just a few of the input records when it checks your setup.
At the Input Processing window (see next page), choose to translate the first, say,
100 pages.
Remember to re-execute if you go back and change any part of your PrintForm
setup. We suggest that you return to the Input Processing step and re- execute
each step through the job.
34
PrintForm User’s Guide
Page 35

Select the input file
Of course, you’ll need to tell PrintForm where to find your print-image input file
so that it can get busy extracting and translating the data.
To do that, click the Input Processing button in the PrintForm window. At the
Input Processing window, choose your input file.
Map file Next, you’ll be asked to tell PrintForm where it can find the map (.map) file for
this job. The map file is a field mapping file, which stores field size and position
information for PrintForm’s extraction process.
Unless you’ve set up a PrintForm job before, you will need to create a
new file for this purpose. Click the new file icon and type a name for a
new map file. PrintForm will create the file with the base name you
supply here and give it a .map extension. Your work on the map file is complete;
PrintForm does the rest.
Select the input file
35
Page 36

Choosing a PCC file
Before you edit a .pcc file
A Printer Carriage Control (PCC) file tells PrintForm what carriage control
information it can expect to find embedded in the input print-image file. This file
contains the codes for actions such as skipping to new page or spacing two lines
and printing. PrintForm must have this information to correctly extract and merge
the address data.
Business Objects supplies PCC files for many common formats from which you
can choose. They're located in the PF directory and can be recognized by their
PCC file name extension.
The PCC files that Business Objects provides are ready for use. You might need
to customize one of these files if you process a print-image file that doesn’t quite
fit any of the “off the shelf” PCC files. That’s easy to do. Choose a PCC file that
most closely correlates with your print-image file; copy and rename it. Then, at
the Edit PCC window in PrintForm, you can change settings and supply new
information to customize the file.
Important: We strongly urge you to rename this file before changing any of
!
its settings at the Edit PCC File window. Make a copy and give it a new file
name. When we ship software updates, we always ship new copies of the PCC
files. If you don’t change the file name, your customized file will be
overwritten the next time you install PrintForm
How to choose a .pcc file
Choose a PCC file from the table shown on the next page or by using the chart on
page ASCII chart for selecting PCC files. Your choice depends on the
manufacturer or protocol of your laser-printing system.
Printer Carriage Control Files
.pcc file name Description Carriage control character
examples
ansi.pcc
asciifix.pcc
asciipcc.pcc
asciibot.pcc
asciitop.pcc
powervs.pcc
largebur.pcc
Standard ANSI carriage control for fixed-length EBCDIC
print records
Standard ANSI characters to process fixed-length ASCII
records
Variable-length ASCII records with ANSI carriage control A, P, and T
Standard ASCII files with carriage return, line feed, form
feed, and tab. For
tom of the page; for
POWER/VS, POWER/VSE, POWER/VSEI, and POWER/
VSEII files with variable-length EBCDIC records
Large Burroughs (or Unisys Series A) mainframe-generated
print files
asciibot.pcc
asciitop.pcc
, the form feed is at the bot-
, it is at the top.
1, +, space, Ø, and -
Carriage control in position 1
No fixed PCC position
Record length in positions 1 and 2; carriage control in byte 3
First six bytes contain Input Output Control Word (IOCW)
36
PrintForm User’s Guide
Page 37

.pcc file name Description Carriage control character
examples
rmsvfc.pcc
rmsvar.pcc
medbur.pcc
RMS file format for VAX and VMS Alpha (AXP) systems Carriage control in positions 3 and 4
RMS file format for VAX and VMS Alpha (AXP) systems No fixed PCC position
Medium Burroughs mainframe-generated files First four bytes contain carriage control
information
Choosing a PCC file
37
Page 38

ASCII chart for selecting PCC files
Start
Print Records are fixed or variable length
Fixed Variable
Are PCC codes present?
No Yes, First byte Yes, first byte No Yes, RMS
Nonstandard;
number of
lines per page
probably is
fixed
asciifix.pcc
asciipcc.pcc
Where are the form feeds?
Top Bottom
asciitop.pcc asciibot.pcc
First two bytes are
record length (0x87
0x00). Byte 2 and 3
are PCC bytes (0x01
0x8d). Odd length
records are terminated
by 00.
Are PCC codes present?
How do the records start?
First two bytes are
record length (0x8
0x00). Odd-length
records are
terminated by 00.
38
rmsvfc.pcc rmsvar.pcc
PrintForm User’s Guide
Page 39

EBCDIC chart for selecting PCC files
Start
Print records are fixed or variable length.
Fixed Variable
Where are the PCC files?
First byte
ansi.pcc
First four bytes;
record length = 136 bytes
medbur.pcc
Data blocked at 1,800 bytes.
Byte 0 = Hex (0E or 06)
Byte 1 = Skip count
Byte 2 = Space count
Byte 3 = Residue count
Bytes 4 and 5 = Record length
How are the records formatted
Data blocked at 2,016 bytes.
Bytes 0 and 1 = Record length
Byte 2 = General-purpose byte
Byte 3 = IBM 1403 carriage control
largebur.pcc powervs.pcc
EBCDIC chart for selecting PCC files
39
Page 40

PCC file setup
The Printer Carriage Control file, or PCC file, contains information that tells
PrintForm what carriage control and file format information it can expect to find
embedded in the print-image file.
Once you’ve chosen a PCC file, you will need to customize it by telling
PrintForm some specific characteristics of your print-image file. You’ll do that at
the Edit PCC File window.
It is very important to set the options in this window correctly to ensure that
PrintForm interprets the carriage controls in your print-image file without error.
So, over the next few pages, we’re going to take a step-by-step look at all of the
elements of this window.
Record Length When you first open this window, PrintForm will always display the default
record length for your file’s format. You can accept the default or change it if you
know that your record length is shorter or longer. If your record length is shorter,
you could save some memory by changing the value in this box from the default.
If you are processing fixed-length records, the record length you note here must
be exact.
Truncate Non-White Space
40
PrintForm User’s Guide
If the output record length cannot accommodate all of the text in a record,
PrintForm will stop processing and issue a warning. If you know that you have
extra text at the end of some records and that the text is unimportant, you can
Page 41

select this option. PrintForm will truncate the text to fit the record length and will
not issue a warning.
Font Controls in File Color Controls in File
At these two options, indicate whether there are index bytes in the file that control
the font and the color. For example, a font index byte will signal which font to
print.
Byte Offset
Indicate the position in which PrintForm can find the font or color byte by
entering the offset value. Remember that the first byte of a line is considered
offset zero.
Default Value If there are no fonts in the print-image input file, but you intend to add fonts on
output, indicate which font you want PrintForm to use in the output file when no
font is defined. The same idea applies to the color default value.
Interpret as Character This option applies to EBCDIC print-image input files.
When PrintForm translates your print-image file, it will convert EBCDIC
characters to ASCII if you select this option.
If your input-file uses a non-standard EBCDIC character set, do not select this
option. PrintForm will retain the current character value during translation.
Pad Blanks to Offset
If your output includes variable-length records and you put the font value at the
end of the record (not recommended), select this option if you want PrintForm to
pad with spaces when needed to ensure that the font value is indeed placed at the
end of the record.
Block Size Fill Character
These two options apply to systems for which records are written to disk as
blocks. Two such systems are Large Burroughs and Power VS. Indicate the block
size and the character that you want PrintForm to use when, if needed, it pads the
block.
Page Length This option applies to files that don’t have a top-of-form character, but do have a
fixed number of lines per page (usually ASCII formats). Indicate the page length
in lines so that PrintForm knows when it has reached the top of a new sheet. If
there is no top-of-form character, each page must be the same length.
If your file has a top-of-form character, set this to zero.
Movement Many file formats include a byte that contains a movement value. That value
indicates how the printer should space down the page.
For some file formats, that movement is consistent down the entire page; for
example, the printer always spaces one line at a time. For those formats, use the
Movement Length and Movement Offset options, and then click the New
Movement button.
PCC file setup
41
Page 42

For file formats in which the movement can vary as the printer progresses down a
page (spacing two lines, then spacing one line, and so on), click the New
Movement button.
At the Movement Control window, you will define which characters represent
each movement; in the example shown below, the control character 32 indicates
that the printer should space 1 line.
When you define a character in the Movement Control window and click OK,
you will see the movement listed in the Edit PCC File window. Once you have
defined all of the movement characters for this file, you can click the Default
Movement button to choose which character to use as the default whenever
PrintForm is unable to find a movement character that you defined.
Delimiters Many file formats include a byte that contains a delimiter value that indicates the
end of a line or the end of a variable-length record. Use the New Delimiter button
to set delimiter values.
42
PrintForm User’s Guide
Page 43

Headers, alignment, and trailers
In the Edit PCC File window, you’ll see an Advanced button. This is where you
can tell PrintForm whether or not your print-image file contains headers, trailers,
or an alignment page.
Directions for each of the tabs are simple; we’ll use the header tab as an example.
Indicate whether or not the file contains a header and then choose whether
PrintForm should translate the header or not (this option is not available for
alignment pages, which are used by line printers to align the forms). If you
choose not to translate the header, provide the size of the header in bytes. If you
do choose to translate the header, indicate the header size in pages.
You may also choose whether or not to strip the header from the file. You might
strip it if you know that you don’t need the file header on output; for example, if it
serves only as a beginning banner page.
PCC file setup
43
Page 44

DJDEs for Xerox printers
The last tab at this Advanced Properties window, the tab titled Other, applies only
to those of you who print using a Xerox printer.
Here, you can make global settings that are common to all Dynamic Job
Description Entry (DJDE) commands that are embedded in your input printimage file, as well as those that you embed in your output files.
First, indicate whether or not there are DJDEs in the print-image file on input.
Then type the character string (separated by commas) in decimal values to
represent the characters in the DJDE prefix.
Note: If you want the DJDE prefix to be different in your output files than
they were on input, simply set up a different PCC file for you output file,
being sure to rename it so that it differs from the input PCC file. You’ll be
asked to do this at the Output Merge step in PrintForm setup.
At the Offset option, tell PrintForm where the prefix starts.
At the Skip option, tell PrintForm the number of bytes from the offset to the end
of the prefix.
Non-DJDE printer instructions
44
PrintForm User’s Guide
If you choose to strip DJDEs from the file on input, PrintForm will use these two
values to find the prefix and remove them. If you select the Strip From File
option, PrintForm will strip DJDEs on input, but will not remove any DJDEs that
you add to statements during PrintForm setup.
Although the printer-instruction feature in PrintForm is designed specifically for
DJDEs, you could write non-DJDE printer instructions, if you want. To do so,
indicate that DJDEs are not present on input and set up no prefix here. You can
still write printer instructions for output-file printing. PrintForm will not add a
prefix.
Page 45

Chapter 4:
The statement file
The statement file contains data extracted and translated from your print-image
file. You determine which input fields are included in the file. This is the file that
is passed among PrintForm, ACE Views, and Presort Views for processing.
45
Page 46

Building the statement file
PrintForm will take the data in your print-image file and translate it into a format
that is unique to PrintForm. We call this the internal format. PrintForm’s internal
format is variable-length ASCII. Processing your records is easier for PrintForm
if the data is in this format; PrintForm does this translation automatically.
Rest assured! After all processing is complete, PrintForm will translate your data
back into the original format or into your choice of available formats.
Fields in the STM file After PrintForm translates your print-image file into the internal format, it
extracts information from each record and builds a database called the statement
file (STM). Each record in the STM file represents a statement from the printimage file.
The data in the STM file is made up of fields from three different sources:
All PrintForm fields (see “PrintForm fields in the STM file” on page 47).
Your choice of existing fields from the print-image file, particularly address
fields. You choose these fields by marking them for PrintForm at the Mark
Fields window (see “Mark statement fields” on page 49).
Any new fields that you define at the Statement Definition window (see
“Adding new fields to the statement file” on page 57). These fields can be
used to place new data that is generated by ACE and Presort. For example,
you might create a field for an optional endorsement that will be generated by
Presort.
We will help you build your statement file using the instructions shown on the
following pages.
46
PrintForm User’s Guide
Page 47

PrintForm fields in the STM file
Your STM file will always include all of the PrintForm fields. You do not need to
define them at the Statement Definition window.
PrintForm fields are added automatically to the STM file to serve as a place to
store information that you provide during job setup and data generated by ACE,
Presort, and PrintForm during processing.
For example, during job setup, you will tell PrintForm the weight of the mail
pieces. PrintForm will store the piece weight in the Ouncewt field.
You can use many of these fields later for writing filters; for example, when you
define a group or when you determine which statements receive inserts.
The table below lists and describes all PrintForm fields.
B = Binary, N = Numeric,C = Character
PrintForm field Length Type Description
BlankAdrLn 2 N Number of lines that are blank in each address
CtnBreak 1 C The container break, if posted from Presort
CustID 15 C The customer field that was marked in Mark Fields
ExactWt 12 C The exact weight of the mail piece
OunceWt 6 C The weight of the mail piece in whole ounces
PageCount 8 N The number of pages (sides of paper) printed for this statement
PkgBreak 1 C The package break, if posted from Presort
SelectFlag 12 C A binary representation of what selective inserts are used
SheetCount 8 N The number of single sheets of paper in this statement
SortSeqNo 9 N The sequence number of the sort, posted from Presort
StaticFlag 6 C A binary representation of what static inserts are used
Thickness 12 C The thickness of the mail piece in inches
UsrBreak 1 C A generic break field, if posted to
UserGrpName 20 C The name of the group, defined at the Group Setup window.
BlankPages 4 B These PrintForm fields are used internally.
These are, for the most part, binary fields and we recommend that you do not
use them when writing filters.
Also, do not post any data from ACE or Presort Views into the binary fields;
if you do, PrintForm might not process your job correctly.
CombFlag 1 C
CombNextRec 9 N
CompID 12 C
FileLocatn 8 B
FlySheets 1 N
PrintForm fields in the STM file
47
Page 48

PrintForm field Length Type Description
PagesIn 4 B
PagesOut 4 B
ReconPages 4 B
SelectID 4 B
SheetsIn 4 B
SheetsOut 4 B
StaticID 4 B
RecNumber 4 B
48
PrintForm User’s Guide
Page 49

Mark statement fields
Your first task in building the STM file is to tell PrintForm which fields from the
print-image input file to include in the STM file. That is, you need to build an
STM file that contains all of the input data that you want PrintForm to process;
data such as the:
Input address Address data that you want standardized and corrected. In the STM
User fields Data that you want available when you write filters to define
Customer field Data that you want to define as a Customer ID.
To define these fields for PrintForm, you need to show PrintForm where to find
those fields in each statement. You will do that at the Mark Fields window.
1. At the PrintForm window, click the Mark Statement Fields button. The Mark
Fields window will appear.
2. To mark fields, you will simply draw a rectangle around the data. You’ll find
step-by-step instructions for marking on the next page.
file, lines of address data will be stored as inaddr1, inaddr2, and so
on.
statement groups (see Chapter 6) and add inserts (Chapter 9).
3. At this window, you can also show PrintForm where to place the output
address, if you want it placed in a location that is different from the input
address. We’ll talk about that on page Marking the output address block.
Mark statement fields
49
Page 50

How to mark statement fields
Follow these step-by-step instructions when marking fields. Remember that you
must Execute at the Input Processing step before you can mark fields.
1. From the PrintForm window, click the Mark Statement Fields button.
2. At the Mark Fields window, the first page in your print-image file will be
displayed. If the file begins with “dummy” forms (usually used to check print
quality and alignment), skip past these until you reach the first mailable
statement (to avoid viewing these header or alignment pages at all, you can
strip them from the input file at the PCC Setup window). Use your Page
Down key to move through the file.
50
PrintForm User’s Guide
3. From the toolbar at the top of the window, click the icon that represents the
type of field that you want to mark.
When you mark the address data, you will mark the entire address area, not
field by field. For all other statement data, you will mark individual fields.
Input Address
Block
Output Address
Block
Unique Field
User Field
Search Field
Search Area
Customer Field
Grid
4. Right click at the upper-left corner of the area that you want to mark and drag
the cursor to form a rectangle around the area and release. The rectangle will
be shown in a color that differs from the background color.
Page 51

5. The properties for your marked field will pop up automatically. You can use
the options at the properties window to refine the boundaries of the area that
you marked, if you want.
6. That’s it! If you made a mistake and want to delete the rectangle and start
again, right click on the rectangle and select Delete.
Tips for marking each type of field are discussed below and on the following
pages.
Tips for marking the input address block
When you mark the input address block, be sure to mark a large enough area so
that you include all of the address data in all records. Since some records could
have larger address blocks than others, page through the file in the Mark Fields
window (by pressing the Page Down key) to ensure that the block that you mark
is large enough to surround the address data in all statements.
If you draw the rectangle too small, PrintForm may extract incomplete addresses.
When this happens, you'll notice on the ACE Job Summary that only a small
percentage of addresses were assigned. If you draw the rectangle too large,
PrintForm may extract some nonaddress data.
How to mark statement fields
51
Page 52

Marking a unique field
For jobs in which statements vary in length (a two-page statement, followed by a
three-page statement, and so on), you must mark data that appears only on the
first page of each statement or whose value is different for each customer. This is
called a unique field and PrintForm uses it to determine when it has reached the
first page of each statement.
Find unique data Your task is to locate some word, phrase, or mark that PrintForm can use to
identify the first page in each statement. You can either find something that:
appears only on the first page of each statement
or a field whose value changes for each customer
Appears only on first page For example, you might find something that appears only on each first page, such
as “Page 1” or “Page 1 of” or an inserter mark.
It is extremely important that the word, phrase, or mark that you select appears
only on first pages. If PrintForm finds your identifier on the second page of a
statement, it treats that page as a separate statement. Your presort will be invalid
and your statements may be corrupted irreparably. When you mark “Page 1,”
remember to include a space after the “1.” If you do not, PrintForm might find
“Page 1” on “Page 1
0.”
Field value changes Another example might involve a customer’s social security number. If that
number appears on each page of each statement, we could instruct PrintForm to
look for the social security number and, when that value changes, to use it as a
signal that it has reached the first page of a new statement.
Find the spot Once you have marked the unique field, the Unique Field Properties box will
automatically appear. Here, tell PrintForm exactly where to look for this data in
each statement. You can specify an exact row and column location, or ask
PrintForm to search a particular row or column, if the data floats.
Be sure to indicate whether PrintForm should look for the same data (as in our
“Page 1” example) or different data (as in our social security number example).
52
PrintForm User’s Guide
Page 53

Marking a user field
As you mark fields, you’ll want to plan ahead and mark any data that you will
want to use later if you plan to write filters for grouping, statement combining, or
inserts.
For example, if you plan to create a group of unpaid invoices, you might want to
filter on a balance or finance charge field. Be sure to include it here so that it is
available to you later as you set up the rest of this PrintForm job.
You can mark up to 20 user fields.
Examples You can use the data in Usern as you would any PrintForm field to filter or sort.
You can sort records in groups by such fields as an account number, internal mail
code, or social security number. Here are some examples:
Example 1 A hospital wants to filter based on the account balance. When the account balance
is zero, no business reply envelopes are inserted into the statement.
Example 2 A credit union wants to filter on a mail code that flags those statements that are
confidential. By channeling these statements to a separate group, you can keep
them from the mail stream and from being mailed.
Example 3 A utility company wants to presort and mail its statements, then reprocess the
print-image input file, this time sorting by account number. The new output file,
with statements sorted in account sequence, can be transferred to microfiche and
used by the utility’s customer service department to access current account
information.
How to mark a user field
To mark a user field at the Mark Fields window, click the Mark User Fields icon
on the toolbar. Then draw a rectangle around the data, just as you did when you
marked address data.
Field name The data that you select is stored in a PrintForm database field that you may
name. That field will be stored in the STM file. To assign a name:
1. Right click on the rectangle you drew around the data (this menu box will
appear automatically when you first draw the rectangle).
2. Select Properties.
3. Type a name. Be sure to use standard characters and avoid using spaces.
If you choose not to assign a name, PrintForm will give the field the default name
Usern.
Guidelines for marking filter data
To mark data, follow these guidelines. The data:
Can float; that is, it can be in a different location from record to record. You
can use a search field to help PrintForm find the data in each record. See
Chapter 6 for an example.
Can be up to 20 lines.
Must not exceed 50 characters per line.
Marking a user field
53
Page 54

Marking a search field
If you have data that floats, that is, it is located in different places from statement
to statement, you can instruct PrintForm to search for the field that contains that
data. You can then place that data in a field in the STM file so that it is available
for writing filters.
For example, suppose we want to place an insert about investment opportunities
in the envelopes of customers whose savings account contain more than $10,000.
The position of the balance data varies from statement to statement, so first we’ll
ask PrintForm to search each statement for the word “balance.”
54
We ask PrintForm to search up and down column 53, since we know that the
word “balance” always begins in that column. Since the location varies by row
from statement to statement, we ask PrintForm to begin searching in Row 1 (and
in each row thereafter) to be sure that it will always find the balance.
PrintForm User’s Guide
Page 55

Next, we’ll set up a user field in our statement file to hold the balance value that
PrintForm finds. And we’ll ask PrintForm to copy the balance from the statement
into our user field.
Finally, we’ll use our new balance field to write a filter to form a group of
customers with large savings.
Marking a search field
55
Page 56

Marking a customer ID field
As an added security measure, some users print inserter marks based on a
customer identification number. The inserter then checks to ensure that all sheets
in a statement are destined for the same customer. This is one way to detect an
error that otherwise would result in sheets from two different customers going
into the same envelope.
PrintForm can generate Customer ID-based inserter marks for the following types
of marks:
3 of 9
OCR
CodeLite
At the Mark Fields window, you can mark as a customer ID field any account
number or other number that is unique to the customer. PrintForm places the data
into the PrintForm field CustID.
For details on combining statements based on this field, see Chapter 7.
56
PrintForm User’s Guide
Page 57

Adding new fields to the statement file
You may want to define new fields in the statement file to provide a place for any
new data that is generated by ACE and Presort; data that did not exist in your
print-image file on input. You might want to use this data for determining the
criteria for selective inserting or to ensure that Presort has all the data it needs to
presort your mailing.
For example, perhaps your input file did not contain carrier-route information,
but you want ACE to generate a CART field for Presort to use to prepare a
carrier-route mailing. You need to add a CART field here to provide a place for
ACE to store the new data.
Much of the work is done
We’ve done much of the work for you. When you open the Statement Definition
window, you’ll see that we’ve already defined many of the fields that users will
typically need. If you want to delete any of these fields, simply highlight the field
name, press Enter, and press Delete.
Adding new fields to the statement file
57
Page 58
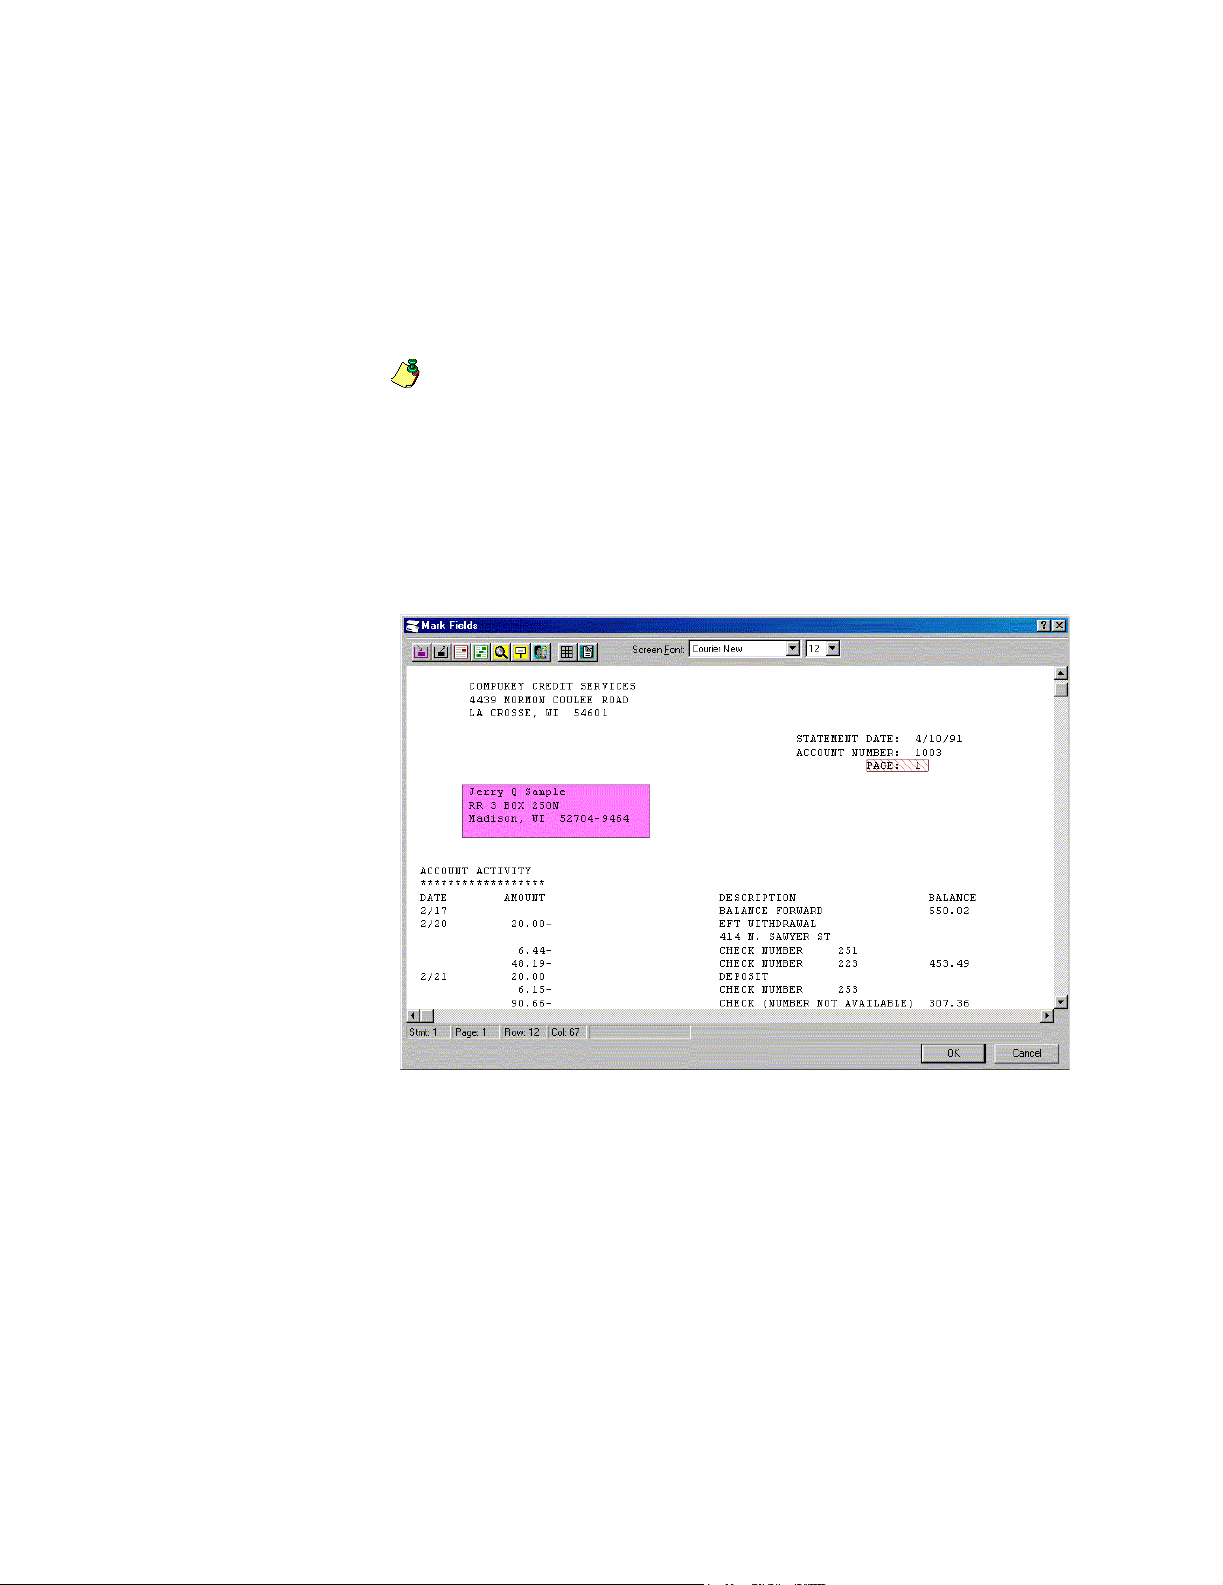
Marking the output address block
You will most likely want to print the output address in the same area as the input
address. If so, then you needn’t mark the output address block.
You’ll want to mark an output address block if:
You plan to add a lot of new information to your output address and you need
to mark a larger space than the input address allowed.
Note: Another option is to mark the input address block larger than the actual
input address data, allowing room for additional data, such as an optional
endorsement or a barcode.
You want PrintForm to print the output address in a different location from
where the input address is located.
In Chapter 8, we will talk about telling PrintForm which address components to
include in this block. For now, we’ll discuss how to mark the output address
block area.
How to mark the output address
Size should be just right
58
PrintForm User’s Guide
To mark the output address, click the Mark Output Address Block icon on the
toolbar and draw a rectangle around the area, just as you did for the input address
area. However, be sure to mark a large enough area that you are able to fit all new
data that you may plan to include, such as the barcode and endorsement line.
PrintForm will use the entire area you mark.
If you make the rectangle too small, PrintForm may not have enough room to fit
the ZIP+4, barcode, endorsement, or other components. If you draw the rectangle
too large, PrintForm may place some components either outside the area of the
envelope window or over other areas on the form.
PrintForm is most often used to mail statements that are printed and inserted into
envelopes with windows. The address block may grow by up to 75 percent
Page 59

(horizontally and vertically) if you add a barcode, an endorsement, or a manifest
keyline (if you are mailing under the USPS Manifest Mailing System). You might
need to use a larger address area on the form and a new envelope design with a
larger window.
When there is not enough room horizontally in the address block to add all the
requested packaging codes or endorsements, PrintForm omits components from
the manifest keyline, endorsement, or break mark (symbols that signal the end of
a package or container of mail). If there is not enough room to print the barcode,
PrintForm does not add one.
If there is not enough room vertically for all of the components that you have
added to the address block, PrintForm will erase components until the remaining
components fit, starting with the manifest keyline, then the endorsement, and
finally the barcode.
Create a sample mail piece
To ensure that your new, output address will fit in your envelope window, we
suggest that you create a sample mail piece.
First, place a folded sheet in the envelope. Next, remove the cellophane window,
then trace a line around the window opening. Move the statement up and down,
and side to side in the envelope to check for “slop.” If the statement has a lot of
room to move around within the envelope, you won’t be able to use the whole
window area as your address block.
Remove the statement and measure the size and position of the window rectangle
you traced. Use a special printer’s rule, which measures in lines and characters
instead of inches.
The tap test If you plan to add barcodes to your statements, you may want to conduct a “tap
test” on your sample. The USPS acceptance clerk might conduct this test on a
sample from your mailing when you submit it to the USPS. If your envelopes fail
the tap test, the USPS will refuse to accept your mailing.
Use a sample of 10 envelopes that include statements with barcodes.
Measure the space between the barcode and the top edge of the window. It
should be 1/25 inch.
Tap each mail piece on a flat surface on its bottom edge (parallel to the
address). Measure the distance again to ensure that it remains at least 1/25
inch.
Tap each mail piece on its left edge and then on its right edge. After tapping,
measure the distance between the barcode and the edge of the window. It
should measure no less than 1/8 inch.
If your sample pieces did not pass the tap test, you will need to modify your mail
piece design to ensure that the barcode is readable by USPS sorting equipment.
Marking the output address block
59
Page 60

60
PrintForm User’s Guide
Page 61

Chapter 5:
Assigning and presorting addresses
This chapter explains how to work with address-assignment and presorting
software from within PrintForm.
61
Page 62

Why assign and standardize addresses?
PrintForm, by itself, does not assign and standardize addresses. Instead, it hands
off those tasks to other software during PrintForm processing. That other
software can be powerful assignment software available from Business Objects or
from the vendor of your choice.
To make this discussion easy to follow, we’ll assume that you want to use the
ACE Views program for address assignment and correction. However, you can
follow the same procedures to link to a different vendor’s address-assignment
software product if you want.
What is address assignment?
Why do I want to do it?
ACE Views is an address assignment and standardization graphical user
interface. ACE is an abbreviation for Address Correction and Encoding.
By address assignment, we mean that ACE can supply you with a corrected,
complete, standardized form of each address, and that it can correct and add
postal codes.
For example, ACE verifies that the city, state, and ZIP Code agree with one
another, and it can add one of those components if it’s missing. It can correct a
misspelled street name, fill in missing information, and abbreviate street type.
It can also assign postal codes such as ZIP, ZIP+4, delivery-point barcode
(DPBC), carrier-route (CART), and line-of-travel (LOT) codes.
Why bother to clean and code your address data?
Statements with correct addresses have a better chance of getting to their
destination and getting there faster.
Postal codes help your mailing to qualify for postal automation discounts and
may speed delivery.
An accurate address presents a more professional statement to your
customers.
62
PrintForm User’s Guide
Page 63

Before you work with ACE or Presort Views
Before you can process addresses with ACE or Presort Views, you must perform
two tasks, one within PrintForm and one using a text editor.
Definition file First, you must set up definition (DEF) files: one for the file that you use as input
to ACE and another for Presort. The DEF file tells ACE and Presort which fields
to process.
This is an important step that you must perform with care.
!
You can use one of two methods to create a DEF file:
Use a text editor and follow the detailed instructions in our Database Prep
manual.
Or, use the DefMap utility. You can access this utility directly from ACE or
Presort Views. At the Set Input File window, click the Map button to activate
DefMap. You can rely on the DefMap online help to guide you.
If you plan to use both ACE and Presort to process your addresses, you will need
to set up a separate DEF file for each. So when you name the DEF files, be sure to
use two different file names. For example, for ACE you might use jobname_a.def
and for Presort you might use jobname_p.def.
When you set up your ACE and Presort Views jobs, at the Auxiliary Files
window, you’ll be asked to specify the name of the DEF file that you created.
Set options There is another preliminary task that you must perform before you can set up
and run an ACE, Presort, or Label Studio job. You must set file options in
PrintForm.
To set PrintForm options:
1. In the PrintForm window,
choose Tools > Options.
At the Job Setup and Job Execu-
tion options, tell PrintForm where to find the
executable files for each
program.
For example, at the Address
Assignment option in the Job
Setup Application section, indicate the location of acevws.exe (usually c:\
pw\ace\acevws.exe).
At the Address Assignment option in the Job Execution Application section,
indicate the location of pwace.exe (usually, :\pw\ace\pwace.exe).
2. While you’re in the Options window, go ahead and set these options for
Presort Views and Label Studio as well.
3. At the Default Directories option, tell PrintForm where to find the default
Work, Output, Report, and Job directories.
Before you work with ACE or Presort Views
63
Page 64

Required in ACE and Presort: Post back to the input file
When you set up your ACE or Presort job, you must choose to post the
!
processed data back to the input file. This ensures that the data generated by
ACE goes into the Statement (STM) file and continues on to further
PrintForm, and possibly Presort, processing.
You may also create output files from ACE and Presort that contain report data or
even address data for your own needs (see “ACE output files” on page 69 and
“Presort output files” on page 75), but you must place the cleaned and coded
address data from ACE and the sorted data from Presort back into the STM file.
Add no new fields When you post back to the input file in ACE and Presort, you may not add any
new fields to STM file. For example, if you decide to use ACE to add carrierroute codes to your addresses, you must have a designated carrier-route field in
the STM file ready to receive that data. That is, you should have already defined a
carrier-route field at the Statement Definition window to provide a place for ACE
to store the carrier-route data.
So, plan ahead So, you must plan ahead. When you begin to set up your PrintForm job and you
reach the Statement Definition window (by clicking on the Define Statement
Fields button in the PrintForm window), you must add any new fields that you
may need in your STM file. That is, you need to think about the new data that you
want ACE and Presort to generate for you and add in the fields to accommodate
that new data before you try to run ACE or Presort.
Default fields At the Statement Definition window, PrintForm already lists some basic fields
that we think you’ll want to include in the STM file. You may remove any that
you want. For a full discussion of defining statement fields, see
Chapter 4.
64
PrintForm User’s Guide
Page 65

Strategies for using ACE and Presort Views
ACE and Presort Views provide a wealth of features from which to choose. No
single job will require all of this functionality, but it is all available to you to pick
and choose from according to your mailing needs.
Mail classes Most PrintForm users prepare First Class and Standard (A) mailings, since most
of their jobs consist of automated letters.
You are not limited to preparing mail in just these two classes, however. If you
have purchased all modules of Presort, you have the full power of Presort at your
fingertips, you can use it to prepare a Periodicals or Standard (B) job.
Please note, however, that PrintForm is not specifically designed to prepare
Periodicals and Standard (B) types of mailings and does not fully support them.
For example, you might use Presort through PrintForm to prepare a Standard (B)
palletized mailing, but PrintForm does not support printing of pallet labels. To
prepare Periodicals and Standard (B) jobs, we suggest that you use stand-alone
Presort and DataLabel, not PrintForm.
Sample job files With your PrintForm software, we’ve included four sample ACE job files and
five Presort job files that you can use as the basis for your own job. Each sample
file is already set up to run a specific type of job; each one is described below.
Choose the sample job that most closely mirrors the goals of your mailing job,
and use ACE and Presort Views to customize it. This step saves you from setting
up the entire job from scratch.
Strategies for using ACE and Presort Views
65
Page 66

Rename it
Before editing any of the sample files, make a copy and give it a new file
!
name. When we ship software updates, we always ship new copies of the
sample files. If you don’t change the file name, your customized file will be
overwritten the next time you install PrintForm.
You’ll find the sample job files in the jobs subdirectory (c:\pw\pf\jobs).
If you want to do this kind of address assignment… Choose this .ace
file as a starting
point:
Standardize only the ZIP Code and ZIP+4.
Standardize address lines; create a Bad Address report and a
ace1.ace
ace2.ace
Standardized Address report.
Leave the input address fields untouched and post the standard-
sample2.ace
ized address to newly created address-line fields in the input
file.
Perform full standardization of the input address, including
sample3.ace
conversion to upper and lower case letters.
If you want to do this kind of presort… Choose this .pst
file as a starting
point:
First Class with carrier-route scheme; all pieces are the same
pst1.pst
weight.
Standard A
First Class; create a postage accounting file.
First Class with multiple segments for each ounce group.
pst2.pst
pst3.pst
pst4.pst
66
PrintForm User’s Guide
First Class with automation letter, regular letter, and single
piece schemes; pieces vary in weight, so the Auto Dimension
feature is used (see the
Presort User’s Guide
for details about
this feature).
sample3.pst
Page 67
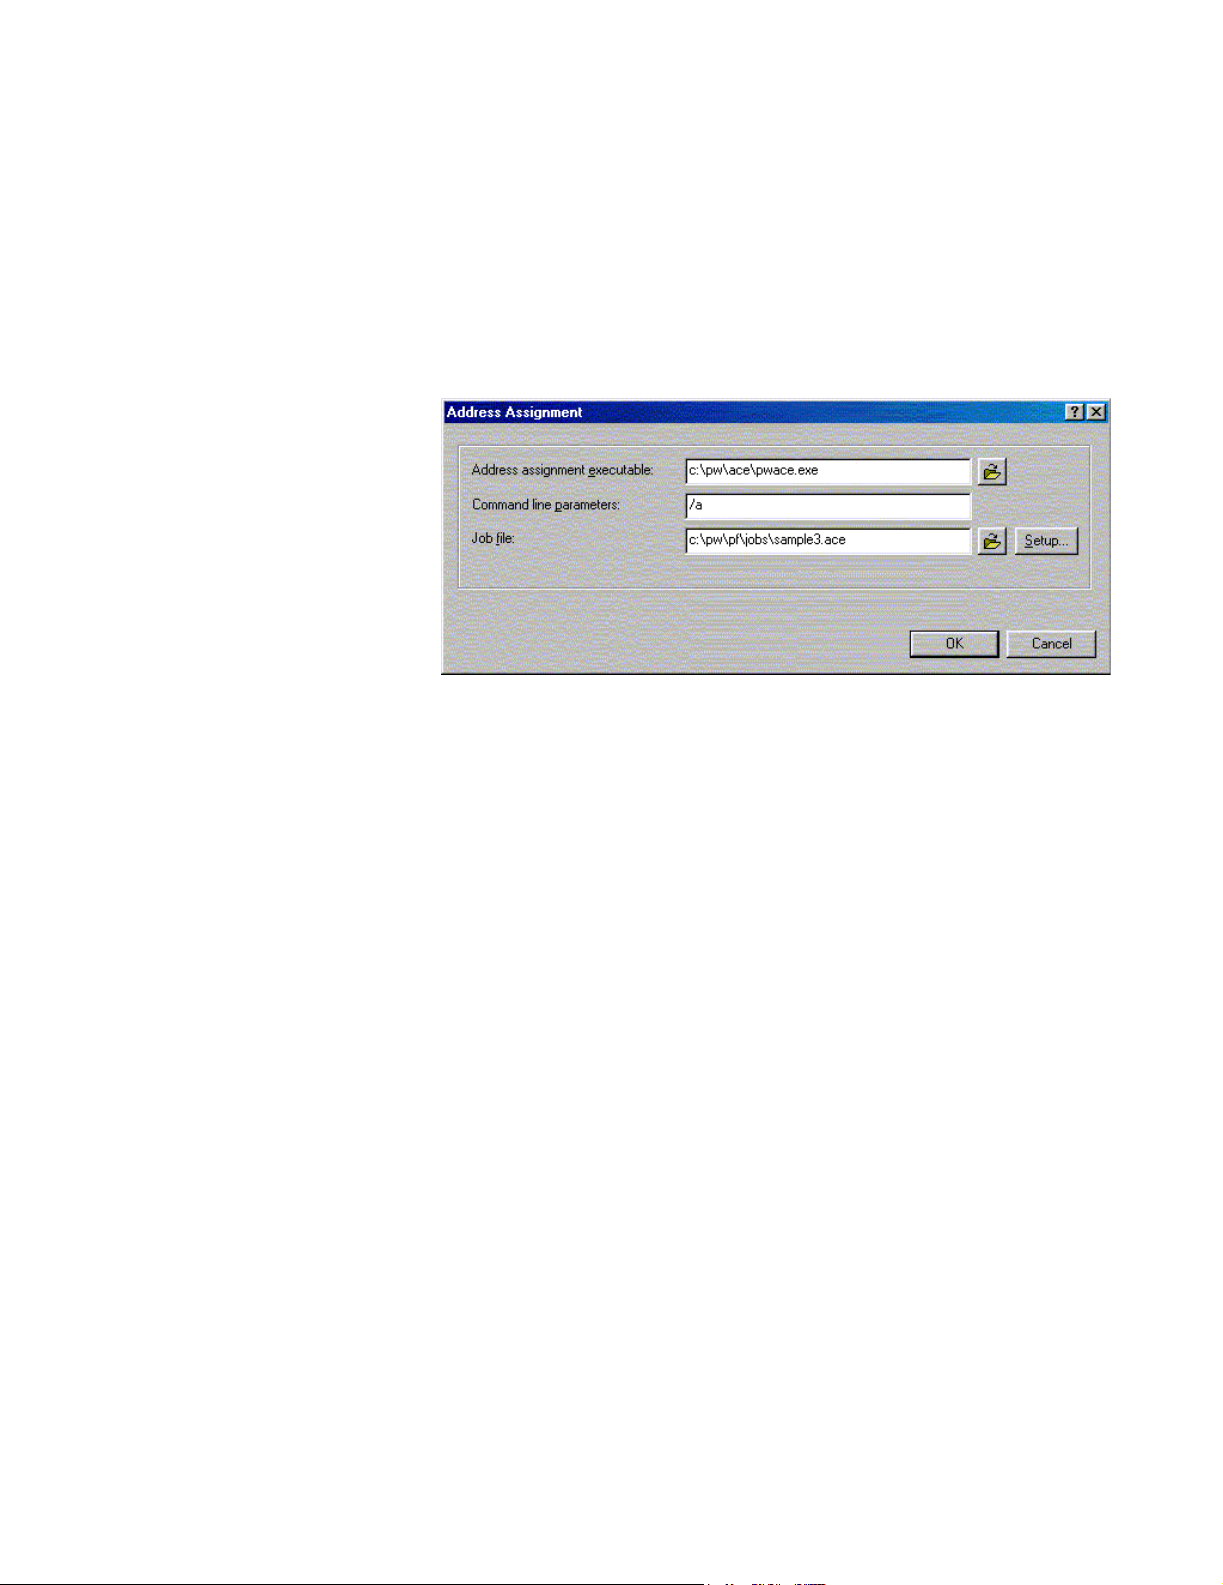
How to connect to ACE Views
As we said, PrintForm does not clean and code addresses, but it does allow you to
take a sidestep during PrintForm processing to perform those tasks with other
software.
That means that, during PrintForm processing, you need to hand off processing to
your choice of address-assignment software. It also means that you’ll need to take
a few minutes to set up the instructions that will tell that software how you want
your addresses cleaned and coded.
You can use the address-assignment software of your choice, but for purposes of
this discussion, we’ll assume that you are using ACE Views.
Begin at the PrintForm window. After marking statement fields, click the
Address Assignment window.
Choose an executable At the Address Assignment Executable box, you’ll be asked to show PrintForm
where the executable file is located for the assignment software you plan to use. If
that software is ACE, you can use the browser or type in the location of
pwace.exe (usually, c:\pw\ace\pwace.exe).
Command line parameters
If you’ve ever started a software program using a DOS command line, then you
know what we mean by command-line parameters. They’re the extra instructions
that you can type after the executable file name. They control such tasks as where
to send warning messages and what to do if the program issues a verifier error.
You can find a complete list of command-line options and descriptions can be
found in the Quick Reference Guide. Type them here just as you would on a DOS
command line, with forward slashes and spaces between commands (see example
in the window shown above).
How to connect to ACE Views
67
Page 68

Job file Next, you’ll need to type the name of the job file. A job file is a file that holds all
of the instructions that you set up using ACE Views: such choices as the way that
you want your addresses assigned and standardized, the reports that you want
ACE to generate, and so on.
When you type the job file name, follow these guidelines:
If you type: Then: ACE Views will: Then:
The name of one of our
existing sample jobs
(renamed, of course!).
The name of an existing job file that you’ve
used to run this job in
the past.
How to use ACE Along with your PrintForm software, we provide you with the ACE User’s
Click Setup. PrintForm will launch the
ACE program and you can change settings to customize the job to your
address-assignment and standardization
needs. Be sure to check the settings at
the Auxiliary Files block and change
path names as needed, and add the location and name of the DEF file that you
created.
Click OK, then click Execute. Process your addresses.
After you make any necessary changes
to the job settings and save the job, ACE
will save those instructions to the sample job file name that you type here.
Click OK,
then click
Execute
Guide. You can rely on that manual, as well as the ACE Views online help, for
specific instructions for setting up and running your ACE job.
Perform address correction after combining statements
PrintForm’s ability to reorder the processes allows you to perform address
correction after combining statements. If you choose to perform processing in this
order, you need to set up an input filter in ACE. Here is an example of a filter you
can use to produce accurate counts on you ACE reports:
db.combflag = "Y"
68
PrintForm User’s Guide
Page 69

ACE output files
Although you must post data back to the input file, as we discussed on page
Required in ACE and Presort: Post back to the input file, you may also choose to
send data to one or several output files from ACE.
Why would you want to post to output files too? You might use ACE to create
these two output files:
Bad Address fileAll addresses that ACE could not standardize
Address Change fileAll addresses that ACE did standardize
By using the Bad Address file, you can identify statements that contain
incomplete or inaccurate address information, and repair or complete them at a
later date. ACE also identifies undeliverable addresses; that is, addresses that are
assigned and are valid, but according to the USPS, delivery to these addresses is
not possible. You can identify and remove these addresses from future jobs.
The Address Change file allows you to accurately report any standardization
changes made to a particular address. You may choose to display the before-andafter standardization appearance of an address, in addition to a status code
assigned by ACE.
You can produce both of these files in report format as well, if you want.
ACE output files
69
Page 70

ACE Reports
When you set up your ACE job, we recommend that you select some of the
unique reports that ACE can generate. All available reports are listed and
described below.
Report Description
CASS Report ACE is certified by the USPS and meets the Coding
Accuracy Support System (CASS) standards for
accuracy of postal coding and address correction.
ACE can produce a facsimile of USPS Form 3553,
the CASS Summary Report. You will need this
3553 form to qualify mailings for postage discounts.
Error Report The Error Report shows you exactly which records
were assigned error codes during processing. ACE
uses these error codes to indicate why it was unable
to match the address to those in the USPS directories. By reading these codes, you might be able to
correct the data in specific records or find a pattern
of incorrect data entry.
Executive Summary This is a concise statement of the most crucial infor-
mation about your ACE job. We’ve designed it to
meet the information needs of managers and clients.
Job Summary We recommend that you produce a Job Summary
for every ACE job. It is a concise statement of your
job setup, input data, and results.
NDI Report The National Deliverability Index (NDI) is a USPS
program. It is a method of measuring and scoring
the quality of address lists performed during processing by ZIP+4 matching software such as ACE.
The result is a printed report, called the NDI Report.
The USPS uses the NDI Report to verify that the
software is capable of determining the input-record
quality.
Standardization Report This report shows which addresses were standard-
ized, offering a before-and-after view of each standardized address.
For examples of each of these reports, see the ACE User’s Guide.
70
PrintForm User’s Guide
Page 71

What is presorting and why do it?
PrintForm, by itself, does not presort addresses. Instead, it can hand off that task
to other software during PrintForm processing. That other software can be the
powerful presorting software available from Business Objects or from the vendor
of your choice.
To make this discussion easy to follow, we’ll assume that you want to use the
Presort Views program.
What is presorting? Presorting is the task of sorting mail and preparing it in containers so that it can
be transported through the postal system. It’s called “pre”sorting because you sort
the mail before you submit it to the USPS, instead of paying them to sort it.
When you run Presort, it will plan for you how packages and containers will be
formed, according to the USPS rules. Every package and container has a
destination—either a local office or a larger, central facility— and a label or mark
that identifies that destination. When it reaches its destination, the package or
container is opened and processed—perhaps for further routing, eventually for
delivery.
Why do I want to do it?
Presort helps you turn a database into a prepared mailing with labels, reports, and
USPS forms. Based on a lot of information from you—for example, piece and
container dimensions—and following USPS rules, Presort figures out how many
pieces will fit into each package, tray, sack, or pallet. When this is done, Presort:
Produces files (databases) containing the data needed to print statements and
container labels in correct USPS sequence. You can use Presort output files
as input for Label Studio or other label-printing software.
Calculates postage and produces USPS forms, including all documentation
required for mailing acceptance.
Produces reports to guide you in assembling packages and containers.
What is presorting and why do it?
71
Page 72

Before you presort: Defining the piece description
To correctly calculate the weight of each mail piece in your mailing, PrintForm
needs information about each component of your mail piece, including the:
envelope
statement sheets
static inserts (up to 6)
selective inserts (up to 12)
Size and weight Accurate size and weight information is critical, so we urge you to create a
sample for each type of component in the mail piece. Start by forming a sample of
20 empty envelopes or more, measure the thickness (in inches) of the sample and
weigh it (in ounces). Record these measurements at the Piece Description
window and let PrintForm calculate the thickness and weight of a single
envelope. You’ll then do the same for statement sheets and inserts.
You’ll enter all measurements at the Piece Description window. You can reach
this window by clicking the Piece Description button in the PrintForm window.
Static and selective inserts
You’ll notice that you can record the measurements of both static and selective
inserts. Let’s take a moment to talk about the difference between the two.
Static inserts are those that you want placed in every envelope.
Selective inserts are those that you want placed into the envelope of recipients
that meet certain criteria, perhaps based on purchase history, current balance, or
where they live.
To determine who receives a selective insert and who doesn’t, you’ll write a
filter. For instructions on setting up a selective insert, see Chapter 9.
You’ll notice that you can set up a filter for static inserts as well in the Piece
Description window. The filter you write for a static insert determines which
group or groups receive the insert. Every statement in that group or groups will
receive the insert. So the filter for static inserts affects which groups receive the
insert, while the filter you write for a selective insert affects which statements
within a group receive an insert.
Piece calculator The Piece Calculator button at the bottom of the Piece Description window serves
as a convenience. You can use the calculator to determine the weight of your mail
piece with various combinations of inserts added. You might use the calculator to
determine whether or not to add an insert; you might choose not to if doing so
will raise the weight of the mail piece to another postage rate level, for example.
72
PrintForm User’s Guide
Page 73

How to connect to Presort Views
As we said, PrintForm does not presort addresses, but it does allow you to take a
sidestep during PrintForm processing to perform t hos e t as ks w it h o th er so ftw ar e.
That means that, during PrintForm processing, you need to hand off processing to
your choice of presorting software and set up the instructions for presorting your
addresses.
Define a Presort group
When you click the Grouping and Sortation button in the PrintForm window, the
Grouping Window opens, where you can define all of the different groups into
which you want PrintForm to sort your statements.
If you want Presort to process your addresses, you must define a group (or
groups) and choose presort as the sortation type. Follow these steps at the
Grouping window:
1. Click Add.
2. Type a name for the presort group.
3. At Sortation Type, select Presort
.
Note: If you plan to presort your statements, but don’t plan to define any
other groups, you can actually choose to define no groups. Remember that
PrintForm always creates a General group. Simply set the Sortation Type for
the General group to Presort. PrintForm will place all of the statements in the
General group and presort them.
Indicate file locations In the Application box, indicate the location of the presort executable file,
presort.exe (usually, c:\pw\pst\presort.exe).
How to connect to Presort Views
73
Page 74

Job file Next, you’ll need to type the name of a job file. A job file is a file that holds all of
the instructions that you set up using Presort Views: the way that you want your
addresses presorted, the reports that you want Presort to generate, and so on.
When you type the name of a job file, follow these guidelines:
If you type: Then: Presort Views will: Then:
The name of one of
our existing sample
jobs (renamed, of
course!).
The name of an existing job file that
you’ve used to run
this job or a similar
job in the past.
Click Setup. PrintForm will launch the
Presort program and you can change settings to customize the job to your address
assignment and standardization needs.
Be sure to check the settings at the Auxiliary Files block and change path names
as needed, and type the name of the definition (DEF) file that you created.
Click OK, then click Execute. Process your addresses.
After you make any necessary changes to
the job settings and save the job, Presort
will save those instructions to the sample
job file name that you type here.
Along with your PrintForm software, we provide you with the Presort User’s
Guide. You can rely on that manual, as well as the Presort Views online help, for
detailed instructions for setting up and running your Presort Views job.
Click OK, then
click Execute.
74
PrintForm User’s Guide
Page 75

Presort output files
Although you must choose to post data back to the input file, as we discussed on
page Required in ACE and Presort: Post back to the input file, you must also
create at least one output file: the container output file.
Container output file The container output file holds information generated by Presort. It includes one
record for each tray or sack that your mailroom staff will need to prepare. You
can use the information in this file to print container labels with Label Studio.
You are required to create a container output file, even if you do not plan to
print container labels.
Postage Accounting file
In addition to creating a container output file, you might choose to send data to
other output files in Presort.
For example, you might ask Presort to create a Postage Accounting file. That file
enables you to track postage for each statement. You might use that information
to bill back postage to a particular department, for example.
Presort output files
75
Page 76

Group statement file
This new feature optimizes the functionality between PrintForm and products that
are unable to post back to the input file.
Products that can create and post to an output database file, such as our ACE
Canada and Presort Canada products, can work seamlessly with PrintForm now.
To work with these products, PrintForm creates a separate statement (STM) file
for each Presort group. Then the external assignment and sortation products can
process a single group without posting back to the input file or filtering. These
products create new output database files with a specific name for PrintForm to
combine together for processing.
How it works Let’s look at how PrintForm makes the STM file for products that don’t post back
to the input file. PrintForm creates a statement file for each defined group at the
Grouping and Sortation step. These statement files are named in this format:
jobname_groupname.stm.
Products that don’t post back to the input file read the jobname_groupname.stm
file and create a new statement file called jobname_groupname.out.stm. For
example, let’s say that you’re processing a job called utilities.pf with Presort
Canada, and you have created two groups: letters and flats. PrintForm creates two
statement files: utilities_letters.stm and utilites_flats.stm. The Presort Canada
program reads these two statement files as input. When Presort Canada finishes
processing, you have two statement files in the jobname_groupname.out.stm
format: utilities_letters.out.stm and utilites_flats.out.stm. PrintForm looks for
these .out.stm files, combines them, and renames them to the original
utilities.stm file, created at the Mark Statements step.
How to create separate STM files
Note: You can’t add any fields or change the format of any file when creating
the output file. Otherwise, the job won’t process properly.
In the Grouping and Sortation window (shown below), PrintForm offers a new
option: Create Statement (STM) File for Each Group.
If you set this new
option, PrintForm creates separate STM
files for programs that
don’t post back to the
input file.
If you select this option, PrintForm creates separate STM files for programs that
don't post back to the input file (like ACE Canada and Presort Canada). If you
don’t select this option, assignment and sortation programs (like U.S. ACE and
U.S. Presort) post back to the input file.
76
PrintForm User’s Guide
Page 77

If you use this option, you have to follow some extra steps in order to ensure that
the proper sortations are set up and processing correctly. If you don’t select this
option, then PrintForm creates a single STM file that becomes the input file for
Presort. You must have an input filter set up in Presort.
If you select this option, PrintForm looks for each Presort group to create a
separate STM file that is named PFJobFileName_GroupName.stm. When you
first set up your Presort job, this file is not there yet, because it is created during
processing. To continue with your setup of Presort you must follow these steps:
1. Name your Presort input file jobname.stm. You don't need to set up a filter.
2. After you have the Presort job file set up and verified, rename your input file
in the PFJobFileName_GroupName.stm format. In the previous example,
you would specify the input file name as utilities_letters.stm.
3. Repeat steps 1 and 2 for each Presort group.
4. Execute the Grouping and Sortation step in PrintForm.
Note: If you don't follow step 1 above, you won't be able to see all of the
options when you set up the Presort job.
Group statement file 77
Page 78

Presort output file If you are processing with a presorting product that doesn't post back to the input
file, you must have an Output File section. You should set the Select File to Copy
Format Of parameter in the Presort Views job to Yes. Make sure that you do not
add any additional fields. If you do, PrintForm will fail. The new output file name
should be in the following format: PFJobFileName_GroupName.out.stm.
How PrintForm merges
STM files
When the presorting is complete, PrintForm looks for an output file name of
PFJobFileName_GroupName.out.stm. If PrintForm finds this file, it merges
these results back into the original STM file. If it doesn't find the file, PrintForm
assumes that you posted back to the input file and used
PFJobFileName_GroupName.stm. PrintForm checks to make sure that this file
was modified by the application. If it was not modified, you receive a warning
message stating this fact.
ACE output file If you are processing with an address assignment product that doesn't post back to
the input file, such as ACE Canada, you must have a Create Output File block.
You should set Copy Format of Input to Yes, and make sure that you do not add
any additional fields. If you do, PrintForm will fail. The new output file name
should be named in the following format: PFJobFileName.out.stm.
78
PrintForm User’s Guide
Page 79

Presort reports
When you set up your Presort job, we recommend that you select some of the
unique reports that Presort can generate. All available reports are listed and
described below.
For more details and an example of each report, see the Presort User’s Guide.
Report Description
Job Summary We recommend that you generate a Job Summary report in every job. This report
gives you a synopsis of your setup, and an overview of your results. It is a quick way
to make sure that your job ran as expected.
Qualification Report You must submit the USPS Qualification Report to the USPS with every mailing.
Postage Statements
(3600, 3541, 3602, 3605, and 3608)
Mail Sort Listing We recommend that you produce a Mail Sort Listing in every job. It is very helpful
Manifest Listing The Manifest Listing is required if you prepare mixed-weight or non-identical pieces
Pallet Mixed-Zone Listing You must submit a Mixed-Zone Listing with any palletized Standard (B) Bound
Processing Center Listing The Processing Center Listing is useful especially for mailers who drop-ship to Sec-
PVDS Consolidated Postage If you drop-ship, but you are not paying for the mail at the facility where you enter it,
Register of Mailings for CPP The Register of Mailings is required when you drop-ship and you are registered for
Summary Listing The Summary Listing can help you manage and analyze your mailings. It contains
You must submit the Postage Statement to the USPS with any mailing. Choose the
correct version of the Postage Statement according to the class of mail.
in the mail prep room and at the post office because it shows how Presort has placed
mail pieces into packages and containers.
under the USPS Manifest Mailing System (MMS).
Printed Matter mailing.
tional Center Facilities (SCF) or Bulk Mail Centers (BMC).
or if you drop-ship and pay at one facility (local), you’ll need the PVDS (Plant Verified Drop Shipment) form.
Centralized Postage Payment (CPP). The report shows the number of containers,
weight, and postage for each mailing.
one line of data per entry point, per segment, per version, or per combination of version and entry point. The information on the report includes piece counts at each rate
level, total copies, total weight, and total postage.
ZIP Code Listing The ZIP Code Listing can help you find out where your mail is going. The report lists
the number of pieces at each rate level.
Presort reports
79
Page 80

80
PrintForm User’s Guide
Page 81

Chapter 6:
Defining groups
When PrintForm processes records, it places each statement into one of several
groups. Your job is to define those groups and determine the criteria upon which
each statement is judged.
This chapter explains how to define groups.
81
Page 82

Introduction to groups
If you’re like most PrintForm users, your jobs involve large mailings. For those
jobs, you want PrintForm to standardize addresses and presort statements so that
you can benefit from postage discounts.
Among the statements that you want to presort, you may want certain statements
presorted together, but not with others. For example, you may want 1-ounce
statements presorted together, and then 2-ounce statements, and so on.
In addition, in almost every job, there will be some statements that either cannot
be presorted (perhaps they lack enough address data) or that you will deliberately
choose not to presort (such as confidential statements).
Separate groups So, in almost every job, you will want to set up separate groups of statements so
that you can control which ones are presorted and which are not, and perhaps,
which ones are presorted together.
Your job, then, is to tell PrintForm what groups to form, which statements to
place into each of those groups, and how to sort them.
You can create up to 50 different groups, although most jobs will require much
fewer.
Two-step process Defining groups is a two-step process:
1. First, set up a group by determining what criteria a statement must meet to be
placed into that group.
2. Second, choose how to sort the statements within each group.
We’ll show you how in the following pages.
82
PrintForm User’s Guide
Page 83

Examples of groups
Here are some examples of different types of groups that you might want to
define. In each of these examples, you would filter on a statement file field to
determine which statement to assign to each group. We’ll discuss filters further
on the next page.
Grouping by weight Most PrintForm users mail First Class, and they set up several groups. In one
group they presort one-ounce statements, in another two-ounce statements, and so
on. The groups are submitted to the USPS as separate mailings, and Presort
generates USPS mailing statements for each mailing in the job.
If you have USPS permission to do so, you can mail pieces of varying
weights in the same mailing; that’s called Manifest Mailing. You can read
more about it in the Presort User’s Guide.
Confidentiality For confidentiality, some customers request that no statement be mailed to them.
You can siphon those statements into a separate group and keep them from being
passed to Presort for processing and mailing.
Undeliverable statements
ACE will often find some addresses that are undeliverable; that is, a postal carrier
cannot physically deliver to those addresses, such as to a vacant lot, cemetery, or
park. By directing those statements to a separate group, you avoid mailing and
paying postage on undeliverable mail.
Large statements Let’s suppose that your inserter can handle statements up to 12 pages, but no
more. You want to divert statements that are 13 pages and larger to a separate
group, and avoid processing them on your inserter.
Unqualified pieces Perhaps you anticipate that this job will contain several unqualified mail pieces.
You want to separate them into a group and keep from out of the mailstream.
Examples of groups
83
Page 84

Setting criteria with filters
To determine which statements will be placed into which group, you can use
filters. A filter determines the criteria under which a statement is tested for
inclusion in a group.
So, a filter is used to include certain records and exclude others. The results of a
filter are either true or false. True will result in including the record in processing
and false will result in excluding the record.
Filter on weight For example, to set up a group of one-ounce statements, we might write a filter
like:
db.ouncewt<1.0
And our filter to define our group of two-ounce statements would look like
this:
db.ouncewt >1.0 AND <2.0
Our results might look like this:
1-ounce group
2-ounce group
Filter on number of pages
If you do not own intelligent inserting equipment, you will likely choose to group
by page so that you can process all of the one-page statements first, then the twopagers, and so on.
If you group by page number (), your group filters might look like this:
db.pagecount = 1
db.pagecount = 2
db.pagecount = 3
db.pagecount = 4
And our results would look like this:
1-ounce group
2-ounce group
84
PrintForm User’s Guide
Page 85

Sorting statements in a group
As you define each of the groups, you can also choose how to sort the statements
within those groups. You can choose from these three sortation types:
presort
by field
none
Presort In most jobs, you’ll be using Presort Views to presort your mailing according to
USPS regulations to benefit from postage discounts. In those jobs, you will want
to define a group or groups of statements and hand them off to Presort Views for
processing.
In the Edit Group window, you would choose presort as the sortation type.
By field If you want to keep some of your statements from being presorted, you will need
to define a separate group or groups for those statements. Then, if you want to
sort those statements by some other criteria (but not presort them), you can
choose to sort by a field value.
Here are two circumstances under which you might want to control how
statements are sorted:
Sort foreign by country You may want to cull certain statements from those that are mailed; for example,
foreign or confidential statements. Then you can sort within those small groups of
statements; for example, you might sort foreign statements by a country field.
Sort by department For some jobs, you might not want to presort any statements because you don’t
plan to mail them. In this case, you can assign all statements to the general group
(simply don’t define any groups) and tell PrintForm how to sort the statements
within the general group; for example, by department, by account number, and so
on.
Sorting statements in a group
85
Page 86

None In some cases, you will not want to sort the statements in a group at all. Rather,
you want to retain the order in which the statements were found in the printimage file. That is also a sortation type option.
86
PrintForm User’s Guide
Page 87

Nonpresorted and unqualified statements
In every mailing, there will probably be some statements in a presort group or
groups that could not be presorted.
Nonpresorted These nonpresorted statements that do not “fit” into any of the presort schemes
that you select when you set up the Presort portion of this job. Since presorting is
a sifting process, and because of the way packages and containers are formed,
some pieces may not be included in any package or container.
Usually, these pieces are gathered in a final container at the tail end of the mail
stream. They won’t fall out of the group, but they will fall to the end of the mail
stream. This “catch-all” container (or containers) is entered at the local post office
at the single-piece rate.
The number of nonpresorted pieces is reported on the Presort Job Summary.
Nonpresorted pieces are not included in the postage calculations or USPS forms.
Unqualified Unqualified records are statements that cannot be included in the presort because
they are missing a ZIP Code or the ZIP is bad. For this reason, foreign records fall
into this category.
There is no point in including these pieces in the mailing. You can set up a
separate group for these pieces to keep them out of the mailstream.
For an example, see See “Group example: Unqualified pieces” on page 97..
Nonpresorted and unqualified statements
87
Page 88

General group
Regardless of how many and what types of groups you create, you will need a
group to catch all of the statements that don’t fit into any of the defined groups.
PrintForm provides a catch-all group for you automatically⎯you don’t have to
define it and you can’t turn it off. It is called the general group.
Statements fall to General Group
In a typical job that involves presorting, you can use this general group to catch
any statements that don’t fit the requirements set by your presort groups filters.
For example, suppose you are preparing a job with statements of varying weight,
but you do not have USPS permission to prepare a Manifest Mailing. You set up
two groups: one to catch the one-ounce statements and another to catch the twoounce statements.
You’re sure that these two groups will catch the majority of the statements in this
job. However, there are a few very large statements that weigh 3 ounces. The
General Group is there to catch these pieces.
For some jobs you can even use this general group in your sorting strategy. We’ll
show you how on page General group example.
88
PrintForm User’s Guide
Page 89

How to set up a group
To set up a group, begin in the PrintForm window. Click the Grouping and
Sorting button. The Grouping window will appear.
This window displays
the names of the groups
as you create them. If
you are using a sample
PrintForm job, you will
see some groups already
listed here. At the very
least, you will see that a
general group already
has been defined for you.
PrintForm automatically
creates this catch-all
group. You cannot turn it
off; however, you can
control how statements within this group are sorted (see “General group
example” on page 98 for general group strategies).
How to add a group
To add a new group, click Add. The Edit Group window appears.
If you are defining only one group, you needn’t type anything at the Filter box.
Just be sure to choose a sortation type.
However, if you are
defining multiple
groups, you will need to
write a filter to set the
criteria that PrintForm
uses to place a
statement into a
particular group. For
help writing filters, use
the Filter Builder (see
“The Filter Builder” on
page 90).
How to set up a group
89
Page 90

The Filter Builder
If you haven’t had much experience writing filters, you’ll appreciate the Filter
Builder feature. It can help you build a filter step by step.
To access the Filter Builder, click the Filter Builder icon to the right of the Filter
option at the Edit Group window. The Filter Builder window will appear.
90
At the top of this window, be sure to give the filter a name. That way, you can
easily re-use this filter in other jobs, if needed, without rewriting the entire filter.
This window provides the tools that you need to build a filter: Fields, operators,
and functions. We urge you to read the Database Prep manual for detailed
instructions and examples on how to write a filter.
You can also see filter examples in each of our group examples:
See “Group example: Confidential statements” on page 92.
See “Group example: Undeliverable addresses” on page 94.
See “Group example: Large statements” on page 95.
See “Group example: Internal mailing” on page 96.
See “Group example: Unqualified pieces” on page 97.
PrintForm User’s Guide
Page 91

Group order counts
The order in which you define the groups in a job determines the order in which
PrintForm sorts statements into groups. So be sure to define your groups in a
logical order.
For example, suppose we defined the four groups shown below (remember that
PrintForm creates the general group). We would define them in the following
order:
1. Confidential
2. Undeliverable
3. Presorted one-page statements
4. Presorted two-page statements
5. General
Using this order, PrintForm will separate the undeliverable and confidential
statements into separate groups and keep them from being presorted.
The remaining statements will be placed into groups by page count and handed to
Presort Views for processing.
Any statements that do not fit into any of these groups (for example, a three-page
statement) will fall to the general group. You cannot move the general
group⎯PrintForm will always place it in the last position.
Group order counts
91
Page 92

Group example: Confidential statements
Suppose that for confidentiality or other reasons, some customers request that no
statement be mailed to them. A common way to cull such statements out of the
mail stream is to assign to “no-mail” statements a bogus ZIP Code (ШШШШШ or
99999) and sort statements in ZIP Code order. Thus, all such statements will all
be printed together at the end of the mail stream.
However, remember that ACE will correct the ZIP Code, so it will change your
bogus ZIP Codes to the correct codes and mail the statements! To avoid that,
you can use PrintForm to “capture” the original bogus ZIP Code and place it in a
newly created statement field. You can then create a group of “no-mail”
statements by filtering on that field.
Step 1: Define a search area
Your first step is to define a search area in which PrintForm should be able to find
the ZIP data.
1. In the PrintForm window,
click Mark Statement
Fields.
2. At the Mark Fields
window, click the Search
Field toolbar button.
3. Click and drag to the size
of the search area that
PrintForm should search.
Define the entire address
area. If you know where
the ZIP should be, you
can define part of the
address area.
4. Right click the defined Search Field, select properties, and fill in the name of
the Search ID and the value that PrintForm should search for in the Search
area; in this case, “00000”.
5. Click OK.
Step 2: Define a user field
92
PrintForm User’s Guide
Next, define a user field in which to place the ZIP data.
1. Click the User
Field toolbar
button.
2. Click and drag to
the size of the
User Field (same
size as the search
value).
3. The Properties
window will
appear automatically. Fill in the field name, select Search By Search ID, and
then select the search field that you’ve defined prior to this step.
Page 93

Step 3: Filter the input to ACE
When you define your input file in the Set Input File window in ACE Views, set
up an input filter to weed out the confidential statements. You might write an
input filter like this:
Step 4: Define a confidential group
The next step is back in PrintForm, after ACE has processed your statements.
Define a confidential group by writing a filter that will create a separate group
that contains all addresses with the ШШШШШ ZIP Code.
For example:
db.confide = “00000”
For this method to work, you must be sure to define the confidential group
before you define the Presort group at the Grouping window in PrintForm.
This will ensure that the no-mail statements are separated before PrintForm
hands the remaining statements to Presort from processing.
Be sure to print a banner page before the beginning of this group, so you can
easily find these statements and remove them from those that you plan to mail.
For information on banner pages, see Chapter 8.
Group example: Confidential statements
93
Page 94

Group example: Undeliverable addresses
When ACE assigns addresses, it detects those addresses that are undeliverable.
An undeliverable address is one to which a postal carrier cannot physically
deliver mail, such as a vacant lot, condemned building, cemetery, or park.
In this example, we'll cull those pieces that the USPS has determined are
undeliverable by separating them into their own group. There is no point in
wasting postage on these pieces.
For every address, ACE places a “T” or “F” in the statement file field Match_Un
(for this example to work, you must define a Match_Un field at the Statement
Definition window).
We can define a group for these undeliverables by setting up our filter to check
the contents of the Match_Un field.
94
PrintForm User’s Guide
Page 95

Group example: Large statements
In our next example, let's suppose that our inserter equipment can accept
statements with up to seven pages. In addition, our standard envelopes are big
enough to accommodate statements up to seven pages. We want to ensure that
very large statements, those over seven pages, are separated from the rest of the
mailing. Thus, we bypass our inserter and avoid jamming the equipment.
First, we would set up two groups to separate large statements from small,
filtering on the number of pages.
Our filters might look like this:
db.pagecount <
db.pagecount >7
When we set up our Presort jobs to process these groups, we would use input
filters to ensure that only one group at a time is presorted. For example, when we
set up our Presort job to process our large statements, we might write an input
filter that looks like this:
db.usergrpname= “Large statements”
And when we set up our Presort job to process our small statements, we might
write an input filter that looks like this:
db.usergrpname= “Small statements”
Then we set up separate output files for each group, sending our small statements
through our inserter and preparing our large statements manually.
7
Group example: Large statements
95
Page 96

Group example: Internal mailing
If you don’t intend to mail the pieces in a job, but you do need to sort them, you
can set up a group for those pieces and choose a field on which to sort them.
For example, suppose your company needs to distribute 401k statements to all
employees except those who have been with the company for less than a year.
Rather than mail these statements, the company plans to distribute them through
the company mail room along with all other incoming mail.
In this example, we would set up a group that will filter on a start-date field.
You also want to sort the statements by department. Here is what you’d do:
96
PrintForm User’s Guide
Page 97

Group example: Unqualified pieces
Unqualified records are statements that cannot be included in the presort because
they are missing a ZIP Code or the ZIP is bad. Statements destined to foreign
countries fall into this category.
There is no point in including these pieces in the mailing. Instead, you can set up
a separate group for these pieces to keep them out of the mailstream and to have
them available in case you want to determine why they are unqualified.
There are several ways that you might do that:
Post db.foreign from ACE to a foreign field that you defined at the
Statement Definition window, and set up a group based on whether or not
this field contains an “F”.
Or set up a filter to determine whether or not db.zip is empty.
Or set up a filter to determine whether or not ap.match_5 contains an “F”.
In each of these examples, be sure to define the field in your statement file so that
ACE has a field in which to post the data. For example, be sure to set up a foreign
field in your STM file if you want to post ap.foreign from ACE.
Group example: Unqualified pieces
97
Page 98

General group example
For some jobs, you may not need to define any groups at all. For example,
perhaps you want to preserve the order of the records in the input file. You want
every statement in the input file to be distributed and you don’t want the
statements to be sorted in any way.
In this case, you needn’t define any groups at all. You can let PrintForm place all
statements in the general group⎯the one group that PrintForm creates
automatically⎯and then choose not to sort the statements in that group.
Presort all statements You also needn’t form any groups if:
You want to presort all of the statements in the print-image file, if you don’t
intend to filter out any statements first.
All of the statements fall into the same weight class or, if they differ in
weight, you have USPS permission to prepare a Manifest Mailing.
In this case, you would let PrintForm place all statements into the general group
and choose presort as the sortation type.
98
PrintForm User’s Guide
Page 99

Subgroup count reporting
In addition to sorting by groups, you can count by subgroups when the sortation
type is Presort.
When you specify a subgroup for a group, you can see the subgroup count
reflected on PrintForm's Grouping report and on banner pages.
You specify a subgroup when you add or edit a Presort group via the Edit Group
window (see below). This window includes the Sub-Group Count Field box
where you can choose from all the fields previously defined in your Statement
(.stm) file.
Note: Your subgroup field doesn't have to be a Presort-related field. To
choose a field not currently listed, you have to add data to a new STM field
that you define. You can add data to the STM file via address correction/
Presort software.
Specify a subgroup: 1. Access the Edit Group window, shown below.
2. For Sortation Type, choose PRESORT. This enables all the fields in the
Presort box.
3. Enter the appropriate Presort information. (For more information about a
specific Presort item in the window, use PrintForm’s context-sensitive help.)
4. From the Sub-Group Count Field drop-down list, select the STM field that
you want.
Subgroup count reporting 99
Page 100

100
PrintForm User’s Guide
 Loading...