

Page 1

Presort User's Guide for 8.00c.06.00
release, December 2010
Presort 8.00c.06.00
Page 2

Copyright
© 2010 SAP AG. All rights reserved.SAP, R/3, SAP NetWeaver, Duet, PartnerEdge,
ByDesign, SAP Business ByDesign, and other SAP products and services
mentioned herein as well as their respective logos are trademarks or registered
trademarks of SAP AG in Germany and other countries. Business Objects and the
Business Objects logo, BusinessObjects, Crystal Reports, Crystal Decisions, Web
Intelligence, Xcelsius, and other Business Objects products and services mentioned
herein as well as their respective logos are trademarks or registered trademarks
of Business Objects S.A. in the United States and in other countries. Business
Objects is an SAP company.All other product and service names mentioned are
the trademarks of their respective companies. Data contained in this document
serves informational purposes only. National product specifications may vary.These
materials are subject to change without notice. These materials are provided by
SAP AG and its affiliated companies ("SAP Group") for informational purposes
only, without representation or warranty of any kind, and SAP Group shall not be
liable for errors or omissions with respect to the materials. The only warranties for
SAP Group products and services are those that are set forth in the express
warranty statements accompanying such products and services, if any. Nothing
herein should be construed as constituting an additional warranty.
2010-11-08
Page 3

Contents
Introduction to Presort 17Chapter 1
The software automates the presorting process.......................................18
Members of the Presort family...................................................................19
Overview of features..................................................................................22
Contacting Technical Customer Assurance...............................................23
Presort for beginners 27Chapter 2
Eight key tasks in any job..........................................................................28
Tips on sequence of job-file sections.........................................................30
Using the Views wizard..............................................................................32
Selecting your schemes and reports.........................................................32
Setting up your mailing list and input files.................................................33
Setting up your mail piece: Version Description........................................34
Setting up your post office: Entry Point Description...................................38
Setting up your postage and forms: Mailing Information...........................38
Setting up your mailing labels: Output File ...............................................39
Presort Job...........................................................................................19
Presort Views.......................................................................................20
Presort for PrintForm............................................................................21
Presort RAPID......................................................................................21
Tips for setting up your definition (DEF) file.........................................31
Tips for setting up reports.....................................................................31
Tip for nonprofit mailers........................................................................32
Processing categories..........................................................................35
Packages and containers are too big or small.....................................36
Automation compatibility......................................................................37
Presort User's Guide for 8.00c.06.00 release, December 2010 3
Page 4

Contents
Available output data............................................................................40
Set up your output files.........................................................................40
Auxiliary files..............................................................................................41
Mail direction data................................................................................42
Download directories............................................................................43
How to verify that your job is ready...........................................................44
Verification messages..........................................................................44
Batch verifier........................................................................................45
Tips for running your job ...........................................................................45
From the USPS: Ten common mistakes and how to avoid them..............46
Schemes and sort levels 49Chapter 3
Introduction to schemes ............................................................................50
How presort schemes work.......................................................................53
The software can help you select and arrange schemes..........................55
Set up schemes....................................................................................56
Scheme priorities..................................................................................56
Scheme options and settings....................................................................57
Optional sort levels....................................................................................58
Carrier-route trays and sacks...............................................................58
5-digit scheme containers ...................................................................59
Automation-compatible letters without barcodes.................................60
Schemes sift out some records.................................................................60
Mailing leftover pieces at single-piece rate (or preventing it)....................62
Prevent single-piece-rate pieces..........................................................63
Prepare single-piece-rate pieces.........................................................64
Standard Mail regular-rate pieces........................................................64
Single-piece price for Standard Mail and First-Class ..........................64
Protecting pallets.......................................................................................66
SCF protection.....................................................................................66
NDC protection.....................................................................................68
4 Presort User's Guide for 8.00c.06.00 release, December 2010
Page 5

Contents
How schemes affect reports and output files.............................................69
Options for output files.........................................................................69
Assembling pieces, packages, containers, and pallets 71Chapter 4
Packages ..................................................................................................72
Package size limits...............................................................................72
Periodicals and Standard Mail flats package size................................73
Options for weekly and daily periodicals..............................................74
Packages that exceed the maximum height........................................74
Spanned (split) packages.....................................................................75
Stacking uneven pieces.......................................................................76
Minimum STD flats 5DG/5DG scheme package size..........................76
If you save work files............................................................................77
Co-Packaging: Automation and regular flats.............................................78
Setting up co-packages........................................................................78
One package per destination...............................................................78
Co-packaging rates..............................................................................79
Create 5-digit scheme (L007) packages..............................................79
Co-sacking BPM flats................................................................................80
Letter trays.................................................................................................80
Tray preparation...................................................................................81
Size limits.............................................................................................81
Overflow and reduced overflow trays...................................................82
STD flats in letter trays.........................................................................83
Periodicals letter trays on pallets .........................................................85
Flat trays....................................................................................................87
Filling trays...........................................................................................88
Stacks...................................................................................................88
Packages..............................................................................................89
Selvage......................................................................................................89
Is your piece a flat or a parcel?.................................................................90
Presort User's Guide for 8.00c.06.00 release, December 2010 5
Page 6

Contents
Flats dimensions..................................................................................91
Testing the flexibility and droop of your flat-sized mail piece...............91
Standard Mail parcels - not flat-machinable (NFM)...................................93
NFM rate information............................................................................94
Using the MailDirShow utility with NFMs..............................................94
Sacks.........................................................................................................95
Size limits for sacks..............................................................................95
Periodicals origin split...........................................................................96
Palletization...............................................................................................97
Pallet size limits....................................................................................98
How the software applies your pallet limits..........................................99
Adjust your pallet limits.......................................................................100
Packages and containers on pallets........................................................100
Prepare packages and containers on pallets.....................................101
Packages on pallets...........................................................................102
Trays on pallets..................................................................................103
Sacks on pallets.................................................................................105
"Fletters"..................................................................................................106
Combination of rates on pallets..........................................................106
Process Standard Mail fletters jobs as flats.......................................107
Process Periodicals fletter-sized mail as flats....................................108
Reaching beyond USPS regulations: Optional Procedures....................109
Leveling...................................................................................................110
CONFIRM................................................................................................111
Multiple versions, editions, or rate categories 113Chapter 5
Multiple versions or editions....................................................................114
Custom assembly...............................................................................115
Ways to set up multiple versions or editions......................................116
Create links between input records and a Version Description..........116
Separately describe each version...........................................................117
6 Presort User's Guide for 8.00c.06.00 release, December 2010
Page 7

Contents
Use Version Defaults and Version Description blocks.......................117
Use a "version code" field..................................................................118
Link each description to a field value.................................................118
Automatic, physically identical versions..................................................119
Link each description to a field value.................................................120
Auto versions based on each record's dimensions ................................121
Set up your job for Auto Dimension...................................................122
A "Version ID" field is optional for Auto Dimension............................122
Automatic version by advertising percentage for Periodicals mailings.123
Automatic version by dimension for a First-Class mailing..................123
Automatic version by advertising percentage....................................124
Version ID field is optional for Auto Dimension..................................125
Repositionable Notes (RPNs)..................................................................125
Rules and procedures for RPNs........................................................126
RPN information in postage statements.............................................126
Bindery sets: Mingling selected versions.................................................126
Important information to consider with bindery sets...........................128
Non-selective binderies: How to prevent mingling...................................129
Use bindery sets to prevent mingling.................................................129
Split output by version........................................................................130
Print pieces together by version.........................................................130
Ride-along enclosures.............................................................................132
Eligibility for ride-along enclosures.....................................................132
Ride-along enclosure dimensions can exceed host piece.................133
Auto dimension and ride-along enclosures.............................................133
Multi-version ride-along enclosures.........................................................134
Mailing with or without ride-along enclosure......................................134
Set up a multi-version ride-along job..................................................135
Reporting ride-alongs.........................................................................136
How versions affect reports and output files............................................136
Multiple rate categories............................................................................137
Presort User's Guide for 8.00c.06.00 release, December 2010 7
Page 8

Contents
Periodicals..........................................................................................137
Standard Mail.....................................................................................138
Multiple entry points 141Chapter 6
Introduction to multiple entry points.........................................................142
Every USPS facility serves a territory.................................................143
Our ZIP ranges are conservative.......................................................143
Entry point sequence is critical...........................................................144
The 24/50 rule for Standard Mail........................................................144
Manual drop-ship planning......................................................................144
Processing Center Listing..................................................................145
ZIPCount............................................................................................146
Setting up SCF, ADC, and NDC entry points...........................................146
The Maildirshow utility.............................................................................148
Maildirshow values.............................................................................148
Create drop-ship discount entry points..............................................150
Determine if an entry point is worthwhile.................................................150
Improve delivery time.........................................................................151
Multiple mailings.................................................................................152
Essential points of setting up entry points...............................................152
How the software assigns mail pieces to entry points.............................153
Two or three entries at the same place..............................................154
How to limit a mailing by ZIP..............................................................155
Last Entry Point.......................................................................................155
Use coded fields to indicate entry points.................................................156
Eligibility for discounts.............................................................................157
DSCF, DADC, and DNDC discounts.......................................................159
DDU discounts.........................................................................................160
Automatic DDU versus setting ZIP ranges.........................................161
Link schemes to entry points...................................................................161
Manually linking schemes to entry points...........................................162
8 Presort User's Guide for 8.00c.06.00 release, December 2010
Page 9

Contents
How multiple entry points affect reports and output files.........................163
Use output fields to identify entry points............................................164
Mixed-class co-mail 167Chapter 7
Introduction to Mixed-class co-mail.........................................................168
Mixed-class co-mail mailing minimums..............................................168
Mixed-class co-mail sortation and other rules....................................169
Mixed-class co-mail bundle and container charges...........................169
Setting up a Mixed-class co-mail job.......................................................170
Creating mixed ADC packages at the Mixed ADC pallet level...........171
Merging under DMM 705.13...............................................................172
Mixed-class co-mail schemes..................................................................172
Mixed-class co-mail reports.....................................................................173
Segmenting 175Chapter 8
Introduction to segmenting......................................................................176
Prevent mingling of versions..............................................................176
Pseudo entry points............................................................................177
Stagger your mailing..........................................................................177
Several "jobs" per job.........................................................................178
Separate mailings and reports...........................................................178
Think before segmenting.........................................................................178
Automatic segmenting.............................................................................179
Manually describing each segment.........................................................181
How segments affect output files.............................................................182
Output field to use when segmenting.................................................183
Firm packaging and multi-piece parcels 185Chapter 9
Periodicals firm packages........................................................................186
Forming firm packages using the matching method ...............................187
Presort User's Guide for 8.00c.06.00 release, December 2010 9
Page 10

Contents
Forming firm packages using the copies method....................................189
Preparing of firm packages and multi-piece parcels................................190
Bundling Periodicals nonautomated pieces.............................................196
Setting up Standard Mail multi-piece parcels..........................................197
Split output by scheme.......................................................................199
Output selection method....................................................................199
Set up input posting............................................................................200
Single piece preparation for BPM multi-piece parcels ............................200
Carrier-sequence mailing: LOT and walk sequence 203Chapter 10
Line-of-travel (LOT) sequencing..............................................................205
Prepare your mailing list for LOT processing.....................................205
LOT field example..............................................................................206
Introduction to walk-sequenced mailing..................................................208
The Computerized Delivery Sequence file (CDS) and your mailing
lists.....................................................................................................209
How the software handles walk-sequenced mailing................................210
Qualify for residential saturation rates................................................211
Walk-sequence processing................................................................211
DPBC required for ECR walk-sequence letters.......................................213
Non-automation-compatible mail.......................................................213
Using the ECR Reg Flat Rates parameter.........................................213
Letter tray labels.................................................................................214
Standard Mail letter walk sequencing......................................................215
Tips for setting up STD Letter walk sequencing.................................216
Mix simplified mail with non-simplified mail.............................................217
Preparation requirements...................................................................218
Required fields...................................................................................219
Mixing simplified and non-simplified mail in a walk sequenced
mailing................................................................................................219
Setting a separate walk sequence setting for simplified mail only.....220
10 Presort User's Guide for 8.00c.06.00 release, December 2010
Page 11

Contents
Populating AP fields for simplified mail..............................................221
Flats Sequencing System (FSS) 223Chapter 11
FSS labeling lists.....................................................................................224
Rules and regulations..............................................................................224
FSS packages (bundles)....................................................................225
FSS pallets.........................................................................................226
FSS prices...............................................................................................227
FSS reports..............................................................................................227
Intelligent Mail® barcode support 229Chapter 12
IM barcode makeup.................................................................................230
Types of IM barcodes..............................................................................231
IM discounts.............................................................................................234
Creating Intelligent Mail barcodes...........................................................237
IM barcode input fields.............................................................................238
Verifying the uniqueness of mailer IDs and serial numbers that are read
from an input file.................................................................................239
Retrieving field values from the job-file block when an input field is
empty..................................................................................................239
Automatically creating versions in auto-dimension jobs.....................239
Auto dimension jobs using IM barcode input fields............................240
IM barcode output fields..........................................................................240
IM barcode service types.........................................................................242
Mixing service types in the same mailing...........................................244
Mixing service types in the same version...........................................244
Mailer IDs.................................................................................................246
Using the mailer ID (MID) of the mail owner......................................246
Using multiple mailer IDs within a single version...............................247
Using MIDs and CRIDs in the Mail.dat...............................................248
Service type identifiers.............................................................................249
Presort User's Guide for 8.00c.06.00 release, December 2010 11
Page 12

Contents
Automation vs. non-automation mail pieces......................................250
Periodicals non-subscriber copies.....................................................250
Converting service type IDs for mail that's not eligible for free ACS...250
IM barcode serial numbers......................................................................251
Serial numbers and non-automation pieces.......................................252
Using static serial numbers for IM Tray/Sack labels..........................252
Serial numbers for mailings with fewer than 10,000 copies...............252
Using different starting serial numbers...............................................253
Firming and serial numbers for Piece barcodes......................................254
Introduction to reports 257Chapter 13
The software creates reports for each mailing........................................258
Figuring out the total number of mailings in a job..............................259
Required reports......................................................................................260
Report file set up......................................................................................264
Organize your report files...................................................................265
Report formats.........................................................................................266
Banner pages.....................................................................................267
Printer controlled report formats.........................................................267
Smooth report lines............................................................................268
Printable area for reports....................................................................268
On-Demand Reporting.............................................................................269
Set a range for On-Demand Reporting..............................................270
Choose which pieces to show on your reports...................................270
Avoid overwriting report files..............................................................271
USPS forms to submit with mailings 273Chapter 14
Introduction to Postage Statements........................................................274
Options for report scope.....................................................................274
USPS Qualification Report......................................................................275
12 Presort User's Guide for 8.00c.06.00 release, December 2010
Page 13

Contents
USPS Postage Statement Form 3600 for First-Class mailings...............276
USPS Postage Statement Form 3541 for Periodicals mailings...............277
USPS Postage Statement Form 3602 for Standard mailings..................277
USPS Postage Statement Form 3605 for Package Services..................278
USPS Pallet Mixed-Zone Listing for Package Services..........................278
USPS Manifest Listing for First-Class and Standard Mail.......................279
PVDS Consolidated Postage Statement Register for Standard Mail......279
USPS Drop Shipment Document Form 8125..........................................280
USPS Consolidated Postage Statement for CPP....................................281
USPS Register of Mailings for CPP.........................................................281
ZIP Code Listing in "USPS" format..........................................................282
CONFIRM Advanced Shipping Notice.....................................................282
PS Form 8125....................................................................................283
Reports for your own mail management 285Chapter 15
Job Summary...........................................................................................288
Mail Sort Listing.......................................................................................289
ZIP Code Listing......................................................................................290
Processing Center Listing........................................................................290
Summary Listing......................................................................................291
Mail.dat....................................................................................................291
IDEAlliance.........................................................................................292
PostalOne!..........................................................................................292
Mail.dat files provided by SAP BusinessObjects................................292
PostalOne!-required fields..................................................................294
FAST-required fields...........................................................................298
IMR or PDR?......................................................................................299
One segment per Mail.dat..................................................................299
Tracking multiple Mail.dat file sets.....................................................300
Defining your own version descriptions..............................................301
Identifying the mail owner by CRID....................................................302
Presort User's Guide for 8.00c.06.00 release, December 2010 13
Page 14

Contents
CONFIRM participants.......................................................................302
The seed file.......................................................................................302
Split output.........................................................................................303
File masking.......................................................................................303
Handling foreign records 305Chapter 16
Input country field for foreign records......................................................306
Options for handling foreign records in output files.................................307
Separate foreign output file................................................................307
Additional sorting on foreign pieces...................................................307
How foreign records are sorted..........................................................308
How to create and manipulate output files 309Chapter 17
Introduction to output files........................................................................310
Package output file.............................................................................310
Container output file...........................................................................311
Pallet output file..................................................................................311
Setting up output files..............................................................................311
Output file templates..........................................................................312
Output file sequence .........................................................................313
Introduction to Mailflow............................................................................314
Using Mailflow to change the sequence of mailings..........................315
Using Mailflow to change sequence within each mailing ..................316
Alternate mailstream hierarchy................................................................318
Output selection.......................................................................................319
Output selection by segment..............................................................320
Output selection by entry point...........................................................320
Split output...............................................................................................321
Split output example...........................................................................321
Naming your split output files.............................................................322
14 Presort User's Guide for 8.00c.06.00 release, December 2010
Page 15

Contents
Concatenating files.............................................................................322
Zoneshow 325Chapter 18
Using ZoneShow.....................................................................................326
ZIPCount 8.00c.06.00 329Chapter 19
General block...........................................................................................330
Auxiliary Files block.................................................................................333
Input File block.........................................................................................334
Report block.............................................................................................335
Command line options.............................................................................338
Command line vs. job file...................................................................338
Messages during verification and processing..........................................339
Correcting errors................................................................................339
Processing messages........................................................................339
Reports generated without the mpc.dir file..............................................339
Reports generated with the mpc.dir and maildirect.dir files.....................340
Index 343
Presort User's Guide for 8.00c.06.00 release, December 2010 15
Page 16

Contents
16 Presort User's Guide for 8.00c.06.00 release, December 2010
Page 17

Introduction to Presort
1
Page 18

Introduction to Presort
1
The software automates the presorting process
Presorting is the task of sorting mail and preparing it in containers so that it
can be transported through the postal system. It's called presorting because
you sort the mail before you submit it to the USPS, instead of paying them
to sort it.
A presort scheme is a set of U.S. Postal Service (USPS) rules for presorting.
There are several schemes for each class of mail and type of mail piece.
Each scheme is linked with a particular type of container (trays, sacks, or
pallets) and a range of postage rates.
When you run the software, it plans for you how packages and containers
will be formed, according to the USPS scheme rules. Every package and
container has a destination—either a local office or a larger, central
facility—and a label or mark that identifies that destination. When it reaches
its destination, the package or container is opened and processed—perhaps
for further routing, eventually for delivery.
The software automates the presorting
process
Think of Postalsoft Presort as a system that helps you turn a database into
a prepared mailing with labels, reports, and USPS forms.
Based on information from you—for example, piece and container
dimensions—and USPS rules, the software figures out how many pieces fit
into each package, tray, sack, or pallet. When this is done, the software does
the following:
• Produces output files (databases) containing the data needed to print
address and container labels in correct USPS sequence. You can use
output files as input for Label Studio or other label-printing software.
• Calculates postage and produces USPS forms, including documentation
for mailing acceptance. If your job involves more than one documented
mailing, the software automatically prepares separate forms for each
mailing.
• Produces reports to guide you in assembling packages and containers.
The software carries out many USPS rules automatically. And when it's not
fully automatic, the software still helps you comply with USPS rules.
18 Presort User's Guide for 8.00c.06.00 release, December 2010
Page 19

Members of the Presort family
This guide covers four different programs. Your company may own only one
of these:
• Presort Job
• Presort Views
• PrintForm Presort
• RAPID Presort
We provide details of each program on the following pages. We're covering
them all here in one guide because they have so much in common.
This section explains a little about each program. When we use the simple
name "Presort," it means that the feature we're discussing applies to all
products in the Presort family.
Related Topics
• Overview of features
Introduction to Presort
Members of the Presort family
1
Presort Job
Postalsoft Presort (Presort) is a program for processing database files. It
takes input records from up to 255 input databases. You can send Presort
output to another database or split it among several output databases.
Postalsoft Presort also produces statistical reports and postal forms.
Presort is batch job-oriented software. It does not directly support the task
of job setup. It is strictly for job processing.
To set up a job, you use a text editor or word-processing program. You put
your instructions and information into a text file called a job file. Here's an
excerpt:
BEGIN Execution ========================================
Presort (Y/N)........................ = y
+ Name Optimizer (Y/N)............... = n
1C/STD Ltr Postage Optimization (Y/N) = n
+ USPS Optional Procedures (Y/N)..... = n
+ Sequence Output by Mailflow (Y/N).. = n
Participate in USPS CONFIRM Prog(Y/N) = n
IMB Intelligent Mail Barcode (Y/N)... = n
Presort User's Guide for 8.00c.06.00 release, December 2010 19
Page 20

Introduction to Presort
1
Members of the Presort family
Create Presort Reports (Y/N)......... = y
+ On-Demand Reporting (Y/N).......... = n
Create Address Output File (Y/N)..... = n
Create Package Output File (Y/N)..... = n
Create Container Output File (Y/N)... = n
Create Pallet Output File (Y/N)...... = n
+ Post to Input File (Y/N)........... = n
Warn Before File Overwrite (Y/N)..... = y
Show Detailed Process Messages (Y/N). = y
Save Work Files (Y/N)................ = y
Work File Directory (path)........... =
END
When your job file is ready, start the software. On most computers you type
a command line; on Windows systems, you may type a command line or
simply double-click on the program icon.
When the software starts, it verifies the entries in your job file. If there is any
error, the program reports and stops. You edit your job file, fix the problem,
and start the software again.
When you finish verification, the software begins processing your job. During
processing, the software displays progress messages on your screen. (It is
often possible, and preferable, to direct these messages into a log file.)
Related Topics
• Tips on sequence of job-file sections
• How to verify that your job is ready
• Tips for running your job
Presort Views
Presort Views (Views) is a program for processing database files. In a way,
Views is built on top of Presort, just as your house sits on its foundation. With
Views you have these additional features:
• Views presents easy-to-use, graphical screens (see below) with menus,
wizards, toolbars, and online help. These guides and tools save time and
prevent setup errors, especially for new users. When it's time to process
your job, you simply select a command from a menu.
• Views can set up some parts of your job automatically. And it verifies your
job setup as you go, so it catches and corrects most errors more quickly.
20 Presort User's Guide for 8.00c.06.00 release, December 2010
Page 21

Many users perform job setup and processing on the same computer. It is
also possible to use Views for job setup on one computer and then process
on another, perhaps more powerful, computer.
Note:
Remote procedure may require a special license from SAP BusinessObjects
and may also require some third-party software. Also, the remote procedure
does not support running jobs within Views. For more information, see Views
Quick Start Guide.
Related Topics
• Using the Views wizard
Presort for PrintForm
PrintForm Presort is a program for processing print-image files. It is part of
the PrintForm Mailing System, an integrated set of programs that bring postal
automation and discounts to forms, statements, and other documents
produced on high-speed laser printing and inserting systems.
Introduction to Presort
Members of the Presort family
1
PrintForm Presort offers an appropriate subset of the features of Postalsoft
Presort.
Related Topics
• Overview of features
Presort RAPID
Rapid Application Integration Deployment (RAPID) Presort is a tool for
programmers. Programmers can use RAPID to build Presort features into
their own program.
RAPID Presort is a C++ and an ActiveX™ control interface. RAPID users
have tremendous flexibility, but they must provide their own support for
database and terminal input and output.
Related Topics
• Overview of features
Presort User's Guide for 8.00c.06.00 release, December 2010 21
Page 22

Introduction to Presort
1
Overview of features
Overview of features
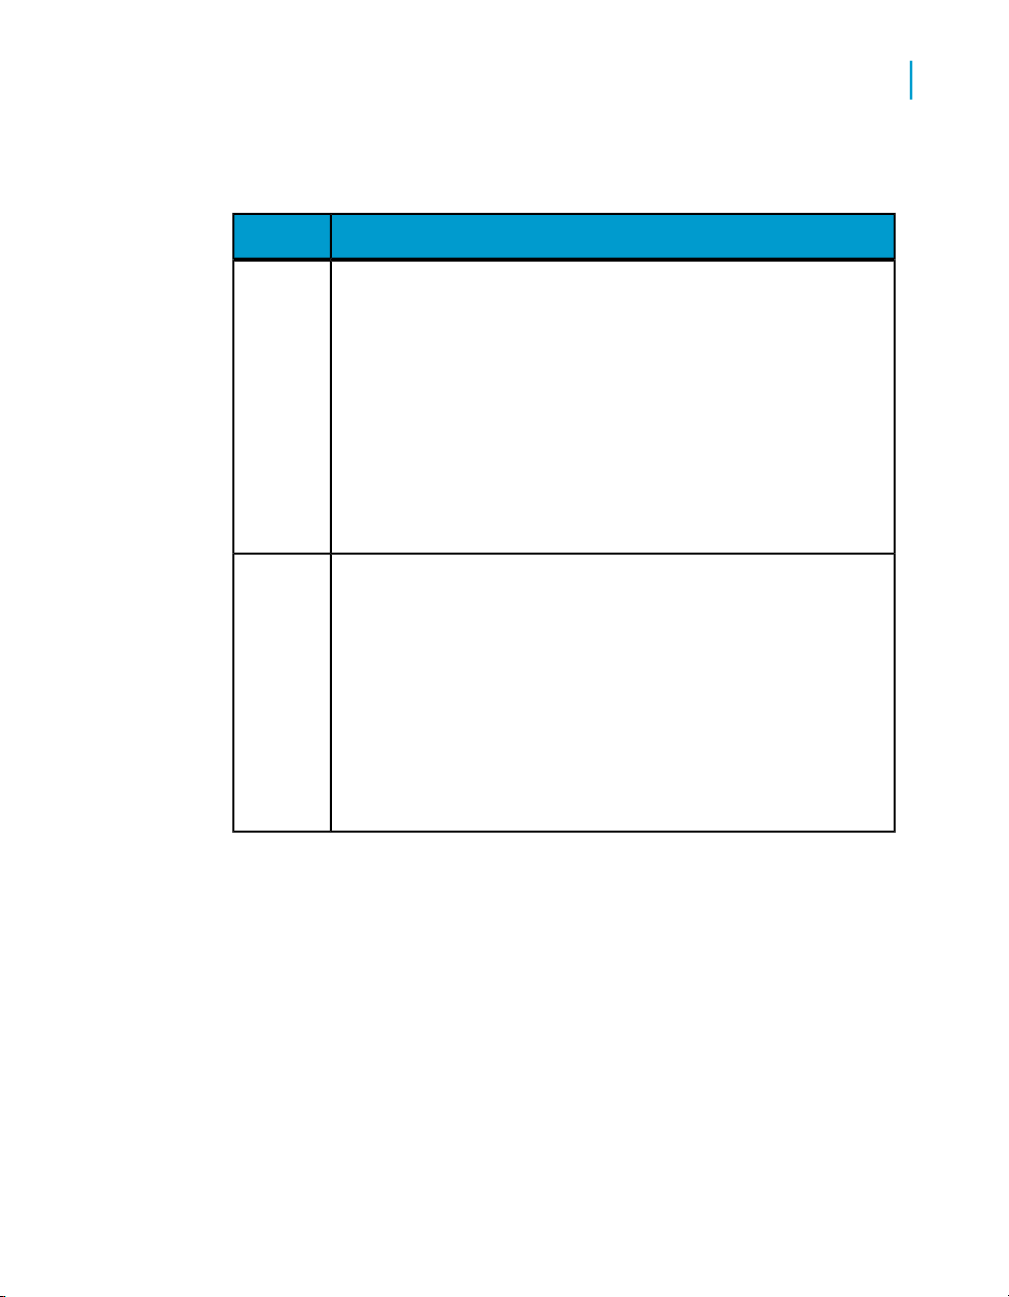
The following table gives you a brief overview of some key features that the
software provides. This is not a complete list of features.
Presort, Presort Views, and RAPID PresortFeature
Schemes and sort levels
and Reports for your own
mail management
Carrier-sequence mailing:
LOT and walk sequence
Multiple entry points
Setting up your mailing
list and input files
Multiple versions, editions, or rate categories
Firm packaging and multi-piece parcels
Segmenting
Offers a full line of presort schemes and reports for
First-Class, Periodicals, Standard Mail, and Package
Services.
Does not assign LOT or walk sequence; however,
it does accept mailing lists that have been through
LOT or Computerized Delivery Sequence (CDS)
processing. Presort verifies eligibility for high-density
and/or saturation rates.
Supports destination entry, zone skipping, and plantverified drop shipment. Prepares all required USPS
forms. Supports up to 999 entry points per job.
Extracts ZIP and ZIP+4 Codes from a multi-line
record format or from a combined city-state-ZIPZIP+4 field.
Supports mixed-weight mail, multiple editions, and
other multi-version mail pieces. Prepares the Manifest Listing. Supports up to 32,500 versions per job.
Prepares Periodicals firm bundles and applies
proper rates. In Package Services, Presort supports
a concept that works like a firm bundle, but it is called
a multi-piece parcel and it is documented differently.
Breaks a job into separate mailings for whatever
reason you like. Supports up to 9,999 segments per
job.
Introduction to Mailflow
22 Presort User's Guide for 8.00c.06.00 release, December 2010
Alters the usual mail-stream sequence to suit truck
dispatching or other needs, in one run. Performs a
"back-end" resorting to resequence whole mailings,
or to change the sequence of packages, containers,
or pallets within mailings, or to alter the traditional
mailstream hierarchy.
Page 23

Introduction to Presort
Contacting Technical Customer Assurance
Presort, Presort Views, and RAPID PresortFeature
1
Mixed-class co-mail
Intelligent Mail® barcode
support
Flats Sequencing System
(FSS)
Puts Periodicals and Standard Mail flats in the same
bundles (and therefore on the same pallets) when
making packages on pallets. Co-mailing Periodicals
and Standard Mail could benefit mailers through increased discounts, fewer packages and sacks (less
labor), more efficient pallet makeup, and improved
drop-ship penetration.
The IMb is a single 4-state barcode that combines
routing ZIP Code information and tracking information. The IMb replaces the POSTNET and PLANET
barcodes. You can use the IMb to qualify for automation discounts as long as you met all other automation requirements.
FSS is a mail-sortation machine that sorts flat-sized
mail into delivery point sequence (in the order that
the mail is to be delivered). The FSS preparation is
optional and available for palletized bundles of
Standard Mail, Periodicals, Package Services Bound
Printed Matter (PSVC BPM) flats, and Mixed class
co-mail. FSS does not support bundles placed in
sacks or trays.
Contacting Technical Customer
Assurance
You can contact SAP Business User Supportthrough the SAP Service Market
Place (SMP).
1.
Go to SAP Service Market Place (http://service.sap.com).
2. Click SAP Support Portal.
3. Enter your S-User ID and password, and click OK.
4. When prompted for a digital certificate, click OK.
5. Enter your S-User ID and password again, and click OK.
Tip:
Setting up your Single Sign-on allows the site to remember your login
and not prompt for it so frequently. To do this, click My Profile at the top
Presort User's Guide for 8.00c.06.00 release, December 2010 23
Page 24

Introduction to Presort
1
Contacting Technical Customer Assurance
of the page. Then click Maintain My Single Sign-on Certificate on the
left of the page and follow the instructions.
Report a product error
1. In the SAP Support Portal, click the Help & Support tab.
2. Click Report a Product Error. The "Report a Product Error - Customer
Messages" window appears.
3. Using the SAP Message Wizard, you can log your message in four steps.
InstructionsSteps
Select the system.Step 1: Choose System
Create a searchable description of your issue.Step 2: Prepare Search
Step 3: Find Solution
Step 4: Enter Message
Choose your system
1. In the System Search box, click the drop-down arrow next to your
installation and select your system.
2. Click Search.
3. Click the BOB link next to your system.
Prepare your solution search
Before you create a new customer message, search for Notes (Knowledge
Base articles) about your issue. If your issue has already been addressed,
you should not need to create another message for Customer Assurance.
1. In the Search Term area, type your question, and click Continue.
2. Read through the search results to see whether any of them addresses
your question.
Search to see if your issue has been addressed
already.
If you don’t find anything about your issue, enter
a message to create a new error report.
24 Presort User's Guide for 8.00c.06.00 release, December 2010
Page 25

Introduction to Presort
Contacting Technical Customer Assurance
Enter your message
If you do not see any Notes about your question, you need to create a
message. To do this:
1. Click Create Message.
2. In the Component box, choose the product that you want to create a
message for. You do so by clicking the icon next to the "Component"
window to see a drop-down list. (By choosing the correct component, you
ensure that your message is logged for the appropriate SAP Business
User Supportteam.)
3. To see a more detailed list, click the arrow by BOJ- SAP Business Objects
and then click the arrow by BOJ-EIM. The names of your products are
listed next to each component.
ProductCode
ACE, DataRight IQ, Match/Consolidate, IACE, FirstPrepBOJ-EIM-COR
1
BOJ-EIM-COM
BOJ-EIM-DEP
Enter the details of your incident
1. In the Problem Details area, required fields are flagged with a red asterisk.
2. In the Short Text box, enter a brief description of the question or issue.
3. In the Long Text box, enter further detail about what you are seeing or
questioning.
4. If needed, attach files to your incident report (be sure to zip your files).
5. When you have finished, you can either send the message or save it.
DeskTop Mailer, Business Edition, Presort, PrintForm,
Label Studio
DQXI, Data Insight, eDQ Infa, SAP Siebel, PSFT, Oracle,
Rapid Library
Data FederatorBOJ-EIM-DF
Data Integrator, Text Analysis, Data ServicesBOJ-EIM-DI
Data Services, Fazi/FuzzyBOJ-EIM-DS
Metadata Manager, ComposerBOJ-EIM-MD
RapidMarts, BOWBOJ-EIM-RMA
Presort User's Guide for 8.00c.06.00 release, December 2010 25
Page 26

Introduction to Presort
1
Contacting Technical Customer Assurance
6. If you save the message, the message is not sent to Customer Assurance.
Instead, it remains in the Draft section of your “My Inbox,” from which you
can send it later.
7. To send your incident report, click Send Message. You can see the
messages you have sent by clicking My Inbox and viewing your sent
items. When your question has been answered or your problem solved,
open the message and click Close Message to keep your message inbox
manageable.
26 Presort User's Guide for 8.00c.06.00 release, December 2010
Page 27

Presort for beginners
2
Page 28
Presort for beginners
2
Eight key tasks in any job
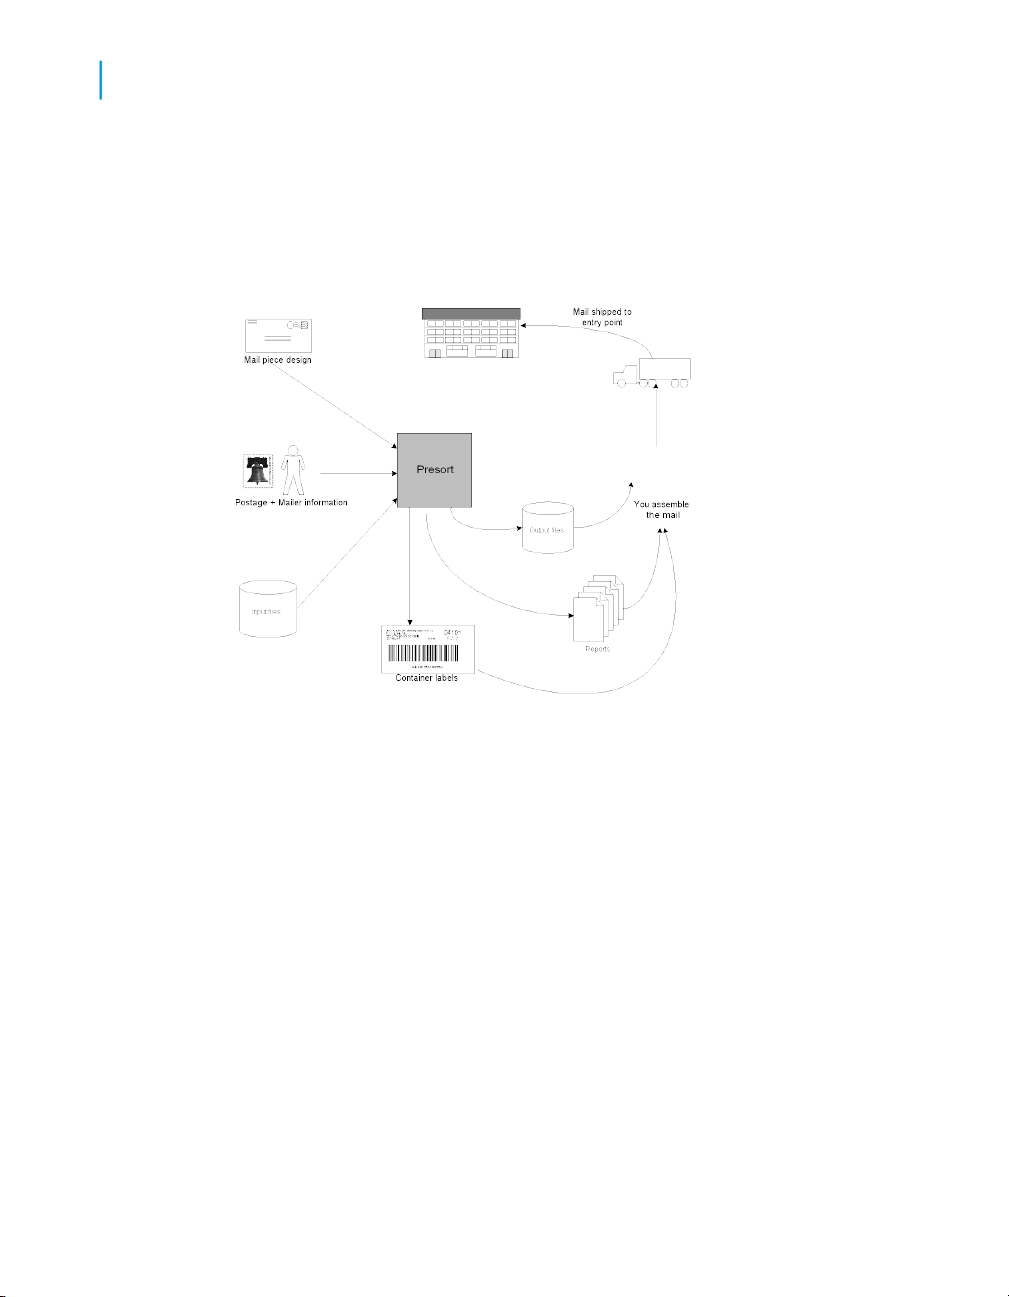
The software takes the information about you, the mail piece, the database,
and your mailing plans, and provides output for reports and labels. You can
use that output to print labels, assemble the mail pieces, and enter the mail.
The following graphic shows you a broad overview of the mailing process:
Eight key tasks in any job
In any job, there are some key tasks that you have to perform to set up your
jobs. Beyond these eight basics, the rest is either optional or purely
administrative.
These basic tasks are intended for new users, along with tips for running
your jobs.
1. Select your schemes. A scheme is a set of USPS rules on mail preparation
(how to form packages and containers, how to calculate postage, and so
on). Some jobs involve only one scheme, others more. The software can
help you select the schemes you need.
28 Presort User's Guide for 8.00c.06.00 release, December 2010
Page 29

Presort for beginners
Eight key tasks in any job
2. Select reports and forms. Which reports do you need? The software can
help you choose the reports and forms that the USPS requires. You'll
probably want one or two others for your own use.
3. Describe your mail piece. The software needs information about the
design, size, and weight of your mail piece. With this information, the
software figures out how many pieces will fit into a tray, sack, or pallet,
and how to calculate your postage.
4. Describe mailer and postage payment method. To fill out USPS forms,
the software needs information about you (and, if applicable, your client)
such as name, address and phone. The software also needs information
about how you pay postage (for example, your permit number, meter
setting, and so on).
5. Specify the post office. At which post office will you enter (submit) your
mail? This information will appear on your reports and container labels.
It may also affect your postage.
6. Describe your input file(s). You have a database; a mailing list of customer
names and addresses. You have to tell the software where that file is and
how to interpret it (be sure to read the Database Prep manual for details
on input-file setup).
2
7. Define your output files. Output files (databases) give you the data you
need to print labels or mail-merge documents in mail-stream sequence.
You may need address labels, tray and sack tags, and pallet placards.
Output files become input for Label Studio or other label-printing systems.
8. Specify location of auxiliary files. The software depends on a small set
of files containing USPS data. We send you updated files every two
months. All you have to do is install these updates promptly and tell the
software where the files are located on your computer.
Related Topics
• Selecting your schemes and reports
• Setting up your postage and forms: Mailing Information
• Setting up your mail piece: Version Description
• Setting up your postage and forms: Mailing Information
• Setting up your post office: Entry Point Description
• Setting up your mailing list and input files
• Setting up your mailing labels: Output File
• Auxiliary files
Presort User's Guide for 8.00c.06.00 release, December 2010 29
Page 30

Presort for beginners
2
Tips on sequence of job-file sections
Tips on sequence of job-file sections
The sequence of sections (blocks) in job files is crucial for two kinds of job
sections. Getting these sections in the wrong order can cause problems.
Where to get help determining block sequenceJob section
Presort
schemes
Multiple entry
points
For three other kinds of job sections, no particular sequence is mandatory.
The sequence of job sections will affect sequence in your reports and output
files. So for efficiency, you might want to place sections in a particular
sequence of your own devising.
Reports
Multiple versions
Segmenting
Other than the sections mentioned above, the sequence of sections does
not matter and you may arrange sections in any order you find convenient.
Some users who edit job files say that it's helpful to place at the top those
sections that you edit most often.
Related Topics
• Selecting your schemes and reports
• Setting up your postage and forms: Mailing Information
• Setting up your mail piece: Version Description
• Setting up your postage and forms: Mailing Information
To get your schemes in the right order, use our template jobs
or the Views Wizard.
If your job involves multiple entry points, you need to be careful
about the sequence of Entry Point Descriptions.
How block sequence affects the jobJob section
The software creates most reports in the order that Report
sections appear in your job. Changing that order usually doesn't
make much difference one way or another.
If your job involves multiple versions or editions, consider the
sequence of Version Descriptions. This will affect sequence in
reports and output files.
If your job involves the Segmenting feature, consider the sequence of Segment Descriptions. This will affect sequence in
reports and output files.
30 Presort User's Guide for 8.00c.06.00 release, December 2010
Page 31

Presort for beginners
Tips on sequence of job-file sections
• Setting up your post office: Entry Point Description
• Setting up your mailing list and input files
• Setting up your mailing labels: Output File
• Auxiliary files
Tips for setting up your definition (DEF) file
Be sure to create a definition (DEF) file to accompany your input file into the
software. See the Database Prep manual for details.
If you created a DEF file automatically with ACE, it will be empty; you must
open the file and populate it with definitions of your input file fields.
If you try to run the software without performing this important step, it will be
unable to read your input file and the job won't run.
Tips for setting up reports
2
Be careful when you set up the format of your reports. If you set left and right
margins, remember to subtract them from the width of the paper itself. The
same applies to the top and bottom margins. When you subtract the margins
from the sheet size, the result is the printable area. Most reports require a
printable area at least 132 characters wide. You might have to set up your
printer to use a condensed font or landscape orientation.
USPS forms require letter-size paper (8.5 by 11 inches). For reports, we
recommend a wide-carriage printer and 11 by 14-inch paper.
If you print reports on a Hewlett-Packard laser printer, or one that can emulate
an HP laser, we can help you set the right Printer Init and Printer Reset codes
to control margin, font, and so on. See the Reports section of the Presort
Job-File Reference manual.
Presort User's Guide for 8.00c.06.00 release, December 2010 31
Page 32

Presort for beginners
2
Using the Views wizard
Tip for nonprofit mailers
Nonprofit rates are available in Periodicals Class and Standard Mail, but not
First-Class. If you select First-Class and indicate that you are a nonprofit
mailer, the software will report an error.
Using the Views wizard
Use the wizard in Views to create new jobs.
The wizard asks you a few questions about your job and how to prepare it.
Then, the wizard sets up your job with the right combination of presort
schemes and reports.
1. Choose File > New > Wizard.
2. At each window, provide the information the wizard asks for. Then click
Next.
3. When you get to the last window, you can run the job right away. Or, if
you prefer, you can simply save the job. If you save the job rather than
running it, you can look at and adjust settings before you run the job.
Selecting your schemes and reports
Selecting schemes and reports can be daunting — you would need to know
a lot about USPS rules. Fortunately, that usually isn't necessary when using
our software.
Several template job files are installed with the software. Templates are
half-completed job files, preset with schemes and reports. You can find them
in the Template directory.
The templates are not quite as helpful as the wizard. However, the templates
are useful for customers who don't use the Views program. To see what
template is right for you, see the table explaining templates in the Presort
Job-File Reference or Views online help. Then you'll have the right schemes
and reports selected, and they will be set up with reasonable starting values.
From there, you can fill out the rest of the job.
32 Presort User's Guide for 8.00c.06.00 release, December 2010
Page 33

Presort for beginners
Setting up your mailing list and input files
Setting up your mailing list and input
files
The software accepts up to 255 input files in one job. Most jobs involve only
one input file. Input files are explained in our Database Prep manual. You
should read that guide before trying to run the software or any other Postalsoft
program.
For flat files and some types of databases, you have to provide a separate
file that describes the physical format of your mailing list. Database Prep
explains guidelines for format files.
Most of the work of setting up your input file is done outside of the software.
Within the software, you need to define the location and filename of the input
file. Use the Override Default Format File and Override Default DEF File
parameter to specify the format and definition file options that you want to
use above all other settings.
For example, let's say that you typically use a template when creating a job,
and you have the format and definition files already specified in the Auxiliary
Files block. You can set these override options to use a different format or
definition file without having to remove the default options in the Auxiliary
Files block.
2
Input fields
The software recognizes a specific set of input fields. Some of the field names
are listed below. This list is meant to be just a glimpse of what's available.
For complete details, refer to our Quick Reference for Views and Job-File
Products.
You will not necessarily work with all of these fields. In fact, simpler jobs
often involve only a dozen or so of these fields.
Database Prep explains how to set up these fields. The Quick Reference for
Views and Job-File Products discusses each field, to help you choose the
fields you need.
Example input fields
Version_IDLOT_OrderEntry_IDCART
Presort User's Guide for 8.00c.06.00 release, December 2010 33
Page 34

Presort for beginners
2
Setting up your mail piece: Version Description
Example input fields
Setting up your mail piece: Version
Walk_SeqMeter_RateFirm_IDCity
WidthName_LineHeightCopies
Wt_LbsPriorityIntl_RegnCountry
Wt_OzSeed_IDKey_CodeCounty
ZIPSegment_IDLast_LineDelete
ZIP4SubscriberLine1–Line 6Bus_Ind
ZIP10ThicknessLOTDPBC
Description
In any job, the software needs information about your mail piece. This part
of job setup is called the Version Description.
Caution:
Accurate size and weight information is critical. We urge you to obtain some
sample mail pieces and measure them carefully.
The procedure for measuring samples depends on whether you are preparing
your mail loose in trays, or in sacks of packages. You'll find detailed
instructions for measuring samples in the Presort Job-File Reference or
Views online help.
Caution:
If you overstate or understate the weight or size of your mail piece, the
software is not able to sort the mail into containers properly, and your reports
will be less accurate. It is also possible that you might pay more postage
than you should, or your whole mailing might be rejected at the post office.
Related Topics
• Processing categories
• Packages and containers are too big or small
34 Presort User's Guide for 8.00c.06.00 release, December 2010
Page 35

• Automation compatibility
Processing categories
Mail pieces are divided into processing categories according to attributes
such as shape, size, thickness, rigidity, weight, and barcoding.
In your job setup, you indicate which category you believe applies to your
piece. The software compares your choice with your piece's characteristics
to make sure you have legal settings. You can choose from the following
processing categories:
• Automated Letter
• Machinable Letter
• Nonmachinable Letter
• PER Nonautomation Letter
• Automated Flat
• PER Alternative Auto Flat
• Flat
• Postcard
• Double Postcard
• Irregular NFM
• Machinable NFM
• Machinable Parcel
• Irregular Parcel
• CMM
• 1C Parcel
Presort for beginners
Setting up your mail piece: Version Description
2
If you're unsure which category applies to your mail piece, check USPS
publications or talk with your postmaster or USPS account representative.
Changing physical dimensions
Perhaps you must run your job before the pieces have been printed. Ask
your client or company if you can get paper samples and make mock-up
pieces. Or you might derive size and weight data from a previous, similar
job.
Here's a typical problem: A big mailing is coming up and the pieces are being
printed now. You've got to be ready to assemble the mail as soon as the
Presort User's Guide for 8.00c.06.00 release, December 2010 35
Page 36

Presort for beginners
2
Setting up your mail piece: Version Description
printing is finished. So you estimate piece dimensions. You run the presort
and print your address and container labels and reports. Everything's ready.
Or so you think.
The mail pieces are then delivered and it turns out that they are slightly
heavier and longer, and they contain more advertising than you were told.
Don't panic. You might be able to recover without too much trouble. You may
still be able to use your labels and even some of your reports. You can go
into your job, and adjust the Version Description as necessary. Then reprint
your USPS forms.
The software detects that you changed the piece dimensions since you ran
the presort, and warns you about this. But it will then produce USPS forms
that reflect the actual weight and size (and in Periodicals, advertising
percentage) of your pieces.
Caution:
Points of caution about this technique:
• The piece must remain in the same processing category.
• The dimension changes should be slight. If your pieces are thicker or
thinner than you estimated, you may have some problems with packages
being too thin or thick, or trays being under- or over-filled.
If the pieces are heavier or lighter than you estimated, you might have
problems with under- or overweight sacks or pallets.
• SAP BusinessObjects cannot be responsible for any acceptance problems
that might result from a job in which the piece dimensions are adjusted
after presorting.
Packages and containers are too big or small
Be careful when setting the dimensions of your mail piece in Version
Description. Accurate information is critical. If your dimensions (especially
piece thickness and weight) are off by as little as one percent, you may face
problems in assembling containers, and the USPS could reject your mailing.
Prepare a sample package or tray (as appropriate), then count the pieces,
weigh it, and measure it carefully. Ask your postmaster or acceptance clerk
36 Presort User's Guide for 8.00c.06.00 release, December 2010
Page 37

to demonstrate how they measure packages and trays, and follow the same
procedure.
Don't guess, and don't measure by eyeball. Remember, your results must
be accurate. A few minutes of careful work at this step in the process can
save you big headaches later. If you'll pardon the pun, an ounce of prevention
is worth a pound of cure.
Sometimes, the software users are asked to run a job before pieces have
arrived from the printer. In that case, you might:
• Mock up some sample pieces from blank paper and envelopes.
• Copy dimensions from a previous, similar job for the same client.
• Negotiate for permission to wait to run the job until dimensions are known.
Automation compatibility
To qualify for automation rates, your letters or flats must comply with some
very specific USPS rules. The USPS sets these rules based on what their
machinery can handle. The rules are spelled out in the Domestic Mail Manual.
Refer to DMM section 201. If you don't have a subscription to the DMM (we
recommend that you do), you can refer to the online version at
http://pe.usps.gov .
Presort for beginners
Setting up your mail piece: Version Description
2
From the dimensions that you enter in the Version Description, the software
may be able to determine that your piece is not automation-compatible. the
software can detect a piece that is too big or small, too thick or heavy, for
example. the software can also check the aspect ratio (width divided by
height). If the software determines that your piece is not
automation-compatible, it will issue a verification error message.
The software cannot check many other characteristics, such as glue or tabs
or how the piece is printed. So successful job verification does not give you
any assurance that your piece is fully automation-compatible.
Fletters
Fletters, also know as digest-size pieces, are treated partly as automation
flats and partly as regular letters. You have to be careful when setting up the
Version Description and the presort schemes.
Presort User's Guide for 8.00c.06.00 release, December 2010 37
Page 38

Presort for beginners
2
Setting up your post office: Entry Point Description
Setting up your post office: Entry Point
Description
To fill out USPS forms, the software needs information about the USPS
facility where you plan to enter your mail and any discounts for which your
mail may be eligible.
You should be able to get the following information from your postmaster or
USPS account representative:
DescriptionInformation
USPS facility
Discounts
Related Topics
• Eligibility for discounts
• Introduction to multiple entry points
The software needs information about the office where you will
enter your mail.
You may need to identify two offices if you verify the mail
locally (that's the origin office), but then you truck it to another office for entry. For example, you might have your mail
verified by the USPS in your city, and then truck it to nearby
towns for a "destination-entry" discount.
You may be able to claim a destination-entry discount on mail
that will be delivered within the service area of the entry office.
The USPS doesn't have to truck this mail to another office, so
some of the transportation savings may be passed on to you.
Ask your postmaster or USPS account rep about your eligibility.
Setting up your postage and forms: Mailing Information
To fill out USPS forms, the software needs information about you and how
you pay postage. In the Mailing Information block of your job, enter the
following information:
38 Presort User's Guide for 8.00c.06.00 release, December 2010
Page 39

Presort for beginners
Setting up your mailing labels: Output File
DescriptionInformation
2
Postage
Contacts
Related Topics
• Introduction to reports
• USPS forms to submit with mailings
• Reports for your own mail management
To fill out your reports and USPS forms, the software needs to
know how you intend to pay postage: stamps, meter, or permit.
If you apply stamps, include the denomination.
To save time filling out USPS forms, you'll need to give information about the company that owns the mail and the company
that prepares and submits the mail. Often, these are the same
company.
For information about parameters available in this block and
related parameters, refer to the Presort Job-File Reference
or the online help.
Setting up your mailing labels: Output
File
Label and document printing are the most common purposes for output files.
You can use them as input for our Label Studio program, or other label
software. Then your labels or documents will be printed in mail-stream
sequence. The software can make four types of output databases:
• address
• package
• container
• pallet
An address file usually contains one record for each mail piece. Typically it
contains the same fields as your input mailing list—name, address, and so
on—plus Presort information appended to each record.
A package, container, or pallet file usually contains one record per package,
container, or pallet (respectively). All of the fields in these files are generated
by the software, although the package file can contain fields from the input
file.
Presort User's Guide for 8.00c.06.00 release, December 2010 39
Page 40

Presort for beginners
2
Setting up your mailing labels: Output File
Available output data
While processing, the software generates data about your mail pieces,
packages, sacks or trays, and pallets (as appropriate). These pieces of data
are available for you to place in the fields of output files.
The list below provides just a glimpse of what's available. For complete
details on output fields, refer to the Quick Reference for Views and Job-File
Products.
Example output fields
Record_NoPkg_LevelFile_NoContents
Scheme_NoPkg_RateIssue_DateCtn_Barcd
Ver _NamePkg_ThkMailing_IDCtn_Level
Ver_NoPkg_WtManfst_KeyCtn_Rate
Set up your output files
There are two tasks you need to do when setting up an output file:
• Define the format. Most of the time, you will want to create a new database
for output. If so, you have to define the format of that new file. That
includes the file type, the sequence of fields, their names and lengths,
and so on. If you would prefer to overwrite or append records to an existing
database, then you don't need to define the format of a new file.
• Determine the content. You determine what information will be placed,
or posted, in the fields of the output file.
40 Presort User's Guide for 8.00c.06.00 release, December 2010
Ver_WtPlt_VolNo_PkgsCtn_Type
ZebraPlt_WtOpt_EndrsCtn_Wt
ZIP_RangePostagePalletEnt_Pt_Nam
ZoneRate_EndrsPiece_RateEnt_Pt_No
Page 41
Presort for beginners
Auxiliary files
For address files, you can define the format and determine the content
manually or automatically with cloning.
DescriptionMethod
2
Cloning
Manual
With cloning, the software automatically creates your address output
file with the same format and content as your input file (technically,
you can clone the format of any database). To the end of each
record, you can append your choice of additional fields generated
by the software, such as endorsements, keylines, and so on.
To clone the format and content of the input file, provide the input
file name at the Create File For Output block.
For package, container, or pallet files, the automatic cloning
feature applies only to setting the file's format. You have to
manually set up the data that will be placed in each field.
If your input file contains a lot of fields that you don't want to carry
over to the output file, that's fine. You can turn off the cloning feature
and specify each field individually. This is the manual method. It's
a little more setup work, but you get exactly what you want for output.
Use the Create File For Output and the Output File blocks to
perform these tasks manually. If you prefer to set up the file
format and data manually for package, container, or pallet files,
you can look for help setting up the output file blocks in any of
the template job files in the software's template subdirectory.
Auxiliary files
The software depends on a small set of files containing USPS data. All you
have to do is tell the software where the files are located on your computer.
You set the paths in the Auxiliary Files block.
Here's a quick glimpse at how the software uses these files. We tell you this
mostly for background, and so that you have a sense of their importance.
Presort User's Guide for 8.00c.06.00 release, December 2010 41
Page 42

Presort for beginners
2
Auxiliary files
File name
directory
Center (MPC) directory
Zone directory
Delivery Statistics
File (DSF) directory
tory
mailings
All mailingsZIP-City File (ZCF)
All mailingsMail Processing
PER, PSVC
BMP, and Parcel Post
Walk-sequenced mailings
All mailingsFacility directory
All mailingsMail Direction direc-
PurposeApplicable
Checks ZIP Codes to keep bad ZIPs out
of the presorted mailing and to label 5digit containers.
Contains information about the service
areas of SCFs, ADCs, NDCs, and other
facilities that's used for forms and labels.
Calculates postage based on distance
between entry and delivery offices.
Verifies compliance with requirements
for Saturation and High-Density rates.
Contains information about USPS drop
site points (keys, names, and physical
addresses).
Determines where and when mail pieces
are dropped so that you can receive
discounts.
Mail direction data
When you claim destination discounts, the software uses USPS FAST data
to determine valid Network Distribution Centers (NDCs), Area Distribution
Centers (ADCs), and Sectional Center Facilities (SCFs) for your mailings
based on the mailing date and the mail piece's shape and class. Some postal
facilities accept only certain mail classes and shapes, because of their sorting
equipment.
USPS FAST data is updated regularly, when facilities change what mail they
accept and process. For instance, if a postal facility is closed because of a
natural disaster, the FAST data is updated to divert mail from that facility to
another facility. The concept of postal facilities changing what they accept
and diverting mail to other facilities is known as mail redirection or mail
direction.
42 Presort User's Guide for 8.00c.06.00 release, December 2010
Page 43

The FAST data that the software uses to determine valid facilities for your
mailings is part of the FAST drop-date scheduling program. Your participation
in the FAST drop-date scheduling program is optional and in no way affects
your use of FAST data within the software. If you're interested in this program,
see the FAST web site for more information.
Download directories
The facility.dir and maildirect.dir directories are included in your
bi-monthly or monthly directory download and are loaded appropriately during
the directory installation process. However, the USPS updates FAST data
continually, and you may want access to this updated data more frequently.
Therefore, updated FAST directories are posted on the second Thursday of
each month. If the second Thursday falls on a holiday, then the directories
are available the day before.
To download the directories:
1.
Go to http://service.sap.com and click SAP Support Portal.
2. Enter your S-User ID and password, and then click OK.
Presort for beginners
Auxiliary files
2
3. When prompted for a digital certificate, click OK.
4. Enter your S-User ID and password again, and then click OK.
5. At the top of the window, click Downloads and then Business Objects
Downloads.
6. Click US Postal Services and Data Quality Supplemental Files in the
left pane and then click Mail Direction File.
7. Select the mail direction file that you want to download (for example,
MailDirection.zip).
8. When prompted, save the .zip file to a temporary area (for example,
c:\temp\dirs).
9. When the file is downloaded, double-click the .zip file and unzip the
files into the location where the Postalsoft directories are currently installed
(for example, c:\postware\dirs or c:\pw\dirs).
The .zip file contains facility.dir, maildirect.dir, and a .upd
(update) script.
Presort User's Guide for 8.00c.06.00 release, December 2010 43
Page 44

Presort for beginners
2
How to verify that your job is ready
How to verify that your job is ready
Before you can run your job, you must verify that it is ready. To do this, select
File > Verify Job. The software's job verifier has several purposes:
• It verifies that your job meets the software's own rules. An example of an
error in this category is shown on the next page.
• It verifies that your job is consistent within itself. An example of an error
in this category would be a First-Class job that included a Standard Mail
report.
• It verifies that your job meets USPS regulations.
Successful verification does not mean that your job is guaranteed to run, nor
that your mailing is guaranteed to be accepted. There are two reasons for
this disclaimer:
• If we were to make the verifier too cautious and overprotective, it would
prevent people from preparing legitimate, if unusual, mailings. Obviously,
we cannot foresee every possibility. So the verifier is designed to do what
is reasonable.
• For sophisticated mailers, who often negotiate special terms and
procedures with the USPS, the software offers some latitude to customize
mailings. The verifier is designed to allow for such exceptional mailings.
Verification messages
The verifier gives these types of messages:
Why it happensMessage
Fatal Error
Error
44 Presort User's Guide for 8.00c.06.00 release, December 2010
The software finds a problem that is certain to cause a rejected
mailing, or certain to prevent the job from running at all, it gives you
a Fatal Error message.
The software finds a serious problem—for example, one that is
certain to cause a rejected mailing, or certain to prevent the job from
running at all.
Page 45

Presort for beginners
Tips for running your job
Why it happensMessage
2
Warning
Views offers a handy way to verify jobs. Views can find and present more
than one error at a time. And you can use the convenient Go To button to
jump directly to the trouble spot.
Batch verifier
Some customers cannot use Views, especially those who run on a
nongraphical system such as Unix. These customers use the nongraphical
version of the software, called Job.
When you start Presort Job, you do so by typing a command line at your
operating system's prompt. Below is an example; you'll find complete details
in the Presort Job-File Reference.
$ presort /user/pwjobs/my_job.pst > my_job.log &
The software automatically starts verifying that the job is ready for processing.
It will stop on the first serious error. When you've corrected the error, you
start the verification process all over again.
The software finds a less serious problem. This means that there is
a possibility that the job will produce unexpected results, or that the
mailing will cause an acceptance dispute.
Tips for running your job
While you're getting to know the software, we urge you to run your jobs in
stages. This will give you a chance to learn faster. It will also help you to find
and correct any errors faster.
Every job includes an Execution Options block. By carefully selecting each
of the options in this block, you can run one step at a time. We recommend
a three-step approach.
1. Presort. On the first pass, in the Execution Options block set the job to
run the presort process itself, and create reports. See the Job-File
Reference Guide or online help for parameter descriptions.
Presort User's Guide for 8.00c.06.00 release, December 2010 45
Page 46

Presort for beginners
2
From the USPS: Ten common mistakes and how to avoid them
Note:
Make sure to select the Save Work Files option. During the presort
process, the software stores its results in work files. These files are
unreadable and of no direct use to you, but the software needs them
when it creates reports and output files.
2. Generate output files. Set up the software so that it generates a Job
Summary report. This report provides a concise, overall statement of job
results. If this report looks good, review all of your other reports to make
sure that your presort results are acceptable. If not, return to the job and
consider how your job setup affected results.
If report results look good, then on the second pass, go into the Execution
Option block and set the options needed to generate your output files.
3. Clean up. When you are certain that you have finished this job, you may
delete the work files. This keeps your computer from becoming cluttered.
Work files can be large, and keeping them when you don't need them
can waste a lot of disk space.
To delete work files, deselect all of the options in the Execution Option
block and then process your job one last time.
From the USPS: Ten common mistakes
and how to avoid them
According to the USPS, there are the ten mistakes mailers make most often:
1. Unpaid fees. Be careful to pay the annual presort or mailing fee. (A
postage permit is a one-time fee.)
2. Low account balance. If there isn't enough money in your deposit account
to cover a mailing, that entire mailing will be held until more money is
deposited. Call ahead to verify your account balance, especially if other
groups or departments use the same account.
3. Inaccurate mailing statement. Mailings may be delayed or rejected for
inaccurate piece counts or postage calculation on the Postage Statement.
4. Incorrect container labels. Mailers who make sack labels by hand
sometimes use the wrong destination table or format.
5. Incorrect presort. A mailing is rejected when there is an error rate of 5
percent or more in the make-up or labeling of packages or containers.
46 Presort User's Guide for 8.00c.06.00 release, December 2010
Page 47

Presort for beginners
From the USPS: Ten common mistakes and how to avoid them
6. Incorrect imprint. Mailings by permit imprint may be rejected if the imprint's
format or content is inadequate.
7. No signature. Especially when you're paying postage by deposit account,
make sure your Postage Statement bears an authorized signature.
8. Inadequate documentation. Carrier-route and automation-rate mailings
must include reports showing that rate requirements are met. Presort and
PrintForm produce these reports.
9. Stale meter date. Be careful to set your postage meter to the date you
will actually enter your mailing. If the meter date is "stale," you may have
to re-meter every piece (at 0¢, just to get the correct date). When you
know you're going to be too late to make the last box collection, use the
next day's date.
10. Late arrival. Each office sets its own hours for acceptance of mail. These
are often shorter than lobby hours because of the time it takes to verify
a presort and mailing statement.
Presort and PrintForm prevent many of these hassles by helping you to
comply with USPS rules automatically. Users say that the software can
streamline mail acceptance because it produces PAVE-certified reports.
2
Presort User's Guide for 8.00c.06.00 release, December 2010 47
Page 48

Presort for beginners
From the USPS: Ten common mistakes and how to avoid them
2
48 Presort User's Guide for 8.00c.06.00 release, December 2010
Page 49

Schemes and sort levels
3
Page 50
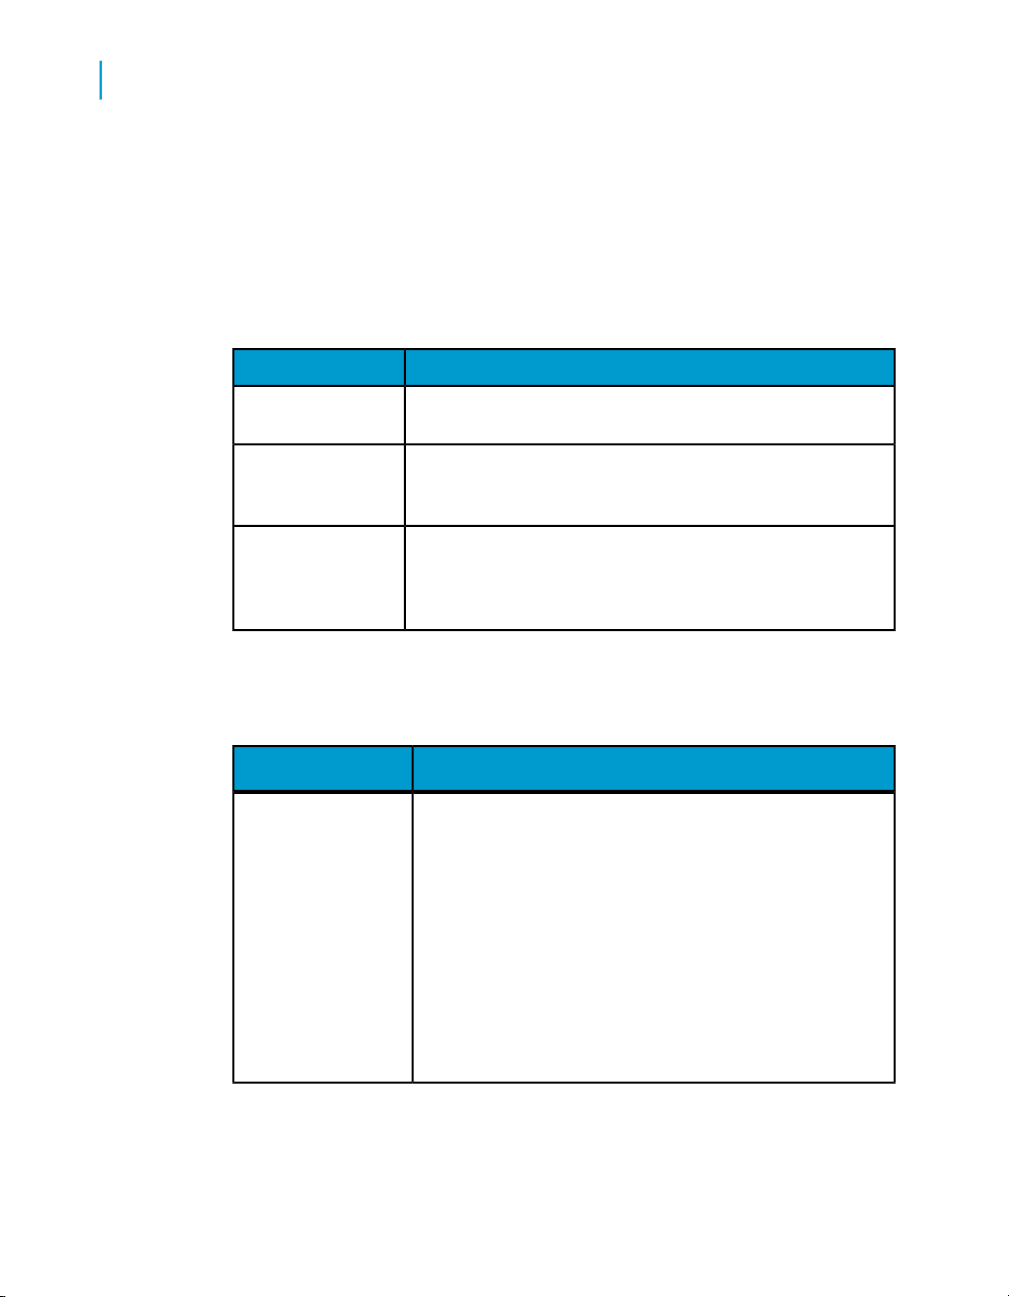
Schemes and sort levels
3
Introduction to schemes
A presort scheme is a set of USPS rules for sorting mail. A scheme involves
a particular way of sorting and assembling mail and assigning postage rates.
Introduction to schemes
Within each scheme, you can set options, which fall into a few basic groups:
DescriptionOption group
Optional sort levels
Package, container, and pallet size
Unqualified action
The software offers a variety of schemes for each class and type of piece.
Each scheme involves a particular way of sorting and assembling the mail,
and a plan for assigning postage rates.
First-Class
In many schemes, there are optional sortation levels that
you can turn on or off.
For schemes involving packages, you can set a minimum
package size. Likewise, you can set minimum and maximum sizes for forming trays, sacks, and pallets.
Tells the software what to do if there isn't enough mail to
meet the USPS minimum for the scheme. For example,
you can tell it to skip the scheme or stop processing the
job.
SchemeClass
Automation Letters
Regular letters
Flats
Single Piece
Parcels
Letter Trays on Pallets
Flat Trays on Pallets
50 Presort User's Guide for 8.00c.06.00 release, December 2010
Page 51

Schemes and sort levels
Introduction to schemes
SchemeClass
3
Periodicals
Automation Letters
Carrier Route Letters
Nonautomation Letters
Flats
Packages on Pallets
Sacks on Pallets
Letter Trays on Pallets
Presort User's Guide for 8.00c.06.00 release, December 2010 51
Page 52

Schemes and sort levels
3
Introduction to schemes
SchemeClass
Standard Mail
Automation Letters
Regular Letters
Flats
Irregular Parcels and NFMs
Irregular Parcels and NFMs Pallets
Irregular parcels and NFMs Sacks on Pallets
Machinable Parcels and NFMs
Machinable Parcels and NFMs Pallets
Carrier Route Irr. Parcels Pkgs on Pallets
Carrier Route Irregular Parcels
Enhanced Carrier Route Letters
Letter Trays on Pallets
Flats Letter Trays on Pallets
Packages on Pallets
Sacks on Pallets
Single Piece First Class
Customized Market Mail (CMM)
52 Presort User's Guide for 8.00c.06.00 release, December 2010
Page 53

Schemes and sort levels
How presort schemes work
SchemeClass
3
Package Services
Mixed-Class CoMail
BPM Carrier Route Irregular Parcels
BPM Flats
BPM Irregular Parcels
BPM/Media and Library, Machinable Parcels
BPM Packages on Pallets
BPM/Media and Library, Machinable Parcels Pallet
Media and Library
Single Piece
Media and Library, Packages on Pallets
Parcel Post
Parcel Post Pallet
PER & STD, Packages on Pallets
PER, OMX Flats
PER, MADC Pallets
STD, ASF/NDC Pallets
How presort schemes work
Before you read the specifics regarding working with schemes, it might be
helpful for you to get an overall picture of how a scheme works.
As you go through the presort process, you see a pattern. At the higher sort
levels, you are dealing with more destinations, each serving a relatively small
area. Later in the presort process, at the lower sort levels, you are dealing
with a smaller number of central USPS facilities, each of which serves a
large area.
Presort User's Guide for 8.00c.06.00 release, December 2010 53
Page 54

Schemes and sort levels
3
How presort schemes work
Example
Let's assume you are using a Standard Mail scheme for automated letters.
To keep this example short and simple, we'll overlook the exceptions and
fine points for now.
The software does the following:
1. Sort by ZIP. First, the software sorts all pieces by ZIP Code. Technically,
of course, the software does not sort physical mail pieces, but it does sort
postal codes that it reads from your input file. When you print address
labels, each database record turns into a mail piece.
2. Form 5-digit trays. When there are at least 150 pieces destined for the
same 5-digit ZIP Code, the USPS gives mailers the option to place these
pieces in a "5-digit tray," which means that this tray is destined and labeled
for a local post office. At the 5-digit level, the USPS also gives mailers
the option to form "scheme" trays. A scheme tray combines mail for two
or more ZIPs. See 5-digit scheme containers for more details.
In this presort scheme, postage on each piece is based on the sort level
of the tray. Pieces in 5-digit scheme trays, are mailed at the 5-digit rate,
which is the least expensive rate in this scheme.
3. Form 3-digit trays. The software takes the mail pieces that don't "fit" into
the first sort level and drops them to the next level.
When there are at least 150 pieces destined for the same 3-digit ZIP
Code, that is, pieces whose ZIP Codes begin with the same three digits,
the software places these pieces in a "3-digit tray." This tray is labeled
for a Sectional Center Facility (SCF), which usually means a larger city
post office that serves surrounding towns.
In larger cities, the main post office often serves two or more 3-digit ZIPs.
the software combines mail for those 3-digit ZIPs to form a "3-digit
scheme" tray.
Pieces in 3-digit trays, or 3-digit scheme trays, are mailed at the 3-digit
rate; a little more expensive than the 5-digit rate, but better than the
automated ADC (AADC) or mixed automated ADC (MAADC) rate.
4. Form AADC trays. If there are at least 150 leftover pieces that are eligible
for the same AADC (Automated Area Distribution Center), the software
prepares an AADC tray. AADC trays may contain mail for more than one
3-digit ZIP Code. The USPS publishes a table that lists sets of 3-digit ZIP
Codes and their corresponding AADCs (L801).
54 Presort User's Guide for 8.00c.06.00 release, December 2010
Page 55

Schemes and sort levels
The software can help you select and arrange schemes
Note:
While it seems that an AADC tray and a 3-digit scheme tray are alike, it
is the tray makeup that makes them different. The 3-digit scheme trays
contain pieces mailed to multiple 3-digit ZIP Codes that the USPS
processes on the same sorting machines. AADC trays also contain mail
for more than one ZIP Code, however, these pieces are not processed
on the same sorting machine.
Pieces in AADC trays are mailed at the AADC rate.
5. Form Mixed-AADC trays. All remaining pieces are grouped by AADC
area and placed into mixed-AADC trays. At the office where you enter
your mail, USPS staff remove pieces from these trays and combine them
with pieces from other mailings destined for the same AADCs.
Pieces in Mixed AADC trays are mailed at the MAADC rate.
Related Topics
• Assembling pieces, packages, containers, and pallets
The software can help you select and
3
arrange schemes
Jobs often involve two or more schemes. After processing one scheme, the
software processes any leftover pieces in the next scheme. In a sense,
presorting is a sifting process. For example, you might follow the Automation
Letters scheme with Regular Letters. Often, the Regular Letters scheme will
"catch" two kinds of pieces:
• If there are not enough pieces to meet the minimum piece requirement,
the Automation Letters scheme will not qualify and all pieces will drop to
the Regular Letters scheme.
• If pieces have flawed addresses, that is, they are missing the postal
automation codes (ZIP+4 and DPBC), they aren't eligible for the
Automation Letters scheme and fall to the Regular Letters scheme.
The software can help you pick the right schemes and place them in the right
order. This is important for your postage and mail-room efficiency.
Presort User's Guide for 8.00c.06.00 release, December 2010 55
Page 56

Schemes and sort levels
3
The software can help you select and arrange schemes
Set up schemes
If you use Views, use the Wizard! The Wizard asks you a few questions
about your job and how you want to prepare it. Based on your answers, the
Wizard sets up your job with the right combination of schemes and reports.
It's very easy!
To manually set up a scheme in an existing job, do the following:
1. Expand the Presort Scheme Setup group. If you are creating a new
scheme, expand the New Schemes group.
2. Double-click the name of the scheme you want to set up.
3. For a new scheme, the software suggests typical settings. You can keep
these settings or adjust them for your job.
4. To adjust sortation levels or size limits for packages, containers, or pallets,
click the appropriate button and make your settings.
We also offer template jobs. These are half-completed job files, preset with
schemes and reports. They're located in your Template directory. The
templates are not quite as helpful as the Wizard, but they are useful if you
don't use Views.
Scheme priorities
When you use our Wizard or template jobs, you get reasonable starting
values for those options. We assume these priorities:
• Minimize postage by sorting all mail at the highest (or finest) possible sort
level.
• Minimize the number of packages and containers to handle, and thereby
minimize the labor cost.
• Minimize delivery time by sorting all mail at the highest (or finest) possible
sort level.
We put delivery last because investing more postage or labor doesn't
guarantee faster delivery. You certainly are free to adjust the initial settings
to suit your own priorities.
56 Presort User's Guide for 8.00c.06.00 release, December 2010
Page 57

Scheme options and settings
In almost every scheme, you'll have optional, as well as required, settings.
Most of the options in our presort schemes fit into the following basic groups:
DescriptionGroup
Schemes and sort levels
Scheme options and settings
3
Unqualified action
Optional sortation
levels
What do you want the software to do if there isn't enough
mail to meet the minimum set by the USPS? You can
choose to:
• Skip to the next scheme (the most common choice).
• Cancel the whole job.
• Cancel the presort process itself, but produce reports
and output files.
As we've said, every scheme requires sorting pieces to at
least one level, usually three or more. In the required levels,
you must make a package or container whenever you have
enough mail to do so.
For the optional sort levels, you can choose to turn the
level on or off. If you turn it on, you can set a minimum
amount of mail needed to form a container. You might
set this a little higher than the USPS minimum. That way,
you'll form optional packages or containers only when
you're sure that there's enough mail to make it worthwhile.
Tip:
Any parameter that starts with the word “Create” or
“Prepare” controls an optional sort level.
Package and container limits
Related Topics
• Optional sort levels
• Leveling
In schemes that involve making packages, you can set a
maximum package size. Likewise, you can set minimum
and maximum amounts of mail for forming trays, sacks, and
pallets. In other pallet schemes, you can set a maximum
tray, sack, and pallet mail weight.
Presort User's Guide for 8.00c.06.00 release, December 2010 57
Page 58

Schemes and sort levels
3
Optional sort levels
Optional sort levels
For all sort levels that the USPS considers optional, the software lets you
control whether to turn that level on or off, gives you an option to set a
minimum amount of mail, or both.
In some cases, turning on an optional sort level might reduce your postage.
It may also reduce delivery time by sorting more mail more directly to its
destination. However, optional sort levels can result in more packages and
containers to strap, label, and handle, so they may increase your costs for
material, labor, and transportation.
Carrier-route trays and sacks
Let's look at some optional sort levels. A carrier-route package contains mail
for one route. Carrier packages may be placed in trays or sacks or on pallets
at two or three levels.
DescriptionContainer level
Direct CART
5-digit CART
58 Presort User's Guide for 8.00c.06.00 release, December 2010
An entire container, all packages for the same route.
Forming direct CART containers are required for most
mail classes (except CMM). If you have enough mail
to fill a direct-CART container, you must form it. For
some mail classes, you can set the minimum number
of pieces required to form a direct CART container.
Packages for one or more routes, delivered from the
same post office. If you have enough mail, you must
form the 5-digit CART container for most mail classes
(except CMM), so the software does not offer an on/off
control. However, you do have the option to set a minimum amount of mail.
You can set the minimum at a fixed number of
pieces. Or you can set the minimum at a "full" tray,
and leave it to the software to determine how many
pieces are the minimum for a full tray.
Page 59

Schemes and sort levels
Optional sort levels
DescriptionContainer level
3
5-digit-scheme CART
3-digit CART
Packages for two or more 5-digit ZIP Codes served by
the same facility. Forming scheme sacks is required.
You can set a minimum amount of mail per container.
Packages for two or more routes, delivered from two
or more post offices in the same 3-digit ZIP Codes. In
the tray letter schemes, 3-digit CART trays are optional.
You can turn them on or off, but you cannot set a minimum amount of mail.
The 3-digit CART level does not apply to sacks.
5-digit scheme containers
Preparing 5-digit-scheme containers is another optional sort level. Some
post offices serve as delivery offices for two or more ZIP Codes. This is
becoming more common as the USPS increases automation and consolidates
delivery offices.
With such offices in mind, the USPS has created an incentive for automated
mailers. The USPS permits you to form some 5-digit trays, sacks, and pallets
that actually contain mail for more than one ZIP Code. These are called
5-digit scheme containers, because the USPS publishes a scheme, or list,
of offices where combined containers are permitted. In the software, we fold
this information into the Mail Processing Center (MPC) directory.
The USPS has strict rules about using current scheme information when
preparing scheme trays. That's why you receive an updated MPC directory
every two months. It's important that you install these updates promptly. The
requirement for current scheme data also means you might have a problem
if you presort your job 60 days or more before the date you enter the mail.
Scheme containers should help you save postage and reduce the number
of containers you handle. That's because pieces from more than one ZIP
Code can be used to meet the minimum container volume.
Presort User's Guide for 8.00c.06.00 release, December 2010 59
Page 60

Schemes and sort levels
3
Schemes sift out some records
Automation-compatible letters without barcodes
Another optional sort level is machinable preparation. This option may apply
to you if you're mailing a First-Class or Standard letter that does not bear a
barcode, but is in all other respects automation-compatible. If your letters fit
these criteria, the USPS calls your letters "machinable." The letters must:
• Have a machine-printed address (non-script font)
• Have an address in the MLOCR read zone
• Have a barcode clear zone
This means that the USPS has a reasonably good chance of barcoding your
letters by running them through an MLOCR machine (multiline optical
character-recognition).
Schemes sift out some records
Sometimes, users are surprised to discover that not all of their input records
"make it" into the mailing.
The normal output mail stream consists of three portions. The software
produces presorted pieces, then qualified, nonpresort pieces, and finally
unqualified pieces.
Is the record eligible?
The first step in sifting out records depends on choices you make when you
set up your job; it has nothing to do with USPS rules. As the software reads
a record from your input file, it evaluates whether the record is eligible for
processing. A record is ineligible in the following situations:
• The record is marked as deleted, either by database marking or the field
PW.Delete. See the Database Prep manual for details about how the
software handles deleted records.
• The record is sifted out by the Input Filter feature. See the Database Prep
manual for details about filtering.
• A record may be sifted out if the job involves multiple versions, and the
record's PW.Version_ID value cannot be matched to any of your Version
Descriptions, and your choice for undetermined records is to ignore them.
60 Presort User's Guide for 8.00c.06.00 release, December 2010
Page 61

Schemes and sort levels
Schemes sift out some records
• A record may be sifted out if the job involves multiple segments and the
software cannot match the record's PW.Segment_ID field with any of
your Segment Descriptions.
• A record can be sifted out if the job involves multiple entry points and the
software cannot match the record's PW.Entry_ID field or its ZIP Code
with the ZIP Code range for any entry point.
If the record is eligible, it goes on to the next step. If not, it is excluded from
the job entirely. You can choose to include or exclude ineligible records from
output files.
Does the record qualify under USPS rules?
The USPS says that every piece in a presorted mailing must bear a valid
ZIP Code. So the software checks the ZIP Code of every input record against
the USPS ZIP Code directory. If the record contains an acceptable ZIP, it
goes into the presort. If the software finds no ZIP Code, or the ZIP is bad,
the record is tagged as unqualified, and falls to the end of the mail stream.
However, an unqualified record still is included in the job, and would normally
appear in output files.
Likewise, the software can detect foreign addresses. Foreign records are
automatically shifted into the unqualified portion of the mail stream.
3
Unqualified pieces for the U.S. may be mailed at the single-piece rate when
its available. The number of unqualified pieces is mentioned on the Job
Summary report. Other than that, unqualified pieces do not show up on
reports, and they are not included in postage calculations or USPS forms.
You can control whether or not they will be included in your output files or
labels by using the Output Selection feature.
Two more points to note about unqualified pieces:
• If your job involves segmenting, note that your unqualified pieces will
have an undetermined segment.
• If your job involves multiple entry points, the unqualified pieces will have
an undetermined entry point. Usually, this means that they will be entered
at the default entry point (which usually means the local post office).
Does the piece fit into a package and container?
A piece may be excluded from a presort scheme for either of two reasons:
• Each presort scheme requires certain postal codes. If a piece is missing
any of these codes, it will be excluded from the scheme. For example,
Presort User's Guide for 8.00c.06.00 release, December 2010 61
Page 62

Schemes and sort levels
3
Mailing leftover pieces at single-piece rate (or preventing it)
any automated-letter scheme will reject a piece that is missing ZIP+4 or
DPBC. (Automated flats require only ZIP+4.) Carrier-route schemes will
exclude any piece with an empty or undefined CART field.
Carrier-sequence presorts may reject any piece that is lacking line-of-travel
or walk-sequence fields.
• Presorting is a sifting process. Because of the way packages and
containers are formed, some pieces may not be included in any package
or container. Usually, these pieces are gathered in a final container at
the end of the mail stream. This "catch-all" container (or containers) is
entered at the local post office at the single-piece rate.
If any pieces should happen to be left over after the last scheme in the job,
they are tagged as qualified, nonpresort (or NPS) pieces.
Qualified, nonpresort pieces may be mailed at the single-piece rate. The
number of NPS pieces is mentioned on the Job Summary report and ZIP
Code Listing. Other than that, NPS pieces are not included in postage
calculations or USPS forms. You can control whether or not they will be
included in your output files or labels by using the Output Selection feature.
• If your job involves Segmenting, your NPS pieces will be assigned to a
segment the same way as presorted pieces.
• If your job involves multiple entry points, note that NPS pieces will have
an undetermined entry point. Usually, this means that they will be entered
at the default entry point (which usually means the local post office).
Related Topics
• Link each description to a field value
• Mailing leftover pieces at single-piece rate (or preventing it)
• Segmenting
Mailing leftover pieces at single-piece
rate (or preventing it)
A single-piece presort scheme might sound like a contradiction, but it is useful
in Package Services, and First-Class jobs of postcards, letters, or flats.
Add the PSVC, Single Piece scheme block to your job in order to mail
nonmachinable and non-barcoded machinable parcels at the Parcel Post
rate. This scheme sorts first by zone and then by 5-digit within each zone.
62 Presort User's Guide for 8.00c.06.00 release, December 2010
Page 63

Mailing leftover pieces at single-piece rate (or preventing it)
A single-piece scheme could serve two purposes:
• You might prevent any pieces from mailing at the single-piece rate.
• If pieces do fall to the single-piece rate, you can include them in your
mailing documentation and prepare them in containers.
Prevent single-piece-rate pieces
As you may recall, any pieces left over after the last presort scheme become
the qualified nonpresort (NPS) portion of the mail stream. If you mail these
pieces, you must pay postage at the single-piece rate. You might be able to
prevent pieces from falling to the single-piece rate. Let's go through an
example where the scheme sequence is as follows:
1. Automation
2. Regular
3. Single piece
Suppose that we are mailing 1,250 1-ounce letters. We have 800 pieces that
qualify for the automation mailing at the 3-digit level and 450 pieces left over.
We need at least 500 pieces for a First-Class mailing, so our 450 leftover
pieces won't qualify for the regular scheme. Therefore, those pieces become
qualified nonpresort, and mail at the single-piece rate.
Schemes and sort levels
3
To prevent this, we would like to force 50 pieces to drop from the automation
to the regular scheme. Then the regular scheme would qualify. We'll pay a
little more postage on 50 pieces, and a lot less postage on 450 pieces. To
control how much mail is dropped from the automation scheme, use the Max
to Drop, ATM to REG parameter in the Single Piece scheme. Here are your
choices at that parameter:
DescriptionOption
Off
Max
Turns off the dropping feature by setting the maximum number of
pieces to zero. Use this option if you never want to drop any pieces,
even if it would save postage. You will probably have some singlepiece-rate mail.
Sets the limit at its maximum. Use this option if you want to minimize
the chances of any pieces mailing at the single-piece rate.
Presort User's Guide for 8.00c.06.00 release, December 2010 63
Page 64

Schemes and sort levels
3
Mailing leftover pieces at single-piece rate (or preventing it)
DescriptionOption
Postage
To minimize postage, you need to set a reasonable limit, somewhere
between zero and the maximum. The right figure depends on your
mailing list and piece design.
Prepare single-piece-rate pieces
You might choose not to use the Max to Drop parameter. Or even if you do
use it, it is still possible that some mail will fall to qualified nonpresort. That's
when the second purpose of the 1C, Single Piece scheme comes into effect.
Should any pieces fall into the qualified nonpresort category, the Single Piece
scheme enables you to prepare them along with the presorted mail.
• The software forms trays with periodic break marks.
• The software prepares documentation (including a Postage Statement)
for the Single Piece mailing, just as it does for presorted mail.
• Pieces are produced in ZIP Code sequence (00000 to 99999).
Standard Mail regular-rate pieces
The USPS does not provide for a Single Piece scheme in Standard Mail, but
instead, allows you to fold up to 199 regular-rate pieces into the final qualifying
scheme in your Standard Mail job. The regular-rate mail will appear in the
documentation for your carrier-route or automation mailing.
Single-piece price for Standard Mail and First-Class
This feature is only for First Class Mail and Standard Mail letters and flats.
Be aware that the USPS does not offer a Standard Mail single-piece rate.
64 Presort User's Guide for 8.00c.06.00 release, December 2010
Page 65

Schemes and sort levels
Mailing leftover pieces at single-piece rate (or preventing it)
Standard Mail unqualified pieces
Presort automatically prepares unqualified mail at the single-piece price for
both Standard Mail and First Class when you use the Include Unqualified
Pieces parameter in the 1C, Single Piece scheme block and the new STD,
Single Piece First Class scheme block.
Note:
Unqualified (UNQ) ZIP Codes can also be failed numeric ZIP Codes. The
software does not support any alpha-numeric ZIP Codes, foreign ZIP Codes,
blanks, or ZIP Codes that have less than 5 digits.
Standard Mail and First Class letters and flats
There are times when you might want to force Standard Mail and First Class
records into the single-piece price. Usually this is done because you want
to use the original address on the piece and not the corrected address from
NCOALink/CASS/LACS.
Use the PW.FORCE_SP input field to mark records that you want to force
to the single-piece price. The PW.FORCE_SP field would override the job-file
parameter setting. For example, if you have the PW.FORCE_SP field set to
Yes, the software will force qualified record to the single-piece rate even if
the Include Unqualified Pieces parameter is set to No.
3
The software marks pieces as UNQ in the Address Output File when they
are truly unqualified (for example, ZIP Codes that are blank, alpha-numeric,
foreign, or less than 5-digits). Unqualified pieces that merely fall within the
single-piece STD, Single Piece First Class scheme are marked as REG.
Note:
The software creates single-piece trays with records containing invalid ZIP
Codes if either of the following occur:
• You are using Optional Procedure and have the ZIP Verify parameter
set to Valid 5.
• Your job contains the 1C, Single Piece or the STD, Single Piece First
Class scheme block.
Presort User's Guide for 8.00c.06.00 release, December 2010 65
Page 66

Schemes and sort levels
3
Protecting pallets
Protecting pallets
In some Packages on Pallets schemes, you also can shift pieces from one
pallet to another for your benefit. This method is called protecting pallets.
You can shift packages onto these pallet levels:
Protecting pallets means the software tries to keep mail at that pallet level,
even if it means taking pieces from other pallets or sacks.
The motivation behind protecting pallets is different for SCF pallets than for
NDC pallets.
• For SCF pallets, the goal is to keep mail from falling to the NDC or ADC
level so that more mail is entered closer to its destination.
Pallet levelMail class
SCFPeriodicals
SCF and NDCStandard Mail
• For NDC pallets, the goal is to keep mail from falling to the mixed-NDC
level, so the software palletizes more mail and forms fewer sacks, which
means less labor for you and the USPS.
Pallet protection is just one way that the USPS encourages mailers to prepare
fewer containers. There are other ways that you can (or must) prepare your
mailing so that more containers are full, and fewer total containers result
overall.
Having fewer containers that each contain more mail requires less labor for
USPS staff, and more room in USPS facilities and trucks. It also can translate
into less labor for you and, in some cases, better postage and delivery.
SCF protection
The software begins forming an SCF pallet by taking mail from NDC or ADC
pallets or sacks. The software takes the mail that would have been on an
SCF pallet originally if only there had been enough pieces to form one.
The software then shifts mail from finer sort levels (3-digit or, in some cases,
5-digit pallets) until the minimum SCF pallet weight is met. Because of the
66 Presort User's Guide for 8.00c.06.00 release, December 2010
Page 67

Schemes and sort levels
Protecting pallets
weights of moved pieces, the final SCF pallet weight may be larger than the
minimum you specified.
Note:
Shifting pieces from the NDC or ADC pallet level may cause those pallets
to fall below the minimum pallet weight, resulting in more sacked mail (results
could vary, depending on your input data). For example, if you set your
minimum NDC pallet weight to 500 pounds, and you turn on SCF pallet
protection, the software might shift so much mail from the NDC pallet that
its weight falls below 500 pounds. The mail destined to the NDC would then
be prepared in sacks. So, if your priority is to keep as much mail on pallets
as possible, then you may not want to activate SCF Pallet Protection.
Because postage is based on the package level (not the pallet), postage is
not affected by shifting pieces among pallet levels.
Two methods
There are two methods of protecting SCF pallets. Although both methods
strive to keep mail at the SCF pallet level, they each allocate packages
differently and they each follow different USPS guidelines.
3
PSOFT
Results and guidelinesWhen the software applies itMethod
After the software forms 3-digit
packages, but before it forms 3digit pallets, it reserves enough 3digit packages to later form an SCF
pallet.
The software pulls tthe packages
in this order:
• 3DG pkgs from a single 3-
digit area.
• 3DG pkgs from multiple 3-
digit areas.
Presort User's Guide for 8.00c.06.00 release, December 2010 67
More SCF pallets and possibly
more sacked mail at NDC and
ADC levels.
The software can borrow pieces
from several 3-digit pallets as
long as the 3-digit pallets do not
dip below the minimum pallet
weight.
Page 68

Schemes and sort levels
3
Protecting pallets
Results and guidelinesWhen the software applies itMethod
USPS
NDC protection
In NDC pallet protection, the software begins forming a NDC pallet by taking
mail from sacks. The software takes the mail that would have been on a
NDC pallet originally if only there had been enough pieces to form one. The
software then shifts mail from a single ASF pallet until the minimum NDC
pallet weight is met.
After the software forms 3- and 5digit packages and pallets, it forms
SCF pallets, borrowing pieces as
needed.
The software pulls the packages
in this order:
• 3- or 5-digit pkgs from a single
3DG pallet.
• An entire 3DG pallet.
• 5-digit pkgs from a 5-digit pal-
let.
More SCF pallets, possibly fewer
3-digit pallets, and more sacked
mail at NDC and ADC levels.
The software begins by trying
to borrow pieces from a single
3-digit pallet. If no 3-digit pallet
has enough excess pieces to
save the SCF pallet, the software can eliminate an entire 3digit pallet in favor of the SCF
pallet. The software reallocates
the minimum number of packages necessary to save the
SCF pallet, but cannot eliminate
a 5-digit pallet to preserve an
SCF pallet.
Caution:
The software borrows pieces only from an ASF pallet that is bound for an
ASF facility whose ZIP range is defined in the same entry point description
as the NDC. That is, you can apply NDC pallet protection only for those entry
points in which a NDC is associated with an ASF.
In addition, pieces that the software shifts to the NDC pallet are not eligible
for the DNDC discount. You benefit from the labor savings of preparing a
mailing with more pallets and fewer sacks, but there is no postage incentive.
68 Presort User's Guide for 8.00c.06.00 release, December 2010
Page 69

Schemes and sort levels
How schemes affect reports and output files
To activate this feature, enable the NDC Pallet Protection parameter in the
Optional Sortation Levels window of the software.
How schemes affect reports and output
files
Each presort scheme in your job results in a separate legal mailing, with
separate reports. For example, if you have two schemes, the software
automatically creates one set of reports for each scheme, even though you
set up each type of report only once.
Options for output files
Normally when you create output files, the software outputs all schemes in
the order in which they appeared in the job setup. You have four options for
controlling this output behavior:
• If you would like to output only a selected scheme (or schemes), use the
Output Selection feature. The particular option to look for is Select Presort
Schemes To Output.
3
• To output each scheme to a separate output file, use the Split Output
feature. The particular option to look for is Create Files per Presort
Scheme.
• If you output all schemes together, in one file, you might want to control
their sequence. You could use the Mailflow feature. In the Mailflow window,
the particular option to look for is Alternate Presort Scheme Sequence.
• If you want to change the mail-stream hierarchy from the normal order of
entry point, segment, and scheme, to make scheme more dominant, use
Alternate Mailstream Hierarchy.
Output field
You might like to include a field in your output file to identify the scheme.
Mailing crews and acceptance clerks might appreciate this. Just one field is
available: AP.Scheme_No. Here are the possible value of this field:
Presort User's Guide for 8.00c.06.00 release, December 2010 69
Page 70

Schemes and sort levels
3
How schemes affect reports and output files
DescriptionValues
1 to 99
The Foreign designation is supported only in Periodicals jobs.
Related Topics
• Output selection
• Split output
• Using Mailflow to change the sequence of mailings
• Alternate mailstream hierarchy
• Schemes sift out some records
Scheme number, according to the sequence of schemes in the
job file. The sequence of numbering is not affected by any use
of the Mailflow feature.
70 Presort User's Guide for 8.00c.06.00 release, December 2010
Page 71

Assembling pieces, packages, containers, and pallets
4
Page 72

Assembling pieces, packages, containers, and pallets
4
Packages
The USPS sets many rules about the minimum and maximum amounts of
mail that you may place in packages, containers, and pallets. The software
gives you the flexibility to adjust within and outside these limits.
In the template jobs, options are set in ways that make sense for most mailers.
It's up to you to decide whether any adjustments will make your mail-room
or bindery operations more efficient.
Packages
In most types of mailings, you will have to band or strap your pieces into
packages. Schemes that don't require packaging include:
• Machinable parcels
• Automated or machinable letters
• Irregular parcels (greater than 1/2 inch)
Package size limits
The following table shows USPS limits on package size (see the DMM for
the most up-to-date information).
Within these limits, the software offers you as much flexibility as USPS rules
permit. The larger your maximum package size, the fewer packages you will
have to make. However, larger packages may be more difficult to handle
and, therefore, more time-consuming.
Mailers who band packages manually often find that a maximum thickness
of four inches makes a workable handful. If you use automatic binding or
strapping machines, consider their limitations.
72 Presort User's Guide for 8.00c.06.00 release, December 2010
Page 73

Assembling pieces, packages, containers, and pallets
Packages
4
Packages placed directly on
pallets
MaximumMinimumMaximumMinimum
6 piecesLetters: 6 in.6 piecesPeriodicals
10 piecesLetters: 6 in.10 piecesStandard Mail
pounds
whichever
comes first
24 in. thick or
20 lbs.
whichever
comes first
24 in. thick or
20 lbs.
whichever
comes first
20 pounds10 pieces or 10
(excludes 5digit and 5digit scheme
pkgs)
Package Services Bound
Printed Matter
Note:
Packages in trays or sacksSize limits
10 pieces or
10 pounds
whichever
comes first
20 pounds
Carrierroute: 40
pounds
• The USPS requires that irregular parcel packages directly placed onto
pallets must be of uniform thickness and more than 15 inches long or
more than 12 inches high (see DMM 705.8.10.2).
• The software will verify your job to make sure the dimension of mail pieces
complies with this requirement. However, the software is not be able to
verify the uniform thickness.
Periodicals and Standard Mail flats package size
The following table lists the package thickness requirements for Standard
and Periodicals in sacks. The requirements are based on the type of paper
coating and type of binding, and are designed to reduce package breakage.
If you strap your packages, the USPS requires one strap around packages
that are up to 1-inch thick (residual packages only) and two straps around
packages greater than 1-inch thick.
Presort User's Guide for 8.00c.06.00 release, December 2010 73
Page 74

Assembling pieces, packages, containers, and pallets
4
Packages
Type of binding and/or wrapping
one along length
straps
Maximum package thickness (Standard
and Periodicals)
Uncoated paperCoated paper
8 in. (6 in. recommended)6 in.Two straps; one along width and
8 in. (6 in. recommended)3 in.Shrink-wrapped
8 in. (6 in. recommended)6 in.Shrink-wrapped plus one or two
Options for weekly and daily periodicals
Periodicals packages of at least six pieces are eligible for presort discounts,
so we call them "reduced-rate" packages. However, in some sort levels, you
have the option to create packages as small as one or two pieces. Undersize
packages are mailed at the basic rate. To create them, look in the Periodicals
flats schemes for options that begin with the words Min Basic.
Note:
Undersize packages usually increase postage and require more labor,
because there are more packages to band. However, they tend to push more
mail up to finer sort levels, so they may improve delivery time. For this reason,
we see the undersize-package options being used most often by publishers
of daily and weekly periodicals.
Packages that exceed the maximum height
The USPS accepts packages that exceed the maximum height, but only if
they exceed the height by less than the thickness of a single piece. For
example, suppose your mail piece is printed on coated paper and is 0.625
(5/8) of an inch thick. If you form a package with five pieces, the total
thickness is 3.125 inches, which is more than the 3 inch maximum. That's
acceptable because the total thickness is less than the three inch maximum
plus the thickness of a single piece (3 + 0.625 = 3.625).
74 Presort User's Guide for 8.00c.06.00 release, December 2010
Page 75

Spanned (split) packages
If you are mailing thicker pieces, it is possible that a package meeting the
USPS minimum number of pieces will exceed the maximum package
thickness. For example, consider a package of department-store catalogs;
10 pieces might make a package almost a foot thick. That's acceptable on
pallets, but not in sacks.
When the software forms such an oversize package, it breaks it into two or
perhaps three smaller packages. These are called spanned packages.
Assembling pieces, packages, containers, and pallets
Packages
4
Spanning is approved by the USPS. Spanned packages qualify for package
rates the same as a normal package, even though an individual package
might contain less than the minimum number of pieces.
Spanning is automatic; you cannot turn it off. The software automatically
creates spanned packages when applicable, and when the following
conditions are met:
• The total number of pieces in the package to that destination meets the
minimum package requirement.
• The total number of physical packages created is not more than the
number that would have been created if we had not balanced the pieces
in the packages.
The software treats spanned packages the same as other packages,
generating break marks and listing them on reports.
Presort User's Guide for 8.00c.06.00 release, December 2010 75
Page 76

Assembling pieces, packages, containers, and pallets
4
Packages
Stacking uneven pieces
If your pieces are unevenly proportioned (for example, a magazine that is
saddle stitched and thicker on the bound edge), you must counter stack the
pieces to form an even-sized package.
Split the package into no more than four groups of pieces, with each group
measuring at least 1 inch (that is, if your piece thickness is less than 1 inch,
don't alternate one piece after another, but group them and then alternate
the groups).
Each of these packages meets USPS requirements. Each group of pieces
is at least 1-inch thick, and there are no more than four groups counterstacked
in the package.
When you measure a package that is uneven in thickness, the USPS allows
you to measure at the thinnest point.
Minimum STD flats 5DG/5DG scheme package size
The minimum package size for Standard Mail flats 5-digit and 5-digit scheme
packages is different than other Standard Mail flats packages. For 5-digit
and 5-digit scheme packages, the piece weight and thickness determines
the minimum number of pieces.
For all applicable Standard Mail flats jobs, the software automatically sets
the Min 5DG/Scheme Package parameter to 10 or 15 pieces, regardless
of what you have entered in the software, based on the piece weight and
thickness:
76 Presort User's Guide for 8.00c.06.00 release, December 2010
Page 77

Assembling pieces, packages, containers, and pallets
Packages
4
Piece weight and thickness
<= 5 ounces and <= .75 inches thick
> 5 ounces or > .75 inches thick
Multiple segment jobs
When you have a job with multiple segments, the software treats each
segment as a separate mailing. When your segments have more than one
version, the software sets the minimum number of pieces per package based
on the heaviest (or thickest) piece in that segment. For example, each
segment below has two versions. Segment 1 and 3 both have Version 1.
1
2
3
Version 1
6 ounces, 1 inch
Version 3
3 ounces, .75 inch
Version 1
4 ounces, .5 inch
2 ounces, .25 inch
Minimum pieces per package
15 pieces
10 pieces
MinimumVersionVersionSegment
10Version 2
15Version 4
10Version 5
6 ounces, 1 inch
If you save work files
The software warns you when you have saved your work files and gone back
into your job and changed the piece dimensions making the minimum
package setting incorrect in your saved work files
The warning indicates that the minimum package size listed in the reports
generated from the saved work files may violate USPS rules.
Presort User's Guide for 8.00c.06.00 release, December 2010 77
6.25 ounces, 1.25
inches
Page 78

Assembling pieces, packages, containers, and pallets
4
Co-Packaging: Automation and regular flats
Co-Packaging: Automation and regular
flats
Co-packaging is an option to combine automated and regular
(non-automated) pieces into packages. In most cases, your postage is
reduced using this preparation.
This preparation also saves the post office time and labor, and speeds up
delivery. Co-Packaging is an optional sortation level available in these
schemes:
• Periodicals Flats
• Periodicals Sacks on Pallets
• Periodicals Packages on Pallets
• Standard Flats
• Standard Sacks on Pallets
• Standard Packages on Pallets
• Package Services BPM flats
• Package Services BPM Packages on Pallets
Setting up co-packages
There are three different ways to set up co-packaging. The method you
choose is based on the mail class that you are processing.
For Package Services BPM, see the Co-Package Barcoded and Reg Pcs
parameter description in the Presort Job-File Reference.
For Periodicals and Standard Mail flats, enable the Co-Package Auto and
Reg Pieces parameter, the Prepare Automation Rate parameter, and the
Prepare Regular Rate parameter.
One package per destination
Co-packaging is limited to one package per destination.
If you have 50 automated pieces and 30 regular (non-automated) pieces
going to the same destination, and you set your maximum pieces per package
78 Presort User's Guide for 8.00c.06.00 release, December 2010
Page 79

to 20, (and you have selected the co-package option), the software makes
four packages with 20 pieces each. Here's how the packages are made:
• Package 1: Automated, 20 pieces
• Package 2: Automated, 20 pieces
• Package 3: Co-package automated and regular (non-automated), 20
pieces
• Package 4: Regular (non-automated), 20 pieces
Notice in the example that the co-package is made before the regular
(non-automated) package is made. The co-package will always fall towards
the middle of the sortation unless there are not enough regular
(non-automated) pieces to make a package. Then it will be formed last.
Co-packaging rates
For co-packaged automated and regular pieces, rates are based on the
following:
For packages in sacks and trays:
• Automated piece rates are based on the package level.
• Regular (nonautomated) piece rates are based on the container level.
Assembling pieces, packages, containers, and pallets
Co-Packaging: Automation and regular flats
4
For packages on pallets, the rate is based on the package level. For
automated pieces in Periodicals packages with fewer than 6 pieces, the rate
is the Automated basic rate.
Create 5-digit scheme (L007) packages
You can create 5-digit scheme (L007) co-packages in the two BPM schemes
that have the option to co-package. When you select both the co-package
and the create 5-digit scheme (L007) packages options, the software makes
5-digit scheme co-packages that contain presorted and regular rate pieces.
When both the Co-Package and the Create 5DG Scheme parameters are
enabled (set to Y), the software places the packages in containers and pallets
this way:
Presort User's Guide for 8.00c.06.00 release, December 2010 79
Page 80

Assembling pieces, packages, containers, and pallets
4
Co-sacking BPM flats
name
ContainersPackagesScheme
BPM Flats
BPM Packages on
Pallets
The software creates 5digit scheme co-packages.
The software creates 5digit scheme co-packages.
Co-sacking BPM flats
Co-sacks may contain:
• Presorted rate pieces that claim the barcode discount (must have a ZIP+4
or a delivery point barcode).
• Presorted rate pieces that don't claim the barcode discount (must have
a readable 5-digit barcode).
• Co-packages of BPM flats that meet the previous two presorted rate
characteristics.
Other rules include the following:
• The pieces in the co-sacks must all be from the same mailing job.
• Each rate level (carrier route, automated, and regular) that is included in
your job must separately meet the minimum requirement of 300 pieces.
The co-packages go in 5-digit scheme
and merged 5-digit scheme containers.
The co-packages go on 5-digit, 3-digit,
and SCF pallets when applicable.
Note:
Bound Printed Matter cannot be merged under DMM 705.1, 705.12.1.1,
and 705.13.
Letter trays
The USPS furnishes mailers with three types of trays for letter mail:
• one-foot ordinary (MM) trays
• two-foot ordinary (MM) trays
• two-foot extended (EMM) trays
80 Presort User's Guide for 8.00c.06.00 release, December 2010
Page 81

Ordinary trays are designed to hold #10 envelopes. If your mail piece is larger
than 45/8 inches tall or 10½ inches long, you are required to use extended
trays if they are available.
Trays slope at each end, so you cannot load a 24-inch stack of mail into a
"two-foot" tray. Two-foot trays actually are 21.75 inches long as measured
along the bottom of the tray. One-foot trays actually are 10.25 inches long.
The USPS requires you to use a mixture of one-foot and two-foot trays in
the same mailing for pieces that meet MM tray-size limitations. If you don't
have enough of one size tray or the other, ask the USPS for authorization
to prepare letters in all one-foot or all two-foot trays. When you use a mixture
of sizes, you might find it helpful to print an output field (AP.Ctn_Size) on
your tray labels, as a convenient signal for the mail-room crew.
Tray preparation
The USPS accepts presorted letters only in trays, not sacks. There are three
ways of preparing letter trays: loose, separator cards, and packages. The
method you must follow will depend on the presort scheme you chose.
Assembling pieces, packages, containers, and pallets
Letter trays
4
On your Mail Sort Listing, the software indicates which type of preparation
is required for each tray. You can also print an output field (AP.Tray_Prep)
on your tray labels, as a convenient signal for the mail-room crew. The USPS
requires that you place a sleeve around the tray. Then you have to wrap a
strap around it from end to end.
Size limits
In tray schemes, you can set a minimum and maximum amount of mail as
a percentage of full. Look for the Minimum and Maximum Tray Volume
options.
We preset these to 85 and 100 percent, respectively. These settings will
serve most mailers very well. Any change to these settings might result in
refused mailing.
There is one situation in which you might need to reduce these settings.
When you mail large (tall) letters, you're supposed to use extended (EMM)
trays. However, you might get permission to use regular trays if your
postmaster can't supply enough EMM trays.
Presort User's Guide for 8.00c.06.00 release, December 2010 81
Page 82

Assembling pieces, packages, containers, and pallets
4
Letter trays
In this event you'll have to slant the pieces, or you won't be able to get the
sleeves on. When you slant pieces steeply, trays don't hold as much mail,
so you would have to reduce both the minimum and maximum limits.
Overflow and reduced overflow trays
In some schemes, you can control if the software makes overflow or reduced
overflow trays.
Overflow trays
The software includes the option to create overflow trays in certain automation
letter schemes. In other schemes, there is no overflow option; the software
automatically creates the overflow tray when applicable. As a general rule,
overflow trays are allowed if the next sortation level has a higher rate. Refer
to the DMM for mail types that cannot have overflow trays.
If you choose not to create overflow trays, but the software determines that
because of piece thickness, it has to make overflow trays, the software
overrides your setting and creates the overflow tray anyway. A warning
appears on the Job Summary report.
Some schemes don't include the option to create overflow trays. You can
control the creation of overflow trays for carrier route mail through your
minimum tray settings for 5-digit trays, or by choosing to create 3-digit trays.
Reduced overflow trays
The reduced overflow trays option is available for First-Class automation
and Standard Mail automation and machinable letters. Reduced overflow
trays may reduce the number of trays required for a mailing without impacting
postage.
DMM 245.7.5 reads, "Instead of preparing overflow trays with fewer than
150 pieces, mailers may include these pieces in the next tray level when a
tray of 150 or more pieces can be made."
When you choose to use reduced overflow trays, you must group the mail
that is going into the next tray level by destination and place it at the front of
the tray. You then keep the highest level, lowest postage rate, no matter
what levels the mail falls to.
82 Presort User's Guide for 8.00c.06.00 release, December 2010
Page 83

Assembling pieces, packages, containers, and pallets
Letter trays
The reduced overflow tray option does not apply to origin, entry 3-digit, or
scheme trays. This means that you have to make additional overflow
origin/entry 3-digit scheme trays because you can't drop the remaining mail
to the next level. Also note that trays can't be reduced if your mail is in a
5-digit scheme tray in which the scheme contains ZIP Codes from multiple
3-digit areas.
Parameters
Use the following parameters to control the creation of overflow and reduced
overflow trays:
• Overflow Trays Option
• STD Overflow Trays Option
• Min Carrier 5DG Tray
• Create 3DG Carrier Route Trays
See the Presort Job-file Reference for more information about these
parameters.
4
STD flats in letter trays
If your Standard Mail flat pieces meet specific USPS criteria, you can place
them in letter trays instead of sacks. The flats must be packaged under most
situations, and then the trays must be palletized.
Your pieces are less likely to be damaged when they are placed in trays.
Bundles are also less likely to break open when they are in trays. For
example, if your flats include a sample of laundry detergent, there is a good
chance that some may break open when they are handled in sacks. However,
placed in trays, the packets of detergent are more protected and fewer pieces
are broken.
You can learn the rules about flats in letter trays by reading the applicable
DMM sections. Here is an overview:
Presort User's Guide for 8.00c.06.00 release, December 2010 83
Page 84

Assembling pieces, packages, containers, and pallets
4
Letter trays
DescriptionRequirement
Ninety-percent requirement
Minimum piece requirement
Size and weight
requirements
To be eligible for this sortation option, at least 90 percent
of your entire mailing must be automated or enhanced
carrier route (ECR) rate flats. The remaining 10 percent (or
less) can be presorted rate flats. You cannot base the 10
percent on individual plant-verified drop shipment (PVDS)
destinations. You must consider the entire mailing. The
software does not check for this requirement, but it does
issue a warning when you validate your job.
Your mailing must meet all minimum piece requirements
(DMM 243) for automation and ECR flats.
• Automation flats have a minimum of 200 pieces (and
remember, they must consist of at least 90 percent of
the job.)
• ECR flats have a minimum of 200 pieces.
• Presorted flats have no minimum requirement (and must
consist of 10 percent or less of the job).
Automated, presorted, and ECR rate flats must meet the
specific dimension stated in the DMM, sections 301 and
201. In addition, the pieces must fit correctly in the trays.
That means that the pieces cannot stick out of the tray or
be jammed in the tray. Find tray dimensions in the DMM
345.03.04.
If the dimensions of the flat piece permits, you can position the pieces in the trays in double rows. To set this
up, enter twice the length of the tray in the USPS Optional Procedures block.
84 Presort User's Guide for 8.00c.06.00 release, December 2010
Page 85

Assembling pieces, packages, containers, and pallets
Letter trays
DescriptionRequirement
4
Preparation requirements
All flats must be packaged, except for flats in full 5-digit
trays and full individual carrier route trays. Sacks are not
allowed when you prepare flats in letter trays except when
there aren't enough pieces to fill a tray or enough trays to
complete a pallet.
• Roll up leftover pieces: If ECR pieces don't meet the
minimum pieces requirement, the remaining pieces
must mail at First-Class rates.
• Co-trays: Presorted and automation rate pieces must
be co-trayed where applicable. You cannot co-package
this type of mailing
Periodicals letter trays on pallets
Presort supports the palletization of Periodicals letter trays (see DMM
705.8.10.1). Use the Presort Scheme: PER, Letter Trays on Pallets to process
carrier route, automation, and nonautomation priced mail. This feature does
not include flats in letter trays on pallets.
Note:
Periodicals mail does not have a minimum volume requirement for each
price category.
Destination entry eligibility
The pallet level of the mail piece affects the destination entry eligibility. The
following is a breakdown of what you might see at each level:
DescriptionPallet level
DDU (Destination Delivery
Unit)
Available for in-county and carrier route pieces when deposited at the facility where the delivery address on the mail is
located. The pallet levels affect what is eligible for DDU.
Presort User's Guide for 8.00c.06.00 release, December 2010 85
Page 86

Assembling pieces, packages, containers, and pallets
4
Letter trays
DescriptionPallet level
DSCF (Destination Sectional
Facility)
DADC (Destination Area Distribution Center)
Tray sequence
Available for mail placed on an SCF or more finely presorted
pallet. You must also deposit the mail at an SCF and address
it for delivery to one of the 3-digit ZIP Codes served by the
facility where you deposited it.
Available for mail placed on an ADC or more finely presorted
pallet. You must also deposit the mail at an ADC and address
it for delivery to one of the 3-digit ZIP Codes served by the
facility where you deposited it.
Within a pallet, trays are sequenced in the following order (unless you are
using mail flow to change the tray sequence): direct carrier route, 5-digit
carrier route, 3-digit carrier route, 5-digit barcode, 5-digit (non-barcode or
regular), 3-digit barcode, 3-digit (non-barcode or regular), ADC, and mixed
ADC.
Pallet levels
The following is a list of optional and required pallet levels for the PER, Letter
Trays on Pallets scheme. See DMM 705.8.10.2 for more information:
Pallet level
required?
DescriptionOptional or
Optional5-digit carri-
er route
Optional5-digit
Optional3-digit
86 Presort User's Guide for 8.00c.06.00 release, December 2010
The pallet contains only carrier route mail for the
same 5-digit ZIP Code.
The pallet contains automation and/or presorted
priced mail for the same 5-digit ZIP Code. No carrier
route rate mail. Only 5-digit scheme and 5-digit trays
allowed.
Carrier route, automation, and/or presorted priced
mail allowed. Carrier route, 5-digit, 5-digit scheme,
and 3-digit trays allowed.
Page 87

Assembling pieces, packages, containers, and pallets
Flat trays
4
Pallet level
required?
RequiredSCF
RequiredADC
OptionalMIxed ADC
Template
The template file, p_ltrplt.pst, contains the PER, Letter Trays on Pallets
scheme, in addition to schemes that are in p_letter.pst.
DescriptionOptional or
Carrier route, automation, and/or presorted priced
mail for 3-digit ZIP Code groups in L005. Carrier
Route, 5-digit, 5-digit scheme, and 3-digit trays allowed.
Carrier route, automation, and/or presorted priced
mail for 3-digit ZIP Code groups in L004. Carrier
Route, 5-digit, 5-digit scheme, and 3-digit, AADC,
and ADC trays allowed.
Carrier route, automation, and/or presorted priced
mail allowed. Labeled with city, state and ZIP Code
information for ADC serving 3-digit ZIP Code prefix
of entry Post Office as shown in L004.
The sequence in the template is as follows:
1. PER, Letter Trays on Pallets
2. PER, Carrier Route Letters
3. PER, Automation Letters
4. PER, Nonautomation Letters
Flat trays
Use flat trays for First-Class flats and CMM pieces; if you prepare Periodicals
or Standard Mail flats, place them in sacks, not trays.
Flat trays are much taller than letter trays; they are 11¼ inches high. Some
people call them flat tubs.
Presort User's Guide for 8.00c.06.00 release, December 2010 87
Page 88

Assembling pieces, packages, containers, and pallets
4
Flat trays
Filling trays
The USPS requires that you package First-Class flats if you use the following
preparation types (see the Presort Job-File Reference for details of each):
• automation
• regular
• combined
However, the USPS doesn't require packaging if you use Tray Automation
preparation; you must prepare those flats loose in trays.
Regardless of whether pieces are packaged or loose, the USPS wants you
to use the space in trays efficiently. The USPS considers a flat tray to be full
when:
• It contains at least one stack of pieces or packages lying flat.
• The stack reaches at least to the bottom of the handholds (8 inches tall
in a flat tray).
You can control tray filling by setting four options in the First-Class Flats
scheme:
• Maximum Package Thickness (except Tray Automation)
• Number of Stacks in Tray
• Minimum Tray Height
• Maximum Tray Height
Stacks
Don't confuse a stack with a package. A stack is a column of pieces between
8 and 11¼ inches tall.
The size of most flats will allow you to place two stacks in the tub, one at
each end. You may place up to four stacks in a tub (when mailing a
digest-size piece, for example).
A stack cannot extend beyond the top of the tray. You'll need to place a lid
on the tray and secure it with two straps around the width (the shorter
dimension).
88 Presort User's Guide for 8.00c.06.00 release, December 2010
Page 89

Packages
Selvage
Assembling pieces, packages, containers, and pallets
Selvage
A stack typically contains two or more packages. So if you package
First-Class flats, you'll want to set your maximum package thickness so that
you can fit multiple packages in a stack. You could also stand a single
package on end and place it next to a stack.
If you set maximum package thickness at 6 inches, you'll have some 12-inch
stacks, too tall for the tray. So we recommend that you set the maximum
package thickness to no greater than 5 or 5½ inches.
Obviously, tray filling is something you can plan more precisely if you can
get some sample mail pieces.
The USPS includes selvage when determining the maximum size of flats in
all mail classes.
4
Selvage is the extra polywrap material around a mail piece. For example,
let's say you are mailing a polywrapped magazine. You would need to shake
the magazine so that it settles into the bottom, left-hand corner of the
wrapping.
To determine the selvage height, measure the distance between the "top"
of the magazine and the edge of the polywrap. Do the same on the other
side of the mail piece to obtain the selvage width.
The software uses only the dimensions that you enter for the actual mail
piece — not the selvage, which is used to verify the piece dimensions — to
determine the amount of mail that can go into a sack, tray, and so on.
If you want the software to verify the selvage amounts, enter a value for each
parameter.
The DMM's definition of the top of the mail piece is different than what is
shown in the following illustration. DMM section 301.3.3.3 says, "...the top
edge of the mailpiece is one of the two physically longer edges of the piece,
regardless of address orientation and whether bound or unbound."
Presort User's Guide for 8.00c.06.00 release, December 2010 89
Page 90

Assembling pieces, packages, containers, and pallets
4
Is your piece a flat or a parcel?
Note:
If you are processing an auto-dimension job, do not include the selvage
dimensions in your width and height amounts.
It is up to you to make sure that mail pieces that include the selvage
measurements do not exceed the maximum height and width of an automated
or machinable flat. The software does not check this for you.
To set selvage measurements, use the following parameters in the Version
Description and Version Defaults blocks:
• Additional Selvage Height
• Additional Selvage Width
Is your piece a flat or a parcel?
You will process some of your flats as parcels or not flat-machinables (NFM).
Use this section to figure out how you should mail your pieces.
Please note the following definitions of postal terms as they apply to your
mailings. Specific requirements regarding the number of pieces and the
dimensions and weight and other characteristics (for example, flexibility) of
the mail piece vary by mail class and shape. See the DMM for specific
requirements for each mail class and shape.
90 Presort User's Guide for 8.00c.06.00 release, December 2010
Page 91

Assembling pieces, packages, containers, and pallets
Is your piece a flat or a parcel?
DefinitionTerm
4
Machinable flat
Nonmachinable
flat
Not flat-machinable (NFM)
Related Topics
• Standard Mail parcels - not flat-machinable (NFM)
Flats dimensions
The length of a flat-sized mail piece is the longest dimension. Width is the
dimension perpendicular to the length.
Flat-sized mail that meets USPS requirements for processing
on their equipment. The term “machinable” also applies to
parcels and not flat-machinables (NFM).
Flat-sized mail that does not meet USPS requirements for
processing on their equipment. It may be too flimsy or too
rigid, for example. Nonmachinable rates are higher; therefore,
do not choose this category if your mail piece is machinable.
The term “machinable” also applies to parcels and NFMs.
NFM is a processing category for Standard Mail pieces of a
certain size (overlapping the flats and parcels dimensions)
that are too rigid to be processed on USPS flats-sorting
equipment. Previously these pieces were handled by the
UFSM 1000 flats processing category.
Testing the flexibility and droop of your flat-sized mail piece
For a piece to be considered a flat, it must meet the flexibility requirements
as stated in DMM 301.1.4:
a. All flats:
1. Place the piece with the length parallel to the edge of a flat surface and
extend the piece halfway off the surface.
2. Press down on the piece at a point 1 inch from the outer edge, in the
center of the piece's length, exerting steady pressure.
3.
The piece is not flexible if it cannot bend at least 1 inch vertically without
being damaged.
Presort User's Guide for 8.00c.06.00 release, December 2010 91
Page 92

Assembling pieces, packages, containers, and pallets
4
Is your piece a flat or a parcel?
4.
The piece is flexible if it can bend at least 1 inch vertically without being
damaged and it does not contain a rigid insert. No further testing is
necessary.
5. Test the piece according to 1.4b or 1.4c below if it can bend at least 1
inch vertically without being damaged and it contains a rigid insert.
b. Flats 10 inches or longer that pass the test in 1.4a and contain a rigid
insert:
1. Place the piece with the length perpendicular to the edge of a flat surface
and extend the piece 5 inches off the surface.
2. Press down on the piece at a point 1 inch from the outer edge, in the
center of the piece's width, exerting steady pressure.
3. Turn the piece around and repeat steps 1 and 2. The piece is flexible if
both ends can bend at least 2 inches vertically without being damaged.
c. Flats less than 10 inches long that pass the test in 1.4a and contain a rigid
insert:
1. Place the piece with the length perpendicular to the edge of a flat surface
and extend the piece one-half of its length off the surface.
2. Press down on the piece at a point 1 inch from the outer edge, in the
center of the piece's width, exerting steady pressure.
3. Turn the piece around and repeat steps 1 and 2. The piece is flexible if
both ends can bend at least 1 inch vertically without being damaged.
DMM 301.1.4
Automation flat
Furthermore, for a flat to qualify as an automation flat, it must pass the USPS
deflection test (see DMM 301.3.2.4), which tests how much the piece droops
when held over the edge of a hard surface. The USPS rules state that a mail
piece is automation-compatible if it meets the other automation requirements
and passes the following deflection test:
a. For pieces 10 inches or longer:
1. Place the piece with the length perpendicular to the edge of a flat surface
and extend the piece 5 inches off the surface. Turn the piece around and
repeat the process.
2. The piece is automation-compatible if it does not droop more than 4 inches
vertically.
b. For pieces 10 inches or longer:
92 Presort User's Guide for 8.00c.06.00 release, December 2010
Page 93

Assembling pieces, packages, containers, and pallets
Standard Mail parcels - not flat-machinable (NFM)
1. Place the piece with the length perpendicular to the edge of a flat surface
and extend the piece one-half of its length off the surface. Turn the piece
around and repeat the process.
2. The piece is automation-compatible if it does not droop more than 1 inch
less than the extended length. For example, a piece 8 inches long would
extend 4 inches off a flat surface. It must not droop more than 3 inches
vertically.
c. For pieces with bound or folded edges perform the test in 3.2.4a or 3.2.4b
above by placing the bound or final folded edge perpendicular to the edge
of the flat surface.
DMM 301.3.2.4
Standard Mail parcels - not
flat-machinable (NFM)
Not flat-machinable (NFM) pieces fall within the Standard Mail parcel
category. According to the USPS, "The NFM subcategory gives mailers the
option to mail qualifying pieces at the lower, NFM rates, rather than at the
higher, parcel rates."
4
NFMs are pieces that are either too rigid for processing as an automation
flat. The physical standards for NFMs are described in DMM 401.2.2.2.
LimitsDimension
Between 4 and 12 inchesHeight
Between 4 and 15.75 inchesLength/width
Thickness
There are two NFM processing categories:
Between 0.009 and 1.25 inches. Pieces less than 5 inches in
length must be over 0.25 inches thick.
Presort User's Guide for 8.00c.06.00 release, December 2010 93
Page 94

Assembling pieces, packages, containers, and pallets
4
Standard Mail parcels - not flat-machinable (NFM)
Related Topics
• Testing the flexibility and droop of your flat-sized mail piece
NFM rate information
Not flat-machinable pieces have their own rates for regular and nonprofit.
These rates are described in DMM 443.5.5 NFMs are also eligible for
destination rates.
Note:
There is a surcharge on some NFM pieces (see DMM 443.4.4). You are not
subject to surcharge if you use barcodes on your Standard Mail parcel and
NFM pieces. Additionally, the surcharge does not apply to pieces sorted to
5-digit ZIP Codes (5-digit/scheme sacks or pallets). If you plan to place a
barcode on your NFM pieces, set the Parcel or NFM is Barcoded parameter,
which is located in the Version Descriptions block, to Yes. If you set this
parameter to No (no barcode on the piece), the software applies the
surcharge.
DescriptionProcessing category
NFM pieces that are 6 ounces or less.Irregular NFM
NFM pieces that are more than 6 ounces.Machinable NFM
Using the MailDirShow utility with NFMs
The MailDirShow utility treats NFMs as parcel pieces. You need to determine
if the shape of your mail piece falls under IRREG or MACH. You determine
this based on the weight and intended processing of your mail piece.
• NFMs weighing less than 6 ounces are considered irregular parcels
(IRREG).
• NFMs weighing more than 6 ounces are considered machinable parcels
(MACH).
Related Topics
• The Maildirshow utility
94 Presort User's Guide for 8.00c.06.00 release, December 2010
Page 95

Sacks
Assembling pieces, packages, containers, and pallets
Sacks are used in the following mail classes:
• Periodicals
• Standard Mail flats and parcels
• Package Services
The USPS furnishes mailers with the following sacks:
Sacks
4
Size
Sack
Sack
Capacity (Cubic
ft.)
Size limits for sacks
The USPS sets the minimum amount of mail that you can place in a sack
and qualify for a presort discount. See the DMM for specific amounts.
When you set up your presort schemes, you can control sack filling by setting
the maximum weight and volume. The volume limit is a percentage of the
total capacity listed above.
Max weight (lbs.)Capacity (Cubic
in.)
7077764.5#1
7051843.0#2
7025921.5#3
7065003.75#1 Clear
7040002.5#3 Clear
If you raise the limits too high, you might end up with some heavy, full sacks.
If you set them too low, the software forms more sacks, and you might waste
time by handling more sacks than necessary.
The software uses whichever limit best fits the mailing. To determine which
limit to apply, the software divides the weight of one piece into the maximum
Presort User's Guide for 8.00c.06.00 release, December 2010 95
Page 96

Assembling pieces, packages, containers, and pallets
4
Sacks
weight, and the volume of one piece into the maximum volume, and uses
the limit that results in the smaller number of pieces.
If you mingle multiple versions, the software applies both the weight and
volume limits. This ensures that sacks will be properly filled no matter what
mix of versions they happen to contain.
Periodicals origin split
The software uses a mixed package/sack level. The mixed sack level, MADC
L201, is in addition to another mixed sack level called MADC L009.
The content of a sack at the mixed origin level— as well as the content of
mixed packages from mail left over after the 3-digit, 5-digit and ADC bundles
have been prepared— is determined from the table, L201.
This L201 table is based upon the 3-digit ZIP Code of both the entry point
and the destination. Mail left over after this level is prepared in mixed
packages and sacks according to the L009 table.
In Views, select Mixed Origin ADC (L201) in the Optional Sortation Levels
window for the PER, Flats scheme. In Job-file, use the parameter named
Create MXD Origin(L201) Pkg/Sack in Presort Scheme: PER, Flats.
The following diagrams show where the L201 Mixed ADC level fits in.
96 Presort User's Guide for 8.00c.06.00 release, December 2010
Page 97

Assembling pieces, packages, containers, and pallets
Palletization
Rules
The following list gives an overview of the USPS rules for the Periodicals
origin split processing. For more detailed information, see DMM 707.
• After preparing all bundles at finer sort levels (for example, any carrier
route and automation pieces first and then any presorted levels prior to
mixed), prepare origin mixed packages based on the L201 table (using
entry point and piece destinations) before making "normal" L009 MADC
bundles.
4
• Before making Mixed ADC sacks, make L201 Origin Mixed ADC sacks
(based on entry point and bundle destinations). These may contain L201
Origin Mixed ADC packages and bundles from finer sortation levels.
Palletization
Palletizing means preparing packages, letter trays, or sacks on shipping
pallets that are destined and labeled for a USPS facility. The USPS supports
palletizing in the following mail classes:
• Periodicals
• Standard Mail
• Package Services
Presort User's Guide for 8.00c.06.00 release, December 2010 97
Page 98

Assembling pieces, packages, containers, and pallets
4
Palletization
• First-Class
Palletizing is the only practicable way to handle large mailings. However,
they can be practical and attractive even for medium-sized mailings. With
some exceptions, pallets may weigh from 250 to 2200 pounds.
Palletizing makes it easier to transport mail within your plant, and into and
out of trucks. If you prepared these packages in a sack scheme, postage
would be based on sack level. Postage for the same mail prepared with a
Packages on Pallets scheme would be based on package level, resulting in
potentially overall lower postage
To palletize your mail, you will need the software's Palletization module. The
USPS does not require any special permit for palletizing. However, you must
be careful to follow all USPS rules regarding pallet preparation, materials,
and stacking. If the USPS decides that you prepare unsafe pallets, they could
withdraw your palletization privilege. You may need additional equipment to
shrink-wrap and move pallets.
Pallet size limits
The USPS limits pallets both by weight and height.
LimitsDimension
Weight
Height
Some Parcel Post rate categories qualify pallets based on the number of
inches of mail. For example, an inter-NDC pallet of machinable parcels that
qualifies for a NDC or Origin NDC presort must contain at least 52 inches of
mail.
98 Presort User's Guide for 8.00c.06.00 release, December 2010
With some exceptions, pallets should contain at least 250
pounds of mail, unless you make special arrangements with
the USPS. No single pallet, nor stack of pallets, may weigh
more than 2200 pounds. This figure includes the weight of the
pallet itself, so if you put 2200 pounds of mail on a pallet, it's
overweight.
Single pallets are limited to 77 inches tall, and stacked pallets
to 84 inches. This is measured from the floor, so it does include
the height of the pallet itself, not just the mail. Pallets of letter
trays must contain at least 36 linear feet of trays.
Page 99

Assembling pieces, packages, containers, and pallets
Palletization
Within these USPS limits, you can set your own pallet limits, through options
in the palletizing schemes.
DescriptionLimit
4
Minimum
weight
Maximum
weight
Maximum volume
250 to 500 pounds
You have the option either to:
• set the same minimum at all sort levels, or
• set different minimums at each sort level.
1000 to 2200 pounds
We recommend 2100 pounds because you must count the
weight of the pallet, wrapping, boxes, straps, top cap, and
so on. The same maximum weight is applied at all sort
levels.
Note that for Standard Mail pallet schemes you have the
option to set the max pallet weight for each pallet level.
85 to 100 percent, based on the USPS maximum volume of
85½ cubic feet.
Our figure for maximum volume assumes a stack of mail
40 inches wide, 48 inches long (which are normal pallet
dimensions), and 77 inches tall. You may find that your
stacks of mail do not cover the entire pallet area; for example, there may be a few inches of open space around each
edge. You might want to allow for this by reducing the
maximum pallet volume. Otherwise, the software might
form a pallet taller than 77 inches.
How the software applies your pallet limits
Generally, the software applies either the maximum weight or volume limit,
not both. To determine which limit to apply, the software divides the weight
of one piece into the maximum weight, and the volume of one piece into the
Presort User's Guide for 8.00c.06.00 release, December 2010 99
Page 100

Assembling pieces, packages, containers, and pallets
4
Packages and containers on pallets
maximum volume. Whichever method yields the smaller number of pieces,
the software uses as the limit.
When you mingle multiple versions or editions, the software applies both the
weight and volume limits to each pallet. This ensures that pallets will be
properly filled no matter what mix of versions they happen to contain.
Adjust your pallet limits
You can set different minimum weights at each sort level. You might do this
to reduce the number of small pallets, and thus, reduce handling.
For example, when preparing a Packages on Pallets scheme, you might set
the pallet weight for 5-digit and 3-digit pallets at 500 pounds, and set the
pallet weight for SCF pallets at 250 pounds (the minimum allowed by the
USPS). Fewer, fuller pallets would be formed using this strategy, because
more mail would fall to the SCF pallets. You'll benefit from less mail handling
and no increase in postage, because postage applies to the package level,
not the pallet level.
If you have USPS authorization, you may set the minimum pallet weight at
less than 250 pounds. The software will warn you that your setting is below
USPS regulations, but you can ignore the warning and process the job
anyway.
Packages and containers on pallets
For convenience, the USPS allows mailers to place packages or containers
of mail directly on pallets in certain classes. The software supports preparation
of the following packages or containers on pallets:
100 Presort User's Guide for 8.00c.06.00 release, December 2010
 Loading...