


Label Studio
Inkjet Reference
Label Studio 7.90c
November 2008

Contact information Contact us on the Web at http://service.sap.com/.
If you find any problem with this documentation, please report it to Business Objects
in writing at
Copyright © 2008 Business Objects. All rights reserved.
Patents Business Objects owns the following U.S. patents, which may cover products that are
documentation@businessobjects.com
.
offered and licensed by Business Objects: 5,555,403; 5,857,205; 6,289,352;
6,247,008; 6,490,593; 6,578,027; 6,831,668; 6,768,986; 6,772,409; 6,882,998;
7,139,766; 7,299,419; 7,194,465; 7,222,130; 7,181,440 and 7,181,435.
Trademarks Business Objects and the Business Objects logo, BusinessObjects, Business Objects
Crystal Vision, Business Process On Demand, BusinessQuery, Crystal Analysis,
Crystal Applications, Crystal Decisions, Crystal Enterprise, Crystal Insider, Crystal
Reports, Desktop Intelligence, Inxight, the Inxight Logo, LinguistX, Star Tree, Table
Lens, ThingFinder, Timewall, Let there be light, Metify, NSite, Rapid Marts,
RapidMarts, the Spectrum Design, Web Intelligence, Workmail and Xcelsius are
trademarks or registered trademarks in the United States and/or other countries of
Business Objects and/or affiliated companies. All other names mentioned herein may
be trademarks of their respective owners.
Third-party contributors Business Objects products in this release may contain redistributions of software
licensed from third-party contributors. Some of these individual compo nents may
also be available under alternative licenses. A partial listing of third-party
contributors that have requested or permitted acknowledgments, as well as required
notices, can be found at: http://www.businessobjects.com/thirdparty
2
Label Studio Inkjet Reference

Contents
Preface.............................................................................................................5
Supported printers.................................................. ..........................................7
Feature overview..............................................................................................8
Chapter 1:
Messaging..................................................................................................... 11
Messaging overview.......................................................................................12
Messaging components..................................................................................14
Input files and messaging...............................................................................15
Message files..................................................................................................16
Set up messaging in your design....................................................................18
Personalized messages ....................................................................... .... ..... ...19
Setting up Heidelberg drivers for messaging.................................................21
Chapter 2:
Selective binding, hopper mapping, and auxiliary control mapping..... 25
Selective binding............................................................................................26
Hopper mapping.............................................................................................27
Auxiliary control mapping.............................................................................29
Chapter 3:
Inkjet output and reports........................................................................... 31
Quality control books.....................................................................................32
Test labels.......................................................................................................33
Inkjet Output Summary file............................................................................35
ANSI header data...........................................................................................36
Reports ...........................................................................................................37
Index..............................................................................................................41
Contents
3

4
Label Studio Inkjet Reference

Preface
About Label Studio Label Studio is a design tool that takes your input name and address information
and outputs customized labels that you crea te along with reports. It is a pe rfect fit
with our other database and mailing-list management and production products.
Working with Label Studio is easy and efficient because it provides you with an
all-in-one tool that you can use to set up your job, design your labels, and set up
your printer . It works with many di f ferent printe r drivers and with many different
kinds of inkjet printers.
About this guide This reference contains information about setting up inkjet printers in Label
Studio, as well as setting up and using features specific to inkjet printers.
This guide does not explain Label Studio or Label Toolbox features, other than
those specific to inkjet. For complete information about Label Studio and Label
Toolbox, refer to the Label Studio User’s Guide or the online help.
Note: Your printer’s documentation is the best source of information about
how to use the settings available with your printer. We do not provide you
that information in this reference.
Preface
5

Documentation
Complete documentation set
Your complete Label Studio documentation set includes the following:
Label Studio User’s Gu id e
Label Studio Inkjet Reference
Quick Reference for Views and Job-File Products
System Administrator’s Guide
Edjob User’s Guide
Database Prep
Windows Vista If you run Label Studio on Windows Vista, you must download and install the
WinHlp32.exe file from Microsoft before you can access the Label Studio online
help. Go to http://support.microsoft.com/kb/917607
for download and installation
instructions.
Access the latest documentation
You can access product documentation in several places:
On your computer. Release notes, manuals, and other documents for each
product that you have installed are available in the Documentation folder.
Choose Start > Programs > Business Objects Applications > Documentation.
On the Customer Portal. Go to http://service.sap.com and choose SAP
Support Infrastructure > Business Objects Support > Documentation. You
can view the PDFs online or save them to your computer for vi ewing or
printing.
Conventions This document follows these conventions:
Convention Description
Bold
Highlights file names, paths, and text that you should type exactly as
shown. For example, “Type
Italics
Both emphasizes text and indicates text for which you should substitute your own data or values. For example, “Type a name for your file,
> in menu
commands
and the
Indicates commands that you choose from menus in the following for-
mat: Menu Name > Command Name. For example, “Choose File >
.txt
extension (
testfile
New.”
!
Alerts you to important information and potential problems.
Points out special cases that you should know about.
Draws your attention to tips that may be useful to you.
cd\dirs
.txt
).”
.”
6
Label Studio Inkjet Reference

Supported printers
Label Studio supports the inkjet controllers most widely used in the publishing
and mailing industries. Label Studio uses a generic suite of setup windows, so
there’s no learning curve to overcome when you change printing systems or add
new label designs for new clients.
Label Studio supports the following printers and drivers.
Printer manufacturer Printer driver
Cheshire Jetstream II
System 4000
VIP II
VIP III-IV
VMS
Domino JetAddress
Donnelley SIGS
VIP NT
Heidelberg SE-125 Rev M
SE-125 Rev P
SE-163 Rev E
SE-163 Rev F
SE-163 Rev K
Scitex 4200 Spec 4
4200 Spec C
Admark IIIv8
Ektajet 5000
V ideojet PrintPro
Preface
7

Feature overview
Full access to the control line
Label Studio allows you to control the size and content of the control line. Also,
we have included default settings that will allow your line to run without having
to make any changes.
Messaging Messaging involves inserting text, other than the text in the fields of your input
files, onto your address labels or onto specific pages. Although you could include
the text in defined fields in each of your input fi le records, the program runs much
faster and uses much less disk space if you use the messaging technique. In
general, this technique places the reusable text me ssages in a separate place in the
output and then combines the called-for message with the record when the label
prints.
Label Studio incorporates information about your printer’s message capabilities
and format requirements. It also adapts itself to what your controller can do and to
your printer’s codes.
For information about whether messaging is available for your printer, and the
details about your printer’s messaging requirements, see your printer’s
documentation.
Bindery control
BCT code mapping Label Studio supports selective bindery for those inkjet systems that support
bindery codes (demographic or book version) and have control lines in the record.
Label Studio can place the bindery codes in the control line of your print reco rds
using a field that you specify. As usual, your controller uses those codes to fire
the pockets of the selective bindery.
Label Studio copies book-version codes from the database records to your print
records. You provide an input file field properly coded for this purpose, and you
set up (at the printer console) the links between code values and hopper maps.
Hopper mapping You can create an ASCII text file that sp ecifies hopper map data. This data allows
large bindery systems to load data that electronically maps the pockets for
selective binding. Hopper mapping is only available for certain inkjet printer
drivers. Consult your printer driver specifications for information.
Auxiliary file mapping This feature is similar to hopper mapping, but it allows you to place data into the
bindery control line. An auxiliary map file is also an ASCII text file, and it is also
only available for certain inkjet printer drivers.
This feature is useful if you use card feeders or inserters.
Q-Books Quality Control Books, or Q-Books include data from a normal label, at regular
intervals. You can use Q-Book labels to check that your printer worked correctly
throughout the job. You can set the Q-Book interval, which controls how many
normal labels are printed between the test labels.
8
Label Studio Inkjet Reference

Test labels If your inkjet printer does not support Q-Books, y ou can create test labels to
check that your printer works correctly throughout the job. You can place any
field or object that you want onto your test labels in the Test layer of Label
Toolbox. Label Studio does not verify the test label design.
Inkjet Output Summary file
The Inkjet Output Summary file describes t he properties o f each in kjet outp ut file
that you create for the current job.
Reports The Inkjet Simulation report lets you verify your design, even if your inkjet is not
ready. With this report you can make sure that your address and message
information is correct for your mail piece.
The Inkjet Format Summary report gives the bindery line operator pertinent
information about the output file setup. The specific printer you selected
determines the format of the data. Therefore, the Inkjet Format Summary is
printer-specific and only shows information that relates to your printer.
Inkjet printers that support Intelligent Mail barcoding
Label Studio can output Intelligent Mail barcodes on these inkjet printers:
Cheshire VIP III-IV
Heidelberg SE 163 Rev E
Heidelberg SE 163 Rev F
Heidelberg SE 125 Rev M
Heidelberg SE 125 Rev P
Video Jet PrintPro
As the implementation date for Intelligen t M ail ba rc odes draws nearer, watch for
this list to grow. If you will need to print Intelligent Mail barcodes on an inkjet
printer that is not listed above, contact our customer support department, and we
will work with you to provide an updated print driver.
Preface
9

10
Label Studio Inkjet Reference

Chapter 1:
Messaging
In this chapter, you ’ll find in formation ab out the messag ing capab ilities av ailable
with Label Studio. We’ll introduce you to the process of creating messages and
the process of placing them on your labels.
Chapter 1: Messaging
11

Messaging overview
C
Printer drivers that support messaging
The table below lists the supported printer drivers that support some form of
messaging.
Printer manufacturer Printer driver
Cheshire VIP II
VIP III-IV
Donnelley SIGS
VIP NT
Heidelberg SE 125 Rev M
SE 125 Rev P
SE 163 Rev E
SE 163 Rev F
SE 163 Rev K
Scitex 4200 Spec 4
4200 Spec C
Admark IIIv8
What is messaging? Messaging involves inserting text, other than the text in the fields of your input
files, onto your address labels or onto specific pages. Although you could include
the text in defined fields in each of your input fi le records, the program runs much
faster and uses much less disk space if you use the messaging technique. In
general, that technique places the reusable text messages in a separate place in the
output and then combines the called-for message with the record when the label
prints.
You create a message file that stores the messages for yo ur job. When you lay out
your label, you identify the field codes that dictate which message gets printed
and which fields make up the address block.
BULK RATE
the Andy Smith Company
S
Dear John Smith,
Dear Joseph E. van Oss:
How are things in La Crosse? We want
How are things in La Crosse? We
to do business with Business Objects!
want to do business with Firstlogic Inc!
*****************CAR-RT SORT**C-001
Joseph E. van Oss
John Smith
Business Objects
Firstlogic Inc
100 Harborview Plaza
100 Harborview Plaza
La Crosse, WI 54601-4071
La Crosse WI 54601-4071
U.S. POSTAGE
PAID
ANDY SMITH CO.
12
Label Studio Inkjet Reference
Messaging options Label Studio helps you produc e messages w ith your inkjet printer , based on what
your system supports.
When set up properly, you can have one message appear on all of your labels, or
you have different messages appear on different labels.
You can also print personalized information in your messages, such as a
customer’s name or state.
The process You create a message file that stores the messages for your mail piece. When you
create your design file and set up your printer, you identify the field codes that
dictate which message gets printed and which fields make up the address bl ock.
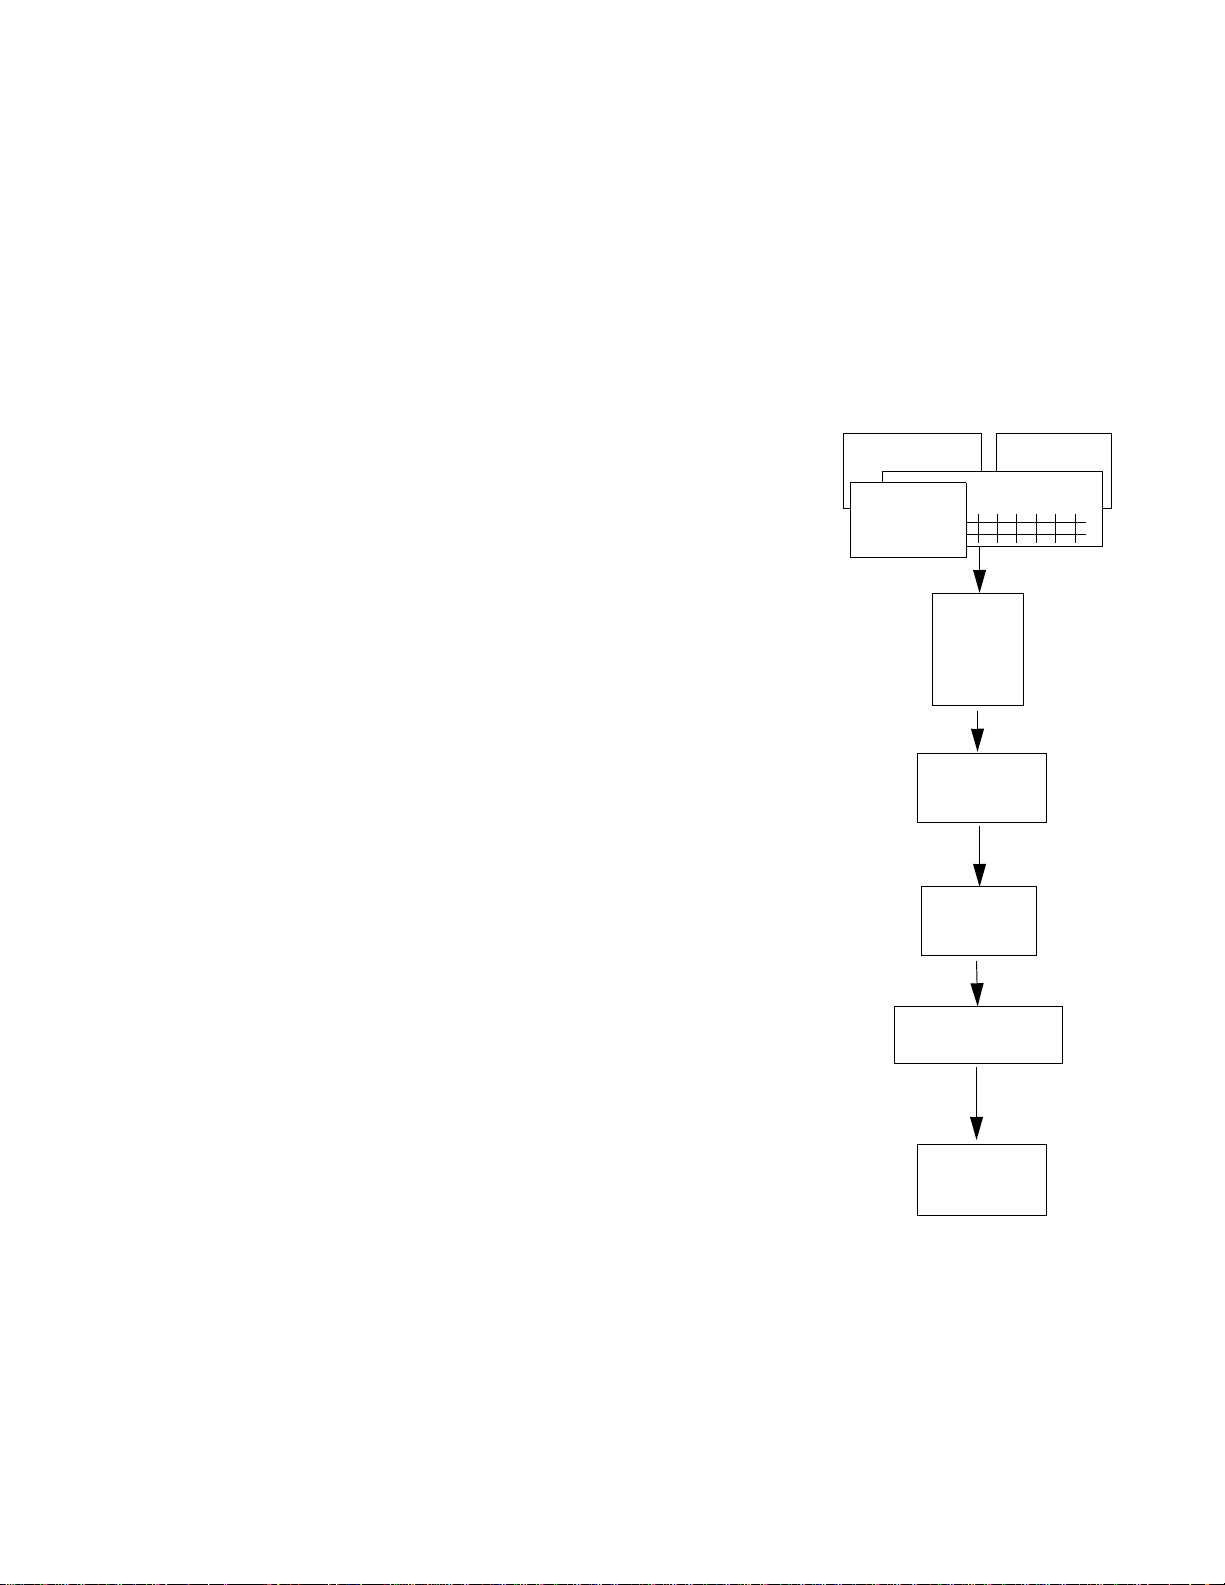
The diagram on the right shows a typical
process for completing a Label Studio job.
1. Prepare your input files and the associated
definition and format files.
2. Prepare your message file in a word
processing program. (See “Message files”
on page 16.) Save this file as an ASCII
text file.
3. Set up your Label Studio job.
4. Set up your inkjet printer driver.
5. Set up your design file layout and page
dimensions to incorporate messaging.
6. Print the Inkjet Simulation report, and
check the results. Make any necessary
changes. See “Inkjet Simulation” on
page 37.
7. Print your address labels.
When Label Studio builds the record for
output, it gets the record from the input file,
adds the coded data from the label design, and
sends it to the output device, along with the
text of your message(s).
Definition files
Message file
Inkjet Simulation
Format files
Input files
Label
Studio
Job
Inkjet driver
information
Address label
design
report
Printer
Chapter 1: Messaging
13

Messaging components
Before you can message correctly, you must properly set up your print hardwa re .
Hardware includes the print heads, signature bins, the bindery line itsel f, the
sensors, and the computer that controls it. Label Studio depends on your
knowledge of your hardware, software, input file, and the message file.
Printer system (hardware)
How many print heads will
you run?
How does your system
message?
Label Studio (software)
Label Studio can use most features of most inkjet printers. Some inkjet printers
are far from standard, though, and yours may not have some of the abilities Label
Studio incorporates. Or, Label Studio may not support some of your printer
features.
In Label Studio, you set the number of lines according to Label Studio’s printer
driver capabilities. To take advantage of all the printing space you can control,
you must know how your plant setup corresponds.
Does your printer support multi-line or single-line messages? Can it personalize
mail pieces? You must know how your system messages to take advantage of
every built-in capability. For details, see your printer’s documentation.
You must also properly set up Label Studio for the messaging to work correctly.
The printer controller can then read your information pr operly and send the right
signals to the hardware.
Label Studio defines:
Which address and message(s) print on this particular mail piece.
The location of the address and message(s).
14
Label Studio Inkjet Reference

Input files and messaging
Correct messaging depends on having the correct content in yo ur in pu t fil e. With
Label Studio, you will print your file to disk. Your Label Studio output file
contains address information, message content, and signals for the bindery line
software and hardware.
Messaging data (read by the print controller) defines:
Address content.
Message(s) content.
Where (on the x axis) the characters print (only for some drivers).
Input file requirements
X
(Print direction)
Y
message
Some inkjet printer features, such as messaging, add requirements to your input
file or its definition file.
(Print direction)
address
There is one field created especially for Label Studio and messaging :
PW.Msg_Link. You can also make your own PW fields with User: x. (For details
on those fields, see the Quick Reference.) You can use these fields to identify
database fields or constants that use your inkjet’s messaging features. Remember,
each printer may differ slightly.
Note: Label Studio does not require you to use PW.Msg_Link for
messaging. As long as the field contains the appropriate information, you
can use any field you want.
Message linking To do messaging, you must tell Label Studio which message from your message
file goes on each address label and accurately code the label (record) for your
printer . To do this, you need to populate t he correct printe r settings in y our desi gn
file. For more information, see “Set up messaging in your design” on page 18.
Chapter 1: Messaging
15

Message files
For Label Studio to successfully add messages to your address labels, you need to
include a message file. Your job refers to your message file, and then it assembles
your printed address labels with the specified message.
Notes about message files
You can only use one message file per job file.
You do not need to use all messages in a message file. This means that you
can create a message file that contains every message you will ever use, and
then share the file among other jobs.
File requirements Your message file must be in an ASCII text format; Label Studio won’t process a
message file of another file type. However, the file doesn’t need to have the usual
.txt file name extension. Make sure that you don’t include any formatting that
your printer or the ASCII text format doesn’t support.
What a message file might include
Join our Discount Club and receive savings of up to 25%! See the details on the order form.
Gift boxing and delivery available!
Dear |1, The weather is cold in |2! Stay warm in one of our fur-lined parkas featured on p.12!
Dear |1, The weather is warm in |2! Stay cool in one of our silk sarongs featured on p.63!
Check out the prices in the special pull-out section!
We’re sorry we haven’t heard from you.
Thank you for your latest purchase! Any purchase from this catalog gets you free shipping!
Recent subscriber, |1, please use the discount certificate when placing your next order!
For a limited time you can defer billing until next year! See the details on p.2.
Thank you for your order!
Make sure that You know your inkjet printer’s capabilities and limitations.
Your message file follows any rules your inkje t printer pla ces on it, i ncluding
the proper codes.
Your message file content
Your message file must contain only the text of the message(s) you want to
appear on the mail piece. Each line of text in your message file represents a
message. Type the content of the first message on the first line of your message
file. If you have a second message, type it on the second line of your message file,
and so on, until all required messages have been entered.
16
Label Studio Inkjet Reference

Show the line breaks In each message, use “~” (the tilde character) to show where lines of your
message should break on your mail piece. Label Studio converts the tilde to the
correct “line break” control for your printer. He id elb erg drivers have different
requirements, see “Setting up Heidelberg drivers for messaging” on page 21.
Note: You can only add as many “~” characters as the number of message
lines your printer supports. If more tilde characters are entered than your
printer supports, the extra lines will not be printed.
Example For example, you may want to print this message on your mail piece:
We're having a clearance sale!
Check the bargains in
our special pull-out section!
Your message file would include the following line:
We're having a clearance sale!~Check the bargains in~our special pull-out section!
Assign a message file to a job
To assign a message file to the job:
1. In Label Studio, open the Inkjet block under the Inkjet Setup category.
2. Enter a path and file name for your message file.
3. Click OK.
Chapter 1: Messaging
17

Set up messaging in your design
You need to tell Label Studio what to pull from your message file and place onto
your labels, and you need to do this in your design file. In Label Toolbox, choose
File > Design Settings and click More to access the Message Link Settings. The
following table tells you how to prepare these settings.
Driver Message Link Setting(s) Expected input
Heidelberg SE-163
(all revisions)
Heidelberg SE-125
(all revisions)
Donnelley SIGS Message1
Donnelley VIP-NT Message1-Message8 The driver expects a single message link for each setting. The driver
Cheshire VIP II and
III-IV
Scitex 4200 Spec C &
Spec 4
Scitex Admark III v8 N/A The driver uses the NumFixedMsgs setting to determine the number
MessageLinkLine T ype the field that includes your message link data or the links for all
messages together.
For example, type
MessageLinkSize The size of each link is 2 or 3.
MessageLinkLine T ype the field that includes your message link data or the links for all
messages together.
For example, type
The driver expects a single message link for each setting. The numMessage2
Message1
Message2
Message1
Message2
Message3
ber you enter here determines which message text is included with
each record.
configures the number entered here in a format that the VIP-NT
expects. For example, a value of 1 will output as "001".
The driver expects a single message link for each setting. The num-
ber you enter here determines which message text is included with
each record.
The driver expects a single message link for each setting. The num-
ber you enter here determines which message text is included with
each record.
of messages for this driver (0 - 2).
"001002003"
"001002003"
.
.
You can print the same message on each piece by using a constant. You can print
different messages on each piece by using a message link field.
Printing the message Inkjet drivers use your message linking value to print the correct message on each
piece.
For most printer drivers, the message position is governed by settings that are
made by your printer operators during make-ready. However, if you are using a
Heidelberg printer driver, additional action is needed in the label design on the
lines of your label. See page 21 for instructions on setting up line options to
position the message in the label d esign.
18
Label Studio Inkjet Reference

Personalized messages
What is personalized messaging?
Personalized messaging lets you copy data from fields in the defined address
block and print them in appropriate places in the message. For example, instead
of printing “Dear Sir/Madam,” a personalized message might copy the
addressee’s name, insert it into the message, and print “Dear John Smith.”
Process To personalize messages, the inkjet controller extracts data from the address
block (a name, for example) and inserts it into your message text. Your printer
may or may not support this feature; check your printer’s documentation.
For drivers that include the message text in each record, such as the VIP III-IV, or
Scitex 4200 Spec C & 4, Label Studio will make insertions into the message for
each record. For drivers that include a message link, the controller does the
insertions; the message file must be set up with the proper insertion characters, as
defined in your printer specifications.
Set up your message file
Open the message file referenced in your job file with a text editor.
In the message text, mark each place inkjet drivers should insert text taken from
the personal field. They can be in the forms |1, |01, or |001. For example:
Dear |1~ How are things in |2?~ We want to do business with you!
Set up your personal field
In your design file, you must define a field that Label Stu di o wi ll ext r act the
personal information from; for example, DB.First_Name or PW.State. To do this:
1. Choose File > Design Settings.
2. In the Message Inserts category (or the appropriate category of your driver),
define each InsertNumber value with the field you want to use.
3. Click OK.
Chapter 1: Messaging
19

Example This example shows where the personal data is placed in the message, based on
your settings.
Insert the first personal field (DB.First_Name)
Dear |1,~ How are things in |2?~ We want to do business with you!~
Insert the second personal field (PW.State)
This is how it might look when printed on your mail piece:
Dear John,
How are things in Wisconsin?
We want to do business with you!
Donnelley VIP-NT Cheshire VIP II driver
The Donnelley VIP-NT and Cheshire VIP II drivers behave differently than the
rest of the supported drivers with regards to personalized messaging: you will
need to drop an expression object onto your layout before and after the field you
want to use in the messages.
For example, suppose you are using DB.Name to populate your personalized
messages. Your design file layout should look similar to this:
Both expression objects are shown collapsed
Donnelly VIP-NT The value expression for the expression object in front of DB.Name should
be: ^TS
The value expression for the expression object behind DB.Name should be:
^X
Cheshire VIP II The value expression in front of DB.Name should be: {
The value expression behind DB.Name should be: }
20
Label Studio Inkjet Reference

Setting up Heidelberg drivers for messaging
Heidelberg printer drivers require some more set up compared to other inkjet
printer drivers. With Heidelberg printer drivers you can specify the location of
each message on a line-by-line basis. To set up your Heidelberg printer driver,
you must set up the:
Message file
Message location
Message link
Creating message files
Specifying the location of messages
Enter the text of your message on the lines of your message file just as you want it
to appear on your mail piece. Heidelberg drivers expect that one line of the
message will be on each line of the message file. For example, if you want the
message to use three lines, then type it on three lines.
Look at the great savings!
This is our finest sale yet!
And we are doing it for you!
Your message file should include these three lines:
Look at the great savings!
This is our finest sale yet!
And we are doing it for you!
Enter each line of the
message on a separate
message line.
Heidelberg printer drivers do not recognize the tilde as a line break signal in the
way that many other inkjet printers do.
With line-by-line messaging
and Heidelberg drivers, you
control the content and
alignment of messages. You
designate the message
alignment through control
signals that you enter at the
Line Properties window.
In the Line Properties window ,
use LineDescriptor settings to
control the alignment and
appearance of messages.
MessageOnLine setting You need to set this option to True to turn on messaging on this line.
MessageIndentation
setting
Enter the number of characters from the printable edge of the mail piece to the
beginning of the message text. This sets offset—not position. For example , if you
st
enter 20, the message line starts at the 21
character.
Chapter 1: Messaging
21

Message linking Heidelberg accepts message linking values of two- and three-digit numbers from
01 through 99 and from 001 th rough 999, depe nding on the print er settings. S tring
them together in your database field (or message link constant). The numbers
correspond to the line number in your message file.
Driver specific: Only the Heidelberg SE-125 drivers support two-digit
links.
For example, if using a “three-digit” Heidelberg driver , 001 corresponds to line 1,
002 to line 2, 003004 identifies lines 3 and 4, and so on. For “two-digit”
Heidelberg drivers, 01 identifies line 1, 0304 to lines 3 and 4, and so on.
Do not type the line numbers into your message file text itself.
Check the special section for prices on pencils, pens, and other everyday essentials!
Free USPS delivery in U.S.
Thanks for your recent order.
As a return customer you are entitled to a 10% discount on everything in our special section.
Thank you!
We’re sorry that we haven’t heard from you!
Your last order was over a year ago. This is the last catalog you receive unless you order.
Attention Buyers! This catalog contains a coupon for 15% off items in the special section.
When placing messages on your mail pieces through message linking, your
database would typically have a field such as the CustStat field (this example is
for a “three digit” Heidelberg printer):
Specifying the message link
LastName First CustStat InitOrdDate
Smith Mary 001002003 920322
Jones Sam 007008009 920325
Garcia Maria 010011 920326
Thao Xeng 004005006 920326
The printer would print the first three message lines as the message for the first
record shown here. Lines 7, 8, and 9 would be printed on the mail piece for the
second record, lines 10 and 11 for the third, and so on.
To begin setting up your design file for messaging, you need to set up your
design-specific settings. To do this:
1. Open your design file in Label Toolbox.
2. Choose File > Design Settings, and choose your printer from the Printer
Name drop-down list (if you haven’t already).
22
Label Studio Inkjet Reference

3. Click the More
button, and
select the
MessageLinkLine category.
4. Enter the field
you want to use
to link your
message file to
the design file.
You can use any
field you want.
If you are
placing the same
message(s) on
all labels, you
can enter the
message
number(s) directly into the MessageLinkLine. There is no need to use a
defined field.
Personalized messaging
Any field can be placed in this setting’s value. You are not limited to the fields
you use on your design layout. Yo u do not need t o set up a message file o r specify
your MessageLinkLine to use this feature.
To use personalized
messaging:
1. Choose
MessageInsertL
ine, and set the
Active setting to
True.
2. Enter the value
of the
TotalLength that
you would like
the lines of all
inserts to be.
3. In the
InsertNumberX
settings, include
the field from
which you want to draw your personal information.
Chapter 1: Messaging
23

24
Label Studio Inkjet Reference

Chapter 2:
Selective binding, hopper mapping, and
auxiliary control mapping
This chapter describes selective binding, hopper mapping, and auxiliary control
mapping for your inkjet printers.
Chapter 2: Selective binding, hopper mapping, and auxiliary control mapping
25

Selective binding
You can output Book Configuration Type (BCT) data from Label Studio. The
BCT data lets large bindery systems load data that electronically maps the
pockets for selective binding.
What is selective binding?
How to set up selective binding
You may want to selectively bind your mail pieces. Selective binding entails
creating two or more different versions of your mail piece from the records of a
single input file. For example, you may create a magazine with advertisements
from the West coast and the same magazine with advertisements from the East
coast.
Label Studio must determine which version of the mail piece goes to each
addressee, and must code each record so the bindery line assembles the right
piece for the record.
1. Make sure that your input file contains a field that relates to a book version.
You might know this by the name of demographic code, signature code, or
book configuration type (BCT). The field must contain values your inkjet
controller can recognize. For example, some Heidelberg inkjet systems
recognize codes 001 through 999.
2. Choose File > Design Settings, and set your book configuration type to use
the field that you defined to contain the BCT code. Label Studio then places
the code in the control line of each record as it generates label data. Your
inkjet printer then grabs the proper sheets to generate the book, based on the
hopper maps. Hopper maps can be set up at make-ready time or by using the
hopper map file in Label Studio.
Note: If your input files have different names for the fields that contain the
BCT code, you may want to use the PW.Demog_Code field. For example,
suppose you have a field DB.Book_Co de in one inpu t file and a DB.BCT in
another input file.
26
In the .def file associated with your first input file include:
PW.Demog_Code = DB.Book_Code
In the .def file associated with your second input file include:
PW.Demog_Code = DB.BCT
Label Studio Inkjet Reference

Hopper mapping
Hopper mapping is used in conjunction with BCT codes. If you would like to
include the hopper maps in your output from LS, you do this with a separate
hopper map file.
Hopper map file You can specify BCT data for Label Studio through an ASCII text hopper map
file. You can create that text file in any word processor. However, keep these
items in mind:
Save the file as a text file.
Do not use tabs to align the data.
The hopper-map file below indicates that BCT0001 needs pockets 1, 2, 3 , 4, 6,
18, and 87 fired. BCT0002 needs pockets 1, 2, 3, 5, 6, 18, and 88 fired (and so
on).
PW .Demog_Code looks at the BCT
lines.
Label Studio populates AP.Hopper_Map_X
and AP.Hopper_Map_1 with this data.
BCT Size: 4
Map Size: 100
CMT:Hopper map for regional 2002 spring fashion catalog
CMT: 1
CMT: 1 2 8 9 0
CMT: 12345678901234567890123456...012345678901234567890
0001:xxxx x x x
0002:xxx xx x x
0003:xxxx xx x x
0004:xxxx xx x x
0005:xxxx xx x x
0006:xxxx xx x x
This table describes the elements of your hopper map file.
Line Format Description
BCT size
(required)
Map size
(required)
BCT Size: The number of digits in your BCTs.
The BCT size must be before any of the hopper map
definitions. Type
BCTs. Type
3
if your inkjet driver uses 3-digit
4
if your inkjet driver uses 4-digit BCTs.
Map Size: The number of pockets in the bindery line. For
example, if your bindery line has 45 pockets, you
would enter a map size of 45.
The map size line must be before any of the hopper
map definitions. You can use an integer between 1
and 124 (depending on your printer driver—some
drivers have 40 as the maximum). All hopper map
definition lines will be truncated to the map size
value.
Comment CMT: Comments include any notes. Comments can be on
any line of the file and are ignored by the program.
We recommend using the last comment lines to display a list of pockets. Remember, t his list will be the
same length as your map size.
Chapter 2: Selective binding, hopper mapping, and auxiliary control mapping
27

Line Format Description
Setting up hopper mapping in your job
Hopper map
definition
The number
before the colon
must have the
same number of
characters as
defined in the
Hopper map definitions contain the BCT data
needed by the inkjet system to fire the correct pockets when printing.
The data after the colon (the Xs and spaces) indicate
which pocket to fire. Only uppercase Xs and spaces
are accepted.
Hopper Map size
line.
There are a few things you need to do with your job and your design file to set up
hopper mapping:
Set up selective binding (see “Selective binding” on page 26.)
Assign the hopper map file to your job in the Inkjet block.
Set up your design file printer settings to incorporate hopper mapping by
choosing File > Design Settings in Label Toolbox. For example, if you are
using a Heidelberg SE163 driver, you need to set up Event7.
Or, set up a printer instance to incorporate hopper mapping every time you
use that specific printer. Choose Tools > Printer Setup and use that printer in
your design (File > Design Settings).
28
Label Studio Inkjet Reference

Auxiliary control mapping
Auxiliary controls Auxiliary controls for drivers that support it function similarly to hopper
mapping. These controls allow you to place data into the control line. You will
need to create an external file that defines the auxiliary control maps the way you
define hopper maps.
The Auxiliary Control Map file
The Auxiliary Control Map file is the external file you create to be linked by the
PW.Aux_Ctrl field (or another field that you define) to the desired map for each
record. This ASCII text file can be created in any word processor . However, keep
these things in mind:
Save the file as a text file.
Do not use tabs to align the data.
PW.Aux_Ctrl reads the
map definition
Label Studio populates AP.Aux_Ctrl_Map_X
and AP.Aux_Ctrl_Map_1 with this data.
This table describes the elements in your auxiliary control map file.
Map Size: 12
Aux ctrl Size: 4
CMT: Auxiliary control map for catalog
CMT: 1
CMT: 123456789012
0001:XXXX X X
0002:XXX XX
0003:XXXX XX X
0004:XXXX XX
0005:XXXX XX X
Line Format Description
Map size Map Size: A required line that defines the size of the
map. This line must be placed before the
Auxiliary Control Map Definition lines.
The value entered depends on the driver
used.
Auxiliary
control size
Aux_ctrl Size: A required line used to define the size of
the map number. The value entered must be
an integer greater than 0. This data is used
to verify the map number size on the Map
Definition lines and to determine how
many digits of PW.Aux_Ctrl to use.
Comment CMT: Used for your own notes and ignored by
Label Studio. You can place it on any line.
Map definition The number before the
colon must have the
same number of digits
Contains the data needed by the inkjet system. The data after the colon must be Xs or
spaces only.
as defined in the Auxiliary control size line.
Chapter 2: Selective binding, hopper mapping, and auxiliary control mapping
29

Setting up auxiliary control mapping in your job
There are a few things you need to do with your job and your design file to set up
auxiliary control mapping:
Assign the auxiliary control map file to your job in the Inkjet block.
Set up your design file printer settings to incorporate auxiliary control
mapping by choosing File > Design Settings.
This table contains the category and settings to define for a few drivers. It is
not a complete list:
Printer driver Category Setting
Heidelberg SE163 Rev X
Heidelberg SE125 Rev X
Event8 All
Event28 All
Donnelley VIP-NT ControlLineSegment8 AuxiliaryDeviceControl
Cheshire VIP III-IV ControlLineSegment3 AuxiliaryDeviceControl
Or, set up a printer instance to incorporate hopper mapping every time you
use that specific printer. Choose Tools > Printer Setup and use that printer in
your design (File > Design Settings).
30
Label Studio Inkjet Reference

Chapter 3:
Inkjet output and reports
This chapter introduces you to inkjet specific reports, as well as the various ways
to generate output using your inkjet printer, including Quality Control Book
labels and test labels.
Chapter 3: Inkjet output and reports
31

Quality control books
In inkjet printing, you do not normally print test labels. However, you can check
the quality of your print run by using Quality Control Book labels (or Q-books).
Different inkjet systems handle Q-books differently, depending on their
capabilities and your hardware setup. Some may kick the Q-books to a separate
part of the bindery line; some may simply leave a break around each piece in the
stream. Whatever the exact procedure, the result is that your bindery line people
can evaluate the continuing quality of your inkjet job as it is being run.
A Q-book will look like a normal label, but your system will recognize it as a Qbook and handle it accordingly.
Setting up Q-books You can set up the printing of Q-books in the Inkjet window of Label Studio.
In the example shown in the window above, we have chosen to print a Q-book
between every 10th record. Therefore, Label Studio will output a Q-book after
printing every 10 records.
Note: Some drivers support Q-books in a different manner. The controller
for these drivers makes a copy of a reco rd marked as a Q-book. For these
drivers, you will not use the Label Studio Q-book options. You need to set
up the appropriate control line information to mark specific records as a Qbook.
32
Label Studio Inkjet Reference

Test labels
Why print test labels? Y o u may want to print te st labels to make sure your labels are set up correctly and
that Label Toolbox and your printer are communicating properly. Previously,
Label Studio supported only Qu ality Control Book labels (Q-bo oks) for testing on
inkjet printers. However, not every printer supports Q-books. Now, you can print
test labels, Q-books, or both (when available) for your inkjet jobs .
Set your test label options
Design your test labels
To print test labels, you must fi rst
decide where in your output to print
them. You can set this up from the
Label Options block by choosing the
option that you want — job start or job
end, for example.
After you decide where in your output
to print test labels, you must decide
how many labels you want. In the
Number of Rows of Test Labels
option, enter the total number of test
labels that you want to print at the
chosen position because inkjet drivers
do not print in rows as do other drivers. In the example, Label Studio prints six
test labels at the beginning of your job. If you chose to print at the job start and
the job end, Label Studio would print 6 test labels at each location.
In Label Toolbox, you can now design test labels with the Test layer. You can
place any field or object you want onto your test labels. Label Studio does not
verify the Test layer.
To design your test labels:
1. With a job open in Label Studio, choose T ools > Design Labels.
2. Choose an inkjet design file from the list, and click the Edit button.
3. In Label Toolbox, click the Test tab.
4. Drag and drop any field or object you want onto the test label.
Chapter 3: Inkjet output and reports
33

5. When you have finished designing your labels and test labels, choose
File > Save or File > Save As.
Line indent and length consideration with Heidelbergs
If you use frames on the base layer to calculate line indent and length settings
with any Heidelberg driver, these settings are not mirrored onto the Test layer
within the Label Toolbox designer.
The following images show this behavior in the designer.
Base layer
Test layer
When printing and previewing, Label S tudio uses the sa me line i ndent an d leng th
values for both the regular and test labels. The label preview and outp ut show the
correct indent settings based on the line settings of the base layer.
Base layer
Test layer
34
Label Studio Inkjet Reference

Inkjet Output Summary file
The Output Summary file describes the properties of each inkjet output file you
create for the current job, including:
Job name
Date
Printer
Vol ume
Number of records (does not include copies or q-book records)
Block size and record size, if fixed length
T wo-up description
Unit number and description
Subunit number
Absolute label range (does not include q-book records)
The following is an example of an Output Summary file for a job that has two
output files. If any line exceeds 60 characters, it is truncated.
Job: job1_fixed 09-Jan-2004
Printer: Cheshire VIP III-IV
Volume: 000001 # Recs: 150
BS/RS: 8041/473 2up: NO
Unit: (1) Unit Break = ATM
Subunit: 1
ABS Label: 1-150
Job: job1_variable 09-Jan-2004
Printer: Cheshire VIP III-IV
Volume: 000001 # Recs: 150
BS/RS: N/A 2up: NO
Unit: (1) Unit Break = ATM
Subunit: 1
ABS Label: 1-150
How to create the Output Summary file
The Output Summary file is created only when you print your labels. You cannot
print this file separately, as you can the Label Studio reports.
To create the Output Summary file:
1. Expand the Inkjet Setup folder, and double-click the Inkjet block.
2. Enter the file path and name for the Output Summary file. Click the Browse
icon to navigate to the appropriate file path, if necessary.
3. Choose to Replace or Append if an Output Summary file already exists in
the chosen file path.
4. Click OK.
5. Complete your label design and job file setup. Choose File > Run Job or
enter lsprint [Options] <jobname.lsj> at your command line.
After your job runs, the Output Summary file is located in the designated file
path.
Chapter 3: Inkjet output and reports
35

ANSI header data
Some inkjet systems—for example Heidelberg—require ANSI headers for their
jobs. Label Studio lets you produce ANSI informatio n, if necessary. You can turn
off the creation of the data by editing the printer settings of your design file.
Check your printer documentation to see if you n eed to enter ANSI Header data.
Format
You don’t have to set all
of the header data
required. Label Studio
calculates all of the ANSI
Header 2 data for you.
However, you do have to
set most of the Volume
data and
Header 1 data.
You can find the window
to enter your ANSI
information in the Inkjet
Setup category of your
job.
36
Label Studio Inkjet Reference

Reports
In Label Studio, there are two reports available for those who use inkjet printers:
the Inkjet Format Summary report and the Inkjet Simulation report.
For information about setting up report defaults and printing your reports, see th e
Label Studio User’s Gu id e .
Note: If your printer supports variable block sizes, the value of the block
size is shown as “N/A (Variable)” in both the Inkjet Simulation and Inkjet
Format Summary reports.
Inkjet Simulation Label Studio produces a simulation report that lets you verify your design, even if
your inkjet printer is not ready. By printing this report, you can make sure that
you have set up your address and message information correctly.
You can produce inkjet simulations any time after you have designed your label
and messages—just deselect the Print Labels option in the Execution Options
window. If you don’t want to print other reports, comment out the other report
blocks, and run the job.
You can produce the Inkjet Simulation report by selecting Create Reports in the
Execution Options window or by including the prpts option in your command
line. Be sure the Inkjet Simulation block is not commented out.
Message summary A message summary is listed at the bottom of the Inkjet Simulation repo rt (if you
select the Include Message Summary option). This summary provides you with a
look at all of your messages in your message file.
Sample report type A sample Inkjet Simulation report shows you simulations for only those records
you define in the Record Selection area. In the example below, the simulation
th
report would only print simulations for the first 5 records, every 100
record, and
the last 10 records.
Message report type A Message report type produces a simulation for each message used in your job.
The record selection values are ignored for this type of report.
If you select the Message option and the Include Message Summary option, Label
Studio places an asterisk in the Message Summary section next to each message
used in your output.
Chapter 3: Inkjet output and reports
37

Inkjet Simulation Message Report Label Studio [version] [c01] Page 3
-------------------------------------------------------------------
Message Summary ---------------------------------------------------
Message 1: *Here is message 1
Message 2: *Here is message 2
Message 3: *Here is message 3
Message 4: *Here is message 4
Message 5: *Here is message 5
Message 6: Here is message 6
Message 7: Here is message 7
Message 8: Here is message 8
Message 9: *Here is message 9
Message 10: *Here is message 10
Intelligent Mail barcode If you’re using an Int elligent Mail barcode in your design, you can see in the
Inkjet Simulation report if the conversion of barcode digits to Intelligent Mail
barcode DATF (descender, ascender, tracker, and full barcode lines) characters
was successful.
In the Inkjet Simulation report, DATF characters appear in place of the barcode
digits if conversion was successful. If conversion was unsuccessful, nothing
appears in the barcode position.
Sample Inkjet Simulation
report
Inkjet Simulation Sample Report Label Studio [version] [c01] Page 1
----------------------------------------------------------------------------------------------------------
Printer Summary ------------------------------------------------------------------------------------------
Printer Name: Heidelberg SE-125 Rev M
Manufacturer: Heidelberg
Model: SE-125 Rev M
Driver version: 7.00c
Record Size: 347
Block Size: 7981
Simulation Number: 1 (Unit: 1 Subunit: 1 Label: 1) ---------------------------------
1...|....10...|....20...|....30...|....40
1 |***************************ECRLOT**R-001
2 |
3 |
4 |SALLY SMITH
5 |100 E MAIN ST
6 |ELBRIDGE NY 13060
7 |
8 |
Record ID 1.........................................................01
Record ID 2....................................................0000001
Event Indicator 1 (USPS Consolidation Level).......................01
Event Indicator 2 (End of Zone).....................................
Event Indicator 3 (End of Sack or Pallet)...........................
Event Indicator 4 (ZIP Code)..............................13060970700
Event Indicator 5 (State)..........................................NY
Event Indicator 29 (Divert)..........................................
38
Label Studio Inkjet Reference

Line descriptors If you would like to see line descriptor values in your Inkjet Simulati on reports, a
printer setting is available for Heidelberg SE-163 printers to turn this capability
on or off. The setting, ShowLDsOnSim, has a default value of False (off).
To change the value of your printer:
1. In Label Toolbox, choose File > Design Settings.
2. Make sure one of the Heidelberg SE-163 printers is in the printer name drop-
down list, and click the More button.
3. Click Settings from the list, and choose True from the drop-down list by
ShowLDsOnSim.
4. Click OK, and click OK.
You can also access any printer’s setting at anytime from the Printer Setup
window:
1. In Label Toolbox, choose Tools > Printer Setup.
2. Choose your printer from the list, and click Modify.
The following sample is what the Inkjet Simulation report looks like with line
descriptors.
1...|....10...|....20...|....30...|....40
LD-1 1 |**************************AUTO**3-DG 018
LD-2 2 |MURPHY,JAMES F
LD-2 3 |275 RUSSELL ST
LD-3 4 | 01801-5811 MA
LD-4 5 |text
LD-5 6 |text
LD-6 7 |
LD-7 8 |
LD-8 9 |
LD-9 10 |
LD-10 11 |end of label
Inkjet Format Summary
The Inkjet Format Summary report gives the bindery line operator pertinent
information about the inkjet printer setup. Because the specific printer you
selected determines the format of the output, the report only shows information
that relates to your printer. You may print the Inkjet Format Summary report if
you are using any of the inkjet printer drivers supported by Label Studio.
The Inkjet Format Summary describes what the bytes in your output file
represent, including ANSI headers, hopper maps, and so on. The exact
information you will see there depends upon what printer you have selected.
You can produce the Inkjet Format Summary report by selecting the Create
Reports option in the Executio n Options wind ow or by incl uding the prpts opti on
in your command line. (Be sure the Inkjet Format Summary block is not
commented out.)
Chapter 3: Inkjet output and reports
39

Sample Inkjet Format
Summary report
Inkjet Format Summary Report Label Studio [version] [c01] Page 1
-------------------------------------------------------------------------------------------------------
Printer Summary ---------------------------------------------------------------------------------------
Printer Name: Cheshire VIP III-IV
Manufacturer: Cheshire/Marconi/Videojet
Model: VIP III-IV
Driver version: 2.00b
Record Size: 965
Block Size: 7720
Data Record -------------------------------------------------------------------------------------------
Bytes Description
--------- -----------------------1-1 <RS>
2-2 Tape Format
3-3 Record Type
4-12 Record Number
13-13 <US>
14-23 Search Code
24-24 Sortation Group Change
25-25 Stacker Control
26-26 List Identifier
27-30 Makeup Code
31-31 <US>
32-63 Device Control
64-64 <GS>
65-104 Label Line 1
105-105 <GS>
106-145 Label Line 2
146-146 <GS>
147-186 Label Line 3
187-187 <GS>
188-227 Label Line 4
228-228 <GS>
229-268 Label Line 5
269-269 <GS>
270-309 Label Line 6
310-310 <GS>
311-350 Label Line 7
351-351 <GS>
352-391 Label Line 8
392-392 <GS>
393-432 Message 1 Line 1
433-433 <US>
434-473 Message 2 Line 1
Condensed for illustration purposes
40
Label Studio Inkjet Reference

Index
Symbols
.def files, 15
~ (tilde) character, 17
A
ANSI header data
format, 36
Header 2 data, 36
source, 36
auxiliary control mapping, 8, 29
setting up, 30
B
BCT codes, 8, 26
bindery lines, 39
book version codes, 8
C
control line
, 8
access
D
definition files
PW.Demog_Code
PW.Msg_Link, 15
demographic codes, 8, 26
Donnelley VIP NT, 20
drivers
messaging, 12
, 26
F
feature overview, 8
features
access to control line
auxiliary control mapping, 8
bindery control, 8
hopper mapping, 8
messaging, 8
fields in personalized messages, 19
file name extensions
message files
files
, 15
input
message, 16, 17
, 8
, 16
H
Heidelberg drivers
messaging
hopper map file, 27
hopper mapping, 8, 26, 27
setting up, 28
, 22
I
inkjet
hardware, 14
printer system, 14
inkjet drivers
supported, 7
Inkjet features, 8
inkjet format summary, 39
Inkjet Output Summary file, 35
inkjet simulation report
, 38
sample
input files, 15
message requirements, 15
Intelligent Mail barcode, 9, 38
L
Label Studio
printer drivers
software, 14
labels
aligning elements
line breaks, 17
line descriptor values, 39
line options, 21
, 7
, 21
M
message file, 16
~ (tilde) character, 17
assigning to a job, 17
creating, 16
file name extensions, 16
Heidelberg, 21
limitations, 16
requirements, 16
message link, 18
message linking
Heidelberg drivers
message summary, 37
messages
, 21
aligning
Heidelberg, 21
line breaks, 17
number of print heads, 14
personalized, 19
printer capabilities, 8
simulator, 37
wrapping lines, 17
messaging
components
files, 17
input file requirements, 15
printer drivers, 12
process, 13
, 22
, 14
Index
41

setup, 14
O
output
inkjet format summary
inkjet simulation report, 37
q-books, 32
, 39
Q
Quality Control books, 32
R
reports
Inkjet Format Summary, 39
inkjet simulation, 37
P
personalized messages, 19
Donnelley VIP NT driver, 20
printer drivers
messaging, 12
printers
number of print heads, 14
supported inkjets, 7
PW.Demog_Code, 26
PW.Msg_Link, 15
PW.Userx, 15
S
selective binding, 26
setting up q-books, 32
signature codes, 26
supported inkjet drivers, 7
T
test labels, 33
W
wrapping lines, 17
42
Label Studio Inkjet Reference
 Loading...