


Interactive Analysis Getting Started Guide
■ Interactive Analysis 1.0
2010-07-29

Copyright
© 2010 SAP AG. All rights reserved.SAP, R/3, SAP NetWeaver, Duet, PartnerEdge, ByDesign, SAP
Business ByDesign, and other SAP products and services mentioned herein as well as their respective
logos are trademarks or registered trademarks of SAP AG in Germany and other countries. Business
Objects and the Business Objects logo, BusinessObjects, Crystal Reports, Crystal Decisions, Web
Intelligence, Xcelsius, and other Business Objects products and services mentioned herein as well
as their respective logos are trademarks or registered trademarks of Business Objects S.A. in the
United States and in other countries. Business Objects is an SAP company.All other product and
service names mentioned are the trademarks of their respective companies. Data contained in this
document serves informational purposes only. National product specifications may vary.These materials
are subject to change without notice. These materials are provided by SAP AG and its affiliated
companies ("SAP Group") for informational purposes only, without representation or warranty of any
kind, and SAP Group shall not be liable for errors or omissions with respect to the materials. The
only warranties for SAP Group products and services are those that are set forth in the express
warranty statements accompanying such products and services, if any. Nothing herein should be
construed as constituting an additional warranty.
2010-07-29

Contents
Introduction to Interactive Analysis.........................................................................................5Chapter 1
1.1
1.2
1.2.1
1.2.2
2.1
2.2
2.3
3.1
3.2
3.3
3.3.1
3.4
3.4.1
3.4.2
3.4.3
3.5
3.5.1
3.5.2
What is Interactive Analysis?....................................................................................................5
Who is Interactive Analysis for?...............................................................................................5
About this guide.......................................................................................................................6
Who should read this guide?....................................................................................................6
Installing Interactive Analysis.................................................................................................7Chapter 2
System requirements...............................................................................................................7
Compatibility with other SAP BusinessObjects products..........................................................7
Installing Interactive Analysis....................................................................................................8
Interactive Analysis basics....................................................................................................11Chapter 3
Creating an Web Intelligence document.................................................................................11
Interactive Analysis working modes........................................................................................11
Launching Interactive Analysis................................................................................................12
Launching Interactive Analysis in Standalone mode................................................................12
Creating an Interactive Analysis document.............................................................................13
Creating an Interactive Analysis document by using a personal data provider.........................13
Creating an Interactive Analysis document by using a universe..............................................14
Saving an Web Intelligence document locally.........................................................................16
Interactive Analysis Update feature........................................................................................16
Checking for updates manually...............................................................................................17
Downloading and installing Interactive Analysis updates.........................................................17
4.1
4.2
4.2.1
4.2.2
4.2.3
4.2.4
4.3
Universe Designer Personal basics......................................................................................19Chapter 4
Universe fundamentals...........................................................................................................19
Creating an eFashion universe...............................................................................................20
Creating a new eFashion connection......................................................................................21
Creating a new eFashion universe..........................................................................................23
Inserting tables and creating a schema...................................................................................25
Creating classes and objects in a universe.............................................................................25
Saving a universe...................................................................................................................26
2010-07-293

Contents
Deployment Considerations for OEM Partners....................................................................29Chapter 5
More Information...................................................................................................................31Appendix A
Index 33
2010-07-294

Introduction to Interactive Analysis
Introduction to Interactive Analysis
1.1 What is Interactive Analysis?
Interactive Analysis (IA) is a standalone, end-to-end reporting tool that enables you to interact with Web
Intelligence reports without any business intelligence platform support. It offers both self-service access
to data and intuitive information analysis by helping you turn business insights into effective decisions.
It also enables you to create Web Intelligence documents by using local data sources such as EXCEL,
CSV, TEXT files, Print files, ASCII files, and standalone universes, without connecting to Central
Management Server (CMS). In addition, you can build standalone universes based on your specific
requirements, by connecting to different databases.
The Interactive Analysis tool optimizes report creation efficiency and generates calculation results much
faster than online clients. This tool does not require you to install an application server.
The Interactive Analysis consists of the following components:
• Universe Designer Personal (UDP): An integrated standalone tool that enables you to create
standalone universes, by connecting to the database middleware. The standalone universes can
be shared across the Interactive Analysis users for the specified deployment.
• Interactive Analysis: An integrated standalone query, reporting, and analysis tool that enables you
to create Web Intelligence reports.
• Universe Connection Manager (UCM): An integrated tool that enables you to manage universe
connections. It associates connections with universes without using Universe Designer Personal.
Note:
The UCM component is available only for Interactive Analysis Version for OEM users.
SAP BusinessObjects provides Interactive Analysis viewlets that are online videos. These viewlets
explain Interactive Analysis concepts and processes required to build ad hoc reports. For information
on viewlets, see: https://www.sdn.sap.com/irj/sdn/businessobjects-webi?rid=/webcontent/uuid/20c3f6f2-
2672-2b10-0494-eb4d421fb4af
1.2 Who is Interactive Analysis for?
2010-07-295

Introduction to Interactive Analysis
Interactive Analysis is ideal for users who want to create, edit, and view Web Intelligence documents
by using local data sources and standalone universes, without connecting to the CMS or without installing
an application server. You can also use Interactive Analysis to build standalone universes.
1.2.1 About this guide
This guide describes how to install Interactive Analysis. Also it describes how to create Web Intelligence
documents by using personal data providers (PDP) and standalone universes. In addition, it describes
how to create standalone universes, connections, classes, and objects.
1.2.2 Who should read this guide?
This guide is intended for users who want to install the Interactive Analysis tool and create documents
by using local data sources such as EXCEL, CSV, TEXT files, Print files, ASCII files, and standalone
universes.
For creating standalone universes, users must be familiar with database with which they want to work.
2010-07-296

Installing Interactive Analysis
Installing Interactive Analysis
This chapter describes the system requirements and the process for installing Interactive Analysis.
2.1 System requirements
The following components must be installed and configured correctly on the system before installing
Interactive Analysis:
• Windows operating system: Windows 2000, Windows 2003, Windows XP, Windows Vista, or Windows
2008
• .NET 2 Framework
Note:
Interactive Analysis installation fails if the installer detects a Web Intelligence Rich Client (WRC)
installation.
For a detailed list of tested environments, see the Platform Availability Report (PAR) available at the
SAP BusinessObjects community network website: http://service.sap.com.
This file provides the list of specific version and service pack requirements for databases and operating
systems.
2.2 Compatibility with other SAP BusinessObjects products
The following SAP BusinessObjects products are compatible with Interactive Analysis:
• Crystal Reports 2008 V1 Service Pack 2 Patch update
• Live Office XI 3.1 Service Pack 2 Patch update
The following SAP BusinessObjects products are incompatible with Interactive Analysis:
• Crystal Reports 2008 V0
• Crystal Reports 2008 V1
• Live Office (XI 3.0)
• Live Office XI 3.1
• BusinessObjects Enterprise XI 3.0 Client Tools
2010-07-297

Installing Interactive Analysis
• BusinessObjects Enterprise XI 3.1 Client Tools
• BusinessObjects Enterprise XI 3.1 Client Tools Service Pack 2 Patch update
• BusinessObjects Edge BI 3.0 Client Tools
• BusinessObjects Edge BI 3.1 Client Tools
• BusinessObjects Edge BI 3.1 Client Tools Service Pack 2 Patch update
• BusinessObjects Enterprise XI 3.0 Server
• BusinessObjects Enterprise XI 3.1 Server
• BusinessObjects Enterprise XI 3.1 Server Service Pack 2 Patch update
• BusinessObjects Edge BI 3.0 Server
• BusinessObjects Edge BI 3.1 Server
• BusinessObjects Edge BI 3.1 Server Service Pack 2 Patch update
• Enterprise XI Release 2
• Edge XI Release 2 (also known as Crystal Decisions)
• Crystal Reports Designer 2008
If you try to install Interactive Analysis on a system that already has any of the above-mentioned products
installed, the Interactive Analysis installer displays an appropriate message and the installation terminates.
2.3 Installing Interactive Analysis
This section describes how to install Interactive Analysis.
To install Interactive Analysis, perform the following steps:
1.
Run setup.exe from the root folder of the product distribution.
The "Open File - Security Warning" dialog box appears with the following message: "Do you want
to run this file?"
2.
Click Run.
The "Please Choose Setup Language" screen appears.
If the installer detects any unsupported SAP BusinessObjects products installed on the same system
then, the "Unsupported Product Detected" screen appears. To know the list of supported products
click the link List of supported Co-existence BusinessObjects products.
3.
Select the setup language from the drop-down list, and click OK.
The "Welcome to the Interactive Analysis Installation Wizard" screen appears.
4.
Click Next.
The "License Agreement" screen appears.
5.
Select the I accept the license agreement option, and click Next.
The "User Information" screen appears.
6.
Enter the full name, name of the organization, and product keycode information in the "Full Name",
"Organization", and "Product Keycode" fields, and click Next.
2010-07-298

Installing Interactive Analysis
The "Destination Folder" screen appears.
7.
If you choose to install to the default location (C:\Program Files\Business Objects\), then
click Next. If you want to install to a different location, then click Browse to select the preferred
location, and click Next.
Note:
If you have already installed any SAP BusinessObjects product on the system, then you cannot
change the installation path. The location where the SAP BusinessObjects product is installed is
selected by default.
The "Choose Language Packs" screen appears.
8.
Select the language packs you want to install, and click Next.
Note:
By default, the English language pack is installed along with the language packs you specify.
The "Ready to Install the Application" screen appears.
9.
Click Next to begin the installation process.
The installation program validates your system and installs Interactive Analysis in the specified
directory.
10.
Click Finish to complete the installation.
You can run a silent installation from the command line to automatically install Interactive Analysis on
any system. The installation program does not prompt you for information during the installation process.
You can use the following script to perform a silent installation of Interactive Analysis:
setup.exe /qn+ CLIENTLANGUAGE="EN" ENABLELOGFILE="1"
INSTALL.LP.EN.SELECTED="1" PIDKEY="XXXXX-XXXXXXX-XXXXXXX-XXXX"
ADDLOCAL="ALL" LAUNCHAPP=0
Note:
In silent installation, you must ensure that the value of LAUNCHAPP parameter is set to 0, so that the
application does not get launched after the installation.
2010-07-299

Installing Interactive Analysis
2010-07-2910

Interactive Analysis basics
Interactive Analysis basics
Interactive Analysis is a standalone, locally installed Microsoft Windows application that enables you
to view and edit Web Intelligence documents (WID) that are stored either on a local system or in a CMS.
It also enables you to create new Web Intelligence documents by using local data sources such as
EXCEL, CSV, TEXT files, Print files, ASCII files, and standalone universes.
For more information on the Interactive Analysis functionality, see the
Analysis
.
3.1 Creating an Web Intelligence document
After installing Interactive Analysis, you must launch the Interactive Analysis from the Start menu to
create an Web Intelligence document. You can create an Web Intelligence document by using one of
the following data sources:
• Local data source (personal data provider): You can create a query from an external file located in
the local system or in the local network. You can create queries in the following formats: EXCEL,
CSV, TEXT files, Print files, ASCII files, and Custom Data Providers.
For more information on Custom Data Providers, see
Guide
and
CDS Framework Object Model Diagrams
• Universe: A universe is mapped to a database containing corporate business information. You must
use objects in the universe to build a query, and to return data from the database to the Web
Intelligence document.
If you want to create an Web Intelligence document by using a universe, you must first create the
universe by using Universe Designer Personal. For information about creating a universe, see Creating
a new eFashion universe.
Building Reports with Interactive
Custom Data Provider Plug-in Developer
available at http://help.sap.com/.
3.2 Interactive Analysis working modes
You can work with Interactive Analysis in three modes: Connected, Offline, or Standalone.
2010-07-2911

Interactive Analysis basics
Interactive Analysis Standalone mode
In Standalone mode, Interactive Analysis is not connected to a CMS and no security is enforced. You
can work only with local, unsecured documents and universes.
Interactive Analysis Connected mode
In Connected mode, Interactive Analysis is connected to a CMS. You can work with documents on the
CMS, or with local, secured documents, or unsecured documents.
Interactive Analysis Offline mode
In Offline mode, Interactive Analysis is not connected to a CMS. However, Interactive Analysis applies
CMS security rights by matching the access rights for the document or universe with the locally stored
security file. For example, if a document was downloaded from a CMS to your local system, and you
do not have the right to open the document in the CMS from which it was downloaded, then you cannot
open the document on your local system.
You can work with local documents and universes that are secured by the CMS you selected at login,
or with unsecured local documents and universes.
Note:
Before you start work in Offline mode with documents or universes secured by a CMS, you must first
have connected to that CMS at least once in Connected mode. This allows Interactive Analysis to
download the CMS security information to your local system, and to display the CMS as a choice in the
System list on the login page. You can then log into Interactive Analysis in Offline mode and work
without a CMS connection, because Interactive Analysis reads the CMS security information in the local
file.
For more information on Interactive Analysis working modes, see
3.3 Launching Interactive Analysis
When you launch Interactive Analysis from the Start menu, the application is launched in Standalone
mode by default. However, you can work in Connected or Offline mode by using the Tools > Login As
option.
You can run multiple instances of Interactive Analysis simultaneously, in any mode, and connect to any
available CMS.
The CMS connection status and the current Interactive Analysis working mode are shown in the status
bar in the bottom right corner of the screen.
3.3.1 Launching Interactive Analysis in Standalone mode
In Standalone mode, you cannot work with documents or universes that have been secured by a CMS.
Interactive Analysis User's Guide
.
2010-07-2912

Interactive Analysis basics
Any middleware required to work with unsecured documents and universes must be installed on your
computer.
To launch Interactive Analysis in Standalone mode, select Start > Programs > Interactive Analysis.
Interactive Analysis is launched in Standalone mode.
If Interactive Analysis was already running on your computer, launching it again opens a new instance
of the application.
For information on launching Interactive Analysis in Connected or Offline mode, see
with Interactive Analysis
.
Building Reports
3.4 Creating an Interactive Analysis document
This section describes how to create an Interactive Analysis document by using universes and local
data sources.
3.4.1 Creating an Interactive Analysis document by using a personal data provider
This section describes how to create a new Interactive Analysis document by using a personal data
provider such as Excel.
To create an Interactive Analysis document by using an EXCEL file, perform the following steps:
1.
Select Start > Programs > Interactive Analysis.
Interactive Analysis is launched in Standalone mode.
2.
Select File > New.
The "Data source selection" screen appears.
3.
Select Other data source, and select Text and Excel files from the drop-down list. Click Next >>.
The "Select a data source" screen appears.
4.
Click Browse.
5.
Select the Excel file located on your local system, and click Open.
The "Worksheet/Workbook File" pane appears.
6.
In the Sheet Name field, select the sheet name from the drop-down list.
7.
In the Field Selection field, select Range Definition, and specify the range of cells you want to
include in the query.
For example, "A1:B20". In this case, the data is retrieved from A1 cell to B20 cell (2 columns and
20 rows).
2010-07-2913

Interactive Analysis basics
8.
Select the First row contains column names option to display the first row as column names.
If this option is not selected, then the column names in the table are displayed as "col1", "col2", and
so on.
9.
Click Next>>.
The "Create Query" window appears. It contains the first row of the column as data source objects
in the "Result Objects" pane. The data sample is displayed in the bottom pane, which contains the
data available in the selected data range.
10.
Click Run Query.
The data is retrieved from the Excel data source, and an Interactive Analysis document is created.
3.4.2 Creating an Interactive Analysis document by using a universe
If you want to create an Interactive Analysis document in the Standalone mode, you must ensure that
the universe is available on your local system.
You can use the eFashion sample universe packaged along with the Interactive Analysis to create an
Interactive Analysis document. This section describes how to create an Interactive Analysis document
by using the eFashion universe.
To create a new Interactive Analysis document by using the eFashion universe, perform the following
steps:
2010-07-2914
Interactive Analysis basics
1.
Select Start > Programs > Interactive Analysis.
Interactive Analysis is launched in Standalone mode.
2.
Select File > New.
The "Data source selection" screen appears.
3.
Select Universe, and click Next >>.
The "Universe" screen appears, and lists the available universes.
4.
Select the eFashion universe from the list of universes, and click OK.
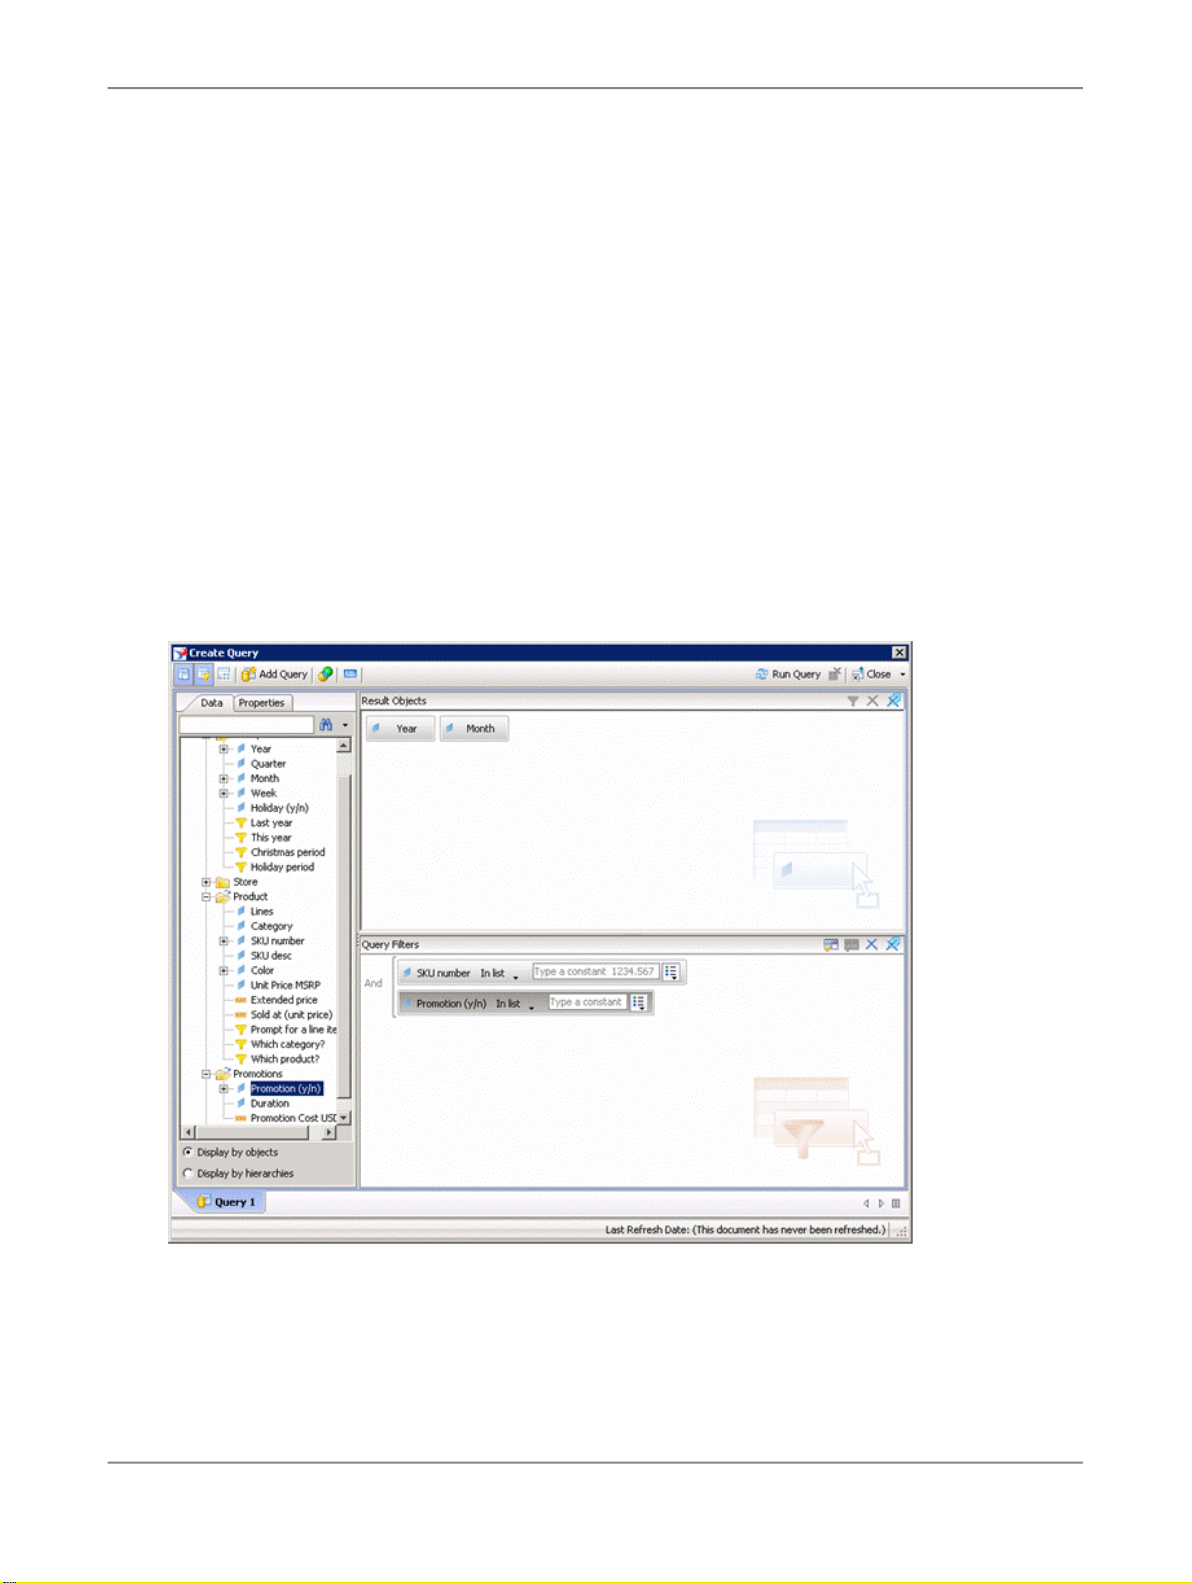
The "Create Query" screen appears. It displays the classes and objects in the eFashion universe.
5.
In the Data tab, select the objects you want to include in the query, and drag them to the "Result
Objects" pane.
Note:
To add all objects in the class, drag the class to the "Result Objects" pane.
6.
Select the objects on which you want to define query filters, and drag them to the "Query Filters"
pane.
7.
Set the scope of analysis and other query properties.
8.
Click Run Query.
2010-07-2915

Interactive Analysis basics
Interactive Analysis retrieves data from the database, and an Interactive Analysis document is
created.
3.4.3 Saving an Web Intelligence document locally
You can save Web Intelligence documents locally in the following file formats:
• Web Intelligence document
• Excel document
• PDF document
• CSV file
To save Web Intelligence document locally, perform the following steps:
1.
Select File > Save.
The "Save Document" screen appears.
2.
Type the name of the document in the File Name field.
3.
Select the document format from the Files of type drop-down list.
Note:
You cannot save a document if All Files is selected in the Files of type drop-down list.
The dialog box displays the options associated with the selected format type.
4.
Set the options associated with the file format, and click Save.
The document is saved in the default location: C:\Documents and
Settings\Administrator\My Documents\My Business Objects Documents\userDocs.
However, you can change the default location and save the document in a directory of your choice.
3.5 Interactive Analysis Update feature
Interactive Analysis Update is a feature that enables you to check for Interactive Analysis updates
available at the SAP BusinessObjects Support website. It also enables you to download and install
these updates on your system.
This feature provides you with the following options:
• Check for updates automatically: This option is enabled by default. If the Update feature detects
updates, the Update icon appears at the bottom right of the Interactive Analysis screen. You can
double-click the Update icon to view the list of available updates.
Note:
The Interactive Analysis Update feature checks for updates the first time Interactive Analysis is
launched on a particular day.
2010-07-2916

Interactive Analysis basics
• Check for updates manually: This option enables you to check for updates manually whenever you
want, and enables you to download and install the updates.
3.5.1 Checking for updates manually
To check for Interactive Analysis updates manually, perform the following steps:
1.
Select Start > Programs > Interactive Analysis.
Interactive Analysis is launched in Standalone mode.
2.
Select Help > Check for updates.
The "Interactive Analysis - Check for updates" screen displays the list of available updates.
3.5.2 Downloading and installing Interactive Analysis updates
To download and install Interactive Analysis updates, perform the following steps:
1.
Select Start > Programs > Interactive Analysis.
Interactive Analysis is launched in Standalone mode.
2.
Select Help > Check for updates.
The "Interactive Analysis - Check for updates" screen appears with the list of available updates.
3.
Select the update you want to install, and click Download.
The Windows Installer Package is downloaded to the following location: C:\Documents and
Settings\<user account>\Local Settings\Temp
4.
Click Install.
The "Install" screen appears with the following message: "Shutdown and install updates?"
5.
Click OK.
The Interactive Analysis session closes and the Installation Wizard appears.
Note:
If the Universe Designer Personal or the Universe Connection Manager is open, you must close it
manually.
6.
Follow the on-screen instructions to install the updates.
The selected update is installed.
2010-07-2917

Interactive Analysis basics
2010-07-2918

Universe Designer Personal basics
Universe Designer Personal basics
Universe Designer Personal is a tool that enables you to create standalone universes for Interactive
Analysis users. It is a semantic layer that isolates end users from technical issues in the database
structure. The Universe Designer Personal offers only the standalone functionality. It does not support
importing universes from or exporting universes to the CMS.
For more information on Universe Designer Personal functionality, see the
User's Guide
.
4.1 Universe fundamentals
Universe
A universe is a file that contains the database connection parameter. It also contains SQL structures
called objects, which map to actual SQL structures in the database such as columns, tables, and SQL
tables.
A universe can represent any specific application, system, or group of users. For example, a universe
can relate to a department in a company such as marketing or accounting. A universe can also relate
to a section within a department or just about any set of organized procedures such as a payroll or
inventory system. A universe consists of a set of objects grouped by classes.
Universe objects
In SAP BusinessObjects products, an object is a named component in a universe that represents a
column or function in a database. An object represents a meaningful entity, fact, or calculation that is
used in an end user's business environment.
In Universe Designer Personal, you can qualify an object as one of the following three types:
• Dimension object: A dimension object represents data that provides the basis for analysis in a report.
Dimension objects retrieve character-type data. For example, customer names, resort names, or
dates.
Universe Designer Personal
• Detail object: A detail object provides descriptive data about a dimension. A detail object is always
attached to a dimension object and provides additional information about the dimension object. For
example, "Age" is a detail object that is associated with the "Customer" dimension.
• Measure object: A measure object retrieves numeric data that is the result of calculations performed
on data in the database. For example, "Revenue" is the result of calculations performed on the
number of items sold multiplied by item price.
2010-07-2919

Universe Designer Personal basics
Following are the types of measure:
• Classic measures: calculated by Interactive Analysis.
• Smart measures: calculated by the database on which the universe is based.
Classes and subclasses
Objects are grouped into folders called classes. Each class can also contain one or more subclasses.
Subclasses contain objects that form the subcategory of objects in the upper level of the class.
The classes organize the objects into logical groups. When you create queries by using a universe,
classes enable you to find the objects that represent the information you want to use in a query.
Connection
A connection is a named set of parameters that defines how an SAP BusinessObjects application
accesses data in a database file. A connection links Interactive Analysis to your middleware. You must
have a connection to access data.
Join
A join enables you to combine two or more tables with a common domain into a single table.
Schema
A schema is a graphical representation of database structures. The schema contains tables and joins.
The tables contain columns that map to objects that end users make use of to create reports. The joins
link the tables so that correct data is returned for queries that are run on more than one table.
4.2 Creating an eFashion universe
This section describes how to create an eFashion universe.
An eFashion universe is a sample universe packaged with Interactive Analysis. This universe is built
on Microsoft Access database. The eFashion.mdb and eFashion.unv files are available at the
following location in your installation: $INSTALLDIR\Business Objects\BusinessObjects
Enterprise 12.0\Samples\webi
This section discusses the following topics:
• Creating a new eFashion connection
• Creating a new eFashion universe
• Inserting tables and creating a schema
• Creating classes and objects in a universe
2010-07-2920

Universe Designer Personal basics
4.2.1 Creating a new eFashion connection
To create a new connection for eFashion universe, perform the following steps:
1.
Select Start > Programs > Interactive Analysis > Universe Designer.
The Universe Designer Personal session opens.
2.
Select Tools > Connections.
The "Wizard Connection" screen appears.
3.
Click Add.
The "Welcome to the New Connection Wizard" screen appears.
4.
Click Next.
The "Database Middleware Selection" screen appears. It lists the database and middleware that
corresponds to your Data Access license key.
5.
In the "Database Middleware Selection" screen, perform the following steps, and click Next:
a. Select the connection type from the drop-down list.
The following are the supported connection types:
• Shared
• Personal
b. Type the connection name in the "Connection Name" field.
c. Select a Microsoft Access driver for the connection.
The "Login Parameters" screen appears.
6.
In the "Login Parameters" screen, type the following information, and click Next:
a. Select the authentication mode from the drop-down list.
Note:
The default option is Use specified username and password.
b. Type the database user name in the "User name" field.
c. Type the database password in the "Password" field.
d. Ensure that you have created a data source name (DSN) for the eFashion database.
For information about how to create a new DSN , see Creating a DSN.
Note:
The data source name is RDBMS dependent.
e. Select the DSN from the drop-down list.
Or
Type the name of the data source that you want to access.
f. Click Test Connection to test whether the server is responding.
2010-07-2921

Universe Designer Personal basics
The "Configuration Parameters" screen appears. This screen defines the advanced parameters that
enable you to access the database server by using the ODBC middleware. For information about
advanced options, see the
Universe Designer Personal User's Guide
.
7.
Select values for advanced connection parameters, and click Next >.
Or
Click Next >, if you want to retain the default values for the advanced parameters.
The "Custom Parameters" screen appears.
8.
Click Finish.
The "Connections list" screen appears. The new connection is now included in the list.
9.
Click Finish to close the connections list.
The connection is now available to the universe.
4.2.1.1 Creating a DSN
To create a system DSN for the eFashion database, perform the following steps:
1.
Select Start > Settings > Control Panel.
The "Control Panel" folder appears.
2.
Double-click Administrative Tools.
The "Administrative Tools" folder appears.
2010-07-2922

Universe Designer Personal basics
3.
Double-click Data Sources (ODBC).
The "ODBC Data Source Administrator" screen appears.
4.
Click the System DSN tab.
5.
Click Add.
The "Create New Data Source" screen appears.
6.
Select Microsoft Access Driver (*.mdb), and click Finish.
The "ODBC Microsoft Access Setup" screen appears.
7.
In the "ODBC Microsoft Access Setup" screen, perform the following steps:
a. Type the data source name in the Data Source Name field.
b. Type the description in the Description field.
c. In the Database field, click Select.
The "Select Database" screen appears.
d. Select the directory where .mdb file is located.
e. Select the .mdb file, and click OK.
f. Click OK.
The DSN is added to the System Data Sources list.
8.
Click OK.
The system DSN is created and is available to create a connection.
4.2.2 Creating a new eFashion universe
To create a new eFashion universe by defining universe parameters, launch the Universe Designer
and then perform the following steps:
1.
Select File > New.
The "Universe Parameter" dialog box appears.
2010-07-2923

Universe Designer Personal basics
2.
In the Definition tab, perform the following steps:
a. Type the name of the universe.
b. Type the description of the universe.
c. Select the eFashion connection from the Connection drop-down list.
or
Click New, if you want to create a new eFashion connection. For more information on creating
a new eFashion connection, see Creating a new eFashion connection.
3.
Click Summary.
The "Summary" tab appears.
4.
Type universe information in the Comments box.
5.
Click Strategies.
The "Strategies" tab appears. This tab displays the strategies available for your connected data
source.
6.
Select a strategy from each of the Objects, Joins, and Tables drop-down list boxes.
Depending on the RDBMS for the connection, more than one strategy may be available in each
drop-down list box.
7.
Click Controls.
The "Controls" tab appears. The Controls settings enable you to limit the size of the result set and
the execution time of queries. Modify the default settings or clear the check boxes per your
requirement.
8.
Click SQL.
The "SQL" tab appears. Select or clear the check boxes per your requirement.
9.
Click Parameters.
2010-07-2924

Universe Designer Personal basics
The "Parameters" tab appears.
10.
Create properties by specifying the name and value, and click Add.
The properties are added to the Parameters list.
11.
Click OK.
The universe and structure panes open in Universe Designer Personal.
After creating a universe, you must create a schema by inserting tables from the eFashion database
and then create classes and objects.
Related Topics
• Creating classes and objects in a universe
4.2.3 Inserting tables and creating a schema
After creating an eFashion universe, you must create a schema that represents the tables, the fields
in each table, and the relationship between fields and tables.
To insert tables into the designer and create a schema, perform the following steps:
1.
Select Insert > Tables.
The "Table Browser" screen appears.
Note:
The "Table Browser" is an independent screen that displays a tree view of the tables available in
the target database.
2.
Select the tables you require, and click Insert.
The tables are inserted in the "Structure" pane.
3.
Select Tools > Automated Detection > Detect Joins.
The "Candidate Joins" screen appears. This screen displays the list of joins that are detected
according to the join strategy.
4.
Select the joins, and click Insert.
The automatic join detection strategy detects joins based on matching column names. You can
select the join strategy you want to apply when you use automatic join detection.
The schema is created and you can now create classes and objects based on the schema.
4.2.4 Creating classes and objects in a universe
2010-07-2925

Universe Designer Personal basics
To create a class and an object, perform the following steps:
1.
Select Insert > Class.
The "Edit properties of class" screen appears.
2.
Type the name in the Class Name field.
For example, Time Period.
3.
Type the description for the class in the Description field, and click OK.
For example, Time Hierarchy.
The named class folder appears in the Universe pane.
4.
Right-click the class in the Universe pane, and select Object from the contextual menu.
An object is inserted under the selected class, and the "Edit Properties of Object" screen appears.
5.
Type a name for the object in the Name field.
For example, Year. Ensure that object names are always expressed in the end user business
vocabulary. This name may be different from the actual column names with which the object is
associated within the database schema.
6.
Select the type of object from the Type drop-down list.
For example, Character.
7.
Type the SELECT statement in the Select field, or click the >> button to use the SQL editor.
If you click the >> button, the "Edit Select Statement of Object" screen appears.
8.
In the Tables and Columns field, double-click the field you want the object to represent.
For example, Year (Yr).
The object SQL appears in the text field.
9.
Click Parse to parse the SQL statement.
The "Parsing Result" screen appears with the parsed result. If the SELECT statement is valid, then
the following message appears: Parsing is OK. If the SELECT statement is invalid, then a
message with a valid reason appears.
10.
Click OK.
The "Parsing Result" screen closes.
11.
Click OK.
The "Edit Select Statement of Object" screen closes.
The class and the object are created. Similarly, you can create as many classes and objects per your
requirement. Ensure that you save your universe before you end the designer session to avoid any
data loss.
4.3 Saving a universe
To save a universe, perform the following steps:
2010-07-2926

Universe Designer Personal basics
1.
Click File > Save.
The "Save As" screen appears.
2.
Type a name for the universe file.
3.
Select the Save for all users option, if you want to make the universe accessible to all Designer
users.
4.
Click Save.
The universe is saved in the default location. The default location is C:\Documents and
Settings\Administrator\Application Data\Business Objects\Business Objects
12.0\Universes.
2010-07-2927

Universe Designer Personal basics
2010-07-2928

Deployment Considerations for OEM Partners
Deployment Considerations for OEM Partners
The Interactive Analysis client is a repackaging of the recently released Web Intelligence Rich Client
(WRC). Interactive Analysis is distributed, by OEM partners wishing to distribute the full feature-rich ad
hoc capabilities of the Web Intelligence Rich Client without the packaging of the other 3rd party tools
that ship on the client CD today. In this context, Interactive Analysis can be deployed by an OEM partner
in two ways:
Interactive Analysis only deployment
The Interactive Analysis client can be distributed as a standalone tool with a prepackaging of universes
(.unv) and Web Intelligence documents (.wid). In this scenario, the OEM partner will ship the Interactive
Analysis client for installation using the GUI or command line, to be unpackaged at the customer site
with the universes and Web Intelligence documents included in the predefined location for this content.
This deployment scenario assumes that all connection information is appropriate for the end-customer,
coming from the OEM partner. In this scenario, the connections to the operational data sources cannot
be changed, as there is no means to do so in the Interactive Analysis client.
Interactive Analysis plus Designer
The Interactive Analysis client can be distributed by the OEM partner in conjunction with just the Universe
Designer Personal application included. Similar to scenario 1, universes and documents can be included.
However, in this deployment, the end-customer will be allowed to open any prepackaged universe
(.unv) files shipped by the OEM to do the following:
• Overriding or changing the connection information within the universe to accommodate any
site-specific configuration settings, such as change of hostname, database name, etc. that would
vary from site to site.
• Modification or creation of distributed universe files for the purpose of adding or removing additional
database content (new tables, fields, calculations, and so on).
The Interactive Analysis client can be installed manually by the end-user using the GUI installer or by
invoking the command-line install within the OEM Partner’s installation routine.
2010-07-2929

Deployment Considerations for OEM Partners
2010-07-2930
More Information
More Information
LocationInformation Resource
SAP BusinessObjects product information
SAP Help Portal
SAP Service Marketplace
http://www.sap.com
Navigate to http://help.sap.com/businessobjects and on the "SAP BusinessObjects Overview" side panel click All Products.
You can access the most up-to-date documentation covering all SAP
BusinessObjects products and their deployment at the SAP Help Portal.
You can download PDF versions or installable HTML libraries.
Certain guides are stored on the SAP Service Marketplace and are not
available from the SAP Help Portal. These guides are listed on the Help
Portal accompanied by a link to the SAP Service Marketplace. Customers
with a maintenance agreement have an authorized user ID to access
this site. To obtain an ID, contact your customer support representative.
http://service.sap.com/bosap-support > Documentation
• Installation guides: https://service.sap.com/bosap-instguides
• Release notes: http://service.sap.com/releasenotes
The SAP Service Marketplace stores certain installation guides, upgrade
and migration guides, deployment guides, release notes and Supported
Platforms documents. Customers with a maintenance agreement have
an authorized user ID to access this site. Contact your customer support
representative to obtain an ID. If you are redirected to the SAP Service
Marketplace from the SAP Help Portal, use the menu in the navigation
pane on the left to locate the category containing the documentation you
want to access.
Docupedia
Developer resources
https://cw.sdn.sap.com/cw/community/docupedia
Docupedia provides additional documentation resources, a collaborative
authoring environment, and an interactive feedback channel.
https://boc.sdn.sap.com/
https://www.sdn.sap.com/irj/sdn/businessobjects-sdklibrary
2010-07-2931

More Information
LocationInformation Resource
SAP BusinessObjects articles on
the SAP Community Network
Notes
Forums on the SAP Community
Network
Training
Online customer support
https://www.sdn.sap.com/irj/boc/businessobjects-articles
These articles were formerly known as technical papers.
https://service.sap.com/notes
These notes were formerly known as Knowledge Base articles.
https://www.sdn.sap.com/irj/scn/forums
http://www.sap.com/services/education
From traditional classroom learning to targeted e-learning seminars, we
can offer a training package to suit your learning needs and preferred
learning style.
http://service.sap.com/bosap-support
The SAP Support Portal contains information about Customer Support
programs and services. It also has links to a wide range of technical information and downloads. Customers with a maintenance agreement
have an authorized user ID to access this site. To obtain an ID, contact
your customer support representative.
Consulting
http://www.sap.com/services/bysubject/businessobjectsconsulting
Consultants can accompany you from the initial analysis stage to the
delivery of your deployment project. Expertise is available in topics such
as relational and multidimensional databases, connectivity, database
design tools, and customized embedding technology.
2010-07-2932

Index
C
CMS 5
Connection 19
D
data source
EXCEL 13
Detail 19
Dimension 19
I
installing Web Intelligence Personal 7
Interactive Analysis 11
Interactive Analysis 5
Universe Connection Manager 5
Universe Designer Personal 5
M
Measure 19
P
personal data provider 13
S
Schema 19
setup 8
U
Universe 19
save 26
Universe Designer Personal 19
W
working modes
connected 11
offline 11
standalone 11
2010-07-2933

Index
2010-07-2934
 Loading...