

Page 1

Data Integrator Advanced Development
and Migration Guide
Data Integrator Advanced Development and Migration Guide
Data Integrator 11.0.1
for Windows and UNIX
Page 2

1
Copyright
Trademarks
Patents
If you find any problems with this documentation, please report them to Business Objects
S.A. in writing at documentation@businessobjects.com.
Copyright © Business Objects S.A. 2005. All rights reserved.
Business Objects, the Business Objects logo, Crystal Reports, and Crystal Enterprise are
trademarks or registered trademarks of Business Objects SA or its affiliated companies in the
United States and other countries. All other names mentioned herein may be trademarks of
their respective owners.
Business Objects owns the following U.S. patents, which may cover products that are offered
and sold by Business Objects: 5,555,403, 6,247,008 B1, 6,578,027 B2, 6,490,593 and
6,289,352.
2 Data Integrator Advanced Development and Migration Guide
Page 3

Contents
Chapter 1 Overview 7
About this document . . . . . . . . . . . . . . . . . . . . . . . . . . . . . . . . . . . . . . . . . . 8
Audience and assumptions . . . . . . . . . . . . . . . . . . . . . . . . . . . . . . . . . . . . . 9
More Data Integrator product documentation . . . . . . . . . . . . . . . . . . . . . . . 9
Chapter 2 Migration basics 11
Development phases . . . . . . . . . . . . . . . . . . . . . . . . . . . . . . . . . . . . . . . . . 12
Design phase . . . . . . . . . . . . . . . . . . . . . . . . . . . . . . . . . . . . . . . . . . . . 13
Test phase . . . . . . . . . . . . . . . . . . . . . . . . . . . . . . . . . . . . . . . . . . . . . . 13
Production phase . . . . . . . . . . . . . . . . . . . . . . . . . . . . . . . . . . . . . . . . . 13
Migration mechanisms and tools . . . . . . . . . . . . . . . . . . . . . . . . . . . . . . . . 14
Which mechanism is best? . . . . . . . . . . . . . . . . . . . . . . . . . . . . . . . . . 14
Export/import migration . . . . . . . . . . . . . . . . . . . . . . . . . . . . . . . . . . . . 15
Multi-user migration . . . . . . . . . . . . . . . . . . . . . . . . . . . . . . . . . . . . . . . 16
Chapter 3 Preparing for migration 17
Naming conventions for migration . . . . . . . . . . . . . . . . . . . . . . . . . . . . . . . 18
Connections to external datastores . . . . . . . . . . . . . . . . . . . . . . . . . . . 19
Directory locations . . . . . . . . . . . . . . . . . . . . . . . . . . . . . . . . . . . . . . . . 20
Schema structures and owners . . . . . . . . . . . . . . . . . . . . . . . . . . . . . . 20
Datastore and system profiles . . . . . . . . . . . . . . . . . . . . . . . . . . . . . . . . . . 21
Datastore profiles and migration . . . . . . . . . . . . . . . . . . . . . . . . . . . . . 22
How datastore profiles work . . . . . . . . . . . . . . . . . . . . . . . . . . . . . . . . . 24
Multiple profiles in multi-user environments . . . . . . . . . . . . . . . . . . . . . 25
Chapter 4 Export/import 27
Exporting/importing objects in Data Integrator . . . . . . . . . . . . . . . . . . . . . . 28
The Export editor . . . . . . . . . . . . . . . . . . . . . . . . . . . . . . . . . . . . . . . . . 28
Exporting objects to a database . . . . . . . . . . . . . . . . . . . . . . . . . . . . . . 31
Data Integrator Advanced Development and Migration Guide 3
Page 4

1
Exporting objects to a file . . . . . . . . . . . . . . . . . . . . . . . . . . . . . . . . . . .32
Exporting a repository to a file . . . . . . . . . . . . . . . . . . . . . . . . . . . . . . . .33
Importing from a file . . . . . . . . . . . . . . . . . . . . . . . . . . . . . . . . . . . . . . .33
Removing obsolete repository contents . . . . . . . . . . . . . . . . . . . . . . . . . . . 34
Backing up repositories . . . . . . . . . . . . . . . . . . . . . . . . . . . . . . . . . . . . . . . .35
Maintaining Job Server performance . . . . . . . . . . . . . . . . . . . . . . . . . . . . .35
Chapter 5 Multi-user development 37
Central versus local repository . . . . . . . . . . . . . . . . . . . . . . . . . . . . . . . . . .38
Data Integrator and multiple users . . . . . . . . . . . . . . . . . . . . . . . . . . . . . . . 39
Chapter 6 Multiuser environment setup 43
Creating a nonsecure central repository . . . . . . . . . . . . . . . . . . . . . . . . . . .44
Defining a connection to a nonsecure central repository . . . . . . . . . . . . . .44
Activating a central repository . . . . . . . . . . . . . . . . . . . . . . . . . . . . . . . . . . . 45
Chapter 7 Implementing Central Repository Security 51
Overview . . . . . . . . . . . . . . . . . . . . . . . . . . . . . . . . . . . . . . . . . . . . . . . . . . .52
Group-based permissions . . . . . . . . . . . . . . . . . . . . . . . . . . . . . . . . . . .52
Levels of permissions . . . . . . . . . . . . . . . . . . . . . . . . . . . . . . . . . . . . . .53
Process overview . . . . . . . . . . . . . . . . . . . . . . . . . . . . . . . . . . . . . . . . .53
Creating a secure central repository . . . . . . . . . . . . . . . . . . . . . . . . . . . . . .53
Adding a multiuser administrator (optional) . . . . . . . . . . . . . . . . . . . . . . . . .55
Setting up groups and users . . . . . . . . . . . . . . . . . . . . . . . . . . . . . . . . . . . .55
Defining a connection to a secure central repository . . . . . . . . . . . . . . . . .55
Working with objects in a secure central repository . . . . . . . . . . . . . . . . . . 57
Adding objects to the central repository . . . . . . . . . . . . . . . . . . . . . . . .57
Viewing and modifying permissions . . . . . . . . . . . . . . . . . . . . . . . . . . .57
Chapter 8 Working in a multi-user environment 59
Filtering . . . . . . . . . . . . . . . . . . . . . . . . . . . . . . . . . . . . . . . . . . . . . . . . . . . .60
Adding objects to the central repository . . . . . . . . . . . . . . . . . . . . . . . . . . . 61
Checking out objects . . . . . . . . . . . . . . . . . . . . . . . . . . . . . . . . . . . . . . . . . .62
Check out single objects or objects with dependents . . . . . . . . . . . . . .63
Check out single objects or objects with dependents without replacement
65
4 Data Integrator Advanced Development and Migration Guide
Page 5

Check out objects with filtering . . . . . . . . . . . . . . . . . . . . . . . . . . . . . . . 65
Undoing check out . . . . . . . . . . . . . . . . . . . . . . . . . . . . . . . . . . . . . . . . . . . 66
Checking in objects . . . . . . . . . . . . . . . . . . . . . . . . . . . . . . . . . . . . . . . . . . . 67
Checking in single objects, objects with dependents . . . . . . . . . . . . . . 67
Checking in an object with filtering . . . . . . . . . . . . . . . . . . . . . . . . . . . . 68
Labeling objects . . . . . . . . . . . . . . . . . . . . . . . . . . . . . . . . . . . . . . . . . . . . . 69
Getting objects . . . . . . . . . . . . . . . . . . . . . . . . . . . . . . . . . . . . . . . . . . . . . . 71
Comparing objects . . . . . . . . . . . . . . . . . . . . . . . . . . . . . . . . . . . . . . . . . . . 72
Viewing object history . . . . . . . . . . . . . . . . . . . . . . . . . . . . . . . . . . . . . . . . . 72
Deleting objects . . . . . . . . . . . . . . . . . . . . . . . . . . . . . . . . . . . . . . . . . . . . . 74
Using aliases . . . . . . . . . . . . . . . . . . . . . . . . . . . . . . . . . . . . . . . . . . . . . . . . 75
Application phase management . . . . . . . . . . . . . . . . . . . . . . . . . . . . . . . . . 77
Chapter 9 Migrating multi-user jobs 79
Application phase management . . . . . . . . . . . . . . . . . . . . . . . . . . . . . . . . . 80
Copying contents between central repositories . . . . . . . . . . . . . . . . . . . . . 80
Index 83
1
Data Integrator Advanced Development and Migration Guide 5
Page 6

1
6 Data Integrator Advanced Development and Migration Guide
Page 7

Data Integrator Advanced Development and Migration Guide
Overview
chapter
Page 8

Overview
1
About this document
One of the most powerful aspects of Data Integrator is its architectural
flexibility through development, test, and production environments. Data
Integrator is designed to support a number of environments, including large
enterprises with many developers working on multiple projects. Data
Integrator supports multi-site architectures whether centralized or not.
This book discusses architectural options for implementing Data Integrator in
development, test, and production environments and covers the following
topics:
• Migration basics
• Preparing for migration
• Export/import
• Multi-user development
• Multiuser environment setup
• Working in a multi-user environment
• Migrating multi-user jobs
This chapter also includes the following topics:
• About this document
• Audience and assumptions
• More Data Integrator product documentation
About this document
The book contains advanced development information. Topics include:
• Migration
How to move your projects to different environments
• Multi-user development
How to manage a project developed by multiple users
You will find this book most useful:
• After you have learned product basics
• While planning the design, test, and production phases of your data-
movement projects
• As an advanced source of information during any phase of your projects
8 Data Integrator Advanced Development and Migration Guide
Page 9

Audience and assumptions
This and other Data Integrator product documentation assumes the following:
• You are an application developer, consultant, or database administrator
working on data extraction, data warehousing, or data integration.
• You understand your source data systems, RDBMS, business
intelligence, and messaging concepts.
• You understand your organization’s data needs.
• You are familiar with SQL (Structured Query Language).
• If you are interested in using this product to design real-time processing,
you are familiar with:
• DTD and XML Schema formats for XML files
• Publishing Web Services (WSDL, HTTP, and SOAP protocols, etc.)
• You are familiar Data Integrator installation environments—Microsoft
Windows or UNIX.
Further, Business Objects recommends that you review both the Data
Integrator Getting Started Guide and the Data Integrator Designer Guide
before using advanced concepts in this document.
Overview
Audience and assumptions
1
More Data Integrator product documentation
Consult the Data Integrator Getting Started Guide for:
• An overview of Data Integrator products and architecture
• Data Integrator installation and configuration information
• A list of product documentation and a suggested reading path
After you install Data Integrator, you can view technical documentation from
many locations. To view documentation in PDF format, you can:
• Select Start > Programs > Data Integrator version > Data Integrator
Documentation and choose:
• Release Notes
• Release Summary
• Technical Manuals
• Select one of the following from the Designer’s Help menu:
• Release Notes
• Release Summary
Data Integrator Advanced Development and Migration Guide 9
Page 10

Overview
1
More Data Integrator product documentation
• Technical Manuals
• Select Help from the Data Integrator Administrator
To access more documentation at the following Web site, you must have a
valid user name and password. To obtain your user name and password, go
to http://www.techsupport.businessobjects.com and click Register.
10 Data Integrator Advanced Development and Migration Guide
Page 11

Data Integrator Advanced Development and Migration Guide
Migration basics
chapter
Page 12

Migration basics
2
Development phases
Migration as it relates to Data Integrator is the process of moving applications
through multiple development phases into production. Data Integrator
supports simple and complex application migration through all phases into
production.
This chapter includes the following topics:
• Development phases
• Migration mechanisms and tools
Development phases
The ETL application development process typically involves three distinct
phases:
• Design phase
• Test phase
• Production phase
You can use Data Integrator in all three phases. Because each phase might
require a different repository to control environment differences, Data
Integrator provides controlled mechanisms for moving objects from phase to
phase.
Each phase could involve a different computer in a different environment with
different security settings. For example, design and initial test may only
require limited sample data and low security, while final testing may require a
full emulation of the production environment including strict security.
Test phase
Does not expose
production data
Production phase
Use results to refine jobs
12 Data Integrator Advanced Development and Migration Guide
Design phase
Define data movement
requirements
Page 13

Design phase
In this phase, you define objects and build diagrams that instruct Data
Integrator in your data movement requirements. Data Integrator stores these
specifications so you can reuse them or modify them as your system evolves.
Design your project with migration to testing and final production in mind.
Consider these basic guidelines as you design your project:
• Construct design steps as independent, testable modules.
• Use meaningful names for each step you construct.
• Make independent modules that can be used repeatedly to handle
• Use test data that reflects all the variations in your production data.
Test phase
In this phase, you use Data Integrator to test the execution of your
application. At this point, you can test for errors and trace the flow of
execution without exposing production data to any risk. If you discover errors
during this phase, return the application to the design phase for correction,
then test the corrected application.
Testing has two parts:
• The first part includes designing the data movement using your local
• The second part includes fully emulating your production environment,
Data Integrator provides feedback through trace, error, and statistics logs
during both parts of this phase.
The testing repository should emulate your production environment as closely
as possible, including scheduling jobs rather than manually starting them.
common operations.
repository.
including data volume.
Migration basics
Development phases
2
Production phase
In this phase, you set up a schedule in Data Integrator to run your application
as a job. Evaluate results from production runs and when necessary , return to
the design phase to optimize performance and refine your target
requirements.
After moving a Data Integrator application into production, monitor it in the
Administrator for performance and results. During production:
• Monitor your jobs and the time it takes for them to complete.
Data Integrator Advanced Development and Migration Guide 13
Page 14

Migration basics
2
Migration mechanisms and tools
The trace and monitoring logs provide information about each job as well
as the work flows and data flows contained within the job.
You can customize the log details. However, the more information you
request in the logs, the longer the job runs. Balance job run-time against
the information necessary to analyze job performance.
• Check the accuracy of your data.
To enhance or correct your jobs:
• Make changes in your design environment.
• Repeat the object testing.
• Move changed objects back into production.
Migration mechanisms and tools
Data Integrator provides two migration mechanisms:
• Export/import migration works best with small to medium-sized projects
where a small number of developers work on somewhat independent
Data Integrator applications through all phases of development.
• Multi-user development works best in larger projects where two or more
developers or multiple teams are working on interdependent parts of
Data Integrator applications through all phases of development.
Regardless of which migration mechanism you choose, Business Objects
recommends you prepare for migration using one or more tools that best fit
your development environment (see Chapter 3: Preparing for migration for
more information). The mechanism and tools you use will depend on the
needs of your development environment.
If your source data will come from multiple, homogeneous systems, Business
Objects recommends you use Datastore and system profiles tools. When
migrating applications in a multi-user environment, Business Objects strongly
recommends you use Naming conventions for migration.
Which mechanism is best?
Although Data Integrator supports a multi-user environment, you may not
need to implement this architecture on all projects. If your project is small to
medium in size and only consists of one or two developers, then a Central
Repository may not be a necessary solution to integrating the work of those
developers.
14 Data Integrator Advanced Development and Migration Guide
Page 15
Migration mechanisms and tools
For example, only two Data Integration Consultants worked on the PeopleSoft
HR Rapid Mart. The Development system was architected so that while
Consultant 1 managed the Master Repository, Consultant 2 worked on a new
section within a complete copy of the Master Repository.
Consultant 2 then exported this new section back into the Master Repository
using the export utility that allows objects to be ‘Created’, ‘Replaced’, and
‘Ignored’. After updating the Master Repository, Consultant 2 took a new
complete copy of the Master Repository overwriting the previous copy.
Use the following matrix to help you determine which mechanism and tools
would work best in your environment.
Migration guideline matrix
Situation/requirements Migration Mechanisms Tools
Export/import Multi-user Naming conventions Profiles
Small to medium-sized
project
Multiple-team project
Source data from multiple,
homogeneous systems
Need a “fast and easy”
migration solution
✰✓✓
✰✰ ✓
✰✰
✓✰
Migration basics
2
Optimal solution: ✰ Compatible solution: ✓
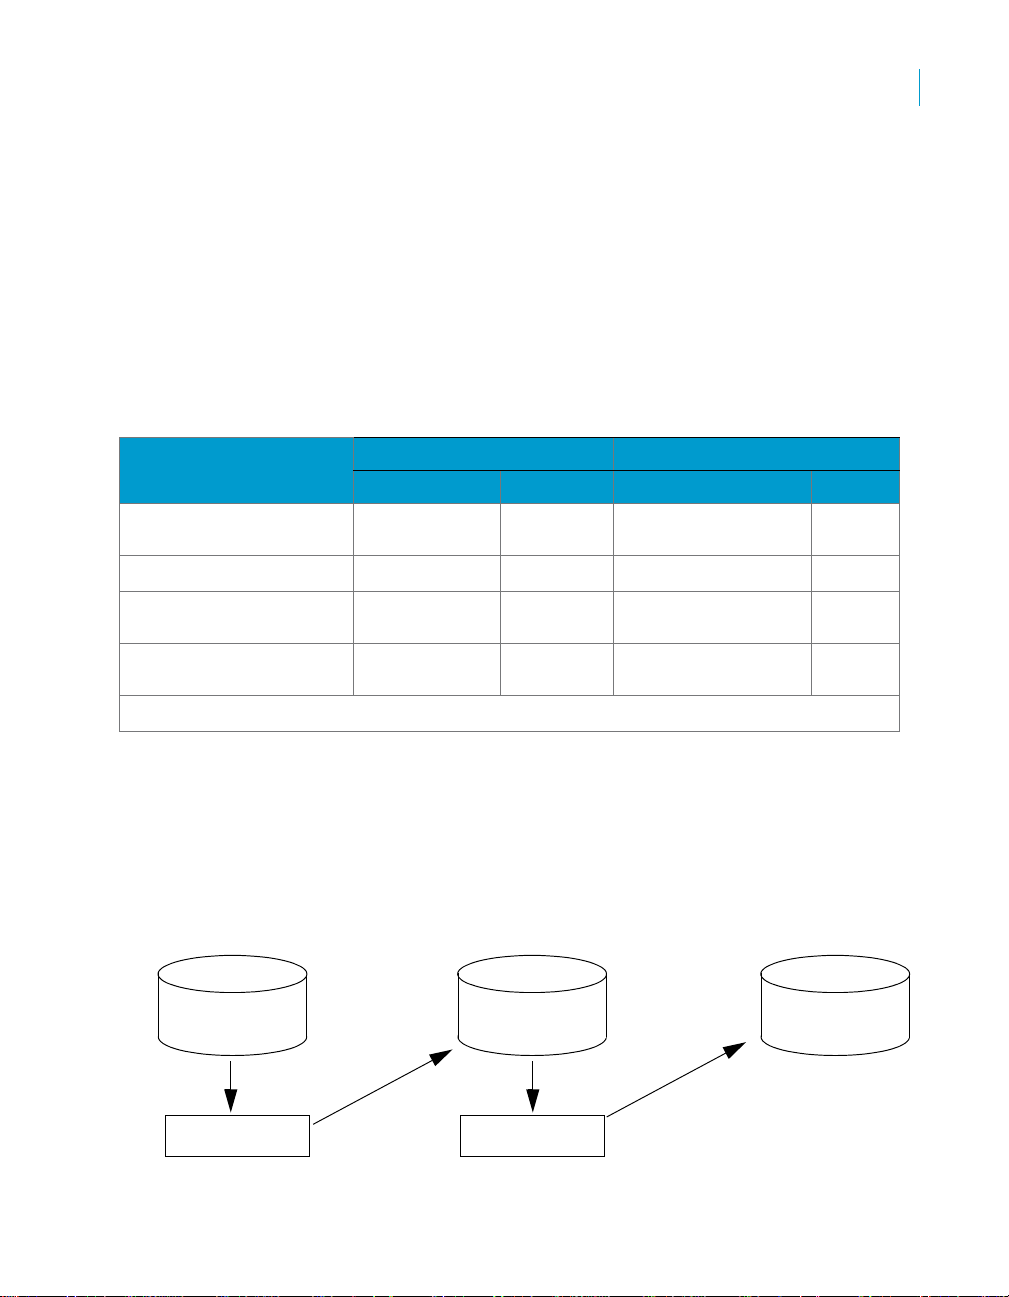
Export/import migration
Export/import is the basic mechanism for migrating Data Integrator
applications between phases. First, you export jobs from the local repository
to either a file or a database, then you can import them into another local
repository. For example, when moving from design repository to test
repository, you export from design repository and import the file or database
to your test repository.
Design
Repository
Export
File or database
Import to test
repository
Data Integrator Advanced Development and Migration Guide 15
Test
Repository
Export
File or database
Import to
production
repository
Production
Repository
Page 16

Migration basics
2
Migration mechanisms and tools
If you find application errors and need to send back to the design repository,
simply export from the test repository and import back into the design
repository. After you correct any application errors, export again, import back
into the test repository, and retest. For more information on exporting, see
Chapter 4: Export/import.
Multi-user migration
You can also migrate Data Integrator applications between phases in more
complex development environments. Instead of exporting and importing
applications, multi-user development provides a more secure check-in,
check-out, and get mechanism, using a central repository to store the master
copies of your application elements. Multi-user development includes other
advanced features like labeling and filtering to provide you more flexibility and
control in managing application objects. To learn more about multi-user
development migration, see Chapter 9: Migrating multi-user jobs.
16 Data Integrator Advanced Development and Migration Guide
Page 17

Data Integrator Advanced Development and Migration Guide
Preparing for migration
chapter
Page 18

Preparing for migration
3
Naming conventions for migration
Before you develop Data Integrator applications, Business Objects
recommends that you first set up a comprehensive structure to facilitate the
migration process between development phases.
This chapter discusses two tools that can help you build your migration
structure:
• Naming conventions for migration
• Datastore and system profiles
Business Objects recommends that you implement standardized naming
conventions for connectivity between computer systems. Add datastore and
system profiles to more easily work with multiple homogeneous systems.
Naming conventions for migration
The best way to ensure fast and seamless migration is to use common
naming conventions across all systems and phases of all your development
environments.
Just as Business Objects recommends you standardize object prefixes,
suffixes, and path name identifiers to simplify your projects internally, we also
recommend the use of naming conventions externally for migration purposes.
Note: To learn more about object identification in jobs, see “Naming
conventions for objects in jobs” on page 75 of the Data Integrator Designer
Guide.
To ease migration, use common naming conventions for:
• Connections to external datastores
• Directory locations
• Schema structures and owners
You want to make it as quick and easy as possible to migrate applications
between users and between phases. This translates to significantly reducing
or eliminating time spent reconfiguring your jobs to work in each specific
environment.
While the actual data you are extracting, transforming, and loading usually
differs by database, the essential structure of the data should be the same on
every database with which you want the same applications to work.
Therefore, it makes the most sense to standardize your database naming and
structuring before starting the development process.
18 Data Integrator Advanced Development and Migration Guide
Page 19

Connections to external datastores
In Data Integrator, migration is the process of moving objects between local
repositories, whether directly using the Export/import method or indirectly
using the Multi-user development method. Regardless of method, you must
consider how the migration will impact connection configurations associated
with your jobs.
Using generic naming for similar external datastore connections reduces the
time you spend on reconfiguring the connections to the same database type.
For example, you should choose the same logical name for all your Oracle
datastore connections to the same type of database structure regardless of
migration phase environment.
When you make connection names meaningful to a certain phase and
specific computer system names (Test_DW, Dev_DW, Prod_DW), you make
it difficult to migrate between phases.
Development phase Test phase
User name: Dev_DW User name: Test_DW
Password: Dev_DW Password: Test_DW
Host String: Dev_DW Host String: Test_DW
Preparing for migration
Naming conventions for migration
3
For the same job to run against Test and Development, the job would have to
use Test_DW and Dev_DW and this would require you to reconfigure the
connection depending on whether the job was running against the Test or the
Dev instance.
Instead, you could simply call the connection string DW and regardless of
what instance you ran the job against, it would run without users having to
edit the datastore properties.
Development Phase Test Phase
Database A Datastore Connection Database B Datastore Connection
User name: DW User name: DW User name: DW User name: DW
Password: DW Password: DW Password: DW Password: DW
Host string: DW Owner name: DW Host String: DW Owner name: DW
Examples:
• There is one Oracle source system in your company that processes order
entry data. Multiple instances of this system exist for development, test,
and production purposes. Therefore, you name the connection string to
Data Integrator Advanced Development and Migration Guide 19
Page 20

Preparing for migration
3
Naming conventions for migration
your Oracle source system “ORDER_SYSTEM” then in all phases
configure that name to point to the correct (phase-specific) instance of
the system.
• Name the connection string to your target data warehouse “DW” then
point it to different databases depending on whether you are in the
development, test, or production environment.
When you use this generic, cross-phase naming method, you cannot access
both dev and test from the same computer (since the connection string maps
only to one instance).
Directory locations
Business Objects recommends you use logical directory names (for example,
X:\)or point to common local drives to standardize directory location. For
example, since every computer has a C drive, pointing to the directory
location, C:\TEMP would be a safe, reproducible standard.
Schema structures and owners
To further facilitate a seamless structure between development phases, give
all your database instances the same owner name for the same schema
structures from which you are reading and to which you are loading.
Regardless of name, the owner of each schema structure can vary and Data
Integrator will reconcile them.
20 Data Integrator Advanced Development and Migration Guide
Page 21

Preparing for migration
Datastore and system profiles
3
Data Integrator
Development system
Repository 1
Datastore name: DS_SalesOrder
User name: SO_User
Password: SO_User
Owner name: SO_User
Tables: Billing, Sales_Orders
- File: C:\TEMP\status.txt
Repository 2
Datastore name: DS_SalesOrder
User name: SO_User
Password: SO_User
Owner name: SO_User
Tables: Billing, Sales_Orders
- File: C:\TEMP\status.txt
Oracle DB System for
Sales Orders
Development instance
Datastore
Billing
Sales
Order
--------
--------
-------
Test instance
Datastore
Billing
Sales
Order
Test system
Datastore and system profiles
Datastore and system profiles are powerful tools for reducing the
configurations required to execute the same logic against different datastore
environments. With profiles, migration between development phases
becomes faster and more simplified.
This chapter includes the following sections:
• Datastore profiles and migration
• How datastore profiles work
• Multiple profiles in multi-user environments
Data Integrator Advanced Development and Migration Guide 21
--------
--------
-------
Page 22

Preparing for migration
3
Datastore and system profiles
Datastore profiles and migration
Without multiple profile datastores, each time you export/import from one
repository to another, you must spend time reconfiguring datastore
connections to work with the new repository (and sometimes new host
computer).
Without multiple profiles, each job in a repository can only run against one
datastore configuration.
Repository A
Job 1
Export
Repository B
Job 1
Export
Repository C
Job 1
Datastore
Configuration
1
Datastore
Configuration
2
Datastore
Configuration
3
With multiple profiles, instead of a separate datastore (and datastore
configuration) for each database instance, you can associate multiple
datastore profiles with a single datastore connection.
Each datastore profile defines a connection for a particular datastore. When
working with multiple datastore profiles, Data Integrator can only import
objects from a database instance if those objects share the same owner
name.
After importing objects, Data Integrator temporarily replaces the specific
owner name with a default “dummy” name (DSOWNER). Then during runtime, Data Integrator substitutes a real owner name for DSOWNER based on
your datastore profile and system profile selections.
22 Data Integrator Advanced Development and Migration Guide
Page 23

Preparing for migration
Datastore and system profiles
Therefore, to use datastore profiles, you must use DSOWNER as the owner
of your datastore objects.
Each system profile defines a set of datastore profiles that you want to use
together when running a job. You must create datastore profiles for the
datastores in your repository before you can create system profiles.
With multiple datastore profiles,
each job in a repository can run
with multiple datastore
configurations.
Datastore
Configuration
1
3
Repository
Job 1
Datastore
Profiles
Datastore
Configuration
2
Datastore
Configuration
3
Datastore
Configuration
4
All objects you want to import into a multiple profiles datastore must share the
same owner.
Data Integrator Advanced Development and Migration Guide 23
Page 24

Preparing for migration
3
Datastore and system profiles
In a multiple profile datastore,
each object you import
automatically shares the
same default “dummy” name
(DSOWNER) in the repository.
Data Integrator replaces the
“dummy” name with your
choice of profile-based owner
name during job execution.
Source Database
User.TableA
User.TableB
User.TableC
import
Data Integrator
Multiple Profile
Datastore
Configuration
DATASTORE PROFILES:
DB connection
User name
Password
DB connection: A
DB name
User name: Joe
Password: ******
DB name: DB_1
Repository
(DSOWNER is default owner name)
DSOWNER.TableA
DSOWNER.TableB
DSOWNER.TableC
DB connection: B
User name: Susan
Password ****
DB name: DB_2
How datastore profiles work
To associate a datastore with multiple configuration profiles, when creating or
editing most types of datastores, you must first select the Multiple profiles
option. Datastores with multiple profiles support development in
homogeneous environments where systems use different connections and
properties but the same naming structures.
In the Datastore Profile editor, configure multiple profiles with different
databases, commit sizes, bulkload and overflow directories, owners, user IDs,
and passwords. You can also use multiple profiles to define Development,
Test, and Production, or site-specific profiles for a datastore such as
ORDERS_EAST, ORDERS_SOUTH, and so forth.
24 Data Integrator Advanced Development and Migration Guide
Page 25

Preparing for migration
Datastore and system profiles
You could have several people designing jobs that can use the same
datastore. Each person would have their own profile, configured for their
computer and database connections. The datastore name and dummy owner
(always DSOWNER) would be the same for each user. However, profile
name and associated connection information would specify different
designers, computers, and database connections.
Another use example: You have identical databases for different departments
in your firm and want to run the same job to work with data from all of the
databases, perhaps a job that tracks billable time for several departments.
Your source information exists on different databases and each has a unique
database connection name. You could create a datastore for each source.
However, a more elegant solution would be to create a single datastore with
multiple datastore profiles. Then, create system profiles that contain each
datastore profile. With the datastore profiling solution, at run-time you would
just select the appropriate system profile.
Each datastore profile you define contains connection information. Your
datastore profiles can support multiple development environments and crossdevelopment phases using the same structural rules.
For specific instructions to define datastore and system profiles, see
“Creating and managing multiple datastore configurations” on page 1 12 of the
Data Integrator Designer Guide.
3
Multiple profiles in multi-user environments
Data Integrator also supports a multi-user development environment. A team
can work together on an application during development, testing, and
production phases. Further, different teams can work on the different phases
simultaneously.
Data Integrator Advanced Development and Migration Guide 25
Page 26

Preparing for migration
3
Datastore and system profiles
Individual users work on an application in their unique local repositories. The
team uses a central repository to store, check in, and check out objects that
belong to the application master copy. The central repository preserves all
versions of an application’s objects, allowing you to revert to a previous
version if needed.
The easiest way to set up your environment to work with multi-user
functionality is by establishing the exact same environment naming standards
among your developers. In each developer’s environment, the configuration
would be different. For example a database connection string would point to
their local database. However, if implementing these naming standards is not
possible, you can still save time and streamline your multi-user environment
by using multiple-profile datastores.
For example, if your database owners use the same metadata structure but
different database instances and owners, you can define a datastore profile
for each owner on your design team. This way , they can share and contribute
to the same projects without having to set up their datastore connection
information each time they check out a project from the central repository.
To find out more about multi-user environments, see Chapter 5: Multi-user
development, Chapter 6: Multiuser environment setup, and Chapter 8:
Working in a multi-user environment. For more details on migrating within
multi-user environments, see Chapter 9: Migrating multi-user jobs.
26 Data Integrator Advanced Development and Migration Guide
Page 27

Data Integrator Advanced Development and Migration Guide
Export/import
chapter
Page 28

Export/import
4
Exporting/importing objects in Data Integrator
The simplest type of migration in Data Integrator is called export/import.
This chapter discusses the export/import method and includes the following
topics:
• Exporting/importing objects in Data Integrator
• Removing obsolete repository contents
• Backing up repositories
• Maintaining Job Server performance
Exporting/importing objects in Data
Integrator
The export feature gives you the flexibility to manage and migrate projects
involving multiple developers and different execution environments. When
you export a job from a development repository to a production repository,
you can change the properties of objects being exported to match your
production environment.
In particular, you can change datastore defin itions—application and database
locations and login information—to reflect production sources and targets.
You can export objects to another repository or a flat file (.atl or .xml). If the
destination is another repository, you must be able to connect to and have
write permission for that repository, and your repository versions must match.
This section discusses:
• The Export editor
• Exporting objects to a database
• Exporting objects to a file
• Exporting a repository to a file
• Importing from a file
The Export editor
In the Export editor, specify the objects you want to export and an export
location. Choose Tools > Export or select an object and right-click Export to
open the export editor.
To specify an object to export, drag the object from the object library into the
Objects to Export window.
28 Data Integrator Advanced Development and Migration Guide
Page 29
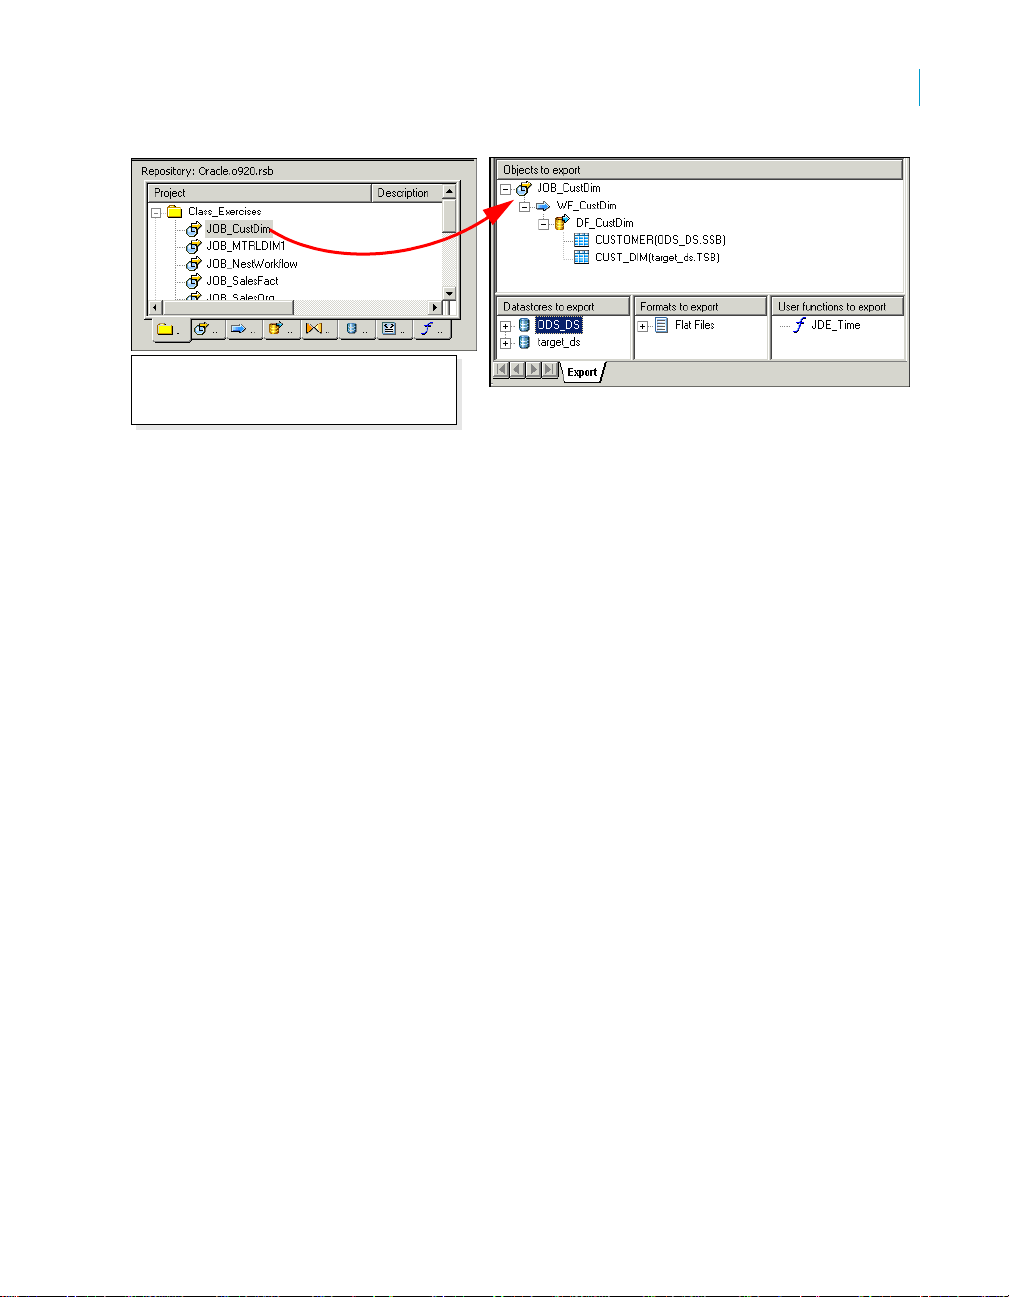
To add an object to the export list, drag it
from the object library to the main section of
the export editor.
The Object to Export window shows the final list of objects to be exported.
When you drag any object from the object library, the datastores, file formats,
and custom functions included in the object definition are automatically added
to the other export sections. Each object in an export window opens to show
objects called by this object.
You can control which associated objects to exclude or include. For example,
you can export a work flow and all tables contained in the work flow without
exporting an associated data flow.
To control which objects to export, either select an object, right-click, and
choose a shortcut menu option, or select the white space in the Export editor,
right-click, and choose a shortcut menu option:
• Exclude
Removes only the selected object from the list of objects to be exported.
The object remains in the list, but its exclusion is indicated by a red “x” on
the object icon.
All occurrences of the object are excluded.
When you export the list, excluded objects are not copied to the
destination. Objects called by this object are not removed from the list of
objects to be exported, unless they are specifically excluded.
• Include
Adds an excluded object to the export plan. The red “X” on the icon
disappears. All occurrences of the object are included.
When you export, the included objects are copied to the destination.
Export/import
Exporting/importing objects in Data Integrator
4
Data Integrator Advanced Development and Migration Guide 29
Page 30

Export/import
4
Exporting/importing objects in Data Integrator
• Exclude Tree
Removes the selected object and all objects called by this object from the
export. The objects remain in the list, but their exclusion is indicated by a
red “x” on the icons—the selected object and any objects it calls are
excluded.
When you export the list, the excluded objects are not copied to the
destination.
• Include Tree
Add the selected excluded object and the objects it calls to the export list.
The red x on the selected object and dependents disappears. When you
export the list, the included objects are copied to the destination.
• Exclude environmental information
Removes all connections (datastores and formats) and their dependent
content (tables, files, functions) from the objects in the Export editor.
From the white space in the Export editor, you can right-click and select
this option. Using this option you can export jobs without connections so
that you avoid connection errors. Business Objects recommends you
configure datastores and formats for the new environment separately.
When you export, excluded objects are not copied to the destination.
• Include environmental information
Adds all connections (datastores and formats) and their dependent
content (tables, files, functions) to the objects you want to export.
• Clear All
Removes all objects from all sections of the editor.
• Delete
Removes the selected object and objects it calls from the Export editor.
Only the selected occurrence is deleted; if any of the effected objects
appear in another place in the export plan, the objects are still exported.
This option is available only at the top level. You cannot delete other
objects; you can only exclude them.
• Export
Starts the export process.
30 Data Integrator Advanced Development and Migration Guide
Page 31

Exporting objects to a database
You can export objects from the current repository to another repository.
However, the other repository must be the same version as the current one.
The export process allows you to change environment-specific information
defined in datastores and file formats to match the new environment.
To export a repository object to a database
1. In the object library, choose an object to export.
Right-click and choose Export.
The Export editor opens in the workspace. To add more objects to the list
of objects to export, drag the objects from the object library into the
Objects to Export section of the editor.
2. Refine the list of objects to export.
You can use the options available in the right-click menu for each object
to include or exclude the object from the export list.
3. When your list is complete, right-click and choose Export.
4. In the Export Destination window, add the destination database
connection information.
5. In Export Confirmation window, verify the components to export.
The Destination status column shows the status of the component in the
target database and the proposed action.
Export/import
Exporting/importing objects in Data Integrator
4
Destination Status Action
Does not exist Create/Exclude
Exists Replace/Exclude
To edit an action, select any number of objects (using SHIFT and CTRL
keys) and select either Create, Exclude, or Replace from the Target
Status list box.
6. Click Next.
7. In the Datastore Export Options window, select the datastore.
You can change the owner of a table or the connection properties of the
datastore.
Click Advanced.
8. Change the database connection information as required by the target
database.
Click Next.
Data Integrator Advanced Development and Migration Guide 31
Page 32

Export/import
4
Exporting/importing objects in Data Integrator
9. In the File Format Mapping dialog, select a file and change the
Destination Root Path if necessary.
You can change the Destination Root Path for any file formats to match
the new destination.
10. Click Finish.
Data Integrator copies objects in the Export editor to the target destination.
When copying is complete, the objects display in the Output window. The
Output window shows the number of objects exported as well as a list of any
errors.
Exporting objects to a file
You can also export objects to a file. If you choose a file as the export
destination, Data Integrator does not provide options to change environmentspecific information.
Note: Objects in a repository are exported in the .atl format, while whole
repositories can be exported in either the .atl or .xml format. ATL is Data
Integrator’s scripting language format. Using the .xml file format might make
repository content easier for you to read. It also allows you to export Data
Integrator to other products.
32 Data Integrator Advanced Development and Migration Guide
Page 33

Exporting a repository to a file
You can also export an entire repository to a file. When you export or import a
repository, jobs and their schedules (created in Data Integrator) are
automatically exported or imported as well. Schedules cannot be exported or
imported without an associated job and its repository.
If you choose a file as the export destination, Data Integrator does not provide
options to change environment-specific information.
To export a repository to a file
1. From the object library, right-click and choose Repository > Export To
File.
A window opens to prompt you for the destination of the export file. You
can browse the directory to change the location, set the file type (.xml or
.atl), and enter a name for the file.
2. Click Open.
The repository is exported to the file.
Importing from a file
Export/import
Exporting/importing objects in Data Integrator
4
Importing objects or an entire repository from a file overwrites existing objects
with the same names in the destination repository. You must restart Data
Integrator after the import process completes.
To import a repository from a file
1. There are two ways to import Data Integrator repository files into another
repository. Use Tools > Import from file, or in the object library, rightclick and choose Repository > Import from File.
A window opens for you to specify the file to import. You can import
individual files or the whole repository using either an XML or ATL file
type. (ATL is Data Integrator’s internal scripting language. )
2. Select the file to import and click Open.
Data Integrator displays this warning:
Warning: You are about to import using the path filename
file. This will create new versions of existing
objects and requires shutting down the application.
This may take a long time. Are you sure?
3. Click OK.
Data Integrator imports the repository file and shuts down.
Data Integrator Advanced Development and Migration Guide 33
Page 34

Export/import
4
Removing obsolete repository contents
4. Choose Programs > BusinessObjects Data Integrator 6.1 > Data
Integrator Designer from the Start menu.
5. Log in to the repository where the file was imported.
6. Verify that the file or repository was imported.
Removing obsolete repository contents
Data Integrator saves a version of each object every time you save the object.
Repeatedly modified object definitions can consume a substantial amount of
space. If you notice your repository performance degrading, consider
compacting the repository.
To access the Compact Repository command, select Project > Compact
Repository from the menu bar. This command removes previous object
versions maintained by Data Integrator.
Y ou can also compact your repository manually. If you have never compacted
the repository , the majority of space in the repository could be occupied by old
versions of Data Integrator objects. In this case, the Compact Repository
command might be too slow and tedious. Instead, you can export the latest
versions of the repository object definitions to a file, clear the repository
database by creating a new repository, then reimport the object definitions.
T o compact your repository by creating a new repository
1. Export the repository to a file.
The file type can be either XML or ATL. The latest version of each object
is exported.
2. Choose Repository Manager from the Start > Programs > Data
Integrator menu.
3. From the Repository Manager, add the database connection information
for the repository.
4. Click Create.
Data Integrator warns that a valid repository already exists.
5. Click Yes to overwrite the old repository.
The Repository Manager creates a new repository , removing all of the old
objects.
6. Import the previously exported repository.
34 Data Integrator Advanced Development and Migration Guide
Page 35

Backing up repositories
Use your DBMS utilities to back up your repositories regularly. For
information, refer to your DBMS documentation.
Maintaining Job Server performance
If you are designing jobs, typically you might use the same computer for your
Designer, repository, and Job Server. In addition, you might use the same
datastore for both your repository and your target database.
However, when you migrate your jobs into a test environment, the Job Server
could move to a separate computer (typically from a Windows to a UNIX
platform). The Data Integrator Job Server computer uses source, target, and
repository database client libraries to extract, transform, and load data
according to a job’s design. Therefore, the Job Server computer must have a
database client installed for each database you are using to run a Data
Integrator job. In addition, Data Integrator allows you to localize source and
target databases using locale and codepage settings. For more information
about locales, see “Locales and Multi-Byte Functionality” on page 609 of the
Data Integrator Reference Guide.
When migrating jobs between different Job Servers verify that the codepage
used by each source and target database is the same as the codepage set for
the corresponding database client on the Job Server’s computer.
The database client codepage used by a Job Server on a Windows might be
different from the one used on UNIX. For example, the Oracle client
codepage MS1252 on Windows should be changed to the ISO88591
codepage on UNIX.
Data Integrator allows different codepages to be used in sources and targets.
Mismatched locale settings do not cause errors. However, mismatches
typically result in performance degradation from transcoding done by Data
Integrator during job execution.
If your jobs do not require the use of different locales, you can increase
performance by ensuring that default locales are not mismatched. After
migration, if you notice a significant difference between the speed of design
and test environments, check locale settings. In the Designer, check to see
that datastore codepages for sources and targets match client codepages on
the Job Server computer.
Export/import
Backing up repositories
4
Data Integrator Advanced Development and Migration Guide 35
Page 36

Export/import
4
Maintaining Job Server performance
36 Data Integrator Advanced Development and Migration Guide
Page 37

Data Integrator Advanced Development and Migration Guide
Multi-user development
chapter
Page 38

Multi-user develop m ent
5
Central versus local repository
Data Integrator supports a multi-user development environment. A team can
work together on an application during the development, testing, or
production phase. And different teams can work on the different phases at the
same time.
Each individual user works on an application in a unique local repository. The
team uses a central repository to store the master copy of its application. The
central repository preserves all versions of an application’s objects, allowing
you to revert to a previous version if needed.
This chapter discusses:
• Central versus local repository
• Data Integrator and multiple users
Central versus local repository
Data Integrator allows you to create a central repository for storing the master
copy of a Data Integrator application. The central repository contains all
information normally found in a repository such as definitions for each object
in an application. However, the central repository is merely a storage locatio n
for this information. To change the information, you must work in a local
repository.
A local repository provides a view of the central repository. You can “get” or
copy objects from the central repository into your local repository. To make
changes, “check out” an object from the central repository into your local
repository. While you have an object checked out from the central repository,
other users cannot change the information.
When done, you “check in” the changed object. When you check in objects,
Data Integrator saves the new, modified objects in the central repository.
Get
Central
Repository
Multiple users working from unique local repositories can connect to the same
central repository. These users can work on the same application and share
their work. However, at any given time only one user can check out and
38 Data Integrator Advanced Development and Migration Guide
Check out
Check in
Local
Repository
Page 39

Multi-user development
Data Integrator and multiple users
change a particular object. While an object is checked out to one user, other
users can “get” the object but cannot make changes that will update the
central repository.
Central
Repository
Job
Object
5
Check Out
Get
Local
Repository A
User A
Local
Repository B
User B
The central repository retains each object’s history. Therefore, if you find you
made a change that did not work as planned, you can revert to a previous
version of the object.
The local repository and the central repository must use the same repository
version. For example, you can run Data Integrator Designer X.2 with a central
and local repository version X.1. However, you cannot run Data Integrator
Designer X.2 with a central repository X.1 and a local repository X.2
Get
Local
Repository C
User C
Data Integrator and multiple users
A multi-user environment affects how you use Data Integrator and how you
manage different phases of an application. For success in a multi-user
environment, you must maintain consistency between your local repository
and the central repository.
The following terms apply when discussing multi-user environments and Data
Integrator:
DRAFT Data Integrator Advanced Development and Migration Guide 39
Page 40

Multi-user develop m ent
5
Data Integrator and multiple users
• Highest level object
• Object dependents
• Object version
When working in a multi-user environment, you activate the link between your
local repository and the corresponding central repository each time you log in.
To ensure that your repository is current, you can get, or copy, the latest
version of each object in the central repository . Once you get an application in
your local repository, you can view and run it from the Designer.
The highest level object is the object that is not a dependent of any object
in the object hierarchy . For example, if Job 1 is comprised of Work Flow 1
and Data Flow 1, then Job 1 is the highest level object.
Object dependents are objects associated beneath the highest level
object in the hierarchy . For example, if Job 1 is comprised of Work Flow 1
which contains Data Flow 1, then both Work Flow 1 and Data Flow 1 are
dependents of Job 1. Further, Data Flow 1 is a dependent of Work Flow
1.
An object version is an instance of an object. Each time a you add or
check in an object into the central repository, Data Integrator creates a
version of the object. The latest version of an object is the last or most
recent version created.
Central
a
n
d
Repository
R
u
n
Get Objects
E
VAT
I
ACT
LOG ON
40 Data Integrator Advanced Development and Migration Guide
Local
Repository
V
i
e
w
Page 41

Multi-user development
Data Integrator and multiple users
However, if you plan to make changes to objects in the application, you
should check out the objects. When you check out an object, no other user
can make changes. Essentially, you lock the version in the central repository;
only you can change that version. Other users can only get and view the
object.
Central
Repository
Work
Check Out
Work Flow A
Local
Repository 1
Flow A
Get Work
Flow A
(read only)
Get Work
Flow A
(read only)
Local
Repository 3
5
Edit Work
Flow A
Local
Repository 2
When you are done making changes to an object, save those changes in the
local repository and check the object back into the central repository. Data
Integrator saves the changed object in the central repository and makes the
object available for check-out by others. Data Integrator maintains all versions
of saved objects in the central repository. Thus later, you can copy an old
version of a saved object, even after replacing it in your local repository with a
new version.
At any time, you can label an object or a group of objects. An object label
provides a convenient mechanism for identifying objects later. For example,
you may find it helpful to label objects by feature. Later, if you decide you want
to eliminate a recently-added feature, you can get all objects that have the
label without that feature.
You can also compare two objects—such as two different object versions in
the central repository , or an object in your local repository—to an object in the
central repository . By comp aring two object s, you can determine what part s of
an object changed and decide whether you want to revert to an older version
of an object.
DRAFT Data Integrator Advanced Development and Migration Guide 41
Page 42

Multi-user develop m ent
5
Data Integrator and multiple users
42 Data Integrator Advanced Development and Migration Guide
Page 43

Data Integrator Advanced Development and Migration Guide
Multiuser environment setup
chapter
Page 44

Multiuser environment setup
6
Creating a nonsecure central repository
To support multiple users, you must configure a multiuser environment and
set up several repositories. Specifically, you must:
• Create a local repository for each user
• Create a central repository—see “Creating a nonsecure central
repository”.
• Define a connection to central repository from each local repository—see
“Defining a connection to a nonsecure central repository” on page 44.
• Activate the connection to a central repository—see “Activating a central
repository” on page 45.
Creating a nonsecure central repository
To support multiple users in a single development environment, you must
define a central repository. The central repository stores master information
for the development environment.
This procedure applies to nonsecure repositories only. To create a secure
central repository, see Chapter 7: Implementing Central Repository Security.
To create a nonsecure central repository
1. Create a database to be used for the central repository using your
database management system.
2. From the Start menu, choose Programs > Data
Integrator > Repository Manager (assuming you installed Data
Integrator in the Data Integrator directory).
3. In the Repository Manager window, click the Central button in the
Repository T ype field, and enter the database connection information for
the central repository.
4. Click Create.
Data Integrator creates repository tables in the database you identified.
Defining a connection to a nonsecure central repository
A team working on an application only needs one central repository . However ,
each team member requires a local repository. Furthermore, each local
repository requires connection information to any central repository it must
access.
44 Data Integrator Advanced Development and Migration Guide
Page 45

Multiuser environment setup
Activating a central repository
This procedure applies to nonsecure repositories only. To define the
connection to a secure central repository, see Chapter 7: Implementing
Central Repository Security.
Note: The version of the central repository must match the version of the
local repository.
To define a connection to a central repository
1. Start the Data Integrator Designer and log in to your local repository.
2. Choose Tools > Central Repositories to open the Options window.
The Central Repository Connections option is selected in the
Designer Options list.
3. Right-click in the Central Repository Connections box and select Add.
The Datastore Administrator window opens.
4. In the Name box, enter a name to identify your central repository.
5. In the Database Type list, select the appropriate database type for your
central repository.
6. Complete the appropriate login information for your database type.
7. Click OK.
The list of central repository datastores now includes the newly
connected central repository. You can continue adding additional
connections or you can proceed to the next step.
6
Activating a central repository
To connect to a central repository, you must activate the link between your
local repository and a specific central repository.
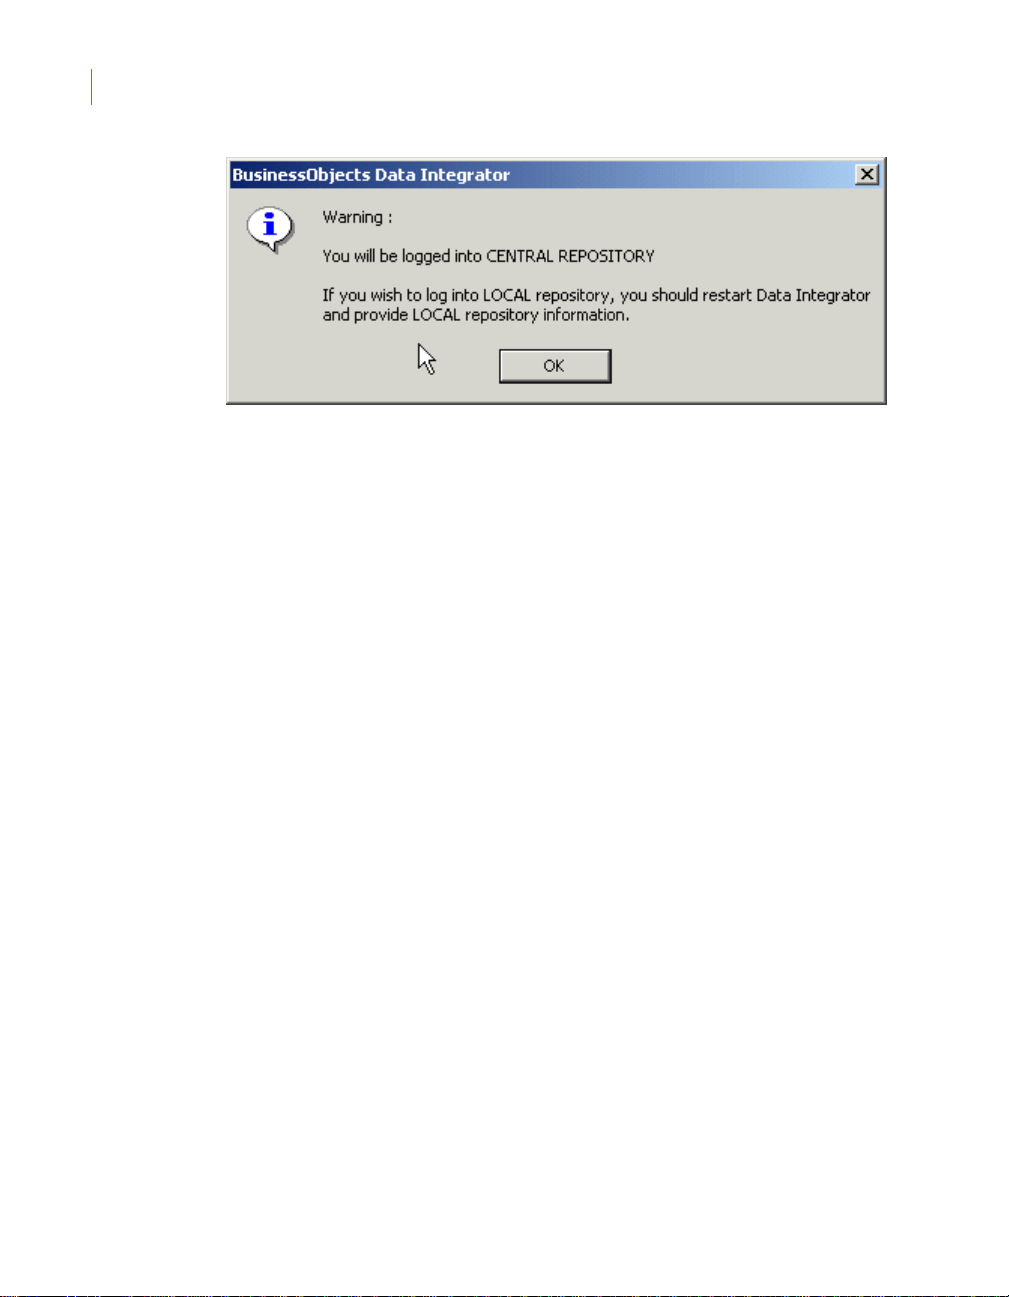
Note: When you start the Designer, always log in to a local repository. Never
log into a central repository. If you do, then the central repository acts as a
local repository. Then you run the risk of corrupting version information. If you
attempt to log in to the central repository, Data Integrator will present a
warning message. You should log out immediately and log into a local
repository.
Data Integrator Advanced Development and Migration Guide 45
Page 46
Multiuser environment setup
6
Activating a central repository
Your local repository provides a view of the objects in the active central
repository . Whenever you get or check out objects, you copy object s from the
active central repository. Whenever you check in objects, you save the
version from your local repository into the active central repository.
You must activate the correct central repository each time you log in. When
you activate a central repository, Data Integrator opens the central object
library , which shows all the objects in the central repository and the check-out
status of each object.
To activate a central repository
1. Choose Tools > Central Repositories to open the Options window.
The Central Repository Connections option is selected in the
Designer Options list.
2. In the Central Repository Datastore list, select a central repository to
make active.
3. Right-click and select Activate.
Data Integrator activates the link between your local repository and the
selected central repository and opens the central object library. The
Options window indicates that the selected central repository is active.
46 Data Integrator Advanced Development and Migration Guide
Page 47

Multiuser environment setup
Activating a central repository
4. Check Reactivate automatically if you want the active central repository
to be reactivated when you next log on to this local repository.
5. The Options window will be closed automatically.
To open the central object library
Click the Central Object Library button on the toolbar.
6
The central object library looks like the object library—it shows all the objects
in the repository, grouped on appropriate tabs.
Data Integrator Advanced Development and Migration Guide 47
Page 48

Multiuser environment setup
6
Activating a central repository
The window opens floating and can be docked by dragging. You can change
the docking state by right-clicking on the window’s tool bar and selecting
Allow Docking.
You can also change central repository connection information from the
central object library.
T o ch ange the active ce ntral repository
Select a central repository from the list on the top of the central object library.
Data Integrator makes the selected central repository active—objects from
that repository appear in the central object library. Connection information
about that repository appears in the upper right corner of the central object
library.
Active central
repository
List of available
central repositories
T o ch ang e central repo sitory con nec tio ns
1. Click the Edit Central Repository Connection button on the top of the
central object library.
Data Integrator opens the Options window with the Central Repository
Connections option selected in the Designer Options list.
48 Data Integrator Advanced Development and Migration Guide
Page 49

Multiuser environment setup
Activating a central repository
Alternatively, you can open the Options window by selecting Tools >
Central Repositories.
2. Select a central repository in the Central Repository Connections box,
right-click, and select Edit.
The Datastore Administrator window opens.
Follow the instructions beginning at step 4 to define a connection to the
central repository. See “Activating a central repository” on page 45.
3. To delete connection information for a central repository, right-click the
central repository in the Central Repository Datastores box and select
Delete.
After confirming your selection, Data Integrator deletes the connection
information from this local repository. You can no longer connect to that
central repository from this local repository.
Note: You are not deleting the central repository; you are only deleting
the connection information between your local repository and this central
repository.
4. To make another repository the active central repository, right-click the
central repository in the Central Repository Datastores box and select
Activate.
5. To disconnect from the currently active central repository, right-click the
central repository in the Central Repository Datastores box and select
Deactivate.
6
Data Integrator Advanced Development and Migration Guide 49
Page 50

Multiuser environment setup
6
Activating a central repository
50 Data Integrator Advanced Development and Migration Guide
Page 51

Data Integrator Advanced Development and Migration Guide
Implementing Central Repository Security
chapter
Page 52

Implementing Central Repository Security
7
Overview
This chapter describes how to implement optional security features for central
repositories.
The process overview is as follows:
• Overview
• Creating a secure central repository
• Adding a multiuser administrator (optional)
• Defining a connection to a secure central repository
• Working with objects in a secure central repository
Overview
Data Integrator provides options for managing secure access and tracking for
objects in central repositories. The mechanisms for managing this security
include:
• Authentication — Allows only valid users to log in to a central repository.
• Authorization — Grants various levels of permissions to objects.
• Auditing — Maintains a history of changes made to an object including
user names.
These security procedures only apply to central repositories.
Group-based permissions
You implement security for a central repository by establishing a structure of
groups and associated users using the Web Administrator. (You can
optionally add a user to the Administrator with the role Multiuser
administrator. For details, see “Managing user roles” on page 26 of the Data
Integrator Administrator Guide.)
Access permissions for objects apply at the group level. More than one group
can have the same permissions to the same object at a time. Groups are
specific to a repository and are not visible in any other local or central
repository.
Therefore, users do not get individual permissions. In the Designer, users
select from the group(s) to which they belong, and the selected (current)
group dictates their access to that object. Each user must have one default
group but can belong to more than one group. When a user adds an object to
a secure central repository, the user’s current group automatically has Full
permissions to that object.
52 Data Integrator Advanced Development and Migration Guide
Page 53

User name and password authentication is required for every logon to a
secure central repository. Users can change their p asswords at any time from
the Central Repository Editor in the Designer.
Levels of permissions
Each object in a secure central repository can have one of the following
permissions levels:
• Full — This is the highest level of permission. The group can perform all
possible actions including checking in, checking out, and deleting the
object. You might assign this type of access to developers, for example.
• Read — Users can only get a copy of the object from the central
repository or compare objects between their local and central object
libraries. You might assign this type of access to QA, for example.
• None — Users cannot get copies of the object but can view it and its
properties.
When an authenticated user adds an object to a secure central repository, the
user’s current group receives Full permissions to the object. All other groups
receive Read permissions. Members of the group with Full permissions can
change the other groups’ permissions for that object.
Implementing Central Repository Security
Creating a secure central repository
7
Process overview
The process for implementing security for a central repository is as follows:
1. Using the Repository Manager, add a secure central repository or
upgrade an existing nonsecure central repository.
2. Using the Web Administrator, add groups and users.
3. Open the Designer and define a connection to the secure central
repository.
4. Add objects to the central repository.
The remainder of this chapter describes these procedures.
Creating a secure central repository
The first step in establishing security measures for multiuser development is
to create a secure central repository or upgrade an existing nonsecure central
repository.
Data Integrator Advanced Development and Migration Guide 53
Page 54

Implementing Central Repository Security
7
Creating a secure central repository
These procedures apply to secure repositories only. To create a nonsecure
central repository, see Chapter 6: Multiuser environment setup.
T o crea te a secu re cen tra l re pos ito ry
1. Create a database to be used for the central repository using your
database management system.
2. From the Start menu, click Programs > Data Integrator > Repository
Manager (assuming you installed Data Integrator in the Data Integrator
directory).
3. In the Repository Manager window, click the Central button in the
Repository Type field and enter the database connection information for
the central repository.
4. Select the Enable security check box.
5. Click Create.
Data Integrator creates repository tables in the database you identified.
Data Integrator creates a security key file with a name in the form of
databaseserver_database_user.key.
T o upgrade a central repository from nonsecure to secure
You can modify an existing repository to make it secure; however, you cannot
undo this change.
1. From the Start menu, click Programs > Data Integrator > Repository
Manager (assuming you installed Data Integrator in the Data Integrator
directory).
2. In the Repository Manager window, click the Central button in the
Repository Type field and enter the database connection information for
the central repository to modify.
3. Select the Enable security check box.
4. Click Upgrade.
Data Integrator updates the repository tables in the database you
identified.
Data Integrator creates a security key file with a name in the form of
databaseserver_database_user.key.
54 Data Integrator Advanced Development and Migration Guide
Page 55

Implementing Central Repository Security
Adding a multiuser administ rato r (o ptional)
Adding a multiuser administrator (optional)
In the Web Administrator , you have the option of adding a user with the role of
Multiuser Administrator. This role is limited to managing secure central
repositories, so it is therefore a subset of the Administrator role. For example,
Multiuser Administrators cannot add a local repository or a nonsecure central
repository.
Multiuser Administrators can:
• Add and remove secure central repositories.
• Manage users and groups.
• View secure central repository reports.
For details, see “Managing user roles” on page 26 of the Data Integrator
Administrator Guide.
Setting up groups and users
The next step in implementing central repository security is to add and
configure groups and users with the Data Integrator Web Administrator.
For detailed procedures, see “Managing user roles” on page 26 of the Data
Integrator Administrator Guide.
7
Defining a connection to a secure central repository
The next step in implementing central repository security is to define a
connection to the repository in the Designer.
This procedure applies to secure repositories only. To define a connection to
a nonsecure central repository, see Chapter 6: Multiuser environment setup.
To define a connection to a secure central repository
1. Start the Data Integrator Designer and log in to your local repository.
2. From the Tools menu, click Central Repositories to open the Options
window.
3. The Central Repository Connections option should be selected in the
Designer list.
4. Click Add.
Data Integrator Advanced Development and Migration Guide 55
Page 56

Implementing Central Repository Security
7
Defining a connection to a secure central repository
5. The Central Repository Editor opens.
6. In the Repository Name box, enter a name to identify the connection to
this central repository (this name is only visible in the Options window in
the Central Repository Connections list).
7. Click the Secure check box.
8. This enables the Repository User Information fields and the Security
key buttons.
9. In the Database Connection Information area, you have two options:
1. Click Read Security Key to import the database connection
information values from the key that Data Integrator generated when
you created the secure central repository using the Repository
Manager.
OR
2. Type the appropriate database and user information manually.
Optionally, to save this information for future use, click Generate
Security Key, which creates a key file with a name in the form of
databaseserver_database_user.key
10. In the Repository User Information area, type the user name and
password as defined in the Web Administrator.
11. Optionally click the Remember check box to store the information for the
next time you log in.
12. Optionally click Change Password to change the user’s password for
accessing this secure central repository. In the Change Password dialog
box, type the current password, the new password, then again to confirm
it, and click OK.
13. Click OK.
The list of central repository connections now includes the newly
connected central repository and it is identified as being secure.
14. With the repository selected, click Activate.
For more information about activating central repositories, see “Activating
a central repository” on page 45.
15. Click OK.
56 Data Integrator Advanced Development and Migration Guide
Page 57

Implementing Central Repository Security
Working with objects in a secure central reposit ory
Working with objects in a secure central
repository
This section includes:
• Adding objects to the central repository
• Viewing and modifying permissions
Adding objects to the central repository
See “Adding objects to the central repository” on page 61.
Viewing and modifying permissions
After completing all configuration tasks and you have added objects to the
secure central repository, use the central object library to view and modify
group permissions for objects.
To view permissions for an object
1. Start the Data Integrator Designer and log in to your local repository.
2. Open the secure central object library.
Your default group appears in the drop-down list at the top of the window and
is marked with an asterisk. The Permissions column displays the current
group’s access level for each object. If you add a new object to the central
library, the current group gets FULL permissions and all other groups get
READ permission.
7
Data Integrator Advanced Development and Migration Guide 57
Page 58

Implementing Central Repository Security
7
Working with objects in a secure central repository
T o change object permissions to other groups
You must have Full permissions to change object access to other groups.
1. In the central object library, right-click the object and click Permission >
Object or Permission > Object and dependants.
2. The Permission
groups and the group’s access level for the object(s).
3. Click in the Permission column, and from the drop-down list select a
permission level for the group.
4. Click Apply or OK.
Note: Modifying permissions with filtering has not yet been implemented for
the Windows release (December 2004).
T o change the current group or the default group
1. To change the current group, in the central object library select a group
from the drop-down box.
2. To change your default group, select the desired group from the drop-
down box and click the save icon.
Data Integrator marks the default group with an asterisk.
dialog box opens, which displays a list of available
58 Data Integrator Advanced Development and Migration Guide
Page 59

Data Integrator Advanced Development and Migration Guide
Working in a multi-user environment
chapter
Page 60

Working in a multi-user environment
8
Filtering
To obtain optimal results from development in a multi-user environment,
Business Objects recommends certain processes, such as checking in and
checking out objects that you change, and establishing a set of conventions
that your team follows, such as labeling objects.
You will complete several tasks on a regular basis:
• Filtering
• Adding objects to the central repository
• Checking out objects
• Undoing check out
• Checking in objects
• Labeling objects
• Getting objects
• Comparing objects
• Viewing object history
• Deleting objects
• Using aliases
• Application phase management
Filtering
Data Integrator allows you to customize by filtering (selectively changing)
environment-specific information in object definitions. Application objects can
contain repository-specific information. For example, datastores and
database tables might refer to a particular database connection unique to a
user or a phase of development. When multiple users work on an application,
they can change repository-specific information.
Specifically, filtering allows you to:
• Change datastore and database connection information
• Change the root directory for files associated with a particular file format
• Select or clear specific dependent objects
The filtering process is available when adding, checking in, checking out, or
getting latest objects in a central repository.
When you select any command that uses the filtering option, Data Integrator
presents the following two windows:
60 Data Integrator Advanced Development and Migration Guide
Page 61

Working in a multi-user environment
Adding objects to the central repository
1. The Version Control Confirmation window shows your selected object
and any dependent objects. You can exclude objects by selecting the
object and changing the Target status (lower right) from
replace to exclude.
2. The Datastore Options window shows any datastores used by the object.
This window only opens if the objects that you are adding, checking in, or
checking out include a datastore.
create or
8
Adding objects to the central repository
After creating a central repository, connecting it to the local repository, and
activating the central repository , you can add objects from the local repository
to the central repository . Remember that you do all design work—the creation
of jobs, work flows, and data flows—in a local repository. Therefore, you use a
local repository for the initial creation of any objects in an application. After the
initial creation of an object, you add it to the central repository. Once in the
central repository, the object is subject to version control and can be shared
among users.
Data Integrator Advanced Development and Migration Guide 61
Page 62

Working in a multi-user environment
8
Checking out objects
You can add objects to the central repository at any point. Of course, you
cannot add an object that already exists in the central repository.
Y ou can add a single object to the central repository, or you can add an object
with all of its dependents to the central repository. When you add a single
object, such as a data flow, you add only that object. No dependent objects
are added.
T o add a single object to the central repository
1. Open the local object library.
2. Right-click the object and select Add to Central Repository > Object.
3. The Comments window opens. Enter any comments in the Comments
field, and click OK.
Data Integrator adds the object to the active central repository.
Note: The Add to Central Repository command is not available if the
object already exists in the central repository.
To add an object and its dependent objects to the central repository
1. Open the local object library.
2. Right-click the object and select either Add to Central Repository >
Object and dependents or Add to Central Repository > With filtering
(if filtering is required).
3. The Comments window opens. Enter any comments in the Comments
field, and click OK.
4. If you selected With filtering, complete the filtering windows, as
described in “Filtering” on page 60.
5. Click Finish to add the selected objects.
Alternatively, you can select the object and drag it to the central object library
to add the object and its dependents to the central repository. The filtering
windows are displayed.
Note: The Add to Central Repository command is not available if the object
already exists in the central repository. However, the Add to Central
Repository command is available if the object’s dependents already exist in
the central repository but the object itself does not.
Checking out objects
When you might change any of the objects in an application, you should
check out the objects that you expect to change. When you check out an
object, you make that object unavailable to other users—other users can view
62 Data Integrator Advanced Development and Migration Guide
Page 63
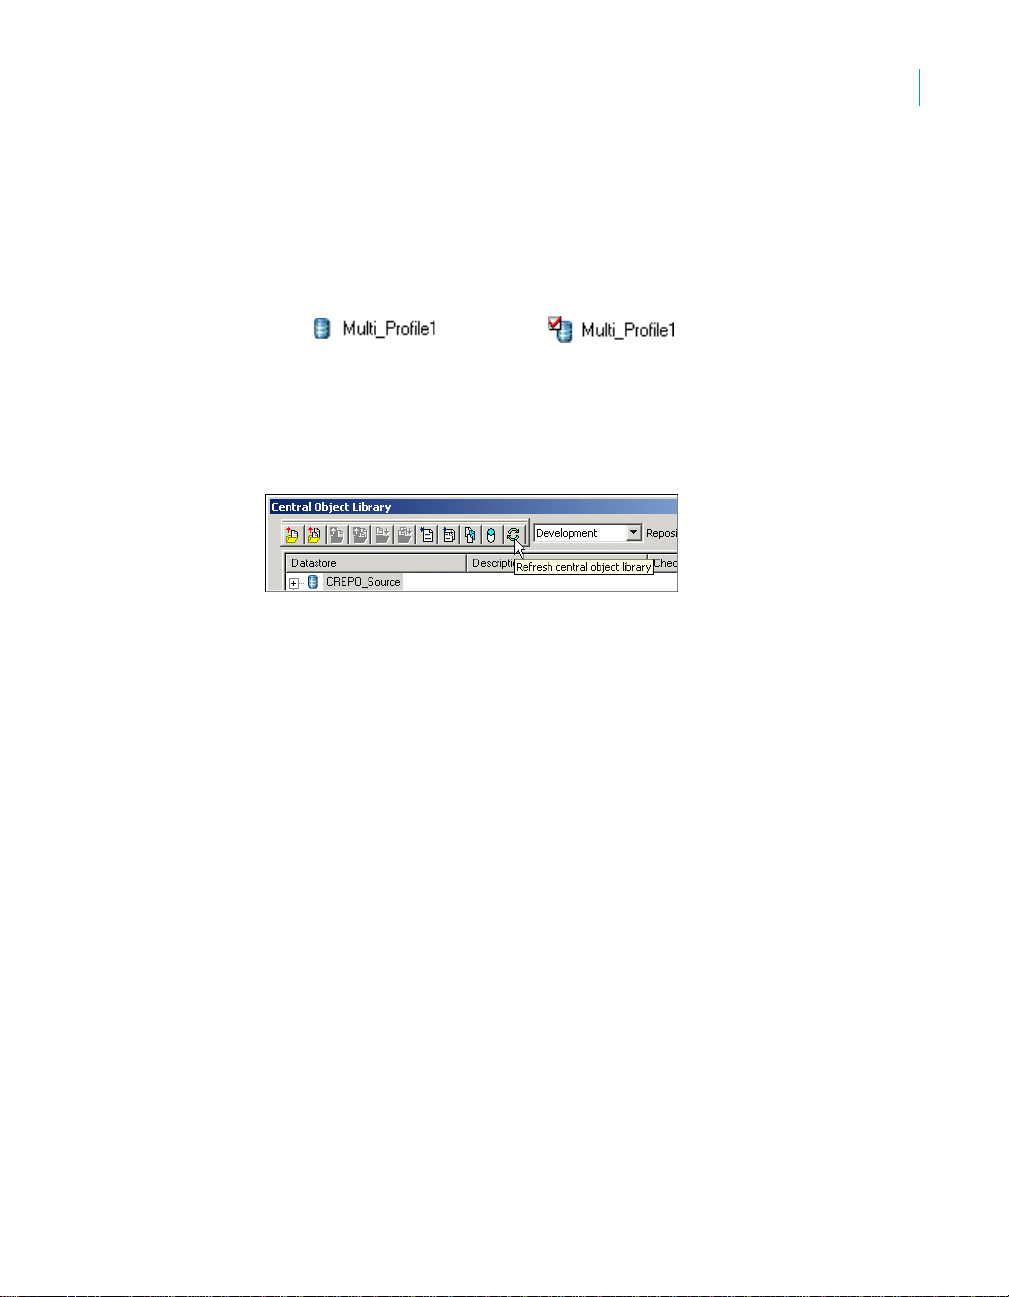
Working in a multi-user environment
Checking out objects
the object but cannot make changes to the object. Checking out an object
ensures that two users do not make conflicting changes to the object
simultaneously.
Data Integrator changes the object icons in both the local and central object
libraries to indicate that the object is checked out.
Object is checked outObject is not checked out
When an object is checked out, your central object library shows you the local
repository that has checked out the object. Based on the repository name,
you can determine which user is working with that object.
To see periodic changes, refresh the central object library by clicking on the
refresh central object library icon in the toolbar of the central object library.
Choose a check-out command based on what you will do to an object:
• Check out single objects or objects with dependents
• Check out single objects or objects with dependents without replacement
• Check out objects with filtering
8
Check out single objects or objects with dependents
Dependents are objects used by another object—for example, data flows that
are called from within a work flow. You can check out a single object or an
object with all of its dependents (as calculated in the central repository). For
example, you can simply check out a work flow. In that case, you can change
that work flow, such as adding a new script to the work flow; however, you
cannot change dependent objects in the work flow, such as data flows, and
retain the changes in the central repository. Changes to dependent objects
will only be retained in the local repository. Alternatively, you can check out
the work flow with all of its dependents. In that case, you can make changes
to the work flow or any of its dependents and retain the changes in both
central and local repositories.
Generally , it is safest to check out an object with all dependents. When you do
this, you prevent others from accidentally changing dependent objects.
Data Integrator Advanced Development and Migration Guide 63
Page 64

Working in a multi-user environment
8
Checking out objects
To check out a single object
1. Open the central object library.
2. Right-click the object you want to check out.
3. Choose Check Out > Object.
Alternatively, you can select the object in the central object library, and
click the Check Out Object button on the top of the central object library.
Data Integrator copies the most recent version of the selected object from
the central repository to your local repository, then marks the object as
checked out.
T o ch eck out an object and it s dependent object s
1. Open the central object library.
2. Right-click the object you want to check out.
3. Choose Check Out > Object and dependents.
Alternatively, you can select the object in the central object library, and
click the Check out object and dependents button on the top of the
central object library.
Data Integrator copies the most recent version of the selected object and
all of its dependent objects from the central repository and marks these
objects as checked out.
If a dependent object is checked out by you or another user, then Data
Integrator alerts you with a Check Out Alert window, asking to get the
latest version of the checked out object. See “Getting objects” on
page 71.
64 Data Integrator Advanced Development and Migration Guide
Page 65

Working in a multi-user environment
Checking out objects
Check out single objects or objects with dependents without replacement
When you check out an object, you can replace the object in your local
repository with the latest version from the central repository, or you can leave
the current version in your local repository intact.
When you check out an object, Data Integrator copies the object definition
from the central repository and replaces any existing definitions for that object
in your local repository.
You can check out objects without replacing the objects in your local
repository . For example, suppose you are working in your local repository and
you make a change to an object that is not checked out. If you determine that
the change improves the design or performance of your application, you will
want to include that change in the central repository.
To do this, check out the object without replacing the object in your local
repository—the object that you have already improved with a change. Then,
check the changed object back into the central repository.
Note: Use caution when checking out objects without replacing the version in
your local repository. When you do not replace the version in your local
repository, you can lose changes that others have incorporated into those
objects.
8
To check out an object or an object and its dependent objects without
replacement
1. Open the central object library.
2. Right-click the object you want to check out and choose Check Out >
Object without replacement to check out the single object or choose
Check Out > Object and dependents without replacement to check
out the object and all of its dependent objects.
Data Integrator marks all appropriate objects as checked out—in both the
object library and in the workspace—but does not copy any objects from
the central repository to the local repository.
Check out objects with filtering
When you check out an object with filtering, the object and all its dependents
are checked out.
Note: When you check out objects with filtering, you always replace local
versions with the filtered objects from the central repository.
Data Integrator Advanced Development and Migration Guide 65
Page 66

Working in a multi-user environment
8
Undoing check out
To check out and object and its dependent objects with filtering
1. Open the central object library.
2. Right-click the object you want to check out and choose Check Out >
With filtering.
3. Complete the filtering windows, as described in “Filtering” on page 60.
4. Click Finish to check out the selected objects.
Undoing check out
Occasionally, you may decide that you did not need to check out an object
because you made no changes. Or, you may decide that the changes you
made to a checked-out object are not useful and you prefer to leave the
master copy of the object as is. In these cases, you can undo the check out.
When you undo a check out:
• the object in the central repository remains as it was before the checkout;
no changes are made and no additional version is saved in the central
repository . Only the object st atus changes from checked out to available.
• the local version of the object maintains the changes you made. If you
want the local object to be an exact copy of the central object, perform a
Get latest operation on that object.
After you undo a check out, other users can check out and make changes to
the object.
T o undo single object check out
1. Open the central object library.
2. Select a checked-out object.
3. Click the Undo object check out button.
Data Integrator removes the check-out symbol and makes no changes to
the object in the central repository. Any checked-out dependent objects
remain checked out.
Alternatively, you can right-click the object and select
Undo Check Out > Object.
66 Data Integrator Advanced Development and Migration Guide
Page 67

To undo check out of an object and its dependents
1. Open the central object library.
2. Select the checked-out object that is the highest level for which you want
to undo the check out.
3. Click the Undo object and dependents check out button.
Data Integrator removes the check-out symbols for the object and any
dependent objects that are also checked out. No changes are made to
these objects in the central repository.
Alternatively , you can right-click the object in the central object library and
select Undo Check Out > Object and dependents.
Checking in objects
After you finish making changes to checked out objects, you must check them
back into the central repository. Checking in objects creates a new version in
the central repository, and allows others to get the changes that you have
made. Checking in objects also preserves a copy of the changes for revision
control purposes. Later, you can get a particular version of a checked in
object and compare it to subsequent changes or even revert to the previous
version.
Check in an object when you are done making changes, when others need
the object that contains your changes, or when you want to preserve a copy
of the object in its present state.
Choose a check-in command based on what you will do to an object:
• Checking in single objects, objects with dependents
• Checking in an object with filtering
Working in a multi-user environment
Checking in objects
8
Checking in single objects, objects with dependents
Just as you can check out a single object or an object with all dependent
objects, you can check in a single object or an object with all checked-out
dependent objects (as calculated in the local repository).
Data Integrator Advanced Development and Migration Guide 67
Page 68

Working in a multi-user environment
8
Checking in objects
To check in a single object
1. Open the central object library.
2. Select the object you want to check in.
3. Click Check in object button at the top of the central object library.
Alternatively , you can right-click the object in the central object library and
select Check In > Object.
4. A Check In window opens with a Comment box, in which you can enter
comments. After entering any comments, click OK.
Data Integrator copies the object from your local repository to the central
repository, and removes the check-out mark.
T o ch ec k in an object a nd its dependent objects
1. Open the central object library.
2. Select the highest level object you want to check in.
3. Click Check in object and dependents button at the top of the central
object library.
Alternatively , you can right-click the object in the central object library and
select Check In > Object and dependents.
4. A Check In window opens with a Comment box, in which you can enter
comments. After entering any comments, click OK.
Data Integrator copies the selected object and all of its dependent objects
from your repository to the central repository and removes the check-out
mark.
Checking in an object with filtering
Just as you could check out objects with filtering, you can check in objects
with filtering. When you check in an object with filtering, the object and all its
dependent objects are checked in.
68 Data Integrator Advanced Development and Migration Guide
Page 69

To check in an object with filtering
1. Open the central object library.
2. Right-click the object you want to check out and choose Check In > With
filtering.
3. A Check In window opens with a Comment box, in which you can enter
comments. After entering any comments, click OK.
Data Integrator warns you that you are about to create a new version of
the object in the central repository.
4. Click Yes to continue with the check in.
5. Complete the filtering windows, as described in “Filtering” on page 60.
6. Click Finish to check in the selected objects.
Labeling objects
To help organize and track the status of objects in your application, you can
label objects. When an object is labeled, the object and all its dependent
objects are labeled. A label not only describes an object, but also allows you
to maintain relationships between various versions of objects.
For example, suppose a job is added to the central repository where user 1
works on a work flow in the job, and user 2 works on a data flow in the same
job. At the end of the week, after user 1 checks in two versions of the work
flow and user 2 checks in four versions of the data flow into the central
repository, the job is labeled “End of week 1 status.” This label contains
version 1 of the job, version 2 of the work flow, and version 4 of the data flow.
Later, user 1 and user 2 continue to change their respective work flow and
data flow.
Working in a multi-user environment
Labeling objects
8
Data Integrator Advanced Development and Migration Guide 69
Page 70

Working in a multi-user environment
8
Labeling objects
Objects added on
Monday
Versions checked in
to the Central
Repository later
Job
Version 1
Work Flow
Version 1
Work Flow
Version 2
Work Flow
Version 3
Data Flow
Version 1
Data Flow
Version 2
Data Flow
Version 3
Data Flow
Version 4
Data Flow
Version 5
At some later point, if you want to get the job with the version of the data flow
with this label, getting the job by its label (see “Getting objects” on page 71)
accomplishes this, whereas checking out the job and its dependents does
not.
Label: “End of week 1 status”
Job
Version 1
Work Flow
Version 2
Data Flow
Version 4
Get job and
dependent objects
Job
Version 1
The label “End of week 1 status” serves the purpose of collecting the versions
of the work flow and data flow that were checked in at the end of the week.
Without this label, you would have to get a particular version of each object in
order to reassemble the collection of objects labeled “End of week 1 status.”
To label an object and its dependents
1. Open the central object library.
2. Right-click the object you want to label and choose Label.
Data Integrator opens the Get by Label window.
70 Data Integrator Advanced Development and Migration Guide
Work Flow
Version 3
Data Flow
Version 5
Page 71

3. In the Label box, enter text that describes the current status of the object,
then click OK.
Data Integrator inserts this label in the history of the object and its
dependents. To view the labels associated with a particular object, see
“Viewing object history” on page 72.
Getting objects
To make sure that your repository is up-to-date, you “get” objects. When you
get an object, you copy the latest version of that object in the central object
library and copy it into your local repository, replacing the version in your local
repository. When you get an object, you do not check out the object. The
object remains free for others to check out and change.
You can get an object with or without dependent objects and filtering. For
information about getting earlier versions of objects or objects with particular
labels, see “Viewing object history” on page 72.
Working in a multi-user environment
Getting objects
8
To get a single object
1. Open the central object library.
2. Select the object you want to get.
3. Click Get latest version of object at the top of the central object library.
Alternatively, right-click the object in the central object library and select
Get Latest Version > Object.
Data Integrator copies the most recent version of the object in the central
repository to your local repository.
To get an object and its dependent objects
1. Open the central object library.
Data Integrator Advanced Development and Migration Guide 71
Page 72

Working in a multi-user environment
8
Comparing objects
2. Select the highest level object you want to get.
3. Click Get latest version of objects and dependents at the top of the
central object library.
Alternatively, right-click the object in the central object library and select
Get Latest Version > Object and dependents.
Data Integrator copies the most recent version of the selected object and
all dependent objects from the central repository to your local repository.
To get an object and its dependent objects with filtering
1. Open the central object library.
2. Select the highest level object you want to get.
3. Right-click the object in the central object library and select Get Latest
Version > With filtering.
4. Complete the filtering windows, as described in “Filtering” on page 60.
5. Click Finish to get the selected objects.
T o get a previous version of an object
See “To get a previous version of an object” on page 72 .
To get an object with a particular label
See “To get an object with a particular label” on page 72.
Comparing objects
Data Integrator allows you to compare two objects from local and central
repositories to determine the differences between those objects.
For details on using the Difference Viewer, see “Comparing Objects” on
page 351 of the Data Integrator Designer Guide.
Viewing object history
The central repository retains a history of all changes made to objects in the
central repository. Use this history to help manage and control development
of your application. For example, you can use the central repository:
• To examine the history of an object
• To get a previous version of an object
• To get an object with a particular label
72 Data Integrator Advanced Development and Migration Guide
Page 73

Working in a multi-user environment
Viewing object history
To examine the history of an object
1. Open the central object library.
2. Select an object.
3. Click the Show History button at the top of the central object library.
Alternatively , you can right-click the object in the central object library and
select Show History.
Data Integrator opens the History window.
8
This window shows several pieces of information about each revision of
the object.
Column Description
Version The object revision number. Each time a user saves
the object, Data Integrator creates a new version.
Label Text that a user enters to describe the status of the
object at a given point. See “Labeling objects” on
page 69 for more information about object labeling.
Repository Information about the local repository from which
Data Integrator saved this version of the object.
Other information includes:
• user name
• database connection name
• type of database
Data Integrator Advanced Development and Migration Guide 73
Page 74

Working in a multi-user environment
8
Deleting objects
Column Description
Date The date and time Data Integrator saved this
Action The type of change a user made to the object. This
Comment Comments a user enters when adding an object or
T o get a previous version of an object
1. Select an object.
2. Click the Show History button at the top of the central object library.
3. Click the version of the object you want.
4. Click the Get Obj By Version button.
Note: When you get a previous version of an object, you only get the object
but not its dependent objects.
To get an object with a particular label
1. Select an object.
2. Click the Show History button at the top of the central object library.
3. Click the version of the object with the particular label you want.
4. Click the Get By Label button.
version of the object.
table records actions such as:
Checked in — User checked in object
checking it into a central repository.
Deleting objects
You can delete objects from either the central repository or a local repository.
To delete an object from the central repository, right-click the object in the
central object library and select Delete. To delete an object from the local
repository, right-click on the object in the object library and select Delete.
When you delete an object from a local repository, you do not automatically
delete that object from the active central repository. In fact, you can get the
object from the central repository to re-insert it.
Similarly, when you delete an object from a central repository, you do not
automatically delete the object from connected local repositories. Until you
delete the object from the local repository, you can add the object back to the
central repository.
74 Data Integrator Advanced Development and Migration Guide
Page 75
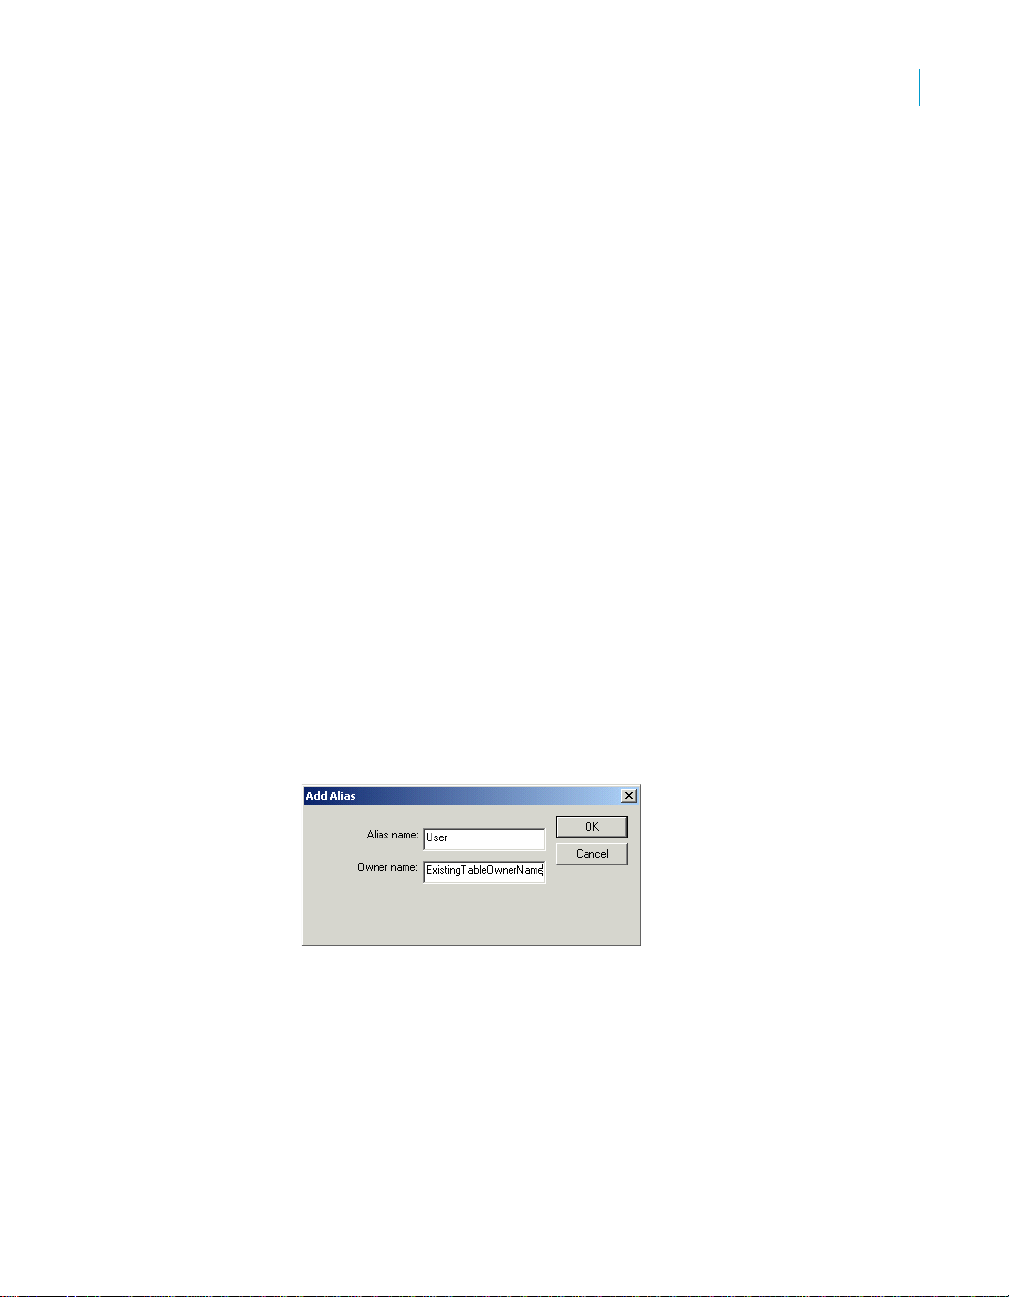
When you delete objects from the central repository, you only delete the
selected object and all versions of the selected object; you do not delete any
dependent objects.
To delete all versions except the latest version of an object from the central
repository, use the compact repository. Select Project > Compact
Repository from the menu bar.
Using aliases
You can specify an alias for a specified table owner and datastore
combination. In your local repository, Data Integrator displays your alias as
the table owner name.
Using an alias can be beneficial when you are working in a multi-user
environment. With an alias, you can move a table between different Local
Repositories using the Central Repository. Further, Data Integrator can load
to a table in another owner's schema without modifying the owner name.
To create an alias
1. In the object library, click the Datastore tab.
2. Right-click a datastore and select Properties.
The Properties window opens.
3. In the Properties window, select the Aliases tab, right-click, and select
Add.
The Add Alias window opens.
Working in a multi-user environment
Using aliases
8
4. In the Add Alias window, enter:
• Alias name: The owner name displayed when viewing objects.
Data Integrator Advanced Development and Migration Guide 75
Page 76

Working in a multi-user environment
8
Using aliases
• Owner name: The owner name used at runtime.
5. Click OK.
The alias information appears in the Properties window.
6. Click Apply to save the alias information, keeping the Properties window
open for more editing. Or, click OK to save the alias information and
close the Properties window.
After you save alias information, all tables or function s that you import into the
repository or check out from the repository will be identified in the object
library by table or function name, datastore, and alias name.
Example: You enter “development” for Alias name and “user_1” for Owner
name.
After establishing this alias, all tables owned by 'user_1' that you import into
the datastore will show the owner name, 'user_1' in the local object library. If
you use one of these objects as a target table in a data flow, the owner name
displays the alias 'development'. At run time, Data Integrator replaces the
alias (development) with the associated owner name (user_1). If you check
this data flow with its dependent table into a Central Repository, the owner for
the target table would be the alias, 'development'.
Another user (user_2) could use the same data flow and without modifying it,
have it load to a table owned by another user. Af ter user_2 checks out or gets
the latest version of the data flow they should delete the existing alias for dev
then recreate the alias associating it with the proper owner. If the same table
existed in user_2's schema, and that is where you want to load to or pull data
from, the alias of development should be associated with user_2. At load
time, Data Integrator substitutes the owner alias of 'development' with
'user_2'.
Note: The following guidelines apply when you use the alias feature:
• The table must exist in the schema of the owner before job execution
unless the target is a template table.
76 Data Integrator Advanced Development and Migration Guide
Page 77

• Specifying an alias will not convert the owner name of existing objects to
the alias name. If you want to use the alias, you must re-import the
objects.
• If you export a datastore using aliases either directly to another repository
or to a file, the datastore will retain the alias owner names along with the
alias definition.
Application phase management
Typically, applications pass through different phases on the way from
development to production. For example, an application might pass through
three phases:
• Developers creating an application
• Testers validating the application
• Administrators running the application
A single central repository can support your application through these
phases. Use job labeling and projects to maintain application components
independently for the phases. In addition, filtering of database owners and file
locations allows you to configure the application to run in each local
environment.
In some situations, you may require more than one central repository for
application phase management. If you choose to support multiple central
repositories, use a single local repository as a staging location for the
transition.
Working in a multi-user environment
Application phase management
8
Data Integrator Advanced Development and Migration Guide 77
Page 78

Working in a multi-user environment
8
Application phase management
78 Data Integrator Advanced Development and Migration Guide
Page 79

Data Integrator Advanced Development and Migration Guide
Migrating multi-user jobs
chapter
Page 80

Migrating multi-user jobs
9
Application phase management
Migration is slightly more complex in a multi-user environment.
• Application phase management
• Copying contents between central repositories
Application phase management
Typically, applications pass through different phases on the way from
development to production. For example, an application might pass through
three phases:
• Developers creating an application
• Testers validating the application
• Administrators running the application
A single central repository can support your application through these
phases. Use job labeling and projects to maintain application components
independently for the phases. In addition, filtering of database owners and file
locations allows you to configure the application to run in each local
environment.
In some situations, you may require more than one central repository for
application phase management. If you choose to support multiple central
repositories, use a single local repository as a staging location for the
transition.
Copying contents between central repositories
You cannot directly copy the contents of one central repository to another
central repository. Rather, you must use your local repository as an
intermediate repository.
T o copy the contents of one central repository to another central
repository
1. Activate the central repository whose contents you will copy. See
“Activating a central repository” on page 45,
2. Get the latest version of the contents of this active central repository by
getting the latest version of the objects in this central repository. See
“Getting objects” on page 71.
3. Activate the central repository into which you want to copy the contents.
See “Activating a central repository” on page 45.
80 Data Integrator Advanced Development and Migration Guide
Page 81

Migrating multi-user jobs
Copying contents between central repositories
4. The first time you copy the contents, add the objects from your local
repository into this central repository. See “Adding objects to the central
repository” on page 61.
However, if you must re-copy the contents of one central repository into
another (for example, during your testing phase some part of a job was
reassigned to the development phase for redesign), the process is
slightly more complex:
a. First check out specific objects without replacement from the second
central repository. See “Checking out objects” on page 62.
b. From your local repository, get the latest version of the objects from
the first (for example, development) central repository.
c. Then, instead of adding, check in the updated objects from your local
repository to the second (for example, test) central repository. See
“Checking in objects” on page 67.
9
Data Integrator Advanced Development and Migration Guide 81
Page 82

Migrating multi-user jobs
9
Copying contents between central repositories
82 Data Integrator Advanced Development and Migration Guide
Page 83

Index
C
central object library 47
central repositories
activating 46
adding a single object 62
adding objects 61
adding objects and dependents 62
changing 48
connection to 45
copying contents of 80
creating 44
multiple 77, 80
overview 38
checking in
object and its dependent objects 68
object with filtering 69, 72
single object 68
checking out
object and its dependent objects 64
object and its dependent objects with filtering
66
object and its dependent objects without
replacement 65
object without replacement 65
single object 64
undoing, object and its dependent objects 67
undoing, single object 66
Compact Repository command 34
D
databases
naming 18
datastore and system profiles 18
datastore connections
naming 19
datastores
multiple profiles 24
deleting
objects 74
version of object 75
dependent objects 40
design phase
description 13
designing ELT projects 13
developing applications
design phase 13
production phase 13
testing phase 13
E
Export editor options 28–30
exporting
objects 28–32
repository to a file 33–33
repository versions 31
F
filtering
checking in object with 69, 72
checking out objects with 65
description 60–62
G
generic naming 19
getting
object and its dependent objects 71
object with label 74
objects 71
previous version of object 74
single object 71
H
highest level object 40
history of objects 72
Data Integrator Advanced Development and Migration Guide 83
Page 84

10
J
job server
performance, matching locales 35
L
label
getting object with 74
object 69, 70
locales
job server performance 35
logical directory names 20
M
migration
naming conventions 18
multi-user development
application development 39
environment, setting up 44
overview 38
repository versions 39
tasks 60–??
N
names
logical directory 20
naming
datastore connections 19
naming conventions
for migration 18
O
objects
adding to central repository 62, 62
checking out 62
deleting 74
dependents of 40
getting 71
highest level 40
history 72
label 69, 70
version 40
P
performance
job servers, matching locales 35
84 Data Integrator Advanced Development and Migration Guide
Page 85

production phase 13
profiles
datastore and system 18
R
repository
export, to .xml or .atl 32
exporting 33
importing 33
removing obsolete contents from 34
versions 31, 39
T
test phase 13
testing
applications 13
U
undo
checking out a single object 66
checking out object and its dependent objects 67
V
versions
object, deleting 75
object, description 40
object, getting 74
10
Data Integrator Advanced Development and Migration Guide 85
 Loading...