


Crystal Analysis® 10
Installation Guide
Crystal Decisions, Inc.
895 Emerson St.
Palo Alto
California, USA 94301

Copyright © 2003 Crystal Decisions, Inc., 895 Emerson St., Palo Alto, California,
USA 94301. All rights reserved.
Issue 1.
No part of this documentation may be stored in a retrieval system, transmitted or
reproduced in any way, except in accordance with the terms of the applicable
software license agreement. This documentation contains proprietary information
of Crystal Decisions, Inc., and/or its suppliers.
Trademark Acknowledgements
Crystal Decisions, Crystal Reports, Crystal Enterprise, Crystal Analysis, Crystal
Services, Crystal Care, Crystal Assist, Crystal Applications, Info and Holos are
trademarks or registered trademarks of Crystal Decisions, Inc. in the U.S. and/or
other countries. Microsoft, SQL Server and Excel are registered trademarks of the
Microsoft Corporation in the U.S. and/or other countries. All other trademarks or
registered trademarks referenced are the property of their respective owners.
This product includes software developed by the Apache Software Foundation
http://www.apache.org/).
(

Contents
Chapter 1: Introduction
About this guide ................................................................................ 2
Target audience .................................................................................................... 2
Chapter contents ................................................................................................... 2
Customer Handbook ......................................................................... 3
Product registration .......................................................................... 4
Crystal Care technical support .......................................................... 4
Crystal Training ................................................................................. 4
Crystal Consulting ............................................................................. 5
Document conventions ..................................................................... 5
Trademark acknowledgements .......................................................... 6
Chapter 2: About Crystal Analysis
Crystal Analysis components ............................................................. 8
Client components described ................................................................................ 8
Server components described ................................................................................ 8
Component installation configurations ............................................. 9
Scenario 1: Viewing applications in a browser ...................................................... 9
Scenario 2: Viewing applications on the desktop ................................................... 9
Scenario 3: Designing applications ...................................................................... 10
Scenario 4: Designing and publishing applications .............................................. 10
Minimum system requirements ....................................................... 11
Full stand-alone installation ................................................................................ 11
Client installation (Application Designer) ............................................................ 12
Client Web browser ............................................................................................ 12
CMS Add-on, WCS Add-on, and Web server support installation ........................ 12
Crystal Analysis Installation Guide iii

Chapter 3: Installing Crystal Analysis on Windows
Overview ........................................................................................ 14
Main installation types ........................................................................................ 14
Starting the installation ................................................................... 16
OLAP support ................................................................................. 18
Continuing a Custom installation .................................................... 19
Installing sample data ..................................................................... 20
Modifying Essbase and DB2 support for Rich Client ....................... 20
Registering Crystal Analysis ............................................................ 22
Installing web server support on UNIX ........................................... 22
Chapter 4: Adding or Removing Components
Overview ........................................................................................ 26
Adding components ........................................................................ 26
Removing components .................................................................... 27
Repairing Crystal Analysis ............................................................... 28
Uninstalling Crystal Analysis ........................................................... 29
Chapter 5: Command Line Installation
Prerequisites ................................................................................... 32
Installation types ............................................................................. 32
Installing ......................................................................................... 32
Examples ......................................................................................... 34
iv Crystal Analysis Installation Guide

Chapter 6: Installing Crystal Analysis on UNIX
Prerequisites ................................................................................... 36
Integrating with Enterprise .............................................................. 36
Installing Crystal Analysis ............................................................... 36
Integrating with Enterprise .............................................................. 37
Setting up the web application server ............................................. 38
Weblogic ............................................................................................................ 38
Websphere .......................................................................................................... 39
Tomcat ................................................................................................................ 40
Deploying styles and help ............................................................... 41
Weblogic ............................................................................................................ 41
Websphere .......................................................................................................... 41
Tomcat ................................................................................................................ 41
Crystal Analysis Installation Guide v

vi Crystal Analysis Installation Guide

Introduction 1
Welcome to the Crystal Analysis Installation Guide.
Crystal Analysis lets you create and view analytic
applications on the desktop. Using Crystal Enterprise, you
can also publish analytic applications for web distribution.
Crystal Analysis Installation Guide 1

About this guide
About this guide
This guide provides you with information about installing Crystal Analysis,
including detailed descriptions of the installation modes.
This guide also explains how to extend an existing Crystal Enterprise installation
to enable it to distribute analytic applications. You must install some server
components to enable Crystal Enterprise to distribute analytic applications.
You do not need to install Crystal Enterprise on the local machine to distribute
analytic applications. You can use Crystal Enterprise on any computer in the
network, as long as you have installed the server components to that computer.
In this guide we assume that you have already installed Crystal Enterprise. For a
description of the Crystal Enterprise components and installation instructions, see
the Crystal Enterprise Installation Guide.
The main product CD also includes some sample data for the tutorials.
Target audience
This guide is intended for the designers of analytic applications. You need
administrator rights to install Crystal Analysis and Crystal Enterprise.
If your installation of Crystal Enterprise uses a UNIX web server, you will need
appropriate privileges to stop and start the web server. You will also need write
permission on the Crystal Enterprise installation directory. Depending on how
your site is set up, this may require superuser (root) privileges.
Chapter contents
The following is a short description of each chapter in this guide.
Chapter 1: Introduction
This chapter describes provides an overview of this guide. It also describes how to
register the product and how to obtain technical support.
Chapter 2: About Crystal Analysis
This chapter describes the components of Crystal Analysis and provides several
installation scenarios to help you decide which installation is right for you.
2 Crystal Analysis Installation Guide

1: Introduction
Chapter 3: Installing Crystal Analysis on Windows
This chapter tells you how to install Crystal Analysis. It describes the four
installation types available: Desktop Client, Web Components, Complete and
Custom.
It also describes how to install the web server support for a web server running
under UNIX.
Chapter 4: Adding or Removing Components
This chapter tells you how to add or remove components from an existing Crystal
Analysis installation.
Chapter 5: Command Line Installation
This chapter describes how to run an installation of Crystal Analysis from the
Windows Command Prompt window. It is intended for system administrators.
The command line installation makes installing Crystal Analysis on many
computers easy and allows the user to run an install that does not prompt for
input.
Chapter 6: Installing Crystal Analysis on UNIX
This chapter tells you how to install Crystal Analysis on UNIX.
Customer Handbook
For the latest details about product registration, maintenance, support, and
services, visit our web site and download the Customer Handbook that
corresponds to your region:
• North America
http://www.crystaldecisions.com/customerhandbookitl/ (English)
• Europe
http://www.crystaldecisions.com/customerhandbookitl/ (English)
http://www.crystaldecisions.com/customerhandbookde/ (German)
http://www.crystaldecisions.com/customerhandbookfr/ (French)
If a Crystal Decisions Customer Handbook is not available for your region, please
refer to the rest of this Welcome chapter, or contact your sales or support
representative for complete details.
Crystal Analysis Installation Guide 3

Product registration
Product registration
There are several ways you can register your product:
• Use the Registration Wizard that is accessible from the Application Designer
Help menu.
• Fill out the Product Registration form on the Crystal Decisions web site at:
http://www.crystaldecisions.com/register/
• Print the Product Registration form and fax it to the registration fax number
closest to you. Crystal Decisions will then fax you a registration number that
can be entered into the product the next time you use it.
Registration fax numbers
USA/Canada +1 (604) 681-5147
United Kingdom +44 (0) 20 8231 0601
Australia +6 2 9955 7682
Germany +49 (0) 69 9509 6182
Hong Kong +852 2893 2727
Singapore +65 777 8786
Registration is required to access online or telephone technical support. In
addition, registering the product ensures that you are kept up to date with product
advancements.
Crystal Care technical support
To find out about the technical support programs available for Crystal Analysis:
• Consult the enclosed Crystal Care information card.
• Go to our support web site at:
http://support.crystaldecisions.com/crystalcare/
• Contact your regional office. For details, go to:
http://www.crystaldecisions.com/contact/offices.asp
Crystal Training
Whether you're a developer, information technology professional or business user,
we offer a wide range of Crystal Analysis training courses designed to build or
enhance your existing skills. Courses are available online, at certified training
centers or at your own site.
• For a complete list of training courses and special offers, visit:
http://www.crystaldecisions.com/training/
• Or contact your regional office. For details, go to:
http://www.crystaldecisions.com/offices/
4 Crystal Analysis Installation Guide

Crystal Consulting
Our global team of certified consultants and consulting partners can guide you
through a corporate-wide solution—including strategy, design, integration and
deployment—for the fastest results, maximum performance, and increased
productivity.
• To learn more, visit:
http://www.crystaldecisions.com/consulting/
• Or contact your regional office. For details, go to:
http://www.crystaldecisions.com/offices/
Document conventions
This guide uses the following conventions:
• Commands and buttons
For easy recognition within procedures, User Interface (UI) features appear in
bold type. For example: On the File menu, click New.
• Keyboard shortcuts
Delete means the Delete key, or the Del key on your numeric keypad. Enter
means the Enter, Return, or CR key, depending on which of these keys appears
on your keyboard.
• Key combinations
CTRL+KEY, SHIFT+KEY, and ALT+KEY are examples of key combinations.
Hold down the first key in the combination and, at the same time, press the
second key in the combination (designated above as KEY). For example:
CTRL+C means hold the Control key down and press the letter C on your
keyboard (CTRL+C is the Windows Copy command).
• Key terms are italicized when first defined.
• Monospaced font indicates file paths and names, lines of code, and data that
you enter using your keyboard (for example: In the Formula Editor, type
Sales > 1000 Then crRed
• Monospaced, italicized font indicates variable data that you must replace with
data appropriate to your current settings, environment, or task. For example,
in the following URL, you would replace
http://
webserver
/crystal/enterprise/
1: Introduction
If
).
webserver:
Crystal Analysis Installation Guide 5

Trademark acknowledgements
Trademark acknowledgements
Crystal Decisions, Crystal Reports, Crystal Enterprise, Crystal Analysis, Crystal
services, Crystal Care, Crystal Assist, Crystal Applications, Info and Holos are
trademarks or registered trademarks of Crystal Decisions, Inc. in the U.S. and/or
other countries. All other trademarks or registered trademarks referenced are the
property of their respective owners.
This product includes software developed by the Apache Software Foundation
http://www.apache.org/).
(
6 Crystal Analysis Installation Guide

About Crystal Analysis 2
This chapter describes the components of Crystal Analysis
and provides several installation scenarios to help you
decide which installation is right for your organization.
Crystal Analysis Installation Guide 7

Crystal Analysis components
Crystal Analysis components
A full Crystal Analysis installation consists of the following components:
• Application Designer
• Crystal Analysis Add-In
• Crystal Management Server (CMS) Add-on
• Web Component Server (WCS) Add-on
• Rich Client
• Web Server Support
The first two are client components. The remaining four are server components,
although the Rich Client is a special case; it is an ActiveX control that is copied from
server to client computers when a user first tries to view an analytic application
that has been configured to use it. Most of the server components extend an
existing Crystal Enterprise installation so that you can publish analytic
applications to the Web.
Client components described
Application Designer
The Application Designer enables you to design analytic applications. If you
distribute these applications as CAR files, users will require the Application
Designer to view them. Alternatively, you can publish applications using Crystal
Enterprise. Users can then view applications in a Web browser.
Four Application Designer Experts are also included, to help you create some
standard business analytic applications. You choose the type of application to
create, then the Expert guides you through the steps involved in creating the
application.
Crystal Analysis Add-In
The Crystal Analysis Add-In is a component that allows you to use Microsoft®
Excel™ to view and analyze OLAP data. If you choose to install the add-in, it
automatically becomes available for use when you next start Excel.
Server components described
These components extend an existing Crystal Enterprise installation so that you
can publish analytic applications to the Web. The complexity of the installation
depends on the Crystal Enterprise installation.
For a description of the Crystal Enterprise components and installation
instructions, see the Crystal Enterprise Installation Guide.
8 Crystal Analysis Installation Guide

2: About Crystal Analysis
Web Component Server Add-on
This add-on enables the Crystal Enterprise Web Component Server to distribute
analytic applications. You must install this on the server(s) on which the Web
Component Server is installed.
CMS Add-on
This add-on enables analytic applications to be published to the Crystal Enterprise
CMS. You must install this on the server on which the CMS is installed.
Rich Client
The Rich Client is automatically copied to a user’s computer when they first try to
view an analytic application that has been configured to use it. It provides an
alternative to the Zero Client when viewing applications over the Web. You must
install the Rich Client on the web server computer.
Web Server support
This add-on provides a Crystal Enterprise Web Connector for analytic
applications. You must install this on the server on which the Web server is
installed.
Component installation configurations
Here are some scenarios to help you choose the configuration that is best for your
organization.
Scenario 1: Viewing applications in a browser
Users can view analytic applications in a Web browser, using either the Zero Client
or the Rich Client (Windows only).
Scenario 2: Viewing applications on the desktop
Users can view analytic applications on the desktop. You must install the
Application Designer on each user’s computer. A “Desktop Client” installation
installs all the client components on one computer. See “Desktop Client” on
page 14.
Note: Users also needs access rights to the cubes used in the applications and to
PTS, if connecting to MS OLAP.
Crystal Analysis Installation Guide 9

Component installation configurations
Scenario 3: Designing applications
Users can design analytic applications on their local computers. You must perform
a “Desktop Client” installation to install all the client components on each user’s
computer. See “Desktop Client” on page 14.
Scenario 4: Designing and publishing applications
Users can design analytic applications on their local computers and publish them
to the Web. You must install all the Crystal Analysis client components on each
user’s computer and extend an existing Crystal Enterprise installation by adding
the server components.
To extend an existing Crystal Enterprise Express installation, install the server
components on the Crystal Enterprise Express computer. Crystal Enterprise
Express installs all of its components on one computer.
Because Crystal Enterprise Professional enables you to perform a Custom
installation, the CMS, WCS and Web connectors may be installed on different
computers. To extend an existing Crystal Enterprise Professional installation,
install each server component (CMS Add-on, WCS Add-on and Web server
support) to the corresponding server(s).
Note: The WCS computer also needs access rights to the cubes used in the
applications.
Crystal Analysis and Crystal Enterprise Express on one computer
If you want to install Crystal Analysis on the same computer as Crystal Enterprise
Express, do one of the following:
• Carry out a Complete installation.
• Carry out a full Custom installation.
• If a Desktop Client installation has already been carried out, add the server
components. See “Adding or Removing Components” on page 25.
Crystal Analysis and Crystal Enterprise Express on different
computers
If you want to install Crystal Analysis on a different computer to Crystal
Enterprise Express, do the following:
• On the Crystal Analysis computer, perform a “Desktop Client” installation to
install the client components.
• On the Crystal Enterprise Express computer, perform a “Web Components”
installation to install the server components.
10 Crystal Analysis Installation Guide

Crystal Analysis and Crystal Enterprise Professional
To install Crystal Analysis to work with a custom Crystal Enterprise Professional
installation, you may need to perform several installations:
• On the Crystal Analysis computer, perform a Desktop Client installation to
install the client components.
• On each computer that has Crystal Enterprise Professional components
installed, perform a Custom installation to install the relevant server
components.
Note: You can also use a Custom installation to install the components that you
need. For example, if you want to install Crystal Analysis to a computer that has
the WCS installed, you do not need to perform a Desktop Client installation.
Instead, you can use a Custom installation to install Crystal Analysis and the WCS
Add-on at the same time.
See “Desktop Client” on page 14, “Web Components” on page 14 and “Custom”
on page 15.
Minimum system requirements
Crystal Analysis has the following minimum installation requirements.
Drill through is currently only available when running Microsoft SQL Server 2000
Analysis Services and a Microsoft SQL Server 2000 data source. However, Crystal
Holos supports drill-through for base-level members.
For a list of supported platforms, see the file
CD.
Platforms.txt
2: About Crystal Analysis
on the main product
Full stand-alone installation
In this configuration, all components are installed on one computer.
• 133 MHz or higher Pentium-compatible CPU.
• Microsoft Windows 2000 SP3 or above.
• Microsoft Internet Explorer 6.0 or above.
• A supported Web server.
• Crystal Enterprise Express or Professional version 10.
• 128 MB RAM minimum—256 MB is recommended.
• Approximately 140 MB free disk space.
• A supported data source.
Crystal Analysis Installation Guide 11

Minimum system requirements
Client installation (Application Designer)
This is the minimum configuration required to create and view desktop analytic
applications.
• 133 MHz or higher Pentium-compatible CPU.
• Microsoft Windows 2000 SP3 or above.
• Microsoft Internet Explorer 6.0 or above.
• Approximately 100 MB free disk space.
• A supported data source.
Client Web browser
This is the minimum configuration for a computer to view Web applications. None
of these components are supplied with Crystal Analysis.
• A supported Windows platform.
• A supported Web browser.
CMS Add-on, WCS Add-on, and Web server support installation
These are the Crystal Analysis components that you add to a Crystal Enterprise
installation to distribute analytic applications.
• Microsoft Windows 2000 SP3.
• A supported Web server.
• Crystal Enterprise Express or Professional version 10.
• A supported data source on each computer running a WCS.
• Approximately 60 MB free disk space.
12 Crystal Analysis Installation Guide

Installing Crystal Analysis on Windows 3
This chapter tells you how to install Crystal Analysis on
Windows for the first time. It describes the four installation
types available when installing under Windows: Desktop
Client, Web Components, Complete and Custom.
It also describes how to install the web server support for a
UNIX web server.
Crystal Analysis Installation Guide 13

Overview
Overview
This section gives you general information on the types of installation available
under Windows. To start installing Crystal Analysis, see “Starting the installation”
on page 16.
Main installation types
Crystal Analysis installation wizard offers a number of options for installing and
configuring the software to meet your company’s needs. The wizard lets you pick
from four installation types: Desktop Client, Web Components, Complete and
Custom. These options all install Crystal Analysis components under Windows. If
the web server is running on a UNIX computer, see “Installing web server support
on UNIX” on page 22.
Desktop Client
This option installs the client components necessary for running Crystal Analysis.
This installation type does not install any server components for publishing
analytic applications to Crystal Enterprise, as these have to be installed on the
Crystal Enterprise computer. To install the client and server components on one
computer, use the Complete option.
Note: You can publish analytic applications using any Crystal Enterprise
installation that has the Crystal Analysis server components installed. You also
need publishing rights in Crystal Enterprise.
The following items are installed when this type is selected:
• Application Designer
• Crystal Analysis Add-In
• Help files
For a description of each component, see “Crystal Analysis components” on
page 8.
Web Components
This option adds all the Crystal Analysis server components to an existing Crystal
Enterprise implementation. If you have a Crystal Enterprise Professional
installation in which the CMS, WCS, and web server are on separate computers,
use the Custom option to install the server components separately.
The following items are installed when this type is selected:
• Web Component Server (WCS) Add-on
• Crystal Management Server (CMS) Add-on
• Rich Client
• Web Server support
• Custom Web chart files
For a description of each component, see “Crystal Analysis components” on page 8.
14 Crystal Analysis Installation Guide

3: Installing Crystal Analysis on Windows
Complete
This option adds all the Crystal Analysis components (server and client) to one
computer. The computer must already have a complete Crystal Enterprise
installation.
A Complete installation can be used to both design analytic applications and
publish them to Crystal Enterprise.
The following items are installed when this type is selected:
• Application Designer
• Crystal Analysis Add-In
• Crystal Management Server (CMS) Add-on
• Web Component Server (WCS) Add-on
• Rich Client
• Web Server support
• Help files.
For a description of each component, see “Crystal Analysis components” on
page 8.
Custom
This option lets you choose from a list of Crystal Analysis components, both client
and server. You can customize your installation to meet specific site or resource
requirements. To add Crystal Analysis components to a custom Crystal Enterprise
Professional installation, you may need to perform a Custom installations on each
computer that has Crystal Enterprise Professional components installed.
The following items are installed when this type is selected:
• Application Designer
• Crystal Analysis Add-In
• Help files
• Web Component Server (WCS) Add-on
Install this component on the computer that is running the WCS.
• Crystal Management Server (CMS) Add-on
Install this component on the computer that is running the CMS.
• Web Server support
Install this component on the computer that is running the web server.
• Web help files
Install this component on the computer that is running the web server.
For a description of each component, see “Crystal Analysis components” on
page 8.
Crystal Analysis Installation Guide 15

Starting the installation
You can independently control the location of three sets of components when you
perform a Custom installation:
• Common files shared with Crystal Enterprise, including chart support.
• Crystal shared components, such as the Crystal Enterprise SDK.
• All other files, including the web and desktop components.
These can be installed in any location, including to a non-system drive. A small
number of files remains on the system drive, regardless of the locations that you
choose.
Note: If you have already installed Crystal Enterprise or Crystal Reports, then
you may only be able to install Crystal Analysis to the default location.
Starting the installation
Crystal Analysis uses a wizard to guide you through the installation process.
To install Crystal Analysis
1 Insert the main Crystal Analysis product CD into your CD drive. The
installation starts automatically and you are offered the following options:
• What’s New
• Install Sample Data
You must install the sample data if you want to follow the Tutorials in the
Crystal Analysis User’s Guide. For details, see “Installing sample data” on
page 20.
• Product Registration
• Services
• Crystal Decisions Products
• Install Crystal Analysis 10
2 Click Install Crystal Analysis 10.
If the installation does not start automatically, find the
product CD and double-click it.
3 Select the language in which you want to run the installation and click Install.
setup.exe
file on the
16 Crystal Analysis Installation Guide

3: Installing Crystal Analysis on Windows
4 Proceed through the Setup program’s dialog boxes and follow the instructions
displayed on your screen until you reach the Installation Type dialog box:
5 If you want to install to a different folder, click Browse.
Search for, or create, the new folder on your computer. The folder you specify
can be on a non-system drive. You may want to specify a non-system drive if
there is limited free space on your system drive. If you have already installed
Crystal Enterprise or Crystal Reports, then you may only be able to install
Crystal Analysis to the default location.
6 Choose an installation type:
• Click Desktop Client and then click Next three times to install the client
components of Crystal Analysis.
• Click Web Components and then click Next twice to extend an existing
Crystal Enterprise installation in which all the components are on one
computer.
• Click Complete to install the Crystal Analysis client and server
components on a single computer.
• Click Custom to install only specific components of Crystal Analysis, or to
extend a custom installation of Crystal Enterprise. For more details, see
“Continuing a Custom installation” on page 19.
7 Select the versions of Essbase and DB2 that you want. For more details, see
“OLAP support” on page 18.
8 Once the files are installed, the Crystal Decisions Registration Wizard appears,
allowing you to register the software. See “Registering Crystal Analysis” on
page 22.
9 Once the files are installed, click Finish.
Crystal Analysis Installation Guide 17

OLAP support
OLAP support
Follow this procedure to select the version of Essbase or DB2 OLAP database that
you want.
To select your OLAP database
1 Select the required DB2 or Essbase driver from the lists:
The drivers support the following database versions:
Driver name Data sources supported
Essbase 6.2 and above Essbase 6.2 and above
Essbase 6.1 Essbase 6.1.4, 6.1.3a, and 6.1.2
Essbase 6.0 Essbase 6.0.3, 6.0.2, 6.0.1, and 6.0.0
DB2 8.1 DB2 OLAP Server 8.1
DB2 7.1.7 DB2 OLAP Server 7.1.7, 7.1.6, 7.1.5, and 7.1.4
DB2 7.1 DB2 OLAP Server 7.1.3, 7.1.1, and 7.1.0
2 Click Next to proceed with the installation.
If you want to change the version of Essbase or DB2 that Crystal Analysis uses after
installing, see “Modifying Essbase and DB2 support for Rich Client” on page 20.
18 Crystal Analysis Installation Guide

Continuing a Custom installation
Follow this procedure to perform a Custom installation.
To continue with a Custom installation type
1 For a Custom installation, select Custom and click Next.
The Select Features dialog box appears with a list of the Crystal Analysis
components. The list of server components depends on the Crystal Enterprise
components that are already installed on the computer.
3: Installing Crystal Analysis on Windows
2 Click the driver icon of the feature or features that you want to install.
3 Select an installation type for each feature and then click Next.
Installation type What is installed
Will be installed on
local hard drive
Entire feature will be
installed on local hard
drive
Entire feature will be
unavailable
4 If you want to install to a different folder, click Browse.
To see how much disk space your configuration requires, click Disk Cost. If
you want to go back to the default installation location, click Reset.
5 Click Next to proceed with the installation.
Crystal Analysis Installation Guide 19
Select this menu item if you want the feature to be
installed on the local hard drive. Subcomponents of
the feature will not be installed.
Select this menu item if you want the feature to be
installed on the local hard drive. All
subcomponents of the feature will be installed.
Select this menu item if you do not want this feature
to be available. Subcomponents of the feature will
not be available.

Installing sample data
Installing sample data
The main Crystal Analysis product CD contains sample data cubes. These include
the Sales Reports cube, which is used in the Tutorials in the Crystal Analysis User’s
Guide.
To enable users to follow the tutorials, install the sample data on a computer that
is running one of the supported Microsoft data sources.
The samples are stored as both MDB files (or server cubes), which can be used to
create the data cube, and as CUB files. CUB files are also known as local or offline
cubes.
If the correct version of Microsoft
server cubes and offline cubes. Otherwise, you can only install offline cubes.
Installing the sample data cubes adds a catalog containing the cubes to the server.
To install the sample data
1 Insert the product CD into your CD drive.
The installation starts automatically.
2 Click Install Sample Data.
3 Click Next.
4 Select Server Cubes and Offline Cubes, as appropriate, and click Next.
5 Click Browse if you want to specify a different destination folder from the
default.
Search for or create the new folder on your computer.
6 Click Next twice to install the files.
7 Once the files are installed, click Finish.
®
SQL Server™ is available, you can install both
Modifying Essbase and DB2 support for Rich Client
Crystal Analysis has several DLLs for connection to Hyperion® Essbase® and
IBM® DB2 OLAP Server data sources. These DLLs support different versions of
Essbase and DB2.
When you view an application for the first time in Crystal Enterprise, and the Rich
Client is selected as your chosen viewer, the Rich Client is installed on your
computer. All the Essbase and DB2 support DLLs are installed, but only the most
recent versions are active.
If you want to use a previous version, you must delete the active version and then
copy and rename the correct version.
20 Crystal Analysis Installation Guide

3: Installing Crystal Analysis on Windows
To change to an older version of Essbase
1 Navigate to the following directory:
InstallPath
where InstallPath is the location to which Crystal Analysis was installed.
2 Delete the file
The following files are required for the data sources listed:
File name Data sources supported
essbhapi_650.dll
essbhapi_610.dll
essbhapi_600.dll
\10.0\Analysis\Olap\Bin
essbhapi.dll
.
Essbase 6.2 and above
Essbase 6.1.4, 6.1.3a, and 6.1.2
Essbase 6.0.3, 6.0.2, 6.0.1, and 6.0.0
3 Rename the DLL that you require to
essbhapi.dll
For example, if you require support for Essbase 6.1.2, delete
rename
essbhapi_610.dll
to
essbhapi.dll
.
.
essbhapi.dll
To change to an older version of DB2 OLAP
1 Navigate to the following directory:
InstallPath
where InstallPath is the location to which Crystal Analysis was installed.
2 Delete the file
The following files are required for the data sources listed:
File name Data sources supported
db2hapi_81.dll
db2hapi_717.dll
db2hapi_71.dll
3 Rename your required DLL to
For example, if you require support for DB2 OLAP 7.1.5, delete
then rename
\10.0\Analysis\Olap\Bin
db2hapi.dll
.
DB2 OLAP Server 8.1
DB2 OLAP Server 7.1.7, 7.1.6, 7.1.5, and 7.1.4
DB2 OLAP Server 7.1.3, 7.1.1, and 7.1.0
db2hapi_717.dll
to
db2bhapi.dll
db2bhapi.dll
.
db2hapi.dll
.
and then
and
Crystal Analysis Installation Guide 21

Registering Crystal Analysis
Registering Crystal Analysis
The Registration Wizard lets you create a user profile you can mail, fax, email, or
submit over the web to register your implementation of Crystal Analysis.
To register Crystal Analysis
1 On the Registration Wizard, click Next.
2 Select the method by which you want to register:
• Web (allows you to submit your user profile via the web).
• E-mail (allows you to submit your user profile via email).
• Fax or Mail (allows you to print your user profile to fax or mail).
3 If you’ve registered before and have received a registration number, enter that
number.
When you enter an existing registration number, the wizard updates the
appropriate files and then closes.
4 Click Next.
5 Enter your user profile information and click Next.
• If you register via the web, your web browser directs you to the Crystal
Decisions registration site. Fill out all necessary fields and click Done. You
receive a registration number immediately; enter it in the Registration
Wizard and click Finish.
• If you register via email, fill out all necessary fields and click Done. Your
user profile is sent to Crystal Decisions. A registration number is returned
by email or fax.
• If you register by fax or mail, fill out all necessary fields and click OK when
the Print dialog box appears. A registration number is sent to you after you
fax or mail your registration form.
Installing web server support on UNIX
This section describes how to install Crystal Analysis web server support on a
Solaris or Linux computer. For a list of web servers and supported UNIX
platforms, see the file
Before you can install the web server support, the Web Component Server must be
running on a Windows 2000 computer in the same network. The Solaris or Linux
computer must have a configured CGI or ASAPI web connector installed. See the
Crystal Enterprise Installation Guide for details.
Platforms.txt
To install UNIX web server support
1 Mount the installation CD, if necessary, and navigate to the
2 Execute the
./setup.sh
22 Crystal Analysis Installation Guide
setup.sh
script. For example:
on the main Crystal Analysis product CD.
unix
directory.

3: Installing Crystal Analysis on Windows
3 Specify the Crystal Enterprise installation directory. The default directory is
/usr/local/crystal
under Linux and
/opt/crystal
under Solaris.
In the following description, we assume that the Crystal Enterprise installation
directory is
/usr/local/crystal
.
4 Edit the configuration file for your web connector. The configuration files are
stored in:
/usr/local/crystal/wcs/conf
The Apache configuration file is called
cgi.apache.conf
called
5 Add
Alias
entries for the stylesheets and the help in the configuration file.
For example, the
# Alias the Crystal Analysis Professional stylesheets files
Alias /styles /usr/local/crystal/stylesheets
# Alias the Crystal Analysis Professional help files
Alias /AnalysisHelp /usr/local/crystal/stylesheets/help
The
Alias
entry for Netscape would be:
NameTrans fn="pfx2dir" from="/styles" dir="/usr/local/crystal/
stylesheets"
NameTrans fn="pfx2dir" from="/AnalyisHelp" dir="/usr/local/crystal/
stylesheets/help"
. The CGI with Netscape file is called
Alias
entry for Apache would be:
asapi.conf.
The CGI with Apache file is
cgi.netscape.conf
6 Configure the virtual path mapping to the Web Component Server:
• For Apache (ASAPI Web Connector), add the following line to the file
asapi.conf
AddPathMap /styles csp "stylesheet_dir"
where
:
stylesheet_dir
is the absolute path to the stylesheets directory.
• For iPlanet Enterprise Server (NSAPI Web Connector) add the following
into the
/styles;.csp;stylesheet_dir
where
WCSPathMap
stylesheet_dir
in the
Init
line of the
magns.conf
file:
is the absolute path to the stylesheets directory.
• For supported web servers with the CGI Web Connector, add the following
wscgi.cgi
line to
WCSPATHMAPx="/styles;csp;stylesheet_dir"; export WCSPATHMAPx
where
stylesheet_dir
is a number not already used. For example, if
already exist, add a line containing
:
is the absolute path to the stylesheets directory, and
WCSPATHMAP3
WCSPATHMAP1
.
and
WCSPATHMAP2
On Windows, the default path of the stylesheets directory is:
C:\Program Files\Crystal Decisions\10.0\Analysis\Olap\stylesheets
7 Restart the web server using the following commands:
/etc/init.d/httpd stop
/etc/init.d/httpd start
.
x
Crystal Analysis Installation Guide 23

Installing web server support on UNIX
24 Crystal Analysis Installation Guide

Adding or Removing Components 4
This chapter tells you how to add components to, or remove
components from, an existing Crystal Analysis installation.
It also describes how to repair or uninstall Crystal Analysis.
Crystal Analysis Installation Guide 25
Overview
Overview
Components can be added or removed as necessary to suit your company’s
implementation of Crystal Analysis. When you first install, you can also specify
components individually using the Custom installation type. See “Custom” on
page 15.
Once you have installed Crystal Analysis, there are several ways to add or remove
components:
• By running
• By running
• By running Add/Remove Programs from the Windows Control Panel.
The procedure is the same in all three cases. The following descriptions assume
that you are using the Windows Add/Remove Programs feature.
setup.exe
setup.exe
Adding components
Adding components uses the same selection interface as the Custom installation
type—you choose the components and the installation location from a list.
To add components to Crystal Analysis
1 In Windows, click Start, point to Settings, and then select Control Panel.
2 Double-click Add/Remove Programs.
3 Find Crystal Analysis and select it. Depending on the version of Windows that
you are running, click the button that is labelled either Change or Add/
Remove.
After searching for existing components, the installation program displays the
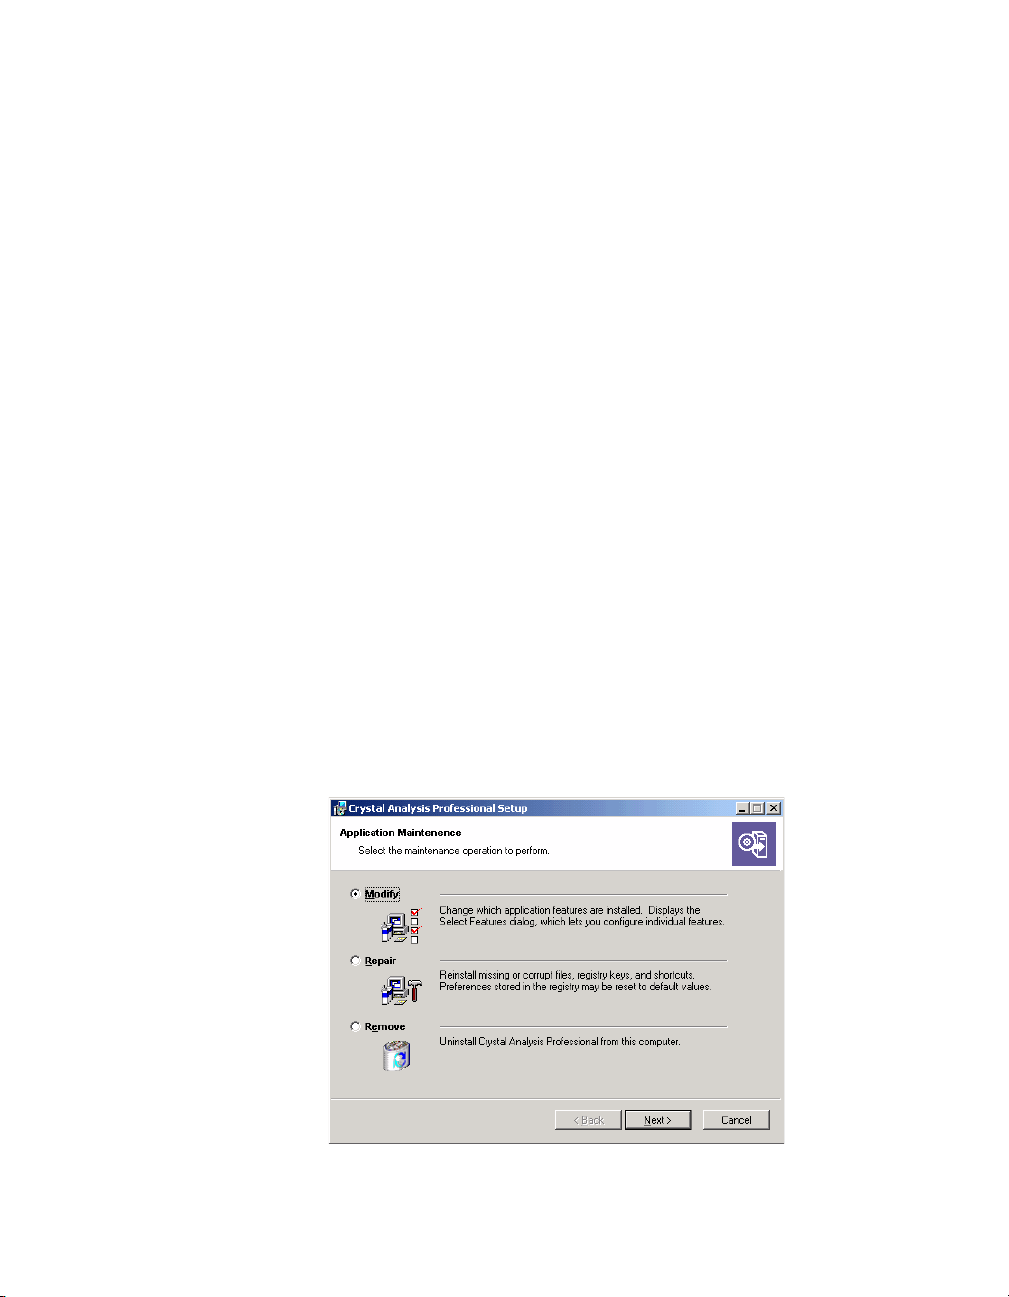
Application Maintenance dialog box.
from the main product CD on the target computer.
from the main product CD from a shared network drive.
26 Crystal Analysis Installation Guide

4 Click Modify.
5 Select the components that you want to add.
For more information about selecting components, see “Continuing a Custom
installation” on page 19.
6 Click Next, and then Next again to install the files.
Wait while the appropriate files are installed and the necessary configuration is
carried out.
7 Click Finish.
Removing components
Removing components uses the same selection interface as the Custom installation
type—you choose the components to remove from a list.
To remove components from Crystal Analysis
1 In Windows, click Start, point to Settings, and then select Control Panel.
2 Double-click Add/Remove Programs.
3 Find Crystal Analysis and select it. Depending on the version of Windows that
you are running, click the button that is labelled either Change or Add/
Remove.
After searching for existing components, the installation program displays the
Application Maintenance dialog box.
4: Adding or Removing Components
4 Click Modify.
Crystal Analysis Installation Guide 27

Repairing Crystal Analysis
5 Select the components that you want to remove.
For more information about selecting components, see “Continuing a Custom
installation” on page 19.
6 Click Next. Click Next again when you want to begin removing files.
Wait while the appropriate files are removed and the necessary configuration
is carried out.
7 Click Finish.
Repairing Crystal Analysis
The Repair option reinstalls missing or corrupt files, registry keys and shortcuts.
In the process of reinstalling, any preferences stored in the registry may be set to
the default values.
1 In Windows, click Start, point to Settings, and then select Control Panel.
2 Double-click Add/Remove Programs.
3 Find Crystal Analysis and select it. Depending on the version of Windows that
you are running, click the button that is labelled either Change or Add/
Remove.
After searching for existing components, the installation program displays the
Application Maintenance dialog box.
4 Click Repair.
You are prompted to confirm that you want to install Crystal Analysis.
28 Crystal Analysis Installation Guide

5 Click Next.
Please wait while the appropriate files are installed and the necessary
configuration is carried out.
6 Click Finish.
Uninstalling Crystal Analysis
This option removes Crystal Analysis from your computer.
1 In Windows, click Start, point to Settings, and then select Control Panel.
2 Double-click Add/Remove Programs.
3 Find Crystal Analysis and select it. Depending on the version of Windows that
you are running, click the button that is labelled either Remove or Add/
Remove.
After searching for existing components, the installation program displays the
Application Maintenance dialog box.
4 Click Remove and then Next.
4: Adding or Removing Components
You are prompted to confirm that you want to uninstall Crystal Analysis.
5 Click Next.
Please wait while the appropriate files are removed and the necessary
configuration is carried out.
6 Click Finish.
Crystal Analysis Installation Guide 29

Uninstalling Crystal Analysis
30 Crystal Analysis Installation Guide

Command Line Installation 5
This chapter describes how to run an installation of Crystal
Analysis from the Windows Command Prompt window. It
is intended for system administrators. The command line
installation makes it easy to install Crystal Analysis on
many computers and allows the system administrator to
run an install that does not prompt for input.
Crystal Analysis Installation Guide 31

Prerequisites
Prerequisites
For a command line installation to work, Microsoft Installer 2.0 (MSI2) must be
installed on the computer. If this is not the case, you can install it from the main
Crystal Analysis product CD.
To install Microsoft Installer 2.0
1 On the product CD, navigate to the directory win32.
2 Run the file instmsiw.exe.
Installation types
The command line installation can be used to perform several standard types of
installation:
• To perform a Desktop Client installation, omit all component flags. The
desktop client components are installed by default.
• To perform a Web Components installation, set
NOCLIENTCOMPONENTS=1
• To perform a Complete installation, set
components are installed by default.
You cannot use the command line installation to perform a Custom installation.
SERVERCOMPONENTS=1
and
.
SERVERCOMPONENTS=1
. The desktop client
Installing
You install Crystal Analysis by running the Microsoft installer, msiexec, at the
command line and specifying the appropriate MSI file and other options. There are
four installation files for Crystal Analysis, each installing a different language:
File name Language
ca.msi
ca_DE.msi
ca_FR.msi
ca_JP.msi
The syntax for installing Crystal Analysis from the command line is as follows
(values in square brackets are optional):
msiexec /i /x
[/qn] [/qr]
[PIDKEY=
[DESKTOPDESIGNER=
[DESKTOPWIZARD=n]
[SERVERCOMPONENTS=
32 Crystal Analysis Installation Guide
Installs the English language version of Crystal Analysis.
Installs the German language version of Crystal Analysis.
Installs the French language version of Crystal Analysis.
Installs the Japanese language version of Crystal Analysis.
msifile
IDKey
]
n
]
n
]

[NOCLIENTCOMPONENTS=n]
[OO_db2=
[OO_ESSB=
[/l*v
Db2Version
EssVersion
LogFile
where:
5: Command Line Installation
]
]
]
/i
/x
msifile
/qn
Specifies an installation.
Removes an installation.
Gives the MSI file, including its path.
Specifies that no user interface is displayed. If omitted,
the normal interface is displayed, and you must enter
any details that were not given in the command line.
/qr
Specifies that only progress dialog boxes are displayed.
You can still see and respond to error messages.
IDKey
Specifies a product keycode. Not required if the product
is being removed. The case of the product keycode does
not matter.
DESKTOPDESIGNER=
n
Specifies the Application Designer. Specifying 1 (the
default) installs the Application Designer. Specifying 0
installs no Application Designer.
DESKTOPEXCEL=
Combining
DESKTOPDESIGNER=0
produces the same result as
n
Specifies the Crystal Analysis Add-In. Specifying 1
and
DESKTOPEXCEL=0
NOCLIENTCOMPONENTS=1
.
installs the Add-in. Specifying 0 (the default) installs no
Add-in.
SERVERCOMPONENTS=
n
Specifies the server components. Specifying 1 installs
the server components. Specifying 0 (the default)
installs no server components.
NOCLIENTCOMPONENTS=
OO_DB2=
Db2Version
n
Specifies client components. Specifying 0 installs client
components, while specifying 1 (the default)
client components. If you specify
you must also specify
SERVERCOMPONENTS=1
NOCLIENTCOMPONENTS=1
installs no
.
Specifies the version of the DB2 driver to install. Valid
versions are 81, 717, and 71. You can only specify one
version. If omitted, no DB2 driver is configured.
OO_ESSB=
EssVersion
Specifies the version of the Essbase driver to install.
Valid versions are 650, 610, and 600. You can only
specify one version. If omitted, no Essbase driver is
configured.
/l*v LogFile Specifies verbose logging. LogFile is the full name of the
log file, including its path.
,
Crystal Analysis Installation Guide 33

Examples
Examples
When the command line installation runs without any user interface, the user is
not prompted if any of the options are incorrect. We recommend that you carefully
check the options that you are using before performing a command line
installation, and that you specify a log file.
The installer restarts the computer when it has completed the installation.
The following examples show some common installation combinations.
Installing desktop components
This installs the desktop features in English and produces a log file. The desktop
client components are installed by default.
msiexec /i ca.msi PIDKEY=xxxxx-xxxxxxx-xxxxxxx /qn /l*v c:\installlog.txt
Installing server components
This installs the server components in English:
msiexec /i ca.msi PIDKEY=xxxxx-xxxxxxx-xxxxxxx SERVERCOMPONENTS=1
NOCLIENTCOMPONENTS=1
Installing complete product
This installs the complete product in French. The desktop client components are
installed by default.
msiexec /i ca_FR.msi PIDKEY=xxxxx-xxxxxxx-xxxxxxx SERVERCOMPONENTS=1
Uninstalling
This removes the product, with no user interface or progress dialog boxes.
Progress is written to a log file.
msiexec /x ca.msi /qn /l*v c:\temp\removelog.txt
34 Crystal Analysis Installation Guide

Installing Crystal Analysis on UNIX 6
This chapter tells you how to install Crystal Analysis on
UNIX.
Crystal Analysis Installation Guide 35

Prerequisites
Prerequisites
You must have the following installed before you install Crystal Analysis:
• Crystal Enterprise 10.0.
• Weblogic 7.02 or Websphere 5.0.
• Essbase 6.5 or DB2 8.1 client drivers (Essbase and DB2 data source users only)
You must install Crystal Analysis on the same application server as your
Enterprise installation.
This guide also includes instructions for setting up an Apache Tomcat 4.1.27
application server for your development environment.
Integrating with Enterprise
You must edit the file
env.sh
Enterprise.
Navigate to the top level Crystal directory in your Enterprise installation. Open the
env.sh
file
$PLUGINDIST/desktop/CrystalEnterprise.Analysis
Your
LIBRARYPATH="$LIBDIR:$WCSCOMPONENTDIR:$PLUGINDIST/auth/secEnterprise:
for editing. Add the following to the
LIBRARYPATH
$CRYSTALDIR/enterprise/$SOFTWAREPATH/odbc/lib:
$CRYSTALDIR/enterprise/$SOFTWAREPATH/crpe:${MWHOME}:
$PLUGINDIST/desktop/CrystalEnterprise.Report:
$PLUGINDIST/desktop/CrystalEnterprise.Analysis:
$CRYSTALDIR/enterprise/$SOFTWAREPATH/ras:$OLAPHOME"
definition should look something like this:
Installing Crystal Analysis
It is strongly recommended that you run the
crystal
directory before you install Crystal Analysis. This script sets the
environment for the installation shell.
1 Create a directory for the Crystal Analysis install files.
For example, create a directory called
2 Copy the Crystal Analysis installation files to the directory that you’ve just
created.
3 Change the access mode of the
chmod +x install.sh
to enable the Crystal Analysis components in
capro
install.sh
LIBRARYPATH
env.sh
script located in the Enterprise
.
file to make it executable:
definition:
36 Crystal Analysis Installation Guide

6: Installing Crystal Analysis on UNIX
4 Type
install.sh xx
to run the install where xx is the language code for the
installation:
Language Code Install Language
en
de
fr
jp
English
German
French
Japanese
5 When prompted, enter an installation path, or press ENTER to accept the
default (shown in square brackets).
Note: If you enter an installation path, the install appends a directory called
crystal
to your installation path. The Crystal Analysis files are installed in the
crystal
directory.
6 Follow the steps to install Essbase or DB2 support.
See “OLAP support” on page 18 for more information on which driver versions
you need to install.
The installer unpacks the GZ files and registers the libraries.
Integrating with Enterprise
You must edit the file
Enterprise.
Navigate to the top level Crystal directory in your Enterprise installation. Open the
file
env.sh
for editing. Add the following to the
$PLUGINDIST/desktop/CrystalEnterprise.Analysis
Your
LIBRARYPATH
LIBRARYPATH="$LIBDIR:$WCSCOMPONENTDIR:$PLUGINDIST/auth/secEnterprise:
$CRYSTALDIR/enterprise/$SOFTWAREPATH/odbc/lib:
$CRYSTALDIR/enterprise/$SOFTWAREPATH/crpe:${MWHOME}:
$PLUGINDIST/desktop/CrystalEnterprise.Report:
$PLUGINDIST/desktop/CrystalEnterprise.Analysis:
$CRYSTALDIR/enterprise/$SOFTWAREPATH/ras:$OLAPHOME"
env.sh
to enable the Crystal Analysis components in
definition should look something like this:
LIBRARYPATH
definition:
Crystal Analysis Installation Guide 37

Setting up the web application server
Setting up the web application server
Weblogic
To configure Weblogic to use the Crystal Analysis components, you must add
content to the
/
weblogic_home_dir
where weblogic_home_dir is the Weblogic home installation directory, and
server_name is the name of the server.
1 Add the following path definitions:
WEBLOGIC_HOME="/
CAPRO_HOME=
CAPRO_BIN=${CAPRO_HOME}/bin
where weblogic_home_dir is the Weblogic home installation directory and
ca_home_dir is the directory where Crystal Analysis was installed.
2 Add the following lines to set up the Java environment variables:
JAVA_OPTS="-Dcrystal.analysis.home=${CAPRO_HOME}"
setEnv.sh
ca_home_dir
file. This file is located here:
/bea/user_projects/
weblogic_home_dir
server_name
/bea/weblogic700"
/
JAVA_OPTS="${JAVA_OPTS} -Dcrystal.analysis.env=
JAVA_OPTS="${JAVA_OPTS},HOME=${HOME},CRYSTAL_REGISTRYHOME=
For AIX, replace
LD_LIBRARY_PATH
${HOME}/crystal/data/.crystal/registry"
with
LD_LIBRARY_PATH=${CAPRO_BIN}"
LIBPATH
.
Note: If you are using Essbase or DB2, the second line should read:
JAVA_OPTS="${JAVA_OPTS} -Dcrystal.analysis.env=LD_LIBRARY_PATH=
${CAPRO_BIN}:/home/sw/essbase/bin,holos_language=${CAPRO_BIN},ARBORPATH=
/home/sw/essbase"
Again, replace
LD_LIBRARY_PATH
with
LIBPATH
for AIX.
3 Add the following two lines if you want your charts to use TrueType fonts:
JAVA_OPTS="${JAVA_OPTS} -Dcrystal.analysis.fonts.path=/
JAVA_OPTS="${JAVA_OPTS} -Dcrystal.analysis.fonts.default=
font_path
font.ttf
"
"
where font_path is the path to the TrueType fonts, and font.ttf is the font you
want to set as your default.
Note: If you want to display the Euro symbol, you must ensure that you use
TrueType fonts that are Euro enabled.
38 Crystal Analysis Installation Guide

Websphere
6: Installing Crystal Analysis on UNIX
4 Add this line to use verbose logging:
JAVA_OPTS="${JAVA_OPTS} -Dcrystal.enterprise.trace=false"
5 And finally, add the following to the line that exports the environment
variables:
CAPRO_HOME CAPRO_BIN JAVA_OPTS WEBLOGIC_HOME holos_language
6 Update the file
startWebLogic.sh
(found in the same directory as
setEnv.sh
adding the following before the lines that set the server name:
# Set Environment
. setEnv.sh
This ensures that
setEnv.sh
is run when the application server restarts.
7 Restart the application server.
) by
1 Open the file
/
Websphere_dir
startServer.sh
/AppServer/bin/
for editing. The file is located here:
where Websphere_dir is the Websphere installation directory.
2 Add the following line to the file:
LD_LIBRARY_PATH="/home_dir/crystal/enterprise/solaris_sparc:$/
ca_home_dir
/bin":$LD_LIBRARY_PATH
where home_dir is the user home directory and ca_home_dir is the Crystal
Analysis home directory.
For AIX, replace
aix_rs6000
.
LD_LIBRARY_PATH
with
LIBPATH
, and
solaris_sparc
with
3 To configure Websphere to use the Crystal Analysis components on Solaris,
add the following line to the generic JVM arguments found in
Application server/
-Dcrystal.analysis.home=/
/
home_dir
LD_LIBRARY_PATH=/
/
font_path
,CRYSTAL_REGISTRYHOME=/
" -Dcrystal.analysis.fonts.default=
server_name
ca_home_dir
ca_home_dir
/Process Definition/Java virtual Machine
-Dcrystal.analysis.env=HOME=
home_dir
/bin -Dcrystal.analysis.fonts.path=
/crystal/data/.crystal/registry,
font.ttf
Server/
"
where home_dir is the user home directory, ca_home_dir is the Crystal Analysis
home directory,
font_path is the path to the TrueType fonts, and font.ttf is
the font you want to set as your default.
For AIX, replace
LD_LIBRARY_PATH
with
LIBPATH
.
:
Crystal Analysis Installation Guide 39

Setting up the web application server
If you are using Essbase or DB2, the line you need to add should look like this:
-Dcrystal.analysis.home=/
/home/sw/essbase,holos_language=/
CRYSTAL_REGISTRYHOME=/
LD_LIBRARY_PATH=/
.fonts.path=/
where home_dir is the user home directory, ca_home_dir is the Crystal Analysis
home directory,
the font you want to set as your default.
4 Restart the application server to set the new paths.
Tomcat
To configure Tomcat to use the Crystal Analysis components, you must add
content to the
/
tomcat_dir
where tomcat_dir is the path to the Tomcat home directory.
1 Add the following lines to set up the Java environment variables:
JAVA_OPTS="-Dcrystal.analysis.home=/
JAVA_OPTS="${JAVA_OPTS} -Dcrystal.analysis.env=LD_LIBRARY_PATH=
/
ca_home_dir
ca_home_dir
home_dir
ca_home_dir
font_path
font_path is the path to the TrueType fonts, and font.ttf is
catalina.sh
/bin/
/bin:/
file. This file is located here:
ca_home_dir
/bin:/home/sw/essbase/bin -Dcrystal.analysis
" -Dcrystal.analysis.fonts.default=
/enterprise/solaris_sparc"
-Dcrystal.analysis.env=ARBORPATH=
ca_home_dir
/crystal/data/.crystal/registry,
ca_home_dir
/bin,HOME=/
/"
home_dir
,
font.ttf
"
JAVA_OPTS="${JAVA_OPTS},HOME=
home_dir
home_dir
,CRYSTAL_REGISTRYHOME=
/crystal/data/.crystal/registry"
where ca_home_dir is the directory where Crystal Analysis is installed, and
home_dir is the user home directory.
For AIX, replace
aix_rs6000
.
LD_LIBRARY_PATH
with
LIBPATH
, and
solaris_sparc
with
Note: If you are using Essbase or DB2, the second line should read:
JAVA_OPTS="${JAVA_OPTS} -Dcrystal.analysis.env=LD_LIBRARY_PATH=
/
ca_home_dir
:/home/sw/essbase/bin,holos_language=/
/home/sw/essbase"
Again, replace
aix_rs6000
/bin:/
ca_home_dir
LD_LIBRARY_PATH
.
/enterprise/solaris_sparc
with
ca_home_dir
LIBPATH
/bin,ARBORPATH=
for AIX, and
solaris_sparc
with
2 Add the following two lines if you want your charts to use TrueType fonts:
JAVA_OPTS="${JAVA_OPTS} -Dcrystal.analysis.fonts.path=/
JAVA_OPTS="${JAVA_OPTS} -Dcrystal.analysis.fonts.default=
40 Crystal Analysis Installation Guide
font_path
font.ttf
"
"

where font_path is the path to the TrueType fonts, and font.ttf is the font you
want to set as your default.
Note: If you want to display the Euro symbol, you must ensure that you use
TrueType fonts that are Euro enabled.
Deploying styles and help
Crystal Analysis has specific style sheets that must be deployed using WAR files
in the install.
The Crystal Analysis Zero Client help is found in the
Weblogic
6: Installing Crystal Analysis on UNIX
AnalysisHelp.war
file.
Websphere
Tomcat
1 Deploy the file
The context root is
2 Deploy the file
The context root is
1 Deploy the file
The context root is
2 Deploy the file
The context root is
1 Navigate to the
styles.war
2 Navigate to the Tomcat
styles.war
/styles
AnalysisHelp.war
/AnalysisHelp
styles.war
/styles
AnalysisHelp.war
/AnalysisHelp
websphere
and
AnalysisHelp.war
, found in the
weblogic
, found in the
directory.
weblogic
directory.
.
, found in the
websphere
, found in the
directory.
websphere
directory.
.
directory on the installation CD, and copy the files
to a suitable location on your computer.
conf
directory and open the file
server.xml
Add these two lines to the file:
<Context path="/styles" docBase="/
debug="0" reloadable="false" trusted="false"/>
<Context path="/AnalysisHelp" docBase="/
crossContent="false" debug="0" reloadable="false" trusted="false"/>
path
/styles.war" crossContent="false"
path
/AnalysisHelp.war"
where path is the path to the copied files.
for editing.
Crystal Analysis Installation Guide 41

Deploying styles and help
42 Crystal Analysis Installation Guide
 Loading...