

Page 1

BusinessObjects Auditor Guide
BusinessObj ects Auditor 6.5
Windows and UNIX
Page 2

2 BusinessObjects Auditor Guide
Copyright
Trademarks
Use restrictions
Patents
Service Pack
Copyright © 2004 Business Objects. All rights reserved.
If you find any problems with this documentation, please report them to Business Objects in
writing at documentation@businessobjects.com.
Printed in France.
Business Objects, the Business Objects logo, Crystal Reports, and Crystal Enterprise are
trademarks or registered trademarks of Business Objects S.A. or its affiliated companies in the
United States and other countries. All other names mentioned herein may be trademarks of their
respective owners.
Contains IBM Runtime Environment for AIX(R), Java(TM) 2 Technology Edition Runtime
Modules (c) Copyright IBM Corporation 1999, 2000. All Rights Reserved.
This product includes code licensed from RSA Security, Inc. Some portions licensed from IBM
are available at http://oss.software.ibm.com/icu4j.
Contains ICU libraries (c) 1995-2003 International Business Machines Corporation and others.
All rights reserved.
This software and documentation is commercial computer software under Federal Acquisition
regulations, and is provided only under the Restricted Rights of the Federal Acquisition
Regulations applicable to commercial computer software provided at private expense. The use,
duplication, or disclosure by the U.S. Government is subject to restrictions set forth in
subdivision (c)(1)(ii) of the Rights in Technical Data and Computer Software clause at 252.227-
7013.
Business Objects owns the following U.S. patents, which may cover products that are offered
and sold by Business Objects: 5,555,403, 6,247,008 B1, 6,578,027 B2, 6,490,593, and
6,289,352.
Last updated for 6.5.0
Part Number
397-10-650-01
Page 3

BusinessObjects Auditor Guide 3
Contents
Preface Maximizing Your Information Resources 7
Information resources . . . . . . . . . . . . . . . . . . . . . . . . . . . . . . . . . . . . . . . . . . 9
Services . . . . . . . . . . . . . . . . . . . . . . . . . . . . . . . . . . . . . . . . . . . . . . . . . . . . 11
Useful addresses at a glance . . . . . . . . . . . . . . . . . . . . . . . . . . . . . . . . . . . . 12
About this guide . . . . . . . . . . . . . . . . . . . . . . . . . . . . . . . . . . . . . . . . . . . . . . 14
Part I Administering Auditor
Chapter 1 Introducing BusinessObjects Auditor 17
What you can do with Auditor . . . . . . . . . . . . . . . . . . . . . . . . . . . . . . . . . . . 19
Auditor components . . . . . . . . . . . . . . . . . . . . . . . . . . . . . . . . . . . . . . . . . . . 20
The Audit facility . . . . . . . . . . . . . . . . . . . . . . . . . . . . . . . . . . . . . . . . . . . . . . 22
Chapter 2 Setting Up and Removing Auditor 23
Installing Auditor . . . . . . . . . . . . . . . . . . . . . . . . . . . . . . . . . . . . . . . . . . . . . . 25
Configuring Auditor . . . . . . . . . . . . . . . . . . . . . . . . . . . . . . . . . . . . . . . . . . . 26
Setting privileges for an Auditor-dedicated Designer user . . . . . . . . . . . . . . 31
Enabling Impact Analysis export . . . . . . . . . . . . . . . . . . . . . . . . . . . . . . . . . 32
Exporting universes . . . . . . . . . . . . . . . . . . . . . . . . . . . . . . . . . . . . . . . . . . . 33
Exporting predefined indicators . . . . . . . . . . . . . . . . . . . . . . . . . . . . . . . . . . 47
Monitoring consolidated rights . . . . . . . . . . . . . . . . . . . . . . . . . . . . . . . . . . . 55
Monitoring multiple clusters . . . . . . . . . . . . . . . . . . . . . . . . . . . . . . . . . . . . . 65
Restoring predefined indicators . . . . . . . . . . . . . . . . . . . . . . . . . . . . . . . . . . 66
Removing Auditor . . . . . . . . . . . . . . . . . . . . . . . . . . . . . . . . . . . . . . . . . . . . . 67
Chapter 3 Setting Access Rights 71
Access rights . . . . . . . . . . . . . . . . . . . . . . . . . . . . . . . . . . . . . . . . . . . . . . . . 73
Contents
Page 4

4 BusinessObjects Auditor Guide
Chapter 4 Universes, Classes and Objects 79
Universe structure . . . . . . . . . . . . . . . . . . . . . . . . . . . . . . . . . . . . . . . . . . . . 81
Universes and analytical categories . . . . . . . . . . . . . . . . . . . . . . . . . . . . . . 82
Predefined vs. custom-made universes . . . . . . . . . . . . . . . . . . . . . . . . . . . 83
Broadcast Agent analysis universe . . . . . . . . . . . . . . . . . . . . . . . . . . . . . . . 85
Repository analysis universe . . . . . . . . . . . . . . . . . . . . . . . . . . . . . . . . . . . 100
Universe domain analysis universe . . . . . . . . . . . . . . . . . . . . . . . . . . . . . . 113
System information universe . . . . . . . . . . . . . . . . . . . . . . . . . . . . . . . . . . . 123
Data Integrator universe . . . . . . . . . . . . . . . . . . . . . . . . . . . . . . . . . . . . . . 144
Impact Analysis universe . . . . . . . . . . . . . . . . . . . . . . . . . . . . . . . . . . . . . . 150
Part II Using Auditor
Chapter 5 Using Predefined Indicators 157
Predefined indicators available with Auditor . . . . . . . . . . . . . . . . . . . . . . . 159
User Information category . . . . . . . . . . . . . . . . . . . . . . . . . . . . . . . . . . . . . 162
Document Management category . . . . . . . . . . . . . . . . . . . . . . . . . . . . . . . 168
Universe Management category . . . . . . . . . . . . . . . . . . . . . . . . . . . . . . . . 174
Broadcast Agent category . . . . . . . . . . . . . . . . . . . . . . . . . . . . . . . . . . . . . 179
System Information category . . . . . . . . . . . . . . . . . . . . . . . . . . . . . . . . . . . 181
Data Integrator category . . . . . . . . . . . . . . . . . . . . . . . . . . . . . . . . . . . . . . 186
Contents
Chapter 6 Creating, Modifying, and Publishing Indicators 189
Universes, classes, and objects . . . . . . . . . . . . . . . . . . . . . . . . . . . . . . . . 191
Access rights for indicators . . . . . . . . . . . . . . . . . . . . . . . . . . . . . . . . . . . . 193
Creating indicators . . . . . . . . . . . . . . . . . . . . . . . . . . . . . . . . . . . . . . . . . . 194
Modifying indicators . . . . . . . . . . . . . . . . . . . . . . . . . . . . . . . . . . . . . . . . . . 196
Publishing indicators . . . . . . . . . . . . . . . . . . . . . . . . . . . . . . . . . . . . . . . . . 198
Saving indicators in Auditor . . . . . . . . . . . . . . . . . . . . . . . . . . . . . . . . . . . . 201
Deleting indicators . . . . . . . . . . . . . . . . . . . . . . . . . . . . . . . . . . . . . . . . . . . 204
Exercise: Creating a new indicator . . . . . . . . . . . . . . . . . . . . . . . . . . . . . . 205
Page 5

BusinessObjects Auditor Guide 5
Chapter 7 Using Auditor to Solve Business Problems 209
How do I monitor the use of Business Objects products? . . . . . . . . . . . . . 216
How do I track Broadcast Agent usage? . . . . . . . . . . . . . . . . . . . . . . . . . . 219
How do I find out which machines are accessing my system? . . . . . . . . . 220
Can I detect fraud with Auditor? . . . . . . . . . . . . . . . . . . . . . . . . . . . . . . . . . 221
How do I monitor login information? . . . . . . . . . . . . . . . . . . . . . . . . . . . . . . 222
How do I monitor the load on my server? . . . . . . . . . . . . . . . . . . . . . . . . . 224
How do I track the most requested documents? . . . . . . . . . . . . . . . . . . . . 225
How do I track the least/most popular documents? . . . . . . . . . . . . . . . . . . 226
How do I monitor universe hits? . . . . . . . . . . . . . . . . . . . . . . . . . . . . . . . . . 228
How do I use Auditor for billing? . . . . . . . . . . . . . . . . . . . . . . . . . . . . . . . . 230
How do I perform impact analysis? . . . . . . . . . . . . . . . . . . . . . . . . . . . . . . 231
Index 233
Contents
Page 6

6 BusinessObjects Auditor Guide
Contents
Page 7

Maximizing Your Information Resources
preface
Page 8

8 BusinessObjects Auditor Guide
Overview
Information, services, and solutions
The Business Objects business intelligence solution is supported by thousands
of pages of documentation, available from the products, on the Internet, on CD,
and by extensive online help systems and multimedia.
Packed with in-depth technical information, business examples, and advice on
troubleshooting and best practices, this comprehensive documentation set
provides concrete solutions to your business problems.
Business Objects also offers a complete range of support and services to help
maximize the return on your business intelligence investment. See in the
following sections how Business Objects can help you plan for and successfull y
meet your specific technical support, education, and consulting requirements.
Maximizing Your Information Resources
Page 9

Information resources
Whatever your Business Objects profile, we can help you quickly access the
documentation and other information you need.
Where do I start?
Below are a few suggested starting points; there is a summary of useful web
addresses on page 12.
!
!
Documentation Roadm ap
! !
The Documentation Roadmap references all Business Objects guides and
multimedia, and lets you see at a glance what information is available, from
where, and in what format.
View or download the Business Objects Documentation Roadmap at
www.businessobjects.com/services/documentation.htm
!
!
Documentation from the products
! !
You can access electronic documentation at any time from the product you are
using. Online help, multimedia, and guides in Adobe PDF format are available
from the product Help menus.
BusinessObjects Auditor Guide 9
!
!
Documentation on the web
! !
The full electronic documentation set is available to customers with a valid
maintenance agreement on the Online Customer Support (OCS) website at
www.businessobjects.com/services/support.htm
!
!
Buy printed documentation
! !
You can order printed documentation through your local sales office, or from the
online Business Objects Documentation Supply Store at
www.businessobjects.com/services/documentation.htm
!
!
Search the Docume ntation CD
! !
Search across the entire documentation set on the Business Objects
Documentation CD shipped with our products. This CD brings together the full set
of documentation, plus tips, tricks, multimedia tutorials, and demo materials.
Order the Documentation CD online, from the Business Objects Documentation
Supply Store, or from your local sales office.
Information resources
Page 10

10 BusinessObjects Auditor Guide
!
!
Multimedia
! !
Are you new to Business Objects? Are you upgrading from a previous release or
expanding, for example, from our desktop to our web solution? Try one of our
multimedia quick tours or Getting Started tutorials. All are available via the Online
Customer Support (OCS) website or on the Documentation CD.
How can I get the most recent documentation?
You can get our most up-to-date documentation via the web. Regularly check the
sites listed below for the latest documentation, samples, and tips.
!
!
Tips & Tricks
! !
Open to everyone, this is a regularly updated source of creative solutions to any
number of business questions. You can even contribute by sending us your own
tips.
www.businessobjects.com/forms/tipsandtricks_login.asp
!
!
Product documentation
! !
We regularly update and expand our documentation and multimedia offerings.
With a valid maintenance agreement, you can get the latest documentation – in
seven languages – on the Online Customer Support (OCS) website.
!
!
Developer Suite Online
! !
Developer Suite Online provides documentation, samples, and tips to those
customers with a valid maintenance agreement and a Developer Suite license
via the Online Customer Support (OCS) website.
Send us your feedback
Do you have a suggestion on how we can improve our documentation? Is there
something you particularly like or have found useful? Drop us a line, and we wil l
do our best to ensure that your suggestion is included in the next release of our
documentation: documentation@businessobjects.com
NOTE
If your issue concerns a Business Objects product and not the documentation,
please contact our Customer Support experts. For information about Customer
Support visit: www.businessobjects.com/services/support.htm
Maximizing Your Information Resources
Page 11

Services
A global network of Business Objects technology experts provides customer
support, education, and consulting to ensure maximum business intelligence
benefit to your business.
How we can support you?
Business Objects offers customer support plans to best suit the size and
requirements of your deployment. We operate three global customer support
centers:
• Americas: San Jose, California and Atlanta, Georgia
• Europe: Maidenhead, United Kingdom
• Asia: Tokyo, Japan and Sydney, Australia
!
!
Online Customer Support
! !
Our Customer Support website is open to all direct customers with a current
maintenance agreement, and provides the most up-to-date Business Objects
product and technical information. You can log, update, and track cases from this
site using the Business Objects Knowledge Base.
Having an issue with the product?
Have you exhausted the troubleshooting resources at your disposal and still not
found a solution to a specific issue?
For support in deploying Business Objects products, contact Worldwide
Customer Support at: www.businessobjects.com/services/support.htm
BusinessObjects Auditor Guide 11
Looking for the best deployment solution for your company?
Business Objects consultants can accompany you from the initial analysis stage
to the delivery of your deployment project. Expertise is available in relational and
multidimensional databases, in connectivities, database design tools,
customized embedding technology, and more.
For more information, contact your local sales office, or contact us at:
www. businessobjects.com/services/consulting.htm
Looking for training options?
From traditional classroom learning to targeted e-learning seminars, we can offer
a training package to suit your learning needs and preferred learning style. Find
more information on the Business Objects Education website:
www.businessobjects.com/services/education.htm
Services
Page 12

12 BusinessObjects Auditor Guide
Useful addresses at a glance
Address Content
Business Objects Documentation
www.businessobjects.com/services/
documentation.htm
Business Objects Documentation
mailbox
documentation@businessobjects.com
Product documentation
www.businessobjects.com/services/
support.htm
Business Objects product information
Overview of Business Objects documentation. Links
to Online Customer Support, Documentation Supply
Store, Documentation Roadmap, Tips & Tricks,
Documentation mailbox.
Feedback or questions about documentation.
The latest Business Objects product
documentation, to download or view online.
Information about the full range of Business
Objects products.
www.businessobjects.com
Developer Suite Online
www.techsupport.businessobjects.com
Knowledge Base (KB)
www.techsupport.businessobjects.com
Tips & Tricks
www.businessobjects.com/forms/
tipsandtricks_login.asp
Maximizing Your Information Resources
Available to customers with a valid maintenance
agreement and a Developer Suite license via the
Online Customer Support (OCS) website. Provides
all the documentation, latest samples, kits and tips.
Technical articles, documents, case resolutions.
Also, use the Knowledge Exchange to learn what
challenges other users – both customers and
employees – face and what strategies they find to
address complex issues. From the Knowledge
Base, click the Knowledge Exchange link.
Practical business-focused examples.
Page 13

Address Content
Online Customer Support
BusinessObjects Auditor Guide 13
www.techsupport.businessobjects.com
www.businessobjects.com/services
Business Objects Education Services
www.businessobjects.com/services/
education.htm
Business Objects Consulting Services
www.businessobjects.com/services/
consulting.htm
Starting point for answering questions, resolving
issues.
Information about registering with Worldwide
Customer Support.
The range of Business Objects training options and
modules.
Information on how Business Objects can help
maximize your business intelligence investment.
Useful addresses at a glance
Page 14

14 BusinessObjects Auditor Guide
About this guide
This guide describes BusinessObjects Auditor.
The first part of this guide, Administering Auditor, describes how to set up,
configure and administer an Auditor deployment. It is designed for Business
Objects system administrators and supervisors.
The second part of the guide, Using Auditor, describes how to use Auditor to
analyze Business Objects user and system activity. It is designed for the IT
administrators in charge of monitoring and tuning the Business Objects
deployment.
NOTE
This guide replaces the BusinessObjects Auditor Administrator’s Guide and the
BusinessObjects Auditor User’s Guide.
Conventions used in this guide
The conventions used in this guide are described in the table below.
Convention Indicates
This font Code, SQL syntax, computer programs. For
Some code #
more code
$DIRECTORYPATHNAME The path to a directory in the Business Objects
example: @Select(Country\Country Id).
This font is also used for all paths, directories,
scripts, commands and files for UNIX.
Placed at the end of a line of code, the s ymbol (#)
indicates that the next line should be entered
continuously with no carriage return.
installation/configuration directory structure. For
example:
• $INSTALLDIR refers to the Business Objects
installation directory.
• $LOCDATADIR refers to a subdirectory of the
BusinessObjects installation directory called
locData.
Maximizing Your Information Resources
Page 15

Administering Auditor
I
part
Page 16

Page 17

Introducing BusinessObjects Auditor
1
chapter
Page 18

18 BusinessObjects Auditor Guide
Overview
BusinessObjects Auditor is a web-based product that allows you to monitor and
analyze user and system activity for WebIntelligence, InfoView, BusinessObjects
in 3-tier mode and Broadcast Agent, then display the results on a user-friendly
web interface. This information provides valuable insight into your Business
Objects deployment, enabling you to optimize your Business Intelligence
solution.
NOTE
In this guide, “Auditor” is a shortened form of the full product name,
BusinessObjects Auditor.
Auditor is built on the existing Business Objects technology and server
infrastructure, taking advantage of their ease of use, security, scalability, and
extensibility.
Introducing BusinessObject s Audito r
Page 19

What you can do with Auditor
Auditor enables you to determine which users are using a particular Business
Objects system, how often they are using it, and what data they are accessing.
You can use Auditor to:
• monitor your Business Intelligence system by examining user activity, access
rights, resource information pertaining to the use of documents and
universes, as well as system information such as response time, Broadcast
Agent details, and server load
• analyze system trends over daily, weekly, and monthly periods
• delete or modify unused objects and reports, in order to provide users with
easier and quicker access to essential information
• accelerate analysis by using the Favorites and Dashboard features, which
give you direct access to the queries you want to see
• optimize your data warehouse and speed up refresh actions by tracking
frequently-used queries
Auditor can help identify situations where aggregate tables or additional
indexes can be used.
• generate new billing opportunities by highlighting the most popular reports
BusinessObjects Auditor Guide 19
What you can do with Auditor
Page 20

20 BusinessObjects Auditor Guide
Auditor comp onen ts
Auditor contains the following components:
• indicators that enable you to monitor and analyze
• analytical categories (and subcategories) by which indicators are classified
• universes on top of which indicators are built
• database views that retrieve and format data extracted from the various
RDBMS on different platforms into a common interface for Auditor universes
Indicators
Auditor uses predefined indicators to give you quick access to the information
you need in order to monitor, analyze, and optimize your Business Objects
deployment. These indicators are delivered as part of the Auditor package.
Predefined indicators cover a wide range of useful data. They are your key to
information such as:
• which users are accessing and utilizing your system
• the most popular reports and universes
• reports impacted by changing an object
Each indicator contains one or more reports that focus on a very s pecific area of
analysis; for example, the Average Refresh Time indicator, which shows the
average refresh time (in seconds) for all documents, broken down by document
name, user, document type, and node.
You can modify the existing indicators, and then save the modified indicators. For
monitoring and analysis that is even more finely tuned to your unique sy stem, you
can create your own indicators.
Categories
The analytical categories organize the Business Objects deployment into
practical areas of analysis. There are several categories:
• User Information
• Document Management
• Universe Management
• Broadcast Agent
• System Information
• Data Integrator
Each category has a number of subcategories, which further organize indicators
for ease of access, pointing you directly to the information you want.
Introducing BusinessObject s Audito r
Page 21

Universes
Auditor is delivered with a set of predefined universes that facilitate monitoring
and analysis activities. These universes are designed and tested to provide you
with an effective set of reporting options.
Each universe provides an interface for different classes of database objects,
permitting compatible objects to be used in building queries.
For more information about universes and the classes and objects of which they
are composed, see Universes, Classes and Objects on page 79.
Database views
Database views are a powerful tool to retrieve and format data extracted from the
various RDBMS on different platforms into a common interface for Auditor
universes. By providing data from views to Auditor universes, only one version of
them is maintained, deployed and accessed on the server system.
In a database-based information system, views are the transparent
presentation layers that sit on top of a data model, providing a way of looking
at the stored data. Views are stored in the data dictionary of the RDBMS
based on specific SQL statements.
Technically, views are just queries stored in the database server, and look like
simple tables. No data is stored in them. These virtual tables are computed each
time a query call them and can used with other tables or database objects in a
query.
BusinessObjects Auditor Guide 21
Auditor components
Page 22

22 BusinessObjects Auditor Guide
The Audit facility
A key component in the Auditor environment is the Audit facility, which tracks
crucial information relating to user and system ac tivity. Each time any predefined
events occurs, a record of the event is created and stored by the Audit facility.
You can then retrieve and analyze the individual events.
The Audit facility is part of the Business Objects system. You activate and
administer it using the Administration Console.
The Audit facility gathers and stores event records in the Database mode.
Because of its complexity, information in Database mode normally is viewed and
analyzed through the use of indicators in Auditor. However, this can also be
performed in SQL if no other solution is available.
Auditor can access and present audited data only when Database mode is
activated.
For complete information about the Audit facility and how to configure it for use
with Auditor, see the
Administrator’s Guide for Windows, depending on your platform.
Introducing BusinessObject s Audito r
System Administrator’s Guide for UNIX or System
Page 23

Setting Up and Removing Auditor
2
chapter
Page 24

24 BusinessObjects Auditor Guide
Overview
This chapter describes:
• Installing Auditor
• Configuring Auditor
• Setting privileges for an Auditor-dedicated Designer user
• Exporting universes
• Exporting predefined indicators
• Monitoring multiple clusters
• Restoring predefined indicators
• Removing Auditor
For the first five sections you should have the following guides close by for
reference:
Designer’s Guide
•
• Installation and Configuration for UNIX
or
Installation and Configuration for Windows
• Supervisor’s Guide
• WebIntelligence User’s Guide
• installation and configuration documentation for the application server
• readme for BusinessObjects Enterprise 6
NOTE
If you are migrating Auditor to a new version of BusinessObjects, see Migrating
from a Previous Version.
For deployment information, see the Deployment Guide.
Setting Up and Removing Auditor
Page 25

Installing Auditor
To install Auditor you need to complete the following steps:
1. Requesting a connection to a database server
2. Installing the application and web servers
3. Installing the BusinessObjects Enterprise 6 product suite
Requesting a connection to a database server
The Audit database is located on the database server, and so you need a
connection created. Only your database system administrator can do this for you,
along with providing you user names and passwords that allow access to the
database server.
You will need this information for the section Configuring Auditor on page 26.
Installing the application and web servers
If you have a JSP deployment, you must install application and web servers
before installing the BusinessObjects Enterprise 6 product suite.
!
!
Finding the latest news on versions supported by Business Objects
! !
You can find an up-to-date list of the application and web server versions
supported by Business Objects in the Products Availability Report (PAR). To find
this:
1. Go to www.techsupport.businessobjects.com.
The Online Customer Support page appears.
2. Log in to the site.
3. From the Enterprise 6 list, click the PAR link.
BusinessObjects Auditor Guide 25
Installing Auditor
Page 26

26 BusinessObjects Auditor Guide
Configuring Auditor
You need to complete the following steps to configure Auditor:
1. Configuring the web and application servers
2. Creating a data source for the Audit database
3. Setting up the Audit database
Configuring the web and application servers
You use the Configuration Tool to configure the web and application servers on
the host, and create the following virtual directories for Auditor:
• http://<hostname>:<portname>/auditor
For complete configuration instructions, see the
UNIX
Creating a data source for the Audit database
If you have not already created a data source, you must do so using the ODBC
Administrator so that you can access your repository and audit database.
To create a data source for the repository:
1. Select Start, Programs, Administrative Tools, Data Sources (ODBC).
The ODBC Data Source Administrator dialog box appears.
2. Click the System DSN tab.
Installation and Configuration for
or Installation and Configuration for Windows depending on your platform.
Setting Up and Removing Auditor
Page 27
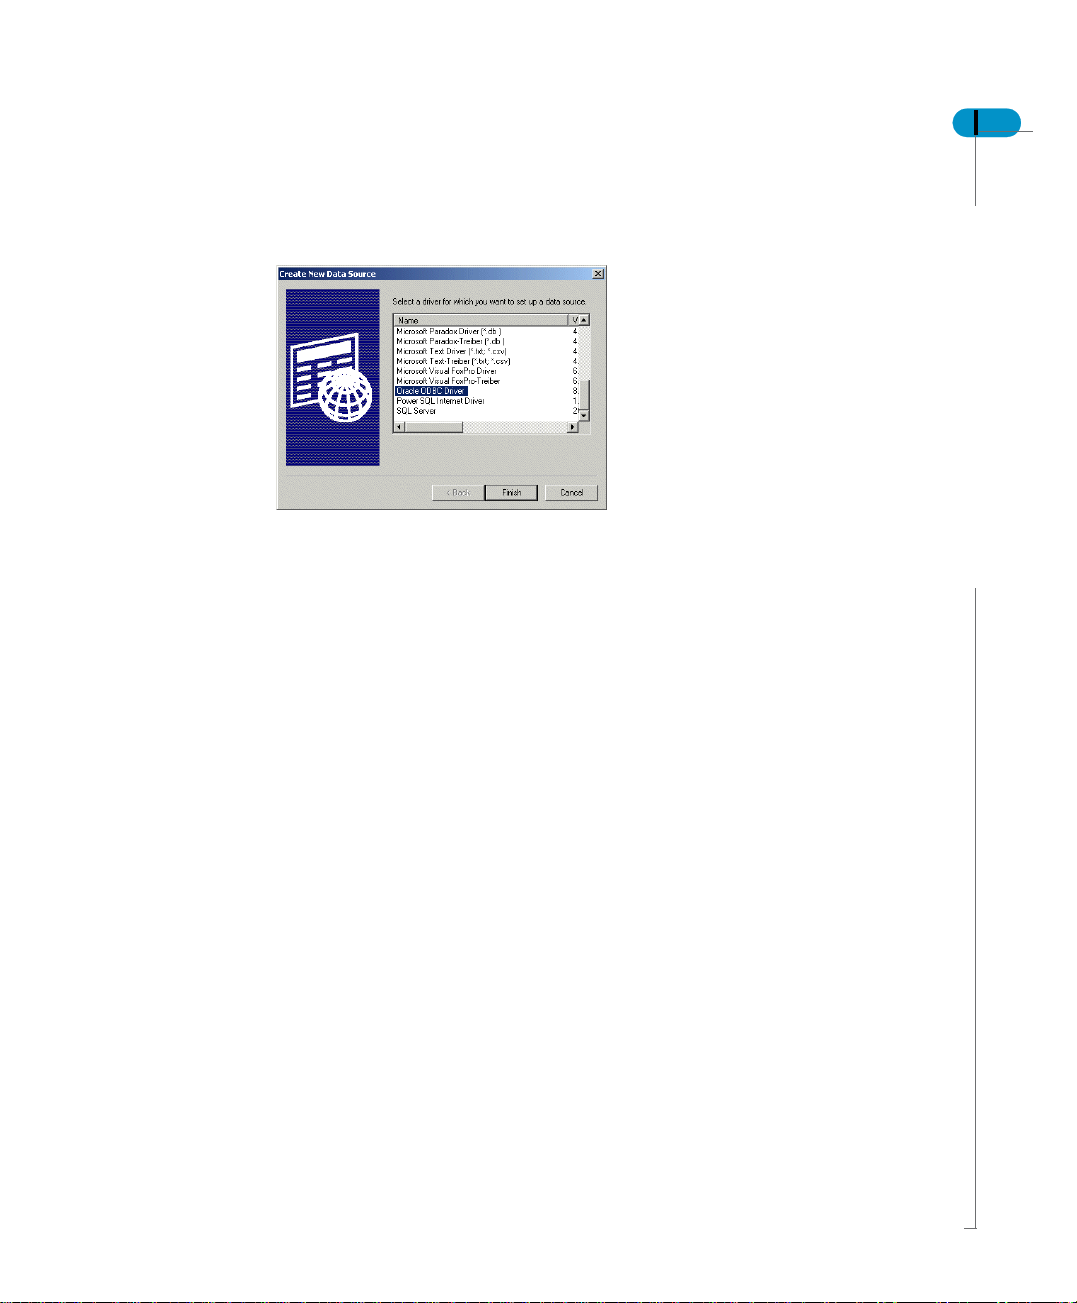
3. Click Add.
The Create New Data Source dialog box appears.
4. Select the driver for which you want to set up a data source and click Finish.
The driver setup dialog box appears.
5. Enter the required information and click OK.
Setting up the Audit database
Auditor delivers reports based on the system and user activity data stored in the
Business Objects system’s Audit database and the repository.
In order to be able to use the system’s audit information from Auditor, you must:
• use Supervisor to set up secured connections to an Audit-dedicated database
and the security repository
• use the Administration Console to make sure that the system writes its audit
information to that audit database
BusinessObjects Auditor Guide 27
Configuring Auditor
Page 28
28 BusinessObjects Auditor Guide
!
!
Creating a secured connection for the Audit-dedicated database
! !
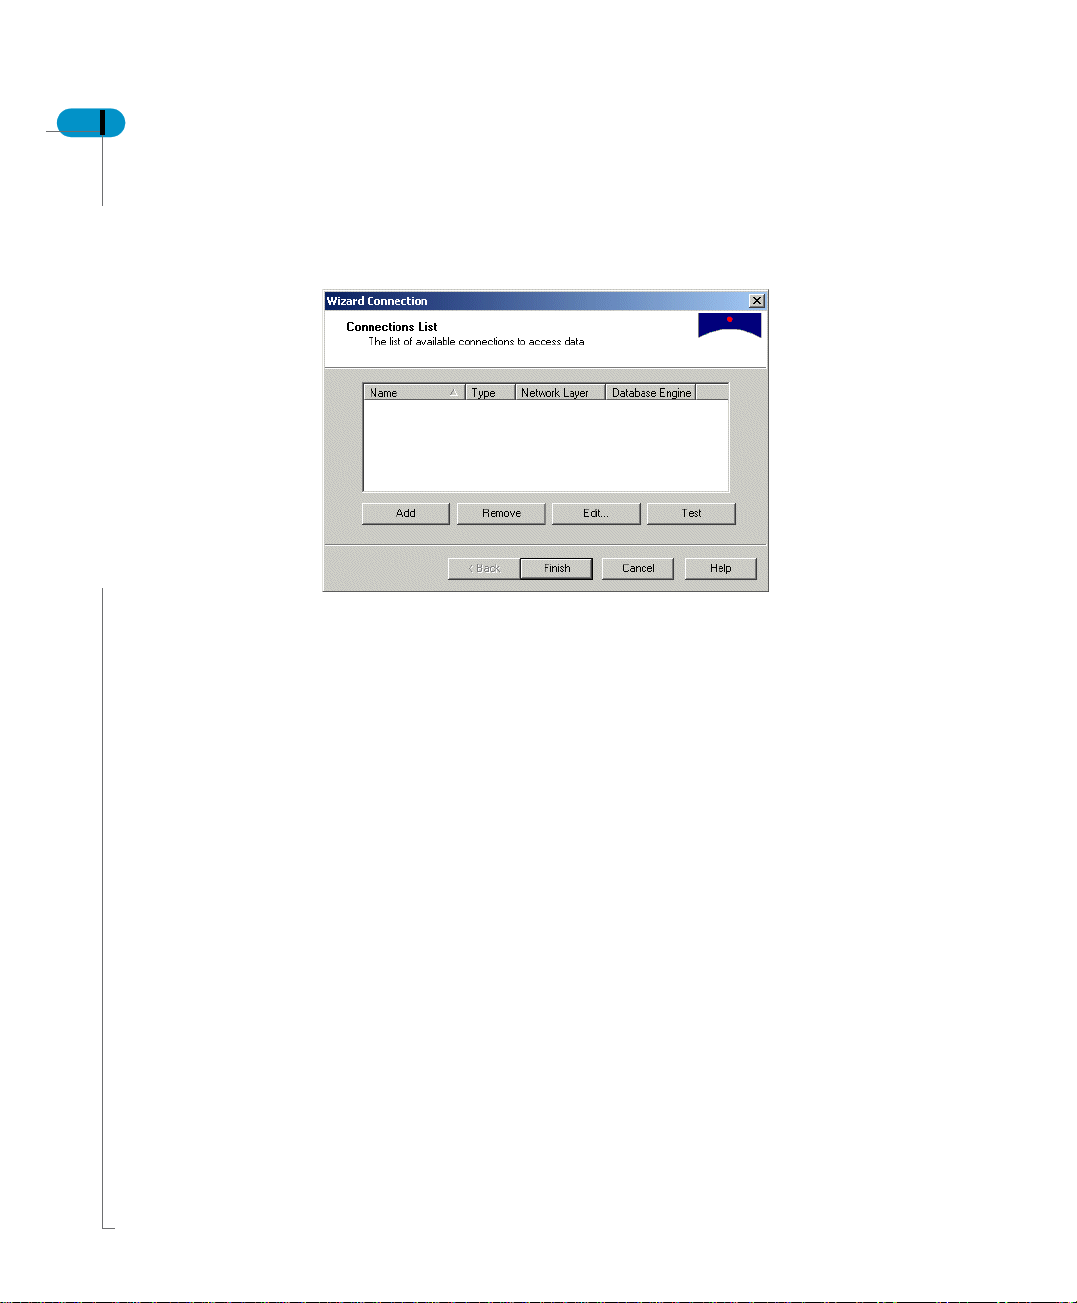
1. In Supervisor, select Tools, Connections from the menu.
The Wizard Connection dialog box appears.
2. Click Add.
The New Connection Wizard appears.
3. Click Next.
The Database Middleware Selection dialog box appears.
4. From the tree select the driver for your connection, then click Next
The Login Parameters dialog box appears.
5. Select the type of connection from the Type list.
6. In the Connection Name text box, type the name of the connection, for
example audit_connection.
7. Enter the user name, password, and data source name for the audit-
dedicated database. Click Next.
The Perform a test dialog box appears.
8. Click Test Connection.
Any errors appear in the scroll box in the dialog box. If the test is not
successful, check the information in the Login Parameters dialog box for
correctness.
9. If the test is successful, click Next.
The Advanced Parameters dialog box appears. For information on setting the
parameters in this dialog box, see the
Data Access Guide.
Setting Up and Removing Auditor
Page 29

BusinessObjects Auditor Guide 29
10.Click Next.
The Custom Parameters dialog box appears. For information on setting the
parameters in this dialog box, see the
Data Access Guide.
11.Click Finish.
The Wizard Connection dialog box reappears and lists connection that you
created.
!
!
Creating tables in the Audit database
! !
1. Start the BusinessObjects server, Tomcat, and Apache.
2. To open the Administrative Console, do one of the following:
-Click Start, Programs, Business Objects, Administrative Console 6.5.
- Log in to http://<hostname>:<port number>/wiadmin
The BusinessObjects Administrative Console login dialog box appears.
3. Log in using a user name and password with a General Supervisor profile.
The Business Objects Administrator Console page appears.
4. Click Audit.
5. From the Audit database connection drop-down list select the secured
connection you just created in Supervisor.
Configuring Auditor
Page 30

30 BusinessObjects Auditor Guide
6. If necessary, set the maximum audit information cache size and regularity
with which the cache is emptied into the Audit database.
For information on setting the cache parameters, see the
Administrator’s Guide for UNIX or System Administrator’s Guide for Windows,
depending on your platform.
7. Click Apply.
The system verifies that the database tables exist. If they do not, an SQL
script is executed to create them.
For complete information about the Audit facility and how to configure it for use
with Auditor, see the
Administrator’s Guide for Windows
System
System Administrator’s Guide for UNIX or System
, depending on your platform.
Setting Up and Removing Auditor
Page 31

BusinessObjects Auditor Guide 31
Setting privileges for an Auditor-dedicated Designer user
Once you have set up the Audit database, you may want to allow another user,
perhaps as your backup, the permission to export universes and predefined
indicators.
To create users with a Designer profile and the specific privileges required to
export the universes and predefined indicators required for your Auditor
deployment:
1. Click Start, Programs, Business Objects, Supervisor.
2. Create a new user and assign a profile.
The following user rights need to be enabled:
- Manage All corporate categories
- Save to corporate documents
- Manage personal categories
- Save and read personal documents
The following user rights need to be disabled:
- Do not delete other users’ corporate documents
Setting privileges for an Auditor-dedicated Designer user
Page 32

32 BusinessObjects Auditor Guide
Enabling Impact Analysis export
When you export a universe, column information associated to object definition
needs to be exported to the repository in the tables UNV_COLUMNS and
UNV_OBJ_COLUMN for future analysis purposes. Storing this information in the
repository allows the ‘Impact Analysis’ module to figure out the list of objects that
have to be modified if a column name in the data warehouse has changed.
In order for this export function to occur, you need to enable the Activate universe
Impact Analysis option in Supervisor.
To activate the option:
1. Click Start, Programs, Business Objects, Supervisor.
2. Click Tools, Options.
3. In the Repository tab, select Activate universe Impact Analysis.
4. Click OK.
REMINDER
If the universes were already exported before you activated this option, you need to
re-export them.
Setting Up and Removing Auditor
Page 33

Exporting universes
The Universe Exporter allows you to easily create domain connections and
database views, and export the Auditor universes to your corporate repository.
If you need to do these actions manually, the following sections can help you:
• Manually exporting universes
• Manually creating the database views
NOTE
You must:
• be using Microsoft Office 2000 in order to use Universe Exporter. If you are
not using Microsoft Office 2000, you need to export universes manually. See
page 44.
• have Designer installed on your machine in order to export the univ erses you
require for using Auditor with your system.
Using the Universe Exporter
To launch the Universe Exporter:
1. Click Start, Programs, Business Objects, Auditor 6.5, Universe Exporter.
A user identification dialog box appears.
BusinessObjects Auditor Guide 33
Exporting universes
Page 34

34 BusinessObjects Auditor Guide
2. Enter the user name and password that have access rights to the repository
to which the views are to be exported, and click OK.
The user name must have at least one Designer profile, because you need to
export universes and create connections.
The Universe Exporter appears.
The Universe Exporter contains the following tabs.
Page name Description
Welcome Explains what the Universe Exporter does
Security Creates an OLEDB/ODBC connection for the Security domain,
Universe Creates an OLEDB/ODBC connection for the universe domain,
Audit Creates an OLEDB/ODBC connection for the Audit domain, and
Data
Integrator
Export For automatic export of the Auditor universes
Each tab corresponds to a specific stage or procedure that is described in the
following sections. These procedures can be performed in any order, but you
need to create the database views in the Security, Universe, Audit, and Data
Integrator tabs before you can successfully export and refresh documents.
Setting Up and Removing Auditor
and creates the database views
and creates the database views
creates the database views
Creates an OLEDB/ODBC connection for the Data Integrator
domain, and creates the database views
Page 35

BusinessObjects Auditor Guide 35
!
!
Creating domain connections
! !
To export views and universes using Universe Exporter, you need to create
connections to the Audit database or a repository. For each export function you
need a specific connection.
If you are exporting to the... you need a connection to the...
Security domain security repository
Universe domain security repository
Audit domain Audit database
Data Integrator domain Data Integrator-dedicated repository or security
repository
To create a connection:
1. Click Start, Programs, Business Objects, Auditor 6.5, Universe Exporter.
A user identification dialog box appears.
2. Enter the user name and password that have access rights to the repository
to which the views are to be exported, and click OK.
The user name must have at least one Designer profile, because you need to
export universes and create connections.
The Universe Exporter appears.
3. Click the tab for the domain requiring a domain connection.
4. In the Data Source Name section, click New.
The Data Source Connection Editor dialog box appears.
Exporting universes
Page 36

36 BusinessObjects Auditor Guide
5. Click the tab that corresponds to your type of database.
NOTE
For Sybase, use the ODBC tab and then select Sybase as the database. You can
use the ODBC tab when you need to create an Oracle or IBM DB2 connection on
a client that does not have OLE DB Oracle or IBM DB2.
6. In the Name field, enter a unique name for the connection. For example, if you
are creating a connection to the security repository, type <server
name>_connection, or for the audit database, type audit_connection.
7. In the Data Source text box, enter:
NOTE
For SQL Server, the server is the name of the machine containing the database.
For... Data source
Oracle Net Service Name
IBM DB2 Database Alias
SQL Server Database Name
8. To use the Microsoft OLEDB provider instead of the Oracle Client provider,
select Use Microsoft Oracle OLEDB Driver in the Oracle tab.
9. In the User ID text box, type the user name that has access rights to the Audit
database or repository.
This user name must have at least one Designer profile for you to be able to
create connections.
10.In the Password text box, type the password.
11.Click Test.
If you do not receive notice that the server is responding, verify that you
entered the correct parameters and that the User ID has the permission in
Supervisor to create this sort of connection.
12.Click OK.
The tab reappears. In the Views section, a list of views is now available, with
the Already in database? status of No if this is your first time connecting to the
domain or repository, or Yes for views that are already installed.
Setting Up and Removing Auditor
Page 37

BusinessObjects Auditor Guide 37
NOTE
If you have migrated from a previous version of Business Objects, you need to
delete any remaining views by selecting them in the Views list and clicking Delete
and then recreating the views by clicking Create.
13.To add these views to the database, click Create.
All the views for the security domain are marked Yes in the Views area.
!
!
Using the Security tab to manage database connections
! !
To launch the Universe Exporter:
1. Click Start, Programs, Business Objects, Auditor 6.5, Universe Exporter.
A user identification panel appears.
2. Enter the user name and password that have access rights to the repository
to which the views are to be exported, and click OK.
The user name must have at least one Designer profile, because you need to
export universes and create connections.
The Universe Exporter appears.
Exporting universes
Page 38

38 BusinessObjects Auditor Guide
3. Click the Security tab or Next on the Welcome page.
The Security tab appears.
4. In the Data Source Name list, select a connection to the security repository.
If you do not have a connection, see Creating domain connections on
page 35.
Any views that already exist for the selected connection are marked Yes in
the Views area.
NOTE
If you have migrated from a previous version of Business Objects, you need to
delete any remaining views by selecting them in the Views lis t and clicking Delete
and then recreating the views by clicking Create.
5. If you want to delete a view, select a view and click Delete.
6. Click Next to go to the Universe tab, or Finish.
Setting Up and Removing Auditor
Page 39

BusinessObjects Auditor Guide 39
!
!
Using the Universe tab to m anage connections to universes
! !
1. Click Start, Programs, Business Objects, Auditor 6.5, Universe Exporter.
A user identification panel appears.
2. Enter the user name and password that have access rights to the repository
to which the views are to be exported, and click OK.
The user name must have at least one Designer profile, because you need to
export universes and create connections.
The Universe Exporter appears.
3. Click the Universe tab in the Universe Exporter window.
The Universe tab appears.
4. In the Data Source Name list, select a dedicated-connection to the universe
domain repository or to the security repository containing the universe
domain. If you do not have a connection, see Creating domain connections
on page 35.
Any views that already exist for the selected connection are marked Yes in
the Views area.
NOTE
If you have migrated from a previous version of Business Objects, you need to
delete any remaining views by selecting them in the Views list and clicking Delete
and then recreating the views by clicking Create.
5. If you want to delete a view, select a view and click Delete.
6. Click Next to go to the Audit tab, or Finish.
Exporting universes
Page 40

40 BusinessObjects Auditor Guide
!
!
Using the Audit tab to manage connections to the Audit database
! !
1. Click Start, Programs, Business Objects, Auditor 6.5, Universe Exporter.
A user identification panel appears.
2. Enter the user name and password that have access rights to the repository
to which the views are to be exported, and click OK.
The user name must have at least one Designer profile, because you need to
export universes and create connections.
The Universe Exporter appears.
3. Click the Audit tab in the Universe Exporter window.
The Audit tab appears.
4. In the Data Source Name list, select a connection to the Audit database. If you
do not have a connection, see Creating domain connections on page 35.
Any views that already exist for the selected connection are marked Yes in
the Views area.
NOTE
If you have migrated from a previous version of Business Objects, you need to
delete any remaining views by selecting them in the Views lis t and clicking Delete
and then recreating the views by clicking Create.
5. If you want to delete a view, select a view and click Delete.
6. Click Next to go to the Data Integrator tab, or Finish.
Setting Up and Removing Auditor
Page 41

BusinessObjects Auditor Guide 41
!
!
Using the Data Integrator tab to manage connections to the Data Integrator
! !
universe
1. Click Start, Programs, Business Objects, Auditor 6.5, Universe Exporter.
A user identification panel appears.
2. Enter the user name and password that have access rights to the repository
to which the views are to be exported, and click OK.
The user name must have at least one Designer profile, because you need to
export universes and create connections.
The Universe Exporter appears.
3. Click the Data Integrator tab in the Universe Exporter window.
The Data Integrator tab appears.
4. In the Data Source Name list, select a connection to the Data Integrator-
dedicated repository or security repository. If you do not have a connection,
see Creating domain connections on page 35.
Any views that already exist for the selected connection are marked Yes in
the Views area.
5. If you want to delete a view, select a view and click Delete.
6. Click Next to go to the Export tab, or Finish.
Exporting universes
Page 42

42 BusinessObjects Auditor Guide
!
!
Using the Export tab to manage the export of specific universes
! !
From this tab, you can set the parameters to export the specific universes you
wish to use with Auditor. These parameters include the universes:
• security domain connection
• universe domain connection
• audit database connection
• data integrator connection
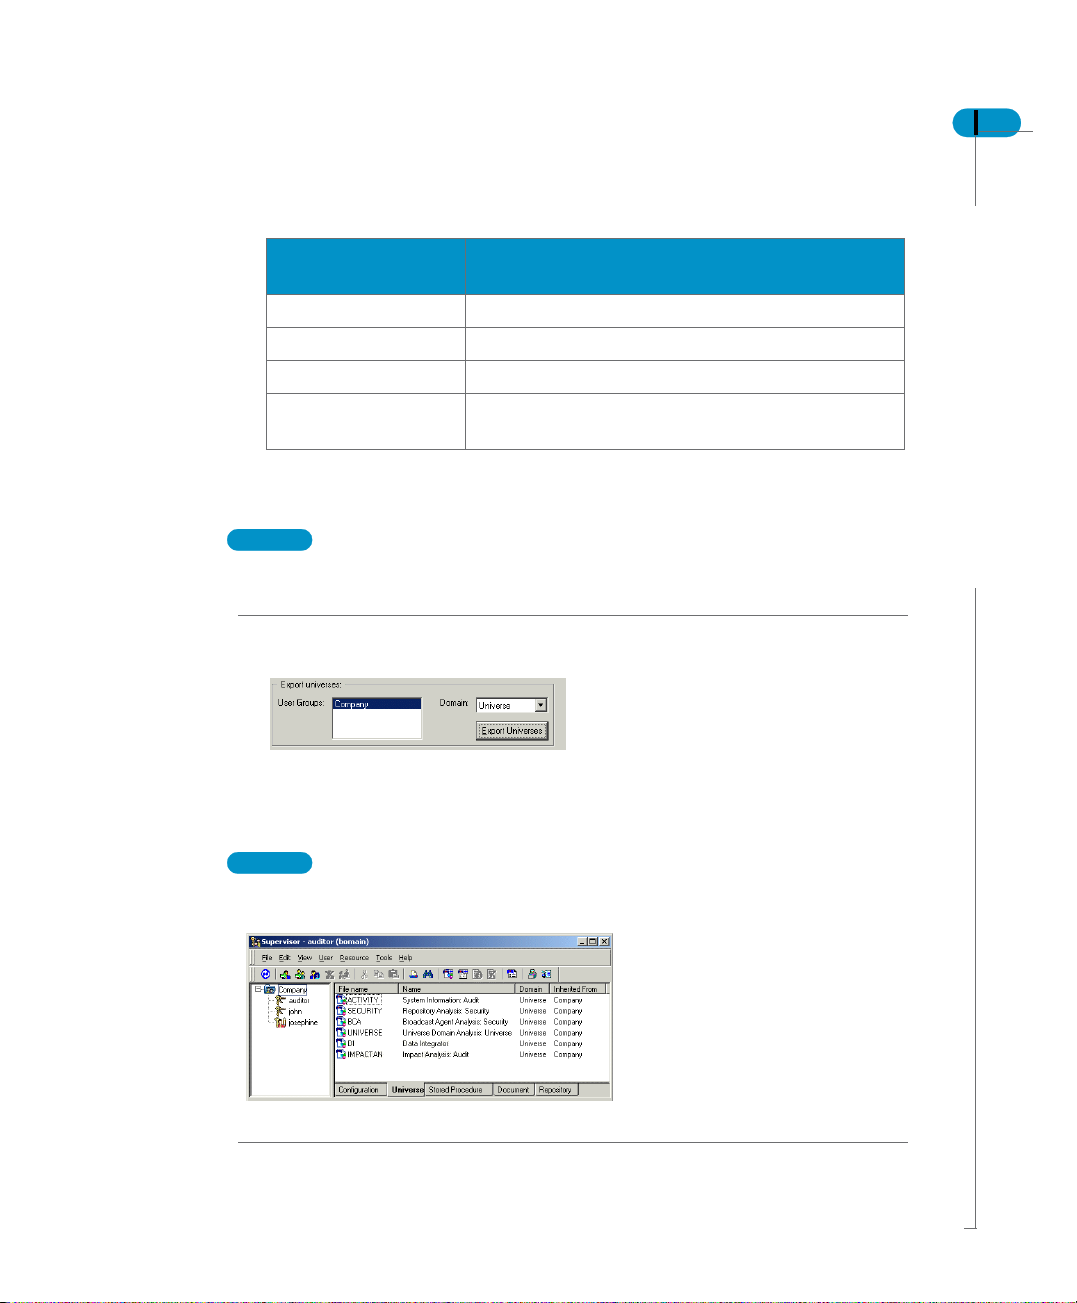
• assigned user groups
• destination universe domain
Once you’ve defined these settings, the Export tab lets you trigger the export.
1. Click Start, Programs, Business Objects, Auditor 6.5, Universe Exporter.
A user identification panel appears.
2. Enter the user name and password that have access rights to the repository
to which the views are to be exported, and click OK.
The user name must have at least one Designer profile, because you need to
export universes and create connections.
The Universe Exporter appears.
3. Navigate to the Export tab either by clicking Next from the Data Integrator tab,
or by clicking the Export tab in the Universe Exporter window.
The Export tab appears.
4. Select the universes that you want to export.
By default all of the universes are selected to be exported.
Setting Up and Removing Auditor
Page 43
BusinessObjects Auditor Guide 43
5. If you want to:
Connect to the... Select from the drop-down list the connection
to the...
Security domain security repository
Universe domain security repository
Audit database audit database
Data Integrator
domain
Data Integrator-dedicated repository or security
repository
If you need to create a connection, see Adding a new connection in the Export
tab on page 44.
TIP
To hide other connections that you did not create for the three domains, select the
Filter BusinessObjects connections for previously defined connections box.
6. In the lower right corner of the Export tab, select the user group and domain
to which the universes will be exported.
7. Click Export Universes.
A summary of the universe export appears.
8. Click OK, then Finish.
NOTE
You can confirm that the universes have been exported by viewing the Universe
page in Supervisor.
Exporting universes
Page 44

44 BusinessObjects Auditor Guide
Adding a new connection in the Export tab
1. To add a new connection in the Export tab, click Add Connection.
The New Connection Wizard appears.
2. Click Next.
The Database Middleware Selection dialog box appears.
3. From the tree select the driver for your connection, then click Next.
The Login Parameters dialog box appears.
4. Select the type of connection from the Type list.
5. In the Connection Name text box, type the name of the connection.
6. Enter the user name, password, and data source name. Click Next.
The Perform a test dialog box appears.
7. Click Test Connection.
Any errors appear in the scroll box in the dialog box. If the test is not
successful, verify that the information in the Login Parameters dialog box is
correct.
8. If the test is successful, click Next.
9. In the Advanced Parameters dialog box select Disconnect After Each
Transaction.
10.When you have set the parameters in the Advanced Parameters and Custom
Parameters dialog boxes, click Finish.
The connection is now available in the connection drop-down list.
Manually exporting universes
To manually export the Auditor universes:
1. Do either of the following:
- Copy the *.unv files (BCA.unv, SECURITY.unv, UNIVERSE.unv, DI. unv,
IMPACTAN.unv, and ACTIVITY.unv) to the machine running Designer.
- Make them available to this machine by sharing them
The files are located at:
$INSTALLDIR\auditorData\Universes\Universes
2. Start Designer.
3. Enter your user name and password.
Setting Up and Removing Auditor
Page 45

BusinessObjects Auditor Guide 45
Perform the remaining steps below for each universe:
4. Open a universe (*.unv) file.
5. Click File, Parameters.
6. In the Definition section, do either of the following:
- Assign one of the existing secured connections to the universe.
- Create a new secured connection (you must do this if there is no existing
secured connection available).
7. Click OK.
8. Click File, Export. If you are prompted to save the universe before exporting
it, click Continue.
The Export Universe dialog box appears.
9. Select the relevant domain and group, and then click OK.
If you previously exported this universe, you are prompted to overwrite the
previous version.
The suggested connections for the universes are:
Universe Domain Database
Broadcast Agent Analysis Security Corporate repository
Repository Analysis Security Corporate repository
Universe Domain Analysis Universe Corporate repository
System Information Audit database Audit database
Data Integrator Data Integrator Data Integrator
Impact Analysis Audit database Audit database
Manually creating the database views
If you do not want to automatically create the database views by using the
Universe Exporter, follow the procedures below for creating them manually.
The objects used in the universes are based on the views, and not directly on the
repository or the Audit database tables.
For each database, you must create five sets of views. A view is created by
executing the script contained in an *.sql file.
Exporting universes
Page 46

46 BusinessObjects Auditor Guide
To create the database views:
1. Open an SQL session.
2. Execute the five scripts for your particular database.
- For the xxx_activity_xxx.sql files, use the audit database.
- For the xxx_bca_xxx.sql and xxx_security_xxx.sql files, use the security
domain.
- For the xxx_universe_xxx.sql files, use the universe domain.
The following table shows the location and names of the *.sql files containing
the scripts.
Database Location of files File names
Oracle $INSTALLDIR\
IBM DB2 $INSTALLDIR\
Universes\auditorData\
Views\ Oracle\
Universes\auditorData\
Views\IBMDB2\
creviews_activity_ora.sql
creviews_security_bca_ora.sql
creviews_universe_ora.sql
creviews_activity_db2udb.sql
creviews_security_bca_db2udb.sql
creviews_universe_db2udb.sql
Setting Up and Removing Auditor
Page 47

Exporting predefined indicators
The Document Exporter enables you to automatically export the Auditor
documents (predefined indicators) to the corporate repository.
NOTE
The Business Objects server must be running before you start the Document
Exporter.
If you cannot run Document Exporter, you can export these indicators manually.
For instructions, see Manually exporting predefined indicators on page 50.
Accessing the Document Exporter in UNIX
1. At the command prompt, go to:
<$INSTALLDIR>/tools/
With a standard Business Objects deployment the path would be:
BOBJ/Enterprise6/tools/
2. To open document exporter type:
./DocumentExporter.sh
BusinessObjects Auditor Guide 47
Exporting predefined indicators
Page 48

48 BusinessObjects Auditor Guide
Exporting documents with the Document Exporter
1. Click Start, Programs, Business Objects, Auditor 6.5, Document
Exporter.
The Document Exporter login dialog box appears.
2. Enter the Auditor user name and password.
To export documents, you must ensure that the Auditor user name and
password have the correct privileges. See Setting privileges for an Auditor-
dedicated Designer user on page 31.
3. Click OK.
The BusinessObjects Auditor 6.5.0 Document Exporter dialog box appears.
The Document Name column shows all the documents that are delivered with
Auditor. Documents already exported to the Corporate and Personal areas
have “Yes” in the In Corporate and In Personal columns, respectively.
Setting Up and Removing Auditor
Page 49

BusinessObjects Auditor Guide 49
4. Select the document domain in the drop-down list near the top of the dialog
box.
5. For each document that you want to export, select its box in the Document
Selection column.
- To select all the documents, click All. (Click None to deselect them.)
- T o select only the documents that have not already been published to your
Corporate area, click Not in Corporate.
- T o select only the documents that have not already been published to your
Personal area, click Not in Personal.
6. If you select the Publish the selected document to option, do either or both
of the following:
- To export the selected documents to the Corporate area, select the
Corporate list type check box, and then choose a user group.
- To export the selected documents to your Personal area, select the
Personal list type check box.
7. Click Apply.
A panel appears with a list of the documents to export. This list includes the
type and name of document, the status of the document export, and the action
that will be performed, for example, the export function creates a category and
publishes a document. The title bar indicates the percentage of documents
exported.
If you want to cancel the export, close the window.
Exporting predefined indicators
Page 50

50 BusinessObjects Auditor Guide
8. To start the export, click Start.
9. If you need to interrupt the export, click Interrupt.
When the documents are successfully exported, they are marked “Yes” in the
In Corporate and/or In Personal columns.
10.When you are finished exporting documents, click Exit.
To remove documents with Document Exporter, go to Removing the documents
on page 69.
!
!
Manually exporting predefined indicators
! !
To manually export the Auditor predefined indicators:
1. Create a temporary folder on your computer.
2. Copy into this folder all of the documents in:
$INSTALLDIR\auditorData\Documents
3. Select all of the documents.
4. Click File, Properties.
5. De-activate the Read-only attribute and click OK.
Setting Up and Removing Auditor
Page 51

BusinessObjects Auditor Guide 51
6. Refer to the file input.txt located in the Documents file for the correct
document category and keyword.
The input.txt document lists the information in the following sequence:
<document name>, <keyword>, <category>
7. Select Start, Programs, Business Objects, BusinessObjects 6.5.
The BusinessObjects panel opens. If the New Report Wizard dialog box
appears, click Cancel.
8. Select File, Open. Selec t all of the documents in the temporary report folder
then click OK.
TIP
Select all of the documents in a specific category. That way you publish all of the se
documents at the same time to Corporate Documents.
Exporting predefined indicators
Page 52

52 BusinessObjects Auditor Guide
9. Click File, Properties.
10.In the Keywords text box, type the keyword for the documents.
11.Click File, Publish to.
The Send dialog box opens.
12.Click Categories.
The Select Categories dialog box appears.
Setting Up and Removing Auditor
Page 53

BusinessObjects Auditor Guide 53
13.Click Manage.
The Categories dialog box appears.
14.Click Add.
A new folder appears, with an empty space for the category name.
15.Type a name for the category, for example Document Management. Click
OK.
The Send dialog box reappears.
16.Next to the Document(s) to Send section, click Add.
The Add Documents dialog box appears with a l ist of the doc uments open in
BusinessObjects.
Exporting predefined indicators
Page 54

54 BusinessObjects Auditor Guide
17.Select the documents that belong in the Document Category you created.
Click OK to return to the Send dialog box, and OK again to publish the
documents.
18.To verify that the documents were published correctly, select File, Retrieve
from, Corporate Documents.
The Retrieve dialog box appears. The documents you imported are listed.
Setting Up and Removing Auditor
Page 55

Monitoring consolidated rights
As the amount of users, domains, universes, and documents grows, so does the
difficulty in controlling access rights. Normal Auditor reports exist in the cluster
repository. User access rights reports are located in the memory of the server but
they are transient, in that the reports are not stored and shared via the Auditor's
cluster repository.
The General Supervisor can create a connection to create transient reports
based on queries containing all of the documents, domains, or universes to which
a user has access rights.
Once the connection is created, an additional category cal led Consolidated rights
reports appears in the User Information tree. In this category, three query options
offer the ability to create a consolidated rights report listing document, universe,
or domain rights.
NOTE
• For report queries to be successfully generated, the database server version
and jdbc driver version must be the same.
• If you want to control access to the consolidated rights reports, you need to
create the connection on a cluster that is separate from the production cluster.
BusinessObjects Auditor Guide 55
Monitoring consolidated rights
Page 56

56 BusinessObjects Auditor Guide
Creating the connection for transient reports
NOTE
For report queries to be successfully generated, the database server version and
jdbc driver version must be the same.
To create the connection:
1. Do one of the following:
- Copy your JDBC driver to either the lib folder of the web application or the
common lib folder of the application server.
- Manually add the JDBC driver path to the class path.
You must have a JDBC driver installed and functioning on the s ame database
as the Auditor repository before setting up this connection.
2. Log in to Auditor as the General Supervisor.
3. Select the Options link.
4. Select the Connection for transient reports link.
The connection parameter text boxes appear.
5. In the Driver text box, type the name of your JDBC driver.
For this driver... Type...
MS SQL com.microsoft.jdbc.sqlserver.SQLServerDriver
Sybase com.sybase.jdbc2.jdbc.SybDriver
Oracle oracle.jdbc.driver.OracleDriver
IBM DB2 com.merant.datadirect.jdbc.db2.DB2Driver
Setting Up and Removing Auditor
Page 57

BusinessObjects Auditor Guide 57
6. In the URL text box, type the URL address for the driver.
With this driver... Use this format
Microsoft SQL jdbc:microsoft:sqlserver://<server_name>:<port
number>
For example:
jdbc:microsoft:sqlserver:/
/corporate:port(default:1433)
For more information on Microsoft SQL drivers, go
to http://www.microsoft.com/sql/downloads/
default.asp
Sybase jdbc:<sub protocol>:<database locator>
For example:
The sub protocol is specific to the JDBC driver and
the database locator specifies the database with
which Auditor interacts. This locator can include a
hostname, port, and database system name.
Oracle jdbc:oracle:thin:@(description=(address=(host=<n
ameofhost>)(protocol=tcp)(port=<port
number>))(connect_data=(sid=QABP)))
IBM DB2 The format for this URL depends on which company
has supplied your driver. Consult the
documentation for your driver. The following is an
example:
jdbc:merant:db2://persistentjava.com:50000
For more information on JDBC configurations consult your database vendor’s
documentation.
7. In the Name text box, type the user name for the driver.
8. In the Password text box, type the password for the driver.
9. Click Test connection.
If the test is successful, “Connection OK” appears.
10.Click Save to save the connection.
The connection created is read-only and saved in encrypted mode.
Monitoring consolidated rights
Page 58

58 BusinessObjects Auditor Guide
Creating consolidated rights reports
!
!
Selecting users for a report
! !
1. In the User Information category, select a query from the Consolidated rights
reports list.
The user selection pane appears. It includes the following sections:
- Search options - this section offers options for selecting users for your query
- Counters - this section indicates the number of users in the repository, the
number of users selected for a query, the number of users shown in the Users
selection section, and the number of resources (documents, domains, or
universes) in the repository.
- User selection - this section shows, once you have entered your criteria in
the Search options section, users for which you can run a report. It also offers
you a variety of selection options.
2. To select specific users, you use the Search options section. You can do any
or all of the following:
- In th e Name or first letter(s) text box, type name or the first letter of the name
you want to find.
- From the Group drop-down list, select a group.
3. If you want to run a report on all of the users in the repository, click Select all.
To cancel the selection of all of the repository users, click Unselect all.
Setting Up and Removing Auditor
Page 59

BusinessObjects Auditor Guide 59
NOTE
The more users you select, the longer it will take to run a report. It is
recommended that you limit the report to no more than a few users at a time.
4. Click Show users.
A list of users appears in the Users section. The Counters section indicates
how many users are shown.
5. If you want to select all the users in the list, click Select all users shown. If
you want to cancel this selection, click Unselect all users shown.
6. To have only those users you have selected appear in the Users selection
section, click Show selected users.
7. When you have finished selecting users, click Run report.
TIP
You can select users in more than one step. For example, you can select users
who are in Group 1, which includes all of Group 1’s subgroups and users whose
names start with “ba”.
To do this, leave the “name” box empty and select “Gr oup1” in the group box. Click
Show users, then Select all users shown. Type “ba” in the Name or first letters
text box and clear the Group drop-down list. Click Show users, then Select all users
shown. This creates a list of Group 1 users and users whose names start with “ba”.
As many steps as required can be added, however the more users you select for a
report, the longer it will take for the report to be compiled.
The users in your report remain selected until you run a report with a new
selection of users.
Monitoring consolidated rights
Page 60

60 BusinessObjects Auditor Guide
!
!
Creating document reports
! !
1. In the User Information category, select Documents per User from the
Consolidated rights reports list.
The user selection pane appears.
2. Select the users to be included in the report using the steps in Selecting users
for a report on page 58.
3. Click Run report.
A report appears listing the documents that a user can access.
The green links with a plain icon indicate reports and domains to which the
user has access. The red link and icon with a red X indic ate that the user does
not have access. A user can have access to a domain, but not to all of the
documents that are in that domain.
4. Click on a link in the Name column to see a list of the user’s rights in the
domain. In the following example, the user has access to the document
because it is available to all of the company
.
The solid green checkmark represents an assigned right of access. The
green checkmark with the white center represents an inherited right of
access.
Setting Up and Removing Auditor
Page 61

BusinessObjects Auditor Guide 61
In the next example the user has access to the domain but not the document.
A solid red X represents an specific denial of access, while a red X with a
white center represents an inherited denial of access. Even though the user
has access to the domain in which a document is located, that document is
not by default authorized.
5. Click OK to return to the report.
6. To filter the report by enabled and disabled resources, select a status from the
Filter on resources status drop-down list.
7. To save the report:
- to a comma-separated values list, click Save report to csv list.
- to an xml file, click Save report in xml file.
!
!
Creating domain reports
! !
1. In the User Information category, select Domains per User from the
Consolidated rights reports list.
The user selection pane appears.
2. Select the users to be included in the report using the steps in Sel ecting users
for a report on page 58.
Monitoring consolidated rights
Page 62

62 BusinessObjects Auditor Guide
3. Click Run report.
A report appears listing the domains that a user can and cannot access, as
well as the type of domain.
The green links with a plain icon indicate domains to which the user has
access. The red link and icon with a red X indicate that the u ser does not have
access.
4. To see the details of the user’s access to the domain, click on the link in the
Name column.
The solid green checkmark represents an assigned right of access. The
green checkmark with the white center represents an inherited right of
access.
A solid red X represents an specific denial of access, while a red X with a
white center represents an inherited denial of access.
5. Click OK to return to the report.
6. To filter the report by enabled and disabled resources, select a status from the
Filter on resources status drop-down list.
7. To save the report:
- to a comma-separated values list, click Save report to csv list.
- to an xml file, click Save report in xml file.
Setting Up and Removing Auditor
Page 63

BusinessObjects Auditor Guide 63
!
!
Creating universe reports
! !
1. In the User Information category, select Universes per User from the
Consolidated rights reports list.
The user selection pane appears.
2. Select the users to be included in the report using the steps in Sel ecting users
for a report on page 58.
3. Click Run report.
A report appears listing the universes that a user can and cannot access, as
well as the domain on which the universe is located.
The green links with a plain icon indicate universes to which the user has
access. The red link and icon with a red X indicate that the user does not have
access. A user can have access to a domain, but not to al l of the documents
that are in that domain.
Monitoring consolidated rights
Page 64

64 BusinessObjects Auditor Guide
4. Click on a link in the Name column to see the user’s rights to a universe.
The solid green checkmark represents an assigned right of access. The
green checkmark with the white center represents an inherited right of
access.
A solid red X represents an specific denial of access, while a red X with a
white center represents an inherited denial of access.
5. Click OK to return to the report.
6. To filter the report by enabled and disabled resources, select a status from the
Filter on resources status drop-down list.
7. To save the report:
- to a comma-separated values list, click Save report to csv list.
- to an xml file, click Save report in xml file.
Setting Up and Removing Auditor
Page 65

Monitoring multiple clusters
You can use Auditor to monitor multiple clusters, with no administrative
overhead. To set up the system to do this, you connect to the Administration
Console for each cluster to be monitored, and set the Audit database connection
to the same database in the Audit page.
EXAMPLE
Setting up the monitoring of multiple clusters
You want Auditor to monitor oracleCluster1, oracleCluster2 and db2Cluster1.
Having already set up the Audit database and its connection:
1. Click Start, Programs, Business Objects, Administration Console 6.5
The Administration Console appears.
2. In the Administration Console on Cluster1’s primary node, click Audit.
3. Click Log to database.
A login panel appears.
4. Enter the user name and password with access to the Audit database.
5. From the Audit database connection drop-down list select oracleCluster1.
6. Click Apply.
BusinessObjects Auditor Guide 65
7. Repeat steps 5 and 6 for oracleCluster2 and db2Cluster1.
For information about the Audit facility, see the
UNIX or System Administrator’s Guide for Windows, depending on your platform.
The audit information for all three clusters are now recorded in the same
database. The Administration Console for each cluster initializes the database
and registers the new cluster.
System Administra tor’s Guide for
Monitoring multiple clusters
Page 66

66 BusinessObjects Auditor Guide
Restoring predefined indicators
If a user mistakenly deletes a predefined indicator, you need to republish the
indicator back to the corporate repository. The replacement indicator is found in
the personal documents’ area of the user with which Auditor was originally
installed.
To restore an indicator, you can use the Document Exporter or the following
procedure:
1. Log into InfoView using the user name and password with access to the
cluster in which the indicators were first installed.
2. Click Personal Documents.
The indicators in the Personal area are displayed.
3. Click the indicator you want to restore.
The associated document appears.
4. Click Publish.
The Publish as Corporate Document page appears.
5. Verify that the document’s name, description, and category are the same as
those of the original indicator.
6. Verify that the document keyword corresponds to the indicator’s subcategory
in Auditor.
7. Click No for the Overwrite if Document Exists option.
This guarantees that you will not overwrite a document that already exists in
the repository.
8. Select the Refresh option:
- Refreshed Manually
The indicator is refreshed only when a user refreshes it manually.
- Scheduled Refresh
Select this option if you want to schedule a refresh using Broadcast Agent.
The Scheduling Options page appears.
9. Set the refresh frequency you want, and then click OK.
For information on the refresh frequency, see the InfoView User’s Guide.
10.Click Publish.
If the name already exists, a message appears at the bottom of the page.
You must either return to step 5 to change the name, or s tep 7 to select Yes.
11.Log into Auditor, and you see the indicator under the specified category and
subcategory.
Setting Up and Removing Auditor
Page 67

Removing Auditor
To remove Auditor from the server, there is a procedure to follow. The following
sections must be completed in this sequence:
1. Deleting the universes
2. Removing the database views
3. Removing the documents
4. Removing the Auditor files
Deleting the universes
To delete the universes:
1. Click Start, Programs, Business Objects, Supervisor.
2. Select Tools, Delete Universe.
The Delete Universes dialog box appears.
3. Select the Auditor universes, and then click OK.
BusinessObjects Auditor Guide 67
Removing Auditor
Page 68

68 BusinessObjects Auditor Guide
Removing the database views
To remove the database views:
1. Open the Universe Exporter.
2. Click the Security tab.
The Security page appears.
3. In the Data Source Name area, select the connection to the security domain.
4. Click Delete near the bottom of the dialog box.
All the views for the security domain are marked “No” in the Views area.
5. Repeat the previous two steps for the Universe and Audit tabs.
6. Click Finish.
Setting Up and Removing Auditor
Page 69

Removing the documents
To remove the documents:
1. Open the Document Exporter:
- Under UNIX – at the command prompt, type ./DocumentExporter.sh
This file is usually located in <$INSTALLDIR>/tools/.
- In Windows click Start, Programs, Business Objects, Auditor 6.5,
Document Exporter.
The Log In dialog box appears.
2. Enter the Auditor user name and password.
Use the same Business Objects user name that you originally used to export
the documents during installation.
3. Click OK.
The main window of the Document Exporter appears.
BusinessObjects Auditor Guide 69
4. Select the document domain in the drop-down list near the top of the dialog
box.
Removing Auditor
Page 70

70 BusinessObjects Auditor Guide
5. Select the documents you want to remove by:
- select the box in the Document Selection column
-click All to select all of the documents
-click None to deselect all of the documents
6. Click Remove the selected document from.
7. Do either or both of the following:
- To remove the selected documents from the Corporate area, click
Corporate list type.
- To remove the selected documents from your Personal area, click Personal
list type.
8. Click Apply.
The Status dialog box appears with the number of selected documents
deleted and offers you the option of viewing a detailed status report. If you
want to see this report, click Yes. If not, click No.
When the documents are successfully removed, they are marked “N” in the In
Corporate and/or In Personal columns.
9. When you are finished removing documents, click Exit.
Removing the Auditor files
To remove the Auditor software from the server, follow the instructions in the
Installation and Configuration Guides for Windows or Unix.
Setting Up and Removing Auditor
Page 71

Setting Access Rights
3
chapter
Page 72

72 BusinessObjects Auditor Guide
Overview
Auditor runs in a secure environment, using a repository to store all security
information. Auditor inherits the access rights functionality of Supervisor for *.rep
documents. You therefore modify access rights for Auditor using Supervisor.
In addition, Auditor adds a layer of Form Authentication architecture using Java
Server Page (JSP) technology.
This chapter explains how to set access rights for Auditor using Supervisor. For
complete information about setting access rights for Business Objects users, see
Supervisor’s Guide.
the
Setting Access Rights
Page 73

Access rights
In Supervisor, access rights are organized into command sets. A command set
contains related menu commands, toolbar buttons, and other interface elements.
Access rights usually are controlled by enabling or disabling command sets.
Command sets, in turn, are grouped into families. The command set families are:
• Document
Document handling; analytical categories
• Options
Options for list display, home page, password, editing, and technology
• Query and Report Panels
BusinessObjects Query Panel and WebIntelligence Report Panel
functionality
BusinessObjects Auditor Guide 73
Access rights
Page 74

74 BusinessObjects Auditor Guide
Command set family: Document
The following table shows which command sets to choose in order to restrict
Document functionality.
I don’t want my group/user to... So I disable or hide command set
Publish indicators to the repository Publish Document
Save indicators Save Document
See the list of indicators Read Corporate Documents
!
!
Interface impact
! !
The following table shows the impact on the user interface of disabling or hi ding
Document command sets.
Disabling or hiding command
set...
Publish Document Removes the Publish command under
Save Document Removes the Save command under the
Read Corporate Documents Removes the following tabs:
Has this impact on the interface
the indicator name.
indicator name.
• Dashboard
• Customize Dashboard
• Favorites
• Options
Setting Access Rights
Page 75

Command set family: Options
The following table shows which command sets to choose in order to restrict
Options functionality.
I don’t want my group/user to... So I disable or hide command set
See document list options or change the
default home page
Change their own password Change Password
Change the viewing and editing of
technology options (applets and
technology options on the Options page)
!
!
Interface impact
! !
The following table shows the impact on the user interface of disabling or hi ding
Options command sets.
BusinessObjects Auditor Guide 75
Change List Display and Default
Home Page
Change Viewing and Editing
Technology Options
Disabling or hiding command
Has this impact on the interface
set...
Change List Display and Default
Home Page
Removes the Start Page tab from
Options
Change Password Removes the Password tab from Options
Change Viewing and Editing
Technology Options
Removes the Create and Edit Indicators
tab from Options
Access rights
Page 76

76 BusinessObjects Auditor Guide
Command set family: Query and Report Panel
The following table shows which command sets to choose to restrict Query Panel
and Report Panel functionality.
I don’t want my group/user to... So I disable or hide command set
Create a new indicator Download 3-Tier BusinessObjects
Modify an existing indicator Edit Documents
Use the formatting toolbar Formatting Toolbar
Refresh lists of values Refresh Lists of Values
Run and refresh indicators Run and Refresh Documents
Use or refresh lists of values Use List of Values
View the SQL of a query View SQL
!
!
Interface impact
! !
The following table shows the impact on the user interface of disabling or hi ding
Query and Report Panel command sets.
Setting Access Rights
Disabling or hiding
command set...
Create Indicators Removes the Add a New Indicator tab
Edit Indicators Removes the Edit button from indicators
Formatting Toolbar Removes the formatting commands from the
Refresh Lists of Values Does not show the Refresh button when a choice of
Has this impact on the interface
Removes the Add a New Indicator tab
Report Panel
values is displayed for a document
Page 77

BusinessObjects Auditor Guide 77
Disabling or hiding
Has this impact on the interface
command set...
Run and Refresh
Documents
The user can modify the document but cannot run
the associated query (that is, the Run button is
removed from the applet).
The Add a New Indicator, Dashboard, and
Customize Dashboard tabs are removed.
If a report is published with a manual Refresh, the
user can open and modify it, but cannot run or
refresh it.
If a report is published with the Refresh on Open
option, the user cannot open, modify, or refresh it.
Use List of Values If the user:
1. creates a document
2. drags an object from the Classes and Objects
Panel to the Conditions tab
3. clicks on the operand of the object
then the Show Values From List and Prompt Values
From List options are unavailable.
If the user:
1. opens an expanded documents page
2. clicks Edit underneath a document, then
3. creates or edits an object using a List of Values
in the Conditions tab of the WebIntelligence
Report Panel
then Refresh is unavailable in the List of Values
dialog boxes.
View SQL If the user creates a new indicator, or opens an
existing indicator, then the SQL button is not
available in the WebIntelligence Report Panel.
Access rights
Page 78

78 BusinessObjects Auditor Guide
Setting Access Rights
Page 79

Universes, Classes and Objects
4
chapter
Page 80

80 BusinessObjects Auditor Guide
Overview
This chapter describes the universes that are provided with Auditor, as well as
the objects that can be selected from the universes to create and edit indicators.
Knowledge of universes is important for understanding the elements used in
creating and modifying indicators. For example, the BusinessObjects Query
Panel is displayed following the selection of either Add a New Indicator or the Edit
option for an existing indicator. It is the universe that determines the objects that
are available in the panel for building the new query.
Universes, Classes and Objects
Page 81

Universe structure
Universes are composed of objects and classes. Objects are elements that map
to a set of data from a relational database. Objects all ow y ou to retrieve data for
your queries. Classes are logical groupings of objects.
Universes permit mutually compatible objects to be used in queries by means of
the BusinessObjects Query Panel.
Objects are classified as one of the following types:
• Dimension
A dimension retrieves the data that provides the basis for analysis. This data
is usually character-type data or dates. In the following universe sections the
names of objects that are dimensions are followed by (D).
• Detail
A Detail object is always associated with a specific Dimension object, in order
to provide additional information. In the following universe se ctions the names
of objects that are detail objects are followed by (De).
• Measure
A measure retrieves numeric information that is the result of calculations on
data in the database. In the following universe sections the names of objects
that are measures are followed by (M).
BusinessObjects Auditor Guide 81
Universe structure
Page 82

82 BusinessObjects Auditor Guide
Universes and analytical categories
Universes correspond approximately to the various analytical categories in
Auditor. The universe/analytical category mapping is shown in the following
table.
This universe... Is used by indicators in these categories
Broadcast Agent Analysis:
Security
Repository Analysis: Security Document Management
Universe Domain Analysis:
Universe
System Information: Audit System Information
Data Integrator Data Integrator
Impact Analysis: Audit Document Management
Broadcast Agent
User Information
Broadcast Agent
Universe Management
User Information
Document Management
Universe Management
NOTE
This table and the ones following show the ful l names o f the uni verses. The part
of the name after the colon shows the domain to which the universe is attached.
In the remainder of this document, the shorter name (such as Repository
Analysis) is used.
Universes, Classes and Objects
Page 83

BusinessObjects Auditor Guide 83
Predefined vs. custom-made universes
With Auditor, you can use either a set of predefined universes delivered with the
product, or any other universes available to you through the Business Objects
system.
Predefined universes
Auditor comes with the following predefined universes:
Universe name File name
Broadcast Agent Analysis: Security BCA.unv
Repository Analysis: Security SECURITY.unv
Universe Domain Analysis: Universe UNIVERSE.unv
System Information: Audit ACTIVITY.unv
Data Integrator DI.unv
Impact Analysis: Audit IMPACTAN.unv
They allow you to carry out monitoring and analysis activities immediately after
installation.
These predefined universes are attached to different domains. These domains
are connected to databases during installation, prior to export of the universes.
Universe Domain Database
Broadcast Agent Analysis: Security Security Corporate repository
Repository Analysis: Security Security Corporate repository
Universe Domain Analysis: Universe Universe Corporate repository
System Information: Audit Audit database Audit database
Data Integrator Data Integrator Data Integrator
Impact Analysis: Audit Audit database Audit database
Predefined vs. custom-made universes
Page 84

84 BusinessObjects Auditor Guide
Custom-made universes
In Auditor, you can access universes that you:
• created in Designer
• exported to the repository
• made accessible to users via Supervisor
The universes that you create appear in the list of default universes. This list is
automatically presented to users when they create a new indicator without having
selected a default universe (see Creating indicators on page 194).
Universes, Classes and Objects
Page 85

Broadcast Agent analysis universe
This section lists the classes in the Broadcast Agent Analysis universe, and the
objects that are available for selection within each class.
Objects in each class are listed alphabetically, and no t in the order in which they
appear in the user interface.
NOTE
Because the security domain handles international date and time operations,
dates may be displayed in Greenwich mean time (GMT) format, which is the time
zone reference for the repository. For more information, see the Broadcast Agent
Administrator’s Guide.
BCA information class
This class provides Broadcast Agent system information. The following table lists
the objects that you can select from this class in the BusinessObjects Query
Panel.
This object... Returns
BCA & BO
Server Names
(D)
BCA ID (De) Broadcast Agent server IDs.
BCA Name (D) Name of the monitored Broadcast Agent.
Two server names, or Not Processed.
The first name is the server on which Broadcast Agent is
running; the second name is the Business Objects server on
which the task was processed (the machine running
BOManager).
For a task that has not been executed, the column returns
“Not Processed.”
The column is updated after a task is processed.
Note: This object is not supported or available in versions of
Auditor 6.5 or higher. You can still refresh these objects
where they exist in reports created in versions up to and
including Auditor 6.1.
Each Broadcast Agent server is assigned a unique ID.
BusinessObjects Auditor Guide 85
Broadcast Agent analysis universe
Page 86

86 BusinessObjects Auditor Guide
This object... Returns
BCA Name
(label) (D)
BCA Server
Name (D)
BCA Status (D) Enabled, Disabled, or “Exceeded number of logins allowed.”
BO Server Name
(D)
BO Server Name
(with label) (D)
Group Name (D) Broadcast Agent group names
Name of the monitored Broadcast Agent, preceded by the
text string “Broadcast Agent.”
Note: This object is not supported or available in versions of
Auditor 6.5 or higher. You can still refresh these objects
where they exist in reports created in versions up to and
including Auditor 6.1.
Name of the machine on which the Broadcast Agent server
is running, or Not Processed.
For a task that has never been executed, the object has no
value.
The value is updated after a task is processed.
Name of the Business Objects server that sent the job to
Broadcast Agent (that is, the server machine running
BOManager).
For a task that has not been executed, the object returns
“Not Processed.”
The object can be seen from any console, and is updated
after a task is processed.
Name of the Business Objects server that sent the job to
Broadcast Agent, preceded by the text string “WebI Server
Name.”
For a task that has not been executed, the object returns
“Not Processed.”
The object can be seen from any console and is updated
after a task is processed.
Note: This object is not supported or available in versions of
Auditor 6.5 or higher. You can still refresh these objects
where they exist in reports created in versions up to and
including Auditor 6.1.
Universes, Classes and Objects
Page 87

Batch information class
This class provides Broadcast Agent system information. The following table lists
the objects that you can select from this class in the BusinessObjects Query
Panel.
This object... Returns
Batch ID (D) ID of the pending Broadcast Agent job.
End User
Process ID (D)
Job Description
(D)
Job Platform (D) All Platforms, Windows Platform, Windows Platform
Overwrite Mode
(D)
Priority (D) High, Normal, or Low
Priority (picture)
(De)
BusinessObjects Auditor Guide 87
The end-user module process ID launched on the server.
Job description initially compl eted by the user submitting the
document.
The description can be modified.
(BusinessObjects 4.1 task), UNIX Platform, New attempt on
a UNIX platform, All attempts failed on UNIX platforms, or
“Not Processed.”
With or without, depending on whether the Broadcast Agent
job was submitted with the overwrite option turned on.
Note: This object is not supported or available in versions of
Auditor 6.5 or higher. You can still refresh these objects
where they exist in reports created in versions up to and
including Auditor 6.1.
A graphical indicator of the job’s priority: High, Normal, or
Low (Auditor interface only).
Broadcast Agent analysis universe
Page 88

88 BusinessObjects Auditor Guide
!
!
Actions subclass
! !
This is a subclass of the Batch Information class that provides information on
Broadcast Agent batch job actions. The following table lists the objects that you
can select from this subclass in the BusinessObjects Query Panel.
This object... Returns
Action Type (De) One of the following Broadcast Agent action types:
Data (De) Value of the condition associated with the batch job.
Job Actions List
(D)
Job Selected
First Action (De)
Job Selected
Second Action
(De)
Job Selected
Third Action (De)
Job Selected
Fourth Action
(De)
Job Selected
Fifth Action (De)
Job Selected
Sixth Action (De)
Job Selected
Seventh Action
(De)
• First Begin Date
• Distributed via Web Server
• Distributed via Server File System
• File Watcher Detection.
A list of the actions used to perform a job.
Note: This object is only available on Oracle.
The first action used to perform a job.
Note: This object is only available on Oracle.
The second action used to perform a job.
Note: This object is only available on Oracle.
The third action used to perform a job.
Note: This object is only available on Oracle.
The fourth action used to perform a job.
Note: This object is only available on Oracle.
The fifth action used to perform a job.
Note: This object is only available on Oracle.
The sixth action used to perform a job.
Note: This object is only available on Oracle.
The seventh action used to perform a job.
Note: This object is only available on Oracle.
Universes, Classes and Objects
Page 89

This object... Returns
Particular
Conditions (D)
Details of the Broadcast Agent action, such as:
• First Begin Date, if distributed via a web server
• Web Server name, if distributed via a server file system
• Server File System, File Watcher detection on file named
Report Bursting
feature (D)
Mode used to refresh the document, such as Refresh with
Profile of Each Recipient, Refresh with Profile of the
Submitter.
Script Options
(D)
Broadcast Agent script options that the user selected and
sent with the document.
The values are separated by commas:
Refresh Document = 1, Print Document = 2, Web
Server = 3, Custom Macro, = 4, Condition = 5, Channel = 6,
Save as RTF = 7, Save as TXT = 8, Save as PDF = 9
BusinessObjects Auditor Guide 89
Broadcast Agent analysis universe
Page 90

90 BusinessObjects Auditor Guide
!
!
Scheduling Information subclass
! !
This is a subclass of the Batch Information class that provides job frequency
information. The following table lists the objects that you can select from this
subclass in the BusinessObjects Query Panel.
This object... Returns
Begin Time (D) Start time of the pending Broadcast Agent job.
Days of the
Month (D)
Days of the
Week (D)
Frequency (D) One of the following:
Periodicity (D) Scheduling for daily, weekly, and monthly tasks.
Periodicity Detail
(D)
For hourly tasks, it displays the information in the following
form: “30 minutes after the hour from 9 to 11.”
Days selected for monthly tasks.
The information appears in the following form: “2nd 3rd 4th
26th and last day of the month.”
Days selected for daily, monthly interval, and user-defined
tasks.
The information appears in the following form: “Monday
Wednesday Friday.”
• Once (4,6)
• Hourly (8,10)
• Daily (16,18)
• Weekly (32,34)
• Monthly (64,66)
• Monthly interval (128, 130)
• User defined (256, 258).
The information appears in the following form: “Every 6
week(s).”
Day scheduling for monthly interval tasks and the
scheduling details for user-defined tasks.
The information appears in the following form: “Every 2nd
business day.”
Universes, Classes and Objects
Page 91

BusinessObjects Auditor Guide 91
!
!
Monitoring Job Information subclass
! !
This is a subclass of the Batch Information class that provides job status
information. The following table lists the objects that you can select from this
subclass in the BusinessObjects Query Panel.
This object... Returns
Job Error Code
(De)
Broadcast Agent job error code, if there is one.
Make a note of the code so that you can use it when referring
to the Error Message Guide.
Job Error or
Warning Text (D)
Full error description, with the error code that relates to the
Error Message Guide.
Job State (D) Indication of whether a job is still running.
Job Status (D) Text description of a job’s current status.
Broadcast Agent analysis universe
Page 92
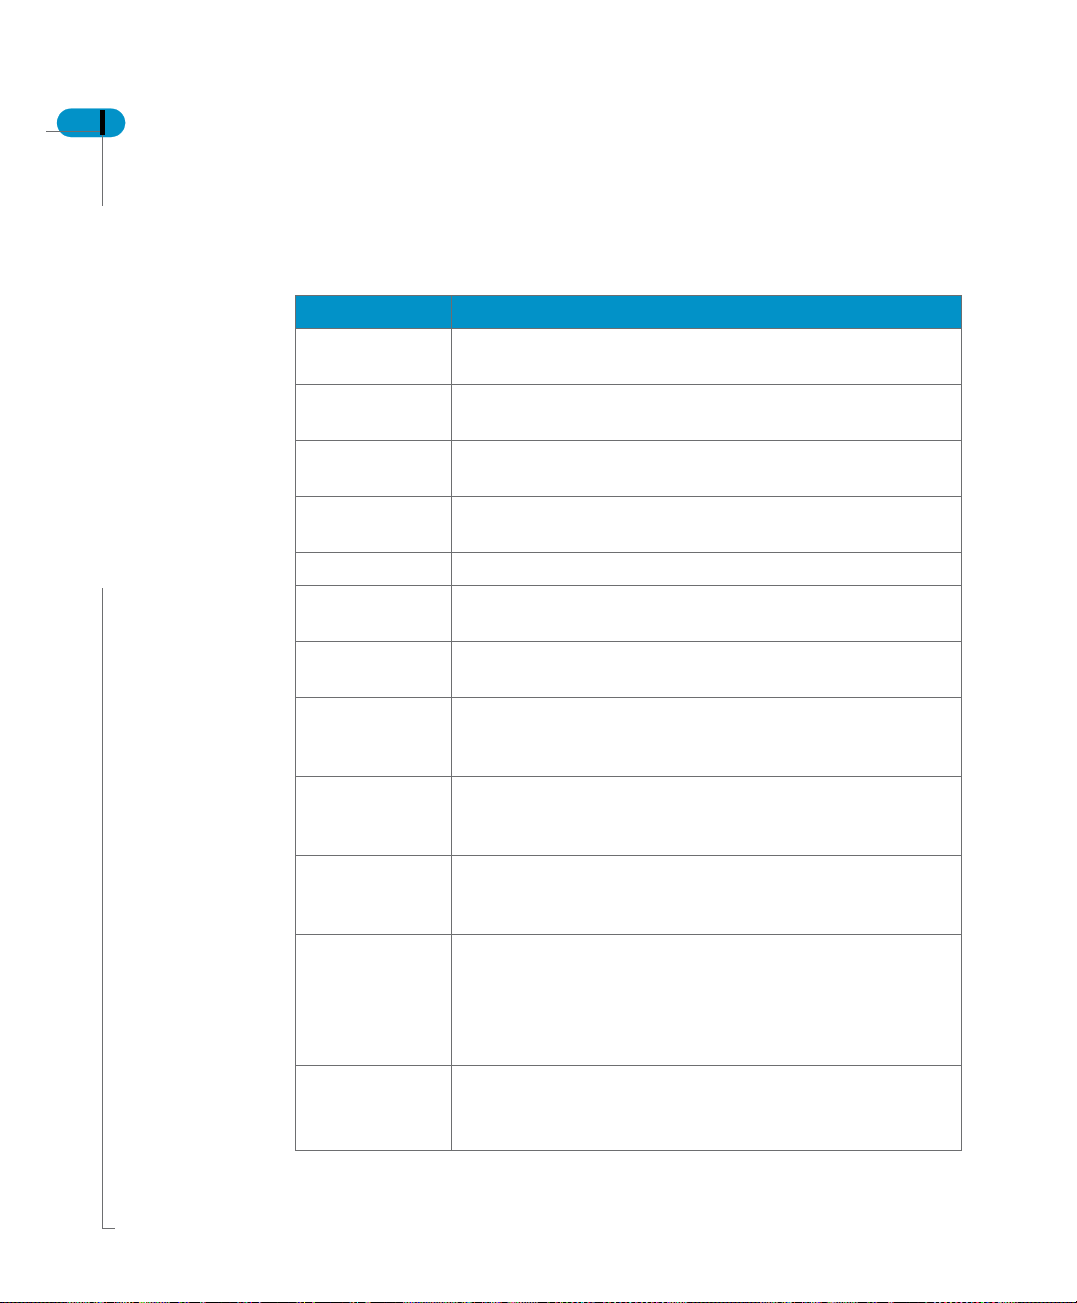
92 BusinessObjects Auditor Guide
Document information class
This class provides Broadcast Agent document data. The following table lists the
objects that you can select from this class in the BusinessObjects Query Panel.
This object... Returns
Category
Creator (De)
Category Name
(De)
Category Path
(De)
Document
Category (D)
Document ID (D) Document ID
Document Name
(D)
Document Name
& Type (D)
Document
Persistent (D)
Document
Repository ID
(De)
Document
Repository
Name (D)
Document Size
(M)
Document Type
(D)
Name of the user who created the document category.
Document's category name.
Hierarchical path of the document category if there is one.
List of document categories with the hierarchical path if
there is one.
Name of a document sent to Broadcast Agent.
Complete document name with its type.
Persistent if a document is published to the corporate
repository, or Not Persistent if the document is automatically
deleted when retrieved by the last user.
ID of the document repository.
Name of the repository where a document is stored.
Size of a sent document, in bytes.
The object does not represent the size of a document when
it is stored in the document domain; rather, it represents the
initial size of the document (the size of the document when
it was submitted).
The WebIntelligence or BusinessObjects document.
The file extension type is .rep, .bqy, .wqy, .wid, or .rea;
otherwise, it is Unknown.
Universes, Classes and Objects
Page 93

BusinessObjects Auditor Guide 93
This object... Returns
Document Type
(Picture) (De)
Graphical image representing the WebIntelligence or
BusinessObjects document type.
Note: This object is not supported or available in versions of
Auditor 6.5 or higher. You can still refresh these objects
where they exist in reports created in versions up to and
including Auditor 6.1.
Last Action (D) Last action performed on a document, and the date of the
action.
Values that can be returned include: Unchanged, Deleted,
Inserted, Updated, Moved, or Other.
Last Action Date
Most recent, date of a change to a referenced document.
(D)
Last Action Type
(D)
Number of
Last type of action performed on a referenced document.
Values that can be returned include: Unchanged, Inserted,
Updated, or Moved.
Number of documents sent to Broadcast Agent.
documents (M)
Broadcast Agent analysis universe
Page 94

94 BusinessObjects Auditor Guide
Submitter information class
This class provides information on the users and user groups submitting
documents. The following table lists the objects that you can select from this
class in the BusinessObjects Query Panel.
This object... Returns
BO Version of
the Submitter (D)
External
Repository (M)
Group Submit
Name (D)
Group Submit
Name (with
label) (D)
Submit name &
User Profile (D)
Submit name &
User Profile
(label) (D)
Version number of the end-user module that submitted the
job to Broadcast Agent.
This object value is updated only at the time of document
submission.
‘Yes’ if users referenced in an external repository, LDAP for
example, were logged in previously.
Note: Do not use with other objects.
Group receiving the user’s submitted document.
Group receiving the user’s submitted document, preceded
by the text string “Group Submit Name”.
Note: This object is not supported or available in versions of
Auditor 6.5 or higher. You can still refresh these objects
where they exist in reports created in versions up to and
including Auditor 6.1.
The submit name and user profile, as defined in Supervisor.
Note: This object is not supported or available in versions of
Auditor 6.5 or higher. You can still refresh these objects
where they exist in reports created in versions up to and
including Auditor 6.1.
The submit name and user profile as defined in Supervisor,
preceded by the appropriate text string.
Note: This object is not supported or available in versions of
Auditor 6.5 or higher. You can still refresh these objects
where they exist in reports created in versions up to and
including Auditor 6.1.
Universes, Classes and Objects
Page 95

This object... Returns
Submitter
External
Membership (D)
User Submit
Name (D)
User Submit
Type (D)
Recipient information class
This class provides data on document recipients. The following table lists the
objects that you can select from this class in the BusinessObjects Query Panel.
This object... Returns
Count Recipients
(M)
Distribution Path
(De)
Distribution
System (D)
Group Recipient
Name (D)
Recipient Name
(D)
Recipient Status
(D)
Recipient User
Type (D)
Recipient
External
Membership (D)
BusinessObjects Auditor Guide 95
‘Yes’ if the submitter is an external user. External users are
managed by external repository, LDAP for example, and not
by the BusinessObjects repository.
Name of the user who submitted the job to Broadcast Agent.
User type or user profile, as defined in Supervisor.
Total number of recipients of a document.
Values of the distribution path.
Distributed via Web Server, or Distributed via Server File
System, to indicate how the processed Broadcast Agent
document is to be distributed.
Also returns information on the concatenated path.
Group Name receiving the document.
Name of the recipient.
Enabled, Disabled, or “Exceeded number of logins allowed.”
User profile, as set in Supervisor.
Possible values are: General Supervisor, Supervisor,
Designer, Supervisor-Designer, User, Broadcast Agent,
Versatile, or External.
‘Yes’ if the submitter is an external user. External users are
managed by external repository, LDAP for example, and not
by the BusinessObjects repository.
Broadcast Agent analysis universe
Page 96

96 BusinessObjects Auditor Guide
Time frame class
This class provides job duration data. The following table l ists the objects that you
can select from this class in the BusinessObjects Query Panel.
This object... Returns
Average Duration (M) Average duration of a job, in seconds.
Job Duration (M) Duration of a job, in seconds.
Job Duration Max (M) Maximum duration of a job, in seconds.
Job Duration Min (M) Minimum duration of a job, in seconds.
!
!
Submit Date Time Frame subclass
! !
This is a subclass of the Time Frame class that provides job submission dates.
The following table shows the object that you can select from this subclass in the
BusinessObjects Query Panel.
This object... Returns
Submit Datetime
(D)
Date on which the task was submitted on the client machine.
!
!
Start Date Time Frame subclass
! !
This is a subclass of the Time Frame class that provides system start dates for
jobs. The following table shows the object that you can select from this subclass
in the BusinessObjects Query Panel.
This object... Returns
Start Date (D) Date on which the task started on the server.
Universes, Classes and Objects
This is the start time for waiting tasks; it is a system
parameter that is used until the task is completed.
Note: You may receive the value “Friday 06 February 2037
6:28:16 AM.
Page 97

BusinessObjects Auditor Guide 97
!
!
End Date Time Frame subclass
! !
This is a subclass of the Time Frame class that provides job end dates. The
following table shows the object that you can select from this subclass in the
BusinessObjects Query Panel.
This object... Returns
End Date (D) Date on which a task ended on the server.
This is the end time for waiting tasks; it is a system
parameter that is used until the task is completed.
Note: You may receive the value “Friday 06 February 2037
6:28:16 AM.
!
!
Expiration Date Time Frame subclass
! !
This is a subclass of the Time Frame class that provides job expiry dates. The
following table shows the object that you can select from this subclass in the
BusinessObjects Query Panel.
This object... Returns
Expiration Date
Date on which a task expired.
(D)
!
!
Begin Date Time Frame subclass
! !
This is a subclass of the Time Frame class that i s used to c ontrol job start dates.
The following table shows the object that you can select from this subclass in the
BusinessObjects Query Panel.
This object... Returns
Begin Date (D) Date from which a job is considered valid.
• Set this date in the Conditions tab if you want to control
the execution date.
• When a job is run, the task is duplicated, its status is set
to Running (for the duplicated task), and the execution
date of the original task is computed.
Broadcast Agent analysis universe
Page 98

98 BusinessObjects Auditor Guide
Audit BCA measures class
This class provides various Broadcast Agent job counts. The following table lists
the objects that you can select from this class in the BusinessObjects Query
Panel.
NOTE
You cannot use more than one object from the Audit BCA Measures Class in a
single indicator.
This object... Returns
Count BCA Jobs (M) Number of batch jobs submitted.
Count Job Expired (M) Number of jobs that were retried but not ultimately
Count Job Failed (M) Number of failed jobs.
Count Job Running (M) Number of jobs currently running.
Count Job Success (M) Number of successful jobs.
Count Job Suspended
(M)
Count Job Waiting (M) Number of waiting jobs.
executed.
Number of suspended jobs.
Universes, Classes and Objects
Page 99

Broadcast Agent analysis incompatibilities
The following table lists the objects in the Broadcast Agent Analysis universe that
are known to be incompatible with each other.
BusinessObjects Auditor Guide 99
This object... in Class... is incompatible
in Class
with...*
Count BCA Jobs Audit BCA Measures the other objects Audit BCA
Measures
Count Job Expired Audit BCA Measures the other objects Audit BCA
Measures
Count Job Failed Audit BCA Measures the other objects Audit BCA
Measures
Count Job
Success
Count Job
Suspended
Audit BCA Measures the other objects Audit BCA
Measures
Audit BCA Measures the other objects Audit BCA
Measures
Count Job Waiting Audit BCA Measures the other objects Audit BCA
Measures
* This incompatibility can be caused by one of two factors:
• Incompatibility of WHERE clauses
• Use of the “Count” operator
Broadcast Agent analysis universe
Page 100

100 BusinessObjects Auditor Guide
Repository analysis universe
This section lists the classes in the Repository Analysis universe, and the objects
that are available for selection within each class.
NOTE
Because the security domain handles international date and time operations,
dates may be displayed in GMT format, which is the time zone reference for the
repository. For more information, see the Broadcast Agent Administrator’s Guide.
User class
This class provides information on the people who want to access your business
intelligence system. The following table lists the objects that you can s elect from
this class in the BusinessObjects Query Panel.
This object... Returns
External
Repository (M)
Failed Logins (D) Number of times that a user tried to log in, without success.
Group Name (D) Existing group names “the list of” or “group names from the
Identification
Strategy (D)
Inheritance
Rights (De)
Last Action Date
(D)
‘Yes’ if users referenced in an external repository, LDAP for
example, were logged in previously.
Note: Do not use with other objects.
repository.”
Do not use with User Name, use instead User Group.
Note: The Status object in the Document class can only be
used with the Document Name and User Name (or Group
Name) objects to query the documents that are enabled or
disabled for a user (or group).
No Password Checking or Full Password Checking.
Group from which rights were inherited.
Most recent date of a change of the user.
Universes, Classes and Objects
 Loading...