

Page 1

ACE
Job-File Reference
ACE 7.90c
November 2008
Page 2

Contact information Find contact information on the Web at http://service.sap.com.
Copyright information © 1992-2008 Business Objects, Inc. All rights reserved.
USPS information Business Objects is a non-exclusive Interface Distributor Licensee of the United
States Postal Service. The following trademarks are owned by the United States
Postal Service: USPS, CASS, Standard Mail, First-Class Mail, DPV, LACSLink,
NCOALink, and United States Postal Services.
2
ACE Job-File Reference
Page 3

Contents
Preface.............................................................................................................7
Chapter 1:
Introduction to ACE Job............................................................................ 11
Your first ACE Job is ready to run now!.......................................................12
How to begin creating your own ACE jobs ...................................................13
Guidelines for editing job files.......................................................................14
How to run ACE.............................................................................................15
Tips for efficient batch processing.................................................................16
Job file verification.........................................................................................17
Progress messages..........................................................................................18
Chapter 2:
Job-file blocks and parameters.................................................................. 19
General...........................................................................................................20
Execution........................................................................................................21
Memory Usage...............................................................................................28
GeoCensus......................................................................................................33
Z4Change.......................................................................................................35
Customer & USPS Licensee Information......................................................36
Mover ID NCOALink....................................................................................40
Mover ID NCOALink Service Provider........................................................43
Mover ID NCOALink PAF ............................................................................45
Mover ID Contact Information ......................................................................47
Auxiliary Files................................................................................................49
Input File........................................................................................................52
Standardization Style............................................................................... .......55
Non-CASS......................................................................................................60
Multiline Style................................................................................................63
Post to Input File............................................................................................66
Output Control................................................................................................69
Create Output File..........................................................................................74
Post to Output File..........................................................................................76
Report Defaults ..............................................................................................81
Report: Job Summary.....................................................................................84
Report: Executive Summary..........................................................................85
Report: USPS Form 3553...............................................................................86
Report: NDI....................................................................................................88
Report: Delivery Sequence Invoice................................................................89
Report: Error ..................................................................................................90
Report: Standardization..................................................................................94
Job Statistics File ...........................................................................................96
File Statistics File...........................................................................................97
Report: GeoCensus ........................................................................................98
Report: Mover ID Summary ..........................................................................99
USPS ACS (Address Conversion Statistics) file..........................................100
Contents
3
Page 4

Appendix A:
Master job file (master.ace)......................................................................101
Appendix B:
Delivery Point Validation (DPV)..............................................................113
What is DPV? ..............................................................................................114
USPS requirements......................................................................................115
Installing DPV and its directories................................................................116
Performing DPV processing........................................................................117
DPV performance........................................................................................118
Loading DPV directories into system memory............................................119
Job Summary report.....................................................................................120
DPV locking ................................................................................................121
DPV false-positive log.................................................................................122
Unlocking DPV............................................................................................123
DPV No Stats indicators..............................................................................124
DPV Vacant indicators................................................................................126
Appendix C:
Residential Delivery Indicator (RDI).......................................................127
What is RDI? ...............................................................................................128
RDI directories.............................................................................................129
Setting up RDI processing...........................................................................130
RDI in reports..............................................................................................131
Appendix D:
LACSLink...................................................................................................133
Overview......................................................................................................134
Installing LACSLink and its directories......................................................135
Perform LACSLink processing ...................................................................136
LACSLink locking.......................................................................................137
LACSLink false-positive log.......................................................................138
Unlocking LACSLink..................................................................................139
Reports and log file......................................................................................140
Pre-LACSLink (APPL) fields......................................................................142
Appendix E:
DSF2............................................................................................................143
Set up DSF2 processing in ACE..................................................................146
Address attributes ........................................................................................148
Walk sequencing..........................................................................................150
Delivery Sequence Invoice report................................................................152
ACE Job Summary report............................................................................153
Statistics files...............................................................................................155
No Stats indicator.........................................................................................156
Vacant indicators.........................................................................................156
Appendix F:
SuiteLink.....................................................................................................157
Overview......................................................................................................158
Install SuiteLink and its directories.............................................................159
Set up SuiteLink in ACE .............................................................................160
SuiteLink information in the Job Summary.................................................161
Statistics files...............................................................................................162
4
ACE Job-File Reference
Page 5

SuiteLink output components.......................................................................163
Index..........................................................................................................165
Contents
5
Page 6

6
ACE Job-File Reference
Page 7

Preface
About ACE ACE Job is batch job-oriented software. It takes records from one input database
and sends output to another database. ACE also produces a statistical report.
ACE Job is not a GUI (graphical user interface). ACE Views is a GUI. If you are
interested in using a GUI to set u p your jobs, see the ACE User’s Guide or the
ACE Views online help.
Instead of completing screens in a GUI, with ACE Job you set up yo ur ACE jobs
by using a text-edit or progr am to create a confi guration f ile refer red to as your job
file. In addition, you prepare several files for input, and type a command line at
your operating-system prompt. ACE Job starts processing, requiring little or no
further input from you. Most of this manual is about the job file.
For information about how ACE works with databases, and how to construct
filter expressions, refer to our Database Prep manual.
The illustration below shows what goes into, and comes out of, an ACE job.
Output
database
Reports
Supporting
files
jobfile.ace
Input
database
Job file
Supporting
files
ACE
Work
files
About this manual This manual provides details on setting up and running jobs in ACE job file. If
you are a Views user, this manual is a helpful resource for block and option
descriptions, even though some options are named differently in Views.
Pre f ace
7
Page 8

Conventions This document adheres to the following documentation conventions:
Convention Description
Bold
Italics
> in menu
commands
!
Highlights file names, paths, and text that you should type exactly as
shown. For example, “Type
cd\dirs
.”
Both emphasizes text and indicates text for which you should substitute your own data or valu es. F or e xam ple , “Type a name for your file,
and the
Indicates commands that you choose from menus in the following for-
.txt
extension (
testfile
.txt
).”
mat: Menu Name > Command Name. For example, “Choose File >
New.”
Alerts you to important information and potential problems.
Points out special cases that you should know about.
Draws your attention to tips that may be useful to you.
8
ACE Job-File Reference
Page 9

Documentation
Complete
documentation set
Your complete ACE documentation set inc ludes the following:
ACE User’s Guid e
ACE Job-File Reference
Mover ID User’s Guide for NCOA
Quick Reference for Views and Job-File Products
System Administrator’s Guide
Edjob User’s Guide
Database Prep
Views Quick Start Guide
RAPID User’s Guide
NCOA
Link
add-on option)
Link
(if you purchased the Mover ID
Related document For more information about U.S. Postal Service (USPS) rules on address
standardization, ref er to USPS publication #28, P ostal Add r essi ng S tan dards. Or,
for information about CASS (Coding Accuracy Support Sytem) and MASS
(Multiline Accuracy Support System), visit the USPS RIBBS (Rapid Information
Access the latest
documentation
Bulletin Board System) web site at
To view or download the complete set of ACE documentation (listed above), go
to
http://help.sap.com. Select the Business Objects tab, select Data Quality from
http://www.ribbs.usps.gov/.
the All Products drop list, and choose ACE from the All Releases drop list.
Pre f ace
9
Page 10

Software versions
About ACE ver s i o ns Three separate version numbers exists for three separate areas of ACE:
ACE. This is the overall version of the ACE software.
CASS-certified ACE. This is the most recently CASS-certified version of
ACE. This version may or may not be the same as the ACE version. If the
CASS version is less than the ACE version, it is only because the newer
version of ACE did not include changes to CASS-related areas of ACE, and
so re-certification was not necessary.
Mover ID. This version applies to ACE’s Move r ID for NCOALink option.
Where version
numbers appear
You can see the versions of ACE, CASS-certified ACE, and Mover ID in the
following ways:
Release notes. With each ACE release, the release notes will tell you the
ACE, CASS, and Mover ID version numbers.
Command line options. Use the command line option pwace /rev or
pwace -rev to see what your installed versions are. Or use the command line
option pwace /lib or pwace -lib to see the installed versions for a complete
list of underlying components that make up ACE.
Help menu. In ACE Views, choose Help > About ACE Views to see what
your installed versions are. Choose Help > Library Version to see the
installed versions of the underlying components that make up ACE.
Mover ID Summary. In the Mover ID Summary report header, you can see
the ACE version and the Mover ID version that you used when processing
your Mover ID job.
CASS 3553 report. The CASS report shows the version of ACE that was
most recently CASS-certified.
10
ACE Job-File Reference
Page 11

Chapter 1:
Introduction to ACE Job
This chapter explains how to run the ACE sample job, and how to create and run
your own jobs. It provides guidelines about how to edit job files and tips for
efficient batch processing.
Chapter 1: Introduction to ACE Job
11
Page 12

Your first ACE Job is ready to run now!
A sample job is included with your software. Running this job will help you ge t
started
messages when it performs the following processes:
starts the program, checks the license key, and verifies the job file
processes the input addresses and writes them to the output file
generates reports
and confirm that you r installat ion was corr ect and co mplete. ACE d isplays
Run on Microsoft Windows
To run the sample job, click the ACE Sample Job icon in your Applications
group. After running the job, use Windows Explorer to browse the files in the
<Install_dir>pw\ace\samples folder.
Run on UNIX To run the sample job, type the commands shown below. We’re assuming that
you’ve installed in usr/postware. If you’ve used another location, change the
path name accordingly.
Run ls bef ore an d after, so you may compare the data that’s input to ACE, and the
files that ACE creates.
$ cd /usr/postware/ace/samples ↵
$ ls ↵
$ pwace quikunx.ace ↵
...processing messages appear...
Processing completed.
$ ls
View reports Reports such as the Job Summary are saved in the Samples subdirectory. After
you run the sample job, look at the Job
Summary Report in the file named
quik***.ajs.
12
ACE Job-File Reference
Page 13

How to begin creating your own ACE jobs
To help you get started preparing your own ACE jobs, use one of the samples
described below
Welcome to ACE Now that you’ve run a sample ACE job, and you are familiar with ACE
functionality,
needs.
Templates Templates are job files nearly ready to use; these files require just a few minutes
of editing from you. Each job is set up to reflect a different situation in which you
might
use ACE.
The template files are located in the template subdirec to ry. Each file is descri bed
below. Choose a template job that most closely matches the way you intend to use
ACE, and make a copy of it. Use the chosen template as a starting point to help
set up your job file.
crdpbcpl.ace prepare two output files: One for assigned records and the
other for unassigned and undeliverable records.
dpbcpl.ace assigns DPBC and creates two output files
dsf2pse.ace is for DSF2 PSE Certification
. You can copy any of these files as a starting point.
you can make modific ations to the job file to customize it to y ou r
dsf2seq.ace is for for DSF2 SEQ Certification
ncoastg1.ace is for NCOALink Stage 1 testing
ncoastg2.ace is for NCOALink Stage 2 testing
newfld.ace creates a new output file that contains both original and
standardized address fields
plus.ace produces an output file with fully assigned addresses and another
output file containing unassigned and undeliverable records
Master job file The master job file is called master.ace. Use this file as a resource. It contains
one specimen of each type of block that an ACE Job file might contain. When
you need to add new blocks to a template job, for example, copy the blocks from
master.ace.
Editing tips To edit job files, you need working knowledge of a good text editor or word-
processing program. If you use a word processor, save job files as simple ASCII
text.
Before editing any sample AC E jobs, make a copy with a different file name.
When software updates are shipped, new cop ies of the sample jobs are always
included. It would be unfortunate to have a new version overwrite a file on
which you’ve been working!
Chapter 1: Introd ucti on to ACE Job
13
Page 14

Guidelines for editing job files
Here are some rules and facts to remember when you’re creating job files:
Do not type parameter blocks from scratch. Copy and edit the job files we
provide, or copy blocks between files as necessary.
Use the file name extensio n .ace.
Some blocks are required and some are optional. Mostly it depends on what
you want to do. You can place blocks in any sequence.
ACE assumes nearly nothing. Many parameters require some sort of entry.
There are some optional parameters that may be left blank.
Do not edit the BEGIN or END lin es, block titles, or parameter names
(anything to the left of the e qual sign). There is only one exception to this
rule: To make ACE ignore a block, insert an asterisk (*) before the word
BEGIN.
Never delete parameters or rearrange them within a block unless the manual
says it’s okay.
Never press <Enter> while typing a long parameter entry. Simply let the
entry wrap onto an additional line. If you press <Enter>, ACE will count the
extra end-of-line marks as separate lines. It will complain about the extra
“lines” and insist that you take them out.
Feel free to add comments at the beginning or end of the job file or between
blocks, but not within a block. Start all comment lines with an asterisk (*).
Do not use the keywords BEGIN or END in comments.
Where space allows, parameter names are followed by clues or options in
parentheses. Clues are in lower case, options in FULL CAPS. Case doesn’t
matter in the entry you type, but spell options exactly as shown, and do not
abbreviate. At Y/N parameters, you may spell out yes or no.
Do not update your job files by hand. Instead, use the Edjob utility. Look for
instructions in the Edjob User’s Guide or the Quick Reference for Views and
Job-File Products.
On Microsoft Windows, ACE supports the Universal Naming Convention.
UNC has these formats for paths:
//server/directory/directory/…/file
or
\\server\directory\directory\…\file
You may use either forward or back slashes, but you may not mix them wi thin t he
same path. You can use UNC-style paths to refer to disk files stored on your PC
or a network server. When you set up reports, you may use a UNC path to ref er to
a printer that is cabled dir ectl y t o a po rt on your P C. You may not use UNC paths
to send reports to a network print queue.
14
ACE Job-File Reference
Page 15

How to run ACE
Checklist Before you run ACE, make sure the following preparation is complete:
Create an FMT file for the input file (if fix ed-length ASCII).
Create a DMT file for the input file (if delimited ASCII).
Create a DEF file for the input file.
Complete the job file (.ace file).
Verify that adequate disk and memory space are available . You should have
free disk space equal to at least twice the size of your input file, as well as
necessary space for new output files.
Command line For your convenience, ACE command-line options also are listed in the Quick
Reference.
To run your job, type the ACE command, followed by the path and name of your
job file.
Windows:pwace
pwace /rev
pwace /v jobfile.ace
pwace [/a | /nos] [/watch] jobfile.ace
UNIX: pwace
pwace -rev
pwace -v jobfile.ace
pwace [-a | -nos] [-watch] jobfile.ace
Each option has a specific result. See the table below for details.
Option Result
(none)
/a Answer. If ACE issues a warning during verification, it will do so and then continu e processing witho ut
/lfile.log Record messages in a log file. (You can use with the /nos and the /a options. However, you will not see
/l
messagefile
/nos No stop on verifier error. Handy when you are running jobs via a batch or shell script. When an error is
/rev Display revision level. When you contact , the advisor may ask you for this information.
/v Verify only; do not process job. Handy when you want to run a job overnight, because you can verify
Display command-line options.
waiting for a response from you.
all the verification issues when /a is chosen.
.log Capture ACE messages in a log file. Add to the end of your command line. For more detals see “Mes-
sages” on page 16.
found, pwace exits and the batch script can go on. It’s a good idea to use this command if you have sev
eral batch jobs queued.
your job during the day.
-
/watch Add system time-of-day to progress messages. Handy when you redirect processing messages to a log
file.
Chapter 1: Introd ucti on to ACE Job
15
Page 16

Tips for efficient batch processing
Messages You can capture ACE messages in a file for later reading. This is a good idea
when you run ACE in the background (see
or overnight. To capture messages, add the following to the end o f your comma nd
line (this is called redirecting the standard output to a file).
Microsoft Windows:/l messagefile.log
UNIX:> messagefile.log
“Background processing” on page 16)
Background processing
Run overnight Some ACE users prefer to set up their job files during the day and run the jobs
To run ACE in the background in UNIX, add an ampersand (&) to the end of the
command line.
overnight, when their c omputer i s not bu sy with other work and net work tr af fic is
lower.
If this interests you, we recommend that you verify your job files during the day.
Use the “Verify Only” option on your pwace command line so that ACE only
verifies, not runs, your job. For example, on a UNIX system:
% pwace –v job.ace
Usually you would verify each job separately, then run them consecutively. To
queue up several jobs, create a command file (also known as a shell script or a
batch or BAT file). In this file, type the ACE command lines t o run your jobs. For
example, on a UNIX system, your shell script might look like this:
pwace -a -nos job1.ace >night.log
pwace -a -nos job2.ace >>night.log
pwace -a -nos job3.ace >>night.log
UNIX users do not have to write a shell script. The alternative is to type several
commands on the same line, separated by semicolons. For example:
16
% pwace -nos job1.ace >log ; pwace -nos job2.ace >>log ; …
ACE Job-File Reference
Page 17

Job file verification
When you run ACE, it first re ads your job file to verify that the entries are valid.
This
is called verifying the job. ACE looks for invalid commands, blank
parameters, or
a problem when
an error message.
Verifier warnings Verification warnings alert you to choices that you’ve made in the job file that
may
result in unwanted ou tcome.
For example, in the job file, you must provide file names for output and report
files. While verifying your job file, ACE checks these file names. If a file already
exists, ACE may warn you that it is about to overwr ite the data in the exist ing file .
ACE pauses your job and warns you with a message like the one shown below.
The message lists the name of the file t o b e over wr i tten during processing. If you
want ACE to continue processing and overwrite the file, press any key. If you do
not want ACE to overwrite the file, press the Escape key to stop the program.
Return to the job file a nd change the name of the file listed in the warn ing
message.
Performing Inter Block Verification
Verification Warning
The file c:\pw\ace\client.rpt already exists. If you choose
CONTINUE, the file will be overwritten
Press any key to continue or <ESC> to exit
anything that would keep the pr ogram f r om runni ng . I f ACE fi nds
verifying your job file, it will issue either a warning message or
Verifier error messages
Verification errors alert you to choices that you’ve made in the job file that
prevent ACE from processing your addresses. For example, if you’ve typed the
wrong name for a field, ACE won’ t be abl e to fi nd th e field , and an error message
will be issued.
If an error message appears, press Enter, return to the job file, and change the
parameter entry (in this example, correct the field name). Then run ACE again.
Opening the Input file
Verification Error
Post to Input File Block: 1, Parameter: 2
The copy parameter specifies an invalid destination,
<ap.error_code, error_code>
Chapter 1: Introd ucti on to ACE Job
17
Page 18

Progress messages
ZIP Code sort You have the option in ACE to sort input records by ZIP Code. This makes
address processing much faster.
If the input ZIP Code is stored in a discrete field, then ACE does not display
processing messages and you will not be able to interrupt. ACE only reports
“Ending ZIPsort Process” upon completion. This is because ACE turns
processing over to a separate sub-program which does not report its progress.
If city, state, and ZIP Code are stored together in a lastline or multiline field,
then ACE must parse out ZIP Codes before sorting. In this case, progress
messages are displayed during sorting.
Address processin g Once processing begins, ACE displays progress messages that indicate the job’s
progress (unless you’ve chosen to run ACE in the background, or you are
redirecting the messages to a fil e). ACE periodical ly updates da ta on the scr een to
show the number of addresses processed, assigned, and unassigned.
Input File = mailfile.dbf
Starting Record = 1
Ending Record = 19693
-------------------------------- = -------------Records Processed = 19000
Records Deleted (but processed) = 0
Records Detected by ZIP+4 Change = 0
Records Passed by Input Filter = 19000
Undeliverable Addresses = 58
Foreign Addresses = 0
Other Addresses Not Matched = 2499
-------------------------------- = -------------Addresses Assigned = 16443
Percentage Matched = 86.85
To interrupt processing
18
ACE Job-File Reference
You can stop ACE from processing your job after verification is complete by
pressing the Escape key once (Windows) or twice (UNIX). ACE will generate
reports based on the records that have been processed up to this point.
If you interrupt processing, and then process just the remaining records in a
separate operation, reports will be generated for each separate run, not for the
whole job.
If you want to resume processing at the point of int err upt io n, not e th e Number of
Records Processed on your screen. You may then run the job again and start
where you left off .
Note: If you use an input filter, then the Number of Records Processed will
not give you an accurate idea of the physical record number where you
should resume processing.
Page 19

Chapter 2:
Job-file blocks and parameters
This chapter contains detailed reference information about every block and
parameter in th e ACE Job fi l e .
Chapter 2: Job-file blocks and parameters
19
Page 20

General
The product name and version appear in the title line of this b lock. ACE and the
Edjob utility use that information so do not change it. When you update a job,
Edjob changes the version number for you. For more information about Edjob
and how it dates your job, see your most recent release notes or refer to the Edjob
User’s Guide.
Job Description (to 80 chars)
Enter a brief description of th e job. This parameter is optional so you can leave it
blank.
The Job Description is printed in the Job Summary report. You might include a
project or client’s name, your company name, or other key facts about the job.
You may also use the shortcuts below, however, the Job Summary report inc ludes
the date, tim e, and job name by default.
Type $job in place of the job file name and ACE conv erts i t to the base name
Type $date and $time to have ACE use the date and time from your
Required Block
(without path or extension) of your job file.
computer’s clock at the time you start the job. The date is 9 characters long,
in the format dd-mmm-yy. The time is 10 characters long, in the hh:mm:ss
format with am or pm.
Job Owner (to 20 chars)
Enter the name of the job owner. This parameter is optional so you can leave it
blank.
The Job Owner should be you, the person who created the job file. This
information is printed in the Job Summary report.
20
ACE Job-File Reference
Page 21

Execution
Assignment Mode(NONE/ASSIGN/PARSE/GEO)
Option Description
Assign Normal ACE processing, including parsing, directory look-up, postal-
code assignment, and addr ess sta nd ard iza tion.
None ACE sorts your data using ZIP Code Sort. ACE does not process records
through the assignment engine. This mode is rarely used.
Parse ACE parses records into its discrete components, but does not perform a
look-up in the postal director ies. This m od e is
unverified and many AP fields contain only
some are blank. Only the first page of the Job Summary report is available, and no other reports.
Geo Available only for the GeoCensus Option. ACE performs look-ups in the
GeoCensus directories, and only the GeoCensus components are available for posting. The GeoCensus Report, and the first page of the Job
Summary report, are the only reports available.
Assign Which Records (ALL/UNASSIGNED)
Required Block
fast
, but parsing results are
unstandardized
data, and
Option Description
All ACE attempts to assign all eligible input records.
Unassigned ACE examines each input record to determine whether it needs to be
assigned or not. Selecting Unassigned can save time if you manage a
database that you run through ACE regularly. On each run, you would
have ACE assign on ly th os e fe w re cor ds tha t yo u’ ve a dde d s inc e the last
run.
ACE decides to assign or not based on your DEF file (what input fields
you set up) and the physical layout of your output file. For exam ple,
CART will be checked if you set up PW.CART in your input file and
AP.CART is posted to your output file (either manually or by automatic
posting).
Note:
ACE does not determine whether the existing codes are
only whether they are
ACE reports reflect
you need a USPS 3553 form covering your entire mailing list, be sure to
set this parameter to All: Assign Which Records = All.
present
.
only
the unassigned records that ACE processed. If
correct
,
Chapter 2: Job-file blocks and parameters
21
Page 22

Perform Mover ID NCOA
Link
(Y/N)
This parameter controls the Mover ID Option. Mover ID is a separate for-sale
option.
Option Description
Y If you purchased the Mover ID NCOA
this job, then type
N If you do not own Mover ID or do not want to use it on this job, type N.
Perform Z4 Change Processing (Y/N)
Type Y to enable Z4 Change processing. This parameter controls the Z4Change
option. You must also complete a Z4Change block in your job, and install a
Z4Change directory on your computer.
Enter N to disable Z4 Change processing.
Link
Y
. In addition, you must also complete these blocks:
Mover ID NCOALink
Customer & USPS Licensee Information
Mover ID NCOALink Service Provider
Mover ID NCOALink PAF
Memory Usage
Auxiliary Files
option and you want to use it for
Z4Change is based on a USPS directory of the same name. The Z4Change
directory lists all the ZIP and ZIP+4 codes in the country. A record in this file is
tagged if it has changed within the last 12 months.
Z4 Change is a for-sale option. Refer to the ACE User’s Guide for more
information.
Perform GeoCensus Processing (Y/N)
Type Y to enable the GeoCensus Opt ions, Centroid and Addr ess-Level. You must
also complete a GeoCensus block in your job, and install one or both of the
GeoCensus directories on your computer as applicable.
Enter N to disable the GeoCensus options.
ACE uses GeoCensus to assign geographic codes, including latitude, longitude,
and census codes. With that information, you have the basis for using mapping
and demographic-coding programs. For details on GeoCensus, refer to the ACE
User’s Guide. GeoC ensu s is a for-sale option.
Perform EWS Processing (Y/N)
Type Y to process addr esses using the EWS directories. Type N if you do not plan
to process addresses using the EWS directories.
If you enable EWS, you must regularly download new directory data from the
SAP SMP (Service Marketplace). For more information, see the ACE User’s
Guide.
22
Early Warning System (EWS) detects delivery points that are not yet listed in the
current ZIP+4 directories.
ACE Job-File Reference
Page 23

Perform eLOT processing (Y/N)
Type Y to enable eLOT processing. Type N to disable eLOT processing.
Enhanced Line of Travel (eLOT) takes Line of Travel one step further in the
presorting process. The original line of travel narrowed down the mail carrier’s
delivery route to the block face level (ZIP4 level) by distinguishing whether an
address resides on the odd or even side of a street/thoroughfare. eLOT narrows
the mail carrier’s delivery route walk sequence to the house (Delivery Point)
level. This allows you to sort your mailings to a more precise level.
Perform RDI Processing (Y/N)
Type Y to enable RDI processing. Type N to disable RDI proce ssing.
The Residential Delivery Indicator (RDI) lets you dete rmine if a given address i s
for a residence or a business. For more information on RDI processing, see
“Residential Delivery Indicator (RDI)” on page 127.
Perform LACSLink Processing (Y/N)
Type Y to enable LACS
processing.
Note: LACSLink must be enabled if you want to produce a CASS 3553
report.
The USPS LACS
addresses. These “911” conversions make it easier for police, fire, ambulance,
and postal personnel to locate a rural address. LACS
when streets are renamed or post offi ce boxes renumbered.
Link
LACS
is available as a for-sale option in ACE.
Link
processing in your job. Type N to disable LACS
Link
product updates rural-route addresses to street-name
Link
also converts addresses
Link
If you type Y for this parameter, you must also set the following options:
LACSLink Directory in the Auxiliary Files block. (See “LACSLink
Directory (path only)” on page 50.)
Load LACSLink Dirs into Memory in the Memory Usage block. (See “Load
LACSLink Dirs into Memory (Y/N)” on page 30.)
Chapter 2: Job-file blocks and parameters
23
Page 24

Perform SuiteLink Processing (Y/N)
Type Y to enable Suite
Link
Suite
Suite
is a for-sale option in ACE.
Link
is a USPS directory. It contains multiple files of specially indexed
information like secondary numbers and unit designators for high-rise buildings.
ACE uses the data in the Su ite
ACE matches a company name, a known high-rise address, and the CASScertified ZIP+4 in your database to data in Suite
creates a complete business address that includes the suite number.
To perform SuiteLink processing, you must also set the following options:
SuiteLink Directory in the Auxiliary Files block (see “Load SuiteLink Dirs
into Memory (Y/N)” on page 30).
Name Parsing Files in the Auxiliary Files block (see “Name Parsing files
(path only)” on page 51)
Load SuiteLink Dirs into Memory in the Memory Usage block (see “Load
SuiteLink Dirs into Memory (Y/N)” on page 30).
Enter licensee information in the Customer & USPS License Information
block (see “Customer & USPS Licensee Information” on page 36).
Perform DPV Processing (Y/N)
Type Y t o enable DPV processing. Type N if you don’t want DPV enabl ed in you r
job.
Link
processing. Type N to disable it for this job.
Link
product to add suite numbers to an address.
Link
. When there is a match, ACE
DSF2 Mode
DPV is a for-sale option in ACE.
Delivery Point Validation (DPV) is a directory developed to assist you in
validating the accuracy of your address information. With DPV, ACE identifies
addresses that are undeliverable as addressed. ACE also determines if an address
is a Commercial Mail Receiving Agency (CMRA, a private business that acts as a
mail receiving agent).
Important: Beginning with CAS S Cycle L (August 2007), you must pr ocess
!
your data with DPV. However, i f you do not want DPV enabled, run y our job
in Non-CASS mode (
“Enable Non-CASS Features? (Y/N)” on page 25). For
information about DPV processing, see “Delivery Point Validation (DPV)”
on page 113.
Type Y to enable DSF2 processing. Type N if you don’t want DSF2 enabled in
your job
DSF2 Mode setting Description
.
Augment Your data receives address attributes.
Sequence Your data receives walk-sequence data, which you can use to
earn mailing discounts.
24
ACE Job-File Reference
Both Your data receives both the address attributes and walk-
sequencing benefits of DSF
2
.
N Disables DSF2 processing.
Page 25

If you enable the DSF2 mode, you must also set the Assignment Mode par amet er
to Assign (see
Important: Because DSF2 includes DPV (Delivery Point Validation) and
!
eLOT information, you must enable DPV and eLOT processing when you
perform any type of DSF
Enable Non-CASS Features? (Y/N)
Type Y when you want to use the options in the Non-CASS block (see “Non-
CASS” on page 60). Otherwise, this parameter is set to N by default.
This option enables non-mailing users the ability to process data without using
some CASS-required features.
When you enable non-CASS feat ures, AC E does n ot generate CASS reports, and
you won’t be eligible for postal discounts.
If you choose to r eset t hi s op ti on to N and your direct ori es h ave expired, you will
receive an error message stating that the CASS 3553 report is disabled.
+ Sort Input File by ZIP Code (Y/N)
Type Y to sort th e input datab ase by ZI P Cod e in ascen ding (00 000-9 9999) order.
This may help ACE run faster because it reads sections of the ZIP+4 Directory
into memory much less often.
“Assignment Mode(NONE/ASSIGN/PARSE/GEO)” on page 21).
2
processing.
ZIP-Code sorting may or may not be helpful for you. Here are some
considerations to help you decide whether or not to use this feature:
Sorting saves time only if your mailing includes many addresses in each of a
number of cities (we call this a dense and wide list). Sortin g may not save you
much time if the addresses in your input file are:
sparse (only a few addresses per ZIP Code)
local (all in one ZIP Code or just a few ZIP Codes)
sorted (already listed in ZIP Code order)
To sort, ACE needs work space on your hard-disk drive. Do not sort by ZIP
Code unless you have free disk space equal to twice the size of your input
file.
Do not sort by ZIP Code if you want to retain the original record sequence.
For example, if your input records are in account-number order, and you
want them to stay that way, do not sort by ZIP Code.
If you want the speed of ZIP Sort, but you want to keep your records in their
original sequence, make a backup copy of the original database, before ACE
processing (see “Create Backup File (Y/N) Backup Directory (path)” on
page 27). Important: ACE will not process the backup copy, so addresses in
that file will not be corrected or coded.
You may not use ZIP sorting if you process just a part of the input file by
setting Starting and Ending Record Numbers (see “Input File” on page 52).
Also, you may not use ZIP sorting on delimited files.
Chapter 2: Job-file blocks and parameters
25
Page 26

Warn Before File Overwrite (Y/N)
Type Y if you want to receive a warning message before ACE overwrites an
existing file. This parameter applies to all types of files that ACE may create,
except work files. ACE always overwrites your work files without issuing a
warning.
Option Description
Yes ACE stops processing, displays a warn ing message, and waits for you to
respond to it. You then need to stop the job, change the file name, and resu me
processing. Important: The job will stop processing and remain stopped until
you respond to the warning message. This could delay processing if you are
running batches at night and the computer is unattended.
No ACE overwrites the existing file with the new informatio n withou t warning
you.
Show Detailed Process Messages (Y/N)
Type Y to receive all error, warning, pre-processing and verification messages.
Type N to view only error and warning messages. ACE will not show pre-
processing or verification messages.
We suggest that you set this parameter to Y. The number of pre-processing
and verification messages in ACE does not slow processing much, and you
can monitor ACE’s progress as it verifies your job.
Message Update Increment
Enter a value to indicate the number of records that you want ACE to process
between messages. If you don’t want ACE to display processing messages, set
this parameter to the same number of records in your input file.
During address processing, ACE keeps you updated on the job’s progress with
on-screen processing messages. If you choose to receive processing messages,
you’ll need to tell ACE how often to display these messages on your screen.
The number that you enter de pen ds on t he size of your input file and the speed of
your machine. If your computer processes quickly, you will want to set this
number high so that messages don’t flash across the screen too quickly to be
readable. Also consider that the more frequently you choose to update these
messages, the slower ACE runs.
Work File Directory (path)
Type a path and name of the directory where ACE should sto re work fi le s. If you
don’t enter a path and name, ACE places the work files in the current directory.
Work files are used for temporary storage during ACE sort routines.
We recommend that you set a side a sep arate subd irectory for work fi l es, an d
not put other files there.Be sure that you have adequate disk space and
permission to write file s into this directory.
26
ACE Job-File Reference
Page 27

Create Backup File (Y/N)
Backup Directory (path)
Create Reports (Y/N)
Type Y if you want ACE to create a backup copy of your database before input
posting begins. T hen pro vide the pa th for a backu p direct ory. Type N so that ACE
does not create a backup copy of your database.
An output file needs as much space as a backup file.Therefore, you can
choose not to create the backup file and set up ACE to create an output file
instead. This way you r input file remains untouched.
Type Y to create reports. Type N if you don’t want any reports.
Option Description
Y ACE verifies all report blocks in your job file (except those that are com-
mented out) and creates the reports at the end of processing.
N ACE does not create any reports, and the verifier ignores report blocks. (You
may want to type N if you are processing in parse-only mode and you want
the job to process quickly (see
GEO)” on page 21).
“Assignment Mode(NONE/ASSIGN/PARSE/
Chapter 2: Job-file blocks and parameters
27
Page 28

Memory Usage
Optional Block
Save processing time by loading directories into memory before processing.
You may need to install additional memory on your system. To determine the
amount of memory required, add the size of the directories to the amount of
memory required to run ACE. The size of t he dir ect ori es var ies depending on the
amount of new data in each directory release. For more information about space
requirements and directory sizes, see the System Administrator’s Guide.
More speed improvement tips
Windows Use Extended Memory
See the Appendix A in your Mover ID User’s Guide for NCOA
explanation of NCOA
Set these parameters only if you use Windows operating systems. Settings here
won’t effect operating systems other than Windows. You will obtain the best
results if you have more than 2GB of memory available for processing.
The Windows Use E xtended Memory parameter controls memory cach ing o n t he
Windows operating system. This applies to caching NCOA
Other directories such as DPV and R DI may be ava ilable in futu re releases. I f you
set this option to Manual or Auto, then also set the NCOALink Memory and
NCOALink Memory Allocation options.
Value Description
None ACE uses all available application memory for processing.
Auto Recommended setting. ACE determines how much memory to use. Typi-
Manual Allows you to manually enter the amount of memory. Enter the amount of
Link
Link
processing speed and what you can do to improve it.
cally, this is approximately 200MB of application memory.
memory to use at the W indows M emory Window Size option. For important
information about setting this parameter, see
Size” on page 30.
“Windows Memory Window
for a complete
Link
directories only.
Important: Read the rest of this section for important information about
how to prepare your Windows system for extended memory.
Note: For more information about setting up for NCOALink processing, see
Link
the MoverID User’s Guide for NCOA
Prepare Windows system In order to take advantage of processing improvements, you or your System
.
Administrator must perform two system-level tasks. Unless you perform these
two tasks first, th e two Windows memory parameters are unusable. The two tasks
are:
1. Edit th e boot.ini file. See “Edit boot.ini” on page 29 for details.
2. Edit permissions so that pages can be locked into memory. See “Edit
permissions” on page 29 for details.
28
ACE Job-File Reference
Page 29

Edit boot.ini The boot.ini file specifies how to start (or boot) the computer. If you have over
4GB of memory, follow the steps below to use Physical Address Extensions
(PAE) to enable storing more data in memory.
If you have never made changes to boot.ini before, we recommend that you
!
give these instructions to your System Administrator. If you accidentally
delete something, it may seriously and adversely affect your computer.
1. At a command prompt, navigate to the root of the boot directory. For
example, c:\boot.ini (where c is the drive where the file is located).
2. Type attrib -s -h -r boot.ini to remove the system, hidden, and read-only
attributes of the boot.ini file.
3. Open the boot.ini file in a text editor and then type /pae at the end of the
operating system that will process your ACE jobs. For example,
multi(0)disk(0)rdisk(0)partition(1)\WINDOWS="Microsoft Windows
XP Professional" /fastdetect /pae
4. Save and close the boot.ini file.
5. At the command prompt, type attrib +s +h +r boot.ini to restore the syste m,
hidden, and read-only attributes that protect the boot.ini file.
Edit permissions Follow these instructions to grant permissions for someone to lock pages in
memory.
1. Choose Start > Run.
2. In the Open box, type gpedit.msc.
3. In the Group Policy window, open the following fo lders in this order:
Computer Configuration
Windows Settings
Security Settings
Local Policies
User Rights Assignment
4. In the details pane, double-click Lock pages in memory.
5. In the Lo cal Security Policy Setting window, click Add.
6. In the Select Users or Groups window, add the applicable user.
7. Reboot to make your changes take effect.
Chapter 2: Job-file blocks and parameters
29
Page 30

Windows Memory Window Size
If you set the W indo ws Use Extende d Memory o ption to Manua l, we reco mmend
setting the Win dows Memory W indow Size option to 200MB. Th is will be a good
starting point for any performance testing that you do. Then you can modify the
size as needed after further testing.
ACE displays a verification error or warning if your system hasn’t been set
up properly. If you are unable to set the Windows memory options, follow
the steps under
Memory cached with these options cannot be monitored through standard
means. Task Manager does not attribute the used memory to the application.
However, system memory will decrease during ACE processing.
Load RDI Dirs into System Memory (Y/N)
Type Y to load the RDI directories into system memory.
For more information about RDI, see “What is RDI?” on page 128.
Load LACSLink Dirs into Memory (Y/N)
Type Y to load the LACS
To perform LACS
Link
“Prepare Windows system” on page 28.
Link
directories in to sy stem memory.
processing, you must also set the following options:
Perform LACSLink Processing in the Execution block. (See page 21.)
LACSLink Directory in the Auxiliary Files block. (See page 49.)
The USPS LACS
Link
addresses. These “911” conversions make it easier for police, fire, ambulance,
and postal personnel to locate a rural address. LACS
when streets are renamed or post offi ce boxes renumbered.
Link
LACS
LACS
LACS
is available as a for-sale option in ACE. If you’ve purchased the
Link
option, you can control memory usage with this parameter. Caching
Link
directories requires approximately 150 MB of memory. Ensure that
your computer has adequate memory available before performing LACS
processing.
If you load LACS
Link
considerably.
Load SuiteLink Dir s int o Memory (Y/N)
Type Y to load the Suite
performance.
Load DPV Dirs into Syst em M em ory (Y/N)
Type Y to load the DPV directories into system memory.
When you perform DPV and NCOA
the DPV directories into memory first, before the NCOA
product updates rural-route addresses to street-name
Link
also converts addresses
Link
directories into memory, ACE performance improves
Link
directory into memory. This may improve Suite
Link
processing at the same time, ACE loads
Link
directories.
Link
30
ACE Job-File Reference
Page 31

Load DSF2 Dirs into Memory (Y/N)
Type Y to load DSF2 directories into memory.
ACE caches only the directories needed for adding address attributes (when the
DSF2 Mode parameter is set to Augment or Both ). If y ou’re performing
sequencing only, there’s no need to cache the DSF
NCOALink Memory (Auto/Manual/N)
Control NCOA
Option Description
Auto Recommended setting. ACE loads your NCOA
ory. ACE determines the amount of memory to use based on the available
memory, the size of the files, and the exten t to which caching the files will
improve processing time.
Manual ACE loads your NCOA
you enter in the NCOALink Memo ry Allocation param eter. If you choose to
set this option to Manual, then we recommend setting NCOALink Memory
Allocation to 2048MB or more.
N Disables transferring the NCOA
slower.
Link
memory usage with these options:
Link
files into system memory based on the amount
Link
directories. Your processing will be
2
directories.
Link
files into system mem-
When you perform DPV and NCOA
directories will be loaded into m emory first, before the NCOA
NCOALink Memory Allocation (# of MB)
If you entered Manual at the NCOALink Memory parameter, then enter the
amount of memory, in megabytes (MB), that you want to dedicate to loading
Link
NCOA
files into memory. We recommend 2048MB or more.
To maximize NCOA
to 4GB. Even as little as 200MB can provide a large boost in performance. The
amount of memory that you can allocate is limit ed only by the amount o f memory
available on your computer.
The USPS recommends that you have at least 1.5GB free while performing
Link
NCOA
processing. Ideally, there would be 4GB available.
Cache for ZIP Order Processing (Y/N)
Type Y to improve NCOA
Code order.
Two ways to place data in
ZIP Code order
To place your data in ZIP Code order, you have several options. For example:
Use a program such as FirstPrep to place the data in ZIP Code order before
you process the data with ACE.
Link
processing at the same time, the DPV
Link
performance, allocate as much memory as possible, up
Link
processing speed when your input data is in ZIP
Link
directories.
Turn on the Sort Input File by ZIP Code option (Execution block) in ACE to
place the data in ZIP Code order. ACE performs the ZIP sort while you run
ACE.
Chapter 2: Job-file blocks and parameters
31
Page 32

Caching When the Cache for ZIP Order Processing option is turned on, one or more
segments of the NCOA
Link
data are cached on your computer. A segment of data
is temporarily saved in the computer’s RAM until that segment of data has been
processed. Then the next segment is loaded into RAM and the previous segment
is removed from RAM.
Turning this option on when processing data that is not in ZIP Code order
!
will slow performance. Turn on the Cache for ZIP Order Proc e ssing option
only when processing your data in ZIP Code order.
Best results When you use the Cache for ZIP Order Processing option, you’ll see the greatest
speed improvements in the following situations:
Your data is concentrated geographically. For example, a 100,000-record file
that contains only Wisconsin addresses is processed much faster than a
100,000-record file that contains addresses for all 50 states.
Your data file is large. The speed improves in proportion to the size of the
data file.
The Cache for ZIP Order Processing option is not an automatic performance
enhancement in every situation. Take some time to analyze how it affects your
processing speeds.
Insufficient Memo r y Act ion(ABORT/CONT)
ACE generates a verification warning if there is not enough system memory
available to load the directories. Choose one of the following options:
Setting Description
Abort Discontinue processing the entire job. This is the default setting.
Cont Continue processing the job without loading the directories into system
memory. Choose this setting if you want to ensure that the job is processed
without interruption.
32
ACE Job-File Reference
Page 33

GeoCensus
Remember to set the Perform GeoCensus Processing parameter in the Execution
block.
Geo Mode (Centroid/Address/Best/All)
Select to have ACE check the Centroid GeoCensus (CGEO) or the Address-Level
GeoCensus (AGEO) information, and to assign geographic codes to addresses.
AGEO information. ACE determines that latitude and longitude information on
each address is unique to that address.
CGEO information. ACE attempts to match latitude and longitude information
on each address based on a ci rcular area (a centroid circle) in which the addr ess is
located.
Output return values: ACE outputs one of these return codes based on theGeo
Mode parameter setting:
0 Matched in address level.
1 9-digit match in Centroid.
4 7-digit match in Centroid.
Optional Block
5 5-digit match in Centroid.
7 No match in Centroid.
8 Not matched in Address level.
9 Both options tried, but n o match in either.
Blank Not tried.
Mode option Description
Address ACE searches the AGEO directory for this information.
Centroid ACE searches the CGEO directory for this information.
Best ACE checks the AGEO directory, and if it doesn’t find any infor-
mation, ACE checks the CGEO directory. ACE first checks
AGEO to see if the address has data, and if it does, ACE returns
that information. If it does not, ACE searches CGEO and returns
that information. ACE does not return both the Address-Level and
the Centroid-Level information.
All ACE checks AGEO and CGEO fo r inf or matio n. Re gar dless of
whether information is found in AGEO, ACE runs CGEO. With
this option it is possible to get both AGEO and CGEO information.
Centroid Dir (path & cgeox.dir)
If you are using the Centroid GeoC ensus option, ty pe the full path of the Centroid
directory. Example:
MS Windows: \pw\dirs\cgeox.dir
UNIX: path/postware/dirs/cgeox.dir
Chapter 2: Job-file blocks and parameters
33
Page 34

Addr Level Dir 1—10 (path & ageo*.dir)
If you are using the Address-Lev el GeoCensus opt ion, use these 10 parameters to
type the full path of each of the 10 d irectory f iles that you plan to use. The address
directories are named ageo1.dir through ageo10.dir.
Each file covers a region of th e U.S. You can designate the paths of only t he fi les
that you need to use in each job. The ZIP ranges covered by each file will likely
change with each quarterly update of the directories, so check the most recent
ACE release notes for the current ranges.
34
ACE Job-File Reference
Page 35

Z4Change
If you want to perform Z4Change processing, you must set the Perform
Z4Change Processing parameter in the Execution block and set the two
parameters described below.
To learn more about the Z4Change option, see the ACE User’s Guide.
Z4Change Dir (path & z4change.dir)
Enter the location and name of the Z4Change directory. You may use a full
(absolute)
your
Microsoft Windows: \pw\dirs\z4change.dir
UNIX: path/postware/dirs/z4change.dir
Last ZIP+4 Assi gnment Date (MM/Y YYY)
Enter the month and year that the input records were most recently ZIP+4
coded—either through a full ACE process or a previous Z4Change pass.
Enter the month and year in mm/yyyy format . For example, you would enter July,
2007 as “07/2007.”
or relative path. For example, if the Z4Change directory is installed in
PostWare dirs subdirectory:
Optional Block
ACE will verify that your date is within the 12-month period covered by your
Z4Change file. If there is a date problem, you will receive an error message when
ACE verifies your job file.
Chapter 2: Job-file blocks and parameters
35
Page 36

Customer & USPS Licensee Information
Optional Block
Required for NCOA
Link
Suite
and DSF
, LACS
2
Link
Link
,
, DPV,
This block is required for all users performing NCOA
2
DPV, and DSF
processing. You must provide information about the company
Link
performing the processing (the licensee) and the company for whom they are
, Suite
Link
, LACS
Link
performing the processing (the customer). If you’re performing the processing for
yourself, you are the licensee and the customer.
Required parameters There are parameters in this b lo ck that must be complete if you are processing
NCOALink, DSF
Parameter NCOA
Service Provider
Link
Full
2
, DPV, or LACS
Link
NCOA
Service Provider
Limited
Link
.
End User DSF
2
DPV LACS
Link
NCOALink Platform ID X X X
DSF2 Licensee ID X
Licensee Name X X X X
List Owner NAICS X X X X
Customer/List ID X X X X
Customer Company Name
Customer Address
Customer City
Customer State
Customer ZIP
XXXXXX
Customer ZIP+4
,
IMB Mailer ID
Date List Received X X X
List Return Date X X X
Log File Directory X X X X X X
Required for DSF
2
When you perform DSF2 processing, you must provide information about the
2
DSF
-licensed company and the party for whom it is processing this job.
If you are performing DSF2 and NCOA
Link
processing in the same pass, then the
information that you enter in the Customer & USPS Licensee Information block
2
must apply to both DSF
and NCOA
customer ID is different for DSF
Link
2
processing. If, for example, the
and NCOA
Link
, you will need to perform the
job in two passes.
IMB Mailer ID
Enter your 6 to 9-digit numeric Intelligent Mail Barcode (IMB) ID code that was
assigned to you from the USPS based on your annual mail volume.
The IMB Mailer ID is required for the NCOA
Link
Processing Acknowledgement
Form (PAF).
36
ACE Job-File Reference
Page 37

NCOA
Link
Platform ID (4 chars)
The Platform ID is the NCOA
assigned by the USPS. It’s exactly four characters long.
The licensee information will appear in the Processing Acknowledgement Form
(PAF) log and in the Mover ID Summary. The Platform ID is available on the
license agreement from the USPS.
DSF2 Licensee ID (to 4 chars)
Enter your DSF2 identification number, as the USPS assigned it to you.
For NCOA
processing.
Licensee Name (to 30 chars)
Enter the name of the company that is licensed to perform DSF2 processing.
For NCOA
NCOA
The Licensee Name is available on the license agreement from the USPS.
Link
Link
or Suite
Link
or Suite
or Suite
Link
or Suite
Link
processing, the licensee is the party who performs the
Link
Link
processing, the Licensee Name is the name of the
licensee, up to 30 characters.
Link
licensee’s identification number,
List Owner NAICS (6 chars)
Enter the North American Industry Classification System (NAICS) code, which
identifies what business the list owner engages in. For more information, see
http://www.census.gov/epcd/www/naics.html.
Customer ID/List ID (6 chars)
Enter the unique ID assigned by the licensee to identify the list owner (customer).
Customer/List ID is a unique ID assigned by the licensee to identify the list owner
(customer).
If the licensee does not have a naming scheme in place for the customer, the
6 digits could be made up of:
First 3 digits: Customer name/identifie r
Last 3 digits: List name/identifier
The Customer/List ID is required for limited and full service providers. End users
may leave it blank.
Customer Company Name (to 50 chars)
Customer Add ress (to 50 char s)
Customer City (to 28 chars)
Customer State (2 chars)
Customer ZIP (5 chars)
Customer ZIP+4 (4 chars)
Customer Phone (10 chars)
The customer is the person o r comp any for whom you are performing NCOA
processing. This might be your own company or an external client. These
parameters are required if you are performing NCOA
Link
processing.
Link
The customer information appears in the Mover ID Summary and log files.
Chapter 2: Job-file blocks and parameters
37
Page 38

Processing Frequency (2 chars)
Enter a 2-digit number (from 1 to 52) that indicates how many times per year the
list is processed with NCOA
If the list owner has other lists processed by the NCOA
frequencies, enter 99.
Date List Received (yyyy/mm/dd)
Enter the date when the NCOA
yyyy/mm/dd format.
List Return Date (yyyy/mm/dd)
Enter the date when the list will be returned to the customer. Use the
yyyy/mm/dd format.
Link
.
Link
licensee at different
Link
or DSF2 licensee received the list. Use the
38
ACE Job-File Reference
Page 39

Log File Directory (path only)
Indicate where specific log files should be produced:
NCOA
DSF
DPV false-p ositive log file
LACS
ACE determines the file names during processing, as the USPS requires. This
directory must exist and must be writable.
It’s very important that you use the same path for all jobs. If you have multiple
clients, use the same log file directory for all clients so that the log files are
combined.
Link
log file
2
log file
Link
false positive log file
Chapter 2: Job-file blocks and parameters
39
Page 40

Mover ID NCOALink
Optional Block
Required for NCOA
users
Link
If you’re performing NCOA
mode, the number of data months, and other NCOA
Link
processing, you must specify the match logic,
Mode (COA, RETCODE, STATS)
Choose your NCOA
Option Description
Link
mode:
COA You’re processing this job to update it with the latest address data.
Stats You’re processing this job for statistical analysis, such as the number of
records in your list that have updated addresses and the number of moves of
each type. When you choose Stats, you do not get move-updated addresses.
Retcode Yo u’ re proc essin g this job fo r inf orm atio na l purpo se s. Whe n you choo se
Retcode (return code), and you post to the APM.RetCode field, you can see
the return codes, which further explain if matching records were found in the
Link
NCOA
directories, and why or why not . With this option, you do not get
move-updated addresses.
Match Logic Choose the types of moves that you want to process:
Option Description
Link
processing options.
Business Business moves only. This ignores family and individual moves.
Individual Individual moves only. This ignores family and business moves.
Ind & Bus Individual and business only. This ignores family moves.
Residential Individual and family moves only. This ignores business moves.
Standard All types of moves will be processed.
Processing Category Specify your reason for using NCOA
Option Description
Emp Train You’re processing this file as part of employee training.
Int Db Tst You’re testing with a licensee-owned database.
Mktg Test You’re testing with external customer lists.
Normal You’re processing the mailing list to update it before a mailing.
Stage I
You’re testing the matching performance against a USPS test file. The
Stage II
USPS scores the Stage II test file. Choose Stage I or Stage II only if you
are processing a USPS test file. See your
Link
NCOA
for details.
Sys Test You’re processing this file as part of system testing, such as loading of
USPS file updates.
Link
:
Mover ID User’s Guide for
40
ACE Job-File Reference
Page 41

High Match Rate Description
The USPS wants to distinguish between files that have a legitimate reason for a
high percentage of NCOA
create mover lists.
If there is a legitimate reason for your file to contain a lot of matches with the
NCOA
blank if you don’t expect an unusually high match rate.
Value Description
A
Link
matches and files that are fraudulently used to
Link
directory, specify the reason at this parameter. Leave the parameter
Link
ANK
people who have moved, but you don’t yet have their new address. This option
is available only to full service providers.
-processed file.
An ANK
Link
-processed file contains records for
S
R
Accepted COA Months
Stage file.
cessing category is set to Stage also.
Return Mail File.
returned to sender.
Use this setting to make ACE ignore change-of-address data older than the
specified number of months. For example, enter 12 t o use change-o f-address data
that has a move-effective date within the last 12 months.
If you are an end user or limited service provider, enter a value from 6 to 18. If
you’re a full service provider, enter a value from 6 to 48. If you leave it blank,
ACE accesses all data that you have access to.
Processing First-Class Mail (Y/N)
Processing Periodicals Mail (Y/N)
Processing Standard Mail (Y/N)
Processing Package Services Mail (Y/N)
Indicate the mail classes that you’re processing by entering Y for those you’re
processing and N for those you’re not.
If you’re performing Stage I or Stage II testing, be sure that the pro-
A “return mail file” contains records for mail that was
List Name (to 30 chars)
Enter the name of this list. You can name the list whatever you like, up to 30
characters.
If this list is a master house list or your only mailing list, you might
consider entering your company name here.
The name you enter here will appear in the log files.
Chapter 2: Job-file blocks and parameters
41
Page 42

Other Processes Used to Prepar e List
The USPS requires information about all processes used in obtaining your final
data results. In particular, the USPS wants to know if you performed any USPS
processes, such as CASS, DPV, RDI, and NCOA
performed these processes through ACE, ACE keeps track of t his information for
you in the Mover ID Summary. If you’ve performed any additional processes on
this data, using software other tha n ACE, you must enter it at this parameter.
Link
processing. If you’ve
You can enter up to 512 characters. The text you enter here will appear in the
Link
Mover ID Summary and the NCOA
log files.
42
ACE Job-File Reference
Page 43

Mover ID NCOALink Service Provider
Optional Block
Required for NCOA
users
Link
If you’re an NCOA
type of processing being done. If you’re an end user, you can skip this section.
Broker Involved (Y/N)
The broker directs business to an NCOA
If a broker is involved, you must enter the broker’s contact information in the
Mover ID Contact Information window or block.
If a list administrator, a broker, or both are involved in your job, you must
complete a Mover ID Contact Information window or block for each of them,
separately.
List Administrator Involved (Y/N)
A list administrator maintains and stores lists. List administrators are different
from brokers in two ways:
List administrators don’t send move-updated files back to the list owner.
List administrators may have an NCOA
If a list administrator, a broker, or both are involved in your job, you must
complete a Mover ID Contact Information window or block for each of them,
separately.
Link
service provider, you must provide information abo ut the
Link
service provider.
Link
license.
Buyer Company Name (to 30 chars)
If the list was processed for rent, sale, or lease, enter the name of the company or
individual who bought the list.
Mailing ZIP Code ( 5 chars)
Enter the ZIP Code of the Business Mail Entry Unit (BMEU) or post offi ce where
the mail will be submitted for mailing.
Pre-Processes Performed (Y/N)
Indicate whether you processed or will process this data before performing
Link
NCOA
processing.
Pre-Proc Changes w/ Postal Data (Y/N)
If you will have processed this data before performing NCOA
indicate whether that pre-processing included changes with postal data.
Pre-Proc Changes w/ Other Data (Y/N)
If you will have processed this data before performing NCOA
indicate whether that pre-processing included changes with non-postal data.
Link
processing,
Link
processing,
Chapter 2: Job-file blocks and parameters
43
Page 44

Concurrent Processes Performed (Y/N)
Indicate whether you will have processed this data in some other way while
performing NCOA
Link
Conc-Proc Changes w/ Postal Data (Y/N)
If you will have processed this data in some other way while performing
Link
NCOA
processing, indicate whether that pre-processing included changes
with postal data.
Conc-Proc Changes w/ Other Data (Y/N)
If you will have processed this data in some other way while performing
NCOA
Link
processing, indicate whether that pre-processing included changes
with non-postal data.
Post-Processes Performed (Y/N)
Indicate whether you will process this data after performing NCOA
processing.
Post-Proc Changes w/ Postal Data (Y/N)
If you will process this data after performing NCOA
whether that post-processing included changes with postal data.
processing.
Link
Link
processing, indicate
Post-Proc Changes w/ Other Data (Y/N)
If you will process this data after performing NCOA
whether that post-processing included changes with non-postal data.
Output Returned (STANDARD/MODIFY/BOTH)
If all required NCOA
If the NCOA
Link
Link
output was returned to the client, choose Standard.
output was returned to the client after other changes, choose
Modify.
If the NCOA
Link
output was returned to the client unchanged, and a separate file
with the required output data was also returned, choose Both.
Additional Notes
Enter EXT REQUEST if the customer submitted a written request for an extension.
If there was no request for extension, leave this blank.
Link
processing, indicate
44
ACE Job-File Reference
Page 45

Mover ID NCOALink PAF
Optional Block
Required for NCOA
service providers
Link
If you’re a USPS full or limited service provider, and you’re performing
Link
NCOA
processing in this job, then you must complete this block.
PAF requirements The Processing Acknowledgement Form (PAF) gives the NCOA
provider (licensee) permission from the list owner to perform NCOA
processing on the list or lists from that list owner.
Each list must have its own PAF ID. You can itemize multiple lists and their PAF
IDs on the back of the paper form.
If you’re an end user (performing NCOA
Link
processing on your own data),
you don’t need to complete a PAF.
The USPS requires that NCOA
Have a completed PAF for a customer on file before performing NCOA
Link
licensees:
processing on that customer’s data.
Keep a copy of the PAF on file for each of its customers.
Get updated PAFs from each customer at least once a year.
Assign a unique PAF ID for each PAF.
In addition, if a job invol ves both a br oker and a l ist admini strato r, you must have
a paper PAF o n fi le fo r both of them.
Link
service
Link
Link
If you’re transitioning from NCOA
PAFs are available from the USPS (http://ribbs.usps.gov/).
The USPS has authorized the use of the NCOA
from NCOA to NCOA
Link
. According to the USPS:
This process will allow existing NCOA and current NCOA
Link
well as approved NCOA
PAFs for future NCOA
applicants, to distribute and collect NCOA
Link
processing, and for processing of client lists
Link
PAF during your transition
Link
Licensees, as
Link
through the current NCOA licensed services. This will eliminate the need to
collect multiple forms for processing.
Therefore, we [the USPS] have included a temporary alternate “Transition”
Required Text Document within the Service Provider Licensee Performance
Requirements. Please obtain the most current copy of the Licensee
Performance Requirements at http://www.ribbs.usps.gov/files/ncoalink
.
Please be advised that NCOA PAF are not acceptable for authorizing
Link
NCOA
processing.
If you have any questions about transitioning, contact the USPS Move Update
Support Department at 800-589-5766.
Chapter 2: Job-file blocks and parameters
45
Page 46

Steps The order of steps to follow in routing the PAF is a s follows:
1. The list owner fills out the “List Owner” section, sign s it, and sends it to the
broker, agent, or list administrator.
2. The broker, agent, or list administrator fills out the “Broker/Agent/List
Administrator” section, signs it, and sends it to the licensee.
3. The licensee completes the “Licensee” section, signs it, and keeps it on file.
Person Signing PAF (to 50 chars)
Enter the name of the perso n si gni ng th is PAF. You may enter up to 50 characters.
Title of Person Signing (to 50 char s)
Enter the job title of the person signing this PAF. You may enter up to 50
characters.
Date PAF Signed by Cust.(yyyy/mm/dd)
Enter the date that the customer signed the PAF. Use the yyyy/mm/dd date
format.
PAF Type (INITIAL/RENEWAL/MODIFIED)
Specify the reason for completing your current PAF:
Option Description
Initial This is the first PAF you’re completing to become authorized to process
addresses for this particular customer.
Modified You’re completing a new PAF because some information on your old one
changed.
Renewal You’re completing a new PAF because your old one is expiring.
Customer Parent Company (to 50 chars)
f the list owner’s company is owned by another company (a “parent company”),
enter the parent company’s name here.
Customer Altern. Company (to 50 chars)
If the list owner’s company is also known by another name, enter that alternate
name here.
Date PAF Signed by Licens.(yyyy/mm/dd)
Enter the date that the licensee signed the PAF. (The licensee is the NCOA
service provider.) Use the yyyy/mm/dd date format.
Link
46
ACE Job-File Reference
Page 47

Mover ID Contact Information
This block is required only if you have indicated that there is a broker or list
administrator involved with this job. You indicate that there is a broker or list
administrator involved in the Mover ID NCOALink block.
Enter the contact information for the broker or list administrator in this block.
Information entered here appears in the customer service log and is also sent to
the contact log file.
Contact Type (BROKER/LISTADMIN)
If you’ve indicated that there is a broker or list administrator in the Mover ID
block, you must complete this parameter. Select the type of entity (broker or list
administrator) for which you are supplying contact information. If you are
supplying information for both a broker and a list administrator, you need to
include a Mover ID Contact Information block for each one.
Contact ID Number (to 8 chars)
If you’ve indicated that there is a broker or list administrator in the Mover ID
block, you must complete this parameter. The number must be unique to that
particular broker or list administrator. You assign the ID number.
Optional Block
NCOALink Contact Level (1 to 99)
Enter the degree of separation this contact is from you. For example, enter 1 if
you received the list from this contact. If your contact received the list from a
different broker, then enter 2 for this contact. En te r a value from 1 to 99.
An entry at this parameter is required only if you’re performing NCOA
processing.
NCOALink Contact NAICS
Enter the broker’s or list administrator’s NAICS code, which identifies the
business that they engage in. For more information, see
epcd/www/naics.html.
An entry at this parameter is required only if you’re performing NCOA
processing.
NCOALink Date Signed PAF (yyyy/mm/dd)
Enter the date when this conta c t signed the PAF.
An entry at this parameter is required only if you’re performing NCOA
processing.
Link
http://www.census.gov/
Link
Link
Contact Name (to 50 chars)
If you’ve indicated that there is a broker or list administrator in the Mover ID
block, you must complete this parameter. Type the name of the broker or list
administrator who is processing this job.
Chapter 2: Job-file blocks and parameters
47
Page 48

Contact Address (to 50 c hars)
Contact City (to 28 chars)
Contact State Code (2 cha rs)
Contact ZIP (5 chars)
Contact Plus 4 Code (4 chars)
Contact Telephone Number (10 chars)
Enter the address and telephone information of the broker or list administrator
who is processing this job.
48
ACE Job-File Reference
Page 49

Auxiliary Files
City Directory (path & city09.dir)
ZCF Directory (path & zcf09.dir)
ZIP+4 Directory 1 (path & zip4*.dir)
ZIP+4 Directory 2 (path & zip4*.dir)
Rev ZIP+4 Dir (path & revzip4.dir)
Insert full paths for the postal directories. They should be located in your dirs
directory.
Most users should leave the ZIP+4 Directory 2 parameter blank. (Some users
work
with two directories. You can read about this in the ACE User’s Guide or
our Extract
Rev Soundex Dir (path & zip4us.rev)
Set the path for the Reverse Soundex directory.The directory enhances ACE’s
normal street name lookups.
The Reverse Soundex directory is included on the U.S. National Directories CD.
Make sure that you include this directory when you install the software or
directory updates.
utility booklet.)
Required Block
ZIP+4 SHS Dir (path & zip4us.shs)
Set the path for the ZIP+4 SHS directory. The directory enhances ACE’s normal
street name lookups.
Make sure that you include this directory when you install the software or make
directory updates.
The SHS directory is included on the U.S. National Directories CD. Make sure
that you include t his dir ec to ry when yo u i nst al l t he so ftwar e or di rect or y upd ates.
Set the path for this directory in the ZIP+4 SHS Dir option in the Auxil i a r y Fi le s
block.
EWS Directory (path & ewyymmdd.dir)
An unzipped directory downloaded from our Customer Care web site is in this
format: ewyymmdd.dir. If you plan to access the most current directory, type the
path and ew*.dir. ACE automatically searches for all matching files in the path
that is defined in this parameter and then selects the most current date.
You may name the directory file any name you choose. If you use a file naming
format other than the user recommended format, be sure to type the exact path
and file name.
eLOT Directory (Path & elot.dir)
Type the path and file name for the Enhanced Line of Travel directory.
RDI Directory (path only)
Type the RDI directory path only. For more information on RDI processing, see
“Residential Delivery Indicator (RDI)” on page 127.
Chapter 2: Job-file blocks and parameters
49
Page 50

LACSLink Directory (path only)
The USPS LACS
addresses. These “911” conversions make it easier for police, fire, ambulance,
and postal personnel to locate a rural address. LACS
when streets are renamed or post offi ce boxes renumbered.
LACS
purchasing this option, contact Business Objects.
If you’ve purchased the LACS
processing in this job , specify the location of the LACS
the path at this param eter.
To perform LACS
Perform LACSLink Processing in the Execution block. (See page 21.)
Load LACSLink Dirs into Memory in the Memory Usage block. (See
page 28.)
SuiteLink Directory (path only)
Enter the path of the Suite
The Suite
Link
Suite
example, the December 2006 Suite
December 2006 ZIP+4 directory.
Link
product updates rural-route addresses to street-name
Link
also converts addresses
Link
is available as an add-on option in ACE. For more information about
Link
option, and you’re performing LACS
Link
processing, you must also set the following options:
Link
directory.
Link
directory is distributed monthly by the USPS. You must use the
Link
directories by typing
directory with a ZIP+4 directory labeled for the same month. For
Link
directory can be used with only the
Link
DPV Directory (path only)
DSF2 Directory (path only)
Non-CASS mode: SuiteLink is disabled if you are running your job in non-
!
CASS mode.
You cannot use a Suite
Link
directory that is o lder t han 60 days ba sed on it s release
date. ACE warns you 15 days before the directory expi res. As with all direct ories,
ACE won’t process your records with an expired Suite
Link
directory.
T ype the DP V directorie s path onl y. For more information about DPV processing,
see
“Delivery Point Validation (DPV)” on page 113.
DPV accesses multiple files duri ng processing. If you enter a specific file
!
name at this parameter, ACE will issue a verification error.
Do not rename DPV files. DPV will not run if the file names are changed.
T ype the path to the dir ectory that holds the D SF2 files you received from the USPS. Make
sure you don’t type a directory file name, just type the path. For more information about
DSF2, see
“Specify the path to DSF2 files” on page 146.
DELSTATS Directory (path and dsf.dir)
Type the path to, and file name of, the delivery statistics product (
Objects provides this file to you on the National Directory CD.
The
dsf.dir
file provides counts of business and residential addresses per ZIP Code per
carrier route.
50
ACE Job-File Reference
dsf.dir
). Business
Page 51

NCOALink Directory (path only)
Link
NCOA
processing requires the NCOA
must specify the locations of this file so that ACE can access them while
processing your files.
Enter only the path. Don’t enter th e file name.
Name Parsing files (path only)
Link
Suite
and NCOA
allow the software to parse name data for possible NCOA
assignment.
The supporting files consist of:
acenpe.dat
acenpr.dat
acenpu.dat
pwcap.dct
acenp.so
(on all UNIX
platforms except HP)
Firm Line Dct (path & firmln.dct)
Address Line Dct (path & addrln.dct)
Last Line Dct (path & lastln.dct)
Capitalization Dct (path & pwcas.dct)
Enter full paths for the parsing and capitalization dictionaries. They should be
located in your ACE directory.
Link
directory from the USPS. You
Link
use the same supporting files. These supporting files
acenpp.dat
acenps.dat
parsing.dct
acenp.dll
acenp.sl
(on Windows)
(on HP)
Link
and Suite
Link
Default Format (path & file name)
Default DEF (path & file.def)
If all your input files are in the same format, you do not need to create separate
format files for each file. Create just one format file, and type the path, directory,
and file name on this line. The same concept applies to DEF files as well.
If you have one or two files that differ from the standard format, you may create
an individual format or DEF for the exceptions. When ACE finds an individual
format or DEF file, it will override the default format or DEF file.
If your files are not in a standardized format, leave these lines blank, but do not
remove them, and use individual format and DEF files all the time. DEF and
format files are explained in Database Prep.
Chapter 2: Job-file blocks and parameters
51
Page 52

Input File
Along with your input file, ACE needs a corresponding DEF file. A format file
(FMT, DMT, or EBC) may also be required. Refer to our Database Prep manual
for instructions.
Input File Name (path & file name)
Type the path and file na me of the add r ess f ile t o be processed. If you have based
the job file name on the input file name, you may use the $job macro.
Override Default Format (path & file)
Override Default DEF (path & file)
Use these options to specify the format and definition file options that you want
to use above all other settings. For example, let’s say that you typically use a
template when creating your jobs, and you have the format and definition files
already specified in the Auxiliary Files block. You can set these override options
to use a different format or definition file without having to remove the default
options in the Auxiliary Files block.
ACE looks for the definition and format files in the following order:
the Override options listed in the Input File block
the files with the same name in the same folder as the input file
the files listed in the Auxiliary Files block
Required Block
+ Input Filter (to 512 chars)
With a filter, you can select certain records from the input file for processing.
ACE enables you to set the criteria that each reco r d must meet to be selected. F or
example, you might limit input to a certain ZIP Code area.
If you use an input filter, perhaps you should create an output file (versus update
the input file).
Output file format. If you are copying the input format to your output file,
and you have the format and definition files set in both the Input File and
Auxiliary File blocks, the output format will use the override se tting
specified in the Input File block.
Entering paths in the I nput File block ar e opti onal. You do not need to set
these options in order to process the job.
52
ACE Job-File Reference
Page 53

Starting Record Number
Ending Record Number
If you want ACE to process the whole input file, leave these parameters blank.
T o proce ss only part of the file, ty pe the in put record nu mbers where ACE shoul d
begin and end processing. ACE does not use database indexes, so remember you
are entering physical record numbers.
If your system fails during processing, u se these parameters to tell ACE where to
resume processing. To determine the new beginning record number, look in your
.log file for the number of the last record processed.
If you interrupt processing, and then process just the remaining records, reports
are generated for each separate run, not for the whole job.
If you choose to process just a part of the input file by defining starting and
ending record numbers, ACE will issue a verification error message if the Sort
Input File by ZIP Code parameter is set to yes in the Execution block. In other
words, you may sort all or none of the input file by ZIP Code, but you may not
sort part of it.
Process Deleted Records (Y/N)
If your database supports nondestruc tive del ete marki ng, some input r ecords may
be marked for deletion, but have not yet been removed. For example, supp ose that
your input file contains a list of magazine subscribers. The list also includes the
records of those who have let their subscription expire. These records have been
marked for deletion. You might want to process these records, in add ition to the
rest of the list, even though you've marked them for deletion. You could send a
special offer to these previous subscribers, encouraging them to renew.
To detect deleted records in ASCII input files, ACE checks the PW field Delete.
(See the Database Prep manual for more information on nondestructive delete
marking).
Type yes if you want ACE to process those records in the input file that are
marked for deletion.
If this parameter is set to no, only active records will be processed, not deleted
records.
Chapter 2: Job-file blocks and parameters
53
Page 54

Unverified Postal Code (ERASE/PRESERVE)
Through this parameter, you can control how ACE will behave when it cannot
assign an address. In this situation, ACE cannot verify any postal codes that may
have appeared in the input record. You may choose to drop unverified codes or
preserve them.
This parameter controls handling of postal codes such as CART, DPBC, ZIP+4,
and so on. It does not apply to ZIP Codes. ACE always preserves an unverified
ZIP Code.
Your choice will depend on whether or not you believe that a possibly incorrect
code is better than no code at all. Your choice will take effect in the following
situations:
If you automatically update your input file (see the Standardize PW Fields
parameter in the Post to Input File block).
If you create an output file and use the cloning feature (see the Copy Input
Data to Output File para m eter in the Post to Output File block).
This parameter also controls whether or not an unverified ZIP+4 code is
included in AP.ZIP4, AP.ZIP9, AP.ZIP10, and AP.Last_Line.
If you are using ACE to prepare your mailing list for a presorted mailing, be
!
sure to select the Erase option. Otherwise, your mailing list may end up
containing more postal codes that ACE assigned. T he USPS accep tance cl erk
might see higher counts on your presort reports than on your 3553 form, and
that would be cause for rejecting your mailing.
If you set this option to Preserve, ACE will not produce a 3553 form.
!
Preserving old postal codes is a violation of CASS regulations.
54
ACE Job-File Reference
Page 55

Standardization Style
These options are explained in the ACE User’s Guide. Refer to that guide for
details about how these options affect your results. The quick information below
is meant to serve as a reminder only.
# Unit Desig to Sec Addr (Y/N)
You have the option to output “#” into either extraneous fields or to the
AP.Unit_Desig output field.
The parameter will not effect the followi ng address situat ions:
Puerto Rican addresses
Military addresses
Rural Route addresses
Addresses with no “#” on the address line.
Addresses that have remainder words
Option Description
Yes Output the “#” sign in an address to AP.Unit_Desig.
No Output the “#” sign in an address to AP.Extraneous.
Required Block
Example Input address:
3217 Bruner Ave #2
Bronx NY 10469
Parameter set to N Parameter set to Y
AP.Unit_Desig
AP.Sec_Range
AP.Extraneous
AP.Extran_Sec
Assign City From Input / LL Idx (Y/N)
Option Description
Yes Assign the city name based on the city that is input if it is valid for the ZIP
and not a place name; otherwise, assign city based on the last-line index of
the address line.
Produces a more geographically true city name. If you select Yes, your setting at the Non-Mailing Cities parameter does not matter; place names are
converted.
No Assign the city based on the city name that is input if it is valid for the ZIP.
Do not change the city name based on last-line index.
# 2
# 2
AP.Unit_Desig
AP.Sec_Range
AP.Extraneous
AP.Extran_Sec
#
2
Chapter 2: Job-file blocks and parameters
55
Page 56

Non-Mailing Cities (CONVERT/PRESERVE)
Option Description
Convert Change non-mailing city names (place names) to city names preferred by
the USPS. Given Hollywood as input, produce Los Angeles as output.
Preserve Preserve the non-mailing city name. Given Hollywood as input, produce
Hollywood as output.
Yes, your setting at the Non-Mailing Cities parame ter does not matter; place
names are converted.
Note:
If you set Assign City from Input or LLIdx =
Unit Designator (CURRENT/DIRECTORY)
Option Description
Current Correct a misspelled designator.
Directory Convert any designator that does not match the postal directory.
Suffix Style (SHORT/LONG/PRESERVE)
Direct. Style (SHORT/LONG/PRESERVE)
Option Description
Short Convert suffixes/directionals to USPS abbreviations (for example, Main
Street South become s Main St S).
Long Convert suffixes/directionals to full English words (for example, Main St S
becomes Main Street South).
Preserve Preserve the style of suffixes/directionals as they were input.
Append PMB to Address Line (Y/N)
Private mail boxes (PMB) are like post-office boxes, except that they are hosted
by private companies such as Mailboxes, Etc.
ACE can recognize the forms of PMB shown in the box
at left when the data appears in an address line.
These may be followed by a punctuation mark such as
the pound sign (#). All forms are standardized to “PMB”
followed by a space and the box number.
This parameter determines whe ther the sta ndardized PMB data is placed in a f ield
with address data or in its own field.
Option Description
Yes If there is private mail-box data, place it in the same field with the address.
No Place private mail-box data in a separate field.
Post AP.NP_SecAddr to your output file. The field will contain both the d esignator “PMB” and the box number. If you wish to keep the designator and
the box number in separate fields, post AP.NP_Unit and AP.NP_Srange.
Standardize Unassigned Ad dres s (Y/N)
56
ACE Job-File Reference
PMB
P M B
PRIVATE MB
PRIVATE MAIL
PRIVATE MAILBOX
PRIVATE MAIL BOX
PRIVATE MAIL BOX
Page 57

Option Description
Yes ACE will attempt to standardize even those addresses that it cannot assign;
that is, those that cannot be matched in the directories.
No When ACE cannot assign an address, it will produce unstandardized data,
just as it was input, for the address line.
Case (UPPER/lower/Upper and Lower)
Case User PW Fields (Y/N)
Option Description
Upper ACE converts data to full capitals (for example, Main Street South becomes
MAIN STREET SOUTH).
Lower ACE converts data to lowercase (for example, Main Street South becomes
main street south).
Upper
and
ACE converts data to initial capitals (for example, MAIN STREET SOUTH
becomes Main Street South).
Lower
User-defined PW fields are explained in Database Prep.
Chapter 2: Job-file blocks and parameters
57
Page 58

+ Address Line Standard (STRICT/LOOSE)
Option Description
Strict If ACE finds any extraneous information on the address line, it will be
stripped off and output through the Remainder field. For example, if the
address line reads “123 Main St. Bldg X Apt 567”, the “Bldg X Apt 567”
portion is placed in the Remainder field.
Loose If ACE finds any extraneous information on the address line, it will be
allowed to remain in place.
Address Line Alias (CONV ERT /PRE SE RVE)
Option Description
Convert If the input address is an alias, convert it to the USPS-preferred form. Given
3500 Valley View Mall, ACE will produce 3500 State Road 16.
With a preferred alias, the conversion is from the base record to the pre-
ferred alias. With a non-preferred alias, the conversion is from the non-preferred alias to the base record.
Preserve If the input address is an alias, retain it. Given 3500 Valley View Mall, ACE
will produce 3500 Valley View Mall.
Dual Address (STREET/MAILING/POSITION)
Option Description
Street Try to assign based on the street address. If that fails, try again based on the
mailing address (rural route or PO box).
Mailing Try to assign based on the mailing address. If that fails, try again based on
the street address.
Position Always use this option when CASS certifying. Select an address based on
the arrangement of the input data. ACE will try to assign the address that is
closest to the lower left corner of the address block. That might be the mailing or the street address; it depends entirely on how the data was entered.
Mover ID Auto Update (Y/N)
Mover ID Option only: With this option turned on, ACE automatically replaces
the old address with the new address. Most users should turn it off.
Important information about using the auto update feature!
!
If you need to keep both the old and the new address, turn this option off.
If you want to sele cti vel y p ost move- up dat ed ad dr esses, set thi s opt i on t o
Yes and add additional fields and filters as needed.
58
If you select this optio n, and no for ward ing addr ess is in the USPS move-
update data, then blanks will be posted. If you have a 100 percent mailing
requirement, you should not select this option—do manual posting
instead.
ACE Job-File Reference
Page 59

This option does not affect the style or availability of APM fields for manual
posting. Most users should set up the output file using the cloning features—to
get the original address standardized—then manually append APM fields to get
the move addresses (see below).
BEGIN Standardization Style ==================================
...
Mover ID Auto Update (Y/N)........... = N
END
BEGIN Create Output File =====================================
...
Copy Format of Input File (Y/N)... = YES
Field (name,length,type,misc)..... = FORWARD, 1, c
Field (name,length,type,misc)..... = EFF_DATE, 6, c
Field (name,length,type,misc)..... = MOVE_TYPE, 1, c
Field (name,length,type,misc)..... = ADDRESS, 40, c
Field (name,length,type,misc)..... = CITY, 28, c
Field (name,length,type,misc)..... = STATE, 2, c
Field (name,length,type,misc)..... = ZIP9, 9, c
END
BEGIN Post to Output File ====================================
...
Copy Input Data to Output File(Y/N)= YES
Copy (source, destination)........ = APM.Forward, FORWARD
Field (name,length,type,misc)..... = APM.Eff_Date, EFF_DATE
Field (name,length,type,misc)..... = APM.Move_Type, MOVE_TYPE
Field (name,length,type,misc)..... = APM.Address, ADDRESS
Field (name,length,type,misc)..... = APM.City, CITY
Field (name,length,type,misc)..... = APM.State, STATE
Field (name,length,type,misc)..... = APM.ZIP9, ZIP9
END
Chapter 2: Job-file blocks and parameters
59
Page 60

Non-CASS
These non-CASS options let you optimize the quality of your database without
adhering to CASS rules.
With non-CASS options selected, ACE does not produce a USPS form
!
3553. In order to receive postal discounts, you must submit a form 3553
with your mailing. Therefore, you will not receive any postal discounts
when you choose the Enable Non-CASS Features option in the Execution
block.
When you set up your job for non-CASS processing, you must select the
Enable Non-CASS Features option in the Execution block in addition to
selecting the non-CASS option(s) in the Non-CASS block.
Accept Input ZIP+4 if Sec Match
This non-CASS option enables ACE to use the record’s ZIP+4 code to try to
make a finer level of assignment than it could make under CASS rules. Under
CASS rules, ACE doesn’t consider the ZIP+4 code in your database. This option
is effective when the input record has invalid or missing firm or secondary
address information.
Optional Block
Assignment under CASS
rules
When you process databases under CASS rules, ACE searches the National
Directory and tries to find a matching address. ACE then tries to assign to the
highest address level possible:
1. When your input record contains a valid
firm, ACE assigns the highe s t level address
(firm).
2. If the firm is missing or invalid, ACE looks
for a secondary address. If the secondary
Address levels
(from highest to lowest)
Firm address
Secondary address
Default address
address is present and valid, ACE assigns
the medium level address (secondary).
3. If the secondary address information is missing or invalid, ACE assigns the
lowest level address (defa ult).
ACE does this without using the ZIP+4 information in your database.
60
ACE Job-File Reference
Page 61

Assignment with nonCASS option selected
When you use this non-CASS option, ACE uses the ZIP+4 information in its
search for an address match. In order for this to work, the record’ s ZIP+4 must be
unique to a valid firm or secondary address before ACE makes the assignment.
1. When your input record contains an invalid or missing firm, but the ZIP+4
matches with a firm in the dire c to r y, and is unique to that firm, ACE assign s
the highest level address (firm).
2. If ACE can’t match the ZIP+4 with a firm, it tries to match the ZIP+4 with a
secondary address in the directory. If a match is found, and the ZIP+4 is
unique to the secondary address, ACE assigns the medium level address
(secondary).
3. If ACE can’t match the ZIP+4 with a secondary address, ACE assigns the
lowest level address (defa ult).
ACE doesn’t populat e your inp ut r ecord wit h the inf ormatio n fou nd in the
National Directory. In order to get the non-CASS output infor mat i on, you
must include the AP.NC* (non-CASS) fields in your output file.
In non-CASS mode, the firm and secondary address information may be output;
however you have to manually update your address file if you want that
information to appear in your addresses. We suggest using a filter to post
secondary address information back to your address file. Read about filters in our
Database Prep manual.
Inexact ZIP Move Forwarding
This option is effective when your database contains records that have dead ZIP
Codes or ZIP-move type ZIP Codes.
Dead ZIP: A ZIP Code that has been “retired.” Sometimes the USPS renumbers
an area that has grown too large for one ZIP Code and creates new codes for the
area. Then the USPS retires the original ZIP Code, and doesn’t use it any more.
ZIP move: A valid ZIP Code that has been split or moved, so only a portion of
the area that had been covered by the one ZIP Code now has two or more ZIP
Codes, including the original one, for the same area.
Assignment under CASS
rules
For ACE to update an incorrect ZIP Code in a record that contains either a dead
ZIP or a ZIP move ZIP Code:
Every element of the address line of the input record must exactly match the
Every element of the address line that is present in the National Directory
Elements include the primary street name, suffix, and any directional.
address found in the National Directory.
must be present in the address line of the input record.
Assignment with nonCASS option selected
When an input record has a dead ZIP Code or a ZIP Move ZIP Code, ACE
ignores some of the unmatching ele ments between the i nput record and t he record
in the National Directory, and uses built-in ma tching thresholds to determine if
the records match.
Chapter 2: Job-file blocks and parameters
61
Page 62
Assign ZIP+4 to Non DPV Confirmed (Y/N)
Enter Y to enable ACE to assign ZIP+4 information to your records, even when
the addresses do not DPV-confirm. Enter N to disable this option.
With the implementation of CASS Cycle L, the USPS requires that an address
have DPV confirmation before it can be assigned a ZIP+4. However, if you don’t
need ACE to generate the CASS documentation and the USPS 3553 form, you
can set up your job so that ACE assigns the ZIP+4 even when the address is not
DPV-confirmed.
Caution: ACE blanks out all ZIP+4 information in your data if you disable
!
DPV processing (in the Execution block) and you di sable the “Assign ZIP +4
to Non DPV Confirmed” option. This includes ZIP+4 information provided
in your input file.
Assignment under CASS
rules
Assignment with nonCASS option selected
Addresses must be DPV-confirmed before ACE assigns a ZIP+4 and generates
the CASS-required reports. To set up your job so that your addresses receive a
ZIP+4 under CASS rules, enable DPV processing in the Execution block and set
the Assign ZIP+4 to Non DPV Confirmed option to N.
Perform DPV
Processing
(Execution block)
Assign ZIP+4 to Non DPV
Confirmed
(Non-CASS block)
ZIP+4
assigned
USPS 3553
generated
Y (enabled) N (disabled) Yes Yes
If you are not a CASS customer, but you want to retain input ZIP+4 information
and have ACE assign ZIP+4 information, use the non-CASS options.
Perform DPV
Processing
(Execution block)
Assign ZIP+4 to Non DPV
Confirmed
(Non-CASS block)
ZIP+4
assigned
USPS 3553
generated
Y (enabled) Y (enabled) Yes No
N (disabled) Y (enabled) Yes No
62
ACE Job-File Reference
Page 63

Multiline Style
All of the Multiline S tyle op tions are expl ained in the ACE User’s Guide. Refer to
that
guide for details about ho w these options will affect your results. The quick
information below is meant to serve as a reminder only.
Standardize (ADDRESS/CTY_ST/BOTH/NONE)
Option Description
Address Standardize only the address line, and leave the last-line data unstandardized.
Cty_St Standardize only the city and state, but not the address line. (You control the
ZIP Code separately, through the Include ZIP parameter.)
Both Standardize the address line, city, and state.
None Do not standardize the address line, city, or state.
If you are processing a two-line format, choose Address or None. Your discrete
city , state, and ZIP fields are not subject to this paramet er. So for you, the City_St
and Both options are moot.
Optional Block
Swap Address Lines (TO P /B OT T O M /NONE)
Option Description
Top Move lines around per USPS guidelines. If there are any blank lines, move
them down, and shift the data to the top of the block.
Bottom Move lines around per USPS guidelines. If there are any blank lines, move
them up, and shift the data to the bottom of the block.
None Do not move any lines around, blank or otherwise.
If you turn on the swapping feature, ACE will rearrange your multiline data to
conform with USPS guidel ines. ACE will move t he pr imary add ress in to posi tion
above the city-state-ZIP line. If the secondary address was input on a separate
line, ACE will place it just above the primary address.
To use this f eature, all of your multiline fields must be the same length (in y our
d
BASE, FMT, DMT, or EBC file).
The swapping feature does not require that you standardize your data.
Chapter 2: Job-file blocks and parameters
63
Page 64

Preserve dual address orde r (Y/ N)
Option Description
Yes Keeps the address order as it was input.
T o assign properly according to the USPS requirements, do not select the Preserve Dual Address Order option.
If the Preserve Dual Address Order option is selected, ACE allows the deliverable address to not be directly above the last line.
No Moves the assigned address immediately above the city and state.
When an address contains both a street ad dress an d a post of fi ce box number, that
mail piece will be delivered to the address on the line above the city and state. In
the example below, it will be delivered to PO Box 118.
431 Stevenson St
PO Box 118
Westport NY 12993-0118
If the line immediately above the city and state does not match the information in
the directories, ACE will attempt to match on the top address line (in the above
case, 431 Stevenson). If that results in a match and this option is set to No, then
the address lines are switched to make the deliverable address immediately above
the city and state. For example, you’ll see that 431 Stevenson was moved to the
second line.
PO Box 118
431 Stevenson St
Westport NY 12993-0118
Combine Address Line Infor (Y/N)
Combine Last Line Infor (Y/N)
Option Description
This is the preferred USPS setting.
64
Yes Look for related components that were input o n separate lines, and try to pu t
them together on the same line.
No Do not try to combine components.
If you are processing a two-line format, then it does not matter how you set
Combine Last Line Info.
ACE Job-File Reference
Page 65

Include ZIP (Y/N)
Include ZIP+4 (Y/N)
Option Description
No Do not touch the ZIP or ZIP+4 inside the multiline address block. This
option is chosen by some ACE users who are forbidden to change anything
inside the address block.
Yes If ACE can assign a ZIP, then place the assigned ZIP inside the multiline
address block. If ACE cannot assign a ZIP, keep the ZIP that was in the input
record (if there was one).
If ACE can assign a ZIP+4, then ACE will update the ZIP+4 inside your
multiline address block. If ACE
depend on how you set the Unverified Postal Code parameter in the Input
File block. The options for that parameter are:
Preserve ACE will pass along the ZIP+4 code from the input data, if one
was found there.
Erase ACE will not pass along an y ZI P+4 that m igh t have app eared in
the input data. The resulting address block will not include any
ZIP+4.
cannot
assign a ZIP+4, then the result will
These parameters apply to you only if you are processing a multiline format.
They have no effect on a two-line format.
Barcode mailers note: The ZIP and ZIP+4 numbers in the address block
!
must match the Postnet barcode. This means that you must either allo w ACE
to update the ZIP and ZIP+4 inside the address block, or give up your
barcoding discount
Chapter 2: Job-file blocks and parameters
65
Page 66

Post to Input File
Standardize PW Fields (Y/N)
Copy (source, destinati on )
Through these parameters, you control the content going into the input file. You
have three options here.
Method Description
Optional Block
Automatic
posting
Automatic
plus
To update your address data, set Standardize PW Fields to Yes. ACE standardizes the fields that you set up in your DEF file.
If you use automatic posting, you may also need to do some additional
posting of your own, manually. To do this, set Standa r dize PW Fields
to
Yes. Then use the Copy parameter for manual posting. You can repeat the
Copy line as many times as necessary.
Manual It is usually wise to use the automatic posting feature, because it saves
time. However, if you prefer to do all posting yourself, you can do that.
Set Standardize PW Fields to No, and use Copy parameters to post
selected fields of your input file. You may repeat the Copy line as many
times as necessary.
Through the Copy parameter, you can specify the content of one field. By using
the Copy parameter, you are copying data from one place to another — from the
“source” to the “destination.” The source is the informat ion tha t you want to p ost,
and the destination is th e name of a field in your input file.
PW and AP fields are listed in the Quick Reference.
ACE
Automatic input posting
DB
means that ACE standardizes
those PW fields that were
identified in your DEF file
Manual input posting
means that you pick any
combination of DB, PW, and
AP fields, and place them
yourself, just where you
want them.
.
PW fields are those set up in
your DEF file. They come from
the input file and pass through
ACE. If you post them manually,
they are capitalized, but not
standardized. If ACE posts them
automatically, they are
standardized per job settings.
AP fields origi nat e i nside the
ACE assignment engine. Some
are parsed from the input data,
others are assigned from the
postal directories. All are
standardized, some per job-file
settings.
66
DB fields are original,
untouched data.
ACE Job-File Reference
Page 67

Example See the following example of input posting with full standardization and
assignment.
Fields Input record (Before) Input record (After)
Name_Line*
Title*
Firm*
Address* 1600
City*
VERONICA R. LENNON
STAFF ASSISTANT
WHITE HOUSE
PENSYLVSNIA
WISHINGTON
Veronica R. Lennon
Staff Assistant
White House
1600 Pennsylvania Ave NW
Washington
State* DC DC
ZIP* 20500 20500
PolParty*
ZIP4**
CART**
County**
DPBC**
Err_Stat***
INDEPENDENT INDEPENDENT
empty
empty
empty
empty
empty
0005
C001
001
00
SA5C
* These fields are defined in the DEF file as PW fields. ACE can update them
automatically. Notice that ACE capitalizes the basic fields. You control
capitalization of user-defined PW fields, such as PolParty, through a separate
style parameter.
** Because these postal-code fields are defined in the DEF file as PW fields,
ACE can automatically post these codes.
*** Err_Stat is not a PW field. Post to this field manually; automatic posting will
not do it.
How to set up your job If you’d like to fully standardize your data, the setup may be very simple.
We turn on the “automatic p ostin g” feat ure b y set tin g Standardize PW Fields
= Yes. That takes care of the name, address, and postal-code fields (as
explained above).
We use “manual” posting for the Err_Stat field. After processing, this field
will contain either an ACE status code (for assigned records) or an ACE error
code (for unassigned records).
BEGIN Post to Input File ==============================
Standardize PW Fields (Y/N)
End-User CASS Cert (overwrite hdr) (Y/N)
Copy (source, destination)......... = AP.Err_Stat, Err_Stat
Chapter 2: Job-file blocks and parameters
67
Page 68

End-User CA SS Cert (overwrite hdr) (Y/N)
If you perform CASS self-certification testing, the USPS requires you to include
the USPS 3553 in the header record of the CASS certification file.
Type Y to include the USPS 3553 in the header record when you perform CASS
certification testing. Leave this parameter set to N when you are not performing
CASS certification testing.
68
ACE Job-File Reference
Page 69

Output Control
Some examples of using this block begin on the next page.
Output Each Record (ONCE/ALL FILTERS)
This parameter controls how ACE evaluates output filters.
Option Description
Once Output each record only once, at the first Post-to-Output-File block where
that record passes the output filter.
All Filters Output each record as many times as it passes an output filter. You might
end up with more output records that you input!
Undetermined Records (DEFAULT/IGNORE)
Default Output File (path & filename)
Undetermined records are those that don’t pass any of your output filters.
Through these two parameters, you can control how ACE will handle such
records.
Option Description
Optional Block
Separating the “good” from “bad”
Ignore Drop undetermined records. They simply will not be output.
Default Place undetermined records in the default output file.
Job editing tip:
Pick one of your output files to be the default. Go back to
that Post to Output File block, and copy your entry at the Output File Name
parameter. Then come back and paste the file name here, at the Default Output File parameter .
If you own ACE Plus, you can create two or more output files. Use these
examples as guides to set up mult iple output files.
You can separate quality addresses from problem addresses by directing them to
separate output files. The picture below shows an example. In this case, we’re
creating four output files:
Quality addresses are 9-digit matches. Remember that undeliverable
addresses are also 9-digit matches. In our view, these don’t belong in a
quality mailing list. So we will sift them out.
Foreign addresses will be mailed separately.
Undeliverable addresses are those dubbed by the USPS as unsuitable for
mail delivery, such as a cemetery, park, parking lot, or condemned building.
9-digit failures are unassigned addresses.
You could return the Undeliverable and 9-digit Failure files to the client. The 9digit Failure file might be sent in for manual correction through the USPS
Address Element Correction (AEC) program.
Chapter 2: Job-file blocks and parameters
69
Page 70

The job-file blocks for setting this up are shown on the next page. Note that we
need 9 blocks: 1 Output Control block, 4 Create Output File block, and 4 Post to
Output File blocks. The sequence of these blocks is important; read about it on
the next page.
Also note that, in this example, each input record will be output once and only
once.
The output filters are based on ACE data (AP fields). You can find details about
these AP fields in the Quick Reference.
quality.dbf
9dgfail.dbf
input.dbf
foreign.dbf
undeliv.dbf
Filter sequence Note that in this job file, the sequence of Post to Output File blocks is important.
You see, as ACE prepares to output each record, it runs that record through each
output filter, in the order that they appear in the job file. Since we’ve chosen to
output each recor d only on ce, ACE will output a record the first time that it passes
an output filter (that is, the filter returns True).
The block for the “Quality” output file appears first, for efficiency. Most records
will go in this file, and ACE will not bother evaluating the other filters. This saves
a small percentage of processing time.
Also, the block for the Foreign file must come before the block for the 9-digit
Failure file. All foreign records will also be 9-digit failures. We want them
70
ACE Job-File Reference
Page 71

“caught” by the Foreign filter. If the 9-digit Failure filter came first, all foreign
records would end up in that file, and the Foreign file would be empty.
BEGIN Output Control ===================================
Output Each Record (ONCE/ALL FILTERS) = Once
Undetermined Records (DEFAULT/IGNORE) = Ignore
Default Output File (path & filename) =
END
(Usually, a job like this would require four Create Output File blocks. We’ve omitted them, and the posting det ails, for the sake of
focus. Remember to set up Create blocks and posting in your own jobs.)
BEGIN Post to Output File ==============================
Output File Name (path & file name).. = d:\data\QUALITY.dbf
Existing File (APPEND/REPLACE)....... = REPLACE
+ Output Filter...................... = AP.MATCH_9 = “T” .AND. AP .MATCH_UN = “F”
Copy Input Data to Output File (Y/N). = Y
END
BEGIN Post to Output File ==============================
Output File Name (path & file name).. = d:\data\UNDELIV.dbf
Existing File (APPEND/REPLACE)....... = REPLACE
+ Output Filter...................... = AP.MATCH_UN = “T”
Copy Input Data to Output File (Y/N). = Y
END
BEGIN Post to Output File ================= ===== ====== ==
Output File Name (path & file name).. = d:\data\FOREIGN.dbf
Existing File (APPEND/REPLACE)....... = REPLACE
+ Output Filter...................... = AP.FOREIGN = “F”
Copy Input Data to Output File (Y/N). = Y
END
BEGIN Post to Output File ==============================
Output File Name (path & file name).. = d:\data\9DGFAIL.dbf
Existing File (APPEND/REPLACE)....... = REPLACE
+ Output Filter...................... = AP.MATCH_9 = “F”
Copy Input Data to Output File (Y/N). = Y
END
Separating LACS addresses
Another option for output files is to output each record more than once—in other
words, each time it passes an output filter. In the following example, we want to
create a mailing list for today’s use. And we will also create a smaller file of
LACS addresses. This smaller LACS file will contain rural add resses that need to
be sent in to a service bureau for 9-1-1 conversion to street-type addressing.
W e want c ustomers at tho se LACS addre sses to receiv e today’s mailing, however.
So those records will be outpu t twice: Once to the “All” file, and again to the
LACS file.
Our LACS filter is based on an AP field. For details about AP fields, refer to the
Quick Reference.
Chapter 2: Job-file blocks and parameters
71
Page 72

input.dbf
all.dbf
LACS.dbf
This parameter is
set to All Filters
so that LACS
records will be
placed in the “all”
file and also in the
LACS file. We’ll
have more output
records than input
records.
Filter is based on
ACE’s LA CS in di ca tor.
All records processed will be output here, so there
is no need for a
filter on this file.
BEGIN Output Control ===================================
Output Each Record (ONCE/ALL FILTERS) = All Filters
Undetermined Records (DEFAULT/IGNORE) = ignore
Default Output File (path & filename) =
END
(Usually, a job like this would require two Create Output File blocks. We’ve omitted them, and the
posting details, for the sake of focus. Remember to set up Create blocks and posting in your
jobs.)
BEGIN Post to Output File ==============================
Output File Name (path & file name).. = d:\data\LACS.dbf
Existing File (APPEND/REPLACE)....... = REPLACE
+ Output Filter...................... = AP.LACSCODE = “T”
Copy Input Data to Output File (Y/N). = Y
END
BEGIN Post to Output File ==============================
Output File Name (path & file name).. = d:\data\all.dbf
Existing File (APPEND/REPLACE)....... = REPLACE
+ Output Filter...................... =
Copy Input Data to Output File (Y/N). = Y
END
Separating by user defined codes
In the first two examples, we based our output separa ti on on ACE and the resul ts
of address processing. But you can split output in ways that are unrelated to the
address, based on any criteria that you can express as a filter.
In the example below, records are coded for four sales regions. Our output filters
are based on the database field c ontai ning thi s code. We also create a fifth, “catchall” file for records that contain an invalid sales-region code (or no code).
72
ACE Job-File Reference
Page 73

east.out
midwest.out
input.dbf
no_sale.out
west.out
south.out
As before, we’re omitting the Create blocks and posting details, to save space.
BEGIN Output Control ===================================
Output Each Record (ONCE/ALL FILTERS) = Once
Undetermined Records (DEFAULT/IGNORE) = Default
Default Output File (path & filename) = D:\data\NO_SALE.DBF
END
BEGIN Post to Output File ==============================
Output File Name (path & file name).. = d:\data\MIDWEST.DBF
Existing File (APPEND/REPLACE)....... = REPLACE
+ Output Filter...................... = upper(DB.SALES)=“M”
...
BEGIN Post to Output File ==============================
Output File Name (path & file name).. = d:\data\WEST.DBF
Existing File (APPEND/REPLACE)....... = REPLACE
+ Output Filter...................... = upper(DB.SALES)=“W”
...
We do not use
any filter,
because this a
catch all file.
BEGIN Post to Output File ==============================
Output File Name (path & file name).. = d:\data\EAST.DBF
Existing File (APPEND/REPLACE)....... = REPLACE
+ Output Filter...................... = upper(DB.SALES)=“E”
...
BEGIN Post to Output File ==============================
Output File Name (path & file name).. = d:\data\SOUTH.DBF
Existing File (APPEND/REPLACE)....... = REPLACE
+ Output Filter...................... = upper(DB.SALES)=“S”
...
BEGIN Post to Output File =================================
Output File Name (path & file name).. = d:\data\NO_SALE.DBF
Existing File (APPEND/REPLACE)....... = REPLACE
+ Output Filter...................... =
Chapter 2: Job-file blocks and parameters
73
Page 74

Create Output File
This block is for specifying the path and physical layout of an output file. Each
Create Output File block should be paired with a Post to Output File block. To
understand how they work toge ther , see pages
Name (path & filename).
Output File Name (path & file name)
Type a path for the output file. We recommend you enter a full path.
If you omit the path, or use a relative path, the actual file location will be based on
the current working directory at the time you launch ACE Job processing.
You can use the shortcut $job. For example, your entry here might be
$job.dbf. Then if your job fil e is named example.ace, your output file would
be named example.dbf. But be warned: If you also use the $job shortcut
when naming your input file, make sure to set a different location for the
output file, or you might have a file-name conflict. Likewise, to avoid
conflict, do not use $job.out.
If you are creating multiple ou tp ut f iles, use $job plus a number or letter to make
each name unique. For examp le, supp ose in y our region.ace job, you are creating
output files for Midwest, Western, Eastern, and Southern regions. You could do
this:
Optional Block
Post to Ou tput Fi le and Output File
Job-file entry Actual output file name
$jobM.dbf regionM.dbf
$jobW.dbf regionW.dbf
$jobE.dbf regionE.dbf
$jobS.dbf regionS.dbf
File Type (ASCII, DBASE3, DELIMITED, EBCDIC)
Enter the type of output file you want to create. If you’re not sure, turn to the
Database Prep manual for more information about file types.
74
ACE Job-File Reference
Page 75

Copy Format of Input File (Y/N)
Field (name,length,type,misc)
Through these parameters, you set th e format of t he output f ile (that is, the recor d
layout or structure). You have three options here.
Method Description
Automatic
cloning
Clone an d
append
Manual You should not clone if your input file contains field s that you don ’t
T o ba se the form at of yo ur
set Copy Format of Input File
Note
: If you decide only to clone, and not to add any more fields,
must delete the
the verifier will report an error.
If you clone, you may also append new fields to the end of each
record. (You cannot intersperse new fields among those cloned.) To
do this, set Copy Format of Input File
parameter to define adde d fiel ds. You can copy and repeat the Field
line as many times as necessary.
want to include in the output file. In that case, set Copy Format of
Input File = No, and use Field parameters to define all the fields of
your output file.
Field
output
file on the format of your
=
Yes.
line
. You cannot leave it blank in the job file, or
=
Yes, then use the Field
input
file,
you
Through the Field parameter, you can specify the name, length, data-type, and
format of one field. Separate these items by placing a comma between them.
Your entries at the Field parameter will look just like entries in an FMT or DMT
file. For guidelines, refer to the Database Prep manual.
You may copy and repeat the Field line as many times as necessary.
Chapter 2: Job-file blocks and parameters
75
Page 76

Post to Output File
r
f
A
A
p
Optional Block
Output posting means writing ACE results to a new or existing database(s).
In this section, we explain how Post-to-Output-File works with the Create-
Output-File
block. Next we’ll go over the parameters, and then an example of
posting setup.
Important! There are two separate, and equally important tasks when you set up an output
file. The first is format, determining the physical layout of the database (sequ ence
and names of fields, field types and lengths). The second is content, determining
what data you want (some people call this populating your fields). The figure on
the next page shows a small example.
Define the format through entries in the Create File for Output block.
Control the content through posting commands in the Post to Output File
block.
There are three ways to approach this task:
ACE can automatically create a basic output file, based on the input database.
We call this cloning the format and automatic posting of the data content.
This saves time when you want the out put f ile to basical ly resembl e the input
file.
The source o
DB fields is
your input file.
DB
You can turn off the automatic features and specify everything yourself,
manually. This takes more time but enables you to make lots of changes such
as dropping fields, changing the sequence or names of fields, etc.
Set up a combination. Turn on th e automatic features, and use manual posting
to add more fields or override the automatic posting.
ACE
PW fields are those set up in your
DEF file. They come from the input file
and pass through ACE. If you post
them manually, they are capitalized, but
not standardized. If ACE posts them
automatically, they are standardized per
job settings.
utomaticposting means that
CE copies over all input
fields, and standardizes those
PW fields that were ide ntified
in the DEF file.
The destination
of posting is you
output file.
DB
AP fields origi nate inside the ACE
assignment engine. Some are parsed
from the input data, others are assigned
from the postal directories. All are
standardized, some per job-file settings.
Manual posting means that
you pick any combination of
DB, PW, and AP fields, and
lace them yourself, just
where you want them.
DB fields are original, untouched data.
76
ACE Job-File Reference
Page 77

File Name
BEGIN Create Output File ============================
Output File Name (path & file name).. = d:\example.dbf
File Type (see NOTE) ................ = dBASE3
Copy Format of Input File (Y/N)...... = YES
Field (name,length,type,misc)........ = zip4, 4, c
Field (name,length,type,misc)........ = dpbc, 2, c
Field (name,length,type,misc)........ = cart, 4, c
Format
END
BEGIN Post to Output File ===========================
Output File Name (path & filename)... = d:\example.dbf
Existing File (APPEND/REPLACE)....... = replace
Copy Input Data to Output File (Y/N). = YES
+ Output Filter...................... =
Copy (source, destination)........... = AP.ZIP4, ZIP4
Copy (source, destination)........... = AP.DPBC, DPBC
Copy (source, destination)........... = AP.CART, CART
Content
END
Option Description
File Type
Cloning
Field specs
Automatic posting
Manual posting
File Name The format and content setups are separate tasks. The link between them is that they both
refer to the same output file name. To save time, type the file name and location in one block,
then copy and paste it into the other block.
File Type This entry serves the same purpose as the Database Type parameter that you place in a DEF
file. Possible types are ASCII, DBASE3, DELIMITED, and more.
Cloning ACE ACE can cop y the physical fo rmat of th e input file. Th is saves a lo t of setup tim e. If yo u need
to add more fields, you can specify them manually
Field specs Each line specifies the format of one output field. Copy and paste the line to create as many
fields as you need.
Notice that these entries look like FMT or DMT entries. In effect, you’re writing a format file
for a database that doesn’t yet exist.
Automatic Posting ACE can automatically copy the content (data) from the input file to the
output file. This
saves a lot of setup time.
Manual Posting These entries place information into the output fields.
Notice the one-to-one relationship: Each Copy line corresponds to a Field line above.
Output File Name (path & filename)
If you are sending output to a ne w file, go back to your Create Output File block.
the file name, and paste it here in the Posting block.
Copy
If you are appending ACE output to the end of an existi ng database, type here the
and location of that file.
name
Chapter 2: Job-file blocks and parameters
77
Page 78

Existing File (APPEND/REPLACE)
If the output file you named already exist s, you can ch oose to replace t he existi ng
data
with the new records, or you can add new records to the end of the file . Type
either
append or replace. You might want to append if:
You interrupted ACE during processing. On a later run, process the
remaining records and appe nd them to the same output file. (Tip: Set the
Starting Record Number parameter before you resume processing.)
You want to accumulate records from several jobs in one file.
+ Output Filter
If you own ACE Plus, you can set criteria that records must meet in order to be
included in the output file.
Copy Input Data to Output File (Y/N)
Copy (source, destinati on )
Through these parameters, y ou con tro l t he content going into the output file. You
have three options here.
Method Description
Automatic
posting
Automatic
plus
Manual It is usually wise to use the automatic posting feature, because it saves
T o base the content of your
Copy Input Data to Outp ut File = Yes. Note that when ACE posts autom atically , it will standardize many fields.
If you use automatic posting, you may also need to do some additional
posting of your own, manually. To do this, set Copy Input Data to Output
File = Yes, then use the Copy parameter for m anual posting. You can
repeat the Copy line as many times as necessary.
time. However, if you prefer to do all posting yourself, you can do that.
Set Copy Input Data to O utput File = No, an d use C opy param eters to po st
all the fields of your output file. You may repeat the Copy line as many
times as necessary.
output
file on the content of your
input
file, set
Through the Copy parameter, you can specify the content of one field. The reason
it is called “Copy” is that, in effect, you are copying data from one place to
another . That’s why you see “source, destination” on the Copy line. The source is
the information that yo u want to post, and the destination is the name of a field in
your output file.
In general, you will copy data from your input file, or from ACE, to your output
file.
78
ACE Job-File Reference
Page 79
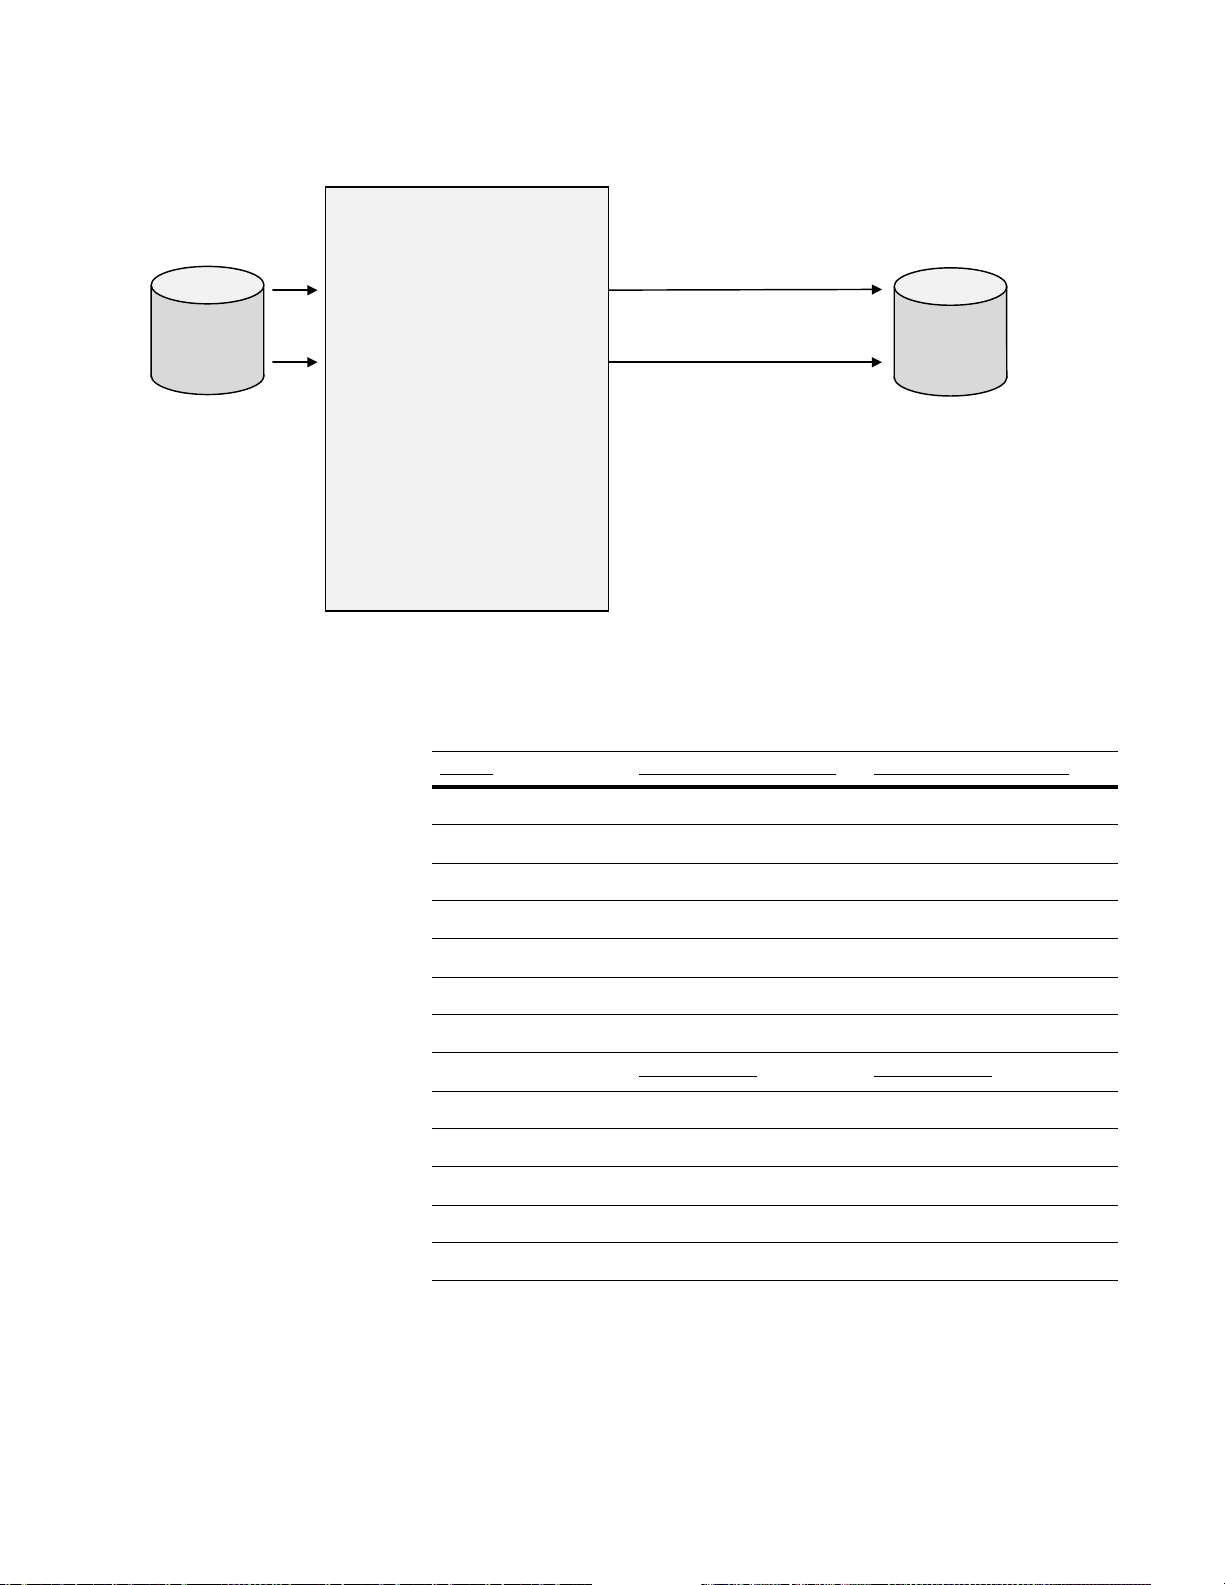
PW and AP fields are listed in appendices in the Quick Reference.
f
Automatic posting means
that ACE copies over all input
fields, and standardizes those
PW fields that were identified
in the DEF file.
Manual posting m e ans that
you pick any comb ination of
DB, PW, and AP fields, and
place them yourself, just
where you want them.
The destination
of posting is your
output file.
DB
The source o
DB fields is
your input file.
DB
ACE
PW fields are those set up in your
DEF file. They come from the input
file and pass through ACE. If you
post them manually, they are
capitalized, but not standardized. If
ACE posts them automatically, they
are standardized per job settings.
AP fields originate inside the ACE
assignment engine. Some are
parsed from the input data, others
are assigned from the postal
directories. All are standardized,
some per job-file settings.
fields are original, untouched
DB
data.
Example Let’s st art with an ex ample of fu ll standardiz ation and assignment, so you can see
how it might affect your data:
Fields Input record (Before) Output record (After)
Name_Line* VERONICA R. LENNON Veronica R. Lennon
Title* STAFF ASSISTANT Staff Assistant
Firm* WHITE HOUSE White House
Address* 1600 PENSYLVSNIA 1600 Pennsylvania Ave NW
City* WISHINGTON Washington
State* DC DC
ZIP* 20500 20500
PolParty*
ZIP4**
CART**
County**
DPBC**
Err_Stat**
INDEPENDENT INDEPENDENT
n/a
n/a
n/a
n/a
n/a
0005
C001
001
00
SA5C
* Fields marked with an asterisk are defined in the DEF file as PW fields.
These are the fields that ACE recognizes automatically. Notice that ACE
capitalizes the basic fields. You control capitalization of user-defined PW fields,
such as PolParty, through a separate style parameter.
Chapter 2: Job-file blocks and parameters
79
Page 80

** Because these postal-code fields are new fields appended to the record, we
must add them manually—by defining the format, and post ACE data to them.
How to set up your job
Turn on format cloning by setting the
Copy parameter to
YES.
If you want to post fully standardized fields and assigned postal codes to your
output file, follow this example to set up your job. Notice these points:
W e instruct ACE to automatically clone the format of the input file by setting
Copy Format of Input File to Yes. T o aut omat i cal ly copy and st anda rd iz e the
data, we set Copy Input Data to Output File to Yes. This takes care of the
Name_Line through PolParty fields, as explained on the previous page.
We manually specify the added fields for postal codes. To repeat, we have to
separately specify the format of each field, then post the data (content) of
each field. In the figure below, we’ve marked this part of the setup with
shading.
B
EGIN Standardization Style ==================================
...
Case (UPPER/lower/Upper and Lower)... = Upper and Lower
Case User PW Fields (Y/N)............ = N
...
END
BEGIN Create Output File ==============================
Output File Name (path & filename) = fullpost.dbf
File Type (see NOTE).............. = DBASE3
Copy Format of Input File (Y/N)... = YES
Field (name,length,type,misc)..... = ZIP4, 4, c
Field (name,length,type,misc)..... = CART, 4, c
Field (name,length,type,misc)..... = County, 3, c
Field (name,length,type,misc)..... = DPBC, 2, c
Field (name,length,type,misc)..... = Err_Stat, 4, c
END
T urn on automatic
posting by setting
this parameter to
YES.
80
ACE Job-File Reference
BEGIN Post to Output File ==============================
Output File Name (path & filename) = fullpost.dbf
Existing File (APPENT/REPLACE).... = REPLACE
+ Output Filter................... =
Copy Input Data to Output File(Y/N)= YES
Copy (source, destination)........ = AP.ZIP4, ZIP4
Copy (source, destination)........ = AP.CART, CART
Copy (source, destination)........ = AP.County, County
Copy (source, destination)........ = AP.DPBC, DPBC
Copy (source, destination)........ = AP.Err_Stat, Err_Stat
E
ND
Page 81

Report Defaults
Required Block
Location and File Name/
Printer Device
At this parameter you choose the destina tion of your reports. You can send reports
to a disk file, or directly to your printer. Most users send reports to disk files. Y ou
can put all reports into one file, or put each report into a separate file; most users
choose separate files.
To write each report to a separate file, leave the
Location and File parameter blank in the Report
Defaults block, and type a file name in each of
the individual Report blocks. Use the file-name
extensions listed at right.
You may string all your reports together in one
file. Type a file name at this parameter in the
Report Defaults block, but in the individual
Report blocks, leave the same parameter blank.
All reports will be written into the same file.
(Also read about the Existing File parameter on
Job Summary$job.ajs
Exec. Summary$job.aex
Form 3553$job.353
NDI$job.ndi
Delivery Sequence Invoice
$job.dsi
Standardization$job.std
Error$job.err
GeoCensus$job.geo
Mover ID$job.mia
Mover ID Summary$job.msr
the next page.)
Shortcut You may use the macro $job in your report file name. ACE interprets $job as the
base name of your job file. For example, if your job fi le i s examp le. ace, and your
entry in the Job Summary block is $job.ajs, then your Job Summary report will be
written to example.ajs. You can use $job in paths but remember, ACE will not
create any directories for you, only files.
Location If you type only a file name, ACE will create report files in the current directory.
If you want reports in anot her locati on, includ e the pa th bef ore the file name . You
may use an absolute (for example, c:\$job\reports\$job.pjs) or relative path (..\..\
reports\$job.pjs).
Direct to printer If you wish, you may send reports directly to a printer. Type the device file name
or port address of the printer (for example, LPT1 or COM1 or /dev/lp). Note that
the printer must be ready and waiting when ACE reache s t he repo rt-writing stage
of your job run!
UNC-style paths On Microsoft Windows, ACE supports the Universal Naming Convention. UNC
has these formats for paths:
//server/directory/directory/…/file
or
\\server\directory\directory\…\file
You may use either forward or back slashes, but do not mix them. You can use
UNC-style paths to refer to disk files stored on your PC or a network server.
When you set up reports, you may use a UNC path to refer to a printer that is
cabled directly to a port on your PC. You may not use UNC paths to send reports
to a network print queue.
Chapter 2: Job-file blocks and parameters
81
Page 82

Existing File (APPEND/REPLACE)
If ACE finds that the report file already exists, it can either append reports to the
end of the file, or replace it (overwrite). Your setting here will depend on how
you set the Location and File Name parameter:
Option Description
Replace If you write each report to a separate file, choose
Append If you chose to string all your reports together in one file, set this parame-
Number of Copies
Type the number of copies that you want printed.
Case (UPPER/Upper and Lower)
Select the case in which the report(s) should be printed. Reports are easier to read
in Upper and Lower case. Some printers support only UPPER case.
Page Header Line 1
Page Header Line 2
Page Header Line 3
Page Header Line 4
If you wish, type up to four lines, including a project or client name, and other
identifying information such as address, phone number, and so on.
Replace
deletes the contents of the existing file and saves the new contents.
ter to Append. Each new report will be tacked onto the end of the file.
ACE does not add totals between the two reports or otherwise combine
data.
here. ACE
You can set up four lines to be printed at the top of ACE reports. ACE does not
print headers on USPS forms.
In the Report Defaults block, you can set up default header lines that will appl y to
all reports and forms. If necessary, you can override—set a special header
applying to only one particular report—by setting the Header Lines in that
specific Report block.
You may use the following shortcuts:
$job is converted to the base name (without path or extension) of your job
file.
$date and $time are taken from your system’s clock at the time you start the
job. The date is 11 characters long, in the format dd-mmm-yyyy. The time is
10 characters long, in the hh:mm:ss format with am or pm.
82
ACE Job-File Reference
Page 83

Printer Init, USPS Forms
Printer Reset, USPS Forms
Printer Init, For Reports
Printer Reset, For Reports
You can control your printer through your ACE Job!
Most printers can detect special control codes in the stream of data sent to them
by the
computer (sometimes called “escape” codes). By sending such codes to
your printer,
portrait or landscape
modes from the program is
ACE can signal the printer to use a certain font or point size, select
mode, or select normal or condensed printing. Switching
easier than switching them manually at the printer.
You can enter into your ACE Job the codes that your printer recognizes. (You
should
codes when it
the report (to
(to reset the printer
find a listing in your printer owner’s manual.) ACE will pass along these
produces reports and forms. You can set up codes that will precede
initialize the printer) and other codes that will follow the report text
to default mode, for example).
In the Report Defaults block, you’ll find separate parameters for ACE reports and
for
USPS facsimile forms. Type a three-digit ASCII code, preceded by a
backward slash;
parameter is 20 codes. Do
for example, \001\002\003. The maximum length for each
not type spaces or commas between codes.
If your printer manual provides these codes in hexidecimal, you must convert
them to
ASCII decimal before typing them at these parameters.
Page Length
Page Width
Top Margin
Bottom Margin
Left Margin
Right Margin
Set vertical limits (Page Length, Top and Bottom Margins) in lines, and
horizontal limits (Page Width, Left and Right Margins) in characters.
Do not measure in inches. Assuming you print on standard letter-size paper,
there would be 66 lines when printing at 6 lines per in ch, or 88 lines at 8 lines per
inch.
To determine the print width available, ACE subtracts your Left and Right
!
margins from the Page Width. If you set Left and Right Margins other than
zero, remember that ACE will not be able to use the full Page Width for
printing.
Be careful to allow a wide enough area for printing. Otherwise, lines will
wrap and reports will be difficult to read. Be especially careful when printing
the Error and Standardization Reports. If necessary, use the Custom
formatting option to lay out a report that will fit your paper
Suppress Product Name
If you set no, ACE prints its name and version number on the top line of every
page. If you wish to suppress this, type yes.
Version information affected by this parameter includes the ACE version, CASScertified ACE version, and Mover ID version.
Chapter 2: Job-file blocks and parameters
83
Page 84

Report: Job Summary
Location and File Name/Printer Device = $job.a js
Existing File
Number of Copies
Case
Page Header Line 1
Page Header Line 2
Page Header Line 3
Page Header Line 4
Printer Init, For Reports
Printer Reset, For Reports
Page Length
Page Width
Top Margin
Bottom Margin
Left Margin
Right Margin
See the Report Defaults block.
Report on Files (INPUT/OUTPUT/ALL)
This parameter applie s to page 3 of the Job Summary Report.
Optional Block
Option Description
Input ACE will print a summary (us ually one pa ge) of statistics sho wing how you
updated the input file. Of co urse, this option makes sense on ly if you really
did update the input file.
Output ACE will print one page of statistics per output file.
All ACE will print one page for the input file, and one page per output file.
84
ACE Job-File Reference
Page 85

Report: Executive Summary
Location and File Name/Printer Device = $job.a ex
Existing File
Number of Copies
Case
Page Header Line 1
Page Header Line 2
Page Header Line 3
Page Header Line 4
Printer Init, For Reports
Printer Reset, For Reports
Page Length
Page Width
Top Margin
Bottom Margin
Left Margin
Right Margin
See the Report Defaults block.
Optional Block
Chapter 2: Job-file blocks and parameters
85
Page 86

Report: USPS Form 3553
If the Enable Non-CASS Features option is set to Yes in the Execution block,
this report is automatically disabled.
Location and File Name/Printer Device = $job.353
Existing File (APPEND/REPLACE)
Number of Copies (1 to 10)
Case (UPPER/Upper and Lower)
See the Report Defaults block.
CASS Certif ication Line (to 40 chars) =
If you rely on Business Objects for vendor CASS certification, leave this
parameter blank, and ACE will insert the default value Business Objects. If you
have your own end-user CASS certification from the USPS, type your company
name.
Mailer's Address 1 (to 29 chars)
Mailer's Address 2 (to 29 chars)
Mailer's Address 3 (to 29 chars)
Mailer's Address 4 (to 29 chars)
Type the name and address of the person or organization for whom you are
preparing the mailing. If you process your output file with Presort, type the same
information here that you list on y our statement s of mailing (forms 3600, 3541, or
3602).
Optional Block
List Processor (to 19 chars)
Type the name of your company.
Software Version (Name and Version)
If you rely on Business Objects for vendor CAS S certification, you may l eave this
parameter blank. ACE will insert a default value (“ACE”) and our version
number.
If you have received end-user CASS certification in your own company's name,
type the name and version number of the software you use to receive CASS
certification.
86
ACE Job-File Reference
Page 87

LOT Certified (Y/N )
Set this parameter to No only if these two conditions apply to you:
1. You have CASS certification in your own name and
2. You did not seek or obtain LOT certification
In this case, setting LOT Ce rtified = No ensures that the LOT Certification lines
on your 3553 forms will be blank, which is appropriate.
Print Extended ASCII Characters (Y/N)
If your printer supports the extended ASCII character set (check the printer
manual), type yes. ACE will produce smooth lines when it prints the 3553 Form.
If you type no, dashed lines will be printed wit hin the form.
Printer Init, USPS Forms
Printer Reset, USPS Forms
See the Report Defaults block.
Chapter 2: Job-file blocks and parameters
87
Page 88

Report: NDI
Location and File Name/Printer Device = $job.ndi
Existing File (APPEND/REPLACE)
Number of Copies (1 to 10)
Case (UPPER/Upper and Lower)
See the Report Defaults block.
Print Extended ASCII Characters (Y/N)
If your printer supports the extended ASCII character set (check the printer
manual), type yes. ACE will produce smoot h lines when it pr ints the NDI form. If
you type no, dashed lines will be printed within the form.
Company Name (to 40 chars)
Type the name of your company.
Company ID (to 20 chars)
Type the identification number that was assigned to you by the USPS National
Customer Support Center . The maximum lengt h is 20 characters. If you leave this
parameter blank, nothing will be printed.
Optional Block
Have MLNF Addresses Been Deleted (Y/N)
MLNFA is an abbreviation for “Moved Left No Forwarding Address.” When
records are processed through the National Change of Address (NCOA) system,
some MLNFA records are bound to result. If you’ve del et ed al l MLNFA records,
type yes.
If you are applying for NDI certification using a Stage 2 tape, type yes or no at
this parameter. It doesn’t matter which way you answer, because the NCSC will
ignore the entry. Just don’t leave this parameter blank.
Printer Init, USPS Forms
Printer Reset, USPS Forms
See the Report Defaults block.
88
ACE Job-File Reference
Page 89

Report: Delivery Sequence Invoice
For DSF2 reporting. For details, see “Delivery Sequence Invoice report” on
page 152.
Important: The Delivery Sequence Invoice report can be large, sometimes
!
exceeding 1000 pages. The number of pages relates to the number of ZIP
Codes in your output.
Location and File Name/Printer Device
Existing File (APPEND/REPLACE)
Number of Copies (1 to 10)
Case (UPPER/Upper and Lower)
Page Header Line 1 (to 80 chars)
Page Header Line 2 (to 80 chars)
Page Header Line 3 (to 80 chars)
Page Header Line 4 (to 80 chars)
Printer Init, For Reports
Printer Reset, For Reports
Page Length (in lines)
Page Width (in chars)
Top Margin (in lines)
Bottom Margin (in lines)
Left Margin (in chars)
Right Margin (in chars)
See “Report Defaults” on page 81.
Optional Block
Site Location (to 20 chars)
Type the name of your company’s location where the DSF2 processing is
performed for this job.
Chapter 2: Job-file blocks and parameters
89
Page 90

Report: Error
Location and File Name/Printer Device = $job.err
See the Report Defaults block.
Report on File (ALL/path & file name) = All
Option Description
All ACE will produce a report that covers all input and output file(s). If an unas-
signed record happens to be p osted to m ore than one file, it will be listed on ly
once.
Optional Block
Existing File
Number of Copies
Case
Page Header Line 1
Page Header Line 2
Page Header Line 3
Page Header Line 4
Printer Init, For Reports
Printer Reset, For Reports
Page Length
Page Width
Top Margin
Bottom Margin
Left Margin
Right Margin
File If you want an Error Report on a particular output file, type its name here.
Tip
: Go back to the Create Output File block, copy the path and file name,
and paste it in here.
If you want separate r eports f or ea ch outp ut file, copy and repeat the E rror R eport
block. In each block, set Report on File to the name of the output files on which
you want an Error Report. If you request a report on a file that contains no
unassigned records, ACE will still produce the report. It will simply state, "No
records matched your selection criteria."
See the Report Defaults block.
90
ACE Job-File Reference
Page 91

Start Report at Record #
Max # of Records to Print
Nth Select (1.0 - ???)
If you don't require a complete li sting, you can use these parameters t o save paper
or
disk space by limiting the report to a portion of the total records. If you leave
these lines blank, ACE will include all eligible records in the report.
Nth Select gives you the option to print a representative sampling of records. For
example, if you type 4, ACE will print every fourth eligible record.
When you set these parameters, bear i n mind t hat not all i nput reco rds are el igible
to be included in this report. “Eligible” means any record that meets the criteria
you set at the Err or Code List pa ramete r (bel ow). Also, ACE wil l skip some inp ut
records if you use any of the following features: Input Filter, Starting Record
Number, Assign Which Records =
NO. Therefore, record number here does not mean a database record number.
Starting the report at record number 1 does not ensure that the first record on the
report is the first record in the input file.
Error Code List (ALL, Exxx, Exxx,...)
This parameter gives you a way to limit the scope of your report. You can focus
your report on specific types of errors or include all errors in your report.
Type ALL to generate a report containing all error types. If you want your report
to reflect two or more error codes, list them in a string, separated by commas.
UNASSIGNED, or Process Deleted Records =
For example, the parameter setting below generates an Error Report that includes
only those records that had a last-line problem. Assigned records, and records that
had an address-line problem, will not appear on the report
Error Code List = E101, E212, E213, E214, E216
If you include an error code, E412 for example, you limit the report to include
only those records in which ACE assigned the error code E412. If ACE does not
assign E412 to any records, then your Error Report will be empty, no records.
However, ACE still creates the report, with a statement explaining why it is
empty.
Chapter 2: Job-file blocks and parameters
91
Page 92

Error Codes
Code Description Code Description
E101 Last line is bad or missing E212 No city and bad ZIP
E213 Bad city and no ZIP E214 Bad city and bad ZIP
E216 Bad ZIP, can’t determine which city match to select E302 No primary address line parsed
E412 Street name not found in directory E413 Possible street name matches too close to choose
E420 Primary range is missing E421 Primary range is invalid for street/route/building
E422 Predirectional needed, input is wrong or missing E423 Suffix needed, input is wrong or missing
E425 Suffix & directional needed, input wrong or missing E427 Post directional needed, input is wrong or missing
E428 Bad ZIP, can’t select an address match E429 Bad city, can’t select an address match
E430 Po ssib le addr. line matches too close to choose one E431 Urbanization needed, input is wrong or missing
E439 Address found in Early Warning System directory E500 Other Error
E501 Foreign address E502 Input record entirely blank
E503 ZIP not in area covered by partial ZIP+ directory E504 Overlapping ranges in ZiP+4 directory
E505 Matched to undeliverable default record E600 Marked by USPS as unsuitable for delivery of
mail
E601 Primary number did not DPV confirm, ZIP+4
removed
92
ACE Job-File Reference
Page 93

Field Type (POSTWARE/CUSTOM)
Custom Copy (source, length[,title])
At the Field Type parameter, you may choose th e type of data that wil l b e pri nt e d
for each record:
Option Description
PostW are Type Postware to save setup time. Then you can ignore the
parameter.
In your reports, ACE automatically includ es all o f the
Ware fields that you defined in your DEF file (just the fields used in the
assignment process). It also includes the input record number. ACE deter
mines the width for each column based on database field lengths.
Custom Type Custom for flexibility. Custom allows you to choose which fields will
be printed, their sequence and column width, and the title over each colum n
of data. Getting the report you really want will cost just a few minutes of
setup time.
Use the Custom Copy p arameter to "p ost" fields o n your report, in much the
same way that you would post fields to an output file (except that you may
not use filters).
Custom Copy
address-related
Post-
The PostWare format automatically includes input record numbers. The
Custom format does not. To print the input record number, use Custom Copy
to post AP.Record_No. Print the output record number by using
AP.Rec_No_Out, and include AP.Error_Code for error listings.
For the Custom Copy parameter, set the source, length of the column, and a title
for each column.
-
Option Description
Source For the Source field, you may select ACE code fields such as
AP.Error_Code. For ordinary data fields, use PW field names (such as
PW.City). If you use DB or AP fields (such as DB.City or AP.City), your
report will not be formatted correctly.
Length Length refers to the width of the printed column on the report; usually this
will equal the length of the source field.
Title If you want to place a Title over each column, you may do so. ACE will
insert one blank space between columns. If your title is too long, ACE will
truncate the excess.
You can repeat the Custom Copy parameter as many times as you h ave fields
to print on the report. (Of course, you are limited by the width of your
paper!)
Chapter 2: Job-file blocks and parameters
93
Page 94

Report: Standardization
Location and File Name/Printer Device
Existing File
Number of Copies
Case
Page Header Line 1
Page Header Line 2
Page Header Line 3
Page Header Line 4
Printer Init, For Reports
Printer Reset, For Reports
Page Length
Page Width
Top Margin
Bottom Margin
Left Margin
Right Margin
See the Report Defaults block.
Start Report at Record #
Max # of Records to Print
Nth Select (1.0 - ???)
If you don't require a complete li sting, you can use these paramete rs to save paper
or disk space by limiting the report to a portion of the total records. If you leave
these lines blank, ACE will include all eligible records in the report.
Required Block
Nth Select gives you the option to print a representative sampling of records. For
example, if you type 4, ACE will print every fourth eligible record.
When you set these parameters, bear in mind that not all input records are
eligible to be included in this report.
“Eligible” means any record that meets the criteria you set at the Changed
Components parameter (next page). Also remember ACE will skip some input
records if you use any of the following features: Input Filter, Starting Record
Number, Assign Which R ecords =
UNASSIGNED, or Process Deleted Records =
NO.
Therefore, record number here does not mean a database record number. Starting
the report at record number 1 does not ensure that the first record on the report is
the first record in the input file.
94
ACE Job-File Reference
Page 95

Changed Component List
This parameter gives you a way to limit the scope of your report. You can focus
your report on just the sort of address changes that you care about.
If you consider any change significant, set this parameter to ALL. If you care
only about changes to certain components, then you can name those components
at this parameter. For example, here’s a common setup:
Changed Component List = Prim_Name, City, State, ZIP
With this setup, the report will include only those records where the ACE
assigned value for primary name, city, state, or ZIP was significantly different
from the input value. A record not chan ged i n any of these components would be
dropped from the report.
The full list of possible component names is at right.
Don’t put any prefix on these names. If you want your rep ort t o
reflect changes in two or mor e components, li st them in a string,
separated by commas or + signs (as in our example above).
Notes:
This parameter does not determine which fields will be
printed on your report. (To control that, see the Custom
format on the next page.) This report only controls which
records will be included or omitted.
A component is not considered “changed” if ACE merely
capitalized it, or changed a suffix or directional to long or short style. For
more discussion of what ACE counts as a “change,” refer to the Quick
Reference section on status codes.
Suppose you limit the report to include only those records in which ACE
changed the Prim_Name. If it should happen that ACE does not actually
change the primary name in any records, then your Standardization Report
will be empty, no records. However, ACE will still create the report, with a
statement explaining why it is empty.
Field Type (POSTWARE/CUSTOM)
Custom Copy (source, length[,title])
Find descriptions on page 93.
PRIM_NAME
PRIM_RANGE
SEC_RANGE
UNIT_DESIG
PREDIR
POSTDIR
SUFFIX
CITY
STATE
ZIP
ZIP4
Chapter 2: Job-file blocks and parameters
95
Page 96

Job Statistics File
When you include this block in your job setup, ACE generates one statistics file
covering the whole job. Fo r inf o rmati on a bout ge ner at ing a st at ist ic s file f or each
output file, see
The job statistics file contains much of the same information that you would find
on pages 1 and 2 of the Job Summary Report. It consists of a single record.
See the ACE User’s Guide for a complete listing of the contents of the statistics
file.
File Name (path & file name)
Type the path and filename of your statistics file. To avoid overwriting your
supporting files we suggest that y ou do not use t he $job shortcut. A verifier error
appears if you try to use the same base name (but different extensions) the two
statistics files.
!
File Type (see NOTE)
Enter the type of output file you want to create. If you’re not sure, turn to the
Database Prep manual for more information about file types.
Optional Block
“File Statistics File” on page 97.
If the file that you name already exist s, ACE overwr ites it. There i s no optio n
to append the statistics fro m one job to an existing statistics file.
Here are the File types optio ns:
ASCII
DBASE3
DELIMITED
EBCDIC
96
ACE Job-File Reference
Page 97

File Statistics File
Use this block if you want ACE to gene rate a statist ics file for each output fi le. To
generate one statistics f ile covering the whole job, see
page 96.
The file statistics file describe how your input file was updated, or what was
posted to output files. This statistics file will contain one record per database file.
There is a strong relationship between this statistics file and the ACE Job
Summary Report. The fil e statistics file contains much of the same informa tion
that you would see on page 3 and subsequent pages of the Job Summary Report.
The scope of this statistics file is governed by the Repor t on Files parameter in the
Job Summary Report block. At that parameter, you can choose to cover the input
file, the output file(s), or both.
See the ACE User’s Guide for a complete listing of the c ontents of this statistics
file.
File Name (path & file name)
Type the path and filename of your statistics file. To avoid overwriting your
supporting files we suggest that y ou do not use t he $job shortcut. A verifier error
appears if you try to use the same base name (but different extensions) the two
statistics files.
Optional Block
“Job Statistics File” on
File Type (see NOTE)
If the file that you name already exist s, ACE over writes it. T here is no option
!
to append the statistics fro m one job to an existing statistics file.
Enter the type of output file you want to create. If you’re not sure, turn to the
Database Prep manual for more information about file types.
Here are the File types options:
ASCII
DBASE3
DELIMITED
EBCDIC
Chapter 2: Job-file blocks and parameters
97
Page 98

Report: GeoCensus
Location and File Name/Printer Device = $job.geo
Existing File
Number of Copies
Case
Page Header Line 1
Page Header Line 2
Page Header Line 3
Page Header Line 4
Printer Init, For Reports
Printer Reset, For Reports
Page Length
Page Width
Top Margin
Bottom Margin
Left Margin
Right Margin
For descriptions of these parameters, refer to “Report Defaults” on page 81.
Optional Block
98
ACE Job-File Reference
Page 99

Report: Mover ID Summary
Location and File Name/Printer Device = $job.msr
Existing File
Number of Copies
Case
Page Header Line 1
Page Header Line 2
Page Header Line 3
Page Header Line 4
Printer Init, For Reports
Printer Reset, For Reports
Page Length
Page Width
Top Margin
Bottom Margin
Left Margin
Right Margin
For descriptions of these parameters, refer to “Report Defaults” on page 81.
Print Return Code Descriptions (Y/N)
Type Y at this parameter to enable printing of the detailed return code
descriptions.
Return codes indicate if a record was affected by a move, how the NCOA
match was made, or why a match could not be made.
Link
You can include detailed, up-to-date return code descriptions in the Mover ID
Summary report. If and when the USPS adds return codes in the future or changes
return code descriptio ns, t ho s e new or up dat ed return codes will automatically be
available to you in the Mover ID Summary report, Customer Service Log (CSL),
and Address Correction Statistics (ACS) file.
The short descriptions of the return codes are always automatically included
on the Mover ID Summary report, even if you do not turn on the Print Return
Code Descriptions option.
Chapter 2: Job-file blocks and parameters
99
Page 100

USPS ACS (Address Conversion Statistics) file
Unlike the customer service log (CSL), the USPS ACS file contains information
for only one run of your job.
The NCOA
run of address conversion processes, such as NCOA
and DPV. The USPS requires this information in this single-file format. However,
because of the large file size, it can be difficult to find specific info rm ation
contained in the CSL.
Use the USPS ACS file to create a statistics file that contains all the same
information that’s in the CSL, plus additional information (such as licensee name,
input database name, and Mover ID “00” matches).
See the ACE User’s Guide for a complete listing of the c ontents of this statistics
file.
File Name (path & file name)
Enter the path to and name of the statistics file that you’re creating (for example,
c:\ace\stats\usps_stats.txt).
Link
-required customer service log (CSL) contains a record for each
Note: When you process a job using an assignment mode of Geo or Parse,
ACE does not produce the USPS address conversion statistics file.
Link
Optional Block
, LACS
Link
, ANK
Link
File Type (see NOTE)
Enter the type of output file you want to create (ASCII, dBase3, Delimited or
EBCDIC). See the Database Prep manual for more information about file types.
100
ACE Job-File Reference
 Loading...