

Bushnell Yardage Pro Yardage Pro, Yardage Pro Quick Start Manual
QuickStart Guide
Sync App Installer Screen
GPS Course File Download Screen
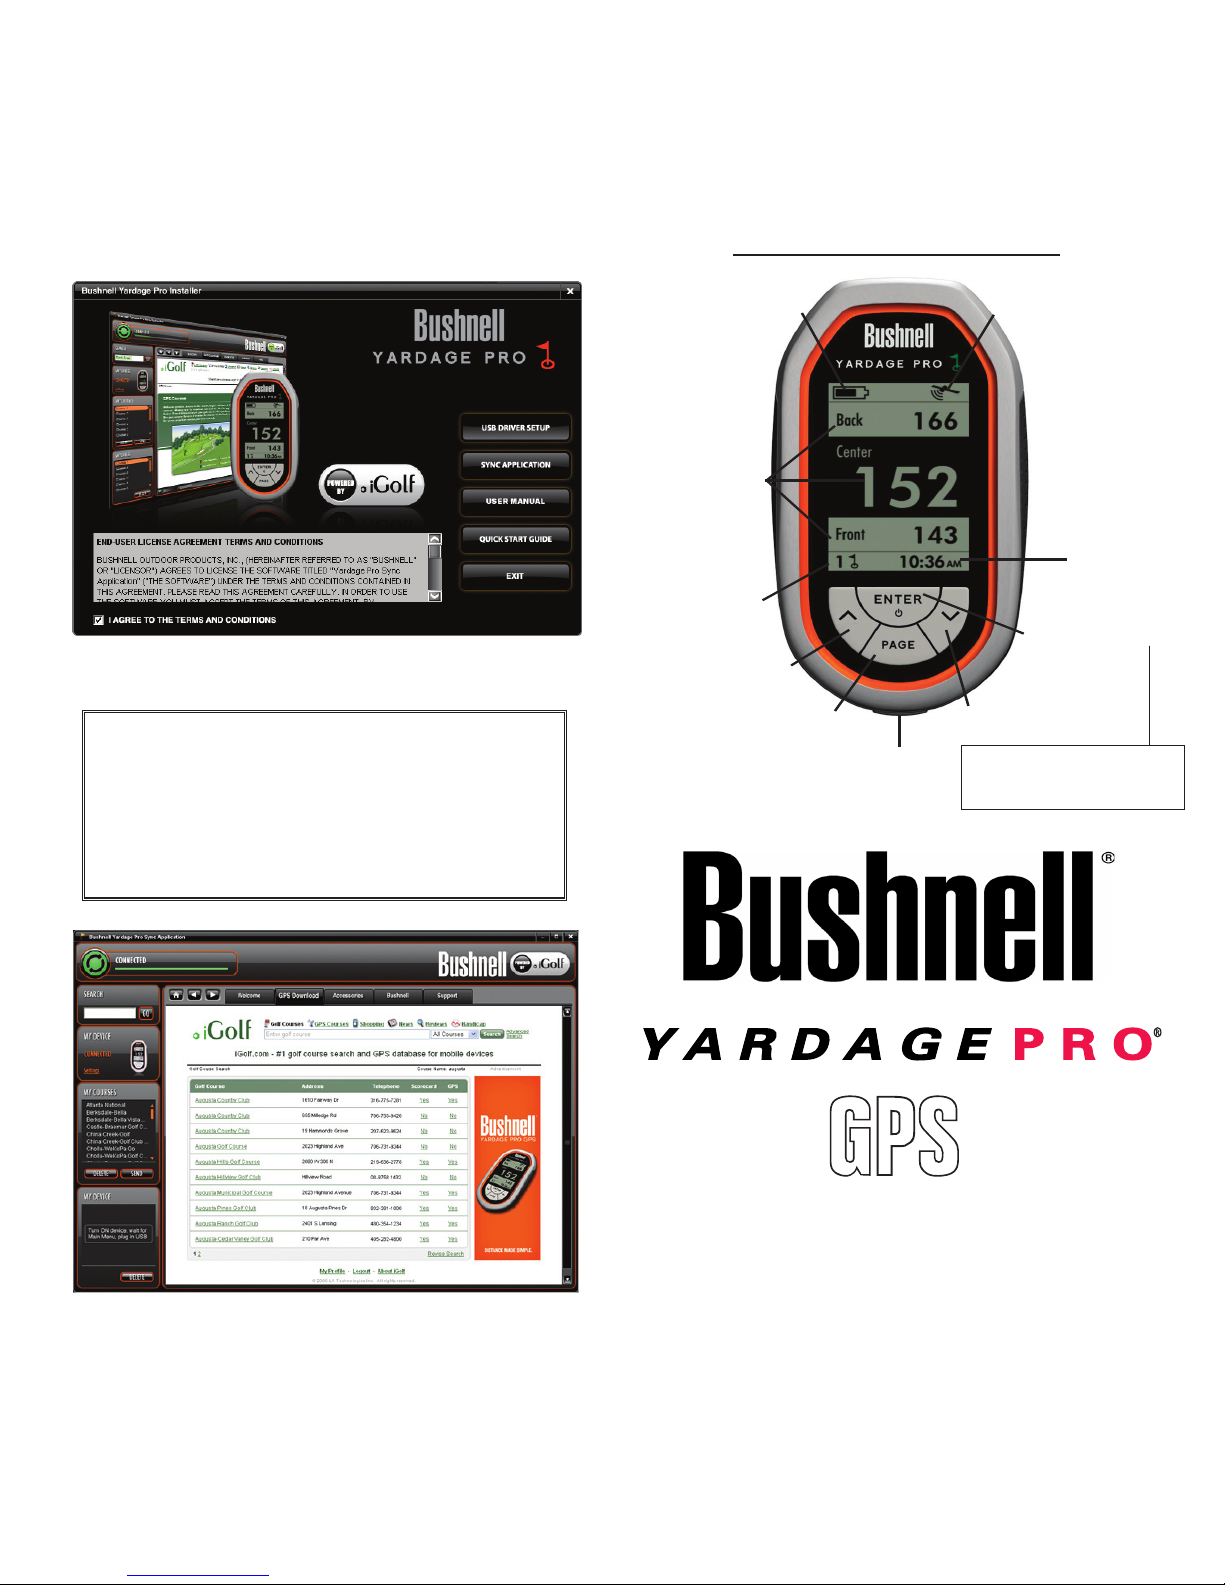
Satellite Icon
Battery Status
Distance to
Green
ENTER/Power ON*
Key
PAGE Key
UP/Previous Key
DOWN/Next Key
Hole #
or Timer
USB Port
Clock
Display and Control Layout
Quick Start Guide
Problems or Questions? Please contact
Bushnell Customer Service via email or
phone before returning your YP GPS
unit to your dealer:
Call (800) 423-3537 or write to
gpsinfo@bushnell.com
*For Power OFF, hold the
PAGE Key for 2 sec., select
“Power O”, press ENTER.

Step 1: Charge the battery via the supplied AC charger and USB cable, until the battery icon indicates a full charge (refer to the online instruction manual for details)
Step 2: Download, “UnZip” and Run the Software Installer (Do Not Connect The Yardage Pro GPS Unit Yet)
Go to • http://www.bushnellgolf.com. Click “GPS Rangenders” (gray box), then “Yardage Pro”. Click the “SYNC APP” tab. Click the link to download the Installer for your
computer platform (note: Power PC Macs are not fully supported, only Intel). Chose “Save” when the File Download window appears and select a save destination.
When the download is complete, go to the “BushnellYardageProSyncInstaller..” zip folder (where you saved the download), and double click the folder to view its contents •
(or right click and choose an “Extract..” option) (1). Then double click the le named “Bushnell Yardage Pro Installer.exe” to open the main installation screen (2).
You will need to install both a driver for the YP GPS hardware unit, and the Sync application that handles GPS data downloads and transfers.•
Note: for more details/updates about downloading, installing and using the Sync applications, see the pdf guides under the “• QUICK START” tab on the Yardage Pro webpage,
as well as the tips/answers under the FAQ tab.
Step 3: Install the USB Driver and Sync Application (Do Not Connect The Yardage Pro GPS Unit Yet)
Click the • USB DRIVER SETUP box and follow the onscreen directions to install the driver (3).
Click • SYNC APPLICATION and install it (don’t change the “Program Files\Bushnell” destination).
When the installation is complete, you will have a Bushnell Yardage Pro Sync shortcut (golf ag icon) on your computer’s desktop.•
Step 4: Start the Sync Application and Setup An iGolf Account (Do Not Connect The Yardage Pro GPS Unit Yet)
Double click the Bushnell Yardage Pro Sync icon (golf ag) on your desktop to launch the Sync app (“Welcome” screen). •
Click the “• GPS Download” tab. This will open a webpage where you will set up a membership to iGolf.com, which allows you to access their worldwide golf course
database.
Under “Join Now”, ll in your email, choose a password, and select a membership level. If you wish, you may start with a “free trial” membership which allows downloading •
one course, so you can try out your Yardage Pro before paying for a membership (required for full functionality) (4).
Enter your contact information. You will also need to enter the serial number of your unit-hold • PAG E to go to the main menu, arrow down to “SETTINGS”, press ENTER, then
go down to “Unit Info” and press ENTER. (Note: if your unit does not display the serial number in the Unit Info menu, slide open the battery compartment and carefully lift aside
the battery pack (do not disconnect it)- the serial number (“YP...”) is printed underneath).
Click • Save when you are done entering all required info.
Step 5: Download and Save GPS Data for Courses (Do Not Connect The Yardage Pro GPS Unit Yet)
After setting up your iGolf membership (or logging in with your email+password), you will see your account prole page. •
To search for a golf course, click “• GPS Courses” near the top of the screen. Next, enter the course name in the box at the top and click “SEARCH”.
You also have an “Advanced Search” option -this will allow you to restrict the search by state, city or zip code, set search radius in miles, etc.•
In the Search results list, click the name of your course. On the Course Info screen, click “• Download GPS & Scorecard”.
Click • OK to use one credit from your account. The course data will download (note the “DOWNLOADING: course name” progress bar on the top left of the Sync app window)
and then appear under “My Courses” in the Sync application window.
Step 6: Send the Course Data from your Computer to Your Yardage Pro GPS Unit
Hold down • ENTER on your YP GPS unit for two seconds. Connect the supplied USB cable from your computer to the unit.
The activity indicator at the top left of the Sync app window will conrm the unit is “CONNECTED”, then change to “READING DEVICE”, and the “My Device” frame will list any •
courses previously stored on your Yardage Pro.
Select the name of the course under “My Courses” that you want to upload to the unit (• or you may “drag and drop” a course from “My Courses” to “My Device”), and click the
SEND button.
The activity indicator changes to a “SENDING” progress bar, and the golf course name will appear in the “My Device” frame when the process is nished. •
Disconnect the YP GPS unit, then turn it o by selecting the “• Power O” option on the unit’s main menu and pressing ENTER.
Step 7: Head for the Links and Play Golf!
Make sure you are in an open area, away from tall buildings and trees, for best reception of GPS satellite signals. •
Hold the • ENTER key on the YP GPS unit for a few seconds to turn it on.
Press the • DOWN arrow key to highlight “Settings” on the display, then press ENTER. Highlight “Course Set”, then press ENTER.
Use the • DOWN or UP keys to select (highlight) the course name you want from the list of course data you downloaded or transferred to your YP GPS, then press ENTER
again.
Newer YP GPS units will automatically select the course for you based on your current GPS location.•
The unit will automatically power o after 30 minutes without user activity. This may be changed in the • Settings menu if desired.
Quick Start Guide
(1) WinZip® or similar le decompression utility is required to open (extract) .zip les. Free downloads are available on the internet if your PC does not already have a suitable program.
(2) If you get “Compressed (Zip) Folders” or “Unveried publisher” warning pop-ups, click Run.
(3) If you get a popup indicating the driver installer could not be launched, go to www.java.com to download & install the latest version of Java, then try again.
(4) Free trial course data expires after 45 days, and will not be usable after that time. Please upgrade your iGolf account to a regular paid membership.
 Loading...