

Page 1

INSTRUCTION MANUAL
Model#: 119598
For more help go to: www.trophycam.eu/wireless
10-15
Page 2

Rejoignez la communauté Wireless Trophy Cam HD sur www.trophycam.fr pour :
• Trouver des informations sur l’utilisation et les capacités de votre Wireless Trophy Cam HD
• Partager vos expériences, vos conseils et astuces avec les autres utilisateurs de la
communauté mondiale Wireless Trophy Cam HD
• Découvrir des animaux du monde entier
FrançaisEspañolDeutschItaliano
• Accéder à un service internet gratuit pour gérer et publier les photos et vidéos prises avec
votre Wireless Trophy Cam HD (vidéos hébergées sur YouTube)
www.trophycam.fr
Visita la web-site de la comunidad Wire less Trophy Cam HD donde quieras y cuando quieras:
• Más información sobre las capacidades y aplicaciones de las Wireless Trophy Cam HD
• Comenta tus experiencias Wireless Trophy Cam HD con otros usuarios, forma parte de esta
nueva comunidad
• Descubre animales de todos los rincones del mundo
• Accede a un servicio gratuito para gestionar tus fotos y videos on-line y sube tus fotos (los
videos se suben a través de YouTube)
www.trophycam.es
Besuchen Sie noch heute die deutsche Wir ele ss Trop hy Cam HD Community Internetseite, dort:
• Finden Sie weitere Informationen zu den Funktionen und Anwendungen der Wireless Trophy
Cam HD
• Können Sie mit anderen Nutzern der Wireless Trophy Cam HD Ihre Erfahrungen austauschen
und Tipps von Anwendern aus der ganzen Welt erhalten
• Entdecken Sie Tiere aus der ganzen Welt
• Haben Sie Zugri auf einen freien Service, um Ihre Wireless Trophy Cam HD Bilder/Videos
online zu verwalten und Ihre Bilder zu speichern (Videos werden bei YouTube gespeichert)
www.trophycam.de
Visita oggi la Wireless Trophy Cam HD Community del tuo paese, e se possibile:
• Cerca ulteriori informazioni sulle funzionalità e sulle applicazioni delle Bushnell Wireless
Trophy Cam HD
• Discuti le tue esperienze con le Wireless Trophy Cam HD con altri utenti, condividi
suggerimenti, entra in questa nuova comunità mondiale
• Scopri gli animali di tutto il mondo
• Accedi al un servizio gratuito per gestire online le foto/ video ottenute con le Wireless Trophy
Cam HD e carica le vostre foto (i video sono caricati su YouTube)
www.trophycam.it
Page 3

TABLE OF CONTENTS PAGE
ENGLISH
FrANçAIS
ESPAñOL
DEuTSCH
ITALIANO
PYCCKNN
For more help, go to : www.trophycam.eu/wireless
www.trophycam.eu
www.trophycam.co.uk
4-47
48-101
102-153
154-207
208-261
262-319
3
Page 4

IMPORTANT NOTE
Congratulations on your purchase of your Bushnell WIRELESS Trophy
Cam HD ! Bushnell is very proud of this camera and we are sure you will
be pleased with it as well. We appreciate your business and want to earn
your trust. Please refer to the notes below and the instructions in this
manual to ensure that you are completely satised with this product.
If your Bushnell WIRELESS Trophy Cam HD does not seem to be
functioning properly or if you are having photo/video quality issues,
please check the Troubleshooting/FAQ section on pages 39-44 and
online at: www.trophycam.eu/wireless.
Problems are often due to something simple that was overlooked, or
require only changing one setting to solve.
If your problem continues after trying the solutions in the
Troubleshooting/FAQ section, please contact Bushnell Customer Service
for FAQs, rmware updates, presets and online setup at:
www.trophycam.eu/wireless
or send email to contact@bushnell.eu.
Bushnell recommends using a full set of Energizer® Lithium AA
batteries (12) in this WIRELESS Trophy Cam HD model to obtain
maximum battery life.
Do not mix old and new batteries. Do not mix battery types-use
ALL lithium or ALL alkaline. Bushnell does not recommend the use
of rechargeable batteries in this model.
®
Bushnell recommends using SanDisk
32GB capacity, class 6 or higher speed rating for HD video) in this
WIRELESS Trophy Cam HD model.
4
SD and SDHC Cards (up to
Page 5

QUICK START GUIDE: BASIC SETUP STEPS
Step 1: Purchase and activate a SIM card from your mobile phone service provider.
An SMS/MMS (voice+text) enabled SIM card is recommended if you have unlimited
text messaging, as it will minimize costs and allow control of the camera remotely
via text messages. Select a SIM card that also supports data (SMTP or SSMTP) if
you also want the option to receive images from the camera via email through
your data plan.
Step 2: You may need to disable the PIN code on the SIM card, so the camera can
transmit unattended. Insert the SIM card in your smartphone. On iPhones, select
Settings>Phone>SIM PIN. Move the switch to the O position, and enter the
current PIN for the card. On Android, select Settings>Security>Set up SIM Lock.
Untick Lock SIM card and enter the PIN.
Step 3: Insert the SIM card into the Wireless Trophy Cam HD (slot on top left edge).
Install batteries (12x AA lithium or alkaline) and an SD or SDHC card (up to 32GB).
Attach the antenna by screwing it onto the socket at the top of the camera. Please
refer to the full instruction manual for complete, detailed directions.
Step 4: Set the Power/Mode Switch to “SETUP”. You should see the wireless signal
strength indicator bars once a connection has been established (allow time for
this).
Step 5A (MMS Setup): Press the MENU key, then press the LEFT arrow key 3 times
to go to “Wireless Setting”. Press the OK key, then select “MMS” (if you are using
an SMS/MMS capable SIM card) and press OK again. Highlight “Auto Setting” and
press the OK key
based) using the UP/DOWN arrow keys and press OK. Select your mobile service
provider and press OK to input your receiving phone number. Proceed to Step 6.
1
If “Auto Setting” does not work (which may be due to recent changes made by your service provider) or if your
mobile service provider is not on the list for your country, please use the “Manual Setting” option instead. Your
service provider can help you with the correct settings to enter.
(1)
. Select your country (where your mobile phone service is
Step 5B (SMTP Setup): If you are using an SMTP enabled SIM card, and wish to get
images via data rather than text, select “Email via SMTP” instead, then press OK.
Limited auto setup is available (for SMTP carrier info). You will still need to create
a new email account to add it as sender with email address and password, then
choose your sender email provider in the "Manual Settings" screen
(2)
. Next, select
5
Page 6

QUICK START GUIDE: BASIC SETUP STEPS
the sender's "SMTP Type" (with or without SSL), and input the receiver's email
address ("Email Address" screen). Proceed to Step 8.
2
Gmail is a recommended choice of sender. To setup, use "smtp.gmail.com", Port 465, with SSL.
Step 6: Enter the phone number you want the camera to send images to (as a
text message). Make sure you enter only numbers without country code- do not
include any spaces or dashes. Press the MENU key to save the phone number
You may enter additional phone numbers if you wish. Press MENU to return to the
MMS screen. Note: only the rst phone # can control the camera.
3
If more phone #s are added (in addition to the primary #), turn o the group messaging feature on your phone
(iPhone : Setup>Messages>Group Messaging) (Android : Text Messaging>Settings>Multimedia>Group
Conversations -set to "O")
Step 7: From the “MMS” or “Email via SMTP” screen, you can also set up an email
address to receive data from the camera (this is the only option when using
SMTP, as receiving images via text is not possible. For SMS/MMS operation, email
is optional in addition to phone (text) receipt of images). Select “Email Address”
then press OK. Press OK again to begin entering your email address. When
nished, press the MENU key to save it.
Step 8: Test the camera to ensure that you will receive images. With the camera
switched to “SETUP”, and a wireless signal conrmed by green bars at the right
of the antenna icon, press the LEFT arrow key. You will see a “Step” display while
the camera snaps and transmits a photo, followed by “Wireless test over!” and a
“Send Success!” or “Communication Err” message. If success is indicated, check
your text messages and/or email for the test image. If the camera displayed an
error message, try the test again, after double checking the steps and settings
listed above. You may also ask your wireless provider to verify that all wireless
related data/numbers as shown in the menus are correct and current.
(3)
.
Step 9: (Optional) From the “Wireless Setting” menu screen, select “Preferences”
and press OK. Select your preferred Image Size (smaller image les are lower
quality but can be transmitted faster/cheaper). Set a “Daily Max Number” to limit
the total quantity of images you receive within a 24 hour period.
6
Page 7

INTRODUCTION
About the WIRELESS Trophy Cam HD
The Bushnell WIRELESS Trophy Cam HD is a digital scouting camera. It can
be triggered by any movement of game in a location, detected by a highly
sensitive Passive Infra-Red (PIR) motion sensor, and then take high quality
pictures (up to 8MP still photos), or video clips.
The WIRELESS Trophy Cam HD consumes very little power (less than 0.25 mA)
in a stand-by (surveillance) state (ECO Mode only). This means it can deliver a
long battery life when the device is powered by the full capacity of AA alkaline
batteries, and even longer utilizing lithium AA batteries. Once motion in the
monitored area is detected, the digital camera unit will be triggered at once
(typically within one second) and then automatically take photos or videos
according to previously programmed settings. The WIRELESS Trophy Cam
HD is equipped with built-in infrared LEDs that function as a ash, so that it
delivers clear photos or videos (in black & white) even in the dark, and it can
take color photos or videos under sucient daylight. The WIRELESS Trophy
Cam HD is designed for outdoor use and is resistant against water and snow.
Your trail camera is one of the latest generation of Bushnell WIRELESS Trophy
Cam HDs, and includes many new or improved features, including:
• Auto PIR Sensitivity-the camera monitors ambient temperature
conditions and automatically adjusts the sensor/trigger signal to be
more sensitive to slight variations in temperature on hot days, less
sensitive on cold days.
• Hyper NightVision-The IR LED Flash array now has increased range,
brighter output and better coverage for improved nighttime images.
• Field Scan 2x with Live Trigger-This “time lapse” feature includes the
option for a second block of recording with its own start/stop times.
Trigger signals generated by nearby wildlife activity will still generate
additional photos/videos as they normally would, independently of the
Field Scan operation.
• GPS Geotag Capability-allows the user to input the longitude and
latitude of the camera’s position, which will be embedded in each
photo le. This enables Google Earth, Picassa and other geotag enabled
software to automatically show a map pinpointing each camera’s
location when a group of photos are reviewed on a computer. Especially
7
Page 8

useful for those who setup multiple WIRELESS Trophy Cam HDs to
monitor large or widely separated areas.
• Multi Flash Mode (LED Control)- prevents overexposed ash photos in
close range applications
• NV Shutter-user can select shutter speed for images captured at night
allowing control over brightness vs. ability to stop motion
• Camera Operating Mode can be limited to Day only, Night only, or 24
HRs
And many more features such as 1080p HD Video with Audio, widescreen or
fullscreen format still photos, imprintable camera name (user set) along with
current data including temperature and moon phase.
Applications
The WIRELESS Trophy Cam HD can be used as a trail camera for scouting or
observation. It is also suitable for surveillance usage.
PARTS AND CONTROLS
The WIRELESS Trophy Cam HD provides the following connections for
external devices: USB port, SD card slot and external DC power in (pg 9, Fig. 1).
A 3-way power switch is used to select the main operating modes: OFF,
SETUP, and ON (pg 9, Fig. 2).
A control key interface with six keys is primarily used in SETUP mode to select
operational functions and parameters. As shown on the next page, these keys
are: UP, DOWN, LEFT, RIGHT, OK and MENU. Four of the keys can also perform
a second function (shortcut operations in SETUP mode) in addition to their
main function: The DOWN key can be used to set the camera to Photo mode
(still camera icon), and the UP key can set the camera to Video mode (movie
camera icon). The RIGHT key also serves as the manual shutter (“SHOT”)
button of the camera. The OK key can be used to review an image or video.
These secondary functions are indicated by icons or text above the key (Fig. 2).
8
Page 9
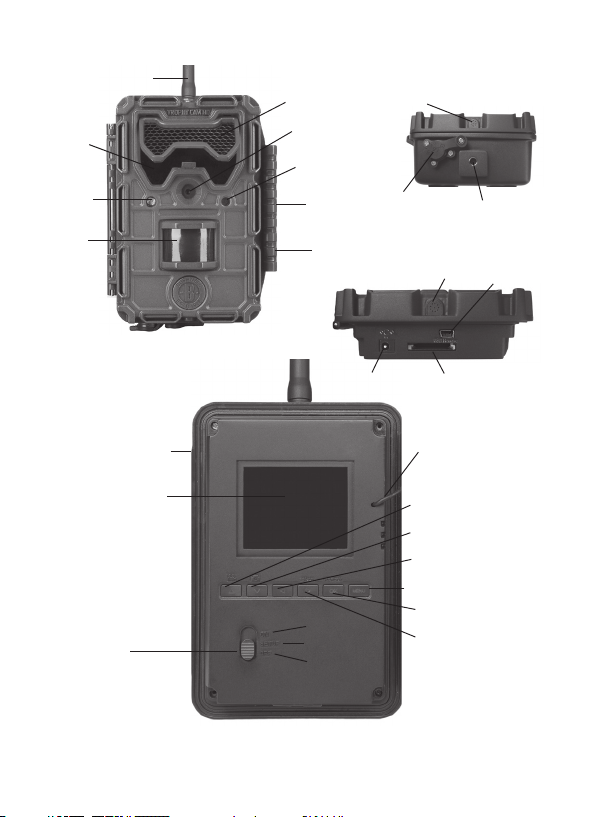
LED IR
Flash
Light
Sensor
PIR
Sensor
Antenna
FRONT VIEW
ARD
Lens
Motion/ Low
Battery Indicator
Lock
Hole
Latch
DC In
Video Mic
DC in
Cover Plug
Fig. 1: Connections
Video Mic
SD Card Slot
Tripod Socket
USB Port
SIM card slot
LCD Screen
Power/Mode
Switch
INSIDE VIEW
ON
SETUP
OFF
Cable to Battery
Compartment
UP/Video
DOWN/Photo
LEFT
MENU
OK/Replay
RIGHT/Shot
Fig. 2: Button and
Switch Guide
9
Page 10
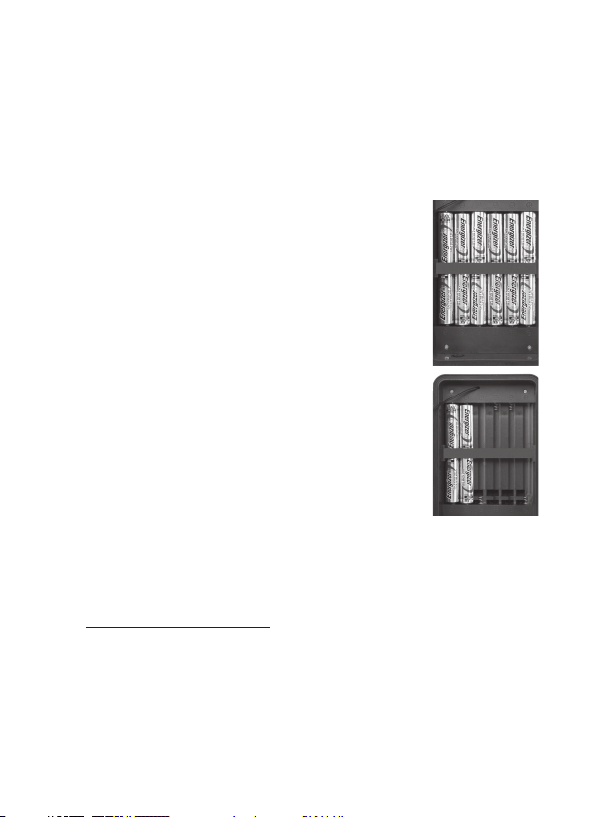
INSTALLING THE BATTERIES AND SD CARD
Before you begin learning how to use your WIRELESS Trophy Cam HD, you
will rst need to install a set of batteries and insert an SD card. Although that
may only take you a minute, there are some important notes about both
batteries and SD cards you should be aware of, so please take the time to read
the following directions and cautions:
Loading Batteries
After opening the latch on the right side of the WIRELESS
Trophy Cam HD, you will see that the WIRELESS Trophy
Cam HD has twelve battery slots. For maximum battery
life, you should install a full set of batteries. The WIRELESS
Trophy Cam HD may also be operated by just four batteries
installed in the rst slots only (starting on the left-see photo).
Battery life will be shorter with 4 batteries, but the camera
will operate normally. Whether you use 4 or a full set, be
sure to insert each battery with correct polarity (negative
or “at” end against the long spring of each battery slot).
Bushnell recommends using a full set of new lithium
AA (Energizer® brand) or alkaline AA batteries. NiMh
Rechargeable batteries are not recommended, as the lower
voltage of 1.2v they produce can cause operational issues.
When the camera's internal (AA) batteries become weak,
the low-battery indicator LED will glow blue, indicating the
camera's batteries should be changed (pg 9, Front View). You will also receive
an alert if battery levels drop via MMS or email when wireless is on.
Optionally, you can connect the #119656C Accessory Solar Panel (please
visit www.trophycam.eu/wireless for more information) to the “DC In” jack at
the bottom of the WIRELESS Trophy Cam HD (other external power supplies
should not be used, as the camera and/or display may not function correctly).
If the solar panel is connected and AA batteries are installed, the WIRELESS
Trophy Cam HD will be powered by the solar panel's rechargeable lith-ion
battery, as long as it provides adequate voltage (if not, the camera will switch
to battery power). The solar panel's battery will power the camera at night.
10
Page 11

Note: as battery consumption is less of a concern when using the Solar Panel together to
supplement the internal batteries, Wake mode can be set (via text message) for a quicker
transition from standby (consumes more power). See pg. 30 regarding the use of "Wake" mode
vs "Eco" mode. The default Eco mode extends battery life.
Inserting the SD Card
Insert the SD card (with the camera’s power switch in the OFF position) before
beginning to operate the camera. Don’t insert or remove the SD card when
the power switch is in the ON position.
The WIRELESS Trophy Cam HD uses a standard SD (Secure Digital) memory
card to save photos (in .jpg format) and/or videos (in .mov format). SD and
SDHC (High Capacity) cards up to a maximum 32GB capacity are supported.
Using high speed SD cards (SanDisk® SDHC rated class 6 or higher) is
recommended if you will use the 1280x720 or 1920x1080 HD video settings.
Before inserting the SD card into the card slot after opening the camera’s front
cover, please make sure that the write-protect switch on the side of the card
is “o” (NOT in the “Lock” position). The following describes how to insert and
remove the SD card:
• Insert the SD card into the card slot with its label side upwards (see
below). A “click” sound indicates that the card is installed successfully. If
the wrong side of the card is facing up, you will not be able to insert it
without force-there is only one correct way to insert cards. If the SD card
is not installed correctly, the device will not display an SD card icon on the
LCD in SETUP mode (the SD card icon displayed after switching to SETUP
mode will have a “lock” symbol inside it in it if the card is locked). Formatting
the SD card by using the WIRELESS Trophy Cam HD’s “Format SD Card”
parameter before using it for the rst time is recommended, especially
when a card has been used in other devices (see pg. 25, “Format SD Card”
for details).
• To take out the SD card, just gently push in the card (do not try to pull it
out without pushing in rst). The card is released from the slot and ready
to be removed when you hear the click.
WARNING: Be sure the camera’s power is switched
OFF before inserting or removing SD cards or
batteries.
11
Page 12

INSTALLING THE ANTENNA AND SIM CARD
Inserting the SIM Card
Purchase and activate a SIM card from your mobile
phone service provider. An SMS/MMS (voice+text)
enabled SIM card is recommended if you have
unlimited text messaging, as it will minimize costs.
You will also have the option to control the camera
remotely via text messages. Select a SIM card that
also supports data (SMTP or SSMTP) if you prefer to
receive images from the camera via email through your data plan. Insert your
activated SIM card in the slot near the top left corner of the display. Always
make sure the PIN Code is deactivated on your SIM card.
Attaching the Antenna
As the wireless antenna is not pre-mounted (for packaging considerations),
you will need to attach it to the camera to enable wireless operation. Simply
screw the threaded base of the antenna onto the socket at the top of the
camera. Make sure it is securely attached, but do not over-tighten it. When not
using the antenna, replace rubber cap to keep out dust and dirt.
SIM card slot
USING THE WIRELESS Trophy Cam HD
Once you’ve prepared your WIRELESS Trophy Cam HD by properly installing
batteries and an SD card, you could simply take it outside, strap it to a tree,
switch it on and leave-and you might get some great photos that are exactly
what you wanted. However, we highly recommend that you rst spend some
additional time indoors with this manual and your camera until you know a
bit more about what the 3-way switch and those control keys do. If nothing
else, you’ll probably want to at least set the date and time so the camera will
imprint them (or not-it’s your option) on your photos as they are taken, learn
how to set the camera to shoot video clips instead of still photos if you like,
and read some tips about mounting it on a tree.
THE OFF, ON, AND SETUP MODES
The WIRELESS Trophy Cam HD has three basic operational modes:
• OFF mode: Power switch in the OFF position.
• ON mode: Power switch in the ON position (LCD screen is o.)
12
Page 13

• SETUP mode: Power switch at SETUP position (LCD screen is on).
OFF MODE
The OFF mode is the “safe” mode when any actions must be taken, e.g.,
replacing the SD card or batteries, or transporting the device. You will also
use OFF mode if you connect the camera to a computer’s USB port later to
download your photos/videos. And of course, when you are storing or not
using the camera, you will switch it to OFF. Please note that even in the
OFF mode the WIRELESS Trophy Cam HD still consumes power at a very
low level. Therefore, it’s a good idea to take the batteries out of the battery
compartment if the camera will not be used for a long time.
ON MODE
Anytime after the batteries and SD card have been inserted, you can switch
on the camera. When the power switch is moved to the top position, the
camera will enter into the ON (Live) mode. The motion indicator LED (pg.
9, “Front View”) will blink red for about 10 seconds. This interval allows time for
you to close the WIRELESS Trophy Cam HD’s front cover, lock it, and leave
the monitored area. Once in the ON mode, no manual controls are needed
or possible (the control keys have no eect). The WIRELESS Trophy Cam HD
will take photos or videos automatically (according to its current parameter
settings) when it is triggered by the PIR sensor’s detection of activity in the
area it covers.
You can either move the power switch directly from OFF to ON mode, or stop
at the SETUP position rst to change one or more settings, then move the
switch to ON after you have nished doing so.
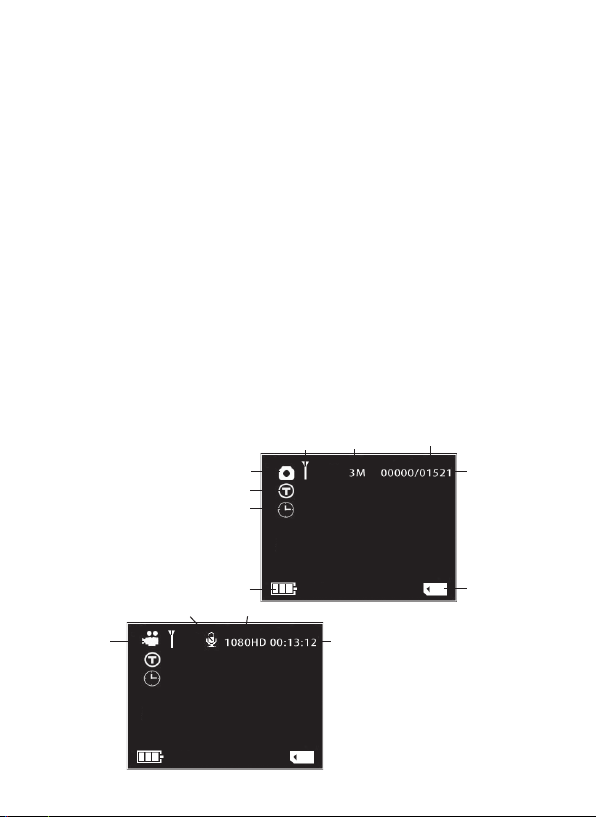
SETUP MODE
In the SETUP mode you can check and change the settings of the WIRELESS
Trophy Cam HD with the help of its built-in LCD. These settings, found in the
SETUP Menu, let you change the photo or video resolution, interval between
photos, switch the time imprint on, etc. Moving the power switch to the
SETUP position will turn on the LCD display, and you will see an information
screen that shows how many images have been taken, the battery level,
camera or video mode, etc (Fig. 3, next page).
NOTE: Always move the power switch from OFF to SETUP mode. It is possible that the
13
Page 14
camera could lockup if it is switched from ON to SETUP mode. If this occurs, simply move
the switch to OFF and then push it up to SETUP again.
SETUP Mode Shortcut Keys/Functions
As mentioned earlier in “Parts & Controls”, ve of the keys below the LCD have
secondary, “shortcut” functions when the camera is switched to SETUP mode
(but the MENU key has not been pressed):
• Press the UP key to quickly set the camera to shoot video clips.
• Press the DOWN key to quickly set the camera to take still photos.
• Press the RIGHT key to manually trigger the shutter. This is useful for
testing the camera-make sure you are in SETUP mode, press the RIGHT
key, and a few seconds later a photo or video (depending on how the
camera was set) will be saved to the SD card (or internal memory if no
card is inserted). The “number of images taken” counter on the top right
of the LCD will increase by one. If the display indicates “SD PROTECTED”
when you press the SHOT key, switch the camera OFF, remove the SD
card and slide its protect switch o.
• Press the LEFT key to snap and send a test photo. You will see a "Step"
display, followed by "Wireless test over!" and conrmation of wireless
communication (or error).
Fig. 3: SETUP Information Screen
Still Photo Mode
Time Stamp
Field Scan On
Cell Network
Signal Strength
Image Size
(Resolution)
# of Photos Taken
Remaining Photo
Capacity
Camera (Still Photo) Mode
14
Video Mode
Video Sound On
Battery Level
Video Resolution
Available Video
Recording Time
Video Mode
SD Card Status
Page 15

• Press the OK key to review a photo or video on the display. See
"Reviewing Images on the Color LCD", on pg. 36 for more details.
USING THE SETUP MENU TO CHANGE SETTINGS
The main purpose of the SETUP mode is to allow you to change the settings of
the camera’s parameters (21 dierent ones are available!) so your WIRELESS
Trophy Cam HD operates exactly the way you want it to. You will do this by
entering the SETUP Menu and pressing the keys below the LCD display, which
will show you each parameter and its setting.
Changing Parameter Settings in SETUP Mode
A wide range of options or “parameters” are provided to allow you to set
the WIRELESS Trophy Cam HD to your operational preferences. To change
the setting of any parameter you must rst switch to the SETUP mode.
Once in SETUP mode, pressing the MENU button will allow you to select
any parameter and change its setting. The name of the parameter and its
current setting will be shown on the LCD. Pressing the RIGHT or LEFT key
scrolls to the next or previous parameter (RIGHT key to move on to the next
parameter and LEFT key to go back to the previous parameter), and pressing
the UP or DOWN key lets you select a dierent setting for the currently
displayed parameter. Once you have selected your preferred new setting for
a parameter, press the OK button to save the new setting (actually change it).
When you are nished changing the settings of one or more parameters, press
MENU again to exit the SETUP menu. MENU can also be pressed anytime you
want to cancel changing a parameter’s setting after a new setting has been
selected (but OK has not been pressed yet). After setting the parameters to
your preferences, be sure to move the switch to ON to begin actually taking
photos or videos. No images will be captured if the switch is left in the SETUP
position (unless you press the RIGHT/Shot key after exiting the menu)-in fact, the
camera will power o automatically after a few minutes with no key pressed.
Parameter Settings Display
The settings for each parameter are shown on the display screen of your
WIRELESS Trophy Cam HD. All the available settings for the currently
displayed parameter are shown on one screen, with a checkmark next
to the current setting (Pg. 16, Fig. 4a). To change the setting, rst use
the UP/DOWN keys to highlight (select) the new setting you want (Fig.
4b), then press OK to “Execute” the actual change to the selected setting.
15
Page 16
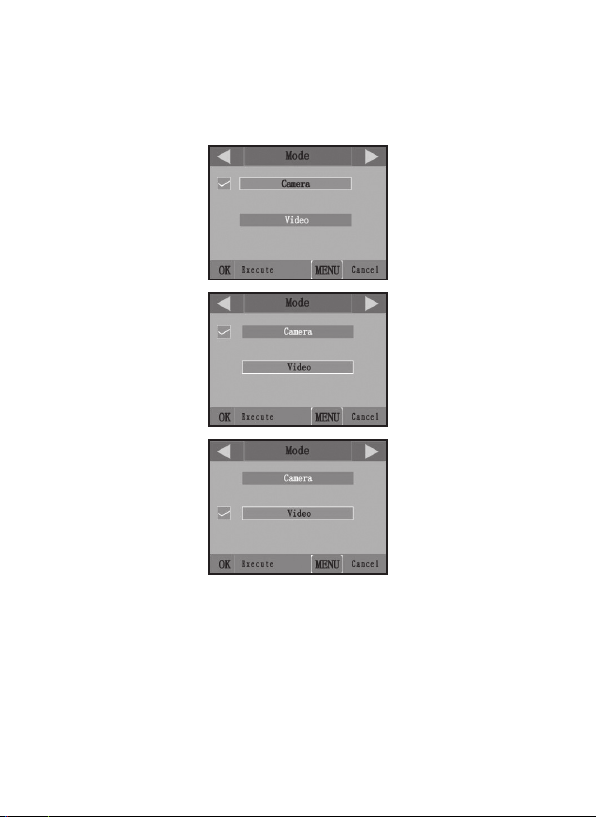
Fig. 4: Selecting Parameter Settings
(4a)
(4b)
(4c)
Press MENU
Press DOWN
Press OK
16
Page 17

The checkmark will appear next to your new setting to conrm this
(Fig. 4c).
EXAMPLES-Changing the Settings of Some Common
Parameters
Following this page, you will nd tables listing all of the parameters found in
the SETUP Menu, along with their possible settings (or range of settings), and
a detailed description of what the parameter controls and what the settings
do. If you read the previous section detailing how to select parameters and
change their settings, you should be able to dive right in, nd the parameter(s)
you want, and setup the camera to suit your preferences. But maybe you’d
rather walk through an example or two rst:
To change any parameter’s setting, always start with the power switch in
the SETUP position. After the LCD comes on, wait until you see the message
"Wireless Network Initialization Success!", then press the MENU key.
The rst parameter you will see when you rst enter the SETUP Menu is
“Mode”. To change it from its default setting of “Camera” (still photos) to “Video”
(shoot video clips), press the DOWN key to select the “Video” setting. Press the
OK key to “Execute” (Set) the new setting you’ve selected for this parameter.
Now press the RIGHT key to move to another parameter in the Menu. Pressing
it three times will take you to “Capture Number”. Try using the UP and DOWN
keys to scroll through the range of settings, then press OK to lock in your
setting for the number of photos the camera takes each time it's triggered.
Press the RIGHT key until you reach the "Default settings" parameter.
Highlight to select “Execute” (using UP or DOWN) then press OK to restore all
parameters (including the Mode and Video Length parameters you changed a
minute ago) back to their original factory default settings. The default settings
for each parameter are indicated in bold type in the SETUP Menu tables on
the next several pages.
Be sure the current date and time are set correctly if you choose to set the
“Time Stamp” parameter to “On”, since that will tell the camera to imprint the
date and time on each of the images it captures. The camera will get the date
and time when it rst connects to the network. You can also manually set or
17
Page 18

adjust the date and time, using the "Set Clock" parameter in the SETUP Menu.
Field Scan 2x with Live Trigger Feature
Field Scan is a revolutionary new feature for the Bushnell WIRELESS Trophy
Cam HD, which allows you to monitor your food plots or eld edges with time
lapse images or video. When set to “On”, the WIRELESS Trophy Cam HD will
take a photo (or record a video clip) automatically at your choice of intervals
(for example, once every ve minutes) during one or two blocks of time you
set up for each day, without requiring a trigger from an active animal. This
has the advantage of giving you the ability to monitor the edge of a eld that
might be 50 or 150 yards away from the camera out of the PIR sensor’s range.
The result is an eective range much greater than it would normally be, with
the camera dependant on triggers generated by nearby animals. This is a
great tool to scout an entire eld with only one camera.
If an animal does enter the area covered by the PIR sensor and generate a
trigger event during a time in between the Field Scan intervals you set, the
camera will capture an image or video just as it normally would, based on your
other menu settings. Here’s how to setup and use Field Scan (be sure you’ve
set the current time in “Set Clock” rst, so your Field Scan recording will stop
and start at the correct times of day):
1. Move the main switch to SETUP, then press MENU.
2. Keep pressing the RIGHT key, stepping through the Setup Menu until
you reach Set Field Scan.
3. Press the UP key to select On, and press OK (Step 1, pg. 20). You will
see "A", representing the rst block of time you can dene (a second
block of time later in the day, "B" can also be setup if you wish). Press
OK (Step 2). This takes you to the screen to set Start and Stop times,
which determines the clock times when the rst block of Field Scan
recording will begin and end for each day. You can set these times to
the exact hour and minute you want, for a recording “window” that lasts
anywhere from just a minute to a full 24 hours.
4. Set the [Start] and [Stop] times, beginning with the Start hour, using
the UP/DOWN keys to change the setting (Step 3). The hour setting is
based on a 24-hour clock, with “00” hours = midnight, “12” hours = noon,
“23” hrs = 11PM, etc. To move to the next setting, press the RIGHT key,
18
Page 19

change the minute for the Start time with UP/DOWN, then on to the
hour and minute settings for the Stop time.
5. After you nish setting the Stop minutes, press OK to conrm your
settings for the rst block of Field Scan recording. If desired, you can
create a second block of time by pressing the DOWN key to select "B"
(Step 4), then press OK and follow the same process to set Start and
Stop times for Field Scan block "B" (Step 5). As an example of how you
might use these two available time blocks, you could setup Field Scan
time block "A" for the dawn hours from 6 AM to 8 AM, and block "B" to
capture images between 5:30 and 7 PM. No Field Scan recording would
occur from 8AM to 5:30PM, or from 7PM to 6AM.
6. After setting Start/Stop times to dene Field Scan block "A" and/or "B",
press OK, then press the UP or DOWN key to select "Interval" and press
OK (Step 6). The Field Scan "Interval" setting lets you control how often a
photo or video clip is recorded during the block(s) of time you dened
with the Start and Stop settings. Your options are 60 minutes, 30 minutes,
15 minutes, 5 minutes (this is the default), or 1 minute (still photo mode
only). Use the UP/DOWN keys to select your preference, then press OK
to save it (Step 7). Note that for videos, "Interval" is independent of the
Length of each video recording-it’s how often videos are recorded, not
how long each one lasts.
7. Here’s an example of how the camera would operate, based on the
following Field Scan settings:
Field Scan: On
Field Scan A:
[Start]: 6:00
[Stop]: 8:00
Field Scan B:
[Start]: 17:30
[Stop]: 19:00
Interval: 15M
Note: avoid any "overlap" of Field Scan A & B
recording blocks when setting their start and
stop times, to assure correct operation. Also-if the
"Camera Mode" menu parameter is set to "Day" or
"Night" operation only, that will take priority
over your Field Scan settings. Set the Camera
Model to "24 HR" if you are setting both day and
night start and/or stop times in Field Scan.
These settings would cause the camera to capture a photo (or video, if
the camera is set to that mode) once every 15 minutes, beginning at 6
AM, until the Field Scan "A" recording block stops at 8:00 AM. Later that
day, the camera would again take a photo or video every 15 minutes
between 5:30 PM and 7:00 PM (during Field Scan time block "B"). The
19
Page 20
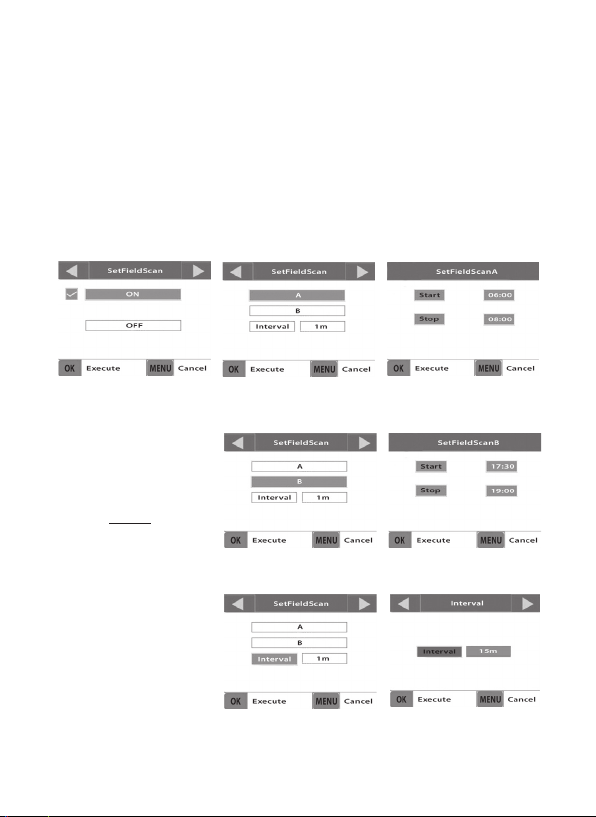
next day, the camera would again record an image or video once every
15 minutes between 6:00 and 8:00 AM, and between 5:30 and 7:00 PM.
No Field Scan recording would occur from 8AM to 5:30PM, or from 7PM
to 6AM. Remember, Field Scan recording is independent of normal
triggers due to animal activity–even if no animals enter the IR sensor
coverage zone, an image or video will still be captured every 15 minutes
during the block(s) of time. If an animal triggers the camera “in between”
the 15 minute intervals, it will be recorded.
Note: Field Scan settings of frequent intervals and/or long periods
between start and stop time can reduce battery life.
(Step 1)-set Field
Scan Mode to “On”
Steps 4 & 5 are
optional (only
required if you want to
set up a second block
of Field Scan recording
with dierent stop and
start times)
Note: the Interval
Setting sets the timing
between each image for
both Field Scan "A" and
"B" recording blocks.
20
(Step 2)
-select Field
Scan "A" (press OK)
(Step 4) (opt)-select Field
Scan "B" (press OK)
(Step 6)-select Field
Scan "Interval"
(Step 3)-set Field
Scan "A" Stop & Start
(opt)-set Field
(Step 5)
Scan "B" Stop & Start
(Step 7)-set Field
Scan Interval timing
Page 21

The SETUP Menu – Parameters and Settings List
w/Descriptions
Parameter
Settings
Description
(Bold=default)
Mode Camera, Video* Selects whether still photos or video
Image Size
(only aects
still photos in
Camera mode)
Image Format
(only aects still
photos-format
for video is tied
to Video Size)
Capture
Number
(only aects
still photos in
Camera mode)
3M Pixel,
5M Pixel,
8M Pixel
Full Screen 4:3,
Wide Screen16:9
1 (photo),
2 (photos),
3 (photos)
clips are captured when the camera
is triggered.
Selects resolution for still photos
from 3 to 8 megapixels. Higher
resolution produces better quality
photos, but creates larger les
that take up more of the SD card
capacity (lls up faster). 5M is a good
compromise between quality and
le size.
Selects 4:3 (Fullscreen, like older TV
sets) or 16:9 (Widescreen, like new
at TVs) “aspect ratio” for still photos.
Selects how many photos are
taken in sequence per trigger in
Camera mode. This setting aects
photos taken in Field Scan mode
as well (to snap two photos every
10 minutes, for example). Note:
only one thumbnail image will be
transmitted wirelessly, regardless of
this setting. Field Scan images are
not transmitted. Please also refer to
the Interval parameter.
* Only still photos can be transmitted wirelessly, due to the large les generated by video
and carrier bandwidth limitations. Only the rst frame of a video will be sent wirelessly.
When the camera is set to video mode, the video les are stored on the SD card for later
review (see REVIEWING/DELETING THE PHOTOS/VIDEOS, pg.36)
21
Page 22

Parameter
Settings
(Bold=default)
IR LED Control
(Multi-Flash
feature)
Camera Name (Input)
Video Size (only
aects video
clips in Video
mode)
High, Medium, Low Controls how many LED lamps re
See "Camera Name
Input", pg. 33"
848x480,
HD1280x720,
HD1920x1080
Description
when images are taken in low light.
“High”=all 33 LEDs re, which is the
default setting. Set to Medium or
Low if you are getting overexposed
ash photos or will place the camera
at very close range to the subject
you want to photograph. In general,
select High if most of your intended
subjects will be over 30 ft. from the
camera, Medium for the 15 to 30 ft.
range, and Low for subjects under
15 ft. away. Note: in video mode, with
LED Control set to High, the maximum
length of each video captured at night
will be 15 seconds to avoid excessive
battery drain, even if the Video Length
parameter is set to a higher value (see
next page).
Allows the user to set a custom
name for the camera. Useful for ID
purposes when multiple cameras
are setup, since each camera will
imprint its name on all photos (but
not videos) it captures.
Selects video resolution (in pixels
per frame). Higher resolution
produces better quality videos,
but creates larger les that take up
more of the SD card capacity (lls up
faster). The highest settings provides
HD video. Using high speed SD cards
®
SDHC class 6 or higher) is
(SanDisk
recommended if you will use the
1280x720 or 1920x1080 HD video
settings.
22
Page 23

Parameter
Settings
(Bold=default)
Video Length
(only aects
video clips in
Video)
Interval 10S (second)
10S (second)
default, with 60S to
5S possible range
default, with a
60M (minute) to1S
(second) range of
settings available.
(60M-1M are set
in one minute
increments, 59S-1S
are set in one second
increments)
Description
Sets length per captured video
clip. Settings begin with 10 second
default when parameter is rst
selected. After stepping down to
5S, video length settings start over
at 60S. Note: if LED Control setting
is "High", Video Length at night is
automatically limited to 15 seconds
max. Daytime videos can be up to 60S.
Selects the length of time that the
camera will “wait” until it responds
to any additional triggers from the
PIR after an animal is rst detected
and remains within the sensor’s
range. During this user set “ignore
triggers” interval, the camera will not
capture photos/videos. This prevents
the card from lling up with too
many redundant images. Settings
begin with 10 second default when
parameter is rst selected. Note: after
setting down past “1S”, settings start
over at “60M”.
23
Page 24

Parameter
Settings
Description
(Bold=default)
Sensor Level Low, Normal, High,
NV (Night
Vision) Shutter
Camera Mode Day, Night, 24 Hrs Allows user to limit operation
Auto
High, Medium, Low Aects the shutter speed during
Selects the sensitivity of the PIR
sensor. The “High” setting will
make the camera more sensitive
to infrared (heat) and more easily
triggered by motion, and the “Low”
setting makes it less sensitive to
heat and motion. The High setting
can be useful when the ambient
temperature is warm (making
it more dicult for the sensor
to detect animals), and the Low
setting may help in cold weather if
the camera is being triggered too
often by anything warmer than
the surroundings. “Normal” is for
average or moderate conditions.
The default “Auto” setting will
allow the camera to determine the
best setting based on its current
operating temperature. This is
an ideal setting if the weather is
expected to change signicantly
during the period the camera will
be used.
Night Vision operation. High will
freeze motion better, but photos
may be darker. A Low shutter speed
setting will produce brighter photos,
but rapid motion may be blurred.
to only day or night period if
desired. An ambient light level
sensor determines "Day" vs "Night"
automatically. This setting takes
priority over any Field Scan settings.
24
Page 25

Parameter
Settings
Description
(Bold=default)
Format SD Card Execute (followed
by an additional No/
Yes step)
TV Output NTSC, PAL Not implemented-please disregard.
Time Stamp ON, OFF Select “On” if you want the date &
Set Clock (Set) Press OK and use the UP/DOWN
Deletes (erases) all les stored
on a card to prepare it for reuse.
Always format a card that has been
previously used in other devices.
Caution! Make sure you have
downloaded and backed up any
les you want to preserve rst!
Press OK to execute, press MENU
(or select NO then press OK) to exit
without formatting.
Either setting will have no eect.
time (that the image was captured)
imprinted on every photo/video,
select “O” for no imprint. Note: the
current temperature, moon phase,
and (user set) camera name will also
be imprinted on your still photos.
keys (to change the setting) and
LEFT/RIGHT keys ( to move to
the next eld) to set the hour
(24-hr format only, “00”=midnight,
“12”=noon) and minute, and then
(on the lower row), the year, month
and date. Once all settings are made,
press OK to save. When wireless is
active, time will be set automatically
during the initial network
connection.
25
Page 26

Parameter
Settings
(Bold=default)
Set Field Scan ON, OFF
Coordinate
(After ON is
selected): “A” Start/
Stop, “B” Start/Stop,
Interval
Note: Field Scan
images are not
transmitted
wirelessly.
ON, OFF
Input
See "Using the
Setup Menu Input
Screens"
Description
Turns Field Scan (Time Lapse)
recording mode on/o. When activated, Field Scan forces the camera
to take photos or videos even when
it is not triggered by a nearby live
animal, useful for constant monitoring of an area that might be far
away from the camera. The user
can set the start and stop times for
up to two independent “blocks” of
Field Scan recording, as well as the
interval time between each photo/
video. To ensure correct operation,
avoid setting overlapping start/stop
times for Field Scan A and B. Please
read the “Field Scan 2x…” section of
this manual for details on using this
feature (pg.18). NOTE: If the "Camera
Mode" parameter is set to "Day"
or "Night" operation only, that will
take priority over your Field Scan
settings. Set Camera Mode to "24HR"
if you are setting day and night Field
Scan start and/or stop times.
Allows the user to input latitude
and longitude coordinates for the
camera’s location. This data will
be embedded in the les saved
on the camera’s SD card (if “On” is
selected). This makes it possible
to see each camera’s location as a
“pushpin” on Google Earth maps
when reviewing a folder full of
photos from multiple cameras,
or use other “geotag” capable software (Picassa, etc). See pg. 31
26
Page 27

Parameter
Settings
(Bold=default)
Set Video
Sound
(only affects
video clips in
Video mode)
Default
settings
Wireless
Setting
Language English, Francais,
On, O Select “On” to record audio along
Execute,
Cancel
Send By ,
Preferences
Deutsch, Espanol,
Italiano, Pyccknn
(Russian)
Description
with the video when the camera
is set to video mode (saved le
sizes will be slightly larger).
Select “Execute” and press OK
to restore all parameters to the
original factory default settings. If
the camera is behaving oddly and
you think you may have changed
the setting for something
accidently (but aren’t sure which
one), this will reset all parameters
to their most commonly used or
“generic” settings.
This is the entry screen for the
complete submenu containing
all Wireless related settings and
options. See pgs. 28-30 for details.
Note: only photos can be transmitted,
not videos.
Selects user's preferred language
for all menu screens.
Version (none)
Displays current operating
system (rmware) version, and
the modem IMEI number (may
be required by some carriers to
activate your service). Log on to
www.trophycam.eu/wireless for
the latest rmware updates.
27
Page 28

THE WIRELESS SUBMENU: Structure
Level 1 Level 2 Level 3 Level 4 Level 5 Level 6
Wireless
Setting >
(ON/OFF)
Send By > MMS > Auto
Setting >
Manual
Settings >
Phone
Numbers >
Email
Address >
Email via
SMTP >
Auto
Setting >
Manual
Settings >
SMTP Type > Select:
Email
Address >
Prefer-
ences >
Thumbnail
Size >
Select: 640x480,
352x288, or
320x240 (default)
Daily Max
Number >
Enter: Daily Number
Max (1-999)
(199=default)
Select:
Country >
Enter:
URL, APN, IP, Port
Enter:
Phone #(s)
Enter:
Email(s)
Select:
Country >
Enter:
1
APN, Server
Sender, Password
with SSL,
without SSL
Enter:
Email(s)
Provider
Provider
, Port,
2
Select:
Select:
1
Gmail is a recommended choice of sender. To setup, use "smtp.gmail.com", Port 465, with SSL.
2
Receiving email address for the thumbnail images.
28
Page 29

THE WIRELESS SUBMENU: Reference Guide
Send By > MMS (Multimedia Messaging Service) > Auto or Manual Setting
MMS uses text messaging data to include photos or other media les within
certain size limits. Select "Auto Setting", then simply select the name of the
country and service provider. Select "Manual Setting" if "Auto" doesn't work
correctly, or if you wish to enter the URL, APN (host address), IP and Port for
your mobile carrier service yourself*.
* online setup also available at www.trophycam.eu/wireless
Send By > MMS > Phone Numbers/Email Address
Select "Send By" then "MMS" and enter the mobile phone number(s) and/or
email addresses you want the camera's thumbnail images sent to.
Send By > Email via SMTP (Simple Mail Transfer Protocol)
An Internet email protocol, SMTP handles thumbnail images sent from
client (transmitting device) to an email server. Both MMS and SMTP allow
control of the camera remotely via text messages. Use SMTP to receive
images as data rather than text. Limited auto setup if your SIM has data
service active is available (for SMTP carrier info). You will still need to add
your personal email, address and password as sender in the "Manual
Settings" screen. Next, select the sender's "SMTP Type" (with or without
SSL), and input the receiver's email address ("Email Address" screen). We
recommend setting up a separate Gmail account for the camera to use
as "Sender".
Preferences > Thumbnail Size
Select "Image Size" then select a photo resolution to limit the size of each
transmitted thumbnail image based on your preference for quality vs.
your data plan limitations. VGA resolution=640x480 pixels per frame (0.3
megapixels-best quality), QVGA=320x240 (smallest les) and CIF= 352x288.
Your camera will capture and store (on its SD card) high resolution, full
quality images regardless of the setting you choose for the thumbnails.
Preferences > Daily Max Number
Select "Daily Number" then enter the maximum number of messages you
receive per day, from 1 up to 999.
29
Page 30

The table on the next two pages lists the various text messages which you can
send to your camera, a short description of the result when it's received (action
or change to the setting of a Setup menu parameter), and the conrmation
response/display from the camera.
Text Message Notes:
• Command and Control of camera is accomplished via TXT message with
mobile phone. In MMS, this first mobile number is REQUIRED for control,
in SMTP, this is an option if you desire to send commands to the camera.
• In SMTP, after completing setup, you must then select MMS mode to set
the master control mobile number, then reselect Email via SMTP.
• If a command is not entered correctly, the camera will respond with
"Invalid command ! "
WAKE / ECO MODE OPERATION
Your 2G Wireless Trophy Cam HD operates by default in "ECO" mode, to
ensure the longest possible battery life. However, the use of "WAKE" mode
is required if you want the camera to "listen" for your remote (SMS text)
commands constantly-for example, #PIC# and other commands that require
an immediate action. In ECO mode, the camera can only check for and respond
to new commands when it connects to the network (per Send Interval when
triggered, and once per day during daily check in, around 3PM local time).
Both WAKE and ECO can be selected/changed via SMS text commands from
your smartphone. See page 31-32 for specific details.
If the camera is in ECO mode and you send the WAKE message, the camera will
respond at the next network connection opportunity (trigger or daily checkin) and switch to WAKE mode. If the camera is in WAKE mode and you send the
ECO message, the camera will respond to the command at once and switch
to ECO mode.
When the camera's power is first switched on (manually), it is in the default
ECO mode. If WAKE mode was previously selected remotely, and the camera
power is manually switched off then back on, WAKE mode operation will
resume after the first trigger.
Note: When the camera is in ECO mode, the PIC command will not work.
It will only function in WAKE mode.
30
Page 31

TEXT MESSAGE REFERENCE REMOTE CONTROL
TEXT
(COMMAND)
#CAM# MODE: Camera Pictures ON !
#VID# MODE: Video Video ON !
#IMG#3M RESOLUTION: 3M Img. resolution : 3MP !
#IMG#5M RESOLUTION: 5M Img. resolution : 5MP !
#IMG#8M RESOLUTION: 8M Img. resolution : 8MP !
#LED#H LED CONTROL: High LED-Flash : High !
#LED#M LED CONTROL:
#LED#L LED CONTROL: Low LED-Flash : Low !
#VID#L VIDEO: 480P Video resolution : 480p !
#VID#M VIDEO: 720P Video resolution :
#VID#H VIDEO: 1080P Video resolution :
#PIR#H SENSOR LEVEL: High PIR Sensor : High !
#PIR#M SENSOR LEVEL:
#PIR#L SENSOR LEVEL: Low PIR Sensor : Low !
#PIR#A SENSOR LEVEL: Auto PIR Sensor : Auto !
#NVS#H NVS (Night Vision
#NVS#M NVS (Night Vision
#NVS#L NVS (Night Vision
#PH#ADD#060102030X Phone: Add Number 060102030X added ! *
DESCRIPTION CAMERA
FEEDBACK
Medium
Normal
Shutter): High
Shutter): Medium
Shutter): Low
LED-Flash : Medium !
HD 720p !
HD 1080p !
PIR Sensor : Medium !
Night-Vision Shutter :
High !
Night-Vision Shutter :
Medium !
Night-Vision Shutter :
Low !
31
Page 32

TEXT MESSAGE REFERENCE REMOTE CONTROL
TEXT
(COMMAND)
#PH#DEL#060102030X Phone: Delete
#EM#ADD#joe@bushnell.
com
#EM#DEL#joe@bushnell.
com
#WAKE# Wake: On Mode "Wake" - (SMS-
#ECO# Eco: On Mode "Eco" - (SMS-
(1)
#PIC#
(2)
#GPS#
#SND#ON Send: ON Send Pictures : ON !
#SND#OFF
#WL#ON Wireless: On Wireless : ON !
#WL#OFF
*
If more phone #s are added (in addition to the primary #), turn o the group messaging feature
on your phone (iPhone:Setup>Messages>Group Messaging)
(Android : Text Messaging>Settings>Multimedia>Group Conversations -set to "O")
32
(3)
(4)
NOTES:
(1) When the camera is in ECO mode, the PIC command will not work. It will only function
in WAKE mode.
(2) Your SIM must have data service active to use this function. Some carriers may not
support this feature, and accuracy varies.
(3) Remember to send #SND#ON command to reinstate transmits.
(4) To turn Wireless back on, send #WL#ON. Next transmission will be following day at 3PM.
Restoring #WL#ON after a #WL#OFF command may take more than one daily check in by
camera to achieve due to network availability.
DESCRIPTION CAMERA
FEEDBACK
060102030X deleted !
Number
Email: Add joe@bushnell.com
added !
Email: Delete joe@bushnell.com
deleted !
Commands instantly
processed)
Commands processed
after triggered images)*
Take Pic: PIC IMG Transmitting to
phone/Email !
Send GPS: LOC GPS Location :
+40.5-110.5
Send: OFF Send Pictures : OFF !
Wireless: O Wireless : OFF !
Page 33

USING THE SETUP MENU INPUT SCREENS
Camera Name Input
After selecting the Camera Name parameter (the only setting is "Input"), press
OK. If necessary, delete the previous or default name by pressing the RIGHT
key until the backspace symbol ( ) (located between letters "M" & "N") is
highlighted, then keep pressing OK. Select (highlight) each alphanumeric
character you want, using the LEFT/RIGHT and UP/DOWN keys, and pressing
OK after each one to set it. When nished naming the camera, press MENU to
save the name to memory.
Coordinate Input
After selecting the Coordinate Input parameter, press UP or DOWN to select
the ON setting and press OK. The latitude and longitude for any location
where you plan to place the camera can be obtained at many websites,
for example: http://itouchmap.com/latlong.html. You can enter a nearby
street address, just zip code, or use the various types of maps to locate the
approximate position. The format you will need to use to enter the coordinates
in the WIRELESS Trophy Cam HD menu screen is shown below:
Degrees
N=North,
S=South
Latitude
(3 digits)
Minutes Seconds
Latitude
Longitude
Note: You may see "negative" latitude or longitude coordinates online. These
designate South latitudes and West longitudes.
(La) N000,00'00"
(Lo) W000,00'00"
W=West,
E=East
Degrees
Longitude
(3 digits)
Minutes Seconds
33
Page 34

MOUNTING and POSITIONING the WIRELESS
Trophy Cam HD
Mounting
After you’ve set up the camera’s parameters to your personal preferences,
you’re ready to take it outside and slide the power switch to “ON”. When
setting up the WIRELESS Trophy Cam HD for scouting game or other outdoor
applications, you must be sure to mount it in place correctly and securely. We
recommend mounting the WIRELESS Trophy Cam HD on a sturdy tree with
a diameter of about 6 in. (15cm). To get the optimal picture quality, the tree
should be about 16-17 ft. (5 meters) away from the place to be monitored,
with the camera placed at a height of 5-6.5 ft. (1.5~2 m). Also, keep in mind
that you will get the best results at night when the subject is within the ideal
ash range, no farther than 60’ (19m) and no closer than 10’ (3m) from the
camera.
There are two ways to mount the WIRELESS Trophy Cam HD: using the
provided adjustable web belt, or the tripod socket.
• Using the adjustable web belt: Fig. 5 illustrates using the web belt on
the WIRELESS Trophy Cam HD. Push one end of the belt through the
two brackets on the back of the WIRELESS Trophy Cam HD. Thread the
end of the strap through the buckle. Fasten the belt securely around the
tree trunk by pulling the end of the strap rmly so there is no slack left.
Note: it is not possible to use a cable lock (in the upper part of the bracket)
and the web belt at the same time.
• Using the tripod socket: The camera is equipped with a socket at
the bottom end (see pg. 9) to enable mounting on a tripod or other
mounting accessories with a standard1/4-20 thread.
34
Belt
Channel
Fig. 5: Attaching the Belt
Strap Buckle
Page 35

Another socket, on the back of the camera, is also provided for accessory
mounting devices.
Two optional accessories are also available: a Deluxe Tree Bracket (#119652C)
that attaches to the tripod socket, and a Solar Panel (#119656C) supplemental
power source that connects to the "DC In" jack.
Sensing Angle and Distance Test
To test whether the WIRELESS Trophy Cam HD can eectively monitor the
area you choose, this test is recommended to check the sensing angle and
monitoring distance of the WIRELESS Trophy Cam HD. To perform the test:
• Switch the WIRELESS Trophy Cam HD to the SETUP mode.
• Make movements in front of the camera at several positions within
the area where you expect the game or subjects to be. Try dierent
distances and angles from the camera.
• If the motion indicator LED light blinks, it indicates that position can be
sensed. If it does not blink, that position is outside of the sensing area.
The results of your testing will help you nd the best placement when
mounting and aiming the WIRELESS Trophy Cam HD. The height away
from the ground for placing the device should vary with the animal size
appropriately. In general, 3 to 6 feet is preferred.
You can avoid potential false triggers due to temperature and motion
disturbances in front of the camera by not aiming it at a heat source or nearby
tree branches or brush (especially on windy days).
Switching ON the Camera
Once you switch to the ON mode, the motion indicator LED (red) will blink for
about 10 seconds. This gives you time to close and lock the front cover of the
WIRELESS Trophy Cam HD and then walk away. During this time, the motion
indicator LED will blink red continuously. After it stops blinking, the PIR is
active, and any motion that is detected by it will trigger the capture of photos
or videos as programmed in the SETUP Menu. Be sure you have read the
descriptions of the Capture Number, Video Length, Interval and Sensor Level
parameters. Please note, the PIR is strongly sensitive to ambient temperature.
The greater the temperature dierence between the environment and your
subject, the farther the possible sensing distance. The average sensing
distance is about 45 ft.
35
Page 36

Before leaving the camera unattended, please check for the following:
• Are the batteries or DC power supply inserted/connected with correct
polarity and is the power level is sucient?
• Does the SD card have sucient available space and is its writeprotection (lock) switch o?
• Is the Power switch in the ON position? (do not leave it in SETUP).
About the ARD (Anti Reflective Device)
A removable lter grid (ARD) covers the LED ash, so that light reections
from the protective black glass panel over the LED array are greatly reduced.
This helps to prevent detection of the camera by animals (and potential
thieves). If getting maximum light output from the LED ash is a higher
priority than concealment, the ARD grid may be easily removed by inserting
a small screwdriver, key, etc. in the slot at the lower center of the ARD (above
the camera lens), and gently pulling it up away from the camera (see pg. 9).
REVIEWING/DELETING THE PHOTOS/VIDEOS
After you have setup, mounted and activated your WIRELESS Trophy Cam
HD, you will of course be eager to return later and review the images it has
captured for you. There are several dierent ways this can be done.
Reviewing Images Directly From the SD Card
This is the most popular method of viewing images. Since unmounting the
camera and taking it to your computer isn’t very convenient, you may nd
it easier to just take the card out. By removing the SD card (swapping it for
a new empty card if you like) and taking it to your home or campsite to view
the images by using an SD card “reader” (user supplied) connected to your
computer (some computers and TVs have a built in SD card slot), you can leave
the camera in place ready to capture more images. Once connected, the card
reader works the same way as described below-please read that section if you
have any problem nding your les.
Reviewing Images on the Color LCD
• Put the power switch in SETUP mode (switch to OFF rst).
• Push the MENU key twice to go to “live view” mode, then press OK.
• Use the UP/DOWN keys to scroll through your photos or videos. A zoom
36
Page 37

feature is available for still photos: rst press the LEFT key, then use the
UP/DOWN keys to zoom in or out. After zooming in, you can then press
OK, and use the UP/DOWN/LEFT/RIGHT keys to move around and
examine small details in dierent areas of the photo. Press OK at anytime
to exit and return to the full view.
• Press the RIGHT (Shot) key to play a video. If “Video Sound” was set to
“On” in the Setup Menu, you should hear audio from the speaker during
playback.
• Push MENU to delete an image. Image delete mode works as described
in "Deleting Photos or Videos" (next page). To exit image review mode,
press the OK key.
Deleting Photos or Videos
If you see a photo or video during playback on the LCD or video monitor that
you want to delete, it can be done easily without leaving SETUP mode:
• Press the MENU key. You will see the rst “Delete” screen, which lets you
selects the option to delete only the currently displayed photo/video, or
all photos/videos (see below).
• Highlight the “Delete Current” or “Delete All” option, then press OK.
• Next, select “ Yes ” and press OK to erase only the last displayed photo
or video (if you selected “Delete Current”), or every photo and video le
on the card (if you selected “Delete All”)-or select “No” and press OK to
cancel the operation without deleting any les.
NOTE: after deleting a picture or a video le, the deleted les can’t be restored! It is also
possible to delete all les from the card by using the Format parameter (see pg. 25).
The WIRELESS Trophy Cam HD supports 3 kinds of le system formats, FAT12,
FAT16, and FAT32. The default value is FAT16 to save photos and videos. Here
are some related notes:
• You don’t need to be concerned about the le system format of the
WIRELESS Trophy Cam HD unless your equipment has problems
reading the SD card. If this happens, please format the SD card with the
WIRELESS Trophy Cam HD or in your computer rst and then insert the
card into your WIRELESS Trophy Cam HD and try again.
• The default le system format of the WIRELESS Trophy Cam HD is
FAT16, which most computers can read. If you format an SD card for the
WIRELESS Trophy Cam HD in your computer, you should choose the le
37
Page 38

system format FAT16. Normally FAT16 is recommended unless you have
another image viewer that uses FAT12 or FAT32 format.
The WIRELESS Trophy Cam HD’s photo les are named “09020001.JPG” etc,
and are located in the “DCIM\100EK113” folder on this “Removable Disk”. Video
le names will end with “.MOV”. You may copy the photos/videos to your hard
drive as you would any le-just copy/paste or drag the le names or icons to
your drive or desktop.
The .JPG format photo les from the WIRELESS Trophy Cam HD may be
viewed and edited with any photo software you choose to use. The .MOV video
les may be viewed with the Windows Media Player on PCs with Windows 7 or
later. If your computer is running an older version of Windows, or you are on a
Mac, and you don’t already have a compatible video player, you can download
a free version of the DivX player from http://www.divx.com/.
38
Page 39

TROUBLESHOOTING / FAQ : BASIC CAMERA FUNCTIONS
Camera takes continuous images of no subject
A camera has what is known as a “false trigger” if the PIR sensor thinks that
there is motion and heat in front of the camera lens when there is no subject
in the image. These “False Triggers” are the result of placing the camera in an
environment where there is motion associated with tree branches creating
motion in front of the camera or an area where there is high heat in the
foreground and any motion from wind could set o the camera. Setting
a camera up over water is also a potential cause for this issue. To remedy
this situation:
1. Try moving the camera to an area that does not have any of these issues
or try changing the sensor level on the menu settings.
2. If the camera continues to take images when there is no subject in them,
try placing the camera in an inside environment and aiming at a location
where there is no motion.
3. If the camera continues to show issues, then there is probably an
electronic component issue. If this is the case, please contact our
customer service to send the camera back for repair.
Battery life is shorter than expected
1. Battery life will vary with operating temperature and the number of
images taken over time. Typically, the WIRELESS Trophy Cam HD will
be able to capture several thousand images before the batteries die.
2. Check to make sure you have used new alkaline or lithium batteries.
Bushnell recommends using a full set of 12 Energizer® Lithium AA
batteries in your WIRELESS Trophy Cam HD model to obtain maximum
battery life.
3. Make sure that the power switch was turned to the “On” position and
that the camera was not left in “Setup” mode while in the eld.
4. Make sure that you are using a good quality name brand SD card in
your camera. Bushnell recommends SanDisk® brand SD Cards up to
32GB (Class 6 or higher for HD video). Our experience indicates that poor
quality SD cards can sometimes reduce your WIRELESS Trophy Cam HD
battery life.
5. See pg. 30 regarding the use of "Wake" mode vs "Eco" mode. The default
Eco mode extends battery life.
39
Page 40

Camera stops taking images or won’t take images
1. Please make sure that the SD card is not full. If the card is full, the camera
will stop taking images.
2. Check the batteries to make sure that they are new alkaline or lithium AA
batteries. See note above about short battery life.
3. Make sure that the camera power switch is in the “On” position and not
in the “O ” or “Setup” modes.
4. Make sure that you are using a good quality SD card in your camera.
Bushnell recommends SanDisk® SD Cards up to 32GB (Class 6 or higher
for 1920x1080 or 1280x720 HD video) .
5. If the SD card has its write protect switch in the lock position, the camera
will not take images.
6. If you have used an SD card in another device before inserting it in
your WIRELESS Trophy Cam HD, you might want to try formatting the
card using the “Format” parameter in Setup mode (make sure you have
backed up any important les rst, as formatting will erase all previous
les). In some cases, other devices may change the formatting of the SD
card so that it will not work properly with the WIRELESS Trophy Cam
HD.
Camera won’t power up
1. Make sure that you have installed at least 4 batteries (the required
minimum #) in the battery compartment, starting at the top, lling
battery spaces 1-4 with no “gaps”.
Bushnell recommends using a full set of 12 Energizer® Lithium AA
batteries in your WIRELESS Trophy Cam HD (the max. capacity).
2. Make sure that the batteries are installed correctly, observing proper
polarity. Always place the negative (at) end of each battery in contact
with the spring side of its slot inside the camera.
3. After moving the switch from “O ” to “Setup” or “On”, make sure that
the switch is correctly in position to ensure the proper mode (avoid
positions “between” two modes).
4. Do not move the switch directly from “On” to “Setup”-always move the
switch all the way down to “O ” rst, then back up to “Setup”.
Still Photo and/or Video Quality Problems
1. Night photos or videos appear too dark
• Check the battery indicator icon to see if battery power is full. The
ash will stop operating near the end of the battery life.
40
Page 41

• You will get the best results when the subject is within the ideal
ash range, no farther than 60' (19m) . Subjects may appear too
dark at greater distances.
• Please note that when the Capture Number parameter is set
higher than "1 Photo", or with very short Interval settings, some
images may appear darker than others due to the quick response
and rapid retriggering of the camera, allowing less time for the
ash to fully recharge before ring again.
• Make sure "LED Control" in the setup menu is set to "High" to
ensure maximum output. You can also try setting "NV Shutter" in
the menu to "Low" (slower shutter speed=brighter images, with
tradeo of increased blur if subject moves rapidly).
• The ARD (anti-reective device) shield can be removed to
maximize ash output. See page 34 for more details.
2. Daytime photos or videos appear too dark
• Make sure that the camera is not aimed at the sun or other light
sources during the day, as this may cause the auto exposure to
produce darker results.
3. Night photos or videos appear too bright
• If the subject is close to the camera (less than10ft/3m), change the
LED Control parameter in the Setup Menu to "Medium" or "Low".
4. Daytime photos or videos appear too bright
• Make sure that the camera is not aimed at the sun or other light
sources during the day.
5. Photos with streaked subject
• In some cases with low lighting conditions and fast moving
subjects, the 5MP or 8MP resolution settings may not perform as
well as the 3MP setting.
• If you have multiple images where fast moving subjects produce
streaks on the photo, try the 3MP setting instead.
• Set "NV Shutter" to "High" to minimize motion blur.
6. Red, green or blue color cast
• Under certain lighting conditions, the sensor can become
confused resulting in poor color images.
• If this is seen on a consistent basis, then the sensor may need
servicing. Please contact Bushnell customer service.
41
Page 42

7. Short video clips—not recording to the length set
• Check to make sure that the SD card is not full.
• Make sure that the camera has good batteries in it.Near the end
of the battery life, the camera may choose to record shorter video
clips (or even stop recording video, only still photos) to conserve
power.
Date/Time Stamp not appearing on images
Make sure that the “Time Stamp” parameter is set to “On”.
Photos Do Not Capture Subject of Interest
1. Check the “Sensor Level” (PIR sensitivity) parameter setting. For warm
temperature conditions, set the Sensor Level to “High” and for cold
weather use, set the sensor for “Low”. For variable weather, use "Auto".
2. Try to set your camera up in an area where there is not a heat source in
the camera’s line of sight.
3. In some cases, setting the camera near water will make the camera take
images with no subject in them. Try aiming the camera over ground.
4. Try to avoid setting the camera up on small trees that are prone to being
moved by strong winds.
5. Remove any limbs that are right in front of the camera lens.
PIR Sensor LED Flashes/Doesn’t Flash
1. When the camera is in the “Setup” mode, a special LED on the front of the
camera will ash when it senses motion. This is for setup purposes only
and will help the user aim the camera.
2. During use, the LED will not ash when the camera takes an image. This
is to help keep the camera hidden from game.
LCD Screen Issues
1. LCD screen powers on but no text is present.
• After moving the switch from “O” to “Setup” or “On”, make sure
that the switch is correctly in position to ensure the proper mode
(avoid positions “between” two modes).
• Do not move the switch directly from “On” to “Setup”-always
move the switch all the way down to “O” rst, then back up to
“Setup”.
42
Page 43

2. Screen comes on but then powers off
• Make sure that you have installed the SD card correctly.
Camera won’t retain settings
Make sure that you have been saving the changes to any parameter settings
that you made while in Setup mode, by pressing “OK” after changing the
setting. If you don’t save your new setting after changing it, the camera will
continue to use the original default setting for that parameter.
Moisture or Ants Inside Camera
1. To ensure humidity or rain is kept out of the camera, secure the DC In
plug rmly in place.
2. Ants can be attracted by low level electronic vibrations, and enter
through any gaps between the exterior and interior of the camera.
Make sure the DC In plug is securely attached.
Field Scan (Time Lapse) not working properly
1. Make sure that the stop and start times of Field Scan "A" and "B" do not
overlap (for example, do not set the start time of "B" to 8AM if the stop
time of "A" is 10AM).
2. When using Field Scan in video mode, the smallest interval time available is 5 min, to avoid potential overheating of the batteries and electronic components, which could cause operational failure or damage to
the camera. In still photo mode, a 1 min. Interval can be set.
Do not mix old and new batteries.
Do not mix battery types-use ALL lithium or ALL alkaline.
Rechargeable batteries are not recommended.
43
Page 44

TROUBLESHOOTING / FAQ : WIRELESS FUNCTIONS
Q: Why won't the GPS command work?
A: Your SIM must have data service active to use this function. Some
carriers may not support this feature. See page 32.
Q: Why can't I send commands to control the camera remotely?
A: You must have text service activated by your carrier.
Q: Why can't I get SMTP to work?
A: Make sure your SIM has data service active. Make sure you input both
sender and receiver email setups correctly. It is also recommended to set
up a separate email account (Gmail) for the camera.
Q: Why can't I get my SIM card to work?
A: Make sure to remove the PIN code (please refer to pg. 5), also make
sure there is enough credit on your SIM card, that the Country/operator
settings are correct and that there is no mistake in your phone number
or email address. Check that are both SIM card and SD card are in place. If
you still have a problem please log on to www.trophycam.eu/wireless.
44
Page 45

TECHNICAL SPECIFICATIONS
Maximum Pixel Size 3264x2448 (8MP)
Lens F = 3.1; FOV=40°; Auto IR-Cut-Remove (at night)
IR-Flash Range Selectable (Low/Med/High), up to 60’(19m) on High
Display Screen Color Display (2.4”)
Memory Card
Picture Size
Video Size
PIR sensitivity
Operation
Response Time 0.6 second
Triggering Interval 1 sec. - 60 min. programmable
Shooting Numbers 1— 3 programmable
Video Length 5-60sec. programmable
Power Supply
Stand-by Current < 0.25mA (<7mAh/day)
Power Consumption 250mA (+1300mA when all LEDs re)
Night Vision Shutter
Speed
Interface USB; SD card slot; DC external (> 8V)
Security Strap; ¼-20 attachment
Operating
Temperature
Operating Humidity 5% - 90%
SD or SDHC Card, Maximum capacity 32GB, Class 6 or
higher for 1920x1080 or 1280x720 HD video
8MP = 3264x2448; 5MP = 2592x1944;
3MP = 1920x1440
1920x1080, 1280x720, 848x480 pixels per frame at 20-30
fps (Day) / 15-20 fps (Night)
Hyper PIR with 4 sensitivity settings: Low/Normal/High/
Auto
User selectable: 24 Hour, Day only, or Night only (based
on ambient light level)
12x AA batteries recommended, 4xAA as emergency
power
User selectable (High/Med/Low)-aects night (NV)
photos/videos only
-20 - 50° C (Storage temperature: -30 - 70° C)
45
Page 46

TWO YEAR LIMITED WARRANTY
Your Bushnell® electronic product is warranted to be free of defects in materials and
workmanship for two years after the date of purchase. In the event of a defect under this
warranty, we will, at our option, repair or replace the product, provided that you return
the product postage prepaid. This warranty does not cover damages caused by misuse,
improper handling, installation, or maintenance provided by someone other than a Bushnell
Authorized Service Department.
Any return made under this warranty must be accompanied by the items listed below:
1. A check/money order in the amount of $10.00 to cover the cost of postage and
handling.
2. Name, address and daytime phone # for product return.
3. An explanation of the defect.
4. Copy of your dated proof of purchase.
5. Do not send in accessories (batteries, SD cards, cables), only the product for repair.
Product should be well packed in a sturdy outside shipping carton to prevent damage in
transit, and shipped to the address listed below:
IN U.S.A. Send To: IN CANADA Send To:
Bushnell Outdoor Products Bushnell Outdoor Products
Attn.: Repairs Attn.: Repairs
9200 Cody 140 Great Gulf Drive, Unit # B
Overland Park, Kansas 66214 Vaughan, Ontario L4K 5W5
For products purchased outside the United States or Canada please contact your local
dealer for applicable warranty information.
www.bushnell.eu/eu/shop/distributor.php
This warranty gives you specific legal rights.
You may have other rights which vary from country to country.
©2015 Bushnell Outdoor Products
46
Specications and designs are subject to change without
any notice or obligation on the part of the manufacturer.
Page 47

EU REGULATORY CONFORMANCE
Hereby, We declare that this device is in compliance with the essential requirements and other
relevant provisions of Directive 1999/5/EC.
For the declaration of conformity,
Notice: Observe the national local regulations in the location where the device is to be used.
The minimum distance between the user and/or any bystander and the radiating structure of the
transmitter is 20cm.
FCC COMPLIANCE STATEMENT:
This device complies with part 15 of the FCC Rules.
Operation is subject to the following two conditions: (1) This device may not cause harmful
interference, and (2) This device must accept any interference received, including interference
that may cause undesired operation.
FCC WARNING
This equipment has been tested and found to comply with the limits for a Class B digital device,
pursuant to Part 15 of the FCC Rules. These limits are designed to provide reasonable protection
against harmful interference in a residential installation.
This equipment generates, uses and can radiate radio frequency energy and, if not installed
and used in accordance with the instructions, may cause harmful interference to radio
communications. However, there is no guarantee that interference will not occur in a particular
installation. If this equipment does cause harmful interference to radio or television reception,
which can be determined by turning the equipment o and on, the user is encouraged to try to
correct the interference by one or more of the following measures:
• Reorient or relocate the receiving antenna.
• Increase the separation between the equipment and the receiver.
• Connect the equipment into an outlet dierent from that to which the receiver is connected.
• Consult the dealer or an experienced radio/TV technician for help.
Caution: To comply with the limits for an FCC Class B computing device, always use the shielded
signal cord supplied with this unit.
(Applicable in the EU and other European countries with separate collection systems)
This equipment contains electric and/or electronic parts and must therefore not
be disposed of as normal household waste. Instead, it should be disposed at the
respective collection points for recycling provided by the communities. For you,
this is free of charge.
If the equipment contains exchangeable (rechargeable) batteries, these too must
be removed before and, if necessary, in turn be disposed of according to the
relevant regulations (see also the respective comments in this unit’s instructions).
Further information about the subject is available at your community
administration, your local waste collection company, or in the store where you
purchased this equipment.
Disposal of Electric and Electronic Equipment
47
Page 48

FrANçAIS
Félicitations ! Vous venez d'acquérir un appareil Trophy Cam HD Wireless de
Bushnell ! Nous sommes très ers de cet appareil photo et certains que vous en
serez satisfait. Nous vous sommes très reconnaissants de votre choix et de votre
conance. Veuillez consulter les informations ci-dessous et les instructions de ce
manuel pour garantir une utilisation optimale de ce produit.
Si votre Trophy Cam HD Wireless Bushnell ne semble pas fonctionner
correctement, ou si vous avez des problèmes de qualité avec les photos/vidéos,
veuillez consulter la section Dépannage/FAQ aux pages 91-97 et en ligne sur :
INFORMATIONS IMPORTANTES
www.trophycam.eu/wireless
Les problèmes sont souvent dus à un détail qui n'a pas été remarqué et un simple
réglage peut parfois les résoudre.
Si votre problème persiste après avoir essayé les solutions proposées à la section
Dépannage/FAQ, prenez contact avec le service client de Bushnell pour obtenir des
réponses aux FAQ et des instructions concernant les mises à jour de micrologiciel,
les précongurations et la conguration en ligne, depuis la page:
www.trophycam.eu/wireless
ou envoyer un e-mail à l'adresse suivante : contact@bushnell.eu.
Bushnell vous recommande d'utiliser un jeu complet de piles AA
au lithium Energizer® (12) avec ce modèle Trophy Cam HD Wireless
pour bénécier d'une autonomie maximale.
Ne mélangez pas des piles ayant déjà servi avec des piles neuves.
Ne mélangez pas diérents types de piles. N'utilisez QUE des piles
au lithium ou QUE des piles alcalines. Bushnell ne recommande
pas l'utilisation de piles rechargeables avec ce modèle.
Bushnell recommande l'utilisation de cartes SanDisk® SD et SDHC
(jusqu'à 32 Go de capacité, vitesse d'écriture de classe 6 ou plus
élevée pour la vidéo HD) dans ce modèle de Trophy Cam HD
Wireless.
48
Page 49

GUIDE DE RÉFÉRENCE RAPIDE : ÉTAPES DE CONFIGURATION DE BASE
Étape 1 : Achetez et activez une carte SIM auprès de votre opérateur de téléphonie
mobile. Une carte SIM compatible SMS/MMS (voix + texte) est recommandée si
vous bénéciez d'un envoi illimité de messages textes, car cela vous permettra de
diminuer les coûts et de contrôler l'appareil à distance via des messages textes.
Sélectionnez une carte SIM avec Data qui permet aussi le transfert de données
(SMTP ou SSMTP) si vous souhaitez avoir la possibilité de recevoir des images
envoyées par l'appareil par e-mail via un abonnement data.
Étape 2 : Vous devez désactiver le code PIN de la carte SIM (ou demander à
votre opérateur de le faire en magasin) an que l'appareil puisse transmettre
des données automatiquement. Pour le faire vous-même, insérez la carte SIM
dans un Smartphone. Sur les iPhones, sélectionnez Réglages>Téléphone>Code
identication SIM. Mettez sur OFF puis saisissez le code PIN fourni par l’opérateur.
Sur les Android, sélectionnez Réglages>Sécurité>Conguration verrouillage carte
SIM. Désélectionnez Verrouiller Carte SIM, puis saisissez le code PIN fourni par
l’opérateur.
Étape 3 : Insérez la carte SIM dans le Trophy Cam HD Wireless (dans l'emplacement
prévu à cet eet en haut à gauche). Rajoutez les piles (12 x AA lithium ou alcaline)
et une carte SD ou SDHC (jusqu'à 32 Go). Fixez l'antenne en la vissant dans son
logement en haut de l'appareil.
Étape 4 : Mettez le commutateur de mode/d'alimentation sur « SETUP »
[Conguration]. Vous devriez voir les barres indiquant la force du signal une fois la
connexion établie (ce processus peut prendre un peu de temps).
Étape 5A (Conguration MMS) : Appuyez sur la touche MENU, puis appuyez 3
fois sur la touche comportant une èche vers la GAUCHE pour acher « Wireless
Setting » [Réglages Wireless]. Appuyez sur la touche OK, puis sélectionnez «
MMS » (si vous utilisez une carte SIM compatible avec les SMS/MMS*) et appuyez
de nouveau sur OK. Mettez en surbrillance « Auto Setting » [Réglage Auto] et
appuyez sur la touche OK
de téléphonie mobile est basé) en utilisant les touches comportant des èches
vers le HAUT/BAS et appuyez sur OK. Sélectionnez l'opérateur de la Carte SIM
insérée et appuyez sur OK pour entrer votre numéro de téléphone de réception.
Passez à l'étape 6.
1
Si « Réglage Auto » ne fonctionne pas (à la suite, par exemple, de récents changements eectués par votre
(1)
. Sélectionnez votre pays (dans lequel votre opérateur
49
Page 50

GUIDE DE RÉFÉRENCE RAPIDE : ÉTAPES DE CONFIGURATION DE BASE
opérateur) ou si votre opérateur de téléphonie mobile ne se trouve pas sur la liste de votre pays, veuillez utiliser
l'option « Manual Setting » [Réglage manuel] à la place. Votre opérateur peut vous aider à entrer les bons
paramètres.
Étape 5B (Conguration SMTP) : Si vous utilisez une carte SIM compatible SMTP
(avec de la data internet) et souhaitez recevoir les images par email plutôt que
par MMS, sélectionnez « Email via SMTP », puis appuyez sur OK. Vous avez la
possibilité de choisir «Réglage Auto» qui vous propose un réglage automatisé
des paramètres de l’opérateur et du SMTP. Nous vous conseillons de créer un
nouveau compte email pour votre Trophy Cam sur gmail.com pour ne pas
avoir à utiliser votre email personnel. Ensuite vous choisissez votre fournisseur
d’email dans le menu du Trophy Cam, les paramètres APN et SMTP se chargeront
automatiquement et vous devrez entrer l’adresse email «Email ID» et le mot de
passe «Password» du compte email nouvellement créé, puis appuyez sur Menu
pour sauvegarder. Un nouvel écran vous proposera de rentrer jusqu’à 5 adresses
email de destinataires auxquels les photos seront envoyées – vous devez entrer
au moins un email de destinataire diérent de l’Email ID. Si vous le souhaitez,
vous pouvez également eectuer un réglage SMTP manuel qui vous permettra
d’utiliser d’autres services de messagerie que ceux préenregistrés en utilisant les
sections « Réglage Manuel»
l'étape 8.
2
Gmail est un fournisseur de messagerie recommandé. Pour la conguration, utilisez « smtp.gmail.com »,
Port 465, avec SSL.
Étape 6 : Entrez le numéro de téléphone portable (sans indicatif de pays) auquel
vous souhaitez que l'appareil envoie les images (sous la forme d'un message
texte). Assurez-vous de n'entrer que des chires, sans espaces ni tirets. Appuyez
sur la touche MENU pour sauvegarder le numéro de téléphone
entrer jusqu’à 5 numéros diérents. Appuyez sur MENU pour revenir à l'écran
MMS. Remarque : seul le premier numéro de téléphone entré peut contrôler
l'appareil par SMS.
3
Si vous ajoutez plusieurs numéros de téléphone (en complément du numéro principal), désactivez la fonction
de messagerie de groupe de votre téléphone (iPhone : Setup>Messages>Group Messaging [Conguration>
Messages>Messagerie de groupe]) (Android : Text Messaging>Settings>Multimedia>Group Conversations
[Messagerie texte>Réglages>Multimédia>Conversations de groupe] dénis sur « O »)
Étape 7 : En mode « MMS » ou « Email via SMTP », vous pouvez également
(2)
, «Type SMTP» et «Adresses e-mail». Passez à
(3)
. Vous pouvez
50
Page 51

GUIDE DE RÉFÉRENCE RAPIDE : ÉTAPES DE CONFIGURATION DE BASE
paramétrer une adresse e-mail vers laquelle l'appareil enverra des données (il
s'agit de la seule option quand vous utilisez le mode SMTP, car l’envoi de MMS n'est
alors pas possible.) En mode MMS, l'e-mail est facultatif. Sélectionnez « Adresses
e-mail» , puis appuyez sur OK. Appuyez à nouveau sur OK pour commencer à
entrer votre adresse e-mail de réception. Lorsque vous avez ni, appuyez sur la
touche MENU pour sauvegarder.
Étape 8 : Testez l'appareil pour vérier que vous recevez des images. Avec le
commutateur de l'appareil sur « SETUP » [Conguration] et un signal sans l
conrmé par les barres vertes à droite de l'icône de l'antenne, appuyez sur la
touche comportant une èche vers la GAUCHE. Vous verrez un message « Step
» [en cours] pendant que l'appareil prend une photo puis la transmet, suivi par
« Wireless test over! » [n du test sans l] et « Send Success! » [Envoi eectué
avec succès] ou « Communication Err » [Erreur de communication]. Si vous avez
lu un message de réussite, vériez vos messages textes et/ou votre boîte mail
pour voir si avez reçu l'image du test. Si l'appareil a aché un message d'erreur,
essayez à nouveau d'eectuer un test, après avoir vérié le bon accomplissement
des étapes et réglages listés ci-dessus. Vous pouvez également vérier auprès
de votre opérateur de téléphonie mobile que tous les numéros/données liés à la
communication sans l qui sont achés dans les menus sont corrects et à jour.
Étape 9 : (Facultatif ) Dans l'écran du menu « Réglages Wireless » [Wireless
Settings], sélectionnez « Préférences » et appuyez sur OK. Vous pourrez modier la
résolution des images envoyées dans «Résolution d’envoi» (par défaut l’appareil
est réglé sur la résolution la plus basse, la résolution maximale en 640*480 est de
meilleure qualité et mettra jusqu’à 1min pour transmettre la photo.) Vous pouvez
également dénir un nombre maximum d’images transmises par jour dans « Nb
quotidien» pour limiter la quantité totale d'images que vous recevez dans une
période de 24 heures.
51
Page 52

INTRODUCTION
À propos du Trophy Cam HD Wireless
Le Trophy Cam HD Wireless de Bushnell est un appareil photo de surveillance
numérique. Il peut être déclenché par tout mouvement dans un endroit
donné, décelé par un détecteur de mouvement ultrasensible à capteur
infrarouge passif (PIR), puis prendre des photos de haute qualité (résolution
pouvant atteindre 8 MP), ou des séquences vidéo.
Le Trophy Cam HD Wireless consomme très peu d'électricité (moins de 0,25
mA) en mode veille (surveillance) (Mode ECO uniquement, voir détail des modes
ECO / WAKE en page 80). Cela signie qu'il dispose d'une longue autonomie
lorsqu'il fonctionne avec des piles alcaline AA entièrement chargées, et d'une
autonomie encore plus longue avec des piles AA au lithium. Une fois qu'un
mouvement est détecté dans la zone surveillée, l'appareil photo numérique
se déclenchera immédiatement puis prendra automatiquement des photos
ou des séquences vidéo selon la conguration établie au préalable. Le Trophy
Cam HD Wireless est équipé de LED infrarouges intégrées qui fonctionnent
comme un ash pour enregistrer des photos ou vidéos (en noir et blanc) dans
le noir, et des photos ou des vidéos en couleur de jour. Le Trophy Cam HD
Wireless est conçu pour être utilisé à l'extérieur et résiste à l'eau et à la neige.
Votre appareil de surveillance numérique fait partie de la dernière génération
de Trophy Cam HD Wireless s Bushnell et propose de nombreuses fonctions,
nouvelles ou améliorées, notamment :
• Sensibilité infrarouge passive automatique : l'appareil surveille la
température ambiante et ajuste automatiquement le capteur / signal de
déclenchement an qu'il soit plus sensible aux faibles variations quand
il fait chaud, et moins sensible quand il fait froid.
• HyperVision nocturne : le ash à LED infrarouge possède désormais une
plus grande portée, un rendu plus lumineux et une meilleure couverture
pour de meilleures images de nuit.
• Field Scan avec déclenchement en direct à double intervalle :
• Cette fonctionnalité ore la possibilité d'ajouter un second intervalle
d’enregistrements ayant ses propres temps de démarrage et d'arrêt. Le
Fieldscan prends des photos à intervalle déni même sans détection
de mouvement. Les mouvements alentour continuent toutefois de
déclencher des photos / vidéos indépendamment du mode FieldScan.
52
Page 53

• Fonction de géomarquage GPS : elle permet à l'utilisateur de saisir la
latitude et la longitude de l'emplacement de l'appareil photo, qui seront
ensuite intégrées à chaque chier photo. Ce système permet à Google
Earth, Picasa et à d'autres logiciels compatibles avec le géomarquage
d'acher automatiquement une carte indiquant les lieux des prises de
vue lors de leur visionnage sur un ordinateur. Fonction particulièrement
utile pour ceux qui placent des Trophy Cam HD Wireless à de multiples
endroits pour surveiller des zones vastes ou éloignées les unes des
autres.
• Mode Multi Flash [contrôle des LED] : Flash LED réglage en intensité pour
éviter les photos surexposées de nuit.
• NV Shutter [Obturateur de vision nocturne] – l'utilisateur peut
sélectionner la vitesse d'obturation pour la prise d'images pendant
la nuit, permettant ainsi de contrôler la luminosité et de ger tout
mouvement.
• Le mode de fonctionnement de l'appareil peut être réglé sur Day only
[Jour seulement], Night only [Nuit seulement] ou 24 HRs [24h].
Et bien d'autres fonctions comme la vidéo 1080p HD avec audio, les formats
écran large ou plein écran pour la prise de photos, l'impression du nom de
l'appareil photo (déni par l'utilisateur) avec les données de température et
la phase de la lune.
Applications
Le Trophy Cam HD Wireless peut être utilisé comme appareil photo de
détection ou d'observation. Il convient également à la surveillance.
COMPOSANTS ET COMMANDES
Le Trophy Cam HD Wireless dispose des connexions suivantes an d'être
raccordé à des appareils externes : Port USB, emplacement pour carte SD et
alimentation c.c. externe (p. 54, Fig. 1).
Un commutateur d'alimentation à trois positions sert à sélectionner les modes
d'opération principaux : OFF [Arrêt], SETUP [Conguration] et ON [Marche]
(p. 54, Fig. 2).
L'interface à six touches sert principalement en mode SETUP [Conguration]
à sélectionner les fonctions et paramètres opérationnels. Comme indiqué
53
Page 54

Flash LED
Infrarouge
Détecteur
de lumière
PIR
Capteur
Antenne
VUE DE FACE
ARD
Objectif
Indicateur de
mouvements/
faible charge
des piles
Fixation
pour cadenas
Verrou
Alimentation
externe
Micro Audio
Cache de la
prise CC
Fig. 1 : Connexions
Micro Audio
Emplacement de
carte SD
Point de xation
pour trépied
Port USB
Commutateur
Marche /
Conguration
VUE INTERNE
54
Emplacement
de carte SIM
Écran LCD
ON
SETUP
OFF
Câble vers le compartiment des piles
HAUT/Vidéo
BAS/Photo
GAUCHE
MENU
OK/Replay [Lecture]
DROITE/Photo
Fig. 2 : Commutateur
d'alimentation et
interface à six touches
Page 55

à la page suivante, les touches sont : HAUT, BAS, GAUCHE, DROITE, OK
et MENU. Quatre de ces touches peuvent également avoir une seconde
fonction (raccourci en mode SETUP [Conguration]) en plus de leur fonction
principale : La touche BAS peut servir à mettre l'appareil photo en mode
Photo (icône appareil photo), et la touche HAUT sert à mettre l'appareil photo
en mode Vidéo (icône appareil photo). La touche DROITE sert également
de déclencheur manuel de l'appareil photo « SHOT » [Déclencheur manuel].
La touche OK peut être utilisée pour regarder une image ou une vidéo. Ces
fonctions secondaires sont indiquées par des icônes ou un texte au-dessus
de la touche (Fig. 2).
INSTALLATION DES PILES ET DE LA CARTE SD
Avant de pouvoir utiliser votre Trophy Cam HD Wireless, vous devrez d'abord
installer des piles et insérer une carte SD. Même si cela ne vous prendra qu'une
minute, vous devez prendre conscience de quelques remarques importantes
concernant à la fois les piles et les cartes SD, donc veuillez prendre le temps de
lire les instructions et avertissements suivants :
Chargement des piles
Après avoir ouvert le loquet sur le côté droit du Trophy
Cam HD Wireless, vous constaterez que le Trophy Cam
HD Wireless possède douze emplacements pour les piles.
Pour une autonomie maximale, installez un jeu complet
de piles. Le Trophy Cam HD Wireless peut également
fonctionner avec seulement quatre piles installées dans les
premiers compartiments (à partir de la gauche, voir photo).
L'autonomie de l'appareil est plus courte avec 4 piles, mais
il fonctionne normalement. Que vous utilisiez 4 piles ou un
jeu complet, veillez à respecter la polarité de chaque pile
(pôle négatif ou « plat » en contact avec le long ressort de
chaque emplacement).
Bushnell recommande d'utiliser un jeu complet de piles AA
au lithium neuves (de la marque Energizer®) ou des piles AA
alcalines. Il est déconseillé d'utiliser des piles rechargeables
au NiMh car leur tension moins élevée de 1,2 V peut causer
des problèmes de fonctionnement.
55
Page 56

Lorsque les piles (AA) de l'appareil photo faiblissent, le voyant indicateur LED
bleu de faible charge des piles s'allumera, indiquant que les piles doivent être
changées (p. 54, « Vue de face »). Vous recevrez également un avertissement
par MMS ou par e-mail si le niveau de charge des piles baisse, à condition que
le mode sans l soit activé.
Vous pouvez, si vous le souhaitez, utiliser une source d'alimentation
supplémentaire sous forme de panneau solaire (n° 119656C) (consultez le site
www.trophycam.eu/wireless pour plus de renseignements) à connecter dans «
l'entrée d'alimentation CC » au bas du Trophy Cam HD Wireless (l'utilisation
d'autres sources d'alimentation externes n'est pas recommandée, car elles peuvent
empêcher l'appareil ou l'écran de fonctionner correctement). Si le panneau
solaire est connecté et les piles installées, le Trophy Cam HD Wireless sera
alimenté par la pile au lithium-ion rechargeable du panneau solaire, tant que
celle-ci fournira la tension adéquate (dans le cas contraire, l'appareil passera
en mode piles). La batterie interne du panneau solaire alimentera l'appareil
photo pendant la nuit.
Remarque : comme le niveau de charge des piles importe moins lorsque vous utilisez un
panneau solaire en complément des piles internes, le mode Wake (Réveil) peut-être activé (par
SMS) pour permettre une prise en compte plus rapide des diverses commandes SMS (NB: le
mode Wake consomme plus d'électricité). Voir p. 80 pour plus d'informations sur l'utilisation
du mode « Wake » par rapport au mode « Eco ». Le mode Eco par défaut prolonge l'autonomie
des piles.
Insertion de la carte SD
Insérez la carte SD (le commutateur d'alimentation de l'appareil photo étant
en position OFF [ARRÊT]) avant de commencer à utiliser l'appareil. N'insérez
pas ou n'enlevez pas la carte SD lorsque le commutateur d'alimentation est en
position ON [Marche].
Le Trophy Cam HD Wireless utilise une carte mémoire SD (Secure Digital)
standard pour sauvegarder les photos (au format .jpg) et/ou les vidéos (au
format .mov). Il accepte des cartes SD et SDHC (Haute Capacité) d'une capacité
maximale de 32 Go. L'utilisation de cartes SD à grande vitesse (SanDisk® SDHC
présentant une vitesse d'écriture de classe 6 ou plus élevée) est recommandée
si vous comptez utiliser les réglages vidéo HD 1280x720 ou 1920x1080. Avant
d'insérer la carte SD dans l'appareil, veuillez vous assurez que le loquet de
protection contre l'écriture situé sur la carte SD est sur « o » (NON pas en
position « Lock »). Veuillez respecter les étapes suivantes pour insérer et retirer
la carte SD :
56
Page 57

• Insérez la carte SD dans l'emplacement pour carte, l'étiquette de la
carte vers le haut (voir ci-dessous). Un « déclic » indique que la carte
est installée avec succès. Si le mauvais côté de la carte est vers le haut,
vous ne pourrez pas l'insérer sans forcer, il n'y a qu'une seule manière
d'insérer correctement les cartes. Si la carte SD n'est pas installée
correctement, l'écran LCD n'achera pas d'icône carte SD en mode SETUP
[Conguration] (un symbole de « cadenas » sera visible sur l'icône carte SD
achée après être passé au mode SETUP si la carte est verrouillée). Il est
recommandé de formater la carte SD en utilisant le paramètre « Formater
la carte » du Trophy Cam HD Wireless avant de l'utiliser pour la première
fois, en particulier lorsque la carte a été utilisée dans d'autres appareils
(voir p. 73 « Formater la carte » pour de plus amples renseignements).
• Pour retirer la carte SD, enfoncez-la légèrement avec votre doigt, vous
allez alors entendre un clic indiquant qu'il est désormais possible de
l'extraire (n'essayez pas de la retirer
sans avoir eectué cette manipulation
au préalable). La carte sera libérée de
l'emplacement et prête à être retirée
lorsque vous entendrez un déclic.
AVERTISSEMENT : Veillez à ce que l'alimentation de
l'appareil soit sur OFF [Arrêt] avant d'insérer ou de
retirer la carte SD ou les piles.
INSTALLATION DE L'ANTENNE ET DE LA CARTE SIM
Insertion de la carte SIM
Achetez et activez une carte SIM auprès de votre opérateur de téléphonie
mobile. Une carte SIM compatible SMS/MMS illimité (voix+texte) est
recommandée (abonnement ou carte prépayée). Vous aurez également la
possibilité de contrôler l'appareil à distance par SMS. Pour le mode Email,
choisissez une carte SIM qui permette aussi le
transfert de données internet Data (SMTP ou SSMTP)
si vous préférez que l'appareil vous envoie les images
par e-mail. Insérez votre carte SIM activée dans
la fente près du coin en haut à gauche de l'écran
et vériez toujours préalablement que le Code
PIN a été désactivé, si la carte SIM a un code PIN la
transmission ne peut pas fonctionner.
Emplacement
de carte SIM
57
Page 58

Fixation de l'antenne
Étant donné que l'antenne sans l n'est pas montée à l'avance (pour des
questions d'emballage), vous aurez besoin de la xer sur l'appareil an
d'activer le fonctionnement sans l. Vissez simplement la base letée de
l'antenne dans son logement en haut de l'appareil. Assurez-vous qu'elle
tient fermement en place, mais ne la serrez pas excessivement. Lorsque vous
n'utilisez pas l'antenne, remettez le capuchon en caoutchouc pour éviter
l'inltration de poussière et de débris.
UTILISATION DU Trophy Cam HD WIRELESS
Une fois que vous avez préparé votre Trophy Cam HD Wireless en installant
correctement les piles et une carte SD, vous pouvez simplement sortir,
l'attacher à un arbre, l'allumer et vous en allez, et il se peut que vous obteniez
des photos superbes qui correspondent exactement à ce que vous désiriez.
Toutefois, nous vous recommandons de prendre le temps de lire cette notice
an de comprendre les diérents réglages possibles que propose votre
appareil. Au minimum vous voudrez probablement régler au moins la date
et l'heure pour qu'elles soient indiquées sur vos photos (automatique en
mode Wireless), apprendre comment congurer l'appareil pour qu'il prenne
des séquences vidéo au lieu de photos si vous le désirez, et lire quelques
suggestions concernant sa xation sur un arbre.
LES MODES MARCHE, ARRÊT ET CONFIGURATION
Le Trophy Cam HD Wireless a trois modes de fonctionnement de base :
• mode OFF [Arrêt] : Commutateur d'alimentation en position OFF.
• mode ON [Marche] : Commutateur d'alimentation en position ON (l'écran
LCD est éteint).
• mode SETUP [CONFIGURATION] : Commutateur d'alimentation en
position SETUP (l'écran LCD est allumé).
MODE ARRÊT
Le mode OFF [ARRÊT] est le mode de « sécurité » permettant toute une série
d'actions, par exemple, remplacer la carte SD ou les piles, ou transporter
l'appareil. Vous utiliserez également le mode OFF si vous connectez l'appareil
à un port USB d'un ordinateur plus tard pour télécharger vos photos/vidéos.
Et bien sûr, lorsque vous rangez ou n'utilisez pas l'appareil, vous le mettrez sur
OFF. Veuillez noter que même sur le mode OFF le Trophy Cam HD Wireless
58
Page 59

continue à consommer de l'électricité à un très bas niveau. Par conséquent, il
est conseillé d'enlever les piles du compartiment des piles si vous êtes amené
à ne pas utiliser l'appareil pendant une longue période.
MODE MARCHE
À n'importe quel moment après que les piles et la carte SD ont été insérées
vous pouvez allumer l'appareil. Lorsque le commutateur d'alimentation sera
placé en position haute, l'appareil sera en mode ON [MARCHE] (en direct).
L'indicateur LED de mouvements (p. 54, « Vue de face ») clignotera en rouge
pendant environ 10 secondes. Cet intervalle vous laissera assez de temps
pour fermer le couvercle avant du Trophy Cam HD Wireless, le verrouiller
et quitter la zone surveillée. Une fois en mode ON, aucun contrôle manuel
n'est nécessaire ou possible (les touches n'ont aucun eet). Le Trophy Cam
HD Wireless prendra automatiquement des photos ou des vidéos (selon
vos réglages) lorsqu'il est déclenché c'est-à-dire quand le capteur infrarouge
passif détecte de l'activité dans la zone qu'il couvre.
Vous pouvez soit déplacer le commutateur d'alimentation directement de la
Fig. 3: Écran du menu SETUP
Mode photo
Impression date/heure
Balayage de champ activé
Mode appareil photo
Puissance du signal
du réseau mobile
Taille des images
(Résolution)
Nombre de prises de vue
Nombre de photos
restantes
Mode vidéo
Niveau de charge des piles
Son vidéo activé
Résolution vidéo
Temps d'enregistrement
vidéo restant
Mode vidéo
État de la carte SD
59
Page 60

position OFF [Arrêt] à la position ON [Marche], soit vous arrêter d'abord en
position SETUP [Conguration] pour changer un ou plusieurs réglages, puis
passer en position ON [Marche] lorsque vous avez terminé.
MODE SETUP
En mode SETUP [Conguration], vous pouvez vérier et changer les réglages
du Trophy Cam HD Wireless à l'aide de son écran LCD intégré. Ces réglages,
que vous trouverez dans le menu SETUP, vous permettent de changer la
résolution des photos/vidéos, l'intervalle de prise de vue, d'activer l'impression
date/heure sur les photos, etc. En plaçant le commutateur d'alimentation en
position SETUP [Conguration], vous allumerez l'écran LCD qui achera le
nombre de prises de vue, le niveau de charge des piles, le mode appareil
photo ou vidéo, etc. (Fig. 3).
REMARQUE : toujours déplacer le commutateur d'alimentation du mode OFF [Arrêt] au
mode SETUP [Conguration]. Il est possible que l'appareil se bloque s'il passe du mode
ON [Marche] au mode SETUP [Conguration]. Si cela se produit, mettez simplement
le commutateur sur OFF [ARRÊT] puis poussez de nouveau le vers le haut sur SETUP
[Conguration] de nouveau.
Touche raccourcis en mode SETUP [Configuration]
Comme mentionné préalablement dans la section « Composants et
commandes », cinq des touches situées sous l'écran LCD possèdent des
fonctions de « raccourci » secondaires lorsque l'appareil photo est en mode
SETUP [Conguration] (et que la touche MENU n'a pas été utilisée) :
• Appuyez sur la touche HAUT pour régler rapidement l'appareil pour
lmer des séquences vidéo.
• Appuyez sur la touche BAS pour régler rapidement l'appareil pour
prendre des photos.
• Appuyez sur la touche DROITE pour déclencher l'appareil photo/vidéo
manuellement. Ceci est utile pour tester l'appareil-veillez à ce que vous
soyez en mode SETUP [Conguration], appuyez sur la touche DROITE,
et quelques secondes plus tard, une photo ou une séquence vidéo
(selon le réglage de l'appareil) sera sauvegardée sur la carte SD (ou la
mémoire interne si aucune carte n'est insérée). Le compteur « nombre
de prises de vues » en haut à droite de l'écran LCD augmentera de un. Si
l'écran indique « SD PROTECTED » [CARTE SD PROTÉGÉE] lorsque vous
appuyez sur la touche SHOT [DÉCLENCHEUR], mettez l'appareil sur OFF
[ARRÊT], retirez la carte SD et glissez le curseur de protection contre
l'écriture en position « o ».
60
Page 61

• Appuyez sur la touche de GAUCHE pour prendre une photo de test et
l'envoyer. Vous verrez un message « Step » [Etape], suivi de « Wireless
test over! » [Test terminé !], ainsi que d'une conrmation de réussite
("Envoi réussi") ou d'un message d'erreur de communicatio du à un code
PIN non désactivé, un problème de forfait disponible, un problème de
couverture réseau, ou un mauvais réglage.
• Appuyez sur la touche OK pour regarder une photo ou une vidéo sur
l'écran. Voir « Visionner des images sur l'écran LCD en couleur », p. 88 pour
plus de renseignements.
Fig. 4: Sélection des réglages des paramètres
Appuyez sur MENU
(4a)
Appuyez sur BAS
(4b)
Appuyez sur OK
(4c)
61
Page 62

UTILISATION DU MENU SETUP [CONFIGURATION]
POUR CHANGER LES RÉGLAGES
Le but principal du mode SETUP [CONFIGURATION] est de vous permettre
de changer les réglages des paramètres de l'appareil photo (21 paramètres
disponibles!) pour que votre Trophy Cam HD Wireless fonctionne
exactement comme vous le désirez. Pour cela, vous ouvrirez le Menu SETUP
[CONFIGURATION] et appuierez sur les touches situées sous l'écran LCD, qui
vous indiquera chaque paramètre et son réglage.
Changement des réglages des paramètres en Mode SETUP
Une grande gamme d'options ou de « paramètres » est fournie pour vous
permettre de régler le Trophy Cam HD Wireless selon vos préférences
de fonctionnement. Pour changer le réglage d'un paramètre donné, vous
devez d'abord passer au mode SETUP [CONFIGURATION]. Une fois en mode
SETUP, le fait d'appuyer sur la touche MENU vous permettra de sélectionner
n'importe quel paramètre et changer son réglage. Le nom du paramètre et
son réglage actuel sera aché à l'écran LCD. Le fait d'appuyer sur la touche
DROITE ou GAUCHE fait déler vers le paramètre suivant ou précédent (la
touche DROITE pour passer au paramètre suivant et la touche GAUCHE pour
revenir au paramètre précédent), et le fait d'appuyer sur la touche HAUT ou
BAS vous permet de sélectionner un réglage diérent pour le paramètre
actuel aché. Une fois que vous avez choisi votre nouveau réglage pour un
paramètre, appuyez sur la touche OK pour sauvegarder le nouveau réglage
(le paramètre modié). Lorsque vous avez ni de changer les réglages d'un ou
de plusieurs paramètres, appuyez sur MENU de nouveau pour sortir du menu
SETUP. Il est possible d'appuyer sur MENU chaque fois que vous désirez
annuler un changement de réglage de paramètre après qu'un nouveau
réglage ait été sélectionné (annulation possible si vous n'avez pas encore
appuyé sur OK). Après avoir réglé les paramètres selon vos préférences, veillez
à déplacer le commutateur sur ON [Marche] pour pouvoir prendre des photos
ou des vidéos. Aucune image ne sera prise si le commutateur reste en position
SETUP [Conguration] (à moins que vous n'appuyiez sur la touche DROITE/
Photo après être sorti du menu) ; en eet, l'appareil s'éteindra automatiquement
après quelques minutes si vous n'appuyez sur aucune touche.
Affichage du réglage des paramètres
Le réglage de chaque paramètre est aché sur l'écran de votre Trophy Cam
HD Wireless. Tous les réglages disponibles pour un paramètre donné sont
62
Page 63

achés sur un écran, avec une coche placée près du réglage actuel (p. 61,
Fig. 4a). Pour changer de réglage, utilisez d'abord les touches HAUT/BAS pour
mettre en surbrillance (sélectionner) le nouveau réglage que vous désirez (Fig.
4b), puis appuyez sur OK pour valider le nouveau réglage. La coche apparaîtra
à côté de votre nouveau réglage pour conrmer le changement (Fig. 4c).
EXEMPLES-Changer les des réglages de certains paramètres
courants
Dans les pages suivantes, vous trouverez des tableaux listant tous les
paramètres du Menu SETUP, ainsi que leurs réglages possibles (ou plage
de réglages), une description détaillée de ce que contrôle le paramètre et le
but des réglages. Si vous avez lu la section précédente détaillant comment
sélectionner les paramètres et changer leurs réglages, vous devriez être en
mesure de trouver le(s) paramètre(s) que vous désirez, et régler l'appareil
selon vos préférences. Mais vous préférez peut-être pratiquer d'abord avec un
exemple ou deux :
Pour changer le réglage de n'importe quel paramètre, commencez toujours
en vous assurant que le bouton d'alimentation est en position SETUP
[CONFIGURATION]. Une fois l'écran LCD allumé, attendez l'apparition du
message « Your Trophy Cam Wireless is now connected to the network » [Votre
Trophy Cam Wireless est maintenant connecté au réseau] puis appuyez sur la
touche MENU.
Le premier paramètre que vous verrez lorsque vous entrez dans le Menu
SETUP [CONFIGURATION] est « Mode ». Par défaut, il est réglé sur « Appareil
photo » (photos). Pour passer au mode « Vidéo » (enregistrement de séquences
vidéo), appuyez sur la touche BAS pour sélectionner le réglage « Vidéo ».
Appuyez sur la touche OK pour appliquer « Execute » le nouveau réglage que
vous avez choisi pour ce paramètre.
Appuyez à présent sur la touche DROITE pour passer à un autre paramètre du
Menu. En appuyant trois fois, vous allez accéder à « Capture Number » [Nombre
d'images]. À l'aide des boutons HAUT et BAS, faites déler les diérents
réglages disponibles puis appuyez sur OK pour enregistrer votre réglage du
nombre de prises de vue à chaque déclenchement de l'appareil.
63
Page 64

Appuyez sur la touche DROITE jusqu'à ce que vous ayez atteint le paramètre «
Default settings » [Réglage par défaut]. Mettez en surbrillance ou sélectionnez
« Execute » [Exécuter] (en utilisant HAUT ou BAS) et appuyez sur OK pour
restaurer tous les paramètres d'usine (en incluant les paramètres Mode et
Video Length [Durée de la vidéo], que vous venez de changer il y a quelques
minutes) par défaut. Les réglages par défaut de chaque paramètre sont
indiqués en caractères gras dans les tableaux du menu SETUP [Conguration]
des pages suivantes.
Si vous choisissez de mettre le paramètre « Time Stamp » [Horodatage] sur
« ON » [Activé], cela commandera à l'appareil d'imprimer la date et l'heure
sur chacune des prises de vue. Veillez donc bien à régler la date et l'heure
actuelles en utilisant le paramètre « Set Clock » [Régler Date/heure]. En
mode Wireless, l'appareil enregistrera la date et l'heure lors de la première
connexion au réseau. Vous pouvez également valider ou régler la date et
l'heure à l'aide du paramètre « Set Clock » [Régler Date/heure] dans le menu
SETUP [Conguration].
Field Scan avec double intervalle grâce à la fonctionnalité de
déclenchement en direct
Field Scan est une nouvelle fonctionnalité du Trophy Cam HD Wireless de
Bushnell, qui vous permet de surveiller vos plantations ou les abords de vos
champs au moyen de photographies ou de vidéos prises à intervalles de
temps réguliers. En position « On » [Marche], le Trophy Cam HD Wireless
prend une photo (ou une séquence vidéo) automatiquement à la fréquence
de votre choix (par exemple, une toutes les cinq minutes) pendant un ou
deux intervalles de temps que vous aurez déterminés, chaque jour, sans
la nécessité d'un déclenchement par les mouvements d'un animal.
L'avantage est que cela vous permet de surveiller l'abord d'un champ situé à
45 ou 137 mètres de l'appareil, au-delà de la portée du capteur PIR. La portée
eective de l'appareil photo est ainsi beaucoup plus importante qu'elle ne
l'est normalement lorsque le déclenchement est produit par les animaux se
trouvant à proximité. C'est un superbe outil pour surveiller une zone entière
avec un seul appareil.
Si un animal ou une personne pénètre dans la zone couverte par le capteur
PIR et provoque un déclenchement entre les intervalles Field Scan [Balayage
de champ] que vous avez dénis, l'appareil prendra une photo ou enregistrera
64
Page 65

une vidéo comme il le ferait normalement en fonction de vos autres réglages.
Voici comment régler et utiliser la fonction Field Scan [Balayage de champ]
(veillez à d'abord régler l'heure actuelle de l'appareil dans « Set Clock » [Régler
Date/heure] an que l'enregistrement Set Field Scan débute et se termine aux
heures adéquates) :
1. Placez le commutateur principal sur SETUP [Conguration], puis
appuyez sur MENU.
2. Appuyez de manière continue sur la touche de DROITE pour faire déler
le menu de conguration jusqu'à atteindre Set Field Scan [Réglage Field
Scan].
3. Appuyez sur la touche HAUT pour sélectionner On, puis appuyez sur
OK (étape 1, p. 67). « A » représente le premier intervalle de temps que
vous pouvez dénir (un deuxième intervalle de temps, plus tard dans
la journée, « B », peut être également conguré si vous le souhaitez).
Appuyez sur OK (étape 2). Ceci vous amène à l'écran dans lequel vous
allez dénir les horaires de démarrage et d'arrêt, qui déterminent, pour
chaque jour, à quel moment l'enregistrement Field Scan [Balayage de
champ] débute et s'arrête. Vous pouvez régler ces horaires à l'heure et à
la minute près, pour un enregistrement qui peut durer d'une minute à
24 heures.
4. Réglez les horaires de démarrage [Start] et d'arrêt [Stop], en commençant
par l'horaire de démarrage, au moyen des touches de réglage HAUT/
BAS (étape 3). Le réglage de l'heure est basé sur une horloge de 24
heures : « 00 » = minuit, « 12 » = midi, « 23 » = 11 pm, etc. Pour passer
au paramètre suivant, appuyez sur la touche de DROITE. Choisissez la
minute exacte de l'heure de démarrage au moyen des touches HAUT/
BAS, puis passez ensuite au réglage de l'heure et des minutes de
l'horaire d'arrêt.
5. Quand vous avez réglé les minutes de l'heure d'arrêt, appuyez sur OK
pour conrmer le réglage de la première période d'enregistrement Field
Scan [Balayage de champ]. Si vous le souhaitez, vous pouvez créer une
deuxième période d'enregistrement en appuyant sur la touche BAS
pour sélectionner « B » (étape 4), puis appuyez sur OK et suivez le même
procédé pour régler les heures de démarrage et d'arrêt du balayage
de champ Field Scan pour la période « B » (étape 5). Par exemple, vous
pouvez congurer la période « A » pour un balayage de champ à l'aube
de 6h à 8h, et la période « B » pour des prises de vue entre 17h30 et 19h.
65
Page 66

Il n'y aura aucun enregistrement Field Scan entre 8h et 17h30 et entre
19h et 6h.
6. Après avoir réglé les heures de démarrage/d'arrêt de l'intervalle « A »
et/ou « B », appuyez sur OK puis sur les touches HAUT ou BAS pour
sélectionner « Interval » [Intervalle] et enn sur OK (étape 6). Le paramètre
Field Scan « Interval » [Intervalle] vous permet de dénir à quelle
fréquence une photo ou une vidéo est prise pendant les périodes
congurées précédemment. Vous avez le choix entre 60 minutes, 30
minutes, 15 minutes, 5 minutes (valeur par défaut) ou 1 minute (pour
le mode photos xes uniquement). Utilisez les touches HAUT/BAS pour
sélectionner votre préférence, puis appuyez sur OK pour l'enregistrer
(étape 7). Notez que, pour les vidéos, le réglage de « Interval » est
totalement indépendant de la durée de chaque enregistrement vidéo
: il s'agit de dénir à quelle fréquence les vidéos sont enregistrées, et
non la durée de chacune.
7. Voici un exemple de fonctionnement de l'appareil photo avec les
réglages Field Scan suivants :
Field Scan : On
Période A :
[Start] : 06:00
[Stop] : 08:00
Période B :
[Start] : 17:30
[Stop] : 19:00
Interval : 15M
Remarque : pour garantir le bon fonctionnement
de l'appareil, veillez à ce que les périodes A et B de
balayage de champ ne se chevauchent pas au moment
de régler les horaires de démarrage et d'arrêt. Aussi,
lorsque le paramètre du mode Camera [Appareil
photo] est réglé sur « Day » [Fonctionnement de jour
seulement] ou sur « Night » [Fonctionnement de nuit
seulement], il aura la priorité sur les paramètres
du mode Field Scan. Réglez le mode Appareil photo
sur « 24HR » [24h] si vous paramétrez les temps de
démarrage et/ou d'arrêt du mode Field Scan, pour le
fonctionnement de jour et de nuit.
Selon ces réglages, l'appareil prend une photo (ou une vidéo, s'il
fonctionne dans ce mode) toutes les 15 minutes, à partir de 6h jusqu'à
la n de la période « A » du balayage de champ à 8h. Le même jour,
l'appareil va à nouveau prendre une photo ou une vidéo toutes les
15 minutes de 17h30 à 19h (pendant la période « B » du balayage de
champ). Le lendemain, l'appareil recommencera à prendre une photo
ou une vidéo toutes les 15 minutes entre 6h et 8h et entre 17h30 et 19h.
Dans ce cas, il n'y aura aucun enregistrement Field Scan [Balayage de
66
Page 67

champ] entre 8h et 17h30 ou entre 19h et 6h. Rappelez-vous que ceci
est indépendant des déclenchements normaux dus à l'activité animale
- même si aucun animal ne pénètre dans la zone de couverture du
détecteur à infrarouge, une image sera prise, ou une vidéo enregistrée,
toutes les 15 minutes pendant la/les période(s) de temps déterminée(s).
Si un animal déclenche l'appareil entre les intervalles de 15 minutes, cela
sera enregistré.
Remarque : Des intervalles de balayage de champ courts et/ou des
tranches horaires longues risquent de réduire la durée de vie de la
batterie.
(Étape 1) -activez le mode Field
Scan en sélectionnant « On »
Les étapes 4 et 5
sont facultatives
(elles sont nécessaires
uniquement si
vous souhaitez une
seconde période
d'enregistrement
Field Scan [Balayage
de champ] avec des
horaires de démarrage
et d'arrêt diérents)
Remarque : le
paramètre Interval
dénit l'intervalle
de temps entre deux
images à la fois pour
la période « A » et la
période « B » Field Scan
[Balayage de champ].
(Étape 2)-sélectionnez Field Scan «
A » (appuyez sur OK)
(Étape 4) (facultatif), sélectionnez Field
Scan « B » (appuyez sur OK)
(Étape 6)-sélectionnez Field Scan «
Interval » [Intervalle]
(Étape 3)-églez le démarrage et
l'arrêt de la période « A »
(Étape 5) (facultatif), réglez le dé-
marrage et l'arrêt de la période « B »
(Étape 7)-dénissez la fréquence
de l'intervalle Field Scan
67
Page 68

LE MENU SETUP [CONFIGURATION] : LISTE DES
PARAMÈTRES ET RÉGLAGES AVEC DESCRIPTIONS
Paramètre Réglages
(paramètres par défaut
en gras)
Mode Camera, Video* Permet de sélectionner la prise
Taille de l'image
(aecte
uniquement les
photos en mode
Appareil photo)
Format d'image
(n'aecte que
les photos. Le
format des
vidéos est lié
à la taille de la
vidéo)
3M Pixel,
5M Pixel,
8M Pixel
Plein Ecran 4:3
Grand Ecran16:9
Description
de photos ou de vidéos lors du
déclenchement de l'appareil.
Permet de sélectionner la résolution
des photos de 3 à 8 mégapixels. Une
résolution plus élevée produit des
photos de meilleure qualité, mais
crée des chiers plus volumineux qui
occupent plus d'espace sur la carte
SD (celle-ci se remplit plus vite). Une
résolution de 5 mégapixels ore un bon
rapport qualité-taille de chier.
Permet de sélectionner le format 4:3
(plein écran, comme les téléviseurs plus
anciens) ou 16:9 (grand écran, comme
les nouveaux téléviseurs) pour les
photos.
* Seules les photos peuvent être transmises par une liaison sans l, car les chiers lourds
générés par la vidéo sont incompatibles avec les limitations de bande passante imposées
par les opérateurs. Seule la première image d'une vidéo sera envoyée par liaison sans l.
Lorsque l'appareil est en mode vidéo, les chiers vidéo sont stockés sur la carte SD en vue
d'un visionnage ultérieur (voir VISIONNER/EFFACER LES PHOTOS/VIDÉOS, p. 88).
68
Page 69

Paramètre Réglages
(paramètres par défaut
en gras)
Nombre
d'images
(aecte
uniquement les
photos en mode
Appareil photo)
IRéglage des
LED IR
(Fonction
Multi-Flash)
1 (photo),
2 (photos),
3 (photos)
Forte , Moyenne,
Faible
Description
Permet de sélectionner le nombre
de prises de vue en rafale à chaque
déclenchement en mode Appareil
photo. Ce réglage concerne également
les photos prises en mode Field Scan
(pour prendre deux photos toutes les 10
minutes, par exemple). Remarque : une
seule image miniature sera transmise
par une liaison sans l quel que soit le
réglage de ce paramètre. Les images
Field Scan ne sont pas transmises.
Veuillez également vous référer au
paramètre Interval [Intervalle].
Permet de contrôler le nombre de LED
qui ashent quand une photo est prise
par faible luminosité. « High » [Forte] =
les 33 LED s'allument. C'est le réglage
par défaut. Choisissez « Medium » ou
« Low » si vous obtenez des photos
surexposées ou si vous comptez
placer l'appareil très près du sujet à
photographier. En général, il vous faudra
sélectionner « High » [Forte] si les sujets
visés se trouvent à plus de 9,2 m de
l'appareil ; « Medium » [Moyenne] s'ils
se situent à une distance entre 4,6 et 9,2
m ; et « Low » [Faible] s'ils sont à moins
de 4,6 m de l'appareil. Remarque : en
mode vidéo, avec la fonction LED Control
[Contrôle des LED] réglée sur High [Forte],
la durée maximum de chaque vidéo prise
la nuit sera de 15 secondes an d'éviter
tout déchargement excessif des piles,
même si le paramètre Video Length [Durée
de la vidéo] est réglé sur une valeur plus
élevée (voir page suivante).
69
Page 70

Paramètre Réglages
(paramètres par défaut
en gras)
Nom de
l'appareil
Taille de la
vidéo
(aecte
uniquement les
séquences vidéo
en mode Vidéo)
Durée de la
vidéo
(aecte
uniquement les
séquences vidéo
en mode Vidéo)
(Saisie)
Voir « Saisie du nom
de l'appareil photo»
p. 84
848x480,
HD1280x720,
HD1920x1080
10S (seconde) par
défaut, avec une
plage possible de
5 à 60 s
Description
Permet à l'utilisateur de personnaliser
le nom de l'appareil. Très utile pour
l'identier quand de multiples appareils
sont installés puisque chacun d'entre
eux marque son nom sur toutes les
photos (mais pas sur les vidéos) qu'il
prend.
Permet de sélectionner la résolution
vidéo (en pixels par image). Une
résolution plus élevée produit des
séquences vidéo de meilleure qualité,
mais crée des chiers plus volumineux
qui occupent plus d'espace sur la carte
SD (celle-ci se remplit plus vite). Le
réglage le plus élevé ore une vidéo de
haute dénition. L'utilisation de cartes
SD à grande vitesse (SanDisk® SDHC de
classe 6 ou supérieure) est recommandée
si vous comptez utiliser les réglages
vidéo HD 1280x720 ou 1920x1080.
Détermine la durée de chaque prise
de séquence vidéo. L'intervalle est
de 10 secondes par défaut lorsque
le paramètre est sélectionné pour la
première fois. Après être descendus
à 5 s, les réglages de la longueur des
vidéos reprennent à 60 s. Remarque :
si le réglage de la fonction LED Control
[Contrôle des LED] est « High » [Forte],
la longueur des vidéos [Video Length] la
nuit est automatiquement limitée à 15
secondes max. Les vidéos de jour peuvent
aller jusqu'à 60 secondes.
70
Page 71

Paramètre Réglages
(paramètres par défaut
en gras)
Intervalle 10S (seconde) par
défaut, avec une
plage de réglages
disponibles de 60
mn (minute) à 1 s
(seconde).
(60 mn-1 mn
sont réglés par
incréments d'une
minute, 59 s-1 s sont
réglés par incrément
d'une seconde)
Description
Permet de sélectionner la durée
pendant laquelle l'appareil «
attendra » avant de répondre à des
déclenchements supplémentaires du
capteur infrarouge passif après qu'un
animal ait été initialement détecté
et reste dans les limites de la portée
du capteur. Pendant cet intervalle
xé par l'utilisateur, l'appareil ne
prendra pas de photos/vidéos. Ceci
empêche que la carte ne se remplisse
d'images superues. L'intervalle est
de 10 secondes par défaut lorsque
le paramètre est sélectionné pour la
première fois. Remarque : après avoir
diminué et passé « 1S », les réglages
recommencent à « 60 mn ».
71
Page 72

Paramètre Réglages
(paramètres par défaut
en gras)
Finesse du
capteur
NV Obturation Forte, Moyenne,
Faible, Normale,
Forte, Auto
Faible
Description
Permet de sélectionner la sensibilité du
capteur infrarouge passif. Le réglage
« High » [Forte] rendra l'appareil plus
sensible aux infrarouges (chaleur) et il
sera plus facilement déclenché par les
mouvements, tandis que le réglage
« Low » [Faible] le rendra moins sensible
à la chaleur et aux mouvements. Le
réglage High peut être utile lorsque
la température ambiante est chaude
(quand il est plus dicile pour le capteur
de détecter les animaux), et le réglage
Low pourra être utile lorsqu'il fait
froid et si l'appareil se déclenche trop
souvent par n'importe quel élément
plus chaud que l'espace environnant. Le
réglage « Normale » est utilisé lorsque
les températures sont moyennes ou
modérées. Le réglage « Auto » par défaut
permettra à l'appareil de déterminer
le meilleur réglage en fonction de sa
température de fonctionnement en
cours. Ce réglage est idéal s'il est prévu
que le temps change radicalement dans
la période où l'appareil sera utilisé.
Aecte la vitesse d'obturation pendant
le fonctionnement en vision nocturne.
L'option « High » [Forte] gera mieux
les mouvements, mais il se peut que
les photos soient plus sombres. Avec
une vitesse d'obturation plus faible,
on obtient des images plus nettes,
cependant tout mouvement rapide les
rendra plus oues.
72
Page 73

Paramètre Réglages
(paramètres par défaut
en gras)
Mode Jour, Nuit, 24 Hrs Permet à l'utilisateur de limiter
Formater la
carte
Sortie TV NTSC, PAL Non intégré, veuillez ne pas en tenir
Horodatage ON, OFF Sélectionnez « On » [Activé] si vous
Exécuter (suivi par
Non/Oui)
Description
le fonctionnement de l'appareil
uniquement pendant le jour ou la nuit,
si nécessaire. Le niveau de lumière
ambiante que perçoit le capteur de
l'appareil détermine automatiquement
s'il fait jour ou nuit. Ce paramètre a la
priorité sur les paramètres Field Scan.
Eace (supprime) tous les chiers
sauvegardés sur la carte pour la préparer
à sa réutilisation. Formatez toujours une
carte qui a été utilisée auparavant dans
d'autres appareils. Attention ! Veillez
à télécharger et sauvegarder tous les
chiers que vous désirez conserver !
Appuyez sur OK pour valider, appuyez
sur MENU (ou sélectionnez NO puis
appuyez sur OK) pour quitter sans
formater.
compte. Aucun de ces réglages n'aura
d'eet.
désirez que la date et l'heure (de la
prise de vue) soit imprimées sur chaque
photo, sélectionnez « O » [Désactivé]
pour ne pas les imprimer. Remarque : la
température actuelle, la phase lunaire
et le nom de l'appareil photo (déni par
l'utilisateur) seront également imprimés
sur vos photos.
73
Page 74

Paramètre Réglages
(paramètres par défaut
en gras)
Régler Date/
heure
(Réglage) Appuyez sur OK et utilisez les touches
Description
HAUT/BAS (pour changer le réglage) et
sur les touches GAUCHE/DROITE (pour
passer au champ suivant) pour régler les
heures (format 24h uniquement, « 00 » =
minuit, « 12 » = midi) et les minutes, puis
(sur la rangée du bas), l'année, le mois
et la date. Une fois tous les réglages
eectués, appuyez sur OK pour les
enregistrer. Lorsque le mode sans l est
activé, l'heure sera automatiquement
réglée lors de la première connexion au
réseau.
74
Page 75

Paramètre Réglages
(paramètres par défaut
en gras)
Régler FieldScan
ON, OFF
(Une fois ON
sélectionné) : Dé-
marrage/Arrêt « A »,
Démarrage/Arrêt «
B », Fréquence
Remarque : les
images Field
Scan ne sont pas
transmises par
liaison sans l.
Description
Active/désactive le mode
d'enregistrement du balayage de
champ (intervalle). Une fois la fonction
Field Scan activée, l'appareil prend
des photos ou des vidéos même
lorsqu'elles ne sont pas déclenchées
par un animal à proximité, ce qui est
utile pour la surveillance continue d'une
zone éloignée de l'appareil. L'utilisateur
peut dénir les horaires de démarrage
et d'arrêt pour deux « périodes »
indépendantes d'enregistrement Field
Scan, ainsi que l'intervalle de temps
entre les photos/vidéos. Pour garantir le
bon fonctionnement, évitez de dénir
des horaires de démarrage/d'arrêt qui
se chevauchent pour les périodes de
balayage de champ A et B. Veuillez
lire la section « Field Scan avec double
intervalle… » de ce manuel pour plus
de renseignements sur cette fonction
(p.64). REMARQUE : lorsque le paramètre
Camera mode [Mode Appareil photo]
est réglé sur « Day » [Fonctionnement
de jour seulement] ou sur « Night »
[Fonctionnement de nuit seulement],
il aura la priorité sur les paramètres
du mode Field Scan. Réglez le mode
Appareil photo sur « 24HR » [24h] si vous
paramétrez les temps de démarrage et/
ou d'arrêt du mode Field Scan, pour le
fonctionnement de jour et de nuit.
75
Page 76

Paramètre Réglages
(paramètres par défaut
en gras)
Coordonnées
GPS
Activer le son
(affecte
uniquement
les séquences
vidéo en mode
Vidéo)
Réglage par
défaut
ON, OFF
Voir « Utilisation
des écrans de saisie
du menu Setup »
On, O Sélectionnez « On » [Activé] pour
Exécuter,
Annuler
Description
Permet à l'utilisateur de saisir les
coordonnées de latitude et de longitude correspondant à l'emplacement
de l'appareil. Ces données seront
intégrées aux chiers enregistrés sur
la carte SD de l'appareil (si « On » est
sélectionné). Ce système permet de
voir chaque emplacement d'appareil
« épinglé » sur les cartes Google Earth
quand vous regardez un dossier
contenant des photos provenant de
diérents appareils. Il est également
possible de l'utiliser avec d'autres
logiciels compatibles avec le «
géomarquage » (comme Picasa, etc.).
Voir pg. 84
enregistrer également le son lorsque
l'appareil est utilisé en mode vidéo
(les tailles des chiers sauvegardés
seront légèrement plus importantes).
Sélectionnez « Execute » [Exécuter] et
appuyez sur OK pour restaurer tous
les paramètres par défaut. Si l'appareil
se comporte de manière étrange et
vous pensez que vous avez peut-être
modié accidentellement un réglage
(mais ne savez pas exactement
lequel), ceci remettra tous les
paramètres à leurs réglages le plus
souvent utilisés ou « générique ».
76
Page 77

Paramètre Réglages
(paramètres par défaut
en gras)
Réglages
Wireless
Langues English, Français,
Envoyer par :,
Préférences
Español, Deutsch,
Italiano, Pyccknn
(russe)
Description
Il s'agit de l'écran qui permet
d'accéder à l'ensemble du sousmenu contenant tous les réglages et
options liés à la liaison sans l. Voir p.
78-80 pour plus de détails. Remarque
: seules les photos peuvent être transmises, et
non pas les vidéos.
Permet de sélectionner la langue
préférée par l'utilisateur pour tous les
écrans de menu.
Version (aucun)
Ache la version du système
d'exploitation actuel (micrologiciel) et
le numéro IMEI du modem (qui peut
être demandé par certains opérateurs
pour activer votre service). Consultez
le site www.trophycam.eu/wireless
pour connaître les dernières mises à
jour de micrologiciel.
77
Page 78

LE SOUSMENU DE LA LIAISON SANS FIL : STRUCTURE
Niveau 1 Niveau 2 Niveau 3 Niveau 4 Niveau 5 Niveau 6
Wireless Setting >
(ON/OFF) Réglages
Wireless> Activé/
Désactivé]
Send By >
[Envoyer par]
MMS > [MMS] Auto Setting >
[Réglage Auto]
Manual Settings >
[Réglage manuel]
Phone Numbers >
[N° de Téléphone]
Sélectionner : Country
> [Pays]
Enter:
URL, APN, IP, Port
Entrer :
N°(s) de téléphone
Sélectionner
: Provider
[Opérateur]
Email Address >
[Adresses e-mail]
E-mail via
SMTP >
[E-mail par
SMTP]
Preferences >
[Préférences]
1
Gmail est un fournisseur de messagerie recommandé. Pour la conguration, utilisez « smtp.gmail.com »,
Port 465, avec SSL.
2
Adresse e-mail de réception des images miniatures.
Thumbnail
Size >
[Résolution
d'envoi ]
Daily Max
Number > [Nb
quotidien]
Auto Setting >
[Réglage Auto]
Manual Settings >
[Réglage manuel]
SMTP Type > [Type
SMTP]
E-mail Address >
[Adresses e-mail]
Sélectionner : 640x480,
352x288, ou 320x240
(par défaut
Enter: Nombre quoti-
dien max. (1 à 999)
(199 = nombre par
défaut)
Entrer :
E-mail(s)
Sélectionner :
Country > [Pays]
Enter:
1
APN, Serveur
, Port,
Expéditeur, Mot de
passe
Sélectionner :
with SSL [avec SSL],
without SSL [sans SSL]
Enter:
2
Email(s)
78
Sélectionner
: Provider
[Opérateur]
Page 79

LE SOUSMENU DE LA LIAISON SANS FIL : GUIDE DE
RÉFÉRENCE
Send By [Envoyer par] > MMS (Multimedia Messaging Service) > Auto Setting [Réglage Auto] ou Manual Setting [Réglage manuel]
La fonction MMS utilise les données de messagerie texte pour inclure des
photos ou d'autres chiers multimédia en respectant certaines limites
de taille. Sélectionnez « Auto Setting » [Réglage Auto], puis sélectionnez
simplement le nom du pays et l'opérateur. Sélectionnez « Manual Setting
» [Réglage manuel] si « Auto » ne fonctionne pas correctement, ou si vous
souhaitez entrer l'URL, l'APN (adresse hôte), l'IP et le Port correspondant à
votre opérateur mobile par vous-même*.
* conguration en ligne également disponible sur www.trophycam.eu/wireless
Send By [Envoyer par] > MMS [MMS] > Phone Numbers/Email Address [N°
de Téléphone/Adresses e-mail]
Sélectionnez « Send By » [Envoyer par] puis « MMS » [MMS] et entrez le ou
les numéros de téléphone portable et/ou adresses e-mail auxquels vous
souhaitez que l'appareil envoie les images miniatures.
Send By [Envoyer par] > Email via SMTP (Simple Mail Transfer Protocol)
[E-mail par SMTP]
Un protocole de transfert par e-mail via Internet, SMTP, gère les images
miniatures envoyées depuis un client (le dispositif qui transmet) vers un
serveur de messagerie électronique. Les fonctionnalités MMS et SMTP
permettent de contrôler l'appareil à distance via des messages textes.
Utilisez SMTP pour recevoir les images sous forme Adresses e-mail plutôt
que de MMS. Une conguration automatique est disponible (pour les
informations de l'opérateur SMTP). Vous devrez tout de même ajouter
votre adresse e-mail et votre mot de passe personnels d'expéditeur sur
l'écran « Manual Settings » [Réglage manuel]. Ensuite, sélectionnez le «
Type SMTP » (avec ou sans SSL), et saisissez l'adresse e-mail de l'expéditeur
(Écran « Email Address »). Nous vous recommandons de créer un compte
Gmail indépendant qui pourra être utilisé par l'appareil comme « "
Expéditeur " (Email ID + Password) ».
79
Page 80

Preferences > Thumbnail Size [Préférences > Résolution d'envoi]
Sélectionnez « Image Size » [Résolution d'envoi] puis sélectionnez une
résolution de photo an de limiter la taille de chaque image miniature
transmise en fonction de vos préférences en matière de qualité et des
limites de votre plan de données. Résolution VGA = 640x480 pixels par
image (0,3 mégapixels, la meilleure qualité), QVGA = 320x240 (les chiers
les plus petits) et CIF = 352x288. Votre appareil prendra et stockera (sur sa
carte SD) des images de grande qualité et à haute résolution quel que soit
le réglage que vous avez adopté pour les miniatures.
Preferences > Daily Max Number [Préférences > Nb quotidien]
Sélectionnez « Daily Number » [Nombre quotidien] puis entrez le nombre
maximum de messages que vous souhaitez recevoir par jour, de 1 à 999.
Le tableau au deux pages suivantes répertorie les divers messages textes
que vous pouvez envoyer à votre appareil, et fournit une brève description
du résultat suivant la réception (action ou modication du réglage d'un
paramètre du menu Setup), ainsi que la réponse/conrmation de l'appareil.
Remarque :
• Le control à distance du Trophy Cam est effectué par l’envoi de
commandes SMS depuis votre téléphone portable. En mode MMS,
le premier numéro de téléphone entré dans le Trophy Cam est le
numéro Master. En mode SMTP pour utiliser les commandes SMS, il faut
paramétrer le numéro en mode MMS.
• En mode SMTP, une fois que votre réglage est terminé , vous devez
resélectionner le mode MMS pour entrer un numéro de téléphone et
ressortir du mode MMS pour resélectionner le mode SMTP avant de
mettre votre Trophy Cam en mode ON.
• Si une commande n'est pas correctement saisie, l'appareil affichera le
message « Invalid command ! » [Commande incorrecte]
FONCTIONNEMENT DU MODE WAKE/ECO RÉVEIL/ÉCO
Votre Trophy Cam HD Wireless 2G fonctionne par défaut en mode « ECO »
afin de prolonger l'autonomie des piles. Le Mode Eco éteint le modem après
chaque transmission d’une photo résultant d’une détection de mouvement.
L'utilisation du mode « WAKE » est nécessaire si vous souhaitez que votre
appareil reste continuellement a l'écoute des commandes que vous envoyez
par SMS, telles que #PIC# et celles qui requièrent une action immédiate. En
80
Page 81

LISTE DES COMMANDES SMS
TEXTE
(COMMANDE)
#CAM# MODE: Camera Pictures ON !
#VID# MODE: Video Video ON !
#IMG#3M RESOLUTION: 3M Img. resolution : 3MP !
#IMG#5M RESOLUTION: 5M Img. resolution : 3MP !
#IMG#8M RESOLUTION: 8M Img. resolution : 3MP !
#LED#H LED CONTROL:
#LED#M LED CONTROL:
#LED#L LED CONTROL:
#VID#L VIDEO: 480P Video resolution : 480p !
#VID#M VIDEO: 720P Video resolution : HD 720p !
#VID#H VIDEO: 1080P Video resolution : HD 1080p !
DESCRIPTION RÉPONSE DE
L'APPAREIL
[Mode Photo activé !]
[Mode Vidéo activé !]
[Résolution d'image :
3 mégapixels !]
[Résolution d'image :
5 mégapixels !]
[Résolution d'image :
8 mégapixels !]
High
Medium
Low
LED-Flash : High !
[Flash LED : Élevé !]
LED-Flash : Medium !
[Flash LED : Moyen !]
LED-Flash : Low !
[Flash LED : Faible !]
[Résolution vidéo : 480p !]
[Résolution vidéo : HD 720p !]
[Résolution vidéo : HD 1080p !]
* Si vous ajoutez plusieurs numéros de téléphone (en complément du numéro principal), désactivez
la function de messagerie de groupe de votre téléphone (iPhone : Setup>Messages>Group
Messaging [Conguration>Messages>Messagerie de groupe]) (Android : Text Messaging>Set
tings>Multimedia>Group Conversations [Messagerie texte>Réglages>Multimédia>Conversat
ions de groupe] dénis sur « O »)
81
Page 82

LISTE DES COMMANDES SMS
TEXTE
(COMMANDE)
#PIR#H SENSOR LEVEL:
#PIR#M SENSOR LEVEL:
#PIR#L SENSOR LEVEL:
#PIR#A SENSOR LEVEL:
#NVS#H NVS (Night Vision
#NVS#M NVS (Night Vision
#NVS#L NVS (Night Vision
#PH#ADD#060102030X Phone: Add
#PH#DEL#060102030X Phone: Delete
#EM#ADD#joe@bushnell.
com
#EM#DEL#joe@bushnell.
com
#WAKE# Wake: On Mode «Wake» - (SMS-
DESCRIPTION RÉPONSE DE
L'APPAREIL
High
Normal
Low
Auto
Shutter): High
Shutter): Medium
Shutter): Low
Number
Number
Email: Add joe@bushnell.com added !
Email: Delete joe@bushnell.com deleted !
PIR Sensor : High !
[Capteur PIR : Élevé !]
PIR Sensor : Medium !
[Capteur PIR : Moyen !]
PIR Sensor : Low !
[Capteur PIR : Faible !]
PIR Sensor : Auto !
[Capteur PIR : Automatique !]
Night-Vision Shutter : High !
[Obturateur de
vision nocturne : Élevé !]
Night-Vision Shutter : Medium
! [Obturateur de
vision nocturne : Moyen !]
Night-Vision Shutter : Low !
[Obturateur de
vision nocturne : Faible !]
060102030X added !
[060102030X ajouté !] *
060102030X deleted !
[060102030X ajouté !] *
[joe@bushnell.com ajouté !]
[joe@bushnell.com supprimé !]
Commands instantly
processed) [Mode « Wake » :
(Commandes par SMS traitées
immédiatement)]
82
Page 83

LISTE DES COMMANDES SMS
TEXTE
(COMMANDE)
#ECO# Eco: On Mode «Eco» - (SMS-Commands
(1)
#PIC#
(2)
#GPS#
#SND#ON Send: ON Send Pictures : ON !
#SND#OFF
#WL#ON Wireless: On Wireless : ON !
#WL#OFF
REMARQUES :
(1) Lorsque l'appareil fonctionne en mode ECO, la commande PIC ne fonctionne pas. Elle
ne fonctionne qu'en mode WAKE.
(2) Le service de données de votre carte SIM doit être activé pour utiliser cette fonction.
Certains opérateurs peuvent ne pas prendre en charge cette fonction, et la précision
peut varier.
(3) N'oubliez pas d'envoyer la commande SND#ON pour rétablir les transmissions.
(4) Indépendamment du mode EDO ou Wake, pour réactiver le mode sans l après un
#WL#OFF, envoyez #WL#ON. La prise en compte de cette commande se fera le jour
même à 15h ou le lendemain à 15h si la commande est envoyée après 15h. La remise
en route par la commande sms #WL#ON après une extinction par #WL#OFF peut
éventuellement prendre plus d’un jour pour se rétablir, et ce en fonction de la qualité du
réseau au moment de la connection quotidienne forcée à 15h.
(3)
(4)
DESCRIPTION RÉPONSE DE
L'APPAREIL
processed after
triggered images)*
[Mode « Eco » : (Commandes
par SMS traitées après
déclenchement
de prise de vues)]
Take Pic: PIC IMG Transmitting to phone/
Email [Transmission d'image
au téléphone/Email]
Send GPS: LOC GPS Location : +40.5-110.5
[Position GPS : +40.5-110.5]
[Envoi d'images : activé !]
Send: OFF Send Pictures : OFF !
[Envoi d'images : désactivé !]
[Mode sans l : activé !]
Wireless: O Wireless : OFF !
[Mode sans l : désactivé !]
83
Page 84

mode ECO, l'appareil ne peut détecter les nouvelles commandes et y répondre
que lorsqu'il se connecte au réseau (à chaque mouvement déclenchant une
nouvelle photo/vidéo et une fois par jour lors du contrôle quotidien, a environ
15h, heure locale).
Vous pouvez sélectionner/changer les modes WAKE et ECO a l'aide de
commandes envoyées par SMS texte à partir de votre Smartphone. Voir pages
81-83 pour plus de renseignements.
Si l'appareil fonctionne en mode ECO et que vous envoyez un message WAKE,
il répondra dès la prochaine connexion au réseau (déclenchée ou lors du
contrôle quotidien) et passera en mode WAKE. Si l'appareil fonctionne en
mode WAKE et que vous envoyez un message ECO, il répondra immédiatement
à la commande et passera en mode ECO.
Lorsque l'appareil est initialement allumé (manuellement), il fonctionne par
défaut en mode ECO. Si le mode WAKE a précédemment été sélectionné
à distance et que l'appareil est éteint puis rallumé manuellement, le
fonctionnement en mode WAKE sera rétabli dès le premier déclenchement.
Remarque : lorsque l'appareil fonctionne en mode ECO, la commande PIC ne
fonctionne pas. Elle ne fonctionne qu'en mode WAKE.
UTILISATION DES ÉCRANS DE SAISIE DU MENU SETUP
Saisie du nom de l'appareil photo
Après avoir sélectionné le paramètre « Camera Name » [Nom de l'appareil],
(le seul réglage possible est « Input » [Entrer ]), appuyez sur OK. Si nécessaire,
eacez le nom précédent ou par défaut en appuyant sur la touche DROITE
jusqu'à ce que le symbole ( ) (situé entre les lettres « M » et « N ») soit
surligné puis maintenez la touche OK enfoncée. Sélectionnez (surlignez)
chaque caractère alphanumérique dont vous avez besoin à l'aide des touches
GAUCHE/DROITE et HAUT/BAS, et validez en appuyant sur OK. Quand vous
avez renommé l'appareil, appuyez sur MENU pour sauvegarder le nom.
Remarque : Il se peut que vous trouviez des coordonnées de latitude ou
de longitude négatives en ligne. Elles désignent les latitudes sud et les
longitudes ouest.
84
Page 85

Saisie des coordonnées
Après avoir sélectionné le paramètre « Coordinate Input » [Coordonnées
GPS], appuyez sur HAUT ou BAS pour sélectionner le réglage ON et appuyez
sur OK. Vous pouvez trouver la latitude et la longitude de n'importe quel
emplacement où vous voulez installer votre appareil sur de nombreux site
Internet, par exemple : http://itouchmap.com/latlong.html. Vous pouvez
saisir l'adresse d'une rue avoisinante, un code postal ou utiliser diérents
types de cartes pour localiser la position approximative. Le format de saisie
des coordonnées dans l'écran de menu du Trophy Cam HD Wireless est
indiqué ci-dessous :
Latitude
N=Nord,
S=Sud
en degrés
(3 chires)
Minutes Secondes`
Latitude
Longitude
(La) N000,00'00"
(Lo) W000,00'00"
O = Ouest,
E = Est
Longitude
en degrés
(3 chires)
Minutes Secondes
MONTAGE ET POSITIONNEMENT du Trophy
Cam HD WIRELESS
Montage
Après avoir conguré les paramètres de l'appareil selon vos préférences vous
êtes prêt à l'amener sur le terrain et à mettre le commutateur d'alimentation
sur « ON » [Marche]. Lorsque vous congurez le Trophy Cam HD Wireless
pour détecter le gibier ou toutes autres activités à l'extérieur, vous devez
veiller à le mettre en place correctement et solidement. Nous recommandons
de monter le Trophy Cam HD Wireless sur un arbre robuste d'un diamètre
d'environ 15 cm. Pour obtenir la qualité d'image optimale, l'arbre devra se
trouver à environ 5 mètres de l'endroit à surveiller, l'appareil étant placé à une
85
Page 86

hauteur de 1,5 à 2 mètres. Gardez à l'esprit que vous obtiendrez les meilleurs
résultats de nuit, lorsque le sujet est à portée idéale du ash, pas plus loin que
19 mètres et pas plus près que 3 mètres de l'appareil.
Il y a deux manières de monter le Trophy Cam HD Wireless : en utilisant soit
la sangle réglable fournie, soit, la xation pour trépied.
• En utilisant la sangle réglable fournie : Fig. 5 illustre l'utilisation de la
sangle sur le Trophy Cam HD Wireless. Enlez l'une des extrémités de
la sangle dans l'un ou l'autre des supports à l'arrière du Trophy Cam
HD Wireless. Enlez l'extrémité de la sangle dans la boucle. Attachez
la sangle fermement contre le tronc de l'arbre en tirant fermement
l'extrémité de la sangle de manière à ce qu'il n'y ait pas de jeu. Remarque
: Il n'est pas possible d'utiliser un cadenas à câble (dans la partie supérieure
du support) en même temps que la ceinture.
• En utilisant la xation pour trépied : L'appareil est équipé d'une xation
à son extrémité inférieure (voir p. 54) pour permettre de le monter sur
un trépied ou autre accessoire de montage au moyen d'un pas de vis
1/4-20 standard.
Un autre point de xation est disponible à l'arrière de l'appareil pour les
dispositifs de montage d'accessoire.
Deux accessoires en option sont également disponibles : un support de
montage sur arbre Deluxe (n° 119652C) qui s'attache au niveau du point de
xation pour trépied et une source d'alimentation supplémentaire sous la
forme d'un panneau solaire (n° 119656C) qui se branche sur la prise « DC In
» [entrée c.c.].
Passage de
la sangle
Fig. 5: Fixation de la sangle
Boucle de la sangle
Angle de détection et test de distance
Pour tester si le Trophy Cam HD Wireless peut eectivement surveiller la
zone que vous avez choisie, ce test est recommandé pour vérier l'angle de
détection et la distance de surveillance du Trophy Cam HD Wireless. Pour
86
Page 87

faire un essai :
• Mettez le Trophy Cam HD Wireless en mode SETUP [Conguration].
• Bougez devant l'appareil à des emplacements diérents à l'intérieur de
la zone où vous pensez que le gibier se trouve. Essayez des distances et
des angles diérents.
• Si le voyant LED de l'indicateur de mouvement clignote, cela indique que
l'emplacement peut être détecté. S'il ne clignote pas, cet emplacement
se trouve en dehors de la zone de détection.
Les résultats de vos essais vous aideront à déterminer la meilleure position
lorsque vous monterez et pointerez le Trophy Cam HD Wireless. La hauteur
de positionnement au-dessus du sol devra varier de manière appropriée en
fonction de la taille de l'animal. En général, il est recommandé une hauteur
de 90 cm à 1,80 m.
Vous pouvez éviter les déclenchements intempestifs dus à la température
et aux perturbations de la détection devant l'appareil en ne l'orientant pas
vers une source de chaleur, des branches d'arbre ou des arbustes avoisinants
(notamment lorsqu'il y a du vent).
Allumer l'appareil
Une fois le mode ON [Marche] sélectionné, le voyant LED (rouge) de
l'indicateur de mouvement clignotera pendant environ 10 secondes. Cela
vous donne assez de temps pour fermer et verrouiller le couvercle avant du
Trophy Cam HD Wireless et sortir de la zone. Pendant ce temps, le voyant
LED de l'indicateur de mouvements clignotera au rouge continuellement.
Après qu'il se soit arrêté de clignoter, l'infrarouge passif est donc activé, et tout
mouvement qu'il détectera déclenchera la prise de photos ou de vidéos selon
la programmation faite dans le Menu SETUP [Conguration]. Assurez-vous
d'avoir lu les descriptions des paramètres Capture Number [Nombre de prises
de vue], Video Length [Longueur de vidéo], Interval [Fréquence], Sensor Level
[Niveau de sensibilité]. Veuillez noter que l'infrarouge passif est très sensible
à la température ambiante. Plus la diérence de température est élevée entre
l'environnement et votre sujet, plus la distance de détection possible est
grande. La distance de détection moyenne est d'environ 14 mètres.
Avant de laisser l'appareil, veuillez vérier les choses suivantes :
• Les piles ou l'alimentation externe sont elles installées/branchées
en respectant la polarité, et la puissance de l'alimentation est-elle
susante ?
87
Page 88

• La carte SD a-t-elle assez d'espace disponible et le curseur de protection
contre l'écriture (verrou) est-il sur o [Arrêt] ?
• Le commutateur d'alimentation est-il en position ON [Marche] ? (ne le
laissez pas sur SETUP [Conguration]).
À propos du DAR (ARD) (dispositif antireflet)
Une grille de ltration amovible (DAR) couvre le ash LED, de telle sorte que la
réexion de la lumière du panneau de protection de verre noir sur la rangée
de LED est considérablement réduite. Cela permet d'éviter la détection de
l'appareil par les animaux (et les voleurs potentiels). Si vous préférez obtenir
la puissance lumineuse maximale du ash LED plutôt que camouer l'appareil,
vous pouvez facilement retirer la grille du DAR en insérant un petit tournevis,
une clé, etc. dans la fente située sur la partie centrale inférieure du DAR (audessus de l'objectif de l'appareil photo) et en tirant doucement vers le haut de
l'appareil (voir pg. 54).
VISIONNER/EFFACER LES PHOTOS/VIDÉOS
Après avoir conguré, monté et activé votre Trophy Cam HD Wireless, vous
aurez bien sûr hâte de revenir plus tard et regarder les photos qu'il aura prises.
Il y a plusieurs manières de regarder les photos prises
Visionner des photos / vidéos directement à partir de la
carte SD
C'est la méthode la plus simple pour visionner des images. Comme démonter
l'appareil et l'amener à votre ordinateur n'est pas très pratique, vous trouverez
peut-être plus facile de simplement prendre la carte. Vous pouvez retirer la
carte SD (et la remplacer par une carte vide si vous le souhaitez) et rentrer chez
vous ou au camping pour regarder vos images à l'aide d'un lecteur de carte
SD (fourni par l'utilisateur) connecté à votre ordinateur (certains ordinateurs et
téléviseurs disposent d'un emplacement pour insérer une carte SD), tout en
laissant l'appareil en place, prêt à prendre d'autres photos. Une fois branché,
le lecteur de carte fonctionne comme expliqué ci-dessous, veuillez lire cette
section si vous avez des dicultés à trouver vos chiers.
Visionner les images sur l'écran LCD en couleur
• Placez le bouton d'alimentation en mode SETUP [Conguration]
(mettez-le d'abord sur OFF [Arrêt]).
88
Page 89

• Appuyez deux fois sur la touche MENU pour choisir le mode d'achage
en direct, puis appuyez sur OK.
• Utilisez les touches HAUT/BAS pour faire déler vos photos ou vidéos.
Une fonction zoom est disponible pour les photos : appuyez d'abord sur
la touche GAUCHE, puis utilisez les touches HAUT/BAS pour zoomer
en avant ou en arrière. Pendant un zoom avant, vous pouvez appuyer
sur OK puis utiliser les touches HAUT/BAS/GAUCHE/DROITE pour vous
déplacer dans l'image et examiner les détails des diérentes parties
de la photo. Appuyez sur OK à tout moment pour quitter et revenir à
l'achage normal.
• Appuyez sur la touche DROITE (Photo) pour lire une vidéo. Si le
paramètre « Video Sound » [Son vidéo] est réglé sur « On » [Activé] dans
le menu de conguration, vous devriez entendre le son envoyé par le
haut-parleur durant la lecture.
• Appuyez sur MENU pour eacer une image. Le mode de suppression
d'image fonctionne comme décrit dans « Eacer des photos ou des
vidéos » (voir page suivante). Pour sortir du mode de visionnage,
appuyez sur la touche OK.
Effacer des photos ou des vidéos
Si vous désirez eacer une photo ou une vidéo, cela peut se faire facilement
sans quitter le mode SETUP [Conguration] :
• Appuyez sur la touche MENU. Vous verrez le premier écran de
suppression, qui vous propose d'eacer seulement la photo/vidéo
actuellement à l'écran, ou d'eacer toutes les photos/vidéos (voir cidessous).
• Mettez en surbrillance « Delete Current » [Suppr. sélection] ou « Delete
All » [Supprimer tout], puis appuyez sur OK.
• Ensuite, sélectionnez « Yes » [Oui] et appuyez sur OK pour eacer
seulement la dernière photo ou vidéo achée (si vous avez choisi «
Delete Current »), ou chaque chier photo et vidéo sur la carte (si vous
avez sélectionné « Delete All ») ; ou sélectionnez « No » [Non] et appuyez
sur OK pour annuler l'opération et ne pas eacer de chiers.
REMARQUE : les chiers eacés ne peuvent pas être restaurés ! Il est également possible
d'eacer tous les chiers de la carte en utilisant le paramètre « Format » [Formater] (voir
p. 73).
89
Page 90

Le Trophy Cam HD Wireless supporte 3 types de formats de système de
chiers, FAT12, FAT16 et FAT32. La valeur par défaut est FAT16 pour sauvegarder
les photos et les vidéos. Voici quelques remarques à ce sujet :
• Vous n'avez pas besoin de vous préoccupez du format du système de
chiers du Trophy Cam HD Wireless à moins que votre équipement
ait des dicultés à lire la carte SD. Si cela est le cas, veuillez d'abord
formater la carte SD avec le Trophy Cam HD Wireless ou dans votre
ordinateur, puis insérez la carte dans votre Trophy Cam HD Wirelesset
essayez de nouveau.
• Le format de chier par défaut du Trophy Cam HD Wireless est FAT16,
la plupart des ordinateurs peuvent le lire. Si vous formatez une carte
SD pour le Trophy Cam HD Wireless dans votre ordinateur, vous devez
choisir le format de système de chier FAT16. Normalement, FAT16 est
recommandé, à moins que vous ayez une autre visionneuse d'images
qui utilise le format FAT12 ou FAT32.
Les chiers photos du Trophy Cam HD Wireless sont appelés « 09020001.
JPG » etc., et se trouvent dans le dossier « DCIM\100EK113 » sur ce « Disque
amovible ». Les noms des chiers vidéo se termineront par « .MOV ». Vous
pouvez copier les photos/vidéos sur votre disque dur comme vous le feriez
pour n'importe quel chier – copiez/collez simplement ou glissez/déposez les
noms ou les icônes des chiers dans votre disque dur ou sur votre bureau.
Il est possible de visionner ou d'éditer les chiers au standard .jpg du Trophy
Cam HD Wireless avec n'importe quel logiciel photo de votre choix. Vous
pouvez visionner les chiers vidéo .MOV avec Windows Media Player sur les
PC fonctionnant sous Windows 7 ou une version ultérieure. Si votre ordinateur
fonctionne sous une version de Windows plus ancienne, ou si vous utilisez un
Mac et que vous n'avez pas encore de lecteur vidéo compatible, vous pouvez
télécharger une version gratuite du lecteur DivX sur http://www.divx.com/.
90
Page 91

DÉPANNAGE/FAQ : FONCTIONS DE BASE DE L'APPAREIL
L'appareil prend continuellement des images sans
sujet
Un appareil a ce qu'on appelle un « faux déclenchement » si le capteur PIR
croit qu'il y a un mouvement et de la chaleur devant la lentille de l'appareil
alors qu'il n'y a pas de sujet dans l'image. Ces « faux déclenchements
» sont le résultat du placement de l'appareil dans un environnement où
des branches d'arbres créent un eet de mouvement devant l'appareil, ou
bien en un lieu où il y a une forte chaleur au premier plan et où le moindre
courant d'air peut déclencher l'appareil. L'installation de l'appareil au
dessus de l'eau peut également causer ce problème. Pour remédier à cette
situation :
1. Essayez de déplacer l'appareil en un lieu où ces problèmes ne se posent
pas ou essayez de modier la sensibilité du détecteur grâce aux réglages
du menu.
2. Si l'appareil continue à prendre des images alors qu'elles ne contiennent
pas de sujet, essayez de placer l'appareil en intérieur, en l'orientant dans
une direction où il n'y a aucun mouvement.
3. Si l'appareil continue à poser des problèmes, il y a alors probablement
un problème avec un composant électronique. Si tel est le cas, veuillez
contacter notre service clientèle an d'envoyer l'appareil en réparation.
La durée de vie des piles est plus courte que prévue
1. La durée de vie des piles varie selon la température ambiante et le
nombre de photos prises. Généralement, le Trophy Cam HD Wireless
sera capable de prendre plusieurs milliers de photos avant que les piles
ne soient déchargées.
2. Vériez que vous utilisez des piles alcalines ou au lithium neuves.
Bushnell vous recommande d'utiliser un jeu complet de douze piles AA
au lithium Energizer® avec votre modèle Trophy Cam HD WIRELESS pour
bénécier d'une autonomie maximale.
3. Assurez-vous que le commutateur d'alimentation soit en position «
ON » [Marche] et que l'appareil n'ait pas été laissé en mode « Setup »
[Conguration] sur le terrain.
4. Utilisez une marque de carte SD reconnue avec votre appareil. Bushnell
recommande d'utiliser des cartes SD de marque SanDisk® d'une
capacité maximale de 32 Go (Classe 6 ou supérieure pour des vidéos
HD). Notre expérience indique que les cartes SD de faible qualité
91
Page 92

peuvent parfois réduire la durée de vie des piles de votre Trophy Cam
HD Wireless.
5. Voir p. 80 pour plus d'informations sur l'utilisation du mode « Wake
» [Réveil] par rapport au mode « Eco » [Éco]. Le mode Eco par défaut
prolonge l'autonomie des piles.
L'appareil arrête de prendre des photos ou n'en
prend pas
1. Vériez que la carte SD n'est pas pleine. L'appareil cesse de prendre des
photos lorsque la carte est pleine.
2. Vériez les piles pour vous assurer qu'il s'agit bien de piles AA alcalines ou
au lithium neuves. Reportez-vous au paragraphe précédent concernant
la durée de vie des piles.
3. Assurez-vous que le commutateur d'alimentation de l'appareil soit en
position « On » [Marche] et non en mode « O » [Arrêt] ou « Setup »
[Conguration].
4. Assurez-vous que vous utilisez une carte SD de bonne qualité avec votre
appareil. Bushnell recommande d'utiliser des cartes SD de marque
SanDisk® d'une capacité maximale de 32 Go (Classe 6 ou supérieure
pour des vidéos HD 1920x1080 ou 1280x720).
5. Si le commutateur de protection contre l'écriture de la carte SD est en
position « lock » [verrouillé], l'appareil ne prendra pas de photos.
6. Si vous utilisez une carte SD dans un autre dispositif avant de l'insérer
dans votre Trophy Cam HD Wireless, vous pourrez formater la carte en
utilisant le paramètre « Format » du mode Setup (assurez-vous d'avoir
sauvegardé d'abord tous les chiers importants, car le formatage
eacera tous les chiers existants). Dans certains cas, d'autres appareils
peuvent modier le formatage de la carte SD de telle manière qu'elle ne
fonctionnera pas correctement avec le Trophy Cam HD Wireless.
L'appareil ne s'allume pas
1. Assurez-vous d'avoir installé au moins 4 piles (le nombre requis
minimum) dans le compartiment des piles, en commençant par le haut
et en remplissant les emplacements de piles 1-4 sans laisser d'« espaces ».
Bushnell vous recommande d'utiliser un jeu complet de 12 piles AA
au lithium Energizer® avec votre Trophy Cam HD Wireless (la capacité
maximale de votre modèle).
2. Vériez que les piles sont bien installées et que la polarité est correcte.
Placez toujours l'extrémité négative (plate) de chaque pile en contact
avec le ressort à l'intérieur du compartiment.
92
Page 93

3. Après avoir changé le commutateur de la position « O » [Arrêt] à la
position « Setup » [Conguration] ou « On » [Marche], veillez à ce qu'il
soit en bonne position pour activer le mode qui convient (évitez les
positions intermédiaires entre deux modes).
4. Ne passez pas le commutateur directement de la position « On » à la
position « Setup », mettez toujours le commutateur tout en bas sur « O
», puis sur « Setup ».
Problèmes de qualité des photos et/ou vidéos
1. Les photos ou vidéos prises de nuit sont trop sombres
• Vériez l'icône de charge des piles pour voir si les piles ont une
charge maximum. Le ash cesse de fonctionner lorsque les piles
commencent à faiblir.
• Vous obtiendrez de meilleurs résultats lorsque le sujet se tient
dans la distance idéale du ash, à moins de 19 m. Les sujets
risquent d'être trop sombres à des distances plus importantes.
• Veuillez noter que lorsque le paramètre « Capture Number »
[Nombre d'images] est réglé sur plus de « 1 photo », ou est
réglé avec des intervalles très courts, certaines photos pourront
sembler plus sombres que d'autres du fait du temps de réponse
plus court et du re-déclenchement rapide de l'appareil, laissant
moins de temps au ash pour se recharger complètement avant
de se déclencher une nouvelle fois.
• Veillez à ce que LED Control [Réglage des LED IR], dans le menu
des paramètres, soit réglé sur « High » [Forte] an de permettre
une portée maximale. Vous pouvez également essayer de régler
le paramètre « NV Shutter » [NV Obturation] du menu, sur « Low »
[Faible]. Avec une vitesse d'obturation plus faible, on obtient des
images plus nettes, malgré un ou plus prononcé dans le cas où le
sujet se déplace rapidement.
• L'écran du DAR (dispositif antireet) peut être enlevé an de
maximiser la puissance du ash. Voir page 87 pour plus de détails.
2. Les photos ou vidéos prises en plein jour sont trop sombres
• Assurez-vous que l'appareil n'est pas orienté vers le soleil ou
une autre source lumineuse pendant la journée. Ceci pourrait
inuencer l'exposition automatique et produire des photos ou
des vidéos plus sombres.
93
Page 94

3. Les photos ou vidéos prises de nuit sont trop claires
• Si le sujet est prêt de l'appareil (moins de 3 m), modiez le
paramètre de contrôle des LED dans le menu Setup pour qu'il soit
en position « Medium » [Moyen] ou « Low » [Faible].
4. Les photos ou les vidéos prises en plein jour sont trop claires
• Assurez-vous que l'appareil n'est pas orienté vers le soleil ou une
autre source lumineuse pendant la journée.
5. Les photos présentent des stries
• Dans certains cas, dans des conditions de faible luminosité et
avec les sujets qui se déplacent rapidement, il est possible que les
réglages de la résolution sur 5 MP ou 8 MP ne fonctionnent pas
aussi bien que le réglage sur 3 MP.
• Si les photos que vous prenez de sujets qui se déplacent
rapidement sont striées, essayez plutôt le réglage sur 3 MP.
• Réglez le paramètre « NV Shutter » [NV Obturation] sur « High »
[Forte], an de réduire le ou dû au mouvement.
6. Voile rouge, vert ou bleu
• Certaines conditions de luminosité peuvent aecter les
performances du capteur et produire des photos aux couleurs
altérées.
• Si ce problème se produit régulièrement, il peut être nécessaire
de faire réparer le capteur. Dans ce cas, merci de contacter votre
revendeur Bushnell.
7. Séquences vidéo écourtées : la durée d'enregistrement ne correspond
pas à la durée réglée.
• Vériez que la carte SD n'est pas pleine.
• Assurez-vous que les piles de l'appareil sont bonnes. Lorsque les
piles de l'appareil arrivent en n de vie, l'appareil peut prendre des
séquences vidéo écourtées (voire ne plus enregistrer de vidéos et
seulement prendre des photos) an d'économiser les piles.
L'impression date/heure n'apparaît pas sur les
photos
Assurez-vous que le paramètre « Time Stamp » [Horodatage] est sur « On
» [Activé].
94
Page 95

Les photos prises ne contiennent pas le sujet ciblé
1. Vériez le réglage du paramètre « Sensor Level » [Finesse du capteur].
Par temps chaud, réglez le paramètre Sensor Level [Finesse du capteur]
sur « High » [Forte] et par temps froid, sur « Low » [Faible]. Quand le
temps est variable, utilisez le réglage « Auto » .
2. Essayez d'installer votre appareil dans un endroit où il n'y a pas de
source de chaleur dans l'axe de l'appareil.
3. Dans certains cas, la présence d'eau à proximité peut entraîner la prise
de photos sans sujet. Essayez d'orienter l'appareil vers le sol.
4. Évitez d'installer l'appareil sur des arbres de petite taille susceptibles
d'être agités en cas de vents forts.
5. Dégagez toutes les branches se trouvant directement devant l'objectif
de l'appareil.
La LED du capteur infrarouge passif (PIR) clignote/
ne clignote pas
1. Lorsque l'appareil est en mode « Setup » [Conguration], une LED
clignote à chaque mouvement détecté. Cela est utile lors de l'installation
et aidera l'utilisateur à orienter l'appareil dans l'axe choisi.
2. Pendant l'utilisation, la LED ne clignotera pas lorsque l'appareil prendra
une photo. Ceci sert à camouer l'appareil du gibier.
Problèmes d'écran LCD
1. L'écran LCD s'allume mais il n'y a pas de texte.
• Après avoir changé le commutateur de la position « O » [Arrêt] à
la position « Setup » [Conguration] ou « On » [Marche], veillez à
ce qu'il soit en bonne position pour activer le mode qui convient
(évitez les positions intermédiaires entre deux modes).
• Ne passez pas le commutateur directement de la position « On » à
la position « Setup », mettez toujours le commutateur tout en bas
sur « O », puis sur « Setup ».
2. L'écran s'allume mais s'éteint aussitôt
• Assurez-vous d'avoir bien inséré la carte SD.
95
Page 96

L'appareil ne garde pas les réglages en mémoire
Assurez-vous d'avoir sauvegardé tous les changements des réglages de
paramètres que vous avez faits en mode Setup [Conguration], en appuyant
sur « OK » après avoir eectué le changement. Si vous ne sauvegardez pas
votre nouveau réglage après l'avoir changé, l'appareil continuera à utiliser
le réglage par défaut pour ce paramètre.
Humidité ou fourmis à l'intérieur de l'appareil
1. An d'empêcher toute inltration d'humidité ou de pluie dans l'appareil,
veillez à bien brancher la prise d'arrivée de courant continu.
2. Les fourmis peuvent être attirées par de faibles vibrations électroniques,
et entrer par tout interstice entre l'extérieur et l'intérieur de l'appareil.
Veillez à ce que la prise d'arrivée de courant continu soit bien attachée.
Le balayage de champ (intervalle de temps) ne
fonctionne pas correctement
1. Vériez que les horaires d'arrêt et de démarrage des périodes « A » et « B
» ne se chevauchent pas (par exemple, ne réglez pas le démarrage de «
B » à 8h si l'arrêt de « A » est à 10h).
2. Quand vous utilisez le balayage de champ en mode vidéo, l'intervalle
de temps disponible le plus court est de 5 min an d'éviter une possible surchaue des piles et des composants électroniques qui pourrait
provoquer une panne ou endommager l'appareil. En mode Photo, vous
pouvez régler l'intervalle à 1 minute.
Ne mélangez pas des piles ayant déjà servi avec des piles neuves.
Ne mélangez pas diérents types de piles. N'utilisez QUE des piles au
lithium ou QUE des piles alcalines.
Les piles rechargeables ne sont pas recommandées.
96
Page 97

DÉPANNAGE/FAQ : FONCTIONS SANS FIL
Q : Pourquoi la commande GPS ne fonctionne-t-elle pas ?
R : Le service de données de votre carte SIM doit être activé pour utiliser
cette fonction. Certains opérateurs peuvent ne pas prendre en charge
cette fonction. Voir page 83.
Q : Pourquoi m'est-il impossible d'envoyer des commandes pour
contrôler l'appareil à distance ?
R : Le service de messagerie texte doit être activé par votre opérateur.
Q : Pourquoi SMTP ne fonctionne-t-il pas ?
R : Assurez-vous que le service de données de votre carte SIM est
activé. Assurez-vous d'avoir correctement conguré et saisi les adresses
d'expédition et de réception. Il est également recommandé de congurer
un compte de messagerie électronique indépendant (Gmail) dédié à
l'appareil.
Q : Pourquoi la carte SIM ne fonctionne-t-elle pas ?
R : Assurez-vous de retirer le code PIN, vérier qu’il y a bien du forfait et
que les réglages Pays/opérateur sont bons. Vérier également que vous
n’avez pas fait d’erreur en entrant votre numéro de téléphone / email.
Vériez que les Cartes SIM et carte SD sont bien en place (veuillez-vous
reporter à la page 49 et au site www.trophycam.eu/wireless).
97
Page 98

CARACTÉRISTIQUES TECHNIQUES
Résolution maximale 3264x2448 (8 MP)
Objectif F = 3,1 ; CDV = 40° ; Infrarouge automatique (de nuit)
Portée du Flash Infrarouge
Écran d'achage Écran en couleur (2,4 pouces)
Carte mémoire
Taille des photos 8MP = 3264x2448 ; 5MP = 2592x1944 ;
3MP = 1920x1440
Taille des vidéos
Sensibilité de l'infrarouge
passif
Fonctionnement
Temps de réponse 0,6 seconde
Intervalle de
déclenchement
Nombres de prises de vue Programmable 1-3
longueur de vidéo Programmable 5-60 s
Alimentation
Consommation en stand-by < 0,25 mA (< 7 mA/jour)
Consommation 250 mA (+1300 mA lorsque toutes les LED s'allument)
Vitesse d'obturation pour la
vision nocturne
Interface USB ; fente carte SD ; CC externe (> 8 V)
Sécurité Sangle ; xation ¼-20 pour trépied
Température de
fonctionnement
Taux d'humidité requis pour
un bon fonctionnement
Sélectionnable par l'utilisateur (High/Med/Low, c.-à-d.
Élevé/Normal/Faible), jusqu'à 19 m si le paramétrage est
réglé sur « High » [Élevé]
Carte SD ou SDHC, capacité maximale 32 Go, Classe 6 ou
supérieure pour vidéos HD 1920x1080 ou 1280x720
1920x1080, 1280x720, 848x480 pixels per frame at 20-30
fps (Day) / 15-20 fps (Night)
1920x1080, 1280x720, 848x480 pixels par image à 20-30
ips (Jour) / 15-20 ips (Nuit)
Hyper PIR avec 4 niveaux de sensibilité : Faible/Normal/
Élevé/Auto
Sélectionnable par l'utilisateur : 24 Hour (24 h), Day only
(Jour uniquement), or Night only (Nuit uniquement), en
fonction du niveau de lumière ambiante
programmable de 1 s à 60 min
12 piles AA recommandées, 4 piles AA pour une
alimentation de secours
Sélectionnable par l'utilisateur (High/Med/Low, c.-à-d.
Élevé/Normal/Faible) – aecte uniquement la vision
nocturne des photos/vidéos
-20 à 50 °C (Température de stockage : -30 à 70 °C)
5 %-90 %
98
Page 99

GARANTIE LIMITÉE DE DEUX ANS
Votre produit Bushnell® est garanti contre les éventuels vices de matière ou de fabrication
pendant deux ans à compter de la date d’achat. En cas de défaut durant la période de
garantie, nous nous réservons la possibilité de réparer, ou d’échanger le produit, sous
condition que vous retourniez le produit en port payé. Cette garantie ne couvre pas les
dommages causés par une mauvaise utilisation, une mauvaise manipulation, une mauvaise
installation, ou un entretien incorrect effectué par une personne autre que le Centre de
Réparation agréé par Bushnell.
Tout retour effectué dans le cadre de la présente garantie doit être accompagné des
éléments ci-dessous :
1. Un chèque/mandat de 10 $ pour couvrir les frais de port et de manutention.
2. Nom, adresse et n° de téléphone en journée pour le retour du produit.
3. Une explication de la défaillance constatée.
4. Copie de votre preuve d’achat datée.
5. N’envoyez pas les accessoires (batteries, cartes SD, câbles), mais uniquement le
produit à réparer.
Le produit doit être correctement emballé dans un carton d’expédition renforcé, pour
éviter tout dommage pendant le transport, et expédié à l’adresse ci-dessous :
AUX USA, envoyer à: AU CANADA envoyer à:
Bushnell Outdoor Products Bushnell Outdoor Products
Attn.: Repairs Attn.: Repairs
9200 Cody 140 Great Gulf Drive, Unit # B
Overland Park, Kansas 66214 Vaughan, Ontario L4K 5W5
Pour les produits achetés hors des États-Unis ou du Canada veuillez contacter votre
revendeur local pour les informations applicables de la garantie.
www.bushnell.eu/eu/shop/distributor.php
Cette garantie vous ouvre des droits spécifiques.
Vos droits peuvent varier d’un pays à l’autre.
©2015 Bushnell Outdoor Products
Les caractéristiques et les modèles sont susceptibles de changer
sans préavis ou obligation de la part du fabricant.
99
Page 100

CONFORMITÉ RÉGLEMENTAIRE EUROPÉENNE
Nous déclarons par les présentes que ce dispositif est conforme aux exigences essentielles et
autres dispositions pertinentes de la Directive 1999/5/CE.
Pour la déclaration de conformité,
Avis : Respecter les réglementations locales du pays où le dispositif est utilisé.
La distance minimale entre l'utilisateur et/ou d'un sujet et la structure rayonnante de l'émetteur
est de 20 cm.
Traitement des déchets d’équipements
électriques et électroniques
(En vigueur dans l’Union européenne et autres pays européens
ayant des systèmes de collecte des déchets séparés)
Cet équipement contient des composants électriques et/ou électroniques et
par conséquent ne doit pas être éliminé en fin de vie avec les autres déchets
ménagers. Vous devez au contraire vous débarasser de ce produit afin qu’il
soit recyclé aux points de collecte respectifs fournis par les communautés
locales. Pour vous, ceci est sans frais.
Si l’équipement contient des piles amovibles (rechargeables), cellesci doivent également être retirées de l’équipement et, si nécessaire, être
éliminées à leur tour conformément aux règlements en vigueur (voir également
les commentaires respectifs dans la notice d’utilisation de ce produit).
De plus amples renseignements à ce sujet sont disponibles auprès de votre
mairie, votre compagnie de ramassage d’ordures locale, ou dans le magasin
où vous avez acheté cet équipement.
100
 Loading...