

Bushnell StealthView 260542 Instruction Manual

INSTRUCTION MANUAL
MANUEL D’INSTRUCTIONS
MANUAL DE INSTRUCCIONES
BEDIENUNGSANLEITUNG
MANUALE DI ISTRUZIONI
MANUAL DE INSTRUÇÕES
Model: 260542
Lit. #: 98-0752/05-13
digital
night vision
5 x 42
S
tealthView
™

2

3
ENGLISH 4
FraNçaIS 11
ESpañoL 18
DEutScH 25
ItaLIaNo 32
portuGuêS 39

4
2
11
12
1
3
4
5
6
7
8
9
10
13
14

5
Congratulations on the purchase of your Bushnell® StealthView™ Digital Night Vision. Comprised of high quality electronics
and optics, the Bushnell StealthView is a hand-held digital night vision viewing system that utilizes a low-light CMOS
(complementary metal oxide semiconductor) sensor providing images comparable to generation 2 & 3 resolution. Day and
Night time images are magnified and displayed on a black and white micro display screen. The StealthView also contains
an RCA Video Output port which allows live transmission to video camcorders, computer lap tops / monitors, and television
screens.
HOW DIGITAL NIGHT VISION WORKS
Bushnell Digital Night Vision products collect existing light through the objective lens. The light is then processed through
a highly sensitive complementary metal oxide semiconductor and transferred to the micro display (black and white viewing
screen). Images viewed through the viewing screen are magnified 5 times.
StealthView has two infrared illuminators. A short range illuminator which is always on when the device is on, and a “Super”
infrared illuminator used for objects at longer distances and for exceptionally dark conditions.
StealthView is ideal for camping, caving, scouting, maritime navigation, and observing wildlife under the veil of darkness,
patrolling warehouses and similar surveillance operations where light is scarce.
OPERATING INSRUCTIONS
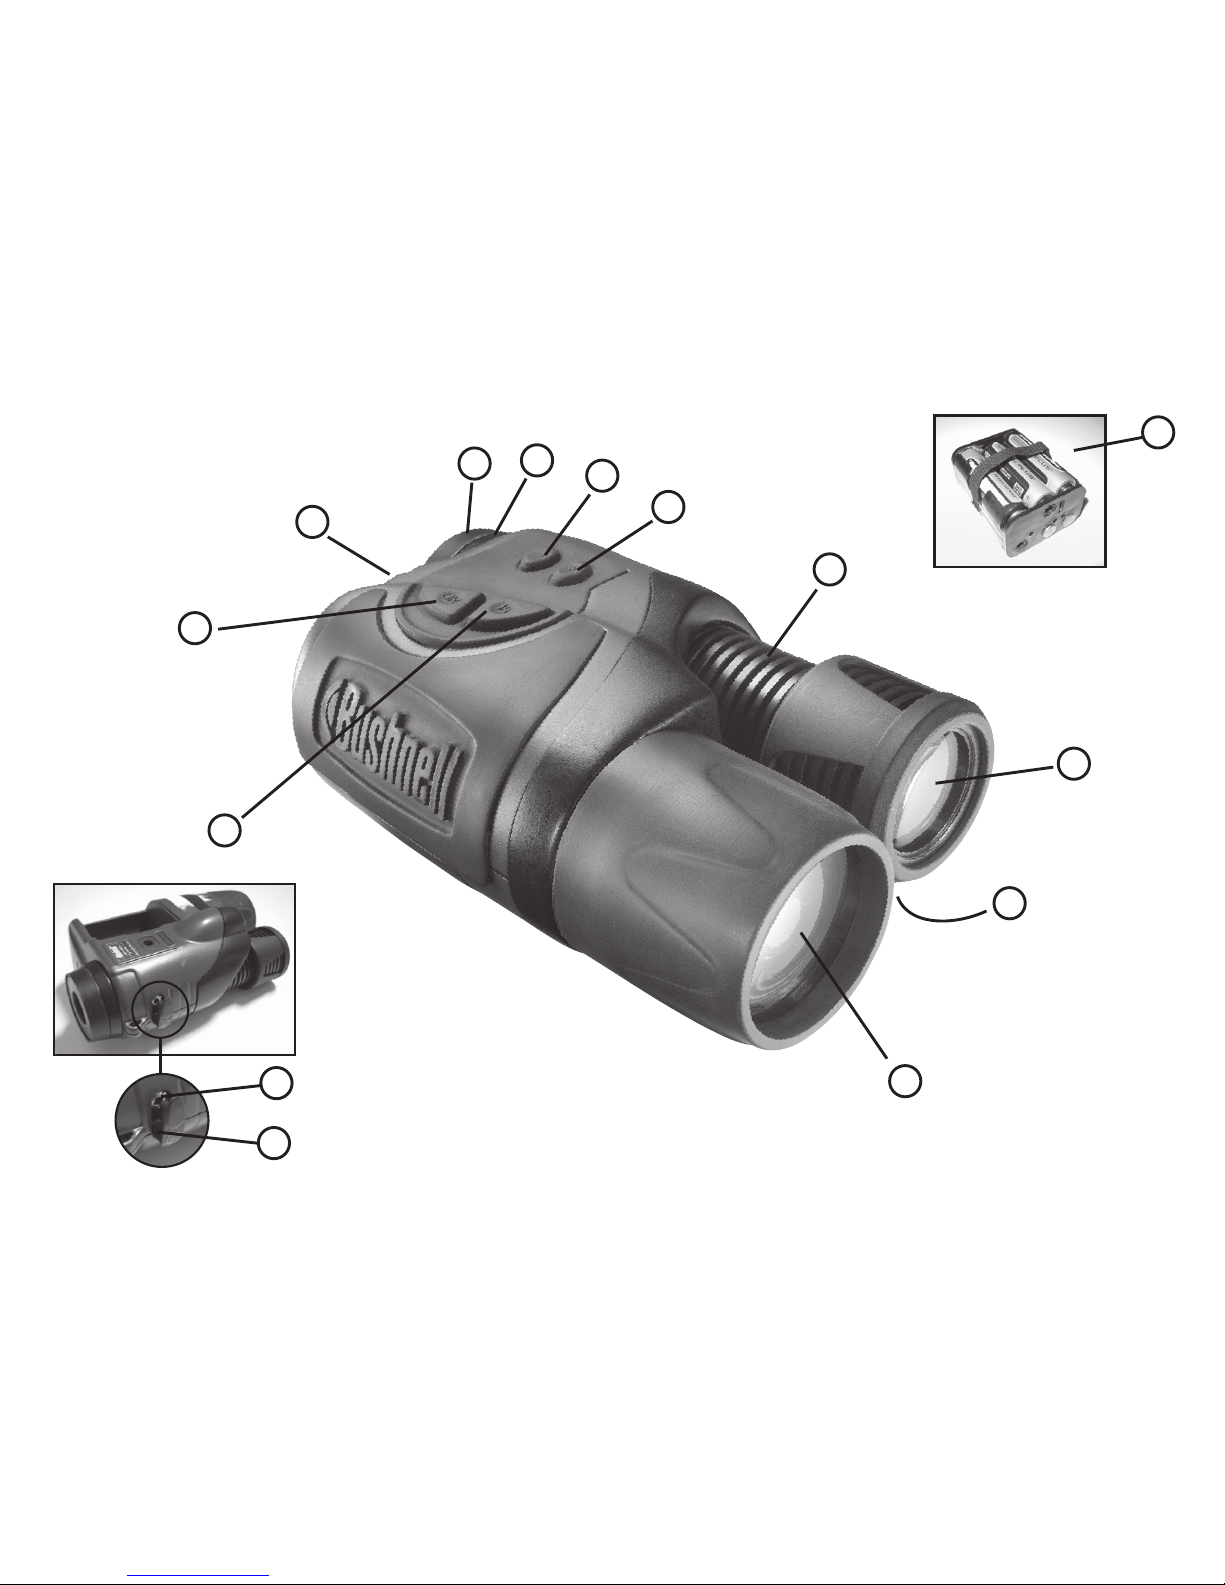
1. Remove the objective lens cap from the objective lens (1).
2. Slide the battery door open and remove the battery cartridge. Insert six AA alkaline or 6 AA nickel cadmium batteries into
the battery cartridge (2) Be sure to observe the polarity indicators as shown within the battery cartridge.
3. Insert the battery cartridge into the device making sure that the cartridge connectors are making contact with the contacts
within the device.
4. Press the ON button (3) to power the device on. A stable green LED indicator light (4) indicates that the device is ready for
use. A flashing green indicator light indicates that the battery power is low. A flashing red indicator light indicates that the
battery power is empty.
5. View through the eyepiece (5) and locate an object within 20-30 yards / meters.
english

6
6. To focus the image, first adjust the eyepiece diopter (9) and then rotate the objective lens (1) until the display screen is in focus
and the view is clearest. At this point, the eyepiece diopter is set for your individual eyesight and will not require further
adjustment when viewing objects at different distances. When changing the viewing distance, simply rotate the objective
lens (1) until the image is in focus.
7. To adjust the image brightness of the viewing screen, either press the “+” (6) to increase brightness or the “-“(7) to decrease
brightness. If the device is turned off and then back on, the brightness level will return to the previous brightness level.
8. When you power the device on, the short range Infrared Illuminator (13) is automatically turned on.
9. StealthView Digital Night Vision also contains a “super” infrared (I.R.) diode (14) for illumination of objects in complete
darkness where no ambient light source, such as moonlight, is available. To activate the super IR, simply press the IR button
(10) located next to the ON button. If the device is focused on an object closer than 15 yards / meters, the emission spot
of this “super” infrared (bright light circle) will be shifted to the right side of the display. While focusing from one object to
another object, it might be necessary to rotate the objective lens and increase or decrease image brightness of the viewing
screen in order to achieve the best image quality.
10. The StealthView contains a video output port (11). This port allows one to transmit images to an external LCD monitor or
video recorder. Plug the output video cable into the StealthView video output port (11). When the StealthView is coupled
with video equipment, the observed image can be recorded.
11. The StealthView also contains a 12 volt auxiliary power port (12). To connect the StealthView to this port, plug the power
cable (not included) into the StealthView’s power input port and connect the other end of the cable to the vehicle’s auxiliary
power port. To connect the StealthView to a household outlet, use a 12 volt dc output switching power adapter (not
included).
NOTE: When the batteries are in the battery cartridge and the external power source is turned on, the device operates on the
external power source. If you unplug the external power source, and you want to use the battery source, you have to press
the ON button (3) to make the device operate.

7
TROUBLESHOOTING
StealthView will not turn on
1. Check that the batteries and battery cartridge (2) are installed correctly. If the batteries and cartridge are installed correctly
and the batteries are good, then the green LED indicator light should be on.
2. Check that the power button (3) has been depressed to the ON position.
Image is not focused.
1. Adjust the focus of the objective lens (1) and eyepiece diopter (9).
2. Adjust the LCD brightness screen up or down until satisfactory.
3. Try turning the super I.R. spotlight ON (10). Typically, the super I.R spotlight needs to be on when viewing objects far away
in complete darkness and can be off when viewing objects at close distances with some ambient light.
CARE AND MAINTENANCE
Your Bushnell Digital Night Vision device was designed to provide many years of reliable service. To ensure that you get the
most enjoyment out of your Digital Night Vision device, always obey the following warning and precautions.
• Do not open the body of the device or otherwise attempt to service this device.
• Always store the device in a dry, well ventilated room.
• Keep the device away from any heating and air conditioning vents or other heating devices, direct sunlight, and moisture.
• Avoid dropping or otherwise shocking the unit. Although designed for rugged outdoor use, this device incorporates a
sophisticated digital circuitry which could be damaged in extreme cases of misuse.
• Clean the optical lens with a professional lens cleaning supplies.
• Clean the exterior of the device with a soft clean cloth.
• Avoid removing the objective lens as the CMOS chip can be damaged.
• Do not leave the device in direct sunlight or rain.
• Do not cover the vent grid (8) of the super I.R.
• The device can be powered with 6 nickel cadmium batteries or 6 alkaline batteries.
• The super I.R. is focused correctly from the factory. Do not attempt to adjust the focus of the super I.R.
• Remove the batteries if the device will not be used for longer than 2 months.

8
SPECIFICATIONS
Magnification: 5x
Objective Size: 42 mm
Battery Type: 6 AA batteries (not included)
Operating Time with “super” Infrared: Up to 2 hours of continuous run time
Operating Time without “super” infrared: Up to 8 hours of continuous run time
Temperature Range (F/C): 14-104 / -10-40
Dimensions (in. /mm): 6.5 x 3.5 x 2.3 / 166 x 102 x 57
Weight (oz./g): 20.2 oz. / 573
Tripod Mount: Yes
Video Out*: NTSC
12V Connector: 5mm outside dimension, 2 mm inside dimension,
14mm shaft length, Positive center signal
* Note: use of lowest brightness settings may create signal levels too low for some NTSC televisions.

9
ONE-Year LIMITED WARRANTY
Your Bushnell
®
product is warranted to be free of defects in materials and workmanship for one year after the date of
purchase. In the event of a defect under this warranty, we will, at our option, repair or replace the product, provided that
you return the product postage prepaid. This warranty does not cover damages caused by misuse, improper handling,
installation, or maintenance provided by someone other than a Bushnell Authorized Service Department.
Any return made under this warranty must be accompanied by the items listed below:
1) A check/money order in the amount of $10.00 to cover the cost of postage and handling
2) Name and address for product return
3) An explanation of the defect
4) Proof of Date Purchased
5) Product should be well packed in a sturdy outside shipping carton, to prevent damage in transit, with return postage
prepaid to the address listed below:
IN U.S.A. Send To: IN CANADA Send To:
Bushnell Outdoor Products Bushnell Outdoor Products
Attn.: Repairs Attn.: Repairs
9200 Cody 25A East Pearce Street, Unit 1
Overland Park, Kansas 66214 Richmond Hill, Ontario L4B 2M9
For products purchased outside the United States or Canada please contact your local dealer for applicable warranty
information. In Europe you may also contact Bushnell at: Bushnell Germany GmbH
European Service Centre
Mathias-Brüggen-Str. 80
D-50827 Köln
GERMANY
Tél: +49 221 995568-0
Fax: +49 221 995568-20
This warranty gives you specific legal rights.
You may have other rights which vary from country to country.
©2013 Bushnell Outdoor Products

10
FCC notE
This equipment has been tested and found to comply with the limits for a Class B digital device, pursuant to Part 15 of the FCC Rules. These
limits are designed to provide reasonable protection against harmful interference in a residential installation. This equipment generates, uses
and can radiate radio frequency energy and, if not installed and used in accordance with the instructions, may cause harmful interference to
radio communications. However, there is no guarantee that interference will not occur in a particular installation. If this equipment does cause
harmful interference to radio or television reception, which can be determined by turning the equipment o and on, the user is encouraged to
try to correct the interference by one or more of the following measures:
• Reorient or relocate the receiving antenna.
• Increase the separation between the equipment and receiver.
• Connect the equipment into an outlet on a circuit dierent from that to which the receiver is connected.
• Consult the dealer or an experienced radio/TV technician for help.
Shielded interface cable must be used with the equipment in order to comply with the limits for a digital device pursuant to Subpart B of Part
15 of FCC Rules.
Specications and designs are subject to change without any notice or obligation on the part of the manufacturer.
Disposal of Electric and Electronic Equipment
(Applicable in the EU and other European countries with separate collection systems)
This equipment contains electric and/or electronic parts and must therefore not be disposed of as normal household
waste. Instead, it should be disposed at the respective collection points for recycling provided by the communities. For
you, this is free of charge.
If the equipment contains exchangeable (rechargeable) batteries, these too must be removed before and, if necessary, in
turn be disposed of according to the relevant regulations (see also the respective comments in this unit’s instructions).
Further information about the subject is available at your community administration, your local waste collection
company, or in the store where you purchased this equipment.
11
2
11
12
1
3
4
5
6
7
8
9
10
13
14
Français

12
Nous vous félicitons d’avoir acheté un appareil numérique de vision nocturne StealthViewMC de BushnellMD. Composé de dispositifs
optiques et électroniques de haute qualité, le StealthView de Bushnell est un appareil numérique d’observation nocturne à main qui utilise
un capteur CMOS (circuits intégrés à transistors MOS) à photosensibilité élevée pour produire des images d’une résolution comparable à
celle de deuxième ou de troisième générations. Les images diurnes et nocturnes sont grossies et affichées sur un micro-écran noir et blanc. Le
StealthView comporte aussi une sortie vidéo RCA qui permet la transmission d’images en direct vers des caméscopes, ordinateurs portatifs,
moniteurs et écrans de télévision.
FONCTIONNEMENT DES APPAREILS NUMÉRIQUES DE VISION NOCTURNE
Les appareils numériques de vision nocturne Bushnell recueillent la lumière ambiante à travers l’objectif. Cette lumière est alors traitée dans un
métal-oxyde-semiconducteur (MOS) extrêmement sensible, puis acheminée vers le micro-écran (écran d’affichage en noir et blanc). Les images
affichées à l’écran sont grossies 5 fois.
StealthView est doté de deux illuminateurs infrarouges. Un illuminateur de courte portée, toujours allumé lorsque l’appareil est en marche, et
un illuminateur puissant pour voir des objets à une longue distance ou dans une obscurité très profonde.
StealthView est idéal pour le camping, l’exploration de grottes, la reconnaissance, la navigation maritime, l’observation de la faune dans
l’obscurité, la surveillance d’entrepôts et d’autres opérations similaires où la lumière est faible.
NOTICE D’UTILISATION
1. Retirez le capuchon de l’objectif (1).
2. Faites glisser le couvercle du compartiment des piles et retirez le logement des piles. Insérez six piles alcalines AA ou six piles cadmium-nickel
AA dans le logement des piles (2). Veillez à respecter la polarité correcte indiquée dans le logement des piles.
3. Insérez le logement des piles dans l’appareil en veillant à ce que les connecteurs du logement des piles entrent en contact avec les éléments
de contact de l’appareil.
4. Appuyez sur le bouton ON (3) pour mettre l’appareil en marche. Un voyant vert fixe (4) à diode électroluminescente (DEL) indique que
l’appareil est prêt à l’emploi. Un voyant vert clignotant indique que les piles sont faibles. Un voyant rouge clignotant indique que les piles sont
mortes.
5. Regardez dans l’oculaire (5) et localisez un objet à une distance de 20 à 30 mètres / verges.
6. Pour mettre l’image au point, réglez d’abord l’oculaire (9) puis faites pivoter l’objectif (1) jusqu’à ce que vous obteniez une image nette de
qualité optimale. L’oculaire est maintenant réglé à votre vue et ne demandera aucun réglage supplémentaire lorsque vous observerez des
objets à des distances diverses. Pour changer la distance d’observation, faites simplement pivoter l’objectif (1) jusqu’à ce que vous obteniez
une image nette.
Français

13
7. Pour régler la luminosité de l’écran, appuyez soit sur le bouton « + » (6) pour augmenter la luminosité ou sur le bouton « - » (7) pour diminuer la
luminosité. Si l’appareil est éteint, puis remis en marche, l’intensité lumineuse sera celle qui avait été sélectionnée avant d’éteindre l’appareil.
8. Lorsque vous mettez l’appareil en marche, l’illuminateur infrarouge de courte portée (13) se met automatiquement en marche.
9. L’appareil numérique de vision nocturne StealthView comprend également une diode infrarouge (IR) puissante (14) pour l’éclairement d’objets
dans l’obscurité complète, même en l’absence de toute source d’éclairage ambiant, ne serait-ce que celle de la lune. Pour activer cette diode
infrarouge puissante, appuyez simplement sur le bouton IR (10) situé près du bouton de mise en marche (ON). Lorsque l’appareil vise un objet
à une distance inférieure à 15 mètres / verges, le point d’émission de cette diode infrarouge puissante (cercle de lumière intense) se déplacera
vers la droite de l’écran. Lorsque vous dirigez l’appareil d’un objet vers un autre, il peut être nécessaire de faire pivoter l’objectif et d’augmenter
ou de diminuer la luminosité de l’écran afin d’obtenir une image de qualité optimale.
10. Le StealthView comporte une sortie vidéo (11) qui permet la transmission d’images vers un moniteur à affichage à cristaux liquides ou à un
magnétoscope. Branchez le câble vidéo de sortie dans la sortie vidéo (11) du StealthView. Lorsque le StealthView est branché à du matériel
vidéo, l’image observée peut être enregistrée.
11. Le StealthView est également muni d’une prise d’alimentation auxiliaire (12) de 12 volts. Pour connecter le StealthView à cette prise, branchez
une extrémité du cordon d’alimentation (non compris) dans la borne d’entrée du StealthView et branchez l’autre dans la borne d’alimentation
auxiliaire de votre véhicule. Pour connecter le StealthView à une prise domestique, utilisez un adaptateur de courant à découpage de 12 volts
(non compris).
REMARQUE : Lorsque les piles sont dans le logement des piles et que la source d’alimentation externe est en marche, c’est cette dernière qui
fait fonctionner l’appareil. Si vous débranchez l’alimentation externe et désirez faire fonctionner l’appareil à piles, vous devez appuyer sur le
bouton de mise en marche (ON) (3).
DÉPANNAGE
Le StealthView ne se met pas sous tension
1. Vérifiez que les piles et le logement des piles (2) sont installés correctement. Si les piles et le logement des piles sont installés correctement et
que les piles sont bonnes, le voyant vert DEL devrait être alllumé.
2. Vérifiez que le bouton d’alimentation (3) a été enfoncé à la position de MARCHE (ON).
L’image n’est pas nette.
1. Réglez la mise au point de l’objectif (1) et de l’oculaire (9).
2. Augmentez ou diminuez la luminosité de l’écran LCD selon le besoin.
3. Essayez de mettre en marche (ON) la diode infrarouge puissante (10). En règle générale, la diode infrarouge puissante doit être en marche
pour permettre l’observation d’objets lointains ou se trouvant dans l’obscurité complète; elle peut être éteinte pour observer des objets proches
avec une source d’éclairage ambiant.

14
NETTOYAGE ET ENTRETIEN
Votre appareil numérique de vision nocturne Bushnell a été conçu pour vous assurer de nombreuses années de service fiable. Pour retirer le
maximum de satisfaction de votre appareil de vision nocturne, veillez à toujours respecter les précautions et avertissements qui suivent :
• N’ouvrez pas le boîtier de cet instrument ni n’essayez de le réparer vous-même de quelque façon que ce soit.
• Rangez toujours cet instrument au sec dans une pièce bien aérée.
• Conservez cet instrument éloigné des bouches d’air climatisé ou de chaleur ou d’autres dispositifs de chauffage, et tenez-le à l’abri de l’humidité
et des rayons directs du soleil.
• Évitez de laisser tomber ou de heurter l’instrument. Bien qu’il soit conçu pour résister à un usage de plein air dans des conditions de service
sévères, cet appareil comprend un système optique numérique d'une haute technicité, susceptible d’être endommagé dans des cas extrêmes
de mauvaise utilisation.
• Nettoyez les lentilles optiques à l’aide de produits professionnels de nettoyage de lentilles.
• Nettoyez la surface de l’instrument à l’aide d’un chiffon doux et propre.
• Évitez de retirer l’objectif de l’appareil, car cela risque d’endommager la puce CMOS.
• Ne laissez pas cet appareil à la lumière solaire directe ni sous la pluie.
• N’obstruez pas la grille de ventilation (8) de la diode infrarouge puissante.
• Cet appareil utilise six piles cadmium-nickel ou six piles alcalines.
• La diode infrarouge puissante est réglée correctement en usine; n’essayez pas d’en régler la mise au point
• Retirez les piles, si vous ne prévoyez pas utiliser cet appareil pendant plus de deux mois.
11

15
SPÉCIFICATIONS
Grossissement : 5x
Taille de l’objectif : 42 mm
Type de pile : 6 piles AA (non comprises)
Autonomie de fonctionnement avec la diode infrarouge puissante : Jusqu’à deux heures de fonctionnement continu
Autonomie de fonctionnement sans la diode infrarouge puissante : Jusqu’à huit heures de fonctionnement continu
Plage de températures (C/F) : -10-40/14-104
Dimensions (mm/po) 166 x 102 x 57/6,5 x 3,5 x 2,3
Poids (g/oz) : 573 / 20,2 oz.
Monture de trépied : Oui
Sortie vidéo* : NTSC
Connecteur 12 V : dimension externe : 5 mm;
dimension interne : 2 mm; longueur de la hampe : 14 mm;
signal central positif
* Une commande de luminosité réglée au plus bas peut causer des signaux trop faibles pour certains NTSC téléviseurs.
12
 Loading...