

Bushnell ImageView 98-0917/04-09, Imageview SyncFocus Instant Replay, ImageView 118326 Quick Start Manual

Quick Start Guide
Model#: 118326
LIT. #: 98-0917/04-09
SYNCFOCUS™ INSTANT REPLAY

2
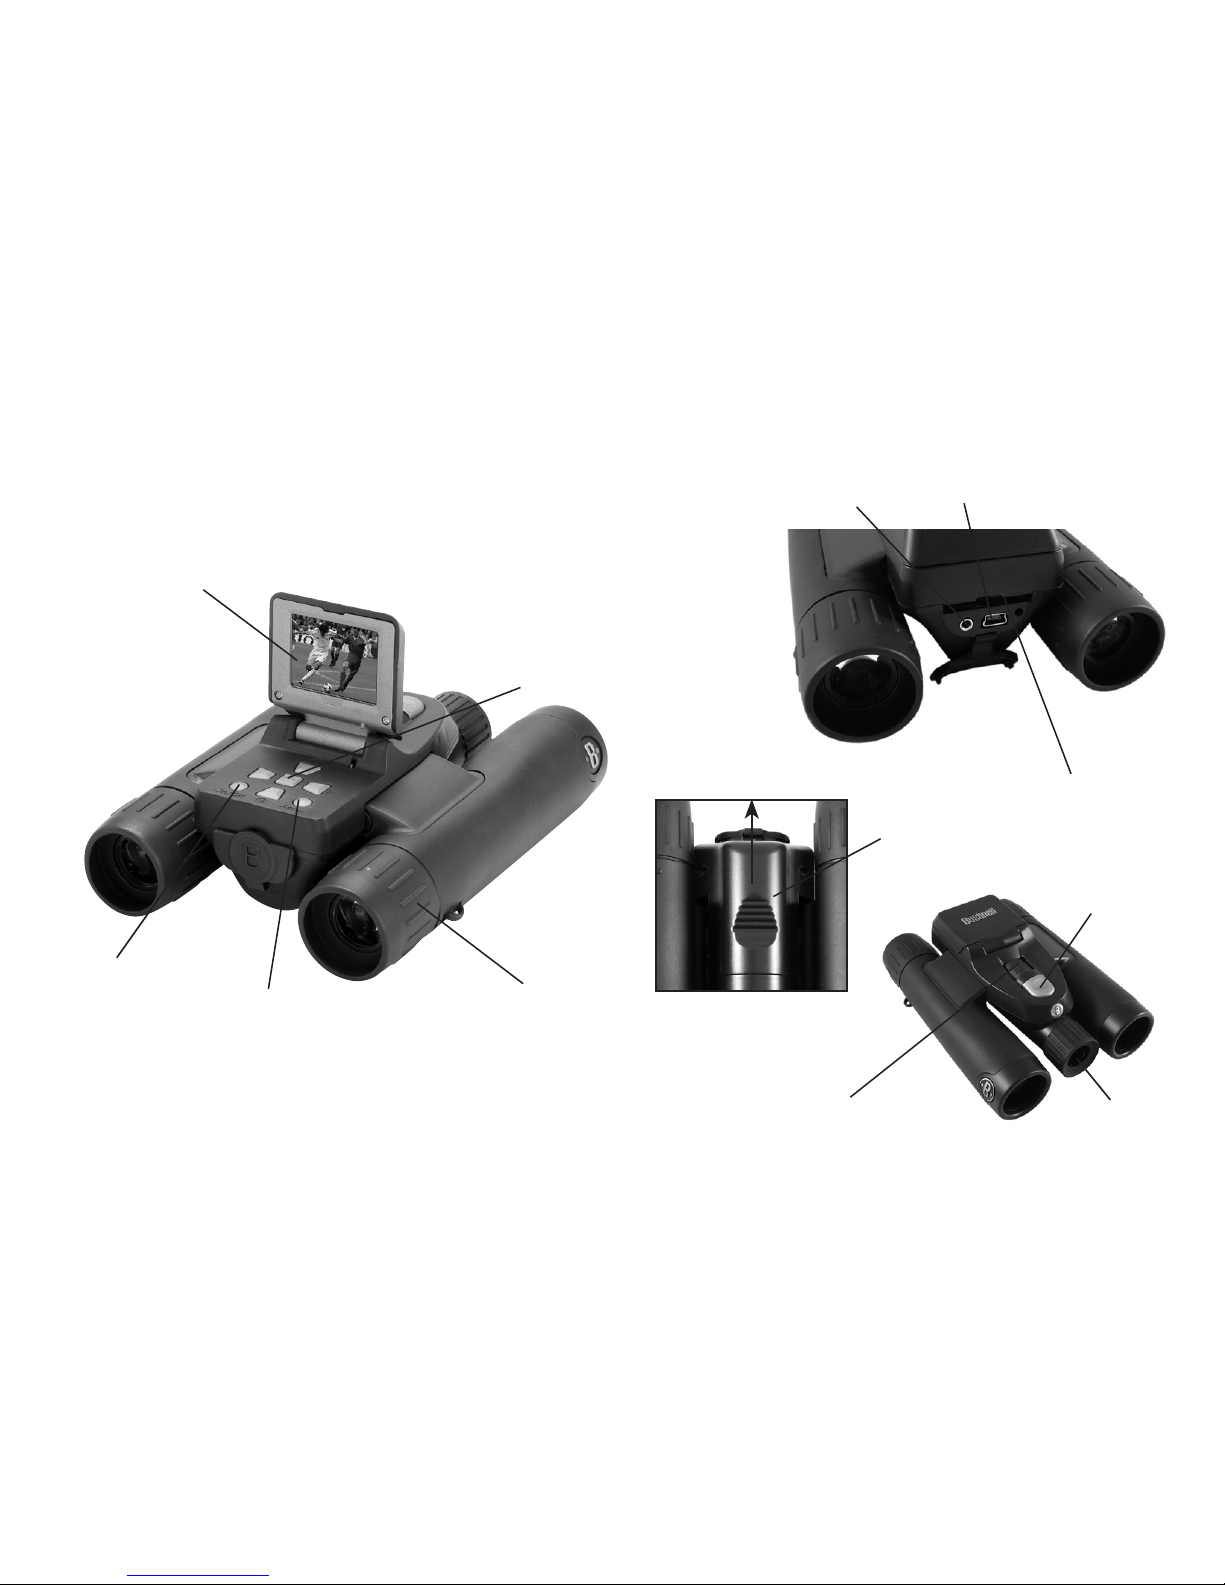
Camera and Binocular Parts Guide
(I) USB
Port
(H) Remote
Jack
(K) Card Slot
(E) LCD Display
(D) 5-way Keypad w/
“Enter”, Left/Right,
Plus/Minus
(C) Diopter
Adjustment
(A) ON/OFF
Button
(B) MENU
Button
(G) Battery
Compartment
(M) Camera Lens
(L) SNAP Button
(F) Binocular Focus

3
1) The SyncFocus is powered by two AAA batteries (not included). Insert batteries into the compartment (G), using the polarity marks inside for reference. A power meter in the
lower left corner of the display indicates battery condition.
2) Insert an SD card into slot (K) if greater storage is desired. The card will click into place. You may use SD cards (not MMC cards) up to 2 GB capacity.
Note: If the card you insert was previously used in other devices, format it before taking photos. Press the Enter button (D) to enter Play mode, then press the MENU button (B). Press the
Minus key (D) once to select “Format”, then press Enter. Note the warning that this will erase all files – make sure you have backed up any files you wanted to keep. Press
the Plus key (D) to select “OK”, then press Enter to format the card.
3) Raise the LCD display (E), and press the ON/OFF button (A) briefly. The camera will automatically turn itself off after two minutes of inactivity (this can be changed using the
“Auto Off” option in the Setup menu).
4) The Date/Time imprint feature is turned on by default. To set the date, press the MENU button. Find “Clock Set” using the Minus key and press Enter. Now set the Year, Month,
Date, Hour and Minute (in order from left to right), using the Plus/Minus keys to make changes, and the Right key to move to the next item. Once date & time are set, press
the Enter button. Use “Date Stamp” to set your preference (month first, year first or off). Press Enter then Exit menu to return to the preview display. Reset the date/time if
you replace batteries.
5) Hold the camera steady with both hands and press the SNAP button (L) to take a still photo. When using a tripod, you can help avoid the effects of camera shake by plugging the
supplied remote shutter release cable into the jack next to the SD card slot rather than SNAP to take photos.
6) To shoot a video, press the Right key (D) three times until the red movie camera icon appears at the top right corner of the display (see “LCD Preview Display Icons”-#10). You
can then start shooting the video at any time by pressing the SNAP button. To stop recording the video, press the SNAP button again. By default, videos are recorded as a 15
second loop (“instant replay”). To change this, press Menu-the first item is “Resolution”. Press Enter, then select “Video Size”. Use the Plus/Minus buttons to select a different
video resolution and frame rate combination (which determines loop length-8, 15, 30 or 60 seconds). You also have the option to select a “Norm” video setting if you prefer to
shoot standard video clips, instead of loops that re-record (refresh) automatically.
QUICK START GUIDE: BUSHNELL SYNCFOCUS™ INSTANT REPLAY
ENGLISH

4
For more details regarding using the still and video resolution options and other menu settings, please read the full instruction manual, available online at:
http://www.bushnell.com/customer_service/manuals.cfm
7) To review or playback a still photo or video, press the Enter button. You will see the most recent still photo or video. To review previous photos or videos one at a time, press
the Left key. To playback a video, press the SNAP button (press again to stop playback). To delete photos/videos, press MENU. Select Delete One (only the currently displayed
photo/video) by pressing Enter, then the Plus button to select “OK”, and press Enter to delete the file. If you wish to delete all photos/videos, use the Format menu option as
described earlier.
8) To download photos/videos to your PC or Mac, connect the USB cable from the SyncFocus to your computer. The SyncFocus will be recognized as a standard “USB Mass Storage”
device and will appear as a “Removable Disk” under the “My Computer” list (on Macs, an icon will appear on your desktop). The photo files are located in the “DCIM” folder on
this “Removable Disk”. Copy the files to your hard drive (drag or use the “copy files” option), then disconnect the camera. (On Mac computers, drag the “disk” that appeared
on your desktop when the camera was connected into your Trash to “eject” it before disconnecting.) The jpg standard files from the SyncFocus may be edited with any photo
software you choose to use.
NOTE: If you are not using an SD card in the SyncFocus, be sure to download all files from its internal memory before changing batteries and before storing the camera for a long period.
If you use an SD card, photos may also be downloaded by removing the card and using any USB card reader with an SD slot.
Your SyncFocus camera is already set for high resolution and quality right out of the box, and it is not necessary to change any of the settings to get good results.
However, many features and options are provided to enhance your enjoyment of the camera. For more information about them, please refer to the complete
instruction manual, available online at: http://www.bushnell.com/customer_service/manuals.cfm
Adjusting the Binocular IPD
The distance between the eyes, called “interpupillary distance,” varies from person to person. To set the hinge for your personal IPD:
Hold the binocular in the normal viewing position, with a firm grip on each side. Move the barrels closer together or further apart (Fig. 1) until you see a single circular field.
Always re-set your binocular to this position before using.

5
Eyecups
The SyncFocus binocular is fitted with rubber roll-down eyecups designed for your comfort and to exclude extraneous light. If you wear glasses, roll down the eyecups. This will bring
your eyes closer to the binocular lens so you can view the entire image without any cutoff.
Setting the Eyepiece Dual Diopter Adjustments
First, look only through the left side of the binocular – you will see a black ring (reticle) in the center. Rotate the left eyecup (diopter adjustment) until this reticle appears as sharp as
possible. Next, look through the left side only at an object in the distance, and adjust the center focusing knob until it appears as sharp as possible to your left eye. Then, look at the
same object through only the right side of the binocular, and rotate the right eyecup (diopter adjustment) until it appears sharp for your
right eye (do not touch the center focus knob while doing this). Once set, note the number on the left and right binocular tubes that the
index mark on each eyecup is lined up with. With the eyepieces set to these positions, you should be able to get sharp photos/videos of
a subject at any distance while you look through the binoculars and adjust the center focus knob (do not re-adjust the eyepiece diopter
settings), without the need to pull up or view the LCD display. Just focus normally and snap the photo or shoot the video.
Full Instruction Manual available at: http://www.bushnell.com/customer_service/manuals.cfm
Fig. 1

6
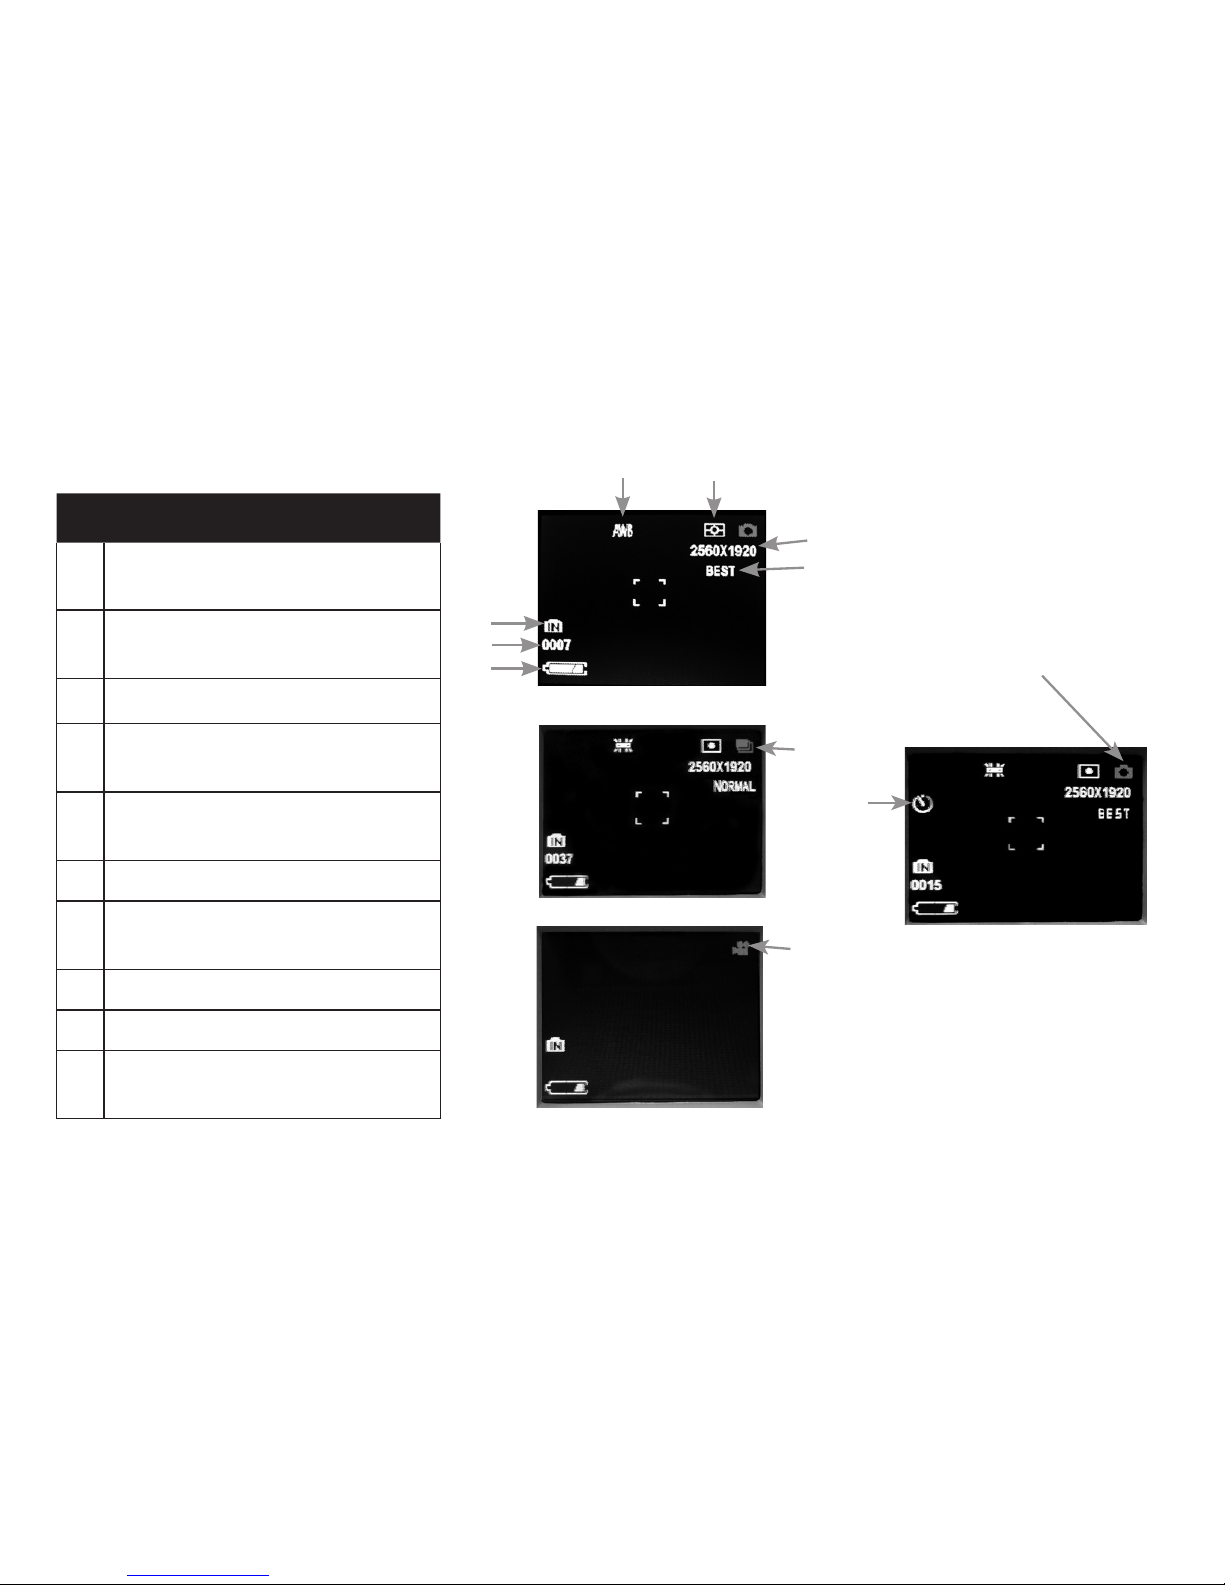
LCD Preview Display Icons Additional Feature Icons
Press the Right key (1, 2, or 3 times) to
select the self timer, rapid sequence, or video
mode features. Press again after selecting
video mode to return to normal still photo
operation (camera icon returns at top right
of LCD).
# Icon
1 Battery Indicator (full battery shown)
2
# of Photos Remaining
(based on unused internal or card memory)
3 Internal or Card Memory
4 White Balance Setting (Auto White Balance shown)
5 Exposure Meter Pattern setting
6 Photo Resolution setting (Pixels)
7 Photo Quality setting (File Compression)
8 Self Timer (10 sec delay)
9 Rapid Sequence (3 shot burst)
10
Video Mode (Elapsed time counter
also appears while recording)
7
6
5
3
2
1
4
9
10
8

7
FCC COMPLIANCE STATEMENT:
This equipment has been tested and found to comply with the limits for a Class B digital device, pursuant
to part 15 of the FCC Rules. These limits are designed to provide reasonable protection against harmful
interference in a residential installation.
Operation is subject to the following two conditions: (1) This device may not cause harmful interference,
and (2) this device must accept any interference received, including interference that may cause undesired
operation.
This equipment generates, uses and can radiate radio frequency energy and, if not installed and used in
accordance with the instructions, may cause harmful interference to radio communications. However, there is
no guarantee that interference will not occur in a particular installation. If this equipment does cause harmful
interference to radio or television reception, which can be determined by turning the equipment off and on, the
user is encouraged to try to correct the interference by one or more of the following measures:
·
Reorient or relocate the receiving antenna.
·
Increase the separation between the equipment and receiver.
·
Connect the equipment into an outlet on a circuit different from that to which the receiver is connected.
·
Consult the dealer or an experienced radio/TV technician for help.
The device does not contain any user-serviceable parts. Repairs should only be made by an Authorized Bushnell repair center. Unauthorized repairs or modifications could result in permanent damage to the equipment,
and will void your warranty and your authority to operate this device under Part 15 regulations.
The shielded interface cable which is provided must be used with the equipment in order to comply with the
limits for a digital device pursuant to Subpart B of Part 15 of FCC Rules.
Specifications and designs are subject to change without any notice or obligation on the part of the manufacturer.
Windows is a registered trademark of Microsoft Corporation in the United States and other countries.
Mac and Mac OS are trademarks of Apple Inc., registered in the U.S. and other countries.
TWO-YEAR LIMITED WARRANTY
Your Bushnell® product is warranted to be free of defects in materials and workmanship for two years after
the date of purchase. In the event of a defect under this warranty, we will, at our option, repair or replace the
product, provided that you return the product postage prepaid. This warranty does not cover damages caused by
misuse, improper handling, installation, or maintenance provided by someone other than a Bushnell Authorized
Service Department.
Any return made under this warranty must be accompanied by the items listed below:
1) A check/money order in the amount of $10.00 to cover the cost of postage and handling
2) Name and address for product return
3) An explanation of the defect
4) Proof of Date Purchased
5) Product should be well packed in a sturdy outside shipping carton, to prevent
damage in transit, with return postage prepaid to the address listed below:
IN U.S.A. Send To: IN CANADA Send To:
Bushnell Outdoor Products Bushnell Outdoor Products
Attn.: Repairs Attn.: Repairs
8500 Marshall Drive 25A East Pearce Street, Unit 1
Lenexa, Kansas 66214 Richmond Hill, Ontario L4B 2M9
For products purchased outside the United States or Canada please contact your local dealer for applicable
warranty information. In Europe you may also contact Bushnell at:
Bushnell Germany GmbH
European Service Centre
Mathias-Brüggen-Str. 80
D-50827 Köln
GERMANY
Tel: +49 221 995568-0
Fax: +49 221 995568-20
This warranty gives you specific legal rights.
You may have other rights which vary from country to country.
©2009 Bushnell Outdoor Products
8
Guide pour l’appareil photo et les différentes
parties des jumelles
(I) Port
USB
(H) Prise pour
commande à distance
(K) Emplacement
pour carte mémoire
(E) Écran LCD
(D) Clavier à cinq
entrées, « Entrer » , Gauche/
Droite, Plus/Moins
(C) Réglage de la
dioptrie
(A) Bouton
MARCHE/
ARRÊT
(B) Bouton MENU
(G) Compartiment
des piles
(M) Objectif de
l’appareil photo
(L) Déclencheur
(F) Mise au point
des jumelles

9
1) Les jumelles SyncFocus sont alimentées par deux piles AAA (qui ne sont pas comprises). Placez les piles dans le compartiment (G), en tenant compte des marques indiquant la polarité qui se
trouvent à l’intérieur. Un indicateur de charge en bas et à gauche de l’écran indique le niveau des piles.
2) Insérez une carte mémoire SD dans l’emplacement prévu à cet effet (K) si vous désirez plus de capacité de stockage. Insérez la carte mémoire jusqu’à ce que vous entendiez un déclic. Vous
pouvez utiliser des cartes mémoires SD (et non pas des cartes MMC) pouvant avoir jusqu’à 2 GB de capacité.
REMARQUE: Si la carte que vous désirez insérer a été auparavant utilisée dans d’autres appareils, il est nécessaire de la formater avant de prendre des photos. Appuyez sur le bouton ENTRER
(D) pour entrer dans le mode Play, puis appuyez sur le bouton MENU (B). Appuyez une fois sur la touche Moins (D) pour choisir « Format », puis appuyez sur ENTRER. Veuillez remarquer
l’avertissement que cette action effacera tous les fichiers – assurez-vous d’avoir gardé une copie de tous les fichiers que vous désirez conserver. Appuyez sur la touche
Plus (D) pour choisir « OK », puis appuyez sur ENTRER pour formater la carte mémoire.
3) Levez l’écran LCD (E), et appuyez brièvement sur le bouton MARCHE/ARRÊT (A). L’appareil photo s’éteindra automatiquement de lui-même s’il reste inactif pendant deux minutes (ceci peut
être changé en utilisant l’option « Arrêt auto » dans le menu de configuration).
4) La fonction insertion Date/Heure est employée par défaut. Pour configurer la date, appuyez sur le bouton MENU. Trouvez « Configuration Horloge » en utilisant la touche Moins et appuyez
sur ENTRER. À présent, configurez l’année, le mois, la date, l’heure et les minutes (dans cet ordre, de droite à gauche), en utilisant les touches Plus/Moins pour effectuer les changements, et
la touche Droite pour aller au choix suivant. Une fois que la date et l’heure sont configurées, appuyez sur le bouton ENTRER. Utilisez « Tampon Date » pour indiquer vos préférences (mois en
premier, année en premier, ou annuler). Appuyez sur Entrer puis sur le menu SORTIE pour retourner à l’écran précédent. Reconfigurez la date/l’heure si vous remplacez les piles.
5) Tenez l’appareil photo fermement à deux mains et appuyez sur le DÉCLENCHEUR (L) pour prendre une photo. Si vous utilisez un tripode, vous pouvez éviter les effets des vibrations de
l’appareil photo en branchant le déclencheur à distance fourni avec l’appareil dans la prise qui se trouve à côté de l’emplacement pour carte mémoire SD plutôt que d’utiliser le DÉCLENCHEUR
pour prendre des photos.
GUIDE D’UTILISATION RAPIDE: JUMELLES SYNCFOCUS™ INSTANT REPLAY DE BUSHNELL
FRANÇAIS

10
6) Pour prendre une vidéo, appuyez trois fois sur la touche Droite (D) jusqu’à ce que l’icône représentant une caméra rouge apparaisse en haut et à droite de l’écran (voir – « Icônes de l’écran
LCD de prévisualisation » - No. 10). Vous pouvez maintenant prendre une vidéo à tout moment en appuyant sur le DÉCLENCHEUR. Pour arrêter d’enregistrer la vidéo, appuyez encore une
fois sur DÉCLENCHEUR. Par défaut, les vidéos sont enregistrées comme des séquences vidéo continues pendant 15 secondes (« instant replay »). Pour changer ceci, appuyez sur Menu – le
premier choix est « Résolution ». Appuyez sur ENTRER, puis sélectionnez « Taille de la vidéo ». Utilisez le bouton Plus/Moins pour sélectionner une combinaison différente pour la
résolution et le nombre d’images pour la vidéo (ce qui détermine la longueur de la séquence vidéo continue – 8, 15, 30 ou 60 secondes). Vous avez également la possibilité de choisir
une configuration « Norme » pour la vidéo si vous préférez prendre des clips vidéo standards, au lieu de défilements en continu qui se réenregistrent (se rafraîchissent) automatiquement.
Pour plus de détails concernant l’utilisation des options de résolution pour les photos et les vidéos et autres choix de menu, veuillez lire le manuel de mode d’emploi
complet, disponible en ligne à : http://www.bushnell.com/customer_service/manuals.cfm
7) Pour revoir ou visionner une photo ou une vidéo, appuyez sur le bouton ENTRER. Vous verrez alors la photo ou la vidéo la plus récente. Pour revoir les photos ou les vidéos une à la fois, appuyez
sur la touche Gauche. Pour visualiser une vidéo, appuyez sur le DÉCLENCHEUR (appuyez une fois de plus pour arrêter la visualisation). Pour effacer les photos/vidéos, appuyez sur MENU.
Choisissez Effacer Un (seulement la photo/vidéo que vous pouvez voir en ce moment sur l’écran) en appuyant sur ENTRER, puis sur le bouton Plus pour choisir « OK », et appuyez sur ENTRER
pour effacer le fichier. Si vous désirez effacer toutes les photos/vidéos, utilisez le choix de menu Format comme il a été décrit plus haut.
8) Pour télécharger des photos/vidéos sur votre PC, branchez le câble USB des jumelles SyncFocus sur votre ordinateur. Les jumelles SyncFocus seront reconnues comme un « Stockage de masse
USB » dans la liste « Mon ordinateur » (sur les Macs, une icône apparaîtra sur votre bureau). Les fichiers photo se trouvent dans le dossier « DCIM » sur ce « Disque détachable ». Copiez les
fichiers sur votre disque dur (glissez-posez ou utilisez l’option « copier les fichiers »), puis débranchez l’appareil photo. Sur les ordinateurs Mac, glissez-posez le « disque » qui apparaît sur
votre bureau, lorsque l’appareil photo est branché, dans la Corbeille pour l’« éjecter » avant de le débrancher). Il est possible d’éditer les fichiers au standard jpg des jumelles SyncFocus avec
n’importe quel logiciel photo de votre choix.
REMARQUE: Si vous n’utilisez pas de carte mémoire SD avec les jumelles SyncFocus, assurez-vous de télécharger tous les fichiers de sa mémoire interne avant de changer les piles et avant de
ranger l’appareil photo pendant une longue période. Si vous utilisez une carte mémoire SD, il est également possible de télécharger vos photos en enlevant la carte et en utilisant n’importe quel
lecteur de carte USB doté d’un emplacement pour SD.

11
Votre appareil photo SyncFocus est livré déjà réglé sur haute résolution et haute qualité, et il n’est nécessaire de changer aucun des paramètres pour obtenir de bons
résultats. Cependant, de nombreuses fonctionnalités et options sont disponibles pour augmenter encore le plaisir que vous aurez d’utiliser votre appareil photo. Pour
de plus amples renseignements à ce sujet, veuillez vous référer au manuel de mode d’emploi complet, disponible en ligne à:
http://www.bushnell.com/customer_service/manuals.cfm
Réglage de l’écartement interpupillaire des jumelles
La distance entre les deux yeux, également appelée « écartement interpupillaire », varie d’une personne à l’autre. Pour régler l’écartement interpupilaire à votre propre morphologie: Placez les
jumelles en position d’observation normale en les tenant fermement de chaque côté. Rapprochez les lunettes ou éloignez-les l’une de l’autre (Fig.1) jusqu’à ce que vous puissiez voir un seul
champ circulaire. Remettez toujours vos jumelles sur cette position avant de les utiliser.
Oculaires
Les jumelles SyncFocus sont pourvues d’œilletons réglables conçus pour votre confort et pour éliminer toute lumière parasite. Si vous portez des lunettes, baissez les œilletons. Ceci rapprochera
vos yeux des lentilles des jumelles pour que vous puissiez voir l’image entière sans qu’elle soit coupée.
Réglages de la double dioptrie des œilletons
En premier lieu, regarder uniquement dans le côté gauche des jumelles – vous verrez un anneau noir (réticule) au centre. Faites tourner l’œilleton gauche (réglage de la dioptrie) jusqu’à ce que
ce réticule soit aussi net que possible. Ensuite, regardez dans le côté gauche uniquement un objet distant et réglez la molette centrale de mise au point jusqu’à ce qu’il apparaisse aussi net que
possible pour votre œil gauche. Ensuite, regardez le même objet seulement avec le côté droit des jumelles et faites tourner l’œilleton de droite (réglage de la dioptrie) jusqu’à ce qu’il apparaisse
net pour votre œil droit (ne touchez pas la molette centrale de mise au point en faisant ceci). Une fois le réglage effectué, notez le chiffre à
gauche et à droite des tubes des jumelles avec lequel est alignée la marque de l’index sur chacun des œilletons. Une fois les œilletons réglés
dans ces positions, vous devriez pouvoir obtenir des photos/vidéos nettes d’un sujet à n’importe quelle distance lorsque vous regardez dans les
jumelles et réglez le bouton de mise au point central (ne rajustez pas les réglages de la dioptrie des œilletons), sans devoir relever ou regarder
l’écran LCD. Réglez la mise au point normalement et tirez une photo ou enregistrez une vidéo.
Un manuel de mode d’emploi complet est disponible à: http://www.bushnell.com/customer_service/
manuals.cfm
Fig. 1
12
Icône de l’écran LCD de prévisualisation
# Icône
1
Indicateur de charge des piles (une pile chargée
est montrée)
2
Nombre de photos restantes (basé sur la mémoire
interne ou de la carte mémoire encore disponible)
3 Mémoire interne ou de la carte mémoire
4
Réglage du blanc (réglage automatique du blanc
montré)
5
Réglage du posemètre pour le type d’exposition
désiré
6 Réglage de la résolution des photos (pixels)
7
Réglage de la qualité des photos (compression
des fichiers)
8 Retardateur (délai de 10 sec.)
9 Rafale (3 photos en succession rapide)
10
Mode vidéo (un indicateur de temps écoulé apparaît
également lors de l’enregistrement)
Icônes des fonctions
additionnelles
Appuyez sur la touche Droite (1, 2 ou 3
fois) pour choisir les fonctions retardateur,
rafale ou mode vidéo. Appuyez encore
une fois après avoir choisi le mode vidéo
pour retourner à la fonction photo normale
(l’icône caméra retourne en haut et à droite
de l’écran LCD).
7
6
5
3
2
1
4
9
10
8
 Loading...