

Page 1

Page 2

Table of ContentsUser Manual
Section 1: Introduction.................................................................................... 2
Welcome
Important Information
iGolf.com
Package Contents
Additional Requirements
iGolf Neo Features
Battery Information
Keypad Function
Start Up
Section 2: iGolf Neo......................................................................................... 9
Main Menu
Play Golf
Map Course
Delete Course
Satellites
Battery Level
Sync Handheld
Settings
About iGolf
Section 3: iGolf Neo Sync............................................................................... 19
Introduction
Installation
Sync Courses
Download Courses
Save Courses
Create/Edit
Settings
Section 4: Appendices.................................................................................... 26
2
3
4
5
5
6
7
8
8
9
10
13
15
15
15
15
16
18
19
20
21
22
23
24
25
1
Page 3

IntroductionUser ManualUser ManualIntroduction
Welcome
Dear Valued Consumer:
We sincerely hope you will nd your iGolf product both enjoyable and easy to use.
Knowing the exact distance for each shot will assist you in lowering your score and
enhance your overall golng experience.
This User Manual was created for you to get the most out of your new device. It only
takes a few minutes to read, after which you can immediately begin using the iGolf
Neo and enjoying its many features.
Also, please visit www.iGolf.com to explore the benets of becoming an iGolf Member.
As a member, you have access to all the features and benets iGolf.com has to offer,
including access to an extensive database of GPS enabled golf course les for use on
your iGolf Neo.
Thank you for choosing iGolf.
Sincerely,
L1 Technologies
Important Information
Legal Disclaimer
By using this product, you agree that L1 Technologies, Inc. will not be held legally
responsible for any injury or damage to you or any person or property caused by the
user’s improper operation and/or poor judgment while using this product
Note: See Limited Warranty for other limitations on our liability.
Additional Information
The Global Positioning System (GPS), a network of 24 satellites orbiting Earth, is
operated and maintained by the U.S. government. This GPS device requires at least 3
satellites to be acquired to accurately determine your position. Any change made to the
system by the government could affect the accuracy and performance of this product.
32
Page 4

IntroductionUser ManualUser ManualIntroduction
iGolf.com
iGolf.com
iGolf.com is an online resource for all golfers,
but serves as a community for iGolf members
to access GPS golf course les to use with
their iGolf products. Membership is not required
for much of the content; however, access to
GPS course les and the ability to download
GPS les requires a membership.
Download Course Files
Go to www.iGolf.com, and log in to access account. If not a member, use the 1.
“Join Now” link to become a member.
Search for desired course using simple terms to broaden results 2.
(i.e. Augusta National Golf Club: search for Augusta).
Select course name from search results and download GPS le.3.
When prompted, SAVE le to green iGolf folder on the desktop.4.
Use iGolf Sync to transfer golf course le to device.5.
Visit www.iGolf.com today to become a member!
Package Contents – Additional Requirements
Package Contents*
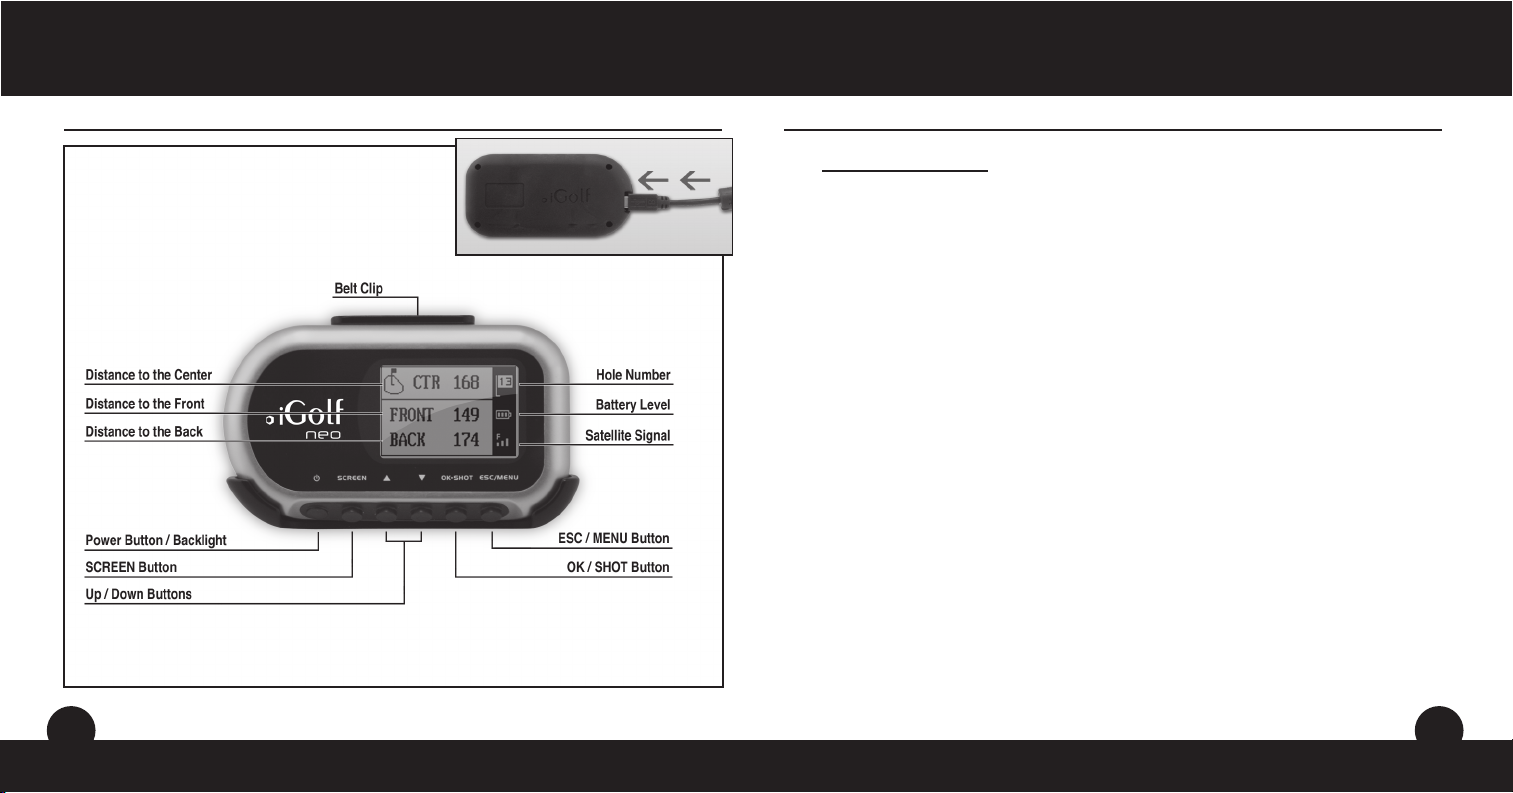
1 - iGolf Neo
1 - Belt Clip
1 - USB Cable
1 - AC/DC 5V Adapter
1 - Software CD
1 - User Manual
1 - Quick Start Guide
*Please contact vendor if your package is incomplete.
Additional Requirements*
PC with Windows Vista, Windows XP, Windows 2000, Windows Me or Windows 98**
PC with CD-ROM
PC with USB port
Required to transfer les from computer
*
Windows is a registered trademark of Microsoft Corporation in the United States and
**
other countries.
54
Page 5
IntroductionUser ManualUser ManualIntroduction
iGolf Neo Features
USB Connection >
Battery Information
Battery Information
This product contains an internal rechargeable lithium-ion battery. Under normal
operating conditions, a new battery will last 14-16 hours on a full charge. However,
battery life is diminished due to a variety of factors including temperature and backlight
usage. All rechargeable batteries lose their effective charge length over time.
The internal battery can be charged by connecting the included USB cable to the
device and a computer. Alternatively, the battery can be charged by connecting the
USB cable to the device and using the included adapter to plug the charger into a
standard 110V wall outlet.
76
Page 6
iGolf NeoUser ManualUser ManualIntroduction
Keypad Function – Start-up
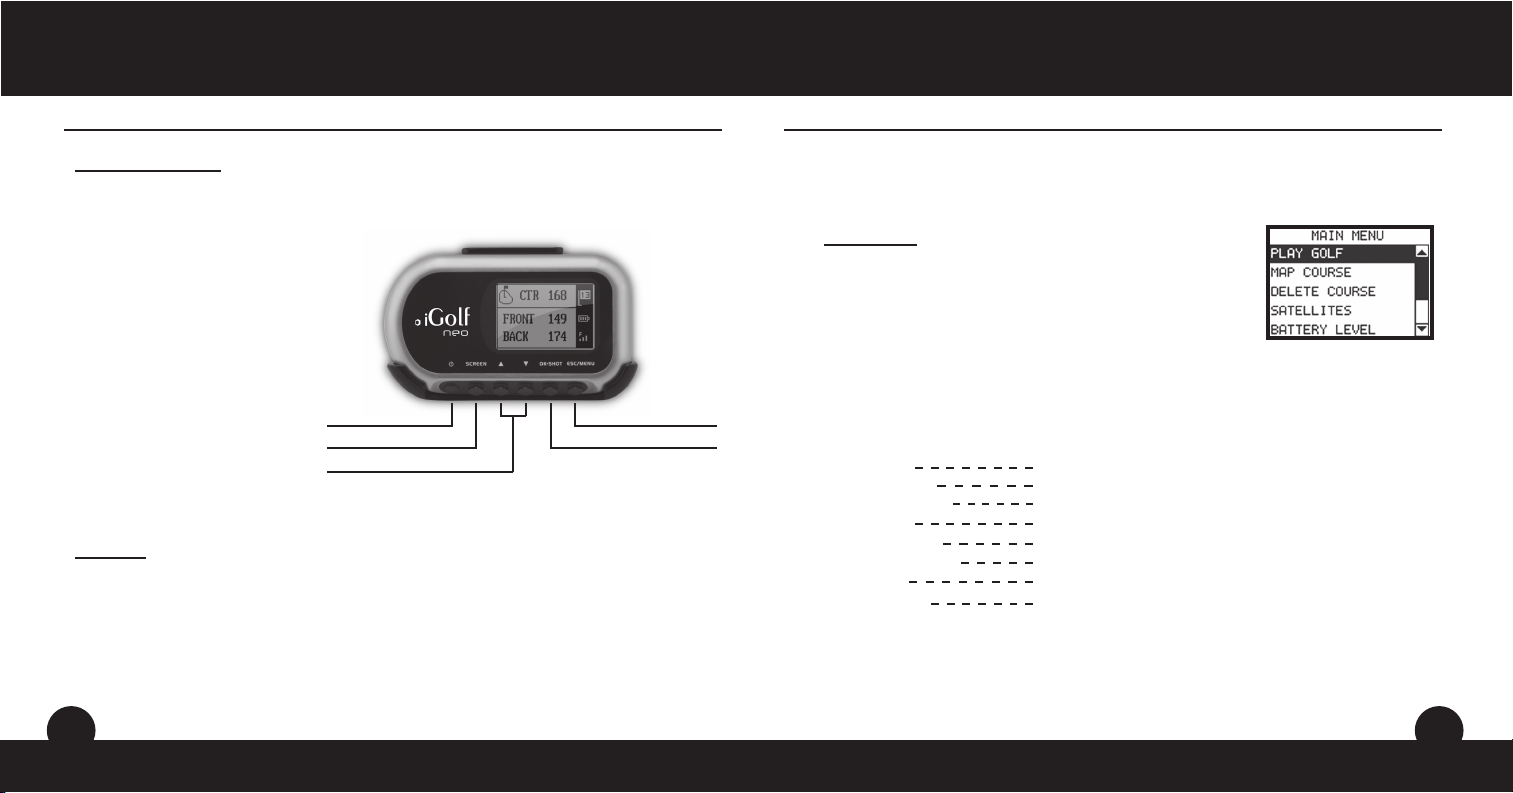
Keypad Function
Power Button
• Turns the device on and off
• Turns the backlight on and off
SCREEN Button
• Switches between screens within Play
Golf mode
Up Button
• Scrolls up
• Changes hole number (+)
Down Button
• Scrolls down
• Changes hole number (-)
OK/SHOT Button
• Selects highlighted option
• Activates Shot Distance
ESC/MENU Button
• Cancels current operation
• Returns to previous step or screen
Start-Up
Power On
• Press and hold power button until the welcome screen appears (about 2 seconds).
Power Off
• Press and hold power button until the screen goes blank.
Backlight On/Off
• From any screen, press power button to turn backlight on.
• Press power button again to turn backlight off.
Power Button ESC / MENU Button
SCREEN Button
Up / Down Buttons
OK / SHOT Button
Main Menu
Main Menu
The Main Menu displays all the features available to the
user, which are explained in detail in subsequent sections
of this User Manual. To begin using the device, scroll to
highlight any feature and press OK.
Feature Descriptions
Play Golf Select to play golf using GPS data
Map Course Select to create and customize golf course les
Delete Course Select to delete les from the device
Satellites Select to view satellite position and signal strength
Battery Level Select to verify remaining battery power
Sync Handheld Select to sync or save les to computer
Settings Select to customize additional features
About iGolf Select to display version and company information
98
Page 7

iGolf NeoUser ManualUser ManualiGolf Neo
Play Golf Play Golf
Play Golf
This feature is the main interface to display distance
information. Course information must be rst downloaded
from iGolf.com or manually entered using the Map Course
feature. If GPS data is available, distances to the front,
center and back of the green and up to four custom
points per hole will be displayed upon satellite acquisition.
Highlight “Play Golf” on the Main Menu and press OK.
Scroll to highlight the desired golf course and press OK.
Screen Operation
Up/Down buttons Move between holes
SCREEN button Move between screens
OK/SHOT button Activate Shot Distance
ESC/MENU button Go to Play Menu
Shot Distance Operation
From any Play Golf screen, press SHOT to activate the
Shot Distance feature. Press SHOT again to establish
starting point. Distance will automatically update as the
user moves. Once the user reaches the end position,
press SHOT to freeze the shot distance measurement.
Press SHOT again to reactivate the Shot Distance
feature and establish a new start position.
1110
Page 8

iGolf NeoUser ManualUser ManualiGolf Neo
Play Golf Map Course
Play Menu
From any Play Golf screen, press MENU to access the Play
Menu. This menu allows the user to easily view status or
modify settings being used for the current course.
1. Map Golf Hole
Allows the user to map the current hole being played without having to exit the
game.
2. Satellites
Displays various bar lengths to show signal strength for all satellites being
tracked.
3. Battery Level
Displays a horizontal bar representing the power remaining in the battery.
4. Return to Game
Resumes play from previous hole.
5. Exit
Returns to Main Menu.
Map Course
This feature is used to manually input course name
and map GPS data points. Existing course les may
be customized or new les created using the device.
Highlight “Map Course” on the Main Menu and press OK.
1. Select Course
Scroll to highlight the desired new or existing golf course and press OK.
2. Function: Course Name
To revise name highlight “Course Name” and press OK. Names are limited to
fourteen (14) characters and should be distinguishable from other golf courses
entered. Scroll to highlight the character and press OK. To delete characters,
scroll to “BKSPC” and press OK. When nished, scroll to highlight “SAVE” and
press OK.
1312
Page 9

iGolf NeoUser ManualUser ManualiGolf Neo
Map Course Delete Course - Satellites - Battery Level - Sync Handheld
Map Course (continued)
3. Function: Map GPS Point
To add or revise GPS data highlight “Map GPS Point”
and press OK. Select the desired hole and press OK.
Highlight point to map* and press OK. Stand at desired
location, conrm satellite strength and press OK to
register point. Do not move until process is complete.
Repeat these instructions for all desired points. When
nished, scroll to highlight “Save” and press OK.
Repeat for all holes, then select “Save/Exit” to return to
Main Menu.
*If mapping a Custom Point, the user may customize the name prior to registering GPS data.
The user may select from a list of common abbreviations, or choose a six (6) character name,
to easily identify the point on the course. If the user chooses not to customize the name,
proceed directly to “Register Point”.
4. Function: Save/Exit
After all data has been entered and/or captured, the
user MUST scroll to “Save/Exit” and press OK to save
all information. All entered data will be lost if function is
exited without saving.
Delete Course
This feature allows the user to permanently remove a golf course le from the
device. Highlight “Delete Course” on the Main Menu and press OK. Scroll to
highlight the golf course to delete and press OK. To remove course from device,
conrm by highlighting “Yes” and pressing OK.
Satellites
This feature displays the GPS satellites recognized by the device. Satellites
providing location data to the device for use in distance calculation are represented
by black horizontal bars and black boxes around the satellite numbers. Typically, at
least three satellites providing location data are required before GPS distance can
be calculated. Highlight “Satellites” on the Main Menu and press OK.
Battery Level
This feature displays the status of the battery in the device. Battery information is
displayed using a horizontal bar representing the amount of power remaining in the
battery. Highlight “Battery Level” on the Main Menu and press OK.
Sync Handheld
This feature initiates communication between the device and computer, allowing
golf course les to be transferred using the iGolf Sync software. When the device is
ready to send or receive les, the connection status will display “Waiting”. Once the
transfer of les has begun, the le name will be displayed on the screen. Highlight
“Sync Handheld” on the Main Menu and press OK.
1514
Page 10

iGolf NeoUser ManualUser ManualiGolf Neo
Settings Settings
Settings (continued)
Settings
This feature provides various conguration settings to
personalize the device, such as screen contrast, distance
measurement and GPS performance. Highlight “Settings” on
the Main Menu and press OK.
1. Screen Contrast
Allows the user to adjust the contrast of the screen to aid viewing in various light
conditions.
2. Yard or Meter
Allows the user to select yards or meters as the measure of distance.
3. WAAS
Allows the user to select if location correction is used to improve GPS accuracy
within the United States. Commonly known as WAAS, this system of satellites
and ground stations provides GPS signal corrections for much of the U.S. The
user may need to adjust the WAAS setting according to geographic location. The
default setting on the device is “On”.
4. Stabilizer
Allows the user to select the rate at which the device refreshes GPS position.
With stabilizer “On” the device will not refresh GPS distance readings once
movement has ceased. This is useful to users who experience uctuating
distance readings, even though they are stationary. The default setting on the
device is “On”.
5. Default Settings
Allows user to return device to factory default settings. All data, including course
les, will be permanently deleted. It is recommended all les are saved to
computer prior to accessing this setting.
6. Update
For factory use only.
1716
Page 11

iGolf Neo SyncUser ManualUser ManualiGolf Neo
About iGolf Introduction
About iGolf
This feature displays general information pertaining to the
device including version of software. Highlight “About iGolf”
on the Main Menu and press OK.
Introduction
iGolf Sync provides the user with all the tools required to enable communication
between the device and Windows Vista, Windows XP, Windows 2000, Windows
Me, or Windows 98* computer. Using this interface, the user can control every
aspect of golf course le management. From accessing the iGolf.com database to
syncing course les, iGolf Sync encompasses many functions which enhance the
GPS experience.
Feature Descriptions
Sync Courses Select to transfer data from computer to device
Download Courses Select to access iGolf.com database of golf course les
Save Courses Select to transfer all course les from device to computer
Create/Edit Select to create or edit scorecard data on computer
Settings Select to change COM Port and modify course le locations
*
Windows is a registered trademark of Microsoft Corporation in the United States and
other countries.
1918
Page 12

iGolf Neo SyncUser ManualUser ManualiGolf Neo Sync
Installation Sync Courses
Installation
Follow these instructions to assist in the proper and complete installation of iGolf
Sync on a computer. Conrm USB cable is not attached to computer before beginning
installation.
To install iGolf Sync on a Windows Vista, Windows XP, Windows 2000,
Windows Me, or Windows 98 computer*:
Insert CD included with the product into computer.1.
Go to “Start”, select “My Computer” and open appropriate CD drive to view 2.
contents.
Select “iGolf Neo Installer” to launch program.3.
Select “USB Driver Setup” to install required drivers.4.
Select “Sync Application” to install sync software.5.
Launch software from “iGolf Neo Sync” icon on desktop.6.
Note: If trouble with installer, check for Software Updates at www.igolf.com/about_us/techsupport.
Windows is a registered trademark of Microsoft Corporation in the United States and
*
other countries.
Sync Courses
This feature allows the user to transfer golf course les from a computer to the device.
Select “Sync Courses” from Main Menu and follow the on-screen instructions. For
further assistance, please note:
The USB cable must be connected to device and computer. 1.
Multiple courses can be selected and transferred at one time. This device 2.
will hold up to ten (10) course les.
2120
Page 13

iGolf Neo SyncUser ManualUser ManualiGolf Neo Sync
Download Courses Save Courses
Download Courses
This feature provides direct access to iGolf.com where users may search for golf
courses and members may download les. Select “Download Courses” and login to
access account. If not yet an iGolf.com member, use the “Join Now” link to enroll. For
further assistance, please note:
Search for desired course using simple terms to broaden results (i.e. 1.
Augusta National Golf Club: search for Augusta).
If search returns more than one page of results, use Advanced Search to 2.
narrow results.
When prompted, SAVE le to the green “iGolf” folder on the desktop. Files 3.
downloaded from iGolf.com cannot be opened on the computer.
Save Courses
This feature allows the user to transfer golf course les from the device to a computer.
Select “Save Courses” from Main Menu and follow the on-screen instructions. For
further assistance, please note:
The USB cable must be connected to device and computer. 1.
Individual courses may not be selected. All course les on device will be 2.
saved to Backup folder within green iGolf folder on the desktop.
2322
Page 14

iGolf Neo SyncUser ManualUser ManualiGolf Neo Sync
Create/Edit Settings
Create/Edit
This feature provides direct access to iGolf.com where members may create and edit
golf course les. Select “Create/Edit” and login to access account. If not yet an iGolf.com
member, use the “Join Now” link to enroll. For further assistance, please note:
This feature only allows general text entry, including names and 1.
abbreviations.
When completed, le must be saved to green iGolf folder on the desktop.2.
Settings
This feature allows the user to specify how the device communicates with a computer
and where course les are stored. Select “Settings” from Main Menu. For further
assistance, please note:
Always set COM to “AUTO” unless specic port being used is known. 1.
Software does not support higher than COM9.
Default course le storage location is C:\iGolf. If the setting must be 2.
changed, note new location and save downloads from iGolf.com in same
folder.
Default setting is all les from device replace les of the same name stored 3.
on computer. If changed to “No”, modied les on device will not replace
les of the same name on computer.
Default course le backup location is C:\iGolf\Backup. If the setting must 4.
be changed, note new location.
2524
Page 15

User ManualUser Manual
AppendicesAppendices
Appendix A - Troubleshooting Appendix A - Troubleshooting (Continued)
Problem 1: The backlight does not work.
Turn unit off for ten (10) seconds and try again. Re-test in a low-light environment.•
From Main Menu, press and release power button.•
Problem 2: The device will not turn off.
Press and hold power button for at least ten (10) seconds.•
Problem 3: There are no golf course names listed in Play Menu.
No golf course les are loaded on the device.•
Transfer le again and conrm that the iGolf Sync software reads “Completed” •
before disconnecting device.
Problem 4: There is no GPS data for the selected golf course.
No golf course les are loaded on the device.•
Conrm GPS le downloaded from iGolf.com. (Note: GPS data not included in •
scorecard les).
Conrm mapped GPS points were saved prior to exiting the Map Course feature.•
Conrm the device has acquired at least 3 satellites.•
Problem 5: There are no custom points available for my golf course.
No custom points are loaded on the device.•
Conrm custom points are available on iGolf.com for golf course in question.•
Conrm GPS le downloaded from iGolf.com. (Note: GPS data not included in •
scorecard les).
Conrm mapped GPS points were saved prior to exiting Map Course feature.•
26
Problem 6: GPS points cannot be mapped/registered on device.
Ensure satellite strength is sufcient to obtain accurate data.•
Move to a clear, unobstructed view of the sky (i.e. no trees, buildings or objects •
that might interfere GPS satellite strength).
Time of day may affect GPS signal strength. Reattempt during various hours of •
the day.
Problem 7: Entire golf course name cannot be entered in the space
provided.
Limit the golf course name to fourteen (14) characters.•
Abbreviate name so it can be identied from other golf courses on device.•
Problem 8: There are no satellites in view.
Move to a clear, unobstructed view of the sky (i.e. no trees, buildings or objects •
that might interfere GPS satellite strength).
The time required to acquire satellites may increase to 5-10 minutes for rst use •
or if device has not been used for an extended period of time.
Problem 9: The distances on the device are inaccurate.
Conrm correct golf course and hole number are selected from Play screen.•
Move to a clear, unobstructed view of the sky (i.e. no trees, buildings or objects •
that might interfere GPS satellite strength).
Go to Settings and set WAAS to “Off”.•
Go to Settings and set Stabilizer to “On”.•
Remap GPS points using device and conrm accuracy.•
Report any GPS or scorecard errors found through iGolf.com.•
27
Page 16

User ManualUser Manual
AppendicesAppendices
Appendix A - Troubleshooting (Continued) Appendix A - Troubleshooting (Continued)
Problem 10: The distances on the device are in yards, not meters.
Go to Settings and set device to display “Meters”.•
Problem 11: The distance displayed on the device is uctuating.
Go to Settings and set Stabilizer to “On”.•
Move to a clear, unobstructed view of the sky (i.e. no trees, buildings or objects •
that might interfere GPS satellite strength).
Go to Settings and set WAAS to “Off•
Problem 12: Sync software does not state “Connected”.
Conrm USB cable is connected to computer.•
Conrm USB cable is connected to the device.•
Conrm sync software was installed correctly. Remove and reinstall software if •
necessary.
Conrm correct COM port selected.•
Problem 13: Golf course les cannot be sent to the device.
Conrm USB cable is connected to the device.•
Conrm sync software was installed correctly. Remove and reinstall software if •
necessary.
Conrm correct COM port selected.•
Conrm status as “Connected” on sync software.•
Conrm le to be sent is selected on sync software.•
28
Problem 14: Golf course les cannot be saved to computer from device.
Conrm USB cable is connected to the device.•
Conrm sync software was installed correctly. Remove and reinstall software •
if necessary.
Conrm correct COM port selected•
Conrm status as “Connected” on sync software.•
Problem 15: No golf course les are available to transfer in sync
software.
Conrm settings in sync software to locate le sync location. The default •
location is C:\iGolf.
Perform a search for the le using search feature on computer.•
Problem 16: Saved golf course les cannot be located on computer.
Conrm settings in sync software to locate le save location. The default •
location is C:\iGolf\Backup.
Perform a search for the le using search feature on computer.•
Problem 17: No more golf course les can be transferred to the device.
Delete unused les from the device to make room for new les.•
Ensure les deleted from device are safely saved on computer before •
conrming deletion.
Approximately ten (10) courses can be stored on your device.•
29
Page 17

Appendices User Manual
User Manual
Appendices
Appendix B - Limited Warranty
Limited Warranty
The limited warranty on the hardware of your iGolf product covers parts and
labor against defects in material or workmanship for a period of ninety (90)
days from the original date of purchase from a Company-authorized vendor.
You can extend the warranty period to twelve (12) months from the original
date of manufacture by joining iGolf.com and registering your iGolf product
within ninety (90) days of the purchase date. Visit www.iGolf.com to enroll.
Products returned to L1 Technologies, Inc. (the “Company”) under warranty
will be repaired or replaced with the same or a functionally equivalent
product by Company, at its discretion, free of charge provided you: (1)
return the failed product directly to a Company approved repair facility
with sufcient insurance and shipping charges prepaid, and (2) provide
Company with a copy of the receipt showing the original date of purchase
and the amount paid. Repaired or replacement products will be returned to
you with shipping charges prepaid and will be warranted for the remainder
of the original warranty period or ninety (90) days from date of shipment,
whichever is longer. Replacement products may be refurbished or contain
refurbished materials. If Company, by its sole determination, is unable to
repair or replace the defective warranted product, it will refund the purchase
price of the product.
Appendix B - Limited Warranty
Limited Warranty (continued)
This warranty does not apply if, in the judgment of Company, the product
fails due to damage from abuse or misuse, accident, storage, shipment,
handling, or if it has been used or maintained in a manner not conforming
to product manual instructions, has been modied in any way, or has had
any ID number removed or defaced. Purchaser is responsible for ling an
insurance claim with the carrier for any damage due to shipping. Repair by
anyone other than an approved agent will void this warranty. The maximum
liability of Company under this warranty is limited to the purchase price
of the product covered by the warranty. Prior to returning any defective
product, a Return Materials Authorization (RMA) number must be obtained
directly from Company. All defective products must be returned to Company
with insurance and shipping charges prepaid. Company will not accept
collect shipments.
EXCEPT AS SPECIFICALLY PROVIDED IN THIS AGREEMENT OR AS REQUIRED
BY LAW, THE WARRANTIES AND REMEDIES STATED ABOVE ARE EXCLUSIVE
AND IN LIEU OF ALL OTHER, ORAL OR WRITTEN, EXPRESS OR IMPLIED.
ANY AND ALL OTHER WARRANTIES, INCLUDING NON-INFRINGEMENT OR
THIRD PARTY RIGHTS ARE EXPRESSLY EXCLUDED. COMPANY SHALL
NOT UNDER ANY CIRCUMSTANCES BE LIABLE TO ANY PERSON FOR ANY
SPECIAL INCIDENTAL, INDIRECT OR CONSEQUENTIAL DAMAGES, INCLUDING
WITHOUT LIMITAION, DAMAGES RESULTING FROM USE OR MALFUNCTION
OF THE PRODUCTS, LOSS OF THE PROFITS OR REVENUES OR COSTS OF
REPLACEMENT GOODS, EVEN IF COMPANY IS INFORMED IN ADVANCE OF
THE POSSIBILITY OF SUCH DAMAGES.
30
Retain original proof of purchase with this warranty for future reference.
31
 Loading...