

Page 1
The World’s Easiest Equatorial Mount
Instruction Manual for Reflector Telescopes
78-4502 (QVC # E3495)
Before you get started, you’ll need to know that your telescope is a Reflector telescope.
That means that everything you see will be upside down and backwards. No exceptions.
If you are looking for a telescope to use on land based objects then you should use a
Refractor telescope as it can erect an image and in many cases correct the right to left
viewing.
Without getting fancy or technical, equatorial mounts are basically star finders. Most all
of the visible stars in the sky have an address in a book called a Star Atlas (roadmap of
stars) that is expressed in terms of its Right Ascension and then its Declination.
Basically it’s outer space longitude and then latitude. It will look something like this:
23hr 42min 03sec, 78.3deg N
When using an equatorial mount, you can move your telescope to these settings and find
the star that corresponds to that address.
You will need to have a Star Atlas to use the equatorial mount. You can purchase one at
just about any bookstore on earth.
As well, you will need to be able to identify 2 stars in the sky. The first star will be the
North Star. Coincidentally this star is perfectly north EVERY night you go out. It is
generally around 25 to 45 degrees up from the horizon in North America.
The second star you will need to be able to identify in the sky is a little bit harder. The
second star can really be any star in the sky other than our sun and the North Star. You
can pick a star from a constellation that is in the sky and use a particular star in it. You
will not only have to be able to identify it, but in Step 5 you will need to be able to center
it in the telescope. Unfortunately, there is no other alternative. If you want to use your
equatorial mount, you’ll need to be able to do this.
In most Star Atlas books there is a section that gives suggestions on which stars to use for
the second star, I recommend using it. Also, there is a section that has the latitude setting
for the North Star in certain areas. You will need this when going through Step 4.
Finally, you will need to set your telescope up to be able to use a Star Atlas. The
following instructions in steps 1-7 will show you how to do this. Good Luck and Have
Fun!!!!!
1
Page 2

Table of Contents
2
Page 1 ….... Introduction
Page 2 ….... Table of Contents
Page 3 ….... Listing of all the Telescope Sections
Page 4 ….... Fine Adjustment Cables
Page 5 ….... The Telescope’s Axis’s
Page 6 ….... The Barlow Lens and Eyepieces
Page 7 ….... Figuring the Magnification
Page 8 ….... Aligning the Finderscope
Page 9 ….... Aligning the Finderscope cont.
Page 10 ….. Aligning the Finderscope cont.
Page 11 ….. Step 1 – Getting the Mount at Right Angles
Page 12 ….. Step 2 – Facing the Telescope North
Page 13 ….. Step 3 – Putting in the Eyepiece
Page 14 ….. Step 4 – Finding the North Star
Page 15 ….. Step 5 – Setting the Declination Dial to 90 degrees
Page 16 ….. Step 6 – Finding the Second Star – Its Declination Address
Page 17 ..… Step 7 – Finding the Second Star – Its Right Ascension Address
Page 18 ….. Keeping the Telescope Aligned
Page 19 ….. The Video Eyepiece
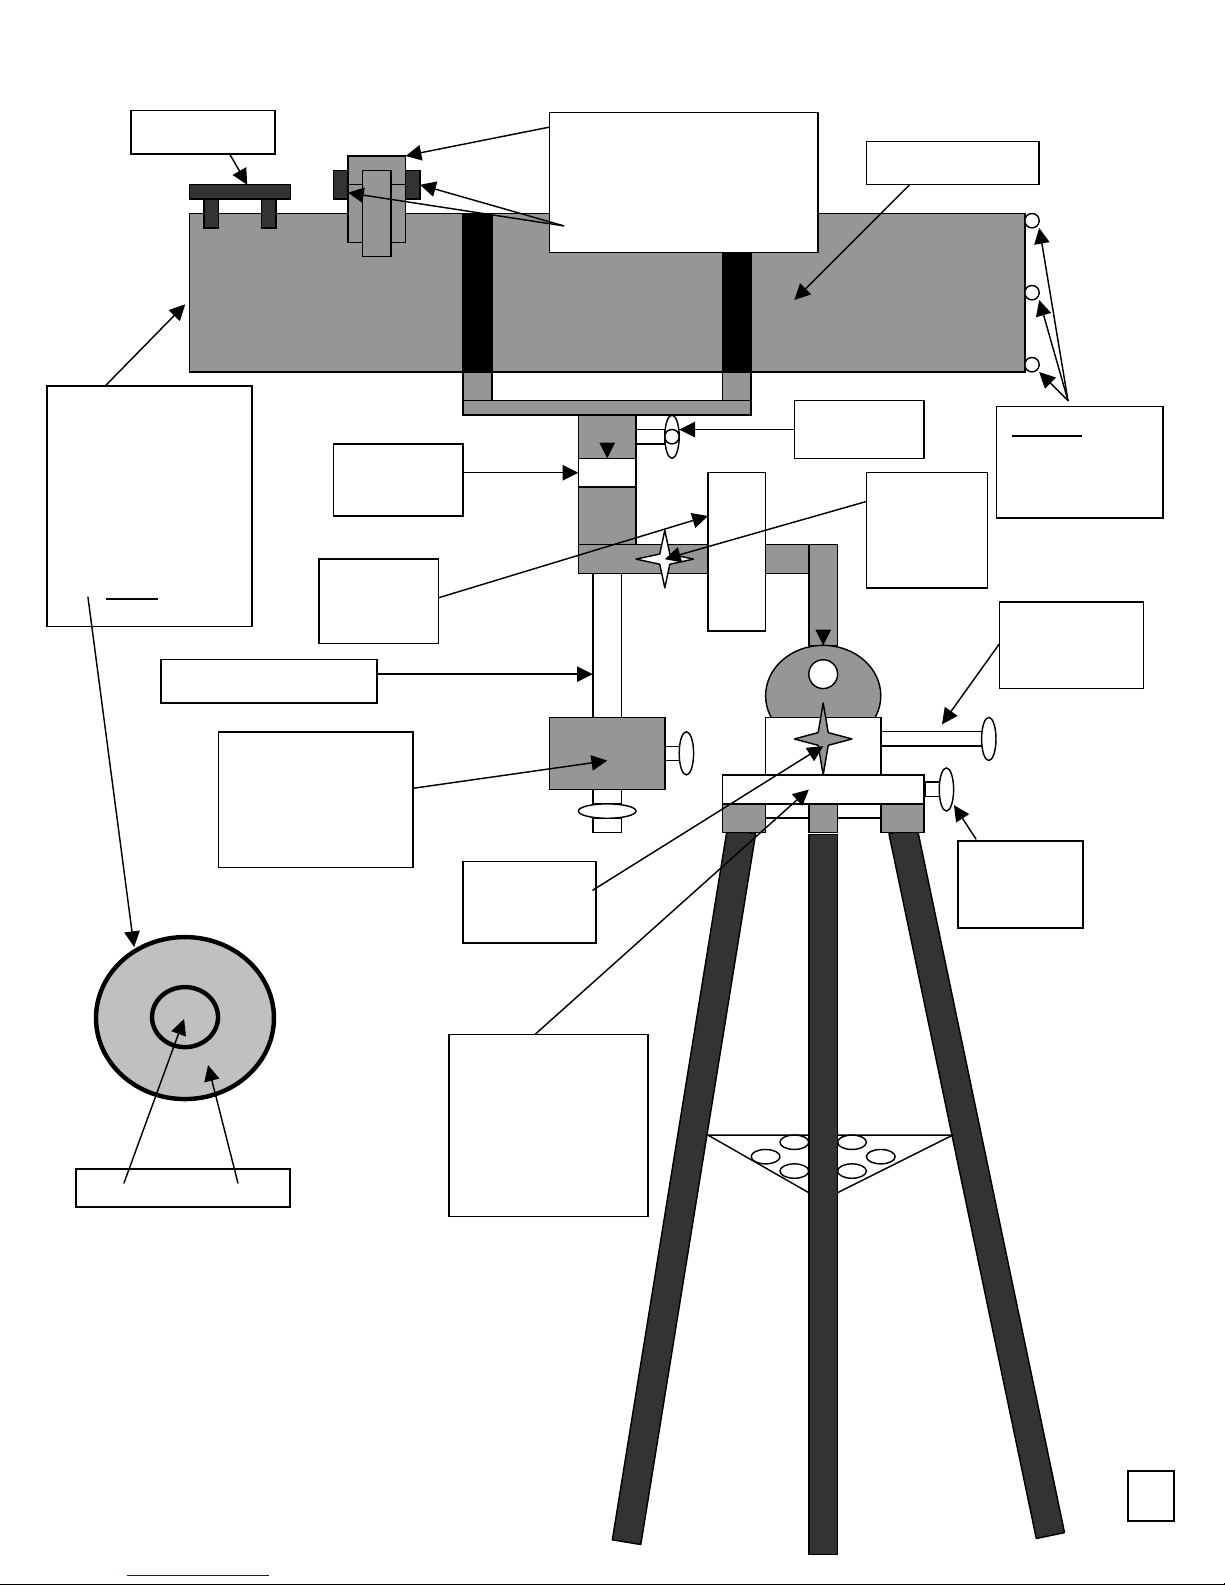
Page 3
oc
g
j
Finderscope
3
Open End That Faces
What You Are
Looking At.
Generally there are 2
lens caps on this side.
They normally
should be both taken
off. They look like
this. Never
look at
Counterweight Shaft
Cap #1 Cap #2
Declination
Setting
Right
Ascension
Settin
Counter Weight
Makes Sure the
Telescope Doesn’t
Fall Because Of
Uneven Weight
Latitude
Ad
ustment
Lock Knob
Horizontal Axis
Setting – If there are
numbers on this just
ignore them. Only
in step 2 will you
ever turn the
telescope here.
Focusing Tube That you put
the eyepieces into and bring
the image into focus by
turning either of the two
Focusing Knobs on the sides.
23
22
21
20
19
18
-
Declination
L
k Knob
-
-
-
Telescope Tube
Right
Ascension
Lock
Knob
-
Horizontal
Axis Lock
Knob
NEVER Adjust
These Screws as
they are preset
from the factory.
Latitude
Adjustment
Knob
Page 4
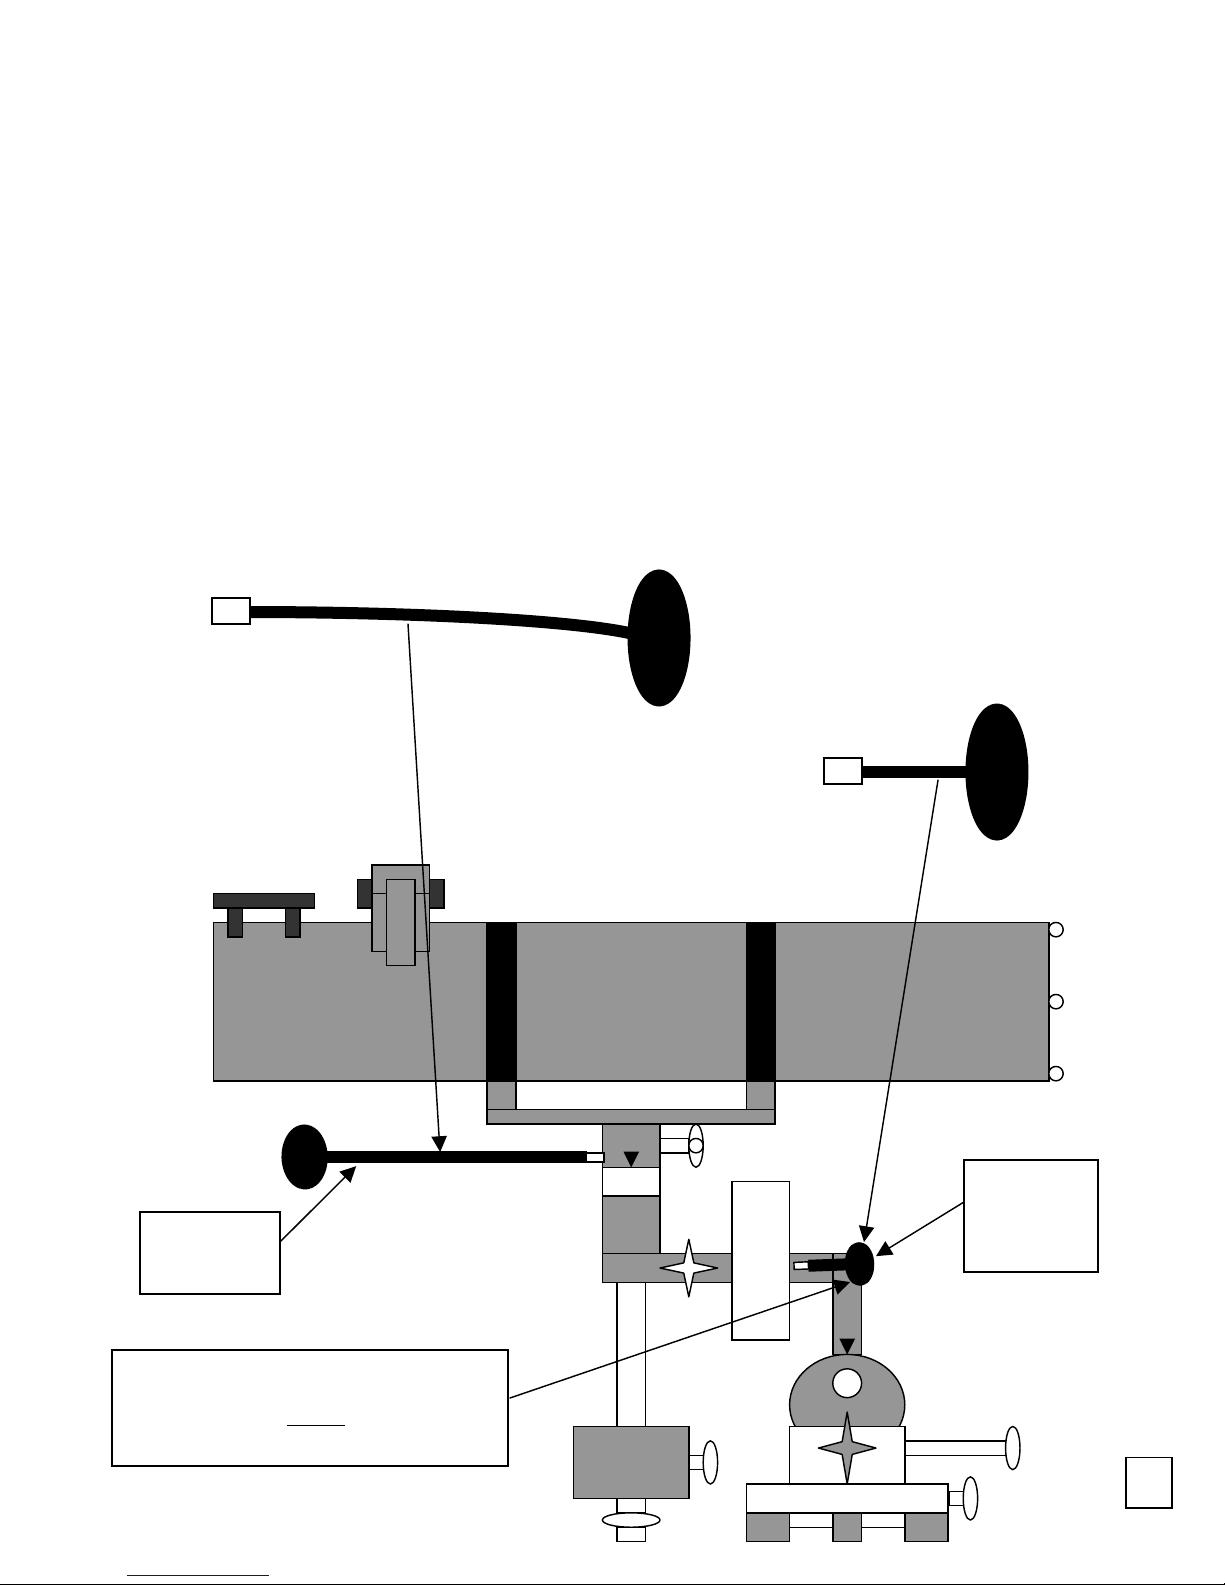
Fine Adjustment Cables
g
4
j
The fine adjustment cables move the declination and right ascension settings in very
small increments. When you are aligning the finderscope or centering a star or planet in
the telescope there will be a time when only small adjustments will be necessary. That is
when you’ll use these knobs. They look like the diagram below. Notice one is long and
the other is short. It really doesn’t matter which one goes on the declination and which
one goes on the right ascension. Generally though, they go on just like the below
diagram. They connect to the telescope mount only one way so I won’t cover their
attachment procedure.
Declination
Fine
Ad
ustment
If your equatorial mount is set up correctly,
you can move just the Ri
Adjustment Knob ONLY
across the sky!
ht Ascension Fine
to follow any star
23
22
21
20
19
18
Right
Ascension
Fine
Adjustment
-
-
-
-
-
Page 5
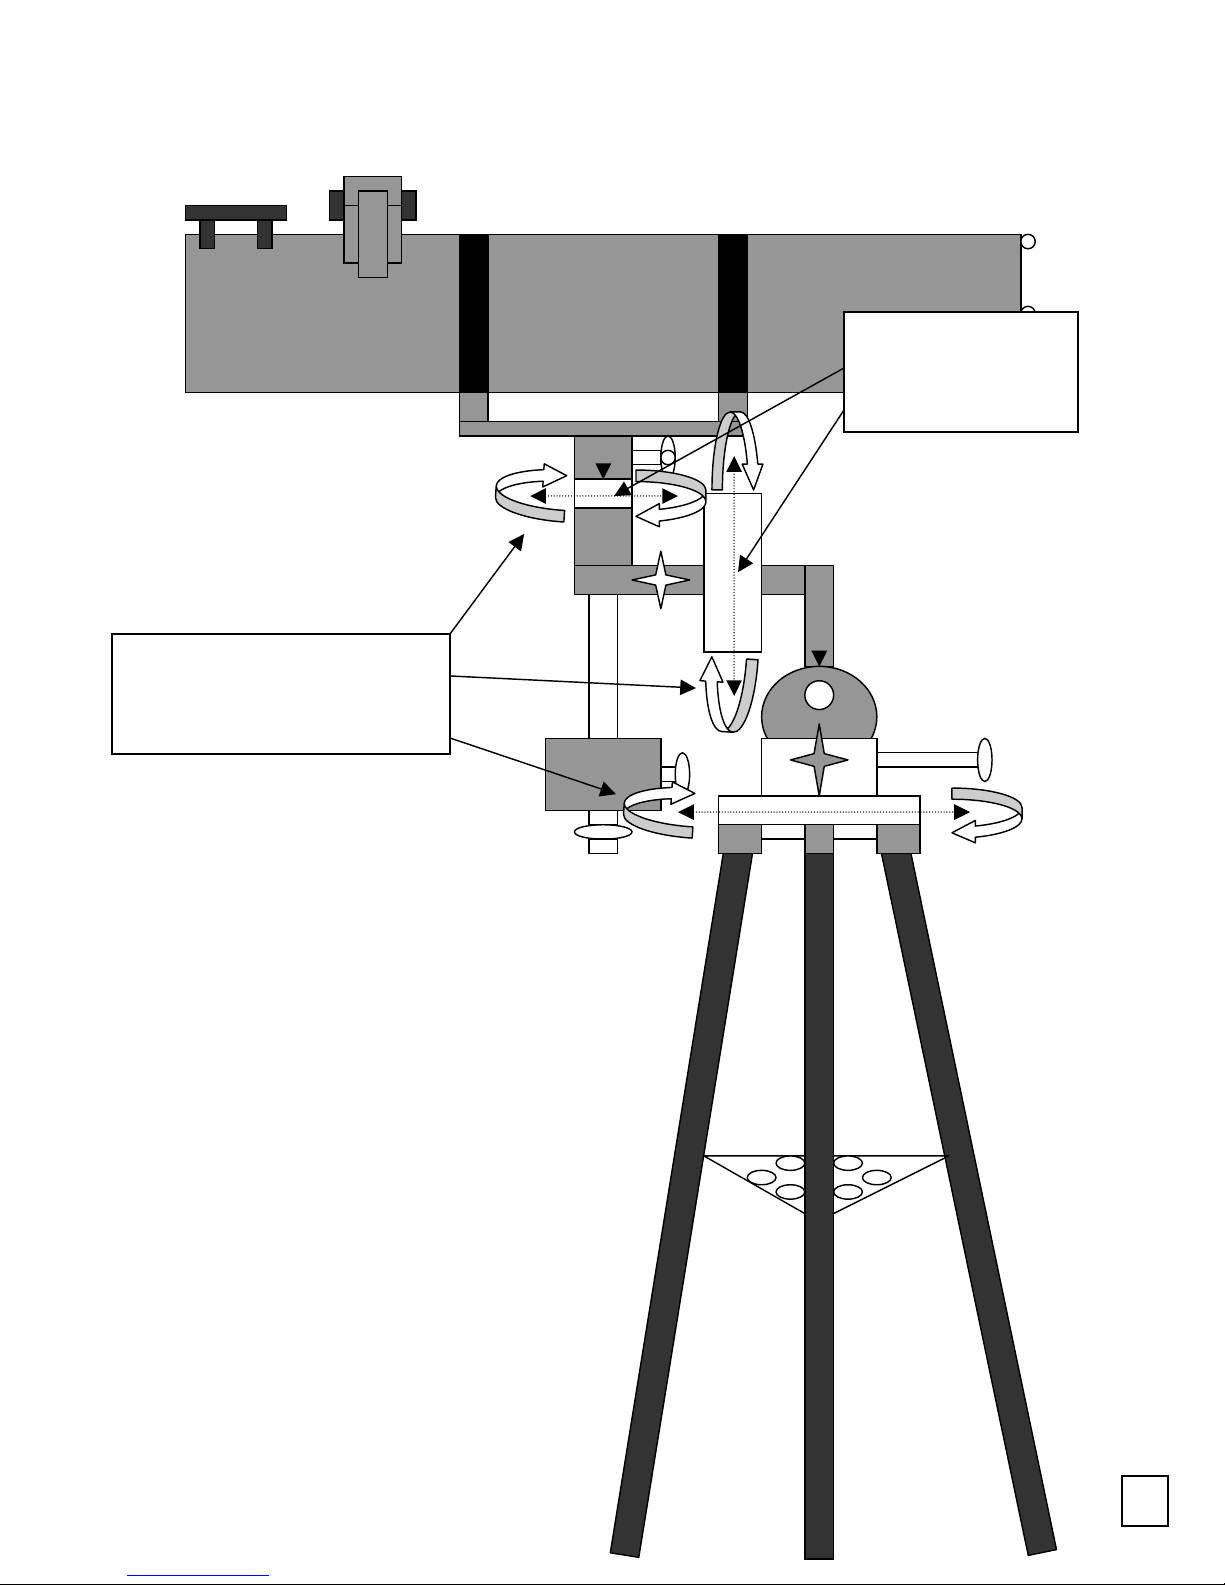
Telescope Axis’s
5
This instruction manual refers to 3
axis’s in which the telescope will
turn. This diagram illustrates these
axis’s where the telescope can move.
When using your fine
adjustment cables, you’ll
be moving these two
axis’s.
Page 6
The Barlow Lens and Eyepieces
6
Here are a few things you’ll need to know and know how to do before getting started.
You should receive several different lenses for your telescope. Some you’ll use a lot and
some you’ll hardly ever use. The following explains what the pieces are and in what
order they should go into the telescope.
This the Barlow lens. It multiplies the magnification of the image. Generally it will say
something like 2X or 3X on the side of it, meaning that it multiplies the magnification by
that much. Sometimes it’ll just say “Barlow Lens”. Regardless it still does the same
thing.
Next will be the eyepieces. There are generally 2 different ones with a new telescope.
The eyepiece along with the focal length of the telescope determines the magnification.
Most the time they are 20mm and 4mm.
The eyepieces can fit directly into the focusing tube as well as into the Barlow Lens.
Regardless, you must have an eyepiece in to see anything through the telescope.
3X
Page 7

Figuring the Magnification
7
To figure the magnification you must first know the focal length of your telescope. Many
times the focal length will be 700mm to 900mm. Here is the formula to figure the
magnification.
Focal Length in mm
Magnification = X Barlow Lens (ie 2X or 3X)
Eyepiece in mm
900÷20 = 45
(900÷20)X3=135)
Eyepiece
Focusing
Tube on the
telescope.
Assuming the
eyepiece is 20mm
and the focal length
is 900mm, here are
the magnifications
of each set up.
45 Power
135 Power
3X
Eyepiece
Barlow Lens
Focusing
Tube on the
telescope.
Page 8

Aligning the Finderscope
8
You will need to line up the Finderscope with your telescope. A finderscope acts kind
of like a riflescope in that it helps you aim. To get started you should always use the
highest number eyepiece (lowest power) without the Barlow lens. If you use too
powerful of an eyepiece (low number) then it may be very hard to find an object or it will
be too dark to see anything as higher powers cause light loss. Below is an example of
why aligning the finderscope is important.
Without an aligned finderscope you might think you are aiming
directly at a star or planet but you could actually be way off!
But with an aligned finderscope, you can find objects in
the sky a lot faster and easier!
Page 9

(op
)
9
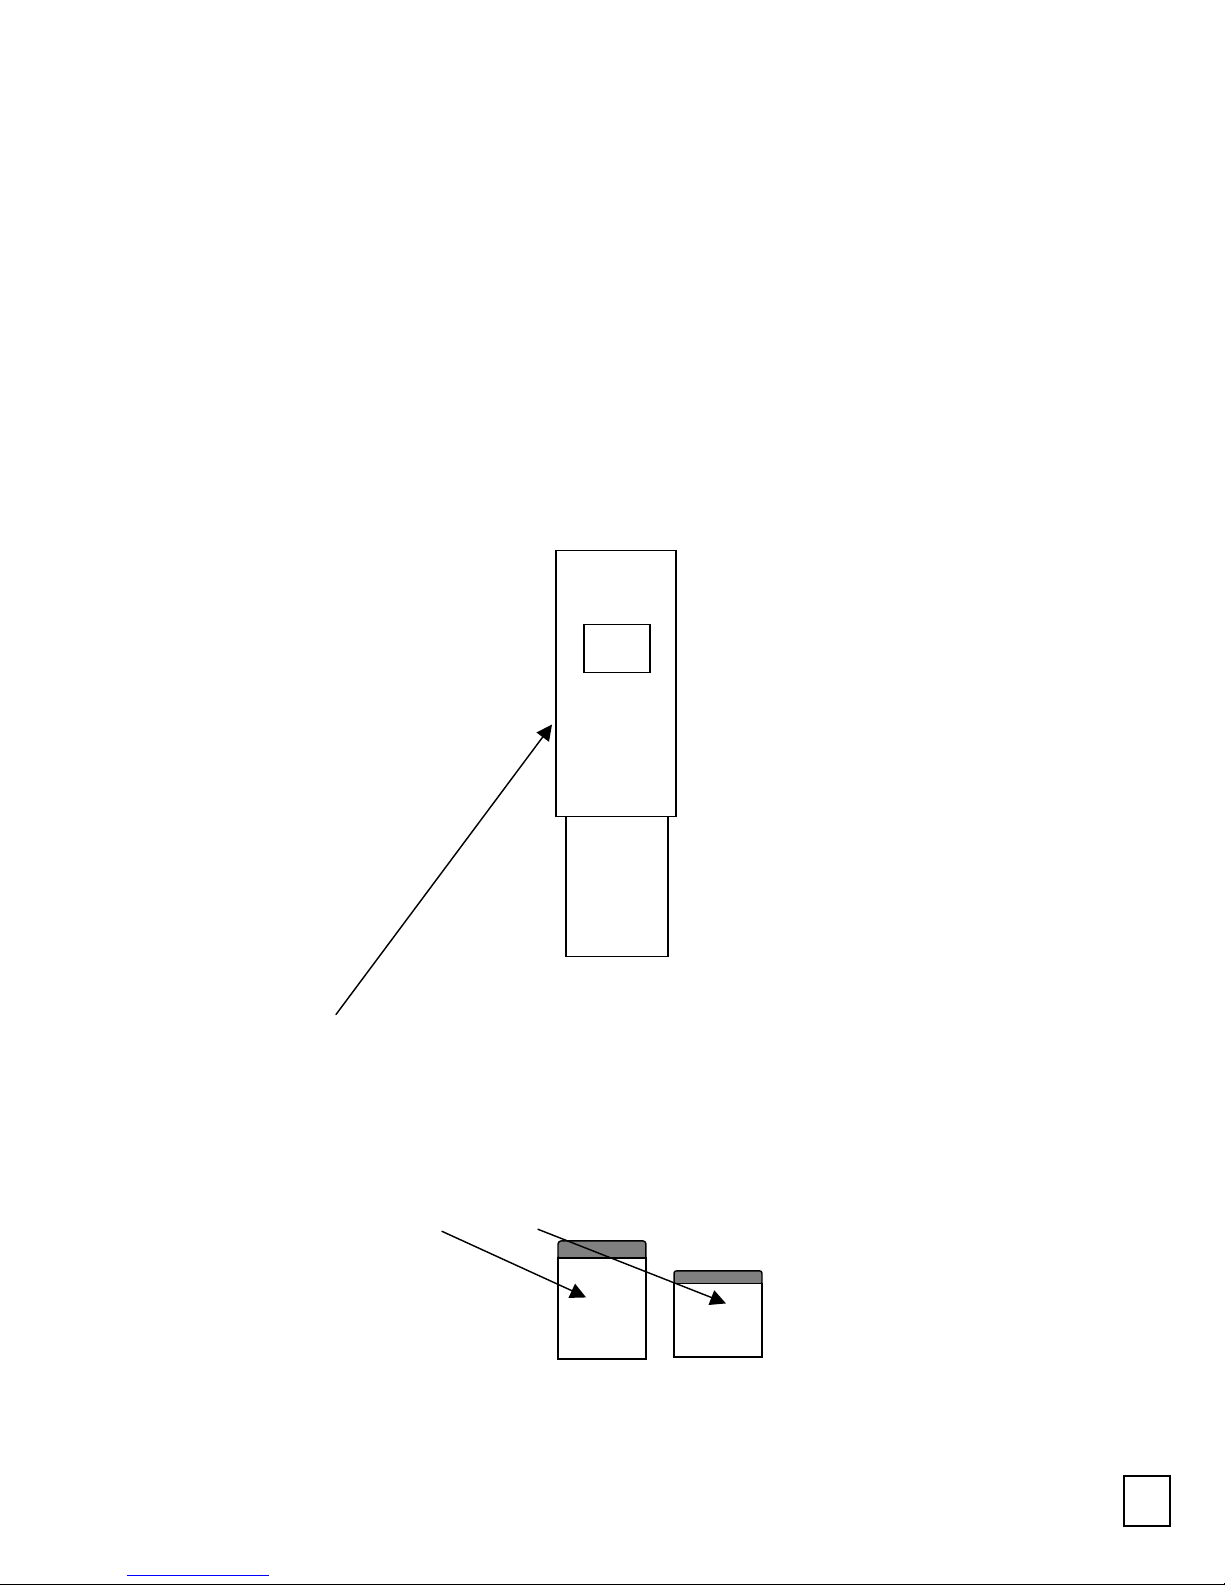
To get started, put the
20mm eyepiece in the
focusing tube without
the Barlow lens.
Since the finderscope has a slight magnification to
it, put it on so that when viewing through it you
see the magnification. If you put it in backwards,
everything will appear small and far away.
en end of the telescope
Start with a large object about 200
yards away. You do not have to be
absolutely accurate with the distance as
it will not help you or hinder you if you
are not exact. In this example I’ll use a
house as the object
Note: It is recommended for best viewing to not look through a window when aligning the finderscope
or even when viewing things through the telescope. Ideally you should be outside with the telescope. If
fogging occurs let the telescope sit outside for approximately 30 minutes to allow it to clear up.
Page 10

N
Know that finderscopes sometimes have a red dot in them as opposed to crosshairs. Sometimes they adjust with thumbscrews on the
outside of the mounting bracket and sometimes they have actual fine adjustment knobs on the finderscope itself. Regardle ss, y ou will
need to determine how to adjust them yourself using common sense and if you have it, the instruction manual.
ext, find the object in the telescope and center it in the viewing area.
Finally, get the object centered in the finderscope.
If the finderscope is not the crosshair type but
instead the dot kind, get the dot directly in the
middle of the object then tighten the finderscope
best as possible. Note: The finderscope just like
the telescope turns the image upside down also.
10
Page 11

23
22
21
20
19
18
-
-
-
-
-
You can generally
leave the
Counterweight all
the way down and
tighten the screw
so it won’t move.
Get everything at right angles.
If you’re not sure, just make it
look like this picture. As well,
on level ground make sure the
tripod legs are fully extended or
at least even as far as length.
Note: It is recommended for best viewing to not look through a window when aligning the finderscope
or even when viewing things through the telescope. Ideally you should be outside with the telescope. If
fogging occurs let the telescope sit outside for approximately 30 minutes to allow it to clear up.
11
Page 12

Once again,
ignore these
With everything at 90-degree angles, turn
the telescope scope north along its
Horizontal Axis using a compass as
reference to be completely accurate. Once
facing north, tighten the Horizontal Axis
Lock Knob and know that you will not
have to touch this setting again for the rest
S
23
22
21
20
19
18
-
-
-
-
-
12
Page 13

Many models have
thumbscrews around the
Focusing Tube to tighten the
eyepiece down. Even if there
aren’t any, they are probably
not needed.
Put the 20 mm eyepiece
into the Focusing Tube.
If you do not have a
20mm eyepiece, use the
highest number eyepiece
you do have. The
eyepiece looks like this.
(It will say 20mm on the
top of the eyepiece.)
23
22
21
20
19
18
-
-
-
-
-
13
Page 14

N
(Has numbers on it)
-
-
-
-
-
ext, you will need to
elevate the telescope up to
the North Star. Do this by
turning the Latitude
Adjustment Knob to the
number on the Star Atlas that
corresponds to your location.
Looking through the
eyepiece, find the North Star
then tighten the Latitude
Lock Knob. Note: when
this is done you will not have
to touch either of these knobs
again for the rest of the night.
14
Page 15

Once the Declination
Setting is set you will NOT
have to touch this again for
the rest of the night.
There will be numbers on
the Declination Setting
and either an arrow or a
pointer. Turn the DIAL
‘til the pointer or arrow
-
-
-
-
-
is at 9 then tighten the
Declination Lock Knob.
(9 stands for 90 degrees.)
15
Page 16

N
-
-
-
-
-
ext, you will need to find the
second star I talked about earlier.
See the Star Atlas and it will
show you some fairly easy stars
that should be bright in the sky
during different times of the
year. When you have identified
your star, move the
TELESCOPE TUBE along the
Declination Axis until the
pointer is on the declination
address of the star according to
the Star Atlas.
16
Page 17

Even though it
is not shown,
the Right
Ascension
Setting has
numbers on it.
Finally, move the tube of the
telescope along the Right
Ascension Axis until the star
you have chosen as your
-
-
-
-
-
second star is visible in the
telescope. Then with your
fingers, move the dial on the
Right Ascension Setting to
match what the Star Atlas’s
Right Ascension Settings
are for that star. Once again,
there is a pointer/arrow that
you’ll align the Right
Ascension number up with.
You are done!
17
Page 18

d
d
g
When you have centered the 2
it should look somethin
like this.
(Simulated views through your telescope)
As the earth rotates, the star will
appear to move like this.
Therefore, every few
minutes while you are
surfing the sky with your
telescope you will need
to repeat Step 7.
n
star,
This is the 2
n
star that
you are aligning your
telescope to. It is the
same star as in Step 7.
18
Page 19

QVC TELESCOPE
f
78-4502 (QVC)
QVC refers to this telescope as the E3495. It comes with a black
and white video eyepiece and a clock drive.
Put this into
the focus
tube by itsel
Plug the cord into this
and into the device you
want the picture going
to.
(It is powered by one 9Volt battery)
Brightness
control dial
The battery for the video adapter lasts about 10 hours of continual
use. Most all-video inputs are yellow in color and on the left side
of the audio inputs. In the example below, the video input is on the
face of a VCR or DVD and the arrow illustrates where the cord
should go. The eyepiece acts as a 20mm eyepiece, which means
they are looking at a 45X, magnified image. The clock drive has a
handheld speed control that is connected by a cord to the actual
drive itself.
VCR/DVD
Comes with a 20’ cable
19
 Loading...