

Page 1
Model #: 110833
Lit.#: 980917/0810
Instruction
Manual
Version 2.0
Page 2

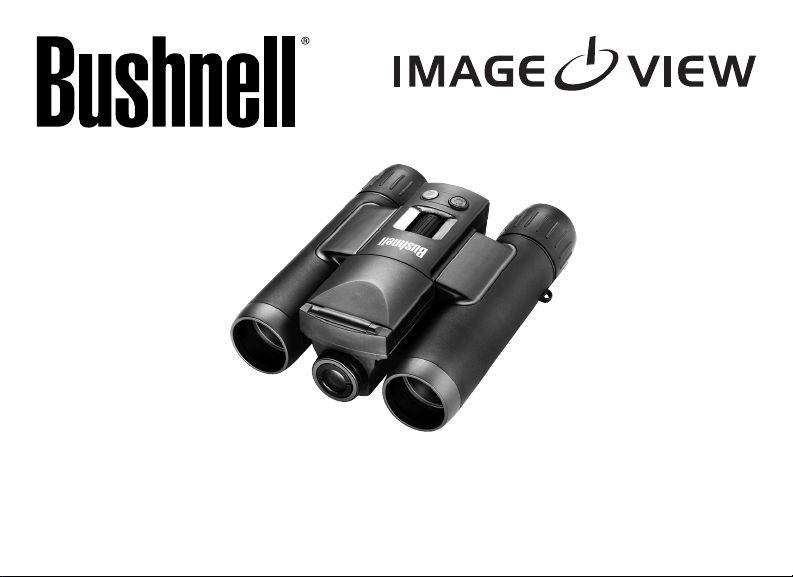
Congratulations on your purchase of the Bushnell® 3.2 MP ImageView™!
Your ImageView “digital binocular” is ideal for all sporting events and nature
observation, as it combines a high quality 8 power compact binocular with a
versatile digital camera in a single compact unit.
Your Imageview has a dual personality, capable of taking high resolution digital
still photos as well as shooting video, with a maximum recording time limited
only by the capacity of the memory card you use. The photos and videos are
automatically stored in the internal memory, or on an SD card (optional), and
can be instantly reviewed on the ip-up LCD, or downloaded to your computer
without the need to install any special software*.
Before using your new ImageView, please read the instructions contained in this
manual and take time to familiarize yourself with the camera’s operation and
many special features.
*Compatible OS: Windows 2000, XP, Vista, Windows 7 or Mac OSX.
Windows 98 is not supported.
2
Page 3
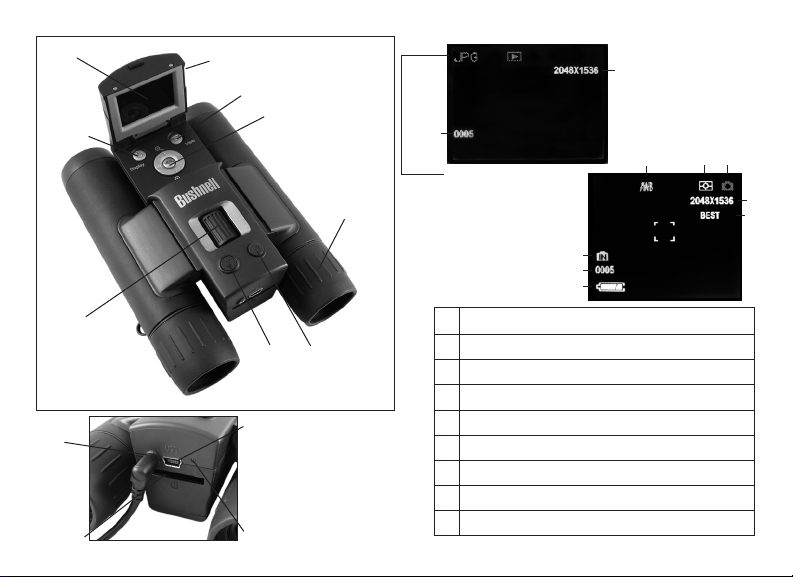
LCD Display
Display
Button
Binocular
Focus
Remote
Jack
Card Slot
Pull up both sides of this
end to raise the display
View Button
4-way Arrow
Keypad+MENU
Button
Diopter
Adjustment
(rotate eyepiece)
POWER
SNAP
Button
Button
USB Port
Power LED
Review Display
Resolution
of the le
File #
JPG=photo le
AVI=video le
Parts Guide
3
2
1
# Display Icon Guide (Preview Mode)
1 Battery Indicator (“full” battery shown)
2 # of Photos/Videos Left (based on remaining memory)
3 Internal or SD card Memory (“Internal” shown)
4 White Balance Setting (“Auto” shown)
5 Exposure Meter Pattern (“Weighted” shown)
6 Still Photo or Video Mode (Still Photo mode shown)
7 Resolution Setting (in pixels)
8 Quality/File Compression (Best / Better / Standard )
3
4
6
5
7
8
Page 4

Quick Start Guide
The camera is powered by two AAA batteries (not included). Slide the battery cover open (see arrow on 1.
cover) and insert batteries, using the polarity marks inside for reference. A battery indicator on the lower
left corner of the display indicates remaining power.
The camera has 16 MB of internal memory, so you can take photos anytime without using a card. To be 2.
able to take more photos without having to stop and download them frequently, you may use SD cards
(not MMC cards) up to 32 GB capacity. Insert a new SD card ("upside down" with metal contacts facing
up) in the slot. The card will click into place. Push the card in slightly to release and remove it. Turn o
the camera’s power before inserting or removing a card. Cards that have been previously used in other
devices should be formatted by the camera before taking photos (see “Review Mode”: Format)
Pull the LCD display up to viewing position, by grasping the indented areas on each side. Briey press 3.
the POWER button. The red power LED will turn on, and the LCD will display a “Bushnell” logo, then go
to black (to conserve battery life). Press the Display button to turn the LCD back on. Pressing Display
again will rst turn o all screen icons, then turn the entire display o (camera power remains on). The
entire camera will automatically turn o after one minute if it has been inactive (no buttons pressed).
This can be changed, using the “Auto O” option in the camera’s menu. To turn the camera o manually,
briey press the POWER button. The default camera settings will provide optimum quality under most
conditions, but you may want to set the date since it will be imprinted on photos by default (you can also
turn it o using the menu options).
To set the current date and time for imprinting, press 4. MENU. Press the Down arrow key 7 times to
highlight “CLOCK SET”, then press MENU again. Now set the Year, Month, Date, Hour, and Minute, using
the Up/Down arrow keys to make changes, and the Right key to move to the next eld. Once the date
& time have been set, press the MENU button again. Press the Down arrow key once to highlight “DATE
STAMP”, press MENU, then highlight your preference: Month/Day/Year or Year/Month/Day order, or select
“OFF” if you don’t want to imprint the date on your photos. Press MENU to conrm your setting, then
keep pressing the down arrow key to highlight “Exit”. Press MENU again to return to the “live” preview
4
Page 5

display. Note: you may need to reset the date/time after changing batteries.
To take a still photo, hold the camera steady with both hands and press the 5. SNAP button. The camera
focus is preset to take sharp photos from approximately 35 feet to “innity”. To shoot a video, press the
right arrow key three times until the red movie camera icon appears at the top right corner of the display
(see below). You can then start shooting the video at any time by pressing SNAP. To stop recording the
video, press SNAP again. Note: if the power is turned o, then back on, the camera will return to still photo
mode.
When using a tripod, you can help avoid the eects of camera shake by plugging the supplied remote 6.
shutter release into the jack above the SD card slot, and using the button on the remote rather than
SNAP to take photos.
To review or playback a still photo or video, press the 7. View button. You will see the most recent still
photo or video (rst frame). To review previous photos or videos one at a time, press the Left arrow key.
The top left corner of the display will indicate “AVI” instead of “JPG” if the le is a video. The le number
is shown on the lower left of the display, and the resolution (of still photos) or length in seconds (for
videos) is shown on the right. To play back a video, press the SNAP button (press again to stop playback).
To see “thumbnail” images of multiple stored photos/videos at once, press the Display button. Use the
Left/Right arrow keys to select an individual le, then press Display again to see it full frame. To delete
a photo or video, press MENU. “DELETE ONE” is the rst option in the PLAY menu (only the currently
displayed photo/video will be deleted-use “FORMAT” if you want to delete all les from memory). Press
MENU again, then the Up arrow key to highlight OK. Press MENU to delete the photo or video, then press
View to return to the review screen. Press View again to switch to the live preview screen when you are
ready to take more photos or videos.
Your ImageView is ready to use right away- it is not necessary to “go into the menu” before taking photos.
However, your percentage of successful photos (especially under less than ideal conditions) will increase if
you read the rest of this manual and understand how to use the available options and settings, as well as the
section covering “Downloading the Photos & Videos to Your PC”.
5
Page 6

Loading Batteries
Turn the ImageView over, and slide open the battery cover as indicated by
the arrow, setting it aside. Insert 2 AAA Alkaline or Lithium batteries into the
compartment in the direction indicated by the polarity marks inside, then
replace the cover and slide it back into place until it clicks. Note: Rechargeable
NiMh type batteries may also be used, but some may not deliver adequate
current to power the ImageView. AAA NiMh batteries with a current rating of
850 mAh or higher are recommended.
Tripod
Socket
Battery
Compartment
(Slide Open
In Direction
of Arrow)
Using the Internal Memory and SD Cards
The camera’s 16 MB internal memory can store from a minimum of only 3-4 (at 3264x2440 resolution and
Best quality) up to hundreds of photos, depending on resolution and quality settings you choose in the
main menu. A “countdown” indicator on the lower left of the display shows the remaining number of photos
that the available memory can hold. When no more photos will t in the available storage, a “Memory Full!”
message appears. To expand the available storage, you may add an optional SD (Secure Digital) memory
card, with up to 32GB capacity. MMC cards, which look similar to SD cards, are not recommended. The card is
inserted into the slot on the back of the camera pod, with the “notched” corner on the left as indicated by the
card icon below the slot. Insert the SD card with the label side facing down. Note: be sure the power is turned
o before inserting or removing cards to prevent possible loss of les or damage to the card. A new card will
not require formatting, but a card that has been previously used in other devices (cameras, PDAs, etc) should
be formatted by the ImageView before beginning to take photos or videos (see “Format” in the Review Mode
section of this manual for details). Note that formatting will erase all les previously stored on the card,
so be sure they have been downloaded or copied rst if you wish to keep them.
6
Page 7

Basic Binocular and Camera Setup
Before you begin using it, you’ll probably want to take a few moments to set up the ImageView for your
individual eyesight and user preferences. Leave the rubber eyecups in their “up” position if you are not
wearing glasses, or roll them down if you are. Grasp the left and right sides of the binocular, and pull them
apart or push them together while looking through the binocular to adjust the eyepiece spacing until your
view is a single circular image. Find a distant object with ne detail (tree, sign, brick wall, etc), and adjust the
center focus knob until the object appears sharp when viewed through the left binocular eyepiece only. Then,
looking at the same object through just the right side of the binocular, simply rotate the right eyepiece until
the image is equally sharp for your right eye. This is called the diopter adjustment, and compensates for any
dierence in sight between your left and right eyes. Once set during this initial procedure, you can leave the
diopter adjustment alone and just use the center focus knob to bring objects at any distance into sharp focus
through the binoculars (the minimum focus distance is about 15 feet).
Your digital photos and videos are not aected by the center focus knob, as the camera lens located
between the binocular’s objective lenses does not require focusing. It is preset so that objects ranging from
approximately 50 feet and farther away will be in focus. Note that the binocular is capable of focusing closer
than the camera. Check the live preview image on the LCD display to make sure you are far enough away to
ensure sharp photos. The camera lens provides 8x magnication, which is the same as the binocular’s optics,
and is aligned so that and object centered in the binocular’s view will also be centered in your photos or
videos. Therefore, it is not necessary to have the LCD turned on or even raised while you are shooting photos
or videos. Reducing use of the LCD will extend battery life signicantly. Pressing the Display button will turn
the LCD screen o but leave the camera powered on, ready to take photos anytime you press SNAP.
You may want to go into the camera’s main menu and set the correct date before using the camera for the rst
time, since the date stamp (imprint) feature is turned on by default (but can be defeated if you wish). Please
refer to Step 4 under “Basic Setup” for details.
7
Page 8

Taking Still Photos
After following the initial setup as described in the previous pages, you are ready to take a photo:
Raise the LCD and press the 1. POWER button briey (red LED lights, Bushnell logo screen appears, then
display goes black). Press the Display button to turn on the LCD again if you want to see a preview of the
“live” image or check menu settings, battery condition, etc via the display icons.
The ImageView will default to high resolution and quality settings, as well as “everything on automatic” 2.
when it is turned on for the rst time, so you can take excellent photos right away. If you prefer to use
dierent settings, refer to the section “Using the Main Menu” for directions regarding how to nd and
change settings such as resolution and exposure and other options.
You may compose your photo while looking through the binocular (the LCD does not need to be 3.
on to take a photo). However, for the most accurate framing, checking the LCD preview display is
recommended.
Be sure you are not closer than approximately 50 feet from your subject. The binocular optics will focus 4.
closer than this, but the camera focus is preset to take photos of distant subjects (no focusing is necessary
for the camera). The LCD may be used to verify that the subject is not too close for sharp results.
Hold the camera as steady as possible with both hands and slowly squeeze the 5. SNAP button. The
display will “freeze” briey while the le is stored, then you are ready to take another photo. The 4-digit
counter on the lower left will count down to indicate the number of remaining photos as you use up the
available internal or card memory. Once the display indicates “Memory Full” when SNAP is pressed, you
are out of memory (storage space) and should download any photos you wish to keep so they may be
deleted, or you may remove the full card and install another SD card.
Digital zoom up to 3x is available. Press the 6. Down arrow key to zoom in (note the “Wide to Tele” indicator
bar at the bottom of the display). Press the Up arrow key to zoom back out. No digital zoom is used
(optical magnication only) when the W>T zoom indicator bar goes out after you zoom all the way back
to the left (“W”).
8
Page 9

Press the 7. View button if you wish to check the photo after you take it, then press it again to return to a
live preview.
See the section “Review Mode” section for more detail about reviewing and deleting previously taken
photos.
Warning: Use care during handling to avoid touching the camera lens (located front center between the
binocular lenses) to prevent degrading the image quality.
Clean the camera lens only with dry lens tissue or microber cloth. DO NOT use liquids of any type.
Selecting and Using the Video Mode
Follow steps 1-4 on the previous page, “Taking Still Photos”1.
To change from still photo to video mode, press the Right arrow key 3 times, until the movie camera icon 2.
is displayed at the top right area of the LCD. You are now in Video Mode. Press SNAP to start recording a
new video clip, and press it again to stop recording and store the video in memory. The recording time
is limited only by the amount of internal or card memory currently available. You may record a single
long video until you run out of memory, or multiple shorter videos by stopping and starting recording
whenever you wish by pressing SNAP. The counter on the right side of the display shows the elapsed
time in seconds since the recording was started.
Press the 3. View button if you wish to check a video after you shoot it. Press the SNAP button to begin
playback, press it again to stop playback. Press the Left arrow key to review your previous video or
still photo les. Pressing the Display button will let you see a “thumbnail” review of multiple les-use
the arrow keys to highlight the le you wish to review, then press Display again to select and view it.
When you are ready to return to the live preview display to shoot more videos (or stills), press the View
button.
See the section “Review Mode” for more detail about reviewing and deleting previously taken videos.
9
Page 10

Using The Main Menu-Options and Settings
As mentioned earlier in this manual, your ImageView is already set for high resolution and quality right out
of the box. Exposure, white balance, and other variables are set automatically. This means that you will get
good results for most subjects and lighting without the need to go into the menus and change any settings.
However, we recommend that you become familiar with the available options so that you can improve your
photos if, for example, you decide they are coming out too dark (common for snow scenes with most cameras),
or too green (under many uorescent lights). Press the Menu button to enter the main menu. Use Down or
Up arrow keys to highlight an option within the menu, then press MENU if you wish to change the settings
for that option. Use the Left/Right arrow keys to select the setting you want, then press MENU to conrm this
setting. The main menu contains a submenu, called “Resolution”, with separate settings for still photo and
video resolution. Select “Exit” after using the Resolution submenu to return to the main menu. Here are the
options and settings available in the main menu (Default settings are shown in Bold).
Option Settings Description
Image Size
(Resolution Submenu)
Video Size
(Resolution Submenu)
3264x2440(8MP*),
2550x1920(5MP*),
2048x1536(3MP),
1600x1200(2MP),
800x600(0.5MP)
640x480/30fps,
640x480/15fps,
320x240/30fps,
320x240/15fps
Sets the still photo resolution in pixels. Higher resolution
settings produce sharper/larger prints but require more
storage space in internal or card memory. Use lower
settings to store more in memory, or for email, PC viewing
only, etc. (*resolution interpolated via internal software)
Sets the video resolution (pixels per frame and frame rate).
Higher resolution/frame rate settings produce better/
smoother videos but require more storage space in
internal or card memory. Use lower settings to store more
in memory.
10
Page 11

Main Menu-Options and Settings
Option Settings Description
Image Quality Best, Better,
Standard
EV -2.0 ~ +2.0
(Default= 0 EV)
White Balance Auto, Daylight,
Cloudy,
Fluorescent,
Tungsten
Meter Weight, Center,
Average
Sets the amount of le compression, which aects the
quality of the photo and the size of the le it creates. This
can be used independently of Image Size to help store
more photos in exchange for slightly reduced quality.
“Best” produces the highest quality, but also generates
larger les that ll available memory sooner (fewer photos
possible).
Provides manual under/over exposure adjustment in 0.5
EV steps. Minus values produce darker photos, plus values
lighter.
Sets the reference for neutral white, so that colors are
reproduced correctly. If “Auto” does not provide good
results, try the setting that matches the light source.
Sets what area of the framed subject is used to determine
exposure. “Weight” bases the exposure 60% on the center
of the frame, 40% on the rest of the frame., “Center” uses
only the center area (good for strong backlit situations),
and “Average” sets exposure based on an average of the
overall scene light levels.
11
Page 12

Main Menu-Options and Settings
Option Settings Description
Language English, Spanish,
Italian, French,
German
Auto O 60 Seconds, 120
Seconds, Cancel
Clock Set Use the Arrow keys to set (in order) the Year, Month, Date,
Date Stamp MM/DD/YY, YY/
MM/DD
Sound Eect On, O Turns the conrmation beep sound on or o
Default Setup OK, Cancel Select “OK” and press the MENU button to restore all
EXIT Select “Exit” and press MENU to exit the Main menu and
Selects your preferred language for all menu display
screens.
Sets the interval after the last action (pressing any button)
before the camera turns o to conserve battery power.
Select “Cancel” to prevent auto shuto altogether.
(2nd row) Hour, and Minute. Press MENU when done. See
“Date Stamp” also.
MM/DD/YY: Month/Date/Year are imprinted on each
photo. YY/MM/DD: Year/Month/Date are imprinted. O:
no imprint is added to photos.
settings to their original factory defaults.
return to the preview (“live” camera) display
12
Page 13

Additional Features
From the “live” preview display (not the main menu), press the Right arrow key to select/cycle through these
additional camera features (a fourth press will return to the preview display again):
Feature Icon Description
Self Timer Clock (white) Photo is taken after a 10 second delay when the SNAP button is
Sequence Multiple Frames (red) 3 frames are taken in rapid sequence when SNAP is pressed.
pressed. With the ImageView mounted on a tripod, this can help
prevent blur caused by jarring the camera when SNAP is pressed.
To take a photo at the exact time you wish and reduce camera
shake, plug the included remote shutter release cable into the
jack on the rear of the camera pod and press the button on the
remote instead of SNAP on the camera.
Normal
Video
Movie Camera (red) Camera shoots a video clip when SNAP is pressed, with
maximum recording time limited only by the amount of available
internal or card memory. The counter on the right side of the
display shows elapsed minutes and seconds. Press SNAP again to
stop recording.
13
Page 14

Review Mode -Viewing and Deleting Photos Using the Review Menu
Press View to enter Review mode. Use the Left arrow key to go back through the stored photos/videos. Press
SNAP to playback a video (indicated by AVI at top left of display). Once you are in review mode, pressing the
MENU button will enter the review menu. This operates in the same way previously described in the main
menu section (use the Arrow keypad to navigate to the desired menu option and settings, press MENU to
conrm a setting), with these available options:
Option Settings Description
Delete One OK, Cancel Deletes only the currently viewed photo or video. Highlight
Format Cancel, OK Select OK and press MENU to format (clear) an SD card for use
Protect Lock, Unlock Prevents accidental erasure. If “Lock” is activated, that le
Language,
Auto O, Clock
Set, etc.
Exit Exits the review menu and returns to the last image viewed.
various Same functions as described in “Main Menu-Options and
“OK” and press the MENU button to delete the photo or video.
in the camera. Erases all previously stored les on the card. Will
also erase internal memory contents.
cannot be deleted using the “Delete One” function. Highlight
“Lock” and press MENU to protect the currently viewed photo
or video. Note: Formatting internal or card memory will erase
even protected les.
Settings”-these are just duplicated in the Review menu for your
convenience.
Press the View button to switch to the live Preview display
again.
14
Page 15

System Requirements
OS: Windows® 2000/ME/XP/Vista/Windows 7 or Mac OS 9/OS X
Internal USB Port
Downloading the Photos & Videos to Your PC
Turn on the Imageview’s power. Connect the supplied cable to the ImageView’s USB port, then directly 1.
to a main USB port on your computer-do not use front panel/keyboard USB ports or unpowered “hubs”.
The LCD display will indicate “Mass Storage”2. , and the ImageView will be recognized as a standard “USB
Mass Storage” device. This means that the camera les can be easily viewed, edited, or copied to your
hard drive, just as if they were stored on an external hard drive or a CD-ROM.
Open “My Computer” or Windows Explorer on your PC (3. if your PC is running Windows XP or a later operating
system, you may simply use the options in the pop-up window to view, copy or edit your photos). The camera
is the device identied as “BUSHNELL” with an unused drive letter assigned to it (on Mac computers, it will
appear on your desktop). Double click this “Bushnell” storage device, open the “DCIM” folder inside, then
the folder(s) inside that (“100MEDIA” ,etc). Your photos/videos are the les inside-they have the prex
“HUNT__” followed by a 4-digit number. To view the photos, change to a Filmstrip or Thumbnail le view,
or double click a le name to open it with your default PC program.
From the “My Computer” menu bar, select “Edit>Select All”, or click on one photo le (Contol+click to 4.
select multiple photos), then select “Edit>Copy to Folder” . Choose an existing folder on your hard drive,
such as “My Pictures”, or create a new folder (“Hawaiian Vacation”, etc), then click “OK” to transfer copies
of any or all of the photo les you want from the camera to your hard drive.
After the photos are transferred to your hard drive, you can disconnect the camera. Some older Windows 5.
OS computers may produce a screen warning that you have disconnected a USB device without stopping
or ejecting the “disk” rst (your photo les will not be harmed). If so, check the box that adds an icon to
your system tray or taskbar. Then next time you nish transferring photos, you can click that icon rst,
and “Stop the USB Mass Storage Device” before disconnecting the camera*.
15
Page 16

Downloading the Photos & Videos to Your PC
You’re now ready to open the photo les in any photo editing software. Just go to the folder where you 6.
stored the photos earlier and select File>Open. It is also possible to open and work with your photos
directly from the ImageView while it is still connected. If you choose to work this way, from a connected
camera, be sure that you save the photo (when nished editing) to your hard drive, and not the camera’s
memory or card.
If you are new to photo editing on a computer, consult your software’s Help menu for tips on using its 7.
features. Along with adjusting the brightness, contrast, sharpness and color of your photos, you can
resize the photo to t the paper if you are printing, or save a smaller, low or medium resolution version
for email or inserting into documents. When you are ready to save your edited le, you will likely want to
use “Save As” and give it a more descriptive name than “HUNT___”. Doing this also preserves the original
le as a backup if you decide to make dierent edits later. Make sure you have successfully transferred
all the photos you wanted to save before using “Delete One” or “Format” in the Review menu to delete
your old les to make room for new images.
* On Mac computers, you should “eject” the “disk” that appeared on your desktop when the camera was
connected.
Note: If your PC will not play the .avi movie les in Windows Media Player, you may need to download a newer
version of Media Player or Direct X from Microsoft.com. The movie les can also be played back with the
QuickTime Player, included with many computers, or available as a free download from Apple.com.
16
Page 17

Technical Specications
Magnication 8x Sensor Type CMOS
Objective Diameter 30mm Sensor Resolution 3.2 Megapixels
Exit Pupil 3.75mm Eective Resolution
Field of View 320 ft @ 1000 yds Internal Memory 16MB Flash Memory (NAND)
Eye Relief 13mm Memory Expansion SD / SDHC card (optional) , up to 32 GB capacity
Lens Coating Fully Coated File Format (Still/
Prism Type Roof, BK-7 glass File Management DCF (version 1.0), FAT 16 Format
Focusing Range
(binocular)
Weight 14.9 oz / 422 g Video Resolution/
Shutter Electronic,
Focusing Range
(camera)
Lens Aperture f/5.6 Menu Languages English, French, Spanish, Italian, German
Power Supply 2xAAA Batteries,
14’ ~ innity LCD 1.5” TFT
1/16 to 1/1000
seconds
Fixed, approx 30’
~ innity
Alkaline/Lithium/
NiMh type
Exposure Value Range +/- 2 EV in 0.5 EV steps
White Balance Options Auto, Daylight, Cloudy, Fluorescent, Tungsten
Auto Power O (after
Settings
Video)
Frame Rate
inactivity)
17
8MP*, 5MP*, 3MP (default setting), 2MP, 0.5MP
(*via software interpolation)
JPEG/AVI
640x480 or 320x240 pixels per frame
@ 15 or 30 fps.
1 or 2 minutes or Disabled
Page 18

TWOYEAR LIMITED WARRANTY
Your Bushnell® product is warranted to be free of defects in materials and workmanship for two years
after the date of purchase. In the event of a defect under this warranty, we will, at our option, repair
or replace the product, provided that you return the product postage prepaid. This warranty does
not cover damages caused by misuse, improper handling, installation, or maintenance provided by
someone other than a Bushnell Authorized Service Department.
Any return made under this warranty must be accompanied by the items listed below:
1) A check/money order in the amount of $10.00 to cover the cost of postage and handling
2) Name and address for product return
3) An explanation of the defect
4) Proof of Date Purchased
5) Product should be well packed in a sturdy outside shipping car ton, to prevent
damage in transit, with return postage prepaid to the address listed below:
IN U.S.A. Send To: IN CANADA Send To:
Bushnell Outdoor Products Bushnell Outdoor Products
Attn.: Repairs Attn.: Repairs
9200 Cody 25A East Pearce Street, Unit 1
Overland Park, Kansas 66214 Richmond Hill, Ontario L4B 2M9
For products purchased outside the United States or Canada please contact your local dealer for
applicable warranty information. In Europe you may also contact Bushnell at:
Bushnell Germany GmbH
European Service Centre
Mathias-Brüggen-Str. 80
D-50827 Köln
GERMANY
Tel: +49 221 995568-0
Fax: +49 221 995568-20
This warranty gives you specific legal rights.
You may have other rights which vary from country to country.
©2010 Bushnell Outdoor Products
FCC Note:
This equipment has been tested and found to
comply with the limits for a Class B digital device,
pursuant to Part 15 of the FCC Rules. These limits are
designed to provide reasonable protection against
harmful interference in a residential installation. This
equipment generates, uses and can radiate radio
frequency energy and, if not installed and used in
accordance with the instructions, may cause harmful
interference to radio communications. However,
there is no guarantee that interference will not occur
in a particular installation. If this equipment does
cause harmful interference to radio or television
reception, which can be determined by turning the
equipment o and on, the user is encouraged to tr y
to correct the interference by one or more of the
following measures:
· Reorient or relocate the receiving antenna.
·
Increase the separation bet ween the equipment and
receiver
.
· Connect the equipment into an outlet on a circuit
dierent from that to which the receiver is
connected.
· Consult the dealer or an experienced radio/TV
technician for help.
The shielded interface cable must be used with the
equipment in order to comply with the limits for
a digital device pursuant to Subpart B of Part 15 of
FCC Rules.
Specications and designs are subject to change without
any notice or obligation on the part of the manufacturer.
Page 19

Page 20

For further questions or additional information please contact:
Bushnell Outdoor Products
9200 Cody, Overland Park, Kansas 66214
(800) 423-3537 • www.bushnell.com
©2010 Bushnell Outdoor Products
 Loading...