

Page 1

OUTDOOR
DIGITAL CAMERA
Model 11-0013G & 11-0013Y
LIT #:98-0494/10-04
Instruction Manual
Page 2

CONTENTS
ENGLISH. . . . . . . . . . . . . . . . . . . . . . . . . . . 1
FRANÇAIS . . . . . . . . . . . . . . . . . . . . . . . . 25
ESPAÑOL . . . . . . . . . . . . . . . . . . . . . . . . . 49
DEUTSCH . . . . . . . . . . . . . . . . . . . . . . . . 72
ITALIANO. . . . . . . . . . . . . . . . . . . . . . . . . 97
PORTUGUÊS. . . . . . . . . . . . . . . . . . . . . . 121
Page 3

1
Congratulations on your purchase of the Bushnell® Outdoor Camera! The Outdoor
Camera is especially designed to capture the memories of your best outdoor adventures,
as it is water resistant, dust resistant, shock resistant and rubberized to provide a sure
grip. Of course, with its auto flash and close focus capabillity, it will also deliver great
photos indoors as well.
Before using the camera, please read the instructions contained in this manual and
take time to familiarize yourself with the camera’s operation and many great features.
Please note that although the camera is weatherproof (JIS Grade 4 water resistance),
it should not be used underwater, submerged, or washed with a strong stream of
water. Damage due to misuse is not covered by warranty.
Page 4

2
3
QUICK GUIDE: BUSHNELL OUTDOOR DIGITAL CAMERA 11-0013G/Y
Install Batteries
1
& (optional)
Memory Card
Turn On the
2
Camera
Set the Menu
3
Language and
Date/Time
Format the SD
4
Card (optional)
Insert 2 AA alkaline or lithium batteries as indicated in the battery compartment on the
bottom of the camera. An SD card (optional) for additional photo storage may also be
installed in the card slot inside, with the notched corner on the left, towards the LCD
display.
Press and release the power switch. When the live preview is displayed on the LCD, you
are ready to snap a picture. The default settings will provide optimum quality under most
conditions. However, we recommend reading the full manual to take advantage of the
many available options for different photo conditions and user preferences.
Press the OK/Menu button, then the right arrow pad key to open the Mode Menu. Press
the down arrow twice to highlight “Set”, then use the right arrow to move over to the Set
menu list. Go down to “Language”, then press the right arrow. Select your language, and
press the OK button. The display returns to the Set menu. Keep pressing the down arrow
until you highlight “Date & Time” (go past “File Name”), then press the right arrow. In
the Date & Time setting screen, use the left/right arrows to select the date/time part you
want to change, then use the up/down arrows to set it. The letter at the end of the date
line sets the date format (Y/M/D first). The time can be set to a 12 or 24 hour format.
Press OK when finished setting the Date & Time.
If you inserted an SD card earlier, format it before using the camera. Go to “Format”
in the Set Menu, and press the right arrow key. Move down to “Yes” and press OK to
confirm you want to format the card. Press OK to exit all menus.
QUICK GUIDE: BUSHNELL OUTDOOR DIGITAL CAMERA 11-0013G/Y
Take A Photo
5
Review and
6
Delete Photos
Connect To A
7
Computer &
Transfer Photos
Press the shutter release button halfway down to set the autofocus (green AF light
comes on), then fully down when you are ready to take the photo. The frame marks
in the center of the LCD show the area used to set focus. For off-centered subjects,
place this frame over the main subject, press the shutter button until the AF light is on,
continue to hold it, then move the camera to recompose your image before depressing
the shutter fully to snap the picture. Scene presets for landscapes, action, and portraits
are available, see “Inside the Mode Menu” for detailed instructions.
Press (hold) “Quick View” to review stored photos. The left/right arrow keys step backwards/forwards through the photos. The up/down arrow keys zoom in/out for close
inspection of photo details. To delete a photo during review, briefly press Quick View
(trashcan icon appears). Press the down key to choose Yes, then press the OK button to
delete the photo. To exit the photo review, press and hold Quick View.
Before connecting the camera, install the drivers from the CD-ROM if you use
Windows 98/98SE, and install PhotoSuite if you do not already have photo editing
software. Connect the supplied USB cable from your PC to the USB port under the
connector cover (above the strap). Press “OK” on the camera. If you have Windows XP,
just follow the onscreen directions/options. If you have Win 98 or 2000, open “My
Computer” on your PC. The camera is identified as a “Removable Disk.” Double click
this “disk” and open the folders inside. Select any or all of the “.jpg” files, and use “Edit
>Move (or Copy) to Folder” to save the photos to “My Pictures” or another folder on
your hard drive. Once transferred, you may disconnect the camera, and the files can be
opened, edited and resaved using the supplied PhotoSuite or any imaging software . See
“Downloading Your Photos Step by Step” for more details.
Page 5
4
5
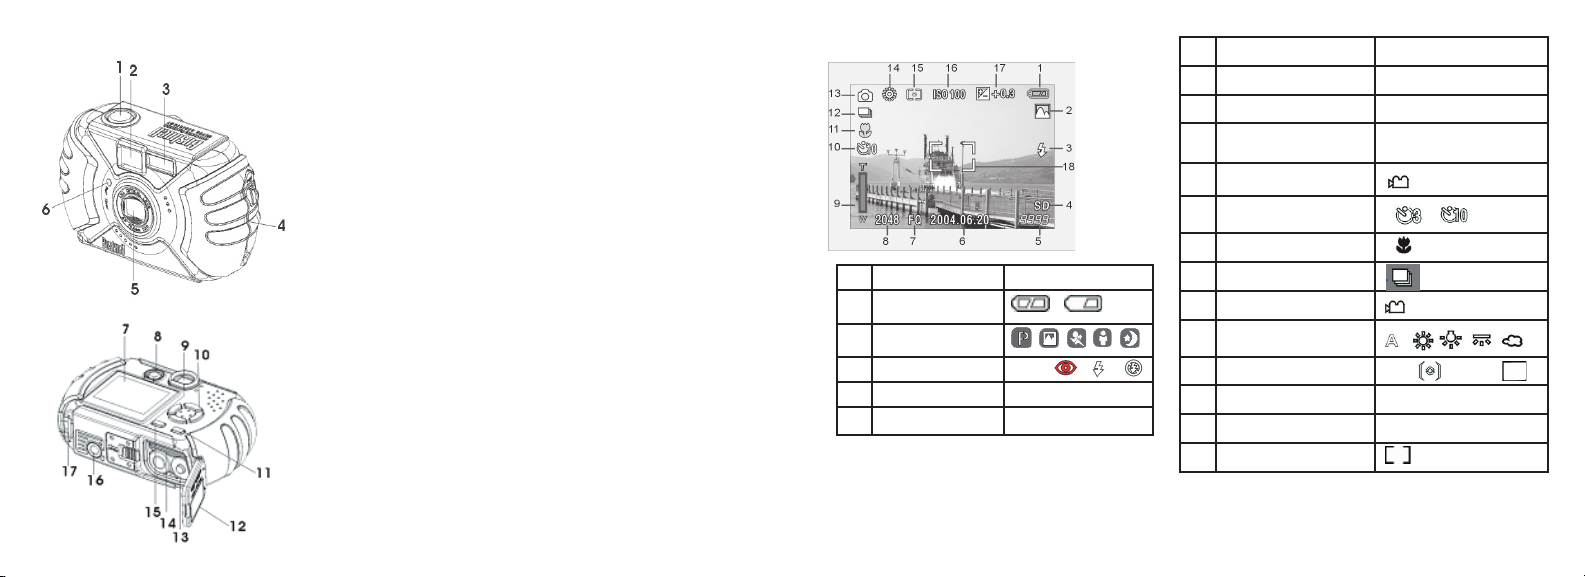
Parts Identification
1. Shutter Release
2. Viewfinder
3. Flash
4. Connector Cover
5. Lens
6. Self-Timer Lamp
7. LCD Monitor 15. Quick View Button
8. Power Button 16. Tripod Socket
9. Viewfinder 17. Strap Bar
10. 4-way Keypad
11. OK / Menu Button
12. Battery Compartment Cover
LCD Display Icons
# Indicator Icons
1 Battery Check
2 Shooting Mode (Scene)
3 Flash Mode AUTO
4 SD Card Inserted “SD”
5 # of Photos Remaining [ 999]
# Indicator Icons
6 Date Display 2004.06.20
7 Image Quality (compression) FQ / NQ / EQ
8 Image Size (resolution) 2048x1536, 1600x1200,
9 Digital Zoom Bar
10 Self Timer
11 Macro
12 Sequence Shot (3 frames)
13 Movie Mode
14 White Balance
15 Meter Pattern Center Average
16 ISO Setting AUTO ISO100 ISO200 ISO400
17 Exposure Value (EV)
18 Auto Focus Area Indicator
1280x960, 1024x768, 800x600
-2 ~ +2
13. Batteries (AA x 2)
14. SD Card Slot
Page 6

6
7
Loading Batteries
Slide the switch towards the tripod socket as shown on the right,
then swing open the battery cover. Insert 2 AA Alkaline batteries into
the camera as indicated, then close the battery cover until it clicks.
Inserting An SD Card
The camera stores 10-271 photos in the 16MB internal memory,
depending on resolution/quality settings (refer to the chart at the
back of this manual). To expand the available storage, you may add an
optional SD (“Secure Digital”) memory card, with any capacity up to
512 MB. The card is inserted into a slot in the battery compartment
as shown in the last diagram. Note that the “notched” corner is on the
left, with the metal connectors facing up.
Taking A Photo
Hold the power button for 2 seconds to turn on the camera. The LCD
monitor startup screen will appear, and the red fl ash charge indicator will
blink briefl y. When you see the live image preview (1), the camera is ready
to shoot. Compose your photo on the LCD display (or use the viewfi nder
if the LCD is hard to see or batteries are low). Press the shutter release halfway down to set the autofocus on the central area indicated by the AF marks
(2). When focus is complete, the green AF light by the viewfi nder comes
on, and the AF marks on the LCD will change from red to green (you can
snap a photo while the marks are still red, but it may not be sharp). For offcenter subjects, set focus with AF area centered on the subject, then move
the camera as desired, while continuing to hold the shutter release halfway.
Press the release down all the way when you are ready to take the photo (3).
The LCD will automatically show a quick review of the photo after you take
it (the review time can be changed in the Mode Menu settings). To turn off
the LCD to conserve battery power, press the Quick View button quickly
twice (holding it down changes to Photo Review Mode).
1
2 3
Autofocus Area Frame
Using The Digital Zoom
Press the “T” (telephoto) key on the arrow pad to zoom in (up to 4x digitally). Pressing the “W” (wide)
key after you start to zoom in will zoom back out towards normal magnifi cation. NOTE: At high digital
zoom settings, the live preview image may appear “coarse” or soft due to real time processing limitations. This does
not represent the actual quality of the captured image, as you will see in the quick review after the photo is taken.
Once the AF indicator turns green, this confi rms that focus is locked in and your subject will be as sharp as possible
in the fi nal photo.
Page 7

8
9
Using The Flash
The default setting is “Auto Flash” when the camera is turned on, meaning the flash will fire only if needed, in low
light conditions. Pressing the right button on the 4-way keypad
(short pre-flash to reduce pupil size for portraits ), Flash On (forces flash to fire in bright conditions-good
for filling in shadows on a person’s face with the sun behind them), and Flash Off
conditions-useful in museums or theatres where flash is prohibited.) The icon corresponding to the current flash
setting is displayed on the LCD (see “LCD Display Icons”). NOTE: When on “normal” Auto Flash, no icon will be
seen. After taking a flash photo, there will be a delay of several seconds before the next photo may be taken, while
the flash circuits are recharging, .
will select other options: Red-Eye Reduction
(will not fire in any light
Using The Macro Focus and Self Timer
Macro focus allow you to photograph close up subjects in a range from approx. 4” to 24”
(10-60cm). To set the camera to macro focus mode, press the left keypad button.
timer menu will be displayed on the LCD. With the macro (flower) icon highlighted, press “OK” to
select it. The macro icon will be seen on the preview LCD. Be sure to hold the camera steady and wait
for the autofocus light when taking photos in macro mode. To return to normal focus range, press the
left key button, select macro again and press OK.
Once in the macro/timer menu, pressing the down keypad button will highlight the self timer
options, which allow you to include yourself in a photo, with 3
able. Press OK with the desired time selected. With the camera set up on a tripod or sturdy level
surface, press the shutter release-the shutter will snap at the end of the time. The timer is also useful
for avoiding shaking the camera when taking night scene photos, as the camera will operate at slower
shutter speeds. To return to normal shutter operation, press the left key button, select the current timer,
and press OK.
Press Cancel while in the macro/timer menu to exit it without making a selection.
or 10 second delays avail-
The macro/
Macro/
Timer
Menu
Using The Top Menu
Pressing the OK/Menu button below the arrow pad will display the
top menu selections on the LCD. There are 2 “Shortcut” menus, which allow
you to quickly change the photo size/quality or switch to movie mode, and a
Mode menu containing multiple settings arranged in groups or “tabs.” Press
the keypad button in the same direction of the icon for each menu to enter it.
The menus and their functions are :
Menu Icon Action
Movie Mode/
Still Photo
Mode
Image Size &
Quality
from photo mode
from movie mode
Note: only the first # is
shown in the size menu:
2048 x 1536
1600 x 1280
1280 x 960
1024 x 768
800 x 600
Switches from still photo to movie mode for recording
video clips (avi format). Press the “up” arrow key again to
return from movie mode to still photos.
Image (file) Size can be set from 2048x1536 down to
800x600 pixels in 5 steps. Larger image sizes provide higher
resolution (sharpness) but use more storage memory. Image
Quality can be set to “FQ” (fine quality), “NQ” (normal)
or “EQ” (economy). This affects the amount of .jpg file
compression, with FQ being the least compression/highest
quality/largest file. The smaller size/lower quality settings
will use less memory , if you know you will only make small
prints or email your photos.
Menu Selection
Display
Page 8

10
11
Using The Top Menu continued
Menu Icon Action
Mode Menu Opens additional menus as
described next.
Inside The Mode Menu-Additional Settings
After pressing the OK/Menu button to see the 3 top menus, use the right
keypad button to open the Mode Menu. Selections within the Mode
Menu are arranged in 3 groups, or tabs, as seen on the left column in the
Mode Menu screen. To select a menu group, use the up/down buttons.
Then press the right button to move to the second column, which shows
the items in that group. Again use the up/down button to go to the item
you want, then press the right key to move to the third column and see
the available settings for that item. Use the up/down buttons to select
the setting you want, then press the OK/Menu button to confirm. When
finished making your settings, continue to press the OK/Menu button
until you return to the normal display. The Mode Menu groups, and the
item/settings submenus within each, are arranged in the following order
(default settings are in
bold):
Mode Menu screen,
showing (from left)
Group, Item, and Setting columns. Use the
4-way keypad to move
around within them in
any direction.
Inside the Mode Menu-Groups/Items/Settings
Group Item Settings Description
1: Exposure Scene P (Program) Standard auto exposure for normal photos
Landscape
Portrait
Action
Night
Meter
Center Camera sets exposure based mostly on center of frame. Useful when
Average Camera sets exposure based on overall image. No icon on LCD.
ISO Auto Light sensitivity will be set automatically from ISO 100 ~400.
100/200/400 Manual settings. Use higher ISOs only for low light conditions.
EV
-2.0 ~ +2.0 Provides manual under/over exposure adjustment in 0.3 EV steps
2: Color WB Auto (A) White Balance is automatically set for correct color reproduction
Daylight
Deeper zone of focus for extended sharpness from foreground to
background.
Shallow zone of focus for photos of people-helps isolate subject from
background.
Uses higher shutter speeds to help freeze motion
Uses lower shutter speeds for better low light exposures
main subject and background brightness differ greatly.
Manual setting for outdoor sunny conditions
Page 9

12
13
Inside the Mode Menu-Groups/Items/Settings continued
Group Item Settings Description
Cloudy Manual setting for outdoor overcast or shade conditions
Tungsten
Fluorescent
Color
Mode
Contrast Hi Enhanced contrast for overcast days or flat lighting
3: Set All Reset No / Yes Select “Yes” and press “OK/Menu” button to erase all user settings
Format No / Yes Select “Yes” , then press the “OK” button to format (prepare) an
Color Normal color reproduction
Black & White For black and white only photography
Sepia Special effect for “antique” toned photo look
Normal Average contrast for most scenes
Low Reduced contrast for mid-day or other high contrast conditions
Manual setting for indoor tungsten (light bulb) lighting
Manual setting for indoor fluorescent lighting
and restore default settings
inserted (optional) SD card. Caution: this will erase all previouly
stored files on the card.
Inside the Mode Menu-Groups/Items/Settings continued
Group Item Settings Description
3: Set Language English/Spanish/
Rec View Off,
File Name Reset or Series File numbering for new photos after deleting all starts over at
LCD
Brightness
Date &
Time
Video Out NTSC or PAL Affects video out signal. Set for your location’s TV system.
Rec Mode 1-Shot or 3-Shot Sets number of photos taken each time shutter release is
Storage Auto Files are stored on SD card if inserted, internal RAM if not
French/Deutsch/Italian/Portuguese
1, 2, or 3 Sec. Sets duration of photo review display after a photo is taken
Set to any of 7 levels Sets display brightness. Left box=dimmer, Right box=brighter.
> to go to setup. Press
“OK” once set.
SD Card Files are stored on the SD card only (must be inserted)
Internal Files are stored in internal memory only, never on card
Selects the language displayed in all menus
“1” (Reset), or continues to advance from last # used (Series)
Middle box is normal level. Press OK to set.
Left/right keys move between fields. Up/down keys change
setting. Letter at end of date sets format: M, D, or Y first.
pressed. 1-shot is normal single shot, 3-shot will take 3 photos
in a rapid series to capture an action sequence.
Page 10

14
15
Reviewing and Deleting Stored Photos
To review (playback) your photos stored in the internal memory or SD card, press and hold the “Quick
View” button until the display shows your previous photo. Use the left/right keypad buttons to move
in backwards or forwards order through your photos. While a photo is displayed, pressing the “up”
button will begin zooming into (magnifying up to 4x) the image, useful for verifying that the photo
is sharp. Once zoomed, you may press “OK”, then use the 4-way keypad to view different areas of
the photo (press OK again to exit). After zooming in, you may press the down button to zoom back
out. Pressing the down button when the photo is displayed normally (not zoomed) will change to a
multiple photo overview (up to 9 at once), displaying thumbnail images of all photos. You can then use
the keypad to highlight a specific photo, and display it full screen by pressing the OK/Menu button. To
erase (delete) a photo during the review, briefly press (do not hold) the Quick View button. The Delete
menu will apppear, with a choice of One or All. Press the down key (select “One”), then OK to delete
only that photo. You will see a blinking “hourglass” as the photo(s) are deleted. Note that pressing the
OK button after selecting “One” or “All” photos will perform the deletion immediately, so be careful
not to select “All” if you have not transferred the photos to your PC first. When you are done review
ing your photos, press and hold the Quick View button to return to the live preview display.
Review Menus
After pressing the Quick View button to enter Review mode, pressing the OK/
Menu button will enter the review set of menus. These operate in the same way
previously described in the still photo mode menu instructions (use the arrow
pad keys to navigate to the desired menu, press OK to confirm a setting), but
with different menu items and settings as follows:
Review Mode:
Top Menu Display
-
Review Menus continued
Menu Icon Action
Slide Show Automatically cycles through stored photos, beginning with the oldest. Press
the up arrow key to start the show. It will stop at the most recent photo taken
and return to normal review mode.
Info Sets whether the information (file #, image size and quality, date/time) for
each photo is displayed or not during review mode. It does not permanently
affect the stored information.
Review
Mode Menu
Opens additional settings as described in the next section
Review Mode Menu Settings
Group Item Settings Description
1: Play Protect Off / On Setting to “On” blocks ability to delete photos until turned
Rotate 90 Degrees > or < Rotates display of reviewed photo. Eliminates having to turn
2: Color Black &
White
Off / On Creates additional B&W version (new file) from the current
“Off” again in this menu. Prevents accidental erasure.
camera to review shots taken with camera held vertically (full
length portraits, etc).
review photo (allow several seconds). Original color photo file
is not affected.
Page 11

16
17
Review Mode Menu Settings continued
Group Item Settings Description
Sepia Off / On See Black & While description. With sepia tone effect.
Copy to SD card No / Yes Copies all internal memory contents to the SD card
Format No / Yes Formats the inserted SD card, erasing all contents.
3: Set All Reset No / Yes Select “Yes” and press “OK/Menu” button to erase all user
Language As previously described in Photo Mode Menu section
LCD Brightness As previously described in Photo Mode Menu section
Date & Time As previously described in Photo Mode Menu section
Video Out As previously described in Photo Mode Menu section
settings and restore default settings
Movie Mode-Operation and Menus
From Photo mode, with the live preview displayed, press OK/Menu to go to the top menus. Press the up
keypad button to change to Movie mode. The movie icon will be displayed. Select “320” or “160”
resolution by pressing OK/Menu, then the left key. Press the shutter release to begin shooting a video
clip (avi format), and press again to stop the video. To playback the video movie, hold down Quick View
until the display switches to Review (you will see the first frame of the movie). Press the shutter release
to start the playback. Press Quick View briefly to go to the Delete menu. When you are finished shoot
ing videos, Press OK for the top menu, then the up button (still camera icon) to return to normal photo
mode. Please note the following menu/feature option differences for Movie mode vs. Photo mode:
Movie Mode-Operation and Menus continued
In movie mode, all features and menu options are identical to those in
normal still photo mode with these exceptions:
• No scene preset options are available (landscape, portrait, etc).
• No rec mode options (3x sequence).
• The image size options available are
Changing to 160x120 resolution will provide 4x more recording time than 320x240, but at lower
quality. Frame rate is preset at 20 frames per second.
• No quality (file compression) options are provided.
• Before you begin recording a video, the counter in the lower right of the LCD shows the available
recording time in seconds (31”, 124”, etc).
• While shooting the video, the counter shows elapsed seconds.
• Digital zoom and macro focus are not available, flash is set to “Off”
• If the camera is powered off while in movie mode, it will return to still photo mode when turned
on again.
Note: If your PC will not play the .avi movie files in Windows Media Player, you may need to download a
-
newer version of the player from Microsoft.com (search for “media player download”). The movie files can also
be played back with the QuickTime Player, included with many computers, or available as a free download
from Apple.com.
320x240 or 160x120. This sets the movie resolution per frame.
Page 12

18
19
System Requirements (Minimum)
OS: Windows® 98/98SE/2000/ME/XP
CPU: MMX Pentium® 200MHZ equivalent or faster (
Memory: 32MB minimum (64MB recommended for PhotoSuite)
SVGA video card w/2MB VRAM, 800x600 screen display, 16 bit High color
200 MB available hard disk space (if installing PhotoSuite)
Internal USB Port
Pentium® III 500 MHz for PhotoSuite5™)
Software Installation
If you are using Windows 98, you must install drivers before connecting the camera to your PC. Insert the CD-ROM
into your computer’s CD drive; it will auto-run and the install screen will be displayed. Select “Install Driver”, then
follow the directions. After installation, restart your computer. Windows 2000, ME, and XP do not require drivers,
as the camera uses the USB mass storage standard, allowing the photo files to be accessed as if they were stored on an
external hard drive. For any Windows OS, if you are not already using photo editing software you prefer, you may
install Roxio PhotoSuite® from the CD-ROM. Be sure to read the “Release Notes” completely, noting any tips or
potential issues relevant to your PC configuration and OS.
Downloading Your Photos - Step by Step
1. Be sure the driver has been installed first if you are on Windows 98/98SE.
2. Turn on the camera and connect the supplied cable to the camera’s USB jack (open the
connector cover on the strap side of the camera), then directly to your computer’s main USB
port-do not use front panel/keyboard USB ports or unpowered “hubs”.
3. The camera will display the Transfer screen, with the PC icon highlighted. Press “OK”, the
display will change to “Mass Storage.” If not, close all open programs, disconnect the camera,
restart your computer and try again.
Download
Screen
Downloading Your Photos - Step by Step continued
4. Open My Computer or Windows Explorer. The camera will be seen as a new “Removable Disk” with an unused
drive letter assigned to it. Double click this new “Disk” icon, open the “DCIM” folder inside, then any folder(s)
inside that (“100BUSHN” ,etc). Your photos are the JPEG files inside-they have the prefix “BUSH__” followed by a
number, same as seen earlier on the camera’s display when you review photos. Single clicking any file should show a
small preview image.
5. Click “Edit>Select All” (or click on one photo, contol+click to select multiple photos), then “Edit>Copy to Folder”
(in Windows menus). Select an existing folder on your hard drive, such as “My Pictures”, or create a new folder (“2004
Vacation”, etc), then click “OK” to transfer copies of the photo files you want.
6. After the photos are transferred to your hard drive, you can disconnect the camera. Windows may produce a screen
warning that you have disconnected a USB device without stopping or ejecting the “disk” first (your photo files
will not be harmed). If so, check the box that adds an icon to your system tray or taskbar. Then next time you finish
transferring photos, you can click that icon first, and “Stop the USB Mass Storage Device” before disconnecting
the camera.
7. You’re now ready to open the photo files in any photo editing software. Just use File>Open and go to the folder
where you stored the photos earlier. If you are using PhotoSuite, select File>Open Photo, then use the “Look in”
pull down menu at the top of the Open window, select “My Computer”, select your hard drive, and double click
any photo in the folder where you copied the files from the camera. It is also possible to open and work with your
photos directly from the Outdoor camera while it is still connected.To do this with PhotoSuite, first follow steps 1-3,
then open PhotoSuite, select File>Open Photo and use the “Look in” menu to select My Computer, then select the
“Removable Disk”, and open the folders inside until you get to the JPEG photo files. If you choose to work this way,
from a connected camera, be sure that you save the photo (when you are done editing) to your hard drive, and not
the camera’s memory or card. To do this in PhotoSuite, after clicking “Done”, answer “Save Changes?” with “Yes”, but
then answer “Replace Existing File”? with “No” and use the “Save As” dialog box to save the edited photo in a folder
on your hard drive (“Save In>Local Disk”), not the “Removable Disk” (camera).
Page 13

20
21
Downloading Your Photos - Step by Step continued
8. If you are new to photo editing on a computer, consult your software’s Help menu (PhotoSuite has extensive
built-in Help) for tips on using its features. Along with adjusting the brightness, contrast, sharpness and color
of your photos, you can resize the photo to fit the paper if you are printing, or save a smaller, low or medium
resolution file for email or inserting into documents. When you are ready to save your edited file, you may want
to use “Save As” and give it a more descriptive name than “BUSH0001.” Doing this also preserves the original
file as a backup to reopen and re-edit later. Make sure you have successfully transferred all the photos you wanted
to save before using “Delete All” on your camera to make room for new images.
Using the Direct Printing (Pictbridge) Feature
The Outdoor Camera also supports direct printing from the camera to PictBridge
compatible printers, without using a PC. It is recommended that you first read the
direct printing/PictBridge section of your printer’s manual. With the printer power on,
connect the supplied USB cable to the camera, then to the direct print USB port on the
front or side of the printer. The camera’s display should come on (if not, turn on the
camera). Select the printer icon (1), and press “OK.” After a brief delay while the camera
to printer communication is established, you should see the camera’s Print options menu
(2). Use the up/down keys as usual to select a print option, then press OK. The options
are (in order from top to bottom icon):
1. Print One (Use left/right keys to select the image, up/down to select # of copies you
wish to print. Press OK when ready to print.)
2. Print All Images (No/Yes). Prints all photos stored in camera.
3. Print Selected Photo from Thumbnail Review (use left/right keys to select a photo,
up/down to choose how many copies you want)
4. Print All Images as Index: prints thumbnails of all photos (“contact sheet”)
5. Exit print menu
1
2
Photo Storage Capacity Reference (max capacity, +/- 2 photos)
Image Size Megapixels
(approx)
2048x1536 3.2 FQ 10 photos 39 photos
1600x1280 2.1 FQ 16 64
1280x960 1.3 FQ 26 101
1024x768 0.8 FQ 41 158
800x600 0.5 FQ 67 259
Quality * Internal
Memory
NQ 20 79
EQ 41 158
NQ 33 129
EQ 67 259
NQ 53 202
EQ 106 405
NQ 82 317
EQ 165 634
NQ 135 519
EQ 271 1038
64 MB
SD Card
* Selects amount of file compression
(jpg ratio)
(FQ=low/EQ=high)
FQ: Fine Quality (1:2.5)
NQ: Normal Quality (1:5)
EQ: Economy Quality (1:10)
Image Size refers to the pixel
dimensions, or resolution, of the
digital file.
Actual storage capacity will vary
based on content of each photo
file. You may be able to take a few
photos more or less than the listed
average capacity.
Use large size and high quality
settings for photos you may want
to enlarge or crop later. If required,
they may also be reduced to a
smaller file size using your photo
software. Use small size and/or low
quality settings if you will only
email, insert into documents, or
make small prints, and do not want
to resize the file later.
Page 14

22
23
TWO-Year LIMITED WARRANTY
Your Bushnell
two years after the date of purchase. In the event of a defect under this warranty, we will,
at our option, repair or replace the product, provided that you return the product postage
prepaid. This warranty does not cover damages caused by misuse, improper handling, in
stallation, or maintenance provided by someone other than a Bushnell Authorized Service
Department.
Any return made under this warranty must be accompanied by the items listed below:
1)
2) Name and address for product return
3) An explanation of the defect
4) Proof of Date Purchased
5) Product should be well packed in a sturdy outside shipping carton, to prevent damage in transit,
with return postage prepaid to the address listed below:
IN U.S.A. Send To: IN CANADA Send To:
Bushnell Performance Optics Bushnell Performance Optics
Attn.: Repairs Attn.: Repairs
8500 Marshall Drive 25A East Pearce Street, Unit 1
Lenexa, Kansas 66214 Richmond Hill, Ontario L4B 2M9
For products purchased outside the United States or Canada please contact your local dealer
for applicable warranty information. In Europe you may also contact Bushnell at:
BUSHNELL Performance Optics Gmbh
European Service Centre
MORSESTRASSE 4
D- 50769 KÖLN
GERMANY
Tél: +49 (0) 221 709 939 3
Fax: +49 (0) 221 709 939 8
®
product is warranted to be free of defects in materials and workmanship for
A check/money order in the amount of $10.00 to cover the cost of postage and handling
This warranty gives you specific legal rights.
You may have other rights which vary from country to country.
©2004 Bushnell Performance Optics
FCC Note:
This equipment has been tested and found to comply
with the limits for a Class B digital device, pursuant
to Part 15 of the FCC Rules. These limits are designed
to provide reasonable protection against harmful
interference in a residential installation. This equipment
generates, uses and can radiate radio frequency energy
and, if not installed and used in accordance with the
instructions, may cause harmful interference to radio
communications. However, there is no guarantee that
interference will not occur in a particular installation. If
this equipment does cause harmful interference to radio
or television reception, which can be determined by
turning the equipment off and on, the user is encouraged
to try to correct the interference by one or more of the
following measures:
· Reorient or relocate the receiving antenna.
·
Increase the separation between the equipment and receiver
· Connect the equipment into an outlet on a circuit
different from that to which the receiver is connected.
· Consult the dealer or an experienced radio/TV
technician for help.
The shielded interface cable must be used with the
equipment in order to comply with the limits for a digital
device pursuant to Subpart B of Part 15 of FCC Rules.
Specifications and designs are subject to change without
any notice or obligation on the part of the manufacturer.
Notes:
.
Page 15

24
 Loading...