

BUSHMASTER XM15 OPERATION INSTRUCTION

BFI OP. MANUAL
PDF Version
get help from someone qualified in the safe handling of firearms.
WARNING: BEFORE USING THlS FIREARM,
READ AND FOLLOW THESE INSTRUCTIONS.
If there is anything you do not understand,
®
For all
BUSHMASTER
XM15 Models
OPERATING AND SAFETY
INSTRUCTION MANUAL
A1 & A2 Sight Systems
All Rifles & Carbines
including V Match
PLEASE PRACTICE SAFE FIREARMS HANDLING!
This instructional manual should always accompany your Bushmaster firearm.
WARNING: IF THIS FIREARM IS CARELESSLY OR IMPROPRERLY HANDLED,
UNINTENTIONAL DISCHARGE COULD RESULT AND COULD CAUSE INJURY,
DEATH, OR DAMAGE TO PROPERTY.
CAUTION: CAREFULLY READ THIS INSTRUCTION MANUAL PRIOR TO LOADING
AND FIRING THIS FIREARM. FOLLOW ALL INSTRUCTIONS ON THE PROPER
HANDLING AND SAFE USE OF THIS FIREARM - LIVES MAY DEPEND ON IT! If
unfamiliar with firearms, seek further advice through safe handling courses run by your
local gun clubs, NRA approved instructor, or similar qualified organizations.
CAUTION: USE ONLY CLEAN, DRY, HIGH QUALITY COMMERCIALLY
MANUFACTURED AMMUNITION IN GOOD CONDITION which is appropriate to the
.223 Rem. caliber of your firearm. We do not recommend the use of remanufactured or
hand loaded ammunition because it may damage your rifle. Use of improper ammunition
will invalidate your warranty.
WARNING: THIS WEAPON COULD CHAMBER A ROUND if it is dropped or jarred with
a loaded magazine in place - either with the Bolt Carrier Assembly locked to the rear, or in
its forward position.
PLEASE PRACTICE SAFE FIREARMS HANDLING!
FUNDAMENTAL RULES FOR SAFE GUN HANDLING
FUNDAMENTAL RULES FOR SAFE GUN HANDLING
ALWAYS KEEP THE GUN POINTED IN A SAFE DlRECTlON.
NEVER LOAD THE GUN UNTIL READY TO USE.
KEEP YOUR FINGER OFF THE TRIGGER UNTIL READY TO SHOOT.

WARNING: BEWARE OF DANGEROUS PROCEDURES
• Be sure cam pin is installed in the bolt group. If it isn't, your rifle can still fire and will
explode.
• If you are using a blank firing attachment, never fire anything except blank
rounds (for safety, we recommend the visible military style blank firing attachment).
• If your rifle stops firing with a live round in the chamber of a hot barrel (a misfire),
remove the round fast. However, if you cannot remove it within 10 seconds, remove
magazine and wait 15 minutes with the rifle pointing in a safe direction. This way you
won't get hurt by a possible round “cooking-off” (i.e. the round detonating just from the
heat of the barrel). In any event, keep your face away from the ejection port while
clearing a hot chamber.
• If your bolt fails to unlock, and you try to free it by banging the buttstock on the ground,
keep yourself clear of the muzzle.
• If there's water in the barrel, do not fire the rifle. It could explode.
• If a noticeable difference in sound or recoil is experienced, STOP FIRING. Either
condition could indicate an incomplete powder burn and/or a bullet stuck in the bore.
ALWAYS PRACTICE SAFE FIREARMS HANDLING!
FACTS ABOUT YOUR BUSHMASTER XM15 E2S RIFLE…
The Bushmaster XM15 E2S rifle system consists of a rifle, a magazine, and a sling. It
is a lightweight, gas operated, air-cooled, magazine-fed, shoulder-fired weapon that can
be fired in a semi-automatic mode - i.e., a single shot each time the trigger is pulled.
• The upper receiver and barrel assembly has a fully adjustable rear sight.
• The upper and lower receivers are easily opened for cleaning and inspection.
• The bolt group and barrel extension are designed with locking lugs that lock the bolt
group to the barrel extension.
• The forged aluminum upper and lower receivers reduce the weight of the rifle.
• The bore and chamber are chrome plated for long life and ease of maintenance.
• Caliber: .223 Remington / 5.56 mm
• Weight: (depends upon model) 20" Bbl. Rifle = 8.27 Ibs. / 3.75 kg
• Length: (depends upon model) 20" Bbl. Rifle = 38.25" / 97cm
• Barrel Rifling: R.H. twist; 1 in 9"; 6 lands & grooves
• Firing characteristics: muzzle velocity approx. 3,260 fps; chamber pressure 52,000 psi
• Maximum effective rate of fire: 45 rounds per min. / semi-automatic
• Max effective range: 550 meters (individual/point targets) / 800 meters (area targets)
• Maximum range: 3534 meters
2
1

TABLE OF CONTENTS
Rifle Parts and Where To Find Them……… 4
Clearing Your Rifle……… 6
Disassembling Your Rifle……… 8
Cleaning / Inspection / Lubrication……… 13
Detailed Cleaning Techniques……… 14
Cleaning the Upper Receiver……… 15
Cleaning the Lower Receiver……… 16
Cleaning the Ejector……… 17
Inspection before Lubrication……… 18
Lubrication / Upper Receiver……… 19
Lubrication / Lower Receiver……… 19
Lubrication / Bolt Carrier Group……… 20
Lubrication / Adjustable Rear Sight……… 21
Reassembly……… 22
Magazine Disassembly / Reassembly……… 28
WARNING: BEFORE USING THIS FIREARM, READ AND
FOLLOW THESE INSTRUCTIONS. If there is anything you do
not understand, get help from someone qualified in the safe
handling of firearms.
Preventative Maintenance Checks……… 29
Safety Function Checks……… 30
Adjustable Front Sight Post……… 32
Dual Aperture Rear Sight……… 32
Zeroing Your Sights……… 33
Zeroing Adjustments……… 34
25 Meter Zeroing Procedure……… 34
A1 Sights - Differences / Adjustments……… 36
Operation of Your Rifle / Loading……… 38
Operation / Inserting a Magazine……… 39
Operation / Chambering a Round……… 40
Immediate Action in Case of Trouble……… 42
Remedial Action……… 44
Bullet Stuck in the Bore……… 45
Troubleshooting……… 46
Parts Illustration……… 54
Limited Warranty……… 55
RIFLE PARTS AND WHERE TO FIND THEM (Right Side)…
REAR SIGHT
ELEVATION KNOB
CHARGING HANDLE
FORWARD ASSIST
ASSEMBLY
REAR SLING
LOOP
4
TRIGGER
MAGAZINE
RELEASE
BUTTON
REAR SIGHT
WINDAGE KNOB
SPENT BRASS
DEFLECTOR
EJECTION PORT
COVER
MAGAZINE
(RIFLE ACCEPTS ALL
CAPACITY AR15 / M16 TYPE)
FRONT SIGHT
ASSEMBLY
FRONT SLING
SWIVEL
HANDGUARDS
BARREL
MUZZLE

RIFLE PARTS AND WHERE TO FIND THEM (Left Side)…
A2 “SQUARE” FRONT
SIGHT POST
(A Round Post can be
found on some A1
models. Bushmaster
only uses the A2)
SLIP RING
(DELTA RING)
CARRYING HANDLE
(A3 Removeable type is
illustrated at lower left.)
BOLT
CATCH
B.F.I.
WINDHAM, ME.
®
U.S.A.
BUSHMASTER
L099999
CAL.223-5.56MM
MOD. XM15-E2S
WITH ”TRAPDOOR”
A2 TYPE
UPPER RECEIVER
TAKEDOWN PIN
BUTTPLATE
ASSEMBLY
STORAGE
Above, A Bushmaster
V Match “Flat-Top” Style
Upper Receiver And A3 Type
Removeable Carry Handle.
Right, an early A1 Upper Receiver
(note the rear sight differences).
CLEARING YOUR RIFLE…
PIVOT
PIN
SAFETY
SELECTOR
LEVER
PISTOL
GRIP
BUTTSTOCK
5
Point Rifle in a SAFE DIRECTION!
1.)
Place Safety Selector Lever on SAFE.
(If the rifle is not cocked, the Selector
Lever cannot be pointed toward SAFE.)
6
Press Magazine Catch Button and pull
2.)
Magazine down to remove.

CLEARING YOUR RIFLE (continued)…
To Lock Bolt Open, Pull Charging
3.)
Handle rearward. Press bottom of
Bolt Catch and allow Bolt to move
forward until it engages Bolt Catch.
Return Charging Handle to forward.
If you haven't before, place Safety
Selector Lever on SAFE.
Check Receiver and
4.)
Chamber to ensure there is
no ammunition in the rifle.
With Selector Lever pointing
5.)
toward SAFE, allow Bolt to
go forward by pressing upper
portion of Bolt Catch.
7
DISASSEMBLING YOUR RIFLE…
1.) Clear your Rifle and disconnect the Sling.
3.) Push in Front Pivot Pin.
2.) Push in Takedown Pin as far as it will go.
Pivot Upper Receiver away from Lower.
4.) Separate Upper and Lower Receivers. 5.) Pull back Charging Handle and Bolt Carrier
8
DISASSEMBLING YOUR RIFLE (continued)…
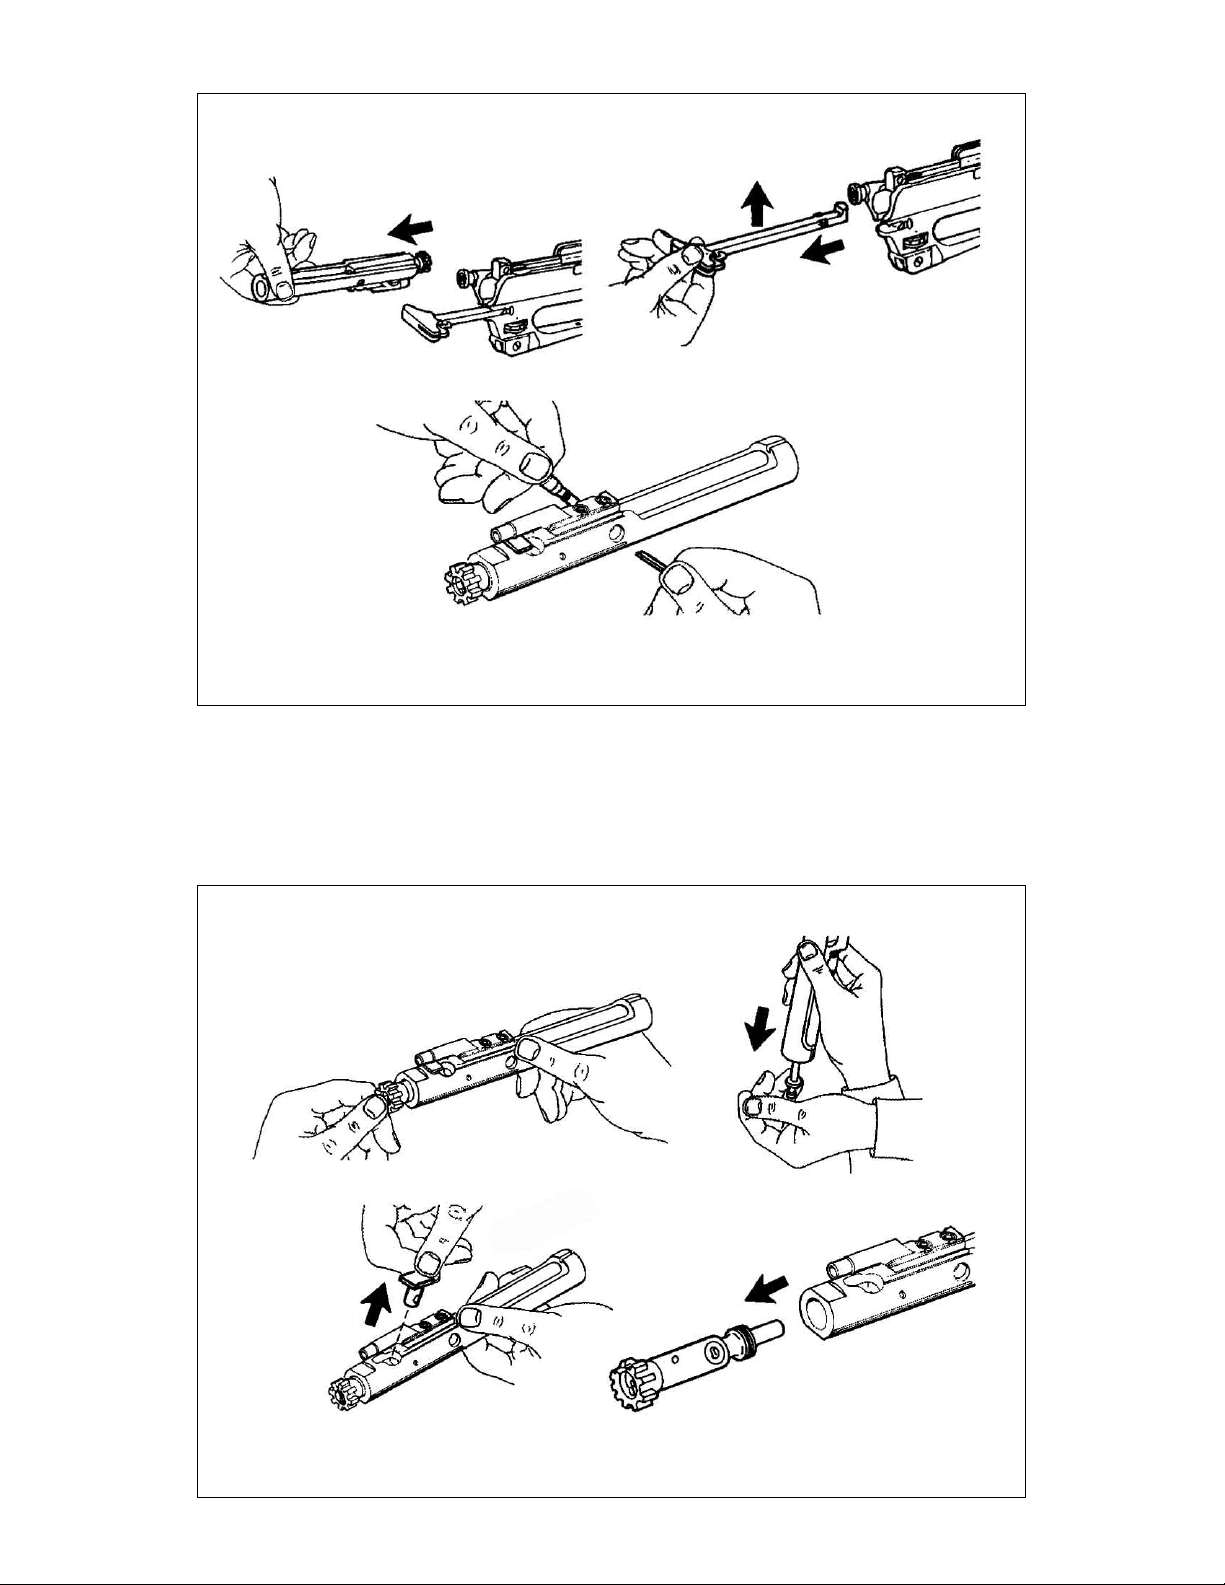
6.) Remove Bolt Carrier and Bolt 7.) Remove Charging Handle by pulling
back and up
DO NOT OPEN
OR CLOSE
SPLIT END
OF PIN
8.) Remove Firing Pin Retaining Pin.
9
DISASSEMBLING YOUR RIFLE (continued)…
9.) Push Bolt in to locked position.
PUSH BOLT IN
10.) Drop Firing Pin out rear of Bolt Carrier.
11.) Remove
Bolt Cam Pin.
GIVE CAM
PIN A 1/4
TURN AND
LIFT OUT
12.) Remove Bolt Assembly from Carrier.
10

DISASSEMBLING YOUR RIFLE (continued)…
DISASSEMBLE USING STEPS 13 THRU 16 ONLY WHEN DIRTY OR DAMAGED
PUSH
EXTRACTOR
PIN OUT
NOTE: Press rear
of extractor to check
spring function.
13.) Remove Extractor Pin by pushing out
with a punch or the tip of a bullet.
14.) Remove Extractor and Spring.
CAUTION: Extractor Spring may
pop out and get lost!
11
DISASSEMBLING YOUR RIFLE
(continued)…
15.) Press in Buffer, depress Retainer,
and release Buffer.
16.) Remove Buffer and
Action Spring.
The Handguards may be disassembled at any point in your cleaning
procedures as necessary (see Pg. 27 - “Buddy System” instructions).
If your Rifle is equipped with the A3 Type Removeable Carry Handle,
that may be removed for cleaning by loosening the 2 thumbnuts. Clean as
per instructions for aluminum Upper and Lower Receivers (see Pg. 16).
Lightly lubricate the thumbnut threads and the Rear Sight mechanism (as
described on Pg. 21 - Lubrication - Adjustable Rear Sight).
12
BUFFER
RETAINER
BUFFER
STOP
BUSHMASTER
DOES NOT
RECOMMEND
ANY FURTHER
DISASSEMBLY
CLEANING • INSPECTION • LUBRICATION…
After firing, clean your rifle as soon as possible to make the job easier and to avoid allowing
the development of any corrosion.
When your firearm has not been fired, you should clean it at least once or twice a year if
you live in a temperate climate, or as often as once a week in a tropical climate.
If you get your firearm wet, clean it as soon as possible.
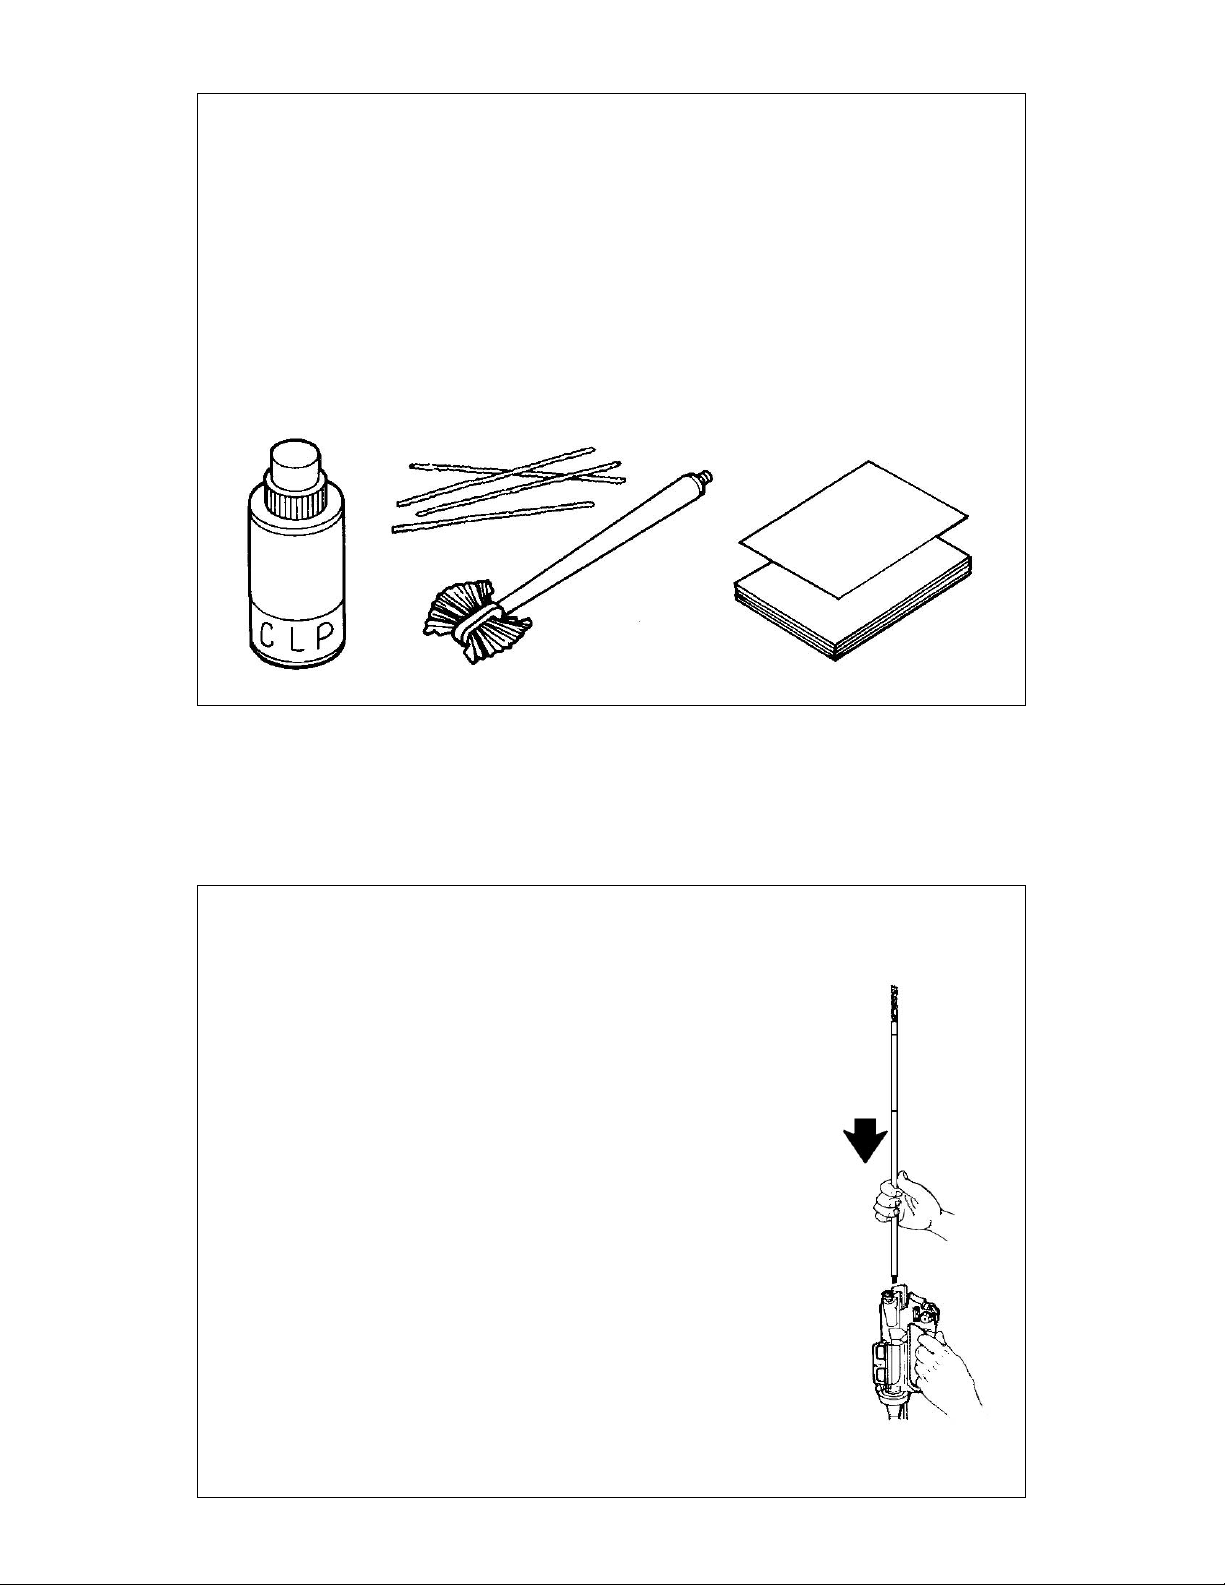
Use a high quality rifle cleaning kit that includes a cleaning rod; swab holder; cotton flannel
bore patches; pipe cleaners; a small toothbrush; brass wire bristle bore and chamber brushes
and a Cleaner/Lubricant/Preservative (CLP in Army terminology).
After you have disassembled the rifle, thoroughly clean, inspect and lubricate all parts
according to the techniques described on following pages.
13
DETAILED CLEANING TECHNIQUES…
NOTE: The procedures below describe cleaning with a standard military
issue multi-piece rod cleaning kit. Other commercial cleaning kits may
include alternate cleaning instructions which may be just as effective.
CLEANING THE BORE: The bore of your Bushmaster rifle has lands and
grooves called rifling. Rifling makes the bullet spin very fast as it moves
down the bore and down range. It is difficult to push a new, stiff bore brush
through the bore. You will find it much easier, and more effective, to pull
your bore brush through the bore. Also, because the brush will clean
better if the bristles follow the grooves (this is called tracking), you want the
bore brush to be allowed to turn as you pull it through. Always clean from
from chamber toward the muzzle. This is how you do it:
1.) Swab out the bore with a patch moistened with “CLP”.
2.) Attach three rod sections together but leave each one about two turns
short of being tight.
3.) Attach the bore brush but leave it two turns short also.
4.) Point muzzle down. Hold the upper receiver in one hand while inserting
the end of the rod without the brush into the chamber. Guide the rod
carefully through the bore. CAUTION - do not let the rod or its threaded
end scratch the Chrome Lining of the Bore or Firing Chamber.
About 2 - 3 inches of the rod should protrude out of the muzzle.
14
BORE
BRUSH
AND
THREE
ROD
SECTIONS

DETAILED CLEANING TECHNIQUES (continued)…
5.) Attach the handle section of the cleaning rod to the end of the rod sticking
out of the muzzle.
6.) Pull the brush through the bore and out the muzzle. You should be able to
see the rod twisting as you pull it - this is the brush "tracking" in the rifling. Never
reverse the direction of the bore brush while it is in the bore.
7.) After one pull, take off the handle section and repeat the process. After
three or four pulls, the three rod sections and the bore brush may become
screwed tightly together. Loosen them up and repeat the process.
8.) Send a patch through the bore occasionally to help clean out the crud that
the brush is getting loose. Just replace the bore brush with the rod tip (patch
holder) and a wet patch. Pull it through. If you leave the rods loose again, the
patch will "track" in the rifling as before. But remember, always have the bore
wet with cleaner before trying to pull a brush through.
CLEANING THE UPPER RECEIVER…
NOTE: Check to ensure that there is no looseness between the Barrel
and the Upper Receiver - if you detect any movement by twisting with your
hands, the barrel nut must be retorqued. Bring the Rifle to a qualified
gunsmith.
1.) Using a “CLP“ type product, clean all areas of Powder Fouling,
Corrosion, Dirt and Rust. Never use a wire brush or any type of abrasive to
clean the Aluminum Upper Receiver - you'll scratch and damage the finish.
AND PULL THROUGH
ATTACH HANDLE
FROM CHAMBER
TO MUZZLE
15
CLEANING THE UPPER RECEIVER (continued)…
2.) Clean the Firing Chamber - dip the larger chamber cleaning brush in CLP and use at least
five plunge strokes and three 360 clockwise rotations. Then swab out the bore as described
previously to remove any contaminated solution or loosened crud.
3.) Use the bore cleaning brush, still wet with CLP, and clean carbon and powder residue from
around the gas tube, run a pipe cleaner into the gas tube, clean the bolt locking lugs, bolt rings,
firing pin, bolt cam pin, lip of the extractor, and inside the bolt carrier from both front and rear.
4.) Wipe all components clean and dry, and inspect
for excessive wear, corrosion or mechanical damage.
Replace any defective parts before firing again (call
us at 1-800-998-SWAT for any parts needs.)
A SMALL TOOTHBRUSH
WILL REMOVE BUILT-UP
DIRT
CLEANING THE LOWER RECEIVER…
1.) Clean all areas of Powder Fouling, Corrosion, Dirt
and Rust. Again, never use a wire brush or any type of
abrasive to clean the Aluminum Lower Receiver.
2.) Wipe any dirt from the Trigger Mechanism. Clean
the Buffer, Action Spring, and inside
the Lower Receiver Extension
(the Buffer Tube).
WIPE INSIDE OF BUFFER
16
TUBE CLEAN
CLEAN THE DRAIN HOLE IN
THE BUTTPLATE SCREW
PIPE
CLEANER
 Loading...