

Page 1
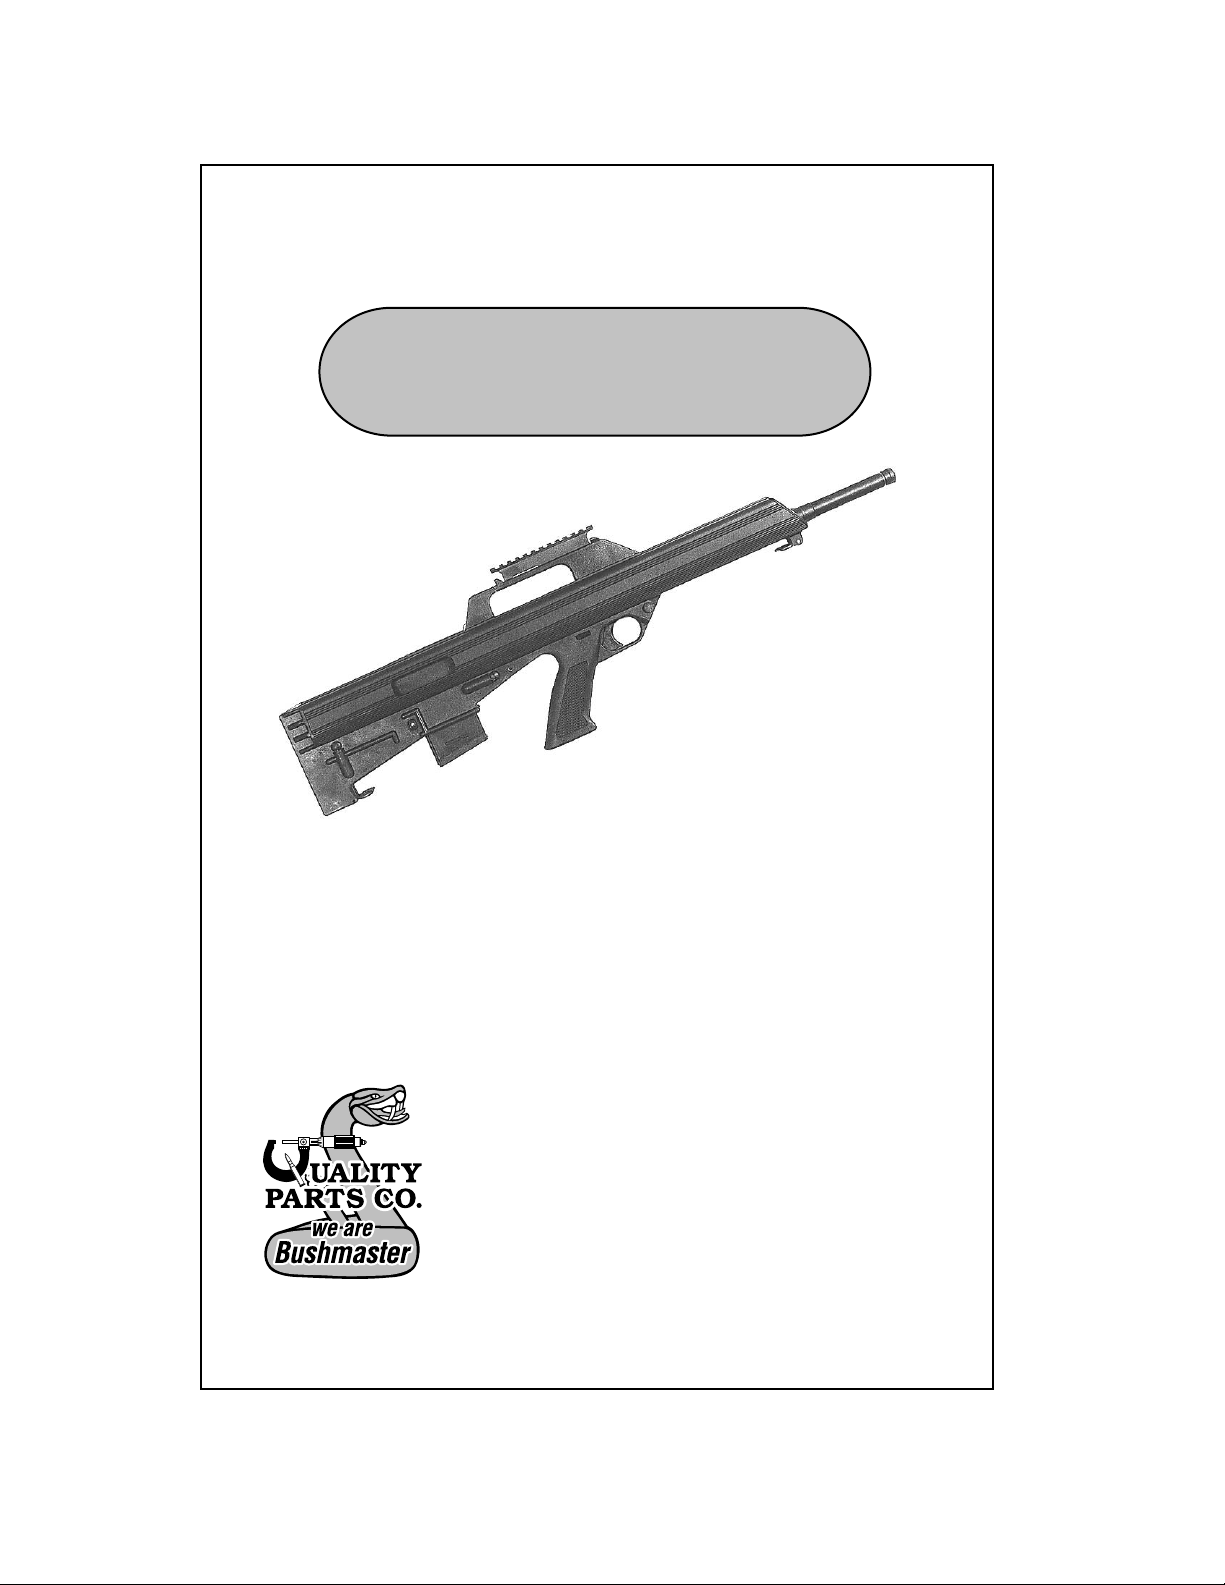
Bushmaster Bullpup Operation & Safety Instructions
Downloadable version - July 1999
BUSHMASTER
M17S Bullpup
OPERATION
SAFETY
INSTRUCTIONS
Bushmaster Firearms, Inc.
Quality Parts Co.
P.O. Box 1479
999 Roosevelt Trail
Windham, Maine 04062
Customer Service: 1 800 883 6229
Orders:1 800 998 SWAT • 1 207 892 3594
®
AND
Part Number 30-962
Page 2

Bushmaster Bullpup Operation & Safety Instructions
Downloadable version - July 1999
WARNING!
THINK
SAFE
Semi-automatic rifles are classified as FIREARMS or DANGEROUS
WEAPONS and are sold by Bushmaster Firearms, Inc. with the
specific understanding that we are not responsible in any manner
whatsoever for their improper or negligent handling or resale under
local laws and regulations. Bushmaster Firearms, Inc. shall not be
responsible in any manner whatsoever for malfunctioning of the
firearm or for physical injury or property damage resulting in whole or
in part from:
1. Criminal or negligent discharge
2. Improper or careless handling
3. Unauthorized modifications
4. Defective, improperly loaded or reloaded ammunition
5. Corrosion
6. Neglect
7. Other influences beyond our immediate control.
DANGEROUS WEAPONS
This limitation applies regardless of whether liability is asserted on
the basis of contract, negligence or strict liability (including any failure
to warn.) Under no circumstances shall Bushmaster Firearms, Inc. be
liable for incidental or consequential damages such as loss of use of
property, commercial loss, and loss of earnings or profits.
WARNING!
THINK
SAFE
Always wear adequate shooting glasses, ear plugs or earmuff type
protection when discharging firearms. Ensure that persons close to
you are similarly protected.
Unprotected eyes may be injured by powder gas, carbon residue,
lubricant, metallic particles or similar debris which may emanate
occasionally from any firearm in normal use.
Without ear protection, repeated exposure to shooting noise may
lead to cumulative permanent hearing loss.
Page 2
EYE AND EAR PROTECTION
Page 3

Bushmaster Bullpup Operation & Safety Instructions
Downloadable version - July 1999
LIMITED WARRANTY...
It is our intention under normal conditions to warrant any and all
defects in parts, material or workmanship which affect the satisfactory
operation of the rifle. Our warranty obligation is limited to the repair or
replacement of any part(s) which is returned to us and is determined by
us to be defective. We assume no liability for any incidental or
consequential damage. Our warranty is made to the original owner and
is not transferable. The following items are specifically excluded from
coverage under this warranty.
(A) Normal wear of the protective finishes, and of all metal or plastic
parts;
(B) Damage or malfunction resulting from accident, negligence,
misuse or unauthorized repair or alteration;
(C) Damage or malfunction resulting from barrel obstructions;
(D) Damage or malfunction resulting from use of other than factory
ammunition.
THINK
SAFE
FIREARM SAFETY IS UP TO YOU!
1. ALWAYS KEEP MUZZLE POINTED IN SAFE
DIRECTION
2. UNLOAD FIREARM WHEN NOT IN USE
3. DON'T RELY ON YOUR GUN'S “SAFETY”
4. BE SURE OF YOUR TARGET AND WHAT IS
BEYOND IT
5. USE CORRECT AMMUNITION
6. IF RIFLE FAILS TO FIRE, HANDLE WITH CARE
7. WEAR EYE AND EAR PROTECTION
8. ENSURE BARREL IS CLEAR OF OBSTRUCTIONS
9. DON'T ALTER OR MODIFY YOUR GUN
10. LEARN ITS MECHANICAL AND HANDLING
CHARACTERISTICS
11. SERVICE OFTEN
Page 3
Page 4

Bushmaster Bullpup Operation & Safety Instructions
Downloadable version - July 1999
SAFETY WARNINGS !
THESE ARE ALL IMPORTANT SAFETY WARNINGS.
THINK
SAFE
THINK
SAFE
THINK
SAFE
PLEASE NOTE WARNING SYMBOLS FOUND
THROUGHOUT THIS MANUAL.
These safety warnings are for your protection as well as the
safety of others.
Disregarding information in this manual may result in
serious injury or death.
Do not attempt to load or use any firearm until you have
read and understand the information contained in this
manual. Before handling this firearm, learn how it
operates - and how to maintain it. This includes knowing
its basic parts, how the safety features operate, how to
safely open and close the action and how to safely load and
unload ammunition.
Page 4
THINK
SAFE
THINK
SAFE
THINK
SAFE
Improper use and handling could cause severe injury or death
to you or those around you.
Be certain this owner's manual is available for reference and
is kept with this firearm if transferred to another party. If
the manual is lost or misplaced, write or call for a
replacement copy to:
Bushmaster Firearms, Inc.
999 Roosevelt Trail, Windham, Maine 04062
Customer Service Tel.: 1 800 883 6229
As the owner of this firearm, you must undertake the full
time responsibility of safe firearms handling for your own
safety and the safety of others.
Page 5

Bushmaster Bullpup Operation & Safety Instructions
Downloadable version - July 1999
• Keep all firearms and ammunition out of reach of children.
• Store firearms and ammunition separately.
THINK
SAFE
THINK
• Never store a loaded gun and always separate Upper and
Lower Receiver and remove Bolt Carrier.
• Never leave a loaded firearm unattended.
• Never carry a loaded firearm in a vehicle.
A firearm's safety button is a mechanical device which can
never replace safe gun handling.
SAFE
Always point the muzzle of your firearm in a safe direction,
regardless of whether the firearm is loaded or unloaded.
THINK
SAFE
It's your responsibility to obtain proper training to use and
maintain your firearm. Certified and reputable safety
courses and instructions are offered by the National Rifle
THINK
SAFE
THINK
SAFE
Association and state and local organizations. You also
have a responsibility to know and obey all local, state and
federal laws governing the use, possession and transport-
ation of firearms.
TREAT EVERY FIREARM AS IF IT WERE LOADED.
Give your firearm to someone with the action open and in
the “safe” position, after you verify that the firearm is
unloaded. Insist on the same procedure when receiving a
firearm. Learn the location and operation of all safety
features.
SAFE GUN HANDLING DEPENDS ON YOU!
Page 5
Page 6

Bushmaster Bullpup Operation & Safety Instructions
Downloadable version - July 1999
CONTENTS:
A. GENERAL DESCRIPTION - Page 7
1. Type of Weapon
2. Technical Data
3. Ammunition
4. Main Groups
B. SAFETY MODE SELECTION - Page 8
C. STRIPPING AND ASSEMBLING - Page 8
1. Stripping
2. Assembling
3. Check Function
4. Cleaning
D. LOADING, FIRING AND
UNLOADING WEAPON - Page 11
1. Loading
2. Firing
3. Loading after last round fired
4. Unloading
E. PARTS LIST AND EXPLODED DRAWING - Page 14
F. SERVICE INFORMATION/INSTRUCTIONS - Page 16
Page 6
Page 7
Bushmaster Bullpup Operation & Safety Instructions
Downloadable version - July 1999
OPERATING INSTRUCTIONS
Read and understand this entire manual and its safety warnings
BEFORE firing the rifle.
THINK
SAFE
A. GENERAL DESCRIPTION
A1. Type of Weapon...
The Bushmaster M17S Bullpup is a gas operated Semi-Automatic rifle. It fires
from the locked bolt position and the design makes it a short, handy rifle with
high accuracy and reliability.
A2. Technical Data...
Caliber ............................................. 5.56mm (.223")
Overall Length ............................... 30 inches
Weight (empty) ............................. 8.2 lbs.
Barrel ................................................ chrome moly vanadium steel - 21.5" long
with chrome plated chamber and bore
Number of Grooves .................... 6 right hand (1 in 9") twist
Maximum Effective Range ........... 600 yds.
Magazine Capacity ......................... accepts all standard M16/AR15 magazines
A3. Ammunition...
All M193 type, M855 type, tracer ammunition, blanks and dummy rounds
produced in accordance with International or NATO standards may be used.
A4. Main Groups...
The Bushmaster M17S Bullpup generally consists of 4 main groups.
Additionally, accessories may be considered as a group but they are not dealt
with in this manual.
• Upper Receiver group
• Lower Receiver group
• Ignition Pocket group
• Bolt Carrier group
• Accessories
Page 7
Page 8
Bushmaster Bullpup Operation & Safety Instructions
Downloadable version - July 1999
B. SAFETY MODE SELECTION
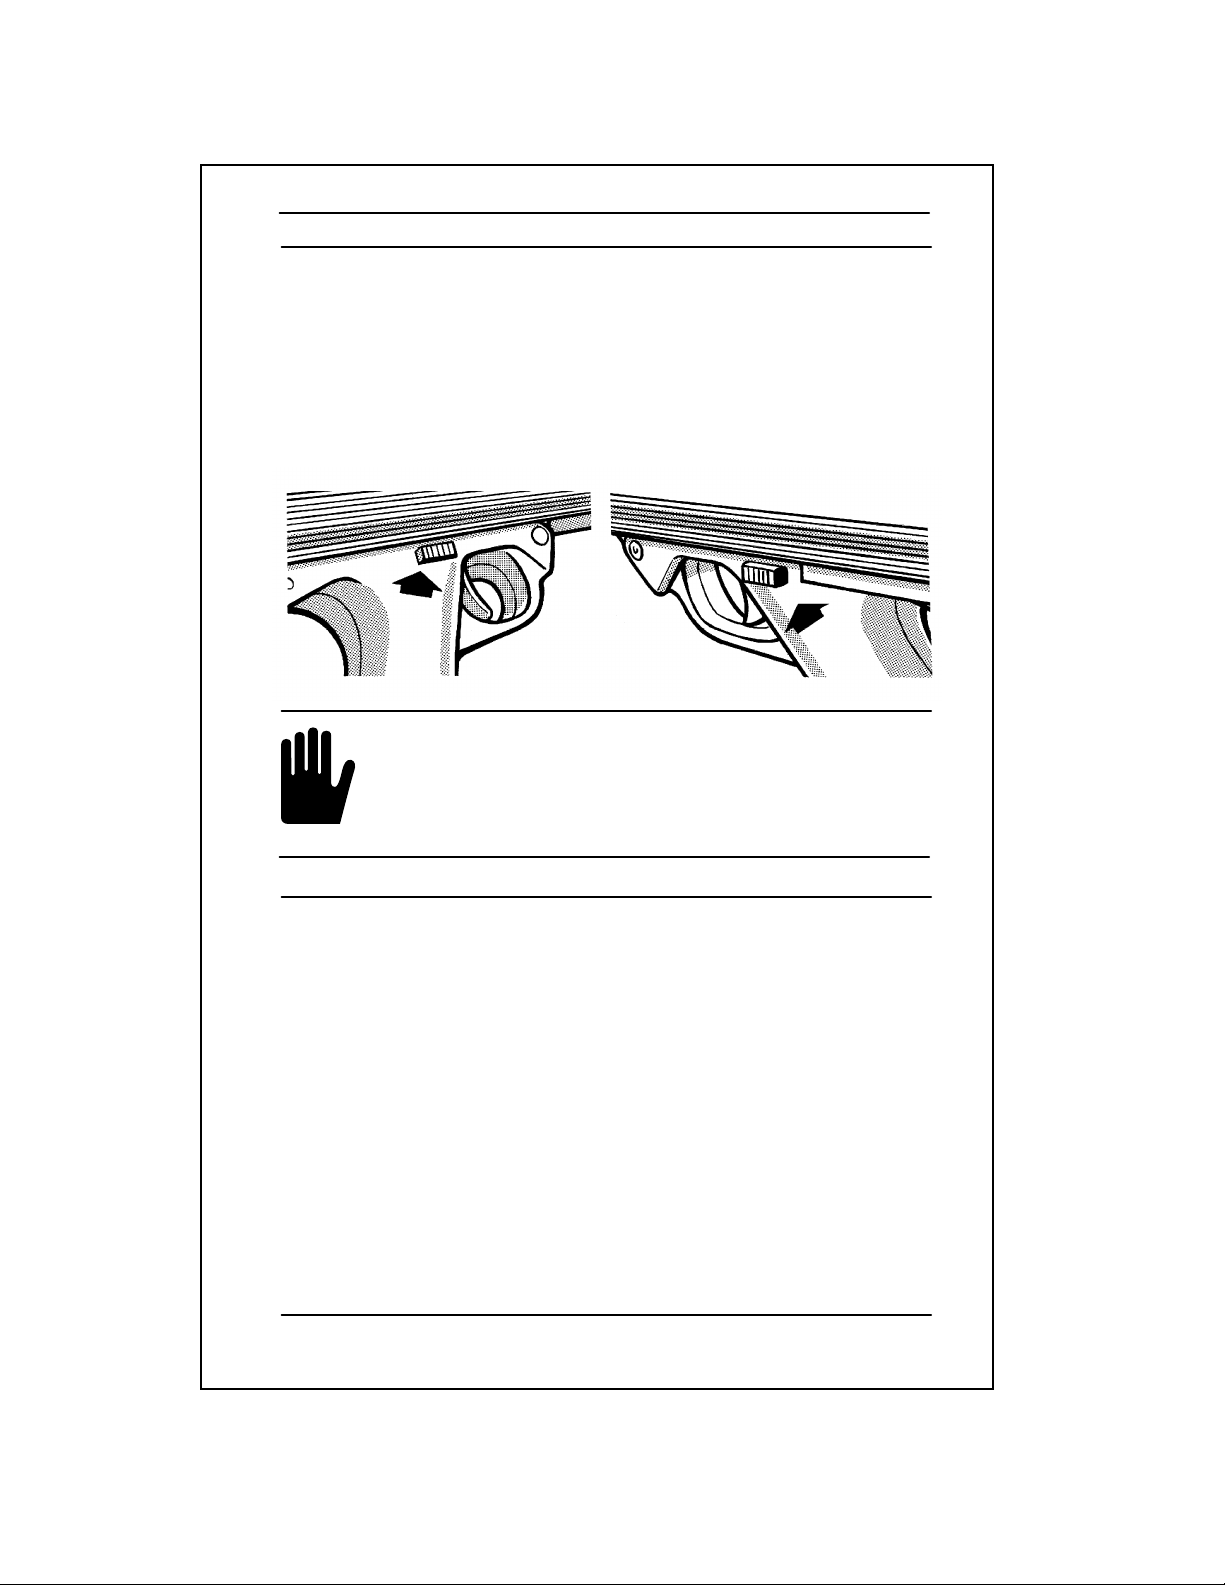
When the safety catch is pushed flush with the left side of the Lower Receiver,
a WHITE line can be seen on the right side of the Lower Receiver.
The rifle is now in SAFE mode.
When the safety catch is pushed flush with the right side of the Lower Receiver,
a RED line can be seen on the left side of the Lower Receiver.
The rifle is now in FIRE mode.
WHITE = SAFE RED = FIRE
BEFORE STRIPPING, the rifle must be unloaded and placed in
SAFE mode.
The Safety is located on the left side of the Lower Receiver.
THINK
Push safety in. A WHITE line will be visible on the RIGHT side
SAFE
of the lower receiver.
C. STRIPPING AND ASSEMBLING (for cleaning purposes)
C1. Stripping...
Step 1.
remains in chamber.
Step 2.
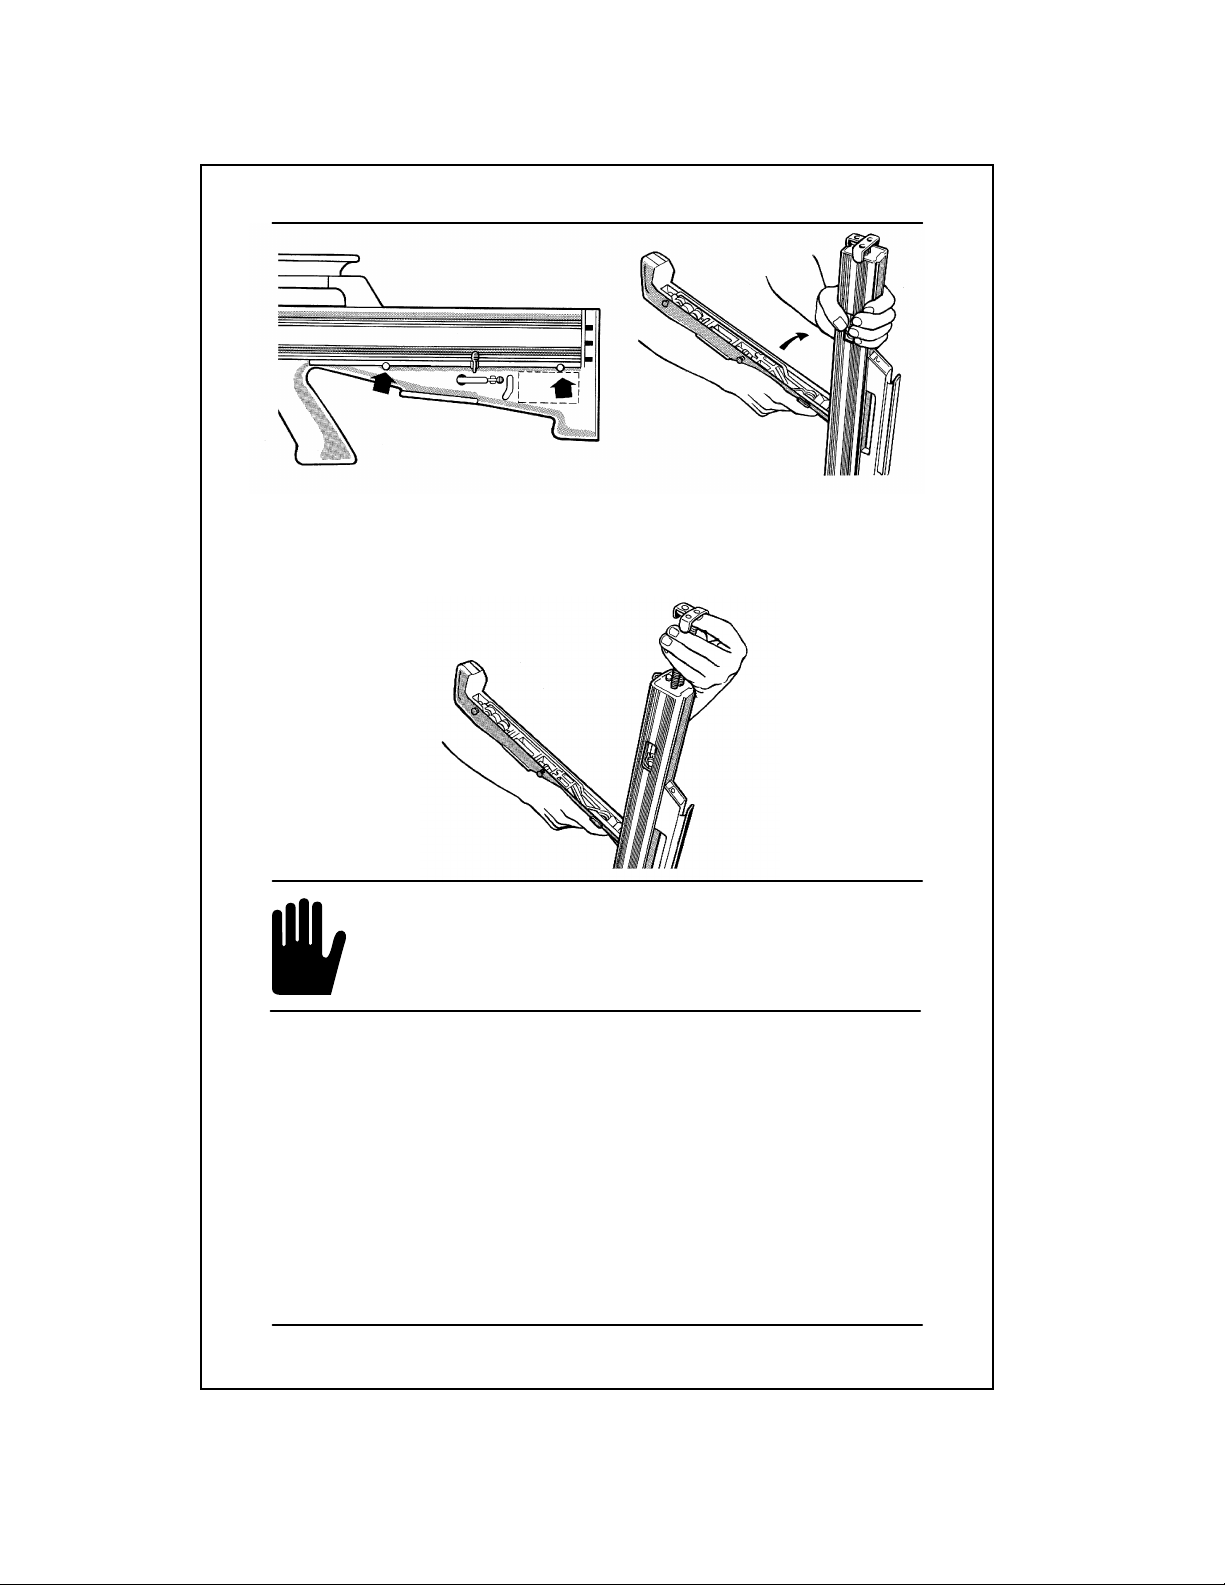
Place right hand on the pistol grip, fingers
with the left hand. Press in the heads of the two pins on the left hand side of the
Lower Receiver.
The upper receiver group can now be swung open - exposing internal
mechanisms.
Note:
to its maximum swing position. Damage may occur to hinge or pin.
Unload rifle. Remove the Magazine. Check to ensure no round
Open the Rifle.
away
from trigger. Cock the rifle
Do not over pressure the hinge pivot pin by forcing the upper receiver
Page 8
Page 9
Bushmaster Bullpup Operation & Safety Instructions
Downloadable version - July 1999
Step 3.
Holding the pistol grip, use the thumb and two fingers of the left hand to grip
the exposed action plate. Withdraw bolt carrier by pulling up and out.
Do not strip Bolt Carrier any further.
THINK
SAFE
C2. Assembling Bolt Carrier Group to Upper Receiver...
Removing the Bolt Carrier Group.
Removing the Ignition Pocket is a complex operation.
It is recommended that it be carried out only by a qualified
gunsmith.
Step 1.
open position, hold the bolt carrier by the action plate with the thumb and the
two fingers of the left hand.
Lower the bolt carrier into the Upper Receiver with the cam pin head located
in the cam track of the Upper Receiver. Ensure breech bolt enters the slots of the
barrel assembly. Align the three legs of the action plate inside the Upper Receiver.
Assembly is now complete.
With the right hand on the pistol grip and the Upper Receiver in the
Page 9
Page 10
Bushmaster Bullpup Operation & Safety Instructions
Downloadable version - July 1999
Step 2.
Closing the Rifle
Cock the hammer onto the sear with the left hand. Hold the end of the upper
receiver with the left hand with the thumb pressing on the action plate to keep it
level with the end of the receiver.
Swing the upper receiver down until the action plate is retained by the face of
the lower receiver. Remove thumb and fully close the rifle.
Press in the two headed pins on the right side of the Lower Receiver until the
heads are against the Lower Receiver. Rifle is now closed.
WARNING!
Do not insert full magazine until the next function
is completed.
THINK
SAFE
C3. Check Function...
ENSURE RIFLE IS POINTED IN A SAFE DIRECTION.
safety to
hitting the firing pin). Push the safety to
FIRE
position and pull the trigger. You must hear a click (hammer
SAFE
position. Now try to pull the
Push the
trigger - it must not move.
Magazine Check...
With the right hand on the pistol grip push in the magazine with the left hand.
Push it upward until a click is heard. Check by pulling down on the magazine. It
should not be able to be removed.
C4. Cleaning...
1. Barrel
Open rifle and remove bolt carrier. Using a standard type cleaning kit, pull the
patch through the barrel using cleaning fluid. Repeat until barrel is clean. Use a
dry patch to clean the dirty fluid from barrel.
Note: Clean the barrel from the chamber towards muzzle.
After cleaning, make sure barrel is free of obstructions and
excessive lubricant.
THINK
SAFE
Page 10
Page 11
Bushmaster Bullpup Operation & Safety Instructions
Downloadable version - July 1999
2. Plastic Parts and Metal Parts
Plastic parts and the upper receiver are cleaned with a soft rag. If necessary,
use water for cleaning. The bolt carrier and ignition pocket are cleaned with a
soft brush.
To increase the life of the rifle and ensure proper functioning, some metal
parts have to be oiled slightly after cleaning. Use only lubricants specially designed
for firearms. Avoid abrasives. Oil outside metal surfaces very lightly. Oil bolt
carrier as follows:
• 2 drops of oil per guide rod.
• 2 drops of oil into cam slot.
After any cleaning, disassembly or accessory installation,
the rifle should be re-checked for proper functioning
before firing.
THINK
SAFE
Clean and inspect rifle periodically to ensure it remains in good condition.
Clean after use, especially if it has been exposed to moisture.
Before loading, slide safety to SAFE position.
During loading, never allow fingers or any objects to contact
THINK
SAFE
the trigger. Keep the muzzle pointed in a safe direction at
all times.
Inspect the chamber - the rear portion of barrel which
contains the bullet - and bore of the barrel for any obstruction, excessive oil or grease. Failure to do so may result in gun
damage and, or personal injury when rifle is fired. Do not load
until ready for use. Unload firearm when shooting has been
completed. The safety slide should always be in the SAFE
position whether the firearm is loaded or not.
D. LOADING, FIRING AND UNLOADING...
D1. Loading...
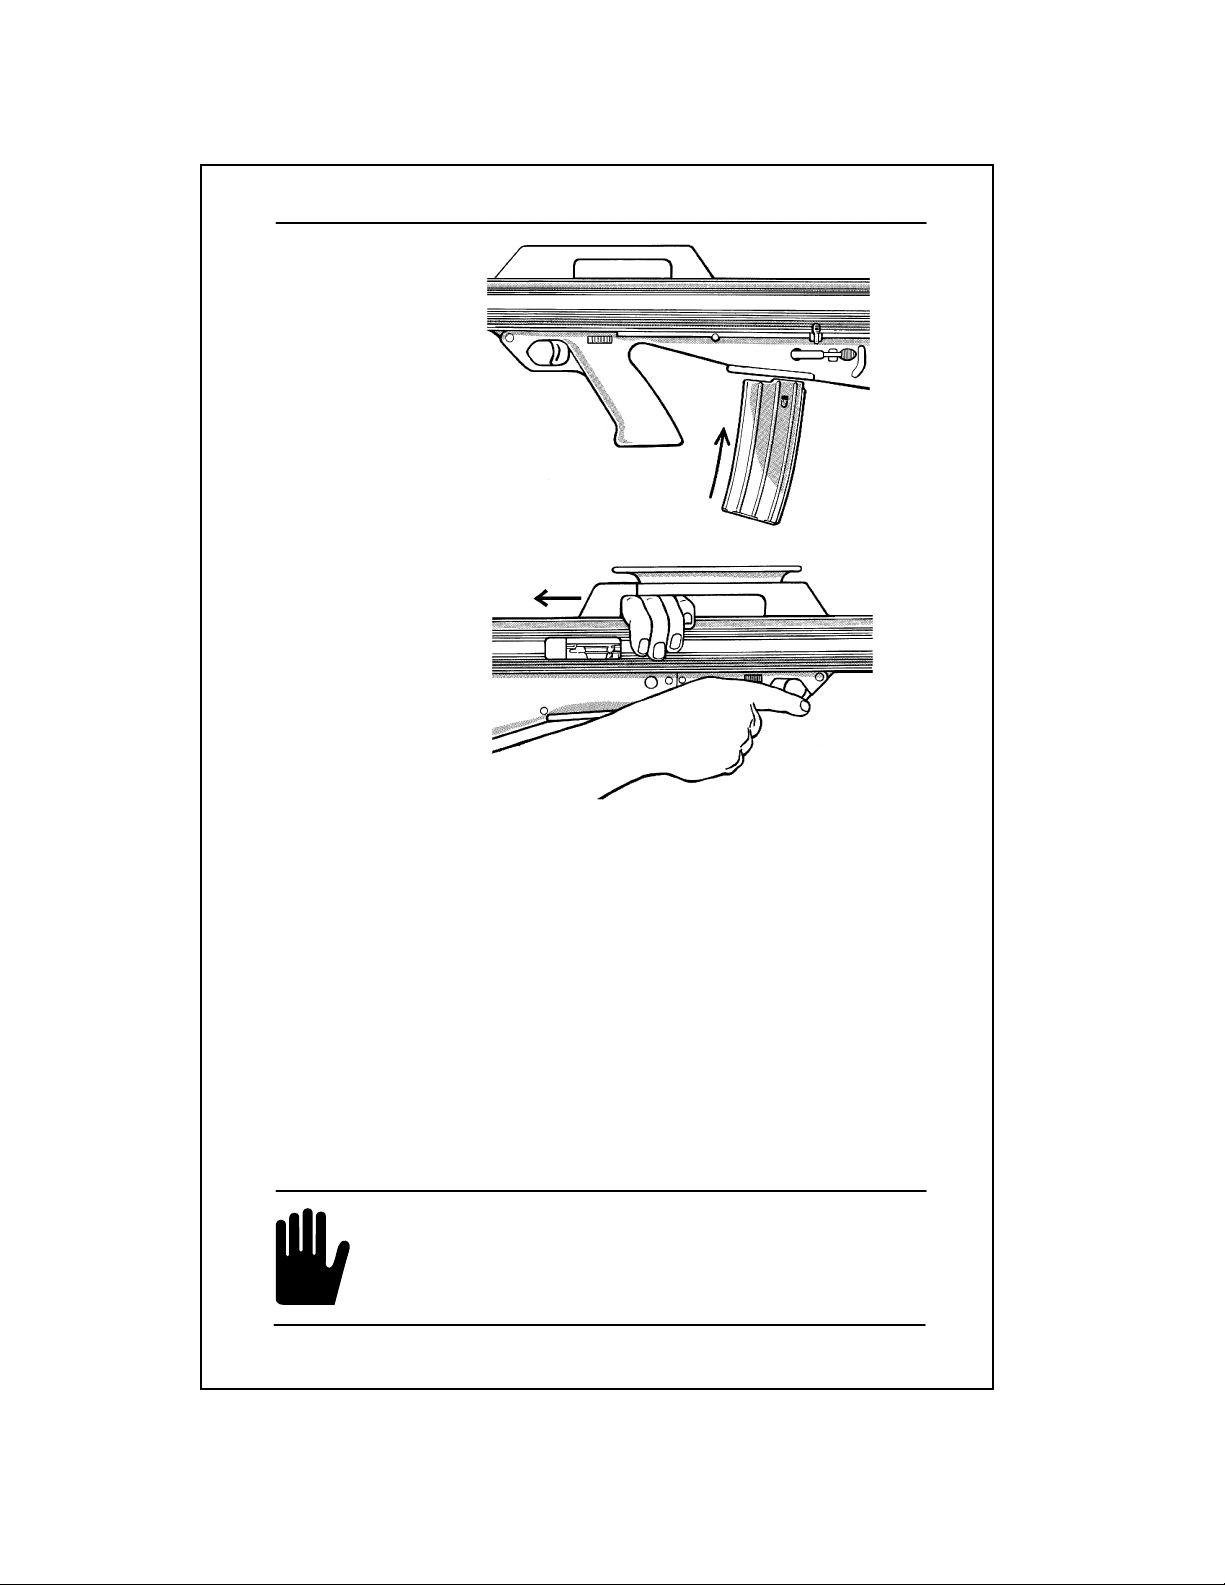
Insert a loaded magazine into magazine well. The magazine is home once an
audible click is heard and when pulling downward, the magazine cannot be
removed.
See illustration on next page.
Page 11
Page 12
Bushmaster Bullpup Operation & Safety Instructions
Downloadable version - July 1999
Inserting Magazine...
Cocking...
Place left hand in the space between the carry handle and slide rearward as far
as possible. When the furthermost point of this motion is reached, remove hand
to allow the cocking handle to slide forward. The cocking handle will
automatically return to its previous position to form part of the carry handle.
This cocks the action and makes the gun
NOTE:
is required. Cocking handle stays in place when firing.
D2. Firing...
To fire the rifle, slide the safety to
Aim at intended target and pull the trigger through its full travel towards you.
THINK
SAFE
Page 12
This action is non-reciprocating. A once-only cocking action is all that
Aim rifle only at your intended target.
SAFE GUN HANDLING DEPENDS ON YOU!
READY TO FIRE.
FIRE
position.
Page 13
Bushmaster Bullpup Operation & Safety Instructions
Downloadable version - July 1999
Should the ammunition fail to fire, keep the rifle pointed in a
safe direction. Slide safety to SAFE position. Do not refire
shell. Slide cocking handle rearwards. The problem round
THINK
will be ejected and a new round automatically selected.
SAFE
NOTE: Spent cartridges are ejected from the right of the rifle through the
ejection port. Be sure that all observers are clear of the path of ejection as empty
cartridges are thrown out with considerable force and are very hot.
If a noticeable difference in sound or recoil is experienced,
STOP FIRING! Move safety slide to SAFE. Remove the
magazine from the body and cock the action to remove any
THINK
live rounds. Inspect the rifle for damage or obstruction in the
SAFE
barrel or bore. If you have recurring misfires, have the rifle
inspected by a qualified gunsmith.
D3. Loading after Having Fired the Last Round...
After having fired the last round of a magazine, the bolt carrier will be held in
its rear position by the bolt catch. You can now see that you have an empty
magazine and that the chamber is clear.
With the pistol grip in the right hand, select SAFE mode. Remove the magazine
and replace with a fully loaded one. Press the bolt release button. The bolt carrier
will automatically travel forward to the locked bolt position, loading a round into
the chamber.
D4. Unloading...
Move safety slide to SAFE. Locate the magazine release button on the side of
the rifle. Press button, at the same time removing magazine in a downward
motion.
Keep fingers away from trigger when removing the magazine.
Turn rifle over and cock the action several times to see if any live ammunition
is remaining in the chamber.
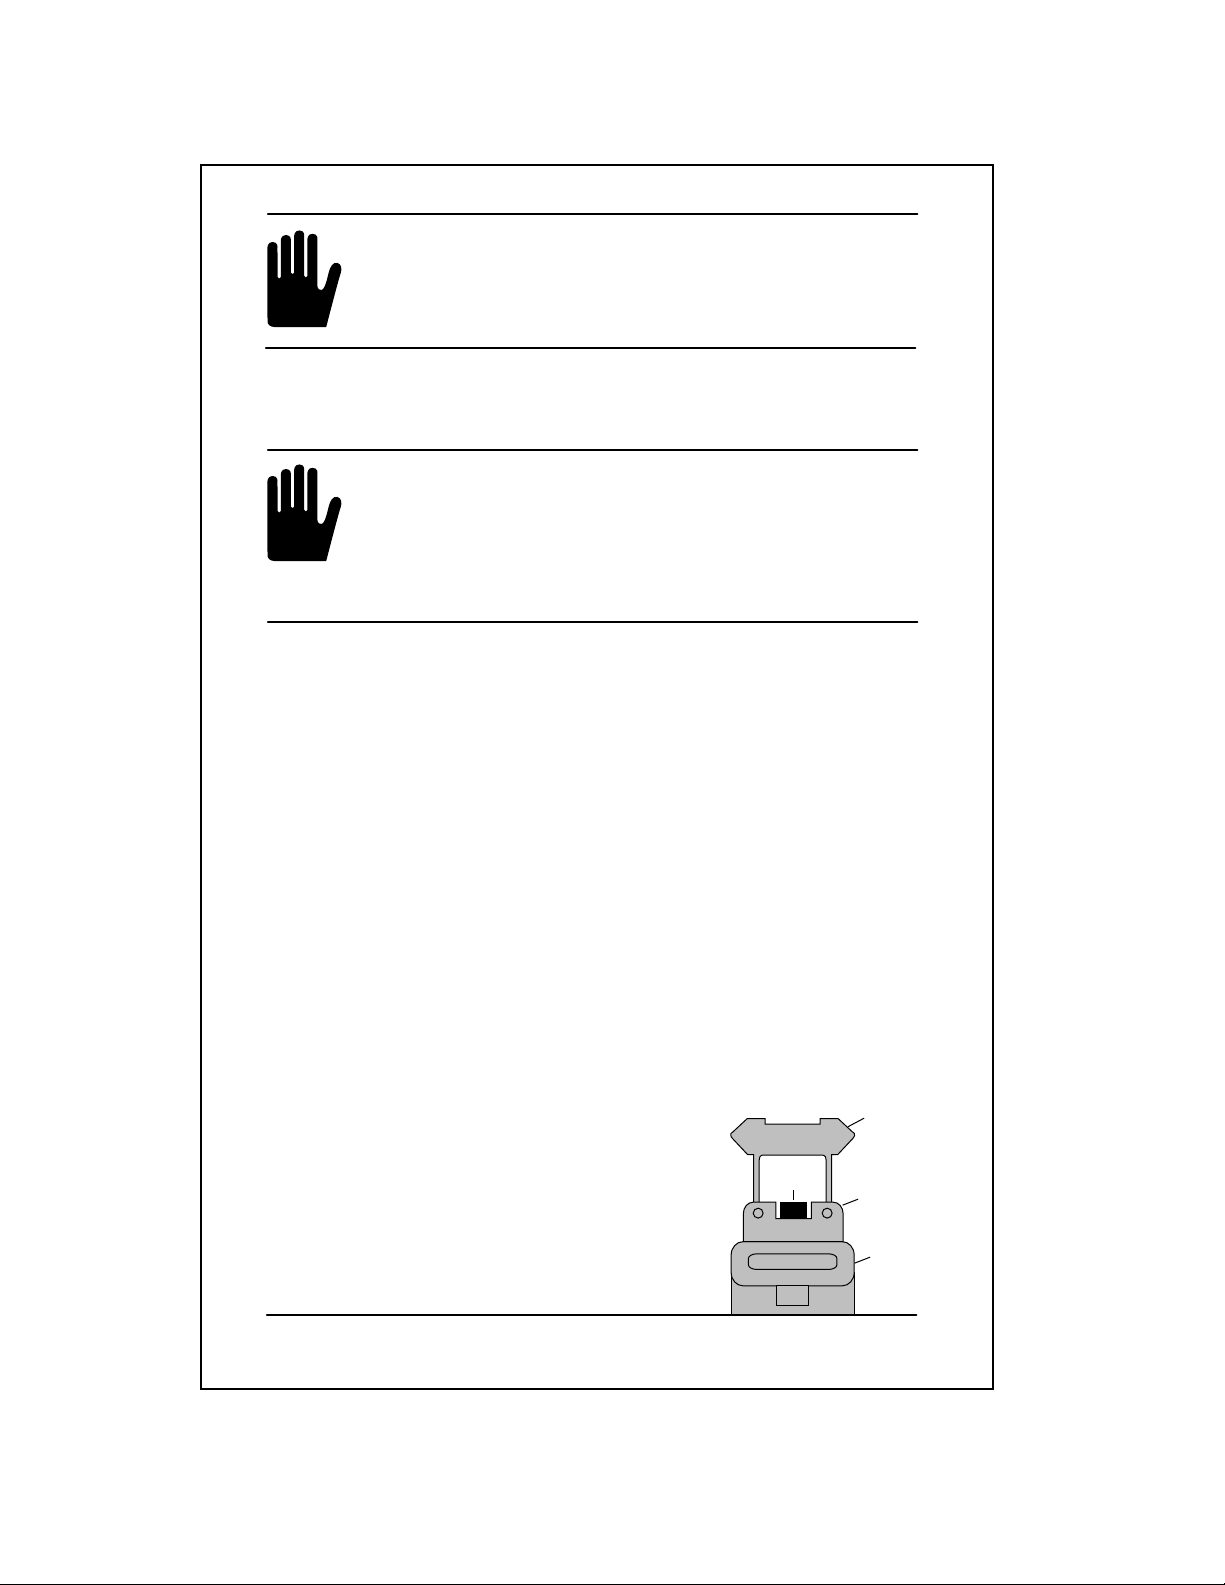
Note:
The Bushmaster M17S is designed for use
with either a telescopic sight or the rifle's open iron
“field sights”. A simulated “shooter's view” of
sighting with the field sights is shown at right. If you
depend on telescopic sights, it may be advisable to
Blade
Front
Sight
Scope
Mount
Notch
Rear Sight
Charging/
Carrying
Handle
carry a spare scope due to their inherent delicacy.
Page 13
Page 14
Bushmaster Bullpup Operation & Safety Instructions
Downloadable version - July 1999
0.50
0.95
6.95
0.50
0.50
3.50
4.95
19.95
30-408 (MS19060-4808) - A-2 Ball Bearing
30-409 - Hinge Pin Spring
30-400a - Hinge Pin Assembly (400+408+409)
30-410 (8448585) - Tkdwn Pin Detent (2 per gun)
30-411 (8448586) - Tkdwn Pin Det. Spring (2)
30-413 - Hammer
30-414 - Hammer Spring
30-415 - Pivot Pin (2 per gun)
1.00
5.95
1.00
9.00
7.95
11.95
3.00
19.95
0.50
2.50
0.95
14.95
11.95
10.95
30-417 - Sear
30-418 - Disconnector
30-419 - Disconnector Spring
30-420 - Ignition Pocket
2.00
19.95
0.50
64.95
0.95
30-430 (8448571) - Sling Swivel (2 per gun)
30-434 - Rear Sling Swivel Roll Pin
30-440 - Ignition Pocket Retaining Clip
6.95
0.80
0.50
6.00
6.00
0.50
0.50
0.50
2.95
1.95
0.50
30-441 - Bolt Catch
30-442 - Ambi. Magazine Release
30-443 (8448633) - Bolt Catch Spring
30-444 (8448634) - Bolt Catch Plunger
30-445 (MS16562-119) - Spring Pin (2 per gun)
30-447 (8448638) - Magazine catch
30-448 - Magazine Button
30-449 (8448637) - Magazine Catch Spring
0.95
4.95
1.95
0.50
10.95
75.00
0.80
12.95
.50
4.95
0.95
30-451 - Takedown Pin (2 per gun)
30-452 - Front Sling Swivel Rivet
30-962 - Operator's Manual
5.00
1.95
14.95
29.95
195.00
89.95
Major Assemblies:
30-905 - Barrel /Gas Housing Sub-Assembly
30-925 - Stripped Lwr. Rec./Pistol Grip Asmbly.
30-965 - Field Repair Kit (described below)
*
2.00
4.95
0.50
4.95
30-216 - Trigger Roll Pin
30-217 - Safety
30-218 - Trigger Cam
30-219 - Trigger Cam Roll Pin
30-221 - Trigger Bar
30-222 - Cover Plate
30-224 - Cocking Spring
30-230 - Scope Mount
30-231 - Rail
30-232 - Rail Retaining Screw (4 per gun)
30-301 - Breech Bolt
1.00
1.95
2.50
0.95
18.95
Bushmaster M 17 S Parts List:
30-103 - 1/4 High Collar Lock Washer
30-104 -Thrust Washer
30-105 - Barrel Extension Retaining Screw
30-106 - Gas Housing
30-107 (9349054btp) - Taper Pin (2 per gun)
Page 14
9.95
14.95
30-108 - Piston
9.95
15.95
30-109 - Gas Cylinder
30-110 - Link Rod
30-111 - Operating Rod
30-302 (MS16562-98) - Ejector Roll Pin
30-303 (8448512 - Extractor Cartridge
30-304 (8448513) - Extractor Pin
30-305 (8448755sp) - Extractor Spring
30-306 - Firing Pin
30-307 - Firing Pin Spring (deleted 1998)
30-308 - Cam Pin
30-309 - Bolt Carrier
30-310 (8448515) - Ejector Cartridge
30-311 - Firing Pin Retaining Pin
30-312 (8448516) - Ejector Detent Spring
30-313 - Action Plate
30-314 - Action Rod (2 per gun)
30-315 - Action Spring (2 per gun)
3.00
6.95
5.00
2.00
2.50
8.00
2.00
2.00
2.00
20.00
30-112 - Operating Rod Spring
30-113 - Sleeve Piston
30-114 - Handguard Cap
30-115 - Lock Nut (2 per gun)
30-116 (8448577) - Lock Washer
30-118 - Sight Base Screw
29.95
119.95
30-201 - Upper Receiver - Stripped
30-202-L - Barrel Extension Tube
30-204 - Sight Base
30-205 - Sight Base/Cocking Handle Screw (3)
5.00
15.95
30-206 - Spring Washer (4 per gun)
30-207 - Sight Base Screw
30-208 - Spring Retainer
30-209 - Cocking Handle
30-316 - Retainer - Action Rod (2 per gun)
30-317 - Bolt Carrier Cap Screw
30-318 - Buffer
30-321 (8448754) - Extractor Spring Insert
30-400 - Hinge Pin
9.95
2.00
2.00
2.00
19.95
30-210 - Cocking Plate
30-211 - Trigger Spring
30-212 (8448583) - Safety Detent Spring
30-213 - Safety Detent
Note: In later model Bullpups, the Bolt Carrier was redesigned to eliminate the Firing Pin Spring (Part # 30-307).
30-215 - Trigger
Page 15
Bushmaster Bullpup Operation & Safety Instructions
Downloadable version - July 1999
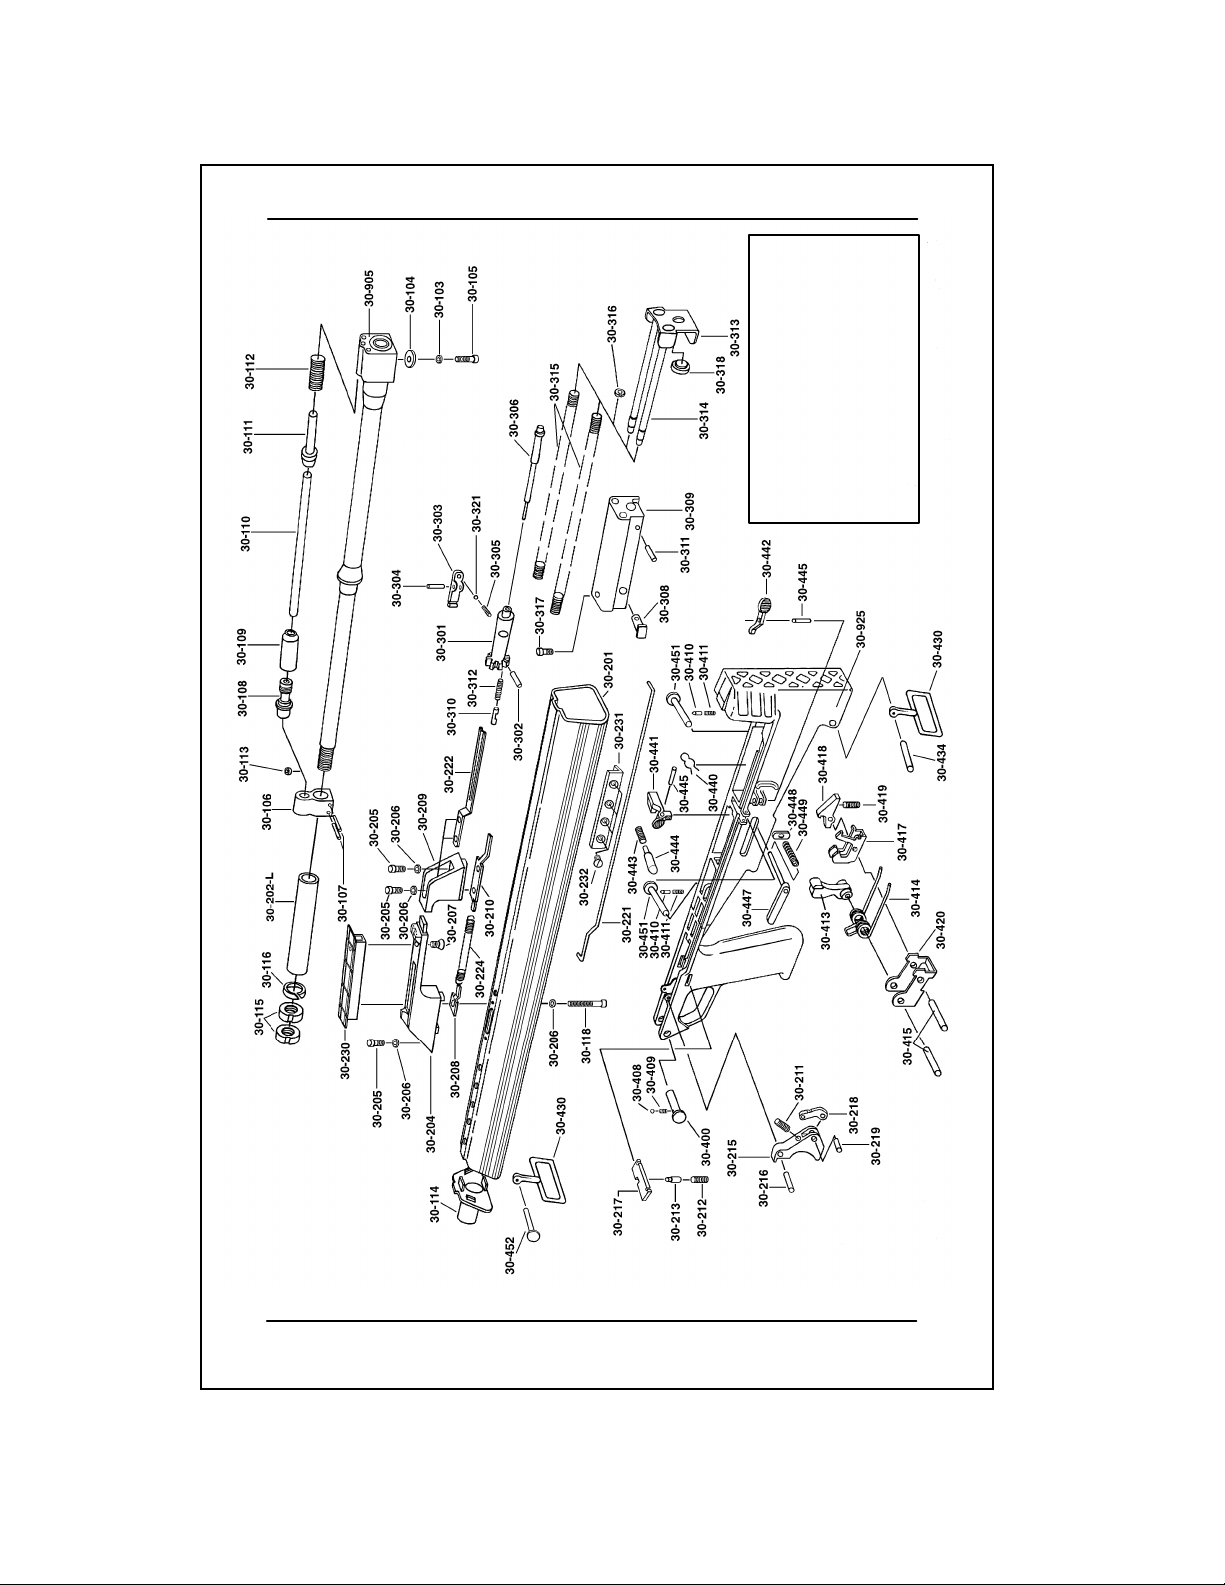
Field Repair Kit (Part # 30-965) Consists of:
*
1 - Extractor Spring Insert (#30-321)
2 - Tkdwn Pin Detents (#30 410)
2 - Tkdwn Pin Det. Springs (#30 411)
1 - Hammer Spring (#30-414)
1 - Disconnector Spring (#30-419)
1 - Ignition Pocket Ret. Clip (#30-440)
1 - Bolt Catch Spring (#30-443)
1 - Bolt Catch Plunger (#30-444)
1 - Magazine Catch Spring (#30-449)
1 - Ejector Roll Pin (#30-302)
1 - Extractor Cartridge (#30-303)
1 - Extractor Pin (#30-304)
1 - Extractor Spring (#30-305)
1 - Firing Pin (#30-306)
1 - Cam Pin (#30-308)
1 - Ejector Cartridge (#30-310)
1 - Firing Pin Ret. Pin (#30-311)
2 - Action Springs (#30-315)
2 - Action Rod Retainers (#30-316)
Bushmaster
M17S Bullpup
Exploded Drawing
Page 15
Page 16
Bushmaster Bullpup Operation & Safety Instructions
Downloadable version - July 1999
SERVICE INSTRUCTIONS
Should your firearm require service that necessitates shipping to an authorized
service center, please follow these instructions.
BE ABSOLUTELY SURE THAT
THE FIREARM IS NOT LOADED!
THINK
SAFE
Ship the firearm in a sturdy gun case or appropriate padded container. Do not
send accessories, scopes or optics with the firearm. Wrap all pieces, if
disassembled, in protective wrapping (foam or bubblepak). The Service Center
will not be responsible for damage to firearms that may occur during shipping.
Insure your rifle with the shipper.
Please include a letter stating the reason you are returning the firearm. Ship to
our Central Factory Service Center:
BUSHMASTER FIREARMS, lNC.
999 ROOSEVELT TRAIL
WINDHAM, MAINE 04062
Customer Service Telephone: 1 800 883 6229
PARTS ORDERS:
When ordering replacement parts, please provide the Model Number of Rifle
(M17S for the Bullpup), the Serial Number of Rifle, the Part Name and Part
Reference Number as indicated on the exploded view drawing (Pg. 15 of this
manual) - or you may order by phone. Call 1-800-998 SWAT. Our phone lines
are open seven days a week / 24 hours a day.
lf ordering by mail, please include your complete return address (not a Post
Office Box number) and phone number where you can be reached during normal
business hours.
Bushmaster Firearms, Inc. / Quality Parts Co.
999 Roosevelt Trail • P.O. Box 1479
Windham, Maine 04062 U.S.A.
Customer Service Tel: 1 800 883 6229
Orders: 1 800 998 SWAT • 1 207 892 3594
MADE WITH PRIDE
®
IN THE U.S.A.
Page 16
Part Number 30-962
 Loading...