

Page 1
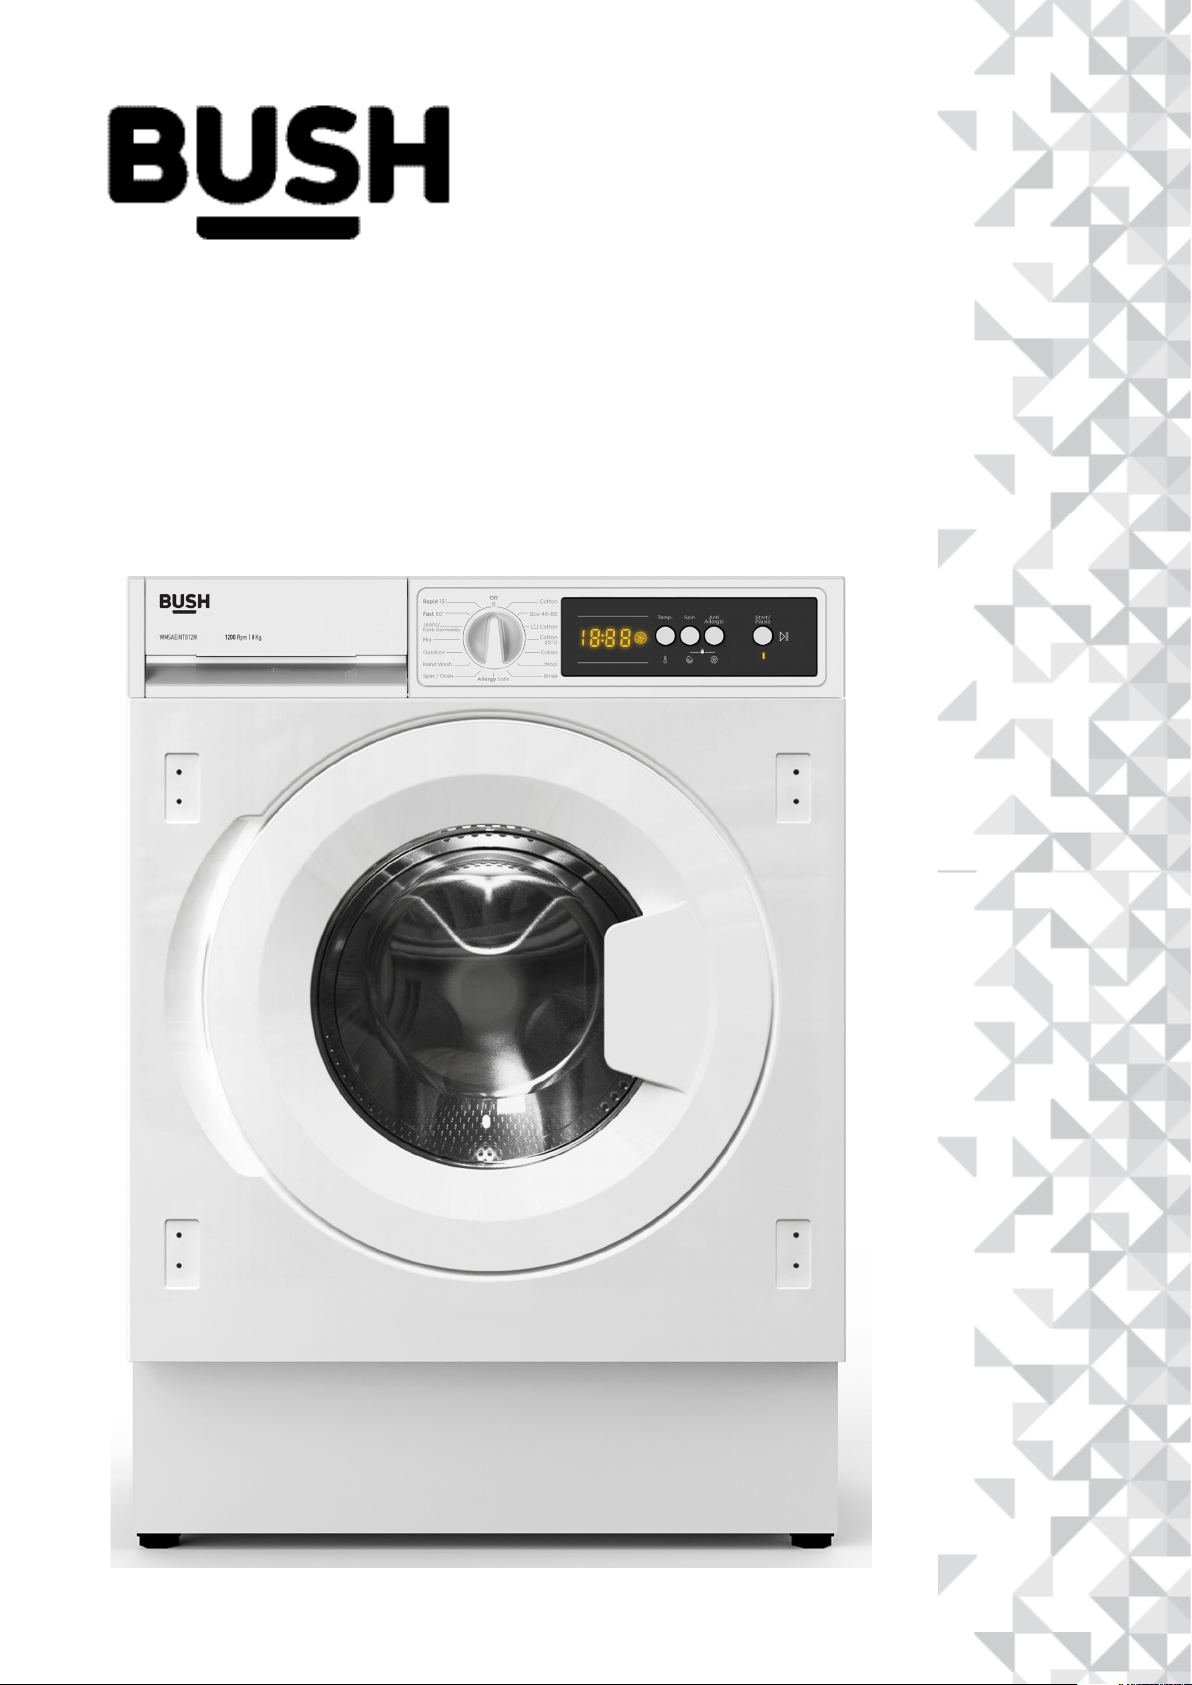
Instruction manual
Washing Machine
WMSAEINT812W
Page 2

You’ll soon be enjoying your new washing machine.
It all begins here, with your instructions. Don’t worry,
there’s nothing too technical coming up. Just simple,
step-by-step guidance to get you up and running
quickly. Sound good? Then let’s get started.
Help and Guidance
We’re here to help you get the most from your <washing machine>. Should you require
any guidance, a simple solution can often be found online at:
www.bush-support.com
If you still require further assistance, call one of our experts on 0345 257 7271.
If you require any technical guidance or find that your product is not operating as intended, a simple solution can often be found in the Troubleshooting section of these instructions,
If you require any technical guidance or find that your product is not operating as intended, a simple solution can often be found in the Troubleshooting section of these instructions,
or online at www.bush-support.com If you still require further assistance, call one of our experts on 0345 257 7271.
or online at www.bush-support.com If you still require further assistance, call one of our experts on 0345 257 7271.
2
Page 3

Contents
Safety information
1
Safety information 6
Getting to know your washing
2
machine
Ready? Let’s begin 10
Accessories 12
Installing your washing
3
machine
Installation requirements 14
Unpacking 14
Connections (electrical, water, gas) 15
Functions
4
Functions 18
Product support
7
Troubleshooting 38-39
Error Signals 40
Technical Specifications 41
Help and assistance 42
Disposal 43
Guarantee 44
Using your washing machine
5
First use of <washing machine> 30
Standard and advanced functions/use 31
Care and Maintenance
6
Cleaning 34
Maintenance actions 34
If you require any technical guidance or find that your product is not operating as intended, a simple solution can often be found in the Troubleshooting section of these instructions,
or online at www.bush-support.com If you still require further assistance, call one of our experts on 0345 257 7271.
3
Page 4

Page 5

Safety information
1
Page 6
Safety information
Important - Please read these instructions fully before
installing or operating your washing machine
Before use
• If the supply cord is damaged, it must be replaced
by the manufacturer, their service agent or similarly
qualified persons in order to avoid a hazard.
• The new hose-set supplied with the appliance are to
be used and that old hose-set should not be reused.
• This appliance can be used by children aged 8
years and above and persons with reduced physical,
sensory or mental capabilities or lack of experience
and knowledge if they have been given supervision or
instruction concerning use of the appliance in a safe
way and understand the hazards involved. Children
shall not play with the appliance. Cleaning and user
maintenance shall not be done by children without
supervision.
• Children should be supervised to ensure that they do
not play with the appliance.
• Pull out its plug from the power socket before
cleaning or maintenance.
• Make sure that all pockets are emptied.
• Pull out its plug and cut off water supply after the
operation.
• Pets and children may climb into the machine. Check
the machine before every operation.
• Glass door may be very hot during the operation.
Keep children and pets far away from the machine
during the operation.
• Take care that power voltage and frequency shall be
identical to those of washing machine.
• Dispose of all packaging carefully and responsibly.
• This appliance is for indoor use only. Only install in a
dry indoor environment.
• The appliance MUST be positioned on a firm level
base.
• Do not position the appliance where it is exposed
to direct sunlight or heat sources as this will age the
plastic and rubber components.
• Ensure all 4 packing bolts have been removed.
• Ensure the appliance is connected directly to a
domestic mains water supply.
• Warning: This washing machine MUST only be
connected to a cold water supply.
• Ensure all electrical connections are as stated in this
document.
• Ensure the appliance is plugged into a separate
earthed socket that is easily accessible.
• Ensure the power lead is not trapped under the
appliance.
• Do not connect the appliance to the power supply
until installation is complete.
• This appliance is for domestic/household use only
and is not suitable for commercial use.
• Check that the water hose joints and connections are
secure and there are no leaks. If the hoses leak, do not
use them until the leaks have been stopped.
• Do not forget that the packing material of your
machine may be hazardous for children.
• Do not use any socket with rated current less than
that of washing machine. Never pull out the power
plug with wet hands.
• To ensure your safety, the power cord plug must
be inserted into an earthed three-pole socket. Check
carefully and make sure that your socket is properly
and reliably earthed.
• Packing materials may be dangerous to the children.
Please keep all packing materials (plastic bags, foams
etc) far away from the children.
• The installation of this appliance is best carried out by
2 people.
If you require any technical guidance or find that your product is not operating as intended, a simple solution can often be found in the Troubleshooting section of these instructions,
or online at www.bush-support.com If you still require further assistance, call one of our experts on 0345 257 7271.
Safety information6
WARNING: The manufacturer is not responsible for
any damage or injury if the safety instructions are not
followed.
Page 7
Safety information
Important - Please read these instructions fully before
installing or operating your washing machine
During use
• Do not use a multiple socket or extension cord.
• Do not use if the power lead is damaged. It must be
replaced by the manufacturer, their approved service
agent or similarly qualified person. Customer Helpline:
0345 257 7271.
• Do not insert the plug into the power supply with wet
hands.
• Do not touch or use the appliance when barefoot or
with wet or damp hands.
• Do not open the detergent drawer during a wash
cycle.
• Do not touch the porthole (door) during the washing
cycle - it will get hot.
• Never force the machine door open while the
machine is running.
• Do not open the door if water is visible through the
porthole.
or the Customer Helpline: 0345 257 7271.
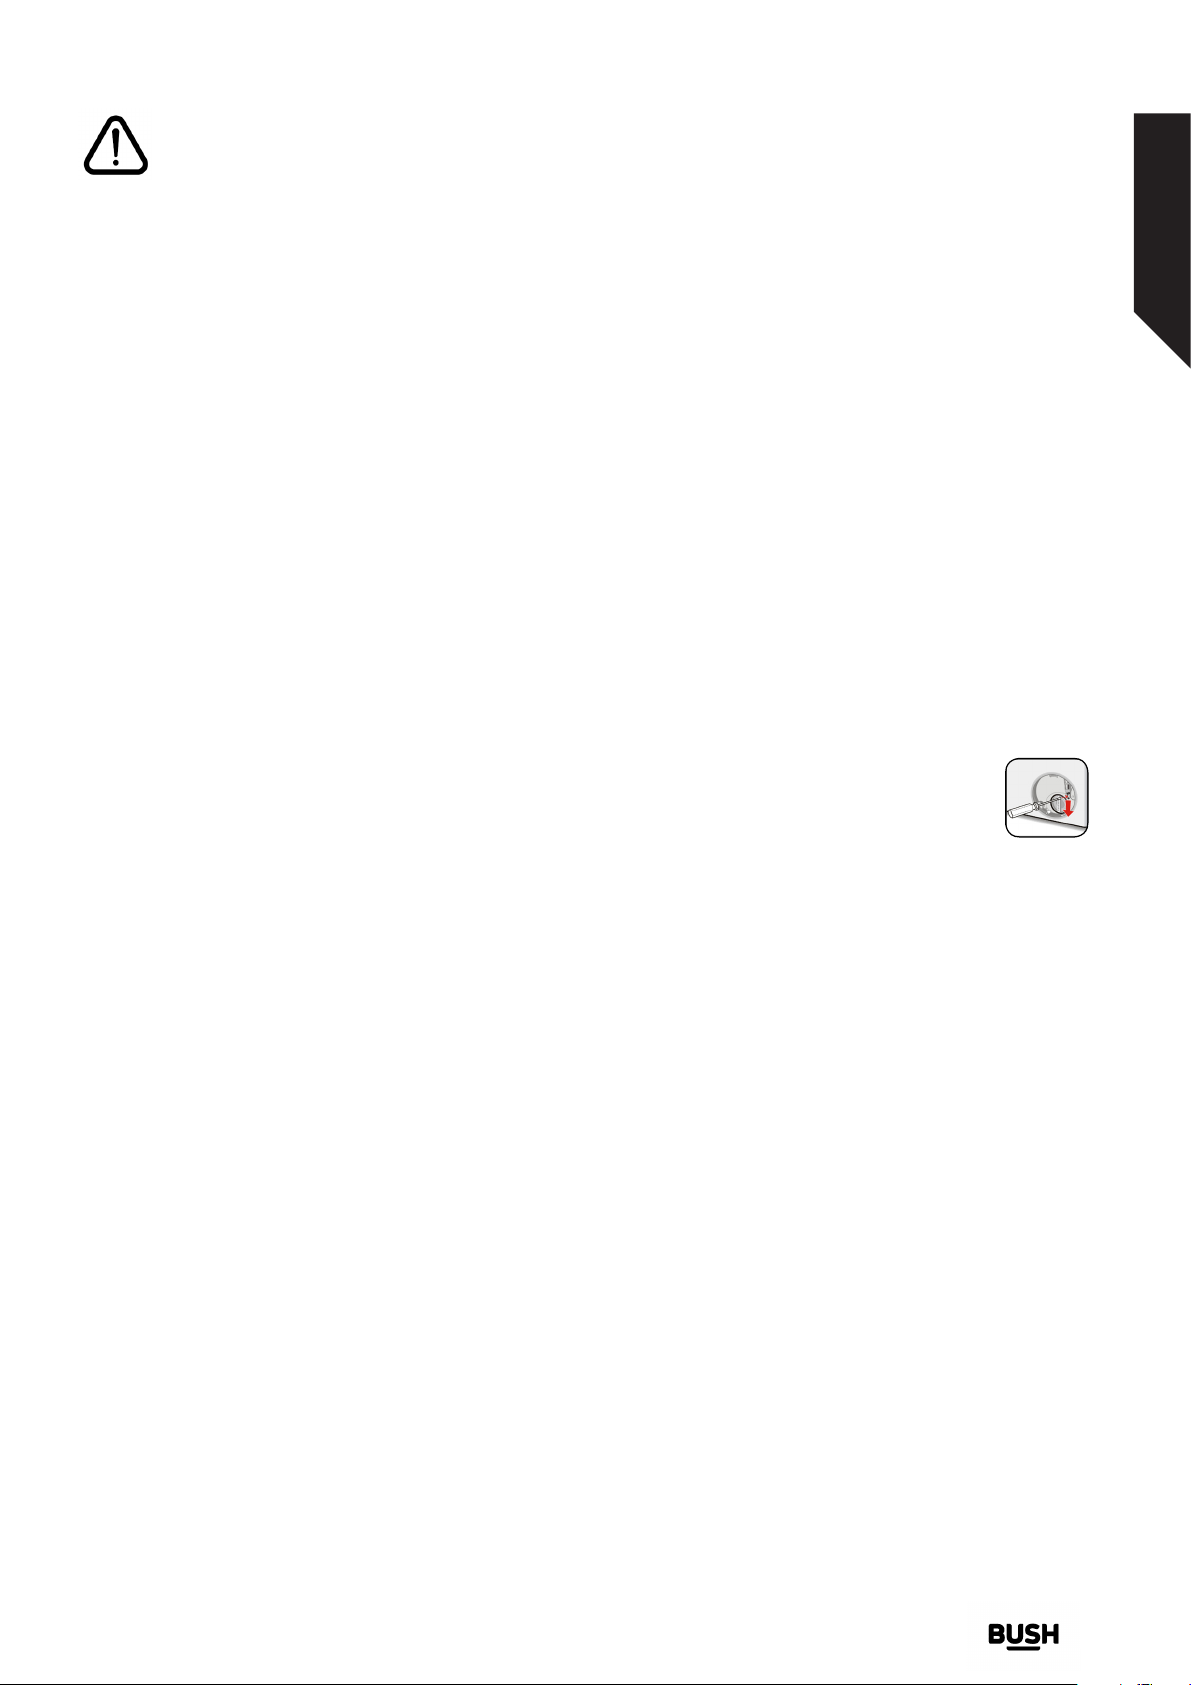
Door emergency opening function
When the machine is running, any power cut or when
the program is not yet complete, the door will remain
locked.
To open the door;
• Please turn off the machine. Take off the power plug
from the mains socket.
• To drain the waste water, follow the instructions given
in cleaning the pump filter section.(*)
• Pull the down the emergency opening mechanism
with the help of a tool and open the door at the same
time.
• Doors, move the emergency opening
handle to the open position after being
closed again, if the door remains locked.
• Do not wash foam rubber or sponge like materials on
a hot wash.
• The machine can reach high temperatures while
running. Do not touch the drain hose or waste water
during draining.
• Keep your pet away from your machine.
• Do not use flammable detergent, sprays or dry
cleaning agents in or near to the appliance.
• Do not remove or insert the plug in the presence of
flammable gas.
• The appliance should not be put on a carpet which
can block the air ventilation on the bottom side.
• Do not place heavy objects or sources of heat or
damp on top of the washing machine.
• Only use detergents which are suitable for automatic
washing machines and follow the detergent
manufacturers recommendations.
• Do not use this appliance if there are any missing or
damaged parts.
(*) Instead of pump cover part, Plinth sheet part is
using in Built-in Machine. To remove the plinth sheet
part, please follow the Built-in Installation Manual
instructions.
If the machine is Built-in;
• Built-in Machine must be used with Plinth sheet.
• Please keep the plug accessible after the installation.
Please follow the Built-in Installation Manual
instructions to use Built-in Machine.
WARNING: The manufacturer is not responsible for
injuries or damage caused by improper installation or
use.
• Do not attempt to repair the appliance yourself.
Contact the manufacturer, their approved service agent
If you require any technical guidance or find that your product is not operating as intended, a simple solution can often be found in the Troubleshooting section of these instructions,
or online at www.bush-support.com If you still require further assistance, call one of our experts on 0345 257 7271.
Safety information 7
Page 8

Page 9

Getting to know your washing
machine
2
Page 10

Getting to know your washing machine
You’ll be up and running in no time
Ready? Let’s begin...
Please read these instructions carefully. They contain
important information which will help you get the
best from your washing machine and ensure safe and
correct installation and operation.
If you require any further assistance, our technical
experts are happy to help. For full details, refer to
the product support section at the end of these
instructions.
10
If you require any technical guidance or find that your product is not operating as intended, a simple solution can often be found in the Troubleshooting section of these instructions,
or online at www.bush-support.com If you still require further assistance, call one of our experts on 0345 257 7271.
Getting to know your <washing machine>
Page 11
Getting to know your washing machine
You’ll be up and running in no time
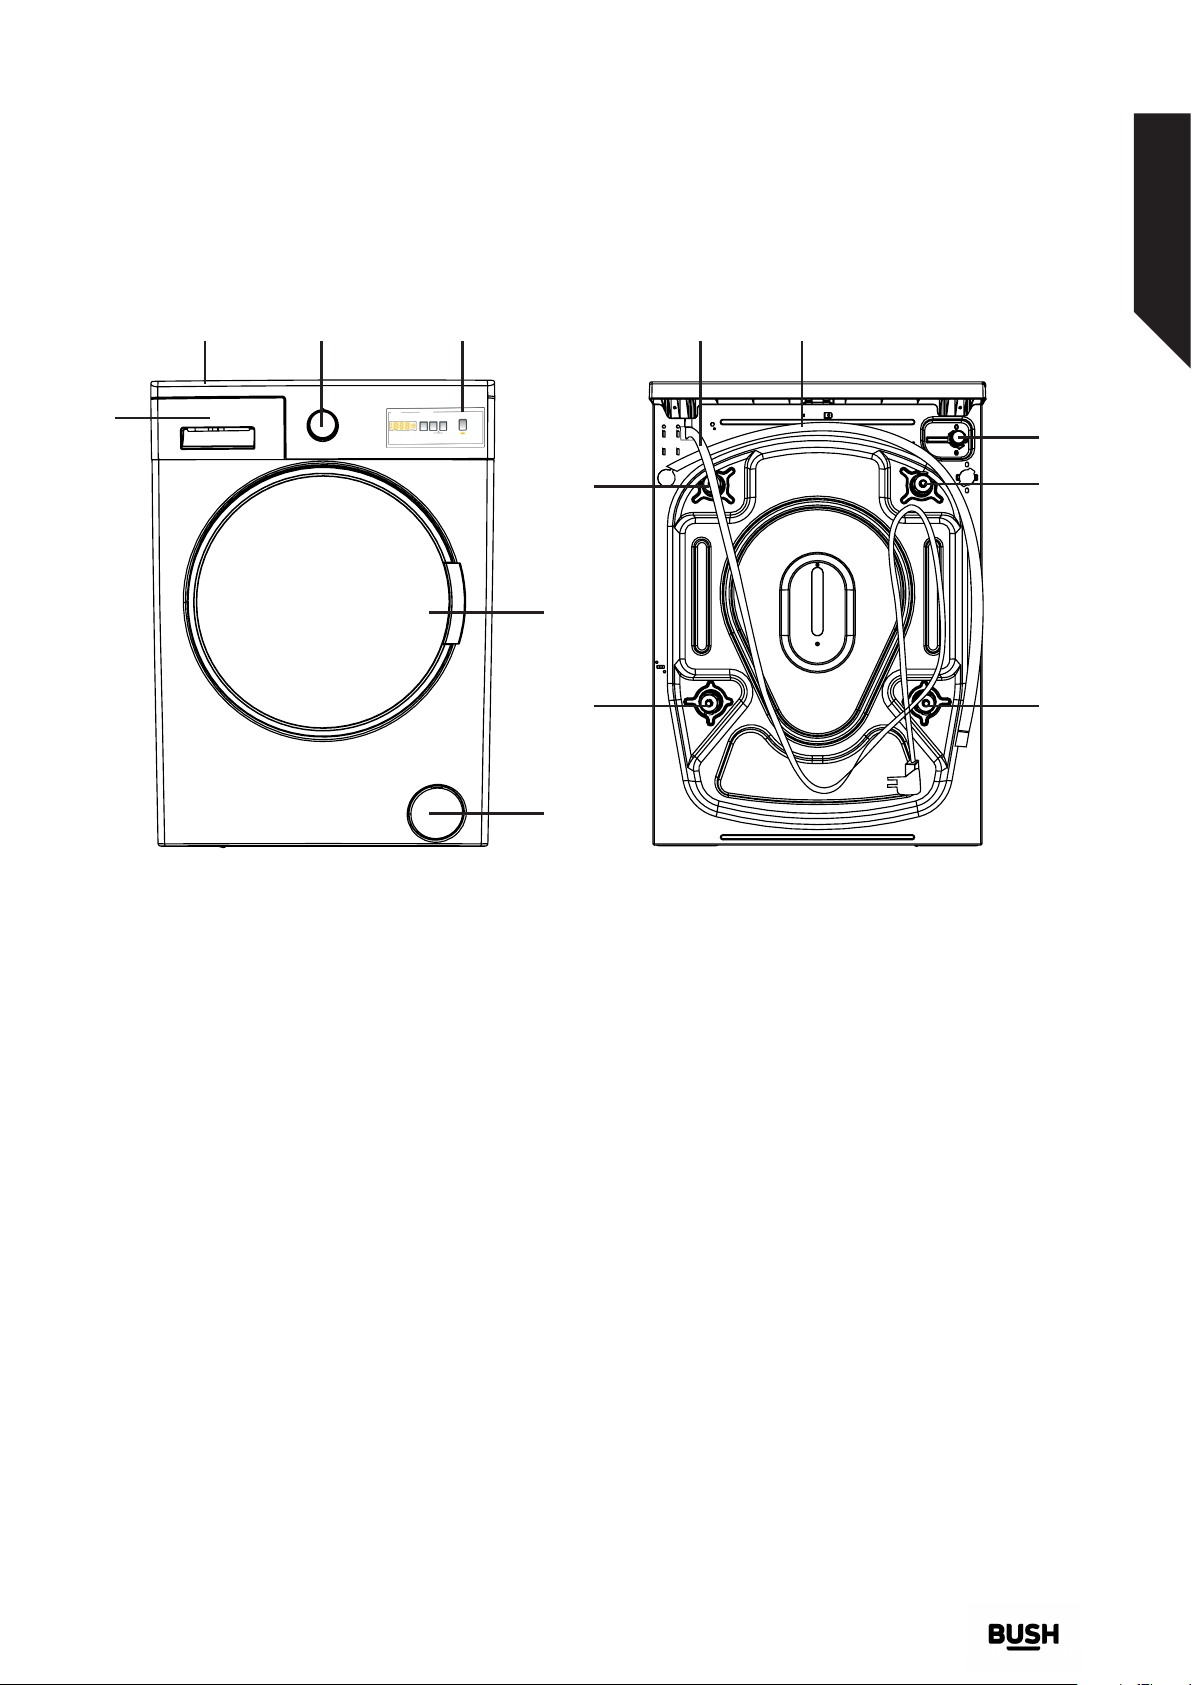
2 3 4 8 9
1
7
5
7 7
6
10
7
Front Back
1. Detergent drawer
2. Top panel
3. Programme knob
4. Start/Pause button
5. Door
6. Filter
If you require any technical guidance or find that your product is not operating as intended, a simple solution can often be found in the Troubleshooting section of these instructions,
or online at www.bush-support.com If you still require further assistance, call one of our experts on 0345 257 7271.
Getting to know your <washing machine>
7. Packing bolt x 4
8. Power lead
9. Drain hose
10. Water inlet
11
Page 12
Getting to know your washing machine
You’ll be up and running in no time
Model Capacity Spin Speed
WMSAEINT812W 8kg 1200rpm
Accessories
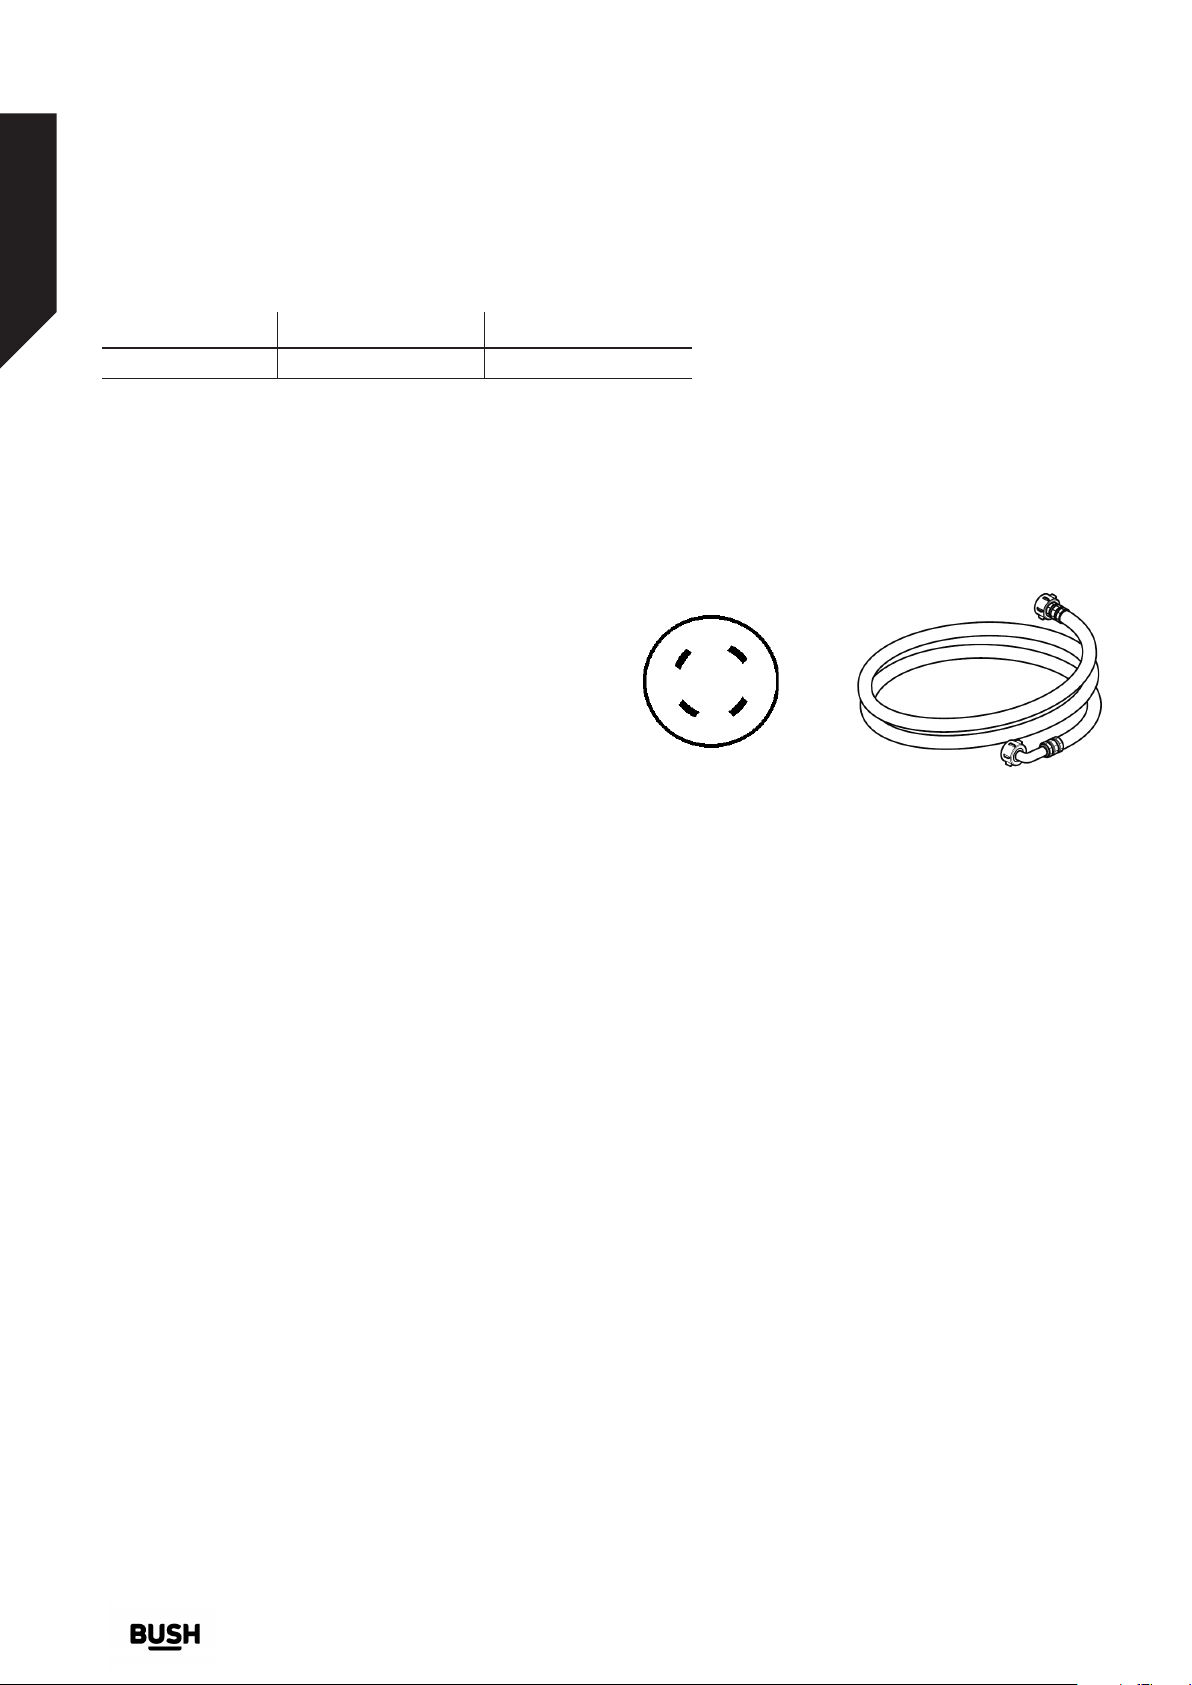
This machine includes the below accessories, please
install these parts before operating.
• plastic hole plug x 4
• Inlet hose
12
If you require any technical guidance or find that your product is not operating as intended, a simple solution can often be found in the Troubleshooting section of these instructions,
or online at www.bush-support.com If you still require further assistance, call one of our experts on 0345 257 7271.
Getting to know your <washing machine>
Page 13

Installing your washing
machine
3
Page 14
Installing your washing machine
Bringing it all together
Unpacking your washing machine
Caution: 2 people are required to unpack the washing
machine, it is recommended that gloves are worn.
a: Carefully remove all packaging materials including
the foam base, dispose of correctly.
Note: When opened, water droplets may be visible in
the drum etc. this is normal as each appliance is factory
tested.
1 2
X
4
X
4
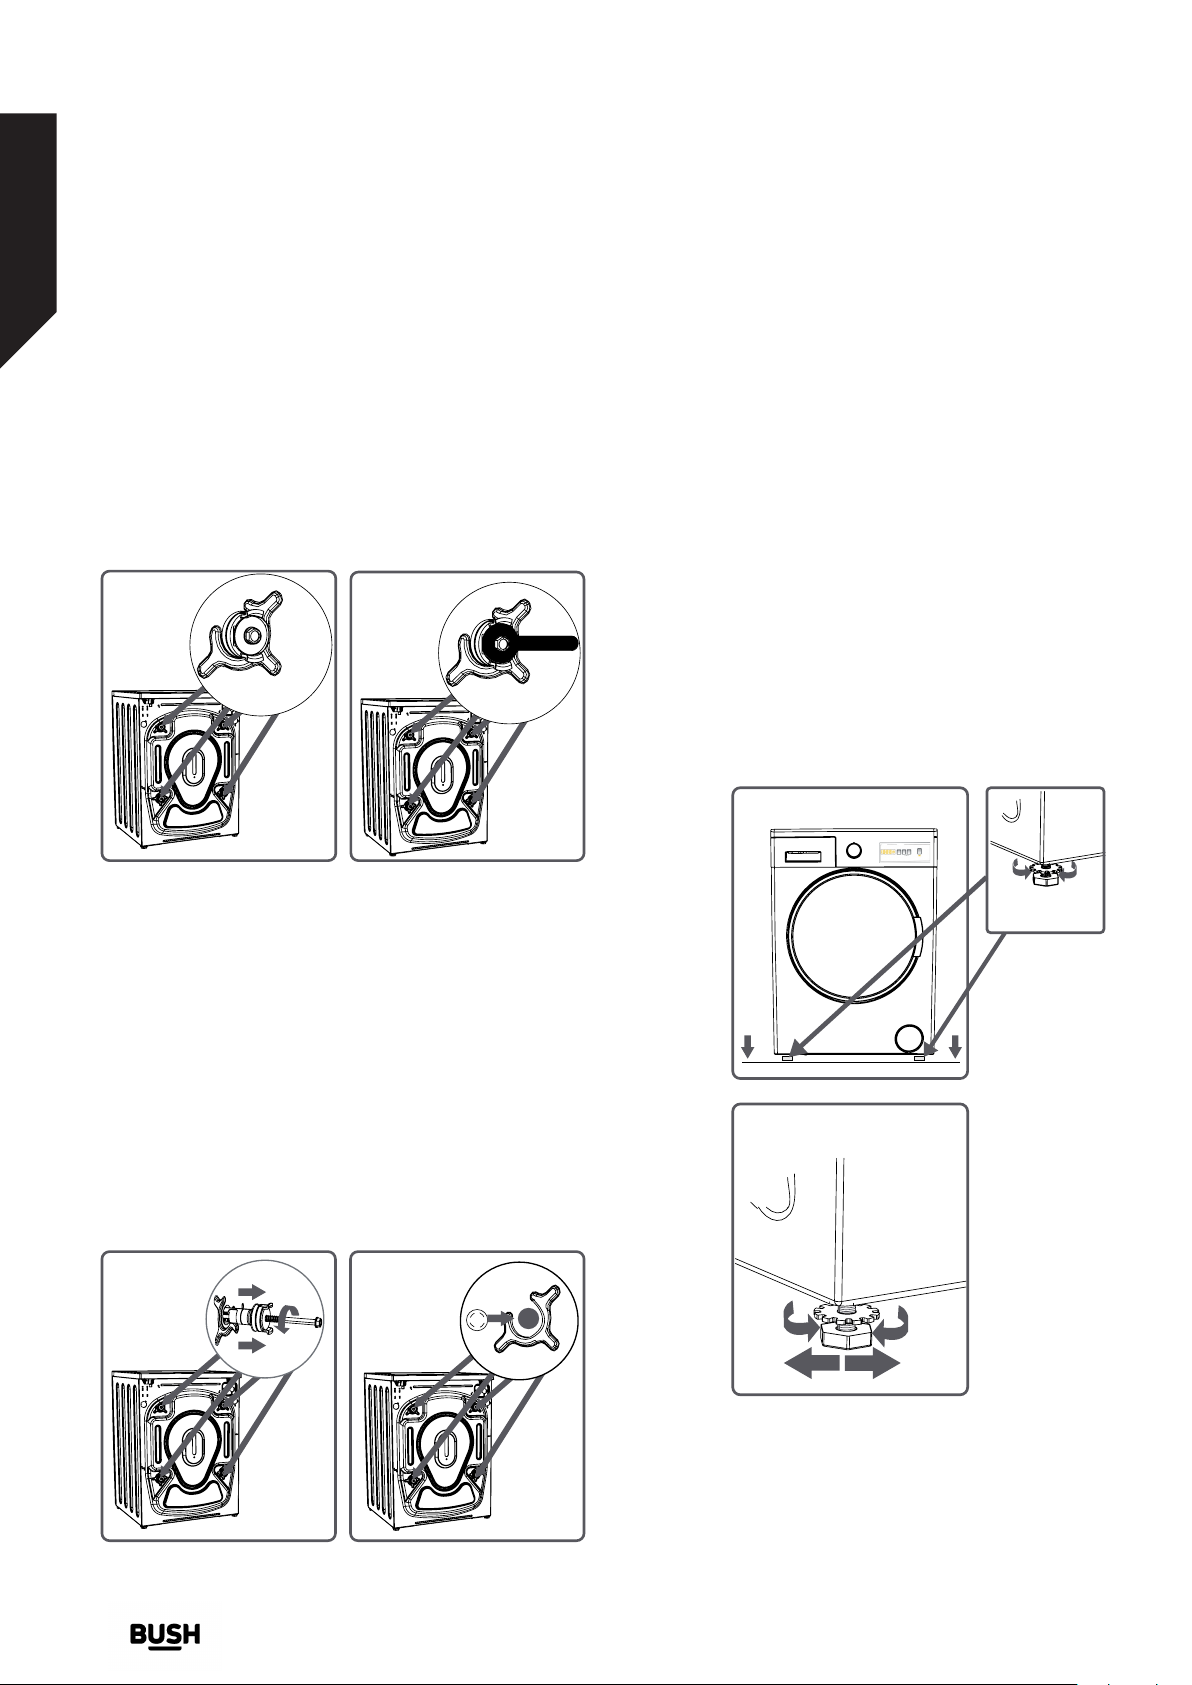
Removing the packing bolts
Adjusting the feet
a: For your machine to work efficiently with minimum
vibration it should be settled on flat, non-slippery, firm
ground.
b: You can adjust the balance of your machine by
changing the positioning of its feet.
c: First, loosen the plastic adjustment nut. (5)
d: Adjust by rotating the feet upwards or downwards.
(6)
e: After the desired position has been reached, tighten
the plastic adjustment nut again by rotating it upwards.
Note: Never put cartons, wooden blocks or similar
materials under the machine to balance irregularities
in the level of the ground.
5
Important: The packing bolts are designed to support
the internal components during transit, these MUST be
removed before use.
a: Loosen the screws by rotating counter clockwise
with a suitable wrench. (1 & 2)
b: Remove the bolts by pulling them. (3)
c: When the transport bolts have been removed,
insert the plastic transport screw taps found in the
accessories bag into the holes. (4)
3 4
X
4
6
4
X
14
If you require any technical guidance or find that your product is not operating as intended, a simple solution can often be found in the Troubleshooting section of these instructions,
or online at www.bush-support.com If you still require further assistance, call one of our experts on 0345 257 7271.
Installing your <washing machine>
Page 15
Installing your washing machine
Bringing it all together
Connections
Water inlet hose connections
Important: This washing machine MUST only be
connected to a cold water supply.
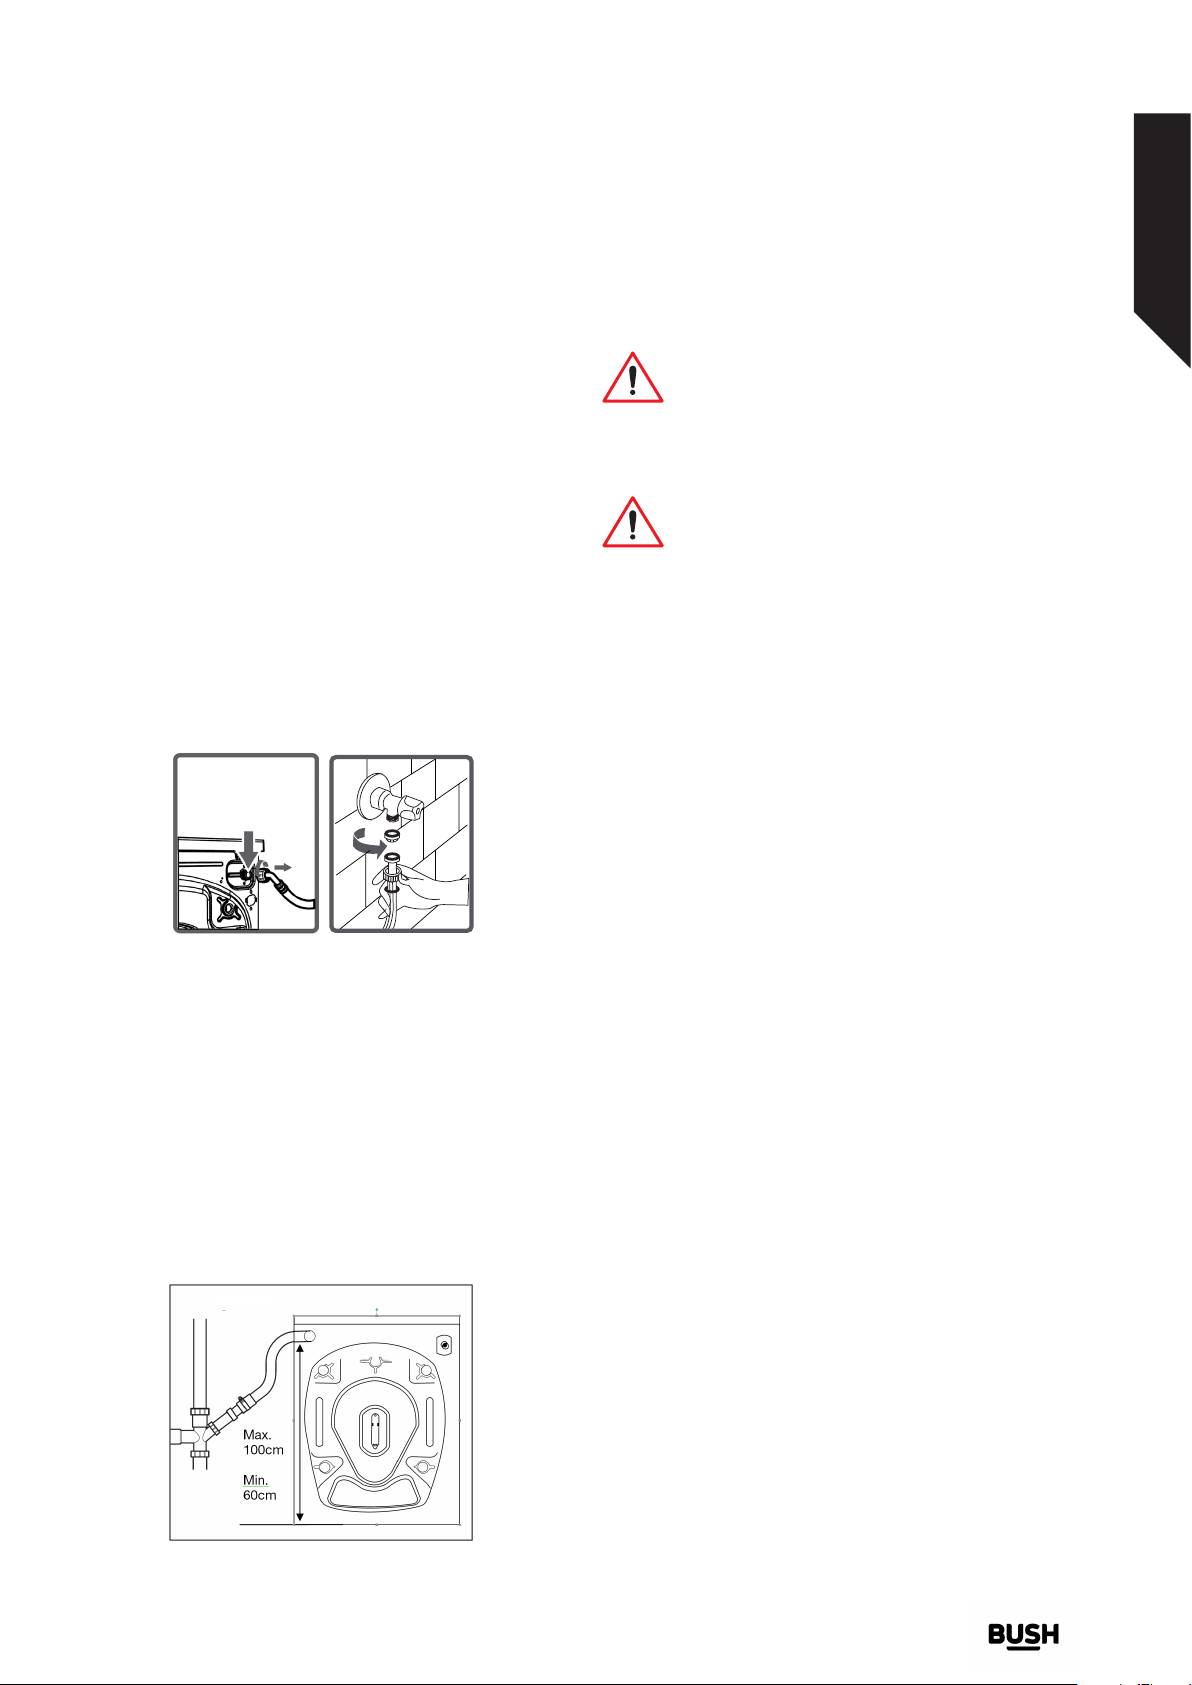
a: Connect the water inlet hose, the angled
connection attaches to the water inlet on the back of
the washing machine. (7)
b: The straight connection attaches to the water supply
valve. (8)
c: Ensure all seals are in place before connecting.
Important: Only tighten the hose connection nut by
hand - do not overtighten.
87
Electrical
Any electrical work that is required
to install this washing machine
MUST be carried out by a qualified
electrician.
THIS APPLIANCE MUST BE
EARTHED
Before making any electrical connections, ensure that:
• The power socket is suitable for the maximum power
of the washing machine (fuses in the power circuit
must be 13 amp).
• The supply voltage should be the same as that
indicated in the technical specifications and the
appliance rating plate (located where shown).
• The appliance should be earthed and in compliance
with the applicable law.
Drain hose connections
Important: The height of the top of the curve in the
drain hose MUST be between 60 - 100cm from the
floor. (9)
Important: The end of the water drain hose may be
fitted directly to the waste water outlet hole or a special
apparatus mounted on the outlet bracket of the washstand.
Important: Never attempt to extend the water drain
hose by adding extra parts.
9
• Additional earth cables should not be necessary if the
plug and socket are earthed. If necessary, an additional
earth cable should be attached to the earth terminal on
the back of the washing machine and earthed.
• When installed, the power socket must be within easy
reach.
• The use of adapters, multiple connectors or extension
cables are not recommended.
• The appliance must be connected to a 220-240 volt
50 cycle AC supply by means of a three pin socket,
suitably earthed and protected by a 13 amp fuse.
• Should the fuse need to be replaced, a 13 amp fuse
approved to BS1363/A must be used.
• The plug contains a removable fuse cover that must
be refitted when the fuse is replaced. If the fuse cover
is lost or damaged, the plug must not be used until
a replacement cover has been fitted or the plug is
replaced.
• A damaged plug should be cut off as close to the
plug body as possible, the fuse should be removed and
the plug disposed of safely.
If you require any technical guidance or find that your product is not operating as intended, a simple solution can often be found in the Troubleshooting section of these instructions,
or online at www.bush-support.com If you still require further assistance, call one of our experts on 0345 257 7271.
Installing your <washing machine>
15
Page 16
Installing your washing machine
Bringing it all together
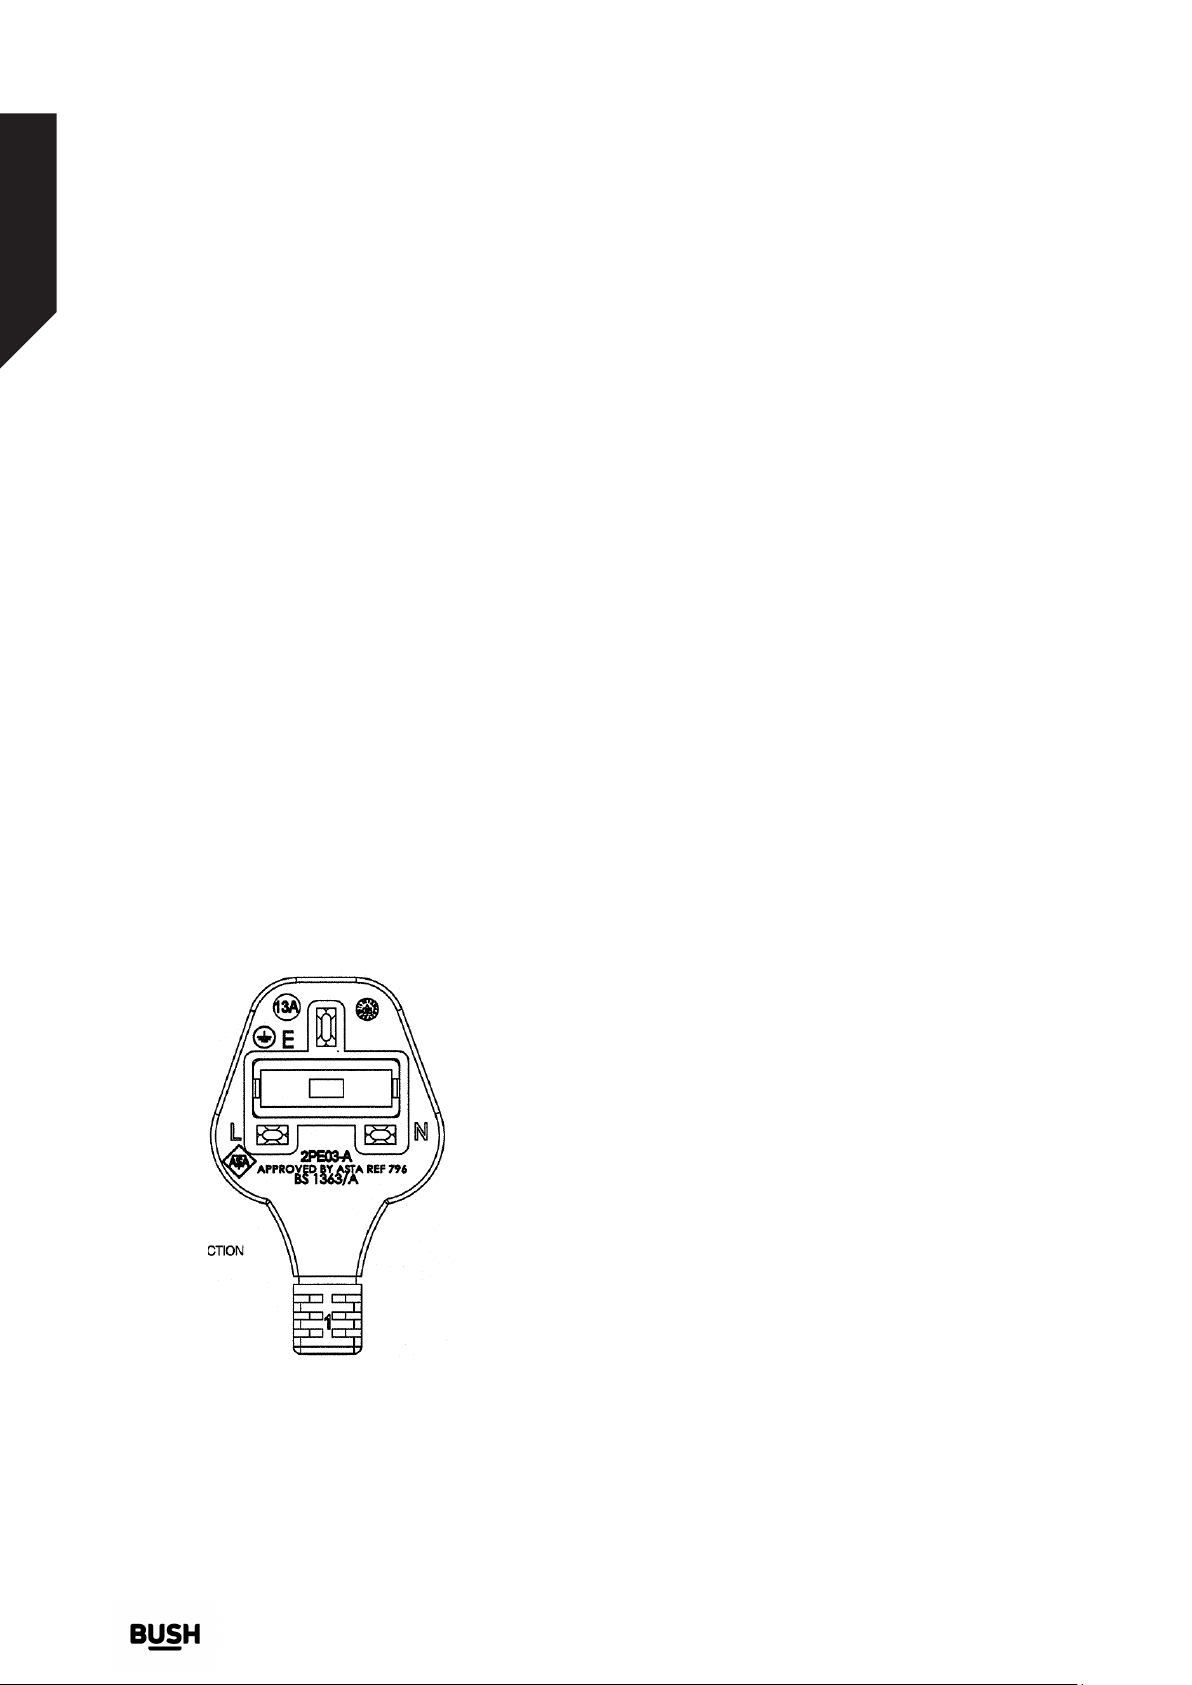
Plug replacement (UK & Ireland only)
Should you need to replace the plug; the wires in the
power cable are coloured in the following way:
Blue – Neutral ‘N’
Brown – Live ‘L’
Green & Yellow – Earth ‘E’
The green & yellow wire must be connected to the
terminal in the plug that is marked with the letter E or
by the earth symbol.
The blue wire must be connected to the terminal that
is marked with the letter N.
The brown wire must be connected to the terminal
that is marked with the letter L.
If the power lead is damaged, it must be replaced by a
qualified electrician.
16
If you require any technical guidance or find that your product is not operating as intended, a simple solution can often be found in the Troubleshooting section of these instructions,
or online at www.bush-support.com If you still require further assistance, call one of our experts on 0345 257 7271.
Installing your <washing machine>
Page 17

Functions
4
Page 18
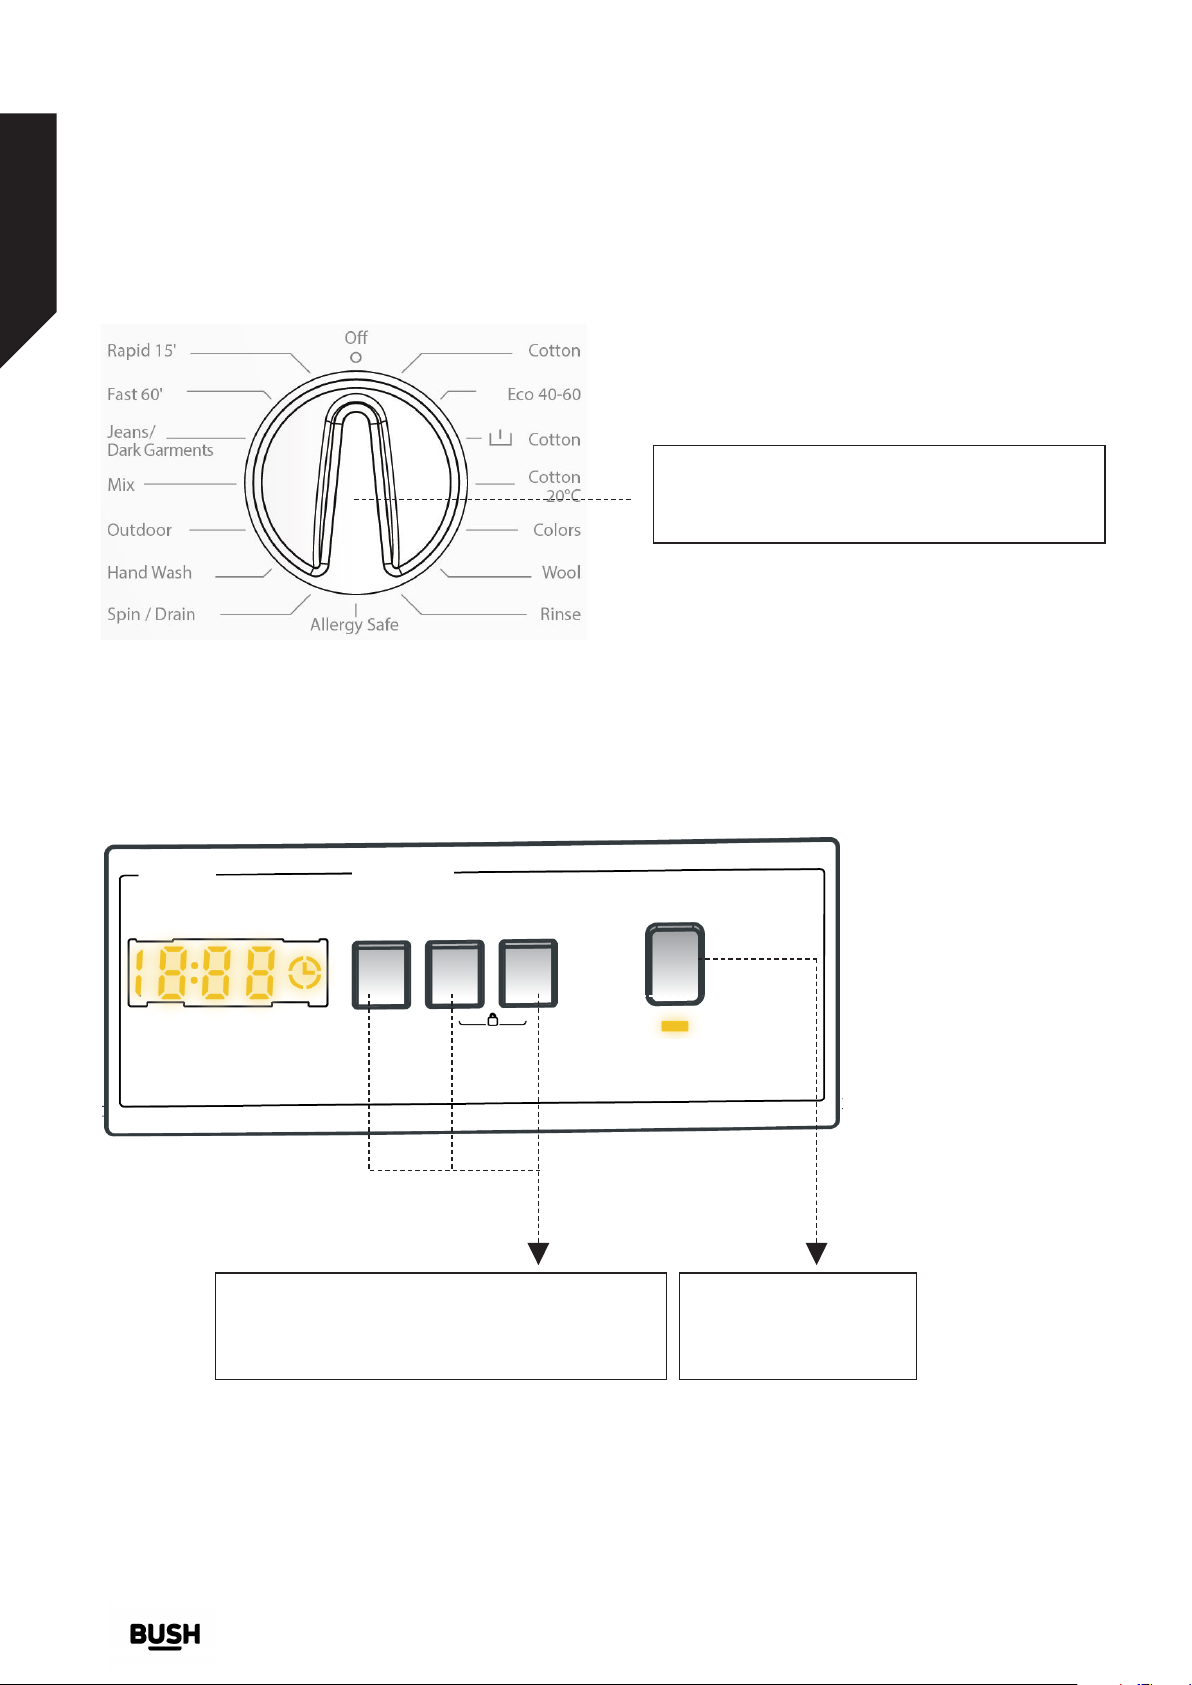
Functions
Simple everyday use
Programme selection knob
For you to select different washing programme.
Temperature
Selection
Spin Speed
Additional
Function
Button
Auxiliary functions setting
Press the button set the Additional Function
Button. Temperature, speed and so on.
Start/Pause
Start/Pause
Press the button to start
or pause the wash cycle
18
If you require any technical guidance or find that your product is not operating as intended, a simple solution can often be found in the Troubleshooting section of these instructions,
or online at www.bush-support.com If you still require further assistance, call one of our experts on 0345 257 7271.
Functions
Page 19
Functions
Simple everyday use
WASHING SEQUENCE
• Plug your machine into the mains power supply.
• Open the water tap.
• Open the washing machine door.
• Load your items of clothing into the drum, ensuring
they are loosely packed.
• Push the door of your machine until you hear the
locking sound to close it.
Selecting programme
Select the programme appropriate for your laundry
from the programme table (Page-23).
EXTRA FUNCTIONS
Before starting the programme you can optionally
select an extra function.
• Press on the button of extra function you would like
to select.
• If an auxiliary function symbol on the electronic
display flashes continuously, the extra function you
have selected will be activated.
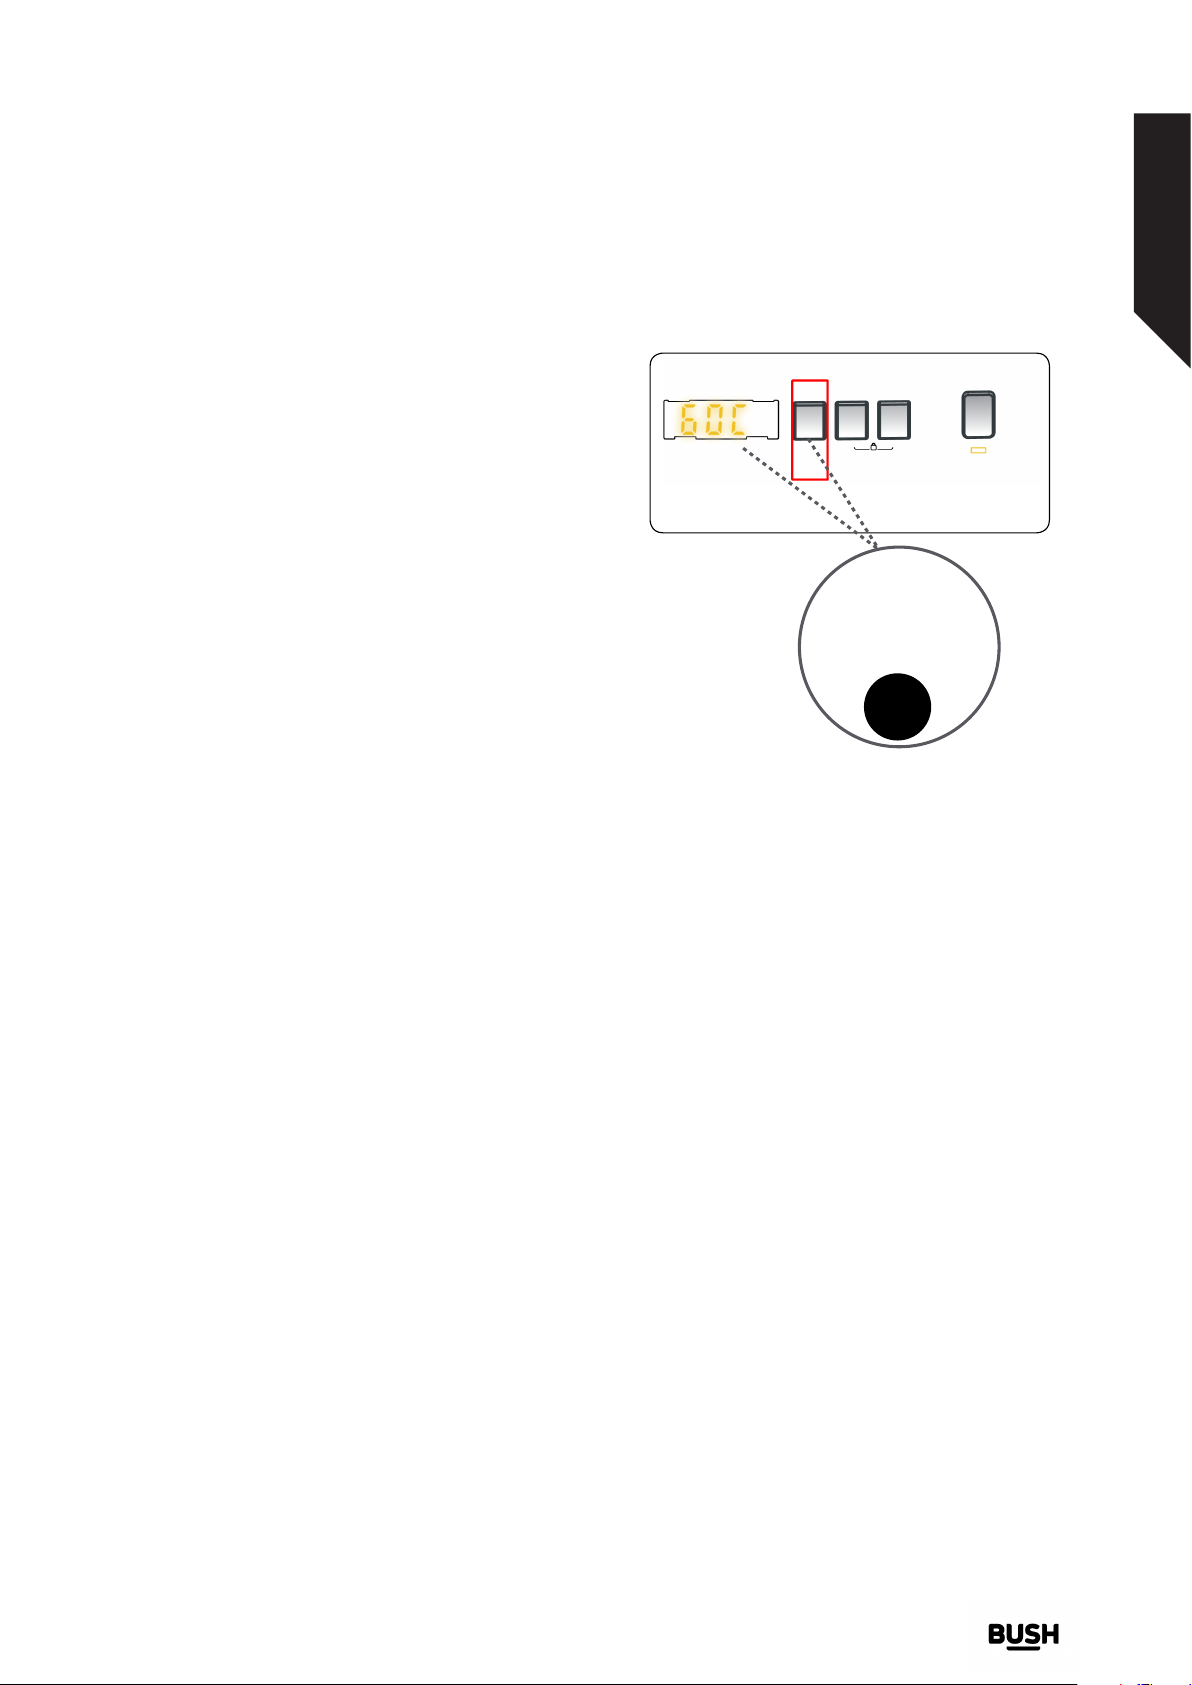
1-Temperature Selection
Auxiliary
function
button 1
Use the washing water temperature adjustment button
to alter the automatically programmed washing water
temperature.
When you select a programme the maximum
temperature for that programme is automatically
selected. To adjust the temperature, press the water
temperature adjustment button until the desired
temperature is displayed on the digital display.
• If an extra function symbol on electronic display
blinks, the extra function you have selected will not be
activated.
Reason for non-activation:
• The extra function you want to use in the washing
programme you have selected is not applicable.
• Your machine has passed over the stage, during
which the extra function you would like to select
would be implemented.
• It is not compatible with an extra function you have
selected previously.
If you require any technical guidance or find that your product is not operating as intended, a simple solution can often be found in the Troubleshooting section of these instructions,
or online at www.bush-support.com If you still require further assistance, call one of our experts on 0345 257 7271.
You can gradually decrease the washing
water temperature between the maximum washing
water temperature of the selected programme
and cold washing (- - C) selections by pressing the
temperature adjustment button.
Functions
19
Page 20
Functions
Simple everyday use
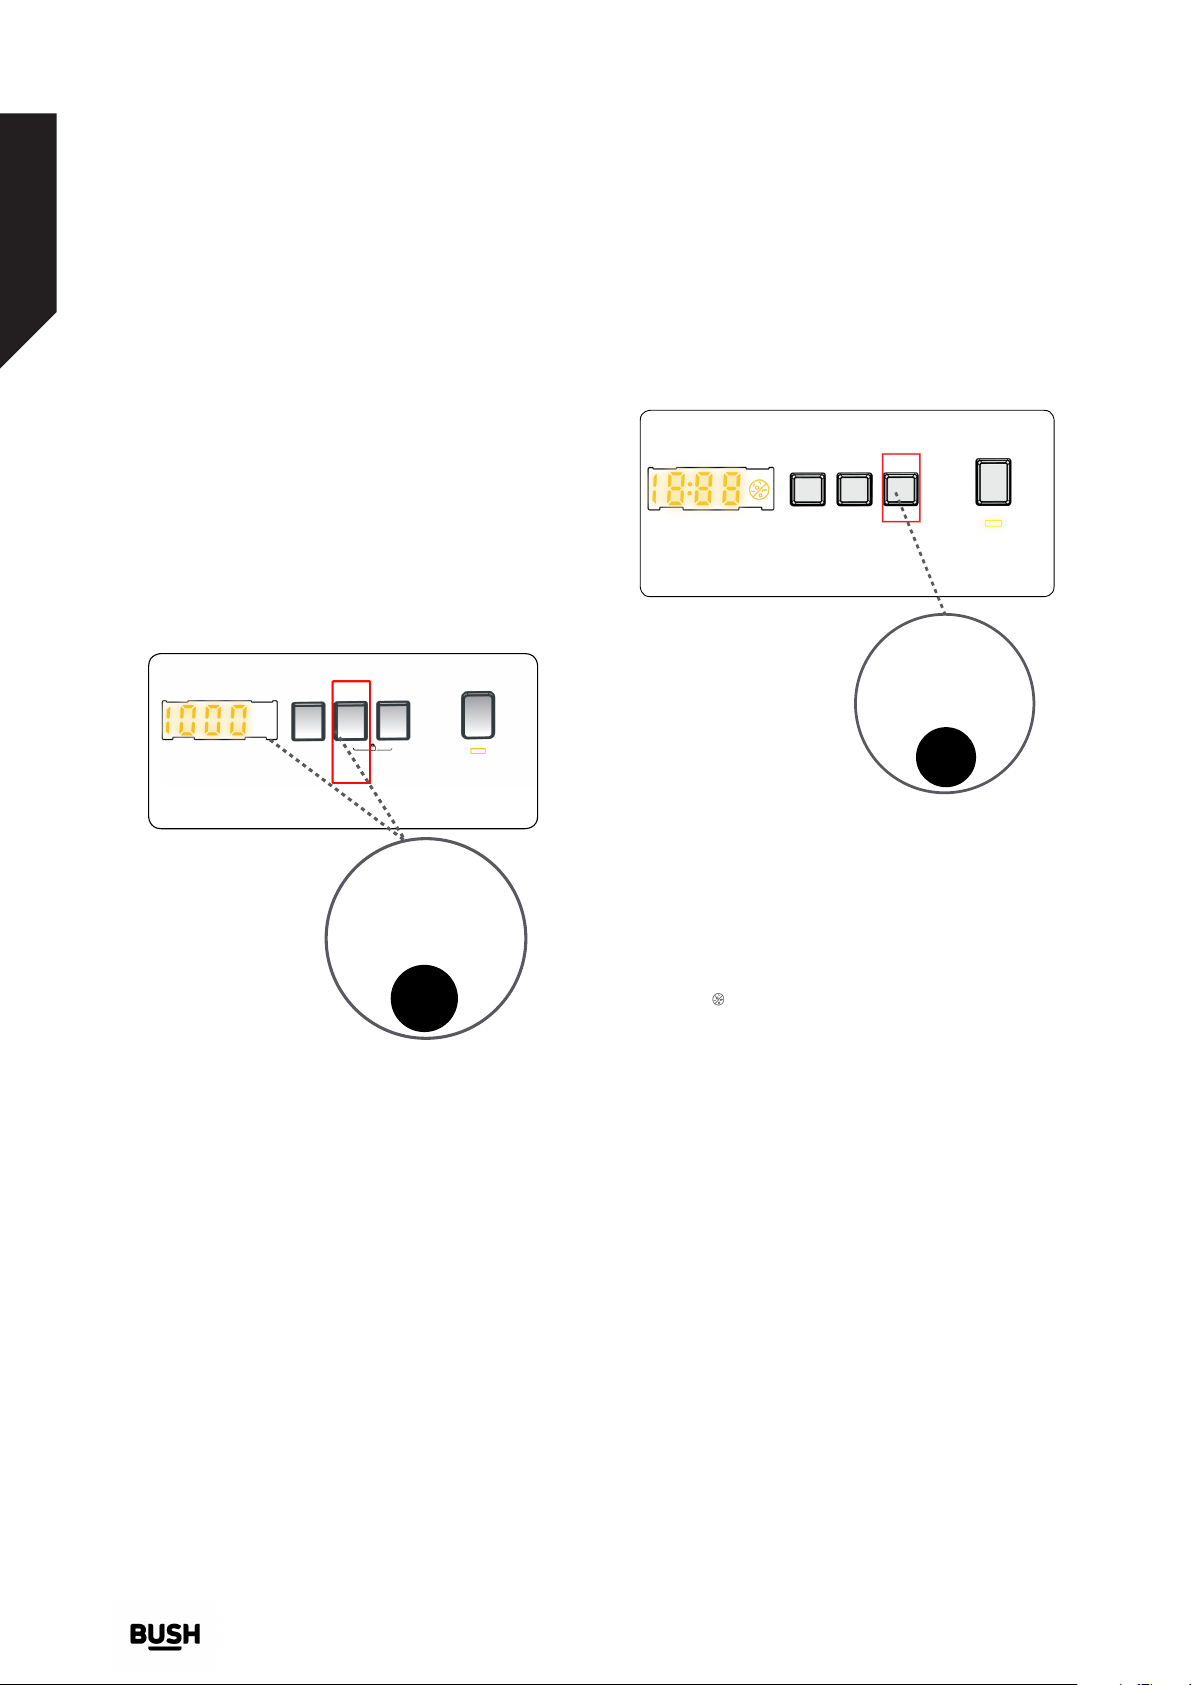
2- Spin Speed Selection
You can adjust the spin speed of your laundry with the
spin speed setting button.
To adjust the spin speed between the maximum spin
speed and the cancel spinning option (- - -), press the
Spin speed button until the desired speed is displayed.
If you have skipped the spin speed you want to set,
keep pressing the spin speed adjustment button until
the desired spin speed is displayed again.
Auxiliary
function
button 1
3- Anti- Allergic
Auxiliary
function
button 3
You can add an additional rinse operation to your
laundry using this additional function. Your machine
will carry out all rinsing steps with hot water. We
recommend this setting for laundry worn on delicate
skin, baby clothes and underwear.
To select this function, press the Antiallergic button
when the symbol is displayed.
20
If you require any technical guidance or find that your product is not operating as intended, a simple solution can often be found in the Troubleshooting section of these instructions,
or online at www.bush-support.com If you still require further assistance, call one of our experts on 0345 257 7271.
Functions
Page 21
Functions
Simple everyday use
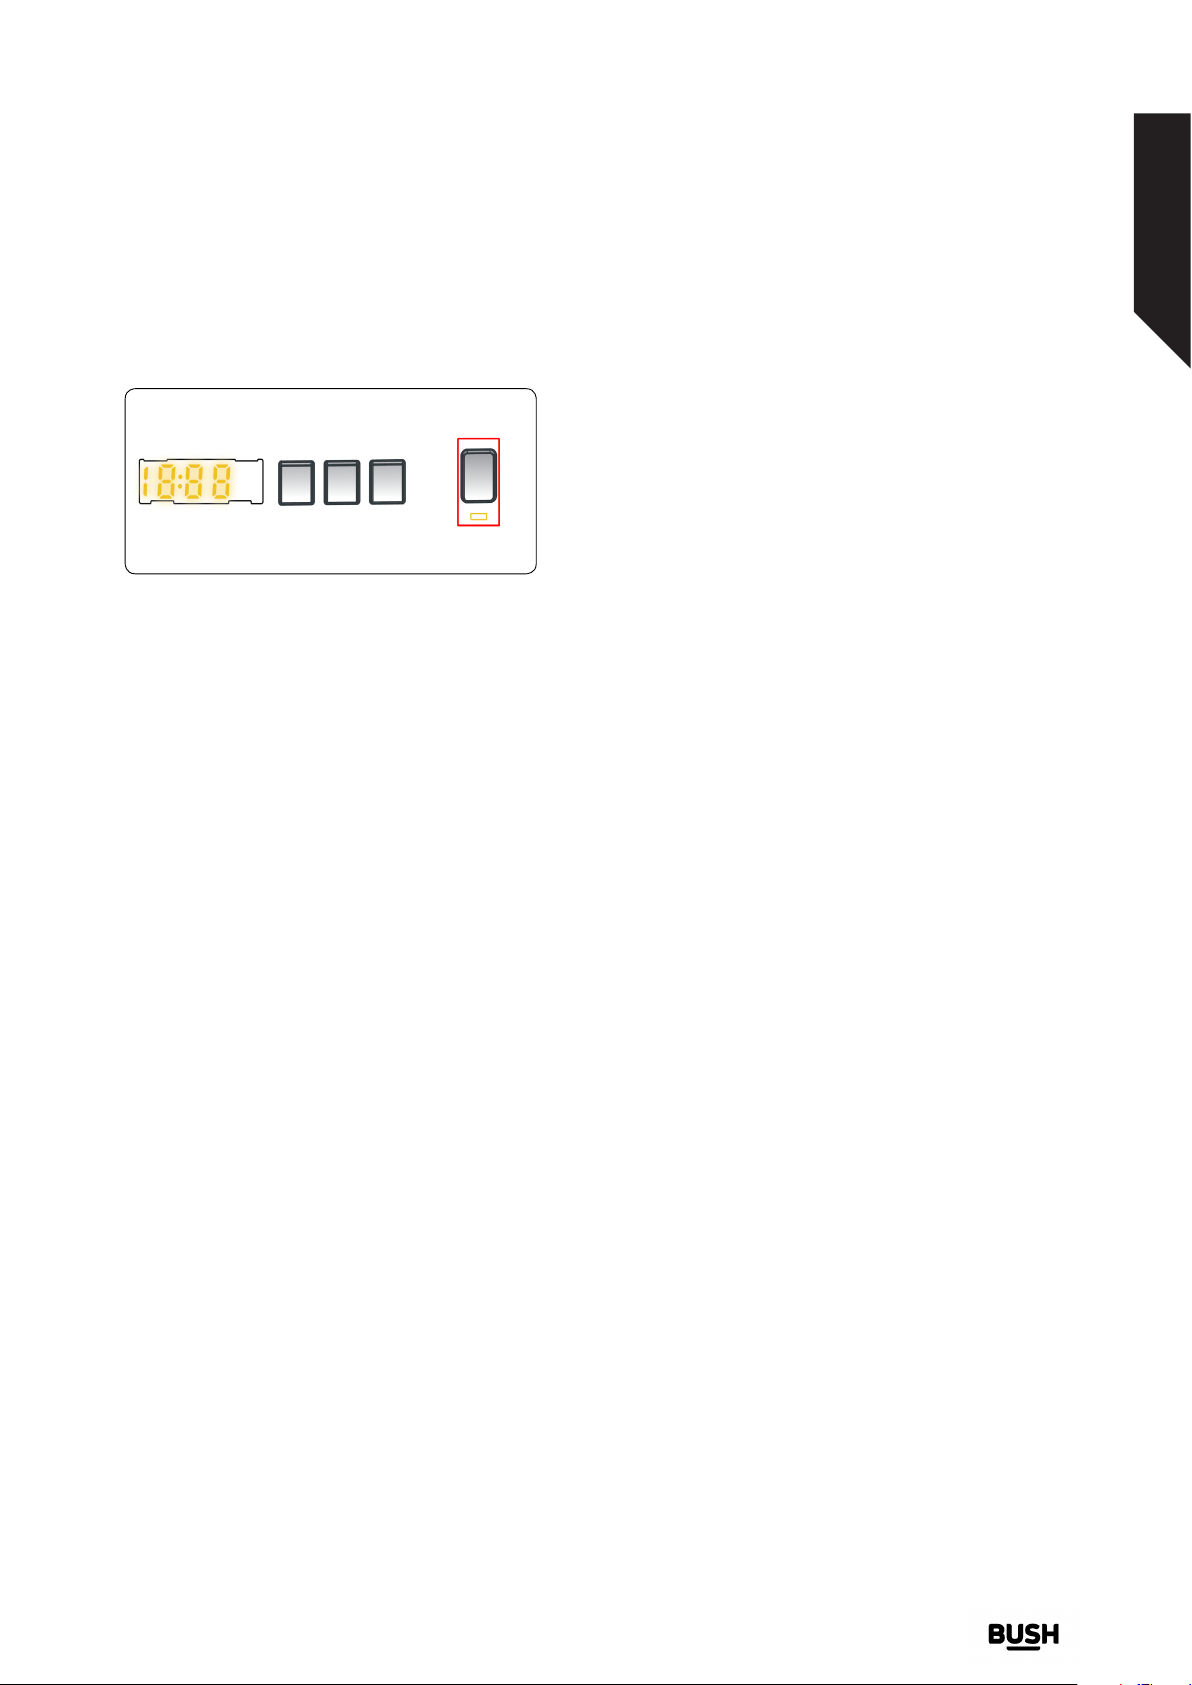
Start/Pause button
By pressing on the Start/Pause button, you may start
the programme you have selected or suspend a
running programme. If you switch your machine to the
standby mode, the Start/Pause led on the electronic
display will blinkdisplay will blink
If you require any technical guidance or find that your product is not operating as intended, a simple solution can often be found in the Troubleshooting section of these instructions,
or online at www.bush-support.com If you still require further assistance, call one of our experts on 0345 257 7271.
Functions
21
Page 22
Functions
Simple everyday use
Child Lock
The Child Lock function allows you to lock the buttons
so that the wash cycle you have chosen cannot be
changed unintentionally.
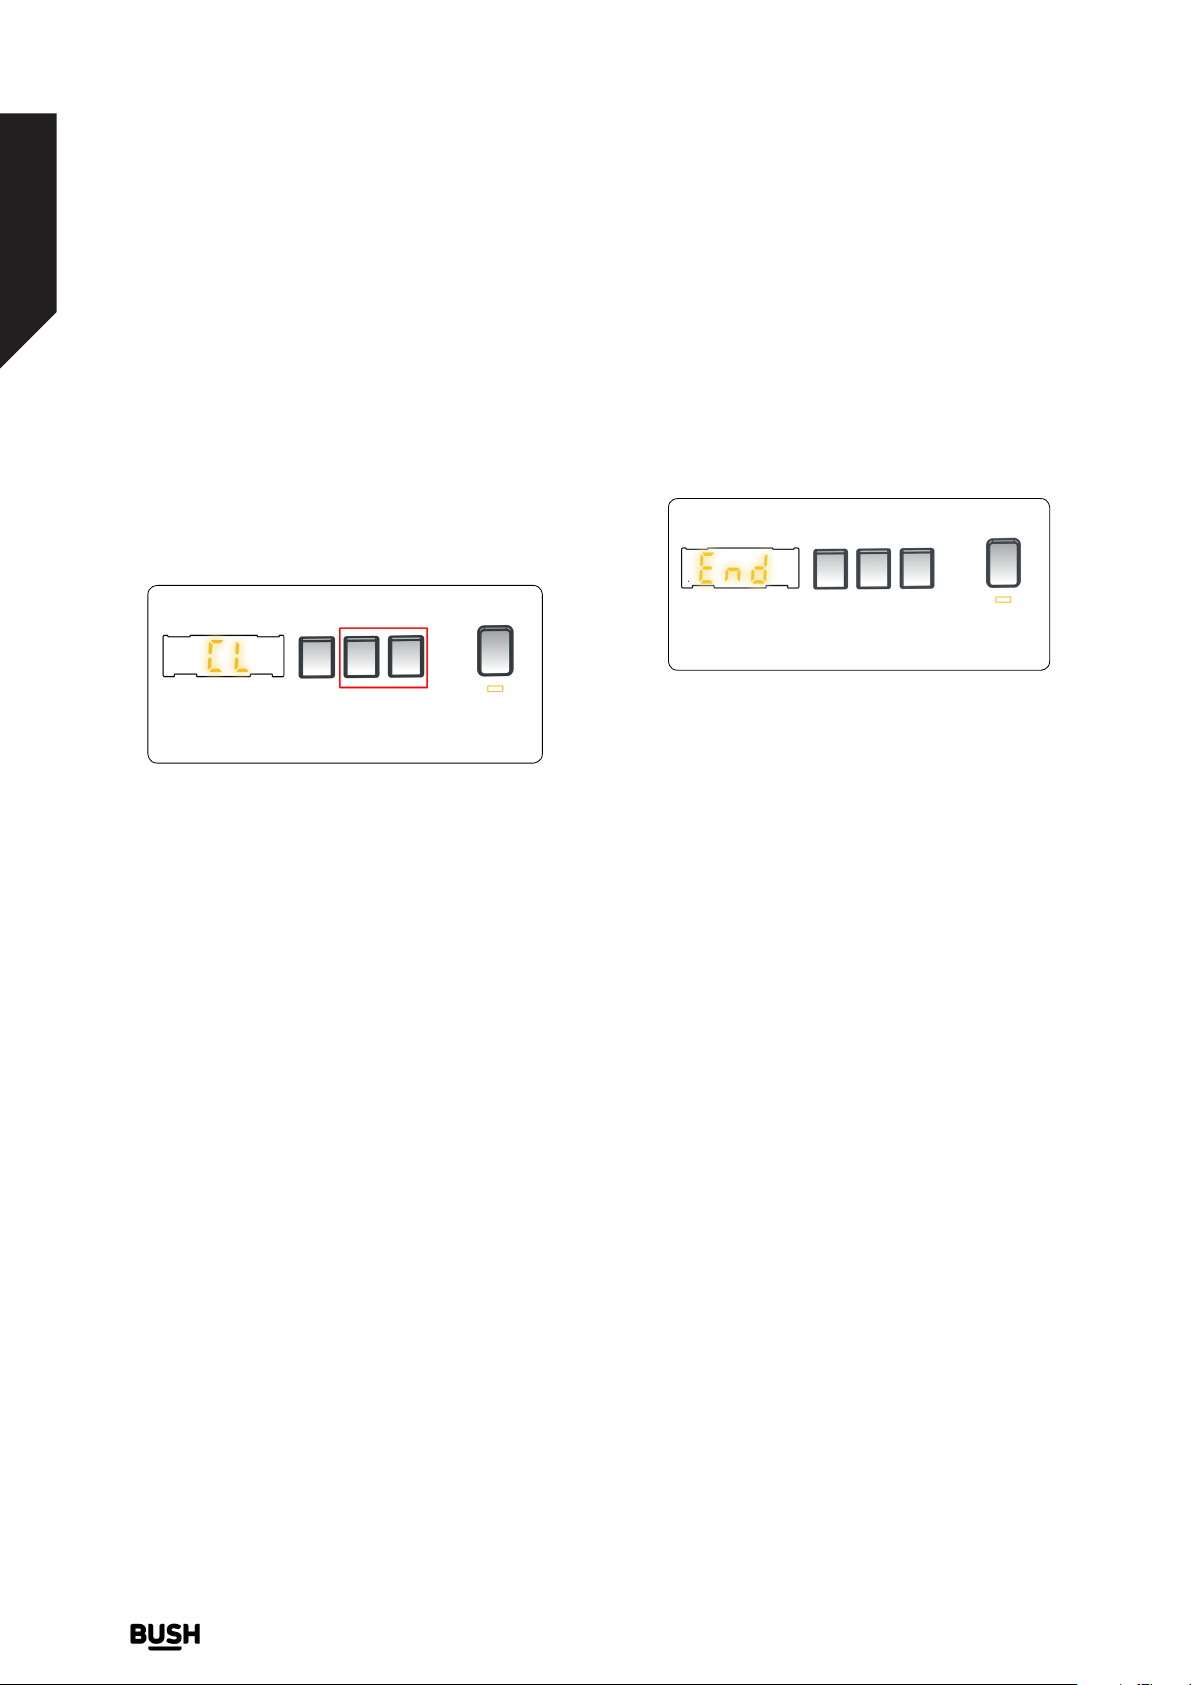
To activate child lock, press and hold buttons 2 and 3
simultaneously for at least 3 seconds. ‘’CL’’ will flash on
the electronic display for 2 seconds when the child lock
is activated.
If any button is pressed or the selected programme is
changed by the programme dial while the child lock
is active, the “CL” symbol will flash on the electronic
display for 2 seconds.
If the child lock function is active and a programme
is running, when the programme dial is turned to the
CANCEL position and another programme is selected,
the previously selected programme continues from
where it was left.
Finishing Programme
Your machine will stop by itself as soon as the
programme you have selected finishes.
- “End” led will blink on the display panel.
- You can open the machine’s door and remove the
laundry.
- Leave the door of your machine open to allow the
inner part of your machine to dry after removing your
laundries.
- Switch the programme dial to Off position.
- Unplug your machine.
- Turn the water tap off.
To deactivate the child lock, press and hold buttons 2
and 3 simultaneously for at least 3 seconds until the
“CL” symbol on the electronic display disappears.
Cancelling Programme
If you want to cancel any programme running:
1. Turn the programme dial to the “Off” position.
2. Your machine will stop the washing operation and
the programme will be cancelled.
3. Turn the programme dial to any other programme
to drain the machine.
4. Your machine will perform the necessary draining
operation and cancel the programme.
You can now select and run a new programme.
If you require any technical guidance or find that your product is not operating as intended, a simple solution can often be found in the Troubleshooting section of these instructions,
or online at www.bush-support.com If you still require further assistance, call one of our experts on 0345 257 7271.
22
Functions
Page 23
Functions
Simple everyday use
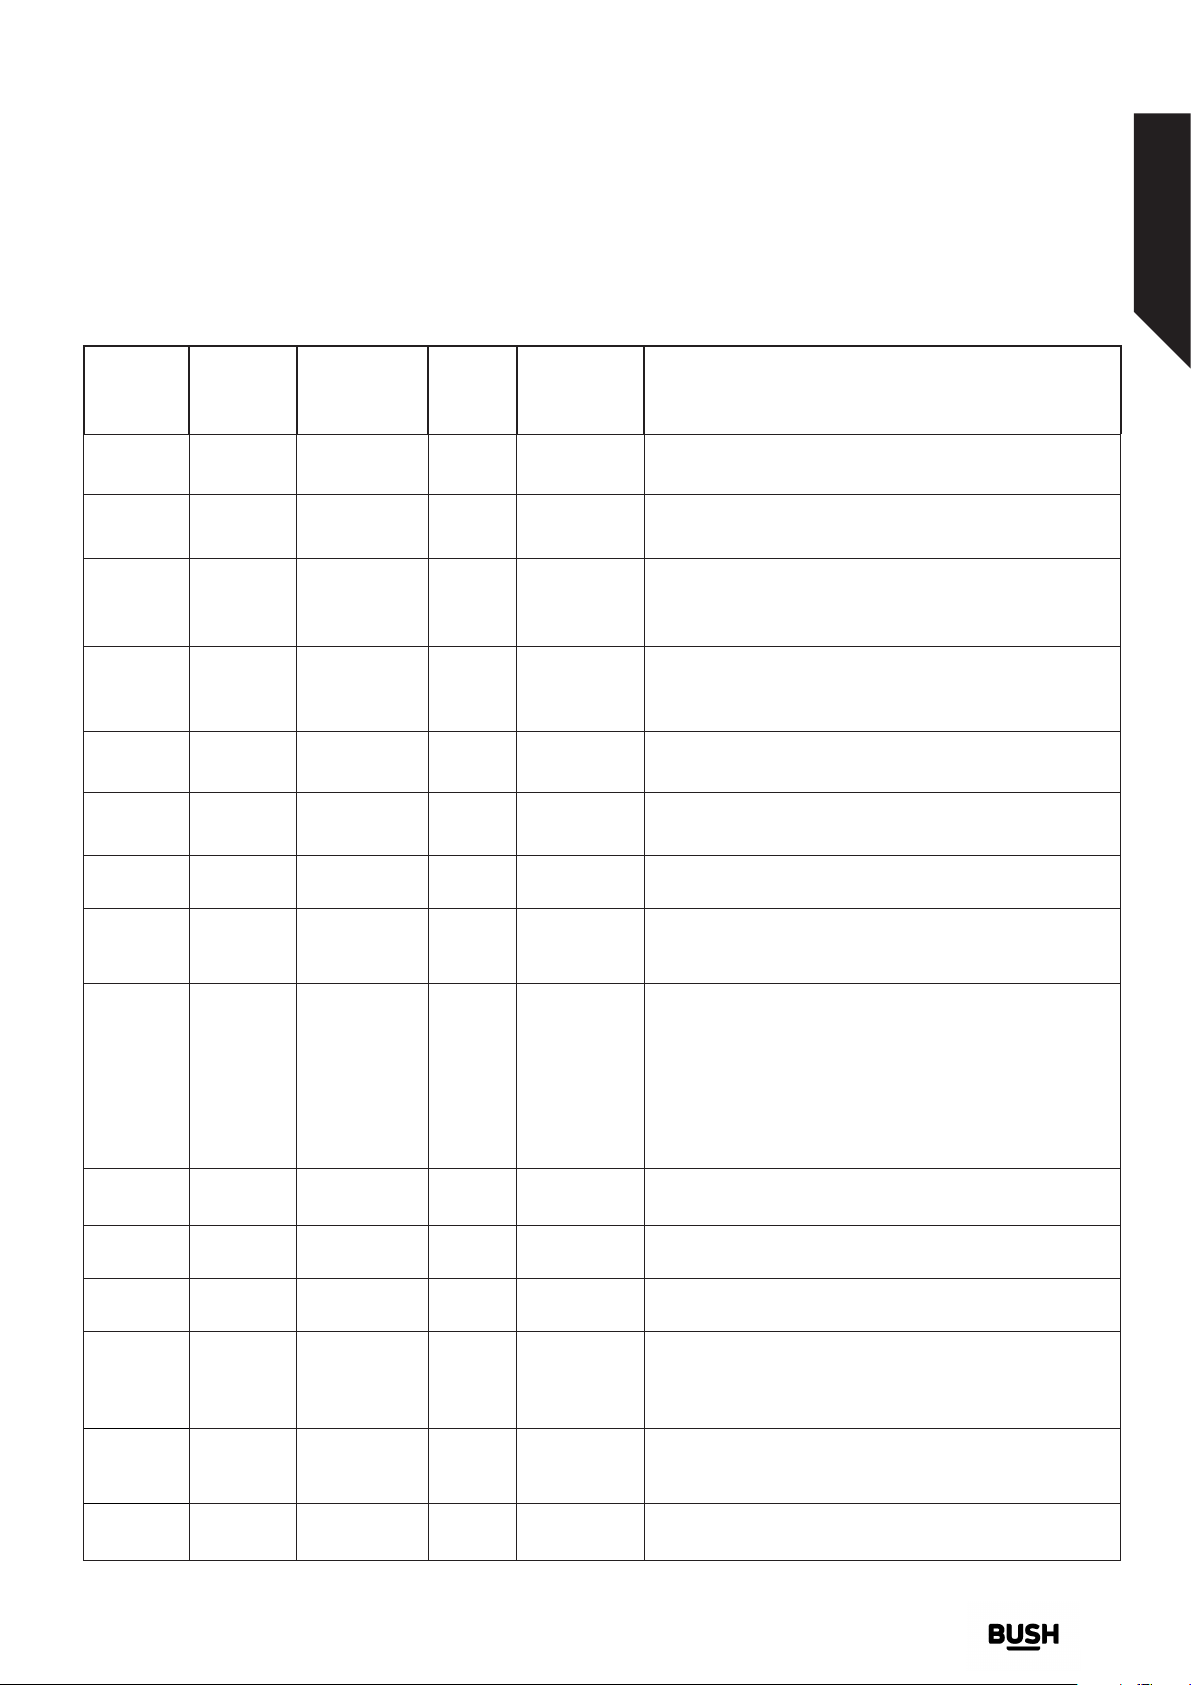
Programme Selection Guide
Programme Washing
temperature
(°c)
COTTON
ECO 40-
60
COTTON
Pre-Wash
COTTON
20°C
COLORS
WOOL
*60-9080-70-40
*40 - 60 218 2 8,0
*60 - 50
- 40 - 30 “- -C”
*20- “- -C” 96 2 4,0
*40 - 30 “- -C”
*30 - “-
-C”
Prog. Time (mins)
WMSAEINT812W
Detergent
compart.
235 2 8,0
164 1&2 8,0
230 2 3,5
43 2 2,5 Woollen laundry with machine wash labels.
/Max load
capacity (kg)
WMSAEINT812W
RINSE *“- -C” 30 - 8,0
Allergy
Safe
*60 - 50
- 40 - 30 “- -C”
197 2 4,0 Baby laundry
Spin/Drain *“- -C” 17 - 8,0
Hand
Wash
Easy Care
/ Outdoor
Mixed
Jeans
/ Dark
Garments
FAST 60’
60°C
Rapid 15
Min.
*30 - “-
-C”
*40 - 30 “- -C”
*40 - 30 “- -C”
*30 - “-
-C”
*60 - 50
- 40 - 30 “- -C”
*30 - “-
-C”
90 2 2,5
110 2 3,5
105 2 3,5
96 2 4,0
60 2 4,0
15 2 2,0
Type of laundry
Very dirty, cotton and flax textiles. (Underwear, linen,
Tablecloths, towel (maximum 4,0 kg), bedclothes, etc.)
Dirty cotton and flax textiles. (Underwear, linen,
Tablecloths, towel (maximum 4,0 kg), bedclothes, etc.)
Dirty cotton and flax textiles. (Underwear, linen,
Tablecloths, towel (maximum 4,0 kg), bedclothes, etc.)
Less dirty, cotton and linen textiles. (Underwear, bedsheet,
Tablecloths, towel (max.2,0 kg) bedcloth, etc.)
Less dirty, cotton and linen textiles. (Underwear, bedsheet,
Tablecloths, towel (max.2,0 kg) bedcloth, etc.)
Provides an additional rinse to any type of laundry after
the washing cycle.
You can use this programme for any type of laundry if
you want an additional rinsing step after the washing
cycle./ You can use the drain program to drain the water
accumulated inside the machine (adding or removing
laundry). To enable the drain program, turn the program
knob to the spin/drain program. After you select “spin
cancelled” using the auxiliary function key, the program
will start to run.
Laundry recommended for hand wash or sensitive
laundry.
Very dirty or synthetic-mixed textiles. (Nylon socks, shirts,
blouses, synthetic-including trousers etc. )
Dirty cotton, synthetics, colour and flax textiles can be
washed together.
Black and dark items made of cotton, mixed fibre or jeans.
Wash inside out., Jeans often contains excess dye and
may run during the first few washes. Wash light and dark
coloured items separately
Dirty, cotton, coloured and linen textiles washed at 60°C
in 60 minutes.
In a short time of 15 minutes, Lightly soiled, cotton,
colored and linen textiles your can wash.
If you require any technical guidance or find that your product is not operating as intended, a simple solution can often be found in the Troubleshooting section of these instructions,
or online at www.bush-support.com If you still require further assistance, call one of our experts on 0345 257 7271.
Functions
23
Page 24
Functions
Simple everyday use
You can use softeners in all programmes (except spinning and draining programmes) optionally. When you arrange the quantity
of the softener, comply with the warning of the softener producer. Fill your softener in the (softener) compartment of the
detergent drawer..
NOTE: PROGRAMME DURATION MAY CHANGE ACCORDING TO THE AMOUNT OF LAUNDRY, TAP WATER, AMBIENT
TEMPERATURE AND SELECTED ADDITIONAL FUNCTIONS.
(*) Washing water temperature of the programme is the factory default.
Due to the short washing time of this programme, we recommend that less detergent is used. The programme may last
longer than 15 minutes if your machine detects an uneven load. You can open the door of your machine 2 minutes after the
completion of a washing operation. (The 2 minute period is not included in the programme duration).
According to regulation 1015/2010 and 1061/2010, the programme 1 and the programme 2 are respectively the ‘Standard 60°C
cotton programme’ and the ‘Standard 40°C cotton programme’.
The Eco 40-60 programme is able to clean normally soiled cotton laundry declared to be washable at 40°C or 60°C, together
in the same cycle, and that this programme is used to assess the compiance with the EU ecodesign legislation.
24
If you require any technical guidance or find that your product is not operating as intended, a simple solution can often be found in the Troubleshooting section of these instructions,
or online at www.bush-support.com If you still require further assistance, call one of our experts on 0345 257 7271.
Functions
Page 25
Functions
Simple everyday use
• The most efficient programmes in terms of energy consumption are generally those that perform at lower
temperatures and longer duration.
• Loading the household washing machine up to the capacity indicated by the manufacturer for the respective programmes
will contribute to energy and water savings.
• Program duration, energy consumption and water consumption values may vary according to wash load weight and type,
selected extra functions, tap water and ambient temperature.
• It’s recommended to use liquid detergent for the washing programmes at low temperature. The amount of detergent to
be used may vary depending on the amount of laundry and the level of dirtiness of the laundry. Please follow the detergent
manufacturers’ recommendations for the amount of the detergent to be used.
• The noise and remaining moisture content are influenced by the spinning speed. The higher spinning speed in the spinning
phase, the higher noise and the lower remaining moisture content.
• You can access the product database where the model information is stored by reading the QR code on the energy label.
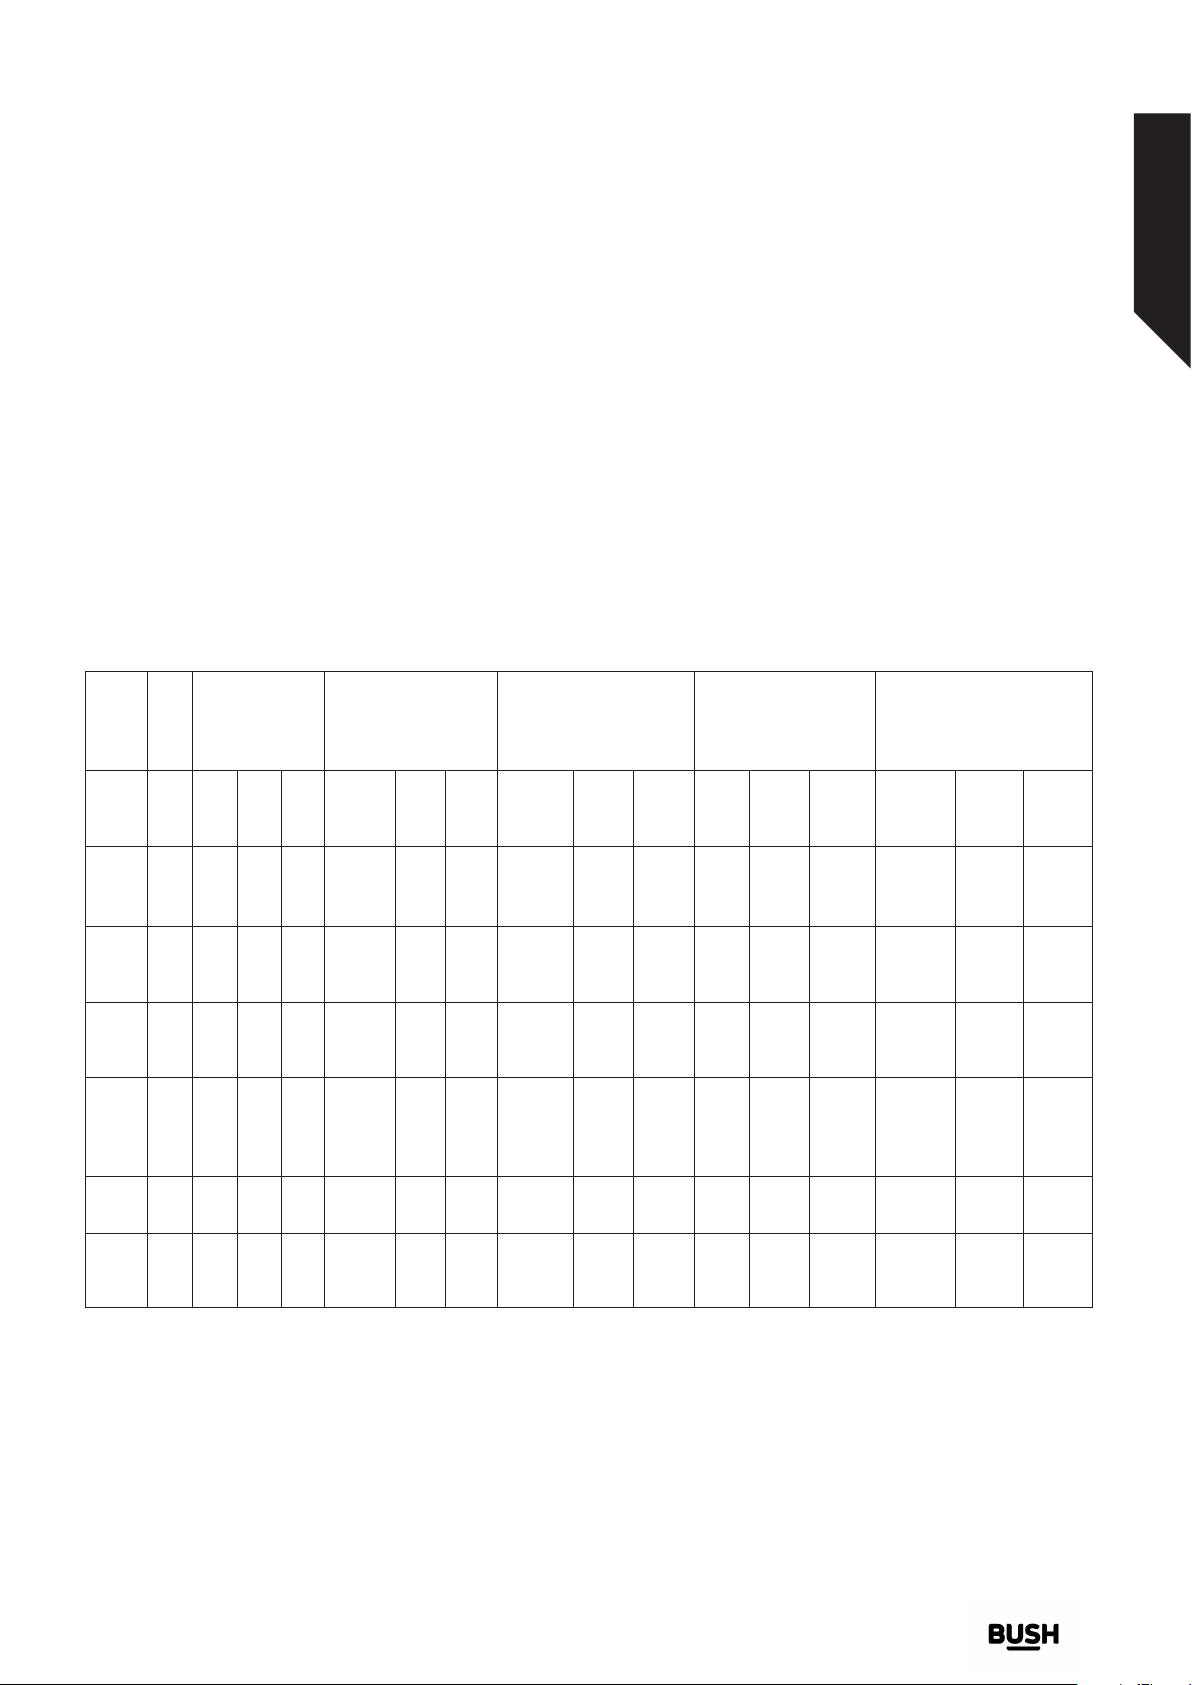
Energy
Consumption
kWh/cycle
Rated
Name
Programme
90°C
COTTON
60°C
COTTON
ECO
40-60
Easy Care
60’.
FAST
20°C
COTTON
Capacity kg
Rated
1/2 Load
Capacity
8 2,38 03:07 82 81 53%
8 1,1 03:55 52 48 53%
8 1,16 0,61 0,33 03:38 02:48 02:48 54 43 43 49 36 22 53% 53% 53%
3,5 0,56 01:50 50 42 62%
/ Outdoor
4 1,02 01:00 34 58 53%
4 0,2 01:36 43 20 53%
Programme Duration
Hours:Minutes
Rated
1/4 Load
Capacity
1/2 Load
1/4 Load
Water Consumption
Litres/Cycle
Rated
Capacity
1/2 Load
1/4 Load
max. Temperature
°C
Rated
Capacity
1/2 Load
Remaining Moisture Content
1200 Rpm
1/4 Load
Rated
Capacity
%
1/2 Load
1/4 Load
If you require any technical guidance or find that your product is not operating as intended, a simple solution can often be found in the Troubleshooting section of these instructions,
or online at www.bush-support.com If you still require further assistance, call one of our experts on 0345 257 7271.
Functions
25
Page 26

Functions
Simple everyday use
Important Informations
• Use detergents, softeners and other additives suitable for automatic washing machines only. Excessive foam has occurred and
automatic foam absorption system has been activated due to too much detergent usage.
• We recommend that periodic cleaning for washing machine every 2 months. For periodic cleaning please use Drum Clean
programme. If your machine do not have Drum Clean programme, use Cottons-90 programme. When required, use limescale
removers manufactured specifically for washing machines only.
• Never force the door open when your Washing Machine is running. You can open the door of your machine 2 minutes after
the completion of a washing operation. *
• Never force the door open when your Washing Machine is running. The door will open immediately after the washing cycle
has ended. *
• The installation and repairing procedures should always carried out by the Authorised Service Agent in order to avoid possible
risks. The manufacturer shall not be held liable for damages that may arise from procedures carried out by unauthorised
persons.
(*) Specifications may vary depending on the machine purchased.
26
If you require any technical guidance or find that your product is not operating as intended, a simple solution can often be found in the Troubleshooting section of these instructions,
or online at www.bush-support.com If you still require further assistance, call one of our experts on 0345 257 7271.
Functions
Page 27

Using your washing machine 5
Page 28
Using your washing machine
Getting the most from your appliance
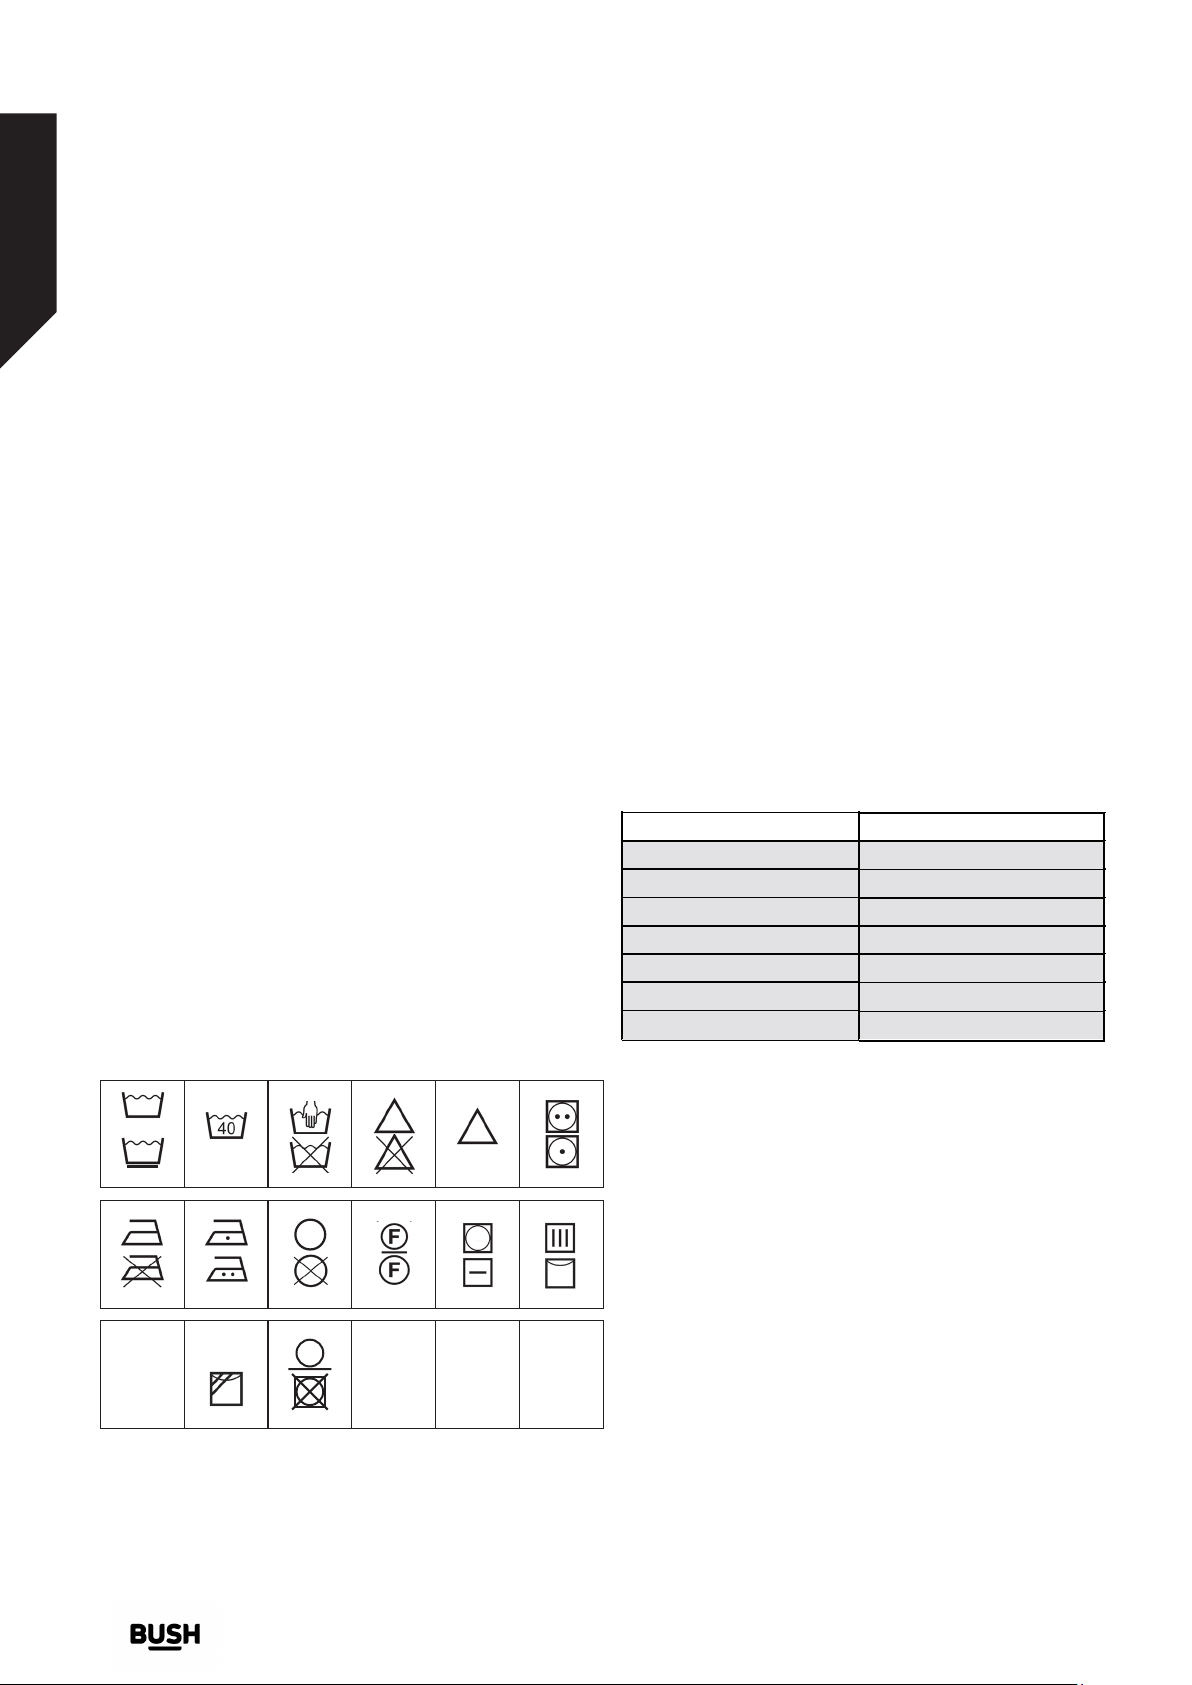
• Your laundry has product labels on them that specifiy
their specifications. Wash or dry your laundry according
to the specifciations on the product label.
• Separate your laundry according to their types
(cotton, synthetic, sensitive, wool etc.), their
temperatures (cold, 30°, 40°, 60°, 90°) and degree of
contamination (slightly stained, stained, highly stained).
• Never wash your coloured and white laundry
together.
• Wash your coloured laundry separately in the first
washing as they may bleed.
• Ensure that there are no metallic materials on your
laundry or in the pockets; if so, take them up.
CAUTION: Faults that will emerge in case of
penetration of foreign substances into your machine
are not included within the scope of warranty.
• Zip up and button up your laundry.
• Remove the metallic or plastic hooks of tulle curtains
or curtains or place them in a washing net or bag and
then muzzle them.
• Reverse textiles such as pants, knitwear, t-shirt and
sweat suit.
• Wash socks, handkerchief and suchlike small laundry
in a washing net.
NOTE: Maximum loading capacity may vary
based on the laundry type you will wash, degree
of contamination and the programme you have
chosen. Do not exceed maximum dry loading
capacity indicated in the programme table for
washing programmes.
You can take the following table of weights as an
example.
• Put each item of laundry separately.
• Ensure that no laundry is stuck between the cover
and bellow seal when closing the door of your
machine.
• Push the door of your machine until hearing
thelocking sound to close it.
• Close the door of your machine properly, otherwise
your machine will not start the washing operation.
LAUNDRY TYPE WEIGHT (g)
Towel
Linen
Bathrobe
Quilt cover
Pillow slip
Underwear
Tablecloth
200
500
1200
700
200
100
250
PUTTING LAUNDRY IN THE MACHINE
Hand wash
Normal wash
Warm wash
Gentle wash
Iron
Do not iron
Iron with cloth
Steam iron Line Dry in shade Do not tumble dry
(max 40 °C)
Cool iron (max.
110 °C)
Warm iron medium
(max. 150 °C)
Dry after wash
Do not wash Do not bleach
Dry clean
Do not dry clean
Warmly dry clean
• Open the door of your machine.
• Spread your laundry in your machine.
If you require any technical guidance or find that your product is not operating as intended, a simple solution can often be found in the Troubleshooting section of these instructions,
or online at www.bush-support.com If you still require further assistance, call one of our experts on 0345 257 7271.
28
Using your <washing machine>
Bleach
Chlorine
bleach may be
Dry clean normal cycle
with any solvent
Dry clean normal cycle
petroleum solvent only
Line Dry No Wring No machine wash
Tumble dry
Tumble dry. Medium
(max. 150 °C)
Tumble dry. Low heat
used
normal
Dry flat Hang to dry / Line dry
(max. 110 °C)
Drip dry
ADDING DETERGENT INTO MACHINE)
The amount of detergent you will put in your machine
will depend on the following criteria:
• Your detergent utilization will be based on the degree
of contamination of your laundry. Do not prewash
your less stained laundry and put your slight amount
of detergent in the 2nd compartment of the detergent
drawer.
• For your much stained laundry, select a programme
including prewashing, and put ¼ of the detergent you
will put in the detergent drawer in the 1st compartment
of the detergent drawer while putting the remaining ¾
of it into 2nd compartment.
Page 29
Using your washing machine
Getting the most from your appliance
Liquid Detergent
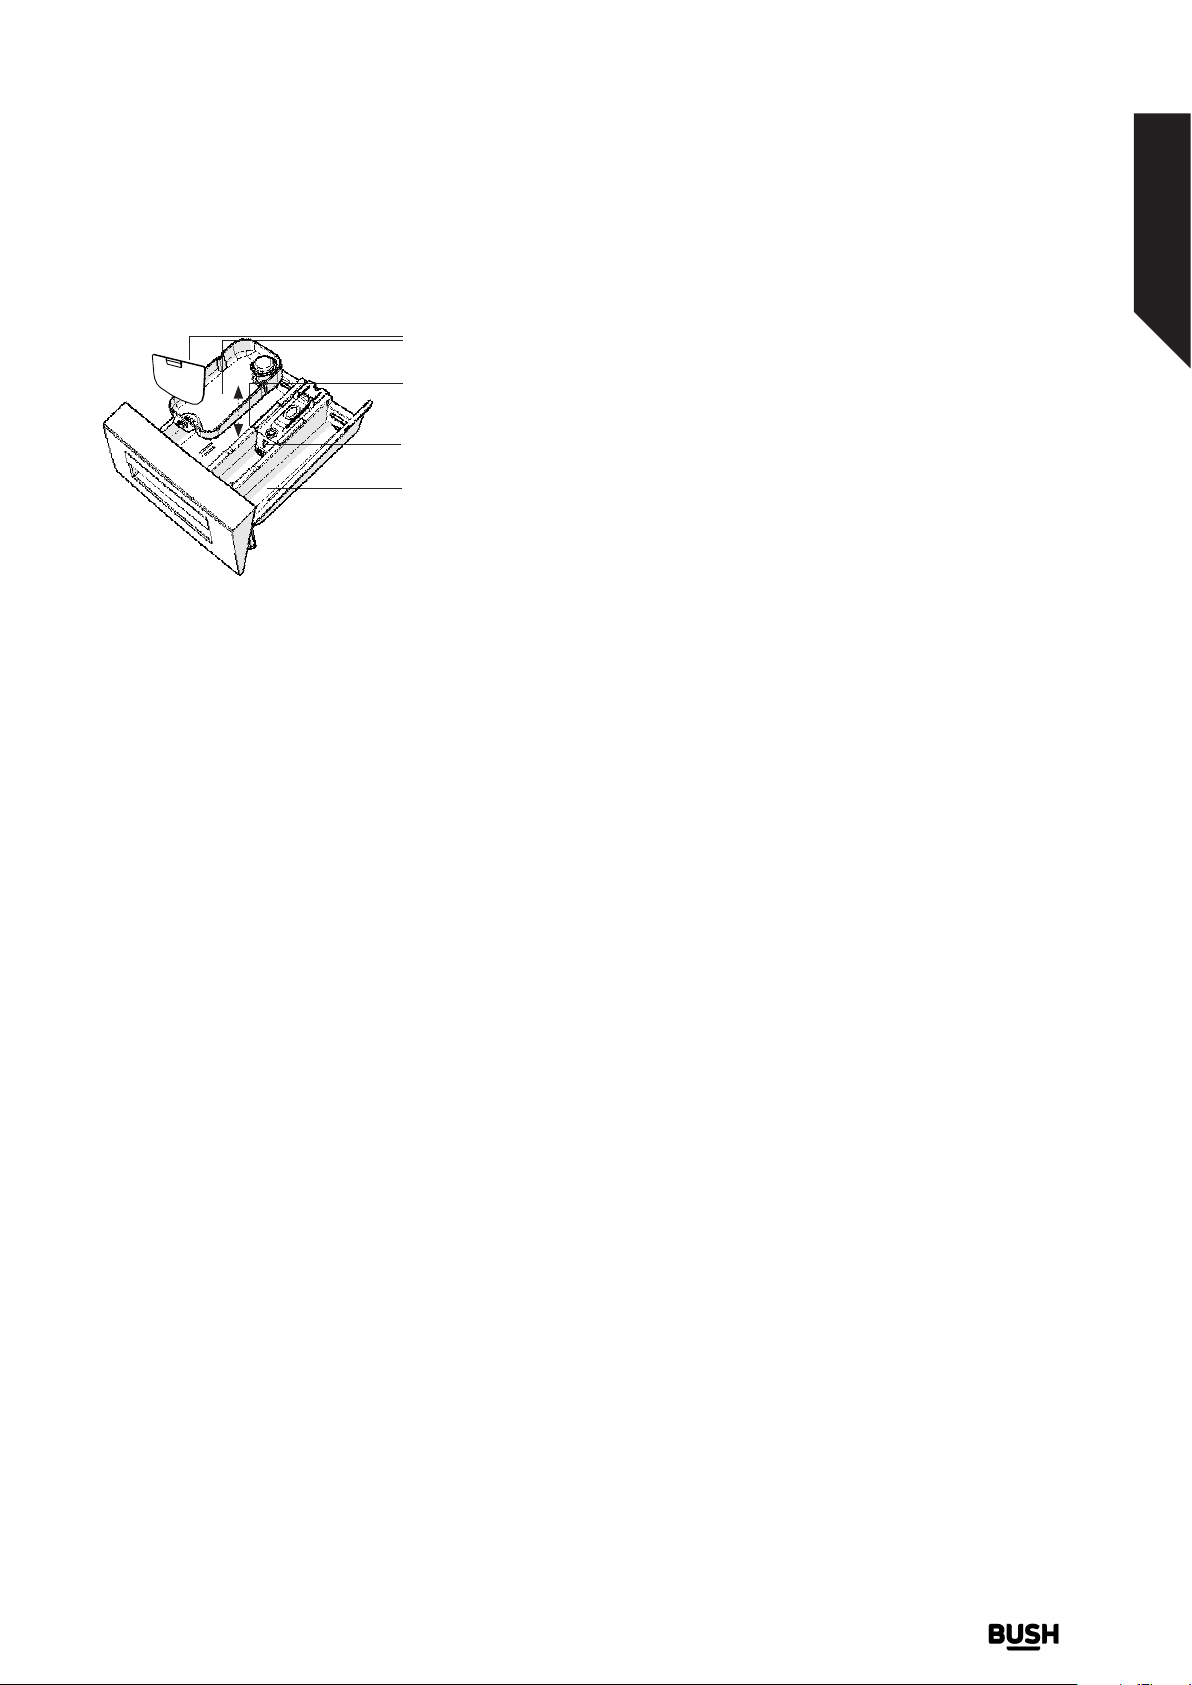
Apparatus
Main wash detergent
compartment
Softener
Compartment
Pre-wash detergent
compartment
• Use detergents produced for automatic washing
machine in your machine. The amount of detergent
you will use for your laundry is printed on the detergent
package.
• The higher the degree of hardness of the water the
more detergent you will use.
• The amount of the detergent you will use will
increase as the amount of your laundry increase.
• Put the softener in the softener compartment in
the detergent drawer. Do not exceed the MAX level.
Otherwise, softener will flow into washing water
through flushing.
• Softeners with high density are required to be thinned
to a degree before being put in the drawer. Because
high-density softener will clog the flush and avoid the
flow of the softener.
• You can use your liquid detergents in all programmes
without prewashing. For this, fit liquid detergent level
plate in the accessories bag or the liquid detergent
apparatus (*) into 2nd compartment of the detergent
drawer and set the amount of liquid detergent
according to the levels on this plate. Remember to
detach the liquid detergent plate.
(*)Machinery specifications may vary depending on the
product purchased.
If you require any technical guidance or find that your product is not operating as intended, a simple solution can often be found in the Troubleshooting section of these instructions,
or online at www.bush-support.com If you still require further assistance, call one of our experts on 0345 257 7271.
Using your <washing machine>
29
Page 30
Using your washing machine
Getting the most from your appliance
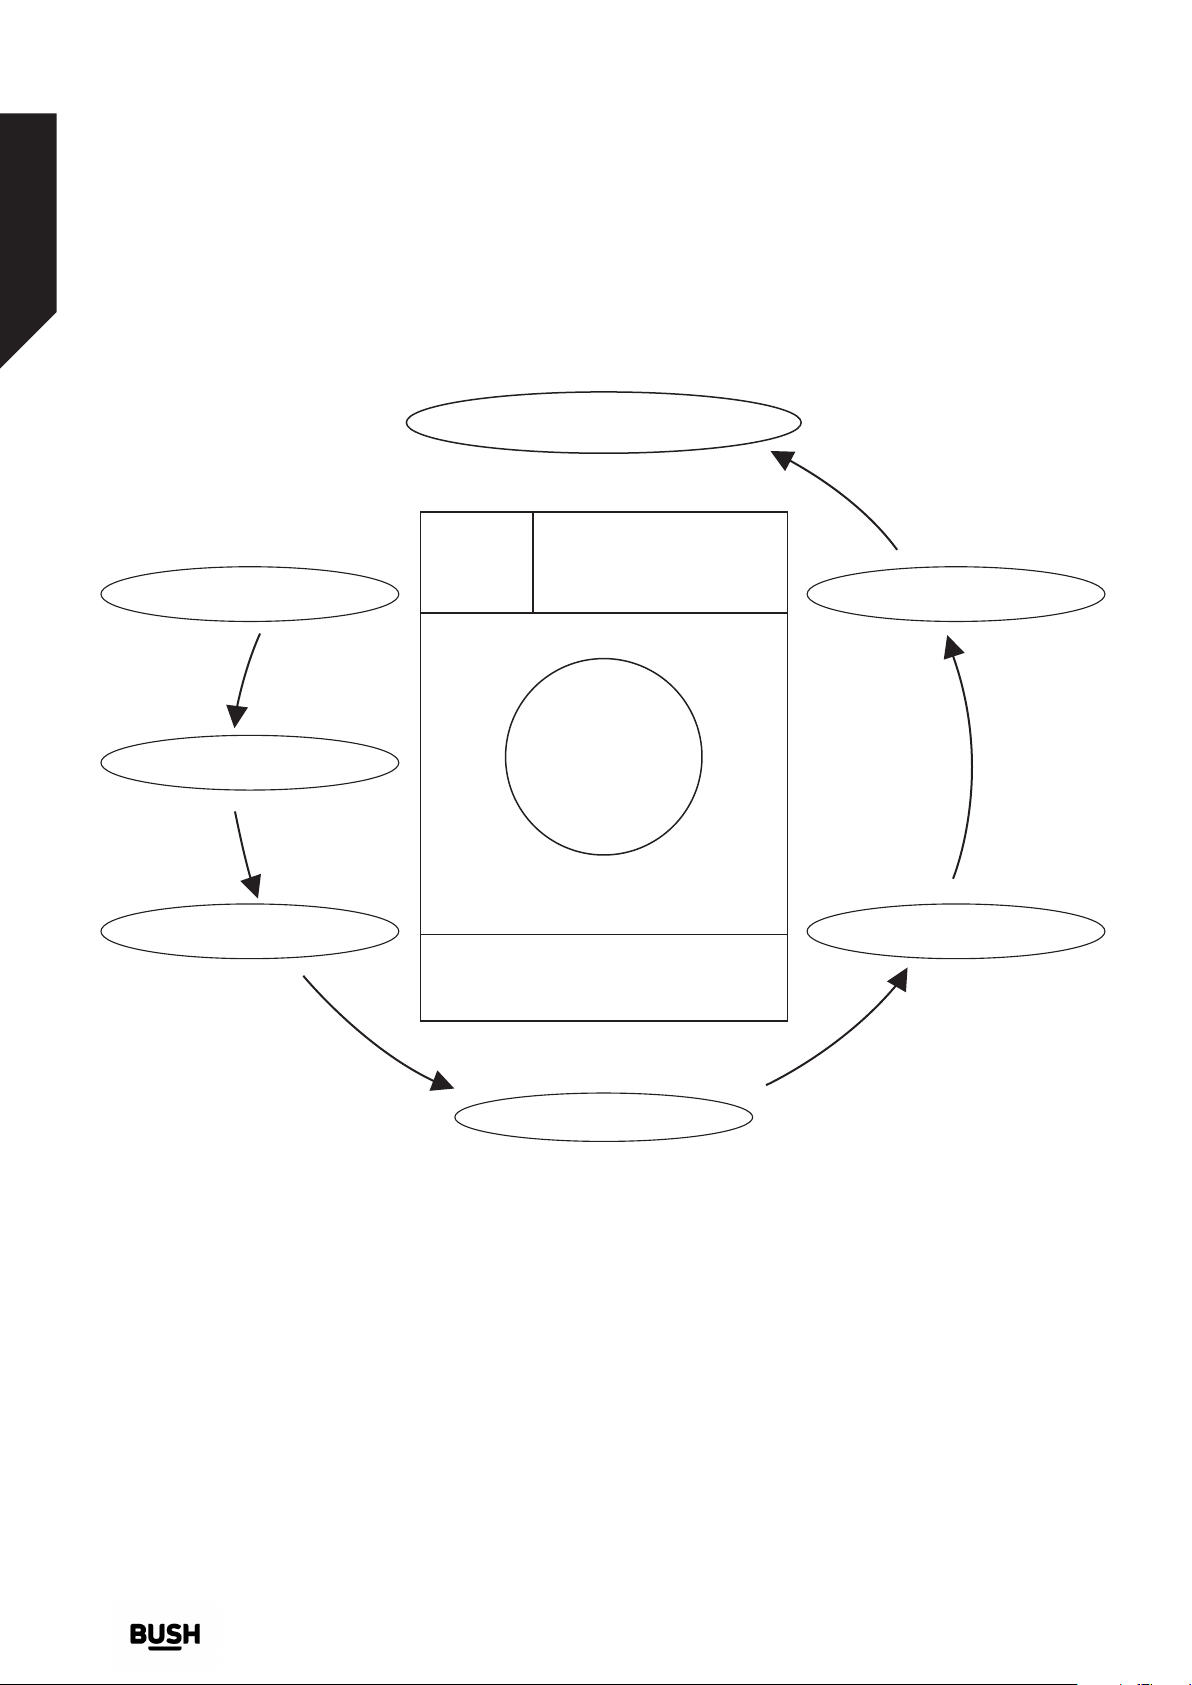
Quick start
8. Press the ( start/pause )
1. Open the door and
Load the laundry
2. Measure out the
detergent
3. Close the door
7. Select the desired
programme
5. Plug the power
supply
4. Turn on the water tap
30
If you require any technical guidance or find that your product is not operating as intended, a simple solution can often be found in the Troubleshooting section of these instructions,
or online at www.bush-support.com If you still require further assistance, call one of our experts on 0345 257 7271.
Using your <washing machine>
Page 31

Care and maintenance
6
Page 32
Care and maintenance
Looking after your appliance
Before cleaning your washing machine.
a: Unplug your machine from the mains power supply.
b: Close the water tap.
Water inlet filters
On the tap part of your machine’s water inlet hose
and at the ends of water inlet valves, there are filters
to prevent entrance of the dirt and foreign materials in
the water to the machine. If the machine is unable to
receive sufficient water even though your water tap is
fully opened, filters should be cleaned.
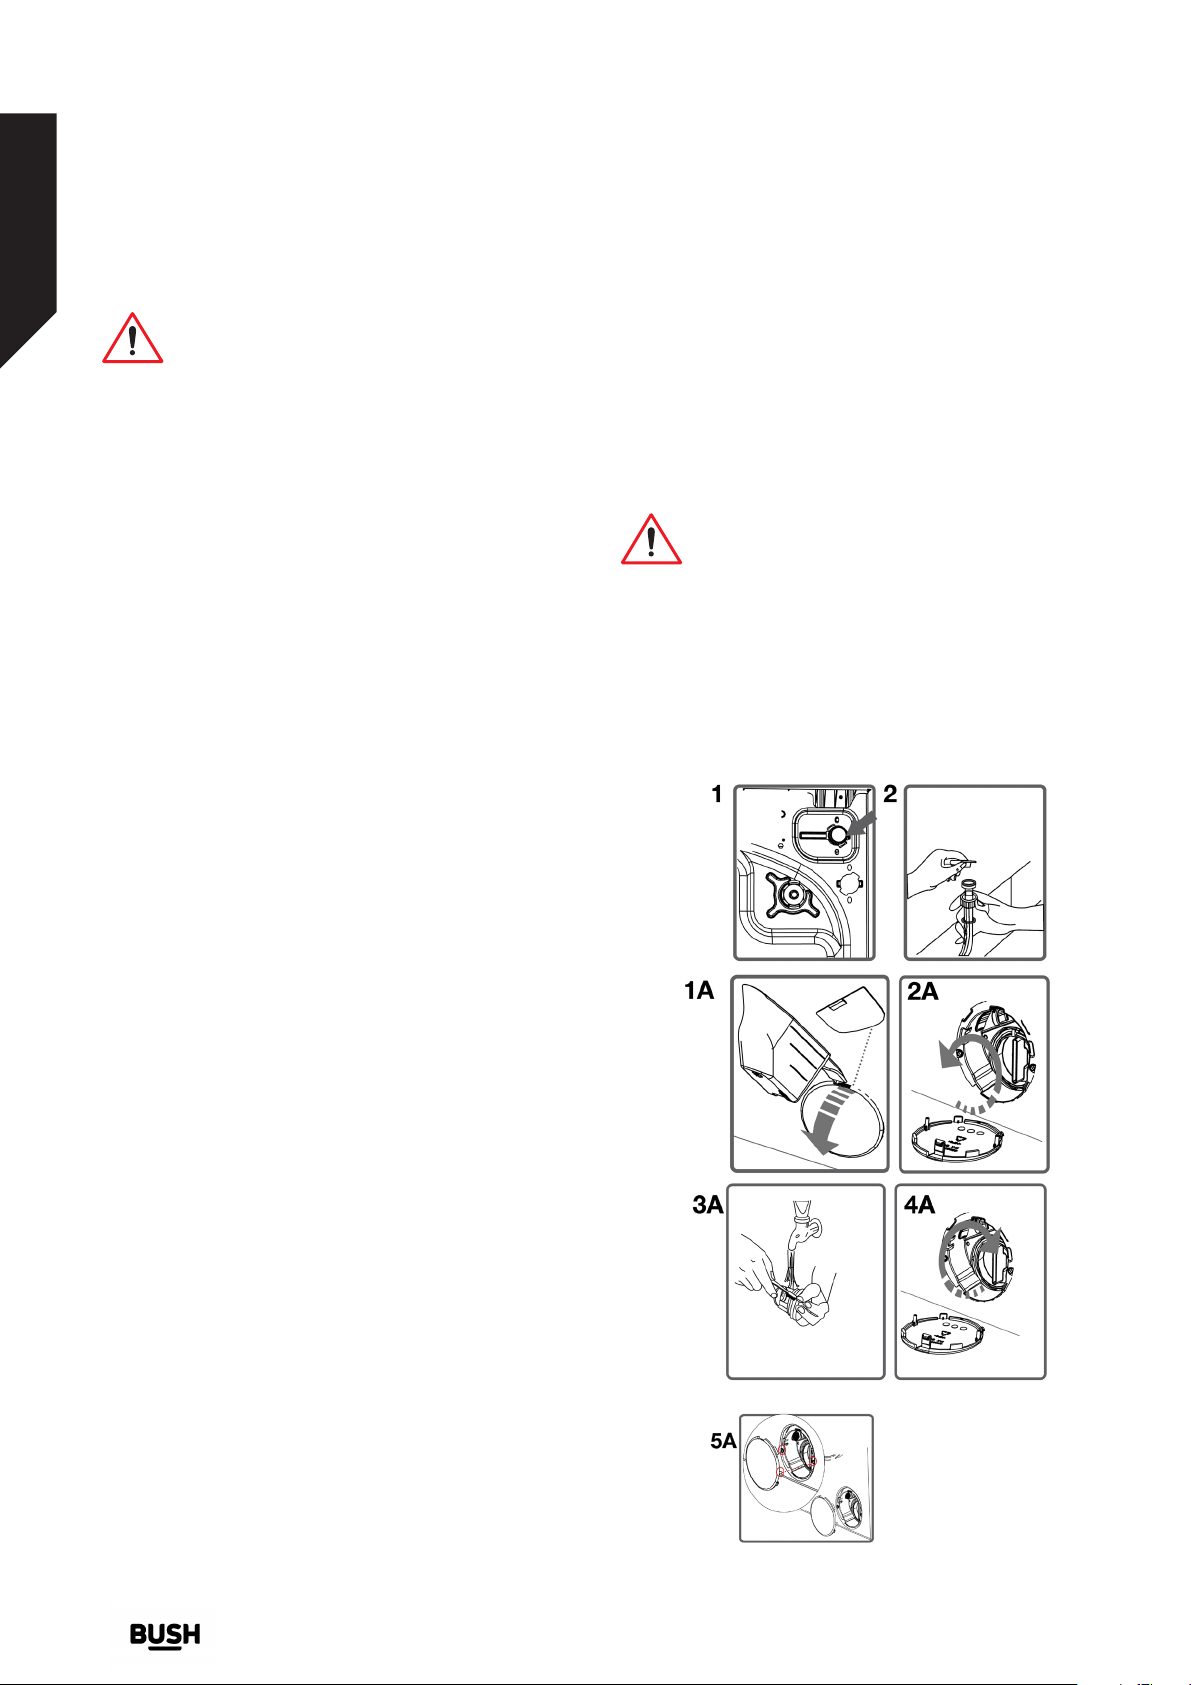
• Remove the water inlet hose.
• Remove the filters found on the water inlet valves by
using a pincer and wash thoroughly with a brush. (1)
• Clean the filters of the water inlet hoses located on
the tap side by removing manually together with the
seal. (2)
• After you clean the filters, you can fit them the same
way as you have removed them.
• While closing the pump cover, ensure that the parts
on the inner side of the cover match the holes on the
front panel side. (5-A)
• You can reattach the pump cover in the reverse order
that you removed it.
Danger of being scalded!
The water inside the pump maybe hot- wait
for it to cool.
(*) Machinery specifications may vary depending on the
product purchased.
(**) Instead of pump cover part, Plinth sheet part is
using in Built-in Machine. To remove the plinth sheet
part, please follow the Built-in Installation Manual
instructions.
Pump filter
The pump filter system elongates the life of your pump,
which is used to drain the dirty water. It prevents dirt
entering the pump. Cleaning of your pump filter every
2-3 months is recommended. To clean your pump
filter:
• To open the pump cover, you can use the powder
detergent spade (*) or liquid detergent level plate
coming out of your machine. (1-A & 2-A) (**)
• Before opening the filter cover, place a cup in front of
the filter cover to prevent flow of the remaining water in
the machine.
• Clean the foreign materials in the filter with a brush
and flush with clean water. (3-A)
• Check for the rotation of the pump manually.
• After cleaning the filter, fit the filter cover and tighten it
by rotating it in clockwise direction. (4-A)
• Remove the foreign materials from the filter.
• Do not forget that if you do not fit the filter cover
properly, it will leak water.
32
If you require any technical guidance or find that your product is not operating as intended, a simple solution can often be found in the Troubleshooting section of these instructions,
or online at www.bush-support.com If you still require further assistance, call one of our experts on 0345 257 7271.
Care and maintenance
Page 33
Care and maintenance
Looking after your appliance
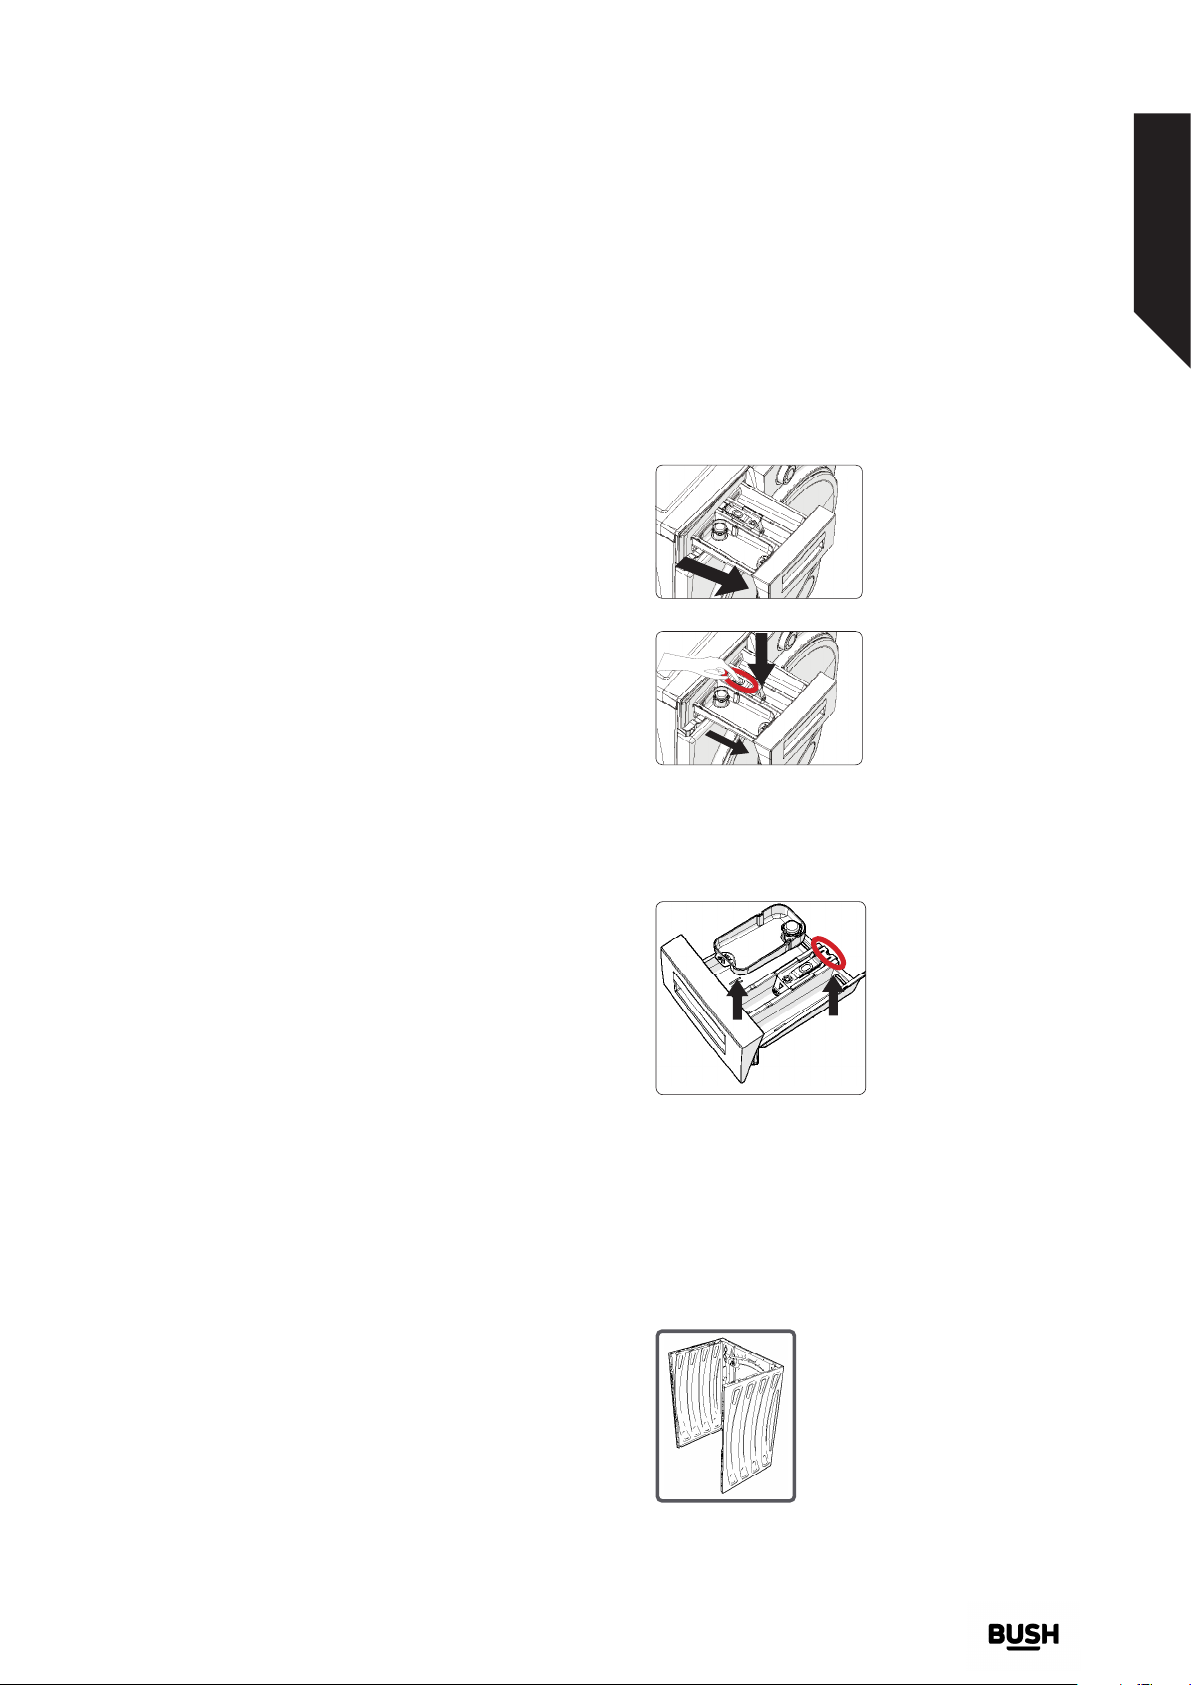
Detergent drawer
Detergents may form sediments in your detergent
drawer or in the housing of the detergent drawer over
time. To clean the sediment, pull out the detergent
drawer from time to time. To pull out the detergent
drawer:
• Pull the detergent drawer to the end. (1)
• Keep on pulling by depressing on the section shown
below in the detergent drawer and keep pulling and
then remove the detergent drawer. (2&3)
• Clean the detergent drawer with a soft brush like an
old toothbrush and flush with clean water.
• Collect residues in the housing of the detergent
drawer without dropping them inside the machine.
• Assemble the detergent drawer after drying it using a
towel or dry cloth.
• Do not wash your detergent drawer in a dishwasher!
Liquid Detergent Apparatus (*)
limescale remover, especially in hard water areas.
Note: After each wash leave the door of the machine
open to help air the drawer and reduce any mould
build up;
1
2
Take out the liquid detergent level apparatus for
cleaning and maintenance purposes as shown in the
picture and clean away detergent residues. Put the
apparatus back into its place. Make sure no residues are
left inside.
(*) Machinery specifications may vary depending on the
product purchased.
Siphon plug
Pull out the detergent drawer. Remove the siphon plug
and clean any residues away. Fit the cleaned siphon
plug in its location. Check it is placed properly. (3)
Cabinet
Clean the exterior surface of the cabinet of your
machine with lukewarm water and a cleaning
substance that will not damage the cabinet. After rinsing
with clean water, wipe it with a soft and dry cloth.
Note: To get the best out of your machine. We
recomend that you periodically run a wash cycle with
Note: Wipe the door seal ideally after each wash;
Note: Undertake a maintenance wash every 4-6 weeks
with the drum empty. This wash should be undertaken
with lime scale and detergent remover;
If you require any technical guidance or find that your product is not operating as intended, a simple solution can often be found in the Troubleshooting section of these instructions,
or online at www.bush-support.com If you still require further assistance, call one of our experts on 0345 257 7271.
Care and maintenance
33
Page 34
Care and maintenance
Looking after your appliance
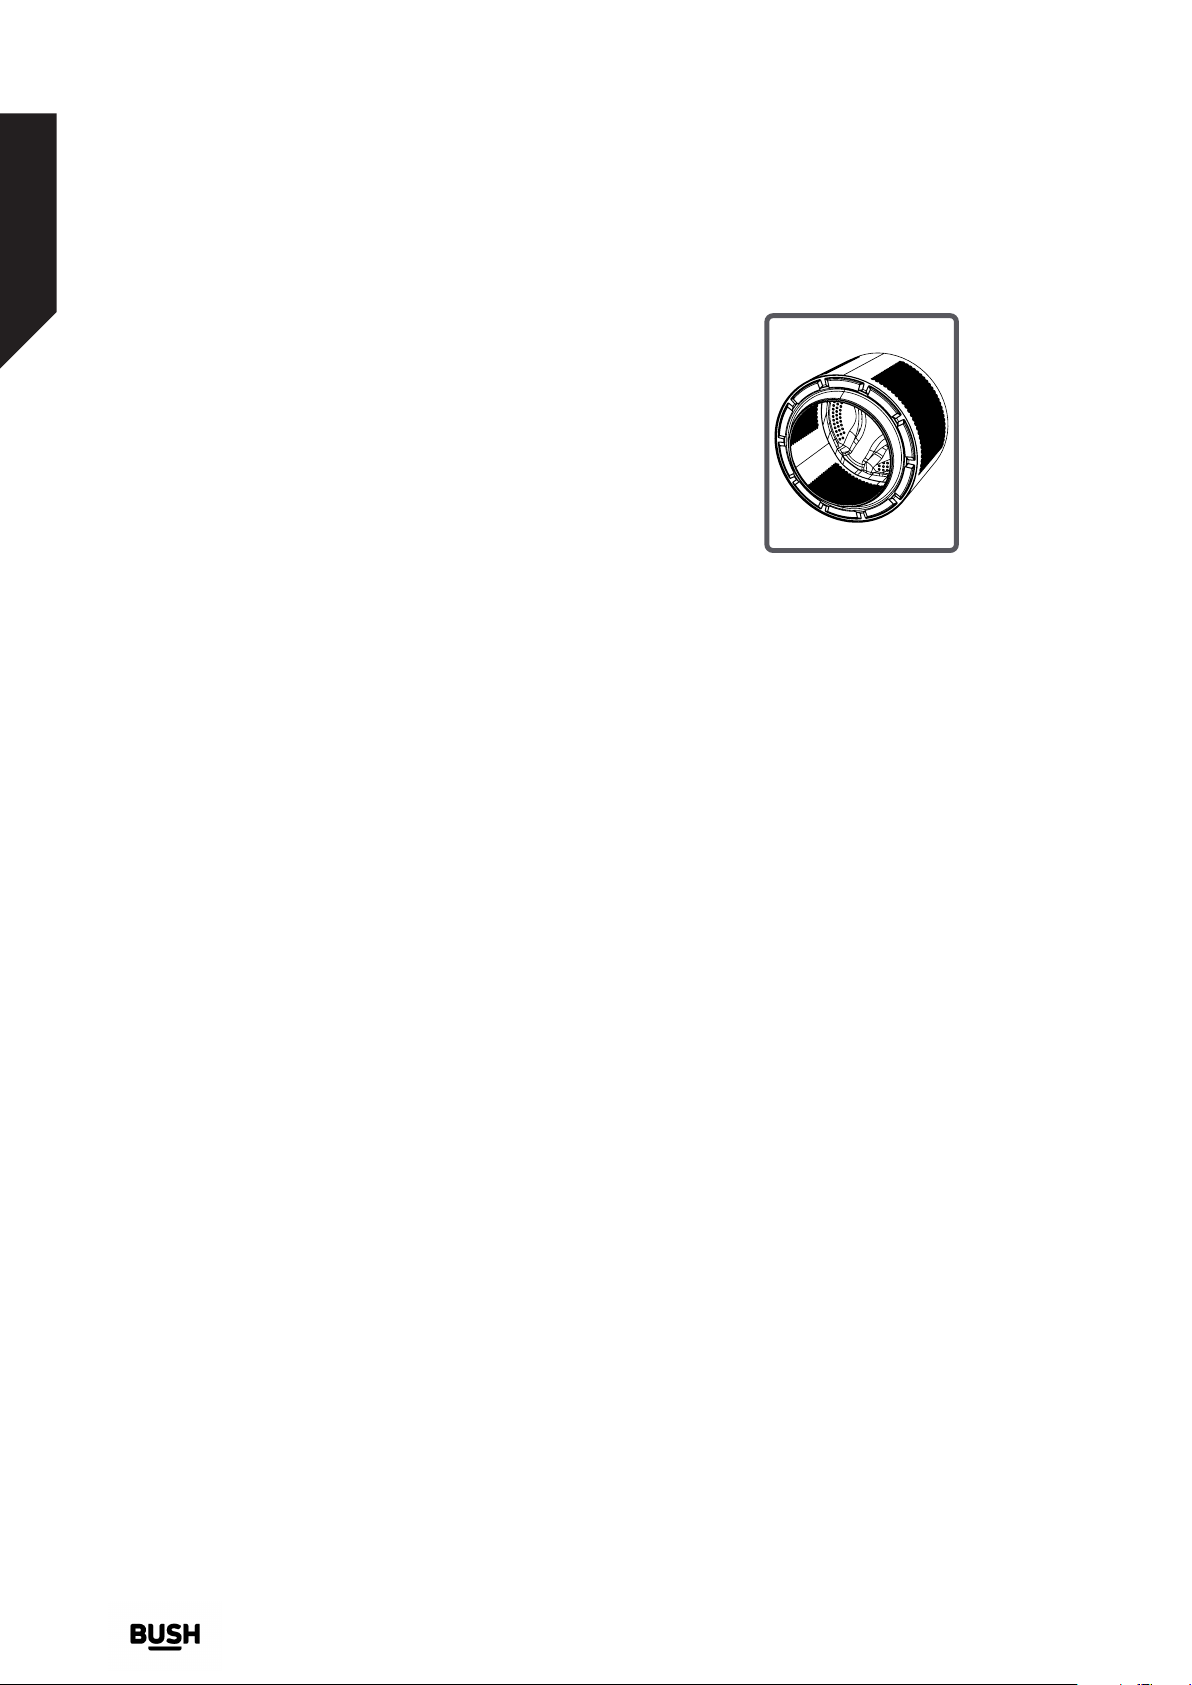
Drum
Do not leave metallic objects such as needles, paper
clips, coins etc. in your machine. These objects lead
to stains in the drum. To clean such rust stains, use a
non-chlorine cleaning agent and follow the instructions
of manufacturers of the cleaning agent. Never use wire
wool or similar hard objects for cleaning rust stains.
34
If you require any technical guidance or find that your product is not operating as intended, a simple solution can often be found in the Troubleshooting section of these instructions,
or online at www.bush-support.com If you still require further assistance, call one of our experts on 0345 257 7271.
Care and maintenance
Page 35

Product support
7
Page 36
Product support
Help is always at hand
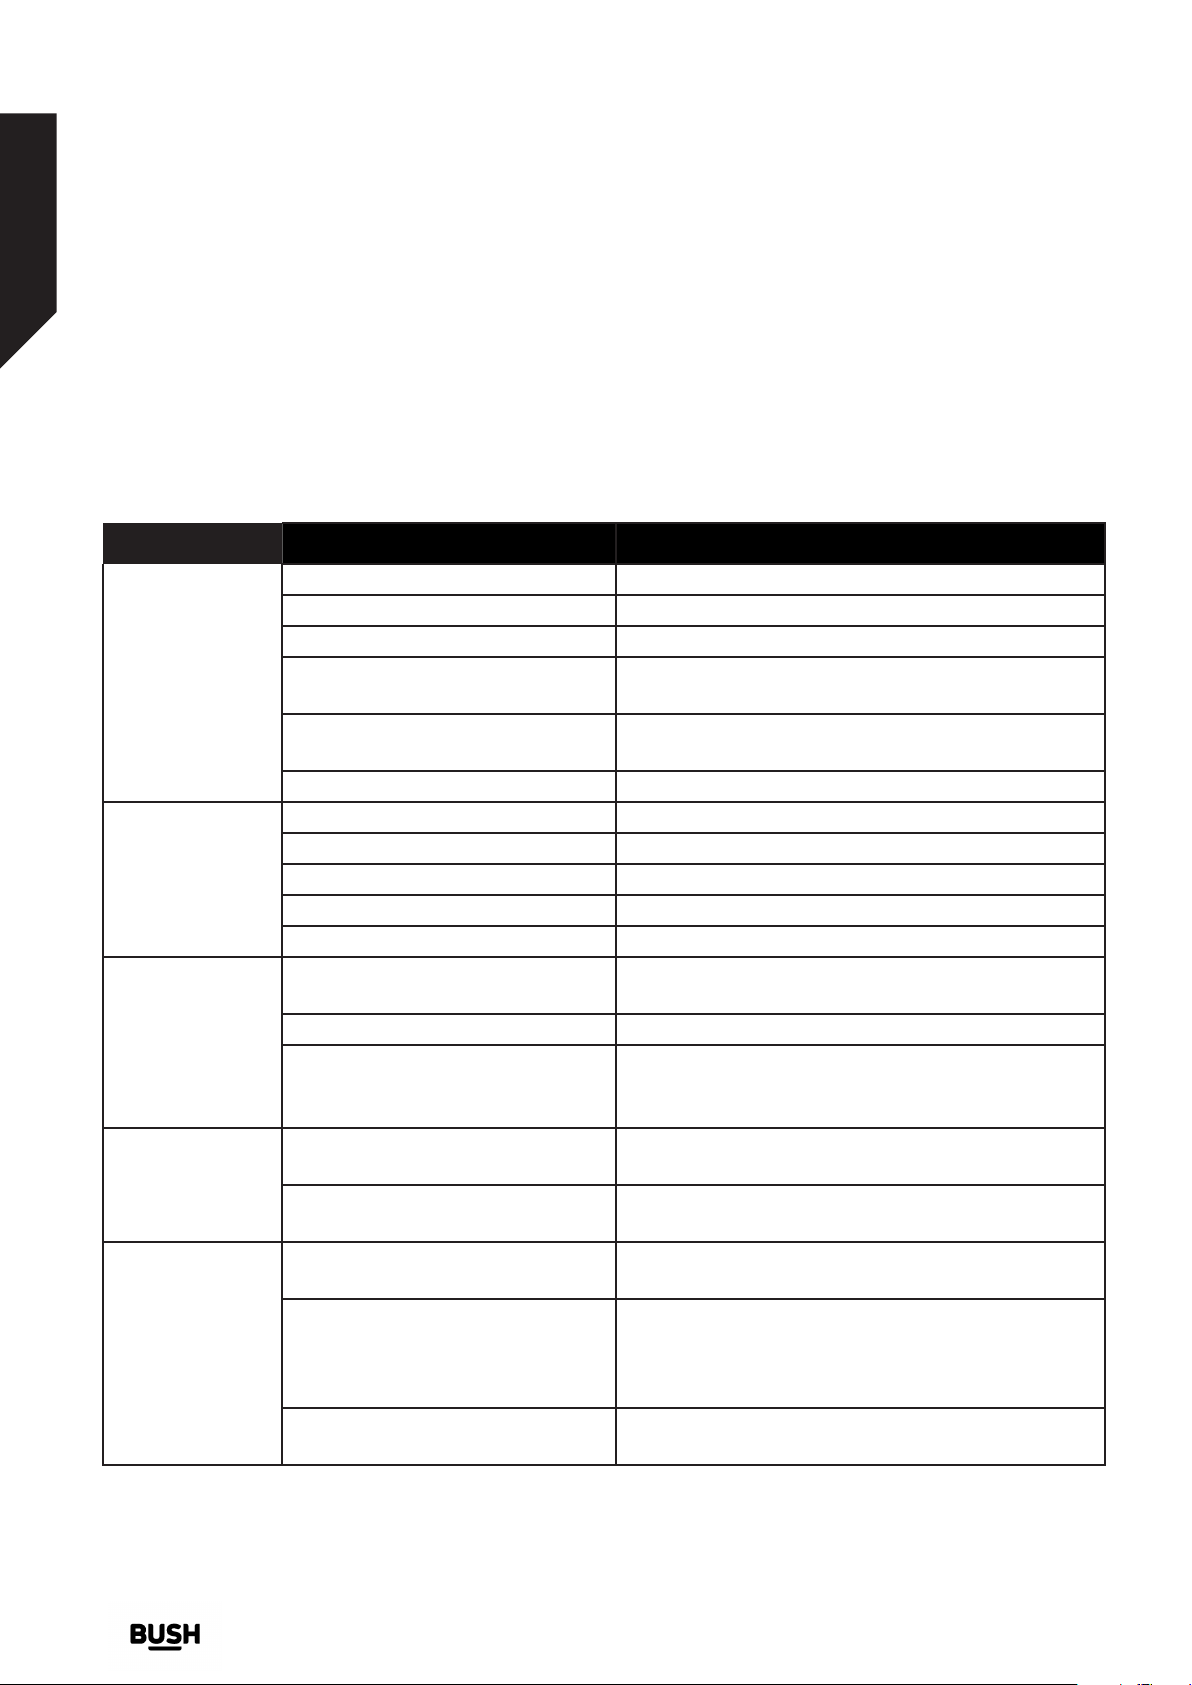
All repairs to the machine must be carried out by an authorised repair agent. When a repair is required or you are
unable to eliminate the failure with the help of the information below:
a: Unplug the machine.
b: Close the water tap.
c: Contact the nearest authorised repair agent.
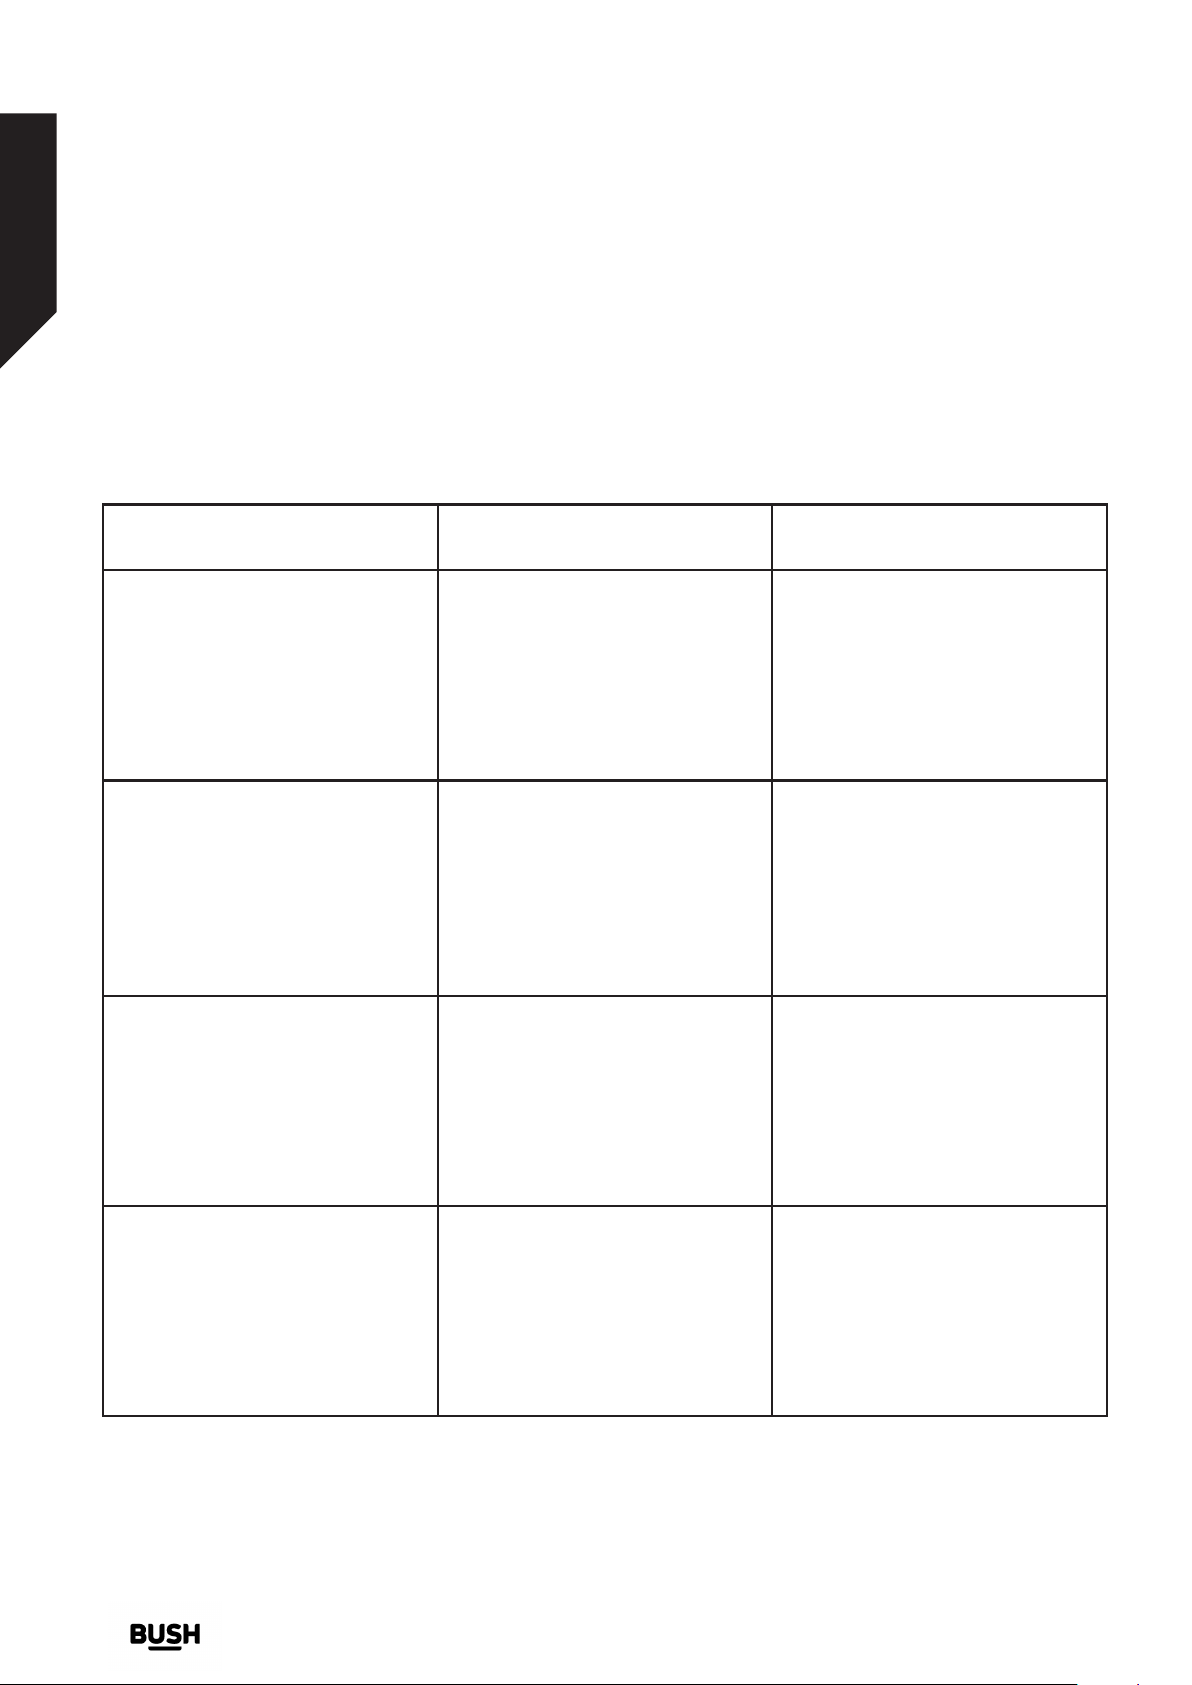
FAILURE PROBABLE CAUSE METHODS OF ELIMINATION
It is unplugged. Insert the plug into the socket.
Your fuse is defective. Change your fuse.
The electric power is off. Check the electric power.
Your machine
does not operate.
Your machine
does not receive
water.
Your machine is
not draining water.
Your machine is
vibrating.
Your machine is
vibrating.
Start/pause button has not been
pressed.
The programme knob is in the 0
(off) position.
The door is not shut properly. Shut the door properly. You should hear the click.
Water tap is closed. Open water tap.
The water inlet hose may be bent. Check the water inlet hose.
The water inlet hose is obstructed. Clean the filters of water inlet hose. (*)
The valve inlet filter is obstructed. Clean the valve inlet filters. (*)
The door is not shut properly. Shut the door properly. You should hear the click.
The drain hose is obstructed or
bent.
The pump filter is obstructed. Clean the pump filter. (*)
The clothes are not placed inside
the machine in a well-balanced
manner.
The feet of your machine are not
adjusted.
Transportation screws are not
removed.
There are only few clothes in the
device.
Excessive amount of clothes are
filled in the machine or the clothes
are not placed in a well-balanced
manner.
Your machine is touching a rigid
object.
Press the start/pause button.
Turn the programme knob to the desired position.
Check the drain hose.
Spread the clothes inside the machine in an orderly
and well-balanced manner.
Adjust the feet. (**)
Remove transportation screws. (**)
It does not prevent operation of the machine.
Do not exceed the recommended quantity of clothes
and spread your clothes in the machine in a wellbalanced manner.
Ensure machine is not in contact with hard objects.
(*) See the section concerning the care and maintenance of your machine.
(**) See the section concerning installation of your machine.
If you require any technical guidance or find that your product is not operating as intended, a simple solution can often be found in the Troubleshooting section of these instructions,
or online at www.bush-support.com If you still require further assistance, call one of our experts on 0345 257 7271.
36
Product support
Page 37
Product support
Help is always at hand
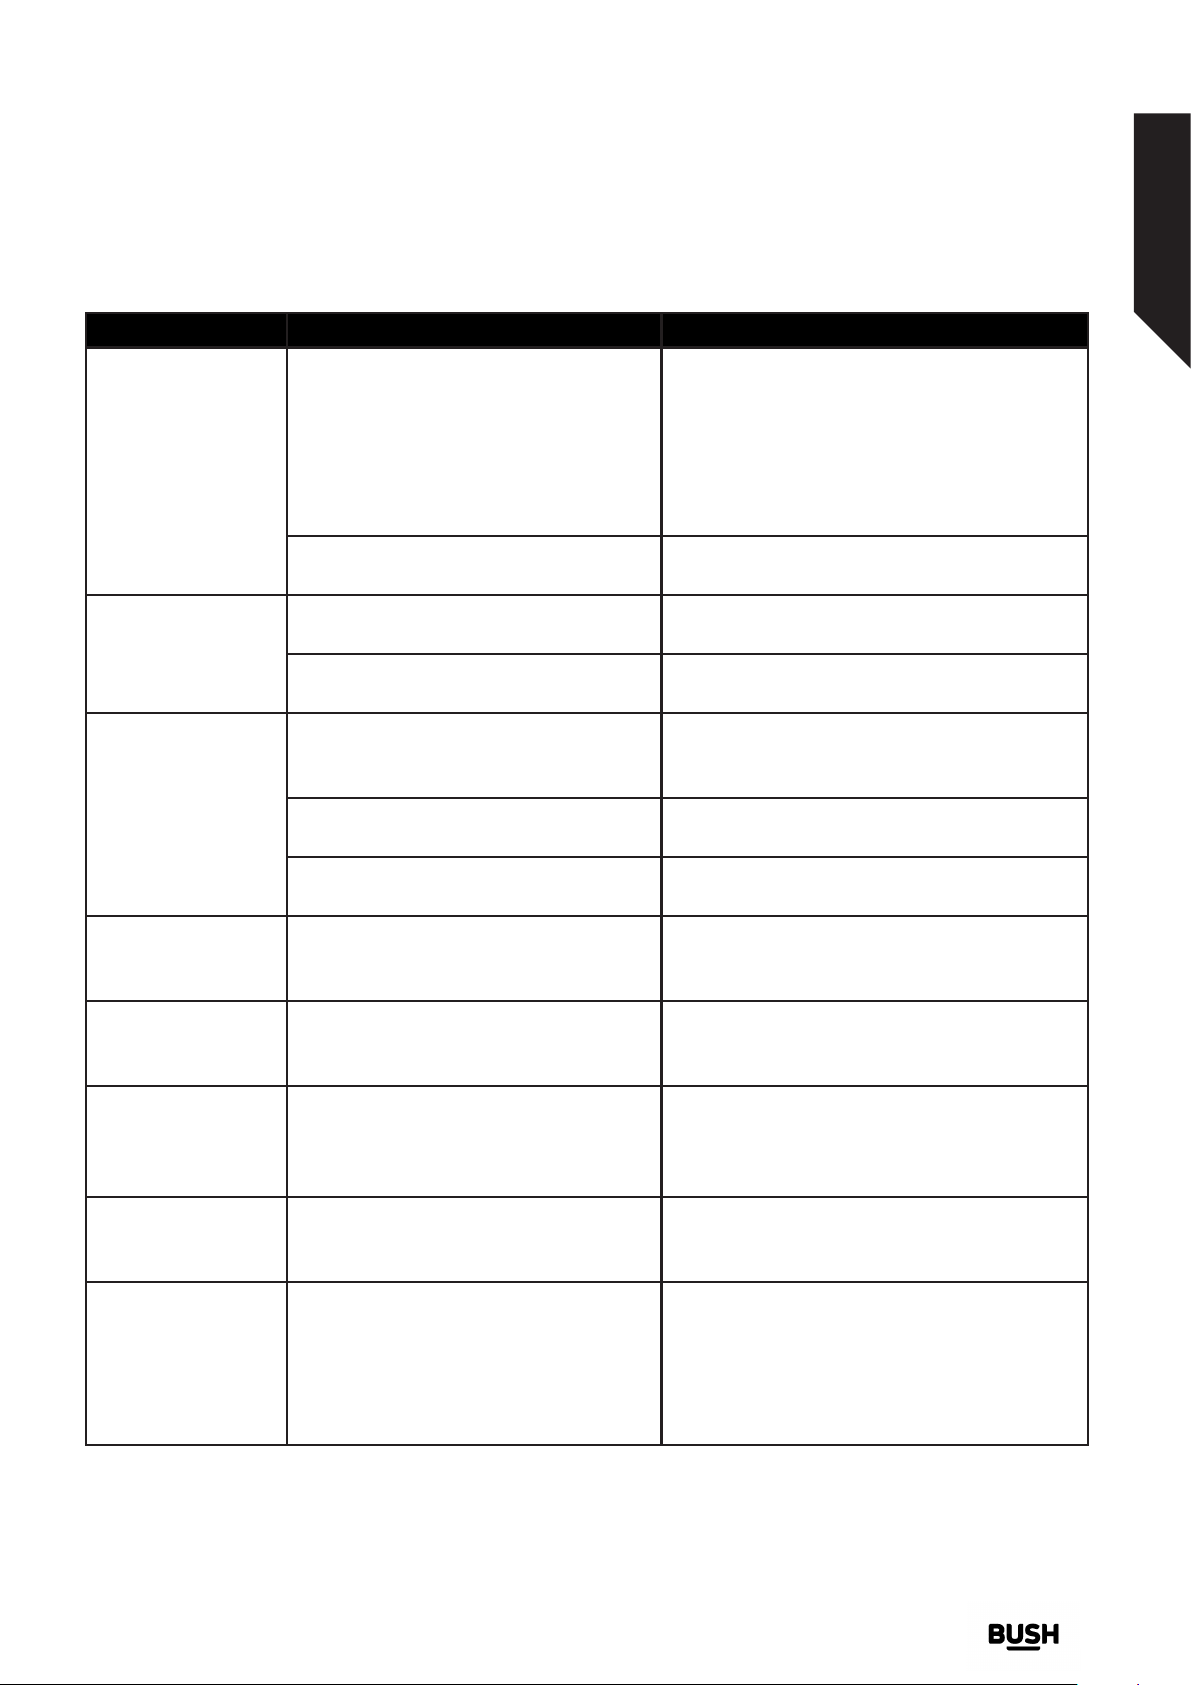
FAILURE PROBABLE CAUSE METHODS OF ELIMINATION
Press the start/pause button.In order to
stop the foam, dilute one table-spoon of
softener in half liter of water and pour it in the
Excessive foam
in the detergent
drawer.
The washing result
is poor.
The washing result is
not good.
The water is drained
from the machine as
soon as it is filled.
No water is seen
in the drum during
washing.
There are residues
of detergent on the
clothes.
There are grey stains
on the clothes.
The spinning
process is not done
or starts with delay .
Too much detergent has been used.
Wrong detergent has been used. Use only the detergents produced for full
Your laundry is too dirty for the
programme you have selected.
The amount of detergent used is not
sufficient.
Clothes exceeding the maximum
capacity have been loaded in the
machine.
Your water may be hard. Use the amount of detergent specified by the
Distribution of the clothes in your
machine is not well-balanced.
The end of the water drain hose is in
a position too low according to the
machine.
No failure. The water is in the lower part
of the drum.
Some detergents contain ingredients
which are not soluble in water and
which may form white stains on your
clothes.
These stains may be caused by oil,
cream or ointment.
No failure. The unbalanced load control
may work in that way.
detergent drawer. Press the start/pause button
after 5-10 minutes. Arrange the amount of
the detergent properly in the next washing
process.
automatic machines.
Select a suitable programme.
Use more detergent.
Put the clothes in your machine in a manner
not to exceed its maximum capacity.
detergent manufacturer.
Spread the clothes inside the machine in an
orderly and well-balanced manner.
Position the water drain at an appropriate
height. (**)
-
By adjusting your machine, carry out an
additional rinse, or eliminate the stains after
drying, with a brush.
In the next washing operation, use the
maximum detergent amount declared by the
detergent producer.
The unbalanced load control system will try
to distribute your clothes in a homogenous
manner. After your clothes are distributed,
passage to spining process will be realized. In
the next washing process, place your clothes
into the machine in a well-balanced manner.
(*) See the section concerning the care and maintenance of your machine.
(**) See the section concerning installation of your machine.
If you require any technical guidance or find that your product is not operating as intended, a simple solution can often be found in the Troubleshooting section of these instructions,
or online at www.bush-support.com If you still require further assistance, call one of our experts on 0345 257 7271.
Product support
37
Page 38
Product support
Help is always at hand
Error Signals
Your machine is equipped with systems which will take the necessary precautions and warn you in case of any.
IMPORTANT: IT CAN TAKE UPTO 10 MINUTES FOR ERROR TO REGISTER.
Failure code Probable failure Process to be followed
Shut the door properly so
that you hear the click. If the
E01
The door is not shut properly.
problem persists, turn off the
machine unplug and contact the
nearest authorised service agent
immediately.
E02
E03
E04
The water level in your machine is
below heater. The pressure of your
water supply may be low or water
supply may be blocked.
The pump has failed or the pump
filter is obstructed.
Your machine has excessive
amount of water.
Turn on the tap fully. The water
supply may be interrupted. If the
problem persists, your machine
will automatically stop after a
while.Unplug your machine,
turn off the tap and contact the
nearest authorised service agent
immediately.
Clean the pump filter.If the
problem persists and contact the
nearest authorised service agent
immediately. (*)
Your machine will discharge water
by itself. Pursuant to discharging
operation, turn off your machine
and unplug it. Turn off your tap
and contact the nearest authorised
service.
(*) See the section regarding the care and maintenance of your machine.
If you require any technical guidance or find that your product is not operating as intended, a simple solution can often be found in the Troubleshooting section of these instructions,
or online at www.bush-support.com If you still require further assistance, call one of our experts on 0345 257 7271.
38
Product support
Page 39
Product support
Help is always at hand
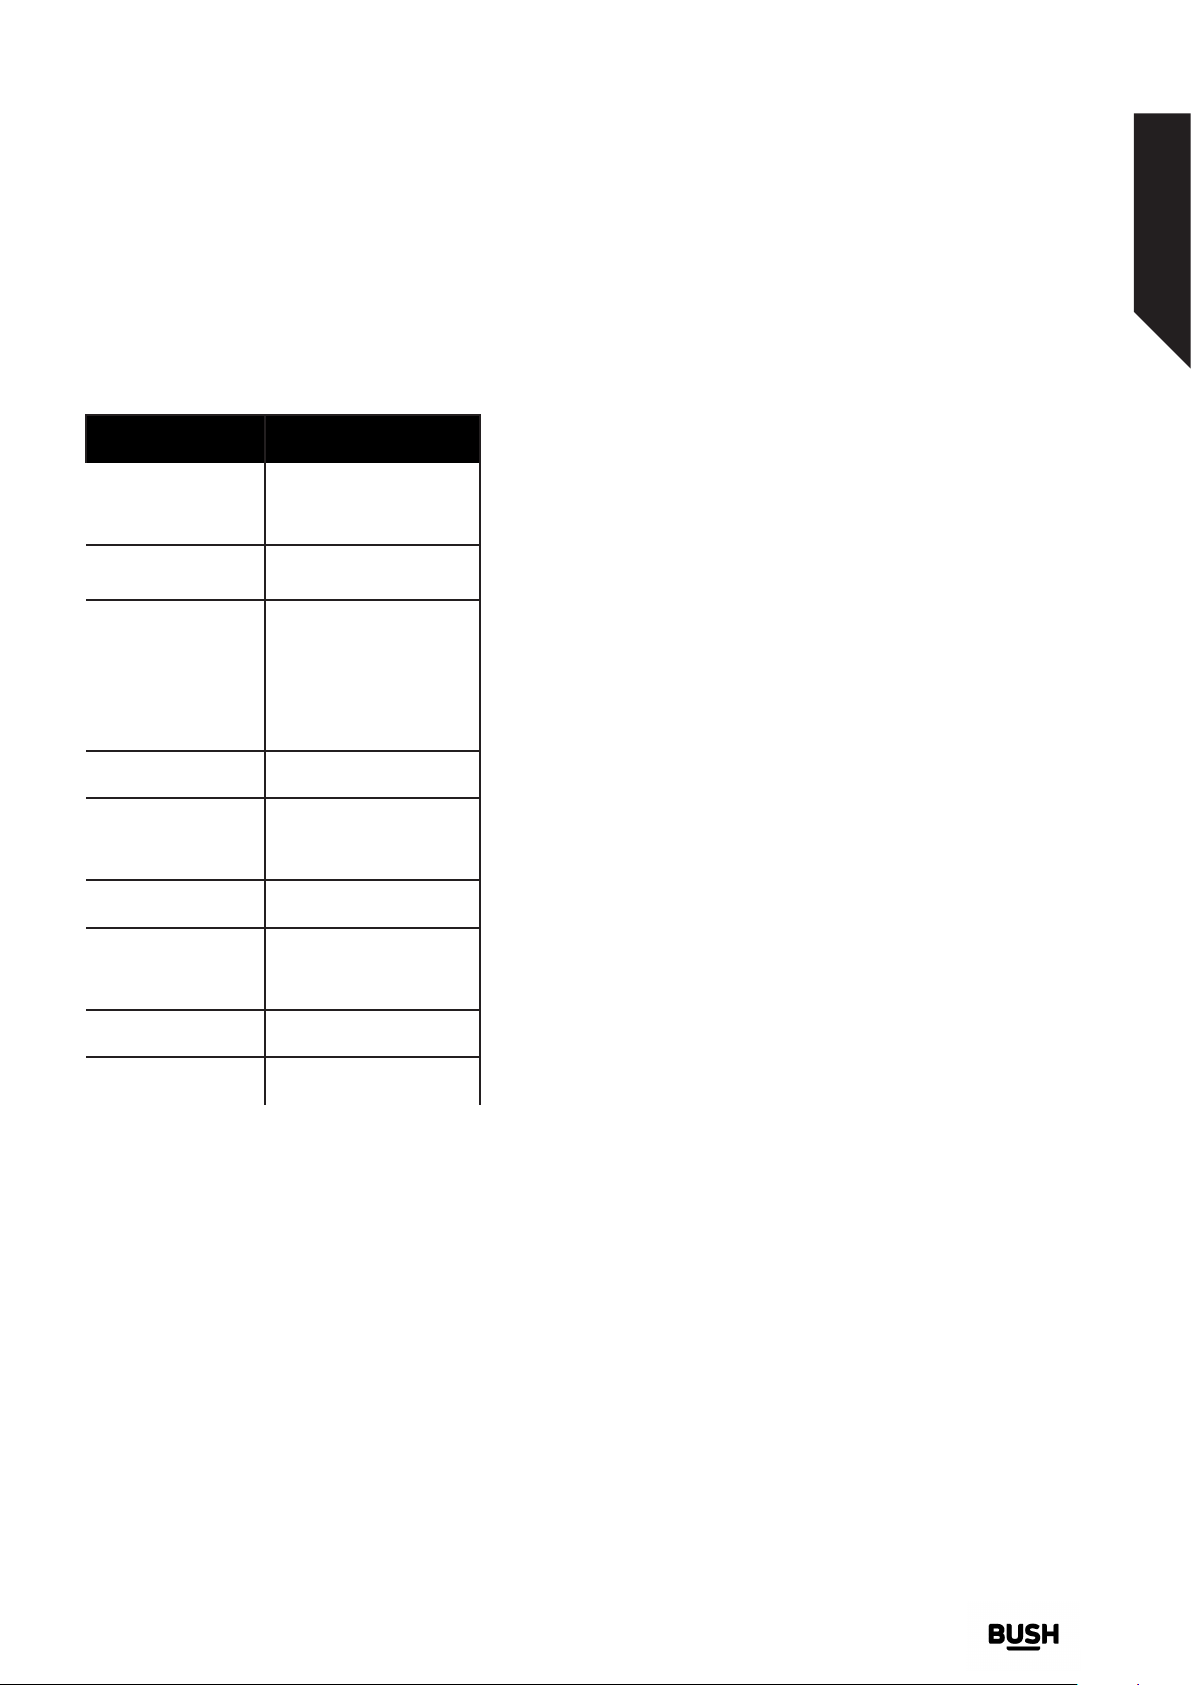
Technical Specifications
Model / Item WMSAEINT812W
Power supply (220-240) V ~/50Hz
Max working
current
Water pressure
Maximum power 2100 watt
Maximum washing load (dry)
Spinning speed 1200 rpm
Washing
programmes
Size
Net weight 66,2 kg
10 amp
Maximum : 1Mpa
Minumum : 0.01 MPa
8 kg
15
817,4 x 597,4 x 544,3
If you require any technical guidance or find that your product is not operating as intended, a simple solution can often be found in the Troubleshooting section of these instructions,
or online at www.bush-support.com If you still require further assistance, call one of our experts on 0345 257 7271.
Product support
39
Page 40
Product support
Help is always at hand
Help and assistance
If you require any technical guidance or find that your washing machine is not operating as intended, a simple
solution can often be found in the Troubleshooting section of these instructions or online at
www.bush-support.com
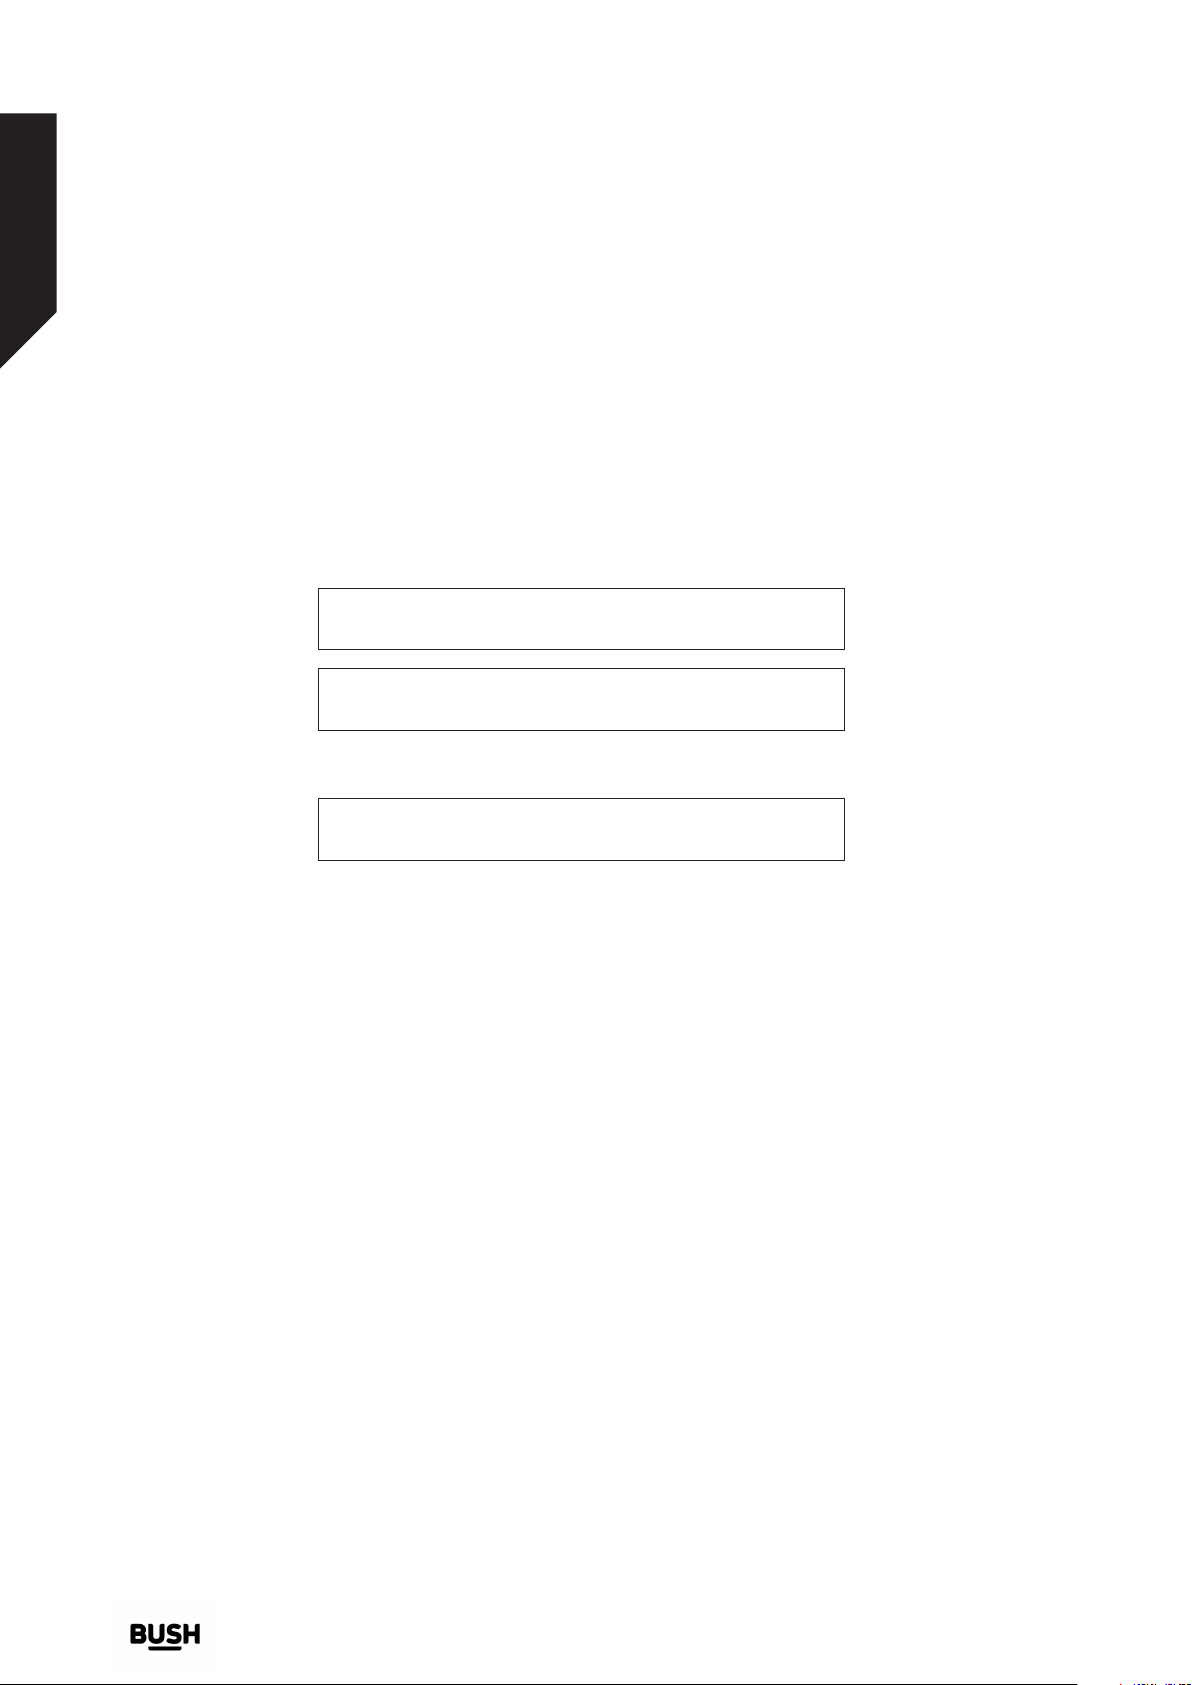
If you still require further assistance, call one of our experts on 0345 257 7271*. To help give us give you a fast and
efficient service please have the following information ready:
Model Ref.
Serial number
Date of purchase
Local call rates applies*
You can find these on
the rating plate - a small
information panel (usually
a sticker or metal plate) on
the rear of your appliance
This will be shown on
your receipt
Lines open 8am-7pm Monday to Saturday and 10am-4pm Sunday.
*Calls to Bush enquiry lines may attract a charge and set up fee from residential lines depending on your call plan/tari. Mobile and other
providers costs may vary, see www.bt.com/pricing for details.
For Security and training purposes, telephone calls to and from customer service centres maybe recorded and monitored. Calls from
Republic of Ireland will attract international call charges.
40
If you require any technical guidance or find that your product is not operating as intended, a simple solution can often be found in the Troubleshooting section of these instructions,
or online at www.bush-support.com If you still require further assistance, call one of our experts on 0345 257 7271.
Product support
Page 41
Product support
Help is always at hand
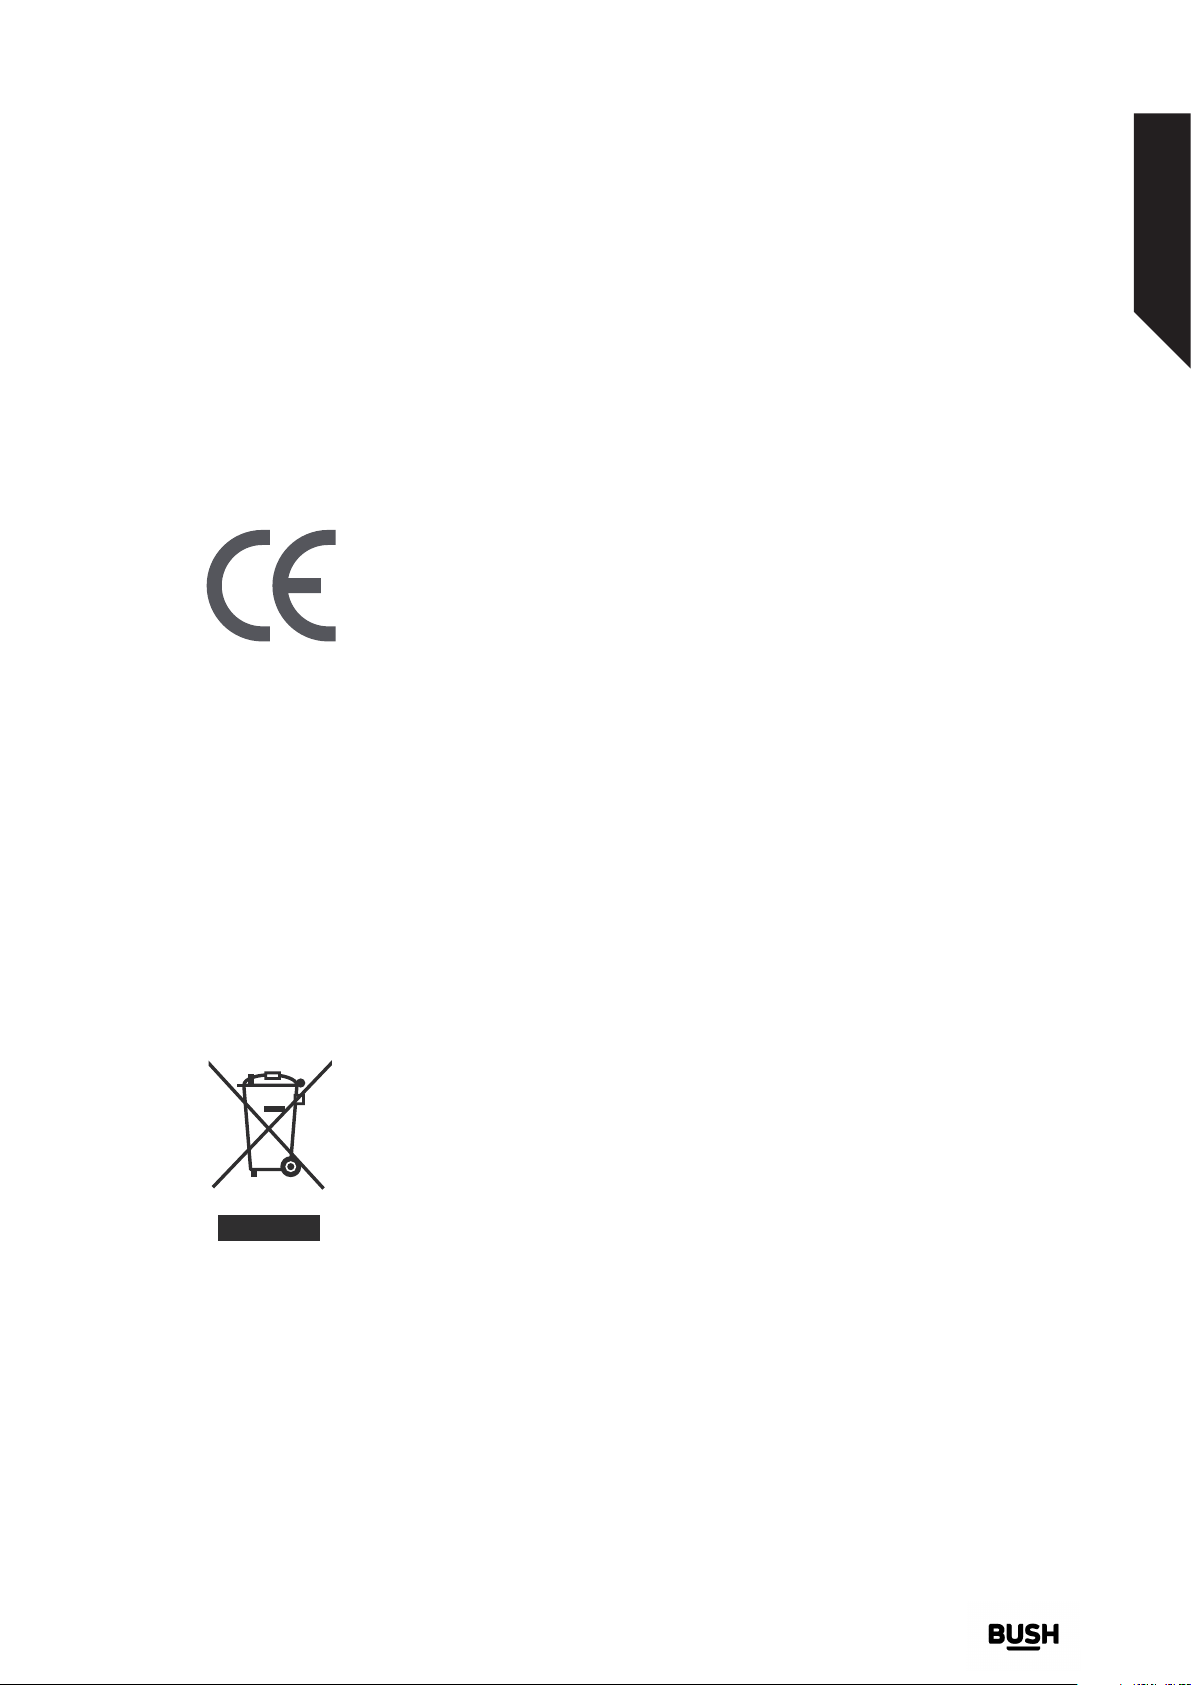
Notes on disposal :
The symbol on the product or its packaging
indicates that this product may not be treated as
household waste. Instead it should be handed
over to the applicable collection point for the
recycling of electrical and electronic equipment. By
ensuring this product is disposed of correctly, you
will help prevent potential negative consequences
for the environment and human health, which
could otherwise be caused by inappropriate
waste handling of this product. For more detailed
information about recycling this product, please
contact your local council office, your household
waste disposal service or the shop where the
product was purchased.
If you require any technical guidance or find that your product is not operating as intended, a simple solution can often be found in the Troubleshooting section of these instructions,
or online at www.bush-support.com If you still require further assistance, call one of our experts on 0345 257 7271.
Product support
41
Page 42

Product support
Help is always at hand
Call us now and activate your 12 month guarantee
Thank you for choosing Bush. Your new product is guaranteed against faults and
breakdowns for 12 months. Don’t forget to register it with us today so we can provide you
with our best possible after-sales service and useful updates.
www.bushregistration.co.uk
FREEPHONE*
0800 597 8548
Lines are open 8am - 8pm, 365 days a year. *Calls may be recorded and monitored.
Your Bush Guarantee
This product is guaranteed for twelve months from the date of original purchase. Any defect that arises due to
faulty materials or workmanship will be repaired free of charge (or if applicable the product will be replaced or the
purchase price refunded) where possible during this period by the dealer from who your purchased the unit.
The guarantee is subject to the following provisions:
• The guarantee does not cover accidental damage,
misuse, cabinet parts, knobs or consumable items.
• The product must be correctly installed and
operated in accordance with the instructions
contained in the manual.
• It must be used solely for domestic purposes. The
guarantee will be rendered invalid if the product is
re-sold or has been damaged by inexpert repair.
• Specifications are subject to change without notice.
• Bush disclaim any liability for loss or damage arising
from the breakdown of the product.
• This guarantee is in addition to and does not
diminish your statutory or legal rights.
Important Data Protection Information
To find out how we and Domestic & General Insurance Plc use your data please refer to the guarantee registration
material or visit www.bushregistrations.co.uk.
42
Guarantor: Sainsbury’s Supermarkets Ltd, 33 Holborn, London EC1N 2HT.
If you require any technical guidance or find that your product is not operating as intended, a simple solution can often be found in the Troubleshooting section of these instructions,
or online at www.bush-support.com If you still require further assistance, call one of our experts on 0345 257 7271.
Product support
Page 43

The minimum period which
must supply the spare parts
for the household washing
machine is 10 years.
Page 44

Contact:
www.bush-support.com
Helpline: 0345 257 7271
52345564
 Loading...