

Page 1
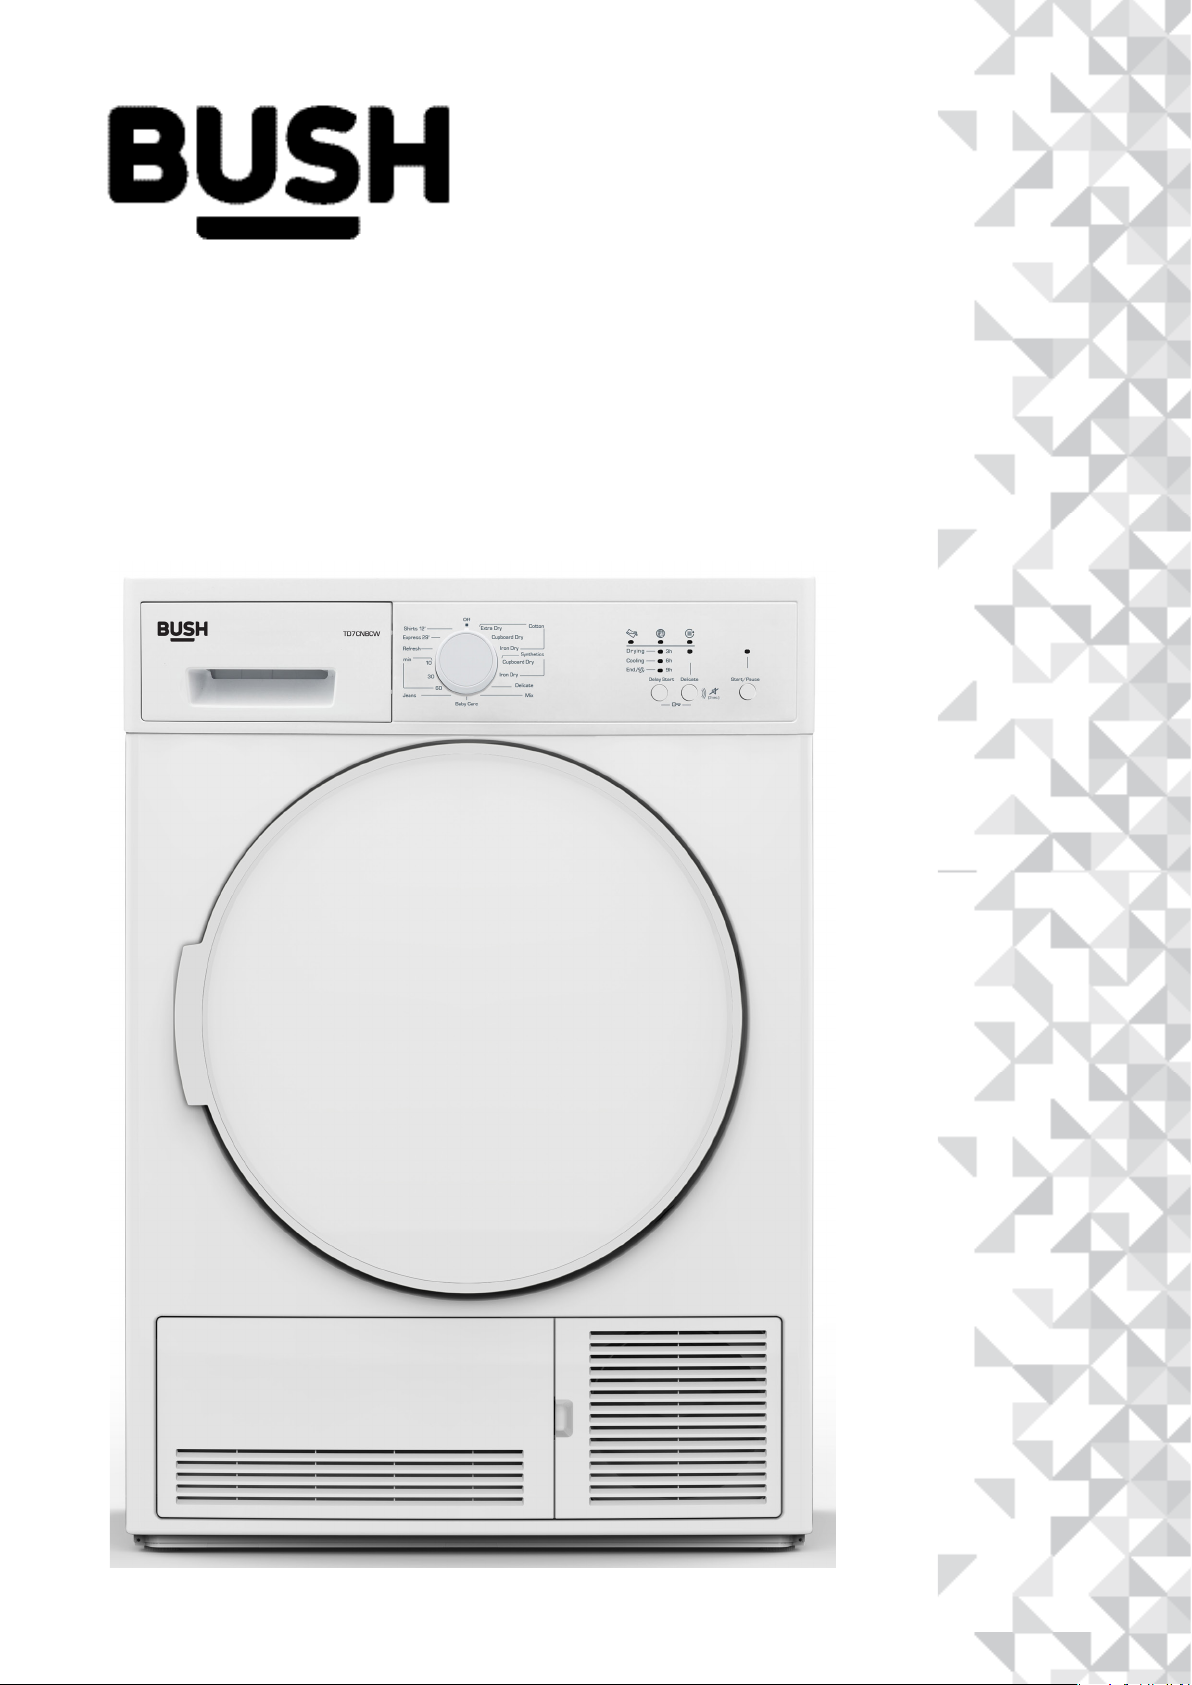
Instruction manual
umble Dryer
T
TD7CNBCW
Page 2

You’ll soon be enjoying your new tumble dryer.
t all begins here, with your instructions. Don’t worry,
I
there’s nothing too technical coming up. Just simple,
step-by-step guidance to get you up and running
quickly. Sound good? Then let’s get started.
H
elp and Guidance
We’re here to help you get the most from your tumble dryer. Should you require any
guidance, a simple solution can often be found online at:
www.bush-support.com
If you still require further assistance, call one of our experts on 0345 257 7271.
If you require any technical guidance or find that your product is not operating as intended, a simple solution can often be found in the Troubleshooting section of these instructions,
or online at www.bush-support.com If you still require further assistance, call one of our experts on 0345 257 7271.
2
2
Page 3

Contents
afety Information
S
1
Safety information
Getting to know your tumble
2
dryer
Ready? Let’s begin
Overview
Installing your tumble dryer
Correct Use
3
Installing on top of a washing machine
Installation
Connection to Water Outlet (with optional drain
hose) - Connecting the Water Discharge Hose
Electrical Connection
F
unctions
Functions
4
Using The Tumble Dryer
(Control Panel - Programme Selection Knob-
10
11
14
15
16
17
18
19
ing your tumble dryer
Us
5
6
Preparing The Laundry
Sorting the Laundry to be Dried
Preparing the Laundry to be Dried
Load Capacity
Care and Maintenance
6
Cleaning and Care 29
Cleaning the Lint Filter
Cleaning the Condenser
Cleaning the Humidity Sensor
Cleaning the Inner Surface of the Loading Door 30
oduct support
Pr
Troubleshooting 32- 33
26
27
7
Automatic Fault Warnings and What To Do 34
Technical Specifications 35
Environmental Protection and Packing
Electronic Indicator and Additional Functions-
Display)
Programme Seletion and Consumption Table 20
Auxiliary Functions
Starting the Programme
Programme Progress
Drum light information
If you require any technical guidance or find that your product is not operating as intended, a simple solution can often be found in the Troubleshooting section of these instructions,
or online at www.bush-support.com If you still require further assistance, call one of our experts on 0345 257 7271.
21
22
23
Information 36
Describing The Energy Label And Saving Energy
Energy Efficiency 37
Product Fiche 38
Help And Asistance 39
Disposal 40
Guarantee 41
3
3
Page 4

Safety information
1
Page 5

Safety information
Important - Please read these instructions fully before
installing or operating your tumble dryer
PRIMARY CONSIDERATIONS
This appliance can be used by children aged from 8 years
and above and persons with reduced physical, sensory or
mental capabilities or lack of experience and knowledge
if they have been given supervision or instruction
concerning use of the appliance in a safe way and
understand the hazards involved. Children must not play
with the appliance. Cleaning and user maintenance must
not be made by children without supervision.
• This tumble dryer is intended only for household
and indoor use. The warranty will be void in case of
commercial use.
• Use this product only for laundry with a label that
indicates it is suitable for drying.
• The manufacturer will not accept responsibility for
damages resulting from incorrect use or transport.
• The service life time of your tumble dryer is 10 years.
This is the period during which the spare parts
required for the tumble dryer to operate properly will
be commercially available.
• The appliance must not be installed behind a lockable
door, a sliding door or a door with a hinge on the
opposite side to that of the tumble dryer, if it prevents
the door from being fully opened.
• Do not allow floor coverings to obstruct the ventilation
openings.
• Installation and repair of the machine should only be
made by an authorised repair agent. The manufacturer
cannot be held responsible for damages resulting from
un-authorised repairs.
WARNING: Never spray or pour water onto the dryer
to wash it! There is risk of electric shock!
• Leave at least 3 cm of space between the side and rear
walls of the product and above if you plan on placing
your appliance under a worktop.
• Assembly / disassembly for under-counter installation
if neccessary must be done by an authorised service
agent.
• Before installation, check the product for visible
damage. Never install or operate a damaged product.
• Keep pets away from the dryer.
• Fabric softeners, or similar products, should be used in
accordance with the manufacturers instructions.
• Remove all objects from pockets such as lighters and
matches.
If you require any technical guidance or find that your product is not operating as intended, a simple solution can often be found in the Troubleshooting section of these instructions,
or online at www.bush-support.com If you still require further assistance, call one of our experts on 0345 257 7271.
Safety information5
Page 6

Safety information
Important - Please read these instructions fully before
installing or operating your tumble dryer
SAFETY INSTRUCTIONS
This section contains saf
protect you from risk of personal injury or property
damage. Failure to follow these instructions will void any
warranty.
ELECTRICAL SAFETY
• The appliance must not be supplied through an
external switching device, such as a timer, or connected
to a circuit that is regularly switched on and off by a
utility.
•
Do not touch the power plug with wet hands. Always
pull the plug to unplug the product, otherwise, there
will be risk of an electric shock.
• Connect the dryer to a grounded socket with fuse
protection. Have the earth connection installed by
a qualified electrician. Our company cannot be held
responsible for damages/losses resulting from using the
dryer without an earth connection as required by local
regulations.
ety instructions that will help
CHILDREN’S SAFETY
• This appliance is not intended for use by persons
(including children) with reduced physical, sensory
or mental capabilities, or lack of experience and
knowledge, unless they have been given supervision or
instruction concerning use of the appliance by a person
responsible for their safety.
• This appliance can be used by children aged from 8
years and above and persons with reduced physical,
sensory or mental capabilities or lack of experience and
knowledge if they have been given supervision or
instruction concerning use of the appliance in a safe
way and understand the hazards involved. Children
must not play with the appliance. Cleaning and user
maintenance must not be made by children without
supervision.
• Do not leave children unattended near the machine.
• Children might lock themselves in the machine
resulting in risk of serious injury or possible death.
• Do not allow children to touch the door during
operation. The surface becomes extremely hot and may
cause serious injury.
• The voltage and the allowable fuse protection are
indicated on the type plate. (For the type plate, please
see 3. Overview)
• Voltage and frequency values indicated on the
type plate must be equal to the mains voltage and
frequency value in your house.
• Unplug the dryer when it is not used for an extended
period and before installation, maintenance, cleaning
and repair, otherwise, the dryer may become damaged.
• The plug socket must be freely accessible at all times
after installation.
A damaged power cord/plug can cause fire or give
you an electric shock. When damaged, it must be
replaced by qualified personnel only.
To avoid the risk or fire or electric shock, do not use
extension cords, multi sockets or adapters to connect the
dryer to mains power.
• Keep packaging material away from children.
• Poisoning and irritation may occur if detergent and
cleaning materials are consumed or come into contact
with the skin and eyes.
• Keep cleaning materials out of the reach of children
Electrical products are dangerous for children.
• Keep children away from the product while it is running.
• To prevent children from interrupting the dryer cycle,
you can use the child lock to avoid any changes in the
running programme.
• Do not allow children to sit/climb on or climb inside the
product.
If you require any technical guidance or find that your product is not operating as intended, a simple solution can often be found in the Troubleshooting section of these instructions,
or online at www.bush-support.com If you still require further assistance, call one of our experts on 0345 257 7271.
Safety information 6
Page 7

Safety information
Important - Please read these instructions fully before
installing or operating your tumble dryer
PRODUCT SAFETY
Due to risk of fire, the following laundry items and
products should NEVER be dried in the dryer:
• Do not dry unwashed items in the tumble dryer.
• Items that have been soiled with substances such as
cooking oil, acetone, alcohol, petrol, kerosene, spot
removers, turpentine, waxes and wax removers should
be washed in hot water with an extra amount of
detergent before being dried in the tumble dryer.
• Cleaning cloths and mats that have residues of
flammable cleaning agents or acetone, gas, pe
stain remover, turpentine, candle, wax, wax remover or
chemicals.
• Laundry that has residues of hair sprays, nail polish
remover and similar substances.
trol,
• Laundry on which industrial chemicals have been used
for cleaning (such as chemical cleaning).
• Laundry that has any kind of foam, sponge, rubber or
rubber-like parts or accessories. These include latex
foam sponge, shower caps, waterproof fabrics, fitted
clothes and foam pillows.
• Items with filling and damaged items (pillows or
jackets). Foam protruding from these items might
catch fire during the drying process.
• Operating the dryer in environments that contain flour
or coal dust may cause explosion.
ATTENTION: Underwear that contain metal
reinforcements should not be put in the dryer.
may be damaged if metal reinforcements come loose and
break off during drying.
• Do not attempt to repair the appliance yourself. Contact
the manufacturer, their approved service agent or the
Customer Helpline: 0345 257 7271.
The dryer
If you require any technical guidance or find that your product is not operating as intended, a simple solution can often be found in the Troubleshooting section of these instructions,
or online at www.bush-support.com If you still require further assistance, call one of our experts on 0345 257 7271.
Safety information7
Page 8

Getting to know your tumble
dryer
2
Page 9

Getting to know your tumble dryer
Getting to know your tumble dryer
Y
ou’ll be up and running in no time
Ready? Let’s begin...
Please read these instructions carefully. They contain
important information which will help you get the
best from your tumble dryer and ensure safe and
correct installation and operation.
If you require any further assistance, our technical
experts are happy to help. For full details, refer to
the product support section at the end of these
instructions.
If you require any technical guidance or find that your product is not operating as intended, a simple solution can often be found in the Troubleshooting section of these instructions,
or online at www.bush-support.com If you still require further assistance, call one of our experts on 0345 257 7271.
9
Page 10

Getting to know your tumble dryer
You’ll be up and running in no time
Getting to know your tumble dryer
OVERVIEW
10
1
2
7
9
8
1. Upper tray
2. Control panel
3. Loading door
4. Plinth opening slot
3
4
5
11
6
7. Plinth cover
8. Type plate
9. Lint filter
10. Drawer Cover
5. Plinth
6. Adjustable feet
If you require any technical guidance or find that your product is not operating as intended, a simple solution can often be found in the Troubleshooting section of these instructions,
or online at www.bush-support.com If you still require further assistance, call one of our experts on 0345 257 7271.
11. Ventilation grills
10
Page 11
Getting to know your tumble dryer
Model Capacity Energy class
TD7CNBCW 7kg B
If you require any technical guidance or find that your product is not operating as intended, a simple solution can often be found in the Troubleshooting section of these instructions,
or online at www.bush-support.com If you still require further assistance, call one of our experts on 0345 257 7271.
11
Page 12

Installing your tumble
dryer
3
Page 13

Installing your tumble dryer
Bringing it all together
Installing your tumble dryer
CORRECT USE
ATTENTION: Never stop a tumble dryer before the end of the drying cycle unless all items are quickly removed and
spread out so that the heat is dissipated.
ATTENTION: Make sure that pets do not enter the dryer. Check the inside of the dryer before using it.
ATTENTION: Superheating of clothes inside of the dryer can occur if you cancel the programme or in the event of
a power failure whilst the dryer is running. This concentration of heat can cause self-combustion so always activate the
Refresh programme to cool down or quickly remove all laundry from the dryer in order to hang them up and dissipate
the heat.
• Use the dryer only for household drying and to dry fabrics with a label that indicates they are suitable for drying. All
other uses are out of the scope of intended use and are prohibited.
• The warranty will be void in case of any commercial use.
• This appliance is designed to be used inside domestic residences only, and should be placed on a straight and stable
surface.
• Do not lean against or sit on the door of the dryer. The dryer may tip over.
• To maintain a temperature that will not harm the laundry (e.g. to prevent the laundry from catching fire), a cooling
process starts after the heating process. After this, the programme ends. At the end of the programme, always remove
the laundry promptly.
ATTENTION: Never use the dryer without a lint filter or with a damaged lint filter.
• Lint filters must be cleaned after each use as indicated in Cleaning the Lint Filter Section.
• Lint filters must be dried after wet cleaning. Wet filters might cause malfunction during the drying process.
• Lint accumulation must not to be allowed around the tumble dryer (not applicable for appliances intended to be
vented to the exterior of the building)
IMPORTANT: The clearance between the dryer and the floor should not be reduced with objects such as
carpets, wood or panels. In these instances, sufficient air intake cannot be ensured for the machine.
• Do not install the dryer in rooms where there is a risk of freezing. Freezing temperatures negatively affect the
dryers performance. Condensation that freezes in the pump and hose may cause damage.
13
If you require any technical guidance or find that your product is not operating as intended, a simple solution can often be found in the Troubleshooting section of these instructions,
or online at www.bush-support.com If you still require further assistance, call one of our experts on 0345 257 7271.
Page 14

Installing your tumble dryer
Bringing it all together
Installing your tumble dryer
INSTALLING ON TOP OF A WASHING MACHINE
ATTENTION: A washing machine cannot be placed on the dryer. Pay attention to the warnings below when
installing the dryer on a washing machine.
ATTENTION: The dryer can only be placed on washing machines that have a capacity for equal and above.
• To use the dryer on the washing machine, a fixing part must be used between the two products. The fixing part must
be attached by an Authorised Service Provider.
• When the dryer is placed on the washing machine, the total weight of these products may reach almost 150
kilograms (when loaded). Place the products on a solid floor that has a load bearing capacity!
Appropriate Installation Table for Washing Machine and Tumble Dryer
Tumble
Dryer
(Depth)
56 cm X X
61 cm X X X
(For the depth information, please see 7. Technical Specifications)
Washing Machine
37 cm 42 cm 53 cm 56 cm 59 cm 85 cm
In order to put the washing machine onto the dryer, a special stacking kit is required as an optional extra. Please contact
customer service to acquire. The assembly instruction will be served together with the stacking kit
CE Declaration of conformity
We declare that our products meet the applicable European Directives, Decisions and Regulations and the requirements
listed in the standards referenced.
Disposing the Old Product
This product complies with EU WEEE Directive
(2013/19/EU). This product bears a classification symbol for waste electrical and electronic equipment
(WEEE).
This symbol, which is found on the product or information label, indicates that this product must not be
disposed together with other household waste at the end of its service life. To prevent the potential
harm of uncontrolled waste disposal on the environment and human health, please keep this product
separate from other types of waste, and to prevent sustainable reuse of material resources, make sure that it is
recycled responsibly.
Contact your dealer or local authorities to get information on how and where you can take the product for
environmentally-safe recycling. This product cannot be mixed with other commercial wastes for recycling.
If you require any technical guidance or find that your product is not operating as intended, a simple solution can often be found in the Troubleshooting section of these instructions,
or online at www.bush-support.com If you still require further assistance, call one of our experts on 0345 257 7271.
14
Page 15
Installing your tumble dryer
Bringing it all together
Installing your tumble dryer
INSTALLATION
• Before contacting the local Authorised Service
Provider for the installation of the dryer, check the
information in the user manual to make sure that the
electrical installation and water outlet is suitable. If
they are not, call a qualified electrician and a plumber
to have the necessary adjustments made.
• It is the customer’s responsibility to prepare the dryer’s
installation place, as well as the electricity and waste
water installation. Before installation, check the dryer
for damage. If damaged, do not have it installed.
Damaged products may endanger your health.
• Install the dryer on a stable and flat surface.
• Run the dryer in a dust-free environment where the air
ventilation is good.
• The clearance between the dryer and the floor should
not be reduced with objects such as carpets, wood or
tape.
• Do not block the ventilation grills found on the plinth
of the tumble dryer.
• Do not place the dryer onto the power cable.
CONNECTION TO WATER OUTLET (WITH OPTIONAL DRAIN
HOSE)
In products with a condenser unit, water accumulates in the
water tank during the drying process. You must empty the
accumulated water after each drying process. Instead of
periodically emptying the water tank, you can also use the
water drain hose provided with the product to directly drain
the water outside.
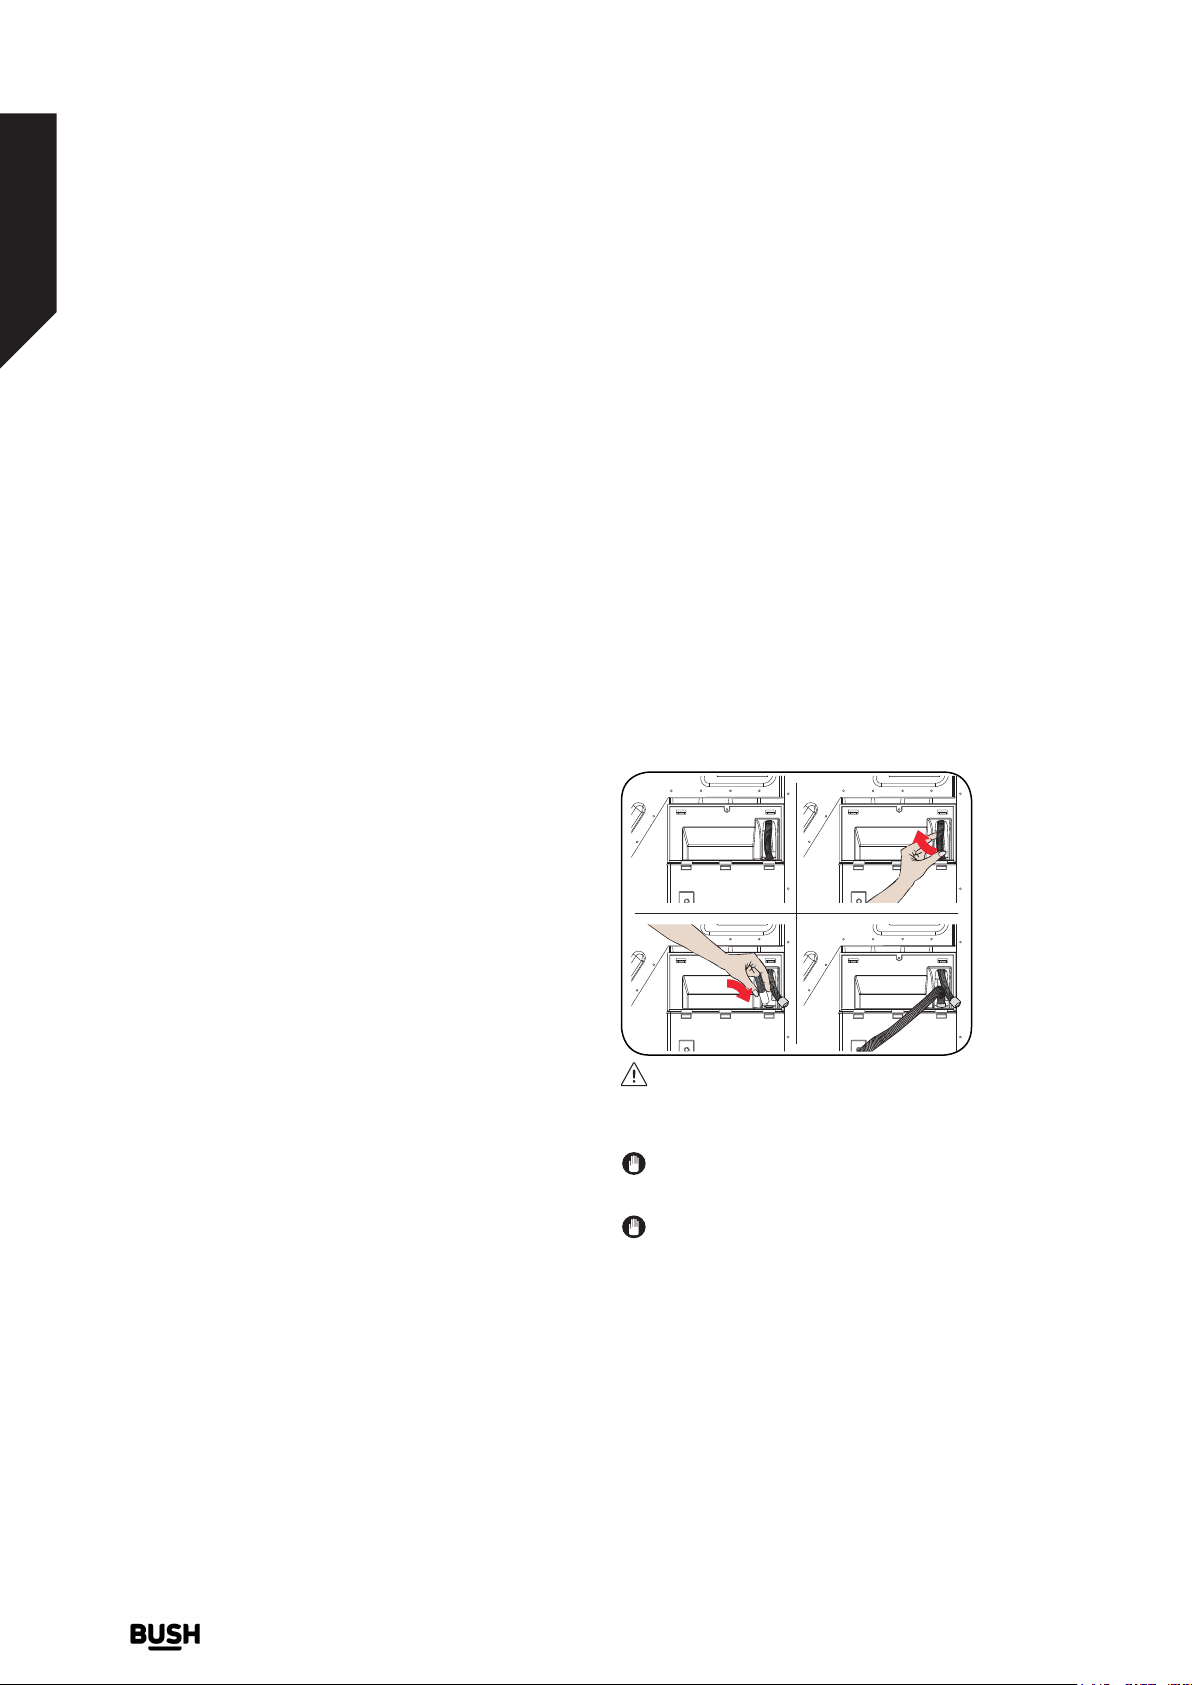
CONNECTING THE WATER DISCHARGE HOSE
1. Pull and take out the end of the hose at the back of
the dryer. Do not use any tools to take out the hose.
2. Fit one end of the water discharge hose, which is
provided with the product, to the slot from which
you have removed the hose.
3. Fix the other end of the water discharge hose directly
to the water outlet or sink.
1
• The appliance must not be installed behind a lockable
door, a sliding door or a door with a hinge on the
opposite side of the tumble dryer, in such a way that
blocks the full opening of the tumble dryer door.
• Once the dryer has been installed, the connections
must remain stable. When installing the dryer, make
sure that the rear surface is not leaning on anything
(e.g. tap, socket).
• The operating temperature of the dryer is +5°C to
+35°C. If operated out of this temperature range, the
performance of the dryer will be affected negatively
and the product will be damaged.
• Be careful when carrying the product since it is heavy.
Always wear safety gloves.
• The rear surface of the product should be placed
against the wall.
• When the product is placed on a stable surface, use
the water level to check if it is fully stable. If not, adjust
the feet until it becomes steady. Repeat this process
every time you relocate the product.
2
ATTENTION: The hose must be connected in a manner
that it cannot be displaced. If the hose comes out during
water discharge, flooding in your home may occur.
IMPORT
installed at a height of 80 cm maximum.
IMPORTANT: The water discharge hose must not
be bent between the outlet and the product, folded or
stepped over.
ADJUSTING THE FEET
• For the dryer to work with less noise and vibration, it
must be stable and balanced on its feet. Adjust the
feed to ensure that the product is balanced.
• Rotate the feet to the right and to the left until the
dryer is even and stable.
ANT: The water discharge house must be
3
15
If you require any technical guidance or find that your product is not operating as intended, a simple solution can often be found in the Troubleshooting section of these instructions,
or online at www.bush-support.com If you still require further assistance, call one of our experts on 0345 257 7271.
Page 16

Installing your tumble dryer
Bringing it all together
Installing your tumble dryer
IMPORTANT: Never remove the adjustable feet.
ELECTRICAL CONNECTION
ATTENTION: There is risk of fire and electric shock.
• Your dryer is set to 220-240 V and 50 Hz.
• The mains cable of the dryer is equipped with a special
plug. This plug must be connected to an earthed
socket protected by a fuse of 13 Amperes as indicated
on the type plate. The fuse current rating of the power
line where the outlet is connected must also be 13
amperes. Consult a qualified electrician if you do not
have such an outlet or fuse.
• Our company cannot be held responsible for damages
resulting from usage without earthing.
IMPORTANT: Operating your machine at low voltage
values will shorten the service life and decrease the
performance of your machine.
UNDER COUNTER INSTALLATION
• Leave at least 3 cm of space between the side and rear
walls of the product and the underside of the worktop
when installing your product under a counter.
• Assembly / disassembly under the counter if
neccessary must be done by authorised service.
If you require any technical guidance or find that your product is not operating as intended, a simple solution can often be found in the Troubleshooting section of these instructions,
or online at www.bush-support.com If you still require further assistance, call one of our experts on 0345 257 7271.
16
Page 17

Functions
4
Page 18
Functions
Simple everyday use
USING THE TUMBLE DRYER
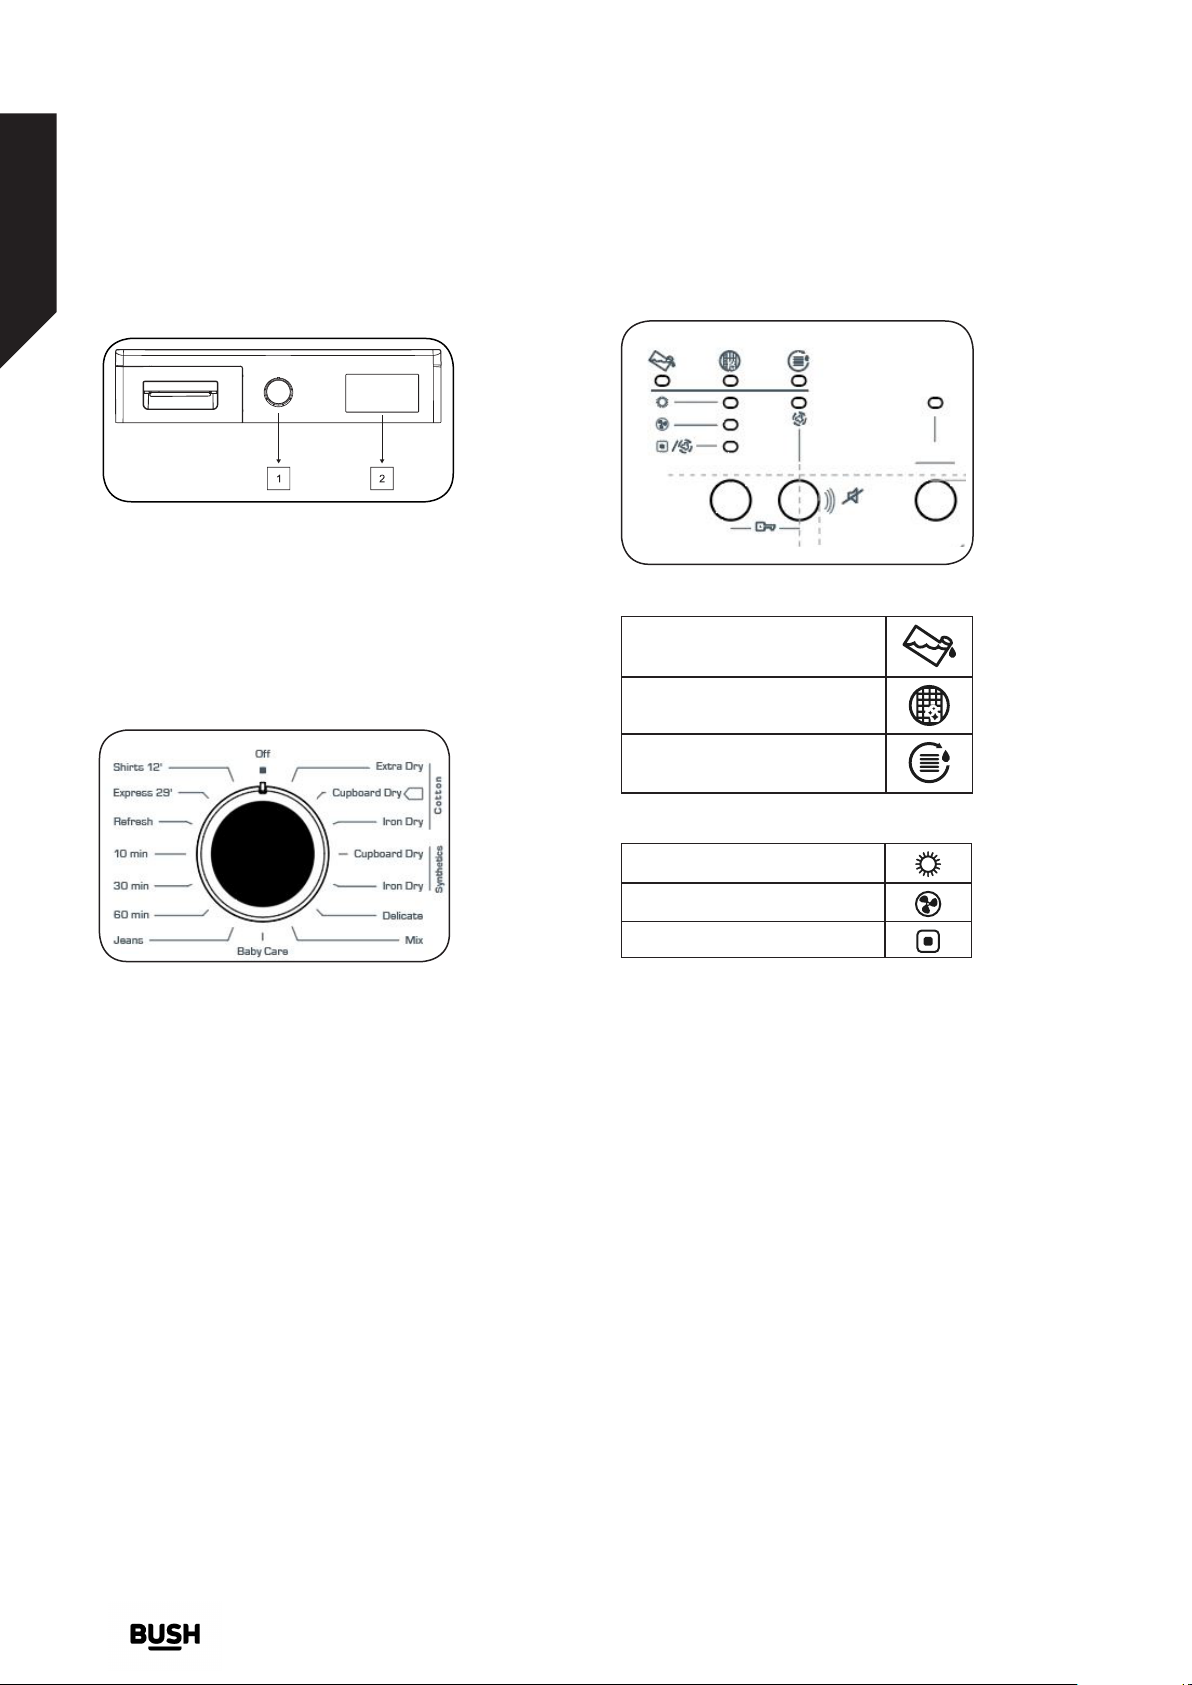
CONTROL PANEL
1. Programme Selection Knob
2. Electronic indicator and additional
functions
Programme Selection Knob
Use the programme selection knob to
select the desired drying programme
ELECTRONIC INDICATOR AND ADDITIONAL
FUNCTIONS
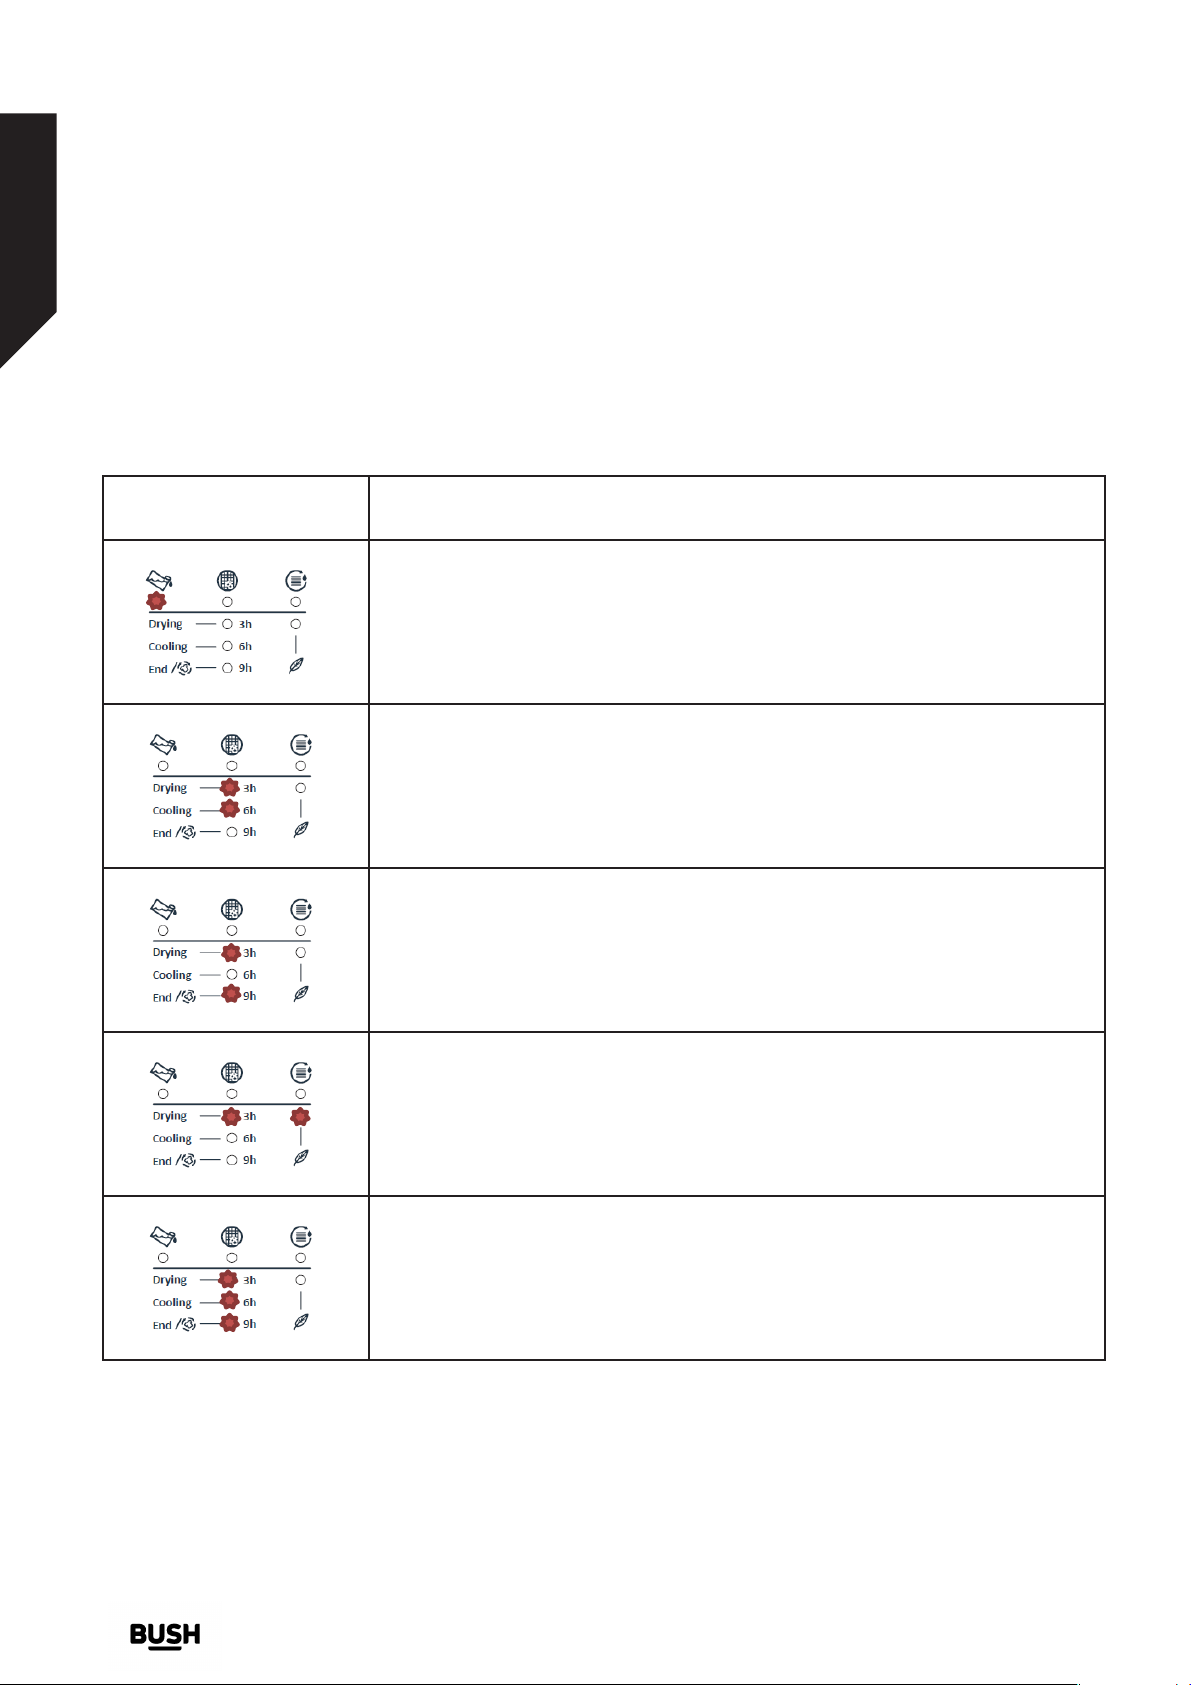
Display symbols:
Water tank warning indicator
Lint lter cleaning warning indicator
Condenser cleaning warning indicator
Drying stages indicator:
Drying
Cooling
End
• The electronic indicators show the progress of a
running programme. At the beginning of each
programme step, the relevant indicator LED comes on
and the LED of the completed step turns off.
If you require any technical guidance or find that your product is not operating as intended, a simple solution can often be found in the Troubleshooting section of these instructions,
or online at www.bush-support.com If you still require further assistance, call one of our experts on 0345 257 7271.
Functions18
Page 19
Functions
Simple everyday use
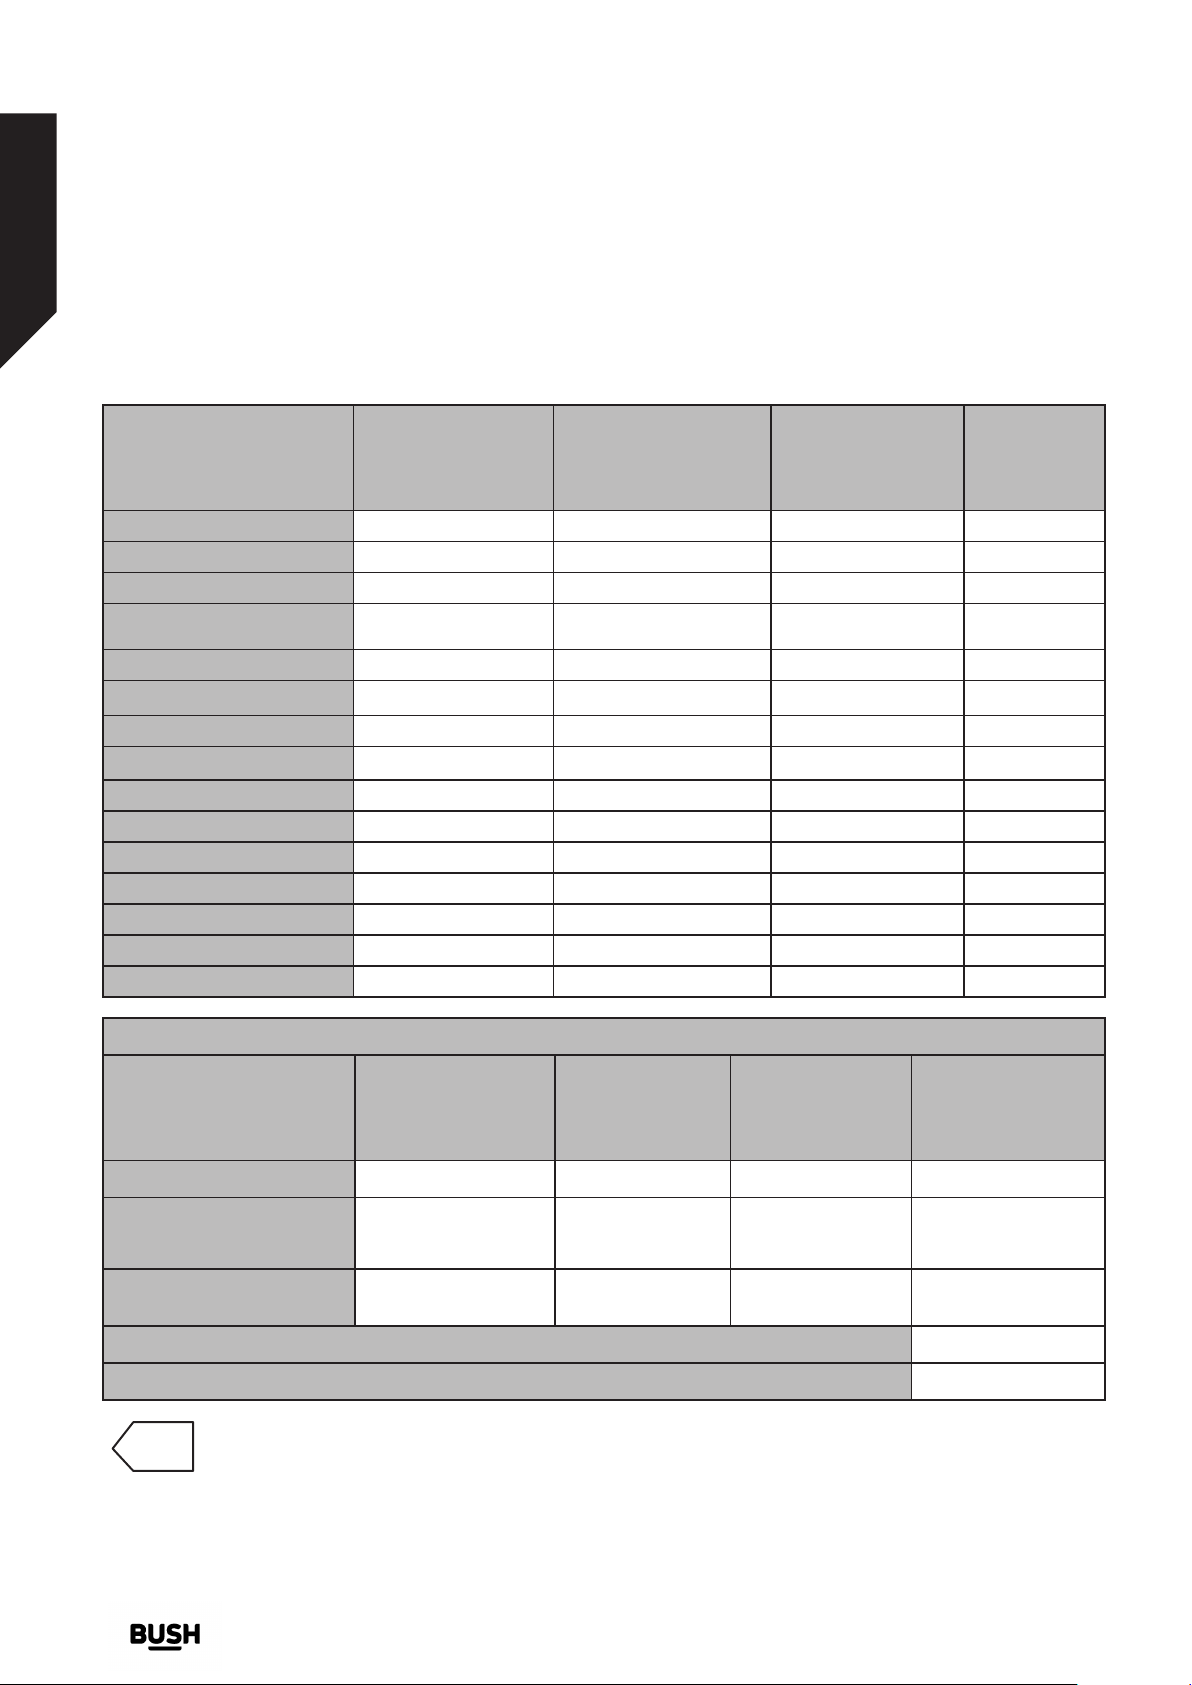
PROGRAMME SELECTION AND CONSUMPTION TABLE
Press the Start/Pause button to start the programme. The Start/Pause LED that indicates that the programme has started
and the Drying LED will come on.
Programme Load (kg)
Tumble
dryer
spin speed
Approximate
amount of remaining
humidity
Duration
(minutes)
Cotton Extra Dry 7 1000 60% 128
Cotton Cupboard Dry 7 1000 60% 125
Cotton Iron Dry 7 1000 60% 95
Synthetics Cupboard Dry 3,5 800 40% 44
Synthetics Iron Dry 3,5 800 40% 35
Delicates 2 600 50% 39
Mix 4 1000 60% 82
Baby Care 3 1000 60% 60
Jeans 4 1000 60% 83
60 min - - - 60
30 min - - - 30
10 min - - - 10
Refresh - - - 10
Express 29' 2 1200 50% 29
Shirts 12' 0.5 1200 50% 12
Energy consumption values
Programme Load (kg)
Cotton Cupboard Dry
7 1000 60% 4.18
Tumble
dryer
spin speed
Approximate
amount of
remaining humidity
Energy consumption
values (kWh)
7 1000 60% 3.40
Cotton Iron Dry
Synthetics Cupboard Dry 3,5 800 40% 1.42
Power consumption in the "off mode" P
Power consumption in the "on mode" P
(W) 0.5
O
(W) 1.0
L
The Cotton Cupboard Dry programme is the standard drying programme that can be run with a full or half
load and for which the information is given on the label and product receipt. This programme is the most
energy efficient programme to dry normal wet cotton clothes.
*Energy labelling standard programme (EN 61121:2013)
All values in the table were determined in accordance with the EN 61121:2013 standard. Consumption values may vary from
the values in the table depending on the fabric type, spin speed, environment conditions and voltage values.
If you require any technical guidance or find that your product is not operating as intended, a simple solution can often be found in the Troubleshooting section of these instructions,
or online at www.bush-support.com If you still require further assistance, call one of our experts on 0345 257 7271.
Functions19
Page 20

Functions
AUXILIARY FUNCTIONS
Option Description
Delicate Delicate fabrics are dried for a longer time at a low temperature
You can delay the start time of the programme by selecting the 3-hour, 6-hour or
9-hour option. You can activate the desired delay time by pressing the Start/Pause
Delay Timer
button. When the time is up, the selected programme will start automatically.
During the delay time, options compatible with the programme can be activated/
deactivated.
The dryer gives an audible warning when program selection knob is turned, buttons
Buzzer Cancel
are pressed and at the end of programme. To cancel these warnings, press and hold
the “Delicate Option” button for 3 seconds. When you press the button, you will hear
an audible warning that the option has been cancelled.
There is a child lock option to avoid changes in the programme flow when keys are
pressed during the programme. To activate the child lock, press and hold the “Delay
Timer” and “Delicate” keys simultaneously for 3 seconds. When the child lock is active,
all keys will be deactivated. Child lock will be deactivated automatically at the end of
the programme. When activating/deactivating the child lock, the LEDs of the ‘‘Delay
Child Lock
Timer” and “Delicate” options will flash and an audible warning will be heard. Warning:
when the product is running or the child lock is active, if you turn the programme
selection knob, you will hear an audible warning. Even if you set the programme
knob to another programme, the previous programme will continue running. To
select a new programme, you need to deactivate the child lock and then set the
programme selection knob to “Off” position. Then, you can select and start the desired
programme.
If you require any technical guidance or find that your product is not operating as intended, a simple solution can often be found in the Troubleshooting section of these instructions,
or online at www.bush-support.com If you still require further assistance, call one of our experts on 0345 257 7271.
20
Page 21
Functions
Functions
Simple everyday use
Simple everyday use
STARTING THE PROGRAMME
The Start/Pause LED will flash during programme selection.Press the Start/Pause button to start the programme. The
Start/Pause LED that indicates that the programme has started and the drying LED will come on.
Programme Description
Cotton Extra Dry
Cotton Cupboard Dry
Cotton Iron Dry
Synthetics Cupboard
Dry
Synthetics Iron Dry
Delicate
Mix
Baby Care This programme dries delicate infant clothes at a low temperature to make them ready to wear.
Jeans This programme is used to dry jeans.
Time Programmes
Refresh
Express 29' 2 kg of cotton shirts spun at a high speed in the washing machine are dried in 29 minutes.
Shirts 12' 2 to 3 shirts are ready for to be ironed in 12 minutes.
This programme dries thick and multi-layer fabrics, such as cotton towels, bedsheets,
pillowcases, bathrobes, at a high temperature to allow you to place them in a closet.
This programme dries cotton pyjamas, underwear, tablecloths etc. to allow you to place them
in a closet.
This programme dries cotton laundry to prepare it for ironing. Laundry removed from the
machine will be damp.
This programme dries synthetics, such as shirts, t-shirts, blouses, at a lower temperature
compared to the cottons programme to allow you to place them in a closet.
This programme dries synthetics, such as shirts, t-shirts, blouses, at a lower temperature
compared to the cottons programme to prepare them for ironing. Laundry removed from the
machine will be damp.
This programme dries thin clothes like shirts, blouses and silk garments at a low temperature to
make them ready to wear.
This programme dries cotton-synthetic mixed garments that do not discolour to make them
ready to wear.
To reach the required drying level at a low temperature, you can use the timed programmes
of 10 min., 30 min., and 60 min. Regardless of the drying level, the programme stops at the
desired time.
This programme provides ventilation for 10 minutes without applying heat to help freshen up
your garments.
IMPORTANT: Do not open the loading door while the programme is running. If you have to open the door, do not
keep it open for a long time.
If you require any technical guidance or find that your product is not operating as intended, a simple solution can often be found in the Troubleshooting section of these instructions,
or online at www.bush-support.com If you still require further assistance, call one of our experts on 0345 257 7271.
Functions21
Page 22

Functions
Functions
Simple everyday use
PROGRAMME PROGRESS INDICATOR
The programme follow-up indicator shows the progress of the programme running. At the beginning of
each programme step, the relevant indicator LED comes on and the LED of the completed step turns off.
Drying:
• It remains on during the whole drying process until the drying level reaches “Cooling”.
Cooling:
• It lights up when the drying level reaches “Cooling” and remains on until the next step.
End:
• It lights up at the end of the programme.
During the Programme
If you open the door when the programme is running, the product will switch to standby mode. Once the door has been
closed, press the Start/Pause key to resume the programme.
Do not open the loading door when the programme is running. If you have to open the door, do not keep it open for a
long time.
Programme End
Once the programme is over, the warning LEDs for Start/Pause, water tank level, filter cleaning and condenser cleaning
will turn on. Additionally, an audible warning will be given at the end of the programme. You can remove the laundry to
make the machine ready for a new load.
IMPORTANT: Clean the lint filter after every programme. Empty the water tank after every programme.
IMPORTANT: If you do not take out the laundry after the programme has ended, the 1-hour Anti Crease phase will
automatically be activated. This programme rotates the drum at regular intervals to prevent creases
DRUM LIGHT INFORMATION
• This product includes LED Drum Light. The light works automatically when you open the door and turns itself off
automatically after a while.
• It is not an adjustable option for user to open or close it.
• Please do not try to replace or modify the LED Light.
If you require any technical guidance or find that your product is not operating as intended, a simple solution can often be found in the Troubleshooting section of these instructions,
or online at www.bush-support.com If you still require further assistance, call one of our experts on 0345 257 7271.
22
Page 23

Functions
Simple everyday use
OPTIONS
PROGRAMMES
Time Delay
Cotton Extra Dry
Cotton Cupboard
Dry
Cotton Iron Dry
Synthetics
Cupboard Dry
Synthetics Iron Dry
Delicates
Mix
Baby Care
Jeans
60 min X
30 min X
10 min X
Refresh X
Express 29' X
Shirts 12' X
X Not selectable
Cancelling
the Audible
Warning
Child Lock Delicate
(default)
Selectable
If you require any technical guidance or find that your product is not operating as intended, a simple solution can often be found in the Troubleshooting section of these instructions,
or online at www.bush-support.com If you still require further assistance, call one of our experts on 0345 257 7271.
Functions23
Page 24

Using your tumble dryer
5
Page 25

Using your tumble dryer
Getting the most from your appliance
Using your tumble dryer
PREPARING THE LAUNDRY
SORTING THE LAUNDRY TO BE DRIED
Follow the instructions on the labels of the laundry to be dried. Only dry items that have a statement/symbol that
indicates “they can be dried in a dryer”.
• Do not operate the product with load amounts and laundry types other than those given in 4.3. Load Capacity.
Suitable for drying in a dryer
Does not need ironing
Sensitive/Delicate drying Not suitable for drying in a dryer
No drying
At medium temperatures At low temperatures Heatless Hang to dry
Spread to dry Hang wet to dry Spread in shadow to dry Suitable for dry cleaning
Do not dry-clean
At any temperature
At high temperatures
Do not dry thin, multi-layer or thick-layer fabrics together as they dry at different levels. For this reason, dry clothes
together that have the same structure and fabric type. This way, you can get an even drying result. If you think that the
laundry is still wet, you can select a time programme for additional drying.
Please dry your big (like duvets) and small
pieces of laundry seperately in order to not to have damp laundry.
IMPORTANT: Delicate fabrics, embroidered fabrics, woolen/silk fabrics, clothes made of delicate and expensive
fabrics, airtight clothes and tulle curtains are not suitable for drying in the dryer.
If you require any technical guidance or find that your product is not operating as intended, a simple solution can often be found in the Troubleshooting section of these instructions,
or online at www.bush-support.com If you still require further assistance, call one of our experts on 0345 257 7271.
25
Page 26

Using your tumble dryer
Getting the most from your appliance
Using your tumble dryer
PREPARING THE LAUNDRY TO BE DRIED
Risk of explosion and fire!
Remove all objects from pockets such as lighters and
matches.
ATTENTION: The drum of the dryer and the fabrics may
become damaged.
• The clothes may have become entangled during the
washing process. Separate them from each other
before placing them in the dryer.
• Remove all objects in the pockets of the clothes and
apply the following:
Tie fabric belts, apron laces etc. to each other or use a
laundry bag.
Lock the zips, clasps and fasteners, do up the buttons of
covers.
• To get the best drying result, sort the laundry
according to the textile type and drying programme.
• Remove clips and similar metal parts from the clothes.
• Woven goods such as t-shirts and knit clothes
generally shrink in the first drying. Use a protective
programme.
• Do not over-dry synthetics. This will cause creases.
• When washing the laundry to be dried, adjust the
amount of softener according to the data from the
manufacturer of the washing machine.
LOAD CAPACITY
Follow the instructions in the “Programme selection and
consumption table”. (See: 5.2 Programme selection and
consumption table). Do not load the product with more
laundry than the capacity values specified in the table.
IMPORTANT: It is not recommended to load the
dryer with more laundry than the amount shown in the
figure. When overloaded, the drying performance of
the dryer will decrease and the dryer and laundry might
become
damaged.
Laundry Dry load weight (gr)
Bedsheet (double) 725
Pillowcase 240
Bath Towel 700
Hand Towel 225
Shirt 190
Cotton Shirt 200
Jean 650
Fabric - Gabardine Trousers 400
T-shirt 120
If you require any technical guidance or find that your product is not operating as intended, a simple solution can often be found in the Troubleshooting section of these instructions,
or online at www.bush-support.com If you still require further assistance, call one of our experts on 0345 257 7271.
26
Page 27

Care and maintenance
6
Page 28
Care and maintenance
Looking after your appliance
CLEANING AND CARE
IMPORTANT: Do not use industrial chemicals to clean
your dryer. Do not use a dryer that has been cleaned with
industrial chemicals.
CLEANING THE LINT FILTER
IMPORTANT: DO NOT FORGET TO CLEAN THE LINT
FILTER AFTER EACH USE.
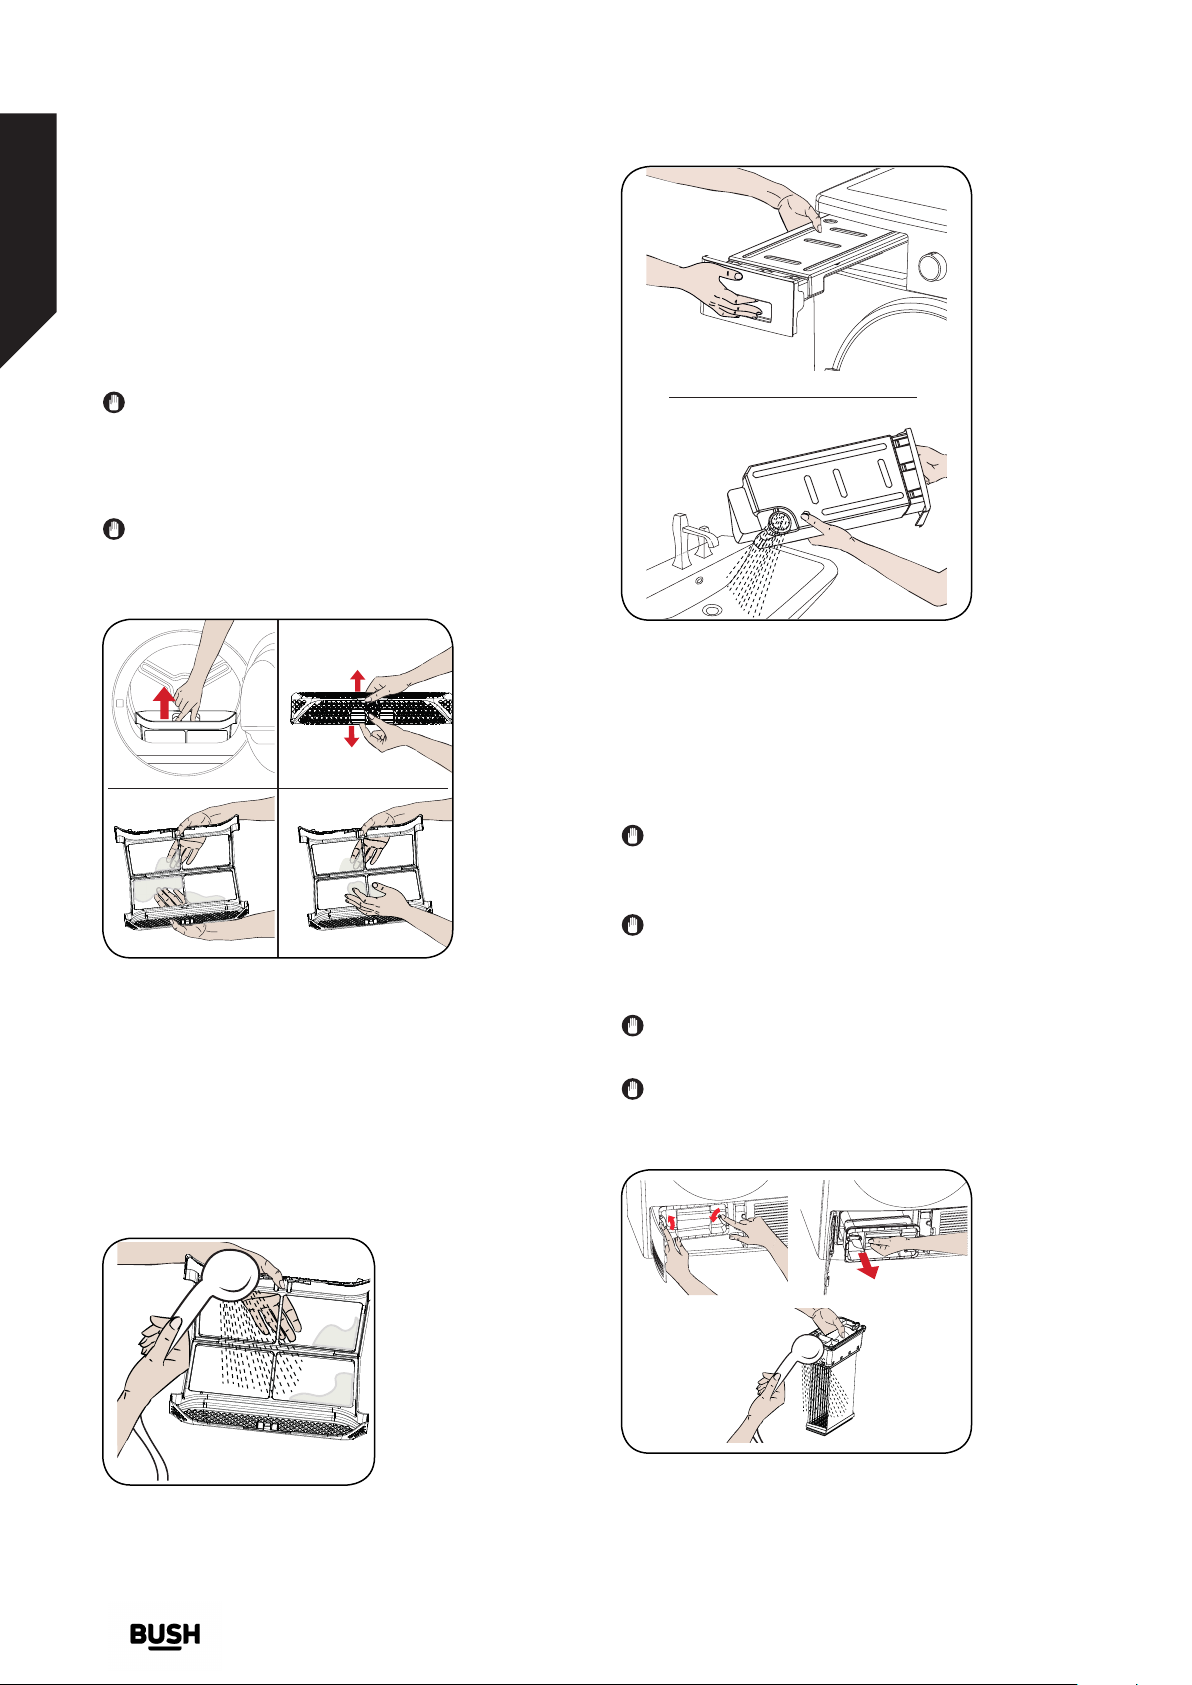
To clean the lint filter:
EMPTYING THE WATER TANK
1
2
1
3
1. Open the loading door.
2. Pull up the lint filter to remove it.
3. Use your hands or a soft cloth to clean the lint.
4. Close and refit the lint filter.
After the dryer has been used for a certain period, you may
find a build-up on the filter which may cause an obstruction.
Should this arise, remove and clean the filter with warm
water and then dry thoroughly before reinstalling
2
4
1. Pull the drawer cover and carefully take out the tank.
2. Empty the water in the tank.
3. If there is lint accumulated on the discharge cap in
the tank, clean it with water.
4. Refit the water tank.
IMPORTANT: Never remove the water tank when the
programme is running. The water condensed in the water
tank is not suitable for human consumption.
IMPORTANT: DO NOT FORGET TO EMPTY THE WATER
TANK AFTER EACH USE.
Cleaning the Condenser
IMPORTANT: Clean the condenser when you see the
warning “Condenser Cleaning”.
IMPORTANT: EVEN IF THE “CONDENSER CLEANING
WARNING LED” IS NOT ON: CLEAN THE CONDENSER AFTER
EVERY 30 DRYING PROCESSES OR ONCE A MONTH.
28
If the drying process is completed, open the loading door
and wait for it to cool down.
If you require any technical guidance or find that your product is not operating as intended, a simple solution can often be found in the Troubleshooting section of these instructions,
or online at www.bush-support.com If you still require further assistance, call one of our experts on 0345 257 7271.
Care and maintenance
Page 29

2
Care and maintenance
Looking after your appliance
1. Open the plinth and release the 2 cover locks of the
condenser.
2. Hold the condenser by the plastic part and pull it out.
3. Clean it with a showerhead and wait for the water to
drain off.
4. Fully insert the condenser into its seat and lock the 2
locks.
5. Close the plinth cover
CLEANING THE HUMIDITY SENSOR
Inside the machine, there are humidity sensors that detect
whether the laundry is dry or not.
CLEANING THE INNER SURFACE OF THE LOADING DOOR
IMPORTANT: DO NOT FORGET TO CLEAN THE INNER
SURFACE OF THE LOADING DOOR AFTER EACH DRYING
PROCESS.
Open the loading door of the dryer and clean all of the
inner surfaces and the gasket with a soft, damp cloth.
To clean the sensors:
1. Open the loading door of the machine.
2. If the machine is still hot due to the drying process,
wait for it to cool down.
3. Using a soft cloth soaked in vinegar, wipe the metal
surfaces of the sensor and dry them.
IMPORTANT: CLEAN THE METAL SURFACES OF THE
SENSOR 4 TIMES A YEAR.
IMPORTANT: Do not use metal tools to clean the metal
surfaces of the sensor.
WARNING: Due to the risk or fire and explosion, do not
use solution agents, cleaning agents or similar products
when cleaning the sensors.
If you require any technical guidance or find that your product is not operating as intended, a simple solution can often be found in the Troubleshooting section of these instructions,
or online at www.bush-support.com If you still require further assistance, call one of our experts on 0345 257 7271.
Care and maintenance
29
Page 30

Product support
7
Page 31

Product support
Product support
Help is always at hand
T
ROUBLESHOOTING
Your dryer is fitted with systems that continuously perform checks during the drying process. This enables it to take the
necessary measures and warn you in the case of any malfunction(s).
WARNING: If the problem persists even if you have applied the steps in this section, please contact the your dealer
or an Authorised Service Provider. Never try to repair a nonfunctional product.
PROBLEM REASON SOLUTION
The drying process takes a long
time.
Laundry comes out damp at the end
of the drying process.
The surface of the lint lter might be
clogged.
The condenser might be clogged. Wash the condenser.
The ventilation grills in front of the
machine might be closed.
There might be a layer of limescale
on the humidity sensor.
The dryer might be overloaded with
laundry.
The laundry might be insuciently
spun.
The laundry that comes out hot at the end of the drying process generally feels more humid.
The programme used might not be
suitable for the type of laundry.
Wash the lter with lukewarm water.
Open the doors/windows to prevent the room temperature from rising too much.
Clean the humidity sensor.
Do not overload the dryer.
Select a higher spin speed on your washing machine.
Check the care labels on the laundry items, select a suitable programme for the
type of laundry and additionally, use the time programmes.
The surface of the lint lter might be
clogged.
The condenser might be clogged. Wash the condenser.
The dryer might be overloaded with
laundry.
The laundry might be insuciently
spun.
The dryer cannot be opened or the
programme cannot be started. The
dryer does not get activated when
adjusted.
The programme has been
interrupted for no reason.
Clothes have shrunk, felted or
deteriorated.
Water leaking from the loading door. There might be lint accumulated on
The loading door opens on its own. The loading door might not be
The water tank warning symbol is
on/ashing.
The dryer might not be plugged in. Make sure that the plug is tted in the socket.
The loading door might be open. Make sure that the loading door is properly closed.
You might not have set a
programme or pressed the Start/
Pause key.
Child lock might be active. Deactivate the child lock.
The loading door might not be
closed properly.
There might have been a power
failure.
The water tank might be full. Empty the water tank.
The programme used might not be
suitable for the type of laundry.
the inner surfaces of the loading
door and on the surfaces of the
gasket of the loading door.
closed properly.
The water tank might be full. Empty the water tank.
The water discharge hose might
be bent.
Wash the lter with lukewarm water.
Do not overload the dryer.
Select a higher spin speed on your washing machine.
Make sure that the programme has been set and the dryer is not in the Standby
(Pause) mode.
Make sure that the loading door is properly closed.
Press the Start/Pause key to start the programme.
Check the care labels on the laundry items, select a suitable programme for the
type of laundry.
Clean the inner surfaces of the loading door and the surfaces of the gasket of the
loading door.
Push the loading door until you hear a clicking sound.
If the product is connected directly to the water outlet, check the water discharge
hose.
31
If you require any technical guidance or find that your product is not operating as intended, a simple solution can often be found in the Troubleshooting section of these instructions,
or online at www.bush-support.com If you still require further assistance, call one of our experts on 0345 257 7271.
Page 32

Product support
Help is always at hand
PROBLEM REASON SOLUTION
The lter cleaning warning symbol
is on.
The lter cleaning warning symbol
is ashing.
The lint lter might be unclean. Clean the lter.
The lter seat might be clogged
by lint.
There might be a layer that causes
obstruction on the surface of the
lint lter.
The condenser might be clogged. Wash the condenser.
Clean the lter seat.
Wash the lter with lukewarm water.
If you require any technical guidance or find that your product is not operating as intended, a simple solution can often be found in the Troubleshooting section of these instructions,
or online at www.bush-support.com If you still require further assistance, call one of our experts on 0345 257 7271.
Product support 32
Page 33
Product support
AUTOMATIC FAULT WARNINGS AND WHAT TO DO
Your tumble dryer is equipped with a built-in fault detection system, indicated by a combination of flashing operation
lights. The most common failure codes are shown below.
ERROR CODE SOLUTION
E03
E04
E05
E06
Empty the water tank, if problem is
Contact the nearest authorised service agent.
Contact the nearest authorised service agent.
Contact the nearest authorised service agent.
not solved, contact the nearest authorised service agent.
33
There may be voltage fluctuation in mains.
Wait until voltage is appropriate for working range.
E08
If you require any technical guidance or find that your product is not operating as intended, a simple solution can often be found in the Troubleshooting section of these instructions,
or online at www.bush-support.com If you still require further assistance, call one of our experts on 0345 257 7271.
Page 34

Product support
Help is always at hand
TECHNICAL SPECIFICATIONS
Brand BUSH
Model name D7CNBCW
Height Min: 845 mm / Max: 855 mm*
Width 596 mm
Depth 563mm
Capacity (max.) 7 kg**
Net weight (with plastic door) 35,2 kg
Net weight (with glass door) 37,5 kg
Voltage
Power
220-240 V
2700 W
*Min. height: Height with the adjustable feet not used. Max. height: Height with the adjustable feet extended to the
maximum.
**Dry laundry weight before washing.
IMPORTANT: To improve the quality of the dryer, technical specifications are subject to change without prior notice.
IMPORTANT: The values declared have been obtained in a laboratory environment according to the relevant
standards. These values may change depending on the environmental conditions and use of the dryer.
If you require any technical guidance or find that your product is not operating as intended, a simple solution can often be found in the Troubleshooting section of these instructions,
or online at www.bush-support.com If you still require further assistance, call one of our experts on 0345 257 7271.
Product support 34
Page 35

Product support
Help is always at hand
ENVIRONMENTAL PROTECTION AND
PACKAGING INFORMATION
DES
CRIBING THE ENERGY LABEL AND
SAVING ENERGY
PACKAGING INFORMATION
The packaging of this product is made of recyclable
materials. Do not dispose of the packaging, waste
together with household or other waste. Instead, take
it to a packaging collection point defined by your local
authority.
ENERGY LABELLING
1. Trademark
2. Model
3. Energy Class
4. Annual Power Consumption
5. Noise During Drying
6. Dry Laundry Capacity
7. Cotton Cupboard Dry Cycle Time
8. Condensing Efficiency Class
9. Machine Technology
If you require any technical guidance or find that your product is not operating as intended, a simple solution can often be found in the Troubleshooting section of these instructions,
or online at www.bush-support.com If you still require further assistance, call one of our experts on 0345 257 7271.
Product support 35
Page 36

Product support
Help is always at hand
Energy Efficiency
• You should operate the dryer to full capacity, but make
sure that it is not overloaded.
• When the laundry is being washed, the spin
speed should be at the highest level possible. This
will shorten the drying time and reduce energy
consumption.
• Make sure that the same kinds of laundry are dried
together.
• Please follow the recommendations in the user manual
for programme selection.
• For air circulation, leave an appropriate clearance on
the front and back sides of the Dryer. Do not cover the
grills on the front side of the machine.
• Unless necessary, do not open the door of the machine
when drying. If you have to open it, do not keep it
open for a long time.
• Do not add new (wet) laundry during the drying
process.
• Hairs and lint that detach from the laundry and merge
in the air are collected by the “Lint Filters”. Please make
sure that the filters are cleaned before and after each
use.
• For models with a condenser, make sure that the
condenser is cleaned at least once a month or after
each 15 uses.
• During the drying process, the environment where the
dryer is installed must be well ventilated.
If you require any technical guidance or find that your product is not operating as intended, a simple solution can often be found in the Troubleshooting section of these instructions,
or online at www.bush-support.com If you still require further assistance, call one of our experts on 0345 257 7271.
Product support 36
Page 37

Product support
PRODUCT FICHE
Complying Commission Delegated Regulation (EU) No 392/2013
Supplier name or trademark BUSH
Model name
TD7CNBCW
Rated capacity (kg) 7
Type of Tumble Dryer Condenser
Energy efficiency class
Annual Energy Consumption (kWh)
(1)
(2)
B
504
Automatic of Non-automatic Automatic
Energy Consumption of the standard cotton programme at full load (kWh) 4,18
Energy Consumption of the standard cotton programme at partial load (kWh) 2,31
Power consumption of the off-mode for the standard cotton programme at full load PO
0,5
(W)
Power consumption of the left-on mode for the standard cotton programme at full load
1,0
PL (W)
The duration of the left mode on (min) n/a
Standard cotton programme
Programme time of the standard cotton programme at full load , T
Programme time of the standard cotton programme at partial load , T
(3)
(min) 125
dry
(min) 70
dry1/2
Weighted programme time of the standard cotton programme at full and partial load (Tt) 94
Condensation efficiency class
Average condensation efficiency of the standard cotton programme at full load C
(4)
dry
Average condensation efficiency of the standard cotton programme at partial load C
Weighted condensation efficiency of the standard cotton programme at full load and
partial load C
Sound power level for the standard cotton programme at full load
t
(5)
dry1/2
B
81%
81%
81%
65
Built-in No
(1) Scale from A+++ (most efficient) to D (least efficient)
(2) Energy consumption based on 160 drying cycles of the standard cotton programme at full and partial load and the
consumption of the low-power modes. Actual energy consumption per cycle will depend on how the appliance is
used.
(3) “Cotton cupboard dry programme” used at full and partial load is the standard drying programme to which the
information in the label and the fiche relates, that this programme is suitable for drying normal wet cotton laundry and
that it is the most efficient programme in terms of energy
consumption for cotton
(4) Scale from G (least efficient) to A (most efficient)
(5) Weighted average value - L wA expressed in dB(A) re 1 pW
37
If you require any technical guidance or find that your product is not operating as intended, a simple solution can often be found in the Troubleshooting section of these instructions,
or online at www.bush-support.com If you still require further assistance, call one of our experts on 0345 257 7271.
Page 38

Product support
Help and assistance
If you require any technical guidance or find that your washing machine is not operating as intended, a simple
solution can often be found in the Troubleshooting section of these instructions or online at
www.bush-support.com
If you still require further assistance, call one of our experts on 0345 257 7271*. To help give us give you a fast and
efficient service please have the following information ready:
Model Ref.
You can find these on
the rating plate - a small
information panel (usually
a sticker or metal plate) on
Serial number
Date of purchase
Local call rates applies*
the rear of your appliance
This will be shown on
your receipt
Lines open 8am-7pm Monday to Saturday and 10am-4pm Sunday.
*Calls to Bush enquiry lines may attract a charge and set up fee from residential lines depending on your call plan/tariff. Mobile and other
providers costs may vary, see www.bt.com/pricing for details.
For Security and training purposes, telephone calls to and from customer service centres maybe recorded and monitored. Calls from Republic of
Ireland will attract international call charges.
38
If you require any technical guidance or find that your product is not operating as intended, a simple solution can often be found in the Troubleshooting section of these instructions,
or online at www.bush-support.com If you still require further assistance, call one of our experts on 0345 257 7271.
Page 39

Product support
Help is always at hand
Notes on disposal :
The symbol on the product or its packaging
indicates that this product may not be treated as
household waste. Instead it should be handed
over to the applicable collection point for the
recycling of electrical and electronic equipment. By
ensuring this product is disposed of correctly, you
will help prevent potential negative consequences
for the environment and human health, which
could otherwise be caused by inappropriate
waste handling of this product. For more detailed
information about recycling this product, please
contact your local council office, your household
waste disposal service or the shop where the
product was purchased.
If you require any technical guidance or find that your product is not operating as intended, a simple solution can often be found in the Troubleshooting section of these instructions,
or online at www.bush-support.com If you still require further assistance, call one of our experts on 0345 257 7271.
Product support 39
Page 40

Product support
Call us now and activate your 12 month guarantee
Thank you for choosing Bush. Your new product is guaranteed against faults and
breakdowns for 12 months. Don’t forget to register it with us today so we can provide you
with our best possible after-sales service and useful updates.
www.bushregistration.co.uk
FREEPHONE*
0800 597 8548
Lines are open 8am - 8pm, 365 days a year. *Calls may be recorded and monitored.
Your Bush Guarantee
This product is guaranteed for twelve months from the date of original purchase. Any defect that arises due to
faulty materials or workmanship will be repaired free of charge (or if applicable the product will be replaced or the
purchase price refunded) where possible during this period by the dealer from who your purchased the unit.
The guarantee is subject to the following provisions:
• The guarantee does not cover accidental damage,
misuse, cabinet parts, knobs or consumable items.
• The product must be correctly installed and
operated in accordance with the instructions
contained in the manual.
• It must be used solely for domestic purposes. The
guarantee will be rendered invalid if the product is
re-sold or has been damaged by inexpert repair.
• Specifications are subject to change without notice.
• Bush disclaim any liability for loss or damage arising
from the breakdown of the product.
• This guarantee is in addition to and does not
diminish your statutory or legal rights.
Important Data Protection Information
To find out how we and Domestic & General Insurance Plc use your data please refer to the guarantee registration
material or visit www.bushregistrations.co.uk.
40
Guarantor: Sainsbury’s Supermarkets Ltd, 33 Holborn, London EC1N 2HT.
If you require any technical guidance or find that your product is not operating as intended, a simple solution can often be found in the Troubleshooting section of these instructions,
or online at www.bush-support.com If you still require further assistance, call one of our experts on 0345 257 7271.
Page 41

Page 42

Contact:
www.bush-support.com
Helpline: 0345 257 7271
52259997
 Loading...