

Page 1
19 /22 Digital LCD Television
INSTRUCTION MANUAL
Customer helpline:0845 604 0105
Page 2

P.25
P. 3 8
P. 4 0
P. 4 4
P. 4 5
P.02
P.03
P.04
P.05
P.06
01 Safety Warnings
02 About your LCD TV
03 Getting Started
04 Using the features
05 Reference Sections
P.08
P.09
P.11
P.12
P.13
P.16
P.18
P.19
P.20
P.21
P.23
P.28
P.29
Welcome
Important information
Safety notice
Electrical connections
Get to know your TV
Get to know your remote control
Connecting your TV
Preparation of your remote control
Setting up
tuning your TV
using your TV
adjusting picture settings
adjusting sound settings
function settings
time settings
lock menu settings
shortcut menu display
common interface
Teletext function
USB Mode
REC
Using your DVD player(certain models only)
Troubleshooting
Specification
P. 3 1
06 Product guarantee
Product guarantee
P. 4 6
P. 0 1
Contents
Page 3
P. 0 2
WELCOME
01 Safety Warnings
01 Safety Warnings
Thanks for buying this 19"/22" HD Ready Digital LCD TV.
This guide will help you set up and begin using your TV.
First, check the contents of your box with the parts checklist below:
19"/22"HD Ready Digital LCD TV
Remote control
AAA battery x2
Now you can get started!
Page 4
P. 0 3
CAUTION
TO REDUCE THE RISK OF ELECTRIC SHOCK AND FIRE, DO NOT
PUT THE TV SET NEAR SOURCES OF HUMIDITY.
DO NOT USE ANY ABRASIVE CLEANERS WHICH MAY SCRATCH
OR DAMAGE THE LCD SCREEN. AVOID CONTACT WITH OBJECTS
THAT MAY SCRATCH THE LCD SCREEN.
NOTE: SERVICING THE UNIT YOURSELF IS UNAUTHORISED AND
COULD LEAD TO INJURY OR PRODUCT DAMAGE. REFER ALL
SERVICING TO THE CUSTOMER HELPLINE.
IMPORTANT INFORMATION
READ ALL INSTRUCTIONS BEFORE USE AND KEEP FOR FUTURE REFERENCE.
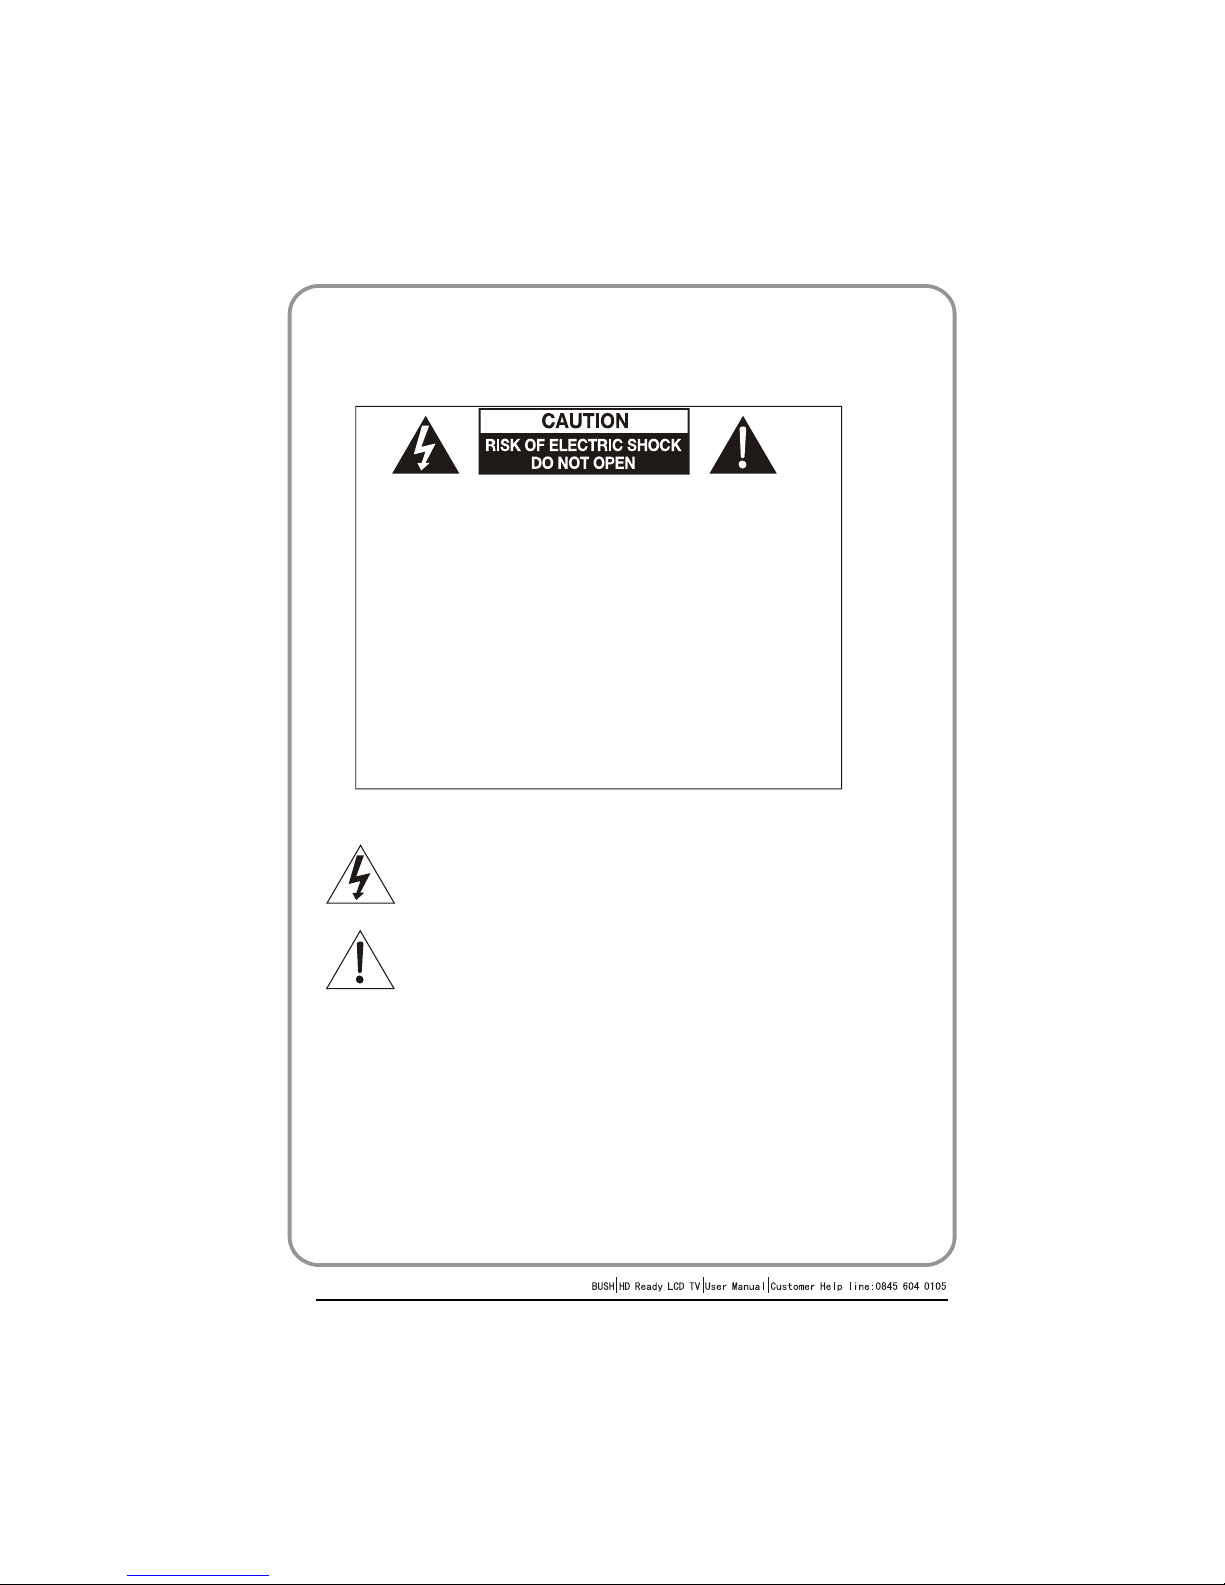
CAUTION
TO REDUCE THE RISK OF ELECTRIC SHOCK, DO NOT
REMOVE COVER (OR BACK).NO USER SERVICEABLE
PARTS INSIDE. FOR ANY PROBLEMS, REFER SERVICING
TO THE CUSTOMER HELP LINE. THERE IS A LIGHTNING
ARROW SYMBOL IN THE TRIANGLE: THIS SYMBOL
INDICATES HIGH VOLTAGE IS PRESENT INSIDE. IT IS
DANGEROUS TO MAKE ANY KIND OF CONTACT WITH ANY
INSIDE PART OF THIS PRODUCT.
THERE IS A EXCLAMATION MARK IN THE TRIANGLE:
THIS SYMBOL ALERTS YOU THAT IMPORTANT LITERATURE
CONCERNING OPERATION AND MAINTENANCE HAS
BEEN INCLUDED WITH THIS PRODUCT.
Page 5
P. 0 4
01 Safety Warnings
For your protection please read these instruction completely and keep this manual
for future reference
Please ensure that the set has adequate ventilation.
Do not place the set near a heat source or in direct sunlight.
Do not put the unit near water or oil as it may cause a fire.
During thunderstorms, unplug both the antenna and power plug to prevent damage.
Do not use a damaged power plug or put the power supply near a heat source as it may
cause electric shock or fire.
To prevent potential fire, do not overload an electrical outlet with too many plugs.
Place the set on a level surface to prevent it from tipping and potential damage.
Do not remove the cover of the set or try to service your TV. This may result in electrical
shock or fire. All service work must be completed by an authorised technician.
If there are any abnormal sounds or smells from the unit, unplug it immediately and
contact an authorised service provider.
To prevent fire, do not use or store any flammable materials near the unit.
To prevent fire, do not place the unit near a damp wall.
To prevent electric shock, ensure that any external antenna connected to the set is clear
of contact with any power lines.
Do not plug/unplug the unit while your hands are wet. This may cause an electric shock.
Please ensure a solid connection with the AC wall socket in order to avoid shock and
potential fire.
To prevent electric shock or fire, please prevent rain from entering the set along the wire
connected to the outside antenna.
When cleaning, please unplug the unit. Use a soft cotton cloth. Do not use any abrasive
cleansers, and prevent water from entering the set.
If any plugs or input wires are dirty, unplug the set and clean them. This will prevent the
risk of electric shock or fire.
If the set is not going to be used for an extended period, unplug the unit from the main
power.
The apparatus should not be exposed to dripping or splashing and no objects filled with
liquids, such as vases should be placed on the apparatus.
The mains plug is used for disconnecting the device, make it easily accessible.
Do not use any accessories that are not recommended by the manufacture.
SAFETY NOTICE
Page 6
P. 0 5
ELECTRICAL CONNECTIONS
CONNECTING TO POWER
Check that the voltage marked on the product corresponds with your supply
voltage. This product is fitted with a 13A plug complying with BS1363. If this plug
is unsuitable or needs to be replaced, please note the following:
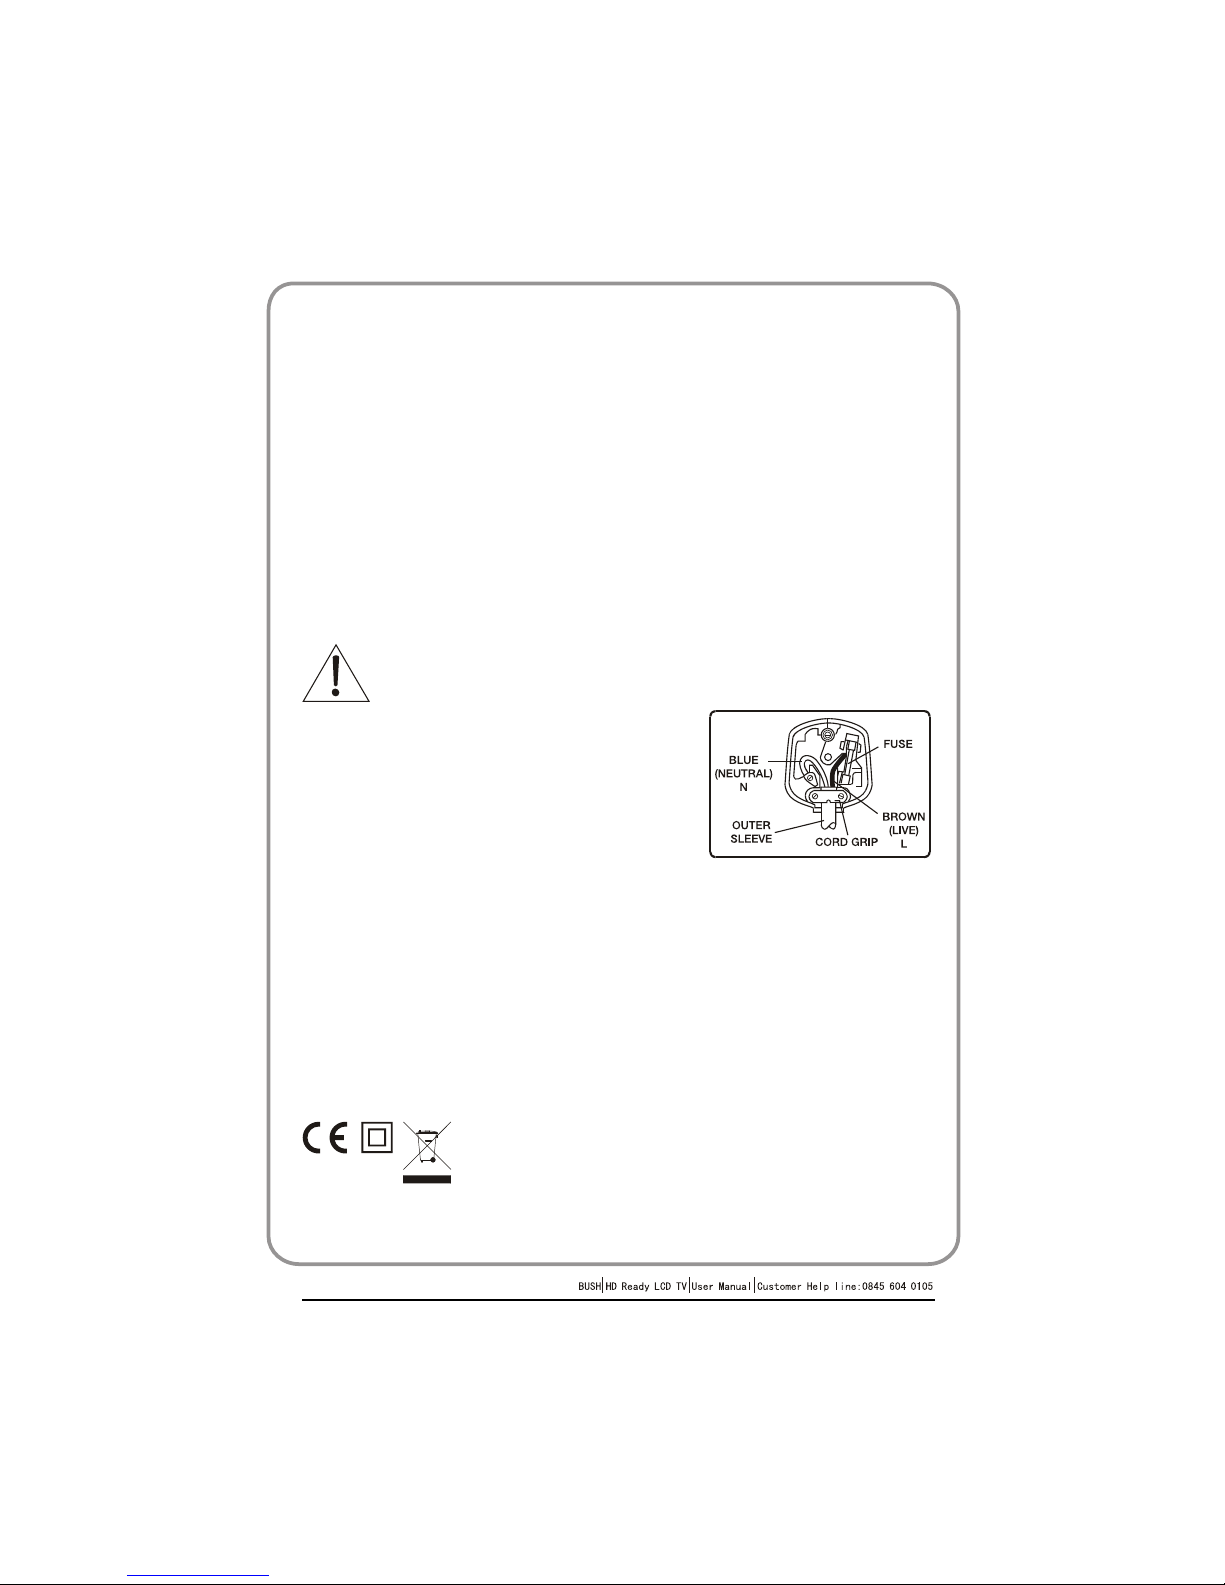
PLUG REPLACEMENT
If you need to replace the fitted plug:
IMPORTANT
The wires in this mains lead are coloured as follows:
BlueNeutral
BrownLive
As the colours of the wires in the mains lead of this apparatus may not correspond
with the coloured markings identifying the terminals in your plug, proceed
as follows:
WARNING
Never connect live or neutral wires to the earth terminal of the
plug. Only fit an approved 13 Amp BS1363/A plug and the correct
rated fuse. If in doubt, consult a qualified electrician.
The wire which is coloured blue must be connected to the terminal, which is
marked with N or coloured blue. The wire which is coloured brown must be
connected to the terminal which is marked L or coloured brown. The green and
yellow wire must be connecting to the terminal marked with the letter E or the
earth symbol . Always ensure that the plug cord grip is fastened correctly.
If a 13A (BS1363) fused plug is used it must be fitted with a 3A fuse conforming
to BS1362 and be ASTA approved. If in doubt contact a qualified electrician.
WASTE ELECTRICAL PRODUCTS SHOULD NOT BE
DISPOSED OF WITH HOUSEHOLD WASTE. PLEASE
RECYCLE WHERE FACILITIES EXIST. CHECK
WITH YOUR LOCAL AUTHORITY FOR RECYCLING
ADVICE.
Page 7
SOURCE MENU VOL- VOL+ CH- CH+ STANDBY
-----------------------------------------
DVD insert
STOP
PLAY/PAUSE
OPEN/CLOSE
PREV
NEXT
(Please refer to actual product
of the DVD slot and buttons)
Just take one TV with DVD for example,
please see the real)
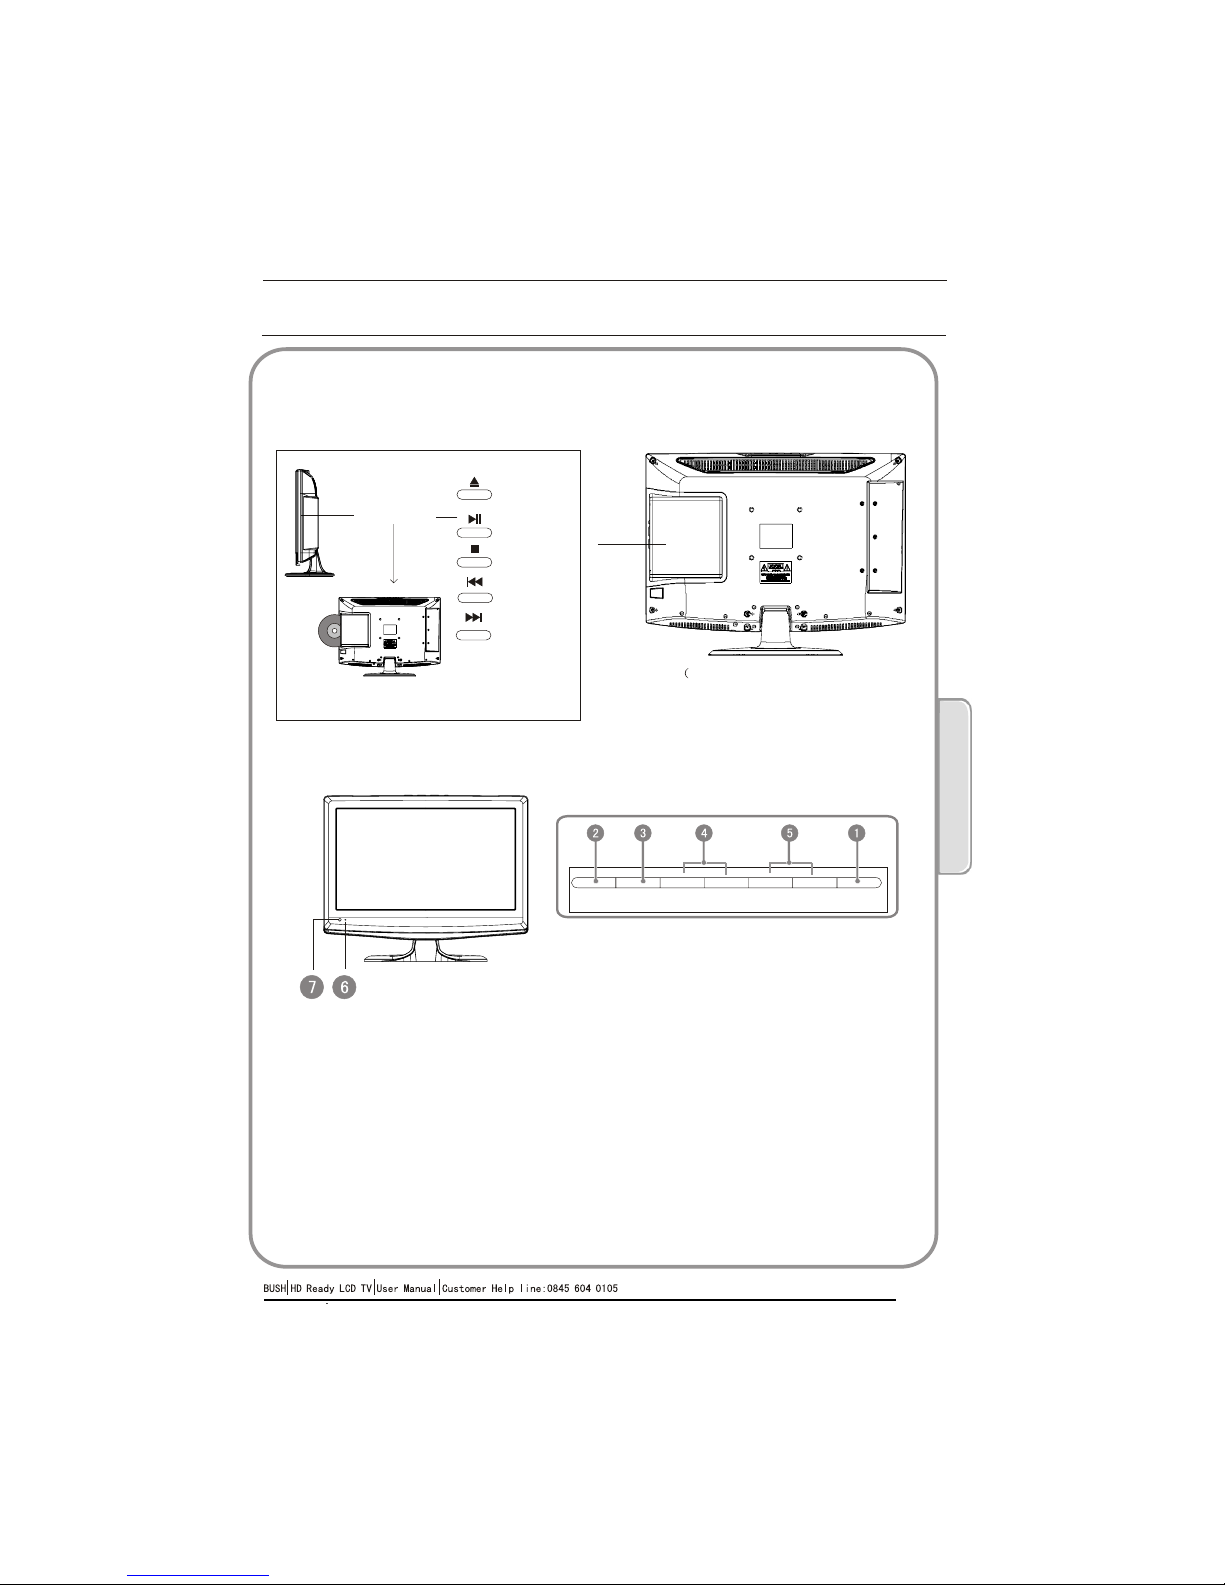
Control Panel Function
1. Standby switch
2. SOURCE Call the Input Source menu/Confirm button when operation
menu.
3. MENU Press to select the main menu
4. VOL- Volume down / Left orientation to adjust the item in the OSD
VOL+ Volume up / Right orientation to adjust the item/Press to enter
5. CH- TV channel down to select the item in the menu
CH+ TV channel up to select the item in the menu
6. Power indicator
7. Remote Sensor
RIGHT SIDE
-----------------------------------------
FRONT
02 About your LCD TV
P. 0 6
02 About your LCD TV
GET TO KNOW YOUR TV
Page 8

TV SCART
Y
HDMI USB
ANT IN
COAXIAL
S-VIDEO
VGA IN
PC AUDIO IN
PC AUDIO IN
Common Interface
R-AUDIO-L
Pr
Pb
10
1.USB
2.HDMI
3.TV SCART
4.YPbPr
5.Common Interface
6.S-VIDEO
AUDIO IN
8.VGA IN
9.PC AUDIO IN
ANT IN
Connect to HDMI output of other equipment
Connect a component video/audio device to these jacks
Component/S-Video Input
7.
Earphone port
11.COAXIAL
12.
Connect to the VGA 15PIN analog output connector of the PC display
card for PC display purpose
Connect the PC output connector from a PC to the audio
10.
Connect cable or antenna signals to the TV, either directly or through
your cable box.
BACK
-----------------------------------------
P. 0 7
GET TO KNOW YOUR TV
Page 9
When using the remote control, aim it
towards the remote sensor on the TV
NOTE:RED button GREEN button
BLUE button and YELLOW button are fast
text button in analog signal .Function
button in DVBT (just reference the OSD)
SCREEN
SCREEN
STOP
.
P. 0 8
02 About your LCD TV
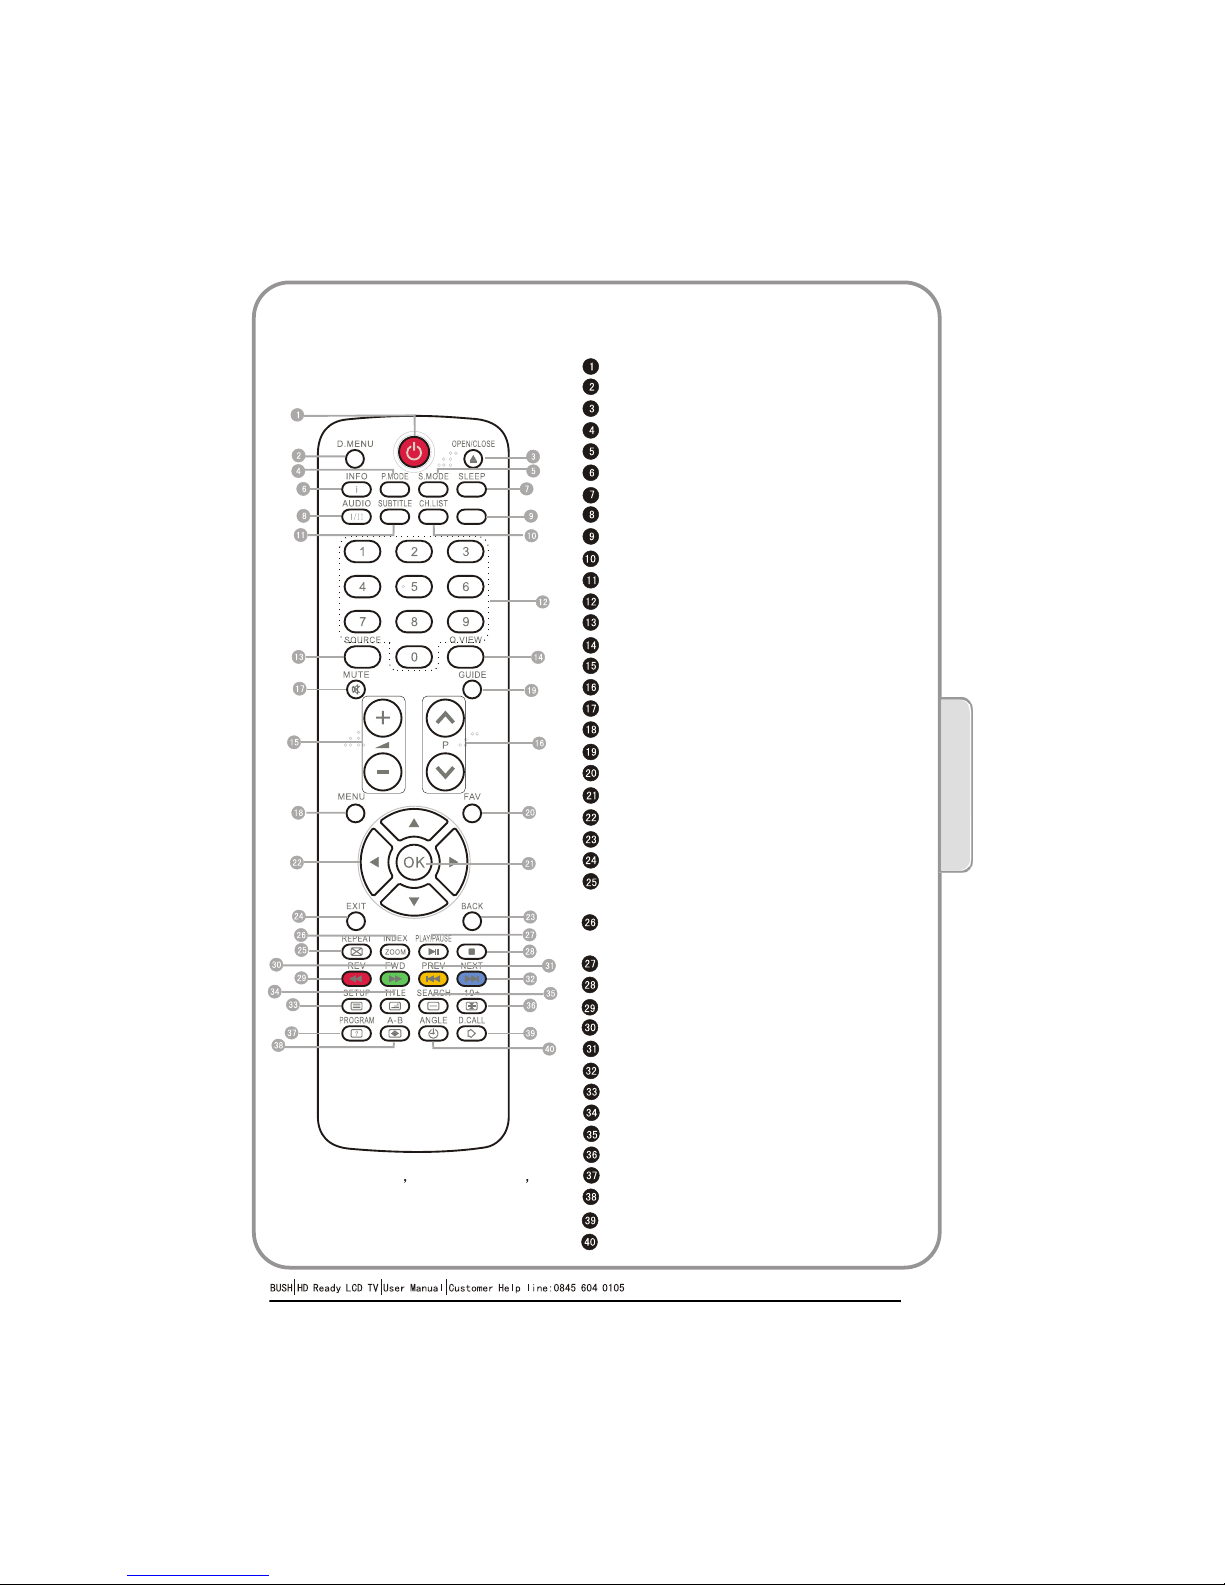
GET TO KNOW YOUR REMOTE CONTROL
Stand By
DVD Menu/REC
DVD open/close
Picture Mode
Sound Mode
Call Screen Display
Sleep button
DTV Audio/NICAM/DVD Audio
Aspect Ratio Control button
Channel list button
Subtitle button
Program Number Channel selection
Source Exchange
Q.VIEW
V+/V- :Volume selection
P+/P-:Channel selection
Mute
Menu button
GUIDE Button (only for DTV)
Favourite list button
OK button
Cursor Mover Button
Back button (only for USB)
Exit Screen Display
REPEAT
(only for DVD,USB,REC & Timeshift)/
CANCEL button
Zoom(only for DVD &USB)/Teletext index(only for TV)/
REC index
Play/pause button(only for DVD &USB)/Timeshift
STOP(only for DVD,USB,REC & Timeshift)
FAST REVERSE(only for DVD,USB,REC & Timeshift)
FAST FORWARD(only for DVD,USB,REC & Timeshift)
PREVIOUS(only for DVD,USB,REC & Timeshift)
NEXT(only for DVD,USB,REC & Timeshift)
DVD SET UP/ TEXT
DVD TITLE/TELETEXT MIX
DVD SEARCH/TELETEXT SUBCODE
DVD 10+/TELETEXT HOLD
DVD PROGRAM/TELETEXT REVEAL
DVD A-B REPEAT/TELETEXT SIZE
DVD CALL/TELETEXT MODE
DVD ANGLE/TELETEXT TIME
Page 10
LR YPbPr
DVD
P. 0 9
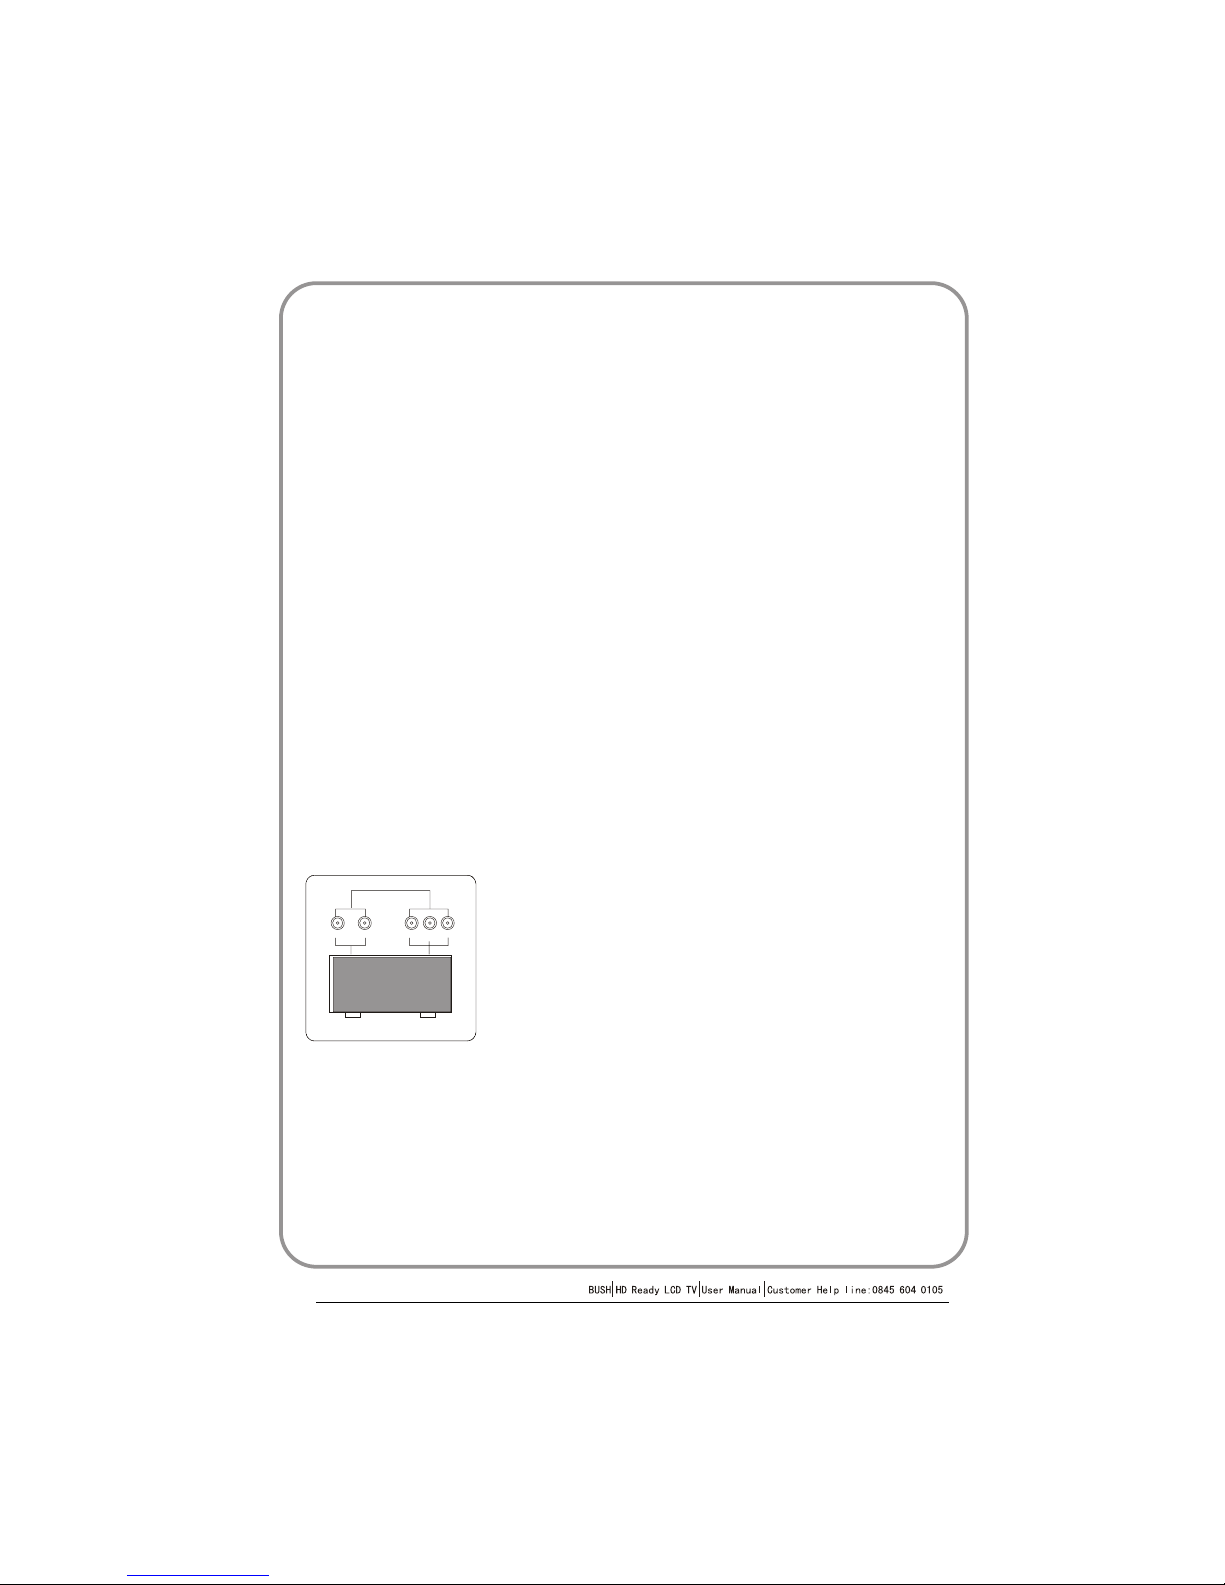
ANTENNA CONNECTION
Connect your aerial to the side of the TV into the ANTENNA IN socket.
IMPROVE YOUR SIGNAL
To improve picture quality in a poor signal area, use a signal amplifier
(not supplied).
CONNECT YOUR PC TO THE TV
You can use your TV as a monitor for your personal computer by connecting it
with a VGA cable (not supplied).
1.Read your computer user guide and check it has a VGA connector.
2.Turn the power off on your TV and PC.
3.Connect a D type 15-pin VGA interface cable to the VGA video interface
connector on the PC. Connect the other end of the cable to the PC interface
connector on the TV. Tighten the screws on the VGA connectors and connect
the audio cable (not supplied) to the audio input socket on the back of the TV.
4.Turn on the power of the TV first and then the PC.
5.Press the button on the TV or TV remote control to set the video input mode
to VGA.
6. Once the image shows, if there is noise present, change the VGA mode to
another resolution, change the refresh rate to another rate or adjust the
brightness and contrast on the menu until the picture is clear.
CONNECT A DVD PLAYER TO YOUR TV
Connect the DVD video outputs (Y, Pb, Pr) to the
COMPONENT (Y, Pb, Pr) IN socket on your TV.
1 .Turn on the DVD player and insert a DVD.
2 .Press the button to select .
3 .Refer to the DVD player user guide for operating
instructions.
CONNECTING YOUR TV
Page 11
P. 1 0
02 About your LCD TV
CONNECT A DVD PLAYER OR VCR TO YOUR TV
There are two ways in which you can connect a DVD player or VCR to your TV.
Make sure that both the TV and DVD player or VCR are switched off before you
connect them.
Connection Option
1.Connect the audio and S-VIDEO cables from the VCR output jacks to the TV
input jacks.
2.Insert a video tape into the VCR and press PLAY on the VCR.
3.Turn on the power of the TV first, then the VCR.
4.Press the SOURCE button on the TV to set the video input mode to S-VIDEO.
SCART INPUT
1.Connect the scart lead from the external device (DVD player, Set-top box
or games console) to the TV scart socket.
2.Press the SOURCE button to select SCART mode.
3.Press the PLAY button on the external device.
HDMI INPUT
1.Connect the cable from the HDMI device to the TV HDMI socket.
2.Press the SOURCE button to select HDMI mode.
3.Refer to the HDMI device user guide for how to operate.
MOUNT YOUR TV ONTO THE WALL
You can mount your TV onto the wall by using a wall bracket (not supplied).
Use M4 machine screws (4 pcs) to screw the TV onto the bracket (not supplied).
See the wall bracket user guide for instructions.
Page 12
P. 1 1
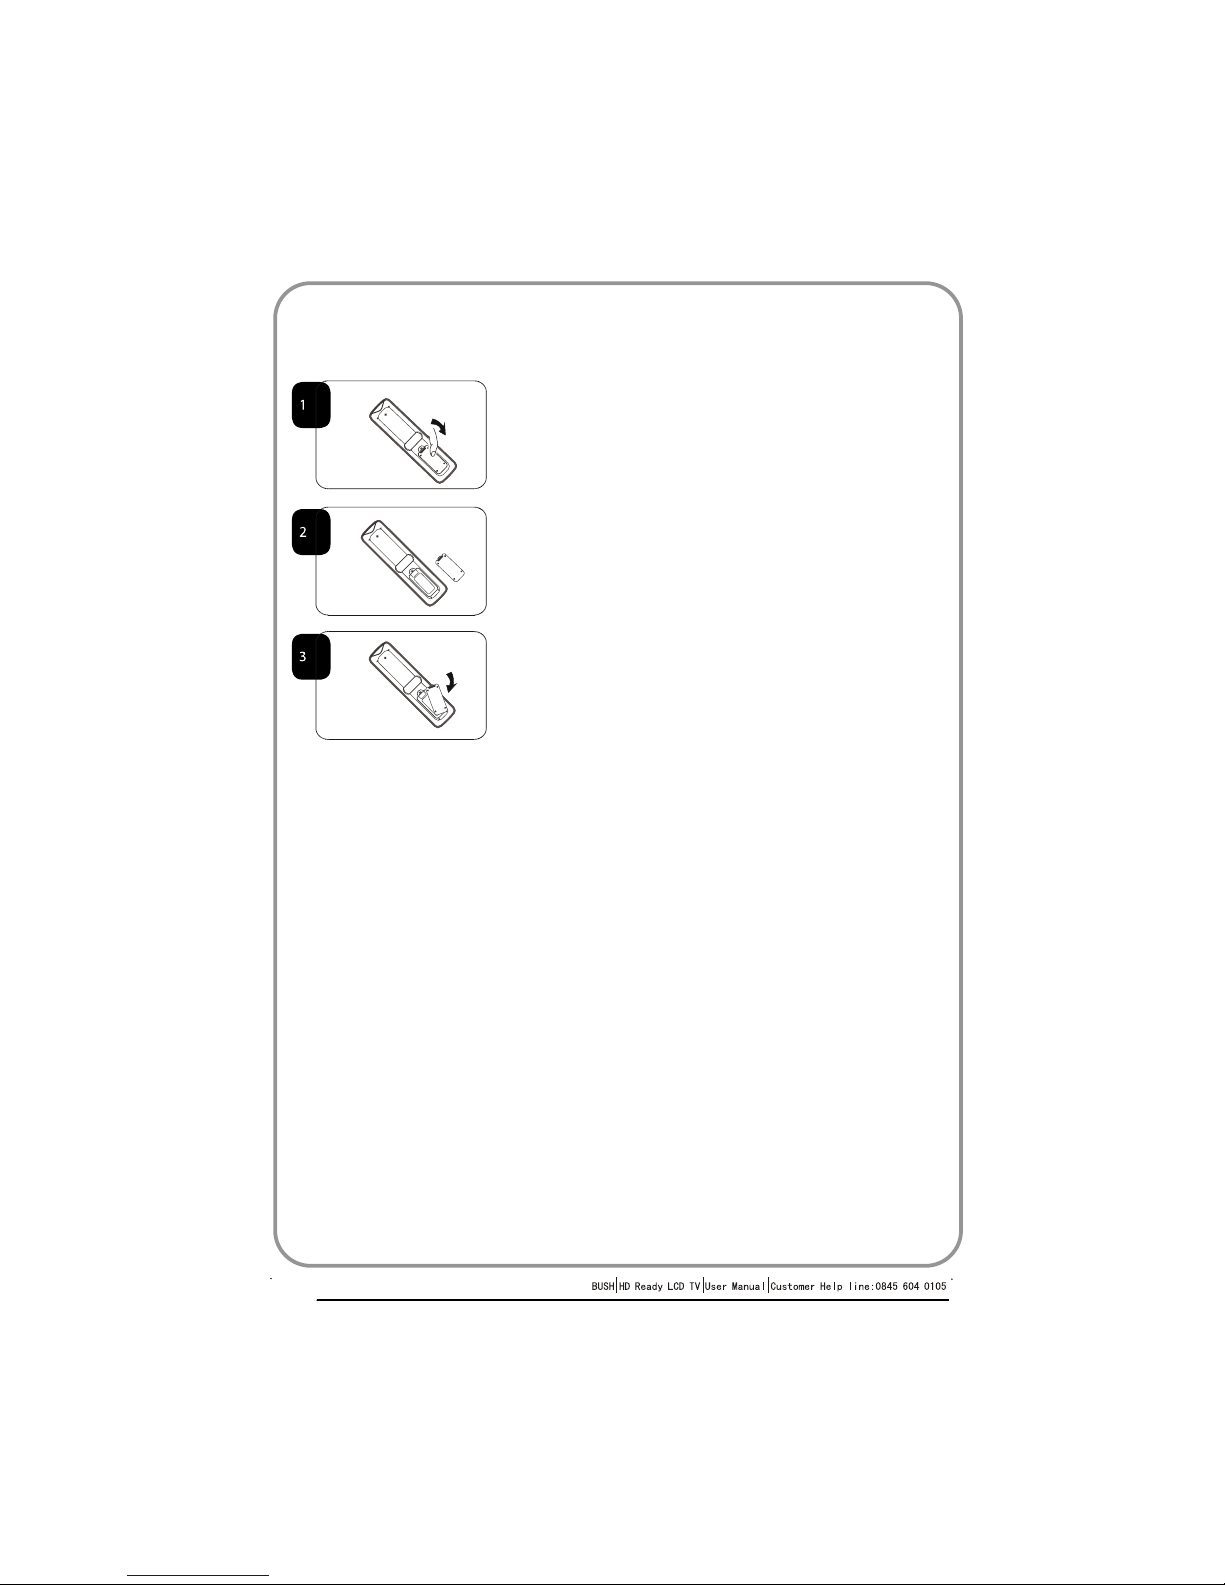
BATTERY INSTALLATION
1.Place the remote control face down, then open
the cover of the battery compartment.
2.Install two AAA batteries. (The + and- symbol
of the battery must match with the marks on the
remote).
3.Close the cover of the battery compartment.
BATTERY CAUTION
Confirm there is no object between the remote
control and the remote sensor of the TV set.
Sunshine or other strong light will interfere with
the signal sent by the remote control. In this
situation turn the TV set to avoid the direct light
source.
Do not put the remote control in direct heat or in
a damp place as you may damage the remote.
Please use two AAA 1.5V batteries. Do not mix
battery types. Install the batteries at the correct
polarities. Do not use rechargeable batteries.
If your TV is to be stored for a period of time,
remove the batteries from the remote control.
PREPARATION OF YOUR REMOTE CONTROL
Page 13
03 Getting Started
P. 1 2
LOCATION
You will need to place your TV near your plug socket (so the power cable can comfortably
reach) and within reach of your aerial socket or extension lead.
CONNECTION
1. Insert your TV aerial lead into the Antenna input at the side of the TV.
2. Insert the batteries into the remote control. Make sure they are inserted the right
way around, matching the polarity as indicated inside the battery compartment.
SWITCHING YOUR TV ON
1.Press the STANDBY button on the right side of the TV once. A red flashing light will
appear in the corner of the screen.
2.Press STANDBY on the remote control. The TV will turn on and the red light will turn
green. This may take a few moments.
3.Select your chosen language when prompted from the list that will appear on
screen. Use the button to scroll to the language you want and press to confirm.
Setting up
Page 14
EXIT
OK
MENU
DTV 13
Radio 6
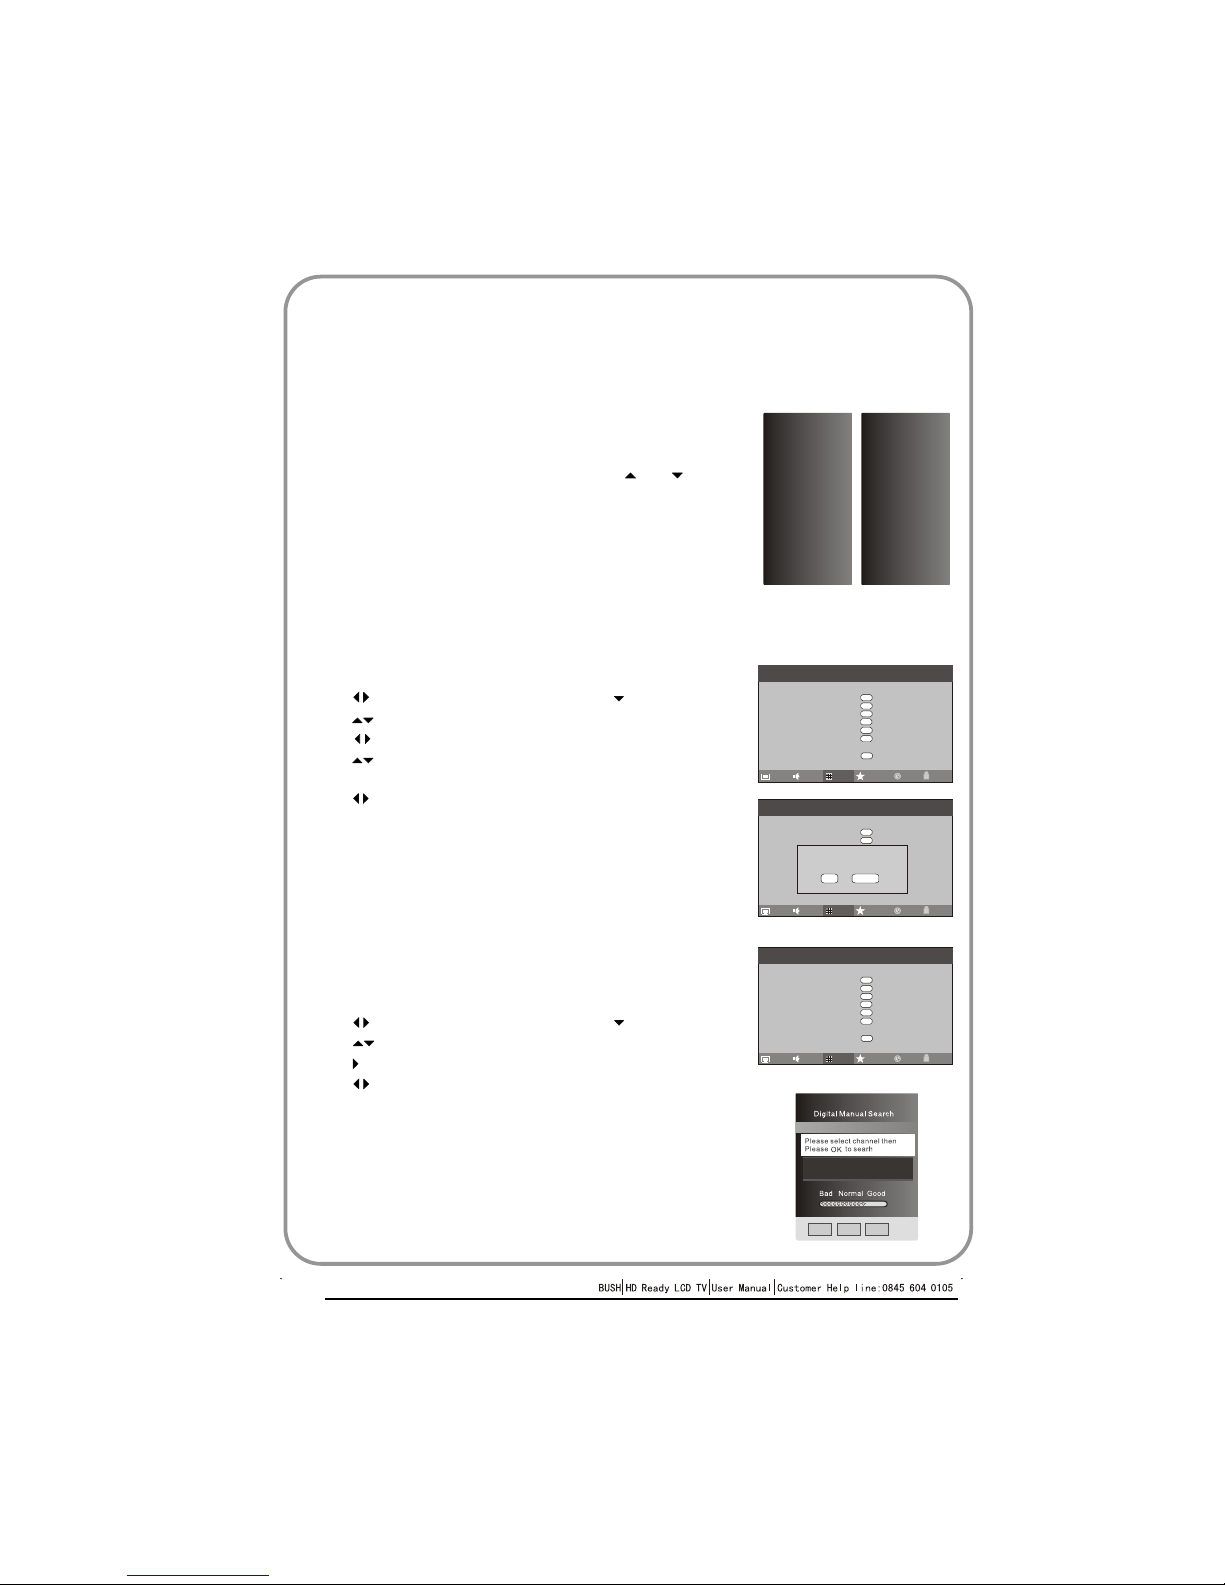
1. Press MENU button.
2. Press button to select Tuning menu, press button to enter.
3. Press button to select Country item,
Press button to select you needed.
4. Press button to select Auto Search item, press OK button to
enter.
Press button to select the OK option, and press OK button
to start searching.
Press the MENU button ,you can choose to skip the TV /DTV
Search or not.
5. Press EXIT button to stop auto search during searching.
Note: It may take a few moments to complete the Auto Search.
1. Press MENU button.
2. Press button to select Tuning menu, press button to enter.
3. Press button to select Digital Manual Search item,
press button to enter.
4. Press button to select the Channel.
Press OK button to start searching.
5. Once a channel is located, you can press OK button to save it.
Press EXIT button to exit.
DIGITAL MANUAL SEARCH
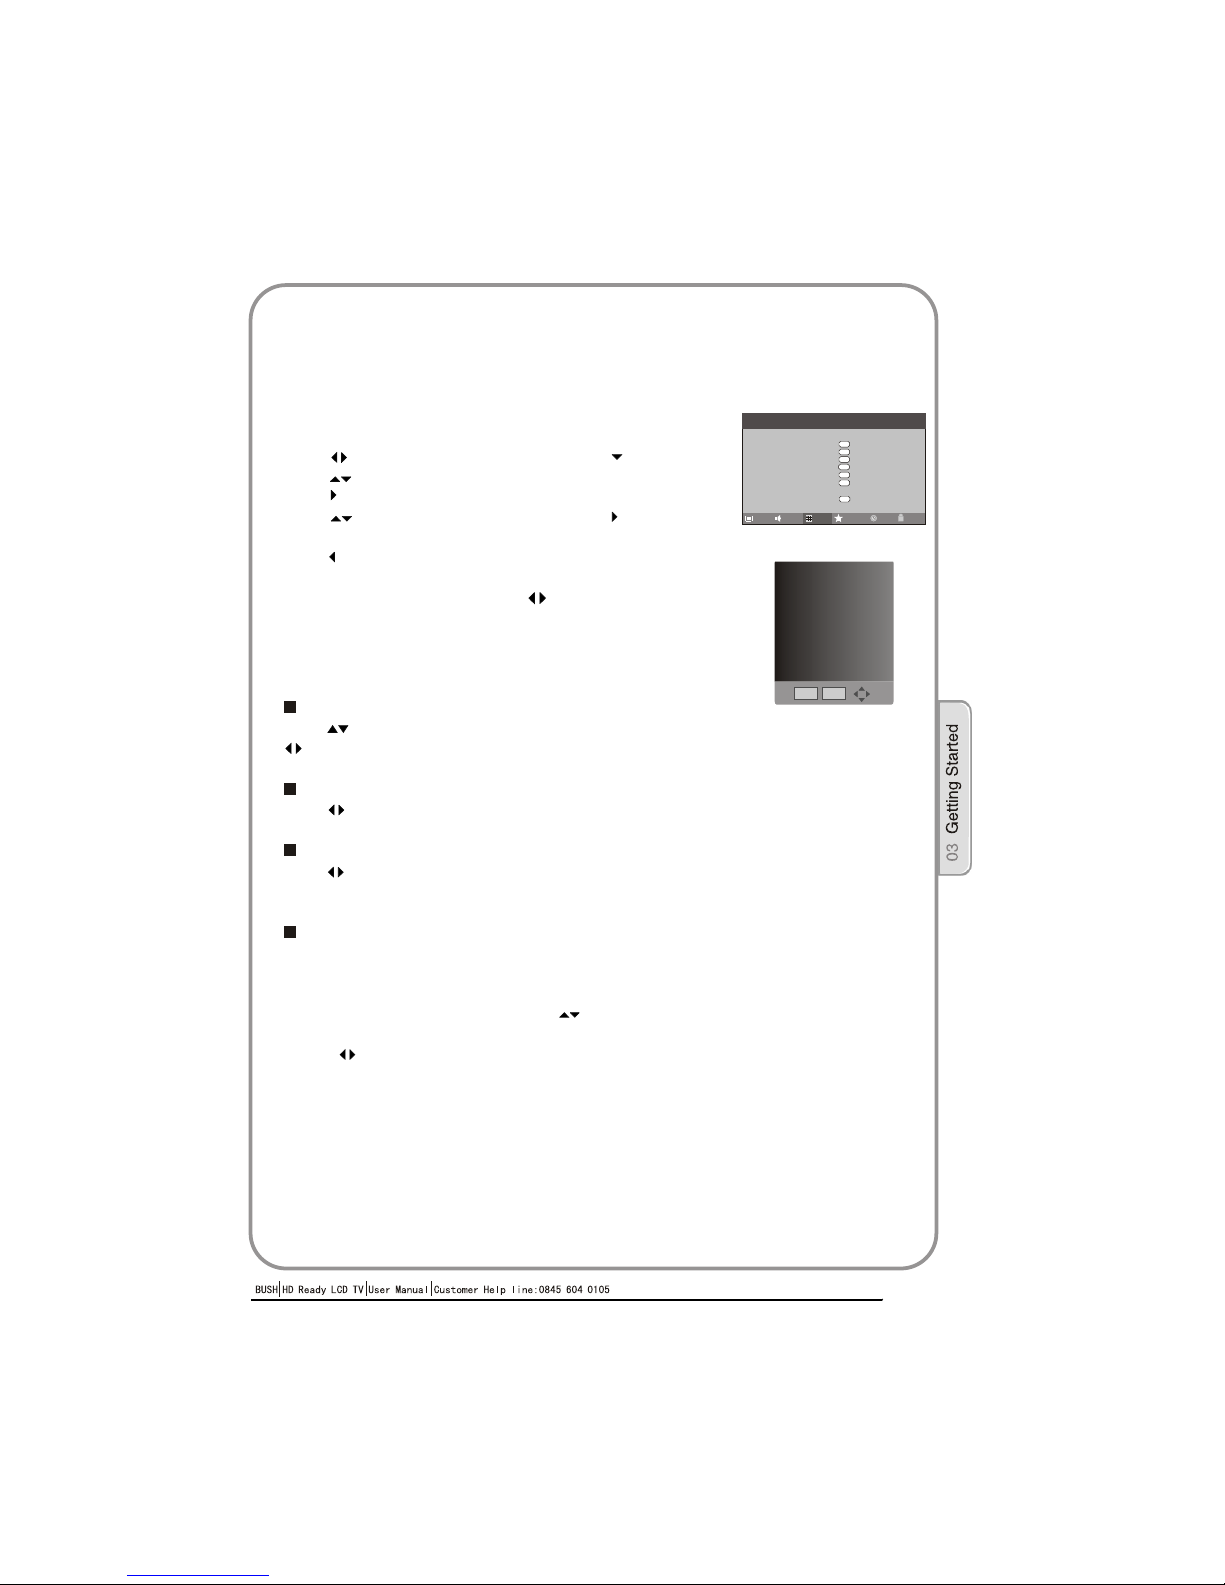
If you have attached a DVD player or similar external device
to the TV, you will need to tell the TV to display the content
from it. Simply press SOURCE which will bring up the source
menu in the right corner of the screen, Use the and button
to highlight the required source and press OK select.
For details of how to plug in other equipment see GET TO KNOW
YOUR TV on page 8.
P.13
AUTO SEARCH
TUNING YOUR TV
SWITCHING TO AN EXTERNAL SOURCE OTHER THAT TV
Input Source
TV
SCART
S-Video
Component
PC
HDMI
USB
DVD
TV
SCART
S-Video
Component
PC
HDMI
USB
DVD
Input Source
TV
SCART
S-Video
Component
PC
HDMI
USB
TV
SCART
S-Video
Component
PC
HDMI
USB
With DVD
Without DVD
Function
Country
Auto Search
Digital Manual Search
Analog Manual Search
Channel Edit
Guide
CI Information
Software upgrade
Start upgrade
PictureOKSound
Lock
Time
OK
Tuning
OK
OK
OK
OK
OK
< UK >
Menu
< on >
Function
Country
Auto Search
Digital Manual Search
Analog Manual Search
Channel Edit
Guide
CI Information
Software upgrade
Start upgrade
PictureOKSound
Lock
Time
OK
Tuning
OK
OK
OK
OK
OK
< UK >
Menu
< on >
< on >
Do you want to start Auto Search.
OK
CANCEL
Function
Country
Auto Search
Digital Manual Search
Analog Manual Search
Channel Edit
Guide
CI Information
Software upgrade
Start upgrade
PictureOKSound
Lock
Time
OK
Tuning
OK
OK
OK
OK
OK
< UK >
Menu
< on >
U FH CH 26
Page 15
EXIT
OK
Colour System
Sound System
Current CH
Storage To
Search
Fine Tune
Frequency 487.25Mhz
PAL
< I >
< 909 >
< 909 >
< >
< >
Analog Manual Search
Analog Manual Search
Follow the below steps when you need to have a manual search.
1. Press MENU button.
2. Press button to select Tuning menu, press button to enter.
3. Press button to select Analog Manual Search item,
Press button to enter.
4. Press button to select Search item, press button is used
to select the higher frequency channel.
Press button is used to select the lower frequency channel.
5. Once a channel is located, you can press red button to save it.
And then select Storage To, press button to select the position
number you want the channel on.
Press EXIT button to exit.
Sound System
Current CH
Press button to select the channel number to edit.
Storage To
Press button to select the program number you
want to storage to.
Fine tune
Press button to select "Sound System", then press
button to select the correct sound system.
1 Repeat above steps 1-3, then press button to select
the Fine Tune item.
2 Press button repeatedly to carry out fine tune, till the
best picture and sound are obtained, then loosen the butto
n.
If the picture and/or sound are poor, try using the FINE
TUNE feature. Do not use this feature unless reception
is poor.
P. 1 4
TUNING YOUR TV
Function
Country
Auto Search
Digital Manual Search
Analog Manual Search
Channel Edit
Guide
CI Information
Software upgrade
Start upgrade
PictureOKSound
Lock
Time
OK
Tuning
OK
OK
OK
OK
OK
< UK >
Menu
< on >
Page 16

NAME
MOVE
SKIP
904 S-04
905 S-05
906 S-06
907 S-07
908 S-08
909 S-09
910 S-10
911 S-11
912 S-12
913 S-13
Channel Edit
FAV
TV
TV
TV
TV
TV
TV
TV
TV
TV
TV
Channel Edit
BBC ONE Wales
INFO RECORD SCHEDULE DATE
REMIND
P. 1 5
Using this function ,you can rename, move, set favourite
channel and skip the channel in the analogue mode.
1.Press MENU button.
2.Press button to select TUNING menu, press button to enter
3.Press button to select CHANNEL EDIT item, Press button
to enter the sub-menu.You can press red, green, yellow or blue
button to enter the menu you need.
RENAME
1.Press button to select the channel ,and press green
button to rename.
2.Press button to select the number position of channel
name, press button to select number.
3.You can press the EXIT button to cancel the changes at
anytime.
NOTES: The RENAME function is only available in ATV program.
MOVE
1.Press button to select the channel and press yellow button to select the
position.
2.Press button to select the number position you want to remove to, press
yellow button to confirm.
3.You can press the EXIT button to cancel the changes at anytime.
Setting favourite channel
1.Press button to select the channel ,press Red button to set your favourite
channel.
2.You can press the Red button to cancel the changes at anytime.
3.Press FAV button on the remove control and Favourite List will be displayed.
4.Press button to select the channel, and press OK button to enter.
SKIP
1.Press button to select the channel and press blue button to skip the current
channel.
2.You can press the blue button to cancel the changes at anytime.
GUIDE (Electronic Program Guide)
Using this function ,you can access the DTV program
information
1.Press MENU button.
2.Press button to select TUNING menu. press
button to enter.
3.Press button to select the guide item.
Press button to enter the submenu, the
electronic program guide is displayed.
You can quickly call up Guide menu by GUIDE
button on the remove control.
Notes: Only DTV mode.
TUNING YOUR TV
Function
Country
Auto Search
Digital Manual Search
Analog Manual Search
Channel Edit
Guide
CI Information
Software upgrade
Start upgrade
PictureOKSound
Lock
Time
OK
Tuning
OK
OK
OK
OK
OK
< UK >
Menu
< on >
Function
Country
Auto Search
Digital Manual Search
Analog Manual Search
Channel Edit
Guide
CI Information
Software upgrade
Start upgrade
PictureOKSound
Lock
Time
OK
Tuning
OK
OK
OK
OK
OK
< UK >
Menu
< on >
Page 17

P. 1 6
COMMON INTERFACE
The common interface (CI) slot is designed to accept the
Conditional Access (CA) Module and Smart card in order
to view the pay TV programmes and additional services.
Contact your Common Interface service provider to get
more information about the modules and subscription.
Please noted that CA modules and smart cards are neither
supplied nor optional accessories from us.
Warning: switch off your TV before any module is inserted in the
Common Interface slot.
1 Insert the CAM correctly, then Smart Card to the
CI slot that is located at the side of the TV.
2 Turn on the TV and it will display the below
message if the CA module is detected. Wait
for few moments until the card is activated.
3 Press the MENU button to display the Main
Menu and use the and button to highlight
the "Common Interface" line and press
the "OK" button.
4 Detailed information on the CI card in use is displayed.
5 Press OK button to access the card menu. Refer to the module
instruction manual for setting details
6 When module is removed, the following message will appear on
the screen.
Function
Country
Auto Search
Digital Manual Search
Analog Manual Search
Channel Edit
Guide
CI Information
Software upgrade
Start upgrade
PictureOKSound
Lock
Time
OK
Tuning
OK
OK
OK
OK
OK
< UK >
Menu
< on >
CI module removed
Main Menu
Module information
Smart card information
Language
Software Download
Press OK to select,or Exit toquit
CI Module Insert
Page 18

Function
Country
Auto Search
Digital Manual Search
Analog Manual Search
Channel Edit
Guide
CI Information
Software upgrade
Start upgrade
PictureOKSound
Lock
Time
OK
Tuning
OK
OK
OK
OK
OK
< UK >
Menu
< on >
P. 1 7
Software Update function
When you get the updating news from the TV shop's web,
you can update the operating software using the Download
menu. The data for various units are transferred consecutively
on a special receiving channel.
You need to search the channel with updating code stream.
Note: You can get information from the TV shop or internet.
1 Press MENU button.
2 Press button to select TUNING menu,
press button to enter.
3 Press button to select Software Upgrade item.
4 Press button to set it as On. The default is Off
5 If the updating code stream of the channel is suitable for
your set, Do System Update option can be selected. Otherwise
the Do System Update option is grey and cannot be selected.
6 Press button to select the System Update option and
use OK button to enter. Then the TV will restart and search
the upgrade information.
NOTES: If the upgrade information is received, the TV will begin
to upgrade. Or else, the TV will be back the DTV source.
7
ou can press EXIT button to cancel the
download and your TV set will be standby.
8 After the download has finished, your TV set will enter burning
state and the indicator light is shining. The menu 4 of right appears.
The set will be standby when the update is completed.
Load the receiver identification. This process may also take
several minutes. Y
Operation
Are you sure?
Function
Country
Auto Search
Digital Manual Search
Analog Manual Search
Channel Edit
Guide
CI Information
Software upgrade
Start upgrade
PictureOKSound
Lock
Time
OK
Tuning
OK
OK
OK
OK
OK
< UK >
Menu
< on >
Page 19

P. 1 8
USING YOUR TV
How to select the TV program
1.Using Program number button Enter the channel number with the number keypad
on the remote control.
2.Using P+/P- button
Press the P+/P- button to select a channel number.
How to adjust volume
Press V+/V- button on the remote control or the side of the TV to adjust the volume level.
CH.LIST function
Press CH.LIST button on the remote control will display Channel List menu, and then
press button to enter.
Press button to select the channel, and then press OK button to enter.
Page 20

Contrast
This will adjust the intensity of bright parts in the picture but keep
the dark parts unchanged.
Brightness
This will adjust the light output of the complete picture, which will
mainly affect the darker areas of the picture.
Colour
This will adjust the saturation level of the colours to suit your personal
preference.
Sharpness
This will adjust the sharpness of fine details in the picture.
Tint
Allows you to select the colour mix (Tint) of the picture.
Note: The Tint function is only available in TV mode.
Mode
This will select the picture mode. Select Standard/Mild/User/Vivid according to the program.
Colour temperature
This will increase or decrease Warm (red) and Cool (blue) colours to suit
personal preferences.
Select Cool to give the white colour a blue tint; N to give the white
colour a neutral tint; Warm to give the white colour a red tint.
Noise Reduction
Automatically filters out and reduces the image noise and improves picture
quality when receiving weak video signals.
Select Off/Low/Standard/High according to the image noise.
Reset
To recover to the default value.
You can quickly select the desired mode by P.MODE button on the remote control.
ormal
1. Press MENU button.
2. Press button to select Picture menu,
3. Press button to select the item requires adjusting.
4. Press button to adjust the selection item.
5.
press button to enter.
When you are satisfied with your choice, press the EXIT
button to return to normal viewing or press MENU button to
return to the previous menu.
Changing the Picture Setting
Lock
Function
Time
TuningSound
Contrast
Brightness
Colour
Sharpness
Tint
Mode
Colour Temperature
Noise Reduction
Reset
Picture
<
<
<
<
<
<
<
<
>
>
>
>
>
>
>
>
OK
50
50
50
50
0
Standard
Cool
standard
Menu
P. 1 9
ADJUSTING PICTURE SETTINGS
Page 21

Balance
This will adjust the output of the right and left speakers to obtain the best
stereo reproduction for your listening position.
Mode
This will select the sound mode.
Press button to select Standard/Music/Theater/User according to the program.
You can quickly select the desired mode by S.MODE button on the remote control.
AVL (Automatic volume control)
This will reduces the differences in volume level among broadcasters.
SRS TS XT
This will control the Woofer output.
Press button to select SRS TS XT,
Press button to set SRS TS XT as OFF, ON.
Equalizer
This sound setting can be adjusted to suit your personal
preference.
Audio Languages
Press button to select Primary/Secondary item, and then
press button to select the languages you needed.
Press button to select Close item, Press OK button to close it.
Note: The Audio Language function is only available in DTV
mode.
Reset
To recover to the default value.
1. Press MENU button.
2. Press button to select Sound menu,
3. Press button to select the item requires adjusting.
4. Press button to adjust the selection item.
5.
press button to enter.
When you are satisfied with your choice, press theEXIT
button to return to normal viewing or press MENU button to
return to the previous menu.
Changing the Sound Setting
Function
Tuning
Balance
Mode
AVL
SRS TS XT
Equalizer
Audio Languages
Reset
Picture
<
<
<
<
>
>
>
>
OK
Sound
Lock
Time
0
Standard
Off
Off
OK
OK
English
Menu
Lock
Function
Time
Tuning
100Hz
300Hz
1KHz
3KHz
10KHz
Picture
<
<
<
<
<
>
>
>
>
>
50
50
50
50
50
Sound
Menu
Function
Tuning
Balance
Mode
AVL
SRS TS XT
Equalizer
Audio Languages
Reset
Picture
<
<
<
<
>
>
>
>
OK
Sound
Lock
Time
0
Standard
Off
Off
OK
OK
English
Primary < English >
Secondary < English >
Close
Menu
P. 2 0
ADJUSTING SOUND SETTINGS
Page 22

1. Press MENU button.
2. Press button to select Function menu,
3. Press button to select the item requires adjusting.
4. Press button to adjust the selection item.
5.
press button to enter.
When you are satisfied with your choice, press theEXIT
button to return to normal viewing or press MENU button
to return to the previous menu.
Language
To select the menu language.
Subtitle Language
To select the Subtitle language.
Display Mode
To set the picture proportion, press button to
select 4:3/Zoom1/Zoom2/Wide/16:9/Auto.
You can quickly select the desired mode by
SCREEN button on the remote control.
4:3 mode
Choose 4:3 when you want to view a picture with an original 4:3 aspect ratio, with gray
bars appearing at both the left and right sides.
16:9 mode
Choose 16:9 when you want to adjust the picture horizontally, in a linear proportion to
fill the entire screen.
Zoom1
Choose Zoom1 when you want to view the picture without any alteration. However,
the top and bottom portions of the picture will be cropped.
Zoom2
Choose Zoom2 when you want the picture to be altered, both vertically extended and
cropped.
The picture taking a halfway trade off between alteration and screen coverage.
Wide
Choose Wide when you want to adjust the picture in a non-linear proportion, that is, more
enlarged at top sides and no alteration, at bottom side.
This will select the character background colour.
Note: The Blue Screen function is only available for TV mode.
Blue Screen
Recorder
To recorder the DTV program.
Details of Recorder are described in the page of 38.
TuningSound
Language
Subtitle Language
Display Mode
Blue Screen
Recorder
OSD Time Out
OSD Transparency
Reset
Picture
<
>
OK
English
Function
<
>
Off
Lock
Time
OK
English
<
>
16:9
<
>
Off
<
>
Off
OK
Menu
P. 2 1
FUNCTION SETTINGS
TuningSound
Language
Subtitle Language
Display Mode
Blue Screen
Recorder
OSD Time Out
OSD Transparency
Reset
Picture
<
>
OK
English
Function
<
>
Off
Lock
Time
OK
English
<
>
16:9
<
>
Off
<
>
Off
OK
Menu
Off
AV
Off
Off
Primary < English >
Secondary < English >
Close
Page 23

Time Out
To s
Each press of button repeatedly to select the number of
preset minutes, the Time will be set in sequence: off,10s,15s,
30s,45s,60s.
will be set in sequence:
Reset
OSD
et how long you want the menus to appear on-screen.
OSD T
To set the transparency background of OSD, the transparency
To recover to the default value.
ransparency
Off,25%,50%,75%,100%.
P. 2 2
FUNCTION SETTINGS
TuningSound
Language
Subtitle Language
Display Mode
Blue Screen
Recorder
OSD Time Out
OSD Transparency
Reset
Picture
<
>
OK
English
Function
<
>
Off
Lock
Time
OK
English
<
>
16:9
<
>
Off
<
>
Off
OK
Menu
Page 24

1 Press MENU button.
2 Press button to select Time menu, press button to enter.
3 Press button to select Clock item, press button to enter
setting.
Press button to select hour or minute, press button to
adjust the value.
1 Press MENU button.
2 Press button to select Time menu, press button to enter.
3 Press button to select Off Time item, press button to enter
setting.
Press button to select Repeat option, and then press
button to set it On.
Press button to select hour or minute,
Press button to adjust the value.
When the off time has arrived, the TV set will enter
into standby mode.
Clock
1 Press MENU button.
2 Press button to select Time menu, press button to enter.
3 Press button to select On Time item, press button to
enter setting.
Press button to select activate option, and then press
button to set it On.
Press button to select hour or minute,
Press button to adjust the value.
When the on time has arrived, the TV set will switch on automatically.
Date
1 Press MENU button.
2 Press button to select Time menu, press button to enter.
3 Press button to select Date item, press button to enter setting.
Press button to select the option, and then press button to
adjust value.
Function
TuningSound
Clock
Date
Off time
On time
Sleep
Time Zone
Picture
<
<
>
>
>
00:00
--:--
--:- 000
Off
Lock
Time
OK
OK
OK
OK
London GMT
<
<
>
>
>
OK
OK
OK
London GMT
Hour < 02 >
Minute < 03 >
Close
Menu
Function
TuningSound
Clock
Date
Off time
On time
Sleep
Time Zone
Picture
<
<
>
>
>
00:00
--:--
--:- 000
Off
Lock
Time
OK
OK
OK
OK
London GMT
<
<
>
>
>
OK
OK
OK
London GMT
Dat e < 02 >
Mon th < 3 >
Yea r < 20 09 >
Clo se
Menu
Function
TuningSound
Clock
Date
Off time
On time
Sleep
Time Zone
Picture
<
<
>
>
>
00:00
--:--
--:--
000
Off
Lock
Time
OK
OK
OK
OK
London GMT
Repeat < Off >
Hour < 00 >
Minute < 00 >
Close
Menu
Function
TuningSound
Clock
Date
Off time
On time
Sleep
Time Zone
Picture
<
<
>
>
>
00:00
--:--
--:--
000
Off
Lock
Time
OK
OK
OK
OK
London GMT
<
<
>
>
>
OK
OK
OK
London GMT
Activate < Off >
Hour < 00 >
Minute < 00 >
Close
Menu
P. 2 3
TIME SETTINGS
NOTE: In DTV mode, because the time information is from the
signal,the Clock and Date are not able to be changed. If you want
to change the time, turn off the TV in ATV mode, then turn on
the TV.
Page 25

Function
Tuning
Menu
Sound
Clock
Date
Off time
On time
Sleep
Time Zone
Picture
<
<
>
>
>
00:00
--:--
--:- 000
Off
Lock
Time
OK
OK
OK
OK
London GMT
Sleep
1 Press the MENU button and then use button to select the Time menu.
2 Press the button and then use button to select the Sleep.
3 Press the button and then use button to select the number
of minutes.Select Off, 5Min, 10Min, 15Min, 30Min, 45Min
60Min, 90Min, 120Min, 180Min, 240Min
4 When you are satisfied with your choice, press MENU
button to return to the previous menu or press the EXIT
button to return to TV viewing. And the time begins to
count down from the number of minutes selected.
Time Zone
1 Press MENU button.
MENU
2 Press button to select Time menu, press button to enter.
3 Press button to select Time Zone item.
4 Press button to select the correct time zone.
5 Press button to save and exit.
Function
TuningSound
Clock
Date
Off time
On time
Sleep
Time Zone
Picture
<
<
>
>
>
00:00
--:--
--:- 000
Off
Lock
Time
OK
OK
OK
OK
London GMT
Menu
P. 2 4
TIME SETTINGS
Page 26

Press button to select Child Lock.
Press button to setOn or Off mode. If lock on mode is set, Child Lock is in
activated automatically. In such case, if Child Lock button (button on the television)
is pressed, the screen will displayChild Lock, which can be erased by press of
MENU button. 5 seconds later after the latest press, the screen display will disappear
automatically. The Child Lock mode can be resumed by entering Lock Set menu,
set Child LockOn or Off.
1.Press button to select Change Password item.
Press button to enter the sub-menu.
2.When you have inputted the four digits you will be
prompted to enter it again.
Your new password will then be automatically saved.
Using this function can control the tuner, program,
source volume and so on. Pressing MENU on the remote
control, press button to select Lock menu, press button
to enter the sub-menu, and you will be required to enter
the password. The initial password of the television is 0000.
If you forget your password, you can always input 9443
to regain control.
Tuning Lock
Press to select Tuner Lock and to set On/Off. (To set On, some operation
such as search will be not available. When enter the Tuning menu, Tuner Lock will be on
the screen. If you want to operate Tuning menu, you need to enter the Lock menu to set
Tuner Lock Off or operate unLock.
Channel NO.
Channel set is opted for setting up start source.
Press button to select Off, DTV, TV, SCART, S-Video, Component, PC, HDMI, USB in turn.
DVD is available for some model.
Source set
Channel NO. is opted for setting up preset channel.
Press button to select preset Channel. Press button to select channel number.
TuningSound
Change Password
Child Lock
Tuning Lock
Source Set
Channel No
Source Lock
Max Volume
Initial Volume
Parental Lock
Picture
<
<
<
<
>
>
>
>
OK
Function
Off
Lock
Time
OK
<
>
100
<
>
Off
TuningSound
Change Password
Child Lock
Tuning Lock
Channel Set
Channel No
Source Lock
Max Volume
Initial Volume
Parental Lock
Picture
<
<
<
<
>
>
>
>
OK
Function
Off
Lock
Time
OK
16:9
<
>
100
<
>
Off
Please Enter Password
----
Off
Off
Off
Menu
Menu
P. 2 5
LOCK MENU SETTING
CHANGE PASSWORD
CHILD LOCK
<
>
Off
<
>
Off
Page 27

Press button to select Max Volume. Press button for adjustment between 0-100. If a certain
Value is set, when volume is being adjusted, the sound value can not exceed maximum volume
value. If current volume is over Max Volume, when lock set menu is set, current volume will
become set maximum volume, if current volume is below maximum volume, customer set volume
will stay unchanged.
Max Volume
Initial Volume
Clear Lock
Press button to select Unlock mode. Press OK button to unlock all set modes, setting all lock
options to off, and the maximum volume returns to 100.
The TV will remember it after your setting,that will be the volume when turn on the TV next time.
Source Lock
Source Lock will control the On or Off of hinder external input modes.
Press button to set as on or off.
When the source lock is set as on, TV source will display, at
this time, when press SOURCE button, the TV can not switch
to corresponding source and the Source Lock will display on
the screen.
P. 2 6
Press button to select parental lock. Press button to select OFF or 4-18 to limit the age
of children who will watch TV.
Parental Lock
TuningSound
Change Password
Child Lock
Tuning Lock
Source Set
Channel No
Source Lock
Max Volume
Initial Volume
Parental Lock
Picture
<
<
<
<
>
>
>
>
OK
Function
Off
Lock
Time
OK
<
>
100
<
>
Off
Off
Off
Off
Menu
<
>
Off
Page 28

Subtitle Function
1. Press SUBTITLE button on the remote control, Subtitle
languages menu will be displayed ,then press button to enter.
2. Press button to select the item and press OK button to
enter. You can press the EXIT button to cancel OSD at anytime.
Notes: press SUBTITLE button on the remote, it will display
subtitle languages menu only in the DTV mode.
AUDIO
CH.LIST Function
1. Press CH.LIST button on the remote control, Channel List menu
will be displayed .
2. Press button to select the channel and press OK button
to enter. You can press the EXIT button to cancel the OSD at anytime.
Press GUIDE button on the remote control, will display
Program Guide menu, press button to select the program.
You can press the EXIT button to cancel the OSD at anytime.
Notes: Available only in the DTV mode.
GUIDE Function
FAV Function
Press FAV button on the remote control, will display
Favorite List menu.
Press button to select program and press OK button to enter.
You can press the EXIT button to cancel the OSD at anytime.
Press AUDIO button on the remote control, will display
Audio Languages menu.
Press button to select the desired settings and press OK button
to enter.
You can press the EXIT button to cancel the OSD at anytime.
Notes: press AUDIO button on the remote, it will display
Audio Languages menu only in the DTV mode.
Press INFO button on the remote control, will display the current
channel information.
You can press the EXIT button to cancel the OSD at anytime.
Channel List
Subtitle Language
off
English
OK
BBC ONE Wales
INFO
Record
Schedule
DATE REMIND
OK
P. 2 7
SHORTCUT MENU DISPLAY
INFO
Page 29

Quick program view
1 Suppose the channel number you used just now is 8 and the
channel number you are using is 18 (as shown in the figure).
If you want to return to the last watched program channel 8, you
can simply press the Q.View button.
If you want to return to channel 18, press the button again. Use
this function, you can easily change between the channel you are
using and the channel you used last Timer.
2
3
This function enables quick swap to the last watched program. Press
Q.view button, and the TV will be back to the TV source, expect in the USB
and DVD source.
When you need to pay attention to surrounded sounds, or there is a telephone calling you
or there are some guests visiting you, the sound elimination (mute) function is very
convenient.
Eliminate Sound
1 Press the MUTE button on the remote control and "Mute" type face will display on the lower part
of the screen. At this Time, the sound of the TV set is turned off.
2 If you want to recover the sound, press the MUTE button again or directly press v+ button.
P. 2 8
SHORTCUT MENU DISPLAY
Page 30

04 Using the features
P. 2 9
Teletext is an information system, broadcast by certain channels, which can be read like
a newspaper . It also provides subtitles for people with hearing difficulties or those who
are unfamiliar with the language in which a particular program is being broadcast (cable
networks, satellite channels, etc.).
Note: The teletext buttons could be working even if there is no teletext signal, but there
is no teletext display.
Teletext functions
Page up/down
Use the P+/P- buttons to browse next or previous page.
To select teletext press the button on the
handset. To switch off teletext, press the button again.
Note all menu functions are not available in teletext
mode . Only a few direct button control functions are
available in teletext mode, they are:
Volume adjustment
Mute function
Teletext
Page number entering
Mix mode
To select a Teletext page, enter the page number using
the numeric key pad on the remote control, or use the
P+ or P- buttons, or the coloured Fast text buttons.
To view the TV picture while in Text mode press the
button, this will superimpose the Teletext data on top
of the TV picture. Press this button again to return to
Full text.
INDEX
Press the INDEX button to go to the index page of teletext.
Teletext functions
Page 31

P. 3 0
Language change
Pressing the button will change the Teletext characters
between Eastern and Western.
Hold
Pressing the button will stop the teletext page automatically updating. This feature is very useful where there are
several teletext pages or data on the same page number.
Size
Pressing the button changes between full screen top
half bottom half full screen. This feature is very useful as it
magnifies the image making the characters easier to read.
Reveal
Pressing the button will reveal hidden text. This feature
is used to reveal information such as answers to Teletext
on-line interactive puzzles.
Time
While in normal TV mode only, pressing the button will
display the teletext time in the top right hand corner for a
few seconds.
Fast text coloured buttons
Fast text automatically displays the four most commonly
used pages that the broadcaster thinks that you may want
to choose next. Press the same coloured button on the
remote control as the coloured link at the bottom of the
teletext page to go directly to that page.
Subcode
Pressing the button by entering its 4-digit number to
enter a secondary page
Teletext functions
SEARCH
-----
Teletext
-----
Page 32

Note:The diagrams in the following section are schematic and only for your reference.
Please see the actual product if necessary.
TO USE THE USB DEVICE
1.Supported file formats:
1)Photo: *.jpg
2)Music: *.mp3 files
3)Movie: *.avi files;
4)TEXT:*.txt;
Note: Due to the particularity of file cording, some files may be unable to read.
2.Supported equipment:
Support the equipment that supports Mass Storage Protocol and whose file system is
FAT32,such as some USB disks, mobile harddisks,MP3 player and digital cameras.
If USB equipment could not be identified due to unsupported file system, please
format the equipment to the above-mentioned file system.
3.To achieve smooth playing, ensure the following:
1) The file code rate should be lower than 300KB/S;
2) Due to the limitation of USB signal transmission distance, it is recommended not
to use USB patch cord, in case of using the cord ,make sure that its length is not
over 1m;
3) Use high-speed USB equipment in conformity with USB2.0 Interface Standard;
If USB equipment in conformity with USB1.1 Interface Standard is used ,the playing
may be unsmooth.
USB MODE
P. 3 1
Page 33

When connecting/removing the USB device
1. Press SOURCE on the remote control unit to select USB option.
2.Insert USB equipment into corresponding USB interface 2s after starting the system.
3. After entering the system menu, press on the remote control unit to select the
require USB files press “OK” button to confirm the selection and enter the interface .
5. To exit the streaming media playing system and watch a TV program, you must press
“BACK”button to return to the streaming media main menu at first(to protect equipment),
and then press SOURCE to select TV to return to the TV mode.
Notes:
1. B ,
2.While playing the USB ,press “BACK”button repeatly, the screen picture will return
to USB main interface,and only at this time you can switch corresponding signal
sources by pressing “SOURCE” again.
3.
Under source of US , when press button MENU screen goes black, except when
images or movies are being played.
Please do not turn off the TV or unplug the USB device when the connected USB
storage device is working.When such device is suddenly separated or unplugged, the
stored files or the USB storage device may be damaged.
4. Press on the remote control unit to select the required file, press OK button
to enter the selected file.
/
/
USB MODE
P. 3 2
Page 34

USB MODE
Operating the USB device
1. Press to scroll through main menu or submenu and select your desired
option.
2.Press “OK” to confirm your selection.
3.Press “(FWD)/(REV)” to achieve the FWD (fast forward) and REV (fast back) of
option being played.
the
4. Press "PLAY/PAUSE" to play and press it again to pause playing.
5.Press “ZOOM” to magnify pictures; when the picture is enlarged, press “ ” and
to move the picture.
6.Press “ STOP ” to stop playing ,or return to the previous menu, and press “BACK”
repeatedly to return to the main menu.
NOTE: You can choose the photos or music in different files to play together.
/
/
/
P. 3 3
Page 35

USB MODE
Playing a Picture
1.After entering USB main interface, press
to select “PHOTO” item.
2.Press OK to confirm the selection and
enter the picture playing interface.
3. Press to select the picture you
want to play press OK to enter the
playing display interface, and then press
“PLAY/PAUSE” button to play the pictures.
4. If you want to pause the picture which is being palyed, press the PALY/PAUSE button again.
Press ZOOM to magnify the picture. When the picture is enlarged, press “ and
to move the picture.
Press PREV/NEXT ” to select the last or next picture.
Press to rotate the picture.
Press “STOP ” to stop the picture being played.
4.To exit playing, just press BACK repeatedly.
NOTE: The menu display varies with the photo name and pixel in your equipment.
/
/
/
/
P. 3 4
/
OK
ENTER
Page 36

USB MODE
Playing Music
1. After entering USB main interface,
press to select “MUSIC”.
2. Press OK to confirm the selection
and enter the music playing interface.
3. Press and “OK” button to select the music you want to play then press
to play the music.PLAY/PAUSE button
4. To return to the main menu just press BACK repeatedly.
/
/
Press PREV/NEXT ” to select the last or next music.
Press “STOP ” to stop the picture being played,when the current interface is the music
being played.
Press “ ” to achieve the REV (fast back) and FWD (fast forward) of musicbeing
played.
the
/
NOTE: You can enjoy the music and the picture at the same time.
P. 3 5
OK
ENTER
Page 37

USB MODE
Playing a Movie
2. Press OK to confirm the selection
and enter the movie playing interface.
3. Press and “OK” button to select the movie you want to play and then press
PLAY/PAUSE button to play the movie.
4. To exit playing, just press BACK repeatedly.
1. After entering USB main interface, press
to select “Movie”.
/
/
Press ZOOM to magnify the picture
Press PREV/NEXT ” to select the last or next movie.
Press “STOP ” to stop the movie being played.
P. 3 6
OK
ENTER
Page 38

Text
1. After entering USB main interface,
press to select Text .
2. Press OK to confirm the selection
and enter the text playing interface.
4. To exit the Text mode just press BACK repeatedly.
3. Press and OK” buttonto
select the text you want to play and
then press PLAY/PAUSE button to play the text .
/
/
Press PREV/NEXT ” to select the last or next text.
USB MODE
P. 3 7
NOTE: You can enjoy the music and the text at the same time.
OK
ENTER
Page 39

REC
P. 3 8
1.Press MENU button.
2.Press button to select FUNCTION menu,
press button to enter .
3.Press button to select Recorder. press OK
button to enter the submenu.
Menu
Select Disk USB1 C:
Check File System start
USB Disk
Format
Time Shift Size
Speed
Ok
Ok
Ok
4.Press button to select Select Disk and
press or OK button to enter .press button to
select disk if your device has several disks.
5.Press button to select Format and press to
enter.Press button to select the size you want
to format .Press OK button to format the USB Disk
firstly.
NOTES:The system will format the whole device and
if your device size is bigger than 1GB,you can set
the size which is used for timeshift.
6.Format may take several minutes and the time how
long it takes lies on the device size.press button
to select the Time Shift Disk Size .press OK button to
save it.
NOTES: If you select all the size format for timeshift,
you can not do recorder.
7.Then you can see the speed data after the success checking.
NOTES:
1.Only formating when you first use the device for REC.
2. The minimum device size for REC is 1GB. Provide device formatting function is
up to 2TB. The max Multi-Partition is 16 partitions and one is active at a time
3.Bit rate:
Device bit-rate>4.5MB/s REC is safe at HD stream
Device bit-rate>1.5MB/s REC is safe at SD stream
Device bit-rate<600KB/s REC is bad for REC
4.We don t ensure the system work normally, if the REC device have below list:
The device has bug
The device has error block
The device reports the unfaithful size
File System Size
File System Size All
SD 27Min HD7Min
OK CANCEL
Format
Do not unplug USB device
Formating.....
Time Shift Size
Time Shift Size All
SD 14Min HD4Min
OK CANCEL
Page 40

Press MENU repeatedly or EXIT button to exit
the menu, press PLAY/PAUSE to time shift the
program. if you want to stop time shift, press the
STOP button , and press PLAY/PAUSEthen the
time shift program will be played. Press EXIT
button to stop the time shift program being
played.
RECORDING
1.Press D.MENU begin to record the program being played, and press D.MENU
or EXIT button to make the recording interface minimum.
2.Press STOP button to stop the program
recording being played.
3.Press INDEX button to read the recorded
list, Press button to select the
content you recorded, Press the button
to read the information, then press button
to cancel it.
4.Press OK or PLAY/PAUSE button to play
the program recorded and press STOP
button to stop it.
Recording
REC
5 five
The streets of SAN francisco
15:06
(384MB)
[00:00:00]
TIME SHIFT
Gold workshopwit...
Gold workshop with jan Springer
Gold workshop with jan Springer
NOTE: Changing the channel will not influence the recording, and when the
recorded program is being played, you can not delete it.
P. 3 9
5 FIVE
Page 41

USING YOUR DVD PLAYER (certain models only)
PLAYING A DVD
1.Press the SOURCE button on the remote control to
enter DVD mode.
2.Place the DVD in the disc slot with the DVD label
facing away from you and the screen. The disc slot
will only take standard-sized DVDs.
3.The DVD will automatically load; most begin with
a disc menu.
4.Use the , , and buttons to navigate around
the DVD menu to highlight the play option and then
press PLAY/PAUSE.
PAUSING A DVD
1.Press PLAY/PAUSE to pause playback. The sound
will also be muted.
2.Press PLAY/PAUSE to resume normal playback.
STOPPING A DVD
1.Press the button to stop playback of a DVD. The
TV screen will show the DVD start-up logo.
2.Some discs will remember the moment at which the
DVD was stopped, so press PLAY/PAUSE to recall the
moment and continue playback.
3.Press the button twice to stop completely and
clear the memory.
USING FAST FORWARD OR REWIND
1.To move forward through a disc more quickly, press
the button.
To rewind through the disc, press the button.
2.Press the or button repeatedly to cycle through
the available speeds, which appear in the top left
corner of the screen: 2X, 4X, 8X, 16X, 32X and normal
playback speed.
3.Press PLAY/PAUSE to resume normal playback.
SKIP TO THE NEXT OR PREVIOUS SCENE
During playback press the button to skip to the next
scene on the disc, or press to skip to the previous one.
PASSWORD
Parental control can be activated by setting the Password
Mode to On. The default password is 0000. If you forget
the password, you can always input 1369 to regain control.
P. 4 0
Page 42

USING THE ZOOM FUNCTION
1.Press the ZOOM button to zoom into the image on screen. You can press it repeatedly
to further enlarge the picture.
2.In zoom mode use the , , and buttons to display a different section of the
enlarged picture on the screen.
SWITCHING ON SUBTITLES
1.Press the SUBTITLE button during playback.
2.The available languages will appear in the top left corner of the screen.
Press repeatedly until your desired subtitle language is shown.
3.Press SUBTITLE repeatedly until SUBTITLE OFF is shown to switch the subtitles off.
USING REPEAT MODE
Press REPEAT once to repeat the chapter on a DVD, twice to repeat the
currently playing title or three times to repeat the whole contents of the disc.
CHANGING THE CAMERA ANGLE
Some DVDs have multiple camera angles for some or all scenes. Press the ANGLE
button to change the camera angle. Different camera angles may include: front, side,
whole view or exterior.
P. 4 1
Page 43

P. 4 2
D.MENU
Press this button to return to the previous menu item.
AUDIO
Many DVD have multiple soundtracks. To change between them press the AUDIO
button. Wait three seconds before pressing the button again, to cycle through the options.
TITLE
Press this button to return to the title menu on some DVD . Use the , ,
and buttons to navigate around the menu.
SEARCH
Press SEARCH and use the numerical keys to enter the chapter number you wish to
go to and press PLAY/PAUSE.
PROGRAM
During playback press PROGRAM to move directly to a section or programme on the
DVD. Press the digit buttons to select the programme number that you want. When
finished, move the cursor to select START. The DVD will jump directly to that section
and begin to play. If you want to cancel this function, press PROGRAM and move to
STOP, then press PLAY/PAUSE.
A-B
Use A-B to set a section of a DVD to repeat. Press A-B to mark the start point and again
to mark the end. The section will begin to be repeated immediately.
Press A-B to cancel the repetition.
ANGLE
D.CALL
When enjoying sports, concert or theatre, press this key to watch same actions in
different angles.(Valid for discs possessing this function. Using a disc recorded in
multi-angle you can view the scene from different angles, for example, front, side, whole
view and exterior scene.)
When pressing theD.CALL button repeatedlydifferent OSD indicator will be displayed for
different types of disc DVD, CD etc
ADDITIONAL DVD FUNCTIONS
Page 44

PLAYING A JPEG CD
1.Insert a JPEG CD in the same way as you would a DVD or Audio CD, with the label
facing away from you.
2.The CD will load and a menu of the disc's contents will appear on screen.
3.Use the and buttons to highlight the folder and picture you wish to view and press
PLAY/ENTER. Each image on the disc will show consecutively, like a slide show.
4.Press PAUSE/STEP during the slide show to pause on one image.
5.Press the or button to skip to the next image or return to the previous one.
PLAYING AN AUDIO CD
1.Insert a CD in the same way as you would a DVD, with the label facing away from you.
2.The CD will load and a menu of the disc's contents will appear on screen.
3.Use the and buttons to highlight the track you wish to play and press PLAY/PAUSE,
or just press PLAY/PAUSE to listen to the whole CD from the beginning.
You can stop, pause, fast forward or fast rewind a CD in the same way as a DVD.
You can also use the REPEAT button to repeat a track, folder album or the contents of
the whole disc. Press repeatedly to select what you would like to repeat. You can also
use the A-B function to repeat a certain section of a track or CD.
P. 4 3
Page 45

05 Reference Sections
TROUBLESHOOTING
To assist in location of possible faults use the help guide below:
Note:
1.If the fault can not be repaired using the above guide consult with your local authorized service
center.
2.The TV set must only be repaired by a qualified registered service person. Never attempt to
remove the back cover as the TV set has dangerous voltages in side that may cause a fatally or fire.
No picture, no sound
Verify if the television is properly plugged in.
Verify if the television has a proper supplied power source.
Verify if electricity is available.
Blank screen
Verify if correct signals are input.
Operate the remote to change signal input to correct input.
Restart the television if power supply is interrupted.
No sound
Press MUTE button and verify if Mute mode is set.
Switch to other channel and verify if the same problem
happens.
Press VOL+ button to see if the problem can be solved.
Poor sound
Verify if sound system is correct. Refer to user's manual
for adjustment.
No picture in some
channel
Verify if correct channel is selected.
Adjust the antenna.
No color for some channel
program (black and white)
Verify if the same problem exists in other channels.
Check out of picture and sound systems.
Refer to relative instructions in the Manual for color
adjustment.
Spots with some or
all pictures
Verify if the antenna is correctly connected.
Verify if the antenna is in good condition.
Make fine adjustment of channel.
Television out of control
Disconnect the television from power supply and 10
seconds later, connect the television to the power supply.
If the problem still exists, contact authorized after-sales
service for technical assistance.
P. 4 4
Page 46

Specifications
Note:
All specifications are subject to change without notice.
All quality are approximate value.
Specifications of the television that you have just purchased may
vary from the information in this table due to technical innovations.
Accessories
Picture, sound
system
Audio output
External input port
Power requirements
Temperature
2.5W+2.5W
COMPONENT input PC input S-VIDEO input Audio input
SCART Antenna input HDMI input USB
~150-240V 50/60Hz
PAL/SECAM-B/G,I,D/K,L,L
Working:5 C~35 C
Storage:-15 C~45 C
Power consumption
35W
Model
Remote control
Batteries
Owner
's manual
55W
Humidity
Working:20%~80%
Storage:5%~90%
19
22
P. 4 5
Page 47

Year
This product is guaranteed for twelve months from the date of original purchase. Any
defect that arises due to faulty materials or workmanship will either be replaced,
refunded or repaired free of charge where possible during this period by the dealer
from whom you purchased the unit.
The guarantee is subject to the following provisions:
- The guarantee does not cover accidental damage, misuse, cabinet parts, knobs
or consumable items.
- The product must be correctly installed and operated in accordance with the
instructions contained in this manual.
- It must be used solely for domestic purpose.
- The guarantee will be rendered invalided if the product is re-sold or has been
damaged by inexpert repair.
- Specifications are subject to change without notice.
- The manufacturer disclaims any liability for the incidental or consequential damages.
- The guarantee is in addition to, and does not diminish your statutory or legal rights.
- In the event of a problem with the product within the guarantee period call the
customer helpline on 0845 604 0105
Guarantor: Argos Ltd
489 - 499 Avebury Boulevard
Central Milton Keynes
MK9 2NW
PRODUCT GUARANTEE
This product is guaranteed against manufacturing defects for a period of
07 Product guarantee
P. 4 6
Page 48

0090504932K
 Loading...