

Page 1
Customer helpline:08456040105
24”Digital LCD Television
INSTRUCTION MANUAL
Page 2

Contentss
BUSH | HD Ready LCD TV | User Manual | Helpline: 0845 604 0105 P.01
01 Safety Warnings 2
Welcome ................................................................................2
Important Information ......................................................2
Safety notice .........................................................................3
Electrical connections........................................................4
02 About your LCD TV 5
Get to know your TV...........................................................5
Get to know your remote control..................................7
Connecting your TV............................................................8
Preparation of your remote control..............................9
03 Getting Started 9
Setting up...............................................................................9
Tuning your TV .................................................................. 10
Common interface ......................................................... 11
Using your TV..................................................................... 12
Adjusting picture settings............................................. 12
Adjusting sound settings ..............................................13
Function settings.............................................................. 13
Channel managment...................................................... 14
Time settings...................................................................... 15
Lock menu settings ......................................................... 15
Shortcut menu display ................................................... 17
04 Using the features 19
Teletext functions............................................................. 19
USB mode............................................................................ 20
Using external USB disk for recording ...................... 21
Using your DVD player
(certain models only) ...................................................... 22
Additional DVD functions .............................................23
05 Reference Sections 24
Troubleshooting ...............................................................24
Specification ...................................................................... 25
06 Product Guarantee 26
Product guarantee................................................... 26
Page 3
01 Safety Warningss
P.02 BUSH | HD Ready LCD TV | User Manual | Helpline: 0845 604 0105
WELCOME
Thanks for buying this 24" HD Ready Digital LCD TV. This guide will help you set up and begin using your TV.
First, check the contents of your box with the parts checklist below:
24" HD Ready Digital LCD TVt
Remote controlt
AAA battery t ×2
Instruction Manualt
Quick start guidet
Now you can get started!
IMPORTANT INFORMATION
READ ALL INSTRUCTIONS BEFORE USE AND KEEP FOR FUTURE REFERENCE.
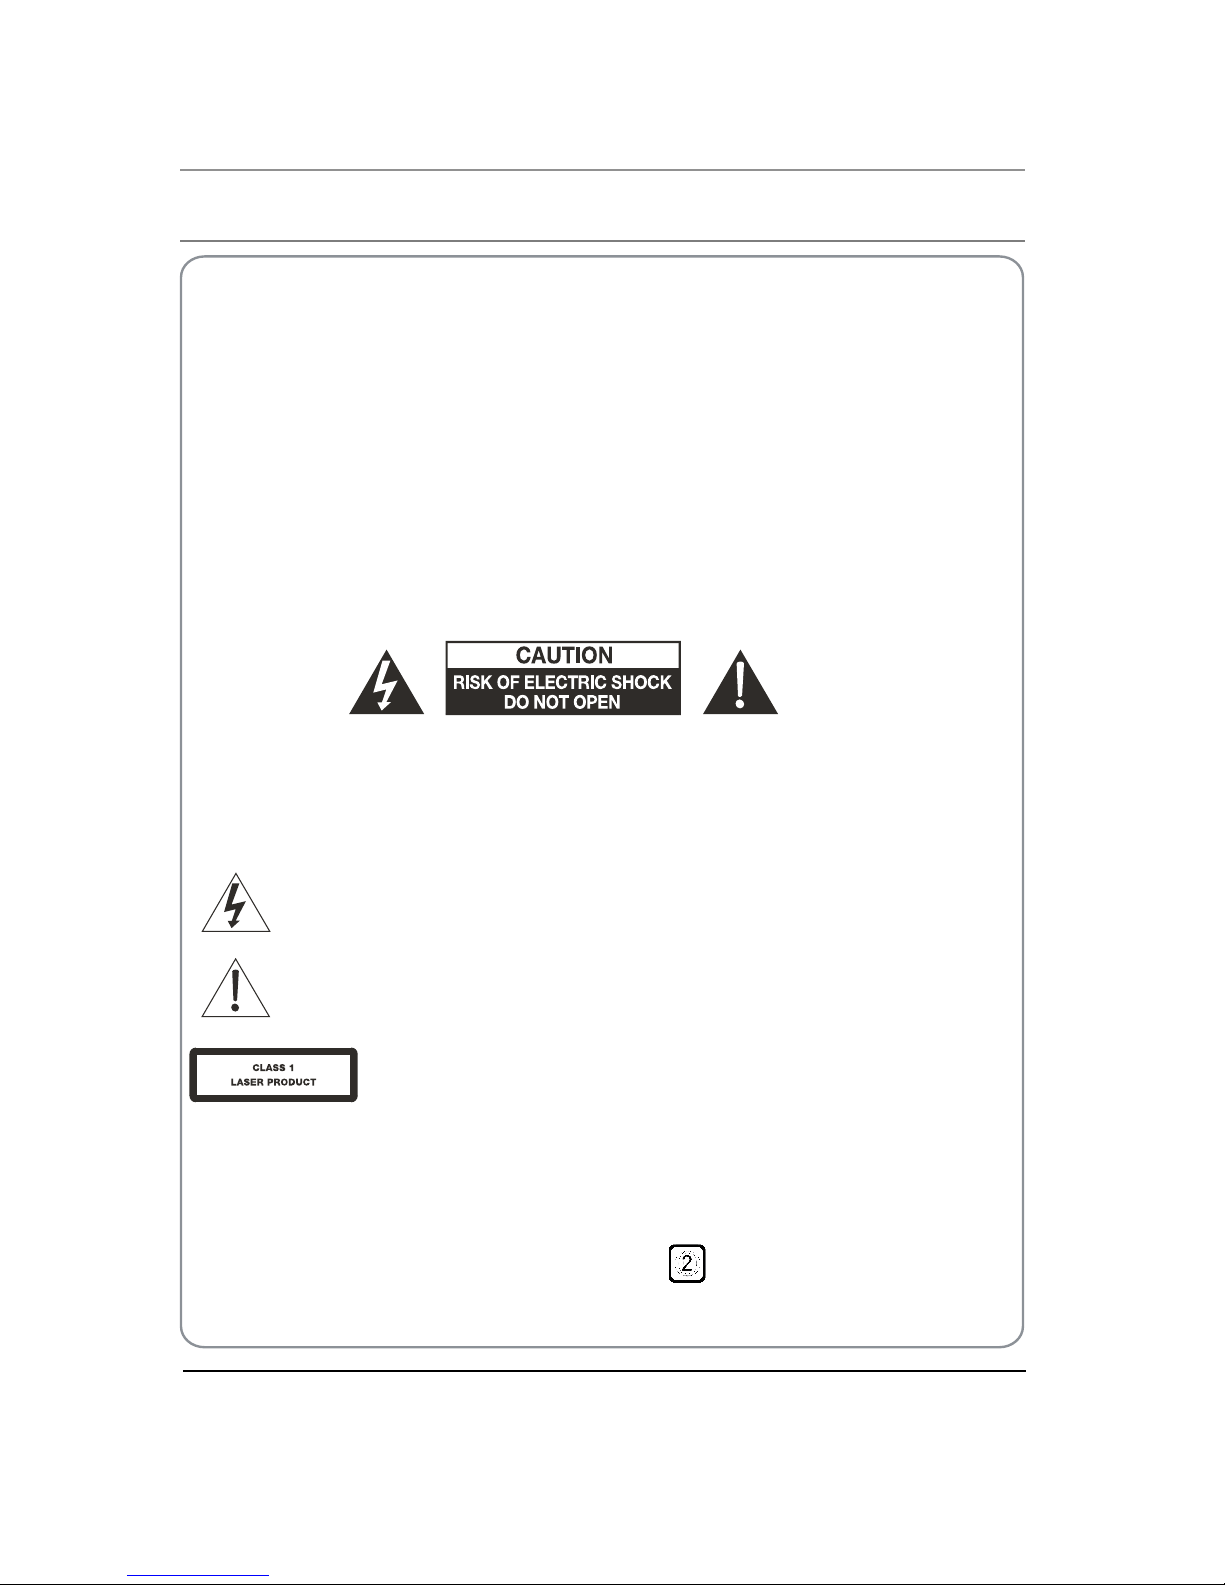
CAUTION
TO REDUCE THE RISK OF ELECTRIC SHOCK, DO NOT REMOVE COVER (OR BACK).NO USER SERVICEABLE PARTS INSIDE.
FOR ANY PROBLEMS, REFER SERVICING TO THE CUSTOMER HELP LINE. THERE IS A LIGHTNING ARROW SYMBOL IN
THE TRIANGLE: THIS SYMBOL INDICATES HIGH VOLTAGE IS PRESENT INSIDE. IT IS DANGEROUS TO MAKE ANY KIND OF
CONTACT WITH ANYINSIDE PART OF THIS PRODUCT.
THERE IS A EXCLAMATION MARK IN THE TRIANGLE: THIS SYMBOL ALERTS YOU THAT IMPORTANT LITERATURE
CONCERNING OPERATION AND MAINTENANCE HAS BEEN INCLUDED WITH THIS PRODUCT.
CAUTION:TO REDUCE THE RISK OF ELECTRIC SHOCK AND FIRE, DO NOT PUT THE TV SET NEAR
SOURCES OF HUMIDITY. DO NOT USE ANY ABRASIVE CLEANERS WHICH MAY SCRATCH OR DAMAGE
THE LCD SCREEN. AVOID CONTACT WITH OBJECTS THAT MAY SCRATCH THE LCD SCREEN.
NOTE: SERVICING THE UNIT YOURSELF IS UNAUTHORISED AND COULD LEAD TO INJURY OR PRODUCT
DAMAGE. REFER ALL SERVICING TO THE CUSTOMER HELPLINE.
VISIBLE AND INVISIBLE LASER RADIATION WHEN OPENED. AVOID EXPOSURE TO BEAM
(WARNING LOCATION: INSIDE ON LASER COVER SHIELD).
REGION MANAGEMENT INFORMATION
This DVD player is designed and manufactured to respond to the Region Management
Information that is recorded on a DVD disc. If the Region number described on the DVD
disc does not correspond to the Region number of this DVD Player, this DVD player can
not play hat disc.
This Region number of this DVD player is
Page 4

BUSH | HD Ready LCD TV | User Manual | Helpline: 0845 604 0105 P.03
01 Saftety Warnings
For your protection,please read these instruction completely and keep this manual for future reference.O
Please ensure that the set has adequate ventilation.O
Do not place the set near a heat source or in direct sunlight.O
Do not put the unit near water or oil as it may cause a re.O
During thunderstorms, unplug both the antenna and power plug to prevent damage.O
Do not use a damaged power plug or put the power supply near a heat source as it may cause electric shock or O
re.
To prevent potential re, do not overload an electrical outlet with too many plugs. O
Place the set on a level surface to prevent it from tipping and potential damage.O
Do not remove the cover of the set or try to service your TV. This may result in electrical shock or re. All service O
work must be completed by an authorised technician.
If there are any abnormal sounds or smells from the unit, unplug it immediately and contact an authorised O
service provider.
To prevent re, do not use or store any ammable materials near the unit.O
To prevent re, do not place the unit near a damp wall.O
To prevent electric shock, ensure that any external antenna connected to the set is clear of contact with any O
power lines.
Do not plug/unplug the unit while your hands are wet. This may cause an electric shock.O
Please ensure a solid connection with the AC wall socket in order to avoid shock and potential re.O
To prevent electric shock or re, please prevent rain from entering the set along the wire connected to the outside O
antenna.
When cleaning, please unplug the unit. Use a soft cotton cloth. Do not use any abrasive cleansers, and prevent O
water from entering the set.
If any plugs or input wires are dirty, unplug the set and clean them. This will prevent the risk of electric shock or O
re.
If the set is not going to be used for an extended period, unplug the unit from the main power.O
The apparatus should not be exposed to dripping or splashing and no objects lled with liquids, such as vases should
be placed on the apparatus.
The mains plug is used for disconnecting the device, make it easily accessible.
Do not use any accessories that are not recommended by the manufacture.
SAFETY NOTICE
Page 5
P.04 BUSH | HD Ready LCD TV | User Manual | Helpline: 0845 604 0105
WASTE ELECTRICAL PRODUCTS SHOULD NOT BE DISPOSED OF WITH
HOUSEHOLD WASTE. PLEASE RECYCLE WHERE FACILITIES EXIST. CHECK
WITH YOUR LOCAL AUTHORITY FOR RECYCLING ADVICE.
Tru Surround XT, SRS and the symbo
l are trademarks of SRS Labs, Inc. TruSurround XT technology is
incorporated under license from SRS Labs, Inc.
Tru Surround XT® creates a truly immersive surround sound experience with rich bass and clear dialog from only
two speakers.
Page 6
02 About your LCD TVs
BUSH | HD Ready LCD TV | User Manual | Helpline: 0845 604 0105 P.05
02 About your LED LCD
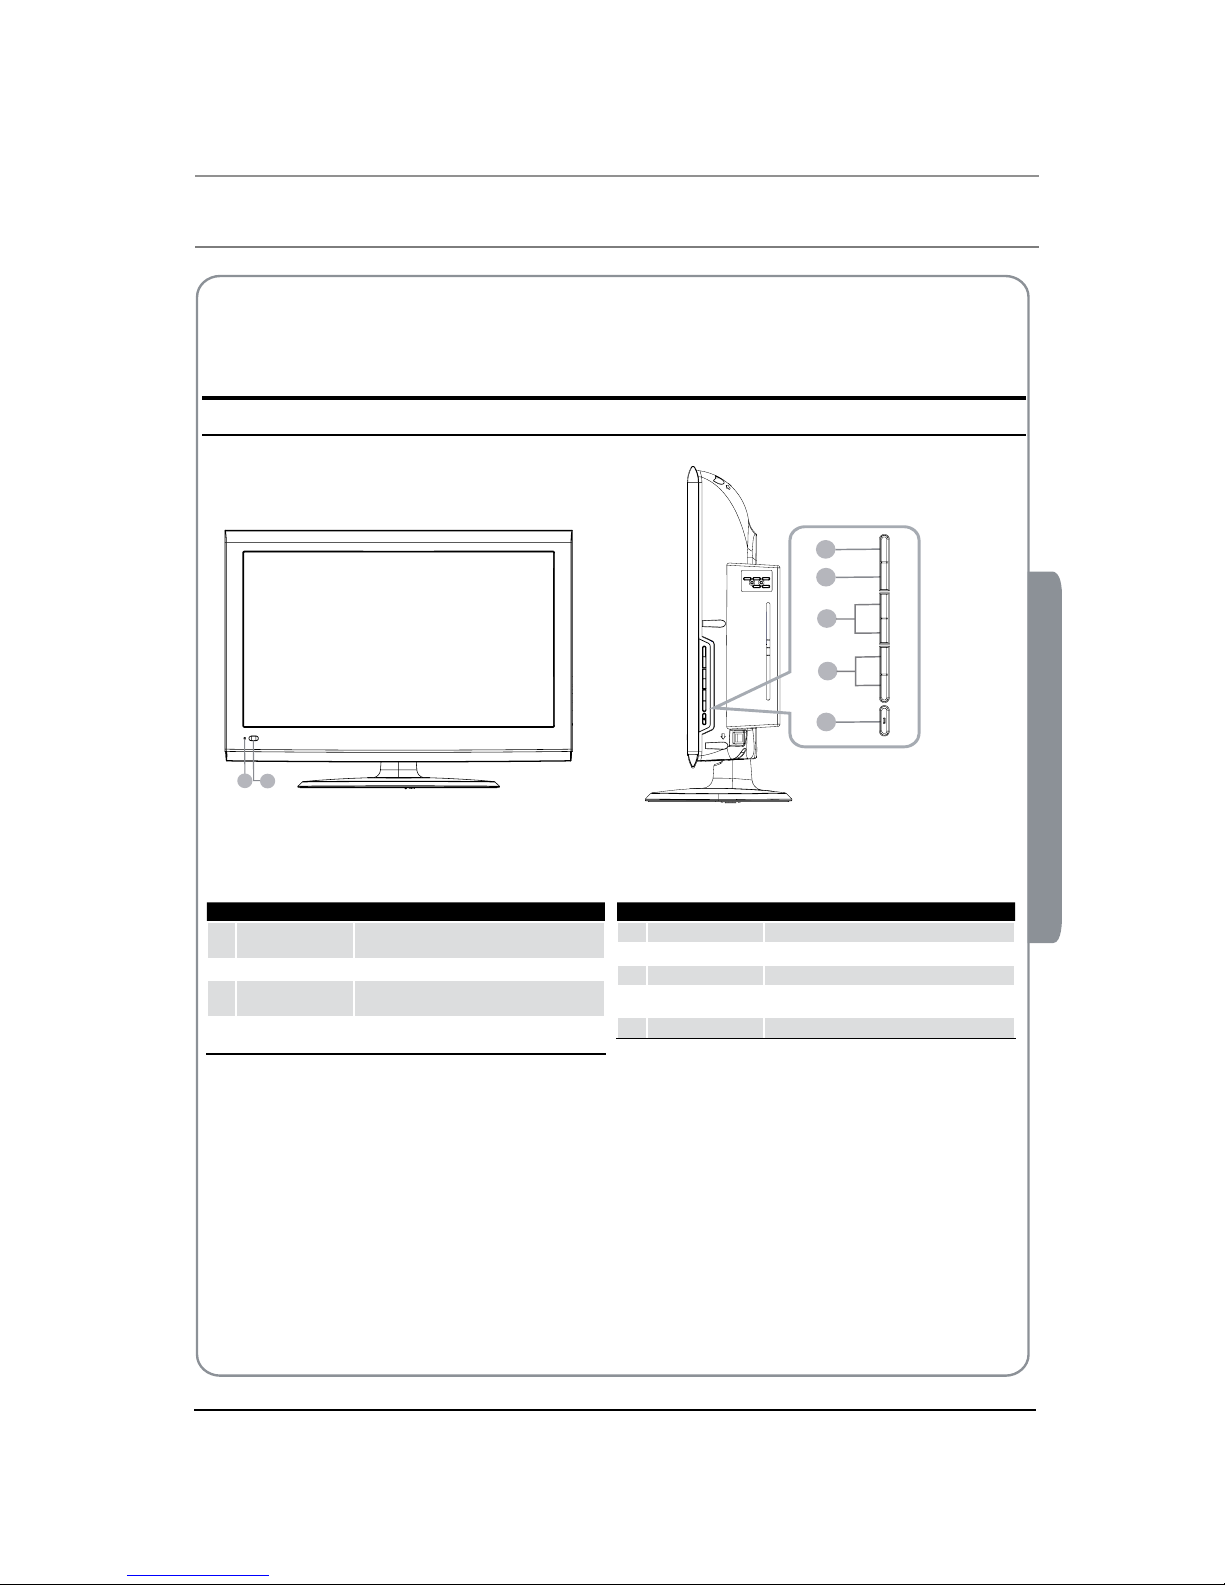
GET TO KNOW YOUR TV
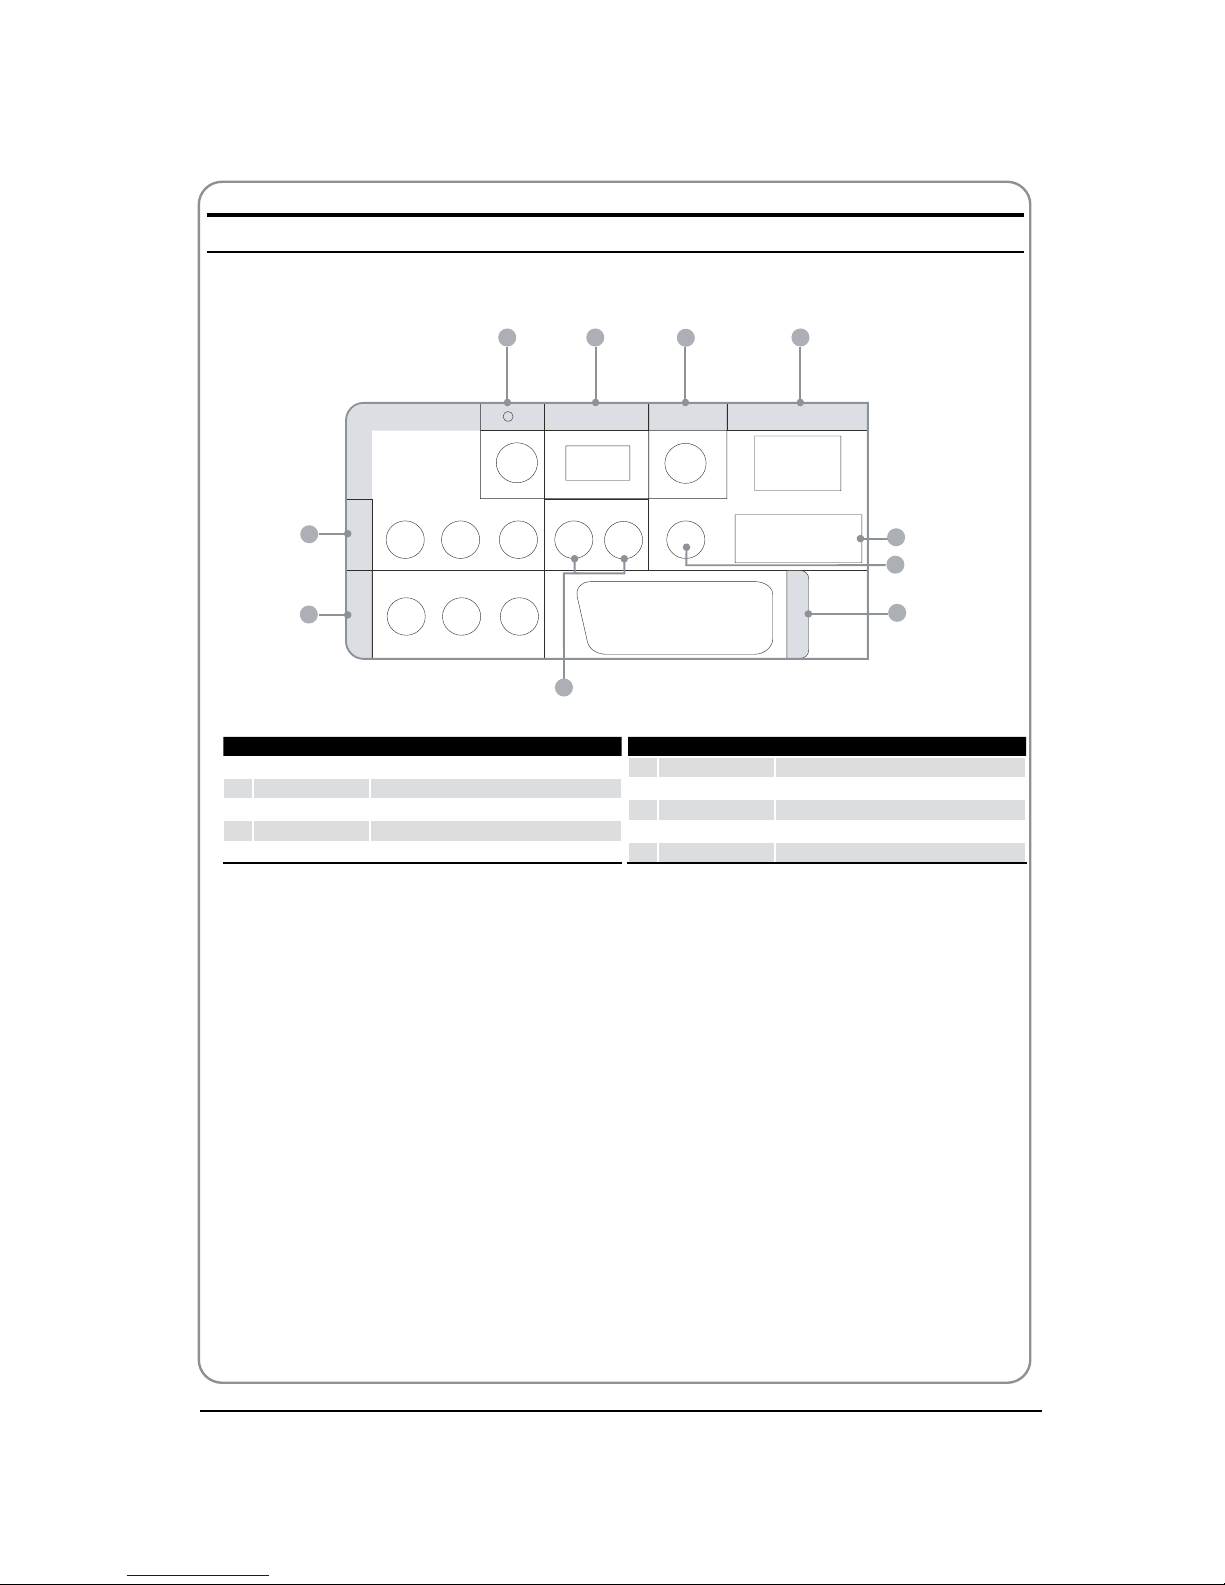
Front control panel
6
7
C
o
nte
n
tSid
eFacingTowa
r
dsYou
OS
R
UECM
N
EU V
LO
+V
LO
-C
+
HC
-
HP
W
ORE
1
2
4
3
5
OS
R
UECM
N
EU V
LO
+V
LO
-C
+
HC
-
H
STANDBY
1
SOURCE
Call the input Source menu/Conrm button
when operating menu.
2
MENU
Press to select the main menu.
3
VOL-
Volume down/Left orientation to adjust the item
in the OSD.
VOL+
Volume up/Right orientation to adjust the item
in the OSD.
4
CH-
TV channel down/to select the item in the menu.
CH+
TV channel up/to select the item in the menu.
5
STANDBY
6
Power indicator
7
Remote Sensor
Page 7
P.06 BUSH | HD Ready LCD TV | User Manual | Helpline: 0845 604 0105
Back panel
USB
DIGITALVOUT
(COAXIAL)
HDMI IN
C
OMPONENT
IN
AV
I
N
Y Pb Pr
VIDEO L-AUDIO-R
L-AUDIO-R
PC/DVI AUDIO IN
PC IN
SCART
1 2
3
4
5
6
7
8
9
10
1
EARPHONE
output
2
USB
input
3
Digital output input
4
HDMI IN
input
5
PC IN input
6
PC/DCI AUDIO IN
input
7
TV SCART input
8
AUDIO IN
input
9
AV IN input
>
COMPONENT IN
input
Page 8
BUSH | HD Ready LCD TV | User Manual | Helpline: 0845 604 0105 P.07
02 About your LCD
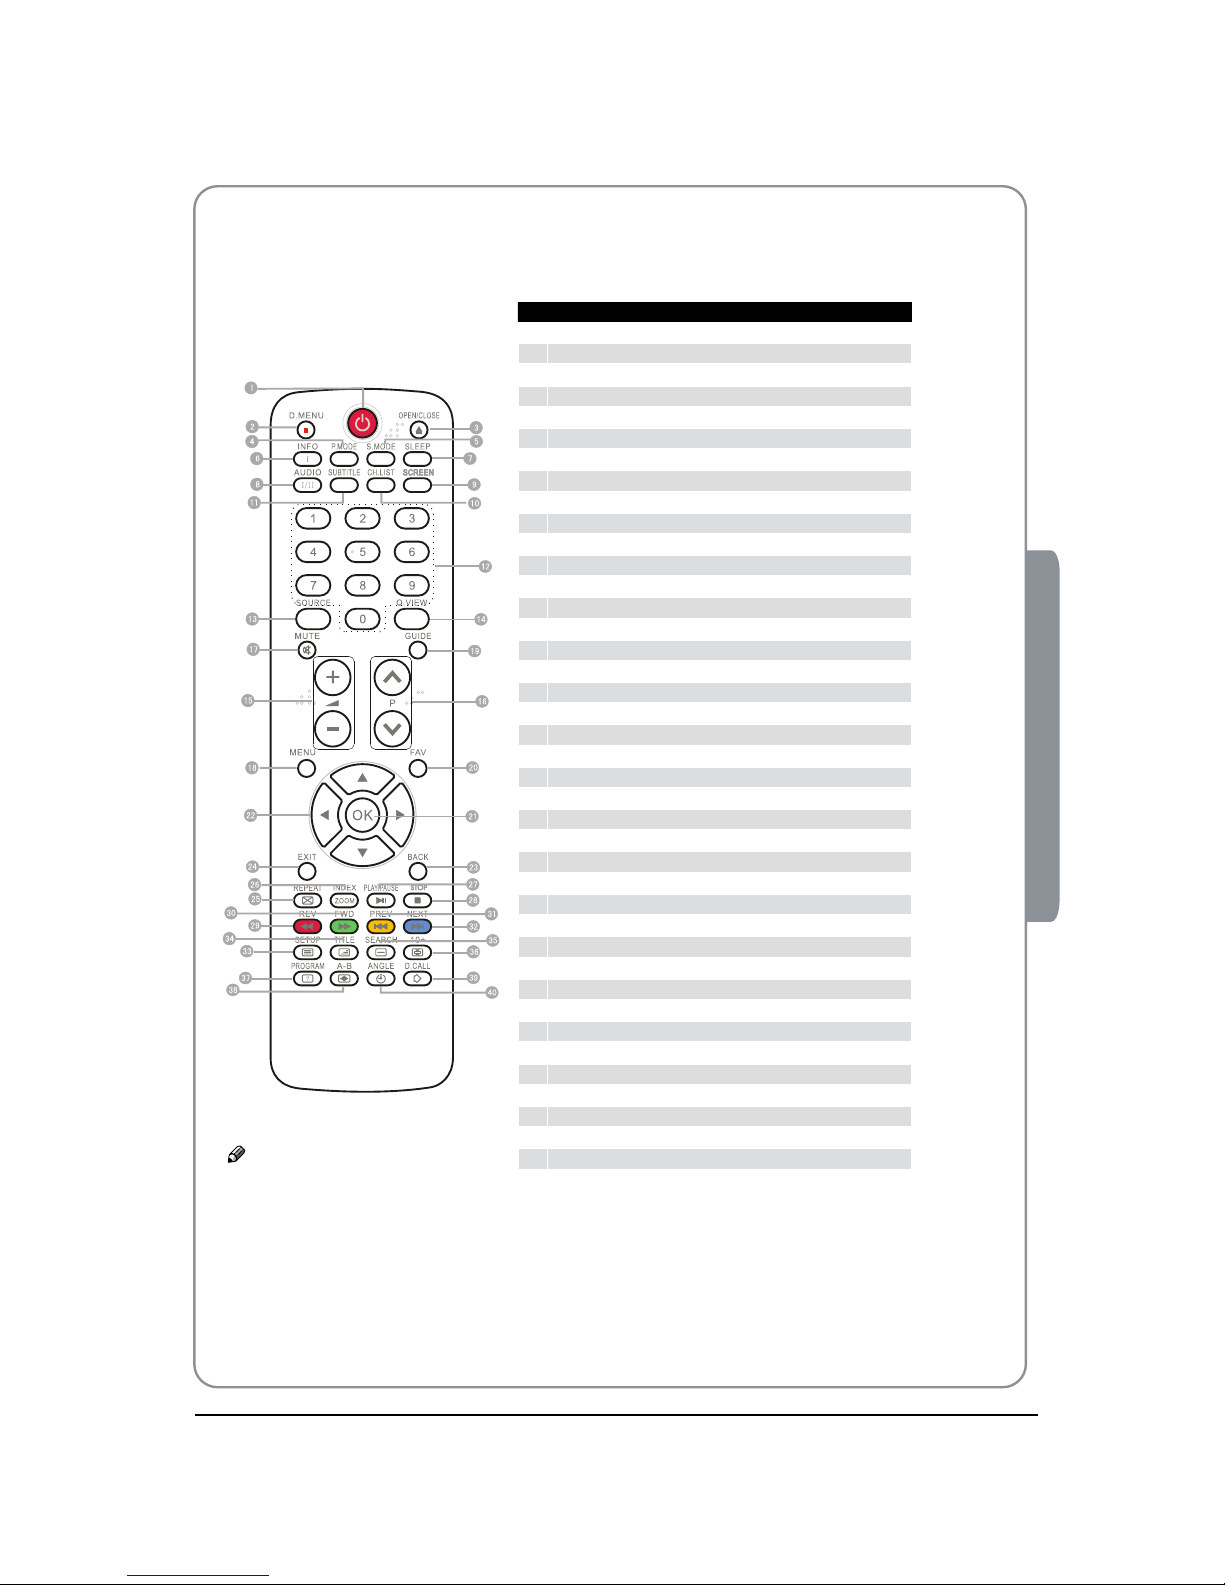
GET TO KNOW YOUR REMOTE CONTROL
When using the remote control, aim it towards the remote sensor on the TV.
1
Standby
2
DVD Menu / REC
3
DVD open / close
4
Picture Mode
5
Sound Mode
6
Call Screen Display
7
Sleep button
8
DTV Audio / NICAM / DVD Audio
9
Aspect Ratio Control button
0
Channel list button
A
Subtitle button
B
Program Number Channel selection
C
Source Exchange
D
Q.VIEW / Swap Channel
E
V+/V-: Volume selection
F
P+/P-: Channel selection
G
Mute
H
Menu button
I
GUIDE button (only for DTV)
J
Favourite list button
K
OK button
L
Cursor Mover button
M
Back button (only for USB)
N
Exit Screen Display
O
REPEAT (only for DVD & USB)/CANCEL button
P
Zoom (only for USB)/Teletext index (only for TV) / REC index
Q
Play / Pause button (only for DVD & USB) / Timeshift
R
Stop (only for DVD, USB, REC & Timeshift)
S
Fast Reverse (only for DVD, USB & Timeshift)
T
Fast Forward (only for DVD, USB & Timeshift)
U
Previous (only for DVD & USB)
V
Next (only for DVD & USB )
W
DVD Set up / Text
X
DVD Title / Teletext Mix
Y
DVD Search / Teletext Subcode
Z
DVD 10+ / Teletext Hold
[
DVD Program / Teletext Reveal
\
DVD A-B Repeat / Teletext Size
]
DVD Call / Teletext Mode
`
DVD Angle/Teletext Time
Note
RED button, GREEN button,O BLUE
button and YELLOW button are fast
text button in analog signal. Function
button in DVBT (just reference the
OSD)
Page 9
P.08 BUSH | HD Ready LCD TV | User Manual | Helpline: 0845 604 0105
CONNECTING YOUR
TV
ANTENNA CONNECTION
Connect your aerial to the back of the TV into the
ANTENNA IN socket.
IMPROVE YOUR SIGNAL
To improve picture quality in a poor signal area, use a
signal amplifier (not supplied).
CONNECT YOUR PC TO THE TV
You can use your TV as a monitor for your personal
computer by connecting it with a VGA cable (not
supplied).
Read your computer user guide and check it has a
A
VGA connector.
Tur n the power o on your TV and PC.
B
Connect a D type 15-pin VGA interface cable to C
the VGA video interface connector on the PC.
Connect the other end of the cable to the PC
interface connector on the TV. Tighten the screws
on the VGA connectors and connect the audio
cable (not supplied) to the audio input socket on
the back of the TV.
Tur n on the power of the TV firstly and then the
D
PC.
Press the button on the TV or TV remote control to
E
set the video input mode to VGA.
Once the image shows, if there is noise present,
F
change the VGA mode to another resolution,
change the refresh rate to another rate or adjust
the brightness and contrast on the menu until the
picture is clear.
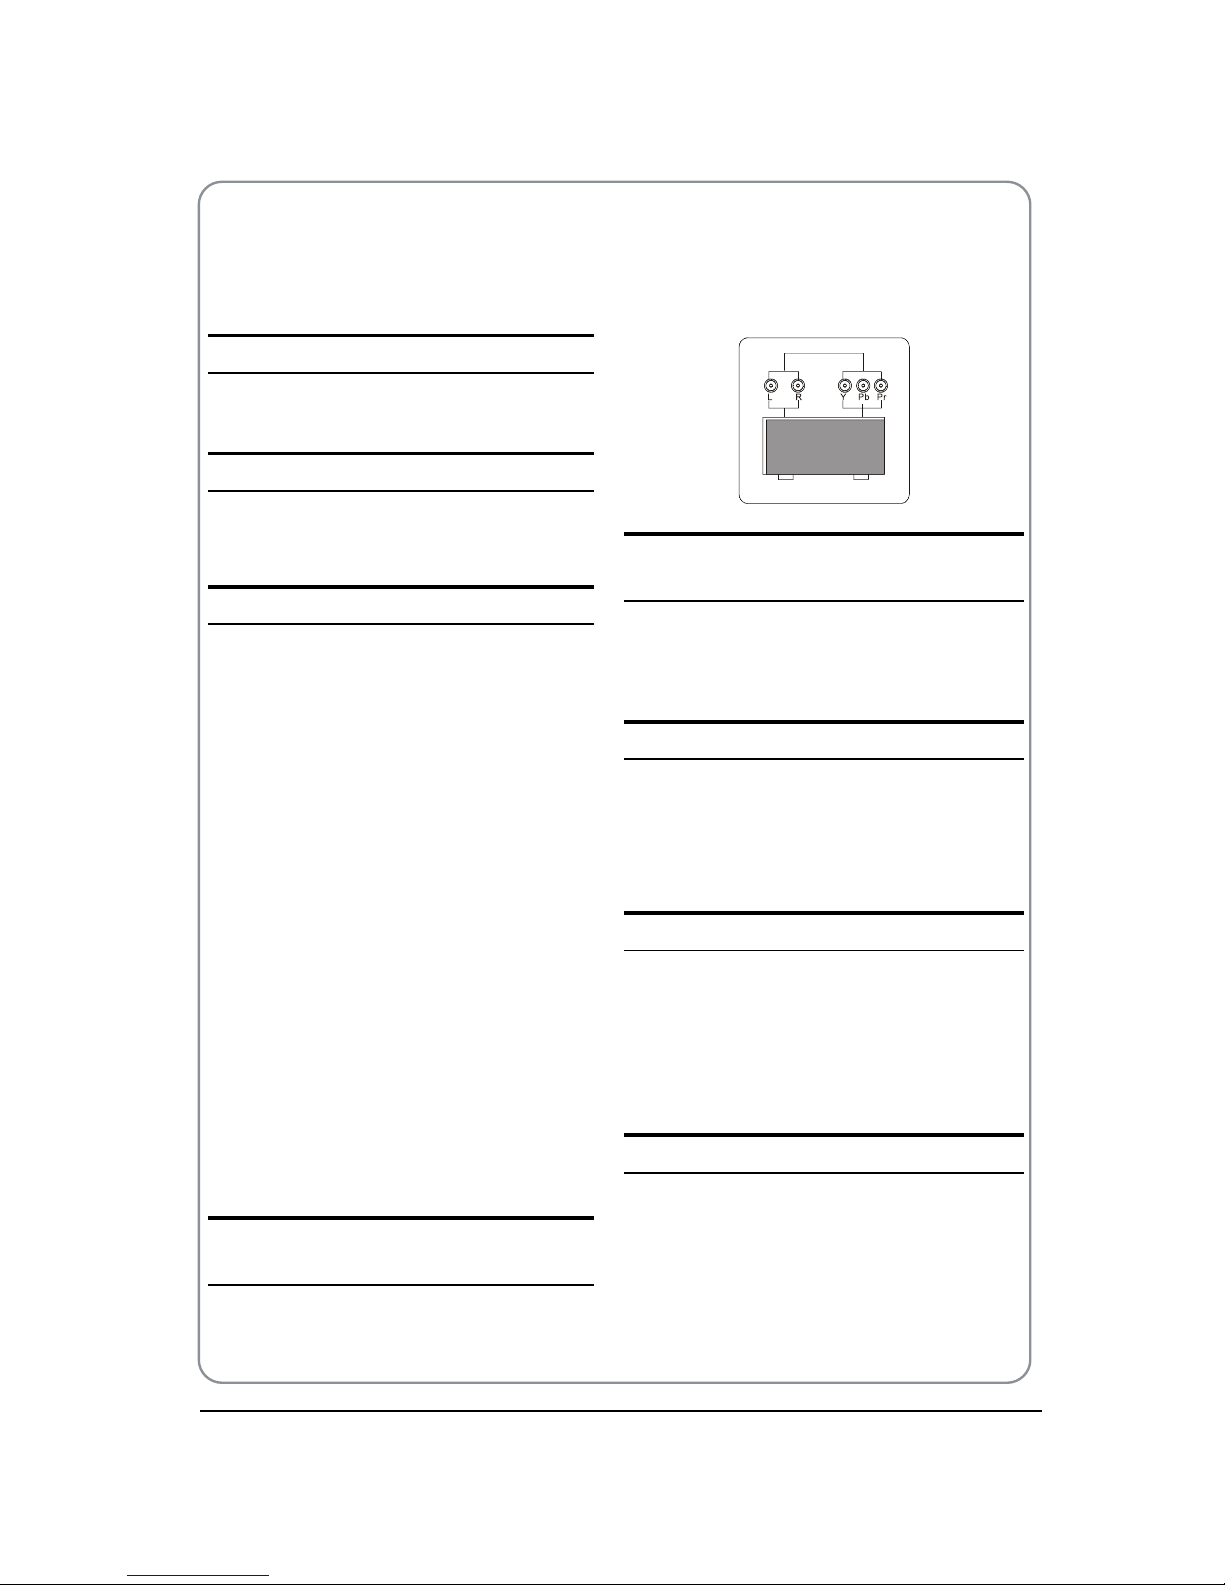
CONNECT A DVD PLAYER TO YOUR
TV
Connect the DVD video outputs (Y, Pb, Pr) to the
COMPONENT (Y, P
b, Pr) IN socket on your TV.
Tur n on the DVD player and insert a DVD.A
Press the button to select .B
Refer to the DVD player user guide for operating C
instructions.
DVD
CONNECT A DVD PLAYER OR VCR TO
YOUR TV
There are two ways in which you can connect a DVD
player or VCR to your TV. Make sure that both the TV and
DVD player or VCR are switched o before you connect
them.
Connection Option
Connect the AV DVD/VCR outputs to the AV IN A
socket on your TV.
Press the
B SOURCE button on the TV to set the video
input mode to AV.
SCART INPUT
Connect the scart lead from the external device A
(DVD player, Set-top box or games console) to the
TV scart socket.
Press the
B SOURCE button to select SCART mode.
Press the
C PLAY button on the external device.
HDMI input
Connect the cable from the HDMI device to the TV A
HDMI socket.
Press the
B SOURCE button to select HDMI mode.
Refer to the HDMI device user guide for how to
C
operate.
Page 10

BUSH | HD Ready LCD TV | User Manual | Helpline: 0845 604 0105 P.09
03 Getting Started
Prepartion of your
remote control
Battery installation
Place the remote control face down, then open the A
cover of the battery compartment.
Install two AAA batteries. (The + and - symbol of B
the battery must match with the marks on the
remote).
Close the cover of the battery compartment.C
Battery caution
Confirm there is no object between the remote control
and the remote sensor of the TV set.
Sunshine or other strong light will interfere with the
signal sent by the remote control. In this situation turn
the TV set to avoid the direct light source.
Do not put the remote control in direct heat or in a
damp place as you may damage the remote.
Please use two AAA 1.5V batteries. Do not mix battery
types. Install the batteries at the correct polarities.
Do not use rechargeable batteries. If your TV is to be
stored for a period of time, remove the batteries from
the remote control.
03
GettingStarted
Setting up
Location
You will need to place your TV near your plug socket (so the
power cable can comfortably reach) and within reach of your
aerial socket or extension lead.
Connection
Insert your TV aerial lead into the Antenna input at the A
side of the TV.
Insert the batteries into the remote control. Make sure
B
they are inserted the right way around, matching the
polarity as indicated inside the battery compartment.
Switching your TV on
Press the A STANDBY button on the right side of the TV
once. A red ashing light will appear in the corner of the
screen.
Press
B STANDBY on the remote control. The TV will turn
on and the red light will turn blue. This may take a few
moments.
Select your chosen language when prompted from the
C
list that will appear on screen. Use the button to
scroll to the language you want and press OK button to
confirm.
TUNING YOUR TV
Switching to an external source other
that TV
If you have attached a DVD player or similar external device
to the TV, you will need to tell the TV to display the content
from it. Simply press SOURCE which will bring up the source
Page 11

P.10 BUSH | HD Ready LCD TV | User Manual | Helpline: 0845 604 0105
menu in the right corner of the screen, use the and
button to highlight the required source and press OK
select.
For details of how to plug in other equipment see Get to
konw your TV on page 8.
Source
TV
DTV
AV
SCART
Component
PC
HDMI
USB
DVD
Auto search
Press A MENU button.
Press
B button to select Tuning menu, press
button to enter.
Press
C button to select Country item.
Press button to select you needed.
Press
D button to select Auto Search item, press
button to start searching.
Press
E MENU button to stop auto search during
searching.
Note
It may take a few moments to complete the Auto O
Search.
Manual search
Press A MENU button.
Press
B button to select Tuning menu, press
button to enter.
Press
C button to select Manual Search,then
press button to start searching.
Press
D MENU button to stop Manual Search during
searching.
Current CHV
Press button to select the channel number to
edit.
Colour SystemV
Press button to select “Colour System”, then
press button to select the correct colour system.
Sound SystemV
Press button to select “Sound System”, then
press button to select the correct sound system.
SkipV
To skip the channel when press P+/P- button by
setting the Skip button On.
Fine tuneV
If the picture and/or sound are poor, try using the
FINE TUNE feature. Do not use this feature unless
reception is poor.
Repeat above steps 1-3 ,then press
A button to
select the Fine Tune item.
Press
B button repeatedly to carry out fine tune,
till the best picture and sound are obtained, then
loosen the button.
COMMON INTERFACE
The common interface (CI) slot is designed to accept the
Conditional Access (CA) Module and Smart card in order
to view the pay TV programmes and additional services.
Contact your Comm
on Interface service provider to get
more information about the modules and subscription.
Please noted that CA modules and smart cards are
neither supplied nor optional accessories from us.
Main Menu
Tuning
Select
Exit
MENU
Current CH 9
Country United Kingdom
Coulor System PAL
Sound System DK
Auto Search
Manual Search
Skip Off
Main Menu
Tuning
Select
Exit
MENU
Current CH 9
Country United Kingdom
Coulor System PAL
Sound System DK
Auto Search
Manual Search
Skip Off
Page 12

BUSH | HD Ready LCD TV | User Manual | Helpline: 0845 604 0105 P.11
03 Getting Started
Warning
Switch o your TV before any module is inserted in t
the Common Interface slot.
Insert the CAM correctly, then Smart Card to the CI
A
slot that is located at the side of the TV.
CI Slot
CAM
Smart Card
Tur n on the TV and it will display the below message B
if the CA module is detected. Wait for few moments
until the card is activated.
Press the
C MENU button then press button to
select TUNING menu, press button to enter
Press D button to select Option item, press
button to enter.
Press
E button to select CI Information option.
Detailed information on the CI card in use is
F
displayed.
Press
G OK button to access the card menu. Refer to
the module instruction manual for setting details.
When module is removed, the following message H
will appear on the screen.
Software Update function
When you get the updating news from the TV shop’s t
web, you can update the operating software using
the Download menu. The data for various units are
transferred consecutively on a special receiving
channel.
You need to search the channel with updating code t
stream.
Note
You can get information from the TV shop or O
internet.
Operation
Press A MENU button.
Press
B button to select TUNING menu, press
button to enter.
Press
C button to select Option item, press
CI Module Inserted
Message
CI Module is OK
Message
Main Menu
Tuning
Select
Exit
MENU
Channel Management
Country United Kingdom
Auto Search
Manual Search
Time
Option
Version 1.6.0826
CI Module Removed
Message
Main Menu
Tuning
Select
Exit
MENU
Channel Management
Country United Kingdom
Auto Search
Manual Search
Time
Option
Version 1.6.0826
Main Menu
Option
Select
Exit
MENU
Audio Language
Subtitle Language Off
CI Information
Parental Lock
Parental Rating
Software Upgrade Off
Guide
English
Main Menu
Tuning
Select
Exit
MENU
Channel Management
Country United Kingdom
Auto Search
Manual Search
Time
Option
Version 1.6.0826
Page 13

P.12 BUSH | HD Ready LCD TV | User Manual | Helpline: 0845 604 0105
button to enter.
Press
D button to select System Update
option.
Press
E button to set it as On. (The default is
O)
If the upgrade information is received, the TV will
F
begin to upgrade.
Load the receiver identification. This process may
G
also take several minutes. You can press EXIT
button to cancel the download .
After the download has finished, please restart
H
the TV.
USING YOUR TV
How to select the TV program
Using Program number button Enter the channel A
number with the number keypad on the remote
control.
Using
B P+/P- button.
Press the P+/P- button to select a channel
number.
How to adjust volume
Press V+/V- button on the remote control or the side of
the TV to adjust the volume level.
ADJUSTING PICTURE
SETTINGS
Changing the Picture Setting
Press A MENU button.
Press
B button to select Picture menu, press
button to enter.
Press
C button to select the item requires
adjusting.
Press
D button to adjust the selection item.
When you are satisfied with your choice, press the
E
EXIT button to return to normal viewing or press
MENU button to return to the previous menu.
ContrastV
This will adjust the intensity of bright parts in the
picture but keep the dark parts unchanged.
BrightnessV
This will adjust the light output of the complete
picture, which will mainly aect the darker areas of
the picture.
ColourV
This will adjust the saturation level of the colours to
suit your personal preference.
SharpnessV
This will adjust the sharpness of fine details in the
picture.
TintV
Allows you to select the colour mix (Tint) of the
picture.
Main Menu
Picture
Contrast
Brightness
Colour
Sharpness
Tint
Picture Mode Standard
Colour Temp Standard
50
50
50
50
50
Select
Exit
MENU
Start system upgrade
Do you wantto upgrade yourTV?
Don t turnoff your TV or touch any button!
YES NO
,
Updating
Download-Don t turnoff the TV!
It will takeseveral minutes.
Please wait...
50%
Upgrade finished
Please turn off theTV!
Upgrade finished
Page 14

BUSH | HD Ready LCD TV | User Manual | Helpline: 0845 604 0105 P.13
03 Getting Started
Note
The Tint function is only available in NTSC mode.O
Picture ModeV
This will select the picture mode. Select Standard/
Mild/User/Vivid according to the program. You can
quickly select the desired mode by P.MODE button on
the remote control.
Colour tempV
This will increase or decrease Warm (red) and Cool
(blue) colours to suit personal preferences.
Select Cool to give the white colour a blue tint,
Standard to give the white colour a neutral tint,
Warm to give the white colour a red tint.
ADJUSTING SOUND
SETTINGS
Changing the Sound Setting
Press A MENU button.
Press
B button to select Sound menu, press
button to enter.
Press
C button to select the item requires
adjusting.
Press
D button to adjust the selection item.
When you are satisfied with your choice, press the
E
EXIT button to return to normal viewing or press
MENU button to return to the previous menu.
BalanceV
This will adjust the output of the right and left
speakers to obtain the best stereo reproduction for
your listening position.
Sound ModeV
This will select the sound mode.
Press button to select Standard/Music/Theater/
User according to the program. You can quickly select
the desired mode by S.MODE button on the remote
control.
AVL V (Automatic volume control)
This will reduces the dierences in volume level
among broadcasters.
SRS TS XTV
This will control the Woofer output.
Press button to select SRS TS XT.
Press button to set SRS TS XT as OFF, ON.
EqualizerV
This sound setting can be adjusted to suit your
personal preference.
FUNCTION SETTINGS
Press A MENU button.
Press
B
button to select Function menu, press
button to enter.
Press C button to select the item requires adjusting.
PressD button to adjust the selection item.
When you are satisfied with your choice, press the
E
EXIT button to return to normal viewing or press
MENU button to return to the previous menu.
LanguageV
To set the OSD language, press button to
select English/Italiano/Espanol/Francais/ Deutsch/
Nederlands.
Text LanguageV
To set the Text language, press button to select
West/East/Russian/Arabi/ Farsi .
Display ModeV
To set the picture proportion, press button to
select 4:3/16:9/Auto/Wide/Zoom1/Zoom2. You can
quickly select the desired mode by SCREEN button on
Main Menu
Sound
0
Select
Exit
MENU
Balance
Sound Mode Standard
AVL Off
SRS TS XT Off
Equalizer
Main Menu
FUCTION
Select
Exit
MENU
Language English
Text L West
Display Mode Wide
Blue Screen On
Osd Time Out 15 Secs
Sleep
anguage
Reset
Off
Page 15

P.14 BUSH | HD Ready LCD TV | User Manual | Helpline: 0845 604 0105
the remote control.
4:3 modet
Choose 4:3 when you want to view a picture
with an original 4:3 aspect ratio, with gray bars
appearing at both the left and right sides.
16:9 modet
Choose 16:9 when you want to adjust the picture
horizontally, in a linear proportion to fill the entire
screen.
Widet
Choose Wide when you want to adjust the picture
in a non-linear proportion, that is, more enlarged
at top sides and no alteration at bottom side.
Zoom1t
Choose Zoom1 when you want to view the picture
without any alteration. However, the top and
bottom portions of the picture will be cropped.
Zoom2t
Choose Zoom2 when you want the picture to be
altered, both vertically extended and cropped.
The picture taking a halfway trade o between
alteration and screen coverage.
Blue ScreenV
This will select the character background colour.
Note
The Blue Screen function is only available for O
ATV mode.
OSD Time OutV
To set how long you want the menus to appear
on-screen. Each press of button repeatedly to
select the number of preset minutes, the Time will
be set in sequence: 5secs, 10secs, 15secs, 20secs,
25secs,30secs.
SleepV
To set how long you want to turn o the TV after a
preset time (from 5 to 240 minutes).
LockV
To control the turner , program,source volume and so
on , please refer to the page 15 for detail.
ResetV
To recover to the default value.
HDMI Scan Info V
To set the HDMI Scan Info as oversacn or underscan.
Note
The HDMI Overscan function is only available O
for HDMI mode.
Channel management
Press A MENU button.
Press
B button to select Tuning menu, press
button to enter.
Press
C button to select the Channel
management item , and press to enter.
When you are satisfied with your choice, press the
D
EXIT button to return to normal viewing or press
MENU button to return to the previous menu.
Channel Edit V
Press button to enter the Channel Edit item,then
press button to choose the channel you want to
edit.You can press red,green,yellow or blue button to
set the option you need.
Main Menu
Tuning
Select
Exit
MENU
Channel Management
Country United Kingdom
Auto Search
Manual Search
Time
Option
Version 1.6.0826
DTV Channel Manager
Channel Edit
Channel Sorting
Channel Grouping
Delete All Channels
S.NO Channel name Fav/ Del/ Skip/ Lock
0005 five
0015 Ch15
0016 QVC
0017 UK Gold
0023 bid-up.tv
0025 TCM
Channel Organizer
United Kingdom/618000KHz/8M
Fav Del
Skip
Lock
United Kingdom/514000KHZ/8M
Page 16

BUSH | HD Ready LCD TV | User Manual | Helpline: 0845 604 0105 P.15
03 Getting Started
Channel SortingV
Press button to enter the Channel Sorting item,then
press button to choose the way to order the
channels .
Channel GroupingV
Press button to enter the Channel Grouping
item,then press button to choose the channel
you want to grouping.You can press digit button to
grouping the channels.
Delete All ChannelV
Press button to choose the item to delete all
channels.
Note
The Channel Managment function is only O
available for DTV mode.
TIME SETTINGS
Press A MENU button.
Press
B button to select Tuning menu, press
button to enter.
Press
C button to select item you want to set,
and press or digit button to set the time
mode you need.
Press
D MENU button to save and exit.
Note
The Time function is only available for DTV O
mode.
LOCK MENU
SETTINGS
Using this function can control the tuner, program,
source volume and so on.
Pressing MENU on the remote control, press
button to select Lock menu, press button to
enter the sub-menu, and you will be required to
enter the password. The initial password of the
television is 0000. If you forget your password, you
can always input 9443 to regain control.
Change PasswordV
Press A button to select Change Password
item. Press button to enter the submenu.
When you have inputted the four digits you
B
will be prompted to enter it again.
Your new password will then be
automatically saved.
Main Menu
Tuning
Select
Exit
MENU
Channel Management
Country United Kingdom
Auto Search
Manual Search
Time
Option
Version 1.6.0826
Time
Auto
Manual
Timer Mode Manual
Date 09/06/2008
Clock 15:47
Time Zone Auto
Summer Time OFF
Move
Select
Channel Sorting
United Kingdom/618000KHz/8M
First Option
Second Option
Third Option
England
All
LCN+
Germany
England
Italy
0005 five 618000KHz 8M
0015 Ch15
0016 QVC
618000KHz 8M
618000KHz 8M
S.NO Channel Freq Bandwidth
Move
Select
S.NO Channel name Fav Group
0005 five
0015 Ch15
0016 QVC
0017 UKGold
0023 bid-up.tv
0025 TCM
Channel Grouping
United Kingdom/618000KHz/8M
1 None
2 News
3 Sevice
4 Sports
5 Movies
6 Kids
7 Music
8 Fashion
1
1
1
1
1
1
1
Main Menu
Function
Select
Exit
MENU
Lock
HDMI Overscan Overscan
Main Menu
Function
Select
Exit
MENU
Change Password
Child Lock Off
Tuning Lock Off
Source Set Off
Channel No 1
Source Lock
Page 17

P.16 BUSH | HD Ready LCD TV | User Manual | Helpline: 0845 604 0105
Child LockV
Press button to select Child Lock.
Press button to set On or O mode. If lock on
mode is set, Child Lock is in activated automatically.
In such case, if Child Lock button (button on the
television) is pressed, the screen will display Child
Lock, which can be erased by press of MENU button.
5 seconds later after the latest press, the screen
display will disappear automatically. The Child Lock
mode can be resumed by entering Lock Set menu, set
Child Lock On or O.
Tuning LockV
Press to select Tuner Lock and to set On/
O. ( To set On, some operation such as search will
be not available. When enter the Tuning menu, Tuner
Lock will be on the screen. If you want to operate
Tuning menu, you need to enter the Lock menu to set
Tuner Lock O or operate unlock.)
Source setV
Source set is opted for setting up start source.
Press button to select O, T V, DTV, SCART,
Component , PC, HDMI , USB in turn. DVD is available
for some model.
Channel NO.V
Channel NO. is opted for setting up preset channel.
Press button to select preset Channel. Press
button to select channel number.
Source LockV
Source Lock will control the On or O of hinder
external input modes.
Press button to set as on or o.
When the source lock is set as on, TV source will
display, at this time, when press SOURCE button,
the TV can switch to corresponding source and will
display the Source is locked.
Main Menu
Function
Select
Exit
MENU
Max Volume 100
Initial Volume Off
Clear Lock
Max VolumeV
Press button to select Max Volume. Press
button for adjustment between 0-100. If a certain
Value is set, when volume is being adjusted, the
sound value can not exceed maximum volume value.
If current volume is over Max Volume, when lock set
menu is set, current volume will become set maximum
volume, if current volume is below maximum volume,
customer set volume will stay unchanged.
Initial VolumeV
The TV will remember it after your setting, that will be
the volume when turn on the TV next time.
Clear LockV
Press button to select clear lock mode. Press
button to clear lock all set modes, setting all lock
options to o, and the maximum volume returns to
100.
Parental LockV
Press A MENU button on the remote control.,then
press button to select Tuning menu, press
button to enter the sub-menu.
Press
B button to select Option menu,then
press button to enter.
C Press button to select Parental Rating item,
you will be required to enter the password. The
initial password of the television is 0000.
If you want to change the password of Parental
D
Rating, Press button to select Parental Lock
to set it
Main Menu
Tuning
Select
Exit
MENU
Channel Management
Country United Kingdom
Auto Search
Manual Search
Time
Option
Version 1.6.0826
Main Menu
Option
Select
Exit
MENU
Audio Language
Subtitle Language Off
CI Information
Parental Lock
Parental Rating
Software Upgrade Off
Guide
English
System Setup
OFF
4
5
6
7
8
9
Parental Rating OFF
Move
Select
Enter Old Password
Enter New Password
Confirm New Password
Parental Lock
Page 18

BUSH | HD Ready LCD TV | User Manual | Helpline: 0845 604 0105 P.17
03 Getting Started
SHORTCUT MENU
DISPLAY
Subtitle FunctionV
Press A SUBTITLE button on the remote control,
the Subtitle languages menu will be displayed.
Press
B button to set the item SUBTITLE
or OFF, and press OK button to enter. You can
press the EXIT button to cancel the changes at
anytime.
Note
Press O SUBTITLE button on the remote, it will
display subtitle languages menu only in the
DTV mode.
CH.LIST Function V
Press CH.LIST button on the remote control the TV will
display Channel List menu.
In TV mode, press button to select the channel, and
then press OK button to enter,then you can edit the
characters of the channel .
In DTV mode, press button to select the channel,
and then press OK button to enter .
GUIDE FunctionV
Press GUIDE button on the remote control, will
display Program Guide menu, press button
to select the program.
You can press the EXIT button to cancel the changes
at anytime.
Note
AvO ailable only in the DTV mode.
FAV FunctionV
Press FAV button on the remote control, will display
Favourite List menu.
Press button to select program and press OK
button to enter. You can press the EXIT button to
cancel the changes at anytime.
INFOV
Press INFO button on the remote control, it will
display the current channel information.
You can press the EXIT button to cancel the changes
at anytime.
Subtitle
Subtitle ON
English
Move
Channel list
Channel Frequency SystemName Skip
1 49.75 DK CH-02 Off
2 62.25 BG CH-04
3 83.25
Off
BG CC-77 Off
4 144.25 DK CC-06 Off
5 152.25 DK CC-07 Off
6 184.25 DK CH-06 Off
7 220.25 I CH-11 Off
8 471.25 BG CH-21 Off
9 487.25 DK CH-23 Off
Swap Insert Copy Delete
Move
Enter/Edit
Channel List
Channel 5
Name CC-07
Sound System DK
Frequeny 152.25
Fine Tune
Skip On
Channel list
Group None
0005 five
0015 Ch15
0016 QVC
0017 UK Gold
0023 bid-up.tv
Move
Daily Mode
Daily Weekly Info Remider/Recorder
S.No Channel name
0005 five
0015 Ch15
0016 QVC
0017 UK Gold
0023 bid-up.tv
0025 TCM
03/10/2004 15:07:09
03/10/2004 Wednesday
14:35-15:38 The Streets of San Francisco
14:35-15:38 The Streets of San Francisco
15:38-15:40 Five News Update
S.NO Channel
0005 five
0015 Ch15
0016 QVC
0017 UK Gold
0023 bid-up.tv
Move
Favourite LIST
Page 19

P.18 BUSH | HD Ready LCD TV | User Manual | Helpline: 0845 604 0105
0005 five 03/10 15 05
14 35-15 38 The Streets of San Francis
15 38-15 40 Five News Update
Singal 50%
Quality 81%
SleepV
The sleep timer automatically shuts o the TV after a
preset time (from 5 to 240 minutes).
Press the
A Sleep button and then the "Sleep Left
Time" will be diaplayed on the screen.
Press the
B Sleep button again,you can set the
Sleep time.
When you are satisfied with your choice, press
C
MENU button to return to the previous menu or
press the EXIT button to return to TV viewing.
And the time begins to count down from the
number of minutes selected.
AUDIO/I/IIV
Press AUDIO button on the remote control, will
display Audio Languages menu.
Press button to select the desired settings and
press OK button to enter.
You can press the EXIT button to cancel the changes
at anytime.
Note
Press O AUDIO button on the remote, it will
display Audio Languages menu only in the DTV
mode.
Eliminate SoundV
When you need to pay attention to surrounded
sounds, or there is a telephone calling you
or there are some guests visiting you, the sound
elimination (mute) function is very convenient.
Press theA MUTE button on the remote control and
“Mute” type face will display on the lower part of
the screen. At this Time, the sound of the TV set is
turned o.
If you w
ant to recover the sound, press the
B MUTE
button again .
Quick program viewV
This function enables quick swap to the last watched
program. Press Q.view button, and the TV will be back
to the TV source, expect in the USB and DVD source.
Suppose the channel number you used just now
A
is 8 and the channel number you are using is 18
(as shown in the figure).
If you want to return to the last watched program B
channel 8, you can simply press the Q.Vie w button.
If you want to return to channel 18, press the C
button again. Use this function, you can easily
change between the channel you are using and
the channel you used last Time.
04 Using the
features
Teletext functions
Teletext is an information system, broadcast by certain
channels, which can be read like a newspaper. It also
provides subtitles for people with hearing difficulties or
those who are unfamiliar with the language in which a
particular program is being broadcast (cable networks,
satellite channels, etc.).
Note
The O teletext buttons could be working even if
there is no teletext signal, but there is no teletext
display.
Multiaudio
Multiaudio Stereo
English
English V.I.
Move
Page 20

BUSH | HD Ready LCD TV | User Manual | Helpline: 0845 604 0105 P.19
04 Using the features
Teletext
Teletext functionsV
To select “teletext” press the button on the
handset. To switch o teletext, press the button again.
“Note all menu functions are not available in teletext
mode”. Only a few direct button control functions are
available in teletext mode, they are:
Volume adjustment t
Mute functiont
Page up/downV
Use the P+/P- buttons to browse next or previous
page.
Page number enteringV
To select a Teletext page, enter the page number
using the numeric key pad on the remote control,
or use the P+ or P- buttons, or the coloured Fast text
buttons.
Mix modeV
To view the TV picture while in Text mode press the
button, this will superimpose the Teletext data on top
of the TV picture. Press this button again to return to
Full text.
INDEXV
Press the INDEX button to go to the index page of
teletext.
Language changeV
Pressing the button will change the Teletext
characters between Eastern and Western.
HoldV
Pressing the button will stop the teletext page
automatically updating. This feature is very useful
where there are several teletext pages or data on
the same page number.
SizeV
Pressing the button changes between full screen
top half bottom half full screen. This feature is
very useful as it magnifies the image making the
characters easier to read.
RevealV
Pressing the button will reveal hidden text. This
feature is used to reveal information such as answers
to Teletext on-line interactive puzzles.
TimeV
While in normal TV mode only, pressing the button
will display the teletext time in the top right hand
corner for a few seconds.
Fast text colouredV buttons
Fast text automatically displays the four most
commonly used pages that the broadcaster thinks
that you may want to choose next. Press the same
coloured button on the remote control as the
coloured link at the bottom of the teletext page to
go directly to that page.
SubcodeV
Pressing the button by entering its 4-digit
number to enter a secondary page.
Page 21

P.20 BUSH | HD Ready LCD TV | User Manual | Helpline: 0845 604 0105
USB MODE
Note
The diagrams in the following section are O
schematic and only for your reference. Please
see the actual product if necessary.
USB Devices
Connect the USB device to the USB IN jack on the side
of TV (or on the back of TV).
To use the USB device
Supported file formats:A
Photo: *.jpg;t
Music: *.mp3 files;t
Movie: *.avi files;t
Note
Due to the particularity of file cording, some O
files may be unable to read.
Supported equipment:
B
Support the equipment that supports Mass
Storage Protocol and whose file system is FAT32,
such as some USB disks, mobile harddisks, and
MP3 player. If USB equipment could not be
identified due to unsupported file system, please
format the equipment to the above-mentioned
file system.
To achieve smooth playing, ensure the following:
C
The file code rate should be lower than t
300KB/S;
Due to the limitation of USB signal transmission t
distance, it is recommended not to use USB
patch cord, in case of using the cord, make sure
that its length is not over 1m;
Use high-speed USB equipment in conformity t
with USB2.0 full speed Interface Standard; If
USB equipment in conformity with USB1.1 full
speed Interface Standard is used, the playing
may be unsmooth.
Playing Pictures
After entering USB main interface, press yellow A
button to select “ PHOTO” item.
Press ”
B OK“ to confirm the selection and enter the
picture file list,and the TV will prompt us to set the
background music. You can set the background
music as you need.
Press
C “/“ and “ / “ to select the picture you
want to play, press ”OK“ to play the pictures.
If you want to pause the picture which is being
D
palyed, press the PALY/PAUSE button again.
Press ”ZOOM“ to magnify the picture. Press “PREV/
NEXT“ to select the last or next picture.
Press “/“
and “/“ to rotate the picture.
To exit playing, just press “
E BACK” repeatedly.
Note
The menu display varies with the photo name and O
pixel in your equipment.
Playing Music
After entering USB main interface, press green A
button to select “ MUSIC”.
Press ”
B OK“ to confirm the selection and enter the
music file list.
Press C “/“ button to select the music you want to
play, then press “ PLAY/PAUSE“ button to play the
music.
Press “
/“ to achieve the REV (fast back) and FWD
(fast forward) of the music being played.
Press “ PREV/NEXT “ to select the last or next music.
Music
Move
Select
Move Music Photo
0001 C:
Photo
Move
Select
Move Music Photo
Recorder
Do you want to select background
music?
YES NO
Page 22

BUSH | HD Ready LCD TV | User Manual | Helpline: 0845 604 0105 P.21
04 Using the features
To return to the main menu, just press “D BACK”
repeatedly.
Note
You can enjoy the music and the picture at the O
same time.
Playing a Movie
Atter entering USB main interface, press A “/“ to
select “ Movie”.
Press “
B OK” to confirm the selection and enter the
movie file list.
Press C “/“ button to select the movie you want to
play, and then press “ PLAY/PAUSE” button to play
the movie.
Press “ PREV/NEXT “ to select the last or next movie.
To exit playing, just press “
D BACK” repeatedly.
Using External USB
Disk For Recording
Insert the USB device with FAT32 format into the A
USB connector.
Waiting for the system checking. And you can see
B
the speed data after the success checking.
Note
The system can not work normally if the USB O
device have the listing problem below:
The device has bug.t
The device has error block.t
The device reports the unfaithful size.t
Time shift
Time Shift function is only available in DTV mode.
Press PLAY/PAUSE to prepare and then the TV begin
timeshifting. If you want to stop time shift function,
press the STOP button.
Pr
ess V “
/“ to achieve the REV (fast back) and FWD
(fast forward) of the time shift program.
Press “PLAY/PAUSE “ to pause timeshifting.V
You can stop the time shift program being playe
d by V
pressing the STOP button.
Recording
Press A D.MENU button to record the program being
played.
Press
B STOP button to stop the program recording
being played.
For Playback the recorded program. Press C INDEX
button to open the recorded list.
Movie
Move
Select
Move Music Photo
0001 C:
Timeshifting
Message
Doyou want to stop TIMESHIFT?
YES OK
Timeshifting
Pause II
Recording
Recording
Message
Doyou want to stop RECORDING?
YES OK
Page 23

P.22 BUSH | HD Ready LCD TV | User Manual | Helpline: 0845 604 0105
Press button to select the content you recorded.
Press the button to display the program
information.
Press red button to cancel.
Press OK or PLAY/PAUSE button to play the
program recorded and press STOP button to stop it.
Press D button to select the Select Disk.
Press the button to enter,then
press button
to select the device .
Press
E button to select the Reminder.
Press the button to enter , then set the
appointment of recording.
Note
Changing the channel will not inuence the O
recording in the same frequency, but will inuence
the time shift. When the recorded program is being
played, you can not
delete it.
Using your DVD
player(certain models
only)
PLAYING A DVDV
Press theA SOURCE button on the remote control
to enter DVD mode.
Place the DVD in the disc slot with the DVD label
B
facing away from you and the screen. The disc slot
will only take standard-sized DVD.
The DVD will automatically load; most begin with
C
a disc menu.
Use the
D ,, and buttons to navigate
around the DVD menu to highlight the play
option and then press PLAY/PAUSE.
PAUSING A DVDV
Press A PLAY/PAUSE to pause playback. The sound
will also be muted.
Press
B PLAY/PAUSE to resume normal playback.
STOPPING A DVDV
Press the A button to stop playback of a DVD. The
TV screen will show the DVD start-up logo.
Some discs will remember the moment at which
B
the DVD was stopped, so press PLAY/PAUSE to
recall the moment and continue playback.
Press the
C button twice to stop completely and
clear the memory.
USING FAST FORWARD OR REWINDV
To move forward through a disc more quickly, A
press the button.
To rewind through the disc, press the
button.
Press the
B or button repeatedly to cycle
through the available speeds, which appear in the
Recorder
Recorded List
Select Disk
Reminder
Select: OK or -->
Disk Manager
001 QVC(000101_022255).mpg)
002 five(040310_145012).mpg)
DELETE
Duration 00:00:13 (3MB)
Wakeup Timer
1
2
3
4
5
6
Timer NO 1
Mode Off
Program five
Data 03/10/2004
Time 14:5
Duration 00:00
Move
Select
0001 C:
Device LIST
Page 24

BUSH | HD Ready LCD TV | User Manual | Helpline: 0845 604 0105 P.23
04 Using the features
top right corner of the screen: 2X, 4X, 8X, 16X, 32X
and normal playback speed.
Press
C PLAY/PAUSE to resume normal playback.
SKIP TO THE NEXT OR PREVIOUS SCENEV
During playback press the button to skip to the
next scene on the disc, or press to skip to the
previous one.
PASSWORDV
Parental control can be activated by setting the
Password Mode to On. The default password is 0000.
If you forget the password, you can always input 1369
to regain control.
USING THE ZOOM FUNCTIONV
Press theA ZOOM button to zoom into the image
on screen. You can press it repeatedly to further
enlarge the picture.
In zoom mode use the
B , , and buttons to
display a dierent section of the enlarged picture
on the screen.
SWITCHING ON SUBTITLESV
Press the A SUBTITLE button during playback.
The available languages will appear in the top left
B
corner of the screen.
Press repeatedly until your desired subtitle
language is shown.
Press
C SUBTITLE repeatedly until SUBTITLE OFF is
shown to switch the subtitles o.
USING REPEAT MODEV
Press REPEAT once to repeat the chapter on a DVD,
twice to repeat the currently playing title or three
times to repeat the whole contents of the disc.
CHANGING THE CAMERA ANGLEV
Some DVD have multiple camera angles for some
or all scenes. Press the ANGLE button to change the
camera angle. Dierent camera angles may include:
front, side, whole view or exterior.
Additional DVD
functions
D.MENUV
Press this button to return to the previous menu item.
AUDIOV
Many DVD have multiple soundtracks. To change
between them press the AUDIO button. Wait three
seconds before pressing the button again, to cycle
through the options.
TITLEV
Press this button to return to the title menu on some
DVD. Use the , , and buttons to navigate
around the menu.
SEARCHV
Press SEARCH and use the numerical keys to enter
the chapter number you wish to go to and press
PLAY/PAUSE.
PROGRAMV
During playback press PROGRAM to move directly
to a section or programme on the DVD. Press the
digit buttons to select the programme number
that you want. When finished, move the cursor to
select START. Th e DVD will jump directly to that
section and begin to play. If you want to cancel this
function, press PROGRAM and move to STOP, then
press PLAY/PAUSE.
A-BV
Use A-B to set a section of a DVD to repeat. Press A-B
to mark the start point and again to mark the end.
The section will begin to be repeated immediately.
Press A-B to cancel the repetition.
ANGLEV
When enjoying sports, concert or theatre, press
this key to watch same actions in dierent angles.
(Valid for discs possessing this function. Using a
disc recorded in multi-angle you can view the scene
from dierent angles, for example, front, side, whole
view and exterior scene.)
D.CALLV
When pressing the D.CALL button repeatedly
dierent OSD indicator will be displayed for
dierent types of disc DVD, CD etc.
PLAYING A JPEG CDV
Insert a JPEG CD in the same way as you would A
a DVD or Audio CD, with the label facing away
from you.
The CD will load and a menu of the disc’s
B
contents will appear on screen.
Use the
C and buttons to highlight the
folder and picture you wish to view and press
PLAY/PAUSE. Each image on the disc will show
consecutively, like a slide show.
Page 25

P.24 BUSH | HD Ready LCD TV | User Manual | Helpline: 0845 604 0105
Press D PLAY/PAUSE during the slide show to pause
on one image.
Press the
E or button to skip to the next
image or return to the previous one.
PLAYING AN AUDIO CDV
Insert a CD in the same way as you would a DVD, A
with the label facing away from you.
The CD will load and a menu of the disc’s contents
B
will appear on screen.
Use the
C and buttons to highlight the track
you wish to play and press PLAY/PAUSE, or just
press PLAY/PAUSE to listen to the whole CD from
the beginning.
You can stop, pause, fast forward or fast rewind a
CD in the same way as a DVD. You can also use the
REPEAT button to repeat a track, folder album or
the contents of the whole disc. Press repeatedly to
select what you would like to repeat. You can also
use the A-B function to repeat a certain section of
a track or CD.
Protect your DVD
discs
HANDLE DISCS PROPERLY
Do not touch the playback side of the disc.O
Do not attach paper or tape to the disc.O
HOW TO CLEAN A DISC
Fingerprints and dust on the disc cause picture and O
sound deteriation. Wipe the disc with a soft cloth
from the centre outwards
If you cannot wipe o the dust with a sof
t cloth, O
wipe the disc lightly with a slightly moistened soft
cloth and nish with a dry cloth.
Do not use any type of solvent such as thinner, O
benzine, commercially available cleaners or
antisep
tic spray for vinyl LPs. It may damage
the disc.
05 Reference
sections
Troubleshooting
To assist in location of possible faults use
the help guide below:
No picture, no
sound
Verify if the television is
properly plugged in.
Verify if the television has a
proper supplied power source.
Verify if electricity is available.
Blank screen
Verify if correct signals are
input.
Operate the remote to change
signal input to correct input.
Restart the television if power
supply is interrupted.
No sound
Press MUTE button and verify if
Mute mode is set.
Switch to other channel and
verify if the same problem
happens.
Press VOL+ button to see if the
problem can be solved.
Poor sound
Verify if sound system is correct.
Refer to user‘s manual for
adjustment.
No picture in
some channel
Verify if correct channel is
selected.
Adjust the antenna.
Page 26

BUSH | HD Ready LCD TV | User Manual | Helpline: 0845 604 0105 P.25
05 Reference Sections
No color for
some channel
program
(black and
white)
Verify if the same problem exists
in other channels.
Check out of picture and sound
systems.
Refer to relative instructions
in the Manual for color
adjustment.
Spots with
some or all
pictures
Verify if the antenna is correctly
connected.
Verify if the antenna is in good
condition.
Make fine adjustment of
channel.
Television out
of control
Disconnect the television from
power supply and 10 seconds
later, connect the television
to the power supply. If the
problem still exists, contact
authorized after-sales service
for technical assistance.
Note
If the fault can not be repaired using the above O
guide consult with your local authorized service
centre.
The TV set must only be repaired by a qualified O
registe
red service person. Never attempt to
remove the back cover as the TV set has dangerous
voltages in side that may cause a fatally or fire.
Specification
Colour system
PAL, SECAM, NTSC (AV)
Sound system BG, DK, I, L,L'
Video input
SCART, Y P
b/Pr, YCb/Cr, AV,
VGA, HDMI, USB
DTV Y/P
b/Pr
Composite: 480i/p, 576i,
720p, 1080i, 1080p
Power See rating plate
Power
consumption
See rating plate
Audio output ≥2.5W+2.5W
Environment
conditions
Working temperature:
+5 °C - +35 °C
Working humidity:
20% - 80%
Storage temperature:
-15 °C - +45 °C
Storage humidity:
5% - 90%
Accessory
User manual
Remote control
Battery (×2)
*The part specifications of this TV set provided here
are for reference only.
Dierences may occur as product technology is
updated.
Design and specifications are subject
to change
without notice.
Page 27

06 Product Guarantee
P.26 BUSH | HD Ready LCD TV | User Manual | Helpline: 0845 604 0105
Year
This product isguaranteed for twelve months from the date of original purchase. Any
defect that arisesdue to faulty materials or workmanship will either be replaced,
refunded or repairedfree of charge where possible during this period bythe dealer
from whom you purchased the unit.
The guarantee issubject to the following provisions:
- The guarantee does not cover accidental damage, misuse, cabinet parts, knobs
or consumable items.
- The product must be correctly installed and operated in accordance with the
instructions contained inthis manual.
- It mustbe used solely for domestic purpose.
- The guarantee will be rendered invalided if the product is re-sold or has been
damaged by inexpert repair.
- Specifications are subject to change without notice.
- The manufacturer disclaims any liability for the incidental or consequential damages.
- The guarantee is in addition to, and does not diminish your statutory or legal rights.
- In theevent of a problem with the product within theguarantee period call the
customer helpline on0845 604 0105
Guarantor: Argos Ltd
489 - 499 Avebury Boulevard
Central Milton Keynes
MK9 2NW
PRODUCT GUARANTEE
This product isguaranteed against manufacturing defects for a period of
Page 28

0090509580D
 Loading...