

Page 1
Instruction manual
Built-in Solid Plate Hob
RL60SPH
Page 2

If you require any technical guidance or find that your product is not operating as intended, a simple solution can often be found in the Troubleshooting section of these instructions,
You’ll soon be enjoying your new Built-in Hob
It all begins here, with your instructions. Don’t worry,
there’s nothing too technical coming up. Just simple,
step-by-step guidance to get you up and running
quickly. Sound good? Then let’s get started.
Help and Guidance
We’re here to help you get the most from your Built-in Hob. Should you require any
guidance, a simple solution can often be found online at:
www.bush-support.com
If you still require further assistance, call one of our experts on 01759 487838.
Page 3

or online at www.bush-support.com If you still require further assistance, call one of our experts on 01759 487838
Contents
Safety information
1
Safety information
Getting to know
2
your Hob
Accessories 12
Installing your Hob
3
Installation requirements
Installation guide
Electrical connections
Using your Hob
4
11Overview
14
15
16
Care and Maintenance
5
6
Cleaning
Technical specifications
Product support
6
Troubleshooting
Help and assistance
Declaration of conformance to
product standards
Disposal
Guarantee
24
25
28
29
30
30
31
Operation
Advice
Utensils
20
20
21
3
Page 4

Page 5

1
Safety information
Page 6

Safety information
Safety information
If you require any technical guidance or find that your product is not operating as intended, a simple solution can often be found in the Troubleshooting section of these instructions,
Important - Please read these instructions fully before
installing or operating
INSTALLATION WARNINGS
IMPORTANT: Prior to Installation ensure that the local
supply conditions (electricity voltage and frequency)
are compatible with the requirements of your built-in
hob.
IMPORTANT: Carefully unpack and examine the
appliance for any damage. If you think there is a
defect, do not use the appliance and contact BUSH
Product Support on 01759 487838. Packaging
materials should be collected together and disposed
of immediately as they may be harmful to children.
IMPORTANT: Keep the electrical cable of your built-in
hob away from the hot areas of your appliance, do
not let the cable touch the appliance. Keep the cable
away from sharp edges and heated surfaces.
IMPORTANT: Ensure that the electric supply cable is
not trapped or damaged during installation.
IMPORTANT: In the event that the cable
connecting your built-in hob becomes damaged, it
must be replaced by a suitably qualified person.
This cable must not be replaced by an
unauthorised person.
IMPORTANT: Protect your built-in hob against
atmospheric effects. Do not expose your cooker
to effects such as sun, rain, snow etc.
IMPORTANT: The materials surrounding the
appliance (cabinets) must be able to withstand a
minimum temperature of 100°C.
DURING USAGE
IMPORTANT: This appliance can be used by children
aged from 8 years and above and persons with
reduced physical, sensory or mental capabilities or
lack of experience and knowledge if they have been
given supervision or instruction concerning use of
the appliance in a safe way and understand the
hazards involved. Children shall not play with the
appliance. Cleaning and user maintenance shall not
be made by children without supervision.
WARNING: The appliance and its accessible parts
become hot during use. Care should be taken to
avoid touching heating elements. Children less than 8
years of age shall be kept away unless continuously
supervised.
WARNING: NEVER try to extinguish a cooking fire
with water. Instead switch off the appliance and
cover flame e.g. with a lid or a fire blanket.
CAUTION: Do not allow children in the kitchen
when cooking or after, as the parts may still be hot.
Many parts of the cooker will become hot and
present a considerable hazard to children.
CAUTION: When the hob is hot never touch the
solid plates by hand or with tools.
CAUTION: Before starting to use your appliance,
ensure curtains, paper or flammable items are kept
away from your appliance. Do not keep flammable
materials on or around your built-in hob.
IMPORTANT: When using your appliance for the first
time your built-in hob may give off an unusual
odour from the heating elements. This is normal for
cooking appliances.
WARNING: Before obtaining access to terminals, all
supply circuits must be disconnected.
6
Page 7

Safety information
Safety information
or online at www.bush-support.com If you still require further assistance, call one of our experts on 01759 487838
Important - Please read these instructions fully before
installing or operating
IMPORTANT: Make sure the built-in hob control
knobs are all in the off position when not in use.
IMPORTANT: If you do not intend to use your hob
for a long period of time turn off the electric supply
to the cooker.
GENERAL SAFETY WARNINGS
IMPORTANT: This appliance has been designed for
non-professional, domestic use only. Do not use
this cooker for commercial use or any other
application e.g. room heating.
WARNING: Danger of fire: do not store flammable
items on or near the cooking surfaces of the
appliance.
IMPORTANT: Do not try to lift or move this
appliance by pulling on the control knobs.
IMPORTANT: Your appliance is produced in
accordance with all applicable local and
international standards and regulations.
IMPORTANT: Do not hang towels, dishcloths or
clothes from the built-in hob or its control
knobs.
CLEANING AND MAINTENANCE
IMPORTANT: Always turn the appliance off before
operations such as cleaning or maintenance. You can
do this by switching the built-in hob off using cooker
isolation switch.
IMPORTANT: Do not remove the control knobs
to clean the control panel.
WARNING: Do not use harsh abrasive cleaners or
sharp metal scrapers to clean the hob top since
they can scratch the surface.
TO MAINTAIN THE EFFICIENCY AND SAFETY OF
YOUR APPLIANCE, WE RECOMMEND YOU
ALWAYS USE OUR AUTHORISED SERVICE
AGENTS AND ORIGINAL SPARE PARTS.
FOR ASSISTANCE CALL BUSH PRODUCT
SUPPORT 01759 487838.
IMPORTANT: Maintenance and repair work must only
be performed by authorised service technicians.
Installation and repair work that is carried out by
unauthorised technicians is dangerous and could
invalidate your guarantee.
7
Page 8

Page 9

Getting to know your
Built-in Hob
2
Page 10

Getting to know your Built-in Hob
If you require any technical guidance or find that your product is not operating as intended, a simple solution can often be found in the Troubleshooting section of these instructions,
Getting to know your Built-in Hob
You’ll be up and running in no time
Ready? Let’s begin...
Please read these instructions carefully. They contain
important information which will help you get the best
from your Built-in Hob and ensure safe and
correct installation and operation.
If you require any further assistance, our technical
experts are happy to help. For full details, refer to
the product support section at the end of these
instructions.
10
Page 11
Getting to know your Built-in Hob
You’ll be up and running in no time
2
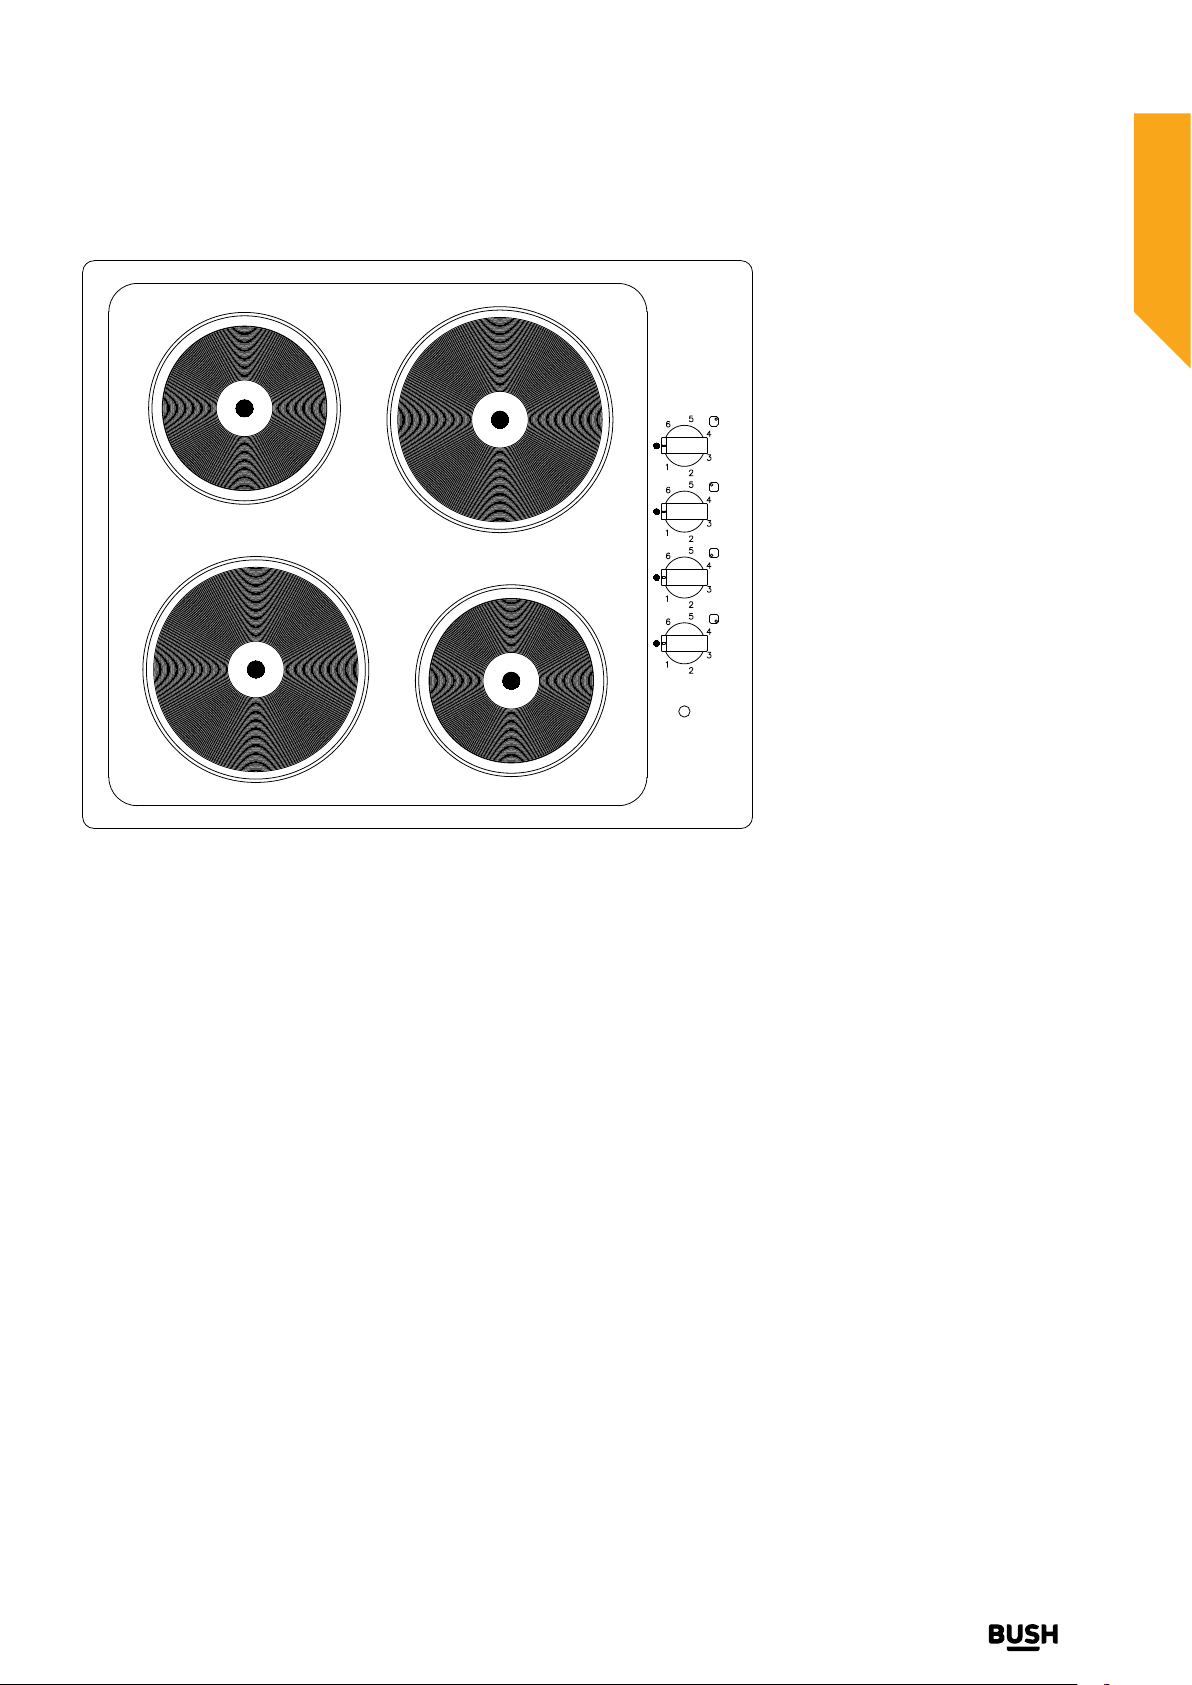
1
1
2
3
4
1 =Rapid heating plate 2000W
2 =Rapid heating plate 1500W
3 =Heating plate control knobs
4 =signal lamp
or online at www.bush-support.com If you still require further assistance, call one of ou
r experts on 01759 487838
Getting to know your Built-in Hob
11
Page 12

Getting to know your Built-in Hob
You’ll be up and running in no time
"DDFTTPSJFT
1. Bracket*4
2. Screw*4
3. Seal*1
12
If you require any technical guidance or find t at your product is not operating as intended, a simple solution can often be found in the Troubleshooting section of these instructions,
Getting to know your Built-in Hob
Page 13

Installing your
Built-in Hob
3
Page 14

Installing your Built-in Hob
RISK OF ELECTRIC SHOCK
DO NOT OPEN
CAUTION
CAUTION:
TO REDUCE THE RISK OF ELECTRIC
SHOCK, DO NOT REMOVE COVER
(OR BACK). NO USER-SERVICEABLE
PARTS INSIDE. REFER SERVICING TO
QUALIFIED SERVICE PERSONNEL.
RISK OF ELECTRIC SHOCK
DO NOT OPEN
CAUTION:
TO REDUCE THE RISK OF ELECTRIC SHOCK,
DO NOTREMOVE COVER (OR BACK).
NO USER-SERVICEABLE PARTS INSIDE.
REFER SERVICING TO QUALIFIED SERVICE
PERSONNEL.
Bringing it all together
authorised service person or qualified technician,
ance must WARNING: This appli be installed by an
according to the instructions in this guide and in
compliance with the current local regulations.
• Incorrect installation may cause harm and damage, for
which the manufacturer accepts no responsibility and
the warranty will not be valid.
• Prior to installation, ensure that the local distribution
conditions (electricity voltage and frequency and/or
nature of the gas and gas pressure) and the
adjustments of the appliance are compatible. The
adjustment conditions for this appliance are stated on
the label.
The laws, ordinances, directives and standards in force in
the country of use are to be followed (safety regulations,
proper recycling in accordance with the regulations, etc.).
Instructions for the installer
General instructions
• After removing the packaging material from the appliance
and its accessories, ensure that the appliance is not
damaged. If you suspect any damage, do not use it
and contact an authorised service person or
qualified technician immediately.
• Make sure that there are no flammable or combustible
materials in the close vicinity, such as curtains, oil,
cloth etc. which may catch fire.
• The worktop and furniture surrounding the appliance
must be made of materials resistant to temperatures
above 100°C.
• If a cooker hood or cupboard is to be installed above the
appliance, the safety distance between cooktop and any
cupboard/cooker hood should be as shown below.
•
The cut aperture dimensions is indicated in the figure.
14
Minimum
42 cm
Minimum 65
cm (with hood)
HOB
hood)
cm (without
Minimum 70
Minimum
42 cm
• The appliance should not be installed directly above a
dishwasher, fridge, freezer, washing machine or
clothes dryer.
• If the base of the appliance is accessible by hand, a barrier
made from a suitable material must be fitted below
the base of the appliance, ensuring that there is no
access to the base of the appliance.
• If the hob is installed above an oven, the oven
should have a cooling fan.
If you require any technical guidance or find t at your product is not operating as intended, a simple solution can often be found in the Troubleshooting section of these instructions,
Installing your Built-in Hob
Page 15

Installing your Built-in Hob
Bringing it all together
Fixing the seal to the back of the Hob
The hob must be sealed to the work surface to prevent liquid
from entering into the cabinet. A tape seal is supplied with the
hob. Refer to Fig. 1
1.
Turn the hob over and place on a secure, level surface.
2.
Spread the seal around the left, front, right and rear
outer edges of the cooktop. Take special care in the
corners making sure there are no gaps. The ends of the
strips must fit together without overlapping.
3.
If the surface that the hob is to be fitted to is tiled or is
not reasonably smooth, additional sealing with a
waterproof silicone sealant may be required.
4.
Turn the hob back the right way up and position it in
the worktop cut-out.
Fastening the Installation Brackets
Each cooktop is provided with an installation kit including
brackets and screws for fastening the top to fixture panels
from 20 to 40 mm thick. Refer to Fig. 2
1.
Turn the cooktop upside down and fasten the brackets
“F” and “R” to the appropriate socket holes, without
tightening the screws for the moment.
2. NOTE: Dependent on the thickness of the worktop as
shown in Fig. 2 Slide the optional sleeve onto the
bracket if fitting to thin work surfaces.
3.
Make sure that the brackets are fastened as shown in
Fig. 2
Installing the Hob
1.
Turn the hob back the right way up and position it in
the worktop cut-out.
2.
Insert the cooktop into the hole and position it correctly.
3.
Adjust the position of the brackets “F” and “R” and
tighten “Rear Screw” and “Front Screw” to lock
the cooktop firmly in position (Fig. 2).
4.
With a sharp cutter or trimmer knife trim the excess
sealing material around the edge of the cooktop. Take
care not to damage the workbench.
If the surface that the hob is to be fitted to is tiled or is not
reasonably smooth, additional sealing with a waterproof
silicone sealant may be required.
or online at www.bush-support.com If you still require further assistance, call one of our experts
on 01759 487838
Getting to know your Built-in Hob
15
Page 16

Installing your Built-in Hob
Bringing it all together
Rear Screw
Mains
Connector
Rear Screw
(R)
(R)
Fig.
1
Seal no gaps
in corners
Worktop
Sleeve
Rear side (R)
Front Screw
(F)
30 mm
Front side (F)
Hob
Front Screw
(F)
Fig. 2
Figures for reference only
If you require any technical guidance or find t at your product is not operating as intended, a simple solution can often be found in the Troubleshooting section of these instructions,
16
Bracket
Worktop
40 mm
Bracket
Installing your Built-in Hob
Retaining
screw
Hob
Retaining
screw
Page 17

Installing your Built-in Hob
Bringing it all together
Electrical connection
Appliances with three-pole cable are set up for operation with alternating current at the
voltage and frequency indicated on the rating plate. The earth conductor is yellow/green.
The connection to the electricity supply must be made by a qualified person and
following the regulations in force.
When the appliance is to be installed above a built-in oven, the two appliances must be
connected separately, to make it easier to take the appliances out and for electrical
safety.
The supply cable must be so positioned that no point can reach a temperature 50° C higher
than ambient temperature.
Also check that the supply system has an effective earth connection and corresponds to the
standards in force and that the plug (or omnipolar switch) can be reached easily when
the appliance is installed.
IMPORTANT: The wires in the mains lead are coloured in accordance with the
following code:
Earth
•
Green and yellow: Earth
•
Blue:
•
Brown:
Neutral
Live
Live
Neutral
or online at www.bush-su
pport.com If you still require further assistance, call one of our
experts on 01759 487838
Getting to know your Built-in Hob
17
Page 18

Page 19

Using your Built-in Hob
4
Page 20

Using your Built-in Hob
Getting the most from your appliance
Using your Built-in Hob
If you require any technical guidance or find that your product is not operating as intended, a simple solution can often be found in the Troubleshooting section of these instructions,
Operation of the top with the electric plates
The electric tops can either be of the standard type, or of the rapid type. These last
feature a red mark at their centre. According to your needs, the tops can be
adjusted by turning the knobs either clockwise or anti-clockwise on 6 position
besides the 0 position (off).
The positions marked by the higher numerical index match the maximum output
of heat (see table). When using rapid tops, a thermostat automatically reduces
the power when the selected temperature is reached, and the top
operates intermittently to reach a constant cooking temperature.
The pilot light set in the control area signals that the electric plates are switched on.
Reheating Cooking Roasting-frying
Normal and fast
electric hot plates
Pyroceram tops Grill 1 2 3
1 2 3 4 5 6
Advice on the use of cooking tops
To Spare energy and to have a longer life of the electric tops, we advise using
pans with flat bottom and with a diameter not lesser than the diameter of the tops.
Care must be taken that fluids do not spill on the electric plates.
Never leave the tops on without pans on them or with empty pans, and never
use the tops to heat the place. Switch on the plates after having set the pans on
them. Once switches off, the plates remain warm for a while.
Switch off the heating element before removing the pans
20
Page 21

Using your
Built-in Hob
Getting the most from your appliance
Utensils
Use pans with flat bottoms. Uneven or thin bottoms will waste energy and are
slow to cook
Use pans slightly larger than the hotplates. Smaller pans will waste energy.
Do not use oversized pans. More than 50mm overhang can overheat the hob
components and can cause fine cracks in the enamel hob which will trap dirt.
Use only dry utensils. Do not place wet or steamy parts (eg. lids) on the
hotplates.
Do not use pots and pans that are unsteady and likely to rock or overbalance.
Do not operate the hob for an extended time without a saucepan or
pot on the hotplate.
Good BAD
(recessed
base)
BAD
(convex base)
BAD
(undersize)
BAD
(oversize)
BAD
(moisture on
hotplate)
BAD
(no utensil)
or online at www.bush-support.com
If you still require further assistance, call one of our expe
rts on 01759 487838
Getting to know your Built-in Hob
21
Page 22

Page 23

Care and maintenance
5
Page 24

Care and maintenance
If you require any technical guidance or find that your product is not operating as intended, a simple solution can often be found in the Troubleshooting section of these instructions,
Care and maintenance
Looking after your appliance
Cleaning
WARNING! Isolate the power supply to the built-in
Hob and make sure that the built-in hob is cool.
Before cleaning your hob or performing
maintenance, make sure that the cooking zone
control knobs are set to ‘OFF’. To extend the life
of your hob, it must be cleaned frequently.
The built-in hob should preferable be cleaned
immediately after use, when it is still warm (but
not hot), with warm water and
soap. The soap should be rinsed away and dried
thoroughly. Avoid using abrasive detergents,
scourers, acidic cleaners such as lime scale
remover, etc, as these could damage the surface,
and can result in development of rust and
corrosion. If stains are particularly tough to
remove, use cleaners specifically recommended
to clean stainless steel and follow the instructions
provided with the cleaner. Never use steam
cleaner for cleaning the appliance.
Stainless Steel:
Stainless steel parts must be cleaned frequently
with mildly warm soapy water and a soft
sponge and then dried with a soft cloth. Do not
use abrasive powders or abrasive cleaning
materials. Do not leave anything spilled onto
stainless steel parts for long periods of time.
Do not clean using caustic creams,
abrasive cleaning powders, thick wire wool
or hard tools.
Never use flammable agents like acid, thinner
or petrol when cleaning your hob.
Do not clean your hob with a steam cleaner.
Do not wash any part of your hob in a dishwasher.
24
Page 25

Care and maintenance
Looking after your appliance
Technical specification
We apologise for any inconvenience caused by minor inconstancies within these instructions that
may occur due to product improvements and development
All images and drawings are for illustration purposes only.
or online at www.bush-support.com If you still require further assistance, call one of our experts on 01759 487838
Care and maintenance
25
Page 26

Page 27

Product support
6
Page 28

Product support
Help is always at hand
Product support
If you require any technical guidance or find that your product is not operating as intended, a simple solution can often be found in the Troubleshooting section of these instructions,
Troubleshooting
1. If no electrical functions appear to work, check
the isolation switch has not been turned off also
check the fuse in the switch and the circuit
breaker in you consumer unit
2. After replacing the fuse or resetting the circuit
breaker turn on individual parts of your hob one
at a time to check function
3. DO NOT ATTEMPT TO REPAIR THIS
APPLIANCE YOURSELF. CALL BUSH
PRODUCT SUPPORT ON 01759 487838 OR
CONSULT A QUALIFIED ELECTRICIAN
28
Page 29

Product support
or online at www.bush-support.com If you still require further assistance, call one of our experts on 01759 487838
Product support
Help is always at hand
Help and assistance
If you require any technical guidance or find that your Built-in Hob is not operating as intended, a simple solution
can often be found in the Troubleshooting section of these instructions or online at
www.bush-support.com
If you still require further assistance, call one of our experts on 01759 487838*. To help give us give you a fast and
efficient service please have the following information ready:
Model Ref.
Serial number
Date of purchase
Local call rates applies*
You can find these on
the rating plate - a small
information panel (usually
a sticker or metal plate) on
the rear of your appliance
This will be shown on
your receipt
Lines open 8am-7pm Monday to Saturday and 10am-4pm Sunday.
*Calls to BUSH enquiry lines
providers costs may vary, see www.bt.com/pricing for details.
For Security and training purposes, telephone calls to and from customer service centres maybe recorded and monitored. Calls from
Republic of Ireland will attract international call charges.
may attract a charge and set up fee from residential lines depending on your call plan/tariff. Mobile and other
29
Page 30

Product support
Help is always at hand
Product support
If you require any technical guidance or find that your product is not operating as intended, a simple solution can often be found in the Troubleshooting section of these instructions,
Declaration of conformance to
product standards
This appliance conforms to all relavant standards
applicable to domestic appliances sold in the UK
Disposal
This appliance/fitting is marked
according to the European directive
2012/19/EU on Waste Electrical
and Electronic Equipment (WEEE).
By ensuring this product is disposed of
correctly, you will help prevent potential
negative consequences for the environment
and human health, which could otherwise be
caused by inappropriate waste handling of
this product.
The symbol on the product, or on the
documents accompanying the product, the
crossed out wheelie bin symbol, indicates
that this appliance/fitting may not be treated
as household waste. Instead it shall be
handed over to the applicable collection point
for the recycling of electrical and electronic
equipment.
Disposal must be carried out in accordance
with local environmental regulations for waste
disposal.
For more detailed information about
treatment, recovery and recycling of this
product, please contact your local authority,
your household waste disposal service or the
retailer where you purchased the product.
30
Page 31

Product support
or online at www.bush-support.com If you still require further assistance, call one of our experts on 01759 487838
Call us now and activate your 12 month guarantee
Thank you for choosing Bush. Your new product is guaranteed against faults and
breakdowns for 12 months. Don’t forget to register it with us today so we can provide
you with our best possible after-sales service and useful updates.
www.bushregistration.co.uk
FREEPHONE*
0800 597 8548
Lines are open 8am - 8pm, 365 days a y
ear. *Calls may be recorded and monitored.
Your Bush Guarantee
This product is guaranteed for twelve months from the date of original purchase. Any defect that arises due to
faulty materials or workmanship will be repaired free of charge (or if applicable the product will be replaced or the
purchase price refunded) where possible during this period by the dealer from who your purchased the unit.
The guarantee is subject to the following provisions:
• The guarantee does not cover accidental damage,
misuse, cabinet parts, knobs or consumable items.
• The product must be correctly installed and
operated in accordance with the instructions
contained in the manual.
• It must be used solely for domestic purposes. The
guarantee will be rendered invalid if the product is
re-sold or has been damaged by inexpert repair.
• Specifications are subject to change without notice.
• Bush disclaim any liability for loss or damage arising
from the breakdown of the product.
• This guarantee is in addition to and does not
diminish your statutory or legal rights.
Important Data Protection Information
To find out how we and Domestic & General Insurance Plc use your data please refer to the guarantee
registration material or visit www.bushregistrations.co.uk
Guarantor: Argos Limited - 489 - 499 Avebury Blvd. - Milton Keynes - MK9 2NW
31
Page 32

Page 33

Page 34

Contact:
www.bush-support.com
Helpline: 01759 487838
 Loading...